Scan to watch an - gamelyngames.com
20
Scan to watch an instructional video! T he P ir ates ’ C ode
Transcript of Scan to watch an - gamelyngames.com
Scan to watch an instructional video!
The Pirates’ Code

2
BACKS BACKS
BACKS
BACKS
Components
Rigging
Sure-fire
Cannons Extort Repair
11
:Rigging
Sure-fire
Cannons Extort Repair
11
:Rigging
Sure-fire
Cannons Extort Repair
11
:Rigging
Sure-fire
Cannons Extort Repair
11
:
DreadPirate
Legend
Buccaneer
Swash Buckler
Corsair
Pirate
Sea Dog
DreadPirate
Legend
Buccaneer
Swash Buckler
Corsair
Pirate
Sea Dog
DreadPirate
Legend
Buccaneer
Swash Buckler
Corsair
Pirate
Sea Dog
DreadPirate
Legend
Buccaneer
Swash Buckler
Corsair
Pirate
Sea Dog
4 Helm Mats
16 Map Cards
11 Merchant Cards
24 Crew Cards
20 Order Tokens (5 in 4 colors) 20 Search Tokens
4 Double-Sided Captain Cards FRONTS
FRONTS
FRONTS FRONTS
4 Legend Mats
1 Market Mat
2 Port Tokens
Cpt. Magnus BoltCpt. Francisco de Guerra
Cpt. Carmen RougeCpt. Morgan Whitecloud
2
Jolly Rodge
Quartermaster QuigleyTaylor Truenorth Willow Watch Ursula Bane Eliza Lucky
Betty Blunderbuss Buck Cannon
Sydney Sweetwater Lisa Legacy Doc Blockley Alice O’Malice
2 2 4
1-2
4
1-2
4
1-2
6
1-3
6
1-3
6
1-3
8
1-4
8
1-4
Tina Trickshot Sally SuresightChopper Donovan
Jack “Fuse” Rogers Sara Silver Cutter Fang Salty Pete Pale PimBlack-Eyed Brutus
2Raina Rumor
2Lieutenant Flint
1
Silent Seamus
3
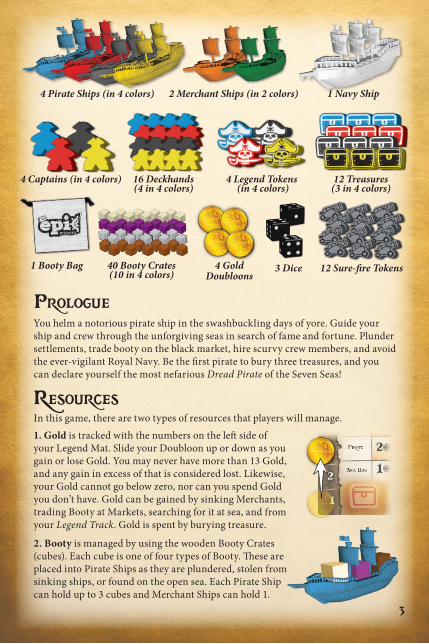
Resources In this game, there are two types of resources that players will manage.1. Gold is tracked with the numbers on the left side of your Legend Mat. Slide your Doubloon up or down as you gain or lose Gold. You may never have more than 13 Gold, and any gain in excess of that is considered lost. Likewise, your Gold cannot go below zero, nor can you spend Gold you don’t have. Gold can be gained by sinking Merchants, trading Booty at Markets, searching for it at sea, and from your Legend Track. Gold is spent by burying treasure.
2. Booty is managed by using the wooden Booty Crates (cubes). Each cube is one of four types of Booty. These are placed into Pirate Ships as they are plundered, stolen from sinking ships, or found on the open sea. Each Pirate Ship can hold up to 3 cubes and Merchant Ships can hold 1.
Prologue You helm a notorious pirate ship in the swashbuckling days of yore. Guide your ship and crew through the unforgiving seas in search of fame and fortune. Plunder settlements, trade booty on the black market, hire scurvy crew members, and avoid the ever-vigilant Royal Navy. Be the first pirate to bury three treasures, and you can declare yourself the most nefarious Dread Pirate of the Seven Seas!
DreadPirate
Legend
Buccaneer
Swash Buckler
Corsair
Pirate
Sea Dog
4 Pirate Ships (in 4 colors) 2 Merchant Ships (in 2 colors) 1 Navy Ship
1 Booty Bag 4 GoldDoubloons
3 Dice 12 Sure-fire Tokens40 Booty Crates (10 in 4 colors)
4 Captains (in 4 colors) 4 Legend Tokens (in 4 colors)
16 Deckhands (4 in 4 colors)
12 Treasures(3 in 4 colors)

4
Game Setup1. Set up the Sea:
A. Shuffle all 16 Map Cards and randomly place them face-up in a 4x4 grid.B. Shuffle the Search Tokens and place 1 face-down
onto the center of each card (unused tokens are returned to the game box without revealing).
2. Give each player (returning unused components to the game box):• 1 Legend Mat (placed on left) • 1 Helm Mat (placed on right)• 1 Pirate Ship*• 1 Legend Token* and 3 Treasures*• 1 Captain* and 4 Deckhands* • 5 Order Tokens* • 1 random Captain Card• 1 Gold Doubloon* Component in their chosen color
3. Prepare each player’s Legend Mat:C. Place the Legend Token, bloodied-side down, on the
bottom space of the Legend Track on the right side.D. Place the Gold Doubloon on the 1 space on the Gold Track on the left side.E. Place the 3 Treasures on the bottom.F. Place 1 Deckhand onto its matching icon on the Legend Track's third row.
4. Prepare each player’s Helm Mat:G. Shuffle your 5 Order Tokens face-down, and then one-by-one place each face-
up onto the 5 open spaces (“1-5”) going clockwise around the Wheel (giving each player a random setup of Order Tokens on their Wheels).
H. Place the Captain onto the empty Hide Out space (“0” on the Wheel). I. Place 3 Deckhands, one onto each of the 3 Deck Assignments at the bottom of
the mat (not Repair).
5. Place the Market Mat in reach of all players and set up the Booty Bag:J. Get 1 Booty (cube) of each color and randomly place each onto
one of the 4 spaces on the left side of the Market Mat.K. Place all of the remaining cubes into the Booty Bag.
6. Prepare the 2 Merchant Ships and the Ports:L. Place the 2 Ports onto Map Cards at opposite corners of the Sea.M. Place 1 Merchant Ship onto each of the 2 Map Cards with Ports (it doesn’t
matter which color ship). Make sure the front of each ship is pointing diagonally toward the opposite Port.
N. Place 1 randomly drawn Booty Crate into each Merchant Ship.
Rigging
Sure-fire
Cannons Extort Repair1 1 :
DreadPirate
Legend
Buccaneer
Swash Buckler
Corsair
Pirate
Sea Dog
Cpt. Wendy Byrd
Legend MatCaptain
Card
Helm Mat
Face-Up Face-Down
Bloodied-sideUnbloodied-side
4
S
3
G
IE C
F
D
H
J

5
Sea of 16 Map Cards
3 Face-up Crew CardsDeck ofCrew CardsDice and
Sure-fire TokensMarket Mat
Booty Cratesinto the
Booty Bag L
5
K
2 2
7. Create the Merchant Card Deck:O. Separate the Merchant Cards into values 2, 4, 6, and 8
(listed on each card’s top left). Stack the 8’s first face-down on the bottom, then the 6’s on top of them, then the 4’s, and finally the 2’s on top.
P. Draw the top 2 Merchant Cards and place 1 face-up into each of the 2 slots at the bottom of the Market Mat.
8. Shuffle the Crew Card Deck (face-down) and draw 3 face-up cards to form a row.
9. Choose a first player (the youngest, or select using a method of your choice):Q. The first player then places the Navy Ship onto a Map Card in either of the 2
corners that do not have a Merchant.R. Starting with the first player and going clockwise, each player chooses any
Map Card with an unoccupied Cove ( ) and places their Pirate Ship on the Cove, to indicate that it begins the game hiding out.
S. Starting with the first player and going clockwise, each player selects which side of their Captain Card to use for the beginning of the game (see Mutiny, pg. 10) and places it to the right of their Helm Mat.
10. Place the 3 Dice and the Sure-fire Tokens within reach of all players.11. Each player starts with 1 Booty from the Booty Bag placed into their Pirate Ship,
based on the Booty’s value on the Market Mat. The first player starts with the type of Booty at the “2 Gold” spot, the second player starts with the type of Booty at the “3 Gold” spot, and so on, until each player has a cube.
Quartermaster Quigley Eliza Lucky
2Raina Rumor
Deck ofMerchant
Cards
Navy ShipMerchant Ship
Pirate Shipsonto Coves
Face-downSearch Tokens
Port
B
N
M
R
Q
7
11
1
810
P
Merchant Ship
Merchant Cards
8's
6's
4's
2's
O

6
Gameplay Overview The game is played in a series of turns, starting with the first player and going clockwise until one of the pirates has won the game. Your goal is to be the first to bury 3 treasures.
You begin with a slow ship, the bare-minimum crew, low Status, and little Gold. As you gain experience, your ship gets faster, you gain more crew, you fight better, and you start collecting enough Gold that it’s worth burying your treasure.
On Your Turn1. Choose Your Captain’s Order and Assign DeckhandsEach turn, you begin by advancing your Captain on your Wheel to choose your Captain’s Order for the turn. As you advance your Captain, you may juggle the Assignments for your Deckhands, moving them onto the Wheel or onto the 3 Deck Assignments (at the bottom of your Helm Mat).
2. Sail Your Pirate ShipYou may sail your Pirate Ship from one Map Card to another. Try to avoid being jostled by Storms!
3. Execute Your Captain’s OrderOnce you’ve reached your desired Map Card, you may execute the Captain’s Order:
• Plunder a Settlement to gain Booty.• Trade Booty at a Market for Gold.• Crew Up to gain more Crew.• Search the sea for valuables.• Attack ships to gain Booty, Gold, and Legend.• Hide Out in the safety of a Cove, re-assigning your Crew.
4. Trigger Bonus ActionsBased on your Captain’s Order, check the bottom of your Captain and Crew Cards for any listed Bonus Actions that may be triggered. Taking these Bonus Actions is always optional.
5. Crossing the Ship LineCheck to see whether your Captain has crossed the Ship Line on the Wheel ( ). If so, any Deckhands assigned to Extort now gain 1 Gold each, and the Navy and Merchant Ships sail in their listed order.
Then it is the next player’s turn.

7
Rigging
Sure-fire
Cannons Extort Repair1 1 :
In future turns, spaces that already have a Deckhand from a previous turn may be skipped again. When skipping or moving onto spaces with Deckhands from previous rounds, immediately move the Deckhands skipped or landed on to any Deck Assignment. You may skip multiple adjacent spaces this way, moving each Deckhand to an Assignment afterward. Deckhands removed from the Wheel and moved to Assignments this way CANNOT be used to skip more spaces in the same turn.
1a. Choose Your Captain’s OrderTo begin your turn, you advance your Captain (the first turn starting on “Hide Out”) clockwise on your Helm Mat’s Wheel to choose your Captain’s Order for this turn. You must always advance your Captain clockwise at least one space; it cannot stay on the same space, nor can it move counterclockwise.
Skipping Spaces with Deckhands:Moving to the next space on the Wheel is always free, but you may skip spaces by placing a Deckhand onto each space you wish to skip. These Deckhands are taken from ANY of the 4 Deck Assignments at the bottom of the Helm Mat (Rigging, Cannons, Extort, or Repair). Note: you cannot move to the same space you started on, even if you have enough Deckhands to skip all the way around the Wheel. There is one exception for skipping: you never need a Deckhand to skip the Hide Out “space 0.” From “space 5,” you may automatically jump over it to “space 1” (see Hide Out, pg 12).
Any number of Deckhands may be placed into each Assignment, and for each Deckhand there:
• Rigging gives you 1 additional (movement) when sailing your Pirate Ship.
• Cannons gives you 1 additional (damage)
when battling.
• Extort gives you 1 Gold if the Captain crosses the Ship Line ( ).
• Repair is where Deckhands from the first 3 Assignments are placed when Jostled (see Getting Jostled, pg 8). While in Repair, they cannot be assigned into the other Assignments unless you use a Reassign Bonus Action or a Hide Out Order while at a Cove. However, Deckhands in Repair CAN be used to skip spaces on the Wheel when choosing a Captain’s Order.
Rigging
Sure-fire
Cannons Extort Repair1 1 :
Rigging
Sure-fire
Cannons Extort Repair1 1 :
Rigging
Sure-fire
Cannons Extort Repair1 1 :
1b. Assign Deckhands

8
2. Sail Your Pirate ShipAfter choosing a Captain’s Order and assigning Deckhands, you may sail your Pirate Ship as many Map Cards as you are allowed ( ). The number of Map Cards you are allowed to move is determined by:
• ’s noted by your Legend Level (see pg 16).
• 1 per each Deckhand in Rigging.
• Search Tokens that grant additional (discard from the game when used).
You may sail across any number of Map Cards up to your total . Your sail path must be to Map Cards orthogonally adjacent (not diagonally). Once done, place your Pirate Ship in the center of the final Map Card where sailing ends, not covering any islands. You may freely sail into, sail out of, and stop on Map Cards with other ships without penalty.
StormsSailing your Pirate Ship onto a Map Card with a Storm ( )causes your ship to get Jostled (see below). If this forces you to move a Deckhand out of Rigging, it will reduce your total and could prevent you from reaching your destination. If you sail into multiple Storms, you are Jostled by each one. Remaining in a Storm or sailing out of it does not cause your ship to get Jostled any more.
Getting JostledWhen your ship is Jostled, either from a Storm or from losing after an attack, check what penalty you take:
1. If there are Deckhands on Rigging, Cannons, or Extort: move any 1 Deckhand you choose from any of those 3 into Repair.
2. If no Deckhands are on those 3 Assignments: move any 1 Deckhand you choose from your Wheel into Repair.
3. If ALL of your Deckhands are in Repair, you do not get Jostled from losing an attack. However, you cannot sail into a Storm if ALL of your Deckhands are in Repair. You first need to move at least 1 Deckhand to your Wheel by skipping a Captain’s Order, or Hide Out to reassign your Deckhands.
Rigging
Sure-fire
Cannons Extort Repair1 1 :
1
1
2
2
3
9
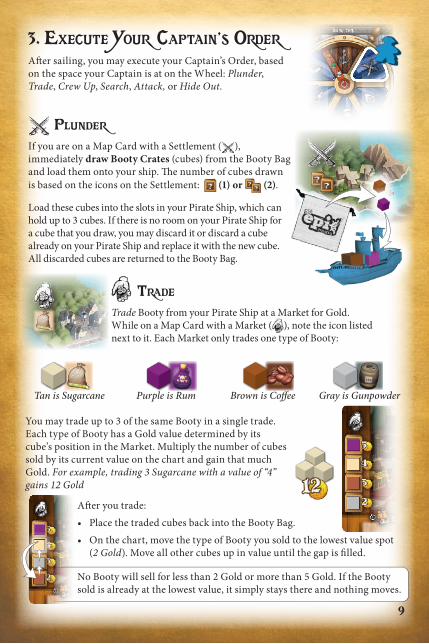
TradeTrade Booty from your Pirate Ship at a Market for Gold. While on a Map Card with a Market ( ), note the icon listed next to it. Each Market only trades one type of Booty:
You may trade up to 3 of the same Booty in a single trade. Each type of Booty has a Gold value determined by its cube’s position in the Market. Multiply the number of cubes sold by its current value on the chart and gain that much Gold. For example, trading 3 Sugarcane with a value of “4” gains 12 Gold
After you trade:• Place the traded cubes back into the Booty Bag.• On the chart, move the type of Booty you sold to the lowest value spot
(2 Gold). Move all other cubes up in value until the gap is filled.
No Booty will sell for less than 2 Gold or more than 5 Gold. If the Booty sold is already at the lowest value, it simply stays there and nothing moves.
3. Execute Your Captain’s OrderAfter sailing, you may execute your Captain’s Order, based on the space your Captain is at on the Wheel: Plunder, Trade, Crew Up, Search, Attack, or Hide Out.
PlunderIf you are on a Map Card with a Settlement ( ), immediately draw Booty Crates (cubes) from the Booty Bag and load them onto your ship. The number of cubes drawn is based on the icons on the Settlement: (1) or (2).
Load these cubes into the slots in your Pirate Ship, which can hold up to 3 cubes. If there is no room on your Pirate Ship for a cube that you draw, you may discard it or discard a cube already on your Pirate Ship and replace it with the new cube. All discarded cubes are returned to the Booty Bag.
Rigging
Sure-fire
Cannons Extort Repair1 1 :
Tan is Sugarcane Purple is Rum Brown is Coffee Gray is Gunpowder
10
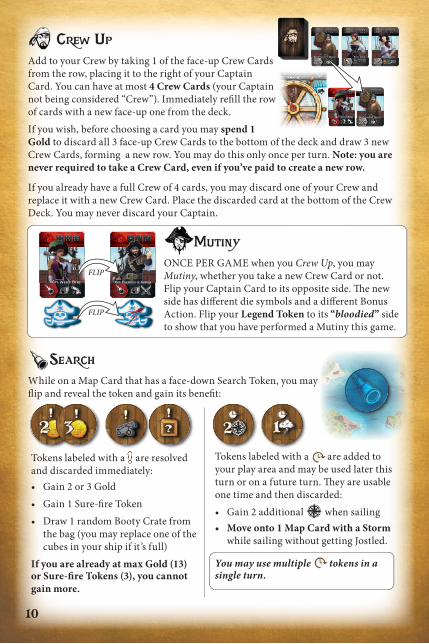
Crew UpAdd to your Crew by taking 1 of the face-up Crew Cards from the row, placing it to the right of your Captain Card. You can have at most 4 Crew Cards (your Captain not being considered “Crew”). Immediately refill the row of cards with a new face-up one from the deck.If you wish, before choosing a card you may spend 1 Gold to discard all 3 face-up Crew Cards to the bottom of the deck and draw 3 new Crew Cards, forming a new row. You may do this only once per turn. Note: you are never required to take a Crew Card, even if you’ve paid to create a new row.
If you already have a full Crew of 4 cards, you may discard one of your Crew and replace it with a new Crew Card. Place the discarded card at the bottom of the Crew Deck. You may never discard your Captain.
SearchWhile on a Map Card that has a face-down Search Token, you may flip and reveal the token and gain its benefit:
Tokens labeled with a are resolved and discarded immediately:• Gain 2 or 3 Gold• Gain 1 Sure-fire Token• Draw 1 random Booty Crate from
the bag (you may replace one of the cubes in your ship if it’s full)
If you are already at max Gold (13) or Sure-fire Tokens (3), you cannot gain more.
Tokens labeled with a are added to your play area and may be used later this turn or on a future turn. They are usable one time and then discarded:• Gain 2 additional when sailing• Move onto 1 Map Card with a Storm
while sailing without getting Jostled.
You may use multiple tokens in a single turn.
MutinyONCE PER GAME when you Crew Up, you may Mutiny, whether you take a new Crew Card or not. Flip your Captain Card to its opposite side. The new side has different die symbols and a different Bonus Action. Flip your Legend Token to its “bloodied” side to show that you have performed a Mutiny this game.
Cpt. Wendy Byrd Cpt. Francisco de Guerra
Rigging
Sure-fire
Cannons Extort Repair1 1 :
Cpt. Wendy Byrd
FLIP
FLIP
Quartermaster Quigley
Quartermaster Quigley
Eliza Lucky
2Raina Rumor

11
2
AttackYou may fire your cannons at another Pirate Ship or Merchant Ship that’s on the same Map Card as you are. You cannot attack the Navy Ship. If multiple ships are on the same Map Card as you, choose which one to attack. Your goal is to deal more (damage) than the ship you’re attacking. Total your by:
Rolling for Damage: Roll the number of dice indicated by your Legend Level (either 2 or 3 dice). Compare the die results to the symbols listed at the top of all of your Captain and Crew Cards. For each die symbol that matches your roll, you deal 1 . For example, if you have two 6-symbols and roll a 6, you deal 2 . If you have two 6-symbols and roll two 6’s, you instead deal 4 . Numbers rolled that do not match any die symbols on your cards deal zero .
Use Sure-fire Tokens: After rolling, you may discard a Sure-fire Token from your Helm Mat to set 1 already rolled die to a face of your choice, using that die result instead. This only changes the die number; it does not count as an additional die result. You may do this multiple times in an attack if you have the Sure-fire Tokens to discard.
Deckhands on Cannons: Add 1 for each Deckhand on Cannons.
Automatically add Crew with to your total.
Attacking a Merchant ShipThe amount of damage the Merchant Ship deals is shown on its Merchant Card under the Market Mat. In order to sink a Merchant Ship, you must deal MORE to the ship than the damage it deals. A tie in doesn’t sink a Merchant Ship.
If you sink a Merchant Ship:
1. Collect the Booty carried by the Merchant Ship and gain the amount of Gold shown on its Merchant Card. If you don’t have enough room for the cube, you must discard it or discard a cube on your ship (back to the bag) to make room for it.
2. Discard the Merchant's card from the game and draw a new card to replace it, placing it face-up in the now-vacant spot under the Market Mat.
3. Move the Merchant Ship onto the Map Card with a Port that is furthest from your Pirate Ship (counting the cards orthogonally) and point it toward the opposite Port. If both Ports are equidistant, you choose which Port it moves to.
4. Draw a new Booty from the bag and place into the Merchant Ship.
When you sink an 8 Merchant Ship, you no longer replace the card. Instead reset the Merchant Ship as normal, but keep using the same card.
Ursula BaneCpt. Wendy Byrd
Rigging
Sure-fire
Cannons Extort Repair1 1 :
4
8
1-4
1
Silent Seamus
12
Hide OutHide Out is a special Captain’s Order on your Wheel (at space “0”), just past the Ship Line. It is the only space that can be voluntarily skipped without using a Deckhand. To Hide Out, your ship must be on a Map Card with a Cove ( ) that is not already occupied by another Pirate Ship. Place your ship over the Cove location on the Map Card. A Cove may only hide one Pirate Ship at a time.
Then, you may take any number of your Deckhands from ANYWHERE (including Repair) on your Helm Mat and move them into any Deck Assignment (Rigging, Cannons, or Extort). Note that every Deckhand placed onto Extort gains 1 Gold immediately (since you just crossed the Ship Line).
Hiding Out will trigger the Navy and Merchant Ships to sail at the end of your turn, since you crossed the Ship Line (see Cross the Ship Line, pg 15). However while hiding out in a Cove, neither the Navy nor other players may attack your ship. The Navy Ship still sails toward you.
Rigging
Sure-fire
Cannons Extort Repair1 1 :
Rigging
Sure-fire
Cannons Extort Repair1 1 :
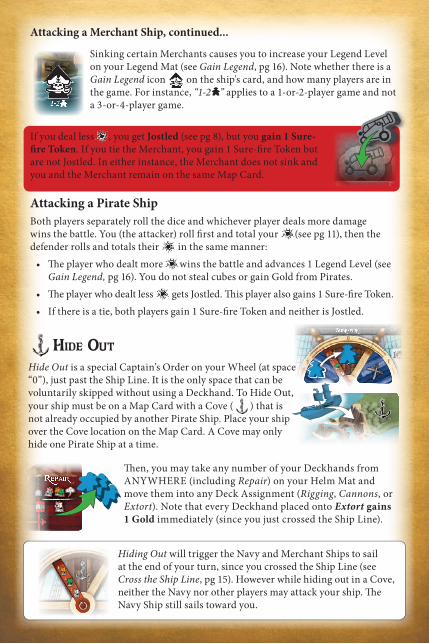
Attacking a Merchant Ship, continued...
Sinking certain Merchants causes you to increase your Legend Level on your Legend Mat (see Gain Legend, pg 16). Note whether there is a Gain Legend icon on the ship's card, and how many players are in the game. For instance, “1-2 ” applies to a 1-or-2-player game and not a 3-or-4-player game.
If you deal less , you get Jostled (see pg 8), but you gain 1 Sure-fire Token. If you tie the Merchant, you gain 1 Sure-fire Token but are not Jostled. In either instance, the Merchant does not sink and you and the Merchant remain on the same Map Card.
Attacking a Pirate ShipBoth players separately roll the dice and whichever player deals more damage wins the battle. You (the attacker) roll first and total your (see pg 11), then the defender rolls and totals their in the same manner:
• The player who dealt more wins the battle and advances 1 Legend Level (see Gain Legend, pg 16). You do not steal cubes or gain Gold from Pirates.
• The player who dealt less gets Jostled. This player also gains 1 Sure-fire Token.• If there is a tie, both players gain 1 Sure-fire Token and neither is Jostled.
4
1-2
Rigging
Sure-fire
Cannons Extort Repair1 1 :
Rigging
Sure-fire
Cannons Extort Repair1 1 :
Rigging
Sure-fire
Cannons Extort Repair1 1 :
Rigging
Sure-fire
Cannons Extort Repair1 1 :
13
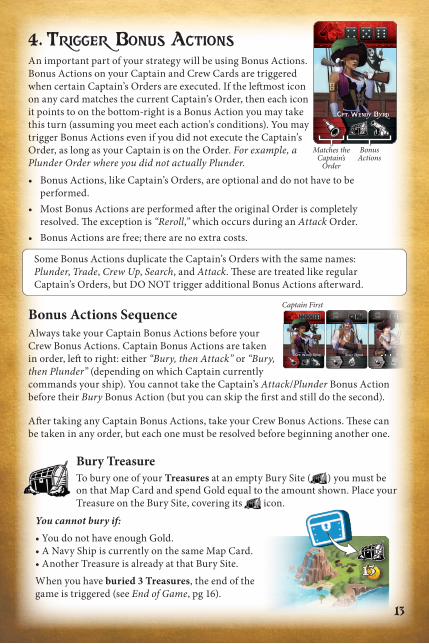
4. Trigger Bonus ActionsAn important part of your strategy will be using Bonus Actions. Bonus Actions on your Captain and Crew Cards are triggered when certain Captain’s Orders are executed. If the leftmost icon on any card matches the current Captain’s Order, then each icon it points to on the bottom-right is a Bonus Action you may take this turn (assuming you meet each action’s conditions). You may trigger Bonus Actions even if you did not execute the Captain’s Order, as long as your Captain is on the Order. For example, a Plunder Order where you did not actually Plunder.• Bonus Actions, like Captain’s Orders, are optional and do not have to be
performed.• Most Bonus Actions are performed after the original Order is completely
resolved. The exception is “Reroll,” which occurs during an Attack Order.• Bonus Actions are free; there are no extra costs.
Some Bonus Actions duplicate the Captain’s Orders with the same names: Plunder, Trade, Crew Up, Search, and Attack. These are treated like regular Captain’s Orders, but DO NOT trigger additional Bonus Actions afterward.
Bonus Actions SequenceAlways take your Captain Bonus Actions before your Crew Bonus Actions. Captain Bonus Actions are taken in order, left to right: either “Bury, then Attack” or “Bury, then Plunder” (depending on which Captain currently commands your ship). You cannot take the Captain’s Attack/Plunder Bonus Action before their Bury Bonus Action (but you can skip the first and still do the second).
After taking any Captain Bonus Actions, take your Crew Bonus Actions. These can be taken in any order, but each one must be resolved before beginning another one.
Bury TreasureTo bury one of your Treasures at an empty Bury Site ( ) you must beon that Map Card and spend Gold equal to the amount shown. Place yourTreasure on the Bury Site, covering its icon.
Cpt. Wendy Byrd
Cpt. Wendy Byrd Jolly Rodge Taylor Truenorth
Bonus Actions
Matches the Captain’s
Order
Captain First
You cannot bury if:• You do not have enough Gold.• A Navy Ship is currently on the same Map Card.• Another Treasure is already at that Bury Site.When you have buried 3 Treasures, the end of the game is triggered (see End of Game, pg 16).

14
Trigger Bonus Actions, continued...
Trade Special BootyTrade the listed combination of Booty and gain the amount of Gold shown. You still need to be at a Market that matches one of the Booty types shown. This occurs after a Trade Order. It is neither affected by nor does it adjust the position of Booty in the Market.
ExchangeDiscard 1 cube from your Pirate Ship to the Booty Bag and take your choice of any 1 type of Booty from the bag to replace it.
Sail the Navy Ship / Merchant ShipSail the indicated ship (the Navy Ship or one of the Merchant Ships) the number of Map Cards listed. This does not have to follow the ship’s normal rules, but each Merchant Ship must still remain pointing at its target Port (see Sail the Merchant Ships, next page). The Navy Ship ignores Pirate Ships during this movement.
Gain GoldImmediately gain the amount of Gold shown.
RerollIf you roll either or both of the die faces shown at the bottom of a Crew Card with Reroll, you may reroll each such die once during the attack. If you have multiple Crew Cards with this ability, fully resolve one card completely before resolving the next. This action is only usable when executing an Attack Order, and not during Attack Bonus Actions or when attacked by another player.
ReassignYou may reassign any or all Deckhands currently on any of the 4 Deck Assignments (including those from Repair), placing them into any Assignment. You cannot reassign Deckhands on the Wheel. Deckhands assigned in this way to Rigging or Cannons can give you an immediate boost to Sail or Attack Bonus Actions, and those assigned to Extort can generate Gold if you have passed the Ship Line this turn.
SailYou may perform a single Sail as a Bonus Action. Calculate your total
as normal (see Sail Your Pirate Ship, pg 8). You must complete your movement (as usual) before performing additional Bonus Actions.
15
5. Cross the Ship LineAfter you execute your Captain’s Order and trigger Bonus Actions, check if your Captain has crossed over the Ship Line ( ) on this turn. If it has crossed:
1. Gain 1 Gold for each Deckhand in Extort.
2. The Navy and Merchant Ships now sail. This is performed by the player to the right of the “active player” (the player who just crossed the Ship Line).
Sail the Merchant ShipsThe goal of each Merchant Ship is to sail to the opposite Map Card with a Port from where it started. First, the
Orange Merchant Ship sails 1 towards the Port it points to, and then the Green Merchant Ship sails 1 towards its Port.
When sailing, keep the ship pointed in the direction of its target Port. This ensures that it is always moving in the correct direction. The player to the right of the active player chooses which Map Cards the Merchant Ships sail to, as long as that moves each ship toward its target Port.
When a Merchant Ship reaches its Port, it turns around and now points to the opposite Port. It also delivers its Booty, so return its Booty to the bag and draw a new Booty for it. Merchant Ships are not affected by Storms when sailing.
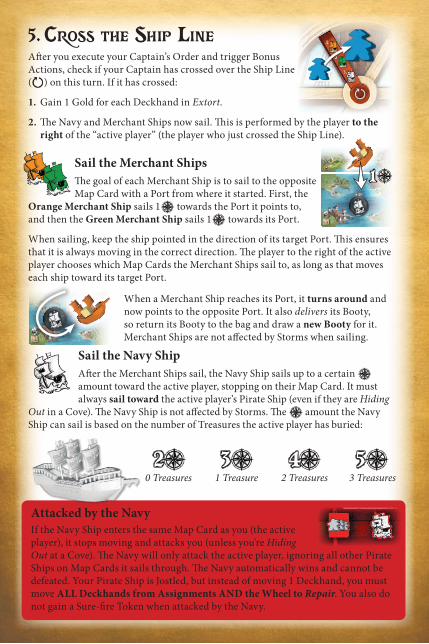
Sail the Navy ShipAfter the Merchant Ships sail, the Navy Ship sails up to a certain amount toward the active player, stopping on their Map Card. It must always sail toward the active player’s Pirate Ship (even if they are Hiding
Out in a Cove). The Navy Ship is not affected by Storms. The amount the Navy Ship can sail is based on the number of Treasures the active player has buried:
0 Treasures 1 Treasure 2 Treasures 3 Treasures
Attacked by the NavyIf the Navy Ship enters the same Map Card as you (the active player), it stops moving and attacks you (unless you're Hiding Out at a Cove). The Navy will only attack the active player, ignoring all other Pirate Ships on Map Cards it sails through. The Navy automatically wins and cannot be defeated. Your Pirate Ship is Jostled, but instead of moving 1 Deckhand, you must move ALL Deckhands from Assignments AND the Wheel to Repair. You also do not gain a Sure-fire Token when attacked by the Navy.
Rigging
Sure-fire
Cannons Extort Repair1 1 :
Rigging
Sure-fire
Cannons Extort Repair1 1 :
Rigging
Sure-fire
Cannons Extort Repair1 1 :
2 3 4 5
1

16
Gain LegendWhen you win a battle against another player’s Pirate Ship or sink certain Merchant Ships, you
immediately advance your Legend Token 1 level on your Legend Mat. With each new level, you immediately gain one-time bonuses (Gold, a new Deckhand, or a Sure-fire Token), and it may increase the number of you can sail and the number of dice you roll when attacking. Once the Legend Token is at the final level, you no longer receive more bonuses, even if you would gain more Legend. You cannot lose Legend Levels (your token cannot go down on the track).
Next Player’s TurnAfter you have (1.) chosen a Captain’s Order, (2.) sailed, (3.) resolved the Order and (4.) triggered any Bonus Actions, and (5.) resolved crossing the Ship Line (if you did), your turn is over. It is now the next clockwise player’s turn.
End of GameWhen a player has placed their third and final Treasure Token, the end of the game is triggered. Continue until all players have taken an equal number of turns (the first player is not given another turn). The game then ends.
The player who buried all 3 Treasures wins the game.• If players are tied for burying 3 Treasures, the tied player with the
highest Legend Level reached on their Legend Mat wins. • If still tied, the tied player with the most Gold is the winner.• If still tied, the tied player with the most Booty in their ship is the
winner.• If still tied, enjoy a shared victory!
DreadPirate
Legend
Buccaneer
Swash Buckler
Corsair
Pirate
Sea Dog
DreadPirate
Legend
Buccaneer
Swash Buckler
Corsair
Pirate
Sea Dog
©2021 Gamelyn Games, LLC all rights reserved. No part of this product may be reproduced without specific permission. Tiny Epic Pirates, Gamelyn Games, the Gamelyn Games logo, and the TEP logo are trademarks of Gamelyn Games, LLC.
Check out other Tiny Epic Games:GamelynGames.com
Designer: Scott AlmesIllustrators: Felix Wermke, Nikoletta Vaszi, Ian Rosenthaler, Chip ColeGraphic Designer: Benjamin Shulman
Honorary Producers: Stephen B. Eckman, Robert Corbett, Randal Lloyd, Brian Kirchhoff, Curtis Thornock, Arioch Morningstar, Chris Estep, Jeff Hoffman, Carly Othling, Smiley Wilkinson, Josh Pactor, John Mark Brown, Ramon van Hal, Branson Bryant, Cheng Xiong, Mark Heffernan, the Printed Meeple and the Schroeder Family.
Game Developers: Michael Coe, Sam Aho3D Designer: Emerson MatsuuchiEditor: David Ladyman

17
Solo Play: The Legendary Pirate In the solo game, you compete against a legendary pirate with a unique personality. Be the first to bury all 3 of your Treasures and you win!
Solo SetupSet up the game as normal for a 2-player game, with these changes:1. Randomly select a Helm Mat and Legend Mat and flip them over to the Solo
sides. Place them next to each other to form a combo of captain and personality.2. Select a player color for the Solo Pirate:
A. Randomly place the 5 Order Tokens of that color on the Helm Mat's wheel.
B. Place the Captain onto the Hide Out space at the top of the wheel.
C. Place 3 Deckhands, one on each of the 3 Deckhand Assignment spaces at the bottom of the Helm Mat. Discard the fourth Deckhand back to the box.
D. Place the 3 Treasures onto their spots at the bottom of the Legend Mat.
E. Place the Legend Token on the marked top-left space on the Legend Mat.F. Place a Gold Doubloon next to the Gold Track, representing “zero.”
Do not give the Solo Pirate a Captain Card (the Solo Helm Mat is the Captain).
3. First, place your Pirate Ship into a Cove, and then place the Navy Ship in a corner Card that does not contain a Merchant Ship. Then, place the Solo Pirate’s Ship into an unoccupied Cove that is the furthest away orthogonally from the Navy Ship.
4. You and the Solo Pirate both gain a starting Booty according to normal setup rules, you acting as first player.
On Your Turn You are the first player, and you take your turn as normal, with one change:
When you cross the Ship Line, the Solo Pirate will sail the ships. If it has to make a choice, it prioritizes sailing vertically before horizontally.
Merchants: If possible, the Solo Pirate sails each Merchant to the adjacent Map Card that will take it further away from you (as long as that location is still advancing toward its Port). With one exception: a Merchant WILL NOT sail onto the same Map Card as another Merchant, even if that means sailing it onto your ship’s Map Card. If it is possible, move the Merchants in a way that will avoid this conflict.
Navy: Sail vertically until it is in your row, and then sail horizontally toward you.
Rigging
Sure-fire
Cannons Extort Repair1 1 :
Rigging
Sure-fire
Cannons Extort Repair1 1 :
RepairCannons Rigging Cannons1 11
1 1
Solo CaptainCaptain Jack
1
2 3
2
2
2
2
3
2
DreadPirateBuccaneerPirateSea Dog
Solo Legend
Vengeful
Solo Legend Mat Solo Helm Mat
A
CD
E
F
B

On the Solo Pirate’s TurnAt the start of the turn, roll a die to dictate the order the Solo Pirate will execute:
Rolling 1-5: The Solo WheelThe Solo Pirate advances its Captain clockwise around the Wheel (using Deckhands if necessary, to skip spaces) to reach the Order marked by the die’s number. When it is required to skip a space, it takes the rightmost Deckhand from the bottom of the mat (including from Repair) and places it on the skipped space. If the Captain skips over or lands on a Deckhand that is already on the wheel, that Deckhand is added back to the leftmost unoccupied Deck Assignment. Only 1 Deckhand may be placed on each Assignment, except for Repair which can hold multiple Deckhands. If the Solo Pirate cannot reach the Order space based on its rolled number because it lacks the available Deckhands, it moves as far as possible around the wheel before stopping its Captain on an Order Token.
Rolling 6: The Legend ActionAdvance the Solo Pirate’s Legend Token one place clockwise on its Legend Mat and execute the Order(s) or perform the Action(s) listed in that space in order going from top to bottom.
Solo Pirate Sails and then Executes an OrderNote the space on the wheel that the Solo Pirate’s Captain is in. Next to that space’s die icon, there is an icon for the ship that the Solo Pirate will target (either one of the Merchants or your Pirate Ship). The Solo Pirate always targets you when a 6 is rolled. Execute the Solo Pirate Order in 3 steps:1. Sail it as far as possible towards the target ship, first
sailing vertically to the ship’s row and then sailing horizontally. Note any that the Solo Pirate may receive from Bonus Actions, Deck Assignments, or from its Legend Level. The Solo Pirate will stop sailing at the Map Card with its target.
2. Execute the Solo Pirate’s Order (see next page).
3. After executing the Order, note if that Order triggers a Bonus Action listed on the top of the Solo Helm Mat. Note that the Solo Pirate’s Crew Cards DO NOT trigger any of the Bonus Actions based on their icons. Just use them for their dice results and hits in battle.
1
2 3
2
2
2
2
3
2
DreadPirateBuccaneerPirateSea Dog
Solo Legend
Vengeful
RepairCannons Rigging Cannons1 11
1 1
Solo CaptainCaptain Jack
RepairCannons Rigging Cannons1 11
1 1
Solo CaptainCaptain Jack
18

19
Plunder: Draw 1 Booty from the bag and add it to the Solo Pirate’s Ship. It does not need to be at a Settlement to Plunder (it Plunders any island).
If this is the third Booty added to the ship, the Solo Pirate immediately Trades (see below).
Attack: Attack the target ship if on its Map Card (see next page).
Trade: Trade all of the highest-valued Booty type on the ship (based on the Market) for Gold. Discard the cubes to the bag, and then adjust the cubes in the Market based on what was sold. The Solo Pirate does not have to be at a Market to Trade.
Search: If there is a Search Token on the Solo Pirate’s Map Card it takes the token and resolves the effect, as shown below, and then it discards the token:
Crew Up: Draw the top Crew Card from the deck and add it face up to the right of the Solo Helm Mat, always adding the new card to the right of previous ones. The Solo Pirate still has a limit of 4 Crew Cards. If the Solo Pirate would draw a fifth Crew, it instead discards the 3 face-up Crew to the bottom of the deck and draws 3 new cards.
Hide Out and Cross the Ship Line: The Solo Pirate never places its Captain onto the Hide Out space, and will always skip it when advancing. When its Captain crosses the Ship Line, you move the Merchant Ships and Navy Ship (targeting the Solo Pirate) for it at the end of the Solo Pirate’s turn.
Bury TreasureWhen the Solo Pirate’s Doubloon reaches the final space at the top of its track, it immediately places its leftmost Treasure at the bottom of the Legend Mat onto the closest island to its ship with an available . If there are multiple equidistant islands, bury at the cheapest one. If there is a tie for cheapest, then you choose which. Afterward place the Doubloon at the bottom of the track, representing “zero.” If there was additional Gold gained when the Doubloon reached the top of the track, that Gold is considered lost.
Each Treasure removed from the Solo Legend Mat increases the power of the Solo Pirate Ship. Note its boosts to sailing, number of dice rolled, and automatic hits.1
2 3
2
2
2
2
3
2
DreadPirateBuccaneerPirateSea Dog
Solo Legend
Vengeful
Gain listed amount of Gold Gain 1 Gold
Draw 1 Booty(see rules above)

Solo Pirate AttackWhen the Solo Pirate attacks (or is attacked) its is totaled in this way:• Roll the number of dice based on its level at the bottom of the Legend Mat (the
rightmost space that does not have a Treasure on it). Compare these dice results to the Captain’s dice icons at the top-right of the Solo Helm Mat and any Crew it has.
• Each Deckhand in Cannons grants +1 .• Any “automatic hit” icons ( ) listed on the the bottom of the Legend Mat, Helm
Mat Bonus Actions, Legend Mat actions, or the tops of Crew Cards add to the total.The Solo Pirate does not use and cannot gain Sure-fire Tokens. Anytime it would gain a Sure-fire Token, it instead gains 1 Gold (see below).
Solo Pirate vs. Merchant• Solo Pirate sinks Merchant: It gains the Gold listed on the ship’s Merchant Card,
and it adds the Merchant’s Booty to its ship (immediately Trade if it is the ship’s third cube). Then “reset” the Merchant Ship like normal.
• Merchant defeats Solo Pirate: It is Jostled (see below) and gains 1 Gold (instead of a Sure-fire Token). Place the Solo Pirate Ship onto the nearest unoccupied Cove.
• Tie: The Solo Pirate gains 1 Gold. Nothing happens to the Merchant.
Solo Pirate vs. You• You defeat Solo Pirate: You advance your Legend Level 1 space. The Solo Pirate is
Jostled, it gains 1 Gold, and its ship is placed onto the nearest unoccupied Cove.• Solo Pirate defeats You: You are Jostled and gain a Sure-fire Token. The Solo
Pirate gains Gold equal to the lower amount listed on the face-up Merchant Cards currently under the Market Mat.
• Tie: You gain a Sure-fire Token and the Solo Pirate gains 1 Gold.
Navy vs. Solo PirateThe Solo Pirate becomes fully Jostled: move ALL 3 Deckhands into Repair, place the ship onto the nearest unoccupied Cove.
Jostling the Solo PirateWhen deciding which Solo Pirate Deckhand to move to Repair, first check to see if there are any Deckhands in any “non-Repair” Assignment. If there are, move the rightmost Deckhand. If there are no Deckhands in Assignments, check the Wheel: move the closest Deckhand to the Captain (going counter-clockwise) to Repair. If all the Deckhands are already in Repair, do nothing.
Solo Game EndThe first to bury 3 Treasures is the winner. When either of you does this, the other does not get another turn.
20
RepairCannons Rigging Cannons1 11
1 1
Solo CaptainCaptain Jack