Sass Essentials - Sample Chapter
40
Community Experience Distilled Develop efficient and streamlined CSS styles using Sass for any website or online application with minimal effort and maximum scope for reusability in future projects Sass Essentials Alex Libby Free Sample
-
Upload
packt-publishing -
Category
Technology
-
view
126 -
download
0
Transcript of Sass Essentials - Sample Chapter
C o m m u n i t y E x p e r i e n c e D i s t i l l e d
Develop effi cient and streamlined CSS styles using Sass for any website or online application with minimal effort and maximum scope for reusability in future projects
Sass Essentials
Alex Libby
Sass EssentialsSass is a professional grade CSS extension language known for its stability and versatility in the fi eld of web design. It introduces new concepts to CSS, such as variables and nesting, that allow users to speed up their workfl ows and make their code more dynamic.
Sass Essentials is a fast-paced, hands-on guide that breaks down the mysteries of preprocessing CSS styles using the Sass preprocessor and shows you how you can apply simple techniques to quickly and effi ciently create CSS style sheets.
With this book, you will dive in and familiarize yourself with some popular directives and see how, with some care and planning, they can prove to be really powerful tools to use in Sass.
Who this book is written forThis book is primarily aimed at web designers who have a good understanding of CSS, jQuery, and HTML, but who are new to using CSS preprocessing. Some prior knowledge is assumed of WordPress, CSS grids, and Bootstrap, although these skills can be picked up reasonably quickly.
$ 29.99 US£ 19.99 UK
Prices do not include local sales tax or VAT where applicable
Alex Libby
What you will learn from this book
Install Sass and compile code to produce valid CSS style sheets
Work with mixins and variables to help streamline writing styles
Defi ne CSS attribute values using the power of functions and operators
Reduce repetition of code through the use of nesting styles
Understand how to rationalize code by extending existing styles
Explore the use of directives to control how styles are created
Apply techniques to existing projects or well-known applications such as WordPress or Bootstrap
Sass Essentials
P U B L I S H I N GP U B L I S H I N G
community experience dist i l led
Visit www.PacktPub.com for books, eBooks, code, downloads, and PacktLib.
Free Sample

In this package, you will find: The author biography
A preview chapter from the book, Chapter 2 'Creating Variables and Mixins'
A synopsis of the book’s content
More information on Sass Essentials
About the Author
Alex Libby comes from an IT support background. He has been involved in supporting end users for almost 20 years in a variety of different environments. Currently, Alex works as a technical analyst and supports a medium-sized SharePoint estate for an international parts distributor in the UK. Although he gets to play with different technologies in his day job, his fi rst true love has always been the open source movement, particularly, experimenting with CSS/CSS3, jQuery, and HTML5. To date, Alex has written nine books based on jQuery and CSS3, among others, for Packt. Sass Essentials is Alex's tenth book for Packt. He has reviewed several books and videos as well.
PrefacePicture this scene—you consider yourself pretty au fait with developing CSS styling; you've produced some stunning work over the years, spending time carefully crafting styles for demanding clients.
A colleague starts to band this word "Sass" around the offi ce—you soon hear others talk of this "Sass" on Twitter and begin to wonder what it's all about.
Well, fear no more—welcome to the world of Sass! Throughout the course of this book, we'll delve into the world of CSS preprocessing, where we will explore tips and tricks that can help you make your CSS development more effi cient, using Sass. Of course, you're probably wondering how; all will be revealed. Consider this as a taster though—how often have you spent time choosing colors for buttons only to fi nd out that the client doesn't like the color scheme.
Sound familiar? I'll bet the answer is yes. In the next few pages, I will show you the tricks you need to know to create a color scheme from a single color. Let's just say that should you fi nd out that your clients want the color changed, long evenings of changing code will become a thing of the past.
Let's dive in and start our journey through the world of Sass.
What this book coversChapter 1, Introducing Sass, takes you through the journey of Sass and discusses its essentials. This chapter will introduce Sass, tell you how to install it, and explore how it will make your development workfl ow smarter and more effi cient, ultimately saving you valuable time. It will also help you create a simple layout and show you how to use Sass to compile the code to produce valid CSS.
Preface
Chapter 2, Creating Variables and Mixins, explores a key facet of Sass in the form of using variables. It discusses how editing one value can automatically update a whole series of rules at a single stroke. Just imagine altering the font sizes for your website in one go by simply editing one number!
Chapter 3, Building Functions, Operations, and Nested Styles, talks about how to use functions and operators to construct an entire site from just a handful of variables. We will also touch on nesting styles to help make code easier to read and maintain.
Chapter 4, Directing Sass, takes a look at another key element of Sass in the form of directives. It provides information on how to use some of the more popular options, such as @extend or @media. These will be used to a great effect in a series of demos, which quickly illustrates how careful use of these directives can have a signifi cant positive effect on our code.
Chapter 5, Incorporating Sass into Projects, examines how to apply some of the tips and tricks we have covered throughout the book into more practical uses. It talks about several popular frameworks, such as Bootstrap, WordPress, and CSS grids. This chapter also shows you how Sass can be used to great effect to help construct sites, while reducing the amount of code we need to write.

[ 31 ]
Creating Variables and MixinsImagine that classic scenario if you will, where some well-meaning soul says that they want a change made to a proposed style for a website and they want it tomorrow. Oh! And it's 6 o'clock on a Friday…
Sound familiar? How many times have you had to style an element only to have to go and change it to something else? It's a real pain, right?
A key part of Sass is getting familiar with setting variables; they allow you to defi ne values in one place that can be used many times in our CSS output. Mixins go one step further—we can create reusable blocks of code that can be dropped in with care and planning. It saves us valuable time at the compilation stage.
Throughout this chapter, we will cover a number of tricks that will help reduce or remove the need to update elements individually, which include:
• Adding comments to Sass files• Creating variables• Building mixins and incorporating them into our pages• Using prebuilt mixin libraries, such as Compass• Adapting existing mixins to use libraries• Building custom mixin libraries
Time to level up. Let's go!
Creating Variables and Mixins
[ 32 ]
Making a start on our codeWe started this book by preparing our environment—now that everything is installed, we can look at writing some code.
Of course, we can jump in, but as you are likely to be relatively new to working with Sass, it's a wise idea to get as much help as possible. One way to achieve this is through the use of linting code or running a continual background check to ensure that we are writing valid Sass code.
The great thing about this is that we can easily set this up with the addition of Ruby gems. These are the Ruby equivalent to plugins and work in a similar fashion to using standard plugins such as those we may use when working with jQuery. The plugin we will use is scss-lint, which is available at https://github.com/brigade/scss-lint. Let's take a look at how to set this up from within Sublime Text, using the SublimeLinter SCSS plugin from https://github.com/attenzione/sublimeLinter-scss-lint.
This exercise assumes that you have Package Control and Sass support for Sublime Text 3 installed along with Node.js. For details on how, refer to Chapter 1, Introducing Sass, before continuing with the exercise. Note that the linter plugin does not work on Sublime Text 2.
Let's start. Perform the following steps:
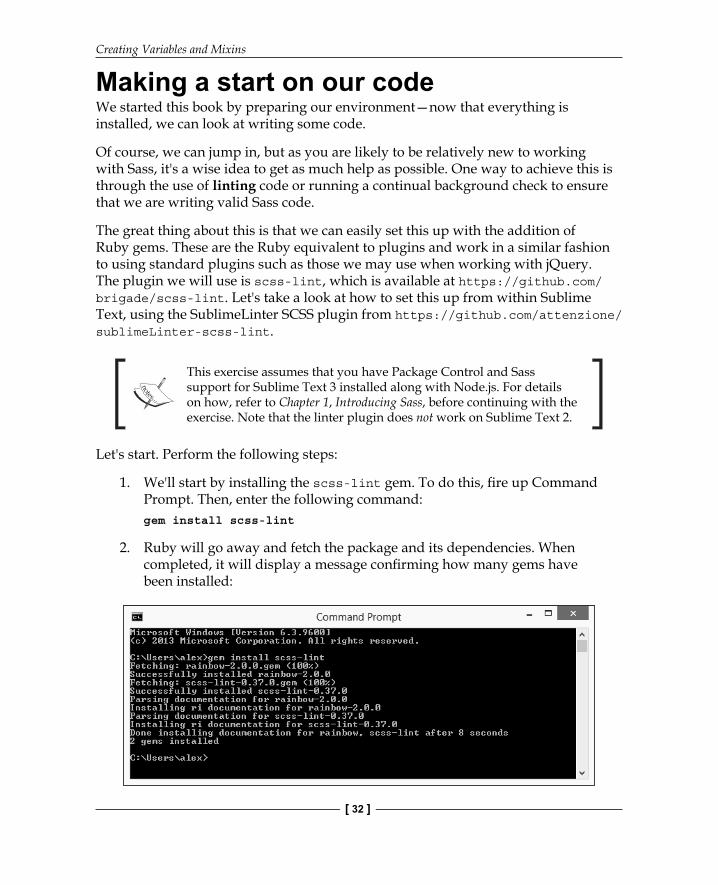
1. We'll start by installing the scss-lint gem. To do this, fi re up Command Prompt. Then, enter the following command:gem install scss-lint
2. Ruby will go away and fetch the package and its dependencies. When completed, it will display a message confi rming how many gems have been installed:
Chapter 2
[ 33 ]
3. Next, we need to install the SublimeLinter plugin. This provides the framework to lint our code. Go ahead and fi re up Sublime Text. Then, press Ctrl + Shift + P to display the command palette.
The scss-lint gem must be installed first; this is a dependency for the Sublime Text linter plugin to work.
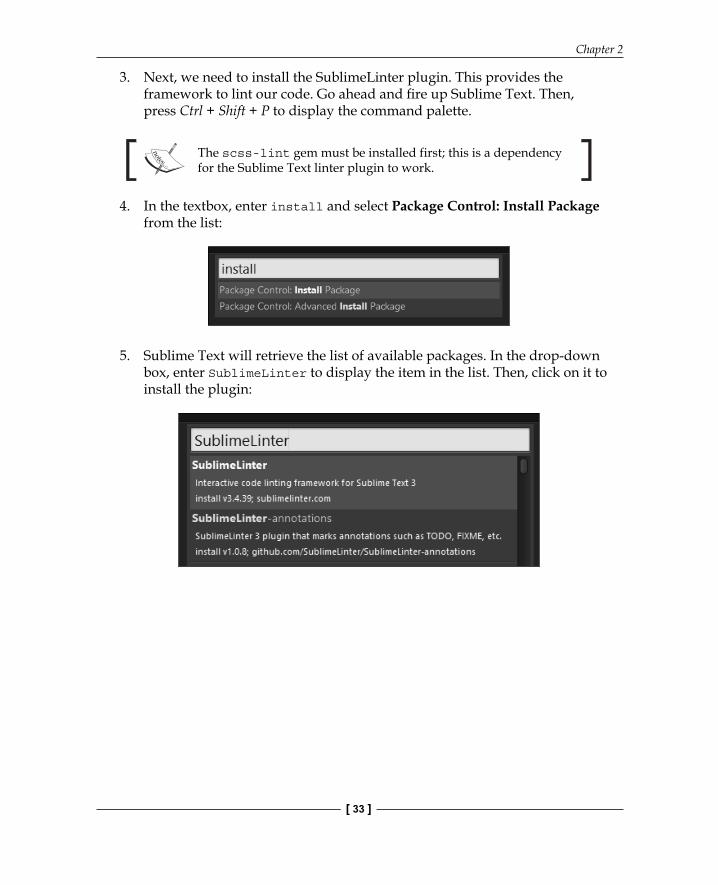
4. In the textbox, enter install and select Package Control: Install Package from the list:
5. Sublime Text will retrieve the list of available packages. In the drop-down box, enter SublimeLinter to display the item in the list. Then, click on it to install the plugin:
Creating Variables and Mixins
[ 34 ]
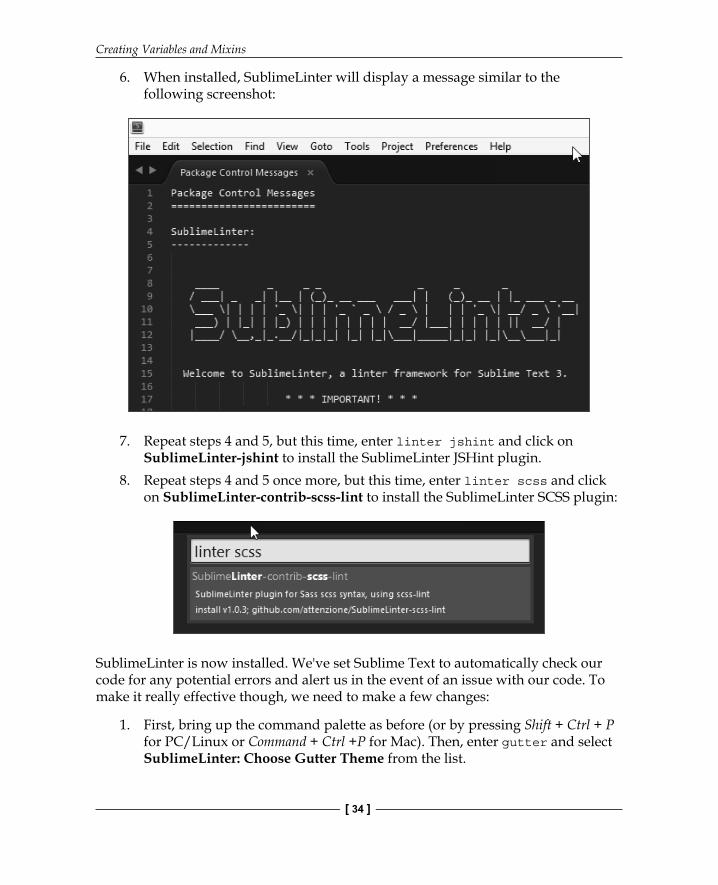
6. When installed, SublimeLinter will display a message similar to the following screenshot:
7. Repeat steps 4 and 5, but this time, enter linter jshint and click on SublimeLinter-jshint to install the SublimeLinter JSHint plugin.
8. Repeat steps 4 and 5 once more, but this time, enter linter scss and click on SublimeLinter-contrib-scss-lint to install the SublimeLinter SCSS plugin:
SublimeLinter is now installed. We've set Sublime Text to automatically check our code for any potential errors and alert us in the event of an issue with our code. To make it really effective though, we need to make a few changes:
1. First, bring up the command palette as before (or by pressing Shift + Ctrl + P for PC/Linux or Command + Ctrl +P for Mac). Then, enter gutter and select SublimeLinter: Choose Gutter Theme from the list.

Chapter 2
[ 35 ]
2. From the list that appears, choose Knob – Symbol to change the icons that show in the left-hand side margin when there is an issue in the code.
3. We will also alter the style used to mark our code if there is an issue; fi re up the command palette as before. Then, enter mark to select SublimeLinter: Choose Mark Style and select Squiggly underline from the list.
4. We can now check to see whether it works. Restart Sublime Text. Then, open up the sassfunctions.scss fi le from Chapter 1, Introducing Sass.
5. Press Ctrl + S to save. While we haven't changed our code, it's enough to trigger the linter to kick in, as shown in the following code:
6. Click on $mainColour. If all is well, we should see a message appearing in the status bar, which is similar to this screenshot:
The error shown isn't really an error as such; variables can be written using camelCase if desired. It's more about maintaining a consistent style in your code.
Okay. Now, we have our helping hand in place. We're now ready to start writing code; we'll begin with creating variables to help with assigning values in our code.
Altering the compilation processBefore we start creating code, we can benefi t from a change to our compilation process. At present, our Grunt fi le is compiling a hardcoded fi le, which is a little limiting. Instead, it would be better to set it to compile multiple fi les while working through the book. This removes the need to change the names, and deals with compiling fi les without our intervention.
Creating Variables and Mixins
[ 36 ]
Let's go ahead and make this change now:
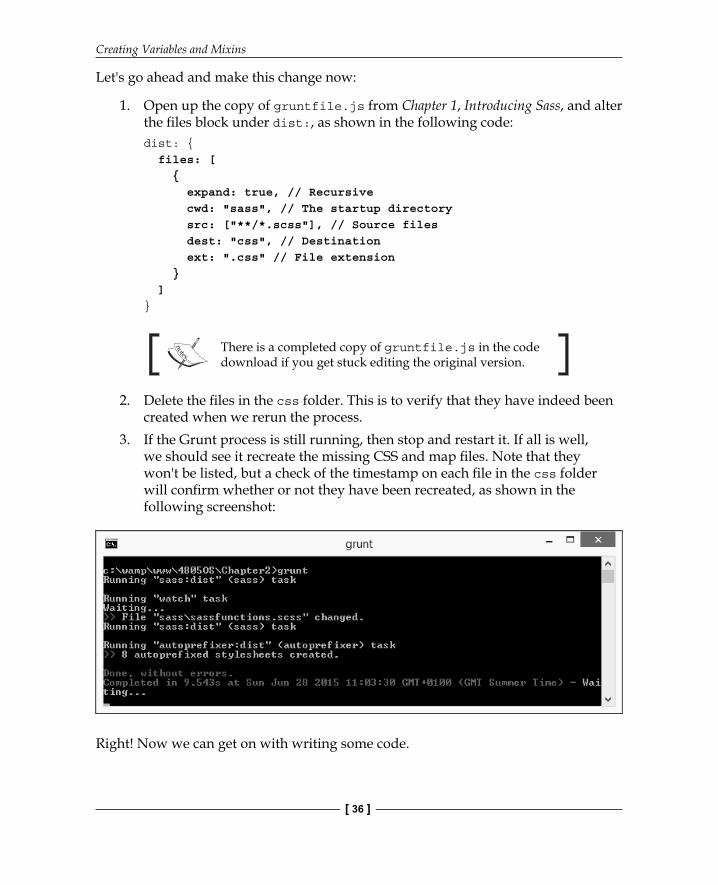
1. Open up the copy of gruntfile.js from Chapter 1, Introducing Sass, and alter the fi les block under dist:, as shown in the following code:dist: { files: [ { expand: true, // Recursive cwd: "sass", // The startup directory src: ["**/*.scss"], // Source files dest: "css", // Destination ext: ".css" // File extension } ]}
There is a completed copy of gruntfile.js in the code download if you get stuck editing the original version.
2. Delete the fi les in the css folder. This is to verify that they have indeed been created when we rerun the process.
3. If the Grunt process is still running, then stop and restart it. If all is well, we should see it recreate the missing CSS and map fi les. Note that they won't be listed, but a check of the timestamp on each fi le in the css folder will confi rm whether or not they have been recreated, as shown in the following screenshot:
Right! Now we can get on with writing some code.
Chapter 2
[ 37 ]
You may have noticed the style value that is set to expanded. If we change this to compressed, then it will compress each CSS fi le that is created. There is also an autoprefi xer task included in this Grunt fi le; we will cover this in more detail later in the Animating content using Sass section.
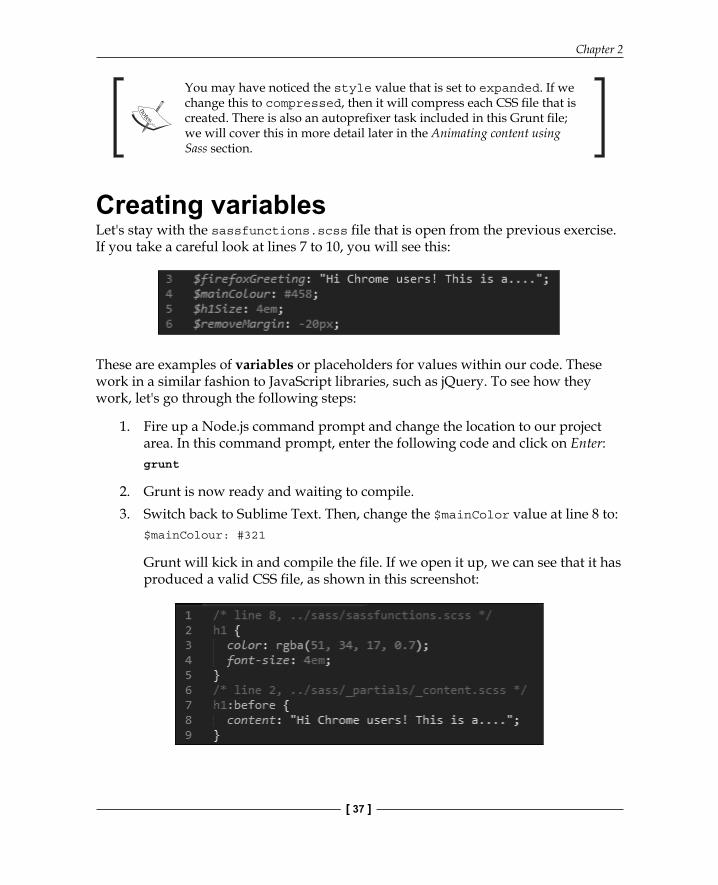
Creating variablesLet's stay with the sassfunctions.scss fi le that is open from the previous exercise. If you take a careful look at lines 7 to 10, you will see this:
These are examples of variables or placeholders for values within our code. These work in a similar fashion to JavaScript libraries, such as jQuery. To see how they work, let's go through the following steps:
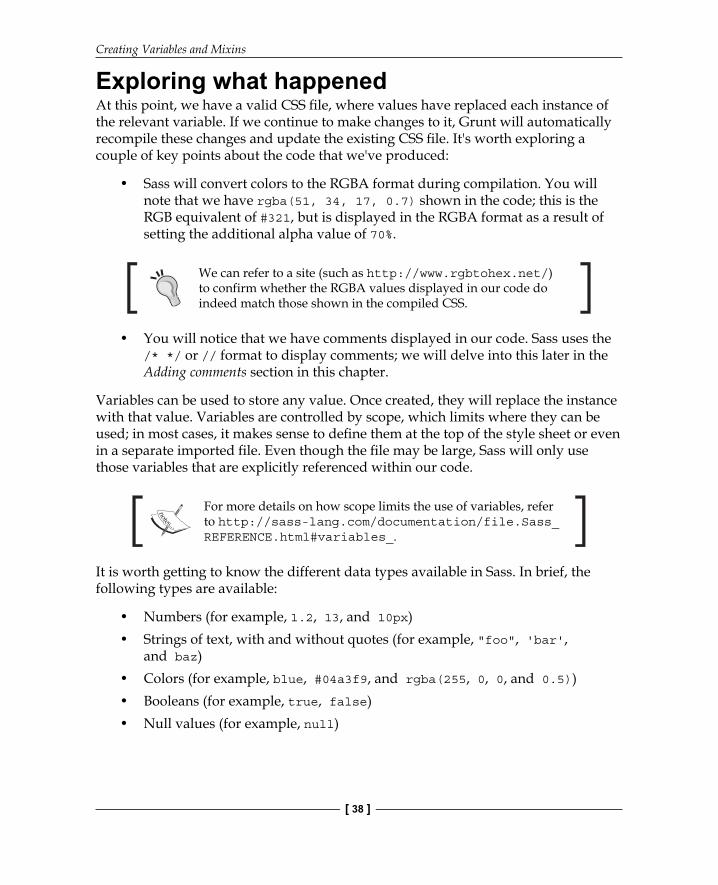
1. Fire up a Node.js command prompt and change the location to our project area. In this command prompt, enter the following code and click on Enter:grunt
2. Grunt is now ready and waiting to compile.3. Switch back to Sublime Text. Then, change the $mainColor value at line 8 to:
$mainColour: #321
Grunt will kick in and compile the file. If we open it up, we can see that it has produced a valid CSS file, as shown in this screenshot:
Creating Variables and Mixins
[ 38 ]
Exploring what happenedAt this point, we have a valid CSS fi le, where values have replaced each instance of the relevant variable. If we continue to make changes to it, Grunt will automatically recompile these changes and update the existing CSS fi le. It's worth exploring a couple of key points about the code that we've produced:
• Sass will convert colors to the RGBA format during compilation. You will note that we have rgba(51, 34, 17, 0.7) shown in the code; this is the RGB equivalent of #321, but is displayed in the RGBA format as a result of setting the additional alpha value of 70%.
We can refer to a site (such as http://www.rgbtohex.net/) to confirm whether the RGBA values displayed in our code do indeed match those shown in the compiled CSS.
• You will notice that we have comments displayed in our code. Sass uses the /* */ or // format to display comments; we will delve into this later in the Adding comments section in this chapter.
Variables can be used to store any value. Once created, they will replace the instance with that value. Variables are controlled by scope, which limits where they can be used; in most cases, it makes sense to defi ne them at the top of the style sheet or even in a separate imported fi le. Even though the fi le may be large, Sass will only use those variables that are explicitly referenced within our code.
For more details on how scope limits the use of variables, refer to http://sass-lang.com/documentation/file.Sass_REFERENCE.html#variables_.
It is worth getting to know the different data types available in Sass. In brief, the following types are available:
• Numbers (for example, 1.2, 13, and 10px)• Strings of text, with and without quotes (for example, "foo", 'bar',
and baz)• Colors (for example, blue, #04a3f9, and rgba(255, 0, 0, and 0.5))• Booleans (for example, true, false)• Null values (for example, null)
Chapter 2
[ 39 ]
• Lists of values separated by spaces or commas (for example, 1.5em 1em 0 2em, Helvetica, Arial, and sans-serif)
• Maps from one value to another (for example, (key1: value1, key2 value2))
I strongly recommend that you carefully read the main documentation on the Sass website at http://sass-lang.com/documentation/file.SASS_REFERENCE.html#data_types. This is a common source of problem for those getting to know Sass!
For now, let's switch to one use of variables, where it is important to get it right—that of assigning colors.
Using variables to create colorsSo far, we've seen how easy it is to create variables. As long as the variable name is preceded with a $ symbol, we can create any number of variables that can be reused in current or future projects. For now, let's turn our attention to creating colors. This is one area where variables come into their own.
Imagine that you have a block of code where colors are being used. The typical thing to do is to assign them to a style sheet, which is similar to this:
#box1 { background-color: #327DA0 }#box2 { background-color: #a03246 }#box3 { background-color: #a08c32 }
…and so on.
Seems pretty reasonable, right? If we wanted to change a particular shade of color to another value (say, make it lighter), we would go through it and change every instance in our code, right?
You can, but I won't. That's too much like hard work! Instead, let's use Sass to better manage our colors. The sensible way to do this is through a two-step process:
1. First, let's assign proper names to our variables. Instead of trying to decipher hex codes or even RGB(A) values, we will know that #327DA0 is dark blue, for example:$darkBlue: #327DA0;$darkRed: #a03246;$darkYellow: #a08c32;
Creating Variables and Mixins
[ 40 ]
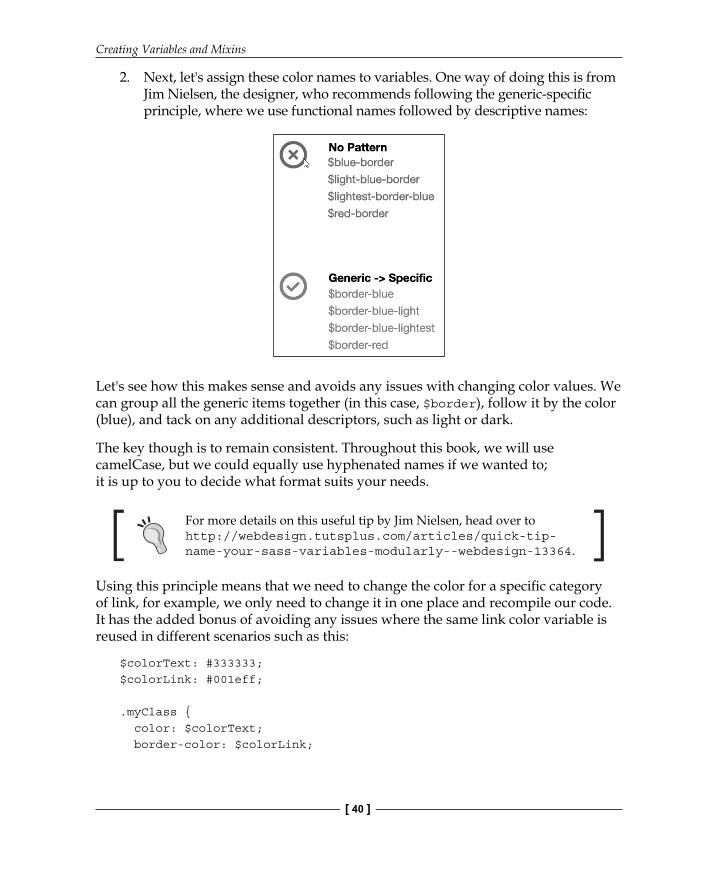
2. Next, let's assign these color names to variables. One way of doing this is from Jim Nielsen, the designer, who recommends following the generic-specifi c principle, where we use functional names followed by descriptive names:
Let's see how this makes sense and avoids any issues with changing color values. We can group all the generic items together (in this case, $border), follow it by the color (blue), and tack on any additional descriptors, such as light or dark.
The key though is to remain consistent. Throughout this book, we will use camelCase, but we could equally use hyphenated names if we wanted to; it is up to you to decide what format suits your needs.
For more details on this useful tip by Jim Nielsen, head over to http://webdesign.tutsplus.com/articles/quick-tip-name-your-sass-variables-modularly--webdesign-13364.
Using this principle means that we need to change the color for a specifi c category of link, for example, we only need to change it in one place and recompile our code. It has the added bonus of avoiding any issues where the same link color variable is reused in different scenarios such as this:
$colorText: #333333;$colorLink: #001eff;
.myClass { color: $colorText; border-color: $colorLink;
Chapter 2
[ 41 ]
}
a { color: $colorLink;}
In this instance, we've reused the $colorLink variable in two different rules. If we wanted to change the border color, and not the link color, then we would've created a problem.
Let's put this into practice with a quick and easy demo. We'll set up a row of simple boxes and assign colors using variables:
1. We start with extracting copies of colorvariables.html. Go ahead and save this in the root of your project area.
2. In a new fi le, add the following Sass code. This takes care of styling our boxes, starting with the creation of six color variables:$darkBlue: #327DA0;$darkRed: #a03246;$darkYellow: #a08c32;$darkPink: #a0327d;$darkOrange: #a05532;$darkCyan: #32a08c;$white: #fff;
3. Next comes the assignment of these color variables to the box colors:$colorBox1: $darkBlue;$colorBox2: $darkRed;$colorBox3: $darkYellow;$colorBox4: $darkPink;$colorBox5: $darkOrange;$colorBox6: $darkCyan;
4. Then comes the generic styling for all six boxes, where we set the size and position on screen:body { font: 1.2rem bold Helvetica, sans-serif; color: $white;}
div { height: 5rem; width: 5rem;
Creating Variables and Mixins
[ 42 ]
border: 0.1rem solid $black; display: inline-block; margin: 1rem; padding-top: 1.0rem; padding-left: 1.5rem;}
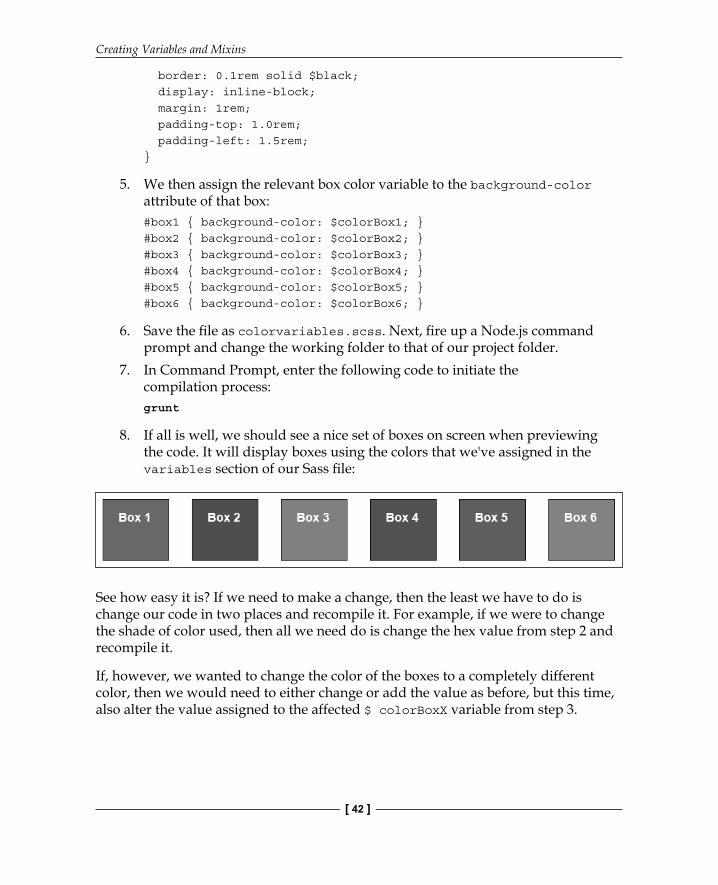
5. We then assign the relevant box color variable to the background-color attribute of that box:#box1 { background-color: $colorBox1; }#box2 { background-color: $colorBox2; }#box3 { background-color: $colorBox3; }#box4 { background-color: $colorBox4; }#box5 { background-color: $colorBox5; }#box6 { background-color: $colorBox6; }
6. Save the fi le as colorvariables.scss. Next, fi re up a Node.js command prompt and change the working folder to that of our project folder.
7. In Command Prompt, enter the following code to initiate the compilation process:grunt
8. If all is well, we should see a nice set of boxes on screen when previewing the code. It will display boxes using the colors that we've assigned in the variables section of our Sass fi le:
See how easy it is? If we need to make a change, then the least we have to do is change our code in two places and recompile it. For example, if we were to change the shade of color used, then all we need do is change the hex value from step 2 and recompile it.
If, however, we wanted to change the color of the boxes to a completely different color, then we would need to either change or add the value as before, but this time, also alter the value assigned to the affected $ colorBoxX variable from step 3.
Chapter 2
[ 43 ]
There are pitfalls with how we name our color variable. For insight into some of the pitfalls we may face, take a look at the article by Ben Smithett at http://bensmithett.com/stop-using-so-many-sass-variables/.
Working across multiple fi lesAnyone can spot a potential fl aw with our design. It may not be immediately obvious, but what happens when we start to add a lot of variables? We will shoot ourselves in the proverbial foot. We spent all this time creating variables, but completely missed the point of Sass: reusability. Let me explain what I mean.
If we create a standard CSS style sheet for a complex site, it will get very large and unwieldy over time. Instead, we can take advantage of Sass' ability to compile multiple SCSS fi les in one single CSS style sheet.
Why would we do this? If we group statements into a number of separate fi les, it makes them shorter and easier to manage, while still maintaining the same end result.
Adapting our color box demoTo see what we mean, let's take a moment to adapt the color box demo that we created in the Using variables to create colors section to import the color variables from a separate fi le into the main style sheet. Granted, it is a little simplistic, but the same principle applies, irrespective of the size of the style sheet. Perform the following steps:
1. We start with fi ring up a Node.js command prompt. Then, change the working folder to our project area and enter this in the prompt:grunt
2. This will start Grunt running, which is ready to compile changes to our code.3. Next, open up a copy of the colorvariables.scss fi le from the previous
demo and copy lines 1 to 6 to a new fi le. Save the new fi le as _colors.scss in the _partials folder in our project area.
4. Switch back to colorvariables.scss, remove the fi rst six lines, and replace them with the following code at the top of the fi le:@import "_partials/_colors";
Creating Variables and Mixins
[ 44 ]
5. Revert back to the colorvariables.scss fi le and save this fi le as cvimport.scss. If all is well, Grunt will kick in and recompile our code automatically.
6. Check inside the project area. We should not see any compiled CSS fi les with the color names, but will see the color values used in cvimport.css.
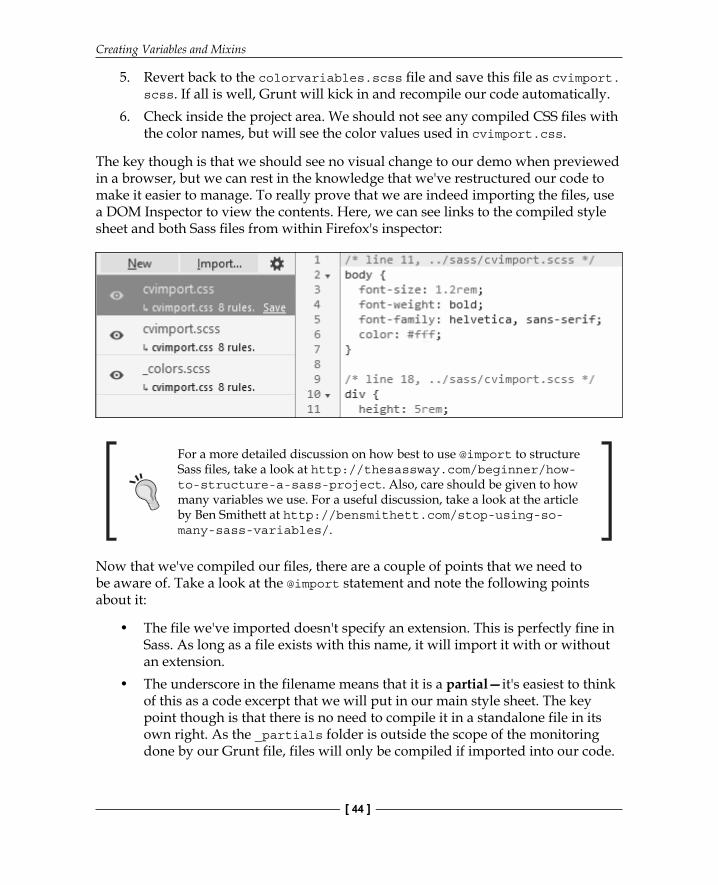
The key though is that we should see no visual change to our demo when previewed in a browser, but we can rest in the knowledge that we've restructured our code to make it easier to manage. To really prove that we are indeed importing the fi les, use a DOM Inspector to view the contents. Here, we can see links to the compiled style sheet and both Sass fi les from within Firefox's inspector:
For a more detailed discussion on how best to use @import to structure Sass fi les, take a look at http://thesassway.com/beginner/how-to-structure-a-sass-project. Also, care should be given to how many variables we use. For a useful discussion, take a look at the article by Ben Smithett at http://bensmithett.com/stop-using-so-many-sass-variables/.
Now that we've compiled our fi les, there are a couple of points that we need to be aware of. Take a look at the @import statement and note the following points about it:
• The file we've imported doesn't specify an extension. This is perfectly fine in Sass. As long as a file exists with this name, it will import it with or without an extension.
• The underscore in the filename means that it is a partial—it's easiest to think of this as a code excerpt that we will put in our main style sheet. The key point though is that there is no need to compile it in a standalone file in its own right. As the _partials folder is outside the scope of the monitoring done by our Grunt file, files will only be compiled if imported into our code.
Chapter 2
[ 45 ]
Okay, let's move on to the next step. Now, we will take a look at how to create mixins or blocks of code that you can literally "mix-in" to existing code. We can use these to build up a library of existing code that can be pulled into future projects. However, before we do so, I want to cover one small, but key part of Sass—what if we want to add comments to our code so that we know what it's all about if we revisit it at a later date?
Adding commentsIf you've spent any time developing code (which I am sure you have!), then you will no doubt be used to adding comments. We can easily apply the same principles to Sass fi les.
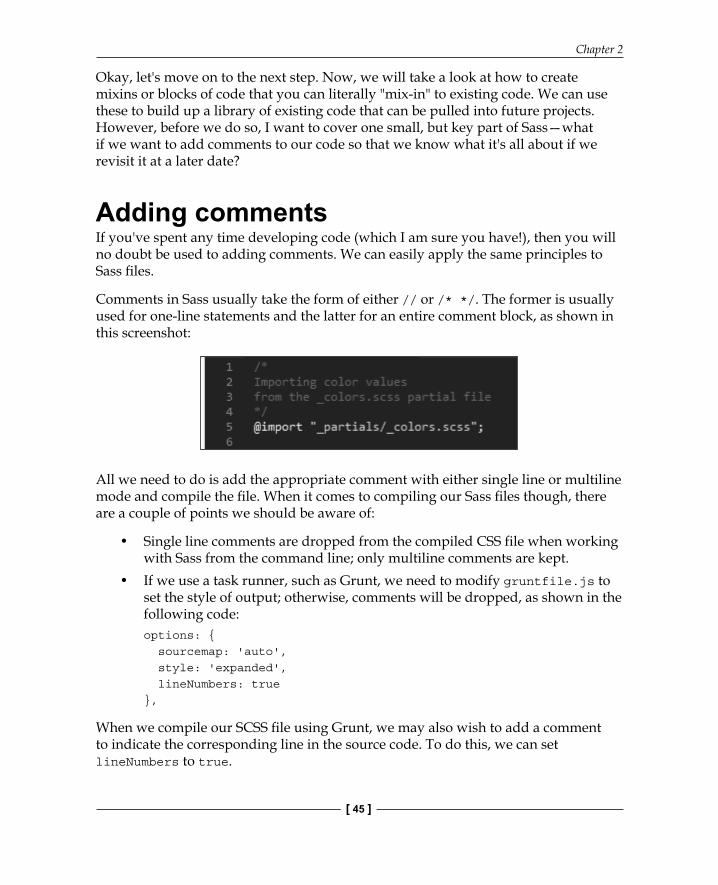
Comments in Sass usually take the form of either // or /* */. The former is usually used for one-line statements and the latter for an entire comment block, as shown in this screenshot:
All we need to do is add the appropriate comment with either single line or multiline mode and compile the fi le. When it comes to compiling our Sass fi les though, there are a couple of points we should be aware of:
• Single line comments are dropped from the compiled CSS file when working with Sass from the command line; only multiline comments are kept.
• If we use a task runner, such as Grunt, we need to modify gruntfile.js to set the style of output; otherwise, comments will be dropped, as shown in the following code:options: { sourcemap: 'auto', style: 'expanded', lineNumbers: true},
When we compile our SCSS fi le using Grunt, we may also wish to add a comment to indicate the corresponding line in the source code. To do this, we can set lineNumbers to true.
Creating Variables and Mixins
[ 46 ]
When we set the style of output in the Grunt fi le, we can choose to render our compiled code in one of several ways:
Output style value Result Output in CSS file, when compiled
expanded Single line comments using // This specifies that comments are dropped.
Multiline comment block using /* and */
This indicates that comments are kept, irrespective of whether the comment is on one line or over several lines.
nested Single line comments using // This specifies that comments are dropped.
Multiline comment block using /* and */
This indicates that comments are kept, irrespective of whether the comment is on one line or over several lines.
compact Single line comments using // This denotes that comments are dropped.
Multiline comment block using /* and */
This indicates that comments are kept, irrespective of whether the comment is on one line or over several lines.
compressed Single line comments using // This specifies that comments are dropped, irrespective of whether the comment is single line or multiline when compressed mode is chosen.Note that multiline comments can be kept in compressed mode if the first character of the comment block is an exclamation mark.
Multiline comment block using /* and */
Okay. We can now comment on our fi le (sorry, pun intended!); let's change focus and take a look at how to build mixins using Sass.
Building mixinsAt this point, we should be comfortable with making changes to and compiling our code. Let's use some of our newfound knowledge to begin creating mixins that we can reuse in our code.
Chapter 2
[ 47 ]
Mixins do as the name suggests. They allow you to "mix-in" blocks of code into our existing projects, which reduces the amount of code we need to write because the work has already been done.
This reduction of code is known as the DRY principle or Don't Repeat Yourself. It's a key tenet of using Sass.
Let's take a look at an example:
@mixin large-text { font: { family: Arial; size: 20px; weight: bold; } color: #ff0000;}
It's a simple block of code. The individual attributes within the block will be recognizable. The two key points of note are that we introduce the block with the @mixin keyword, followed by the name of the mixin.
The great thing about mixins is that we can easily reference them within other rules in our code. As an example, we can use it to defi ne the text style for a .page-title class; all we need to do is include the highlighted single line of code:
.page-title { @include large-text; padding: 4px; margin-top: 10px;}
If we were to compile our code at this point, we will end up with this:
.page-title { font-family: Arial; font-size: 20px; font-weight: bold; color: #ff0000; padding: 4px; margin-top: 10px;}
Creating Variables and Mixins
[ 48 ]
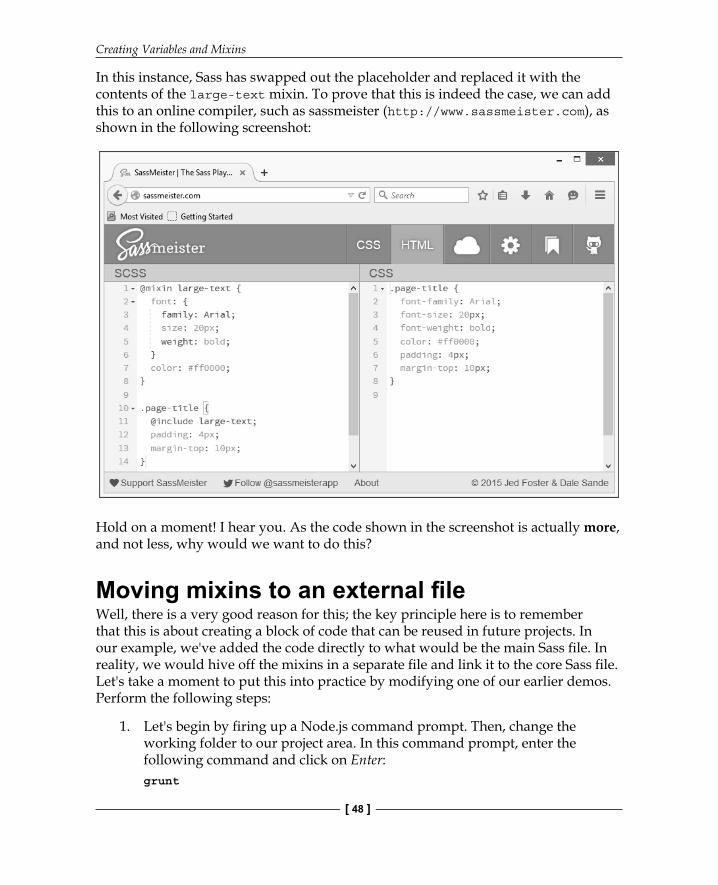
In this instance, Sass has swapped out the placeholder and replaced it with the contents of the large-text mixin. To prove that this is indeed the case, we can add this to an online compiler, such as sassmeister (http://www.sassmeister.com), as shown in the following screenshot:
Hold on a moment! I hear you. As the code shown in the screenshot is actually more, and not less, why would we want to do this?
Moving mixins to an external fi leWell, there is a very good reason for this; the key principle here is to remember that this is about creating a block of code that can be reused in future projects. In our example, we've added the code directly to what would be the main Sass fi le. In reality, we would hive off the mixins in a separate fi le and link it to the core Sass fi le. Let's take a moment to put this into practice by modifying one of our earlier demos. Perform the following steps:
1. Let's begin by fi ring up a Node.js command prompt. Then, change the working folder to our project area. In this command prompt, enter the following command and click on Enter:grunt
Chapter 2
[ 49 ]
2. Open up a copy of sassfunctions.scss from our earlier demo and then look for this block of code:@mixin firefox-message($selector, $message) { #{$selector}:before { content: $message; }}
3. Copy and paste it into a new fi le, saving it as _content.scss in the _partials folder of our project area. Note the addition of the underscore in the fi lename.
4. In sassfunctions.scss, remove the code block shown in step 2 from the top of the fi le and replace it with this line:@import "_partials/_content.scss";
5. Grunt will kick in. If all is well, it will compile the code automatically; we should see no difference visually in the output.
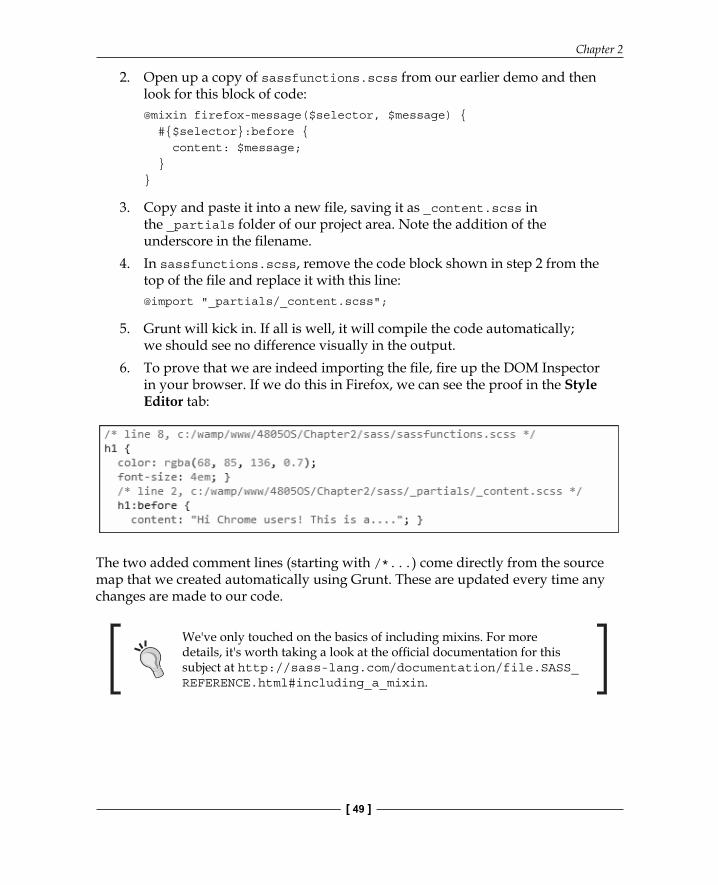
6. To prove that we are indeed importing the fi le, fi re up the DOM Inspector in your browser. If we do this in Firefox, we can see the proof in the Style Editor tab:
The two added comment lines (starting with /*...) come directly from the source map that we created automatically using Grunt. These are updated every time any changes are made to our code.
We've only touched on the basics of including mixins. For more details, it's worth taking a look at the offi cial documentation for this subject at http://sass-lang.com/documentation/file.SASS_REFERENCE.html#including_a_mixin.
Creating Variables and Mixins
[ 50 ]
At this point, we're free to add additional mixins to our library fi le. We may only have one mixin now, but over time, we can gradually build up a custom library of mixins that can be used in future projects. If the mixin library gets too big, we can always split them into smaller fi les and use an @import statement to compile the smaller fi les into one larger library.
Let's change focus and move on. In sassfunctions.scss, something different about the mixin that we moved, that is, it had additional parameters as part of the mixin name.
Passing arguments to mixinsWe can always remain with creating static mixins, but we will soon hit limitations. One in particular will be that if we had blocks of code that were similar, but for some reason could not be adapted to use an existing mixin, then we would have to create multiple variations of what will effectively be the same mixin.
This reduces the level of reusability offered by a mixin. Can we change this? Absolutely! In place of standard mixins with fi xed values, we can use parametric mixins, where we pass it to different values in each instance of calling the mixin. Let's take a moment to explore what this means for our code.
In a nutshell, parametric mixins are similar to standard mixins, but with one key difference: we can pass values to variables within the mixin. This means that we can effectively use the same style attributes, but get different results depending on the values passed to the mixin. Still not sure what I mean? Let's take a look at an example before adapting one of our earlier demos to use parametric mixins.
Let's assume that we're creating a stylish template to apply our images; it's going to have rounded borders, a shaded background, and will be of a particular size:
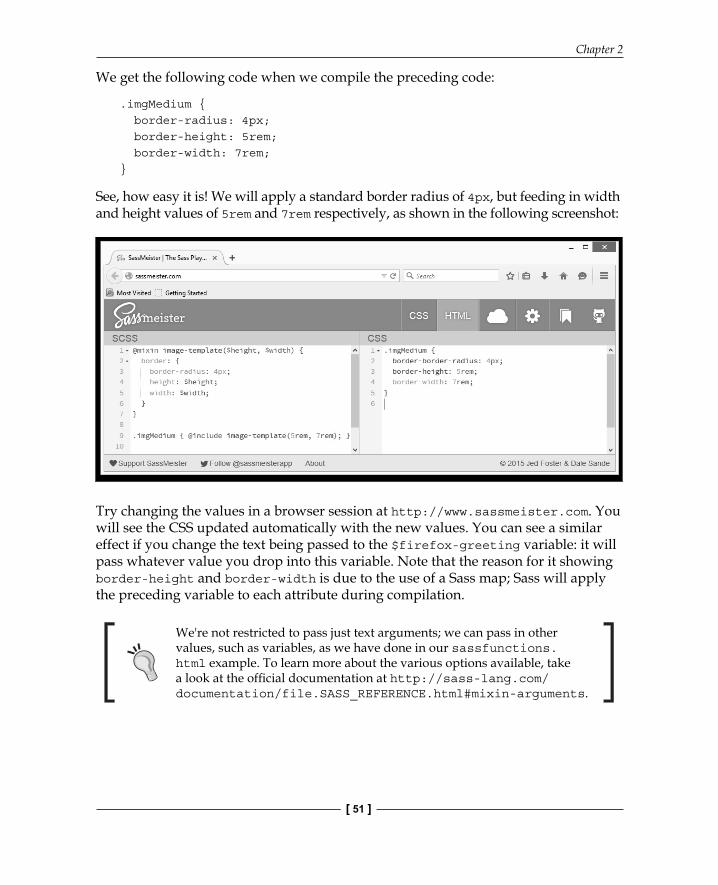
@mixin image-template($height, $width) { border: { border-radius: 4px; height: $height; width: $width; }}.imgMedium { @include image-template(5rem, 7rem); }
Chapter 2
[ 51 ]
We get the following code when we compile the preceding code:
.imgMedium { border-radius: 4px; border-height: 5rem; border-width: 7rem;}
See, how easy it is! We will apply a standard border radius of 4px, but feeding in width and height values of 5rem and 7rem respectively, as shown in the following screenshot:
Try changing the values in a browser session at http://www.sassmeister.com. You will see the CSS updated automatically with the new values. You can see a similar effect if you change the text being passed to the $firefox-greeting variable: it will pass whatever value you drop into this variable. Note that the reason for it showing border-height and border-width is due to the use of a Sass map; Sass will apply the preceding variable to each attribute during compilation.
We're not restricted to pass just text arguments; we can pass in other values, such as variables, as we have done in our sassfunctions.html example. To learn more about the various options available, take a look at the offi cial documentation at http://sass-lang.com/documentation/file.SASS_REFERENCE.html#mixin-arguments.
Creating Variables and Mixins
[ 52 ]
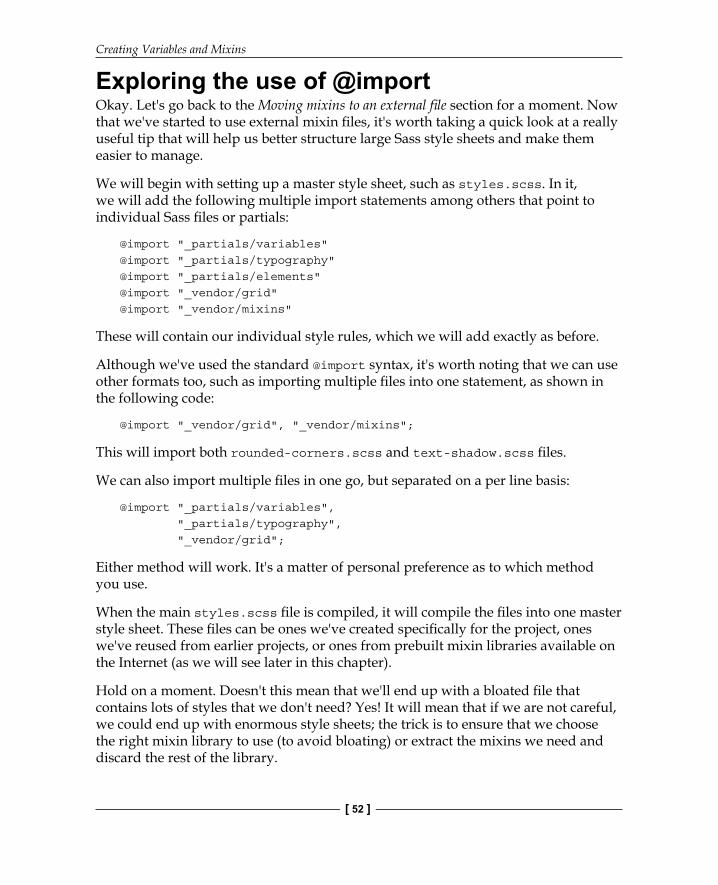
Exploring the use of @importOkay. Let's go back to the Moving mixins to an external fi le section for a moment. Now that we've started to use external mixin fi les, it's worth taking a quick look at a really useful tip that will help us better structure large Sass style sheets and make them easier to manage.
We will begin with setting up a master style sheet, such as styles.scss. In it, we will add the following multiple import statements among others that point to individual Sass fi les or partials:
@import "_partials/variables"@import "_partials/typography"@import "_partials/elements"@import "_vendor/grid"@import "_vendor/mixins"
These will contain our individual style rules, which we will add exactly as before.
Although we've used the standard @import syntax, it's worth noting that we can use other formats too, such as importing multiple fi les into one statement, as shown in the following code:
@import "_vendor/grid", "_vendor/mixins";
This will import both rounded-corners.scss and text-shadow.scss fi les.
We can also import multiple fi les in one go, but separated on a per line basis:
@import "_partials/variables", "_partials/typography", "_vendor/grid";
Either method will work. It's a matter of personal preference as to which method you use.
When the main styles.scss fi le is compiled, it will compile the fi les into one master style sheet. These fi les can be ones we've created specifi cally for the project, ones we've reused from earlier projects, or ones from prebuilt mixin libraries available on the Internet (as we will see later in this chapter).
Hold on a moment. Doesn't this mean that we'll end up with a bloated fi le that contains lots of styles that we don't need? Yes! It will mean that if we are not careful, we could end up with enormous style sheets; the trick is to ensure that we choose the right mixin library to use (to avoid bloating) or extract the mixins we need and discard the rest of the library.
Chapter 2
[ 53 ]
For more details on how to use the @import command in Sass, take a look at the offi cial documentation at http://sass-lang.com/documentation/file.SASS_REFERENCE.html#import.
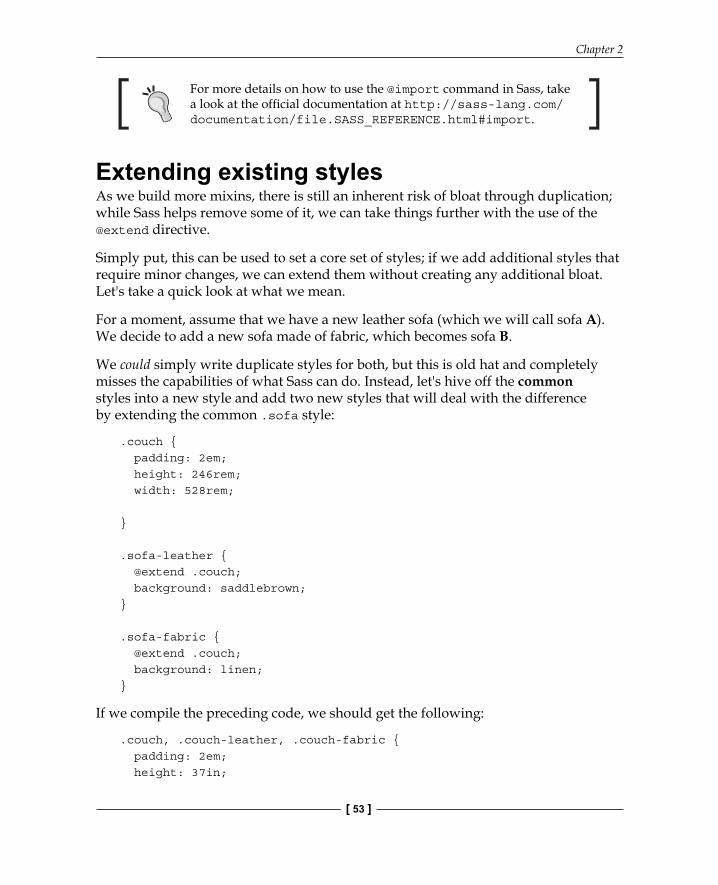
Extending existing stylesAs we build more mixins, there is still an inherent risk of bloat through duplication; while Sass helps remove some of it, we can take things further with the use of the @extend directive.
Simply put, this can be used to set a core set of styles; if we add additional styles that require minor changes, we can extend them without creating any additional bloat. Let's take a quick look at what we mean.
For a moment, assume that we have a new leather sofa (which we will call sofa A). We decide to add a new sofa made of fabric, which becomes sofa B.
We could simply write duplicate styles for both, but this is old hat and completely misses the capabilities of what Sass can do. Instead, let's hive off the common styles into a new style and add two new styles that will deal with the difference by extending the common .sofa style:
.couch { padding: 2em; height: 246rem; width: 528rem;
}
.sofa-leather { @extend .couch; background: saddlebrown;}
.sofa-fabric { @extend .couch; background: linen;}
If we compile the preceding code, we should get the following:
.couch, .couch-leather, .couch-fabric { padding: 2em; height: 37in;
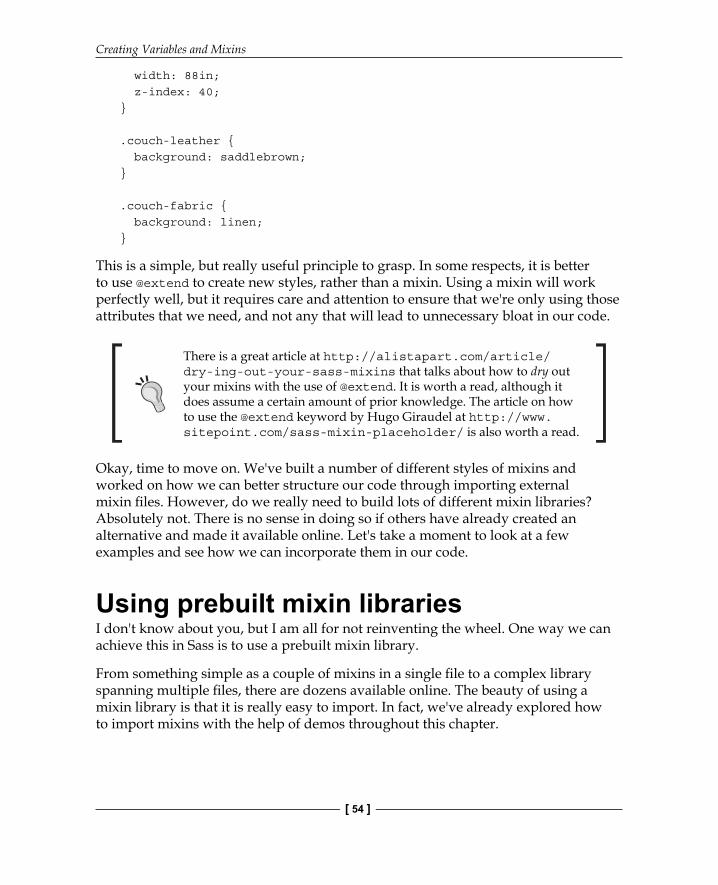
Creating Variables and Mixins
[ 54 ]
width: 88in; z-index: 40;}
.couch-leather { background: saddlebrown;}
.couch-fabric { background: linen;}
This is a simple, but really useful principle to grasp. In some respects, it is better to use @extend to create new styles, rather than a mixin. Using a mixin will work perfectly well, but it requires care and attention to ensure that we're only using those attributes that we need, and not any that will lead to unnecessary bloat in our code.
There is a great article at http://alistapart.com/article/dry-ing-out-your-sass-mixins that talks about how to dry out your mixins with the use of @extend. It is worth a read, although it does assume a certain amount of prior knowledge. The article on how to use the @extend keyword by Hugo Giraudel at http://www.sitepoint.com/sass-mixin-placeholder/ is also worth a read.
Okay, time to move on. We've built a number of different styles of mixins and worked on how we can better structure our code through importing external mixin fi les. However, do we really need to build lots of different mixin libraries? Absolutely not. There is no sense in doing so if others have already created an alternative and made it available online. Let's take a moment to look at a few examples and see how we can incorporate them in our code.
Using prebuilt mixin librariesI don't know about you, but I am all for not reinventing the wheel. One way we can achieve this in Sass is to use a prebuilt mixin library.
From something simple as a couple of mixins in a single fi le to a complex library spanning multiple fi les, there are dozens available online. The beauty of using a mixin library is that it is really easy to import. In fact, we've already explored how to import mixins with the help of demos throughout this chapter.
Chapter 2
[ 55 ]
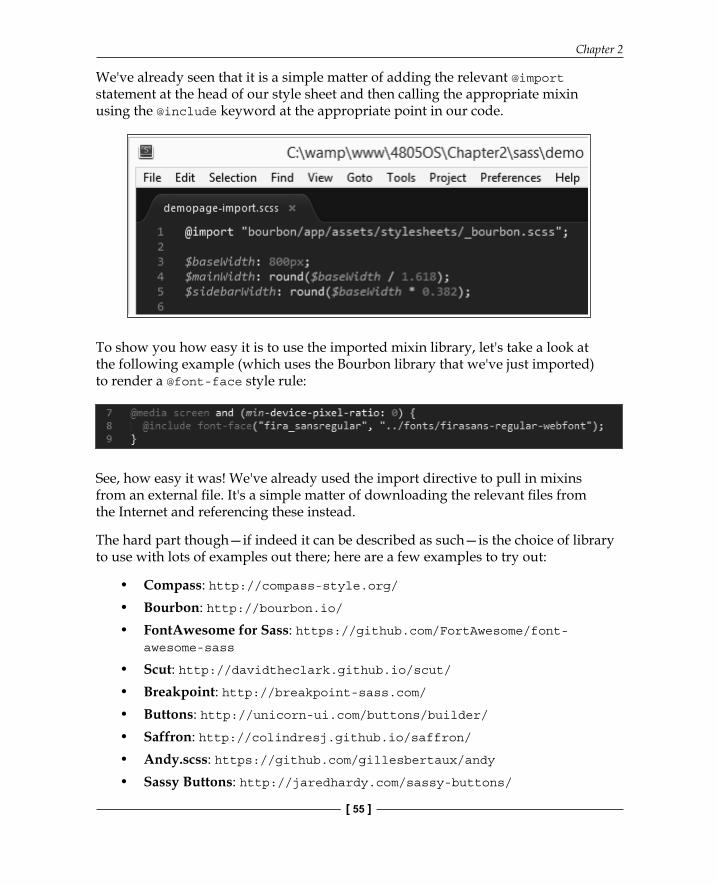
We've already seen that it is a simple matter of adding the relevant @import statement at the head of our style sheet and then calling the appropriate mixin using the @include keyword at the appropriate point in our code.
To show you how easy it is to use the imported mixin library, let's take a look at the following example (which uses the Bourbon library that we've just imported) to render a @font-face style rule:
See, how easy it was! We've already used the import directive to pull in mixins from an external fi le. It's a simple matter of downloading the relevant fi les from the Internet and referencing these instead.
The hard part though—if indeed it can be described as such—is the choice of library to use with lots of examples out there; here are a few examples to try out:
• Compass: http://compass-style.org/• Bourbon: http://bourbon.io/• FontAwesome for Sass: https://github.com/FortAwesome/font-
awesome-sass
• Scut: http://davidtheclark.github.io/scut/• Breakpoint: http://breakpoint-sass.com/• Buttons: http://unicorn-ui.com/buttons/builder/• Saffron: http://colindresj.github.io/saffron/• Andy.scss: https://github.com/gillesbertaux/andy• Sassy Buttons: http://jaredhardy.com/sassy-buttons/
Creating Variables and Mixins
[ 56 ]
Using a library will reduce the amount of work we need to do when building style sheets. Simply dropping it in won't be enough though; it does require a little work to incorporate the library. Here are a few tips that will help:
• Don't try to convert everything in one go; it is not worth the trouble. The great Pyramids weren't built in a day. Working with Sass, particularly in large sites, should be an iterative process over time (with changes made in chunks).
• The key to working with libraries is choice, choice, and choice. There are dozens of libraries available; don't feel obliged to stay with one if it doesn't work well for you.
• Sass will compile all the mixins from a library into valid CSS. If the bulk of the styles are not used, then consider either extracting those that are needed into a new custom library or move to using a different library where more styles will be used.
• We're not limited to just using mixin libraries. There are lots of people who have written single or multiple mixins that are not part of any library. It's worth researching online to see what is available. We will use some of these examples, such as those created by Sebastian Ekström, which are available at http://zerosixthree.se/8-sass-mixins-you-must-have-in-your-toolbox/.
• Don't forget to also look at the NPM (http://www.npmjs.com), Grunt, or Bower websites. Authors will sometimes make them available via these routes in addition to downloading them from their respective sites. Two good examples include the sass-font-face mixin at https://www.npmjs.com/package/sass-font-face and the sass-rem mixin at https://www.npmjs.com/package/sass-rem.
Enough chatting. I feel a couple of demos coming! It's time to put something of what we've discussed into practice; to get a feel of what is involved, let's fi rst use the Animate.scss library (available at https://github.com/geoffgraham/animate.scss) to animate some simple buttons. It's not going to win any awards for sure, but it still shows the process involved in switching to using external libraries as our mixin source.
Animating content using SassWhen building sites, how often have you been asked to animate content in some form or other?
I guess it is fairly often. The mundane part of animating is making sure that we include any attributes that still require vendor prefi xes. This isn't an issue when using Sass. We can build a mixin that includes them automatically.
Chapter 2
[ 57 ]
It is worth noting though that the recommended practice is to use an autoprefi xer option to provide vendor prefi xes; this can be automated using a task runner, such as Node or Grunt.
There is one built-in within the Grunt fi le that we have used in previous exercises in this chapter.
For this reason, mixins should concentrate more on the values required for an animation to work and less on vendor prefi xes. An ideal use for mixins is to provide support for keyframe-based mixins, which require a few lines.
Let's dig in and take a look at how to animate content using Sass. We will use the Sass version of Animate.scss created by Geoff Graham at https://github.com/geoffgraham/animate.scss.
If desired, this can be installed using Bower. Look inside bower.json for details of the name to use when installing.
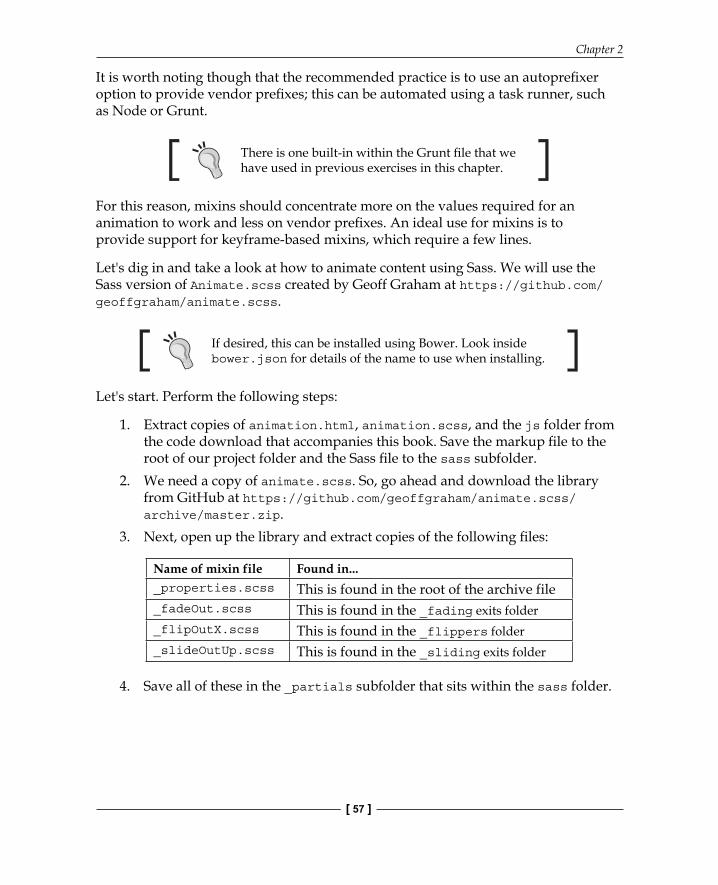
Let's start. Perform the following steps:
1. Extract copies of animation.html, animation.scss, and the js folder from the code download that accompanies this book. Save the markup fi le to the root of our project folder and the Sass fi le to the sass subfolder.
2. We need a copy of animate.scss. So, go ahead and download the library from GitHub at https://github.com/geoffgraham/animate.scss/archive/master.zip.
3. Next, open up the library and extract copies of the following fi les:
Name of mixin file Found in..._properties.scss This is found in the root of the archive file_fadeOut.scss This is found in the _fading exits folder_flipOutX.scss This is found in the _flippers folder_slideOutUp.scss This is found in the _sliding exits folder
4. Save all of these in the _partials subfolder that sits within the sass folder.
Creating Variables and Mixins
[ 58 ]
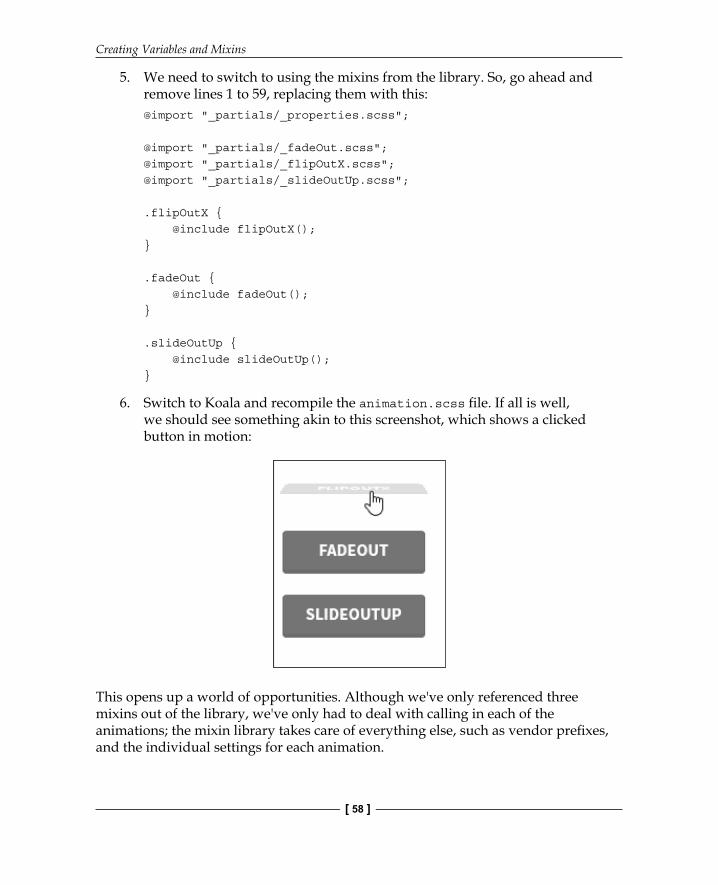
5. We need to switch to using the mixins from the library. So, go ahead and remove lines 1 to 59, replacing them with this:@import "_partials/_properties.scss";
@import "_partials/_fadeOut.scss";@import "_partials/_flipOutX.scss";@import "_partials/_slideOutUp.scss";
.flipOutX { @include flipOutX();}
.fadeOut { @include fadeOut();}
.slideOutUp { @include slideOutUp();}
6. Switch to Koala and recompile the animation.scss fi le. If all is well, we should see something akin to this screenshot, which shows a clicked button in motion:
This opens up a world of opportunities. Although we've only referenced three mixins out of the library, we've only had to deal with calling in each of the animations; the mixin library takes care of everything else, such as vendor prefi xes, and the individual settings for each animation.
Chapter 2
[ 59 ]
We could easily just use any of the mixins in the library. While it is a perfectly usable library in its own right, it only touches on a small part of what is possible. To give a small fl avor of what can be done, try visiting these three sites:
• http://cubic-bezier.com: This allows you to generate any number of different Bezier curve animations.
• http://easings.net: This site shows off each of the standard animations available in libraries, such as the jQuery UI. It even includes a link to the Compass Ceaser plugin, which allows you to use these same values as Sass variables within any transition animation that we create (we can also use the Sass Easings plugin for Node available at https://www.npmjs.com/package/sass-easing to achieve a similar effect).
• http://cssanimate.com: This is a relatively new site at the time of writing. It is a perfect work area to create our own animations. The code is automatically generated as standard CSS, but with a little work, it can be converted to Sass.
The key message here is that it is worth spending time when working with something such as animation mixins. First, it is key to get your head around how animation mixins work in Sass and then explore some of the options available in terms of animations that we can use.
Let's move on and take a look at a different library. We will use similar principles in the next demo, but this time, we will use the Compass library, which is frequently used with Sass.
Adapting existing mixins to use librariesFor our second demo, we will take the single page demo used earlier in the chapter and modify the Sass code to use the font-face mixin from the Bourbon library.
The mere mention of the word Bourbon may make you think of a fi ne whiskey, but in this case, I must disappoint—it is the name of one of the more well-known Sass libraries.
At fi rst value, our change would seem a pretty straightforward change. Well, as it so happens, there is a sting in the tail. Don't worry, it's not catastrophic, but it highlights perfectly some of the considerations we need to be mindful of when making these changes.
Creating Variables and Mixins
[ 60 ]
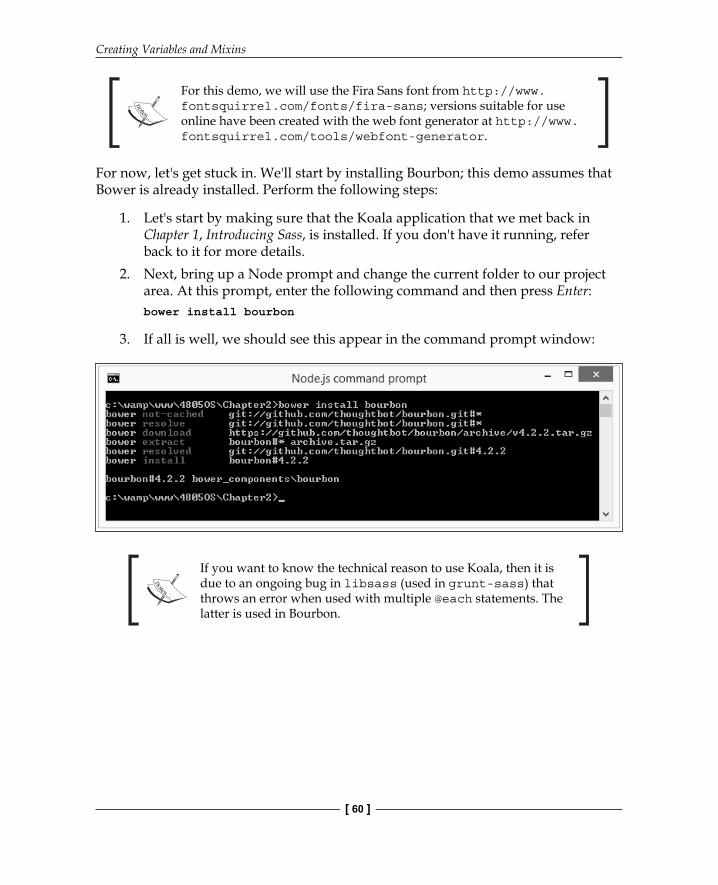
For this demo, we will use the Fira Sans font from http://www.fontsquirrel.com/fonts/fira-sans; versions suitable for use online have been created with the web font generator at http://www.fontsquirrel.com/tools/webfont-generator.
For now, let's get stuck in. We'll start by installing Bourbon; this demo assumes that Bower is already installed. Perform the following steps:
1. Let's start by making sure that the Koala application that we met back in Chapter 1, Introducing Sass, is installed. If you don't have it running, refer back to it for more details.
2. Next, bring up a Node prompt and change the current folder to our project area. At this prompt, enter the following command and then press Enter:bower install bourbon
3. If all is well, we should see this appear in the command prompt window:
If you want to know the technical reason to use Koala, then it is due to an ongoing bug in libsass (used in grunt-sass) that throws an error when used with multiple @each statements. The latter is used in Bourbon.
Chapter 2
[ 61 ]
4. Next, go ahead and extract demopage-import.html, demopage-import.css, demopage-import.scss, and the fonts folder from the code download that accompanies this book. Then, save them in the project area.
5. Open up a copy of demopage-import.scss and alter the code, as shown in the following code:@import "bourbon/app/assets/stylesheets/_bourbon.scss";
$baseWidth: 800px;$mainWidth: round($baseWidth / 1.618);$sidebarWidth: round($baseWidth * 0.382);
@include font-face("fira_sansregular", "../fonts/firasans- regular-webfont");
6. We need to copy the bourbon folder from the bower_components folder to the sass folder. So, go ahead and do this now before continuing with the next step.
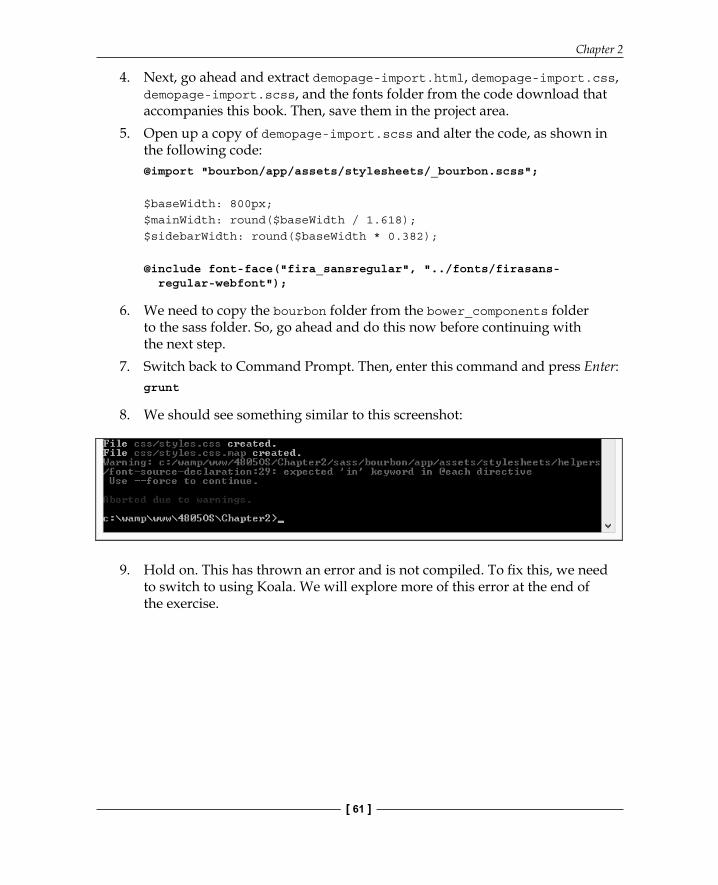
7. Switch back to Command Prompt. Then, enter this command and press Enter:grunt
8. We should see something similar to this screenshot:
9. Hold on. This has thrown an error and is not compiled. To fi x this, we need to switch to using Koala. We will explore more of this error at the end of the exercise.
Creating Variables and Mixins
[ 62 ]
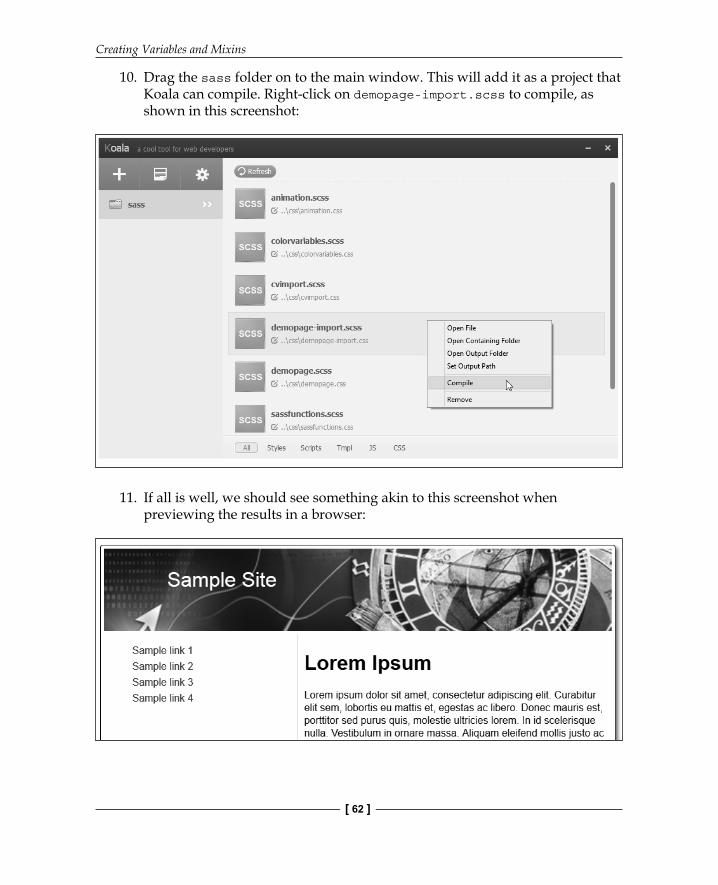
10. Drag the sass folder on to the main window. This will add it as a project that Koala can compile. Right-click on demopage-import.scss to compile, as shown in this screenshot:
11. If all is well, we should see something akin to this screenshot when previewing the results in a browser:
Chapter 2
[ 63 ]
At this point, we now have a working page that uses the @font-face mixin…except…hold on…hasn't the font changed from the previous demo?
Absolutely! With a good reason: the font we used in the original demo is provided using Google Fonts. Licensing issues mean that we can't download the font source fi les and convert it to use the @font-face mixin. This means that we must use an alternative font, such as Fira Sans, which we can download and import using the @font-face mixin.
You may also spot that the quality of the font rendered on screen could look better. This is not because I've chosen a bad font; some fonts are just not rendered well on screen in a browser. To get around this, we can use the min-device-pixel-ratio attribute to change the number of device pixels shown per CSS pixel. Alter the Sass code as follows:
@media screen and (min-device-pixel-ratio: 0) { @include font-face("fira_sansregular", "../fonts/firasans- regular-webfont");}
Then, recompile it, and all should be well. Hopefully, it will look a lot more like the screenshot shown at the end of the exercise.
SummaryMixins and variables are two of the most important parts of Sass; without them, our options become somewhat limited. Let's take a moment to consolidate what you have learned throughout this chapter.
We kicked off our journey with a look at how to use variables. Then, we looked at how to assign numeric or alpha values, followed by how to store color values.
We then moved on to look at how Sass allows you to split your style sheet across several fi les; we can use this to better structure our code and make each constituent fi le more manageable.
Next, we discussed how to create mixins. We fi rst touched on standard mixins before altering them to become more dynamic and useful by passing values to each mixin. We also covered how to use @extend with a pointer and how this can help dry out our mixins and remove unnecessary code bloat.
Creating Variables and Mixins
[ 64 ]
We then rounded out our journey with a look at how to use external mixins from prebuilt libraries, such as Compass or Bourbon, before diving into two examples that used completely different libraries, yet demonstrated that the principals involved are still the same.
Onwards we go! How many times have you had to write style rules that duplicate (in whole or in part) selector names already in the style sheet? It's a real pain—not any more with Sass! Sass has a great facility that allows you to nest styles. I'll explain more in the next chapter.
Where to buy this book You can buy Sass Essentials from the Packt Publishing website.
Alternatively, you can buy the book from Amazon, BN.com, Computer Manuals and most internet
book retailers.
Click here for ordering and shipping details.
www.PacktPub.com
Stay Connected:
Get more information Sass Essentials