SAS/IntrNet 9.2 Application Dispatcher
210
SAS/IntrNet ® 9.2 Application Dispatcher SAS ® Documentation
Transcript of SAS/IntrNet 9.2 Application Dispatcher

SAS/IntrNet® 9.2Application Dispatcher
SAS® Documentation

The correct bibliographic citation for this manual is as follows: SAS Institute Inc. 2008. SAS/IntrNet® 9.2: Application Dispatcher. Cary, NC: SAS Institute Inc.
SAS/IntrNet® 9.2: Application Dispatcher
Copyright © 2008, SAS Institute Inc., Cary, NC, USA
All rights reserved. Produced in the United States of America.
For a hard-copy book: No part of this publication may be reproduced, stored in a retrieval system, or transmitted, in any form or by any means, electronic, mechanical, photocopying, or otherwise, without the prior written permission of the publisher, SAS Institute Inc.
For a Web download or e-book: Your use of this publication shall be governed by the terms established by the vendor at the time you acquire this publication.
U.S. Government Restricted Rights Notice: Use, duplication, or disclosure of this software and related documentation by the U.S. government is subject to the Agreement with SAS Institute and the restrictions set forth in FAR 52.227-19, Commercial Computer Software-Restricted Rights (June 1987).
SAS Institute Inc., SAS Campus Drive, Cary, North Carolina 27513.
1st electronic book, March 2008
SAS® Publishing provides a complete selection of books and electronic products to help customers use SAS software to its fullest potential. For more information about our e-books, e-learning products, CDs, and hard-copy books, visit the SAS Publishing Web site at support.sas.com/publishing or call 1-800-727-3228.
SAS® and all other SAS Institute Inc. product or service names are registered trademarks or trademarks of SAS Institute Inc. in the USA and other countries. ® indicates USA registration.
Other brand and product names are registered trademarks or trademarks of their respective companies.
Table of ContentsWhat's New in SAS/IntrNet 9.2Application Dispatcher.................................................................................1
About Application Dispatcher..........................................................................................................................2
An Overview of the Application Dispatcher.....................................................................................................3What Is the Application Dispatcher?.......................................................................................................3What Are Application Dispatcher Services?...........................................................................................3What Are Application Dispatcher Applications?....................................................................................4What Is the Application Load Manager?.................................................................................................4Who Uses the Application Dispatcher?...................................................................................................4
How the Application Dispatcher Works...........................................................................................................6How a Request Is Submitted to the Application Broker..........................................................................6How the Application Broker Processes a Request...................................................................................7How the Application Server Processes a Request...................................................................................7How Program Output Is Sent to the Application Broker.........................................................................8How the Load Manager Works................................................................................................................8
Requirements for the Application Dispatcher...............................................................................................11Requirements for the Application Broker..............................................................................................11Requirements for the Application Server..............................................................................................11Requirements for the Application Load Manager.................................................................................12
Application Dispatcher Security......................................................................................................................13Related Topics.......................................................................................................................................13
Application Broker and Web Server Security...............................................................................................14Using a Secure Web Server...................................................................................................................14Hiding Sensitive Information from Web Server Logs...........................................................................14Protecting the Application Broker Configuration File...........................................................................14Creating Encrypted User Names and Passwords...................................................................................15Authenticating the Application Broker..................................................................................................15
Application Server Security.............................................................................................................................16The Application Server Should Not Trust the Application Broker.......................................................16Application Server May Restrict Application Broker Access...............................................................17Supplying a Password When Starting the Application Server...............................................................17Hiding Passwords and Other Sensitive Data from the SAS Log...........................................................17Restricting Access to Program Libraries...............................................................................................18Disabling Sample Programs...................................................................................................................18Reviewing New or Modified Code........................................................................................................18
Controlling Access to Data Sources with the AUTHLIB Data Set...............................................................19AUTHLIB Functions.............................................................................................................................20Verifying the AUTHLIB Data Set.........................................................................................................21
Application Dispatcher Program Security.....................................................................................................23Using SCL or Compiled Macro Code....................................................................................................23Using Password−Protected Data Sets....................................................................................................23
SAS Documentation
Table of ContentsUpgrading from Version 8 to Version 9..........................................................................................................24
Completing the Installation..............................................................................................................................25
Create and Start the Default Service..............................................................................................................26Windows Platforms................................................................................................................................26UNIX Platforms.....................................................................................................................................26z/OS.......................................................................................................................................................27OpenVMS..............................................................................................................................................28
Add the Default Service Definition..................................................................................................................30
Testing the Installation.....................................................................................................................................31Completing the Application Dispatcher Installation..............................................................................32
Customizing the Application Dispatcher........................................................................................................33Customizing the Application Broker.....................................................................................................33Customizing the Application Server......................................................................................................33
Using the Application Broker Configuration File..........................................................................................34Template Configuration File..................................................................................................................34Modifying the Application Broker Configuration File..........................................................................34
Creating a Customized Welcome Page...........................................................................................................36
ISAPI/GWAPI Application Brokers...............................................................................................................37ISAPI.....................................................................................................................................................37GWAPI..................................................................................................................................................37
Specifying the Global Administrator..............................................................................................................39
Specifying the Self−Referencing URL.............................................................................................................40
Specifying HTTP Methods...............................................................................................................................41
Setting the Default Value of _DEBUG............................................................................................................42
Using DebugMask and ServiceDebugMask....................................................................................................43
Displaying the Powered by SAS Logo.............................................................................................................44
Exporting Environment Variables..................................................................................................................45
Configuration File Directives...........................................................................................................................47Administrator Directives........................................................................................................................47Debugging Directives............................................................................................................................47File and Variable Manipulation Directives............................................................................................47General Service Directives....................................................................................................................48Service−Specific Directives...................................................................................................................50
LaunchService.................................................................................................................................50
SAS Documentation
Table of ContentsConfiguration File Directives
LaunchService Directives for Previous Version Servers................................................................50PoolService......................................................................................................................................51SocketService..................................................................................................................................52
URL Directives......................................................................................................................................52
Running Multiple Application Servers at Your Site.....................................................................................54
Application Server Administration Programs...............................................................................................55
Application Server Libraries...........................................................................................................................57Program Libraries..................................................................................................................................57Data Libraries.........................................................................................................................................57
Using Services....................................................................................................................................................58
Choosing a Service Type..................................................................................................................................59Socket Services......................................................................................................................................59
Advantages......................................................................................................................................59Disadvantages..................................................................................................................................59
Pool Services..........................................................................................................................................59Advantages......................................................................................................................................59Disadvantages..................................................................................................................................60
Launch Services.....................................................................................................................................60Advantages......................................................................................................................................60Disadvantages..................................................................................................................................60
Services on OpenVMS......................................................................................................................................61Creating a Service..................................................................................................................................61Starting the Service................................................................................................................................62Stopping the Service..............................................................................................................................62Service Log Files...................................................................................................................................63Removing a Service...............................................................................................................................63
Services on z/OS................................................................................................................................................64Creating a Service..................................................................................................................................64Starting the Service................................................................................................................................66Stopping the Service..............................................................................................................................67Service Log Files...................................................................................................................................67Removing a Service...............................................................................................................................67
Services on UNIX Platforms............................................................................................................................68Creating a Service..................................................................................................................................68Starting the Service................................................................................................................................70Stopping the Service..............................................................................................................................70Service Log Files...................................................................................................................................70Removing a Service...............................................................................................................................71
SAS Documentation
Table of ContentsServices on Windows Platforms......................................................................................................................72
Creating a Service..................................................................................................................................72Starting the Service................................................................................................................................73Stopping the Service..............................................................................................................................74Modifying a Service or Accessing Service Log Files............................................................................74Windows Services..................................................................................................................................75Removing a Service...............................................................................................................................75
Enhancing Performance...................................................................................................................................76Using Multiple Servers (Random Load Balancing)...............................................................................76Using the Load Manager (Intelligent Load Balancing).........................................................................76Increasing Timeout................................................................................................................................77Using Server Weights............................................................................................................................77Specifying a Backup Machine...............................................................................................................77
Development vs. Production Environments...................................................................................................79Development Services...........................................................................................................................79Production Services...............................................................................................................................79
Using the Load Manager..................................................................................................................................80
Application Load Manager Reference............................................................................................................81Starting the Load Manager.....................................................................................................................81Stopping the Load Manager...................................................................................................................82Application Broker Directives for the Load Manager...........................................................................83Load Manager Statistics.........................................................................................................................83
Load Manager serv.abc.com:5555..................................................................................................83Load Manager Data for Application Server Activity............................................................................84
Load Manager serv.abc.com:5555..................................................................................................84
Load Manager on Windows Platforms...........................................................................................................86Configuring and Starting the Load Manager.........................................................................................86Accessing Log Files...............................................................................................................................86Windows Services..................................................................................................................................86
Application Load Manager Log Files.............................................................................................................87
Running Jobs in the Background....................................................................................................................89
The Input Component......................................................................................................................................90Reserved Names.....................................................................................................................................90Specifying Name/Value Pairs in a URL................................................................................................91Specifying Name/Value Pairs in an HTML Form.................................................................................91Specifying Name/Value Pairs in the Application Broker Configuration File.......................................92Multiple Value Pairs..............................................................................................................................93
HTML Syntax Reference.................................................................................................................................94HTML Tags...........................................................................................................................................94
Quotation Marks..............................................................................................................................94Anchor Tag......................................................................................................................................94
SAS Documentation

Table of ContentsHTML Syntax Reference
FORM Tag......................................................................................................................................94IMG Tag..........................................................................................................................................95INPUT Tag......................................................................................................................................95TEXTAREA Tag.............................................................................................................................96
URL Syntax...........................................................................................................................................96
The Program Component.................................................................................................................................98
The Four Types of Programs...........................................................................................................................99SAS Programs........................................................................................................................................99Source Entries........................................................................................................................................99SCL Entries............................................................................................................................................99Macro Entries.......................................................................................................................................100
Receiving Input Component Data.................................................................................................................101
Reserved or Special Variables.......................................................................................................................103
HTTP Headers................................................................................................................................................105Automatic Header Generation.............................................................................................................105
Example.........................................................................................................................................106Disabling Automatic Header Generation......................................................................................107HTTP Output Reference................................................................................................................107Content−type.................................................................................................................................107Expires...........................................................................................................................................108Location.........................................................................................................................................108Pragma...........................................................................................................................................108Set−Cookie....................................................................................................................................108
Using HTML Formatting Tools.....................................................................................................................109
The Output Delivery System (ODS)..............................................................................................................110Creating Web Output with ODS..........................................................................................................110Layout Examples.................................................................................................................................111
Body Only.....................................................................................................................................111Body and Table of Contents..........................................................................................................112Table of Contents Only.................................................................................................................112Graphics and Text.........................................................................................................................113
Cleaning Up.........................................................................................................................................113
Using the REPLAY Program.........................................................................................................................114
Advanced Programming Techniques............................................................................................................115Data Passing and Program Chaining....................................................................................................115
First HTML Form..........................................................................................................................116First Program (PGM1.SAS)..........................................................................................................116Second Program (PGM2.SAS)......................................................................................................117Modified Version of First Program (PGM1.SAS)........................................................................118
Embedded Graphics.............................................................................................................................119
SAS Documentation
Table of ContentsAdvanced Programming Techniques
Web Browser Referral by Using the Location Header........................................................................120Creating Various Date/Time Formats..................................................................................................121
Creating Temporary Files..............................................................................................................................123Creating a File with a Unique Name....................................................................................................123Creating a File in a Unique Subdirectory............................................................................................123Storing a File in a Unique Catalog.......................................................................................................124Example...............................................................................................................................................124
Using Sessions: A Sample Web Application.................................................................................................126Sample Data.........................................................................................................................................126Login....................................................................................................................................................126Main Aisle............................................................................................................................................127Library Aisles.......................................................................................................................................130Add Items.............................................................................................................................................132Shopping Cart......................................................................................................................................133Checkout and Logout...........................................................................................................................135Invalid Session Program......................................................................................................................138
Uploading Files................................................................................................................................................140Reserved Macro Variables...................................................................................................................140Examples of How to Upload Files.......................................................................................................141
Example 1: Uploading a single file...............................................................................................141Example 2: Uploading multiple files.............................................................................................142
Examples of How to Use Uploaded Files............................................................................................145Example 3: Uploading a CSV file to a SAS table.........................................................................145Example 4: Uploading an Excel XML workbook to multiple SAS tables....................................145Example 5: Uploading a SAS table or view..................................................................................146Example 6: Uploading a SAS catalog...........................................................................................146Example 7: Uploading a SAS table, view, or catalog and saving a permanent copy....................146Example 8: Uploading an Excel workbook to a SAS table...........................................................147
Application Server Functions........................................................................................................................148
APPSRVGETC...............................................................................................................................................149Syntax..................................................................................................................................................149Arguments............................................................................................................................................149Details..................................................................................................................................................149Examples..............................................................................................................................................149
APPSRVGETN...............................................................................................................................................150Syntax..................................................................................................................................................150Arguments............................................................................................................................................150Details..................................................................................................................................................150Examples..............................................................................................................................................150
APPSRVSET...................................................................................................................................................151Syntax..................................................................................................................................................151Arguments............................................................................................................................................151
SAS Documentation
Table of ContentsAPPSRVSET
Details..................................................................................................................................................151Examples..............................................................................................................................................152
APPSRV_AUTHCLS.....................................................................................................................................153Syntax..................................................................................................................................................153Arguments............................................................................................................................................153Details..................................................................................................................................................153Examples..............................................................................................................................................153
APPSRV_AUTHDS........................................................................................................................................155Syntax..................................................................................................................................................155Arguments............................................................................................................................................155Details..................................................................................................................................................155Examples..............................................................................................................................................155
APPSRV_AUTHLIB......................................................................................................................................156Syntax..................................................................................................................................................156Arguments............................................................................................................................................156Details..................................................................................................................................................156Examples..............................................................................................................................................156
APPSRV_HEADER........................................................................................................................................158Syntax..................................................................................................................................................158Arguments............................................................................................................................................158Details..................................................................................................................................................158Examples..............................................................................................................................................158Disabling Automatic Header Generation.............................................................................................159
APPSRV_SESSION........................................................................................................................................160Syntax..................................................................................................................................................160Arguments............................................................................................................................................160Details..................................................................................................................................................160Examples..............................................................................................................................................160
Application Dispatcher Debugging...............................................................................................................161
Debugging in the Input Component..............................................................................................................162List of Valid Debug Values.................................................................................................................162Disabling Debug Flags.........................................................................................................................163Special Cases.......................................................................................................................................164Debugging Application Broker Installation Problems.........................................................................164
Debugging in the Program Component........................................................................................................167Examining the SAS Log......................................................................................................................167Using SAS Options..............................................................................................................................167The DATA Step Debugger..................................................................................................................167The SCL Debugger..............................................................................................................................167
SAS Documentation

Table of ContentsThe APPSRV Procedure................................................................................................................................169
Syntax..................................................................................................................................................169
PROC APPSRV Statement............................................................................................................................171PROC APPSRV Arguments................................................................................................................171Special Requirements for AUTH=HOST............................................................................................174
Using AUTH=HOST on OpenVMS systems................................................................................174Using AUTH=HOST on z/OS systems.........................................................................................175Using AUTH=HOST on UNIX systems.......................................................................................175Using AUTH=HOST on Windows systems..................................................................................175
ADMINLIBS Statement.................................................................................................................................176Syntax..................................................................................................................................................176Arguments............................................................................................................................................176
ALLOCATE FILE Statement.......................................................................................................................177Syntax..................................................................................................................................................177Arguments............................................................................................................................................177
ALLOCATE LIBRARY Statement..............................................................................................................179Syntax..................................................................................................................................................179Arguments............................................................................................................................................179Nesting Library Names in Concatenated Libraries..............................................................................179
Concatenated Data Libraries.........................................................................................................179Concatenated Program Libraries...................................................................................................180
DATALIBS Statement....................................................................................................................................182Syntax..................................................................................................................................................182Arguments............................................................................................................................................182
LOG Statement...............................................................................................................................................183Syntax..................................................................................................................................................183Arguments............................................................................................................................................183Default Log File Append Behavior......................................................................................................184
PROGLIBS Statement....................................................................................................................................185Syntax..................................................................................................................................................185Arguments............................................................................................................................................185
REQUEST Statement.....................................................................................................................................186Syntax..................................................................................................................................................186Arguments............................................................................................................................................186
SESSION Statement.......................................................................................................................................188Syntax..................................................................................................................................................188Arguments............................................................................................................................................188
STATISTICS Statement.................................................................................................................................190Syntax..................................................................................................................................................190Arguments............................................................................................................................................190
SAS Documentation
Table of ContentsSTATISTICS Statement
Default Contents of the Data Set........................................................................................................191Customizing the Statistics Data Set.....................................................................................................192Application Server Access to the Data Set..........................................................................................193Application Access to the Data Set......................................................................................................193
Samples............................................................................................................................................................195
SAS Documentation
What's New in SAS/IntrNet 9.2Application Dispatcher
OverviewApplication Dispatcher provides background processing, support for 64−bit hosts and IPv6−based hosts, LoadManager enhancements, new options for the PROC APPSRV statement, new parameters for the _REPLAYprogram, and improved documentation.
General Enhancements
SAS/IntrNet Application Dispatcher includes the following enhancements:
Long−running SAS/IntrNet programs can now run in the background to avoid problems with commontimeouts for the Application Broker, Web server, and Application Server. The Web browser does nothave to wait for a job to complete. The results are returned via e−mail or stored for subsequentretrieval. The following new APPSRVSET parameters are available:
APPSRVSET('background',request_timeout);♦ APPSRVSET('disconnect');♦
•
SAS/IntrNet now runs on 64−bit hosts and IPv6−based hosts. Any fields in the broker.cfg file that arespecified with host:port have to be changed to [host]:port if host contains a colon.
•
SAS/IntrNet supports the following additional parameters for starting the Load Manager:
−background=nspecifies the number of Application Servers that can be run in the background at one time.
−delete=service−nameremoves a previously installed Load Manager as a system service on Windows. This is usefulif you are running multiple Load Managers. If the service_name is not specified, the namedefaults to SAS IntrNet Load Manager.
−install=service−nameinstalls the Load Manager on Windows as a system service. This is useful if you want to runmultiple Load Managers. If the service_name is not specified, the Load Manager is installedas SAS IntrNet Load Manager.
−localhost=hostnameforces the Load Manager to use the specified string as the local host name for all system hostname comparisons.
•
SAS/IntrNet Application Dispatcher supports the following additional options for the PROCAPPSRV statement:
CHARSET= and NOCHARSET optionsenable the PROC APPSRV statement to append a specified character set name to the HTTPcontent−type header and to disable any special content−type processing, respectively.
AUTH=META optionenables the PROC APPSRV statement to use a metadata server.
•
SAS/IntrNet Application Dispatcher now supports additional parameters for the _REPLAY program.The _OUTPUTAPP= parameter enables you to replay output to a Microsoft Office application. The_CONTDISP parameter enables you to control the filename of the replayed content.
•
1

About Application DispatcherApplication Dispatcher, a SAS/IntrNet component, is a Web gateway from your Web browser to the power ofSAS processing. This gateway, written by using the Common Gateway Interface (CGI), provides access todata in combination with a powerful array of analysis and presentation procedures. SAS software does nothave to be installed on your machine!
To access and analyze data, a Web user completes an HTML form by selecting items and filling in fields.When the user selects the option to submit the information, the Application Dispatcher passes the informationthrough the CGI program to a waiting SAS session. SAS software processes the information by using theidentified program. Program results return through the CGI to the Web browser and are displayed to thewaiting user.
You do not need CGI programming experience to use the Application Dispatcher. You can create the Webuser interface and retrieve SAS data for display on the Web without having to program a CGI script.
2
An Overview of the Application DispatcherUsing the Application Dispatcher, you can send information from a Web browser to a SAS session forprocessing and receive the results on your Web browser. The results can appear as text, HTML, GIF, JPEG, orany other format that is supported by your Web browser.
By submitting an HTML form or clicking a hypertext link, you can cause SAS to run a program. The programcan be written by you or someone else at your site, or it can be a sample program that is provided by SAS.You can even use the sample forms and code as the foundation for your own applications. You can easilymodify almost any SAS batch program to run on the Web and thus add new life to legacy applications andlegacy data. Some commercial SAS applications that run by using the Application Dispatcher are includedwith SAS/IntrNet software.
To get started with Application Dispatcher terminology and concepts, read the following:
What Is the Application Dispatcher?• What Are Application Dispatcher Services?• What Are Application Dispatcher Applications?• What Is the Application Load Manager?• Who Uses the Application Dispatcher?•
What Is the Application Dispatcher?
The Application Dispatcher exchanges and processes information by using the following components:
The input component runs on the Web server or the client. It normally consists of static or dynamicallygenerated HTML pages containing URL references or HTML forms. The input component is responsible forselecting what program component to run and what input data to pass to that program component.
The Application Broker is a CGI program that resides on your Web server (for example, in the cgi−bin orscripts directory). The Application Broker interprets the information received from the input component andpasses it to the Application Server.
The Application Server is a SAS session that receives input from the Application Broker. The ApplicationServer accepts information from the Application Broker CGI program and invokes the program component.
The program component is a SAS program invoked within the Application Server. The program
receives the request from the server1. processes it2. returns the results to the Application Broker for delivery to the Web browser and the waiting user.3.
What Are Application Dispatcher Services?
Each request from the Web browser contains the name of a service that will fulfill the request. TheApplication Broker identifies the service by looking into its configuration file and then determines where andhow the request should be forwarded. The configuration file defines the three services (socket, launch, andpool) that are available for Application Dispatcher applications to use.
A socket service runs the Application Server continuously, waiting for new requests, and refers to the protocol3
that is used (TCP/IP sockets) to communicate between the server and the Application Broker. Using this typeof service, many servers can run at the same time, letting the Application Broker balance the load. As multipleusers invoke Application Dispatcher programs, multiple servers can be used to improve applicationperformance. An optional component called the Application Load Manager can be added to assist theApplication Broker in balancing the load.
Instead of using the socket service method of running the Application Server, you can use the launch service,which starts a new server for each request. Although this method can require more time than the socketservice because of the Application Server start−up time, it is easier to administer and provides some securityadvantages.
Using the Application Load Manager, the pool service starts servers from the pool as needed to handle queuedjobs. When a job completes, the server becomes available for new requests until an optional idle time−out isreached, at which time the server shuts down.
What Are Application Dispatcher Applications?
The Application Broker and the Application Server provide the communication and processing mechanismsfor Application Dispatcher applications. An Application Dispatcher application consists of one or moreassociated input components and program components. The program components for an ApplicationDispatcher application can be any of the following:
a SAS program (an external file that has a .sas extension)• a source entry (a catalog entry that has a .source extension)• an SCL entry (a catalog entry that has a .scl extension)• a compiled macro (a catalog entry that has a .macro extension).•
The program component that you create must be designed to accept the information that is received from theWeb browser. In many cases, this means that you not only create the source program but also the HTML pagethat passes information to the Application Broker.
What Is the Application Load Manager?
The Application Load Manager (LOADMGR) is a separate, optional process that can be used to enhance thedistribution of Application Dispatcher resources on a network. If installed, it records the state of allApplication Servers and maintains a separate dynamic pool of available servers. These capabilities enable theLoad Manager to distribute Application Dispatcher requests most efficiently.
The Load Manager is of greatest use to the person who creates and maintains the configuration file for theApplication Broker.
Who Uses the Application Dispatcher?
You should use the Application Dispatcher if you
want to analyze and display information dynamically on the Web and let your Web users immediatelyretrieve the information they need.
•
have SAS programming experience but have little or no CGI programming experience. ApplicationDispatcher enables you to create the Web user interface and retrieve the SAS data for display on theWeb without writing a CGI script.
•
want to create applications that provide Web output without investing a lot of programming time.•
SAS Documentation
4
want to create applications that run on a variety of Web browsers.•
The Application Dispatcher has several types of users:
End users enter information in a form, select a link, or view an inline image that displays in a Webbrowser.
•
Web−page authors create the HTML forms or pages, which include unique Application Dispatcherfields. These individuals could be SAS application developers.
•
Application Dispatcher program developers create the Application Dispatcher programs that receiveinformation entered on the Web page.
•
System administrators, also known as Webmasters, maintain programs on the Web server or maintainthe Application Server(s).
•
SAS Documentation
5

How the Application Dispatcher WorksHow a Request Is Submitted to the Application Broker• How the Application Broker Processes a Request• How the Application Server Processes a Request• How Program Output Is Sent to the Application Broker• How the Load Manager Works•
The SAS/IntrNet Application Dispatcher enables you to offer the power of SAS to Web users without havingthem install client software on every desktop. Here's a summary of how it works:
Users enter information in an HTML form using their Web browser and then submit it. Theinformation is passed to the Web server, which invokes the first component of the ApplicationDispatcher, the Application Broker.
1.
The Application Broker accepts data from the Web server and sends it to the second ApplicationDispatcher component, the Application Server.
2.
The Application Server invokes a SAS program that processes the information.3. The results of the SAS program are sent back through the Application Broker and Web server to theWeb browser and the awaiting users.
4.
The following diagram, which is described in detail later, illustrates how the Application Dispatcher submitsand processes a communication request.
How a Request Is Submitted to the Application Broker
Web users submit information and processing requests via their Web browsers. The interface to theApplication Dispatcher is usually an HTML form that users access from their Web browser, but users can alsoaccess the Application Dispatcher through a hypertext link that contains the URL and required parameters thatare necessary to run the program.
Depending on the design and purpose of the form, users can
formulate queries by selecting items from lists, check boxes, or radio buttons• 6
specify analysis variables, processing options, and reporting options by selecting items from lists,check boxes, or radio buttons, or by completing text entry fields
•
input data by completing text entry fields.•
When a user selects the Submit button or a hypertext link, the Web browser sends the information to the Webserver, which immediately invokes the Application Broker. The Application Broker is a Common GatewayInterface (CGI) program that runs on any Web server that supports the CGI standard. The Application Brokerthen forwards the request to the Application Server.
In addition to providing the user interface, the HTML form provides
the location of the Application Broker, as defined in the ACTION= attribute of the HTML FORM tag• the name of the service that is used to process the request, as specified in the _SERVICE field• the name of the program that executes the request, as specified in the _PROGRAM field• generic name and value information that is contained in optional fields.•
To learn how to enter these fields in HTML code and how to make your own Application Dispatcher form andits associated SAS code, see the Input Component and the Program Component.
How the Application Broker Processes a Request
The Web server invokes the Application Broker each time a user submits a request. The location of theApplication Broker CGI program is provided by the ACTION= attribute in the HTML form or by the HREF=attribute in a hypertext link.
The _SERVICE field in the request specifies the service name. The Application Broker reads its configurationfile to get the definition of the requested service. The Application Broker then connects to an ApplicationServer that is associated with the service. Application Dispatcher currently supports three types of services:
Socket Servicespecifies one or more Application servers that run permanently on the SAS Server and wait for arequest. The Application Broker either picks an available server or queries the Load Manager for anidle server.
Pool Serviceidentifies multiple servers (a pool of servers) that might be running. The Application Broker contactsthe Load Manager in order to find an available Application Server. If no server is available, the LoadManager can start a new server that will then handle the request. After the request is completed, thenew server is added to the service pool and is available for future requests.
Launch Serviceenables the Application Broker to launch a new Application Server for each new request. TheApplication Server runs on the Web server machine and terminates when the request is complete.
The Application Broker forwards information from input fields and any configuration information that isspecified in the Application Broker configuration file. For socket services, the configuration file also specifiesthe machine name or IP address and the TCP/IP port name or number that will receive the request.
How the Application Server Processes a Request
It can be helpful for you to know the specific steps that the Application Server performs when it handles arequest. This information can be useful when you are enhancing server performance or performingadministrative tasks. The following list describes how the Application Server processes a request:
SAS Documentation
7
After the Application Server is started, it listens on the TCP socket for a request.1. When the server receives a request, it examines the _PROGRAM parameter to determine the type andlocation of the program that is being run. If the Application Server does not find the program, itgenerates an error page that displays in the user's browser.
2.
The server creates macro variables and a SAS Component Language (SCL) list that contains the inputname/value pairs so that the program can access them.
3.
The Application Server creates a _WEBOUT fileref connection so that SAS can send data back to thebrowser.
4.
The server runs the program, cleans up, and then waits for a new request. If the server was started fora launch service and no session was created by the user program, the server exits immediately.
5.
How Program Output Is Sent to the Application Broker
The program output is sent directly to the Application Broker by using a predefined file reference. The formatof the output is defined by the HTTP standard. See HTTP Headers for more information.
As the Application Broker receives the program output, it does a quick consistency check on the HTTPheaders and sends the results back to the Web server, which streams the results back to the browser. Becauseof the streaming, results begin to appear in the browser before the program has finished processing.
How the Load Manager Works
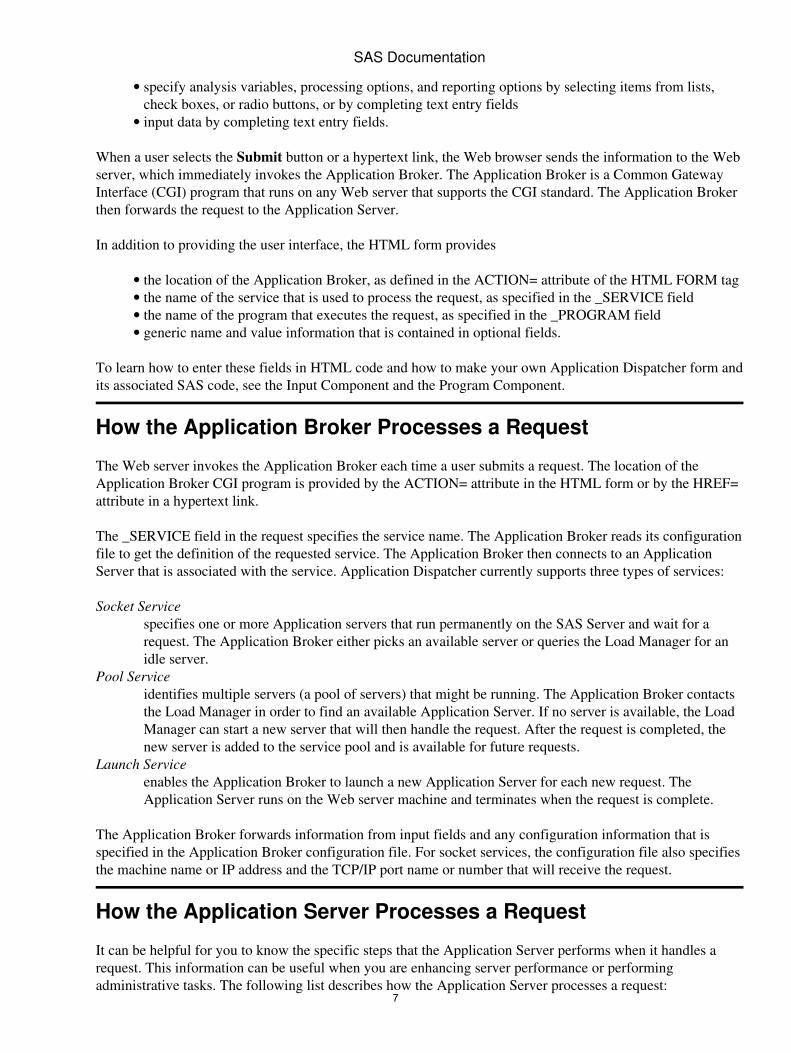
You can use the Load Manager, which is a separate, optional process, to optimize the use of ApplicationDispatcher resources on a network. The Load Manager can route requests to available idle servers and startadditional available servers as needed.
The Load Manager listens for requests from Application Brokers for Application Servers that are idle.• If a server is not designated as being busy, it is allocated to the requesting Application Broker.•
When the Application Server receives the job, it notifies the Load Manager that it is busy processing therequest. The following diagram illustrates how the Application Server notifies the Load Manager after it hasreceived a request.
SAS Documentation
8
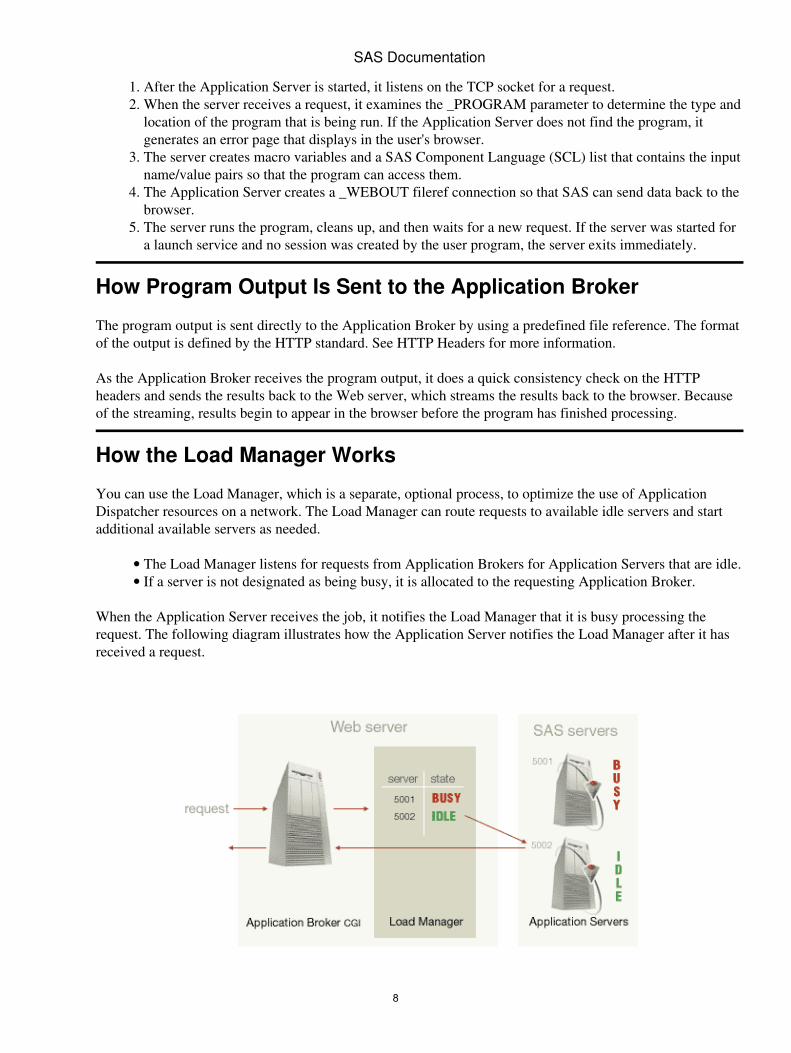
After completing the job, the Application Server again notifies the Load Manager that it is free to work onanother request. The following diagram illustrates how the Application Server notifies the Load Manager afterit is free to process the next request.
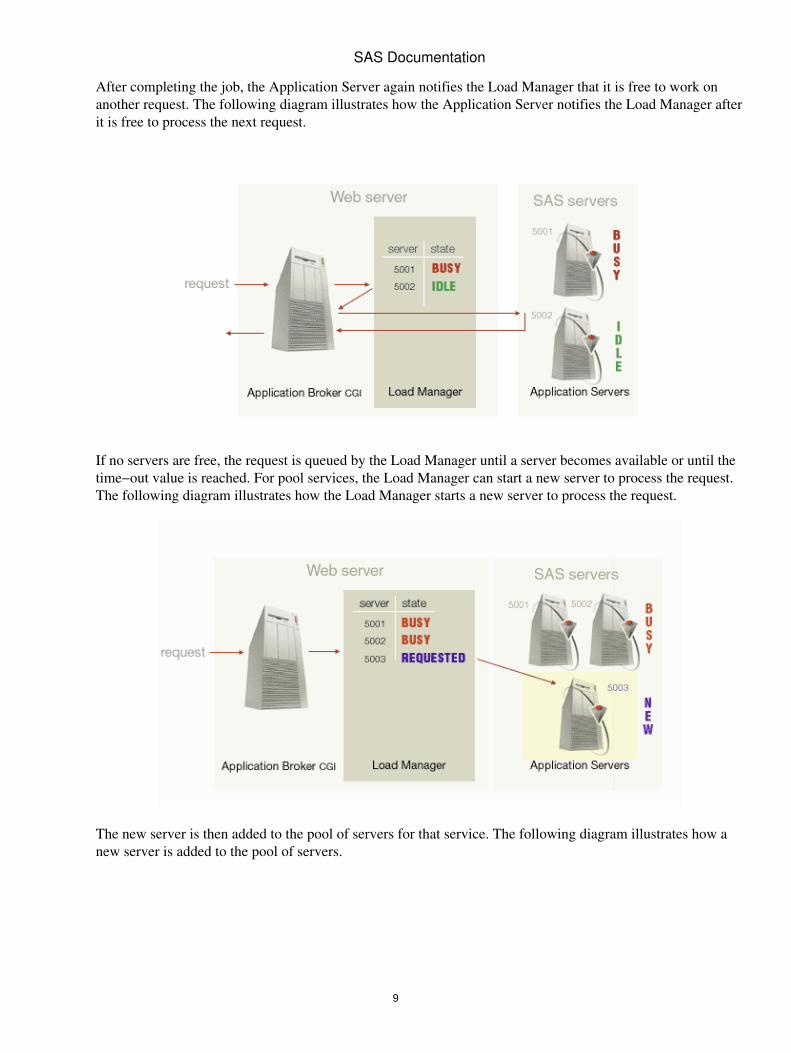
If no servers are free, the request is queued by the Load Manager until a server becomes available or until thetime−out value is reached. For pool services, the Load Manager can start a new server to process the request.The following diagram illustrates how the Load Manager starts a new server to process the request.
The new server is then added to the pool of servers for that service. The following diagram illustrates how anew server is added to the pool of servers.
SAS Documentation
9
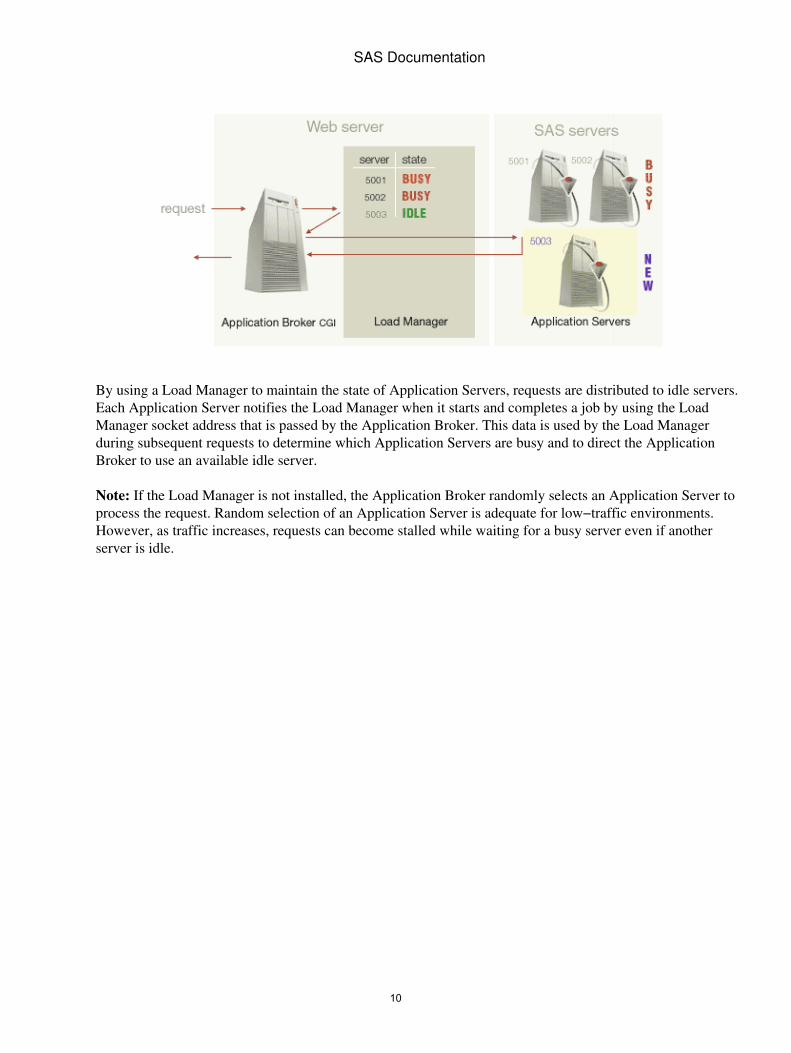
By using a Load Manager to maintain the state of Application Servers, requests are distributed to idle servers.Each Application Server notifies the Load Manager when it starts and completes a job by using the LoadManager socket address that is passed by the Application Broker. This data is used by the Load Managerduring subsequent requests to determine which Application Servers are busy and to direct the ApplicationBroker to use an available idle server.
Note: If the Load Manager is not installed, the Application Broker randomly selects an Application Server toprocess the request. Random selection of an Application Server is adequate for low−traffic environments.However, as traffic increases, requests can become stalled while waiting for a busy server even if anotherserver is idle.
SAS Documentation
10
Requirements for the Application DispatcherThe following are required:
The end user must have a Web browser.• The site must have a machine that has a Web server.• The site must have a SAS server for SAS 9.2 with an Application Server installed.•
These requirements (a Web browser, a Web server, and an Application Server) can reside on one machine oron three separate machines.
You must install both the Application Broker and the Application Server components of the ApplicationDispatcher. Install the Application Server on a machine that has SAS software running, and install theApplication Broker on the machine that has your Web server running. A third component of the ApplicationDispatcher, the Application Load Manager, is not required for a typical setup. SAS software is not required onthe Web server or the local desktop. The installation requirements are
Requirements for the Application Broker• Requirements for the Application Server• Requirements for the Application Load Manager•
Requirements for the Application Broker
Because the Application Broker is invoked by the Web server, the Web server must already beinstalled on the machine where you plan to install the Application Broker.
•
You must have WRITE access to the directory where your CGI scripts and programs are stored.• You must have already installed at least one Application Server.• The machine on which you install the Application Broker must have access by means of aTCP/IP−based network to the machine on which you installed the Application Server.
•
For pool services, a Load Manager must be running on the network. A SAS spawner is also requiredif servers are to be started by using user name or passwords.
•
You must have access to a Web browser to test your installation.•
Requirements for the Application Server
This documentation describes the Application Server for SAS 9.2. If your SAS server is an earlier version,refer to the documentation for that version.
You must install the Application Server on a machine where SAS 9.2 is installed, because theApplication Server is a SAS program.
•
If you want to use a launch service, both the Web server and the SAS server must reside on the samemachine. This is because the Web server invokes the Application Broker and the Application Brokerinvokes the SAS server.
•
A socket service can be configured by using the Web server and the SAS server on the same or ondifferent machines.
•
For increased functionality, you can take advantage of other SAS software you already have installed,such as SAS/GRAPH, SAS/SHARE, SAS/ACCESS, or SAS/EIS software.
•
The machine on which the Application Server is installed must have access to all of the data that isnecessary to run the Application Dispatcher applications. This data can be stored in local SAS datasets, in third−party databases accessed through SAS/ACCESS software, or on remote servers
•
11

accessed through SAS/SHARE software.
Requirements for the Application Load Manager
You must install both the Application Broker and the Application Server in order to use LoadManager.
•
Load Manager must have access to the Web server and the Application Server by means of aTCP/IP−based network. You can install Load Manager on your Web server machine, your SAS servermachine, or any other machine on your network.
•
You can run Load Manager as an unattended, background process, or you can start it as a systemservice.
•
SAS Documentation
12
Application Dispatcher SecuritySecurity is a complex topic for networked, client/server applications. Security issues include userauthentication, authorization, communications security, and writing secure applications. Here are some of themany approaches and tools you can use to secure the Application Dispatcher.
Application Broker and Web Server SecurityUsing a Secure Web Server♦ Hiding Sensitive Information from Web Server Logs♦ Protecting the Application Broker Configuration File♦ Creating Encrypted User Names and Passwords♦ Authenticating the Application Broker♦
•
Application Server SecurityThe Application Server Should Not Trust the Application Broker♦ Application Server May Restrict Application Broker Access♦ Supplying a Password When Starting the Application Server♦ Hiding Passwords and Other Sensitive Data from the SAS Log♦ Restricting Access to Program Libraries♦ Disabling Sample Programs♦ Reviewing New or Modified Code♦
•
Controlling Access to SAS Data Sources With the AUTHLIB Data SetAUTHLIB Functions♦ Verifying the AUTHLIB Data Set♦
•
Application Dispatcher Program SecurityUsing SCL or Compiled Macro Code♦ Using Password−Protected Data Sets♦
•
Related Topics
Host Authentication• Firewalls (support.sas.com/rnd/web/intrnet/misc/firewall.html)• Application Broker Directives. See BrokerPassword under Administrator Directives and Encryptunder General Service Directives.
•
13

Application Broker and Web Server SecurityUsing a Secure Web Server• Hiding Sensitive Information from Web Server Logs• Protecting the Application Broker Configuration File• Creating Encrypted User Names and Passwords• Authenticating the Application Broker•
Using a Secure Web Server
One security risk involves the network between the Web browser and the Web server. You can improvesecurity by using a secure Web server. A secure Web server uses an HTTPS protocol, which is HTTP that hassecure sockets. This protocol encrypts all the data flowing back−and−forth between the Web browser and theWeb server. Unauthorized users are not able to decipher the secure packets of data as it passes through thevarious computers between the Web browser and the Web server.
Hiding Sensitive Information from Web Server Logs
Parameters on a GET request are logged by the Web server. This means that passwords and other sensitiveparameters might be captured in the Web server log. Using POST generally prevents submitted form datafrom appearing in the Web server log files. You should use POST instead of GET to handle sensitive data inApplication Dispatcher requests, although POST is not a guarantee that the Web server will not log inputparameters.
Protecting the Application Broker Configuration File
As a security precaution, you should protect your Application Broker configuration file. Your first priorityshould be to restrict file system access so that only specific individuals can update the configuration file.Protecting this file means that you can rely on the settings you define in the file, such as DebugMask andDebug.
Usually the configuration file is stored in the CGI executable directory along with the Application Brokerexecutable. Some Web servers allow files stored in a CGI executable directory to be downloaded the sameway as a regular HTML file. To test this, try one of the following URLs, and see if your Web server allowsyou to download a copy of the configuration file:
UNIX:http://yourserver/cgi−bin/broker.cfg
Windows:http://yourserver/scripts/broker.cfg
If you are able to download the file, then you need to adjust your Web server configuration to prevent this.Next, ensure that the DebugMask value is set in your configuration file to disallow _DEBUG=4. This debugvalue displays the contents of the configuration file. Try one of the following URLs, to ensure that this debugflag is disabled:
UNIX:http://yourserver/cgi−bin/broker?_debug=4
Windows:http://yourserver/scripts/broker.exe?_debug=4
14
Creating Encrypted User Names and Passwords
The user name and password parameters in the Application Broker configuration file can be encrypted orentered as open text. If a value starts with an exclamation point (!), the value is assumed to be encrypted. Toobtain the encrypted equivalent for a user name/password, send the values to the Application Broker with a_DEBUG=1. For example,
http://abc.def.com/cgi−bin/broker? _service=default&_debug=1&_username=myname&_password=xyzzy
should produce output with the fields encrypted following an exclamation point (!). These new values canthen be used in place of the original open−text versions.
Note: When you use the Application Broker to encrypt a user name or password, the original unencrypteduser name and password might be saved in the Web server log. You can run the Application Broker from thecommand line to avoid this issue:
broker "_service=default&_debug=1&_username=myname&_password=xyzzy"
An alternative to entering this password in plain−text is to use the encrypted version of the password. Forexample, if your password is xyzzy, the encrypted version that you can put into the broker.cfg is!ci3mC.Xmq.t2Chnx. By hardcoding the encrypted version in the broker.cfg, the text of your actualpassword is protected from anyone who has read access to the broker.cfg file.
Authenticating the Application Broker
By default, Web servers enable any client to connect and make an anonymous request for a static page or aCGI program. You can enable Web server authentication for the CGI executable directory that contains theApplication Broker. This requires that users supply a user ID and password in their Web browser to run theApplication Broker. When a Web server launches a CGI program that is authenticated, it supplies the user IDof the client in the environment variable REMOTE_USER. By examining the corresponding SAS macrovariable, _RMTUSER, your programs can determine who the requesting client is. Using this information, youcan provide the appropriate access to application features.
Note that it might be easy for users to fake the value of the REMOTE_USER variable without authenticating.Because the Application Broker program accepts this value through an environment variable, users can set theenvironment variable REMOTE_USER to any value that they want and run the Application Broker from anoperating system command prompt. Therefore, they can masquerade as other users and the Application Serverdoes not know the difference. See the section titled Application Server Should Not Trust the ApplicationBroker for an explanation of how to overcome this problem.
SAS Documentation
15

Application Server SecurityThe Application Server Should Not Trust the Application Broker• Application Server May Restrict Application Broker Access• Supplying a Password When Starting the Application Server• Hiding Passwords and Other Sensitive Data from the SAS Log• Restricting Access to Program Libraries• Disabling Sample Programs• Reviewing New or Modified Code•
The Application Server Should Not Trust the Application Broker
By enabling Web−server authentication for the Application Broker executable file, your Web server can passthe user ID of the client to the Application Broker in the REMOTE_USER environment variable. Byexporting this environment variable, you can pass the remote−user value to SAS as the macro variable_RMTUSER. Then your application can use the value of this variable to activate or de−activate variousapplication features.
Note: You cannot trust that the Application Broker that is connected to your Application Server is the sameApplication Broker that is executed on your Web server machine. It is possible that another Web server, or auser running the Application Broker from an operating system command prompt, could make a connection toyour Application Server and supply a bogus value for REMOTE_USER. In other words, there is not a strongcoupling between the Application Broker and the Application Server to ensure the transmission of a securitycontext.
This is not to say that Web server authentication and the REMOTE_USER value are worthless. On thecontrary, they are quite valuable as long as their reliability has not been compromised. One way to repair thesecurity model outlined above is to create a strong coupling between the Application Broker and ApplicationServer. If you can ensure that the only Application Broker that can run programs on your Application Serveris the same Application Broker that you are authenticating on your Web server, then REMOTE_USER is atrustworthy value.
You can use the ServiceSet directive in the Application Broker configuration file to define a variable nameand a constant value. For example,
SocketService default "Default service" Server appsrv.yourcomp.com Port 5001 ServiceSet passkey "some value that is hard to guess"
With each request to the specified service, the Application Broker passes all the normal application data andthe additional variable defined by using ServiceSet to the Application Server. In this example, each requestwould contain the name/value pair passkey=some value that is hard to guess. You cancheck the value of this special variable within your Application Server program. If the value of this variablepassed to your program does not match the value you assigned in the configuration file, then you can refusethe request because it violates your security model. Any requests that perform the required Web serverauthentication will contain the special variable that has the correct value. These requests will pass your initialsecurity check and then you can trust the value of _RMTUSER.
Because the Application Broker merges exported environment variables and variables created by using the Setdirectives after the Web server receives the request from the Web browser, there is no fear of the specialvariable appearing in the URL or in the Web server log files. In this example, only the Application Server sees
16

the variable PASSKEY and its value.
There are some important caveats to this technique. Placing this "secret" value in the Application Brokerconfiguration file means that you must protect the configuration file and ensure that no one can read itscontents. The "secret" variable and its value must be treated like a password. Secondly, you need to disablethe _DEBUG=1 flag by using the DebugMask directive. This debug flag will display the "secret" variable andits value in the Web browser of the user along with the reset of the data for the request. You also have toinclude the "secret" variable and its value in your program code. This means that you have to restrict access toyour program code just as you restricted access to the configuration file. See also Protecting the ApplicationBroker Configuration File
Application Server May Restrict Application Broker Access
An Application Broker might be restricted from making requests from an Application Server if theApplication Server's request syntax is limited to specific IP addresses.
For example, the Application Broker is started on a machine with IP address 12.34.56.78. The ApplicationServer is started on another machine using the following syntax:
proc appsrv port=5800; request fromadr=("12.34.56.99"); run;
A request from the Application Broker to this Application Server fails because the Application Broker's IPaddress does not match the APPSRV FROMADR.
Supplying a Password When Starting the Application Server
When you start the server, you can optionally specify an administrative password by using the ADMINPWoption. For example,
PROC APPSRV PORT=5001 ADMINPW='XXXX' ...
The password must not contain quotation marks. Specifying a password prevents anyone from runningadministrative programs such as STOP without supplying the password. By using an HTML form that has apassword field, as shown in the following example, you can create an administrative interface to the server:
<FORM ACTION= "/cgi−bin/broker" METHOD="POST"> <INPUT TYPE= "hidden" NAME= "_SERVICE" VALUE="default"> <INPUT TYPE="hidden" NAME="_PROGRAM" VALUE="stop"> Password: <INPUT TYPE="PASSWORD" NAME="_ADMINPW"> <INPUT TYPE="SUBMIT" VALUE="Shut down"> </FORM>
Note: Use METHOD=POST when creating forms that supply passwords to the Application Server. Includingthe password on a URL by using METHOD=GET or an explicit URL will expose the password in potentiallyunsecure places such as Web server logs, Application Server logs, history files or bookmark files.
Hiding Passwords and Other Sensitive Data from the SAS Log
The SAS log exposes programs and input parameters, which could pose a security issue. There are someactions you can take to hide passwords and other sensitive data from the SAS log. Password values are
SAS Documentation
17

automatically hidden from the Application Server log. You can disable the SAS log with the DebugMaskoption. You can also use the prefix _NOLOG_ with macro symbols to hide request variable values.
The _NOLOG_ feature enables you to create special macro symbols that can be sent to the Application Serverwithout publishing the macro values in the APPSRV log. The special macro symbols must start with theprefix _NOLOG_. The prefix is case insensitive. For example:
http://yourserver/cgi−bin/broker.exe?_service=default &_program=test.getEmployeeSalary.sas&_nolog_salary=secretpw
If _NOLOG_SALARY is displayed in the SAS logs, it shows
_NOLOG_SALARY=XXXXXXXX;
Restricting Access to Program Libraries
Another recommended security measure is to separate Application Dispatcher programs from their data.Application Dispatcher programs should not be placed in libraries along with the data they read and update. Ifyour operating environment allows you to set read and write permissions for specific directories, then specifyor assign the Application Server READ access only to all program libraries. Also, it is best to allocateprogram libraries by using the ACCESS=READONLY option. If any programs need to create or update datasets or files, then READ and WRITE access must be allowed to those data libraries. Though the ApplicationDispatcher functions correctly without these security measures, we strongly recommend that you follow theseguidelines.
Do not permit unlimited access to existing application libraries. To achieve a high level of security, restrictaccess to the Application Dispatcher application libraries only to those developers who should be allowed tomodify application code.
Disabling Sample Programs
The sample programs shipped with SAS/IntrNet are enabled by default. These samples programs include theability to browse data in any library defined to an Application Server. If you want to limit access to SASlibraries defined in a server's data libraries, you should disable the sample programs. You can do this byediting the appstart.sas file (or @APSTXn members on z/OS) for the Application Dispatcher service. Youmust remove or comment out the ALLOCATE LIBRARY statement for the SAMPLIB libref, remove orcomment out the ALLOCATE FILE statement for the SAMPLE fileref, and remove SAMPLE and SAMPLIBfrom the PROGLIBS statement.
Reviewing New or Modified Code
To prevent security holes that could be created inadvertently, review any new code or code that has beenchanged in any way. See the section on Application Dispatcher Program Security for details about what tolook for to find potential problems.
SAS Documentation
18
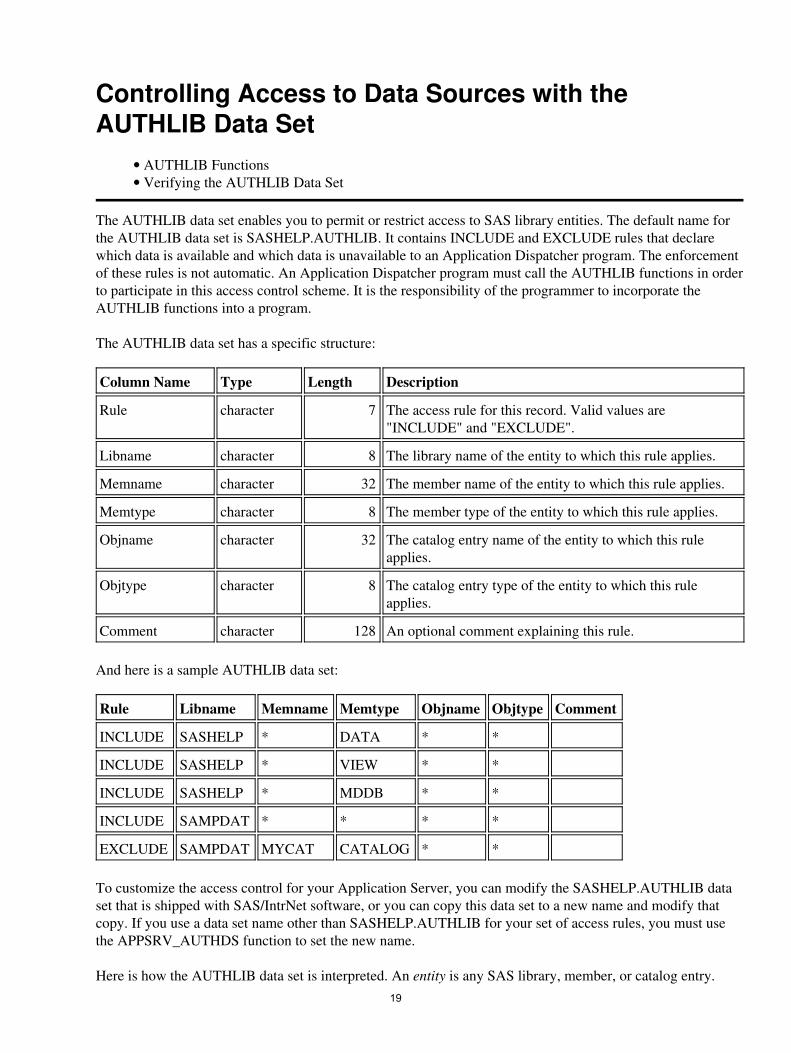
Controlling Access to Data Sources with theAUTHLIB Data Set
AUTHLIB Functions• Verifying the AUTHLIB Data Set•
The AUTHLIB data set enables you to permit or restrict access to SAS library entities. The default name forthe AUTHLIB data set is SASHELP.AUTHLIB. It contains INCLUDE and EXCLUDE rules that declarewhich data is available and which data is unavailable to an Application Dispatcher program. The enforcementof these rules is not automatic. An Application Dispatcher program must call the AUTHLIB functions in orderto participate in this access control scheme. It is the responsibility of the programmer to incorporate theAUTHLIB functions into a program.
The AUTHLIB data set has a specific structure:
Column Name Type Length Description
Rule character 7 The access rule for this record. Valid values are"INCLUDE" and "EXCLUDE".
Libname character 8 The library name of the entity to which this rule applies.
Memname character 32 The member name of the entity to which this rule applies.
Memtype character 8 The member type of the entity to which this rule applies.
Objname character 32 The catalog entry name of the entity to which this ruleapplies.
Objtype character 8 The catalog entry type of the entity to which this ruleapplies.
Comment character 128 An optional comment explaining this rule.
And here is a sample AUTHLIB data set:
Rule Libname Memname Memtype Objname Objtype Comment
INCLUDE SASHELP * DATA * *
INCLUDE SASHELP * VIEW * *
INCLUDE SASHELP * MDDB * *
INCLUDE SAMPDAT * * * *
EXCLUDE SAMPDAT MYCAT CATALOG * *
To customize the access control for your Application Server, you can modify the SASHELP.AUTHLIB dataset that is shipped with SAS/IntrNet software, or you can copy this data set to a new name and modify thatcopy. If you use a data set name other than SASHELP.AUTHLIB for your set of access rules, you must usethe APPSRV_AUTHDS function to set the new name.
Here is how the AUTHLIB data set is interpreted. An entity is any SAS library, member, or catalog entry.19

An INCLUDE rule indicates that access is allowed for matching entities.• An EXCLUDE rule indicates that access is not allowed for matching entities.• All explicit EXCLUDE rules override all INCLUDE rules.• If an entity does not match any rules, then an implicit EXCLUDE rule is assumed.• Variable values are not case sensitive.• A single asterisk in a variable value matches any entity or partial entity name.•
Here are a few additional guidelines:
Keep it simple. Avoid creating an overly complex set of rules. This reduces the chance ofunintentionally allowing access to sensitive entities.
•
Verify any changes you make to the AUTHLIB data set.• You cannot combine a text value with an asterisk to create a pattern match. An asterisk is effectiveonly when used by itself.
•
Do not leave any variable values blank. This does not evaluate properly. Place an asterisk in anycolumns that you might expect to leave blank. For example, OBJNAME and OBJTYPE do not makesense when the MEMTYPE is DATA. However, placing asterisks in these columns is required.
•
Use a MEMTYPE value of CATALOG when you supply a nonasterisk value for OBJNAME orOBJTYPE. For example, suppose you want to exclude access to all catalog entries of type SCL. Thatrule would look like
Rule Libname Memname Memtype Objname Objtype Comment
EXCLUDE * * CATALOG * SCL Exclude all SCL entries.
•
As stated above, the default rule (if none match) is EXCLUDE. If you add an INCLUDE rule withasterisks in all columns, this changes the default rule to INCLUDE, for example:
Rule Libname Memname Memtype Objname Objtype Comment
INCLUDE * * * * * Now all entities are includedby default.
•
If you add an EXCLUDE rule with asterisks in all columns, then no access is allowed to any entities,for example:
Rule Libname Memname Memtype Objname Objtype Comment
EXCLUDE * * * * * Turn off all access to SASlibrary data.
•
AUTHLIB Functions
The following functions enable you to use the AUTHLIB data set in your Application Dispatcher programs.
APPSRV_AUTHLIB checks whether access is allowed for a given entity. The arguments to thisfunction are similar to the columns of the AUTHLIB data set. This function is efficient if you arechecking either a single or just a few entities. If you want to check many entities it is more efficient touse the APPSRV_AUTHCLS function.
•
APPSRV_AUTHCLS produces various WHERE clauses. These clauses can be used to subset theentities in the current SAS session to only the entities that are authorized by the AUTHLIB data set. Ifyour program needs to check the authorization for a large number of entities, or if your program needsto generate lists of authorized entities, then use this function. The returned WHERE clause can becombined with your own subsetting criteria and applied to the SQL dictionaries or various SASHELP
•
SAS Documentation
20
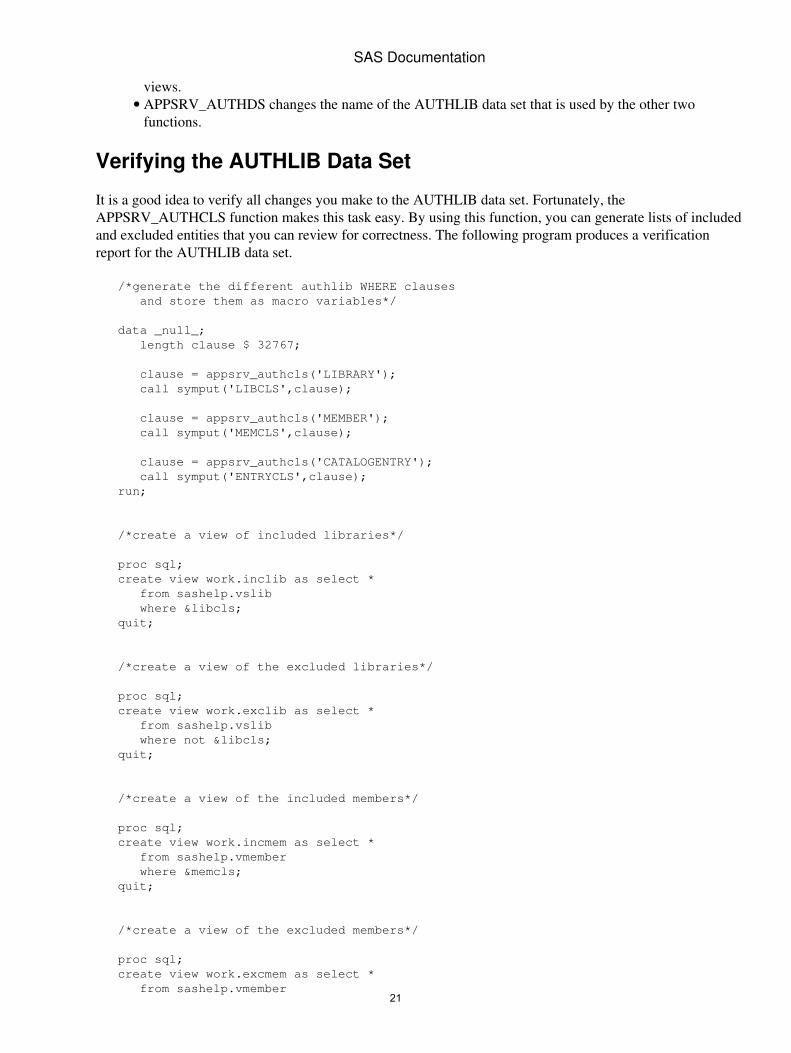
views.APPSRV_AUTHDS changes the name of the AUTHLIB data set that is used by the other twofunctions.
•
Verifying the AUTHLIB Data Set
It is a good idea to verify all changes you make to the AUTHLIB data set. Fortunately, theAPPSRV_AUTHCLS function makes this task easy. By using this function, you can generate lists of includedand excluded entities that you can review for correctness. The following program produces a verificationreport for the AUTHLIB data set.
/*generate the different authlib WHERE clauses and store them as macro variables*/
data _null_; length clause $ 32767;
clause = appsrv_authcls('LIBRARY'); call symput('LIBCLS',clause);
clause = appsrv_authcls('MEMBER'); call symput('MEMCLS',clause);
clause = appsrv_authcls('CATALOGENTRY'); call symput('ENTRYCLS',clause); run;
/*create a view of included libraries*/
proc sql; create view work.inclib as select * from sashelp.vslib where &libcls; quit;
/*create a view of the excluded libraries*/
proc sql; create view work.exclib as select * from sashelp.vslib where not &libcls; quit;
/*create a view of the included members*/
proc sql; create view work.incmem as select * from sashelp.vmember where &memcls; quit;
/*create a view of the excluded members*/
proc sql; create view work.excmem as select * from sashelp.vmember
SAS Documentation
21
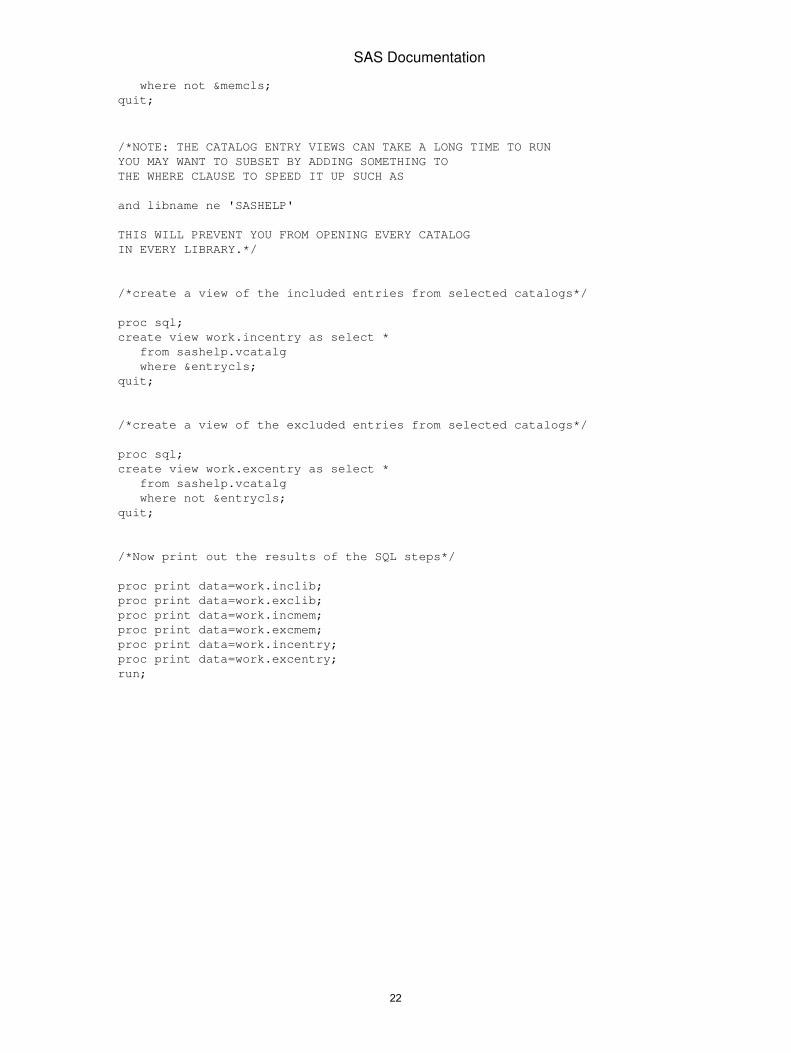
where not &memcls; quit;
/*NOTE: THE CATALOG ENTRY VIEWS CAN TAKE A LONG TIME TO RUN YOU MAY WANT TO SUBSET BY ADDING SOMETHING TO THE WHERE CLAUSE TO SPEED IT UP SUCH AS
and libname ne 'SASHELP'
THIS WILL PREVENT YOU FROM OPENING EVERY CATALOG IN EVERY LIBRARY.*/
/*create a view of the included entries from selected catalogs*/
proc sql; create view work.incentry as select * from sashelp.vcatalg where &entrycls; quit;
/*create a view of the excluded entries from selected catalogs*/
proc sql; create view work.excentry as select * from sashelp.vcatalg where not &entrycls; quit;
/*Now print out the results of the SQL steps*/
proc print data=work.inclib; proc print data=work.exclib; proc print data=work.incmem; proc print data=work.excmem; proc print data=work.incentry; proc print data=work.excentry; run;
SAS Documentation
22
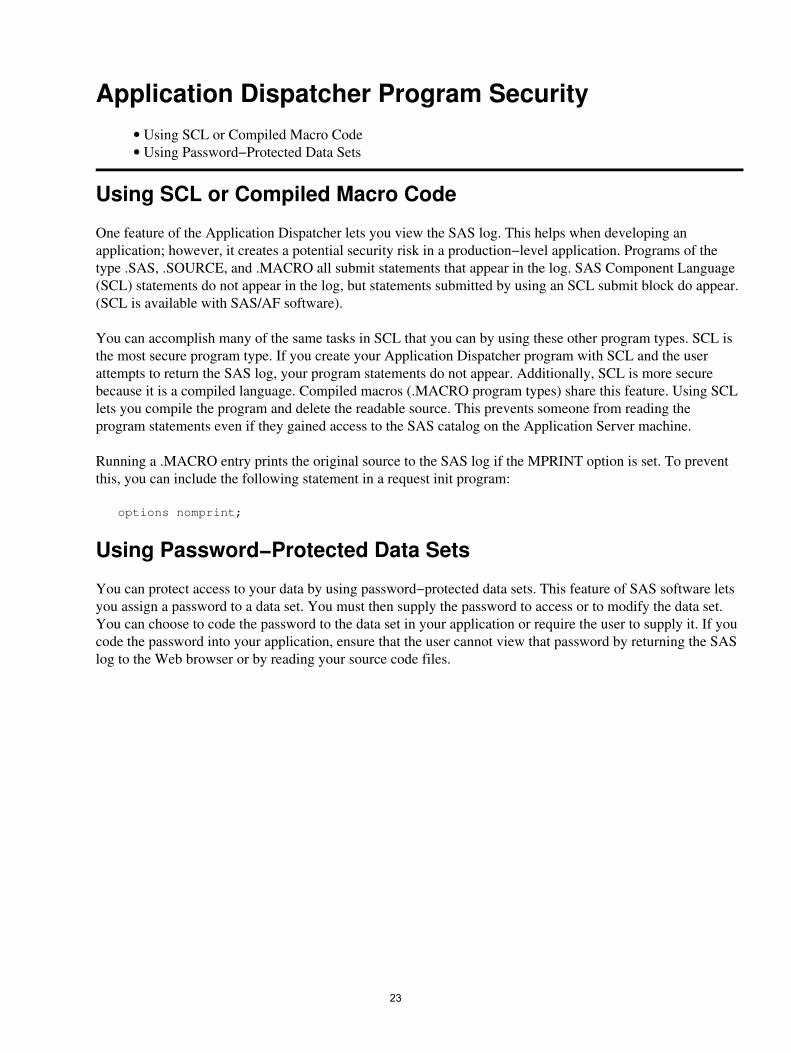
Application Dispatcher Program SecurityUsing SCL or Compiled Macro Code• Using Password−Protected Data Sets•
Using SCL or Compiled Macro Code
One feature of the Application Dispatcher lets you view the SAS log. This helps when developing anapplication; however, it creates a potential security risk in a production−level application. Programs of thetype .SAS, .SOURCE, and .MACRO all submit statements that appear in the log. SAS Component Language(SCL) statements do not appear in the log, but statements submitted by using an SCL submit block do appear.(SCL is available with SAS/AF software).
You can accomplish many of the same tasks in SCL that you can by using these other program types. SCL isthe most secure program type. If you create your Application Dispatcher program with SCL and the userattempts to return the SAS log, your program statements do not appear. Additionally, SCL is more securebecause it is a compiled language. Compiled macros (.MACRO program types) share this feature. Using SCLlets you compile the program and delete the readable source. This prevents someone from reading theprogram statements even if they gained access to the SAS catalog on the Application Server machine.
Running a .MACRO entry prints the original source to the SAS log if the MPRINT option is set. To preventthis, you can include the following statement in a request init program:
options nomprint;
Using Password−Protected Data Sets
You can protect access to your data by using password−protected data sets. This feature of SAS software letsyou assign a password to a data set. You must then supply the password to access or to modify the data set.You can choose to code the password to the data set in your application or require the user to supply it. If youcode the password into your application, ensure that the user cannot view that password by returning the SASlog to the Web browser or by reading your source code files.
23

Upgrading from Version 8 to Version 9The following information details the steps that you must take in order to upgrade from Version 8 to Version9 of Application Dispatcher.
Note: If you are upgrading from a release earlier than Version 8, read the documentation for Release 8.2 ofApplication Dispatcher (at support.sas.com/rnd/web/intrnet), which describes upgrading from prior releases.
You must install the SAS 9 CGI Tools package on your Web server to access the SAS 9 ApplicationServer. Note that the SAS 9 Application Broker and Load Manager will work with existing Version 8Application Dispatcher services, so you can upgrade one or more services to SAS 9 while keepingother services at previous versions.
1.
Upgrade socket services by editing the server start script and changing the path to the SAS executablefrom your Version 8 installation to the new SAS 9 executable. The following table lists the serverstart script for each operating environment.
Operating Environment Server StartScript
Windows appstart.bat
UNIX start.pl
z/OS APSTRTn JCL
OpenVMS start.com
No changes are required for the appstart SAS program or other support files.
2.
Upgrade pool and launch services by editing the Application Broker configuration file and changingthe path of the SAS executable. No changes are required to the appstart SAS program or othersupport files.
3.
If you are using Load Manager, modify your procedure for starting Load Manager to use the SAS 9executable. On Windows, use the "Create a New IntrNet Service" utility to set up a SAS 9 LoadManager. Uninstall any existing Window Load Manager services from the Version 8 SAS SystemStart Menu. On UNIX you might need to edit the loadmgr script created by the inetcfg.pl utility.
4.
If you are using Spawner for pool services, modify your procedure for starting the Spawner to use theSAS 9 executable.
5.
Existing programs from earlier versions will run on the SAS 9 Application Server withoutmodifications in most cases.
6.
24

Completing the InstallationBefore you can use the Application Dispatcher, you must perform the following steps:
If you are upgrading from a previous version, see Upgrading From Version 8 to Version 9 for moreinformation before completing the installation.
1.
Install SAS 9.2 (including SAS/IntrNet.) The SAS/IntrNet software that is installed in this stepincludes the Application Server.
2.
Install the Application Broker, which is contained in the CGI Tools for the Web Server. Theinstructions for installing the CGI Tools for the Web Server package are included with SAS/IntrNetsoftware.
3.
Create and start the default service for the Application Server by using the inetcfg utility.4. Add the default service definition to the Application Broker configuration file.5. Run the sample applications to test your installation.6.
Note: For z/OS, the SAS 9 or later Application Broker requires that the IBM Web maintenance patch,PQ47248, be installed if you intend to use a Web server codepage (FSCP) other than ibm−1047.
25
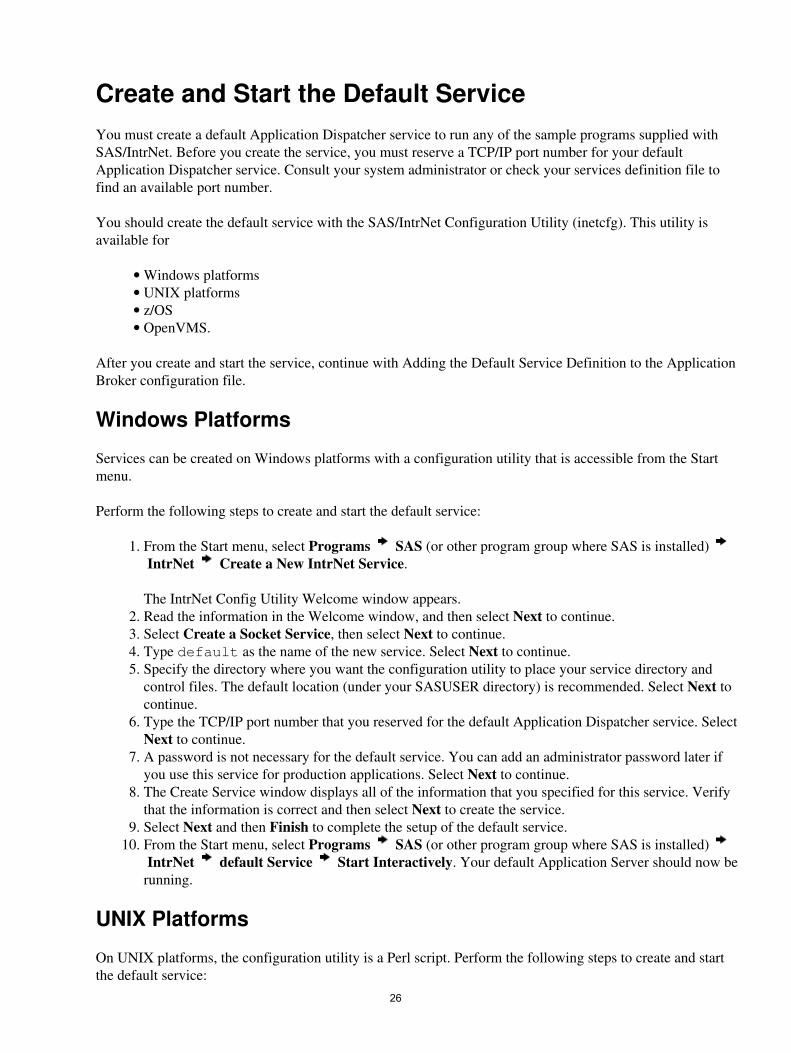
Create and Start the Default ServiceYou must create a default Application Dispatcher service to run any of the sample programs supplied withSAS/IntrNet. Before you create the service, you must reserve a TCP/IP port number for your defaultApplication Dispatcher service. Consult your system administrator or check your services definition file tofind an available port number.
You should create the default service with the SAS/IntrNet Configuration Utility (inetcfg). This utility isavailable for
Windows platforms• UNIX platforms• z/OS• OpenVMS.•
After you create and start the service, continue with Adding the Default Service Definition to the ApplicationBroker configuration file.
Windows Platforms
Services can be created on Windows platforms with a configuration utility that is accessible from the Startmenu.
Perform the following steps to create and start the default service:
From the Start menu, select Programs SAS (or other program group where SAS is installed) IntrNet Create a New IntrNet Service.
The IntrNet Config Utility Welcome window appears.
1.
Read the information in the Welcome window, and then select Next to continue.2. Select Create a Socket Service, then select Next to continue.3. Type default as the name of the new service. Select Next to continue.4. Specify the directory where you want the configuration utility to place your service directory andcontrol files. The default location (under your SASUSER directory) is recommended. Select Next tocontinue.
5.
Type the TCP/IP port number that you reserved for the default Application Dispatcher service. SelectNext to continue.
6.
A password is not necessary for the default service. You can add an administrator password later ifyou use this service for production applications. Select Next to continue.
7.
The Create Service window displays all of the information that you specified for this service. Verifythat the information is correct and then select Next to create the service.
8.
Select Next and then Finish to complete the setup of the default service.9. From the Start menu, select Programs SAS (or other program group where SAS is installed) IntrNet default Service Start Interactively. Your default Application Server should now berunning.
10.
UNIX Platforms
On UNIX platforms, the configuration utility is a Perl script. Perform the following steps to create and startthe default service:
26
From a system prompt, submit the following command:
SASROOT/utilities/bin/inetcfg.pl
where SASROOT is the path to the SAS root directory.
As the configuration utility runs, you are prompted for information about the service that you arecreating.
1.
Press Return to accept the default value, which names the service default.2. The next prompt asks for the name of the directory where all of the service control files should bestored. Press Return to accept the suggested value, or type the desired directory name and then pressReturn.
3.
Type S and press Return to define a socket service.4. Press Return to select one server.5. Type the TCP/IP port number that you reserved for this service and press Return.6. Press Return to skip entering an administrator password. You can add an administrator passwordlater if you use this service for production applications.
7.
Verify the displayed information and press Return to create the service. Note the path for the servicedirectory.
8.
The configuration utility created a start.pl file to start the default Application Server. Change to theservice directory path and start the server by submitting the following command:
./start.pl
9.
z/OS
The configuration utility provided for z/OS is a batch job. It is installed as a member named INETCFG in theCNTL data set that you created as the first step in the installation of your SAS software. To use the utility, youmust edit the parameter file, member INETEDTP in the CNTL data set, edit the INETCFG job, and thensubmit the INETCFG job. The INETEDTP member contains the parameters necessary for creating a service.
To create and start the default service on z/OS, perform the following steps:
Edit the member INETEDTP.1. Verify the name of the service that you are creating. The service name is defined by the linebeginning with ISVC= and should be DEFAULT.
2.
Verify that the service is a socket service. The line containing ISVCTYP=%SOCKETTYP should beuncommented.
3.
Locate the line I$−PORT1. Change the value 5001 to the correct port number or network servicename for your Application Server.
4.
Save and close INETEDTP.5. Edit INETCFG to verify the job header information. Verify that the service name is DEFAULT. Ifyou make changes, be sure to save them. Do NOT change SASEDITP to INETEDTP because this isyour original SAS installation parameters file.
6.
Submit the INETCFG JCL job for processing. The INETCFG job will submit another job(INETCFGA). Verify that both jobs completed with a return code of 0. If they completedsuccessfully, you now have the data sets and members necessary for running the default service.
If the INETCFG job failed, examine the messages and sysprint members for error messages. If yousee a message that reads
ERROR: THIS REPLACEMENT CAUSES RESULT TO EXCEED OUTPUT LRECL
7.
SAS Documentation
27
you might have supplied a pathname in one of your INETEDTP parameters that is too long. Tryshortening this pathname and rerun INETCFG.
Note: Before you run INETCFG again, you must delete any data sets created by the previous failureof INETCFG. You can find these data sets by looking in the namespace determined by your originalSAS install. For example, if your SAS software was installed with the prefix name SYS.SAS and yourfailed INETCFG was trying to create the DEFAULT service, then delete all data sets beginning withthe name prefix SYS.SAS.WEB.DEFAULT before running INETCFG again.The configuration utility creates a server root in a partitioned data set (PDS) namedprefix.WEB.DEFAULT, where prefix is the data set prefix that you supplied during your SASinstallation. The PDS contains any JCL procedures and server start−up code required for starting theservice. You will find the following members:
APSTRT1contains the JCL necessary to run the corresponding @APSTX1 file as a started task. Youshould move this file to your started task library and enable it as a started task.
@APSTX1contains the SAS code that invokes the server. This file is called by the JCL in thecorresponding APSTRT1 file. This SAS program must remain in the PDS where it wascreated.
In addition to the server root PDS, the configuration utility creates an empty PDS namedprefix.WEB.DEFAULT.TDIR, where prefix is the data set prefix that you supplied during your SASinstallation. The Application Server will use this PDS as a scratch location.
8.
You must modify the permissions for the data sets created above so that the server can write to themas necessary. To modify the permissions, create a special RACF data set profile that applies to all thedata sets in this service (prefix.WEB.DEFAULT.*). The RACF data set profile should also grant writeaccess to the user ID of the Application Server.
9.
Issue a START command from the system console to start the default Application Server.10.
OpenVMS
To create and start the default service on OpenVMS, perform the following steps:
From a system prompt, submit @sas$root:[tools]inetcfg.com.
As the configuration utility runs, you are prompted for information about the service that you arecreating.
1.
Press Return to name the service DEFAULT.2. Press Return to accept the suggested value for the server root directory.3. Type S to define a socket service. Press Return to continue.4. Press Return to select one server for this service.5. Type the TCP/IP port number or name that you reserved for the default Application Server and pressReturn.
6.
A password is not necessary for the default service. You can add an administrator password later ifyou use this service for production applications. Press Return to continue.
7.
The utility displays the information that you entered for this service. Verify that the information iscorrect. If the information is correct, press Return to create the service. Read the messages todetermine whether the service was created correctly. One of these messages contains the path for theservice directory created by the utility. You should note this path for use later in this process.
8.
The configuration utility created a START.COM file that starts the default Application Server. Tostart the server, change to the service directory created by the utility. Then submit the followingcommand:
9.
SAS Documentation
28

@START.COM
SAS Documentation
29
Add the Default Service DefinitionAfter you have created the default service, you must add the service definition to the Application Brokerconfiguration file. The configuration file is usually named broker.cfg and lives in the same directory as theApplication Broker executable. The following instructions describe just the changes needed for the defaultservice. See Using the Configuration File for more information about this file.
Open the configuration file, broker.cfg, in edit mode. The configuration file is in the directory whereyou installed the Application Broker.
1.
Search the file for Global administrator. Change the values for Administrator and AdministratorMailto appropriate values for your site.
2.
Search the file for SocketService default.Change the value for Server from appsrv.yourcomp.com to the DNS name or IP address ofthe machine where you created the default service (where SAS software is installed).
♦
Change the value for Port from 5001 to the TCP/IP port that you selected when creating thedefault service.
♦
3.
Save the changes to the configuration file and continue to Testing the Installation.4.
30
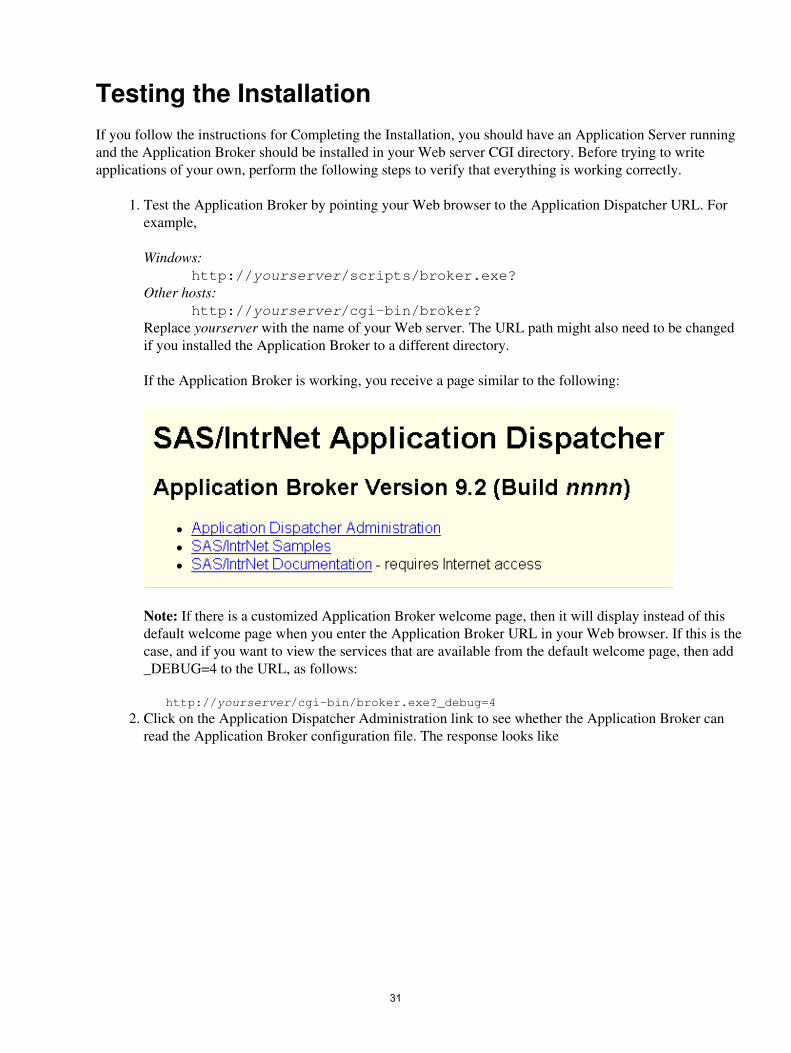
Testing the InstallationIf you follow the instructions for Completing the Installation, you should have an Application Server runningand the Application Broker should be installed in your Web server CGI directory. Before trying to writeapplications of your own, perform the following steps to verify that everything is working correctly.
Test the Application Broker by pointing your Web browser to the Application Dispatcher URL. Forexample,
Windows:http://yourserver/scripts/broker.exe?
Other hosts:http://yourserver/cgi−bin/broker?
Replace yourserver with the name of your Web server. The URL path might also need to be changedif you installed the Application Broker to a different directory.
If the Application Broker is working, you receive a page similar to the following:
Note: If there is a customized Application Broker welcome page, then it will display instead of thisdefault welcome page when you enter the Application Broker URL in your Web browser. If this is thecase, and if you want to view the services that are available from the default welcome page, then add_DEBUG=4 to the URL, as follows:
http://yourserver/cgi−bin/broker.exe?_debug=4
1.
Click on the Application Dispatcher Administration link to see whether the Application Broker canread the Application Broker configuration file. The response looks like
2.
31

Ping the Application Server by clicking on the ping link in the Application Dispatcher Services page.If the server is working correctly, the response is
3.
To complete installation testing, return to the main Application Dispatcher page (see step 1) and selectSAS/IntrNet Samples. Try some of the Application Dispatcher samples to verify the completeinstallation.
Note: If the samples fail, stop the Application Server and examine the SAS log file. You can stop theApplication Server by clicking on the stop link on the Application Dispatcher Services page (see step2).
4.
Completing the Application Dispatcher Installation
Congratulations! If you followed all the steps, you now have a working Application Dispatcher. While youshould find this setup sufficient for many simple applications, the Application Dispatcher includes additionalfeatures that easily handle more complex applications. For details about creating your own ApplicationDispatcher applications, see The Input Component and The Program Component. For details about additionalsettings or customization options, see Customizing the Application Dispatcher.
SAS Documentation
32

Customizing the Application DispatcherThe topics listed here provide information for customizing your Application Dispatcher installation. Followthe instructions in Completing the Installation if you have not already done so.
Customizing the Application Broker
Using the Application Broker Configuration File• Creating a Customized Welcome Page• ISAPI/GWAPI Application Brokers• Specifying the Global Administrator• Specifying the Self−Referencing URL• Specifying HTTP Methods• Setting the Default Value of _DEBUG• Using the DebugMask and ServiceDebugMask• Displaying the Powered by SAS Logo• Exporting Environment Variables• Configuration File Directives•
Customizing the Application Server
Running Multiple Application Servers at Your Site• Application Server Administration Programs• Application Server Libraries•
33
Using the Application Broker Configuration FileThe Application Broker is controlled by the directives in a configuration file. Usually, the configuration file isnamed broker.cfg and lives in the same directory as the broker executable, but other names or directories canbe used in special cases. The Application Broker searches for the configuration file in the following manner:
builds the configuration file name by adding .cfg as the file type to the executable name. For example,broker.exe would look for broker.cfg and broker7 or broker7.cgi would look for broker7.cfg.
1.
checks for the environment variable BROKER_CFG. If this variable exists, it is assumed to containthe path with the configuration file. If the BROKER_CFG variable exists, the configuration file mustexist in this directory or the Application Broker will fail to execute.
2.
checks for the configuration file in the same directory as the executable.3.
Platform Notes
UNIX
Check /usr/local/lib/IntrNet/broker/ for the configuration file.•
z/OS
Check /usr/local/lib/IntrNet/broker/ for the configuration file.• Starting with Release 8.2, the Application Broker configuration file is assumed to be in the encodingspecified by the Web server's file system codepage option (FSCP).
•
If the configuration file is not found in any of the locations above, the Application Broker will fail to execute.
Template Configuration File
A template Application Broker configuration file named broker.cfg_v9 is installed with SAS/IntrNet. If this isthe first installation of SAS/IntrNet, the template file will be installed as your initial Application Brokerconfiguration file. The template contains example directives to help configure the Application Broker for yoursite. The following pages describe some of these directives in greater detail.
Specifying the Global Administrator• Specifying the Self−Referencing URL• Specifying HTTP Methods• Setting the Default Value of _DEBUG• Using the DebugMask and ServiceDebugMask• Displaying the Powered by SAS Logo• Exporting Environment Variables• Configuration File Directives•
Modifying the Application Broker Configuration File
Use the following guidelines when modifying the template configuration file:
Comments start with # as the first non−blank character.• Because the Application Broker ignores leading spaces, you can include them to make the file easierfor you to read.
•
34
Each line of the configuration file must not extend beyond the first 256 columns. The plus sign (+) atthe end of a non−comment line is used for line continuation.
•
Quotation marks are required for values that contain blanks.• You can use single or double quotation marks. Values that might require quotation marks arefilenames and descriptions.
•
If a configuration file entry accepts multiple values, delimit the values with spaces only.• To specify a single quotation mark in a value, use \'.• To specify double quotation marks in a value, use \".• To specify a single backslash in a value, use \\.• If an entry in the configuration file begins with #, you can activate that entry by removing the #.• To complete an entry, delete or modify the text provided in the sample file. Replace this text withinformation that is valid for your site and installation.
•
SAS Documentation
35

Creating a Customized Welcome PageWhen the Application Broker is invoked with no parameters, it displays a default welcome page that lookslike this:
To display a customized welcome page, create an HTML file in the same directory as the Application Brokerconfiguration file. The name of the file should be the same as the configuration file with a file type of "html"instead of "cfg". For example, if the configuration file is named broker.cfg, then the customized welcomepage should be named broker.html. For most installations, the customized welcome page will be namedbroker.html and be located in the same directory as the Application Broker executable.
36

ISAPI/GWAPI Application BrokersTwo additional versions of the Application Broker have been developed for heavily loaded systems whereperformance is critical. These versions are built as shared libraries that are linked directly into the Web serverat run time. When a new request is accepted by the Web server, it starts an Application Broker copy in a Webserver thread rather than starting a new CGI process. In this manner, the overhead of process creation isreplaced by the creation of a new Web server thread.
The two new modules are broker.dll (ISAPI Windows) and broker.so (GWAPI z/OS). These files are typicallyinstalled into the Web server CGI directory. When the first request is made to the Web server, these modulesare loaded and linked to the Web server. The Application Broker configuration file is read once and stored inmemory. This means that if the configuration file is subsequently changed, the Web server must be stoppedand restarted in order to reload the changes. On Windows, the IIS Admin Service must also be stopped andrestarted, using the Control Panel/Services dialog box. To see when the configuration file was last read,invoke the Application Broker with a _DEBUG value of 16384.
ISAPI
To use the ISAPI version on Windows, change the URL in the Web browser from broker.exe to broker.dll. AURL of the form
http://yourserver/cgi−bin/broker.dll?
loads and executes the ISAPI module. If no parameters are specified, then the default or optional customizedwelcome page is displayed.
Note: For Apache Web servers on Windows, the ISAPI Application Broker will work only with Apache 2.0or greater and with the following configuration lines added for your CGI directory to the Web serverHTTP.CONF file:
ISAPICacheFile c:/cgi−bin/broker.dll Addhandler isapi−isa .dll
You must also add the ExecCGI options line to the directory section of the HTTP.CONF file, as follows:
<Directory "C:/Program Files/Apache Group/Apache2/cgi−bin"> AllowOverride None
Options ExecCGI Order allow,deny Allow from all </Directory>
For ISAPI, the Application Broker thread typically runs under the user ID IUSR_nodename, as it does withthe CGI version.
GWAPI
The z/OS GWAPI version requires a Web server configuration change. Add a line of the form
Service /cgi−bin/gwbroker* /dept/test/cgi−bin/broker.so:broker
to the Web server configuration file httpd.conf. In addition, execute the following command for the broker.so37
module:
extattr +p /dept/test/cgi−bin/broker.so
The exact form of the commands depends on the directory specification for the CGI directory. Changing theURL to the form
http://yourserver/cgi−bin/gwbroker?
loads and executes the GWAPI module, which will look for an Application Broker configuration file namedgwbroker.cfg. If no parameters are specified, then the default or optional customized welcome page(gwbroker.html) is displayed.
For GWAPI, the Application Broker runs under the same user ID as the Web server.
Note: The Application Broker encryption option is not available with the GWAPI Application Broker.
SAS Documentation
38
Specifying the Global AdministratorThe global administrator is the designated contact for service definition requests and general Brokerproblems. You can specify a single person or a group of people. At least one administrator must have writeaccess to the configuration file and understand the information required to define a service.
To specify information about the global administrator
Locate the following two lines that appear near the top of the file:
Administrator "Your Name"AdministratorMail "yourname@yoursite"
1.
Replace Your Name with the administrator's name. This value can include spaces.2. Replace yourname@yoursite with the fully qualified e−mail address for the administrator.3.
These two values become the macro variables _ADMIN and _ADMAIL in your Dispatcher program.
39
Specifying the Self−Referencing URLThe self−referencing URL identifies the Application Broker program URL. In most cases you will not need toset this value. The URL is passed to the SAS program in a macro variable called _URL. The Web server usesthe script−name environment variable to change the value of _URL. The Application Server uses thevariable _URL to generate the variables _THISSRV and _THISSESSION.
You might need to change the self−referencing URL in the following situations:
if your Web server does not set the script−name environment variable or sets it incorrectly.• if your site uses load balancing with its Web servers. For example, a site might have a Web serverwww.company.com that dynamically refers all Web browser requests to a range of Web serversfrom www1.company.com through www5.company.com. In this situation, theself−referencing URL might direct the request to www2.company.com/cgi−bin/broker ratherthan to the original, load−balanced Web server. If all the company's Web servers used the ApplicationDispatcher, you could set the self−referencing URL to point towww.company.com/cgi−bin/broker, which would direct all requests to the load−balancedservice to maintain the use of Web server load balancing with each page of the ApplicationDispatcher application.
•
40
Specifying HTTP MethodsThe HTTP methods specified in the ALLOW directive are the two methods used by the HTTP server to passinformation to the CGI program (Application Broker). The ALLOW directive lists the allowable values forthe request method; this line does not actually set the method. The method names are GET and POST:
GET tells the server to process the entire form as one long concatenated string of values appended tothe URL. Using GET allows users to bookmark the resulting dynamic pages. However, the resultingpage's URL can become very long and display variable information that you might prefer not todisplay.
•
POST sends the form data in a long input stream, which is not visible to users. Using POST is helpfulwhen processing a large amount of data. However, users cannot bookmark the resulting pages.
•
To specify which HTTP methods the Application Broker should allow, locate the following line in theconfiguration file:
Allow get post
If you want to allow both methods, leave the line as it is. If you want to allow only one method, delete themethod that you do not want to allow. By default, both methods are allowed, so commenting or omitting thedirective allows both GET and POST.
As stated, the ALLOW directive does not set the HTTP method. That is done in each HTML page thatreferences the Application Broker. The author of the HTML portion of an Application Dispatcher applicationspecifies either the GET or POST method in the HTML form tag, for example:
<form action=<location of Application Broker> method=post|get>
One simple, but not ironclad, security technique is to use the POST method when you invoke the ApplicationBroker. In your HTML form tag, specify ACTION=, which points to the Application Broker. In addition, youcan specify a method as shown in the following example:
<form action="/cgi−bin/broker" method="post";>
The POST method passes all form variables to the Application Broker on standard input, which prevents themfrom appearing as part of the URL. This method makes it more difficult for users to subvert the values sent toyour program.
Note: Using POST prevents the submitted form data from appearing in the Web server log files. POST alsoprevents you from bookmarking those dynamically generated pages.
41
Setting the Default Value of _DEBUGIf you are writing your own Application Dispatcher applications or are having problems with some of thesamples we provide, you might want to specify a different default _DEBUG value or keyword. The default is2, or TIME, which will display the elapsed processing time, the Powered by SAS logo (if available), and theApplication Broker build number at the bottom of the Web page.
However, you can set a different default value that will take effect if the _DEBUG field is not included in theHTML page. The config file directives Debug and ServiceDebug set the default values for the _DEBUG field.To set them, follow the directive with the value that you want as the default.
See the List of Valid Debug Values for a complete list of debug values and keywords.
Remember that you can set more than one debug option. To do so, add the option values together. Forexample, to set both the 2048 and 4 options, enter 2052 as the value for Debug, DebugService, or _DEBUG,as appropriate. You can also use more than one keyword separated by spaces or commas to specify more thanone option. For example, to set both the 2048 (TRACE) and 4 (SERVICES) options, specify
_DEBUG=TRACE SERVICES
42
Using DebugMask and ServiceDebugMaskThe Application Dispatcher has several debugging options that can be turned on and off through the _DEBUGfield in Application Dispatcher requests. Some of these options might represent security risks, including a fewthat are not documented and are used by Technical Support. For example, the Application Dispatcher includesan option to show the SAS log (which might contain source code), the host name and port number where theApplication Server is running, or a list of all services known to the Application Broker.
To create a secure Application Dispatcher setup, decide which debugging options you want to allow and setthe value of DebugMask or ServiceDebugMask in the Application Broker configuration file to the sum ofthose options. Add together the debug values that you want to allow and use that number in the directive. Forexample, if you want to allow only the field echo (1), status message (2), and output dump (16) values, youwould set DebugMask to 19 (1+2+16). You can also use keywords to specify these options. For a list of validdebug values and keywords, see the List of Valid Debug Values.
Note: By default, all debugging options are allowed because the DebugMask and ServiceDebugMaskdirectives are global and by−service directives.
The default value for the DebugMask is 32767, which is acceptable for most sites. The value 32767 indicatesthat all debug values are allowed. If you comment out the DebugMask option by maintaining the # sign infront of DebugMask, you are also allowing all debug values.
Some debug values pose a security risk, so it is recommended that you selectively disable these values byspecifying a different DebugMask value. Setting a different DebugMask value controls the allowable valuesfor the _DEBUG field in the HTML form or link.
43
Displaying the Powered by SAS LogoYou can include the Powered by SAS logo at the end of every request on the bottom of the returned page. Toenable this, complete the following steps:
Download the Powered by SAS logo from the SAS Web site. Review the logo guidelines beforedownloading the Powered by SAS logo.
1.
Edit your Application Broker configuration file (broker.cfg). Find the four directives beginning with#SASPowered and remove the leading pound sign on each line to enable the Powered by SAS logo.
2.
Set the _DEBUG=2 flag in your HTML code to show the Powered by SAS logo and the ApplicationBroker build number in addition to the elapsed time. You can enable the logo for all programs bydefaulting the debug mask in the broker.cfg file with the Debug 2 directive.
3.
The Application Dispatcher adds the image in the status line at the bottom of each results page.
44

Exporting Environment VariablesThe following table from the sample configuration file lists some standard CGI environment variables.However, you can pass any variables that your Web server supports. (For more information aboutenvironment variables, see the CGI area at the World Wide Web Consortium Web site at www.w3.org.)
Note: These SAS macro variable names are suggestions only; you do not need to use these exact names.
Environment variables SAS macro variable Description
GATEWAY_INTERFACE _GATEWAY Version of the Common Gateway Interface(CGI) that the Web server uses.
SERVER_NAME _SRVNAME Web server's DNS (host) name or IPaddress.
SERVER_SOFTWARE _SRVSOFT Web server software name and version.
SERVER_PROTOCOL _SRVPROT Name and revision of the HTTP informationprotocol transmitting the client request.
SERVER_PORT _SRVPORT Web server port number.
REQUEST_METHOD _REQMETH
Method with which the information requestwas issued, for example, GET or POST.This corresponds with the<FORM...METHOD=GET|POST>statement in the HTML form.
PATH_INFO _PATHINF Extra path information after the scriptpassed to a CGI program.
PATH_TRANSLATED _PATHTRN Local filename of PATH_INFO.
SCRIPT_NAME _SCRIPT
Virtual path of the script being executed. Inthis case, a duplicate of _URL, anothermacro variable passed to the ApplicationDispatcher program.
DOCUMENT_ROOT _DOCROOT Directory from which Web documents areserved. This variable is unreliable.
QUERY_STRING _QRYSTR
Query information passed to the program. Itis appended to the URL with a questionmark (?). In this case, it is an unparsedversion of the user macro parameters. Setonly with GET.
REMOTE_HOST _RMTHOST User's DNS (remote host) name, if known.
REMOTE_ADDR _RMTADDR User's IP address.
AUTH_TYPE _AUTHTYP Authentication method used to validate auser, usually Basic.
REMOTE_USER _RMTUSER User name, if authenticated.
REMOTE_IDENT _RMTID45
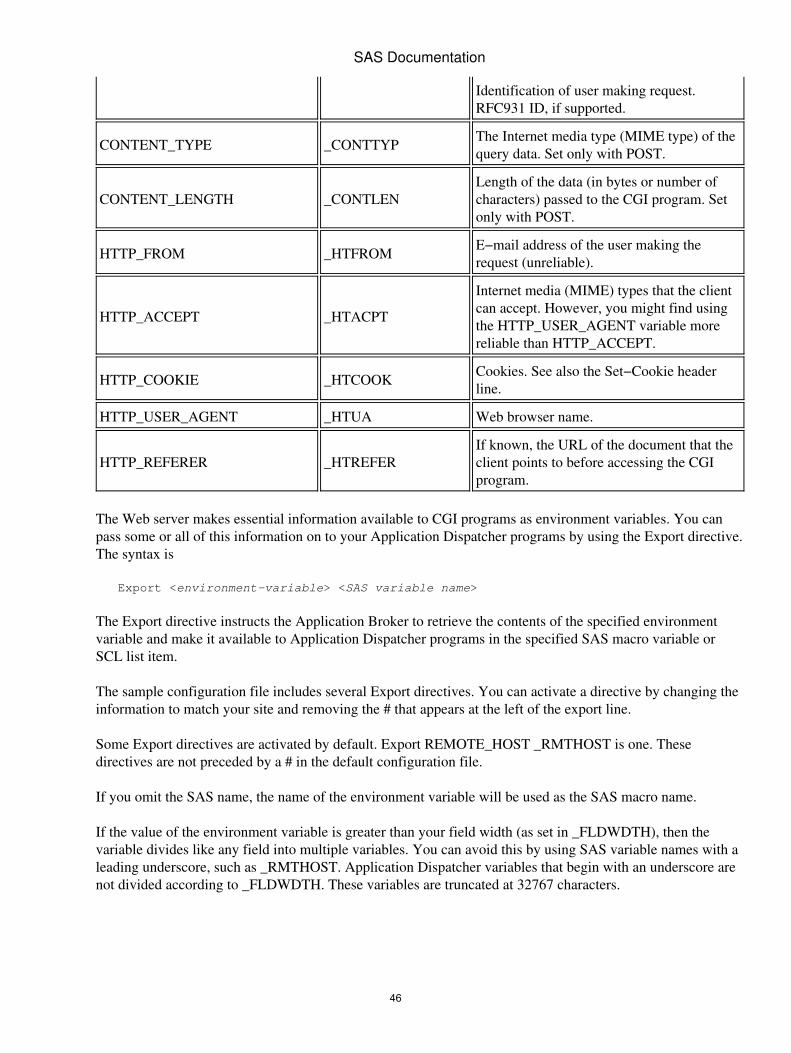
Identification of user making request.RFC931 ID, if supported.
CONTENT_TYPE _CONTTYP The Internet media type (MIME type) of thequery data. Set only with POST.
CONTENT_LENGTH _CONTLENLength of the data (in bytes or number ofcharacters) passed to the CGI program. Setonly with POST.
HTTP_FROM _HTFROM E−mail address of the user making therequest (unreliable).
HTTP_ACCEPT _HTACPT
Internet media (MIME) types that the clientcan accept. However, you might find usingthe HTTP_USER_AGENT variable morereliable than HTTP_ACCEPT.
HTTP_COOKIE _HTCOOK Cookies. See also the Set−Cookie headerline.
HTTP_USER_AGENT _HTUA Web browser name.
HTTP_REFERER _HTREFERIf known, the URL of the document that theclient points to before accessing the CGIprogram.
The Web server makes essential information available to CGI programs as environment variables. You canpass some or all of this information on to your Application Dispatcher programs by using the Export directive.The syntax is
Export <environment−variable> <SAS variable name>
The Export directive instructs the Application Broker to retrieve the contents of the specified environmentvariable and make it available to Application Dispatcher programs in the specified SAS macro variable orSCL list item.
The sample configuration file includes several Export directives. You can activate a directive by changing theinformation to match your site and removing the # that appears at the left of the export line.
Some Export directives are activated by default. Export REMOTE_HOST _RMTHOST is one. Thesedirectives are not preceded by a # in the default configuration file.
If you omit the SAS name, the name of the environment variable will be used as the SAS macro name.
If the value of the environment variable is greater than your field width (as set in _FLDWDTH), then thevariable divides like any field into multiple variables. You can avoid this by using SAS variable names with aleading underscore, such as _RMTHOST. Application Dispatcher variables that begin with an underscore arenot divided according to _FLDWDTH. These variables are truncated at 32767 characters.
SAS Documentation
46

Configuration File DirectivesThe required directives are listed below. For usage tips, see Using the Application Broker Configuration File.
Administrator Directives
Administrator nameServiceAdmin name
specifies the name of the person who is the administrator of the entire system or service. The name ispassed to the Application Dispatcher program in the _ADMIN variable and is used in error messages.
AdministratorMail e−mailServiceAdminMail e−mail
specifies the fully qualified e−mail address of the system or service administrator. The e−mail valueis passed to the Application Dispatcher program in the _ADMAIL variable and is used in errormessages.
BrokerPassword stringspecifies a password to protect the administration interface. If the BrokerPassword directive isspecified, you must supply the password to access the Application Broker Admin page (debug=4).
ConnectionError "string"ServiceConnectionError "string"
specifies the message to be displayed when there is an Application Server connection error. Thedirective can be specified in the configuration file on a global or service level. The message is notdisplayed for connection errors in socket service administration programs such as ping and status.
Debugging Directives
Debug flagsServiceDebug flags
specifies flags for debugging and output management. This directive can be overridden with the_DEBUG field, which can be specified with a value or a keyword. The default is 2, or TIME,(indicates to display the status line and the Powered by SAS logo). See also List of Valid DebugValues.
DebugMask flagsServiceDebugMask flags
specifies the debug values that users are allowed to set. The default value for the DebugMask is32767, which indicates that all debug values are allowed. If any debug values represent a securityrisk, you can selectively disable them by specifying a different DebugMask value, and then allowthem only on certain services or for troubleshooting. See also List of Valid Debug Values.
File and Variable Manipulation Directives
Allow method−1 ...lists the allowable values for the request method. This directive does not actually set the method. Themethod names are GET and POST. See also HTML Syntax Reference.
AppendFile filepathServiceAppendFile filepath
specifies a file that is added to the bottom of every HTML page that is generated by your application.The file will also be added to requests that generate errors in the Application Server, but will not beadded when errors are generated by the Application Broker. Note that this is a host pathname, not aURL. If you use this feature, your applications might not output the </BODY> and </HTML> tags,
47
but most Web browsers allow this.Export env−var sas−varServiceExport env−var sas−var
specifies environment variables to be made available to Application Dispatcher programs. Thesas−var is optional; if omitted, the SAS variable name is the same as the environment variable name(as long as it is a valid SAS name). Variables that do not begin with an underscore are subject tolong−value splitting according to the field width. See also Exporting Environment Variables.
Language codespecifies the language used for error messages. The code is a two−letter language code. Currentlyonly EN and FR are valid. The default is English.
PrependFile filepathServicePrependFile filepath
specifies a file that is added at the top of every HTML page that is generated by your application. Thefile will also be added to requests that generate errors in the Application Server, but will not be addedwhen errors are generated by the Application Broker. Note that this is a host pathname, not a URL. Ifyou use this feature, your applications might not output the </BODY> and </HTML> tags, but mostWeb browsers allow this.
Set variable valueServiceSet variable value
specifies a variable to define on every request. This is similar to Export, but no environment variableis needed. This enables you to avoid hard−coding values such as the location of htmSQL in yourapplications. Values that do not begin with an underscore are subject to long−value splittingaccording to the field width.
General Service Directives
DefaultServicespecifies the default service to use when no service name is supplied. DefaultService is the default.
Encrypt algorithm lib−pathServiceEncrypt algorithm lib−path
specifies the configuration file line that enables encryption. When this line is included for a serviceand the SAS/SECURE product has been installed, all data sent between the Application Broker andthe Application Server will be encrypted by using the specified algorithm.
algorithmis one of the values SASPROPRIETARY, RC4, RC2, DES, or TRIPLEDES. A special keywordNONE can be entered to disable encryption for a particular service.
lib−pathis the path to where the SAS libraries TCPDENCR.DLL, TCPDEAM.DLL, and TCPDCAPI.DLL(Windows) and TCPENCR and TCPDRSA/TCPDRSAI (all other platforms) reside, for example,
"C:\\Program Files\\SAS\\SASFoundation\\9.2\\core\\sasexe".
Platform Notes
z/OS
lib−path is not used, but the path must be specified in an environment variable named STEPLIB.•
Windows
You must install Microsoft Enhanced Cryptographic Provider Version 1.0 or later in order to use DESor TRIPLEDES.
•
SAS Documentation
48
The lib−path value is optional if SAS/SECURE has been installed. The library location will beautomatically obtained from the Windows registry.
•
LoadManager host:portServiceLoadManager host:port
defines the host and port number for the Application Load Manager. The Application Broker attemptsto connect to this host and port to request an available Application Server from the Load Manager.You can supply the DNS name (for example, APPSRV.YOURCOMP.COM) or IP address (forexample, 127.0.0.1) of the machine for host. You can supply a numeric port value or a symbolic namethat is defined in the system services file for port.
Note: Any fields that are specified with host:port have to be changed to [host]:port if host contains acolon.
LocalAddress addressoverrides the automatic determination of the local host IP address. Only specify this directive inspecial cases where the Application Server cannot connect back to the Application Broker host.
ServiceCompatibility versionspecifies the Application Server version number, if not the current version. This directive is useful fortransitioning between incompatible releases. It is not needed if the Application Broker and the serverreleases match. For Version 6 and Version 7 of SAS software, set this value to 1.0.
ServiceDescription descriptionprovides a long description for the service.
Set variable valueServiceSet variable value
specifies a variable to define on every request. This is similar to Export, but no environment variableis needed. This enables you to avoid hard−coding values such as the location of htmSQL in yourapplications. Values that do not begin with an underscore are subject to long−value splittingaccording to the field width.
Timeout secondsServiceTimeout seconds
specifies the number of seconds that the Application Broker waits for a response from the ApplicationServer. When the specified time elapses, the Application Broker returns an error message to the Webbrowser. If no global timeout is specified, then the timeout default is 60 seconds.
For z/OS Only
ServerEncoding encodingServiceServerEncoding encoding
defines the encoding used for data sent from the Application Broker to the Application Server andreturned from the Application Server to the Application Broker. This option is not necessary unlessthe Web server uses a different encoding from the one used by the Application Server. The defaultServerEncoding is automatically set based on the Web server encoding. The server encoding mustmatch the Application Server output encoding. The Application Server output encoding is normallydetermined by the locale setting of your SAS installation, but can be set directly using the PROCAPPSRV ENCODING option.
Use one of the following values for encoding:
wlatin1 (Western Europe): This value is the default in all cases except for when the Webserver encoding is IBM−870 or IBM−1025.
◊
SAS Documentation
49
wlatin2 (Eastern Europe): This is the default encoding when the Web server is usingIBM−870 encoding.
◊
wcyrillic (Cyrillic): This is the default encoding when the Web server is usingIBM−1025 encoding.
◊
ISO−8859−1 (Latin1)◊ ISO−8859−2 (Eastern Europe)◊ ISO−8859−5 (Cyrillic)◊ ISO−8859−15 (Latin9)◊
Note that the body of the response from the Application Server (whether in HTML or another textformat) defaults to the specified encoding but might be changed by the request program. For example,your request program might choose to generate a ISO−8859−1 response even if the ServerEncodingdirective specifies wlatin1.
Service−Specific Directives
LaunchService
LaunchService name descbegins a service definition and accepts two values: a name and an optional short description for theservice. The name is used as the value for the _SERVICE field that is passed to the ApplicationBroker from the HTML information in the Web browser. The name value is required.
Note: A launch on Windows NT systems does not work if you do not have the TEMP system variableset or if you do not specify −work on the SAS command line. Within the SAS configuration file,WORK is defined as
/* Setup the default SAS System user the work folder */ −WORK "!TEMP\SAS Temporary Files"
Because the Web server uses only system variables, if TEMP is not defined as a system variable, thenWORK is not found and SAS does not start.
SasCommand commandspecifies the SAS command and arguments that are necessary to invoke a new SAS session. It isusually the fully qualified path to your SAS executable file or a shell script. The argument SYSPARMmust be included with the command. It must be specified at the end of the command as shown in thetemplate configuration file delivered with SAS/IntrNet software. When you specify SasCommand ona Windows system, you must include the .exe extension for the SAS executable file.
LaunchService Directives for Previous Version Servers
InitCmd(Version 6 servers only)
specifies the SAS statement necessary to invoke the Application Server. Do not include the PORT=argument, which is valid only with the SocketService.
InitStmt(Version 7 servers only)
specifies the SAS statement necessary to invoke the Application Server. Do not include the PORT=argument, which is valid only with the SocketService.
SasBin command(Version 7 and Version 6 servers only)
specifies the SAS command necessary to invoke a new SAS session. It is usually the fully qualifiedpath to your SAS executable file. When you specify SasBin on a Windows system, you must include
SAS Documentation
50
the .exe extension for the SAS executable file.SasOpts options(Version 7 and Version 6 servers only)
specifies the SAS command line options that are used to invoke a SAS session. You must include a−SYSIN file as one of your SAS options or the server will not start. This file must exist, but it isempty because the real input to the server session is supplied by the InitStmt directive.
TmpDir directory(in Version 7 and Version 6 LaunchServices only)
specifies a directory (that must end with a slash) on the Web server machine (with read and writepermissions allowed) where the application writes temporary files. All temporary files and directories,including the SASUSER and WORK libraries, log files, and other files used by the ApplicationBroker and the server, are created in TmpDir. The directory value is passed to the ApplicationDispatcher application in the _TMPDIR variable.
PoolService
Note: You must specify a Load Manager before you use PoolService. Also, if the specified server is not onthe same machine as the Load Manager, you must specify a spawner port to use.
FullDuplex Trueindicates that the Application Broker and Application Server use only one socket for communication.Use this only with servers Release 8.1 or later because it will cause previous releases to hang.
IdleTimeout minutesspecifies the optional pool server timeout (in minutes). The default is 60 minutes. A value of 0indicates immediate shutdown after processing the job. A server does not shut down until all sessionshave expired.
MinRun valuespecifies the minimum number of servers to keep running. This directive is optional.
Password stringspecifies the optional password used with the Username directive to start a new server. If_PASSWORD is specified, the password is taken from the client _PASSWORD field. A passwordthat starts with an exclamation point (!) character is assumed to be encrypted. This directive is validonly if you have specified a spawner port.
PoolService name descbegins a service definition and accepts two values: a name and an optional short description for theservice. The name specified for the service is used as the value for the _SERVICE field that is passedto the Application Broker from the HTML information in the Web browser.
Port port1 port1−port3specifies the TCP/IP port number(s) or network service name(s) used by the Application Broker tosend requests to the Application Servers. You can define multiple ports by separating their valueswith spaces or by issuing the Port directive multiple times. Numeric port ranges and symbolic namesthat are defined in the system services file are supported. A number less than 256 indicates a count ofthe maximum number of servers to start.
SasCommand commandspecifies the SAS command and arguments that are necessary to invoke a new SAS session. It isusually the fully qualified path to your SAS executable file or a shell script. The argument SYSPARMmust be included with the command. It must be specified at the end of the command as shown in thetemplate configuration file delivered with SAS/IntrNet software. When you specify SasCommand ona Windows system, you must include the .exe extension for the SAS executable file. On UNIXsystems, it is recommended that you use the −LOG /DEV/NULL option.
Server host−1 host−2 ...specifies the names of the physical machines on which the Application Servers are installed. You can
SAS Documentation
51

supply the DNS name (for example, APPSRV.YOURCOMP.COM) or IP address (for example,127.0.0.1) of the machine. This directive is required with the pool service. You can supply a value ofLOCALHOST instead of a fully qualified DNS name if the Application Server is running on the samemachine as the Web server.
SpawnerPort portspecifies the port on which the SAS Spawner is listening. The SAS Spawner is used to start newApplication servers for this service. This directive is optional.
Note: Some of the SAS Spawner features cannot be used with pool services. For example, becausethe Load Manager does not support data encryption, the SAS Spawner cannot be started with−netencrypt or −netencralg.
StartAhead valueindicates how many SAS servers to start ahead of time when all current servers are busy. The defaultis 0. This directive is optional.
Username stringspecifies an optional user name used with the Password directive to start a new server. If_USERNAME is specified, the user name is taken from the client _USERNAME field. A user namestarting with a ! character is assumed to be encrypted. This option is valid only if you have specified aspawner port.
SocketService
FullDuplex Trueindicates that the Application Broker and Application Server use only one socket for communication.Use this only with servers Release 8.1 or later because it will cause previous releases to hang.
Port port1 port1−port3 ...specifies the TCP/IP port number(s) or network service name(s) used by the Application Servers forthis service. You can define multiple ports by separating their values with spaces or by issuing thePort directive multiple times. Numeric port ranges and symbolic names defined in the system servicesfile are supported.
Note: For Pool Services, a number less than 256 indicates a count of the maximum number of serversto start.
Server host−1 host−2 ...specifies the names of the physical machines on which the Application Servers are installed. You cansupply the DNS name (for example, APPSRV.YOURCOMP.COM) or IP address (for example,127.0.0.1) of the machine. This directive is required with the socket service. You can supply a valueof LOCALHOST instead of a fully qualified DNS name if the Application Server is running on thesame machine as the Web server. See also Enhancing Performance.
SocketService name descBegins a service definition and accepts two values: a name and an optional short description for theservice. The name specified for the service is used as the value for the _SERVICE field passed to theApplication Broker from the HTML information in the Web browser. The name value is required.
URL Directives
SASPoweredAlt textServiceSASPoweredAlt text
specifies the alternate text used for the Powered by SAS logo image. This text appears while theimage is loading, or if images are disabled or not supported, or in some Web browsers, when themouse is held motionless over the image. The default is "SAS Institute Inc."
SAS Documentation
52
SASPoweredHref URLService SASPoweredHref URL
specifies the destination URL, that is, where you go when you click the image. The default isHTTP://WWW.SAS.COM.
SASPoweredLogo URLServiceSASPoweredLogo URL
specifies the location of the Powered by SAS logo image file. See also Displaying the Powered bySAS Logo.
SASPoweredTarget frameServiceSASPoweredTarget frame
specifies the frame that is used for the hypertext link on the Powered by SAS logo. The default is notarget. Any Web browser−supported target might be used, such as _TOP, which indicates to take overthe whole Web browser window, _BLANK, which indicates to open a new window, _PARENT,which indicates to use the parent of the current frame, and _SELF, which indicates to use the currentframe.
SelfURL URLspecifies the self−referencing URL that identifies the Application Broker program. The default valueis the SCRIPT_NAME environment variable set by the Web server. The URL is passed to the SASprogram in a macro variable named _URL.
Note: Normally you do not need to set SelfURL. SelfURL might be useful in the following situations:
if your Web server does not set the SCRIPT_NAME environment variable or sets itincorrectly.
◊
if your site uses DNS load balancing with its Web servers. SelfURL can be used to specifythe load−balanced Web server name instead of the particular Web server executing theApplication Broker. For example, assume your company Web addressHTTP://WWW.COMPANY.COM uses DNS to refer Web browser requests to one of fiveservers (WWW1.COMPANY.COM through WWW5.COMPANY.COM). An ApplicationBroker running on WWW2.COMPANY.COM might have a default SCRIPT_NAME valueof HTTP://WWW2.COMPANY.COM/SCRIPTS/BROKER.EXE. The SelfURL directivecould be used to specify the load−balanced addressHTTP://WWW.COMPANY.COM/SCRIPTS/BROKER.EXE instead.
◊
SAS Documentation
53
Running Multiple Application Servers at Your SiteRunning multiple Application Servers raises the same issues as running multiple SAS sessions. There is littleto be concerned with if you set up each server on a different file system. However, quite often, multipleservers could be set up that access the same file system. This raises the general issue of file contentionbetween the Application Servers.
Here are some guidelines to follow if you set up multiple Application Servers on the same file system:
Servers can share a server root directory.• Servers can share program libraries. Be sure to use access=readonly when allocating sharedprogram libraries. Allocating shared program libraries in this way prevents an Application Serverfrom opening SAS catalogs in update mode.
•
Servers on the same machine must use different port numbers.• Update access to data sets should be done through the use of SAS/SHARE software. If you do not useSAS/SHARE software and two users attempt to update the same SAS data set at the same time, afailure will result.
•
Because update access to files can fail due to operating environment contention, ApplicationDispatcher programs should be prepared to handle such failures.
•
Each server should write to a different log file.•
54

Application Server Administration ProgramsThe Application Server has a few built−in programs that instruct the server to perform special administrativetasks. Starting with Release 8.2 of Application Dispatcher, you can use an administration interface to performthese tasks. To access the interface, enter the Application Broker URL in your Web browser. The ApplicationBroker URL depends on your Web server platform and the Application Broker location. Typical URLs mightbe
http://yourserver/cgi−bin/broker (UNIX or z/OS) http://yourserver/scripts/broker.exe (Windows)
When you access the Application Broker URL using no parameters, a welcome page appears in your Webbrowser. This page gives you access to an administration interface, SAS/IntrNet samples, and SAS/IntrNetdocumentation. Clicking on the Application Dispatcher Administration link will display information about alldefined Application Dispatcher services. Links are provided to administrative and status programs for eachservice. The available programs are described below. The administration interface can be password protectedusing the BrokerPassword directive in the Application Broker configuration file. To disable the administrationinterface, use the DebugMask directive to disable _DEBUG=4.
Note: If there is a customized Application Broker welcome page, then it will display instead of this defaultwelcome page when you enter the Application Broker URL in your Web browser. If this is the case, and ifyou want to view the services that are available from the default welcome page, then add _DEBUG=4 to theURL, as follows:
http://yourserver/cgi−bin/broker.exe?_debug=4
The following administrative programs are available for Application Dispatcher services.
Command Description
STOP Stops the Application Server. All currently active requests are allowed to complete. An optional_WAIT parameter can be used to specify a maximum wait time (in seconds) for any sessions toexpire. An Application Server that has received a STOP command with a _WAIT parameterwill accept requests that access existing sessions, but will not accept other new requests. Thedefault value for _WAIT is zero. BREAK and ENDSAS commands are also supported forcompatibility with earlier releases, although the STOP command is recommended.
PING Executes a simple program that verifies that the Application Server is working correctly.
STATUS Displays a status page for the server that contains useful information, such as when the serverwas started and how many jobs it has processed.
In addition to using the administration interface, you can execute an Application Server administrationprogram by supplying the name of the program in an Application Dispatcher request. For example,
http://yourserver/cgi−bin/broker?_service=default&_program=ping
These special program names are not case sensitive. If you start the Application Server by using a password,you must supply the password to execute the STOP program. For example,
http://yourserver/cgi−bin/broker?_service=default&_program=stop&_adminpw=foo
Note: If you do not start the Application Server by using a password, any client can run the STOP program55

and shut down your server.
SAS Documentation
56
Application Server Libraries
Program Libraries
Program libraries are directories, partitioned data sets, or SAS libraries that contain Application Dispatcherprograms. Each Dispatcher program must be placed in a program library before the Application Server canrun it. One Application Server can access multiple program libraries. They are defined by the ALLOC file,ALLOC library, and PROGLIB statements in PROC APPSRV. These libraries are separated from datalibraries for security reasons.
Data Libraries
Data created or used by Application Dispatcher programs should not be stored in program libraries. It is asecurity risk to store programs in the same location as their data. For a more complete discussion on securityprecautions, see Restricting Access to Program Libraries. The recommended method for accessing data froman Application Dispatcher program is to issue a LIBNAME or FILENAME statement in the ApplicationDispatcher program code. After the program has completed, the Application Server clears any librefs orfilenames that the program has left assigned.
57
Using ServicesAn Application Dispatcher service is a collection of one or more Application Servers. The servers might berunning on one system or could be distributed across multiple systems. All of the servers in a specified serviceare assumed to have access to the same applications and data so that a particular client request can be fulfilledby any server within the service. All Application Dispatcher requests include a service name (the _SERVICEparameter) that determines which service will perform the request. The Application Broker is responsible forselecting a particular server belonging to that service and forwarding the request to that server.
During the SAS/IntrNet installation process, you will have created a default service. The default service is asocket service with only one server, the simplest type of service to set up and use. This service is adequate forrunning the sample programs delivered with Application Dispatcher and beginning to develop your ownapplications, but there are many reasons that you might want to create additional services. You might want tocreate separate services for different applications so that you can distribute resources (such as memory, diskspace, or priority) among applications. You can create different services with different levels of access as asimple form of security. Often, you will need to create separate services for development and productionapplication environments, so that development activities do not affect production applications.
The following pages address some of these issues and describe the process of creating and maintainingservices:
Choosing a Service Type• Creating and Modifying Services
on OpenVMS♦ on z/OS♦ on UNIX platforms♦ on Windows platforms.♦
•
Enhancing Performance• Development vs. Production Environments.•
58

Choosing a Service TypeA service can be a socket, pool, or launch service. The features, advantages, and disadvantages of each ofthese service types is discussed below.
Socket Services
Socket services consist of one or more Application Servers that run continuously, servicing client requests.Socket services are generally started whenever a machine is restarted (either manually or by an operatingenvironment mechanism for starting processes at boot or login time). The service usually runs until themachine is shut down. Socket services are relatively simple to configure and manage and are adequate formost applications.
Advantages
Socket services are supported on all SAS/IntrNet platforms. Other service types are not supportedeverywhere.
•
The server is already running by the time a client request appears, so clients do not have to wait for aserver to start.
•
The administrator has explicit control of resources allocated to the service: the administrator cancontrol how many servers are run on each system and which resources are allocated to each server.
•
Increasing load can be handled by adding more servers to the service.•
Disadvantages
Servers must be started and stopped manually or by the operating system. No automated start−up andshutdown service is provided by SAS/IntrNet software.
•
No dynamic scaling to meet increasing loads is provided. A fixed number of servers are available tohandle all client requests. A few long−running requests can slow the entire service for all clients.
•
Pool Services
Pool services consist of a pool of Application Servers shared by clients. Based on system loading the serversare started and stopped by the Application Load Manager. Numerous options are provided to fine−tune theoperation of a pool service. Pool services combine some of the advantages of socket and launch services.
Advantages
Servers are started as needed. If all servers in the service are busy, the Load Manager can start anadditional server.
•
Servers can be reused by new clients once they are started. A started server remains in the pool untilan idle timeout is reached and the server is stopped.
•
Unlike launch services, pool services can be on a different system than the Web server and can bedistributed across multiple server systems.
•
Using the SAS Spawner, servers can be started under specific user names to control access to systemresources.
•
59

Disadvantages
Installation and configuration are more complex for pool services. The Application Load Managermust be installed. The SAS Spawner must be installed in some cases.
•
Client requests might have to wait for a new server to start, although this is typically no worse (andcould be better) than waiting for currently executing requests to complete in a socket service.
•
Launch Services
A launch service starts a new Application Server for each client request. An existing server is reused only forapplications that use sessions or the _TMPCAT catalog for IDS output. Most of the features of launch servicesare better provided by pool services. Launch services are not generally recommended for new installations.
Advantages
Server start−up is automatic for each request. Once the launch service is configured, little or noadditional administration is necessary.
•
Requests run in a separate server, so a long−running request will not block access to the service forother clients.
•
Many requests can run in parallel, assuming that the system will support the load.• Ill−behaved applications that "crash" or "hang" a server will not affect other client requests.•
Disadvantages
Launch services are started by the Application Broker and must run on the same system as the Webserver.
•
Each new request incurs the resource overhead and delay of starting a new server session.• Launch services are not suitable for high user loads. There are no settable limits on the server load.The service will attempt to start a new server for each new client. In an extreme case, 200simultaneous users could cause 200 servers to be started, likely causing extreme "memory thrashing"and very slow response for all users. Most Web servers have limits on the number of simultaneousCGI requests that could help to control this problem.
•
Each launch service request must incur the additional time for starting a SAS session.• Launch services are not supported on OpenVMS and z/OS platforms.• Launched servers can be difficult to shut down. A launched server that creates a session or_TMPCAT catalog will continue running until an idle timeout is reached. These servers cannot beshut down other than by interrupting the server process.
•
SAS Documentation
60

Services on OpenVMS
Creating a Service
To create a service on OpenVMS:
From a system prompt, submit @sas$root:[tools]inetcfg.com.
Note: Square brackets in syntax indicates that an attribute is optional; do not include the squarebrackets in your code.
As the configuration utility runs, you are prompted for information about the service that you arecreating.
1.
At the first prompt, type the name of the service. Press Return to accept the default value, whichnames the service default. To create a service other than default, type the service name and then pressReturn.
2.
The next prompt asks for the name of the directory where all of the service control files should bestored. Press Return to accept the suggested value, or type the desired directory name and then pressReturn.
3.
Specify the type of service you are defining. Type S for a socket service or P for a pool service. PressReturn to continue.
4.
If you choose a socket service, specify the number of servers that you want to include in this service.The number you specify here represents only those servers running on this physical machine.
If there is only one server, press Return. If you plan to have multiple servers, type the number andthen press Return.
5.
If you have selected a socket service, you are prompted to enter a TCP/IP port number or name foreach of the servers that you requested as the answer to the previous prompt. Type the value and pressReturn.
6.
You are asked whether you want to protect this service with an administrator password. Answer Y orN, and press Return. Type a password and press Return.
7.
The utility displays the information that you entered for this service. Verify that the information iscorrect.
If the information is correct, press Return. The utility creates the service. Read the messages printedby the utility to determine whether the service was created correctly. One of these messages containsthe path for the service root directory created by the utility. Note this path for use later in this process.
If you want to change the information, type N and press Return. The utility exits and you can startover.
8.
If you are creating a pool service, you must install the SAS Spawner. Refer to the SAS/CONNECTdocumentation for installation instructions for the SAS Spawner.
9.
The Application Broker must know about this service for you to access it. Open the Brokerconfiguration file on your Web server in a text editor and add a service definition block.
The following code is an example of a socket service definition:
# This service contains one server (port 5801) on yourserver. SocketService service−name "brief−text−desc" ServiceDescription "text−desc" ServiceAdmin "administrator−name" ServiceAdminMail "administrator−email−address@host"
♦
10.
61
Server yourserver Port 5801
The following code is an example of a pool service definition:
# Start up to 5 servers on node yourserver using the spawner # started at port 7777. All servers will be started with the # specified username/password. At least 1 server will not timeout # and will be kept running. PoolService service−name "brief−text−desc" ServiceDescription "text−desc" ServiceAdmin "administrator−name" ServiceAdminMail "administrator−email−address@host" ServiceLoadManager load−manager−host:port SasCommand "sas9 disk:+ [username.INTRNET.service−name]APPSTART.SAS+ /rsasuser /noterminal /noprint /nolog /SYSPARM " Server yourserver Port 6000−6004 Username your−username Password your−password SpawnerPort 7777 MinRun 1
♦
Starting the Service
Socket services must be started with the START.COM created by the configuration utility. To start theservice, change to the service root directory created by the utility. Then submit the following command:
@START.COM
Pool services are started automatically by the Application Load Manager. See Using the Load Manager formore details.
Once a service is started, you can test it from a Web browser. The URL depends on the platform and pathwhere your Application Broker is installed. For typical installations, use one of the following URLs to test (or"ping") a service:
Windows:http://yourserver/scripts/broker.exe?_service=service−name&_program=ping
UNIX and z/OS:http://yourserver/cgi−bin/broker?_service=service−name&_program=ping
Specify your Web server name in place of yourserver and your service name in place of service−name. Youmight need to use a different URL path if you chose a different path when you installed the ApplicationBroker. If the service is running, an HTML page will be returned stating that the Application Server isfunctioning.
Stopping the Service
Services can be stopped from a Web browser. The URL depends on the platform and path where yourApplication Broker is installed. For typical installations, use one of the following URLs to stop a service:
Windows:http://yourserver/scripts/broker.exe?_service=service−name&_program=stop
UNIX and z/OS:
SAS Documentation
62

http://yourserver/cgi−bin/broker?_service=service−name&_program=stop
Specify your Web server name in place of yourserver and your service name in place of service−name. Youmight need to use a different URL path if you chose a different path when you installed the ApplicationBroker.
Service Log Files
Log files are placed in the LOGS directory under the service root directory and are named<day>_<port>.LOG, for example, MON_5001.LOG;1 or TUE_5001.LOG;1. By default, logs are kept for oneweek (six full days and one partial day) and then overwritten.
SAS 9 has implemented a set of % codes that can be used in the −log parameter. You must add a −logparmoption in order to get the codes translated into the log. For example, adding the following options:
−log 'disk:[service−root.service−name.LOGS]appsrv_%v.log' −logparm rollover=auto
creates log files with unique log filenames. The rollover=auto option causes an automatic "rollover" of the logwhen the directives in the value of the LOG option change. This is particularly useful for generating log filesfor pool services. This example creates log filenames such as APPSRV_1.LOG;1, APPSRV_2.LOG;1, andAPPSRV_3.LOG;1.
Note: You must use a full path to specify the log file because there is limited control over what path the LoadManager or spawner will use as the current directory for each Application Server.
For more information, see the documentation on the LOGPARM= system option in SAS Language Elements.
Removing a Service
You can remove a service by deleting the service root directory and its contents. Any active servers must bestopped before you delete this directory.
SAS Documentation
63
Services on z/OS
Creating a Service
The configuration utility provided for z/OS is a batch job. It is installed as a member named INETCFG in theCNTL data set that you created as the first step in the installation of your SAS software. To use the utility, youmust edit the parameter file, member INETEDTP in the CNTL data set, edit the INETCFG job, and thensubmit the INETCFG job. The INETEDTP member contains the parameters necessary for creating a service.You can read the comments provided and change the default values to the values required for your service.
To create a service under z/OS:
Edit the member INETEDTP.1. Specify the name of the service you are creating. The service name can be a maximum of eightcharacters. Locate the line containing ISVC= and replace the default value with the name of theservice you are creating.
2.
Specify the type of service that you are defining. Uncomment the appropriate line containingISVCTYP=:
If you want a socket service, uncomment %SOCKETTYP.♦ If you want a pool service, uncomment %POOLTYP.♦
Ensure that the line containing the other service type is commented out by placing an asterisk in thefirst column.
3.
For socket services, specify the TCP/IP port number or network service name for each server in theservice. You must specify at least one port, but you can specify up to ten. Port numbers or names arenot used for pool services.
To specify the TCP/IP port, locate the line containing I$−PORT1. Change the value 5001 to thecorrect port number or network service name for the first server in your service. If you want to usemore than one server for this service, remove *NO* from the desired number of I$−PORT entries andchange the value to the appropriate value for each server in the service.
4.
If you are creating a pool service, you must install the Application Load Manager. You might alsowant to install the Load Manager if you have a socket service with more than one server. See Usingthe Load Manager for more information.
If you want to use the Load Manager on your z/OS system, you must install the SAS/IntrNet CGITools for the Web Server package. Verify the settings for the Load Manager in INETEDTP:
Choose a TCP port number or network service name for the Load Manager. Supply this valueon the line containing I$−LDMPORT=.
♦
Supply the entire UNIX System Services file path to the Load Manager executable on the linecontaining I$−LDMPROG=. The Load Manager is named LOADMGR and is installed in thedirectory corresponding to the URLhttp://yourserver/sasweb/IntrNet9/tools/.
♦
Determine where the Load Manager should write its log file. Supply the entire UNIX SystemServices file path for the log file on the line containing I$−LDMSOUT.
♦
5.
Save and close INETEDTP.6. Edit INETCFG to verify the job header information and the name of the service you are defining. Theservice name in this Job Control Language (JCL) should match the value you supplied for ISVC inINETEDTP. If you make changes, be sure to save them. Do NOT change SASEDITP to INETEDTP.This filename refers to your original SAS installation parameters file.
7.
64

Submit the INETCFG JCL job for processing. The INETCFG job submits another job (INETCFGA).Verify that both jobs completed with a return code of 0. If they completed successfully, you now havethe data sets and members necessary for running your service.
If the INETCFG job failed, examine the messages and sysprint members for error messages. If yousee the following message:
ERROR: THIS REPLACEMENT CAUSES RESULT TO EXCEED OUTPUT LRECL
you might have supplied a pathname in one of your INETEDTP parameters that is too long. Tryshortening this pathname and rerun INETCFG.
Note: Before you run INETCFG again, you must delete any data sets created by the previous failureof INETCFG. You can find these data sets by looking in the namespace determined by your originalSAS install. For example, if your SAS software was installed with the prefix name SYS.SAS and yourfailed INETCFG was trying to create the default service, then delete all data sets beginning withthe name prefix SYS.SAS.WEB.DEFAULT before running INETCFG again.
8.
The configuration utility creates a server root in a partitioned data set (PDS) namedprefix.WEB.service−name, where prefix is the data set prefix you supplied during your SASinstallation and service−name is the name of the service that you just created. The PDS contains anyJCL procedures and server start−up code required for starting the service. You will find thesemembers:
APSTRTncontains the JCL necessary to run the corresponding @APSTXn file as a started task. Thesemembers exist only for socket services. You should move these files to your started tasklibrary and enable them as started tasks.
@APSTXncontains the SAS code that invokes the server. This file is called by the JCL in thecorresponding APSTRTn file for socket services and by the Spawner for pool services. TheseSAS programs must remain in the PDS where they were created.
LOADMGRcontains the JCL necessary to run the Load Manager. You should move this file to yourstarted task library and enable it as a started task.
In addition to the server root PDS, the configuration utility creates an empty PDS namedprefix.WEB.service−name.TDIR, where prefix is the data set prefix that you supplied during yourSAS installation and service−name is the name of the service you just created. All of the servers inthe service use this PDS as a scratch location. Each server also has its own scratch SAS data library.These libraries are named TBLIB1 through TBLIBn.
9.
You must modify the permissions for the data sets created above so that the server can write to themas necessary. To modify the permissions, create a special RACF data set profile that applies to all thedata sets in this service (prefix.WEB.service−name.*). The RACF data set profile shouldalso grant write access to the user ID of the Application Server.
10.
If you are creating a pool service, you must install the SAS Spawner. Refer to the SAS/CONNECTdocumentation for installation instructions for the SAS Spawner.
11.
The Application Broker must know about this service so that you can access it. Open the Brokerconfiguration file on your Web server in an editor and add a service definition block. Example servicedefinitions are found in the template configuration file installed with the Application Broker. Thefollowing examples also show service definitions.
The following code is an example of a socket service definition:
# This service contains one server (port 5801) on yourserver.
♦
12.
SAS Documentation
65
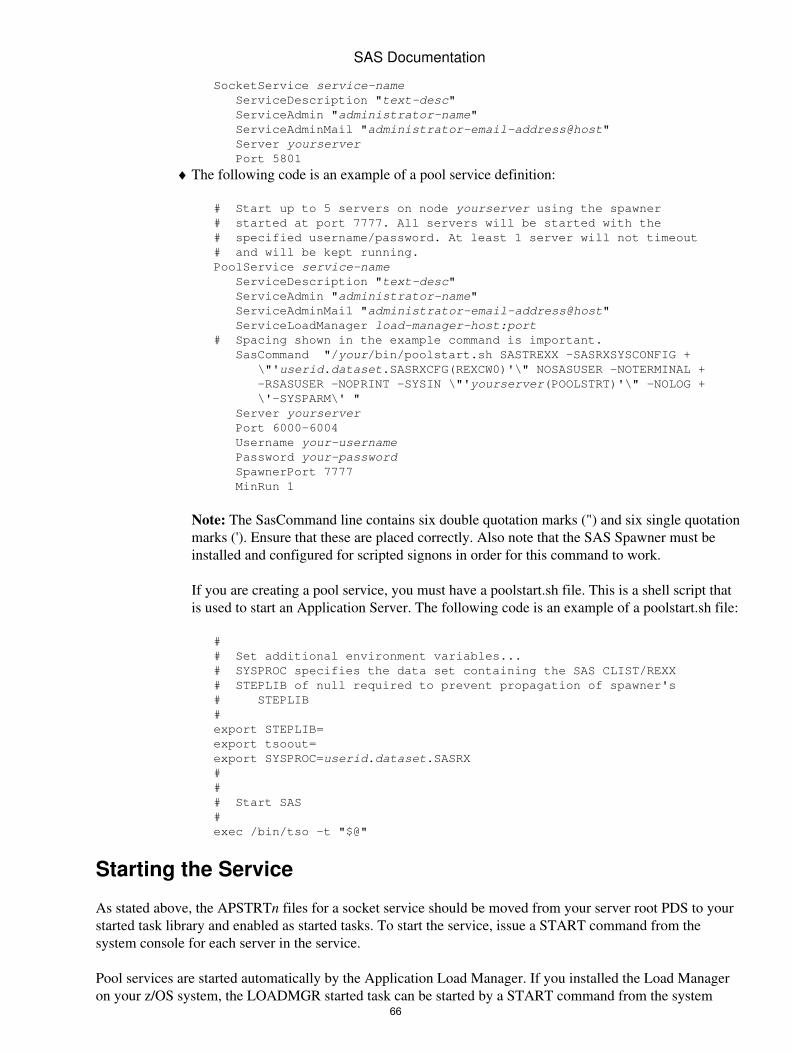
SocketService service−name ServiceDescription "text−desc" ServiceAdmin "administrator−name" ServiceAdminMail "administrator−email−address@host" Server yourserver Port 5801
The following code is an example of a pool service definition:
# Start up to 5 servers on node yourserver using the spawner # started at port 7777. All servers will be started with the # specified username/password. At least 1 server will not timeout # and will be kept running. PoolService service−name ServiceDescription "text−desc" ServiceAdmin "administrator−name" ServiceAdminMail "administrator−email−address@host" ServiceLoadManager load−manager−host:port # Spacing shown in the example command is important. SasCommand "/your/bin/poolstart.sh SASTREXX −SASRXSYSCONFIG + \"'userid.dataset.SASRXCFG(REXCW0)'\" NOSASUSER −NOTERMINAL + −RSASUSER −NOPRINT −SYSIN \"'yourserver(POOLSTRT)'\" −NOLOG + \'−SYSPARM\' " Server yourserver Port 6000−6004 Username your−username Password your−password SpawnerPort 7777 MinRun 1
Note: The SasCommand line contains six double quotation marks (") and six single quotationmarks ('). Ensure that these are placed correctly. Also note that the SAS Spawner must beinstalled and configured for scripted signons in order for this command to work.
If you are creating a pool service, you must have a poolstart.sh file. This is a shell script thatis used to start an Application Server. The following code is an example of a poolstart.sh file:
# # Set additional environment variables... # SYSPROC specifies the data set containing the SAS CLIST/REXX # STEPLIB of null required to prevent propagation of spawner's # STEPLIB # export STEPLIB= export tsoout= export SYSPROC=userid.dataset.SASRX # # # Start SAS # exec /bin/tso −t "$@"
♦
Starting the Service
As stated above, the APSTRTn files for a socket service should be moved from your server root PDS to yourstarted task library and enabled as started tasks. To start the service, issue a START command from thesystem console for each server in the service.
Pool services are started automatically by the Application Load Manager. If you installed the Load Manageron your z/OS system, the LOADMGR started task can be started by a START command from the system
SAS Documentation
66
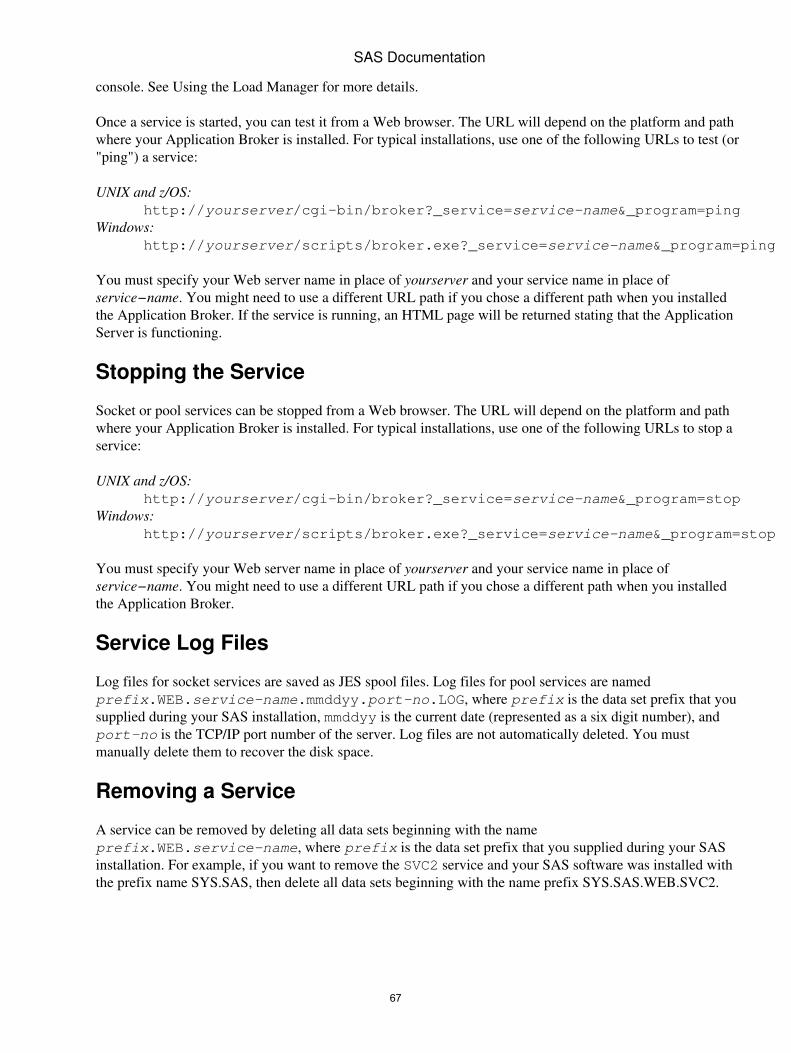
console. See Using the Load Manager for more details.
Once a service is started, you can test it from a Web browser. The URL will depend on the platform and pathwhere your Application Broker is installed. For typical installations, use one of the following URLs to test (or"ping") a service:
UNIX and z/OS:http://yourserver/cgi−bin/broker?_service=service−name&_program=ping
Windows:http://yourserver/scripts/broker.exe?_service=service−name&_program=ping
You must specify your Web server name in place of yourserver and your service name in place ofservice−name. You might need to use a different URL path if you chose a different path when you installedthe Application Broker. If the service is running, an HTML page will be returned stating that the ApplicationServer is functioning.
Stopping the Service
Socket or pool services can be stopped from a Web browser. The URL will depend on the platform and pathwhere your Application Broker is installed. For typical installations, use one of the following URLs to stop aservice:
UNIX and z/OS:http://yourserver/cgi−bin/broker?_service=service−name&_program=stop
Windows:http://yourserver/scripts/broker.exe?_service=service−name&_program=stop
You must specify your Web server name in place of yourserver and your service name in place ofservice−name. You might need to use a different URL path if you chose a different path when you installedthe Application Broker.
Service Log Files
Log files for socket services are saved as JES spool files. Log files for pool services are namedprefix.WEB.service−name.mmddyy.port−no.LOG, where prefix is the data set prefix that yousupplied during your SAS installation, mmddyy is the current date (represented as a six digit number), andport−no is the TCP/IP port number of the server. Log files are not automatically deleted. You mustmanually delete them to recover the disk space.
Removing a Service
A service can be removed by deleting all data sets beginning with the nameprefix.WEB.service−name, where prefix is the data set prefix that you supplied during your SASinstallation. For example, if you want to remove the SVC2 service and your SAS software was installed withthe prefix name SYS.SAS, then delete all data sets beginning with the name prefix SYS.SAS.WEB.SVC2.
SAS Documentation
67
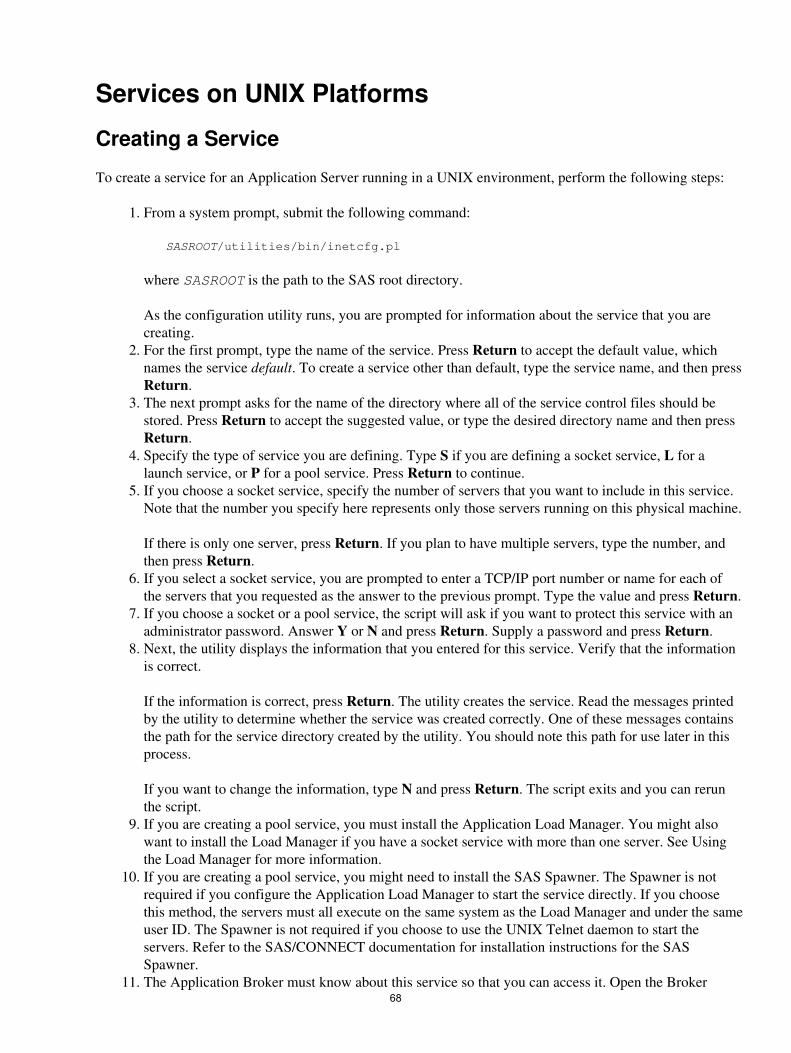
Services on UNIX Platforms
Creating a Service
To create a service for an Application Server running in a UNIX environment, perform the following steps:
From a system prompt, submit the following command:
SASROOT/utilities/bin/inetcfg.pl
where SASROOT is the path to the SAS root directory.
As the configuration utility runs, you are prompted for information about the service that you arecreating.
1.
For the first prompt, type the name of the service. Press Return to accept the default value, whichnames the service default. To create a service other than default, type the service name, and then pressReturn.
2.
The next prompt asks for the name of the directory where all of the service control files should bestored. Press Return to accept the suggested value, or type the desired directory name and then pressReturn.
3.
Specify the type of service you are defining. Type S if you are defining a socket service, L for alaunch service, or P for a pool service. Press Return to continue.
4.
If you choose a socket service, specify the number of servers that you want to include in this service.Note that the number you specify here represents only those servers running on this physical machine.
If there is only one server, press Return. If you plan to have multiple servers, type the number, andthen press Return.
5.
If you select a socket service, you are prompted to enter a TCP/IP port number or name for each ofthe servers that you requested as the answer to the previous prompt. Type the value and press Return.
6.
If you choose a socket or a pool service, the script will ask if you want to protect this service with anadministrator password. Answer Y or N and press Return. Supply a password and press Return.
7.
Next, the utility displays the information that you entered for this service. Verify that the informationis correct.
If the information is correct, press Return. The utility creates the service. Read the messages printedby the utility to determine whether the service was created correctly. One of these messages containsthe path for the service directory created by the utility. You should note this path for use later in thisprocess.
If you want to change the information, type N and press Return. The script exits and you can rerunthe script.
8.
If you are creating a pool service, you must install the Application Load Manager. You might alsowant to install the Load Manager if you have a socket service with more than one server. See Usingthe Load Manager for more information.
9.
If you are creating a pool service, you might need to install the SAS Spawner. The Spawner is notrequired if you configure the Application Load Manager to start the service directly. If you choosethis method, the servers must all execute on the same system as the Load Manager and under the sameuser ID. The Spawner is not required if you choose to use the UNIX Telnet daemon to start theservers. Refer to the SAS/CONNECT documentation for installation instructions for the SASSpawner.
10.
The Application Broker must know about this service so that you can access it. Open the Broker11. 68

configuration file on your Web server in an editor and add a service definition block. Example servicedefinitions are found in the template configuration file installed with the Application Broker. Thefollowing examples also show service definitions.
The following code is an example of a socket service definition:
# This service contains one server (port 5801) on yourserver. SocketService service−name "brief−text−desc" ServiceDescription "text−desc" ServiceAdmin "administrator−name" ServiceAdminMail "administrator−email−address@host" Server yourserver Port 5801
♦
The following code is an example of a launch service definition:
LaunchService service−name "brief−text−desc" ServiceDescription "text−desc" ServiceAdmin "administrator−name" ServiceAdminMail "administrator−email−address@host" SasCommand "/your/bin/sas+ /your/intrnet/service−name/appstart.sas+ −rsasuser −noterminal −noprint −nolog −SYSPARM"
♦
The following code is an example of how to define a pool service that is started directly bythe Load Manager:
# Start up to 2 servers on the same node as the Load Manager. No # username/password or spawner is needed for this case. Servers # will time out after 30 minutes. PoolService service−name ServiceDescription "text−desc" ServiceAdmin "administrator−name" ServiceAdminMail "administrator−email−address@host" ServiceLoadManager load−manager−host:port SasCommand "/your/bin/sas+ /your/intrnet/service−name/appstart.sas+ −rsasuser −noterminal −noprint −nolog −SYSPARM" IdleTimeout 30 Server yourserver Port 2
♦
The following code is an example of how to define a pool service that is started by the SASSpawner:
# Start up to 5 servers on node yourserver using the spawner # started at port 7777. All servers will be started with the # specified username/password. At least 1 server will not timeout # and will be kept running. PoolService service−name ServiceDescription "text−desc" ServiceAdmin "administrator−name" ServiceAdminMail "administrator−email−address@host" ServiceLoadManager load−manager−host:port SasCommand "/your/bin/sas+ /your/intrnet/service−name/appstart.sas+ −rsasuser −noterminal −noprint −nolog −SYSPARM" Server yourserver Port 6000−6004 Username your−username Password your−password SpawnerPort 7777 MinRun 1
♦
SAS Documentation
69
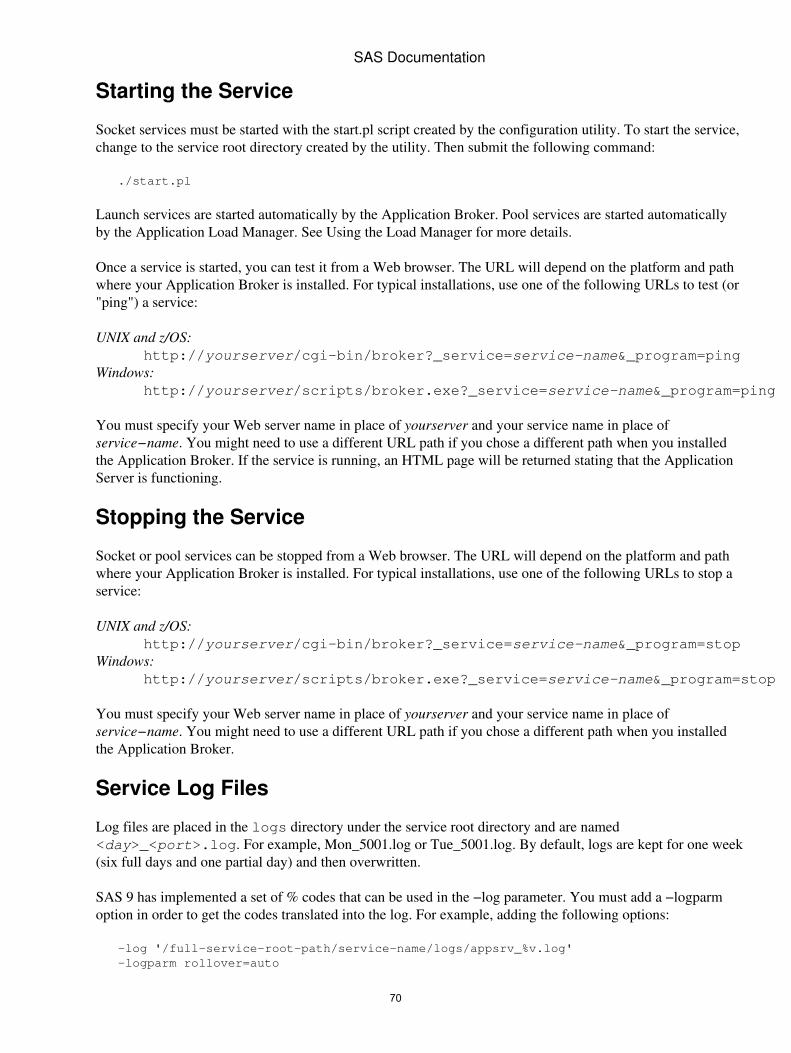
Starting the Service
Socket services must be started with the start.pl script created by the configuration utility. To start the service,change to the service root directory created by the utility. Then submit the following command:
./start.pl
Launch services are started automatically by the Application Broker. Pool services are started automaticallyby the Application Load Manager. See Using the Load Manager for more details.
Once a service is started, you can test it from a Web browser. The URL will depend on the platform and pathwhere your Application Broker is installed. For typical installations, use one of the following URLs to test (or"ping") a service:
UNIX and z/OS:http://yourserver/cgi−bin/broker?_service=service−name&_program=ping
Windows:http://yourserver/scripts/broker.exe?_service=service−name&_program=ping
You must specify your Web server name in place of yourserver and your service name in place ofservice−name. You might need to use a different URL path if you chose a different path when you installedthe Application Broker. If the service is running, an HTML page will be returned stating that the ApplicationServer is functioning.
Stopping the Service
Socket or pool services can be stopped from a Web browser. The URL will depend on the platform and pathwhere your Application Broker is installed. For typical installations, use one of the following URLs to stop aservice:
UNIX and z/OS:http://yourserver/cgi−bin/broker?_service=service−name&_program=stop
Windows:http://yourserver/scripts/broker.exe?_service=service−name&_program=stop
You must specify your Web server name in place of yourserver and your service name in place ofservice−name. You might need to use a different URL path if you chose a different path when you installedthe Application Broker.
Service Log Files
Log files are placed in the logs directory under the service root directory and are named<day>_<port>.log. For example, Mon_5001.log or Tue_5001.log. By default, logs are kept for one week(six full days and one partial day) and then overwritten.
SAS 9 has implemented a set of % codes that can be used in the −log parameter. You must add a −logparmoption in order to get the codes translated into the log. For example, adding the following options:
−log '/full−service−root−path/service−name/logs/appsrv_%v.log' −logparm rollover=auto
SAS Documentation
70

creates log files with unique log filenames. The rollover=auto option causes an automatic "rollover" of the logwhen the directives in the value of the LOG option change. This is particularly useful for generating log filesfor pool or launch services. This example creates log filenames such as appsrv_1.log, appsrv_2.log, andappsrv_3.log.
Note: You must use a full path to specify the log file because there is limited control over what path the LoadManager or spawner will use as the current directory for each Application Server.
For more information, see the documentation on the LOGPARM= system option in SAS Language Elements.
Removing a Service
A service can be removed by deleting the service root directory and its contents. Any active servers must bestopped before deleting this directory.
SAS Documentation
71
Services on Windows Platforms
Creating a Service
To create a service for an Application Server running in a Windows operating environment, perform thefollowing steps:
From the Start menu, select Programs SAS IntrNet Create a New IntrNet Service.1. Read the information in the IntrNet Config Utility Welcome window. Select Next to continue.2. Select the type of service that you want to create. Select Next to continue.3. Type the name of the new service. (Remember that service names must begin with either a letter or anunderscore and can contain letter, number, underscore, or dash characters.)
The default value for this field is default. Create this as your first service because this is what isused when you run the samples. Select Next to continue.
4.
The configuration utility selects a default service root directory based on the location that you chosefor user files when you installed SAS software. This default location is recommended for most users,although you can use the Browse button to select a different directory. Select Next to continue.
5.
If you are defining a socket service, you are prompted to specify the TCP/IP port numbers or namesfor each Application Server that you want to define as part of this service. If you supply multiplenumbers or names, use a space to separate each entry. Select Next to continue.
6.
Review the contents of the Service Created window for information about your service. Note theApplication Broker configuration sample text. You are required to enter similar text in theApplication Broker configuration file in a later step. Select Next to continue.
7.
The Create Service window displays all of the information that you specified for this service. Verifythe information in this window before continuing. If it is not correct, select the Back button to changethe information. If it is correct, select Next to create the service.
8.
Select Next and then select Finish to exit the utility.9. If you are creating a pool service, you must install the Application Load Manager. You might alsowant to install the Load Manager if you have a socket service with more than one server. See Usingthe Load Manager for more information.
10.
If you are creating a pool service, you might need to install the SAS Spawner. The Spawner is notrequired if you configure the Application Load Manager to start the service directly. If you choosethis method, the servers must all execute on the same system as the Load Manager and under the sameuser ID. Refer to the SAS/CONNECT documentation for installation instructions for the SASSpawner.
11.
The Application Broker must know about the new service before you can access it. Open theApplication Broker configuration file on your Web server in a text editor and add a service definitionblock. Example service definitions are provided in the template configuration file that is installed withthe Application Broker. In addition, sample configuration text was generated by the configurationutility in a preceding step. The following examples also show service definitions.
The following code is an example of a socket service definition:
# This service contains one server (port 5801) on yourserver. SocketService service−name ServiceDescription "text−desc" ServiceAdmin "administrator−name" ServiceAdminMail "administrator−email−address@host" Server yourserver Port 5801
♦
The following code is an example of how to define a pool service that is started directly by♦
12.
72
the Load Manager:
# Start up to 2 servers on the same node as the Load Manager. No # username/password or spawner is needed for this case. Servers # will time out after 30 minutes. PoolService service−name ServiceDescription "text−desc" ServiceAdmin "administrator−name" ServiceAdminMail "administrator−email−address@host" ServiceLoadManager load−manager−host:port SasCommand ""\"C:\\Program Files\\SAS\\SASFoundation\\9.2\\sas.exe\"+ \"C:\\Program Files\\SAS\\IntrNet\\service−name\\appstart.sas\"+ −rsasuser −noterminal −noprint −nolog −SYSPARM " IdleTimeout 30 Server yourserver Port 2
The following code is an example of how to define a pool service that is started by the SASSpawner:
# Start up to 5 servers on node yourserver using the spawner started # at port 7777. All servers will be started with the specified # username/password. At least 1 server will not timeout and # will be kept running. PoolService service−name ServiceDescription "text−desc" ServiceAdmin "administrator−name" ServiceAdminMail "administrator−email−address@host" ServiceLoadManager load−manager−host:port SasCommand ""\"C:\\Program Files\\SAS\\SASFoundation\\9.2\\sas.exe\"+ \"C:\\Program Files\\SAS\\IntrNet\\service−name\\appstart.sas\"+ −rsasuser −noterminal −noprint −log /dev/null −SYSPARM" Server yourserver Port 6000−6004 Username your−username Password your−password SpawnerPort 7777 MinRun 1
♦
The following code is an example of a launch service definition:
LaunchService service−name ServiceDescription "text−desc" ServiceAdmin "administrator−name" ServiceAdminMail "administrator−email−address@host" SasCommand ""\"C:\\Program Files\\SAS\\SASFoundation\\9.2\\sas.exe\"+ \"C:\\Program Files\\SAS\\IntrNet\\service−name\\appstart.sas\"+ −rsasuser −noterminal −noprint −nolog −SYSPARM "
♦
Starting the Service
Socket services must be started manually. From the Start menu, select Programs SAS (or your SAS 9.2program group) IntrNet. Select the entry for the service you just created, and then select StartInteractively.
Launch services are started automatically by the Application Broker. Pool services are started automaticallyby the Application Load Manager. See Using the Load Manager for more details.
After a service is started, you can test it from a Web browser. The URL depends on the platform and pathwhere your Application Broker is installed. For typical installations, use one of the following URLs to test (or
SAS Documentation
73
ping) a service:
Windowshttp://yourserver/scripts/broker.exe?_service=service−name&_program=ping
UNIX and z/OShttp://yourserver/cgi−bin/broker?_service=service−name&_program=ping
Specify your Web server name in place of yourserver and your service name in place of service−name. Youmight need to use a different URL path if you chose a different path when you installed the ApplicationBroker. If the service is running, an HTML page is returned stating that the Application Server is functioning.
Stopping the Service
Socket or pool services can be stopped from a Web browser. The URL depends on the platform and pathwhere your Application Broker is installed. For typical installations, use one of the following URLs to stop aservice:
Windowshttp://yourserver/scripts/broker.exe?_service=service−name&_program=stop
UNIX and z/OShttp://yourserver/cgi−bin/broker?_service=service−name&_program=stop
Specify your Web server name in place of yourserver and your service name in place of service−name. Youmight need to use a different URL path if you chose a different path when you installed the ApplicationBroker.
Modifying a Service or Accessing Service Log Files
Service configuration and log files are kept in a service directory tree. The service root directory can beaccessed from the Windows Start menu. From the Start menu, select Programs SAS (or your SAS 9.2program group) IntrNet. Select the entry for the service you just created, and then select ServiceDirectory. This directory contains an appstart.sas file with the SAS code used to start the Application Serversfor this service. Other scripts and configuration files for this service are also located in this directory.
Log files are placed in the logs directory under the service root directory and are named <day>_<port>.log.For example, Mon_5001.log or Tue_5001.log. By default, logs are kept for one week (six full days and onepartial day) and then overwritten.
SAS 9 has implemented a set of % codes that can be used in the −log parameter. You must add a −logparmoption in order to get the codes translated into the log. For example, adding the following options:
−log 'C:\Program Files\Sas\IntrNet\service−name\logs\appsrv_%v.log' −logparm rollover=auto
creates log files with unique log filenames. The rollover=auto option causes an automatic "rollover" of the logwhen the directives in the value of the LOG option change. This is particularly useful for generating log filesfor pool or launch services. This example creates log filenames such as appsrv_1.log, appsrv_2.log, andappsrv_3.log.
Note: You must use a full path to specify the log file because there is limited control over what path the LoadManager or spawner will use as the current directory for each Application Server.
SAS Documentation
74
For more information, see the documentation on the LOGPARM= system option in SAS Language Elements.
Windows Services
Socket services can be installed as Windows services. Installing as a Windows service enables the service torun automatically whenever the Windows system is booted, even if a user is not logged into the system. Asnoted above, install the SAS Service Configuration Utility before you create any service that will be installedas a Windows service. Information about the SAS Service Configuration Utility is located in the SAS 9.2System Requirements documentation at support.sas.com/documentation/installcenter.
From the Start menu, select Programs SAS (or your SAS 9.2 program group) IntrNet. Select theentry for the service you just created, and then select Install as Windows Service. This step does not start theservice. Once the service has been installed as a Windows service, each time the system reboots the service isstarted automatically. You can manually start and stop the Windows service by using the Start WindowsService and Stop Windows Service menu selections. Note that you can still run this service interactively byusing the Start Interactively menu selection, but only if the Windows service has been stopped.
A Windows service can also be uninstalled from the Uninstall Windows Service menu selection. This onlyuninstalls the Windows service. The SAS/IntrNet service remains and can still be run interactively.
The Services icon in the Windows Control Panel enables you to see the current status of all Windowsservices. Each SAS/IntrNet service display name begins with SAS App Server. Note that a separate Windowsservice is created for each server in a multiple server socket service. Individual servers can be started andstopped from the Services Control Panel. You can use the Start menu selections to start or stop all servers inthe service.
Removing a Service
You can remove a service by deleting the service directory and removing the associated Start menu entry.Follow these steps:
If the service is running, stop it.1. If the service is a socket service and has been installed as a Windows service, uninstall it as aWindows service. From the Start menu, select Programs SAS (or your SAS 9.2 program group)
IntrNet. Select the entry for the service, and then select Uninstall as a Windows Service. Performthis step even if you are not sure if this service is installed as a Windows service.
2.
Find the service directory, select Start Menu, and select Programs SAS (or whatever programgroup under which you installed SAS 9.2) IntrNet. Select the entry for the service, and then selectService Directory.
3.
Go up one level to the parent directory and delete the directory for the service that you want toremove.
4.
Remove the Start menu entry for the service. To do this, right−click on the Start menu and selectExplore All Users (or Explore on Windows 95/98).
5.
Use the Explorer window to find the Programs folder.6. Select SAS, then select IntrNet. Delete the service entry in this folder for the service that you want toremove.
7.
SAS Documentation
75
Enhancing PerformanceAs more users access your applications, you might need to fine−tune the performance of your ApplicationDispatcher setup. You can improve performance by
Using Multiple Servers (Random Load Balancing)• Using the Load Manager (Intelligent Load Balancing)• Increasing Timeout• Using Server Weights• Specifying a Backup Machine•
Using Multiple Servers (Random Load Balancing)
In a socket service definition in the Application Broker configuration file you can supply multiple names ofthe physical machines on which Application Servers are installed or multiple TCP/IP port numbers thatrepresent many server processes on a single machine. The following example shows multiple servers andports:
server machine_a machine_b machine_c machine_d port 5000−5002 server machine_e port 5001 5003
This example provides 14 different Application Servers:
3 servers (5000,5001,5002) on machine_a• 3 servers (5000,5001,5002) on machine_b• 3 servers (5000,5001,5002) on machine_c• 3 servers (5000,5001,5002) on machine_d• 2 servers (5001,5003) on machine_e•
For the Application Broker to access these Application Servers, they must be running. If one or more of theservers is not running, the Application Broker tries to access another one. If you need a diagnostic tool, youcan set a _DEBUG value to trace the connection attempts. Notice that you can specify a range of ports, forexample, 5000−5002. You can also specify any number of single ports or port ranges on one line.
When a Web browser request is made, the Application Broker uses one of two methods for selecting a serverout of the specified service:
If a Load Manager is defined in the configuration file, the Application Broker attempts to ask theLoad Manager for an available server in the list that is defined for the service.
•
If the Load Manager is unavailable or undefined, the Application Broker randomly chooses a serverfrom the list.
•
Using the Load Manager (Intelligent Load Balancing)
The Load Manager balances requests from Application Brokers for Application Server processing. Each timean Application Broker is activated, it sends a list of Application Servers that are associated with the service tothe Load Manager. The Load Manager checks an in−memory list of server states to determine whether anyservers are idle. The first server found idle with the least number of outstanding sessions is returned to theApplication Broker and marked as in use. If no servers are idle, the request is queued by the Load Manager
76
until a server is free. If the Application Servers are configured with multiple programs enabled, the request issent to a server that is not handling the maximum number of programs.
Each Application Server contacts the Load Manager to record its state. As a job is received, the server sends amessage to the Load Manager indicating that the server is busy. When the job has been completed, an idlestate message is sent. In this manner, the Load Manager can maintain which servers are available forApplication Broker requests. The Load Manager also periodically checks server sockets to try to determinewhether each server is still functioning. The Load Manager log can be used to track the state changes and joballocation for the Application Servers.
Increasing Timeout
The ServiceTimeout directive specifies the number of seconds that the Application Broker should wait for aresponse from the Application Server. The default value is 60 seconds. This can be lengthened dependingupon your needs. When the specified time elapses, the Application Broker returns an error message to theWeb browser. To avoid receiving this error message and to increase your chances of connecting when theserver is very busy, increase the timeout period. The global directive Timeout overrides the default of 60seconds. The directive ServiceTimeout further overrides the global timeout for a particular service.
Using Server Weights
If you are not using the Load Manager and you want to direct the connection to a particular machine out of arange of the servers that you have predefined, specify weights for each machine. For example, if you have twocomputers running Application Servers, each machine has a one−in−two chance of receiving a request fromthe Application Broker. The Application Broker randomly selects one of your predefined servers. To increasethe likelihood that a server receives requests, assign a weight to the machine in the server directive, as shownin the following example:
server machine_a machine_b*5
Server A now has only a one−in−six chance of receiving a request. Server B now has a five−in−six chance.You could rewrite the previous example to show the following and attain the same result. The weightassignment of 5 eliminates the need to type the following line:
server machine_a machine_b machine_b machine_b machine_b machine_b
If you are using the Load Manager, you can use weights to reorder the list of servers in the service. Theservers with higher weights appear first in the list that is sent to the Load Manager. Because the LoadManager always selects the first available server in the list, those with higher weights are selected first.
Specifying a Backup Machine
You can also use weights to specify a backup machine that receives requests only if the server that is runningon the primary machine is not operating. To do so, set the weight to zero (0), as shown in the followingexample:
server machine_a machine_b*0
Under normal circumstances, server A acts as your primary machine and server B never receives requests.However, if server A is not operating, the Application Broker attempts to connect to server B.
SAS Documentation
77
Note: Weights apply to server machines and not to individual ports on those machines. You cannot force theApplication Broker to favor one port over another on the same machine.
SAS Documentation
78

Development vs. Production EnvironmentsIn most cases, you will need separate services for your development and production Application Dispatcherenvironments. Isolating your development environment from your production applications will help youprovide application stability and security to your end users, while providing flexibility and freedom to yourapplication developers.
Development Services
A development environment can typically be provided by a one−server socket service. A single server willgenerally simplify debugging and will allow testing of most application features (other than performance).The developer is free to start and stop the server as needed. You might want to create a separate service foreach developer to allow independent updates to the application under development.
Note: Applications that are intended to run in multiple−server services must be written and tested with this inmind. Programs must allow for concurrent access to shared resources by multiple servers. Even if thedevelopment is performed on a single−server service, some testing should be done on a multiple−serverservice before deploying the application.
Launch services were recommended for development on previous releases of SAS/IntrNet software. This wasbecause the Version 6 SCL based Application Server was not tolerant of some common development errors(such as mismatched quotes in SAS code). Later releases of the Application Server are much more tolerant ofthese types of errors. Most programming errors will cause the individual request to fail without affecting theserver.
Production Services
Most production applications can be deployed on a socket service with one or more servers. Additionalservers can be added as the total system load grows. Servers can easily be distributed across multiple serversystems. Once your service uses more than one server, you should consider using the Application LoadManager. The Load Manager provides intelligent load balancing between multiple servers in a socket service.
Applications with widely varying user loads or special security requirements might benefit from pool services.Pool services enable servers to be started and stopped dynamically as the user load grows and shrinks.
79

Using the Load ManagerThe Application Load Manager is a separate process that can be used to control distribution of client requestsacross multiple Application Servers. The Load Manager can run on any node that is visible to both theApplication Brokers and Application Servers. The Load Manager keeps track of which Application Serversare busy. When a new request arrives, it is routed to an idle server. If no servers are idle, the request queues atthe Load Manager and waits for the first available server. In the case of pool services, the Load Manager canstart another Application Server when all servers are busy. It can also shut down unused servers after an idletimeout.
The Load Manager is not required for socket and launch services, but it is recommended for socket servicesthat have more than one server. The Load Manager is required for pool services. See Using Services for moreinformation about service types. The Load Manager requires only a few command line options to start andthat a single directive be added to the Application Broker configuration file. For more information, see
Application Load Manager Reference
Load Manager on Windows Platforms♦
•
Load Manager Log Files.•
80
Application Load Manager ReferenceThe Application Load Manager is available for z/OS, UNIX, and Windows systems. The Load Managerexecutable (loadmgr.exe on Windows, loadmgr on other platforms) is included in the CGI Tools for the WebServer package. After you have installed this package, you can find the Load Manager executable in the Webserver directory corresponding to the URL
http://yourserver/sasweb/IntrNet9/tools
The Load Manager executable is also included in the SAS installation on UNIX and Windows systems. TheLoad Manager can be found at the following locations:
UNIX!SASROOT/utilities/bin/loadmgr
Windows!SASROOT\intrnet\sasexe\loadmgr.exe
Starting the Load Manager
The syntax for starting the Load Manager is
loadmgr <options>
where <options> can be any of the following:
−background<=n>specifies the number of Application Servers that can run in the background at one time. The default is0, which disables backgrounding.
−delete<=service−name>removes a previously installed Load Manager as a system service on Windows. This is useful if youare running multiple Load Managers. If the service name is not specified, the name defaults to SASIntrNet Load Manager.
−install<=service−name>installs the Load Manager on Windows as a system service. This is useful if you want to run multipleLoad Managers. If the service name is not specified, the Load Manager is installed as SASIntrNet Load Manager.
−localhost<=hostname>forces the Load Manager to use the specified string as the local host name for all system host namecomparisons. This is useful if you want to override the default value for the local host name. In orderfor the Load Manager to start a pool service, you might need to set the local host name explicitly tomatch the requested host name.
−log<=filename>specifies an optional log file. The STDOUT device is used if a filename is not specified. If the LoadManager log file specification contains any of the following directives, the corresponding value willbe inserted into the filename:
%a Day of week [Sun − Sat] %b Month [Jan − Dec] %d day [01 −31] %H hour [00 − 23] %m month [01 − 12] %w day of week [0=Sunday − 6=Saturday] %Y full year 81
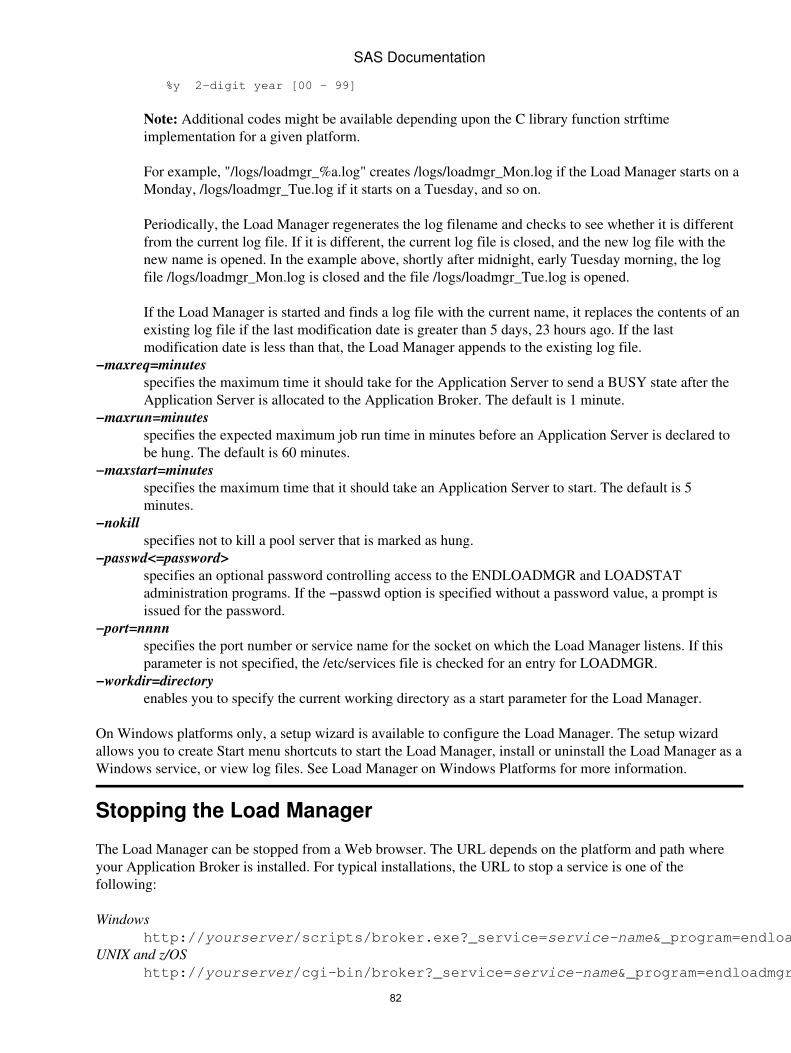
%y 2−digit year [00 − 99]
Note: Additional codes might be available depending upon the C library function strftimeimplementation for a given platform.
For example, "/logs/loadmgr_%a.log" creates /logs/loadmgr_Mon.log if the Load Manager starts on aMonday, /logs/loadmgr_Tue.log if it starts on a Tuesday, and so on.
Periodically, the Load Manager regenerates the log filename and checks to see whether it is differentfrom the current log file. If it is different, the current log file is closed, and the new log file with thenew name is opened. In the example above, shortly after midnight, early Tuesday morning, the logfile /logs/loadmgr_Mon.log is closed and the file /logs/loadmgr_Tue.log is opened.
If the Load Manager is started and finds a log file with the current name, it replaces the contents of anexisting log file if the last modification date is greater than 5 days, 23 hours ago. If the lastmodification date is less than that, the Load Manager appends to the existing log file.
−maxreq=minutesspecifies the maximum time it should take for the Application Server to send a BUSY state after theApplication Server is allocated to the Application Broker. The default is 1 minute.
−maxrun=minutesspecifies the expected maximum job run time in minutes before an Application Server is declared tobe hung. The default is 60 minutes.
−maxstart=minutesspecifies the maximum time that it should take an Application Server to start. The default is 5minutes.
−nokillspecifies not to kill a pool server that is marked as hung.
−passwd<=password>specifies an optional password controlling access to the ENDLOADMGR and LOADSTATadministration programs. If the −passwd option is specified without a password value, a prompt isissued for the password.
−port=nnnnspecifies the port number or service name for the socket on which the Load Manager listens. If thisparameter is not specified, the /etc/services file is checked for an entry for LOADMGR.
−workdir=directoryenables you to specify the current working directory as a start parameter for the Load Manager.
On Windows platforms only, a setup wizard is available to configure the Load Manager. The setup wizardallows you to create Start menu shortcuts to start the Load Manager, install or uninstall the Load Manager as aWindows service, or view log files. See Load Manager on Windows Platforms for more information.
Stopping the Load Manager
The Load Manager can be stopped from a Web browser. The URL depends on the platform and path whereyour Application Broker is installed. For typical installations, the URL to stop a service is one of thefollowing:
Windowshttp://yourserver/scripts/broker.exe?_service=service−name&_program=endloadmgr
UNIX and z/OShttp://yourserver/cgi−bin/broker?_service=service−name&_program=endloadmgr
SAS Documentation
82
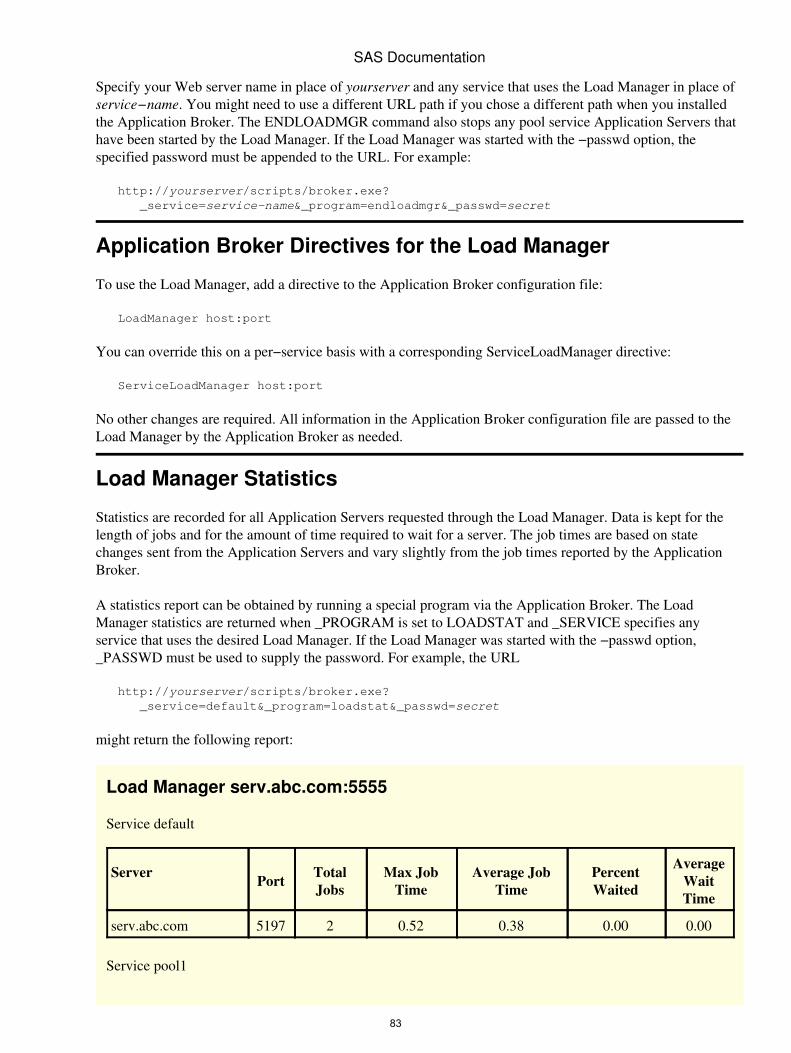
Specify your Web server name in place of yourserver and any service that uses the Load Manager in place ofservice−name. You might need to use a different URL path if you chose a different path when you installedthe Application Broker. The ENDLOADMGR command also stops any pool service Application Servers thathave been started by the Load Manager. If the Load Manager was started with the −passwd option, thespecified password must be appended to the URL. For example:
http://yourserver/scripts/broker.exe? _service=service−name&_program=endloadmgr&_passwd=secret
Application Broker Directives for the Load Manager
To use the Load Manager, add a directive to the Application Broker configuration file:
LoadManager host:port
You can override this on a per−service basis with a corresponding ServiceLoadManager directive:
ServiceLoadManager host:port
No other changes are required. All information in the Application Broker configuration file are passed to theLoad Manager by the Application Broker as needed.
Load Manager Statistics
Statistics are recorded for all Application Servers requested through the Load Manager. Data is kept for thelength of jobs and for the amount of time required to wait for a server. The job times are based on statechanges sent from the Application Servers and vary slightly from the job times reported by the ApplicationBroker.
A statistics report can be obtained by running a special program via the Application Broker. The LoadManager statistics are returned when _PROGRAM is set to LOADSTAT and _SERVICE specifies anyservice that uses the desired Load Manager. If the Load Manager was started with the −passwd option,_PASSWD must be used to supply the password. For example, the URL
http://yourserver/scripts/broker.exe? _service=default&_program=loadstat&_passwd=secret
might return the following report:
Load Manager serv.abc.com:5555
Service default
Server Port TotalJobs
Max JobTime
Average JobTime
PercentWaited
AverageWaitTime
serv.abc.com 5197 2 0.52 0.38 0.00 0.00
Service pool1
SAS Documentation
83

Server Port TotalJobs
Max JobTime
Average JobTime
PercentWaited
Average WaitTime
poolserv.abc.com 2909 12 10.40 2.20 10.00 1.79
poolserv.abc.com 2940 1 0.08 0.08 100.00 0.19
The columns of the report are defined as
Serveris the Application Server host.
Portis the port number for the Application Server.
Total Jobsis the number of complete Application Broker requests that were processed.
Max Job Timeis the length of the longest−running Application Broker request, in seconds.
Average Job Timeis the average length of all Application Broker requests, in seconds.
Percent Waitedis the percentage of Application Broker requests that had to wait for an Application Server.
Average Wait Timeis the average amount of time, in seconds, that an Application Broker request waited, if it had to wait.
Load Manager Data for Application Server Activity
An Application Server activity report can be obtained by running a special program via the ApplicationBroker. The activity data is returned when _PROGRAM is set to LOADCURRENT and _SERVICE specifiesany service that uses the desired Load Manager. It reports only information contained in the Load Managerand does not contact any Application Servers. If the Load Manager was started with the −passwd option,_PASSWD must be used to supply the password. For example, the URL
http://yourserver/scripts/broker.exe? _service=default&_program=loadcurrent&_passwd=secret
might return the following report:
Load Manager serv.abc.com:5555
Service pool1
Server Port State TotalJobs Last Job
poolserv.abc.com 2990 BUSY 1 Jan 1514:32:04
poolserv.abc.com 2972 BUSY 3 Jan 1514:32:01
poolserv.abc.com 2985 BUSY 2
SAS Documentation
84
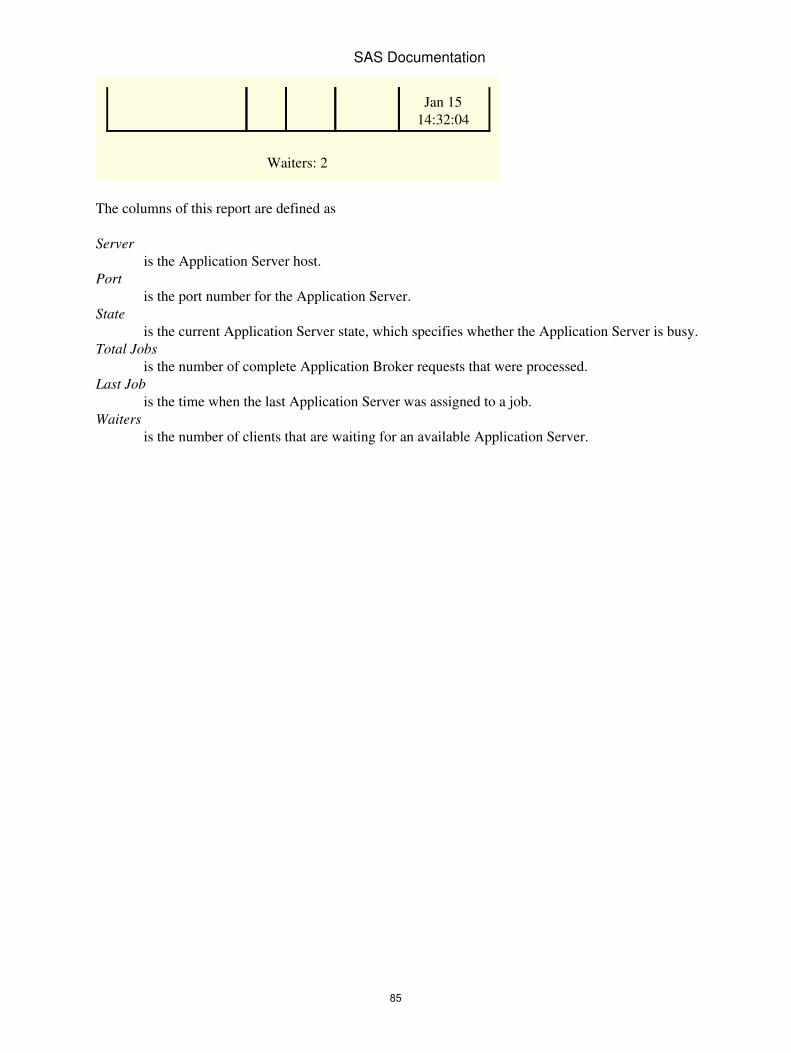
Jan 1514:32:04
Waiters: 2
The columns of this report are defined as
Serveris the Application Server host.
Portis the port number for the Application Server.
Stateis the current Application Server state, which specifies whether the Application Server is busy.
Total Jobsis the number of complete Application Broker requests that were processed.
Last Jobis the time when the last Application Server was assigned to a job.
Waitersis the number of clients that are waiting for an available Application Server.
SAS Documentation
85
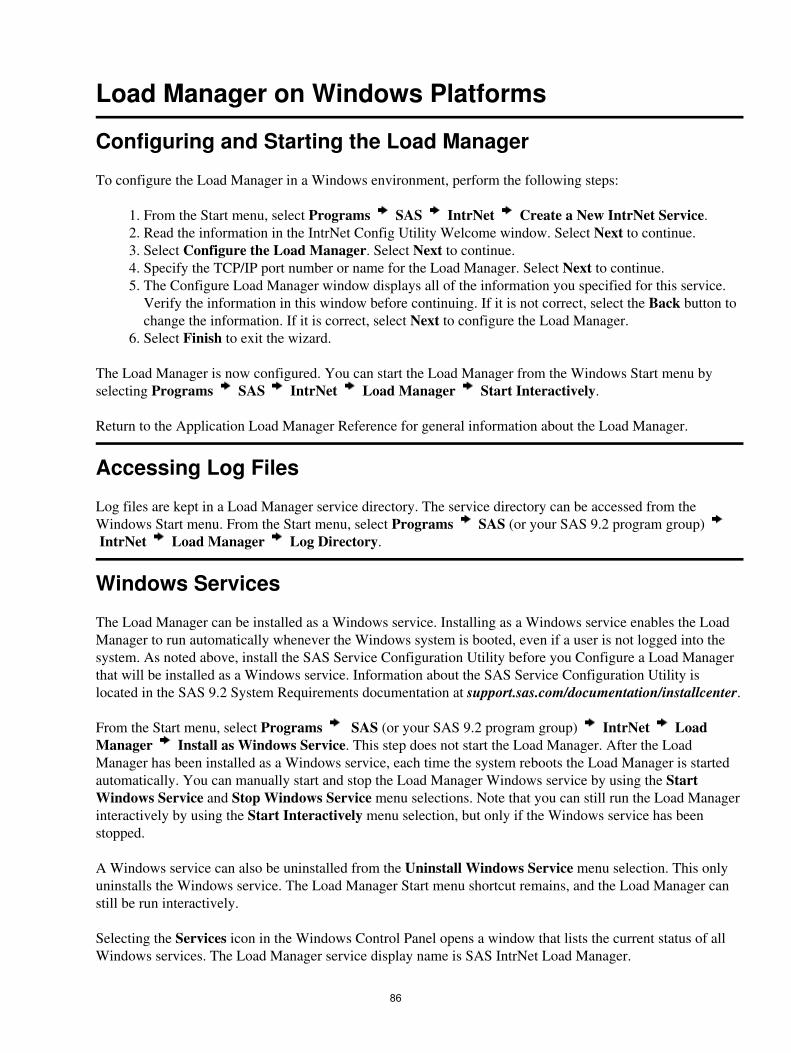
Load Manager on Windows Platforms
Configuring and Starting the Load Manager
To configure the Load Manager in a Windows environment, perform the following steps:
From the Start menu, select Programs SAS IntrNet Create a New IntrNet Service.1. Read the information in the IntrNet Config Utility Welcome window. Select Next to continue.2. Select Configure the Load Manager. Select Next to continue.3. Specify the TCP/IP port number or name for the Load Manager. Select Next to continue.4. The Configure Load Manager window displays all of the information you specified for this service.Verify the information in this window before continuing. If it is not correct, select the Back button tochange the information. If it is correct, select Next to configure the Load Manager.
5.
Select Finish to exit the wizard.6.
The Load Manager is now configured. You can start the Load Manager from the Windows Start menu byselecting Programs SAS IntrNet Load Manager Start Interactively.
Return to the Application Load Manager Reference for general information about the Load Manager.
Accessing Log Files
Log files are kept in a Load Manager service directory. The service directory can be accessed from theWindows Start menu. From the Start menu, select Programs SAS (or your SAS 9.2 program group) IntrNet Load Manager Log Directory.
Windows Services
The Load Manager can be installed as a Windows service. Installing as a Windows service enables the LoadManager to run automatically whenever the Windows system is booted, even if a user is not logged into thesystem. As noted above, install the SAS Service Configuration Utility before you Configure a Load Managerthat will be installed as a Windows service. Information about the SAS Service Configuration Utility islocated in the SAS 9.2 System Requirements documentation at support.sas.com/documentation/installcenter.
From the Start menu, select Programs SAS (or your SAS 9.2 program group) IntrNet LoadManager Install as Windows Service. This step does not start the Load Manager. After the LoadManager has been installed as a Windows service, each time the system reboots the Load Manager is startedautomatically. You can manually start and stop the Load Manager Windows service by using the StartWindows Service and Stop Windows Service menu selections. Note that you can still run the Load Managerinteractively by using the Start Interactively menu selection, but only if the Windows service has beenstopped.
A Windows service can also be uninstalled from the Uninstall Windows Service menu selection. This onlyuninstalls the Windows service. The Load Manager Start menu shortcut remains, and the Load Manager canstill be run interactively.
Selecting the Services icon in the Windows Control Panel opens a window that lists the current status of allWindows services. The Load Manager service display name is SAS IntrNet Load Manager.
86
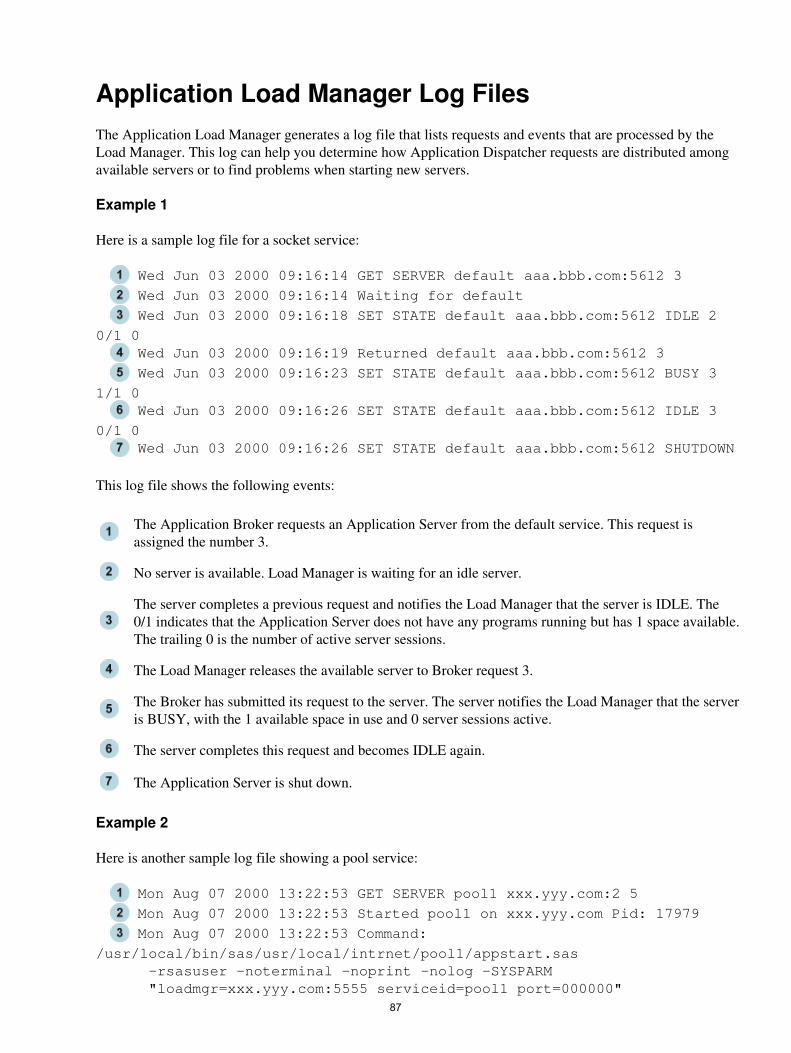
Application Load Manager Log FilesThe Application Load Manager generates a log file that lists requests and events that are processed by theLoad Manager. This log can help you determine how Application Dispatcher requests are distributed amongavailable servers or to find problems when starting new servers.
Example 1
Here is a sample log file for a socket service:
Wed Jun 03 2000 09:16:14 GET SERVER default aaa.bbb.com:5612 3
Wed Jun 03 2000 09:16:14 Waiting for default
Wed Jun 03 2000 09:16:18 SET STATE default aaa.bbb.com:5612 IDLE 2
0/1 0Wed Jun 03 2000 09:16:19 Returned default aaa.bbb.com:5612 3
Wed Jun 03 2000 09:16:23 SET STATE default aaa.bbb.com:5612 BUSY 3
1/1 0Wed Jun 03 2000 09:16:26 SET STATE default aaa.bbb.com:5612 IDLE 3
0/1 0Wed Jun 03 2000 09:16:26 SET STATE default aaa.bbb.com:5612 SHUTDOWN
This log file shows the following events:
The Application Broker requests an Application Server from the default service. This request isassigned the number 3.
No server is available. Load Manager is waiting for an idle server.
The server completes a previous request and notifies the Load Manager that the server is IDLE. The0/1 indicates that the Application Server does not have any programs running but has 1 space available.The trailing 0 is the number of active server sessions.
The Load Manager releases the available server to Broker request 3.
The Broker has submitted its request to the server. The server notifies the Load Manager that the serveris BUSY, with the 1 available space in use and 0 server sessions active.
The server completes this request and becomes IDLE again.
The Application Server is shut down.
Example 2
Here is another sample log file showing a pool service:
Mon Aug 07 2000 13:22:53 GET SERVER pool1 xxx.yyy.com:2 5
Mon Aug 07 2000 13:22:53 Started pool1 on xxx.yyy.com Pid: 17979
Mon Aug 07 2000 13:22:53 Command:
/usr/local/bin/sas/usr/local/intrnet/pool1/appstart.sas −rsasuser −noterminal −noprint −nolog −SYSPARM "loadmgr=xxx.yyy.com:5555 serviceid=pool1 port=000000"
87

Mon Aug 07 2000 13:22:53 Waiting for: pool1 5
Mon Aug 07 2000 13:22:56 SET STATE pool1 xxx.yyy.com:4525 STARTED
Mon Aug 07 2000 13:22:56 Returning: pool1 xxx.yyy.com:4525 5
Mon Aug 07 2000 13:22:57 SET STATE pool1 xxx.yyy.com:4525 WORKING 5
1/3 1Mon Aug 07 2000 13:22:58 SET STATE pool1 xxx.yyy.com:4525 IDLE 5 0/3
1
This log file shows the following events:
The Application Broker requests an Application Server from the pool1 service. This request isassigned the number 5.
No server is available so the Load Manager starts a new Application Server.
This is the exact command that is used to start the server.
The requesting Broker is placed in the wait queue waiting for the server to start.
The server notifies the Load Manager that it has started.
The Load Manager releases the available server to Broker request 5
The Broker has submitted its request to the server. The server notifies the Load Manager thatthe server is in a WORKING state, with 1 of the 3 available spaces in use and 1 server sessionactive.
Note: The WORKING state will only appear if the Applications Server was started with thePROGRAMS parameter set to be greater than one.
The server completes this request and becomes IDLE again.
SAS Documentation
88
Running Jobs in the BackgroundBefore SAS/IntrNet 9.2, a long−running job would occupy an Application Server until the job was completed.This prevented new jobs from using that Application Server. Starting with SAS/IntrNet 9.2, long−runningjobs can run in the background. This new capability releases an Application Server from the pool ofApplication Servers so that the server can continue to run on its own until the job has completed. Then, theserver exits. A new Application Server can be started in the pool service if it is needed for another job.
Long−running jobs also would often exceed the timeouts that are set for the Application Broker, Web server,and Application Server. For example, the Web server typically has a default timeout of 5 minutes. By runningthe Application Server in the background, timeouts can be avoided, and the job can run as long as required.
Starting with SAS/IntrNet 9.2, the APPSRVSET Application Server function has two parameters that are usedtogether to force an Application Server to run in the background. The BACKGROUND parameter removesthe Application Server from the pool service so that it can run on its own. The DISCONNECT parameterreleases the Application Broker (and subsequently the Web browser) from the Application Server. The Webbrowser does not have to wait for a job to complete. A message could first be returned to the user indicatingthat the job is running and where to find any output when it is finished. After the Application Server isdisconnected, no further text can be sent back to the Web browser. The results are returned using e−mail orstored for subsequent retrieval.
You must use the Load Manager −background option to allow programs to request background processing.The background jobs appear in the Load Manager status program under the special service $background.
89
The Input ComponentAn Application Dispatcher application consists of input and program components. The program component isthe actual SAS program that runs on the Application Server. The input component is the remainder of theapplication, which runs on the Web server or the client. It normally consists of static or dynamically generatedHTML pages that contain one or more of the following:
an HTML form that has a Submit button. When the Web user provides the required information andsubmits the request, the Web browser sends the data that was entered plus data from any hidden fieldsto the Application Broker.
•
a hypertext link to the Application Broker. When the user selects the link, the Web browser sends arequest, which includes parameters that are specified in the link's uniform resource locator (URL), tothe Application Broker.
•
an inline image whose source is a reference to the Application Broker. When the user brings the pageup for viewing, the Web browser loads the image and sends a request to the Application Broker.Similar to the process used for a hypertext link, parameters can be included in the URL.
•
a Java applet, ActiveX control, or Plug−in that contains a reference to the Application Broker.Depending on the object, the Application Server might send a request to the Application Brokerimmediately or wait for a user action, such as clicking a button.
•
The input component selects what program component to run and passes input data to the program componentas a list of name/value pairs. The name/value pairs can be specified in a URL, in input fields in an HTMLform, by an object such as a Java applet or ActiveX control, or in the Application Broker configuration file asdescribed below. The Web user, who does not need to know how the Application Dispatcher passes andprocesses the information, receives the results of the application in the Web browser. The results are typicallydisplayed as an HTML page, but they can be presented as a downloaded file in more sophisticatedapplications.
The Application Dispatcher uses macro variables to pass name/value pair data to your programs. SASComponent Language (SCL) programs are supplied with an SCL list as an additional mechanism foraccessing the data. Usually, both the macro variable names and list−item names match the names supplied inthe HTML code. The HTML names that are used to create the macro variable names must be valid SASnames and must be expected by the program. The Application Dispatcher rejects invalid SAS names.
Because the SAS rules for names are more restrictive than the rules for HTML names, Application Dispatcherapplication developers use the following SAS naming rules for all fields:
Use between 1 and 32 characters.• Begin the name with a letter or an underscore.• Continue the name with letters, underscores, or digits.•
Reserved Names
Reserved names have special meaning to the Application Dispatcher. For example, every request must includea _PROGRAM name/value pair to identify the program to be run by the Application Dispatcher. In mostcases, a _SERVICE name/value pair is required to identify the service that handles the request. More detailson these and other special variables (name/value pairs) are available in Reserved or Special Variables.
90
Specifying Name/Value Pairs in a URL
You can specify name/value pairs in a URL by using Application Broker CGI−parameter syntax. Forexample, the URL
http://yourserver/cgi−bin/broker? _service=default&_program=sample.webhello.sas
specifies two name/value pairs. Note the question mark (?) that follows BROKER. The section of the URLthat follows the question mark is called the query string. The query string contains the name/value pair datathat is input to the application. Each name is separated from the following value by an equal sign (=). Multiplename/value pairs are separated by ampersands (&). In this example, the _SERVICE=DEFAULT pair specifiesthe service that handles this request, and the _PROGRAM=SAMPLE.WEBHELLO.SAS pair specifies therequest program that is executed.
The Web browser has strict rules about the format of the query string. Any special characters (includingspaces) in a value must be URL encoded. Spaces can be encoded as a plus sign (+) or %20. For example, ifyou want to pass the name AUTHOR with a value of John Doe, specify it in the URL asAUTHOR=John+Doe or AUTHOR=John%20Doe. See the HTML Syntax Reference section and theURLENCODE function in the SAS Language Reference: Dictionary for more complete information.
URLs with name/value pairs can be manually typed in a Web browser location field, saved as a Web browserbookmark, included as an HREF attribute of an anchor tag, included as an SRC attribute of an IMG tag, orused anywhere a URL can be used. Java or ActiveX components such as the SAS/GRAPH thin−client graphiccomponents might generate URLs with name/value pairs to activate Application Dispatcher programs.
URLs with name/value pairs that are included in an HTML page (for example, as an HREF= or SRC=attribute) must be properly encoded to prevent incorrect interpretation of the ampersand characters. Forexample, the anchor tag
<A HREF="http://yourserver/cgi−bin/broker? _program=lib.pgm.sas©=true">
causes the Web browser to interpret © as the character entity reference for a copyright character. Thecorrect way to encode this URL is
<A HREF="http://yourserver/cgi−bin/broker? _program=lib.pgm.sas&copy=true">
In addition, some Web browsers incorrectly identify a character entity reference even if it is not terminated bypunctuation. For example, ®ION=EAST might be interpreted as fiION=EAST by some (but not all) Webbrowsers. To avoid this problem, encode all ampersands that separate name/value pairs in a URL as &when used in an HTML tag.
Specifying Name/Value Pairs in an HTML Form
HTML forms provide the most versatile mechanism for data input in an Application Dispatcher application. Aform definition begins with the <FORM> tag and ends with the </FORM> tag. Between these two tags, otherHTML tags define the various components of the form, including input fields, selection lists, push buttons,and more. Several forms of varying complexity are included in the HTML file section of the ApplicationBroker package sample directory. The HTML code in these files, as well as the descriptions in the followingsections, helps you learn how to create forms. A detailed list of form requirements and components can be
SAS Documentation
91
found in the HTML Syntax Reference section.
Hidden fields are name/value pairs that do not appear as buttons, selection lists, and so on, in the HTML page.Here is an example of a hidden field:
<INPUT TYPE="hidden" NAME="_service" VALUE="default">
This HTML tag passes the name/value pair _SERVICE=DEFAULT when the form that contains thename/value pair is submitted. The required Application Dispatcher fields _SERVICE and _PROGRAM areoften passed as hidden fields, but you can also include your own fields as hidden fields. Although hiddenfields do not appear visually in the Web browser, you can use them to
pass parameters to the Application Dispatcher program. For example, you can pass a list of variablesto an Application Dispatcher program for processing. A single Application Dispatcher program canthen be referenced by many HTML files.
•
pass name/value pairs from one form to the next. The input component to a complicated applicationoften has more than one form and more than one page, which means that the name/value pair datamust be propagated through each of the forms until the final program is invoked. Hidden fields are aneasy way to accomplish this.
•
capture data generated by user interaction with screen widgets if your application uses JavaScript orVisual Basic Script.
•
Specifying Name/Value Pairs in the Application BrokerConfiguration File
You can specify name/value pairs in the Application Broker configuration file (broker.cfg). The Set directivedefines a constant name/value pair that is passed to all program components. For example, your broker.cfgmight contain
Set IMGHOME http://server.xyz.com/images
This directive defines the name/value pair IMGHOME=http://server.xyz.com/images for allrequests executed by this Application Broker. The IMGHOME macro variable can then be used to constructURL links to images in an HTML page without coding a fixed URL path in each Application Dispatcherprogram. This feature is used to define the codebase location of SAS/GRAPH Java applets (in the_GRAFLOC name/value pair) in a default SAS/IntrNet installation. The ServiceSet directive defines aname/value pair for a specific service.
You can define name/value pairs by issuing the Export and ServiceExport directives. These directives enableyou to export a CGI environment variable as a name/value pair. The default configuration file exports anumber of variables. For example, the
Export REMOTE_USER _RMTUSER
directive exports the REMOTE_USER environment variable as the _RMTUSER name/value pair. SeeExporting Environment Variables for more information.
Application Broker directives are documented in Configuration File Directives.
SAS Documentation
92
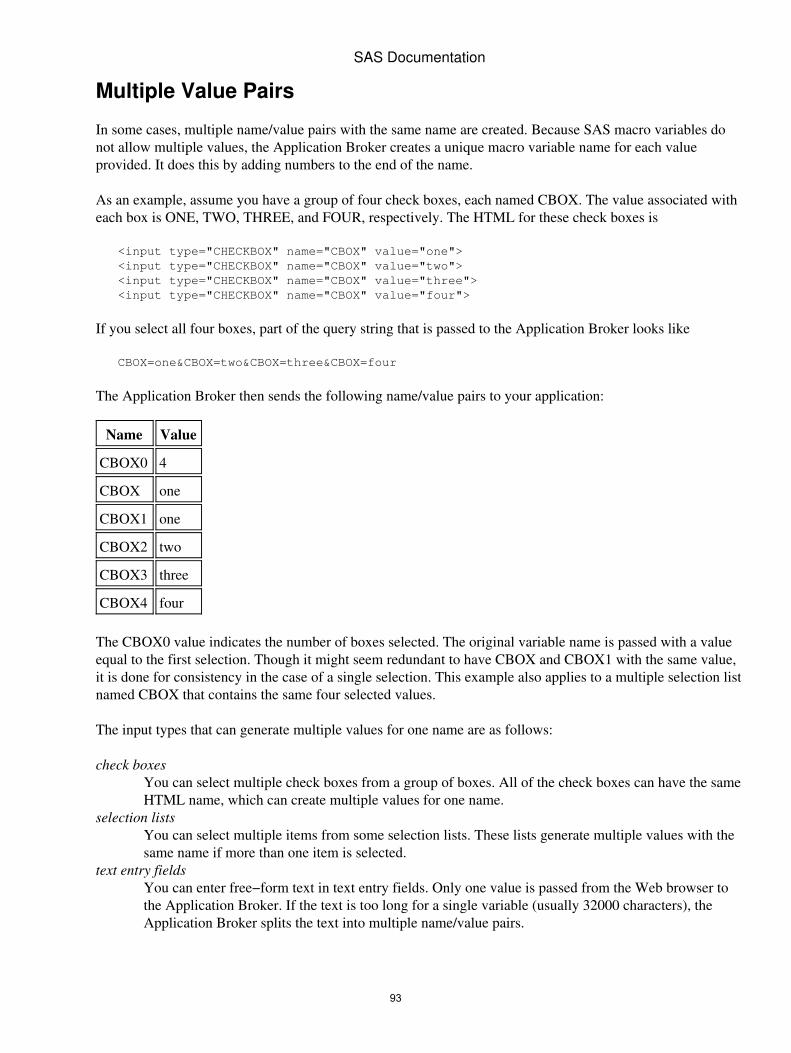
Multiple Value Pairs
In some cases, multiple name/value pairs with the same name are created. Because SAS macro variables donot allow multiple values, the Application Broker creates a unique macro variable name for each valueprovided. It does this by adding numbers to the end of the name.
As an example, assume you have a group of four check boxes, each named CBOX. The value associated witheach box is ONE, TWO, THREE, and FOUR, respectively. The HTML for these check boxes is
<input type="CHECKBOX" name="CBOX" value="one"> <input type="CHECKBOX" name="CBOX" value="two"> <input type="CHECKBOX" name="CBOX" value="three"> <input type="CHECKBOX" name="CBOX" value="four">
If you select all four boxes, part of the query string that is passed to the Application Broker looks like
CBOX=one&CBOX=two&CBOX=three&CBOX=four
The Application Broker then sends the following name/value pairs to your application:
Name Value
CBOX0 4
CBOX one
CBOX1 one
CBOX2 two
CBOX3 three
CBOX4 four
The CBOX0 value indicates the number of boxes selected. The original variable name is passed with a valueequal to the first selection. Though it might seem redundant to have CBOX and CBOX1 with the same value,it is done for consistency in the case of a single selection. This example also applies to a multiple selection listnamed CBOX that contains the same four selected values.
The input types that can generate multiple values for one name are as follows:
check boxesYou can select multiple check boxes from a group of boxes. All of the check boxes can have the sameHTML name, which can create multiple values for one name.
selection listsYou can select multiple items from some selection lists. These lists generate multiple values with thesame name if more than one item is selected.
text entry fieldsYou can enter free−form text in text entry fields. Only one value is passed from the Web browser tothe Application Broker. If the text is too long for a single variable (usually 32000 characters), theApplication Broker splits the text into multiple name/value pairs.
SAS Documentation
93

HTML Syntax ReferenceThe information contained in this section is only a partial listing of the HTML tags that your Web browserunderstands. For more detailed information about HTML and elements needed to create a basic form, see theWorld Wide Web Consortium at www.w3.org or the Web Design Group at www.htmlhelp.com. Squarebrackets in syntax indicates that an attribute is optional; do not include the square brackets in your code.
HTML Tags• URL Syntax•
HTML Tags
Quotation Marks
You can use quotation marks to enclose the values provided in your HTML page, and you should usequotation marks if the values contain blanks. Use double, not single, quotation marks. If you are entering textthat contains a single quotation mark, you must enclose the entire string in double quotation marks.
Anchor Tag
<A HREF=URL>
The HREF= attribute specifies a hypertext link. When selected by the user, this link invokes the ApplicationDispatcher. For example:
<A HREF="/cgi−bin/broker? _service=default&program=sample.webhello.sas">click me</A>
See URL Syntax for more information on URLs.
FORM Tag
<FORM ACTION=broker−URL [METHOD=GET | POST]>
The ACTION= attribute, included in the FORM tag, specifies the location of the Application Broker CGIprogram. For example:
<FORM ACTION="/cgi−bin/broker">
The METHOD= attribute is optional. It specifies the value GET or POST. The broker−URL cannot contain aquestion mark or have any parameters. For example:
<FORM ACTION="/scripts/broker.exe" METHOD=PUT>
Use GET for nonupdate programs that have no side effects. GET is limited to between 256 and 1024characters total URL length, depending on your Web browser. If your application is complex, theresulting page's URL can become very long and might display variable information that you wouldprefer the user not see. You can bookmark pages by using GET.
•
Use POST for operations that have potential side effects (such as writing to a data set). POST is asimple security technique that hides the inner workings of your application from the user and hidesthe variables that can appear on the URL location line from the users. It also prevents form data from
•
94

appearing in Web server logs. However, you cannot bookmark these pages.
On some Web browsers, such as Netscape, the reload button works with both GET and POST. On other Webbrowsers, such as Internet Explorer 3.02, refresh does not repost the form data. This works only with GET. Ifyou omit the METHOD= attribute from the FORM tag, the Application Dispatcher uses the default GET.
Note: If you want to restrict applications from using either the GET or the POST method, use the ALLOWdirective in the Application Broker configuration file. If you want to invoke the Application Dispatcher with ahypertext link, an inline image, or other URL, use the default method GET.
IMG Tag
<IMG SRC=image−URL [HEIGHT=value] [WIDTH=value] [ALT=value]>
A reference to an inline image causes the Application Dispatcher to be invoked as soon as the page is viewed.For example:
<IMG SRC="/cgi−bin/broker?_service=default&program=sample.grphics.sas">
See URL Syntax for more information on URLs.
INPUT Tag
<INPUT TYPE=input−type NAME=input−name VALUE=input−value>
The INPUT tag specifies a simple input element inside a form. The INPUT tag can include the followingattributes:
The TYPE= attribute identifies the type of input specified. Valid types are
Value Description
CHECKBOX specifies a single toggle button that is either on or off.
HIDDEN indicates not to display the fields in the form on the Web browser.
PASSWORD specifies a text−entry field where the entered characters are represented as asterisks.
RADIO specifies a single toggle button that is either on or off. Other fields that have the same NAMEare grouped into one−of−many behavior.
RESET specifies a push button that re−sets input elements on the form to their default values.
SUBMIT specifies a push button that packages data entered in the current form into a request that issent to the Application Broker CGI (and then to SAS software for processing).
TEXT A simple text−entry field.
The NAME= attribute identifies the name in a name/value pair that passes to the Application Broker CGI andthen on to SAS software for processing.
The VALUE= attribute depends on the TYPE=.
For TYPE= TEXT or PASSWORD, use VALUE= to specify the default contents of the field.•
SAS Documentation
95
For TYPE= CHECKBOX or RADIO, use VALUE= to specify the value that is passed in response toa checked button. Unchecked buttons are not passed by the Web browser.
•
For TYPE= SUBMIT or RESET, use the NAME= attribute to specify the label for the push button.•
TEXTAREA Tag
<TEXTAREA NAME=field−name [ROWS=rows−value] [COLS=cols−value]>
The TEXTAREA tag inserts a free−form field for text, which enables the user to enter more than just a singleline of text. Use this with the _FLDWDTH attribute.
URL Syntax
URLs must be encoded according to strict rules whether they appear in static HTML pages, are created byhtmSQL or the Application Dispatcher in dynamic pages, or are typed manually into the Location field of theWeb browser. This section gives a quick overview. For more information, see W3C's Web AddressingOverview at www.w3.org/Addressing.
Here is a sample URL that is broken into two lines for readability:
http://yourcomp.com/cgi−bin/broker?_service=default &_program=dev.houses.sas&name=Fred%20Jones
where
http: is the protocol (must be http: for Application Broker invocations).
yourcomp.com indicates the name of the Web server.
cgi−bin is the path to the Application Broker; an alias or directory mapping set up in the Webserver.
broker is the name of the program to run. For the Application Dispatcher this will usually bebroker, broker.exe, or broker.cgi.
? (questionmark) indicates the start of parameters.
name=valueis a name/value pair. URLs can have zero or more name/value pairs, just like an HTMLform.
& separates name/value pairs.
%nn
indicates an escape character in hexadecimal notation. In the example, %20 is a space. Thisescape notation is used for any characters in a name or value other than alphanumericcharacters or one of the following punctuation marks: "−_.!~*'()". Use the URLENCODEfunction to escape characters in a URL string. For more information about theURLENCODE function, see the SAS Language Reference: Dictionary.
A partial URL results if the protocol, the Web server, or the path is omitted. Partial URLs use informationfrom the currently viewed page to fill in the blanks. For example, if your current page is
http://yourcomp.com/cgi−bin/broker?_debug=4
SAS Documentation
96

and the source code references the URL
broker?_service=default&_program=x
then the actual URL is
http://yourcomp.com/cgi−bin/broker?_service=default&_program=x
This is very useful when you move pages between directories or servers, because there are fewer changes tomake.
SAS Documentation
97
The Program ComponentApplication Dispatcher applications consist of program components and input components. The nameprogram component is a convenient name for the part of the Application Dispatcher application that runs onthe SAS server. It will be one of the four types of programs that are listed below. The input component isstored on the Web server and is the interface between users and the program component (or SAS).
The Four Types of ProgramsSAS Programs♦ Source Entries♦ SCL Entries♦ Macro Entries♦
•
Receiving Input Component Data• Reserved or Special Variables• HTTP Headers• Using HTML Formatting Tools• Using the Output Delivery System (ODS)• Using the REPLAY Program• Advanced Programming Techniques
Data Passing and Program Chaining♦ Embedded Graphics♦ Web Browser Referral with the Location Header♦ Creating Various Date/Time Formats♦
•
Creating Temporary Files• Sessions• Using Sessions: A Sample Web Application• Uploading Files• Application Server Functions
APPSRVGETC♦ APPSRVGETN♦ APPSRVSET♦ APPSRV_AUTHCLS♦ APPSRV_AUTHDS♦ APPSRV_AUTHLIB♦ APPSRV_HEADER♦ APPSRV_SESSION♦ APPSRV_UNSAFE♦
•
98
The Four Types of ProgramsThere are four types of Application Dispatcher programs:
SAS Programs• Source Entries• SCL Entries• Macro Entries•
The input component of the Application Dispatcher application must pass a special variable named_PROGRAM. This variable names the program to run and also specifies the program type. The value for_PROGRAM is a three− or four−level name delimited by periods(.). The first level in the name indicates theApplication Dispatcher program library where the program is stored. The last level in the name must be sas,source, scl, or macro.
SAS Programs
SAS programs are stored in external files, and these files must
have a .sas filename extension on directory−based platforms. The filename must match the combinedsecond and third levels in the value of _PROGRAM.
•
be contained in a partitioned data set (PDS) on z/OS systems. The PDS member name must match thesecond level in the value of _PROGRAM.
•
SAS programs can contain a DATA step, procedures, and macro code. This is the only program type notstored in a SAS catalog. The program name is case sensitive if the Application Server platform is casesensitive. The proper query string syntax for specifying a SAS program is
_program=library.program.sas
Source Entries
Source entries are stored in SAS catalog entries with an entry type of SOURCE. They can contain the samecode as SAS programs. The program names for source entries are not case sensitive. The proper query stringsyntax for specifying a program of this type is
_program=library.catalog.program.source
SCL Entries
SCL entries are stored in SAS catalog entries with an entry type of SCL. These entries contain SCL code thatmust be compiled. The program names for SCL entries are not case sensitive. The proper query string syntaxfor specifying an SCL entry program is
_program=library.catalog.program.scl
Note: There are many visual functions, objects, and routines in SCL that require a windowing environment.The Application Server normally does not run in an interactive windowing environment and cannot supportvisual SCL components. Using visual components in Application Server programs can produce unpredictableresults and is not supported.
99

Macro Entries
Macro entries are stored in SAS catalog entries with an entry type of MACRO. They consist of compiled SASmacro language statements. These programs can be created with the STORE option in the %macro statementalong with the SAS option SASMSTORE= to indicate a library. Using macro entries can speed up theexecution of macro code when compared to SAS programs or source entries. Because the macro codecontained within macro entries is stored in compiled form, there is a performance improvement. Names formacro entries are not case sensitive. The proper query string syntax for specifying a macro entry program is
_program=library.catalog.program.macro
SAS software automatically creates stored compiled macros in a catalog named SASMACR. The ApplicationDispatcher enables you to copy these macro entries to any catalog name and run them. They do not have to bein a catalog named SASMACR for the Application Dispatcher to access them.
SAS Documentation
100
Receiving Input Component DataThe name/value pair data provided by the input component are sent to the program component and madeavailable as macro variables. The Application Dispatcher creates these variables, assigns their values, andclears their values after the program has completed. The name/value pair data are also supplied in an SCL listto Application Dispatcher programs written in SCL.
Application developers must write their Application Dispatcher program to accept the proper macro variablenames. The macro variable values can be obtained by direct reference (for example, &var) or by using one ofthe following:
the SYMGET function of the DATA step• the SYMGET, SYMGETC, and SYMGETN functions in SCL.•
For example, if the HTML name/value pair for a text entry field is color=blue, all of the following storethe value blue in the DATA step variable color:
color="&color";
or
color=%superq(color);
or
color=symget('color');
The left side of each assignment statement is the DATA step variable. The right side shows three differenttechniques for extracting the macro variable value. All of these techniques return the 'safe' value of the inputvalue. The Application Server will strip any unsafe characters (as defined by the UNSAFE option on PROCAPPSRV). This means it is usually safe to use the &var reference in Application Dispatcher programs. Usethe APPSRV_UNSAFE function to retrieve the full input value, including any 'unsafe' characters:
color=appsrv_unsafe('color');
Because all macro variables are a character data type, some extra processing is required in DATA step code ifthe value will be stored in a numeric variable. For example:
age=input(symget('age'),12.);
If the Application Dispatcher program is written in SCL, you have another option for accepting the variablevalues. An SCL list is passed to each Application Dispatcher program written in SCL. Therefore, each SCLprogram should contain the following statement:
entry inputlist 8;
The input list contains named character items that correspond to the macro variables created. If your programis written in SCL, you can use either the input list or macro variables. To access the same name/value pair asabove, a statement like this can be used:
color=getnitemc(inputlist,'COLOR',1,1,'');
101
As with the macro variables, this SCL list is cleaned up by the Application Server when the ApplicationDispatcher program completes.
The Application Dispatcher automatically creates several variables based on the program request and variousinformation in the Application Broker configuration file. These automatic variables are available to yourprogram as macro variables and SCL list items. For a complete list of these automatic variables, see thesections Reserved or Special Variables and Exporting Environment Variables.
SAS Documentation
102
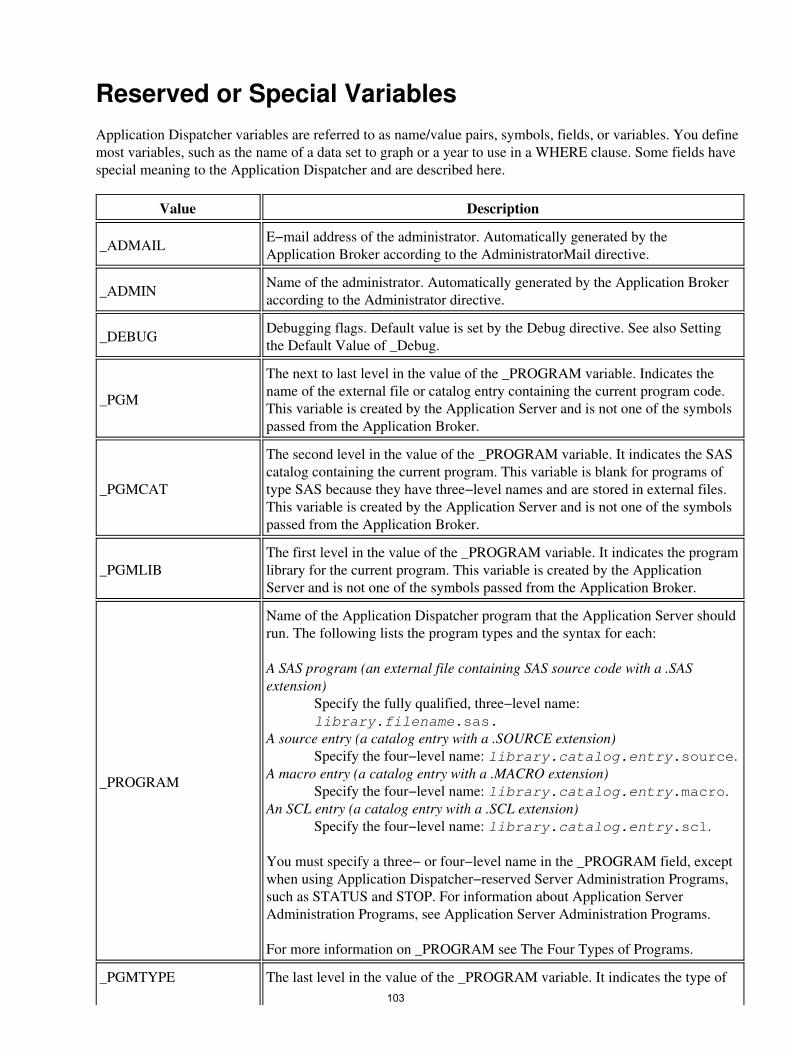
Reserved or Special VariablesApplication Dispatcher variables are referred to as name/value pairs, symbols, fields, or variables. You definemost variables, such as the name of a data set to graph or a year to use in a WHERE clause. Some fields havespecial meaning to the Application Dispatcher and are described here.
Value Description
_ADMAIL E−mail address of the administrator. Automatically generated by theApplication Broker according to the AdministratorMail directive.
_ADMIN Name of the administrator. Automatically generated by the Application Brokeraccording to the Administrator directive.
_DEBUG Debugging flags. Default value is set by the Debug directive. See also Settingthe Default Value of _Debug.
_PGM
The next to last level in the value of the _PROGRAM variable. Indicates thename of the external file or catalog entry containing the current program code.This variable is created by the Application Server and is not one of the symbolspassed from the Application Broker.
_PGMCAT
The second level in the value of the _PROGRAM variable. It indicates the SAScatalog containing the current program. This variable is blank for programs oftype SAS because they have three−level names and are stored in external files.This variable is created by the Application Server and is not one of the symbolspassed from the Application Broker.
_PGMLIBThe first level in the value of the _PROGRAM variable. It indicates the programlibrary for the current program. This variable is created by the ApplicationServer and is not one of the symbols passed from the Application Broker.
_PROGRAM
Name of the Application Dispatcher program that the Application Server shouldrun. The following lists the program types and the syntax for each:
A SAS program (an external file containing SAS source code with a .SASextension)
Specify the fully qualified, three−level name:library.filename.sas.
A source entry (a catalog entry with a .SOURCE extension)Specify the four−level name: library.catalog.entry.source.
A macro entry (a catalog entry with a .MACRO extension)Specify the four−level name: library.catalog.entry.macro.
An SCL entry (a catalog entry with a .SCL extension)Specify the four−level name: library.catalog.entry.scl.
You must specify a three− or four−level name in the _PROGRAM field, exceptwhen using Application Dispatcher−reserved Server Administration Programs,such as STATUS and STOP. For information about Application ServerAdministration Programs, see Application Server Administration Programs.
For more information on _PROGRAM see The Four Types of Programs.
_PGMTYPE The last level in the value of the _PROGRAM variable. It indicates the type of103

the current program. This variable is created by the Application Server and isnot one of the symbols passed from the Application Broker.
_PORT The TCP/IP port number of the current Application Server. Together with_Server, it indicates the server selected out of the specified service.
_REPLAY
A complete URL for use with programs that use the Output Delivery System(ODS). It is composed from the values of _URL, _SERVICE, and _TMPCAT.ODS uses this URL to create links that will replay stored output when they areloaded by the user's Web browser. See also Using the Output Delivery System.This variable is created by the Application Server and is not one of the symbolspassed from the Application Broker.
_SERVER The DNS or IP address of the current Application Server. Together with_PORT, it indicates the server selected out of the specified service.
_SERVICE Name of an Application Dispatcher Service defined in your configuration filewith the LaunchService or SocketService directives.
_STATDATALIBNAME
The LIBNAME, the physical name, and the options of the ALLOCATE FILEstatement for the statistics data set library. This variable enables the applicationto assign a LIBNAME to the library with additional options (for example,ACCESS=READONLY).
_STATDATASET The library.DATASET setting of the statistics data set for this server.
_STATDATASETAVAILThe status of the statistics data set. This variable is set to one of the followingvalues: OK, NOADMINPW, or NOSTATS. See also the STATISTICSstatement.
_THISSRVA URL composed from the values of _URL and _SERVICE. This variable iscreated by the Application Server and is not one of the symbols passed from theApplication Broker.
_THISSESSIONA URL composed from the values of _URL, _SERVICE, _SERVER, _PORT,and _SESSIONID. This variable is created by the Application Server and shouldbe used as the base URL for all URL references to the current session.
_TMPCAT
A unique, temporary catalog name. This catalog can be used to store temporaryentries to be retrieved later. In socket servers, the _TMPCAT catalog is deletedafter a number of minutes specified in the variable _EXPIRE. This variable iscreated by the Application Server and is not one of the symbols passed from theApplication Broker. See Using the Output Delivery System.
_URLSelf−reference to the Application Broker CGI program. Useful for generatingpages that have links or inline images that reinvoke the Application Dispatcher.See also the SelfURL directive.
_VERSION Application Broker version number. Automatically generated by the ApplicationBroker.
SAS Documentation
104
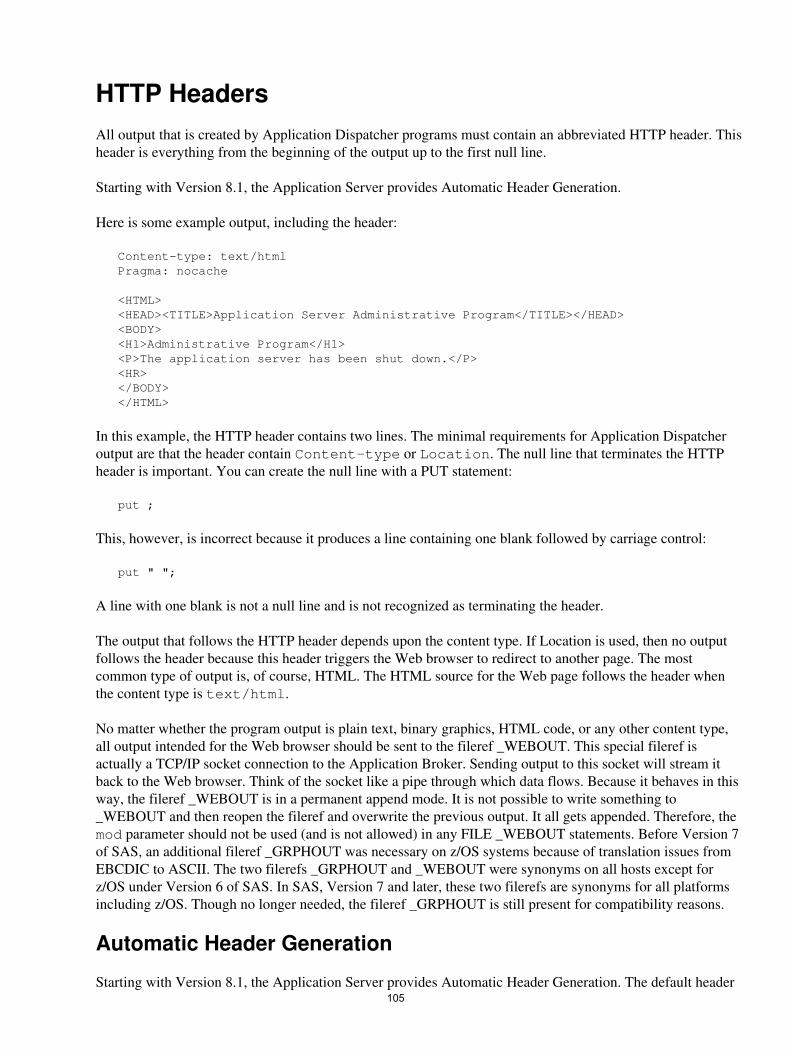
HTTP HeadersAll output that is created by Application Dispatcher programs must contain an abbreviated HTTP header. Thisheader is everything from the beginning of the output up to the first null line.
Starting with Version 8.1, the Application Server provides Automatic Header Generation.
Here is some example output, including the header:
Content−type: text/html Pragma: nocache
<HTML> <HEAD><TITLE>Application Server Administrative Program</TITLE></HEAD> <BODY> <H1>Administrative Program</H1> <P>The application server has been shut down.</P> <HR> </BODY> </HTML>
In this example, the HTTP header contains two lines. The minimal requirements for Application Dispatcheroutput are that the header contain Content−type or Location. The null line that terminates the HTTPheader is important. You can create the null line with a PUT statement:
put ;
This, however, is incorrect because it produces a line containing one blank followed by carriage control:
put " ";
A line with one blank is not a null line and is not recognized as terminating the header.
The output that follows the HTTP header depends upon the content type. If Location is used, then no outputfollows the header because this header triggers the Web browser to redirect to another page. The mostcommon type of output is, of course, HTML. The HTML source for the Web page follows the header whenthe content type is text/html.
No matter whether the program output is plain text, binary graphics, HTML code, or any other content type,all output intended for the Web browser should be sent to the fileref _WEBOUT. This special fileref isactually a TCP/IP socket connection to the Application Broker. Sending output to this socket will stream itback to the Web browser. Think of the socket like a pipe through which data flows. Because it behaves in thisway, the fileref _WEBOUT is in a permanent append mode. It is not possible to write something to_WEBOUT and then reopen the fileref and overwrite the previous output. It all gets appended. Therefore, themod parameter should not be used (and is not allowed) in any FILE _WEBOUT statements. Before Version 7of SAS, an additional fileref _GRPHOUT was necessary on z/OS systems because of translation issues fromEBCDIC to ASCII. The two filerefs _GRPHOUT and _WEBOUT were synonyms on all hosts except forz/OS under Version 6 of SAS. In SAS, Version 7 and later, these two filerefs are synonyms for all platformsincluding z/OS. Though no longer needed, the fileref _GRPHOUT is still present for compatibility reasons.
Automatic Header Generation
Starting with Version 8.1, the Application Server provides Automatic Header Generation. The default header105
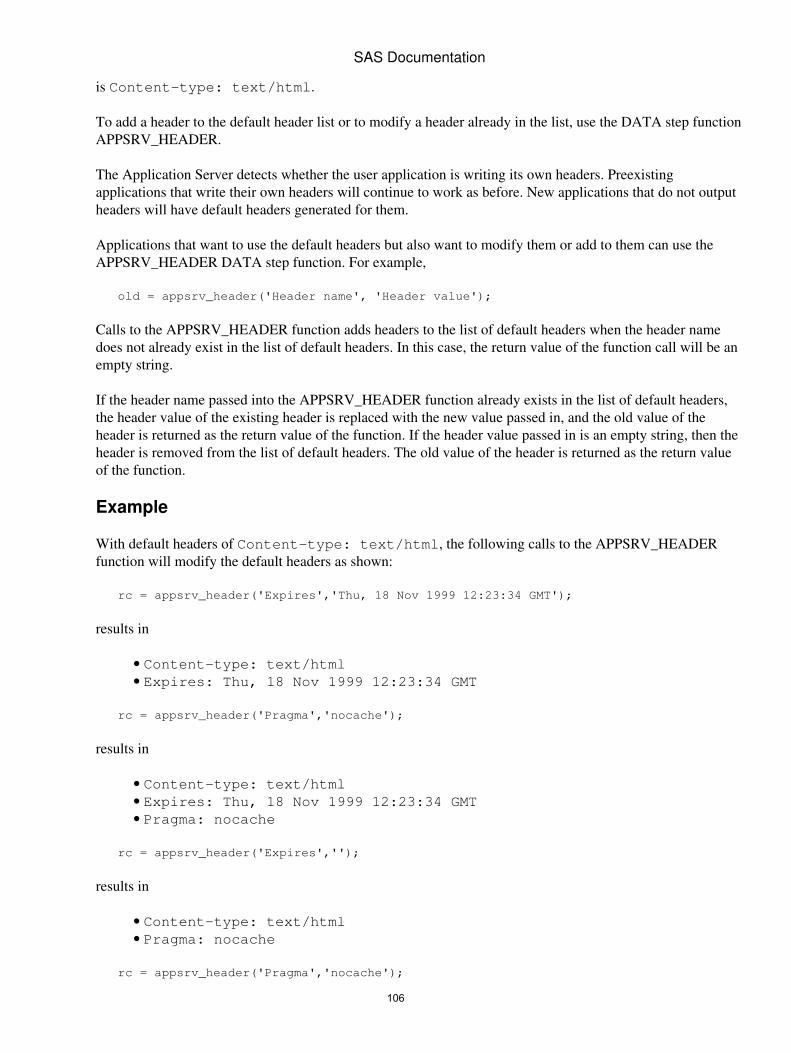
is Content−type: text/html.
To add a header to the default header list or to modify a header already in the list, use the DATA step functionAPPSRV_HEADER.
The Application Server detects whether the user application is writing its own headers. Preexistingapplications that write their own headers will continue to work as before. New applications that do not outputheaders will have default headers generated for them.
Applications that want to use the default headers but also want to modify them or add to them can use theAPPSRV_HEADER DATA step function. For example,
old = appsrv_header('Header name', 'Header value');
Calls to the APPSRV_HEADER function adds headers to the list of default headers when the header namedoes not already exist in the list of default headers. In this case, the return value of the function call will be anempty string.
If the header name passed into the APPSRV_HEADER function already exists in the list of default headers,the header value of the existing header is replaced with the new value passed in, and the old value of theheader is returned as the return value of the function. If the header value passed in is an empty string, then theheader is removed from the list of default headers. The old value of the header is returned as the return valueof the function.
Example
With default headers of Content−type: text/html, the following calls to the APPSRV_HEADERfunction will modify the default headers as shown:
rc = appsrv_header('Expires','Thu, 18 Nov 1999 12:23:34 GMT');
results in
Content−type: text/html• Expires: Thu, 18 Nov 1999 12:23:34 GMT•
rc = appsrv_header('Pragma','nocache');
results in
Content−type: text/html• Expires: Thu, 18 Nov 1999 12:23:34 GMT• Pragma: nocache•
rc = appsrv_header('Expires','');
results in
Content−type: text/html• Pragma: nocache•
rc = appsrv_header('Pragma','nocache');
SAS Documentation
106
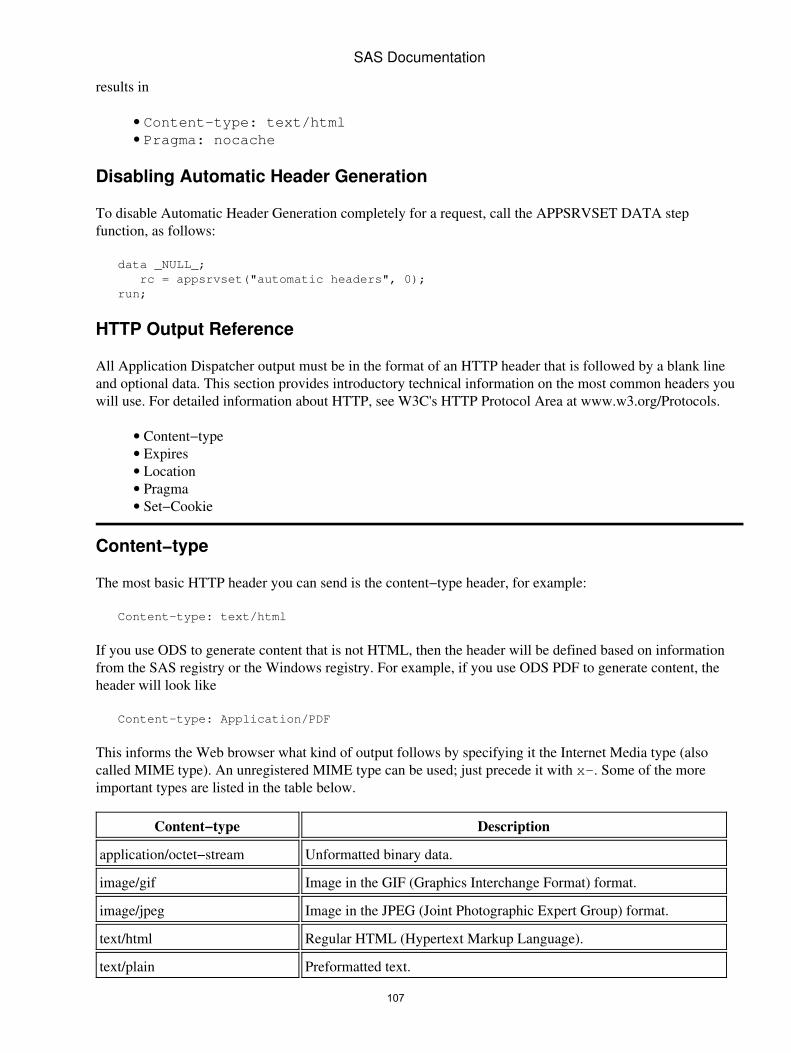
results in
Content−type: text/html• Pragma: nocache•
Disabling Automatic Header Generation
To disable Automatic Header Generation completely for a request, call the APPSRVSET DATA stepfunction, as follows:
data _NULL_; rc = appsrvset("automatic headers", 0); run;
HTTP Output Reference
All Application Dispatcher output must be in the format of an HTTP header that is followed by a blank lineand optional data. This section provides introductory technical information on the most common headers youwill use. For detailed information about HTTP, see W3C's HTTP Protocol Area at www.w3.org/Protocols.
Content−type• Expires• Location• Pragma• Set−Cookie•
Content−type
The most basic HTTP header you can send is the content−type header, for example:
Content−type: text/html
If you use ODS to generate content that is not HTML, then the header will be defined based on informationfrom the SAS registry or the Windows registry. For example, if you use ODS PDF to generate content, theheader will look like
Content−type: Application/PDF
This informs the Web browser what kind of output follows by specifying it the Internet Media type (alsocalled MIME type). An unregistered MIME type can be used; just precede it with x−. Some of the moreimportant types are listed in the table below.
Content−type Description
application/octet−stream Unformatted binary data.
image/gif Image in the GIF (Graphics Interchange Format) format.
image/jpeg Image in the JPEG (Joint Photographic Expert Group) format.
text/html Regular HTML (Hypertext Markup Language).
text/plain Preformatted text.
SAS Documentation
107
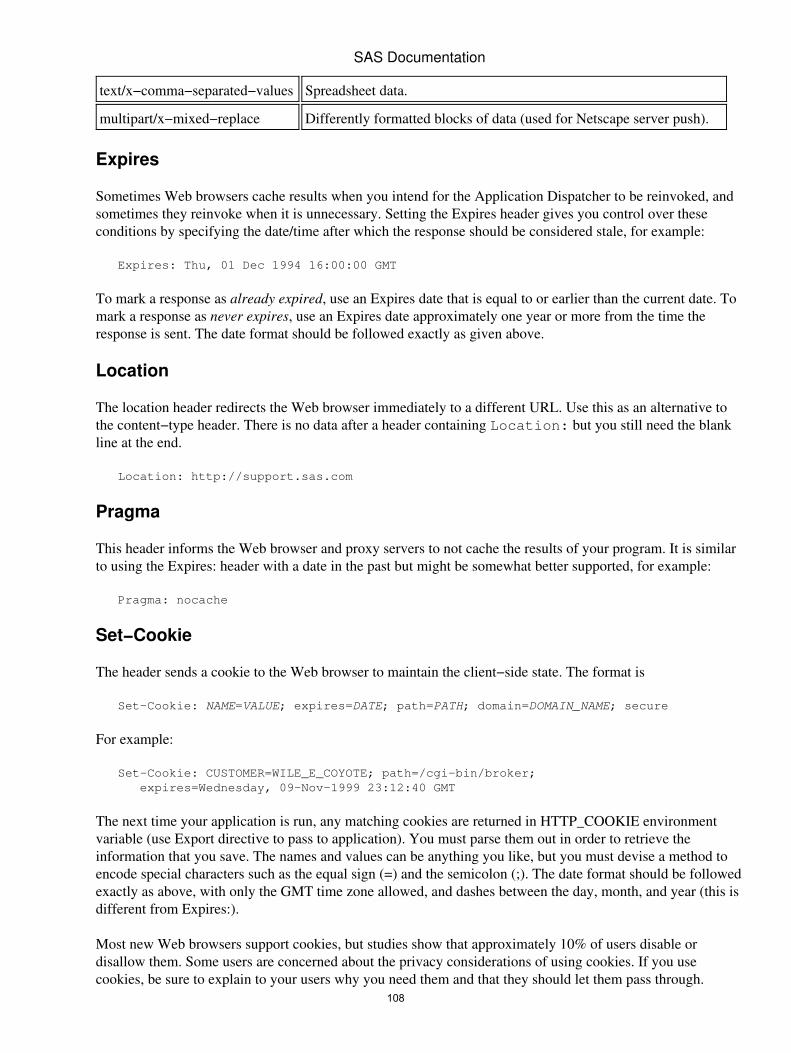
text/x−comma−separated−values Spreadsheet data.
multipart/x−mixed−replace Differently formatted blocks of data (used for Netscape server push).
Expires
Sometimes Web browsers cache results when you intend for the Application Dispatcher to be reinvoked, andsometimes they reinvoke when it is unnecessary. Setting the Expires header gives you control over theseconditions by specifying the date/time after which the response should be considered stale, for example:
Expires: Thu, 01 Dec 1994 16:00:00 GMT
To mark a response as already expired, use an Expires date that is equal to or earlier than the current date. Tomark a response as never expires, use an Expires date approximately one year or more from the time theresponse is sent. The date format should be followed exactly as given above.
Location
The location header redirects the Web browser immediately to a different URL. Use this as an alternative tothe content−type header. There is no data after a header containing Location: but you still need the blankline at the end.
Location: http://support.sas.com
Pragma
This header informs the Web browser and proxy servers to not cache the results of your program. It is similarto using the Expires: header with a date in the past but might be somewhat better supported, for example:
Pragma: nocache
Set−Cookie
The header sends a cookie to the Web browser to maintain the client−side state. The format is
Set−Cookie: NAME=VALUE; expires=DATE; path=PATH; domain=DOMAIN_NAME; secure
For example:
Set−Cookie: CUSTOMER=WILE_E_COYOTE; path=/cgi−bin/broker; expires=Wednesday, 09−Nov−1999 23:12:40 GMT
The next time your application is run, any matching cookies are returned in HTTP_COOKIE environmentvariable (use Export directive to pass to application). You must parse them out in order to retrieve theinformation that you save. The names and values can be anything you like, but you must devise a method toencode special characters such as the equal sign (=) and the semicolon (;). The date format should be followedexactly as above, with only the GMT time zone allowed, and dashes between the day, month, and year (this isdifferent from Expires:).
Most new Web browsers support cookies, but studies show that approximately 10% of users disable ordisallow them. Some users are concerned about the privacy considerations of using cookies. If you usecookies, be sure to explain to your users why you need them and that they should let them pass through.
SAS Documentation
108
Using HTML Formatting ToolsThe HTML Formatting Tools are often used to produce Application Dispatcher program output. There aresome important guidelines to follow when using the Formatting Tools in an Application Dispatcher program.
When using the Output Formatter and Tabulate Formatter mechanism, do not forget to turn capturingoff before the program completes. Each capture=on needs to have a correspondingcapture=off. The Application Server is not guaranteed to turn off these tools for you.
•
The listing output destination must be active or these two tools will not work. The listing destinationis active by default when you start SAS, and it is also turned on in the default server reset file.However, it is possible that the listing could be closed if you remove the ODS statement from yourreset file and explicitly turn it off in one of your programs. If you need to turn the listing on, thensubmit the following before you invoke the capture=on mechanism for either the Tabulate or theOutput Formatter:
ods listing;
•
Use RUNMODE=S with each of the tools. This RUNMODE value designates that the tools arerunning in server mode. If openmode=replace is used along with this run mode, then the toolswill generate a Content−type: text/html header automatically.
•
Use openmode=replace if this call to one of the tools will be creating the first output from thisprogram. This open mode will cause the formatting tools to generate the header (if RUNMODE=S),the HTML head section of the document, and body tags.
•
Use openmode=append if this call to one of the tools will not be creating the first output from thisprogram. If the program has already produced some output, then it has already supplied thecontent−type header and most likely the HTML head section, as well.
•
The Application Dispatcher is a very flexible programming environment because it provides procedures andtools that automatically generate output, but it also allows exact control of the output. Many SASprogrammers have encountered the situation where they want to generate completely customized output. Thisis often done by using the DATA step and PUT statements. The Application Dispatcher technology supportsPUT statement reporting and allows you to supplement such reports with powerful procedures and FormattingTools.
109
The Output Delivery System (ODS)The Output Delivery System (ODS) enables SAS procedures to generate output in several formats. One ofthese output formats is HTML. You can use ODS in your Application Dispatcher programs to easily createWeb pages containing HTML and graphics. This page discusses features and options of ODS that areappropriate for the Application Dispatcher environment. ODS can be used in other SAS environments and cangenerate other forms of output. For more information about ODS, refer to the SAS Output Delivery System:User's Guide.
Creating Web Output with ODS
HTML output is enabled with the ODS HTML statement. The ODS HTML statement can create
an HTML file (called the body file) that contains the results from the procedures run in yourApplication Dispatcher program
•
a table of contents that links to the body file• a table of pages that links to the body file• a frameset that displays the table of contents, the table of pages, and the body file.•
ODS might also generate additional HTML or image files if you split the output across multiple body pages oryou use embedded GIF or JPEG images to display graphics.
The HTTP protocol used by the Application Dispatcher can deliver only one output file back to the Webbrowser per request. This output file is written to the _WEBOUT fileref. Because ODS generates multipleoutput files in many cases, the extra files must be stored in a temporary location and retrieved by the Webbrowser in subsequent requests. The Application Server automatically creates a unique temporary catalog forevery request for this purpose. The two−level catalog name is defined in the special macro variable_TMPCAT. ODS must also put hyperlinks and inline image links into the HTML that it generates that willretrieve the files from the temporary catalog. The special macro variable _REPLAY contains the base URLused to create these links.
To enable the above features, any Application Dispatcher program that uses ODS to generate HTML shouldinclude the following options on the ODS HTML statement:
ods html path=&_tmpcat (url=&_replay) rs=none ...;
Note: The RS=none option forces ODS to perform record based output and is required when writing to the_WEBOUT fileref or to a catalog entry.
ODS is capable of creating a number of different layouts for your output. All layouts have one thing incommon: the "primary" page must be returned directly to your Web browser (via the _WEBOUT fileref). Thepage written to the _WEBOUT fileref must be preceded by an HTTP header with the appropriatecontent−type field.
Starting with Release 8.2, the automatic HTTP header generation feature recognizes some ODS output typesand generates appropriate content−type headers. Supported output types include HTML, GIF, and JPEG. Anappropriate content type must be manually set with APPSRV_HEADER function for all other output types.
If you are writing to _WEBOUT using PUT statements while ODS has _WEBOUT open, when you executethe code the PUT statement data might be out of sequence with the data generated by ODS. This problemoccurs because both your code and ODS are opening the same fileref at the same time. This problem can be
110
fixed by inserting your PUT statements before you open ODS, closing ODS while you write directly to thefileref, or using the ODS HTML TEXT="string" option to write data. The following code is an exampleof how you can use the ODS HTML TEXT="string" option to write data:
ods listing close; ods html body=_webout path=&_tmpcat (url=&_replay) Style=Banker; ... other code ... ods html text='<p align="center"> </p>' ; ods html text='<p align="center"><b>Test. If you see this in order, it worked.</b></p>'; ... other code ... ods html close;
Layout Examples
The following annotated examples illustrate how to return various ODS layouts to your Web browser. Forthese examples, we will use the following data set:
data stocks; length symbol $4 price 8.; input @1 symbol price; label symbol = 'Symbol' price = 'Share Price'; format price 7.2; cards; AMD 23.50 BORL 9.31 CA 47.25 CPQ 32.06 DELL 139.88 GTW 44.00 HWP 67.00 IBM 104.44 INTC 89.69 MSFT 84.75 ORCL 24.63 SUNW 47.63 ; run;
The examples are
Body Only• Body and Table of Contents• Table of Contents Only• Graphics and Text.•
Body Only
When you return only the body output to your Web browser, the page will be rendered as a single, unframedpage. Sample code to produce such output is shown below.
ods listing close; ods html body=_webout path=&_tmpcat (url=&_replay) rs=none; title 'Stock Prices'; proc print data=stocks label noobs; run; quit;
SAS Documentation
111

ods html close;
Because the body file is the only file created, it is the primary file and is directed to the fileref _WEBOUT.
Body and Table of Contents
You can return the Table of Contents (or Table of Pages) and the body file using ODS framed output. In thiscase, the file created by the ODS HTML FRAME option is the primary file, and it must be directed to_WEBOUT. Other files will be stored in the temporary catalog in the WORK library and will be replayedautomatically at the proper time.
The sample code below illustrates the creation of a Table of Contents in addition to the body file.
ods listing close; ods html frame=_webout body=b.html contents=c.html path=&_tmpcat (url=&_replay) rs=none charset=' '; title 'Stock Prices'; proc print data=stocks label noobs; run; quit; proc contents data=stocks; run; quit; ods html close;
Note: The charset=' ' option eliminates the CHARSET value in the <META> tag. For more informationabout using the CHARSET option, see SAS Note #23971 at support.sas.com/kb.
The body and contents files are directed to the temporary catalog and will be named B.HTML and C.HTML,respectively. You can choose any valid SAS name for the entries, but the object type must be HTML. Do notenclose the name in quotes or it will be interpreted to be an external file rather than a catalog entry.
Table of Contents Only
You might want to return only the Table of Contents to your Web browser to avoid using HTML frames. Thepage will be rendered as a single, unframed page. Links on the Table of Contents page will allow you to loadbody output to the Web browser. A simple modification to the previous example will drop the FRAMEkeyword and make the contents file the primary file returned to _WEBOUT.
ods listing close; ods html contents=_webout body=b.html path=&_tmpcat (url=&_replay) rs=none charset=' '; title 'Stock Prices'; proc print data=stocks label noobs; run; quit; proc contents data=stocks; run; quit; ods html close;
Note: The charset=' ' option eliminates the CHARSET value in the <META> tag. For more informationabout using the CHARSET option, see SAS Note #23971 at support.sas.com/kb.
When you click on an item in the Table of Contents, the body file will be replayed from the temporaryWORK catalog.
SAS Documentation
112
Graphics and Text
The code below will return framed output consisting of the Table of Contents and the body, which containsintegrated graphics and text. Note that no special ODS keywords were required to create and store the graphicimages. This example is essentially the same as the Body and Table of Contents example with someSAS/GRAPH code added.
ods listing close; ods html frame=_webout body=b.html contents=c.html path=&_tmpcat (url=&_replay) rs=none charset=' '; goptions reset=all; goptions device=gif colors=(red orange yellow ligr green blue) ctext=black cback=white; title 'Stock Prices'; axis1 major=none minor=none value=none; proc gchart data=stocks; hbar3d symbol / sumvar=price subgroup=symbol shape=cylinder patternid=subgroup raxis=axis1; run; quit; title; proc print data=stocks label noobs; run; quit; proc contents data=stocks; run; quit; ods html close;
Note: The charset=' ' option eliminates the CHARSET value in the <META> tag. For more informationabout using the CHARSET option, see SAS Note #23971 at support.sas.com/kb.
Cleaning Up
HTML and graphics created by ODS in the _TMPCAT catalog must eventually be deleted. The ApplicationServer will handle this task automatically. By default, a temporary catalog will be deleted if it is not used for aperiod of 15 minutes. This timeout value can be changed with the SESSION TIMEOUT=seconds option onPROC APPSRV, or with the APPSRV_SET('session timeout',seconds) DATA step function. All temporarycatalogs are deleted immediately when a server is stopped.
SAS Documentation
113
Using the REPLAY ProgramThe REPLAY program replays an existing catalog entry to the Web browser. This program is used withApplication Dispatcher programs that invoke the Output Delivery System (ODS) and with other programs thatcreate output and retrieve it for later display. For details on ODS, see Using the Output Delivery System(ODS).
A sample invocation of REPLAY looks like the following URL:
http://yourserver/scripts/broker.exe?_service=default &_program=replay&_entry=SAMPDAT.WEBSAMP.RETAIL.HTML
The user must specify _SERVICE, _PROGRAM=REPLAY, and _ENTRY=lib.cat.entry.type.
If you are using the _REPLAY program with Microsoft Office, then you need to build a URL that uses the_OUTPUTAPP= parameter. Supported values for the _OUTPUTAPP= parameter include EXCEL, WORD,and POWERPOINT. For example, if you specify _OUTPUTAPP=EXCEL in the URL, then the content typefor the replayed output is application/vnd.ms−excel.
If you need to specify the name of the file that the _REPLAY program returns, use the _CONTDISPparameter in the URL. The value of this parameter is returned as a content−disposition header.
114
Advanced Programming TechniquesThe techniques described in this section will help you to expand the capabilities of your ApplicationDispatcher applications. It is a good idea to review the basic programming techniques that are described inThe Four Types of Programs before continuing with this section.
Data Passing and Program Chaining• Embedded Graphics• Web Browser Referral by Using the Location Header• Creating Various Date/Time Formats•
Data Passing and Program Chaining
Only the simplest Application Dispatcher applications contain a single page. With the addition of a secondand subsequent pages, you face the problem of passing information from one page to another. It is also typicalto have an application that contains more than a single program. This means that you must find a way toconnect the programs that compose your application and ensure that all the data collected along the way isavailable in the appropriate places.
It is good programming practice to design applications so that they do not request the same informationmultiple times. Because HTTP is a stateless environment, each program request is separate from all otherrequests. If users enter a phone number on the first page of an application and submit the form, that phonenumber is available only to the first program. But after that program completes, the state of the data valuespassed is lost. If the third program in the application needs to know the specified phone number, theapplication must ask for the phone number again or retrieve the data from a stored location. There are severalways to solve this problem. You can store data values
on the client, in hidden form fields• on the client, in cookies or Web page scripts• on the server.•
Storing data on the client, in hidden fields, is the simplest technique. To do this, you must dynamicallygenerate all of the HTML pages in your application except for the first HTML page. Because each HTMLpage functions as a mechanism for transporting data values from the previous program to the next program, itcannot be static HTML stored in a file.
Usually, the process involves the following steps:
The first HTML form calls the first program.1. The first program performs some kind of setup to initialize the user.2. At the end of the first program, the second HTML page is created by writing to _WEBOUT.3. When the HTML form on the second page is written out, you dynamically generate a series of HTMLfields by using the TYPE="hidden" attribute.
4.
Each hidden field in the second form can contain one name/value data pair passed from the first form. Youshould use unique names for all of the data values in the entire application. In this way you can pass all of theapplication data throughout the entire application.
At the same time that you dynamically generate the second form, you can write out the name of the secondprogram in the hidden field _PROGRAM. Because the first program contains the logic to determine thesecond program, this is referred to as program chaining. Your application can have multiple second programs.
115

The logic in the first program can decide which second program the current user should run.
Here is an example.
First HTML Form
<FORM ACTION="/cgi−bin/broker"> Please enter your first name: <INPUT TYPE="text" NAME="fname"><BR> <INPUT TYPE="hidden" NAME="_service" VALUE="default"> <INPUT TYPE="hidden" NAME="_program" VALUE="mylib.pgm1.sas"> <INPUT TYPE="submit" VALUE="Run Program"> </FORM>
This form passes the first name of the user as the variable FNAME to the program named PGM1.SAS in theprogram library MYLIB.
First Program (PGM1.SAS)
data _null_; file _webout; put 'Content−type: text/html'; put; put '<HTML>';
/*create reference to the broker from special automatic macro variable _url*/ url=symget('_url'); put '<FORM ACTION="' url +(−1) '">';
/*supply service name*/ service=symget('_service'); put '<INPUT TYPE="hidden" NAME="_service" VALUE="' service +(−1) '">';
/*use current program library so that this application can be easily moved to another library*/ pgmlib=symget('_pgmlib'); program=compress(pgmlib)||'.pgm2.sas'; put '<INPUT TYPE="hidden" NAME="_program" VALUE="' program +(−1) '">';
/*pass first name value on to next program*/ fname=symget('fname'); put '<INPUT TYPE="hidden" NAME="fname" VALUE="' fname +(−1) '">';
put 'What is your favorite color?'; put '<SELECT SIZE=1 NAME="fcolor">'; put '<OPTION VALUE="red">red'; put '<OPTION VALUE="green">green'; put '<OPTION VALUE="blue">blue'; put '<OPTION VALUE="other">other'; put '</SELECT><BR>'; put '<INPUT TYPE="submit" VALUE="Run Program">'; put '</FORM>'; put '</HTML>'; run;
SAS Documentation
116
This program uses the special variables _URL, _SERVICE, and _PGMLIB to maintain program portability.The second program name PGM2.SAS is hard−coded. The important section of this program is where thevariable FNAME is received by calling the SYMGET function and written out as a hidden form variable. Thisis the key step that enables the data value to "live" beyond the stateless execution of this first program. Inaddition to inserting the hidden data value, this program generates a selection list that asks the user to enter afavorite color.
Second Program (PGM2.SAS)
data _null_; file _webout; put 'Content−type: text/html'; put; put '<HTML>';
/*extract first name and favorite color and print them out*/ fname=symget('fname'); fcolor=symget('fcolor'); put 'Your first name is <b>' fname '</b>'; put '<BR>'; put 'Your favorite color is <b>' fcolor '</b>'; put '<BR>'; put '</HTML>'; run;
The second program prints the value of the variables from both the first and second form, illustrating that thedata has been correctly passed throughout the entire application. The technique of passing data by usinghidden fields has these advantages:
simple to do• easy to debug• state is maintained indefinitely• works seamlessly across multiple Application Servers.•
The major disadvantage of this technique is that it is easy for a user to change the values in the form andsubmit incorrect or falsified information to the application. Another technique that is nearly equivalent tousing hidden fields is to pass name/value pair data as part of the query string in a hyperlink. In the SecondProgram, (PGM2.SAS), suppose the initial forms were the same, but you want the second page to contain alist of hyperlinks instead of a selection list. In this case, you would generate a list of hyperlinks by using theanchor tag, and the HTML source would look like this:
<A HREF="path to Application Broker plus data">Red</a> <A HREF="path to Application Broker plus data">Green</a> <A HREF="path to Application Broker plus data">Blue</a> <A HREF="path to Application Broker plus data">Other</a>
Using this example, the path to Application Broker plus data would consist of the URL for the ApplicationBroker, which is stored in the special variable _URL followed by all of the name/value pair data that shouldbe passed from the first program to the second program. This data includes the required fields _SERVICE and_PROGRAM. At least one additional parameter is added to each hyperlink that will be used to indicate whichlink is chosen. In this case, that additional field is COLOR. To use hyperlinks instead of an HTML form thathas a select list, the first program must change to PGM1.SAS.
SAS Documentation
117
Modified Version of First Program (PGM1.SAS)
data _null_; file _webout; put 'Content−type: text/html'; put; put '<HTML>';
/*store broker path in data step variable*/ url=symget('_url');
/*store current service name*/ service=symget('_service');
/*use current program library so that this application can be easily moved to another library*/ pgmlib=symget('_pgmlib'); program=compress(pgmlib)||'.pgm2.sas';
/*pass first name value on to next program*/ fname=symget('fname');
/*build partial URL, color will be added later*/ href=trim(left(url))||'?_service='||trim(left(service))|| '&_program='||trim(left(program))|| '&fname='||urlencode(trim(left(fname)));
put '<HTML>'; put 'What is your favorite color?<br>'; put '<A HREF="' href +(−1) '&color=red">red</a><br>'; put '<A HREF="' href +(−1) '&color=green">green</a><br>'; put '<A HREF="' href +(−1) '&color=blue">blue</a><br>'; put '<A HREF="' href +(−1) '&color=other">other</a><br>'; put '</HTML>'; run;
This modified version uses a special function named URLENCODE in this program. The purpose of thisfunction is to encode any special characters that might be contained in the query string. Because the values for_PROGRAM and _SERVICE do not contain any special characters, it is not necessary to encode them.
However, the value that the user supplies for a first name might contain some special characters. For the FirstProgram, (PGM1.SAS) to pass this value safely to the second program, (PGM2.SAS) it should beURL−encoded. It does not harm a value to URL−encode it even when it does not contain special characters.The URLENCODE function was not used because if data is passed through an HTML form, then the Webbrowser would perform the encoding for you. Aside from the need to URL−encode data and the differentHTML syntax, the use of a hyperlink and hidden form fields are essentially the same.
Two alternatives to passing the data throughout every form in the application are: storing the data in a Webbrowser cookie or storing data within the Application Server environment. Both of these techniques are moredifficult than using hidden form fields, but they have different advantages.
HTTP cookies are packets of information that are stored in the client Web browser. They are shuttled back andforth with the CGI requests. In this general sense, they are quite similar to hidden form fields. Cookies havethe advantage of being nearly invisible to the user. They contain a built−in expiration mechanism, and theyare slightly more secure than hidden fields. They also work seamlessly across multiple Application Servers.
Storing data within the Application Server environment is a tempting way to solve the problem of passingdata. You can create a data set and assign each user a unique key variable. All the data collected for that user
SAS Documentation
118
can be stored in the data set within the Application Server environment. This is a much better mechanism forapplications that have a large volume of data to be collected and passed from program−to−program. The keyvariable still needs to be passed along by the Web browser, and that can be done by using cookies or a hiddenform field. If the key is unique and sufficiently difficult to guess, then this data passing mechanism also has anadded level of security. The advantages to this technique are
it is easier if there is a large volume of data needs to be passed• it is nearly invisible to the user• it is a significant security improvement• it reduces duplication of program code.•
You might experience contention problems if your service contains multiple servers and all servers try toupdate the same data set that contains the user data. Using a SAS/SHARE data server to read and write to thedata set can overcome this problem.
Embedded Graphics
The typical Web page contains embedded graphic images. This is easy to do in static pages. To your staticHTML, add an IMG tag, for example:
<IMG SRC="mykids.gif">
In a dynamic environment such as the Application Dispatcher, the value for the SRC parameter must be aURL that invokes the Application Broker. For example, inserting the following HTML code in a static HTMLpage causes the sample graphics program to be run when the Web browser loads the image:
<IMG SRC="/cgi−bin/broker?_service=default&_program=sample.webgraph.sas">
Programs called from an IMG tag must respond with a content type of image/gif or image/jpeg. You can addmultiple parameters to this type of URL to make your graphics program output more flexible andcustomizable. Each dynamic image tag in your HTML page represents a separate request to the ApplicationDispatcher and a separate program execution. It is important to keep that in mind when you design yourapplication. You might want to show only one or just a few graphics on each page. That will reduce thedemand on your Application Server.
Sometimes, you might be generating a dynamic HTML page, and you want that dynamic page to contain oneor more embedded graphics that are also dynamic. One way to accomplish this is to use the Output DeliverySystem (ODS). Using ODS is convenient, because it lets you run procedures that produce HTML and graphicswithin a single Application Dispatcher program.
If you choose not to use ODS, you must have separate programs for producing HTML and graphics. The firstprogram that is called produces the HTML page by writing to _WEBOUT. At the appropriate place in theHTML source code, the first program writes an image tag that calls the second program −− the program thatproduces the graphics. By using the concepts outlined in Data Passing and Program Chaining, the firstprogram passes any name/value pair data to the second program. Because the image tag is not an HTML form,you cannot use hidden fields to pass the name/value pairs. You must encode them in the query string of theURL that you generate for the SRC parameter.
Most of the time your embedded graphics represent some underlying data. If that underlying data changes,you expect the Web browser to display a new picture.
Note: Unfortunately, there is a serious defect in some Web browsers that prevents the new graphic image
SAS Documentation
119
from being displayed. This is not a defect in SAS/IntrNet software. Web browsers exhibiting this defect willload the URL, that causes the Application Dispatcher program to execute and deliver a new image; but theold, cached image is displayed. When the user arrives at the page by selecting a hyperlink, a favorite, or abookmark, or submits a form, an old image might be seen. By clicking REFRESH or RELOAD in the Webbrowser the new image will display. Unfortunately, sending the graphic image by using the Expires or thePragma: no−cache HTTP headers does not fix this problem.
One solution to this problem is to add a caption to your embedded graphics that tells the user to reload thepage for the most up−to−date graphic. If your data does not change too quickly, you might not need thiscaption. The best solution is to trick the Web browser into not using a cached image. You can do this bygenerating a unique URL every time the program is executed. Because HTML files and images are cachedaccording to their URLs, the Web browser will never have an old image that matches the unique URL that theprogram generates.
To create a unique URL, generate the SRC= URL string that you need and append to the end of the URL aname/value pair that has a value of the current SAS datetime, as shown in this example.
data _null_; file _webout;
/*store broker path in data step variable*/ url=symget('_url');
/*store current service name*/ service=symget('_service');
/*use current program library so that this application can be easily moved to another library*/ pgmlib=symget('_pgmlib'); program=compress(pgmlib)||'.graphit.sas';
/*create partial URL*/ src=trim(left(url))||'?_service='||trim(left(service))|| '&_program='||trim(left(program));
/*the above URL is enough to embed the graphic but a unique string must be added to avoid incorrect caching*/ nocache=datetime(); src=src||'&nocache='||trim(left(nocache));
/*write out image tag*/ put '<IMG SRC="' src +(−1) '">'; run;
Each time this code is executed, a different datetime value is returned. This process results in a unique URL.The NOCACHE parameter is not used by the graphics program because its only purpose is to trick the Webbrowser into not using its cache.
Note: On some systems it might be better to call one of the SAS random functions instead of datetime. If yoursystem is fast and you make repeated, close calls to the datetime function, it is possible to get the same valuereturned.
Web Browser Referral by Using the Location Header
Another advanced programming technique is to have the output from one Application Dispatcher programinvoke another Application Dispatcher program without displaying a page from the first program. Suppose
SAS Documentation
120
that you have a program named PGM1.SAS, and it performs some error checking of the form data that is sentas input. If your program detects an error condition, you want to run some additional code. The additionalcode is contained in another program file named ERROR.SAS. Instead of copying the code fromERROR.SAS into PGM1.SAS and having to maintain two pieces of identical code, you can invoke the errorprogram via the output of PGM1.SAS. This is another form of program chaining.
The HTTP header Location is a special header that the Web browser recognizes. This header re−directs theWeb browser to another Web page. The only parameter to this header line is the URL that the Web browsershould load. In your first program, you can dynamically construct this URL and refer the Web browser toanother Application Dispatcher program. The URL that you supply by using the location header should befully qualified and can contain any additional name/value pair data that you want to send to the secondprogram shown as shown in this example code.
data _null_; if error>0 then do; /*construct referral URL*/ file _webout;
/*because URL is fully qualified get name of the Web server from automatic exported variable*/ srvname=symget('_srvname');
/*store broker path in data step variable _url is a special automatic variable*/ url=symget('_url');
/*store current service name _service is a special automatic variable*/ service=symget('_service');
/*use current program library so that this application can be easily moved to another library _pgmlib is a special automatic variable*/ pgmlib=symget('_pgmlib'); program=compress(pgmlib)||'.error.sas';
/*create fully qualified URL*/ loc='http://'||trim(left(srvname))|| trim(left(url))||'?_service='|| trim(left(service))|| '&_program='||trim(left(program));
/*put out location header instead of content−type header make sure to include null line to terminate HTTP header no content needed after location header because browser will refer to another page*/ put 'Location: ' loc; put ; end; run;
It is also possible to perform Web browser referrals by using the <META> tag in the generated HTML page.
Creating Various Date/Time Formats
Occasionally, you might find the need to create various specialized date/time formats as part of yourApplication Dispatcher output. These formats might not be compatible with the standard set of SAS date/timeformats that require you to create the format yourself. The most common format is the EXPIRES format. This
SAS Documentation
121
format is used to expire HTTP cookies and pages that are cached in the Web browser. The DATATYPEoption in the FORMAT procedure allows you to create specialized date/time formats easily, such theEXPIRES format. By specifying DATATYPE= in the PICTURE statement, you can use a special set of codesto represent both numerical and textual components of the date, the time, or the DATETIME value that youare formatting. Here is an example of how you can use this feature to create DATETIME format that expires:
proc format; picture expires other='%A, %d−%b−%y %0H:%0M:%0S GMT' (DATATYPE=DATETIME); run;
The special codes in the OTHER= parameter represent locale full weekday name, day of the month, localeabbreviated month name, and so on. See the documentation on the FORMAT procedure in the SASProcedures Guide for more information. The test program below illustrates how to use the DATETIMEformat.
data _null_; x=datetime(); /*adjust local datetime to GMT by adding five hours*/ x=x+5*3600; put x expires33.; run;
This program produces the following output:
Tuesday, 29−SEP−98 14:39:29 GMT
You can use this formatted output to create Expires headers or to set expiration dates and times for HTTPcookies.
SAS Documentation
122

Creating Temporary FilesThe Application Dispatcher program creates a temporary file for each request. When multiple requests are runat the same time, one request might write over the temporary file of another. There are several ways to createa unique file for the duration of a request so that files do not interfere with each other:
Creating a File with a Unique Name• Creating a File in a Unique Subdirectory• Storing a File in a Unique Catalog•
Creating a File with a Unique Name
To create a uniquely named file, use a random function to generate the filename. Then, use the name in aFILENAME statement:
/* Use a data step function RANUNI to generate a random number and format the number with some text to create the unique name. The RAN macro variable will be something like 'A2578900.txt' */
data _null_; numb = ceil (ranuni(0)*10000000); r = 'A' || put(numb, Z7.) || '.txt'; call symput ('ran', r); run;
filename foo "c:\temp\&ran"; /* prepend the temp subdirectory */
data _null_; file foo; put 'This is output to a uniquely named file'; run;
This technique requires that you explicitly delete the file when you are finished.
Creating a File in a Unique Subdirectory
You can avoid file interference by using a unique subdirectory. Beginning with Version 8 of SAS/IntrNetApplication Dispatcher, the WORK library is unique for each request. Find the path to the WORK library anduse it as the subdirectory to store the temporary file.
Note: To append text to a macro variable reference, use the period (.) operator.
/* use pathname function to get work library's path and store in macro variable wpath */
%let wpath=%sysfunc(pathname(work));
/* use wpath macro variable and append filename to it in filename statement */
filename foo "&wpath.\winapi.txt";
data _null_; file foo; put 'This output is going to file in the work subdirectory';
123
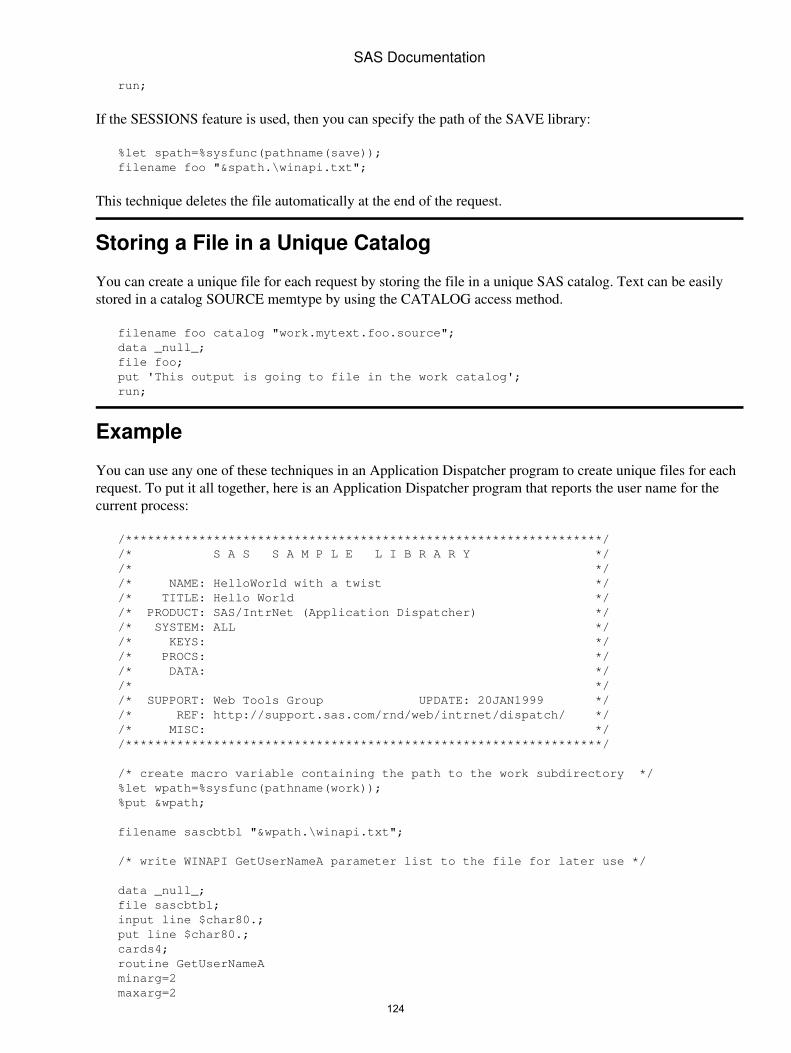
run;
If the SESSIONS feature is used, then you can specify the path of the SAVE library:
%let spath=%sysfunc(pathname(save)); filename foo "&spath.\winapi.txt";
This technique deletes the file automatically at the end of the request.
Storing a File in a Unique Catalog
You can create a unique file for each request by storing the file in a unique SAS catalog. Text can be easilystored in a catalog SOURCE memtype by using the CATALOG access method.
filename foo catalog "work.mytext.foo.source"; data _null_; file foo; put 'This output is going to file in the work catalog'; run;
Example
You can use any one of these techniques in an Application Dispatcher program to create unique files for eachrequest. To put it all together, here is an Application Dispatcher program that reports the user name for thecurrent process:
/*****************************************************************/ /* S A S S A M P L E L I B R A R Y */ /* */ /* NAME: HelloWorld with a twist */ /* TITLE: Hello World */ /* PRODUCT: SAS/IntrNet (Application Dispatcher) */ /* SYSTEM: ALL */ /* KEYS: */ /* PROCS: */ /* DATA: */ /* */ /* SUPPORT: Web Tools Group UPDATE: 20JAN1999 */ /* REF: http://support.sas.com/rnd/web/intrnet/dispatch/ */ /* MISC: */ /*****************************************************************/
/* create macro variable containing the path to the work subdirectory */ %let wpath=%sysfunc(pathname(work)); %put &wpath;
filename sascbtbl "&wpath.\winapi.txt";
/* write WINAPI GetUserNameA parameter list to the file for later use */
data _null_; file sascbtbl; input line $char80.; put line $char80.; cards4; routine GetUserNameA minarg=2 maxarg=2
SAS Documentation
124
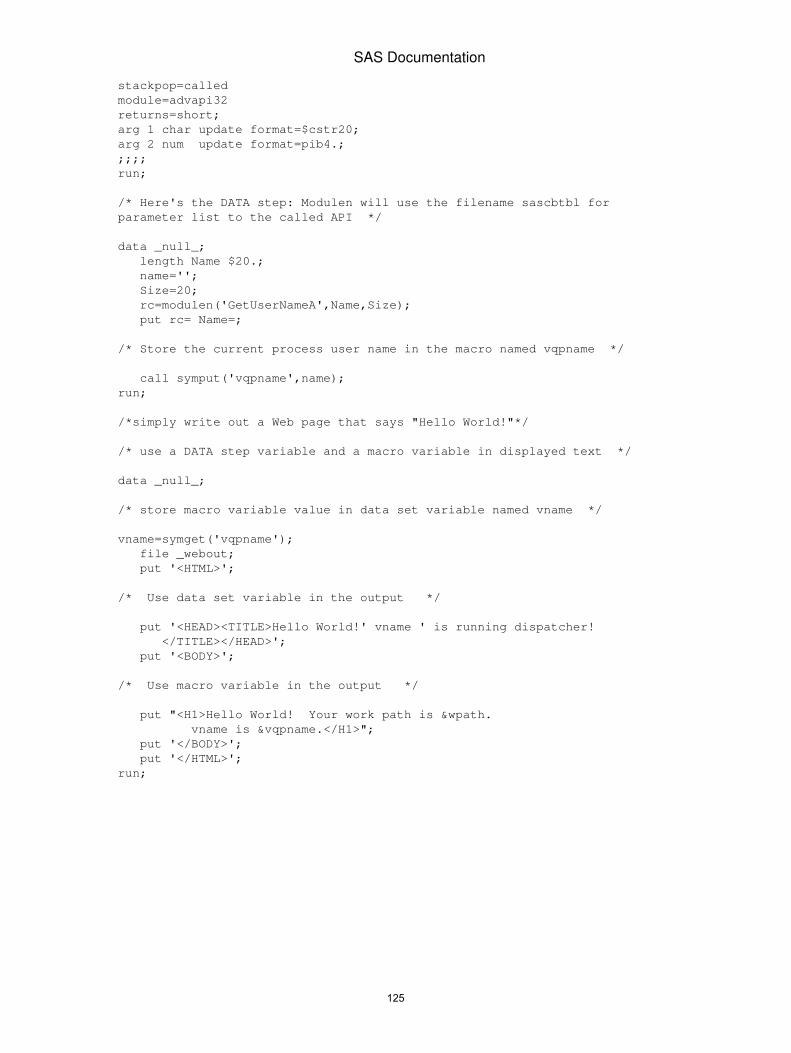
stackpop=called module=advapi32 returns=short; arg 1 char update format=$cstr20; arg 2 num update format=pib4.; ;;;; run;
/* Here's the DATA step: Modulen will use the filename sascbtbl for parameter list to the called API */
data _null_; length Name $20.; name=''; Size=20; rc=modulen('GetUserNameA',Name,Size); put rc= Name=;
/* Store the current process user name in the macro named vqpname */
call symput('vqpname',name); run;
/*simply write out a Web page that says "Hello World!"*/
/* use a DATA step variable and a macro variable in displayed text */
data _null_;
/* store macro variable value in data set variable named vname */
vname=symget('vqpname'); file _webout; put '<HTML>';
/* Use data set variable in the output */
put '<HEAD><TITLE>Hello World!' vname ' is running dispatcher! </TITLE></HEAD>'; put '<BODY>';
/* Use macro variable in the output */
put "<H1>Hello World! Your work path is &wpath. vname is &vqpname.</H1>"; put '</BODY>'; put '</HTML>'; run;
SAS Documentation
125
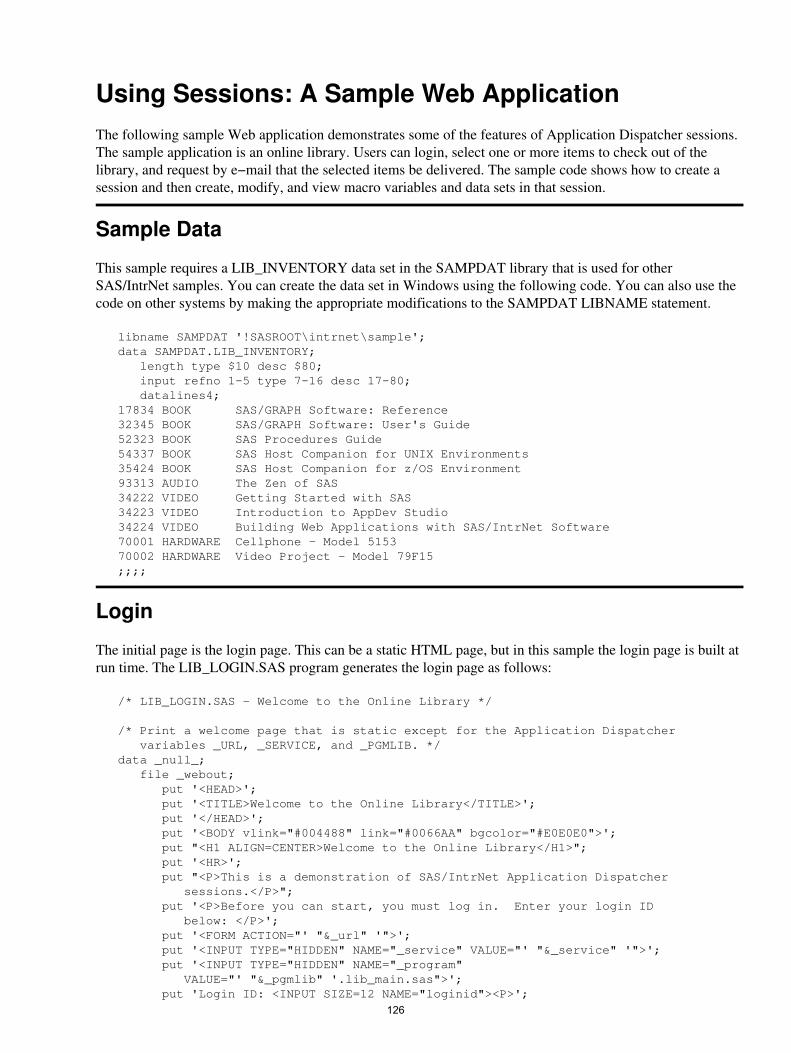
Using Sessions: A Sample Web ApplicationThe following sample Web application demonstrates some of the features of Application Dispatcher sessions.The sample application is an online library. Users can login, select one or more items to check out of thelibrary, and request by e−mail that the selected items be delivered. The sample code shows how to create asession and then create, modify, and view macro variables and data sets in that session.
Sample Data
This sample requires a LIB_INVENTORY data set in the SAMPDAT library that is used for otherSAS/IntrNet samples. You can create the data set in Windows using the following code. You can also use thecode on other systems by making the appropriate modifications to the SAMPDAT LIBNAME statement.
libname SAMPDAT '!SASROOT\intrnet\sample'; data SAMPDAT.LIB_INVENTORY; length type $10 desc $80; input refno 1−5 type 7−16 desc 17−80; datalines4; 17834 BOOK SAS/GRAPH Software: Reference 32345 BOOK SAS/GRAPH Software: User's Guide 52323 BOOK SAS Procedures Guide 54337 BOOK SAS Host Companion for UNIX Environments 35424 BOOK SAS Host Companion for z/OS Environment 93313 AUDIO The Zen of SAS 34222 VIDEO Getting Started with SAS 34223 VIDEO Introduction to AppDev Studio 34224 VIDEO Building Web Applications with SAS/IntrNet Software 70001 HARDWARE Cellphone − Model 5153 70002 HARDWARE Video Project − Model 79F15 ;;;;
Login
The initial page is the login page. This can be a static HTML page, but in this sample the login page is built atrun time. The LIB_LOGIN.SAS program generates the login page as follows:
/* LIB_LOGIN.SAS − Welcome to the Online Library */
/* Print a welcome page that is static except for the Application Dispatcher variables _URL, _SERVICE, and _PGMLIB. */ data _null_; file _webout; put '<HEAD>'; put '<TITLE>Welcome to the Online Library</TITLE>'; put '</HEAD>'; put '<BODY vlink="#004488" link="#0066AA" bgcolor="#E0E0E0">'; put "<H1 ALIGN=CENTER>Welcome to the Online Library</H1>"; put '<HR>'; put "<P>This is a demonstration of SAS/IntrNet Application Dispatcher sessions.</P>"; put '<P>Before you can start, you must log in. Enter your login ID below: </P>'; put '<FORM ACTION="' "&_url" '">'; put '<INPUT TYPE="HIDDEN" NAME="_service" VALUE="' "&_service" '">'; put '<INPUT TYPE="HIDDEN" NAME="_program" VALUE="' "&_pgmlib" '.lib_main.sas">'; put 'Login ID: <INPUT SIZE=12 NAME="loginid"><P>';
126

put 'Password: <INPUT SIZE=12 TYPE="password" NAME="password"><P>'; put '<INPUT TYPE="SUBMIT" VALUE="Login">'; put '<INPUT TYPE="RESET" VALUE="Reset">'; put '</FORM>'; put '</BODY>'; put '</HTML>'; run;
The LIB_LOGIN.SAS program generates the following page:
The login page is generated dynamically. The FORM ACTION= attribute, the _SERVICE value, and the_PROGRAM library name are all generated at run time based on Application Server macro variables. Thisenables you to move the application to different Web servers, Application Dispatcher services, or programlibraries without editing static HTML. Only the URL for the initial login page changes.
The login page allows the user to enter a login ID and password. Clicking the Login button runs theLIB_MAIN.SAS program in order to verify the input data, create a session, and display the Main Aisle page.
Main Aisle
The main aisle page is generated by the LIB_MAIN.SAS program. The LIB_MAIN program also verifies theinformation that is supplied from the login page.
/* LIB_MAIN.SAS − Main Aisle of the Online Library */
/* Use a macro here in order to use conditional logic. */
SAS Documentation
127

%macro lib_main;
/* Check to see if you are already in a session; if so, you don't need to validate login info. */ %if %sysfunc(libref(SAVE)) %then %do; /* SAVE libref doesn't exist, so you have not successfully logged in. */
/* Insert logic here in order to validate the login ID and password. For the purposes of this sample, assume that any non−blank password is valid. This is not usually a good idea; a real application can be expected to insert some real validation logic here. */ %if &password ne %then %let IDCHECK=PASSED; %else %let IDCHECK=FAILED;
%if &IDCHECK ne PASSED %then %do;
/* Validation failed − print a failure page. */ data _null_; file _webout; put '<HTML>'; put '<HEAD><TITLE>Invalid Login</TITLE></HEAD>'; put '<BODY vlink="#004488" link="#0066AA" bgcolor="#E0E0E0">'; put '<H1>Invalid Login</H1>'; put; put '<P>The login ID and password that you supplied are invalid.'; put 'Please return to the <A HREF="' @; put "&_URL?_SERVICE=&_service" '&_program=' "&_pgmlib" @; put '.lib_login.sas">login page</a> and re−enter a valid'; put 'login ID and password.</P>'; put; put '<P>If you are unable to login, please contact the'; put 'Library Help at extension 14325.</P>'; put '</BODY></HTML>'; run; %end; %else %do; /* Validation successful − create session and save login ID. */
%let rc=%sysfunc(appsrv_session(create));
/* SAVE_* variables must be global. */ %global SAVE_LOGINID; /* Save the login ID in the session. */ %let SAVE_LOGINID=&loginid; %end; %end; /* Assume valid login if session already exists. */ %else %let IDCHECK=PASSED;
%if &IDCHECK eq PASSED %then %do;
/* Print the Main Aisle page. */ data _null_; file _webout; put '<HTML>'; put '<HEAD><TITLE>Online Library Main Aisle</TITLE></HEAD>'; put; put '<BODY vlink="#004488" link="#0066AA" bgcolor="#E0E0E0">'; put '<H1>Online Library Main Aisle</H1>'; put; put 'Select one of the following areas of the library:'; put '<UL>'; length hrefroot $400;
SAS Documentation
128

hrefroot = "%superq(_THISSESSION)" || '&_PROGRAM=' || "&_PGMLIB"; put '<LI><A HREF="' hrefroot +(−1) '.lib_aisle.sas&type=Book">Book Aisle</A></LI>'; put '<LI><A HREF="' hrefroot +(−1) '.lib_aisle.sas&type=Video">Video Aisle</A></LI>'; put '<LI><A HREF="' hrefroot +(−1) '.lib_aisle.sas&type=Audio">Audio Aisle</A></LI>'; put '<LI><A HREF="' hrefroot +(−1) '.lib_aisle.sas&type=Hardware">Hardware Aisle</A></LI>'; put '<LI><A HREF="' hrefroot +(−1) '.lib_cart.sas">View my shopping cart</A></LI>'; put '<LI><A HREF="' hrefroot +(−1) '.lib_logout.sas">Logout</A></LI>'; put '</UL>'; put '</BODY>'; put '</HTML>'; run; %end; %mend;
%lib_main;
You should display the main aisle page only if the user has logged in; therefore, the first step is to verify userlogin. First, verify that a session already exists. If the session exists (which is verified by testing whether theSAVE libref exists), then you know that the user has already logged in and you can allow the user to view themain aisle page section of the program.
If the session does not exist, then you can verify valid login information. This sample requires a non−blanklogin ID and password. If a valid login ID and password are not supplied, the program will display an invalidlogin page and redirect the user to the login page.
If the supplied login ID and password are valid, the program will create a session and then save the LOGINIDvalue in a session macro variable that is named SAVE_LOGINID. Because the SAVE_LOGINID is declaredas a global variable and its name begins with SAVE_, it will be saved for the duration of the session.
SAS Documentation
129
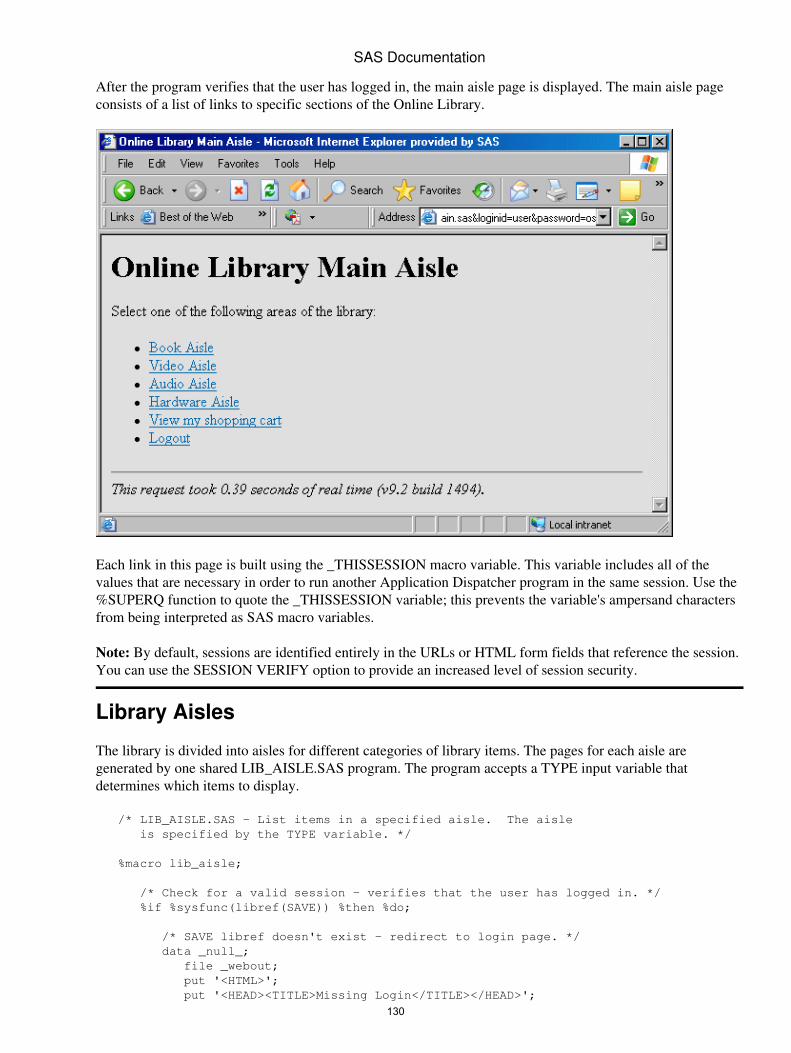
After the program verifies that the user has logged in, the main aisle page is displayed. The main aisle pageconsists of a list of links to specific sections of the Online Library.
Each link in this page is built using the _THISSESSION macro variable. This variable includes all of thevalues that are necessary in order to run another Application Dispatcher program in the same session. Use the%SUPERQ function to quote the _THISSESSION variable; this prevents the variable's ampersand charactersfrom being interpreted as SAS macro variables.
Note: By default, sessions are identified entirely in the URLs or HTML form fields that reference the session.You can use the SESSION VERIFY option to provide an increased level of session security.
Library Aisles
The library is divided into aisles for different categories of library items. The pages for each aisle aregenerated by one shared LIB_AISLE.SAS program. The program accepts a TYPE input variable thatdetermines which items to display.
/* LIB_AISLE.SAS − List items in a specified aisle. The aisle is specified by the TYPE variable. */
%macro lib_aisle;
/* Check for a valid session − verifies that the user has logged in. */ %if %sysfunc(libref(SAVE)) %then %do;
/* SAVE libref doesn't exist − redirect to login page. */ data _null_; file _webout; put '<HTML>'; put '<HEAD><TITLE>Missing Login</TITLE></HEAD>';
SAS Documentation
130
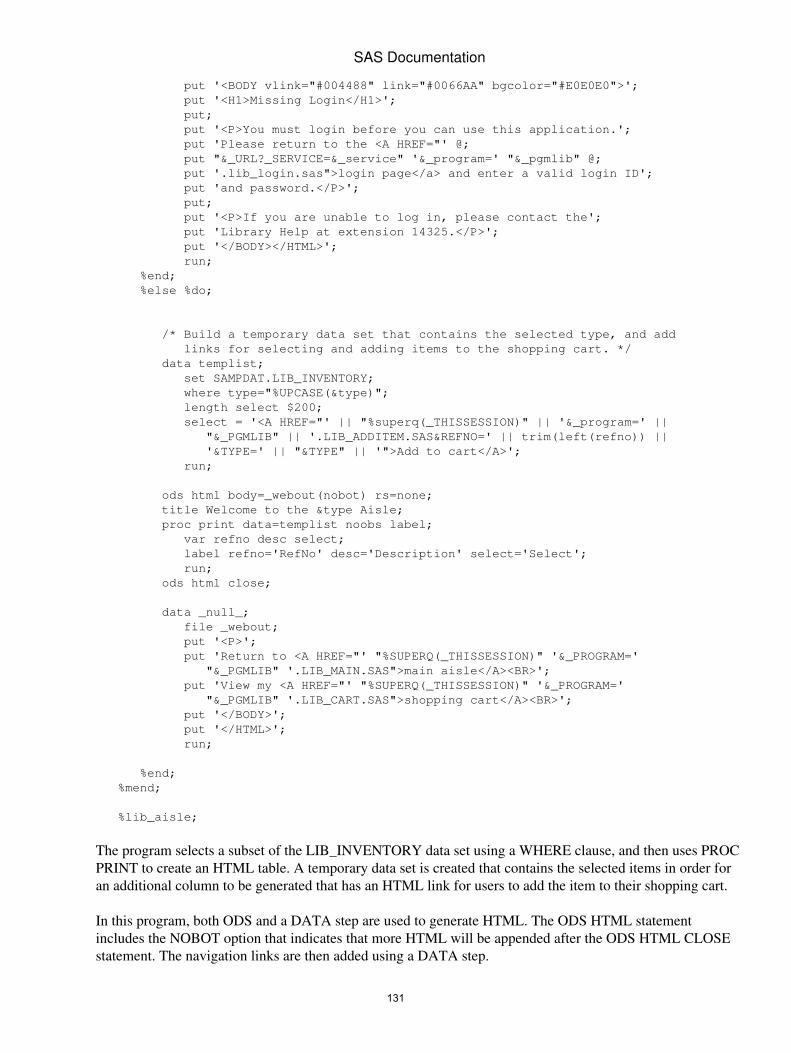
put '<BODY vlink="#004488" link="#0066AA" bgcolor="#E0E0E0">'; put '<H1>Missing Login</H1>'; put; put '<P>You must login before you can use this application.'; put 'Please return to the <A HREF="' @; put "&_URL?_SERVICE=&_service" '&_program=' "&_pgmlib" @; put '.lib_login.sas">login page</a> and enter a valid login ID'; put 'and password.</P>'; put; put '<P>If you are unable to log in, please contact the'; put 'Library Help at extension 14325.</P>'; put '</BODY></HTML>'; run; %end; %else %do;
/* Build a temporary data set that contains the selected type, and add links for selecting and adding items to the shopping cart. */ data templist; set SAMPDAT.LIB_INVENTORY; where type="%UPCASE(&type)"; length select $200; select = '<A HREF="' || "%superq(_THISSESSION)" || '&_program=' || "&_PGMLIB" || '.LIB_ADDITEM.SAS&REFNO=' || trim(left(refno)) || '&TYPE=' || "&TYPE" || '">Add to cart</A>'; run;
ods html body=_webout(nobot) rs=none; title Welcome to the &type Aisle; proc print data=templist noobs label; var refno desc select; label refno='RefNo' desc='Description' select='Select'; run; ods html close;
data _null_; file _webout; put '<P>'; put 'Return to <A HREF="' "%SUPERQ(_THISSESSION)" '&_PROGRAM=' "&_PGMLIB" '.LIB_MAIN.SAS">main aisle</A><BR>'; put 'View my <A HREF="' "%SUPERQ(_THISSESSION)" '&_PROGRAM=' "&_PGMLIB" '.LIB_CART.SAS">shopping cart</A><BR>'; put '</BODY>'; put '</HTML>'; run;
%end; %mend;
%lib_aisle;
The program selects a subset of the LIB_INVENTORY data set using a WHERE clause, and then uses PROCPRINT to create an HTML table. A temporary data set is created that contains the selected items in order foran additional column to be generated that has an HTML link for users to add the item to their shopping cart.
In this program, both ODS and a DATA step are used to generate HTML. The ODS HTML statementincludes the NOBOT option that indicates that more HTML will be appended after the ODS HTML CLOSEstatement. The navigation links are then added using a DATA step.
SAS Documentation
131
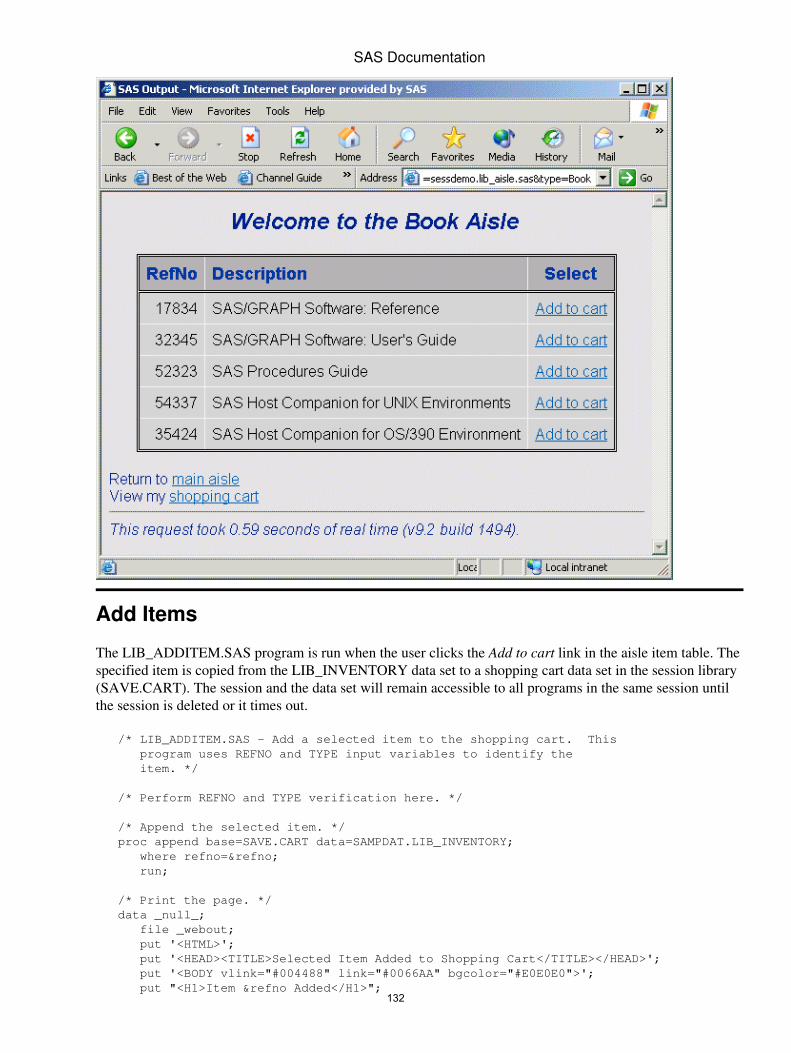
Add Items
The LIB_ADDITEM.SAS program is run when the user clicks the Add to cart link in the aisle item table. Thespecified item is copied from the LIB_INVENTORY data set to a shopping cart data set in the session library(SAVE.CART). The session and the data set will remain accessible to all programs in the same session untilthe session is deleted or it times out.
/* LIB_ADDITEM.SAS − Add a selected item to the shopping cart. This program uses REFNO and TYPE input variables to identify the item. */
/* Perform REFNO and TYPE verification here. */
/* Append the selected item. */ proc append base=SAVE.CART data=SAMPDAT.LIB_INVENTORY; where refno=&refno; run;
/* Print the page. */ data _null_; file _webout; put '<HTML>'; put '<HEAD><TITLE>Selected Item Added to Shopping Cart</TITLE></HEAD>'; put '<BODY vlink="#004488" link="#0066AA" bgcolor="#E0E0E0">'; put "<H1>Item &refno Added</H1>";
SAS Documentation
132
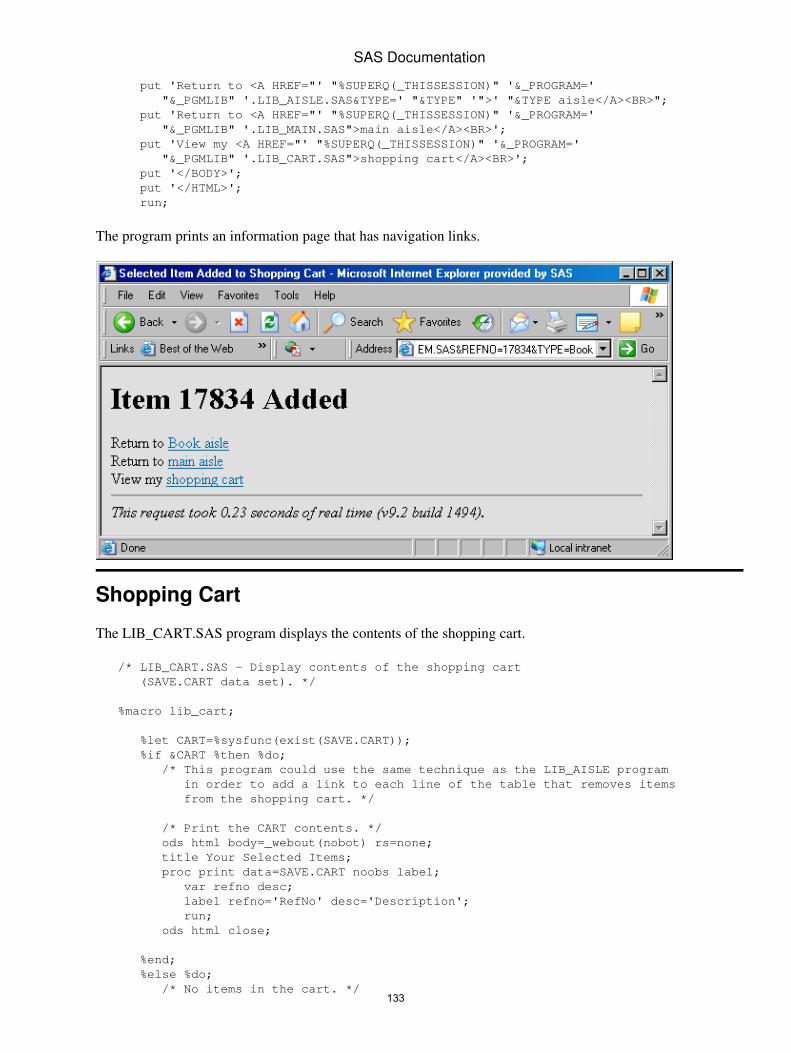
put 'Return to <A HREF="' "%SUPERQ(_THISSESSION)" '&_PROGRAM=' "&_PGMLIB" '.LIB_AISLE.SAS&TYPE=' "&TYPE" '">' "&TYPE aisle</A><BR>"; put 'Return to <A HREF="' "%SUPERQ(_THISSESSION)" '&_PROGRAM=' "&_PGMLIB" '.LIB_MAIN.SAS">main aisle</A><BR>'; put 'View my <A HREF="' "%SUPERQ(_THISSESSION)" '&_PROGRAM=' "&_PGMLIB" '.LIB_CART.SAS">shopping cart</A><BR>'; put '</BODY>'; put '</HTML>'; run;
The program prints an information page that has navigation links.
Shopping Cart
The LIB_CART.SAS program displays the contents of the shopping cart.
/* LIB_CART.SAS − Display contents of the shopping cart (SAVE.CART data set). */
%macro lib_cart;
%let CART=%sysfunc(exist(SAVE.CART)); %if &CART %then %do; /* This program could use the same technique as the LIB_AISLE program in order to add a link to each line of the table that removes items from the shopping cart. */
/* Print the CART contents. */ ods html body=_webout(nobot) rs=none; title Your Selected Items; proc print data=SAVE.CART noobs label; var refno desc; label refno='RefNo' desc='Description'; run; ods html close;
%end; %else %do; /* No items in the cart. */
SAS Documentation
133
data _null_; file _webout; put '<HTML>'; put '<HEAD><TITLE>No items selected</TITLE></HEAD>'; put '<BODY vlink="#004488" link="#0066AA" bgcolor="#E0E0E0">'; put '<H1>No Items Selected</H1>'; put; run; %end;
/* Print navigation links. */ data _null_; file _webout; put '<P>'; if &CART then do; put '<FORM ACTION="' "&_url" '">'; put '<INPUT TYPE="HIDDEN" NAME="_service" VALUE="' "&_service" '">'; put '<INPUT TYPE="HIDDEN" NAME="_program" VALUE="' "&_pgmlib" '.LIB_LOGOUT.SAS">'; put '<INPUT TYPE="HIDDEN" NAME="_server" VALUE="' "&_server" '">'; put '<INPUT TYPE="HIDDEN" NAME="_port" VALUE="' "&_port" '">'; put '<INPUT TYPE="HIDDEN" NAME="_sessionid" VALUE="' "&_sessionid" '">'; put '<INPUT TYPE="HIDDEN" NAME="CHECKOUT" VALUE="YES">'; put '<INPUT TYPE="SUBMIT" VALUE="Request these items">'; put '</FORM><P>'; end; put 'Return to <A HREF="' "%SUPERQ(_THISSESSION)" '&_PROGRAM=' "&_PGMLIB" '.LIB_MAIN.SAS">main aisle</A><BR>'; put '<A HREF="' "%SUPERQ(_THISSESSION)" '&_PROGRAM=' "&_PGMLIB" '.LIB_LOGOUT.SAS&CHECKOUT=NO">Logout</A><BR>'; put '</BODY>'; put '</HTML>'; run; %mend;
%lib_cart;
The contents of the shopping cart are displayed using a PROC PRINT statement. The page also includes arequest button and navigation links. The request button is part of an HTML form. In order to connect to thesame session, include _SERVER, _PORT, and _SESSIONID values in addition to the normal _SERVICE and_PROGRAM values. These values are usually specified as hidden fields and set to the corresponding SASmacro variables. This program has a hidden CHECKOUT field that is initialized to YES in order to indicatethat the user is requesting the items in the cart.
SAS Documentation
134
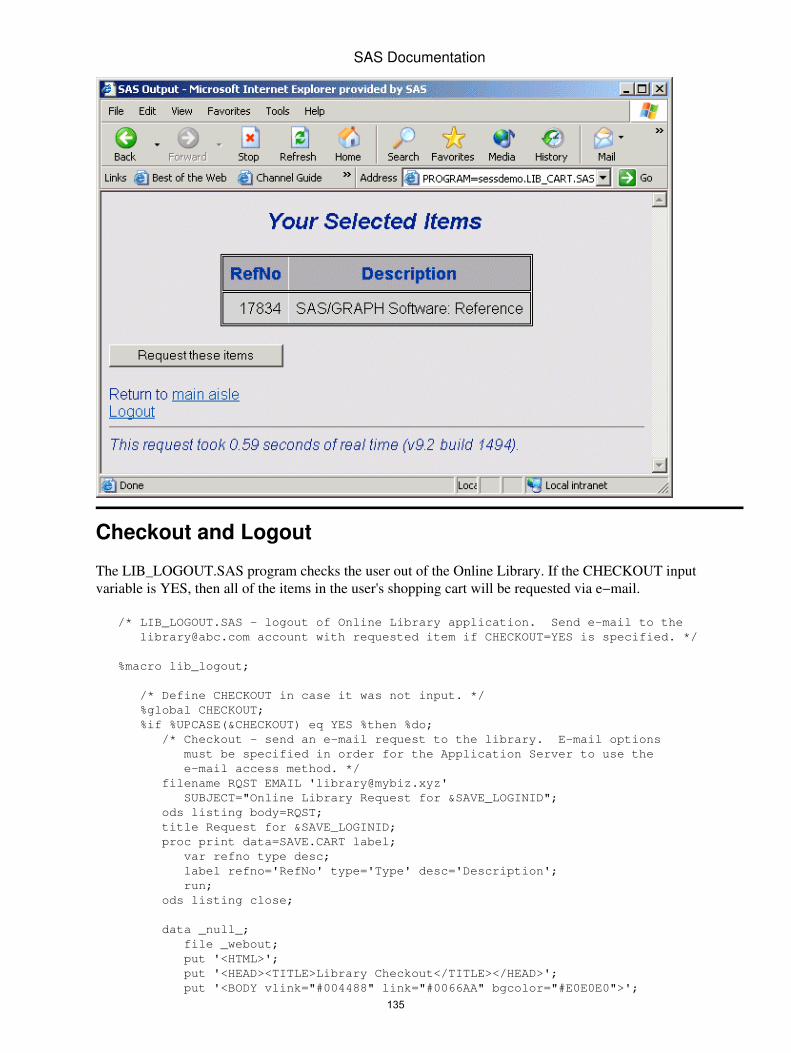
Checkout and Logout
The LIB_LOGOUT.SAS program checks the user out of the Online Library. If the CHECKOUT inputvariable is YES, then all of the items in the user's shopping cart will be requested via e−mail.
/* LIB_LOGOUT.SAS − logout of Online Library application. Send e−mail to the [email protected] account with requested item if CHECKOUT=YES is specified. */
%macro lib_logout;
/* Define CHECKOUT in case it was not input. */ %global CHECKOUT; %if %UPCASE(&CHECKOUT) eq YES %then %do; /* Checkout − send an e−mail request to the library. E−mail options must be specified in order for the Application Server to use the e−mail access method. */ filename RQST EMAIL '[email protected]' SUBJECT="Online Library Request for &SAVE_LOGINID"; ods listing body=RQST; title Request for &SAVE_LOGINID; proc print data=SAVE.CART label; var refno type desc; label refno='RefNo' type='Type' desc='Description'; run; ods listing close;
data _null_; file _webout; put '<HTML>'; put '<HEAD><TITLE>Library Checkout</TITLE></HEAD>'; put '<BODY vlink="#004488" link="#0066AA" bgcolor="#E0E0E0">';
SAS Documentation
135
put '<H1>Library Checkout</H1>'; put; put 'The items in your shopping cart have been requested.'; put '<P>Requested items will normally arrive via interoffice'; put 'mail by the following day. Thank you for using the Online Library.'; put '<P><A HREF="' "&_URL?_SERVICE=&_SERVICE" '&_PROGRAM=' "&_PGMLIB" '.LIB_LOGIN.SAS">Click here</A> to re−enter the'; put 'application.'; put '</BODY>'; put '</HTML>'; run;
%end; %else %do;
/* Logout without requesting anything. */ data _null_; file _webout; put '<HTML>'; put '<HEAD><TITLE>Logout</TITLE></HEAD>'; put '<BODY vlink="#004488" link="#0066AA" bgcolor="#E0E0E0">'; put '<H1>Library Logout</H1>'; put; put '<P>Thank you for using the Online Library.'; put '<P><A HREF="' "&_URL?_SERVICE=&_SERVICE" '&_PROGRAM=' "&_PGMLIB" '.LIB_LOGIN.SAS">Click here</A> to re−enter the'; put 'application.'; put '</BODY>'; put '</HTML>'; run; %end;
%mend;
%lib_logout;
/* User is finished − delete the session. */ %let rc=%sysfunc(appsrv_session(delete));
An information page is displayed if the user chooses to request the shopping cart items.
SAS Documentation
136

A simple logout screen is displayed if the user selects the Logout link.
Note: Logging out is not required. All sessions have an associated timeout (the default is 15 minutes). If thesession is not accessed for the duration of the timeout, the session and all temporary data in the session will bedeleted. In this sample, the SAVE.CART data set and the SAVE_LOGINID macro variable would beautomatically deleted when the session timeout is reached. You can change the session timeout using theTIMEOUT option of the PROC APPSRV SESSION statement or by using the APPSRV_SET('sessiontimeout',seconds) function inside the program.
SAS Documentation
137
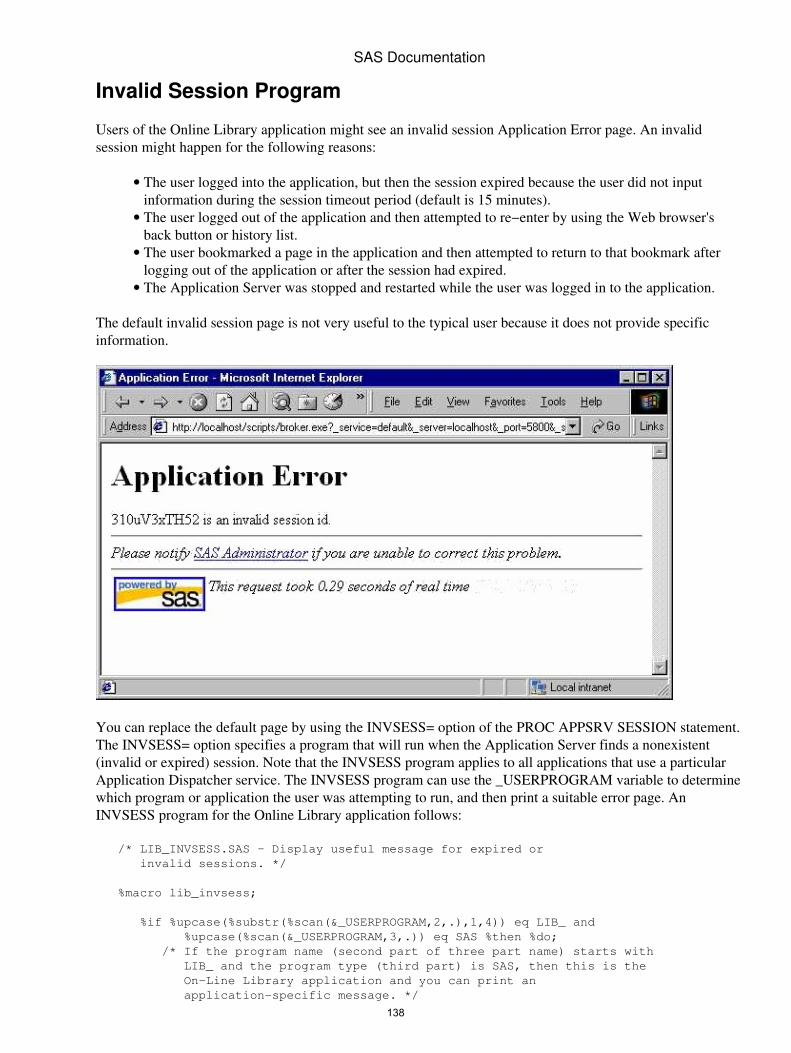
Invalid Session Program
Users of the Online Library application might see an invalid session Application Error page. An invalidsession might happen for the following reasons:
The user logged into the application, but then the session expired because the user did not inputinformation during the session timeout period (default is 15 minutes).
•
The user logged out of the application and then attempted to re−enter by using the Web browser'sback button or history list.
•
The user bookmarked a page in the application and then attempted to return to that bookmark afterlogging out of the application or after the session had expired.
•
The Application Server was stopped and restarted while the user was logged in to the application.•
The default invalid session page is not very useful to the typical user because it does not provide specificinformation.
You can replace the default page by using the INVSESS= option of the PROC APPSRV SESSION statement.The INVSESS= option specifies a program that will run when the Application Server finds a nonexistent(invalid or expired) session. Note that the INVSESS program applies to all applications that use a particularApplication Dispatcher service. The INVSESS program can use the _USERPROGRAM variable to determinewhich program or application the user was attempting to run, and then print a suitable error page. AnINVSESS program for the Online Library application follows:
/* LIB_INVSESS.SAS − Display useful message for expired or invalid sessions. */
%macro lib_invsess;
%if %upcase(%substr(%scan(&_USERPROGRAM,2,.),1,4)) eq LIB_ and %upcase(%scan(&_USERPROGRAM,3,.)) eq SAS %then %do; /* If the program name (second part of three part name) starts with LIB_ and the program type (third part) is SAS, then this is the On−Line Library application and you can print an application−specific message. */
SAS Documentation
138

data _null_; file _webout; put '<HTML>'; put '<HEAD><TITLE>Session Expired</TITLE></HEAD>'; put '<BODY vlink="#004488" link="#0066AA" bgcolor="#E0E0E0">'; put '<H1>Session Expired</H1>'; put; put 'Your connection to the Online Library has expired. You must'; put 'login again.'; put '<P>'; put '<A HREF="' "&_URL?_SERVICE=&_SERVICE" '&_PROGRAM=' "%scan(&_USERPROGRAM,1,.).LIB_LOGIN.SAS" '">Click here</A> to login.'; put '</BODY>'; put '</HTML>'; run; %end; %else %do; /* Otherwise, this is an unknown application; print a generic error page. */ data _null_; file _webout; put '<HTML>'; put '<HEAD><TITLE>Invalid or Expired Session</TITLE></HEAD>'; put '<BODY vlink="#004488" link="#0066AA" bgcolor="#E0E0E0">'; put '<H1>Invalid or Expired Session</H1>'; put; put 'Your application session has expired. In order to continue,'; put 'you must restart this application.'; put '</BODY>'; put '</HTML>'; run; %end; %mend;
%lib_invsess;
After the Application Server is configured to use the LIB_INVSESS.SAS program, an expired sessionmessage for the Online Library application will display:
SAS Documentation
139

Uploading FilesStarting with SAS 9.1.3 Service Pack 4, you can use Application Dispatcher to upload one or more files toyour Application Server. The upload process is usually initiated by an HTML page that contains an INPUTtag with the attribute TYPE set to "file":
<input type="file" name="myfile">
This tag enables you to specify the file that you want to upload. After the form data is submitted, the file youchose and any other name/value pairs that are contained in the HTML form are sent to the Application Server.Your SAS program can then use both the name/value pairs and the file that was uploaded.
Reserved Macro Variables
The reserved SAS macro variables that are associated with uploading files all start with _WEBIN_.
_WEBIN_CONTENT_LENGTHspecifies the length, in bytes, of the file that was uploaded.
_WEBIN_CONTENT_TYPEspecifies the content type that is associated with the file.
_WEBIN_FILE_COUNTspecifies the number of files that were uploaded. If no files were uploaded, the value of this variablewill be set to zero.
_WEBIN_FILEEXTspecifies the extension of the file that was uploaded.
_WEBIN_FILENAMEspecifies the original location of the file.
_WEBIN_FILEREFspecifies the SAS FILEREF that is automatically assigned to the uploaded file. You can use thisFILEREF to access the file. The uploaded file is stored in a temporary location on the ApplicationServer, and will be deleted when the request is completed. Be sure to copy the file to a permanentlocation if you need to access it at a later date.
_WEBIN_NAMEspecifies the value that is specified in the NAME attribute of the INPUT tag. In the example above,the value would be myfile.
_WEBIN_SASNAMEspecifies a unique name for the uploaded SAS table, view, or catalog. A value is set for this macrovariable only if a SAS table, view, or catalog was uploaded. All SAS data types are stored in theWork library. The type of SAS file that was uploaded is stored in the _WEBIN_SASTYPE macrovariable. See also _WEBIN_SASNAME_ORI.
_WEBIN_SASNAME_ORIspecifies the original name of the uploaded SAS table, view, or catalog. If a SAS table namedmydata.sas7bdat was uploaded, then _WEBIN_SASNAME_ORI would contain the valuemydata. A value is set for this macro variable only if a SAS table, view, or catalog was uploaded.All SAS data types are stored in the Work library. The type of SAS file that was uploaded is stored inthe _WEBIN_SASTYPE macro variable. See also _WEBIN_SASNAME.
_WEBIN_SASTYPEspecifies the type of SAS file that was uploaded: DATA for SAS tables, VIEW for SAS views, andCATALOG for SAS catalogs. A value is set for this macro variable only if a SAS table, view, orcatalog was uploaded. The name of the uploaded file is stored in the _WEBIN_SASNAME macrovariable.
140
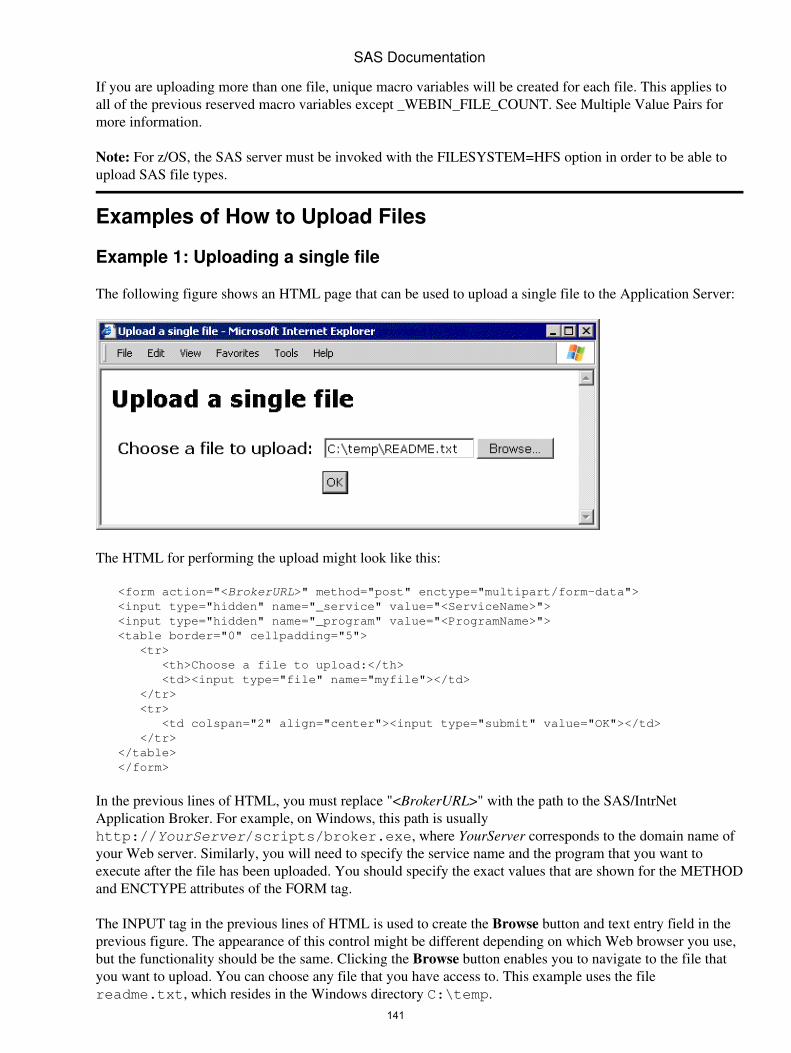
If you are uploading more than one file, unique macro variables will be created for each file. This applies toall of the previous reserved macro variables except _WEBIN_FILE_COUNT. See Multiple Value Pairs formore information.
Note: For z/OS, the SAS server must be invoked with the FILESYSTEM=HFS option in order to be able toupload SAS file types.
Examples of How to Upload Files
Example 1: Uploading a single file
The following figure shows an HTML page that can be used to upload a single file to the Application Server:
The HTML for performing the upload might look like this:
<form action="<BrokerURL>" method="post" enctype="multipart/form−data"> <input type="hidden" name="_service" value="<ServiceName>"> <input type="hidden" name="_program" value="<ProgramName>"> <table border="0" cellpadding="5"> <tr> <th>Choose a file to upload:</th> <td><input type="file" name="myfile"></td> </tr> <tr> <td colspan="2" align="center"><input type="submit" value="OK"></td> </tr> </table> </form>
In the previous lines of HTML, you must replace "<BrokerURL>" with the path to the SAS/IntrNetApplication Broker. For example, on Windows, this path is usuallyhttp://YourServer/scripts/broker.exe, where YourServer corresponds to the domain name ofyour Web server. Similarly, you will need to specify the service name and the program that you want toexecute after the file has been uploaded. You should specify the exact values that are shown for the METHODand ENCTYPE attributes of the FORM tag.
The INPUT tag in the previous lines of HTML is used to create the Browse button and text entry field in theprevious figure. The appearance of this control might be different depending on which Web browser you use,but the functionality should be the same. Clicking the Browse button enables you to navigate to the file thatyou want to upload. You can choose any file that you have access to. This example uses the filereadme.txt, which resides in the Windows directory C:\temp.
SAS Documentation
141
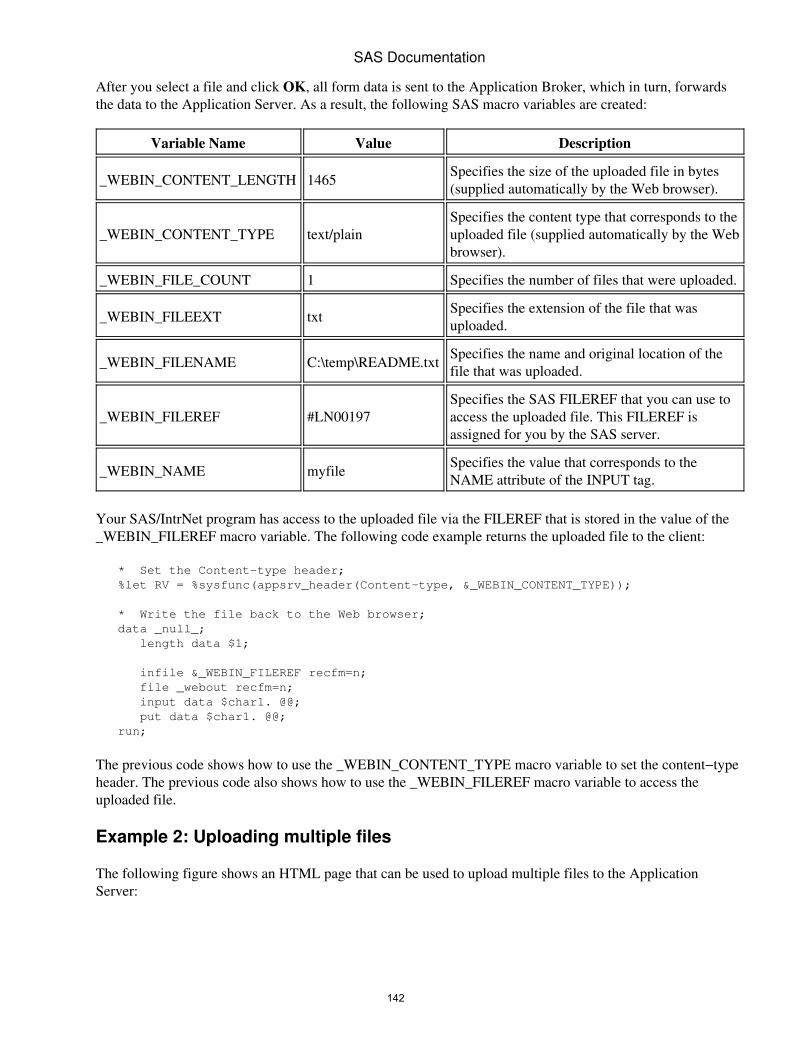
After you select a file and click OK, all form data is sent to the Application Broker, which in turn, forwardsthe data to the Application Server. As a result, the following SAS macro variables are created:
Variable Name Value Description
_WEBIN_CONTENT_LENGTH 1465 Specifies the size of the uploaded file in bytes(supplied automatically by the Web browser).
_WEBIN_CONTENT_TYPE text/plainSpecifies the content type that corresponds to theuploaded file (supplied automatically by the Webbrowser).
_WEBIN_FILE_COUNT 1 Specifies the number of files that were uploaded.
_WEBIN_FILEEXT txt Specifies the extension of the file that wasuploaded.
_WEBIN_FILENAME C:\temp\README.txt Specifies the name and original location of thefile that was uploaded.
_WEBIN_FILEREF #LN00197Specifies the SAS FILEREF that you can use toaccess the uploaded file. This FILEREF isassigned for you by the SAS server.
_WEBIN_NAME myfile Specifies the value that corresponds to theNAME attribute of the INPUT tag.
Your SAS/IntrNet program has access to the uploaded file via the FILEREF that is stored in the value of the_WEBIN_FILEREF macro variable. The following code example returns the uploaded file to the client:
* Set the Content−type header; %let RV = %sysfunc(appsrv_header(Content−type, &_WEBIN_CONTENT_TYPE));
* Write the file back to the Web browser; data _null_; length data $1;
infile &_WEBIN_FILEREF recfm=n; file _webout recfm=n; input data $char1. @@; put data $char1. @@; run;
The previous code shows how to use the _WEBIN_CONTENT_TYPE macro variable to set the content−typeheader. The previous code also shows how to use the _WEBIN_FILEREF macro variable to access theuploaded file.
Example 2: Uploading multiple files
The following figure shows an HTML page that can be used to upload multiple files to the ApplicationServer:
SAS Documentation
142

The HTML for performing the upload might look like this:
<form action="<BrokerURL>" method="post" enctype="multipart/form−data"> <input type="hidden" name="_service" value="<ServiceName>"> <input type="hidden" name="_program" value="<ProgramName>"> <table border="0" cellpadding="5"> <tr> <th>Choose a file to upload:</th> <td><input type="file" name="firstfile"></td> </tr> <tr> <th>Choose another file to upload:</th> <td><input type="file" name="secondfile"></td> </tr> <tr> <td colspan="2" align="center"><input type="submit" value="OK"></td> </tr> </table> </form>
Refer to Example 1 for a basic discussion of the previous lines of HTML. This example uses the filesreadme.txt and winter.jpg, which reside in the Windows directory C:\temp. Note that the two inputfiles do not need to be in the same directory.
After you select a file and click OK, all form data is sent to the Application Broker, which in turn, forwardsthe data to the Application Server. As a result, the following SAS macro variables are created:
Variable Name Value Description
_WEBIN_CONTENT_LENGTH 1465Specifies the size of the first uploaded file inbytes (supplied automatically by the Webbrowser).
_WEBIN_CONTENT_LENGTH0 2 Specifies the number of files that wereuploaded.
_WEBIN_CONTENT_LENGTH1 1465Specifies the size of the first uploaded file inbytes (supplied automatically by the Webbrowser).
_WEBIN_CONTENT_LENGTH2 5367 Specifies the size of the second uploaded file in
SAS Documentation
143
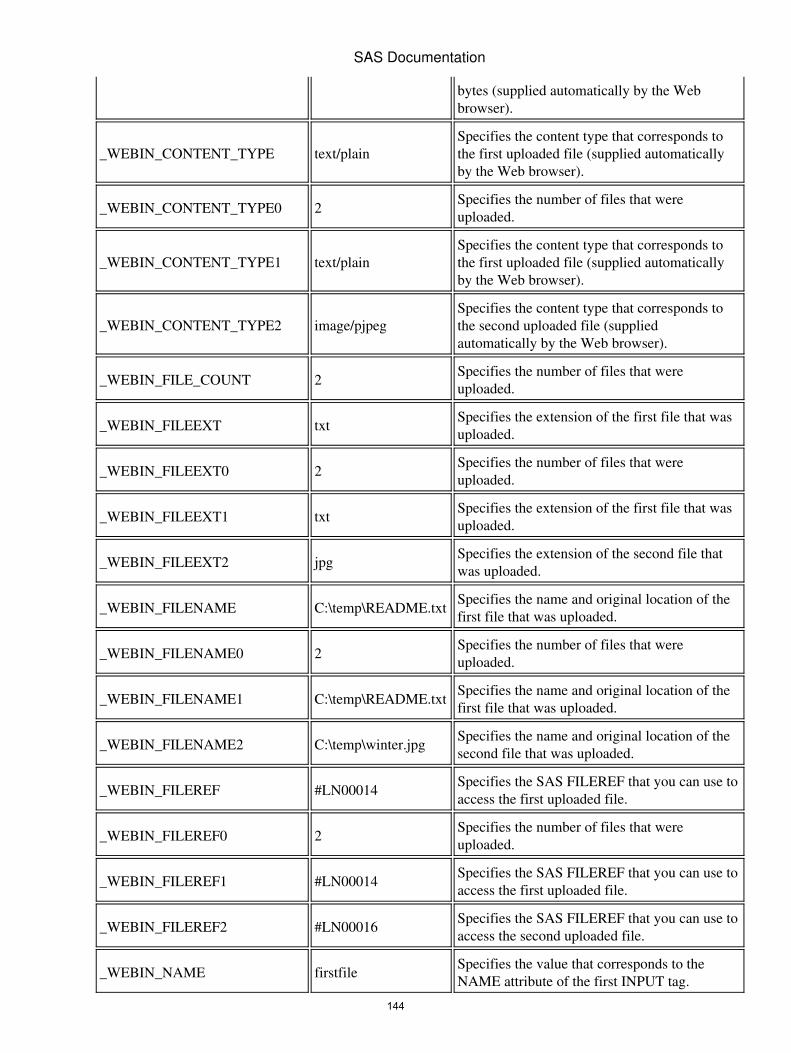
bytes (supplied automatically by the Webbrowser).
_WEBIN_CONTENT_TYPE text/plainSpecifies the content type that corresponds tothe first uploaded file (supplied automaticallyby the Web browser).
_WEBIN_CONTENT_TYPE0 2 Specifies the number of files that wereuploaded.
_WEBIN_CONTENT_TYPE1 text/plainSpecifies the content type that corresponds tothe first uploaded file (supplied automaticallyby the Web browser).
_WEBIN_CONTENT_TYPE2 image/pjpegSpecifies the content type that corresponds tothe second uploaded file (suppliedautomatically by the Web browser).
_WEBIN_FILE_COUNT 2 Specifies the number of files that wereuploaded.
_WEBIN_FILEEXT txt Specifies the extension of the first file that wasuploaded.
_WEBIN_FILEEXT0 2 Specifies the number of files that wereuploaded.
_WEBIN_FILEEXT1 txt Specifies the extension of the first file that wasuploaded.
_WEBIN_FILEEXT2 jpg Specifies the extension of the second file thatwas uploaded.
_WEBIN_FILENAME C:\temp\README.txt Specifies the name and original location of thefirst file that was uploaded.
_WEBIN_FILENAME0 2 Specifies the number of files that wereuploaded.
_WEBIN_FILENAME1 C:\temp\README.txt Specifies the name and original location of thefirst file that was uploaded.
_WEBIN_FILENAME2 C:\temp\winter.jpg Specifies the name and original location of thesecond file that was uploaded.
_WEBIN_FILEREF #LN00014 Specifies the SAS FILEREF that you can use toaccess the first uploaded file.
_WEBIN_FILEREF0 2 Specifies the number of files that wereuploaded.
_WEBIN_FILEREF1 #LN00014 Specifies the SAS FILEREF that you can use toaccess the first uploaded file.
_WEBIN_FILEREF2 #LN00016 Specifies the SAS FILEREF that you can use toaccess the second uploaded file.
_WEBIN_NAME firstfile Specifies the value that corresponds to theNAME attribute of the first INPUT tag.
SAS Documentation
144
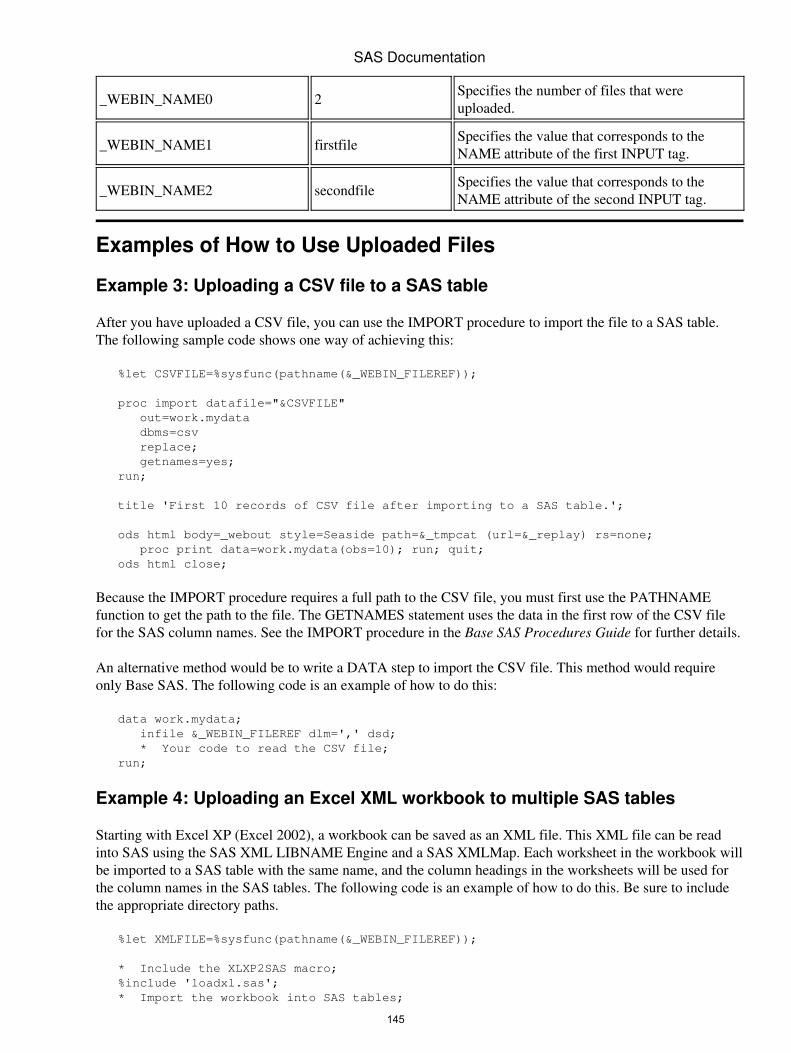
_WEBIN_NAME0 2 Specifies the number of files that wereuploaded.
_WEBIN_NAME1 firstfile Specifies the value that corresponds to theNAME attribute of the first INPUT tag.
_WEBIN_NAME2 secondfile Specifies the value that corresponds to theNAME attribute of the second INPUT tag.
Examples of How to Use Uploaded Files
Example 3: Uploading a CSV file to a SAS table
After you have uploaded a CSV file, you can use the IMPORT procedure to import the file to a SAS table.The following sample code shows one way of achieving this:
%let CSVFILE=%sysfunc(pathname(&_WEBIN_FILEREF));
proc import datafile="&CSVFILE" out=work.mydata dbms=csv replace; getnames=yes; run;
title 'First 10 records of CSV file after importing to a SAS table.';
ods html body=_webout style=Seaside path=&_tmpcat (url=&_replay) rs=none; proc print data=work.mydata(obs=10); run; quit; ods html close;
Because the IMPORT procedure requires a full path to the CSV file, you must first use the PATHNAMEfunction to get the path to the file. The GETNAMES statement uses the data in the first row of the CSV filefor the SAS column names. See the IMPORT procedure in the Base SAS Procedures Guide for further details.
An alternative method would be to write a DATA step to import the CSV file. This method would requireonly Base SAS. The following code is an example of how to do this:
data work.mydata; infile &_WEBIN_FILEREF dlm=',' dsd; * Your code to read the CSV file; run;
Example 4: Uploading an Excel XML workbook to multiple SAS tables
Starting with Excel XP (Excel 2002), a workbook can be saved as an XML file. This XML file can be readinto SAS using the SAS XML LIBNAME Engine and a SAS XMLMap. Each worksheet in the workbook willbe imported to a SAS table with the same name, and the column headings in the worksheets will be used forthe column names in the SAS tables. The following code is an example of how to do this. Be sure to includethe appropriate directory paths.
%let XMLFILE=%sysfunc(pathname(&_WEBIN_FILEREF));
* Include the XLXP2SAS macro; %include 'loadxl.sas'; * Import the workbook into SAS tables;
SAS Documentation
145
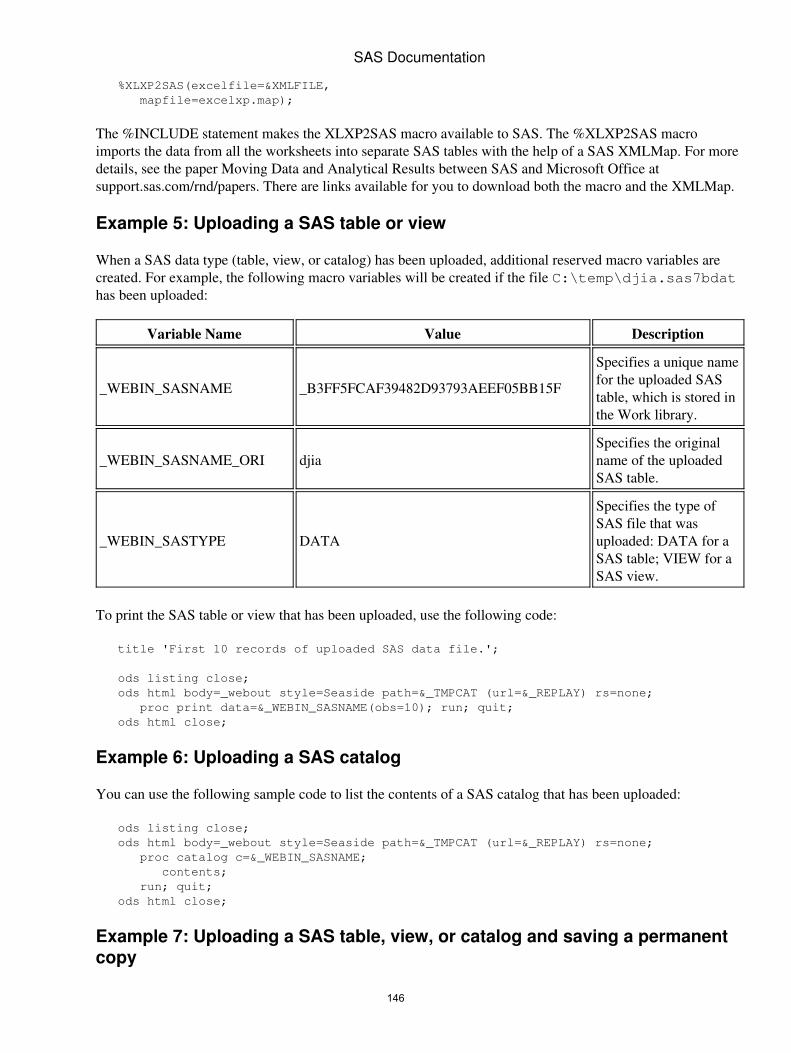
%XLXP2SAS(excelfile=&XMLFILE, mapfile=excelxp.map);
The %INCLUDE statement makes the XLXP2SAS macro available to SAS. The %XLXP2SAS macroimports the data from all the worksheets into separate SAS tables with the help of a SAS XMLMap. For moredetails, see the paper Moving Data and Analytical Results between SAS and Microsoft Office atsupport.sas.com/rnd/papers. There are links available for you to download both the macro and the XMLMap.
Example 5: Uploading a SAS table or view
When a SAS data type (table, view, or catalog) has been uploaded, additional reserved macro variables arecreated. For example, the following macro variables will be created if the file C:\temp\djia.sas7bdathas been uploaded:
Variable Name Value Description
_WEBIN_SASNAME _B3FF5FCAF39482D93793AEEF05BB15F
Specifies a unique namefor the uploaded SAStable, which is stored inthe Work library.
_WEBIN_SASNAME_ORI djiaSpecifies the originalname of the uploadedSAS table.
_WEBIN_SASTYPE DATA
Specifies the type ofSAS file that wasuploaded: DATA for aSAS table; VIEW for aSAS view.
To print the SAS table or view that has been uploaded, use the following code:
title 'First 10 records of uploaded SAS data file.';
ods listing close; ods html body=_webout style=Seaside path=&_TMPCAT (url=&_REPLAY) rs=none; proc print data=&_WEBIN_SASNAME(obs=10); run; quit; ods html close;
Example 6: Uploading a SAS catalog
You can use the following sample code to list the contents of a SAS catalog that has been uploaded:
ods listing close; ods html body=_webout style=Seaside path=&_TMPCAT (url=&_REPLAY) rs=none; proc catalog c=&_WEBIN_SASNAME; contents; run; quit; ods html close;
Example 7: Uploading a SAS table, view, or catalog and saving a permanentcopy
SAS Documentation
146
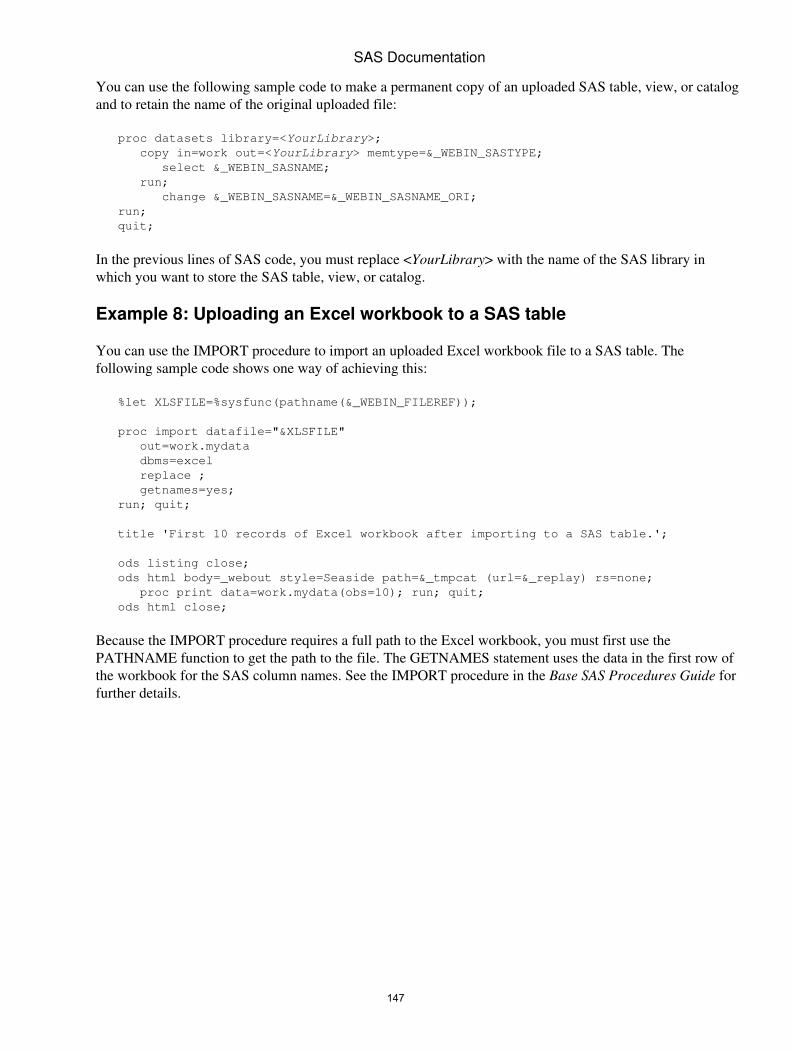
You can use the following sample code to make a permanent copy of an uploaded SAS table, view, or catalogand to retain the name of the original uploaded file:
proc datasets library=<YourLibrary>; copy in=work out=<YourLibrary> memtype=&_WEBIN_SASTYPE; select &_WEBIN_SASNAME; run; change &_WEBIN_SASNAME=&_WEBIN_SASNAME_ORI; run; quit;
In the previous lines of SAS code, you must replace <YourLibrary> with the name of the SAS library inwhich you want to store the SAS table, view, or catalog.
Example 8: Uploading an Excel workbook to a SAS table
You can use the IMPORT procedure to import an uploaded Excel workbook file to a SAS table. Thefollowing sample code shows one way of achieving this:
%let XLSFILE=%sysfunc(pathname(&_WEBIN_FILEREF));
proc import datafile="&XLSFILE" out=work.mydata dbms=excel replace ; getnames=yes; run; quit;
title 'First 10 records of Excel workbook after importing to a SAS table.';
ods listing close; ods html body=_webout style=Seaside path=&_tmpcat (url=&_replay) rs=none; proc print data=work.mydata(obs=10); run; quit; ods html close;
Because the IMPORT procedure requires a full path to the Excel workbook, you must first use thePATHNAME function to get the path to the file. The GETNAMES statement uses the data in the first row ofthe workbook for the SAS column names. See the IMPORT procedure in the Base SAS Procedures Guide forfurther details.
SAS Documentation
147

Application Server FunctionsApplication Server functions are DATA step functions that you use to define character, numeric, andalphanumeric strings to generate output in the desired format within a PROC APPSRV statement. Thefollowing list of Application Server functions can be used to return the correct character, numeric, oralphanumeric value of a PROC APPSRV parameter setting.
APPSRVGETC• APPSRVGETN• APPSRVSET• APPSRV_AUTHCLS• APPSRV_AUTHDS• APPSRV_AUTHLIB• APPSRV_HEADER• APPSRV_SESSION• APPSRV_UNSAFE•
148
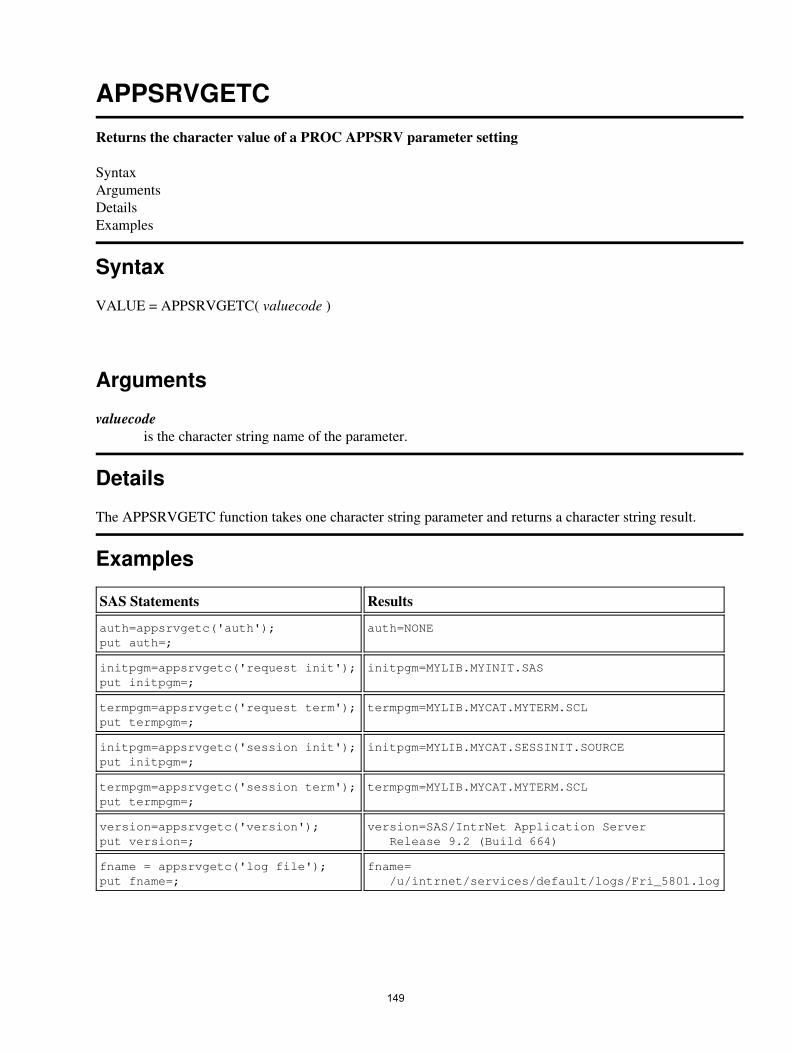
APPSRVGETC
Returns the character value of a PROC APPSRV parameter setting
SyntaxArgumentsDetailsExamples
Syntax
VALUE = APPSRVGETC( valuecode )
Arguments
valuecodeis the character string name of the parameter.
Details
The APPSRVGETC function takes one character string parameter and returns a character string result.
Examples
SAS Statements Results
auth=appsrvgetc('auth');put auth=;
auth=NONE
initpgm=appsrvgetc('request init');put initpgm=;
initpgm=MYLIB.MYINIT.SAS
termpgm=appsrvgetc('request term');put termpgm=;
termpgm=MYLIB.MYCAT.MYTERM.SCL
initpgm=appsrvgetc('session init');put initpgm=;
initpgm=MYLIB.MYCAT.SESSINIT.SOURCE
termpgm=appsrvgetc('session term');put termpgm=;
termpgm=MYLIB.MYCAT.MYTERM.SCL
version=appsrvgetc('version');put version=;
version=SAS/IntrNet Application Server Release 9.2 (Build 664)
fname = appsrvgetc('log file');put fname=;
fname= /u/intrnet/services/default/logs/Fri_5801.log
149

APPSRVGETN
Returns the numeric value of a PROC APPSRV parameter setting
SyntaxArgumentsDetailsExamples
Syntax
VALUE = APPSRVGETN( valuecode )
Arguments
valuecodeis the character string name of the parameter.
Details
The APPSRVGETN function takes one character string parameter and returns a numeric string result.
Examples
SAS Statements Results
maxtimeout=appsrvgetn('request maxtimeout');put maxtimeout=;
maxtimeout=900
timeout=appsrvgetn('request timeout');put timeout=;
timeout=300
sessmaxtimeout=appsrvgetn('session maxtimeout');put sessmaxtimeout=;
sessmaxtimeout=900
session=appsrvgetn('session timeout');put session=;
session=900
starttime=appsrvgetn('server starttime'); put starttime=datetime.;
starttime=01SEP02:08:15:59
version=appsrvgetn('version');put version=;
version=9.2
150

APPSRVSET
Returns the numeric value of a PROC APPSRV parameter setting
SyntaxArgumentsDetailsExamples
Syntax
RC = APPSRVSET( valuecode, newvalue )
Arguments
valuecodeis the character string name of the parameter.
newvalueis the numeric string name of the parameter.
The following table lists the valid parameters for valuecode and provides a description of each.
Valuecode Description
AUTOMATICHEADERS
specifies whether the APPSRV procedure returns headers. The value must be 0(disabled) or 1 (enabled). Automatic header generation is enabled by default.
BACKGROUND specifies that the APPSRV procedure runs in the background. This parameter is validonly for pool services. An optional parameter can also be set to specify a new requesttimeout value.
DISCONNECT closes the socket that is opened to the Application Broker. This causes theApplication Broker to exit.
PROGRAM ERROR specifies the return code when there is an error. This can be set to any value.
REQUESTTIMEOUT
specifies the number of seconds that a requested program is allowed to run beforeit is terminated by the server. The default session timeout is 300 (5 minutes).
SESSIONTIMEOUT
specifies the number of seconds that elapse before a session expires. The defaultsession timeout is 900 (15 minutes).
Details
The APPSRVSET function takes one character string parameter and one numeric string parameter and returnsa numeric string result.
151

Examples
SAS Statements
rc=appsrvset('request timeout',300);
rc=appsrvset('session timeout',900);
rc=appsrvset('program error',256);
/* disable generation of MIME headers */
rc=appsrvset('automatic headers',0);
/* run the job in the background with *//* a new timeout value of 5 minutes */
rc=appsrvset('background',300);
rc=appsrvset('disconnect');
SAS Documentation
152
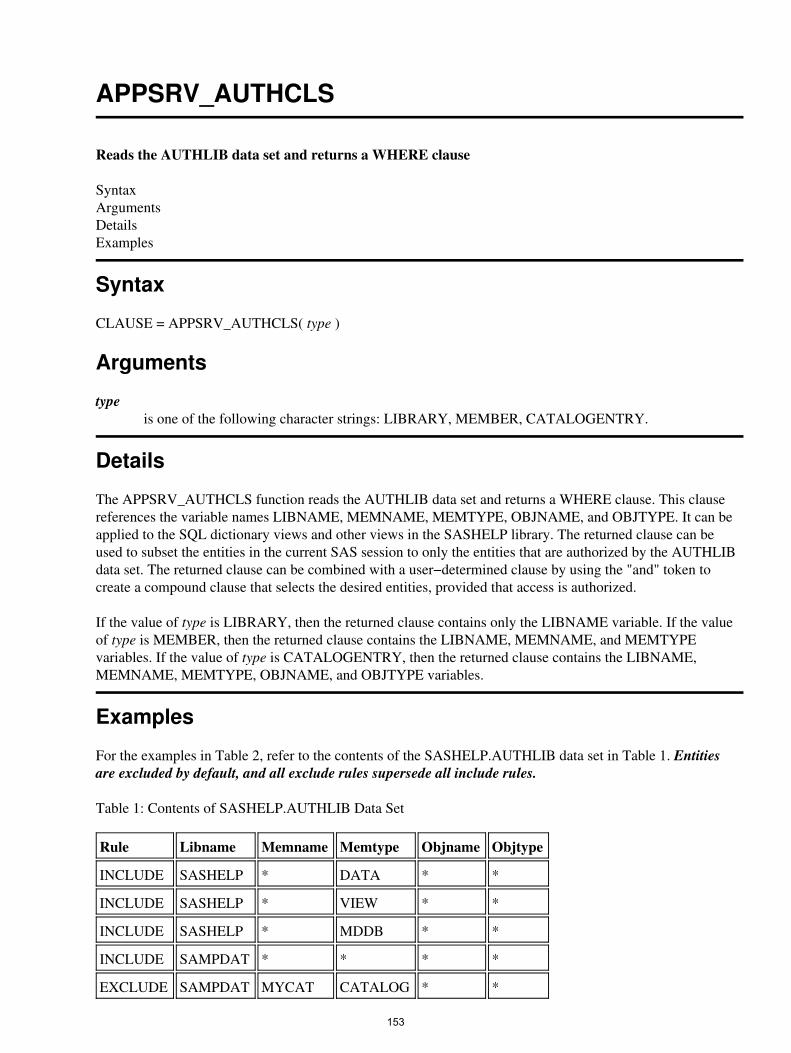
APPSRV_AUTHCLS
Reads the AUTHLIB data set and returns a WHERE clause
SyntaxArgumentsDetailsExamples
Syntax
CLAUSE = APPSRV_AUTHCLS( type )
Arguments
typeis one of the following character strings: LIBRARY, MEMBER, CATALOGENTRY.
Details
The APPSRV_AUTHCLS function reads the AUTHLIB data set and returns a WHERE clause. This clausereferences the variable names LIBNAME, MEMNAME, MEMTYPE, OBJNAME, and OBJTYPE. It can beapplied to the SQL dictionary views and other views in the SASHELP library. The returned clause can beused to subset the entities in the current SAS session to only the entities that are authorized by the AUTHLIBdata set. The returned clause can be combined with a user−determined clause by using the "and" token tocreate a compound clause that selects the desired entities, provided that access is authorized.
If the value of type is LIBRARY, then the returned clause contains only the LIBNAME variable. If the valueof type is MEMBER, then the returned clause contains the LIBNAME, MEMNAME, and MEMTYPEvariables. If the value of type is CATALOGENTRY, then the returned clause contains the LIBNAME,MEMNAME, MEMTYPE, OBJNAME, and OBJTYPE variables.
Examples
For the examples in Table 2, refer to the contents of the SASHELP.AUTHLIB data set in Table 1. Entitiesare excluded by default, and all exclude rules supersede all include rules.
Table 1: Contents of SASHELP.AUTHLIB Data Set
Rule Libname Memname Memtype Objname Objtype
INCLUDE SASHELP * DATA * *
INCLUDE SASHELP * VIEW * *
INCLUDE SASHELP * MDDB * *
INCLUDE SAMPDAT * * * *
EXCLUDE SAMPDAT MYCAT CATALOG * *
153
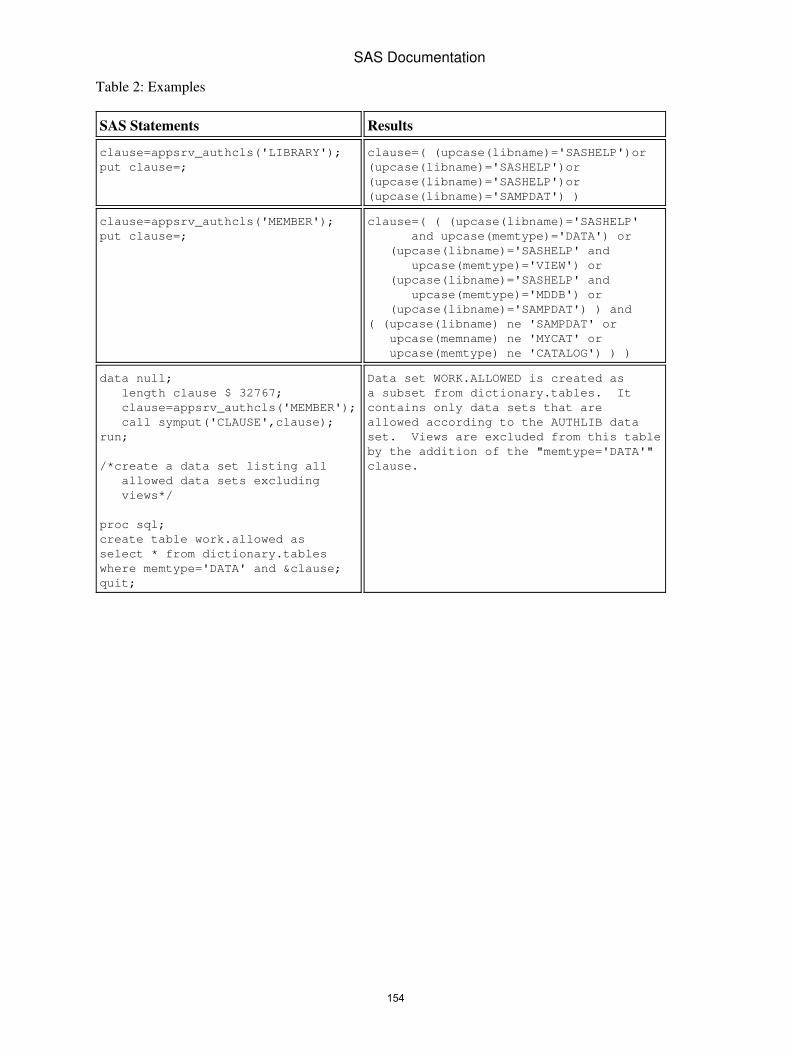
Table 2: Examples
SAS Statements Results
clause=appsrv_authcls('LIBRARY');put clause=;
clause=( (upcase(libname)='SASHELP')or(upcase(libname)='SASHELP')or(upcase(libname)='SASHELP')or(upcase(libname)='SAMPDAT') )
clause=appsrv_authcls('MEMBER');put clause=;
clause=( ( (upcase(libname)='SASHELP' and upcase(memtype)='DATA') or (upcase(libname)='SASHELP' and upcase(memtype)='VIEW') or (upcase(libname)='SASHELP' and upcase(memtype)='MDDB') or (upcase(libname)='SAMPDAT') ) and ( (upcase(libname) ne 'SAMPDAT' or upcase(memname) ne 'MYCAT' or upcase(memtype) ne 'CATALOG') ) )
data null; length clause $ 32767; clause=appsrv_authcls('MEMBER'); call symput('CLAUSE',clause);run;
/*create a data set listing all allowed data sets excluding views*/
proc sql;create table work.allowed asselect * from dictionary.tableswhere memtype='DATA' and &clause;quit;
Data set WORK.ALLOWED is created asa subset from dictionary.tables. It contains only data sets that are allowed according to the AUTHLIB data set. Views are excluded from this tableby the addition of the "memtype='DATA'"clause.
SAS Documentation
154

APPSRV_AUTHDS
Enables the user to change the AUTHLIB data set name
SyntaxArgumentsDetailsExamples
Syntax
RC = APPSRV_AUTHDS( dataset )
Arguments
datasetis a character string that is the SAS data set name.
Details
The APPSRV_AUTHDS function enables the user to change the AUTHLIB data set name. The AUTHLIBdata set is the table that is examined by the APPSRV_AUTHLIB and APPSRV_AUTHCLS functions. Bydefault, these functions operate on the data set SASHELP.AUTHLIB. Calling the APPSRV_AUTHDSfunction causes subsequent calls to these functions to use the same data set name. In an Application Serverenvironment, the effect of calling APPSRV_AUTHDS lasts for the duration of the request. To change theAUTHLIB data set name for all requests, call the APPSRV_AUTHDS function in the program that isspecified by the INIT argument of the REQUEST statement. The function returns 1 if successful and 0 ifunsuccessful.
Examples
SAS Statements Results
rc=appsrv_authds('MYLIB.MYAUTH');put rc=;
rc=1
155
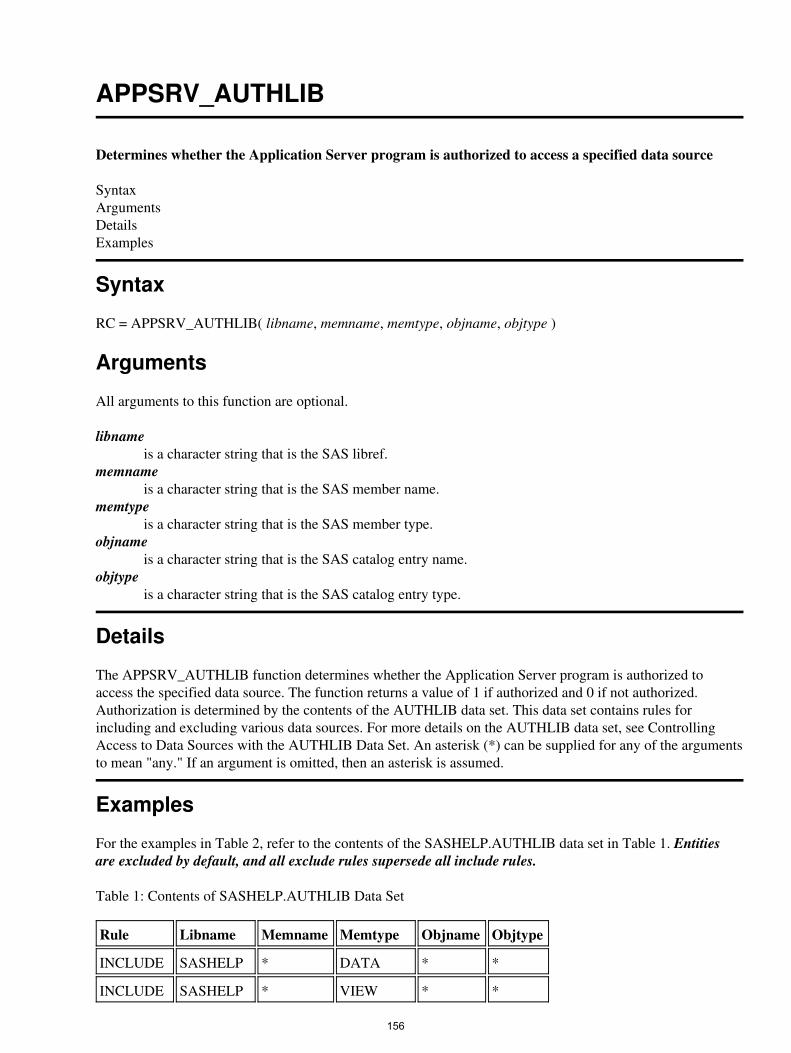
APPSRV_AUTHLIB
Determines whether the Application Server program is authorized to access a specified data source
SyntaxArgumentsDetailsExamples
Syntax
RC = APPSRV_AUTHLIB( libname, memname, memtype, objname, objtype )
Arguments
All arguments to this function are optional.
libnameis a character string that is the SAS libref.
memnameis a character string that is the SAS member name.
memtypeis a character string that is the SAS member type.
objnameis a character string that is the SAS catalog entry name.
objtypeis a character string that is the SAS catalog entry type.
Details
The APPSRV_AUTHLIB function determines whether the Application Server program is authorized toaccess the specified data source. The function returns a value of 1 if authorized and 0 if not authorized.Authorization is determined by the contents of the AUTHLIB data set. This data set contains rules forincluding and excluding various data sources. For more details on the AUTHLIB data set, see ControllingAccess to Data Sources with the AUTHLIB Data Set. An asterisk (*) can be supplied for any of the argumentsto mean "any." If an argument is omitted, then an asterisk is assumed.
Examples
For the examples in Table 2, refer to the contents of the SASHELP.AUTHLIB data set in Table 1. Entitiesare excluded by default, and all exclude rules supersede all include rules.
Table 1: Contents of SASHELP.AUTHLIB Data Set
Rule Libname Memname Memtype Objname Objtype
INCLUDE SASHELP * DATA * *
INCLUDE SASHELP * VIEW * *
156

INCLUDE SASHELP * MDDB * *
INCLUDE SAMPDAT * * * *
EXCLUDE SAMPDAT MYCAT CATALOG * *
Table 2: Examples
SAS Statements Results
rc=appsrv_authlib('SASHELP','RETAIL','DATA');put rc=;
/*equivalent to rc=appsrv_authlib('SASHELP','RETAIL', 'DATA','*','*');*/
rc=1
if (appsrv_authlib('SASHELP','CORE', 'CATALOG')) put 'You may proceed ...';else put 'You are not authorized to access this SAS catalog';
/*equivalent to if (appsrv_authlib('SASHELP','CORE', 'CATALOG','*','*'))*/
You are not authorized to access this SAS catalog.
/*Check to see if access to any SCL catalog entries is allowed*//*NOTE: A true (1) response does not mean that you can see ALL SCL entries, just some.*//*This returns true because some catalogs in SAMPDAT are included*/
rc = appsrv_authlib('*','*','CATALOG','*', 'SCL');put rc=;
rc=1
/*Check to see if access to any of the entries in the MYDATA.MYCAT catalog is allowed*/
rc = appsrv_authlib('SAMPDAT','MYCAT', 'CATALOG');if (rc = 1) then put 'You can access at least some of the entries';else put 'Access to this entire catalog is restricted';
Access to this entire catalog is restricted.
SAS Documentation
157

APPSRV_HEADER
The DATA step function used to add or modify a header
SyntaxArgumentsDetailsExamples
Syntax
OLD−HEADER = APPSRV_HEADER(Header Name,Header Value);
Arguments
Header nameThe name of the header to set or reset.
Header ValueThe new value for the header.
Details
The APPSRV_HEADER function enables automatic header generation. You can add a header to the defaultlist or modify an existing header from the list. When you modify the value of an existing header, the old valuebecomes the return value of the function.
The automatic HTTP header generation feature recognizes Output Delivery System (ODS) output types andgenerates appropriate default content−type headers. If no content type is specified with APPSRV_HEADER,ODS is not used and no HTTP header is written to _WEBOUT, a default Content−type: text/htmlheader is generated.
Examples
SAS Statements Resulting Headers
No calls to appsrv_header Content−type: text/html
/* add expires header */rc = appsrv_header('Expires','Thu, 18 Nov 1999 12:23:34 GMT');
Content−type: text/html Expires: Thu, 18 Nov 1999 12:23:34 GMT
/* add expires header */rc = appsrv_header('Expires','Thu, 18 Nov 1999 12:23:34 GMT');/* add pragma header*/rc = appsrv_header('Cache−control', 'no−cache');
Content−type: text/htmlExpires: Thu, 18 Nov 1999 12:23:34 GMT Cache−control: no−cache
/* add expires header */rc = appsrv_header('Expires','Thu, 18 Nov 1999 12:23:34 GMT');
Content−type: text/htmlCache−control: no−cache
158
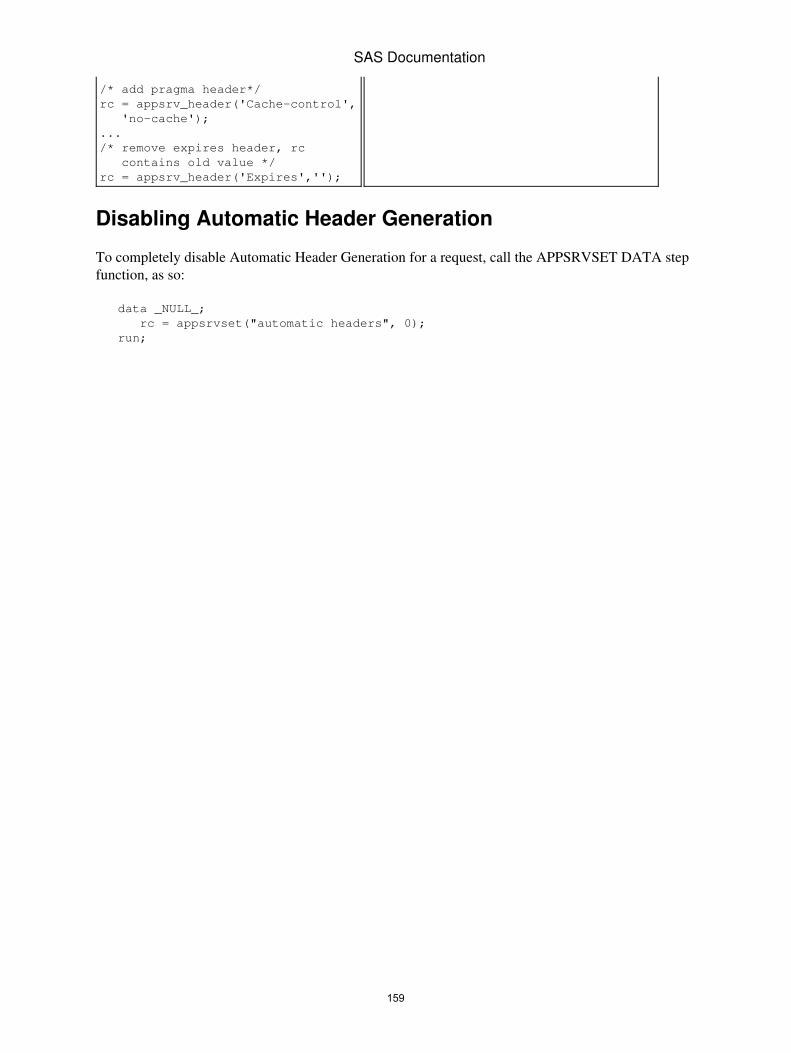
/* add pragma header*/rc = appsrv_header('Cache−control', 'no−cache');.../* remove expires header, rc contains old value */rc = appsrv_header('Expires','');
Disabling Automatic Header Generation
To completely disable Automatic Header Generation for a request, call the APPSRVSET DATA stepfunction, as so:
data _NULL_; rc = appsrvset("automatic headers", 0); run;
SAS Documentation
159
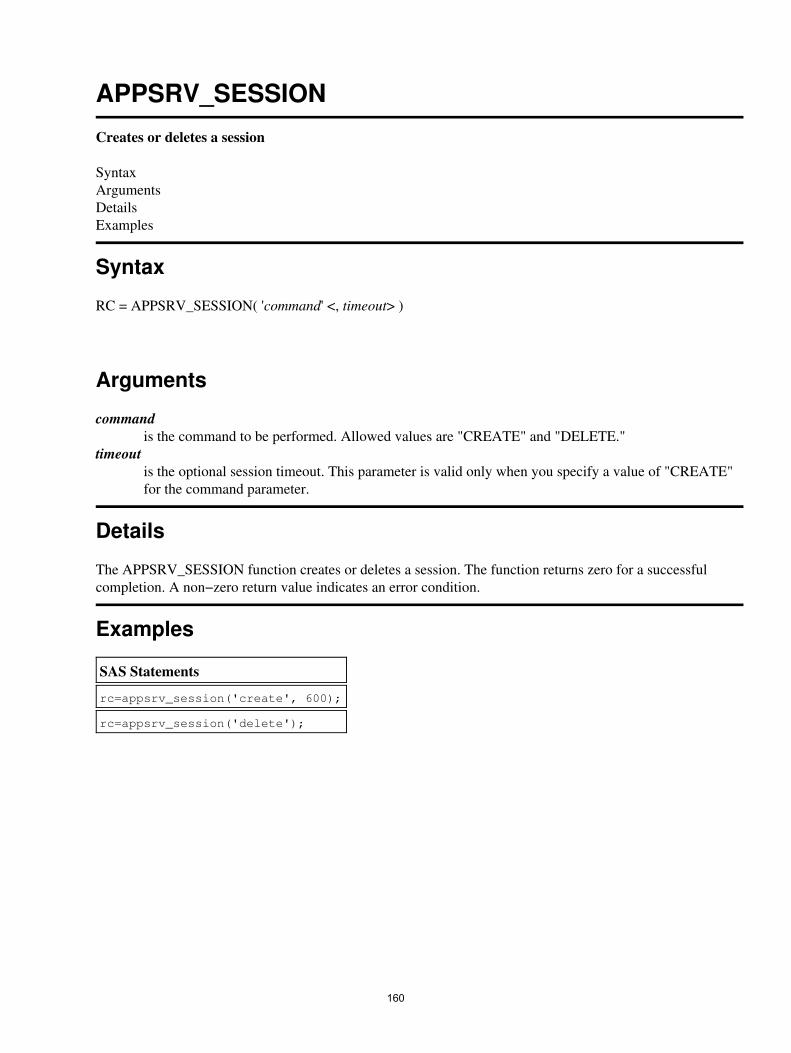
APPSRV_SESSION
Creates or deletes a session
SyntaxArgumentsDetailsExamples
Syntax
RC = APPSRV_SESSION( 'command' <, timeout> )
Arguments
commandis the command to be performed. Allowed values are "CREATE" and "DELETE."
timeoutis the optional session timeout. This parameter is valid only when you specify a value of "CREATE"for the command parameter.
Details
The APPSRV_SESSION function creates or deletes a session. The function returns zero for a successfulcompletion. A non−zero return value indicates an error condition.
Examples
SAS Statements
rc=appsrv_session('create', 600);
rc=appsrv_session('delete');
160

Application Dispatcher DebuggingDebug flags are not used only for diagnostic purposes. At many sites, it might be necessary to disable debugflags for security reasons. This section defines all of the debug flags, gives you some usage scenarios, andprovides diagnostic information. It also helps you determine which debug flags should be disabled and how toidentify valid debug values, which options are best suited for the four types of programs that constitute theinput component, and which debugging methods is best suited for your needs, (based on the debuggingoptions that are available in the programming component).
Debugging in the Input ComponentList of Valid Debug Values♦ Disabling Debug Flags♦ Special Cases♦ Debugging Application Broker Installation Problems♦
•
Debugging in the Program ComponentExamining the SAS Log♦ Using SAS Options♦ The DATA Step Debugger♦ The SCL Debugger♦
•
161
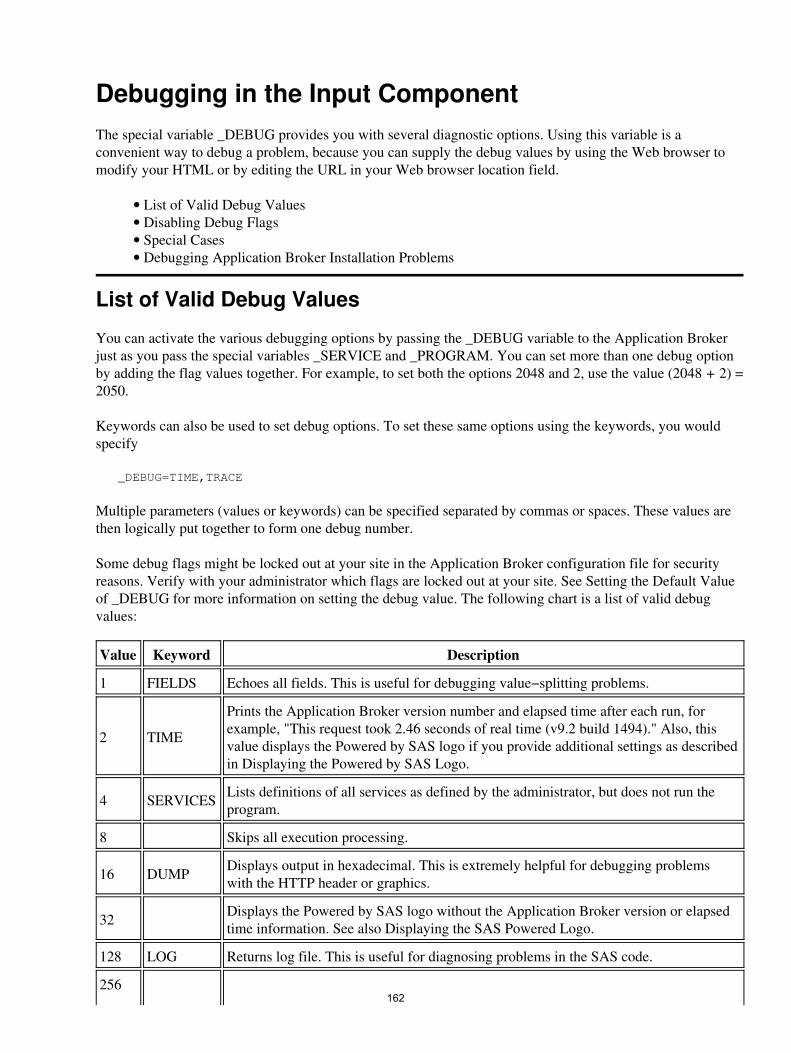
Debugging in the Input ComponentThe special variable _DEBUG provides you with several diagnostic options. Using this variable is aconvenient way to debug a problem, because you can supply the debug values by using the Web browser tomodify your HTML or by editing the URL in your Web browser location field.
List of Valid Debug Values• Disabling Debug Flags• Special Cases• Debugging Application Broker Installation Problems•
List of Valid Debug Values
You can activate the various debugging options by passing the _DEBUG variable to the Application Brokerjust as you pass the special variables _SERVICE and _PROGRAM. You can set more than one debug optionby adding the flag values together. For example, to set both the options 2048 and 2, use the value (2048 + 2) =2050.
Keywords can also be used to set debug options. To set these same options using the keywords, you wouldspecify
_DEBUG=TIME,TRACE
Multiple parameters (values or keywords) can be specified separated by commas or spaces. These values arethen logically put together to form one debug number.
Some debug flags might be locked out at your site in the Application Broker configuration file for securityreasons. Verify with your administrator which flags are locked out at your site. See Setting the Default Valueof _DEBUG for more information on setting the debug value. The following chart is a list of valid debugvalues:
Value Keyword Description
1 FIELDS Echoes all fields. This is useful for debugging value−splitting problems.
2 TIME
Prints the Application Broker version number and elapsed time after each run, forexample, "This request took 2.46 seconds of real time (v9.2 build 1494)." Also, thisvalue displays the Powered by SAS logo if you provide additional settings as describedin Displaying the Powered by SAS Logo.
4 SERVICES Lists definitions of all services as defined by the administrator, but does not run theprogram.
8 Skips all execution processing.
16 DUMP Displays output in hexadecimal. This is extremely helpful for debugging problemswith the HTTP header or graphics.
32 Displays the Powered by SAS logo without the Application Broker version or elapsedtime information. See also Displaying the SAS Powered Logo.
128 LOG Returns log file. This is useful for diagnosing problems in the SAS code.
256162
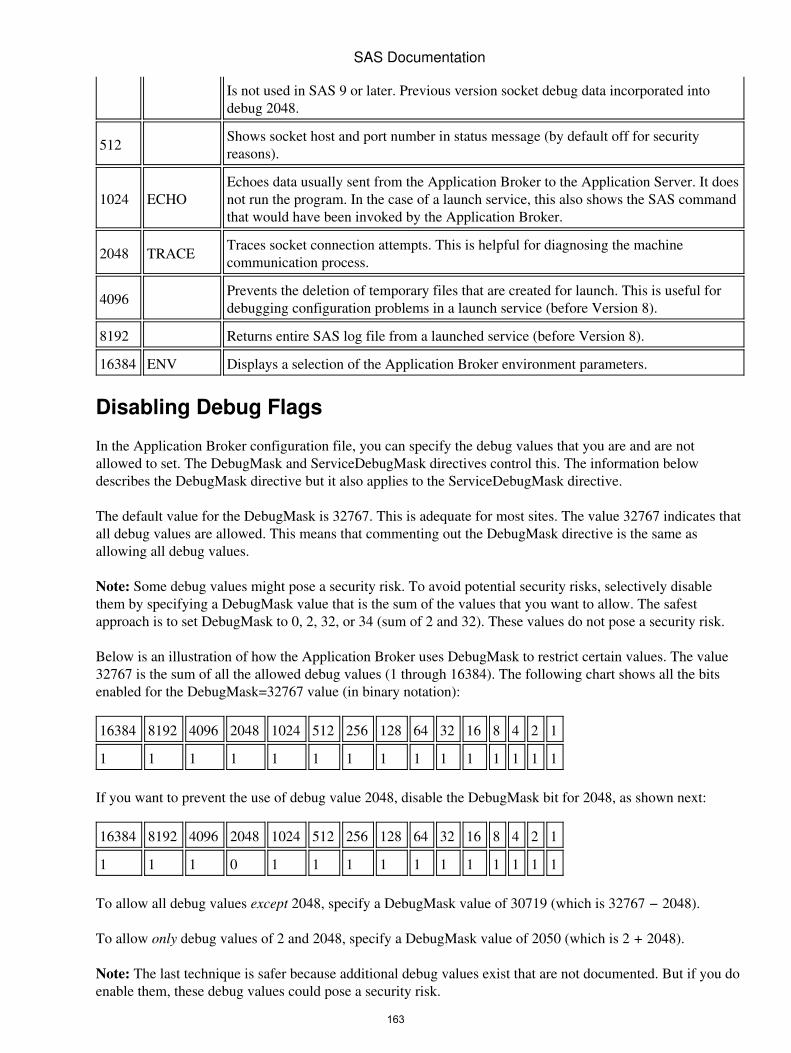
Is not used in SAS 9 or later. Previous version socket debug data incorporated intodebug 2048.
512 Shows socket host and port number in status message (by default off for securityreasons).
1024 ECHOEchoes data usually sent from the Application Broker to the Application Server. It doesnot run the program. In the case of a launch service, this also shows the SAS commandthat would have been invoked by the Application Broker.
2048 TRACE Traces socket connection attempts. This is helpful for diagnosing the machinecommunication process.
4096 Prevents the deletion of temporary files that are created for launch. This is useful fordebugging configuration problems in a launch service (before Version 8).
8192 Returns entire SAS log file from a launched service (before Version 8).
16384 ENV Displays a selection of the Application Broker environment parameters.
Disabling Debug Flags
In the Application Broker configuration file, you can specify the debug values that you are and are notallowed to set. The DebugMask and ServiceDebugMask directives control this. The information belowdescribes the DebugMask directive but it also applies to the ServiceDebugMask directive.
The default value for the DebugMask is 32767. This is adequate for most sites. The value 32767 indicates thatall debug values are allowed. This means that commenting out the DebugMask directive is the same asallowing all debug values.
Note: Some debug values might pose a security risk. To avoid potential security risks, selectively disablethem by specifying a DebugMask value that is the sum of the values that you want to allow. The safestapproach is to set DebugMask to 0, 2, 32, or 34 (sum of 2 and 32). These values do not pose a security risk.
Below is an illustration of how the Application Broker uses DebugMask to restrict certain values. The value32767 is the sum of all the allowed debug values (1 through 16384). The following chart shows all the bitsenabled for the DebugMask=32767 value (in binary notation):
16384 8192 4096 2048 1024 512 256 128 64 32 16 8 4 2 1
1 1 1 1 1 1 1 1 1 1 1 1 1 1 1
If you want to prevent the use of debug value 2048, disable the DebugMask bit for 2048, as shown next:
16384 8192 4096 2048 1024 512 256 128 64 32 16 8 4 2 1
1 1 1 0 1 1 1 1 1 1 1 1 1 1 1
To allow all debug values except 2048, specify a DebugMask value of 30719 (which is 32767 − 2048).
To allow only debug values of 2 and 2048, specify a DebugMask value of 2050 (which is 2 + 2048).
Note: The last technique is safer because additional debug values exist that are not documented. But if you doenable them, these debug values could pose a security risk.
SAS Documentation
163
The Application Broker displays an error if the binary values for _DEBUG and DebugMask do not equal 0using binary logic. The Application Broker performs error checking only on the _DEBUG value in the HTMLform or link. It does not check to confirm that Debug and DebugMask do not overlap. In other words, it doesnot check Debug to see whether it has an allowed value in DebugMask. DebugMask is used to check values of_DEBUG only.
Special Cases
Some combinations of content types and debug values do not produce the expected results. The debug values2, 32, 128, and 8192 do not function correctly if the content type is anything other than TEXT or HTML. Forexample, if your program sends a content type of IMAGE or GIF, then the Web browser expects the data thatfollows to be binary graphic data. If you supply one of these debug values, then the Application Broker triesto append HTML code to the end of the binary graphic data. This HTML is not displayed in the Web browser;only the image is displayed. One way to work around this is to supply the debug value 1 in addition to thevalue(s) above. This causes the Application Broker to send the content type TEXT or HTML before yourprogram can send the IMAGE or GIF content type. Because the Web browser sees the TEXT or HTMLcontent type first, it displays the debug output that you have requested. However, because the binary graphicdata is combined with HTML data, garbage characters will take the place of the expected image on the Webpage.
Keep in mind that setting the debug variable to 1 or 128 generates an HTTP header. This will affect thebehavior of a test that changes the HTTP header in any way.
Some HTML formatter macros create their own headers. For example, if you are using SETCOOKIE on aheader, the cookies do not work when DEBUG=1 or DEBUG=128 is set.
Debugging Application Broker Installation Problems
To verify that the Application Broker can be executed, run the image from a command line on theWeb server machine:
broker "_service=default&_program=ping"
If the broker.cfg file is set up correctly and there is an Application Server running for service"default", the results will be similar to
Content−type: text/html Pragma: no−cache
Ping. The Application Server your.server.com:5800 is functioning properly.
−−−−−−−−−−−−−−−−−−−−−−−−−−−−−−−−−−−−−−−−−−−−−−−−−−−−−−−−−−−−−
This request took 0.28 seconds of real time (v9.2 build nnnn).
Because CGI programs typically run as special nonprivileged users, it is sometimes useful to performthis test with a guest account. On z/OS machines there are occasional problems with the installation ofthe SAS/C transient library that will be revealed by performing this test.
1.
From a Web browser on the client machine, try to access the Application Broker image via a URL ofthe form
http://yourserver/cgi−bin/broker.exe?
2.
SAS Documentation
164
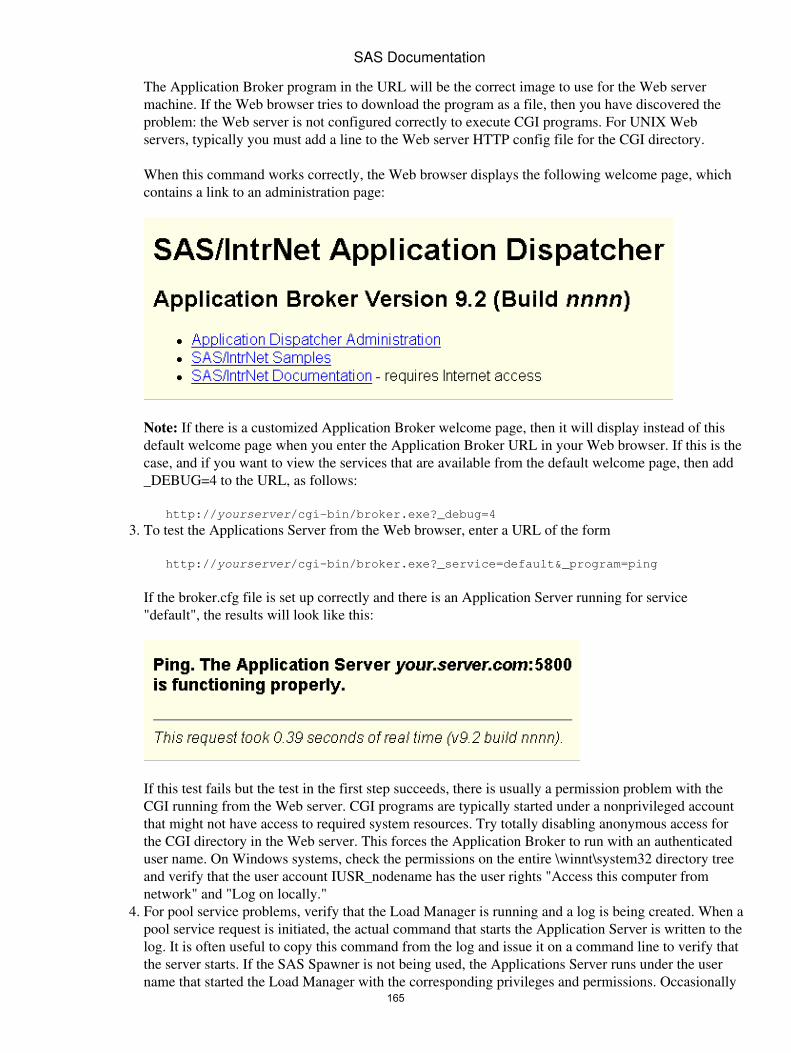
The Application Broker program in the URL will be the correct image to use for the Web servermachine. If the Web browser tries to download the program as a file, then you have discovered theproblem: the Web server is not configured correctly to execute CGI programs. For UNIX Webservers, typically you must add a line to the Web server HTTP config file for the CGI directory.
When this command works correctly, the Web browser displays the following welcome page, whichcontains a link to an administration page:
Note: If there is a customized Application Broker welcome page, then it will display instead of thisdefault welcome page when you enter the Application Broker URL in your Web browser. If this is thecase, and if you want to view the services that are available from the default welcome page, then add_DEBUG=4 to the URL, as follows:
http://yourserver/cgi−bin/broker.exe?_debug=4
To test the Applications Server from the Web browser, enter a URL of the form
http://yourserver/cgi−bin/broker.exe?_service=default&_program=ping
If the broker.cfg file is set up correctly and there is an Application Server running for service"default", the results will look like this:
If this test fails but the test in the first step succeeds, there is usually a permission problem with theCGI running from the Web server. CGI programs are typically started under a nonprivileged accountthat might not have access to required system resources. Try totally disabling anonymous access forthe CGI directory in the Web server. This forces the Application Broker to run with an authenticateduser name. On Windows systems, check the permissions on the entire \winnt\system32 directory treeand verify that the user account IUSR_nodename has the user rights "Access this computer fromnetwork" and "Log on locally."
3.
For pool service problems, verify that the Load Manager is running and a log is being created. When apool service request is initiated, the actual command that starts the Application Server is written to thelog. It is often useful to copy this command from the log and issue it on a command line to verify thatthe server starts. If the SAS Spawner is not being used, the Applications Server runs under the username that started the Load Manager with the corresponding privileges and permissions. Occasionally
4.
SAS Documentation
165
the work directory does not get set correctly and you must add a "−work /tmp" parameter to the SAScommand.
If the server starts but the Application Broker times out, verify that there are not multiple TCP/IPnode names defined for a given host. The Application Broker and Load Manager hosts must resolveall node names to the same value. Host name mismatches can cause various error messages to appearin the Load Manager log.To debug problems with launch and pool services, it is useful to obtain the SAS log and investigateany errors concerning the SasCommand that was executed.
To see the SasCommand that is being processed, add the parameter _DEBUG=1024 to the URL thatis being used to start the service. This shows any errors with quotes or non−escaped backslashes.
Under UNIX, using the following syntax puts the SAS log, STDOUT, and STDERR messages intofiles using the Application Broker PID for the filenames:
SasCommand "/bin/ksh −c '/usr/local/bin/sas + /user/web/launchsas.sas −rsasuser −noterminal −noprint + −log $$.log −SYSPARM $$.out 2>$$.err'"
Note: The user name that the Application Broker runs under must be able to write to the directorywhere the Application Broker runs.
5.
SAS Documentation
166
Debugging in the Program ComponentThere are four techniques for debugging Application Dispatcher programs:
Examining the SAS Log• Using SAS Options• The DATA Step Debugger• The SCL Debugger•
Examining the SAS Log
Passing a name/value pair of _DEBUG=128 to the Application Dispatcher will cause the SAS log to bereturned to the Web browser. This is useful because you will be able to check for errors, which typicallyappear in the log. The Application Dispatcher will highlight them in red. If the code that you are debuggingcontains macro statements, turn on various options such as MPRINT and MLOGIC. Sometimes theApplication Dispatcher will return an error message that suggests to send a debug value of 131. This is thevalues 1, 2, and 128 combined. See the List of Valid Debug Values section for a complete list of debugvalues.
If you are unable to retrieve the SAS log with _DEBUG=128, then you should contact your ApplicationServer administrator. The administrator might need to examine the SAS log file that the Application Serverwrites to disk. This file can often contain more information than is displayed in your Web browser.
Using SAS Options
There are several SAS options that can help you debug problems in your Application Dispatcher programs. Ifyou can return the SAS log to your Web browser, activating some of these options can make that log moreuseful. If you are debugging a program that contains macro code, you should supply one or more of theseoptions at the beginning of your program: MPRINT, SYMBOLGEN, MLOGIC, MERROR.
If, for security reasons, you have disabled the display of submitted source code in your program using theNOSOURCE option when you are debugging, you should enable this feature by supplying the SOURCEoption. You can then see your submitted SAS code in the log that is returned to your Web browser. After youare done, you can revert to using NOSOURCE if your security model requires it.
The DATA Step Debugger
To use the DATA step debugger, you must start the Application Server in the SAS windowing environment,and you must be working on the computer where SAS software will display the debugger windows. To debuga DATA step, add /debug to the DATA statement, like this:
data mylib.mydata/debug;
When the Application Server executes the program, the DATA step debugger windows will pop up and pause,waiting for you to step through the code.
The SCL Debugger
To use the SCL debugger, you must start the Application Server with the AFPARMS='debug=yes' option.The SCL program that you want to debug must be compiled with the debug option. The Application Server
167
must be running in the SAS windowing environment, and you must be working on the computer where SASsoftware will display the debugger windows. When the Application Server executes the SCL program, thedebugger windows will appear and allow you to step through the code.
SAS Documentation
168

The APPSRV Procedure
The APPSRV procedure invokes the Application Server, which is the server component of the SAS/IntrNetApplication Dispatcher. It is recommended that you use the inetcfg utility to set up a new Application Server.This utility creates a standard PROC APPSRV statement with reasonable default options that can be modifiedto meet your requirements. See the syntax documentation below for more information about these options.
Syntax
PROC APPSRV PORT=n <options>;
ADMINLIBS libref−1 | libref−1.catalog−1 | fileref−1 <...libref−n | libref−n.catalog−n | fileref−n>;
ALLOCATE FILE fileref <device−type> 'directory−or−PDS−path' <host−options>;
ALLOCATE LIBRARY libref <engine> 'SAS−data−library' <options>;
DATALIBS libref−1 | fileref−1 <...libref−n | fileref−n>;
LOG <DISPLAY=NONE | ERRORS | ALL> <SYMBOLS=NONE | ERRORS | ALL> <FILE=fileref><APPEND | REPLACE>;
PROGLIBS libref−1 | libref−1.catalog−1 | fileref−1 <...libref−n | libref−n.catalog−n | fileref−n>;
REQUEST <INIT=program−name> <TERM=program−name> <LOGIN=program−name><TIMEOUT=seconds> <MAXTIMEOUT=seconds> <READ=seconds><FROMADR=("IP−address−1" <..."IP−address−n">)>;
SESSION <INIT=program−name> <INVSESS=program−name> <TERM=program−name><TIMEOUT=seconds> <MAXTIMEOUT=seconds> <VERIFY=(variable−1 <...variable−n>)>;
STATISTICS CREATE=library.dataset <(data−set−options)>;
STATISTICS DATA=library.dataset <(data−set−options)> <ADDPORT> <EXITONERROR><TEMPLATE=library.dataset <(data−set−options)>> <WRITECOUNT=n> <WRITEEVERY=n>;
To do this Use this statement
Declare whichlibraries,filerefs, andcatalogscontainprograms thatcan be run byanadministratorusing the_ADMINPWpassword
ADMINLIBS
169

Define a filethat theApplicationServer assigns
ALLOCATE FILE
Define a librarythat theApplicationServer assigns
ALLOCATE LIBRARY
Define librefsand filerefs thatare available toall programsthat are run bythe ApplicationServer
DATALIBS
Control contentand behavior ofthe ApplicationServer log
LOG
Declare whichlibraries,filerefs, andcatalogscontainprograms thatcan be run onthe ApplicationServer
PROGLIBS
Control how arequest isprocessed bythe ApplicationServer
REQUEST
Control how asession isadministered bythe ApplicationServer
SESSION
Control writingof requeststatistics to adata set
STATISTICS
SAS Documentation
170
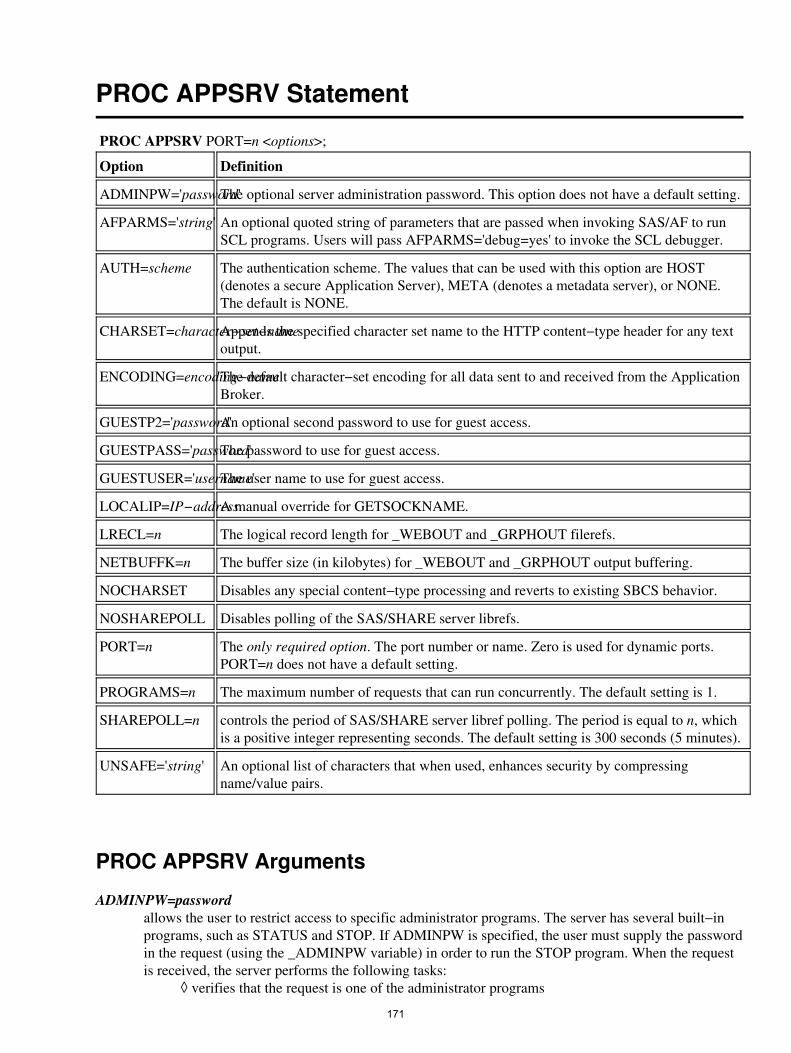
PROC APPSRV Statement
PROC APPSRV PORT=n <options>;
Option Definition
ADMINPW='password'The optional server administration password. This option does not have a default setting.
AFPARMS='string' An optional quoted string of parameters that are passed when invoking SAS/AF to runSCL programs. Users will pass AFPARMS='debug=yes' to invoke the SCL debugger.
AUTH=scheme The authentication scheme. The values that can be used with this option are HOST(denotes a secure Application Server), META (denotes a metadata server), or NONE.The default is NONE.
CHARSET=character−set−nameAppends the specified character set name to the HTTP content−type header for any textoutput.
ENCODING=encoding−nameThe default character−set encoding for all data sent to and received from the ApplicationBroker.
GUESTP2='password'An optional second password to use for guest access.
GUESTPASS='password'The password to use for guest access.
GUESTUSER='username'The user name to use for guest access.
LOCALIP=IP−addressA manual override for GETSOCKNAME.
LRECL=n The logical record length for _WEBOUT and _GRPHOUT filerefs.
NETBUFFK=n The buffer size (in kilobytes) for _WEBOUT and _GRPHOUT output buffering.
NOCHARSET Disables any special content−type processing and reverts to existing SBCS behavior.
NOSHAREPOLL Disables polling of the SAS/SHARE server librefs.
PORT=n The only required option. The port number or name. Zero is used for dynamic ports.PORT=n does not have a default setting.
PROGRAMS=n The maximum number of requests that can run concurrently. The default setting is 1.
SHAREPOLL=n controls the period of SAS/SHARE server libref polling. The period is equal to n, whichis a positive integer representing seconds. The default setting is 300 seconds (5 minutes).
UNSAFE='string' An optional list of characters that when used, enhances security by compressingname/value pairs.
PROC APPSRV Arguments
ADMINPW=passwordallows the user to restrict access to specific administrator programs. The server has several built−inprograms, such as STATUS and STOP. If ADMINPW is specified, the user must supply the passwordin the request (using the _ADMINPW variable) in order to run the STOP program. When the requestis received, the server performs the following tasks:
verifies that the request is one of the administrator programs◊
171

searches the request data for the variable _ADMINPW◊ determines whether the variable value matches the ADMINPW password that is specified inthe PROC APPSRV statement
◊
if it is a match, the request is returned; if it is not a match, the request is rejected.◊ In addition to built−in programs, the ADMINLIBS statement can be used to declare various librefsand filerefs as containing administrator−only programs. Programs in these libraries are not executedunless _ADMINPW is passed and is verified.
Note: If a libref or fileref has been defined in both a PROGLIBS statement and an ADMINLIBSstatement, then the ADMINPW is not required for programs in that libref or fileref. General users willhave access to programs that might have been intended only for administrators.
AFPARMS='string'is a quoted string that is appended to the SAS/AF command when users invoke user programs that arewritten in SCL. It can be used to pass a variety of parameters to the SAS/AF environment, but theprimary use in the Application Server is to enable the SCL debugger. To invoke the SCL debugger,compile your SCL program with debug on and then start the server with
AFPARMS='debug=yes'
AUTH=schemespecifies the authentication scheme. The default scheme (AUTH=NONE without GUESTUSER beingspecified) causes all requests to be run with the credentials of the user name under which PROCAPPSRV was started. Specifying GUESTUSER (and the corresponding GUESTPASS) with thedefault AUTH=NONE scheme causes all requests to be run with the credentials of the GUESTUSERuser name. All access to catalogs, data sets, and external files are checked against this user name.Note that the AUTH=HOST special requirements listed below also apply to AUTH=NONE whenGUESTUSER and GUESTPASS are specified.
The AUTH=HOST scheme requires a user name and password with each request, which will runusing the credentials of the authenticated user name. All access to catalogs, data sets, and externalfiles are checked against this user name. The user name and password can be specified with thereserved variables _USERNAME and _PASSWORD (and optionally _PASSWORD2). TheGUESTUSER and GUESTPASS (and optionally GUESTP2) options can be used to specify defaultvalues if they are not specified with the request. If the user name is not specified by either the_USERNAME variable or by the GUESTUSER option, the request is rejected (unless the LOGINoption is used.) User names and passwords are saved with sessions, so requests that connect to anexisting session do not need to and cannot specify a new user name and password.
The AUTH=META option enables the PROC APPSRV statement to use a metadata server. Thecredentials passed in _USERNAME and _PASSWORD are validated against the metadata serverinstead of the host operating environment. META* SAS options must be set to valid values forAUTH=META to function. The GUESTUSER and GUESTPASS options are supported forAUTH=META. For more information about system options for metadata, see SAS LanguageInterfaces to Metadata.
The AUTH schemes do not apply to administration programs. Unprotected administration programssuch as PING and STATUS can be run by any client without specifying a user name or password.Protected administration programs such as STOP require only the _ADMINPW parameter (for moredetails, see the ADMINPW option). ADMINPW is required if AUTH=HOST is specified.
See the Special Requirements section for more information about the AUTH=HOST option.CHARSET=character−set−name
appends the specified character set name to the HTTP content−type header for any text output unlessthe content−type was explicitly set by APPSRV_HEADER() or explicitly written to _WEBOUT by
SAS Documentation
172
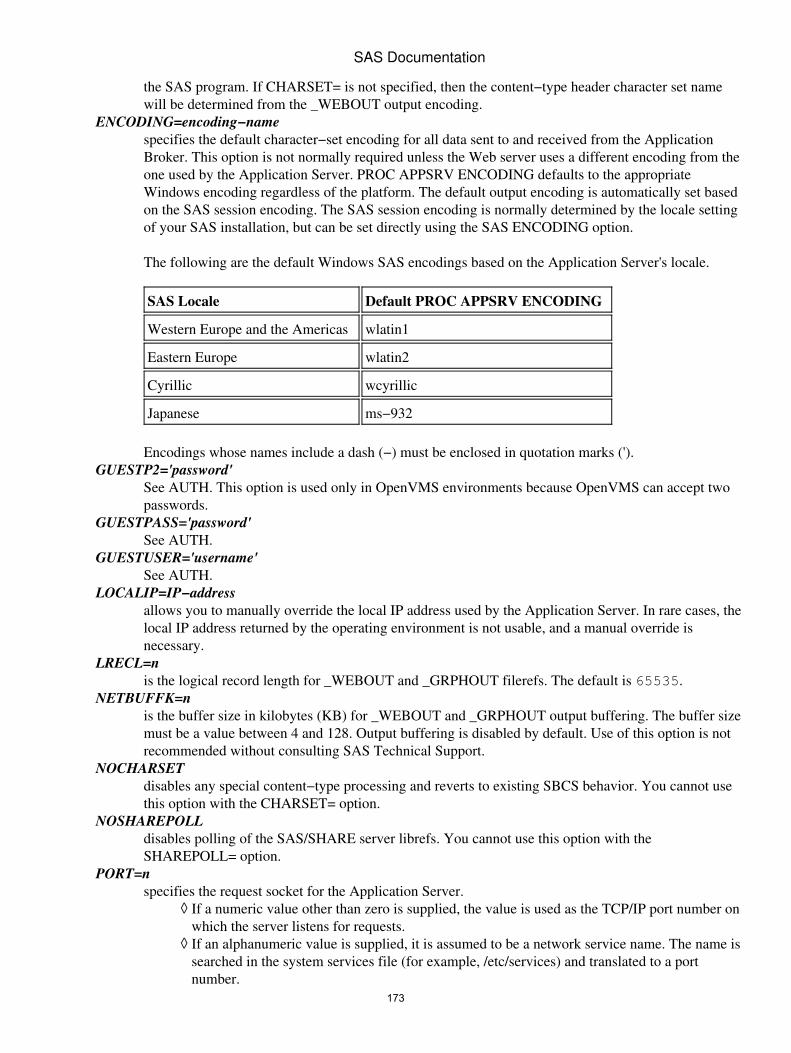
the SAS program. If CHARSET= is not specified, then the content−type header character set namewill be determined from the _WEBOUT output encoding.
ENCODING=encoding−namespecifies the default character−set encoding for all data sent to and received from the ApplicationBroker. This option is not normally required unless the Web server uses a different encoding from theone used by the Application Server. PROC APPSRV ENCODING defaults to the appropriateWindows encoding regardless of the platform. The default output encoding is automatically set basedon the SAS session encoding. The SAS session encoding is normally determined by the locale settingof your SAS installation, but can be set directly using the SAS ENCODING option.
The following are the default Windows SAS encodings based on the Application Server's locale.
SAS Locale Default PROC APPSRV ENCODING
Western Europe and the Americas wlatin1
Eastern Europe wlatin2
Cyrillic wcyrillic
Japanese ms−932
Encodings whose names include a dash (−) must be enclosed in quotation marks (').GUESTP2='password'
See AUTH. This option is used only in OpenVMS environments because OpenVMS can accept twopasswords.
GUESTPASS='password'See AUTH.
GUESTUSER='username'See AUTH.
LOCALIP=IP−addressallows you to manually override the local IP address used by the Application Server. In rare cases, thelocal IP address returned by the operating environment is not usable, and a manual override isnecessary.
LRECL=nis the logical record length for _WEBOUT and _GRPHOUT filerefs. The default is 65535.
NETBUFFK=nis the buffer size in kilobytes (KB) for _WEBOUT and _GRPHOUT output buffering. The buffer sizemust be a value between 4 and 128. Output buffering is disabled by default. Use of this option is notrecommended without consulting SAS Technical Support.
NOCHARSETdisables any special content−type processing and reverts to existing SBCS behavior. You cannot usethis option with the CHARSET= option.
NOSHAREPOLLdisables polling of the SAS/SHARE server librefs. You cannot use this option with theSHAREPOLL= option.
PORT=nspecifies the request socket for the Application Server.
If a numeric value other than zero is supplied, the value is used as the TCP/IP port number onwhich the server listens for requests.
◊
If an alphanumeric value is supplied, it is assumed to be a network service name. The name issearched in the system services file (for example, /etc/services) and translated to a portnumber.
◊
SAS Documentation
173
If zero is supplied, PROC APPSRV chooses an available port. This feature is used only forlaunch or pool services.
◊
PROGRAMS=nspecifies the maximum number of requests that can execute concurrently. The default setting is 1.
Note: This option should not be used if PROC APPSRV is run in the SAS windowing environment.SHAREPOLL=n
controls the period of SAS/SHARE server libref polling. The period is equal to n, which is a positiveinteger representing seconds. The default setting is 300 seconds (5 minutes). The SHAREPOLLsetting should be interpreted as the minimum amount of time between polls of the SAS/SHAREserver. SHARE polling has a lower priority than the servicing of client requests so in periods of highclient activity the SHARE polling will be delayed beyond the period specified by n. TheSHAREPOLL= option cannot be used at the same time as the NOSHAREPOLL option.
UNSAFE='string'specifies a quoted string listing characters that should be stripped from values in the request data (thename/value pairs). This option is normally used to strip characters from input values that could causeunwanted SAS macro language processing.
The characters that users most often want to mark as unsafe are the following:
single quotation mark◊ double quotation mark◊ ampersand◊ percent◊ semicolon.◊
Because this list is enclosed by single quotation marks, you can represent a single quotation mark byplacing two single quotation marks within the quoted string in the following manner:
UNSAFE='&"%;'''
There are times, such as processing free−format text input, when you might want to use the original,complete value for an input name/value pair. The APPSRV_UNSAFE function can be used for thispurpose. For example, the complete text of an input variable named MYTEXT can be accessed in aDATA step or SCL program with APPSRV_UNSAFE, as in the following:
fulltext = appsrv_unsafe('MYTEXT');
The APPSRV_UNSAFE function can be called from macro with the %sysfunc function:
%let fulltext = %sysfunc(appsrv_unsafe(MYTEXT));
Note: If you are using programs developed before Version 8 of SAS, you might need to omit theUNSAFE option for proper operation of your application. If the UNSAFE option is not specified, nounsafe processing is performed and all name/value pairs are passed unmodified to the requestprogram.
Special Requirements for AUTH=HOST
Using AUTH=HOST on OpenVMS systems
The AUTH=HOST option requires that the account that is running PROC APPSRV must have SYSPRVprivilege enabled to allow the server to verify login information. Note that all client requests will be rejected
SAS Documentation
174
as invalid if the server account does not have this privilege.
Using AUTH=HOST on z/OS systems
The AUTH=HOST option requires that the SAS SVC routine be installed on z/OS systems. The SAS SVCcontrol program routine is an interface between the z/OS operating environment and a specific request, suchas third−party checking. This facility provides verification in the form of calls for authentication of both theuser ID and password and of library authority. Perform the following steps before using the AUTH=HOSToption.
Install the SAS SVC routine, if necessary.If you have already installed the SAS SVC routine for SAS 9.2, do not repeat the step here. Ifyou need to perform the installation, see the installation instructions for SAS under z/OS atsupport.sas.com/documentation/installcenter for details.
♦
Because SAS SVC 9.2 is backward compatible, it replaces the SAS SVC routines fromprevious releases. You can continue using previous releases of Base SAS and SAS/IntrNet orSAS/SHARE with SAS SVC 9.2.
♦
1.
Verify the SAS options for the SVC routine.You must verify that the SAS options for the SVC routine accurately reflect the way that theSAS SVC is installed. The SAS option SVC0SVC should be set to the number at which theSAS SVC is installed (for example, 251 or 109). If the SAS SVC is installed at 109 as an ESRSVC, set the SAS option SVC0R15 to the ESR code (for example, 4).
♦ 2.
Verify installation on all CPUs, as needed.If you have more than one CPU, verify that the SAS SVC routine is installed on the systemsthat will be running the Application Server at your site.
♦ 3.
Using AUTH=HOST on UNIX systems
The AUTH=HOST option requires that the SAS User Authorization utilities (sasauth and sasperm) beconfigured properly. See the section on configuring user authorization in the SAS 9.2 post−installationinstructions for UNIX at support.sas.com/documentation/installcenter for more information on these utilities.
Using AUTH=HOST on Windows systems
The AUTH=HOST option requires special user rights on Windows systems. Review the followingrequirements carefully before enabling the AUTH=HOST option.
Any user name specified by a client (including the default GUESTUSER) must have Log on as abatch job advanced user right enabled. If this permission is not enabled, the client request is rejectedas an invalid login.
•
On Windows NT and Windows 2000 only, the account that is running PROC APPSRV must haveAct as part of the operating system advanced user right enabled to allow the server to verify logininformation. Note that all client requests are rejected as invalid if the server account does not have thispermission.
•
SAS Documentation
175
ADMINLIBS Statement
Declares which libraries, filerefs, and catalogs contain programs that can be run by an administratorusing the _ADMINPW password
Syntax
ADMINLIBS libref−1 | libref−1.catalog−1 | fileref−1 <...libref−n | libref−n.catalog−n | fileref−n>;
Arguments
Libraries, filerefs, and catalogs listed here can be run on the Application Server only if a valid _ADMINPWvalue is passed in the request data and a password is specified.
Note: If a libref or fileref has been defined in both a PROGLIBS statement and an ADMINLIBS statement,then the ADMINPW is not required for programs in that libref or fileref. General users will have access toprograms that might have been intended only for administrators.
libref−1specifies a library that contains one or more catalogs that contain programs that can be run by theApplication Server. Programs must be SCL, SOURCE, or MACRO catalog entries.
libref−1.catalog−1specifies a catalog that contains SCL, SOURCE, and MACRO programs that can be run by theApplication Server. If a libref is listed as a data library and a program library, then the library isglobally available and can contain programs. If you want to enable programs from one catalog in agiven library to be run without enabling everything in the library to be run, then list just that catalog ina two−level name as in the following example:
ADMINLIBS MYLIB.MYCAT . . .;
Listing both the library and a specific catalog within that library is redundant. For example,
ADMINLIBS MYLIB MYLIB.MYCAT . . .;
enables all programs in MYLIB to run.fileref−1
specifies a host directory or PDS that contains SAS programs that can be run by the ApplicationServer.
...libref−n | libref−n.catalog−n | fileref−nspecifies that you can list multiple librefs, catalogs, and filerefs for this statement.
Note: See also the ADMINPW option of the PROC APPSRV statement.
176

ALLOCATE FILE Statement
Defines a file that the Application Server assigns
Syntax
ALLOCATE FILE fileref <device−type> 'directory−or−PDS−path' <host−options>;
Note: The syntax of the ALLOCATE FILE statement is identical to that of the global FILENAME statement.The above syntax is simplified. For a complete listing of arguments and explanations, see the FILENAMEstatement in SAS Language Reference: Dictionary.
Arguments
filerefassociates a SAS fileref with an external file or directory. You can use any SAS name when you areassigning a new fileref. You can list SAS filerefs that are defined in the ALLOCATE FILE statementin a DATALIBS, PROGLIBS, or ADMINLIBS statement. SAS filerefs that are listed in aDATALIBS statement are available to all programs that are run by the Application Server.
Note: SAS filerefs that are defined outside PROC APPSRV by using FILENAME statements are notaccessible by Application Server programs and cannot be listed in a DATALIBS, PROGLIBS, orADMINLIBS statement.
device−typespecifies the type of device. Values include
DISKspecifies that the device is a disk drive. When assigning a fileref to a file on a disk, you arenot required to specify DISK.
TAPEspecifies a tape drive.
DUMMYspecifies a bit bucket or null device.
directory−or−PDS−pathspecifies a directory or partitioned data set (PDS) that is the pathname for a SAS fileref that is used ina PROGLIBS or ADMINLIBS statement. A directory is assumed to contain SAS source code inindividual .sas flat files. A PDS is assumed to contain SAS source code in individual members. Youmust enter the directory or path in one of the following forms, depending on which operatingenvironment the SAS server is using:
Operating Environment Example Directory or Path
UNIX /u/jdoe/samples
Windows C:\samples
z/OS (HFS directory) /u/jdoe/samples
z/OS (PDS) SAS.INTRNET.SAMPLEShost−options
indicates host− and device−specific details, such as file attributes and processing attributes. For177
details about host and device options, see SAS Language Reference: Dictionary and the SASdocumentation for your operating environment.
SAS Documentation
178
ALLOCATE LIBRARY Statement
Defines a library that the Application Server assigns
Syntax
ALLOCATE LIBRARY libref <engine> 'SAS−data−library' <options>;
Note: The syntax of the ALLOCATE LIBRARY statement is identical to that of the global LIBNAMEstatement. The above syntax is simplified. For a complete listing of arguments and explanations, see theLIBNAME statement in SAS Language Reference: Dictionary.
Arguments
librefassociates a SAS libref (shortcut name) with a SAS data library. The libref specifies either the nameof an existing server library or the name of a new library reference that is defined when you enter thisstatement. You can list SAS librefs that are defined in the ALLOCATE LIBRARY statement in aDATALIBS, PROGLIBS, or ADMINLIBS statement.
SAS librefs that are listed in PROGLIBS or ADMINLIBS statements are assumed to contain catalogsthat contain SAS programs that can be executed by the Application Server. The SAS programs can beSOURCE, MACRO, or SCL catalog entries.
SAS librefs that are listed in a DATALIBS statement are available to all programs that are run by theApplication Server.
Note: SAS librefs that are defined outside PROC APPSRV by using LIBNAME statements are notaccessible by Application Server programs and cannot be listed in a DATALIBS, PROGLIBS, orADMINLIBS statement.
enginespecifies the name of a valid SAS engine that you want to use to access the server library. Specify thisoption only if you want to override the SAS default for a specific server, or if you want to reduce thetime that is needed for the client to determine which engine to use to access a specific server.
SAS−data−librarymust be a valid physical name for the SAS data library on your host system. You must enclose thephysical name in single or double quotation marks.
The physical name of the SAS data library is the name that is recognized by the operatingenvironment.
optionsSee the LIBNAME statement in the SAS Language Reference: Dictionary for a complete list ofoptions.
Nesting Library Names in Concatenated Libraries
Concatenated Data Libraries
You must list all data libraries that are nested in a concatenated library in DATALIBS.179
Single−level nested data libraries work properly regardless of the order of the libraries in the DATALIBSstatement. For example,
PROC APPSRV; ALLOC LIBRARY ONE '/path/one'; ALLOC LIBRARY TWO ('/path/two' ONE); DATALIBS ONE TWO;
works whether the order of the libraries is coded as DATALIBS ONE TWO or DATALIBS TWO ONE.
Multilevel nested libraries work only if the order in the DATALIBS statement is correct. The following codedoes not work because library THREE is assigned before library TWO:
PROC APPSRV; ALLOC LIBRARY ONE '/path/one'; ALLOC LIBRARY TWO ('/path/two' ONE); ALLOC LIBRARY THREE ('/path/three' TWO); DATALIBS THREE TWO ONE;
Instead, use the following code:
DATALIBS ONE TWO THREE; /* or DATALIBS TWO ONE THREE; */
ALLOC statements are order dependent. PROC APPSRV performs an automatic check on library and fileassignments during its startup phase. The code
PROC APPSRV; ALLOC LIBRARY TWO ('/path/two' ONE); ALLOC LIBRARY ONE '/path/one';
fails because library ONE is not defined when the library TWO assignment is tested. This happens regardlessof how the libraries are listed in the DATALIBS, PROGLIBS, or ADMINLIBS statements. Remember thatthe syntax is identical to that of a LIBNAME statement in SAS open code.
Every library that is used must be defined as a data library. The following code does not work because libraryONE is not defined as a data library:
PROC APPSRV; ALLOC LIBRARY ONE '/path/one'; ALLOC LIBRARY TWO ('/path/two' ONE); DATALIBS TWO;
Concatenated Program Libraries
Nested program libraries generally do not work as expected. For example, the following code does not workwhen you attempt to run a program in library TWO. This is because library ONE is not assigned in the requestexecutive when you attempt to assign library TWO.
PROC APPSRV; ALLOC LIBRARY ONE '/path/one'; ALLOC LIBRARY TWO ('/path/two' ONE); PROGLIBS TWO ONE;
You must change library ONE to a DATALIB by using the following code:
PROC APPSRV;
SAS Documentation
180
ALLOC LIBRARY ONE '/path/one'; ALLOC LIBRARY TWO ('/path/two' ONE); DATALIBS ONE; PROGLIBS TWO;
The same problem can occur when you use ADMINLIBS. This can cause the most confusion because it is notalways obvious what can be causing the problem.
SAS Documentation
181
DATALIBS Statement
Defines librefs and filerefs that are available to all programs that are run by the Application Server
Syntax
DATALIBS libref−1 | fileref−1 <...libref−n | fileref−n>;
Assign these logical libraries in an ALLOCATE statement in the same server procedure. Any libraries that aredefined externally to SAS (such as, in JCL code) are automatically permanent data libraries and should not belisted in the DATALIBS statement. In previous versions of the Application Server, global data libraries orfiles were allocated in the permdata.sas file. The Application Server now enables you to
assign the logical libraries externally to SAS• allocate them with an ALLOCATE statement and then list them in the DATALIBS statement.•
Arguments
libref−1specifies that the libref is assigned and accessible to all programs that run on the server. The librefcannot be cleared by the user code. Use DATALIBS for globally accessible data repositories thatcontain non−sensitive data. Keep private or application−specific data in its own library and assign itby using a LIBNAME statement.
fileref−1specifies that the fileref is assigned and accessible to all programs that run on the server. The filerefcannot be cleared by the user code. Use DATALIBS for globally accessible data repositories thatcontain non−sensitive data. Keep private or application−specific data in its own file and assign it byusing a FILENAME statement.
...libref−n | fileref−nspecifies that you can list multiple librefs and filerefs for this statement.
182

LOG Statement
Controls content and behavior of the Application Server log
Syntax
LOG <DISPLAY=NONE | ERRORS | ALL> <SYMBOLS=NONE | ERRORS | ALL> <FILE=fileref><APPEND | REPLACE>;
The Application Server has several options to control the content and operation of the SAS log. The SAS logcan be re−directed to a new file based on the date, the day of the week, or the time. The log containsinformation about each client request. The log can be limited to a brief note for each request, or can capturethe complete SAS log for the request.
By default, the configuration utility (inetcfg) sets up the server so that a new log file is created each day of theweek. Separate log files are created for each unique port so that there are no conflicts when two or moreservers are active. Each time a server is started, it appends to an existing log file unless the log file has notbeen modified in the last six days. If the log file is at least six days old, it is replaced by a new log file. SeeDefault Log File Append Behavior for a more complete description. You can change this behavior by editingthe LOG statement in the appstart.sas file that is created by the configuration utility and by using the optionsdescribed below.
Note: z/OS Application Servers always append to existing log files regardless of their last modified dateunless the REPLACE option is specified.
Arguments
DISPLAY=NONE | ERRORS | ALLcontrols whether the SAS log for each client request is written to the Application Server log. Therequest log can be ignored for all requests, written only for requests that complete with errors, orwritten for all requests.
SYMBOLS=NONE | ERRORS | ALLcontrols whether the client request symbols are written to the Application Server log. The symbolscan be logged for all requests, logged only for requests that complete with errors, or never logged.
FILE=filerefenables you to re−direct the SAS log file of the Application Server to another file. The fileref shouldbe defined in an ALLOCATE FILE statement. The physical path of the fileref can contain any of thefollowing date and time directives.
Date and Time Directives
%a Day of week [Sun − Sat]
%b Month [Jan − Dec]
%d day [01 −31]
%H hour [00 − 23]
%m month [01 − 12]
%w day of week [1=Sunday − 7=Saturday]
%Y full year
183

%y 2−digit year [00 − 99]
%p port number of listen port
%n nodename up to first period (.)For example:
allocate file one '/u/username/%a_%p.log';
...
log file=one;
creates /u/username/Mon_5001.log if the Application Server starts on a Monday,/u/username/Tue_5001.log if it starts on a Tuesday, and so on.
Periodically, the Application Server regenerates the log file name and checks to see whether it isdifferent from the current log file. If it is different, the current log file is closed, and the new log filewith the new name is opened. In the previous example, shortly after midnight, early Tuesdaymorning, the log file /u/username/Mon_5001.log is closed and the file /u/username/Tue_5001.log isopened.
Note: On z/OS, this feature is supported only if the log file is specified as a hierarchical file system(HFS) path, as shown in the previous ALLOCATE FILE statement. (In order to correctly specify anHFS fileref for an Application Server on z/OS, SAS must be started with the HFS option.) You cannotuse partitioned data set members for log files on z/OS.
APPEND | REPLACEspecifies whether the Application Server always appends (APPEND) to an existing log file or replaces(REPLACE) the contents of an existing log file.
Default Log File Append Behavior
The Application Server has special default behavior to simplify the management of server logs. If neither theAPPEND nor the REPLACE options are specified, the server replaces the contents of an existing log file ifthe last modification date is greater than six days ago (actually, 5 days, 23 hours). If the last modification dateis less than six days ago, the server appends to the existing log file.
For example, if log file Mon_5001.log has a last modification date of 5:00 p.m., Monday, June 14, and theApplication Server is re−started at 8:00 p.m. on the same day, the server appends to the existing log. If theserver is restarted on Monday, June 21, the server replaces the contents of the log file. This behavior, togetherwith the service files that are created by the inetcfg utility, ensures that server logs are kept for six days andthen are automatically overwritten.
Note: z/OS Application Servers always append to an existing log file unless the REPLACE option isspecified. In addition, you cannot use partitioned data set members for log files on z/OS.
SAS Documentation
184

PROGLIBS Statement
Declares which libraries, catalogs, and filerefs contain programs that can be run on an ApplicationServer
Syntax
PROGLIBS libref−1 | libref−1.catalog−1 | fileref−1 <...libref−n | libref−n.catalog−n | fileref−n>;
When a request is received by the Application Server, the PROGLIBS list is scanned for a match on the firstone or two levels in the program name that is supplied in the special request variable _PROGRAM. If a matchis found, then the program is executed.
Arguments
libref−1specifies a library that contains one or more catalogs that contain programs that can be run by theApplication Server. Programs must be SCL, SOURCE, or MACRO catalog entries.
libref−1.catalog−1specifies a catalog that contains SCL, SOURCE, and MACRO programs that can be run by theApplication Server. If a libref is listed as a data library and a program library, then the library is bothglobally available and can contain programs. If you want to enable programs from one catalog in aspecified library to be executed without enabling everything in the library to be executed, then list justthat catalog in a two−level name like this:
PROGLIBS MYLIB.MYCAT . . .;
Listing both the library and a specific catalog within that library is redundant. For example:
PROGLIBS MYLIB MYLIB.MYCAT . . .;
enables all programs in MYLIB to run.fileref−1
specifies a fileref that corresponds to a host directory or a PDS that contains SAS programs that canbe executed by the Application Server.
...libref−n | libref−n.catalog−n | fileref−nspecifies that you can list multiple librefs, catalogs, and filerefs for this statement.
185

REQUEST Statement
Controls how a request is processed by the Application Server
Syntax
REQUEST <INIT=program−name> <TERM=program−name> <LOGIN=program−name><TIMEOUT=seconds> <MAXTIMEOUT=seconds> <READ=seconds><FROMADR=("IP−address−1" <..."IP−address−n">)>;
Arguments
INIT=program−namespecifies the name of a program to run before each requested program. By default, no program is runbefore each request.
TERM=program−namespecifies the name of a program to run after each requested program. By default, no program is runafter each request.
LOGIN=program−namespecifies the name of a program to run when the server is running with AUTH=HOST (a secureApplication Server) and when _USERNAME and _PASSWORD are missing or incorrect. If theoption is omitted, the user will receive a default response stating that the login information is missingor incorrect.
TIMEOUT=secondsspecifies the number of seconds that a requested program is allowed to run before it is terminated bythe server. By default, the TIMEOUT is set to 300 (5 minutes). This value can be changed in a requestprogram by calling the Application Dispatcher APPSRVSET function.
MAXTIMEOUT=secondsis the maximum number of seconds that a timeout can be set to using the APPSRVSET function. Thedefault value is 900 (15 minutes). For more information about setting the request timeout from arequest program, see the SAS/IntrNet Application Dispatcher documentation for the APPSRVSETfunction.
READ=secondssets the number of seconds the server waits for a request to be read. The default value for READ is 30seconds. The majority of requests are read in less than one second.
FROMADR=("IP−address−1" <..."IP−address−n">)specifies a space−delimited list of IP addresses from which the server accepts requests. Each addressmust be enclosed in quotation marks. By default, requests are accepted from any address. This optionaccepts numeric IP numbers only. Names and wildcards in addresses are not supported. Enclose eachIP address in quotation marks. Separate the IP addresses from each other with a white space andenclose the complete list in parentheses.
An IPv6 host usually supports both the IPv6 and IPv4 stacks and, therefore, has two IP addresses: theIPv6 address and the IPv4 address. The FROMADR= argument specifically uses an IP address toidentify an acceptable client host. To ensure that an IPv6 host is not erroneously rejected, include bothits IPv6 and IPv4 addresses in the FROMADR= argument. In the following example, the firstFROMADR= argument is the IPv6 address. The second argument is the IPv4 address:
request fromadr=("fec0::1:230:6eff:fef4:c827" "10.41.9.53");
186
Note: Starting with SAS/IntrNet 9.2, an illegal FROMADR IP address terminates the ApplicationServer session. Before SAS/IntrNet 9.2, the illegal IP address appeared as a warning in the log and theApplication Server ran.
SAS Documentation
187

SESSION Statement
Controls how a session is administered by the Application Server
Syntax
SESSION <INIT=program−name> <INVSESS=program−name> <TERM=program−name><TIMEOUT=seconds> <MAXTIMEOUT=seconds> <VERIFY=(variable−1 <...variable−n>)>;
Arguments
INIT=program−namespecifies programs to be run when a session is created and destroyed (including those that expire bytiming out). By default, no program is run at the creation and destruction of a session. The programnames referenced here must be in the same format as the _PROGRAM variable. Also, the libraries orfiles that contain these programs must be allocated in a previous ALLOCATE statement.
INVSESS=program−namespecifies a program that is to be run in the place of the requested program if the session that isspecified by _SESSIONID does not exist. This can happen if the session expired or if the session IDwas modified by the client.
Two special macro variables are created for the invalid session program. The _USERPROGRAMvariable contains the name of the program that was requested by the user. This is the value that isspecified by the _PROGRAM variable in the original request. The _INVSESSREASON variable hasNOSESSION as its value, which means that the session specified by _SESSIONID does not exist.
The invalid session program can be used to display an informative response when a user session hasexpired or is otherwise inaccessible. The response can redirect the user to an application login screen,explain how to restart the application, or provide a friendlier error message.
TERM=program−namespecifies programs to be run when a session is created and destroyed (including those that expire bytiming out). By default, no program is run at the creation and destruction of a session. The programnames referenced here must be in the same format as the _PROGRAM variable. Also, the libraries orfiles that contain these programs must be allocated in a previous ALLOCATE statement.
Remember that when you delete a session, it is only marked for deletion. A session is not deleted untilthe clean−up routine runs. A user creates a session only once throughout an application. The user canreuse the session, but deletion of the session does not occur until the end of the application.
In the following example, a user creates a session and then deletes that session. When the user tries tocreate a new session in the same test program they get a warning.
testa.sas (creates session1 −> calls testb.sas) testb.sas (uses session1 −> deletes session1 −> creates new session2)
The user cannot create session2, because session1 is still being used. Furthermore, after a session ismarked for deletion, another user cannot access that same session, even before the clean−up processruns.
TIMEOUT=seconds
188
specifies the number of seconds that elapse before a session expires. The default session timeout is900 (15 minutes). This value can be changed in a request program by calling the ApplicationDispatcher APPSRVSET function. An Application Server does not honor a pool service idle timeoutstop request from the Load Manager until all sessions have expired.
MAXTIMEOUT=secondsis the maximum number of seconds that a timeout can be set to using the APPSRVSET function. Formore information about setting the session timeout from a request program, see the SAS/IntrNetApplication Dispatcher documentation for the APPSRVSET function.
VERIFY=(variable−1 <...variable−n>)is a space−delimited list of variable names. A session reconnect is a request for a _SESSIONID for anexisting session. For enhanced security, the Application Server can verify other request variables inaddition to validating the _SESSIONID for all session re−connects. For example, the ApplicationServer can ensure that the variable _RMTUSER is the same for all session re−connects. This makes itmore difficult for one client to steal another client's URL and access the first client's sessioninformation. Enclose the list of variables in parentheses.
SAS Documentation
189
STATISTICS Statement
Controls writing of request statistics to a data set
Syntax
STATISTICS CREATE=library.dataset <(data−set−options)>;
STATISTICS DATA=library.dataset <(data−set−options)> <ADDPORT> <EXITONERROR><TEMPLATE=library.dataset <(data−set−options)>> <WRITECOUNT=n> <WRITEEVERY=n>;
Server administrators can use the default data set variables that are supplied by the Application Server, or theycan modify the variables that are written to the data set, by removing default variables and adding variables oftheir own.
Arguments
CREATE=library.dataset <(data−set−options)>creates the specified data set with the default set of statistics variables. The use of the CREATE=option is NOT required. The Application Server (when started with the STATISTICSDATA=library.dataset statement) will create a default data set even if the CREATE= option is notspecified.
This option is used only in a stand−alone SAS session. Do NOT use it when starting the ApplicationServer for application processing. The CREATE= option creates an empty SAS data set containingthe default statistics data set variables. The data set can then be modified using a DATA step (to addnew variables or drop existing default variables). The modified data set can then be used with theSTATISTICS DATA= or TEMPLATE= option. See the Customizing the Statistics Data Set for anexample of how to create and modify the statistics data set.
DATA=library.dataset <(data−set−options)>specifies the data set to which statistics are written. These data set options are not required. If thespecified data set exists, it is opened and used. If the specified data set does not exist, it is created. IfTEMPLATE= is specified, all of the variable definitions from the TEMPLATE data set are copiedinto the new DATA data set. If TEMPLATE= is not specified, the new data set has the defaultvariables. Data set options should include options for creating the data set and for opening the data setfor update.
The library specification must be a library that is specified in one of the Application ServerALLOCATE statements. This enables the Application Server to define the library for the server andfor administrative requests.
Note: On z/OS, the library containing the statistics data set cannot use the DISP=NEW optionbecause the library might be assigned multiple times. If you want to create a new statistics data setwhen running PROC APPSRV, issue the LIBNAME statement with DISP=NEW before the PROCAPPSRV statement. For example,
libname statds '...' disp=new;
proc appsrv port=5800; allocate library statds '...'; statistics data=statds.stats;
190
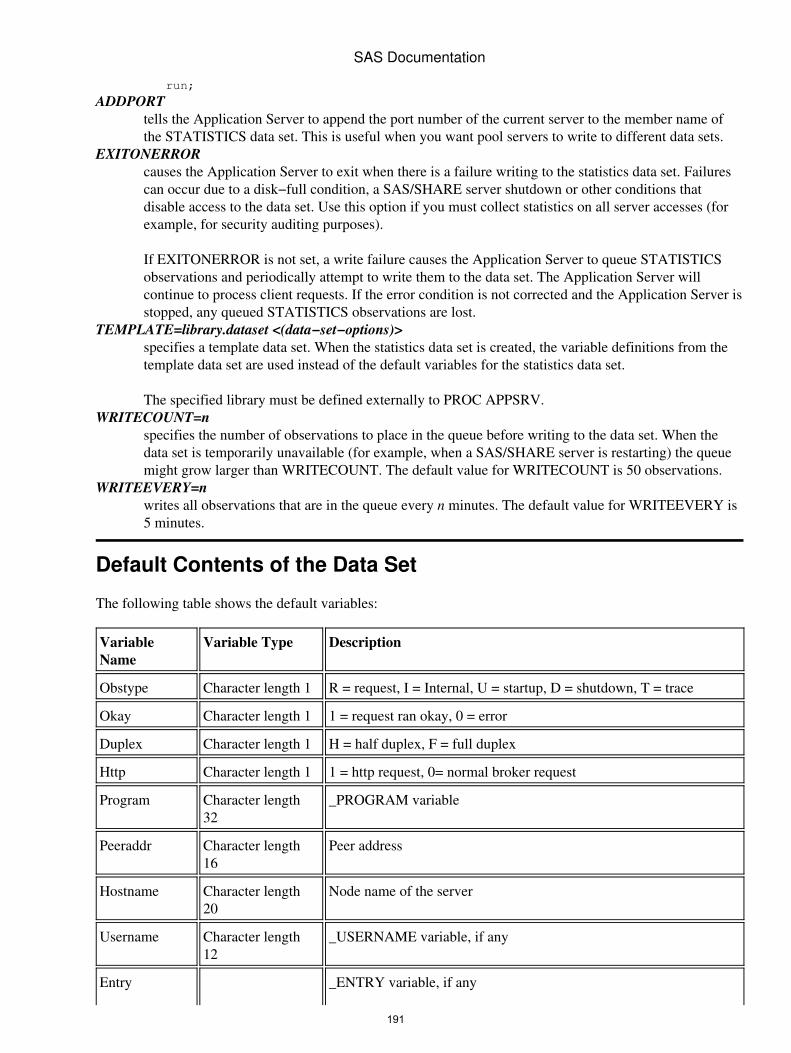
run;
ADDPORTtells the Application Server to append the port number of the current server to the member name ofthe STATISTICS data set. This is useful when you want pool servers to write to different data sets.
EXITONERRORcauses the Application Server to exit when there is a failure writing to the statistics data set. Failurescan occur due to a disk−full condition, a SAS/SHARE server shutdown or other conditions thatdisable access to the data set. Use this option if you must collect statistics on all server accesses (forexample, for security auditing purposes).
If EXITONERROR is not set, a write failure causes the Application Server to queue STATISTICSobservations and periodically attempt to write them to the data set. The Application Server willcontinue to process client requests. If the error condition is not corrected and the Application Server isstopped, any queued STATISTICS observations are lost.
TEMPLATE=library.dataset <(data−set−options)>specifies a template data set. When the statistics data set is created, the variable definitions from thetemplate data set are used instead of the default variables for the statistics data set.
The specified library must be defined externally to PROC APPSRV.WRITECOUNT=n
specifies the number of observations to place in the queue before writing to the data set. When thedata set is temporarily unavailable (for example, when a SAS/SHARE server is restarting) the queuemight grow larger than WRITECOUNT. The default value for WRITECOUNT is 50 observations.
WRITEEVERY=nwrites all observations that are in the queue every n minutes. The default value for WRITEEVERY is5 minutes.
Default Contents of the Data Set
The following table shows the default variables:
VariableName
Variable Type Description
Obstype Character length 1 R = request, I = Internal, U = startup, D = shutdown, T = trace
Okay Character length 1 1 = request ran okay, 0 = error
Duplex Character length 1 H = half duplex, F = full duplex
Http Character length 1 1 = http request, 0= normal broker request
Program Character length32
_PROGRAM variable
Peeraddr Character length16
Peer address
Hostname Character length20
Node name of the server
Username Character length12
_USERNAME variable, if any
Entry _ENTRY variable, if any
SAS Documentation
191
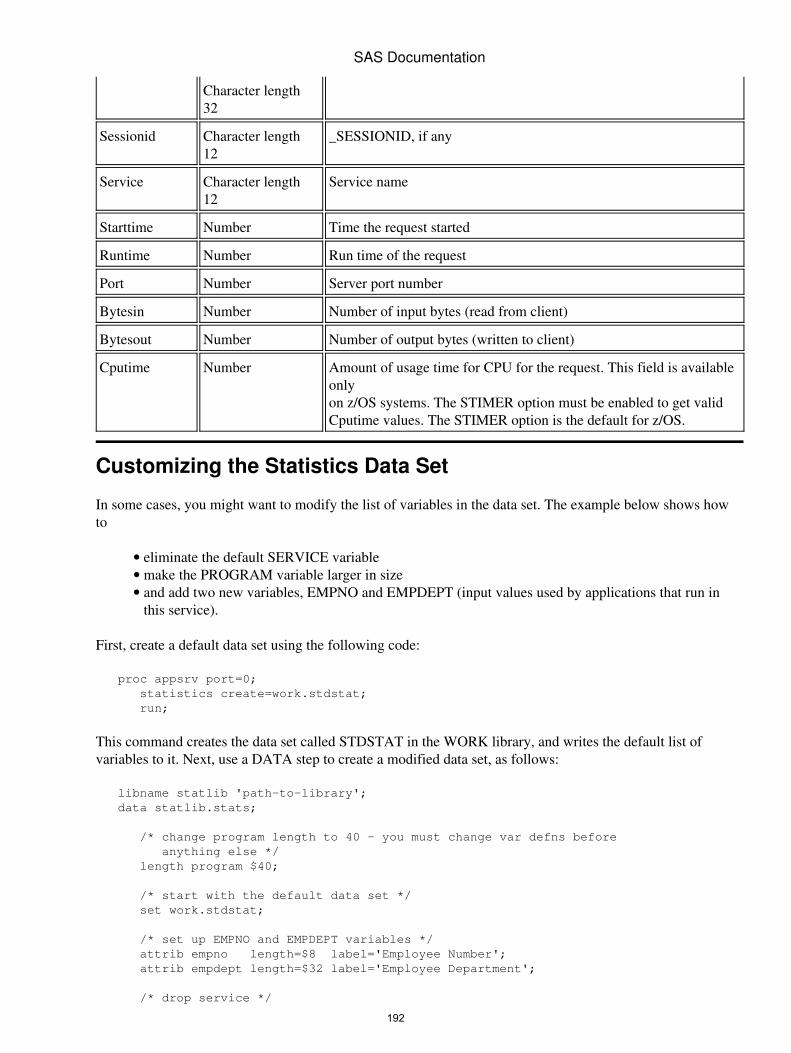
Character length32
Sessionid Character length12
_SESSIONID, if any
Service Character length12
Service name
Starttime Number Time the request started
Runtime Number Run time of the request
Port Number Server port number
Bytesin Number Number of input bytes (read from client)
Bytesout Number Number of output bytes (written to client)
Cputime Number Amount of usage time for CPU for the request. This field is availableonlyon z/OS systems. The STIMER option must be enabled to get validCputime values. The STIMER option is the default for z/OS.
Customizing the Statistics Data Set
In some cases, you might want to modify the list of variables in the data set. The example below shows howto
eliminate the default SERVICE variable• make the PROGRAM variable larger in size• and add two new variables, EMPNO and EMPDEPT (input values used by applications that run inthis service).
•
First, create a default data set using the following code:
proc appsrv port=0; statistics create=work.stdstat; run;
This command creates the data set called STDSTAT in the WORK library, and writes the default list ofvariables to it. Next, use a DATA step to create a modified data set, as follows:
libname statlib 'path−to−library'; data statlib.stats;
/* change program length to 40 − you must change var defns before anything else */ length program $40;
/* start with the default data set */ set work.stdstat;
/* set up EMPNO and EMPDEPT variables */ attrib empno length=$8 label='Employee Number'; attrib empdept length=$32 label='Employee Department';
/* drop service */
SAS Documentation
192

drop service;
/* do not select any observations (there are none) from the previous data set */ stop; run;
The STATLIB.STATS data set now contains the desired variables. Modify your appstart.sas file to savestatistics to this data set, as follows:
proc appsrv ...; ... allocate library statlib 'path−to−library'; statistics data=statlib.stats; run;
Application Server Access to the Data Set
The Application Server opens the statistics data set for WRITE access. This means that usually each serverneeds to write to its own data set. However, if a data set is accessed by using SAS/SHARE software, multipleservers can write to a single data set.
The following code is an example of a PROC APPSRV command that specifies that a single server accesses asingle data set:
proc appsrv ... ; ... allocate library data '.'; STATISTICS DATA=data.stats; ... run;
The following is an example of a PROC APPSRV command that specifies that a server write statistics to adata set on a SAS/SHARE server:
proc appsrv ... ; ... allocate library data '.' server=host.sasapp11; STATISTICS DATA=data.stats; ... run;
Refer to SAS/SHARE documentation for more information about configuring, running, and accessingSAS/SHARE servers.
Application Access to the Data Set
User applications can access the data set by using the _STATDATASET and _STATDATALIBNAME macrovariables. The _STATDATASET macro variable contains the library.DATASET setting of the statistics dataset for this server. The _STATDATALIBNAME contains the LIBNAME, the physical name, and the optionsof the ALLOCATE FILE statement for the statistics data set library. This enables the application to assign aLIBNAME to the library with additional options (for example, ACCESS=READONLY).
Before you access the data set with the _STATDATASET or _STATDATALIBNAME macro variables,check the status of the _STATDATASETAVAIL macro variable. It is set to one of the following values:
SAS Documentation
193
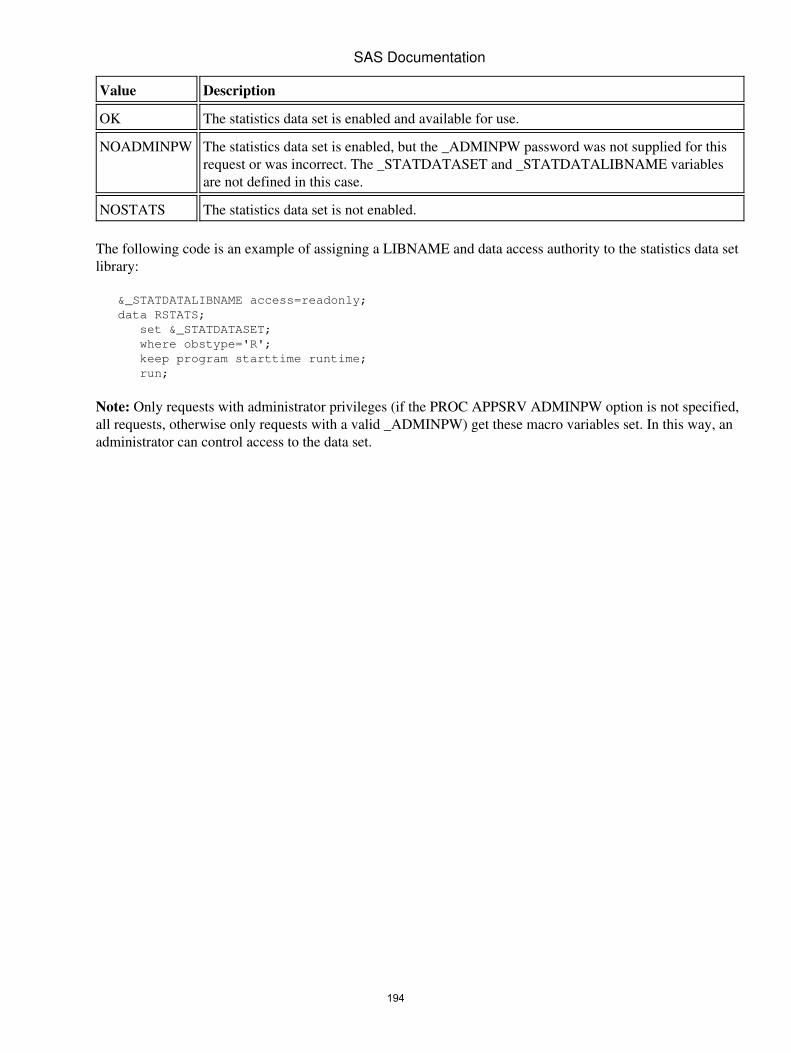
Value Description
OK The statistics data set is enabled and available for use.
NOADMINPW The statistics data set is enabled, but the _ADMINPW password was not supplied for thisrequest or was incorrect. The _STATDATASET and _STATDATALIBNAME variablesare not defined in this case.
NOSTATS The statistics data set is not enabled.
The following code is an example of assigning a LIBNAME and data access authority to the statistics data setlibrary:
&_STATDATALIBNAME access=readonly; data RSTATS; set &_STATDATASET; where obstype='R'; keep program starttime runtime; run;
Note: Only requests with administrator privileges (if the PROC APPSRV ADMINPW option is not specified,all requests, otherwise only requests with a valid _ADMINPW) get these macro variables set. In this way, anadministrator can control access to the data set.
SAS Documentation
194

SamplesThe Application Dispatcher includes some sample applications to help you understand how to create yourown applications. These samples are documented at http://support.sas.com/samples. You can also use theseapplications to ensure that you installed and configured the Application Dispatcher correctly. The inputcomponent for each sample application is installed along with the Application Broker in a default location ofhttp://yourserver/sasweb/IntrNet9/dispatch/. The program component is installed along with the ApplicationServer in the sample and samplib program libraries.
The Xplore sample application uses Application Dispatcher and Web Publishing Tools to browse data sets,catalogs, catalog entries, perform drill−down on PROC SUMMARY data sets, and even download data sets ascomma−separated value files directly into your spread sheet program. This sample application provides anexplorer interface to SAS libraries and their contents. Xplore uses HTML frames, so it requires three HTMLfiles as input. To start this application, type the following URL into your Web browser:http://your_server/sasweb/IntrNet9/xplore/webxplor.html.
195

196
Your Turn
We welcome your feedback.
• If you have comments about this book, please send them to [email protected]. Include the full title and page numbers (if applicable).
• If you have comments about the software, please send them to [email protected].
197

198
SAS® Publishing delivers!Whether you are new to the workforce or an experienced professional, you need to distinguish yourself in this rapidly changing and competitive job market. SAS® Publishing provides you with a wide range of resources to help you set yourself apart.
SAS® Press Series Need to learn the basics? Struggling with a programming problem? You’ll find the expert answers that you need in example-rich books from the SAS Press Series. Written by experienced SAS professionals from around the world, these books deliver real-world insights on a broad range of topics for all skill levels.
s u p p o r t . s a s . c o m / s a s p r e s sSAS® Documentation To successfully implement applications using SAS software, companies in every industry and on every continent all turn to the one source for accurate, timely, and reliable information—SAS documentation. We currently produce the following types of reference documentation: online help that is built into the software, tutorials that are integrated into the product, reference documentation delivered in HTML and PDF—free on the Web, and hard-copy books.
s u p p o r t . s a s . c o m / p u b l i s h i n gSAS® Learning Edition 4.1 Get a workplace advantage, perform analytics in less time, and prepare for the SAS Base Programming exam and SAS Advanced Programming exam with SAS® Learning Edition 4.1. This inexpensive, intuitive personal learning version of SAS includes Base SAS® 9.1.3, SAS/STAT®, SAS/GRAPH®, SAS/QC®, SAS/ETS®, and SAS® Enterprise Guide® 4.1. Whether you are a professor, student, or business professional, this is a great way to learn SAS.
s u p p o r t . s a s . c o m / L E
SAS and all other SAS Institute Inc. product or service names are registered trademarks or trademarks of SAS Institute Inc. in the USA and other countries. ® indicates USA registration. Other brand and product names are trademarks of their respective companies. © 2008 SAS Institute Inc. All rights reserved. 474059_1US.0108