SAS Viya 3.4 Administration: Promotion (Import and Export)
38
SAS ® Viya ® 3.4 Administration: Promotion (Import and Export) Promotion: Overview . . . . . . . . . . . . . . . . . . . . . . . . . . . . . . . . . . . . . . . . . . . . . . . . . . . . . . . . . . . . . . . . . . . . . . . . . . . 2 What Is Promotion? . . . . . . . . . . . . . . . . . . . . . . . . . . . . . . . . . . . . . . . . . . . . . . . . . . . . . . . . . . . . . . . . . . . . . . . . . . 2 What Can Be Promoted? . . . . . . . . . . . . . . . . . . . . . . . . . . . . . . . . . . . . . . . . . . . . . . . . . . . . . . . . . . . . . . . . . . . . . 2 What about Earlier Content? . . . . . . . . . . . . . . . . . . . . . . . . . . . . . . . . . . . . . . . . . . . . . . . . . . . . . . . . . . . . . . . . . . 3 What about Visual Statistics Projects? . . . . . . . . . . . . . . . . . . . . . . . . . . . . . . . . . . . . . . . . . . . . . . . . . . . . . . . . . 3 Promotion from SAS 9: Tasks . . . . . . . . . . . . . . . . . . . . . . . . . . . . . . . . . . . . . . . . . . . . . . . . . . . . . . . . . . . . . . . . . . 3 About These Tasks . . . . . . . . . . . . . . . . . . . . . . . . . . . . . . . . . . . . . . . . . . . . . . . . . . . . . . . . . . . . . . . . . . . . . . . . . . . 3 Step 1: Create an Initial Map of System Information . . . . . . . . . . . . . . . . . . . . . . . . . . . . . . . . . . . . . . . . . . . . 4 Step 2: Promote Internal Groups . . . . . . . . . . . . . . . . . . . . . . . . . . . . . . . . . . . . . . . . . . . . . . . . . . . . . . . . . . . . . . 5 Step 3: Promote Data Definitions . . . . . . . . . . . . . . . . . . . . . . . . . . . . . . . . . . . . . . . . . . . . . . . . . . . . . . . . . . . . . . 5 Step 4: Promote Content . . . . . . . . . . . . . . . . . . . . . . . . . . . . . . . . . . . . . . . . . . . . . . . . . . . . . . . . . . . . . . . . . . . . . 6 Promotion from SAS 9: Reference . . . . . . . . . . . . . . . . . . . . . . . . . . . . . . . . . . . . . . . . . . . . . . . . . . . . . . . . . . . . . . 7 Participating Resources . . . . . . . . . . . . . . . . . . . . . . . . . . . . . . . . . . . . . . . . . . . . . . . . . . . . . . . . . . . . . . . . . . . . . . 7 Details: Identities . . . . . . . . . . . . . . . . . . . . . . . . . . . . . . . . . . . . . . . . . . . . . . . . . . . . . . . . . . . . . . . . . . . . . . . . . . . . . 8 Details: Authorizations . . . . . . . . . . . . . . . . . . . . . . . . . . . . . . . . . . . . . . . . . . . . . . . . . . . . . . . . . . . . . . . . . . . . . . . . 9 Details: Data Definitions . . . . . . . . . . . . . . . . . . . . . . . . . . . . . . . . . . . . . . . . . . . . . . . . . . . . . . . . . . . . . . . . . . . . . 11 Details: Explorations . . . . . . . . . . . . . . . . . . . . . . . . . . . . . . . . . . . . . . . . . . . . . . . . . . . . . . . . . . . . . . . . . . . . . . . . 12 Details: Reports . . . . . . . . . . . . . . . . . . . . . . . . . . . . . . . . . . . . . . . . . . . . . . . . . . . . . . . . . . . . . . . . . . . . . . . . . . . . 12 Workflow Examples . . . . . . . . . . . . . . . . . . . . . . . . . . . . . . . . . . . . . . . . . . . . . . . . . . . . . . . . . . . . . . . . . . . . . . . . . 15 Promotion within SAS Viya: Instructions . . . . . . . . . . . . . . . . . . . . . . . . . . . . . . . . . . . . . . . . . . . . . . . . . . . . . . 16 Introduction . . . . . . . . . . . . . . . . . . . . . . . . . . . . . . . . . . . . . . . . . . . . . . . . . . . . . . . . . . . . . . . . . . . . . . . . . . . . . . . . 16 Promote Resources That Are Stored In SAS Folders . . . . . . . . . . . . . . . . . . . . . . . . . . . . . . . . . . . . . . . . . . 16 Promote Caslibs and Access Controls . . . . . . . . . . . . . . . . . . . . . . . . . . . . . . . . . . . . . . . . . . . . . . . . . . . . . . . . 17 Promote Resources That Are Not Stored in Folders . . . . . . . . . . . . . . . . . . . . . . . . . . . . . . . . . . . . . . . . . . . 20 Promotion within SAS Viya: Reference . . . . . . . . . . . . . . . . . . . . . . . . . . . . . . . . . . . . . . . . . . . . . . . . . . . . . . . . 22 Participating Resources: Promotable with the Transfer CLI . . . . . . . . . . . . . . . . . . . . . . . . . . . . . . . . . . . . . 22 Other Participating Resources . . . . . . . . . . . . . . . . . . . . . . . . . . . . . . . . . . . . . . . . . . . . . . . . . . . . . . . . . . . . . . . 22 Details: Reports That Contain ASTORE Tables . . . . . . . . . . . . . . . . . . . . . . . . . . . . . . . . . . . . . . . . . . . . . . . 23 Details: Jobs . . . . . . . . . . . . . . . . . . . . . . . . . . . . . . . . . . . . . . . . . . . . . . . . . . . . . . . . . . . . . . . . . . . . . . . . . . . . . . . 23 Details: Themes . . . . . . . . . . . . . . . . . . . . . . . . . . . . . . . . . . . . . . . . . . . . . . . . . . . . . . . . . . . . . . . . . . . . . . . . . . . . 24 Additional Details . . . . . . . . . . . . . . . . . . . . . . . . . . . . . . . . . . . . . . . . . . . . . . . . . . . . . . . . . . . . . . . . . . . . . . . . . . . 24 Process Flow Examples . . . . . . . . . . . . . . . . . . . . . . . . . . . . . . . . . . . . . . . . . . . . . . . . . . . . . . . . . . . . . . . . . . . . . 26
Transcript of SAS Viya 3.4 Administration: Promotion (Import and Export)
SAS® Viya® 3.4 Administration: Promotion (Import and Export)
Promotion: Overview . . . . . . . . . . . . . . . . . . . . . . . . . . . . . . . . . . . . . . . . . . . . . . . . . . . . . . . . . . . . . . . . . . . . . . . . . . . 2What Is Promotion? . . . . . . . . . . . . . . . . . . . . . . . . . . . . . . . . . . . . . . . . . . . . . . . . . . . . . . . . . . . . . . . . . . . . . . . . . . 2What Can Be Promoted? . . . . . . . . . . . . . . . . . . . . . . . . . . . . . . . . . . . . . . . . . . . . . . . . . . . . . . . . . . . . . . . . . . . . . 2What about Earlier Content? . . . . . . . . . . . . . . . . . . . . . . . . . . . . . . . . . . . . . . . . . . . . . . . . . . . . . . . . . . . . . . . . . . 3What about Visual Statistics Projects? . . . . . . . . . . . . . . . . . . . . . . . . . . . . . . . . . . . . . . . . . . . . . . . . . . . . . . . . . 3
Promotion from SAS 9: Tasks . . . . . . . . . . . . . . . . . . . . . . . . . . . . . . . . . . . . . . . . . . . . . . . . . . . . . . . . . . . . . . . . . . 3About These Tasks . . . . . . . . . . . . . . . . . . . . . . . . . . . . . . . . . . . . . . . . . . . . . . . . . . . . . . . . . . . . . . . . . . . . . . . . . . . 3Step 1: Create an Initial Map of System Information . . . . . . . . . . . . . . . . . . . . . . . . . . . . . . . . . . . . . . . . . . . . 4Step 2: Promote Internal Groups . . . . . . . . . . . . . . . . . . . . . . . . . . . . . . . . . . . . . . . . . . . . . . . . . . . . . . . . . . . . . . 5Step 3: Promote Data Definitions . . . . . . . . . . . . . . . . . . . . . . . . . . . . . . . . . . . . . . . . . . . . . . . . . . . . . . . . . . . . . . 5Step 4: Promote Content . . . . . . . . . . . . . . . . . . . . . . . . . . . . . . . . . . . . . . . . . . . . . . . . . . . . . . . . . . . . . . . . . . . . . 6
Promotion from SAS 9: Reference . . . . . . . . . . . . . . . . . . . . . . . . . . . . . . . . . . . . . . . . . . . . . . . . . . . . . . . . . . . . . . 7Participating Resources . . . . . . . . . . . . . . . . . . . . . . . . . . . . . . . . . . . . . . . . . . . . . . . . . . . . . . . . . . . . . . . . . . . . . . 7Details: Identities . . . . . . . . . . . . . . . . . . . . . . . . . . . . . . . . . . . . . . . . . . . . . . . . . . . . . . . . . . . . . . . . . . . . . . . . . . . . . 8Details: Authorizations . . . . . . . . . . . . . . . . . . . . . . . . . . . . . . . . . . . . . . . . . . . . . . . . . . . . . . . . . . . . . . . . . . . . . . . . 9Details: Data Definitions . . . . . . . . . . . . . . . . . . . . . . . . . . . . . . . . . . . . . . . . . . . . . . . . . . . . . . . . . . . . . . . . . . . . . 11Details: Explorations . . . . . . . . . . . . . . . . . . . . . . . . . . . . . . . . . . . . . . . . . . . . . . . . . . . . . . . . . . . . . . . . . . . . . . . . 12Details: Reports . . . . . . . . . . . . . . . . . . . . . . . . . . . . . . . . . . . . . . . . . . . . . . . . . . . . . . . . . . . . . . . . . . . . . . . . . . . . 12Workflow Examples . . . . . . . . . . . . . . . . . . . . . . . . . . . . . . . . . . . . . . . . . . . . . . . . . . . . . . . . . . . . . . . . . . . . . . . . . 15
Promotion within SAS Viya: Instructions . . . . . . . . . . . . . . . . . . . . . . . . . . . . . . . . . . . . . . . . . . . . . . . . . . . . . . 16Introduction . . . . . . . . . . . . . . . . . . . . . . . . . . . . . . . . . . . . . . . . . . . . . . . . . . . . . . . . . . . . . . . . . . . . . . . . . . . . . . . . 16Promote Resources That Are Stored In SAS Folders . . . . . . . . . . . . . . . . . . . . . . . . . . . . . . . . . . . . . . . . . . 16Promote Caslibs and Access Controls . . . . . . . . . . . . . . . . . . . . . . . . . . . . . . . . . . . . . . . . . . . . . . . . . . . . . . . . 17Promote Resources That Are Not Stored in Folders . . . . . . . . . . . . . . . . . . . . . . . . . . . . . . . . . . . . . . . . . . . 20
Promotion within SAS Viya: Reference . . . . . . . . . . . . . . . . . . . . . . . . . . . . . . . . . . . . . . . . . . . . . . . . . . . . . . . . 22Participating Resources: Promotable with the Transfer CLI . . . . . . . . . . . . . . . . . . . . . . . . . . . . . . . . . . . . . 22Other Participating Resources . . . . . . . . . . . . . . . . . . . . . . . . . . . . . . . . . . . . . . . . . . . . . . . . . . . . . . . . . . . . . . . 22Details: Reports That Contain ASTORE Tables . . . . . . . . . . . . . . . . . . . . . . . . . . . . . . . . . . . . . . . . . . . . . . . 23Details: Jobs . . . . . . . . . . . . . . . . . . . . . . . . . . . . . . . . . . . . . . . . . . . . . . . . . . . . . . . . . . . . . . . . . . . . . . . . . . . . . . . 23Details: Themes . . . . . . . . . . . . . . . . . . . . . . . . . . . . . . . . . . . . . . . . . . . . . . . . . . . . . . . . . . . . . . . . . . . . . . . . . . . . 24Additional Details . . . . . . . . . . . . . . . . . . . . . . . . . . . . . . . . . . . . . . . . . . . . . . . . . . . . . . . . . . . . . . . . . . . . . . . . . . . 24Process Flow Examples . . . . . . . . . . . . . . . . . . . . . . . . . . . . . . . . . . . . . . . . . . . . . . . . . . . . . . . . . . . . . . . . . . . . . 26
Additional Documentation . . . . . . . . . . . . . . . . . . . . . . . . . . . . . . . . . . . . . . . . . . . . . . . . . . . . . . . . . . . . . . . . . . . 27
Promotion: How to Import (Wizard) . . . . . . . . . . . . . . . . . . . . . . . . . . . . . . . . . . . . . . . . . . . . . . . . . . . . . . . . . . . . 28Introduction . . . . . . . . . . . . . . . . . . . . . . . . . . . . . . . . . . . . . . . . . . . . . . . . . . . . . . . . . . . . . . . . . . . . . . . . . . . . . . . . 28Import SAS 9 Resources . . . . . . . . . . . . . . . . . . . . . . . . . . . . . . . . . . . . . . . . . . . . . . . . . . . . . . . . . . . . . . . . . . . . 28Import SAS Viya Resources . . . . . . . . . . . . . . . . . . . . . . . . . . . . . . . . . . . . . . . . . . . . . . . . . . . . . . . . . . . . . . . . . 30
Promotion: How to Import (Command-Line Interface) . . . . . . . . . . . . . . . . . . . . . . . . . . . . . . . . . . . . . . . . . . 31Prerequisites . . . . . . . . . . . . . . . . . . . . . . . . . . . . . . . . . . . . . . . . . . . . . . . . . . . . . . . . . . . . . . . . . . . . . . . . . . . . . . . 31Import SAS 9 Resources . . . . . . . . . . . . . . . . . . . . . . . . . . . . . . . . . . . . . . . . . . . . . . . . . . . . . . . . . . . . . . . . . . . . 32Import SAS Viya Resources . . . . . . . . . . . . . . . . . . . . . . . . . . . . . . . . . . . . . . . . . . . . . . . . . . . . . . . . . . . . . . . . . 34Check Logs . . . . . . . . . . . . . . . . . . . . . . . . . . . . . . . . . . . . . . . . . . . . . . . . . . . . . . . . . . . . . . . . . . . . . . . . . . . . . . . . 35
Promotion: Concepts . . . . . . . . . . . . . . . . . . . . . . . . . . . . . . . . . . . . . . . . . . . . . . . . . . . . . . . . . . . . . . . . . . . . . . . . . 35Mapping Files . . . . . . . . . . . . . . . . . . . . . . . . . . . . . . . . . . . . . . . . . . . . . . . . . . . . . . . . . . . . . . . . . . . . . . . . . . . . . . 35Substitution Properties . . . . . . . . . . . . . . . . . . . . . . . . . . . . . . . . . . . . . . . . . . . . . . . . . . . . . . . . . . . . . . . . . . . . . . 38
Promotion: OverviewThis document describes promotion of resources to SAS Viya 3.4.
What Is Promotion?
Promotion is the process of making resources that exist in one environment present, available, and usable in another environment.
The promotion process has two phases:
1 Export resources from the source environment.
2 Import resources to the target environment.
A central aspect of both phases is creation, refinement, and application of mappings. Mappings govern transformation of exported resources for use in the target environment. Transformation occurs during the import phase, in accordance with specified mappings. You can save, edit, and reuse mapping files.
What Can Be Promoted?
The following table summarizes the supported source environments, product releases, and resources:
Table 1 Supported Sources for Promotion to SAS Viya 3.4
Environment Release* Participating Resources**
SAS 9
(9.4 and later)
7.x Content: folders, reports, explorations
Supporting resources: graph templates, images
Data definitions: LASR and Base libraries and tables
User groups: most metadata-only groups
Authorizations: most explicit access control entries for promoted objects
2

Environment Release* Participating Resources**
SAS Viya 3.2 8.1 Content: folders, reports, data plans, statistical models, jobs (SAS Viya 3.3 and later), themes
Supporting resources: graph templates, images, files, comments
Data definitions: all types of caslibs and tables
CAS authorization: all direct access controls for promoted objects
General authorization: all direct rules for promoted objects
SAS Viya 3.3 8.2
SAS Viya 3.4 8.3
* These are the supported product releases for promotion of SAS Visual Analytics and SAS Visual Statistics content.** This is a summary. See the SAS 9 and SAS Viya details.
What about Earlier Content?
Promotion of reports and explorations from earlier releases of SAS Visual Analytics and SAS Visual Statistics can be attempted, but you might need to make post-promotion adjustments to content.
What about Visual Statistics Projects?
You cannot directly promote a SAS 9 visual statistics project object to SAS Viya.
To make the content of SAS 9 visual statistics projects (from SAS Visual Statistics 6.4 or 7.1) available in SAS Viya:
1 Upgrade to SAS Visual Analytics Explorer 7.2 or 7.3.
Note: This upgrade converts visual statistics project objects to visual exploration objects.
2 Promote the explorations to SAS Viya.
Promotion from SAS 9: Tasks
About These Tasks
Here are key points about these tasks:
n These tasks assume that you are familiar with the information in “Promotion from SAS 9: Reference”. For successful promotion, it is essential to understand process, scope, and effects.
n These tasks use graphical (point-and-click) interfaces where possible. You can use alternate tools as follows:
o To export, you can use the SAS 9 metadata batch export tool.
o To import, you can use the SAS Viya sas-admin transfer command-line interface.
n These tasks use JSON mapping files. You can instead use YAML mapping files. Note that not all promotion tools support both formats. See “Mapping Files”.
Note: Mapping files are cumulative. Within a series of imports, each successive mapping file supplements and refines a previous mapping file. For that reason, you should use the same format (JSON or YAML) for all of your mapping files.
3

n These tasks reference other documents for details about specific tools. Not all of the SAS 9 promotion documentation is applicable to promotion to SAS Viya. (Much of the SAS 9 promotion documentation is applicable only to promotion within SAS 9.)
n These tasks are organized by object type. For some usage patterns, a different workflow might be more efficient. For example, you might prefer to perform all exports first, and then perform all imports. In any workflow, make sure that you import resources in the specified order.
n These tasks use example file names. You can choose your own names.
n Before you import content to SAS Viya, make sure that you have a current backup.
Step 1: Create an Initial Map of System Information
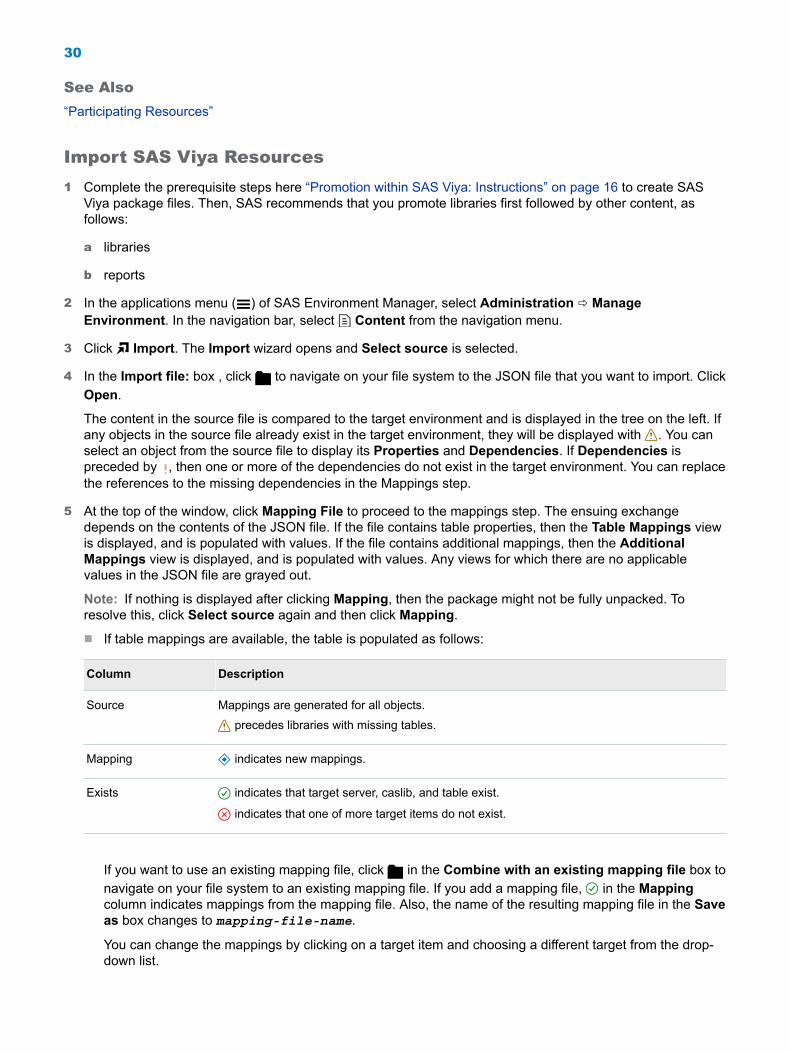
Create a map of system information, unless you already have a current system mappings file.
1 Export metadata identities.
a On the Folders tab in SAS Management Console, navigate to SAS Folders ð System ð Security. Right-click, and select Export SAS Package.
b On the first page of the Export SAS Package Wizard, specify a location and name. (These tasks use the name identities.spk.)
c On the next page, select all users and user groups. Do not export other types of security objects (such as domains, roles, and access control templates).
d When the export is complete, copy the export package to a location that is available to your SAS Viya deployment. If importing using the Import Wizard, copy the export package to your local file system.
2 Export SAS LASR Analytic Server definitions (if you want SAS Viya to access data through a SAS LASR Analytic Server).
a On the Folders tab in SAS Management Console, navigate to SAS Folders ð System ð Servers. In the right pane, select the SAS LASR Analytic Servers that you want to export. Right-click, and select Export SAS Package.
b On the first page of the Export SAS Package Wizard, specify a location and name. (These tasks use the name servers.spk.)
c On the next page, make sure that the SAS LASR Analytic Servers that you want to export are listed.
d When the export is complete, copy the export package to a location that is available to your SAS Viya deployment.
Note: You never import the servers.spk package. Some server properties are added to the mapping file and can be used when you import LASR libraries, converting them to LASR caslibs.
3 Generate a mapping file. At a host prompt, go to the directory where your SAS Viya command-line executable files are stored. Submit commands such as the following:
sas-admin profile initsas-admin auth loginsas-admin transfer generate-content-mapping --mapping output-path--user-package identities.spk --group-package identities.spk
n For visibility, option values are highlighted. If you exported server definitions, add the ‑‑server‑package option to reference that export package file.
n The output file is named ContentMappings.json. Make sure the output location does not already contain a file with the same name if you want to preserve that file.
4

4 Use a text editor to review, refine, and save the mapping file.
a Make sure the file’s contents are as expected. See “Mapping Files”.
b If you want to change any target values, edit the file.
c If you want to prevent promotion of access control entries, set the value for the promoteAuthorization option to false. See “Prevent Promotion of Access Controls”.
d If you plan to promote reports that reference stored processes, add an entry that specifies the base URL for the stored process server. See “References to Stored Processes”.
e If you prefer to work with mapping files in YAML format, use a third-party utility to convert the ContentMappings.json file to that format.
f Place a copy of the revised system mappings file in a location that is available to your SAS Viya deployment. If importing using the Import Wizard, copy the revised system mappings file to your local file system.
Step 2: Promote Internal Groups
Promote internal (metadata-only) identity groups, unless you have already done that.
1 Export.
Locate the identities.spk file that was created in the preceding section. If that file is current, no additional steps are necessary. If that file is not current, repeat the export.
2 Import.
a On the Content page in SAS Environment Manager 3.3 or later, click , and import using the Import Wizard.
For example, you might reference and name files as follows:
Import file: identities.spk
Existing mapping file (input): ContentMappings.json
Saved mapping file (output): map_System.json
Note: To save the mapping file, click on the mapping step of the import.
Note: On the final step of the import, you can save the results as a CSV file. This might be helpful for your records.
b (Optional) Use a text editor to review and refine the mapping file that the import process creates.
3 In the target SAS Viya environment, verify that results are as expected. See “Details: Identities”.
Make post-promotion adjustments as needed.
Step 3: Promote Data Definitions
Promote definitions for LASR and Base libraries and tables.
5

1 Export.
a On the Folders tab in SAS Management Console, right-click the SAS Folders node. Select Export SAS Package.
b On the first page of the Export SAS Package Wizard, provide information as follows:
i Specify a location and name. (These tasks use the name libraries.spk.)
ii If you want to include table definitions for the libraries that you export, select the Include dependent objects when retrieving initial collection of objects check box. (You can instead include LASR table definitions as dependent objects when you export content.)
iii Click Filter. In the Filter window’s Types section, clear all of the check boxes, and select only the Library type.
c On the next page, select the libraries to export. Export only Base and LASR libraries, because those are the only libraries that you can import to SAS Viya 3.4.
d When the export is complete, copy the export package to a location that is available to your SAS Viya deployment.
2 Import.
a On the Content page in SAS Environment Manager 3.3 or later, click , and import using the Import Wizard.
For example, you might reference and name files as follows:
Import file: libraries.spk
Existing mapping file (input): map_System.json
Saved mapping file (output): map_SystemLibraries.json
Note: To save the mapping file, click on the mapping step of the import.
Note: On the final step of the import, you can save the results as a CSV file. This might be helpful for your records.
b (Optional) In a text editor, review the mapping file that the import process creates.
3 In the target SAS Viya environment, verify that results are as expected. See “Details: Data Definitions” and “Details: Authorizations”. Make post-promotion adjustments as needed.
Step 4: Promote Content
Promote folders, reports, explorations, and supporting resources.
1 Export.
a On the Folders tab in SAS Management Console, right-click the SAS Folders node. Select Export SAS Package.
b On the first page of the Export SAS Package Wizard, provide information as follows:
i Specify a location and name. (These tasks use the name content.spk.)
6

ii Select the Include dependent objects when retrieving initial collection of objects check box.
iii Click Filter. In the Filter window’s Types section, clear all of the check boxes, and select only SAS report (2G) and Visual exploration.
c On the next page, select the individual content objects that you want to export.
d When the export is complete, copy the export package to a location that is available to your SAS Viya deployment.
2 Import.
a On the Content page in SAS Environment Manager 3.3 or later, click , and import using the Import Wizard.
For example, you might reference and name files as follows:
Import file: content.spk
Existing mapping file (input): map_SystemLibraries.json
Saved mapping file (output): map_SystemLibrariesContent.json
b (Optional) In a text editor, review the mapping file that the import process creates.
3 If you promoted reports that reference stored processes, make sure that all required configuration is complete. See “References to Stored Processes”.
4 If you promoted reports that reference custom report themes, see “References to Custom Themes”.
5 In the target SAS Viya environment, verify that results are as expected. See “Details: Reports”, “Details: Explorations”, and “Details: Authorizations”. Make post-promotion adjustments as needed.
See AlsoThe SAS 9 export tools are documented in SAS Intelligence Platform: System Administration Guide. Not all SAS 9 export information is relevant for promotion to a SAS Viya target environment.
Promotion from SAS 9: Reference
Participating Resources
The following resources participate in promotion from SAS 9:
n identities
n authorizations
n data definitions
n content
o folders
o reports
n references to stored processes
7

n references to custom report themes
o explorations
o other supporting resources
n images
n graph templates
Note: For all resources that are promoted, the creator of the resource in the source environment might be changed to the person who is performing the promotion in the target environment.
TIP The preceding list addresses resources for SAS Visual Analytics and SAS Visual Statistics. For information about supported resources for another product, see the administrative documentation for that product.
Details: Identities
Important: Promotion assumes that source and target environments share an LDAP identity store.
Scope and Approach
The SAS Viya approach to identity management differs from the SAS 9 approach. For that reason, promotion excludes a lot of SAS 9 identity metadata. Here are details:
Table 2 SAS 9 Identity Metadata That Is Excluded from Promotion
Exclusion Explanation
Metadata for identities that exist in LDAP. SAS Viya does not import and synchronize LDAP identity information. Instead, SAS Viya reads LDAP identity information in place. During promotion, SAS 9 metadata identities that also exist in LDAP are excluded because SAS Viya does not keep its own copy of that information.
Metadata for roles and capabilities. SAS Viya does not have roles (except for the CAS roles, which are outside the scope of promotion).
Metadata for outbound authentication. SAS 9 authentication domains and stored credentials are outside the scope of promotion.
Metadata for internal (metadata-only) users. SAS Viya does not have internal users. Each user must exist in LDAP. Any users who do not have an external identity value in the SAS 9 metadata are assumed to be internal (metadata-only users).
To help preserve memberships and convert authorizations, promotion extracts and manipulates SAS 9 identity information as follows:
n Most SAS 9 internal (metadata-only) groups are converted to SAS Viya custom groups. In most cases, membership information is preserved for members that exist in LDAP. Here are exceptions:
o Two of the predefined SAS 9 internal groups (SAS General Servers and SAS System Services) are discarded. In SAS Viya, corresponding predefined internal service accounts exist as needed.
o A few other predefined SAS 9 identities have specialized mappings. See the following section.
8

Note: If a custom group already exists in the target environment, it is not re-created. Instead, membership is compared and any missing members are added. Promotion is cumulative; it does not delete custom groups or memberships from the target environment.
n If your SAS 9 and SAS Viya environments do not use the same field as a unique identifier, resulting variations in identity names (or IDs) are resolved so that they match the LDAP field that SAS Viya uses as a unique identifier.
Note: To map SAS 9 users to LDAP, promotion uses user IDs from logins in the DefaultAuth authentication domain.
Specialized Mappings
Promotion uses the following specialized mappings:
Table 3 Specialized Mappings (for Predefined Identities)
SAS 9 Metadata Identity SAS Viya Principal How the Mapping is Used
PUBLIC group Everyone* Authorizations
SASUSERS group Authenticated Users Authorizations
SAS Administrators group SAS Administrators Authorizations, Members
Visual Data Builder Administrators group Data Builders Members
Visual Analytics Data Administrators group
Application Administrators Members
* In CAS authorization, there is no Everyone principal, so PUBLIC is mapped to Authenticated Users.
Here are additional details:
n The specialized mappings are implicit. They cannot be customized. They are not reflected in any mapping file.
n Identities that are not listed in the preceding table do not have specialized mappings.
Details: Authorizations
Important: The SAS Viya approach to authorization is very different from the SAS 9 approach. For that reason, promotion cannot fully replicate your SAS 9 authorizations in SAS Viya. See “Comparison to SAS 9 Authorization” in SAS Viya Administration: Orientation to Authorization.
Important: Promotion does not process access control templates (ACTs). If you deconstruct ACTs into individual access control entries (ACEs) before promotion, promotion can process the individual ACEs that are directly set on each promoted object.
Scope and Approach
For most exported objects, any explicit ACEs are extracted from the SAS 9 metadata. Promotion converts most of the extracted ACEs to SAS Viya authorizations.
Here are key points:
n For promoted libraries and tables, all explicit ACEs are converted to CAS access controls. Row-level filters (referred to in SAS 9 as permission conditions) are preserved.
9
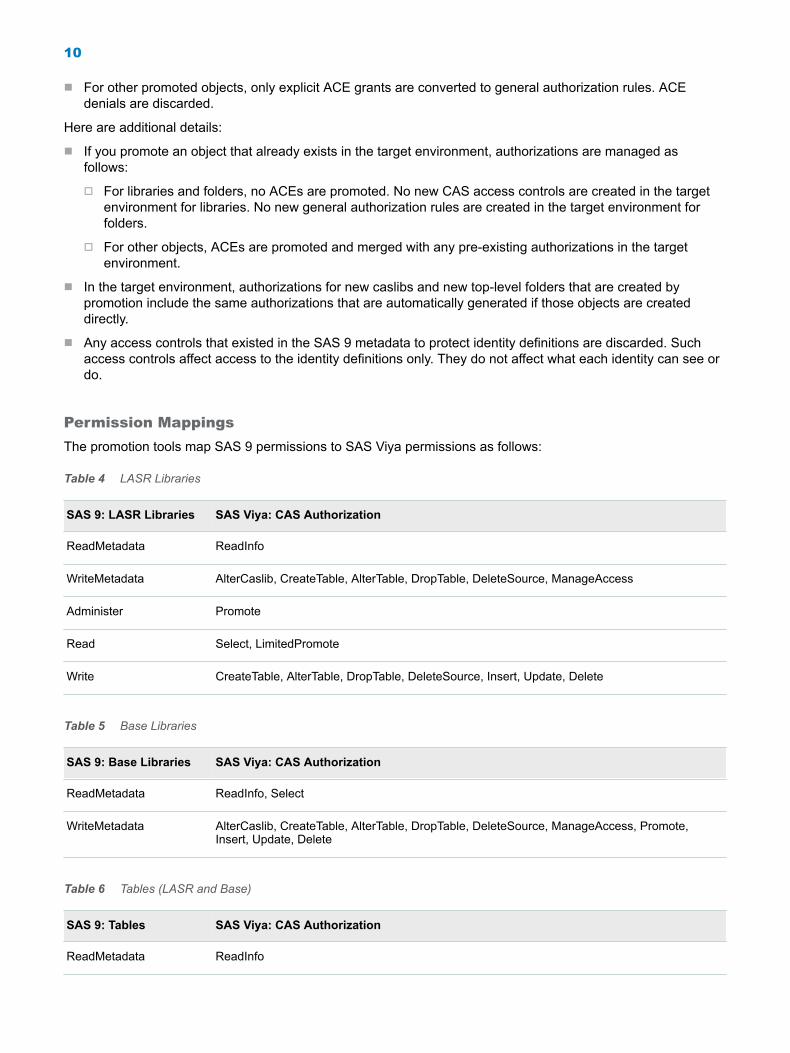
n For other promoted objects, only explicit ACE grants are converted to general authorization rules. ACE denials are discarded.
Here are additional details:
n If you promote an object that already exists in the target environment, authorizations are managed as follows:
o For libraries and folders, no ACEs are promoted. No new CAS access controls are created in the target environment for libraries. No new general authorization rules are created in the target environment for folders.
o For other objects, ACEs are promoted and merged with any pre-existing authorizations in the target environment.
n In the target environment, authorizations for new caslibs and new top-level folders that are created by promotion include the same authorizations that are automatically generated if those objects are created directly.
n Any access controls that existed in the SAS 9 metadata to protect identity definitions are discarded. Such access controls affect access to the identity definitions only. They do not affect what each identity can see or do.
Permission Mappings
The promotion tools map SAS 9 permissions to SAS Viya permissions as follows:
Table 4 LASR Libraries
SAS 9: LASR Libraries SAS Viya: CAS Authorization
ReadMetadata ReadInfo
WriteMetadata AlterCaslib, CreateTable, AlterTable, DropTable, DeleteSource, ManageAccess
Administer Promote
Read Select, LimitedPromote
Write CreateTable, AlterTable, DropTable, DeleteSource, Insert, Update, Delete
Table 5 Base Libraries
SAS 9: Base Libraries SAS Viya: CAS Authorization
ReadMetadata ReadInfo, Select
WriteMetadata AlterCaslib, CreateTable, AlterTable, DropTable, DeleteSource, ManageAccess, Promote, Insert, Update, Delete
Table 6 Tables (LASR and Base)
SAS 9: Tables SAS Viya: CAS Authorization
ReadMetadata ReadInfo
10
SAS 9: Tables SAS Viya: CAS Authorization
WriteMetadata CreateTable, AlterTable, DropTable, DeleteSource, ManageAccess
Read Select, LimitedPromote
Write CreateTable, AlterTable, DropTable, DeleteSource, Insert, Update, Delete
Table 7 Folders
SAS 9: Folders SAS Viya: General Authorization
ReadMetadata Read
WriteMetadata Update, Delete, Secure
WriteMemberMetadata Add, Remove
Table 8 Other Content
SAS 9 SAS Viya: General Authorization
ReadMetadata Read
WriteMetadata Update, Delete, Secure
Prevent Promotion of Access Controls
To prevent promotion of access controls, use a mapping file that specifies a value of false for the promoteAuthorization option.
Here is a YAML example:
options:{ promoteAuthorization:false}
Here is a JSON example:
"options":{ "promoteAuthorization":false}
Details: Data Definitions
Important: Physical data is not promoted (moved). Promotion assumes that source and target environments access data in a common location or use a shared file system.
You can promote the following types of SAS 9 data definitions:
n LASR libraries, which become LASR caslibs in SAS Viya
n LASR tables
11

n Base libraries, which become path caslibs in SAS Viya
n Base tables
Promotion of other types of SAS 9 data definitions is not supported.
Here are additional details:
n If a caslib that results from the promotion of a SAS 9 library already exists in the SAS Viya target environment, the caslib will not be promoted.
n If the SAS 9 environment is secure, then you should import the SAS 9 certificate chain to the trustedcerts.pem file on the CAS controller before promoting. For more information, see “Manage Truststores” in Encryption in SAS Viya: Data in Motion.
Details: Explorations
n Promotion converts explorations to reports.
n For each report that is converted from an exploration, the string "(Exploration)" (or the localized equivalent of that string) is appended to its name. For example, in English locations, promotion of an exploration that is named MyModel creates a report that is named MyModel (Exploration).
TIP In the sas‑admin transfer CLI, the locale global option determines the locale. The default value for that option is en (English).
n Reports that were originally explorations use the default report theme. This can result in color differences in some objects.
Details: Reports
General
n In the mappings, review the target table names, and make any necessary adjustments. The default mapping is as follows:
o In most cases, the source table_name is used as the target table name.
o If the source table_name cannot be used for a particular table, the source table’s metadata object name is used as the target table name.
n In the mappings, make sure that the source that is named "default" specifies target values for at least the CAS library and CAS server. This is essential if you use any auto-generated target values without modification.
n Be aware that three-color ramps are converted to two-color ramps. Consequently, you might notice a difference in the color gradients in heat maps. Also, the color gradient on some of the SAS sample reports also look different.
n Charts that contain date or time data might not be displayed correctly after promotion if the data has an unsupported date format. To work around this issue, you can use SAS Visual Analytics to change the object type and then change it back again.
References to Custom Themes
If you promote a report that uses a custom report theme, and that theme does not exist in your target SAS Viya environment, the following result occurs:
12
n In the target environment, a copy of the default report theme is created. The copied theme’s name (and ID) is in the following format: "Custom_Report_original-theme-name".
n When the promoted report is displayed, it uses the default report theme.
If you want to avoid this result, complete the following steps before you promote reports:
1 Re-create your SAS Visual Analytics 7.x custom report themes in SAS Viya.
2 Assign each original theme’s name to the corresponding new theme.
References to Stored Processes
Important: Stored processes remain in SAS 9 and run only in SAS 9. With appropriate configuration, reports in SAS Viya can call stored processes in SAS 9.
1 Before you import reports that reference stored processes, you must manually insert a mapping file entry for the option storedProcessBaseUrl.
a Determine the appropriate value.
i Log on to SAS Management Console from the SAS 9 environment.
ii On the Plug-ins tab, select Application Management ð Configuration Manager ð SAS Application Infrastructure. Right-click Stored Process Web App 9.4, and select Properties.
iii Examine the values from the Internal Connection tab and the External Connection tab.
n If the values from the External Connection tab are different from the Internal Connection tab, and the Use internal connection information check box is not selected, then use the values from the External Connection tab for the following step.
n If the values from the External Connection tab are the same as the Internal Connection tab, or the Use internal connection information check box is selected, then use the values from the Internal Connection tab for the following step.
iv Concatenate the following values together to compose the URL:
n Communication Protocol value
n ://
n Host Name value
n :
n Port Number value
n Service value
n /do
n Click Cancel.
b In the appropriate mapping file, add the storedProcessBaseUrl option, and specify the URL from the preceding step.
Here is a YAML example:
options:{ storedProcessBaseUrl:"http://serverA.demo.com:7980/SASStoredProcess/do"}
Here is a JSON example:
"options":{
13

"storedProcessBaseUrl":"http://serverA.demo.com:7980/SASStoredProcess/do"}
For an example of a complete YAML and JSON file, see sample YAML file and sample JSON file.
2 Before you use a report that references a stored process, whitelist the SAS Viya host machine.
Note: If you do not whitelist the SAS Viya host machine, SAS Viya cannot use stored processes, because the SAS Viya host machine cannot access the SAS 9 system where stored processes run.
a On the SAS 9 machine where the stored process server runs, in the value for the sas.web.csrf.referers.knownHosts property, add a whitelist entry that specifies the SAS Viya host machine.
For instructions, see Modifying the Whitelist for URLs and HTTP Request Methods.
b Restart the SAS Web Server on the SAS 9 middle tier. If you are performing the next step for inline frames, you can wait until after completing that step to restart the middle tier.
3 If you are on SAS 9.4M5 or later and you want to allow stored processes to be included in an inline frame (IFRAME), you must adjust the security options for the SAS Stored Process web application, as follows:
a From the SAS 9.4 middle tier machine, make a copy of the SAS_configuration-directory/Levn/Web/WebServer/conf/sas.conf file to ensure that you have a backup. Then edit the file as follows.
b Comment out this line:
Header set X-Frame-Options SAMEORIGIN
c For Chrome or Firefox browsers, replace with this line:
Header set Content-Security-Policy "frame-ancestors <communication-protocol>://<SAS Viya host name>"
For example, the following line applies to an HTTPS environment with the specified host:
Header set Content-Security-Policy "frame-ancestors https://host.example.com"
d For Internet Explorer browsers, replace with this line:
Header set X-Frame-Options "ALLOW-FROM <communication-protocol>://<SAS Viya host name>"
For example, the following line applies to an HTTPS environment with the specified host:
Header set X-Frame-Options "ALLOW-FROM https://host.example.com"
e Restart the SAS Web Server on the SAS 9.4 middle tier.
Here are additional details:
n To add a SAS 9 stored process to a SAS Viya report, specify Web Content as the report object in SAS Visual Analytics.
n Pre-existing SAS 9 reports that contain stored processes do not need to be re-created in SAS Viya.
Note: If the SAS Viya machine uses HTTPS while the SAS 9 machine uses HTTP, the stored process might fail. You can load the content anyway using manual steps. This behavior differs between the various browsers.
14
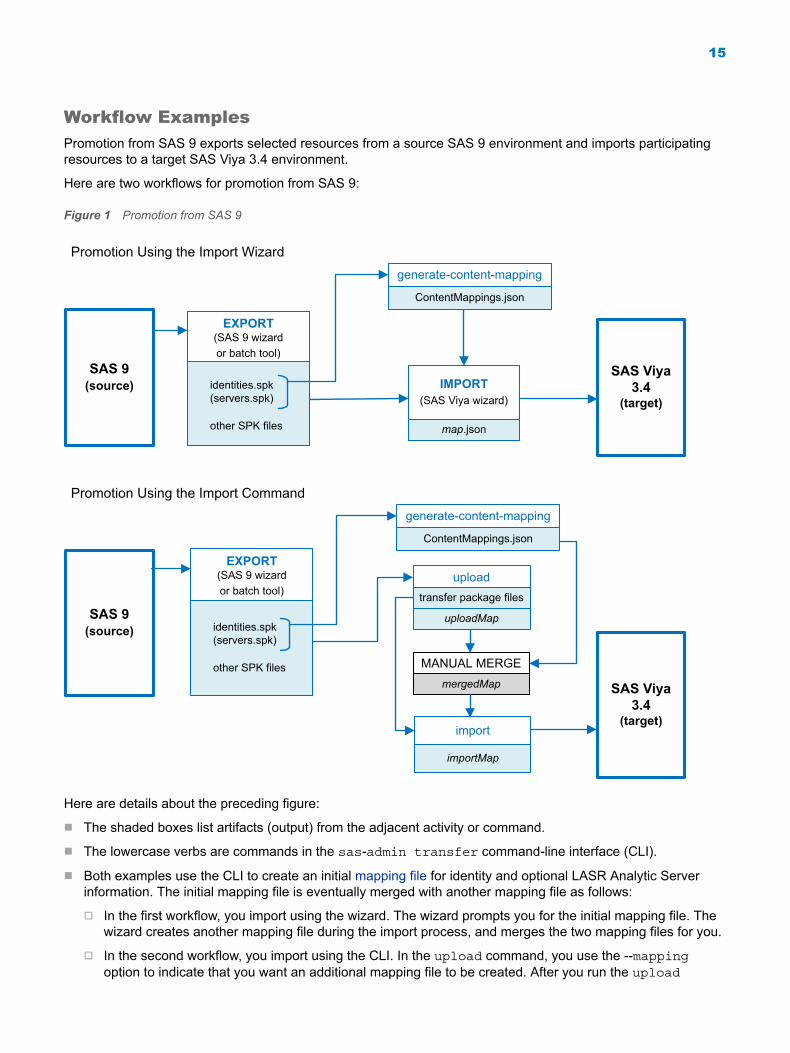
Workflow Examples
Promotion from SAS 9 exports selected resources from a source SAS 9 environment and imports participating resources to a target SAS Viya 3.4 environment.
Here are two workflows for promotion from SAS 9:
Figure 1 Promotion from SAS 9
SAS Viya 3.4
(target)
SAS 9 (source)
EXPORT (SAS 9 wizardor batch tool)
generate-content-mapping
ContentMappings.json
IMPORT (SAS Viya wizard)
map.json
SAS Viya 3.4
(target)
SAS 9 (source)
EXPORT (SAS 9 wizard or batch tool)
importMap
upload
import
Promotion Using the Import Wizard
Promotion Using the Import Commandgenerate-content-mapping
ContentMappings.json
MANUAL MERGEmergedMap
transfer package files
uploadMap
identities.spk (servers.spk)
other SPK files
identities.spk (servers.spk)
other SPK files
Here are details about the preceding figure:
n The shaded boxes list artifacts (output) from the adjacent activity or command.
n The lowercase verbs are commands in the sas‑admin transfer command-line interface (CLI).
n Both examples use the CLI to create an initial mapping file for identity and optional LASR Analytic Server information. The initial mapping file is eventually merged with another mapping file as follows:
o In the first workflow, you import using the wizard. The wizard prompts you for the initial mapping file. The wizard creates another mapping file during the import process, and merges the two mapping files for you.
o In the second workflow, you import using the CLI. In the upload command, you use the ‑‑mapping option to indicate that you want an additional mapping file to be created. After you run the upload
15

command, you manually merge the generated second mapping file (in this example, uploadMap) with the initial mapping file (ContentMappings). The merged mapping file (in this example, mergedMap) is used as an input to the import command.
In other words, you combine the files as follows: ContentMappings + uploadMap = mergedMap
n The figure is not exhaustive. Other workflows, and multiple iterations within each step of each workflow, are possible. The workflow can be repeated for additional resources.
Promotion within SAS Viya: Instructions
Introduction
Different methods are used to promote SAS content between SAS Viya environments, depending on whether items reside in SAS folders with a URI or do not reside in SAS folders.
n SAS content that resides in a SAS folder with a corresponding URI can be promoted using either the SAS Environment Manager or the transfer plug-in to the sas-admin CLI. The transfer plug-in manages both the export and the import of the SAS content.
n Caslibs and their access controls, which do not reside in a SAS folder, cannot be promoted in the usual manner with the transfer plug-in to the sas-admin CLI. Instead, they can be re-created in the target environment using the cas plug-in to the sas-admin CLI.
n Resources like custom groups and rules, which do not reside in a SAS folder, can be promoted using the --request option of the transfer plug-in to the sas-admin CLI. When promoting this type of content, you must manually construct the URI.
Promote Resources That Are Stored In SAS Folders
To promote resources within SAS Viya that live in SAS folders and have a corresponding URI, you can use either SAS Environment Manager or the transfer plug-in to the sas-admin CLI. This method exports the content to a package file, and then imports the package file to the target environment, as follows:
1 Review the information in “Promotion within SAS Viya: Reference”. For successful promotion, you must understand process, scope, and effects.
2 Export content from the source environment to a package as follows:
n To export content using SAS Environment Manager, see “Export Content” in SAS Viya Administration: Content Management.
n To export content using the transfer CLI:
o Retrieve the URI of the content that you want to export as follows:
n Open SAS Environment Manager in the source environment. In the side menu , under SAS
Environment Manager, select Content.n In the navigation pane, navigate to each content item that you want to export. For each item to be
exported, look at the Basic Properties in the right pane and make a note of the item’s URI and type.
o Make sure that your sas-admin command-line interface (CLI) is set up. Specify the URL for the source machine as the endpoint when creating your profile.
o If you have not created a profile and signed in on the source machine, do the following:
16
http://documentation.sas.com/?docsetId=calcli&docsetVersion=3.4&docsetTarget=titlepage.htm&locale=en

n Create a profile that references your source SAS environment as the endpoint.
n Sign in with an account that is a member of the SAS Administrators group in your SAS environment.
o If you are not already there, navigate to the CLI executable files.
TIP The files are on your SAS Viya machine (details). If you downloaded the CLI, the files are in your download location.
o Run the sas-admin transfer export command to export the content items to a package file.
If you are exporting only one item, you can specify its URI on the command line by using the --resource-uri option. To export multiple items, specify the items in a JSON file, and use the --request option to specify the file.
For example, the following command exports a single report from a Test environment (that is, the SAS Viya environment that is specified in a profile called Test).
sas-admin transfer --profile Test export --resource-uri "/reports/reports/faa7f5f2-0822-4ca0-9f92-23bda3e02738" --name "Export Report"
The ID of the created package is displayed at the end of the output. Here is an example:
Package created: faa7f5f2-0822-4ca0-9f92-23bda3e02738
o Run the sas-admin transfer download command to download the exported package to a JSON file on your local machine.
For example, the following command downloads the package from the test environment in the prior step and stores it in a package file called MyPackage.json on your local machine. If you do not specify a path, the file is created in the directory where the command was executed.
sas-admin transfer --profile Test download --id faa7f5f2-0822-4ca0-9f92-23bda3e02738 --file MyPackage.json
3 Save the package files in a location that is accessible to the SAS Viya deployment.
4 Import using the wizard or the command-line interface.
Note: Model Studio project owners must sign in to the target system before any of their projects can be promoted. See “Import Content” on page 26 for other information you that you might need to know before you import.
5 In the target environment, verify results and make any necessary post-promotion adjustments.
See Also
n “Examples” in SAS Viya Administration: Using the Command-Line Interfaces
n “Details” in SAS Viya Administration: Using the Command-Line Interfaces
Promote Caslibs and Access Controls
To promote caslibs and access controls within SAS Viya, you can use the cas plug-in to the sas-admin CLI to create JSON files for caslibs and access controls from the source environment. Then use the cas plug-in to the sas-admin CLI again to create caslibs and access controls from that same JSON file in the target environment. See the following:
1 Review the information in “Promotion within SAS Viya: Reference”. For successful promotion, you must understand process, scope, and effects.
17

2 Create a JSON file for caslibs and access controls from the source environment as follows:
n Make sure that your sas-admin command-line interface (CLI) is set up. Specify the URL for the source machine as the endpoint when creating your profile.
n If you have not created a profile and signed in on the source machine, do the following:
o Create a profile that references your source SAS environment as the endpoint.
o Sign in with an account that is a member of the SAS Administrators group in your SAS environment.
o If you are not already there, navigate to the CLI executable files.
TIP The files are on your SAS Viya machine (details). If you downloaded the CLI, the files are in your download location.
o Run the sas-admin cas caslibs list command to view information about the existing caslibs. Identify the caslib that you want to export.
For example, the following command displays caslib information on the command line. The --limit option can be adjusted to show more caslibs.
sas-admin --output text cas caslibs list --server serverA --limit 20
o Run the sas-admin cas caslibs show-info command to display detailed information about the caslib that you want to export.
For example, the following command displays information about the Sales caslib.
sas-admin --output text cas caslibs show-info --server serverA --name Sales
o Redirect the information about the caslib to a file in JSON format. This file is a backup of the caslib definition from the source environment that can be copied to the target environment.
For example, the following command redirects information about the Sales caslib to a JSON file called salescaslib.json.
sas-admin --output json cas caslibs show-info --name Sales--server serverA > /tmp/salescaslib.json
For example, the contents of the JSON file might look like this:
# more /tmp/salescaslib.json{"attributes": {"active": false,"personal": false,"subDirs": false},"description": "","name": "Sales","path": "/tmp/salescaslib/","scope": "global","server": "serverA","type": "PATH"}
Note: Notice the type value in the JSON file. You will use the type value when creating the caslib in the target environment. In this example, you are creating a path-based caslib in the in the target environment.
o To preserve access controls (caslib authorizations), run the sas-admin cas caslibs list-controls command.
18

For example, the following command redirects the caslib authorizations from the Sales caslib to a JSON file called salescasauths.json.
sas-admin --output json cas caslibs list-controls --server serverA --name Sales > /tmp/salescasauths.json
Note: Authorizations are not included when the caslib definition is retrieved from the source environment. When the caslib is created in the target environment, it gets the same default permissions that it would have received if it had been created with SAS Environment Manager. Other authorizations are lost. Therefore, you must save the authorizations to a JSON file from the source environment and import them into the target environment to preserve them.
3 Copy data to the target environment or, if using external data sources, make sure that the data source is accessible from the target environment.
4 Re-create content in the target environment as follows:
n Make sure that your sas-admin command-line interface (CLI) is set up. Specify the URL for the target machine as the endpoint when creating your profile.
n If you have not created a profile and signed in on the target machine, do the following:
o Create a profile that references your target SAS environment as the endpoint.
o Sign in with an account that is a member of the SAS Administrators group in your SAS environment.
n If you are not already there, navigate to the CLI executable files.
TIP The files are on your SAS Viya machine (details). If you downloaded the CLI, the files are in your download location.
n Run the sas-admin cas caslibs create path command to create a path-based caslib in the target environment using the information stored in the JSON file that you created in the source environment.
For example, the following command creates the Sales caslib in the target environment.
sas-admin cas caslibs create path --source-file /tmp/salescaslib.json
If the caslib already exists in the target environment, it will not be re-created. If the path does not exist in the target environment, it can be manually created prior to running the import or the --create-dir option can be added to the command to automatically create it.
n To re-create access controls (caslib authorizations), run the sas-admin cas caslibs replace-controls command to overwrite the access controls for the Sales caslib with those in the salescasauths.json file.
For example, the following command replaces the access controls for the Sales calib with those in the salescasauths.json file.
sas-admin --output json cas caslibs replace-controls --server serverA --name Sales --source-file /tmp/salescasauths.json
5 In the target environment, verify results and make any necessary post-promotion adjustments.
See Also
n “CLI Examples: CAS Administration” in SAS Viya Administration: Using the Command-Line Interfaces
n “Details” in SAS Viya Administration: Using the Command-Line Interfaces
19
Promote Resources That Are Not Stored in Folders
To promote resources that do not reside in folders such as groups and rules, you can use the transfer plug-in to the sas-admin cli to promote by using the resource’s URI. Specifically, you can build a JSON file that identifies the URI of the items to export, use the transfer plug-in to export the JSON file, and then use it again to import the resulting package to the target environment. See the following:
1 Review the information in “Promotion within SAS Viya: Reference”. For successful promotion, you must understand process, scope, and effects.
2 Export content from the source environment to a package as follows:
n Make sure that your sas-admin command-line interface (CLI) is set up. Specify the URL for the source machine as the endpoint when creating your profile.
n If you have not created a profile and signed in on the source machine, do the following:
o Create a profile that references your source SAS environment as the endpoint.
o Sign in with an account that is a member of the SAS Administrators group in your SAS environment.
o If you are not already there, navigate to the CLI executable files.
TIP The files are on your SAS Viya machine (details). If you downloaded the CLI, the files are in your download location.
o Run the sas-admin identities list-groups command to view information about the existing groups. Identify the group that you want to export, and record the ID of the group. You will use the ID to construct the URI of the group.
For example, the following command displays information about the existing groups on the command line.
sas-admin --output text identities list-groups
o If you are exporting a general authorization rule that is associated with the group, retrieve the ID from SAS Environment Manager as follows:
n Open SAS Environment Manager in the source environment. In the side menu , under SAS
Environment Manager, select .
n Using the Rules Filter, locate the rule that you want to export. From the table on the right, right-click the rule and select Properties. The ID of the rule is the last item on the Rule Properties window. You will use the ID to construct the URI of the rule.
o Build the JSON file that defines what is being exported. This JSON file is used as input to the transfer CLI using the --request option. The format of the JSON file is documented here.
The items option in the JSON file precedes the list of URIs, enumerating all resources that are being exported. The ID of the group and general authorization rule that you retrieved in prior steps make up the last element of their respective URIs.
The first part of the URI is the rest endpoint of the resource, as follows:
Groups /identities/groups/
Rules /authorization/rules/
20
If you do not know the REST endpoint, you can find information at developer.sas.com or contact SAS Technical Support for assistance.
Here is an example of a JSON file. The items option precedes the URIs for a custom group and a general authorization rule.
{
“version”: 1,“name”: “My custom groups”,“description”: “Export Viya Custom groups and Rule”,“items”: [“/identities/groups/Finance Content Developers”,“/authorization/rules/00b08a2f-847f-4c2a-98b5-e1711860d02d”]}
The URIs in the JSON file above consist of the following elements:
REST endpoint ID
/identities/groups/ Finance Content Developers
/authorization/rules/ 00b08a2f-847f-4c2a-98b5-e1711860d02d
o Run the sas-admin transfer export command with the --request option to export the resources denoted in the JSON file that you created.
For example, the following command exports the resources denoted in the export_groups.json file in the /tmp/ directory.
sas-admin transfer export --request @/tmp/export_groups.json
The first character following the --request option must be the @ sign. See the transfer CLI documentation for more information.
Note: Note the ID of the package that is returned with the output of the command.
3 Run the sas-admin transfer download command to download the package to a JSON file that you can import to your target environment. Use the ID of the package from the prior step as input to the command.
For example, the following command downloads the transfer package with the specified ID to the package_groups.json file.
sas-admin transfer download --id 2916d2cb-14bd-4418-9aff-2d90feb4397e --file /tmp/package_groups.json
4 Copy the JSON file to the target environment.
5 To import the package with SAS Environment Manager, see “Import SAS Viya Resources” on page 30. If a custom group already exists in the target environment, it is not imported. If a rule with the same ID exists, then the contents of the rule are updated.
To import the package with the transfer CLI, you must first delete any custom groups that already exist in the target environment with the same ID.
n Remove any groups with the same ID with the sas-admin identities delete-group command.
n Run the sas-admin transfer upload command to upload the JSON file to the target environment.
For example, the following command uploads the package_groups,json file.
sas-admin transfer upload --file /tmp/package_groups.json
21

Note: Note the ID of the package that is returned with the output of the command.
n Run the sas-admin transfer import command to import the package to the target environment. Use the ID of the package from the prior step as input to the command.
For example, the following command imports the package with the specified ID.
sas-admin transfer import --id id
6 In the target environment, verify results and make any necessary post-promotion adjustments.
Promotion within SAS Viya: Reference
Participating Resources: Promotable with the Transfer CLI
The following resources participate in promotion within SAS Viya by using the transfer CLI:
n comments
n data views
n files
n folders
n graph templates
n images
n jobs
o job requests
o job definitions
Note: The Scheduling service schedules job requests, but the promotion of schedules is not currently supported.
n Model Studio projects
n reports
n SAS Data Studio data plans
n statistical models
n themes
Note: For all resources that are promoted, the creator of the resource in the source environment might be changed to the person who is performing the promotion in the target environment.
Other Participating Resources
The following resources participate in promotion within SAS Viya by using other relevant CLIs:
n authorizations (CAS access controls on promoted caslibs and tables; direct rules on other promoted objects)
n data sources
Note: For all resources that are promoted, the creator of the resource in the source environment might be changed to the person who is performing the promotion in the target environment.
22

Details: Reports That Contain ASTORE Tables
Some reports contain a new type of table called analytic store (ASTORE) tables. ASTORE tables are created internally, and are different from the source tables that users include in a mapping file before importing. Currently, tables cannot be promoted. Consequently, ASTORE tables are not transferred to the target system during promotion.
When you open a report that was just promoted and the report contains an ASTORE table, you receive a message about a missing data source. The message is accompanied by the name of the ASTORE table that is missing.
To resolve this, you must manually copy the ASTORE table from the target machine to the source machine:
1 Connect to the source machine with SSH (secure shell), and navigate to this directory: /opt/sas/viya_or_tenant/config/data/cas/default/vamodels.
The value of viya_or_tenant is either viya, which is the default, or the name of the tenant if this is a multi-tenant deployment.
2 Look for the missing ASTORE table. Copy the ASTORE table to the target machine as follows:
scp -p /opt/sas/viya_or_tenant/config/data/cas/default/vamodels/ASTORE_table target_machine:/opt/sas/viya_or_tenant/config/data/cas/default/vamodels/
3 Open the report from SAS Visual Analytics.
4 Repeat steps 1 through 3 for additional ASTORE tables.
Details: Jobs
Job promotion involves the promotion of a job request, a job definition, and a job schedule. If these objects do not live in folders in SAS Environment Manager (which is always the case in SAS Viya 3.3), they can be promoted as follows:
1 If you have not already, create a profile that references your source SAS environment as the endpoint, and sign in with an account that is a member of the SAS Administrators group in your SAS environment.
2 Retrieve the URI of the job definition using the job CLI as follows:
sas-admin job definitions list
sas-admin job definitions show --id job-id
Use the job definitions list command to retrieve a list of all job definitions. Locate the ID of the job definition for which you need the job definition URI. Use the job definitions show --id command to retrieve the job definition URI for the job with the associated ID.
3 You must manually build the job-request URI. The format of the job-request URI is as follows:
/jobExecution/jobRequests/job-request-ID
You can retrieve the job-request ID by examining the properties of the job in SAS Environment Manager or by using the job plug-in to the sas-admin CLI.
Using SAS Environment Manager:
a From SAS Environment Manager 3.3, click the Jobs page from the taskbar.
b Click the Scheduling tab.
23

c Locate the job for which you need the job-request ID, and select Properties. The ID found on the General tab of the Job Properties dialog box is the job-request ID.
Using the job plug-in:
a Create your profile, and sign in to SAS Viya.
b Issue the following command: ./sas‑admin job requests list
c Locate the job request ID from the list of jobs that results.
4 Use the URI of the job definition and job request to export content to package files using the transfer CLI.
5 Import the resulting JSON packages with the transfer CLI.
Note: Report distribution jobs cannot be promoted. If you promote a report that was associated with a report distribution job, then you must manually re-create the report distribution in the target environment. For more information, see “Schedule a New Report Distribution” in SAS Visual Analytics: Designing Reports.
Details: Themes
Theme promotion involves the promotion of the individual theme as well as associated graphic files and animated graphic files (logo, initial loading, and transition). SAS recommends that you use SAS Theme Designer to promote themes. See “Exporting and Importing a SAS Theme” in SAS Theme Designer: User’s Guide for more information.
Additional Details
Promote Content
Action Result
Promote a folder Any supported objects that the folder contains (including reports, comments, files, and subfolders) are automatically included in the promotion. You can also select one or more objects within the folder to promote (for example, a report).
Promote objects that do not live in folders Objects that do not live in folders do not surface when doing an export in SAS Environment Manager. These objects can be promoted with the transfer CLI as follows:
n Retrieve the URI of the object. If there is an associated CLI (for example, identities or authorizations), you can use the CLI to retrieve the URI.
n Use the URI to export the object with the transfer CLI.n Import the resulting JSON package with the transfer CLI.Note: You can also export the object with the transfer CLI, and then import it with the Import Wizard.See jobs, caslibs and access controls, and custom groups for more information about promoting items that do not live in folders.
24

Action Result
Promote from SAS Viya to SAS Viya When promoting with the transfer CLI, general authorization rules are included as part of the export package and applied to objects when imported. If a resource already exists in the target environment, the target resource will be updated and the authorizations will be merged.
When promoting a folder with SAS Environment Manager for which general authorization rules (such as user or group permissions) have been defined, those authorizations are not promoted when importing the folder with SAS Environment Manager.
Perform an upgrade or a promotion of a report from SAS Visual Analytics 8.1 to SAS Visual Analytics 8.3
The report is converted every time you access it.
In some cases, this might cause a delay when opening the report in SAS Visual Analytics 8.3. In other cases, the information bar of the report does not retain all content when printing the report. To prevent this delay in the future, follow these steps:
1 Open the report from the reports editor on the SAS Visual Analytics 8.3 system.
2 Save the report in the SAS Visual Analytics 8.3 system. The report is saved in the SAS Visual Analytics 8.3 format, which eliminates the need to run the conversion process in the future.
Promote a report from SAS Visual Analytics 8.x. Charts that contain date or time data might not be displayed correctly after promotion if the data has an unsupported date format. To work around this issue, you can use SAS Visual Analytics to change the object type and then change it back again.
Export Content
Action Result
Export a folder in SAS Visual Analytics 8.1 In SAS Visual Analytics 8.1, export must be supported by all members of a folder in order to export the folder. For example, export is not supported for SAS Data Preparation plans in SAS Visual Analytics 8.1. To work around this, you must individually export the items in the folder for which export is supported.
Export an object and then rename the exported object
Subsequent imports of the object overwrite the renamed object and replace it with the original object. This is because the renamed object has the same URI as the original object.
Export content that does not surface in a SAS Environment Manager folder, such as SAS Visual Analytics data views or SAS Theme Designer themes.
To export content that does not surface in a SAS Environment Manager folder, look in the following location in SAS Environment Manager: Content ð Products ð Product.
25

Import Content
Action Result
Import a Model Studio project. Model Studio project owners must sign in to the target system before any of their projects can be promoted.
Import any object that has been exported with the transfer CLI or with SAS Environment Manager.
The Import Wizard can import any object that has been exported with the transfer CLI or SAS Environment Manager.
Import a folder when another folder with same name already exists.
When you import a folder, an underlying request is issued to create the folder. It is possible that a request to create another folder of the same name can occur. When this happens, you must address the duplicate folder issue and then retry the import.
Import an object into a folder where there is an existing object with the same name but a different URI.
Two objects with the same name, but different URIs might result.
Import a SAS Visual Analytics 8.3 data view when another data view with the same name already exists in the target system.
When you import a SAS Visual Analytics 8.3 data view and a data view with the same name already exists in the target system, the import overwrites the existing data view.
Import a SAS Visual Analytics 8.3 data view that was specified as the default data view in the source environment.
When you import a SAS Visual Analytics 8.3 data view that was specified as the default data view in the source environment, the default setting is not imported. You must specify the default setting on the data view again in the target environment.
Process Flow Examples
Promotion within SAS Viya extracts certain content and metadata from a source SAS Viya environment and loads those resources to a target SAS Viya 3.4 environment. For example, you might use this type of promotion to copy content from a test environment to a production environment.
Here are two workflows for promotion within SAS Viya:
26

Figure 2 Promotion within SAS Viya
SAS Viya 3.4
(target)
EXPORT (wizard)
transfer package file
SAS Viya 3.4
(target)
SAS Viya (source)
export
upload
SAS Viya (source)
IMPORT (wizard)
uploadMap, package file
map.json
import
importMap
Wizard Interface
Command-Line Interface
download
transfer package
transfer package file
Here are details about the preceding figure:
n The shaded boxes list artifacts of the adjacent activity or command.
n The lowercase verbs are commands in the sas‑admin transfer command-line interface (CLI).
n If you use the wizard, the package file is exported to the download directory on the source machine. Before you import the package file, you must copy it to a location that is available to the target machine.
n You repeat the entire flow for each package of resources that you are promoting.
Additional Documentation
For additional promotion documentation related to specific products, see the following:
Product Promotion Documentation
Model Studio “Promotions within SAS Viya” in SAS Visual Data Mining and Machine Learning: Advanced Topics
“Managing Projects” in SAS Visual Text Analytics: User’s Guide
SAS Visual Text Analytics “Managing Projects” in SAS Visual Text Analytics: User’s Guide
SAS Visual Forecasting “Promoting Projects and Templates to SAS Visual Forecasting 8.3” in SAS Visual Forecasting: User’s Guide
27

Promotion: How to Import (Wizard)The import phase of the promotion process can be performed using the Import wizard in SAS Environment Manager 3.3.
Introduction
The Import wizard contains the following steps:
n Select the source file that contains the content to be promoted.
n To change the table mappings: select different target servers, caslibs, and tables; use an existing mapping file; or select different target servers, caslibs, and tables, and use an existing mapping file.
If you are importing an .spk file that contains substitution properties, change substitution property mappings if needed.
Note: If you are using an existing mapping file as well as making changes to the existing mappings, then you must choose the existing mapping file first. If you choose the existing mapping file after you make changes to the existing mappings, the changes to the existing mappings are erased.
n Import the content into the target environment.
Note: You must close the Import wizard before attempting an additional import.
When you promote content with the Import wizard, the ensuing exchange depends on whether you are importing an .spk or JSON package file. Certain features in the wizard such as substitutions and access controls apply only to .spk files. Based on the type of package file, the wizard determines which features apply and surfaces only the relevant features.
Import SAS 9 Resources
Important: Order matters. Import resources in the following order: first groups, then libraries, then tables, and then reports (explorations).
1 Make sure that the exported packages and initial mappings are available. See “Promotion from SAS 9: Tasks”.
2 In the applications menu ( ) of SAS Environment Manager, select Administration ð Manage Environment. In the navigation bar, select Content from the navigation menu.
3 Click Import. The Import wizard opens and Select source is selected.
4 In the Import file: box , click to navigate on your file system to the .spk file that you want to import.
If this is the first time you have imported content, the first package that you need to import is the identities package file on page 4 that you used as input to the sas-admin transfer generate-content-mapping command in a preliminary step.
Click Open.
The content in the source file is compared to the target environment and is displayed in the tree on the left. If any objects in the source file already exist in the target environment, they will be displayed with . You can select an object from the source file to display its Properties.
5 At the top of the window, click Mapping to proceed to the mappings step. The ensuing exchange depends on the contents of the .spk file. If the file contains substitution properties, then the Substitution Properties view is displayed, and is populated with values. If the file contains table mappings, then the Table Mappings view
28

is displayed, and is populated with values. If the file contains additional mappings, then the Additional Mappings view is displayed, and is populated with values. Any views for which there are no applicable values in the .spk file are grayed out.
Note: If nothing is displayed after clicking Mapping, then the package might not be fully unpacked. To resolve this, click Select source again and then click Mapping.
n If table mappings are available, the table is populated as follows:
Column Description
Source Mappings are generated for all objects.
precedes libraries with missing tables.
Mapping indicates new mappings.
Exists indicates that target server, caslib, and table exist.
indicates that one of more target items do not exist.
If you want to use an existing mapping file, click in the Combine with an existing mapping file box to navigate on your file system to an existing mapping file.
If this is the first time you have imported content, you should specify the ContentMappings.json file that was created as a result of running the sas-admin transfer generate-content-mapping command in a preliminary step.
If you add a mapping file, in the Mapping column indicates mappings from the mapping file.
You can change the mappings by clicking on a target item and choosing a different target from the drop-down list.
n If substitution properties are available, mappings are generated for all objects in the source file by default. You can change the substitutions by clicking on values in the New value column.
n If additional mappings are available, mappings are generated for all objects in the source file by default. You can change the mappings by clicking on a target item and choosing a different target from the drop-down list.
n Click to save the mapping values, and the Save Mapping File window appears. If you combined with an existing mapping file, the name of the resulting mapping file defaults to mapping-file-name. Otherwise, the name of the resulting mapping file defaults to package-file-name_mapping. The mapping file is saved to the downloads location specified in your browser settings.
6 At the top of the window, click Finish to complete the promotion.
Click the Import button at the top right-hand side of the window. If every object was successfully mapped, then the Results table is displayed by default with a list of the objects that were imported. If any items were not mapped, then a Reminders button appears above the table and the list of unmapped objects appears by default.
7 Click the Close button at the top right-hand side of the window. If you have not yet run the import or saved the mappings from the previous step, then you will be prompted to save the mappings.
Note: The mapping file is saved by default to the downloads location specified in your browser settings. If you want the mapping file to be saved in a different location, you must manually move it after you exit the Import wizard.
29
See Also
“Participating Resources”
Import SAS Viya Resources
1 Complete the prerequisite steps here “Promotion within SAS Viya: Instructions” on page 16 to create SAS Viya package files. Then, SAS recommends that you promote libraries first followed by other content, as follows:
a libraries
b reports
2 In the applications menu ( ) of SAS Environment Manager, select Administration ð Manage Environment. In the navigation bar, select Content from the navigation menu.
3 Click Import. The Import wizard opens and Select source is selected.
4 In the Import file: box , click to navigate on your file system to the JSON file that you want to import. Click Open.
The content in the source file is compared to the target environment and is displayed in the tree on the left. If any objects in the source file already exist in the target environment, they will be displayed with . You can select an object from the source file to display its Properties and Dependencies. If Dependencies is preceded by , then one or more of the dependencies do not exist in the target environment. You can replace the references to the missing dependencies in the Mappings step.
5 At the top of the window, click Mapping File to proceed to the mappings step. The ensuing exchange depends on the contents of the JSON file. If the file contains table properties, then the Table Mappings view is displayed, and is populated with values. If the file contains additional mappings, then the Additional Mappings view is displayed, and is populated with values. Any views for which there are no applicable values in the JSON file are grayed out.
Note: If nothing is displayed after clicking Mapping, then the package might not be fully unpacked. To resolve this, click Select source again and then click Mapping.
n If table mappings are available, the table is populated as follows:
Column Description
Source Mappings are generated for all objects.
precedes libraries with missing tables.
Mapping indicates new mappings.
Exists indicates that target server, caslib, and table exist.
indicates that one of more target items do not exist.
If you want to use an existing mapping file, click in the Combine with an existing mapping file box to navigate on your file system to an existing mapping file. If you add a mapping file, in the Mapping column indicates mappings from the mapping file. Also, the name of the resulting mapping file in the Save as box changes to mapping-file-name.
You can change the mappings by clicking on a target item and choosing a different target from the drop-down list.
30
Note: Imports proceed even if there are missing dependencies in the target environment. You can remediate anything that failed to import at a later time.
n If additional mappings are available, mappings are generated for all objects in the source file by default. You can change the mappings by clicking on a target item and choosing a different target from the drop-down list.
n Click to save the mapping values, and the Save Mapping File window appears. The name of the resulting mapping file defaults to the name of the package file. If you combined with an existing mapping file, the name of the resulting mapping file defaults to the name of the file that you combined with. The mapping file is saved to the downloads location specified in your browser settings.
6 At the top of the window, click Results to complete the promotion.
Click the Import button at the top right-hand side of the window. If every object was successfully mapped, then the Results table is displayed by default with a list of the objects that were imported. If any items were not mapped, then a Reminders button appears above the table and the list of unmapped objects appears by default.
7 Click the Close button at the top right-hand side of the window. If you have not yet run the import or saved the mappings from the previous step, then you will be prompted to save the mappings.
Note: The mapping file is saved by default to the downloads location specified in your browser settings. If you want the mapping file to be saved in a different location, you must manually move it after you exit the Import wizard.
See Also
“Participating Resources: Promotable with the Transfer CLI”
Promotion: How to Import (Command-Line Interface)In SAS Viya, the import phase of the promotion process can be performed using the transfer plug-in to the admin command-line interface (CLI).
Prerequisites
Note: You must have administrator privileges to promote data. For details and instructions, see SAS Viya Administration: Identity Management.
Before using the transfer commands to perform imports or exports, do the following:
1 Familiarize yourself with the general Command-line interface documentation.
2 Follow the instructions here to set up your environment.
Note: Use the Help from within the transfer plug-in to learn about the available commands, subcommands, and options. For more information, see “Integrated Help” in SAS Viya Administration: Using the Command-Line Interfaces.
See Also
n “Inventory” in SAS Viya Administration: Using the Command-Line Interfaces
n “Command-Line Interface: Preliminary Instructions” in SAS Viya Administration: Using the Command-Line Interfaces
31
http://documentation.sas.com/?docsetId=calids&docsetVersion=3.4&docsetTarget=titlepage.htm&locale=en

Import SAS 9 Resources
Important: Order matters. Import resources in the following order: first groups, then libraries, then tables, and then reports (explorations).
1 Make sure the exported packages and initial mappings are available. See “Promotion from SAS 9: Tasks”.
2 From the target machine, make sure that you have completed the prerequisite steps to use the command-line interfaces (CLI). See “Command-Line Interface: Preliminary Instructions” in SAS Viya Administration: Using the Command-Line Interfaces.
3 Navigate to the CLI executable files.
TIP The files are on your SAS Viya machine (details). If you downloaded the CLI, the files are in your download location.
4 Run the sas‑admin transfer upload command to upload the SAS 9 package file from your local machine to the SAS Viya environment.
For example, the following command uploads a SAS 9 package file called myPackage.spk. Because the --profile option is not specified and the SAS_CLI_PROFILE environment is not set, the file is uploaded to the SAS Viya environment that is specified in your default profile. The --mapping option creates a mapping file that you can edit to specify substitution values for data libraries and other connections. The file is written in YAML format.
sas-admin transfer upload --file MyPackage.spk --mapping MyPackageMapping.yml
TIP For those familiar with administering SAS 9, the SAS Viya mapping file is analogous to the SAS 9 substitution properties file.
5 Open the mapping file using a text editor, and make changes as needed. If no path was specified in the --mapping option, the file is located in the directory where the upload command was executed.
n If this is the first time you have promoted content, you must combine the initial mapping file (the ContentMappings.json file that you previously created using the sas-admin transfer generate-content-mapping command) with the current mappings. You can do this manually or you can combine them with the Import Wizard.
n If you have only tables or both libraries and tables in your spk package, then you must manually add mappings in order to import the access control entries (ACE) to SAS Viya. When using the Import Wizard, the individual table mappings are generated automatically.
To migrate a package file that contains reports and explorations, on the target: lines in the mapping file, enter the table name, caslib, and server name where each table will reside in SAS Viya. An example of such a mapping file in JSON format is shown below:
{ "version": 1, "connectors": { "table": [ { "resourcename": "", "source": "default", "target": ",HPS,cas-shared-mpp" }, { "resourcename": "",
32

"source": "/<path_to_table>/ORION_STAR_SCHEMA(Table)", "target": "ORION_STAR_SCHEMA" }, { "resourcename": "", "source": "/<path_to_table>/SIMBA(Table)", "target": "SIMBA" } ] }, "substitutions": [
], "options": { }}
Note:
n If you are promoting base libraries, you must add some code to the substitutions: section of the mapping file. Add the name: line with the value of CASServer, and the value: line with the name of your specific CAS server.
Here is a JSON example of the substitutions section of a mapping file with these values added.
"substitutions": [ { "resourceId": "/<path_to_table>/A5LWY7KL.B500003U", "resourceName": "Data Prep Big Data Library", "properties": [ { "name": "DirPath", "value": "/<path_to_table>/VADataPrepBigData" }, { "name": "CASServer", "value": "CAS-server-name" } ] },
When promoting base libraries with the Import Wizard, the name and value lines are automatically added to the mapping file.
n The information about the target: line below the source: default line applies to any other table in the file for which one or more of the values were omitted from the target: line. For more information about the mapping file, see “Mapping Files”.
6 Use the sas‑admin transfer list command to obtain the package ID of the package that you just uploaded. You can also obtain the package ID of the package from the output of the sas‑admin transfer upload command from the preceding step.
7 Run the sas‑admin transfer import command to import the content and the table connections to SAS Viya. Here is an example:
sas-admin transfer import --id 9d4ca052-1788-4e68-b558-a29069d22451--mapping MyPackageMapping.yml
33
Import SAS Viya Resources
Important: Order matters. Import resources in the following order: first libraries and then other content (reports).
Follow these steps to promote content from SAS Visual Analytics 8.x to SAS Visual Analytics 8.3.
1 Make sure the exported packages and initial mappings are available. See “Promotion within SAS Viya: Instructions” on page 16.
2 From the target machine, perform the steps in “Command-Line Interface: Preliminary Instructions” in SAS Viya Administration: Using the Command-Line Interfaces.
3 Navigate to the CLI executable files.
TIP The files are on your SAS Viya machine (details). If you downloaded the CLI, the files are in your download location.
4 Run the sas‑admin transfer upload command to upload the package to the target SAS Viya environment. Make sure that the profile specifies the correct host information for the target environment.
For example, the following command uploads the file MyPackage.json to the Prod environment (that is, the SAS Viya environment that is specified in a profile called Prod).
sas-admin transfer --profile Prod upload --file MyPackage.json
Note: You can use the --mapping option here to create a mapping file that you can edit to specify substitution values. For more information, see the upload step on page 32 in the “Promote Content from SAS Visual Analytics 7.x” section.
The ID of the created package is displayed at the end of the displayed output. Make a note of (or copy) the package ID. You will need it in the next step.
5 To complete the promotion, run the sas‑admin transfer import command to import the uploaded package to SAS Viya. Make sure that the profile specifies the correct host information for the target environment. Specify the package ID of the uploaded package that you noted in step 5.
For example, the following command imports the package that was uploaded in step 5 to the Prod environment:
sas-admin transfer --profile Prod import --id 9d4ca052-1788-4e68-b558-a29069d22451
Note: You can use the --mapping option here to specify the mapping file with substitution values that you created on the upload step. For more information, see the import step on page 32 in the “Promote Content from SAS Visual Analytics 7.x” section.
6 To see the uploaded content, open SAS Environment Manager in the target environment. In the side menu , and select Manage Environment ð Content.
Note: If you are promoting a geo map from SAS Visual Analytics 8.x to SAS Visual Analytics 8.3, be aware that the colors of the geo map in SAS Visual Analytics 8.3 are different from the colors of the geo map in SAS Visual Analytics 8.1.
See Also
n “Examples” in SAS Viya Administration: Using the Command-Line Interfaces
n “Details” in SAS Viya Administration: Using the Command-Line Interfaces
n “Mapping Files” on page 35
n “Substitution Properties” on page 38
34

Check Logs
The transfer CLI interacts with many SAS Viya services. To view log messages from the transfer CLI, you need to check the service logs of the SAS Viya services. See SAS Viya Administration: Logging.
Promotion: Concepts
Mapping Files
A mapping file is a file in YAML or JSON format that you can edit to specify substitution values for data libraries and other connections. The Import Wizard requires a mapping file in JSON format. The transfer CLI reads and writes mapping files in YAML or JSON format. The mapping file can contain the following:
n connectors
Connectors denote a category of items that are being promoted, such as tables, users, and groups. Each connector section contains the following lines: resourceName:, source:, and target:. See “Connectors” on page 35.
n substitutions
Substitutions denote a set of properties on page 38 that originate from the substitution properties file available in SAS 9.x systems.The substitutions section contains the following lines: resourceId:, resourceName:, and properties:.
n options
Options denote additional items, such as the following:
o URI for stored processes on page 13
o a setting to prevent the promotion of access control entities. See “Details: Authorizations” on page 9.
SAS 9 to SAS Viya Mapping File
Connectors
The mapping file for a SAS 9 to SAS Viya promotion contains connectors such as the following:
n table connector
The mapping file for a SAS 9 to SAS Viya promotion can contain a list of tables that are preceded by a table connector. The table connector is denoted by the following lines: connectors: and Table:. The table connector maps information about a source table to a target table.
The first table in the mapping file that follows the connectors line can be a default source table denoted by the following line: source: default. Use the target: line of the default source table to specify the values that are inherited by the other tables.
Here is an example of the target information for a table in the mapping file. In this example, a table from the source environment is given the “tablename” name in the target environment, directed to the “cas_library” library in the target environment, and directed to the “cas_server_name” server in the target environment. The data_source_locale parameter is optional.
target: "tablename, cas_library, cas_server_name, data_source_locale"
n user connector
35

The mapping file for a SAS 9 to SAS Viya promotion can also contain a list of users that are preceded by a user connector. The user connector is denoted by the following lines: connectors: and User:. Each user that follows the connector line is denoted by the following lines: resourcename:, source:, and target:. You can use the user connector to map SAS 9 reports whose paths begin with “User Folders” to the specified user’s SAS Viya “My Folder” location.
Use the source: line to specify the name of the user that you want to map in the SAS 9 “User Folders” location. Use the target: line to specify the user ID of the user to which you want to map the rest of the path.
Here is an example of a user connector:
"User": [ { "resourceName": " *[@Name='John Smith']", "source": "John Smith", "target": "josmit" },
Suppose that you want to promote the following report from the SAS 9 environment: /User Folders/Smith, John/My Folder/My Reports/SomeReport. If you edited the mapping file to contain the user connector in the preceding example, then after the import the report appears in the SAS Viya /My Folder/My Reports folder for the user with the “josmit” user ID. The import can create the user’s “My Folder” even if the user has not previously logged in. If you did not edit the mapping file with the user connector, then the source path is used as is. All needed folders are created in the SAS Viya environment.
ContentMappings.json File
The ContentMappings.json file is the initial mapping file for SAS 9 to SAS Viya promotions. This mapping file is created by the sas-admin transfer generate-content-mapping command and can be read by the Import Wizard. See “The generate-content-mapping Command” on page 37.
Sample Mapping File in JSON Format
Here is a sample mapping file in JSON format for a SAS 9 to SAS Viya promotion. This mapping file was created in YAML format by the transfer CLI and then converted to JSON format with a third-party utility.
{ "version": 1, "connectors": { "table": [ { "resourcename": "", "source": "default", 1 "target": ",HPS,cas-shared-mpp" }, { "resourcename": "", "source": "/<path_to_table>/ORION_STAR_SCHEMA(Table)", 2 "target": "ORION_STAR_SCHEMA" }, { "resourcename": "", "source": "/<path_to_table>/SIMBA(Table)", 3 "target": "SIMBA" } ] }, "substitutions": [
36
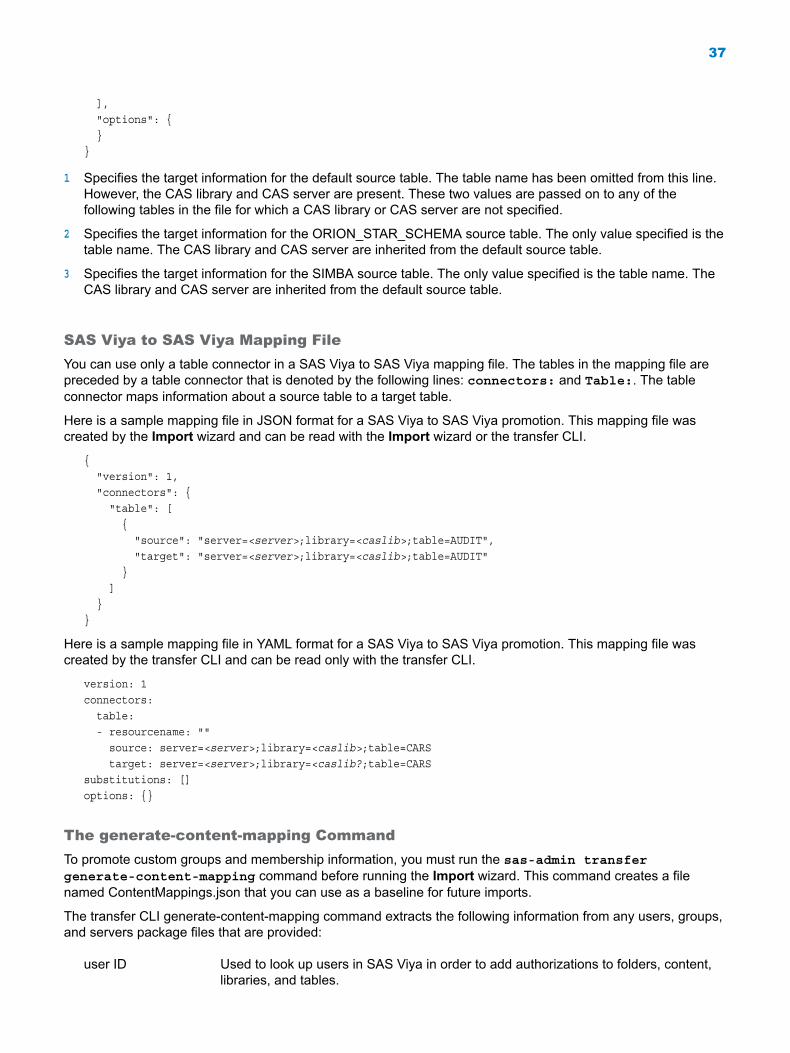
], "options": { }}
1 Specifies the target information for the default source table. The table name has been omitted from this line. However, the CAS library and CAS server are present. These two values are passed on to any of the following tables in the file for which a CAS library or CAS server are not specified.
2 Specifies the target information for the ORION_STAR_SCHEMA source table. The only value specified is the table name. The CAS library and CAS server are inherited from the default source table.
3 Specifies the target information for the SIMBA source table. The only value specified is the table name. The CAS library and CAS server are inherited from the default source table.
SAS Viya to SAS Viya Mapping File
You can use only a table connector in a SAS Viya to SAS Viya mapping file. The tables in the mapping file are preceded by a table connector that is denoted by the following lines: connectors: and Table:. The table connector maps information about a source table to a target table.
Here is a sample mapping file in JSON format for a SAS Viya to SAS Viya promotion. This mapping file was created by the Import wizard and can be read with the Import wizard or the transfer CLI.
{ "version": 1, "connectors": { "table": [ { "source": "server=<server>;library=<caslib>;table=AUDIT", "target": "server=<server>;library=<caslib>;table=AUDIT" } ] }}
Here is a sample mapping file in YAML format for a SAS Viya to SAS Viya promotion. This mapping file was created by the transfer CLI and can be read only with the transfer CLI.
version: 1connectors: table: - resourcename: "" source: server=<server>;library=<caslib>;table=CARS target: server=<server>;library=<caslib?;table=CARSsubstitutions: []options: {}
The generate-content-mapping Command
To promote custom groups and membership information, you must run the sas-admin transfer generate-content-mapping command before running the Import wizard. This command creates a file named ContentMappings.json that you can use as a baseline for future imports.
The transfer CLI generate-content-mapping command extracts the following information from any users, groups, and servers package files that are provided:
user ID Used to look up users in SAS Viya in order to add authorizations to folders, content, libraries, and tables.
37
group Used to determine whether groups exist in the target SAS Viya system, and create new custom groups if not. This is necessary to promote membership information.
LASR Signer information
Used to import LASR libraries.
Important: The ContentMappings.json file is overwritten every time that the sas-admin transfer generate-content-mappings command is run. If you want to reuse this file, make sure that you save and maintain it.
Note: Only users with administrative privileges can run the sas-admin transfer generate-content-mapping command. See SAS Viya Administration: Identity Management.
Substitution Properties
You can substitute a different target value for values that are associated with objects that are being promoted so that the objects function properly in the target system. For example, these values might include physical paths, descriptions, or port numbers. In SAS Viya, these properties are referred to as substitution properties and originate from a SAS 9.x model package (spk) file.
For example, suppose that you are promoting a Base library, and need to substitute a different directory path for SAS Viya. You can specify the new directory path for the associated substitution property. Then when the package file is imported into the SAS Viya system, the Base library objects are directed to the new directory path.
SAS® and all other SAS Institute Inc. product or service names are registered trademarks or trademarks of SAS Institute Inc. in the USA and other countries. ® indicates USA registration. Other brand and product names are trademarks of their respective companies. Copyright © 2018, SAS Institute Inc., Cary, NC, USA. All Rights Reserved. August 2019 3.4-P2:calpromotion
38