SAP GRC RIG - Rashed's Way2SAPBASIS.com • Index pageway2sapbasis.com/upload/GRC/MYGRC/HowTo -...
42
SAP GRC RIG Access Control 5.3 How to Apply Support Packages in AC 5.3 Updated: June, 2009
-
Upload
dangkhuong -
Category
Documents
-
view
219 -
download
2
Transcript of SAP GRC RIG - Rashed's Way2SAPBASIS.com • Index pageway2sapbasis.com/upload/GRC/MYGRC/HowTo -...
SAP GRC RIG Access Control 5.3 How to Apply Support Packages in AC 5.3
Updated: June, 2009

Content
Step 1: Important Information and Download of Support Packages1. Important SAP Notes2. Download AC5.3 Support Package (JAVA)3. Download AC5.3 Support Package (RTA)
Step 2: Apply Support Package to AC5.3 Java Application Components4. AC 5.3 Java Components to be Patched5. Deployment of SP Java Components6. Check New AC5.3 Version7. SP Java Post-Installation Steps
Step 3: Apply Patches to RTAs in all of your back-end systems9. Upload RTA Patches10. Apply Patch for Non-HR RTA11. Apply Patch for HR RTA12. Check Updated Patch Levels in SPAM
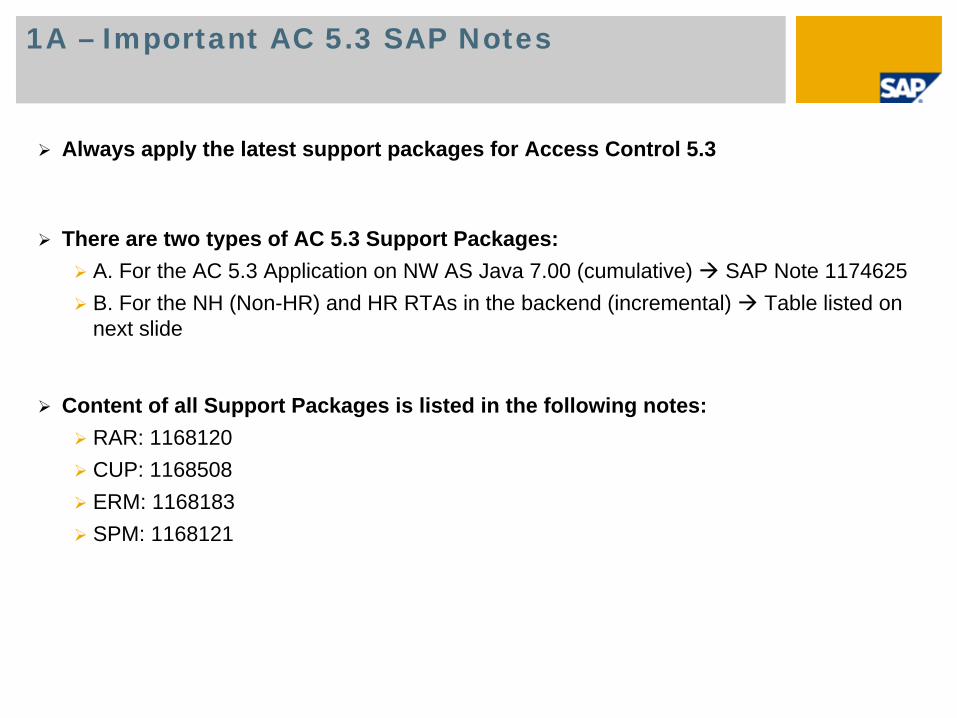
1A – Important AC 5.3 SAP Notes
Always apply the latest support packages for Access Control 5.3
There are two types of AC 5.3 Support Packages:A. For the AC 5.3 Application on NW AS Java 7.00 (cumulative) SAP Note 1174625B. For the NH (Non-HR) and HR RTAs in the backend (incremental) Table listed on next slide
Content of all Support Packages is listed in the following notes:RAR: 1168120CUP: 1168508ERM: 1168183SPM: 1168121
1B - Important AC 5.3 SAP Notes (continued)
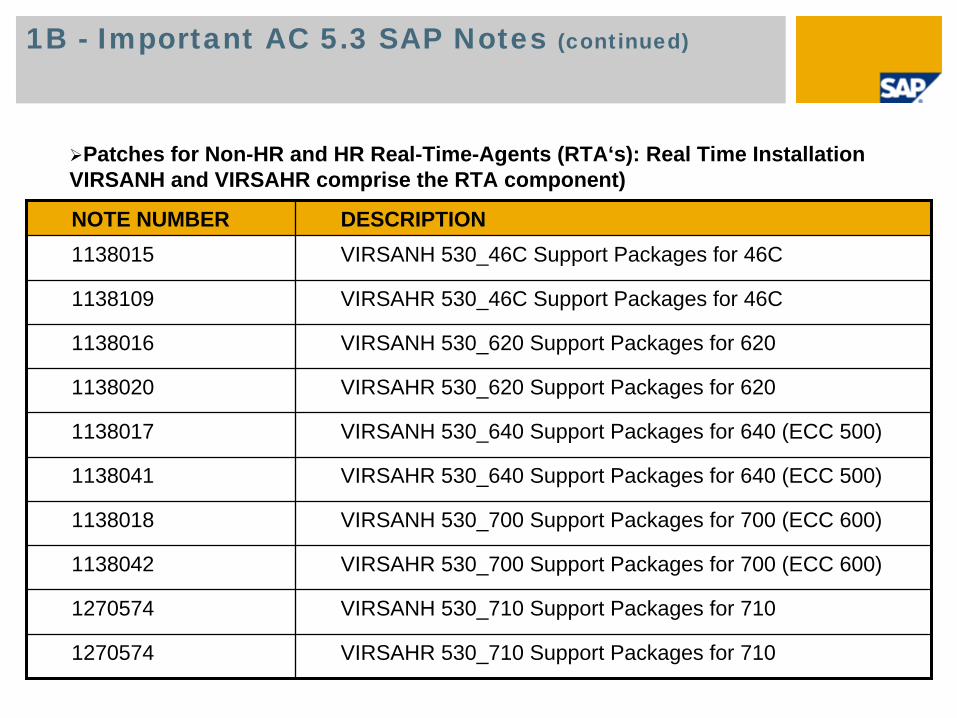
Patches for Non-HR and HR Real-Time-Agents (RTA‘s): Real Time Installation VIRSANH and VIRSAHR comprise the RTA component)
NOTE NUMBER DESCRIPTION1138015 VIRSANH 530_46C Support Packages for 46C
1138109 VIRSAHR 530_46C Support Packages for 46C
1138016 VIRSANH 530_620 Support Packages for 620
1138020 VIRSAHR 530_620 Support Packages for 620
1138017 VIRSANH 530_640 Support Packages for 640 (ECC 500)
1138041 VIRSAHR 530_640 Support Packages for 640 (ECC 500)
1138018 VIRSANH 530_700 Support Packages for 700 (ECC 600)
1138042 VIRSAHR 530_700 Support Packages for 700 (ECC 600)
1270574 VIRSANH 530_710 Support Packages for 710
1270574 VIRSAHR 530_710 Support Packages for 710

2A – Download AC 5.3 Support Packages (JAVA)
Navigate Support Packages and Patches Entry by Application Group
SAP Solutions for GRC SAP GRC Access Control SAP ACCESS CONTROL
SAP GRC ACCESS CONTROL 5.3 JAVA Components

2B – Download AC 5.3 Support Packages (JAVA)
7 Components to Download
7 Files to Download:

2C – Download AC 5.3 Support Packages (JAVA)
Example of JAVA Download:
Example of JAVA Download:

3A – Download AC 5.3 Support Packages (RTA)
Now choose your backend system
Remember that ERP2005, ERP2004, R/3 Enterprise and R/3 4.6C require twoReal-Time Agents (RTA): VIRSANH and VIRSAHR. Both need to be patchedindividually – starting with VIRSANH
Navigate: Support Packages and PatchesEntry by Application GroupSAP Solutions for GRCSAP GRC Access ControlSAP ACCESS CONTROL SAP GRC ACCESS CONTROL 5.3 <Choose your RTA>

3B – Download AC 5.3 Support Packages (RTA)Example: RTA on ERP 2005

4 – AC 5.3 Java Components to be Patched
The following Java components are patched with Support Packages :Risk Analysis and Remediation (RAR) VIRCC_530_700Compliant User Provisioning (CUP) VIRAE_530_700Enterprise Role Management (ERM) VIRRE_530_700Superuser Privilege Management (SPM) VIRFF_530_700Access Control Launchpad (ACLP) VIRACLP_530_700
The Netweaver Portal Real-Time Agent is also patched with a Support Package:Enterprise Portal Real Time Agent (EPRTA) VIREPRTA_530_700To be applied to the Netweaver AS Java that is hosting the Netweaver PortalThe Java Files are .SCA Files which are the archive files of the .SCA Files. The SCA Files have been zipped, again, causing the file to have .SCA.ZIP extension. This file cannot be extracted or unzipped to an installable .SCA format. Please rename these files to .SCA by removing the .ZIP extension

5 – Deployment of the Current Version of AC 5.3SAP Note 1174625 and SDM
Please refer to SAP Note 1174625 on how to apply the Support Packages for theAC 5.3 Java Application Components
Applying Support Packages (or „patching“) to Java Application Componentsmeans that a support package contains the entire Java Application Component in itslatest version (Cumulative Suppport Packages)
Log-on with <SID>adm user on the operating system level of your AC 5.3 serverand start the SDM (Software Deployment Manager)
Logon to SDM using the SDM password (which is different than the passwords of the „Administrator“ and <SID>adm users)

6A – Deployment of SP Java ComponentsThe Java Support Package Manager
The deployment of the Java Support Packaged Components is done with theJSPM (Java Support Package Manager)
On your AC 5.3 server copy the AC 5.3 Support Packaged .SCA Files to thefolder /usr/sap/trans/EPS/in/
The JSPM is a tool that works similar to SDM and has to be started from the OSlevel of the server as user <SID>ADM from /usr/sap/<SID>/<CI>/j2ee/JSPM/go.bat (Windows) or …/go and …/StartGui (Unix).
The .SCA File sap.com/VIREPRTA containing the RTA for the Netweaver Portal EP7.0 SP12+ is deployed to all your Netweaver Portal 7.0 servers in scope of yourimplementation. Don‘t deploy it onto your AC 5.3 server unless you run a Netweaver portal on the same server, as well.

6B – Deployment of SP Java ComponentsLogon to JSPM with SDM Password

6C – Deployment of SP Java ComponentsSelect Package Type
If no AC Components are found under “New Software Components”, please try “Business Packages”

6D – Deployment of the SP Java ComponentsSkip the EPRTA Components

6E – Deployment of the SP Java ComponentsCheck Queue and Confirm

6F – Deployment of SP Java ComponentsCompleted Deployment
Now: Restart the J2EE Engine!

7 – Check the New AC 5.3 Version

8 – SP Java Post-Installation Steps for RAR
Upload the initial data files which are packaged with the SP’s. For RAR, please check SAP Note 1168120 regarding RAR post-installation steps.
Importing Error Messages (CC5.3_MESSAGES.txt):
You will need to import the error message file as part of post-installation for AC 5.3 SP’s:a. Copy the CC5.3_MESSAGES.txt to the local directoryb. Login into Risk Analysis and Remediationc. Import them into AC using the option: Configuration -> Utilities -> Import

9A – SP Java Post-Installation Steps for CUP
1. Upload the initial data files which are packaged with the SP’s. For CUP, please check SAP Note 1168508 for CUP post-installation steps:
1. Copy the AE_init_clean_and_insert_data.xml to the local directory2. Login into Compliance User Provisioning3. Go to menu, Configuration -> Initial System Data4. Select AE_init_clean_and_insert_data.xml from the location where you
copied the file5. Select the 'Clean And Insert' radio button6. Click Import

9B – SP Java Post-Installation Steps for CUP
2. Upload the initial data files which are packaged with the SP’s. For CUP, please check SAP Note 1168508 for CUP post-installation steps.
1. Copy the AE_init_append_data.xml to the local directory2. Login into Compliance User Provisioning3. Go to menu, Configuration -> Initial System Data4. Select AE_init_append_data.xml from the location where you copied the file5. Select the 'Append' radio button6. Click Import
9C – SP Java Post-Installation Steps for CUP
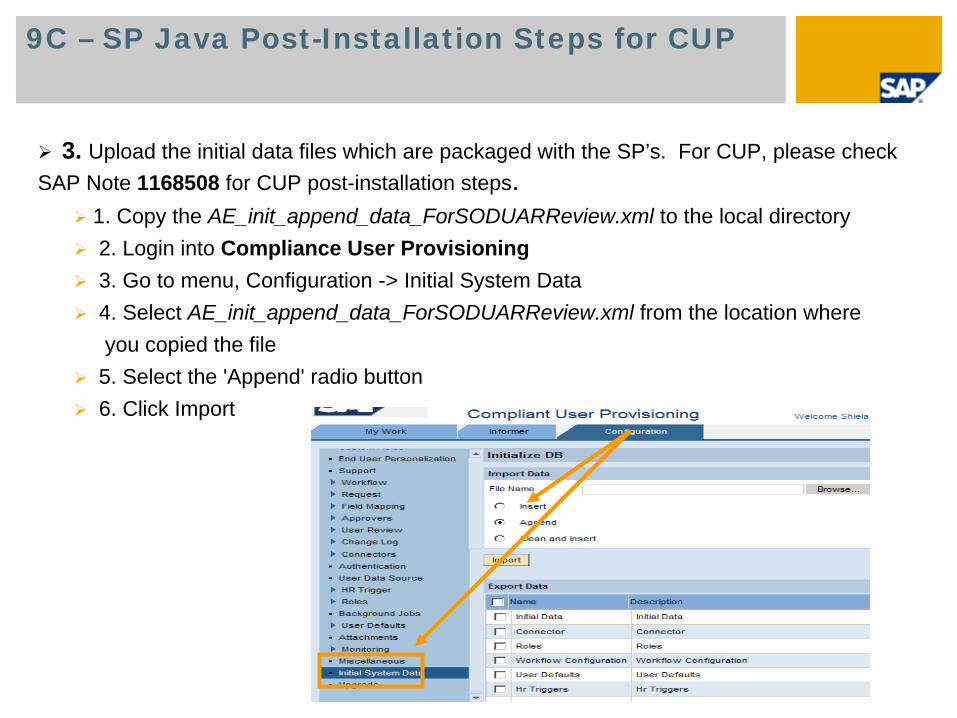
3. Upload the initial data files which are packaged with the SP’s. For CUP, please check SAP Note 1168508 for CUP post-installation steps.
1. Copy the AE_init_append_data_ForSODUARReview.xml to the local directory2. Login into Compliance User Provisioning3. Go to menu, Configuration -> Initial System Data4. Select AE_init_append_data_ForSODUARReview.xml from the location whereyou copied the file
5. Select the 'Append' radio button6. Click Import

9D – SP Java Post-Installation Steps for CUP Required to be Configured Only if CUP Uses RAR
4. Upload the initial data files which are packaged with the SP’s. For CUP, please check SAP Note 1168508 for CUP post-installation steps. Please refer to SAP Note 1157209; in accordance with that note, import the files as follows:
a. Copy the AE_init_append_data_CC.xml to the local directoryb. Login into Compliance User Provisioningc. Go to menu, Configuration -> Initial System Datad. Select AE_init_append_data_CC.xml from the location where you copied the filee. Select the 'Append' radio buttonf. Click Import

9E – SP Java Post-Installation Steps for CUP
5. Currently, after installing the support pack, please make sure you click on the Upgradebutton in Configuration Upgrade screen to complete the installation. This step can be ignored if the button is disabled.
10 – SP Java Post-Installation Steps for SPM
1. For SPM, please check SAP Note 1168121 for SPM post-installation steps. Currently: None

11A – SP Java Post-Installation Steps for ERM
1. Upload the initial data files which are packaged with the SP’s. For ERM, please check SAP Note 1168183 for ERM post-installation steps
1. Copy the RE_init_clean_insert_data.xml to the local directory2. Login into Enterprise Role Management3. Go to menu, Configuration -> Initial System Data4. Select RE_init_clean_insert_data.xml from the location where you copied the file5. Select the 'Clean And Insert' radio button6. Click Import

11B – SP Java Post-Installation Steps for ERM
2. Upload the initial data files which are packaged with the SP’s. For ERM, please check SAP Note 1168183 for ERM post-installation steps
1. Copy the RE_init_append_data.xml to the local directory2. Login into Enterprise Role Management3. Go to menu, Configuration -> Initial System Data4. Select RE_init_append_data.xml from the location where you copied the file5. Select the 'Append' radio button6. Click Import
11C – SP Java Post-Installation Steps for ERM
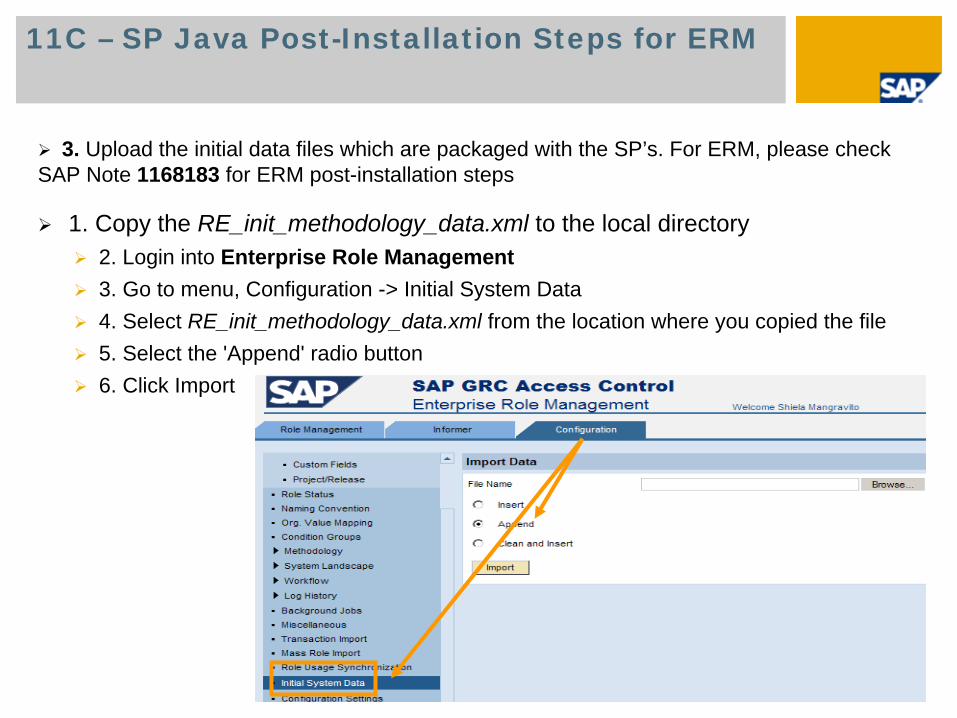
3. Upload the initial data files which are packaged with the SP’s. For ERM, please check SAP Note 1168183 for ERM post-installation steps
1. Copy the RE_init_methodology_data.xml to the local directory2. Login into Enterprise Role Management3. Go to menu, Configuration -> Initial System Data4. Select RE_init_methodology_data.xml from the location where you copied the file5. Select the 'Append' radio button6. Click Import

11D – SP Java Post-Installation Steps for ERM Required to be Configured Only if CUP Uses ERM
4. Upload the initial data files which are packaged with the SP’s. For ERM, please check SAP Note 1168183 for ERM post-installation steps
1. Copy the AE_init_append_data_RE.xml to the local directory2. Login into Compliance User Provisioning3. Go to menu, Configuration -> Initial System Data4. Select AE_init_append_data_RE.xml from the location where you copied the file5. Select the 'Append' radio button6. Click Import

11E – SP Java Post-Installation Steps for ERM
5. Currently, after installing the support pack, please make sure you click on the Upgrade button in Configuration Upgrade screen to complete the installation. This step can be ignored if the button is disabled.

12 – SP Java Post-Installation Steps for Enterprise Portal RTA
1. For Enterprise Portal RTA, please check SAP Note 1168710 for Enterprise Portal RTA post-installation steps.
Currently: None
13 – SP Java Post-Installation Steps for AC 5.3 Launch Pad
1. For AC 5.3 Launch Pad, please check SAP Note 1168691 for AC 5.3 Launch Pad post-installation steps.
Currently: None

14 – Upload RTA PatchesTransaction SAINT
On your backend system copy patch files for Non-HR (and HR, if necessary) RTA downloaded from SMP into the directory /usr/sap/trans/EPS/in
In client 000, start Transaction SAINT, click on „Load“ and „Confirm“

15A – Apply Patch for Non-HR RTATransaction SPAM: Define Queue
Logon to Client 000
Start Transaction SPAM, select the VIRSANH_530_700 Patch and click on „Queue“
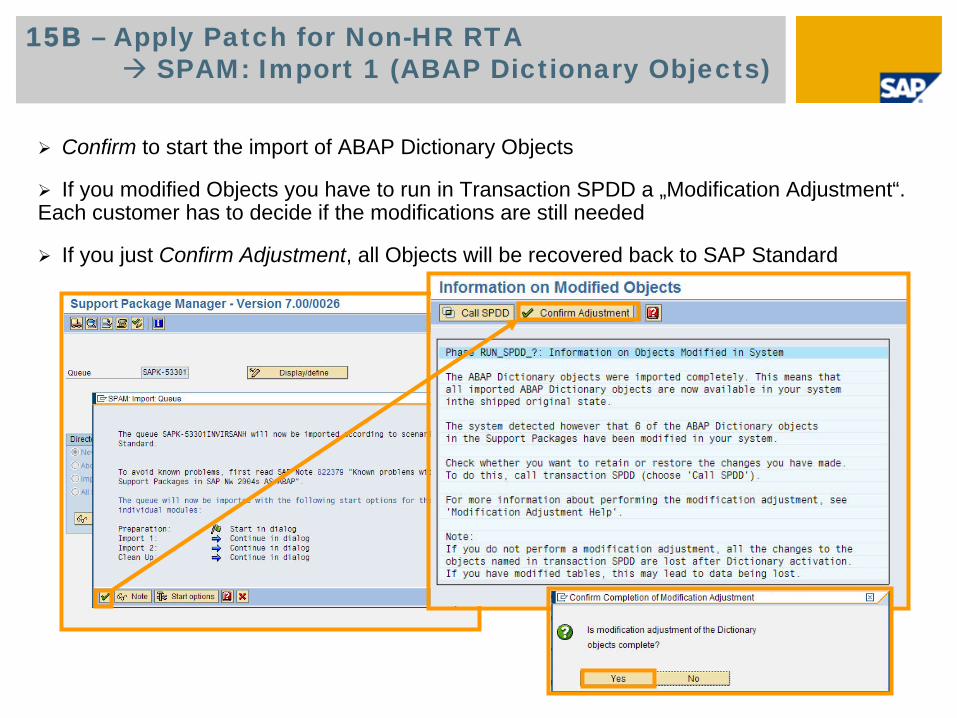
15B – Apply Patch for Non-HR RTASPAM: Import 1 (ABAP Dictionary Objects)
Confirm to start the import of ABAP Dictionary Objects
If you modified Objects you have to run in Transaction SPDD a „Modification Adjustment“. Each customer has to decide if the modifications are still needed
If you just Confirm Adjustment, all Objects will be recovered back to SAP Standard

15C – Apply Patch for Non-HR RTASPAM: Import 2 (Repository Objects)
Confirm to start the import of ABAP Repository Objects
If you modified Repository Objects you have to run in Transaction SPAU another„Modification Adjustment“. Each customer has to decide if the modifications are still needed
If you just Continue, all Objects will be recovered back to SAP Standard.
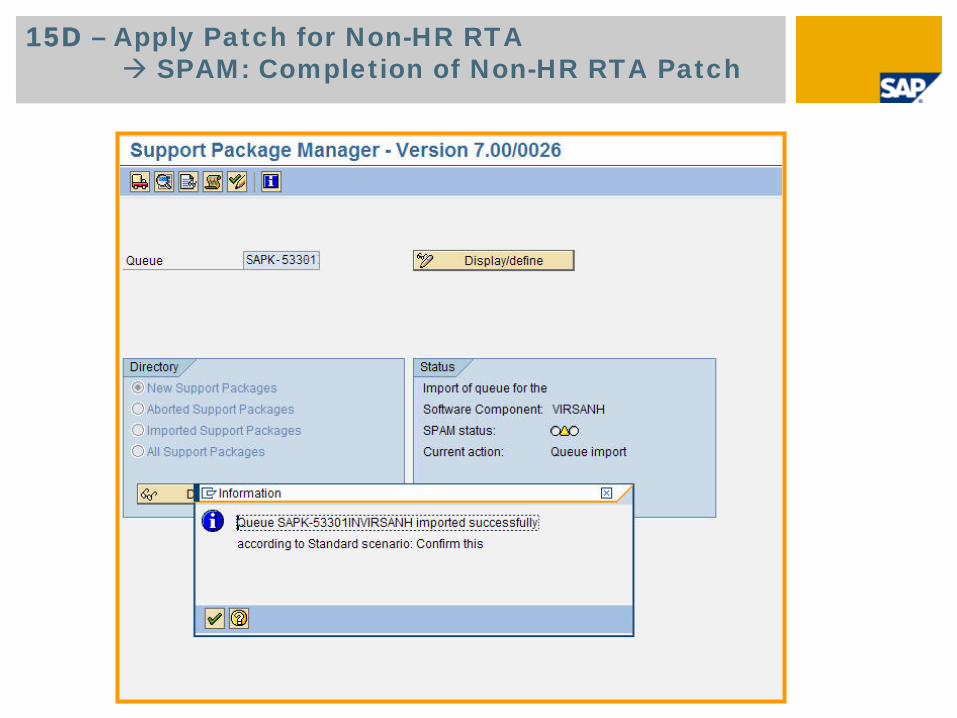
15D – Apply Patch for Non-HR RTASPAM: Completion of Non-HR RTA Patch

16A – Apply Patch for HR RTASPAM: Define Queue for HR-RTA Patch
Patching the VIRSAHR Real-Time Agent is only required if this RTA is installedon the backend system. This is only the case if your backend is ERP2005, ERP2004, R/3 Enterprise, or R/3 4.6C. In other cases, this step is skipped.
Select the VIRSAHR_530_700 Patch (here: Patch 0001 belonging to AC 5.3SP01) and run the exact same steps as in VIRSANH_530_700, again.
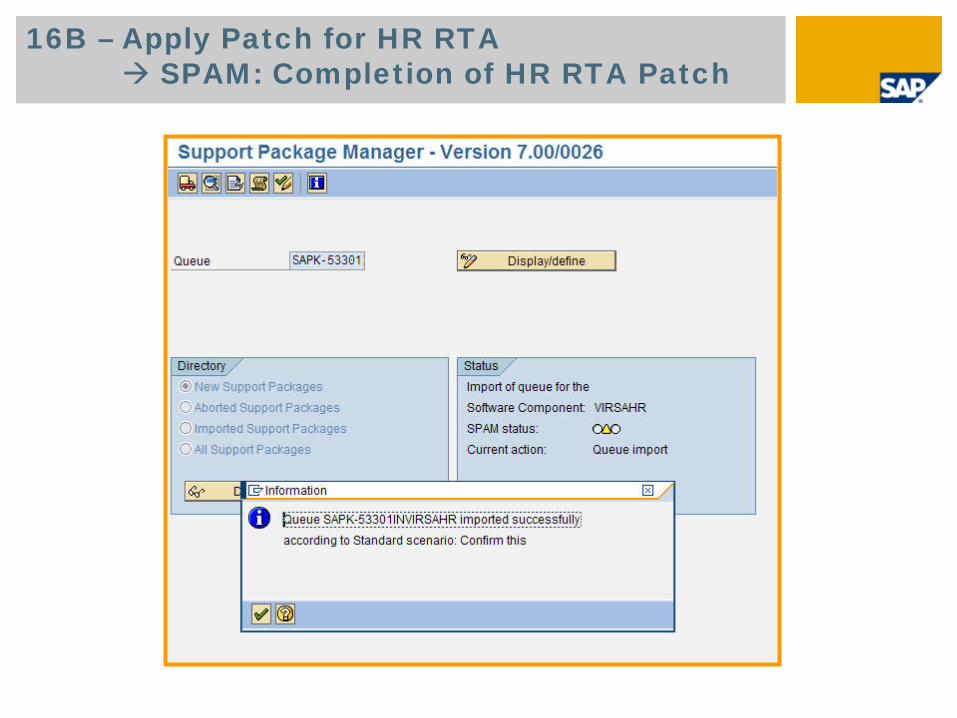
16B – Apply Patch for HR RTASPAM: Completion of HR RTA Patch

17 – Check Updated Patch Levels in SPAM
Check updated patch levels of VIRSANH (and VIRSAHR) RTA in TranscationSPAM.
If you‘ve upgraded from the previous AC 5.2 release, and previously installed VIRSANH_520_700 (and VIRSAHR_520_700) RTAs, then the following screen isdisplayed in transaction SPAM:

18 - GRC RIG Contact & More Information
GRC Regional Implementation GroupSAP BusinessObjects Governance, Risk, and Compliance Solutions
SDN / BPX: https://www.sdn.sap.com/irj/bpx/grc
E-mail: [email protected]

Comments and Accelerator Feedback
Your feedback is very valuable and will enable us to improve ourdocuments. Please take a few moments to complete our feedback form. Any information you submit will be kept confidential.
You can access the feedback form at:
http://www.surveymonkey.com/s.aspx?sm=stdoYUlaABrbKUBpE95Y9g_3d_3d