
Samsung_ML_6000_Toner_Summit_Web
12
Home New Arrivals! Company Info Publications Special Features Contact Us Samsung ML-6000 Toner Cartridges DOC-0308 First introduced in November 1998, the Samsung ML-6000 engine is a 12ppm, 1200 dpi engine. The various models listed below all use the same supplies to recycle, however the cartridges are not interchangeable. The standard cartridge comes new with 190g. toner, and is rated for 6,000 pages at 5% coverage. As of November 15 th 2002 both the Xerox and Samsung cartridges list for $149.00ea Samsung seems to have different part numbers for the same cartridges. The ML+6000D6 and TD-66K are the same 6000 page cartridge. ML+6000D5 and the TD-65K are the same but are rated at 5000 pages. From what I can determine, the 5000 page cartridges have been replaced by the 6000 page cartridges. Some of the worldwide Samsung web sites have not been updated and still list these cartridges, so they may still have them in stock. All the cartridges can be made the higher yield, by adding the correct amount of toner (190g). There is also a possibility that there is another cartridge, the ML+6000D3 rated at 3,000 pages. I have not been able to confirm that this is a valid part number or that this 3000 page cartridge actually exists. The main cartridges in use today are as follows: The Samsung part # is ML+6000D6 or TD-66K The Xerox part # is 106R00398 The machines based on this engine are the: z Samsung ML-6000 z Samsung ML-6050 z Samsung ML-6100 z Samsung ML-6100N z Samsung QL-6000 z Samsung QL-6050 z Samsung QL-6100 z Overview z Required Tools z Required Supplies z Disassembly z Common Cartridge Problems z Test Printing z Printer Error Codes z Recommended Supplies OVERVIEW Page 1 of 12 Summit Laser Products - Samsung ML-6000 Toner Cartridges 4/21/2008 http://www.summitechnologies.com/docs/0308/0308.asp
-
Upload
kbaott-jorruss -
Category
Documents
-
view
212 -
download
0
description
New Arrivals! Company Info Publications Special Features Contact Us Samsung ML-6100N Samsung ML-6000 Samsung ML-6050 Samsung ML-6100 Samsung QL-6000 Samsung QL-6050 Samsung QL-6100 The main cartridges in use today are as follows: The Samsung part # is ML+6000D6 or TD-66K The Xerox part # is 106R00398 Home DOC-0308 The machines based on this engine are the:
Transcript of Samsung_ML_6000_Toner_Summit_Web

Home New Arrivals! Company Info Publications Special Features Contact Us
Samsung ML-6000 Toner Cartridges DOC-0308
First introduced in November 1998, the Samsung ML-6000 engine is a 12ppm, 1200 dpi engine. The various models listed below all use the same supplies to recycle, however the cartridges are not interchangeable. The standard cartridge comes new with 190g. toner, and is rated for 6,000 pages at 5% coverage. As of November 15th 2002 both the Xerox and Samsung cartridges list for $149.00ea
Samsung seems to have different part numbers for the same cartridges. The ML+6000D6 and TD-66K are the same 6000 page cartridge. ML+6000D5 and the TD-65K are the same but are rated at 5000 pages. From what I can determine, the 5000 page cartridges have been replaced by the 6000 page cartridges. Some of the worldwide Samsung web sites have not been updated and still list these cartridges, so they may still have them in stock. All the cartridges can be made the higher yield, by adding the correct amount of toner (190g). There is also a possibility that there is another cartridge, the ML+6000D3 rated at 3,000 pages. I have not been able to confirm that this is a valid part number or that this 3000 page cartridge actually exists.
The main cartridges in use today are as follows: The Samsung part # is ML+6000D6 or TD-66K The Xerox part # is 106R00398
The machines based on this engine are the:
Samsung ML-6000
Samsung ML-6050
Samsung ML-6100
Samsung ML-6100N
Samsung QL-6000
Samsung QL-6050
Samsung QL-6100
Overview Required Tools Required Supplies Disassembly Common Cartridge Problems Test Printing Printer Error Codes Recommended Supplies
OVERVIEW
Page 1 of 12Summit Laser Products - Samsung ML-6000 Toner Cartridges
4/21/2008http://www.summitechnologies.com/docs/0308/0308.asp

Xerox Docuprint P1202
As with other newer Samsung cartridges there is no wiper blade or waste chamber. The cartridge is listed as having a 100% transfer efficiency. As far as Samsung cartridges go, this one is fairly straightforward. It does however have a secondary roller under the PCR. The reason for this roller is not listed in any Samsung literature that I could find. The second roller is smaller in diameter than the PCR and has it’s own separate electrical contact. While researching this I came across a rather vague patent from Samsung where they were trying to address ghosting when printing in a low humidity environment. My guess is that this roller is there to help with that issue. In the Samsung service manual for this printer there is no mention of this, but there is a separate “cleaning board” listed in the wiring diagrams that is controlled by the main controller. In the user guides there is also an “OPC Cleaning Page” procedure that may use this roller as well.
Printer usage, as well as some common printer/cartridge problems will be covered at the end of this article.
Toner approved vacuum.
Small common screwdriver
Phillips head screwdriver
190g Toner (6000 pages)
Replacement drum
White lithium grease
Tape to hold drum cover open.
1. Place the cartridge with the toner hopper facing up and away from you. This will orient the cartridge for right and left sides.
2. Tape the drum cover open so that it is back under the back large tab. See Figure 1
3. Remove the top 2 screws. See Figure 2
REQUIRED TOOLS
REQUIRED SUPPLIES
DISASSEMBLY
Page 2 of 12Summit Laser Products - Samsung ML-6000 Toner Cartridges
4/21/2008http://www.summitechnologies.com/docs/0308/0308.asp

4. On the front of the cartridge there are 3 hidden plastic tabs with small slots above them. GENTLY pry them loose by inserting a small common screwdriver and twisting until the tabs pops loose. See Figure 3
5. On the back of the cartridge there are three more plastic tabs. GENTLY pry these loose also, and remove the top of the cartridge. See Figure 4
CAUTION: The entire upper half of the toner hopper is being removed. If there is a lot of toner left in the hopper, it will dump out all over! Vacuum the hopper clean. See Figure 5
6. Remove the three screws on the left side end cap (Non contact side) Remove the end cap. See Figure 6
FIGURE 1 FIGURE 2
FIGURE 3 FIGURE 4
FIGURE 5 FIGURE 6
Page 3 of 12Summit Laser Products - Samsung ML-6000 Toner Cartridges
4/21/2008http://www.summitechnologies.com/docs/0308/0308.asp

7. Remove the two screws on the PCR assembly. Remove the entire Assy. See Figure 7 Note that there are actually two rollers in this assy. The top is the PCR, the second we believe is a secondary PCR for drum cleaning and printing in low humidity conditions. See text at the beginning of this article for more information. See Figure 8
8. Clean both the PCR’s. WARNING: Do not clean either of the OEM PCR’s with alcohol, as this will remove the conductive coating on the rollers. We recommended they be cleaned with your standard PCR cleaner
9. Carefully pry up the two metal contacts on the right side. Be very careful not to damage the small plastic pins that the contacts lock on to. See Figure 9
10. Remove the three screws on the right side end cap. Remove the end cap. See Figure 10
11. Note the location of the gears on the right side. Remove the two large white gears. The metal shaft may come loose with the gears as they are removed (or stay on the end cap). Be very careful not to lose it! See Figure 11
12. Note the remaining two gears, remove the white gear, and the black bushing from the developer roller shaft. Leave the black gear in place for now. See Figures 12 & 13
13. Remove the PCR Assy. contact plate from the side of the cartridge, remove the drum. Make sure the contact plate is removed or it will damage the drum as it is removed! See Figures 14 & 15 If the drum is in good shape and you plan to re-use it, blow off any remaining dust from the Drum using compressed clean air. If there is any matter on the drum that must be cleaned off, use 99% pure Isopropyl alcohol and a soft lint free cotton pad to lightly wipe the drum surface, then blow off the Drum using compressed clean air.
FIGURE 7
FIGURE 8
FIGURE 9 FIGURE 10
Page 4 of 12Summit Laser Products - Samsung ML-6000 Toner Cartridges
4/21/2008http://www.summitechnologies.com/docs/0308/0308.asp

14. Place the OPC Drum in a soft lint-free cloth and then into a dark colored bag or cover from bright light by some other suitable means. Again, do not rub or wipe the OPC Drum with a dry cloth as this may scratch its surface.
15. To clean the doctor blade (Highly recommended), the developer roller must be removed. Failure to clean this blade will lead to vertical streaking. To remove the developer roller, first remove the remaining black (developer Roller) gear from the developer roller shaft. See Figure 16
16. In the bottom center of the gear box you will see a small rectangular hole with a clip in it. Press the clip in and remove the plastic/foam end cap. The developer roller can now be removed. Clean the roller with a clean dry cloth. Do not use any chemicals on this roller. Vacuum the foam toner feed roller and hopper clean. See Figures 17 & 18
FIGURE 11 FIGURE 12
FIGURE 13 FIGURE 14
FIGURE 15 FIGURE 16
Page 5 of 12Summit Laser Products - Samsung ML-6000 Toner Cartridges
4/21/2008http://www.summitechnologies.com/docs/0308/0308.asp

NOTE: The static roller has two spacers/washers made of Teflon. Be careful not to damage the spacers as they will allow leakage if not installed. See Figure 19
17. Clean the Doctor blade with a foam Q-Tip and Acetone, followed by 99% pure alcohol. The alcohol will remove any Acetone residue; the Acetone is an extremely good cleaner for metal blades. See Figure 20
18. Replace the developer roller, clip, black gear, and bushing. In that order Make sure that the developer roller clip is snapped in place. See Figures 21 & 22
19. Install the remaining gears, except for the white mid-sized gear that fits next to the drum. Make sure that the gears are positioned as in the picture. It is very easy to install the double gears backwards! See Figure 23
FIGURE 17 FIGURE 18
FIGURE 19 FIGURE 20
FIGURE 21 FIGURE 22
Page 6 of 12Summit Laser Products - Samsung ML-6000 Toner Cartridges
4/21/2008http://www.summitechnologies.com/docs/0308/0308.asp
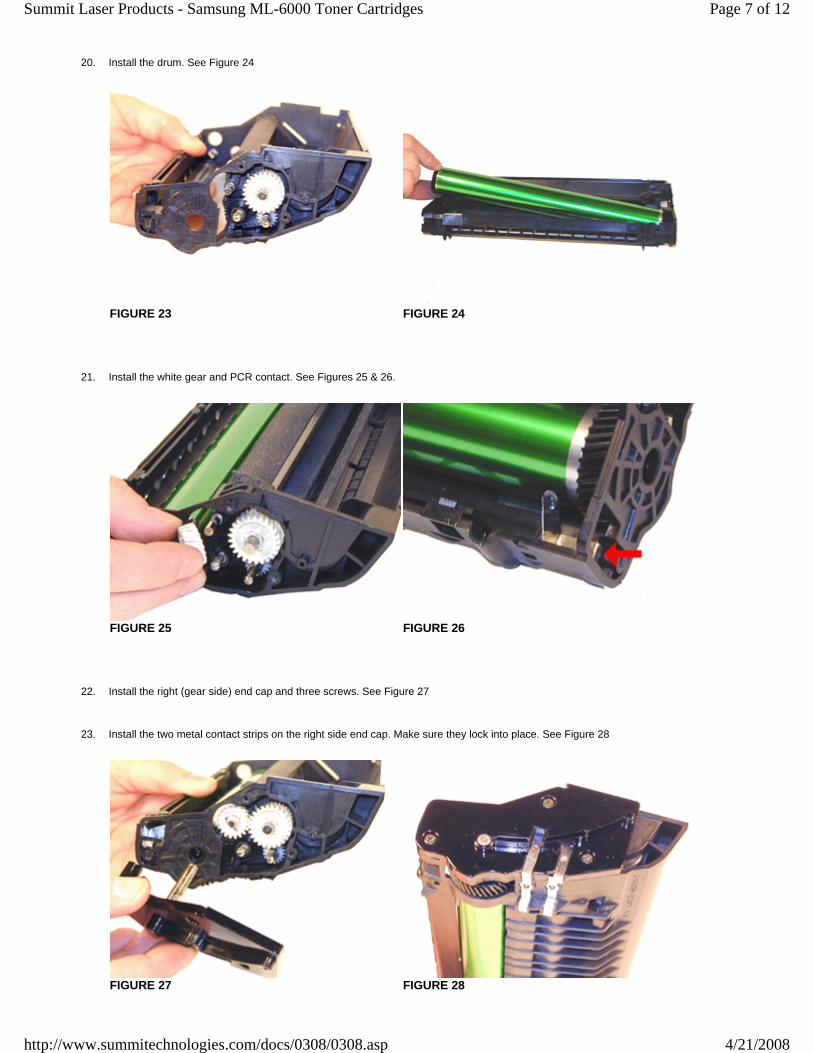
20. Install the drum. See Figure 24
21. Install the white gear and PCR contact. See Figures 25 & 26.
22. Install the right (gear side) end cap and three screws. See Figure 27
23. Install the two metal contact strips on the right side end cap. Make sure they lock into place. See Figure 28
FIGURE 23 FIGURE 24
FIGURE 25 FIGURE 26
FIGURE 27 FIGURE 28
Page 7 of 12Summit Laser Products - Samsung ML-6000 Toner Cartridges
4/21/2008http://www.summitechnologies.com/docs/0308/0308.asp
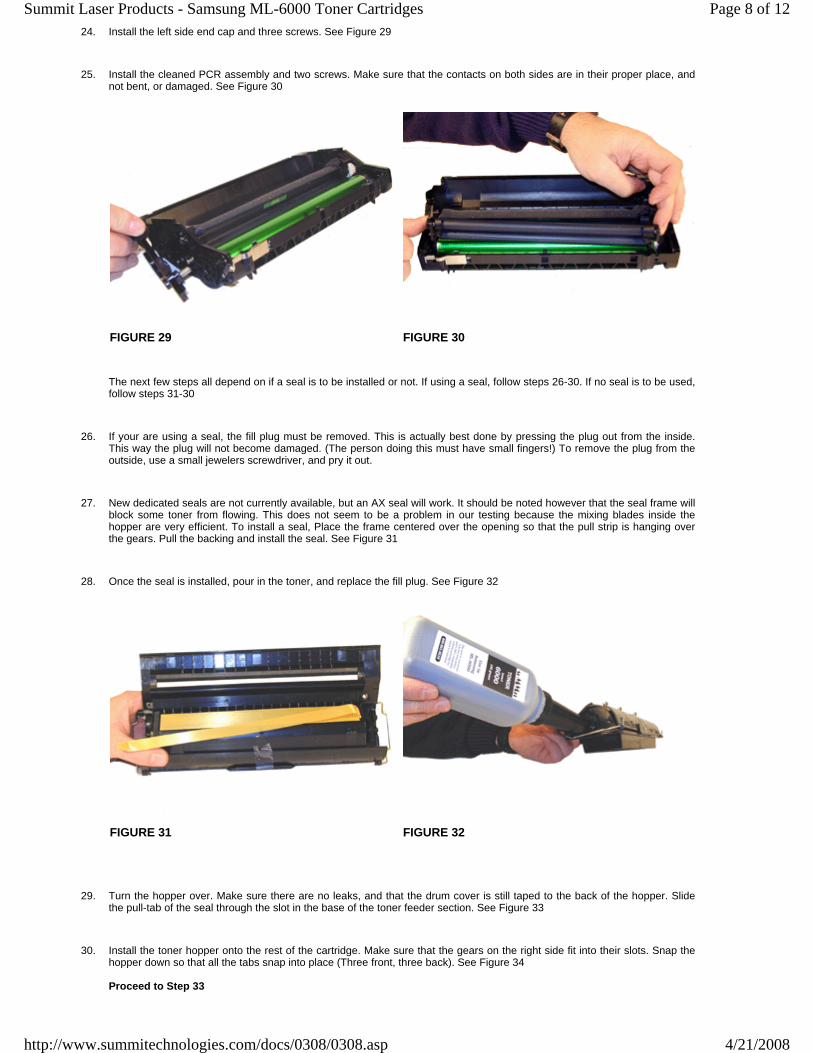
24. Install the left side end cap and three screws. See Figure 29
25. Install the cleaned PCR assembly and two screws. Make sure that the contacts on both sides are in their proper place, and not bent, or damaged. See Figure 30
The next few steps all depend on if a seal is to be installed or not. If using a seal, follow steps 26-30. If no seal is to be used, follow steps 31-30
26. If your are using a seal, the fill plug must be removed. This is actually best done by pressing the plug out from the inside. This way the plug will not become damaged. (The person doing this must have small fingers!) To remove the plug from the outside, use a small jewelers screwdriver, and pry it out.
27. New dedicated seals are not currently available, but an AX seal will work. It should be noted however that the seal frame will block some toner from flowing. This does not seem to be a problem in our testing because the mixing blades inside the hopper are very efficient. To install a seal, Place the frame centered over the opening so that the pull strip is hanging over the gears. Pull the backing and install the seal. See Figure 31
28. Once the seal is installed, pour in the toner, and replace the fill plug. See Figure 32
29. Turn the hopper over. Make sure there are no leaks, and that the drum cover is still taped to the back of the hopper. Slide the pull-tab of the seal through the slot in the base of the toner feeder section. See Figure 33
30. Install the toner hopper onto the rest of the cartridge. Make sure that the gears on the right side fit into their slots. Snap the hopper down so that all the tabs snap into place (Three front, three back). See Figure 34 Proceed to Step 33
FIGURE 29 FIGURE 30
FIGURE 31 FIGURE 32
Page 8 of 12Summit Laser Products - Samsung ML-6000 Toner Cartridges
4/21/2008http://www.summitechnologies.com/docs/0308/0308.asp

31. If a seal is not installed, make sure the fill plug is installed, and fill the hopper from the seal opening. See Figure 35
32. Since no seal is present, the drum/feeder section must be installed onto the toner hopper. Install the drum/feeder section onto the hopper. Make sure that the gears on the right side fit into their slots. Snap the hopper down so that all the tabs snap into place (Three front, three back) See Figure 36
33. Install the top two screws. See Figure 37
34. Release the drum cover. Make sure it is operating properly (bar spring stays in place). See Figure 38
FIGURE 33 FIGURE 34
FIGURE 35 FIGURE 36
FIGURE 37 FIGURE 38
Page 9 of 12Summit Laser Products - Samsung ML-6000 Toner Cartridges
4/21/2008http://www.summitechnologies.com/docs/0308/0308.asp

Vertical streaks: This is normally caused by a dirty doctor blade. It is highly recommended that this blade be cleaned every cycle. See step 17 for more information.
Dirty or Bad Primary Charge Roller(s), (PCR); This cartridge actually has two PCR’s a Primary (normal), and a secondary (smaller) that is probably used in low humidity situations. In theory, this secondary PCR should correct any ghosting, but if not, the pair of them might need to be cleaned and/or replaced. Small defects from the main PCR will repeat every 37.7mm
Dirty PCR Connection; This will show as horizontal dark black bars across the page, or as shading throughout the page. Note that both PCR’s each have their own contact! The main is on the right, secondary on the left.
Scratched Drum; this is shown by a very thin, perfectly straight line that runs from the top to the bottom of the test page.
Chipped Drum; This will show as a dot or series of dots that repeat 3 times per page or every 94.2mm. Any drum defects will repeat 3 times per page (94.2mm).
Light Damaged Drum; This will show up as a shaded area on the test print that should be white. Again this will repeat 3 times per page.
Tire Tracks; This is normally caused by a bad drum. They normally show up on the right edge of the page.
To run the cleaning page, first make sure that the READY light is on. Press and hold the control button until all three lights remain lit, and the printer begins to cycle. Release the button. The printer will run through a cleaning cycle, and a cleaning page will print.
To run a self test page, press and hold the control button for approximately 3 seconds. (All lights flashing) A one page printer status page will print out.
The printer driver when installed on a computer will allow changes to the printer’s density, and two more test pages: a configuration page, and a demo page.
For more sophisticated troubleshooting, Samsung actually has a separate box that they call a DCU (Diagnostic Control Unit). This unit gives what appears to be excellent information on the status of the machine. I don’t know how accurate it is, but in theory, I like it!
For ease of use, we will number the lights 1-4. Refer to this system when reading the error patterns.
Light 1 = Error
Light 2 = Manual Feed
Light 3 = Paper
Light 4 = Ready
Lights 1 & 3 ON Paper jam
Lights 1-4 Blinking System Error. Turn the printer off and back on to see if it clears. (This is most commonly a fuser error)
Light 1 On Printer cover open, or toner cartridge not installed. This error does not have a light pattern, but has become my all time favorite error listing. The service manual actually says this!
COMMON CARTRIDGE PROBLEMS
TEST PRINTING
PRINTER ERROR CODES
Page 10 of 12Summit Laser Products - Samsung ML-6000 Toner Cartridges
4/21/2008http://www.summitechnologies.com/docs/0308/0308.asp

Error Code 3-090: Ear-Splitting Noise! (This is the code for a bad motor or fan) I have seen some strange translations over the years, but this is the best!
© 2003 Summit Laser Products, Inc. Any attempt to reproduce any part of these instructions without the written consent of Summit Laser Products, Inc is prohibited. All registered trademarks are the property of their respective owners.
Contact Summit Laser Products
Toll Free Orders: 800-221-3516 Toll Free Fax: 888-791-9188
International Orders: +1-631-218-8376 International Fax: +1-631-218-3285
PRINT DEFECT MEASUREMENT TABLE
SIZE PART
37.7mm Primary Charge Roller
31.3mm Feed Roller
94.2mm OPC Drum
46mm Developer Roller
69mm Upper AND Lower Fuser Rollers
49mm Transfer Roller
RECOMMENDED SUPPLIES
Samsung ML-6000 OEM# ML+6000 D6 1 Cartridge System
Toners
6050 Toner for ML-6000, 190g
0
Drums
D4508GH HanP Drum w/gears **50 per case** 0
Instructions
DOC0308 Toner Cartridge Disassembly Instructions 0
Reset Quantities Add Items To Quote
Page 11 of 12Summit Laser Products - Samsung ML-6000 Toner Cartridges
4/21/2008http://www.summitechnologies.com/docs/0308/0308.asp

Domestic Sales E-mail: [email protected] International Sales E-mail: [email protected]
Technical Support: +1-631-218-8376 Technical Support E-Mail: [email protected]
Mail: Summit Laser Products 95 Orville Drive, Bohemia, New York 11716 - USA
Please report any broken links to: [email protected]
Authorized Summit Laser Distributors
All products on this web site, unless stated otherwise, are independently produced and distributed by Summit Laser, and not by the individual manufacturers of the copiers and printers referenced herein. Use of trade styles and trademarks of the individual manufacturers of the copiers and printers referenced herein are for descriptive purposes only and are not intended to imply any form of endorsement by the
individual manufacturers of the refill or supply products offered herein. As such, all items in this catalog are deemed to be construed as “for use in,” “for use with or compatible with,” whether or not stated for each individual item as opposed to the group of items.
Ukraine Distributor SINT Company
[email protected] T: +380.44.459.6515 F: +380.44.241.9187
Page 12 of 12Summit Laser Products - Samsung ML-6000 Toner Cartridges
4/21/2008http://www.summitechnologies.com/docs/0308/0308.asp


