Samsung F300
106
Printed in Korea Code No.:GH68-13511A English (EU). 04/2007. Rev. 1.2 * Depending on the software installed or your service provider or country, some of the descriptions in this guide may not match your phone exactly. * Depending on your country, your phone and accessories may appear different from the illustrations in this guide. World Wide Web http://www.samsungmobile.com
Transcript of Samsung F300
Printed in KoreaCode No.:GH68-13511A
English (EU). 04/2007. Rev. 1.2
* Depending on the software installed or your service provider or country, some of the descriptions in this guide may not match your phone exactly.
* Depending on your country, your phone and accessories may appear different from the illustrations in this guide.
World Wide Webhttp://www.samsungmobile.com
sohyeon
노트
앞뒤 표지 , 86, 87
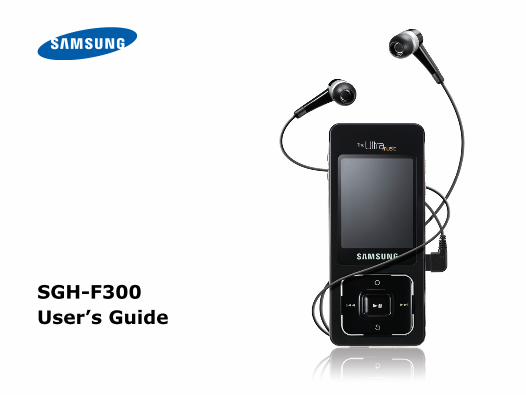
SGH-F300User’s Guide
Importantsafety
precautions
Copyright information• Bluetooth® is a registered trademark of the
Bluetooth SIG, Inc. worldwide.• Windows Media Player® is a registered
trademark of Microsoft Corporation.
Drive safely at all times
Do not use a hand-held phone while driving. Park the vehicle first.
Switch off the phone when refuelling
Do not use the phone at a refuelling point (service station) or near fuels or chemicals.
Switch off in an aircraft
Wireless phones can cause interference. Using them in an aircraft is both illegal and dangerous.
Switch off the phone near all medical equipment
Hospitals or health care facilities may be using equipment that could be sensitive to external radio frequency energy. Follow any regulations or rules in force.
Interference
All wireless phones may be subject to interference, which could affect their performance.
Failure to comply with the following precautions may be dangerous or illegal.
1
Important safety precautions
tteries
proved batteries and headsets and PC data authorised accessories your phone and may
ries according to the ctions.
the phone
e phone for any ack could be damaged materials could get ng the serious damage , causing the phone to
personnel may repair
ety information, see formation" on page 92.
olumes, prolonged eadset can damage your
Be aware of special regulations
Meet any special regulations in force in any area and always switch off your phone whenever it is forbidden to use it, or when it may cause interference or danger.
Water resistance
Your phone is not water-resistant. Keep it dry.
Sensible use
Use only in the normal position (held to your ear). Avoid unnecessary contact with the antenna when the phone is switched on.
Emergency calls
Key in the emergency number for your present location, then press .
Keep your phone away from small children
Keep the phone and all its parts, including accessories, out of the reach of small children.
Accessories and ba
Use only Samsung-apaccessories, such as cables. Use of any uncould damage you orbe dangerous.
Dispose of used battemanufacturer’s instru
Never disassemble
Never disassemble threason. The battery por electro-conductiveinto the phone, causithe phone, as well asbe combustible.
Qualified service
Only qualified serviceyour phone.
For more detailed saf"Health and safety in
At very high vlistening to a hhearing.
timedia gate the phone functions the multimedia player tions separately, by ching your phone’s l display.
features of your phone
chronisation with dows Media Playersfer music files to r phone directly from Windows Media Player.
ic player music files on your ne. You can use other ne functions while ning to music.
2
About this GuideThis User’s Guide provides you with condensed information about how to use your phone. To quickly learn the basics for your phone, please refer to “Get started.”
In this guide, the following instruction icons appear:
Indicates that you need to pay careful attention to the subsequent information regarding safety or phone features.
Indicates that you can get more information on the referenced page.
→ Indicates that you need to press the Navigation keys to scroll to the specified option and then select it.
[ ] Indicates a key on the phone. For example, [ ]
< > Indicates a soft key, whose function is displayed on the phone screen. For example, <Menu>
• MulUseandfuncswitdua
Special • Syn
WinTranyouthe
• MusPlayphopholiste
3
Special features of your phone
browserss the wireless web to p-to-the-minute mation and a wide ty of media content.
imedia Message ice (MMS) and receive MMS ages with aination of text, es, video, and audio.
message SOS messages to family or friends for in an emergency.
niser track of your daily, ly, and monthly dule.
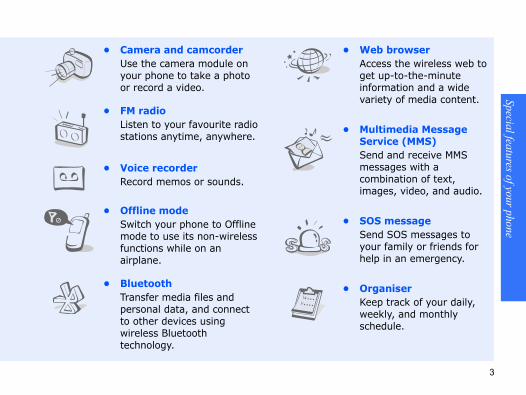
• Camera and camcorderUse the camera module on your phone to take a photo or record a video.
• FM radioListen to your favourite radio stations anytime, anywhere.
• Voice recorderRecord memos or sounds.
• Offline modeSwitch your phone to Offline mode to use its non-wireless functions while on an airplane.
• BluetoothTransfer media files and personal data, and connect to other devices using wireless Bluetooth technology.
• WebAcceget uinforvarie
• MultServSendmesscombimag
• SOSSendyourhelp
• OrgaKeepweeksche
4
ContentsUnpack 6
Make sure you have each item
Your phone 6
Keys, features, and locations
Get started 7
First steps to operating your phone
Install and charge the phone...................... 7Power on or off......................................... 8Switch between Phone mode and Multimedia Player mode............................................. 9Keys and icons ......................................... 9Access menu functions ............................ 12Enter text .............................................. 13Customise your phone............................. 15Make/Answer calls .................................. 17Use a memory card................................. 18Use a leather case .................................. 19Reset the phone ..................................... 20
Multimedia player functions 20
Use multimedia functions: the music player, camera, media album, FM radio, and voice recorder
Use the multimedia player keys................. 20Play music.............................................. 22Use the camera....................................... 27View photos and videos in Album .............. 31Listen to the FM radio .............................. 33Use the voice recorder ............................. 35
Call functions 37
Advanced calling features
Menu functions 41
All menu options listed
Solve problems 90
Help and personal needs
Health and safety information 92
Index 99
5
7 Calendar p. 71
8 Camera p. 74
9 Settings p. 76
1 Time and date2 Phone settings3 Display settings4 Sound settings5 Light settings6 Tutorial7 Network services8 Bluetooth9 Security10 Connection settings11 Reset settings12 Phone information
p. 76p. 77p. 78p. 79p. 80p. 80p. 80p. 83p. 85p. 87p. 88p. 89
. Available only if supported by your SIM card.
. Available only if a memory card is inserted.
OverTo access Me
1 Call log
1 Recent cont2 Missed calls3 Dialled calls4 Received ca5 Delete all6 Call time7 Call costs1
2 Phonebook
1 Contact list2 Create cont3 Group4 Speed dial5 My namecar6 Own numbe7 Managemen8 Service num
3 Application
1 Voice record2 World clock3 Alarm4 Timer5 Stopwatch6 Memo7 Key manage8 SIM applica
menttion toolkit1
p. 50p. 51
act
drtber1
p. 43p. 44p. 45p. 45p. 46p. 46p. 46p. 47
s p. 47
er p. 47p. 48p. 49p. 49p. 50p. 50
1 Create message2 My messages3 Templates4 Delete all5 Settings6 SOS messages7 Memory status
p. 54p. 57p. 62p. 62p. 63p. 65p. 66
6 My files p. 66
1 Images2 Videos3 Music4 Sounds5 Other files6 Memory card2
7 Memory status
p. 67p. 68p. 69p. 69p. 70p. 71p. 71
1
2
view of menu functionsnu mode, press <Menu> in Idle mode.
p. 41
acts
lls
p. 41p. 41p. 41p. 41p. 42p. 42p. 42
p. 43
4 Browser p. 51
1 Home2 Enter URL3 Bookmarks4 Saved pages 5 History6 Clear cache7 Browser settings
p. 51p. 53p. 53p. 54p. 54p. 54p. 54
5 Messages p. 54
Web access/Confirm key
Navigation keys (Up/Down/Left/Right)
Right soft key
Power on/off/Menu exit key
Earpiece
Delete key
6
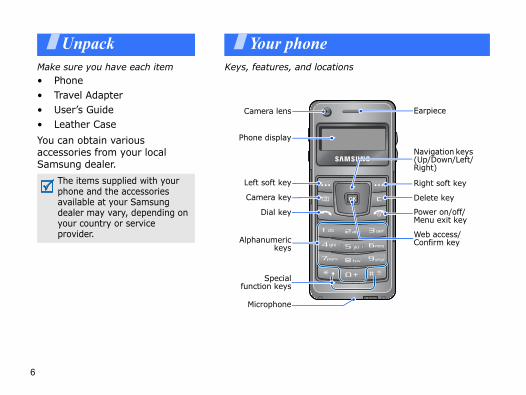
UnpackMake sure you have each item• Phone• Travel Adapter• User’s Guide• Leather Case
You can obtain various accessories from your local Samsung dealer.
The items supplied with your phone and the accessories available at your Samsung dealer may vary, depending on your country or service provider.
Your phoneKeys, features, and locations
Specialfunction keys
Camera lens
Phone display
Dial key
Alphanumerickeys
Left soft key
Microphone
Camera key
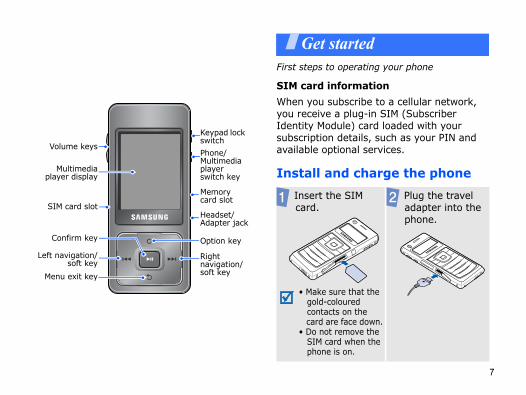
7
your phone
on
to a cellular network, SIM (Subscriber loaded with your uch as your PIN and vices.
rge the phone
n.
e
Plug the travel adapter into the phone.
Get startedFirst steps to operating
SIM card informati
When you subscribe you receive a plug-inIdentity Module) cardsubscription details, savailable optional ser
Install and chaMultimediaplayer display
Right navigation/soft key
Option key
Menu exit key
Volume keys
SIM card slot
Memory card slot
Headset/Adapter jack
Phone/Multimedia player switch key
Keypad lock switch
Left navigation/soft key
Confirm key
Insert the SIM card.
• Make sure that the gold-coloured contacts on the card are face dow• Do not remove the SIM card when th phone is on.
Get started
to prevent any ons from of the keys.
up. To unlock the
non-replaceable. e battery expires, msung service centre
ess and hold [ ].
necessary, enter e PIN and press OK>.
and hold [ ].
phone when mobile ted.the phone for the first ant to launch the
Press <Yes> to learn imedia player keys.
8
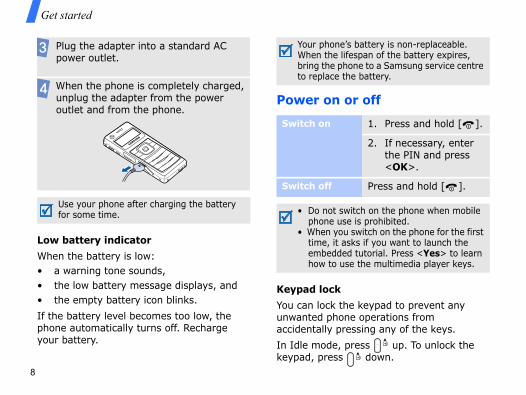
Low battery indicator
When the battery is low:• a warning tone sounds,• the low battery message displays, and• the empty battery icon blinks.
If the battery level becomes too low, the phone automatically turns off. Recharge your battery.
Power on or off
Keypad lock
You can lock the keypadunwanted phone operatiaccidentally pressing any
In Idle mode, press keypad, press down.
Plug the adapter into a standard AC power outlet.
When the phone is completely charged, unplug the adapter from the power outlet and from the phone.
Use your phone after charging the battery for some time.
Your phone’s battery isWhen the lifespan of thbring the phone to a Sato replace the battery.
Switch on 1. Pr
2. Ifth<
Switch off Press
• Do not switch on thephone use is prohibi
• When you switch on time, it asks if you wembedded tutorial. how to use the mult
Get started
9
to Multimedia Player dia player functions, he larger screen on the
the function indicated ttom line of the
ode, access your menus directly.
mode, scroll through tions.
ode, launch the web
mode, select the ed menu option or nput.
Offline mode
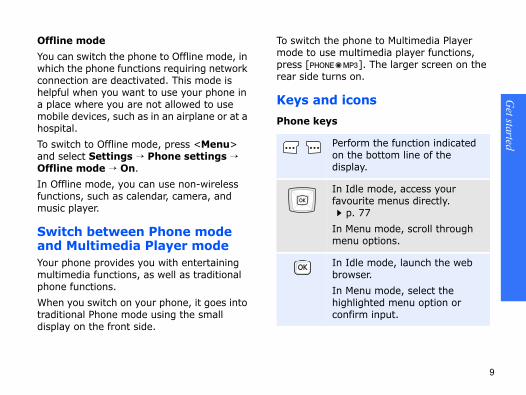
You can switch the phone to Offline mode, in which the phone functions requiring network connection are deactivated. This mode is helpful when you want to use your phone in a place where you are not allowed to use mobile devices, such as in an airplane or at a hospital.
To switch to Offline mode, press <Menu> and select Settings → Phone settings → Offline mode → On.
In Offline mode, you can use non-wireless functions, such as calendar, camera, and music player.
Switch between Phone mode and Multimedia Player modeYour phone provides you with entertaining multimedia functions, as well as traditional phone functions.
When you switch on your phone, it goes into traditional Phone mode using the small display on the front side.
To switch the phone mode to use multimepress [ ]. Trear side turns on.
Keys and icons
Phone keys
Perform on the bodisplay.
In Idle mfavourite
p. 77
In Menu menu op
In Idle mbrowser.
In Menu highlightconfirm i
Get started
keys
ough items or perform function, according to ons: dragging, or holding. p. 20
e highlighted menu confirm input.
oto, record a video or mo, or begin music .
nlock the keys.
tween Phone mode imedia Player mode.
e phone volume.
10
Multimedia player
Common keys
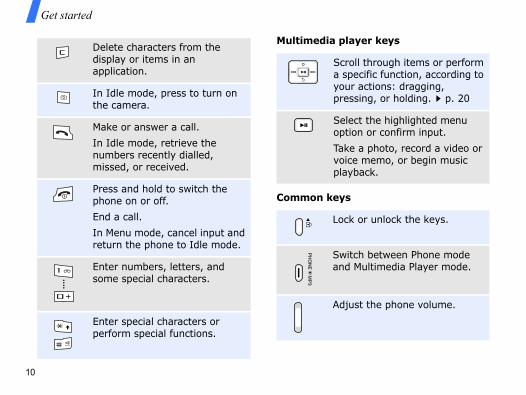
Delete characters from the display or items in an application.
In Idle mode, press to turn on the camera.
Make or answer a call.
In Idle mode, retrieve the numbers recently dialled, missed, or received.
Press and hold to switch the phone on or off.
End a call.
In Menu mode, cancel input and return the phone to Idle mode.
Enter numbers, letters, and some special characters.
Enter special characters or perform special functions.
Scroll thra specificyour actipressing,
Select thoption or
Take a phvoice meplayback
Lock or u
Switch beand Mult
Adjust th
Get started
11
feature active
ive p. 83
dset or hands-free cted p. 84
rnet p. 52
secured web page
rnet on PC using dem
data with PC Studio
k
GPRS network
ata in GPRS network
k
EDGE network
ata in EDGE network
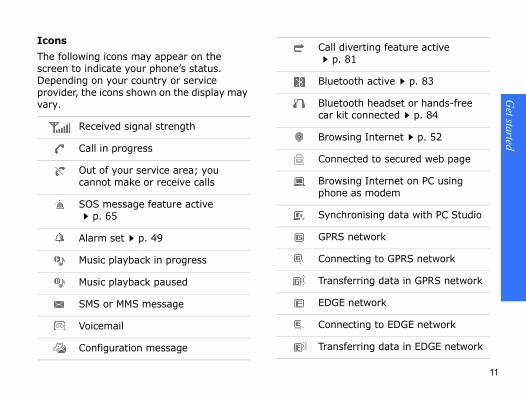
Icons
The following icons may appear on the screen to indicate your phone’s status. Depending on your country or service provider, the icons shown on the display may vary.
Received signal strength
Call in progress
Out of your service area; you cannot make or receive calls
SOS message feature activep. 65
Alarm set p. 49
Music playback in progress
Music playback paused
SMS or MMS message
Voicemail
Configuration message
Call divertingp. 81
Bluetooth act
Bluetooth heacar kit conne
Browsing Inte
Connected to
Browsing Intephone as mo
Synchronising
GPRS networ
Connecting to
Transferring d
EDGE networ
Connecting to
Transferring d
Get started
unctions
oles of the soft keys depending on the ion you are using. The m line of the display tes their current role.
s the soft key lect the lighted n.
Press the right soft key to return to the previous menu level.
Select Back
12
Access menu f
In Phone mode
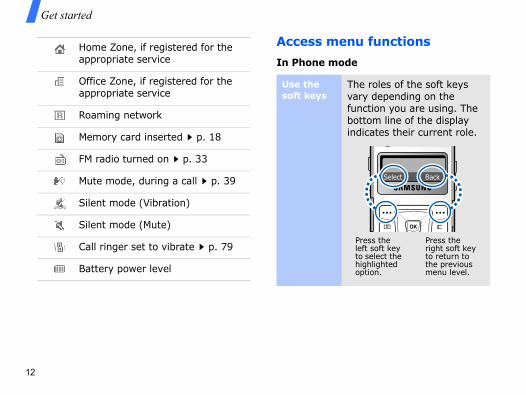
Home Zone, if registered for the appropriate service
Office Zone, if registered for the appropriate service
Roaming network
Memory card inserted p. 18
FM radio turned on p. 33
Mute mode, during a call p. 39
Silent mode (Vibration)
Silent mode (Mute)
Call ringer set to vibrate p. 79
Battery power level
Use the soft keys
The rvary functbottoindica
Presleft to sehighoptio
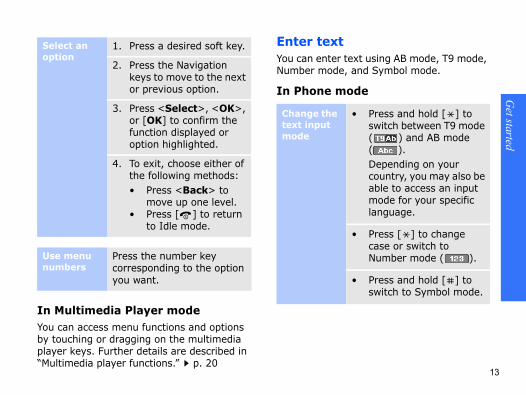
Get started
13
g AB mode, T9 mode, mbol mode.
ss and hold [ ] to tch between T9 mode
) and AB mode ).
ending on your ntry, you may also be to access an input
de for your specific uage.
ss [ ] to change e or switch to ber mode ( ).
ss and hold [ ] to tch to Symbol mode.
In Multimedia Player modeYou can access menu functions and options by touching or dragging on the multimedia player keys. Further details are described in “Multimedia player functions.” p. 20
Enter textYou can enter text usinNumber mode, and Sy
In Phone mode
Select an option
1. Press a desired soft key.
2. Press the Navigation keys to move to the next or previous option.
3. Press <Select>, <OK>, or [OK] to confirm the function displayed or option highlighted.
4. To exit, choose either of the following methods:• Press <Back> to
move up one level.• Press [ ] to return
to Idle mode.
Use menu numbers
Press the number key corresponding to the option you want.
Change the text input mode
• Preswi((Depcouablemolang
• PrecasNum
• Preswi
Get started
g a word in T9 mode
ss [2] to [9] to start ering a word. Press h key once for each er.
er the whole word ore editing or eting characters.
en the word displays rectly, go to step 4. erwise, press [0] to lay alternative word ices for the keys that have pressed.
ss [ ] to insert a ce and enter the next d.
T9 mode operations
ss [1] to enter iods or apostrophes omatically.ss [ ] to insert a ce.
14
AB mode Entering a word in AB mode
Press the appropriate key until the character you want appears on the display.
To enter the same letter twice or to enter a different letter on the same key, press [Right] or wait until the cursor moves to the right. Then, enter the next letter.
Other AB mode operations
• Press [1] to enter special characters.
• Press [ ] to insert a space.
• Press the Navigation keys to move the cursor.
• Press [C] to delete characters one by one.
• Press and hold [C] to clear the display
T9 mode Enterin
1. Preenteaclett
2. Entbefdel
3. WhcorOthdispchoyou
4. Prespawor
Other
• Preperaut
• Prespa
Get started
15
yer mode touching or dragging yer keys. Further in “Multimedia player
phone
ss [Up] or [Down] to play the symbols you nt.
ss the corresponding ber key to select the bol you want.
ss [OK] to insert the bols.
Idle mode, press enu> and select
ttings → Phone ttings → Language.
lect a language.
In Multimedia PlaYou can enter text byon the multimedia pladetails are described functions.” p. 22
Customise your
• Press the Navigation keys to move the cursor.
• Press [C] to delete characters one by one.
• Press and hold [C] to clear the display.
Adding a new word to the T9 dictionary
1. Enter the word that you want to add.
2. Press [0] to display alternative words for your key presses. When there are no more alternative words, Add appears.
3. Press <Add>.4. Enter the word you want
using AB mode and press <OK>.
Number mode
Press the keys corresponding to the digits you want.
Symbol mode
1. Prediswa
2. Prenumsym
3. Presym
1. In<MSese
2. Se
Display language
Get started
can set the Navigation to function as shortcuts cess your favourite us.
n Idle mode, press Menu> and select ettings → Phone ettings → Shortcuts.
elect a key.elect a menu to be ssigned to the key.
can switch the phone to t mode to avoid rbing other people.
le mode, press and hold
16
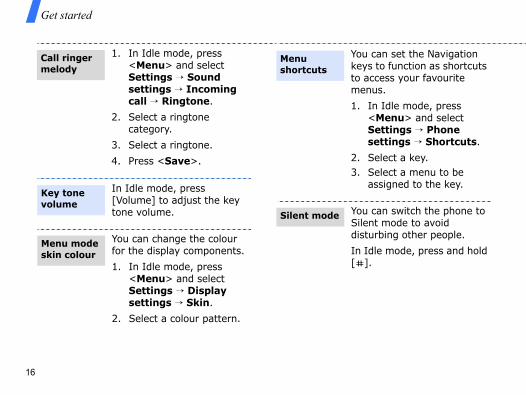
1. In Idle mode, press <Menu> and select Settings → Sound settings → Incoming call → Ringtone.
2. Select a ringtone category.
3. Select a ringtone.
4. Press <Save>.
In Idle mode, press [Volume] to adjust the key tone volume.
You can change the colour for the display components.
1. In Idle mode, press <Menu> and select Settings → Display settings → Skin.
2. Select a colour pattern.
Call ringer melody
Key tone volume
Menu mode skin colour
You keysto acmen
1. I<Ss
2. S3. S
a
You Silendistu
In Id[ ].
Menu shortcuts
Silent mode
Get started
17
calls
n Idle mode, enter an rea code and phone umber.
ress [ ].
o end the call, press ].
hen the phone rings, ress [ ].
o end the call, press ].
s [Volume].
Make/AnswerYou can protect the phone against unauthorised use with a phone password. The phone will require the password when turned on.
1. In Idle mode, press <Menu> and select Settings → Security → Phone lock.
2. Select Enable.
3. Enter a new 4- to 8-digit password and press <OK>.
4. Enter the new password again and press <OK>.
Phone lock1. I
an
2. P
3. T[
1. Wp
2. T[
Pres
Make a call
Answer a call
Adjust the volume during a call
Get started
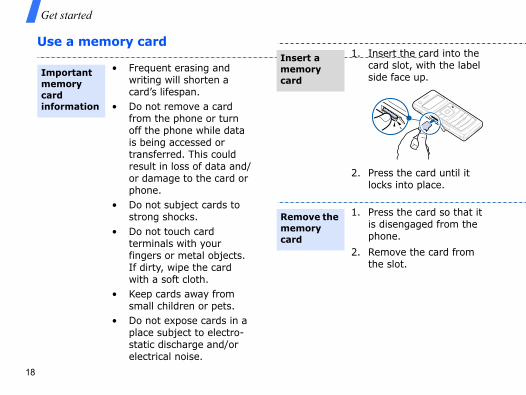
ert the card into the d slot, with the label e face up.
ss the card until it ks into place.
ss the card so that it isengaged from the ne.
ove the card from slot.
18
Use a memory card
• Frequent erasing and writing will shorten a card’s lifespan.
• Do not remove a card from the phone or turn off the phone while data is being accessed or transferred. This could result in loss of data and/or damage to the card or phone.
• Do not subject cards to strong shocks.
• Do not touch card terminals with your fingers or metal objects. If dirty, wipe the card with a soft cloth.
• Keep cards away from small children or pets.
• Do not expose cards in a place subject to electro-static discharge and/or electrical noise.
Important memory card information
1. Inscarsid
2. Preloc
1. Preis dpho
2. Remthe
Insert a memory card
Remove the memory card
Get started
19
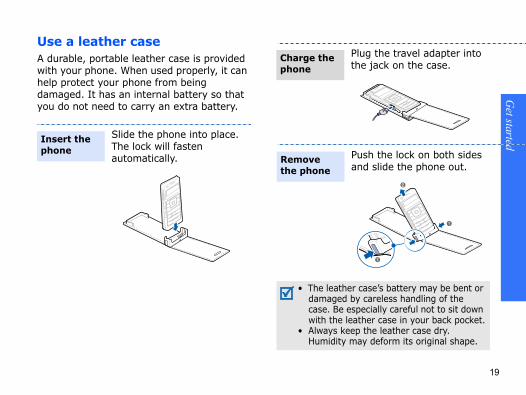
the travel adapter into ack on the case.
the lock on both sides lide the phone out.
’s battery may be bent or reless handling of the ally careful not to sit down case in your back pocket. leather case dry. eform its original shape.
Use a leather caseA durable, portable leather case is provided with your phone. When used properly, it can help protect your phone from being damaged. It has an internal battery so that you do not need to carry an extra battery.
Slide the phone into place. The lock will fasten automatically.
Insert the phone
Plug the j
Pushand s
• The leather casedamaged by cacase. Be especiwith the leather
• Always keep theHumidity may d
Charge the phone
Remove the phone
player functionsions: the music player, , FM radio, and voice
edia player keys
Scroll up or down to move two places on a list at a time.
Scroll one by one on a list.
Scroll one by one through the tabs.
Scroll one by one a list.
20
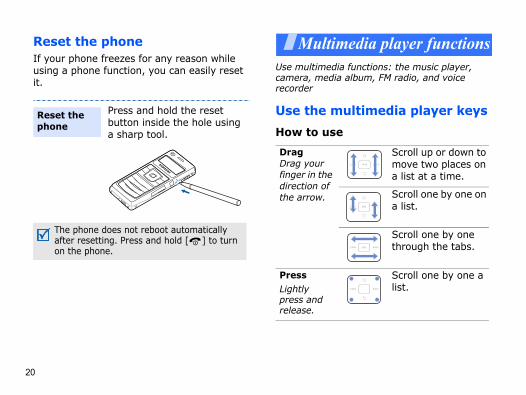
Reset the phoneIf your phone freezes for any reason while using a phone function, you can easily reset it.
MultimediaUse multimedia functcamera, media albumrecorder
Use the multim
How to use
Press and hold the reset button inside the hole using a sharp tool.
The phone does not reboot automatically after resetting. Press and hold [ ] to turn on the phone.
Reset the phone
DragDrag your finger in the direction of the arrow.
PressLightly press and release.
Multim
edia player functions
21
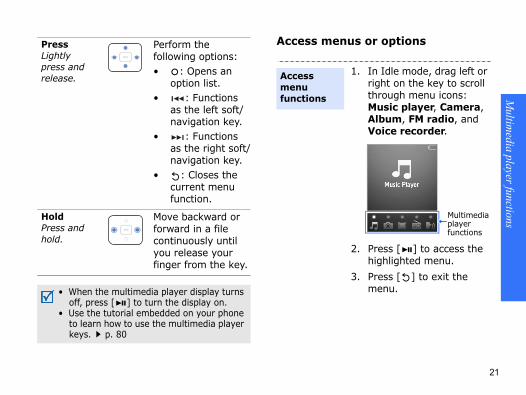
options
Idle mode, drag left or ght on the key to scroll rough menu icons: usic player, Camera, lbum, FM radio, and oice recorder.
ess [ ] to access the ighlighted menu.
ess [ ] to exit the enu.
Multimedia player functions
Access menus orPressLightly press and release.
Perform the following options:• : Opens an
option list.• : Functions
as the left soft/navigation key.
• : Functions as the right soft/navigation key.
• : Closes the current menu function.
HoldPress and hold.
Move backward or forward in a file continuously until you release your finger from the key.
• When the multimedia player display turns off, press [ ] to turn the display on.
• Use the tutorial embedded on your phone to learn how to use the multimedia player keys. p. 80
1. InrithMAV
2. Prh
3. Prm
Access menu functions
Multimedia player functions
up or down to scroll character group.
s [ ] until the acter you want lays.
eat steps 1 and 2.
n you have finished, s [ ] to confirm input.
play .mp3, .aac, m4a, and .wma files. se methods:nload from the less web p. 51nload from a puter using the onal Samsung PC io Samsung PC io User’s Guideive via Bluetooth. 85
22
Enter text
Play music
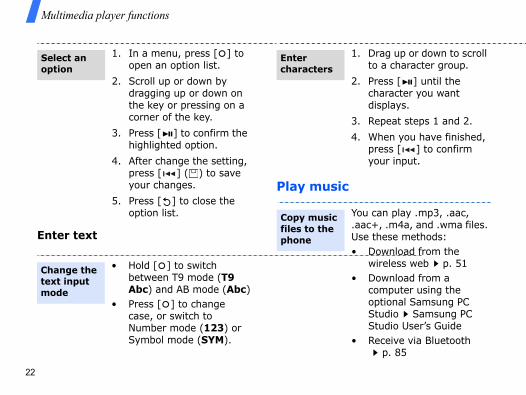
1. In a menu, press [ ] to open an option list.
2. Scroll up or down by dragging up or down on the key or pressing on a corner of the key.
3. Press [ ] to confirm the highlighted option.
4. After change the setting, press [ ] ( ) to save your changes.
5. Press [ ] to close the option list.
• Hold [ ] to switch between T9 mode (T9 Abc) and AB mode (Abc)
• Press [ ] to change case, or switch to Number mode (123) or Symbol mode (SYM).
Select an option
Change the text input mode
1. Dragto a
2. Preschardisp
3. Rep
4. Whepresyour
You can.aac+, .Use the• Dow
wire• Dow
comoptiStudStud
• Recep
Enter characters
Copy music files to the phone
Multim
edia player functions
23
nter the name of your hone and click Finish.
elect and drag the usic files you want to e sync list.
lick Start Sync.
hen synchronisation is nished, disconnect the hone from the PC.
• Copy to a memory card and insert the card into the phone p. 18
• Synchronise music files with Windows Media Player next section
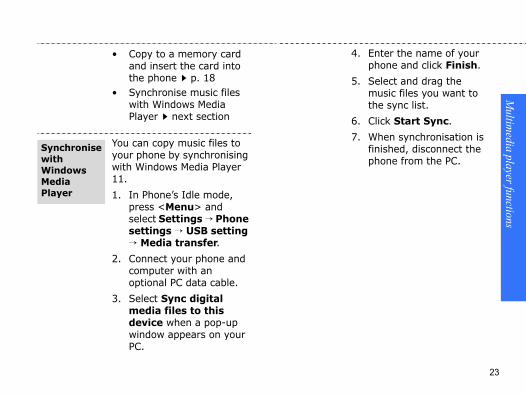
You can copy music files to your phone by synchronising with Windows Media Player 11.
1. In Phone’s Idle mode, press <Menu> and select Settings → Phone settings → USB setting → Media transfer.
2. Connect your phone and computer with an optional PC data cable.
3. Select Sync digital media files to this device when a pop-up window appears on your PC.
Synchronise with Windows Media Player
4. Ep
5. Smth
6. C
7. Wfip
Multimedia player functions
g to the left or t on the key to ess the all music or check the sic player settings.
] to stop ck.
he music player , press [ ] to he option list.
Play via → an
ng Bluetooth tereo headset you to connect adsets with the at the same time.
for and select luetooth stereo t.
he headset’s oth PIN, 0000, ess [ ].
24
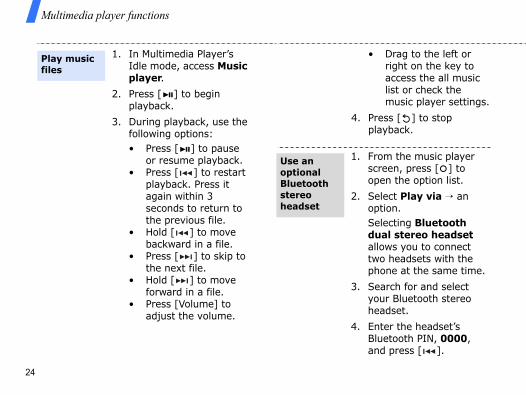
1. In Multimedia Player’s Idle mode, access Music player.
2. Press [ ] to begin playback.
3. During playback, use the following options:• Press [ ] to pause
or resume playback.• Press [ ] to restart
playback. Press it again within 3 seconds to return to the previous file.
• Hold [ ] to move backward in a file.
• Press [ ] to skip to the next file.
• Hold [ ] to move forward in a file.
• Press [Volume] to adjust the volume.
Play music files
• Drarighacclistmu
4. Press [playba
1. From tscreenopen t
2. Select option.Selectidual sallows two hephone
3. Searchyour Bheadse
4. Enter tBluetoand pr
Use an optional Bluetooth stereo headset
Multim
edia player functions
25
Add to playlist → ed or All.
l, press [ ] to the files you want ess [ ].
the playlist you eated.
you have finished, [ ] to access the ite music list.
the play list you eated to begin ck.
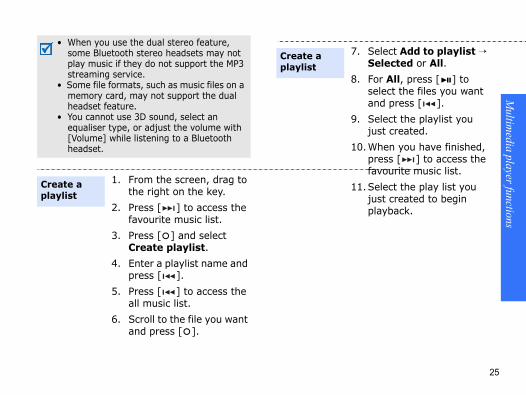
• When you use the dual stereo feature, some Bluetooth stereo headsets may not play music if they do not support the MP3 streaming service.
• Some file formats, such as music files on a memory card, may not support the dual headset feature.
• You cannot use 3D sound, select an equaliser type, or adjust the volume with [Volume] while listening to a Bluetooth headset.
1. From the screen, drag to the right on the key.
2. Press [ ] to access the favourite music list.
3. Press [ ] and select Create playlist.
4. Enter a playlist name and press [ ].
5. Press [ ] to access the all music list.
6. Scroll to the file you want and press [ ].
Create a playlist
7. SelectSelect
8. For Alselect and pr
9. Selectjust cr
10.When press favour
11.Selectjust crplayba
Create a playlist

Multimedia player functions
music player ress [ ]. g on the current vailable options
fer to/Transfer one: switch sound t to the phone er or a Bluetooth headset.ia: begin playback
e phone speaker or tooth stereo et. stop playback.o playlist: add the t file to your
rite music list.e: delete the t file.o other lists: add rrent file to another t.
26
While you using the music player, music files are sorted automatically on the most played music list or recent music list. In addition to playlists you have created, use those playlists to listen to your favourite music easily and quickly.
1. From the music player screen, drag to the right on the key.
2. Press [ ] to access the favourite music list.
3. Select the playlist you want.
Select a playlist
From thescreen, pDependinplaylist, avary:• Trans
to phoutpuspeakstereo
• Play vvia tha Blueheads
• Stop:• Add t
currenfavou
• Deletcurren
• Add tthe cuplaylis
Use player options
Multim
edia player functions
27
alizer type: select qualiser setting. n 3D sound turns on,
option is not ilable.ume: select a sound me.um art: set the ic player to show the m image if a file has corresponding rmation.
of people without their
in a place where lowed. in a place where you another person’s
oto in direct sunlight or , shadows may appear
Use the camera
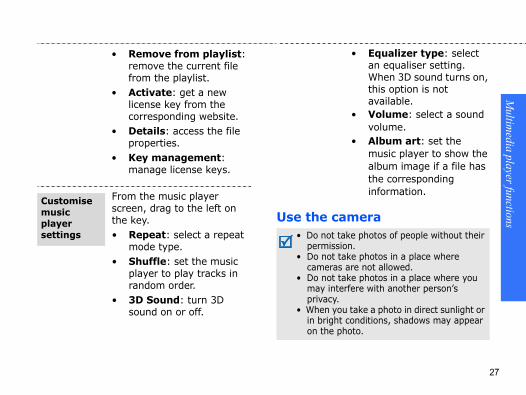
• Remove from playlist: remove the current file from the playlist.
• Activate: get a new license key from the corresponding website.
• Details: access the file properties.
• Key management: manage license keys.
From the music player screen, drag to the left on the key.• Repeat: select a repeat
mode type.• Shuffle: set the music
player to play tracks in random order.
• 3D Sound: turn 3D sound on or off.
Customise music player settings
• Equan eWhethisava
• Volvolu
• Albmusalbuthe info
• Do not take photospermission.
• Do not take photoscameras are not al
• Do not take photosmay interfere withprivacy.
• When you take a phin bright conditionson the photo.
Multimedia player functions
e mode, adjust the be captured:up / down or press elease on the right f the key to adjust
rightness. [Volume], drag up / , or press and e on the left side of y to zoom in or
[ ] to switch the inder to the phone y. [ ] or drag to the the key to access
tion list and change mera settings.
[ ] to switch to d mode. p. 30
28
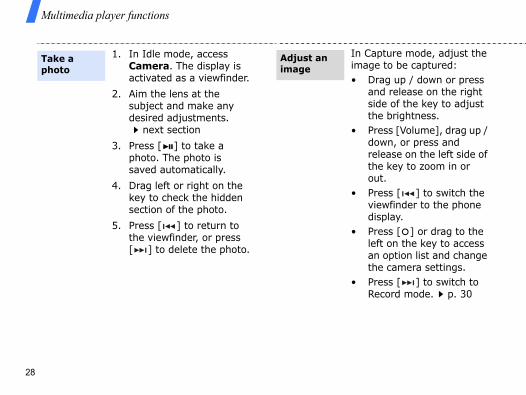
1. In Idle mode, access Camera. The display is activated as a viewfinder.
2. Aim the lens at the subject and make any desired adjustments.
next section
3. Press [ ] to take a photo. The photo is saved automatically.
4. Drag left or right on the key to check the hidden section of the photo.
5. Press [ ] to return to the viewfinder, or press [ ] to delete the photo.
Take a photo
In Capturimage to• Drag
and rside othe b
• Pressdownreleasthe keout.
• Pressviewfdispla
• Pressleft onan opthe ca
• PressRecor
Adjust an image
Multim
edia player functions
29
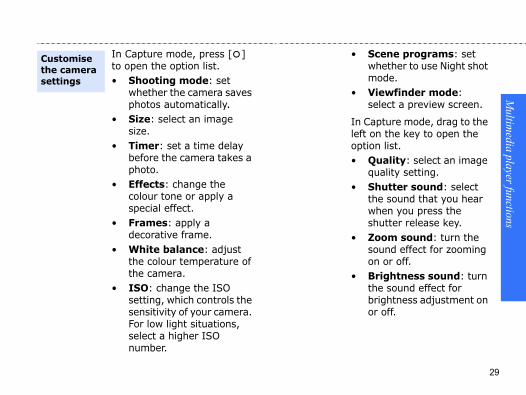
ene programs: set ether to use Night shot de.
ewfinder mode: lect a preview screen.
ture mode, drag to the the key to open the list. ality: select an image ality setting.utter sound: select sound that you hear en you press the utter release key.om sound: turn the und effect for zooming or off.ightness sound: turn sound effect for
ightness adjustment on off.
In Capture mode, press [ ] to open the option list. • Shooting mode: set
whether the camera saves photos automatically.
• Size: select an image size.
• Timer: set a time delay before the camera takes a photo.
• Effects: change the colour tone or apply a special effect.
• Frames: apply a decorative frame.
• White balance: adjust the colour temperature of the camera.
• ISO: change the ISO setting, which controls the sensitivity of your camera. For low light situations, select a higher ISO number.
Customise the camera settings
• Scwhmo
• Vise
In Capleft onoption• Qu
qu• Sh
thewhsh
• Zosoon
• Brthebror
Multimedia player functions
ress [ ] to review the ideo.
ress [ ] to return to he viewfinder, or press
] to delete the video.
cord mode, adjust the e to be recorded:rag up or down on the ight side of the key to djust the brightness.ress [Volume] or drag p or down on the left ide of the key to zoom in r out.ress [ ] or drag to the ft on the key to access n option list and change he camcorder settings.ress [ ] to switch to apture mode. p. 28
30
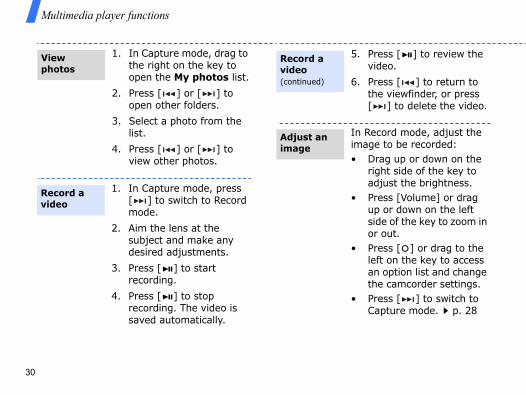
1. In Capture mode, drag to the right on the key to open the My photos list.
2. Press [ ] or [ ] to open other folders.
3. Select a photo from the list.
4. Press [ ] or [ ] to view other photos.
1. In Capture mode, press [ ] to switch to Record mode.
2. Aim the lens at the subject and make any desired adjustments.
3. Press [ ] to start recording.
4. Press [ ] to stop recording. The video is saved automatically.
View photos
Record a video
5. Pv
6. Pt[
In Reimag• D
ra
• Puso
• Pleat
• PC
Record a video (continued)
Adjust an image
Multim
edia player functions
31
ord mode, drag to the the key to open the list. ality: select an image ality setting. om sound: turn the und effect for zooming or off.ightness sound: turn e sound effect for ightness adjustment on off.
Record mode, drag to e right on the key to en the My video clips t.
ess [ ] or [ ] to en other folders.
lect a video clip from e list.
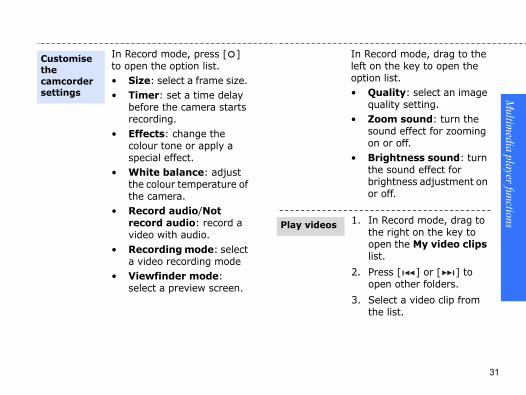
In Record mode, press [ ] to open the option list. • Size: select a frame size. • Timer: set a time delay
before the camera starts recording.
• Effects: change the colour tone or apply a special effect.
• White balance: adjust the colour temperature of the camera.
• Record audio/Not record audio: record a video with audio.
• Recording mode: select a video recording mode
• Viewfinder mode: select a preview screen.
Customise the camcorder settings
In Recleft onoption• Qu
qu• Zo
soon
• Brthbror
1. Inthoplis
2. Prop
3. Seth
Play videos
Multimedia player functions
mode, access .
] or [ ] to Videos.a video folder.a video file. The lays. playback, use the ng options:ss [ ] to pause or ume playback.ss [ ] to restart yback. Press it in within 3 seconds eturn to the vious file. d [ ] to move kward in a file.ss [ ] to move to next file. d [ ] to move ward in a file.ss [Volume] or drag or down on the key djust the volume.
] to stop ck.
32View photos and videos in Album
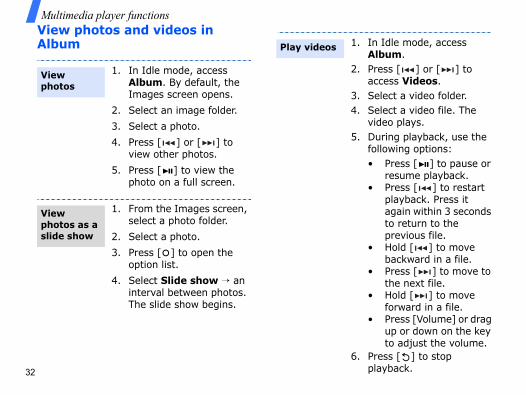
1. In Idle mode, access Album. By default, the Images screen opens.
2. Select an image folder.
3. Select a photo.
4. Press [ ] or [ ] to view other photos.
5. Press [ ] to view the photo on a full screen.
1. From the Images screen, select a photo folder.
2. Select a photo.
3. Press [ ] to open the option list.
4. Select Slide show → an interval between photos. The slide show begins.
View photos
View photos as a slide show
1. In IdleAlbum
2. Press [access
3. Select 4. Select
video p5. During
followi• Pre
res• Pre
plaagato rpre
• Holbac
• Prethe
• Holfor
• Preup to a
6. Press [playba
Play videos
Multim
edia player functions
33
radiodio, you must connect a s as a radio antenna, to
etails: access the file roperties.ettings: change the ttings for the video
layer.iew mode settings: t the video player to
lay video clips on a full reen.rightness settings: just the brightness of e video player screen.ey management: anage license keys.
ug the connecter of the pplied headset into the
eadset/adapter jack.
Listen to the FMTo listen to the FM raheadset, which serveyour phone.
From a photo or video list, press [ ] to access the following options: • View/Play: open the
selected file.• Activate key: get a new
license key from the corresponding website.
• Delete: delete the selected file or all files.
• Rename: change the file name.
• Slide show: view photos in the currently selected folder as a slide show.
• View by: change the view mode of the list.
• Bluetooth visibility: share the file with other Bluetooth devices.
• Lock/Unlock: lock the file to prevent it from being deleted.
Using file options
• Dp
• SsepVsepscBadth
• Km
1. Plsuh
Listen to the FM radio
Multimedia player functions
rom the FM radio creen, press [ ] to pen the option list.
elect Speaker On. ound output switches to he phone speaker.
o switch back to the eadset, press [ ] and elect Earphone On.
g self-tunning:
rom the FM radio creen, drag to the right n the key.
elect Self tuning. The hone saves available tations.
ng radio stations ually:
rom the FM radio creen, drag to the right n the key.
elect Add more.
34
2. In Idle mode, access FM radio.
3. Press [ ] to turn on the FM radio.
4. Press [ ] or [ ] to scan the frequencies to find available radio stations.
5. While listening to the FM radio:• Press [Volume] or
drag up or down on the key to adjust the volume.
• Press [ ] and select Add to preset channels to add the current station to the channel list.
6. Press [ ] to turn the FM radio off.
1. Fso
2. SSt
3. Ths
Usin
1. Fso
2. Sps
Addiman
1. Fso
2. S
Switch between the phone speaker and headset
Set up a radio station list

Multim
edia player functions
35
recorder
ress [ ] to return to he FM radio screen.
ress [ ] or [ ] to croll to the station you ant to listen to.
n Idle mode, access oice recorder.
ress [ ] to start ecording.
peak into the icrophone.
hen you have finished ecording, press [ ]. he voice memo is utomatically saved.
ress [ ] to review the oice memo, or press
] or [ ] to record dditional voice memos.
Use the voice
3. Select Auto and scroll through available stations and press [ ] when you find the station you want. Select Manual, scroll to the frequency of the station you want, and press [ ].
4. When you have finished, press [ ] to return to the FM radio screen.
1. From the FM radio screen, drag to the left on the key.
2. Select Preset channels only → On to set the FM radio to only scrolls through the radio stations stored on the list.
Listen to the saved stations
3. Pt
4. Psw
1. IV
2. Pr
3. Sm
4. WrTa
5. Pv[a
Record a voice memo
Multimedia player functions
ress [ ] to stop layback.
ly supports .amr files. For ds, access the Sounds
.
36
1. From the voice recorder screen, drag to the right on the key to access the voice memo list.
2. Select a voice memo. The voice memo plays.
3. During playback, use the following options:• Press [ ] to pause
or resume playback.• Press [ ] to move
to the previous memo.
• Hold [ ] to move backward in the memo.
• Press [ ] to move to the next memo.
• Hold [ ] to move forward in the memo.
• Press [Volume] or drag up or down on the key to adjust the volume.
Review a voice memo
4. Pp
Voice Recorder onplaying other sounfolder in My files
37
er you want and press
Phonebook a number in ial the number by ebook. p. 43
peed dial feature to uently dialled numbers ys. p. 45
number from the SIM number assigned
r a location number
ght] to scroll through
] to dial the number
llincoming call, the ays the incoming call
] to answer the call.
Call functionsAdvanced calling features
Making a call1. In Idle mode, enter the area code and
phone number.
2. Press [ ].3. When you want to end the call, press
[ ].
Making an international call1. In Idle mode, press and hold [0]. The +
character appears.2. Enter the country code, area code, and
phone number, then press [ ].
Redialling recent numbers1. In Idle mode, press [ ] to display the
list of recent numbers.
2. Scroll to the numb[ ].
Making a call fromOnce you have storedPhonebook, you can dselecting it from Phon
You can also use the sassign your most freqto specific number ke
You can quickly dial acard using its locationwhen stored.1. In Idle mode, ente
and press [ ].2. Press [Left] or [Ri
other numbers.3. Press <Dial> or [
you want.
Answering a caWhen you receive an phone rings and displimage.
Press <Accept> or [
• Press [C] to clear the last digit or press and hold [C] to clear the whole display.
• Press and hold [ ] to enter a pause between numbers.
Call functions
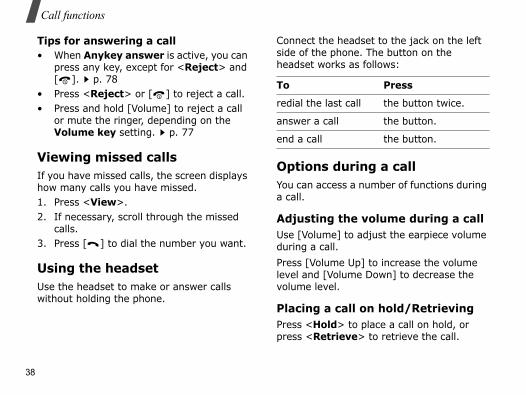
to the jack on the left e button on the ows:
a callber of functions during
ume during a callst the earpiece volume
increase the volume wn] to decrease the
hold/Retrievinge a call on hold, or retrieve the call.
Press
the button twice.
the button.
the button.
38
Tips for answering a call• When Anykey answer is active, you can
press any key, except for <Reject> and [ ]. p. 78
• Press <Reject> or [ ] to reject a call.• Press and hold [Volume] to reject a call
or mute the ringer, depending on the Volume key setting. p. 77
Viewing missed callsIf you have missed calls, the screen displays how many calls you have missed.1. Press <View>.2. If necessary, scroll through the missed
calls.3. Press [ ] to dial the number you want.
Using the headsetUse the headset to make or answer calls without holding the phone.
Connect the headset side of the phone. Thheadset works as foll
Options duringYou can access a numa call.
Adjusting the volUse [Volume] to adjuduring a call.
Press [Volume Up] tolevel and [Volume Dovolume level.
Placing a call on Press <Hold> to placpress <Retrieve> to
To
redial the last call
answer a call
end a call
Call functions
39
tions access the following :set/Switch to phone: to a Bluetooth headset r kit, or back to the is feature, you first need headset or car kit to the
e phone’s menu
on/Whisper mode off: isper mode. Whisper lly increases the sitivity to allow the ear your voice even
be whispering. off: switch off the one so that the other one cannot hear you, or .
Making a second callYou can make another call if your network supports this function.1. Press <Hold> to put the call on hold.2. Make the second call in the normal way.3. Press <Swap> to switch between the
calls.4. Press <Options> and select End held
call to end the call on hold.5. To end the current call, press [ ].
Answering a second callYou can answer an incoming call while already on the phone, if your network supports this function and you have activated the call waiting feature. p. 821. Press [ ] to answer the call. The first
call is automatically put on hold.2. Press <Swap> to switch between the
calls.3. Press <Options> and select End held
call to end the call on hold.4. To end the current call, press [ ].
Using In-call opPress <Options> tooptions during a call• Switch to head
transfer the call or hands-free caphone. To use thto connect your phone. p. 84
• Menu: access thfunctions.
• Whisper mode turn on or off Whmode automaticamicrophone's senother person to hthough you may
• Voice on/Voicephone's microphperson on the phswitch it back on
Call functions
ulti-party call by adding o a currently active call. up to 5 people on a
ct one of the multi-party You can then use the :rivate conversation with
icipant. The other onverse with each other. onversation, select Join
ivate participants to the
nect the selected
40
• Mute keys/Send keys: switch the key tones off or on.
• Send DTMF: send the DTMF (Dual tone multi-frequency) tones as a group. The DTMF tones are the tones used in phones for tone dialling, sounding when you press the number keys. This option is helpful for entering a password or an account number when you call an automated system, like a banking service.
• Phonebook: access the contact list.• SIM service: access special services,
such as news, weather forecasts, entertainment, and location services, provided by your SIM card. This option is available when you use a SIM card supporting SIM Application Toolkit menus.
• Join: set up a ma caller on hold tYou can include multi-party call.
• Select one: selecall participants. following optionsPrivate: have a pthe selected partparticipants can cAfter the private cto return both prmulti-party call.Remove: disconparticipant.
To communicate with answering machines or computerised telephone systems, Send keys must be selected.
41
tionsetails, press <Options> ing options:mber and dial it.ok: save the number to
MS or MMS message to ber.
he selected call log or all
u 1.2)
he most recent calls you
u 1.3)
he most recent calls you
enu 1.4)
he most recent calls you
Menu functionsAll menu options listed
Call log (Menu 1)
Use this menu to view the calls you have dialled, received, or missed, and the length of the calls. You can also check the cost of your calls, if your SIM card supports this function.
To access this menu, press <Menu> in Idle mode and select Call log.
Recent contacts (Menu 1.1)
This menu displays the most recent calls dialled, received, or missed.
Accessing a call log1. Press [Up] or [Down] to scroll through
the call list. 2. Press [OK] to view the details of a call,
or [ ] to dial a number.
Using call log opWhile viewing call dto access the follow• Call: edit the nu• Add to Phonebo
Phonebook.• Send: send an S
the selected num• Delete: delete t
logs.
Missed calls (Men
This menu displays tdid not answer.
Dialled calls (Men
This menu displays thave dialled.
Received calls (M
This menu displays thave received.
Menu functions
.7)
displays the cost of vailable only if IM card. Note that this is sed for billing purposes.
check the cost of your
ck the total cost of all of total cost exceeds the et in Set max. cost, he counter before you er call.k the maximum cost
: reset the cost
set the maximum cost ur calls.
the price per unit that is cost of your calls is
42
Delete all (Menu 1.5)
Use this menu to delete all of the records in each call type.1. Press [OK] to select the call types to be
cleared. 2. Press <Delete>. 3. Press <Yes> to confirm the deletion.
Call time (Menu 1.6)
This menu displays the time log for calls made and received. The actual time invoiced by your service provider will vary.• Last call time: check the length of your
last call.• Total dialled calls: check the total
length of all the calls you have dialled.• Total received calls: check the total
length of all the calls you have received.
To reset the call timers, press <Options> and select Reset or Reset all. You need to enter the phone password.
Call costs (Menu 1
This network featurecalls. This menu is asupported by your Snot intended to be u• Last call cost:
last call.• Total cost: che
your calls. If themaximum cost syou must reset tcan make anoth
• Max. cost: checlimit.
• Reset counterscounters.
• Set max. cost:authorised for yo
• Price/Unit: setapplied when thecalculated.
You can change this password. p. 86
Menu functions Phonebook (M
enu 2)
43
in Idle modes in Idle mode, by the name. The phone tact names starting with n any of the keys you
ess the number keys tters you want.ress <Options> and s spelling.hes Phonebook for the ts and shows results.
optionst, press <Options> to options:act information of the .: switch the screen to layer display. In r mode, you can use the s: n on the key, or press e key to scroll through
Phonebook (Menu 2)
You can store phone numbers on your SIM card and in your phone’s memory. The SIM card and phone’s memory are physically separate, but they are used as a single entity called Phonebook.
To access this menu, press <Menu> in Idle mode and select Phonebook.
Contact list (Menu 2.1)
Use this menu to search for contacts in Phonebook.
Finding a contact1. Enter the first few letters of the name
that you want to find.2. Select a contact from the list.3. Scroll to a number and press [ ] to
dial, or press [OK] to edit contact information.
Finding a contactYou can find contactspelling of a contactsearches for the conthe letters labelled opressed.1. In Idle mode, pr
containing the le2. Press [OK], or p
select Search aThe phone searcmatching contac
Using PhonebookFrom the contact lisaccess the following• View: view cont
selected contact• Switch screens
the multimedia pMultimedia Playefollowing feature- Drag up or dow
the corner of thcontacts.
You can quickly access this menu by pressing <Contacts> in Idle mode.
Menu functions
e/Office/Fax/Other: r in any type.n an e-mail address.ssign an image to alert from the person.ssign a ringtone to alert from the person.n the number to a caller
memo about the person.o save the contact.
on the SIM card
n about the contact.n a name.ber: add a number.sign a location number.
o save the contact.
ller ID image or video, roup, the contact must be phone’s memory.
44
- Drag left or right on the key to scroll through initial letters.
- Press [ ] to view the contact details.- Press [ ] to make a call. The screen
switches back to the phone display.• Send message: send an SMS or MMS
message to the selected contact.• Create contact: add a new contact to
Phonebook.• Send via: send the contact via SMS,
MMS, or Bluetooth. • Delete: delete the selected contact or all
contacts.
Create contact (Menu 2.2)
Use this menu to add a new contact to Phonebook.
Storing a contact in the phone’s memory1. Select Phone.2. Change the settings or enter information
about the contact.• First name/Last name: assign a
name.
• Mobile/Homadd a numbe
• Email: assig• Caller ID: a
you to a call • Ringtone: a
you to a call • Group: assig
group.• Note: add a
3. Press <Save> t
Storing a contact1. Select SIM.2. Enter informatio
• Name: assig• Phone num• Location: as
3. Press <Save> t
To assign a caringtone, or gsaved to the
Menu functions Phonebook (M
enu 2)
45
d a new group.roup properties.end an SMS or MMS oup members you
selected group or all mbers, however, will
Phonebook.
4)
n a speed dial number ost frequently dialled
ial numberson from 2 to 9. Key 1 r voicemail server.om the contact list. the contact has more
al entriescreen, press the following options:ber to an unassigned
Group (Menu 2.3)
Use this menu to organise your contacts in caller groups.
Creating a new caller group1. Press <Options> and select Create
group.2. Enter a name for the group.3. Select the caller ID line and set an
image.4. Select the ringtone line and set a
ringtone.5. Press <Save> to save the group.
Adding members to a caller group1. Select a group.2. Press <Add>.3. Press [OK] to select the contacts to be
added.4. Press <Select>.
Managing caller groupsWhile viewing the group list, press <Options> to access the following options:• View: display the members of the
selected group.
• Create group: ad• Edit: change the g• Send message: s
message to the grwant.
• Delete: delete thegroups. Group menot be deleted from
Speed dial (Menu 2.
Use this menu to assig(2 to 9) for 8 of your mnumbers.
Assigning speed d1. Select a key locati
is reserved for you2. Select a contact fr3. Select a number, if
than one number.
Managing speed diFrom the Speed dial s<Options> to access• Add: assign a num
key.
Menu functions
card: exchange name r person via Bluetooth.e name card.
u 2.6)
eck your phone n a name to each of the ade here do not affect numbers on your SIM
nu 2.7)
nage contacts in
ct to: select a default for saving contacts. If s ask, the phone will a memory location each umber.
y all of the contacts card to the phone’s
versa.e all of the contacts s memory, your SIM
46
• View: check the name and number assigned to a key.
• Change: assign a different number to a key.
• Remove: clear the speed dial setting for a key.
Dialling speed dial numbersIn Idle mode, press and hold the appropriate key.
My namecard (Menu 2.5)
Use this menu to create a name card and send it to other people.
Saving your name cardThe procedure for creating your name card is the same as the one for saving a phone number in the phone’s memory. p. 44
Using name card optionsAfter saving your name card, press <Options> to access the following options:• Edit: edit the name card. • Send via: send the name card via SMS,
MMS, or Bluetooth.
• Exchange namecards with anothe
• Delete: delete th
Own number (Men
Use this feature to chnumbers, or to assignumbers. Changes mthe actual subscribercard.
Management (Me
Use this menu to maPhonebook.• Save new conta
memory location you select Alwayask you to select time you save a n
• Copy all to: copstored on the SIMmemory, or vice
• Delete all: deletfrom your phone’card, or both.
Menu functions A
pplications (M
enu 3)
47
u 3.1)
voice memos. A to one hour long.
emorecording.ophone. or resume
own] to end memo is saved
the voice memo.
order screen, press ect Go to My voice
o.
e following keys:
sumes playback.
he previous memo. ward in a memo own.
• Memory status: check the number of contacts you have stored in the phone’s memory and on the SIM card.
Service number (Menu 2.8)
Use this menu to view the list of Service Dialling Numbers (SDN) assigned by your service provider, including emergency numbers and numbers for directory enquiries. This menu is available if your SIM card supports SDN.1. Scroll to the number you want and press
<View>.2. Press <Dial> or [ ].
Applications (Menu 3)
Use this menu to use convenient features, such as voice recorder, alarm clock, and stopwatch.
To access this menu, press <Menu> in Idle mode and select Applications.
Voice recorder (Men
Use this menu to recordvoice memo can be up
Recording a voice m1. Press [OK] to start 2. Speak into the micr
Press [OK] to pauserecording.
3. Press <Stop> or [Drecording. The voiceautomatically.
4. Press [OK] to review
Playing a voice mem1. From the Voice reco
<Options> and selclips.
2. Select a voice mem
During playback, use th
Key Function
OK Pauses or re
Left Returns to tMoves backwhen held d
Menu functions
ility: share the file or t with other Bluetooth
ck the file to prevent it ed, or unlock the file.the file properties.
u 3.2)
t your local time zone ent time in another part
eight] to scroll to the city time line moves, the the given zone display.ve the city as your local
t saving timeime list, press select Apply daylight
lect the time zones you
48
Using voice memo optionsAfter recording or playing a voice memo, press <Options> to access the following options:• Play: play the selected voice memo in
Review mode.• Record: record a new voice memo.• Go to My voice clips: access the voice
memo list.• Send via: send the file via MMS or
Bluetooth.• Move to: move the file to another folder.• Copy to memory card: copy the file to
a memory card.• Delete: delete the file.• Rename: change the file name.
• Bluetooth visibthe files you wandevices.
• Lock/Unlock: lofrom being delet
• Details: access
World clock (Men
Use this menu to seand find out the currof the world.
Viewing world tim1. Press [Left] or [R
you want. As thetime and date of
2. Press [OK] to satime zone.
Applying dayligh1. From the world t
<Options> and saving time.
2. Press [OK] to sewant.
3. Press <Save>.
Right Skips to the next memo. Skips forward in a memo when held down.
Volume Adjusts the volume.
Down Stops playback.
Key Function
Menu functions A
pplications (M
enu 3)
49
rmou want to deactivate.larm line.
ound when the
, select Auto power
n it is time for the one switches on and
period of time for the The phone sounds an ied period of time
time you want to ess <OK>.t counting down.
Alarm (Menu 3.3)
Use this menu to set alarms. The alert type for a normal alarm corresponds to the call alert type settings. A wake-up alarm is not affected by your sound settings.
Setting an alarm1. Select the type of alarm.2. Set each alarm option:
• Alarm: activate the alarm.• Alarm time: enter the time for the
alarm to sound.• AM/PM: set AM or PM in 12-hour
format.• Repeat: select a repeat option.• Alarm tone: select an alarm tone.
3. Press <Save>.
Stopping an alarm• For a non-wake-up alarm, press any key.• For a wake-up alarm, press <Confirm>
or [OK]. Press any key, except for <Confirm> and [OK], to cause it to sound again after 5 minutes. You can do this a maximum of 5 times.
Deactivating an ala1. Select the alarm y2. Select Off on the A3. Press <Save>.
Setting alarms to sphone is offFrom the Alarm screen→ On.
If the phone is off whealarm to sound, the phsounds the alarm.
Timer (Menu 3.4)
Use this menu to set aphone to count down.alarm when the specifexpires.
Starting the timer1. Press <Set>.2. Enter the length of
count down and pr3. Press [OK] to star
Menu functions
tails, press e following options:mo text.selected memo via oth.emo.
eck how many ated.
Menu 3.7)
e the licence keys tivate media files .
ess the following
e corresponding
elected licence key.s: access the ns the media file.cess the lder.properties of the
50
Stopping the timer• Press any key when the timer alert
appears.• Press [OK] on the timer screen to stop
the timer before it rings.
Stopwatch (Menu 3.5)
Use this menu to measure elapsed time. The maximum time is 10 hours.1. Press [OK] to start the stopwatch.2. Press [OK] to check an interval. You can
repeat this step for a total of 4 intervals.
Memo (Menu 3.6)
Use this menu to make memos of things that are important, and manage them.
Creating a memo1. Press <Options> and select Create.2. Enter the memo text and press [OK].
Viewing a memo1. Select the memo you want to view. 2. Press [Left] or [Right] to view other
memos.
Using memo optionsWhile viewing memo de<Options> to access th• Edit: change the me• Send via: send the
SMS, MMS, or Blueto• Delete: delete the m• Memory status: ch
memos you have cre
Key management (
Use this menu to managyou have acquired to aclocked by DRM systems
Press <Options> to accoptions:• View/Play: open th
item.• Delete: delete the s• Go to My Message
message that contai• Go to My Items: ac
corresponding file fo• Details: access the
licence key.
Menu functions B
rowser (M
enu 4)
51
)
tion Protocol (WAP) ne allows you to access om the wireless web, -date information and a
ia content, such as nd music files.
, press <Menu> in Idle owser.
nnect your phone to the e homepage of the provider. You can also ode. The screen imedia player display pens.
nly available in the er display. When you
or accessing a website in screen automatically
SIM application toolkit (Menu 3.8)
This menu is available if you use a SIM AT card that supports SIM Application Toolkit menus and provides additional services, such as news, weather, sports, entertainment, and location services. Available services may vary, depending on your service provider’s plans. For details, see your SIM card instructions or contact your service provider.
Browser (Menu 4
The Wireless Applicabrowser on your phothe wireless web. Fryou can access up-towide variety of medimages, ringtones, a
To access this menumode and select Br
Home (Menu 4.1)
Use this menu to conetwork and load thwireless web servicepress [OK] in Idle mswitches to the multand the homepage o
Web browsing is omultimedia playselect an option fPhone mode, the switches.
Menu functions
ard or forward through
he current page with tion.okmark the current he bookmark list.nd the URL of the
SMS. The screen the phone display, ompose a message./Desktop view: change of the browser.elected image or page.
ccess the page
s: change the various rowser.he cache mode or clear ache is a temporary t stores recently ges. the cookie acceptance ookies. Cookies are al information sent to a navigating the web.
52
Navigating the webFrom the web browser:• Drag on the key to scroll through
browser items.• Press [ ], or press [ ] and select Open
to select a browser item.• Press [ ] and select Go → Backward to
return to the previous page.• Press [ ] and select Go → Forward to
move to the next page.
Using page optionsFrom any web page, press [ ] to access the following options:• Open: access the linked web page.• Go to homepage: return to the
homepage.• Keys to buy: send a request for buying
a licence key for a DRM file. This option will be available only when you access the web browser from a message containing a DRM file.
• Enter URL: enter a URL address manually.
• Go: move backwpages in history.
• Reload: reload tupdated informa
• Bookmarks: bopage or access t
• Copy URL to: securrent page viaswitches back toallowing you to c
• Smart-Fit viewthe display mode
• Save: save the s• Page details: a
properties.• Browser option
settings for the bCache: change tthe cache. The cmemory site thaaccessed web paCookies: changemode or delete cpieces of personweb server while
Menu functions B
rowser (M
enu 4)
53
rkr press <Options> and mark. he bookmark and press
ress and press <Save>.
marked pagek item launches the web es the associated web
options list, press <Options> ing options:e bookmarked web
e: access the
r a URL address
: edit the URL address ookmark.: add a new bookmark.
Preferences: change the browser display and sound settings.Certificates: access certificate information.About browser: access version and copyright information about the browser.
• Exit: closes the web browser.
Exiting the browserPress [ ] and select Exit to end the network connection and close the browser. The screen will switch to the phone display.
Enter URL (Menu 4.2)
Use this menu to manually enter a URL address and access the associated web page.
You can add the entered URL to the bookmark list by selecting Add bookmark.
Bookmarks (Menu 4.3)
Use this menu to save URL addresses in order to quickly access web pages.
Adding a bookma1. Press <Add>, o
select Add book2. Enter a title for t
[Down].3. Enter a URL add
Accessing a bookSelecting a bookmarbrowser and accesspage.
Using bookmark From the bookmarkto access the follow• Open: access th
page.• Go to homepag
homepage.• Enter URL: ente
manually.• Edit bookmark
and title of the b• Add bookmark
Menu functions
s (Menu 4.7)
lect a connection profile sing the wireless web. or edit a profile. p. 87
u 5)
menu to send and es and multimedia also access push roadcast messages.
, press <Menu> in Idle ssages.
(Menu 5.1)
ate and send messages.
nu 5.1.1)
ice (SMS) allows you to messages that may res, animated images,
54
• Copy URL to: send the URL address of the bookmark via SMS.
• Delete: delete the selected bookmark or all bookmarks.
Saved pages (Menu 4.4)
You can access the list of pages you have saved while online.
If you select a link on the page, the screen switches to the multimedia player display and the phone switches to online to access the linked page.
History (Menu 4.5)
You can access the list of pages you have accessed recently.
Select a URL from the list to access the corresponding web page. The screen switches to the multimedia player display.
Clear cache (Menu 4.6)
Use this menu to clear information stored in the cache, a temporary memory site that stores recently accessed web pages.
Browser setting
Use this menu to seto be used for accesYou can also create
Messages (Men
Use the Messages receive text messagmessages. You can messages and cell b
To access this menumode and select Me
Create message
Use this menu to cre
Text message (Me
Short Message Servsend or receive textinclude simple pictuand melodies.
Menu functions M
essages (Menu 5)
55
: switch the screen to layer display. You can wn or press and release
roll through your
hone display, press [ ]
mplate, Phonebook rk. animation/Add a simple image, an , or a melody. Phonebook entry as a alendar data as a data nt.e message in another
: change the language input mode.nge the text attributes. change the text input
is only available in Phone
Creating and sending an SMS message1. Enter your message and press [OK].
2. Enter a destination number.To send the message to more than one recipient, fill in additional destination fields.
3. Press [OK] to send the message.
Using options while composing an SMS message
While composing a message, press <Options> to access the following options: • Send only: just send the message.• Save and send: send the message and
then save it in the Sentbox folder.
• Switch screensthe multimedia pthen drag up / doon the key to scmessage.To return to the por [ ].
• Insert: add a teentry, or bookma
• Add image/Addmelody: attach animated image
• Attach: attach aname card or a cformat attachme
• Save in: save thmessage folder.
• Input languageto be used in T9
• Text style: cha• Input method:
mode.
• The maximum number of characters allowed in a message varies by service provider. If your message exceeds the maximum number of characters, the phone will split the message.
• You can use various options by pressing <Options>. next section Entering text
mode.
Menu functions
e text and press [OK].nished, press elect Send.
mber or an e-mail
age to more than one ditional destination
d the message.
composing an MMS
essage, press s the following options: ssage subject or
video/Add sound: o clip, or sound clip.hange video/Change n added item.ssage subject or text.e message as it will be ipient’s phone.elected attachment.essage.
56
Multimedia message (Menu 5.1.2)
Multimedia Message Service (MMS) delivers messages containing a combination of text, image, video, and audio, from phone to phone or from phone to e-mail.
Creating and sending an MMS message1. Select the Subject line.
2. Enter the message subject and press [OK].
3. Select the Image or video line.4. Select Add image or Add video and
add an image or a video clip.
5. Select the Sound line.6. Select Add sound and add a sound clip.7. Select the Text line.
8. Enter the messag9. When you have fi
<Options> and s10.Enter a phone nu
address.To send the messrecipient, fill in adfields.
11.Press [OK] to sen
Using options whilemessage
While composing a m<Options> to acces• Add: add the me
message text.• Add image/Add
add a image, vide• Change image/C
sound: replace a• Edit: edit the me• Preview: view th
shown on the rec• View: open the s• Send: send the m
You can use various options by pressing <Options> in each field. next section
• The maximum size allowed for a message can differ, depending on your service provider.
• Depending on the file type or DRM (Digital Rights Management) system, some files may not be able to be forwarded.
Menu functions M
essages (Menu 5)
57
e
ay appear on the the message type:
tion ( : Being : Failed to retrieve)
e from web servers or n message containing ameters from your ideradcast) message from providerort for your sent
he DRM (Digital Rights ystem, messages having y not be able to be
a message means that the igh priority. A grey-ge icon indicates low
• Save in: save the message in another message folder.
• Add page: add pages. Move to each page by pressing [Left] or [Right].
• Delete page: delete an added page.• Edit page: change the duration of page
display or move the page forward among the other pages.
• Attach: attach a Phonebook entry as a name card, a calender data as a data format attachment, or a document file stored in the Other files folder.
• Remove subject/Remove message/Remove media/Remove sound/Remove: remove an added item.
My messages (Menu 5.2)
Use this menu to access messages you have received, sent, or which have failed in sending.
Inbox (Menu 5.2.1)
This folder stores all of the messages you have received.
Viewing a messag
The following icons mmessage list to show• SMS• MMS• MMS notifica
retrieved, • Voicemail• Push messag
Configurationetwork parservice prov
• CB (Cell broyour service
• Delivery repmessages
• Depending on tManagement) sweb content maforwarded.
• A ! icon next to message is of hcoloured messapriority.
Menu functions
edia content from ur phone’s memory. the message to ng deleted, or unlock can protect only those the phone’s memory. add the sender’s k list to reject the sender.
the MMS message er.ssage: reply to the
edia message to: or all of the recipients cluding the sender, via
switch the screen to yer display. You can wn on the key to scroll , or drag left or right
other messages.one display, press [ ]
58
Using message optionsWhile viewing a message, press <Options> to access the following options:
SMS messages• Reply via text message: reply to the
sender via SMS. • Reply via multimedia message to:
reply to the sender via MMS. • Switch screens: switch the screen to
the multimedia player display. You can then drag up or down on the key to scroll through a message, or drag left or right on the key to view other messages.To return to the phone display, press [ ] or [ ].
• Forward: forward the message to other people.
• Delete: delete the message.• Move to phone/Move to SIM: move
the message between the SIM card and the phone’s memory.
• Cut address: extract URL addresses, e-mail addresses, or phone numbers from the message.
• Cut media: save mthe message to yo
• Lock/Unlock: lockprevent it from beithe message. You messages stored in
• Add to Block list:number to the blocmessages from the
MMS messages• Retrieve: retrieve
from the MMS serv• Reply via text me
sender via SMS.• Reply via multim
reply to the senderof the message, inMMS.
• Switch screens: the multimedia plathen drag up or dothrough a messageon the key to viewTo return to the phor [ ].
Menu functions M
essages (Menu 5)
59
k the message to ing deleted, or unlock
ct to the URL address essage. switch the screen to ayer display. You can wn on the key to scroll e, or drag left or right other messages.one display, press [ ]
ract URLs, e-mail ne numbers from the
e message.k the message to ing deleted, or unlock
sessage to the phone’s
• Forward: forward the message to other people.
• Delete: delete the message.• Cut address: extract URL addresses,
e-mail addresses, or phone numbers from the message.
• Attached items: save media content from the message to your phone’s memory.
• Lock/Unlock: lock the message to prevent it from being deleted, or unlock the message.
• Details: access the message properties.
Configuration messages• Install: apply the configuration specified
in the message to your phone.• Switch screens: switch the screen to
the multimedia player display. You can then drag up or down on the key to scroll through a message, or drag left or right on the key to view other messages.To return to the phone display, press [ ] or [ ].
• Delete: delete the message.
• Lock/Unlock: locprevent it from bethe message.
Push messages• Go to URL: conne
specified in the m• Switch screens:
the multimedia plthen drag up or dothrough a messagon the key to viewTo return to the phor [ ].
• Cut address: extaddresses, or phomessage.
• Delete: delete th• Lock/Unlock: loc
prevent it from bethe message.
Broadcast message• Save: save the m
memory.
Menu functions
k the message to ing deleted, or unlock
ssages you have saved e.
essage, it opens in Edit edit and send the
ssages that the phone or has failed to send.
age, press <Options> g options:y sending the message. switch the screen to ayer display. You can wn on the key to scroll e, or drag left or right other messages.
hone display, press [ ]
d the message to other
60
• Switch screens: switch the screen to the multimedia player display. You can then drag up or down on the key to scroll through a message, or drag left or right on the key to view other messages.To return to the phone display, press [ ] or [ ].
• Cut address: extract URL addresses, e-mail addresses, or phone numbers from the message.
• Delete: delete the message.
Delivery reports• Cut address: extract URL addresses,
e-mail addresses, or phone numbers from the report.
• Switch screens: switch the screen to the multimedia player display. You can then drag up or down on the key to scroll through a message, or drag left or right on the key to view other messages.To return to the phone display, press [ ] or [ ].
• Delete: delete the report.
• Lock/Unlock: locprevent it from bethe message.
Drafts (Menu 5.2.2)
This folder stores meto send at a later tim
When you select a mmode so that you canmessage.
Outbox (Menu 5.2.3)
This folder stores meis attempting to send
While viewing a messto access the followin• Send again: retr• Switch screens:
the multimedia plthen drag up or dothrough a messagon the key to viewTo return to the por [ ].
• Forward: forwarpeople.
Menu functions M
essages (Menu 5)
61
one display, press [ ]
ract URLs, e-mail ne numbers from the
message.ove to SIM: move
een the SIM card and ry.k the message to ing deleted, or unlock
e message properties.
.5)
te new folders and es.
e and press <OK>.
s
ss <Options> to ptions:elected folder.
• Cut address: extract URLs, e-mail addresses, or phone numbers from the message.
• Delete: delete the message.• Move to phone/Move to SIM: move
the message between the SIM card and the phone’s memory.
• Lock/Unlock: lock the message to prevent it from being deleted, or unlock the message.
• Details: access the message properties.
Sentbox (Menu 5.2.4)
This folder stores messages that you have sent.
While viewing a message, press <Options> to access the following options:• Forward: forward the message to other
people.• Switch screens: switch the screen to
the multimedia player display. You can then drag up or down on the key to scroll through a message, or drag left or right on the key to view other messages.
To return to the phor [ ].
• Cut address: extaddresses, or phomessage.
• Delete: delete the• Move to phone/M
the message betwthe phone’s memo
• Lock/Unlock: locprevent it from bethe message.
• Details: access th
My folders (Menu 5.2
Use this menu to creaorganise your messag
Creating a folder1. Press <Yes>.2. Enter a folder nam
Using folder option
On the folder list, preaccess the following o• Open: open the s
Menu functions
w template.
e templates
ed MMS templates or o that you can use an MMS message.
press <Options> to tions:ected template.nd a new message emplate.nd the selected
selected template or t for the embedded
messages in each nce.t the message folders
ice displays the hat you can specify ed.
62
• Create folder: add a new folder.• Rename folder: change the folder
name.• Delete: delete the selected folder.
Templates (Menu 5.3)
Use this menu to make and use templates of frequently used messages or passages.
Text message templates (Menu 5.3.1)
You can create SMS templates with the sentences you use frequently so that you can retrieve and insert them when composing an SMS message.
Creating a template1. Select an empty location.2. Enter a message and press <OK>.
Using template options
From the template list, press <Options> to access the following options:• Edit: edit the selected template.• Send message: create and send a new
message using the selected template.• Delete: delete the selected template.
• Add new: add a ne
Multimedia messag(Menu 5.3.2)
You can access embeddones you have saved sthem when composing
From the template list,access the following op• View: open the sel• Edit: create and se
using the selected t• Send message: se
template.• Delete: delete the
all templates, excepones.
Delete all (Menu 5.4)
Use this menu to deletemessage folder all at o1. Press [OK] to selec
to be cleared.Pressing the key twmessage types so tthe ones to be clear
Menu functions M
essages (Menu 5)
63
hown, your phone character encoding
select either GSM or epending on your
re the phone h you want to reject
eck or select an SMS
et the properties of
ore or change the S server. n: enter the default e automatically ient list.he default message an convert the elected format.et the length of time stored in the SMS
er a profile name.
2. Press <Delete>.3. Press <Yes> to delete protected
messages. Otherwise, press <No>.4. Press <Yes> to confirm the deletion.
Settings (Menu 5.5)
Use this menu to set up various options for using the messaging service.
Text messages (Menu 5.5.1)
You can configure SMS settings.• Send settings: set up the options for
sending SMS messages:Reply path: allow recipients to reply to you through your SMS server. Delivery report: set the network to inform you when your messages have been delivered. Character support: select a character encoding type. When you select Automatic, the phone switches the encoding type from GSM-Alphabet to UniCode if you enter a Unicode character. Use of Unicode encoding will reduce the maximum number of characters in a message to about half.
If this menu is not sprovides automatic by default.Bearer selection: GPRS preferred, dnetwork.
• Block number: stonumbers from whicmessages.
• Current profile: chsetting profile.
• Profile settings: seach profile.Service centre: stnumber of your SMDefault destinatiodestination. It will bentered on the recipDefault type: set ttype. The network cmessages into the sDefault validity: syour messages are server.Setting name: ent
Menu functions
accept advertisements.on: accept information
t the network to inform a message has been
network: determine if ves new messages en you are in your a. abroad: determine if ves new messages en you are roaming on
home network or llowing options:one displays e the Retrieve option nload new messages. phone automatically ges from the server.ne rejects all
64
Multimedia messages (Menu 5.5.2)
You can configure MMS settings.• Sending options: set up the options for
sending MMS messages:Send delivery receipt: set the network to inform you when your messages have been delivered.Hide address: set your address to be hidden from the recipient’s phone.Send read receipt: send a read-reply request along with your messages.Priority: set the priority level of messages.Expiry date: set the length of time messages are stored in the MMS server.Delivery time: set a time delay before messages are sent.Outgoing message size: select a maximum size allowed for composing messages.
• Retrieving options: set up the options for receiving MMS messages:Reject unknown senders: reject messages from unknown senders.
Allow adverts: Allow informatimessages.Allow report: sethe sender when delivered to you.Recep. in homeyour phone retrieautomatically whhome service areReception whenyour phone retrieautomatically whanother network.Reception within abroad has the fo- Manual: the ph
notifications. Usto manually dow
- Automatic: theretrieves messa
- Reject: the phomessages.
Menu functions M
essages (Menu 5)
65
: indicate the channels from sh to receive broadcast ease contact your service urther details.elect the preferred which broadcast messages
s (Menu 5.6)
, you can send an SOS family or friends for help. ive an SOS message from are in an emergency. Use
cify options for sending and message.ions: set the options for OS message:: activate or deactivate the feature. To send an SOS
urn to Idle mode, lock the press [Volume] 4 times.
• Block list: store phone numbers and e-mail addresses from which you want to reject messages.
• Multimedia message Profiles: select a connection profile to be used for MMS. You can also create or edit a profile.
p. 87
Push messages (Menu 5.5.3)
You can change the settings for receiving push messages from the wireless web server.• Receive: set how your phone receives
push messages. If you select Black list, the phone will not accept messages from the specified addresses on the Black list.
• Black list: manage blocked server addresses.
Broadcast messages (Menu 5.5.4)
You can change the settings for receiving broadcast messages.• Receive: select to receive broadcast
messages, or not.
• Channel listwhich you wimessages. Plprovider for f
• Language: slanguages in display.
SOS message
In an emergencymessage to yourYou can also receother people whothis menu to spereceiving an SOS• Sending opt
sending an SSending SOSSOS messagemessage, retkeypad, and
Menu functions
ws you to access files, sound files, and phone’s memory or
ress <Menu> in Idle es.
ts Managementl Rights Management the media items you rnet or receive by nce key to access
y from the website o the content; use n.
s on the list: em with a valid key.em without a valid
item with a valid
item without a valid
66
Recipients: specify the phone numbers to which you want to send SOS messages.
Repeats: set the number of times the phone repeats sending SOS messages.Message: check the preset SOS message text.
• Receiving options: set whether or not the phone uses the preset alert type (siren and alert message) for incoming SOS messages. If you select Normal, the phone uses the message ringer setting.
Memory status (Menu 5.7)
Use this menu to view the amount of memory currently in use in each message folder.
My files (Menu 6)
The My files menu alloimages, videos, music other files stored in theon a memory card.
To access this menu, pmode and select My fil
Tips for Digital RighAs a result of the Digita(DRM) system, some ofdownload from the InteMMS may require a licethem.
You can acquire the kewhich owns the rights tthe Activate key optio
Note the following icon• : Forwardable it• : Forwardable it
key.• : Unforwardable
key.• : Unforwardable
key.
While the phone is attempting to send an SOS message, blinks and you cannot access menu functions in this mode. To use the phone as normal, press [ ] when the icon turns to .
You can view the onscreen help by pressing <Options> from the sending option list and selecting Help.
Menu functions M
y files (Menu 6)
67
nsge, press < > to options:he file via MMS or
ge: set the image as a r a Phonebook entry.he file to another folder ory or on a memory
card: copy the file to
t a licence key when lected DRM file expires.e file. the file name.lity: share the file or with other Bluetooth
k the file to prevent it d, or unlock the file.he file properties.t: manage the licence
quired.
Your service provider supports only count-based or unlimited-access DRM files.
Images (Menu 6.1)
This menu displays photos you have taken and images you have downloaded, received in messages, or imported from a computer.
Viewing an image1. Select an image folder.2. Select an image.3. Press [Left] or [Right] to view other
photos.
Viewing a slide showYou can view your photos as a slide show, a sequential presentation of each photo in the current folder.1. Select My photos.2. Press <Options> and select Slide
show.3. Select an interval option.
The slide show begins.4. Press <Stop> to stop the slide show.
Using image optioWhile viewing an imaaccess the following • Send via: send t
Bluetooth.• Set as caller ima
caller ID image fo• Move to: move t
in a phone's memcard.
• Copy to memorya memory card.
• Activate key: gethe key for the se
• Delete: delete th• Rename: change• Bluetooth visibi
the files you wantdevices.
• Lock/Unlock: locfrom being delete
• Details: access t• Key managemen
keys you have ac
Menu functions
s <Options> to access :he file via MMS or
he file to another folder ory or on a memory
card: copy the file to
t a new licence key the selected DRM file
e file. the file name.lity: share the selected u want with other .k the file to prevent it d, or unlock the file.he file properties.t: manage the licence
quired.
68
Videos (Menu 6.2)
This menu displays video clips you have recorded, downloaded, received in messages, or imported from a computer.
Playing a video clip1. Select a video folder.2. Select a video clip.
During playback, use the following keys:
Using video optionAfter playback, pressthe following options• Send via: send t
Bluetooth.• Move to: move t
in a phone's memcard.
• Copy to memorya memory card.
• Activate key: gewhen the key for expires.
• Delete: delete th• Rename: change• Bluetooth visibi
file or the files yoBluetooth devices
• Lock/Unlock: locfrom being delete
• Details: access t• Key managemen
keys you have ac
Video clips recorded on other devices, such as camcorders, may not play correctly.
Key Function
OK Pauses or resumes playback.
Left Moves backward in a file when held down.
Right Moves forward in a file when held down.
Volume Adjusts the volume.
Up Returns to the video list.
Down Stops playback.
Menu functions M
y files (Menu 6)
69
card: copy the file to
t a licence key when lected DRM file expires.e file.lity: share the selected u want with other .k the file to prevent it d, or unlock the file.he file properties.t: manage the licence
quired.
oice memos you have files you have in messages, or puter.
liplder. p. For a voice memo, er. p. 47
Music (Menu 6.3)
This menu displays music files you have downloaded or imported from a computer.
Playing musicSelect a file.
During playback, use the following keys:
Using music optionsWhile playing a music file, press <Options> to access the following options:• Send via Bluetooth: send the file via
Bluetooth.• Set as: set the file as your ringtone or a
ringtone for a Phonebook entry.• Move to memory card: move the file to
a memory card. This option is only available when you insert a memory card into the phone.
• Copy to memorya memory card.
• Activate key: gethe key for the se
• Delete: delete th• Bluetooth visibi
file or the files yoBluetooth devices
• Lock/Unlock: locfrom being delete
• Details: access t• Key managemen
keys you have ac
Sounds (Menu 6.4)
This menu displays vrecorded, and sound downloaded, receivedimported from a com
Playing a sound c1. Select a sound fo2. Select a sound cli
see Voice record
Key Function
Left Moves to the previous file.
Right Moves to the next file.
Volume Adjusts the volume.
Menu functions
ent: manage the licence acquired.
u 6.5)
received but which are our phone are stored in not open these files on
ress <Options> to g options: the file via MMS or
ory card: move the file to . ory card: copy the file to . the selected file or all
ge the file name.bility: share the selected you want with other es.
70
Using sound options
While playing a sound clip, press <Options> to access the following options:• Send via: send the file via MMS or
Bluetooth.• Set as: set the file as your ringtone or a
ringtone for a Phonebook entry. This option is not available for .amr files.
• Move to: move the file to another folder in a phone's memory or on a memory card.
• Copy to memory card: copy the file to a memory card.
• Activate key: get a licence key when the key for the selected DRM file expires.
• Delete: delete the file.• Rename: change the file name.• Bluetooth visibility: share the selected
file or the files you want with other Bluetooth devices.
• Lock/Unlock: lock the file to prevent it from being deleted, or unlock the file.
• Details: access the file properties.
• Key managemkeys you have
Other files (Men
Files that you havenot supported by ythis folder. You canthe phone.
From the file list, paccess the followin• Send via: send
Bluetooth.• Move to mem
a memory card• Copy to mem
a memory card• Delete: delete
files.• Rename: chan• Bluetooth visi
file or the files Bluetooth devic

Menu functions C
alendar (M
enu 7)
71
)
p track of your
press <Menu> in Idle ndar.
tments, anniversaries, ndar. More than one stored.
ntment and select Create →
or change the settings:r a title for the
r the appointment
d Start time: enter te and time for the
ct AM or PM in 12-hour
• Lock/Unlock: lock the file to prevent it from being deleted, or unlock the file.
• Details: access the file properties.
Memory card (Menu 6.6)
Use this menu to access the files stored on a memory card. This menu is only available when you insert a memory card into the phone.
Memory status (Menu 6.7)
You can check the total amount of memory and the amount of memory currently in use in each media box.
Calendar (Menu 7
Use this menu to keeschedule.
To access this menu,mode and select Cale
Creating an item
You can store appoinand tasks on the caleitem per day can be
Entering an appoi1. Press <Options>
Appointment.2. Enter information
• Subject: enteappointment.
• Details: entedetails.
• Start date anthe starting daappointment.
• AM/PM: seletime format.
Your phone is preset to use FAT16-formatted memory cards. If you insert a FAT32-formatted memory card, the phone will ask you to reformat the memory card. If you do not, you will not be able to access the card from the phone.
Menu functions
ter information about ry.he date. to set an alarm for the
ow long before the e alarm is to alert you for your setting.unit for your alarm
enter the time for the ct AM or PM in 12-hour
select an alarm tone.y year: set the phone of the anniversary
save the anniversary.
and select Create →
or change the settings:nformation about the
72
• End date and End time: enter the ending date and time for the appointment.
• AM/PM: select AM or PM in 12-hour time format.
• Location: enter information about the appointed location.
• Alarm: select to set an alarm for the appointment.
• Before: set how long before the appointment the alarm is to alert you and set a unit for your setting.
• Alarm: set a unit for your alarm setting.
• Alarm tone: select an alarm tone.• Repeat: set the appointment to
recur and select a repeat unit.• Repeat: select a repeat unit.• Until: set the ending date, if the
appointment will recur. 3. Press <Save> to save the appointment.
Entering an anniversary1. Press <Options> and select Create →
Anniversary.2. Enter information or change the settings:
• Occasion: enthe anniversa
• Date: enter t• Alarm: select
anniversary.• Before: set h
anniversary thand set a unit
• Alarm: set a setting.
• Alarm time: alarm to ring.
• AM/PM: seletime format.
• Alarm tone: • Repeat ever
to remind youevery year.
3. Press <Save> to
Entering a task1. Press <Options>
Task.2. Enter information
• Task: enter itask.
Menu functions C
alendar (M
enu 7)
73
item.ccess memory items stored on the
tions
<Options> to access
ms scheduled for the
item.’s date or enter a
e item via SMS, MMS,
ms by type of item. items stored on the arious deleting
nts: view items have missed.ccess memory items stored on the
• Start date: enter the starting date.• Due date: enter the ending date.• Select priority: select a priority
level.3. Press <Save> to save the task.
Viewing an item
1. Select a date to display the items for that day. The list of items scheduled for the selected day appears. The following icons indicates each item type:• : Appointment• : Anniversary• : Task
2. Select an item to view its details.3. Press [Left] or [Right] to access the
other items scheduled for the selected day.
While viewing an item, press <Options> to access the following options:• Edit: edit the item.• Create: add a new item.• Send via: send the item via SMS, MMS,
or Bluetooth.
• Delete: delete the• Memory status: a
information for thecalendar.
Using calendar op
On the item list, press the following options:• View: check the ite
selected day.• Create: add a new• Go to: select today
specific date.• Send via: send th
or Bluetooth.• Event list: sort ite• Delete: delete the
calendar by using voptions.
• Missed alarm evewhose alarms you
• Memory status: ainformation for thecalendar.
Menu functions
a photo. The photo is hotos folder.
spress < > to access
e file via MMS or
n to Capture mode.ge: set the photo as a a Phonebook entry. file.the file name.: access the My . 67
Press
ns < >. p. 74
o[Up] or [Down].
[C] and then <Yes>.
< >.
74
Camera (Menu 8)
You can use the camera module embedded in your phone to take photos and record videos.
To access this menu, press <Menu> in Idle mode and select Camera, or press [ ].
Taking a photo
You can take photos in various modes. The camera produces JPEG photos.
Taking a photo1. Access the Camera menu or press [ ]
to turn on the camera.2. Make any desired adjustments.
• Press < > to switch the screen to the multimedia player display.
p. 28• Press [Left] or [Right] to adjust the
brightness.• Press [Up], [Down], or [Volume] to
zoom in or out.• Press [ ] to switch to Record mode.
p. 75
3. Press [OK] to takesaved in the My p
Using photo optionAfter saving a photo, the following options:• Send via: send th
Bluetooth.• Viewfinder: retur• Set as caller ima
caller ID image for• Delete: delete the• Rename: change • Go to My photos
photos folder. p
4. To
access photo optio
check the hidden section of the phot
delete the photo
return to Capture mode
Menu functions C
amera (M
enu 8)
75
p recording. The video aved in the My video
nsclip, press <Options> g options:he file via MMS or
rn to Record mode.e file. the file name.
Press
[OK].
<Options>. p. 75
[C] and then <Yes>.
<Preview>.
• Lock/Unlock: lock the file to prevent it from being deleted, or unlock the file.
• Bluetooth visibility: share the selected file or the files you want with other Bluetooth devices.
• Details: access the file properties.
Recording a video
You can record a video of what is displayed on the camera screen and save it.
Recording a video1. In Capture mode, press [ ] to switch to
Record mode.2. Make any desired adjustments.
• Press < > to switch the screen to the multimedia player display.
p. 30• Press [Left] or [Right] to adjust the
brightness.• Press [Up], [Down], or [Volume] to
zoom in or out.• Press [ ] to switch to Capture
mode. p. 743. Press [OK] to start recording.
4. Press [OK] to stois automatically sclips folder.
Using video optioAfter saving a video to access the followin• Send via: send t
Bluetooth.• Viewfinder: retu• Delete: delete th• Rename: change
5. To
play back the video clip
access video options
delete the video
return to Record mode
Menu functions
elect a mode for rent time and date.your phone will read the ountry Code) from the tomatically update the applying time he country that you are avel abroad. Before hone will ask you if you time information.
you can set the time and
ur phone will receive n from the network. current time.AM or PM in 12-hour
elect a time format.current date.elect a date format.
ation may not be updated ove to one time zone to
hin a country.
76
• Go to My video clip: access the My video clips folder. p. 68
• Lock/Unlock: lock the file to prevent it from being deleted, or unlock the file.
• Bluetooth visibility: share the selected file or the files you want with other Bluetooth devices.
• Details: access the file properties.
Settings (Menu 9)
The Settings menu provides you with various setting options to customise the phone to your preferences and needs. You can also reset the settings to their default status.
To access this menu, press <Menu> in Idle mode and select Settings.
Time and date (Menu 9.1)
Use this menu to change the time and date displayed on your phone. Before setting the time and date, specify your time zone in the World clock menu. p. 48
• Auto update: supdating the cur- Prompt first:
MCC (Mobile Cnetwork and aucurrent time bydifference for tin when you trupdating, the pwant to update
- Manual only: date manually.
- Automatic: yotime informatio
• Time: enter the• AM/PM: select
time format.• Time format: s• Date: enter the • Date format: s
Time informwhen you manother wit
Menu functions S
ettings (Menu 9)
77
ut menu used as a shortcut
be assigned to the key.
ions
access the following
or change a shortcut
ate the shortcut e selected key.ctivate all shortcut
9.2.4)
nge the volume key
ction: set whether the call ringer or rejects a Volume] when a call also set whether the MS message to the is rejected.enter a message to be when a call is rejected.
Phone settings (Menu 9.2)
Many different features of your phone’s system can be customised to suit your preferences.
Language (Menu 9.2.1)
Use this menu to select a language for the display text. If you select Automatic, the phone uses the same language as the SIM card.
Greeting message (Menu 9.2.2)
Use this menu to enter the greeting that is displayed briefly when the phone is switched on.
Shortcuts (Menu 9.2.3)
You can use the Navigation keys as shortcuts to access specific menus directly from Idle mode. Use this menu to assign a shortcut to a key.
Assigning a shortc1. Select a key to be
key.2. Select a menu to
Using shortcut opt
Press <Options> tooptions:• Change: assign
menu.• Remove: deactiv
assignment to th• Remove all: dea
assignments.
Volume key (Menu
Use this menu to chasettings.• Volume key fun
phone mutes thecall if you press [comes in. You canphone sends an Scaller when a call
• Text message: sent to the caller
Some menus may not be available, depending on your service provider.
Menu functions
ou can access a your PC.
an use the Samsung PC e to synchronise data ia files between the
ion: the phone will ask USB mode you want nnect the phone and PC ble.
(Menu 9.3)
nge settings for the
colour pattern for Menu
.3.2)
ightness of the displays onditions.
enu 9.3.3)
ct a font colour for the round colour of the .
78
Extra settings (Menu 9.2.5)
You can turn the automatic redialling or answering feature on or off.• Auto redial: set the phone to make up
to ten attempts to redial a phone number after an unsuccessful call.
• Anykey answer: answer an incoming call by pressing any key, except for <Reject> and [ ].
Offline mode (Menu 9.2.6)
Use this menu to switch the phone to Offline mode or back to Online mode.
USB setting (Menu 9.2.7)
Use this menu to select a USB mode that will be used when you connect your phone to a PC via USB interface.• Media transfer: you can use Media
transfer mode to transfer WMDRM (Window Media Digital Rights Management) content with licence keys directly from the Windows Media Player 10 to the phone. You can also get new licence keys for the DRM files that have expired licence keys.
• Mass storage: ymemory card from
• PC studio: you cStudio programmand transfer medphone and a PC.
• Ask on connectyou to select the each time you cowith a PC data ca
Display settings
Use this menu to chadisplay.
Skin (Menu 9.3.1)
You can select a skin mode.
Brightness (Menu 9
You can adjust the brfor varying lighting c
Dialling display (MUse this menu to selenumbers, and backgdisplay while dialling
Menu functions S
ettings (Menu 9)
79
y how you are to be essage comes in.
fy how often the phone ew message.
9.4.4)
ct the melody that the is switched on or off.
.4.5)
ow the phone acts to event while in Silent
.4.6)
omise additional tones
et the phone to beep g an outgoing call to of the length of your
: set the phone to going call connects to
Sound settings (Menu 9.4)
Use this menu to customise various sound settings.
Incoming call (Menu 9.4.1)
Use this menu to change the sound settings for incoming calls.• Ringtone: select a ringtone to be used
for the call ringer.• Volume: select a ringtone volume.• Alert type: specify how you are to be
informed of incoming calls.
Keypad tone (Menu 9.4.2)
Use this menu to select the tone that the phone sounds when you press a key.
Message tone (Menu 9.4.3)
Use this menu to change the sound settings for incoming SMS messages, MMS messages, and broadcast messages individually. • Tone: select one of several message
tones.
• Alert type: specifinformed when a m
• Repetition: speciinforms you of a n
Power on/off (Menu
Use this menu to selephone sounds when it
Silent mode (Menu 9
Use this menu to set halert you to a specific mode.
Extra tones (Menu 9
Use this menu to custfor the phone. • Minute minder: s
every minute durinkeep you informedcall.
• Connection tonebeep when an outthe system.
You can adjust the key tone volume using [Volume] in Idle mode.

Menu functions
ypad light is used PM and 9:00 AM. can specify the time pad light is used.
how to use the . The screen switches er display and the utorial launches.
the onscreen
(Menu 9.7)
s network services. rvice provider to and subscribe to
9.7.1)
routes incoming calls t you specify.ng option:: divert all calls.lls when you are on
80
• Alert on call: set the phone to beep when you receive a new message or when the time for an alarm comes during a call.
• Indicative tone: set the phone to beep when a pop-up window displays.
Light settings (Menu 9.5)
Use this menu to change the settings for the light.
Backlight time (Menu 9.5.1)
You can select the length of time the backlight of each display stays on.• Normal: select the length of time the
backlight stays on.• Dimmed: select the length of time the
display stays on in Dim mode after the backlight turns off. After a specified time, the display turns off.
Keypad light (Menu 9.5.2)
Use this menu to set how the phone controls the use of the keypad light. Select one of the following options on the Use at line:• Any time: the keypad light is always
used.
• Night time: the keonly between 5:00
• Custom time: youperiod that the key
Tutorial (Menu 9.6)
Use this menu to learnmultimedia player keysto the multimedia playembedded interactive t
Press [ ] and follow instructions.
Network services
Use this menu to accesPlease contact your secheck their availability them, if you wish.
Call diverting (Menu
This network service reto a phone number tha1. Select a call diverti
• Divert always• Busy: divert ca
another call.
Menu functions S
ettings (Menu 9)
81
al: prohibit international
al except home: only numbers within the try when you are to your home service
calls: prohibit ls.hile abroad: prohibit
ls when you use your e of your home service
ancel all call barring wing calls to be sent and
ally.ring password: change ng password obtained rvice provider.f calls to be barred. To deactivate call eactivate.rring password supplied rovider and press
• No reply: divert calls when you do not answer the phone.
• Unreachable: divert calls when you are not in your service area or when your phone is switched off.
• Cancel all: cancel all call diverting options.
2. Select the type of calls to be diverted.3. Select Activate. To deactivate call
diverting, select Deactivate.4. Move to the Divert to line.5. Enter the number to which calls are to be
diverted.6. If you selected No reply, move to the
Seconds line and select the length of time the network delays before diverting a call.
7. Press <Select>.
Call barring (Menu 9.7.2)
This network service allows you to restrict your calls.1. Select a call barring option:
• All outgoing calls: prohibit all outgoing calls.
• Internationcalls.
• Internationallow calls tocurrent counabroad, and area.
• All incomingincoming cal
• Incoming wincoming calphone outsidarea.
• Cancel all: csettings, alloreceived norm
• Change barthe call barrifrom your se
2. Select the type o3. Select Activate.
barring, select D4. Enter the call ba
by your service p<Select>.
Menu functions
(Menu 9.7.6)
re the number of the access your voicemails.
e server: connect to ver to listen to your
mber: enter the number.
(Menu 9.7.7)
incoming and outgoing to a selected user out how to create a UG), contact your
delete, or activate CUG
enable calls to an those in the closed feature depends on the G subscription.
voicemail server number he server. Your service ou the number.
82
Call waiting (Menu 9.7.3)
This network service informs you when someone is trying to reach you while you are on another call.1. Select the type of calls to which call
waiting option will apply.2. Select Activate. To deactivate call
waiting, select Deactivate.
Network selection (Menu 9.7.4)
This network service allows you to manually select the network to be used while roaming outside of your home area, or to let the network be chosen automatically.
You can select a network other than your home network only if there is a valid roaming agreement between the two.
Caller ID (Menu 9.7.5)
This network service allows you to hide your phone number from the person you are calling. If you select Default, the phone will use the default setting provided by the network.
Voice mail serverUse this menu to stovoicemail server and
• Connect to voicthe voicemail sermessages.
• Voice server nuvoicemail server
Closed user groupUse this menu to setcalls to be restricted group. For details abclosed user group (Cservice provider.• Index list: add,
index numbers. • Outside access:
numbers other thuser group. This nature of your CUSome networks may not allow you to change
this setting.
You must store thebefore accessing tprovider can give y

Menu functions S
ettings (Menu 9)
83
uetooth featureu provides the following
ivate or deactivate the e.arch for connectable s. ibility: allow other s to search for your
me: assign a Bluetooth your phone, which is n other devices.
stacles between the erating distance may be
ded that you do not use the re while using multimedia as voice recorder, camera, er, or vice versa, for better
especially those that are pproved by Bluetooth SIG, atible with your phone.
• Default group: enable the default CUG, if you have set one with your service provider. When making a call, you are given the option of using your default CUG, instead of selecting one from the list.
Bluetooth (Menu 9.8)
Using the Bluetooth feature, you can connect the phone wirelessly to other Bluetooth devices and exchange data with them, talk hands-free, or control the phone remotely.
Bluetooth technology allows free wireless connections between all Bluetooth-compliant devices within a range of 10 meters. Since the devices communicate using radio waves, they do not need to be in line of sight to each other.
Setting up the BlThe Bluetooth menoptions:• Activation: act
Bluetooth featur• My devices: se
Bluetooth device• My phone’s vis
Bluetooth devicephone.
• My phone’s nadevice name to then displayed o
• If there are obdevices, the opreduced.
• It is recommenBluetooth featufeatures, such and music playperformance.
• Some devices,not tested or amay be incomp
Menu functions
PIN and press <OK>. just once and you do orise it.f the other device ode, pairing is
nspress <Options> to options: t to a headset or . the connection with vice.arch for data from the t data directly to your
ess the Bluetooth device.
ecially headsets or hands-have a fixed Bluetooth . If the other device has a ter it.
84
• Secure mode: determine if the phone asks for your confirmation when other devices access your data.
• Bluetooth services: display available Bluetooth services.
Searching for and pairing with a Bluetooth device1. From the Bluetooth menu, select My
devices.2. Select Search for new devices.
After searching, a list of devices to which you can connect displays. The following icons indicate the type of device:• Stereo headset• PDA• Mobile phone• Unknown device• Computer• Printer• Hands-free car kit/Mono headset
3. Select a device.
4. Enter a BluetoothThis code is used not need to memWhen the owner oenters the same ccomplete.
Using device optioFrom the device list, access the following • Connect: connec
hands-free car kit• Disconnect: end
the connected de• Browse files: se
device and imporphone.
• Service list: accservice list of the
Some devices, espfree car kits, may PIN, such as 0000code, you must en
Menu functions S
ettings (Menu 9)
85
Bluetoothuetooth, your phone’s st be active and its bled. Bluetooth device r phone, press <Yes> e to access your phone.eceive data.
tect the phone against managing the several phone and SIM card.
.1)
(Personal Identification r SIM card against en this feature is quires your PIN each
.
rrect PIN/PIN2 three is blocked. To unblock it, our PUK/PUK2 (Personal
he codes are supplied by er.
• Rename: rename the paired device.• Authorise device/Unauthorised
device: determine whether or not the phone asks you to permit connection when other devices try to connect to your phone.
• Delete: remove the selected device or all devices from the list.
Sending data via Bluetooth1. Activate the Bluetooth feature.2. Select the application in which the item
you want to send is stored. 3. Select the item you want and press
<Options>.4. Select Send via → Bluetooth.5. For Phonebook, select which data you
want to send.6. Select a device.7. If necessary, enter the Bluetooth PIN
needed for pairing and press <OK>.
Receiving data viaTo receive data via BlBluetooth feature muvisibility must be ena1. If an unauthorised
sends data to youto allow the devic
2. Press <Yes> to r
Security (Menu 9.9)
Use this menu to prounauthorised use by access codes of your
PIN check (Menu 9.9
The 4- to 8-digit PIN Number) protects youunauthorised use. Whenabled, the phone retime it is switched on
If you enter an incotimes, the SIM cardyou need to enter yUnblocking Key). Tyour service provid
Menu functions
phone to work only y assigning a SIM lock the SIM lock code to rd.
(Menu 9.9.7)
IM card, FDN (Fixed e restricts your ited set of phone ature is enabled, you phone numbers .
(Menu 9.9.8)
IM card, use this current PIN2.
u 9.9.9)
o use your phone with phone will preset tracking y or friends. You can er from which the
d then track your useful when the phone eature may be
86
Change PIN code (Menu 9.9.2)
Use this menu to change your PIN. The PIN check feature must be enabled to change the PIN.
Phone lock (Menu 9.9.3)
Use this menu to lock the phone from unauthorised use.
When this feature is enabled, you must enter a 4- to 8-digit phone password each time the phone is switched on.
To change the password, use the Change password menu.
Change password (Menu 9.9.4)
Use this menu to change your phone password.
Privacy (Menu 9.9.5)
Use this menu to lock access to messages, media files, all menu functions on the phone, except for call functions.
When a privacy option is enabled, you must enter the phone password to access the locked items or functions.
SIM lock (Menu 9.9.6)
This menu allows yourwith the current SIM bcode. You must enter use a different SIM ca
Fixed dialling mode If supported by your SDialling Number) modoutgoing calls to a limnumbers. When this fecan make calls only tostored on the SIM card
Change PIN2 codeIf supported by your Smenu to change your
Mobile tracker (Men
When someone tries tanother SIM card, theautomatically send themessage to your familcheck the phone numbmessages are sent anphone. This feature is is stolen or lost. This f
Menu functions S
ettings (Menu 9)
87
ngs (Menu 9.10)
ate and customise the e settings for ne to the network. You to use the web browser ges.
f a profile has already s <Options> and connection.rameters:
e: enter a profile name.RL: enter the URL
e page to be used as ge.ate or deactivate the
enter the IP address of ver.
by default for connecting default. If you change the irst checking with your he web browser and MMS work properly.
unavailable due to certain features supported by your service provider.
1. Enter the phone password and press <OK>.
2. Specify the following options:• Mobile tracker: activate the Mobile
Tracker feature.• Recipients: specify phone numbers
to which you want to send the tracking messages.
• Sender: enter the sender’s name.• Message: check the preset tracking
message text.3. When you have finished, press <Save>,
or press <Options> and select Save.4. Press <Accept> if you agree to the
terms and conditions of service listed on the screen.
Connection setti
Use this menu to creprofiles containing thconnecting your phoneed these settings or send MMS messa
Creating a profile1. Press <New>. I
been saved, presselect Add new
2. Specify profile pa• Profile nam• Homepage U
address of thyour homepa
• Proxy: activproxy server.
• IP address:the proxy ser
Sending of the tracking message will be billed to the user of the unauthorised SIM card. To use your phone with any other SIM card, you must first deactivate the Mobile Tracker feature.
Your phone is set to the network bysettings without fservice provider, tfeatures may not
Menu functions
ter the login
: select a call type for ion.save the profile.
nsaccess the following
cted profile. profile.tion: add a new
nu 9.11)
t the phone’s settings
ct the setting set.
nfirm the reset.assword and press
this password. p. 86
88
• Port: enter the port number of the proxy server.
• Linger time: set a time period after which the network is disconnected if there has been no new data traffic in that time.
• DNS: activate or deactivate the DNS (Domain Name Server) addresses.
• DNS 1 and DNS 2: enter the primary and secondary DNS addresses.
• Bearer: select the network bearer type.
• Advanced settings: change the advanced options. Depending on the bearer setting, available options vary.When the bearer is set to GPRS:APN: enter the access point name.Login ID: enter the login ID.Password: enter the login password.When the bearer is set to GSM:Dial number: enter the PPP phone number.Login ID: enter the login ID.
Password: enpassword.Data call typedata transmiss
3. Press <Save> to
Using profile optioPress <Options> to options:• Edit: edit the sele• Delete: delete the• Add new connec
profile.
Reset settings (Me
Use this menu to reseyou have changed.1. Press [OK] to sele
categories to be re2. Press <Reset>.3. Press <OK> to co4. Enter the phone p
<OK>.
You can change
Menu functions S
ettings (Menu 9)
89
Phone information (Menu 9.12)
Use this menu to check your phone’s ID and version information. When you select this menu, the screen switches to the Multimedia player display. Press [ ] to exit and return to the phone display.

ntered incorrectly e SIM card is now PUK supplied by your
vice unavailable”
ction has been lost. ak signal area. Move
ccess an option for subscription with your ntact the service details.
number but it was
ave pressed [ ].ve accessed the right
ave not set an g option.
cannot reach youhone is switched on. ore than one
90
Solve problemsHelp and personal needs
To save the time and expense of an unnecessary service call, perform the simple checks in this section before contacting a service professional.
When you switch on your phone, the following messages may appear:
“Insert SIM card”• Be sure that the SIM card is correctly
installed.
“Enter password”• The automatic locking function has been
enabled. You must enter the phone’s password before you can use the phone.
“Enter PIN”• You are using your phone for the first
time. You must enter the PIN supplied with the SIM card.
• The PIN locking feature is enabled. Every time the phone is switched on, the PIN has to be entered. To disable this feature, use the PIN check menu.
“Enter PUK”• The PIN code was e
three times, and thblocked. Enter the service provider.
“No service” or “Serdisplays• The network conne
You may be in a weand try again.
• You are trying to awhich you have no service provider. Coprovider for further
You have entered a not dialled• Be sure that you h• Be sure that you ha
cellular network.• Be sure that you h
outgoing call barrin
Your correspondent• Be sure that your p
([ ] pressed for msecond.)
Solve problems
91
when you re-call a
st feature to ensure en stored correctly.er, if necessary.
ions or its display
pressing the reset under [Volume] with a
es low too soon, the early expires. Bring sung service centre
ery.
nes do not help you , take note of:
ial numbers of your
ils of the problem
l dealer or Samsung
• Be sure that you have accessed the right cellular network.
• Be sure that you have not set an incoming call barring option.
Your correspondent cannot hear you speaking• Be sure that he microphone is switched
on.• Be sure that you are holding the phone
close enough to your mouth. The mouthpiece is located at the bottom of the phone.
The phone starts beeping and “Warning. low battery” flashes on the display• Your battery is insufficiently charged.
Recharge the battery.
The audio quality of the call is poor• Check the signal strength indicator on
the display ( ). The number of bars indicates the signal strength from strong ( ) to weak ( ).
• Try moving the phone slightly or moving closer to a window if you are in a building.
No number is dialledPhonebook entry• Use the Contact li
the number has be• Re-store the numb
The phone malfunctfreezes• Reset the phone by
button in the hole sharp tool.
• The battery becombattery’s lifespan nthe phone to a Samto replace the batt
If the above guidelito solve the problem• The model and ser
phone• Your warranty deta• A clear description
Then contact your locaafter-sales service.
lue for this model phone
cted using standard with the phone ighest certified power level cy bands. Although the
at the highest certified ual SAR level of the phone be well below the is is because the phone is at multiple power levels so ower required to reach the l, the closer you are to a er the power output of the
e phones used by the public is 2.0 averaged over ten grams of body rates a substantial margin of safety ction for the public and to account easurements. The SAR values may ional reporting requirements and
92
Health and safety informationSAR certification information
This phone meets European Union (EU) requirements concerning exposure to radio waves.
Your mobile phone is a radio transmitter and receiver. It is designed and manufactured to not exceed the limits for exposure to radio-frequency (RF) energy, as recommended by the EU Council. These limits are part of comprehensive guidelines and establish permitted levels of RF energy for the general population. The guidelines were developed by independent scientific organisations through the periodic and thorough evaluation of scientific studies. The limits include a substantial safety margin designed to ensure the safety of all persons, regardless of age and health.
The exposure standard for mobile phones employs a unit of measurement known as Specific Absorption Rate (SAR). The SAR limit recommended by the EU Council is 2.0 W/kg.1
The highest SAR vawas 0.679 W/kg.
SAR tests are conduoperating positions transmitting at its hin all tested frequenSAR is determined power level, the actwhile operating canmaximum value. Thdesigned to operateas to use only the pnetwork. In generabase station, the lowphone.
1. The SAR limit for mobilwatts/kilogram (W/kg)tissue. The limit incorpoto give additional protefor any variations in mvary, depending on natthe network band.
Health and safety inform
ation
93
ully charged battery will ver time.g-approved batteries, r battery only with ed chargers. Disconnect the power source when o not leave the battery arger for more than a harging may shorten
tures will affect the of your battery: it may warming first.battery in hot or cold e capacity and lifetime l be reduced. Try to at room temperature. A or cold battery may not even when the battery i-ion batteries are ed by temperatures ).
Before a new model phone is available for sale to the public, compliance with the European R&TTE Directive must be shown. This directive includes as one of its essential requirements the protection of the health and safety of the user and any other person.
Precautions when using batteries
• Never use a charger or battery that is damaged in any way.
• Use the battery only for its intended purpose.
• If you use the phone near the network’s base station, it uses less power. Talk and standby time are greatly affected by the signal strength on the cellular network and the parameters set by the service provider.
• Battery charging time depends on the remaining battery charge, the type of battery, and the charger used. The battery can be charged and discharged hundreds of times, but it will gradually wear out. When the operation time is noticeably shorter than normal, it is time to buy a new battery.
• If left unused, a fdischarge itself o
• Use only Samsunand recharge youSamsung-approvthe charger from it is not in use. Dconnected to a chweek, since overcits life.
• Extreme temperacharging capacityrequire cooling or
• Do not leave the places because thof the battery wilkeep the battery phone with a hot work temporarily,is fully charged. Lparticularly affectbelow 0° C (32° F
Health and safety information
ment
ny special regulations u are in, and always whenever it is when it may cause r.
phone or any device, read its user’s ty instructions. Do not products.
adio transmitting advised that for the of the equipment and nnel, it is e equipment should rmal operating ear with the antenna ulder).
ic equipment is equency (RF) signals. ronic equipment may t the RF signals from onsult the
ss alternatives.
94• Do not short-circuit the battery. Accidental short-circuiting can occur when a metallic object like a coin, clip or pen causes a direct connection between the + and – terminals of the battery (metal strips on the battery). For example, do not carry a spare battery in a pocket or bag where the battery may contact metal objects. Short-circuiting the terminals may damage the battery or the object causing the short-circuiting.
• Dispose of used batteries in accordance with local regulations. Always recycle. Do not dispose of batteries in a fire.
Road safety
Your wireless phone gives you the powerful ability to communicate by voice, almost anywhere, anytime. But an important responsibility accompanies the benefits of wireless phones, one that every user must uphold.
When you are driving a car, driving is your first responsibility. When using your wireless phone while driving, follow local regulations in the country or region you are in.
Operating environ
Remember to follow ain force in the area yoswitch off your phoneforbidden to use it, orinterference or dange
When connecting the accessory to another guide for detailed safeconnect incompatible
As with other mobile requipment, users are satisfactory operationfor the safety of persorecommended that thonly be used in the noposition (held to your pointing over your sho
Electronic devices
Most modern electronshielded from radio frHowever, certain electnot be shielded againsyour wireless phone. Cmanufacturer to discu
Health and safety inform
ation
95
be able to assist you in ation.
e in health care facilities sted in these areas .
t improperly installed or d electronic systems in ck with the representative regarding
sult the manufacturer of has been added to your
e in any facility where ire you to do so.
PacemakersPacemaker manufacturers recommend that a minimum distance of 15 cm (6 inches) be maintained between a wireless phone and a pacemaker to avoid potential interference with the pacemaker. These recommendations are consistent with the independent research and recommendations of Wireless Technology Research. If you have any reason to suspect that interference is taking place, switch off your phone immediately.
Hearing aidsSome digital wireless phones may interfere with some hearing aids. In the event of such interference, you may wish to consult your hearing aid manufacturer to discuss alternatives.
Other medical devicesIf you use any other personal medical devices, consult the manufacturer of your device to determine if it is adequately shielded from external RF energy.
Your physician may obtaining this inform
Switch off your phonwhen regulations poinstruct you to do so
VehiclesRF signals may affecinadequately shieldemotor vehicles. Chemanufacturer or its your vehicle.
You should also conany equipment thatvehicle.
Posted facilitiesSwitch off your phonposted notices requ
Health and safety information
reless phone, nals, wireless, and
ell as user- which cannot n all conditions. ever rely solely on essential edical emergencies.
s, the phone must be rvice area with
th. Emergency calls all wireless phone in network services are in use. Check ders.
call:e.cy number for your ergency numbers
ll Barring may need e you can make an t this document and ce provider.
96
Potentially explosive environments
Switch off your phone when in any area with a potentially explosive atmosphere, and obey all signs and instructions. Sparks in such areas could cause an explosion or fire resulting in bodily injury or even death.
Users are advised to switch off the phone while at a refuelling point (service station). Users are reminded of the need to observe restrictions on the use of radio equipment in fuel depots (fuel storage and distribution areas), chemical plants, or where blasting operations are in progress.
Areas with a potentially explosive atmosphere are often but not always clearly marked. They include the areas below decks on boats, chemical transfer or storage facilities, vehicles using liquefied petroleum gas, such as propane or butane, areas where the air contains chemicals or particles, such as grain, dust or metal powders, and any other area where you would normally be advised to turn off your vehicle engine.
Emergency calls
This phone, like any wioperates using radio siglandline networks as wprogrammed functions,guarantee connection iTherefore, you should nany wireless phone for communications like m
To make or receive callswitched on and in a seadequate signal strengmay not be possible onnetworks or when certaand/or phone features with local service provi
To make an emergency1. Switch on the phon2. Key in the emergen
present location. Emvary by location.
3. Press [ ].
Certain features like Cato be deactivated beforemergency call. Consulyour local cellular servi
Health and safety inform
ation
97
our phone before boarding an dangerous and illegal to use nes in an aircraft because erfere with the operation of
serve these instructions may suspension or denial of ervices to the offender, or , or both.
intenance
product of superior design hip and should be treated suggestions below will help arranty obligations and allow is product for many years. hone and all its parts and out of the reach of small pets. They may accidentally se things or choke on small
one dry. Precipitation, d liquids contain minerals electronic circuits.
Other important safety information
• Only qualified personnel should service the phone or install the phone in a vehicle. Faulty installation or service may be dangerous and may invalidate any warranty applicable to the device.
• Check regularly that all wireless phone equipment in your vehicle is mounted and operating properly.
• Do not store or carry flammable liquids, gases, or explosive materials in the same compartment as the phone, its parts, or accessories.
• For vehicles equipped with an air bag, remember that an air bag inflates with great force. Do not place objects, including installed or portable wireless equipment, in the area over the air bag or in the air bag deployment area. Improperly installed wireless equipment could result in serious injury if the air bag inflates.
• Switch off yaircraft. It iswireless phothey can intthe aircraft.
• Failure to oblead to the telephone slegal action
Care and ma
Your phone is aand craftsmanswith care. The you fulfill any wyou to enjoy th• Keep your p
accessorieschildren anddamage theparts.
• Keep the phhumidity, anthat corrode
Health and safety information
hone in or on heating a microwave oven, r. The phone may erheated. or battery gets wet, the ater damage inside the olour. In this case, e no longer guaranteed urer's warranty, even if your phone has not
s a flash or light, do not o the eyes of people or y cause damage to their
plied or an approved enna. Unauthorised ified accessories may ne and violate rning radio devices.ttery, charger, or any working properly, take it qualified service facility. ere will assist you, and nge for service.
98
• Do not use the phone with a wet hand. Doing so may cause an electric shock to you or damage to the phone.
• Do not use or store the phone in dusty, dirty areas, as its moving parts may be damaged.
• Do not store the phone in hot areas. High temperatures can shorten the life of electronic devices, damage batteries, and warp or melt certain plastics.
• Do not store the phone in cold areas. When the phone warms up to its normal operating temperature, moisture can form inside the phone, which may damage the phone’s electronic circuit boards.
• Do not drop, knock, or shake the phone. Rough handling can break internal circuit boards.
• Do not use harsh chemicals, cleaning solvents, or strong detergents to clean the phone. Wipe it with a soft cloth.
• Do not paint the phone. Paint can clog the device’s moving parts and prevent proper operation.
• Do not put the pdevices, such asstove, or radiatoexplode when ov
• When the phonelabel indicating wphone changes cphone repairs arby the manufactthe warranty forexpired.
• If your phone hause it too close tanimals. This maeyes.
• Use only the supreplacement antantennas or moddamage the phoregulations gove
• If the phone, baaccessory is not to your nearest The personnel thif necessary, arra
99
ingcall log • 41e-mail • 61, 62events • 73MMS • 59, 61, 62phonebook • 44, 46SMS • 58, 61, 62d calls • 41ng font, set • 78aybrightness • 78icons • 11language • 77settings • 78ting, calls • 80 (Digital Rights Management) 6 tones, send • 40
gency calls • 96
(Fixed Dialling Number)mode • 86anager • 66dio • 33
ting message • 77
IndeAAB modAlarm •Album •Answeri
case
Anykey Auto redAuto tim
BBackligh
dike
Barring,Battery
chpr
Bluetooresese
BroadcaBrowser
CCalendaCall cos
x
e, text input • 14 49 31ngll • 37cond call • 39answer • 78ial • 78e update • 76
t, setsplay • 80ypad • 80 calls • 81
arging • 7ecautions • 93thceiving, data • 85nding, data • 85ttings • 83st messages • 59, 65, web • 51
r • 71t • 42
Call logdialled • 41missed • 41received • 41
Call time • 42Caller groups • 45Caller ID • 78, 82Calls
answering • 37barring • 81diverting • 80holding • 38redialling • 37rejecting • 38waiting • 82
Cameraphotos • 27, 74videos • 29, 30, 75
CB (Cell Broadcast) messages • 59, 65
Configuration messages • 57Connection tone • 79Creating messages
MMS • 56SMS • 54
CUG (Closed User Group) • 82
DDate, set • 76
Delet
DialleDialliDispl
DiverDRM
• 6DTMF
EEmer
FFDN
File mFM ra
GGree
1
Index
imedia player keys, use • 20imedia Player mode, switch •
iparty-call • 40ic player • 22ic, downloaded • 69
e card • 46esentering • 13searching • 43
ork selection • 82ork services • 80berssearching • 43storing • 44
ne mode • 9box, messages • 60
wordcall barring • 81phone • 86
necare and maintenance • 97charging • 7keys • 9locking • 86overview • 6
00
HHealth and safety • 92Holding, call • 38
IIcons • 11Images, downloaded • 67Inbox, messages • 57Inserting
memory card • 18SIM card • 7
International calls • 37Internet • 51
KKey functions • 9Keypad lock • 8Keypad tones
selecting • 79sending/muting • 40
LLanguage, select • 77Last number, redial • 37Light settings • 80Locking
keypad • 8menu functions • 86phone • 86SIM card • 86
MMemory card
accessing files • 71inserting • 18
Memory statusdownloaded items • 71file manager • 71messages • 66phonebook 47
Menuaccessing • 12overview • 5
Message tone • 79Messages
cell broadcast • 59, 65configuration • 59greeting • 77MMS • 56, 58push • 59, 65SMS • 54, 58SOS • 65
Minute minder • 79Missed calls • 41MMS messages
creating/sending • 56deleting • 59setting • 64viewing • 57
Mobile tracker • 86MTP (Media Transfer Protocol) •
23
MultMult
9MultMusMus
NNamNam
NetwNetwNum
OOffliOut
PPass
Pho
101
Index
ound settings • 79ounds, downloaded • 69peed dial • 45topwatch • 50witching on/off
phone • 8
9 mode, text input • 14emplates, message • 62ext input mode, change • 13ext, enter • 13ime, set • 76imer • 49
ideosplaying • 32, 68recording • 29, 30, 75
oice recorderplaying • 35, 47recording • 35, 47
oicemail server • 82
aiting call • 82eb browser
access • 51bookmarks • 53
orld time • 48
password • 86resetting • 20, 88switching on/off • 8unpacking • 6
Phone mode, switch • 9Phonebook
adding • 44deleting • 44, 46finding • 43managing • 46options • 43speed dialling • 45
Photostaking • 27, 74viewing • 67
PIN, change • 86PIN2, change • 86Power on/off tone • 79Privacy • 86Problems, solve • 90Push messages • 59, 65
QQuiet mode
entering • 16setting • 79
RReceived calls • 41Received messages • 57
Recordingvideos • 29, 30, 75voice memos • 35, 47
Rediallingautomatically • 78manually • 37
Resetting phone • 20, 88Ringer
incoming calls • 79messages • 79
Road safety • 94Roaming • 82
SSafety
information • 92precautions • 1
Security, calls • 85Sent messages • 61Shortcut • 77SIM card
inserting • 7locking • 86
SMS messagescreating/sending • 54deleting • 58setting • 63viewing • 57
Solving problems • 90SOS messages • 65
SSSSS
TTTTTTT
VV
V
V
WWW
W