SampleTank 3 User Manual
88
The ultimate sound and groove workstation USER MANUAL
description
Instructional Manual for Sample Tank 3.
Transcript of SampleTank 3 User Manual

The ultimate sound and groove workstation
USER MANUAL

SampleTank 3
Contents 2
Table of ContentsContents� 2
English� 7Chapter 1 – SampleTank 3 Overview� 71.1�Introduction� 71.2�Features� 11
Chapter 2 – Getting started with SampleTank 3� 122.1�-�Using�SampleTank�3�as�a�standalone�application� 122.1.1�-�AUDIO/MIDI�Settings� 132.1.2�-�PREFERENCES�Settings� 142.1.3�-�REMOTE�Settings� 152.2�-�Computer�keyboard�keys� 162.3�-�CPU�Monitor� 162.4�-�Using�SampleTank�3�as�a�plug-in� 172.4.1�-�Syncing�to�the�host�application’s�tempo� 172.5�-�Custom�Shop� 18
Chapter 3 – The PLAY page� 263.1�-�Overview� 263.1.1�-�Three�Types�of�Instruments� 273.1.2�-�Loop�Instruments�and�Global�Play� 283.1.3�-�Syncing�Loops� 293.1.4�-�Master�BPM�and�Key� 293.2�-�The�MULTI�tab� 303.2.1�-�Multi�Menu� 313.2.2�-�Search�Multis� 313.2.3�-�Rescan�Multis� 313.3�-�The�INSTRUMENTS�tab� 323.3.1�-�Instruments�Menu� 323.3.2�-�The�INFO�button� 343.3.3�-�Search�Instruments� 353.3.4�-�Favorites� 353.3.5�-�Rescan�Instruments� 353.3.6�-�Browsing�Instruments�using�keyboard�arrow�keys� 353.4�-�The�PATTERNS�tab� 363.4.1�-�Loading�Patterns� 363.4.2�-�Activating�Patterns� 373.4.3�-�Removing�Patterns� 373.4.4�-�GLOBAL�Play�Button� 383.4.5�-�Pattern�INTENSITY�Slider� 383.4.6�-�Pattern�KEY� 383.4.7�-�Pattern�QUANTIZE� 383.4.8�-�Loop�instruments�in�the�Pattern�viewer� 393.4.9�-�Pattern�Audition�Play�Button� 393.4.10�-�Octave�Shift�Buttons� 40

SampleTank 3
Contents 3
3.4.11�-�Search�Patterns� 403.4.12�-�Rescan�Patterns� 403.5�-�The�LIVE�tab� 413.5.1�-�Set�Lists� 423.5.2�-�The�Song�Column� 423.5.3�-�The�Multi�Column� 423.5.4�-�Memory�Management�in�LIVE�mode� 423.6�-�Quick�Access�Panel� 43
Chapter 4 – The MIX page� 444.1�-�Overview� 444.1.1�-�INSTRUMENT�and�MULTI�Menus� 454.1.2�-�Instrument�Icon�Display� 454.2�-�The�MIX�Channel�Strips� 464.2.1�-�Insert�Effects� 474.2.2�-�Effects�Lock� 474.2.3�-�Save�/�Load�Effects� 474.2.4�-�Effect�Sends� 484.2.5�-�Pan�Slider� 494.2.6�-�Mute�and�Solo�Buttons� 494.2.7�-�Volume�Slider� 494.2.8�-�Master�Channel� 50
Chapter 5 – The EDIT page� 515.1�-�Overview� 515.1.1�-�INSTRUMENT�and�MULTI�Menus� 525.2�-�The�PART�Strip� 525.2.1�-�MIDI�Channel�drop-down�menu� 525.2.2�-�Polyphony� 525.2.3�-�Transpose� 535.2.4�-�Note�Range� 535.2.5�-�Velocity�Range� 535.2.6�-�Pan� 535.2.7�-�Volume� 535.2.8�-�Mute�and�Solo�buttons� 535.2.9�-�Zone�button� 535.3�-�The�SAMPLE�Strip� 545.3.1�-�Pitch� 545.3.2�-�Fine� 545.3.3�-�Bend� 545.3.4�-�Sample�Pan� 545.3.5�-�Synthesis�Types� 545.3.6�-�Round�Robin�Freeze� 555.3.7�-�Element�Selector� 555.4�-�The�FILTER�Strip� 565.4.1�-�Filter�Type�Menu� 565.4.2�-�Filter�Frequency� 56
SampleTank 3
Contents 4
5.4.3�-�Resonance� 565.4.4�-�Overdrive� 565.5�-�The�VELOCITY�Strip� 575.5.1�-�Velocity�to�Amp�knob� 575.5.2�-�Velocity�to�Pitch�knob� 575.5.3�-�Velocity�to�Resonance�knob� 575.5.4�-�Velocity�to�Filter�knob� 575.5.5�-�Velocity�to�LFO1�Depth�knob� 575.5.6�-�Velocity�to�Env2�Sustain� 585.6�-�The�LFO�Strip� 585.6.1�-�LFO�Selector� 585.6.2�-�LFO�Sync� 585.6.3�-�LFO�Free� 585.6.4�-�LFO�Rate� 585.6.5�-�LFO�Depth� 595.6.6�-�LFO�Phase� 595.6.7�-�LFO�Fade� 595.6.8�-�LFO�Waveform� 595.6.9�-�LFO�to�Pitch�knob� 595.6.10�-�LFO�to�Filter�knob� 595.6.11�-�LFO�to�Level�knob� 595.6.12�-�LFO�to�Pan�knob� 595.7�-�The�ENVELOPE�Strip� 605.7.1�-�Envelope�1�to�Level�knob� 605.7.2�-�Envelope�2�to�Filter�knob� 605.7.3�-�Envelope�2�to�Pitch�knob� 605.8�-�The�KEY�Strip� 615.8.1�-�Keyboard�Mode�menu� 615.8.2�-�Portamento� 615.8.3�-�Curve� 61
Chapter 6 – MIDI control� 626.1�-�The�LEARN�button� 626.2�-�The�CONTROL�button� 626.2.1�-�MIDI�Control�PART�Menu� 63
Chapter 7 – Effects� 647.1�-�FULL�AMPS� 647.1.1�-�American�Vintage�T� 647.1.2�-�Amp�Combo� 647.1.3�-�British�Tube�Lead� 647.1.4�-�Jazz�Amp�120� 657.1.5�-�Modern�Tube�Lead� 657.1.6�-�SVT�Classic� 657.2�-�AMP�COMPONENTS� 667.2.1�-�Cabinet� 667.2.2�-�Preamp� 66

SampleTank 3
Contents 5
7.2.3�-�Tone�Control� 667.3�-�DISTORTION� 677.3.1�Crusher� 677.3.2�-�Distortion�� 677.3.3�-�Overdrive� 677.3.4�-�Overscream� 677.4�-�EQ�+�DYNAMICS� 687.4.1�-�Black�76� 687.4.2�-�Compressor� 687.4.3�-�EQ�Comp� 687.4.4�-�Limiter� 697.4.5�-�Model�670� 697.4.6�-�Parametric�EQ� 697.4.7�-�Vintage�EQ-1A� 707.4.8�-�White�2A� 707.5�-�MODULATION� 717.5.1�-�AM�Modulation� 717.5.2�-�Chorus� 717.5.3�-�Chorus�C1� 717.5.4�-�Electric�Flanger� 727.5.5�-�Env�Flanger� 727.5.6�-�Flanger� 727.5.7�-�FM�Modulation� 727.5.8�-�Multi�Chorus� 737.5.9�-�Opto�Tremolo� 737.5.10�-�Phaser� 737.5.11�-�Rotary�Speaker�� 737.5.12�-�Small�Phazer� 747.5.13�-�Tremolo� 747.5.14�-�Uni-V� 747.6�-�REVERB�+�DELAY� 757.6.1�-�Acoustic�Resonance� 757.6.2�-�Ambience� 757.6.3�-�ConvoRoom� 757.6.4�-�Hall�Reverb��� 757.6.5�-�Plate�Reverb�� 767.6.6�-�Delay� 767.6.7�-�Reverb� 767.6.8�-�Reverb�Delay� 767.6.9�-�Spring�Reverb� 777.6.10�-�Tape�Echo� 777.7�-�FILTERS�/�OTHER� 787.7.1�-�AutoPan� 787.7.2�-�Piano�Lid� 787.7.3�-�LFO�Filter� 78

SampleTank 3
Contents 6
7.7.4�-�Env�Filter� 787.7.5�-�Lo-Fi� 797.7.6�-�Multi�Filter� 797.7.7�-�Phonograph� 797.7.8�-�Slicer� 797.7.9�-�Stereo�Imager� 807.7.10�-�Wah� 80
Chapter 8 – The PAD page� 818.1�-�Initialization,�defaults�and�behaviors� 818.2�-�Assign�a�part�to�a�pad� 828.3�-�Pads�Launch�and�Mode� 848.4�-�SampleTank�3.0�Multis� 848.5�-�Disabling�PAD�mode� 84
Chapter 9 – iRig Pads Full Integration� 859.1�-�Connect�iRig�Pads� 859.2�-�Integration� 869.3�-�Edit�Mode� 86

SampleTank 3
1 - Overview 7
Chapter 1 – SampleTank 3 Overview
1.1�IntroductionSampleTank�3�is�a�16-part�virtual�instrument�that�plays�samples�of�acoustic,�electric�and�electronic�instruments�including�audio�loops�of�rhythmic�grooves�and�musical�performances.�It�also�includes�a�MIDI�sequencer�that�plays�MIDI�patterns�that�can�be�triggered�by�keys�on�the�keyboard�or�via�the�Global�Play�button.�You�can�also�drag�MIDI�patterns�into�the�timeline�of�your�DAW�to�play�or�further�edit�them�from�there.�
SampleTank�3�provides�an�extremely�user-friendly�consolidated�interface�that�lets�you�browse�and�load�the�sounds�you�want�fast.�There�are�3�main�tabs:�PLAY,�MIX�and�EDIT.�These�tabs�let�you�quickly�set�up�your�SampleTank�3�sounds�exactly�the�way�you�want�them�and�then�allows�you�to�save�that�setup�as�a�MULTI�for�future�recall.�
PLAY�gives�you�the�browser�on�the�left�where�you�load�Instruments,�Patterns,�Multis�and�live�Set�Lists.�You�can�see�an�overview�of�the�16�parts,�each�of�which�holds�a�single�Instrument�and�its�collection�of�Patterns�that�are�assigned�to�keys�on�the�keyboard.�You�can�make�quick�adjustments�to�volume,�pan�and�MIDI�channel.
SampleTank 3
1 - Overview 8
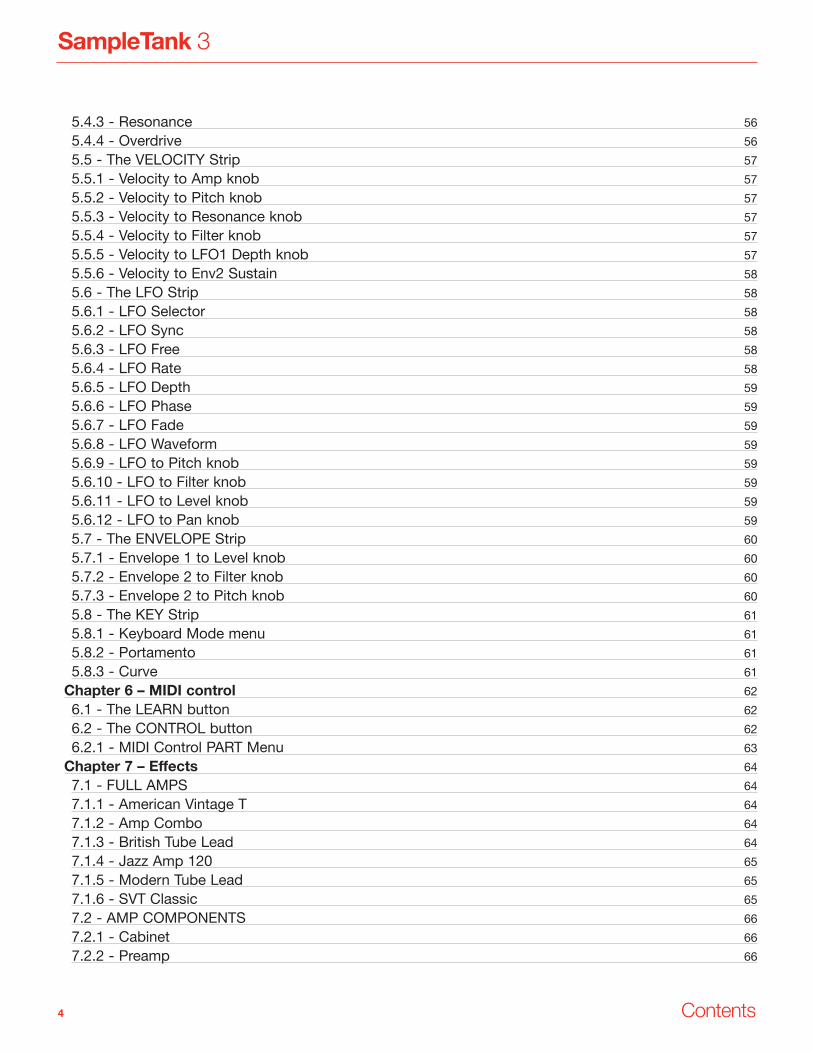
MIX�gives�you�a�DAW-style�mixing�console�interface�with�one�channel�per�part,�each�with�its�own�volume�fader�and�pan�slider�plus�5�insert�effect�slots�and�4�effect�sends.�There�are�also�4�effects�return�channels�at�the�far�right,�where�you�can�load�more�global�effects�like�reverb�and�delay,�along�with�a�master�fader�channel.�The�effect�return�channels�and�master�fader�channel�also�have�5�insert�effect�slots,�each�for�maximum�flexibility.

SampleTank 3
1 - Overview 9
EDIT�gives�you�a�synthesizer�programming�panel�where�you�can�dial�in�deeper�parameters�like�filters,�envelopes�and�LFOs�for�extreme�customization�of�your�instruments.�Here�you�can�view�the�current�settings�of�the�instrument�parameters�and�tweak�them�exactly�the�way�you�want�them.�
All�three�tabs�provide�a�panel�at�the�bottom�that�is�switchable�between�MACRO�and�FX.�The�MACRO�tab�provides�8�controls�that�have�been�customized�for�each�instrument�to�give�you�quick�access�to�the�most�commonly�used�parameters�or�parameter�sets.�This�is�a�quick�edit�panel�that�lets�you�make�fast�changes�without�having�to�go�to�the�actual�EDIT�tab.�The�FX�tab�lets�you�select�and�view�the�5�insert�effect�slots�for�the�selected�part�and�display�each�effect�panel�with�all�its�available�parameters.�
There�is�a�shopping�cart�button�at�the�top�right�of�SampleTank�3.

SampleTank 3
1 - Overview 10
This�launches�the�Custom�Shop�where�you�can�purchase�upgrades,�expansion�libraries�and�relevant�hardware�products.
Next�to�that,�the�gear�icon�opens�the�Settings�window�where�you�choose�your�audio�and�MIDI�preferences,�make�output�assignments�and�set�your�master�disk�path�for�your�sound�libraries.�Next�to�that,�the�info�button�opens�a�window�telling�you�which�version�of�SampleTank�3�you�are�running�along�with�copyright�information.�And�finally,�the�padlock�icon�lets�you�authorize�and�register�your�copy�of�SampleTank�3�with�IK�Multimedia.

SampleTank 3
1 - Overview 11
The�bottom�row�of�SampleTank�3�provides�you�with�various�utility�functions.�LEARN�lets�you�assign�SampleTank�parameters�to�MIDI�Continuous�Controller�numbers.�CONTROL�opens�a�window�where�you�can�view�and�edit�your�Controller�assignments.�The�Panic�Button�(the�“!”�icon)�stops�all�MIDI�notes�and�pattern�playback�in�case�of�stuck�notes�or�other�problems�in�your�setup.�The�SYNC�button�(clock�icon)�sets�the�master�tempo�of�SampleTank�to�match�the�DAW�host.�The�Tempo�Indicator�lets�you�set�the�master�tempo�yourself�when�SYNC�is�off.��Next�to�the�Tempo�Indicator�is�the�Key�Match�control�where�you�can�set�all�loaded�MIDI�Patterns�to�play�in�a�single�global�musical�key�without�needing�to�transpose�them�individually.�And�finally,�the�Global�Play�button�lets�you�start�and�stop�multiple�MIDI�patterns�and�audio�loop�instruments�with�a�single�button.��
1.2�Features•� Intuitive�interface�with�3�main�environments:�Play,�Mix,�Edit,�retaining�the�ease-of-use�and�fast�operation�that�
has�always�characterized�SampleTank.•� 16-channel�multi-part�Play�interface�with�quick�mixer�and�easy�layering,�sound�browser�with�keyword�
searches�and�integrated�MIDI�player/mixer.•� All-in-one�sound�Edit�page�with�3�sample�engines�(including�formant�preserving�pitch-shift/time-stretch),�14�
filter�types,�round�robin�and�articulation�switching�plus�8�macros�per�instrument�for�quick�multi-parameter�editing.
•� Familiar�console-like�Mix�interface,�with�5�insert�effects�per�channel,�4�stereo�FX�returns�with�5�insert�effects�each,�master�channel�with�5�insert�effects�(up�to�30�effects�per�instrument).
•� New�Live�mode�allows�sample�loading�in�the�background�and�instantaneous�sound�switching�in�a�structure�based�on�Set�Lists�and�Songs.
•� PAD�page�allows�Parts�to�be�assigned�to�Pads�for�seamless�integration�with�the�iRig�Pads�MIDI�controller.•� New�Custom�Shop�where�you�can�preview�and�purchase�additional�sound�libraries,�upgrades�and�relevant�
hardware.•� Integrated�multi-effects�with�over�50�high-quality�processors�derived�from�the�AmpliTube�and�T-RackS�
products.•� Accurate�3D�representations�of�instruments�for�instant�identification�and�recall.•� Available�as�standalone�and�as�a�64-bit�plug-in�for�AAX,�VST�2,�VST�3�and�Audio�Units�platforms�on�Mac�OS�
and�Windows.•� Compatible�with�all�previous�“Powered�by�SampleTank”�sound�modules�and�sounds.

SampleTank 3
2 - Getting started 12
Chapter 2 – Getting started with SampleTank 3SampleTank�3�can�be�used�as�a�standalone�application�or�as�a�plug-in.
2.1�-�Using�SampleTank�3�as�a�standalone�application
In�standalone�mode,�launch�SampleTank�3�from�your�applications�folder�to�use�it�without�a�host�application�such�as�a�digital�audio�workstation�(D.A.W.).�In�fact,�this�allows�SampleTank�to�have�all�the�functionality�and�flexibility�of�the�plug-in��in�a�self-contained�software�instrument.�For�example,�you�can�use��SampleTank�3�for�live�performances�when�there�is�no�need�for�a�complex�sequencer�setup�or�in�a�second�computer�that�is�dedicated�to�virtual�instruments�as�each�PART�can�be�triggered�from�an�individual�MIDI�input.

SampleTank 3
2 - Getting started 13
When�launching�SampleTank�3�standalone�for�the�first�time,�you�need�to�set�the�audio�output�and�MIDI�input�as�well�as�the�disk�path�where�the�library�content�is�stored.�This�is�accomplished�in�the�Settings�window�that�can�be�opened�by�clicking�the�gear�icon�at�the�top�right.�
There�are�two�tabs�in�the�Settings�window:�AUDIO/MIDI�and�PREFERENCES.
2.1.1�-�AUDIO/MIDI�SettingsClick�the�AUDIO/MIDI�tab�to�set�up�your�audio�output�and�MIDI�input.�SampleTank�3�is�compatible�with�any�ASIO�or�Direct�Sound�audio�interface�in�Windows�and�any�Core�Audio-compatible�audio�interface�in�Mac�OS�X.
Device�Choose�which�available�audio�interface�you�want�to�use�with�SampleTank�3.
Windows�There�are�two�drop�down�menus�to�select�the�Audio�Driver.�The�drop-down�menu�on�the�left�selects�the�type�of�driver�to�use,�such�as�ASIO�or�DirectX.�The�drop�down�menu�on�the�right�selects�the�actual�audio�interface.�It�will�be�either�ASIO�(preferred)�or�Direct�Sound.�An�ASIO�compatible�sound�card�will�perform�with�faster�response�and�lower�latency�than�a�Direct�Sound�one,�we�strongly�recommend�the�ASIO�setting�when�using�Virtual�Instruments�such�as�SampleTank�3.

SampleTank 3
2 - Getting started 14
Mac OS X�SampleTank�3�is�compatible�with�Core�Audio�audio�interfaces�in�Mac�OS�X..�Any�Audio�interface�supported�by�computer’s�operating�system�will�work�with�SampleTank�3.�There�is�one�drop-down�menu�to�select�the�audio�interface.
Output RoutingThe�Output�Routing�is�used�to�assign�the�output�of�SampleTank�3�to�a�specific�channel�pair�on�your�selected�interface.�This�lets�you�determine�where�the�SampleTank�output�is�routed�in�your�system.�
Sample Rate and Buffer SizeThe�sample�rate�and�buffer�sizes�drop-down�menus�let�you�choose�your�settings�for�SampleTank�3.�These�settings�are�dependent�on�the�audio�interface�as�not�all�audio�interfaces�provide�the�same�sample�rate�or�buffer�setting�options.�For�the�best�performance�in�SampleTank�3�standalone,�set�the�buffer�as�low�as�possible�without�hearing�clicks�and�pops.�This�will�provide�the�lowest�amount�of�latency,�the�delay�between�playing�a�note�and�hearing�the�sound.�Higher�sample�rates�such�as�96kHz�will�deliver�better�sound�quality�but�at�the�expense�of�a�higher�CPU�load.�
MIDI InputThis�drop-down�menu�determines�which�MIDI�input�of�your�computer�that�SampleTank�will�respond�to.�Any�MIDI�interface�supported�by�computer’s�operating�system�will�work�with�SampleTank�3.
2.1.2�-�PREFERENCES�SettingsClick�the�PREFERENCES�tab�to�set�the�disk�path�for�SampleTank�3�and�how�you�prefer�it�to�handle�audio�loops�and�MIDI�patterns.

SampleTank 3
2 - Getting started 15
Disk PathYou�must�specify�where�the�SampleTank�sound�library�is�stored�on�your�hard�disk.�The�hard�disk�may�be�internal�or�external.�Click�BROWSE�to�navigate�to�the�location.�The�default�disk�path�is�User/Documents/IK�Multimedia/SampleTank�3.
Always Sync Loop InstrumentsTurn�this�on�to�cause�all�audio�loops�to�synchronize�to�SampleTank�3’s�master�tempo�which�is�displayed�in�the�lower�right�of�all�windows.�Note�that�audio�loops�can�sound�bad�if�their�tempo�is�changed�too�radically.�To�always�hear�audio�loops�at�their�native�tempo,�turn�this�parameter�off.
Latch MIDI Patterns“Latch”�means�that�you�press�a�key�once�to�start�a�pattern,�and�the�pattern�will�continue�to�play�on�its�own�until�press�the�key�again�to�stop�it.�Turn�this�parameter�on�to�always�latch�MIDI�patterns.�Turn�it�off�if�you�just�want�the�patterns�to�play�while�you�hold�down�their�assigned�key.�The�Latch�MIDI�Patterns�setting�becomes�unavailable�when�PAD�mode�is�enabled.
Latch Audio LoopLike�MIDI�patterns�above,�you�can�set�SampleTank�to�latch�audio�loops�so�that�they�continue�to�play�after�the�first�key�press�regardless�of�how�long�you�hold�the�key,�and�then�they�will�only�stop�when�you�press�the�key�again.�If�you�want�your�audio�loops�to�only�play�while�you�hold�the�key�down,�turn�this�parameter�off.�The�Latch�Audio�Loop�setting�becomes�unavailable�when�PAD�mode�is�enabled.
2.1.3�-�REMOTE�SettingsClick�the�REMOTE�tab�to�enable/disable�remote�functions�and�set�control�changes�where�you�can�select�parts�or�pads,�browse/load�instruments�and�remotely�operate�the�global�play�function.
SampleTank 3
2 - Getting started 16
•� Global�Play�Remote•� Scroll�List•� Open�Folder�/�Load�Selected�Item•� Enable/Disable�-�Select�Part�/�Pad�mode•� Select�Part�/�Pad�mode�-�Part�/�Pad�navigation
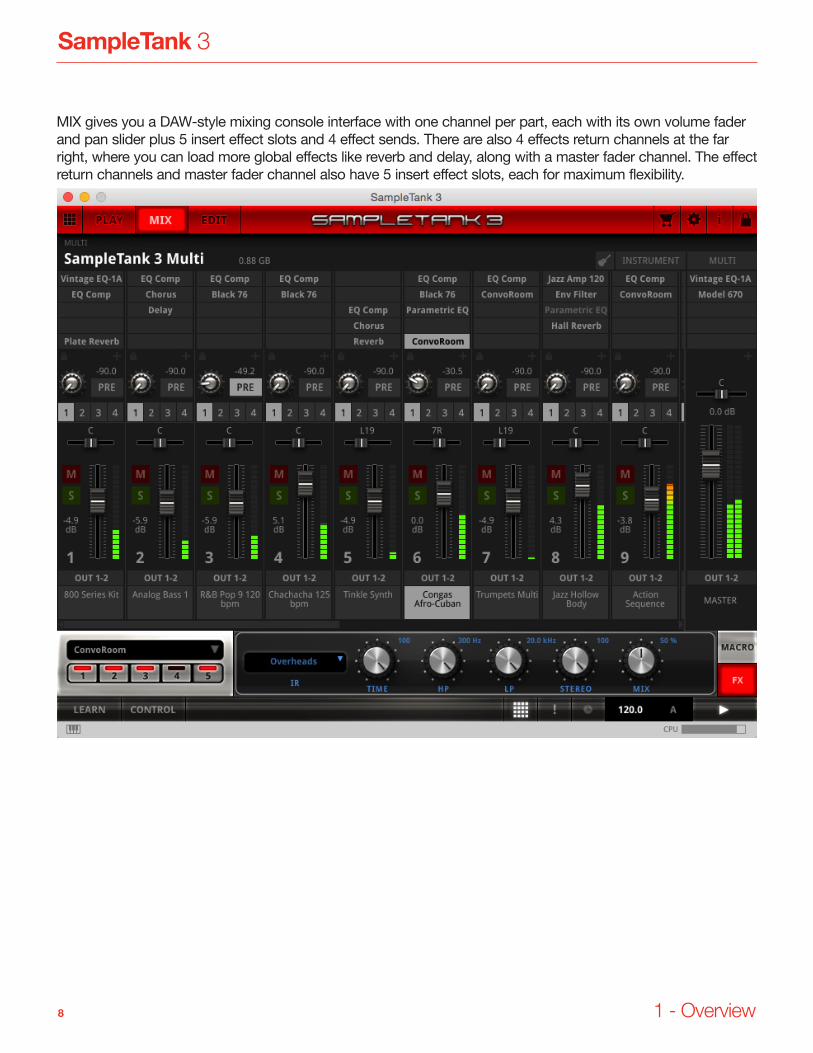
2.2�-�Computer�keyboard�keysIn�Standalone�mode,�you�can�use�your�computer�keyboard�to�play�MIDI�notes�to�trigger�the�Instruments�in�SampleTank�3.�
Click�the�keyboard�icon�in�the�lower�left�to�see�the�legend�that�describes�the�function�of�each�key�on�the�computer�keyboard.
2.3�-�CPU�MonitorIn�Standalone�mode,�you�can�monitor�how�much�of�your�CPU�power�SampleTank�3�is�using�with�the�CPU�meter�at�the�lower�right.�To�reduce�CPU�usage,�increase�your�buffer�size�(note�that�this�will�also�increase�latency).�
SampleTank 3
2 - Getting started 17
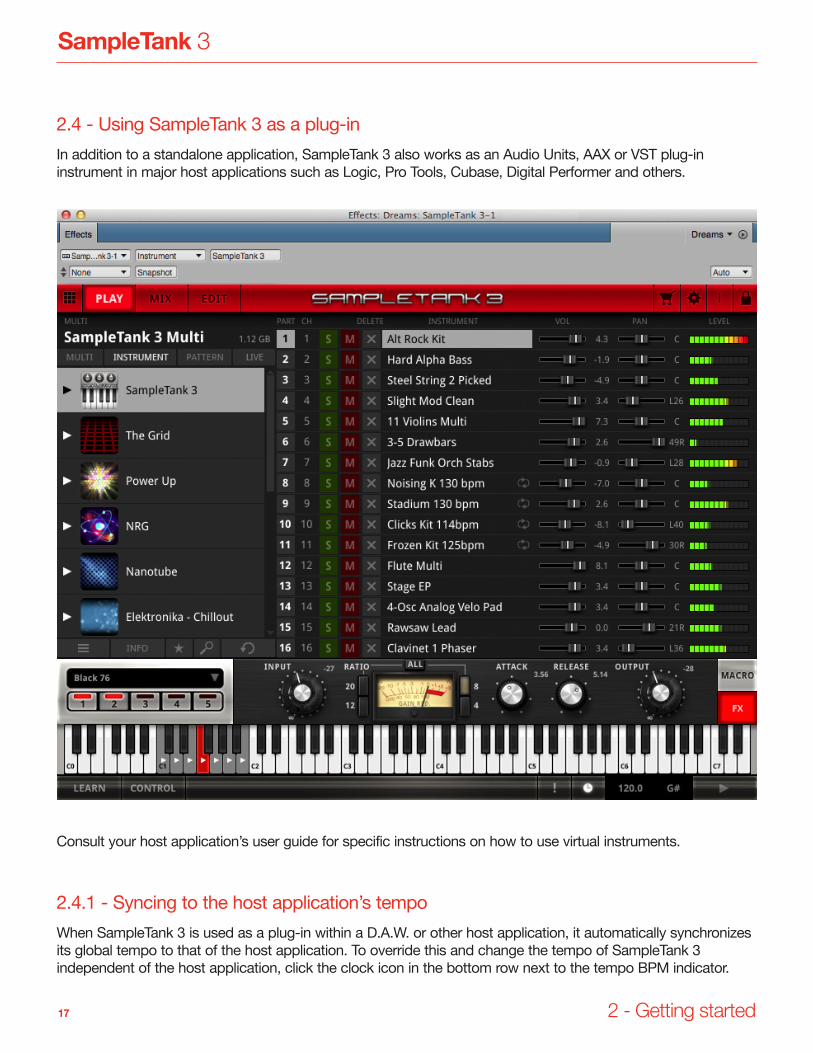
2.4�-�Using�SampleTank�3�as�a�plug-inIn�addition�to�a�standalone�application,�SampleTank�3�also�works�as�an�Audio�Units,�AAX�or�VST�plug-in�instrument�in�major�host�applications�such�as�Logic,�Pro�Tools,�Cubase,�Digital�Performer�and�others.�
Consult�your�host�application’s�user�guide�for�specific�instructions�on�how�to�use�virtual�instruments.
2.4.1�-�Syncing�to�the�host�application’s�tempoWhen�SampleTank�3�is�used�as�a�plug-in�within�a�D.A.W.�or�other�host�application,�it�automatically�synchronizes�its�global�tempo�to�that�of�the�host�application.�To�override�this�and�change�the�tempo�of�SampleTank�3�independent�of�the�host�application,�click�the�clock�icon�in�the�bottom�row�next�to�the�tempo�BPM�indicator.�

SampleTank 3
2 - Getting started 18
2.5�-�Custom�ShopYou�can�expand�your�sound�SampleTank�3�sound�library�with�vast�choices�of�high-quality�libraries�available�in�the�Custom�Shop.

SampleTank 3
2 - Getting started 19
To�launch�the�Custom�Shop�application,�click�the�Cart�button�in�the�top�bar�of�SampleTank�3.
NOTE:�The�Custom�Shop�is�web-based,�so�you�must�be�connected�to�the�Internet�to�do�all�the�following�operations.
Inside�the�shop,�you�can�browse�and�learn�details�about�the�sound�libraries�by�clicking�on�each�library.�Listen�to�the�audio�demos�by�clicking�the�play�button�to�choose�your�preferred�library.�Purchase�new�libraries�by�clicking�the�BUY�button.
You�need�to�be�logged�into�the�Custom�Shop�using�your�IK�User�Account�credentials.

SampleTank 3
2 - Getting started 20
Log�in�using�your�IK�Multimedia�User�Area�credentials�or�create�a�new�IK�Multimedia�User�Account�if�you�don’t�have�one.
If�you�had�previously�logged�in�from�AmpliTube�or�T-RackS�Custom�Shop,�you�can�start�purchasing�new�libraries�in�the�Custom�Shop�using�Credits�–�which�is�the�currency�of�the�Custom�Shop�–�or�directly�with�currency�($/€).

SampleTank 3
2 - Getting started 21
Credits�can�be�purchased�directly�from�the�Custom�Shop�in�different�pack�sizes�choosing�between�two�payment�methods:�Credit�Card�or�PayPal.

SampleTank 3
2 - Getting started 22
The�first�method�is�a�standard�credit�card�procedure�where�you�enter�your�personal�data.�You�can�also�choose�to�use�PayPal.�In�this�case,�you�will�be�redirected�to�the�PayPal�main�page�to�login�with�your�PayPal�account�info.�If�you�don’t�have�a�PayPal�account,�you�will�have�the�opportunity�to�create�one�by�following�the�on-screen�instructions.�Once�the�checkout�procedure�is�complete,�your�total�credits�will�be�displayed�in�the�browser’s�main�window.
If�you�have�purchased�a�Credit�Pack�outside�of�the�Custom�Shop�(from�the�IK�Online�Store,�from�a�dealer,�through�a�promotion,�etc.),�you�must�enter�the�Serial�Number�on�the�ADD�CREDITS�page�of�the�Custom�Shop.�Click�ADD�CREDITS,�and�then�enter�your�serial�number�at�the�bottom�of�the�page�in�the�field�below�“Redeem�Credit�Pack�Serial�Number.”�Now�click�the�REDEEM�CREDITS�button�to�add�the�Credit�Pack�to�your�account.
Credits�already�purchased�in�the�other�Custom�Shops�such�as�AmpliTube�and�T-RackS�can�be�used�also�in�the�SampleTank�Custom�Shop.
The�Sounds�Library�you�just�purchased�is�immediately�authorized.�Click�the�DOWNLOAD�button�to�open�your�default�OS�web�browser�showing�the�download�link.�Click�the�download�link�to�start�the�download.

SampleTank 3
2 - Getting started 23
Once�you’ve�downloaded�the�Sound�Library,�decompress�the�Sound�Library�by�double-clicking�on�the�zip�file�and�launching�the�Sound�Library�Installer.
The�Sound�Library�will�be�automatically�installed�in�your�current�SampleTank�3�library�path.
The�new�libraries�will�appear,�already�authorized�and�ready�to�be�explored.
SampleTank 3
2 - Getting started 24
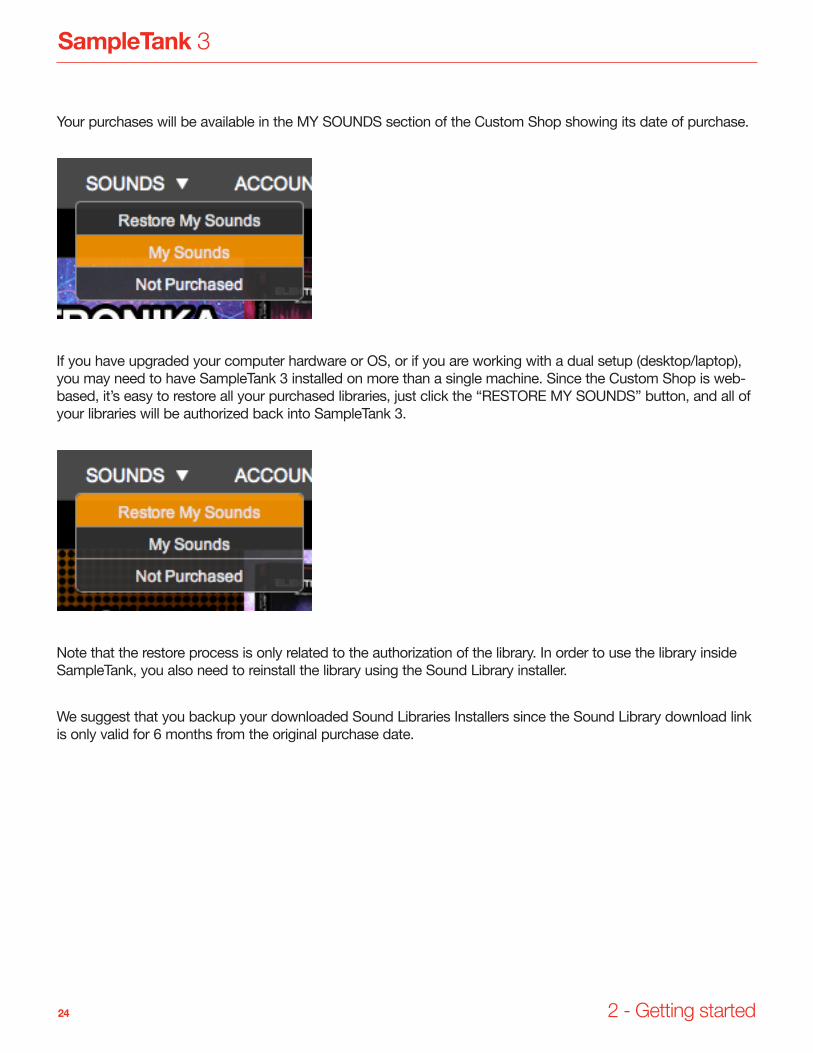
Your�purchases�will�be�available�in�the�MY�SOUNDS�section�of�the�Custom�Shop�showing�its�date�of�purchase.
If�you�have�upgraded�your�computer�hardware�or�OS,�or�if�you�are�working�with�a�dual�setup�(desktop/laptop),�you�may�need�to�have�SampleTank�3�installed�on�more�than�a�single�machine.�Since�the�Custom�Shop�is�web-based,�it’s�easy�to�restore�all�your�purchased�libraries,�just�click�the�“RESTORE�MY�SOUNDS”�button,�and�all�of�your�libraries�will�be�authorized�back�into�SampleTank�3.
Note�that�the�restore�process�is�only�related�to�the�authorization�of�the�library.�In�order�to�use�the�library�inside�SampleTank,�you�also�need�to�reinstall�the�library�using�the�Sound�Library�installer.
We�suggest�that�you�backup�your�downloaded�Sound�Libraries�Installers�since�the�Sound�Library�download�link�is�only�valid�for�6�months�from�the�original�purchase�date.�

SampleTank 3
2 - Getting started 25
If�you�need�to�reactivate�the�Sound�Library�download�link�after�6�months,�click�the�REACTIVATE�button�which�replaces�the�DOWNLOAD�button,�and�purchase�a�Sound�Download�Reactivation�Credit�using�credits�or�regular�currency�(Dollars/Euros).
SampleTank 3
3 - PLAY page 26
Chapter 3 – The PLAY page
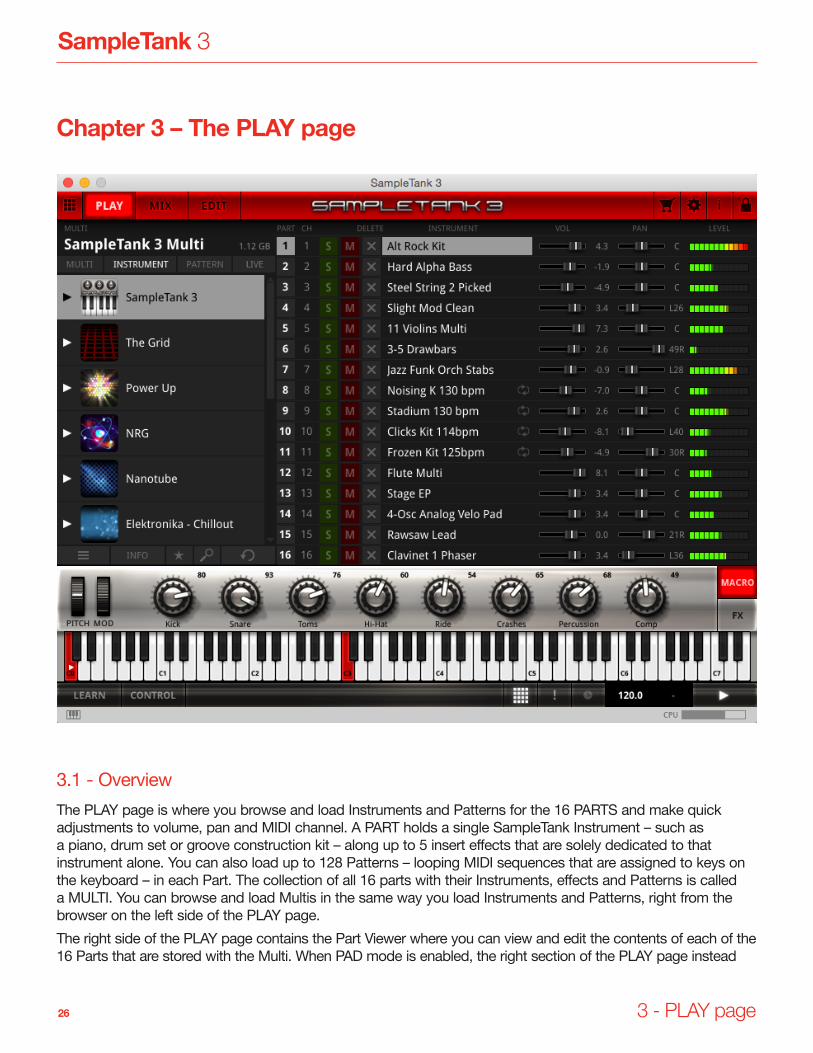
3.1�-�OverviewThe�PLAY�page�is�where�you�browse�and�load�Instruments�and�Patterns�for�the�16�PARTS�and�make�quick�adjustments�to�volume,�pan�and�MIDI�channel.�A�PART�holds�a�single�SampleTank�Instrument�–�such�as�a�piano,�drum�set�or�groove�construction�kit�–�along�up�to�5�insert�effects�that�are�solely�dedicated�to�that�instrument�alone.�You�can�also�load�up�to�128�Patterns�–�looping�MIDI�sequences�that�are�assigned�to�keys�on�the�keyboard�–�in�each�Part.�The�collection�of�all�16�parts�with�their�Instruments,�effects�and�Patterns�is�called�a�MULTI.�You�can�browse�and�load�Multis�in�the�same�way�you�load�Instruments�and�Patterns,�right�from�the�browser�on�the�left�side�of�the�PLAY�page.�The�right�side�of�the�PLAY�page�contains�the�Part�Viewer�where�you�can�view�and�edit�the�contents�of�each�of�the�16�Parts�that�are�stored�with�the�Multi.�When�PAD�mode�is�enabled,�the�right�section�of�the�PLAY�page�instead�
SampleTank 3
3 - PLAY page 27
displays�the�Pad�Viewer�where�you�can�assign�the�16�Parts�to�16�individual�Pads,�also�stored�in�the�Multi.�The�top�left�of�the�PLAY�page�has�four�tabs�for�the�different�kinds�of�objects�that�you�can�browse�and�load:�Multis,�Instruments,�Patterns�and�Live�Set�Lists.
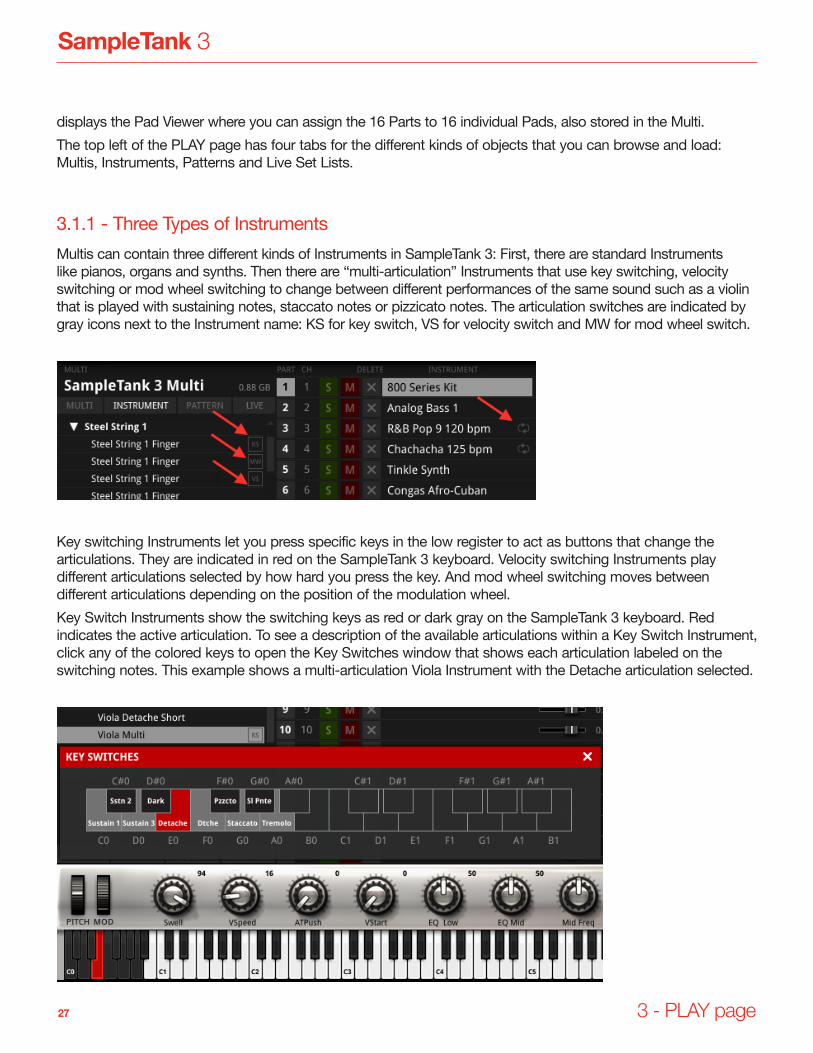
3.1.1�-�Three�Types�of�InstrumentsMultis�can�contain�three�different�kinds�of�Instruments�in�SampleTank�3:�First,�there�are�standard�Instruments�like�pianos,�organs�and�synths.�Then�there�are�“multi-articulation”�Instruments�that�use�key�switching,�velocity�switching�or�mod�wheel�switching�to�change�between�different�performances�of�the�same�sound�such�as�a�violin�that�is�played�with�sustaining�notes,�staccato�notes�or�pizzicato�notes.�The�articulation�switches�are�indicated�by�gray�icons�next�to�the�Instrument�name:�KS�for�key�switch,�VS�for�velocity�switch�and�MW�for�mod�wheel�switch.�
Key�switching�Instruments�let�you�press�specific�keys�in�the�low�register�to�act�as�buttons�that�change�the�articulations.�They�are�indicated�in�red�on�the�SampleTank�3�keyboard.�Velocity�switching�Instruments�play�different�articulations�selected�by�how�hard�you�press�the�key.�And�mod�wheel�switching�moves�between�different�articulations�depending�on�the�position�of�the�modulation�wheel.�Key�Switch�Instruments�show�the�switching�keys�as�red�or�dark�gray�on�the�SampleTank�3�keyboard.�Red�indicates�the�active�articulation.�To�see�a�description�of�the�available�articulations�within�a�Key�Switch�Instrument,�click�any�of�the�colored�keys�to�open�the�Key�Switches�window�that�shows�each�articulation�labeled�on�the�switching�notes.�This�example�shows�a�multi-articulation�Viola�Instrument�with�the�Detache�articulation�selected.
SampleTank 3
3 - PLAY page 28
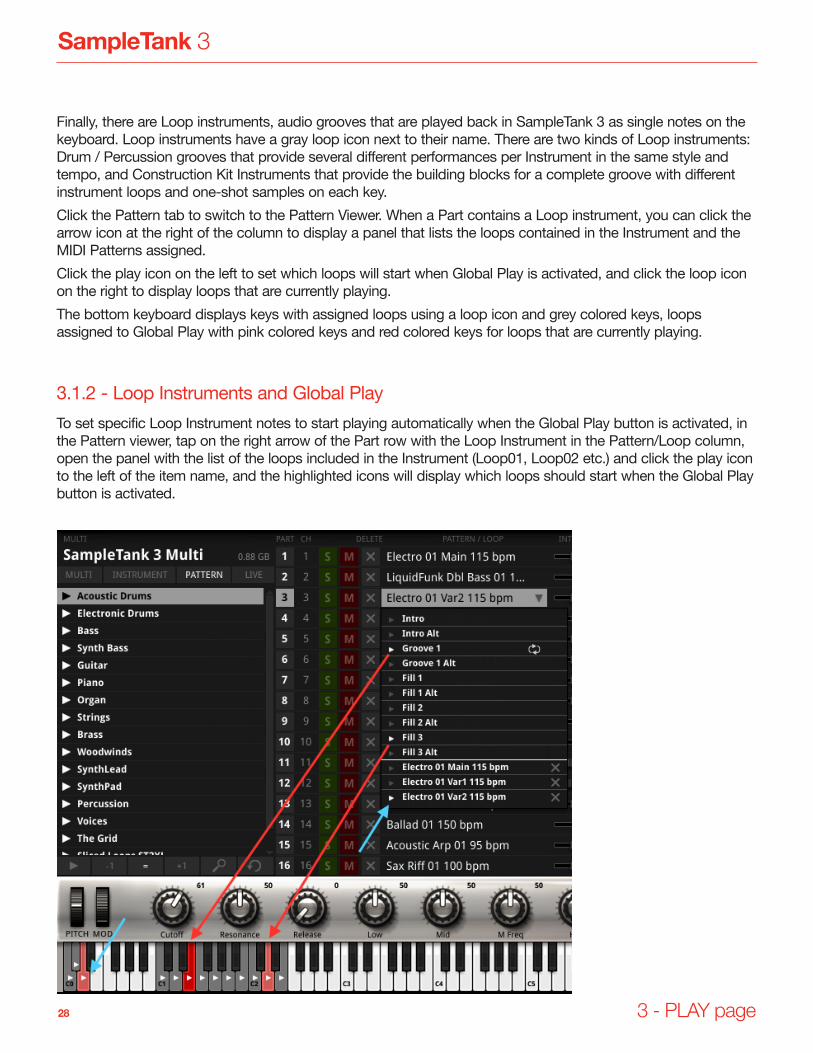
Finally,�there�are�Loop�instruments,�audio�grooves�that�are�played�back�in�SampleTank�3�as�single�notes�on�the�keyboard.�Loop�instruments�have�a�gray�loop�icon�next�to�their�name.�There�are�two�kinds�of�Loop�instruments:�Drum�/�Percussion�grooves�that�provide�several�different�performances�per�Instrument�in�the�same�style�and�tempo,�and�Construction�Kit�Instruments�that�provide�the�building�blocks�for�a�complete�groove�with�different�instrument�loops�and�one-shot�samples�on�each�key.Click�the�Pattern�tab�to�switch�to�the�Pattern�Viewer.�When�a�Part�contains�a�Loop�instrument,�you�can�click�the�arrow�icon�at�the�right�of�the�column�to�display�a�panel�that�lists�the�loops�contained�in�the�Instrument�and�the�MIDI�Patterns�assigned.Click�the�play�icon�on�the�left�to�set�which�loops�will�start�when�Global�Play�is�activated,�and�click�the�loop�icon�on�the�right�to�display�loops�that�are�currently�playing.The�bottom�keyboard�displays�keys�with�assigned�loops�using�a�loop�icon�and�grey�colored�keys,�loops�assigned�to�Global�Play�with�pink�colored�keys�and�red�colored�keys�for�loops�that�are�currently�playing.
3.1.2�-�Loop�Instruments�and�Global�PlayTo�set�specific�Loop�Instrument�notes�to�start�playing�automatically�when�the�Global�Play�button�is�activated,�in�the�Pattern�viewer,�tap�on�the�right�arrow�of�the�Part�row�with�the�Loop�Instrument�in�the�Pattern/Loop�column,�open�the�panel�with�the�list�of�the�loops�included�in�the�Instrument�(Loop01,�Loop02�etc.)�and�click�the�play�icon�to�the�left�of�the�item�name,�and�the�highlighted�icons�will�display�which�loops�should�start�when�the�Global�Play�button�is�activated.�

SampleTank 3
3 - PLAY page 29
The�loop�icon�on�the�right�display�loops�that�are�currently�running.The�Multi�will�then�remember�which�loop�notes�you�assigned,�and�the�next�time�you�press�Global�Play,�those�loop�notes�will�play�automatically�and�in�sync�with�any�assigned�MIDI�Patterns.�You�can�do�this�to�mix-and-match�audio�loops�with�MIDI�Patterns�on�multiple�Parts�so�that�Global�Play�can�start�and�stop�an�entire�arrangement�of�audio�loops�and�MIDI�Patterns.Note�that�audio�loops�and�MIDI�patterns�for�the�loop�instrument�cannot�both�be�set�to�be�active�simultaneously.When�synced�to�the�host,�the�Global�Play�behaves�like�this:•� Global�play�stops�when�the�host�transport�sends�a�stop�command.•� If�the�host�is�not�running�while�the�Global�Play�is�running,�when�the�host�sends�a�play�command,�the�global�
play�will�retrigger�at�the�first�beat�of�the�next�measure.•� When�the�Global�Play�and�the�host�is�not�running,�any�running�patterns�or�any�individual�audio�loops�
included�in�a�loop�instrument�will�stop�when�the�host�sends�a�play�command.
3.1.3�-�Syncing�LoopsInstruments�in�the�Loops�category�have�their�original�tempo�in�the�name.�For�example,�“Dubstep�1�140�bpm.”�When�you�load�a�Loop�Instrument,�you�will�see�a�SYNC�button�on�the�right�side�of�the�MACRO�panel.�Click�this�button�to�change�the�Loop�Instrument’s�tempo�to�match�the�global�tempo�that�is�displayed�in�the�bottom�bar.�When�used�as�a�plug-in,�this�will�usually�be�the�tempo�set�by�your�D.A.W.�or�host�application.�
3.1.4�-�Master�BPM�and�KeySet�the�BPM�of�the�internal�transport�next�to�the�clock�icon�in�the�bottom�row.�MIDI�patterns�and�loop�instruments�will�sync�accordingly.To�automatically�set�each�MIDI�pattern�key�loaded�in�a�part�to�a�common�key,�click�the�left�side�of�the�field,�and�choose�a�key�from�drop�down�menu.

SampleTank 3
3 - PLAY page 30
3.2�-�The�MULTI�tabClick�the�MULTI�tab�to�browse�and�load�SampleTank�3�Multis.�A�Multi�is�the�collection�of�all�16�Parts�with�their�Instruments,�effects�and�Patterns.�When�a�Multi�is�loaded,�you�will�see�the�contents�of�the�16�Parts�listed�in�the�Part�Browser�on�the�right.
The�list�of�Multis�is�at�the�left.�Double�click�to�load�a�Multi.
SampleTank 3
3 - PLAY page 31
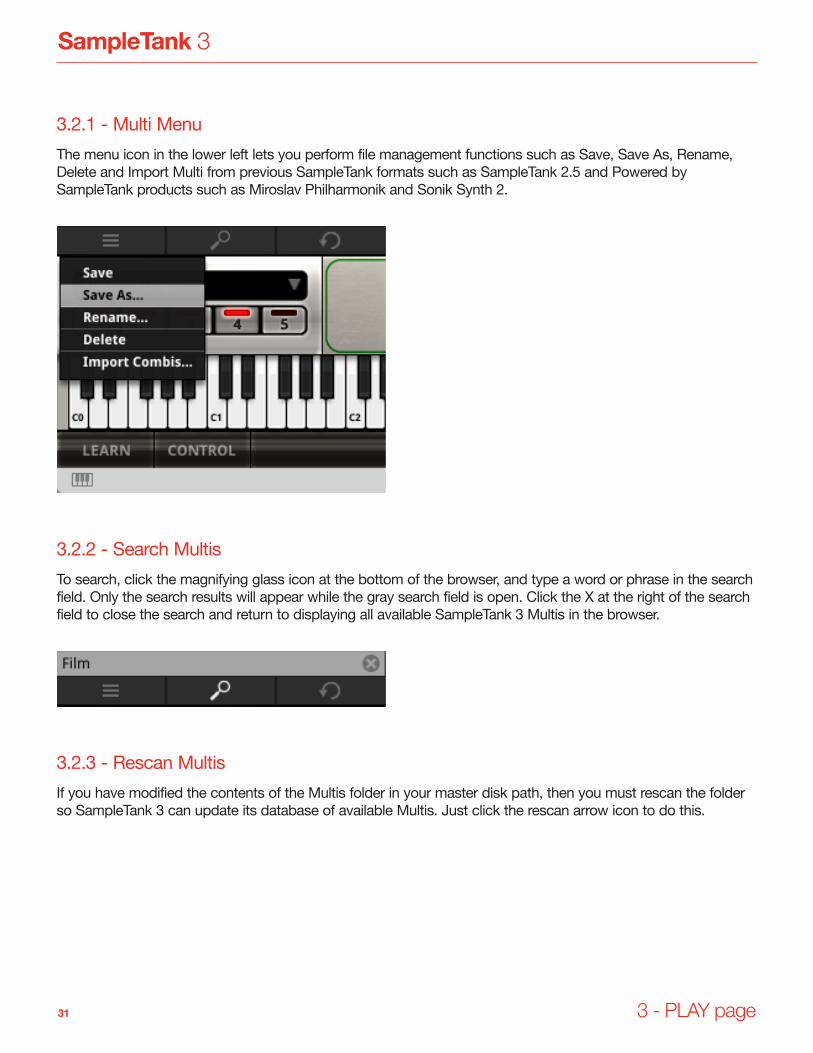
3.2.1�-�Multi�MenuThe�menu�icon�in�the�lower�left�lets�you�perform�file�management�functions�such�as�Save,�Save�As,�Rename,�Delete�and�Import�Multi�from�previous�SampleTank�formats�such�as�SampleTank�2.5�and�Powered�by�SampleTank�products�such�as�Miroslav�Philharmonik�and�Sonik�Synth�2.
3.2.2�-�Search�MultisTo�search,�click�the�magnifying�glass�icon�at�the�bottom�of�the�browser,�and�type�a�word�or�phrase�in�the�search�field.�Only�the�search�results�will�appear�while�the�gray�search�field�is�open.�Click�the�X�at�the�right�of�the�search�field�to�close�the�search�and�return�to�displaying�all�available�SampleTank�3�Multis�in�the�browser.
3.2.3�-�Rescan�MultisIf�you�have�modified�the�contents�of�the�Multis�folder�in�your�master�disk�path,�then�you�must�rescan�the�folder�so�SampleTank�3�can�update�its�database�of�available�Multis.�Just�click�the�rescan�arrow�icon�to�do�this.

SampleTank 3
3 - PLAY page 32
3.3�-�The�INSTRUMENTS�tabClick�the�INSTRUMENTS�tab�to�display�sound�libraries,�browse�and�load�individual�SampleTank�3�Instruments�into�any�of�the�16�Parts.
3.3.1�-�Instruments�MenuThe�menu�icon�in�the�lower�left�lets�you�perform�file�management�functions�such�as�Save,�Save�As,�Rename�and�Delete�as�well�as�Import�Legacy�Instruments�from�previous�SampleTank�formats�such�as�SampleTank�2.5�and�Powered�by�SampleTank�products�such�as�Miroslav�Philharmonik�and�Sonik�Synth�2.�Here�you�can�also�use�the�Import�Samples�function�to�load�AIFF�samples�into�SampleTank�3�to�create�your�own�user�instruments.�Management�functions�are�applied�to�the�item�selected�in�the�instrument�browser.
Import Legacy InstrumentsClick�this�function�to�use�your�previous�SampleTank�libraries�and�Powered�by�SampleTank�virtual�instruments�in�SampleTank�3.�When�you�click�Import�Legacy�Instrument,�a�dialog�will�appear�asking�you�to�name�your�imported�Instrument�library.�This�will�be�name�of�the�folder�that�appears�in�the�actual�SampleTank�3�browser�that�will�contain�all�of�the�imported�instruments�you�are�converting.�

SampleTank 3
3 - PLAY page 33
Click�the�BROWSE�button�to�set�the�disk�path�of�the�legacy�library�that�you�wish�to�import.�For�example,�if�you�are�importing�Miroslav�Philharmonik,�then�you�should�choose�the�master�library�folder�for�Miroslav�Philharmonik�here.�SampleTank�3�will�read�from�the�source�library�you�choose�and�then�rewrite�the�samples�and�Instruments�into�your�specified�SampleTank�3�disk�path�as�it�converts�them�to�SampleTank�3�format.
Import SampleClick�this�function�to�convert�your�samples�into�SampleTank�3�Instruments.�When�you�click�Import�Samples,�a�dialog�will�appear�asking�you�to�select�the�disk�path�of�your�source�samples.�
Click�the�Browse�button�to�define�the�disk�path�of�the�samples�you�want�to�import�to�create�a�new�SampleTank�3�Instrument.�The�NAME�field�is�where�you�enter�the�name�of�your�new�Instrument.�This�is�the�Instrument�name�that�will�appear�in�SampleTank�3.�The�CATEGORY�field�lets�you�assign�your�new�Instrument�to�one�of�the�existing�SampleTank�3�sound�categories.�If�your�samples�have�a�common�tempo�–�such�as�a�collection�of�groove�loops�–�enter�their�tempo�in�the�BPM�field.�Lastly,�the�ROOT�NOTE�SELECTION�section�lets�you�define�how�SampleTank�will�map�your�samples�across�the�keyboard.�Choose�NAME�if�you�want�to�manually�name�your�sample�files�to�set�their�root�notes.�You�must�type�the�note�name�first�and�with�no�spaces�within�the�note�name.�Leave�a�space�after�the�note�name�for�any�explanatory�text.�SampleTank�will�only�look�at�the�information�before�the�first�space�in�the�file�name.�For�example:�C#1�Electric�Bass.aif.�Do�not�use�C#1-Electric�Bass.aif�or�C#1_Electric�Bass.aif�as�SampleTank�will�not�be�able�to�read�the�note�info�with�a�dash,�underscore�or�other�character�before�the�first�space.�If�you�have�a�collection�of�loops�or�sound�effects,�and�you�just�want�to�map�the�samples�chromatically,�choose�the�CHROMATIC�FROM�option�and�then�set�the�key�on�which�you�want�the�first�note�to�appear.�Your�samples�will�be�mapped�from�that�note�ascending�chromatically.�When�you�have�entered�all�the�information�in�the�Instrument�Import�dialog,�click�IMPORT�to�create�your�new�SampleTank�3�Instrument.

SampleTank 3
3 - PLAY page 34
3.3.2�-�The�INFO�buttonClick�INFO�to�show�an�informational�panel�for�the�currently�selected�Instrument�in�the�browser.�The�panel�shows�a�unique�icon�for�the�selected�Instrument�along�with�the�amount�of�memory�that�the�Instrument�requires.�There�is�also�a�text�description�of�the�Instrument�and�a�Macro�field�that�lists�what�the�8�knobs�are�assigned�to�on�the�MACRO�panel�that�is�just�above�the�keyboard.�Note�that�the�INFO�panel�represents�the�Instrument�that�is�selected�in�the�browser�and�not�the�Instrument�that�is�actually�loaded�into�the�selected�Part.

SampleTank 3
3 - PLAY page 35
3.3.3�-�Search�InstrumentsTo�search,�click�the�magnifying�glass�icon�at�the�bottom�of�the�browser,�and�type�a�word�or�phrase�in�the�search�field..�Only�the�search�results�will�appear�while�the�gray�search�field�is�open.�Click�the�X�at�the�right�of�the�search�field�to�close�the�search�and�return�to�displaying�all�available�SampleTank�3�Instruments�in�the�browser.
3.3.4�-�FavoritesClick�the�Favorites�icon�to�display�instruments�tagged�as�Favorites.�The�library�and�instrument�category�tree�organization�will�reflect�the�instruments’�origins.
To�tag�an�instrument�as�a�Favorite,�scroll�with�the�mouse�cursor�along�instrument�list,�then�hover�with�the�mouse�on�the�side�of�the�instrument�name��where�the�Favorite�icon�will�appear,�and�then�click�the�icon�to�make�the�instrument�a�Favorite.
3.3.5�-�Rescan�InstrumentsIf�you�have�modified�the�contents�of�the�Instruments�folder�in�your�master�disk�path,�then�you�must�rescan�the�folder�so�SampleTank�3�can�update�its�database�of�available�Instruments.�Just�click�the�rescan�arrow�icon�to�do�this.
3.3.6�-�Browsing�Instruments�using�keyboard�arrow�keysIn�addition�to�browsing�instruments�using�the�mouse�or�iRig�PADS�and�MIDI�External�controllers,�the�computer�keyboard�arrow�keys�let�you�navigate�through�the�list�of�instruments�and�load�them.�Using�the�up�and�down�arrows,�move�vertically�in�the�list.�To�open�folder�and�close�folders,�use�left�and�right�arrow�keys.�To�load�instruments,�use�the�right�arrow�or�press�the�Enter�key�when�the�individual�instrument�is�selected.

SampleTank 3
3 - PLAY page 36
3.4�-�The�PATTERNS�tabClick�the�PATTERNS�tab�to�browse�and�load�SampleTank�3�Patterns�onto�individual�keyboard�keys�in�each�of�the�16�Parts.�You�can�put�one�pattern�on�every�key�using�up�to�128�keys�(128�MIDI�notes)�per�Part.�You�can�also�drag�patterns�directly�into�the�arrange�window�of�your�DAW�project,�with�all�of�their�edited�settings,�this�way�the�SampleTank�3�MIDI�patterns�can�be�conveniently�used�in�your�arrangement�together�with�all�other�tracks�in�your�composition.
3.4.1�-�Loading�PatternsTo�load�a�Pattern�onto�a�key�in�the�currently�selected�Part,�simply�drag�the�Pattern�from�the�browser�onto�the�key�of�your�choice.�Alternatively,�you�can�double-click�the�Pattern�name,�and�it�will�automatically�load�into�C0�or�the�next�available�chromatic�note�above�if�a�Pattern�already�exists�in�C0.�You�can�also�drag�a�Pattern�straight�into�a�MIDI�track�of�your�DAW’s�arrange�window�where�it�will�appear�as�new�MIDI�data�that�integrates�with�your�composition�that�you�can�edit�at�will.
SampleTank 3
3 - PLAY page 37
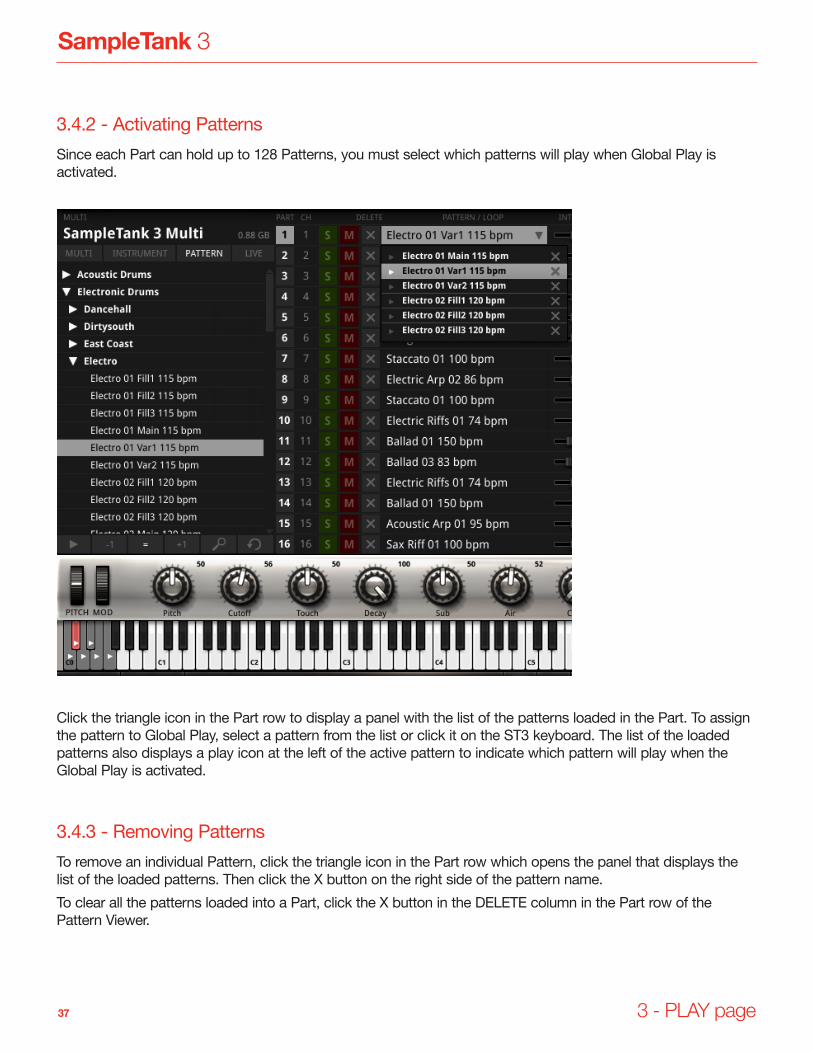
3.4.2�-�Activating�PatternsSince�each�Part�can�hold�up�to�128�Patterns,�you�must�select�which�patterns�will�play�when�Global�Play�is�activated.�
Click�the�triangle�icon�in�the�Part�row�to�display�a�panel�with�the�list�of�the�patterns�loaded�in�the�Part.�To�assign�the�pattern�to�Global�Play,�select�a�pattern�from�the�list�or�click�it�on�the�ST3�keyboard.�The�list�of�the�loaded�patterns�also�displays�a�play�icon�at�the�left�of�the�active�pattern�to�indicate�which�pattern�will�play�when�the�Global�Play�is�activated.�
3.4.3�-�Removing�PatternsTo�remove�an�individual�Pattern,�click�the�triangle�icon�in�the�Part�row�which�opens�the�panel�that�displays�the�list�of�the�loaded�patterns.�Then�click�the�X�button�on�the�right�side�of�the�pattern�name.�To�clear�all�the�patterns�loaded�into�a�Part,�click�the�X�button�in�the�DELETE�column�in�the�Part�row�of�the�Pattern�Viewer.�

SampleTank 3
3 - PLAY page 38
3.4.4�-�GLOBAL�Play�ButtonIn�addition�to�triggering�the�Pattern�from�a�MIDI�note�on�the�keyboard,�you�can�start�and�stop�the�currently�selected�Pattern�by�clicking�the�Global�Play�Button.�Note�that�you�can�have�a�Pattern�selected�in�multiple�Parts�simultaneously.�This�gives�you�the�ability�to�trigger�many�Patterns�as�well�as�audio�loops�simultaneously�if�you�choose.�See�section�3.1.2�for�how�to�assign�audio�loops�to�Global�Play.
3.4.5�-�Pattern�INTENSITY�SliderUse�this�slider�to�scale�the�MIDI�velocities�within�the�Pattern�to�make�the�notes�louder�or�softer.�The�intensity�value�is�also�applied�when�you�drag�the�Pattern�into�your�DAW�timeline.�Note�that�the�slider�is�disabled�when�patterns�are�not�selected�for�a�Loop�Instrument�loaded�in�a�Part.
3.4.6�-�Pattern�KEYClick�and�drag�the�value�up�or�down�to�transpose�the�currently�selected�Pattern.�Pitched�patterns�are�displayed�in�their�original�key�(C,�C#,�D,�etc.),�and�non-pitched�patterns�such�as�drum�and�percussion�patterns�are�displayed�with�a�semitone�offset.�Note�that�when�you�select�a�key�in�the�Key�Match�control�in�the�bottom�bar�(next�to�the�tempo�indicator),�all�loaded�Patterns�will�automatically�play�in�the�selected�key�without�the�need�of�transposing.�Note�that�the�Key�parameter�is�disabled�when�patterns�are�not�selected�for�a�Loop�Instrument�loaded�in�a�Part.
3.4.7�-�Pattern�QUANTIZESelect�any�setting�in�the�QUANTIZE�drop-down�menu�to�re-quantize�the�currently�select�Pattern.�You�can�turn�a�straight�groove�into�a�swing�groove,�a�triplet�groove�into�a�straight�groove�or�even�a�loose�groove�into�a�tighter�groove.

SampleTank 3
3 - PLAY page 39
3.4.8�-�Loop�instruments�in�the�Pattern�viewerIn�the�row�in�the�pattern�viewer�for�a�Part�with�a�loaded�loop�Instrument,�click�the�arrow�on�the�right�of�the�Pattern/Loop�column�to�display�a�panel�with�a�list�of�the�loops�included�in�the�Instrument�and�MIDI�Patterns�assigned�including�a�play�icon�at�the�left�to�set�which�pattern�or�loops�should�start�when�Global�Play�is�activated�and�a�loop�icon�on�the�right�to�display�the�patterns�or�loops�that�are�currently�playing.�
Audio�loops�in�the�loop�instrument�and�MIDI�patterns�can�be�set�to�be�active�simultaneously.�Note�that�this�is�different�from�the�MIDI�pattern�behavior�which�can�have�only�one�active�pattern�a�time�per�Part.�Instrument�loops�can�have�multiple�loops�active�playedto�play�at�the�same�time�for�an�individual�Part.
3.4.9�-�Pattern�Audition�Play�ButtonClick�this�button�to�activate�the�Pattern�audition.�

SampleTank 3
3 - PLAY page 40
When�active,�the�Pattern�that�you�select�in�the�browser�will�automatically�play�the�Instrument�loaded�into�the�currently�selected�Part�without�stopping�the�Global�Play.�If�the�selected�Part�already�has�an�active�pattern�playing,�you�can�select�a�pattern�in�the�browser�to�preview�which�will�mute�the�currently�playing�pattern�until�the�Pattern�audition�button�is�disabled�or�if�you�decide�to�replace�the�currently�active�pattern�with�the�one�selected�in�browser�by�double-clicking�on�the�pattern�selected�from�the�browser.it.�
3.4.10�-�Octave�Shift�ButtonsThe�-1,�=�and�+1�buttons�let�you�shift�the�octave�of�the�Pattern�preview�when�auditioning�in�the�browser.
3.4.11�-�Search�PatternsTo�search,�click�the�magnifying�glass�icon�at�the�bottom�of�the�browser,�and�type�a�word�or�phrase�in�the�search�field.�
Only�the�search�results�will�appear�while�the�gray�search�field�is�open.�Click�the�X�at�the�right�of�the�search�field�to�close�the�search�and�return�to�displaying�all�available�SampleTank�3�Patterns�in�the�browser.
3.4.12�-�Rescan�PatternsIf�you�have�modified�the�contents�of�the�Patterns�folder�in�your�master�disk�path,�then�you�must�rescan�the�folder�so�SampleTank�3�can�update�its�database�of�available�Patterns.�Just�click�the�rescan�arrow�icon�to�do�this.
SampleTank 3
3 - PLAY page 41
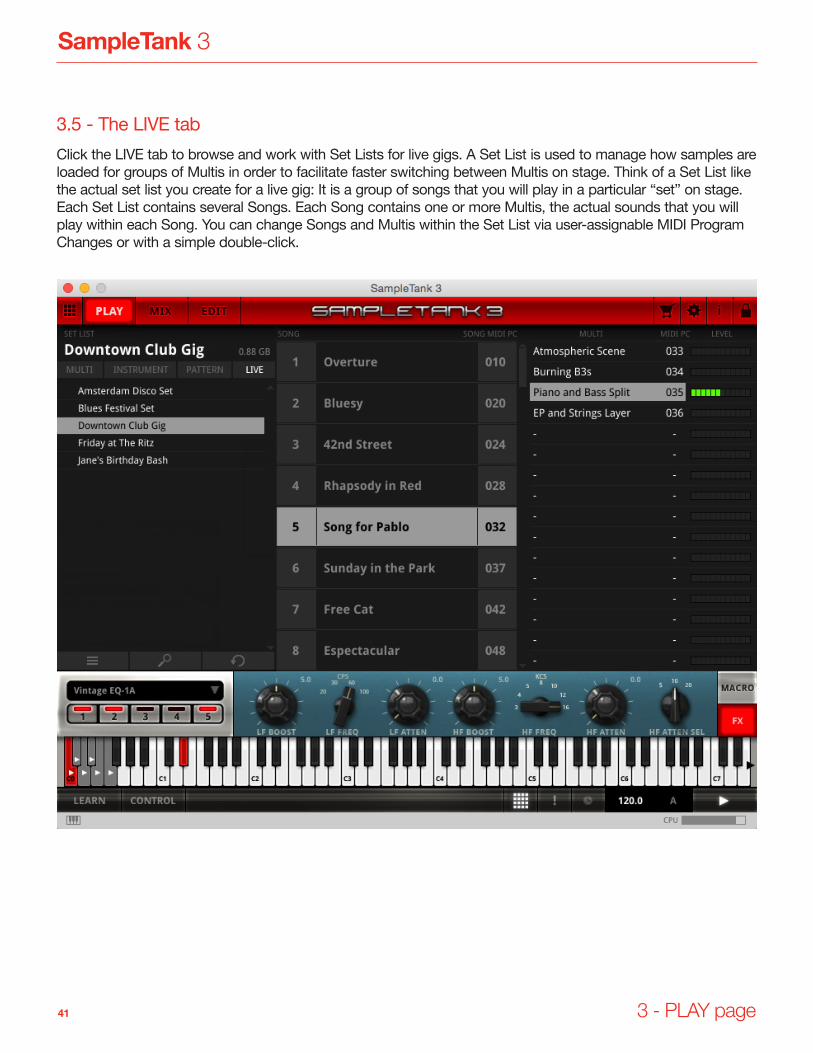
3.5�-�The�LIVE�tabClick�the�LIVE�tab�to�browse�and�work�with�Set�Lists�for�live�gigs.�A�Set�List�is�used�to�manage�how�samples�are�loaded�for�groups�of�Multis�in�order�to�facilitate�faster�switching�between�Multis�on�stage.�Think�of�a�Set�List�like�the�actual�set�list�you�create�for�a�live�gig:�It�is�a�group�of�songs�that�you�will�play�in�a�particular�“set”�on�stage.�Each�Set�List�contains�several�Songs.�Each�Song�contains�one�or�more�Multis,�the�actual�sounds�that�you�will�play�within�each�Song.�You�can�change�Songs�and�Multis�within�the�Set�List�via�user-assignable�MIDI�Program�Changes�or�with�a�simple�double-click.

SampleTank 3
3 - PLAY page 42
3.5.1�-�Set�ListsThe�Set�List�is�the�object�that�is�stored�under�the�Live�tab.�A�Set�List�contains�Songs,�and�Songs�contain�Multis.�Each�Set�List�can�store�up�to�64�Songs,�and�each�Song�can�contain�up�to�16�Multis.�You�manually�load�the�Set�List�into�the�SampleTank�3�Live�tab�browser,�and�then�you�can�use�MIDI�Program�Change�messages�to�load�Songs�and�Multis�within�each�Song.�Double-click�the�desired�Set�List�in�the�browser�to�load�it.
3.5.2�-�The�Song�ColumnThere�are�64�slots�in�the�SONG�column.�Here�you�can�click�in�the�Song�name�field�and�enter�the�name�of�each�Song�within�the�Set�List.�The�Song�number�in�the�left�column�is�for�your�reference�only�and�does�NOT�correspond�to�a�MIDI�Program�Change�number.�You�set�the�MIDI�Program�Change�number�that�will�load�the�Song�in�the�SONG�MIDI�PC�column�on�the�right.�Type�the�MIDI�Program�Change�number�for�the�Song�in�the�SONG�MIDI�PC�field.�Then�when�SampleTank�receives�that�MIDI�Program�Change�number,�it�will�load�the�Song�and�all�samples�for�the�Multis�within�it�along�with�the�first�Multi.
3.5.3�-�The�Multi�ColumnClick�the�drop-down�menu�on�the�left�of�each�slot�to�assign�any�of�your�SampleTank�Multis�to�the�16�slots.�Then�click�in�the�MIDI�PC�column�on�the�right�and�enter�the�MIDI�Program�Change�number�you�want�to�assign�to�the�Multi.�Then�when�SampleTank�receives�that�MIDI�Program�Change�number,�it�will�automatically�load�the�Multi.
3.5.4�-�Memory�Management�in�LIVE�modeWhen�a�Song�is�loaded,�SampleTank�loads�the�samples�for�all�Multis�within�the�Song.�This�helps�the�Multis�to�load�much�faster�which�is�critical�during�live�performance�as�the�samples�are�already�in�memory�like�a�hardware�synthesizer.�With�this�memory�management�system,�you�can�even�use�a�single�“Song”�for�your�entire�set�if�you�don’t�use�too�many�different�Multis.�LIVE�mode�gives�you�the�power�to�configure�sample�loading�the�way�you�want�to�best�fit�your�custom�needs.

SampleTank 3
3 - PLAY page 43
3.6�-�Quick�Access�PanelAll�4�main�pages�of�SampleTank�3�provide�you�with�a�Quick�Access�Panel�at�the�bottom�of�the�interface�that�lets�you�access�the�most�commonly�used�parameters�for�the�currently�loaded�Instrument�as�well�as�all�of�its�assigned�insert�effects.�Click�MACRO�to�view�the�8�controls�that�have�been�customized�for�each�Instrument,�or�Click�FX�to�access�any�of�the�5�insert�effect�slots�for�the�Instrument.�On�the�FX�panel,�select�one�of�the�5�insert�effect�slots�by�clicking�the�slot�1-5�buttons�on�the�left.�Click�the�top�part�of�the�slot�button�to�disable�or�re-enable�the�effect.�The�red�LED�will�light�to�indicate�the�state�of�the�effect.�The�LED�is�red�when�the�effect�is�active�and�dark�when�it�is�bypassed.�Use�the�drop-down�menu�above�the�slot�numbers�to�change�the�effect�in�the�current�effect�slot�or�load�a�new�effect�into�an�empty�slot.�

SampleTank 3
4 - MIX page 44
Chapter 4 – The MIX page
4.1�-�OverviewThe�MIX�page�is�where�you�adjust�the�volume,�pan�and�effects�for�the�instruments�loaded�into�the�16�Parts.�Each�Part�is�represented�by�a�mixing�board-style�channel�numbered�from�1-16.�As�with�the�Part�Viewer�on�the�PLAY�page,�the�Part�Channels�on�the�MIX�page�each�hold�one�SampleTank�3�Instrument�and�its�5�possible�insert�effects.�To�the�right�of�the�16�Part�Channels�are�4�Effect�Return�Channels�where�you�can�load�more�global-style�effects�like�reverbs�and�delays�that�can�be�fed�by�multiple�Instruments�via�the�effect�sends�on�the�individual�Part�channels.�Each�Effect�Return�Channel�has�5�effect�slots�just�like�the�Part�Channels.�And�then�at�the�far�right�is�the�Master�Channel�which�processes�the�master�output.�The�Master�Channel�also�has�5�effect�slots.�The�21�total�channels�of�SampleTank�3�give�you�the�flexibility�to�load�as�many�as�105�simultaneous�effects.�Your�computer’s�CPU�power�is�the�only�limitation!�

SampleTank 3
4 - MIX page 45
4.1.1�-�INSTRUMENT�and�MULTI�MenusAt�the�top�right�of�the�MIX�page�are�two�menus�labeled�INSTRUMENT�and�MULTI.�Click�the�name�to�expand�the�drop-down�menu�where�you�can�perform�file�management�tasks�for�both�Instruments�and�the�currently�loaded�Multi�including�Save,�Save�As,�Rename�and�Delete.
4.1.2�-�Instrument�Icon�DisplayClick�the�guitar�icon�at�the�top�right�to�show�the�icons�for�the�currently�loaded�instruments�in�place�of�the�insert�effects�for�the�Part�Channels.
SampleTank 3
4 - MIX page 46
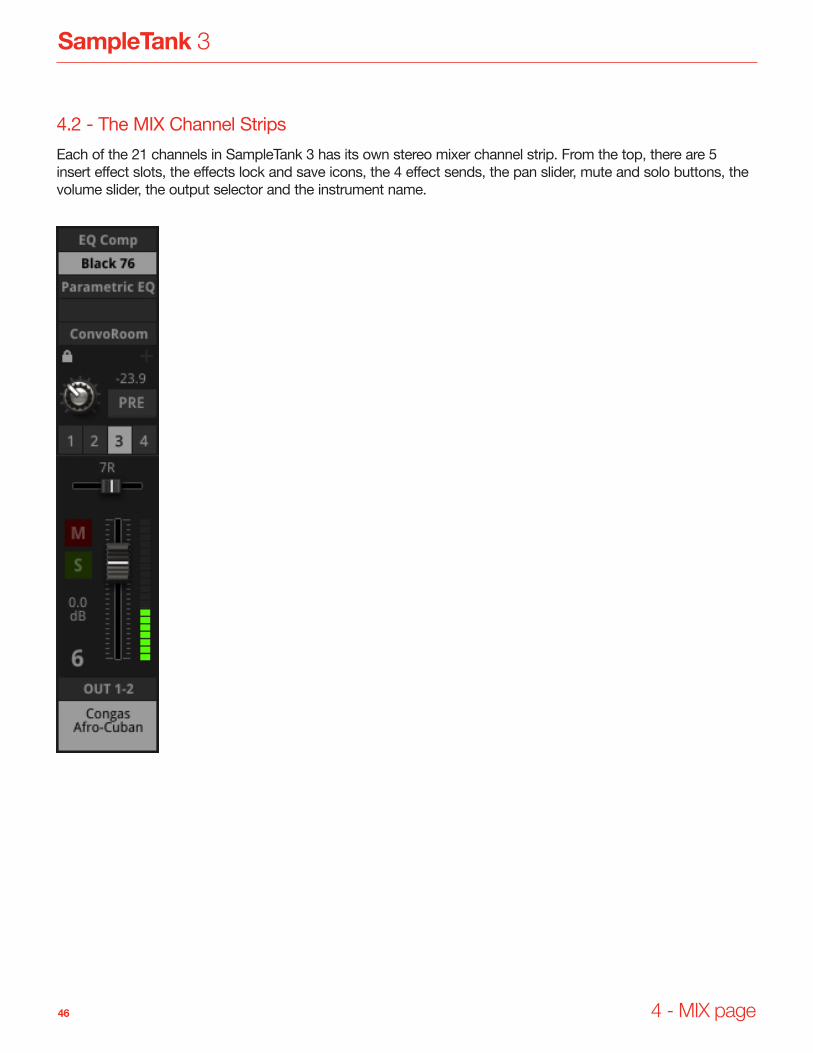
4.2�-�The�MIX�Channel�StripsEach�of�the�21�channels�in�SampleTank�3�has�its�own�stereo�mixer�channel�strip.�From�the�top,�there�are�5�insert�effect�slots,�the�effects�lock�and�save�icons,�the�4�effect�sends,�the�pan�slider,�mute�and�solo�buttons,�the�volume�slider,�the�output�selector�and�the�instrument�name.

SampleTank 3
4 - MIX page 47
4.2.1�-�Insert�EffectsEach�channel�has�5�slots�that�hold�“insert�effects.”�Insert�effects�are�effect�processors�that�are�used�only�for�the�specific�channel.�For�example,�if�you�have�a�piano�in�Part�1�and�load�an�equalizer�into�the�first�insert�effect�slot,�that�equalizer�will�only�affect�the�piano.�The�slots�are�serialized�from�top�to�bottom,�so�the�effect�in�the�higher�slot�feeds�the�effect�in�the�lower�slot.�This�is�particularly�significant�for�dynamics�processors�like�compressors�and�limiters�whose�behavior�will�change�when�EQ�or�any�level�changes�in�the�higher�slots�are�made.�
To�load�an�insert�effect,�click�the�slot�where�you�want�to�put�it.�A�pop-up�menu�will�appear�that�lets�you�choose�from�7�effect�categories.�Click�an�effect�category�to�show�the�available�effects�inside,�and�then�click�the�specific�effect�you�want�in�order�to�load�it�into�the�effect�slot.�To�change�an�existing�effect,�simply�click�it�to�re-open�the�pop-up�menu.�To�clear�the�effect�slot�and�remove�an�effect,�click�the�slot�and�select�“Empty.”
4.2.2�-�Effects�LockYou�can�lock�the�insert�effect�slots�so�that�the�current�effects�do�not�change�when�a�new�Instrument�loaded.�For�example,�perhaps�you�have�set�up�a�chain�of�guitar�effects�including�stomp�boxes,�amp�and�outboard�effects,�but�you�want�to�try�loading�different�guitar�Instruments�while�maintaining�the�same�effects.�Simply�click�the�lock�icon�to�lock�the�channel’s�effects�and�prevent�them�from�being�replaced�by�effects�that�are�normally�associated�with�the�new�instrument�you�are�loading.
4.2.3�-�Save�/�Load�EffectsClick�the�+�button�to�open�a�pop-up�menu�where�you�can�store�your�current�effect�settings�or�to�load�a�saved�effect�preset.

SampleTank 3
4 - MIX page 48
4.2.4�-�Effect�SendsEach�Part�Channel�has�4�effect�sends�represented�by�a�single�knob�with�the�numbers�1-4�below.�Select�one�of�the�4�effect�sends�by�clicking�the�effect�send�number,�and�then�the�knob�will�show�the�value�for�that�effect�send.�Each�effect�send�controls�how�much�of�the�channel’s�signal�is�sent�to�each�of�the�4�Effect�Return�Channels�at�the�far�right�of�the�mixer.�The�Effect�Return�Channels�can�contain�any�effects�you�like,�but�generally�they�are�used�for�more�global�effects�like�reverb�and�delay�where�multiple�instruments�can�be�fed�into�the�same�effect�(a�piano,�guitar�and�synth�lead�all�going�to�the�same�reverb,�for�example).
There�is�also�a�PRE�button�for�each�effect�send�that�lets�you�set�the�effect�send�to�“pre-fader,”�meaning�that�the�effect�send�knob�is�not�affected�by�the�volume�slider�position.�When�the�PRE�button�is�not�active,�the�default�state,�the�effect�send�will�be�increased�or�decreased�by�the�position�of�the�volume�slider.�So�if�you�have�a�piano�on�Channel�1�that�is�sending�to�a�reverb,�when�you�turn�the�volume�slider�up,�the�send�to�the�reverb�will�also�increase.�But�if�you�want�the�reverb�level�to�stay�the�same�but�only�change�the�dry�level�of�the�sound,�click�PRE�to�make�the�effect�send�pre-fader�and�not�affected�by�the�volume�slider.

SampleTank 3
4 - MIX page 49
4.2.5�-�Pan�SliderEach�channel�has�a�pan�slider�that�determines�the�placement�of�the�channel�in�the�stereo�image.�The�pan�position�is�displayed�above�the�slider�and�updates�as�you�move�it.
4.2.6�-�Mute�and�Solo�ButtonsClick�the�red�“M”�button�to�mute�the�channel.�Click�the�green�“S”�button�to�solo�the�channel�so�you�only�hear�that�channel�and�no�others�(unless�other�channels�are�also�in�solo).�You�can�mute�and�solo�multiple�channels�simultaneously.
4.2.7�-�Volume�SliderClick�and�drag�the�volume�slider�up�and�down�to�change�the�volume�of�the�channel.�The�volume�setting�is�displayed�on�the�left�in�decibels�(dB).�
SampleTank 3
4 - MIX page 50
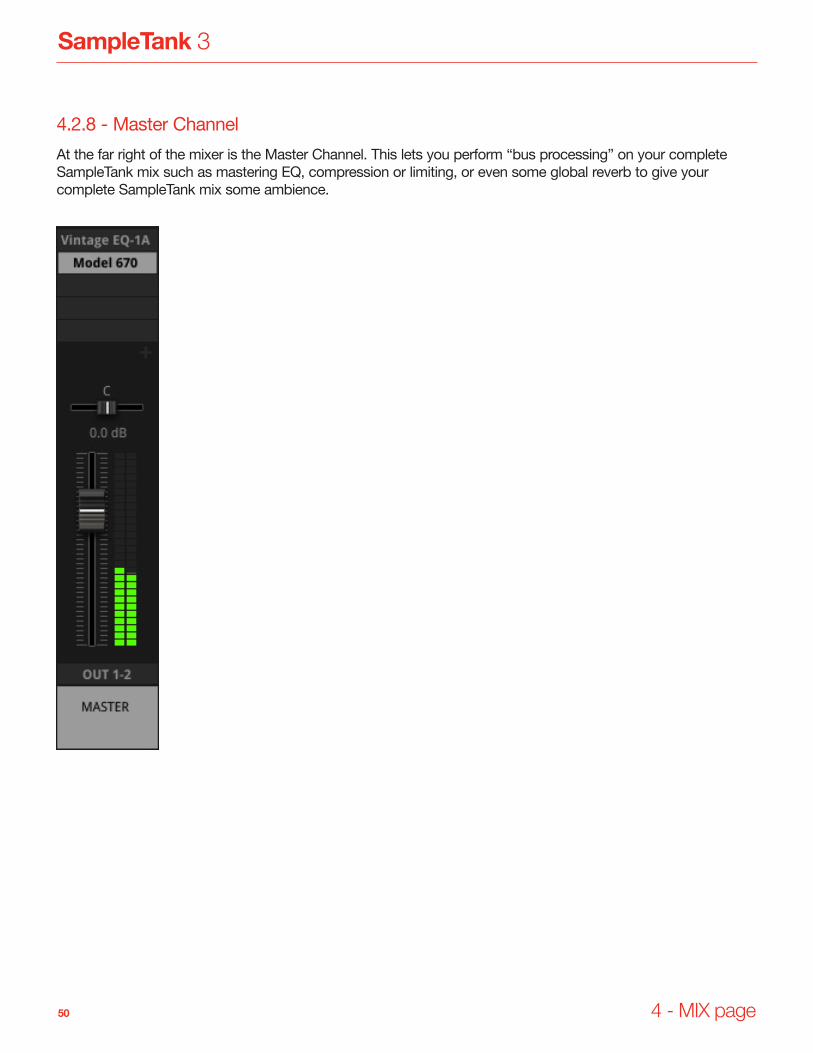
4.2.8�-�Master�ChannelAt�the�far�right�of�the�mixer�is�the�Master�Channel.�This�lets�you�perform�“bus�processing”�on�your�complete�SampleTank�mix�such�as�mastering�EQ,�compression�or�limiting,�or�even�some�global�reverb�to�give�your�complete�SampleTank�mix�some�ambience.

SampleTank 3
5 - EDIT page 51
Chapter 5 – The EDIT page
5.1�-�OverviewClick�the�EDIT�button�to�open�the�editor�where�you�can�adjust�the�various�synthesizer�parameters�for�the�Instrument�in�the�currently�selected�Part.�You�can�change�the�current�Part�by�clicking�the�Part�numbers�on�the�far�right.�The�name�of�the�Instrument�that�is�loaded�into�the�current�Part�is�displayed�at�the�upper�right.
SampleTank 3
5 - EDIT page 52
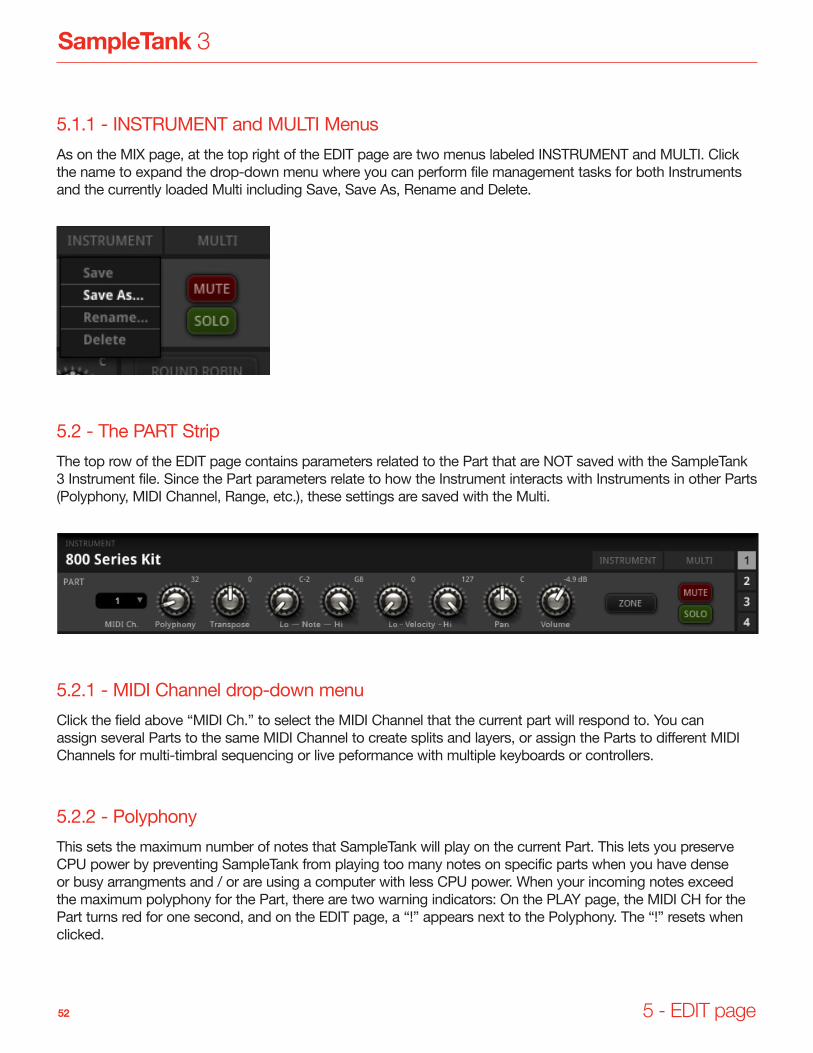
5.1.1�-�INSTRUMENT�and�MULTI�MenusAs�on�the�MIX�page,�at�the�top�right�of�the�EDIT�page�are�two�menus�labeled�INSTRUMENT�and�MULTI.�Click�the�name�to�expand�the�drop-down�menu�where�you�can�perform�file�management�tasks�for�both�Instruments�and�the�currently�loaded�Multi�including�Save,�Save�As,�Rename�and�Delete.
5.2�-�The�PART�StripThe�top�row�of�the�EDIT�page�contains�parameters�related�to�the�Part�that�are�NOT�saved�with�the�SampleTank�3�Instrument�file.�Since�the�Part�parameters�relate�to�how�the�Instrument�interacts�with�Instruments�in�other�Parts�(Polyphony,�MIDI�Channel,�Range,�etc.),�these�settings�are�saved�with�the�Multi.
5.2.1�-�MIDI�Channel�drop-down�menuClick�the�field�above�“MIDI�Ch.”�to�select�the�MIDI�Channel�that�the�current�part�will�respond�to.�You�can�assign�several�Parts�to�the�same�MIDI�Channel�to�create�splits�and�layers,�or�assign�the�Parts�to�different�MIDI�Channels�for�multi-timbral�sequencing�or�live�peformance�with�multiple�keyboards�or�controllers.�
5.2.2�-�PolyphonyThis�sets�the�maximum�number�of�notes�that�SampleTank�will�play�on�the�current�Part.�This�lets�you�preserve�CPU�power�by�preventing�SampleTank�from�playing�too�many�notes�on�specific�parts�when�you�have�dense�or�busy�arrangments�and�/�or�are�using�a�computer�with�less�CPU�power.�When�your�incoming�notes�exceed�the�maximum�polyphony�for�the�Part,�there�are�two�warning�indicators:�On�the�PLAY�page,�the�MIDI�CH�for�the�Part�turns�red�for�one�second,�and�on�the�EDIT�page,�a�“!”�appears�next�to�the�Polyphony.�The�“!”�resets�when�clicked.
SampleTank 3
5 - EDIT page 53
5.2.3�-�TransposeShift�the�MIDI�input�to�the�Part�by�up�to�+/-�60�semitones�to�play�the�Part�in�different�keys�or�octaves.�
5.2.4�-�Note�RangeSet�the�low�and�high�MIDI�note�limit�that�the�current�Part�will�respond�to.�This�is�particularly�useful�for�setting�up�splits�where�you�can�have�multiple�Instruments�spread�across�the�keyboard�in�different�ranges�such�as�a�bass�on�the�left�and�a�piano�on�the�right.�
5.2.5�-�Velocity�RangeSet�the�low�and�high�velocity�limit�that�the�current�part�will�respond�to.�These�settings�let�you�create�velocity�splits�where�you�can�play�multiple�instruments�simply�by�playing�different�velocities.�For�example,�you�could�have�a�piano�set�to�play�in�the�full�velocity�range�on�one�Part,�but�then�have�orchestral�brass�that�comes�in�only�at�the�highest�velocities�on�another�Part.�
5.2.6�-�PanThis�is�the�pan�position�of�the�Part�and�corresponds�to�the�pan�slider�on�the�MIX�page.�
5.2.7�-�VolumeThis�is�the�volume�of�the�Part�and�corresponds�to�the�volume�slider�on�the�MIX�page.
5.2.8�-�Mute�and�Solo�buttonsThese�buttons�allow�you�to�mute�or�solo�the�current�Part.�They�correspond�to�the�Mute�and�Solo�buttons�on�the�MIX�page.�
5.2.9�-�Zone�buttonClicking�the�Zone�button�lets�you�make�adjustments�to�only�one�particular�area�of�the�keyboard.�For�example,�if�you�only�want�to�adjust�the�release�time�of�the�top�notes�of�a�piano,�click�Zone,�and�then�select�that�area�of�the�keyboard.�The�available�zones�will�be�displayed�in�different�shades�of�red.
SampleTank 3
5 - EDIT page 54
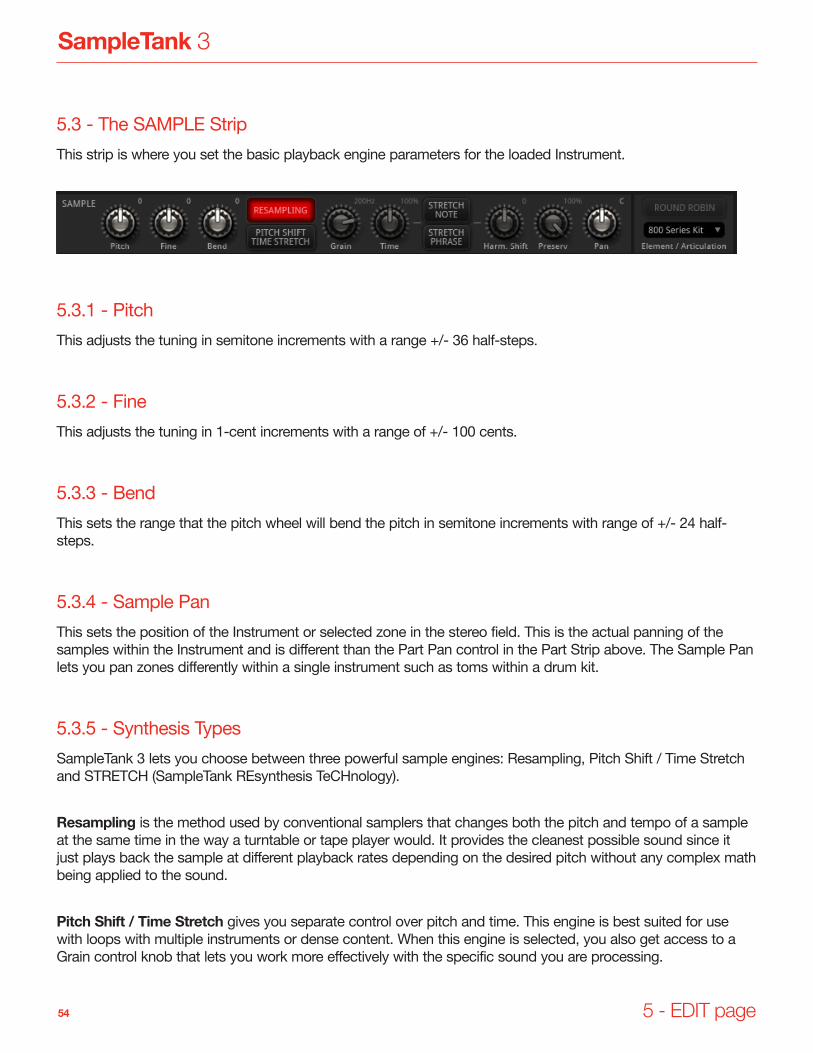
5.3�-�The�SAMPLE�StripThis�strip�is�where�you�set�the�basic�playback�engine�parameters�for�the�loaded�Instrument.
5.3.1�-�PitchThis�adjusts�the�tuning�in�semitone�increments�with�a�range�+/-�36�half-steps.
5.3.2�-�FineThis�adjusts�the�tuning�in�1-cent�increments�with�a�range�of�+/-�100�cents.
5.3.3�-�BendThis�sets�the�range�that�the�pitch�wheel�will�bend�the�pitch�in�semitone�increments�with�range�of�+/-�24�half-steps.�
5.3.4�-�Sample�PanThis�sets�the�position�of�the�Instrument�or�selected�zone�in�the�stereo�field.�This�is�the�actual�panning�of�the�samples�within�the�Instrument�and�is�different�than�the�Part�Pan�control�in�the�Part�Strip�above.�The�Sample�Pan�lets�you�pan�zones�differently�within�a�single�instrument�such�as�toms�within�a�drum�kit.�
5.3.5�-�Synthesis�TypesSampleTank�3�lets�you�choose�between�three�powerful�sample�engines:�Resampling,�Pitch�Shift�/�Time�Stretch�and�STRETCH�(SampleTank�REsynthesis�TeCHnology).
Resampling�is�the�method�used�by�conventional�samplers�that�changes�both�the�pitch�and�tempo�of�a�sample�at�the�same�time�in�the�way�a�turntable�or�tape�player�would.�It�provides�the�cleanest�possible�sound�since�it�just�plays�back�the�sample�at�different�playback�rates�depending�on�the�desired�pitch�without�any�complex�math�being�applied�to�the�sound.�
Pitch Shift / Time Stretch�gives�you�separate�control�over�pitch�and�time.�This�engine�is�best�suited�for�use�with�loops�with�multiple�instruments�or�dense�content.�When�this�engine�is�selected,�you�also�get�access�to�a�Grain�control�knob�that�lets�you�work�more�effectively�with�the�specific�sound�you�are�processing.�

SampleTank 3
5 - EDIT page 55
STRETCH�(SampleTank�REsynthesis�TeCHnology)�gives�you�separate�control�of�pitch,�time�and�harmonic�content.�STRETCH�is�designed�to�shift�a�sample�without�altering�its�formants.�Conversely,�it�also�lets�you�intentionally�shift�the�formants�or�time�(sample�duration)�independently�from�pitch.�For�example,�STRETCH�lets�you�bend�notes�on�a�voice,�saxophone,�violin,�brass,�and�most�acoustic�samples�without�making�it�sounding�artificial.�It�can�be�used�to�make�a�piano�sound�darker�or�brigther,�to�make�an�acoustic�guitar�to�sound�thinner�or�thicker,�and�so�on.�It�can�also�be�used�to�extend�vocal�samples�across�the�keyboard�while�sounding�more�natural�than�traditional�resampling.�For�loops,�this�engine�works�best�with�single�instruments,�but�can�sometimes�work�with�more�complex�sonic�content�as�well�(often�weird�but�interesting�effects�can�be�created�this�way).�To�keep�a�loop�in�sync,�SampleTank�needs�to�know�the�BPM�of�the�loop.�All�loop�Instruments�from�IK�Multimedia�provide�the�BPM�in�the�file�name�and�in�the�BPM�field�as�a�3-digit�number�that�SampleTank�3�reads.�For�user�samples,�the�best�practice�is�to�simply�enter�the�tempo�in�the�BPM�field�when�importing.�
When�you�select�one�of�the�two�STRETCH�options�(STRETCH�NOTE�or�STRETCH�PHRASE),�SampleTank�performs�a�pre-analysis�on�the�content.�Then�you�can�adjust�both�the�time�and�the�harmonic�content�of�the�sound�in�real-time.
5.3.6�-�Round�Robin�FreezeRound�robin�playback�uses�several�“takes”�of�the�same�note�to�create�a�more�realistic-sounding�instrument�and�avoid�the�old�“machine�gun”�effect�of�repeating�the�same�sample�over�and�over.�It�is�particularly�effective�with�drums�and�with�bass�samples�where�the�same�note�is�repeated�often.�However,�sometimes�it�can�be�more�desirable�to�repeat�the�same�sample�and�turn�round�robin�playback�off.�The�Round�Robin�Freeze�button�lets�you�stop�round�robin�playback�and�sets�the�Instrument�to�play�only�the�currently�active�round�robin�sample.�When�the�button�is�lit,�round�robin�playback�is�active,�and�samples�will�alternate�when�new�notes�are�played.�When�the�button�is�unlit,�only�the�last�variation�played�will�continue�to�play�making�the�instrument�into�a�more�traditional�sampled�instrument�with�just�one�sample�per�note�and�velocity�range.�
5.3.7�-�Element�SelectorThis�section�lets�you�choose�the�specific�Element�of�the�SampleTank�Instrument�that�you�want�to�edit.�The�drop-down�menu�lets�you�choose�the�Element�in�a�multi-articulation�instrument�such�as�a�violin�that�uses�key�switching�to�change�between�sustained,�staccato,�detaché�and�pizzicato�articulations.�It�also�lets�you�choose�the�Element�in�layered�instruments�such�as�a�piano�and�strings�sound.�Note�that�changes�to�parameters�on�the�EDIT�page�only�apply�to�the�currently�selected�Element,�so�always�make�sure�you�have�the�desired�Element�selected.�Also�note�that�many�SampleTank�3�Instruments�–�and�especially�legacy�Instruments�–�will�have�only�one�Element.

SampleTank 3
5 - EDIT page 56
5.4�-�The�FILTER�StripThis�is�where�you�select�and�adjust�the�synthesizer�filter.�You�can�choose�from�various�filter�types,�modes�and�slopes�and�also�just�the�cutoff�frequency,�resonance�and�overdrive�(where�applicable).
5.4.1�-�Filter�Type�MenuUse�the�drop-down�menu�to�select�the�type�of�filter�and�filter�mode�you�want.�There�are�many�different�filter�options,�and�each�will�apply�a�different�coloration�to�the�sound.�Low�Pass�filters�remove�high�frequency�content�and�allow�“lows�to�pass”�through.�High�Pass�filters�remove�low�frequency�content�and�allow�“highs�to�pass”�through.�Band�Pass�filters�remove�both�low�and�high�frequency�content�and�allow�only�the�selected�“band�to�pass”�through.�Peak�and�Notch�filters�apply�a�narrow�boost�and�cut�at�the�selected�frequency,�respectively.�The�Formant�filter�provides�a�vocal-style�shape�that�changes�with�the�frequency,�and�the�Phaser�filter�creates�a�comb-filtering�all-pass�sound�that�is�especially�suitable�for�synthesized�sounds.
5.4.2�-�Filter�FrequencyThis�is�the�cutoff�frequency�of�the�filter.�This�knob�will�create�different�effects�depending�on�the�filter�type�and�mode�selected.�In�general,�the�frequency�knob�controls�the�point�in�the�spectrum�at�which�the�filter�will�start�its�processing.�
5.4.3�-�ResonanceThis�knob�controls�the�emphasis�of�the�filter�at�the�cutoff�frequency.�The�higher�the�value,�the�greater�the�filter�effect�at�the�cutoff�frequency�or�as�the�filter�passes�through�the�cutoff�frequency�when�being�modulated.�In�a�traditional�low�pass�or�high�pass�filter,�high�resonance�settings�can�produce�a�whistling�effect�as�the�filter�is�modulated�by�an�envelope�or�LFO.�
5.4.4�-�OverdriveSome�of�the�filter�types,�such�as�the�M�Ladder�filters,�allow�you�to�distort�the�input�to�filter�similar�to�how�many�classic�analog�synthesizers�behave�when�their�oscillator�output�mix�level�is�set�high�before�going�into�the�filter�section.

SampleTank 3
5 - EDIT page 57
5.5�-�The�VELOCITY�StripThis�section�lets�you�program�how�velocity�will�affect�the�sound.
5.5.1�-�Velocity�to�Amp�knobThis�controls�how�velocity�will�affect�the�amplitude�(or�volume)�of�the�sound.�Higher�values�gives�a�greater�range�of�soft-to-loud�depending�on�the�velocity�played.�
5.5.2�-�Velocity�to�Pitch�knobThis�allows�velocity�to�control�the�pitch�of�the�sound.�When�it�is�turned�clockwise,�the�harder�you�play,�the�higher�the�pitch�of�the�sound.�When�it�is�turned�counterclockwise,�the�harder�you�play,�the�lower�the�pitch�of�the�sound.�
5.5.3�-�Velocity�to�Resonance�knobThis�lets�you�modulate�the�filter�resonance�based�on�how�hard�you�hit�the�key.�When�the�knob�is�turned�clockwise,�harder�velocities�will�increase�the�filter�resonance.�When�the�knob�is�turned�counterclockwise,�harder�velocities�will�decrease�the�filter�resonance.�
5.5.4�-�Velocity�to�Filter�knobThis�lets�you�control�the�cutoff�frequency�of�the�filter�with�how�hard�you�hit�the�key.�When�the�knob�is�turned�clockwise,�harder�velocities�will�increase�the�filter�cutoff�frequency.�When�the�knob�is�turned�counterclockwise,�harder�velocities�will�decrease�the�filter�cutoff�frequency.�This�is�a�great�way�to�add�expression�by�making�the�sound�brighter�or�darker�depending�on�how�hard�you�play.�
5.5.5�-�Velocity�to�LFO1�Depth�knobThis�controls�the�amplitude�of�the�LFO1�source�based�on�how�hard�you�press�the�key.�In�order�to�hear�this�effect,�LFO1�must�already�be�assigned�to�modulate�Pitch,�Filter�and�/�or�Level�in�the�LFO�section.�When�that�assignment�is�made,�this�knob�will�control�how�much�the�LFO�modulates�those�destinations�based�on�the�note�velocity.�For�example,�you�can�increase�the�vibrato�on�a�guitar�sound�by�hitting�the�note�harder.�

SampleTank 3
5 - EDIT page 58
5.5.6�-�Velocity�to�Env2�SustainThis�lets�you�control�the�Sustain�stage�of�Envelope�2�–�usually�the�filter�envelope�–�with�how�hard�you�press�the�key.�In�the�case�of�filter�modulation,�harder�velocities�can�keep�the�filter�sustaining�at�a�higher�frequency,�while�softer�velocities�let�the�filter�close�down�more�after�it�decays.
5.6�-�The�LFO�StripThis�section�determines�how�the�LFOs�(Low�Frequency�Oscillators)�will�modulate�the�variation�synthesis�sections�such�as�Pitch,�Filter�and�Amplitude�(volume).�A�“low�frequency�oscillator”�is�a�periodic�wave�generator�that�moves�slower�than�the�perceived�audio�range,�meaning�that�it�moves�slow�enough�that�you�can�hear�the�actual�cycling�of�the�oscillator�rather�than�just�a�continuous�pitch.
5.6.1�-�LFO�SelectorClick�either�LFO1�or�LFO2�to�show�the�settings�for�each�Low�Frequency�Oscillator.
5.6.2�-�LFO�SyncClick�the�SYNC�button�to�force�the�selected�LFO�to�synchronize�to�the�host�tempo.�The�Rate�knob�will�then�determine�the�note�subdivision�at�the�host�tempo.�Leave�the�SYNC�button�unlit�to�let�the�LFO�run�at�its�own�tempo,�set�in�Hertz,�independent�of�any�host.�
5.6.3�-�LFO�FreeWhen�this�button�is�unlit,�a�new�LFO�wave�will�start�with�each�note�pressed.�When�FREE�is�lit,�the�LFO�will�“free�run”�independent�of�when�notes�are�pressed�so�that�all�notes�will�share�the�same�LFO�like�a�vintage�analog�synthesizer.�
5.6.4�-�LFO�RateThis�knob�determines�the�speed�of�the�selected�Low�Frequency�Oscillator.�When�the�SYNC�button�is�lit,�the�Rate�knob�will�choose�between�note�subdivisions�based�on�the�host�tempo�such�as�1/4,�1/8,�1/8d�(dotted�eighth�note),�etc.�The�FREE�button�is�lit,�the�LFO�rate�will�be�displayed�in�Hertz,�the�frequency�(speed)�of�the�free�running�LFO.

SampleTank 3
5 - EDIT page 59
5.6.5�-�LFO�DepthThis�determines�the�amplitude�of�the�LFO�wave�and�therefore�the�master�amount�of�its�modulation�when�applied�to�any�destination�such�as�Pitch,�Filter,�Level�and�/�or�Pan.�
5.6.6�-�LFO�PhaseThis�determines�the�starting�phase�position�of�the�LFO�waveform�and�is�particularly�useful�for�creating�specific�synthesizer-style�modulation�effects.�To�get�the�most�from�this�parameter,�make�sure�the�FREE�button�is�NOT�active.�
5.6.7�-�LFO�FadeThis�creates�a�ramp�effect�on�the�LFO�wave�so�that�it�fades�in.�
5.6.8�-�LFO�WaveformChoose�a�wave�shape�for�the�Low�Frequency�Oscillator�by�clicking�the�icons�including�square,�triangle,�saw,�sine�and�random.�
5.6.9�-�LFO�to�Pitch�knobThis�knob�determines�how�much�the�selected�LFO�will�modulate�the�pitch�(tuning)�of�the�sound.�
5.6.10�-�LFO�to�Filter�knobThis�knob�determines�how�much�the�selected�LFO�will�modulate�the�cutoff�filter�frequency�of�the�sound.�
5.6.11�-�LFO�to�Level�knobThis�knob�determines�how�much�the�selected�LFO�will�modulate�the�level�(volume)�of�the�sound.�
5.6.12�-�LFO�to�Pan�knobThis�knob�determines�how�much�the�selected�LFO�will�modulate�the�panning�(left-right�position)�of�the�sound.�Note�that�only�LFO2�can�modulate�panning.

SampleTank 3
5 - EDIT page 60
5.7�-�The�ENVELOPE�StripSampleTank�has�two�envelopes�that�can�be�used�to�shape�the�volume,�tuning�and�filter�frequency�of�the�sound.�Each�envelope�has�a�slider�for�(A)ttack,�(H)old,�(D)ecay,�(S)ustain�and�(R)elease.�All�parameters�are�time-based�except�for�Sustain�which�indicates�a�level�where�the�envelope�will�remain�until�the�key�or�sustain�pedal�is�released.
5.7.1�-�Envelope�1�to�Level�knobThis�determines�the�output�level�of�Envelope�1�which�controls�the�volume�of�the�sound.�Because�of�its�position�in�the�signal�flow,�this�knob�can�also�be�used�as�a�master�volume�control�for�the�instrument�before�it�goes�into�the�effect.�
5.7.2�-�Envelope�2�to�Filter�knobThis�determines�how�much�Envelope�2�will�modulate�the�filter�cutoff�frequency.�The�greater�the�knob�value,�the�greater�the�range�of�the�filter�modulation.�
5.7.3�-�Envelope�2�to�Pitch�knobThis�determines�how�much�Envelope�2�will�modulate�the�tuning�of�the�sound.�The�greater�the�knob�value,�the�greater�the�range�of�the�pitch�modulation.

SampleTank 3
5 - EDIT page 61
5.8�-�The�KEY�StripThis�section�determines�how�the�keyboard�will�control�the�sound.
5.8.1�-�Keyboard�Mode�menuSelect�whether�the�keyboard�will�play�the�sound�polyphonically�(many�notes�simultaneously�available�as�on�a�piano�or�organ)�or�monophonically�(one�note�at�a�time�only�like�an�early�vintage�analog�synthesizer�or�a�trumpet).�There�are�also�2�different�legato�modes�for�playing�monophonically.
5.8.2�-�PortamentoThis�sets�the�amount�of�gliding�–�or�sliding�in�pitch�–�between�notes.
5.8.3�-�CurveThis�sets�the�curve�of�the�portamento�glide�between�notes.
SampleTank 3
6 - MIDI control 62
Chapter 6 – MIDI control
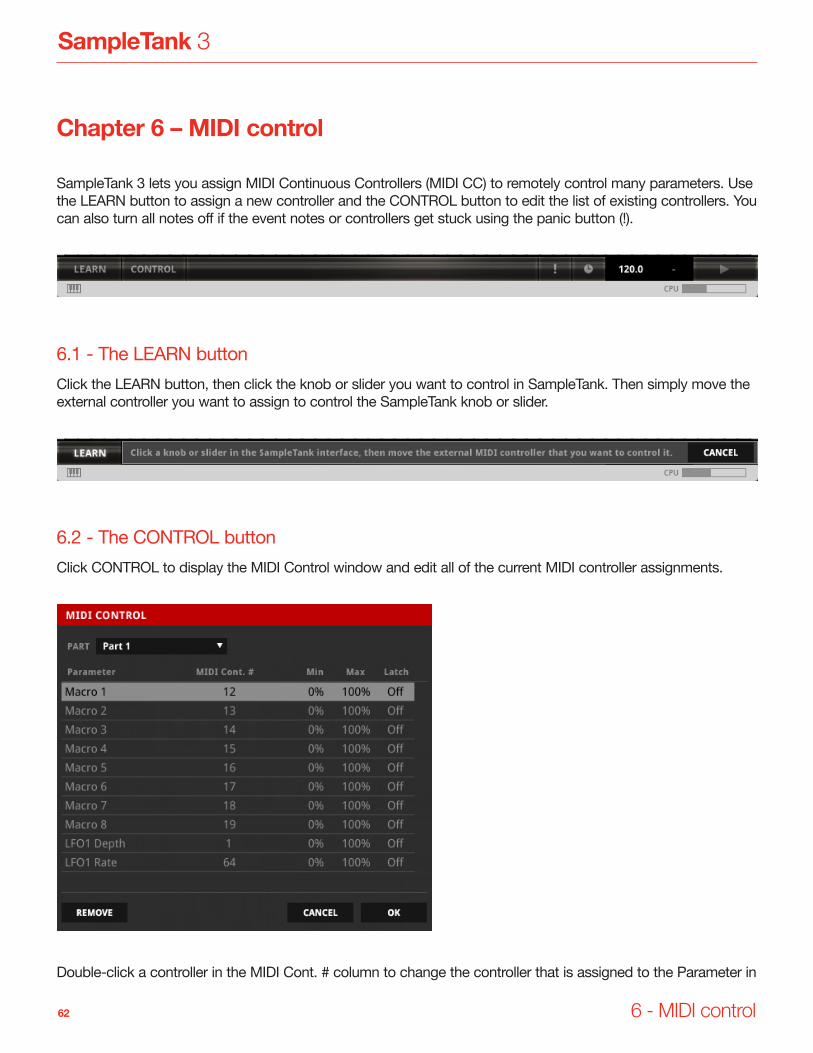
SampleTank�3�lets�you�assign�MIDI�Continuous�Controllers�(MIDI�CC)�to�remotely�control�many�parameters.�Use�the�LEARN�button�to�assign�a�new�controller�and�the�CONTROL�button�to�edit�the�list�of�existing�controllers.�You�can�also�turn�all�notes�off�if�the�event�notes�or�controllers�get�stuck�using�the�panic�button�(!).
6.1�-�The�LEARN�buttonClick�the�LEARN�button,�then�click�the�knob�or�slider�you�want�to�control�in�SampleTank.�Then�simply�move�the�external�controller�you�want�to�assign�to�control�the�SampleTank�knob�or�slider.
6.2�-�The�CONTROL�buttonClick�CONTROL�to�display�the�MIDI�Control�window�and�edit�all�of�the�current�MIDI�controller�assignments.
Double-click�a�controller�in�the�MIDI�Cont.�#�column�to�change�the�controller�that�is�assigned�to�the�Parameter�in�

SampleTank 3
6 - MIDI control 63
the�left�column.�Double-click�in�the�Min�or�Max�columns�to�set�the�range�of�the�controller,�and�double-click�in�the�Latch�column�to�turn�latching�on�or�off�for�the�specified�parameter.�You�can�also�click�the�REMOVE�button�in�the�lower�left�to�remove�a�controller�assignment.
6.2.1�-�MIDI�Control�PART�MenuNote�that�MIDI�controller�assignments�are�unique�for�each�Part.�Use�the�PART�drop-down�menu�to�select�which�Part’s�controller�assignments�you�want�to�edit.

SampleTank 3
7 - Effects 64
Chapter 7 – Effects
SampleTank�3�has�a�complete�set�of�powerful�digitally-modeled�effects�processors.�You�can�load�any�effect�into�any�effect�slot�whether�in�the�Part�Channels,�Effect�Return�Channels�or�Master�Channel.�Some�effects�use�more�processing�power�than�others,�so�monitor�your�CPU�usage�if�you�hear�clicks,�pops�or�distortion.
7.1�-�FULL�AMPS
7.1.1�-�American�Vintage�TBased�on�Fender®�Twin�Reverb®�Silverface�that�went�into�production�in�1968.�It�included�a�spring�reverb�and�was�equipped�with�2x12”�J.B.�Lansing®�speakers.
7.1.2�-�Amp�ComboThis�processor�emulates�with�great�accuracy�the�some�of�the�best�guitar�amplifiers�and�cabinets�with�lower�CPU�usage.�This�effect�is�extremely�useful�when�you�need�to�add�overdrive,�tonal�color�or�even�just�an�additional�midrange�character�to�any�kind�of�sound�for�a�more�realistic�quality�without�using�a�traditional�equalizer�.
7.1.3�-�British�Tube�LeadBased�on�Marshall®�JCM900™.�This�model�is�capable�of�great�rock�tone,�leads,�and�heavy�crunch.�While�grittier�and�a�little�more�aggressive,�it�still�has�the�classic�tone�that�has�made�this�family�of�amps�a�household�name�in�Rock�Guitar.

SampleTank 3
7 - Effects 65
7.1.4�-�Jazz�Amp�120Based�on�Roland®�JC-120™.�It�may�have�Jazz�in�its�name,�but�this�versatile�clean�sound�can�be�heard�in�many�genres.�Many�of�the�top�metal�players�keep�this�not-so-secret�weapon�in�the�studio�for�great�clean�sounds.
7.1.5�-�Modern�Tube�LeadBased�on�Mesa/Boogie®�Dual�Rectifier®.�This�amp�is�a�model�of�one�of�the�leaders�in�hard,�driven�rock�tones�made�today.�Capable�of�searing�leads�and�heavy�crunch,�this�amp�has�been�rectified�to�create�a�modern�rock�tone�that�is�hard�to�beat.
7.1.6�-�SVT�ClassicBased�on�the�Ampeg®�SVT-CLASSIC®�Model.�This�is�the�authentic�and�classic�Ampeg�tube�sound.�This�all-tube�bass�head�delivers�a�warm,�harmonically�rich�and�punchy�sound�that�is�a�trademark�for�the�rock�bass�sound,�both�live�and�in�the�studio.�The�SVT-Classic�is�the�amp�that�created�the�rock�bass�sound.

SampleTank 3
7 - Effects 66
7.2�-�AMP�COMPONENTS
7.2.1�-�CabinetThis�processor�emulates�with�great�accuracy�the�frequency�response�of�some�of�the�best�guitar�cabinets.�This�effect�is�extremely�useful�when�you�need�to�add�a�‘mid-range’�character�to�any�kind�of�sound,�to�give�a�more�realistic�character�without�using�an�equalizer.
7.2.2�-�PreampThis�analog�modeled�processor�emulates�the�first�stage�of�some�of�the�most�acclaimed�classic�tube�guitar�amplifiers.
7.2.3�-�Tone�ControlA�classic�tube�tone�control�that�recreates�the�tone�shaping�stage�found�on�the�best�tube�amplifiers.�Can�deliver�incredible�presence�and�warmth�to�the�sound.�

SampleTank 3
7 - Effects 67
7.3�-�DISTORTION
7.3.1�CrusherThis�model�alters�the�sound�of�the�input�signal�by�changing�the�sample-rate,�cutoff�frequency�and�by�distorting�it.�This�effect�can�produce�very�aggressive�distorted�sounds,�more�pronunciated�than�overdrive�stompboxes.�The�Low�pass�filter�is�very�creative�when�combined�to�high�distortion�levels.
7.3.2�-�Distortion�This�effect�simulates�the�distortion�occurring�as�you�raise�the�gain�of�an�amplifier.�
7.3.3�-�OverdriveThis�entirely�analog�modeled�Overdrive�recreates�the�tone�of�one�of�the�best�overdrive�stompboxes�
7.3.4�-�OverscreamBased�on�Ibanez®�Tube�Screamer.This�is�a�model�of�a�classic�overdrive/distortion�pedal�which�has�become�the�go-to�overdrive�pedal�for�some�of�the�most�influential�guitar�players�of�all�time.�Its�basic�controls�make�it�easy�to�dial�in�the�exact�sound�you�want.

SampleTank 3
7 - Effects 68
7.4�-�EQ�+�DYNAMICS
7.4.1�-�Black�76The�Black�76�Limiting�Amplifier�is�modeled�after�what�is�probably�the�most�used,�most�known,�most�wanted,�and�most�universally�recognized�compressor�/�limiter�in�the�audio�industry.�There�are�probably�no�professionally�created�records�without�tracks�using�this�unit.�This�FET-based�compressor�is�a�true�legend�and�a�piece�of�history�with�a�unique�sound�largely�thanks�to�its�input�transformer�and�class�A�output�stage.
7.4.2�-�CompressorThis�is�an�ultra-smooth�compressor,�modeled�after�a�classic�tube�compressor.�It�can�be�very�soft�and�gentle�on�all�types�of�material.�
7.4.3�-�EQ�CompThis�effect�features�a�semi-parametric�EQ�and�an�easy-to-use�compressor.�Both�units�are�very�high�quality�,�giving�a�very�musical�sounding�equalizer�and�an�“analog-style”�compression.�
SampleTank 3
7 - Effects 69
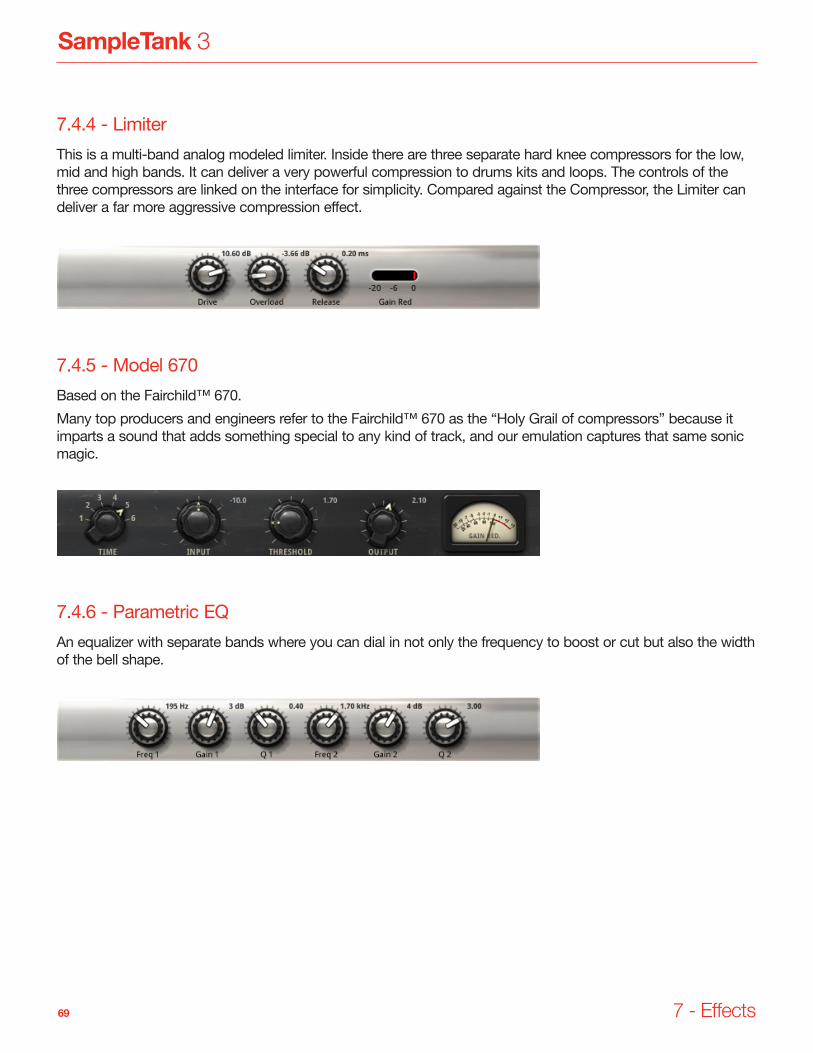
7.4.4�-�LimiterThis�is�a�multi-band�analog�modeled�limiter.�Inside�there�are�three�separate�hard�knee�compressors�for�the�low,�mid�and�high�bands.�It�can�deliver�a�very�powerful�compression�to�drums�kits�and�loops.�The�controls�of�the�three�compressors�are�linked�on�the�interface�for�simplicity.�Compared�against�the�Compressor,�the�Limiter�can�deliver�a�far�more�aggressive�compression�effect.�
7.4.5�-�Model�670Based�on�the�Fairchild™�670.Many�top�producers�and�engineers�refer�to�the�Fairchild™�670�as�the�“Holy�Grail�of�compressors”�because�it�imparts�a�sound�that�adds�something�special�to�any�kind�of�track,�and�our�emulation�captures�that�same�sonic�magic.
7.4.6�-�Parametric�EQAn�equalizer�with�separate�bands�where�you�can�dial�in�not�only�the�frequency�to�boost�or�cut�but�also�the�width�of�the�bell�shape.
SampleTank 3
7 - Effects 70
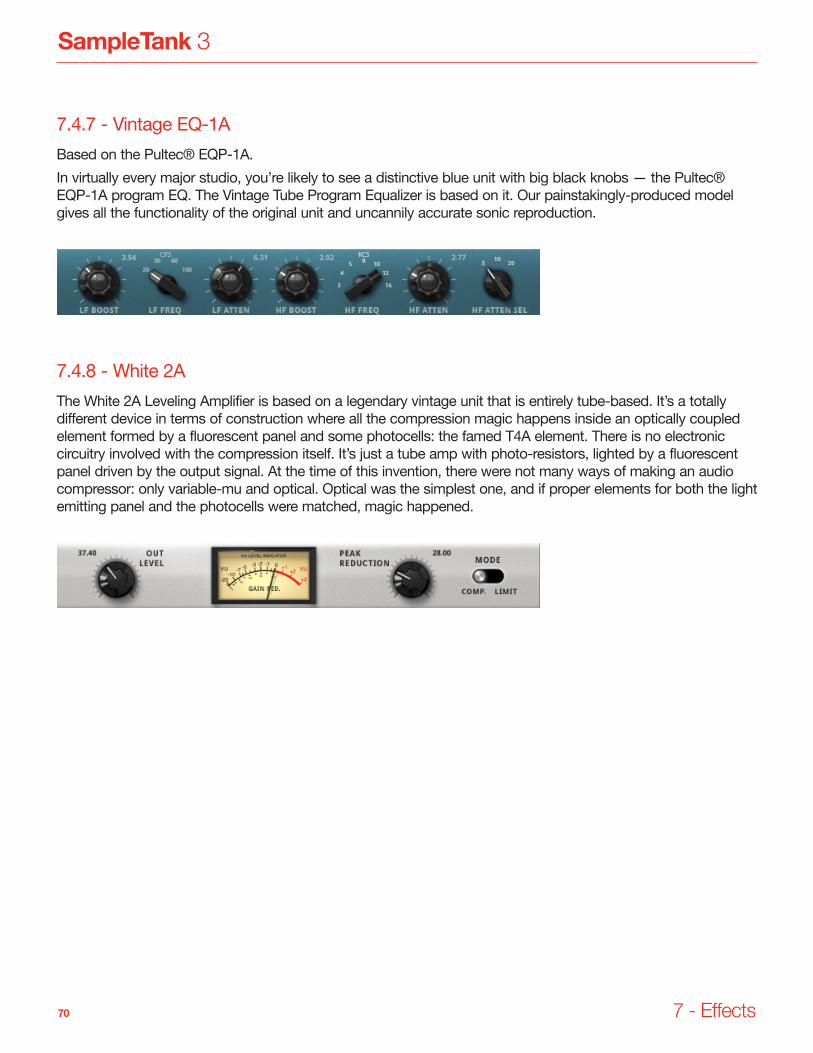
7.4.7�-�Vintage�EQ-1ABased�on�the�Pultec®�EQP-1A.In�virtually�every�major�studio,�you’re�likely�to�see�a�distinctive�blue�unit�with�big�black�knobs�—�the�Pultec®�EQP-1A�program�EQ.�The�Vintage�Tube�Program�Equalizer�is�based�on�it.�Our�painstakingly-produced�model�gives�all�the�functionality�of�the�original�unit�and�uncannily�accurate�sonic�reproduction.
7.4.8�-�White�2AThe�White�2A�Leveling�Amplifier�is�based�on�a�legendary�vintage�unit�that�is�entirely�tube-based.�It’s�a�totally�different�device�in�terms�of�construction�where�all�the�compression�magic�happens�inside�an�optically�coupled�element�formed�by�a�fluorescent�panel�and�some�photocells:�the�famed�T4A�element.�There�is�no�electronic�circuitry�involved�with�the�compression�itself.�It’s�just�a�tube�amp�with�photo-resistors,�lighted�by�a�fluorescent�panel�driven�by�the�output�signal.�At�the�time�of�this�invention,�there�were�not�many�ways�of�making�an�audio�compressor:�only�variable-mu�and�optical.�Optical�was�the�simplest�one,�and�if�proper�elements�for�both�the�light�emitting�panel�and�the�photocells�were�matched,�magic�happened.
SampleTank 3
7 - Effects 71
7.5�-�MODULATION
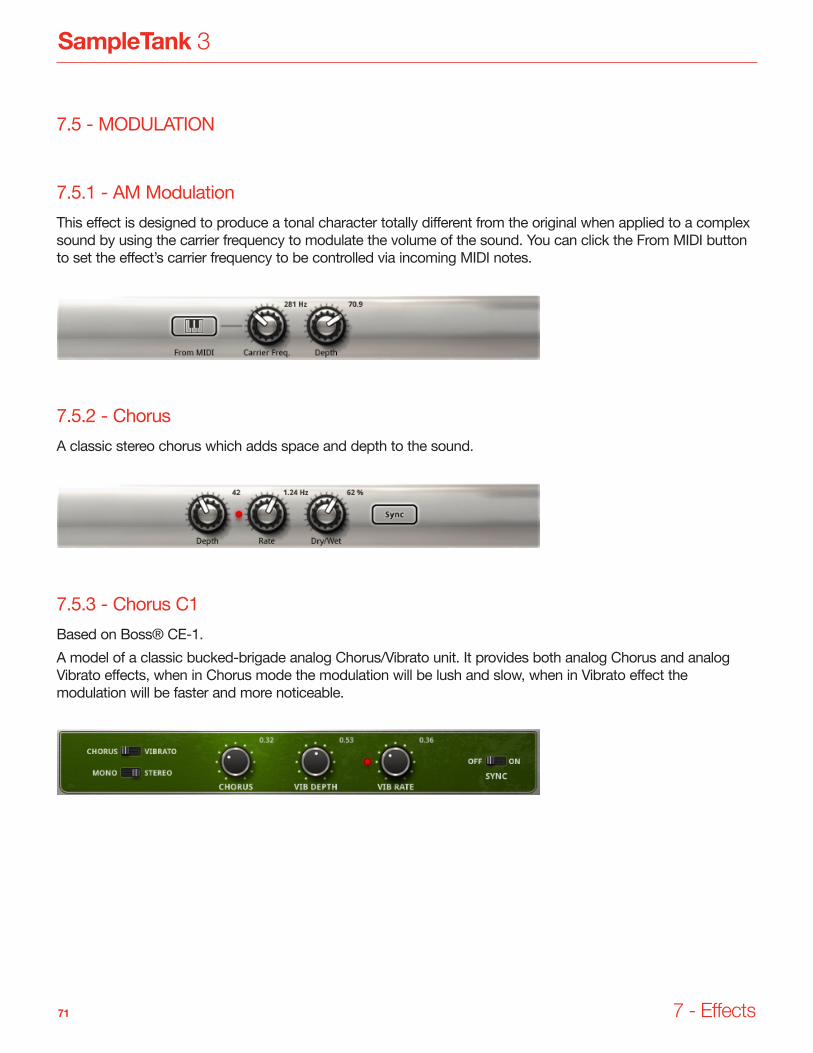
7.5.1�-�AM�ModulationThis�effect�is�designed�to�produce�a�tonal�character�totally�different�from�the�original�when�applied�to�a�complex�sound�by�using�the�carrier�frequency�to�modulate�the�volume�of�the�sound.�You�can�click�the�From�MIDI�button�to�set�the�effect’s�carrier�frequency�to�be�controlled�via�incoming�MIDI�notes.�
7.5.2�-�ChorusA�classic�stereo�chorus�which�adds�space�and�depth�to�the�sound.�
7.5.3�-�Chorus�C1Based�on�Boss®�CE-1.A�model�of�a�classic�bucked-brigade�analog�Chorus/Vibrato�unit.�It�provides�both�analog�Chorus�and�analog�Vibrato�effects,�when�in�Chorus�mode�the�modulation�will�be�lush�and�slow,�when�in�Vibrato�effect�the�modulation�will�be�faster�and�more�noticeable.

SampleTank 3
7 - Effects 72
7.5.4�-�Electric�FlangerBased�on�Electro-Harmonix®�Electric�Mistress.This�stomp�box�is�a�model�of�a�vintage�flanger/filter�matrix�used�by�many�well-known�guitarists�to�achieve�classic�sounds.�While�it�has�amazing�warmth,�it�is�also�capable�of�very�versatile�chorus�and�ring�modulation�type�sounds.
7.5.5�-�Env�FlangerThis�particular�kind�of�flanger�has�its�feedback�parameter,�which�is�internally�controlled�by�the�envelope�of�the�audio�signal.
7.5.6�-�FlangerThe�Flanger�creates�a�sharper�sound�by�adding�a�metallic�resonance�to�the�sound�(like�a�jet�airplane�taking�off�and�landing).
7.5.7�-�FM�ModulationThis�effect�is�designed�to�produce�a�tonal�character�totally�different�from�the�original�when�applied�to�a�complex�sound�by�using�the�carrier�frequency�to�modulate�the�pitch�of�the�sound.�It�can�replicate�the�sounds�of�some�synthesis�systems�like�FM�or�ring�modulation.�You�can�click�the�From�MIDI�button�to�set�the�effect’s�carrier�frequency�to�be�controlled�via�incoming�MIDI�notes.

SampleTank 3
7 - Effects 73
7.5.8�-�Multi�ChorusThis�is�a�special�type�of�chorus�effect�with�a�random�pitching�character.�It�is�designed�to�be�less�regular�and�noticeable�than�a�classic�chorus.
7.5.9�-�Opto�TremoloBased�on�Fender®�Opto-Tremolo.This�model�is�based�on�a�vintage�Opto-Tremolo�effect.
7.5.10�-�PhaserThis�entirely�analog�modeled�Phaser�recreates�the�sound�of�one�of�the�best�known�classics�of�the�past.
7.5.11�-�Rotary�Speaker�Thanks�to�IK’s�VRM�technology,�the�Rotary�Speaker�model�uses�samples�from�a�real�unit�to�create�the�authentic�vibe�and�musicality�of�a�classic�Leslie®�147�for�a�3D-sounding,�spinning�modulation�effect�unlike�any�other.

SampleTank 3
7 - Effects 74
7.5.12�-�Small�PhazerBased�on�Electro-Harmonix®�Small�Stone.This�effect�is�a�model�of�a�classic�analog�phase�shifter,�capable�of�a�range�of�phaser�effects�from�gentle�to�outlandish�swirling�effects.�You�may�wonder�why�it�is�called�“small”�when�you�hear�it.
7.5.13�-�TremoloTremolo�cyclically�modulates�the�volume�to�create�tremolo���
7.5.14�-�Uni-VBased�on�Univox™�Uni-Vibe™.This�was�a�chorus/rotating-speaker�simulator�that�was�introduced�in�1969�and�used�predominantly�in�live�performances.�This�created�a�swirling�effect�quite�similar�to�the�Leslie®�speaker�cabinet�but�with�the�addition�of�speed�control.�This�effect�was�employed�on�tracks�such�as�“Hey�Baby�(The�Land�of�the�New�Rising�Sun),”�“Earth�Blues,”�and�“Machine�Gun.”�A�vintage�Uni-Vibe™�is�in�such�high�demand�it�sells�for�over�a�thousand�dollars,�if�you�can�even�find�one.

SampleTank 3
7 - Effects 75
7.6�-�REVERB�+�DELAY
7.6.1�-�Acoustic�ResonanceThis�effect�models�the�soundboard�and�body�resonances�of�our�sampled�pianos�and�guitars.�
7.6.2�-�AmbienceThis�effect�produces�a�very�short�reverb,�very�useful�for�emulating�the�typical�ambience�of�small�closed�spaces,�like�studio�rooms�or�little�concert�suites.�
7.6.3�-�ConvoRoomThis�is�a�convolution�reverb�that�process�the�incoming�signal�with�real�sampled�spaces�providing�the�ultra-realistic�sound�of�the�actual�rooms�recorded.
7.6.4�-�Hall�Reverb��This�effect�is�modeled�after�a�high-end�studio�hardware�reverb�unit�to�create�the�effect�of�hall-sized�rooms�and�spaces.

SampleTank 3
7 - Effects 76
7.6.5�-�Plate�Reverb�This�effect�is�modeled�after�a�high-end�studio�hardware�reverb�unit�to�create�the�effect�of�spaces�generated�by�a�mechanical�plate.
7.6.6�-�DelayThis�classic�digital�delay�is�an�effect�that�adds�echo�to�the�sound.�
7.6.7�-�ReverbThis�classic�digital�reverberation�effect�simulates�the�sound�of�rooms�and�other�spaces.
7.6.8�-�Reverb�DelayThis�effect�combines�reverberation�with�delay�mixed�in�for�a�spacious�effect.

SampleTank 3
7 - Effects 77
7.6.9�-�Spring�ReverbThis�reverb�sounds�very�close�to�a�real�mechanical�spring�unit,�featuring�their�signature�warmth�with�that�typical�metallic�and�resonant�vibe.�This�reverb�is�mono.�
7.6.10�-�Tape�EchoA�spot-on�emulation�of�one�of�the�classic�tape�echo�units�of�all�time.�To�go�along�with�its�cool�vintage�sound,�we�added�some�great�modern�features,�like�stereo�operation,�separate�delay�times�on�L&R,�and�syncing�to�host�tempo.

SampleTank 3
7 - Effects 78
7.7�-�FILTERS�/�OTHER
7.7.1�-�AutoPanAutopan�automatically�moves�the�stereo�location�of�the�sound.
7.7.2�-�Piano�LidThis�effect�simulates�the�closing�of�the�lid�on�an�acoustic�piano�by�darkening�and�muting�the�sound�with�a�specifically�designed�curve.
7.7.3�-�LFO�FilterIn�this�effect,�the�Cutoff�frequency�can�automatically�sweep�by�the�effect�of�a�built-in�LFO.�The�LFO�can�sync�with�the�song’s�BPM.
7.7.4�-�Env�FilterIn�this�filter�effect,�the�Cutoff�frequency�can�automatically�sweep�by�the�effect�of�the�envelope�of�the�audio�signal�passing�through�it.�

SampleTank 3
7 - Effects 79
7.7.5�-�Lo-FiLo-Fi�degrades�the�audio�quality�to�simulate�a�“Lo-Fidelity”�sound.�In�SampleTank,�this�effect�is�designed�to�be�used�as�a�speaker�and�cabinet�simulator,�too.
7.7.6�-�Multi�FilterThis�is�a�particular�kind�of�filter�where�instead�of�selecting�the�type�of�filter�(LPF,�BPF�or�HPF)�you�can�use�them�all�together�with�independent�levels.
7.7.7�-�PhonographThis�effect�adds�disk�noises�to�simulate�the�sound�of�music�played�by�vinyl�records�on�old�record�players.�
7.7.8�-�SlicerThis�creates�the�effect�of�the�audio�being�cut�up�into�small�slices�for�rhythmic�grooves.

SampleTank 3
7 - Effects 80
7.7.9�-�Stereo�ImagerThis�effect�adjusts�the�stereo�image�from�0�(mono)�to�200%�ultra-wide�stereo.�Note�that�values�over�100%�start�to�lose�mono�compatibility�due�to�the�phase�manipulation�used,�so�be�sure�to�check�your�sound�in�mono�if�that�is�a�concern.
7.7.10�-�WahThis�effect�is�modeled�after�the�classic�wah�pedal�used�often�in�the�60s�and�70s.�

SampleTank 3
8 - PAD page 81
Chapter 8 – The PAD page
8.1�-�Initialization,�defaults�and�behaviorsClick�the�PAD�button�on�the�top�bar�of�the�plug-in�to�enable�PAD�Mode�and�display�the�pads�view�on�top�of�the�classic�list�view.PAD�Mode�intercepts�and�transforms�MIDI�note�events�from�external�MIDI�controllers�set�to�any�MIDI�channel�to�the�pad�numbers�in�the�Pad�view�based�on�the�1st�scene�mapping�on�iRig�Pads:Pad13:�D#2� Pad14:�F2� Pad15:�C#2� Pad16:�E2Pad09:�D2� Pad10:�A1� Pad11:�F1� Pad12:�A#1Pad05:�C#1� Pad06:�D#1� Pad07:�F#1� Pad08:�G#1Pad01:�B0� Pad02:�C1� Pad03:�D1� Pad04:�E1

SampleTank 3
8 - PAD page 82
When�SampleTank�Parts�are�empty,�the�pads�are�initialized�to�parts�one-to-one�(i.e.�Pad1�to�Part1�/�Pad2�to�Part2�etc.)To�select�a�pad,�simply�click�it.�To�select�the�pad�without�playing�the�note,�click�the�small�square�at�the�top�left�corner�which�display�the�Part�number�or�the�small�square�on�the�bottom�left�corner�which�display�the�assigned�note.�Both�small�squares�let�you�click-and-roll�to�modify�assignments�on�the�fly.The�pad�turns�gray�when�selected.�
8.2�-�Assign�a�part�to�a�padClick�the�PAD�button�on�the�top�bar�of�the�plug-in�to�enable�PAD�Mode�and�display�the�pads�view�on�top�of�the�classic�list�view�After�selecting�a�pad,�click�the�Part�field�and�select�between�entries:�Empty�and�part�numbers�from�1�to�16�to�assign�an�already�loaded�part�or�an�empty�part.
If the selected Part was already loaded with:
An instrument:�The�Part�displays�the�instrument�name�in�the�INSTRUMENT�field,�and�MIDI�Channel,�Volume,�Pan�and�Mute/Solo�reflect�their�current�values.MIDI�note�C3�is�assigned�to�NOTE�field�by�default.�On�the�pad,�the�instrument�category�icon�appears�in�the�middle�of�the�pad,�the�assigned�Part�number�in�the�top�left�corner�and,�the�assigned�MIDI�note�to�the�bottom�left�corner.
An instrument with an active MIDI pattern:�The�Part�displays�the�instrument�name�in�the�INSTRUMENT�field,�MIDI�Channel,�Volume,�Pan�and�Mute/Solo�

SampleTank 3
8 - PAD page 83
reflect�their�current�values,�and�the�active�pattern�appears�in�the�PATTERN/LOOP�field.On�the�PATTERN/LOOP�field�clicking�the�arrow�on�the�right,�a�panel�with�a�list�displays�the�patterns�loaded�to�the�part.Set�a�pattern�to�be�active�by�selecting�it�from�the�list.�To�remove�patterns�individually,�click�the�X�icon�on�the�right.The�list�of�the�loaded�patterns�also�display�a�play�icon�at�the�left�of�the�active�pattern�to�indicate�which�pattern�will�play�when�activating�Global�Play.The�NOTE�field�displays�the�value�related�to�the�current�active�pattern�and�also�follows�the�current�KEY�and�QUANTIZE�values.On�the�pad,�the�instrument�category�icon�appears�in�the�middle�of�the�pad,�the�assigned�part�number�at�the�top�left�corner,�the�assigned�note�to�the�bottom�left�corner,�and�a�pattern�icon�at�the�bottom�right�corner.If�multiple�pads�have�the�same�Part�selected�but�with�a�different�MIDI�Pattern�assigned,�then�the�first�playing�pattern�will�be�stopped�when�another�pattern�loaded�on�the�same�part�is�started.
A loop instrument: The�instrument�name�is�displayed�in�the�INSTRUMENT�field,�MIDI�Channel,�Volume,�Pan�and�Mute/Solo�show�their�current�values,�and�the�active�pattern�or�loops�appear�in�the�PATTERN/LOOP�field.On�the�PATTERN/LOOP�field,�click�the�arrow�at�the�right�to�display�a�panel�with�a�list�of�the�included�loops�in�the�Instrument�and�loaded�patterns.Click�the�play�icon�at�the�left�which�will�highlight�the�icon�and�set�which�pattern�or�loops�to�start�when�Global�Play�is�activated.�The�loop�icon�at�the�right�displays�the�pattern�and�loops�that�are�currently�playing.The�NOTE�field�display�the�value�related�to�the�assigned�pattern�or�loop,Note�that�the�KEY�and�QUANTIZE�values�will�be�be�disabled�when�assigning�a�loop�to�the�selected�pad.On�the�pad,�the�instrument�category�icon�will�appear�in�the�middle�of�the�pad,�the�assigned�part�number�at�the�top�left�corner,�the�assigned�note�at�the�bottom�left�corner�and�a�loop�icon�at�the�bottom�right�corner.
If the selected Part is empty:Browse�instruments�from�the�INSTRUMENT�menu�at�the�right�and�double-click�to�load�an�instrument�into�the�Part�assigned�to�the�selected�Pad.Staying�on�the�same�selected�pad,�you�can�switch�to�the�PATTERN�menu�to�browse�and�double�click�to�add�patterns.The�latest�pattern�added�is�the�active�one�and�the�pattern�displayed�in�the�PATTERN/LOOP�field.All�the�previously�added�patterns�will�be�available�by�clicking�the�arrow�at�the�right�to�open�the�panel�which�displays�the�list�of�the�loaded�patterns.If�a�loop�instrument�was�loaded�in�the�Part,�clicking�the�arrow�at�the�right�of�the�PATTERN/LOOP�field�will�show�a�panel�with�a�list�that�displays�the�loops�included�in�the�Loop�Instrument�and�the�loaded�patterns.Clicking�the�play�icon�at�the�left�will�highlight�the�icon�and�set�which�pattern�or�loops�should�start�when�Global�Play�is�activated.�The�loop�icon�at�the�right�displays�loops�that�are�currently�playing.The�PATTERN/LOOP�field�displays�the�name�of�the�selected�audio�loop�or�pattern�assigned�to�the�selected�pad.The�first�audio�loop�in�the�loop�instrument�on�a�Part�will�be�assigned�to�the�selected�Pad.It’s�possible�to�switch�the�Part�assigned�to�a�Pad�by�doing�a�click-and-roll�on�the�small�square�at�the�top�left�corner�of�the�pad�where�the�Part�is�indicated.

SampleTank 3
8 - PAD page 84
It’s�possible�to�switch�the�Note�assigned�to�a�Pad�also�by�doing�a�click-and-roll�on�the�small�square�to�the�top�left�corner�of�the�pad�where�the�Note�is�declared.When�setting�a�note�that�has�no�patterns�or�loops�assigned,�the�PATTERN/LOOP�field�will�be�blank.
8.3�-�Pads�Launch�and�Mode
When�using�patterns�and�loops,�most�of�the�time�it�is�necessary�to�quantize�the�launch�to�avoid�the�parts�getting�out�of�sync.�Set�your�preference�in�the�Launch�field:Off:�The�part�receives�the�MIDI�note�and�immediately�starts�playing.Bar, Half Bar, Beat:�The�part�receives�the�MIDI�note�and�waits�to�start�playing�until�the�transport�reaches�the�next�chosen�interval.
Launch�by�default�is�set�to�Off�when�patterns�or�loops�from�an�instrument�loop�weren’t�assigned.�If�a�MIDI�Pattern�or�audio�loop�is�assigned�to�a�pad,�the�launch�mode�is�set�to�1/1�by�default.
When�you�hit�the�pad,�the�Mode�field�lets�you�choose�the�pad�behavior:Hold:�The�Part�plays�when�you�press�the�pad�and�stops�when�you�release�it.Latch:�The�Part�plays�and�stops�alternately�by�pressing�the�pad.One Shot:�The�Part�plays�once�from�the�start�to�the�end�of�the�sample,�pattern�or�loop�when�you�press�the�pad.
All�the�above�settings�and�Mode�status�are�saved�with�the�Multi.
8.4�-�SampleTank�3.0�MultisWhen�opening�Multis�saved�in�version�3.0,�the�pads�will�be�assigned�to�parts�one-to-one,�and�the�related�active�patterns�are�assigned�in�the�PATTERN/LOOP�field.�For�Parts�which�have�a�loop�instrument�assigned,�the�first�active�audio�in�the�instrument�will�appear�in�the�PATTERN/LOOP�field.
8.5�-�Disabling�PAD�modeClicking�the�PAD�icon�in�the�bottom�bar�of�SampleTank�3�to�disable�PAD�mode.�This�will�disable�MIDI�note�filtering�and�allow�Parts�to�be�controlled�in�the�usual�way.
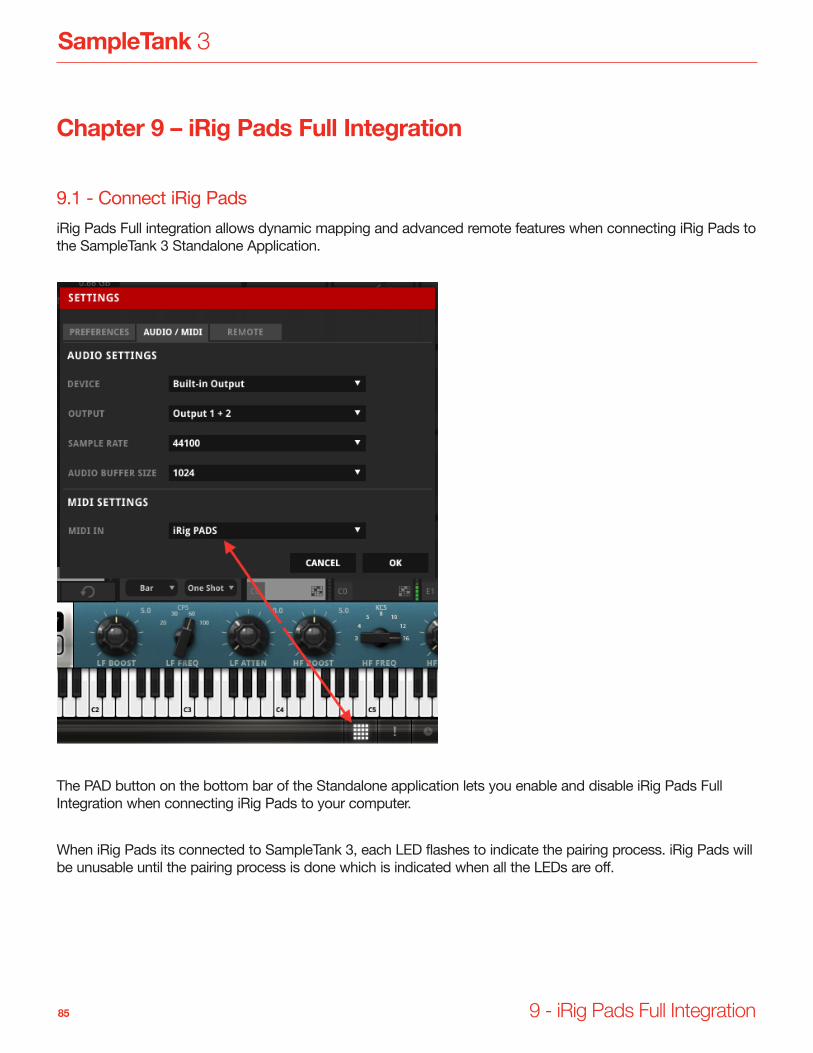
SampleTank 3
9 - iRig Pads Full Integration 85
Chapter 9 – iRig Pads Full Integration
9.1�-�Connect�iRig�PadsiRig�Pads�Full�integration�allows�dynamic�mapping�and�advanced�remote�features�when�connecting�iRig�Pads�to�the�SampleTank�3�Standalone�Application.
The�PAD�button�on�the�bottom�bar�of�the�Standalone�application�lets�you�enable�and�disable�iRig�Pads�Full�Integration�when�connecting�iRig�Pads�to�your�computer.
When�iRig�Pads�its�connected�to�SampleTank�3,�each�LED�flashes�to�indicate�the�pairing�process.�iRig�Pads�will�be�unusable�until�the�pairing�process�is�done�which�is�indicated�when�all�the�LEDs�are�off.

SampleTank 3
9 - iRig Pads Full Integration 86
9.2�-�IntegrationThe�pad�mapping�on�iRig�PADS�always�adapts�to�the�pad�mapping�currently�configured�and�displayed�in�the�SampleTank�3�PAD�page.
When�PAD�mode�is�disabled,�the�iRig�Pads�mapping�adapts�according�to�the�instrument�category�loaded�into�the�selected�Part.
Drumkits:�The�iRig�Pads�mapping�uses�the�General�MIDI�drum�mapping.Multisampled Instruments:�The�iRig�Pads�mapping�using�a�chromatic�mapping�starting�from�C3.Loop Instruments:�The�iRig�Pads�mapping�using�a�chromatic�mapping�starting�from�C1.
SampleTank�buttons,�controls�and�browsing�along�with�the�iRig�Pads�buttons�and�pads�reflect�the�current�status�on�both�the�hardware�and�software.
For�example,�clicking�a�pad�in�the�SampleTank�3�PAD�mode�or�clicking�the�note�assigned�to�the�pad�using�the�keyboard�lights�the�the�related�iRig�Pads�pad.
The�same�happens�when�tapping�a�pad�on�the�iRig�Pads�hardware.
The�DATA�Encoder�lets�you�browse�instruments�or�patterns.�Pushing�the�DATA�encoder�button�opens�the�folder�and�loads�selected�items.
•� The�SCENE�button�switches�between�browser�tabs�(INSTRUMENT,�PATTERN).•� FIX�VEL�sets�any�MIDI�note�event�to�Velocity�value�of�100.•� Button�1�enable�Parts�/�Pads�navigation�to�switch�between�parts�or�pads�using�the�DATA�encoder.•� Button�2�remote�control�the�SampleTank�GLOBAL�PLAY�button.
9.3�-�Edit�ModeCombining�SCENE�and�FIX�VEL�buttons�enables�Edit�mode�which�lets�you�switch�octaves�played�from�iRig�Pads�using�pads�11-12�on�iRig�Pads.�
Pads�11-12�pads�will�turn�green�if�the�selected�octave�is�C3.�
Moving�the�octave�up�and�down,�the�pressed�pad�color�will�turn�orange�to�display�the�transposition.
When�General�MIDI�drum�mapping�is�selected,�pads�11-12�are�disabled.

SampleTank 3
9 - iRig Pads Full Integration 87
If�a�drum�kit�is�loaded�on�the�selected�part,�pads�9�and�13�allow�switching�between�General�MIDI�drum�mapping�by�pushing�pad�13�and�chromatic�mapping�by�pushing�pad�9.
When�PAD�mode�is�enabled,�pads�11-12�let�you�adjust�the�note�assigned�to�the�selected�pad,�and�pushing�pad�9�lets�you�preview�the�selected�pad�in�order�to�avoid�needing�to�enter�and�exit�Edit�Mode�to�preview.
When�in�Edit�Mode,�the�DATA�Encoder�lets�you�adjust�the�Volume�of�the�selected�part,�while�pushing�Pads�1-8�chooses�between�the�8�Macros�of�the�selected�Part�where�you�can�turn�the�DATA�encoder�to�adjust�the�selected�Macro.

www.ikmultimedia.com
SampleTank®�is�a�registered�trademark�property�of�IK�Multimedia�Production�Srl.�All�other�product�names�and�images,�trademarks�and�artists�names�are�the�property�of�their�respective�owners,�which�are�in�no�way�associated�or�affiliated�with�IK�Multimedia.�Product�names�are�used�solely�for�the�purpose�of�identifying�the�specific�products�that�were�studied�during�IK�Multimedia’s�sound�model�development�and�for�describing�certain�types�of�tones�produced�with�IK�Multimedia’s�digital�modeling�technology.�Use�of�these�names�does�not�imply�any�cooperation�or�endorsement.
Fender®�is�a�registered�trademark�of�Fender�Musical�Instruments�Corporation.�Marshall®�is�a�registered�trademark�of�of�Marshall�Amplification�Plc.�Roland®�is�a�registered�trademark�of�Roland�Corporation.�Mesa/Boogie®�is�a�registered�trademark�of�Mesa/Boogie�Ltd.�Ampeg®�is�a�registered�trademark�of�LOUD�Technologies,�Inc.�Ibanez®�is�a�registered�trademark�of�Hoshino�Gakki�Co.�Ltd.�Corporation.�Boss®�is�a�registered�trademark�of�Roland�Corporation.�Electro-Harmonix®�is�a�registered�trademark�of�New�Sensor�Corporation.�LESLIE®�is�a�registered�trademark�of�Hammond�Suzuki�USA,�Inc.�Univox™�is�a�trademark�of�Korg�USA�Corporation.�Fairchild®�is�a�registered�trademark�property�of�Avid�Technology,�Inc.�Pultec®�is�a�registered�trademark�property�of�Pulse�Techniques,�LLC.�LA-2A�and�1176�LN�are�registered�trademarks�of�Universal�Audio,�Inc.�IK�Multimedia’s�products,�specifically,�the�T-RackS�Black�76�Limiting�Amplifier�and�T-RackS�White�2A�Leveling�Amplifier,�are�manufactured�and�developed�by�IK�Multimedia�based�on�its�own�modeling�techniques.�Universal�Audio�has�neither�endorsed�nor�sponsored�IK�Multimedia’s�products�in�any�manner,�nor�licensed�any�intellectual�property�for�use�in�this�product.�Mac�and�the�Mac�logo�are�trademarks�of�Apple�Computer,�Inc.,�registered�in�the�U.S.�and�other�countries.�Windows�and�the�Windows�logo�are�trademarks�or�registered�trademarks�of�Microsoft�Corporation�in�the�United�States�and/or�other�countries.�The�Audio�Units�logo�is�a�trademark�of�Apple�Computer,�Inc.�VST�is�a�trademark�of�Steinberg�Media�Technologies�GmbH.
All�specifications�are�subject�to�change�without�further�notice.
Document�Version:�3.0�(2015/03/18)
©�2001-2015�IK�Multimedia.�All�rights�reserved.
IK Multimedia Production Srl Via�dell’Industria,�46,��41122�Modena�Italy
IK Multimedia US, LLC1153�Sawgrass�Corporate�Pkwy.�Sunrise,�FL�33323�USA
IK Multimedia AsiaTB�Tamachi�Bldg.�1F,�MBE�#709�4-11-1�Shiba�Minato-ku,�Tokyo�108-0014�Japan