SALES AND RECEIVABLES: SERVICE BUSINESS - … · SALES AND RECEIVABLES: ... CHAPTER 2—SALES AND...
82
SALES AND RECEIVABLES: SERVICE BUSINESS LEARNING OBJECTIVES At the completion of this chapter, you will be able to: 1. Create invoices and record sales transactions on account. 2. Create sales receipts to record cash sales. 3. Edit, void, and delete invoices/sales receipts. 4. Create credit memos/refunds. 6. Add new customers and modify customer records. 7. Record cash receipts. 8. Enter partial cash payments. 9. Display and print invoices, sales receipts, and credit memos. 10. Display and print Quick Reports, Customer Balance Summary Reports, Customer Balance Detail Reports, and Transaction Reports by Customer. 11. Display and print Summary Sales by Item Reports and Itemized Sales by Item Reports. 12. Display and print Deposit Summary, Journal Reports, and Trial Balance. 13. Display Accounts Receivable Graphs and Sales Graphs. ACCOUNTING FOR SALES AND RECEIVABLES Rather than use a traditional Sales Journal to record transactions using debits and credits and special columns, QuickBooks Pro uses an invoice to record sales transactions for accounts receivable in the Accounts Receivable Register. Because cash sales do not involve accounts receivable, the transactions are recorded on a Sales Receipt. QuickBooks Pro puts the money received from a cash sale and from a customer’s payment on account into the Undeposited Funds account. When a bank deposit is made the Undepositied Funds are placed in the Checking or Cash account. However, all transactions, regardless of the activity, are placed in the General Journal behind the scenes. A new customer can be added on the fly as transactions are entered. Unlike many computerized accounting programs, in QuickBooks Pro, error correction is easy. A sales form may be edited, voided, or deleted in the same window where it was created. Customer information may be changed by editing the Customer List. A multitude of reports are available when using QuickBooks Pro. Accounts receivable reports include Customer Balance Summary and Balance Detail reports. Sales reports provide information regarding the amount of sales by item. Transaction Reports by Customer are available as well as the traditional accounting reports such as Trial Balance, Profit and Loss, and Balance Sheet. QuickBooks Pro also has graphing
Transcript of SALES AND RECEIVABLES: SERVICE BUSINESS - … · SALES AND RECEIVABLES: ... CHAPTER 2—SALES AND...

SALES AND RECEIVABLES: SERVICE BUSINESS
LEARNING OBJECTIVES At the completion of this chapter, you will be able to: 1. Create invoices and record sales transactions on account. 2. Create sales receipts to record cash sales. 3. Edit, void, and delete invoices/sales receipts. 4. Create credit memos/refunds. 6. Add new customers and modify customer records. 7. Record cash receipts. 8. Enter partial cash payments. 9. Display and print invoices, sales receipts, and credit memos. 10. Display and print Quick Reports, Customer Balance Summary Reports, Customer Balance
Detail Reports, and Transaction Reports by Customer. 11. Display and print Summary Sales by Item Reports and Itemized Sales by Item Reports. 12. Display and print Deposit Summary, Journal Reports, and Trial Balance. 13. Display Accounts Receivable Graphs and Sales Graphs. ACCOUNTING FOR SALES AND RECEIVABLES Rather than use a traditional Sales Journal to record transactions using debits and credits and special columns, QuickBooks Pro uses an invoice to record sales transactions for accounts receivable in the Accounts Receivable Register. Because cash sales do not involve accounts receivable, the transactions are recorded on a Sales Receipt. QuickBooks Pro puts the money received from a cash sale and from a customer’s payment on account into the Undeposited Funds account. When a bank deposit is made the Undepositied Funds are placed in the Checking or Cash account. However, all transactions, regardless of the activity, are placed in the General Journal behind the scenes. A new customer can be added on the fly as transactions are entered. Unlike many computerized accounting programs, in QuickBooks Pro, error correction is easy. A sales form may be edited, voided, or deleted in the same window where it was created. Customer information may be changed by editing the Customer List. A multitude of reports are available when using QuickBooks Pro. Accounts receivable reports include Customer Balance Summary and Balance Detail reports. Sales reports provide information regarding the amount of sales by item. Transaction Reports by Customer are available as well as the traditional accounting reports such as Trial Balance, Profit and Loss, and Balance Sheet. QuickBooks Pro also has graphing

42 QUICKBOOKS® PRO 2006/2007: A COMPLETE COURSE capabilities so you can see and evaluate your accounts receivable and sales at the click of a button. TRAINING TUTORIAL The following tutorial is a step-by-step guide to recording sales (both cash and credit), customer payments, bank deposits, and other transactions for receivables for a fictitious company with fictitious employees. This company was used in Chapter 1 and is called Your Name Computer Consulting. In addition to recording transactions using QuickBooks Pro, we will prepare several reports and graphs for the company. The tutorial for Your Name Computer Consulting will continue in Chapters 3 and 4, where accounting for payables, bank reconciliations, financial statement preparation, and closing an accounting period will be completed. TRAINING PROCEDURES To maximize the training benefits, you should:
1. Read the entire chapter before beginning the tutorial within the chapter. 2. Answer the end-of-chapter questions. 3. Be aware that transactions to be entered are given within a MEMO. 4. Complete all the steps listed for the Your Name Computer Consulting tutorial in the
chapter. (Indicated by: ) ) 5. When you have completed a section, put a check mark next to the final step completed.
DO
6. If you do not complete a section, put the date in the margin next to the last step completed. This will make it easier to know where to begin when training is resumed.
7. As you complete your work, proofread carefully and check for accuracy. Double-check amounts of money.
8. If you find an error while preparing a transaction, correct it. If you find the error after the Invoice, Sales Form, Credit Memo, or Customer:Job List is complete, follow the steps indicated in this chapter to correct, void, or delete transactions.
9. Print as directed within the chapter. 10. You may not finish the entire chapter in one computer session. Always use QuickBooks
Pro to back up your work at the end of your work session as described in Chapter 1 and make a duplicate disk as described in Appendix A.
11. When you complete your computer session, always close your company. If you try to use a computer and a previous student did not close the company, QuickBooks Pro may freeze when you start to work. In addition, if you do not close the company as you leave, you may have problems with your company file, your disk may be damaged, and you may have unwanted .qbi (QuickBooks In Use) files that cause problems when using the company file.
CHAPTER 2—SALES AND RECEIVABLES 43 COMPANY FILE In Chapter 1, you began using the company. You changed the name from Student’s Name Computer Consulting to Your Name Computer Consulting. A backup of the file was made. An account name was changed. The backup file was restored and you learned that the account name change had been replaced by the name in the backup file. During Chapters 2-4, you will continue to use the Computer.qbw file originally used in Chapter 1 to record transactions. COMPANY PROFILE: YOUR NAME COMPUTER CONSULTING As you learned in Chapter 1, Your Name Computer Consulting is a company specializing in computer consulting. The company provides program installation, training, and technical support for today’s business software as well as getting clients online and giving instruction in the use of the Internet. In addition, Your Name Computer Consulting will set up computer systems for customers and will install basic computer components, such as memory, modems, sound cards, disk drives, and DVD and CD-ROM drives. Your Name Computer Consulting is located in Southern California and is a sole proprietorship owned by you. You are involved in all aspects of the business and have the responsibility of obtaining clients. There are three employees: Justine Wong, who is responsible for software training; Silas Kaan, who handles hardware installation and technical support; and Consuelo Alcampo, whose duties include being office manager and bookkeeper and providing technical support. Your Name Computer Consulting bills by the hour for training and hardware installation with a minimum charge of $95 for the first hour and $80 per hour thereafter. Clients with contracts for technical support are charged a monthly rate for service. BEGIN TRAINING IN QUICKBOOKS® PRO As you continue this chapter, you will be instructed to enter transactions for Your Name Computer Consulting. As you learned in Chapter 1, the first thing you must do in order to work is boot up or start your computer, open the program QuickBooks Pro, and open the company. Refer to Chapter 1 to Open QuickBooks Pro
DO

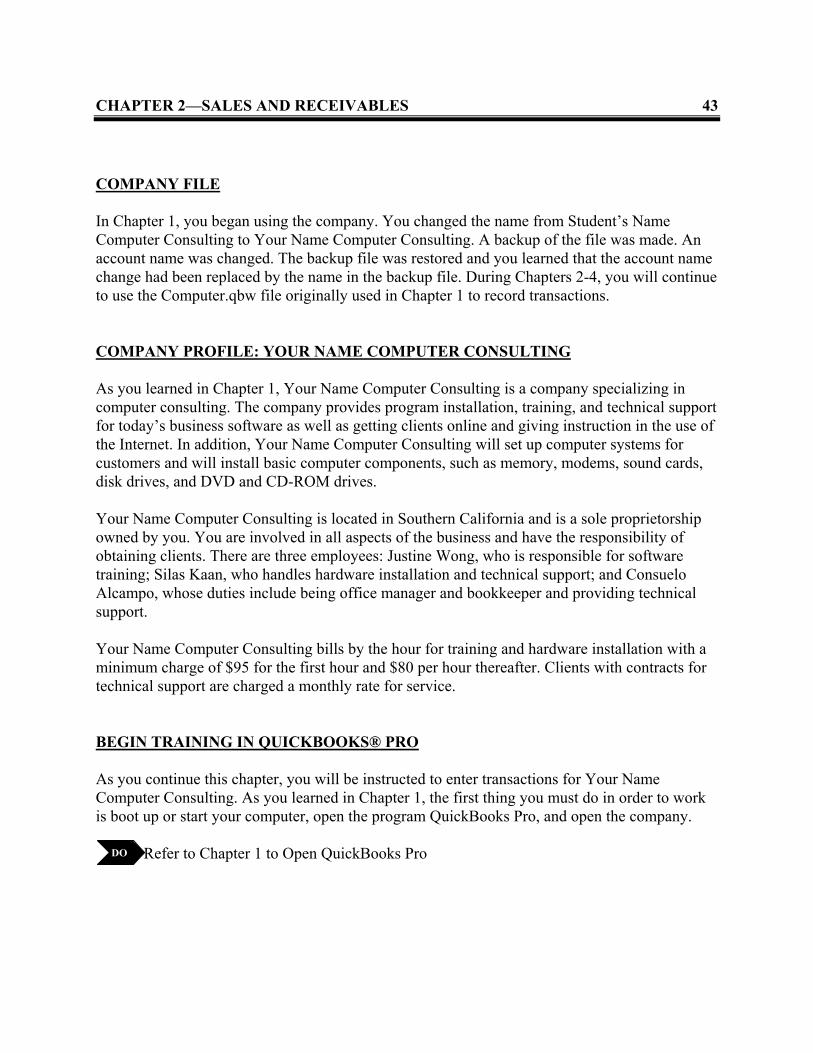
44 QUICKBOOKS® PRO 2006/2007: A COMPLETE COURSE OPEN A COMPANY—YOUR NAME COMPUTER CONSULTING In Chapter 1, Your Name Computer Consulting was opened and a backup of the company file was made using QuickBooks Pro. Your Name Computer Consulting should have been closed in Chapter 1. To open the company for this work session you may click the Open an Existing Company button on the No Company Open screen or by clicking on File menu and Open Company. Verify this by checking the title bar. Open Your Name Computer Consulting
DO
Click Open an Existing Company button at the bottom of the No Company Open screen OR
Click File on the Menu bar and click Open Company
2007 The menu selection is Open or Restore a Company, make sure Open a Company is selected, click Next.
Click the drop-down list arrow for Look in Click Removable Disk (F:) (or whatever drive your instructor wants you to use) Locate Computer (under the Look in text box) • Your company file may have an extension of .qbw. This is the file extension for your
“QuickBooks Working” file. This is the company file that may be opened and used. As you learned in Chapter 1, you may not use a .qbb (backup) file for direct entry. A backup file must be restored to a .qbw (company) file.
CHAPTER 2—SALES AND RECEIVABLES 45
Double-click Computer to open, or click Computer and click Open • Remember, this is the same file you used in Chapter 1.
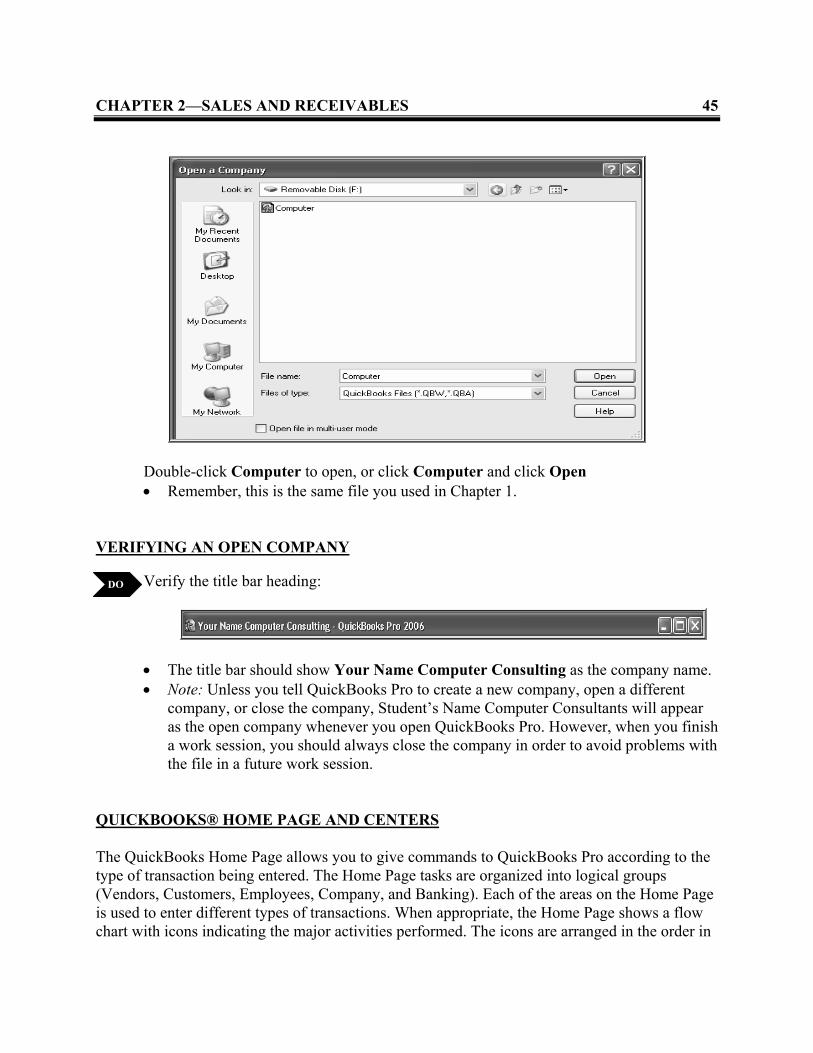
VERIFYING AN OPEN COMPANY Verify the title bar heading:
DO
• The title bar should show Your Name Computer Consulting as the company name. • Note: Unless you tell QuickBooks Pro to create a new company, open a different
company, or close the company, Student’s Name Computer Consultants will appear as the open company whenever you open QuickBooks Pro. However, when you finish a work session, you should always close the company in order to avoid problems with the file in a future work session.
QUICKBOOKS® HOME PAGE AND CENTERS The QuickBooks Home Page allows you to give commands to QuickBooks Pro according to the type of transaction being entered. The Home Page tasks are organized into logical groups (Vendors, Customers, Employees, Company, and Banking). Each of the areas on the Home Page is used to enter different types of transactions. When appropriate, the Home Page shows a flow chart with icons indicating the major activities performed. The icons are arranged in the order in

46 QUICKBOOKS® PRO 2006/2007: A COMPLETE COURSE which transactions usually occur and are clicked to access screens to enter information or transactions in QuickBooks Pro. You may also choose to use the menu bar, the icon bar, or the keyboard to give commands to QuickBooks Pro. For more detailed information regarding the QuickBooks Home Page, refer to Chapter 1. Instructions in this text will be given primarily using the QuickBooks Home Page. However, the menu bar, the icon bar, and/or keyboard methods will be used as well. At the top of the Home Page and below the menu bar, are a series of buttons that allow access to QuickBooks Centers. These are the Vendor, Customer, Employee, and Report centers. The centers focus on providing detailed information and accessing the lists associated with the center. BEGINNING THE TUTORIAL In this chapter you will be entering both accounts receivable transactions and cash sales transactions. Much of the organization of QuickBooks Pro is dependent on lists. The two primary types of lists you will use in the tutorial for receivables are a Customer:Job List and a Sales Item List. The names, addresses, telephone numbers, credit terms, credit limits, and balances for all established credit customers are contained in the Customer:Job List. The Customer:Job List can also be referred to as the Accounts Receivable Ledger. QuickBooks Pro does not use this term; however, the Customer:Job List does function as the Accounts Receivable Ledger. A transaction entry for an individual customer is posted to the customer’s account in the Customer:Job List just as it would be posted to the customer’s individual account in an Accounts Receivable Ledger. The balance of the Customer:Job List will be equal to the balance of the Accounts Receivable account in the Chart of Accounts, which is also the General Ledger. Invoices and accounts receivable transactions can also be related to specific jobs you are completing for customers. You will be using the following Customer:Job List for established credit customers.

CHAPTER 2—SALES AND RECEIVABLES 47 Various types of income are considered to be sales. In Your Name Computer Consulting, there are several income accounts. In addition, there are categories within an income account. For example, Your Name Computer Consulting uses Training Income to represent revenues earned by providing on-site training. The sales items used for Training Income are Training 1 for the first or initial hour of on-site training and Training 2 for all additional hours of on-site training. As you look at the Item List, you will observe that the rates for the two items are different. Using lists for sales items allows for flexibility in billing and a more accurate representation of the way in which income is earned. The following Item List for the various types of sales will be used for the company.
In the tutorial all transactions are listed on memos. The transaction date will be the same date as the memo date unless otherwise specified within the transaction. Always enter the date of the transaction as specified in the memo. By default, QuickBooks Pro automatically enters the current date or the last transaction date used. In many instances, this will not be the same date as the transaction in the text. Customer names, when necessary, will be given in the transaction. All terms for customers on account are Net 30 days unless specified otherwise. If a memo contains more than one transaction, there will be a horizontal line or a blank line separating the transactions.
MEMO DATE: The transaction date is listed here
Transaction details are given in the body of the memo. Customer names, the type of transaction, amounts of money, and any other details needed are listed here.
Even when you are instructed how to enter a transaction step by step, you should always refer to the memo for transaction details. Once a specific type of transaction has been entered in a step-by-step manner, additional transactions will be made without having instructions provided. Of course, you may always refer to instructions given for previous transactions for ideas or for the steps used to enter those transactions. Again, always double-check the date and the year used for the transaction. QuickBooks automatically inserts the computer’s current date, which will

48 QUICKBOOKS® PRO 2006/2007: A COMPLETE COURSE probably be quite different from the date in the text. Using an incorrect date will cause reports to have different totals and contain different transactions than those shown in the text. ENTER SALE ON ACCOUNT Because QuickBooks Pro operates on a business form premise, a sale on account is entered via an invoice. You prepare an invoice, and QuickBooks Pro records the transaction in the Journal and updates the customer’s account automatically.
MEMO: DATE: January 2, 2006 Bill the following: Invoice No. 1—Jose Mendoza has had several questions regarding his new computer system. He spoke with you about this and has signed up for 10 hours of technical support (Tech Sup 2) for January. Bill him for this and use Thank you for your business. as the message.
Record the sale on account shown in the invoice above. This invoice is used to bill a customer for a sale using one sales item:
DO
Click the Invoices icon on the Home Page • A blank invoice will show on the screen.

CHAPTER 2—SALES AND RECEIVABLES 49
Click the drop-down list arrow next to Customer:Job Click Mendoza, Jose • His name is entered as Customer:Job, and Bill To information is completed
automatically. Tab two times to highlight Intuit Service Invoice • Intuit Service Invoice should be displayed in the text box beneath Template. If it is
not, click the drop-down list arrow next to the Customize button, click Intuit Service Invoice.
Tab to Date • When you tab to the date, it will be highlighted. When you type in the new date, the
highlighted date will be deleted. Type 01/02/06 as the date Invoice No. 1 should be showing in the Invoice No. box • The Invoice No. should not have to be changed. There is no PO No. to record Terms should be indicated as Net 30 • If not, click the drop-down list arrow next to Terms and click Net 30. Tab to or click the first line beneath Item Click the drop-down list arrow next to Item • Refer to the memo above and the Item List for appropriate billing information. Click Tech Sup 2 to bill for 10 hours of technical support • Tech Sup 2 is entered as the Item. Tab to or click Qty Type 1 • The quantity is one because you are billing for 1 unit of Tech Sup 2. As you can see
on the Item List, Tech Sup 2 is for 10 hours of support. The total for the item and for the invoice is automatically calculated when you tab to the next item or click in a new invoice area. If you forget to tell QuickBooks Pro to use a quantity, it will automatically calculate the quantity as 1.
Click in the textbox for Customer Message Click the drop-down list arrow next to Customer Message Click Thank you for your business. • Message is inserted in the Customer Message box. • Look at the bottom portion of the Invoice. If there is a check mark in either the “To
be printed” or To be e-mailed,” boxes click to remove the check mark.

50 QUICKBOOKS® PRO 2006/2007: A COMPLETE COURSE EDIT AND CORRECT ERRORS If an error is discovered while entering invoice information, it may be corrected by positioning the cursor in the field containing the error. You may do this by clicking in the field containing the error, tabbing to move forward through each field, or pressing Shift+Tab to move back to the field containing the error. If the error is highlighted, type the correction. If the error is not highlighted, you can correct the error by pressing the backspace or the delete key as many times as necessary to remove the error, then typing the correction. (Alternate method: Point to the error, highlight by dragging the mouse through the error, then type the correction or press the Delete key to remove completely.) Practice editing and making corrections to Invoice No. 1
DO
Click the drop-down list arrow next to Customer:Job Click Matthews, Timothy CPA • Name is changed in Customer:Job and Bill To information is also changed. Click to the left of the first number in the Date—this is 0 Hold down primary mouse button and drag through the date to highlight. Type 10/24/06 as the date • This removes the 01/02/2006 date originally entered. Click to the right of the 1 in Quantity Backspace and type a 2 Press Tab to see how QuickBooks automatically calculates the new total To eliminate the changes made to Invoice No. 1, click the drop-down list arrow next to
Customer:Job Click Mendoza, Jose Click the cursor so it is in front of the 1 in the Date Press the Delete key until the date is removed Type 01/02/06 Click to the right of the 2 in Quantity Backspace and type a 1 Press the Tab key • This will cause QuickBooks Pro to calculate the amount and the total for the invoice
and will move the cursor to the Description field. • Invoice No. 1 has been returned to the correct customer, date, and quantity. Compare
the information you entered with the information provided in the memo.

CHAPTER 2—SALES AND RECEIVABLES 51
PRINT AN INVOICE
With Invoice No. 1 on the screen, print the invoice immediately after entering information
DO
Click Print at the top of the Create Invoices screen • If you click the drop-down list arrow for the Print button, you will get a list of
printing options. Click the Print option. Check the information on the Print One Invoice Settings tab: Printer name (should identify the type of printer you are using): • This may be different from the printer identified in this text. Printer type: Page-oriented (Single sheets) Print on: Blank paper • The circle next to this should be filled. If it is not, click the circle to select. Click the Do not print lines around each field check box to select. • If there is a check in the box, lines will not print around each field. • If a check is not in the box, lines will print around each field. Number of copies should be 1 • If a number other than 1 shows: Click in the box Drag to highlight the number Type 1

52 QUICKBOOKS® PRO 2006/2007: A COMPLETE COURSE
Click the Print button • This initiates the printing of the invoice through QuickBooks Pro. However, because
not all classroom configurations are the same, check with your instructor for specific printing instructions.
• If QuickBooks Pro prints your name on two lines, do not be concerned. Click Save & Close button at the bottom of the Create Invoices screen to record and
close the invoice • If you did not remove the check from “To be e-mailed,” you may get this message:
If you do, click Cancel Click To be e-mailed on the Invoice to remove the check mark

CHAPTER 2—SALES AND RECEIVABLES 53 ENTER TRANSACTIONS USING TWO SALES ITEMS
MEMO: Date: January 3, 2006 Bill the following: Invoice No. 2—Timothy Matthews, CPA, spoke with you regarding the need for on-site training to help him get started using the Internet. Bill him for a 5-hour on-site training session with Justine Wong. Use Thank you for your business. as the message. (Remember to use Training 1 for the first hour of on-site training and Training 2 for all additional hours of training.)
Record a transaction on account for a sale involving two sales items
DO
Click the Invoices icon on the QuickBooks Customers Navigator Click the drop-down list arrow next to Customer:Job Click Matthews, Timothy, CPA • Name is entered as Customer:Job. Bill To information is completed automatically. Tab to or click Date Delete the current date • Refer to instructions for Invoice No. 1 or to editing practice if necessary. Type 01/03/06 as the date Make sure that Invoice No. 2 is showing in the Invoice No. box • The Invoice No. should not have to be changed. There is no PO No. to record Terms should be indicated as Net 30 Tab to or click the first line beneath Item • Refer to Memo and Item List for appropriate billing information. • Note: Services are recorded based on sales items and are not related to the employee
who provides the service. Click the drop-down list arrow next to Item Click Training 1 • Training 1 is entered as the Item. Tab to or click Quantity Type 1 • Amount will be calculated automatically and entered into the Amount Column when
you go to the next line. Notice the amount is $95.00. Tab to or click the second line for Item Click the drop-down list arrow next to Item Click Training 2

54 QUICKBOOKS® PRO 2006/2007: A COMPLETE COURSE
Tab to or click Quantity Type 4 • The total amount of training time is five hours. Because the first hour is billed as
Training 1, the remaining four hours are billed as Training 2 hours. The total amount due for the Training 2 hours and the total for the invoice are automatically calculated when you go to the Customer Message box.
Click Customer Message Click the drop-down list arrow next to Customer Message Click Thank you for your business. • Message is inserted in the Customer Message box.
PRINT AN INVOICE
With Invoice No. 2 on the screen, print the invoice immediately after entering invoice information
DO
Click Print button on the Create Invoices screen • If you click the drop-down list arrow for the Print button, you will get a list of
printing options. Click the Print option. Check the information on the Print One Invoice Settings tab: Printer name (should identify the type of printer you are using): Printer type: Page-oriented (Single sheets) Print on: Blank paper Do not Print lines around each field check box should have a check mark Click the Print button

CHAPTER 2—SALES AND RECEIVABLES 55
After the invoice has printed, click the Save & New button at the bottom of the Create Invoices screen to record the Invoice 2 and go to a new invoice
PREPARE INVOICES WITHOUT STEP-BY-STEP INSTRUCTIONS
MEMO: DATE: January 5, 2006 Bill the following: Invoice No. 3—Kala Jafrood needed to have telephone assistance to help her set up her Internet connection. Prepare an invoice as the bill for 10 hours of technical support for January. (Remember customers are listed by last name in the Customer List. Refer to Item List to select the correct Income account for billing.) Invoice No. 4—Steele, Rhoades, Whitcomb, and Hinson have several new employees that need to be trained in the use of the office computer system. Bill them for 40 hours of on-site training from Justine Wong. (Your Name Computer Consulting does not record a transaction based on the employee who performs the service. It simply bills according to the service provided.) Invoice No. 5—Grace, Anderson, and Binsley, CPA, need to learn the basic features of QuickBooks Pro, which is used by many of their customers. Bill them for 10 hours of on-site training and 15 hours of technical support for January so they may call and speak to Silas Kaan regarding additional questions. (Note: You will use three sales items in this transaction.) Invoice No. 6—Yamashita, Bibey, and Iverson has a new assistant office manager. Your Name Computer Consulting Is providing 40 hours of on-site training for Beverly Wilson. To obtain additional assistance, the company has signed up for 5 hours technical support for January.
Enter the four transactions in the memo above. Refer to instructions given for the two previous transactions entered
DO
• Remember, when billing for on-site training, the first hour is billed as Training 1, and
the remaining hours are billed as Training 2. • Always use the Item List to determine the appropriate sales items for billing. • Use Thank you for your business. as the message for these invoices. • If you make an error, correct it. • Print each invoice immediately after you enter the information for it. • To go from one invoice to the next, click the Save & New button. • Click Save & Close after Invoice No. 6 has been entered and printed.

56 QUICKBOOKS® PRO 2006/2007: A COMPLETE COURSE

CHAPTER 2—SALES AND RECEIVABLES 57
PRINT A/R REPORTS QuickBooks Pro has several reports available for accounts receivable. One of the most useful is the Customer Balance Summary Report. It shows you the balances of all the customers on account.
DO Print the Customer Balance Summary Report

58 QUICKBOOKS® PRO 2006/2007: A COMPLETE COURSE
Click Reports on the menu bar Point to Customers & Receivables Click Customer Balance Summary • The report should appear on the screen. • The current date and time will appear on the report. Since the dates given in the text
will not be the same date as the computer, it may be helpful to remove the date and time prepared from your report.
Remove the date prepared and the time prepared from the report: Click Modify Report Click the Header/Footer tab Click the check box next to Date Prepared to deselect this option Click the check box next to Time Prepared to deselect this option • Note: Some reports will also have a Report Basis—Cash or Accrual. You may turn
off the display of the report basis by clicking the check box for this option. Click OK on the Modify Report screen Change the Dates for the report: Click in or tab to From Enter 01/01/06 Tab to To Enter 01/05/06 Press the Tab key • After you enter the date, pressing the tab key will generate the report. • This report lists the names of all customers with balances on account. The amount
column shows the total balance for each customer. This includes opening balances as well as current invoices.

CHAPTER 2—SALES AND RECEIVABLES 59
Click the Print button at the top of the Customer Balance Summary Report Complete the information on the Print Reports Settings tab: Print To: The selected item should be Printer Orientation: Should be Portrait. If it is not, click Portrait to select Portrait orientation
for this report • Portrait orientation prints in the traditional 8 ½- by 11-inch paper size. Page Range: All should be selected; if it is not, click All Page Breaks: Smart page breaks (widow/orphan control) should be selected Number of copies should be 1 If necessary, click on Fit report to one page wide to deselect this item • When selected, the printer will print the report using a smaller font so it will be one
page in width.
Click Print on the Print Reports screen Do not close the Customer Balance Summary Report
USE THE QUICKZOOM FEATURE You ask the office manager, Consuelo Alcampo, to obtain information regarding the balance of the Steele, Rhoades, Whitcomb, and Hinson account. To get detailed information regarding an individual customer’s balance while in the Customer Balance Summary Report, use the Zoom feature. With the individual customer’s information on the screen, you can print a report for that customer.
DO

60 QUICKBOOKS® PRO 2006/2007: A COMPLETE COURSE
Use the QuickZoom Point to the balance for Steele, Rhoades, Whitcomb, and Hinson • Notice that the mouse pointer turns into a magnifying glass with a Z in it. Click once to mark the balance 3,215.00 • Notice the marks on either side of the amount. Double-click to Zoom in to see the details The report dates used should be from 01/01/06 to 01/05/06 Remove the Date Prepared and Time Prepared from the header • Follow the instructions previously listed for removing the current date from the
header for the Customer Balance Summary Report.
• Notice that Invoice No. 4 was recorded on 01/05/2006 for $3,215. • To view Invoice No. 4, simply double-click on this transaction, and the invoice will
be shown on the screen. To exit Invoice No. 4 and return to the Customer Balance Detail Report, click the Close
button on the title bar of the Create Invoices screen for Invoice No. 4. Print the Customer Balance Detail Report for Steele, Rhoades, Whitcomb, and Hinson • Follow the steps previously listed for printing the Customer Balance Summary
Report.

CHAPTER 2—SALES AND RECEIVABLES 61
Click Close to close Customer Balance Detail Report • If you get a screen for Memorize Report, always click No Click Close to close Customer Balance Summary Report
CORRECT AN INVOICE AND PRINT THE CORRECTED FORM Errors may be corrected very easily with QuickBooks Pro. Because an invoice is prepared for sales on account, corrections will be made directly on the invoice. We will access the invoice via the register for the Accounts Receivable account. The account register contains detailed information regarding each transaction made to the account. Therefore, anytime an invoice is recorded, it is posted to the Accounts Receivable register.
MEMO: DATE: January 7, 2006 The actual amount of time spent for on-site training increased from 10 hours to 12 hours. Change Invoice No. 5 to Grace, Anderson, and Binsley, CPA, to correct the actual amount of training hours to show a total of 12 hours.
Correct an invoice using the Accounts Receivable Register
DO
Correct the error described in the above memo and print a corrected invoice:
Click the Chart of Accounts icon in the Company sections of the Home Page
In the Chart of Accounts, click Accounts Receivable

62 QUICKBOOKS® PRO 2006/2007: A COMPLETE COURSE
Click the Activities button Click Use Register OR Double-click Accounts Receivable in the Chart of Accounts • The Accounts Receivable Register appears on the screen with information regarding
each transaction entered into the account. • Note: This is the same as the Accounts Receivable General Ledger Account
If necessary, scroll through the register until the transaction for Invoice No. 5 is on the screen
• Look at the Number/Type column to identify the number of the invoice and the type of transaction.
• On the Number line you will see an invoice number or a check number. • On the Type line, INV indicates a sale on account, and PMT indicates a payment
received on account.

CHAPTER 2—SALES AND RECEIVABLES 63
Click anywhere in the transaction for Invoice No. 5 to Grace, Anderson, and Binsley, CPA
Click Edit Transaction at the top of the register • Invoice No. 5 appears on the screen. Click the line in the Quantity field that corresponds to the Training 2 hours Change the quantity from 9 hours to 11 hours Position cursor in front of the 9 Press Delete Type 11 Press Tab to generate a new total
• Notice that the date remains 01/05/2006. Click Print button on the Create Invoices screen to print a corrected invoice Check the information on the Print One Invoice Settings tab Click Print Click Save & Close to record changes and close invoice Click Yes on the Recording Transaction dialog box
After closing the invoice, you return to the register.

64 QUICKBOOKS® PRO 2006/2007: A COMPLETE COURSE
VIEW A QUICKREPORT After editing the invoice and returning to the register, you may get a detailed report regarding the customer’s transactions by clicking the QuickReport button.
DO View a QuickReport for Grace, Anderson, and Binsley, CPA Click the QuickReport button to view the Grace, Anderson, and Binsley account
Verify the balance of the account. It should be $1,425.00 • Note: You will get the date prepared, time prepared, and the report basis in the
heading of your QuickReport.
ANALYZE THE QUICKREPORT FOR GRACE, ANDERSON, AND BINSLEY
Analyze the QuickReport
DO
Notice that the total of Invoice No. 5 is $1,425.00 Close the QuickReport without printing Close the Accounts Receivable Register Close the Chart of Accounts

CHAPTER 2—SALES AND RECEIVABLES 65 VOID AND DELETE SALES FORMS Deleting an invoice or sales receipt permanently removes it from QuickBooks Pro without leaving a trace. If you would like to correct your financial records for the invoice that you no longer want, it is more appropriate to void the invoice. When an invoice is voided, it remains in the QuickBooks Pro system with a zero balance. VOID AN INVOICE
MEMO: DATE: January 7, 2006 Kala Jafrood called to cancel the 10 hours of technical support for January. Because no support had been used, you decide to void Invoice 3.
Void the invoice above by going directly to the original invoice:
DO
Use the keyboard shortcut Ctrl+I to open the Create Invoices screen Click the Previous button until you get to Invoice No. 3 With Invoice No. 3 on the screen, click Edit on the menu bar Click Void Invoice • Notice that the amount and total for the invoice are no longer 300. They are both
0.00. Find the Memo text box at the bottom of the screen and verify that the word VOID appears as the memo.
Click Save & Close on the Create Invoices screen Click Yes on the Recording Transaction dialog box Click the Reports Center button above the Home Page Click Customers & Receivables as the Type of Report • The report categories are displayed on the left side of the Report Center. To prepare a
report, click the desired type of report, scroll through the list of reports, and click the desired report.

66 QUICKBOOKS® PRO 2006/2007: A COMPLETE COURSE
Click Transaction List by Customer in the Customer Balance section Click in From Enter 010106 Tab to or click in To Enter 010706, press Tab Remove the date prepared and the time prepared from the report heading: Click Modify Report Click Header/Footer tab Click the check box next to Date Prepared and Time Prepared to deselect these
options Click OK

CHAPTER 2—SALES AND RECEIVABLES 67
Print the Transactions List by Customer Report in Portrait orientation following printing instructions provided earlier in the chapter
• Do not use the option to fit the report to one-page wide. This report may print on two pages.
• This report gives the amount for each transaction with the customer. • Notice that Invoice No. 3 is marked VOID in the Memo column and has a √ in the
Clr column. • The SPLIT column tells you which account was used to record the income. If the
word -SPLIT- appears in the column, this means the transaction amount was split or divided among two or more accounts.
Close the Transaction List by Customer Report • If you get a screen for Memorize Report, always click No Close the Report Center
DELETE AN INVOICE AND USE FIND
When an invoice is deleted, it is permanently removed from QuickBooks. It will no longer be listed in any reports or shown as an invoice. Find is useful when you have a large number of invoices and want to locate an invoice for a particular customer. Using Find will locate the invoice without requiring you to scroll through all the invoices for the company. For example, if customer Jimenez’s transaction was on Invoice No. 3 and the invoice on the screen was Invoice No. 1,084, you would not have to scroll through 1,081 invoices because Find would locate Invoice No. 3 instantly. QuickBooks® Pro 2006 has two methods for finding transactions: simple find and advanced find.

68 QUICKBOOKS® PRO 2006/2007: A COMPLETE COURSE Simple Find allows you to do a quick search using the most common transaction types. Transaction Types include Invoice, Sales Receipt, Credit Memo, Check, and others. The search results are displayed in the lower portion of the window. You can view an individual transaction by highlighting it and clicking Go To, or you can view a report by clicking Report. Advanced Find is used to do a more detailed search for transactions than you can do using Simple Find. Advanced Find allows you to apply filters to your search criteria. When you apply a filter, you choose how you want QuickBooks to restrict the search results to certain customers, for example. QuickBooks then excludes from results any transactions that don't meet your criteria. You can apply filters either one at a time or in combination with each other. Each additional filter you apply further restricts the content of the search. The search results are displayed in the lower portion of the window. You can view an individual transaction by highlighting it and clicking Go To, or you can view a report by clicking Report.
MEMO: DATE: January 7, 2006 Because of the upcoming tax season, Timothy Matthews has had to reschedule his 5-hour training session with Justine Wong three times. He finally decided to cancel the training session and reschedule it after April 15. Delete Invoice No. 2.
Delete Invoice 2 to Timothy Matthews, using Find to locate the invoice:
DO
Use Simple Find by clicking Edit on the menu bar, clicking Find on the Edit menu and clicking the Simple Find tab
The Transaction Type should be Invoice. • If it is not, click the drop-down list arrow for Transaction Type and click Invoice. Click the drop-down list arrow for Customer/Job: Click Matthews, Timothy CPA • This allows QuickBooks Pro to find any invoices recorded for Timothy Matthews. Click the Find button on the Find dialog box

CHAPTER 2—SALES AND RECEIVABLES 69
Click the line for Invoice No. 2 • Make sure you have selected Invoice No. 2 and not the invoice containing the
opening balance. Click Go To • Invoice No. 2 appears on the screen. With the invoice on the screen, click Edit on the menu bar
70 QUICKBOOKS® PRO 2006/2007: A COMPLETE COURSE
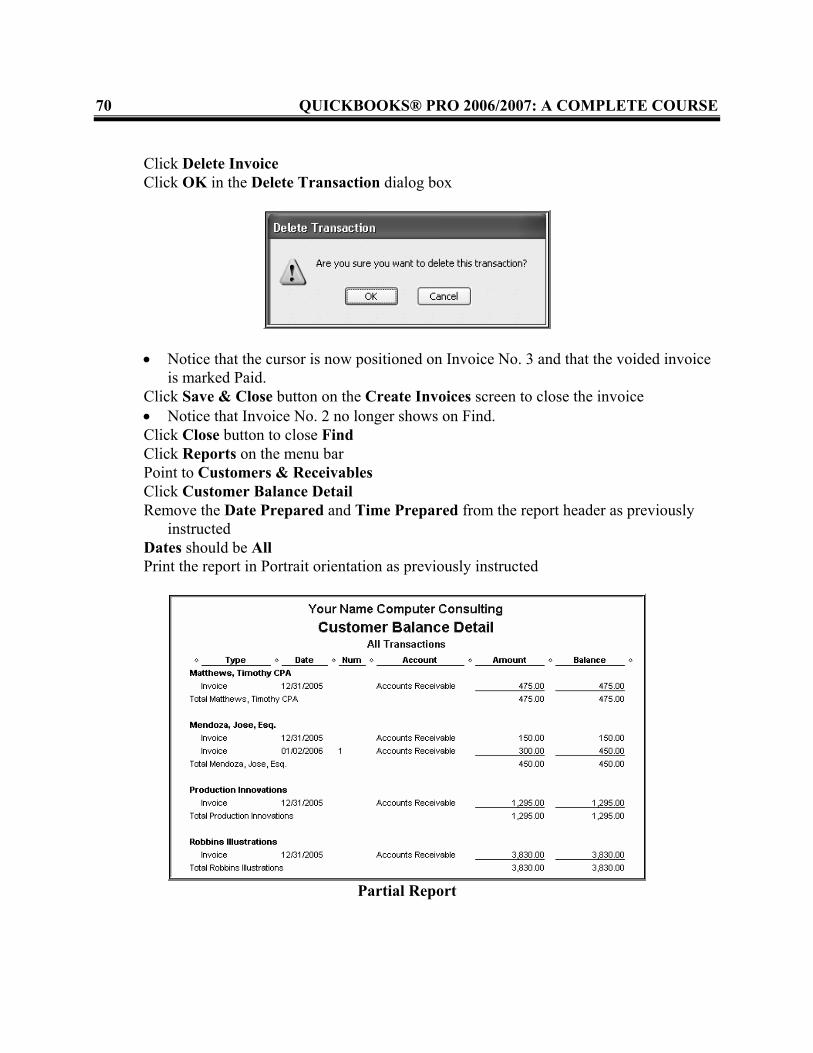
Click Delete Invoice Click OK in the Delete Transaction dialog box
• Notice that the cursor is now positioned on Invoice No. 3 and that the voided invoice is marked Paid.
Click Save & Close button on the Create Invoices screen to close the invoice • Notice that Invoice No. 2 no longer shows on Find. Click Close button to close Find Click Reports on the menu bar Point to Customers & Receivables Click Customer Balance Detail Remove the Date Prepared and Time Prepared from the report header as previously
instructed Dates should be All Print the report in Portrait orientation as previously instructed
Partial Report

CHAPTER 2—SALES AND RECEIVABLES 71
• Look at the account for Timothy Matthews. Notice that Invoice No. 2 does not show up in the account listing. When an invoice is deleted, there is no record of it anywhere in the report.
• Notice that the Customer Balance Detail Report does not include the information telling you which amounts are opening balances.
• The report does give information regarding the amount owed on each transaction plus the total amount owed by each customer.
Close the Customer Balance Detail Report PREPARE A CREDIT MEMO Credit memos are prepared to show a reduction to a transaction. If the invoice has already been sent to the customer, it is more appropriate and less confusing to make a change to a transaction by issuing a credit memo rather than void the invoice and issue a new one. A credit memo notifies a customer that a change has been made to a transaction.
MEMO: DATE: January 8, 2006 Prepare the following: Credit Memo No. 7—Steele, Rhoades, Whitcomb, and Hinson did not need 5 hours of the training billed on Invoice No. 4. Issue a Credit Memo to reduce Training 2 by 5 hours.
Prepare a Credit Memo
DO
Click the Refunds and Credits icon in the Customers area of the Home Page Click the down arrow for the drop-down list box next to Customer:Job Click Steele, Rhoades, Whitcomb, and Hinson Tab twice to Template textbox • It should say Custom Credit Memo. • If not, click the drop-down list arrow and click Custom Credit Memo. Tab to or click Date Type in the date of the credit memo: 01/08/06 The Credit No. field should show the number 7 • Because credit memos are included in the numbering sequence for invoices, this
number matches the number of the next blank invoice. There is no PO No. • Omit this field.

72 QUICKBOOKS® PRO 2006/2007: A COMPLETE COURSE
Tab to or click in Item Click the drop-down list arrow in the Item column Click Training 2 Tab to or click in Quantity Type in 5 Click the next blank line in the Description column Type Deduct 5 hours of additional training, which was not required. Reduce the
amount due for Invoice #4. • This will print as a note or explanation to the customer. Click the drop-down list arrow next to Customer Message Click It’s been a pleasure working with you!
Click Print on Create Credit Memos/Refunds Click Print on Print One Credit Memo Click the Save & Close button Click Apply to an Invoice on the Available Credit screen

CHAPTER 2—SALES AND RECEIVABLES 73
Click OK • Make sure there is a check mark for Invoice 4.
Click Done VIEW CUSTOMER BALANCE DETAIL REPORT Periodically viewing reports allows you to verify the changes that have occurred to accounts. The Customer Balance Detail report shows all the transactions for each credit customer. Cash customers must be viewed through sales reports. View the Customer Balance Detail Report
DO

74 QUICKBOOKS® PRO 2006/2007: A COMPLETE COURSE
Click the Report Center button Click Customers & Receivables as the report type Click Customer Balance Detail on the list of reports displayed Scroll through the report • Notice that the account for Steele, Rhoades, Whitcomb, and Hinson shows Credit
Memo No. 7 for $400.00. The total amount owed was reduced by $400 and is $2,815.00.
Click Close to close the report without printing Close the Report Center
ADD A NEW ACCOUNT TO THE CHART OF ACCOUNTS Because account needs can change as a business is in operation, QuickBooks Pro allows you to make changes to the chart of accounts at any time. Some changes to the chart of accounts require additional changes to lists. You have determined that Your Name Computer Consulting has received a lot of calls from customers for assistance with hardware installation. Even though Your Name Computer Consulting does not record revenue according to the employee performing the service, it does assign primary areas of responsibility to some of the personnel. Silas Kaan will be responsible for installing hardware for customers. As a result of this decision, you will be adding a third

CHAPTER 2—SALES AND RECEIVABLES 75 income account. This account will be used when revenue from hardware installation is earned. In addition to adding the account, you will also have to add two new sales items to the Item list.
MEMO: DATE: January 8, 2006 Add a new account, Installation Income. It is a subaccount of Income.
Add a new income account for Hardware Installation
DO
Click the Chart of Accounts icon in the Company section of the Home Page • Remember that the Chart of Accounts is also the General Ledger.
Click the Account button at the bottom of the Chart of Accounts screen
Click New Click the drop-down list arrow next to Type

76 QUICKBOOKS® PRO 2006/2007: A COMPLETE COURSE
Click Income
2007 Click Income to choose one account type
Click the Continue button. Tab to or click in the text box for Name Type Installation Income Click the check box for Subaccount of Click the drop-down list arrow for Subaccount of Click Income Tab to or click Description Type Hardware Installation Income

CHAPTER 2—SALES AND RECEIVABLES 77
Click OK to record new account and close New Account screen
2007 Click the Save & Close button
Scroll through the Chart of Accounts Verify that Installation Income has been added under Income Close Chart of Accounts
ADD NEW ITEMS TO THE ITEM LIST In order to accommodate the changing needs of a business, all QuickBooks Pro lists allow you to make changes at any time. The Item List stores information about the services Your Name Computer Consulting provides. In order to use the new Hardware Installation Income account, two new items need to be added to the Item List. When these items are used in a transaction, the amount of revenue earned on the transaction will be posted to the Installation Income account.

78 QUICKBOOKS® PRO 2006/2007: A COMPLETE COURSE
MEMO: DATE: January 8, 2006 Add two Service items to the Item List—Name: Install 1, Description: Initial Hour of Hardware Installation, Rate: 95.00, Account: Installation Income.Name: Install 2, Description: Additional Hours of Hardware Installation, Rate: 80.00, Account: Installation Income.
Add two new sales items
DO
Click the Items & Services icon in the Company section of the Home Page Click the Item button at the bottom of the Item List screen Click New Item Type is Service Tab to or click Item Name/Number Type Install 1 Tab to or click Description Type Initial Hour of Hardware Installation Tab to or click Rate Type 95 To indicate the general ledger account to be used to record the sale of this item, click the
drop-down list arrow for Account Click Installation Income
Click Next on the New Item dialog box Repeat the steps above to add Install 2

CHAPTER 2—SALES AND RECEIVABLES 79
The description is Additional Hours of Hardware Installation The rate is $80.00 per hour When finished adding Install 2, click OK to add new items and to close New Item screen • Whenever hardware installation is provided for customers, the first hour will be billed
as Install 1, and additional hours will be billed as Install 2. Verify the addition of Install 1 and Install 2 on the Item List • If you find an error, click on the item with the error, click the Item button, click Edit,
and make corrections as needed.
Close the Item List ADD A NEW CUSTOMER Because customers are the lifeblood of a business, QuickBooks Pro allows customers to be added “on the fly” as you create an invoice or a sales receipt. You may choose between Quick Add (used to add only a customer’s name) and Set Up (used to add complete information for a customer).
MEMO: DATE: January 8, 2006 Prepare the following: Invoice No. 8—A new customer, Kendall Clark, has purchased several upgrade items for his personal computer but needed assistance with the installation. Silas Kaan spent two hours installing this hardware. Bill Mr. Clark for 2 hours of hardware installation. His address is: 20985 Ventura Blvd., Woodland Hills, CA 91371. His telephone number is: 818-555-2058. He does not have a fax. His credit limit is $1,000; and the terms are Net 30.

80 QUICKBOOKS® PRO 2006/2007: A COMPLETE COURSE
DO Add a new customer and record the above sale on account Click the Invoices icon on the Home Page In the Customer:Job dialog box, type Clark, Kendall Press Tab • You will see a message box for Customer:Job Not Found with buttons for three
choices: Quick Add (used to add only a customer’s name) Set Up (used to add complete information for a customer) Cancel (used to cancel the Customer:Job Not Found message box) Click Set Up
Complete the New Customer dialog box • The name Clark, Kendall is displayed in the Customer Name field and as the first
line of Bill To in the Address section on the Address Info tab. There is no Opening Balance, so leave this field blank • An opening balance may be given only when the customer’s account is created. It is
the amount the customer owes you at the time the account is created. It is not the amount of any transaction not yet recorded.
Complete the information for the Address Info tab Tab to or click in First Name, type Kendall Tab to or click in Last Name, type Clark Tab to or click the first line for Bill To If necessary, highlight Clark, Kendall Type Kendall Clark • Entering the customer name in this manner allows for the Customer:Job List to be
organized according to the last name, yet the bill will be printed with the first name, then the last name.
Press Enter or click the second line of the billing address Type the address 20985 Ventura Blvd. Press Enter or click the third line of the billing address Type Woodland Hills, CA 91371
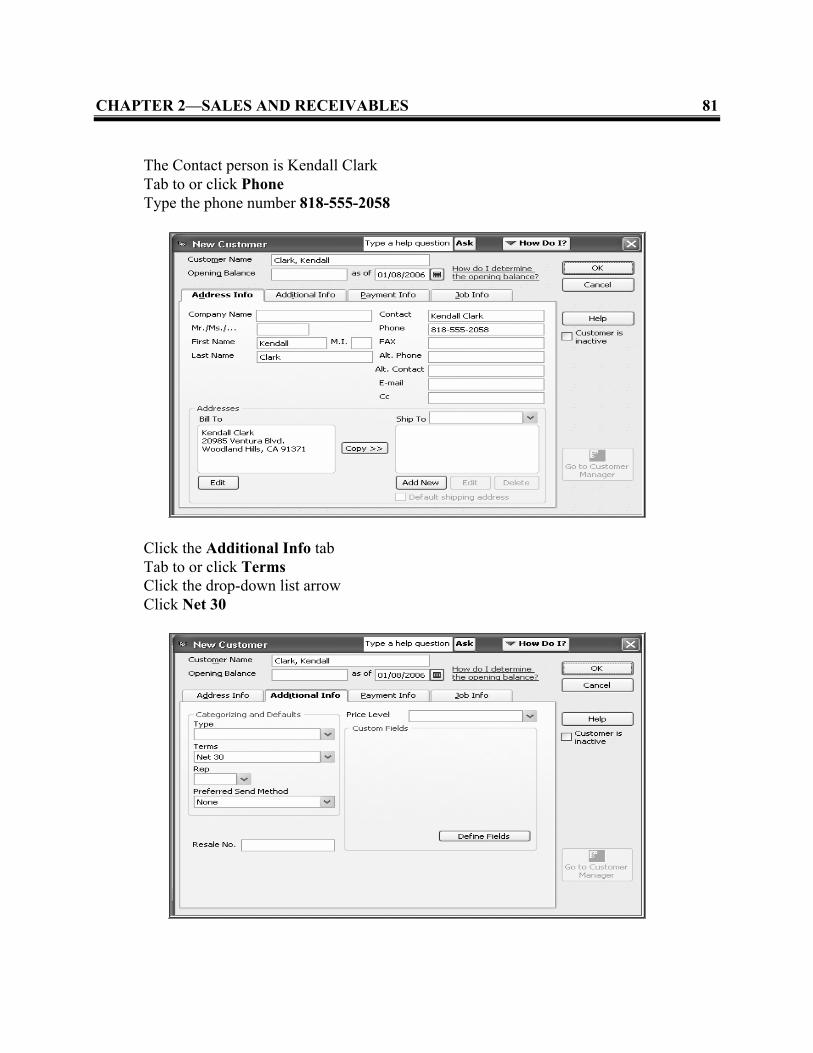
CHAPTER 2—SALES AND RECEIVABLES 81
The Contact person is Kendall Clark Tab to or click Phone Type the phone number 818-555-2058
Click the Additional Info tab Tab to or click Terms Click the drop-down list arrow Click Net 30

82 QUICKBOOKS® PRO 2006/2007: A COMPLETE COURSE
Click Payment Info tab Tab to or click Credit Limit Type the amount 1000 • Do not use a dollar sign. QuickBooks Pro will insert the comma for you.
Click OK to return to the Invoice Enter Invoice information as previously instructed Date of the invoice is 01/08/06 Invoice No. is 8 The bill is for 2 hours of hardware installation • Remember to bill for the initial or first hour, then bill the other hour separately. The message is Thank you for your business. The invoice total should be $175.00

CHAPTER 2—SALES AND RECEIVABLES 83
Print the invoice as previously instructed Click Save & Close on the invoice to record and close the transaction
MODIFY CUSTOMER RECORDS Occasionally, information regarding a customer will change. QuickBooks Pro allows you to modify customer accounts at any time by editing the Customer:Job List.
MEMO: DATE: January 8, 2006 Update the following account: Custom Design Creations has changed its fax number to 310-555-2109.
Edit the above account:
DO
Access the Customer:Job List: • There are several ways to access the Customer:Job List. Some are: Click the Customer Center icon. Use the keyboard shortcut: Ctrl+J Click the Customer icon left side of the Home Page Click Custom Design Creations in the Customers & Job list in the Customer Center

84 QUICKBOOKS® PRO 2006/2007: A COMPLETE COURSE
Edit the customer in one of three ways: Click the Edit Customer button Click Custom Design Creations on the Customer:Job List. Use the keyboard
shortcut Ctrl+E. Double-click Custom Design Creations on the Customer:Job List.
Change the fax number to 310-555-2109: Click at the end of the fax number Backspace to delete 5911 Type 2109

CHAPTER 2—SALES AND RECEIVABLES 85
Click OK Close the Customer Center
RECORD CASH SALES Not all sales in a business are on account. In many instances, payment is made at the time the service is performed. This is entered as a cash sale. When entering a cash sale, you prepare a sales receipt rather than an invoice. QuickBooks Pro records the transaction in the Journal and places the amount of cash received in an account called Undeposited Funds. The funds received remain in Undeposited Funds until you record a deposit to your bank account.
MEMO: DATE: January 10, 2006 Prepare the following to record cash sales: Sales Receipt No. 1—You provided 5 hours of on-site training to Raymond Finley, CPA, and received Ray’s Check No. 3287 for the full amount due. Prepare Sales Receipt No. 1 for this transaction. Use It’s been a pleasure working with you! as the message.
Record a Cash Sale
DO
Click the Create Sales Receipts icon in the Customers section of the Home Page Click No on the Merchant Account Service Message screen

86 QUICKBOOKS® PRO 2006/2007: A COMPLETE COURSE
Click the drop-down list arrow next to Customer:Job Click Finley, Raymond, CPA Tab to Template • This should have Custom Cash Sales as the template. If not, click the drop-down list
arrow and click Custom Cash Sales. Tab to or click Date Type 01/10/06 • You may click on the calendar icon next to the date text box. Make sure the month is
January and the year is 2006 then click 10 Sales No. should be 1 Tab to or click Check No. Type 3287 Click the drop-down list arrow next to Payment Method Click Check Tab to or click the first line for Item Click the drop-down list arrow next to Item Click Training 1 Tab to or click Qty Type 1 Tab to or click the second line for Item Click the drop-down list arrow next to Item Click Training 2 Tab to or click Qty Type 4 • The amount and total are automatically calculated when you go to the Customer
Message or tab past Qty. Click Customer Message Click the drop-down list arrow for Customer Message Click It’s been a pleasure working with you!

CHAPTER 2—SALES AND RECEIVABLES 87
Do not close the Sales Receipt PRINT SALES RECEIPT
Print the sales receipt DO
Click Print button on the top of the Enter Sales Receipts screen Check the information on the Print One Sales Receipt Settings tab: Printer name (should identify the type of printer you are using): Printer type: Page-oriented (Single sheets) Print on: Blank paper Do not print lines around each field check box should be selected Number of copies should be 1 Click Print • This initiates the printing of the sales receipt through QuickBooks Pro. However,
since not all classroom configurations are the same, check with your instructor for specific printing instructions.
Once the Sales Receipt has been printed, click Save & New on the bottom of the Enter Sales Receipts screen

88 QUICKBOOKS® PRO 2006/2007: A COMPLETE COURSE ENTER CASH SALES TRANSACTIONS WITHOUT STEP-BY-STEP INSTRUCTIONS
MEMO: DATE: January 12, 2006 Sales Receipt No. 2—Raymond Finley needed additional on-site training to correct some error messages he received on his computer. You provided 1 hour of on-site training for Raymond Finley, CPA, and received Ray’s Check No. 3306 for the full amount due. (Even though Mr. Finley has had on-site training previously, this is a new sales call and should have the first hour billed as Training 1.) Sales Receipt No. 3—You provided 4 hours of on-site Internet training for Eric Andrews Research Corp. so the company could be online. You received Check No. 10358 for the full amount due.
Record the two transactions listed above
DO
Use the procedures given when you entered Sales Receipt No. 1: • Remember, the first hour for on-site training is billed as Training 1 and the remaining
hours are billed as Training 2. • Always use the Item List to determine the appropriate sales items for billing. • Use Thank you for your business. as the message for these sales receipts. • Print each sales receipt immediately after entering the information for it. • If you make an error, correct it. • To go from one sales receipt to the next, click the Save & New button on the bottom
of the Enter Sales Receipts screen. • Click Save & Close after you have entered and printed Sales Receipt No. 3.

CHAPTER 2—SALES AND RECEIVABLES 89
PRINT SALES BY CUSTOMER DETAIL REPORT QuickBooks Pro has reports available that enable you to obtain sales information about sales items or customers. To get information about the total amount of sales to each customer during a specific period, print a Sales Report by Customer Detail. The total shown represents both cash and/or credit sales.
Prepare and print a Sales by Customer Detail Report DO

90 QUICKBOOKS® PRO 2006/2007: A COMPLETE COURSE
Click Reports on the menu bar Point to Sales Click Sales by Customer Detail To remove the Date Prepared, Time Prepared, and Report Basis from the report, click
the Modify Report button and follow the instructions given previously for deselecting the date prepared, time prepared, and report basis
Change the dates to reflect the sales period from 01/01/06 to 01/14/06 Tab to generate the report • Notice that the report information includes the type of sales to each customer, the
date of the sale, the sales item(s), the quantity for each item, the sales price, the amount, and the balance.
• The report does not include information regarding opening or previous balances due. • The scope of this report is to focus on sales.
Click the Print button on the Sales by Customer Detail screen On the Print Report screen, check the Settings tab to verify that Print to: Printer is
selected and that the name of your printer is correct Click Landscape to change the Orientation from Portrait • Landscape changes the orientation of the paper so the report is printed 11-inches wide
by 8½-inches long. Verify that the Range is All Make sure Smart page breaks have been selected On the Print Report screen, click Print • Do not select Fit report to one page wide. The printed report may require more than
one page.

CHAPTER 2—SALES AND RECEIVABLES 91
Close the Sales by Customer Detail Report CORRECT A SALES RECEIPT AND PRINT THE CORRECTED FORM QuickBooks Pro makes correcting errors user friendly. When an error is discovered in a transaction such as a cash sale, you can simply return to the form where the transaction was recorded and correct the error. Thus, to correct a sales receipt, you would open a Sales Receipt, click the Previous button until you found the appropriate sales receipt, and then correct the error. Because cash or checks received for cash sales are held in the Undeposited Funds account until the bank deposit is made, you can access the sales receipt through the Undeposited Funds account in the Chart of Accounts as well. Accessing the receipt in this manner allows you to see all the transactions entered in the account for Undeposited Funds. When a correction for a sale is made, QuickBooks Pro not only changes the form, it also changes all journal and account entries for the transaction to reflect the correction. QuickBooks Pro then allows a corrected sales receipt to be printed.
MEMO: DATE: January 14, 2006 After reviewing transaction information, you realize the date for the Sales Receipt No. 1 to Raymond Finley, CPA, was entered incorrectly. Change the date to 1/9/2006.
Correct the error indicated in the memo above and print a corrected sales receipt
DO
Click the Chart of Accounts icon on the Home Page Click Undeposited Funds

92 QUICKBOOKS® PRO 2006/2007: A COMPLETE COURSE
Click the Activities button Click Use Register • The register maintains a record of all the transactions recorded within the
Undeposited Funds account.
Click anywhere in the transaction for Sales Receipt No. 1 to Raymond Finley, CPA • Look at the Ref/Type column to see the type of transaction. • The number in the Ref line indicates the number of the sales receipt or the customer’s
check number. • Type shows RCPT for a sales receipt. Click the Edit Transaction button at the top of the register • The sales receipt appears on the screen. Tab to or click Date field Change the Date to 01/09/06 Tab to enter the date

CHAPTER 2—SALES AND RECEIVABLES 93
Print the Sales Receipt as previously instructed Click Save & Close Click Yes on the Recording Transaction dialog box After closing the sales receipt, you are returned to the register for the Undeposited Funds
account Do not close the register
VIEW A QUICKREPORT After editing the sales receipt and returning to the register, you may get a detailed report regarding the customer’s transactions by clicking the QuickReport button.
Prepare a QuickReport for Raymond Finley
DO
Click the QuickReport button to display the Register QuickReport for Raymond Finley, CPA

94 QUICKBOOKS® PRO 2006/2007: A COMPLETE COURSE
ANALYZE THE QUICKREPORT FOR RAYMOND FINLEY
DO Analyze the QuickReport Notice that the date for Sales Receipt No. 1 has been changed to 01/09/2006 • You may need to use the horizontal scroll bar to view all the columns in the report. The account used is Undeposited Funds The Split column contains the other accounts used in the transaction • For Sales Receipt No. 2, the account used is Training Income. • For Sales Receipt No. 1, you see the word Split rather than an account name. • Split means that more than one sales item or account was used for this portion of the
transaction. View the sales items or accounts used for the Split by using QuickZoom to view the
actual Sales Receipt Use QuickZoom by double-clicking anywhere on the information for Sales Receipt No. 1 • The sales items used are Training 1 and Training 2. Close the Sales Receipt Close the Register QuickReport without printing Close the Register for Undeposited Funds Close the Chart of Accounts
ANALYZE SALES To obtain information regarding the amount of sales by item, you can print or view sales reports. Sales reports provide information regarding cash and credit sales. When information regarding the sales according to the Sales Item is needed, a Sales by Item Summary Report is the appropriate report to print or view. This report enables you to see how much revenue is being generated by each sales item. This provides important information for decision making and

CHAPTER 2—SALES AND RECEIVABLES 95 managing the business. For example, if a sales item is not generating much income, it might be wise to discontinue that sales item. Print a summarized list of sales by item
DO
Click the Report Center icon Click Sales as the type of report Click Summary in the Sales by Item report list The dates of the report are from 01/01/06 to 01/15/06 Turn off the Date Prepared, Time Prepared, and Report Basis following instructions
given previously Tab to generate the report
Click Print The Orientation should be Portrait Click Print on Print Reports dialog box Close the report
View a sales report by item detail to obtain information regarding which transactions apply to each sales item
DO
Click Detail on the Sales By Item report list The dates of the report are from 01/01/06 to 01/15/06 Turn off the Date Prepared, Time Prepared, and Report Basis following instructions
given previously Tab to generate the report Scroll through the report to view the types of sales and the transactions that occurred
within each category

96 QUICKBOOKS® PRO 2006/2007: A COMPLETE COURSE
• Notice how many transactions occurred in each sales item.
Close the report without printing Close the Report Center
RECORD CUSTOMER PAYMENTS ON ACCOUNT When customers make a full or partial payment of the amount they owe, QuickBooks Pro places the money received in an account called Undeposited Funds. The money stays in the account until a bank deposit is made. When you start to record a payment made by a customer, you see the customer’s balance, any credits made to the account, and a complete list of outstanding invoices. QuickBooks Pro automatically applies the payment received to the oldest invoice.
MEMO: DATE: January 15, 2006 Record the following cash receipt: Received Check No. 0684 for $815 from Eric Andrews Research Corp. as payment on account.
Record the receipt of a payment on account
DO
Click the Receive Payments icon on the Customers section of the Home Page

CHAPTER 2—SALES AND RECEIVABLES 97
• Notice the flow chart line from Invoices to Receive Payments. This icon is illustrated in this manner because recording a payment receipt is for a payment made on account. This is not a cash sale.
Click the drop-down list arrow for Received From Click Andrews, Eric Research Corp. • Notice that the current date or the last transaction date shows in the Date column and
the total amount owed appears as the balance. • Also note that previous cash sales to Eric Andrews Research Corp. are not listed. This
is because a payment receipt is used only for payments on account. Tab to or click Amount • If you click, you will need to delete the 0.00. If you tab, it will be deleted when you
type in the amount. Enter 815 • QuickBooks Pro will enter the .00 when you tab to or click Date Tab to or click Date • If you click, you will need to delete the date. If you tab, the date will be deleted when
you type 01/15/06. • QuickBooks Pro automatically places a check in the check mark column for the
oldest invoice and enters the payment amount is in the Payment column for the invoice being paid This means that the payment is applied to the oldest open invoice.
Type date 01/15/06 Click the drop-down list arrow for Pmt. Method Click Check Tab to or click Check No. Enter 0684

98 QUICKBOOKS® PRO 2006/2007: A COMPLETE COURSE
Click Save & New
RECORD ADDITIONAL PAYMENTS ON ACCOUNT WITHOUT STEP-BY-STEP INSTRUCTIONS
MEMO: DATE: January 15, 2006 Received Check No. 1952 from Johnson, Cline, Preston, and Weaver for $3,680. Received Check No. 8925 for $2,000 from Robbins Illustrations in partial payment of
account. This receipt requires a Memo notation of Partial Payment. Make sure “Leave as an underpayment” is selected in the lower portion of the Customer Payment window.
Received Check No. 39251 from Timothy Matthews for $475. Received Check No. 2051 for $2,190 from Watley Productions in partial payment of
account. Record a Memo of Partial Payment for this receipt. Received Check No. 5632 from Jose Mendoza for $150 Received Check No. 80195 from Webber, Lewis, and Billesdon for $3,685.
Enter the above payments on account; if necessary, refer to the previous steps listed
DO
• Click Save & New to go from one Receive Payments Screen to the next • Click the Save & Close button after all payments received have been recorded

CHAPTER 2—SALES AND RECEIVABLES 99

100 QUICKBOOKS® PRO 2006/2007: A COMPLETE COURSE

CHAPTER 2—SALES AND RECEIVABLES 101
VIEW TRANSACTIONS BY CUSTOMER In order to see the transactions for credit customers, you need to prepare a transaction report by customer. This report shows all sales, credits, and payments for each customer on account.
DO Prepare a Transaction List by Customer report Click Reports on the menu bar
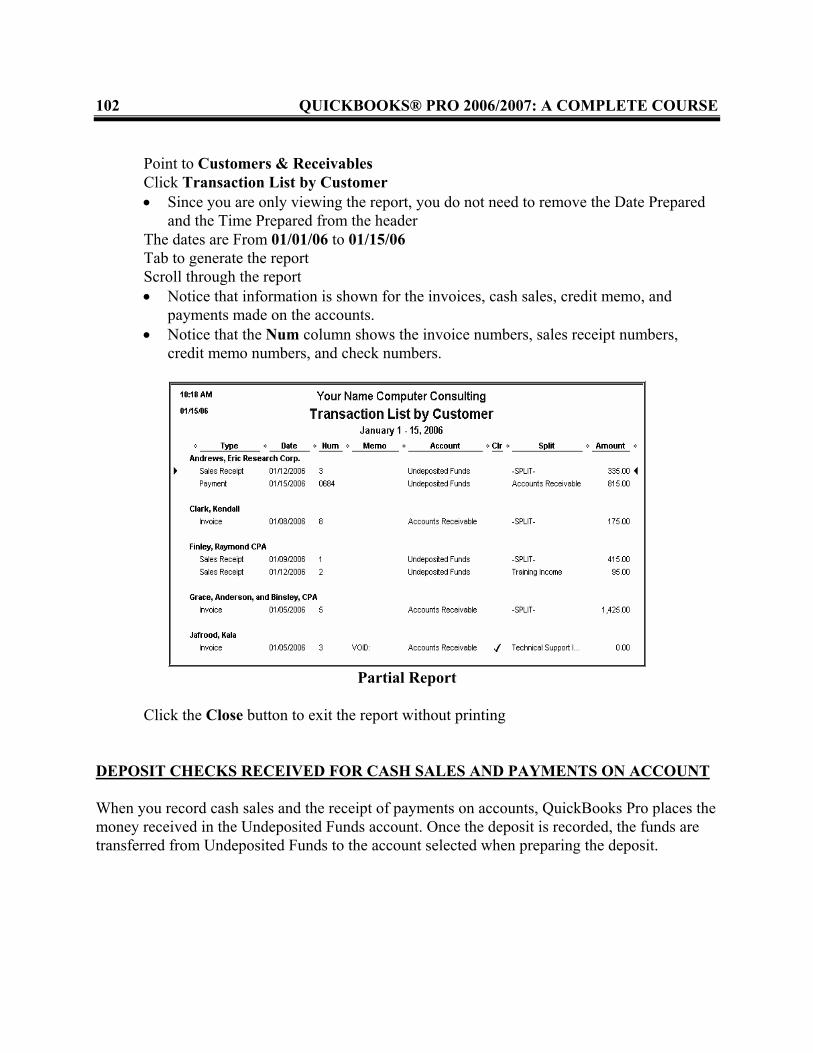
102 QUICKBOOKS® PRO 2006/2007: A COMPLETE COURSE
Point to Customers & Receivables Click Transaction List by Customer • Since you are only viewing the report, you do not need to remove the Date Prepared
and the Time Prepared from the header The dates are From 01/01/06 to 01/15/06 Tab to generate the report Scroll through the report • Notice that information is shown for the invoices, cash sales, credit memo, and
payments made on the accounts. • Notice that the Num column shows the invoice numbers, sales receipt numbers,
credit memo numbers, and check numbers.
Partial Report
Click the Close button to exit the report without printing
DEPOSIT CHECKS RECEIVED FOR CASH SALES AND PAYMENTS ON ACCOUNT When you record cash sales and the receipt of payments on accounts, QuickBooks Pro places the money received in the Undeposited Funds account. Once the deposit is recorded, the funds are transferred from Undeposited Funds to the account selected when preparing the deposit.

CHAPTER 2—SALES AND RECEIVABLES 103
MEMO: DATE: January 15, 2006 Deposit all checks received for cash sales and payments on account.
Deposit checks received
DO
Click the Record Deposits icon in the Banking section of the Home Page • Payments to Deposit window shows all amounts received for cash sales and
payments on account that have not been deposited in the bank. • The column for Type contains RCPT, which means the amount is for a Sales Receipt
(Cash Sale), and PMT, which means the amount received is for a payment on account.
• Notice that the √ column to the left of the Date column is empty. Click the Select All button • Notice the check marks in the √ column.
Click OK to close Payments to Deposit screen and open Make Deposits screen On the Make Deposits screen, Deposit To should be Checking Date should be 01/15/2006 • Tab to date and change if not correct.

104 QUICKBOOKS® PRO 2006/2007: A COMPLETE COURSE
Click the Print button to print Deposit Summary Select Deposit summary only on the Print Deposit dialog box, click OK
Check the Settings for Print List, click Print • Note: QuickBooks Pro automatically prints the date that the Deposit Summary was
printed on the report. It is the current date of your computer; and, therefore, it may not match the date shown in the answer key.
When printing is finished, click Save & Close on Make Deposits screen to record and close
PRINT JOURNAL Even though QuickBooks Pro displays registers and reports in a manner that focuses on the transaction—for example, entering a sale on account via an invoice—it still keeps a General Journal. The Journal records each transaction and lists the accounts and the amounts for debit and credit entries. The Journal is very useful; especially, if you are trying to find errors. Always check the transaction dates, the account names, and the items listed in the Memo column. If a transaction does not appear in the Journal, it may be due to using an incorrect date. Remember, only the transactions entered within the report dates will be displayed.

CHAPTER 2—SALES AND RECEIVABLES 105
Print the Journal
DO
Open the Report Center as previously instructed Click Accountant & Taxes as the Report type Click Journal The dates are from 01/01/06 to 01/15/06 Modify the Report to change the Header/Footer so the Date Prepared and Time
Prepared are not selected, click OK Scroll through the report to view the transactions • You may find that your Trans # is not the same as shown. QuickBooks automatically
numbers all transactions recorded. If you have deleted and re-entered transactions more than directed in the text, you may have different transaction numbers. Do not be concerned with this.
• Also notice that not all names, memos, and accounts are displayed in full. You will learn how to change this later in training.
Click Print On the Print Reports screen, the settings will be the same used previously except: Click Landscape to select Landscape orientation Click on Fit report to one page wide to select this item • The printer will print the Journal using a smaller font so the report will fit across the
11-inch width. Click Print • The Journal will be several pages in length.
Close the report, do not close the Report Center

106 QUICKBOOKS® PRO 2006/2007: A COMPLETE COURSE PRINT THE TRIAL BALANCE When all sales transactions have been entered, it is important to print the Trial Balance and verify that the total debits equal the total credits.
Print the Trial Balance
DO
Click Trial Balance on the Report Center list of Accountant & Taxes reports Enter the dates from 010106 to 011506 Click the Modify Report button and change Header/Footer so Date Prepared, Time
Prepared, and Report Basis do not print Print the report in Portrait orientation • If necessary, click on Fit report to one page wide to deselect this item
Close the report GRAPHS IN QUICKBOOKS® PRO Once transactions have been entered, transaction results can be visually represented in a graphic form. QuickBooks Pro illustrates Accounts Receivable by Aging Period as a bar chart, and it illustrates Accounts Receivable by Customer as a pie chart. For further details, double-click on an individual section of the pie chart or chart legend to create a bar chart analyzing an individual

CHAPTER 2—SALES AND RECEIVABLES 107 customer. QuickBooks Pro also prepares graphs based on sales and will show the results of sales by item and by customer. PREPARE ACCOUNTS RECEIVABLE GRAPHS Accounts Receivable graphs illustrate account information based on the age of the account and the percentage of accounts receivable owed by each customer.
Create graphs for accounts receivable:
DO
Click Customers & Receivables in the Report Center list to select the type of report Click Accounts Receivable Graph to select the report Click Dates on the QuickInsight: Accounts Receivable Graph screen On the Change Graph Dates change Show Aging As of to 01/15/06 Click OK • QuickBooks Pro generates a bar chart illustrating Accounts Receivable by Aging
Period and a pie chart illustrating Accounts Receivable by Customer
Printing is not required for this graph • If you want a printed copy, click Print and print in Portrait mode Click Dates Enter 02/01/06 for the Show Aging As of date Click OK • Notice the difference in the aging of accounts.

108 QUICKBOOKS® PRO 2006/2007: A COMPLETE COURSE
Click Dates Enter 01/15/06 Do not close the graph
USE QUICKZOOM FEATURE TO OBTAIN INDIVIDUAL CUSTOMER DETAILS It is possible to get detailed information regarding the aging of transactions for an individual customer by using the QuickZoom feature of QuickBooks Pro.
Use QuickZoom to see information for Yamashita, Bibey, and Iverson
DO
Double-click on the section of the pie chart for Yamashita, Bibey, and Iverson • You get a bar chart aging the transactions of the customer.

CHAPTER 2—SALES AND RECEIVABLES 109
Printing is not required for this graph Close the chart for Yamashita, Bibey, and Iverson and the Accounts Receivable graph
PREPARE SALES GRAPHS Sales graphs illustrate the amount of cash and credit sales for a given period as well as the percentage of sales for each sales item.
Prepare a Sales Graph
DO
Click Sales in the Report list Click Sales Graph Click the Dates button Click in From Enter 01/01/06 Tab to To Enter 01/15/06 Click OK The By Item button should be indented • You will see a bar chart representing Sales by Month and a pie chart displaying a
Sales Summary by item. • If the By Customer button is indented, you will see the same bar chart but the pie
chart will display a Sales Summary by customer. • If the By Rep button is indented, you will see the same bar chart but the pie chart will
display a Sales Summary by sales rep. Printing is not required for this graph

110 QUICKBOOKS® PRO 2006/2007: A COMPLETE COURSE
USE QUICKZOOM TO VIEW AN INDIVIDUAL ITEM It is possible to use QuickZoom to view details regarding an individual item’s sales by month.
Use QuickZoom to see information for Install 1
DO
In the chart legend, double-click Install 1
You will see the Sales by Month for Install 1 Do not print Close Graphs

CHAPTER 2—SALES AND RECEIVABLES 111 BACK UP AND CLOSE COMPANY As you learned in Chapter 1, when you use QuickBooks Pro to make a back up file, the program creates a condensed file that contains all the data for the entries made up to the time of the backup file. This file has an extension .qbb and cannot be used to record transactions. When new transactions are recorded, a new backup file must be made. In training, it is wise to make a daily backup as well as an end-of-chapter backup. If errors are made in training, the appropriate backup file can be restored. For example, if you back up Chapter 2 and make errors in Chapter 3, the Chapter 2 backup may be restored to a company file with the extension .qbw. The data entered for Chapter 3 will be erased and only the data from Chapter 2 will appear. A duplicate copy of the file may be made using Windows. Instructions for this procedure are given in Appendix A. You may hear the duplicate copy referred to as a backup file. This is different from the QuickBooks backup file.
DO Back up the company
Follow the instructions provided in Chapter 1 to make your backup The name of the backup file is Computer Ch 2.qbb • Your Computer Ch 1.qbb file contains all of your work from Chapter 1 • Your Computer Ch 2.qbb file contains all your work from Chapters 1 and 2. • The Computer Ch 2.qbb will not contain transactions from the work you do in
Chapter 3. • Keeping a separate backup file for each chapter is helpful for those times when you
have made errors and cannot figure out how to correct them. Restoring your Chapter 2 back up file will restore your work from Chapters 1 and 2 and eliminate any work completed in Chapter 3. This will allow you to start over at the beginning of Chapter 3. If you do not have a back up file for Chapter 2, you would need to re-enter all the transactions for Chapter 2 before beginning Chapter 3.
• You may wish to make a daily back up file. If so, you should make a second backup to save your work each day. Use Computer.qbb as your daily backup file. This is helpful for those times when you have made errors and cannot figure out how to correct them but do not want to start over at the beginning of the chapter. Restoring your daily backup file will restore your work from the previous training session and eliminate the work completed in the current session.
The name for the Chapter 2 backup file should be Computer (Backup Ch 2). The name for the daily backup file should be Computer (Backup). 2007

112 QUICKBOOKS® PRO 2006/2007: A COMPLETE COURSE EXIT QUICKBOOKS AND CLOSE THE COMPANY
After the backup file has been made, close the Company and QuickBooks
DO
Follow the procedures given in Chapter 1 to close a company and to close QuickBooks • Refer to Appendix A for the steps to follow to make a duplicate disk.
SUMMARY In this chapter, cash and credit sales were prepared for Your Name Computer Consulting, a service business, using sales receipts and invoices. Credit memos were issued. Customer accounts were added and revised. Invoices and sales receipts were edited, deleted, and voided. Cash payments were received and bank deposits were made. All the transactions entered reinforced the QuickBooks Pro concept of using the business form to record transactions rather than enter information in journals. However, QuickBooks Pro does not disregard traditional accounting methods. Instead, it performs this function in the background. The Journal was accessed and changes to transactions were made via the Journal. The fact that the Customer:Job List functions as the Accounts Receivable Ledger and that the Chart of Accounts is the General Ledger in QuickBooks Pro was pointed out. The importance of reports for information and decision-making was illustrated. Exploration of the various sales and accounts receivable reports and graphs allowed information to be viewed from a sales standpoint and from an accounts receivable perspective. Sales reports emphasized both cash and credit sales according to the sales item generating the revenue. Accounts Receivable reports focused on amounts owed by credit customers. The traditional trial balance emphasizing the equality of debits and credits was prepared.

CHAPTER 2—SALES AND RECEIVABLES 113
END-OF-CHAPTER QUESTIONS TRUE/FALSE ANSWER THE FOLLOWING QUESTIONS IN THE SPACE PROVIDED BEFORE THE QUESTION NUMBER. 1. A new customer can be added to a company’s records on the fly. 2. In QuickBooks Pro, error correction for a sale on account can be accomplished by
editing the invoice. 3. A Sales Item List stores information about products you purchase. 4. Once transactions have been entered, modifications to a customer’s account may be
made only at the end of the fiscal year. 5. In QuickBooks Pro all transactions must be entered with the traditional debit/credit
method. 6. Checks received for cash sales are held in the Undeposited Funds account until the
bank deposit is made. 7. When a correction for a transaction is made, QuickBooks Pro not only changes the
form used to record the transaction, it also changes all journal and account entries for the transaction to reflect the correction.
8. QuickGraphs allow information to be viewed from both a sales standpoint and from
an accounts receivable perspective. 9. QuickZoom allows you to print a report instantly. 10. A customer’s payment on account is immediately recorded in the cash account.

114 QUICKBOOKS® PRO 2006/2007: A COMPLETE COURSE
MULTIPLE CHOICE WRITE THE LETTER OF THE CORRECT ANSWER IN THE SPACE PROVIDED BEFORE THE QUESTION NUMBER. 1. To remove an invoice without a trace, it is .
A. voided B. deleted C. erased D. reversed
2. To enter a cash sale, is completed.
A. a debit B. an invoice C. a sales receipt D. receive payments
3. Two primary types of lists used in this chapter are .
A. receivables and payables B. invoices and checks C. registers and navigator D. customers and item
4. When you enter an invoice, an error may be corrected by .
A. backspacing or deleting B. tabbing and typing C. dragging and typing D. all of the above
5. While in the Customer Balance Summary Report, it is possible to get an individual
customer’s information by using . A. QuickReport B. QuickZoom C. QuickGraph D. QuickSummary
6. Undeposited Funds represents .
A. cash or checks received from customers but not yet deposited in the bank B. all cash sales C. the balance of the accounts receivable account D. none of the above

CHAPTER 2—SALES AND RECEIVABLES 115 7. QuickBooks Pro uses graphs to illustrate information about .
A. the chart of accounts B. sales C. the cash account D. supplies
8. Changes to the chart of accounts may be made .
A. at the beginning of a fiscal period B. before the end of the fiscal year C. at any time D. once established, the chart of accounts may not be modified
9. To obtain information about sales by item, you can view .
A. the income statement B. the trial balance C. receivables reports D. sales reports
10. When you add a customer using the Set Up method, you add .
A. complete information for a customer B. only a customer’s name C. the customer’s name, address, and telephone number D. the customer’s name and telephone number
FILL-IN IN THE SPACE PROVIDED, WRITE THE ANSWER THAT MOST APPROPRIATELY COMPLETES THE SENTENCE. 1. The report used to view all the balances on account of each customer is the . 2. The form prepared to show a reduction to a sale on account is a(n) . 3. The report that proves that debits equal credits is the . 4. QuickBooks Pro shows icons on the that may be clicked to open business
documents used in recording transactions. 5. To verify the company being used in QuickBooks Pro, you check the .

116 QUICKBOOKS® PRO 2006/2007: A COMPLETE COURSE
SHORT ESSAY Explain how the method used to enter an Accounts Receivable transaction in QuickBooks Pro is different from the method used to enter a transaction according to an accounting textbook.

CHAPTER 2—SALES AND RECEIVABLES 117
NAME
TRANSMITTAL CHAPTER 2: YOUR NAME COMPUTER CONSULTING Attach the following documents and reports: Invoice No. 1: Jose Mendoza Invoice No. 2: Timothy Matthews Invoice No. 3: Kala Jafrood Invoice No. 4: Steele, Rhoades, Whitcomb, and Hinson Invoice No. 5: Grace, Anderson, and Binsley Invoice No. 6: Yamashita, Bibey, and Iverson Customer Balance Summary, January 5, 2006 Customer Balance Detail, Steele, Rhoades, Whitcomb, and Hinson Invoice No. 5: Grace, Anderson, and Binsley Transaction List by Customer, January 1-7, 2006 Customer Balance Detail Report Credit Memo No. 7: Steele, Rhoades, Whitcomb, and Hinson Invoice No. 8: Kendall Clark Sales Receipt No. 1: Raymond Finley Sales Receipt No. 2: Raymond Finley Sales Receipt No. 3: Eric Andrews Research Corp. Sales by Customer Detail Report, January 1-14, 2006 Sales Receipt No. 1 (corrected): Raymond Finley Sales by Item Summary, January 1-15, 2006 Deposit Summary Journal Trial Balance, January 15, 2006

118 QUICKBOOKS® PRO 2006/2007: A COMPLETE COURSE
END-OF-CHAPTER PROBLEM YOUR NAME GARDEN & POOL MAINTENANCE Chapter 2 continues with the entry of both cash and credit sales, receipt of payment by credit customers, credit memos, and bank deposits. In addition, reports focusing on sales and accounts receivable are prepared. INSTRUCTIONS Use the company file Garden.qbw that you used for Chapter 1. The company name should be Your Name Garden & Pool Maintenance. The invoices and sales receipts are numbered consecutively. Invoice No. 25 is the first invoice number used in this problem. Sales Receipt No. 15 is the first sales receipt number used in this problem. Each invoice recorded should be a Service Invoice and contain a message. Choose the one that you feel is most appropriate for the transaction. Print each invoice and sales receipt as it is completed. Remember that payments received on account should be recorded as Receive Payments and not as a Sales Receipt. When recording transactions, use the following Sales Item chart to determine the item(s) billed. If the transaction does not indicate the size of the pool or property, use the first category for the item; for example, LandCom 1 or LandRes 1 would be used for standard-size landscape service. Remember that PoolCom 1 and PoolRes 1 are services for spas—not pools. The appropriate billing for a standard-size pool would be PoolCom 2 or PoolRes 2. When printing reports, always remove the Date Prepared, Time Prepared, and Report Basis from the Header/Footer.

CHAPTER 2—SALES AND RECEIVABLES 119
YOUR NAME GARDEN & POOL MAINTENANCE
SALES ITEM LIST
ITEM
DESCRIPTION AMOUNT
LandCom 1
Commercial Landscape Maintenance (Standard Size)
$150 mo.
LandCom 2
Commercial Landscape Maintenance (Medium)
250 mo.
LandCom 3
Commercial Landscape Maintenance (Large)
500 mo.
LandRes 1
Residential Landscape Maintenance (Standard Size)
$100 mo.
LandRes 2
Residential Landscape Maintenance (Medium)
200 mo.
LandRes 3
Residential Landscape Maintenance (Large)
350 mo.
PoolCom 1
Commercial Spa Service
$100 mo.
PoolCom 2
Commercial Pool Service (All pools unless specified as Large)
300 mo.
PoolCom 3
Commercial Pool Service (Large)
500 mo.
PoolRes 1
Residential Spa Service
$ 50 mo.
PoolRes 2
Residential Pool Service (All pools unless specified as Large)
100 mo.
PoolRes 3
Residential Pool Service (Large)
150 mo.
LandTrim
Trimming and Pruning
$75 hr.
LandPlant
Planting and Cultivating
50 hr.
LandWater
Sprinklers, Timers, etc.
75 hr.
LandGrow
Fertilize, Spray for Pests
75 hr.
PoolRepair
Mechanical Maintenance and Repairs
$75 hr.
PoolWash
Acid Wash, Condition
Price by the job
PoolStart
Startup for New Pools
500.00

120 QUICKBOOKS® PRO 2006/2007: A COMPLETE COURSE RECORD TRANSACTIONS
January 1 ► Billed Pacific View Motel for monthly landscape services and monthly pool maintenance
services, Invoice No. 25. (Use LandCom 1 to record the monthly landscape service fee and PoolCom 2 to record the monthly pool service fee. The quantity for each item is 1.) Terms are Net 15.
► Billed Dr. Silverman for monthly landscape and pool services at his home. Both the pool and landscaping are standard size. The terms are Net 30.
► Billed Custom Creations for 2 hours shrub trimming. Terms are Net 30. ► Received Check No. 381 for $500 from Denise Ludlow for pool startup services at her home,
Sales Receipt No. 15. ► Received Check No. 8642 from Kaan Padir for $150 as payment in full on his account. January 15 ► Billed a new customer: Matthew Ericsson (remember to enter the last name first for the
customer name and change the billing name to first name first)—10824 Hope Ranch St., Santa Barbara, CA 93110, 805-555-9825, terms Net 30—for monthly service on his large pool and large residential landscape maintenance.
► Received Check No. 6758 from Pacific View Motel in full payment of Invoice No. 25. ► Received Check No. 987 from a new customer: Larry Bailey (a neighbor of Matthew
Ericsson) for $75 for 1 hour of pool repairs. Even though this is a cash sale, do a complete customer setup: 10877 Hope Ranch St., Santa Barbara, CA 93110, 805-555-7175, fax 805-555-5717, E-mail [email protected], terms Net 30.
► Billed Santa Barbara Bay Resorts for their large pool service and large landscaping maintenance. Also bill for 5 hours planting, 3 hours trimming, 2 hours spraying, and 3 hours pool repair services. Terms are Net 15.
January 30 ► Received Check No. 1247 for $525 as payment in full from Custom Creations. ► Received Check No. 8865 from Sherri Somis for amount due. ► Billed Coast Resorts for large pool and large landscaping maintenance. Terms are Net 15. ► Billed Carillo Street Apartments for standard-size commercial pool service and standard-size
commercial landscape maintenance. Terms are Net 30. ► Deposit all cash receipts. Print Deposit Summary. PRINT REPORTS AND BACKUP
► Customer Balance Detail Report for all transactions. Portrait orientation. ► Sales by Item Summary Report for 1/1/2006 through 1/30/2006. Portrait orientation. ► Journal for 1/1/2006 through 1/30/2006. Print in Landscape orientation, fit to one page wide. ► Trial Balance for 1/1/2006 through 1/30/2006. Portrait orientation. ► Backup your work to Garden Ch 2.qbb

CHAPTER 2—SALES AND RECEIVABLES 121
NAME
TRANSMITTAL
CHAPTER 2: YOUR NAME GARDEN & POOL MAINTENANCE Attach the following documents and reports: Invoice No. 25: Pacific View Motel Invoice No. 26: Dr. Michael Silverman Invoice No. 27: Custom Creations Sales Receipt No. 15: Denise Ludlow Invoice No. 28: Matthew Ericsson Sales Receipt No. 16: Larry Bailey Invoice No. 29: Santa Barbara Bay Resorts Invoice No. 30: Coast Resorts Invoice No. 31: Carillo Street Apartments Deposit Summary Customer Balance Detail Sales by Item Summary Journal Trial Balance