Sagem 160 UK Final - Mediondownload2.medion.com/downloads/anleitungen/bda91160uk.pdf · SAFETY 2...
36
Deutsch English Nederlands Français Español Slovenščina CONTENTS SAFETY ..................................................................................1 Safety notes ....................................................................... 1 Operating safety ............................................................... 1 Point of use ...................................................................... 2 Environment condidtions.................................................. 2 Electro-magnetic compatibility .......................................... 2 Connecting ....................................................................... 3 Power supply ................................................................. 3 Repairs .............................................................................. 4 Data security ...................................................................... 4 Recycling and disposal .......................................................... 4 INTRODUCTION.....................................................................5 Notes on these instructions ................................................... 5 Quality ............................................................................ 5 Service ............................................................................ 5 Our target group ............................................................... 5 Included in the box .............................................................. 6 System requirements ........................................................... 6 Technical Data..................................................................... 7 SETUP ...................................................................................8 1. Connecting to the power supply ......................................... 8 2. Ribbon installation............................................................ 9 To change the ribbon ........................................................ 10 3. Loading paper................................................................. 12 TRANSFERRING IMAGES .....................................................13 Transferring Images from Memory Cards ................................ 13 Infrared transfer ................................................................. 15 Transferring Images via USB ................................................ 16 1. Install the software ....................................................... 16 2. Connect the printer to the computer ................................ 17
-
Upload
nguyenkhuong -
Category
Documents
-
view
213 -
download
0
Transcript of Sagem 160 UK Final - Mediondownload2.medion.com/downloads/anleitungen/bda91160uk.pdf · SAFETY 2...

Deu
tsch
En
glish
N
eder
lands
Fran
çais
Esp
añol
Slo
venšč
ina
CONTENTS
SAFETY..................................................................................1
Safety notes ....................................................................... 1 Operating safety ............................................................... 1 Point of use ...................................................................... 2
Environment condidtions.................................................. 2 Electro-magnetic compatibility.......................................... 2
Connecting....................................................................... 3 Power supply ................................................................. 3
Repairs .............................................................................. 4 Data security ...................................................................... 4 Recycling and disposal.......................................................... 4
INTRODUCTION.....................................................................5
Notes on these instructions ................................................... 5 Quality ............................................................................ 5 Service ............................................................................ 5 Our target group ............................................................... 5
Included in the box .............................................................. 6 System requirements ........................................................... 6 Technical Data..................................................................... 7
SETUP ...................................................................................8
1. Connecting to the power supply ......................................... 8 2. Ribbon installation............................................................ 9
To change the ribbon ........................................................10 3. Loading paper.................................................................12
TRANSFERRING IMAGES .....................................................13
Transferring Images from Memory Cards................................13 Infrared transfer.................................................................15 Transferring Images via USB ................................................16
1. Install the software.......................................................16 2. Connect the printer to the computer................................17

ii
PRINT YOUR PHOTOGRAPHS...............................................18
User interface / Display .......................................................18 Function Crystal Image .....................................................19
Activation/deactivation ...................................................19 Rapid printing ....................................................................21
Example of rapid printing from a memory card .....................22 Create a contact sheet (index)..............................................23 Printing a Series of Photos (print basket function)....................24
Deleting Photos from the Print Basket .................................25 PictBridge / DPOF ...............................................................26
MAINTENANCE ....................................................................27
Cleaning............................................................................27 Cleaning the print head .......................................................27
SERVICE..............................................................................29
First aid for malfunctions .....................................................29 Problems ........................................................................29 Error messages................................................................30 Paper jam .......................................................................31
Technical support................................................................32 Do you need additional help? .............................................32
Guarantee .........................................................................33 Liability limitations ...........................................................34 Copying this manual .........................................................34
Device
At the end of its life, the appliance must not be disposed of in household rubbish. Enquire about the options for environmentally-friendly disposal
Copyright © 2005
All rights reserved. This manual is protected by Copyright. The Copyright is owned by Medion®.
Trademarks:
All trademarks are the property of their respective owners. The information in this document is subject to change without notice.

SSAAFFEETTYY
1
Deu
tsch
En
glish
N
eder
lands
Fran
çais
Esp
añol
Slo
venšč
ina
SSAAFFEETTYY
SAFETY NOTES Please read through this section carefully. Following all the in-structions will guarantee reliable operation and years of enjoy-ment from your new printer.
Always keep these instructions near your printer for easy refer-ence. Keep these instructions and packaging safe. Use the original packaging in the event that you need to ship or transport your printer.
OPERATING SAFETY
• Never open the housing of the printer! This could lead to an electrical short-circuit, dam-age to your printer or fire.
• Slots and openings in the printer serve for ventilation and prevent overheating. Do not cover these openings.
• Never insert any objects through the slots and openings into the inside of the printer. Doing so could lead to an electrical short cir-cuit or damage to your printer.
• Do not allow children to play unattended with any electrical appliances. Children may not always correctly recognize possible safety hazards.
• Keep the packing materials, such as foil away from children. The danger of suffocation could arise in the case of misuse.
• This printer is intended for personal use only. It is not intended for commercial use in a heavy industrial environment.

SSAAFFEETTYY
2
POINT OF USE
• Keep your printer away from moisture, dust, heat and direct sunlight in order to avoid malfunctions.
• Set up and operate all components on a stable, level and vibration-free surface to prevent damage to the printer.
• Only use in a suitable ambient temperature:
ENVIRONMENT CONDIDTIONS The printer can be operated at an ambient temperature of 15° C/59° F to 35° C/95° F and a relative humidity of 30% to 75% (not condensing). When switched off the printer can be stored at temperature from 15° C/59 °F to 35° C/95°F at a relative humidity of 30% to 75% (not condensing).
After transporting your printer wait until it has reached the ambient temperature before putting it into operation. In the event of major variations in the temperature or humidity. Condensation can form on the inside of the printer which can cause an electrical short-circuit.
ELECTRO-MAGNETIC COMPATIBILITY
• When connecting the printer observe the guidelines for electro-magnetic compatibility (EMC).
• Please use only the AC adapter supplied.
• Maintain a distance of at least 3 feet from sources of high frequency and magnetic interference (television sets, loudspeakers, mobile telephones, etc.), in order to avoid malfunctions and data loss.

SSAAFFEETTYY
3
Deu
tsch
En
glish
N
eder
lands
Fran
çais
Esp
añol
Slo
venšč
ina
CONNECTING
POWER SUPPLY
• Do not open the power adapter housing. When the housing is open there is a danger of se-vere electric shock. It contains no user-serviceable parts.
• The power socket must be in the vicinity of the printer and within reach of the power adapter cables. DO NOT stretch the power cables tightly to reach a power socket.
• To disconnect your printer from the power source remove the power cord from the power socket. Always hold the power unit firmly when removing the power cord. Never pull the power cord.
• Only use the power adaptor provided with this printer (HDAD15W101-124) operating at AC 200-240V~/50 Hz.
• If using an extension cord, make certain that it meets your local safety requirements. If in doubt, consult a qualified elec-trician.
• To provide additional protection against electric shock, power surges, lightning strikes, or other electrical damage to your printer, we recommend the use of a surge protector.
Observe the following instructions to connect your printer prop-erly:
• Route the cable so that no one can step on it or stumble over it.
• To avoid damage to the cable do not place any objects or furniture on the cable.

SSAAFFEETTYY
4
REPAIRS Please contact our service centre if you have any problems with your printer. ALWAYS have repairs completed only by our authorised service centre.
Contact your local service centre when...
• Liquid has got into the printer
• The printer does not operate properly
• The printer is dropped or the housing is damaged.
DATA SECURITY
Every time you update your computer’s data make back-up copies on an external storage medium, i.e. CDR disc. We cannot assume a liability for data loss or associated subsequent damage.
RECYCLING AND DISPOSAL This printer and its packaging was produced mostly from materi-als which can be disposed of in an environmentally friendly man-ner and be professionally recycled.
After its use this device will be taken back and recycled or use will be made of its useful material, if it is returned in a condition cor-responding to its intended use.
Parts not usable will be properly disposed of.
Should you have any questions concerning the disposal please contact your dealer or our service.

IINNTTRROODDUUCCTTIIOONN
5
Deu
tsch
En
glish
N
eder
lands
Fran
çais
Esp
añol
Slo
venšč
ina
IINNTTRROODDUUCCTTIIOONN
NOTES ON THESE INSTRUCTIONS We have arranged these instructions so that you can quickly find the subject related information in the table of contents.
The purpose of these instructions is to help you operate your printer safely, quickly and easily.
QUALITY We focused on great features, ease of use, safety and reliability in manufacturing this printer. The balanced hardware and software design offers you an advanced printer design which will provide you a great deal of functionality for business or entertainment purposes.
SERVICE Service and support is available any time you use your printer. Contact us, we will be glad to help you. This manual contains a separate chapter on the subject of service beginning on page 29.
OUR TARGET GROUP Thank your for purchasing this printer. We thank you for your confidence in our products and are pleased to welcome you as a new customer. These instructions are intended for novice users as well as advanced users. Regardless of possible professional func-tions, this printer is intended for domestic home use only.

IINNTTRROODDUUCCTTIIOONN
6
INCLUDED IN THE BOX Please check that the contents are complete and notify us within 14 days of purchase if any of the following components are miss-ing:
• Printer
• Power adapter (model: KSAFJ2400333T1M2)
• Paper tray
• Ink ribbon
• Photo paper
• Installation and application software
• User’s manual
• Guarantee documentation
SYSTEM REQUIREMENTS • Computer PC/AT compatible computer
• Processor type Pentium III class 500 MHz or higher
• Operating system Windows® 98SE/ME/2000/XP
• Memory 128 MB or more
• Hard disc capacity min. 150 MB free storage capacity
• Installation CD-ROM drive
• Connections USB interface

IINNTTRROODDUUCCTTIIOONN
7
Deu
tsch
En
glish
N
eder
lands
Fran
çais
Esp
añol
Slo
venšč
ina
TECHNICAL DATA • Print method Dye-diffusion thermal trans-
fer
• Resolution 300 x 300 ppi
• Colours 16,8 million continuous
• Print speed Less than 60 seconds per photo (excluding image processing)
• Interface CF cards (Type I & II) / SM / MS / MD / MMC / SD / xD cards
USB 2.0 compatible port
• Paper tray By automatic loader, capacity 20 sheets
• Main supply 230V AC 50/60 Hz
• Operating temperature 15 to 35°C
30 to 75% humidity
• Dimensions (in mm) 201 x 174 x 94 excluding paper tray
• Weight (in Kg) 1,5 (except power supply unit)
• Power consumption in standby: 10 W
in print mode: 80 W

SSEETTUUPP
8
SSEETTUUPP
1. CONNECTING TO THE POWER SUPPLY
Remark: When installing your printer near a wall or some other object, keep an open space of at least 4 inches at the back of the printer, to make sure the movement of the sheet of paper being printed is not obstructed.
1. Observe the notes in chapter “Safety” (refer to page 1).
2. Insert one end of the mains lead into the corresponding socket of the power supply.
3. Connect the power supply to the rear of the printer.
4. Plug the other end of the power supply mains lead into a wall socket.
5. Press and hold the On/Off button on the top panel of the printer until three dashes appear on screen.

SSEETTUUPP
9
Deu
tsch
En
glish
N
eder
lands
Fran
çais
Esp
añol
Slo
venšč
ina
2. RIBBON INSTALLATION Switch on the printer. Wait 10 seconds for the printhead to lift, then:
1. Open the external flap located on the right-hand side of the printer.
2. Remove the protective foam.
3. Take the new ribbon out of its pack-aging and make sure that the film is stretched after removing the card (A).
4. Pay attention to the position of the inked ribbon in accordance with the illustration on the right.
5. Lift the green catch lever and push the inked ribbon into the compart-ment until it engages audibly.
6. Close the external flap.
Warning! Never touch the film cartridge with your fingers. Make sure the cartridge is completely in-serted into the printer.

SSEETTUUPP
10
TO CHANGE THE RIBBON The inked ribbon will have been used up and will have to be re-
placed if the Err 12 error code with the symbols is shown on the display. The chip card, which is supplied with every con-sumable item, must be read before each change to the printer, to do this.
Switch on the printer. Wait 10 seconds for the printhead to lift, then:
1. Take the smart card supplied with the ribbon and photo paper and insert it in the reader on the printer's left-hand side. The smart card is recog-nised and read by the printer, and once the procedure is complete the wording: "40 End" or "120 End" ap-pears on screen.
2. Remove the SIM card.
3. Take the new ribbon out of its pack-aging and make sure that the film is stretched after removing the card (A).
4. Open the external flap located on the right-hand side of the printer.

SSEETTUUPP
11
Deu
tsch
En
glish
N
eder
lands
Fran
çais
Esp
añol
Slo
venšč
ina
5. Lift the locking lever and remove the used ink ribbon.
6. Pay attention to the position of the inked ribbon in accordance with the illustration on the right.
7. Lift the locking lever and push in the film cartridge until it touches the back of the compartment the locking lever must be locked after insertion.
8. Close the external flap.
Remark: If the ribbon is replaced during a print job, you can resume printing where you left off by pressing the print button.

SSEETTUUPP
12
3. LOADING PAPER
1. Open a pack of paper with the protection sheet on the top, insert it in the paper tray, making sure the rectangle re-served for postage stamps is on the outside of the tray, that is, towards you.
2. Remove the protection sheet.
3. Line up the tray with its com-partment and push it in slowly until the locking system clicks.
Warning! Handle paper sheets by their pre-cut edges; never allow your fingers to come into contact with the shiny surface before printing. There will be the risk of a reduced print quality.
Warning! Make sure that a previously printed pho-tograph has not been slipped inadvertently into a packet of blank pages; this could damage the rib-bon of your printer.
Protection sheet

TTRRAANNSSFFEERRRRIINNGG IIMMAAGGEESS
13
Deu
tsch
En
glish
N
eder
lands
Fran
çais
Esp
añol
Slo
venšč
ina
TTRRAANNSSFFEERRRRIINNGG IIMMAAGGEESS
You will now be able to print your photos with the printer, after you have carried out the steps of bringing it into operation. The images must be transferred to your printer to do this. Your printer offers various methods to receive photo files.
TRANSFERRING IMAGES FROM MEMORY CARDS A connection to a computer is not necessary when transferring your images from a memory card. Such a connection will only be necessary if your memory card is not compatible with the printer. Take the information whether your card format is supported from the technical data or from the illustration below.
Warning! Images smaller than 80,000 pixels can-not be printed from memory cards (e.g., a 320 x 240 image (equivalent to 76,800 pixels)). However, these photos can be printed from a PC or via direct infrared link.
1. Press and hold the On/Off button on the top panel of the printer until three dashes appear on screen.
2. Insert your memory card into the corresponding slot.
Memory Stick (MS) CompactFlash (CF)
Microdrive (MD)
SmartMedia (SM)
xD card
MultiMediaCard (MMC)
Secure Digital (SD)

TTRRAANNSSFFEERRRRIINNGG IIMMAAGGEESS
14
Pay attention that the contacts, as described in the list below, are pointing in the right direction when inserting the memory card. Incorrect insertion of the memory card could lead to damage to the insertion slot and/or the memory card.
Card format Contacts
• CompactFlash (CF) Pointing forwards
• Memory Stick (MS) Pointing upwards
• Microdrive (MD) Pointing forwards
• MultiMediaCard (MMC) Pointing upwards
• Secure Digital (SD) Pointing upwards
• SmartMedia (SM) Pointing upwards
• xD card Pointing upwards

TTRRAANNSSFFEERRRRIINNGG IIMMAAGGEESS
15
Deu
tsch
En
glish
N
eder
lands
Fran
çais
Esp
añol
Slo
venšč
ina
INFRARED TRANSFER You will be able to print images that you have taken with your mobile phone camera with your printer. The transfer of the im-ages takes place via the wireless infrared connection between the two devices.
Remark: Mobile phones that are equipped with a camera work with a lower resolution. You will achieve good quality if you print 2, 4, or 8 images per sheet.
1. Press and hold the On/Off button on the top panel of the printer until three dashes appear on screen.
2. Place the infrared window of your device face-to-face with the corresponding window of the photo printer, at a dis-tance not exceeding 30 centimetres.
3. Select a photo on your device and launch its transfer via
the infrared link. Please read the operating instructions of your mobile phone for the precise mode of procedure.
4. The message "Ir" blinks on the printer screen throughout the transfer operation.
Infrared window

TTRRAANNSSFFEERRRRIINNGG IIMMAAGGEESS
16
TRANSFERRING IMAGES VIA USB You can connect your device to a PC and to print tour photos with the graphics application supplied, by means of the USB connection on the back of your printer.
Please carry out the following steps to do this:
1. Install the software
2. Connect the printer to the computer
1. INSTALL THE SOFTWARE
Warning! During software installation your impor-tant files can be changed or deleted. To avoid prob-lems in using older files after installation, make sure you backup your hard disk.
Important: First install the driver and then con-nect the printer.
1. Insert the CDROM supplied to automatically start the installation.
Remark: If installation does not start automatically, probably the so-called. “Autorun” feature is deactivated.
Manual installation without Autorun feature: 1) Open the “Start” menu and select “Run”.
2) Then enter the letter for the CD-ROM drive fol-lowed by a colon and the name of the program: “setup.exe”.
3) Confirm by clicking “OK”.
2. You will install the driver of the printer and an additional graphics application by means of the installation menu (Install products). Both products will be installed by means of the All menu point.
3. Follow the further instructions as they are displayed.
4. You will be requested to restart the computer after the in-stallation has concluded. Answer the request positively and restart your computer.

TTRRAANNSSFFEERRRRIINNGG IIMMAAGGEESS
17
Deu
tsch
En
glish
N
eder
lands
Fran
çais
Esp
añol
Slo
venšč
ina
2. CONNECT THE PRINTER TO THE COMPUTER
Remark: The printer software must have already been installed (refer to page 16).
Your printer has two USB connectors:
- a master USB connector (A) for connecting a camera (PictBridge mode) or USB key ...,
- a slave USB connector (B) for connecting to a master ter-minal (such as a PC)
1. Connect the end of the USB cable to a free USB connection socket on your computer, which will have been switched on, and the other end to Connection B of your printer. The USB cable is not in the scope of delivery.
2. Press and hold the On/Off button on the top panel of the printer until three dashes appear on screen.
3. The printer will be recognized and the installation process will be concluded by the operating system.
Remark: If your operating system is configured so that the installation procedure accepts only signed drivers and software (the default) an information screen will appear. Although the software lacks the digital signature it may still work properly. Click on “Tell me why this testing is important” to get de-tailed information. Confirm by clicking on “Conti-nue”.
USB printer port

PPRRIINNTT YYOOUURR PPHHOOTTOOGGRRAAPPHHSS
18
PPRRIINNTT YYOOUURR PPHHOOTTOOGGRRAAPPHHSS
USER INTERFACE / DISPLAY
User interface
1 – On/Off button (press and hold)
2 – Last photo selection button
3 – Next photo selection button
4 – Number of copies to print button (1 – 20)
5 – Photo format button 10x15 full page, no border
10x15 with a white border
10x13
2 photographs per page
4 photographs per page
8 photographs per page
20 photographs per page (index)

PPRRIINNTT YYOOUURR PPHHOOTTOOGGRRAAPPHHSS
19
Deu
tsch
En
glish
N
eder
lands
Fran
çais
Esp
añol
Slo
venšč
ina
6 – Print button
7 – Cancel button (The printer will be reinstalled if you press the button for longer than 3 seconds. It will return to the initial status at the time when the card was inserted.)
8 – Print basket button
9 – Crystal Image button
FUNCTION CRYSTAL IMAGE
Your printer comes equipped with the Crystal Image picture opti-misation function offering enhanced print quality. Crystal Image consists of 2 components that can be utilised according to your needs:
• image optimisation
• red-eye correction
Warning: red-eye correction is a complex process that may re-quire extensive processing time.
Crystal Image automatically implements all the settings and cor-rections required with respect to the sharpness of the image as well as the colour and contrast management, in order to achieve the best possible print quality. What is more, exposure defects will also be corrected (e.g., under-exposed photos are made brighter, or parts of a photo presenting strong contrasts will be compensated). The red-eye correction function corrects the red-eye phenomenon associated with flash photography.
ACTIVATION/DEACTIVATION Remark: By default, the "image optimisation" component of Crystal Image is activated and "red-eye correction" is deactivated.
The following table indicates how many times you need to press the button to activate or deactivate the Crystal Image function.
Number of pressing Image optimisation Red-eye correction
0 (Default status) Deactivated Deactivated
1 Activated Deactivated
2 Activated Activated
3 Deactivated Activated
4 (return to default status) Deactivated Deactivated
PPRRIINNTT YYOOUURR PPHHOOTTOOGGRRAAPPHHSS
20
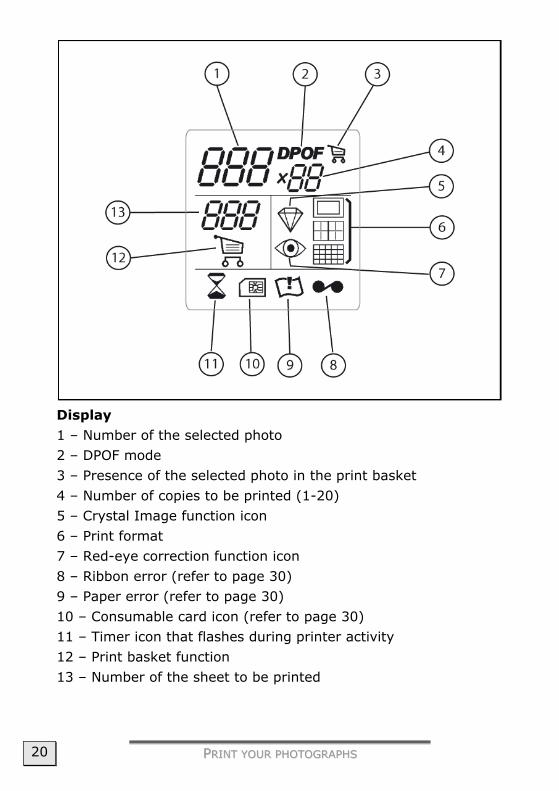
Display
1 – Number of the selected photo
2 – DPOF mode
3 – Presence of the selected photo in the print basket
4 – Number of copies to be printed (1-20)
5 – Crystal Image function icon
6 – Print format
7 – Red-eye correction function icon
8 – Ribbon error (refer to page 30)
9 – Paper error (refer to page 30)
10 – Consumable card icon (refer to page 30)
11 – Timer icon that flashes during printer activity
12 – Print basket function
13 – Number of the sheet to be printed

PPRRIINNTT YYOOUURR PPHHOOTTOOGGRRAAPPHHSS
21
Deu
tsch
En
glish
N
eder
lands
Fran
çais
Esp
añol
Slo
venšč
ina
RAPID PRINTING Your printer is switched on, and you have inserted a memory card or you have transferred the photos via the infrared connection.
Your photos are printed in four stages. The printer first prints the three colours: yellow, magenta and cyan in that order, then deposits a protective film on the sheet of paper, and finally ejects the photo.
1. Select the number of the photograph required using the or keys.
2. Press the key to set the number of copies.
3. Press the key to select print format.
4. Once the selection is made, press the key to start printing. If printing is interrupted due to a lack of paper, paper jam or empty film cartridge, the printing operation may be restarted where it was interrupted by pressing the
key after the necessary replacement or defect correc-tion is performed.

PPRRIINNTT YYOOUURR PPHHOOTTOOGGRRAAPPHHSS
22
EXAMPLE OF RAPID PRINTING FROM A MEMORY CARD
1. Press and hold the On/Off button on the top panel of the printer until three dashes appear on screen.
2. Insert the memory card into the correct printer slot.
3. The printer will analyze the memory card and show the number of valid images in the display (there are 5 in our example).
4. Select the picture that you want to print with the
button. (Photo number 3 in the example)
5. Select the number of copies with the button. (4 copies in the example)
6. You can select the required format with the button.
Four copies will be printed on one page because of this format selection.
7. Press the button, to start the printing process, after now having made all the necessary settings.

PPRRIINNTT YYOOUURR PPHHOOTTOOGGRRAAPPHHSS
23
Deu
tsch
En
glish
N
eder
lands
Fran
çais
Esp
añol
Slo
venšč
ina
CREATE A CONTACT SHEET (INDEX) The contact plate is a simple way of displaying all the photographs on your memory card; choose those to be printed using the num-ber assigned to each of them.
Proceed as follows to print a contact sheet:
1. Press and hold the On/Off button on the top panel of the printer until three dashes appear on screen.
2. Insert the memory card into the correct printer slot.
3. After inserting the memory card, the number of valid pho-tos is displayed on the screen.
4. Press the key until ALL is displayed on screen.
5. Select the format photographs per sheet format using
the key.
Remark: A maximum of 20 index images fits onto one contact sheet. If the number of photos on your memory card exceeds this number, the remaining index images will be printed on another contact plate.
6. Press the key to start printing.

PPRRIINNTT YYOOUURR PPHHOOTTOOGGRRAAPPHHSS
24
PRINTING A SERIES OF PHOTOS (PRINT BASKET
FUNCTION) You have the possibility of starting serial printing through the Print Basket option.
The photos are intended to be printed from a memory card in the following example.
Photo no. Desired quantity
3 4 x
8 1 x
16 2 x
Remark: Printing format remains fixed for series printing.
1. Press and hold the On/Off button on the top panel of the printer until three dashes appear on screen.
2. Insert the memory card into the correct printer slot.
3. After inserting the memory card, the number of valid pho-tos is displayed on the screen.
4. Select photograph 3, using the key; press the key until the figure 4, corresponding to the quantity de-sired, is displayed.
5. Press the key to add the photograph to the "shopping trolley" (the series). The symbol for photos stored in the Print Basket and the symbol that the Print Basket mode has been activated will light up.

PPRRIINNTT YYOOUURR PPHHOOTTOOGGRRAAPPHHSS
25
Deu
tsch
En
glish
N
eder
lands
Fran
çais
Esp
añol
Slo
venšč
ina
6. Select photograph 8, using the key, press key to add this to the shopping trolley (the default number of copies is 1).
7. Press the key to add the photograph to the "shopping trolley" (the series).
8. Select photograph 16, using the key, press key until the figure 2, corresponding to the desired number of copies, is displayed.
9. Press the key to add the photograph to the "shopping trolley" (the series).
10. The required number of sheets is displayed to the right of
the print basket icon.
11. Press the key to start printing.
DELETING PHOTOS FROM THE PRINT BASKET If you notice that you have made an error after having validated
the selection with the key, press the key again to cancel and redo the selection. This cancels only the most recent selec-tion. It is also possible to deselect all photographs by selecting
ALL using the key and pressing the key twice.

PPRRIINNTT YYOOUURR PPHHOOTTOOGGRRAAPPHHSS
26
PICTBRIDGE / DPOF Your printer will support both the PictBridge and the DPOF modes.
You will be able to connect your digital camera to the printer and to send the photos directly to your printer in the PictBridge mode with a USB cable.
The dSc information will appear in the display as soon as you have connected your camera to the printer. The printing process will be started automatically.
In the DPOF mode, you will already define with your camera which pictures should be printed how often. This information will be stored on the memory card and passed to the printer when the card is inserted into it. DPOF and the number of the printouts, which you will have defined previously, will appear in the display (15 in this example).
Press the key to start printing. Press the button to leave the DPOF mode.
Remark! The equipment of your digital camera with these functions is the prerequisite for using both these modes. Please read the documentation supplied with your camera in this respect.

MMAAIINNTTEENNAANNCCEE
27
Deu
tsch
En
glish
N
eder
lands
Fran
çais
Esp
añol
Slo
venšč
ina
MMAAIINNTTEENNAANNCCEE
CLEANING • Ensure that the printer is not dirty.
• Clean the printer with a moist cloth.
• Do not use any type of solvents, caustic or gaseous cleaning agents.
CLEANING THE PRINT HEAD Continuous lines across the length of your photographs may be caused by dirt particles stuck to the printhead.
• You will need a methylated alcohol based cleaning product and some off-the-shelf cotton tips ("Q-tips").
• Switch off your printer, disconnect the main cables and wait for five minutes; since the print head operates at a high temperature, there is a risk of burning if you touch it.
1. Pull out the paper tray.
2. Open the cartridge flap. Press on the
locking lever and pull out the film cartridge.
3. Turn the printer upside down to re-
move the lower hatch.

MMAAIINNTTEENNAANNCCEE
28
4. Clean the heating line of the print head carefully using a cotton bud. Proceed particularly carefully and do not exert excess pressure.
Warning! Never touch the print head with your fingers or any object that might scratch it.
5. Replace the lower hatch, turn the printer right side up, connect the mains cable and switch on the printer.
6. Replace the film cartridge. Take care
that the film is taut before inserting the cartridge into its compartment. Also absolutely pay attention to the notes on page 9.
7. Close the flap.
8. Push the paper tray back into place
until the locking system clicks.

SSEERRVVIICCEE
29
Deu
tsch
En
glish
N
eder
lands
Fran
çais
Esp
añol
Slo
venšč
ina
SSEERRVVIICCEE
FIRST AID FOR MALFUNCTIONS In most cases, problems have simple causes. We would like to give you some tips to solve the most common problems. Should these tips not help you solve your problems, please call us.
PROBLEMS The printer is fitted with an automatic time-out to prevent over-heating; this can be tripped when performing large print jobs. The printer automatically restarts the current print job as soon as the temperature drops back to normal.
No mains supply
• Check that the power supply block is correctly plugged into the mains.
• Check that the power supply connector is correctly plugged into the printer.
• Check that the mains socket is live.
The printer was unplugged during a print job
• Reconnect the power cable. Switch the printer on again and wait to the end of the ini-tialization. Remove any paper jam (refer to page 31) and restart the printing process.
No photograph is printed on a sheet
• Have the sheets been inserted shiny face up?
The photograph is marked
with a continuous line or a lot of spots
• Clean the printhead (refer to page 27).
No PC printing
• Check that the USB cable is correctly connected.
• Is the printer driver installed?

SSEERRVVIICCEE
30
ERROR MESSAGES After any intervention on your printer, do not forget to press the
key to restart the current print job. Error displayed
Icon Error type
Description Action
Err 01
Paper No paper Check that the paper has been correctly inserted in the loading tray.
Err 02
Paper Paper jam Remove any paper jammed in printer (do not reuse this sheet of paper)
Err 11
Film ribbon
No film car-tridge
Insert a new film cartridge or replace the current one.
Err 12
Film ribbon
End of film cartridge
Replace the film cartridge with a new one.
Err 13
Film ribbon
Film cartridge error
Check that the film cartridge is correctly inserted. If error persists: replace the cartridge.
Err 14
Film ribbon
Film cartridge missing or incorrectly inserted
Check that the cartridge is correctly inserted and that the locking lever is locked.
Err 21 - Memory card
File damaged or incorrect
File illegible. Try to print others. If error persists: check the file source, or try with a different source.
Err 22 - Memory card
JPEG decom-pression error
The file cannot be read. Try printing the others. If the error persists, check the source of the file or try with another source.
Err 23 - Memory card
Unsupported JPEG feature
The JPEG file contains an unsupported feature.
Err 27 - Memory card
Read error The card or file is illegible.
Err 72 - IR link Transfer error Error during transfer of photographs from GSM mobile phone camera. Re-start transfer from the GSM phone. Check that both devices are facing each other.
Err 75 - IR link Not enough space to store photograph
Photograph to be transferred too big or insufficient space to store photograph in printer.

SSEERRVVIICCEE
31
Deu
tsch
En
glish
N
eder
lands
Fran
çais
Esp
añol
Slo
venšč
ina
Error displayed
Icon Error type
Description Action
Err 76 - IR link File format not supported
Photograph to be transferred is not in JPEG format.
Err 80
SIM card SIM card no longer valid
The SIM card has already been used. Remove the inserted card and insert a valid SIM card.
Err 81
SIM card Print quantity reached.
The print quantity has been reached. Replace the con-sumable.
Err 82 bis Err 88
SIM card Card illegible or
incompatible Use the smart card supplied with the consumable
Err 89
SIM card Incorrect data transfer
Data transfer error. Remove the inserted card and insert a valid SIM card.
Err 90
SIM card and rib-
bon
Authorised print quantity
reached
The selected number of photos is greater than the remaining ribbon capacity to print all photos.
Other error number
- Other System error Switch off printer, wait 30 seconds and restart. If error persists, contact your re-tailer.
PAPER JAM Follow this procedure if a sheet becomes stuck in the printer and cannot simply be pulled out:
1. Switch off your printer by pressing button and discon-nect the mains cable.
2. Turn the printer upside down.
3. Remove the lower cover.
4. Gently and carefully remove the sheet causing the jam. Under no circumstances touch the printhead.
5. Replace the lower cover and turn the printer right side up.
6. Reconnect the mains cable and switch on the printer.

SSEERRVVIICCEE
32
TECHNICAL SUPPORT This printer has been vigorously tested in our laboratories in con-junction with a wide variety of devices and peripherals.
However, it is not unusual, that drivers are updated from time to time. This is due to possible compatibility problems with other components, programs and equipment not yet tested with the printer.
The latest information on your products and the most current driver updates are available at the following URL address on the Internet:
Internet: http://www.medion.com
DO YOU NEED ADDITIONAL HELP? Should our suggestions in this manual not solve your specific problem, please contact our helpline. We will try and help you over the telephone. However, before you contact us, it would be helpful to have the following information available:
• What additional peripheral devices do you use?
• What error messages, if any, appear on your screen?
• What steps have you already undertaken to solve the prob-lem?
• If you have received a customer number before, please re-fer to this number when you call.

SSEERRVVIICCEE
33
Deu
tsch
En
glish
N
eder
lands
Fran
çais
Esp
añol
Slo
venšč
ina
GUARANTEE The sales receipt serves as proof of first purchase and should be kept in a safe place. It is required should you need to make use of the guarantee. Your legal rights are not restricted by these Guarantee Conditions.
If the product is passed onto another user, then they shall be entitled to guarantee services for the remaining period of the guarantee. The receipt of purchase as well as this declaration should be passed on to the new user.
We guarantee that this equipment is in perfect working order and from a technical point of view it complies with the description in the enclosed documentation. Upon production of the receipt, the remaining period of guarantee shall pass on from the original parts to the respective re-placement parts. If you hand in this equipment to make use of the guar-antee, you must remove any programs, data and removable storage me-dia. Products which are sent with accessories will be replaced without accessories. The warranty obligation does not apply in the case of the problem being caused by an accident, a catastrophe, vandalism, misuse, incorrect use, ignoring the safety and maintenance regulations, changes by software, viruses or another piece of equipment or accessory or by other modifications not approved by the manufacturer. This limited guar-antee declaration replaces all other guarantees of express or implied na-ture. This includes the guarantee of saleability or the suitability for a cer-tain purpose but is not limited to this. In some countries the exclusion of implied guarantees is not permissible upon principle. In this case the validity of all express and implied guarantees is limited to the guarantee period. Once this period has expired, all guarantees become invalid. In some countries limiting the period of validity for implied guarantees is not permitted, so that the above limitation does not come into force. If you have any questions with regard to these guarantee conditions, please contact us.

SSEERRVVIICCEE
34
LIABILITY LIMITATIONS The contents of this manual are subject to unannounced changes caused by technical progress. Manufacturer and sales shall not be responsible for any damages which have been caused as a result of omissions or errors in the information provided in this manual.
Under no circumstances shall we be liable for any of the following:
1. Claims made against you by third parties based on loss or damage. 2. Loss or damage to your media, recordings or data. 3. Economic follow-on damage (including lost profit or savings) or asso-
ciated damage even in the case that we have been informed of the possibilities of this type of damage.
In some countries the exclusion or limitation of accompanying or follow-on damage is not legally accepted so the above limitations do not come into force.
COPYING THIS MANUAL This document contains legally protected information. All rights reserved. Copying in mechanical, electronic and any other form without the written approval of the manufacturer is prohibited.