Sage 300 2019 Sage CRM Integration Guide · Chapter 6, “Using Sage CRM with Sage 300,” is for...
48
Sage 300 2019 Sage CRM Integration Guide August 2018
Transcript of Sage 300 2019 Sage CRM Integration Guide · Chapter 6, “Using Sage CRM with Sage 300,” is for...

Sage 300 2019
Sage CRM Integration Guide
August 2018

This is a publication of Sage Software, Inc.
© 2018 The Sage Group plc or its licensors. All rights reserved. Sage, Sage logos, and Sageproduct and service names mentioned herein are the trademarks of The Sage Group plc or itslicensors. All other trademarks are the property of their respective owners.
Last updated: August 15, 2018
Integration Guide iii
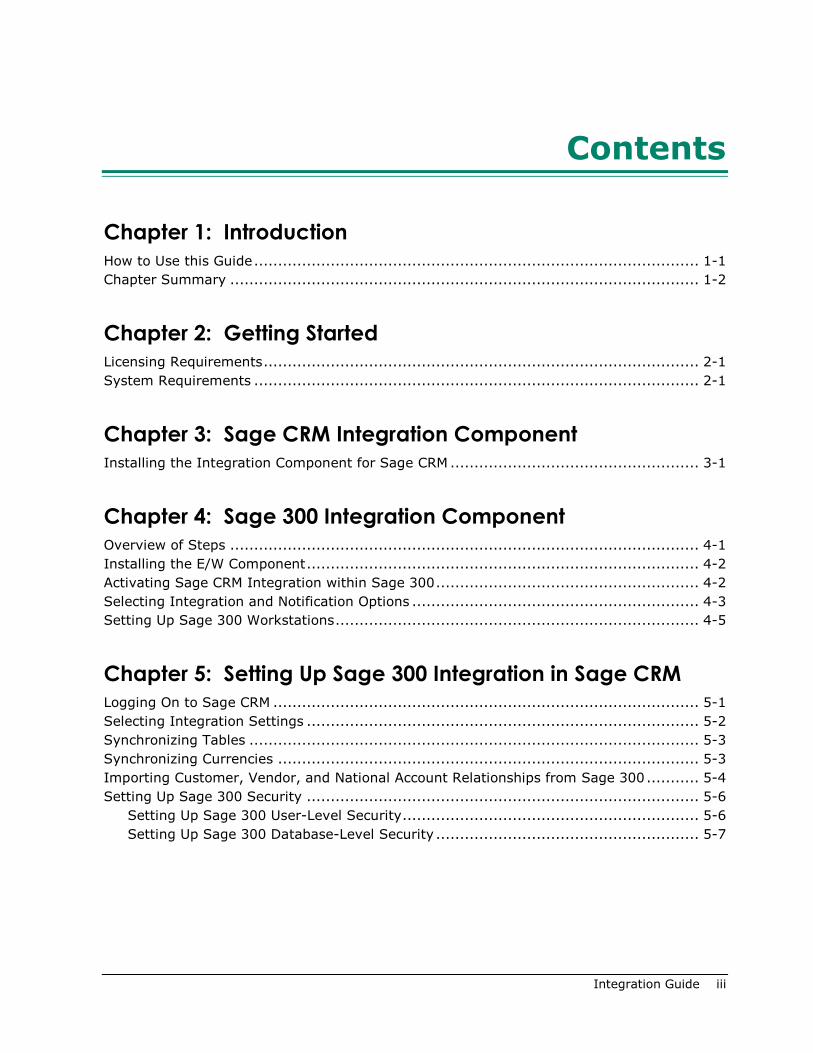
Contents
Chapter 1: Introduction
How to Use this Guide ............................................................................................. 1-1 Chapter Summary .................................................................................................. 1-2
Chapter 2: Getting Started
Licensing Requirements ........................................................................................... 2-1 System Requirements ............................................................................................. 2-1
Chapter 3: Sage CRM Integration Component
Installing the Integration Component for Sage CRM .................................................... 3-1
Chapter 4: Sage 300 Integration Component
Overview of Steps .................................................................................................. 4-1 Installing the E/W Component .................................................................................. 4-2 Activating Sage CRM Integration within Sage 300 ....................................................... 4-2 Selecting Integration and Notification Options ............................................................ 4-3 Setting Up Sage 300 Workstations ............................................................................ 4-5
Chapter 5: Setting Up Sage 300 Integration in Sage CRM
Logging On to Sage CRM ......................................................................................... 5-1 Selecting Integration Settings .................................................................................. 5-2 Synchronizing Tables .............................................................................................. 5-3 Synchronizing Currencies ........................................................................................ 5-3 Importing Customer, Vendor, and National Account Relationships from Sage 300 ........... 5-4 Setting Up Sage 300 Security .................................................................................. 5-6
Setting Up Sage 300 User-Level Security .............................................................. 5-6 Setting Up Sage 300 Database-Level Security ....................................................... 5-7
iv Sage CRM for Sage 300
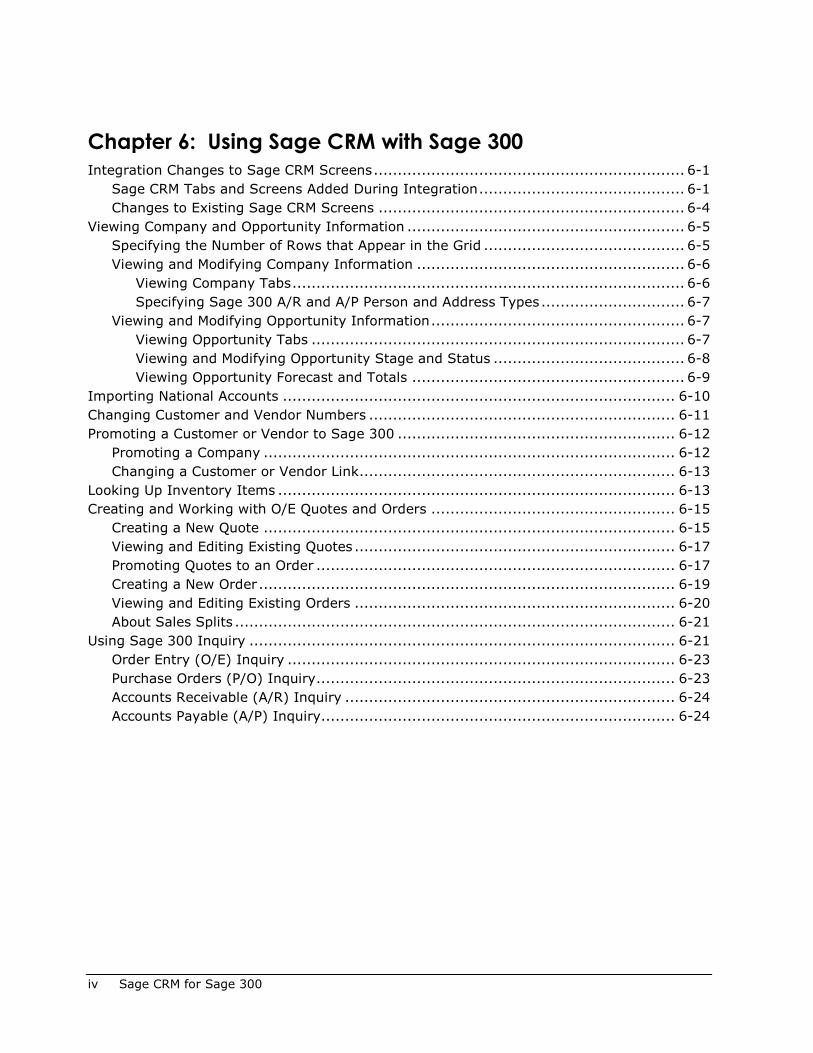
Chapter 6: Using Sage CRM with Sage 300
Integration Changes to Sage CRM Screens ................................................................. 6-1 Sage CRM Tabs and Screens Added During Integration ........................................... 6-1 Changes to Existing Sage CRM Screens ................................................................ 6-4
Viewing Company and Opportunity Information .......................................................... 6-5 Specifying the Number of Rows that Appear in the Grid .......................................... 6-5 Viewing and Modifying Company Information ........................................................ 6-6
Viewing Company Tabs .................................................................................. 6-6 Specifying Sage 300 A/R and A/P Person and Address Types .............................. 6-7
Viewing and Modifying Opportunity Information ..................................................... 6-7 Viewing Opportunity Tabs .............................................................................. 6-7 Viewing and Modifying Opportunity Stage and Status ........................................ 6-8 Viewing Opportunity Forecast and Totals ......................................................... 6-9
Importing National Accounts .................................................................................. 6-10 Changing Customer and Vendor Numbers ................................................................ 6-11 Promoting a Customer or Vendor to Sage 300 .......................................................... 6-12
Promoting a Company ...................................................................................... 6-12 Changing a Customer or Vendor Link .................................................................. 6-13
Looking Up Inventory Items ................................................................................... 6-13 Creating and Working with O/E Quotes and Orders ................................................... 6-15
Creating a New Quote ...................................................................................... 6-15 Viewing and Editing Existing Quotes ................................................................... 6-17 Promoting Quotes to an Order ........................................................................... 6-17 Creating a New Order ....................................................................................... 6-19 Viewing and Editing Existing Orders ................................................................... 6-20 About Sales Splits ............................................................................................ 6-21
Using Sage 300 Inquiry ......................................................................................... 6-21 Order Entry (O/E) Inquiry ................................................................................. 6-23 Purchase Orders (P/O) Inquiry ........................................................................... 6-23 Accounts Receivable (A/R) Inquiry ..................................................................... 6-24 Accounts Payable (A/P) Inquiry .......................................................................... 6-24
Integration Guide 1–1
Chapter 1 Introduction
Sage 300 Integration for Sage CRM creates a link that enables Sage CRM and Sage 300 to share information as it is entered into either program.
After integration, front-office personnel can create customer quotes and orders in Sage CRM and then promote those quotes and orders to Sage 300. As quotes and orders are processed, both systems are updated, preventing redundant data entry and enabling front-office and back-office personnel to view information that is current and correct.
This guide describes how to:
• Integrate Sage CRM with Sage 300
• Use Sage CRM features that are added during integration
How to Use this Guide The first five chapters of this guide are for Sage CRM implementers. Chapter 6, “Using Sage CRM with Sage 300,” is for Sage CRM users.
We assume that implementers:
• Have experience implementing and troubleshooting Sage CRM installations.
• Understand Sage 300 installation and setup.
• Have experience working with Sage 300.
We assume that users are familiar with web browser software and have experience working with Sage 300.
Chapter Summary
1–2 Sage CRM for Sage 300
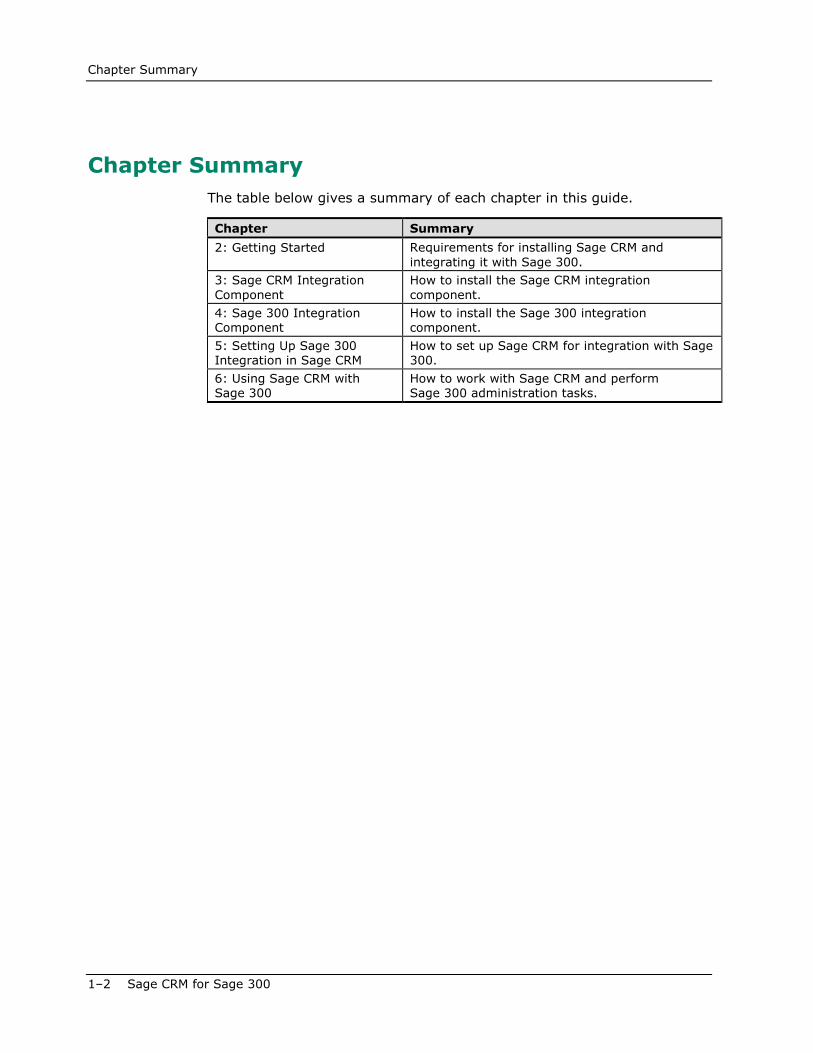
Chapter Summary The table below gives a summary of each chapter in this guide.
Chapter Summary 2: Getting Started Requirements for installing Sage CRM and
integrating it with Sage 300. 3: Sage CRM Integration Component
How to install the Sage CRM integration component.
4: Sage 300 Integration Component
How to install the Sage 300 integration component.
5: Setting Up Sage 300 Integration in Sage CRM
How to set up Sage CRM for integration with Sage 300.
6: Using Sage CRM with Sage 300
How to work with Sage CRM and perform Sage 300 administration tasks.
Integration Guide 2–1
Chapter 2 Getting Started
In this chapter, you will learn about licensing and system requirements for integrating Sage CRM and Sage 300.
Licensing Requirements Your Sage CRM license must include Sage 300 Integration.
You must have a subscription to Sage 300c.
System Requirements For a complete list of software and hardware requirements for Sage CRM and Sage 300, refer to your product documentation. Also note the following:
• Not all versions of Sage CRM and Sage 300 can be integrated. To check if your version of Sage CRM integrates with your version of Sage 300, see the Sage 300 Compatibility Guide.
• For recommended server specifications for Sage CRM, refer to the Sage CRM Software Requirements and Mobile Features guide.
• For Sage 300, you must install the following components on a server:
− Compatible database software. For details, refer to the Sage 300 Installation and Administration Guide.
− Sage 300 with the following programs:
− System Manager
− General Ledger
− Accounts Receivable
− Accounts Payable
− Inventory Control
− Order Entry
System Requirements
2–2 Sage CRM for Sage 300
− Sage CRM Integration
− Web Screens
− Sage 300 WebScreenProxy Application
The Sage 300 WebScreenProxy Application installs a new IIS application in your Sage 300 IIS server.
• You must customize two Sage 300 program files. For more information, see Knowledgebase article 92825.
Notes:
• If you have customized ASP pages that you created for a previous version of Sage CRM integration with Sage 300, you can continue using your customized ASP pages. For more information, see Knowledgebase article 91523.
• Before integrating Sage CRM with Sage 300, you must install the latest System Manager and application product updates.
• All Sage 300 programs that you integrate with Sage CRM must be from the same version of Sage 300.
• Sage CRM also integrates with:
− Sage 300 Purchase Orders
− Optional fields (if you use Sage 300 Transaction Analysis and Optional Field Creator)
Integration Guide 3–1
Chapter 3 Sage CRM Integration Component
In this chapter, you will learn how to install the Integration Component for Sage CRM. This component enables information to flow from Sage CRM to Sage 300.
Note: You must also install the Integration Component for Sage 300. For more information, see the next chapter.
Installing the Integration Component for Sage CRM Install the version of the integration component that matches your version of Sage CRM.
Note: Before installing the integration component, you must install Sage CRM.
To install the integration component:
1. Run the installation program for the integration component.
The Integration Component for Sage CRM screen appears.
2. Click Next.
3. Select a Sage CRM install to integrate with Sage 300, and then click Next.
4. Select an installation or upgrade option.
• If you did not previously have Sage CRM integrated with Sage 300, select Install Sage 300 Integration.
• If you previously had Sage CRM integrated with Sage 300, and you have upgraded Sage CRM or Sage 300, select Upgrade your existing Sage 300 Integration.
5. Click Next.
Installing the Integration Component for Sage CRM
3–2 Sage CRM for Sage 300
6. Select a Sage 300 version or upgrade path.
• If you selected Install Sage 300 Integration in the previous step, select the version of Sage 300 you use.
• If you selected Upgrade your existing Sage 300 Integration in the previous step, select the appropriate upgrade path.
7. Click Next.
8. In the Database Server Login details screen, confirm your server name and your SQL Server user ID, and enter the password for this user ID.
9. Click Next to begin installation.
10. If you are prompted to stop IIS, click Yes.
Note: IIS restarts automatically near the end of the installation process.
When the installation is complete, the Setup Complete screen appears.
11. Click Finish.
If you did not clear the Launch Now check box, the Sage CRM logon page appears in a browser window.
If you are upgrading from a previous version, you may need to re-synchronize tables after installing the upgrade. For details, see “Synchronizing Tables” in Chapter 5.
Integration Guide 4–1
Chapter 4 Sage 300 Integration Component
In this chapter you will learn how to install, activate, and set up the Integration Component for Sage 300. This component, also known as the E/W component, enables information to flow from Sage 300 to Sage CRM, and from quotes or orders.
Note: The E/W component differs from the Integration Component for Sage CRM introduced in the previous chapter.
Overview of Steps To install, activate, and set up the E/W component, follow these steps. The rest of this chapter describes each step in more detail.
1. Install the E/W component on the server where Sage 300 is installed, and also on any workstations that have Sage 300 accounting programs installed.
2. Activate the E/W component.
The following icons appear in the Sage CRM folder on the Sage 300 company desktop:
• Sage CRM Setup
• Workstation Setup
• Error Log
3. Open the Sage CRM Setup screen and select integration and notification options for your system.
4. Run the Workstation Setup utility on any Sage 300 desktop workstation (whether Sage 300 programs are installed locally or running from the server) that you wish to integrate with Sage CRM. You do not need to run the Workstation Setup utility on the client if you are running a browser client only.
After you select the appropriate options and complete these setup steps, any changes made to customers, customer ship-to addresses, vendors, vendor remit-to addresses, and quotes or orders linked to an opportunity in Sage 300 are reflected automatically in Sage CRM.
Installing the E/W Component
4–2 Sage CRM for Sage 300
Installing the E/W Component You install the E/W component for Sage CRM as part of the Sage 300 installation.
To install the E/W component:
• During installation of Sage 300, on the Select Features screen, select Sage CRM Integration.
Note: After installing Sage 300, you must install the Web Services synchronization component on each client workstation where you use the E/W component. For more information, see “Setting Up Sage 300 Workstations” later in this chapter.
Proceed to the next section to activate the E/W component within your Sage 300 accounting system.
Activating Sage CRM Integration within Sage 300 After you install the E/W component, you must activate it.
To activate the E/W component:
1. Open Sage 300.
2. Log on as the ADMIN user in your company database. If security is activated in Sage 300, you must enter the password for the ADMIN user.
3. Select Administrative Services > Data Activation.
4. On the Applications for Activation list, select the appropriate version of Sage CRM Integration, and then click Activate.
The Sage CRM Integration Activation screen appears.
5. In the Sage CRM Installation Name field, enter the name of your Sage CRM installation.
6. Click Proceed to complete the activation.
Note: To cancel the activation while it is in progress, click Close on the Activation screen.
7. When activation is complete, close the Data Activation screen.
The Sage CRM folder appears on the Sage 300 desktop.
Selecting Integration and Notification Options
Integration Guide 4–3
Selecting Integration and Notification Options Use the Sage CRM Setup screen to select setup options for running Sage CRM with Sage 300. You can change these options later.
To use the Sage CRM Setup screen:
1. In the Sage CRM folder, select Sage CRM Setup.
The E/W Sage CRM Setup screen appears.
2. Review and select the following connection options on the Setup screen:
Suspend All Integration to Sage CRM. Select this option if you do not want any changes in Sage 300 to be reflected automatically in Sage CRM.
Suspend A/R Integration to Sage CRM. Select this option if you do not want changes in Accounts Receivable to be reflected automatically in Sage CRM.
Suspend A/P Integration to Sage CRM. Select this option if you do not want changes in Accounts Payable to be reflected automatically in Sage CRM.
Suspend O/E Integration to Sage CRM. Select this option if you do not want changes in Order Entry to be reflected automatically in Sage CRM.
Note: If you suspend O/E integration to Sage CRM, the totals and forecasting information on the Opportunity Summary, Quote Summary, and Order Summary screens will not be updated with information from Sage 300.
You may also see errors when saving quotes or orders in Sage CRM.
Suspend A/R Ship-To Addresses Integration to Sage CRM or Suspend A/P Remit-To Addresses Integration to Sage CRM. Select this option if you do not want changes to these addresses in Accounts Receivable or Accounts Payable to be reflected automatically in Sage CRM. (Note that after an installation, these two options are selected by default.)
Suspend A/R National Account Integration to Sage CRM. Select this option if you do not want changes to the National Account relationship in AR Customers to be reflected automatically in Sage CRM.
Selecting Integration and Notification Options
4–4 Sage CRM for Sage 300
Sage CRM Installation Name. Ensure that the Sage CRM installation is correct (the default is CRM).
If you change this field, click the Sage CRM Web Services URL button to automatically update the Installation Name portion of the Web Services URL field.
Logon User. The default is “CRM”. The CRM user account is created automatically within Sage CRM to allow Sage 300 to connect to it. Accept this default user.
Password. To add security to this connection, enter a password.
Note: If you change the password for the Logon user, you also need to change the password for this user within Sage CRM.
Sage CRM Server Name. This should default to your computer’s machine name. If Sage CRM and Sage 300 are installed on separate servers, enter the name of the Sage CRM server.
If you change this field, click the Sage CRM Web Services URL button to automatically update the Server Name portion of the Web Services URL field.
Web Services URL. The Web Services URL field consists of the Sage CRM Server Name field, the Sage CRM Installation Name field, and program defaults. For example: http://605DEV05/CRM09/eware.dll/webservices/soap where 605DEV05 is the server name, and CRM09 is the installation name.
If you make changes to the Sage CRM Server Name field or the Sage CRM Installation Name field, click the Sage CRM Web Services URL button to automatically update the URL field.
Alternatively, you can manually change the URL field. The server name and installation name in the URL must be the same as the Sage CRM Server Name field and the Sage CRM Installation Name field.
3. Review the notification options at the bottom of the Setup screen.
Acknowledge operations. By default, whenever a customer or vendor record is edited and saved in Sage 300, a notification informs the user that the update to Sage CRM was successful. Uncheck this option if you do not want to receive notification messages.
Display errors. By default, the integration component alerts the user to any problems that occur when the program tries to update a customer or vendor in Sage CRM. You can turn this option off and view the error log to review any problems.

Setting Up Sage 300 Workstations
Integration Guide 4–5
Log errors. This option allows the administrator to turn on or off the logging of errors received by the integration component.
4. Click Save to complete the setup process.
Setting Up Sage 300 Workstations You must run the Workstation Setup utility on any Sage 300 desktop workstation that you want to integrate with Sage CRM, whether Sage 300 programs are installed locally or running on the server. You do not need to run the Workstation Setup utility on the client if you are running a browser client only.
To run workstation setup:
1. Start Sage 300 on the workstation you want to set up.
2. Select the Sage CRM folder, and then select Workstation Setup.
3. If the Sage CRM synchronization component has not yet been installed, a message appears.
Click Yes to install the synchronization component, and then follow the instructions provided by the setup wizard.
4. A message informs you if the workstation is currently set up to communicate with Sage CRM.
Note: This message appears even if the communication connection between Sage CRM and Sage 300 is not successful. You can test the connection in a following step.
5. Click Close.
The E/W Sage CRM Workstation Setup screen appears and displays the Web Services URL.
6. To test the connection, click the Test button.
7. Click Close to exit.
Note: If you move Sage CRM to another installation location or to a different server, you must rerun the Sage CRM Setup program and the Sage CRM Workstation Setup utility.

Integration Guide 5–1
Chapter 5 Setting Up Sage 300 Integration
in Sage CRM
In this chapter you will learn how to log on to Sage CRM, select integration settings, synchronize tables and currency, import accounts, and set up Sage 300 security.
Logging On to Sage CRM To start Sage CRM on the Sage CRM server:
• On the Windows taskbar, click Start > Programs > Sage CRM.
To start Sage CRM on a client workstation:
1. Open your web browser.
2. In the address bar, enter the Sage CRM installation’s URL in the following format:
http://<servername>/<crminstallation>
For example, if your Sage CRM server name is Sage300, and you installed Sage CRM with the default installation name of CRM, enter the following into your browser:
http://Sage300/CRM
The Log On screen appears.
3. Enter admin in the User Name field, and leave the Password field blank.
4. Click Log On.
Selecting Integration Settings
5–2 Sage CRM for Sage 300
Selecting Integration Settings If this is a new installation, you must configure the connection to the Sage 300 database by selecting integration settings.
To select integration settings:
1. On the Profile menu, click Administration.
2. On the Administration screen, click Sage 300 Administration.
The Sage 300 Administration screen appears.
3. Click Setup Integration.
4. To add a link to a Sage 300 database, click Add in the right sidebar.
A new row appears.
5. Enter the following information:
• Sage 300 company database ID. (For example, SAMLTD.)
• Sage 300 Company name. (For example, Sample Company Limited.)
Sage 300 Server Name. Enter the name of the Sage 300 server. This is the URL from which you start the Sage 300 web screens and WebApi.
• Company Email. If you email a document from the O/E Order Entry web screen, a copy of the document is emailed to the address in this field.
• Default Company. Select this option to set this as the default company.
6. Click Save.
Tip: You can add links to multiple Sage 300 databases. Repeat steps 4–6 for each Sage 300 database you want to integrate with Sage CRM.
7. When you are finished, click Continue.
The Sage 300 Administration screen appears, and the Synchronize Tables option is now available.
Synchronizing Tables
Integration Guide 5–3
Synchronizing Tables The Synchronize Tables function updates Sage CRM database tables with the tables defined for the following fields in a Sage 300 database:
• Group Code
• Tax Code
• Terms Code
• Salesperson Code
You must synchronize tables after the installation is completed and before you add any data to the system.
To synchronize tables:
1. On the Sage 300 Administration screen, click Synchronize Tables.
The Select Sage 300 Integration Tables to Synchronize screen appears.
2. In the Sage 300 Company Name field, select a Sage 300 company.
3. Select the Sage 300 tables that you want to synchronize with Sage CRM.
4. Click Synchronize.
When synchronization is completed, Sage CRM displays the values extracted from the Sage 300 database.
5. Click Continue.
Synchronizing Currencies The Synchronize Currencies function updates Sage CRM with currency codes that you use in Sage 300.
To synchronize currencies:
1. On the Sage 300 Administration screen, click Synchronize Currencies.
The Select Sage 300 Integration Tables to Synchronize Currency screen appears.
2. In the Sage 300 Company Name field, select a Sage 300 company.
3. Click Load Currency Codes.
Importing Customer, Vendor, and National Account Relationships from Sage 300
5–4 Sage CRM for Sage 300
Two tables appear:
− Sage CRM Currency Codes. This table lists currencies that are set up in Sage CRM.
− Currency Codes. This table lists currencies that are set up in the selected Sage 300 company.
4. In the Currency Codes table, select the Sage 300 currencies that you want to synchronize with Sage CRM.
Important! Do not synchronize a Sage 300 currency that is the same as the Sage CRM base currency. If you do, Sage CRM will have two currency codes for the same currency.
5. Click Save to synchronize the selected currencies.
Importing Customer, Vendor, and National Account Relationships from Sage 300
The Import Customers and Import Vendors functions let you import a range of customers and vendors from Sage 300 Accounts Receivable and Accounts Payable into Sage CRM.
To import customers or vendors into Sage CRM:
1. On the Sage 300 Administration screen, click Import Customers or Import Vendors.
The Import screen appears.
2. In the Sage 300 Company Name field, select a Sage 300 company.
3. Select records to import:
• If you are importing customers, you can select customer records and ship-to address records.
• If you are importing vendors, you can select vendor records, and remit-to address records.
Note: If you import ship-to addresses or remit-to addresses, you must also import the associated customer or vendor records at the same time, unless the customer or vendor records have already been imported into Sage CRM.
For example, if you had previously imported customers 1000 to 2000, you can select Import Ship-To Addresses for customers 1000 to 2000, without selecting Import Customers.
Importing Customer, Vendor, and National Account Relationships from Sage 300
Integration Guide 5–5
You use these import options in conjunction with the From/To Customer Number or From/To Vendor Number fields — see the next step.
4. Specify the range of customers or vendors that you want to import, or leave the default values in the From and To fields to import all customers or vendors.
We recommend importing no more than 300 entries at a time.
• If you are importing customers, the range you specify is applied to both the Import Customers and Import Ship-To Addresses fields.
• If you are importing vendors, the range you specify is applied to both the Import Vendors and Import Remit-To Addresses fields.
Note: In step 3, if you selected only the Import Ship-To Addresses option for customers or only the Remit-To Addresses option for vendors, Sage CRM will import the addresses of the customers or vendors that fall within the specified range.
For example, if you specified a customer range from 1000 to 2000, Sage CRM imports the ship-to addresses of customers 1000 to 2000.
5. Click Import.
A list of 100 customers or vendors appears at a time while they are being imported.
Note: If you are importing data from a large database for the first time, the import process may take a long time.
When the process is complete, Sage CRM displays the number of customers or vendors (and ship-to or remit-to addresses) imported, and the Continue button appears.
6. Click Continue to return to the Sage 300 Administration screen.
To import national accounts into Sage CRM:
1. On the Sage 300 Administration screen, click Import National Accounts.
2. Specify a range of accounts to import, and then click Import.
Sage CRM imports the accounts and a confirmation screen appears.
3. Click Continue to exit.
Setting Up Sage 300 Security
5–6 Sage CRM for Sage 300
Setting Up Sage 300 Security On the Sage 300 Administration screen, you can set up two levels of security:
• User Level. You use Sage 300 user-level security to define a user’s access permissions for integrated screens, such as A/R Inquiry. These permissions apply to all Sage 300 integrated databases except the databases specified in Sage 300 Database-Level Security.
• Database Level. You use Sage 300 Database-Level Security to define a user’s access permissions for integrated screens, such as A/R Inquiry, where the rights apply only to one Sage 300 integrated database.
For example, assume you have integrated Sage CRM with two Sage 300 databases: SAMINC and SAMLTD. You want user JOHN to have access to all Sage 300 integrated screens (A/R Inquiry, A/R Invoice, and so on) while working with SAMINC. However, while working with SAMLTD, user JOHN should not have access to the A/R Inquiry screen.
In this case, you would use Sage 300 User-Level Security to assign user JOHN permissions for all Sage 300 integrated screens, which would apply to all integrated databases (SAMINC and SAMLTD). You would then use Sage 300 Database-Level Security to revoke user JOHN’s access permissions for the A/R Inquiry screen for SAMLTD.
If customer 1200 existed in both SAMINC and SAMLTD, user JOHN would see the A/R Inquiry screen if viewing customer 1200 from SAMINC, but would not see the A/R Inquiry screen if viewing customer 1200 from SAMLTD.
Setting Up Sage 300 User-Level Security
The Sage 300 User-Level Security function allows you to assign access permissions for integrated Sage 300 screens for all users, and to assign permissions for specific integrated screens, such as A/R Inquiry, to individual users.
To set user permissions for integrated Sage 300 screens for all databases:
1. On the Sage 300 Administration screen, click Sage 300 User-Level Security.
The Sage 300 Integration Screen Access - User-Level Security screen appears, and displays a list of users.
Setting Up Sage 300 Security
Integration Guide 5–7
2. In the User Name column, click a user’s name.
The Sage 300 User-Level Security screen appears.
3. Enter the user’s Sage 300 User ID and Password. (Sage CRM uses this information to access Sage 300 data.)
Note: The Sage 300 User ID and Password must already exist in Sage 300.
4. Select and clear check boxes to set user permissions for integrated Sage 300 screens.
5. When you have finished, click Save.
6. To return to the Sage 300 Administration screen, click Continue.
Setting Up Sage 300 Database-Level Security
The Sage 300 Database-Level Security function lets you assign access permissions for Sage 300 integrated screens, such A/R Inquiry, where the rights apply only to the specific user and Sage 300 integrated database that you select.
When you click Sage 300 Database-Level Security, the screen displays a list of users who are set up for database-level security.
To set user permissions for an integrated Sage 300 database:
1. On the Sage 300 Administration screen, click Sage 300 Database-Level Security.
2. On the right sidebar, click New.
3. On the User Name list, select a CRM user.
4. In the Sage 300 Company Name field, select a Sage 300 company.
5. Type the user’s Sage 300 User ID and Password in the Sage 300 User ID and Sage 300 Password fields. (Sage CRM uses this information to access Sage 300 data.)
Note: The Sage 300 User ID and Password must already exist in Sage 300.
6. Select and clear check boxes to set user permissions for integrated Sage 300 screens.
7. When you have finished, click Save.
8. To return to the Sage 300 Administration screen, click Continue.

Integration Guide 6–1
Chapter 6 Using Sage CRM with Sage 300
In this chapter you will learn how to:
• Identify how Sage CRM screens change after integration with Sage 300.
• View and modify company and opportunity information in Sage CRM.
• Promote Sage CRM customers or vendors to Sage 300.
• Create O/E quotes and orders in Sage CRM.
• Use Sage CRM Inquiry features.
Integration Changes to Sage CRM Screens When you integrate Sage CRM with Sage 300, new screens are added to Sage CRM that you can use to view and edit Sage 300 information. Also, some existing Sage CRM screens are updated with new features that enable you to view and edit Sage 300 information. The following sections describe the new screens and changes to existing screens.
Note: The integrated tabs and customer and vendor information are available only if you have set up the integration link and imported information from Sage 300.
Sage CRM Tabs and Screens Added During Integration
When Sage CRM is successfully integrated with Sage 300, the following new tabs and screens appear in the Company context (when you have selected a company):
• Promote to Sage 300
• A/R Inquiry / A/P Inquiry
• Customer / Vendor
• O/E Inquiry / P/O Inquiry
Integration Changes to Sage CRM Screens
6–2 Sage CRM for Sage 300
Note: Except for the Promote to Sage 300 screen, the above screens are specific to a Sage CRM system with Sage 300 integration and appear only if the selected company is also a customer or vendor in Sage 300.
The following new tabs and screens appear in the Opportunity context (when you have selected an opportunity):
• Quotes (includes Quote Summary and Quote Entry screens)
• Orders (includes Order Summary and Order Entry screens)
The following table gives a brief overview of each screen and its function.
Quotes The Quotes screen lists Sage 300 quotes for an opportunity, and allows you to create quotes, edit existing quotes, and review totals and other key information at a glance, all without opening Sage 300. On this screen, you can:
• View quote totals, including the amount promoted to Sage 300 orders.
• View information about all quotes created for the opportunity, including associated orders, expiration dates, and whether each quote is included in opportunity totals.
• Click New Quote to create a new quote for an open opportunity in Sage CRM without opening Sage 300.
• Click an existing quote to open it in the Quote Entry screen, where you can view and edit details for the quote and specify whether to include it in opportunity totals.
• Select one or more quotes to promote to a Sage 300 order.
Orders The Orders screen lists Sage 300 orders for an opportunity, and allows you to create orders, edit existing orders, and review totals and other key information at a glance, all without opening Sage 300. On this screen, you can:
• View order totals, including order amount, shipment amount, and invoice amount.
• View information about all orders created for an opportunity, including document number, associated quotes, and whether an order is on hold.
• Click New Order to create a new order for an active customer in Sage CRM without opening Sage 300.
• Click an order to open it in the Order Entry screen, where you can view and edit details for the order
Integration Changes to Sage CRM Screens
Integration Guide 6–3
Promote to Sage 300
The Promote to Sage 300 screen shows Sage 300 details about an existing customer or vendor. You can use this screen to promote a Sage CRM company to a Sage 300 customer or vendor.
A/R Inquiry (Customers)
The A/R Inquiry screen lists posted or unposted Accounts Receivable documents for a company. It also displays specialized information, such as national account information for a national account customer.
You can view document details, create and edit documents, and display a list of applied transactions for a document. This tab appears only for companies with a Sage 300 Customer Number.
A/P Inquiry (Vendors)
The A/P Inquiry screen lists posted or unposted Accounts Payable documents for a company. You can edit unposted documents and create new vendor documents in Sage 300.
Customer / Vendor Click these menu items to open Sage 300 web screens:
Click Customer to open the A/R Customers screen. Click Vendor to open the A/P Vendors screen.
O/E Inquiry (Customers)
The O/E Inquiry screen displays the following menu items:
• All Orders (active, standing, future, quotes)
• All Shipments
• All Invoices
• Credit/Debit Notes
• Pending Shipments
• Sales History
• Customer Price List
• Serial Number Sales History
• Lot Number Sales History
Use this screen to view document details, open a document for editing, or create a new O/E document.
Integration Changes to Sage CRM Screens
6–4 Sage CRM for Sage 300
P/O Inquiry (Vendors)
The P/O Inquiry screen displays the following menu items:
• All Purchase Orders (active, standing, future, blanket)
• New Purchase Orders
• All Receipts
• All Invoices
• Requisitions
• Returns
• Credit/Debit Notes
• Pending Receipts
• Purchase History
• Vendor Contract Costs
• Serial & Lot Number Purchase History
Use this screen to view document details, open a document for editing, or create a new P/O document.
Changes to Existing Sage CRM Screens
The following Sage CRM screens are modified during integration to provide additional features that enable further integration between Sage CRM and Sage 300.
• Company Summary
• Opportunity Summary
Company Summary
If you are viewing the Company Summary screen for an active customer, New Quote and New Order buttons appear on the right side of the screen. When you click these buttons, Sage CRM automatically creates a new opportunity for the current company, and then opens a new quote or order that is linked to the new opportunity.
An Item Inventory button also appears on the Company Summary screen. You can click this button to look up inventory items, view available quantities, and create a new quote or order for an item.
Note: This button appears if Opportunity O/E Inquiry access permission is selected for the user and/or database. For information about security, see “Setting Up Sage 300 Security” in Chapter 5.
Viewing Company and Opportunity Information
Integration Guide 6–5
Opportunity Summary
The Opportunity Summary screen displays detailed, up-to-date information about opportunity status, quote totals, and order totals. Any changes made to the opportunity will appear here, whether those changes are made in Sage CRM or Sage 300. As you create quotes and orders for an opportunity, the Status field is updated automatically to reflect the current status of the opportunity. The following fields also display detailed information about the opportunity:
• Forecast. The current value of the opportunity.
• Quote Amount. The sum of all quotes included in the opportunity.
• Pending Amount. The sum of all quotes included in the opportunity but not yet promoted to an order.
• Order Amount. The sum of all orders for this opportunity that have not been shipped.
• Shipment Amount. The sum of all shipments for this opportunity that have not been invoiced.
• Invoice Amount. The sum of all invoiced shipments for this opportunity.
Viewing Company and Opportunity Information This section includes instructions for viewing company and opportunity screens, and for viewing and modifying information and totals for companies and opportunities.
Specifying the Number of Rows that Appear in the Grid
You can specify the number of rows displayed in the grid of any integrated Sage 300 screen, such as A/R unposted invoices.
To specify the number of rows that appear in the grid:
1. On the Profile menu, click Preferences.
2. Click Change.
3. In the Grid Size field, specify the number of rows to display.
Viewing Company and Opportunity Information
6–6 Sage CRM for Sage 300
Viewing and Modifying Company Information
In Sage CRM, you use the tabs at the top of the screen to navigate to different program screens. The tabs that appear depend on the current context. This section describes the Company context.
Viewing Company Tabs
When you select a company, Sage CRM displays tabs that appear in the company context, including the Promote to Sage 300 tab and the different Inquiry tabs,
To view tabs in the Company context:
1. In the Search field at the top of the screen, click Company.
Enter search criteria such as the Sage 300 Company Name, or a Sage 300 Customer or Vendor Number.
2. Click Find.
3. Select the company you want to view from the alphabetized list.
The Company Summary page appears and the Company (or Vendor) context tabs are displayed.
Note: Changes made to the following fields on the Company Summary page in Sage CRM are reflected in Sage 300 when you click Save:
• Tax Group
• Group Code
• Description
• Website
• Terms Code
• Address Fields
• Business Phone, Fax and E-mail fields
• Contact Information
• Company Name

Viewing Company and Opportunity Information
Integration Guide 6–7
Specifying Sage 300 A/R and A/P Person and Address Types
The Person and Address edit screens include a series of check boxes that you can use to specify one or more types. When Sage CRM is integrated with Sage 300, new Type check boxes appear for contacts and addresses.
• If a person is a Sage 300 A/P Contact, A/P Remit-To Contact, A/R Contact, or A/R Ship-To Contact, their contact information is synchronized between Sage CRM and Sage 300. Within the context of a company, only one person can have the Sage 300 A/P or A/R Contact type selected. However, multiple people can be assigned as the Sage 300 A/P Remit-To Contact (or A/R Ship-To Contact).
• If an address is a Sage 300 A/P Address, A/P Remit-To Address, A/R Address, or A/R Ship-To Address, its information is synchronized with the address in the customer/vendor record.
• If an address is a Ship-To or Remit-To address, it is synchronized with A/R Ship-To or A/P Remit-To addresses. Within the context of a company, only one address can have the Sage 300 A/R or A/P Address type selected. However, more than address can be assigned as the Sage 300 A/P Remit-To Address (or A/R Ship-To Address).
Note: Ship-To and Remit-To addresses and contacts can be created only in Sage 300 (not in Sage CRM).
Viewing and Modifying Opportunity Information
In Sage CRM, you use the tabs at the top of the screen to navigate to different program screens. The tabs that appear depend on the current context. This section describes the Opportunity context.
Viewing Opportunity Tabs
When you select a company, Sage CRM displays tabs in the opportunity context. This is the context in which the Quotes and Orders tabs appear, allowing you to view, create, and edit Sage 300 quotes and orders.
To view tabs in the Opportunity context:
1. In the Search field at the top of the screen, click Company.
Enter search criteria such as the Sage 300 Company Name, or a Sage 300 Customer or Vendor Number.
2. Click Find.
3. Select the company you want to view from the alphabetized list.
4. Click the Opportunities tab.
Viewing Company and Opportunity Information
6–8 Sage CRM for Sage 300
The Opportunity Summary page appears, and the Opportunity context tabs are displayed.
Viewing and Modifying Opportunity Stage and Status
On the Opportunity Summary screen, you can view information about the current stage and status of an opportunity as it progresses through the sales cycle. This information is updated as changes are made in Sage CRM and Sage 300.
You can update the Stage and Status fields manually to show the current status of an opportunity, or if workflow is enabled, you can use the workflow bullets in the right sidebar to progress the opportunity.
After integration with Sage 300, these fields are updated as follows when you create an opportunity, create quotes, promote quotes to an order, or save an order that completes the opportunity:
• Create a new opportunity. When you click New Quote or New Order on the Company Summary screen, Sage CRM creates a new opportunity automatically. (You can create a new opportunity manually by right-clicking the New button on the right sidebar and selecting Opportunity.)
− Stage: Lead
− Status: In Progress
• Create a new quote. You can create a new quote by clicking New Quote on the Company Summary Screen or the Quotes tab (available when you are in the Opportunity context).
− Stage: Proposal Submitted
− Status: In Progress
• Create a new order. You can create a new order by clicking New Order on the Company Summary Screen or the Orders tab (available when you are in the Opportunity context).
− Stage: Sale Agreed
− Status: In Progress
• Promote one or more quotes to an order. On the Quotes tab (available when you are in the Opportunity context), you can select one or more quotes to promote to a Sage 300 O/E order. When you save the order, you can choose to complete the opportunity.
Viewing Company and Opportunity Information
Integration Guide 6–9
If you do not complete the opportunity, you can continue to create quotes and orders linked to that opportunity, and the Stage and Status fields are updated as follows:
− Stage: Sale Agreed
− Status: In Progress
• Complete an opportunity. If you save an order and confirm that it completes the opportunity, the opportunity will be closed and you will not be able to create new quotes or orders without reopening it.
− Stage: Sale Agreed
− Status: Won
Viewing Opportunity Forecast and Totals
On the Status tab of the Opportunity Summary screen, the Forecast field shows the current value of an opportunity as it progresses through the sales cycle. This information is updated as changes are made in Sage CRM and Sage 300.
• If the opportunity has quotes but no orders, this field shows total quote value.
• If the opportunity has one or more orders and its status is In Progress, this field shows total order value plus the value of quotes not yet promoted to an order.
• For any opportunity status, the amount displayed in this field is always displays the sum of Pending, Order, Shipment, and Invoice amounts.
On the Opportunity Totals tab, the Amount fields show detailed information to help you track the opportunity as it progresses through the sales process.
Note: Amounts for a quote are only included in opportunity totals if the Include in Opportunity Totals option is selected for the quote.
This ensures that opportunity totals do not show artificially inflated amounts. For example, if you create multiple versions of a quote, you may want to include only the most recent version in opportunity totals.
• Quote Amount. The sum of all quotes included in the opportunity.
• Pending Amount. The sum of all quotes included in the opportunity but not yet promoted to an order.
Importing National Accounts
6–10 Sage CRM for Sage 300
• Order Amount. The sum of all orders for this opportunity that have not been shipped.
• Shipment Amount. The sum of all shipments for this opportunity that have not been invoiced.
• Invoice Amount. The sum of all invoiced shipments for this opportunity.
Note: Shipment and invoice amounts do not include any miscellaneous charge amounts added to the shipment or invoice.
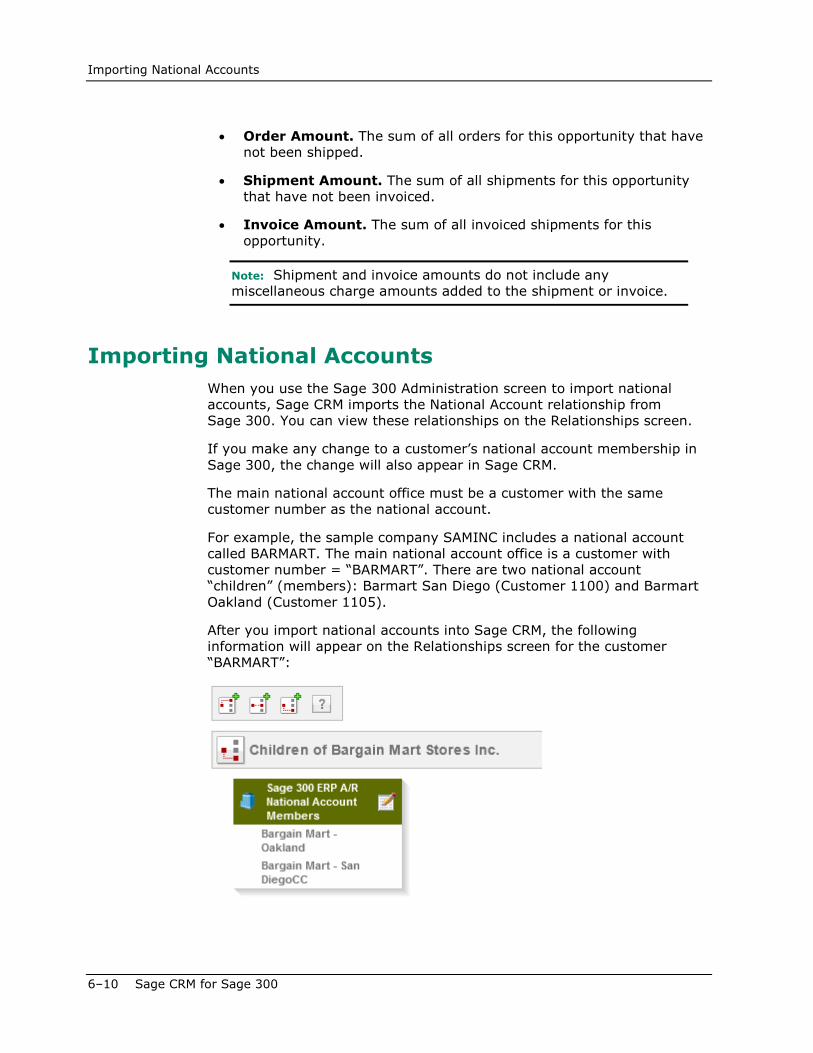
Importing National Accounts When you use the Sage 300 Administration screen to import national accounts, Sage CRM imports the National Account relationship from Sage 300. You can view these relationships on the Relationships screen.
If you make any change to a customer’s national account membership in Sage 300, the change will also appear in Sage CRM.
The main national account office must be a customer with the same customer number as the national account.
For example, the sample company SAMINC includes a national account called BARMART. The main national account office is a customer with customer number = “BARMART”. There are two national account “children” (members): Barmart San Diego (Customer 1100) and Barmart Oakland (Customer 1105).
After you import national accounts into Sage CRM, the following information will appear on the Relationships screen for the customer “BARMART”:
Changing Customer and Vendor Numbers
Integration Guide 6–11
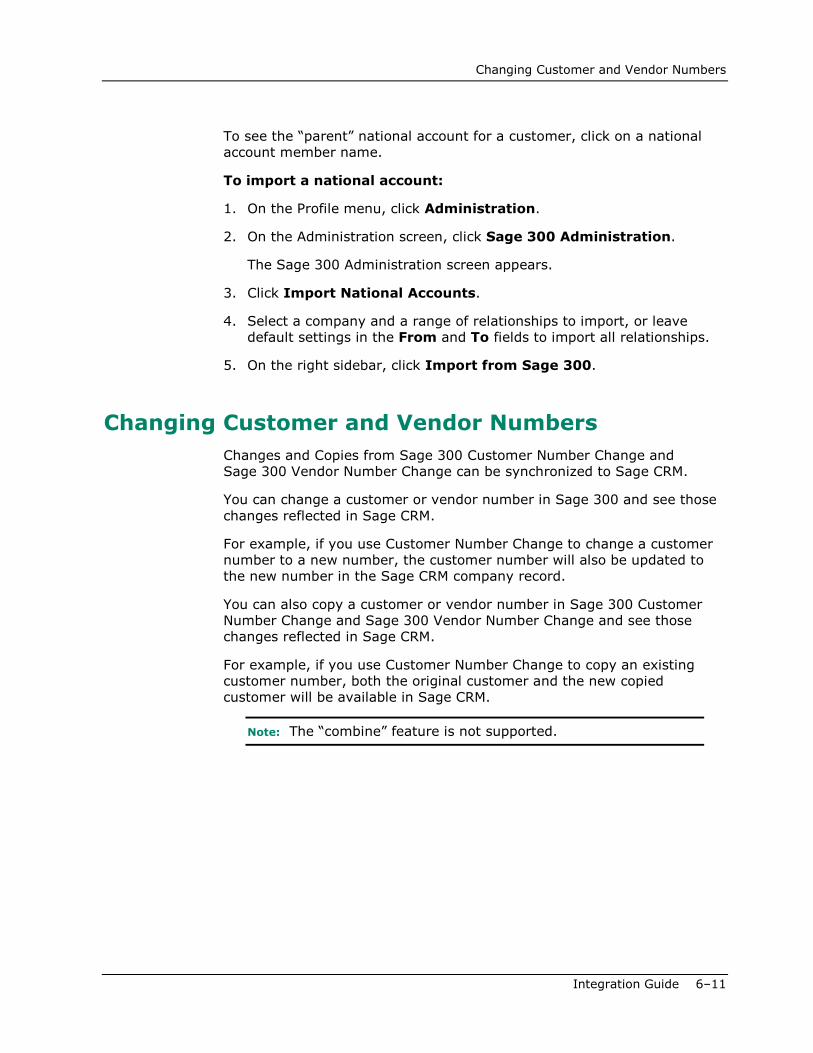
To see the “parent” national account for a customer, click on a national account member name.
To import a national account:
1. On the Profile menu, click Administration.
2. On the Administration screen, click Sage 300 Administration.
The Sage 300 Administration screen appears.
3. Click Import National Accounts.
4. Select a company and a range of relationships to import, or leave default settings in the From and To fields to import all relationships.
5. On the right sidebar, click Import from Sage 300.
Changing Customer and Vendor Numbers Changes and Copies from Sage 300 Customer Number Change and Sage 300 Vendor Number Change can be synchronized to Sage CRM.
You can change a customer or vendor number in Sage 300 and see those changes reflected in Sage CRM.
For example, if you use Customer Number Change to change a customer number to a new number, the customer number will also be updated to the new number in the Sage CRM company record.
You can also copy a customer or vendor number in Sage 300 Customer Number Change and Sage 300 Vendor Number Change and see those changes reflected in Sage CRM.
For example, if you use Customer Number Change to copy an existing customer number, both the original customer and the new copied customer will be available in Sage CRM.
Note: The “combine” feature is not supported.
Promoting a Customer or Vendor to Sage 300
6–12 Sage CRM for Sage 300
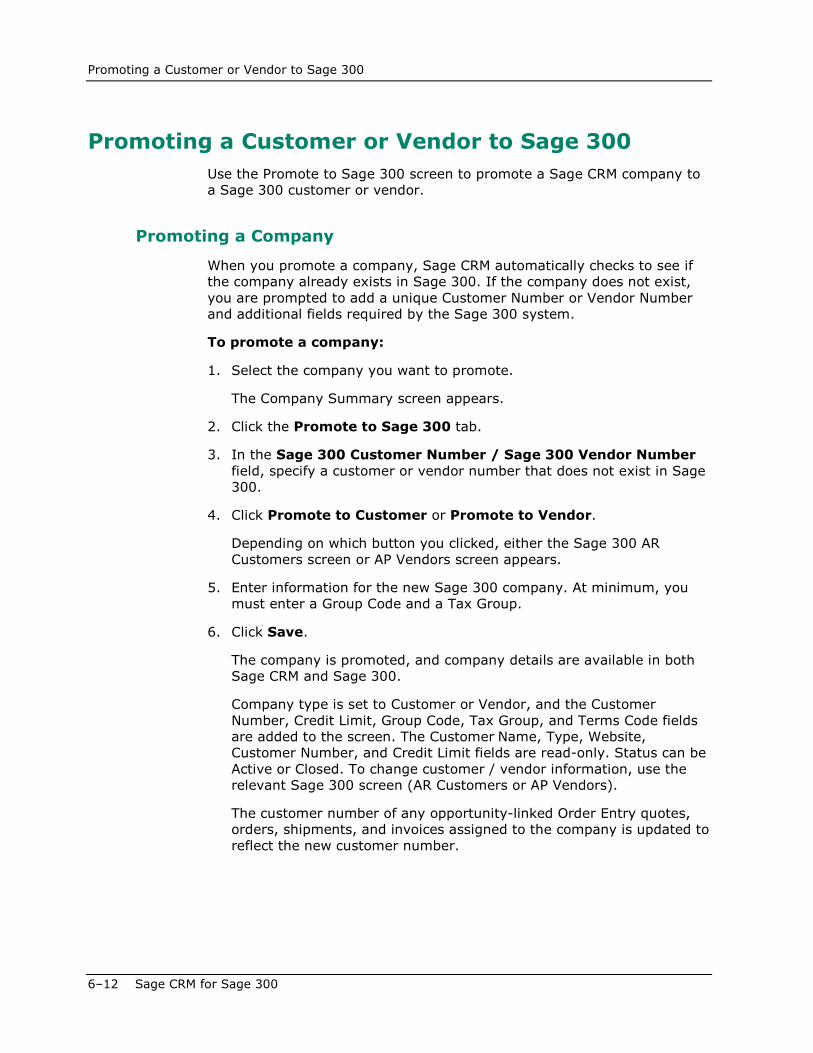
Promoting a Customer or Vendor to Sage 300 Use the Promote to Sage 300 screen to promote a Sage CRM company to a Sage 300 customer or vendor.
Promoting a Company
When you promote a company, Sage CRM automatically checks to see if the company already exists in Sage 300. If the company does not exist, you are prompted to add a unique Customer Number or Vendor Number and additional fields required by the Sage 300 system.
To promote a company:
1. Select the company you want to promote.
The Company Summary screen appears.
2. Click the Promote to Sage 300 tab.
3. In the Sage 300 Customer Number / Sage 300 Vendor Number field, specify a customer or vendor number that does not exist in Sage 300.
4. Click Promote to Customer or Promote to Vendor.
Depending on which button you clicked, either the Sage 300 AR Customers screen or AP Vendors screen appears.
5. Enter information for the new Sage 300 company. At minimum, you must enter a Group Code and a Tax Group.
6. Click Save.
The company is promoted, and company details are available in both Sage CRM and Sage 300.
Company type is set to Customer or Vendor, and the Customer Number, Credit Limit, Group Code, Tax Group, and Terms Code fields are added to the screen. The Customer Name, Type, Website, Customer Number, and Credit Limit fields are read-only. Status can be Active or Closed. To change customer / vendor information, use the relevant Sage 300 screen (AR Customers or AP Vendors).
The customer number of any opportunity-linked Order Entry quotes, orders, shipments, and invoices assigned to the company is updated to reflect the new customer number.

Looking Up Inventory Items
Integration Guide 6–13
Changing a Customer or Vendor Link
If you have used the Import Customers or Import Vendors feature on the Sage 300 Administration screen to import an existing customer or vendor into Sage CRM from Sage 300, the Sage 300 Customer/Vendor Integration tab appears on the Promote to Sage 300 screen:
• To change the customer / vendor number, use the Sage 300 Customer Number Change or Vendor Number Change program.
• To remove the link between a CRM company and a Sage 300 customer / vendor, click Unlink this Customer/Vendor. The company will still exist in both Sage CRM and Sage 300, but if you make a change to the company in one system, the change will not be reflected in the other system.
Looking Up Inventory Items You can look up Sage 300 inventory items from the Company Summary screen in Sage CRM. This enables you to quickly look up an item, review available quantities, and create a new quote or order for an item.
The Item Inventory button appears on the Company Summary screen if both of the following conditions are met:
• The company you are viewing is a Sage 300 customer. (The button does not appear when viewing other company types such as vendors, or when viewing non-integrated companies.)
• Opportunity O/E Inquiry access permission is selected for the user and/or database. (For information about security, see “Setting Up Sage 300 Security” in Chapter 5.)
Before you can create a new quote or new order for an item from the Sage CRM Item Inventory screen, default values must be specified in Sage 300 for the following O/E Order Entry fields:
• Price List. Price list is defaulted by the following selections, listed in order of precedence from lowest to highest:
− O/E Options (price list associated with the selected Default Template Code)
− I/C Items (Default Price List)
− A/R Customers (Customer Price List)
− A/R Ship-To Locations (Customer Price List for the customer's primary ship-to location)
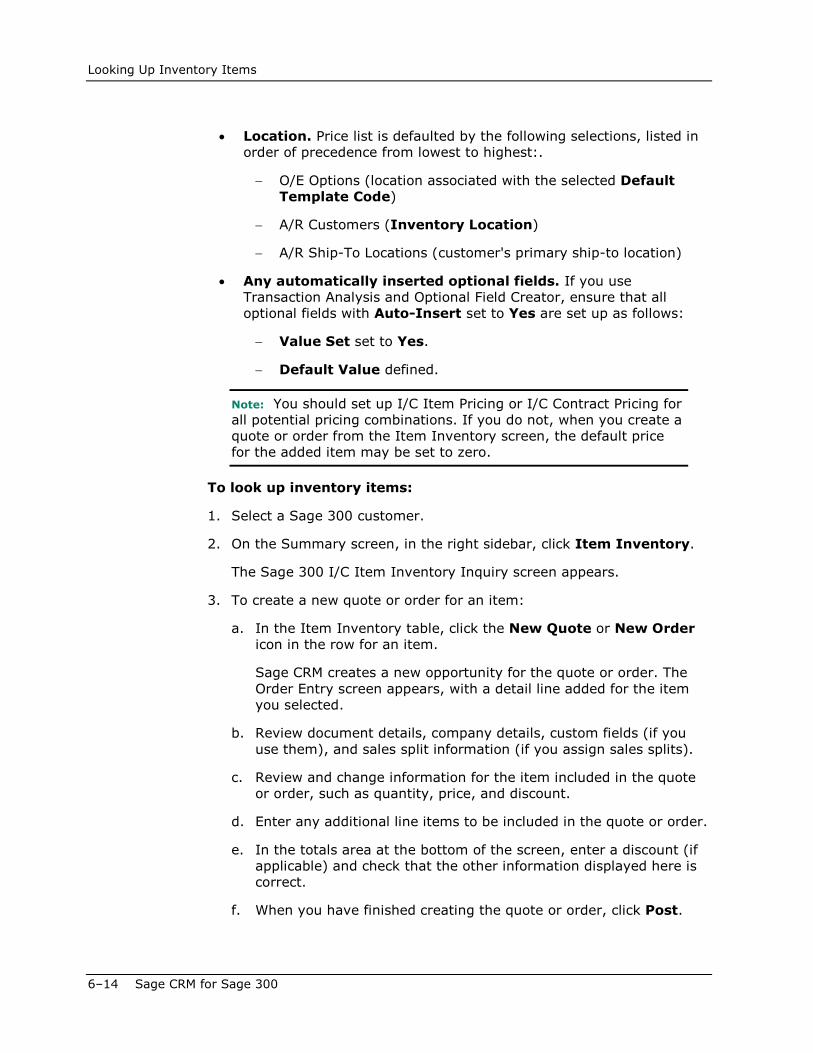
Looking Up Inventory Items
6–14 Sage CRM for Sage 300
• Location. Price list is defaulted by the following selections, listed in order of precedence from lowest to highest:.
− O/E Options (location associated with the selected Default Template Code)
− A/R Customers (Inventory Location)
− A/R Ship-To Locations (customer's primary ship-to location)
• Any automatically inserted optional fields. If you use Transaction Analysis and Optional Field Creator, ensure that all optional fields with Auto-Insert set to Yes are set up as follows:
− Value Set set to Yes.
− Default Value defined.
Note: You should set up I/C Item Pricing or I/C Contract Pricing for all potential pricing combinations. If you do not, when you create a quote or order from the Item Inventory screen, the default price for the added item may be set to zero.
To look up inventory items:
1. Select a Sage 300 customer.
2. On the Summary screen, in the right sidebar, click Item Inventory.
The Sage 300 I/C Item Inventory Inquiry screen appears.
3. To create a new quote or order for an item:
a. In the Item Inventory table, click the New Quote or New Order icon in the row for an item.
Sage CRM creates a new opportunity for the quote or order. The Order Entry screen appears, with a detail line added for the item you selected.
b. Review document details, company details, custom fields (if you use them), and sales split information (if you assign sales splits).
c. Review and change information for the item included in the quote or order, such as quantity, price, and discount.
d. Enter any additional line items to be included in the quote or order.
e. In the totals area at the bottom of the screen, enter a discount (if applicable) and check that the other information displayed here is correct.
f. When you have finished creating the quote or order, click Post.
Creating and Working with O/E Quotes and Orders
Integration Guide 6–15
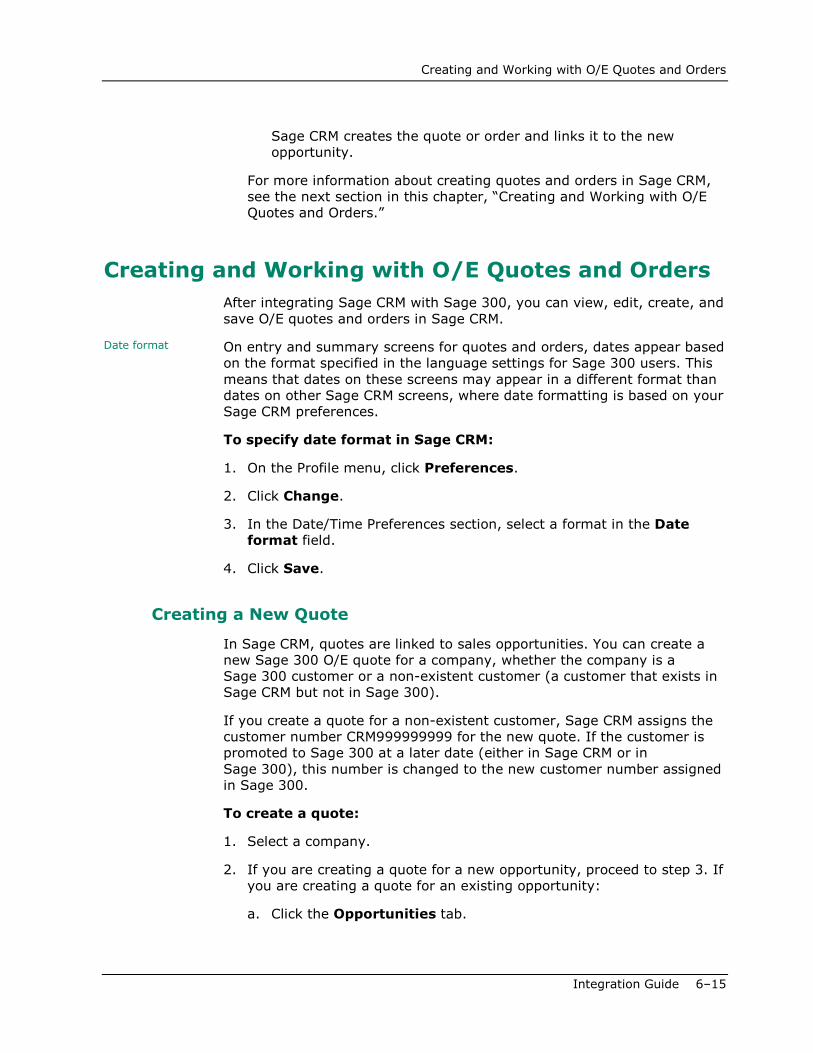
Sage CRM creates the quote or order and links it to the new opportunity.
For more information about creating quotes and orders in Sage CRM, see the next section in this chapter, “Creating and Working with O/E Quotes and Orders.”
Creating and Working with O/E Quotes and Orders After integrating Sage CRM with Sage 300, you can view, edit, create, and save O/E quotes and orders in Sage CRM.
Date format On entry and summary screens for quotes and orders, dates appear based on the format specified in the language settings for Sage 300 users. This means that dates on these screens may appear in a different format than dates on other Sage CRM screens, where date formatting is based on your Sage CRM preferences.
To specify date format in Sage CRM:
1. On the Profile menu, click Preferences.
2. Click Change.
3. In the Date/Time Preferences section, select a format in the Date format field.
4. Click Save.
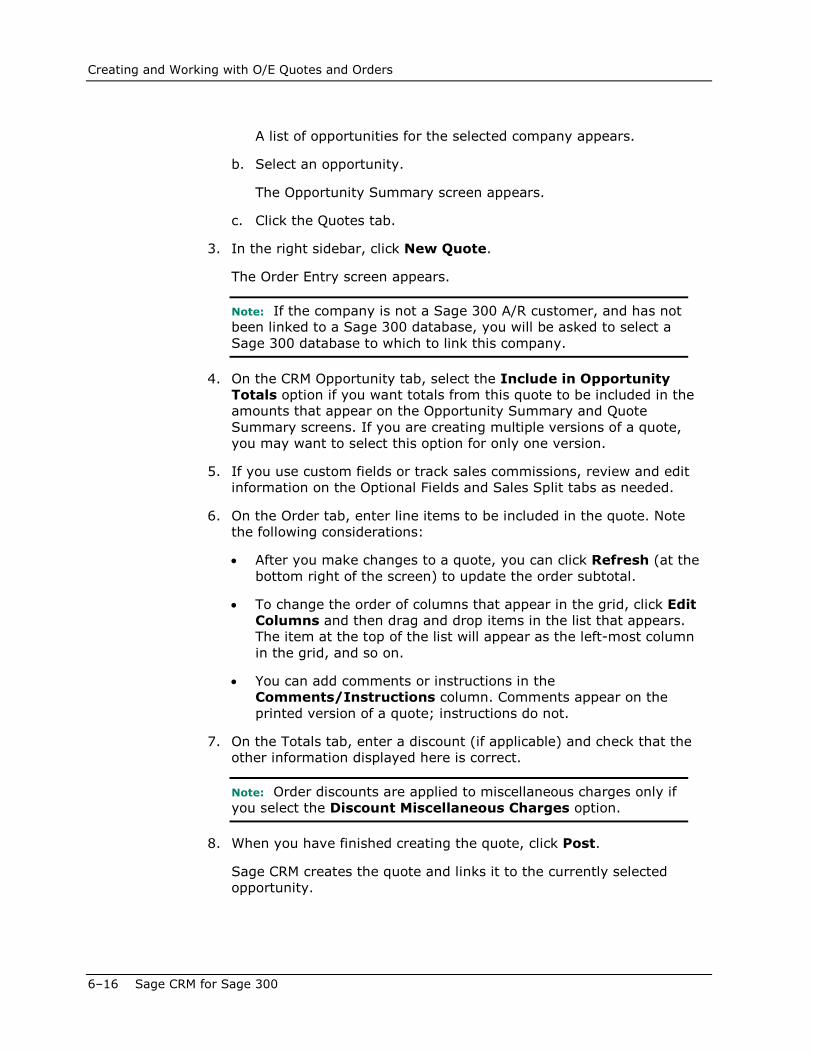
Creating a New Quote
In Sage CRM, quotes are linked to sales opportunities. You can create a new Sage 300 O/E quote for a company, whether the company is a Sage 300 customer or a non-existent customer (a customer that exists in Sage CRM but not in Sage 300).
If you create a quote for a non-existent customer, Sage CRM assigns the customer number CRM999999999 for the new quote. If the customer is promoted to Sage 300 at a later date (either in Sage CRM or in Sage 300), this number is changed to the new customer number assigned in Sage 300.
To create a quote:
1. Select a company.
2. If you are creating a quote for a new opportunity, proceed to step 3. If you are creating a quote for an existing opportunity:
a. Click the Opportunities tab.
Creating and Working with O/E Quotes and Orders
6–16 Sage CRM for Sage 300
A list of opportunities for the selected company appears.
b. Select an opportunity.
The Opportunity Summary screen appears.
c. Click the Quotes tab.
3. In the right sidebar, click New Quote.
The Order Entry screen appears.
Note: If the company is not a Sage 300 A/R customer, and has not been linked to a Sage 300 database, you will be asked to select a Sage 300 database to which to link this company.
4. On the CRM Opportunity tab, select the Include in Opportunity Totals option if you want totals from this quote to be included in the amounts that appear on the Opportunity Summary and Quote Summary screens. If you are creating multiple versions of a quote, you may want to select this option for only one version.
5. If you use custom fields or track sales commissions, review and edit information on the Optional Fields and Sales Split tabs as needed.
6. On the Order tab, enter line items to be included in the quote. Note the following considerations:
• After you make changes to a quote, you can click Refresh (at the bottom right of the screen) to update the order subtotal.
• To change the order of columns that appear in the grid, click Edit Columns and then drag and drop items in the list that appears. The item at the top of the list will appear as the left-most column in the grid, and so on.
• You can add comments or instructions in the Comments/Instructions column. Comments appear on the printed version of a quote; instructions do not.
7. On the Totals tab, enter a discount (if applicable) and check that the other information displayed here is correct.
Note: Order discounts are applied to miscellaneous charges only if you select the Discount Miscellaneous Charges option.
8. When you have finished creating the quote, click Post.
Sage CRM creates the quote and links it to the currently selected opportunity.

Creating and Working with O/E Quotes and Orders
Integration Guide 6–17
Viewing and Editing Existing Quotes
On the Quote Summary screen, you can view information about existing quotes for an opportunity, including associated orders, expiration date, and whether each quote is included in totals for the currently selected opportunity.
You can click the document number for a quote to view additional details, and if the opportunity has not been completed or expired, you can edit quote details.
To view and edit a quote:
1. Select an opportunity.
2. Click the Quotes tab.
The Quote Summary screen appears.
3. In the Document Number column, click a link.
The selected quote opens in the Order Entry screen, where you can edit it.
Note: After you make changes to a quote, you can click Refresh (at the bottom right of the screen) to update the order subtotal.
4. When you have finished editing, click Post to save your changes.
Promoting Quotes to an Order
In Sage CRM, you can create a new Sage 300 O/E order by selecting one or more quotes you have created for an opportunity, and then promoting those quotes to a new order.
If you create a quote or an order for a non-existent customer (a customer that exists in Sage CRM but not in Sage 300), Sage CRM assigns the customer number CRM999999999 to the new order. If the customer is promoted to Sage 300 at a later date, this number is changed to the new customer number assigned in Sage 300.
Note: For information about promoting a Sage CRM customer to Sage 300, see the previous section in this chapter, “Promoting a Customer or Vendor to Sage 300.”
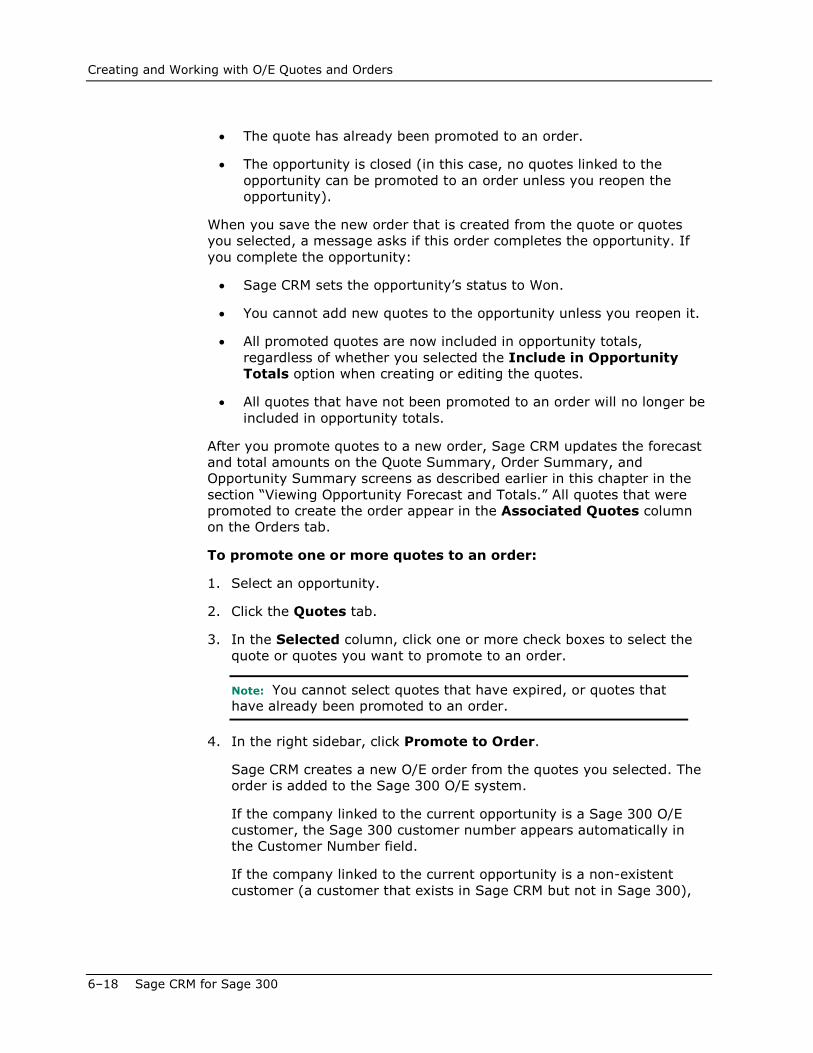
You cannot promote a quote to an order if any of the following conditions apply:
• The quote has expired.
Creating and Working with O/E Quotes and Orders
6–18 Sage CRM for Sage 300
• The quote has already been promoted to an order.
• The opportunity is closed (in this case, no quotes linked to the opportunity can be promoted to an order unless you reopen the opportunity).
When you save the new order that is created from the quote or quotes you selected, a message asks if this order completes the opportunity. If you complete the opportunity:
• Sage CRM sets the opportunity’s status to Won.
• You cannot add new quotes to the opportunity unless you reopen it.
• All promoted quotes are now included in opportunity totals, regardless of whether you selected the Include in Opportunity Totals option when creating or editing the quotes.
• All quotes that have not been promoted to an order will no longer be included in opportunity totals.
After you promote quotes to a new order, Sage CRM updates the forecast and total amounts on the Quote Summary, Order Summary, and Opportunity Summary screens as described earlier in this chapter in the section “Viewing Opportunity Forecast and Totals.” All quotes that were promoted to create the order appear in the Associated Quotes column on the Orders tab.
To promote one or more quotes to an order:
1. Select an opportunity.
2. Click the Quotes tab.
3. In the Selected column, click one or more check boxes to select the quote or quotes you want to promote to an order.
Note: You cannot select quotes that have expired, or quotes that have already been promoted to an order.
4. In the right sidebar, click Promote to Order.
Sage CRM creates a new O/E order from the quotes you selected. The order is added to the Sage 300 O/E system.
If the company linked to the current opportunity is a Sage 300 O/E customer, the Sage 300 customer number appears automatically in the Customer Number field.
If the company linked to the current opportunity is a non-existent customer (a customer that exists in Sage CRM but not in Sage 300),
Creating and Working with O/E Quotes and Orders
Integration Guide 6–19
Sage CRM assigns the customer number CRM999999999 for the new order.
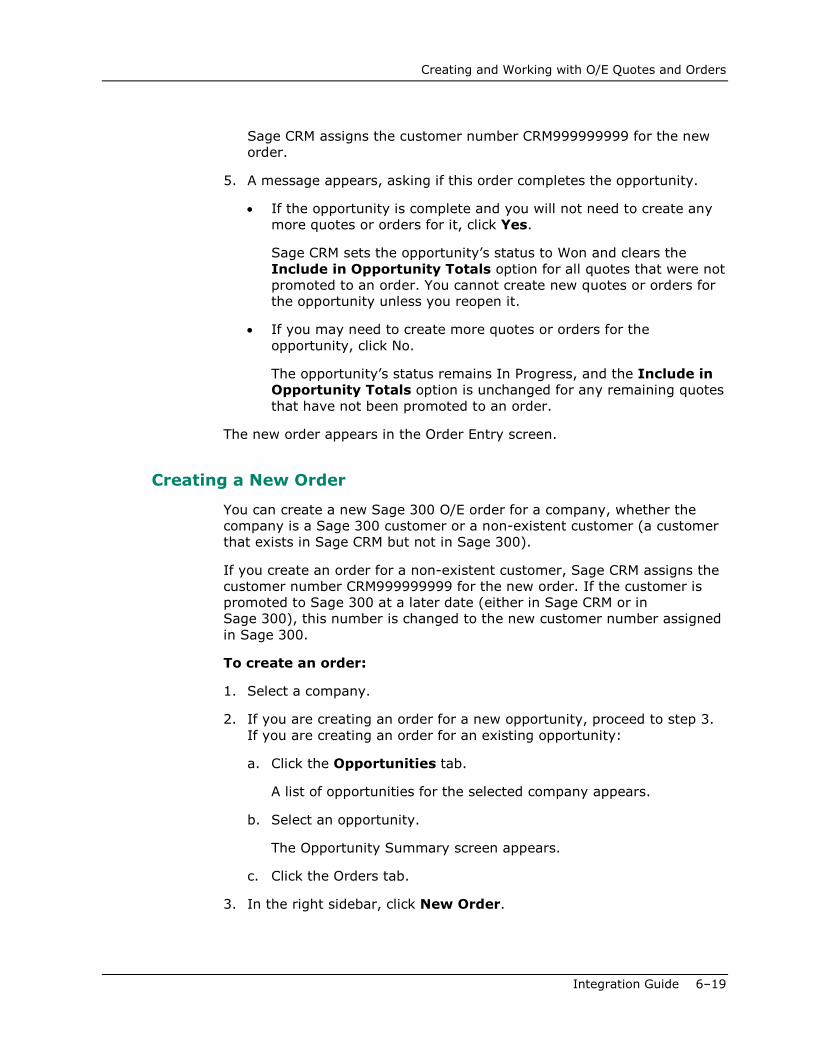
5. A message appears, asking if this order completes the opportunity.
• If the opportunity is complete and you will not need to create any more quotes or orders for it, click Yes.
Sage CRM sets the opportunity’s status to Won and clears the Include in Opportunity Totals option for all quotes that were not promoted to an order. You cannot create new quotes or orders for the opportunity unless you reopen it.
• If you may need to create more quotes or orders for the opportunity, click No.
The opportunity’s status remains In Progress, and the Include in Opportunity Totals option is unchanged for any remaining quotes that have not been promoted to an order.
The new order appears in the Order Entry screen.
Creating a New Order
You can create a new Sage 300 O/E order for a company, whether the company is a Sage 300 customer or a non-existent customer (a customer that exists in Sage CRM but not in Sage 300).
If you create an order for a non-existent customer, Sage CRM assigns the customer number CRM999999999 for the new order. If the customer is promoted to Sage 300 at a later date (either in Sage CRM or in Sage 300), this number is changed to the new customer number assigned in Sage 300.
To create an order:
1. Select a company.
2. If you are creating an order for a new opportunity, proceed to step 3. If you are creating an order for an existing opportunity:
a. Click the Opportunities tab.
A list of opportunities for the selected company appears.
b. Select an opportunity.
The Opportunity Summary screen appears.
c. Click the Orders tab.
3. In the right sidebar, click New Order.
Creating and Working with O/E Quotes and Orders
6–20 Sage CRM for Sage 300
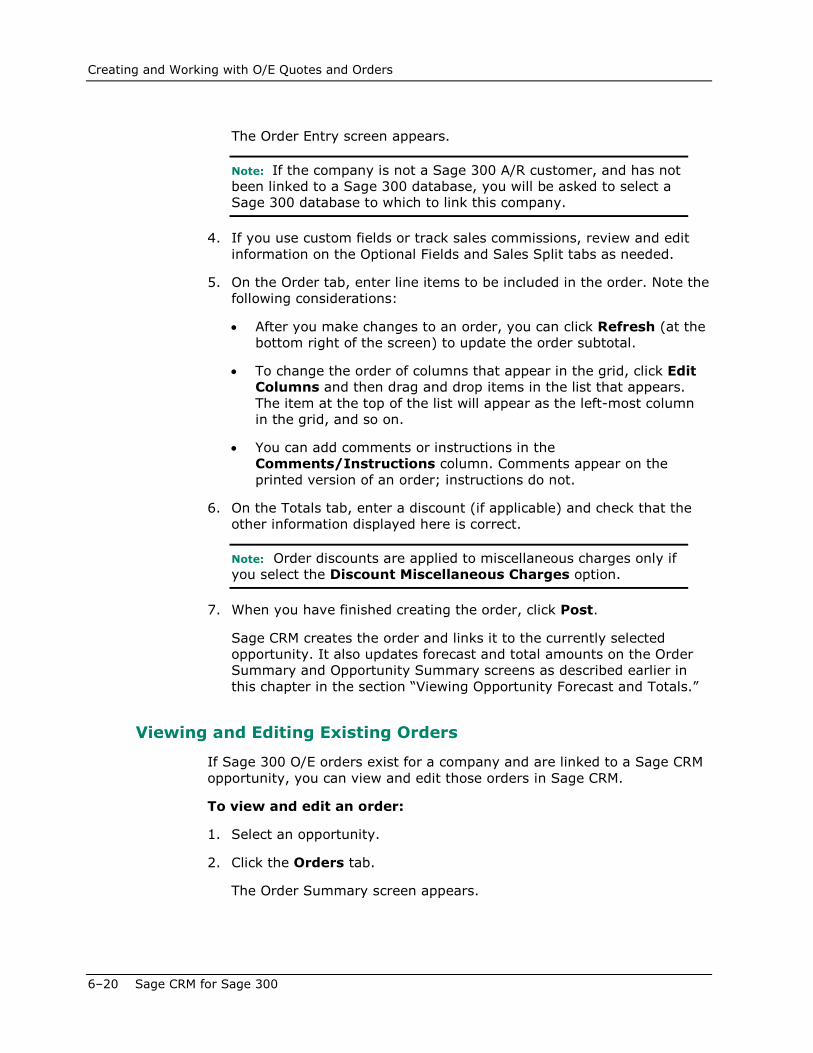
The Order Entry screen appears.
Note: If the company is not a Sage 300 A/R customer, and has not been linked to a Sage 300 database, you will be asked to select a Sage 300 database to which to link this company.
4. If you use custom fields or track sales commissions, review and edit information on the Optional Fields and Sales Split tabs as needed.
5. On the Order tab, enter line items to be included in the order. Note the following considerations:
• After you make changes to an order, you can click Refresh (at the bottom right of the screen) to update the order subtotal.
• To change the order of columns that appear in the grid, click Edit Columns and then drag and drop items in the list that appears. The item at the top of the list will appear as the left-most column in the grid, and so on.
• You can add comments or instructions in the Comments/Instructions column. Comments appear on the printed version of an order; instructions do not.
6. On the Totals tab, enter a discount (if applicable) and check that the other information displayed here is correct.
Note: Order discounts are applied to miscellaneous charges only if you select the Discount Miscellaneous Charges option.
7. When you have finished creating the order, click Post.
Sage CRM creates the order and links it to the currently selected opportunity. It also updates forecast and total amounts on the Order Summary and Opportunity Summary screens as described earlier in this chapter in the section “Viewing Opportunity Forecast and Totals.”
Viewing and Editing Existing Orders
If Sage 300 O/E orders exist for a company and are linked to a Sage CRM opportunity, you can view and edit those orders in Sage CRM.
To view and edit an order:
1. Select an opportunity.
2. Click the Orders tab.
The Order Summary screen appears.
Using Sage 300 Inquiry
Integration Guide 6–21
3. Click the linked number in the Document Number column.
The order appears in the Order Entry screen.
4. Edit the order as needed, and when finished, click Post.
Sage CRM and Sage 300 are updated with the new information for the order.
About Sales Splits
On the Order Entry screen, the Sales Split tab lets you calculate sales commissions by allocating transaction totals to up to five salespersons.
You can assign portions of each transaction to the salesperson/s responsible for the customer account or sale. If you track commissions for sales staff, Sage 300 Order Entry uses this information to update commission data when you post invoices and run Day End Processing.
When you enter a transaction, the salespersons assigned to the customer account in Sage 300 Accounts Receivable appear on the Sales Split tab by default. If you select a ship-to location, the salespersons associated with that ship-to location are used instead.
Note: You assign default salespersons to customer records and to ship-to locations in Accounts Receivable.
The salesperson listed on the first line in the table is the primary salesperson for the transaction. If you specify a sales split, you must specify a primary salesperson.
You can assign the transaction to other salespeople by changing the percentage of the transaction total allocated to each salesperson. The amounts in the Percentage column must total 100 (or 0 if you do not assign salespeople to the transaction).
Using Sage 300 Inquiry After integration, Sage 300 Inquiry tabs appear in Sage CRM when you are in the Company context. You can use these tabs to open inquiry screens, where you can review information and perform a wide variety of tasks that use information from the Sage 300 system.
Most inquiry screens have a standard design and display results in a table. If there are many results, they are not all shown in one large table. Instead, they are separated into ‘pages’, each of which shows a certain number of results. You can navigate from page to page using the controls at the bottom left of the table.
Using Sage 300 Inquiry
6–22 Sage CRM for Sage 300
You can refresh the results in the table by clicking the Refresh button at the bottom right of the table.
Also, you can customize the table in a few ways, including filtering the results that are displayed.
To open an inquiry screen:
1. Select a company.
Available Inquiry tabs appear in the list of tabs.
2. Click an Inquiry tab to see a list of available queries.
3. Click a query.
An inquiry screen appears displaying the type of information that the query is designed to find.
To customize the table in an inquiry screen:
• To change the number of rows that are shown per page, click one of the Per Page options (above the table, at the top right).
• To show or hide columns in the table:
a. Click the menu icon in a column header, and then point to Columns.
b. Select or clear columns to show or hide them.
When you select or clear a column, the table is updated immediately.
To filter results:
1. Click the menu icon in a column header, and then point to Filter.
2. Specify filter settings for the column, and then click Filter.
Note: All filters that you define are displayed above the table.
To clear filters for one column:
1. Click the menu icon in the column header, and then point to Filter.
2. Click Clear.
To clear all filters:
• Click Clear All Filters (above the table, at the top right).
Using Sage 300 Inquiry
Integration Guide 6–23
Order Entry (O/E) Inquiry
You can view and modify Order Entry documents within the context of a customer from the O/E Inquiry tab. This tab appears only for companies with a Sage 300 customer number, and includes the following queries:
• All Orders
• All Shipments
• All Invoices
• Credit/Debit Notes
• Pending Shipments
• Sales History
• Customer Price List
• Serial Number Sales History
• Lot Number Sales History
Purchase Orders (P/O) Inquiry
You can view and modify Purchase Order documents within the context of a vendor from the P/O Inquiry tab. This tab appears only for companies with a Sage 300 vendor number, and includes the following queries:
• All Purchase Orders
• New Purchase Orders
• All Receipts
• All Invoices
• Requisitions
• Returns
• Credit/Debit Notes
• Pending Receipts
• Purchase History
• Vendor Contract Costs
• Serial Number Purchase History
• Lot Number Purchase History

Using Sage 300 Inquiry
6–24 Sage CRM for Sage 300
Accounts Receivable (A/R) Inquiry
You can view lists of Accounts Receivable documents from the A/R Inquiry tab. This tab includes the following queries:
• National Account
• Posted Transactions
• Unposted Invoices
• Unposted Receipts
• Unposted Refunds
• Aged Trial Balance
Accounts Payable (A/P) Inquiry
You can view lists of Accounts Payable documents from the A/P Inquiry tab. This tab includes the following queries:
• Posted Transactions
• Unposted Invoices
• Unposted Payments
• Vendor Activity