
SAFETY & OPERATOR’S MANUAL - …€¦ · 2 Genesis Hydraulic Breaker GHB 250-750 2018 Genesis...
38
Hydraulic Breaker (GHB) GHB 250 - GHB 750 SAFETY & OPERATOR’S MANUAL
-
Upload
truonghanh -
Category
Documents
-
view
219 -
download
0
Transcript of SAFETY & OPERATOR’S MANUAL - …€¦ · 2 Genesis Hydraulic Breaker GHB 250-750 2018 Genesis...

Hydraulic Breaker (GHB)GHB 250 - GHB 750
SAFETY & OPERATOR’S MANUAL
© 2018 Genesis Attachments, LLCGenesis Hydraulic Breaker GHB 250-7502
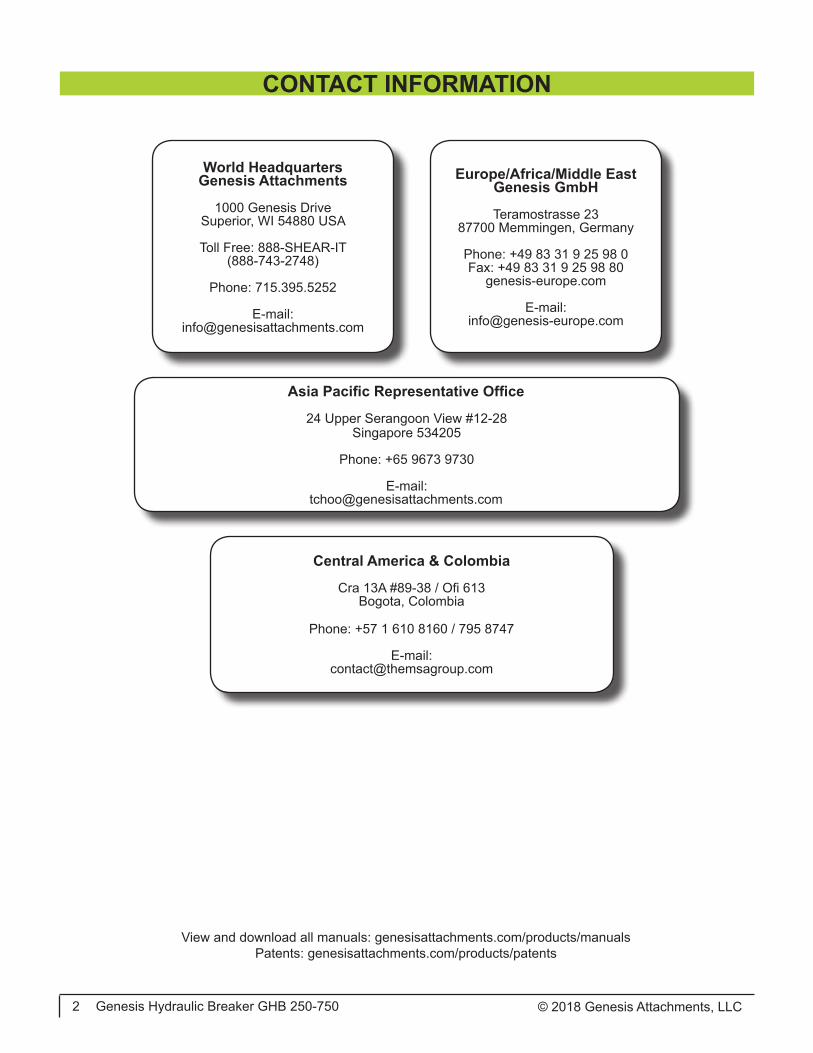
CONTACT INFORMATION
View and download all manuals: genesisattachments.com/products/manualsPatents: genesisattachments.com/products/patents
Asia Pacific Representative Office
24 Upper Serangoon View #12-28 Singapore 534205
Phone: +65 9673 9730
E-mail:[email protected]
Europe/Africa/Middle EastGenesis GmbH
Teramostrasse 2387700 Memmingen, Germany
Phone: +49 83 31 9 25 98 0Fax: +49 83 31 9 25 98 80
genesis-europe.com
E-mail:[email protected]
Central America & Colombia
Cra 13A #89-38 / Ofi 613Bogota, Colombia
Phone: +57 1 610 8160 / 795 8747
E-mail: [email protected]
World HeadquartersGenesis Attachments
1000 Genesis DriveSuperior, WI 54880 USA
Toll Free: 888-SHEAR-IT(888-743-2748)
Phone: 715.395.5252
E-mail:[email protected]

© 2018 Genesis Attachments, LLC Genesis Hydraulic Breaker GHB 250-750 3
PREFACETo ensure years of safe, dependable service, only trained and authorized persons should operate and service your Genesis attachment. It is the responsibility of the product’s owner to ensure the operator is trained in the safe operation of the product and has available this manual for review. It is the responsibility of the operator and maintenance personnel to read, fully understand and follow all operational and safety-related instructions in this manual. The attachment should not be operated until you have read and fully understand these instructions. Always use good safety practices to protect yourself and those around you.
ImportantThis operator’s manual must accompany the attachment at all times and be readily available to the operator.
Manual ReplacementShould this manual become damaged or lost or if additional copies are required, immediately con-tact any authorized Genesis dealer or the Genesis Service Department at 888-743-2748 or 715-395-5252 for a replacement.
Registration FormThe Warranty Registration Form must be filled out by the dealer or customer and returned to Gen-esis indicating the date the attachment went into service.
Possible VariationsGenesis cannot anticipate every possible circumstance that might involve a potential hazard as the owner’s requirements and equipment may vary. Therefore, the warnings in this publication and on the product may not be all-inclusive, and you must satisfy yourself that the procedure, applica-tion, work method or operating technique is safe for you and others before operating.
Public NoticeGenesis reserves the right to make changes and improvements to its products and technical litera-ture at any time without public notice or obligation. Genesis also reserves the right to discontinue manufacturing any product at its discretion at any time.
WarrantyAll work or repairs to be considered for warranty reimbursement must be pre-authorized by the Genesis Service Department. Any alterations, modifications or repairs performed before authoriza-tion by the Genesis Service Department will render all warranty reimbursement consideration null and void without exception. See page 35 for Warranty Claim Procedures.
Improper operation or improperly performed maintenance may render any warranty null and void.

CONTACT INFORMATION 2PREFACE 3
Important 3Manual Replacement 3Registration Form 3Possible Variations 3Public Notice 3Warranty 3
SAFETY STATEMENTS 6GENERAL SAFETY PRECAUTIONS 7
Read Manual Prior to Operation 7Read and Understand All Safety Statements 7Know Your Equipment 7Protect Against Flying Debris 7Lower or Support Raised Equipment 7Do Not Modify Prime Mover or Attachments 8Safely Maintain and Repair Equipment 8Safely Operate Equipment 8
OPERATIONAL SAFETY 9Use Care with Hydraulic Fluid Pressure 9Know Where Utilities Are 10Remove Paint Before Welding or Heating 10End of Life Disposal 10Operating the Attachment 11Transporting the Attachment 12Maintaining the Attachment 12Sound and Vibration 12
DECALS 13Placement and General Information 13
INSTALLATION 14Installing to Prime Mover 14Detaching from Prime Mover 14Tool Style Guide 15Tool Bit Installation/Removal 16
OPERATION 17General Information 17Intended Use 17Moving Loads 17Lifting Loads 17Operating with Cylinders at End Positions 18Prying Loads 18Slant Hammering 18Continuous Hammering 18Underwater Use 18Storage 19Removal from Storage 19
© 2018 Genesis Attachments, LLCGenesis Hydraulic Breaker GHB 250-7504
TABLE OF CONTENTS
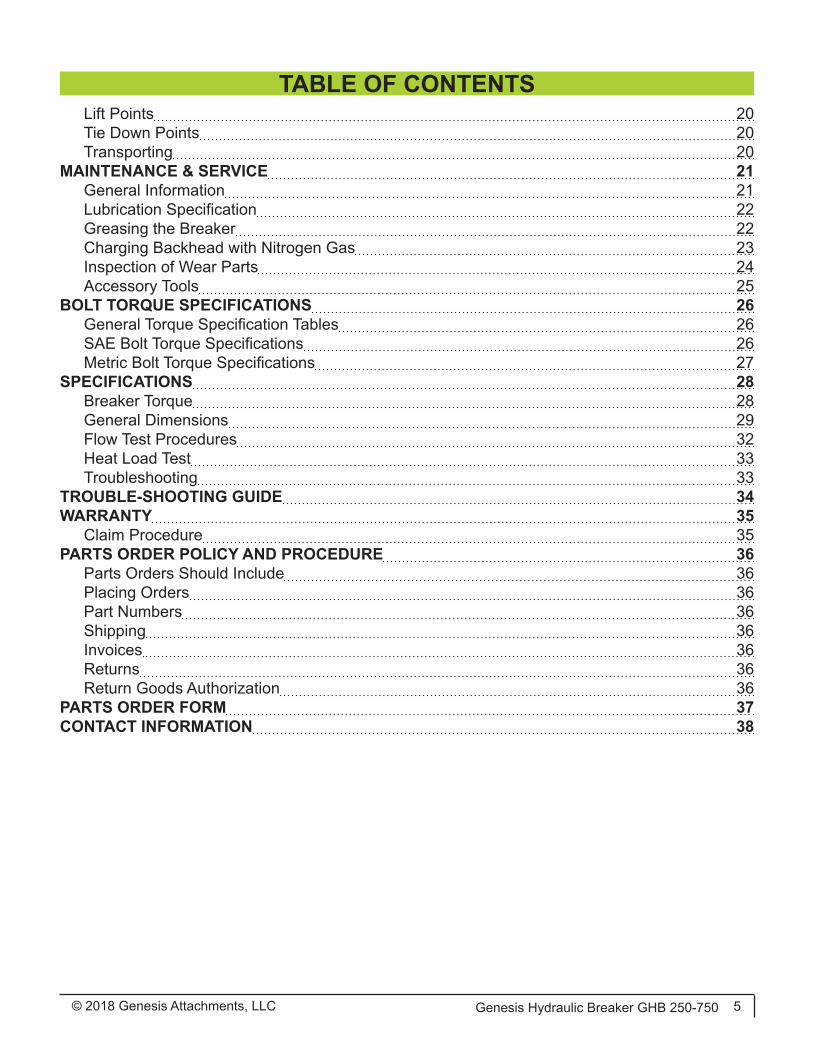
Lift Points 20Tie Down Points 20Transporting 20
MAINTENANCE & SERVICE 21General Information 21Lubrication Specification 22Greasing the Breaker 22Charging Backhead with Nitrogen Gas 23Inspection of Wear Parts 24Accessory Tools 25
BOLT TORQUE SPECIFICATIONS 26General Torque Specification Tables 26SAE Bolt Torque Specifications 26Metric Bolt Torque Specifications 27
SPECIFICATIONS 28Breaker Torque 28General Dimensions 29Flow Test Procedures 32Heat Load Test 33Troubleshooting 33
TROUBLE-SHOOTING GUIDE 34WARRANTY 35
Claim Procedure 35PARTS ORDER POLICY AND PROCEDURE 36
Parts Orders Should Include 36Placing Orders 36Part Numbers 36Shipping 36Invoices 36Returns 36Return Goods Authorization 36
PARTS ORDER FORM 37CONTACT INFORMATION 38
© 2018 Genesis Attachments, LLC Genesis Hydraulic Breaker GHB 250-750 5
TABLE OF CONTENTS

© 2018 Genesis Attachments, LLCGenesis Hydraulic Breaker GHB 250-7506
SAFETY STATEMENTSThis symbol by itself or used with a safety signal word throughout this manual is used to call attention to instruc-tions involving your personal safety or the safety of oth-ers. Failure to follow these instructions can result in injury or death.
This statement is used where serious injury or death could result if the instructions are not followed properly.! WARNING
This statement is used where minor or moderate injury could result if the instructions are not followed properly.! CAUTION
This statement is used where property damage could result if the instructions are not followed properly.NOTICE
! DANGER This statement is used where serious injury or death will result if the instructions are not followed properly.

Read Manual Prior to OperationImproper installation, operation, or maintenance of this equipment could result in serious injury or death. Operators and maintenance personnel should read this manual, as well as all manuals related to this equipment and the prime mover thoroughly before beginning installation, operation, or maintenance. FOLLOW ALL SAFETY INSTRUCTIONS IN THIS MANUAL AND THE PRIME MOVER’S MANUAL(S).
Read and Understand All Safety StatementsRead all safety decals and safety statements in all manuals prior to operating or working on this equipment. Know and obey all OSHA regulations, local laws, and other professional guidelines for your operation. Know and follow good work practices when assembling, maintaining, repairing, mounting, removing, or operating this equipment.
Know Your EquipmentKnow your equipment’s capabilities, dimensions, and operations before operating. Visually inspect your equipment before you start, and never operate equipment that is not in proper working order with all safety devices intact. Check all hardware to ensure it is tight. Make certain that all locking pins, latches, and connection devices are properly installed and secured. Remove and replace any damaged, fatigued, or excessively worn parts. Make certain all safety decals are in place and are legible. Keep decals clean, and replace them if they become worn or hard to read.
Protect Against Flying DebrisAlways wear proper safety glasses, goggles, or a face shield when driving pins in or out, or when any operation causes dust, flying debris, or any other hazardous material.
Lower or Support Raised EquipmentDo not work under raised booms without supporting them. Do not use support material made of concrete blocks, logs, buckets, barrels, or any other material that could suddenly collapse or shift positions. Make sure support material is solid, not decayed, warped, twisted, or tapered. Lower booms to ground level or on blocks. Lower booms and attachments to the ground before leaving the cab or operator’s station.
GENERAL SAFETY PRECAUTIONS
! WARNING Serious injury or death could result if warnings or instructions regarding safe operation are not followed properly.
© 2018 Genesis Attachments, LLC Genesis Hydraulic Breaker GHB 250-750 7

Do Not Modify Prime Mover or AttachmentsModifications may weaken the integrity of the attachment and may impair the function, safety, life, and performance of the attachment. When making repairs, use only the manufacturer’s genuine parts, following authorized instructions. Other parts may be substandard in fit and quality. Never modify any ROPS (Roll Over Protective Structure) or FOPS (Falling Object Protective Structure) equipment or device. Any modifications must be authorized in writing by the manufacturer.
Safely Maintain and Repair Equipment• Do not wear loose clothing or any accessories that can catch in moving parts. If you have
long hair, cover or secure it so that it does not become entangled in the equipment.• Work on a level surface in a well-lit area.• Use properly grounded electrical outlets and tools.• Use the correct tools for the job at hand. Make sure they are in good condition for the task
required.• Wear the protective equipment specified by the tool manufacturer.
Safely Operate EquipmentDo not operate equipment until you are completely trained by a qualified operator in how to use the controls, know its capabilities, dimensions, and all safety requirements. See your prime mov-er’s manual for these instructions.
• Keep all step plates, grab bars, pedals, and controls free of dirt, grease, debris, and oil.• Never allow anyone to be around the equipment when it is operating.• Do not allow riders on the attachment or the prime mover.• Do not operate the equipment from anywhere other than the correct operator’s position. • Never leave equipment unattended with the engine running or the attachment in a raised
position.• Do not alter or remove any safety feature from the prime mover or this attachment.• Know your work site safety rules as well as traffic rules and flow. When in doubt on any
safety issue, contact your supervisor or safety coordinator for an explanation.
GENERAL SAFETY PRECAUTIONS
© 2018 Genesis Attachments, LLCGenesis Hydraulic Breaker GHB 250-7508

© 2018 Genesis Attachments, LLC Genesis Hydraulic Breaker GHB 250-750 9
Use Care with Hydraulic Fluid PressureHydraulic fluid under pressure can penetrate the skin and cause serious injury or death.Hydraulic leaks under pressure may not be visible.
3 Keep unprotected body parts, such as face, eyes and arms as far away as possible from a suspected leak. Flesh injected with hydraulic fluid may develop gangrene or other permanent injuries.
3 If injured by injected fluid see a doctor immediately.
3 Wear safety glasses and protective clothing and use a piece of cardboard or wood when searching for hydraulic leaks.
Do Not Use Your Hands!See illustration below.
3 Hydraulic oil becomes hot during operation. Do not let hydraulic oil or com-ponents contact skin, as it could cause severe burns. Allow hydraulic com-ponents to cool before working on them. Use appropriate protective clothing and safety equipment. If burned, seek immediate medical attention.
! WARNING Serious injury or death could result if warnings or instruc-tions regarding hydraulic fluid pressure are not followed properly.
OPERATIONAL SAFETY

Know Where Utilities AreObserve overhead electrical and other utility lines. Be sure equipment will clear them. When dig-ging, call your local utilities for locqtion of buried utility lines, gas, water, and sewer, as well as any other hazard you may encounter.
It is recommended to use dust suppression, dust collection and if necessary personal protective equipment during the operation of any attachment that may cause high levels of dust.
Remove Paint Before Welding or HeatingHazardous fumes/dust can be generated when paint is heated by welding, soldering or using a torch. Do all work outside or in a well ventilated area, and dispose of paint and solvent properly. Remove paint before welding or heating.
When sanding or grinding paint, avoid breathing the dust. Wear an approved respirator. If you use solvent or paint stripper, remove stripper with soap and water before welding. Remove solvent or paint stripper containers and other flammable material from area. Allow fumes to disperse at least 15 minutes before welding or heating.
End of Life DisposalAt the completion of the useful life of the unit, drain all fluids and dismantle by separating the different materials (rubber, steel, plastic, etc.). Follow all federal, state and local regulations for recycling and disposal of the fluid and components.
! DANGERExposure to respirable crystalline silica dust along with other hazardous dusts may cause serious or fatal respira-tory disease.
© 2018 Genesis Attachments, LLCGenesis Hydraulic Breaker GHB 250-75010
OPERATIONAL SAFETY

Operating the Attachment• Block off work area from bystanders, livestock, etc. Flying debris can cause severe injury or
death. The breaker is capable of producing large amounts of flying debris in all directions.• Let others know when and where you will be working. Make sure no one is behind the
equipment or for several hundred feet in any direction around the equipment when in op-eration. Never allow anyone to approach the breaker when in operation.
• Do not operate breaker on a prime mover without top and front guard shields or FOPS (Falling Object Protective Structure) installed.
• Do not exceed rated operating capacity of prime mover. • Operate only from the operator’s station.• When operating on slopes, drive up and down, not across. Avoid steep hillside operation,
which could cause the prime mover to overturn.• Reduce speed when driving over rough terrain, on a slope, or turning, to avoid overturning
the vehicle.• Never lift, move, or swing a load or attachment over anyone.• Do not lift loads in excess of the capacity of the prime mover. Lifting capacity decreases as
the load is moved further away from the unit.• When using breaker with a quick coupler, operator should check total working weight, in-
cluding weight of the coupler. Always make sure coupler is securely locked on attachment before use.
• The attachment should not be used as a parking brake to immobilize your prime mover or used in any way to assist in moving your prime mover. Follow the instructions in your prime mover operator’s manual before leaving the operator’s station.
• An operator must not use drugs or alcohol, which can change his or her alertness or co-ordination. An operator taking prescription or over-the-counter drugs should seek medical advice on whether or not he or she can safely operate equipment.
• Before exiting the prime mover, lower the attachment to the ground, apply the brakes, turn off the prime mover’s engine and remove the key.
OPERATIONAL SAFETY
© 2018 Genesis Attachments, LLC Genesis Hydraulic Breaker GHB 250-750 11
! WARNING Using your Genesis attachment in unauthorized applica-tions may create an unsafe situation and will void the war-ranty.

Transporting the Attachment• Travel only with the attachment in a safe transport position to prevent uncontrolled move-
ment. Drive slowly over rough terrain and slopes.• When transporting on a trailer secure attachment at recommended tie down locations using
tie down accessories that are capable of maintaining attachment stability.• When driving on public roads use safety lights, reflectors, Slow Moving Vehicle signs etc.,
to prevent accidents. Check local government regulations that may affect you.• Do not drive close to ditches, excavations, etc., as a cave-in could result.• Do not smoke when refueling the prime mover. Allow room in the fuel tank for expansion.
Wipe up any spilled fuel. Secure cap tightly when done.
Maintaining the Attachment• Before performing maintenance (unless otherwise specified), lower the attachment to the
ground, apply the brakes, turn off the engine and remove key.• Always choose hard, level ground to park the vehicle on and set the brake so the unit can-
not roll.• Never perform any work on the attachment unless you are authorized and qualified to do
so. Always read the operator service manuals before any repair is made. After completing maintenance or repair, check for correct functioning of the attachment. If not functioning properly, always tag “DO NOT OPERATE” until all problems are corrected.
• Worn, damaged, or illegible safety decals must be replaced. New safety decals can be ordered from your local dealer or the manufacturer.
• Never make hydraulic repairs while the system is under pressure. Serious personal injury or death could result.
• Never work under a raised attachment.• Only minor maintenance, such as cleaning and lubricating, is required to keep the attach-
ment in top working condition.• Unless noted otherwise, right and left sides are determined from the operator’s control posi-
tion when facing forward.• The illustrations and data used in this manual were current at the time of publishing. How-
ever, we reserve the right to redesign and change the attachment as may be necessary without notification.
• Use only manufacturer replacement parts. Substitute parts may not meet the required stan-dards. The parts department will need your product’s model and serial number.
Sound and VibrationSound pressure levels and vibration data for this attachment are influenced by many different pa-rameters; some items are listed below (not inclusive):
• prime mover type, age condition, with or without cab enclosure and configuration• operator training, behavior and stress level• job site organization, working material condition and environment
Based on the uncertainty of the prime mover, operator and job site it is not possible to get precise prime mover and operator sound pressure levels or vibration levels for this attachment.
OPERATIONAL SAFETY
© 2018 Genesis Attachments, LLCGenesis Hydraulic Breaker GHB 250-75012

DECALSPlacement and General InformationThe following diagram(s) show the location of the decals used on your attachment. The decals are identified by their part numbers, with reductions of the actual decals shown on the following pages. Use this information to order replacements for lost or damaged decals. Be sure to read all the decals before operating coupler. They contain information you need to know for both safety and product longevity.
IMPORTANT: Keep all safety decals clean and legible. Replace all missing, illegible or damaged safety decals. When replacing parts with safety decals attached, the safety decals must also be replaced.
REPLACING SAFETY DECALS: Clean the area of application with nonflammable solvent, then wash the same area with soap and water. Allow surface to fully dry. Remove the backing from the safety decal, exposing the adhesive surface. Apply the safety decal to the position shown in the diagram above and smooth out any bubbles.
Logo
Wear PPESerial Tag
Model Number
Nitrogen Gas
Grease Every2 Hours
GHB 250 & GHB 350
Wear PPEModelNumber
Logo
GHB 500
Grease Every 2 Hours
Logo
ModelNumber
GHB 750
© 2018 Genesis Attachments, LLC Genesis Hydraulic Breaker GHB 250-750 13

Genesis hydraulic breakers are designed to be easy to use and maintain. They are operated by the prime mover’s auxiliary hydraulics. Due to the various prime movers that these attachments can be mounted on, all breakers, except the GHB 500 and GHB 750, are shipped without hydrau-lic hoses or couplers. These can be purchased from your local dealer. The hoses must be long enough not to bind or pinch during operation and rated for the maximum hydraulic pressure of your prime mover’s hydraulic system. See Specifications section for hose size requirements.
Installing to Prime Mover1. Remove any attachment from the front of the loader.2. Following all standard safety practices and the instructions for installing an attachment in
your prime mover operator’s manual, install the attachment onto your loader.
3. Lower the unit to the ground and relieve pressure to the auxiliary hydraulic lines.4. Following the safety shut down procedure for your prime mover, shut down and exit the
prime mover.5. After making sure that the hydraulic lines are free from any foreign material or contami-
nants, connect the couplers to the auxiliary hydraulic system of your prime mover.6. Following the standard start up procedure for your prime mover, start the loader and run the
attachment to purge any air from the system. Check for proper hydraulic connection, hose routing and hose length.
7. Attachment installation is complete.
Detaching from Prime Mover1. Before exiting the prime mover, lower attachment to the ground, apply the brakes, turn off
the prime mover’s engine and remove the key.2. Follow prime mover operator’s manuals to relieve pressure in the hydraulic lines.3. Disconnect couplers and connect them together or install dust caps and plugs to prevent
contaminants from entering the hydraulic system. Store hoses on attachment, off the ground.
4. Follow your prime mover operator’s manual for detaching (removing) an attachment.
INSTALLATION
! WARNINGThe prime mover must be equipped with an operator enclosure that will provide a safe operating environment whenever working with material or objects that may intrude into the operator’s station.
! WARNINGTo avoid serious personal injury, make sure the attach-ment is securely latched to the attachment mechanism of your unit. Failure to do so could result in separation of the attachment from the unit.
© 2018 Genesis Attachments, LLCGenesis Hydraulic Breaker GHB 250-75014
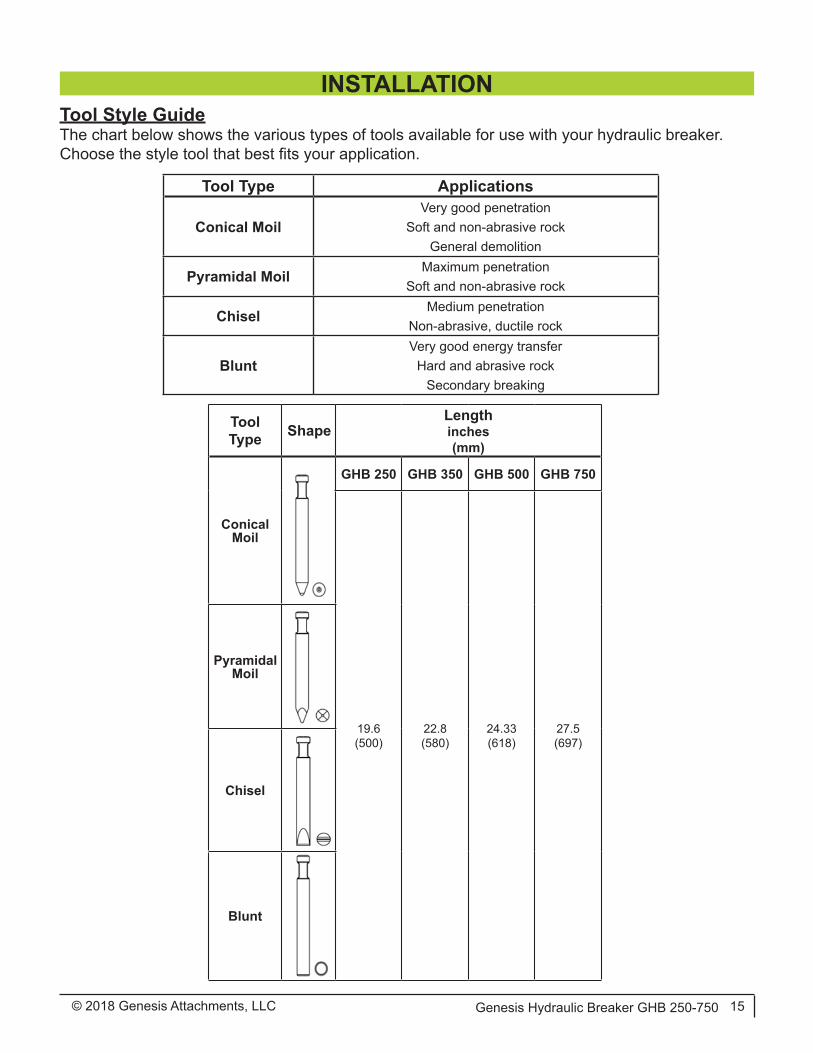
Tool Style GuideThe chart below shows the various types of tools available for use with your hydraulic breaker. Choose the style tool that best fits your application.
Tool Type Applications
Conical MoilVery good penetration
Soft and non-abrasive rockGeneral demolition
Pyramidal Moil Maximum penetrationSoft and non-abrasive rock
Chisel Medium penetrationNon-abrasive, ductile rock
BluntVery good energy transfer
Hard and abrasive rockSecondary breaking
INSTALLATION
ToolType Shape
Lengthinches(mm)
ConicalMoil
GHB 250 GHB 350 GHB 500 GHB 750
19.6(500)
22.8(580)
24.33 (618)
27.5(697)
PyramidalMoil
Chisel
Blunt
© 2018 Genesis Attachments, LLC Genesis Hydraulic Breaker GHB 250-750 15

ToolType Shape
Weightlbs(kg)
ConicalMoil
GHB 250 GHB 350 GHB 500 GHB 750
9.7(4.4)
20.9(9.5)
34(15.4)
38.75(17.6)
PyramidalMoil
9.7(4.4)
21.1(9.6)
33.75(15.3)
37.5(17)
Chisel 9.9(4.5)
21.6(9.8)
35.25(16)
38.5(17.5)
Blunt 10.3(4.7)
22.9(10.4)
37.5(17)
41.25(18.7)
Tool Bit Installation/Removal• Lower breaker to the ground and place on wood
blocks, making sure it is on a level surface.• Insert a 10mm bar in direction of arrow and strike
with hammer to remove the spring pin (1).• With spring pin removed, remove the tool pin (2).• Insert tool bit (3) and reinstall tool pin and spring
pin.• Grease tool before use. Reference Maintenance
and Service section for lubrication specifications.
INSTALLATION
(1)
(2)
(3)
© 2018 Genesis Attachments, LLCGenesis Hydraulic Breaker GHB 250-75016

General InformationThe hydraulic breaker attaches to the attachment mounting mechanism of your prime mover. Due to this arrangement, thorough knowledge of your prime mover is necessary for machine operation. Read and understand your prime mover’s operator’s manual before attempting to use the breaker.
Before operating the breaker, check the Specifications section of this manual for correct size of prime mover, hydraulic flow and pressure requirements. Check that the relief pressure setting is within range given per specification for your breaker model. If the relief pressure is not correct, adjust the relief valve accordingly.
Also check that oil flow, at the specified operating pressure, is within range given per specification for your breaker model. If the prime mover has an oil flow control valve, adjust the control valve accordingly so the oil flow is withing the specified range.
NOTE: Always install flow meter between breaker inlet and outlet hoses when setting hydraulic flow and pressure. Do not rely on prime mover gauges.
If breaker is used with prime mover exceeding the specifications in this manual, the tool warranty is void.
The breaker has been properly charged with nitrogen at the factory and is ready for use.
Intended UseThe Genesis hydraulic breaker is designed as a demolition tool for breaking up hard materials such as rock or concrete. Use in any other way is considered contrary to the intended use.
Some examples of misuse include, but are not limited to, the following:
Moving LoadsDo not move objects with the breaker. Moving objects with any part of the breaker may cause equipment dam-age.
Lifting LoadsDo not lift loads with the breaker. Lifted loads may fall causing serious in-jury or death.
OPERATION
© 2018 Genesis Attachments, LLC Genesis Hydraulic Breaker GHB 250-750 17

Operating with Cylinders at End PositionsDo not operate breaker with prime mover arm and bucket cyl-inders in the fully extended or fully retracted position. Doing so may cause damage to the cylinders.
Prying LoadsDo not use demolition tool as a pry bar. Doing so may cause premature wear of the tool bushings and possible failure of the breaker.
Slant HammeringAlways keep breaker at a 90 degree angle to the material while in use. Slant hammering will add stress and bending force to the demolition tool and tool bushings, which may cause premature wear and possible failure of the breaker.
Continuous HammeringDo not keep breaker on same spot for more than 15 seconds while in use. Doing so will cause the demolition tool to become hot, causing it to soften which may cause the end to mushroom.
Underwater UseDo not operate breaker under water without supplied air pres-sure setting. Doing so will cause damage to the breaker. Before using breaker under water, contact dealer for instructions.
15s
90°
OPERATION
© 2018 Genesis Attachments, LLCGenesis Hydraulic Breaker GHB 250-75018

Storage• Remove breaker from prime mover.• Clean the unit thoroughly, removing all mud, dirt, and grease.• Inspect for visible signs of wear, breakage, or damage. Order any parts required and make
the necessary repairs to avoid delays upon removal from storage.• Tighten loose nuts, capscrews and hydraulic connections.• Seal hydraulic system from contaminants and secure all hydraulic hoses off the ground to
help prevent damage.• Remove the tool and apply grease to piston bottom, tool bushing, tool pin and inside of
front head. After sufficient greasing, reinstall the tool and cover with a waterproof tarp. • Store unit in a dry and protected place. Leaving the unit outside will materially shorten its
life.Additional Precautions for Long Term Storage (longer than one month):
• Store the breaker in a storage stand.• Relieve gas pressure from back head.• Push piston up into cylinder.• Seal the high pressure supply port with plug.• Touch up all unpainted surfaces with paint to prevent rust.
Removal from Storage• Remove cover.• Wash unit and replace any damage and/or missing parts.• Lubricate grease fittings.• Check hydraulic hoses for damage and replace as necessary.
OPERATION
© 2018 Genesis Attachments, LLC Genesis Hydraulic Breaker GHB 250-750 19

Lift PointsLifting points are identified by lifting decals where required. Lifting at other points is unsafe and can damage attachment. Do not attach lifting accessories around cylinders or in any way that may damage hoses or hydraulic components.
• Attach lifting accessories to unit at any recommended lifting points.• Bring lifting accessories together to a central lifting point.• Lift gradually, maintaining the equilibrium of the unit.
Tie Down PointsTie down points are identified by tie down decals where required. Securing to trailer at other points is unsafe and can damage attachment. Do not attach tie down accessories around cylinders or in any way that may damage hoses or hydraulic components.
• Attach tie down accessories to unit at any recommended tie down points.• Check unit stability before transporting.
TransportingFollow all local government regulations that may apply along with recommended tie.down points and any equipment safety precautions at the front of this manual when transporting your attach-ment.
OPERATION
! WARNINGUse lifting accessories (chains, slings, ropes, shackles and etc.) that are capable of supporting the size and weight of your attachment. Secure all lifting accessories in such a way to prevent unintended disengagement. Failure to do so could result in the attachment falling and causing serious personal injury or death.
! WARNINGVerify that all tie down accessories (chains, slings, ropes, shackles and etc.) are capable of maintaining attachment stability during transporting and are attached in such a way to prevent unintended disengagement or shifting of the unit. Failure to do so could result in serious personal injury or death.
© 2018 Genesis Attachments, LLCGenesis Hydraulic Breaker GHB 250-75020
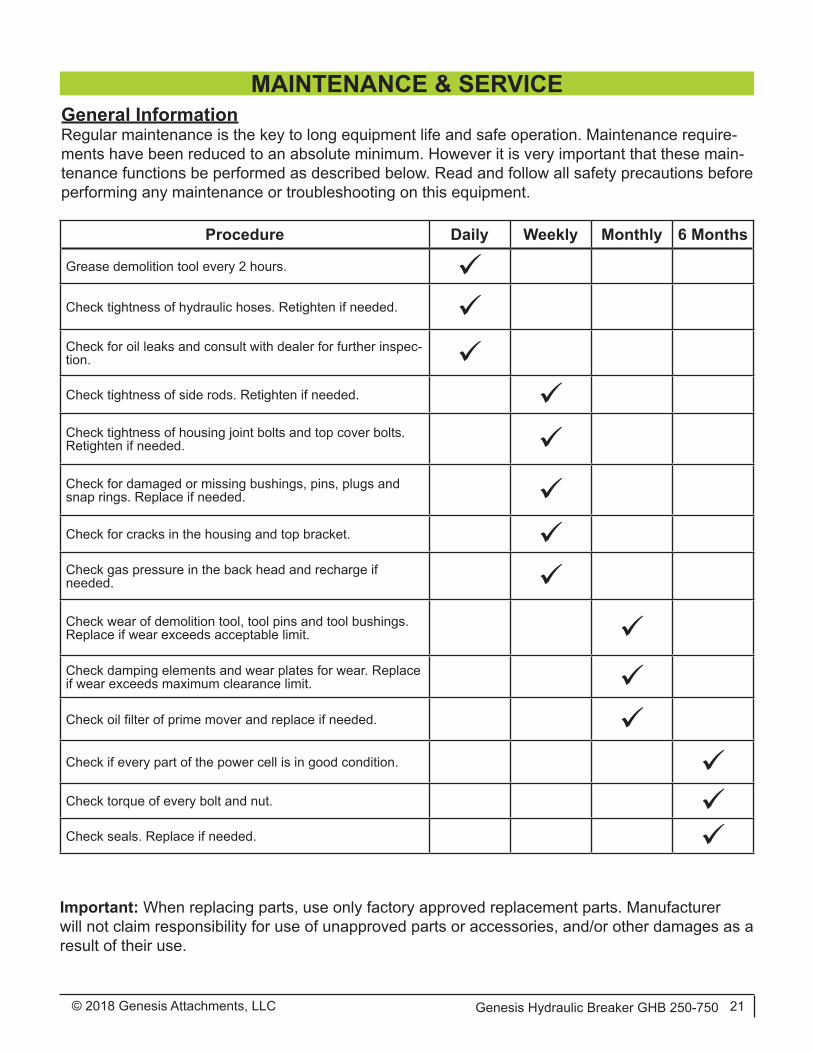
MAINTENANCE & SERVICEGeneral InformationRegular maintenance is the key to long equipment life and safe operation. Maintenance require-ments have been reduced to an absolute minimum. However it is very important that these main-tenance functions be performed as described below. Read and follow all safety precautions before performing any maintenance or troubleshooting on this equipment.
Procedure Daily Weekly Monthly 6 Months
Grease demolition tool every 2 hours. Check tightness of hydraulic hoses. Retighten if needed. Check for oil leaks and consult with dealer for further inspec-tion. Check tightness of side rods. Retighten if needed. Check tightness of housing joint bolts and top cover bolts. Retighten if needed. Check for damaged or missing bushings, pins, plugs and snap rings. Replace if needed. Check for cracks in the housing and top bracket. Check gas pressure in the back head and recharge if needed. Check wear of demolition tool, tool pins and tool bushings. Replace if wear exceeds acceptable limit. Check damping elements and wear plates for wear. Replace if wear exceeds maximum clearance limit. Check oil filter of prime mover and replace if needed. Check if every part of the power cell is in good condition. Check torque of every bolt and nut. Check seals. Replace if needed.
Important: When replacing parts, use only factory approved replacement parts. Manufacturerwill not claim responsibility for use of unapproved parts or accessories, and/or other damages as a result of their use.
© 2018 Genesis Attachments, LLC Genesis Hydraulic Breaker GHB 250-750 21

Lubrication SpecificationAn NLGI Grade 2 lithium grease with molybdenum disulfide additives and high dropping point (260° C, 500° F) is recommended. Temperature range of -30° C~230° C (-20° F~450° F) is desir-able.
Greasing the BreakerTo keep the attachment in proper working condition, it must be greased on a daily basis. Grease points on the attachment are as shown. If any grease fitting(s) are missing or damaged, replace and grease. Metal to metal contact causing pick up may cause deep damage marks, which could lead to the formation of fatigue cracks and eventual failure of the demolition tool.
The demolition tool should be greased every two hours. Make sure the tool shank is well lubri-cated (5-10 strokes from grease gun to both upper and lower tool bushings should be enough). Do not over grease.
Notice: Make sure the demolition tool is firmly pressed into the front head while greasing. Not do-ing so may allow grease to fill space between piston and demolition tool, which could cause dam-age to seals at the lower cylinder, due to its pressurization, and also contaminate the hydraulic oil.
MAINTENANCE & SERVICE
GHB 250, GHB 350 & GHB 750
Grease Fitting(Manual Injection)
Grease Fitting(Manual Injection)
GHB 500
© 2018 Genesis Attachments, LLCGenesis Hydraulic Breaker GHB 250-75022

Charging Backhead with Nitrogen Gas1. Install pressure gauge onto charging block.2. Turn handle of charging block clockwise to close the
exhaust valve.3. Connect one end of hose to the nitrogen gas tank.4. Connect the other end of the hose to the charging
block.5. Remove the plug from the charging valve on the
power cell.6. Install the charging block to the charging valve of
the back head. Make sure an O-ring is installed on the charging block.
7. Slowly turn handle of the nitrogen gas tank counter-clockwise to charge the back head. Make sure the exhaust valve of the charging block is fully closed.
8. Shut off the nitrogen gas tank by turning the handle clockwise. Press the switch of the charging block to check the gas pressure inside the back head (the gas pressure shown while pressing the switch is the actual pressure level inside the back head).
9. After checking gas pressure in step 8 (should be 5-10 bar (72 - 145 psi) more than specified pressure level), slowly open the exhaust valve while continuing to press the switch to discharge excess gas until the pressure drops to the specified level.
10. When the gas pressure is set to the specified level, release the switch and open the exhaust valve to discharge gas from the gas hose.
11. Remove charging block from the charging valve.12. Check for gas leaks using soap bubbles around the charging valve.13. Install the plug.
MAINTENANCE & SERVICE
Handle
Switch
Exhaust Valve
PressureGauge
Charging Block
Plug
ChargingValve
Nitrogen Gas Tank
! WARNING
Before performing maintenance or service, lower the attachment to the ground, disengage auxiliary hydraulics, turn off the engine, remove the key and apply the brakes.
Never perform any work on this attachment unless you are authorized and qualified to do so. Always read the operator’s manuals before any repair is made. After completing maintenance or service, check for correct functioning of the attachment. If not functioning properly, always tag DO NOT OPERATE until all problems are corrected.
© 2018 Genesis Attachments, LLC Genesis Hydraulic Breaker GHB 250-750 23

A (New)inch(mm)
B (Replace)inch(mm)
GHB 250
GHB 350
GHB 500
GHB 750
GHB 250
GHB 350
GHB 500
GHB 750
13.5 (343)
14.6 (373)
15(381)
16.61(422)
9.0(230)
9.8 (250)
11(281)
12.67(322)
1.5(40)
2.1(55) NA NA 1.6
(42)2.2(57) NA NA
NA NA 2.63(67)
2.67(68) NA NA 2.72
(69)2.76(70)
NA NA 2.63(67)
2.67(68) NA NA 2.72
(69)2.76(70)
0.84(21.5)
0.86(22)
1.40(35.5)
0.78(20)
0.76(19.5)
0.78(20)
1.25(31.5)
0.62(16)
Inspection of Wear PartsReplace the demolition tool, lower and upper bushings and tool pin when the wear condition reaches the maximum specifications shown below.
Demolition Tool
AB
Upper Bushing
AB
MAINTENANCE & SERVICE
AB
Lower Bushing
B
Tool Bushing
A
Tool Pin
BA
© 2018 Genesis Attachments, LLCGenesis Hydraulic Breaker GHB 250-75024

Accessory Tools
Tool DescriptionGHB Model
Notes250 350 500 750
Tool Box (Large Size) 1 1 1 1Wrench, 19mm 1 1 - - Gas Charging (Back Head)Wrench, 22mm 1 1 - - Gas Charging (Back Head)Wrench, 24mm - - 2 - Top Plate Bolt
Wrench, 27mm 2 2 - 2Top Plate Bolt
Housing Joint (GHB 250 & 350)Gas Charging (Back Head) GHB 750
Wrench, 30mm 1 1 - 1In Out Adapter
Side Rod (GHB 250)Housing Joint (GHB 500)
Wrench, 36mm - 1 1 1Side Rod (GHB 350)
In Out Adapter (GHB 500)Housing Joint (Open Housing) GHB 750
- - 1 - Side RodAllen Wrench, 8mm 1 - - 1 Under WaterHammer Wrench, 41mm - - - 1 Side RodT-Wrench, 5mm - - 1 1 Gas Charging (Back Head)Pin Bar, 8mm dia. 1 1 1 - Tool Pin
Pin Bar, 15mm dia. - - 1 1 Bushing (Upper and Lower)Tool Pin (GHB 750)
Driver - - - 1 Rubber Plug (Box Housing)Grease Gun, 500cc 1 1 1 1
MAINTENANCE & SERVICE
© 2018 Genesis Attachments, LLC Genesis Hydraulic Breaker GHB 250-750 25

BOLT TORQUE SPECIFICATIONSGeneral Torque Specification TablesUse the following charts when determining bolt torque specifications when special torques are not given. Always use grade 5 or better when replacing bolts.
SAE Bolt Torque SpecificationsNote: The following torque values are for use with extreme pressure lubricants, plating or hard washer applications. Increase torque 15% when using hardware that is unplated and either dry or lubricated with engine oil.
Bolt SizeSAE Grade 5 Torque SAE Grade 8 Torque Bolt head identification marks
as per grade.Note: Manufacturing marks will vary.
Pounds Feet
Newton Meters
Pounds Feet
NewtonMeters
In mm UNC UNF UNC UNF UNC UNF UNC UNF
1/4 6.35 8 9 11 12 10 13 14 185/16 7.94 14 17 19 23 20 25 27 343/8 9.53 30 36 41 49 38 46 52 62
7/16 11.11 46 54 62 73 60 71 81 961/2 12.70 68 82 92 111 94 112 127 152
9/16 14.29 94 112 127 152 136 163 184 2215/8 15.88 128 153 174 207 187 224 254 3043/4 19.05 230 275 312 373 323 395 438 5367/8 22.23 340 408 461 553 510 612 691 8301 25.40 493 592 668 803 765 918 1037 1245
1-1/8 25.58 680 748 922 1014 1088 1224 1475 16601-1/4 31.75 952 1054 1291 1429 1547 1700 2097 23051-3/8 34.93 1241 1428 1683 1936 2023 2312 2743 31351-1/2 38.10 1649 1870 2236 2535 2686 3026 3642 4103
Grade 2
Grade 5
Grade 8
© 2018 Genesis Attachments, LLCGenesis Hydraulic Breaker GHB 250-75026

BOLT TORQUE SPECIFICATIONSMetric Bolt Torque SpecificationsThe following torque values are for use with metric hardware that is unplated and either dry or lubricat-ed with engine oil. Reduce torque 15% when using hardware that has extreme pressure lubricants, plating or hard washer applications.
Bolt head identification marks as per grade.
BoltSize
Grade Pitch (mm)
Pounds Feet Newton Meters Pitch (mm)
Pounds Feet Newton Meters
M65.68.8
10.91.0
3.6 - 5.85.8 - 0.47.2 - 10
4.9 - 7.97.9 - 12.79.8 - 13.6
----
---
M85.68.8
10.91.25
7.2 - 1417 - 2220 - 26
9.8 - 1923 - 29.8
27.1 - 35.21.0
12 - 1719 - 2722 - 31
16.3 - 2325.7 - 36.629.8 - 42
M105.68.8
10.91.5
20 - 2534 - 4038 - 46
27.1 - 33.946.1 - 54.251.5 - 62.3
1.2520 - 2935 - 4740 - 52
27.1 - 39.347.4 - 63.754.2 - 70.5
M125.68.8
10.91.75
28 - 3451 - 5957 - 66
37.9 - 46.169.1 - 79.977.2 - 89.4
1.2534 - 4156 - 6862 - 75
42 - 55.675.9 - 92.184 - 101.6
M145.68.8
10.92.0
49 - 5681 - 93
96 - 109
66.4 - 75.9109.8 - 126
130.1 - 147.71.5
52 - 6490 - 106
107 - 124
70.5 - 86.7122 - 143.6145 - 168
M165.68.8
10.92.0
67 - 77116 - 130129 - 145
90.8 - 104.3157.2 - 176.2174.8 - 196.5
1.569 - 83
120 - 138140 - 158
93.5 - 112.5162.6 - 187
189.7 - 214.1
M185.68.8
10.92.0
88 - 100150 - 168175 - 194
119.2 - 136203.3 - 227.6237.1 - 262.9
1.5100 - 117177 - 199202 - 231
136 - 158.5239.8 - 269.6273.7 - 313
M205.68.8
10.92.5
108 - 130186 - 205213 - 249
146.3 - 176.2252 - 277.8
288.6 - 337.41.5
132 - 150206 - 242246 - 289
178.9 - 203.3279.1 - 327.9333.3 - 391.6
© 2018 Genesis Attachments, LLC Genesis Hydraulic Breaker GHB 250-750 27

SPECIFICATIONS
Item UnitGHB Model
250 350 500 750
Side Rod (A) lb-ft(Nm)
221(300)
332(450)
332(450)
442(600)
Housing Bolt / Nut (B) lb-ft(Nm)
258(350)
258(350)
258(350)
590(800)
Top Cover Bolt / Nut (C) lb-ft(Nm)
221(300)
221(300)
221(300)
221(300)
Breaker Torque
GHB 250, GHB 350 & GHB 750
AC
B
B
GHB 500
A
C
© 2018 Genesis Attachments, LLCGenesis Hydraulic Breaker GHB 250-75028

DimensionLength
inch (mm)GHB Model
250 350 500 750
A 10.4 (266) 12.9 (330) 12 (305) 12 (305)
B 4.5 (116) 5.1 (130) 6.10 (155) 5.70 (145)
C 11.0 (280) 12.9 (330) 14.69 (373) 14.69 (373)
D 4.7 (120) 5.4 (138) 6.10 (155) 6.14 (156)
E 27.4 (697) 34.1 (867) 38.30 (973) 41.92 (1,065)
F 40.9 (1,040) 48.8 (1,240) 53.74 (1,365) 60.11 (1,527)
G 1.5 (40) 2.1 (55) 2.76 (70) 2.67 (68)
B
E
A C
F
D
G
General DimensionsSPECIFICATIONS
Open Housing
© 2018 Genesis Attachments, LLC Genesis Hydraulic Breaker GHB 250-750 29

SPECIFICATIONSGeneral DimensionsBreaker with Skid Steer Mount
DC
G
E
AB
F
DimensionLength
inch (mm)GHB Model
500 750
A 45.31 (1,151) 45.31 (1,151)
B 33.70 (856) 33.70 (856)
C 45.70 (1,161) 49.13 (1,248)
D 62.08 (1,577) 67.32 (1,710)
E 9.89 (251) 9.88 (251)
F 12.68 (322) 13.74 (349)
G 2.76 (70) 2.67 (68)
© 2018 Genesis Attachments, LLCGenesis Hydraulic Breaker GHB 250-75030

SPECIFICATIONS
Description UnitGHB Model
250 350 500 750
Working Weight lbs(kg)
297(135)
414(188)
573(260)
639(290)
Impact Rate bpm 700 - 1500 450 - 1150 650 - 1550 600 - 1100
Operating Pressure psi(bar)
1305 - 1740(90 - 120)
1305 - 1885(90 - 130)
1450 - 1030(100 - 140)
1595 - 2175(110 - 150)
Relief Pressure psi(bar)
2320 - 2610(160 - 180)
2320 - 2610(160 - 180)
2900 - 3045(200 - 210)
2900 - 3045(200 - 210)
Oil Flow gpm(lpm)
4 - 9.2(15 - 35)
6.6 - 11.9(25 - 45)
10 - 21.9(38 - 83)
11.9 - 21.9(45 - 83)
Back Pressure psi(bar)
145(10)
145(10)
145(10)
145(10)
Tool Diameter inch(mm)
1.56(40)
2.15(55)
2.64(67)
2.65(68)
Pressure Line Size inch(mm)
0.5(12)
0.5(12)
0.75(19)
0.75(19)
Return Line Size inch(mm)
0.5(12)
0.5(12)
0.75(19)
0.75(19)
Excavator Weight lbs(ton)
2200 - 6600(1 - 3)
4400 - 9900(2 - 4.5)
4630 - 7055(2.1 - 3.2)
4400 - 9900(2 - 4.5)
Back Head Pressure psi(bar)
217(15)
174(12)
200(13.8)
160(11)
Oil Temperature °F(°C)
-4 ~ +176(-20 ~ +80)
-4 ~ +176(-20 ~ +80)
-4 ~ +176(-20 ~ +80)
-4 ~ +176(-20 ~ +80)
Hydraulic Oil Viscosity cSt 1000 - 15 1000 - 15 1000 - 15 1000 - 15
General
© 2018 Genesis Attachments, LLC Genesis Hydraulic Breaker GHB 250-750 31

Flow Test ProceduresThe correct performance of this procedure will verify if the auxiliary circuit of the prime mover is adequate to properly operate the attachment. This procedure is generic in form. It is the end user’s responsibility to ensure that this procedure will work with his specific type of equipment. If an adequate flow meter is not available, contact your Genesis dealer for assistance.
TEST PROCEDURE:
1. With the auxiliary circuit (or kit) completely installed connect the flow meter between the tool inlet and outlet hoses.
Note: Always use the hoses that are supplied for the attachment and make sure the machine hy-draulic oil is between 90 to 120 °F. this will assure correct readings and adjustments.
2. With the machine setting at the mode that’s going to be used to operate the attachment, record the GPM ________.
Locate the correct flow for the attachment in the manual under the specification section. Adjust the machine to the correct GPM.
Note: If possible, always set the machine to the highest GPM output mode. This will prevent the operator from over flowing the attachments.
3. Once the correct GPM flow is achieved fully open the restrictor on the flow meter.
4. With the machine in the attachment mode set in step 2 record the back pressure. At this point the pressure reading on the pressure gauge is the back pressure in the circuit. This pressure must not exceed 200 psi/13.5bar. Excessive back pressure will slow the attach-ments operation and lead to premature seal failures and over heating.
Record the back pressure _________ psi.5. Close the restrictor valve on the flow meter until the attachment relief starts to crack or
open. The relief valve opens when the flow rate (GPM), indicated on the flow meter begins to decline rapidly. Locate the tools operating system relief pressure in the specification section in the manual. Adjust attachment relief to specification.
Note: The relief valve pressure must be greater than the operating pressure of the attachment and three times the back pressure. Never use the relief valve to control the flow rate in the circuit. Cracking pressure means the loss of 4 or more GPM.
Record the relief cracking pressure _________ psi.Example:Operation pressure of a breaker is 2700 psi. Back pressure is 150 psi. A good rule to follow when setting the relief, multiply the back pressure by 3 then add this number to the operation pressure of the attachment.
Operating Pressure 2700 psi
Back pressure 450 psi
Operating pressure of the tool 3150 psi
The relief valve setting must be greater than the estimated operating pressure of the tool. If the setting is lower, damage to the circuit may occur. Excess heat will be generated in the circuit which will damage the attachment and prime mover.
SPECIFICATIONS
© 2018 Genesis Attachments, LLCGenesis Hydraulic Breaker GHB 250-75032

Heat Load TestWith the installation kit properly installed and adjusted per the above procedure, conduct the heat load test as follows.
1. Connect the flow meter between the tool inlet and outlet hoses.2. With the carrier set in the attachment mode, restrict the flow meter until a pressure of 1000
psi is achieved. This pressure must be maintained throughout the heat test.
NOTE: Closing of the restrictor may be required as the temperature increases.
Monitor the oil temperature from the flow meter until no change is noted. Record the time required for oil to stabilize. Record the surrounding temperature (ambient temperature). Record the time required to stabilize _________ minutes.
Record the stabilized oil temperature _________°F.
TroubleshootingIf adequate pump flow is available from the prime mover pump(s) but it is not getting to the attach-ment, consult your service representative and review the following:
1. Attachment valve(s) are not actuating. Check all electrical connections that are part of at-tachment kit.
2. Ensure proper voltage to the valve(s).3. Ensure the REG port of the valve is not blocked.4. Check that the prime mover’s main relief is set to the manufacturers recommendation and
that this value is equal or greater than the attachment circuit relief.5. If the valve will not turn off, check the drain (tank) line of valve to ensure the pressure is 50
psi or less.
SPECIFICATIONS
© 2018 Genesis Attachments, LLC Genesis Hydraulic Breaker GHB 250-750 33

Problem Possible Cause Possible SolutionHammer does not start Pressure and return lines swapped
Stop valves closed
Gas pressure in back head too high
Operating valve jammed
Poor performance of hydraulic pump
Check hydraulic line connections
Check valves and open if needed
Check pressure and adjust if needed
Check that operating valve is moving smoothly
Check pump and contact prime mover manufacturer if needed
Low impact force Gas pressure in back head too low
Relief pressure setting too low
Poor performance of hydraulic pump
Check pressure and recharge as needed
Check pressure and adjust as need-ed
Check pump and contact prime mover manufacturer if needed
Slow Operation Loose connection
Oil Leak
Stop valves partially closed
Gas pressure in back head is too high
Check connection fittings and tighten if needed
Check for damaged seals and re-place if needed
Check valves and open fully if need-ed
Check pressure and adjust if needed
Irregular blow after nor-mal operation
Oil temperature too high
Poor performance of hydraulic pump
Clearance between demolition tool and tool bushings too large
Wear on top of demolition tool
Debris in operating valve
Seizure of piston and cylinder
Check oil level and top off if needed.Check cooler of the prime mover
Check pump and contact prime mover manufacturer if needed
Check clearance and replace parts as needed
Remove and replace
Remove and clean valve
Remove and check the breaker
TROUBLE-SHOOTING GUIDE
© 2018 Genesis Attachments, LLCGenesis Hydraulic Breaker GHB 250-75034

© 2018 Genesis Attachments, LLC Genesis Hydraulic Breaker GHB 250-750 35
WARRANTYClaim ProcedureNotify the Genesis Service Department of the potential warranty claim prior to making the repair. Digital pictures are very helpful for diagnosing problems and recommending repairs.
Contact the Genesis Service Department before making alterations, changes or repairs to any component that is going to be considered for warranty. Not doing so will void all Genesis warranty consideration.
The Genesis Service Department will issue an authorization number to track the repair costs, out-going parts, and/or defective parts returning to the factory.
Replacement parts must be ordered using a purchase order number. Shipping is standard ground. Overnight shipping is available by request, and Genesis will not cover the shipping charge.
When the repair is complete, submit an invoice to the Genesis Service Department within 30 days. Include itemized internal labor reporting, parts lists and invoices for outside contractors. Reference the authorization number on all invoices.
When returning parts for warranty consideration, include a copy of any related Genesis paperwork along with any other necessary documentation to ensure proper processing and credit. The Gen-esis Service Department will provide the necessary forms.
Your account will be credited when the warranty claim is accepted.
Please direct any questions to the Genesis Service Department: 715-395-5252

© 2018 Genesis Attachments, LLCGenesis Hydraulic Breaker GHB 250-75036
PARTS ORDER POLICY AND PROCEDUREParts Orders Should Include
• Purchase order number• Model and serial number of attachment• Part number and quantity needed• Shipping and billing address• Method of shipment or required delivery date
Placing OrdersOrders may be placed by phone, e-mail or fax. To fax an order, use the form on the following page. Contact information is located at the front of this manual.
Part NumbersPart numbers are listed in a separate Parts Manual or, if included, the Parts section of this manu-al. Contact the Genesis Parts Department with questions regarding part numbers, availability and pricing.
ShippingAll orders will be shipped best way surface unless an alternate shipping method is requested. Shipping charges are not included in the purchase price of parts.
InvoicesAll invoices are due upon receipt. Any accounts with invoices open beyond 60 days are subject to review and may be placed on C.O.D. status without further notice.
ReturnsUnused Genesis parts may be returned with proper documentation. Return shipping is the respon-sibility of the purchaser. Credit will be issued upon return, less a 20% restocking fee. Documen-tation is required for credit of returned parts. Contact the Genesis Parts Department at 715-395-5252 for a RGA (Return Goods Authorization) number and form.
Return Goods AuthorizationAll parts returned to Genesis for warranty consideration must be returned with a completed RGA (Return Goods Authorization) provided by the Genesis Parts Department. The form needs to be completed in its entirety, including any additional information requested by the Parts or Service Department. Return freight is the responsibility of the shipper and will be credited upon claim ap-proval. A determination to accept or deny the claim will be made based on the information avail-able to Genesis. Warranty on purchased parts other than wear components is 6 months. There is no warranty period on wear parts or components.

© 2018 Genesis Attachments, LLC Genesis Hydraulic Breaker GHB 250-750 37
PARTS ORDER FORM
Customer:
Phone:
Shipping Address:
Purchase Order:
Model:
Date:
Contact:
E-mail:
Billing Address:
Shipping Method:
Serial Number:
Quantity Part Number Description Price
E-mail to the Genesis Parts Department: [email protected] assistance, call 715-395-5252

Asia Pacific Representative Office
24 Upper Serangoon View #12-28 Singapore 534205
Phone: +65 9673 9730
E-mail:[email protected]
Europe/Africa/Middle EastGenesis GmbH
Teramostrasse 2387700 Memmingen, Germany
Phone: +49 83 31 9 25 98 0Fax: +49 83 31 9 25 98 80
genesis-europe.com
E-mail:[email protected]
Central America & Colombia
Cra 13A #89-38 / Ofi 613Bogota, Colombia
Phone: +57 1 610 8160 / 795 8747
E-mail: [email protected]
World HeadquartersGenesis Attachments
1000 Genesis DriveSuperior, WI 54880 USA
Toll Free: 888-SHEAR-IT(888-743-2748)
Phone: 715.395.5252
E-mail:[email protected]
CONTACT INFORMATION
View and download all manuals: genesisattachments.com/products/manualsPatents: genesisattachments.com/products/patents
Rev. B - 4-10-18