Safety Information - · PDF file2 safety information read this before operating your unit...
27
WD-1 NETWORK AV ADAPTER ADAPTATEUR AV RÉSEAU ADAPTADOR AV CON CONEXIÓN DE RED NETZWERK-AV-ADAPTER СЕТЕВОЙ AV-АДАПТЕР OPERATING INSTRUCTIONS GUIDE D’UTILISATION INSTRUCCIONES DE FUNCIONAMIENTO BEDIENUNGSANLEITUNG ИНСТРУКЦИЯ ПО ЭКСПЛУАТАЦИИ
Transcript of Safety Information - · PDF file2 safety information read this before operating your unit...

WD-1NETWORK AV ADAPTER
ADAPTATEUR AV RÉSEAU ADAPTADOR AV CON CONEXIÓN DE RED
NETZWERK-AV-ADAPTERСЕТЕВОЙ AV-АДАПТЕР
OPERATING INSTRUCTIONSGUIDE D’UTILISATION
INSTRUCCIONES DE FUNCIONAMIENTOBEDIENUNGSANLEITUNG
ИНСТРУКЦИЯ ПО ЭКСПЛУАТАЦИИ

2
Safety Information
READ THIS BEFORE OPERATING YOUR UNIT
CAUTIONTO REDUCE THE RISK OF ELECTRIC SHOCK, DO NOT REMOVE FRONT OR BACK COVER. NO USER-SERVICEABLE PARTS INSIDE. REFER SERVICING TO QUALIFIED SERVICE PERSONNEL.
CAUTIONRISK OF ELECTRIC SHOCK
DO NOT OPEN
This symbol indicates the presence of uninsulated “dangerous voltage” within the product’s enclosure that may be of sufficient magnitude to constitute a risk of electric shock.
This symbol indicates important operating and maintenance (servicing) instructions in the literature accompanying the appliance.
WARNING : TO REDUCE THE RISK OF FIRE OR ELECTRIC SHOCK, DO NOT EXPOSE THIS APPLIANCE TO RAIN OR MOISTURE.
CAUTION • Leave space around the unit for sufficient
ventilation. • Avoid installation in extremely hot or cold
locations, or in an area that is exposed to direct sunlight or heating equipment.
• Keep the unit free from moisture, water, and dust.
• Do not let foreign objects in the unit. • Keep the ventilation openings clear of items,
such as newspapers, linens, or curtains. • Keep open flame from candles or other
sources away from the unit. • Observe the local regulations regarding
disposal of packaging materials, exhausted batteries and old equipment.
• Do not expose the unit to dripping or splashing, or place objects filled with liquids such as vases.
• Do not let insecticides, benzene, or thinner come in contact with the unit.
• Never disassemble or modify the unit in any way.
Notes on the AC power cord and the wall outlet • The unit remains connected to AC power
as long as it is plugged into the wall outlet, even if the unit has been turned off.
• To completely disconnect this product from AC power, disconnect the plug from the wall socket outlet.
• When setting up this product, make sure that the AC outlet you are using is easily accessible.
• Disconnect the plug from the wall outlet when not using the unit for long periods of time.
FCC NoticeThis equipment has been tested and found to comply with the limits for a Class B digital device, pursuant to Part 15 of the FCC Rules. These limits are designed to provide reasonable protection against harmful interference in a residential installation. This equipment generates, uses and can radiate radio frequency energy and, if not installed and used in accordance with the instructions, may cause harmful interference to radio communications. However, there is no guarantee that interference will not occur in a particular installation. If this equipment does cause harmful interference to radio or television reception, which can be determined by turning the equipment off and on, the user is encouraged to try to correct the interference by one or more of the following measures:

Safety Information
Engl
ish
3
Reorient or relocate the receiving antenna.Increase the separation between the equipment and the receiver.Connect the equipment to an outlet on a circuit different from that to which the receiver is connected.Consult the dealer or an experienced radio/TV technician for help.
This device complies with part 15 of the FCC Rules. Operation is subject to the following two conditions :(a) This device may not cause harmful
interference, and(b) This device must accept any
interference received, including interference that may cause undesired operation.
(FCC Part 15.21) Caution: changes or modifications not expressly approved by the party responsible for compliance could void the user’s authority to operate the equipment.
For Canadian customers:This Class B digital apparatus complies with Canadian ICES-003.Cet appareil numerique de la Classe B est conforme a la norme NMB-003 du Canada.
FCC Radiation Exposure Statement:This equipment complies with FCC radiation exposure limits set forth for an uncontrolled environment. This equipment should be installed and operated with a minimum distance of 20 cm between the radiator and your body.This transmitter must not be co-located or operated in conjunction with any other antenna or transmitter.
Important Safety Instructions1 Read these instructions.2 Keep these instructions.3 Heed all warnings.4 Follow all instructions.5 Do not use this apparatus near water.6 Clean only with dry cloth.
7 Do not block any ventilation openings. Install in accordance with the manufacturer’s instructions.
8 Do not install near any heat sources such as radiators, heat registers, stoves, or other apparatus (including amplifiers) that produce heat.
9 Do not defeat the safety purpose of the polarized or grounding-type plug. A polarized plug has two blades with one wider than the other. A grounding type plug has two blades and a third grounding prong. The wide blade or the third prong is provided for your safety. If the provided plug does not fit into your outlet, consult an electrician for replacement of the obsolete outlet.
10 Protect the power cord from being walked on or pinched particularly at plugs, convenience receptacles, and the point where they exit from the apparatus.
11 Only use attachments/accessories specified by the manufacturer.
12 Use only with the cart, stand, tripod, bracket, or table specified by the manufacturer, or sold with the apparatus. When a cart is used, use caution when moving the cart/apparatus combination to avoid injury from tip-over.
13 Unplug this apparatus during lightning storms or when unused for long periods of time.
14 Refer all servicing to qualified service personnel. Servicing is required when the apparatus has been damaged in any way, such as power-supply cord or plug is damaged, liquid has been spilled or objects have fallen into the apparatus, the apparatus has been exposed to rain or moisture, does not operate normally, or has been dropped.
Product Name: Network AV ADAPTERModel Number: WD-1Responsible Party Name: ETRON CORPORATIONAddress: 6120 Valley View Buena Park, Ca. 90620 Phone: 1-714-739-2000URL: http://www.sherwoodamerica.com

4
Table of Contents
2 SAFETY INFORMATION
5 GETTING STARTED5 What's Included6 Installing the Remote Control Battery6 Operating the Range of the Remote Control7 Parts Description
9 MAKING CONNECTIONS 9 Connecting HDMI Components 10 Connecting Digital Audio Components10 Connecting to a Network 11 Connecting Power
12 OPERATING YOUR DEVICE12 Turning on Your Unit12 Setting the Network Standby Control12 Setting the Network Setup 14 Listening to Internet Radio 15 Listening to Music from the Media Server 16 Using the Sherwood Remote Application21 Updating the Firmware
23 TROUBLESHOOTING
24 ADDITIONAL INFORMATION 24 Specifications25 Trademarks and Licenses

5
Engl
ish
Getting Started
What's Included
Main unit
Remote control (1 ea) Battery “AAA” size, 1.5V (2 ea)
WD-1 NETWORK AV ADAPTER
OPERATING INSTRUCTIONS
Power adapter (1 ea) User manual (1 ea)
• The items supplied with your unit are subject to change without prior notice.

WD-1 NETWORK AV ADAPTER
6
Installing the Remote Control Battery
1 Remove the battery cover.
2 Insert two AAA size batteries with the polarity matched properly.
• Always use alkaline batteries, and do not use the rechargeable batteries (Ni-Cd type).
• If the batteries run out, remove the old batteries and replace them with new ones within several minutes.
• If the batteries are removed or have been exhausted for a longer period of time, memorized contents will be cleared. In this case, you should memorize them again.
• If the battery is placed incorrectly, it can cause explosion.
• Remove the battery if the remote control is not used for a long period of time.
• Do not leave the product in a hot or humid place.
• Do not handle and store the battery with metallic tools.
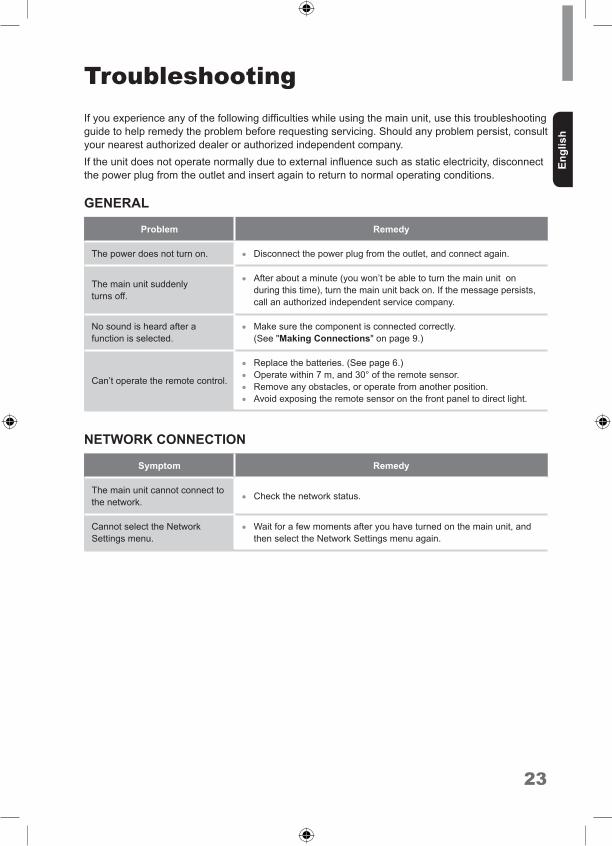
Operating the Range of the Remote Control
Use the remote control within a range of about 7 meters (23 feet) and angles of up to 30 degrees aiming at the remote control sensor.
30 30
7m

Engl
ish
7
Parts Description
Front and Rear Panel
2
1
3
7
5
6
4
1 Status LED
2 Power Connector
3 OPTICAL OUT Connector
4 LAN/ETHERNET Connector
5 HDMI Connector
6 USB Connector (For Upgrade only)
7 IR Sensor

WD-1 NETWORK AV ADAPTER
8
Remote Control
1
3
2
11
10
9
8
76
5
4
1 POWER ON Turns on the main unit.
2 MODE Adjusts the screen resolution. (Original/Full)
3 DISPLAY • When playing audio or video files, turns on
or off the progress bar. • When viewing photos, turns on or off the
slideshow transition time display. 4 / / / / ENTER
• Navigates through the menus. • Confirms a setting option or menu.
5 TOP MENU Moves to the top menu for each media or service.
6 Fast-reverses the current file.
Fast-forwards the current file.
Plays or pauses playback.
Selects the previous file.
Selects the next file.
Stops playback.
7 SHUFFLE Activates the random playback.
8 REPEAT Activates the repeat function.
9 RETURN Returns to the previous menu.
10 SETUP Enters or exits the system setup menu.
11 STANDBY Turns off the main unit to the normal standby mode.

9
Engl
ish
Making Connections
Connecting HDMI Components
With HDMI, you can easily enjoy high quality sounds and images. The main unit plays audio from HDMI compatible products while also passing on the video signal to a HDMI-connected TV.
About HDMIHDMI (High Definition Multimedia Interface) supports both audio and video on a single digital connection for use with DVD players, DTV, set-top boxes, and other AV devices. HDMI was developed to provide the technologies of High Bandwidth Digital Content Protection (HDCP) as well as Digital Visual Interface (DVI) in one specification. HDCP is used to protect the digital content transmitted and received by DVI-compliant displays.HDMI has the capability to support standard, enhanced, or high-definition video plus standard to multi-channel surround-sound audio. HDMI features include uncompressed digital video, a bandwidth of up to 2.2 gigabytes per second (with HDTV signals), one connector (instead of several cables and connectors), and communication between the AV source and AV devices such as DTVs.
This main unit is also compatible with the DeepColor and x.v.Color feature (x.v.Color is trademarks of Sony Corporation.).
• Check the setup of the connected component if an image is poor or there is no sound from a component connected via the HDMI cable.
• Audio signals (sampling frequency, bit length, etc.) transmitted from an HDMI jack may be suppressed by the connected component.
• When the connected component is not compatible with copyright protection technology (HDCP), the image and the sound from the HDMI TV OUT jack may be distorted or may be not output. In this case, check the specification of the connected component.

WD-1 NETWORK AV ADAPTER
10
Connecting Digital Audio Components
You can connect components equipped with an optical input jack. Then, the main unit transmits the digital audio signal to the connected external device.
OPTICALIN
Connecting to a Network
If you have an internet connection, you can connect the main unit to the internet as well as using a wired LAN connection. The following illustration is a configuration example of a home network with the main unit and a server. It is recommended to connect the server to the router with a wired connection.
Internet
Modem
PCRouter
To WAN side
LAN port/Ethernetconnector
To LAN port
Main Unit
To LAN port

Making Connections
Engl
ish
11
• After making a broadband internet connection, you should set the communication settings. For details, see “Setting the Network Setup” on page 12.
• When using a broadband internet connection, a contract with an internet service provider is required. For more information, contact local internet service provider.
• Since the connected equipment and connection method may differ depending on your internet environment, refer to the operating instructions of the equipment.
Connecting Power
Make sure to plug in after you have connected all your components to the main unit. Plug the supplied AC input cord into the AC inlet and then into the wall AC outlet.
To the Wall Outlet
• The supplied AC adapter is designed exclusively for use with this unit. Do not attempt to use it with any device for which was not expressly designed, since fires or shocks may occur.
• Handle the power cord by the plug part. Do not pull out the plug by tugging the cord, and never touch the power cord when your hands are wet, as this could cause a short circuit or electric shock.
• The main unit should be disconnected by removing the main plug from the wall outlet when not in regular use for a long period of time.

12
Operating Your Device
Turning on Your Unit
1 Turn on the main unit by pressing POWER ON.
2 Turn off the standby mode by pressing STANDBY.
Setting the Network Standby Control
1 Press and hold SETUP for more than 3 seconds. When the Network Standby Control is turned on, the status LED on the front panel flashes two times.
2 To turn off the Network Standby Control, press and hold SETUP for more than 3 seconds again.When the Network Standby Control is turned off, the status LED on the front panel flashes three times.
• When the Network Standby Control is turned on, the power consumption may increase.
Setting the Network Setup
To listen to Internet radio stations or music files stored on your computer via a wired network, you should configure network settings first.
1 Press SETUP.
2 Press , , , to navigate the menu.
3 Press ENTER to confirm the desired menu. Press RETURN to move to the previous menu.

Operating Your Device
Engl
ish
13
Network Settings Overview
Main Menu Sub Menu Go to Page
NETWORK CONNECT
Direct AV Set
Soft AP hotspot 13
Wi-Fi Direct 13
WiredEthernet 13
Ethernet Configuration 13
Wi-Fi *
Wi-Fi Direct *
OTHER
AP Name 14
Resolution 14
Display size 14
Factory Setting 14
Auto Power Control 14
INFORMATIONNetwork Information 14
Passcode Information 14
* You cannot adjust Wi-Fi and Wi-Fi Direct settings.
Setting the Direct Wireless Network ConnectionYou can connect the main unit with a mobile device wirelessly through Soft AP hotspot or Wi-Fi direct.
Soft AP hotspot When you enable Soft AP hotspot, you can use the main unit as a wireless access point. It provides internet access to network devices.
Wi-Fi DirectWi-Fi Direct is a standard that allows Wi-Fi devices to connect to the main unit without the need for a wireless access point. When you enable Wi-Fi Direct, you can directly transfer data between Wi-Fi direct devices and the main unit without the need for full setup.
Setting the Wired Network ConnectionBefore you setup the connection, check that the LAN cable is connected to the LAN/ETHERNET connector properly and securely. For details, see “Connecting to a Network” on page 10.
Ethernet You can enable and set the Ethernet connection automatically on the main unit.
Ethernet ConfigurationYou can set the Ethernet connection settings manually.
Menu item Description
Ethernet Device Inputs an Ethernet device name.
Connection Type
Sets the connection type as DHCP or Static IP.
IP Address Inputs IP Address.
Netmask Inputs subnet mask when the DHCP function is disabled.
DNS address
Inputs DNS address when the DHCP function is disabled.
Default Router
Inputs Default Router when the DHCP function is disabled.
• When you set DHCP as a connection type, you do not need to set the IP Address, Netmask, or DNS address etc.
• When you set Static IP as a connection type, you should set the network connection manually by entering the IP Address, etc. In this case, some knowledge of networks is required. If you do not understand internet connections, contact your internet service provider.

WD-1 NETWORK AV ADAPTER
14
Setting Other Network OptionsMenu item Description
AP Name Views and changes the name of the unit displayed on the network.
Resolution Sets the resolution of the video output.
Display size Adjusts the screen display size manually.
Factory Setting
Resets all the settings to the factory default.
Auto Power Control
Sets the time for the main unit to be automatically turned off when any other operation is not inputted. You can set the time to OFF, 2Hour, 4Hour, 6Hour, or 8Hour. The default setting value is OFF.
Viewing the Network Information
Network Information You can view the detailed information of a connected network.
Passcode InformationYou can view and change the passcode of the main unit. When you use the main unit for the first time, you should input this passcode when you enable Soft AP hotspot and try to connect the mobile device to the main unit.
Listening to Internet Radio
You can listen to Internet radio broadcasts provided by vTuner. You can control the internet radio with the menu displayed on the TV screen.
1 When the image is displayed as below, select Internet Radio on the screen, and then press ENTER on the remote control.

Operating Your Device
Engl
ish
15
2 Select the desired category by pressing , , , , and then press ENTER on the remote control.
• To use this function, the unit should be connected to the internet. Refer to "Setting the Network Setup" on page 12 for details.
• The service may be discontinued without notice.
• You may not be able to receive some internet radio stations.
Listening to Music from the Media Server
You can play music files stored on a computer (media server) connected to this unit via a wired network. You can share the music files easily by using Windows Media Player 12 or later versions.
Configuring the Windows Media Player
On Windows Media Player 12 Version
1 Run Windows Media Player 12 on your computer.
2 Click "Stream" at the top of the player.
3 Click "More streaming options" and another dialog box will appear. Locate WD-1 Media Renderer and click "ALLOWED" in the list. Then click "OK" to close the dialog box.
4 In the Media Player "Library" (where all your music is), right click on an Album or Music file and click on "Play to". Then, select WD-1 Media Renderer and press PLAY.
• Windows Media Player 12 can be downloaded for free from the Microsoft web site.
• If the firewall restricts access, Windows Media Player 12 cannot be configured.

WD-1 NETWORK AV ADAPTER
16
Listening to Music from the Media Server
1 Start your computer.
2 Select Media Server on the screen, and then press ENTER on the remote control.
3 When "Waiting for request" is displayed on your monitor at this time you must select music from your PC in the MEDIA PLAYER.Right click on the Music Folder or File and click on Play to. Then select WD-1 Media Renderer and click PLAY.
• You can install applications that support DLNA or UPnP from iTunes or Playstore.
Using the Sherwood Remote Application
Preparing for the Application
Setting the Network on the Main Unit
1 Press SETUP on the remote control.
2 Tap DirectAV set > Soft AP hotspot or Wi-Fi direct.
• The WiFi-direct mode is available only on smartphones that support WiFi-direct.
• Soft AP hotspot is enabled as a default connection setting.

Operating Your Device
Engl
ish
17
Installing the Application on Your Phone
1 Visit Play Store on your Android Smartphone. Or visit App Store on your iPhone.
2 Search for Sherwood Remote.
3 Download and install the application on your phone.
Connecting Your Phone with the Main Unit • On an Android phone
1 Go to Wireless & networks settings in your Android smartphone.
2 Go to Wi-Fi settings to select and tap WD-1 and Connect. • When you connect your phone
with the main unit using a Wi-Fi hotspot, you should enter the password(1234567890) for the main unit connection.
• When a wired network is not connected to the main unit, you cannot connect your phone to Internet.
• On an iPhone
1 Go to Settings in your iPhone.
2 Follow the step 2 that are specified on an Android phone.
Using the Application The Sherwood Remote application helps you to control the main unit remotely by allowing you to use Wiink.
1 Open the Sherwood Remote application.
2 Select and tap WD-1 on the smartphone Wifi setting menu to connect. Then, you can use your smartphone as a remote control for the main unit.
• When a network error occurs, the following screen will pop up.
• Select Product: Check your smartphone network connection, and select the main unit again.
• Demo Mode: Uses the application in Demo Mode.
• Retry: Tries to open the application again.

WD-1 NETWORK AV ADAPTER
18
Using Direct AVOn Direct AV, you can listen to songs, watch videos, and view photos stored on your Android phone or iPhone.
1 Tap Direct AV.
• : Adjusts the settings. • : Turns on or off the main unit.
(To activate the function, you should turn on the Network Standby Control. Then, the power consumption may increase. Refer to "Setting the Network Standby Control" on page 12 for details.)
2 Tap AUDIO to listen to the songs stored on your phone.Tap VIDEO to watch video stored on your phone.Tap PHOTO to view photos stored on your phone.
• iOS
• For iOS phones, you should synchronize contents in iTunes to use this function.
• Android
• Background play is available only on Android smartphones.

Operating Your Device
Engl
ish
19
Listening to Songs on Your SmartphoneYou can select a song on the song list and play it over the main unit.
1
4
23
8
56
7
No. Description
1Moves to the previous menu • This menu is not displayed on Android
smartphone.
2 Plays or pauses a song.
3 Plays a previous song.
4 Sets shuffle function.
5 Volume control bar
6 Sets the repeat function. (Repeat for all song or one song.)
7 Plays the next song.
8 Progress bar
Watching Videos on Your SmartphoneYou can select a video on the video file list and enjoy it on the main unit.
1
432
7
5
6
No. Description
1Moves to the previous menu • This menu is not displayed on the
Android smartphone.
2 Plays or pauses a video.
3 Moves to a previous video.
4 Volume control bar
5 Moves to the next video.
6 Controls display size.
7 Progress bar

WD-1 NETWORK AV ADAPTER
20
Viewing Photos on Your SmartphoneYou can view photos as a slideshow and set the slideshow transition time at 5s, 10s, 20s, 30s.
1
2 3
No. Description
1Moves to the previous menu • This menu is not displayed on the
Android smartphone.
2 Plays or pauses the photo slideshow.
3 Sets the slideshow transition time.
Using Internet Radio and Media ServerYou can use your smartphone as a remote controller for Internet Radio and Media Server.
1 Tap Internet Radio or Media Server.
• This function may not be available depending on types or functions of a smartphone or network connection.

Operating Your Device
Engl
ish
21
Overview of the Main Screen
12
3
4
6
5
No. Description
1Moves to the Wiink main menu • This menu is not displayed on the
Android smartphone.
2
Turns off the main unit.(To activate the function, you should turn on the Network Standby Control. Then, the power consumption may increase. Refer to "Setting the Network Standby Control" on page 12 for details.)
3 Volume control bar
4 Returns to the previous menu.
5 Selects or confirms a broadcast only in Internet Radio.
6 Moves to the settings menu.
Updating the Firmware
New firmware that provides additional features or product improvements will be released as needed. Updates can be downloaded from our website: www.sherwoodamerica.com. After downloading the firmware to a USB device, you can update the main unit by connecting the USB device with a USB OTG cable(faster than USB 2.0) and doing the following procedures. For details, refer to the information supplied with updates. Do not perform this procedure unless firmware update is necessary. Also, make sure you read the information supplied with updates before updating the firmware.

WD-1 NETWORK AV ADAPTER
22
1 Connect the USB connector of the main unit to the device which stores the firmware.
2 Press the buttons in the following order. MODE ENTER
• When the main unit does not turn on automatically after updating, you should turn on the unit manually.
• Make sure not to turn off the main unit, disconnect the USB cable or perform any operation on the main unit while the updating operation is in progress.
23
Engl
ish
Troubleshooting If you experience any of the following difficulties while using the main unit, use this troubleshooting guide to help remedy the problem before requesting servicing. Should any problem persist, consult your nearest authorized dealer or authorized independent company.If the unit does not operate normally due to external influence such as static electricity, disconnect the power plug from the outlet and insert again to return to normal operating conditions.
GENERAL
Problem Remedy
The power does not turn on. • Disconnect the power plug from the outlet, and connect again.
The main unit suddenlyturns off.
• After about a minute (you won’t be able to turn the main unit on during this time), turn the main unit back on. If the message persists, call an authorized independent service company.
No sound is heard after a function is selected.
• Make sure the component is connected correctly. (See "Making Connections" on page 9.)
Can’t operate the remote control.
• Replace the batteries. (See page 6.) • Operate within 7 m, and 30° of the remote sensor. • Remove any obstacles, or operate from another position. • Avoid exposing the remote sensor on the front panel to direct light.
NETWORK CONNECTION
Symptom Remedy
The main unit cannot connect to the network. • Check the network status.
Cannot select the Network Settings menu.
• Wait for a few moments after you have turned on the main unit, and then select the Network Settings menu again.

24
Additional Information
Specifications
Input/Output
HDMI Output 1
Audio Output Optical x1 (Digital)
Supported Codecs
Audio
Codec Type Sampling rate (KHz)
Bitrate (max in Kbps) Channel Container
MP3 MP3 up to 48 KHzCBR/VBR from 8 kbps to 320 kbps
mono, stereo *.mp3
WMA WMA, WMV up to 48 KHz up to 192 kbps mono, stereo *.wma,
*.wmv
WAVE LPCM, m-law, a-law
at 8, 16 and 44.1 KHz - mono, stereo *.wav
AC3Dolby Digital 5.1ch for video
Up to 48 KHz 32 kbps - 640 kbps 1 - 5.1 ch -
Video
Codec Frame rate (max) Bitrate (max) Resolution
(max) Container
H.264 (MPEG4 AVC)
up to 24 fps - 30 fps
up to 16 Mbps
up to Full-HD (1920 x 1080) *.avi, *.mp4, *.mkv, *.mov
Photo
Codec Resolution (max) Container
JPEG
up to 8192 x 8192
*.jpg, *.jpeg
PNG *.png
GIF *.gif
BMP *.bmp
General Specifications
Power supply AC 100 - 240 V, 50/60 Hz (DC 5 V)
Power consumption <0.5 W (standby)
Dimensions (W x H x D) 4.33" X 4.33" X1.26" (110 mm X 110 mm X 32 mm)
Weight 0.595 lb (270 g)
• Design and specifications are subject to change without notice for improvements. • The specifications for the supported codes are the maximum values and may differ depending
on playback status or playback files.

25
Engl
ish
Trademarks and Licenses
HDMI
HDMI, the HDMI Logo, and High-Definition Multimedia Interface are trademarks or registered trademarks of HDMI Licensing LLC in the United States and other countries.
Dolby Digital
Dolby and the double-D symbol are trademarks of Dolby Laboratories.
Wi-Fi
The Wi-Fi CERTIFIED Logo is a certification mark of the Wi-Fi Alliance.


WD-1NETWORK AV ADAPTER
ADAPTATEUR AV RÉSEAUADAPTADOR AV CON CONEXIÓN DE RED
NETZWERK-AV-ADAPTERСЕТЕВОЙ AV-АДАПТЕР
Printed in chinaImprimé en ChineImpreso en ChinaGedruckt in China
Отпечатано в Китае5707-00000-803-1S