Safety EdgeSM Design and Construction Guide · January 5, 2012 Safety EdgeSM Design and...
32
January 5, 2012 Safety Edge SM Design and Construction Guide Final Report January 5, 2012
Transcript of Safety EdgeSM Design and Construction Guide · January 5, 2012 Safety EdgeSM Design and...

January 5 2012
Safety EdgeSM Design and Construction Guide
Final Report January 5 2012
January 5 2012
FOREWORD
The main focus of this document is to explain the important design construction and materials-related considerations for constructing the Safety EdgeSM The target audience of this report is pavement design and construction personnel who will specify and construct the Safety EdgeSM
January 5 2012
1 Report No 2 Government Accession No 3 Recipientrsquos Catalog No
3 Title and Subtitle Safety EdgeSM Design and Construction Guide
5 Report Date January 5 2012
6 Performing Organization Code
7 Authors Andy Mergenmeier PE Harold Von Quintus PE Jagannath Mallela and Paul Littleton PE
8 Performing Organization Report No
9 Performing Organization Name and Address Applied Research Associates Inc 100 Trade Centre Drive Suite 200
Champaign IL 61820
10 Work Unit No
11 Contract or Grant No
12 Sponsoring Agency Name and Address Office of Infrastructure Federal Highway Administration 1200 New Jersey Avenue SE Washington DC 20590
13 Type of Report and Period Covered Design and Construction Guide April 2010 ndash July 2011
14 Sponsoring Agency Code
15 Supplementary Notes Contracting Officerrsquos Technical Representative Byron Lord and Mary Huie Contracting Officerrsquos Technical Manager Andy Mergenmeier
16 Abstract
In a coordinated effort with highway authorities and industry leaders the Federal Highway Administration (FHWA) Every Day Counts initiative serves as a catalyst to identify and promote cost effective innovations to bring about rapid change to increase safety of our nations highway system decrease project delivery time and protect our environment The Safety EdgeSM concept is an example of one such initiative in which the edge of the road is beveled during construction for the purpose of helping drivers who migrate off the roadways to more easily return to the road without over correcting and running into the path of oncoming traffic or running off the other side of the roadway
This Design and Construction Guide shares the findings from ten demonstration projects in multiple states and other ad hoc projects in which the Safety EdgeSM was implemented This Guide supports the FHWAs efforts to implement the Safety EdgeSM technology by providing standards guidance and specifications for adopting this treatment as a standard practice on all applicable new and resurfacing pavement projects
The Guide provides information on the various elements to consider when designing and constructing pavement projects with the Safety EdgeSM The Guide provides insights and lessons learned on previously constructed projects highlighting items that may vary from conventional pavement design and construction
17 Key Words Safety EdgeSM slope asphalt concrete materials PCC roadway departure
18 Distribution Statement No restriction
19 Security Classif(of this report) Unclassified
20 Security Classif (of this page) Unclassified
21 No of Pages 22 Price
Form DOT F 17007 (8-72)
ii
January 5 2012
SI (MODERN METRIC) CONVERSION FACTORS APPROXIMATE CONVERSIONS TO SI UNITS
Symbol When You Know Multiply By To Find Symbol
(none)inft ydmi
in2
ft2
yd2
ac mi2
fl oz gal ft3
yd3
ozlbT
degF
fc fl
lbflbfin2 (psi) kin2 (ksi)
lbft3 (pcf)
LENGTH mil 254 micrometers
inches 254 millimeters feet 0305 meters
yards 0914 meters miles 161 kilometers
AREA square inches 6452 square millimeters square feet 0093 square meters square yards 0836 square meters acres 0405 hectares square miles 259 square kilometers
VOLUME fluid ounces 2957 millimeters gallons 3785 liters cubic feet 0028 cubic meters cubic yards 0765 cubic meters
NOTE volumes greater than 1000 L shall be shown in m3
MASS ounces 2835 grams pounds 0454 kilograms
short tons (2000 lb) 0907 megagrams (or metric ton)
TEMPERATURE (exact degrees) Fahrenheit 5 (F-32)9
or (F-32)18 Celsius
ILLUMINATION foot-candles 1076 lux foot-Lamberts 3426 candela per square meter
FORCE and PRESSURE or STRESS poundforce 445 Newtons
poundforce per square inch 689 kiloPascals kips per square inch 689 megaPascals
DENSITY pounds per cubic foot 1602 kilograms per cubic meter
μm mm m m km
mm2
m2
m2
ha km2
mL L m3
m3
g kg Mg (or t)
degC
lx cdm2
N kPa MPa
kgm3
APPROXIMATE CONVERSIONS FROM SI UNITS Symbol When You Know Multiply By To Find Symbol
μm mmm m km
mm2
m2
m2
hakm2
mLL m3
m3
g kgMg (or t)
degC
lxcdm2
N kPA MPa
LENGTH micrometers 0039 mil
millimeters 0039 inches meters 328 feet meters 109 yards
kilometers 0621 miles AREA
square millimeters 00016 square inches square meters 10764 square feet square meters 1195 square yards
hectares 247 acres square kilometers 0386 square miles
VOLUME milliliters 0034 fluid ounces
liters 0264 gallons cubic meters 35314 cubic feet cubic meters 1307 cubic yards
MASS grams 0035 ounces
kilograms 2202 pounds megagrams (or metric ton) 1103 short tons (2000 lb)
TEMPERATURE Celsius 18C+32 Fahrenheit
ILLUMINATION lux 00929 foot-candles
candela per square meter 02919 foot-Lamberts FORCE and PRESSURE or STRESS
Newtons 0225 poundforce kiloPascals 0145 poundforce per square inch megaPascals 0145 kips per square inch
(none) in ft yd mi
in2
ft2
yd2
ac mi2
fl oz gal ft3
yd3
oz lb T
degF
fc fl
lbf lbfin2 (psi) kin2 (ksi)
SI is the symbol for the International System of Units Appropriate rounding should be made to comply with Section 4 of ASTM E380 (Revised March 2003)
iii
Topic Page
FOREWORD 1
SECTION 1 INTRODUCTION 1
11 INTRODUCTION 1 12 PURPOSE OF THE GUIDE 1 13 SCOPE OF THE GUIDE 1
SECTION 2 SAFETY EDGESM ndash GENERAL DESIGN AND CONSTRUCTION CONSIDERATIONS 3
21 SAFETY EDGESM USE 3
Where the Safety EdgeSM Can Be Placed 4
Where the Safety EdgeSM Should Not Be Placed 4
22 PRE-CONSTRUCTION AND DISCONTINUOUS PAVING OPERATIONS 5 23 PAVEMENT EDGESHOULDER PREPARATION 7 24 SLOPE MEASUREMENT 9 25 BACKING MATERIAL PLACEMENT 9
SECTION 3 SPECIFIC CONSIDERATIONS FOR CONSTRUCTING THE SAFETY EDGESM IN CONJUNCTION WITH NEW AC PAVEMENTS OR AC
OVERLAYS 11
31 DESIGN FEATURES AND SHAPE 11 32 EQUIPMENT ndash AC SAFETY EDGESM DEVICES 13
Devices Attached to the Screed 13
Modification to the End Plate 13
33 ASPHALT CONCRETE MATERIALS 13 34 SAFETY EDGESM CONSTRUCTION 14
Safety EdgeSM Device Installation 14
AC Placement 15
Rolling 18
35 QUALITY MEASUREMENT 19
January 5 2012
Table of Contents
iv
Topic Page
SECTION 4 SPECIFIC CONSIDERATIONS FOR CONSTRUCTING THE SAFETY EDGESM IN CONJUNCTION WITH NEW CONCRETE PAVEMENTS
OR CONCRETE OVERLAYS 20
41 DESIGN FEATURES AND SHAPE 20 42 EQUIPMENT ndash PCC SAFETY EDGESM DEVICES 20 43 CONCRETE MIXTURES 21 44 SAFETY EDGESM CONSTRUCTION 21
PCC Placement 21
Transitioning Between Different Edge Profiles 22
Vibration 23
Curing 23
Sawcutting 23
45 QUALITY MEASUREMENT 24
REFERENCES 25
APPENDICES 26
January 5 2012
Table of Contents
v
January 5 2012
SECTION 1 INTRODUCTION
11 Introduction
The Safety EdgeSM is a relatively simple but effective solution that can help save lives by allowing drivers who drift off highways to return to the road safely
During conventional paving processes the pavement is constructed with vertical or near vertical edges Instead of a vertical drop-off the finished Safety EdgeSM forms the edge of the pavement with a slope of approximately 30 degrees Research has shown this ldquotransition from on-roadway surface to shoulder and back is so smooth it defies assignment of any degree of severityrdquo The Safety EdgeSM provides a strong durable transition for all vehicles and helps prevents pavement edge raveling
The recommended practice of bringing the adjacent soil or aggregate material (unpaved shoulder or modified soil) flush with the top of the pavement often requires frequent maintenance When the vertical edge is exposed due to wearerosion it can contribute to drivers losing control of the vehicle when attempting to recover from a roadway departure The Safety EdgeSM concept is when drop-offs along the pavement edge occur the edge will not be vertical but has a shape that will not induce tire scrubbing By including the Safety EdgeSM detail while paving this safety countermeasure can be implemented system-wide at little or no cost
12 Purpose of the Guide
The Federal Highway Administration (FHWA) works with States and Industry to accelerate the use of innovative technologies This Guide supports efforts to implement the Safety EdgeSM technology by providing information and guidance to assist agencies in developing standards and specifications for adopting this treatment as a standard practice on all applicable new and resurfacing pavement projects
The Guide provides information on the various elements to consider when designing and constructing pavement projects with the Safety EdgeSM The Guide provides insights and lessons learned on previously constructed projects highlighting items that may vary from conventional pavement design and construction
13 Scope of the Guide
The information for this Guide draws significantly from experiences obtained from 10 formal construction project evaluations conducted in 2010 and 2011 as well as several ad hoc evaluations It is expected that significant enhancements in equipment and procedures will be forthcoming as the Safety EdgeSM is implemented into standard practice
The Guide is grouped into four sections including this introductory section Section 2 is focused on general design and construction considerations that are applicable to all pavement types and rehabilitation projects Sections 3 and 4 identify specific considerations for
1
January 5 2012
constructing a Safety EdgeSM for asphalt concrete materials (AC) and Portland cement concrete (PCC) pavements respectively
2
January 5 2012
SECTION 2 SAFETY EDGESM ndash GENERAL DESIGN AND CONSTRUCTION CONSIDERATIONS
In terms of paving operations there is little difference between the placement and construction of AC and PCC materials (refer to Figure 1) with and without the inclusion of the Safety EdgeSM However there are important considerations that should be accounted for when incorporating the Safety EdgeSM into a paving operation This section of the Guide highlights the general design and construction details when constructing a Safety EdgeSM in conjunction with AC or PCC pavements
21 Safety EdgeSM Use
The Safety EdgeSM provides two important safety related functions It serves as a mitigating measure to help with pavement edge drop off that occurs after an AC layer is placed but before shoulders can be reconstructed flush with the paved surface The Safety EdgeSM also serves as a long-term safety feature for areas susceptible to material displacement andor erosion adjacent to the paved surface
An additional benefit of the Safety EdgeSM is that the density of the AC mat adjacent to the pavement edge was found to be higher in most areas with the Safety EdgeSM in comparison to areas without the Safety EdgeSM The Safety EdgeSM is believed to serve as a restriction to the lateral movement of the AC mat along an unconfined edge This observation was found from multiple demonstration projects Visual assessment of many Safety EdgeSM treatments have shown that trucks loaded with asphalt do not deformdamage the finished edge
(a) AC Project (b) PCC Project
Break point
Figure 1 Safety EdgeSM placed on an AC and PCC project
3
Where the Safety EdgeSM Can Be Placed
Where the Safety EdgeSM Should Not Be Placed
January 5 2012
The Safety EdgeSM can be used in almost every situation to provide a condition towards preventing near vertical lane-shoulder drop offs during construction and over time It also provides added insurance until such time that maintenance personnel are able to repair eroded areas of the shoulder adjacent to the paved surface
A site condition where the Safety EdgeSM should not be used is where the foreslopeembankment or ground surface has a steeper slope than the slope of the Safety EdgeSM This condition may exist for a portion of the road being paved thus the Safety EdgeSM should be considered for use on the remainder of the road Figure 2 depicts this condition
Figure 2 Example of where a foreslopeembankment is too steep for the Safety EdgeSM
The Safety EdgeSM should be excluded in areas where curb and gutter have been or will be placed as the Safety EdgeSM is appropriate for the interface of a paved material and an unpavedunbound material In areas where there is a restriction for vehicles leaving the paved surface (for example guardrails and other safety features) whether or not to use the Safety EdgeSM must be assessed on a case-by-case situation The agency may see value in using the Safety EdgeSM for its pavement quality benefit and thus may want to use it in these applications
4
January 5 2012
22 Pre-Construction and Discontinuous Paving Operations
The pre-construction activities for Safety EdgeSM projects are to review the paving plan and make sure the Safety EdgeSM can be placed in suitable areas along the project If there are areas with restrictions along the edge of the pavement (for example guardrails intersections and bridges) the width of the roadway and width of paving should be considered so that there is sufficient room for the Safety EdgeSM device for resurfacing projects As an example narrow bridges along some low volume roadways can result in conditions where the AC paver screed extensions cannot be moved-in sufficiently when using Safety EdgeSM devices that are bolted to the paver screed so the paver operator must steer the paver more towards the center of the roadway during paving operations (center line crown or other cross slope changes need to be considered in these conditions) Other areas where the foreslope is steeper than the Safety EdgeSM slope should be noted These conditions should be discussed in the contractors quality control plan andor pre-paving meeting and how the condition will be resolved
Paving across intersections and driveways with the Safety EdgeSM device in place is generally no different than when paving without the Safety EdgeSM The differences for both AC and PCC paving are noted below All of these conditions or paving anomalies should be identified and addressed prior to beginning paving operations
For AC paving extra attention from the paver and screed operators may be necessary to accommodate the Safety EdgeSM at transitions for intersections driveways and changes in longitudinal elevations or profile The reason for this extra attention is discussed in Section 3 of the Guide Specifically Section 32 discusses the different Safety EdgeSM
devices and their attachment to the paver For devices attached to the screed the screed operator can keep the Safety EdgeSM device lowered or can raise the device above the bottom of the screed so that the Safety EdgeSM is not placed through some intersections (refer to Figure 3) The capability for lowering and raising the device allows the paving operation to continue without disruption when discontinuous features or adjacent features are encountered For devices attached to the end plate the screed operator needs to monitor the height of the end plate ski to ensure the desired shape is placed
For PCC slip-form paving the PCC material at the intersection or driveway will need to be sawcut to remove the Safety EdgeSM (refer to Figure 4) or build up the Safety EdgeSM
by hand in order to tie into pavement intersections
5
January 5 2012
Screed operator raised the Safety EdgeSM device in
paving across this intersection The Safety
EdgeSM device can be kept lowered when paving
across driveways Agreement on how to treat
this condition should be established before paving
starts
Sawcut
Figure 3 Placing an AC overlay at an intersection of a Safety EdgeSM project
Figure 4 Sawcut on a PCC project at an intersection to remove the Safety EdgeSM
6
January 5 2012
23 Pavement EdgeShoulder Preparation
The pavement edge should be prepared in accordance with standard agency paving operations for both AC and PCC surfaces (refer to Figure 5)
Motor grader is used to remove vegetation and soil build-up along the edge of the pavement
A motorized broom cleans the surface of the pavement prior to applying the tack coat to the surface of the existing pavement
A tack coat is applied to the cleaned pavement surface prior to placing the asphalt overlay
Figure 5 Surface preparation activities performed prior to placing an AC overlay
7
January 5 2012
The following items are highlighted to ensure the agency considers them as they have been shown to adversely impact Safety EdgeSM construction on some projects
If vegetation exists along the pavement edge consideration should be given to removing this vegetation in the area supporting the Safety EdgeSM prior to paving Good asphalt paving practice includes not paving on vegetation as the asphalt will not adequately compact and thus will not perform adequately Figure 6 shows an example of a Safety EdgeSM edge placed over vegetation For asphalt paving a cleanclearly visible pavement edge will help the screed operator monitor the material placement along the pavementrsquos edge
If the agency removes vegetationsoil from the edge of the pavement (edge clipping) ensure a reasonable grade elevation and slope of the pavement edgeshoulder is established to minimize use of excess pavement material along the edge
Edge clipping should extend far enough to accommodate the additional width of the Safety EdgeSM which may be a change in standard operating practice The wedge part of the Safety EdgeSM is typically additional width therefore paving a vertical edge depth of 3 inches will require clipping an additional 6 inches of width to accommodate the Safety EdgeSM
Figure 6 Example of Safety EdgeSM placed on heavy vegetation ndash due to lack of adequate compaction the Safety EdgeSM will deteriorate
8
January 5 2012
24 Slope Measurement
Including the Safety EdgeSM on a new construction or resurfacing project does not impact the agencyrsquos material and construction specifications The only difference in determining the quality between projects with and without the Safety EdgeSM is the measurement of slope for the as-built Safety EdgeSM itself This part of the Guide discusses measuring the slope of the Safety EdgeSM
Figure 7 illustrates how the slope is measured or determined for an AC resurfacing project The length of line B is determined as the distance of a vertical virtual line from the edge or toe of the Safety EdgeSM to the pavement surface cross slope extended The toe of the Safety EdgeSM can be defined as where a straight line along the surface of the Safety EdgeSM
contacts the ground surface This point becomes important for asphalt mixtures with larger nominal maximum sized aggregate where the removal of one coarse aggregate particle can significantly change the measured slope The length of line A is determined as the distance from the point where there is space between the straight edge placed on the pavement surface at the edge defined as the break point and the vertical virtual line through the toe of the Safety EdgeSM or vertical line B The angle θ is calculated as θ = arctan BA This angle measurement is the angle that the vehicle tire encounters when the vehicle is attempting to return to the pavement The slope of a PCC Safety EdgeSM is determined in the same manner The angle measurement is made on the sloped portion of the Safety EdgeSM and does not include the vertical portion of the PCC edge
A
B
Toe of the slope
Break point
Figure 7 Measurement of Safety EdgeSM slope or angle
25 Backing Material Placement
It should be remembered that the Safety EdgeSM is a mitigation of the drop off created by the AC or PCC overlay or new paved layer it is not intended to substitute for a shoulder that is flush with the paved surface After the paved layer or overlay has been placed the shoulder or backing material needs to be graded back flush with the paved surface The shoulder material should be placed in accordance with standard equipment and procedures specified
9
January 5 2012
by the owner agency for both AC and PCC pavements The only cautionary note is to grade the backing or shoulder material over and along the Safety EdgeSM as soon as possible but in the case of an AC pavement after the mat has cooled sufficiently so that any scuffing or tearing of the surface from construction equipment is minimized Similarly PCC should be allowed to cure and gain sufficient strength so that the construction equipment grading the backing material does not damage the PCC Safety EdgeSM After construction is completed the Safety EdgeSM will be covered with the backing material and not seen by the road user as shown in Figure 8
Figure 8 Safety EdgeSM completely covered by shoulder backing material
10
January 5 2012
SECTION 3 SPECIFIC CONSIDERATIONS FOR CONSTRUCTING THE SAFETY EDGESM IN CONJUNCTION WITH NEW AC
PAVEMENTS OR AC OVERLAYS
This section of the Guide identifies issues that need to be monitored during the placement and compaction operations of the AC pavement
31 Design Features and Shape
The paved laneshoulder width and location of the Safety EdgeSM break point should be discussed and established prior to paving The Safety EdgeSM can be constructed on the unimproved or improved shoulder with the break point lining up directly over the existing pavement edge or over any portion of the previously paved surface as shown in Figure 9
Figure 9 Paver positioned to align the Safety EdgeSM break point over the existing pavement
The intent is not to sacrifice paved laneshoulder width to construct the Safety EdgeSM Constructing the Safety EdgeSM onto the unimproved shoulder does not result in a decrease in paved laneshoulder width
The Safety EdgeSM is designed to create a 30 degree finished angle relative to the pavement cross slope on the edge of the pavement Agency-specific tolerances may vary from those shown in Figure 10 which is from the FHWA guide specification On projects where multiple AC layers are used it is recommended each AC layer (except leveling layer) of the final 5 inches of AC receive the Safety EdgeSM as shown in Figure 10 For new construction or reconstruction with thicker AC layers consideration should be given to widening the underlying paved layers to accommodate the Safety EdgeSM without decreasing lane width as shown in Figure 10 On projets with multiple AC layers it is expected the additional volume of AC required to form the Safety EdgeSMwill increase bid quantities
11
Edge of Pavement
H Shoulder Backing Material
For H le 5 in
For H gt 5 in
January 5 2012
Note Recommended Rise to Run ratio range 112 to 120 The range of slope is equal to 26deg to 40deg
Figure 10 Recommended Safety EdgeSM configuration for AC pavements and overlays
12
Devices Attached to the Screed
End Plate Modifying Devices
January 5 2012
32 Equipment ndash AC Safety EdgeSM Devices
The current commercial Safety EdgeSM devices can be grouped into two categories (1) devices attached to the paver screed and (2) modifications or attachments to the paver end plate The devices listed below do not constitute an approved products list Highway agencies should evaluate any new Safety EdgeSM hardware for compliance with specifications before approving for use on a project
Currently there are three devices available from two different manufacturers which are (1) the ldquoShoulder Wedge Makerrdquo manufactured by TransTech wwwtranstechsyscom and (2) the ldquoAdvant-Edgerrdquo and ldquoRamp Champrdquo manufactured by the Advant-Edge Paving Equipment LLC wwwadvantedgepavingcom Each manufacturer provides detailed installation instructions for attaching their devices to the paver screed The devices can be easily attached to and removed from the paver screed with a simple two-bolt connection The Safety EdgeSM device should fit closely to the end plate to prevent AC from getting between the device itself and end plate The Ramp Champ can be set to a range of angles while the other devices have a fixed angle
The end plate modification devices are available from Carlson Paving Products Inc (Safety Edge End Gate) httpwwwcarlsonpavingproductscom and Willow Designs LLC httpwwwwillowdesignsllccom The ski of the devices form the slope of the Safety EdgeSM
and can be set to a range of angles The screed operator can adjust the angle of the ski while paving to ensure the final angle of the Safety EdgeSM after rolling is close to 30 degrees
33 Asphalt Concrete Materials
The Safety EdgeSM can be placed with all dense-graded AC materials that have been properly designed in accordance with existing mixture design methods including Hot Mix Asphalt (HMA) Warm Mix Asphalt (WMA) HMA with high amounts of Recycled Asphalt Pavement (RAP) HMA with Recycled Asphalt Shingles (RAS) polymer modified asphalt (PMA) rubberized gap graded and open graded mixes and other specialty mixtures The demonstration projects included HMA RAP RAS WMA and PMA mixtures
There are two critical material issues in terms of placing a Safety EdgeSM for AC mixtures (1) lateral movement of the AC mix during compaction and (2) the size or amount of coarse aggregate in the AC mixture
Most AC mixtures exhibit some lateral movement under the rollers during compaction and that movement is mixture and application dependent Lateral movement of the AC mix should not prevent the contractor from achieving an
13
Safety EdgeSM Device Installation
January 5 2012
acceptable Safety EdgeSM slope after final rolling Ensure that after rolling is completed the Safety EdgeSM break point lines up directly over the existing pavement edge or over any portion of the previously paved surface If the break point is over the unimproved shoulder (ie different support structure) the potential of a longitudinal crack forming is greater (Figure 11) This material related issue is discussed in more detail in Section 34 - Safety EdgeSM Construction under Rolling
The maximum nominal size aggregate of the mixture or amount of coarse aggregate can affect the surface texture or appearance of the Safety EdgeSM and measurement of the slope Fine-graded AC mixtures were observed to have a tighter surface appearance and texture along the edge Rough surface texture makes the measurement of the slope more difficult to quantify ndash increasing variability in slope measurements
Figure 11 Longitudinal crack due to Safety EdgeSM break point located on unimproved shoulder
34 Safety EdgeSM Construction
This section discusses items of interest to asphalt paving projects when a Safety EdgeSM is to be placed as part of the new construction or rehabilitation project
Manufacturers of commercially available devices provide detailed instructions for attaching the Safety EdgeSM devices to the paver Proper installation of the devices was discussed in a previous part of this section (Equipment ndash AC Safety EdgeSM Devices) A key issue for devices attached to the screed without guide rails is to ensure close installation to the end plate so loose mix does not get trapped between the device and end plate during paving operations At the beginning of the dayrsquos production when pulling off a transverse joint the screed operator needs to monitor the position of the device as the auger chamber and
14
AC Placement
January 5 2012
extension are being charged to ensure the device is in contact with the end plate These issues do not affect the end gate type device
The Safety EdgeSM can be placed with normal paving procedures and no changes to the operation of the paver need to be made More importantly the Safety EdgeSM device has no impact on how the paver operates whether paving on an embankment or crushed stone layer recently placed AC existing AC or PCC layers or milled surface
For those agencies that require trial or control sections as part of standard AC paving operations the slope of the Safety EdgeSM should be measured after all rolling has been completed to ensure the Safety EdgeSM slope did not ldquostand uprdquo (substantial increase in the slope) Trial sections provide an opportunity for the screed operator to make adjustments to the Safety EdgeSM and screed before high production paving begins For example to obtain the 30o finished angle the target angle to be achieved behind the paver by the Safety EdgeSM
device may need to be shallower for a given mix eg 25 degree Trial sections can also be used to assess if the edge will ldquostand uprdquo during the AC rolling operation The issue of maintaining the slope of the Safety EdgeSM is discussed under the next subsection ndash Rolling
The screed operator needs to watch and adjust three items during the paving operation when using a Safety EdgeSM device attached to the screed described in Section 32 (1) the Safety EdgeSM device itself (2) the end plate and (3) the screed (refer to Figure 12) If the Safety EdgeSM device with too much downward pressure rides on the AC or other stiff base material that has been previously placed this can result in undesirable paving results as described below
When the Safety EdgeSM device rides on a base with a rough positive surface texture (eg coarse aggregate protruding upward such as in a chip seal) in some cases it may cause the screed to vibrate or jerk The toe of the Safety EdgeSM can get caught on larger aggregate particles and when the particle breaks loose the screed jerks The screed operator will need to monitor the downward pressure of the Safety EdgeSM
device so this does not happen in extreme cases When the Safety EdgeSM device rides on a base with a varying longitudinal profile
the screed operator will need to monitor the downward pressure of the Safety EdgeSM
device to keep the screed functioning as designed within the free-floating principle The spring around the shaft of the Safety EdgeSM is designed to keep a relatively uniform pressure on the mixture being placed under the Safety EdgeSM ndash assuming the vertical operational limit of the Safety Edge is not exceeded
The screed operator also needs to monitor the downward pressure of the Safety EdgeSM device when it rides on soft surfaces The leading edge of the device can dig into the soft shoulder pulling soilaggregate into the asphalt wedge of the Safety EdgeSM This is the same condition experienced in conventional paving when the paver end plate ski digs into the soft shoulder
15
January 5 2012
Wrench used to adjust the elevation
of the Safety EdgeSM
device
Figure 12 Safety EdgeSM adjustment for raising and lowering the device
When paving begins the screed operator should pay close attention to the following items when using a Safety EdgeSM device attached to the screed
In charging the auger chamber with AC the screed operator should ensure that the device is in close contact with the end plate so that mix does not get between the device and end plate and that there is sufficient material surrounding the device to keep it held against the end plate
After the paving operation begins and the full AC lift thickness has stabilized the screed operator should adjust the Safety EdgeSM device by lowering the device into contact with the underlying surface This adjustment should not be made prior to the paver moving off the shims at the start of a dayrsquos paving operation The screed operator should look behind the paver to ensure that the slope of the edge will produce a slope of about 30 degrees after rolling
16
January 5 2012
The paver end plate ski needs to remain in contact with the surface being paved over AC can extrude out under the end plate ski if not in contact with the existing surface which can reduce the amount of AC available for the Safety EdgeSM ndash affecting the slope and density of the wedge itself
When placing an AC overlay the Safety EdgeSM can ride on the underlying layer However the screed operator should closely monitor the downward force on the Safety EdgeSM device relative to underlying hard surfaces with variable longitudinal profiles which can change the forces on one side of the screed (free floating screed principle or mode) This concern is heightened at intersections or areas of increased variation of longitudinal profile The spring around the shaft of the Safety EdgeSM is designed to keep a relatively uniform pressure on the mixture being placed under the Safety EdgeSM ndash assuming the vertical operational limit of the Safety Edge is not exceeded
The operator needs to be aware that the height adjustment screw can be bent from paving with too much downward force especially if the shoe is in contact with a variable elevation of a hard surface The height adjustment screw can also be bent from or hitting objects while in transport
The screed operator should monitor the surface texture and condition of the Safety EdgeSM
When drawing in the hydraulic extension the screed operator needs to closely monitor the process to ensure that the Safety EdgeSM device does not come in contact with the cross feed auger If this occurs it can damage both the Safety EdgeSM device and auger
If the hydraulic extension of the screed is extended during mainline paving the amount of mix in the extension can be reduced near the paver end plate When this occurs the screed operator should monitor the amount of mix to ensure it is not getting between the end plate and Safety EdgeSM device itself as the screed moves out
The flow of AC material to the Safety EdgeSM device should be closely monitored to make sure enough material is available to form a continuous edge and that the material feed augers are properly positioned
Paver manufactures commonly recommend material feed augers be no greater than 18 inches from the end plate
When the paver is being moved the Safety EdgeSM device should be removed or raised to its mounting height or uppermost position This will ensure that the bottom of the device will not strikeget caught on any obstruction
When using a Safety EdgeSM device the screed operator needs to continually be aware of the position of the break point of the Safety EdgeSM slope and keep the break point on the structural base or existing pavement
At the beginning of the project it is recommended that slope measurements be made immediately behind the paver and after each roller pass The focus is on the final Safety EdgeSM slope angle after all rolling to determine how rolling impacts the final slope angle
17
Rolling
January 5 2012
The contractor may want to periodically make these measurements as part of the quality control process
No special rollers are required for compacting the AC mix along and adjacent to the Safety EdgeSM (refer to Figure 13)
Figure 13 Rolling the Safety EdgeSM with standard rollers ndash No special rollers are required
18
January 5 2012
Most AC mixtures exhibit some lateral movement under the rollers during compaction Lateral movement of the AC mix should not prevent the contractor from achieving an acceptable Safety EdgeSM slope after final rolling For some of the demonstration projects the contractor did change or revise the standard rolling pattern to maximize the density of the AC mat while retaining an appropriate Safety EdgeSM angle Just like for any AC paving project the optimum rolling pattern is AC mixture specific A rolling pattern used to compact a low stiffness mix and high stiffness mix may be different to meet the density requirements
The following recommendations are made based on the findings from multiple demonstration projects
The contractor should roll the AC mat and pavement edges based on normal or standard compaction operation This should ensure adequate density along and near the pavement edge Multiple demonstration projects have been constructed successfully where the pavement edge was rolled with the contractorrsquos standard rolling pattern
After final rolling the slope of the Safety EdgeSM should be measured If the slope of the edge is too steep the contractor should determine if the slope of the edge was steepened because of excessive rolling the use of a mix that exhibits tenderness or the AC mixture is simply too soft to retain the targeted slope angle A variable angle Safety EdgeSM device can be used to place the Safety EdgeSM at an angle less than 30 degrees behind the paver which should assist the contractor in achieving 30 degrees after rolling
Delaying the rolling of the edge of the mat should be the last resort taken to retain the slope of the Safety EdgeSM This becomes a decision between durability along and near the pavement edge and retaining a slope of the Safety EdgeSM
Continually monitor the slope of the Safety EdgeSM after final rolling The slope of the Safety EdgeSM varied between 30 to 40 degrees on multiple demonstration projects without delaying the rolling of the Safety EdgeSM
35 Quality Measurement
The same properties used or identified by the owner agency to measure the quality of AC pavement layers for acceptance should also be used on projects that include the Safety EdgeSM The acceptance plan should not be modified for projects that include the Safety EdgeSM More importantly the density strength andor smoothness requirements appropriate for a typical project should not be relaxed simply because the Safety EdgeSM is added to a resurfacing or new construction project Thus the only difference between projects with and without the Safety EdgeSM is the slope of the edge itself
19
January 5 2012
SECTION 4 SPECIFIC CONSIDERATIONS FOR CONSTRUCTING THE SAFETY EDGESM IN CONJUNCTION WITH NEW CONCRETE
PAVEMENTS OR CONCRETE OVERLAYS
This section identifies issues that need to be monitored during the construction of PCC pavements All of the PCC demonstration projects that were used for preparing this Guide included the use of slip-form paving to form the Safety EdgeSM A benefit of forming the Safety EdgeSM during PCC slip-form paving is the sensitivity to edge slump is reduced
41 Design Features and Shape
The Safety EdgeSM is designed to create a 30 degree finished angle relative to the pavement cross slope as shown in Figure 14 and should be constructed on a similar structural base as the adjoining monolithically placed laneshoulder During design the structural base width needs to account for the Safety EdgeSM width
2 in Min
Edge of Pavement
H
5 in Approx
Shoulder Backing Material
Note Recommended Rise to Run ratio range 112 to 120 The range of slope is equal to 26deg to 40deg
Figure 14 Recommended Safety EdgeSM configuration for PCC pavements and overlays
42 Equipment ndash PCC Safety EdgeSM Devices
This part describes the modifications that must be made to a slip form concrete paver to form a Safety EdgeSM It also notes the essential attributes of a concrete paver that are necessary to create an effective Safety EdgeSM When a slip form paver is not being used the Safety EdgeSM needs to be manufactured or created as part of the forms ndash one side of the forms will have an angle of 30 degrees rather than being vertical
Currently there are no commercially available Safety EdgeSM devices for PCC pavers or forms Custom devices however can be fabricated by modifying the finishing pan of the paver (refer to Figure 15) The pan is essentially configured to form an inverted curb under the pan close to the end gate The steel components of the assembly need to be robust in order to resist bending during paving operations from the force of the plastic PCC The following provides a description of the modifications that were made to a Gomaco paver that
20
PCC Placement
January 5 2012
was used on one of the PCC demonstration projects and identifies some of the issues or items that should be considered in fabricating the Safety EdgeSM profile
A template was created for the Safety EdgeSM profile to ensure correct dimensions The template was used to manufacture a stainless steel profile pan of the desired shape and dimensions Portions of the existing profile pan were removed to fit in the new Safety EdgeSM profile [Note The contractor decided against welding the Safety EdgeSM profile to the bottom of the existing profile section or pan because of a concern that the welds might tear the finished PCC]
A 2-inch finish tail on the stainless steel Safety EdgeSM profile was fabricated to help finish the portion of the edge where it goes from slope to vertical When going through existing intersections driveways or where the grade is not exact on the outside edge the 2-inch finish tail did drag in some locations For the demonstration project the contractor cut one inch off of this tail and it performed well but cutting 05 inches from the tail would have also worked well
Adjusting bolts were fitted to the Safety EdgeSM profile pan One adjustment bolt was on the sloped section in case an adjustment had to be made if the edge profile was not finishing properly
In setting up the paver care was taken to position the vibrators in the specific locations for proper consolidation of the Safety EdgeSMndashnear the breakpoint
Unlike the Safety EdgeSM attachments for AC layers or overlays the modifications made to the concrete paver cannot be easily removed and replaced The modifications can be removed but the parts must be cut from the pan using a torch or grinder Touchup of the pan is required to return the unit to service on standard PCC pavements
43 Concrete Mixtures
Demonstration projects completed to date have used standard concrete mixes No changes to the mix were needed to accommodate the SE
44 Safety EdgeSM Construction
This part of the Guide discusses items of interest to PCC paving projects when a Safety EdgeSM is to be placed as part of the new construction or rehabilitation project
Normal paving procedures are usually sufficient for forming the Safety EdgeSM on mainline sections of the roadway using slip form paving operations and equipment Material
21
Transitioning Between Different Edge Profiles
January 5 2012
properties of the hardened concrete from the edge and the interior of the pavement have been demonstrated to be similar
Safety EdgeSM device
Figure 15 View of the Safety EdgeSM device from front of paver
It is recommended to have a transition from a no Safety EdgeSM section to a Safety EdgeSM
section to avoid a vertical edge perpendicular to traffic (ie similar to beginning section of bridge concrete railparapet where the bottom of the railparapet is modified to reduce the probability of vehicle tire snagging)
An important issue to be addressed is the intersection of cross roads where a vertical edge is required Due to the fixed nature of the edge and shoe assembly the contractor can consider different options depending on the number and extent of sections with different edge profiles In either case additional labor should be anticipated to tie into intersections or other areas requiring different edge profiles when paving using the Safety EdgeSM concept The following provides an overview of the two options that were used on some of the demonstration projects
If there are only a few intersecting roadways driveways or limited areas where a vertical face is required along the edge of the pavement the contractor can consider placing the safety edge using normal paving operations The Safety EdgeSM is sawcut
22
Vibration
Sawcutting
January 5 2012
and removed to create a vertical edge The sawing of the Safety EdgeSM can be completed at the same time the transverse joints are sawed This option has worked fine but does waste some PCC and requires additional sawing
Another option is to box out the areas requiring different edge profiles and place forms The PCC in these limited areas is placed by hand using normal construction practices in order to tie into pavement intersections driveways and other features
Generally the standard spacing of the vibrators are sufficient to properly consolidate the fresh concrete at the Safety EdgeSM Consolidation of the material within the Safety EdgeSM
should be checked at the start of any project If slip form pavers are not being used hand vibrators need to be used to ensure that the PCC flows into the lower part of the Safety EdgeSM As noted at the beginning of this section all demonstration projects included the use of slip form pavers in construction the Safety EdgeSM
Curing
Care should be taken to insure the specified curing procedures are properly followed for all surfaces at the edge of the pavement including the Safety EdgeSM The Safety EdgeSM however does not require any special curing requirements beyond that for typical PCC layers
Transverse control joint sawcutting can be stopped at the breakpoint of the Safety EdgeSM
and not continued through the sloped surface of the edge Experience shows the contraction cracks normally form at the end of the sawcut and extend through the Safety EdgeSM as planned (refer to Figure 16)
23
January 5 2012
Figure 16 Sawcut and crack at the formed joint on one of the Safety EdgeSM demonstration projects
45 Quality Measurement
The same properties used or identified by the owner agency to measure the quality of PCC pavement layers for acceptance should also be used on projects that include the Safety EdgeSM The acceptance plan should not be modified for projects that include the Safety EdgeSM More importantly the air void content strength andor smoothness requirements appropriate for a typical project should not be relaxed simply because the Safety EdgeSM is added to a PCC overlay or new construction project Thus the only difference between projects with and without the Safety EdgeSM is the slope of the edge itself
24
January 5 2012
REFERENCES
EDC Safety EdgeSM field reports can be found at httpwwwfhwadotgoveverydaycountstechnologysafetyedgefield_reportscfm
25
January 5 2012
APPENDICES
Safety EdgeSM guide specification can be found at httpwwwfhwadotgoveverydaycountstechnologysafetyedgespecscfm
26

January 5 2012
SI (MODERN METRIC) CONVERSION FACTORS APPROXIMATE CONVERSIONS TO SI UNITS
Symbol When You Know Multiply By To Find Symbol
(none)inft ydmi
in2
ft2
yd2
ac mi2
fl oz gal ft3
yd3
ozlbT
degF
fc fl
lbflbfin2 (psi) kin2 (ksi)
lbft3 (pcf)
LENGTH mil 254 micrometers
inches 254 millimeters feet 0305 meters
yards 0914 meters miles 161 kilometers
AREA square inches 6452 square millimeters square feet 0093 square meters square yards 0836 square meters acres 0405 hectares square miles 259 square kilometers
VOLUME fluid ounces 2957 millimeters gallons 3785 liters cubic feet 0028 cubic meters cubic yards 0765 cubic meters
NOTE volumes greater than 1000 L shall be shown in m3
MASS ounces 2835 grams pounds 0454 kilograms
short tons (2000 lb) 0907 megagrams (or metric ton)
TEMPERATURE (exact degrees) Fahrenheit 5 (F-32)9
or (F-32)18 Celsius
ILLUMINATION foot-candles 1076 lux foot-Lamberts 3426 candela per square meter
FORCE and PRESSURE or STRESS poundforce 445 Newtons
poundforce per square inch 689 kiloPascals kips per square inch 689 megaPascals
DENSITY pounds per cubic foot 1602 kilograms per cubic meter
μm mm m m km
mm2
m2
m2
ha km2
mL L m3
m3
g kg Mg (or t)
degC
lx cdm2
N kPa MPa
kgm3
APPROXIMATE CONVERSIONS FROM SI UNITS Symbol When You Know Multiply By To Find Symbol
μm mmm m km
mm2
m2
m2
hakm2
mLL m3
m3
g kgMg (or t)
degC
lxcdm2
N kPA MPa
LENGTH micrometers 0039 mil
millimeters 0039 inches meters 328 feet meters 109 yards
kilometers 0621 miles AREA
square millimeters 00016 square inches square meters 10764 square feet square meters 1195 square yards
hectares 247 acres square kilometers 0386 square miles
VOLUME milliliters 0034 fluid ounces
liters 0264 gallons cubic meters 35314 cubic feet cubic meters 1307 cubic yards
MASS grams 0035 ounces
kilograms 2202 pounds megagrams (or metric ton) 1103 short tons (2000 lb)
TEMPERATURE Celsius 18C+32 Fahrenheit
ILLUMINATION lux 00929 foot-candles
candela per square meter 02919 foot-Lamberts FORCE and PRESSURE or STRESS
Newtons 0225 poundforce kiloPascals 0145 poundforce per square inch megaPascals 0145 kips per square inch
(none) in ft yd mi
in2
ft2
yd2
ac mi2
fl oz gal ft3
yd3
oz lb T
degF
fc fl
lbf lbfin2 (psi) kin2 (ksi)
SI is the symbol for the International System of Units Appropriate rounding should be made to comply with Section 4 of ASTM E380 (Revised March 2003)
iii
Topic Page
FOREWORD 1
SECTION 1 INTRODUCTION 1
11 INTRODUCTION 1 12 PURPOSE OF THE GUIDE 1 13 SCOPE OF THE GUIDE 1
SECTION 2 SAFETY EDGESM ndash GENERAL DESIGN AND CONSTRUCTION CONSIDERATIONS 3
21 SAFETY EDGESM USE 3
Where the Safety EdgeSM Can Be Placed 4
Where the Safety EdgeSM Should Not Be Placed 4
22 PRE-CONSTRUCTION AND DISCONTINUOUS PAVING OPERATIONS 5 23 PAVEMENT EDGESHOULDER PREPARATION 7 24 SLOPE MEASUREMENT 9 25 BACKING MATERIAL PLACEMENT 9
SECTION 3 SPECIFIC CONSIDERATIONS FOR CONSTRUCTING THE SAFETY EDGESM IN CONJUNCTION WITH NEW AC PAVEMENTS OR AC
OVERLAYS 11
31 DESIGN FEATURES AND SHAPE 11 32 EQUIPMENT ndash AC SAFETY EDGESM DEVICES 13
Devices Attached to the Screed 13
Modification to the End Plate 13
33 ASPHALT CONCRETE MATERIALS 13 34 SAFETY EDGESM CONSTRUCTION 14
Safety EdgeSM Device Installation 14
AC Placement 15
Rolling 18
35 QUALITY MEASUREMENT 19
January 5 2012
Table of Contents
iv
Topic Page
SECTION 4 SPECIFIC CONSIDERATIONS FOR CONSTRUCTING THE SAFETY EDGESM IN CONJUNCTION WITH NEW CONCRETE PAVEMENTS
OR CONCRETE OVERLAYS 20
41 DESIGN FEATURES AND SHAPE 20 42 EQUIPMENT ndash PCC SAFETY EDGESM DEVICES 20 43 CONCRETE MIXTURES 21 44 SAFETY EDGESM CONSTRUCTION 21
PCC Placement 21
Transitioning Between Different Edge Profiles 22
Vibration 23
Curing 23
Sawcutting 23
45 QUALITY MEASUREMENT 24
REFERENCES 25
APPENDICES 26
January 5 2012
Table of Contents
v
January 5 2012
SECTION 1 INTRODUCTION
11 Introduction
The Safety EdgeSM is a relatively simple but effective solution that can help save lives by allowing drivers who drift off highways to return to the road safely
During conventional paving processes the pavement is constructed with vertical or near vertical edges Instead of a vertical drop-off the finished Safety EdgeSM forms the edge of the pavement with a slope of approximately 30 degrees Research has shown this ldquotransition from on-roadway surface to shoulder and back is so smooth it defies assignment of any degree of severityrdquo The Safety EdgeSM provides a strong durable transition for all vehicles and helps prevents pavement edge raveling
The recommended practice of bringing the adjacent soil or aggregate material (unpaved shoulder or modified soil) flush with the top of the pavement often requires frequent maintenance When the vertical edge is exposed due to wearerosion it can contribute to drivers losing control of the vehicle when attempting to recover from a roadway departure The Safety EdgeSM concept is when drop-offs along the pavement edge occur the edge will not be vertical but has a shape that will not induce tire scrubbing By including the Safety EdgeSM detail while paving this safety countermeasure can be implemented system-wide at little or no cost
12 Purpose of the Guide
The Federal Highway Administration (FHWA) works with States and Industry to accelerate the use of innovative technologies This Guide supports efforts to implement the Safety EdgeSM technology by providing information and guidance to assist agencies in developing standards and specifications for adopting this treatment as a standard practice on all applicable new and resurfacing pavement projects
The Guide provides information on the various elements to consider when designing and constructing pavement projects with the Safety EdgeSM The Guide provides insights and lessons learned on previously constructed projects highlighting items that may vary from conventional pavement design and construction
13 Scope of the Guide
The information for this Guide draws significantly from experiences obtained from 10 formal construction project evaluations conducted in 2010 and 2011 as well as several ad hoc evaluations It is expected that significant enhancements in equipment and procedures will be forthcoming as the Safety EdgeSM is implemented into standard practice
The Guide is grouped into four sections including this introductory section Section 2 is focused on general design and construction considerations that are applicable to all pavement types and rehabilitation projects Sections 3 and 4 identify specific considerations for
1
January 5 2012
constructing a Safety EdgeSM for asphalt concrete materials (AC) and Portland cement concrete (PCC) pavements respectively
2
January 5 2012
SECTION 2 SAFETY EDGESM ndash GENERAL DESIGN AND CONSTRUCTION CONSIDERATIONS
In terms of paving operations there is little difference between the placement and construction of AC and PCC materials (refer to Figure 1) with and without the inclusion of the Safety EdgeSM However there are important considerations that should be accounted for when incorporating the Safety EdgeSM into a paving operation This section of the Guide highlights the general design and construction details when constructing a Safety EdgeSM in conjunction with AC or PCC pavements
21 Safety EdgeSM Use
The Safety EdgeSM provides two important safety related functions It serves as a mitigating measure to help with pavement edge drop off that occurs after an AC layer is placed but before shoulders can be reconstructed flush with the paved surface The Safety EdgeSM also serves as a long-term safety feature for areas susceptible to material displacement andor erosion adjacent to the paved surface
An additional benefit of the Safety EdgeSM is that the density of the AC mat adjacent to the pavement edge was found to be higher in most areas with the Safety EdgeSM in comparison to areas without the Safety EdgeSM The Safety EdgeSM is believed to serve as a restriction to the lateral movement of the AC mat along an unconfined edge This observation was found from multiple demonstration projects Visual assessment of many Safety EdgeSM treatments have shown that trucks loaded with asphalt do not deformdamage the finished edge
(a) AC Project (b) PCC Project
Break point
Figure 1 Safety EdgeSM placed on an AC and PCC project
3
Where the Safety EdgeSM Can Be Placed
Where the Safety EdgeSM Should Not Be Placed
January 5 2012
The Safety EdgeSM can be used in almost every situation to provide a condition towards preventing near vertical lane-shoulder drop offs during construction and over time It also provides added insurance until such time that maintenance personnel are able to repair eroded areas of the shoulder adjacent to the paved surface
A site condition where the Safety EdgeSM should not be used is where the foreslopeembankment or ground surface has a steeper slope than the slope of the Safety EdgeSM This condition may exist for a portion of the road being paved thus the Safety EdgeSM should be considered for use on the remainder of the road Figure 2 depicts this condition
Figure 2 Example of where a foreslopeembankment is too steep for the Safety EdgeSM
The Safety EdgeSM should be excluded in areas where curb and gutter have been or will be placed as the Safety EdgeSM is appropriate for the interface of a paved material and an unpavedunbound material In areas where there is a restriction for vehicles leaving the paved surface (for example guardrails and other safety features) whether or not to use the Safety EdgeSM must be assessed on a case-by-case situation The agency may see value in using the Safety EdgeSM for its pavement quality benefit and thus may want to use it in these applications
4
January 5 2012
22 Pre-Construction and Discontinuous Paving Operations
The pre-construction activities for Safety EdgeSM projects are to review the paving plan and make sure the Safety EdgeSM can be placed in suitable areas along the project If there are areas with restrictions along the edge of the pavement (for example guardrails intersections and bridges) the width of the roadway and width of paving should be considered so that there is sufficient room for the Safety EdgeSM device for resurfacing projects As an example narrow bridges along some low volume roadways can result in conditions where the AC paver screed extensions cannot be moved-in sufficiently when using Safety EdgeSM devices that are bolted to the paver screed so the paver operator must steer the paver more towards the center of the roadway during paving operations (center line crown or other cross slope changes need to be considered in these conditions) Other areas where the foreslope is steeper than the Safety EdgeSM slope should be noted These conditions should be discussed in the contractors quality control plan andor pre-paving meeting and how the condition will be resolved
Paving across intersections and driveways with the Safety EdgeSM device in place is generally no different than when paving without the Safety EdgeSM The differences for both AC and PCC paving are noted below All of these conditions or paving anomalies should be identified and addressed prior to beginning paving operations
For AC paving extra attention from the paver and screed operators may be necessary to accommodate the Safety EdgeSM at transitions for intersections driveways and changes in longitudinal elevations or profile The reason for this extra attention is discussed in Section 3 of the Guide Specifically Section 32 discusses the different Safety EdgeSM
devices and their attachment to the paver For devices attached to the screed the screed operator can keep the Safety EdgeSM device lowered or can raise the device above the bottom of the screed so that the Safety EdgeSM is not placed through some intersections (refer to Figure 3) The capability for lowering and raising the device allows the paving operation to continue without disruption when discontinuous features or adjacent features are encountered For devices attached to the end plate the screed operator needs to monitor the height of the end plate ski to ensure the desired shape is placed
For PCC slip-form paving the PCC material at the intersection or driveway will need to be sawcut to remove the Safety EdgeSM (refer to Figure 4) or build up the Safety EdgeSM
by hand in order to tie into pavement intersections
5
January 5 2012
Screed operator raised the Safety EdgeSM device in
paving across this intersection The Safety
EdgeSM device can be kept lowered when paving
across driveways Agreement on how to treat
this condition should be established before paving
starts
Sawcut
Figure 3 Placing an AC overlay at an intersection of a Safety EdgeSM project
Figure 4 Sawcut on a PCC project at an intersection to remove the Safety EdgeSM
6
January 5 2012
23 Pavement EdgeShoulder Preparation
The pavement edge should be prepared in accordance with standard agency paving operations for both AC and PCC surfaces (refer to Figure 5)
Motor grader is used to remove vegetation and soil build-up along the edge of the pavement
A motorized broom cleans the surface of the pavement prior to applying the tack coat to the surface of the existing pavement
A tack coat is applied to the cleaned pavement surface prior to placing the asphalt overlay
Figure 5 Surface preparation activities performed prior to placing an AC overlay
7
January 5 2012
The following items are highlighted to ensure the agency considers them as they have been shown to adversely impact Safety EdgeSM construction on some projects
If vegetation exists along the pavement edge consideration should be given to removing this vegetation in the area supporting the Safety EdgeSM prior to paving Good asphalt paving practice includes not paving on vegetation as the asphalt will not adequately compact and thus will not perform adequately Figure 6 shows an example of a Safety EdgeSM edge placed over vegetation For asphalt paving a cleanclearly visible pavement edge will help the screed operator monitor the material placement along the pavementrsquos edge
If the agency removes vegetationsoil from the edge of the pavement (edge clipping) ensure a reasonable grade elevation and slope of the pavement edgeshoulder is established to minimize use of excess pavement material along the edge
Edge clipping should extend far enough to accommodate the additional width of the Safety EdgeSM which may be a change in standard operating practice The wedge part of the Safety EdgeSM is typically additional width therefore paving a vertical edge depth of 3 inches will require clipping an additional 6 inches of width to accommodate the Safety EdgeSM
Figure 6 Example of Safety EdgeSM placed on heavy vegetation ndash due to lack of adequate compaction the Safety EdgeSM will deteriorate
8
January 5 2012
24 Slope Measurement
Including the Safety EdgeSM on a new construction or resurfacing project does not impact the agencyrsquos material and construction specifications The only difference in determining the quality between projects with and without the Safety EdgeSM is the measurement of slope for the as-built Safety EdgeSM itself This part of the Guide discusses measuring the slope of the Safety EdgeSM
Figure 7 illustrates how the slope is measured or determined for an AC resurfacing project The length of line B is determined as the distance of a vertical virtual line from the edge or toe of the Safety EdgeSM to the pavement surface cross slope extended The toe of the Safety EdgeSM can be defined as where a straight line along the surface of the Safety EdgeSM
contacts the ground surface This point becomes important for asphalt mixtures with larger nominal maximum sized aggregate where the removal of one coarse aggregate particle can significantly change the measured slope The length of line A is determined as the distance from the point where there is space between the straight edge placed on the pavement surface at the edge defined as the break point and the vertical virtual line through the toe of the Safety EdgeSM or vertical line B The angle θ is calculated as θ = arctan BA This angle measurement is the angle that the vehicle tire encounters when the vehicle is attempting to return to the pavement The slope of a PCC Safety EdgeSM is determined in the same manner The angle measurement is made on the sloped portion of the Safety EdgeSM and does not include the vertical portion of the PCC edge
A
B
Toe of the slope
Break point
Figure 7 Measurement of Safety EdgeSM slope or angle
25 Backing Material Placement
It should be remembered that the Safety EdgeSM is a mitigation of the drop off created by the AC or PCC overlay or new paved layer it is not intended to substitute for a shoulder that is flush with the paved surface After the paved layer or overlay has been placed the shoulder or backing material needs to be graded back flush with the paved surface The shoulder material should be placed in accordance with standard equipment and procedures specified
9
January 5 2012
by the owner agency for both AC and PCC pavements The only cautionary note is to grade the backing or shoulder material over and along the Safety EdgeSM as soon as possible but in the case of an AC pavement after the mat has cooled sufficiently so that any scuffing or tearing of the surface from construction equipment is minimized Similarly PCC should be allowed to cure and gain sufficient strength so that the construction equipment grading the backing material does not damage the PCC Safety EdgeSM After construction is completed the Safety EdgeSM will be covered with the backing material and not seen by the road user as shown in Figure 8
Figure 8 Safety EdgeSM completely covered by shoulder backing material
10
January 5 2012
SECTION 3 SPECIFIC CONSIDERATIONS FOR CONSTRUCTING THE SAFETY EDGESM IN CONJUNCTION WITH NEW AC
PAVEMENTS OR AC OVERLAYS
This section of the Guide identifies issues that need to be monitored during the placement and compaction operations of the AC pavement
31 Design Features and Shape
The paved laneshoulder width and location of the Safety EdgeSM break point should be discussed and established prior to paving The Safety EdgeSM can be constructed on the unimproved or improved shoulder with the break point lining up directly over the existing pavement edge or over any portion of the previously paved surface as shown in Figure 9
Figure 9 Paver positioned to align the Safety EdgeSM break point over the existing pavement
The intent is not to sacrifice paved laneshoulder width to construct the Safety EdgeSM Constructing the Safety EdgeSM onto the unimproved shoulder does not result in a decrease in paved laneshoulder width
The Safety EdgeSM is designed to create a 30 degree finished angle relative to the pavement cross slope on the edge of the pavement Agency-specific tolerances may vary from those shown in Figure 10 which is from the FHWA guide specification On projects where multiple AC layers are used it is recommended each AC layer (except leveling layer) of the final 5 inches of AC receive the Safety EdgeSM as shown in Figure 10 For new construction or reconstruction with thicker AC layers consideration should be given to widening the underlying paved layers to accommodate the Safety EdgeSM without decreasing lane width as shown in Figure 10 On projets with multiple AC layers it is expected the additional volume of AC required to form the Safety EdgeSMwill increase bid quantities
11
Edge of Pavement
H Shoulder Backing Material
For H le 5 in
For H gt 5 in
January 5 2012
Note Recommended Rise to Run ratio range 112 to 120 The range of slope is equal to 26deg to 40deg
Figure 10 Recommended Safety EdgeSM configuration for AC pavements and overlays
12
Devices Attached to the Screed
End Plate Modifying Devices
January 5 2012
32 Equipment ndash AC Safety EdgeSM Devices
The current commercial Safety EdgeSM devices can be grouped into two categories (1) devices attached to the paver screed and (2) modifications or attachments to the paver end plate The devices listed below do not constitute an approved products list Highway agencies should evaluate any new Safety EdgeSM hardware for compliance with specifications before approving for use on a project
Currently there are three devices available from two different manufacturers which are (1) the ldquoShoulder Wedge Makerrdquo manufactured by TransTech wwwtranstechsyscom and (2) the ldquoAdvant-Edgerrdquo and ldquoRamp Champrdquo manufactured by the Advant-Edge Paving Equipment LLC wwwadvantedgepavingcom Each manufacturer provides detailed installation instructions for attaching their devices to the paver screed The devices can be easily attached to and removed from the paver screed with a simple two-bolt connection The Safety EdgeSM device should fit closely to the end plate to prevent AC from getting between the device itself and end plate The Ramp Champ can be set to a range of angles while the other devices have a fixed angle
The end plate modification devices are available from Carlson Paving Products Inc (Safety Edge End Gate) httpwwwcarlsonpavingproductscom and Willow Designs LLC httpwwwwillowdesignsllccom The ski of the devices form the slope of the Safety EdgeSM
and can be set to a range of angles The screed operator can adjust the angle of the ski while paving to ensure the final angle of the Safety EdgeSM after rolling is close to 30 degrees
33 Asphalt Concrete Materials
The Safety EdgeSM can be placed with all dense-graded AC materials that have been properly designed in accordance with existing mixture design methods including Hot Mix Asphalt (HMA) Warm Mix Asphalt (WMA) HMA with high amounts of Recycled Asphalt Pavement (RAP) HMA with Recycled Asphalt Shingles (RAS) polymer modified asphalt (PMA) rubberized gap graded and open graded mixes and other specialty mixtures The demonstration projects included HMA RAP RAS WMA and PMA mixtures
There are two critical material issues in terms of placing a Safety EdgeSM for AC mixtures (1) lateral movement of the AC mix during compaction and (2) the size or amount of coarse aggregate in the AC mixture
Most AC mixtures exhibit some lateral movement under the rollers during compaction and that movement is mixture and application dependent Lateral movement of the AC mix should not prevent the contractor from achieving an
13
Safety EdgeSM Device Installation
January 5 2012
acceptable Safety EdgeSM slope after final rolling Ensure that after rolling is completed the Safety EdgeSM break point lines up directly over the existing pavement edge or over any portion of the previously paved surface If the break point is over the unimproved shoulder (ie different support structure) the potential of a longitudinal crack forming is greater (Figure 11) This material related issue is discussed in more detail in Section 34 - Safety EdgeSM Construction under Rolling
The maximum nominal size aggregate of the mixture or amount of coarse aggregate can affect the surface texture or appearance of the Safety EdgeSM and measurement of the slope Fine-graded AC mixtures were observed to have a tighter surface appearance and texture along the edge Rough surface texture makes the measurement of the slope more difficult to quantify ndash increasing variability in slope measurements
Figure 11 Longitudinal crack due to Safety EdgeSM break point located on unimproved shoulder
34 Safety EdgeSM Construction
This section discusses items of interest to asphalt paving projects when a Safety EdgeSM is to be placed as part of the new construction or rehabilitation project
Manufacturers of commercially available devices provide detailed instructions for attaching the Safety EdgeSM devices to the paver Proper installation of the devices was discussed in a previous part of this section (Equipment ndash AC Safety EdgeSM Devices) A key issue for devices attached to the screed without guide rails is to ensure close installation to the end plate so loose mix does not get trapped between the device and end plate during paving operations At the beginning of the dayrsquos production when pulling off a transverse joint the screed operator needs to monitor the position of the device as the auger chamber and
14
AC Placement
January 5 2012
extension are being charged to ensure the device is in contact with the end plate These issues do not affect the end gate type device
The Safety EdgeSM can be placed with normal paving procedures and no changes to the operation of the paver need to be made More importantly the Safety EdgeSM device has no impact on how the paver operates whether paving on an embankment or crushed stone layer recently placed AC existing AC or PCC layers or milled surface
For those agencies that require trial or control sections as part of standard AC paving operations the slope of the Safety EdgeSM should be measured after all rolling has been completed to ensure the Safety EdgeSM slope did not ldquostand uprdquo (substantial increase in the slope) Trial sections provide an opportunity for the screed operator to make adjustments to the Safety EdgeSM and screed before high production paving begins For example to obtain the 30o finished angle the target angle to be achieved behind the paver by the Safety EdgeSM
device may need to be shallower for a given mix eg 25 degree Trial sections can also be used to assess if the edge will ldquostand uprdquo during the AC rolling operation The issue of maintaining the slope of the Safety EdgeSM is discussed under the next subsection ndash Rolling
The screed operator needs to watch and adjust three items during the paving operation when using a Safety EdgeSM device attached to the screed described in Section 32 (1) the Safety EdgeSM device itself (2) the end plate and (3) the screed (refer to Figure 12) If the Safety EdgeSM device with too much downward pressure rides on the AC or other stiff base material that has been previously placed this can result in undesirable paving results as described below
When the Safety EdgeSM device rides on a base with a rough positive surface texture (eg coarse aggregate protruding upward such as in a chip seal) in some cases it may cause the screed to vibrate or jerk The toe of the Safety EdgeSM can get caught on larger aggregate particles and when the particle breaks loose the screed jerks The screed operator will need to monitor the downward pressure of the Safety EdgeSM
device so this does not happen in extreme cases When the Safety EdgeSM device rides on a base with a varying longitudinal profile
the screed operator will need to monitor the downward pressure of the Safety EdgeSM
device to keep the screed functioning as designed within the free-floating principle The spring around the shaft of the Safety EdgeSM is designed to keep a relatively uniform pressure on the mixture being placed under the Safety EdgeSM ndash assuming the vertical operational limit of the Safety Edge is not exceeded
The screed operator also needs to monitor the downward pressure of the Safety EdgeSM device when it rides on soft surfaces The leading edge of the device can dig into the soft shoulder pulling soilaggregate into the asphalt wedge of the Safety EdgeSM This is the same condition experienced in conventional paving when the paver end plate ski digs into the soft shoulder
15
January 5 2012
Wrench used to adjust the elevation
of the Safety EdgeSM
device
Figure 12 Safety EdgeSM adjustment for raising and lowering the device
When paving begins the screed operator should pay close attention to the following items when using a Safety EdgeSM device attached to the screed
In charging the auger chamber with AC the screed operator should ensure that the device is in close contact with the end plate so that mix does not get between the device and end plate and that there is sufficient material surrounding the device to keep it held against the end plate
After the paving operation begins and the full AC lift thickness has stabilized the screed operator should adjust the Safety EdgeSM device by lowering the device into contact with the underlying surface This adjustment should not be made prior to the paver moving off the shims at the start of a dayrsquos paving operation The screed operator should look behind the paver to ensure that the slope of the edge will produce a slope of about 30 degrees after rolling
16
January 5 2012
The paver end plate ski needs to remain in contact with the surface being paved over AC can extrude out under the end plate ski if not in contact with the existing surface which can reduce the amount of AC available for the Safety EdgeSM ndash affecting the slope and density of the wedge itself
When placing an AC overlay the Safety EdgeSM can ride on the underlying layer However the screed operator should closely monitor the downward force on the Safety EdgeSM device relative to underlying hard surfaces with variable longitudinal profiles which can change the forces on one side of the screed (free floating screed principle or mode) This concern is heightened at intersections or areas of increased variation of longitudinal profile The spring around the shaft of the Safety EdgeSM is designed to keep a relatively uniform pressure on the mixture being placed under the Safety EdgeSM ndash assuming the vertical operational limit of the Safety Edge is not exceeded
The operator needs to be aware that the height adjustment screw can be bent from paving with too much downward force especially if the shoe is in contact with a variable elevation of a hard surface The height adjustment screw can also be bent from or hitting objects while in transport
The screed operator should monitor the surface texture and condition of the Safety EdgeSM
When drawing in the hydraulic extension the screed operator needs to closely monitor the process to ensure that the Safety EdgeSM device does not come in contact with the cross feed auger If this occurs it can damage both the Safety EdgeSM device and auger
If the hydraulic extension of the screed is extended during mainline paving the amount of mix in the extension can be reduced near the paver end plate When this occurs the screed operator should monitor the amount of mix to ensure it is not getting between the end plate and Safety EdgeSM device itself as the screed moves out
The flow of AC material to the Safety EdgeSM device should be closely monitored to make sure enough material is available to form a continuous edge and that the material feed augers are properly positioned
Paver manufactures commonly recommend material feed augers be no greater than 18 inches from the end plate
When the paver is being moved the Safety EdgeSM device should be removed or raised to its mounting height or uppermost position This will ensure that the bottom of the device will not strikeget caught on any obstruction
When using a Safety EdgeSM device the screed operator needs to continually be aware of the position of the break point of the Safety EdgeSM slope and keep the break point on the structural base or existing pavement
At the beginning of the project it is recommended that slope measurements be made immediately behind the paver and after each roller pass The focus is on the final Safety EdgeSM slope angle after all rolling to determine how rolling impacts the final slope angle
17
Rolling
January 5 2012
The contractor may want to periodically make these measurements as part of the quality control process
No special rollers are required for compacting the AC mix along and adjacent to the Safety EdgeSM (refer to Figure 13)
Figure 13 Rolling the Safety EdgeSM with standard rollers ndash No special rollers are required
18
January 5 2012
Most AC mixtures exhibit some lateral movement under the rollers during compaction Lateral movement of the AC mix should not prevent the contractor from achieving an acceptable Safety EdgeSM slope after final rolling For some of the demonstration projects the contractor did change or revise the standard rolling pattern to maximize the density of the AC mat while retaining an appropriate Safety EdgeSM angle Just like for any AC paving project the optimum rolling pattern is AC mixture specific A rolling pattern used to compact a low stiffness mix and high stiffness mix may be different to meet the density requirements
The following recommendations are made based on the findings from multiple demonstration projects
The contractor should roll the AC mat and pavement edges based on normal or standard compaction operation This should ensure adequate density along and near the pavement edge Multiple demonstration projects have been constructed successfully where the pavement edge was rolled with the contractorrsquos standard rolling pattern
After final rolling the slope of the Safety EdgeSM should be measured If the slope of the edge is too steep the contractor should determine if the slope of the edge was steepened because of excessive rolling the use of a mix that exhibits tenderness or the AC mixture is simply too soft to retain the targeted slope angle A variable angle Safety EdgeSM device can be used to place the Safety EdgeSM at an angle less than 30 degrees behind the paver which should assist the contractor in achieving 30 degrees after rolling
Delaying the rolling of the edge of the mat should be the last resort taken to retain the slope of the Safety EdgeSM This becomes a decision between durability along and near the pavement edge and retaining a slope of the Safety EdgeSM
Continually monitor the slope of the Safety EdgeSM after final rolling The slope of the Safety EdgeSM varied between 30 to 40 degrees on multiple demonstration projects without delaying the rolling of the Safety EdgeSM
35 Quality Measurement
The same properties used or identified by the owner agency to measure the quality of AC pavement layers for acceptance should also be used on projects that include the Safety EdgeSM The acceptance plan should not be modified for projects that include the Safety EdgeSM More importantly the density strength andor smoothness requirements appropriate for a typical project should not be relaxed simply because the Safety EdgeSM is added to a resurfacing or new construction project Thus the only difference between projects with and without the Safety EdgeSM is the slope of the edge itself
19
January 5 2012
SECTION 4 SPECIFIC CONSIDERATIONS FOR CONSTRUCTING THE SAFETY EDGESM IN CONJUNCTION WITH NEW CONCRETE
PAVEMENTS OR CONCRETE OVERLAYS
This section identifies issues that need to be monitored during the construction of PCC pavements All of the PCC demonstration projects that were used for preparing this Guide included the use of slip-form paving to form the Safety EdgeSM A benefit of forming the Safety EdgeSM during PCC slip-form paving is the sensitivity to edge slump is reduced
41 Design Features and Shape
The Safety EdgeSM is designed to create a 30 degree finished angle relative to the pavement cross slope as shown in Figure 14 and should be constructed on a similar structural base as the adjoining monolithically placed laneshoulder During design the structural base width needs to account for the Safety EdgeSM width
2 in Min
Edge of Pavement
H
5 in Approx
Shoulder Backing Material
Note Recommended Rise to Run ratio range 112 to 120 The range of slope is equal to 26deg to 40deg
Figure 14 Recommended Safety EdgeSM configuration for PCC pavements and overlays
42 Equipment ndash PCC Safety EdgeSM Devices
This part describes the modifications that must be made to a slip form concrete paver to form a Safety EdgeSM It also notes the essential attributes of a concrete paver that are necessary to create an effective Safety EdgeSM When a slip form paver is not being used the Safety EdgeSM needs to be manufactured or created as part of the forms ndash one side of the forms will have an angle of 30 degrees rather than being vertical
Currently there are no commercially available Safety EdgeSM devices for PCC pavers or forms Custom devices however can be fabricated by modifying the finishing pan of the paver (refer to Figure 15) The pan is essentially configured to form an inverted curb under the pan close to the end gate The steel components of the assembly need to be robust in order to resist bending during paving operations from the force of the plastic PCC The following provides a description of the modifications that were made to a Gomaco paver that
20
PCC Placement
January 5 2012
was used on one of the PCC demonstration projects and identifies some of the issues or items that should be considered in fabricating the Safety EdgeSM profile
A template was created for the Safety EdgeSM profile to ensure correct dimensions The template was used to manufacture a stainless steel profile pan of the desired shape and dimensions Portions of the existing profile pan were removed to fit in the new Safety EdgeSM profile [Note The contractor decided against welding the Safety EdgeSM profile to the bottom of the existing profile section or pan because of a concern that the welds might tear the finished PCC]
A 2-inch finish tail on the stainless steel Safety EdgeSM profile was fabricated to help finish the portion of the edge where it goes from slope to vertical When going through existing intersections driveways or where the grade is not exact on the outside edge the 2-inch finish tail did drag in some locations For the demonstration project the contractor cut one inch off of this tail and it performed well but cutting 05 inches from the tail would have also worked well
Adjusting bolts were fitted to the Safety EdgeSM profile pan One adjustment bolt was on the sloped section in case an adjustment had to be made if the edge profile was not finishing properly
In setting up the paver care was taken to position the vibrators in the specific locations for proper consolidation of the Safety EdgeSMndashnear the breakpoint
Unlike the Safety EdgeSM attachments for AC layers or overlays the modifications made to the concrete paver cannot be easily removed and replaced The modifications can be removed but the parts must be cut from the pan using a torch or grinder Touchup of the pan is required to return the unit to service on standard PCC pavements
43 Concrete Mixtures
Demonstration projects completed to date have used standard concrete mixes No changes to the mix were needed to accommodate the SE
44 Safety EdgeSM Construction
This part of the Guide discusses items of interest to PCC paving projects when a Safety EdgeSM is to be placed as part of the new construction or rehabilitation project
Normal paving procedures are usually sufficient for forming the Safety EdgeSM on mainline sections of the roadway using slip form paving operations and equipment Material
21
Transitioning Between Different Edge Profiles
January 5 2012
properties of the hardened concrete from the edge and the interior of the pavement have been demonstrated to be similar
Safety EdgeSM device
Figure 15 View of the Safety EdgeSM device from front of paver
It is recommended to have a transition from a no Safety EdgeSM section to a Safety EdgeSM
section to avoid a vertical edge perpendicular to traffic (ie similar to beginning section of bridge concrete railparapet where the bottom of the railparapet is modified to reduce the probability of vehicle tire snagging)
An important issue to be addressed is the intersection of cross roads where a vertical edge is required Due to the fixed nature of the edge and shoe assembly the contractor can consider different options depending on the number and extent of sections with different edge profiles In either case additional labor should be anticipated to tie into intersections or other areas requiring different edge profiles when paving using the Safety EdgeSM concept The following provides an overview of the two options that were used on some of the demonstration projects
If there are only a few intersecting roadways driveways or limited areas where a vertical face is required along the edge of the pavement the contractor can consider placing the safety edge using normal paving operations The Safety EdgeSM is sawcut
22
Vibration
Sawcutting
January 5 2012
and removed to create a vertical edge The sawing of the Safety EdgeSM can be completed at the same time the transverse joints are sawed This option has worked fine but does waste some PCC and requires additional sawing
Another option is to box out the areas requiring different edge profiles and place forms The PCC in these limited areas is placed by hand using normal construction practices in order to tie into pavement intersections driveways and other features
Generally the standard spacing of the vibrators are sufficient to properly consolidate the fresh concrete at the Safety EdgeSM Consolidation of the material within the Safety EdgeSM
should be checked at the start of any project If slip form pavers are not being used hand vibrators need to be used to ensure that the PCC flows into the lower part of the Safety EdgeSM As noted at the beginning of this section all demonstration projects included the use of slip form pavers in construction the Safety EdgeSM
Curing
Care should be taken to insure the specified curing procedures are properly followed for all surfaces at the edge of the pavement including the Safety EdgeSM The Safety EdgeSM however does not require any special curing requirements beyond that for typical PCC layers
Transverse control joint sawcutting can be stopped at the breakpoint of the Safety EdgeSM
and not continued through the sloped surface of the edge Experience shows the contraction cracks normally form at the end of the sawcut and extend through the Safety EdgeSM as planned (refer to Figure 16)
23
January 5 2012
Figure 16 Sawcut and crack at the formed joint on one of the Safety EdgeSM demonstration projects
45 Quality Measurement
The same properties used or identified by the owner agency to measure the quality of PCC pavement layers for acceptance should also be used on projects that include the Safety EdgeSM The acceptance plan should not be modified for projects that include the Safety EdgeSM More importantly the air void content strength andor smoothness requirements appropriate for a typical project should not be relaxed simply because the Safety EdgeSM is added to a PCC overlay or new construction project Thus the only difference between projects with and without the Safety EdgeSM is the slope of the edge itself
24
January 5 2012
REFERENCES
EDC Safety EdgeSM field reports can be found at httpwwwfhwadotgoveverydaycountstechnologysafetyedgefield_reportscfm
25
January 5 2012
APPENDICES
Safety EdgeSM guide specification can be found at httpwwwfhwadotgoveverydaycountstechnologysafetyedgespecscfm
26

Topic Page
SECTION 4 SPECIFIC CONSIDERATIONS FOR CONSTRUCTING THE SAFETY EDGESM IN CONJUNCTION WITH NEW CONCRETE PAVEMENTS
OR CONCRETE OVERLAYS 20
41 DESIGN FEATURES AND SHAPE 20 42 EQUIPMENT ndash PCC SAFETY EDGESM DEVICES 20 43 CONCRETE MIXTURES 21 44 SAFETY EDGESM CONSTRUCTION 21
PCC Placement 21
Transitioning Between Different Edge Profiles 22
Vibration 23
Curing 23
Sawcutting 23
45 QUALITY MEASUREMENT 24
REFERENCES 25
APPENDICES 26
January 5 2012
Table of Contents
v
January 5 2012
SECTION 1 INTRODUCTION
11 Introduction
The Safety EdgeSM is a relatively simple but effective solution that can help save lives by allowing drivers who drift off highways to return to the road safely
During conventional paving processes the pavement is constructed with vertical or near vertical edges Instead of a vertical drop-off the finished Safety EdgeSM forms the edge of the pavement with a slope of approximately 30 degrees Research has shown this ldquotransition from on-roadway surface to shoulder and back is so smooth it defies assignment of any degree of severityrdquo The Safety EdgeSM provides a strong durable transition for all vehicles and helps prevents pavement edge raveling
The recommended practice of bringing the adjacent soil or aggregate material (unpaved shoulder or modified soil) flush with the top of the pavement often requires frequent maintenance When the vertical edge is exposed due to wearerosion it can contribute to drivers losing control of the vehicle when attempting to recover from a roadway departure The Safety EdgeSM concept is when drop-offs along the pavement edge occur the edge will not be vertical but has a shape that will not induce tire scrubbing By including the Safety EdgeSM detail while paving this safety countermeasure can be implemented system-wide at little or no cost
12 Purpose of the Guide
The Federal Highway Administration (FHWA) works with States and Industry to accelerate the use of innovative technologies This Guide supports efforts to implement the Safety EdgeSM technology by providing information and guidance to assist agencies in developing standards and specifications for adopting this treatment as a standard practice on all applicable new and resurfacing pavement projects
The Guide provides information on the various elements to consider when designing and constructing pavement projects with the Safety EdgeSM The Guide provides insights and lessons learned on previously constructed projects highlighting items that may vary from conventional pavement design and construction
13 Scope of the Guide
The information for this Guide draws significantly from experiences obtained from 10 formal construction project evaluations conducted in 2010 and 2011 as well as several ad hoc evaluations It is expected that significant enhancements in equipment and procedures will be forthcoming as the Safety EdgeSM is implemented into standard practice
The Guide is grouped into four sections including this introductory section Section 2 is focused on general design and construction considerations that are applicable to all pavement types and rehabilitation projects Sections 3 and 4 identify specific considerations for
1
January 5 2012
constructing a Safety EdgeSM for asphalt concrete materials (AC) and Portland cement concrete (PCC) pavements respectively
2
January 5 2012
SECTION 2 SAFETY EDGESM ndash GENERAL DESIGN AND CONSTRUCTION CONSIDERATIONS
In terms of paving operations there is little difference between the placement and construction of AC and PCC materials (refer to Figure 1) with and without the inclusion of the Safety EdgeSM However there are important considerations that should be accounted for when incorporating the Safety EdgeSM into a paving operation This section of the Guide highlights the general design and construction details when constructing a Safety EdgeSM in conjunction with AC or PCC pavements
21 Safety EdgeSM Use
The Safety EdgeSM provides two important safety related functions It serves as a mitigating measure to help with pavement edge drop off that occurs after an AC layer is placed but before shoulders can be reconstructed flush with the paved surface The Safety EdgeSM also serves as a long-term safety feature for areas susceptible to material displacement andor erosion adjacent to the paved surface
An additional benefit of the Safety EdgeSM is that the density of the AC mat adjacent to the pavement edge was found to be higher in most areas with the Safety EdgeSM in comparison to areas without the Safety EdgeSM The Safety EdgeSM is believed to serve as a restriction to the lateral movement of the AC mat along an unconfined edge This observation was found from multiple demonstration projects Visual assessment of many Safety EdgeSM treatments have shown that trucks loaded with asphalt do not deformdamage the finished edge
(a) AC Project (b) PCC Project
Break point
Figure 1 Safety EdgeSM placed on an AC and PCC project
3
Where the Safety EdgeSM Can Be Placed
Where the Safety EdgeSM Should Not Be Placed
January 5 2012
The Safety EdgeSM can be used in almost every situation to provide a condition towards preventing near vertical lane-shoulder drop offs during construction and over time It also provides added insurance until such time that maintenance personnel are able to repair eroded areas of the shoulder adjacent to the paved surface
A site condition where the Safety EdgeSM should not be used is where the foreslopeembankment or ground surface has a steeper slope than the slope of the Safety EdgeSM This condition may exist for a portion of the road being paved thus the Safety EdgeSM should be considered for use on the remainder of the road Figure 2 depicts this condition
Figure 2 Example of where a foreslopeembankment is too steep for the Safety EdgeSM
The Safety EdgeSM should be excluded in areas where curb and gutter have been or will be placed as the Safety EdgeSM is appropriate for the interface of a paved material and an unpavedunbound material In areas where there is a restriction for vehicles leaving the paved surface (for example guardrails and other safety features) whether or not to use the Safety EdgeSM must be assessed on a case-by-case situation The agency may see value in using the Safety EdgeSM for its pavement quality benefit and thus may want to use it in these applications
4
January 5 2012
22 Pre-Construction and Discontinuous Paving Operations
The pre-construction activities for Safety EdgeSM projects are to review the paving plan and make sure the Safety EdgeSM can be placed in suitable areas along the project If there are areas with restrictions along the edge of the pavement (for example guardrails intersections and bridges) the width of the roadway and width of paving should be considered so that there is sufficient room for the Safety EdgeSM device for resurfacing projects As an example narrow bridges along some low volume roadways can result in conditions where the AC paver screed extensions cannot be moved-in sufficiently when using Safety EdgeSM devices that are bolted to the paver screed so the paver operator must steer the paver more towards the center of the roadway during paving operations (center line crown or other cross slope changes need to be considered in these conditions) Other areas where the foreslope is steeper than the Safety EdgeSM slope should be noted These conditions should be discussed in the contractors quality control plan andor pre-paving meeting and how the condition will be resolved
Paving across intersections and driveways with the Safety EdgeSM device in place is generally no different than when paving without the Safety EdgeSM The differences for both AC and PCC paving are noted below All of these conditions or paving anomalies should be identified and addressed prior to beginning paving operations
For AC paving extra attention from the paver and screed operators may be necessary to accommodate the Safety EdgeSM at transitions for intersections driveways and changes in longitudinal elevations or profile The reason for this extra attention is discussed in Section 3 of the Guide Specifically Section 32 discusses the different Safety EdgeSM
devices and their attachment to the paver For devices attached to the screed the screed operator can keep the Safety EdgeSM device lowered or can raise the device above the bottom of the screed so that the Safety EdgeSM is not placed through some intersections (refer to Figure 3) The capability for lowering and raising the device allows the paving operation to continue without disruption when discontinuous features or adjacent features are encountered For devices attached to the end plate the screed operator needs to monitor the height of the end plate ski to ensure the desired shape is placed
For PCC slip-form paving the PCC material at the intersection or driveway will need to be sawcut to remove the Safety EdgeSM (refer to Figure 4) or build up the Safety EdgeSM
by hand in order to tie into pavement intersections
5
January 5 2012
Screed operator raised the Safety EdgeSM device in
paving across this intersection The Safety
EdgeSM device can be kept lowered when paving
across driveways Agreement on how to treat
this condition should be established before paving
starts
Sawcut
Figure 3 Placing an AC overlay at an intersection of a Safety EdgeSM project
Figure 4 Sawcut on a PCC project at an intersection to remove the Safety EdgeSM
6
January 5 2012
23 Pavement EdgeShoulder Preparation
The pavement edge should be prepared in accordance with standard agency paving operations for both AC and PCC surfaces (refer to Figure 5)
Motor grader is used to remove vegetation and soil build-up along the edge of the pavement
A motorized broom cleans the surface of the pavement prior to applying the tack coat to the surface of the existing pavement
A tack coat is applied to the cleaned pavement surface prior to placing the asphalt overlay
Figure 5 Surface preparation activities performed prior to placing an AC overlay
7
January 5 2012
The following items are highlighted to ensure the agency considers them as they have been shown to adversely impact Safety EdgeSM construction on some projects
If vegetation exists along the pavement edge consideration should be given to removing this vegetation in the area supporting the Safety EdgeSM prior to paving Good asphalt paving practice includes not paving on vegetation as the asphalt will not adequately compact and thus will not perform adequately Figure 6 shows an example of a Safety EdgeSM edge placed over vegetation For asphalt paving a cleanclearly visible pavement edge will help the screed operator monitor the material placement along the pavementrsquos edge
If the agency removes vegetationsoil from the edge of the pavement (edge clipping) ensure a reasonable grade elevation and slope of the pavement edgeshoulder is established to minimize use of excess pavement material along the edge
Edge clipping should extend far enough to accommodate the additional width of the Safety EdgeSM which may be a change in standard operating practice The wedge part of the Safety EdgeSM is typically additional width therefore paving a vertical edge depth of 3 inches will require clipping an additional 6 inches of width to accommodate the Safety EdgeSM
Figure 6 Example of Safety EdgeSM placed on heavy vegetation ndash due to lack of adequate compaction the Safety EdgeSM will deteriorate
8
January 5 2012
24 Slope Measurement
Including the Safety EdgeSM on a new construction or resurfacing project does not impact the agencyrsquos material and construction specifications The only difference in determining the quality between projects with and without the Safety EdgeSM is the measurement of slope for the as-built Safety EdgeSM itself This part of the Guide discusses measuring the slope of the Safety EdgeSM
Figure 7 illustrates how the slope is measured or determined for an AC resurfacing project The length of line B is determined as the distance of a vertical virtual line from the edge or toe of the Safety EdgeSM to the pavement surface cross slope extended The toe of the Safety EdgeSM can be defined as where a straight line along the surface of the Safety EdgeSM
contacts the ground surface This point becomes important for asphalt mixtures with larger nominal maximum sized aggregate where the removal of one coarse aggregate particle can significantly change the measured slope The length of line A is determined as the distance from the point where there is space between the straight edge placed on the pavement surface at the edge defined as the break point and the vertical virtual line through the toe of the Safety EdgeSM or vertical line B The angle θ is calculated as θ = arctan BA This angle measurement is the angle that the vehicle tire encounters when the vehicle is attempting to return to the pavement The slope of a PCC Safety EdgeSM is determined in the same manner The angle measurement is made on the sloped portion of the Safety EdgeSM and does not include the vertical portion of the PCC edge
A
B
Toe of the slope
Break point
Figure 7 Measurement of Safety EdgeSM slope or angle
25 Backing Material Placement
It should be remembered that the Safety EdgeSM is a mitigation of the drop off created by the AC or PCC overlay or new paved layer it is not intended to substitute for a shoulder that is flush with the paved surface After the paved layer or overlay has been placed the shoulder or backing material needs to be graded back flush with the paved surface The shoulder material should be placed in accordance with standard equipment and procedures specified
9
January 5 2012
by the owner agency for both AC and PCC pavements The only cautionary note is to grade the backing or shoulder material over and along the Safety EdgeSM as soon as possible but in the case of an AC pavement after the mat has cooled sufficiently so that any scuffing or tearing of the surface from construction equipment is minimized Similarly PCC should be allowed to cure and gain sufficient strength so that the construction equipment grading the backing material does not damage the PCC Safety EdgeSM After construction is completed the Safety EdgeSM will be covered with the backing material and not seen by the road user as shown in Figure 8
Figure 8 Safety EdgeSM completely covered by shoulder backing material
10
January 5 2012
SECTION 3 SPECIFIC CONSIDERATIONS FOR CONSTRUCTING THE SAFETY EDGESM IN CONJUNCTION WITH NEW AC
PAVEMENTS OR AC OVERLAYS
This section of the Guide identifies issues that need to be monitored during the placement and compaction operations of the AC pavement
31 Design Features and Shape
The paved laneshoulder width and location of the Safety EdgeSM break point should be discussed and established prior to paving The Safety EdgeSM can be constructed on the unimproved or improved shoulder with the break point lining up directly over the existing pavement edge or over any portion of the previously paved surface as shown in Figure 9
Figure 9 Paver positioned to align the Safety EdgeSM break point over the existing pavement
The intent is not to sacrifice paved laneshoulder width to construct the Safety EdgeSM Constructing the Safety EdgeSM onto the unimproved shoulder does not result in a decrease in paved laneshoulder width
The Safety EdgeSM is designed to create a 30 degree finished angle relative to the pavement cross slope on the edge of the pavement Agency-specific tolerances may vary from those shown in Figure 10 which is from the FHWA guide specification On projects where multiple AC layers are used it is recommended each AC layer (except leveling layer) of the final 5 inches of AC receive the Safety EdgeSM as shown in Figure 10 For new construction or reconstruction with thicker AC layers consideration should be given to widening the underlying paved layers to accommodate the Safety EdgeSM without decreasing lane width as shown in Figure 10 On projets with multiple AC layers it is expected the additional volume of AC required to form the Safety EdgeSMwill increase bid quantities
11
Edge of Pavement
H Shoulder Backing Material
For H le 5 in
For H gt 5 in
January 5 2012
Note Recommended Rise to Run ratio range 112 to 120 The range of slope is equal to 26deg to 40deg
Figure 10 Recommended Safety EdgeSM configuration for AC pavements and overlays
12
Devices Attached to the Screed
End Plate Modifying Devices
January 5 2012
32 Equipment ndash AC Safety EdgeSM Devices
The current commercial Safety EdgeSM devices can be grouped into two categories (1) devices attached to the paver screed and (2) modifications or attachments to the paver end plate The devices listed below do not constitute an approved products list Highway agencies should evaluate any new Safety EdgeSM hardware for compliance with specifications before approving for use on a project
Currently there are three devices available from two different manufacturers which are (1) the ldquoShoulder Wedge Makerrdquo manufactured by TransTech wwwtranstechsyscom and (2) the ldquoAdvant-Edgerrdquo and ldquoRamp Champrdquo manufactured by the Advant-Edge Paving Equipment LLC wwwadvantedgepavingcom Each manufacturer provides detailed installation instructions for attaching their devices to the paver screed The devices can be easily attached to and removed from the paver screed with a simple two-bolt connection The Safety EdgeSM device should fit closely to the end plate to prevent AC from getting between the device itself and end plate The Ramp Champ can be set to a range of angles while the other devices have a fixed angle
The end plate modification devices are available from Carlson Paving Products Inc (Safety Edge End Gate) httpwwwcarlsonpavingproductscom and Willow Designs LLC httpwwwwillowdesignsllccom The ski of the devices form the slope of the Safety EdgeSM
and can be set to a range of angles The screed operator can adjust the angle of the ski while paving to ensure the final angle of the Safety EdgeSM after rolling is close to 30 degrees
33 Asphalt Concrete Materials
The Safety EdgeSM can be placed with all dense-graded AC materials that have been properly designed in accordance with existing mixture design methods including Hot Mix Asphalt (HMA) Warm Mix Asphalt (WMA) HMA with high amounts of Recycled Asphalt Pavement (RAP) HMA with Recycled Asphalt Shingles (RAS) polymer modified asphalt (PMA) rubberized gap graded and open graded mixes and other specialty mixtures The demonstration projects included HMA RAP RAS WMA and PMA mixtures
There are two critical material issues in terms of placing a Safety EdgeSM for AC mixtures (1) lateral movement of the AC mix during compaction and (2) the size or amount of coarse aggregate in the AC mixture
Most AC mixtures exhibit some lateral movement under the rollers during compaction and that movement is mixture and application dependent Lateral movement of the AC mix should not prevent the contractor from achieving an
13
Safety EdgeSM Device Installation
January 5 2012
acceptable Safety EdgeSM slope after final rolling Ensure that after rolling is completed the Safety EdgeSM break point lines up directly over the existing pavement edge or over any portion of the previously paved surface If the break point is over the unimproved shoulder (ie different support structure) the potential of a longitudinal crack forming is greater (Figure 11) This material related issue is discussed in more detail in Section 34 - Safety EdgeSM Construction under Rolling
The maximum nominal size aggregate of the mixture or amount of coarse aggregate can affect the surface texture or appearance of the Safety EdgeSM and measurement of the slope Fine-graded AC mixtures were observed to have a tighter surface appearance and texture along the edge Rough surface texture makes the measurement of the slope more difficult to quantify ndash increasing variability in slope measurements
Figure 11 Longitudinal crack due to Safety EdgeSM break point located on unimproved shoulder
34 Safety EdgeSM Construction
This section discusses items of interest to asphalt paving projects when a Safety EdgeSM is to be placed as part of the new construction or rehabilitation project
Manufacturers of commercially available devices provide detailed instructions for attaching the Safety EdgeSM devices to the paver Proper installation of the devices was discussed in a previous part of this section (Equipment ndash AC Safety EdgeSM Devices) A key issue for devices attached to the screed without guide rails is to ensure close installation to the end plate so loose mix does not get trapped between the device and end plate during paving operations At the beginning of the dayrsquos production when pulling off a transverse joint the screed operator needs to monitor the position of the device as the auger chamber and
14
AC Placement
January 5 2012
extension are being charged to ensure the device is in contact with the end plate These issues do not affect the end gate type device
The Safety EdgeSM can be placed with normal paving procedures and no changes to the operation of the paver need to be made More importantly the Safety EdgeSM device has no impact on how the paver operates whether paving on an embankment or crushed stone layer recently placed AC existing AC or PCC layers or milled surface
For those agencies that require trial or control sections as part of standard AC paving operations the slope of the Safety EdgeSM should be measured after all rolling has been completed to ensure the Safety EdgeSM slope did not ldquostand uprdquo (substantial increase in the slope) Trial sections provide an opportunity for the screed operator to make adjustments to the Safety EdgeSM and screed before high production paving begins For example to obtain the 30o finished angle the target angle to be achieved behind the paver by the Safety EdgeSM
device may need to be shallower for a given mix eg 25 degree Trial sections can also be used to assess if the edge will ldquostand uprdquo during the AC rolling operation The issue of maintaining the slope of the Safety EdgeSM is discussed under the next subsection ndash Rolling
The screed operator needs to watch and adjust three items during the paving operation when using a Safety EdgeSM device attached to the screed described in Section 32 (1) the Safety EdgeSM device itself (2) the end plate and (3) the screed (refer to Figure 12) If the Safety EdgeSM device with too much downward pressure rides on the AC or other stiff base material that has been previously placed this can result in undesirable paving results as described below
When the Safety EdgeSM device rides on a base with a rough positive surface texture (eg coarse aggregate protruding upward such as in a chip seal) in some cases it may cause the screed to vibrate or jerk The toe of the Safety EdgeSM can get caught on larger aggregate particles and when the particle breaks loose the screed jerks The screed operator will need to monitor the downward pressure of the Safety EdgeSM
device so this does not happen in extreme cases When the Safety EdgeSM device rides on a base with a varying longitudinal profile
the screed operator will need to monitor the downward pressure of the Safety EdgeSM
device to keep the screed functioning as designed within the free-floating principle The spring around the shaft of the Safety EdgeSM is designed to keep a relatively uniform pressure on the mixture being placed under the Safety EdgeSM ndash assuming the vertical operational limit of the Safety Edge is not exceeded
The screed operator also needs to monitor the downward pressure of the Safety EdgeSM device when it rides on soft surfaces The leading edge of the device can dig into the soft shoulder pulling soilaggregate into the asphalt wedge of the Safety EdgeSM This is the same condition experienced in conventional paving when the paver end plate ski digs into the soft shoulder
15
January 5 2012
Wrench used to adjust the elevation
of the Safety EdgeSM
device
Figure 12 Safety EdgeSM adjustment for raising and lowering the device
When paving begins the screed operator should pay close attention to the following items when using a Safety EdgeSM device attached to the screed
In charging the auger chamber with AC the screed operator should ensure that the device is in close contact with the end plate so that mix does not get between the device and end plate and that there is sufficient material surrounding the device to keep it held against the end plate
After the paving operation begins and the full AC lift thickness has stabilized the screed operator should adjust the Safety EdgeSM device by lowering the device into contact with the underlying surface This adjustment should not be made prior to the paver moving off the shims at the start of a dayrsquos paving operation The screed operator should look behind the paver to ensure that the slope of the edge will produce a slope of about 30 degrees after rolling
16
January 5 2012
The paver end plate ski needs to remain in contact with the surface being paved over AC can extrude out under the end plate ski if not in contact with the existing surface which can reduce the amount of AC available for the Safety EdgeSM ndash affecting the slope and density of the wedge itself
When placing an AC overlay the Safety EdgeSM can ride on the underlying layer However the screed operator should closely monitor the downward force on the Safety EdgeSM device relative to underlying hard surfaces with variable longitudinal profiles which can change the forces on one side of the screed (free floating screed principle or mode) This concern is heightened at intersections or areas of increased variation of longitudinal profile The spring around the shaft of the Safety EdgeSM is designed to keep a relatively uniform pressure on the mixture being placed under the Safety EdgeSM ndash assuming the vertical operational limit of the Safety Edge is not exceeded
The operator needs to be aware that the height adjustment screw can be bent from paving with too much downward force especially if the shoe is in contact with a variable elevation of a hard surface The height adjustment screw can also be bent from or hitting objects while in transport
The screed operator should monitor the surface texture and condition of the Safety EdgeSM
When drawing in the hydraulic extension the screed operator needs to closely monitor the process to ensure that the Safety EdgeSM device does not come in contact with the cross feed auger If this occurs it can damage both the Safety EdgeSM device and auger
If the hydraulic extension of the screed is extended during mainline paving the amount of mix in the extension can be reduced near the paver end plate When this occurs the screed operator should monitor the amount of mix to ensure it is not getting between the end plate and Safety EdgeSM device itself as the screed moves out
The flow of AC material to the Safety EdgeSM device should be closely monitored to make sure enough material is available to form a continuous edge and that the material feed augers are properly positioned
Paver manufactures commonly recommend material feed augers be no greater than 18 inches from the end plate
When the paver is being moved the Safety EdgeSM device should be removed or raised to its mounting height or uppermost position This will ensure that the bottom of the device will not strikeget caught on any obstruction
When using a Safety EdgeSM device the screed operator needs to continually be aware of the position of the break point of the Safety EdgeSM slope and keep the break point on the structural base or existing pavement
At the beginning of the project it is recommended that slope measurements be made immediately behind the paver and after each roller pass The focus is on the final Safety EdgeSM slope angle after all rolling to determine how rolling impacts the final slope angle
17
Rolling
January 5 2012
The contractor may want to periodically make these measurements as part of the quality control process
No special rollers are required for compacting the AC mix along and adjacent to the Safety EdgeSM (refer to Figure 13)
Figure 13 Rolling the Safety EdgeSM with standard rollers ndash No special rollers are required
18
January 5 2012
Most AC mixtures exhibit some lateral movement under the rollers during compaction Lateral movement of the AC mix should not prevent the contractor from achieving an acceptable Safety EdgeSM slope after final rolling For some of the demonstration projects the contractor did change or revise the standard rolling pattern to maximize the density of the AC mat while retaining an appropriate Safety EdgeSM angle Just like for any AC paving project the optimum rolling pattern is AC mixture specific A rolling pattern used to compact a low stiffness mix and high stiffness mix may be different to meet the density requirements
The following recommendations are made based on the findings from multiple demonstration projects
The contractor should roll the AC mat and pavement edges based on normal or standard compaction operation This should ensure adequate density along and near the pavement edge Multiple demonstration projects have been constructed successfully where the pavement edge was rolled with the contractorrsquos standard rolling pattern
After final rolling the slope of the Safety EdgeSM should be measured If the slope of the edge is too steep the contractor should determine if the slope of the edge was steepened because of excessive rolling the use of a mix that exhibits tenderness or the AC mixture is simply too soft to retain the targeted slope angle A variable angle Safety EdgeSM device can be used to place the Safety EdgeSM at an angle less than 30 degrees behind the paver which should assist the contractor in achieving 30 degrees after rolling
Delaying the rolling of the edge of the mat should be the last resort taken to retain the slope of the Safety EdgeSM This becomes a decision between durability along and near the pavement edge and retaining a slope of the Safety EdgeSM
Continually monitor the slope of the Safety EdgeSM after final rolling The slope of the Safety EdgeSM varied between 30 to 40 degrees on multiple demonstration projects without delaying the rolling of the Safety EdgeSM
35 Quality Measurement
The same properties used or identified by the owner agency to measure the quality of AC pavement layers for acceptance should also be used on projects that include the Safety EdgeSM The acceptance plan should not be modified for projects that include the Safety EdgeSM More importantly the density strength andor smoothness requirements appropriate for a typical project should not be relaxed simply because the Safety EdgeSM is added to a resurfacing or new construction project Thus the only difference between projects with and without the Safety EdgeSM is the slope of the edge itself
19
January 5 2012
SECTION 4 SPECIFIC CONSIDERATIONS FOR CONSTRUCTING THE SAFETY EDGESM IN CONJUNCTION WITH NEW CONCRETE
PAVEMENTS OR CONCRETE OVERLAYS
This section identifies issues that need to be monitored during the construction of PCC pavements All of the PCC demonstration projects that were used for preparing this Guide included the use of slip-form paving to form the Safety EdgeSM A benefit of forming the Safety EdgeSM during PCC slip-form paving is the sensitivity to edge slump is reduced
41 Design Features and Shape
The Safety EdgeSM is designed to create a 30 degree finished angle relative to the pavement cross slope as shown in Figure 14 and should be constructed on a similar structural base as the adjoining monolithically placed laneshoulder During design the structural base width needs to account for the Safety EdgeSM width
2 in Min
Edge of Pavement
H
5 in Approx
Shoulder Backing Material
Note Recommended Rise to Run ratio range 112 to 120 The range of slope is equal to 26deg to 40deg
Figure 14 Recommended Safety EdgeSM configuration for PCC pavements and overlays
42 Equipment ndash PCC Safety EdgeSM Devices
This part describes the modifications that must be made to a slip form concrete paver to form a Safety EdgeSM It also notes the essential attributes of a concrete paver that are necessary to create an effective Safety EdgeSM When a slip form paver is not being used the Safety EdgeSM needs to be manufactured or created as part of the forms ndash one side of the forms will have an angle of 30 degrees rather than being vertical
Currently there are no commercially available Safety EdgeSM devices for PCC pavers or forms Custom devices however can be fabricated by modifying the finishing pan of the paver (refer to Figure 15) The pan is essentially configured to form an inverted curb under the pan close to the end gate The steel components of the assembly need to be robust in order to resist bending during paving operations from the force of the plastic PCC The following provides a description of the modifications that were made to a Gomaco paver that
20
PCC Placement
January 5 2012
was used on one of the PCC demonstration projects and identifies some of the issues or items that should be considered in fabricating the Safety EdgeSM profile
A template was created for the Safety EdgeSM profile to ensure correct dimensions The template was used to manufacture a stainless steel profile pan of the desired shape and dimensions Portions of the existing profile pan were removed to fit in the new Safety EdgeSM profile [Note The contractor decided against welding the Safety EdgeSM profile to the bottom of the existing profile section or pan because of a concern that the welds might tear the finished PCC]
A 2-inch finish tail on the stainless steel Safety EdgeSM profile was fabricated to help finish the portion of the edge where it goes from slope to vertical When going through existing intersections driveways or where the grade is not exact on the outside edge the 2-inch finish tail did drag in some locations For the demonstration project the contractor cut one inch off of this tail and it performed well but cutting 05 inches from the tail would have also worked well
Adjusting bolts were fitted to the Safety EdgeSM profile pan One adjustment bolt was on the sloped section in case an adjustment had to be made if the edge profile was not finishing properly
In setting up the paver care was taken to position the vibrators in the specific locations for proper consolidation of the Safety EdgeSMndashnear the breakpoint
Unlike the Safety EdgeSM attachments for AC layers or overlays the modifications made to the concrete paver cannot be easily removed and replaced The modifications can be removed but the parts must be cut from the pan using a torch or grinder Touchup of the pan is required to return the unit to service on standard PCC pavements
43 Concrete Mixtures
Demonstration projects completed to date have used standard concrete mixes No changes to the mix were needed to accommodate the SE
44 Safety EdgeSM Construction
This part of the Guide discusses items of interest to PCC paving projects when a Safety EdgeSM is to be placed as part of the new construction or rehabilitation project
Normal paving procedures are usually sufficient for forming the Safety EdgeSM on mainline sections of the roadway using slip form paving operations and equipment Material
21
Transitioning Between Different Edge Profiles
January 5 2012
properties of the hardened concrete from the edge and the interior of the pavement have been demonstrated to be similar
Safety EdgeSM device
Figure 15 View of the Safety EdgeSM device from front of paver
It is recommended to have a transition from a no Safety EdgeSM section to a Safety EdgeSM
section to avoid a vertical edge perpendicular to traffic (ie similar to beginning section of bridge concrete railparapet where the bottom of the railparapet is modified to reduce the probability of vehicle tire snagging)
An important issue to be addressed is the intersection of cross roads where a vertical edge is required Due to the fixed nature of the edge and shoe assembly the contractor can consider different options depending on the number and extent of sections with different edge profiles In either case additional labor should be anticipated to tie into intersections or other areas requiring different edge profiles when paving using the Safety EdgeSM concept The following provides an overview of the two options that were used on some of the demonstration projects
If there are only a few intersecting roadways driveways or limited areas where a vertical face is required along the edge of the pavement the contractor can consider placing the safety edge using normal paving operations The Safety EdgeSM is sawcut
22
Vibration
Sawcutting
January 5 2012
and removed to create a vertical edge The sawing of the Safety EdgeSM can be completed at the same time the transverse joints are sawed This option has worked fine but does waste some PCC and requires additional sawing
Another option is to box out the areas requiring different edge profiles and place forms The PCC in these limited areas is placed by hand using normal construction practices in order to tie into pavement intersections driveways and other features
Generally the standard spacing of the vibrators are sufficient to properly consolidate the fresh concrete at the Safety EdgeSM Consolidation of the material within the Safety EdgeSM
should be checked at the start of any project If slip form pavers are not being used hand vibrators need to be used to ensure that the PCC flows into the lower part of the Safety EdgeSM As noted at the beginning of this section all demonstration projects included the use of slip form pavers in construction the Safety EdgeSM
Curing
Care should be taken to insure the specified curing procedures are properly followed for all surfaces at the edge of the pavement including the Safety EdgeSM The Safety EdgeSM however does not require any special curing requirements beyond that for typical PCC layers
Transverse control joint sawcutting can be stopped at the breakpoint of the Safety EdgeSM
and not continued through the sloped surface of the edge Experience shows the contraction cracks normally form at the end of the sawcut and extend through the Safety EdgeSM as planned (refer to Figure 16)
23
January 5 2012
Figure 16 Sawcut and crack at the formed joint on one of the Safety EdgeSM demonstration projects
45 Quality Measurement
The same properties used or identified by the owner agency to measure the quality of PCC pavement layers for acceptance should also be used on projects that include the Safety EdgeSM The acceptance plan should not be modified for projects that include the Safety EdgeSM More importantly the air void content strength andor smoothness requirements appropriate for a typical project should not be relaxed simply because the Safety EdgeSM is added to a PCC overlay or new construction project Thus the only difference between projects with and without the Safety EdgeSM is the slope of the edge itself
24
January 5 2012
REFERENCES
EDC Safety EdgeSM field reports can be found at httpwwwfhwadotgoveverydaycountstechnologysafetyedgefield_reportscfm
25
January 5 2012
APPENDICES
Safety EdgeSM guide specification can be found at httpwwwfhwadotgoveverydaycountstechnologysafetyedgespecscfm
26

January 5 2012
constructing a Safety EdgeSM for asphalt concrete materials (AC) and Portland cement concrete (PCC) pavements respectively
2
January 5 2012
SECTION 2 SAFETY EDGESM ndash GENERAL DESIGN AND CONSTRUCTION CONSIDERATIONS
In terms of paving operations there is little difference between the placement and construction of AC and PCC materials (refer to Figure 1) with and without the inclusion of the Safety EdgeSM However there are important considerations that should be accounted for when incorporating the Safety EdgeSM into a paving operation This section of the Guide highlights the general design and construction details when constructing a Safety EdgeSM in conjunction with AC or PCC pavements
21 Safety EdgeSM Use
The Safety EdgeSM provides two important safety related functions It serves as a mitigating measure to help with pavement edge drop off that occurs after an AC layer is placed but before shoulders can be reconstructed flush with the paved surface The Safety EdgeSM also serves as a long-term safety feature for areas susceptible to material displacement andor erosion adjacent to the paved surface
An additional benefit of the Safety EdgeSM is that the density of the AC mat adjacent to the pavement edge was found to be higher in most areas with the Safety EdgeSM in comparison to areas without the Safety EdgeSM The Safety EdgeSM is believed to serve as a restriction to the lateral movement of the AC mat along an unconfined edge This observation was found from multiple demonstration projects Visual assessment of many Safety EdgeSM treatments have shown that trucks loaded with asphalt do not deformdamage the finished edge
(a) AC Project (b) PCC Project
Break point
Figure 1 Safety EdgeSM placed on an AC and PCC project
3
Where the Safety EdgeSM Can Be Placed
Where the Safety EdgeSM Should Not Be Placed
January 5 2012
The Safety EdgeSM can be used in almost every situation to provide a condition towards preventing near vertical lane-shoulder drop offs during construction and over time It also provides added insurance until such time that maintenance personnel are able to repair eroded areas of the shoulder adjacent to the paved surface
A site condition where the Safety EdgeSM should not be used is where the foreslopeembankment or ground surface has a steeper slope than the slope of the Safety EdgeSM This condition may exist for a portion of the road being paved thus the Safety EdgeSM should be considered for use on the remainder of the road Figure 2 depicts this condition
Figure 2 Example of where a foreslopeembankment is too steep for the Safety EdgeSM
The Safety EdgeSM should be excluded in areas where curb and gutter have been or will be placed as the Safety EdgeSM is appropriate for the interface of a paved material and an unpavedunbound material In areas where there is a restriction for vehicles leaving the paved surface (for example guardrails and other safety features) whether or not to use the Safety EdgeSM must be assessed on a case-by-case situation The agency may see value in using the Safety EdgeSM for its pavement quality benefit and thus may want to use it in these applications
4
January 5 2012
22 Pre-Construction and Discontinuous Paving Operations
The pre-construction activities for Safety EdgeSM projects are to review the paving plan and make sure the Safety EdgeSM can be placed in suitable areas along the project If there are areas with restrictions along the edge of the pavement (for example guardrails intersections and bridges) the width of the roadway and width of paving should be considered so that there is sufficient room for the Safety EdgeSM device for resurfacing projects As an example narrow bridges along some low volume roadways can result in conditions where the AC paver screed extensions cannot be moved-in sufficiently when using Safety EdgeSM devices that are bolted to the paver screed so the paver operator must steer the paver more towards the center of the roadway during paving operations (center line crown or other cross slope changes need to be considered in these conditions) Other areas where the foreslope is steeper than the Safety EdgeSM slope should be noted These conditions should be discussed in the contractors quality control plan andor pre-paving meeting and how the condition will be resolved
Paving across intersections and driveways with the Safety EdgeSM device in place is generally no different than when paving without the Safety EdgeSM The differences for both AC and PCC paving are noted below All of these conditions or paving anomalies should be identified and addressed prior to beginning paving operations
For AC paving extra attention from the paver and screed operators may be necessary to accommodate the Safety EdgeSM at transitions for intersections driveways and changes in longitudinal elevations or profile The reason for this extra attention is discussed in Section 3 of the Guide Specifically Section 32 discusses the different Safety EdgeSM
devices and their attachment to the paver For devices attached to the screed the screed operator can keep the Safety EdgeSM device lowered or can raise the device above the bottom of the screed so that the Safety EdgeSM is not placed through some intersections (refer to Figure 3) The capability for lowering and raising the device allows the paving operation to continue without disruption when discontinuous features or adjacent features are encountered For devices attached to the end plate the screed operator needs to monitor the height of the end plate ski to ensure the desired shape is placed
For PCC slip-form paving the PCC material at the intersection or driveway will need to be sawcut to remove the Safety EdgeSM (refer to Figure 4) or build up the Safety EdgeSM
by hand in order to tie into pavement intersections
5
January 5 2012
Screed operator raised the Safety EdgeSM device in
paving across this intersection The Safety
EdgeSM device can be kept lowered when paving
across driveways Agreement on how to treat
this condition should be established before paving
starts
Sawcut
Figure 3 Placing an AC overlay at an intersection of a Safety EdgeSM project
Figure 4 Sawcut on a PCC project at an intersection to remove the Safety EdgeSM
6
January 5 2012
23 Pavement EdgeShoulder Preparation
The pavement edge should be prepared in accordance with standard agency paving operations for both AC and PCC surfaces (refer to Figure 5)
Motor grader is used to remove vegetation and soil build-up along the edge of the pavement
A motorized broom cleans the surface of the pavement prior to applying the tack coat to the surface of the existing pavement
A tack coat is applied to the cleaned pavement surface prior to placing the asphalt overlay
Figure 5 Surface preparation activities performed prior to placing an AC overlay
7
January 5 2012
The following items are highlighted to ensure the agency considers them as they have been shown to adversely impact Safety EdgeSM construction on some projects
If vegetation exists along the pavement edge consideration should be given to removing this vegetation in the area supporting the Safety EdgeSM prior to paving Good asphalt paving practice includes not paving on vegetation as the asphalt will not adequately compact and thus will not perform adequately Figure 6 shows an example of a Safety EdgeSM edge placed over vegetation For asphalt paving a cleanclearly visible pavement edge will help the screed operator monitor the material placement along the pavementrsquos edge
If the agency removes vegetationsoil from the edge of the pavement (edge clipping) ensure a reasonable grade elevation and slope of the pavement edgeshoulder is established to minimize use of excess pavement material along the edge
Edge clipping should extend far enough to accommodate the additional width of the Safety EdgeSM which may be a change in standard operating practice The wedge part of the Safety EdgeSM is typically additional width therefore paving a vertical edge depth of 3 inches will require clipping an additional 6 inches of width to accommodate the Safety EdgeSM
Figure 6 Example of Safety EdgeSM placed on heavy vegetation ndash due to lack of adequate compaction the Safety EdgeSM will deteriorate
8
January 5 2012
24 Slope Measurement
Including the Safety EdgeSM on a new construction or resurfacing project does not impact the agencyrsquos material and construction specifications The only difference in determining the quality between projects with and without the Safety EdgeSM is the measurement of slope for the as-built Safety EdgeSM itself This part of the Guide discusses measuring the slope of the Safety EdgeSM
Figure 7 illustrates how the slope is measured or determined for an AC resurfacing project The length of line B is determined as the distance of a vertical virtual line from the edge or toe of the Safety EdgeSM to the pavement surface cross slope extended The toe of the Safety EdgeSM can be defined as where a straight line along the surface of the Safety EdgeSM
contacts the ground surface This point becomes important for asphalt mixtures with larger nominal maximum sized aggregate where the removal of one coarse aggregate particle can significantly change the measured slope The length of line A is determined as the distance from the point where there is space between the straight edge placed on the pavement surface at the edge defined as the break point and the vertical virtual line through the toe of the Safety EdgeSM or vertical line B The angle θ is calculated as θ = arctan BA This angle measurement is the angle that the vehicle tire encounters when the vehicle is attempting to return to the pavement The slope of a PCC Safety EdgeSM is determined in the same manner The angle measurement is made on the sloped portion of the Safety EdgeSM and does not include the vertical portion of the PCC edge
A
B
Toe of the slope
Break point
Figure 7 Measurement of Safety EdgeSM slope or angle
25 Backing Material Placement
It should be remembered that the Safety EdgeSM is a mitigation of the drop off created by the AC or PCC overlay or new paved layer it is not intended to substitute for a shoulder that is flush with the paved surface After the paved layer or overlay has been placed the shoulder or backing material needs to be graded back flush with the paved surface The shoulder material should be placed in accordance with standard equipment and procedures specified
9
January 5 2012
by the owner agency for both AC and PCC pavements The only cautionary note is to grade the backing or shoulder material over and along the Safety EdgeSM as soon as possible but in the case of an AC pavement after the mat has cooled sufficiently so that any scuffing or tearing of the surface from construction equipment is minimized Similarly PCC should be allowed to cure and gain sufficient strength so that the construction equipment grading the backing material does not damage the PCC Safety EdgeSM After construction is completed the Safety EdgeSM will be covered with the backing material and not seen by the road user as shown in Figure 8
Figure 8 Safety EdgeSM completely covered by shoulder backing material
10
January 5 2012
SECTION 3 SPECIFIC CONSIDERATIONS FOR CONSTRUCTING THE SAFETY EDGESM IN CONJUNCTION WITH NEW AC
PAVEMENTS OR AC OVERLAYS
This section of the Guide identifies issues that need to be monitored during the placement and compaction operations of the AC pavement
31 Design Features and Shape
The paved laneshoulder width and location of the Safety EdgeSM break point should be discussed and established prior to paving The Safety EdgeSM can be constructed on the unimproved or improved shoulder with the break point lining up directly over the existing pavement edge or over any portion of the previously paved surface as shown in Figure 9
Figure 9 Paver positioned to align the Safety EdgeSM break point over the existing pavement
The intent is not to sacrifice paved laneshoulder width to construct the Safety EdgeSM Constructing the Safety EdgeSM onto the unimproved shoulder does not result in a decrease in paved laneshoulder width
The Safety EdgeSM is designed to create a 30 degree finished angle relative to the pavement cross slope on the edge of the pavement Agency-specific tolerances may vary from those shown in Figure 10 which is from the FHWA guide specification On projects where multiple AC layers are used it is recommended each AC layer (except leveling layer) of the final 5 inches of AC receive the Safety EdgeSM as shown in Figure 10 For new construction or reconstruction with thicker AC layers consideration should be given to widening the underlying paved layers to accommodate the Safety EdgeSM without decreasing lane width as shown in Figure 10 On projets with multiple AC layers it is expected the additional volume of AC required to form the Safety EdgeSMwill increase bid quantities
11
Edge of Pavement
H Shoulder Backing Material
For H le 5 in
For H gt 5 in
January 5 2012
Note Recommended Rise to Run ratio range 112 to 120 The range of slope is equal to 26deg to 40deg
Figure 10 Recommended Safety EdgeSM configuration for AC pavements and overlays
12
Devices Attached to the Screed
End Plate Modifying Devices
January 5 2012
32 Equipment ndash AC Safety EdgeSM Devices
The current commercial Safety EdgeSM devices can be grouped into two categories (1) devices attached to the paver screed and (2) modifications or attachments to the paver end plate The devices listed below do not constitute an approved products list Highway agencies should evaluate any new Safety EdgeSM hardware for compliance with specifications before approving for use on a project
Currently there are three devices available from two different manufacturers which are (1) the ldquoShoulder Wedge Makerrdquo manufactured by TransTech wwwtranstechsyscom and (2) the ldquoAdvant-Edgerrdquo and ldquoRamp Champrdquo manufactured by the Advant-Edge Paving Equipment LLC wwwadvantedgepavingcom Each manufacturer provides detailed installation instructions for attaching their devices to the paver screed The devices can be easily attached to and removed from the paver screed with a simple two-bolt connection The Safety EdgeSM device should fit closely to the end plate to prevent AC from getting between the device itself and end plate The Ramp Champ can be set to a range of angles while the other devices have a fixed angle
The end plate modification devices are available from Carlson Paving Products Inc (Safety Edge End Gate) httpwwwcarlsonpavingproductscom and Willow Designs LLC httpwwwwillowdesignsllccom The ski of the devices form the slope of the Safety EdgeSM
and can be set to a range of angles The screed operator can adjust the angle of the ski while paving to ensure the final angle of the Safety EdgeSM after rolling is close to 30 degrees
33 Asphalt Concrete Materials
The Safety EdgeSM can be placed with all dense-graded AC materials that have been properly designed in accordance with existing mixture design methods including Hot Mix Asphalt (HMA) Warm Mix Asphalt (WMA) HMA with high amounts of Recycled Asphalt Pavement (RAP) HMA with Recycled Asphalt Shingles (RAS) polymer modified asphalt (PMA) rubberized gap graded and open graded mixes and other specialty mixtures The demonstration projects included HMA RAP RAS WMA and PMA mixtures
There are two critical material issues in terms of placing a Safety EdgeSM for AC mixtures (1) lateral movement of the AC mix during compaction and (2) the size or amount of coarse aggregate in the AC mixture
Most AC mixtures exhibit some lateral movement under the rollers during compaction and that movement is mixture and application dependent Lateral movement of the AC mix should not prevent the contractor from achieving an
13
Safety EdgeSM Device Installation
January 5 2012
acceptable Safety EdgeSM slope after final rolling Ensure that after rolling is completed the Safety EdgeSM break point lines up directly over the existing pavement edge or over any portion of the previously paved surface If the break point is over the unimproved shoulder (ie different support structure) the potential of a longitudinal crack forming is greater (Figure 11) This material related issue is discussed in more detail in Section 34 - Safety EdgeSM Construction under Rolling
The maximum nominal size aggregate of the mixture or amount of coarse aggregate can affect the surface texture or appearance of the Safety EdgeSM and measurement of the slope Fine-graded AC mixtures were observed to have a tighter surface appearance and texture along the edge Rough surface texture makes the measurement of the slope more difficult to quantify ndash increasing variability in slope measurements
Figure 11 Longitudinal crack due to Safety EdgeSM break point located on unimproved shoulder
34 Safety EdgeSM Construction
This section discusses items of interest to asphalt paving projects when a Safety EdgeSM is to be placed as part of the new construction or rehabilitation project
Manufacturers of commercially available devices provide detailed instructions for attaching the Safety EdgeSM devices to the paver Proper installation of the devices was discussed in a previous part of this section (Equipment ndash AC Safety EdgeSM Devices) A key issue for devices attached to the screed without guide rails is to ensure close installation to the end plate so loose mix does not get trapped between the device and end plate during paving operations At the beginning of the dayrsquos production when pulling off a transverse joint the screed operator needs to monitor the position of the device as the auger chamber and
14
AC Placement
January 5 2012
extension are being charged to ensure the device is in contact with the end plate These issues do not affect the end gate type device
The Safety EdgeSM can be placed with normal paving procedures and no changes to the operation of the paver need to be made More importantly the Safety EdgeSM device has no impact on how the paver operates whether paving on an embankment or crushed stone layer recently placed AC existing AC or PCC layers or milled surface
For those agencies that require trial or control sections as part of standard AC paving operations the slope of the Safety EdgeSM should be measured after all rolling has been completed to ensure the Safety EdgeSM slope did not ldquostand uprdquo (substantial increase in the slope) Trial sections provide an opportunity for the screed operator to make adjustments to the Safety EdgeSM and screed before high production paving begins For example to obtain the 30o finished angle the target angle to be achieved behind the paver by the Safety EdgeSM
device may need to be shallower for a given mix eg 25 degree Trial sections can also be used to assess if the edge will ldquostand uprdquo during the AC rolling operation The issue of maintaining the slope of the Safety EdgeSM is discussed under the next subsection ndash Rolling
The screed operator needs to watch and adjust three items during the paving operation when using a Safety EdgeSM device attached to the screed described in Section 32 (1) the Safety EdgeSM device itself (2) the end plate and (3) the screed (refer to Figure 12) If the Safety EdgeSM device with too much downward pressure rides on the AC or other stiff base material that has been previously placed this can result in undesirable paving results as described below
When the Safety EdgeSM device rides on a base with a rough positive surface texture (eg coarse aggregate protruding upward such as in a chip seal) in some cases it may cause the screed to vibrate or jerk The toe of the Safety EdgeSM can get caught on larger aggregate particles and when the particle breaks loose the screed jerks The screed operator will need to monitor the downward pressure of the Safety EdgeSM
device so this does not happen in extreme cases When the Safety EdgeSM device rides on a base with a varying longitudinal profile
the screed operator will need to monitor the downward pressure of the Safety EdgeSM
device to keep the screed functioning as designed within the free-floating principle The spring around the shaft of the Safety EdgeSM is designed to keep a relatively uniform pressure on the mixture being placed under the Safety EdgeSM ndash assuming the vertical operational limit of the Safety Edge is not exceeded
The screed operator also needs to monitor the downward pressure of the Safety EdgeSM device when it rides on soft surfaces The leading edge of the device can dig into the soft shoulder pulling soilaggregate into the asphalt wedge of the Safety EdgeSM This is the same condition experienced in conventional paving when the paver end plate ski digs into the soft shoulder
15
January 5 2012
Wrench used to adjust the elevation
of the Safety EdgeSM
device
Figure 12 Safety EdgeSM adjustment for raising and lowering the device
When paving begins the screed operator should pay close attention to the following items when using a Safety EdgeSM device attached to the screed
In charging the auger chamber with AC the screed operator should ensure that the device is in close contact with the end plate so that mix does not get between the device and end plate and that there is sufficient material surrounding the device to keep it held against the end plate
After the paving operation begins and the full AC lift thickness has stabilized the screed operator should adjust the Safety EdgeSM device by lowering the device into contact with the underlying surface This adjustment should not be made prior to the paver moving off the shims at the start of a dayrsquos paving operation The screed operator should look behind the paver to ensure that the slope of the edge will produce a slope of about 30 degrees after rolling
16
January 5 2012
The paver end plate ski needs to remain in contact with the surface being paved over AC can extrude out under the end plate ski if not in contact with the existing surface which can reduce the amount of AC available for the Safety EdgeSM ndash affecting the slope and density of the wedge itself
When placing an AC overlay the Safety EdgeSM can ride on the underlying layer However the screed operator should closely monitor the downward force on the Safety EdgeSM device relative to underlying hard surfaces with variable longitudinal profiles which can change the forces on one side of the screed (free floating screed principle or mode) This concern is heightened at intersections or areas of increased variation of longitudinal profile The spring around the shaft of the Safety EdgeSM is designed to keep a relatively uniform pressure on the mixture being placed under the Safety EdgeSM ndash assuming the vertical operational limit of the Safety Edge is not exceeded
The operator needs to be aware that the height adjustment screw can be bent from paving with too much downward force especially if the shoe is in contact with a variable elevation of a hard surface The height adjustment screw can also be bent from or hitting objects while in transport
The screed operator should monitor the surface texture and condition of the Safety EdgeSM
When drawing in the hydraulic extension the screed operator needs to closely monitor the process to ensure that the Safety EdgeSM device does not come in contact with the cross feed auger If this occurs it can damage both the Safety EdgeSM device and auger
If the hydraulic extension of the screed is extended during mainline paving the amount of mix in the extension can be reduced near the paver end plate When this occurs the screed operator should monitor the amount of mix to ensure it is not getting between the end plate and Safety EdgeSM device itself as the screed moves out
The flow of AC material to the Safety EdgeSM device should be closely monitored to make sure enough material is available to form a continuous edge and that the material feed augers are properly positioned
Paver manufactures commonly recommend material feed augers be no greater than 18 inches from the end plate
When the paver is being moved the Safety EdgeSM device should be removed or raised to its mounting height or uppermost position This will ensure that the bottom of the device will not strikeget caught on any obstruction
When using a Safety EdgeSM device the screed operator needs to continually be aware of the position of the break point of the Safety EdgeSM slope and keep the break point on the structural base or existing pavement
At the beginning of the project it is recommended that slope measurements be made immediately behind the paver and after each roller pass The focus is on the final Safety EdgeSM slope angle after all rolling to determine how rolling impacts the final slope angle
17
Rolling
January 5 2012
The contractor may want to periodically make these measurements as part of the quality control process
No special rollers are required for compacting the AC mix along and adjacent to the Safety EdgeSM (refer to Figure 13)
Figure 13 Rolling the Safety EdgeSM with standard rollers ndash No special rollers are required
18
January 5 2012
Most AC mixtures exhibit some lateral movement under the rollers during compaction Lateral movement of the AC mix should not prevent the contractor from achieving an acceptable Safety EdgeSM slope after final rolling For some of the demonstration projects the contractor did change or revise the standard rolling pattern to maximize the density of the AC mat while retaining an appropriate Safety EdgeSM angle Just like for any AC paving project the optimum rolling pattern is AC mixture specific A rolling pattern used to compact a low stiffness mix and high stiffness mix may be different to meet the density requirements
The following recommendations are made based on the findings from multiple demonstration projects
The contractor should roll the AC mat and pavement edges based on normal or standard compaction operation This should ensure adequate density along and near the pavement edge Multiple demonstration projects have been constructed successfully where the pavement edge was rolled with the contractorrsquos standard rolling pattern
After final rolling the slope of the Safety EdgeSM should be measured If the slope of the edge is too steep the contractor should determine if the slope of the edge was steepened because of excessive rolling the use of a mix that exhibits tenderness or the AC mixture is simply too soft to retain the targeted slope angle A variable angle Safety EdgeSM device can be used to place the Safety EdgeSM at an angle less than 30 degrees behind the paver which should assist the contractor in achieving 30 degrees after rolling
Delaying the rolling of the edge of the mat should be the last resort taken to retain the slope of the Safety EdgeSM This becomes a decision between durability along and near the pavement edge and retaining a slope of the Safety EdgeSM
Continually monitor the slope of the Safety EdgeSM after final rolling The slope of the Safety EdgeSM varied between 30 to 40 degrees on multiple demonstration projects without delaying the rolling of the Safety EdgeSM
35 Quality Measurement
The same properties used or identified by the owner agency to measure the quality of AC pavement layers for acceptance should also be used on projects that include the Safety EdgeSM The acceptance plan should not be modified for projects that include the Safety EdgeSM More importantly the density strength andor smoothness requirements appropriate for a typical project should not be relaxed simply because the Safety EdgeSM is added to a resurfacing or new construction project Thus the only difference between projects with and without the Safety EdgeSM is the slope of the edge itself
19
January 5 2012
SECTION 4 SPECIFIC CONSIDERATIONS FOR CONSTRUCTING THE SAFETY EDGESM IN CONJUNCTION WITH NEW CONCRETE
PAVEMENTS OR CONCRETE OVERLAYS
This section identifies issues that need to be monitored during the construction of PCC pavements All of the PCC demonstration projects that were used for preparing this Guide included the use of slip-form paving to form the Safety EdgeSM A benefit of forming the Safety EdgeSM during PCC slip-form paving is the sensitivity to edge slump is reduced
41 Design Features and Shape
The Safety EdgeSM is designed to create a 30 degree finished angle relative to the pavement cross slope as shown in Figure 14 and should be constructed on a similar structural base as the adjoining monolithically placed laneshoulder During design the structural base width needs to account for the Safety EdgeSM width
2 in Min
Edge of Pavement
H
5 in Approx
Shoulder Backing Material
Note Recommended Rise to Run ratio range 112 to 120 The range of slope is equal to 26deg to 40deg
Figure 14 Recommended Safety EdgeSM configuration for PCC pavements and overlays
42 Equipment ndash PCC Safety EdgeSM Devices
This part describes the modifications that must be made to a slip form concrete paver to form a Safety EdgeSM It also notes the essential attributes of a concrete paver that are necessary to create an effective Safety EdgeSM When a slip form paver is not being used the Safety EdgeSM needs to be manufactured or created as part of the forms ndash one side of the forms will have an angle of 30 degrees rather than being vertical
Currently there are no commercially available Safety EdgeSM devices for PCC pavers or forms Custom devices however can be fabricated by modifying the finishing pan of the paver (refer to Figure 15) The pan is essentially configured to form an inverted curb under the pan close to the end gate The steel components of the assembly need to be robust in order to resist bending during paving operations from the force of the plastic PCC The following provides a description of the modifications that were made to a Gomaco paver that
20
PCC Placement
January 5 2012
was used on one of the PCC demonstration projects and identifies some of the issues or items that should be considered in fabricating the Safety EdgeSM profile
A template was created for the Safety EdgeSM profile to ensure correct dimensions The template was used to manufacture a stainless steel profile pan of the desired shape and dimensions Portions of the existing profile pan were removed to fit in the new Safety EdgeSM profile [Note The contractor decided against welding the Safety EdgeSM profile to the bottom of the existing profile section or pan because of a concern that the welds might tear the finished PCC]
A 2-inch finish tail on the stainless steel Safety EdgeSM profile was fabricated to help finish the portion of the edge where it goes from slope to vertical When going through existing intersections driveways or where the grade is not exact on the outside edge the 2-inch finish tail did drag in some locations For the demonstration project the contractor cut one inch off of this tail and it performed well but cutting 05 inches from the tail would have also worked well
Adjusting bolts were fitted to the Safety EdgeSM profile pan One adjustment bolt was on the sloped section in case an adjustment had to be made if the edge profile was not finishing properly
In setting up the paver care was taken to position the vibrators in the specific locations for proper consolidation of the Safety EdgeSMndashnear the breakpoint
Unlike the Safety EdgeSM attachments for AC layers or overlays the modifications made to the concrete paver cannot be easily removed and replaced The modifications can be removed but the parts must be cut from the pan using a torch or grinder Touchup of the pan is required to return the unit to service on standard PCC pavements
43 Concrete Mixtures
Demonstration projects completed to date have used standard concrete mixes No changes to the mix were needed to accommodate the SE
44 Safety EdgeSM Construction
This part of the Guide discusses items of interest to PCC paving projects when a Safety EdgeSM is to be placed as part of the new construction or rehabilitation project
Normal paving procedures are usually sufficient for forming the Safety EdgeSM on mainline sections of the roadway using slip form paving operations and equipment Material
21
Transitioning Between Different Edge Profiles
January 5 2012
properties of the hardened concrete from the edge and the interior of the pavement have been demonstrated to be similar
Safety EdgeSM device
Figure 15 View of the Safety EdgeSM device from front of paver
It is recommended to have a transition from a no Safety EdgeSM section to a Safety EdgeSM
section to avoid a vertical edge perpendicular to traffic (ie similar to beginning section of bridge concrete railparapet where the bottom of the railparapet is modified to reduce the probability of vehicle tire snagging)
An important issue to be addressed is the intersection of cross roads where a vertical edge is required Due to the fixed nature of the edge and shoe assembly the contractor can consider different options depending on the number and extent of sections with different edge profiles In either case additional labor should be anticipated to tie into intersections or other areas requiring different edge profiles when paving using the Safety EdgeSM concept The following provides an overview of the two options that were used on some of the demonstration projects
If there are only a few intersecting roadways driveways or limited areas where a vertical face is required along the edge of the pavement the contractor can consider placing the safety edge using normal paving operations The Safety EdgeSM is sawcut
22
Vibration
Sawcutting
January 5 2012
and removed to create a vertical edge The sawing of the Safety EdgeSM can be completed at the same time the transverse joints are sawed This option has worked fine but does waste some PCC and requires additional sawing
Another option is to box out the areas requiring different edge profiles and place forms The PCC in these limited areas is placed by hand using normal construction practices in order to tie into pavement intersections driveways and other features
Generally the standard spacing of the vibrators are sufficient to properly consolidate the fresh concrete at the Safety EdgeSM Consolidation of the material within the Safety EdgeSM
should be checked at the start of any project If slip form pavers are not being used hand vibrators need to be used to ensure that the PCC flows into the lower part of the Safety EdgeSM As noted at the beginning of this section all demonstration projects included the use of slip form pavers in construction the Safety EdgeSM
Curing
Care should be taken to insure the specified curing procedures are properly followed for all surfaces at the edge of the pavement including the Safety EdgeSM The Safety EdgeSM however does not require any special curing requirements beyond that for typical PCC layers
Transverse control joint sawcutting can be stopped at the breakpoint of the Safety EdgeSM
and not continued through the sloped surface of the edge Experience shows the contraction cracks normally form at the end of the sawcut and extend through the Safety EdgeSM as planned (refer to Figure 16)
23
January 5 2012
Figure 16 Sawcut and crack at the formed joint on one of the Safety EdgeSM demonstration projects
45 Quality Measurement
The same properties used or identified by the owner agency to measure the quality of PCC pavement layers for acceptance should also be used on projects that include the Safety EdgeSM The acceptance plan should not be modified for projects that include the Safety EdgeSM More importantly the air void content strength andor smoothness requirements appropriate for a typical project should not be relaxed simply because the Safety EdgeSM is added to a PCC overlay or new construction project Thus the only difference between projects with and without the Safety EdgeSM is the slope of the edge itself
24
January 5 2012
REFERENCES
EDC Safety EdgeSM field reports can be found at httpwwwfhwadotgoveverydaycountstechnologysafetyedgefield_reportscfm
25
January 5 2012
APPENDICES
Safety EdgeSM guide specification can be found at httpwwwfhwadotgoveverydaycountstechnologysafetyedgespecscfm
26
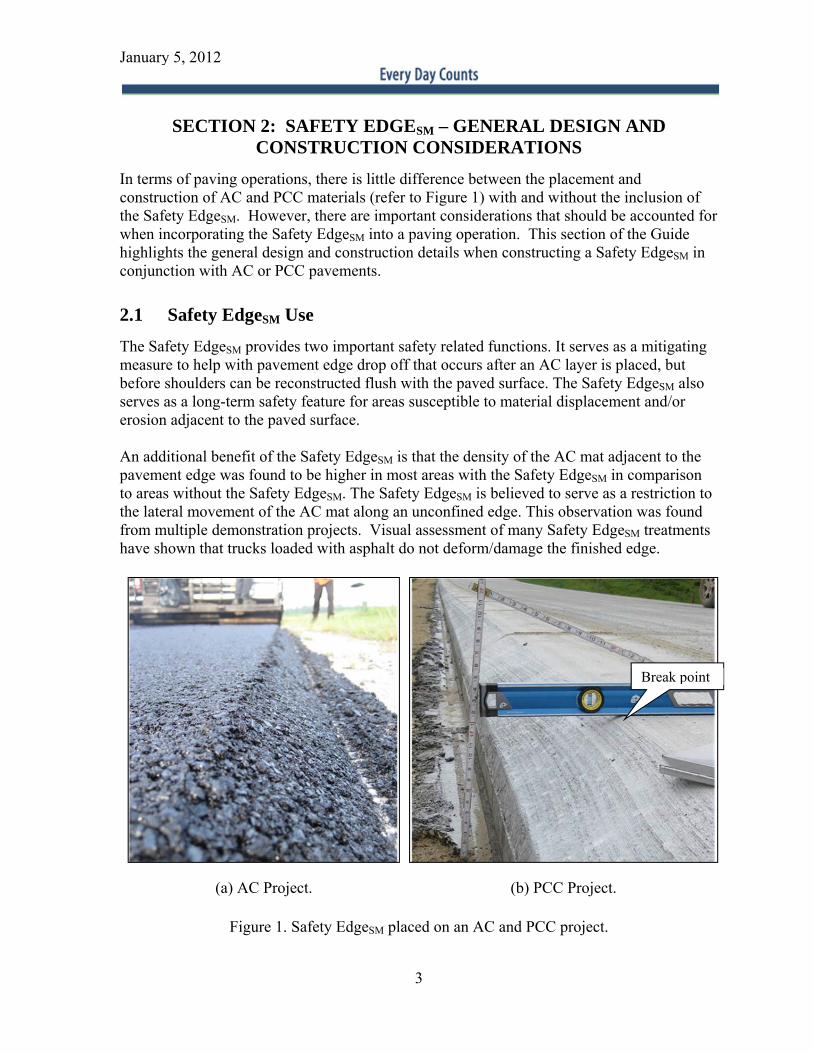
January 5 2012
SECTION 2 SAFETY EDGESM ndash GENERAL DESIGN AND CONSTRUCTION CONSIDERATIONS
In terms of paving operations there is little difference between the placement and construction of AC and PCC materials (refer to Figure 1) with and without the inclusion of the Safety EdgeSM However there are important considerations that should be accounted for when incorporating the Safety EdgeSM into a paving operation This section of the Guide highlights the general design and construction details when constructing a Safety EdgeSM in conjunction with AC or PCC pavements
21 Safety EdgeSM Use
The Safety EdgeSM provides two important safety related functions It serves as a mitigating measure to help with pavement edge drop off that occurs after an AC layer is placed but before shoulders can be reconstructed flush with the paved surface The Safety EdgeSM also serves as a long-term safety feature for areas susceptible to material displacement andor erosion adjacent to the paved surface
An additional benefit of the Safety EdgeSM is that the density of the AC mat adjacent to the pavement edge was found to be higher in most areas with the Safety EdgeSM in comparison to areas without the Safety EdgeSM The Safety EdgeSM is believed to serve as a restriction to the lateral movement of the AC mat along an unconfined edge This observation was found from multiple demonstration projects Visual assessment of many Safety EdgeSM treatments have shown that trucks loaded with asphalt do not deformdamage the finished edge
(a) AC Project (b) PCC Project
Break point
Figure 1 Safety EdgeSM placed on an AC and PCC project
3
Where the Safety EdgeSM Can Be Placed
Where the Safety EdgeSM Should Not Be Placed
January 5 2012
The Safety EdgeSM can be used in almost every situation to provide a condition towards preventing near vertical lane-shoulder drop offs during construction and over time It also provides added insurance until such time that maintenance personnel are able to repair eroded areas of the shoulder adjacent to the paved surface
A site condition where the Safety EdgeSM should not be used is where the foreslopeembankment or ground surface has a steeper slope than the slope of the Safety EdgeSM This condition may exist for a portion of the road being paved thus the Safety EdgeSM should be considered for use on the remainder of the road Figure 2 depicts this condition
Figure 2 Example of where a foreslopeembankment is too steep for the Safety EdgeSM
The Safety EdgeSM should be excluded in areas where curb and gutter have been or will be placed as the Safety EdgeSM is appropriate for the interface of a paved material and an unpavedunbound material In areas where there is a restriction for vehicles leaving the paved surface (for example guardrails and other safety features) whether or not to use the Safety EdgeSM must be assessed on a case-by-case situation The agency may see value in using the Safety EdgeSM for its pavement quality benefit and thus may want to use it in these applications
4
January 5 2012
22 Pre-Construction and Discontinuous Paving Operations
The pre-construction activities for Safety EdgeSM projects are to review the paving plan and make sure the Safety EdgeSM can be placed in suitable areas along the project If there are areas with restrictions along the edge of the pavement (for example guardrails intersections and bridges) the width of the roadway and width of paving should be considered so that there is sufficient room for the Safety EdgeSM device for resurfacing projects As an example narrow bridges along some low volume roadways can result in conditions where the AC paver screed extensions cannot be moved-in sufficiently when using Safety EdgeSM devices that are bolted to the paver screed so the paver operator must steer the paver more towards the center of the roadway during paving operations (center line crown or other cross slope changes need to be considered in these conditions) Other areas where the foreslope is steeper than the Safety EdgeSM slope should be noted These conditions should be discussed in the contractors quality control plan andor pre-paving meeting and how the condition will be resolved
Paving across intersections and driveways with the Safety EdgeSM device in place is generally no different than when paving without the Safety EdgeSM The differences for both AC and PCC paving are noted below All of these conditions or paving anomalies should be identified and addressed prior to beginning paving operations
For AC paving extra attention from the paver and screed operators may be necessary to accommodate the Safety EdgeSM at transitions for intersections driveways and changes in longitudinal elevations or profile The reason for this extra attention is discussed in Section 3 of the Guide Specifically Section 32 discusses the different Safety EdgeSM
devices and their attachment to the paver For devices attached to the screed the screed operator can keep the Safety EdgeSM device lowered or can raise the device above the bottom of the screed so that the Safety EdgeSM is not placed through some intersections (refer to Figure 3) The capability for lowering and raising the device allows the paving operation to continue without disruption when discontinuous features or adjacent features are encountered For devices attached to the end plate the screed operator needs to monitor the height of the end plate ski to ensure the desired shape is placed
For PCC slip-form paving the PCC material at the intersection or driveway will need to be sawcut to remove the Safety EdgeSM (refer to Figure 4) or build up the Safety EdgeSM
by hand in order to tie into pavement intersections
5
January 5 2012
Screed operator raised the Safety EdgeSM device in
paving across this intersection The Safety
EdgeSM device can be kept lowered when paving
across driveways Agreement on how to treat
this condition should be established before paving
starts
Sawcut
Figure 3 Placing an AC overlay at an intersection of a Safety EdgeSM project
Figure 4 Sawcut on a PCC project at an intersection to remove the Safety EdgeSM
6
January 5 2012
23 Pavement EdgeShoulder Preparation
The pavement edge should be prepared in accordance with standard agency paving operations for both AC and PCC surfaces (refer to Figure 5)
Motor grader is used to remove vegetation and soil build-up along the edge of the pavement
A motorized broom cleans the surface of the pavement prior to applying the tack coat to the surface of the existing pavement
A tack coat is applied to the cleaned pavement surface prior to placing the asphalt overlay
Figure 5 Surface preparation activities performed prior to placing an AC overlay
7
January 5 2012
The following items are highlighted to ensure the agency considers them as they have been shown to adversely impact Safety EdgeSM construction on some projects
If vegetation exists along the pavement edge consideration should be given to removing this vegetation in the area supporting the Safety EdgeSM prior to paving Good asphalt paving practice includes not paving on vegetation as the asphalt will not adequately compact and thus will not perform adequately Figure 6 shows an example of a Safety EdgeSM edge placed over vegetation For asphalt paving a cleanclearly visible pavement edge will help the screed operator monitor the material placement along the pavementrsquos edge
If the agency removes vegetationsoil from the edge of the pavement (edge clipping) ensure a reasonable grade elevation and slope of the pavement edgeshoulder is established to minimize use of excess pavement material along the edge
Edge clipping should extend far enough to accommodate the additional width of the Safety EdgeSM which may be a change in standard operating practice The wedge part of the Safety EdgeSM is typically additional width therefore paving a vertical edge depth of 3 inches will require clipping an additional 6 inches of width to accommodate the Safety EdgeSM
Figure 6 Example of Safety EdgeSM placed on heavy vegetation ndash due to lack of adequate compaction the Safety EdgeSM will deteriorate
8
January 5 2012
24 Slope Measurement
Including the Safety EdgeSM on a new construction or resurfacing project does not impact the agencyrsquos material and construction specifications The only difference in determining the quality between projects with and without the Safety EdgeSM is the measurement of slope for the as-built Safety EdgeSM itself This part of the Guide discusses measuring the slope of the Safety EdgeSM
Figure 7 illustrates how the slope is measured or determined for an AC resurfacing project The length of line B is determined as the distance of a vertical virtual line from the edge or toe of the Safety EdgeSM to the pavement surface cross slope extended The toe of the Safety EdgeSM can be defined as where a straight line along the surface of the Safety EdgeSM
contacts the ground surface This point becomes important for asphalt mixtures with larger nominal maximum sized aggregate where the removal of one coarse aggregate particle can significantly change the measured slope The length of line A is determined as the distance from the point where there is space between the straight edge placed on the pavement surface at the edge defined as the break point and the vertical virtual line through the toe of the Safety EdgeSM or vertical line B The angle θ is calculated as θ = arctan BA This angle measurement is the angle that the vehicle tire encounters when the vehicle is attempting to return to the pavement The slope of a PCC Safety EdgeSM is determined in the same manner The angle measurement is made on the sloped portion of the Safety EdgeSM and does not include the vertical portion of the PCC edge
A
B
Toe of the slope
Break point
Figure 7 Measurement of Safety EdgeSM slope or angle
25 Backing Material Placement
It should be remembered that the Safety EdgeSM is a mitigation of the drop off created by the AC or PCC overlay or new paved layer it is not intended to substitute for a shoulder that is flush with the paved surface After the paved layer or overlay has been placed the shoulder or backing material needs to be graded back flush with the paved surface The shoulder material should be placed in accordance with standard equipment and procedures specified
9
January 5 2012
by the owner agency for both AC and PCC pavements The only cautionary note is to grade the backing or shoulder material over and along the Safety EdgeSM as soon as possible but in the case of an AC pavement after the mat has cooled sufficiently so that any scuffing or tearing of the surface from construction equipment is minimized Similarly PCC should be allowed to cure and gain sufficient strength so that the construction equipment grading the backing material does not damage the PCC Safety EdgeSM After construction is completed the Safety EdgeSM will be covered with the backing material and not seen by the road user as shown in Figure 8
Figure 8 Safety EdgeSM completely covered by shoulder backing material
10
January 5 2012
SECTION 3 SPECIFIC CONSIDERATIONS FOR CONSTRUCTING THE SAFETY EDGESM IN CONJUNCTION WITH NEW AC
PAVEMENTS OR AC OVERLAYS
This section of the Guide identifies issues that need to be monitored during the placement and compaction operations of the AC pavement
31 Design Features and Shape
The paved laneshoulder width and location of the Safety EdgeSM break point should be discussed and established prior to paving The Safety EdgeSM can be constructed on the unimproved or improved shoulder with the break point lining up directly over the existing pavement edge or over any portion of the previously paved surface as shown in Figure 9
Figure 9 Paver positioned to align the Safety EdgeSM break point over the existing pavement
The intent is not to sacrifice paved laneshoulder width to construct the Safety EdgeSM Constructing the Safety EdgeSM onto the unimproved shoulder does not result in a decrease in paved laneshoulder width
The Safety EdgeSM is designed to create a 30 degree finished angle relative to the pavement cross slope on the edge of the pavement Agency-specific tolerances may vary from those shown in Figure 10 which is from the FHWA guide specification On projects where multiple AC layers are used it is recommended each AC layer (except leveling layer) of the final 5 inches of AC receive the Safety EdgeSM as shown in Figure 10 For new construction or reconstruction with thicker AC layers consideration should be given to widening the underlying paved layers to accommodate the Safety EdgeSM without decreasing lane width as shown in Figure 10 On projets with multiple AC layers it is expected the additional volume of AC required to form the Safety EdgeSMwill increase bid quantities
11
Edge of Pavement
H Shoulder Backing Material
For H le 5 in
For H gt 5 in
January 5 2012
Note Recommended Rise to Run ratio range 112 to 120 The range of slope is equal to 26deg to 40deg
Figure 10 Recommended Safety EdgeSM configuration for AC pavements and overlays
12
Devices Attached to the Screed
End Plate Modifying Devices
January 5 2012
32 Equipment ndash AC Safety EdgeSM Devices
The current commercial Safety EdgeSM devices can be grouped into two categories (1) devices attached to the paver screed and (2) modifications or attachments to the paver end plate The devices listed below do not constitute an approved products list Highway agencies should evaluate any new Safety EdgeSM hardware for compliance with specifications before approving for use on a project
Currently there are three devices available from two different manufacturers which are (1) the ldquoShoulder Wedge Makerrdquo manufactured by TransTech wwwtranstechsyscom and (2) the ldquoAdvant-Edgerrdquo and ldquoRamp Champrdquo manufactured by the Advant-Edge Paving Equipment LLC wwwadvantedgepavingcom Each manufacturer provides detailed installation instructions for attaching their devices to the paver screed The devices can be easily attached to and removed from the paver screed with a simple two-bolt connection The Safety EdgeSM device should fit closely to the end plate to prevent AC from getting between the device itself and end plate The Ramp Champ can be set to a range of angles while the other devices have a fixed angle
The end plate modification devices are available from Carlson Paving Products Inc (Safety Edge End Gate) httpwwwcarlsonpavingproductscom and Willow Designs LLC httpwwwwillowdesignsllccom The ski of the devices form the slope of the Safety EdgeSM
and can be set to a range of angles The screed operator can adjust the angle of the ski while paving to ensure the final angle of the Safety EdgeSM after rolling is close to 30 degrees
33 Asphalt Concrete Materials
The Safety EdgeSM can be placed with all dense-graded AC materials that have been properly designed in accordance with existing mixture design methods including Hot Mix Asphalt (HMA) Warm Mix Asphalt (WMA) HMA with high amounts of Recycled Asphalt Pavement (RAP) HMA with Recycled Asphalt Shingles (RAS) polymer modified asphalt (PMA) rubberized gap graded and open graded mixes and other specialty mixtures The demonstration projects included HMA RAP RAS WMA and PMA mixtures
There are two critical material issues in terms of placing a Safety EdgeSM for AC mixtures (1) lateral movement of the AC mix during compaction and (2) the size or amount of coarse aggregate in the AC mixture
Most AC mixtures exhibit some lateral movement under the rollers during compaction and that movement is mixture and application dependent Lateral movement of the AC mix should not prevent the contractor from achieving an
13
Safety EdgeSM Device Installation
January 5 2012
acceptable Safety EdgeSM slope after final rolling Ensure that after rolling is completed the Safety EdgeSM break point lines up directly over the existing pavement edge or over any portion of the previously paved surface If the break point is over the unimproved shoulder (ie different support structure) the potential of a longitudinal crack forming is greater (Figure 11) This material related issue is discussed in more detail in Section 34 - Safety EdgeSM Construction under Rolling
The maximum nominal size aggregate of the mixture or amount of coarse aggregate can affect the surface texture or appearance of the Safety EdgeSM and measurement of the slope Fine-graded AC mixtures were observed to have a tighter surface appearance and texture along the edge Rough surface texture makes the measurement of the slope more difficult to quantify ndash increasing variability in slope measurements
Figure 11 Longitudinal crack due to Safety EdgeSM break point located on unimproved shoulder
34 Safety EdgeSM Construction
This section discusses items of interest to asphalt paving projects when a Safety EdgeSM is to be placed as part of the new construction or rehabilitation project
Manufacturers of commercially available devices provide detailed instructions for attaching the Safety EdgeSM devices to the paver Proper installation of the devices was discussed in a previous part of this section (Equipment ndash AC Safety EdgeSM Devices) A key issue for devices attached to the screed without guide rails is to ensure close installation to the end plate so loose mix does not get trapped between the device and end plate during paving operations At the beginning of the dayrsquos production when pulling off a transverse joint the screed operator needs to monitor the position of the device as the auger chamber and
14
AC Placement
January 5 2012
extension are being charged to ensure the device is in contact with the end plate These issues do not affect the end gate type device
The Safety EdgeSM can be placed with normal paving procedures and no changes to the operation of the paver need to be made More importantly the Safety EdgeSM device has no impact on how the paver operates whether paving on an embankment or crushed stone layer recently placed AC existing AC or PCC layers or milled surface
For those agencies that require trial or control sections as part of standard AC paving operations the slope of the Safety EdgeSM should be measured after all rolling has been completed to ensure the Safety EdgeSM slope did not ldquostand uprdquo (substantial increase in the slope) Trial sections provide an opportunity for the screed operator to make adjustments to the Safety EdgeSM and screed before high production paving begins For example to obtain the 30o finished angle the target angle to be achieved behind the paver by the Safety EdgeSM
device may need to be shallower for a given mix eg 25 degree Trial sections can also be used to assess if the edge will ldquostand uprdquo during the AC rolling operation The issue of maintaining the slope of the Safety EdgeSM is discussed under the next subsection ndash Rolling
The screed operator needs to watch and adjust three items during the paving operation when using a Safety EdgeSM device attached to the screed described in Section 32 (1) the Safety EdgeSM device itself (2) the end plate and (3) the screed (refer to Figure 12) If the Safety EdgeSM device with too much downward pressure rides on the AC or other stiff base material that has been previously placed this can result in undesirable paving results as described below
When the Safety EdgeSM device rides on a base with a rough positive surface texture (eg coarse aggregate protruding upward such as in a chip seal) in some cases it may cause the screed to vibrate or jerk The toe of the Safety EdgeSM can get caught on larger aggregate particles and when the particle breaks loose the screed jerks The screed operator will need to monitor the downward pressure of the Safety EdgeSM
device so this does not happen in extreme cases When the Safety EdgeSM device rides on a base with a varying longitudinal profile
the screed operator will need to monitor the downward pressure of the Safety EdgeSM
device to keep the screed functioning as designed within the free-floating principle The spring around the shaft of the Safety EdgeSM is designed to keep a relatively uniform pressure on the mixture being placed under the Safety EdgeSM ndash assuming the vertical operational limit of the Safety Edge is not exceeded
The screed operator also needs to monitor the downward pressure of the Safety EdgeSM device when it rides on soft surfaces The leading edge of the device can dig into the soft shoulder pulling soilaggregate into the asphalt wedge of the Safety EdgeSM This is the same condition experienced in conventional paving when the paver end plate ski digs into the soft shoulder
15
January 5 2012
Wrench used to adjust the elevation
of the Safety EdgeSM
device
Figure 12 Safety EdgeSM adjustment for raising and lowering the device
When paving begins the screed operator should pay close attention to the following items when using a Safety EdgeSM device attached to the screed
In charging the auger chamber with AC the screed operator should ensure that the device is in close contact with the end plate so that mix does not get between the device and end plate and that there is sufficient material surrounding the device to keep it held against the end plate
After the paving operation begins and the full AC lift thickness has stabilized the screed operator should adjust the Safety EdgeSM device by lowering the device into contact with the underlying surface This adjustment should not be made prior to the paver moving off the shims at the start of a dayrsquos paving operation The screed operator should look behind the paver to ensure that the slope of the edge will produce a slope of about 30 degrees after rolling
16
January 5 2012
The paver end plate ski needs to remain in contact with the surface being paved over AC can extrude out under the end plate ski if not in contact with the existing surface which can reduce the amount of AC available for the Safety EdgeSM ndash affecting the slope and density of the wedge itself
When placing an AC overlay the Safety EdgeSM can ride on the underlying layer However the screed operator should closely monitor the downward force on the Safety EdgeSM device relative to underlying hard surfaces with variable longitudinal profiles which can change the forces on one side of the screed (free floating screed principle or mode) This concern is heightened at intersections or areas of increased variation of longitudinal profile The spring around the shaft of the Safety EdgeSM is designed to keep a relatively uniform pressure on the mixture being placed under the Safety EdgeSM ndash assuming the vertical operational limit of the Safety Edge is not exceeded
The operator needs to be aware that the height adjustment screw can be bent from paving with too much downward force especially if the shoe is in contact with a variable elevation of a hard surface The height adjustment screw can also be bent from or hitting objects while in transport
The screed operator should monitor the surface texture and condition of the Safety EdgeSM
When drawing in the hydraulic extension the screed operator needs to closely monitor the process to ensure that the Safety EdgeSM device does not come in contact with the cross feed auger If this occurs it can damage both the Safety EdgeSM device and auger
If the hydraulic extension of the screed is extended during mainline paving the amount of mix in the extension can be reduced near the paver end plate When this occurs the screed operator should monitor the amount of mix to ensure it is not getting between the end plate and Safety EdgeSM device itself as the screed moves out
The flow of AC material to the Safety EdgeSM device should be closely monitored to make sure enough material is available to form a continuous edge and that the material feed augers are properly positioned
Paver manufactures commonly recommend material feed augers be no greater than 18 inches from the end plate
When the paver is being moved the Safety EdgeSM device should be removed or raised to its mounting height or uppermost position This will ensure that the bottom of the device will not strikeget caught on any obstruction
When using a Safety EdgeSM device the screed operator needs to continually be aware of the position of the break point of the Safety EdgeSM slope and keep the break point on the structural base or existing pavement
At the beginning of the project it is recommended that slope measurements be made immediately behind the paver and after each roller pass The focus is on the final Safety EdgeSM slope angle after all rolling to determine how rolling impacts the final slope angle
17
Rolling
January 5 2012
The contractor may want to periodically make these measurements as part of the quality control process
No special rollers are required for compacting the AC mix along and adjacent to the Safety EdgeSM (refer to Figure 13)
Figure 13 Rolling the Safety EdgeSM with standard rollers ndash No special rollers are required
18
January 5 2012
Most AC mixtures exhibit some lateral movement under the rollers during compaction Lateral movement of the AC mix should not prevent the contractor from achieving an acceptable Safety EdgeSM slope after final rolling For some of the demonstration projects the contractor did change or revise the standard rolling pattern to maximize the density of the AC mat while retaining an appropriate Safety EdgeSM angle Just like for any AC paving project the optimum rolling pattern is AC mixture specific A rolling pattern used to compact a low stiffness mix and high stiffness mix may be different to meet the density requirements
The following recommendations are made based on the findings from multiple demonstration projects
The contractor should roll the AC mat and pavement edges based on normal or standard compaction operation This should ensure adequate density along and near the pavement edge Multiple demonstration projects have been constructed successfully where the pavement edge was rolled with the contractorrsquos standard rolling pattern
After final rolling the slope of the Safety EdgeSM should be measured If the slope of the edge is too steep the contractor should determine if the slope of the edge was steepened because of excessive rolling the use of a mix that exhibits tenderness or the AC mixture is simply too soft to retain the targeted slope angle A variable angle Safety EdgeSM device can be used to place the Safety EdgeSM at an angle less than 30 degrees behind the paver which should assist the contractor in achieving 30 degrees after rolling
Delaying the rolling of the edge of the mat should be the last resort taken to retain the slope of the Safety EdgeSM This becomes a decision between durability along and near the pavement edge and retaining a slope of the Safety EdgeSM
Continually monitor the slope of the Safety EdgeSM after final rolling The slope of the Safety EdgeSM varied between 30 to 40 degrees on multiple demonstration projects without delaying the rolling of the Safety EdgeSM
35 Quality Measurement
The same properties used or identified by the owner agency to measure the quality of AC pavement layers for acceptance should also be used on projects that include the Safety EdgeSM The acceptance plan should not be modified for projects that include the Safety EdgeSM More importantly the density strength andor smoothness requirements appropriate for a typical project should not be relaxed simply because the Safety EdgeSM is added to a resurfacing or new construction project Thus the only difference between projects with and without the Safety EdgeSM is the slope of the edge itself
19
January 5 2012
SECTION 4 SPECIFIC CONSIDERATIONS FOR CONSTRUCTING THE SAFETY EDGESM IN CONJUNCTION WITH NEW CONCRETE
PAVEMENTS OR CONCRETE OVERLAYS
This section identifies issues that need to be monitored during the construction of PCC pavements All of the PCC demonstration projects that were used for preparing this Guide included the use of slip-form paving to form the Safety EdgeSM A benefit of forming the Safety EdgeSM during PCC slip-form paving is the sensitivity to edge slump is reduced
41 Design Features and Shape
The Safety EdgeSM is designed to create a 30 degree finished angle relative to the pavement cross slope as shown in Figure 14 and should be constructed on a similar structural base as the adjoining monolithically placed laneshoulder During design the structural base width needs to account for the Safety EdgeSM width
2 in Min
Edge of Pavement
H
5 in Approx
Shoulder Backing Material
Note Recommended Rise to Run ratio range 112 to 120 The range of slope is equal to 26deg to 40deg
Figure 14 Recommended Safety EdgeSM configuration for PCC pavements and overlays
42 Equipment ndash PCC Safety EdgeSM Devices
This part describes the modifications that must be made to a slip form concrete paver to form a Safety EdgeSM It also notes the essential attributes of a concrete paver that are necessary to create an effective Safety EdgeSM When a slip form paver is not being used the Safety EdgeSM needs to be manufactured or created as part of the forms ndash one side of the forms will have an angle of 30 degrees rather than being vertical
Currently there are no commercially available Safety EdgeSM devices for PCC pavers or forms Custom devices however can be fabricated by modifying the finishing pan of the paver (refer to Figure 15) The pan is essentially configured to form an inverted curb under the pan close to the end gate The steel components of the assembly need to be robust in order to resist bending during paving operations from the force of the plastic PCC The following provides a description of the modifications that were made to a Gomaco paver that
20
PCC Placement
January 5 2012
was used on one of the PCC demonstration projects and identifies some of the issues or items that should be considered in fabricating the Safety EdgeSM profile
A template was created for the Safety EdgeSM profile to ensure correct dimensions The template was used to manufacture a stainless steel profile pan of the desired shape and dimensions Portions of the existing profile pan were removed to fit in the new Safety EdgeSM profile [Note The contractor decided against welding the Safety EdgeSM profile to the bottom of the existing profile section or pan because of a concern that the welds might tear the finished PCC]
A 2-inch finish tail on the stainless steel Safety EdgeSM profile was fabricated to help finish the portion of the edge where it goes from slope to vertical When going through existing intersections driveways or where the grade is not exact on the outside edge the 2-inch finish tail did drag in some locations For the demonstration project the contractor cut one inch off of this tail and it performed well but cutting 05 inches from the tail would have also worked well
Adjusting bolts were fitted to the Safety EdgeSM profile pan One adjustment bolt was on the sloped section in case an adjustment had to be made if the edge profile was not finishing properly
In setting up the paver care was taken to position the vibrators in the specific locations for proper consolidation of the Safety EdgeSMndashnear the breakpoint
Unlike the Safety EdgeSM attachments for AC layers or overlays the modifications made to the concrete paver cannot be easily removed and replaced The modifications can be removed but the parts must be cut from the pan using a torch or grinder Touchup of the pan is required to return the unit to service on standard PCC pavements
43 Concrete Mixtures
Demonstration projects completed to date have used standard concrete mixes No changes to the mix were needed to accommodate the SE
44 Safety EdgeSM Construction
This part of the Guide discusses items of interest to PCC paving projects when a Safety EdgeSM is to be placed as part of the new construction or rehabilitation project
Normal paving procedures are usually sufficient for forming the Safety EdgeSM on mainline sections of the roadway using slip form paving operations and equipment Material
21
Transitioning Between Different Edge Profiles
January 5 2012
properties of the hardened concrete from the edge and the interior of the pavement have been demonstrated to be similar
Safety EdgeSM device
Figure 15 View of the Safety EdgeSM device from front of paver
It is recommended to have a transition from a no Safety EdgeSM section to a Safety EdgeSM
section to avoid a vertical edge perpendicular to traffic (ie similar to beginning section of bridge concrete railparapet where the bottom of the railparapet is modified to reduce the probability of vehicle tire snagging)
An important issue to be addressed is the intersection of cross roads where a vertical edge is required Due to the fixed nature of the edge and shoe assembly the contractor can consider different options depending on the number and extent of sections with different edge profiles In either case additional labor should be anticipated to tie into intersections or other areas requiring different edge profiles when paving using the Safety EdgeSM concept The following provides an overview of the two options that were used on some of the demonstration projects
If there are only a few intersecting roadways driveways or limited areas where a vertical face is required along the edge of the pavement the contractor can consider placing the safety edge using normal paving operations The Safety EdgeSM is sawcut
22
Vibration
Sawcutting
January 5 2012
and removed to create a vertical edge The sawing of the Safety EdgeSM can be completed at the same time the transverse joints are sawed This option has worked fine but does waste some PCC and requires additional sawing
Another option is to box out the areas requiring different edge profiles and place forms The PCC in these limited areas is placed by hand using normal construction practices in order to tie into pavement intersections driveways and other features
Generally the standard spacing of the vibrators are sufficient to properly consolidate the fresh concrete at the Safety EdgeSM Consolidation of the material within the Safety EdgeSM
should be checked at the start of any project If slip form pavers are not being used hand vibrators need to be used to ensure that the PCC flows into the lower part of the Safety EdgeSM As noted at the beginning of this section all demonstration projects included the use of slip form pavers in construction the Safety EdgeSM
Curing
Care should be taken to insure the specified curing procedures are properly followed for all surfaces at the edge of the pavement including the Safety EdgeSM The Safety EdgeSM however does not require any special curing requirements beyond that for typical PCC layers
Transverse control joint sawcutting can be stopped at the breakpoint of the Safety EdgeSM
and not continued through the sloped surface of the edge Experience shows the contraction cracks normally form at the end of the sawcut and extend through the Safety EdgeSM as planned (refer to Figure 16)
23
January 5 2012
Figure 16 Sawcut and crack at the formed joint on one of the Safety EdgeSM demonstration projects
45 Quality Measurement
The same properties used or identified by the owner agency to measure the quality of PCC pavement layers for acceptance should also be used on projects that include the Safety EdgeSM The acceptance plan should not be modified for projects that include the Safety EdgeSM More importantly the air void content strength andor smoothness requirements appropriate for a typical project should not be relaxed simply because the Safety EdgeSM is added to a PCC overlay or new construction project Thus the only difference between projects with and without the Safety EdgeSM is the slope of the edge itself
24
January 5 2012
REFERENCES
EDC Safety EdgeSM field reports can be found at httpwwwfhwadotgoveverydaycountstechnologysafetyedgefield_reportscfm
25
January 5 2012
APPENDICES
Safety EdgeSM guide specification can be found at httpwwwfhwadotgoveverydaycountstechnologysafetyedgespecscfm
26

January 5 2012
SECTION 3 SPECIFIC CONSIDERATIONS FOR CONSTRUCTING THE SAFETY EDGESM IN CONJUNCTION WITH NEW AC
PAVEMENTS OR AC OVERLAYS
This section of the Guide identifies issues that need to be monitored during the placement and compaction operations of the AC pavement
31 Design Features and Shape
The paved laneshoulder width and location of the Safety EdgeSM break point should be discussed and established prior to paving The Safety EdgeSM can be constructed on the unimproved or improved shoulder with the break point lining up directly over the existing pavement edge or over any portion of the previously paved surface as shown in Figure 9
Figure 9 Paver positioned to align the Safety EdgeSM break point over the existing pavement
The intent is not to sacrifice paved laneshoulder width to construct the Safety EdgeSM Constructing the Safety EdgeSM onto the unimproved shoulder does not result in a decrease in paved laneshoulder width
The Safety EdgeSM is designed to create a 30 degree finished angle relative to the pavement cross slope on the edge of the pavement Agency-specific tolerances may vary from those shown in Figure 10 which is from the FHWA guide specification On projects where multiple AC layers are used it is recommended each AC layer (except leveling layer) of the final 5 inches of AC receive the Safety EdgeSM as shown in Figure 10 For new construction or reconstruction with thicker AC layers consideration should be given to widening the underlying paved layers to accommodate the Safety EdgeSM without decreasing lane width as shown in Figure 10 On projets with multiple AC layers it is expected the additional volume of AC required to form the Safety EdgeSMwill increase bid quantities
11
Edge of Pavement
H Shoulder Backing Material
For H le 5 in
For H gt 5 in
January 5 2012
Note Recommended Rise to Run ratio range 112 to 120 The range of slope is equal to 26deg to 40deg
Figure 10 Recommended Safety EdgeSM configuration for AC pavements and overlays
12
Devices Attached to the Screed
End Plate Modifying Devices
January 5 2012
32 Equipment ndash AC Safety EdgeSM Devices
The current commercial Safety EdgeSM devices can be grouped into two categories (1) devices attached to the paver screed and (2) modifications or attachments to the paver end plate The devices listed below do not constitute an approved products list Highway agencies should evaluate any new Safety EdgeSM hardware for compliance with specifications before approving for use on a project
Currently there are three devices available from two different manufacturers which are (1) the ldquoShoulder Wedge Makerrdquo manufactured by TransTech wwwtranstechsyscom and (2) the ldquoAdvant-Edgerrdquo and ldquoRamp Champrdquo manufactured by the Advant-Edge Paving Equipment LLC wwwadvantedgepavingcom Each manufacturer provides detailed installation instructions for attaching their devices to the paver screed The devices can be easily attached to and removed from the paver screed with a simple two-bolt connection The Safety EdgeSM device should fit closely to the end plate to prevent AC from getting between the device itself and end plate The Ramp Champ can be set to a range of angles while the other devices have a fixed angle
The end plate modification devices are available from Carlson Paving Products Inc (Safety Edge End Gate) httpwwwcarlsonpavingproductscom and Willow Designs LLC httpwwwwillowdesignsllccom The ski of the devices form the slope of the Safety EdgeSM
and can be set to a range of angles The screed operator can adjust the angle of the ski while paving to ensure the final angle of the Safety EdgeSM after rolling is close to 30 degrees
33 Asphalt Concrete Materials
The Safety EdgeSM can be placed with all dense-graded AC materials that have been properly designed in accordance with existing mixture design methods including Hot Mix Asphalt (HMA) Warm Mix Asphalt (WMA) HMA with high amounts of Recycled Asphalt Pavement (RAP) HMA with Recycled Asphalt Shingles (RAS) polymer modified asphalt (PMA) rubberized gap graded and open graded mixes and other specialty mixtures The demonstration projects included HMA RAP RAS WMA and PMA mixtures
There are two critical material issues in terms of placing a Safety EdgeSM for AC mixtures (1) lateral movement of the AC mix during compaction and (2) the size or amount of coarse aggregate in the AC mixture
Most AC mixtures exhibit some lateral movement under the rollers during compaction and that movement is mixture and application dependent Lateral movement of the AC mix should not prevent the contractor from achieving an
13
Safety EdgeSM Device Installation
January 5 2012
acceptable Safety EdgeSM slope after final rolling Ensure that after rolling is completed the Safety EdgeSM break point lines up directly over the existing pavement edge or over any portion of the previously paved surface If the break point is over the unimproved shoulder (ie different support structure) the potential of a longitudinal crack forming is greater (Figure 11) This material related issue is discussed in more detail in Section 34 - Safety EdgeSM Construction under Rolling
The maximum nominal size aggregate of the mixture or amount of coarse aggregate can affect the surface texture or appearance of the Safety EdgeSM and measurement of the slope Fine-graded AC mixtures were observed to have a tighter surface appearance and texture along the edge Rough surface texture makes the measurement of the slope more difficult to quantify ndash increasing variability in slope measurements
Figure 11 Longitudinal crack due to Safety EdgeSM break point located on unimproved shoulder
34 Safety EdgeSM Construction
This section discusses items of interest to asphalt paving projects when a Safety EdgeSM is to be placed as part of the new construction or rehabilitation project
Manufacturers of commercially available devices provide detailed instructions for attaching the Safety EdgeSM devices to the paver Proper installation of the devices was discussed in a previous part of this section (Equipment ndash AC Safety EdgeSM Devices) A key issue for devices attached to the screed without guide rails is to ensure close installation to the end plate so loose mix does not get trapped between the device and end plate during paving operations At the beginning of the dayrsquos production when pulling off a transverse joint the screed operator needs to monitor the position of the device as the auger chamber and
14
AC Placement
January 5 2012
extension are being charged to ensure the device is in contact with the end plate These issues do not affect the end gate type device
The Safety EdgeSM can be placed with normal paving procedures and no changes to the operation of the paver need to be made More importantly the Safety EdgeSM device has no impact on how the paver operates whether paving on an embankment or crushed stone layer recently placed AC existing AC or PCC layers or milled surface
For those agencies that require trial or control sections as part of standard AC paving operations the slope of the Safety EdgeSM should be measured after all rolling has been completed to ensure the Safety EdgeSM slope did not ldquostand uprdquo (substantial increase in the slope) Trial sections provide an opportunity for the screed operator to make adjustments to the Safety EdgeSM and screed before high production paving begins For example to obtain the 30o finished angle the target angle to be achieved behind the paver by the Safety EdgeSM
device may need to be shallower for a given mix eg 25 degree Trial sections can also be used to assess if the edge will ldquostand uprdquo during the AC rolling operation The issue of maintaining the slope of the Safety EdgeSM is discussed under the next subsection ndash Rolling
The screed operator needs to watch and adjust three items during the paving operation when using a Safety EdgeSM device attached to the screed described in Section 32 (1) the Safety EdgeSM device itself (2) the end plate and (3) the screed (refer to Figure 12) If the Safety EdgeSM device with too much downward pressure rides on the AC or other stiff base material that has been previously placed this can result in undesirable paving results as described below
When the Safety EdgeSM device rides on a base with a rough positive surface texture (eg coarse aggregate protruding upward such as in a chip seal) in some cases it may cause the screed to vibrate or jerk The toe of the Safety EdgeSM can get caught on larger aggregate particles and when the particle breaks loose the screed jerks The screed operator will need to monitor the downward pressure of the Safety EdgeSM
device so this does not happen in extreme cases When the Safety EdgeSM device rides on a base with a varying longitudinal profile
the screed operator will need to monitor the downward pressure of the Safety EdgeSM
device to keep the screed functioning as designed within the free-floating principle The spring around the shaft of the Safety EdgeSM is designed to keep a relatively uniform pressure on the mixture being placed under the Safety EdgeSM ndash assuming the vertical operational limit of the Safety Edge is not exceeded
The screed operator also needs to monitor the downward pressure of the Safety EdgeSM device when it rides on soft surfaces The leading edge of the device can dig into the soft shoulder pulling soilaggregate into the asphalt wedge of the Safety EdgeSM This is the same condition experienced in conventional paving when the paver end plate ski digs into the soft shoulder
15
January 5 2012
Wrench used to adjust the elevation
of the Safety EdgeSM
device
Figure 12 Safety EdgeSM adjustment for raising and lowering the device
When paving begins the screed operator should pay close attention to the following items when using a Safety EdgeSM device attached to the screed
In charging the auger chamber with AC the screed operator should ensure that the device is in close contact with the end plate so that mix does not get between the device and end plate and that there is sufficient material surrounding the device to keep it held against the end plate
After the paving operation begins and the full AC lift thickness has stabilized the screed operator should adjust the Safety EdgeSM device by lowering the device into contact with the underlying surface This adjustment should not be made prior to the paver moving off the shims at the start of a dayrsquos paving operation The screed operator should look behind the paver to ensure that the slope of the edge will produce a slope of about 30 degrees after rolling
16
January 5 2012
The paver end plate ski needs to remain in contact with the surface being paved over AC can extrude out under the end plate ski if not in contact with the existing surface which can reduce the amount of AC available for the Safety EdgeSM ndash affecting the slope and density of the wedge itself
When placing an AC overlay the Safety EdgeSM can ride on the underlying layer However the screed operator should closely monitor the downward force on the Safety EdgeSM device relative to underlying hard surfaces with variable longitudinal profiles which can change the forces on one side of the screed (free floating screed principle or mode) This concern is heightened at intersections or areas of increased variation of longitudinal profile The spring around the shaft of the Safety EdgeSM is designed to keep a relatively uniform pressure on the mixture being placed under the Safety EdgeSM ndash assuming the vertical operational limit of the Safety Edge is not exceeded
The operator needs to be aware that the height adjustment screw can be bent from paving with too much downward force especially if the shoe is in contact with a variable elevation of a hard surface The height adjustment screw can also be bent from or hitting objects while in transport
The screed operator should monitor the surface texture and condition of the Safety EdgeSM
When drawing in the hydraulic extension the screed operator needs to closely monitor the process to ensure that the Safety EdgeSM device does not come in contact with the cross feed auger If this occurs it can damage both the Safety EdgeSM device and auger
If the hydraulic extension of the screed is extended during mainline paving the amount of mix in the extension can be reduced near the paver end plate When this occurs the screed operator should monitor the amount of mix to ensure it is not getting between the end plate and Safety EdgeSM device itself as the screed moves out
The flow of AC material to the Safety EdgeSM device should be closely monitored to make sure enough material is available to form a continuous edge and that the material feed augers are properly positioned
Paver manufactures commonly recommend material feed augers be no greater than 18 inches from the end plate
When the paver is being moved the Safety EdgeSM device should be removed or raised to its mounting height or uppermost position This will ensure that the bottom of the device will not strikeget caught on any obstruction
When using a Safety EdgeSM device the screed operator needs to continually be aware of the position of the break point of the Safety EdgeSM slope and keep the break point on the structural base or existing pavement
At the beginning of the project it is recommended that slope measurements be made immediately behind the paver and after each roller pass The focus is on the final Safety EdgeSM slope angle after all rolling to determine how rolling impacts the final slope angle
17
Rolling
January 5 2012
The contractor may want to periodically make these measurements as part of the quality control process
No special rollers are required for compacting the AC mix along and adjacent to the Safety EdgeSM (refer to Figure 13)
Figure 13 Rolling the Safety EdgeSM with standard rollers ndash No special rollers are required
18
January 5 2012
Most AC mixtures exhibit some lateral movement under the rollers during compaction Lateral movement of the AC mix should not prevent the contractor from achieving an acceptable Safety EdgeSM slope after final rolling For some of the demonstration projects the contractor did change or revise the standard rolling pattern to maximize the density of the AC mat while retaining an appropriate Safety EdgeSM angle Just like for any AC paving project the optimum rolling pattern is AC mixture specific A rolling pattern used to compact a low stiffness mix and high stiffness mix may be different to meet the density requirements
The following recommendations are made based on the findings from multiple demonstration projects
The contractor should roll the AC mat and pavement edges based on normal or standard compaction operation This should ensure adequate density along and near the pavement edge Multiple demonstration projects have been constructed successfully where the pavement edge was rolled with the contractorrsquos standard rolling pattern
After final rolling the slope of the Safety EdgeSM should be measured If the slope of the edge is too steep the contractor should determine if the slope of the edge was steepened because of excessive rolling the use of a mix that exhibits tenderness or the AC mixture is simply too soft to retain the targeted slope angle A variable angle Safety EdgeSM device can be used to place the Safety EdgeSM at an angle less than 30 degrees behind the paver which should assist the contractor in achieving 30 degrees after rolling
Delaying the rolling of the edge of the mat should be the last resort taken to retain the slope of the Safety EdgeSM This becomes a decision between durability along and near the pavement edge and retaining a slope of the Safety EdgeSM
Continually monitor the slope of the Safety EdgeSM after final rolling The slope of the Safety EdgeSM varied between 30 to 40 degrees on multiple demonstration projects without delaying the rolling of the Safety EdgeSM
35 Quality Measurement
The same properties used or identified by the owner agency to measure the quality of AC pavement layers for acceptance should also be used on projects that include the Safety EdgeSM The acceptance plan should not be modified for projects that include the Safety EdgeSM More importantly the density strength andor smoothness requirements appropriate for a typical project should not be relaxed simply because the Safety EdgeSM is added to a resurfacing or new construction project Thus the only difference between projects with and without the Safety EdgeSM is the slope of the edge itself
19
January 5 2012
SECTION 4 SPECIFIC CONSIDERATIONS FOR CONSTRUCTING THE SAFETY EDGESM IN CONJUNCTION WITH NEW CONCRETE
PAVEMENTS OR CONCRETE OVERLAYS
This section identifies issues that need to be monitored during the construction of PCC pavements All of the PCC demonstration projects that were used for preparing this Guide included the use of slip-form paving to form the Safety EdgeSM A benefit of forming the Safety EdgeSM during PCC slip-form paving is the sensitivity to edge slump is reduced
41 Design Features and Shape
The Safety EdgeSM is designed to create a 30 degree finished angle relative to the pavement cross slope as shown in Figure 14 and should be constructed on a similar structural base as the adjoining monolithically placed laneshoulder During design the structural base width needs to account for the Safety EdgeSM width
2 in Min
Edge of Pavement
H
5 in Approx
Shoulder Backing Material
Note Recommended Rise to Run ratio range 112 to 120 The range of slope is equal to 26deg to 40deg
Figure 14 Recommended Safety EdgeSM configuration for PCC pavements and overlays
42 Equipment ndash PCC Safety EdgeSM Devices
This part describes the modifications that must be made to a slip form concrete paver to form a Safety EdgeSM It also notes the essential attributes of a concrete paver that are necessary to create an effective Safety EdgeSM When a slip form paver is not being used the Safety EdgeSM needs to be manufactured or created as part of the forms ndash one side of the forms will have an angle of 30 degrees rather than being vertical
Currently there are no commercially available Safety EdgeSM devices for PCC pavers or forms Custom devices however can be fabricated by modifying the finishing pan of the paver (refer to Figure 15) The pan is essentially configured to form an inverted curb under the pan close to the end gate The steel components of the assembly need to be robust in order to resist bending during paving operations from the force of the plastic PCC The following provides a description of the modifications that were made to a Gomaco paver that
20
PCC Placement
January 5 2012
was used on one of the PCC demonstration projects and identifies some of the issues or items that should be considered in fabricating the Safety EdgeSM profile
A template was created for the Safety EdgeSM profile to ensure correct dimensions The template was used to manufacture a stainless steel profile pan of the desired shape and dimensions Portions of the existing profile pan were removed to fit in the new Safety EdgeSM profile [Note The contractor decided against welding the Safety EdgeSM profile to the bottom of the existing profile section or pan because of a concern that the welds might tear the finished PCC]
A 2-inch finish tail on the stainless steel Safety EdgeSM profile was fabricated to help finish the portion of the edge where it goes from slope to vertical When going through existing intersections driveways or where the grade is not exact on the outside edge the 2-inch finish tail did drag in some locations For the demonstration project the contractor cut one inch off of this tail and it performed well but cutting 05 inches from the tail would have also worked well
Adjusting bolts were fitted to the Safety EdgeSM profile pan One adjustment bolt was on the sloped section in case an adjustment had to be made if the edge profile was not finishing properly
In setting up the paver care was taken to position the vibrators in the specific locations for proper consolidation of the Safety EdgeSMndashnear the breakpoint
Unlike the Safety EdgeSM attachments for AC layers or overlays the modifications made to the concrete paver cannot be easily removed and replaced The modifications can be removed but the parts must be cut from the pan using a torch or grinder Touchup of the pan is required to return the unit to service on standard PCC pavements
43 Concrete Mixtures
Demonstration projects completed to date have used standard concrete mixes No changes to the mix were needed to accommodate the SE
44 Safety EdgeSM Construction
This part of the Guide discusses items of interest to PCC paving projects when a Safety EdgeSM is to be placed as part of the new construction or rehabilitation project
Normal paving procedures are usually sufficient for forming the Safety EdgeSM on mainline sections of the roadway using slip form paving operations and equipment Material
21
Transitioning Between Different Edge Profiles
January 5 2012
properties of the hardened concrete from the edge and the interior of the pavement have been demonstrated to be similar
Safety EdgeSM device
Figure 15 View of the Safety EdgeSM device from front of paver
It is recommended to have a transition from a no Safety EdgeSM section to a Safety EdgeSM
section to avoid a vertical edge perpendicular to traffic (ie similar to beginning section of bridge concrete railparapet where the bottom of the railparapet is modified to reduce the probability of vehicle tire snagging)
An important issue to be addressed is the intersection of cross roads where a vertical edge is required Due to the fixed nature of the edge and shoe assembly the contractor can consider different options depending on the number and extent of sections with different edge profiles In either case additional labor should be anticipated to tie into intersections or other areas requiring different edge profiles when paving using the Safety EdgeSM concept The following provides an overview of the two options that were used on some of the demonstration projects
If there are only a few intersecting roadways driveways or limited areas where a vertical face is required along the edge of the pavement the contractor can consider placing the safety edge using normal paving operations The Safety EdgeSM is sawcut
22
Vibration
Sawcutting
January 5 2012
and removed to create a vertical edge The sawing of the Safety EdgeSM can be completed at the same time the transverse joints are sawed This option has worked fine but does waste some PCC and requires additional sawing
Another option is to box out the areas requiring different edge profiles and place forms The PCC in these limited areas is placed by hand using normal construction practices in order to tie into pavement intersections driveways and other features
Generally the standard spacing of the vibrators are sufficient to properly consolidate the fresh concrete at the Safety EdgeSM Consolidation of the material within the Safety EdgeSM
should be checked at the start of any project If slip form pavers are not being used hand vibrators need to be used to ensure that the PCC flows into the lower part of the Safety EdgeSM As noted at the beginning of this section all demonstration projects included the use of slip form pavers in construction the Safety EdgeSM
Curing
Care should be taken to insure the specified curing procedures are properly followed for all surfaces at the edge of the pavement including the Safety EdgeSM The Safety EdgeSM however does not require any special curing requirements beyond that for typical PCC layers
Transverse control joint sawcutting can be stopped at the breakpoint of the Safety EdgeSM
and not continued through the sloped surface of the edge Experience shows the contraction cracks normally form at the end of the sawcut and extend through the Safety EdgeSM as planned (refer to Figure 16)
23
January 5 2012
Figure 16 Sawcut and crack at the formed joint on one of the Safety EdgeSM demonstration projects
45 Quality Measurement
The same properties used or identified by the owner agency to measure the quality of PCC pavement layers for acceptance should also be used on projects that include the Safety EdgeSM The acceptance plan should not be modified for projects that include the Safety EdgeSM More importantly the air void content strength andor smoothness requirements appropriate for a typical project should not be relaxed simply because the Safety EdgeSM is added to a PCC overlay or new construction project Thus the only difference between projects with and without the Safety EdgeSM is the slope of the edge itself
24
January 5 2012
REFERENCES
EDC Safety EdgeSM field reports can be found at httpwwwfhwadotgoveverydaycountstechnologysafetyedgefield_reportscfm
25
January 5 2012
APPENDICES
Safety EdgeSM guide specification can be found at httpwwwfhwadotgoveverydaycountstechnologysafetyedgespecscfm
26

Edge of Pavement
H Shoulder Backing Material
For H le 5 in
For H gt 5 in
January 5 2012
Note Recommended Rise to Run ratio range 112 to 120 The range of slope is equal to 26deg to 40deg
Figure 10 Recommended Safety EdgeSM configuration for AC pavements and overlays
12
Devices Attached to the Screed
End Plate Modifying Devices
January 5 2012
32 Equipment ndash AC Safety EdgeSM Devices
The current commercial Safety EdgeSM devices can be grouped into two categories (1) devices attached to the paver screed and (2) modifications or attachments to the paver end plate The devices listed below do not constitute an approved products list Highway agencies should evaluate any new Safety EdgeSM hardware for compliance with specifications before approving for use on a project
Currently there are three devices available from two different manufacturers which are (1) the ldquoShoulder Wedge Makerrdquo manufactured by TransTech wwwtranstechsyscom and (2) the ldquoAdvant-Edgerrdquo and ldquoRamp Champrdquo manufactured by the Advant-Edge Paving Equipment LLC wwwadvantedgepavingcom Each manufacturer provides detailed installation instructions for attaching their devices to the paver screed The devices can be easily attached to and removed from the paver screed with a simple two-bolt connection The Safety EdgeSM device should fit closely to the end plate to prevent AC from getting between the device itself and end plate The Ramp Champ can be set to a range of angles while the other devices have a fixed angle
The end plate modification devices are available from Carlson Paving Products Inc (Safety Edge End Gate) httpwwwcarlsonpavingproductscom and Willow Designs LLC httpwwwwillowdesignsllccom The ski of the devices form the slope of the Safety EdgeSM
and can be set to a range of angles The screed operator can adjust the angle of the ski while paving to ensure the final angle of the Safety EdgeSM after rolling is close to 30 degrees
33 Asphalt Concrete Materials
The Safety EdgeSM can be placed with all dense-graded AC materials that have been properly designed in accordance with existing mixture design methods including Hot Mix Asphalt (HMA) Warm Mix Asphalt (WMA) HMA with high amounts of Recycled Asphalt Pavement (RAP) HMA with Recycled Asphalt Shingles (RAS) polymer modified asphalt (PMA) rubberized gap graded and open graded mixes and other specialty mixtures The demonstration projects included HMA RAP RAS WMA and PMA mixtures
There are two critical material issues in terms of placing a Safety EdgeSM for AC mixtures (1) lateral movement of the AC mix during compaction and (2) the size or amount of coarse aggregate in the AC mixture
Most AC mixtures exhibit some lateral movement under the rollers during compaction and that movement is mixture and application dependent Lateral movement of the AC mix should not prevent the contractor from achieving an
13
Safety EdgeSM Device Installation
January 5 2012
acceptable Safety EdgeSM slope after final rolling Ensure that after rolling is completed the Safety EdgeSM break point lines up directly over the existing pavement edge or over any portion of the previously paved surface If the break point is over the unimproved shoulder (ie different support structure) the potential of a longitudinal crack forming is greater (Figure 11) This material related issue is discussed in more detail in Section 34 - Safety EdgeSM Construction under Rolling
The maximum nominal size aggregate of the mixture or amount of coarse aggregate can affect the surface texture or appearance of the Safety EdgeSM and measurement of the slope Fine-graded AC mixtures were observed to have a tighter surface appearance and texture along the edge Rough surface texture makes the measurement of the slope more difficult to quantify ndash increasing variability in slope measurements
Figure 11 Longitudinal crack due to Safety EdgeSM break point located on unimproved shoulder
34 Safety EdgeSM Construction
This section discusses items of interest to asphalt paving projects when a Safety EdgeSM is to be placed as part of the new construction or rehabilitation project
Manufacturers of commercially available devices provide detailed instructions for attaching the Safety EdgeSM devices to the paver Proper installation of the devices was discussed in a previous part of this section (Equipment ndash AC Safety EdgeSM Devices) A key issue for devices attached to the screed without guide rails is to ensure close installation to the end plate so loose mix does not get trapped between the device and end plate during paving operations At the beginning of the dayrsquos production when pulling off a transverse joint the screed operator needs to monitor the position of the device as the auger chamber and
14
AC Placement
January 5 2012
extension are being charged to ensure the device is in contact with the end plate These issues do not affect the end gate type device
The Safety EdgeSM can be placed with normal paving procedures and no changes to the operation of the paver need to be made More importantly the Safety EdgeSM device has no impact on how the paver operates whether paving on an embankment or crushed stone layer recently placed AC existing AC or PCC layers or milled surface
For those agencies that require trial or control sections as part of standard AC paving operations the slope of the Safety EdgeSM should be measured after all rolling has been completed to ensure the Safety EdgeSM slope did not ldquostand uprdquo (substantial increase in the slope) Trial sections provide an opportunity for the screed operator to make adjustments to the Safety EdgeSM and screed before high production paving begins For example to obtain the 30o finished angle the target angle to be achieved behind the paver by the Safety EdgeSM
device may need to be shallower for a given mix eg 25 degree Trial sections can also be used to assess if the edge will ldquostand uprdquo during the AC rolling operation The issue of maintaining the slope of the Safety EdgeSM is discussed under the next subsection ndash Rolling
The screed operator needs to watch and adjust three items during the paving operation when using a Safety EdgeSM device attached to the screed described in Section 32 (1) the Safety EdgeSM device itself (2) the end plate and (3) the screed (refer to Figure 12) If the Safety EdgeSM device with too much downward pressure rides on the AC or other stiff base material that has been previously placed this can result in undesirable paving results as described below
When the Safety EdgeSM device rides on a base with a rough positive surface texture (eg coarse aggregate protruding upward such as in a chip seal) in some cases it may cause the screed to vibrate or jerk The toe of the Safety EdgeSM can get caught on larger aggregate particles and when the particle breaks loose the screed jerks The screed operator will need to monitor the downward pressure of the Safety EdgeSM
device so this does not happen in extreme cases When the Safety EdgeSM device rides on a base with a varying longitudinal profile
the screed operator will need to monitor the downward pressure of the Safety EdgeSM
device to keep the screed functioning as designed within the free-floating principle The spring around the shaft of the Safety EdgeSM is designed to keep a relatively uniform pressure on the mixture being placed under the Safety EdgeSM ndash assuming the vertical operational limit of the Safety Edge is not exceeded
The screed operator also needs to monitor the downward pressure of the Safety EdgeSM device when it rides on soft surfaces The leading edge of the device can dig into the soft shoulder pulling soilaggregate into the asphalt wedge of the Safety EdgeSM This is the same condition experienced in conventional paving when the paver end plate ski digs into the soft shoulder
15
January 5 2012
Wrench used to adjust the elevation
of the Safety EdgeSM
device
Figure 12 Safety EdgeSM adjustment for raising and lowering the device
When paving begins the screed operator should pay close attention to the following items when using a Safety EdgeSM device attached to the screed
In charging the auger chamber with AC the screed operator should ensure that the device is in close contact with the end plate so that mix does not get between the device and end plate and that there is sufficient material surrounding the device to keep it held against the end plate
After the paving operation begins and the full AC lift thickness has stabilized the screed operator should adjust the Safety EdgeSM device by lowering the device into contact with the underlying surface This adjustment should not be made prior to the paver moving off the shims at the start of a dayrsquos paving operation The screed operator should look behind the paver to ensure that the slope of the edge will produce a slope of about 30 degrees after rolling
16
January 5 2012
The paver end plate ski needs to remain in contact with the surface being paved over AC can extrude out under the end plate ski if not in contact with the existing surface which can reduce the amount of AC available for the Safety EdgeSM ndash affecting the slope and density of the wedge itself
When placing an AC overlay the Safety EdgeSM can ride on the underlying layer However the screed operator should closely monitor the downward force on the Safety EdgeSM device relative to underlying hard surfaces with variable longitudinal profiles which can change the forces on one side of the screed (free floating screed principle or mode) This concern is heightened at intersections or areas of increased variation of longitudinal profile The spring around the shaft of the Safety EdgeSM is designed to keep a relatively uniform pressure on the mixture being placed under the Safety EdgeSM ndash assuming the vertical operational limit of the Safety Edge is not exceeded
The operator needs to be aware that the height adjustment screw can be bent from paving with too much downward force especially if the shoe is in contact with a variable elevation of a hard surface The height adjustment screw can also be bent from or hitting objects while in transport
The screed operator should monitor the surface texture and condition of the Safety EdgeSM
When drawing in the hydraulic extension the screed operator needs to closely monitor the process to ensure that the Safety EdgeSM device does not come in contact with the cross feed auger If this occurs it can damage both the Safety EdgeSM device and auger
If the hydraulic extension of the screed is extended during mainline paving the amount of mix in the extension can be reduced near the paver end plate When this occurs the screed operator should monitor the amount of mix to ensure it is not getting between the end plate and Safety EdgeSM device itself as the screed moves out
The flow of AC material to the Safety EdgeSM device should be closely monitored to make sure enough material is available to form a continuous edge and that the material feed augers are properly positioned
Paver manufactures commonly recommend material feed augers be no greater than 18 inches from the end plate
When the paver is being moved the Safety EdgeSM device should be removed or raised to its mounting height or uppermost position This will ensure that the bottom of the device will not strikeget caught on any obstruction
When using a Safety EdgeSM device the screed operator needs to continually be aware of the position of the break point of the Safety EdgeSM slope and keep the break point on the structural base or existing pavement
At the beginning of the project it is recommended that slope measurements be made immediately behind the paver and after each roller pass The focus is on the final Safety EdgeSM slope angle after all rolling to determine how rolling impacts the final slope angle
17
Rolling
January 5 2012
The contractor may want to periodically make these measurements as part of the quality control process
No special rollers are required for compacting the AC mix along and adjacent to the Safety EdgeSM (refer to Figure 13)
Figure 13 Rolling the Safety EdgeSM with standard rollers ndash No special rollers are required
18
January 5 2012
Most AC mixtures exhibit some lateral movement under the rollers during compaction Lateral movement of the AC mix should not prevent the contractor from achieving an acceptable Safety EdgeSM slope after final rolling For some of the demonstration projects the contractor did change or revise the standard rolling pattern to maximize the density of the AC mat while retaining an appropriate Safety EdgeSM angle Just like for any AC paving project the optimum rolling pattern is AC mixture specific A rolling pattern used to compact a low stiffness mix and high stiffness mix may be different to meet the density requirements
The following recommendations are made based on the findings from multiple demonstration projects
The contractor should roll the AC mat and pavement edges based on normal or standard compaction operation This should ensure adequate density along and near the pavement edge Multiple demonstration projects have been constructed successfully where the pavement edge was rolled with the contractorrsquos standard rolling pattern
After final rolling the slope of the Safety EdgeSM should be measured If the slope of the edge is too steep the contractor should determine if the slope of the edge was steepened because of excessive rolling the use of a mix that exhibits tenderness or the AC mixture is simply too soft to retain the targeted slope angle A variable angle Safety EdgeSM device can be used to place the Safety EdgeSM at an angle less than 30 degrees behind the paver which should assist the contractor in achieving 30 degrees after rolling
Delaying the rolling of the edge of the mat should be the last resort taken to retain the slope of the Safety EdgeSM This becomes a decision between durability along and near the pavement edge and retaining a slope of the Safety EdgeSM
Continually monitor the slope of the Safety EdgeSM after final rolling The slope of the Safety EdgeSM varied between 30 to 40 degrees on multiple demonstration projects without delaying the rolling of the Safety EdgeSM
35 Quality Measurement
The same properties used or identified by the owner agency to measure the quality of AC pavement layers for acceptance should also be used on projects that include the Safety EdgeSM The acceptance plan should not be modified for projects that include the Safety EdgeSM More importantly the density strength andor smoothness requirements appropriate for a typical project should not be relaxed simply because the Safety EdgeSM is added to a resurfacing or new construction project Thus the only difference between projects with and without the Safety EdgeSM is the slope of the edge itself
19
January 5 2012
SECTION 4 SPECIFIC CONSIDERATIONS FOR CONSTRUCTING THE SAFETY EDGESM IN CONJUNCTION WITH NEW CONCRETE
PAVEMENTS OR CONCRETE OVERLAYS
This section identifies issues that need to be monitored during the construction of PCC pavements All of the PCC demonstration projects that were used for preparing this Guide included the use of slip-form paving to form the Safety EdgeSM A benefit of forming the Safety EdgeSM during PCC slip-form paving is the sensitivity to edge slump is reduced
41 Design Features and Shape
The Safety EdgeSM is designed to create a 30 degree finished angle relative to the pavement cross slope as shown in Figure 14 and should be constructed on a similar structural base as the adjoining monolithically placed laneshoulder During design the structural base width needs to account for the Safety EdgeSM width
2 in Min
Edge of Pavement
H
5 in Approx
Shoulder Backing Material
Note Recommended Rise to Run ratio range 112 to 120 The range of slope is equal to 26deg to 40deg
Figure 14 Recommended Safety EdgeSM configuration for PCC pavements and overlays
42 Equipment ndash PCC Safety EdgeSM Devices
This part describes the modifications that must be made to a slip form concrete paver to form a Safety EdgeSM It also notes the essential attributes of a concrete paver that are necessary to create an effective Safety EdgeSM When a slip form paver is not being used the Safety EdgeSM needs to be manufactured or created as part of the forms ndash one side of the forms will have an angle of 30 degrees rather than being vertical
Currently there are no commercially available Safety EdgeSM devices for PCC pavers or forms Custom devices however can be fabricated by modifying the finishing pan of the paver (refer to Figure 15) The pan is essentially configured to form an inverted curb under the pan close to the end gate The steel components of the assembly need to be robust in order to resist bending during paving operations from the force of the plastic PCC The following provides a description of the modifications that were made to a Gomaco paver that
20
PCC Placement
January 5 2012
was used on one of the PCC demonstration projects and identifies some of the issues or items that should be considered in fabricating the Safety EdgeSM profile
A template was created for the Safety EdgeSM profile to ensure correct dimensions The template was used to manufacture a stainless steel profile pan of the desired shape and dimensions Portions of the existing profile pan were removed to fit in the new Safety EdgeSM profile [Note The contractor decided against welding the Safety EdgeSM profile to the bottom of the existing profile section or pan because of a concern that the welds might tear the finished PCC]
A 2-inch finish tail on the stainless steel Safety EdgeSM profile was fabricated to help finish the portion of the edge where it goes from slope to vertical When going through existing intersections driveways or where the grade is not exact on the outside edge the 2-inch finish tail did drag in some locations For the demonstration project the contractor cut one inch off of this tail and it performed well but cutting 05 inches from the tail would have also worked well
Adjusting bolts were fitted to the Safety EdgeSM profile pan One adjustment bolt was on the sloped section in case an adjustment had to be made if the edge profile was not finishing properly
In setting up the paver care was taken to position the vibrators in the specific locations for proper consolidation of the Safety EdgeSMndashnear the breakpoint
Unlike the Safety EdgeSM attachments for AC layers or overlays the modifications made to the concrete paver cannot be easily removed and replaced The modifications can be removed but the parts must be cut from the pan using a torch or grinder Touchup of the pan is required to return the unit to service on standard PCC pavements
43 Concrete Mixtures
Demonstration projects completed to date have used standard concrete mixes No changes to the mix were needed to accommodate the SE
44 Safety EdgeSM Construction
This part of the Guide discusses items of interest to PCC paving projects when a Safety EdgeSM is to be placed as part of the new construction or rehabilitation project
Normal paving procedures are usually sufficient for forming the Safety EdgeSM on mainline sections of the roadway using slip form paving operations and equipment Material
21
Transitioning Between Different Edge Profiles
January 5 2012
properties of the hardened concrete from the edge and the interior of the pavement have been demonstrated to be similar
Safety EdgeSM device
Figure 15 View of the Safety EdgeSM device from front of paver
It is recommended to have a transition from a no Safety EdgeSM section to a Safety EdgeSM
section to avoid a vertical edge perpendicular to traffic (ie similar to beginning section of bridge concrete railparapet where the bottom of the railparapet is modified to reduce the probability of vehicle tire snagging)
An important issue to be addressed is the intersection of cross roads where a vertical edge is required Due to the fixed nature of the edge and shoe assembly the contractor can consider different options depending on the number and extent of sections with different edge profiles In either case additional labor should be anticipated to tie into intersections or other areas requiring different edge profiles when paving using the Safety EdgeSM concept The following provides an overview of the two options that were used on some of the demonstration projects
If there are only a few intersecting roadways driveways or limited areas where a vertical face is required along the edge of the pavement the contractor can consider placing the safety edge using normal paving operations The Safety EdgeSM is sawcut
22
Vibration
Sawcutting
January 5 2012
and removed to create a vertical edge The sawing of the Safety EdgeSM can be completed at the same time the transverse joints are sawed This option has worked fine but does waste some PCC and requires additional sawing
Another option is to box out the areas requiring different edge profiles and place forms The PCC in these limited areas is placed by hand using normal construction practices in order to tie into pavement intersections driveways and other features
Generally the standard spacing of the vibrators are sufficient to properly consolidate the fresh concrete at the Safety EdgeSM Consolidation of the material within the Safety EdgeSM
should be checked at the start of any project If slip form pavers are not being used hand vibrators need to be used to ensure that the PCC flows into the lower part of the Safety EdgeSM As noted at the beginning of this section all demonstration projects included the use of slip form pavers in construction the Safety EdgeSM
Curing
Care should be taken to insure the specified curing procedures are properly followed for all surfaces at the edge of the pavement including the Safety EdgeSM The Safety EdgeSM however does not require any special curing requirements beyond that for typical PCC layers
Transverse control joint sawcutting can be stopped at the breakpoint of the Safety EdgeSM
and not continued through the sloped surface of the edge Experience shows the contraction cracks normally form at the end of the sawcut and extend through the Safety EdgeSM as planned (refer to Figure 16)
23
January 5 2012
Figure 16 Sawcut and crack at the formed joint on one of the Safety EdgeSM demonstration projects
45 Quality Measurement
The same properties used or identified by the owner agency to measure the quality of PCC pavement layers for acceptance should also be used on projects that include the Safety EdgeSM The acceptance plan should not be modified for projects that include the Safety EdgeSM More importantly the air void content strength andor smoothness requirements appropriate for a typical project should not be relaxed simply because the Safety EdgeSM is added to a PCC overlay or new construction project Thus the only difference between projects with and without the Safety EdgeSM is the slope of the edge itself
24
January 5 2012
REFERENCES
EDC Safety EdgeSM field reports can be found at httpwwwfhwadotgoveverydaycountstechnologysafetyedgefield_reportscfm
25
January 5 2012
APPENDICES
Safety EdgeSM guide specification can be found at httpwwwfhwadotgoveverydaycountstechnologysafetyedgespecscfm
26

January 5 2012
The paver end plate ski needs to remain in contact with the surface being paved over AC can extrude out under the end plate ski if not in contact with the existing surface which can reduce the amount of AC available for the Safety EdgeSM ndash affecting the slope and density of the wedge itself
When placing an AC overlay the Safety EdgeSM can ride on the underlying layer However the screed operator should closely monitor the downward force on the Safety EdgeSM device relative to underlying hard surfaces with variable longitudinal profiles which can change the forces on one side of the screed (free floating screed principle or mode) This concern is heightened at intersections or areas of increased variation of longitudinal profile The spring around the shaft of the Safety EdgeSM is designed to keep a relatively uniform pressure on the mixture being placed under the Safety EdgeSM ndash assuming the vertical operational limit of the Safety Edge is not exceeded
The operator needs to be aware that the height adjustment screw can be bent from paving with too much downward force especially if the shoe is in contact with a variable elevation of a hard surface The height adjustment screw can also be bent from or hitting objects while in transport
The screed operator should monitor the surface texture and condition of the Safety EdgeSM
When drawing in the hydraulic extension the screed operator needs to closely monitor the process to ensure that the Safety EdgeSM device does not come in contact with the cross feed auger If this occurs it can damage both the Safety EdgeSM device and auger
If the hydraulic extension of the screed is extended during mainline paving the amount of mix in the extension can be reduced near the paver end plate When this occurs the screed operator should monitor the amount of mix to ensure it is not getting between the end plate and Safety EdgeSM device itself as the screed moves out
The flow of AC material to the Safety EdgeSM device should be closely monitored to make sure enough material is available to form a continuous edge and that the material feed augers are properly positioned
Paver manufactures commonly recommend material feed augers be no greater than 18 inches from the end plate
When the paver is being moved the Safety EdgeSM device should be removed or raised to its mounting height or uppermost position This will ensure that the bottom of the device will not strikeget caught on any obstruction
When using a Safety EdgeSM device the screed operator needs to continually be aware of the position of the break point of the Safety EdgeSM slope and keep the break point on the structural base or existing pavement
At the beginning of the project it is recommended that slope measurements be made immediately behind the paver and after each roller pass The focus is on the final Safety EdgeSM slope angle after all rolling to determine how rolling impacts the final slope angle
17
Rolling
January 5 2012
The contractor may want to periodically make these measurements as part of the quality control process
No special rollers are required for compacting the AC mix along and adjacent to the Safety EdgeSM (refer to Figure 13)
Figure 13 Rolling the Safety EdgeSM with standard rollers ndash No special rollers are required
18
January 5 2012
Most AC mixtures exhibit some lateral movement under the rollers during compaction Lateral movement of the AC mix should not prevent the contractor from achieving an acceptable Safety EdgeSM slope after final rolling For some of the demonstration projects the contractor did change or revise the standard rolling pattern to maximize the density of the AC mat while retaining an appropriate Safety EdgeSM angle Just like for any AC paving project the optimum rolling pattern is AC mixture specific A rolling pattern used to compact a low stiffness mix and high stiffness mix may be different to meet the density requirements
The following recommendations are made based on the findings from multiple demonstration projects
The contractor should roll the AC mat and pavement edges based on normal or standard compaction operation This should ensure adequate density along and near the pavement edge Multiple demonstration projects have been constructed successfully where the pavement edge was rolled with the contractorrsquos standard rolling pattern
After final rolling the slope of the Safety EdgeSM should be measured If the slope of the edge is too steep the contractor should determine if the slope of the edge was steepened because of excessive rolling the use of a mix that exhibits tenderness or the AC mixture is simply too soft to retain the targeted slope angle A variable angle Safety EdgeSM device can be used to place the Safety EdgeSM at an angle less than 30 degrees behind the paver which should assist the contractor in achieving 30 degrees after rolling
Delaying the rolling of the edge of the mat should be the last resort taken to retain the slope of the Safety EdgeSM This becomes a decision between durability along and near the pavement edge and retaining a slope of the Safety EdgeSM
Continually monitor the slope of the Safety EdgeSM after final rolling The slope of the Safety EdgeSM varied between 30 to 40 degrees on multiple demonstration projects without delaying the rolling of the Safety EdgeSM
35 Quality Measurement
The same properties used or identified by the owner agency to measure the quality of AC pavement layers for acceptance should also be used on projects that include the Safety EdgeSM The acceptance plan should not be modified for projects that include the Safety EdgeSM More importantly the density strength andor smoothness requirements appropriate for a typical project should not be relaxed simply because the Safety EdgeSM is added to a resurfacing or new construction project Thus the only difference between projects with and without the Safety EdgeSM is the slope of the edge itself
19
January 5 2012
SECTION 4 SPECIFIC CONSIDERATIONS FOR CONSTRUCTING THE SAFETY EDGESM IN CONJUNCTION WITH NEW CONCRETE
PAVEMENTS OR CONCRETE OVERLAYS
This section identifies issues that need to be monitored during the construction of PCC pavements All of the PCC demonstration projects that were used for preparing this Guide included the use of slip-form paving to form the Safety EdgeSM A benefit of forming the Safety EdgeSM during PCC slip-form paving is the sensitivity to edge slump is reduced
41 Design Features and Shape
The Safety EdgeSM is designed to create a 30 degree finished angle relative to the pavement cross slope as shown in Figure 14 and should be constructed on a similar structural base as the adjoining monolithically placed laneshoulder During design the structural base width needs to account for the Safety EdgeSM width
2 in Min
Edge of Pavement
H
5 in Approx
Shoulder Backing Material
Note Recommended Rise to Run ratio range 112 to 120 The range of slope is equal to 26deg to 40deg
Figure 14 Recommended Safety EdgeSM configuration for PCC pavements and overlays
42 Equipment ndash PCC Safety EdgeSM Devices
This part describes the modifications that must be made to a slip form concrete paver to form a Safety EdgeSM It also notes the essential attributes of a concrete paver that are necessary to create an effective Safety EdgeSM When a slip form paver is not being used the Safety EdgeSM needs to be manufactured or created as part of the forms ndash one side of the forms will have an angle of 30 degrees rather than being vertical
Currently there are no commercially available Safety EdgeSM devices for PCC pavers or forms Custom devices however can be fabricated by modifying the finishing pan of the paver (refer to Figure 15) The pan is essentially configured to form an inverted curb under the pan close to the end gate The steel components of the assembly need to be robust in order to resist bending during paving operations from the force of the plastic PCC The following provides a description of the modifications that were made to a Gomaco paver that
20
PCC Placement
January 5 2012
was used on one of the PCC demonstration projects and identifies some of the issues or items that should be considered in fabricating the Safety EdgeSM profile
A template was created for the Safety EdgeSM profile to ensure correct dimensions The template was used to manufacture a stainless steel profile pan of the desired shape and dimensions Portions of the existing profile pan were removed to fit in the new Safety EdgeSM profile [Note The contractor decided against welding the Safety EdgeSM profile to the bottom of the existing profile section or pan because of a concern that the welds might tear the finished PCC]
A 2-inch finish tail on the stainless steel Safety EdgeSM profile was fabricated to help finish the portion of the edge where it goes from slope to vertical When going through existing intersections driveways or where the grade is not exact on the outside edge the 2-inch finish tail did drag in some locations For the demonstration project the contractor cut one inch off of this tail and it performed well but cutting 05 inches from the tail would have also worked well
Adjusting bolts were fitted to the Safety EdgeSM profile pan One adjustment bolt was on the sloped section in case an adjustment had to be made if the edge profile was not finishing properly
In setting up the paver care was taken to position the vibrators in the specific locations for proper consolidation of the Safety EdgeSMndashnear the breakpoint
Unlike the Safety EdgeSM attachments for AC layers or overlays the modifications made to the concrete paver cannot be easily removed and replaced The modifications can be removed but the parts must be cut from the pan using a torch or grinder Touchup of the pan is required to return the unit to service on standard PCC pavements
43 Concrete Mixtures
Demonstration projects completed to date have used standard concrete mixes No changes to the mix were needed to accommodate the SE
44 Safety EdgeSM Construction
This part of the Guide discusses items of interest to PCC paving projects when a Safety EdgeSM is to be placed as part of the new construction or rehabilitation project
Normal paving procedures are usually sufficient for forming the Safety EdgeSM on mainline sections of the roadway using slip form paving operations and equipment Material
21
Transitioning Between Different Edge Profiles
January 5 2012
properties of the hardened concrete from the edge and the interior of the pavement have been demonstrated to be similar
Safety EdgeSM device
Figure 15 View of the Safety EdgeSM device from front of paver
It is recommended to have a transition from a no Safety EdgeSM section to a Safety EdgeSM
section to avoid a vertical edge perpendicular to traffic (ie similar to beginning section of bridge concrete railparapet where the bottom of the railparapet is modified to reduce the probability of vehicle tire snagging)
An important issue to be addressed is the intersection of cross roads where a vertical edge is required Due to the fixed nature of the edge and shoe assembly the contractor can consider different options depending on the number and extent of sections with different edge profiles In either case additional labor should be anticipated to tie into intersections or other areas requiring different edge profiles when paving using the Safety EdgeSM concept The following provides an overview of the two options that were used on some of the demonstration projects
If there are only a few intersecting roadways driveways or limited areas where a vertical face is required along the edge of the pavement the contractor can consider placing the safety edge using normal paving operations The Safety EdgeSM is sawcut
22
Vibration
Sawcutting
January 5 2012
and removed to create a vertical edge The sawing of the Safety EdgeSM can be completed at the same time the transverse joints are sawed This option has worked fine but does waste some PCC and requires additional sawing
Another option is to box out the areas requiring different edge profiles and place forms The PCC in these limited areas is placed by hand using normal construction practices in order to tie into pavement intersections driveways and other features
Generally the standard spacing of the vibrators are sufficient to properly consolidate the fresh concrete at the Safety EdgeSM Consolidation of the material within the Safety EdgeSM
should be checked at the start of any project If slip form pavers are not being used hand vibrators need to be used to ensure that the PCC flows into the lower part of the Safety EdgeSM As noted at the beginning of this section all demonstration projects included the use of slip form pavers in construction the Safety EdgeSM
Curing
Care should be taken to insure the specified curing procedures are properly followed for all surfaces at the edge of the pavement including the Safety EdgeSM The Safety EdgeSM however does not require any special curing requirements beyond that for typical PCC layers
Transverse control joint sawcutting can be stopped at the breakpoint of the Safety EdgeSM
and not continued through the sloped surface of the edge Experience shows the contraction cracks normally form at the end of the sawcut and extend through the Safety EdgeSM as planned (refer to Figure 16)
23
January 5 2012
Figure 16 Sawcut and crack at the formed joint on one of the Safety EdgeSM demonstration projects
45 Quality Measurement
The same properties used or identified by the owner agency to measure the quality of PCC pavement layers for acceptance should also be used on projects that include the Safety EdgeSM The acceptance plan should not be modified for projects that include the Safety EdgeSM More importantly the air void content strength andor smoothness requirements appropriate for a typical project should not be relaxed simply because the Safety EdgeSM is added to a PCC overlay or new construction project Thus the only difference between projects with and without the Safety EdgeSM is the slope of the edge itself
24
January 5 2012
REFERENCES
EDC Safety EdgeSM field reports can be found at httpwwwfhwadotgoveverydaycountstechnologysafetyedgefield_reportscfm
25
January 5 2012
APPENDICES
Safety EdgeSM guide specification can be found at httpwwwfhwadotgoveverydaycountstechnologysafetyedgespecscfm
26

January 5 2012
SECTION 4 SPECIFIC CONSIDERATIONS FOR CONSTRUCTING THE SAFETY EDGESM IN CONJUNCTION WITH NEW CONCRETE
PAVEMENTS OR CONCRETE OVERLAYS
This section identifies issues that need to be monitored during the construction of PCC pavements All of the PCC demonstration projects that were used for preparing this Guide included the use of slip-form paving to form the Safety EdgeSM A benefit of forming the Safety EdgeSM during PCC slip-form paving is the sensitivity to edge slump is reduced
41 Design Features and Shape
The Safety EdgeSM is designed to create a 30 degree finished angle relative to the pavement cross slope as shown in Figure 14 and should be constructed on a similar structural base as the adjoining monolithically placed laneshoulder During design the structural base width needs to account for the Safety EdgeSM width
2 in Min
Edge of Pavement
H
5 in Approx
Shoulder Backing Material
Note Recommended Rise to Run ratio range 112 to 120 The range of slope is equal to 26deg to 40deg
Figure 14 Recommended Safety EdgeSM configuration for PCC pavements and overlays
42 Equipment ndash PCC Safety EdgeSM Devices
This part describes the modifications that must be made to a slip form concrete paver to form a Safety EdgeSM It also notes the essential attributes of a concrete paver that are necessary to create an effective Safety EdgeSM When a slip form paver is not being used the Safety EdgeSM needs to be manufactured or created as part of the forms ndash one side of the forms will have an angle of 30 degrees rather than being vertical
Currently there are no commercially available Safety EdgeSM devices for PCC pavers or forms Custom devices however can be fabricated by modifying the finishing pan of the paver (refer to Figure 15) The pan is essentially configured to form an inverted curb under the pan close to the end gate The steel components of the assembly need to be robust in order to resist bending during paving operations from the force of the plastic PCC The following provides a description of the modifications that were made to a Gomaco paver that
20
PCC Placement
January 5 2012
was used on one of the PCC demonstration projects and identifies some of the issues or items that should be considered in fabricating the Safety EdgeSM profile
A template was created for the Safety EdgeSM profile to ensure correct dimensions The template was used to manufacture a stainless steel profile pan of the desired shape and dimensions Portions of the existing profile pan were removed to fit in the new Safety EdgeSM profile [Note The contractor decided against welding the Safety EdgeSM profile to the bottom of the existing profile section or pan because of a concern that the welds might tear the finished PCC]
A 2-inch finish tail on the stainless steel Safety EdgeSM profile was fabricated to help finish the portion of the edge where it goes from slope to vertical When going through existing intersections driveways or where the grade is not exact on the outside edge the 2-inch finish tail did drag in some locations For the demonstration project the contractor cut one inch off of this tail and it performed well but cutting 05 inches from the tail would have also worked well
Adjusting bolts were fitted to the Safety EdgeSM profile pan One adjustment bolt was on the sloped section in case an adjustment had to be made if the edge profile was not finishing properly
In setting up the paver care was taken to position the vibrators in the specific locations for proper consolidation of the Safety EdgeSMndashnear the breakpoint
Unlike the Safety EdgeSM attachments for AC layers or overlays the modifications made to the concrete paver cannot be easily removed and replaced The modifications can be removed but the parts must be cut from the pan using a torch or grinder Touchup of the pan is required to return the unit to service on standard PCC pavements
43 Concrete Mixtures
Demonstration projects completed to date have used standard concrete mixes No changes to the mix were needed to accommodate the SE
44 Safety EdgeSM Construction
This part of the Guide discusses items of interest to PCC paving projects when a Safety EdgeSM is to be placed as part of the new construction or rehabilitation project
Normal paving procedures are usually sufficient for forming the Safety EdgeSM on mainline sections of the roadway using slip form paving operations and equipment Material
21
Transitioning Between Different Edge Profiles
January 5 2012
properties of the hardened concrete from the edge and the interior of the pavement have been demonstrated to be similar
Safety EdgeSM device
Figure 15 View of the Safety EdgeSM device from front of paver
It is recommended to have a transition from a no Safety EdgeSM section to a Safety EdgeSM
section to avoid a vertical edge perpendicular to traffic (ie similar to beginning section of bridge concrete railparapet where the bottom of the railparapet is modified to reduce the probability of vehicle tire snagging)
An important issue to be addressed is the intersection of cross roads where a vertical edge is required Due to the fixed nature of the edge and shoe assembly the contractor can consider different options depending on the number and extent of sections with different edge profiles In either case additional labor should be anticipated to tie into intersections or other areas requiring different edge profiles when paving using the Safety EdgeSM concept The following provides an overview of the two options that were used on some of the demonstration projects
If there are only a few intersecting roadways driveways or limited areas where a vertical face is required along the edge of the pavement the contractor can consider placing the safety edge using normal paving operations The Safety EdgeSM is sawcut
22
Vibration
Sawcutting
January 5 2012
and removed to create a vertical edge The sawing of the Safety EdgeSM can be completed at the same time the transverse joints are sawed This option has worked fine but does waste some PCC and requires additional sawing
Another option is to box out the areas requiring different edge profiles and place forms The PCC in these limited areas is placed by hand using normal construction practices in order to tie into pavement intersections driveways and other features
Generally the standard spacing of the vibrators are sufficient to properly consolidate the fresh concrete at the Safety EdgeSM Consolidation of the material within the Safety EdgeSM
should be checked at the start of any project If slip form pavers are not being used hand vibrators need to be used to ensure that the PCC flows into the lower part of the Safety EdgeSM As noted at the beginning of this section all demonstration projects included the use of slip form pavers in construction the Safety EdgeSM
Curing
Care should be taken to insure the specified curing procedures are properly followed for all surfaces at the edge of the pavement including the Safety EdgeSM The Safety EdgeSM however does not require any special curing requirements beyond that for typical PCC layers
Transverse control joint sawcutting can be stopped at the breakpoint of the Safety EdgeSM
and not continued through the sloped surface of the edge Experience shows the contraction cracks normally form at the end of the sawcut and extend through the Safety EdgeSM as planned (refer to Figure 16)
23
January 5 2012
Figure 16 Sawcut and crack at the formed joint on one of the Safety EdgeSM demonstration projects
45 Quality Measurement
The same properties used or identified by the owner agency to measure the quality of PCC pavement layers for acceptance should also be used on projects that include the Safety EdgeSM The acceptance plan should not be modified for projects that include the Safety EdgeSM More importantly the air void content strength andor smoothness requirements appropriate for a typical project should not be relaxed simply because the Safety EdgeSM is added to a PCC overlay or new construction project Thus the only difference between projects with and without the Safety EdgeSM is the slope of the edge itself
24
January 5 2012
REFERENCES
EDC Safety EdgeSM field reports can be found at httpwwwfhwadotgoveverydaycountstechnologysafetyedgefield_reportscfm
25
January 5 2012
APPENDICES
Safety EdgeSM guide specification can be found at httpwwwfhwadotgoveverydaycountstechnologysafetyedgespecscfm
26

January 5 2012
REFERENCES
EDC Safety EdgeSM field reports can be found at httpwwwfhwadotgoveverydaycountstechnologysafetyedgefield_reportscfm
25
January 5 2012
APPENDICES
Safety EdgeSM guide specification can be found at httpwwwfhwadotgoveverydaycountstechnologysafetyedgespecscfm
26

January 5 2012
APPENDICES
Safety EdgeSM guide specification can be found at httpwwwfhwadotgoveverydaycountstechnologysafetyedgespecscfm
26