Safer Canoes and Kayaks - Sam Rizzetta · Safer Canoes and Kayaks ... Learn h ow to add flotation...
22
1 Safer Canoes and Kayaks Sam Rizzetta What is the greatest cause of fatalities in canoes and kayaks? What can YOU do about it? How can you put the odds in your favor? Learn how to add flotation to canoes and recreational kayaks for greater safety and self-rescue capability. Sam Rizzetta © 2013 samrizzetta.com
Transcript of Safer Canoes and Kayaks - Sam Rizzetta · Safer Canoes and Kayaks ... Learn h ow to add flotation...

1
Safer Canoes and Kayaks
Sam Rizzetta
What is the greatest cause of fatalities in canoes and kayaks?
What can YOU do about it?
How can you put the odds in your favor?
Learn how to add flotation to canoes and recreational kayaks for greater safety and self-rescue capability.
Sam Rizzetta © 2013
samrizzetta.com

2
Fatalities are most often caused by capsizing. And when your canoe or kayak is swamped or flooded with water it becomes unstable and will capsize much more easily. First, always wear your PFD (personal flotation device). Second, outfit your canoe or kayak with my four-point flotation system and learn the self-rescue techniques to use it. A good PFD might keep your head above water, but it won’t save you from hypothermia if the water is cold. Nor will it save your boat. My flotation system not only saves the boat, but it allows you to quickly get back into the boat and out of the water, greatly reducing risk of hypothermia. The information that follows is the result of my experiments, tests, and experience. I offer it in the hope that canoes and kayaks can be made a little safer for everyone. Remember that you are responsible for using good judgment and assuming the risks involved in paddling. Canoes and kayaks that are 27 inches wide or wider have been successfully tested. Note that kayaks which are very narrow, like sea kayaks, may not be adaptable to all the flotation and rescue methods described. They have not been tested and are not covered. More flotation information is in my book, “Canoe and Kayak Building the Light and Easy Way.”
CONTENTS
I Self-Rescue.......................................................................3 II Outfitting Existing Boats..................................................7 III Outfitting When Building New Boats............................15 IV Testing and Self-Rescue Procedures..............................17 V Some Sources of Supplies and Information...................22
Cover photo: On left is a Wenonah Sandpiper ABS solo canoe with 4-point flotation (bow, stern, port and starboard). On right is a Kayoo, a decked canoe made of Kevlar and carbon fiber, with 4-point flotation chambers built in.

3
I SELF-RESCUE The Basic Idea Canoes and kayaks are great fun. And while emergencies are rare, dangers are real. The risks of capsizing limit where, when, and how we can use our small craft. By reducing the risks, canoes and kayaks can become more useful and more fun. With my flotation system, a flooded canoe or kayak is less likely to capsize. If you do fall out, you can climb back in quickly and without assistance. Flotation outfitting is simple, inexpensive, and adds very little weight. Flotation can be added to a recreational kayak or canoe with a few hours, or less, of easy work. If you are building a canoe or kayak, flotation can be neatly incorporated. I will describe flotation for general use as well as for whitewater. The flotation system is suitable for most canoes and recreational kayaks. Narrower kayaks, like sea kayaks, have not been tested and may be too narrow to take advantage of such flotation. Some special purpose boats like outrigger canoes, inflatables, and sit-on-top kayaks have flotation incorporated. But they do not replace sit-inside kayaks and canoes which have great versatility, efficiency, and light weight portability. Canoes and kayaks are narrow for ease of paddling. Because of that, they tip to the sides more easily than other boats; they are less stable in roll. It is possible to fall out, or to roll over... and then fall out! If you get water inside, they tip more easily. The more water the less stable until, eventually, it is impossible to keep from capsizing or to climb back in. Very large and heavy or heavily loaded tandem canoes are sometimes stable enough to climb back into after capsizing. But for smaller and lighter craft, re-entry is usually impossible without assistance. My flotation allows me to quickly re-enter, unaided, after capsizing in deep water. I can paddle alone in safety. This enhances the usefulness and value of my solo canoes and kayaks. There are many rescue methods for those who are trained and travel only in groups. For sea kayakers, it is good to learn the so called “Eskimo roll” as well as a paddle float recovery. More on the paddle float is below. My flotation is a four-point system. Flotation is placed inside the boat in four locations, bow, stern, left side, and right side. If water gets inside, even after capsizing, the boat will retain some stability. And you can learn easy techniques to climb back inside.
The Paddle Float To learn about kayak and canoe self-rescue, and flotation, it is helpful to understand how to use the paddle float, an essential piece of sea kayaking gear. If you have flotation in the bow and stern, then a paddle float can be used in conjunction with a double blade paddle to make a temporary outrigger to stabilize a kayak or a solo canoe for re-entry. One end of the paddle is temporarily attached to the boat with shock cord. The other end extends out to the side, and the inflated float is attached to the blade out in the water to create an outrigger. This is one reason I like to use a kayak paddle in my solo canoes.

4
Illustration: Top view of a solo canoe with a double paddle and a paddle float attached in outrigger position. The paddle can be held tightly in place with shock cords installed through the gunwales behind the center seat or by using a shock cord loop or ball bungee attached to the center thwart, see below.
Illustration: End view cross section of canoe with paddle float in outrigger position. Paddle is held to gunwales and center thwart with shock cords. If there is a center thwart, or thwart behind a center seat, use one or two shock cord loops to hold paddle to thwart. Leave cords on the thwart so they will be ready at all times. To re-enter after capsizing, climb onto the paddle shaft and gunwale. Crawl face down into the boat with your head toward the stern. It helps to get one foot or leg up onto the paddle shaft as you enter. Practice is required. More details are in my book. Inflatable paddle floats are compact; foam paddle floats are bulkier but do not require inflation. Anti-Roll Flotation Although the paddle float outrigger is useful, it is far from ideal for self-rescue. With the stress of a real emergency in deep water it is difficult and time consuming to retrieve paddle and float, hang onto the boat, attach float to paddle, secure paddle to boat, and re-enter. In cold water you may not have enough time before hypothermia renders you helpless. If the float or paddle gets away from your grasp, you may be in deep trouble,

5
quite literally. Cold or rough water aren’t the only reasons to want a speedier re-entry. When I’m cruising among alligators in Florida, I’d like to climb immediately back into the boat and not fumble for several minutes attaching an outrigger! Over the years, paddlers have experimented with various kinds of external flotation and outriggers. While outriggers are great for large ocean going canoes, external flotation is too clumsy, heavy, and complex for other uses. I wanted something light weight and simple as well as safe. My solution was to add buoyancy inside the canoe, sort of an “inrigger.” If water gets into the canoe, then flotation inside under the gunwales provides some roll stability like a small outrigger. The flotation is at the sides, away from the centerline, and along the widest part of the hull.
A. B. C. Illustrations: A. End view cross section of canoe hull with internal side flotation. B. With internal side flotation, tipping or rolling. C. With internal side flotation, rolling with water inside. The side flotation provides some buoyancy to resist rolling. With no water inside, as in figures A and B, the canoe behaves normally when tipped. However, with water in the canoe, figure C, the flotation is partially submerged which provides buoyancy to resist rolling. It will support some weight at the gunwale, and resistance to rolling continues even if the gunwale is underwater. When the side flotation is sufficient and properly located, it provides two great advantages. It resists capsizing when swamped, and it allows unassisted solo re-entry if you should capsize and exit the boat in deep water. The flotation also helps keep the boat afloat and level. Some hulls will float high enough to keep the canoe from filling with much water if it has to be righted from an upside down position. Since all the flotation is inside the hull, it will have no influence on normal performance and use. Without water inside it, your boat will still tip over just as easily as ever! But the flotation becomes effective if water enters the boat. Note that when a canoe without anti-roll flotation is swamped with water inside, it rides deeper in the water. The reduced freeboard, or distance between the waterline and top of the gunwale, leaves little remaining resistance to rolling, and capsize might be immanent. Even if you could re-enter, you would merely capsize and exit again.

6
A. B. C. Illustration: End view cross sections. A. Loss of balance, waves, or leak causes canoe to tip, or roll, and flood. B. With enough water in the canoe, stability is lost. Canoe rolls and capsizes. C. With side flotation, water in the canoe causes the flotation to submerge which provides some buoyancy and some resistance to capsizing. There are a few kayaks and canoes that do have side flotation as a by-product of their construction. These include some inflatable boats as well as packable skin-on-frame boats that are tensioned by inflated air tubes in the sides, like Pakboats, www.pakboats.com. End Flotation Flotation in the sides, by itself, is not enough to permit recovery. Without flotation in the ends to keep the canoe level, you will be unable to balance the boat fore and aft. Either the bow or stern will dive underwater making it impossible to bail out water, paddle, or control. Unassisted re-entry requires four-point flotation , left, right, bow, and stern. Appropriate Boats The canoes and recreational kayaks that are too wide and open for an Eskimo roll recovery are ideal for anti-roll flotation. So far, the boats that I’ve outfitted are 27 inches wide or greater, but it might work with more kinds of boats than I’ve tried. Side flotation can be fitted under a canoe seat or outboard of a kayak seat, and, in my experience, has not intruded on storage space or comfort. All my gear for several weeks of camping and fishing still fits in all my solo canoes, including a small 12 footer. For those who object to making changes to their pretty canoes, don’t forget that the purpose of flotation is to save both you and your valuable canoe! With a little creativity, the outfitting can look good. Some paddlers make cloth covers in attractive colors for their flotation. Those who use my book to build their own canoe or kayak generally have flotation built in and out of sight.

7
II OUTFITTING EXISTING BOATS End Flotation There are easy and inexpensive ways to add four-point flotation to a canoe or kayak. Most factory-made Kevlar and fiberglass canoes have small flotation chambers built into the ends. The ones that I’ve tried had enough end buoyancy for re-entry once side flotation was added. If you have a canoe with built-in end flotation, you should add the side flotation first and test to find whether more end flotation is needed or not. If you have a wood, plastic, ABS, Royalex, or aluminum canoe without flotation in the ends, you will need to add end flotation. Inflatable flotation bags are readily available for this purpose and are the easiest and lightest weight option. Cost is reasonable and well worth it. One good source is NRS, www.nrsweb.com. There are end bags to fit various kayaks and canoes. For serious whitewater, we would fill every available space with flotation. There is more on whitewater later. But for general use, small end bags are sufficient. The small end bags made for tandem canoes are also fine for solo canoes on flat water and class 2 rivers. This leaves room for camping gear even in small canoes. Installing end bags under the end decks of a kayak or decked canoe is relatively straightforward. They can be held in place by tying them to screw mount tie-down brackets or nylon web loops that are attached inside the kayak. You can drill screw holes in the deck or use the same screws that hold any deck rigging. Use stainless steel screws and nuts. See the illustration below for making web loops. They are made from short lengths of nylon cloth webbing which is available in many sporting goods stores as well as from kayak outfitters and suppliers like Chesapeake Light Craft, www.clcboats.com.
Illustration: Nylon web loop tie-in, exploded view and end view. Use 3/4” wide nylon web material 6” long. After cutting, melt the ends with a candle flame to prevent unraveling. Make screw holes with a heated nail. Hold a large nail in pliers or a vise grip and heat the tip of the nail in a candle flame. When hot, the nail will easily melt a hole in the nylon web. Enlarge hole until screw fits. For open canoes the end flotation bags must be fastened securely down into the boat and against the bottom of the canoe. They should also be firmly pulled into the bow and the stern by the tie-down cords. To attach the cords, drill holes through the gunwales or use web loops or screw mount tie-down brackets every 6 inches or so alongside the flotation
8
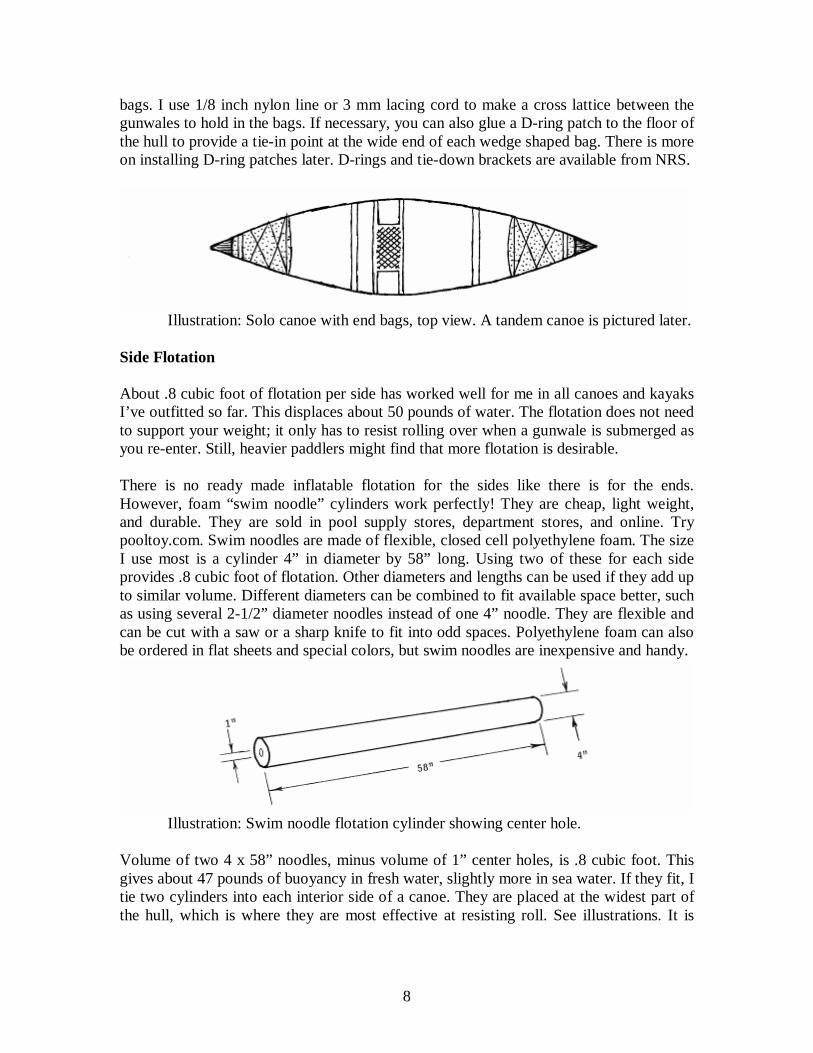
bags. I use 1/8 inch nylon line or 3 mm lacing cord to make a cross lattice between the gunwales to hold in the bags. If necessary, you can also glue a D-ring patch to the floor of the hull to provide a tie-in point at the wide end of each wedge shaped bag. There is more on installing D-ring patches later. D-rings and tie-down brackets are available from NRS.
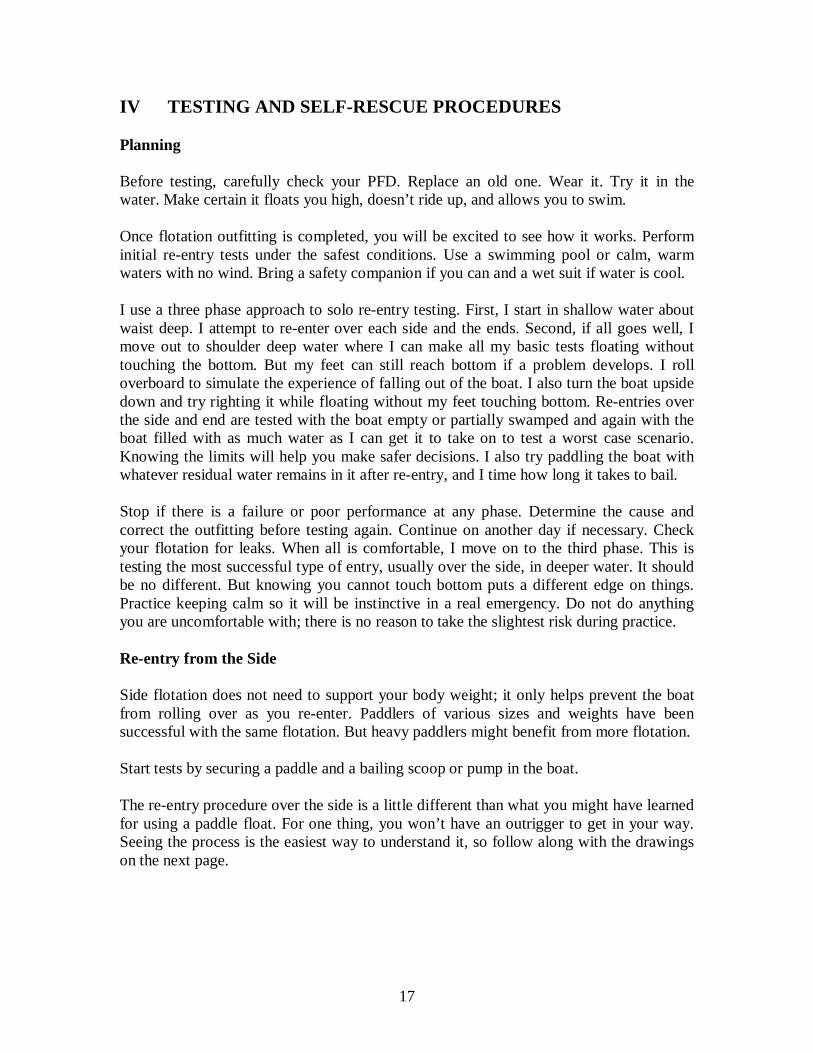
Illustration: Solo canoe with end bags, top view. A tandem canoe is pictured later. Side Flotation About .8 cubic foot of flotation per side has worked well for me in all canoes and kayaks I’ve outfitted so far. This displaces about 50 pounds of water. The flotation does not need to support your weight; it only has to resist rolling over when a gunwale is submerged as you re-enter. Still, heavier paddlers might find that more flotation is desirable. There is no ready made inflatable flotation for the sides like there is for the ends. However, foam “swim noodle” cylinders work perfectly! They are cheap, light weight, and durable. They are sold in pool supply stores, department stores, and online. Try pooltoy.com. Swim noodles are made of flexible, closed cell polyethylene foam. The size I use most is a cylinder 4” in diameter by 58” long. Using two of these for each side provides .8 cubic foot of flotation. Other diameters and lengths can be used if they add up to similar volume. Different diameters can be combined to fit available space better, such as using several 2-1/2” diameter noodles instead of one 4” noodle. They are flexible and can be cut with a saw or a sharp knife to fit into odd spaces. Polyethylene foam can also be ordered in flat sheets and special colors, but swim noodles are inexpensive and handy.
Illustration: Swim noodle flotation cylinder showing center hole. Volume of two 4 x 58” noodles, minus volume of 1” center holes, is .8 cubic foot. This gives about 47 pounds of buoyancy in fresh water, slightly more in sea water. If they fit, I tie two cylinders into each interior side of a canoe. They are placed at the widest part of the hull, which is where they are most effective at resisting roll. See illustrations. It is

9
important that side flotation extend as low into the hull as possible but not toward the centerline. Side flotation should also extend as high as possible toward the gunwales.
Illustration: Kayak flotation. The top kayak has a rear hatch and large storage/flotation compartment built in.
The side flotation, indicated by stippled shading, is extended as far to the stern as possible. Also extend side flotation as far forward as possible while leaving room for feet and foot braces. Bottom kayak is without a rear hatch. After end flotation is installed, extend the side flotation as far to the rear as possible. It is desirable to have a lot of flotation in the rear. You have to get much of your body weight onto the rear deck in order to get your legs into the cockpit. And with more flotation you will have less bailing to do.
Illustration: Canoe end cross section view with side flotation cylinders tied in. Tie the lacing cord to gunwales at the top and to D-ring patches or pipe tie-in fixtures at bottom. Attachment of D-ring patches and tie-in fixtures are described later.

10
Illustration: Solo canoe with side flotation. Use six tie-in points at each gunwale and five at the bottom per side as shown. A tandem canoe is pictured later.
Illustration: Kayak end cross section view with side flotation cylinders.
Illustration: Detail of cylinders being tied to a web loop tie-in. Cylinders should be held tightly to the hull side and deck. This makes a light weight installation.
Illustration: Left side of kayak shows cylinders held in place by seat mount and four tie-in points. Use six tie-in points, as on right side, if seat mount will not hold cylinders in place or if cylinders must be cut to fit.

11
In some kayaks there may not be space to fit two 4” diameter cylinders per side. Try combinations of 4” and 2-1/2” cylinders. Cut foam into smaller strips if necessary to fill the side area. Calculate the foam volume and try to get .8 cubic foot or more per side. You can tie to web loops or brackets screwed to the inside of the hull above the water line. Use stainless steel machine screws and locking nuts, heads on outside of hull and nuts on the inside. A dab of silicone sealer under screw heads will seal holes if you wish. For a more secure installation in some kayaks, you may need to tie cylinders at both top and bottom. Use web loops or brackets at the top and D-ring patches in the bottom. D-rings add a little more weight but work well.
Illustration: Kayak D-ring locations when seat can hold cylinders in place. Use two tie-down points at the top for each one at bottom. Angle the cords as shown.
Illustration: Kayak D-ring locations when cylinders must be cut in sections to fit. D-Ring Patches Flotation must be dependable in an emergency, so the installation must be very secure. For 57” to 60” cylinders, use the number of tie-in points and lacing arrangements shown in the illustrations. In canoes and some kayaks it will be necessary to attach tie in fixtures in the bottom. These can be D-ring patches as mentioned earlier. They can be installed on almost any hull material. Use an adhesive that will bond well between your hull material and the patch. Suppliers like NRS can help you choose the correct adhesive. For ABS or plastic hulls a vinyl adhesive like Vynabond works well for attaching D-ring patches. Follow the adhesive instructions. Mark the desired locations. Next hold a D-ring patch in place and trace a pencil line around the perimeter. Mark about an inch oversize. Use masking tape to mask around the area where the patch will go to avoid messiness. Clean both the hull and the patch with alcohol. Apply adhesive to both surfaces to be bonded and press tightly into place. Keep squeezing out air bubbles and pressing down

12
the edges for a while until the adhesive starts to set. Work outdoors; wear a breathing mask for organic solvents. Let the bond cure a day or two before tying cord to D-rings.
Photo: D-ring patch installed in ABS Royalex hull. Lacing is 1/8” nylon rope. Pipe Tie-In Fixtures If you have a hull made with wood, fiberglass, Kevlar, or carbon, then you have another option. I save the cost and weight of D-rings by making pipe tie-in fixtures. Short lengths of PVC pipe are bonded to the hull with epoxy and fiberglass. I like WEST epoxy resin with 207 UV resistant hardener. But any slow setting fiberglass repair epoxy should do. The fixtures are 1/2” diameter PVC, see illustration. Each fixture is 2” long. Cut ends at 45 degree angles so that pipe cylinder is 2” long on one side and 1” long on the other. Sand the long side so it is flattened. Flat side goes against the hull. Two layers of 4 or 6 oz. fiberglass secure each pipe in place. Cut fiberglass cloth rectangles so that they cover the pipe, blend into the hull along the pipe’s sides, and extend onto the hull at least 2”. After epoxy sets, trim fiberglass around the holes and sand hole edges inside and out.
Illustration: Pipe tie-in fixture. On the left is end view of 1/2”dia. pipe. Bottom is sanded flat. On the right is side view. Flattened long side is against the hull.

13
Illustration: Cross section of hull, pipe fixture, and fiberglass cloth.
Photo: A pipe tie-in fixture is bonded with fiberglass to the carbon rib of a Kevlar hull. Fiberglass has been trimmed from pipe holes and flotation is lashed in place. Mark pipe locations. Open ends face toward bow and stern. Sand the hull very thoroughly in bond area with course sandpaper. On fiberglass, Kevlar, or carbon hulls, sand through the resin and slightly into the fabric. On a wood hull, sand through paint or varnish down to bare wood. You may finish sand with 120 or 180 grit to remove course sanding marks. It is possible to make wood fixtures to match a wood boat. Install them similarly. To install, glue fixtures in place with quick setting epoxy. Then add the 6 oz. fiberglass to one fixture at a time. Coat hull area and pipe with slow setting epoxy. Make a fillet along the sides of the pipe with epoxy thickened with sawdust or microfibers. Lay a precut piece of fiberglass cloth in place and smooth it into the wet epoxy. Smooth it down the sides of the pipe and onto the hull. Brush un-thickened epoxy into the cloth. Before the epoxy cures entirely, add a second layer of fiberglass. Finish with another coat or two of epoxy; let it cure two days before use. You can add paint or UV resistant varnish later. 4-point flotation need add only 1-1/2 to 4 lbs. in weight, depending on your installation. Check flotation and ropes regularly for deterioration and integrity. Replace as necessary.

14
Illustration: Top view, 4-point flotation in a tandem canoe. For long canoes, noodles can be lengthened by combining two end to end. Hold them together with 6” of PVC pipe or wood dowel glued in the center holes with silicone adhesive. Whitewater Flotation For whitewater, fill all available volume with flotation! Inflatable flotation bags are the handiest weight way to do this. NRS, www.nrsweb.com, has various sizes and varieties.
Illustration: For kayaks with support pillars in the ends, split flotation bags can fit on either side. If there are no pillars, a single large bag can fill each end.
Illustration: Solo whitewater canoe with large flotation bags in the ends.
Illustration: Tandem canoe outfitted for whitewater. Small bags fit in the ends. A large center bag is tied behind front seat. Note extended side flotation cylinders. After you have outfitted a boat, read the section on Testing and Self-Rescue Procedures.

15
III INCLUDING FLOTATION WHEN BUILDING NEW BOATS If you want to keep a project simple, use the float bags and foam cylinders described earlier. Alternatively, flotation can be attractively included during wood or composite boat construction. Carved rigid foam or expanded liquid foams can fill flotation areas. But built-in hollow chambers often weigh less and look best. Since the hull is also strengthened, weight can be saved in other areas. A lot more information is in my book. End Flotation Most canoes have short decks at the ends. I just build longer decks and place bulkheads between deck and hull to enclose end flotation chambers. If bulkheads are 20” to 30” from each end, then buoyancy seems adequate without needing to calculate volume. I like to have a 30” chamber at each end if that leaves enough cargo space. For kayaks simply add a watertight bulkhead at bow and stern. Enclose all the volume in front of the feet and behind the seat. If you need cargo space, add watertight hatches to the decks. Thin marine plywood is okay for bulkheads. To save weight I use 1/2” thick rigid polystyrene closed cell foam insulation from a local building supply store. Cut foam into a bulkhead; fit need not be perfect. Use WEST epoxy, or similar, to laminate two layers of 6 oz. fiberglass cloth, or one layer of 5 oz. Kevlar, on each side of the foam. Cut the cloth oversize and trim to shape after the epoxy is no longer sticky to the touch. Bond the bulkhead in placed to the hull with thickened epoxy. The bulkhead to hull joint must be sealed with fiberglass cloth which laps 2” onto the bulkhead and 2” onto the hull and deck. Do this on the cockpit side of the bulkhead. Don’t try to go all around the bulkhead perimeter with one length of fiberglass. It is easier to use overlapping pieces about 6” long. Overlap pieces at least one inch. Brush on three more coats of epoxy to waterproof. Side Flotation For side flotation, you can save a lot of time and labor by using foam cylinders as described earlier. However, hollow chambers can enclose more volume and stiffen the hull. And the boat interior will dry out more quickly than with foam cylinders. Side chambers can be built from rigid foam as described for bulkheads. The book covers this in more detail. Each side chamber must enclose .8 cubic foot of volume or more.
Illustration: Top view of a decked canoe or kayak with deck removed to show flotation. End and side flotation chambers show drain hole locations as black dots.

16
Illustration: At left is an end cross section view of side flotation chambers and a sliding seat in a solo canoe. Illustration: At left is end cross section view of side flotation chambers in a kayak or decked canoe. To get the maximum flotation into the sides of solo canoes and kayaks I make the central seating area as narrow as I can and still be comfortable. My vertical
walls are 19” to 20” apart. Most paddlers find that comfortable, but make yours to suit. Make side chambers as long as possible, but terminate them a few inches before your feet and foot rests. It is best to have a wider area for the feet. Drain Holes and Plugs Hollow flotation chambers without hatches need drain holes. They allow chambers to be drained and dried for repairs if they leak. And stress due to air pressure changes can be prevented. I unplug the drain holes during storage and when transporting. Place holes so chambers will drain completely when the boat is turned upside down.
Illustration: A hardwood pad 1-1/2” in diameter is glued on top of each flotation chamber to accommodate a drain hole. Minimum thickness of the pad is 3/8”; minimum hole diameter is 1/2”. Give the pad and hole three or four coats of epoxy. Fit with a cork or rubber plug; they can be found at hardware and building supply stores. Or check boat supply stores. Handy plugs are made for boat drains and live wells. My favorites, found at building supply stores, are rubber with brass screws that expand the plug to fit tighter. They hold tight and remove easily. Keep a few extras on hand.
Check the chambers and plugs for leaks during testing. Listen for any water sloshing in the flotation chambers whenever you carry the boat. That might indicate a leak.
17
IV TESTING AND SELF-RESCUE PROCEDURES Planning Before testing, carefully check your PFD. Replace an old one. Wear it. Try it in the water. Make certain it floats you high, doesn’t ride up, and allows you to swim. Once flotation outfitting is completed, you will be excited to see how it works. Perform initial re-entry tests under the safest conditions. Use a swimming pool or calm, warm waters with no wind. Bring a safety companion if you can and a wet suit if water is cool. I use a three phase approach to solo re-entry testing. First, I start in shallow water about waist deep. I attempt to re-enter over each side and the ends. Second, if all goes well, I move out to shoulder deep water where I can make all my basic tests floating without touching the bottom. But my feet can still reach bottom if a problem develops. I roll overboard to simulate the experience of falling out of the boat. I also turn the boat upside down and try righting it while floating without my feet touching bottom. Re-entries over the side and end are tested with the boat empty or partially swamped and again with the boat filled with as much water as I can get it to take on to test a worst case scenario. Knowing the limits will help you make safer decisions. I also try paddling the boat with whatever residual water remains in it after re-entry, and I time how long it takes to bail. Stop if there is a failure or poor performance at any phase. Determine the cause and correct the outfitting before testing again. Continue on another day if necessary. Check your flotation for leaks. When all is comfortable, I move on to the third phase. This is testing the most successful type of entry, usually over the side, in deeper water. It should be no different. But knowing you cannot touch bottom puts a different edge on things. Practice keeping calm so it will be instinctive in a real emergency. Do not do anything you are uncomfortable with; there is no reason to take the slightest risk during practice. Re-entry from the Side Side flotation does not need to support your body weight; it only helps prevent the boat from rolling over as you re-enter. Paddlers of various sizes and weights have been successful with the same flotation. But heavy paddlers might benefit from more flotation. Start tests by securing a paddle and a bailing scoop or pump in the boat. The re-entry procedure over the side is a little different than what you might have learned for using a paddle float. For one thing, you won’t have an outrigger to get in your way. Seeing the process is the easiest way to understand it, so follow along with the drawings on the next page.

18
Illustration: Re-entry, view from above. While floating in the water, position yourself facing the canoe near the wide, middle part. Grip the gunwale or coaming with both hands. Kick your feet to get the legs up near the surface of the water so that you are in a belly down prone position, head at gunwale and legs away from the boat at a right angle. Pull the gunwale down and just under the water so that water flows into the boat. Kick your legs to keep them up near the surface or from sinking too far. When there is enough water in the boat to make the flotation effective, you will be able to push down on the gunwale, kick for thrust, and pull forward to slide over the gunwale, which is underwater. Get balanced over the center of the boat before trying to get your legs in. This requires getting your chest or abdomen over the center; your head might project past the far gunwale. Pull into position by holding the thwart, seat, or far gunwale. Grab the far gunwale with the hand that is toward the bow. Stay low and try to balance the boat. Swing your legs one at a time toward the bow and into the boat while your head swings toward the stern to maintain roll balance. Try not to roll over and out the other side! You are now facing down in the boat or kneeling in front of the center seat or center thwart and facing the stern. Roll yourself upright and into the seat.
19
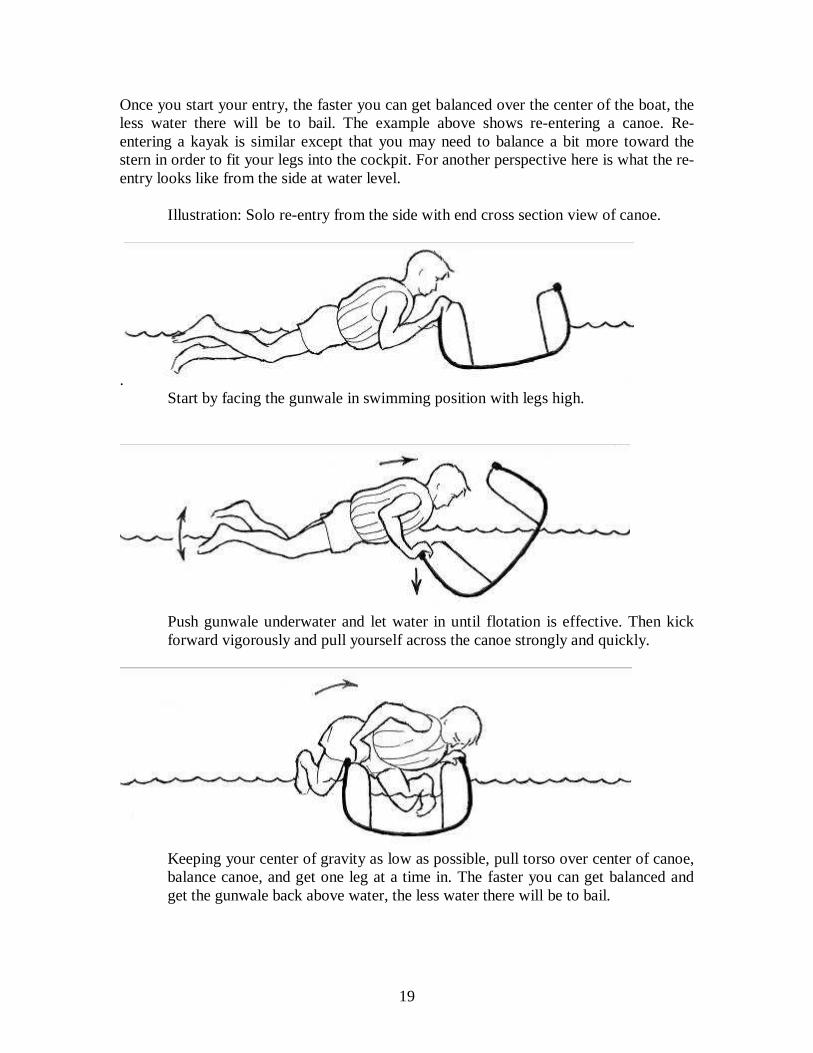
Once you start your entry, the faster you can get balanced over the center of the boat, the less water there will be to bail. The example above shows re-entering a canoe. Re-entering a kayak is similar except that you may need to balance a bit more toward the stern in order to fit your legs into the cockpit. For another perspective here is what the re-entry looks like from the side at water level. Illustration: Solo re-entry from the side with end cross section view of canoe.
. Start by facing the gunwale in swimming position with legs high.
Push gunwale underwater and let water in until flotation is effective. Then kick forward vigorously and pull yourself across the canoe strongly and quickly.
Keeping your center of gravity as low as possible, pull torso over center of canoe, balance canoe, and get one leg at a time in. The faster you can get balanced and get the gunwale back above water, the less water there will be to bail.

20
What I’ve described might appear difficult. The truth is that if you just try to pull yourself into the boat in an instinctive manner, you will eventually figure out what works. That is how I had to do it. The instructions above just make the learning curve easier and faster. In a canoe you will probably now be sitting with only your feet in the remaining water. In a kayak a bit more of you will be in the water. The boat will not be as stable in roll as when empty of water. It may tip easily until the point at which the side flotation becomes effective. But you should be able to balance and remain upright without too much difficulty. Try some test paddling with the water in the boat. Learn how slow it is to move or maneuver. Then time how long it takes you to bail. After a real capsizing, you will use this knowledge to decide whether it is better to swim the boat to shore, to re-enter and paddle, or to re-enter and bail before paddling. If there is any downside to this solo re-entry, it is that water is required in the boat. You will do some bailing. With a paddle float outrigger it is often possible to re-enter without getting much additional water in the boat. But you will be in the water much longer, and may be in serious trouble if the paddle or float gets away from you. Fingers lose control quickly in cold water. I feel safer and happier re-entering quickly without fumbling with paddle and float. The boat can be controlled sooner and then bailed at leisure. Risk of hypothermia is reduced, and you are available to assist others who might need help. Righting the Boat You must test righting the boat in case it capsizes and remains upside down. It may float level and stable upside down on the four-point flotation. Generally, kayaks will easily roll upright. With canoes I usually duck under the gunwale and come up underneath the cockpit. You should find air to breath there and need not be rushed. The boat can usually be righted by pulling down on one gunwale while pushing up on the other. Sometimes it requires bouncing up and down in the water while coordinating the push and pull. Re-entry from the End Try a re-entry over the stern or bow to learn if it is possible. Pull down on the end and pull yourself up on the deck, or push the deck into the water under you. Try to balance, straddle the boat, and work your way toward the cockpit and in. A lot of water in the boat may be required to keep the opposite end from rising and the boat from rolling over. You might have to let some water in from the side first. Most of my canoes can be entered from the end. They usually take on more water this way, so, I normally use side entry. With one kayak I tested, re-entry from the end resulted in less water in the boat. But re-entry over the side was much faster and required less effort. Tests with Cargo Heavily laden canoes are often easier to re-enter, but you should test your boats and loads to make certain. Waterproof packs tied securely into the bottom might even add some temporary flotation. For big waters or rough conditions it is best to have packs tied in.
21
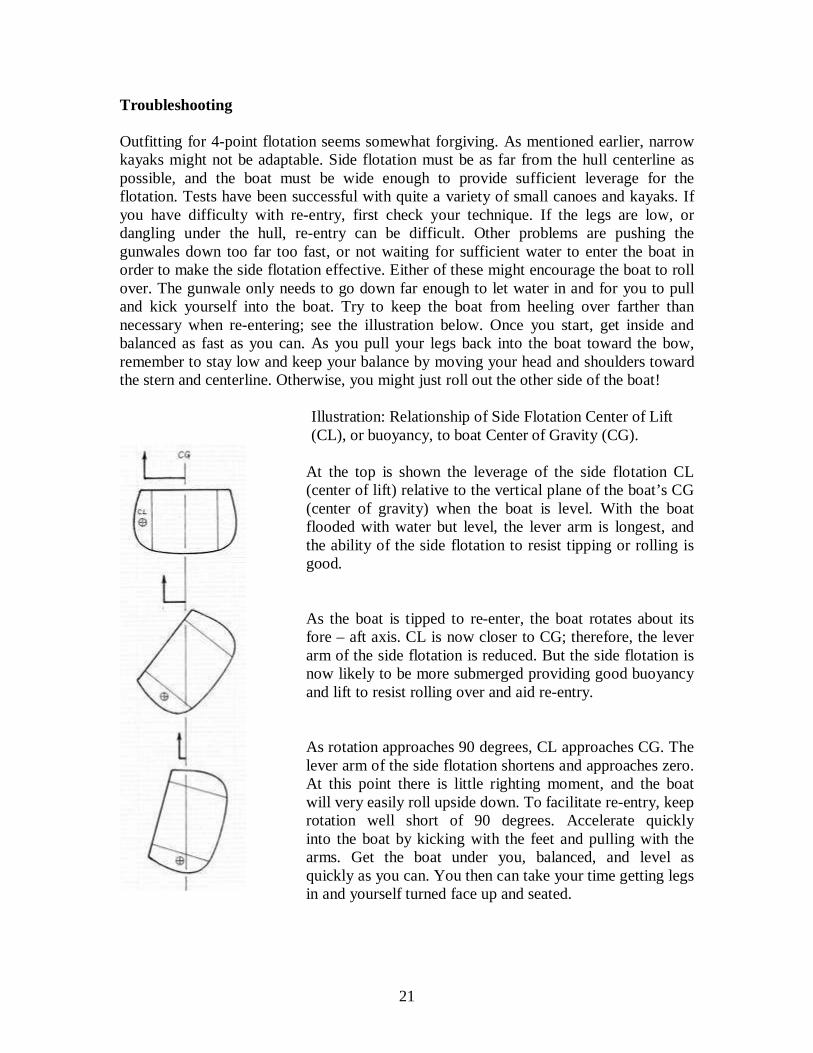
Troubleshooting Outfitting for 4-point flotation seems somewhat forgiving. As mentioned earlier, narrow kayaks might not be adaptable. Side flotation must be as far from the hull centerline as possible, and the boat must be wide enough to provide sufficient leverage for the flotation. Tests have been successful with quite a variety of small canoes and kayaks. If you have difficulty with re-entry, first check your technique. If the legs are low, or dangling under the hull, re-entry can be difficult. Other problems are pushing the gunwales down too far too fast, or not waiting for sufficient water to enter the boat in order to make the side flotation effective. Either of these might encourage the boat to roll over. The gunwale only needs to go down far enough to let water in and for you to pull and kick yourself into the boat. Try to keep the boat from heeling over farther than necessary when re-entering; see the illustration below. Once you start, get inside and balanced as fast as you can. As you pull your legs back into the boat toward the bow, remember to stay low and keep your balance by moving your head and shoulders toward the stern and centerline. Otherwise, you might just roll out the other side of the boat! Illustration: Relationship of Side Flotation Center of Lift (CL), or buoyancy, to boat Center of Gravity (CG).
At the top is shown the leverage of the side flotation CL (center of lift) relative to the vertical plane of the boat’s CG (center of gravity) when the boat is level. With the boat flooded with water but level, the lever arm is longest, and the ability of the side flotation to resist tipping or rolling is good. As the boat is tipped to re-enter, the boat rotates about its fore – aft axis. CL is now closer to CG; therefore, the lever arm of the side flotation is reduced. But the side flotation is now likely to be more submerged providing good buoyancy and lift to resist rolling over and aid re-entry. As rotation approaches 90 degrees, CL approaches CG. The lever arm of the side flotation shortens and approaches zero. At this point there is little righting moment, and the boat will very easily roll upside down. To facilitate re-entry, keep rotation well short of 90 degrees. Accelerate quickly into the boat by kicking with the feet and pulling with the arms. Get the boat under you, balanced, and level as quickly as you can. You then can take your time getting legs in and yourself turned face up and seated.

22
Outfitting problems are likely to be too little flotation or flotation not tied in securely. If end flotation is insufficient, the bow or stern will try to dive underwater. Side flotation is trickier. If it extends from the sides too much toward the bottom center of the hull, the boat will try to roll upside down during re-entry. Insufficient volume of side flotation will cause the same thing. Some flotation materials are denser than others. If your flotation is relatively heavy, it will have to displace more volume. Remember to subtract the weight of your flotation material from the weight of the water it displaces to calculate buoyancy. Let me emphasize how important it is that flotation be well secured. I once fastened flexible foam noodles into the sides of a canoe just by the middles of the cylinders and left them unattached toward their ends. When they were submerged they flexed upward enough to prevent re-entry. Tying the cylinder ends was all that was needed for success. Safety and success depend on preparation and good judgment. Inspect flotation, lacing, and equipment before paddling. Review re-entry procedures and practice them. I love the convenience of not needing assistance or special equipment to accomplish re-entry. Everything required is attached to the boat and ready to do its job whether I’m going fishing, taking a long wilderness trip, or loaning a canoe to a friend or loved one. Canoes and kayaks connect us intimately with the water and keep us humbly mindful of our place in nature. They allow a quiet, contemplative outdoor experience which silences the mind and sharpens the senses. They encourage solitude and provide the freedom and joy of moving over the water by our own power. That freedom is enhanced by knowing that these simple craft might take us farther with less risk. Paddle more and stay safe. See you on the water!
V SOME SOURCES OF SUPPLIES AND INFORMATION
www.aircraftspruce.com Thin plywood, epoxy, fiberglass, Kevlar, carbon fiber, rigid foams. www.clcboats.com Plywood, kits, plans, epoxy, fiberglass, paddle floats, paint, varnish, & more. www.nrsweb.com Flotation bags, paddle floats, D-rings, adhesives, dry bags, wet suits, & more. pooltoy.com Pool swim noodle cylinders. www.thefoamfactory.com Closed cell polyethylene foam sheets and cylinders. Some information for calculating and comparing flotation volumes and buoyancy: The specific gravity of fresh water = 1.0 62.4 lbs. per cubic foot The specific gravity of sea water = 1.03 64.3 lbs. per cubic foot One cubic foot = 12 inches³ = 1728 cubic inches Volume of a cylinder = area of cross section (a circle) times the length Area of a circle = πr² π = 3.14159 r = radius