S1 Mobile Mapper User Guide 5.0 Public Viewer · 2020-04-02 · Import JSON File into ArcGIS ......
58
S1 MOBILE MAPPER USER GUIDE 5.0 PUBLIC VIEWER
Transcript of S1 Mobile Mapper User Guide 5.0 Public Viewer · 2020-04-02 · Import JSON File into ArcGIS ......

S1 MOBILE MAPPER USER GUIDE 5.0 PUBLIC VIEWER

S 1 M o b i l e M a p p e r U s e r G u i d e 5 . 0 P u b l i c V i e w e r
Page 1
Contents About............................................................................................................................................................. 0
Launching Application ................................................................................................................................... 1
Welcome Screen and Public Mode ........................................................................................................... 1
Application Interface ................................................................................................................................. 2
Application Main Toolbar ............................................................................................................................. 2
Activate GPS .............................................................................................................................................. 2
Map View Rotation ................................................................................................................................... 4
Collect Features ........................................................................................................................................ 6
Manage Map Layers .................................................................................................................................. 7
Tools/Options Menu ................................................................................................................................. 7
About S1 Menu ......................................................................................................................................... 8
Downloading Maps ..................................................................................................................................... 10
Base Maps ............................................................................................................................................... 10
Search for Base Maps .......................................................................................................................... 10
Download Base Maps .......................................................................................................................... 16
Change Offline Base Map Displayed ....................................................................................................... 18
GPS Tracklog ............................................................................................................................................... 18
Enabling GPS Tracklog ............................................................................................................................. 19
Archive & Manage GPS Tracklogs ........................................................................................................... 20
Rename and Delete Archived Tracklog(s) ........................................................................................... 21
S1 GeoTag Photos ....................................................................................................................................... 22
Collecting S1 GeoTag Photos .................................................................................................................. 23
S1 GeoTag Photo Layer Visibility ............................................................................................................. 25
Navigate to S1 GeoTag photo ................................................................................................................. 25
Configuring S1 GeoTag Photo Options.................................................................................................... 27
Configure File Name ............................................................................................................................ 27
Share Location ..................................................................................................................................... 27
S1 GeoTag Options .............................................................................................................................. 27
Managing S1 GeoTag Photos .................................................................................................................. 31
Accessing and Viewing GeoTag Photos ............................................................................................... 31

S 1 M o b i l e M a p p e r U s e r G u i d e 5 . 0 P u b l i c V i e w e r
Page 2
S1 Waypoints .............................................................................................................................................. 36
Collecting S1 Waypoint ........................................................................................................................... 37
Capture Waypoint via digitizing .............................................................................................................. 37
Capture Waypoint via GPS Averaging ..................................................................................................... 38
Managing S1 Waypoint Data .................................................................................................................. 40
Copy Waypoint JSON File to Computer .............................................................................................. 40
Import JSON File into ArcGIS ............................................................................................................... 40
Deleting Waypoints on Device ............................................................................................................ 41
Editing Options Menu ................................................................................................................................. 42
Options .................................................................................................................................................... 42
Navigation Capabilities ............................................................................................................................... 42
Navigate to a Map Location .................................................................................................................... 42
Navigate to Selected S1 Waypoint or GeoTag Photo ............................................................................. 44
Tools ............................................................................................................................................................ 45
Measure Tool .......................................................................................................................................... 45
Enter Coordinates Tool ........................................................................................................................... 47
Navigate to Entered Coordinates ........................................................................................................ 49
Create Feature Using Entered Coordinates ........................................................................................ 49
S1 Application Options ................................................................................................................................ 51
External Bluetooth GPS Receiver Support .................................................................................................. 52

S 1 M o b i l e M a p p e r U s e r G u i d e 5 . 0 P u b l i c V i e w e r
Page 3
Document Version Control
Date Doc Version Number Changes 8/4/17 3.1.00 Created from the S1 Mobile for Android Application User Guide,
Version 3.1 1/15/18 3.2.00 Updated from Version 3.2 7/13/18 3.3.00 Updated to reflect 3.3 version. Moved application specifications
and installation sections to front of user guide. 3/22/19 4.0.114 Updated to reflect changes to user interface in v.4.0 7/31/19 4.1.009 Changed reference from 4.0 to v.4.1. Updated bug and
enhancement link to Survey123 form. 3/31/20 5.0 Updated to reflect changes to user interface in v5.0

About
The S1 Mobile application is a custom application built by the Service First (S1) Mobile GIS team, sponsored by Oregon State Office Bureau of Land Management (BLM) and Region 6 U.S. Forest Service (USFS). The Public Viewer mode of the application allows anyone to download and view maps and collect Tracklogs, Waypoints and GeoTag Photos. The application is designed specifically for those wanting to access map content on a mobile device in an offline environment. The application is currently built to run on a mobile device running Android operating system, using the ESRI Runtime Software Development Kit (SDK) framework.
The full application is available to agency employees with a recognized agency ArcGIS Online (AGOL) account. For a full list of application capabilities, or application installation instructions, See the S1 Mobile Mapper Agency User Guide.
For additional information about the application, visit the S1 Mobile website:
https://www.blm.gov/or/gis/mobile/s1mobile/

S 1 M o b i l e M a p p e r U s e r G u i d e 5 . 0 P u b l i c V i e w e r
Page 1
Launching Application The application is launched by tapping on the application icon found on the device application list.
Welcome Screen and Public Mode The application opens to welcome screen with a brief description of the application. The user can either login to the full version of the application by selecting the Organization Login button, which requires an ArcGIS Online Organization Account. The public viewer option allows anyone to download map products published by the BLM and USFS, capture S1 Waypoints, Tracklogs and Geotag Photos, and deploy a few of the app’s tools. Selecting the Public Maps option will send the user to a map gallery of available map products. For more information on downloading maps, go to Downloading Content.

S 1 M o b i l e M a p p e r U s e r G u i d e 5 . 0 P u b l i c V i e w e r
Page 2
Application Interface
Application Main Toolbar
Activate GPS
GPS and Auto Pan On GPS On, Auto Pan Off GPS and Auto Pan Off
• Tap GPS Icon to turn On GPS and to activate Auto Pan • If you pan on the map, Auto Pan turns off but GPS remains on • Tapping the GPS icon again will turn Auto Pan back on

S 1 M o b i l e M a p p e r U s e r G u i d e 5 . 0 P u b l i c V i e w e r
Page 3
• Tap the GPS icon when both GPS and Auto Pan on will turn GPS and Auto Pan off • Once GPS position fix is obtained, your current location will display on map as a blue dot • When GPS is turned on, the GPS Position Toolbar appears at top of screen, which displays:
o Current GPS Location Coordinates o Number of satellites used in position fix o Estimated accuracy of location (in meters or feet) o GPS Source/Quality will be displayed as one of the following:
o No Fix – No satellite fix o GPS – Global Position System o DGPS - Differential Global Positioning Systems o RTK - Real-time kinematic
• GPS location Coordinates are displayed in World Geodetic System 1984 Decimal Degrees (WGS84 DD) by default but can be changed to display a different coordinate systems by tapping on the GPS Position Information and selecting another coordinate system from the list. The display units can also be changed in S1 Options.

S 1 M o b i l e M a p p e r U s e r G u i d e 5 . 0 P u b l i c V i e w e r
Page 4
• Estimated Accuracy is displayed to a 68% confidence interval by default. The display value can be changed to an Estimated Accuracy at a 95% confidence interval in S1 Options. The default accuracy units are metric but this can also be changed to statute in S1 Options.
• Estimated Elevation is displayed in either feet or meters. The default accuracy units are metric but this can also be changed to statute in S1 Options
• For the highest possible location accuracy, it is advised to set your device’s Location setting to GPS only in the mobile device settings. The application will check if this setting is on once GPS is activated and alert you if the device is set to any other Android Location setting such as High Accuracy mode.
• It is possible to connect an external, high accuracy GPS receiver to provide location information to the app instead of using the device’s internal GPS. For more information on this topic, see External Bluetooth GPS Receiver Support section.
Map View Rotation Version 5.0 of the S1 Mobile Mapper now allows the user to rotate the main map view by using 2 fingers spaced at least slightly apart on the screen at the same time. This function works in any S1 screen where the main map view is visible. This option allows the user to orient the map view in a way that makes sense relatively to the users position and orientation on the ground.
• To rotate the main map view, place two fingers on the screen at least slightly apart and rotate them to whatever orientation you would like to vs always North at the top of the screen.

S 1 M o b i l e M a p p e r U s e r G u i d e 5 . 0 P u b l i c V i e w e r
Page 5
• To orient the map back to North facing up just tap the black arrow in the upper right to re-
orient the map view.
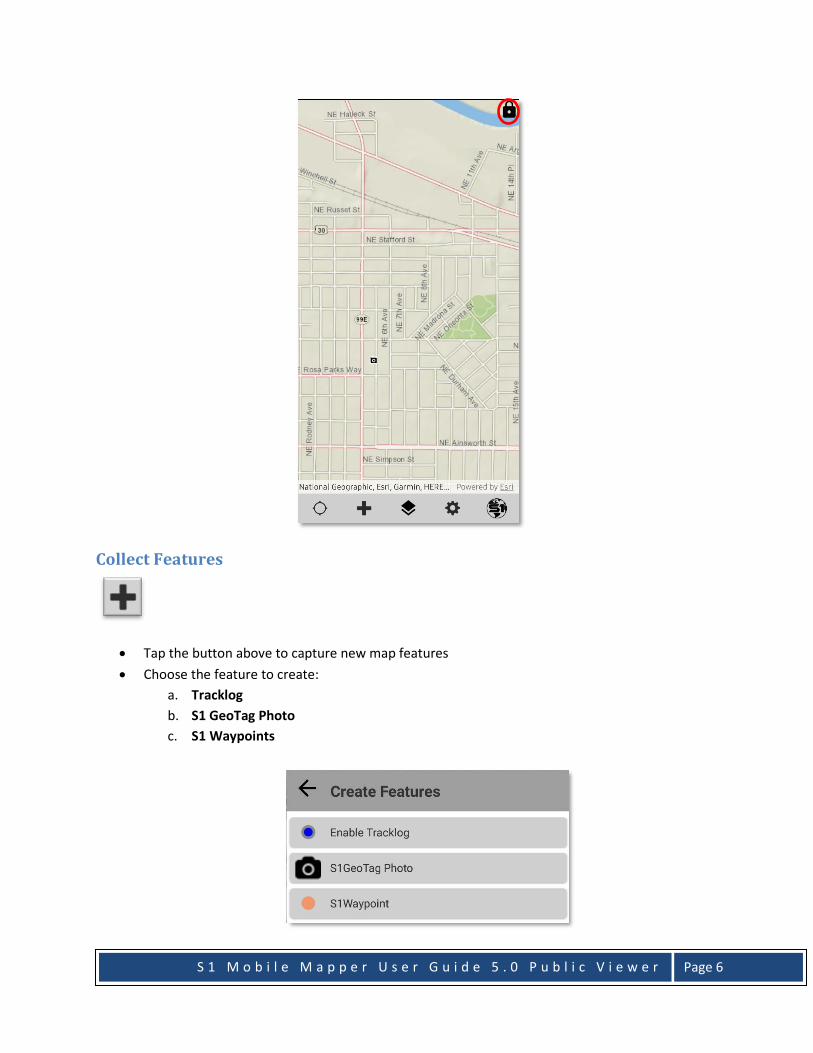
• To lock the screen and temporarily disable screen rotation Long press the black arrow until it turns to a padlock icon, shown below.
• to unlock the screen rotation again, Long press the padlock icon again.
S 1 M o b i l e M a p p e r U s e r G u i d e 5 . 0 P u b l i c V i e w e r
Page 6
Collect Features
• Tap the button above to capture new map features • Choose the feature to create:
a. Tracklog b. S1 GeoTag Photo c. S1 Waypoints

S 1 M o b i l e M a p p e r U s e r G u i d e 5 . 0 P u b l i c V i e w e r
Page 7
• See Tracklog section for full description of tracklogs • See S1 GeoTag Photos section for full description of GeoTag Photos & capabilities • See S1 Waypoints section for full description of Waypoint capture and download
Manage Map Layers
• The Manage Map Layers menu displays base maps and two default edit layers. It also
displays and manages several local data sets that are loaded to the app by default and managed within the application itself.
• See links below for more information about each type of data source: o Base Map o Tracklog o S1 GeoTag Photos o S1 Waypoints
• Displays maps that have been downloaded to device and are currently active in the map. • Use this menu to change from one base map to another. • Use this to turn on/off visibility for Tracklogs, S1 GeoTag, and S1 Waypoint symbology. • Delete content from local storage of device via this menu.
See Managing Downloaded Content for more information.
Tools/Options Menu

S 1 M o b i l e M a p p e r U s e r G u i d e 5 . 0 P u b l i c V i e w e r
Page 8
• Tapping the button above produces the following menu:
• To learn more about S1 Application Options, see Application Options • To learn more about downloading maps to the device, see Downloading Maps to S1 Mobile • To learn more about Connecting to Bluetooth GPS, see External Bluetooth GPS Receiver • To learn more about the application’s various tools, see Tools
About S1 Menu
• Tapping button produces the following menu:
• Tapping Quick Help opens a Quick Reference PDF guide. • Tapping Help opens this document in PDF form on the mobile device. • Tapping Feedback opens a survey form to submit feedback and report issues with to the S1
Mobile GIS Team. • Tapping About produces a pop up showing the current installed version number, application
description, privacy policy and end-user license agreement:

S 1 M o b i l e M a p p e r U s e r G u i d e 5 . 0 P u b l i c V i e w e r
Page 9
• Tapping Log On will take the user to a federal agency specific log on screen for the ArcGIS for Organization. An agency ArcGIS Online account is required to login. If you have an agency login or need information on how to get an agency login, visit the S1 Mobile website and look under How Do You Get it? https://www.blm.gov/services/mobile-gis/s1mobile

S 1 M o b i l e M a p p e r U s e r G u i d e 5 . 0 P u b l i c V i e w e r
Page 10
Downloading Maps The S1 Mobile application can download and store multiple base maps for offline use to the mobile device, so that the user can interact with Base Maps and collect Waypoints and Geotag Photos when in areas of limited or no network connectivity.
Base Maps This section describes how to obtain Base Maps for offline use with the S1 Mobile Mapper application. Base Maps are multi-scale tiled image cache packages (.tpk), which quickly display image tiles appropriate for the current map scale. They are downloaded to mobile devices over Wi-Fi or cellular networks or can be manually copied (“side loaded”) to a mobile device via Windows Explorer.
The available Base Maps are a collection of map products produced and distributed by the Bureau of Land Management (BLM) or U.S. Forest Service (USFS). S1 Mobile Mapper can store many Base Maps on a device at a time and the user can switch between maps to set the appropriate Base Map for their current viewing needs.
Upon first opening the S1 Mobile Mapper application, it displays a high level “wire frame” Default Base Map. Unlike other user-downloaded Base Maps, the Default Base Map cannot be deleted from the device.
Assumptions: • S1 Mobile Mapper Application is open on Android mobile device • Mobile device has connection to 4G or WIFI network
Search for Base Maps • Tap Tools/Options button
• Tap Download Maps
• Upon opening the Maps available for download map and list view, GPS is automatically activated on your device. The list can take time generating depending on how easily the device

S 1 M o b i l e M a p p e r U s e r G u i d e 5 . 0 P u b l i c V i e w e r
Page 11
can determine your current location. To reduce the time it takes to generate the map list, open the device Android Settings menu and search for the Location settings. Ensure the device is in High Accuracy mode.
• Once your location is determined, the Application displays all maps available for download. The Orange pins are BLM maps, Green pins are Forest Service maps that represent the centroids of the map available in that area.
• On phone devices, a map is displayed and a < button is displayed at the top of the map. Select < will allow you to access the Maps in Current Extent menu. On a tablet, the Maps in Current Extent menu is displayed along with the map. Phone: Tablet:

S 1 M o b i l e M a p p e r U s e r G u i d e 5 . 0 P u b l i c V i e w e r
Page 12
Using the Map View to search for maps • Pinch and pull on the map to place you area of interest in the center of the Map View. • Select a Green Map Pin for USFS Maps and an Orange Map Pin for BLM in an area of interest. • A box containing the name of the map and the icon of the agency that published the map
appears.
• Tap the blue text displaying the map name to open the selected Map Information window.
• To close the Map Information window, select the back button on the Map Information window

S 1 M o b i l e M a p p e r U s e r G u i d e 5 . 0 P u b l i c V i e w e r
Page 13
Using the List View to search for maps • To search for a map via the List View, on phone devices tap the List View arrow at the top of the
map view. On tablets, the list will already be displayed.
• The list view opens with all the maps available in the map extent from the map view. The initial
list order is determined by distance of the centroid of the map to your current location. To add more maps to the map list, in the map view zoom out or pan to another location.
• Tap the map name to open the selected maps information window.

S 1 M o b i l e M a p p e r U s e r G u i d e 5 . 0 P u b l i c V i e w e r
Page 14
• To close the Map Information window and return to the map view, select on the arrow in the top left corner of the window.
Filtering Maps by Keyword, Distance, or Sort The map list can be filtered and sorted using the filter map tool.
• Tap the Filter button
• To sort by Key Word, verify that Filter by Key Word is selected.
• Type a Key Word such as State, Agency or location. (Example: Deschutes).
• Tap the Submit button to initiate the list filter.
• To clear the Filter, tap the Cancel button at the bottom right of the screen.
• To Filter by Distance, tap the Filter button
S 1 M o b i l e M a p p e r U s e r G u i d e 5 . 0 P u b l i c V i e w e r
Page 15
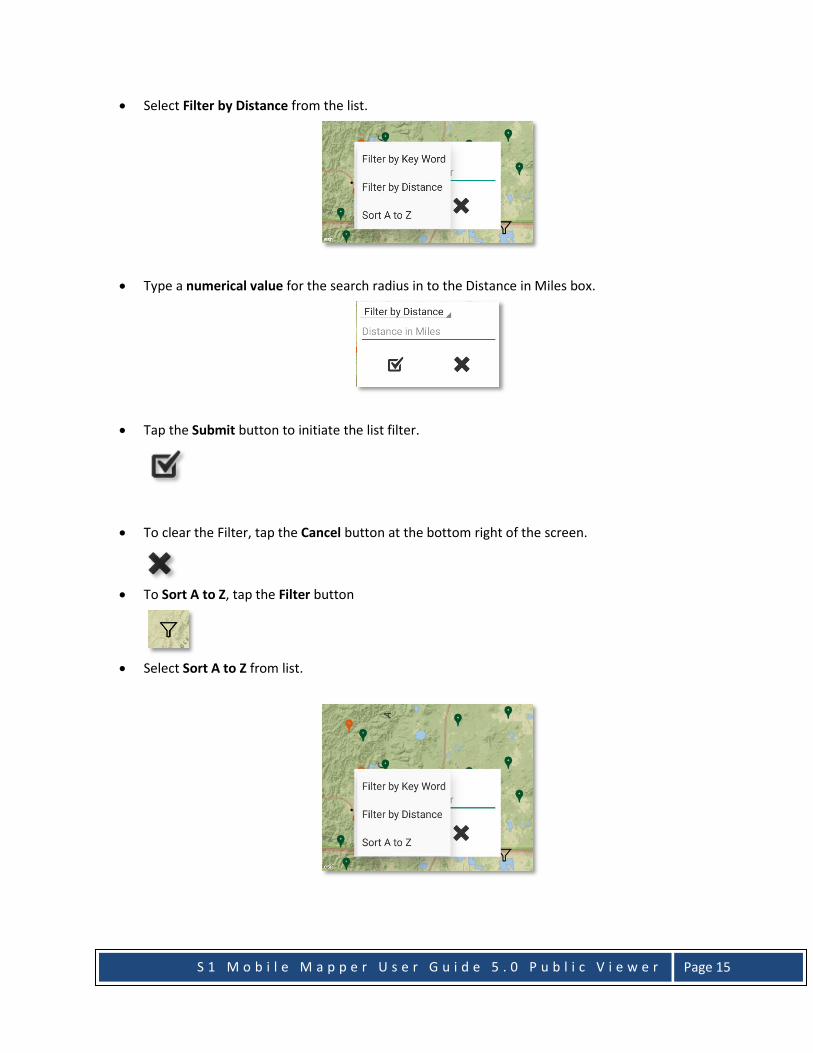
• Select Filter by Distance from the list.
• Type a numerical value for the search radius in to the Distance in Miles box.
• Tap the Submit button to initiate the list filter.
• To clear the Filter, tap the Cancel button at the bottom right of the screen.
• To Sort A to Z, tap the Filter button
• Select Sort A to Z from list.

S 1 M o b i l e M a p p e r U s e r G u i d e 5 . 0 P u b l i c V i e w e r
Page 16
• In the menu that opens, ensure Sort A to Z is selected and tap the Submit button to initiate the list filter.
• To clear the Filter, tap the Cancel button at the bottom right of the screen.
Download Base Maps • From the Information window opened in either map view or list view you can download the
map
• Tap Download button to initiate download.

S 1 M o b i l e M a p p e r U s e r G u i d e 5 . 0 P u b l i c V i e w e r
Page 17
• A spinner will appear in the application toolbar with the percent downloaded in the center of the spinner.
• Track the download progress in the device notification panel. When download is complete, map is automatically added to map view as the current Base Map. Note, map download speeds depending on size of map and network strength.

S 1 M o b i l e M a p p e r U s e r G u i d e 5 . 0 P u b l i c V i e w e r
Page 18
Change Offline Base Map Displayed If you have downloaded multiple maps to your device, you may switch the map currently active regardless if you have network connection or not.
• Tap the Manage Map Layers button
• Tap the Map Thumbnail located to the right of Offline Base Map.
A list of all Base Maps (tile packages) stored on device will appear as thumbnails, with the currently displayed item highlighted in Blue.
• To change the map currently being displayed, tap the Map Thumbnail.
GPS Tracklog A Tracklog includes a series of points that are logged automatically every 5 meters traveled. Travel is logged continuously in the background for as long as the Tracklog feature is enabled. The same Tracklog

S 1 M o b i l e M a p p e r U s e r G u i d e 5 . 0 P u b l i c V i e w e r
Page 19
can be turned on and off as needed or saved and archived to create a new sepearte Tracklog. Tracklog positions are stored as JSON files in the coordinate system WGS 1984 Web Mercator Auxiliary Sphere. Tracklogs files can be shared or exported into GIS using ArcGIS tools.
To improve map performance and reduce memory usage, GPS Tracklog positions only display on screen when the map is zoomed into at least 1:18,000 map scale. They do not draw out beyond this map scale.
Enabling GPS Tracklog • To enable, tap Collect Features button. • Choose Enable Tracklog from list.
• Tracklog positions will begin logging and will display on the map. Tracklog appears as a series of
blue dots when zoomed in closer than 1:18,000.
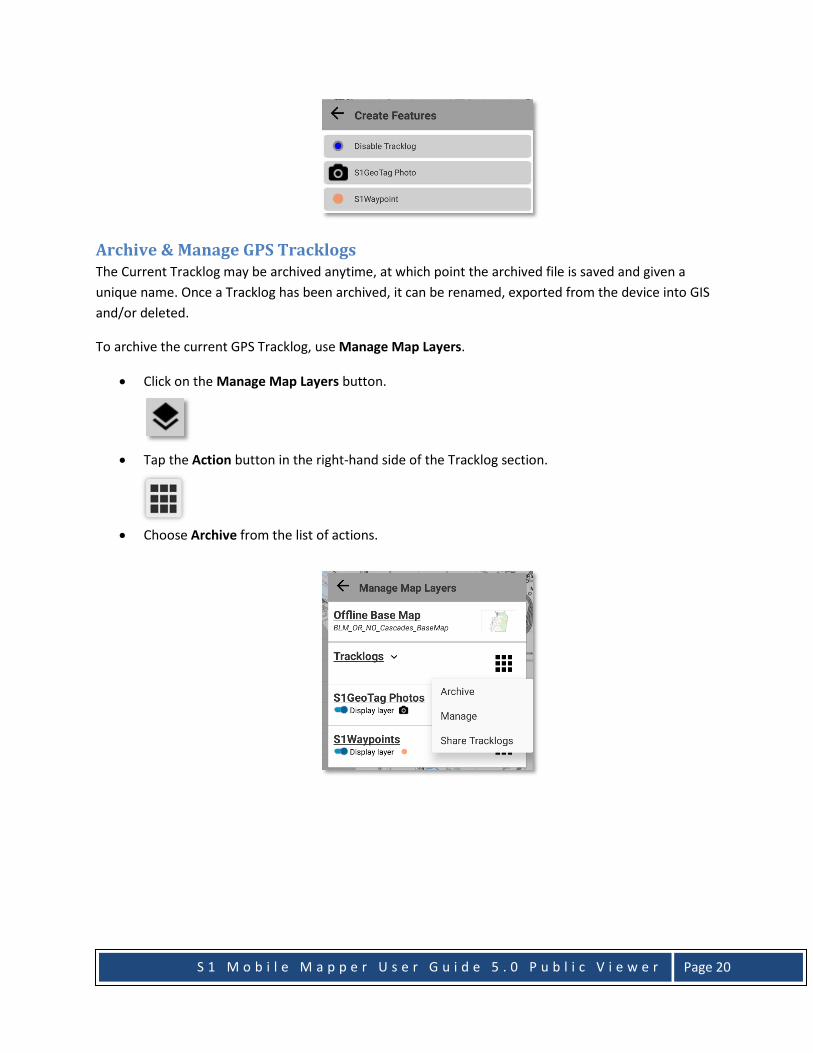
• To suspend capture of a Tracklog, from the Create Features menu, select Disable Tracklog.
S 1 M o b i l e M a p p e r U s e r G u i d e 5 . 0 P u b l i c V i e w e r
Page 20
Archive & Manage GPS Tracklogs The Current Tracklog may be archived anytime, at which point the archived file is saved and given a unique name. Once a Tracklog has been archived, it can be renamed, exported from the device into GIS and/or deleted.
To archive the current GPS Tracklog, use Manage Map Layers.
• Click on the Manage Map Layers button.
• Tap the Action button in the right-hand side of the Tracklog section.
• Choose Archive from the list of actions.

S 1 M o b i l e M a p p e r U s e r G u i d e 5 . 0 P u b l i c V i e w e r
Page 21
• Give the file a descriptive name, then tap Archive button.
The Tracklog is now archived on the device. It will be listed in Manage Map Layers, where its visibility can be toggled on/off as any other Edit GDB layer loaded to the map. Both the Current Tracklog and any archived Tracklog(s) may be displayed in map view at the same time, however, only the current track can log new positions.
Rename and Delete Archived Tracklog(s) • Tap the Manage Map Layers button
• Tap the Action button next to the listing for Tracklog.
• Choose Manage from the list of available actions.
• Tap the Tracklog to select it, and then choose either Rename or Delete.
The Current Tracklog can be deleted, but never renamed. If the current Tracklog is deleted, existing Tracklog points are cleared from the app; a new current Tracklog will be generated when the Tracklog capability is next enabled.

S 1 M o b i l e M a p p e r U s e r G u i d e 5 . 0 P u b l i c V i e w e r
Page 22
S1 GeoTag Photos This section describes how to collect a GeoTag Photo with the S1 Mobile Mapper application. This tool allows the user to capture a photo with the location coordinates embedded into its metadata (EXIF) header. The photo can also be watermarked with azimuth/bearing, pitch/roll, XY location, altitude, date/time, brand icon, and a configurable file name. The location of each GeoTag photo is displayed as a Camera Icon in the map view. The user can also review and delete Geotagged Photos from the device.
Another great feature of the tool is the ability to configure how watermarked elements are displayed on the photo. These elements can be docked in the camera view where the user feels appropriate.
The Share Location tool allows the user to share their location using various methods such as email among other apps depending on device manufacturer. Using email to share your location provides the recipient with the information watermarked in the photo as well as links to maps available on the web.
The graphic below provides an overview of the tools/options available while taking GeoTag photos.

S 1 M o b i l e M a p p e r U s e r G u i d e 5 . 0 P u b l i c V i e w e r
Page 23
Collecting S1 GeoTag Photos • Tap Create Features button
• Tap S1GeoTag Photo
• The camera view opens and the GPS is activated if it was not already on.
• The XY location and altitude display in the upper right hand corner once the GPS has a position. • Tap Zoom In/Zoom Out to bring subject of photo in view (pinch to zoom also works).

S 1 M o b i l e M a p p e r U s e r G u i d e 5 . 0 P u b l i c V i e w e r
Page 24
• Tap Capture GeoTag Photo button
• A message box appears showing the progress of capturing and then saving the photo.
• Tap Cancel if you are not satisfied with the photo.
• Tap Save to commit the GeoTag photo to the S1Photos folder on the device. Photos will be
stored in the S1 Photos folder on device’s internal memory if no SD Card is present, see more details in the Accessing and Viewing GeoTag Photos section below.
• A GeoTag Photo icon is displayed in the map view at the location of where the photo was
captured.
• To delete a single geotag photo, first tap on the GeoTag Photo icon to select a photo.
• Tap Delete Feature button to delete the selected photo.
• Tap No if you do not wish to delete the photo.

S 1 M o b i l e M a p p e r U s e r G u i d e 5 . 0 P u b l i c V i e w e r
Page 25
• Tap Yes if you wish to delete the photo from the map view and remove thumbnail from Manage Map Layer (photo is completely deleted from device).
S1 GeoTag Photo Layer Visibility The visibility of GeoTag photos in the map view can be toggled ON/OFF in Manage Map Layers.
• Tap Manage Map Layers button
• Check/Uncheck box to toggle GeoTag photo map visibility ON/OFF
Navigate to S1 GeoTag photo GeoTag photos also can be set as navigation targets.
• Tap on the GeoTag Photo icon in the map to select it

S 1 M o b i l e M a p p e r U s e r G u i d e 5 . 0 P u b l i c V i e w e r
Page 26
• Pull down the navigation tab to see additional select mode tools. • Tap the Navigate to Feature button to begin navigation to the selected photo.
• Tap Back button on the navigation window to clear the navigation target

S 1 M o b i l e M a p p e r U s e r G u i d e 5 . 0 P u b l i c V i e w e r
Page 27
Configuring S1 GeoTag Photo Options GeoTag Photos are highly configurable. There are a number of settings and options available to the user. Settings are configured before a photo is captured. See the S1 GeoTag Options section for more details.
Configure File Name • The Configure File Name button allows the photo to be given a unique name that is
watermarked on the photo when the photo is stored.
• Take note of the user configured file name for the photo.
Share Location • The Share Location button allows users to share their location using various methods such as
email, Google Maps, memo apps, and Bluetooth.
• Sharing your location by email provides the recipient with web links to Google Maps. • Each web link provides a map at the location of where the photo was captured.
S1 GeoTag Options • From within the Photo viewfinder, tap Photo Settings button to uncover all of the photo setting
options.

S 1 M o b i l e M a p p e r U s e r G u i d e 5 . 0 P u b l i c V i e w e r
Page 28
Full List of Photo Options This section describes options that allow the user to configure units of measure, visual interface, and output format of a photo.
UNITS
Auto Adjust Declination: Report True North if location is available (checkbox)
Manual Declination: Adjust local declination (activate by unchecking Auto Adjust Declination)
Override Measurements: Override sensor measurements by entering your own values
Sensor Calibration: Calibrate device sensors to increase accuracy
VISUAL
Stabilize: Stabilize values by ignoring small changes (checkbox)
Unlock: Make features movable in the camera view (checkbox)
Reset: Reset features in the camera view to their original positions
Text Size: Change the size of text values
Text Color: Change the color of text values
Text Outline: Change the outline color of text values
Elevation: Use meters instead of feet (checkbox)

S 1 M o b i l e M a p p e r U s e r G u i d e 5 . 0 P u b l i c V i e w e r
Page 29
Preview Resolution: Display camera view at different resolutions
Display/Hide: Display or hide features in the camera view
Brand Icon: Choose from BLM/USFS Agency Logos or select from gallery
OUTPUT
Format: Save as JPEG instead of PNG (checkbox)
Quality: Change the quality of the JPEG image output
Flash off: Disable camera flash when taking pictures (toggle through options)
Auto flash: use camera flash automatically (toggle through options)
Flash on: Camera flash on for every photo (toggle through options)
Flashlight: Flashlight will always be on (toggle through options)
Picture Resolution: Choose megapixel resolution of pictures
Naming Convention: Configure file naming format of pictures
S 1 M o b i l e M a p p e r U s e r G u i d e 5 . 0 P u b l i c V i e w e r
Page 30
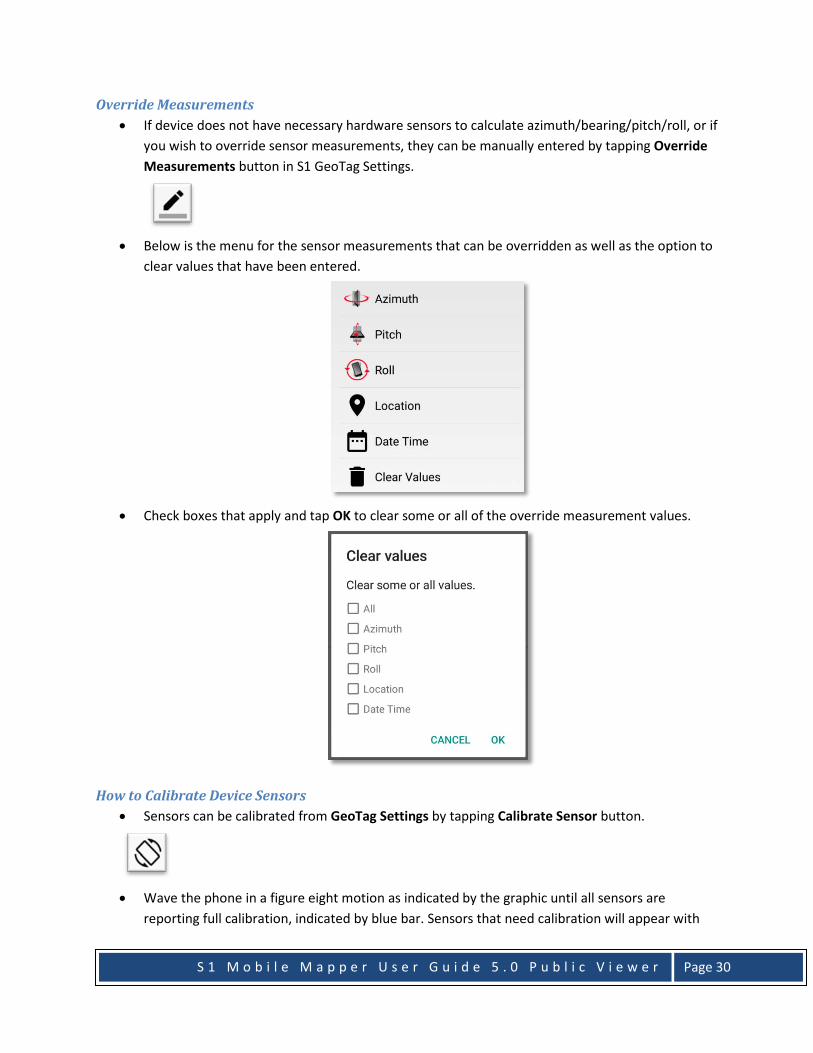
Override Measurements • If device does not have necessary hardware sensors to calculate azimuth/bearing/pitch/roll, or if
you wish to override sensor measurements, they can be manually entered by tapping Override Measurements button in S1 GeoTag Settings.
• Below is the menu for the sensor measurements that can be overridden as well as the option to clear values that have been entered.
• Check boxes that apply and tap OK to clear some or all of the override measurement values.
How to Calibrate Device Sensors • Sensors can be calibrated from GeoTag Settings by tapping Calibrate Sensor button.
• Wave the phone in a figure eight motion as indicated by the graphic until all sensors are
reporting full calibration, indicated by blue bar. Sensors that need calibration will appear with

S 1 M o b i l e M a p p e r U s e r G u i d e 5 . 0 P u b l i c V i e w e r
Page 31
red bars, however, devices without certain sensors will always appear red no matter how many figure eights you complete.
Managing S1 GeoTag Photos
Accessing and Viewing GeoTag Photos The next section describes how to access and view GeoTag photos captured with the S1 Mobile Mapper.
Access Photos in S1 Folder Below is the folder location where GeoTag photos are stored on the device. Photos are stored on the device’s SD Card if external storage card exists. Photos will be stored on the device’s internal memory if it does not have external storage (file location on device will vary, but should be very similar).
• SD Card: This PC\[Device Name]\Card\Android\data\gov.s1.s1mobile\S1 Geotag Photos • No SD Card: This PC\[Device Name]\Tablet\Android\data\gov.s1.s1mobile\S1 Geotag Photos
Access Photos in Device Gallery Photos created via S1 Mobile Mapper are also saved in the device’s Photo Gallery or a default photo viewing app, depending on device manufacturer.
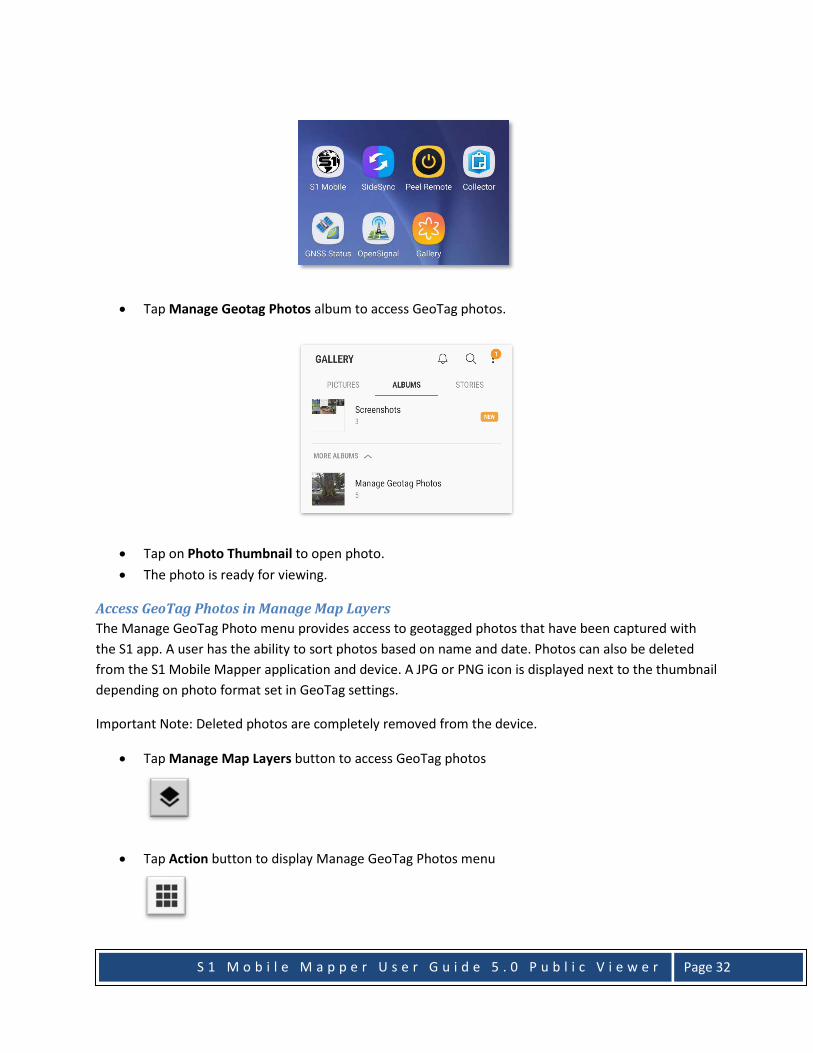
• On Home screen tap Gallery button
S 1 M o b i l e M a p p e r U s e r G u i d e 5 . 0 P u b l i c V i e w e r
Page 32
• Tap Manage Geotag Photos album to access GeoTag photos.
• Tap on Photo Thumbnail to open photo. • The photo is ready for viewing.
Access GeoTag Photos in Manage Map Layers The Manage GeoTag Photo menu provides access to geotagged photos that have been captured with the S1 app. A user has the ability to sort photos based on name and date. Photos can also be deleted from the S1 Mobile Mapper application and device. A JPG or PNG icon is displayed next to the thumbnail depending on photo format set in GeoTag settings.
Important Note: Deleted photos are completely removed from the device.
• Tap Manage Map Layers button to access GeoTag photos
• Tap Action button to display Manage GeoTag Photos menu

S 1 M o b i l e M a p p e r U s e r G u i d e 5 . 0 P u b l i c V i e w e r
Page 33
• Manage GeoTag Photos menu is displayed.
Sort GeoTag Photos: • Tap Manage Geotag Photo Menu button and select Sort.

S 1 M o b i l e M a p p e r U s e r G u i d e 5 . 0 P u b l i c V i e w e r
Page 34
• Tap Name or Date to order photos.
Delete GeoTag Photos:
• Tap the box to add a Checkmark next to the photo thumbnails to be deleted.
• Tap Manage Geotag Options button and select Delete.
• Select Delete to delete the photo(s) or Cancel to not delete the photo(s).

S 1 M o b i l e M a p p e r U s e r G u i d e 5 . 0 P u b l i c V i e w e r
Page 35
• Manage GeoTag Photo menu opens again after photos are deleted.
Viewing XY Coordinates in GeoTag Photo Metadata (EXIF): To view the XY coordinates (Latitude/Longitude) in the photo’s metadata (EXIF), the phots must first be copied off the device. A network drive or local workspace is a great location to store the photos. Once the photos are copied off the device, the image properties can be viewed using Windows Explorer.
• In Windows Explorer, right-click on the photo of interest and tap Properties.

S 1 M o b i l e M a p p e r U s e r G u i d e 5 . 0 P u b l i c V i e w e r
Page 36
• To view the XY coordinates promote the Details tab and Scroll down to the GPS section
Take note the coordinate system of the XY location is using Degrees, Minutes, Seconds (DMS) in WGS84.
S1 Waypoints S1 Mobile allows user to capture simple point locations on the device. These are called S1 Waypoints. The application will store the spatial location of a waypoint, along with a basic description field that is assigned by the user when point is created. While no substitute for an edit geodatabase, it can be an easy way to capture a quick X, Y location on the map. These waypoints are stored in the coordinate system WGS_1984_Web_Mercator_Auxiliary_Sphere. Visibility of the S1 Waypoints layer, like all other layers in the map view is controlled via Manage Map Layers.
S 1 M o b i l e M a p p e r U s e r G u i d e 5 . 0 P u b l i c V i e w e r
Page 37
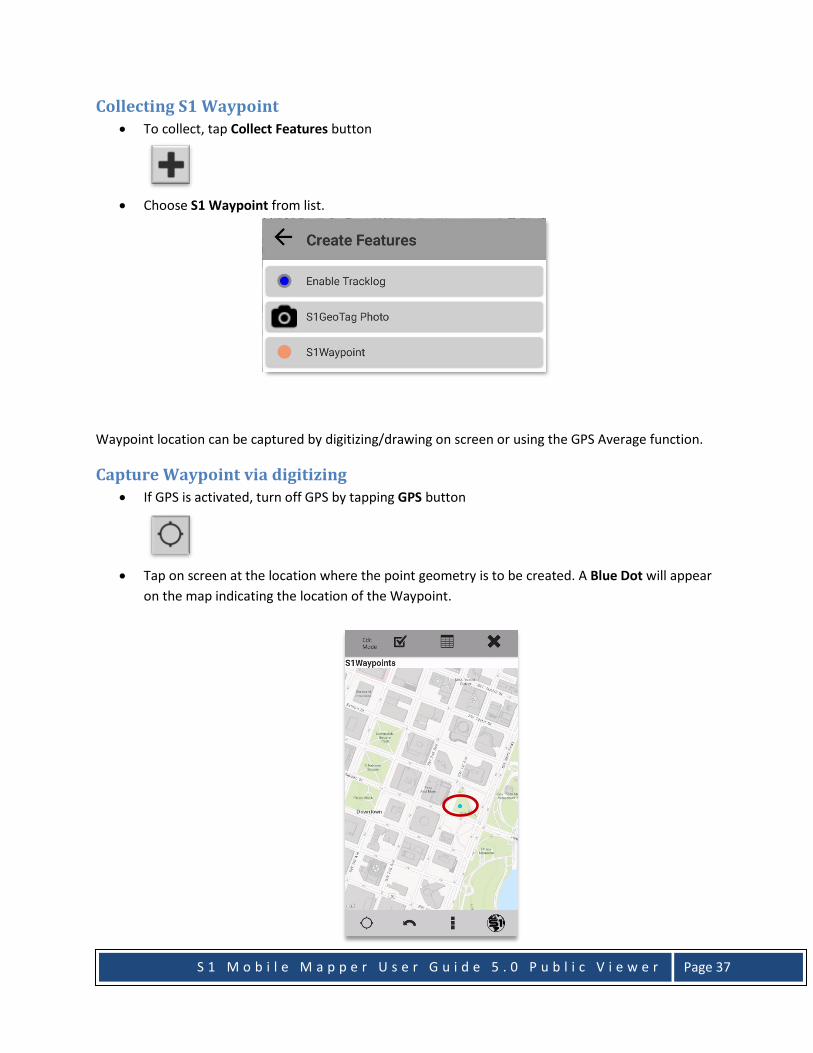
Collecting S1 Waypoint • To collect, tap Collect Features button
• Choose S1 Waypoint from list.
Waypoint location can be captured by digitizing/drawing on screen or using the GPS Average function.
Capture Waypoint via digitizing • If GPS is activated, turn off GPS by tapping GPS button
• Tap on screen at the location where the point geometry is to be created. A Blue Dot will appear on the map indicating the location of the Waypoint.

S 1 M o b i l e M a p p e r U s e r G u i d e 5 . 0 P u b l i c V i e w e r
Page 38
• Select the Attribute View button to edit the attributes for the feature.
On tablets, the attribute table appears on screen with the map while on smaller devices like phones, either the map view or the attribute table view are visible at one time. The Attribute View button allows the user to switch back and forth between the map and the attribute table on smaller devices or to minimize the attribute view on tablet sized devices.
• Tap Submit Edit button on Edit Toolbar to save the geometry and attributes entered.
Capture Waypoint via GPS Averaging • Activate GPS by tapping the GPS button.
Wait until strong position GPS position fix indicated by the replacement of No Fix with GPS on the GPS Position toolbar.
• Tap the Average GPS button to capture the geometry of the point feature by averaging your GPS position.
The averaging status appears at the bottom of the screen in the Position Capture Status bar. Note, a feature is unable to be saved until all positions have been collected though you can populate the attributes prior to collecting all positions. The number of positions collected is based on S1 Application Options settings.
• Select the Attribute View button to edit the attributes for the feature. On tablets, the attribute table appears on screen with the map while on smaller devices like phones, either the map view or the attribute table view are visible at one time. The Attribute

S 1 M o b i l e M a p p e r U s e r G u i d e 5 . 0 P u b l i c V i e w e r
Page 39
View button allows the user to switch back and forth between the map and the attribute table on smaller devices or to minimize the attribute view on tablet sized devices.
• Tap Submit Edit button on Edit Toolbar to save the geometry and attributes entered.
The location of the Waypoint is recorded on the map as an Orange Dot. It can be selected, edited or deleted.

S 1 M o b i l e M a p p e r U s e r G u i d e 5 . 0 P u b l i c V i e w e r
Page 40
Managing S1 Waypoint Data S1 Waypoint information is stored in a JSON file on the device, and can be imported into GIS or to other file formats. In order to import into GIS, the file must first be copied off the device onto a network location known to ArcGIS.
Assumptions: • Mobile device is connected to computer • ArcGIS 10.2 or later installed on a PC
Copy Waypoint JSON File to Computer • Using Windows Explorer, navigate to one of the following directories on your connected mobile
device.
Devices with SD Card: …\Card\Android\data\gov.s1.s1mobile\Edit_Data\Waypoints
Devices without SD Card: …\Phone\Android\data\gov.s1.s1mobile\Edit_Data\Waypoints
• Right-click on the file waypoints.json and choose Copy from the menu.
• Using Windows Explorer, navigate to a network location accessible to ArcGIS.
• Right click and select Paste to add the file to the current directory.
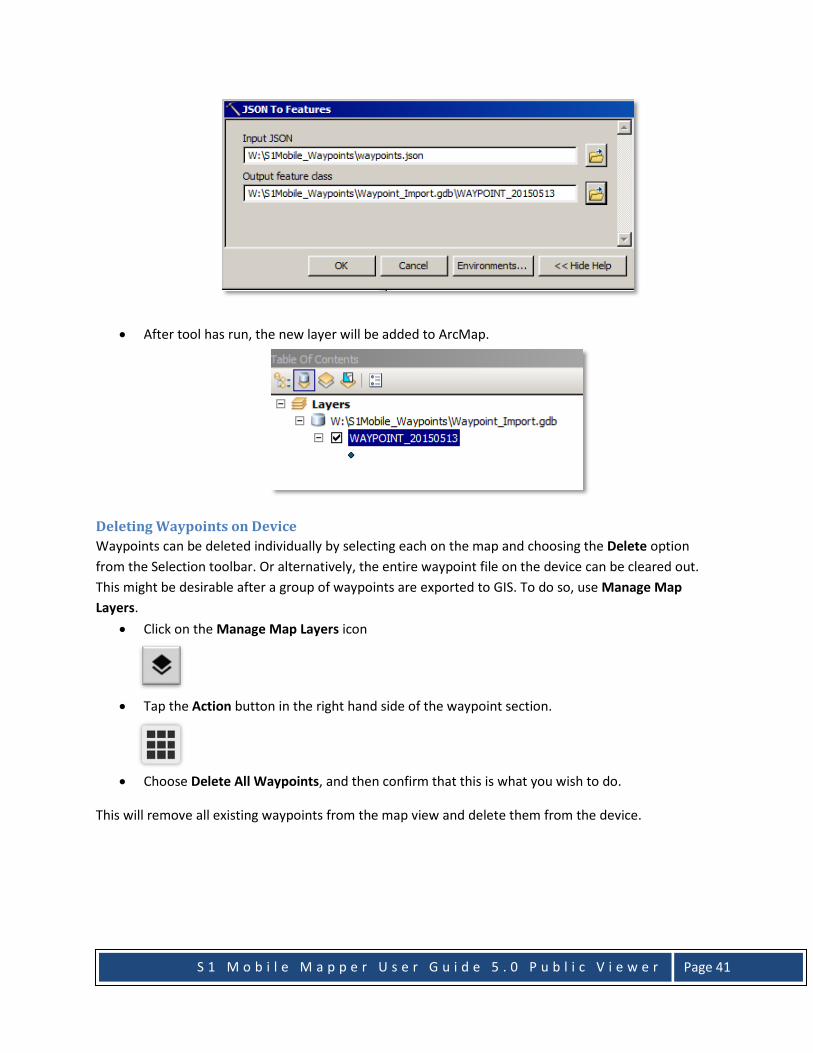
Import JSON File into ArcGIS • Launch ArcMap 10.2 or later on PC or Citrix • Choose Geoprocessing Menu -> ArcToolbox -> Conversion Tools -> JSON -> JSON to Features
o Input JSON = the path to the file copied from the device o Output Feature Class = name of new feature class to be created (in an existing file
geodatabase)
S 1 M o b i l e M a p p e r U s e r G u i d e 5 . 0 P u b l i c V i e w e r
Page 41
• After tool has run, the new layer will be added to ArcMap.
Deleting Waypoints on Device Waypoints can be deleted individually by selecting each on the map and choosing the Delete option from the Selection toolbar. Or alternatively, the entire waypoint file on the device can be cleared out. This might be desirable after a group of waypoints are exported to GIS. To do so, use Manage Map Layers.
• Click on the Manage Map Layers icon
• Tap the Action button in the right hand side of the waypoint section.
• Choose Delete All Waypoints, and then confirm that this is what you wish to do.
This will remove all existing waypoints from the map view and delete them from the device.

S 1 M o b i l e M a p p e r U s e r G u i d e 5 . 0 P u b l i c V i e w e r
Page 42
Editing Options Menu The Options menu can be accessed while actively collecting a Waypoint.
• Tapping the Edit Option button presents the menu Options button.
Options This opens the S1 Options menu, where users can change the Number of Average Positions and Vertex Interval settings.
For a complete overview of the S1 Options menu, see the section on S1 Applications Options.
Navigation Capabilities When the GPS has a position fix, users can set a navigation target at a designated location in the map view or navigate to a selected Waypoint or GeoTag Photo. While in navigation mode, the application provides updated distance, direction, and bearing information (depending on device capabilities) to the user. The user is also alerted when arriving near the target destination.
Navigate to a Map Location • Long tap on the map to set a Navigation Target (GPS will automatically activate if it is not
already enabled). • A Blue Icon is placed at the location of the Navigation Target.
• The Navigation Pane displays at the top of the map view. This pane provides distance and bearing values to the navigation target and a compass rosette with arrow pointing to navigation target (if device hardware supports compass).
o Bearing value to target is displayed in degrees. o Distance value to target is displayed in statute or metric units, configurable in S1
Options

S 1 M o b i l e M a p p e r U s e r G u i d e 5 . 0 P u b l i c V i e w e r
Page 43
• Distance/bearing values change as the GPS position moves in relation to the Navigation Target o Distance value decreases when moving towards the target o Distance value increases when moving away from the target o Bearing degree value changes as the GPS position moves
• The application displays a message toast at the bottom of the screen as the user approaches the navigation target.
• The threshold for this alert is managed by the Navigation Alert Distance setting in S1 Options. • Tap the Back Button to clear the Navigation Target.
• Long tap on the map to set a different Navigation Target.
• To view a full screen compass while navigating, tap the Navigation Pane. A full screen window with the compass will appear.
• The red arrow points toward the direction of the navigation target relative to the orientation of the device

S 1 M o b i l e M a p p e r U s e r G u i d e 5 . 0 P u b l i c V i e w e r
Page 44
• Hit the back button at the top of the window to exit the full screen compass window.
Navigate to Selected S1 Waypoint or GeoTag Photo • Tap on an existing feature in the map. • The selected feature is highlighted Blue and the Select Mode Toolbar appears. • Tap the Navigate button at the top of the screen.
• A blue icon will appear on top the S1 Waypoint or GeoTag Photo. The Navigation Pane will appear at the top of the map view displaying the Bearing and Distance to the selected feature.

S 1 M o b i l e M a p p e r U s e r G u i d e 5 . 0 P u b l i c V i e w e r
Page 45
• Tap the Back Button to clear the Navigation Target.
Tools General application tools can be accessed via the S1 Tools/Options button.
Measure Tool The Measure tool provides the capability to measure Distance or Area by sketching in the Map View.
• To measure a distance or area in the Map View tap on Tools/Options button on the Application Toolbar.
• Select Tools from the list. • Select Measure to open tool.

S 1 M o b i l e M a p p e r U s e r G u i d e 5 . 0 P u b l i c V i e w e r
Page 46
• Tap on screen where Measurement will begin (similar to digitizing a line or polygon). • Continue to tap on screen until satisfied with measurement. The length or distance
measurement is reported at top of screen on the Measure Toolbar. • Tap on Undo Vertex button to remove last vertex in the sketch measurement.
• In the upper menu, tap on Distance Mode to expose the option to change the tool from Distance to Area.
Distance Mode: Area Mode:

S 1 M o b i l e M a p p e r U s e r G u i d e 5 . 0 P u b l i c V i e w e r
Page 47
• Display units can be changed to Metric or Statute in the S1 Options menu under Tools/Options.
• If application display units are set to Metric: o Distance is displayed in kilometers, unless measurement length is less than 0.10
kilometer then meters are displayed. o Area is displayed in hectares, unless area measurement is less than 0.50 hectares
then switch to square meters. • If application display units are set to Statute:
o Distance is displayed in miles, unless measurement length is less than 0.10 miles then feet are displayed.
o Area is displayed in acres, unless area measurement is less than 0.5 acres then switch to square feet.
• Tap on Cancel button to exit Measure Tool.
Enter Coordinates Tool The Enter Coordinates tool provides the capability to specify coordinates that can be used as a Navigation Target, Create a New Feature, or Find Existing Features at the coordinated specified. The user can Enter Coordinates in most of the standard latitude and longitude formats as well as BLM (UTM NAD83) and Forest Service (Albers NAD83) specific coordinate systems.
• To Enter Coordinates, tap on Tools/Options button.
• Select Tools from the list. • Select Enter Coordinates to open tool.

S 1 M o b i l e M a p p e r U s e r G u i d e 5 . 0 P u b l i c V i e w e r
Page 48
• Choose the Coordinate System from the drop down list.
• Enter the X and Y coordinates in the appropriate Coordinate System selected in the pulldown
list.
• After entering the coordinate information there are three options available for what to do with
the specified coordinates; Navigate, Create feature, and Find nearby features.
S 1 M o b i l e M a p p e r U s e r G u i d e 5 . 0 P u b l i c V i e w e r
Page 49
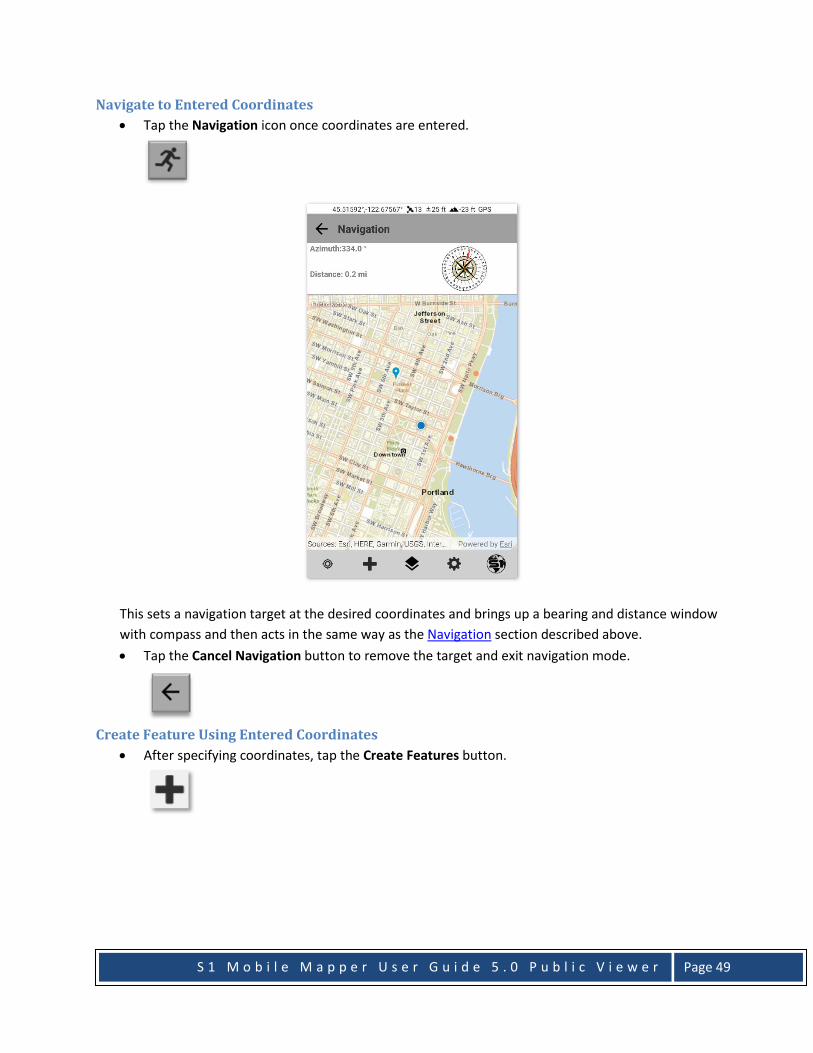
Navigate to Entered Coordinates • Tap the Navigation icon once coordinates are entered.
This sets a navigation target at the desired coordinates and brings up a bearing and distance window with compass and then acts in the same way as the Navigation section described above. • Tap the Cancel Navigation button to remove the target and exit navigation mode.
Create Feature Using Entered Coordinates • After specifying coordinates, tap the Create Features button.

S 1 M o b i l e M a p p e r U s e r G u i d e 5 . 0 P u b l i c V i e w e r
Page 50
• In the Create Features menu, tap Waypoints.
• The feature selected will be created and displayed on the map as a blue dot using the specified
coordinates. • Select the Attribute View button to edit the attributes for the feature.
• Tap Submit Edit button on Edit Toolbar to save the geometry and attributes entered.
S 1 M o b i l e M a p p e r U s e r G u i d e 5 . 0 P u b l i c V i e w e r
Page 51
• To exit without saving a feature created from coordinates, tap the Back button or tap the screen outside of the active window.
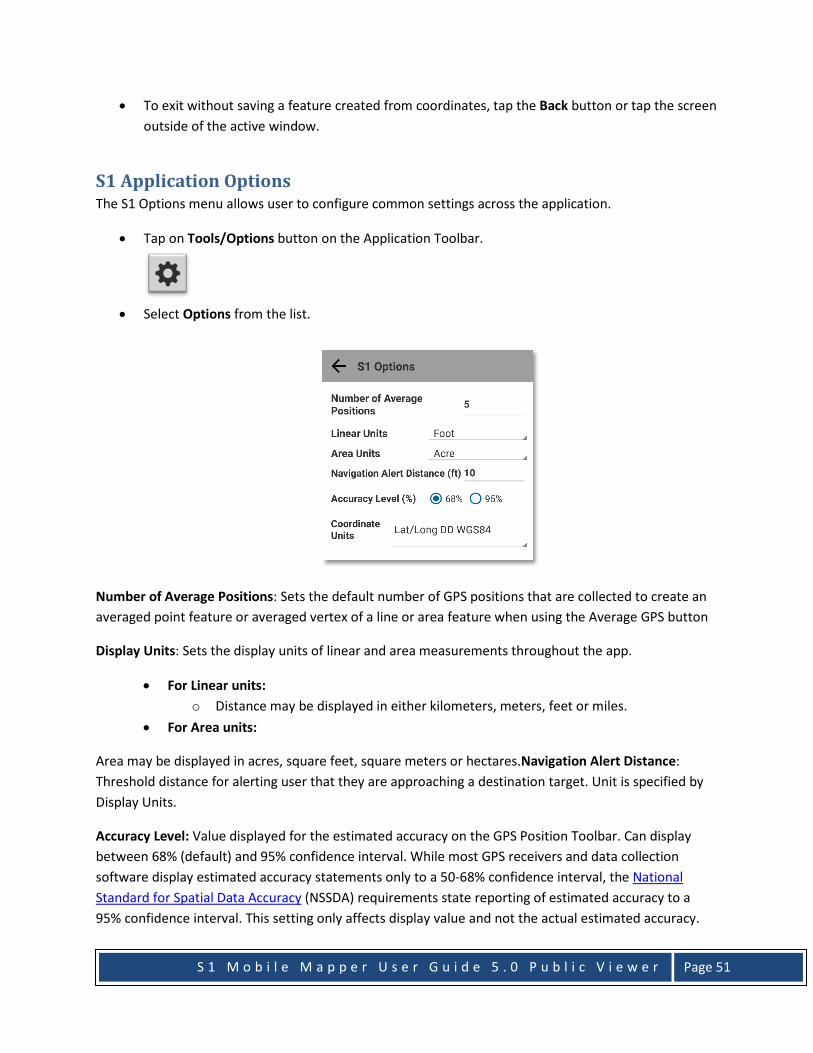
S1 Application Options The S1 Options menu allows user to configure common settings across the application.
• Tap on Tools/Options button on the Application Toolbar.
• Select Options from the list.
Number of Average Positions: Sets the default number of GPS positions that are collected to create an averaged point feature or averaged vertex of a line or area feature when using the Average GPS button
Display Units: Sets the display units of linear and area measurements throughout the app.
• For Linear units: o Distance may be displayed in either kilometers, meters, feet or miles.
• For Area units:
Area may be displayed in acres, square feet, square meters or hectares.Navigation Alert Distance: Threshold distance for alerting user that they are approaching a destination target. Unit is specified by Display Units.
Accuracy Level: Value displayed for the estimated accuracy on the GPS Position Toolbar. Can display between 68% (default) and 95% confidence interval. While most GPS receivers and data collection software display estimated accuracy statements only to a 50-68% confidence interval, the National Standard for Spatial Data Accuracy (NSSDA) requirements state reporting of estimated accuracy to a 95% confidence interval. This setting only affects display value and not the actual estimated accuracy.

S 1 M o b i l e M a p p e r U s e r G u i d e 5 . 0 P u b l i c V i e w e r
Page 52
Coordinate Units: The coordinate system displayed by the application not the coordinate system to be used to collect data. Impacts the format of XY values displayed on the GPS Toolbar as well as the XY information displayed in a selected feature information menu.
Theme: Allows user to select from two agency specific themes (BLM or Forest Service) and the Classic View. The agency themes will apply a custom agency theme, applying different colors throughout the application. The classic view maintains the standard grey scale color theme.
External Bluetooth GPS Receiver Support The S1 Mobile Mapper application can also feed GPS measurements from supported external GPS receivers via Bluetooth to provide high accuracy location information to the application’s map view. This may be desirable if the estimated accuracy of the device’s internal GPS does not meet data accuracy requirements or if the Android device does not possess its own internal GPS receiver.
Generally, to use external receivers with Android devices, the following steps must be performed:
1. Turn on Bluetooth on Android device and on external receiver 2. Pair external receiver with device via Bluetooth 3. Enable Mock Location setting in Android Developer Options 4. Activate external GPS within application
Application supported external GPS receivers include:
• Trimble R1 Bluetooth receiver • Trimble R2 Bluetooth receiver • Trimble Geo 7x handheld receiver • Garmin GLO Bluetooth receiver • Juniper Systems Geode Bluetooth receiver • Eos Arrow 100 Bluetooth receiver
Other models may also function with the app, but steps to pair may be different from what is described in the user guide.
For detailed instruction on configuration settings and pairing each compatible Bluetooth receiver, refer to the External Bluetooth GPS Receiver Support section in the full S1 Mobile Mapper Agency User Guide, starting on page 144.

S 1 M o b i l e M a p p e r U s e r G u i d e 5 . 0 P u b l i c V i e w e r
Page 53
For more information on the S1 Mobile Mapper application, visit:
https://www.blm.gov/services/mobile-gis/s1mobile
To submit applications bugs or app enhancement requests, use the online form at the location below. https://survey123.arcgis.com/share/03b843a287a9436a99570810f90b1b6b
Service First Mobile GIS
U.S. Department of Interior, Bureau of Land Management, Oregon State Office
U.S. Department of Agriculture, Forest Service, Region 6, Data Resources Management