Rubik’s Cube 1. What is it? - Cognumcognum.org/Rubik_Cube.pdf · Rubik’s Cube 1. What is it?...
31
1 Rubik’s Cube 1. What is it? If we slice a cube with two horizontal cuts, we obtain three slices, a bottom, a middle and a top: If we apply similar two cuts vertically, from left to right, then we end up with nine pieces that can all be seen from the front: Finally, if we apply again two vertical cuts, but from front to back, then we end up with 3 x 9 = 27 little cubes: These pieces would fall apart by touching the full cube. Gluing them together would stop the falling apart, but wouldn’t mean any interesting new feature either. If we could use some gluey material that allows slipping and sliding, then holding two layers of 2 x 9 = 18 little cubes together with one hand, say the left, and holding the other third layer’s nine little cubes together with the right hand, we could turn our right hand, thus positioning these nine cubes differently. With a 90 o turn, we could end up at a full cube again. The most natural for a right handed person is to hold the left two layers with the left hand and turn the right layer with the right hand:
Transcript of Rubik’s Cube 1. What is it? - Cognumcognum.org/Rubik_Cube.pdf · Rubik’s Cube 1. What is it?...
1
Rubik’s Cube
1. What is it?
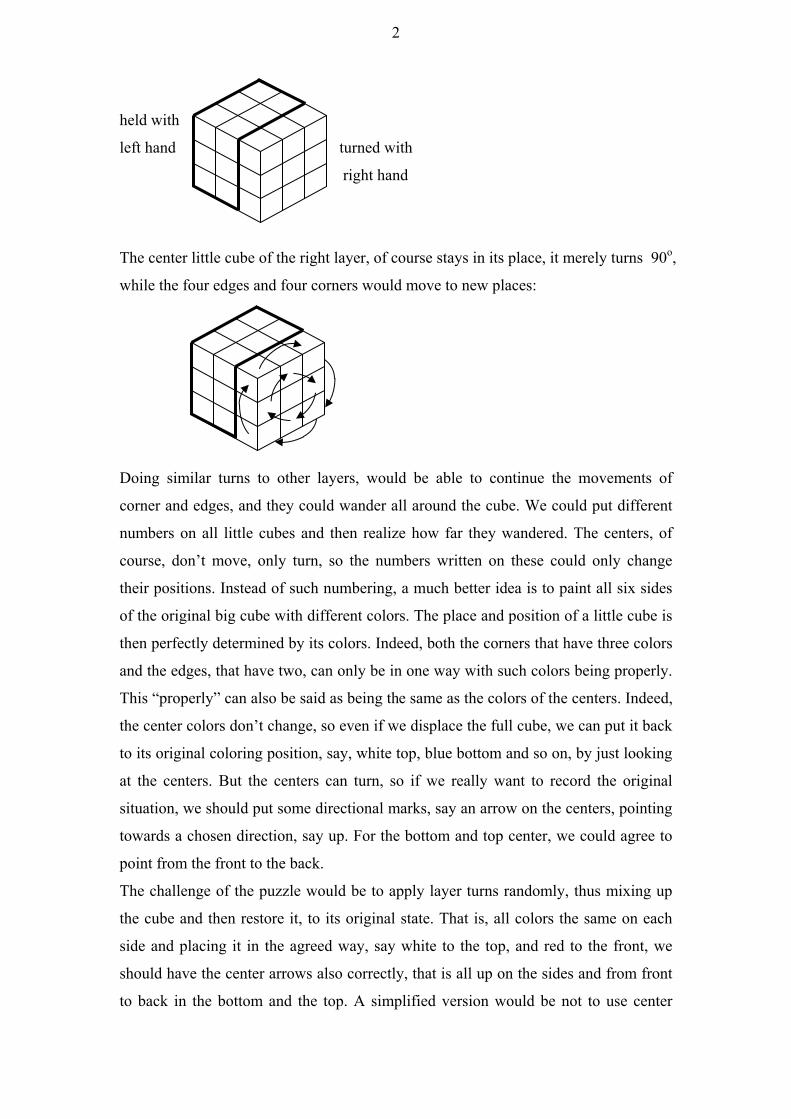
If we slice a cube with two horizontal cuts, we obtain three slices, a bottom, a middle
and a top:
If we apply similar two cuts vertically, from left to right, then we end up with nine
pieces that can all be seen from the front:
Finally, if we apply again two vertical cuts, but from front to back, then we end up
with 3 x 9 = 27 little cubes:
These pieces would fall apart by touching the full cube. Gluing them together would
stop the falling apart, but wouldn’t mean any interesting new feature either.
If we could use some gluey material that allows slipping and sliding, then holding two
layers of 2 x 9 = 18 little cubes together with one hand, say the left, and holding the
other third layer’s nine little cubes together with the right hand, we could turn our
right hand, thus positioning these nine cubes differently. With a 90o turn, we could
end up at a full cube again. The most natural for a right handed person is to hold the
left two layers with the left hand and turn the right layer with the right hand:
2
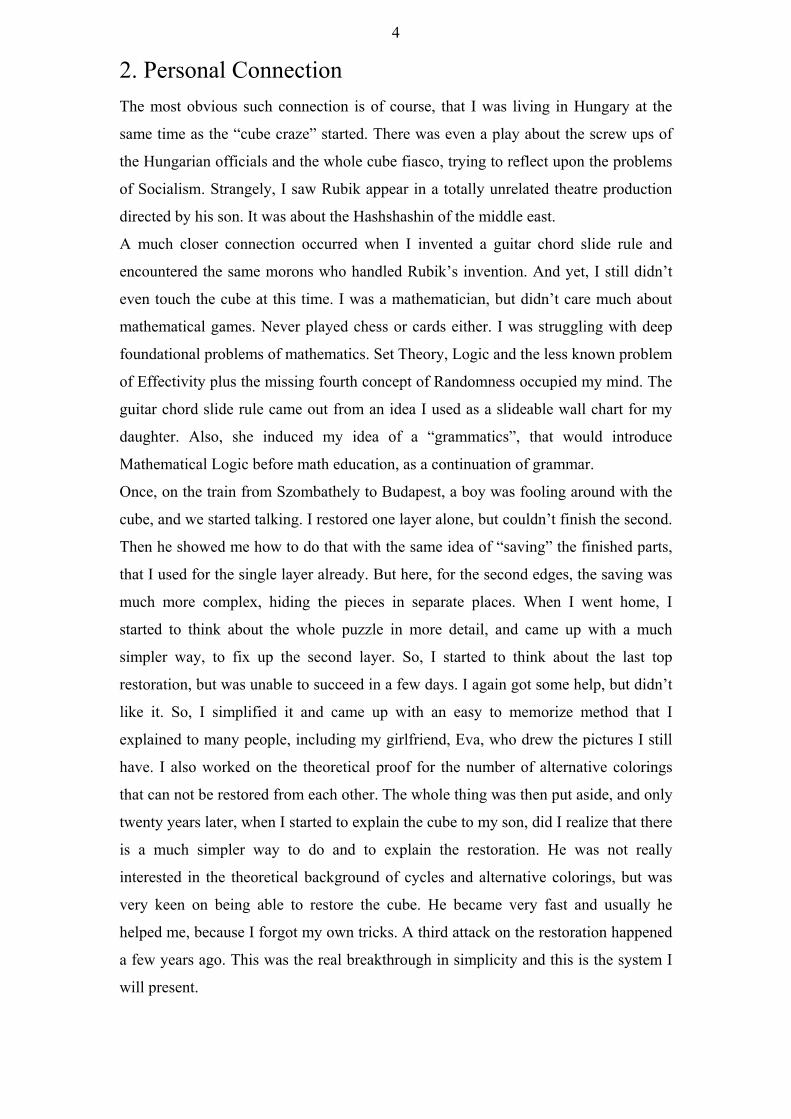
held with
left hand turned with
right hand
The center little cube of the right layer, of course stays in its place, it merely turns 90o,
while the four edges and four corners would move to new places:
Doing similar turns to other layers, would be able to continue the movements of
corner and edges, and they could wander all around the cube. We could put different
numbers on all little cubes and then realize how far they wandered. The centers, of
course, don’t move, only turn, so the numbers written on these could only change
their positions. Instead of such numbering, a much better idea is to paint all six sides
of the original big cube with different colors. The place and position of a little cube is
then perfectly determined by its colors. Indeed, both the corners that have three colors
and the edges, that have two, can only be in one way with such colors being properly.
This “properly” can also be said as being the same as the colors of the centers. Indeed,
the center colors don’t change, so even if we displace the full cube, we can put it back
to its original coloring position, say, white top, blue bottom and so on, by just looking
at the centers. But the centers can turn, so if we really want to record the original
situation, we should put some directional marks, say an arrow on the centers, pointing
towards a chosen direction, say up. For the bottom and top center, we could agree to
point from the front to the back.
The challenge of the puzzle would be to apply layer turns randomly, thus mixing up
the cube and then restore it, to its original state. That is, all colors the same on each
side and placing it in the agreed way, say white to the top, and red to the front, we
should have the center arrows also correctly, that is all up on the sides and from front
to back in the bottom and the top. A simplified version would be not to use center

3
arrows at all, and just restore same colors on all the sides. Then a restoration from a
randomly scrambled position wouldn’t really mean total restoration, because the
center pieces could be in different positions, but this wouldn’t be seeable to us.
Luckily, this restricted version of the puzzle, that is this non perfect restoration, is still
very hard, so it provides a deep puzzle. Plus, not using center arrows, only colors,
makes the whole puzzle much simpler in its appearance, so it gives a perfect toy idea.
Of course, using slippery glue to keep the layers together, we would have to be very
careful at holding the two layers and turning the third, so the little pieces don’t slip out
completely. This makes the toy idea impossible. Magnets came up as a better way to
hold the pieces together, but still there is a danger of falling apart.
Ernő Rubik, Hungarian designer professor, realized that there is a mechanical way to
keep the cube together and yet allow turning of the layers. The trick is the single little
cube, which we didn’t mention yet, namely at the very center of the cube. This is the
only not visible piece from the outside. This real center of the cube could have six
axels sticking out from it, around which the six side centers can rotate. The side
corners and edges would have little arms that are kept under the side centers, thus
keeping them in place, but still allow turning them with the centers.
Sounds like a half baked and shaky idea, but it actually works. The beginning of the
realization was also very “shaky”. The Hungarian “prototypes” were far from perfect
and too expensive. Most importantly, nobody knew if the toy itself would be a hit.
The restoration is too difficult for average people, so it was doubtful whether just to
fool around with turnings is enough to sell, or would there be enough math oriented
people who stick with the challenge. The rest is history. The cube did become a hit
and made Rubik just enough money, so he could develop his other toy ideas, that
really made him rich. Even today with hindsight, it’s hard to tell why the cube became
a hit. Only a very low percentage of sold cubes get restored. So, is the “just fooling
around” enough to sell? Not really. Rather, a combination of factors did the sale trick.
The nerds have cube competitions and the whole puzzle entered the social
consciousness. In short, it became fashionable. Introductory helping books have been
published too, but they didn’t really increase the restoration ratio of the sold cubes.
4
2. Personal Connection
The most obvious such connection is of course, that I was living in Hungary at the
same time as the “cube craze” started. There was even a play about the screw ups of
the Hungarian officials and the whole cube fiasco, trying to reflect upon the problems
of Socialism. Strangely, I saw Rubik appear in a totally unrelated theatre production
directed by his son. It was about the Hashshashin of the middle east.
A much closer connection occurred when I invented a guitar chord slide rule and
encountered the same morons who handled Rubik’s invention. And yet, I still didn’t
even touch the cube at this time. I was a mathematician, but didn’t care much about
mathematical games. Never played chess or cards either. I was struggling with deep
foundational problems of mathematics. Set Theory, Logic and the less known problem
of Effectivity plus the missing fourth concept of Randomness occupied my mind. The
guitar chord slide rule came out from an idea I used as a slideable wall chart for my
daughter. Also, she induced my idea of a “grammatics”, that would introduce
Mathematical Logic before math education, as a continuation of grammar.
Once, on the train from Szombathely to Budapest, a boy was fooling around with the
cube, and we started talking. I restored one layer alone, but couldn’t finish the second.
Then he showed me how to do that with the same idea of “saving” the finished parts,
that I used for the single layer already. But here, for the second edges, the saving was
much more complex, hiding the pieces in separate places. When I went home, I
started to think about the whole puzzle in more detail, and came up with a much
simpler way, to fix up the second layer. So, I started to think about the last top
restoration, but was unable to succeed in a few days. I again got some help, but didn’t
like it. So, I simplified it and came up with an easy to memorize method that I
explained to many people, including my girlfriend, Eva, who drew the pictures I still
have. I also worked on the theoretical proof for the number of alternative colorings
that can not be restored from each other. The whole thing was then put aside, and only
twenty years later, when I started to explain the cube to my son, did I realize that there
is a much simpler way to do and to explain the restoration. He was not really
interested in the theoretical background of cycles and alternative colorings, but was
very keen on being able to restore the cube. He became very fast and usually he
helped me, because I forgot my own tricks. A third attack on the restoration happened
a few years ago. This was the real breakthrough in simplicity and this is the system I
will present.
5
3. Relation to Cognum
The Rubik’s cube is not a natural phenomenon. It’s a man made puzzle. The social
tendencies and technology is a wider “man made” reality, that definitely has its dark
side of hiding the “knowable essence of nature”.
Yet, the Rubik’s cube provides a very concrete example of “Cognum” as reality. The
reality of common sense. And here, common sense is not only the theoretical claim
that everybody can understand everything, rather a much stronger claim that even the
lazy and stupid can be enlightened. The social and technological surrounding is
providing us in general with a multitude of so called “silver platter” “understandings”.
The silver platter was placed in quotation marks merely as a sign of using it as an
analogy for getting something easy or as privileged. Indeed, someone living in our age,
is at once privileged because the calculators and infinite decimals introduce him to the
limits as direct reality. The quotation mark for the understanding, is on the other hand
a sarcastic one. So it raises a doubt whether these silver platters really provide
understanding. One thing is sure, the silver platters are not harmful! We could say that
over-simplifying or trivializing deep problems can suppress the real awakening of
enquiries, but this is a wrong direction of attack. Very few ancient Greek people
pondered about the depths of limits and very few do today. So no harm is done in the
percentage of people going deeper. The fragmented knowledge that we obtain from
the silver platters about the universe by simply seeing computers, buttons, airplanes,
astronauts, movies, provide only a superficial understanding of principles, but
definitely do not stop or maybe even help in awakening someone of his
superficialness. The reason we don’t see this possible help in an increase of real
questionings is not coming from the amount of superficial answers, rather from a
secondary effect of suppression by people using these superficial wisdoms. So here
lies a major difference between the stupidity of the media and the stupidity of the
education system.
Going towards consumption and entertainment is a lure, but would not decrease the
chances of awakenings. Enslaved by and then striving for power, is what paralyzes the
mind. So the bad popular science shows talking about forces as the essence of
Newtonian mechanics are only anesthetic shots to avoid problem raising. Living life
in general is such bombardments of blinding anesthetics. But when in schools, the
teachers list concepts as hollow solutions of the universe, then the attached authority
makes all the difference.
6
A special new development is the internet. While the media is only a mild opposite of
the school system, the internet’s information flood seems to be a real challenge. But
the situation is much trickier. For example, ask the question more directly:
Does the Wikipedia decrease or increase the authority of the school system?
Cognum.org goes a big step further, but it may very well be, that the internet can not
be a vehicle of turning against the power that tries to enslave the mind.
Solving the Rubik’s cube is definitely coming from the entertainment side. Thousands
of young people became cube addicts. Still, a very small minority. The distinction of
whether they achieve the restoration of the cube by themselves or with help, is not
consciously raised. But if we stressed it, it would be towards this second scenario. In
fact, the average wisdom would be that the cube freaks are merely copycats of some
really smart dudes and simply combine what they learnt. And this average wisdom is
correct. Unfortunately, since it’s not conscious, it won’t raise questions. Could people
discover the restoration by themselves? Could anyone learn it without the extreme
motivations? The fact that the cube competitions are a close circle, suggests that these
cube freaks can communicate their wisdom only to each other. There is a seemingly
obvious similarity to other games, say chess. Here too, you have to be smart, but you
learn from others. But there are big differences.
In chess, we all know the rules and the goal is to win against someone else, which
puts us all in a continuous scale of proficiency from layman to champions. At the
cube, the rules are how to turn the sides and not to cheat by peeling off the colors.
These are again, obvious to everyone. However, the goal is not to win against an
opponent, rather to restore the object. This can only be done by a few and yet the
competitions are turned into freak shows of speed, blind restoration, and so on. So
there is a deep contradiction here. Can the cube champions teach a total beginner how
to succeed? Obviously, to be fast they have to learn more tricks, but even a slow
restoration of the cube, takes only minutes. So the shortening of the time is not a
natural goal. Maybe instead of learning more and more tricks, they should learn how
to explain in simpler and simpler way the “long” restorations. And here we encounter,
some amazing new facts.
The strive to be faster is obviously not about turning the sides faster, that is about
oiling the cube, rather about using less and less turns. So learning more and more
special tricks is what helps. But is there an optimum?
If we videotape how someone mixes up the cube, and then play it backwards, we get a
restoration. Usually, a mix up only takes a few seconds. If we mix up the cube for

7
minutes, then we might even decrease the mix up sometimes. In fact, doing random
turns up to infinity, we will definitely restore the cube too accidentally.
There is a minimal number of restoration turns from every mix up, and it is obviously
less or equal to the actual mix up length. In other words, there is no longest mix up,
because we can mix up for arbitrary long. But, there is a maximal mix up, by meaning
the minimal restoration from a mix up.
This maximum of the minimal restorations was quite hard to find.
It was known for years that there are starting situations that can not be restored by
nineteen turns but the sufficiency of twenty from all situations was only established
by checking billions of actual cases.
In reality, the restoration methods all use sequences much longer than twenty turns
because by the aboves it is clear that using only sequences all twenty or less turns,
would require billions of different such short sequences corresponding same many
initial situations. The methods used by speed champions use sequences with about
hundred turns and require also hundreds of different such sequences.
Now we might think that the opposite of this minimalization tendency would be to use
less and less kind of sequences and thus, to be simpler. But this is not quite true. It’s
easy to show that we can combine sequences into one “mega sequence” and then use
this to restore all situations. This mega sequence would be very complicated alone.
A seemingly better way of defining optimal simplicity, could be the minimality of the
total length of the sequences used. That makes sense, because the total amount of the
sequences is what we have to memorize. But, we might have two or more similar
sequences, that are easy to remember together, thus reducing the needed memory
below their total.
Finally, and most importantly though, it is the meaning that makes a system simple.
The direct visibility of what we are doing is actually only one of these meanings.
Indeed, someone may see how the pieces move following a longer sequence of moves,
while others can’t or don’t bother to.
In reality the full sequences are broken into sub sequences that are the “tricks” we use.
Usually we strive for a partial restoration and then from there we need much shorter
sub sequences as “tricks”.
My method will need only three tricks from the partial restoration of a single
“bottom” layer. These tricks will be called 360 , 540 , back-front.
But the 360 will be used in four situations adding different turns as start and finish.
So actually we’ll have six tricks after the bottom layer is done.

8
4. Common sense plan
The simplest way not to get lost in our turnings is to keep the cube in a fix position,
regarding its centers. This wouldn’t be so hard, by remembering only the colors of the
top, front and right centers. Indeed, then the opposite bottom, back and left would be
automatically correct too. The reality is that the applications need some freedom, so as
a compromise, we only fix the top center and easiest to choose this to be the white.
The simplest plan is to build the cube like a house. First fix up the bottom, then the
middle and finally the top.
While the bottom and the top has corners and edges, the second middle layer has only
edges. So seemingly, the middle should be the easiest. But by another logic, the
bottom should be the easiest, because starting with that, we don’t have to worry about
screwing up the middle and the top yet. Doing the middle edges, we have to keep the
bottom intact, and doing the top, we have to preserve both the bottom and the middle.
So one thing seems sure, namely that the top will be a drastically harder job than both
the bottom and middle together. But there is another argument against this too. Indeed,
we might say that as we proceed upwards, all the four top corners and four edges
move up by themselves, so at least they are already there in the top. This even shows
that only two things can be wrong about them. Their places and their positions, that is
how their colors are facing. For an edge, this color misposition can only be one kind,
namely opposite as it should be, because an edge has only two colors. Since these
edges all have a white color, this actually means that a white side is falsely facing not
up, but to the side. This helps to simplify a corner mispositioning too. Indeed, though
this can be of two kinds, it doesn’t matter because all we need is that the white side
should face up. Then the other two colors are correct by itself. So in short, we can
simply call all the right positionings of edges and corners as “whitenings”, meaning
that the top becomes white. Thus, we have four tasks on the top, namely placing and
whitening of the corners and edges. In actual order, they will be:
1. Corner placing.
2. Corner whitening.
3. Edge whitening.
4. Edge placing.
9
5. Bottom layer argument
Without even going into the details of our big plan, just accepting that we have simple
ways to do them, someone might come up with a strange objection. Why don’t we use
this same 1. , 2. , 3. , 4. , top sequence for the bottom already. A counter argument
could be that even though 1. , 2. , 3. , 4. , are “simple”, for the bottoms we could do
even simpler. Of course, by our earlier remarks about the economy of simplicity, this
is a pretty false counter argument. Indeed, why should we learn, even something easy
extra, when we have to learn 1. , 2. , 3. , 4. , anyway. The truth lies in a second
counter argument, namely that in order to apply 1. , 2. , 3. , 4. , for the bottom instead
of the top, we would have to have all the bottom corners and edges to be there.
Remember that by the time we get to the top, the top ones will be there automatically,
but at the start, the bottom ones can be anywhere. Now the person who suggested to
use 1. , 2. , 3. , 4. , for the bottom might insist that maybe moving the bottom pieces
to the bottom, is not that hard and then we could truly use 1. , 2. , 3. , 4. Thus, the
final decision of simplicity boils down to how simple is the sinking of the bottom
pieces to the bottom. Amazingly, as it turns out, moving them down is almost the
same difficulty as moving them down perfectly into their places and positions. So the
1. , 2. , 3. , 4. idea for the bottom would be crazy. But this whole argument was useful
because it leads to our whole strategy. In fact, even the continuation of the details
come out from accepting that we “could” use 1. , 2. , 3. , 4.
First of all, moving an edge to the bottom requires only turning the sides, that is front,
back, left or right. Once there, we can turn the bottom layer, so that an edge goes to a
side without other bottom edge. Simply, because there are four bottom edges and four
sides. So one by one, we could easily drop all edges. Amazingly, the bottom edges
can not only be easily dropped to the bottom, but just as easily be dropped, so that
their bottom color are actually facing the bottom. This is so, because as a bottom edge
moves down, even if it comes from the top, it has to go through the middle and there,
every edge is in two sides. One of them contains the bottom color, the other a side
color. So all we have to do, is use the side color side for turning the edge. Then the
bottom automatically goes to the bottom. This simple method automatically
eliminates the need for 3. to be used for the bottom. Unfortunately, 4. would be still
necessary, that is the placing of the bottom edges. Indeed, they were dropped in
arbitrary order. If one would try to incorporate a method that drops the edges to their
right places, it would ruin the simplicity of the whole process. Instead, an amazingly
10
simple and heuristic idea can be used. The bottom sinking could just as well be
imagined oppositely, that is as floating to the top. In short, we can easily move up all
edges that have bottom colors to the top, so that their bottom colors face up all around
the white center. Now what’s the point of this? Well, just imagine them all having
their bottom colors around the white center. What does that imply? That all the other
side colors are indeed, at the sides. So the top layer can be turned around and match
any of them with the proper side center to be underneath. Of course, we can’t match
them all, because they might be in any arbitrary order around the white center on the
top, not in the same order as the actual side centers go around. So it might seem that
this idea is useless. But not so. Simply, because we don’t have to match all of them to
the side centers! Instead, we can match only one and then use that side and double
turn, so the edge goes to the bottom. Then, match another one, double turn it again,
and so on. One by one, they will sink to their proper places, that is their side color will
be under the same side center.
Next, we should transport the bottom corners to the bottom. Again, it will turn out that
such transport might as well do 1. Placing and 2. Bottom coloring to bottom , at once,
so we won’t need the top solutions at all. The reason of this, is that we can’t just move
the corners down, even if we wouldn’t care where they go and into what positions.
This is so, because the sides that turn the corners down will already contain the edges
which we just moved to the bottom, with our previous ingenious method. What’s
worse, a side might also contain a corner down in the bottom too, that was already
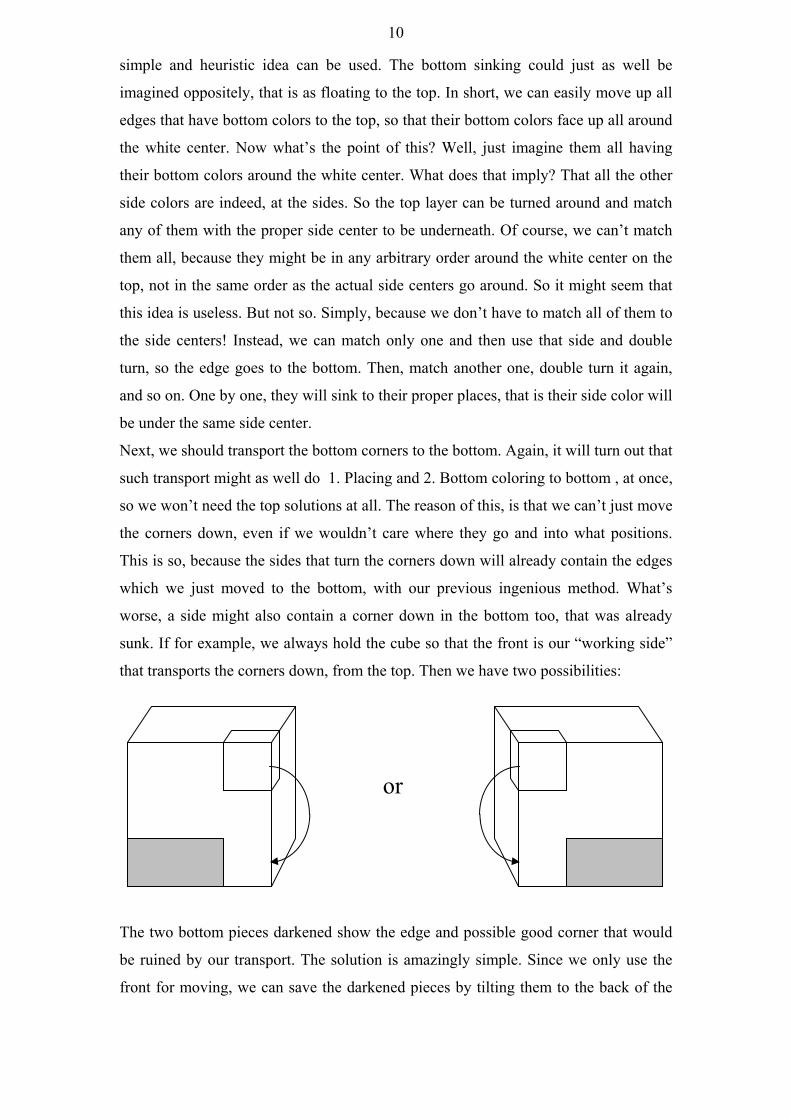
sunk. If for example, we always hold the cube so that the front is our “working side”
that transports the corners down, from the top. Then we have two possibilities:
or
The two bottom pieces darkened show the edge and possible good corner that would
be ruined by our transport. The solution is amazingly simple. Since we only use the
front for moving, we can save the darkened pieces by tilting them to the back of the
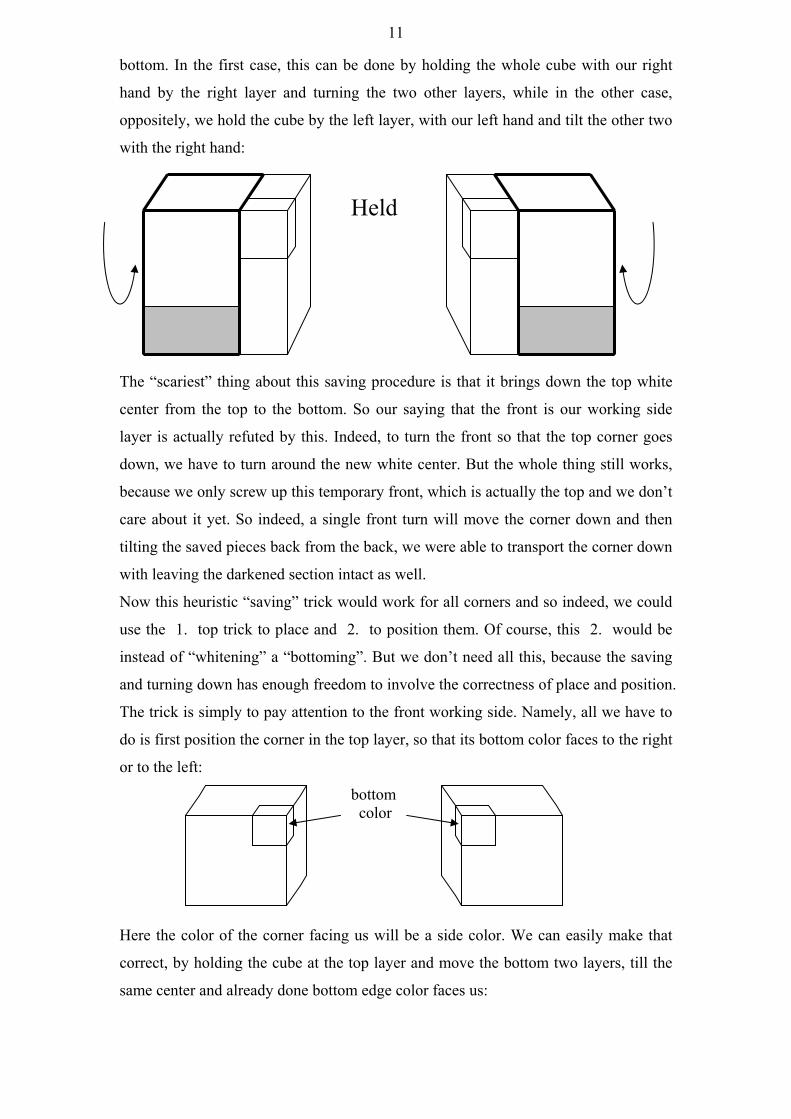
11
bottom. In the first case, this can be done by holding the whole cube with our right
hand by the right layer and turning the two other layers, while in the other case,
oppositely, we hold the cube by the left layer, with our left hand and tilt the other two
with the right hand:
Held
The “scariest” thing about this saving procedure is that it brings down the top white
center from the top to the bottom. So our saying that the front is our working side
layer is actually refuted by this. Indeed, to turn the front so that the top corner goes
down, we have to turn around the new white center. But the whole thing still works,
because we only screw up this temporary front, which is actually the top and we don’t
care about it yet. So indeed, a single front turn will move the corner down and then
tilting the saved pieces back from the back, we were able to transport the corner down
with leaving the darkened section intact as well.
Now this heuristic “saving” trick would work for all corners and so indeed, we could
use the 1. top trick to place and 2. to position them. Of course, this 2. would be
instead of “whitening” a “bottoming”. But we don’t need all this, because the saving
and turning down has enough freedom to involve the correctness of place and position.
The trick is simply to pay attention to the front working side. Namely, all we have to
do is first position the corner in the top layer, so that its bottom color faces to the right
or to the left:
bottom color
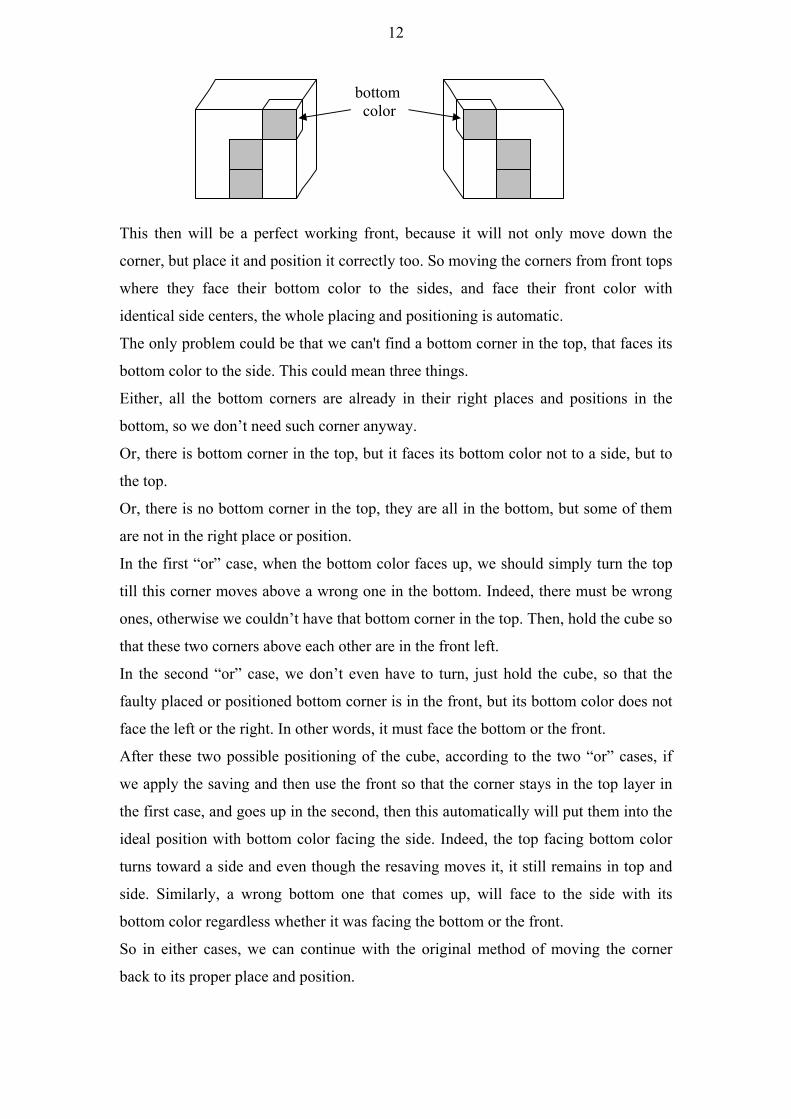
Here the color of the corner facing us will be a side color. We can easily make that
correct, by holding the cube at the top layer and move the bottom two layers, till the
same center and already done bottom edge color faces us:
12
bottom color
This then will be a perfect working front, because it will not only move down the
corner, but place it and position it correctly too. So moving the corners from front tops
where they face their bottom color to the sides, and face their front color with
identical side centers, the whole placing and positioning is automatic.
The only problem could be that we can't find a bottom corner in the top, that faces its
bottom color to the side. This could mean three things.
Either, all the bottom corners are already in their right places and positions in the
bottom, so we don’t need such corner anyway.
Or, there is bottom corner in the top, but it faces its bottom color not to a side, but to
the top.
Or, there is no bottom corner in the top, they are all in the bottom, but some of them
are not in the right place or position.
In the first “or” case, when the bottom color faces up, we should simply turn the top
till this corner moves above a wrong one in the bottom. Indeed, there must be wrong
ones, otherwise we couldn’t have that bottom corner in the top. Then, hold the cube so
that these two corners above each other are in the front left.
In the second “or” case, we don’t even have to turn, just hold the cube, so that the
faulty placed or positioned bottom corner is in the front, but its bottom color does not
face the left or the right. In other words, it must face the bottom or the front.
After these two possible positioning of the cube, according to the two “or” cases, if
we apply the saving and then use the front so that the corner stays in the top layer in
the first case, and goes up in the second, then this automatically will put them into the
ideal position with bottom color facing the side. Indeed, the top facing bottom color
turns toward a side and even though the resaving moves it, it still remains in top and
side. Similarly, a wrong bottom one that comes up, will face to the side with its
bottom color regardless whether it was facing the bottom or the front.
So in either cases, we can continue with the original method of moving the corner
back to its proper place and position.
13
6. Middle edges
This method will be similar to the last one used for the bottom corners. There, we
were looking for well positioned ones that could be moved easily and if there were no
such, then we could force the well positioning. Here the well positioning simply
means that a middle edge is not in the middle second layer at all. Which of course
means that it is in the top layer. These middle edges have no white side, so it will have
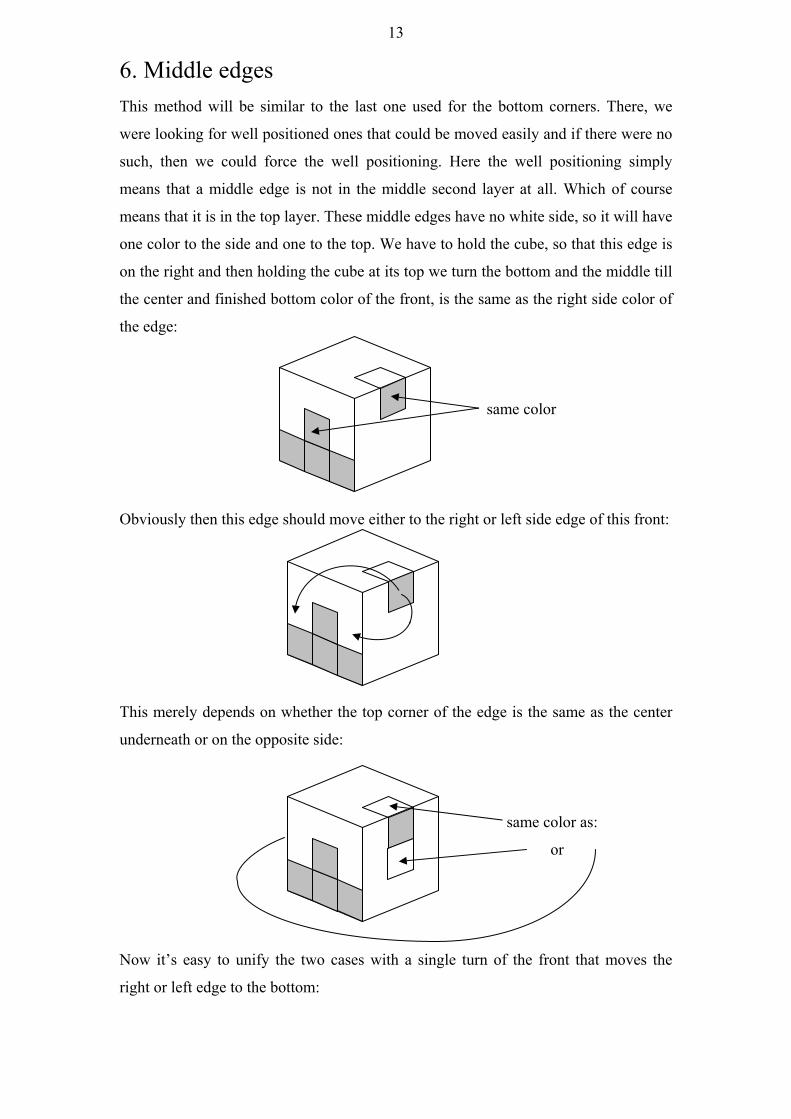
one color to the side and one to the top. We have to hold the cube, so that this edge is
on the right and then holding the cube at its top we turn the bottom and the middle till
the center and finished bottom color of the front, is the same as the right side color of
the edge:
same color
Obviously then this edge should move either to the right or left side edge of this front:
This merely depends on whether the top corner of the edge is the same as the center
underneath or on the opposite side:
same color as:
or
Now it’s easy to unify the two cases with a single turn of the front that moves the
right or left edge to the bottom:

14
was on right side was on left side
So the edge from the top, in either case, must move to the bottom:
Of course, after this is done by some trick, a reverse of the front turn must be applied
to take everything back to normal. Most importantly, since either the left or right full
column of the front must be restored, we can only use a trick that wont involve these.
Luckily, we’ll use a trick that will involve only one additional little piece beside the
top right edge and its target bottom front, namely the other, that is left side edge of the
top:
The arrows show what happens. Namely, these three edges change places in a cycle.
The idea to achieve this is to start with something very obvious, only on the top.
The turnings of the top will always be done in a clockwise direction, so we can merely
use the angle for these turns without even the degree sign:
15
90o
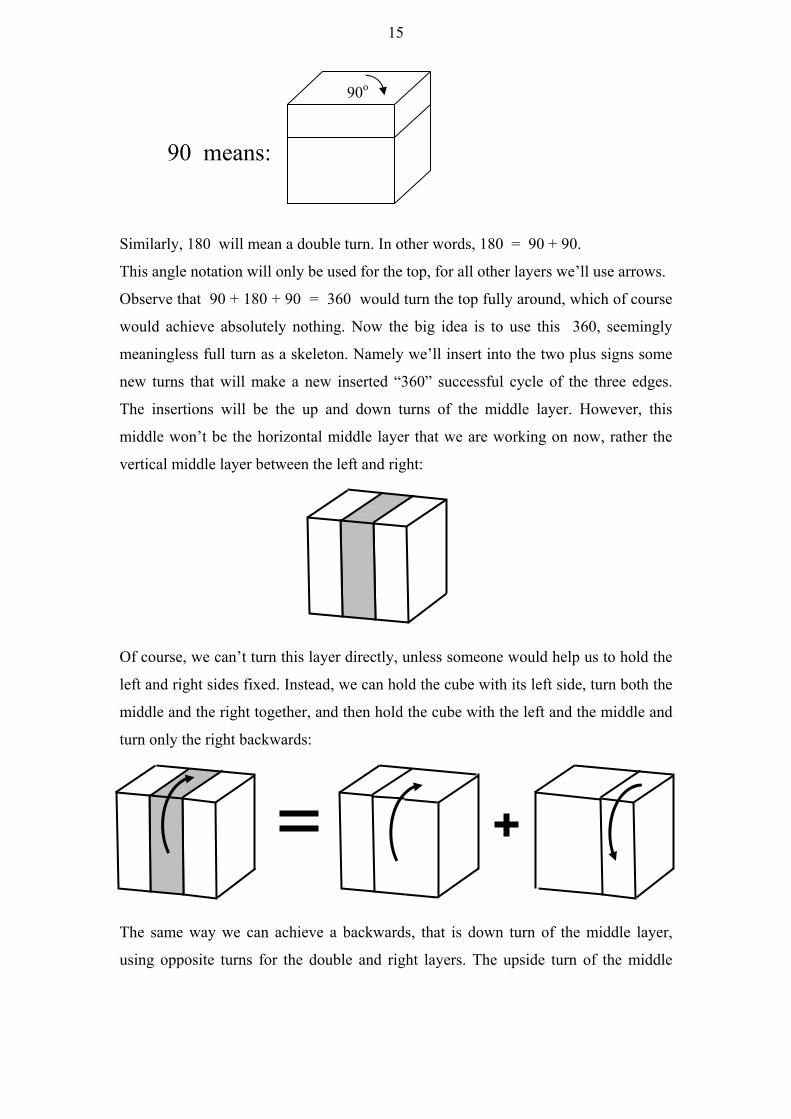
90 means:
Similarly, 180 will mean a double turn. In other words, 180 = 90 + 90.
This angle notation will only be used for the top, for all other layers we’ll use arrows.
Observe that 90 + 180 + 90 = 360 would turn the top fully around, which of course
would achieve absolutely nothing. Now the big idea is to use this 360, seemingly
meaningless full turn as a skeleton. Namely we’ll insert into the two plus signs some
new turns that will make a new inserted “360” successful cycle of the three edges.
The insertions will be the up and down turns of the middle layer. However, this
middle won’t be the horizontal middle layer that we are working on now, rather the
vertical middle layer between the left and right:
Of course, we can’t turn this layer directly, unless someone would help us to hold the
left and right sides fixed. Instead, we can hold the cube with its left side, turn both the
middle and the right together, and then hold the cube with the left and the middle and
turn only the right backwards:
The same way we can achieve a backwards, that is down turn of the middle layer,
using opposite turns for the double and right layers. The upside turn of the middle
16
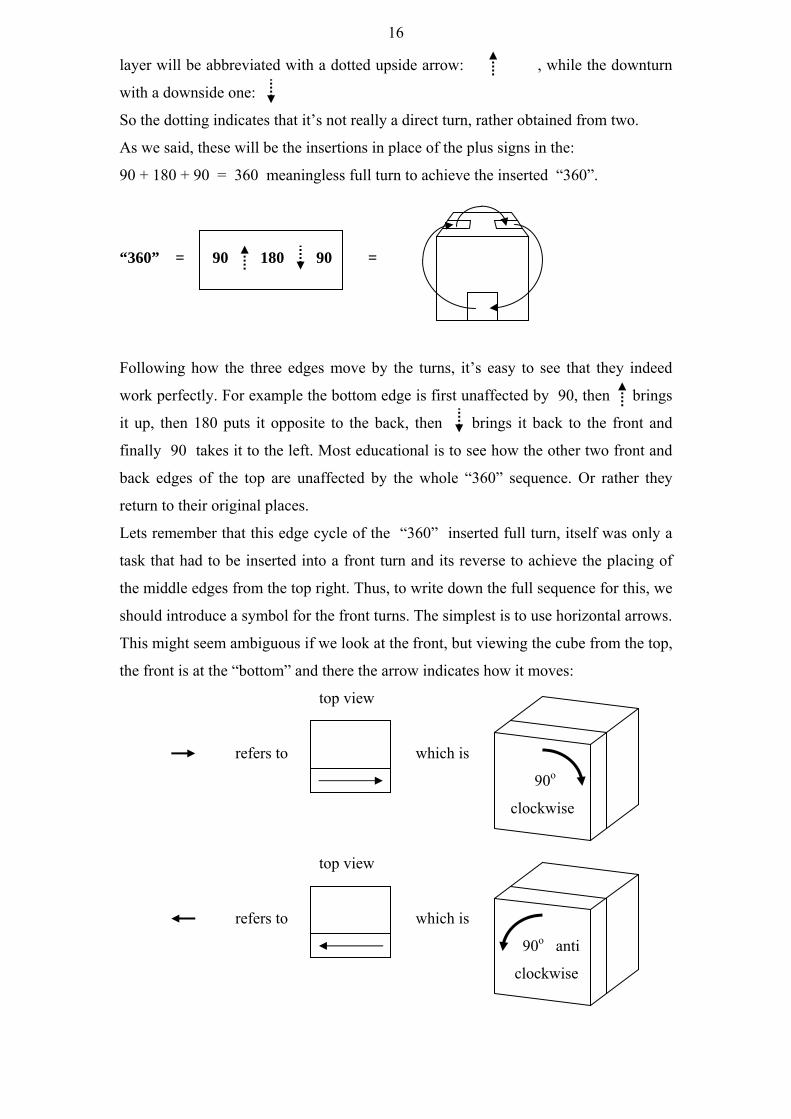
layer will be abbreviated with a dotted upside arrow: , while the downturn
with a downside one:
So the dotting indicates that it’s not really a direct turn, rather obtained from two.
As we said, these will be the insertions in place of the plus signs in the:
90 + 180 + 90 = 360 meaningless full turn to achieve the inserted “360”.
“360” = 90 180 90 =
Following how the three edges move by the turns, it’s easy to see that they indeed
work perfectly. For example the bottom edge is first unaffected by 90, then brings
it up, then 180 puts it opposite to the back, then brings it back to the front and
finally 90 takes it to the left. Most educational is to see how the other two front and
back edges of the top are unaffected by the whole “360” sequence. Or rather they
return to their original places.
Lets remember that this edge cycle of the “360” inserted full turn, itself was only a
task that had to be inserted into a front turn and its reverse to achieve the placing of
the middle edges from the top right. Thus, to write down the full sequence for this, we
should introduce a symbol for the front turns. The simplest is to use horizontal arrows.
This might seem ambiguous if we look at the front, but viewing the cube from the top,
the front is at the “bottom” and there the arrow indicates how it moves:
top view
refers to which is
90o
clockwise
top view
refers to which is
90o anti
clockwise
17
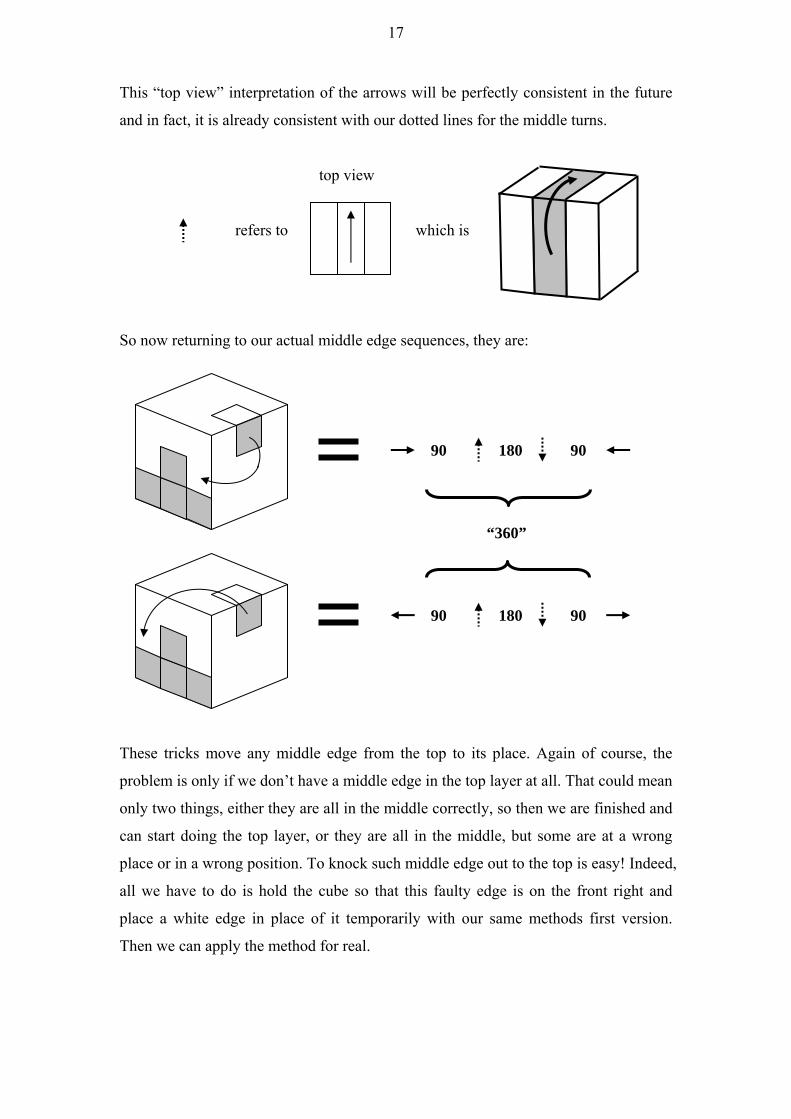
This “top view” interpretation of the arrows will be perfectly consistent in the future
and in fact, it is already consistent with our dotted lines for the middle turns.
top view
refers to which is
So now returning to our actual middle edge sequences, they are:
90 180 90
“360”
90 180 90
These tricks move any middle edge from the top to its place. Again of course, the
problem is only if we don’t have a middle edge in the top layer at all. That could mean
only two things, either they are all in the middle correctly, so then we are finished and
can start doing the top layer, or they are all in the middle, but some are at a wrong
place or in a wrong position. To knock such middle edge out to the top is easy! Indeed,
all we have to do is hold the cube so that this faulty edge is on the front right and
place a white edge in place of it temporarily with our same methods first version.
Then we can apply the method for real.
18
7. Top corners
This is what we called 1. , 2. , of the top, namely first placing, then whitening.
The reason we’ll handle them in a single section is that they are actually very similar,
namely both have a common sequence as their skeleton. This common skeleton can
be approached as an alternative for the skeleton we used already:
90 + 180 + 90 = 360 = nothing
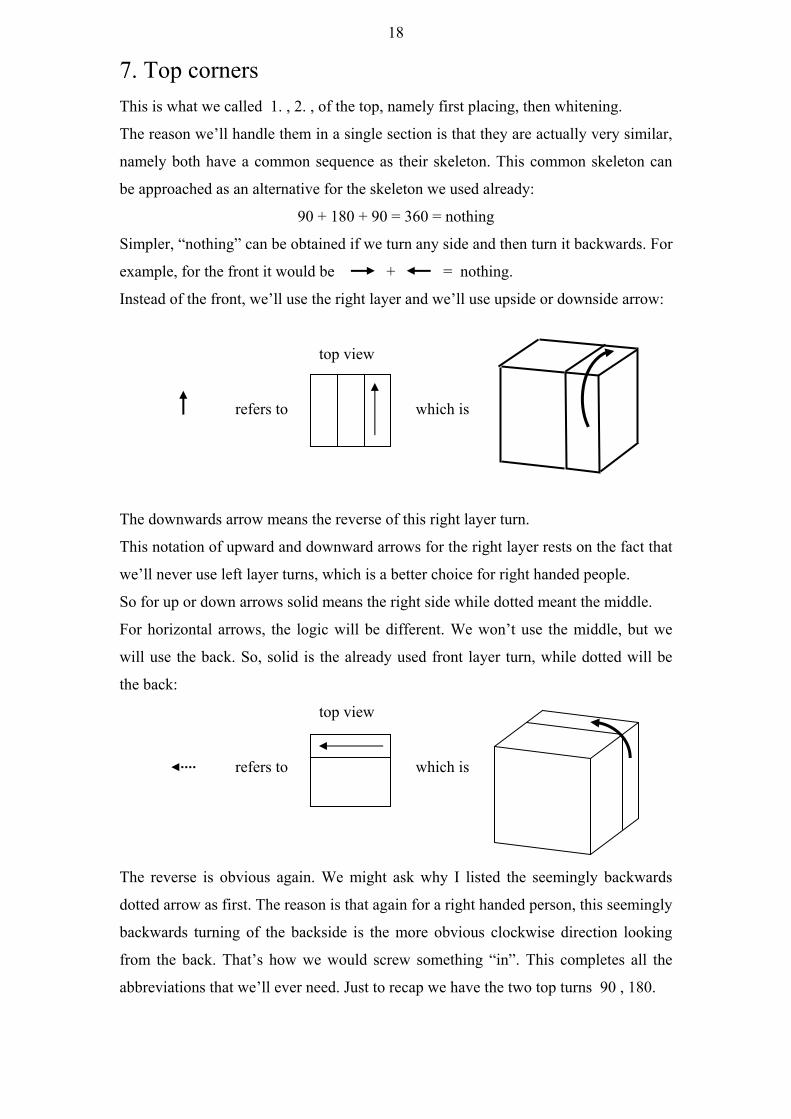
Simpler, “nothing” can be obtained if we turn any side and then turn it backwards. For
example, for the front it would be + = nothing.
Instead of the front, we’ll use the right layer and we’ll use upside or downside arrow:
top view
refers to which is
The downwards arrow means the reverse of this right layer turn.
This notation of upward and downward arrows for the right layer rests on the fact that
we’ll never use left layer turns, which is a better choice for right handed people.
So for up or down arrows solid means the right side while dotted meant the middle.
For horizontal arrows, the logic will be different. We won’t use the middle, but we
will use the back. So, solid is the already used front layer turn, while dotted will be
the back:
top view
refers to which is
The reverse is obvious again. We might ask why I listed the seemingly backwards
dotted arrow as first. The reason is that again for a right handed person, this seemingly
backwards turning of the backside is the more obvious clockwise direction looking
from the back. That’s how we would screw something “in”. This completes all the
abbreviations that we’ll ever need. Just to recap we have the two top turns 90 , 180.
19
Three side layers: front , right , back ,
And the vertical middle: ,
Besides these single turn arrows, we’ll need later the double turning of the front too,
which we’ll abbreviate simply as a line without arrow: + =
The right side is only used to achieve our major skeleton for the top corners.
The simplest would be: + = nothing.
The insertions for the + sign could be any of the top or side turns:
90 or 180 top insertions
or front insertions
or back insertions
Indeed, these six inserted right skeletons are the basic tricks of the top corners.
Studying them separately, one would see similar cycles that we already used for the
middles, but with four participants instead of three. Only combining these can do the
full task of placing and whitening of the top corners. This in effect means that instead
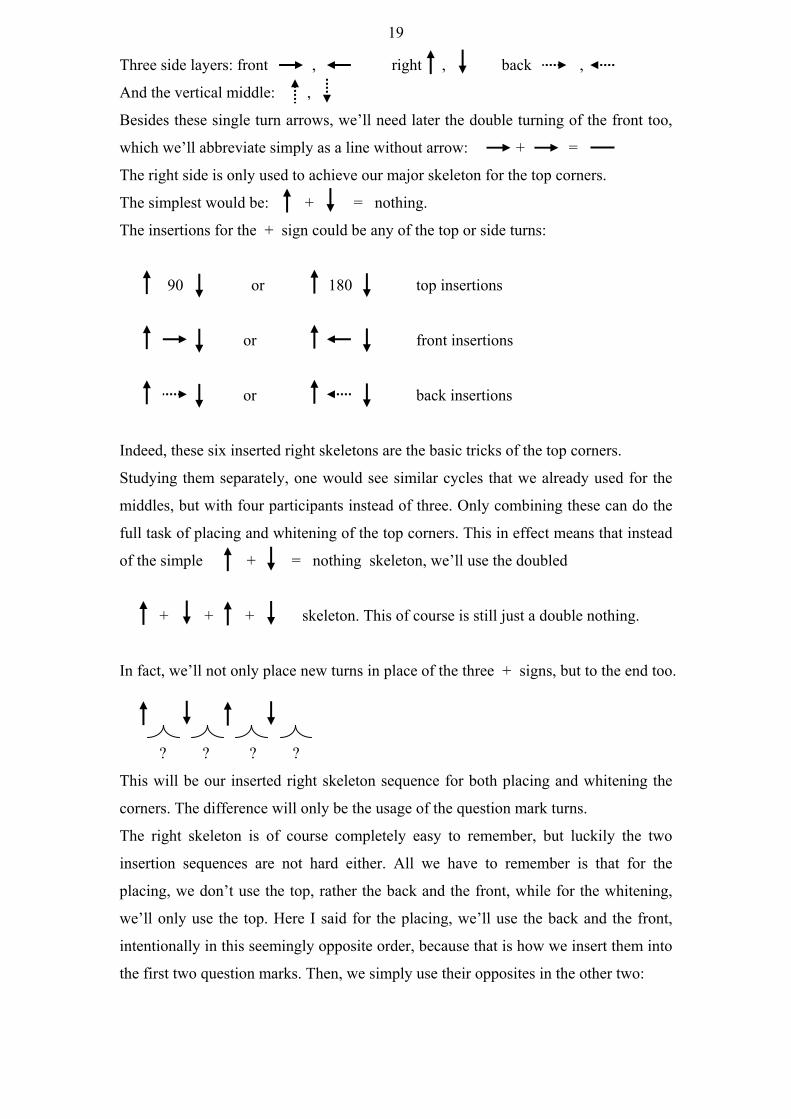
of the simple + = nothing skeleton, we’ll use the doubled
+ + + skeleton. This of course is still just a double nothing.
In fact, we’ll not only place new turns in place of the three + signs, but to the end too.
? ? ? ?
This will be our inserted right skeleton sequence for both placing and whitening the
corners. The difference will only be the usage of the question mark turns.
The right skeleton is of course completely easy to remember, but luckily the two
insertion sequences are not hard either. All we have to remember is that for the
placing, we don’t use the top, rather the back and the front, while for the whitening,
we’ll only use the top. Here I said for the placing, we’ll use the back and the front,
intentionally in this seemingly opposite order, because that is how we insert them into
the first two question marks. Then, we simply use their opposites in the other two:
20
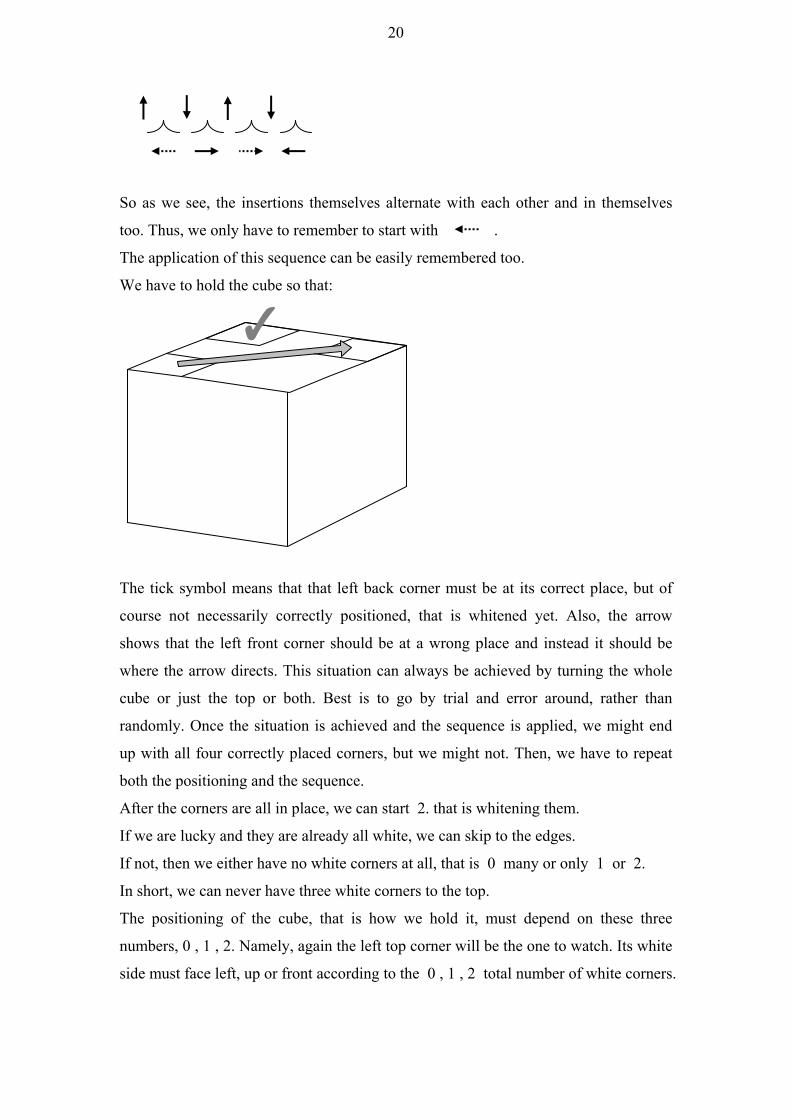
So as we see, the insertions themselves alternate with each other and in themselves
too. Thus, we only have to remember to start with .
The application of this sequence can be easily remembered too.
We have to hold the cube so that:
The tick symbol means that that left back corner must be at its correct place, but of
course not necessarily correctly positioned, that is whitened yet. Also, the arrow
shows that the left front corner should be at a wrong place and instead it should be
where the arrow directs. This situation can always be achieved by turning the whole
cube or just the top or both. Best is to go by trial and error around, rather than
randomly. Once the situation is achieved and the sequence is applied, we might end
up with all four correctly placed corners, but we might not. Then, we have to repeat
both the positioning and the sequence.
After the corners are all in place, we can start 2. that is whitening them.
If we are lucky and they are already all white, we can skip to the edges.
If not, then we either have no white corners at all, that is 0 many or only 1 or 2.
In short, we can never have three white corners to the top.
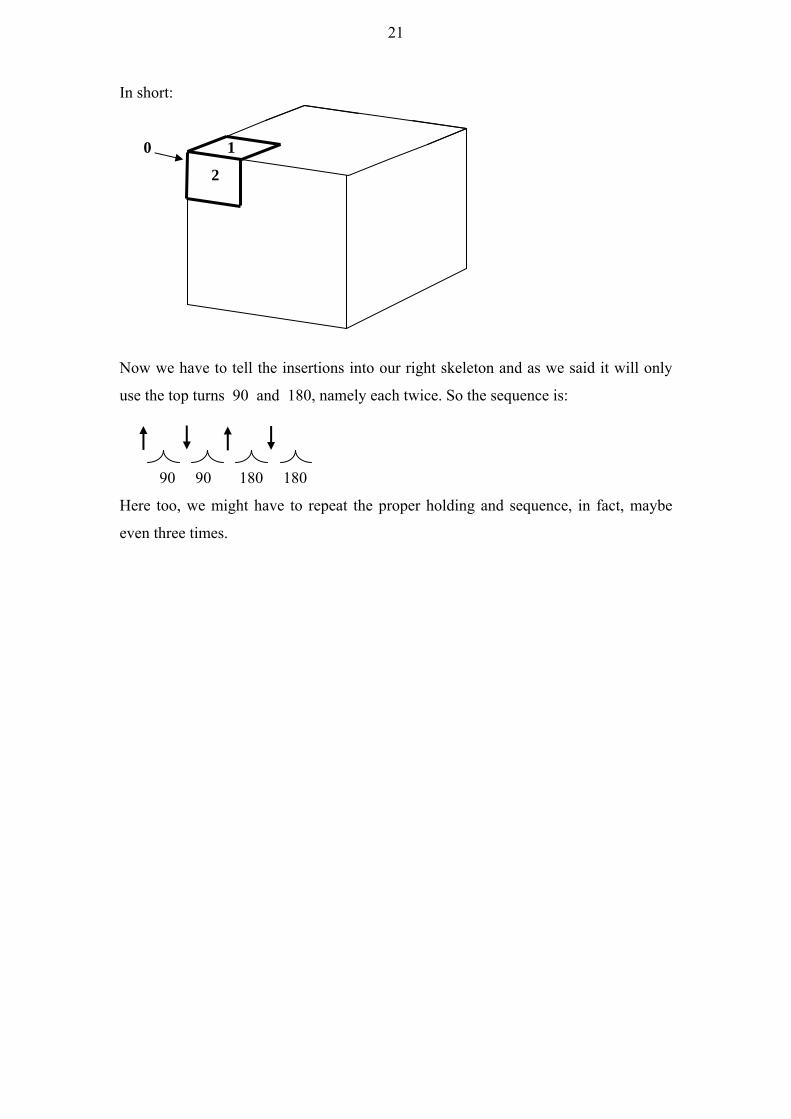
The positioning of the cube, that is how we hold it, must depend on these three
numbers, 0 , 1 , 2. Namely, again the left top corner will be the one to watch. Its white
side must face left, up or front according to the 0 , 1 , 2 total number of white corners.
21
In short:
0 1
2
Now we have to tell the insertions into our right skeleton and as we said it will only
use the top turns 90 and 180, namely each twice. So the sequence is:
90 90 180 180
Here too, we might have to repeat the proper holding and sequence, in fact, maybe
even three times.
22
8. Top edges
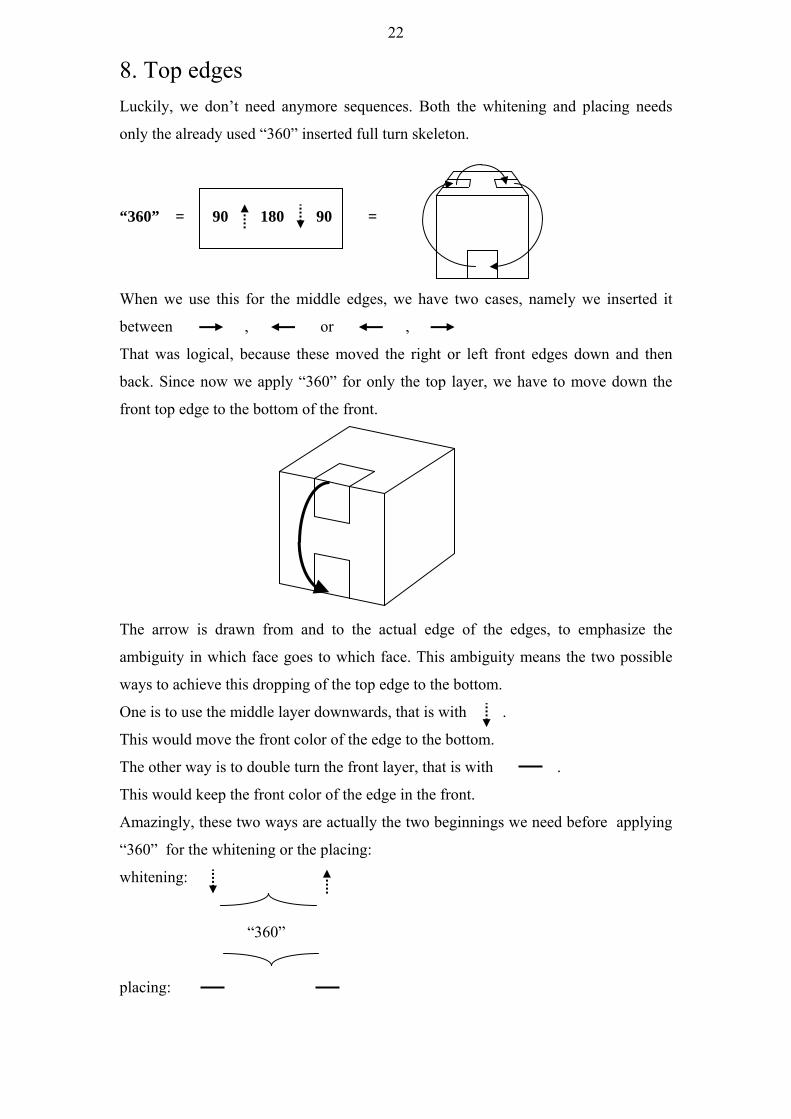
Luckily, we don’t need anymore sequences. Both the whitening and placing needs
only the already used “360” inserted full turn skeleton.
“360” = 90 180 90 =
When we use this for the middle edges, we have two cases, namely we inserted it
between , or ,
That was logical, because these moved the right or left front edges down and then
back. Since now we apply “360” for only the top layer, we have to move down the
front top edge to the bottom of the front.
The arrow is drawn from and to the actual edge of the edges, to emphasize the
ambiguity in which face goes to which face. This ambiguity means the two possible
ways to achieve this dropping of the top edge to the bottom.
One is to use the middle layer downwards, that is with .
This would move the front color of the edge to the bottom.
The other way is to double turn the front layer, that is with .
This would keep the front color of the edge in the front.
Amazingly, these two ways are actually the two beginnings we need before applying
“360” for the whitening or the placing:
whitening:
“360”
placing:
23
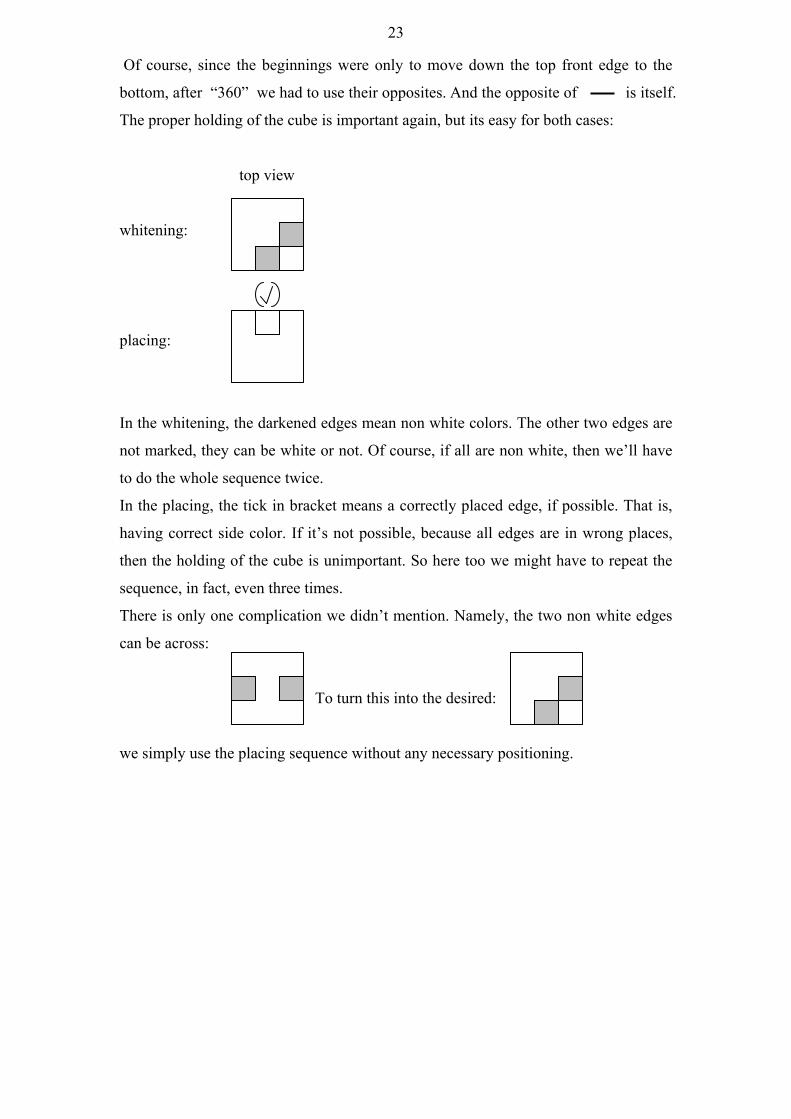
Of course, since the beginnings were only to move down the top front edge to the
bottom, after “360” we had to use their opposites. And the opposite of is itself.
The proper holding of the cube is important again, but its easy for both cases:
top view
whitening:
placing:
In the whitening, the darkened edges mean non white colors. The other two edges are
not marked, they can be white or not. Of course, if all are non white, then we’ll have
to do the whole sequence twice.
In the placing, the tick in bracket means a correctly placed edge, if possible. That is,
having correct side color. If it’s not possible, because all edges are in wrong places,
then the holding of the cube is unimportant. So here too we might have to repeat the
sequence, in fact, even three times.
There is only one complication we didn’t mention. Namely, the two non white edges
can be across:
To turn this into the desired:
we simply use the placing sequence without any necessary positioning.
24
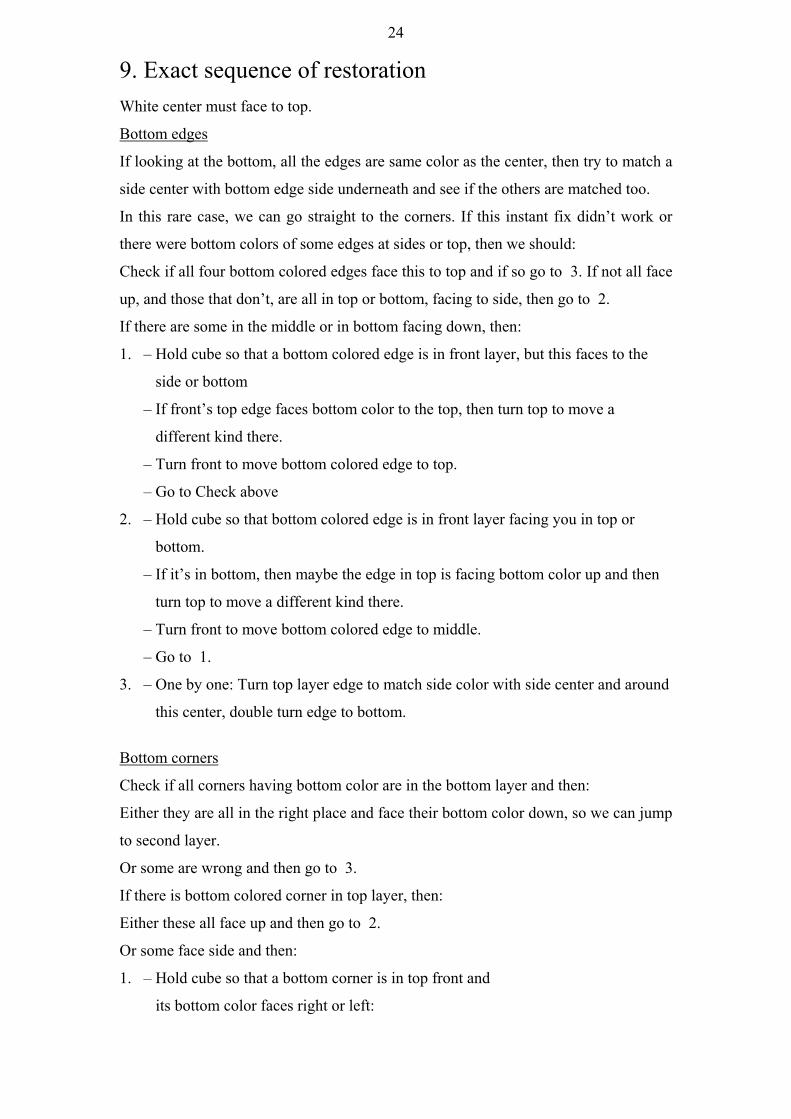
9. Exact sequence of restoration
White center must face to top.
Bottom edges
If looking at the bottom, all the edges are same color as the center, then try to match a
side center with bottom edge side underneath and see if the others are matched too.
In this rare case, we can go straight to the corners. If this instant fix didn’t work or
there were bottom colors of some edges at sides or top, then we should:
Check if all four bottom colored edges face this to top and if so go to 3. If not all face
up, and those that don’t, are all in top or bottom, facing to side, then go to 2.
If there are some in the middle or in bottom facing down, then:
1. – Hold cube so that a bottom colored edge is in front layer, but this faces to the
side or bottom
– If front’s top edge faces bottom color to the top, then turn top to move a
different kind there.
– Turn front to move bottom colored edge to top.
– Go to Check above
2. – Hold cube so that bottom colored edge is in front layer facing you in top or
bottom.
– If it’s in bottom, then maybe the edge in top is facing bottom color up and then
turn top to move a different kind there.
– Turn front to move bottom colored edge to middle.
– Go to 1.
3. – One by one: Turn top layer edge to match side color with side center and around
this center, double turn edge to bottom.
Bottom corners
Check if all corners having bottom color are in the bottom layer and then:
Either they are all in the right place and face their bottom color down, so we can jump
to second layer.
Or some are wrong and then go to 3.
If there is bottom colored corner in top layer, then:
Either these all face up and then go to 2.
Or some face side and then:
1. – Hold cube so that a bottom corner is in top front and
its bottom color faces right or left:

25
bottom color
– Hold cube by top layer and turn middle and bottom till center front becomes
same as front of this corner:
bottom color
– Save the opposite two bottom pieces of front by turning them to the back:
Held
– Turn front to move corner down.
or
– Bring back the saved ones.
Held
– Go to beginning Check.
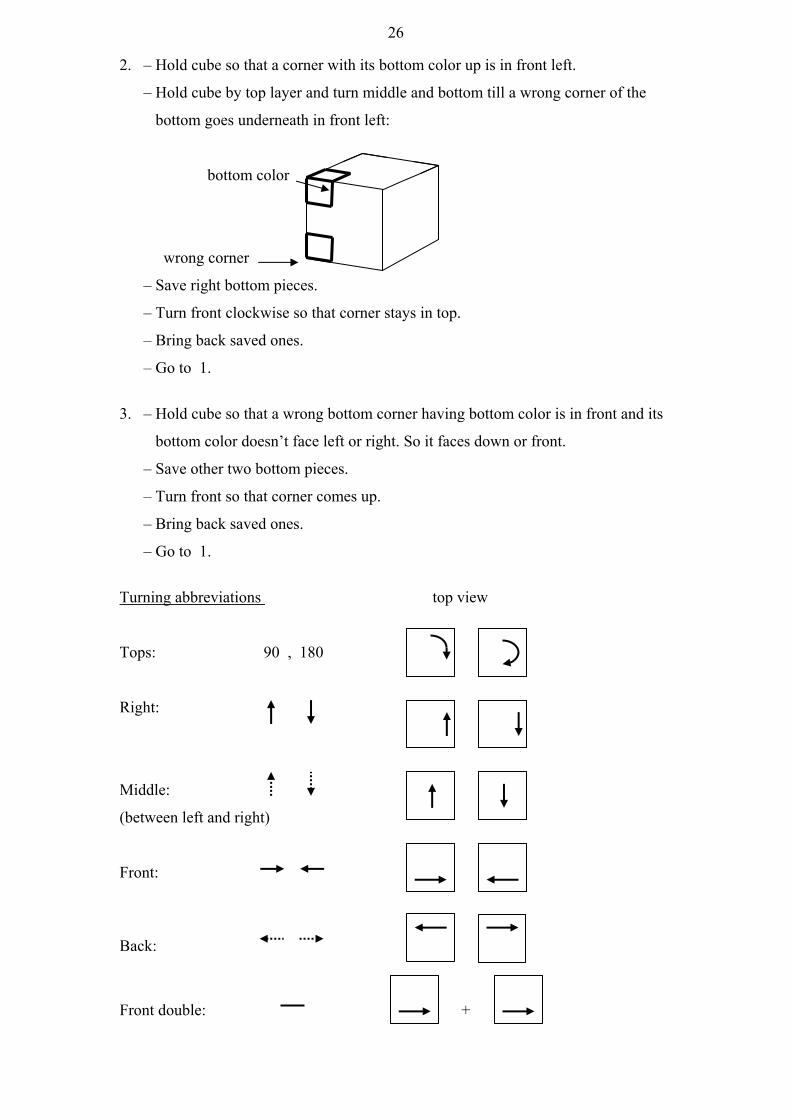
26
2. – Hold cube so that a corner with its bottom color up is in front left.
– Hold cube by top layer and turn middle and bottom till a wrong corner of the
bottom goes underneath in front left:
bottom color
wrong corner
– Save right bottom pieces.
– Turn front clockwise so that corner stays in top.
– Bring back saved ones.
– Go to 1.
3. – Hold cube so that a wrong bottom corner having bottom color is in front and its
bottom color doesn’t face left or right. So it faces down or front.
– Save other two bottom pieces.
– Turn front so that corner comes up.
– Bring back saved ones.
– Go to 1.
Turning abbreviations top view
Tops: 90 , 180
Right:
Middle:
(between left and right)
Front:
Back:
Front double: +
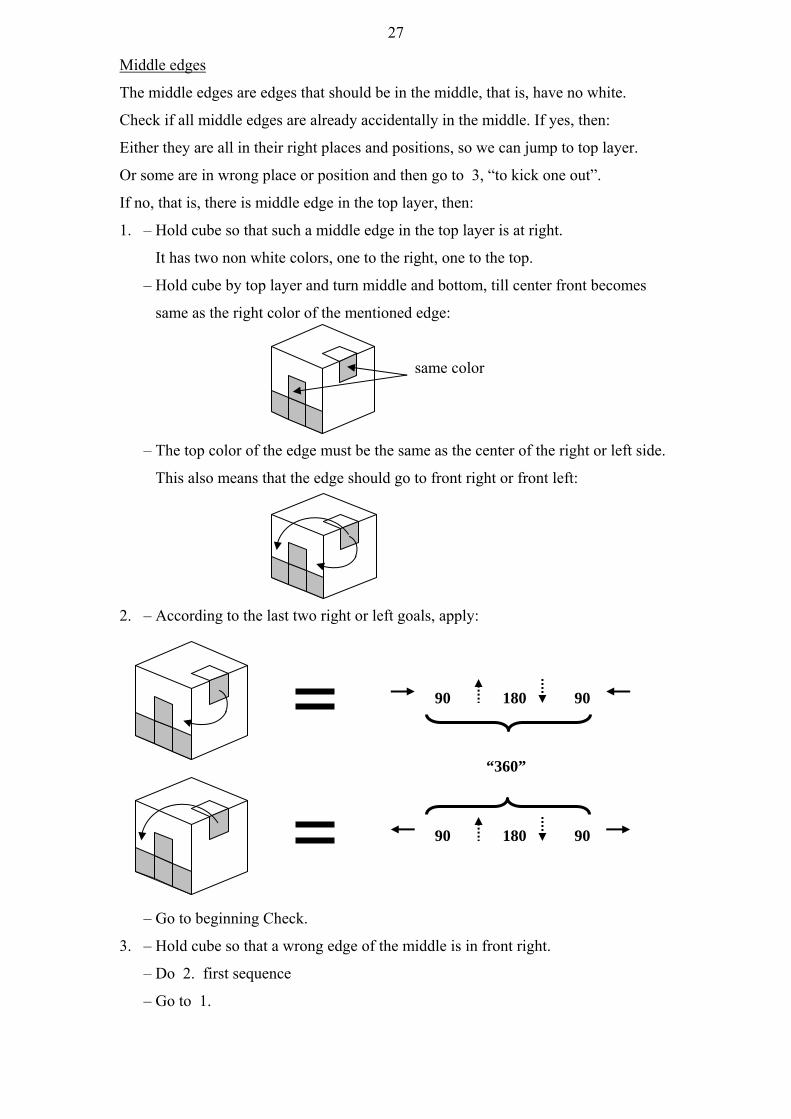
27
Middle edges
The middle edges are edges that should be in the middle, that is, have no white.
Check if all middle edges are already accidentally in the middle. If yes, then:
Either they are all in their right places and positions, so we can jump to top layer.
Or some are in wrong place or position and then go to 3, “to kick one out”.
If no, that is, there is middle edge in the top layer, then:
1. – Hold cube so that such a middle edge in the top layer is at right.
It has two non white colors, one to the right, one to the top.
– Hold cube by top layer and turn middle and bottom, till center front becomes
same as the right color of the mentioned edge:
same color
– The top color of the edge must be the same as the center of the right or left side.
This also means that the edge should go to front right or front left:
2. – According to the last two right or left goals, apply:
90 180 90
90 180 90
– Go to beginning Check.
3. – Hold cube so that a wrong edge of the middle is in front right.
– Do 2. first sequence
– Go to 1.
“360”
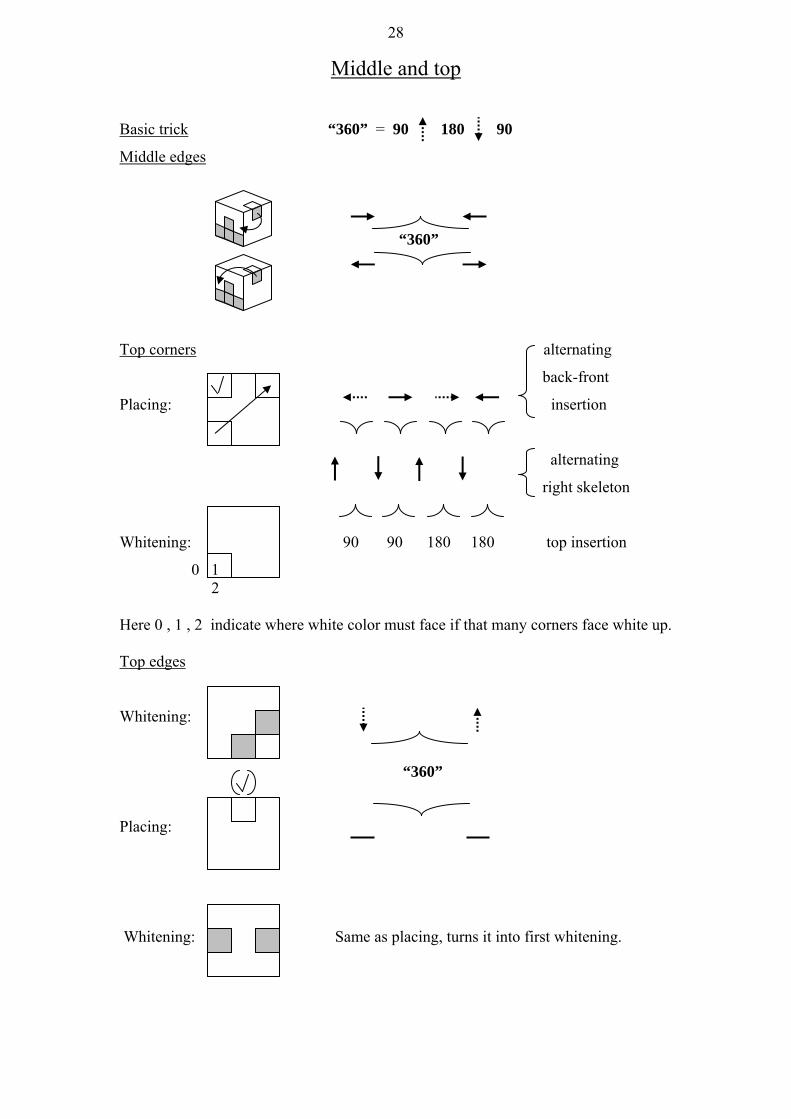
28
Middle and top
Basic trick “360” = 90 180 90
Middle edges
“360”
Top corners alternating
back-front
Placing: insertion
alternating
right skeleton
Whitening: 90 90 180 180 top insertion
0 1 2 Here 0 , 1 , 2 indicate where white color must face if that many corners face white up. Top edges
Whitening:
“360”
Placing:
Whitening: Same as placing, turns it into first whitening.
29
10. Formal remembering of tricks
We went by logic, but there is an easier formal way to remember all the used tricks:
As a start, we’ll use simply angles of turns as 90 , 180 , 360 , 540.
These always mean the turnings of the top layer. The 360 and 540 large angles can
be composed of 90 and 180 in many ways, but we define them as:
360 = 90 + 180 + 90 540 = 90 + 90 + 180 + 180
These two sums are basically all we have to remember and they will guide us.
Doing these two turn sequences would accomplish nothing, so we insert moves into +.
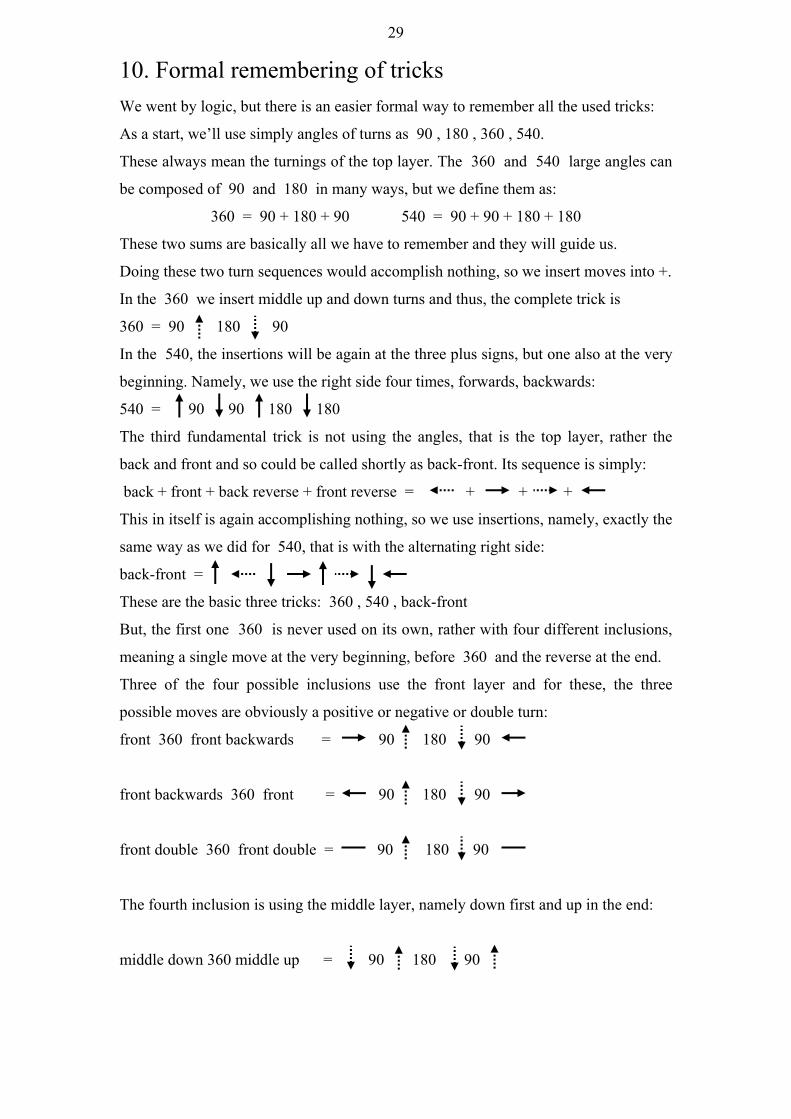
In the 360 we insert middle up and down turns and thus, the complete trick is
360 = 90 180 90
In the 540, the insertions will be again at the three plus signs, but one also at the very
beginning. Namely, we use the right side four times, forwards, backwards:
540 = 90 90 180 180
The third fundamental trick is not using the angles, that is the top layer, rather the
back and front and so could be called shortly as back-front. Its sequence is simply:
back + front + back reverse + front reverse = + + +
This in itself is again accomplishing nothing, so we use insertions, namely, exactly the
same way as we did for 540, that is with the alternating right side:
back-front =
These are the basic three tricks: 360 , 540 , back-front
But, the first one 360 is never used on its own, rather with four different inclusions,
meaning a single move at the very beginning, before 360 and the reverse at the end.
Three of the four possible inclusions use the front layer and for these, the three
possible moves are obviously a positive or negative or double turn:
front 360 front backwards = 90 180 90
front backwards 360 front = 90 180 90
front double 360 front double = 90 180 90
The fourth inclusion is using the middle layer, namely down first and up in the end:
middle down 360 middle up = 90 180 90
30
Thus, these four inclusions as applications of 360 plus 540 and back-front are all
the six tricks that we need to do the second and top layers of the cube. Namely:
Middle edges use:
front 360 front backwards or front backwards 360 front,
depending on, to which side we have to move the middle edge.
Top corner placings use: back-front
Top corner whitenings use: 540
Top edge whitenings use: middle down 360 middle up
Top edge placings use: front double 360 front double
11. A strange post script, the “void cube”.
At the start I said that Rubik’s idea of making a turnable cube sounded as half baked
and yet worked. The tiny hands that hold the external little cubes to the center hidden
one are strong enough to keep the full cube together firmly. This became evident for
millions who handle the cube pretty roughly. But no one dared to even imagine that
without the hidden center any turnable cube is possible. Could the middle centers do
all the support? But lets jump to something really seemingly impossible! Could even
those be avoidable? Such cube would be having three tunnels all the way through
between the opposite sides and we could stick our finger through any of these three.
The conditional mode is unnecessary because a genius Japanese young man
Katsuhiko Okamoto dared to imagine the impossible and succeeded. This so called
void cube is supported by hidden rings made of smaller pieces. Holding and turning it
almost feels surreal. And this is really the only important new feature of it!
Indeed, the puzzle it represents is identical with a normal Rubik cube if the center
colors are peeled off. This of course makes our start already impossible to reorder the
bottom layer. We have to remember how the chosen bottom layer’s side colors were
ordered. For the presently sold void cubes, the best idea is to use one of the opposite
gray and black colors as bottom first layer. Then the side colors are so that red and
yellow are opposite and thus of course blue green are too. Choosing grey as bottom
and having red as front then blue is to the left while using black as bottom, blue is
right of the frontal red. Then we can use the bottom edges as our guide to reassemble
the cube. But a nasty surprise can happen at the very end! We can end up with a cube
having all correct top colors and sides too except that two side edges are exchanged
next to a corner. With our normal Rubik cube this can not happen! The reason for this
31
is that at the start even if we did the first layer as we remembered from the original
cube, this didn’t mean that we did it around the “right hole”. Indeed, we can start a
Rubik cube too, by intentionally build it around a wrong side center.
To fix up the mentioned exchanged two edges on the top, is actually a reordering of
the centers though not visible on the void cube. Namely, with our trick sequence, in
the vertical middle layer between the left and right we move all the centers to the next
clockwise looking from the right. The exchange of the top edges will be merely a
“side effect” though the really important and only visible for us on the void cube.
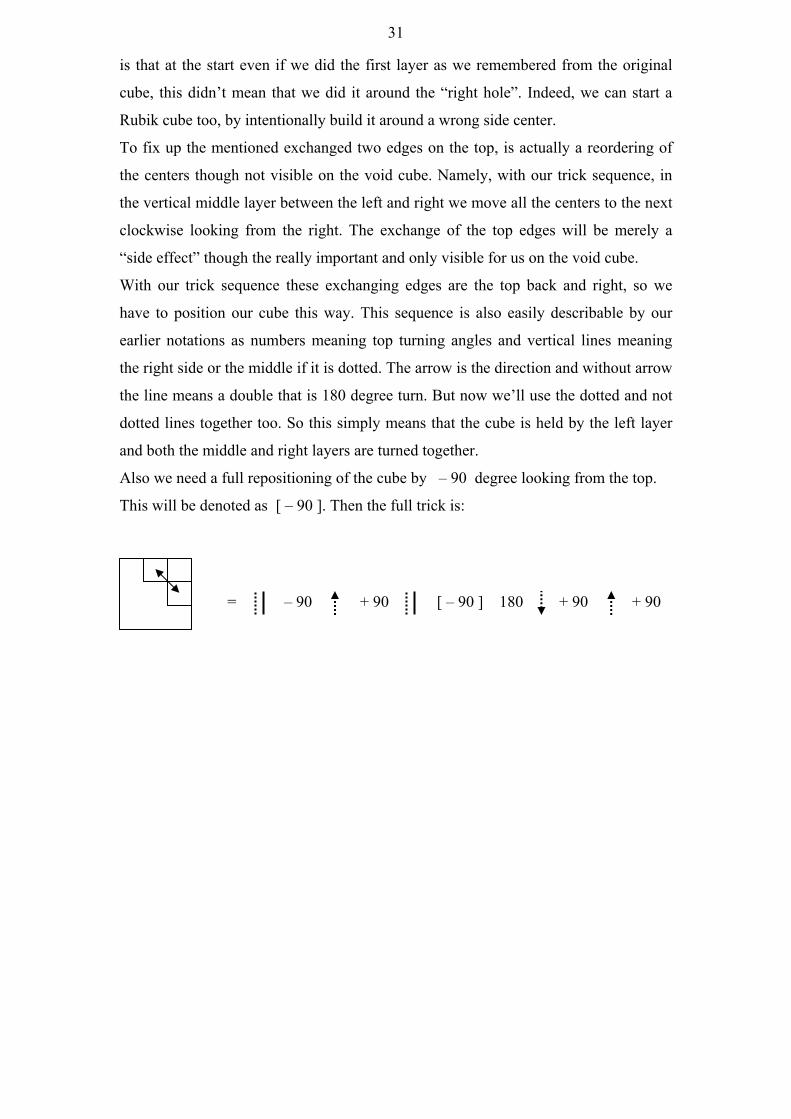
With our trick sequence these exchanging edges are the top back and right, so we
have to position our cube this way. This sequence is also easily describable by our
earlier notations as numbers meaning top turning angles and vertical lines meaning
the right side or the middle if it is dotted. The arrow is the direction and without arrow
the line means a double that is 180 degree turn. But now we’ll use the dotted and not
dotted lines together too. So this simply means that the cube is held by the left layer
and both the middle and right layers are turned together.
Also we need a full repositioning of the cube by – 90 degree looking from the top.
This will be denoted as [ – 90 ]. Then the full trick is:
= – 90 + 90 [ – 90 ] 180 + 90 + 90