Planning and Placing Concrete Planning and Placing Concrete.
www.rivetwars.com
RRiivveett WWaarrss
SScceennaarriioo EEddiittoorr PPaacckk
VVeerrssiioonn 11
www.rivetwars.com
Before We Begin
Thanks for downloading the Rivet Wars Scenario Editor Pack!
This pack includes the following:
This helpful Guide!
A set of tiles which can be used to create maps for your own scenarios
A set of tiles representing Units from the Game
Some useful tiles for creating battle reports including unit movement and attack
Some example maps to get you started
A Template Scenario Document
Blank Allied, Blight and Neutral Unit Cards to create your own Units!
Blank Secret Mission and Action Cards!
I must take a moment to say thank you to Ted Terranova for openly and quickly sharing
Rivet Wars assets for this project. He’s helped me more than I could have expected; he’s
made sure the Rivet Wars Community has access to the highest quality artwork so
projects like this can thrive! It’s fantastic seeing the creator spend his precious time
making sure we all get the best from Rivet Wars!
If you have any questions, comments or improvements please don’t hesitate to contact
me at: me<AT>tehill<DOT>net or on the CoolMiniOrNot Forum, my username is: Decar
Enough talk!
LET’S GET IN THE FIGHT!
- Tom Hill
- March 2014
Copyright Notice:
All of the assets in this archive are subject to the following copyright notice:
© 2013 Super Robot Punch LLC
Rivet Wars® is a registered trademark of
Super Robot Punch LLC.
Unauthorized reproduction is prohibited.
www.rivetwars.com

www.rivetwars.com
Map EDITOR
The Map Editor is made up of the following Tiles:
Basic Map Tileset with all 18 reversible tiles
Marker Tileset with Strategic Objective, Bunkers, etc..
Three Unit Tilesets, for Allied, Blight and Neutral Units
o All the Units from Eastern Front, Second Wave, Spearhead, War Room, Heavy
Metal and Battle of Brighton
A Tileset for marking the Map with Territory or Arrows
A Tileset for marking the Map with Points of Interest
There are plenty of applications for managing tilesets; we’re going to use Tiled, which is
available for free on multiple platforms from the following URL:
http://www.mapeditor.org/
Unpacking the Editor
You’ll need to unpack the Editor which contains all of the useful resources. It’s worth
unpacking the ZIP file into a designate folder so you can find it again later. Some people
have reported problems creating the directories when unpacking the ZIP in Windows 7.
If you find this, try to unpack the ZIP to the desktop and manually moving the files to
their new home. I’m committed to making improvements to the editor so please contact
me if you need any assistance!

www.rivetwars.com
Creating a New MAP
The Scenario Editor comes with an empty 3x3 Template for you to get started. You can
open the file with Tiled and it should look like this:
ZOOM out!
The first thing to do is zoom out – this can be done by adjusting the
two % boxes in the bottom right hand corner: one manages the
Tilesets, while the other manages the view. I recommend setting these
to 25% to begin with.
www.rivetwars.com
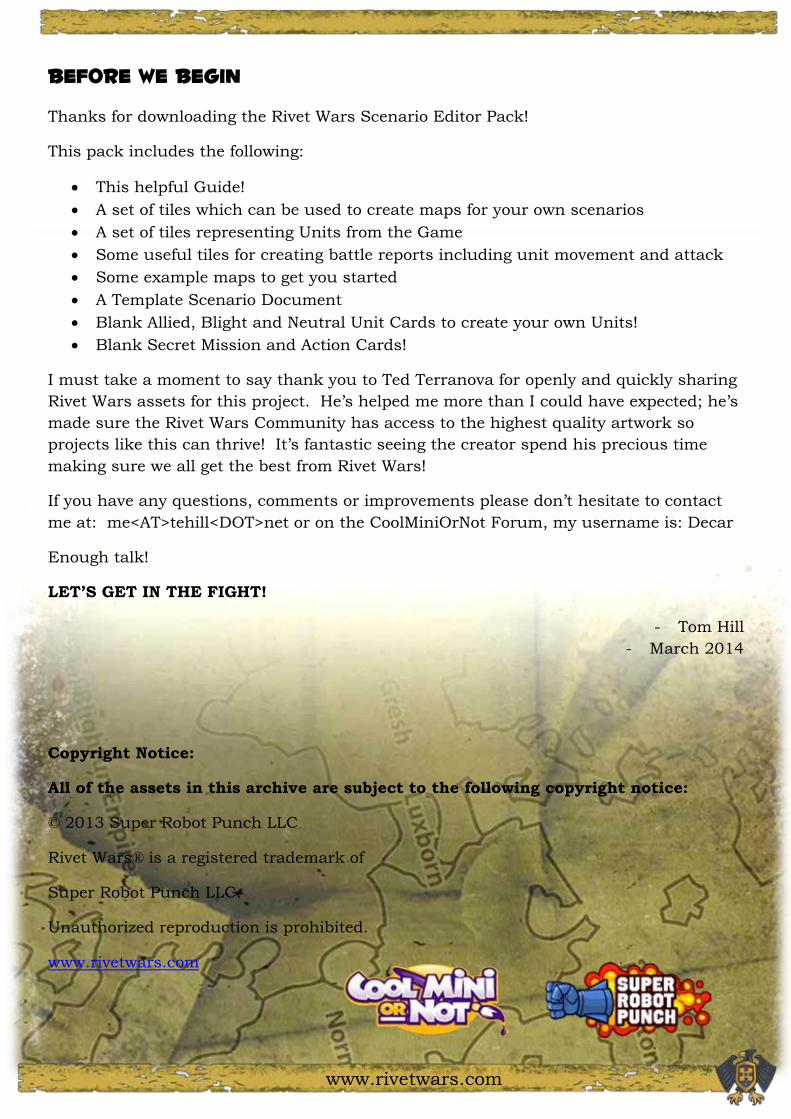
Layering
Tiled assigns tiles to layers. Your map will be made up of various layers you can use to
overlay elements, such as map-tiles, bunkers or units. Make sure you’ve got “Map”
selected; this is the bottom-most layer:
The Template Map comes with pre-created layers, but you can add and remove them as
you need. Select a tile and paint it on the grid.
Tile Control
You can rotate tiles by pressing: Z
You can flip tiles by pressing X or Y
Other useful commands can be found here:
https://github.com/bjorn/tiled/wiki/Keyboard-Shortcuts

www.rivetwars.com
Placing Terrain Elements
Make sure you’ve selected the “Markers” Layer; otherwise you might remove a map tile!
Mines, Tank Traps, Bunkers and Objective can be found in the Markers Tile Set.
Adding Territory
Make sure the Territory Layer is selected. Territory is a little harder to add; there are
some translucent green and red tiles in the arrow tile set. The three tiles can be used to
draw corners, edges and centres of territories. Don’t forget you can rotate the tiles.
www.rivetwars.com
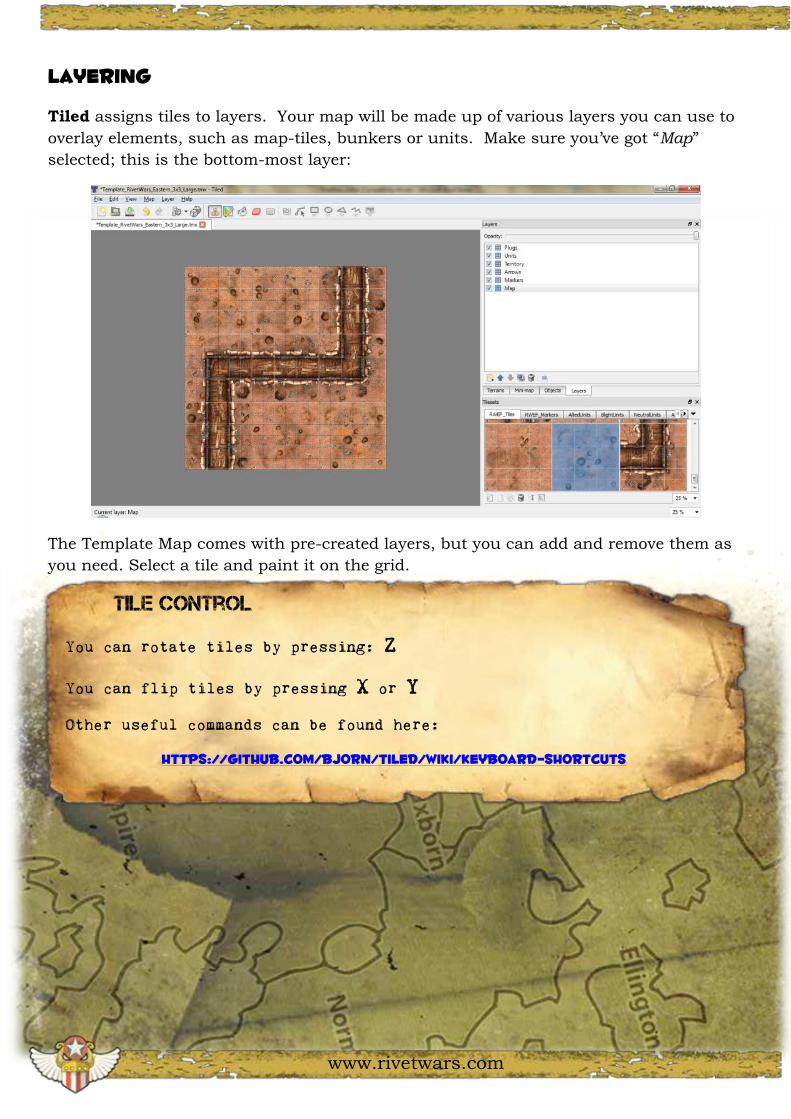
Adding Deployment Zones
Make sure you use a layer above Territory; otherwise the emblems will appear
underneath or worse replace the territory. The Blight and Allied emblems can be found
in the Marker tile set.
Placing Units
The Scenario Editor also has tile sets for Units. These can be placed like any other tile.
You can use the mouse to select multiple tiles to make placing larger units much easier!
www.rivetwars.com
I made a Mistake! – UNDO
Tiled supports Ctrl+Z for undoing the previous action, you can use this if you have
placed a tile in an incorrect place.
If you need to delete any tiles you can use the Erase tool. When you’re selecting a tile
you need to select the grid the tile was originally placed in. So, you can’t delete parts of
a tile you have to delete all of it.
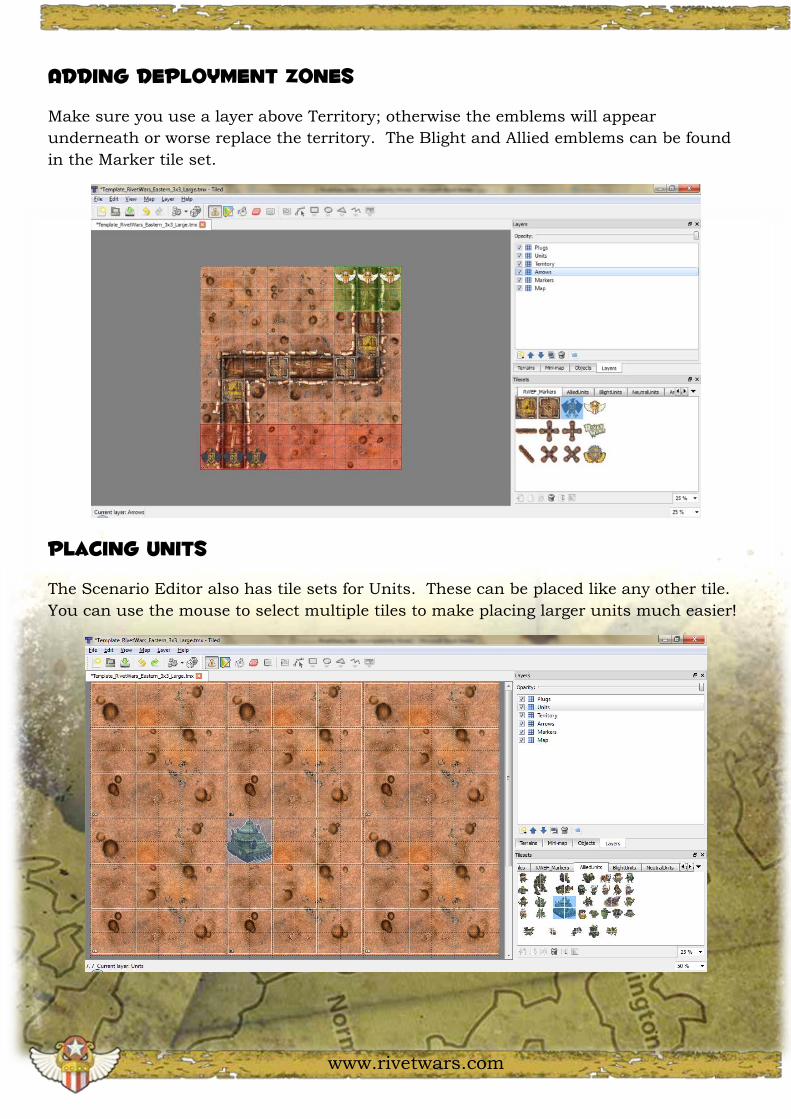
Tile COMMANDER
You can use the Rectangular Select tool to select groups of tiles.
Press Ctrl+X to cut the tiles and Press Ctrl+V to paste them to a new location.
Now you can move large numbers of tiles without having to draw them
all!
Remember, the select tool only selects tiles on your currently
selected layer; Ctrl+A selects all tiles on that layer.
Another Handy Hint
If you’ve Cut tiles from earlier, you can paste them multiple times
and you can apply the X,Y,Z flips and rotations to them!

www.rivetwars.com
Free Form Painting
It’s possible to place tiles outside of the grid; you can do this by creating an object layer
and selecting the “Insert Tile” Tool.
Exporting Your Creation
Under the File menu you can Save your creation as a PNG; it’s worth mentioning you
can export at the current zoom level; so you may want to make it larger or smaller.
Once this completes you will be able to import the image into your own custom Scenario
to share with the rest of the community!
www.rivetwars.com
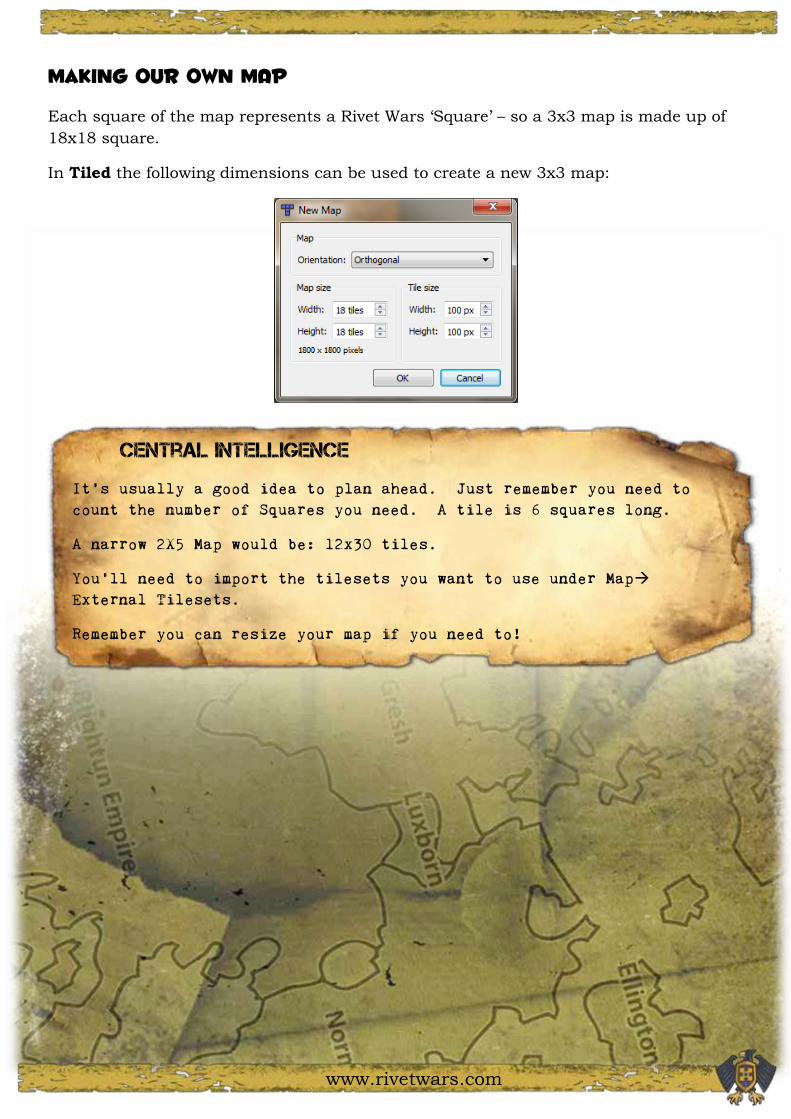
Making our Own MAP
Each square of the map represents a Rivet Wars ‘Square’ – so a 3x3 map is made up of
18x18 square.
In Tiled the following dimensions can be used to create a new 3x3 map:
Central Intelligence
It’s usually a good idea to plan ahead. Just remember you need to
count the number of Squares you need. A tile is 6 squares long.
A narrow 2X5 Map would be: 12x30 tiles.
You’ll need to import the tilesets you want to use under Map
External Tilesets.
Remember you can resize your map if you need to!

www.rivetwars.com
Examples
I’ve included another file: RivetWars_Eastern_Front_Examples.tmx which contains the
following inspiration!
Preparing a Battle:
Highlighting Particular Units:
www.rivetwars.com
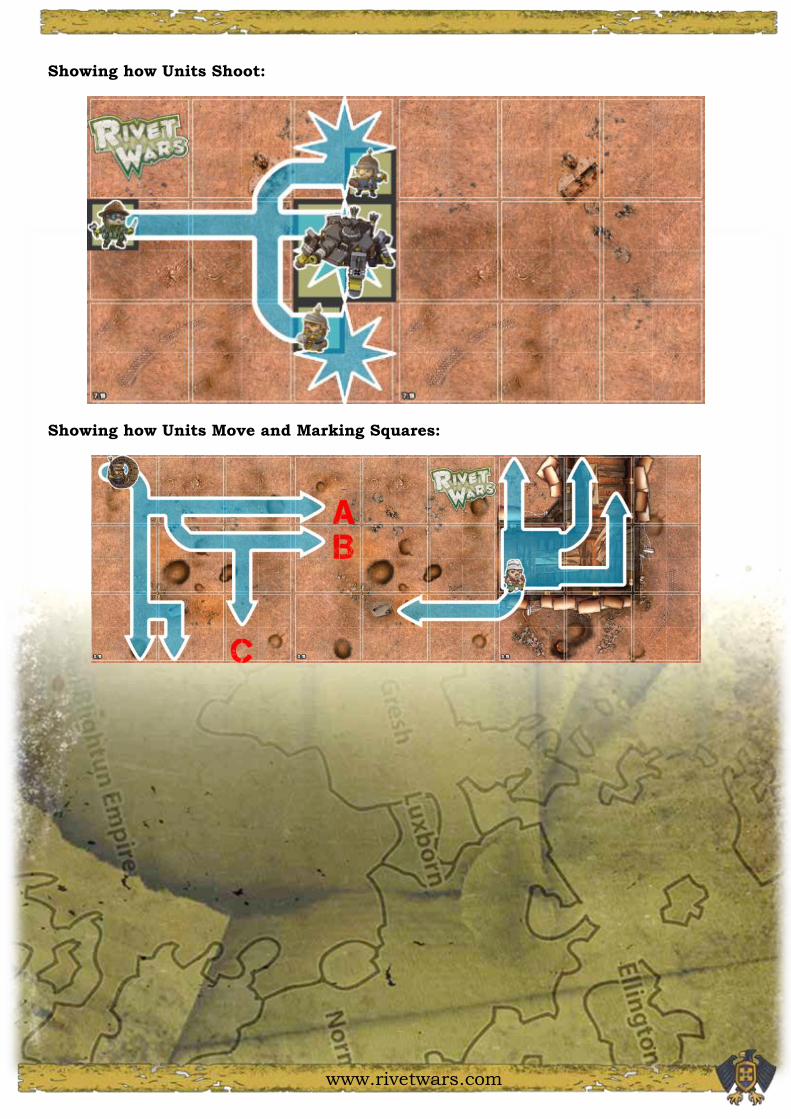
Showing how Units Shoot:
Showing how Units Move and Marking Squares:
www.rivetwars.com
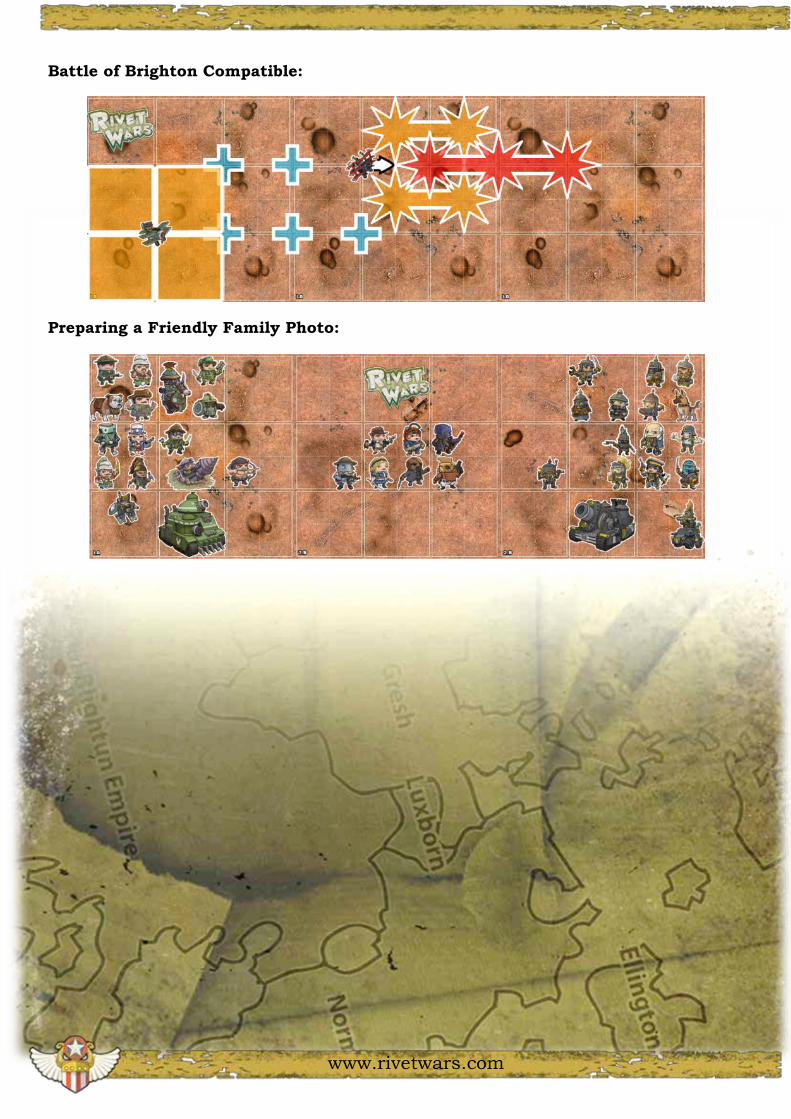
Battle of Brighton Compatible:
Preparing a Friendly Family Photo:

www.rivetwars.com
Scenario Template
There’s no point making stunning maps for your scenarios if you don’t have the
resources to share them with the community. The Scenario Template is a document you
can edit for describing your scenarios:
ScenarioTemplate.RTF
Creating Units
Inside the Unit Maker Folder you’ll find all you need to get you started.
There’s Blank Unit Cards for Allied, Neutral and Blight Units.
There’s also an image that contains all the useful symbols and icons you might require.
Here’s a very simple example I managed to create the using GIMP:
With stats like those,
we probably won’t be seeing
Roxy on the battlefield any time soon!
Where are the FONTS?
For the Ultimate Rivet Wars Experience, use the following fonts:
1) fontdinerdotcom_huggable - For Titles
2) capture_it - For Type Written Titles (like the one used in this heading)
3) kingthings_trypewriter_2 - for Type Written Text (like this one)
4) Bookman Old Style - Main Scenario Description
www.rivetwars.com
Creating Secret Mission and Action Cards
If you’ve got this far, you’re super creative! No doubt you’ll have the skills to layout
some brilliant secret missions or action cards! So remember:
GET IN THE FIGHT!

![EEddiittoorr’’ss NNoottee CONTENTS · Organizational Agility, 2015] Prosci's Building Organization Agility webinar in February 2016 involved 250 participants. Figure 2 depicts](https://static.fdocuments.us/doc/165x107/5ecb74d10746fe023043a3c0/eeddiittoorraass-nnoottee-contents-organizational-agility-2015-proscis-building.jpg)