Rocket SystemBuilder October 2017 SBX-652-SVC-IM-01 · On the Name tab in the User Id Code field,...
50
Rocket SystemBuilder Extensible Architecture Getting Started with SB/XA Services Version 6.5.2 October 2017 SBX-652-SVC-IM-01
Transcript of Rocket SystemBuilder October 2017 SBX-652-SVC-IM-01 · On the Name tab in the User Id Code field,...

Rocket SystemBuilderExtensible Architecture
Getting Started with SB/XA Services
Version 6.5.2
October 2017SBX-652-SVC-IM-01

2
NoticesEdition
Publication date: October 2017Book number: SBX-652-SVC-IM-01Product version: Version 6.5.2
Copyright© Rocket Software, Inc. or its affiliates 1996-2017. All Rights Reserved.
Trademarks
Rocket is a registered trademark of Rocket Software, Inc. For a list of Rocket registered trademarks goto: www.rocketsoftware.com/about/legal. All other products or services mentioned in this documentmay be covered by the trademarks, service marks, or product names of their respective owners.
Examples
This information might contain examples of data and reports. The examples include the names ofindividuals, companies, brands, and products. All of these names are fictitious and any similarity tothe names and addresses used by an actual business enterprise is entirely coincidental.
License agreement
This software and the associated documentation are proprietary and confidential to Rocket Software,Inc. or its affiliates, are furnished under license, and may be used and copied only in accordance withthe terms of such license.
Note: This product may contain encryption technology. Many countries prohibit or restrict theuse, import, or export of encryption technologies, and current use, import, and export regulationsshould be followed when exporting this product.

3
Corporate informationRocket Software, Inc. develops enterprise infrastructure products in four key areas: storage, networks,and compliance; database servers and tools; business information and analytics; and applicationdevelopment, integration, and modernization.
Website: www.rocketsoftware.com
Rocket Global Headquarters77 4th Avenue, Suite 100Waltham, MA 02451-1468USA
To contact Rocket Software by telephone for any reason, including obtaining pre-sales informationand technical support, use one of the following telephone numbers.
Country Toll-free telephone number
United States 1-855-577-4323Australia 1-800-823-405Belgium 0800-266-65Canada 1-855-577-4323China 400-120-9242France 08-05-08-05-62Germany 0800-180-0882Italy 800-878-295Japan 0800-170-5464Netherlands 0-800-022-2961New Zealand 0800-003210South Africa 0-800-980-818United Kingdom 0800-520-0439
Contacting Technical Support
The Rocket Community is the primary method of obtaining support. If you have current support andmaintenance agreements with Rocket Software, you can access the Rocket Community and reporta problem, download an update, or read answers to FAQs. To log in to the Rocket Community or torequest a Rocket Community account, go to www.rocketsoftware.com/support.
In addition to using the Rocket Community to obtain support, you can use one of the telephonenumbers that are listed above or send an email to [email protected].

4
Contents
Notices................................................................................................................................................................................... 2
Corporate information......................................................................................................................................................... 3
Chapter 1: Overview of SB/XA Services...............................................................................................................................5
Chapter 2: Enabling SB/XA Services.................................................................................................................................... 7Authorizing your installation for SB/XA Services....................................................................................................7Creating an application definition for SB/XA Services...........................................................................................7Installing Connection Manager................................................................................................................................9
System requirements................................................................................................................................. 10Downloading Connection Manager........................................................................................................... 12Quick installation (Windows and Linux)................................................................................................... 12Network Installation (Windows and Linux)...............................................................................................13
Installing the MVISDEFN account.................................................................................................. 14Installing the Connection Manager............................................................................................... 15Setting up the Admin API Server...................................................................................................16Starting the Connection Manager Admin service.........................................................................17Starting the Connection Manager services on Windows..............................................................17
UNIX installation (AIX, Solaris, HP)............................................................................................................17Configuring the Communications Server for SB/XA Services.............................................................................. 19Securing SB/XA Services with SSL.........................................................................................................................20
Disabling SSL for SB/XA Services...............................................................................................................21
Chapter 3: Verifying that your service is working.............................................................................................................22
Chapter 4: Logging in to SB/XA Services with the SB/XA Service Request Builder.........................................................24
Chapter 5: SB/XA process services.................................................................................................................................... 25Enabling a process for services............................................................................................................................. 25Process service definitions.....................................................................................................................................26
Example: writing a mixed array from the SB/XA Service Request Builder.............................................. 31Calling a process as a service................................................................................................................................ 34Adding the white list to SB/XA Communications Server......................................................................................35Checking for callable services............................................................................................................................... 35
Chapter 6: SB/XA selection services.................................................................................................................................. 36Selecting records with an SB/XA selection service.............................................................................................. 36
Paging, sorting, and filtering with SB/XA selection services....................................................................38Service information in SERVICE.INFO variable..................................................................................................... 38
Chapter 7: SB/XA file services............................................................................................................................................ 40Defining a file service............................................................................................................................................. 40
Processes before and after reads and writes........................................................................................... 42Reading a record with the file service.................................................................................................................. 43Writing a record with the file service.................................................................................................................... 45Example process before read................................................................................................................................ 46Restricting file services...........................................................................................................................................49
Chapter 8: Troubleshooting SB/XA Services..................................................................................................................... 50

5
Chapter 1: Overview of SB/XA ServicesUsing SB/XA Services, you can leverage your existing knowledge and investment in SB+ to drive newtypes of applications, including web and mobile applications. With SB/XA Services, you can extend thereach of your SB/XA application to new devices, languages, and frameworks. SB/XA Services providesa means to call any non-interactive SB/XA processes with an HTTP interface. SB/XA processes areinvoked through a JSON API. SB+ COMMON variables can be set and returned through the API and areautomatically kept in sync between requests.
SB/XA Services builds upon SB+ business logic and extends through the SB/XA middle tier, clients,and Rocket Connection Manager, and a web application development tool or a mobile applicationdevelopment tool such as Rocket Mobile Application Builder to deliver your SB application to a web ormobile environment.
Note: If you have Rocket Web Development Environment, you can upgrade your Web DEScheduler to Connection Manager in order to utilize SB/XA Services.
The following diagram illustrates the architecture of the SB/XA Services environment.
This documentation assumes you have experience developing applications with SB/XA.
The following features are available in this release:
▪ SB/XA login service: Use your SB/XA credentials to log in to an SB/XA application through an SB/XAService call.
▪ SB+ COMMON management: Automatically keep your SB+ COMMON in sync between requests.
▪ SB/XA process service: Call any non-interactive SB/XA processes over a JSON-based HTTP service.Use traditional SB+ COMMON variables as input and output.
▪ Processes have associated service definitions that guide the transformation from dynamic arraysto JSON.
▪ SB/XA selection service: Call any SB/XA selection process and receive the results in JSON.
▪ SB/XA file service: Use SB/XA field definitions to read and write files.

Chapter 1: Overview of SB/XA Services
6
SB/XA Service Request Builder
The SB/XA Service Request Builder, shipped with your Services-enabled installation of SB/XA,functions as a limited, mock mobile application development tool. You can use the request builder tomake calls to your services and verify that they are working properly.

7
Chapter 2: Enabling SB/XA ServicesYou will need to make some configurations in SB/XA and install and configure Rocket ConnectionManager in order to enable SB/XA Services. Complete the steps in the following sections to install andconfigure the necessary components.
Authorizing your installation for SB/XA ServicesTo access SB/XA services, you need to have Services added as a non-chargeable option to your SB/XAserver license.
Prerequisites
Install and configure SB/XA v6.5.0. See SB/XA Getting Started in the SB/XA documentation set foradditional information.
Procedure
1. To have services added as a non-chargeable option to your server license, complete theappropriate step:▪ Rocket partners: Add the services option via the RBC website.
▪ Rocket direct customers: Send a request to [email protected].
▪ Rocket partners' customers: Contact your Rocket Software partner.2. Once licensed, log out of the client and then log in again to make the changes effective before
continuing to the next step.
Next step
Create an application definition for SB/XA Services.
Creating an application definition for SB/XA ServicesTo set up an SB+ account for access by SB/XA Services, create an SB/XA application definition. An SB/XA application definition defines where an SB+ account resides, including the machine name and thedirectory path where the account is located. You must create an application definition for every SB/XAaccount that you want to use with SB/XA Services.
Procedure
1. If you haven’t already created an “SB Instance” for the machine that you intend to use for SB/XAServices, do so now by running /SBINSTANCE.SETUP in Rich Client or SBClient.

Chapter 2: Enabling SB/XA Services
8
2. In the SBInstance Setup window, shown in the following figure, enter a name for the instance,a description, the database type (“uvcs” for UniVerse or “udcs” for UniData), and the MachineId (dns entry or IP address) where the account exists. You can leave the remaining fields in thisscreen unchanged.
3. Click F2–Save.4. Create an application definition by running /APPLICATION.SETUP.5. In the Application Setup window, shown in the following figure, enter an application name,
description, the instance you defined in step 1 that holds the SB+ account, and the path to theaccount that you are using for SB/XA Services.

Installing Connection Manager
9
6. Click the Web services tab.
7. Check the Enable Web Services check box.8. In the Services System Id field, enter the name of the system in which the Services application
resides.You can perform other application configurations on this screen, but it is not necessary at thispoint.
9. Click F2-Save to save the application definition.
Note: The application definition will be used in the login URL for your services, as well as inthe Rocket Connection Manager or Java Scheduler configuration when you set up connectionpooling for this application.
10. Run the process /SEC.USER.SETUP.11. On the Name tab in the User Id Code field, enter an ID for a user that will have access to the
application definition that you created for SB/XA Services. You don’t need to change any of theother fields on this tab.
12. Click the Single Sign-On tab, and in the Valid Applications field, enter the name of theapplication definition for SB/XA Services. You don’t need to change any other fields on this tab.
13. Click F2–Save.
Installing Connection ManagerConnection Manager installation is composed of installing the Connection Manager, the Admin APIServer, and the MVISDEFN account.
Choose from one of the following installations:
▪ Quick installation (Windows and Linux): Use the Quick Installation for a single, local installation.This is typically used for testing and evaluation purposes. All Windows installations need to bedone by an administrator, or someone with administrator privileges.

Chapter 2: Enabling SB/XA Services
10
▪ Network installation (Windows and Linux): Use the Network Installation for installing ConnectionManager components on separate machines. All Windows installations need to be done by anadministrator, or someone with administrator privileges.
▪ UNIX installation (AIX, Solaris, HP): Use UNIX Installation to install Connection Manager on AIX,Solaris, and HP platforms.
Note: For Windows and Linux platforms, Python is used for the installation process, but Python isneither required nor used for UNIX installations (AIX, Solaris, HP).
Next step▪ Review system requirements
▪ Downloading Connection Manager, on page 12
System requirements
The following table describes the different requirements for each platform that must be completedprior to installation:
Platform Requirements
Windows Java (JDK or JRE) version 1.8
Python 3.4 or later (with the latest version of pip). Regardless of yourPython version, it is recommended that you upgrade to the latest version ofpip before beginning Connection Manager installation.
If you are installing Python for the first time, select Add Python 3.X toPATH from the Setup window.
If you already have Python installed, ensure that the path-to-Python\Scripts directory is on your PATH so that pip (Python’spackage manager) can be found.
If you are unsure whether you have Python installed, check from your PCStart menu.
If you are running Universe v11.3.1 or later or UniData v8.2.1 or later, youhave Python.
For more information about Python or help installing Python, see thePython website at https://www.python.org/.

System requirements
11
Platform Requirements
Linux Java (JDK or JRE) version 1.8
Python 3.4 or later (with the latest version of pip). Regardless of yourPython version, it is recommended that you upgrade to the latest version ofpip before beginning Connection Manager installation.
Each Linux distribution has its own recommended mechanism to installPython 3.x. Please follow the recommendations for your particular Linuxdistribution.
For RedHat Enterprise Linux, the following links provide information oninstalling Python 3.x on RHEL 7 and RHEL 6, respectively:
▪ http://developers.redhat.com/products/softwarecollections/get-started-rhel7-python/
▪ http://developers.redhat.com/products/softwarecollections/get-started-rhel6-python/
If you are unsure whether you have Python installed, check from your PCStart menu.
If you are running Universe v11.3.1 or later or UniData v8.2.1 or later, youhave Python.
For more information about Python or help installing Python, see thePython website at https://www.python.org/.
Note: Python is required to use the Command Line Interface forinstallation, and it offers conveniences (such as the Quick Installation) inthe process. For Linux, however, you can forego Python installation if youdo not want Python on your Linux machine. In this case, you can follow theUNIX installation instructions for your Linux system.
AIX Java 1.8:
java version "1.8.0"Java(TM) SE Runtime Environment (build pap6480sr3fp10-20160720_02(SR3fp10))IBM J9 VM (build 2.8, JRE 1.8.0 AIX ppc64-64 Compressed References 20160719_312156 (JIT enabled, AOT enabled)J9VM - R28_Java8_SR3_20160719_1144_B312156JIT - tr.r14.java_20160629_120284.01GC - R28_Java8_SR3_20160719_1144_B312156_CMPRSSJ9CL - 20160719_312156)JCL - 20160719_01 based on Oracle jdk8u101-b13
Python is not required for AIX. The Connection Manager does not usePython on an AIX platform.
Solaris Java (JDK or JRE) version 1.8
Python is not required for Solaris. The Connection Manager does not usePython on a Solaris platform.
HP Java (JDK or JRE) version 1.8
Python is not required for HP. The Connection Manager does not usePython on an HP platform.
Chapter 2: Enabling SB/XA Services
12
Downloading Connection Manager
You can download the Connection Manager from the Rocket Business Connect (RBC) website https://rbc.rocketsoftware.com/. Use your normal business channels to obtain Connection Manager as youwould any other Rocket products.
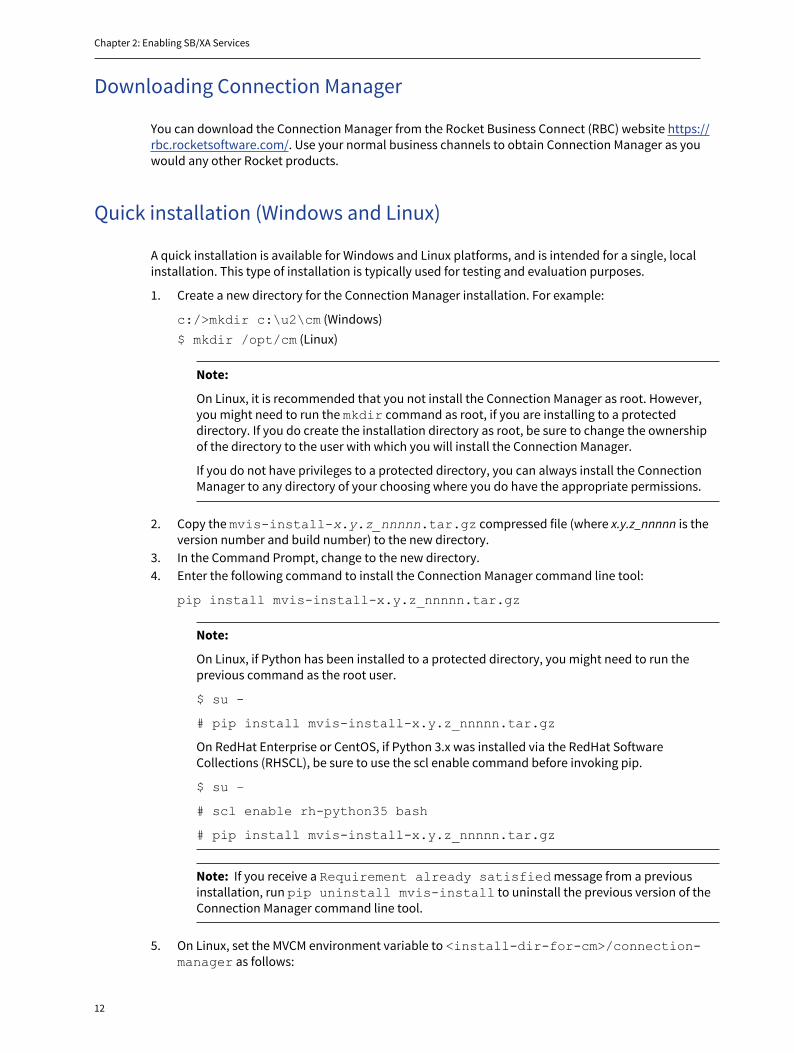
Quick installation (Windows and Linux)
A quick installation is available for Windows and Linux platforms, and is intended for a single, localinstallation. This type of installation is typically used for testing and evaluation purposes.
1. Create a new directory for the Connection Manager installation. For example:
c:/>mkdir c:\u2\cm (Windows)$ mkdir /opt/cm (Linux)
Note:
On Linux, it is recommended that you not install the Connection Manager as root. However,you might need to run the mkdir command as root, if you are installing to a protecteddirectory. If you do create the installation directory as root, be sure to change the ownershipof the directory to the user with which you will install the Connection Manager.
If you do not have privileges to a protected directory, you can always install the ConnectionManager to any directory of your choosing where you do have the appropriate permissions.
2. Copy the mvis-install-x.y.z_nnnnn.tar.gz compressed file (where x.y.z_nnnnn is theversion number and build number) to the new directory.
3. In the Command Prompt, change to the new directory.4. Enter the following command to install the Connection Manager command line tool:
pip install mvis-install-x.y.z_nnnnn.tar.gz
Note:
On Linux, if Python has been installed to a protected directory, you might need to run theprevious command as the root user.
$ su -
# pip install mvis-install-x.y.z_nnnnn.tar.gz
On RedHat Enterprise or CentOS, if Python 3.x was installed via the RedHat SoftwareCollections (RHSCL), be sure to use the scl enable command before invoking pip.
$ su –
# scl enable rh-python35 bash
# pip install mvis-install-x.y.z_nnnnn.tar.gz
Note: If you receive a Requirement already satisfied message from a previousinstallation, run pip uninstall mvis-install to uninstall the previous version of theConnection Manager command line tool.
5. On Linux, set the MVCM environment variable to <install-dir-for-cm>/connection-manager as follows:

Network Installation (Windows and Linux)
13
$ export MVCM=/opt/cm/connection-manager
Note: You might want to set the MVCM environment variable in your shell’s startup file(e.g., .profile/.bashrc/.cshrc) so that you do not have to set the variable every time.
6. Enter cmi-install-all.7. Enter Y to agree to the license and proceed.8. Press Enter to accept the default installation path of the current directory.9. Select the appropriate account flavor, UV for UniVerse or UD for UniData.10. When prompted, enter the correct path for your UniVerse or UniData installation.
For example: C:\U2\UV (Windows) or /usr/uv112 (Linux).11. Enter the User ID that the Connection Manager will use when connecting to the local UniData or
UniVerse system.12. Enter the password for the User ID. You are prompted for this password twice for confirmation.13. Press Enter. The Connection Manager is installed, and the following are created:
▪ connection-manager folder
▪ MVISDEFN account folder, by default at C:\u2\cm\uv or ud\mvisdefn
▪ cm.ini file - created and configured and placed in the connection-manager directory
▪ application.properties file - created and configured and placed in theconnection-manager directory
14. When prompted, enter Y to start the Connection Manager Admin service.
Note: You can also start the Connection Manager Admin service at any time using thefollowing command:
c:\u2\cm\connection-manager> java –jar cm-admin.jar (Windows)
$ java –jar ./cm-admin.jar & (Linux)
15. Open a browser window.16. In the address bar, enter http://localhost:7077 where localhost is the IP address or host
name of the machine where Connection Manager was installed.
The Connection Manager Web Admin UI is displayed. You can log in initially with Admin for username and password.
Network Installation (Windows and Linux)
Prerequisites
Before you begin the installation, ensure you have:
▪ Reviewed the system requirements.
▪ Downloaded the Connection Manager.
To install on a network, complete the following tasks:
▪ Install the MVISDEFN account.
▪ Install the Connection Manager.
▪ Set up the Admin API server.

Chapter 2: Enabling SB/XA Services
14
▪ Start the Connection Manager Admin service.
▪ Start the Connection Manager services on Windows.
Installing the MVISDEFN account
Install the Connection Manager system account (MVISDEFN) on the UniData or UniVerse data servermachine.
1. Create a new directory for the Connection Manager installation similar to the following:c:/>mkdir c:\u2\cm (Windows)
$ mkdir /opt/cm (Linux)
On Linux, it is recommended that you not install the Connection Manager as root. However, youmight need to run the mkdir command as root, if you are installing to a protected directory. Ifyou do create the installation directory as root, be sure to change the ownership of the directoryto the user with which you will install the Connection Manager.
If you do not have privileges to a protected directory, you can always install the ConnectionManager to any directory of your choosing where you do have the appropriate permissions.
2. Copy the mvis-install-x.y.z_nnnnn.tar.gz compressed file (where x.y.z_nnnnn is theversion number and build number) to the new directory.
3. In the Command Prompt, change to the new directory.4. Enter the following command to install the Connection Manager command line tool:
pip install mvis-install-x.y.z_nnnnn.tar.gz
Note: On Linux, if Python has been installed to a protected directory, you might need to runthe previous command as the root user.
$ su -# pip install mvis-install-x.y.z_nnnnn.tar.gz
On RedHat Enterprise or CentOS, if Python 3.x was installed via the RedHat SoftwareCollections (RHSCL), be sure to use the scl enable command before invoking pip.
$ su – # scl enable rh-python35 bash# pip install mvis-install-x.y.z_nnnnn.tar.gz
If you receive a Requirement already satisfied message from a previous installation,run pip uninstall mvis-install to uninstall the previous version of the ConnectionManager command line tool.
5. Run the following command to show a list of all installation commands:cmi-help
6. At the Command Prompt, enter the following:cmi-install-sys-account
This starts the installation of the system account (MVISDEFN) for the Connection Manager.7. When prompted, enter the path for the MVISDEFN account to be installed. If the correct path is
given, press Enter.8. Select the appropriate account flavor, UV for UniVerse or UD for UniData.9. When prompted, enter the correct path for your UniVerse or UniData installation. For example:
C:\U2\UV (Windows) or /usr/uv112 (Linux)
Installing the Connection Manager
15
The MVISDEFN account is installed and located, by default, at C:\u2\cm\uv or ud\mvisdefn(Windows).
Installing the Connection Manager
Install the Connection Manager on either the data server machine or a separate machine with networkaccess to the data server.
1. Create a new directory for the Connection Manager installation similar to the following:c:/>mkdir c:\u2\cm (Windows)
$ mkdir /opt/cm (Linux)
On Linux, it is recommended that you not install the Connection Manager as root. However, youmight need to run the mkdir command as root, if you are installing to a protected directory. Ifyou do create the installation directory as root, be sure to change the ownership of the directoryto the user with which you will install the Connection Manager.
If you do not have privileges to a protected directory, you can always install the ConnectionManager to any directory of your choosing where you do have the appropriate permissions.
2. Copy the mvis-install-x.y.z_nnnnn.tar.gz compressed file (where x.y.z_nnnnn is theversion number and build number) to the new directory.
3. In the Command Prompt, change to the new directory.4. Enter the following command to install the Connection Manager command line tool:
pip install mvis-install-x.y.z_nnnnn.tar.gz
Note: On Linux, if Python has been installed to a protected directory, you might need to runthe previous command as the root user.
$ su -# pip install mvis-install-x.y.z_nnnnn.tar.gz
On RedHat Enterprise or CentOS, if Python 3.x was installed via the RedHat SoftwareCollections (RHSCL), be sure to use the scl enable command before invoking pip.
$ su – # scl enable rh-python35 bash# pip install mvis-install-x.y.z_nnnnn.tar.gz
If you receive a Requirement already satisfied message from a previous installation,run pip uninstall mvis-install to uninstall the previous version of the ConnectionManager command line tool.
5. On Linux, set the MVCM environment variable to install-dir-for-cm/connection-manager as follows:$ export MVCM=/opt/cm/connection-manager
To avoid setting the MVCM variable every time, set the MVCM environment variable in your shell’sstartup file (e.g., .profile/.bashrc/.cshrc).
6. Enter cmi-install-cm to install the Connection Manager.Several things happen with the Connection Manager installation: The MVCM environment variableis created (Windows), and the following files are installed in the MVCM environment variablelocation. This location by default is C:\U2\CM\connection-manger for Windows and /opt/U2/CM/connection-manager for Linux.▪ A cm-admin.jar file, which is the runnable jar file for the Connection Manager Admin API
Server.
Chapter 2: Enabling SB/XA Services
16
▪ A cm.jar file; this is the runnable jar file for the Connection Manager.
▪ A 32-bit and 64-bit .exe file for Connection Manager services: cmservice32.exe andcmservice64.exe
▪ The cm.ini file, which is where you configure the Connection Manager.
▪ The application.properties file, which is where you configure the ConnectionManager Admin API Server.
7. Open the cm.ini file in a text editor such as Notepad.8. Enter the name of the remote server where the MVISDEFN account resides.9. Enter the location of the MVISDEFN account on the remote machine.10. In the User ID field, enter the user ID.11. Leave the Password field blank for now.12. Check to see if the Connection String is correct, reflecting either uvcs for UniVerse or udcs for
UniData.13. Save the cm.ini file.14. Change directory to the location where you installed Connection Manager.15. Enter the following command:
cmi-set-password
16. Press Enter.17. Enter the name of the section of the cm.ini file that you want to set a password, and press
Enter.Default is the section pertaining to the MVISDEFN account; you can set the password for theuser for MVISDEFN or for any other account in your cm.ini file.
The userid parameter for the section in which you are attempting to set a password cannot beempty. It must contain a valid user ID before cmi-set-password can work.
18. At the prompt, enter your password. You will be prompted for it twice for confirmation.19. Press Enter.
The encrypted password is now saved to the cm.ini file.
Setting up the Admin API Server
To set up the Admin API Server, complete the following steps:
1. Open the application.properties file in a text editor. By default, theapplication.properties file is located in the connection-manager folder in theConnection Manager installation directory.
2. In application.properties file, change the db.user to a valid OS user name on localhost.Note that if you need to use a "\" character in the user name, use two slashes ("\\") instead of onein order for the path to be understood by the application.properties file.
3. In application.properties file, change the db.pass to the password for the user from theprevious step. You can copy and paste this value from the cm.ini file that was configured duringConnection Manager installation.
4. Set the db.host to localhost.5. Set the db.service to either uvcs for UniVerse or udcs for UniData.6. Set the db.account entry to the location of your MVISDEFN account. Note that
if you are configuring it to point to a path on a remote Windows machine, theapplication.properties file expects two backslashes “\\” when specifying a backslash “\”character.
7. Save and close the application.properties file.

Starting the Connection Manager Admin service
17
Starting the Connection Manager Admin service
To start the Connection Manager Admin service:
1. From the Control Panel, navigate to Services → Connection Manager Admin → Start the Service.The Connection Manager Admin service starts on port 7077.
2. To stop the Connection Manager Admin service, access the Control Panel and navigate toServices → Connection Manager Admin → Stop the Service.
Starting the Connection Manager services on Windows
There are two ways to start the Connection Manager service: from the Windows Services menu andfrom the Connection Manager Web Admin user interface.
Prerequisites
Your UniVerse or UniData database must be running before you can start the Connection Manager.
To start Connection Manager services from the Services window, access the Windows Serviceswindow, find and select Connection Manager 1.1.1 and click Start the service.
To start services from the Connection Manager Web Admin user interface:
1. Open a browser window.2. In the address bar, enter http://connection-manager-host:7077.
connection-manager-host might be localhost, or the location where you installed ConnectionManager. Additionally, 7077 is the default port for the Web Admin UI, but this port can bechanged.
3. In the Username field, enter your username. Adminis used by default.4. In the Password field, enter your password. Adminis used by default.5. Click Sign In.
The Connection Manager Web Admin UI is displayed.
Note: It is possible that the default sign-in credentials have changed. You can add additionalusers, assign passwords to users, and assign users to groups. Refer to in the ConnectionManager Getting Started Guide.
UNIX installation (AIX, Solaris, HP)
The Connection Manager has two components: the core Connection Manager itself, and an MVISDEFNaccount. You can install either, or both, via the cmappsvr.sh installation script on UNIX systems.
About this task
Follow these instructions to install both the Connection Manager component and the MVISDEFNcomponent on a UNIX data server. If either component is not needed, you can choose No at therelevant prompt during the installation.
Procedure
1. Copy the installation file, mvis-install-1.1.1_nnnnnn-tar.gz, to a location on yourUNIX server.

Chapter 2: Enabling SB/XA Services
18
2. Run the following commands to uncompress the installation files:$ gunzip mvis-install-1.1.1_nnnnnn-tar.gz$ tar -xvf mvis-install-1.1.1-nnnnnn.tar
3. Change directories to mvis-install-1.1.1/mvis_install/unix as follows:$ cd ./mvis-install-1.1.1/mvis_install/unix
4. Make the installation script executable as follows:$ chmod +x cmappsvr.sh
5. Run the cmappsvr.sh script to begin installation as follows and complete the following steps:$ cmappsvr.sh
a. Accept the license file to continue.b. Answer Y at the prompt to install the Connection Manager component.c. Press Enter to install the Connection Manager to the default location, or enter a preferred
location and press Enter.d. Answer Y at the prompt to install the MVISDEFN component.e. Enter UD or UV, depending on whether you are installing for UniData or UniVerse.f. Enter the path to UDHOME or UVHOME, or press Enter to accept the suggested path.g. Enter the path where you want to install the MVISDEFN account, or press Enter to accept the
suggested patThe Connection Manager components are installed on your UNIX server. The next stepsdescribe how to configure them for your system.
6. Use a text editor to open the application.properties file, found by default in theConnection-Manager directory in the Connection Manager installation location, and thencomplete the following steps to make changes to the [DB] section:a. Accept the default for the db.port field.b. In the db.user field, enter the operating system user ID that will be used to access the
MVISDEFN account.c. Leave the db.pass field blank at this point.d. In the db.host field, enter the host where the MVISDEFN account resides.e. n the db.account field, enter the full path to the MVISDEFN location on the db.host machine.f. In the db.service field, enter udcs for UniData or uvcs for UniVerse
Note: It is not recommended to use root for db.user.
7. Save the application.properties file.8. Generate an encrypted form of the password for the db.user by running the following program,
which accepts a password and then returns an encrypted string for the password:$ java -jar hazify.jar -iEnter password: <hidden-password> [Enter]Enter password again: <hidden-password> [Enter] Encrypted password is: 5ngyZOfm3M0kxWUi2SdUlA==
9. Copy the encrypted password string and paste it into the db.pass field in theapplication.properties file.
10. Save the application.properties file.The API Server is configured. At this point, you can start the API Server.
11. $ start-admin.sh &
It might take several minutes for the service to start, depending on your installationconfiguration.

Configuring the Communications Server for SB/XA Services
19
Note: Ensure that the Java executable is set in your PATH environment variable.
You can check for runtime errors in the cm-admin.log file, which is located by default in thedirectory.
The API Server is now started. By default, it is listening on port 7077. You can access it in abrowser from http://host:7077. The default login user name and password are and .
You can stop the Admin service at any time by running stop-admin.sh.
Configuring the Communications Server for SB/XAServices
Seven flags on the SB/XA Communications Server Configuration screen pertain to SB/XA Services. Youneed to change at least one of them to activate your services. Follow the steps in this section.
About this task
Whenever you make changes to the SB/XA Communications Server configuration, you must run RichClient as an administrator on the computer on which the Communications Server is installed. If youmake changes to the configuration while not running the client as an administrator, the changes willnot take effect.
Procedure
1. Run SB/XA Rich Client as an administrator on the computer where your SB/XA CommunicationsServer is installed and log into an account.
2. From the lower-right corner of the main window, click Options > Communications ServerConfiguration to open the SB/XA Communications Server Configuration screen, shown in thefollowing figure.
The bottom seven flags on this screen apply to SB/XA Services. The values in the Scheduler host,Scheduler port, and SB/XA Services Port fields are irrelevant if the value in the Start SB/XAServices field is set to false or is empty.
3. Change the value in the Start SB/XA Services field to true.4. In the Scheduler host field, specify the location of Rocket Connection Manager.5. The Scheduler port is 7070 by default, and the SB/XA Services Port is 9293 by default. You might
need to change the Scheduler port if you for any reason changed the default Connection Managerport. You might need to change the SB/XA Services port if the default port is in use.

Chapter 2: Enabling SB/XA Services
20
6. In the SB/XA Services uses SSL field, enter true to use SSL or false if you do not want to use SSL.For more information about using SSL with SB/XA Services, please see Securing SB/XA Serviceswith SSL.
7. Use the SB/XA Services Origins field for Cross Origins Resource Sharing (CORS). By enteringdomains separated by semicolons in the SB/XA Services Origins field, you allow SB/XA Servicesto work for HTML interfaces that reside on specified domains outside the Communications Serverdomain (and thereby prohibit Services from other domains). This field has no value by default;if you leave it as such, Services will work for all CORS requests. You can enter null as a name inyour list to allow connections that do not provide an Origin with the CORS request. If you create alist and do not include null, the Communications Server will reject such requests.
8. Use the SB/XA Services Max Age field to set the maximum number of seconds the client shouldcache the CORS response. This is used to reduce the number of preflight CORS requests thatare used to check the server CORS status. This value is processed by the client that makes therequests, so the number specified may be ignored or clamped to a client-specific range. If thefield is left blank, the server will not ask for any preflight caching.
9. Click Save.10. Restart the Communications Server to make your changes effective and start your SB/XA Services.
Next step
Verifying that your service is working.
Securing SB/XA Services with SSLIt is recommended that you secure your services with SSL, though you can forego SSL if you are simplytesting in a closed system. Follow the steps in this section to set up SSL.
1. Enable SSL for SB/XA Communications Server as follows.a. Run Rich Client as administrator.b. In the lower-right corner of the main window, click Options → Communications Server
Configuration.c. Set the SB/XA Services uses SSL property to True.d. Click Save.e. Close the client and restart SB/XA Communications Server to make the changes effective.
2. Purchase or create a certificate to use with SB/XA Services. If you need help with this task, pleasesee "Creating a signing certificate" and "Creating a server certificate" in SB/XA Getting Started.
3. Install your certificate to the Services port as follows:a. Run the Command Prompt as administrator.b. Enter certmgr -v -all -s -r LocalMachine My and press Enter. The Certificate
Manager console displays all of your certificates.c. Find the certificate you obtained or created in Step 2 and copy its associated SHA1
Thumbprint (a hexadecimal number).d. In the Command Prompt, enter netsh http add urlacl url=https://+:9293/
user=Everyone and press Enter. The Services port is 9293 by default; if you are using adifferent port, substitute that number.
e. Enter netsh http add sslcert ipport=0.0.0.0:9293 certhash=SHA1Thumbprint for your certificate (with spaces removed)appid={00000000-0000-0000-0000-000000000000}

Disabling SSL for SB/XA Services
21
Disabling SSL for SB/XA Services
1. Run Rich Client as administrator.2. In the lower-right corner of the main window, click Options → Communications Server
Configuration.3. Change the SB/XA Services uses SSL property to False.4. Run the Command Prompt as administrator.5. Enter netsh http delete sslcert ipport=0.0.0.0:9293. Note that 9293 is the
default Services SSL port; if you used a different port, substitute that number here.6. Enter netsh http delete urlacl url=https://+:9293/. Note that 9293 is the
default Services SSL port; if you used a different port, substitute that number here.7. Restart SB/XA Communications Server.

22
Chapter 3: Verifying that your service is workingAt this point you are ready to try to execute a paragraph as a service. A successful test indicates thatyour service is working.
Procedure
1. Start SB/XA Rich Client or SBClient.2. Use the /PD.P process to add the paragraph P.HELLO.SVC to your application, under the
system you defined as the system for this application in the application definition.a. Enter P.HELLO.SVC as the Process Name.b. Add the line @VALUE = “Hello, from SB/XA Service!” to the Paragraph Lines section.c. Click F7.Service.d. Enter Y in the Callable by Services field.e. In the row for the VALUE common variable, enter IO to mark the variable as type input and
output.f. Press F2 to save.

Verifying that your service is working
23
3. In your SB/XA installation media, navigate to Extra → SBXA Service Request Builder, and double-click SBXAReqBuilder.exe to launch the Service Request Builder.
The Method is Login by default. You must always log in before using the Service Request Builder.Intuitive help is available on the current method through the ? button.
4. In the to field, enter the name of the application definition you set up for your SB/XA Services.5. In the Parameters area, enter your SB/XA user name and password.6. Click Submit.
You are logged in to SB/XA Services, and you now have a session ID.7. Change the Method drop-down box to Paragraph, and enter the name of your process,
P.HELLO.SVC, in the Command field.8. Click Submit to invoke the service.
If the service is working properly, the message "Hello, from SB/XA Service!" is displayed in theResponse area.

24
Chapter 4: Logging in to SB/XA Services with theSB/XA Service Request Builder
Procedure
1. In your SB/XA installation media, navigate to Extra → SBXA Service Request Builder, and double-click SBXAReqBuilder.exe to launch the Service Request Builder.
The Service Request Builder is displayed. The Method is Login by default. You must always login before using the Service Request Builder. Intuitive help is available on the current methodthrough the ? button.
2. In the to field, enter the name of the application definition you set up for your SB/XA Services.3. In the Parameters area, enter your SB/XA user name and password.4. Click Submit.
You are logged in to SB/XA Services, and you now have a session ID.

25
Chapter 5: SB/XA process servicesWith SB/XA process services, you can call any non-interactive SB+ process from a mobile or webapplication. The inputs and outputs to an SB/XA process service can be SB+ COMMON variables, SB+Equate names, and SB+ field names.
You can call a process as a service without altering the process or adding any additional information toit. But you must at least enable the process for services. Please see Enabling a process for services.
You can also more specifically define the service to control the way your process behaves in a mobileor web environment. See Process service definitions.
After your process is enabled for Services and optionally given service definitions, you can call theprocess as a service. See Calling a process as a service..
SB/XA Services understands and uses your existing SB+ business logic and definitions, such asconversions, derived values, and validation codes on field definitions.
Restrictions
▪ SB/XA process services support only those SB+ processes that do not involve direct screen input oroutput.
▪ SB+ field names can be used as input and output only when they are “in context.” That is to say,your process or service call must first read the file containing the field names that you want to useas input and output.
▪ Some SB+ COMMON variables are not saved or restored between service calls. In particular, anySB+ COMMON variable that holds a file handle is not saved or restored. Section 3 SB+ COMMONvariables also are not saved or restored. For more information about COMMON variables, see theSB/XA Application Server Reference Manual.
Enabling a process for servicesWith SB/XA process services, you can call any non-interactive SB+ process from a mobile or webapplication. You must enable that process for services as follows.
Procedure
1. In Rich Client, type / to access the Process Id prompt.
Note: You also can perform this task in SBClient.
2. Enter the process type for the process that you want to enable for services; for instance, PD.P fora paragraph process or PD.S for a selection process, and press Enter.The following processes are eligible to be called as services:▪ Assignment PD.A
▪ Conditional PD.C
▪ File Update PD.F
▪ Selection PD.S
▪ Paragraph PD.P
▪ Shell Statements PD.SHL
▪ Shell Wrapper PD.H
Chapter 5: SB/XA process services
26
▪ Job Schedule PD.J
▪ User subroutine PD.B
▪ Transactions PD.T
▪ Periodic update PD.U
▪ Default PD.D
▪ Validation PD.V3. Enter the name of your process, and press Enter.
The Process Definition Screen is displayed.4. Click F7.Service.
The Service Definition screen is displayed.5. Enter Y in the Callable by Services field.6. If you do not wish to make any further alterations to your service definition, click F2.Save.
Your process is added to the Services "white list" of callable services and is available the nexttime you log into your web or mobile client. You can proceed with your service definition asdescribed in Process service definitions or proceed to Calling a process as a service or Selectingrecords with an SB/XA selection service. You can optionally add the Services "white list" to SB/XACommunications Server for greater efficiency. For more information, please see Adding the whitelist to SB/XA Communications Server.
Process service definitionsProcess service definitions allow you to enable your SB+ process for services and optionally allow youto define the way your service handles the elements of your SB+ process.
You can use your SB+ processes as services without making significant alterations to your processes,as described in Calling a process as a service. But you must, at a minimum, access the ServiceDefinition Screen to enable your process for services.
You can do this by clicking F7.Service in the Process Defn window in SB/XA.
When you click F7.Service, the Service Definition window is displayed.
Process service definitions
27
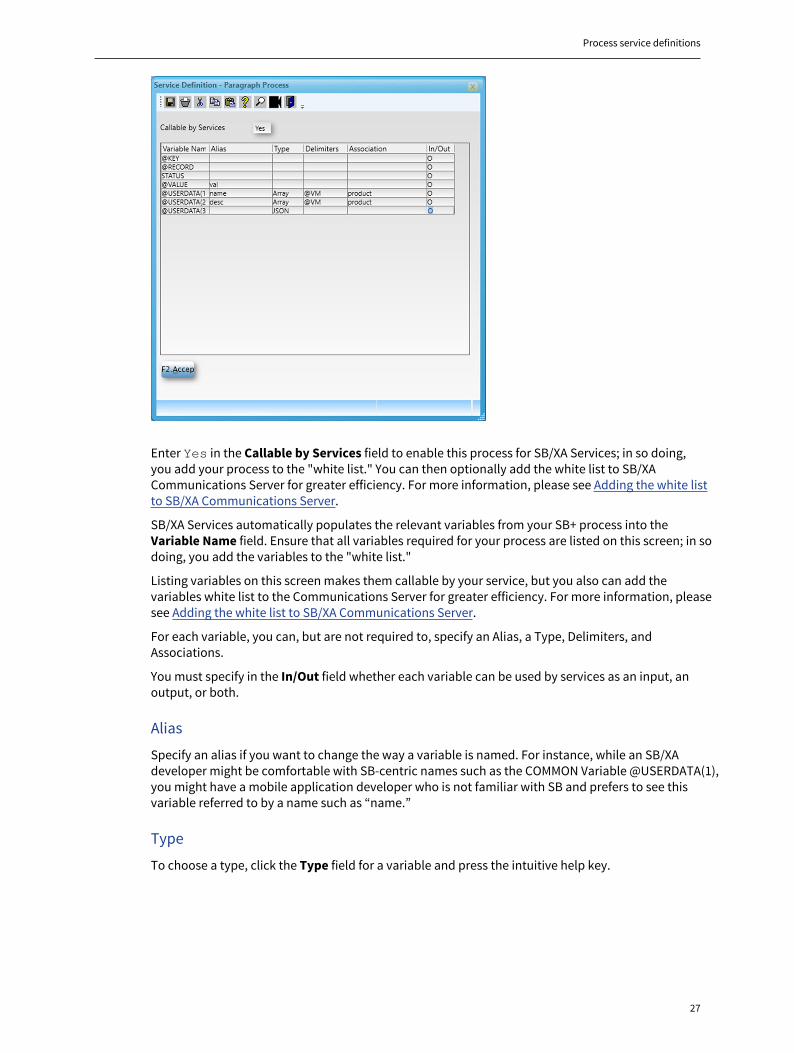
Enter Yes in the Callable by Services field to enable this process for SB/XA Services; in so doing,you add your process to the "white list." You can then optionally add the white list to SB/XACommunications Server for greater efficiency. For more information, please see Adding the white listto SB/XA Communications Server.
SB/XA Services automatically populates the relevant variables from your SB+ process into theVariable Name field. Ensure that all variables required for your process are listed on this screen; in sodoing, you add the variables to the "white list."
Listing variables on this screen makes them callable by your service, but you also can add thevariables white list to the Communications Server for greater efficiency. For more information, pleasesee Adding the white list to SB/XA Communications Server.
For each variable, you can, but are not required to, specify an Alias, a Type, Delimiters, andAssociations.
You must specify in the In/Out field whether each variable can be used by services as an input, anoutput, or both.
Alias
Specify an alias if you want to change the way a variable is named. For instance, while an SB/XAdeveloper might be comfortable with SB-centric names such as the COMMON Variable @USERDATA(1),you might have a mobile application developer who is not familiar with SB and prefers to see thisvariable referred to by a name such as “name.”
Type
To choose a type, click the Type field for a variable and press the intuitive help key.

Chapter 5: SB/XA process services
28
Type Description
Array The value of this SB+ variable is returned as a JSON array by your process service.This type is ideal for multivalued data.
Note: If you return a variable as an array, you must ensure that the delimitersused in your data match the value in the Service Definition. Delimiters field. If nodelimiters are specified in the Delimiters column, the default delimiter of @VM isused.
Implicit This is the default setting. If you choose Implicit, SB/XA Services makes a runtimedetermination to return the value of a variable either as a string or as a JSON array.The determination is based on whether the variable’s value contains delimiters; if itdoes, the variable likely is best displayed as an array.
JSON The variable is returned as a raw JSON object. This allows you to create customJSON objects in your SB+ processes and pass them as they are through services toyour mobile application.
String The variable is returned as a string.
You can pass combinations of arrays with different delimiters (@AM, @VM, @SVM) to and from the SB/XA Service Request Builder. For an example, please see Example: writing a mixed array from the SB/XAService Request Builder, on page 31.
Delimiters
To specify the delimiters to be used for an array-type variable, click the Delimiters field and press theintuitive help key.
Process service definitions
29
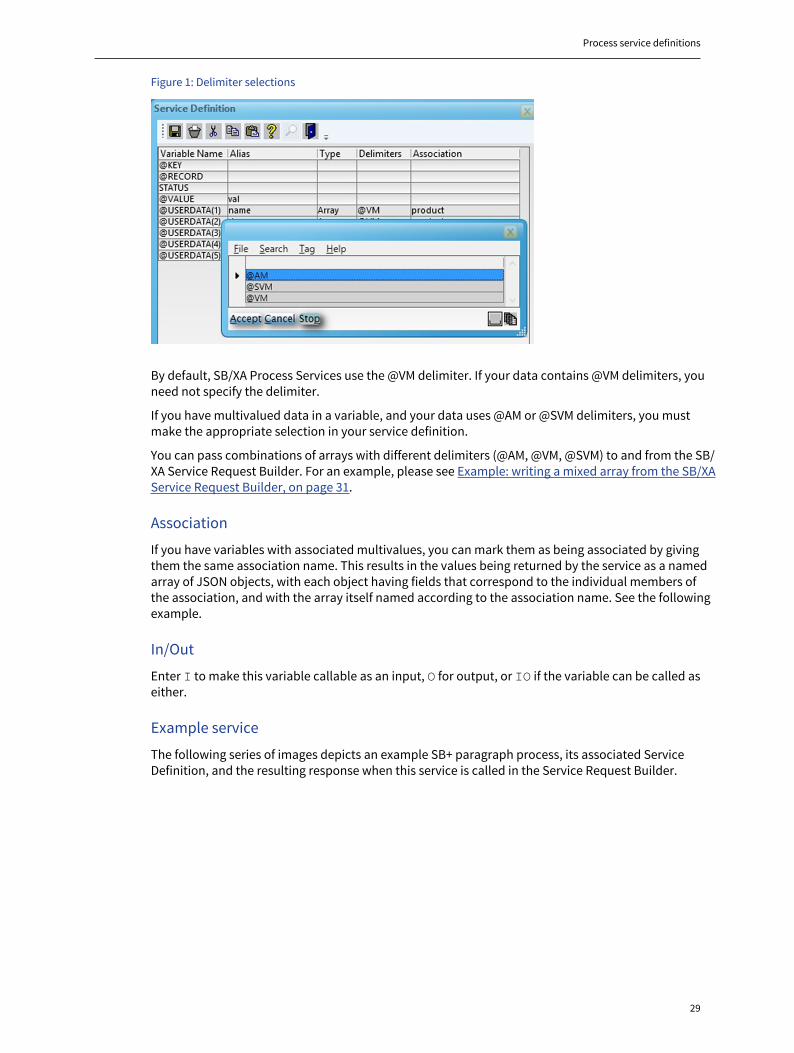
Figure 1: Delimiter selections
By default, SB/XA Process Services use the @VM delimiter. If your data contains @VM delimiters, youneed not specify the delimiter.
If you have multivalued data in a variable, and your data uses @AM or @SVM delimiters, you mustmake the appropriate selection in your service definition.
You can pass combinations of arrays with different delimiters (@AM, @VM, @SVM) to and from the SB/XA Service Request Builder. For an example, please see Example: writing a mixed array from the SB/XAService Request Builder, on page 31.
Association
If you have variables with associated multivalues, you can mark them as being associated by givingthem the same association name. This results in the values being returned by the service as a namedarray of JSON objects, with each object having fields that correspond to the individual members ofthe association, and with the array itself named according to the association name. See the followingexample.
In/Out
Enter I to make this variable callable as an input, O for output, or IO if the variable can be called aseither.
Example service
The following series of images depicts an example SB+ paragraph process, its associated ServiceDefinition, and the resulting response when this service is called in the Service Request Builder.

Chapter 5: SB/XA process services
30
SB+ paragraph process
Service definition

Example: writing a mixed array from the SB/XA Service Request Builder
31
Service Request Builder response
Example: writing a mixed array from the SB/XA Service RequestBuilder
You can pass arrays delimited with @AM, @VM, and @SVM to and from the SB/XA Service RequestBuilder, including combinations of delimiters, as shown in the following example.
Paragraph process definition

Chapter 5: SB/XA process services
32
Associated service definition
The process in the SB/XA Service Request Builder

Example: writing a mixed array from the SB/XA Service Request Builder
33
Resulting data written to file

Chapter 5: SB/XA process services
34
Calling a process as a serviceYou can call any non-interactive SB+ process as a process service from a web or mobile applicationand from the SB/XA Service Request Builder. Use the Service Request Builder to verify that yourprocess service is working before integrating the service into your mobile or web application. Notethat your process must be marked as "Callable by Services."
Prerequisites
Refer to:
▪ Logging in to SB/XA Services with the SB/XA Service Request Builder, on page 24
Procedure
1. In the SB/XA Services Request Builder, select Process from the Method drop-down list.2. In the Command field, enter the name of an SB+ process defined in the application you are using
for this service.3.
In the Parameters area, click the Add Parameter button to add the parameters (such asCOMMON variables and fields) that you want to use as input and output for your service. Theseparameters populate the Payload area, which is delivered when you click Submit. You alsocan manually edit the contents of the payload (for instance pasting in a payload you havemanipulated in another tool such as Notepad). When you manually edit the payload, you mustclick the Refresh button in the upper-right corner of the Payload area before you click Submit.
Tip:
You can use the Add Array button to add a parameter that you want to be displayed as anarray. This allows you to create and manipulate an array in the Payload area of the ServiceRequest Builder.
4. Click Submit.
Adding the white list to SB/XA Communications Server
35
Results
The results of your process call are returned in the Response area of the Service Request Builder.
You can save your service from the Service Request Builder and call it again at a later time. Use the Filemenu in the upper-left corner of the Service Request Builder to save a service, and use the Load optionfrom the File menu to call a saved service again at a later time.
Adding the white list to SB/XA Communications ServerYou must list and define COMMON variables as input, output, or IO in your service definitions inorder to make them callable by services, and you must mark processes as "Callable by Services"in order to make service calls to them. In so doing, you build a "white list" of callable variablesand processes. That "callable" check is done at the Application Server level. For efficiency, youcan use the SERVICES.WHITELIST process to add the variables and processes "white list" to SB/XACommunications Server, which allows the check to be done at the Communications Server level.Follow the steps in this section to add the white list to the Communications Server.
1. In Rich Client, type / to access the Process Id prompt.2. Type SERVICES.WHITELIST and press Enter.3. In the Services Whitelist screen, enter Y in the Use Communications Server Whitelist field.4. Click F2.Save.
Variables and processes that are enabled for services through the Service Definition screen areadded to the Communications Server white list, and white list checks for services calls are doneat the Communications Server level instead of the Application Server level. The CommunicationsServer-level check takes effect the next time you log into your web or mobile client.
Checking for callable servicesYou can run a report to verify which processes in your account are callable by SB/XA Services.
Procedure
1. In Rich Client, type / to access the Process Id prompt.
Note: You can also perform this task from SBClient.
2. Type TM (for Tools Menu), and press Enter.3. Click Other Utilities → House Keeping → Callable Services.
All processes that are callable by SB/XA Services for this account are displayed in a report.

36
Chapter 6: SB/XA selection servicesSB/XA selection processes allow you to look up multiple records from a file and limit the selectionsbased on specified criteria. With SB/XA selection services, you can run these selection processes from amobile or web environment.
SB/XA Services understands and uses your existing SB+ business logic and definitions, such asconversions, derived values, and validation codes on field definitions.
Before you can call a selection process as a service, you must enable the selection for services. SeeEnabling a process for services.
Then, verify that selection services are working with the SB/XA Service Request Builder. See Selectingrecords with an SB/XA selection service.
By appending query string information to the URL of your selection, you can also perform paging,sorting, and filtering.
Selecting records with an SB/XA selection serviceYou can use the SB/XA Service Request Builder to select records with an SB/XA selection service.Success with these services in the Service Request Builder indicates that your service is working, andyou are now ready to use the service in a third-party mobile application development tool such asRocket Mobile Application Builder or in a web application.
Prerequisites
Logging in to SB/XA Services with the SB/XA Service Request Builder, on page 24
Procedure
1. In the SB/XA Service Request Builder, choose Select from the Method drop-down list.2. In the Command field, enter the name of any SB/XA select process in your application.
Note: If a Select process is run as an SB/XA Service, the process defined in the Process Afterslot is not run.

Selecting records with an SB/XA selection service
37
3. Click Submit.
The SB/XA selection service returns a JSON-encoded result of the SB/XA selection process in theResponse area of the Service Request Builder.
If you have aliases defined for field names in the associated field definitions, those aliases areused in the JSON response and can also be used in the parameters sent from the Service RequestBuilder.
Note: SB/XA selection processes generally return only the first value if you use a multivaluedfield as a display field. But with SB/XA Services, all values for the multivalue are returned inthe response if you call the same selection process as a selection service. The response is aJSON array.
If the results span more than one page, the paging buttons (visible in the preceding image) areenabled to page through the results.
Additionally you can page, sort, and filter your selected results by appending query stringparameters to the URL. See Paging, sorting, and filtering with SB/XA selection services, on page38.
You can save your service from the Service Request Builder and call it again at a later time. Usethe File menu in the upper-left corner of the Service Request Builder to save a service, and use theLoad option from the File menu to call a saved service again at a later time.

Chapter 6: SB/XA selection services
38
Paging, sorting, and filtering with SB/XA selection services
You can page through result sets, and sort and filter result sets, by appending the URL of your queryin your mobile or web application. The SB/XA Service Request Builder does not support this feature atv6.5.0. You must do this with your mobile application development tool or in a free utility such as Curl.
Paging
To page through the result set, append &pageNo=page_number to your URL.
For example, the following URL displays the second page of results from using the BRANCH.SELselection process from the SBDEMO account, called through an SB/XA Selection Process:
http://localhost:9293/Select/BRANCH.SEL?&pageNo=2
Sorting
To sort the result set, append &sortBy=field_name to your URL.
For example, the following URL sorts the results of an SB/XA Selection Service call based on theBRANCH.SEL selection process in SBDEMO. The results are sorted by the FAX field.
http://localhost:9293/Select/BRANCH.SEL?&sortBy=FAX
Filtering
You can filter on selection processes that have pre-run questions defined. You specify pre-runquestions with the Selection Criteria field in the Process Defn — Selection screen. For moreinformation, see “Selection process definitions” in the SB/XA Developer’s Guide.
You also can use expressions instead of pre-run questions in your selection criteria, and in that case,your SB/XA selection service will return the results of the expression.
For example, you can replace the selection criteria (a pre-run question) of the CAR.SEL process inSBDEMO (REG.NO = "?]" OR MANUF = "??]" OR MODEL = "??]PFORCEPRERUN,3" HEADING "SelectionChoice") with an expression such as MANUF = "(@WORK<1>)". The value passed from the selectionservice is then used as the value of this expression.
To filter the result set, append &field_name=value to the URL.
For example, the following URL filters the results of an SB/XA Selection Service call based on theBRANCH.SEL selection process in SBDEMO. The results are filtered so that only records with a branchname equal to Chester are returned.
http://localhost:9293/Select/BRANCH.SEL?&BRANCH.NAME=CHESTER
Service information in SERVICE.INFO variableYou can use the SB+ COMMON variable SERVICE.INFO to further define the behavior of selectionservices.
Table 1: SERVICE.INFO fields
Field Description
1 Session ID2 Service type (0 - process, 1 - read, 2 - write, 3 - select)3 Process (currently used for select process)4 DISP MODE VM Text - if DISP has been called

Service information in SERVICE.INFO variable
39
Field Description
5 List of field names for pre-run question substitution6 Matched list of values7 Override sort fields in selection if not empty8 Number of items per page (overwrites what is set on the selection process)

40
Chapter 7: SB/XA file servicesSB/XA file services allow you to read from and write to UniVerse or UniData files from a mobile or webapplication while using SB/XA field definitions to guide the read or write.
Before you can perform reads and writes, you must define a file service. Follow the steps in Defining afile service, on page 40.
Optionally, you can use group security setup to restrict file write and read services for an account. Formore information, please see Restricting file services, on page 49.
SB/XA Services understands and uses your existing SB+ business logic and definitions, such asconversions, derived values, and validation codes on field definitions.
Note that write services utilize existing field validations. If a validation fails, the write is stopped andan error message is returned in the JSON response.
Defining a file serviceThe SB/XA file service allows you to read from and write to database files through mobile applications.You must define an SB/XA File Service before you can perform these reads and writes.
Procedure
1. Launch SB/XA Rich Client and log in to the account you enabled for SB/XA Services.
Note: You can also perform this operation in SBClient.
2. Type / to access the Process Id prompt, type FSD (File Service Definition) and press Enter. Or, youcan select Tools → Other Tools → SBXA Service File Defns.You are prompted for the Dict File Name, or the file you want to enable for an SB/XA File Service.
Defining a file service
41
3. Enter a file name and press Enter.
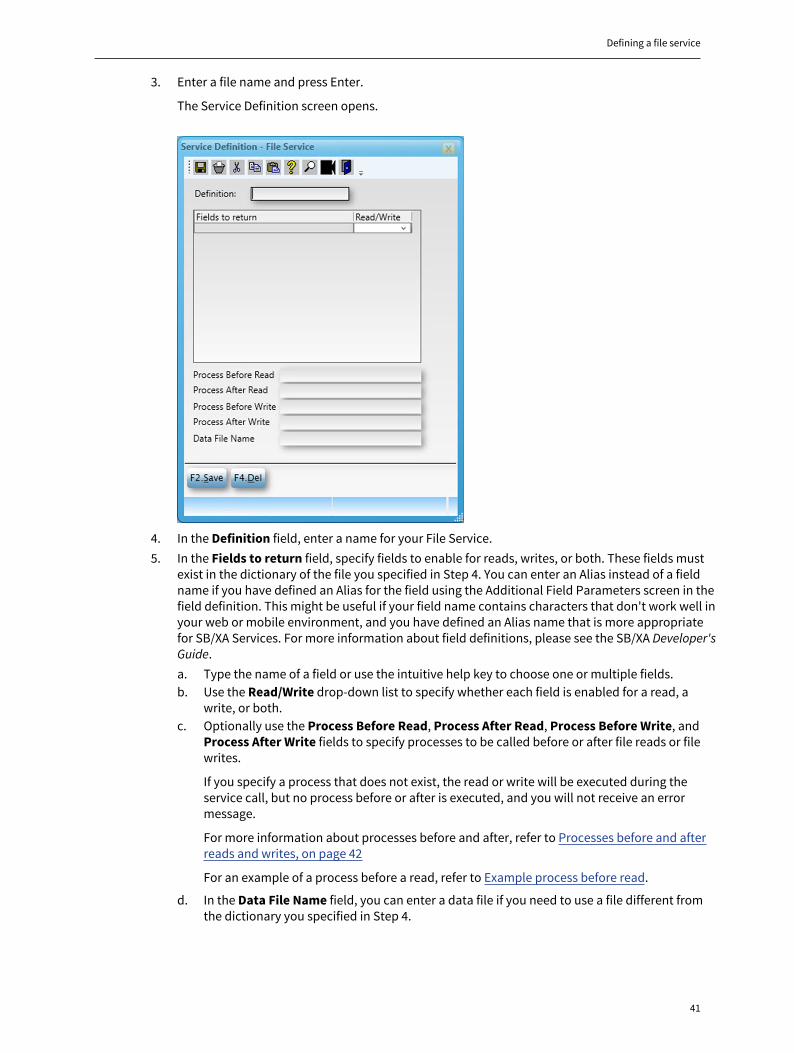
The Service Definition screen opens.
4. In the Definition field, enter a name for your File Service.5. In the Fields to return field, specify fields to enable for reads, writes, or both. These fields must
exist in the dictionary of the file you specified in Step 4. You can enter an Alias instead of a fieldname if you have defined an Alias for the field using the Additional Field Parameters screen in thefield definition. This might be useful if your field name contains characters that don't work well inyour web or mobile environment, and you have defined an Alias name that is more appropriatefor SB/XA Services. For more information about field definitions, please see the SB/XA Developer'sGuide.a. Type the name of a field or use the intuitive help key to choose one or multiple fields.b. Use the Read/Write drop-down list to specify whether each field is enabled for a read, a
write, or both.c. Optionally use the Process Before Read, Process After Read, Process Before Write, and
Process After Write fields to specify processes to be called before or after file reads or filewrites.
If you specify a process that does not exist, the read or write will be executed during theservice call, but no process before or after is executed, and you will not receive an errormessage.
For more information about processes before and after, refer to Processes before and afterreads and writes, on page 42
For an example of a process before a read, refer to Example process before read.
d. In the Data File Name field, you can enter a data file if you need to use a file different fromthe dictionary you specified in Step 4.

Chapter 7: SB/XA file services
42
Note:
Generally, if your VOC points to a local data file and a remote dictionary, you do not needthe Data File Name field. If you have pointers separately to dictionaries and data files, asshown in the following example, you must use the Data File Name field so that the SRDprocess can determine the difference between data and dictionary files.
TEST account – TEST.STOCK (data only)1 F2 TEST.STOCK3 D_TEST.STOCK
TEST account – TESTV.STOCK (dict only)1 Q2 XYZ.MASTER3 TESTV.STOCK
XYZ.MASTER account – TESTV.STOCK1 F2 D_TESTV.STOCK3 D_TESTV.STOCK
6. Click F2–Save.
Next step
After you define a File Service, you can perform reads, writes, or both. Follow the steps in Reading arecord with the file service, on page 43 or Writing a record with the file service, on page 45.
Processes before and after reads and writes
For SB/XA file services, you can specify processes before and after reads and writes on the ServiceDefinition Screen.
Process before read
@MAINFILE contains the file name, and @KEY is the key to be read.
To prevent the read, set the following parameters:
@RTN.FLG=1
@VALUE="message to return to service"
On error, messages returned are prefixed with "26"
Process after read
@MAINFILE contains the file name, and @KEY is the key that is read. @RECORD contains the recordthat is read.
To prevent the read, set the following parameters:
@RTN.FLG=1
@VALUE="message to return to service"

Reading a record with the file service
43
On error, messages returned are prefixed with "27"
Process before write
@MAINFILE contains the file name, and @KEY is the key to be written. @RECORD contains the recordto be written.
To prevent the write, set the following parameters:
@RTN.FLG=1
@VALUE="message to return to service"
On error, messages returned are prefixed with "28"
Process after write
@MAINFILE contains the file name, and @KEY is the key that was written. @RECORD contains therecord that was written.
To flag an error to the service, set the following parameters:
@RTN.FLG=1
@VALUE="message to return to service"
Note: The record has already been written at this stage.
On error, messages returned are prefixed with "29"
For an example of a process before a read, refer to Example process before read, on page 46.
Reading a record with the file serviceYou can use the SB/XA Service Request Builder to read and write records through the file service.Success with these services in the Service Request Builder indicates that your service is working, andyou are now ready to use the service in a mobile application development tool such as Rocket MobileApplication Builder.
Prerequisites
Logging in to SB/XA Services with the SB/XA Service Request Builder, on page 24

Chapter 7: SB/XA file services
44
Procedure
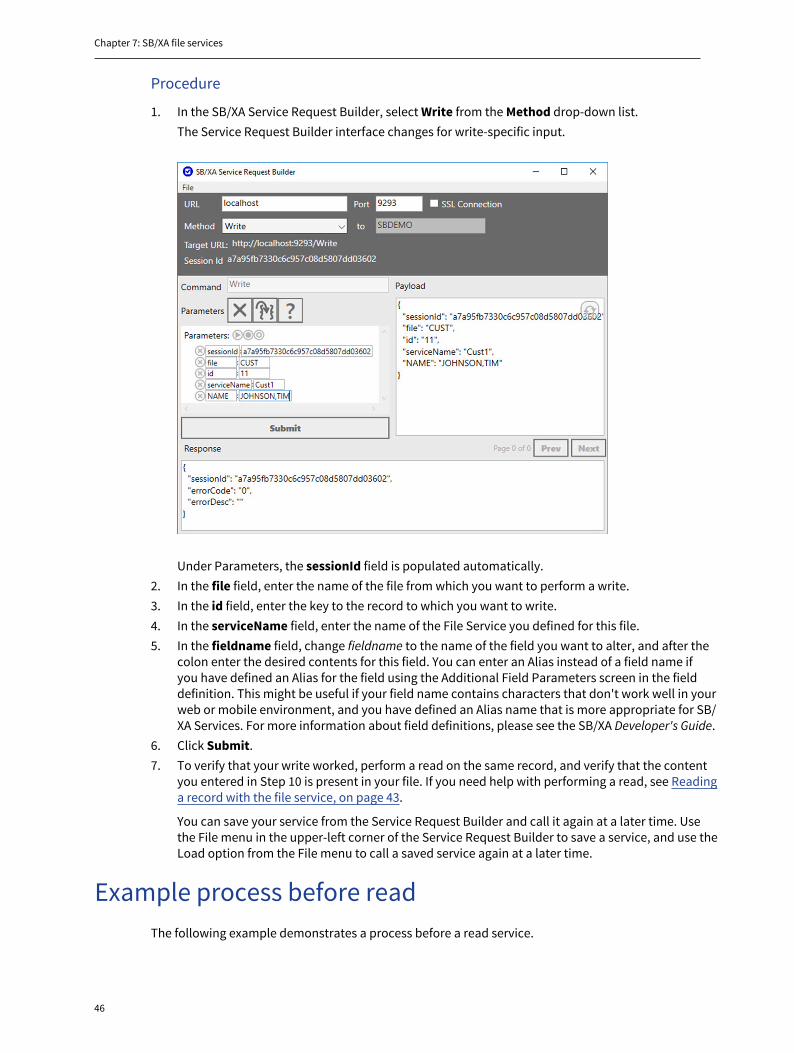
1. In the SB/XA Service Request Builder, select Read from the Method drop-down list.The Service Request Builder interface changes for read-specific input.
Under Parameters, the sessionId field is populated automatically.2. In the file field, enter the name of the file from which you want to perform a read.3. In the id field, enter the key to the record you want to read.4. In the serviceName field, enter the name of the File Service you defined for this file.

Writing a record with the file service
45
5. Click Submit.The specified record in the specified file is read, and the result set is returned as a JSON object inthe Response area of the Service Request Builder.
You can save your service from the Service Request Builder and call it again at a later time. Usethe File menu in the upper-left corner of the Service Request Builder to save a service, and use theLoad option from the File menu to call a saved service again at a later time.
Writing a record with the file serviceYou can use the SB/XA Service Request Builder to read and write records through the file service.Success with these services in the Service Request Builder indicates that your service is working, andyou are now ready to use the service in a mobile application development tool such as Rocket MobileApplication Builder.
Prerequisites
Logging in to SB/XA Services with the SB/XA Service Request Builder, on page 24
Note that write services utilize existing field validations. If a validation fails, the write is stopped andan error message is returned in the JSON response.
Chapter 7: SB/XA file services
46
Procedure
1. In the SB/XA Service Request Builder, select Write from the Method drop-down list.The Service Request Builder interface changes for write-specific input.
Under Parameters, the sessionId field is populated automatically.2. In the file field, enter the name of the file from which you want to perform a write.3. In the id field, enter the key to the record to which you want to write.4. In the serviceName field, enter the name of the File Service you defined for this file.5. In the fieldname field, change fieldname to the name of the field you want to alter, and after the
colon enter the desired contents for this field. You can enter an Alias instead of a field name ifyou have defined an Alias for the field using the Additional Field Parameters screen in the fielddefinition. This might be useful if your field name contains characters that don't work well in yourweb or mobile environment, and you have defined an Alias name that is more appropriate for SB/XA Services. For more information about field definitions, please see the SB/XA Developer's Guide.
6. Click Submit.7. To verify that your write worked, perform a read on the same record, and verify that the content
you entered in Step 10 is present in your file. If you need help with performing a read, see Readinga record with the file service, on page 43.
You can save your service from the Service Request Builder and call it again at a later time. Usethe File menu in the upper-left corner of the Service Request Builder to save a service, and use theLoad option from the File menu to call a saved service again at a later time.
Example process before readThe following example demonstrates a process before a read service.

Example process before read
47
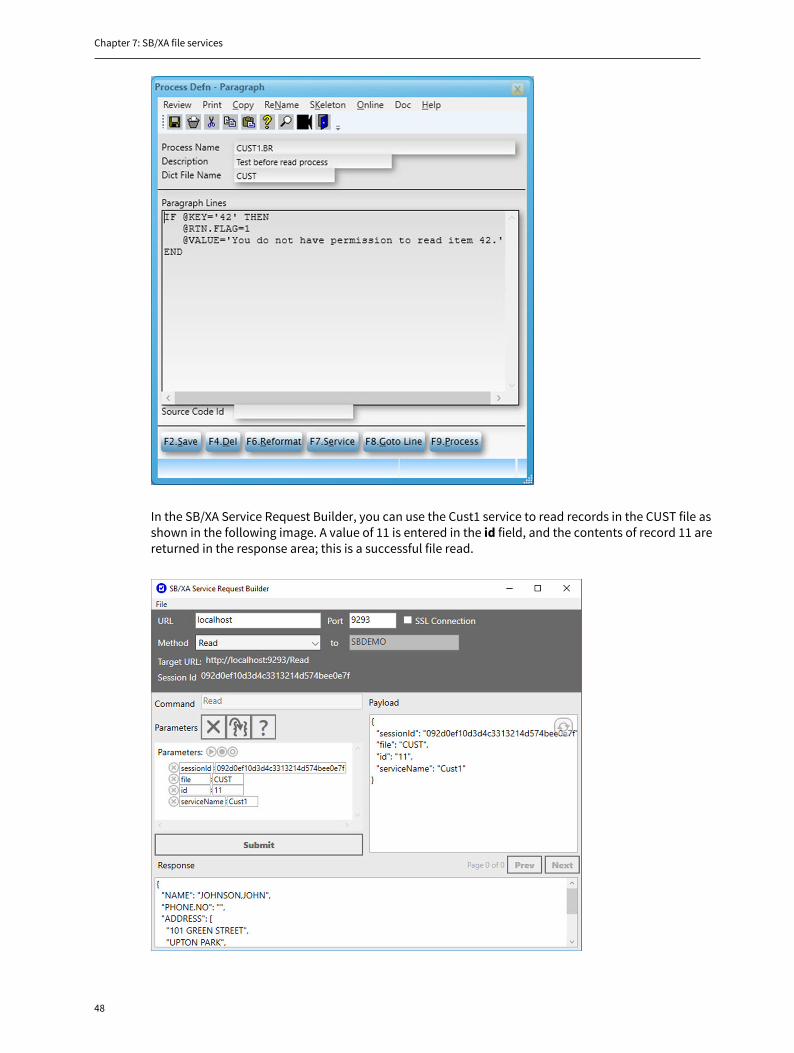
In this example file service, you are able to use the SB/XA Service Request Builder or a web or mobileclient to read all of the records in the CUST file except record 42; the process before read preventsreading that record. You might use other processes before and after, such as a process to preventwriting a certain value to a certain field. Those processes would be created similarly to the followingexample.
For this example, the file service Cust1 was created to work with the CUST file in SBDEMO as follows:
The process CUST1.BR was created with PD.P to prevent the reading of record 42 as follows:
Chapter 7: SB/XA file services
48
In the SB/XA Service Request Builder, you can use the Cust1 service to read records in the CUST file asshown in the following image. A value of 11 is entered in the id field, and the contents of record 11 arereturned in the response area; this is a successful file read.
Restricting file services
49
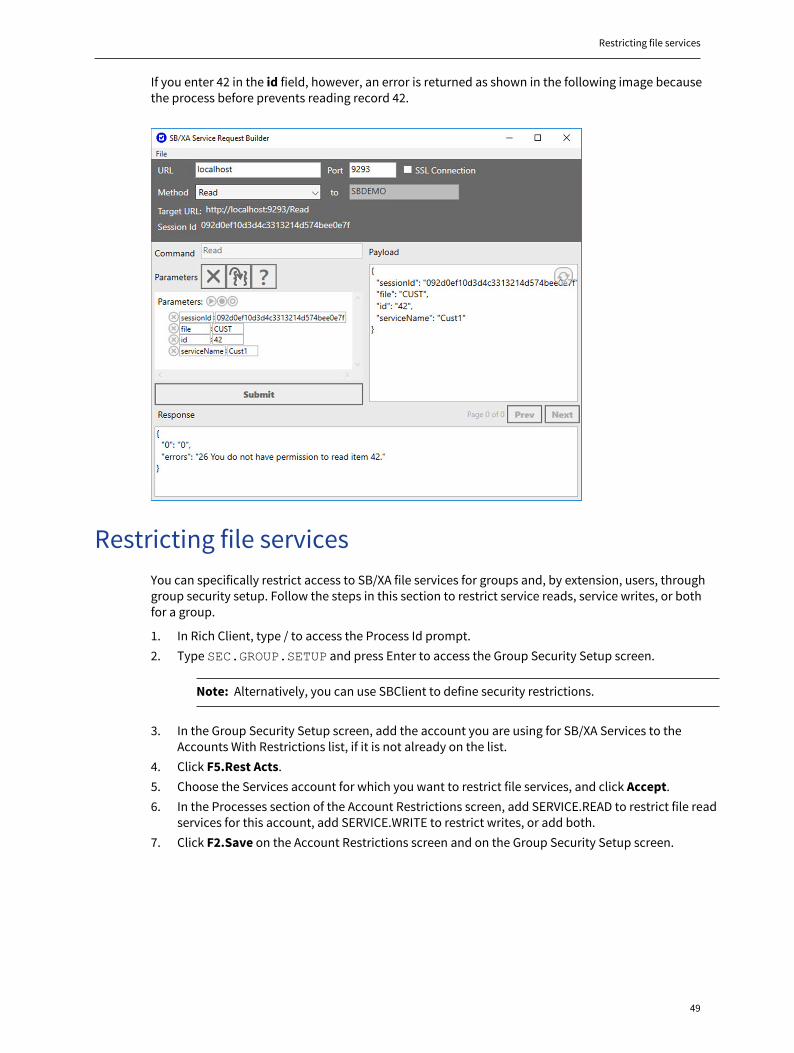
If you enter 42 in the id field, however, an error is returned as shown in the following image becausethe process before prevents reading record 42.
Restricting file servicesYou can specifically restrict access to SB/XA file services for groups and, by extension, users, throughgroup security setup. Follow the steps in this section to restrict service reads, service writes, or bothfor a group.
1. In Rich Client, type / to access the Process Id prompt.2. Type SEC.GROUP.SETUP and press Enter to access the Group Security Setup screen.
Note: Alternatively, you can use SBClient to define security restrictions.
3. In the Group Security Setup screen, add the account you are using for SB/XA Services to theAccounts With Restrictions list, if it is not already on the list.
4. Click F5.Rest Acts.5. Choose the Services account for which you want to restrict file services, and click Accept.6. In the Processes section of the Account Restrictions screen, add SERVICE.READ to restrict file read
services for this account, add SERVICE.WRITE to restrict writes, or add both.7. Click F2.Save on the Account Restrictions screen and on the Group Security Setup screen.
50
Chapter 8: Troubleshooting SB/XA ServicesYou may run into several common problems in this preview version of SB/XA Services. You can addressthem with tips found in this section.
Logging
SB/XA Services write to the SB/XA Communications Server logs. In the Communications Serverconfiguration, set the Log Information and Log Warnings flags to true to increase the level of logging.To access the configuration, in the lower-right corner of the client main window, click Options →Communications Server Configuration.
The default location of these log files on Windows 7, Windows 8, or Windows Vista is C:\Windows\System32\config\systemprofile\AppData\Roaming\Rocket Software\SBXA\Logs\ComServer.
SB/XA Services can also log at the SB/XA Application Server level. These logs contain informationabout the service call processing in the Application Server layer. When activated, logs are written to aSVC.LOG file, keyed on the session ID under which the service is running.
To activate Application Server logging for SB/XA Services, access the System Control Record (/HK.CONTROL). Click the System tab, and set the value in the Turn on Services Logging flag to Yes.
SB/XA Services use Rocket Connection Manager for connection management, so it can be useful tocheck the Connection Manager log files. For more information about Connection Manager logging,please see the Rocket Connection Manager Getting Started Guide.
Services debug flag
You can cause SB/XA Services to send full exception stack traces to the client. Doing so can make itunnecessary to check a log file when an exception occurs.
To enable this functionality, add the following line to the SB/XA Communications Server .config file,under the <appSettings> section:
<add key="servicesDebug" value="true" />
The default location of the .config file on Windows 7, Windows 8, or Windows Vista, is C:\Windows\System32\config\systemprofile\AppData\Local\ Rocket Software\file
Restart SB/XA Communications Server after making the change. With this setting enabled, fullexception stack traces are sent to any client of SB/XA Services, including the SB/XA Service RequestBuilder.