Rochester Institute of Technology Control Best Practices
18
Rochester Institute of Technology Control Best Practices Revision 1.0 8/29/2011 This document is intended to convey RITs standards for building automation control installation and configuration that are above and beyond the manufacturer’s specifications. At all times the installer is expected to adhere to the manufacturer’s specifications and best practices in addition to adhering to local building codes and standards. This document is a constant work in progress. Contractors and engineers are encouraged to make suggestions as to how this document and our standards can be improved, clarified or simplified. Contents 1. Webctrl Equipment files naming and use ............................................................................................. 2 2. Webctrl view file naming and use......................................................................................................... 3 3. Webctrl Reference Name Nomenclature ............................................................................................. 4 4. Netowrk ................................................................................................................................................ 6 5. Template Programs ............................................................................................................................... 8 6. Program substructures ......................................................................................................................... 8 7. Program documentation ..................................................................................................................... 12 8. Graphic screen components and layout ............................................................................................. 12 9. Panels and Panel Drawings ................................................................................................................. 14 10. Riser Drawings................................................................................................................................. 14 11. Floorplan Drawings ......................................................................................................................... 15 12. Webctrl Trees .................................................................................................................................. 15 13. Commissioning ................................................................................................................................ 16 14. Sequences ....................................................................................................................................... 17 15. Miscellaneous ................................................................................................................................. 18
Transcript of Rochester Institute of Technology Control Best Practices

Rochester Institute of Technology
Control Best Practices
Revision 1.0 8/29/2011
This document is intended to convey RITs standards for building automation control installation and
configuration that are above and beyond the manufacturer’s specifications. At all times the installer is
expected to adhere to the manufacturer’s specifications and best practices in addition to adhering to
local building codes and standards.
This document is a constant work in progress. Contractors and engineers are encouraged to make
suggestions as to how this document and our standards can be improved, clarified or simplified.
Contents 1. Webctrl Equipment files naming and use ............................................................................................. 2
2. Webctrl view file naming and use. ........................................................................................................ 3
3. Webctrl Reference Name Nomenclature ............................................................................................. 4
4. Netowrk ................................................................................................................................................ 6
5. Template Programs ............................................................................................................................... 8
6. Program substructures ......................................................................................................................... 8
7. Program documentation ..................................................................................................................... 12
8. Graphic screen components and layout ............................................................................................. 12
9. Panels and Panel Drawings ................................................................................................................. 14
10. Riser Drawings................................................................................................................................. 14
11. Floorplan Drawings ......................................................................................................................... 15
12. Webctrl Trees .................................................................................................................................. 15
13. Commissioning ................................................................................................................................ 16
14. Sequences ....................................................................................................................................... 17
15. Miscellaneous ................................................................................................................................. 18

1. Webctrl Equipment files naming and use a. All file names will begin with the letters bldg_ followed by a two digit building number
followed by a description followed by an underscore and finally followed by a two digit
instance number. In cases where the program serves all instances of the same type of
equipment the instance number is dropped.
b. Use two digits for the building number if possible. Including a leading zero if the
building number is 9 or less.
c. On buildings that have more than three digits use the minimum number possible.
d. If the file corresponds to a single piece of equipment, then the file name should include
the equipment name. AHU, VAV, HP, etc.
e. If the file corresponds to multiple pieces of associated equipment then the file name
should be indicative of the system. HW, CHW, Steam, Radiation, etc.
i. Examples:
1. bldg_01_ahu_02 - serves Building 01 AHU-02 (HC-001-AHU-002)
2. bldg_7b_vav – serves building 7b multiple VAVs (HC-07B-VAV-###)
3. bldg_50b_dhw – serves building 50b domestic hot water
4. bldg_400_ahu_10 – serves building 400 AHU-10 (HC-400-AHU-010)
f. In cases where the program is relevant to multiple buildings the file name will begin
with bldg_00_.
i. Examples
1. bldg_00_chw_btu_v2 – serves multiple buildings for calculating chilled
water energy data
2. bldg_00_hw_hx – serves multiple buildings for hot water heat
exchangers
3. bldg_00_vav - serves multiple buildings for multiple vavs
g. If possible use one of the template files. These files begin with bldg_00_.
i. bldg_00_chw_btu_v2 – Chilled water energy meter program.
ii. bldg_00_hw_btu_v2 – Hot water energy meter program.
iii. bldg_00_gas_meter_v2 – Gas meter energy program.

iv. bldg_00_eleictric_energy_use_v2 – Electrical energy meter program.
v. bldg_00_water_meter_v2 – Water use meter program.
vi. bldg_00_hw_hx – Building hot water connect heat exchanger program.
vii. bldg_00_irrigation_v2 – Irrigation panel program.
viii. More template programs will be added in the future, please check with the
controls department to see if there is a template program to fit your
application.
2. Webctrl view file naming and use. a. In general the view file name should match the associated equipment file name. The
naming rules are the same. Please refer to the equipment file naming above.
b. In situations where the view is to be customized for a more generic building specific
equipment file, then the view file name should include the equipment file name with an
added instance number.
i. Example
1. Equipment file name : bldg_04_vav.equipment
2. Matching generic view file : bldg_04_vav.view
3. Equipment specific view : bleg_04_vav_0305.view
c. In situations where the equipment file is not building specific but the view needs to be
equipment specific, then the view is named specific to the equipment as according to
the rules above, even though this does not match the equipment file.
i. Example
1. Equipment file name : bldg_00_hw_hx.equipment
2. Matching generic view file : bldg_00_hw_hx.view
3. Equipment specific view : bleg_04_hx_02.view
d. View file location
i. All view files are to be located in a subdirectory of the
W:\webroot\rochester_institute_of_tech\views folder. The subfolder name will
generally be named Bldg-# where # refers to the building number.
1. Example all view files for building 1 will be stored in ..\views\Bldg-1

2. If the file does not belong to a building then it should be located in one
of the other subfolders
a. ..\views\Campus Summaries
b. ..\views\Energy (Energy Related, such as BTU metes, etc)
c. ..\views\HCP (Heating Cooling Plant)
d. ..\views\graphics
i. Only as a last resort should items be put in the graphics
folder. Please check to see if it belongs in a building
folder or one of the other folders instead.
3. Webctrl Reference Name Nomenclature a. All geographic reference names are to be absolute names, starting with an #.
b. In cases where one new piece of equipment is to be added to existing equipment in the
building, then the reference name should match the existing reference name style, even
if the existing reference naming does not follow the standard set forth here.
Consistency is important.
c. Geographic Reference Names
i. Geographic Reference name rules follow the rules set for equipment file names,
except generally the bldg portion is left off.
1. Examples
a. #02-ahu-05 - Building 02 AHU-05
b. #75-vav-0312 - Building 75, AHU-03, VAV-12
c. #99-rtu-11 - Building 99 Rooftop unit -11
d. #81-pump-01-02 - Building 81 pumps 01 and 02
e. #400-chw - Building 400 CHW System
d. Network Tree Reference Names
i. LGRs
1. Display name is to be Router #?? Bldg #??.
a. Example: Router #38 Building #13

2. The reference name is to be the corresponding name from site builder.
a. Example: #router__38_bldg_13
ii. Arcnet
1. Main building level: Bldg#?? Arcnet
a. Example Bldg#75 Arcnet
2. AAR
a. Building number – AAR – Instance Number
b. Example 08-AAR-01 – Building 08 AAR number 01
3. Sub-Arcnet (Arcnet on an AAR)
a. Building number – Arcnet – Instance Number
b. Example 08-Arcnet-01 Building 08 Arcnet Number 01
iii. Single Equipment Controllers
1. Building Number – Equipment Type – Instance Number – Module Model
2. Example:
a. Display Name: 99-RTU-11-SE6104 – Building 99, RTU-11,
Controller SE6104
b. Reference Name: #99-rtu-11-se6104 – Building 99, RTU-11,
Controller SE6104
iv. Multiple Equipment Controllers
1. Building Number – Equipment Description –Instance Number (if
Applicable), Module Model
2. Example:
a. Display Name: 99-HWPlant-ME812U – Building 99, Hot Water
Plant, Controller ME812U
b. Reference Name: #99-hwpant-me812u – Building 99, Hot Water
Plant, Controller ME812U

4. Network a. Traditional Topology
i. Each building will have at least one LGR.
ii. AARs
1. If the building has more than 30 control modules connected to the LGR,
then AARs must be used to create sub-arcnet segments.
2. Each AAR will be off the main arcnet segment for the building
3. There are only two acceptable locations for the AARs
a. All of the AARs may be placed in the same panel as the LGR or in
a panel next to the LGR. In this way the main arcnet only has
AARs and optionally some other controllers in the same room.
i. This method is preferred when each AAR will serve one
area of the building. Such as a building floor.
b. Each AAR may be placed in the panel of the associated AHU.
i. In this case the AHU and all of its associated VAVs will
be on the secondary side of the AAR. In this situation all
of the AHU to VAV communication is all on the
secondary side of the AAR.
4. AARs are not to be placed in difficult to reach or difficult to find places.
5. AARs are not to be powered off from equipment power. Shutting down
an AHU or other piece of equipment should never shut down an AAR.
b. Ethernet Controller Topology
i. Plant Equipment controllers can be Ethernet controllers such as the ME812u-E.
1. In this situation these controllers are not using arcnet, and each
controller is located on the campus Ethernet with a dedicated RIT
Ethernet jack.
ii. AHU controllers can be combination Equipment controllers / LGR such as the
ME812u-LGR.
1. The AHU controller is located directly on the RIT campus Ethernet with a
dedicated Ethernet jack.

2. All of the associated VAV controllers are located on the arcnet segment
that originates with the AHU controller.
c. Repeaters
i. No Repeaters are to be used ever.
d. Terminations and Biasing
i. Locations of all network network terminations and/or biasing devisees are to be
clearly marked on the network riser diagrams and on the network floorplans.
ii. BT-485s are to be used at the ends of each and every network segment if
possible.
iii. In situations where using a BT-485 is not possible, then Network terminating
resisters are to be used at each end of the network segment with a DIAG-485
located roughly in the middle of the network segment.
1. The DIAG-485 must be in a panel in a mechanical space.
2. The DIAG-485 must have a dedicated transformer or transformer feed.
Turning off the power to any other control device or piece of
equipment, must not interrupt power to the DIAG-485.
e. Network Variables
i. Outside Air
1. All programs that have a network input for outside air Temperature will
use exp:#oa_conditions/temperature for the primary temperature
value. The secondary value will be set to the local building average
outside air temperature if one exists or to the nearest valid outside air
temperature sensor if a building average does not exist. The intent is to
use the campus average if it is available and use a local temperature
sensor if the campus average is not available.
2. Similar to outside air temperature, all programs
exp:#oa_conditions/humidity for the primary humidity value. The
secondary value will be set to the local building average outside air
humidity if one exists or to the nearest valid outside air humidity sensor
if a building average does not exist.
ii. Network values on the same control module
1. If there are multiple programs that are on the same control module and
at least one of the programs uses a network input to retrieve the value
of one of the other programs then the network input must use the
“this” address format. When using “this” format the network input
does not use up any network traffic. All communications is retained
inside the control module.
a. Example: Instead of exp:#bldg_09_chlr_plant/t4_campus_chws
use bacnet://this/t4_campus_chws_1. Both of these refer to
the same point, but the second does not use or depend upon
network traffic.
5. Template Programs a. RIT would like to reduce the number of programs in use on our Webctrl server.
b. RIT has been developing template programs for certain equipment.
c. If a template program meets your project requirements then please use it.
d. If a template program meets most of your project requirements, but not all, then please
speak to the controls department to see if the template program can be modified to
meet your project requirements while still maintaining compatibility with the existing
equipment using the program.
e. Currently there exists template programs for all types of energy meters.
f. Other template programs exist for irrigation and hw connects.
g. Soon there will be a template program for chilled water connects, domestic hot water,
VAVs, heatpumps, RTUs, and Chilled beams.
6. Program substructures a. Program Edit Order. Ensure that logic blocks are in the correct section in the logic
builder edit order after any program has been modified.
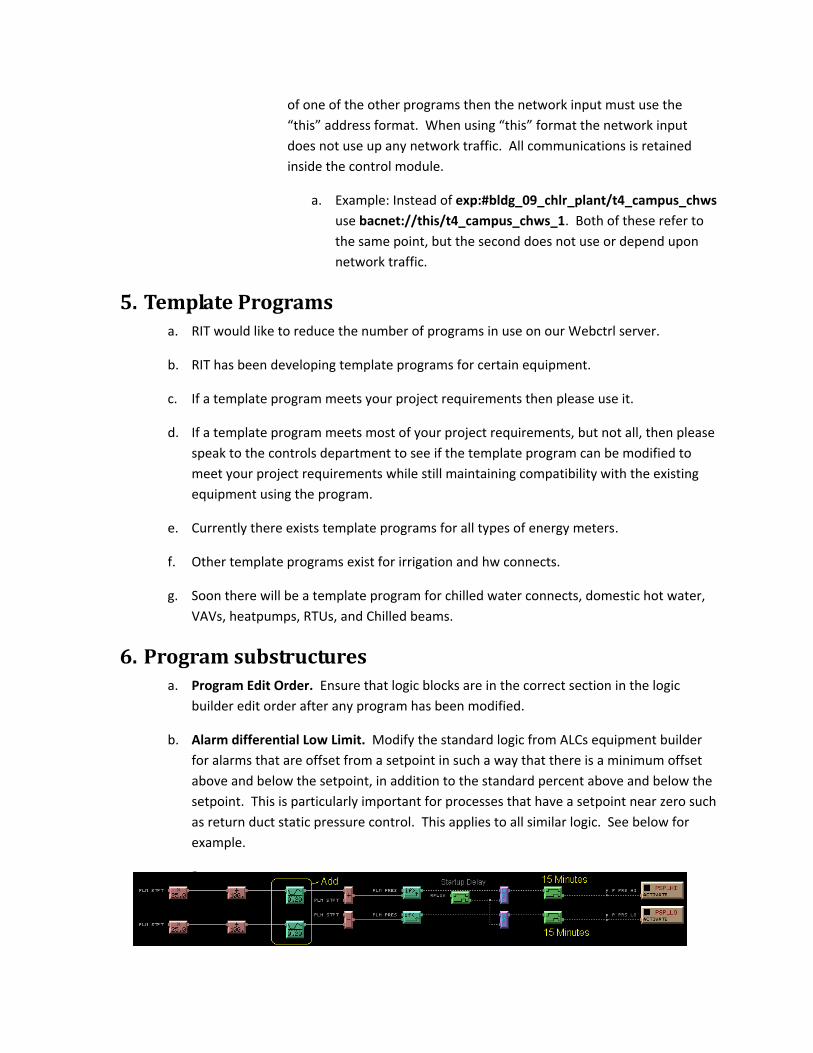
b. Alarm differential Low Limit. Modify the standard logic from ALCs equipment builder
for alarms that are offset from a setpoint in such a way that there is a minimum offset
above and below the setpoint, in addition to the standard percent above and below the
setpoint. This is particularly important for processes that have a setpoint near zero such
as return duct static pressure control. This applies to all similar logic. See below for
example.
c. P
I
D

i. All programs are required to have PID that has a deadband.
1. This can be RITs OCL block 1.61 or 1.63 or later
a. I
n
this example, notice how the final output is used as an input to
the PID block. This output feedback is used to ensure that the
PID does not deviate too far from the output when other
parameters are affecting the output besides the PID block.
These parameters might be a ramp block, limit block, or
switches. Use this method whenever possible.
2. Or it can be the Bacnet PID included in Webctrl 5.2 or later.
3. Do not use the older RIT Custom PID block, this has been superseded by
the RIT OCL PID Block.
ii. PIDs need to be properly tuned so the equipment does not cycle and the control
routines are stable.
d. Lead/Lag
i. Use RITs custom lead/lag block. Do not use ALCs lead/lag block.
1. This block can be found along with associated logic in
the template program lead_lag_with_switch.equipment
a. This program can be used even if there is no
switch, select the appropriate subroutine from the program.
b. There are more instructions within the program
e. Analog Variables for Network Linking
i. When an analog value is expected to be referenced by an analog network input
from a different program, then a dedicated Bacnet Analog Value Status block is
to be created in the program with the same name as the value with the addition
of “Out” to the display name and “_out” to the reference name. In between the
logic generating the value and the BAV block there is to be logic that prevents
the BAV value from changing more than necessary. Typically this time will be 30
seconds to 1 minute.

1. The objective of this logic is to prevent excessive network traffic due to
values changing frequently because of improperly set COV settings or
because of a fluctuating input value.
2. This can easily be accomplished by using RIT’s AVG/DEL V1.2 OCL block
or RIT’s AVG V1.1 OCL Block
3. Example: It is known that the kW feedback of a fan will be trended by
another program. Therefore, a BAV output is created. An AVG/DEL
block is inserted in-between the AI and the BAV. The AVG/DEL block is
set so that the output only changes once every 30 seconds. In this case,
even if the COV of the BAV is set lower then desired, the network traffic
will only be triggered at most once every 30 seconds.
4. In general any value that is related to energy will be referenced by
another program through the network.
a. Examples: kW, BTU, flow, temperatures associated with flow to
calculate BTUs.
5. Outside Air Conditions are generally referenced by another program
and should include a delay out.
6. Other values that are likely to be referenced remotely are Air Flow and
Water Flow values, AHU Discharge Air Temperature, etc.
f. Program block Reference Names
i. For any logic block that might be linked to a graphic or linked by network to
another program enter a meaningful reference name.
1. This includes:
a. All inputs
b. All outputs
c. Any type of adjustable setpont (AV, BV, if Greater/Less then
Constant, Constant High/Low limit, etc) that the user is likely to
change.

2. Use reference names that match existing program naming style.
g. Hand / Off / Auto
i. All equipment programs are to include logic to support a HOA switch on the
graphic screen.
ii. The HOA logic will be programmed in such a way that when the HOA is set to Off
the equipment will not run regardless of freeze protection or other logic and it
will not generate alarms.
iii. However when the HOA switch is set to the On position, the equipment will shut
down due to any software or hardware safety that would normally shut down
the equipment.
h. Environmental Index
i. Every program for equipment that directly conditions an occupied space is to
include the ALC Environmental index logic. The environmental index is to have
provisions for Temperature, Humidity and/or CO2 depending upon what is
controlled by that program.
ii. Each building will have a master Environmental Index that will roll up the zone
EI’s in the building.
i. Occupancy Sensor Logic for zone control
i. Each zone equipment with an occupancy sensor is to have the following logic.
1. The zone is to go occupied if the schedule is occupied or the occupancy
sensor is occupied. (Note: that the schedules can be left empty and
then the occ sensor is the only determination of occupancy)

2. If the occ sensor is unoccupied then the cooling setpoint is adjusted up
by 2°F (adjustable, ref name = clg_adjust).
3. If the occ sensor is unoccupied then the heating setpoint is adjusted
down by 2°F (adjustable, ref name = htg_adjust).
7. Program documentation a. When modifying an existing program include your initials, date and short description of
the changes at the upper right of the program.
b. In sections of a program that are not standard design, include a text description of the
program logic so that someone with little knowledge of the programming language can
read the description and determine what that program section is doing.
8. Graphic screen components and layout a. Outside Air Conditions
i. All graphic pages are to have the outside air temperature
and humidity displayed in the upper left corner of the
page along with a picture of the sun.
1. The values for outside air temperature and humidity are to reference
the local program if one is available.
a. Remember that the local program should be getting its outside
air conditions from #oa_conditions if it is setup correctly.

2. If local outside air conditions are not available in the local program then
these values are to reference exp:#oa_conditions/temperature for
temperature and exp:#oa_conditions/humidity for humidity.
3. In either case clicking on the sun will direct the user to the page
associated with #oa_conditions.
b. Floor Plans
i. All floorplans are to include room numbers on the floorplan if possible.
ii. All floorplans are to include an accurate location of space temperature,
humidity and CO2 sensors.
iii. All floorplans are to include a North Arrow
c. Equipment Graphic Screen Locked Values
i. All screens that primarily show mechanical
equipment that is being controlled by the associated
program shall have an HOA block that contains check
boxes for the locked status of each output and value
boxes for the locked value of each output in the
lower left corner of the screen.
ii. The locked value is to be hidden unless the value is locked to a value.
d. Equipment Screens Master Hand/Off/Auto

i. All equipment screens are to have master HOA switch located near the
top/middle of the screen.
9. Panels and Panel Drawings a. Panel drawings are to include endpoint terminations on any field device that has wiring
designations
b. Terminal Block Colors
i. Gray - Inputs
ii. Red - Power
iii. Blue - Outputs
iv. Yellow - Interlocks
c. In Panel Wire Colors
i. White - Inputs and Outputs signal wire
ii. Black - Inputs and Outputs common wire
iii. Red - 24VAC Power
iv. Blue - 24VAC Common
v. Orange - 24VDC Power
vi. Green - Ground
10. Riser Drawings a. Riser Drawings are to show a schematic layout of controller network connections. This
should include the correct order that the controllers are physically connected. This is to
help with network trouble shooting.
b. Riser Diagrams should also include a dashed line around any controllers that are in a
panel with a designation of the panel name and location. If multiple controllers are

located in the same panel, then all controllers in that panel should be inside the same
dashed line.
c. Riser diagrams are to include network addresses, controller models, terminators, and
equipment served by each controller.
d. Riser diagrams should be integrated with any existing network diagrams that they are to
be connected with.
11. Floor plan Drawings a. In addition to the basic Floor plan, these drawings will include:
i. The accurate location of each controller and control panel
ii. The accurate location of each terminator and network diag
iii. The accurate location of network wires and network terminations
iv. The accurate location of any low voltage power panels that are part of the
controls.
12. Webctrl Trees a. Mechanical Rooms
i. An area will be setup for each mechanical room. The equipment for this
mechanical room will be included under the area for that mechanical room.
ii. The mechanical room area will show a schematic floorplan layout of the room
with approximate equipment locations
iii. Each piece of equipment will show up on the area floorplan with a color
indication and a link to the equipment.
b. Each building will have an area named “Chilled Water” if it is applicable
i. This are will show a schematic representation of all the main chilled water
piping and sensors in the building and how it connects to the campus chilled
water system.
ii. There will be links to each piece of equipment that is related to the chilled
water.
iii. The intent is to see an overall representation of all the chilled water equipment
in one place and to have an easy way to link to the various pieces of equipment
which are likely located under mechanical room areas.

c. Each building will have an area named “Hot Water” if it is applicable
i. See Chilled Water above
d. Each building will have an area named “AHUs”
i. This will be a single graphic containing a list of each AHU in the building.
ii. The list will contain all the AHUs regardless of which system the controls are on.
iii. The list will include Name, Location, Color, SF Status, RF Status, DAT, Supply
Static, Filter Static 1, Filter Static 2, Filter Status 1, Filter Status 2 as applicable.
iv. The name will also be a link to the equipment program location if applicable.
13. Commissioning a. Temporary Server
i. All primary commissioning is to be performed on a local copy of webctrl, not on
the RIT webctrl production server. The local webctrl is to be owned and
operated by the contractor.
b. Alarms
i. Commissioning includes analyzing alarms from operating equipment. Through a
combination of adjusting alarm parameters and adjusting operating parameters,
the commissioning agent is responsible to ensure that the equipment does not
produce false, meaningless or un-useful alarms. Every alarm should be relevant
and important.
c. Point Checkout
i. The point checkout properties page is to be used and checked off as part of the
commissioning process.
ii. Each operator will be logged into webctrl under his/her own name for the point
checkout. Do not use a company login.
d. PIDs
i. PIDs are to have a deadband.
ii. PIDs will be tuned so that the controlled output performs smoothly, without
excessive oscillations and within parameters.

14. Sequences a. Heating / Cooling Source Trees
i. All equipment able to do so is to be setup in the heating and cooling source
trees.
ii. If a sequence calls for something similar but not exactly the same as the ALC
Optimized setpoint, talk to sequence designer about using Heating/Cooling
source trees instead. It is easier to work within the intended ALC system then
design your own for each project. It also provides more consistent
programming and operation to use the resources provided by ALC.
b. Heating Valves
i. Heating valves will use one of the two following sequences for unoccupied
mode.
1. If the OA is above 45F and it is valid then close the heating valve. If the
OA is below 45F then open the hot water valve to 50% open.
2. If the OA is above 45F then the hot water valve is allowed to modulate
to maintain the hot water coil leaving air temperature setpoint.
a. Use this method if there is a temperature sensor located in
close proximity to both the heating coil and cooling coil.
ii. Heating vales will be commanded to 50% open on a freezestat trip.
1. Reason #1: Sometimes the direction of the hot water valve becomes
reversed from the desired direction. If this valve is commanded to 50%
then it does not matter if the valve direction is reversed or normal, in
either case the coil will get a significant amount of water.
2. Reason #2: It should not be necessary to direct 100% flow through the
hot water coil to prevent freezing. By limiting the valve to 50%, more
flow is available for the rest of the hot water system.
c. Air Handling Units
i. OA Damper on startup
1. As normal when the fan is off, the outside damper will be 0% open. Add
in additional sequences so that when the fan first starts, the outside air
damper is not allowed to open 100% right away. Instead the OA
damper will be allowed to open at most 1% every 6 seconds
(adjustable). This delay is only at unit startup.

a. The intent is to prevent the freezestat from tripping and to
prevent the outside air damper from oscillating.
ii. HW Valve on startup
1. If the HW valve is partly or fully open due to unoccupied sequence, then
the HW valve will only be allowed to close down 1% every 6 seconds.
This is to prevent the discharge air from getting too cold too quickly and
tripping the freezestat or freezing the coil. This delay is only at unit
startup.
15. Miscellaneous a. Webctrl shutdowns
i. If possible give advanced notifications for webctrl shutdowns.
ii. For a shutdown that is expected to last for less than 30 minutes
1. Broadcast a notification message on webctrl 15 minutes ahead of time.
“Webctrl will be shutting down in 15 minutes for maintenance.
Expected downtime is XX-XX minutes.”
2. Broadcast a second notification message on webctrl one minutes
ahead of time. “Webctrl will be shutting down in ONE minute for
maintenance. Expected downtime is XX-XX minutes.”
iii. For a shutdown that is expected to last for more than 30 minutes
1. Send out an email a day before to all RIT engineers and contractor using
webctrl notifying of the shutdown.
2. Additionally follow the procedure above 15 minutes and 1 minute
before the actual shutdown.