Robo Compiler Guidebook
19
-
Upload
chengsyus6309 -
Category
Documents
-
view
220 -
download
6
description
Hobby collection
Transcript of Robo Compiler Guidebook


2┃www.robotsrc.com
HUNAROBO COMPILER is the software that makes operating the HUNAROBO and T.O.P programs possible.Robot in general should be programmed by coding directly with C - language (System - programming language). However, it takes a long time to learn this program.This HUNAROBO Compiler makes it easy for everyone to control robots with the GUI interface.If you make a program with the module that you want, you will be able to develop new learning abilities and logical thinking skills.
HunaRobo Compiler User Installation
HUNAROBO COMPILER?
- When installing,the capacity of hard disk needs to be 200MB - When using, the capacity of hard disk needs to be 100MB and more 512MB of RAM- Requires Intel Pentium4 or compatible processor- Suitable for over Microsoft Window XP
HunaRoBo COMPILER┃3
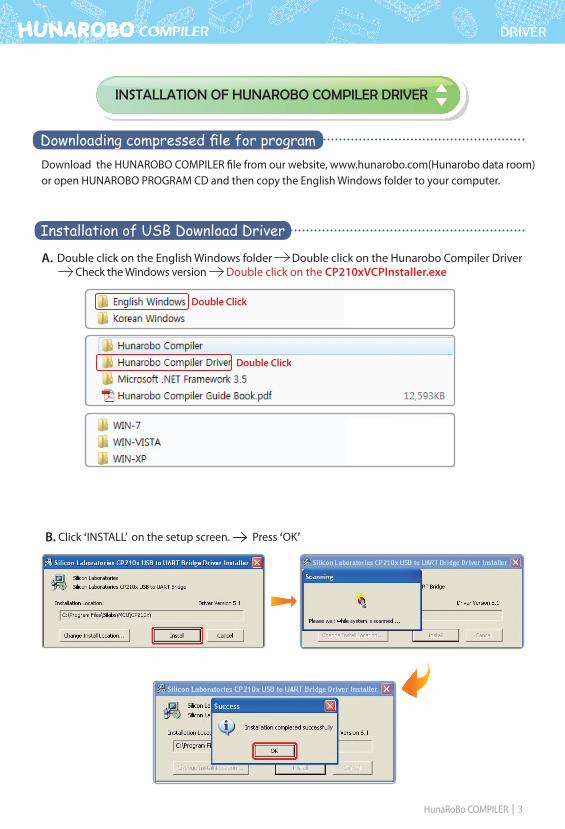
Downloading compressed file for program
Installation of USB Download Driver
Download the HUNAROBO COMPILER file from our website, www.hunarobo.com(Hunarobo data room) or open HUNAROBO PROGRAM CD and then copy the English Windows folder to your computer.
B. Click ‘INSTALL’ on the setup screen. Press ‘OK’
DRIVER
INSTALLATION OF HUNAROBO COMPILER DRIVER
Double Click
Double Click
A. Double click on the English Windows folder Double click on the Hunarobo Compiler Driver Check the Windows version Double click on the CP210xVCPInstaller.exe

4┃www.robotsrc.com
Click on the Properties(R) on my computer Icon Click ‘Hardware’ Tab Click ‘Device Manager’ Check COM Port
DRIVER
C. When connecting USB DOWNLOAD Cable, the USB Drive will be installed automatically.
Check USB DOWNLOAD Communication Port
Depends on your own computer port(ex) COM1 ~ COM8

HunaRoBo COMPILER┃5
.NET Framework Setup
Installation of .NET FrameworkA. When you double-click on the Setup.exe file, you may find the message like this following picture, the reason why the .NET Framework is not installed properly.Therefore, you should click ‘NO’ and install it after you decompress donnetfx35.exe
B. Install .NET Framework
.NET Framewrk
Double Click
6┃www.robotsrc.com
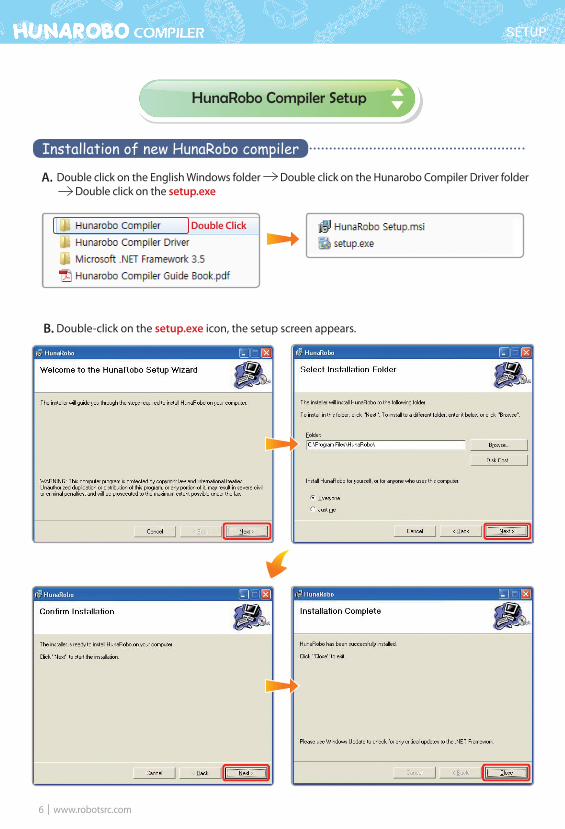
HunaRobo Compiler Setup
SETUP
Installation of new HunaRobo compiler
B. Double-click on the setup.exe icon, the setup screen appears.
Double Click
A. Double click on the English Windows folder Double click on the Hunarobo Compiler Driver folder Double click on the setup.exe

HunaRoBo COMPILER┃7
Double-click on the HunaRobo icon, then the setup screen will appear.
HunaRobo Compiler Program - MAIN
① New-You can create new programs from the start.② Open-Find and execute previously saved programs.③ Save-You can save completed programs within any folder.④ Setting-You can set up connected COM PORT manually.⑤ Download- Program COMPILE and DOWNLOAD⑥ Menu-This part is for starting programs (When starting programs, this icon appears to be clicked on.)
# TIPCopy(Ctrl +C): Copy the written program.Cut(Ctrl +C): Cut the written program.Paste(Ctrl + V): Place any previously copied or cut program in place you want.
MAIN
Program Menu Description

8┃www.robotsrc.com
Select Input tab at selection window <This input tab is selected as default.>
A. Remote Control(Remocon) InputUP, DOWN, LEFT, RIGHTUP+LEFT, UP+RIGHT, DOWN+LEFT, DOWN+RIGHTFunction Key(F1~F6), KEY OFF(When releasing your hands from the remote control)<When using DC Motor, it is recommended to use ‘Both motors stop’ at KEY OFF key. >
B. Input Touch, Mic, IR, Cds sensor Select ‘USE’ button box as below picture depending on the kind of sensors connected to INPUT port of mainboard, activate program after input actions depending on individual sensor functions.<You can simultaneously select IN1~IN7 to the maximum in HunaRobo Level 2, Level 3. >
Input selection window(Input)
< Touch Sensor > < Mic Sensor >
< IR Sensor > < CdS Sensor >
INPUT
HunaRobo Compiler - Input
HunaRoBo COMPILER┃9
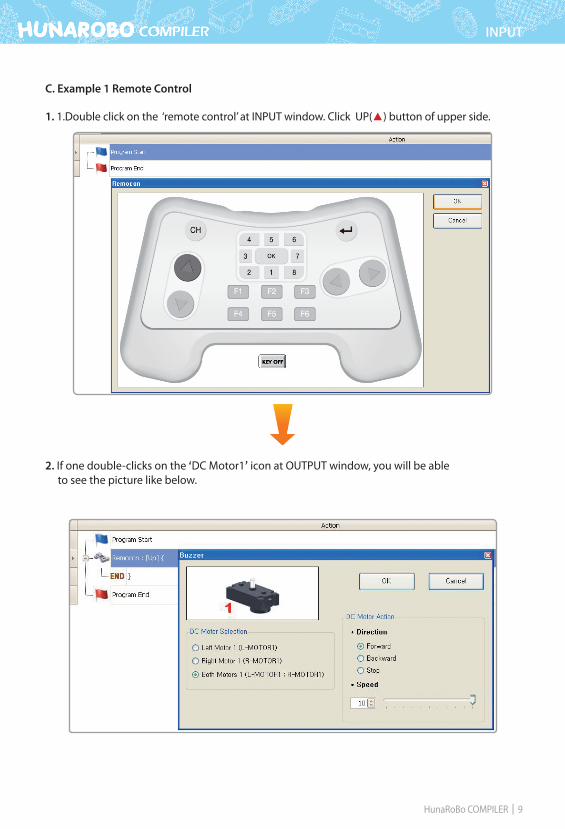
1. 1.Double click on the ‘remote control’ at INPUT window. Click UP(▲) button of upper side.
2. If one double-clicks on the ‘DC Motor1’ icon at OUTPUT window, you will be able to see the picture like below.
C. Example 1 Remote Control
INPUT

10┃www.robotsrc.com
3. When using ‘remote control’ program, one should always input the “KEY OFF” state.
When pressing Remote Control Up KEY: Both motors will move forward at speed of 10 level.
When not pressing Remote Control KEY: Both motors stop
#TIP:You can copy,cut and paste identical input sensor and identical output board.Let’s try to copy and paste it in any place you want. Because it will take too time for you to make the same sensor and the same output board continuously. (Copy: Crtl +C, Cut: Ctrl +X, Paste: Ctrl+V>
INPUT

HunaRoBo COMPILER┃11
D. Example 1. Multiple Inputs for identical sensor
D. Description of the upper pictures.If ‘Touch Sensor’ of IN1 was pressed, LED of OUT1 turns on,LED of OUT2 turns off.If ‘Touch Sensor’ of IN2 was pressed, LED of OUT1 turns off,LED of OUT2 turns on.If ‘Touch Sensor’ of both IN1,IN2 not pressing , LEDs of OUT1,OUT2 turn off. The commend of both red box parts(1,2) makes same actions.
When you perform multiple selections, you can add another sensor after selecting upper sensor of sensor that you want to add.Same type of sensor : select at once(1) select separation in the form of a tree (2)When you choose the second way, first click the upper selected sensor, then select the sensors that you want to add.(Same way for other multiple sensors)
INPUT

12┃www.robotsrc.com
E. Example 2. Multiple Inputs for multiple sensors
D. Description of the upper picturesIf IR sensor of IN#2 receives a signal in situations when Mic sensor of IN#1 have already received signal, LED of OUT#1 turns on.
If IR sensor of IN#2 doesn’t receive a signal in situations when Mic sensor of IN#1 have already received signal, LED of OUT#1 turns off.
IR sensor that is connected to IN #2 on the upper action judges the input signal only in situations where Mic sensor connected to IN#1 receive signal.This way of multiple selections are similar to example 1.
INPUT

HunaRoBo COMPILER┃13
Output Selection Window(OUTPUT)
Select Output tab at selection window
<LED>
<DC Motor2><DC Motor1>
<Buzzer>
A. LED, BuzzerCheck ‘Use’ button box depend on the kind of output board that is connected to OUTPUT port of mainboard, then perform program by inserting actions depending on each OUTPUT board.<You can have multiple selections until OUT#1~OUT#8 to the maximum at once in HunaRobo Level 2, Level 3 >
B. DC MotorYou can control DC Motor. You can use DC Motor 1 in HunaRobo Level 2, 3.
Optional Motor : Left Motor, Right Motor, Both Motors.Optional Action: Forward, Backward, StopOptional Speed: 0~10< It is set basically at speeds of 10 level, the interval of speed is 1>
OUTPUT
HunaRobo Compiler - Output
14┃www.robotsrc.com
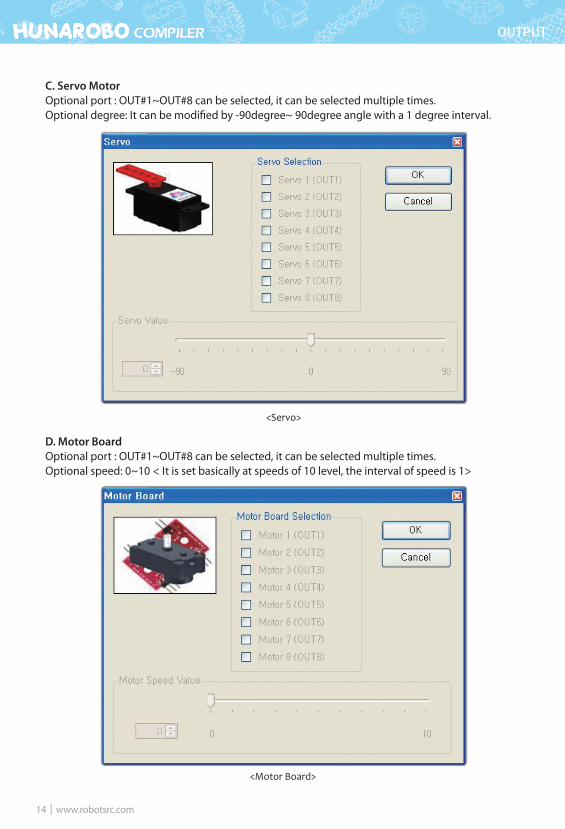
C. Servo MotorOptional port : OUT#1~OUT#8 can be selected, it can be selected multiple times.Optional degree: It can be modified by -90degree~ 90degree angle with a 1 degree interval.
D. Motor BoardOptional port : OUT#1~OUT#8 can be selected, it can be selected multiple times.Optional speed: 0~10 < It is set basically at speeds of 10 level, the interval of speed is 1>
<Servo>
<Motor Board>
OUTPUT

HunaRoBo COMPILER┃15
E. Example 1. Multiple selections
F. Servo Motor Angle
Both programs(1,2) perform same actions.<LEDs connected to OUT1,OUT2, OUT3 turns on>
-90degrees
0degrees
90degrees
OUTPUT

16┃www.robotsrc.com
HunaRobo Compiler - Flow
Flow Selection Window(Flow) Select Flow tab at selection window
A. DelayThe actions which are already functioning before using function of “Delay” are restored during the time you set.It can set up at intervals of 0.5seconds within 0 Sec ~10 Seconds.
B. RepeatThis key’s function is to repeat the same action following the number of “Repeat Count”.Repeat Count can be selected between 1~100.
C. StopIn case you press the “STOP” button, It will turn every program into start-up status and finish the programs.
<Delay>
<Repeat>
FLOW

HunaRoBo COMPILER┃17
D. Example
When you create a program where the LED connected to OUT#1 turns on and off for a second, the mistake may in most cases look like the example as illustrated.The first mistake may be when LED is turned on, give “Delay” function. The second is when,not giving “Delay”function.If you have a try to download a program like left picture, the LED will turn on continuously.
There is one more mistake you can make. Even if you insert “Delay” function suitably like upper side, when the “Repeat” function is completed,if you don’t insert “Stop” function, it continues infinitively, so LED also flicker infinitely.
FLOW
The wrong example
The good example
The wrong example
18┃www.robotsrc.com
DOWNLOAD
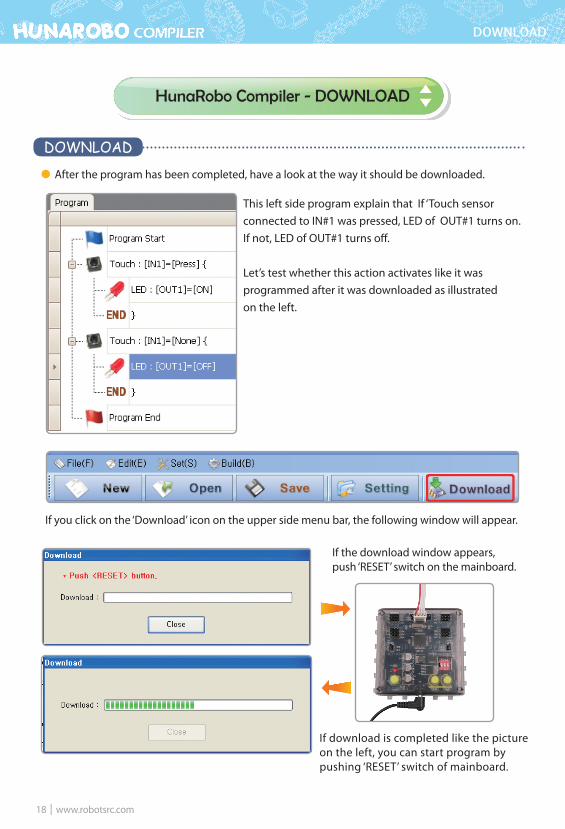
After the program has been completed, have a look at the way it should be downloaded.
If you click on the ‘Download’ icon on the upper side menu bar, the following window will appear.
If the download window appears, push ‘RESET’ switch on the mainboard.
If download is completed like the picture on the left, you can start program by pushing ‘RESET’ switch of mainboard.
This left side program explain that If ‘Touch sensor connected to IN#1 was pressed, LED of OUT#1 turns on. If not, LED of OUT#1 turns off.
Let’s test whether this action activates like it was programmed after it was downloaded as illustrated on the left.
HunaRobo Compiler - DOWNLOAD
DOWNLOAD