Robinson R44 1 - cdn.cloudflare.steamstatic.com
35
Robinson R44 1
Transcript of Robinson R44 1 - cdn.cloudflare.steamstatic.com

Robinson R44 1

Robinson R44 2
Robinson R44
For Microsoft Flight Simulator X Steam Edition
User’s Guide

Robinson R44 3
CONTENTS INTRODUCTION ........................................................................................................................................... 4 INSTALLATION ............................................................................................................................................. 7 SETTING UP FLIGHT SIMULATOR FOR R44 ............................................................................................. 8 HOW TO ACCESS THE AIRCRAFT ............................................................................................................. 9 KEEPING A RECORD OF YOUR FLIGHTS ................................................................................................. 9 THE INSTRUMENT PANELS AND VIRTUAL COCKPITS ......................................................................... 11 R44 PANEL ................................................................................................................................................. 12 IN-COCKPIT KNEEBOARD – CHECKLISTS ............................................................................................. 19 R44 RADIO OPERATION ........................................................................................................................... 20 SPECIAL CLICK AREAS IN VIRTUAL COCKPIT....................................................................................... 23 AEROTOOLS - ACCESSING THE CUSTOMISING UTILITIES ................... Error! Bookmark not defined. FLYING THE R44 ........................................................................................................................................ 25 CREDITS ..................................................................................................................................................... 34 COPYRIGHTS ............................................................................................................................................. 35 PIRACY ....................................................................................................................................................... 35

Robinson R44 4
INTRODUCTION Thank you for purchasing this aircraft expansion for Microsoft Flight Simulator X Steam Edition.
The R44 is a lightweight, versatile, piston-powered four seat helicopter that is renowned for its economical, reliable and safe operation. With its sleek design, impressive speed and unparalleled reliability it delivers the performance of a turbine helicopter at an affordable piston price. Our simulation of the R44 is offered in various models for FSX with the main differences being in the engine and float/skid configuration.

Robinson R44 5
Featured models
R44 Raven II R44 Clipper II with fixed utility floats R44 Clipper II with emergency pop-out floats The Raven II is the skid version of the family and is very popular with both General Aviation helicopter pilots and light business helicopter operators. The real-world aircraft is also available in specialised police and news-copter versions. The helicopter is equipped with a fuel-injected, angle-valve, tuned-induction, IO-540 Lycoming engine which is derated to 245 HP for 5 minutes and 205 HP maximum continuous rating, to assure long life and low cost of maintenance. The Clipper II can be ordered with either fixed utility or emergency pop-out floats.
The Clipper's fixed utility floats - employed for extended flights over water, landings on remote lakes and extra security when flying over busy harbours - add approximately 50 pounds to the R44's empty weight, and the cruise speed is reduced by 10 knots. The pop-out floats add about 65 pounds to the empty weight with almost no reduction in the Raven's cruise speed. Unlike some emergency floats, the Clipper's pop-out floats have the same buoyancy as the fixed utility floats.

Robinson R44 6
Detailed features This simulated version is the latest member of Just Flight's ‘Flying Club’ family of high quality and easy to fly GA (General Aviation) aircraft and helicopters. Modelled to highest standards with a flight model made by the industry leader in the field, this aircraft is a near exact 1:1 replica of the original as it can be.
Highly accurate and intricately detailed model
Authentic custom sounds developed from the real-world aircraft, both inside and out
Highly realistic custom flight model created by an industry leader in this field
Authentic textures throughout
Immersive virtual cockpit with mouse clickable instruments and knobs
Authentic 2D instrument panel
Animations include: rotors, rotating belts, moving swash plates, entry doors, and inspection panels - even the door handles work!
Highly detailed engine and rotor drives and small but important items like the Comms and Nav radio antennas, footsteps, tie-down points, door hinges, temperature gauge probes and even the fire extinguisher!
Operating navigation and landing lights
Cockpit night lighting
A dedicated website www.jfflyingclub.com where you can download additional files, paint schemes and resources to enhance your R44 flying experience.
We hope you enjoy this aircraft and you can find out more about our other great flight simulation products from www.justflight.com

Robinson R44 7
INSTALLATION Installation is handled by Steam after purchase of the product. After purchasing the product the files will be downloaded and installation into the Scenery Library will be automatic. UPDATES Updates to the product will automatically be deployed, downloaded and installed via Steam to all users who own the product. TECHNICAL SUPPORT To obtain technical support (in English) please visit the Support pages at justflight.com. As a Just Flight customer you can obtain free technical support for any Just Flight or Just Trains product. For support specifically on the Steam version of the add-on please contact Dovetail Games. https://dovetailgames.kayako.com REGULAR NEWS To get the latest news about Just Flight products, sign up for our newsletter at justflight.com/newsletter. You can also keep up to date with Just Flight via Facebook (www.facebook.com/justflight) and Twitter (www.twitter.com/justflight).

Robinson R44 8
SETTING UP FLIGHT SIMULATOR FOR R44
The flight model is optimised to work with the settings detailed below. Flight Simulator needs to be set up to allow the aircraft to operate realistically and we recommend the following settings. Start Flight Simulator and load an aircraft. Open Load Aircraft>Realism settings menu. In the ‘Flight model’ section, move the General slider one notch to the right of the middle setting. We recommend you set the ‘Crash tolerance’ slider to zero. Tick ON in the ‘Instrument and Lights’ section: Pilot Controls aircraft lights and Gyro drift. Ensure that ‘Display indicated airspeed’ is set ON. Tick ON in the ‘Engine’ section ‘Enable Auto Mixture’ and ‘Unlimited Fuel’. If you have a set of rudder pedals or a joystick that has a rudder function then tick OFF ‘Autorudder’ in the ‘Flight Controls’ section. In the ‘Crashes and damage’ area we recommend that you set ‘Ignore crashes and damage’ to ON. When finished click ‘OK’.
FLIGHT MODEL NOTES The flight model has been extensively adjusted and tested to work as realistically as possible within the constraints and limits imposed on us by the host simulator and so therefore there may be certain instrument readings and flight characteristics that are not identical to the real world aircraft.

Robinson R44 9
HOW TO ACCESS THE AIRCRAFT Flight Simulator X To access the aircraft in FSX:
1. Start Flight Simulator. 2. Click on ‘Free Flight’ 3. Select ‘Just Flight Ltd’ from the ‘Publisher’ drop-down menu 4. Just Flight developed aircraft, with the three different R44 variants amongst them. 5. Select which version you wish to fly. You might have to select (tick) the box ‘Show all variations’ in
order to see all aircraft variations installed.

Robinson R44 10
KEEPING A RECORD OF YOUR FLIGHTS Just like in real world flying you can keep a log of the hours you fly. Each of the Flying Club aircraft has a ‘running time’ meter – normally referred to as a Hobbs meter (after the manufacturer). This meter runs every time you select the aircraft. If you wish you can note the time elapsed on the meter every time you fly and use the FS logbook to keep track of your time.
FILLING IN YOUR LOGBOOK - FSX In FSX the logbook operation is far more automatic and simplified than in FS2004. Accessing the logbook Start FSX and click on ‘PILOT RECORDS’ on the left side menu. Click on the ‘Logbook’ Tab at the top. On this page you will see a record of your flights – note you must have taken off to have the times register in the log book. On this page you can edit various details if you wish.

Robinson R44 11
THE INSTRUMENT PANELS AND VIRTUAL COCKPITS The R44 has a 2D and a VC (virtual cockpit) instrument panel. In the 2D instrument situation you have a set position for the panel; in the VC situation you can pan around and zoom in and out of the cockpit area. You can use your keyboard Numpad numbers (1- 9) in the 2D cockpit or the hat on your joystick in the VC. In the VC you can move your viewpoint in the following way: Zoom in coarse: + key Zoom out coarse: - Key Zoom in fine: Shift (plus) + key Zoom out fine: Shift (plus) – Key Move up: Shift+Enter keys. Move Down: Shift+Backspace keys. Move left: Control+Shift+Backspace keys. Move right: Control+Shift+Enter keys. There is no ‘pan around’ facility in the VC available via the keyboard – you need a joystick with a hat for this operation. You can reset the view to ‘straight and level’ by pressing the SPACE key in FS9 or the CTRL+SPACE keys in FSX.

Robinson R44 12
R44 PANEL
Please note that not all warning lights may be operational.
Main Panel
1. VOR 1 indicator 2. Altimeter with altimeter calibration knob 3. Clutch light 4. Main rotor gearbox temp light 5. Main rotor gearbox chip light 6. Carbon monoxide warning light 7. Artificial horizon 8. Starter light 9. Tail rotor gearbox chip light 10. Low fuel warning light 11. Low RPM warning light 12. ASI (Air Speed Indicator) 13. Engine and rotor RPM gauge 14. VSI (Vertical Speed indicator) 15. Sub panel switch icons 16. DI (Direction Indicator) 17. Lights (see ‘Engine Panel’ below) 18. Turn co-ordinator 19. Manifold pressure
Robinson R44 13
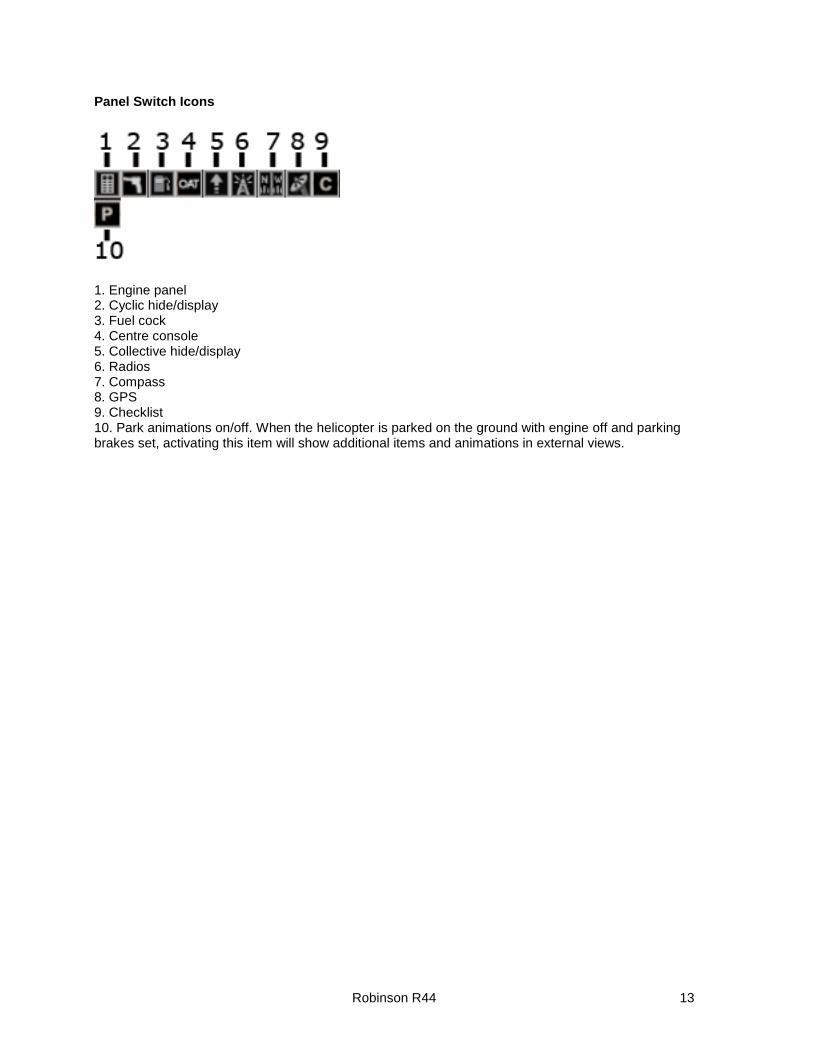
Panel Switch Icons
1. Engine panel 2. Cyclic hide/display 3. Fuel cock 4. Centre console 5. Collective hide/display 6. Radios 7. Compass 8. GPS 9. Checklist 10. Park animations on/off. When the helicopter is parked on the ground with engine off and parking brakes set, activating this item will show additional items and animations in external views.

Robinson R44 14
Engine Panel 1. Hobbs meter 2. Fuel filter light 3. Aux fuel pump light 4. Alternator light 5. Engine fire warning light 6. Oil pressure warning light 7. Governor off light 8. Amps meter 9. Oil pressure 10. Left fuel tank quantity indicator 11. Oil temperature 12. Right fuel tank quantity indicator 13. Cylinder head temperature 14. Magneto / primer switch 15. Mixture lever 16. Clock 17. Rotor brake light 18. Dimmer 19. Navigation lights switch 20. Strobe lights switch 21. Rotor clutch switch and switch guard 22. Alternator switch 23. Master battery switch

Robinson R44 15
Clutch switch and guard positions
From left to right: - Guard closed - Guard open, clutch engaged - Guard open, clutch disengaged
Fuel Switch 1. Top: fuel cock open 2. Bottom: fuel cock closed
Centre Console
1. Outside air temperature 2. Emergency landing lights switch

Robinson R44 16
Cyclic stick 1. COM1 frequency swap 2. Hydraulics switch 3. Engine starter switch
Collective lever
1. Governor switch 2. Engine starter switch 3. Throttle (click and drag to twist) 4. Emergency floats activation handle and secure pin
Robinson R44 17
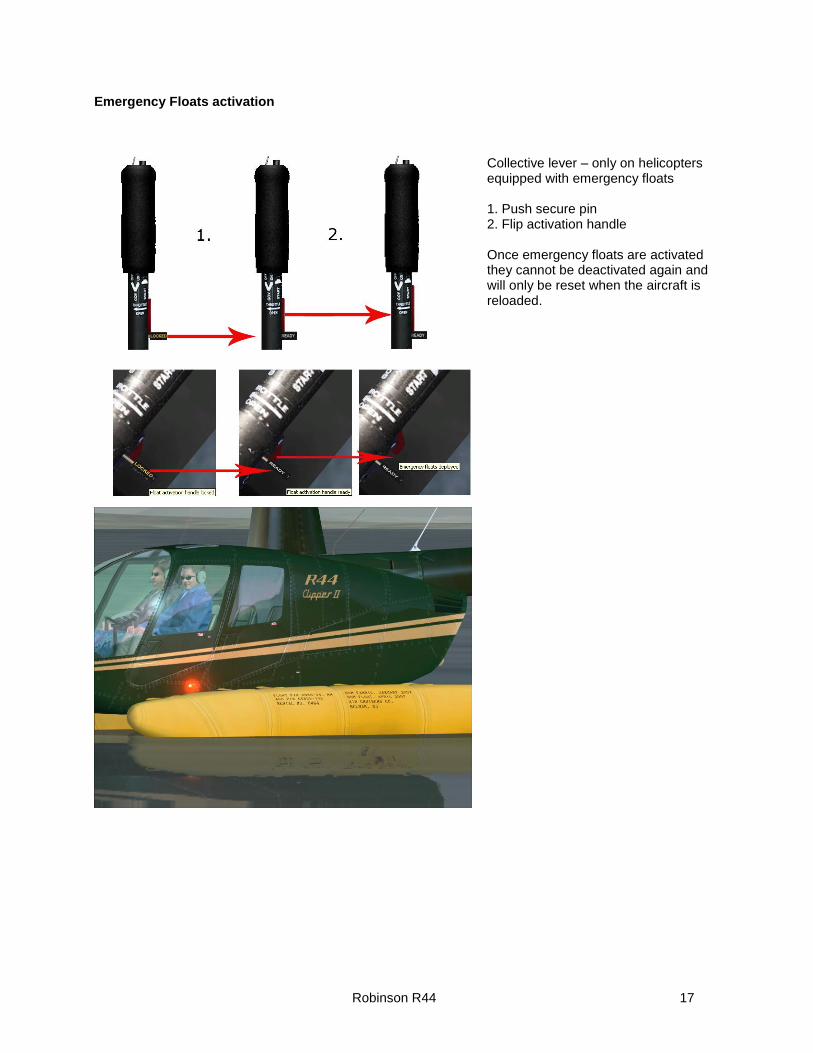
Emergency Floats activation
Collective lever – only on helicopters equipped with emergency floats 1. Push secure pin 2. Flip activation handle Once emergency floats are activated they cannot be deactivated again and will only be reset when the aircraft is reloaded.

Robinson R44 18
Sub panel Selection SHIFT+1 = Shows/hides the main panel SHIFT+2 = Shows/hides the engine panel SHIFT+3 = Shows/hides the cyclic stick SHIFT+4 = Shows/hides the fuel switch SHIFT+5 = Shows/hides the centre console SHIFT+6 = Shows/hides the collective lever SHIFT+7 = Shows/hides the radio stack SHIFT+8 = Shows/hides the compass SHIFT+9 = Shows/hides the default GPS

Robinson R44 19
IN-COCKPIT KNEEBOARD – CHECKLISTS All the Flying Club aircraft have customised checklists that are available for in-cockpit viewing. In the R44 there are two ways to view the checklists; the traditional Flight Simulator checklist and the customised R44 checklist which displays an authentic rendition of a real R44 checklist. Traditional checklist When in the aircraft press the F10 in FS2004 or the SHIFT + F10 keys in FSX to bring these up. This opens the Electronic Kneeboard. Cycling through F10 or SHIFT + F10 keys will display the various pages available and will also close the kneeboard when you have gone through each page. Authentic checklist To show the authentic checklist press the ‘C’ icon on the right side of the Icons at the bottom left of the main instrument panel. This will then show the checklist. To view the reverse side of the list click on the top middle area of the checklist and once more in the same place to view the front again. To close the checklist press the ‘C’ icon once more.
Robinson R44 20
R44 RADIO OPERATION The radio units on this aircraft cover the full range of navigation and communication devices as they are available for a general aviation aircraft. In detail the aircraft is equipped with: 1) Custom VHF Communication/Navigation Transceivers 2) Custom Transponder
OPERATION - GENERAL Powering ON the avionics Each radio has its own ON/OFF switch. By default individual avionic units will be OFF when you load the aircraft. In order to use the radios you need to switch them ON individually. As in reality the procedure always should be to switch ON radios AFTER the engine has been started and to switch OFF all radios BEFORE engine shutdown.
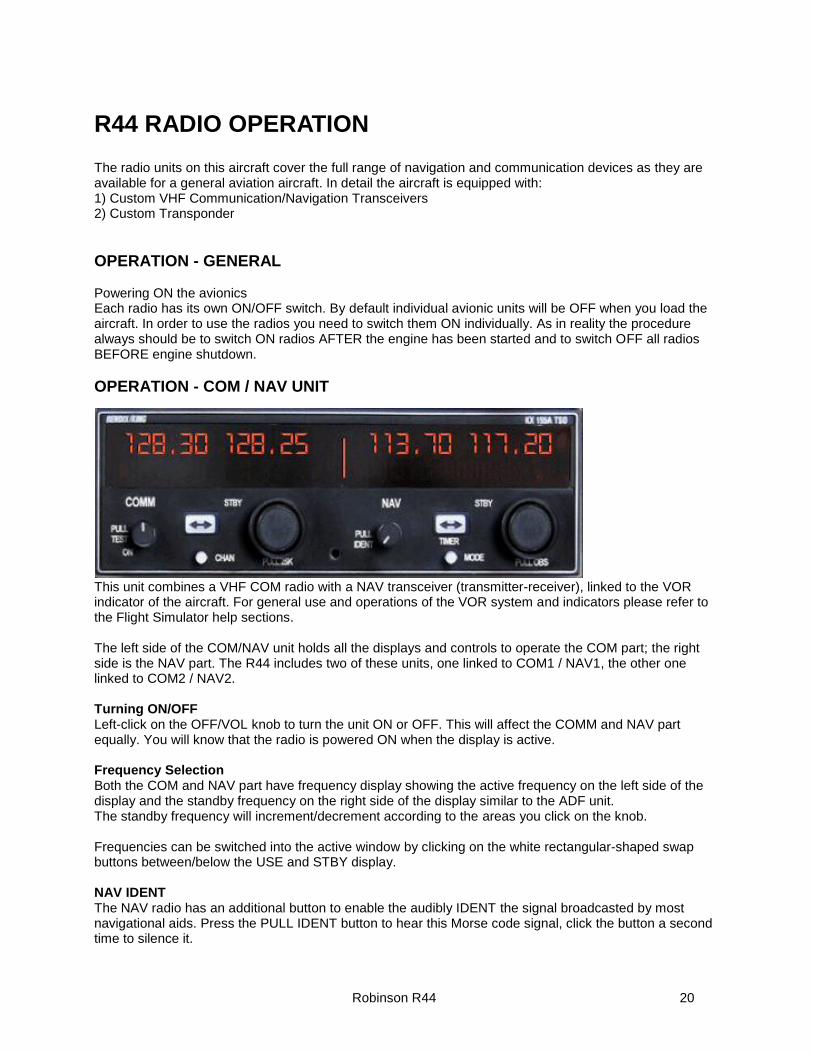
OPERATION - COM / NAV UNIT
This unit combines a VHF COM radio with a NAV transceiver (transmitter-receiver), linked to the VOR indicator of the aircraft. For general use and operations of the VOR system and indicators please refer to the Flight Simulator help sections. The left side of the COM/NAV unit holds all the displays and controls to operate the COM part; the right side is the NAV part. The R44 includes two of these units, one linked to COM1 / NAV1, the other one linked to COM2 / NAV2. Turning ON/OFF Left-click on the OFF/VOL knob to turn the unit ON or OFF. This will affect the COMM and NAV part equally. You will know that the radio is powered ON when the display is active. Frequency Selection Both the COM and NAV part have frequency display showing the active frequency on the left side of the display and the standby frequency on the right side of the display similar to the ADF unit. The standby frequency will increment/decrement according to the areas you click on the knob. Frequencies can be switched into the active window by clicking on the white rectangular-shaped swap buttons between/below the USE and STBY display. NAV IDENT The NAV radio has an additional button to enable the audibly IDENT the signal broadcasted by most navigational aids. Press the PULL IDENT button to hear this Morse code signal, click the button a second time to silence it.

Robinson R44 21
OPERATION - TRANSPONDER
The Transponder unit is a standard transponder unit similar to default transponder found in Flight Simulator. For general information about transponders please refer to the Flight Simulator help sections. The transponder is powered on by setting the rotary selector to the STBY, ALT or ON position. The button also has a TEST position which will perform a display self-test. Operation Modes OFF - Setting the rotary knob to OFF will power off the transponder. ON - Sets the transponder to Mode A operation. In the real world Mode A just supplies position information to a ground station without transmitting altitude information. The R indicator will blink to indicate that the transponder is functioning properly and replying to interrogations from the ground.
ALT - The transponder is operating in Mode A/C operations. In the real world Mode C supplies position information to a ground station as well as the aircraft’s altitude. The R indicator will blink to indicate that the transponder is functioning properly and replying to interrogations from the ground.
SBY - This mode is not simulated on this aircraft. TST - The Transponder will perform a display self test

Robinson R44 22
Code Selection The transponder can be set to codes from 0000 to 7777. To select the code press the numbered buttons at the bottom of the front panel. Pushing one of the keys begins the code selection sequence. The new code is not activated until the fourth key is entered. Pressing the CLR key moves the code back to the previous digit. Pressing the CLR key when the cursor is on the first digit will cancel the data entry and restore the previous code. The numbers 8 and 9 are not used for code entry. Although they have no effect in Flight Simulator, as in the real world the recognised Transponder codes are: - Code 0021 VFR Flight below 5000 ft (Germany) - Code 0022 VFR Flight above 5000 ft (Germany) - Code 1200 VFR Flight (USA) - Code 7000 VFR Flight (UK) - Code 7500 Hijack - Code 7600 Radio Failure - Code 7700 Emergency - Code 7777 Military Interceptor Operations
OTHER FUNCTIONS IDENT mode When you are asked to ‘Ident or Squawk’ by ATC, press the small IDENT button. VFR Sets the transponder to the pre-programmed VFR code (7000). CLR Resets the Count Up Timer During code selection this key cancels the last entry and moves the cursor one step to the left.
Robinson R44 23
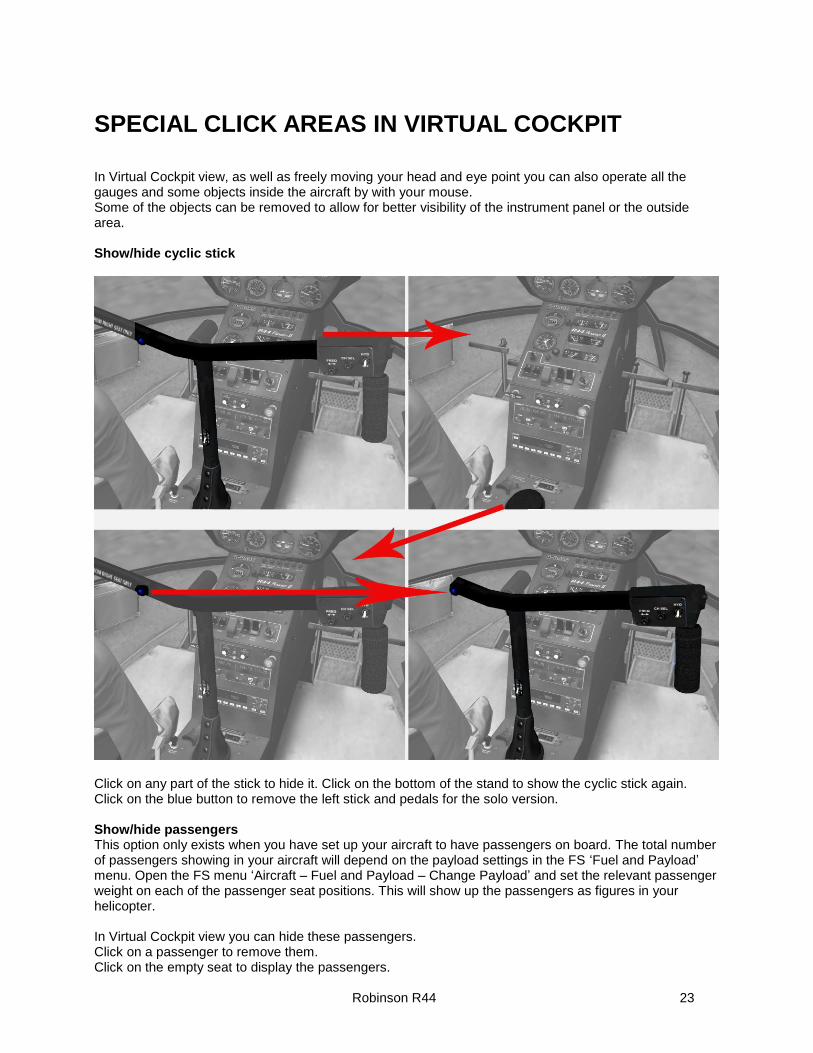
SPECIAL CLICK AREAS IN VIRTUAL COCKPIT
In Virtual Cockpit view, as well as freely moving your head and eye point you can also operate all the gauges and some objects inside the aircraft by with your mouse. Some of the objects can be removed to allow for better visibility of the instrument panel or the outside area. Show/hide cyclic stick
Click on any part of the stick to hide it. Click on the bottom of the stand to show the cyclic stick again. Click on the blue button to remove the left stick and pedals for the solo version. Show/hide passengers This option only exists when you have set up your aircraft to have passengers on board. The total number of passengers showing in your aircraft will depend on the payload settings in the FS ‘Fuel and Payload’ menu. Open the FS menu ‘Aircraft – Fuel and Payload – Change Payload’ and set the relevant passenger weight on each of the passenger seat positions. This will show up the passengers as figures in your helicopter. In Virtual Cockpit view you can hide these passengers. Click on a passenger to remove them. Click on the empty seat to display the passengers.

Robinson R44 24
This works best when using the left seat / left seat passenger as a click area. Please note that removing passengers this way will not affect your payload/weight and balance settings. Show/hide GPS Click on the GPS case on top of the panel to hide it. Click on the empty area to show the GPS again. Rotorbrake The rotorbrake handle is located between the pilot's and co-pilot's seat, above your head.
Pull the handle forward to slow down the rotor.

Robinson R44 25
FLYING THE R44
In order to help you familiarise yourself with this excellent helicopter, Jane-Rachel Whittaker will take you on a tutorial flight across the idyllic Hawaiian Island of Oahu. Welcome to our Flying Club Robinson R44. This sturdy helicopter is a firm favourite with pilots and organisations around the world. Whatever the task, from pleasure flying to police operations and the news media ‘eyes in the sky’, this dependable aircraft is pressed into service. For this tutorial we will be flying the skid-equipped R44 on a picturesque flight across Oahu. Starting at the Marine Corps airfield at Kaneohe Bay (PHNG), we will head west before following the coast to the north and making our landing at Dillingham Airfield (PHDH). Our flight will take a little over twenty-five minutes. Along the route you can expect to get involved in plenty of drills and techniques, but there will also be plenty of time to enjoy the best scenery Hawaii has to offer. We’ll be flying using Visual Flight Rules, navigating purely by compass and external landmarks, but don’t worry - the route is extremely simple to follow.
Getting started Get started by loading the helicopter (the R44 with landing skids and whichever livery you prefer) into Flight Simulator and choosing Kaneohe Bay (PHNG) as your departure airport. For the purposes of this tutorial any suitable location at the airport will make a good starting point. This airfield is well equipped for helicopter operations and there are a number of available helipads as well as plenty of room on the tarmac. With this airport normally reserved for the military, special permission is required for civilian operations, but we’ll presume that we have already received clearance from the appropriate virtual authorities to use the helicopter facilities. Once you have the helicopter on the ground in your preferred parking area, it’s worth saving the flight in Flight Simulator to ensure that this tutorial can be reloaded with the minimum of fuss. We would also advise you to disable all weather generation and AI traffic from the Flight Simulator menus. Weather, traffic and Air Traffic Control would only create additional workload, and our aim here is to concentrate on flying the helicopter without distractions. Fuel the aircraft in the included Aerotools menu - a full fuel load will be just fine. If you wish to fly solo or with company, adjusting the passenger weight (also in the Aerotools menu) will automatically add or remove the passenger.

Robinson R44 26
External pre-flight checks and the helicopter controls A full external inspection should also acquaint you with the fine lines of this popular chopper. (All checklist items referred to here are in BOLD type.) The limitations of Flight Simulator mean that some checklist items cannot be followed within the simulation, so we shall either omit these items or mark them as (REFERENCE ONLY) when the item is of interest but not fully functional within the simulation. We have a shiny new helicopter with no worn or broken parts but it is nevertheless good practice to give the aircraft a ‘once-over’ before we head across the island. Those of you with an external camera utility can walk around the aircraft at their leisure, while the Flight Simulator ‘spot view’ will allow those without such a utility to rotate the external viewpoint. CABIN – CHECK FOR DAMAGE AND DENTS DOOR AND LATCH – CHECK NAVIGATION LIGHTS AND BEACONS – CHECK FOR DAMAGE CANOPY INTEGRITY – CHECK VHF ANTENNA – CHECK FOR DAMAGE ENGINE AND EXHAUST INTAKES – CHECK TAIL ROTOR AND FITTINGS – CHECK MAIN ROTOR BLADES AND ROTOR HEAD – CHECK Once you are satisfied with the external inspection, return to the cabin and make internal preparations for the flight. Remember to sit on the right side of the cabin. With rotary aircraft it is customary for the pilot to sit in the right of the aircraft, rather than the left side which pilots of fixed-wing aircraft will be used to. The Robinson R44 can, however, be flown from either seat. Now you are seated comfortably we can introduce the three primary controls for a helicopter pilot - the cyclic, collective and the torque pedals. The word helicopter is derived from the Greek helix (spiral) and pteron (wing). Unlike a fixed-wing aircraft, a helicopter becomes airborne by virtue of the lift generated by the rotation of the rotor blades. As they spin, sufficient lift is generated to overcome the force of gravity and the helicopter takes to the air. The tail rotor is synchronised to the motion of the main rotor. As Newton points out in his third law, for every action there is an equal and opposite reaction, and the rotation of the main blades, if left unchecked, would cause the cabin of the helicopter to spin like a top in the opposite direction! The tail rotor cancels out this tendency to spin and keeps the helicopter stable. The collective control adjusts the pitch of the rotor blades to ‘bite’ the air and so achieve lift. This changing of pitch also increases drag and decreases engine and rotor RPM (Revolutions Per Minute) and additional power is needed to compensate. The collective achieves this by also being linked to the throttle system. As the collective is engaged, power is also applied as the rotor pitch change takes effect; when the collective is pulled back, power is automatically reduced to compensate for the reduced drag. The net result is that the helicopter engine and rotor maintain a constant RPM. The collective can be found between the seats in the Virtual Cockpit view or opened with an icon in the 2D view. In Flight Simulator the collective control is assigned to the throttle controls. Moving your joystick throttle will operate the throttle in the linked blade pitch/throttle relationship that we have just described.

Robinson R44 27
The collective The cyclic control tilts the entire rotor head in the direction in which the cyclic is moved. In Flight Simulator the cyclic is linked to the Flight Simulator joystick. In most helicopters the cyclic is in the form of a joystick between the legs of the pilot, but the Robinson family is almost unique in having a T-bar arrangement rather than a joystick-style cyclic control. When we refer to joystick in this tutorial, we are referring to your control joystick, which controls the cyclic within the simulation. As the joystick is moved the helicopter cyclic will follow. Pushing the joystick forward will tilt the rotors and move the helicopter forward. Moving the joystick to the left or the right tilts the rotors and moves the helicopter in that direction. A neutral joystick in the centre position will hold the helicopter still with no movement except for any vertical motion that is linked to the collective. TIP: If you find the T-bar obstructs your view of the instruments in the Virtual Cockpit, it can be hidden by clicking on it with the mouse. Clicking the base will bring it back into view.
The T-Bar can be removed from sight if it obstructs your view of the instruments The torque pedals can be likened to the rudder pedals on a fixed-wing aircraft. As mentioned above, the torque force generated by the main rotors is cancelled by the tail rotor. The torque pedals manipulate the tail rotor to deliberately induce a degree of spin into the helicopter. An example of this is using the pedals to turn the helicopter on the spot to change direction when hovering.
Robinson R44 28
In simple terms the collective can be thought of as a power control, the cyclic as a direction control and the torque pedals as a means of yawing the aircraft. TIP: If you do not have pedals in your Flight Simulator set-up, a ‘twist grip’ joystick is an excellent substitute for torque pedals. Alternatively, the rudder control keys on your keyboard will suffice. Internal checks and warming up the helicopter Now that we have established the theory of rotary flight we can warm up our helicopter and prepare to start the engine. Without further ado let’s perform the interior checklist: BATTERY – ON LANDING, NAVIGATION, BEACON AND POSITION LIGHTS – ON ALL LIGHTS ARE FUNCTIONAL – CHECK BATTERY – OFF LANDING, NAVIGATION, BEACON AND POSITION LIGHTS – OFF PEDALS ADJUSTED FOR COMFORT – (REFERENCE ONLY) SEAT BELTS AND SHOULDER HARNESS – (REFERENCE ONLY) GLOVE BOX DOOR CLOSED AND LATCHED – (REFERENCE ONLY) CONTROLS, FREEDOM OF MOVEMENT – CHECK ALTIMETER – SET (TIP: USING THE [B] KEY IN FLIGHT SIMULATOR WILL CALIBRATE THE ALTIMETER AUTOMATICALLY TO THE APPROPRIATE PRESSURE SETTING) ALL SWITCHES – OFF THROTTLE – CLOSED MIXTURE – IDLE CUT-OFF (PULL POSITION) BATTERY SWITCH – ON FUEL QUANTITY – CHECK LOW FUEL CAUTION LIGHT – OFF (PRESS TO TEST) CLUTCH CONTROL SWITCH, GUARD OPEN – RELEASE POSITION CLUTCH DISENGAGED WARNING LIGHT – ON HYDRAULICS – ON (THIS SWITCH IS ON THE T-BAR) The relevant switches for the above checklist can be found on the lower portion of the main 2D panel (accessible by clicking the hidden clickspot at the top of the 2D panel or by simply panning to the lower panel area in the Virtual Cockpit view). The fuel caution light can be found at the top of the main panel. Now that we are satisfied that the aircraft systems are functioning normally we can proceed to an engine start. BATTERY SWITCH – ON ALTERNATOR – ON (The battery should still be on after following the above checklist.) MAGNETO SWITCH – BOTH MIXTURE CONTROL – FULL RICH (PUSH) FUEL FLOW – ON (This switch is on the collective stick and is activated with the mouse.)

Robinson R44 29
STARTER – ENGAGE If you find yourself hunting for the starter switch, it can be found on the upper tip of the collective. In the 2D view the collective can be brought to screen using the Collective icon in the panel switcher. The engine will normally start after the first few turns. We can now engage the rotors. First ensure that the cyclic and collective are in the neutral position (a centred joystick). CLUTCH ENGAGE SWITCH – ENGAGED
The helicopter is now ready for flight, but before we depart on our voyage across Hawaii there is still the engine ground check to perform.

Robinson R44 30
ENGINE OIL TEMPERATURE AND PRESSURES IN GREEN ARC – CHECK ALL CAUTION/WARNING LIGHTS – OFF ALTERNATOR SWITCH – ON – OFF – ON (Movement of the ammeter needle confirms that the alternator is functioning.)
TRANSPONDER – ON SQUAWK CODE – 1200 (THIS IS THE VFR CODE IN US AIRSPACE) Flying under Visual Flight Rules we will fly with a transponder code of 1200, which normally signals to ATC within US airspace that this is a VFR flight. Should Air Traffic Control request another code, it is a simple matter of keying a new four-digit sequence into the unit. We will not be using ATC for this flight but it is good practice to remember to switch on the transponder and ‘squawk’ 1200 (7000 if flying VFR in the UK). We can also switch on the adjacent radio unit. There are no navigation radios, in keeping with the aircraft’s role as a visual flyer, but a modern communication unit is fitted.
Getting airborne Now we can finally get airborne! Let’s start modestly with a very short ascent and descent. Ensure that there are no obstacles in the way of the helicopter. Think three-dimensionally when you perform this safety check – don’t just confirm that there are no obstacles in a radius of the helicopter, but also check above it. Many helicopter flights have come to an unhappy end as a result of ascending into overhead power lines!
Apply some collective very gently. As the aircraft reaches its ‘bite point’ it will start to edge its way into the air. As you continue to increase collective the R44 should start a controlled ascent. If you increase the collective too quickly the aircraft will rise into the air like a scalded cat! One of the key principles of helicopter flight is to always be very gentle on the controls, so apply all control inputs carefully. Before getting too high, gently reduce the collective and you should find yourself returning to terra firma. Careful management of the collective is paramount, as an excessive reduction in collective

Robinson R44 31
will cause your very expensive helicopter to fall from the sky and hit the ground with a force guaranteed to separate you from your fillings! The helicopter skids are designed to withstand the jarring of a 40mph impact but no such guarantees are available for the pilot. Once safely back on the tarmac we can try the process again, but with the added twist of hovering above the ground. Apply collective to get airborne and, once you are about 50 feet above the ground, reduce the collective to stop the ascent. An excessive reduction in collective will bring the helicopter back towards the ground, whilst insufficient reduction will allow the ascent to continue. There is a balance point where the aircraft will neither ascend nor descend but will be held in equilibrium; the forces of gravity acting on the helicopter are in balance with the lift provided by the collective. Don’t be disheartened if finding this balance point proves elusive – just continue to practise. The old adage for student helicopter pilots applies – it can be a lot of bother to hover a chopper! The sense of satisfaction once this technique has been mastered certainly makes up for the frustrations along the way. Across the island With this technique mastered, we can now make our way across the island of Oahu. Using your newly acquired skills, bring the helicopter to a hover at approximately 350 feet above the airfield tarmac. With careful manipulation of the torque pedals (twist grip joystick or rudder keys for those without pedals) pivot the helicopter on the spot to a 270 degree heading. Use the compass card on the main instrument panel to confirm this heading. Monitor the airspeed indicator and vertical speed indicator before making the turn. Both should read zero to ensure that the helicopter is indeed stationary in a hover at 350 feet. Again, care is the watchword here as a rapid spin can quickly become uncontrollable. Once established on the departure heading, pushing forward on the cyclic will tilt the rotor head and the helicopter will move forwards. Acceleration is achieved by further pushing of the cyclic forward and deceleration by pulling it back. As the helicopter moves forward and assumes a nose down attitude you may find that you have to adjust the collective to maintain the current altitude. You would, of course, normally be under the control of the local air traffic controllers and would have to take great care to avoid aircraft on the active runway. For this tutorial feel free to buzz over this helicopter base to your heart’s content because the absence of AI traffic has created something of a ghost town at this busy military field. Once clear of the airport perimeter we can climb to 3,000 feet. While maintaining forward momentum with the cyclic, simply add some collective to achieve a forward climb. A forward airspeed of around 50kts gives the best rate of climb performance. This gives a climb out profile reminiscent of that of a fixed-wing aircraft. At many real-world airports helicopters are often expected to join the traffic pattern and descend to the runway or take off like a light aircraft. Rather than have a helicopter flying haphazardly around an airfield without formal helipad support, it is often easier and safer for all concerned to treat a helicopter as if it were a fixed-wing aircraft. It is actually not unusual to see a helicopter steering along the ground, following the taxiway to the departure runway. In our case the Robinson R44 is not equipped with any form of wheeled assembly and has to rely on skids for take-off and landing. It is still possible to follow a taxiway by flying along it at low speed and at a low altitude in what is described as a hover taxi. Once established at 5,000 feet, confirm that you are on a westerly heading using the compass. It does not have to be exactly 270 degrees. We will fly west until we find the coast; with this being a relatively small island, this will happen in short order! If you find yourself off track, steer the helicopter by pushing the cyclic (joystick) in the appropriate direction. You may want to practise a few airborne turns to feel comfortable with airborne control of the Robinson. This is a relatively benign helicopter and is a great favourite with the news media due to its

Robinson R44 32
stability – many of the dramatic breaking news events around the world are filmed from the cabin of a Robinson R44. If you are looking for more of a challenge, take the opportunity to benefit from the empty skies and execute some climbing and descending S turns. These require significant coordination of cyclic and collective and involve simultaneously maintaining forward cyclic pressure for airspeed, lateral cyclic movement for direction, and collective for altitude. This juggling act may seem daunting but with practice it rapidly becomes second nature. The great benefit of this control system is that it gives a degree of manoeuvrability simply not possible with conventional fixed-wing aircraft. As we continue west we will pass just north of the city of Honolulu and the enormous Honolulu International Airport on our left. Be constantly aware of your altitude, as the island is peppered with mountain ranges that seem designed to trap the unwary pilot. Either climb over or skirt around any terrain that appears to be presenting a danger to your helicopter. We want to enjoy a view of the scenery, but not get too close! If you maintain 5,000ft you should be safe for the entire flight. As you reach the coast, turn right towards the north and you can follow the coastline. Ensure that you stay well away from the cliffs and out over open water as you skirt the coastline, and descend to 1,200ft. Within a few minutes you will encounter the dramatic Kaena Point jutting out into the ocean. Keep following the coastline and navigate the point and you will find yourself having turned east as you keep the shoreline under the aircraft. Just ahead, beyond Kaena Point, is our destination of Dillingham Airfield (PHDH). Approach and landing Pull back the cyclic to slow the aircraft. There is nothing more embarrassing than seeing your potential landing site disappear under the helicopter due to an inadvertent overshoot. A nice steady approach at just over 50kts is fine. Ease back on the collective and, as the helicopter slows, start to descend. Pick out a likely landing zone on the airfield and steer towards it, keeping your target landing point fixed in your windshield view. The primary apron is to the right of the large runway as you approach from this direction. Dillingham is a large airfield that was originally built for military use but is now used as a recreational field. Its military background means there is a large apron and plenty of space for your landing procedures. It is fine if you are still a little high as you approach the landing zone. A gentle vertical descent, as discussed and practised before departure, will take care of any unwanted altitude. The key factor in ensuring that you do not overshoot or undershoot the target is airspeed, so adjust your cyclic accordingly. Aim for an initial approach speed of approximately 53 knots, which is the manufacturer’s recommended speed. As you near the landing zone, reduce speed by adjusting the cyclic. Maintain a smooth and manageable rate of descent with the collective. Approaching the touchdown point at little more than walking speed will make things much easier. As you did before take-off, check your flight path for obstacles. A beautifully managed descent will not win you the Pilot of the Year award if you descend into a tree or building or clip the rotor blades against an obstacle. TIP: Get better all-round visibility by performing take-offs and landings in the Virtual Cockpit mode.

Robinson R44 33
Hover taxi and shut-down We have one more series of manoeuvres to practise, capitalising on having the airfield to ourselves. Using the skills you have learnt so far, take the Robinson into the air and bring it to a hover at the end of the runway. You can now practise the hover taxi that we discussed earlier. Rather than using a taxiway, we’ll take advantage of the wider runway for practice purposes. Hovering 4 or 5 feet above the runway, slowly move the helicopter forward by pushing on the cyclic. Keep the motion slow and steady and keep firm control of the collective to keep the helicopter from an unwanted climb or clipping the runway. With practice – and it may require a lot of practice – you should be able to hover taxi to the end of the runway. Once you have reached the end of the runway, bringing the helicopter to a stationary hover and pulling back on the cyclic will lift the nose and start the helicopter reversing. Believe it or not, we can fly backwards to the start of the runway to repeat the drill - Cessna pilots, eat your hearts out! You might also wish to practise controlled pivots, using the torque pedals, at each end of the runway for a 180-degree direction change. The advantage of Dillingham and its long runway is that there is all the space you will ever need as you practise getting to grips with the Robinson R44. When you are satisfied with the drill, bring the helicopter back to your chosen landing position. Congratulations! You have mastered the basics of helicopter flight. All that remains is to run the shut-down checklist. COLLECTIVE DOWN (OFF POSITION) – CHECK THROTTLE – CLOSED CLUTCH CONTROL – RELEASE MIXTURE – IDLE CUT-OFF (PULL) MAGNETOS – OFF BATTERY – OFF ALTERNATOR – OFF ALL REMAINING SWITCHES – OFF FUEL VALVE – CLOSE HYDRAULICS – OFF We hope that you have enjoyed your brief flight and these training exercises in the sturdy little Robinson helicopter. Why not take the opportunity to take the R44 Clipper for some waterborne exploration of this Pacific paradise. Aloha!

Robinson R44 34
CREDITS Many thanks to all those who have kindly assisted in development of this aircraft. Helicopters Bournemouth Helicopters
Utilities Programming Wolfgang Schwarz
Product manager Alex Ford
Installer Programming Richard Slater
Product Research Alex Ford, Wolfgang Schwarz
Manual creation Alex Ford Wolfgang Schwarz
Aircraft development Marc Siegel, Ian Meredith
Manual editing Dermot Stapleton, Mark Embleton
Flight dynamic modelling Rob Young
Tutorial Jane Rachel Whittaker
‘Expert’ version flight dynamic modifications Jose Monterio
Production Andy Payne, Dermot Stapleton
Sounds Rob Young
Sales James, H, Andy H, Mark, Harley
Gauge development Martin ‘Timo’ Lubda Wolfgang Schwarz
Support Simon Martin, Martyn Northall
Additional gauge programming Wolfgang Schwarz
Special thanks go to Bournemouth Helicopters Eddy from Four Fat Fellas Jose Monterio Loretta Conley, Public Relations, Robinson Helicopter Company Sergio Costa Helicopter Redeye The PPRune posters

Robinson R44 35
COPYRIGHTS ©2008 Just Flight. All rights reserved. Just Flight and the Just Flight logo are trademarks of Mastertronic Group Limited, 1st Floor, Benjamin Street, London EC1M 5QG, United Kingdom. All trademarks and brand names are trademarks or registered trademarks of the respective owners and their use herein does not imply any association or endorsement by any third party.
PIRACY We at Just Flight have invested significant time, effort and money to develop, manufacture and publish any of our flight simulation products. This includes rewarding the programmers and artists whose creativity contributes so much to the products we all enjoy. A pirate, otherwise known as a thief, simply pays a few pence for a gold disc, places it into a CD-writer, clicks a record button, and makes over £4.00 profit PER SALE for his troubles. This is actually more profit than the publishers and developers make from the sale of an original title. Piracy is not just the domain of the casual domestic user in his or her back room, but it is also a multi-million pound business conducted by criminals often with associations with the illegal drugs trade. Buying pirated copies of programs directly support these illegal operations. In addition to this there is the real risk that the pirate product will be of inferior quality and will often contain mechanisms that degrade the performance of the game. The people who really suffer from game piracy are the artists, programmers and other committed game development staff. Piracy & theft directly affects people, and their families. Loss of revenue to the games industry through piracy means many are losing their jobs due to cut-backs that have to be made to ensure developers and publishers survive. The logical outcome of this is that eventually there would be no more Flight Simulation programs commercially available. Some of the most highly regarded, hard-working and creative people in the UK and around the world are losing their jobs while the pirates line their own pockets with YOUR money. Where's the justice in that? It's not just copying software that is against the law, owning copied software also constitutes a criminal offence; so anyone buying from these people is also at risk of arrest and prosecution. To find out more about the implications of piracy please press the Piracy button on our website at www.justflight.com