Roady Guide keys 4' x 4' - siriusretail.com · from the factory setting. This is not a volume...
16
Delphi Corporation 1441 West Long Lake Road Troy, Michigan 48098-5090 U.S.A. Customer Service: [1] 877.GO DELPHI www.delphi.com Printed on Recycled Paper ©2003 Delphi Corporation. All rights reserved. DPSS-03-E-049 The Roady name, XM name, and related logos are trademarks of XM Satellite Radio Inc. Satellite Radio Receiver User Guide SA10035 Roady Guide keys 4" x 4" 8/5/03 1:40 PM Page 1
Transcript of Roady Guide keys 4' x 4' - siriusretail.com · from the factory setting. This is not a volume...

Delphi Corporation1441 West Long Lake RoadTroy, Michigan 48098-5090U.S.A.Customer Service: [1] 877.GO DELPHI
www.delphi.com
Printed on Recycled Paper©2003 Delphi Corporation. All rights reserved.DPSS-03-E-049
The Roady name, XM name, and related logos aretrademarks of XM Satellite Radio Inc.
SatelliteRadioReceiver
UserGuide
SA10035
Roady Guide keys 4" x 4" 8/5/03 1:40 PM Page 1

Welcome
Thank you for purchasing a Delphi XM® Roady™ Satellite Radio Receiver.Your Roady Receiver gives you access to over 100 XM Satellite Radiochannels of music, news, and information.*
Your Roady Receiver must be used with the enclosed connecting devices to ensure maximum performance and safety.
*XM subscription required for reception. Not available in Alaska or Hawaii.
Warning: Do not modify or alter wires or connections in any way.Shortening wires or connections may prevent proper functioning of the protec-tion circuit. Doing so may damage your receiver and will void your warranty.
3
IMPORTANT: The FCC and FAA have not certified the
Delphi XM Roady Satellite Radio Receiver for use in any
aircraft (neither portable nor permanent installation).
Therefore, Delphi cannot support this type of application
or installation.
Roady Guide keys 4" x 4" 8/5/03 1:40 PM Page 3

4
ContentsSection 1Getting Started: Activating
Roady . . . . . . . . . . . . . . . . . . . . . . . . . . . . . . . . . . . . . . . . . . . . . . . . . . . . . .6Section 2 Roady Receiver
Roady Display Screen . . . . . . . . . . . . . . . . . . . . . . . . . . . . . . . . . . . . . . . .7Roady Controls . . . . . . . . . . . . . . . . . . . . . . . . . . . . . . . . . . . . . . . . . . . . . .8
Section 3 Basic Operations
Turning Roady On and Off . . . . . . . . . . . . . . . . . . . . . . . . . . . . . . . . . . . .10Basic Channel Selection . . . . . . . . . . . . . . . . . . . . . . . . . . . . . . . . . . . . . .10Save and Recall . . . . . . . . . . . . . . . . . . . . . . . . . . . . . . . . . . . . . . . . . . . . .12
Section 4 Menu Commands and Settings . . . . . . . . . . . . . . . . . . . . . . . . . . . . . . . . . . .13Section 5Installation
Roady Kit Set-up . . . . . . . . . . . . . . . . . . . . . . . . . . . . . . . . . . . . . . . . . . . .15Roady Receiver Installation . . . . . . . . . . . . . . . . . . . . . . . . . . . . . . . . . . .17XM Antenna Set-up . . . . . . . . . . . . . . . . . . . . . . . . . . . . . . . . . . . . . . . . . .20
Section 6 Reference
Taking Care of Your Roady . . . . . . . . . . . . . . . . . . . . . . . . . . . . . . . . . . . .24Troubleshooting . . . . . . . . . . . . . . . . . . . . . . . . . . . . . . . . . . . . . . . . . . . . .25Contacting Customer Service . . . . . . . . . . . . . . . . . . . . . . . . . . . . . . . . . .28
Section 7Warranty . . . . . . . . . . . . . . . . . . . . . . . . . . . . . . . . . . . . . . . . . . . . . . . . . . . . .29
About RoadyRoady is the latest in the acclaimed line of portable devices from Delphi XMSatellite Radio and represents the best in audio technology. Small, simple, andeasy to use, Roady is always ready to go with you. Just plug it in and go!
About DelphiDelphi is a worldwide leader in mobile electronics and transportationcomponents of audio technology. Delphi created the first in-dash car radiodecades ago, and is responsible for many audio innovations through theyears. Now Delphi technology has helped make satellite radio a reality,and Delphi continues to expand its in-vehicle and consumer electronicstechnologies. Delphi has a broad portfolio of products to answer a widevariety of information and entertainment needs.
About XMOne big idea can change everything. And XM Satellite Radio is one big idea:Radio to the Power of X®. America’s most popular satellite radio service givesyou the power to choose what you want to hear—wherever and wheneveryou want it. XM offers 70 music channels—more than any other satellite radioservice—plus 30 channels of news, talk, sports, and entertainment. That’s 100basic channels in all, for a low monthly subscription. Additional devices mayqualify for a reduced subscription fee through the XM Family Plan.
5
Roady Guide keys 4" x 4" 8/5/03 1:40 PM Page 5
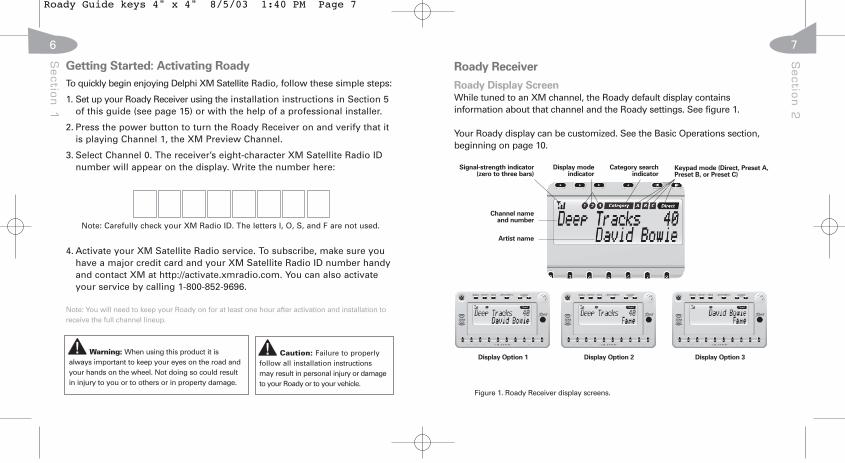
Roady Receiver
Roady Display ScreenWhile tuned to an XM channel, the Roady default display contains information about that channel and the Roady settings. See figure 1.
Your Roady display can be customized. See the Basic Operations section,beginning on page 10.
Sectio
n 1
Getting Started: Activating Roady
To quickly begin enjoying Delphi XM Satellite Radio, follow these simple steps:
1. Set up your Roady Receiver using the installation instructions in Section 5of this guide (see page 15) or with the help of a professional installer.
2. Press the power button to turn the Roady Receiver on and verify that itis playing Channel 1, the XM Preview Channel.
3. Select Channel 0. The receiver’s eight-character XM Satellite Radio ID number will appear on the display. Write the number here:
4. Activate your XM Satellite Radio service. To subscribe, make sure you have a major credit card and your XM Satellite Radio ID number handyand contact XM at http://activate.xmradio.com. You can also activateyour service by calling 1-800-852-9696.
Note: You will need to keep your Roady on for at least one hour after activation and installation toreceive the full channel lineup.
Caution: Failure to properlyfollow all installation instructionsmay result in personal injury or damageto your Roady or to your vehicle.
Warning: When using this product it isalways important to keep your eyes on the road andyour hands on the wheel. Not doing so could resultin injury to you or to others or in property damage.
Note: Carefully check your XM Radio ID. The letters I, O, S, and F are not used.
Signal-strength indicator (zero to three bars)
Keypad mode (Direct, Preset A,Preset B, or Preset C)
Channel nameand number
Artist name
Figure 1. Roady Receiver display screens.
Sectio
n 2
Display Option 1 Display Option 2 Display Option 3
Display modeindicator
Category searchindicator
76
Roady Guide keys 4" x 4" 8/5/03 1:40 PM Page 7

Sectio
n 2
The Roady unit has seven function buttons, a Tuning Wheel, and 10 number keys.
Turns the Roady Receiver on or off.
The display button toggles between three display options:1. Channel name, channel number, artist name2. Channel name, channel number, song title3. Artist name, song title
Press Memory to save artist name and song title information. Pressand hold memory key to recall information.
Press Menu to select and change receiver configuration options.Pressing Menu when in menu mode will allow the user to back outto the previous level.
Switches between Direct Entry, Preset A, Preset B, and Preset C.
Enters category search and displays channels grouped by category.Continued presses step through available categories. Use theTuning Wheel to scroll through channels within a category; pressthe Tuning Wheel in to select a channel. Category search times outafter 6 seconds if no channels are selected.
Use the Tuning Wheel to scroll through channel or menu options.Pressing the Tuning Wheel selects a channel or menu option.
Number keys are used to select a channel directly (when in DirectEntry mode), and to select or set presets when in a Preset mode.
display
menu
category
preset/direct
1
memory
Tuning Wheel (inset
on corner of unit)
Power button
Category searchControl keys
Figure 2. Roady Receiver.
Number keys
Roady Controls
Infrared lens
98
Roady Guide keys 4" x 4" 8/5/03 1:40 PM Page 9

3. Press and hold the number key corresponding to the preset you would like to set. The receiver will beep to indicate that the preset is registered.
4. Pressing a number key in preset mode without having saved a numberto that preset will cause the Roady to display the number and then switch to Channel 1.
Preview and select channels using the Tuning Wheel
You can use your Roady to preview the XM channel lineup, see what is currently playing, and then decide if you want to leave your current channel.1. Roll the Tuning Wheel up or down repeatedly (hold to move quickly) to
scroll through the channel lineup.2. Select a channel by pressing the Tuning Wheel in. If you do not select
a channel, the display will time out and return to the channel you are listening to.
Tune to a channel using the Tuning Wheel (option)
Tune up and down the channel list using the Tuning Wheel . Using theTuning Wheel allows you to tune automatically to the next channel, withouthighlighting or selecting. To activate this mode, go to “Direct Tune” option inthe menu section.
Basic Operations
Turning Roady On and OffPress on the Roady Receiver. When first turned on, the receiver willautomatically tune in to the last channel listened to and recall the previoussettings.
Basic Channel SelectionSelect a channel by number
1. Verify that Roady is in Direct Entry mode. “Direct” should appear in the upper right corner of the display. If A, B, or C appears, press until thedisplay says “Direct.”
2. Enter channel number using the number keys, i.e., 5 + 0 for Channel 50.
Set/select channel presets
Your Roady Receiver can store up to 30 preset channels. They are organizedinto three different groups (Preset A, Preset B, and Preset C), each with 10channels corresponding to the 10 number keys. For preset 10, you onlyneed to press “0.”
Selecting channel presetsPress until an A, B, or C appears in the upper right corner of the display. Press the number key corresponding to the desired preset.
Setting channel presets1. Tune in the channel you want to register as a preset, making sure it is playing.2. Select either Preset A, Preset B, or Preset C by pressing until an A,
B, or C appears in the upper right corner of the display.
Sectio
n 3
preset/direct
preset/direct
preset/direct
1110
Roady Guide keys 4" x 4" 8/5/03 1:40 PM Page 11

Menu Commands and Settings
Pressing enters the menu section of Roady. Here, you can change each of the following options using the Tuning Wheel . Select the highlighted item bypressing the Tuning Wheel . While in the menu section, acts as a “back”button, allowing you to back out of existing sections. Following are the settingsthat can be changed:
Screen ColorChange the color of the display by simply using the Tuning Wheel to scrollthrough the seven color choices. Select a new color by pressing the TuningWheel .
Audio LevelUse this to adjust the Roady Receiver audio-output level if it is too high, causingdistortion, or too low for your car. Most users will NOT need to change this levelfrom the factory setting. This is not a volume control. You should set the volumeusing the audio system connected to your Roady Receiver.
ContrastThis control allows you to adjust the contrast of your display.
Auto-OnOnce you have installed your Roady and the power has been turned on using thepower button , you will discover your Roady has been factory-set to be turnedoff and back on again using the ignition key in your vehicle. To change this factory-set condition and always power your Roady on and off with the power button ,select the “Auto-On” feature in the menu and then select “Off.”
Select a channel by category
Press either of the category keys to enter category search. 1. Continue pressing one of the category keys until a category you
are interested in appears.2. Use the Tuning Wheel to display a channel within the given category.3. Press the Tuning Wheel to select a channel.4. If you do not select a channel, category search will time out after several
seconds.
Save and Recall Artist Name and Song Title Information You can save the artist name and song title on the current channel for futurereference.1. Press and release to save the current screen information. Up to 15
different artist and song titles can be saved, after which any new informationthat is saved will replace the oldest information in memory.
2. To recall saved information, press and hold for 3 seconds. Next, usethe Tuning Wheel to display each saved artist name/song title.
Sectio
n 3
Sectio
n 4
category
category
memory
memory
menu
menu
1312
Roady Guide keys 4" x 4" 8/5/03 1:40 PM Page 13

Auto-OffYou can set your radio to automatically shut off 60, 120, or 180 minutes afterit is turned on. This feature should be used if your vehicle continues to powerthe cigarette lighter/auxiliary power after you remove your key, so if you leaveit on, Roady will shut down automatically after the time period you select andwill not drain your battery.
TuneSelect™
Using this function, you can program your Roady to alert you with a toneand display change when a favorite song is played again on a channel otherthan the one you are listening to.1. While the song is playing, press and hold the Tuning Wheel in for 2
seconds. Roady will beep and display “Song Selected” on line 1 of the display for 2 seconds, then return to normal display for the current song.Up to 10 songs may be stored in the TuneSelect list. Once the list is filled,a new entry will replace the oldest item on the list. You can erase songsfrom your TuneSelect list by going into the menu and choosing TuneSelect.Then, follow your options to erase specific song titles or clear out all titles.
2. When the song plays again on any channel other than the one you are currently listening to, your Roady will beep and display an alert notice.“Song Found” will appear on line 1 and the name of the song on line 2 for5 seconds.
3. While the “Song Found” alert is displayed, push the Tuning Wheel in toswitch to the channel playing the song. If the Tuning Wheel is notpressed while the alert is displayed, TuneSelect will time out and return tonormal display mode.
Sectio
n 4
Sectio
n 5
Installation
Roady Kit Set-upYour Roady Kit contains the following components:
Figure 3. Roady Kit components.
Cell phone mountadaptor
Cassette audio adaptor
Car mount 12V power adaptorXM Antenna
Your kit also includes:
• Car mount bracket • Extra adhesive pad • Surface preparation cleaning kit• Alcohol prep pad • Cable wrap
Hooking up your Roady Receiver
Figure 4. Connect accessories to your RoadyReceiver as shown.
Caution: Connect only appropriateinput devices to the Roady Receiver. Connectingan incorrect input device may damage thesystem and/or the external electronic device.It is recommended that you use only the 12Vto 6V conversion power adaptor that came withyour Roady Kit.
1514
Direct TuneThis feature changes the functionality of the Tuning Wheel so that it auto-matically selects a channel each time it is rolled, without having to pressTuning Wheel in. Note: Roady does not have a preview mode when thisfeature is active.
Roady Guide keys 4" x 4" 8/5/03 1:40 PM Page 15

Wireless FM Modulator*Many late model cars do not come with built-in cassette players. TheseRoady users may purchase an optional wireless FM modulator that sends theaudio signal through the vehicle’s existing FM antenna. See www.delphi.comor your retailer for details.
Roady Receiver InstallationYour Roady Receiver can be installed as follows:1. First, attach all of the components as shown in figure 4 (page 15). Insert
cassette audio adaptor into the vehicle’s cassette deck, the 12V power adaptorinto the cigarette lighter, and the antenna on the car’s roof. Turn on the carand Roady to verify that the system is working. You should always be ableto access Channel 1, even if your service is not activated. Disassemble thesystem, and proceed with step 2.
2. Identify a hard, flat surface within your car to allow the optimum Roadyviewing position for the primary user as well as access to the cassetteplayer, power source, and antenna-cable route. In order to maximize visibility, this position should be chosen to minimize glare or direct sunlight on the display. Do not install the mount where it or Roady could block your vision, vehicle airbags,or controls. Do not install the mount on aleather surface. The adhesive used on themount is not easily repositioned wheninstalled, so please use care when choosingthe location and placing the mount.
Direct Connect:
Cassette Adaptor:
FM Modulator:
Wireless FM Modulator:
Audio Quality Good Better Best
Roady offers the listener an unprecedented variety of options for connectingto your vehicle’s radio. All options provide excellent sound quality and stereoseparation, with the use of the cassette adaptor being most common. XMresearch and lab results show, that for vehicles with a cassette player, usingthe cassette adaptor maximizes the relationship between sound quality andease of installation.
Direct ConnectFor vehicles with radio head-units equipped with auxiliary audio inputs, connecting the audio directly to the auxiliary inputs of the head-unit providesmaximum audio quality.
Cassette AdaptorFor vehicles with a built-in cassette player, using the cassette adaptor foraudio is the most popular solution.
FM ModulatorFor a more professional-looking installation, an additional FM modulatorinstallation kit can be purchased from Delphi. See www.delphi.com or yourretailer for details.
Sectio
n 5
*Optional Delphi XM wireless FM modulator available fall 2003.
1716
Warning: The Roady Receivershould be placed in your vehicle whereit will not interfere with the function ofsafety features, e.g., deployment ofairbags. Failure to correctly place theRoady Receiver may result in injury toyou or others if the unit becomesdetached during an accident.
Roady Guide keys 4" x 4" 8/5/03 1:40 PM Page 17

Sectio
n 5
7. Reassemble the system as in step 1, inserting cassette audio adaptor into the vehicle’s cassette deck and the 12V power adaptor into the cigarette lighter.
8. Attach the antenna as explained on page 20.
Removing car mount from your dashboardYou can remove the car mount from your dashboard by taking the following steps:1. Lift one edge of the adhesive pad gently with fingers or the rounded edge of a
spoon. Once enough of the edge is loosened to grip with your fingers, pull thepad gently from the mounting surface at a 90-degree angle. Avoid usingsharp tools that could damage the vehicle’s interior.
2. If the pad fails to loosen, first warm it with a hair dryer for 2 to 3 minutes tosoften the adhesive. Be careful not to apply too much heat, which could damage the mounting surface.
3. If any adhesive remains on the dashboard surface, the adhesive can easily beremoved by rubbing your thumb or finger across it.
4. As necessary, use a mild household cleaner to clean the dashboard surface.
Figure 5. Attach car mount to back of RoadyReceiver as shown.
Caution: Never use a commercial heatgun or paint-stripping gun. This could result indamage to the unit or to your vehicle.
3. Clean the vehicle mounting surface with the enclosed surface preparationcleaning kit. Wipe with the towelette in only one direction. Do not wipe thesurface in a circular motion or back and forth. Dry area with a clean, drycloth. Wipe dry in the same direction again and then repeat this cleaningprocess. Allow to air dry thoroughly to ensure effective adhesion.
4. Clean the same surface with the enclosed alcohol prep pad. Wipe in thesame direction and manner as with the towelette. Dry the area with a clean,dry cloth, wiping in one direction. Allow to air dry thoroughly. Ensure thatthe surface is at least 60°F.
5. Warm the car mount adhesive pad by using a hair dryer or by placing the car mount on top of the vehicle’s defrost outlet for several minutes withthe heater on. Remove the liner from the adhesive pad and adhere to thevehicle’s surface. Make sure you accurately place the pad on the first trysince in many cases it will bond almost immediately. 3M recommends a72-hour curing time for maximum adhesion.
6. Clip the Roady Receiver onto the car mount (figure 5).
To vehicle
dashboard
1918
Roady Guide keys 4" x 4" 8/5/03 1:40 PM Page 19

Cable Routing• Once you have mounted the antenna in the correct location, plan how to
route the cable from this location to the receiver, avoiding blocked passagesand any obstructions that could kink, crimp, twist, or chafe the cable. Figure 7shows typical routing configurations. If the cable will come into contact witha rough metal opening, use a rubber grommet to prevent damage.
• For antenna mounting locations at the front or middle of the roof, the cablecan be routed down along the door jamb and into the vehicle. In some vehi-cles, the cable may be brought into the vehicle through the grommet in thedoor jamb which carries the power window and power lock wires. If thecable does not fit easily through the grommet, do not try to force it through.Instead, route the cable under the weather seal near the bottom of the door.
Sectio
n 5
XM Antenna Set-up
Antenna Installation• Best reception is achieved with the antenna mounted on the metal sur-
face of the vehicle roof in the center of an area with at least 12" x 12" ofsurface area and a minimum of 6" from a window or sunroof. Figure 6shows three typical mounting locations.
• If the vehicle has roof racks or skid ribs, it may be necessary to mount theantenna off-center.
• If the vehicle roof does not provide a sufficient metal surface area, thenthe antenna can be mounted on the metal trunk lid at least 4" from therear window.
• If an appropriate antenna mounting location cannot be identified, contactyour local retailer installation department for additional guidance.
Figure 6. The design flexibility of your XM Antenna allowsmounting on many types of vehicles. Trunkmounting of the antenna is an alternative onlyfor hard- or soft-top convertibles with non-metallic rooftops. All other vehicles shouldhave roof mounting.
Middle Rear
FrontImportant: Do not install antennainside vehicle passenger compartment.Mounting the antenna in the passengercompartment either on the front dash-board or on the rear window deck areaof the vehicle will cause reception issuesand must be avoided. Mounting theantenna on a non-metallic surface willalso result in severe degradation inreception.
Figure 7. Route XM Antenna through windshield as shown.
Front Mounting Option
2120
Warning: Failure to properlyinstall the antenna may result in injuryto you or others if it becomes detachedduring an accident.
Roady Guide keys 4" x 4" 8/5/03 1:40 PM Page 21

Final installationVerify that the antenna is in its final desired position. The antenna contains a powerful magnet that will secure the antenna to a metal roofunder normal driving conditions.
Sectio
n 5
• For antenna mounting locations at the rear of the roof, the antennacable can be routed into the vehicle through the trunk, as shown in figure 8. Always route the cable under the weather seal near the lowestpart of the trunk to help reduce possible water leaks.
• Use pre-existing wiring channels created by the vehicle manufacturerwhenever possible.
Figure 8. Route XM Antenna wiring as shown.
Rear Mounting Option
2322
Roady Guide keys 4" x 4" 8/5/03 1:40 PM Page 23

Sectio
n 6
Reference
Taking Care of Your Roady(Failure to follow these instructions may result in personal injury or damage to your Roady Receiver or to your vehicle.)
Important:• Use only a soft, dry cloth to clean the outside of your Roady and any
peripherals.
• Do not use any solvents, chemicals, or cleaning solutions containing
alcohol, ammonia, or abrasives.
• Do not allow liquids to spill on the unit.
• Do not use sprays near your Roady.
• It is best to keep Roady out of direct sunlight or other sources of
extreme heat.
• Avoid placing Roady in a setting where air cannot circulate around the unit.
TroubleshootingYour Roady Receiver is designed and built to provide you with trouble-free performance without the need for service. If it does not appear to befunctioning correctly, please follow these troubleshooting steps:1. Make sure all connectors are properly attached.2. Make sure the cigarette lighter/auxiliary power socket is clean and free
of corrosion.3. Make sure the adaptor is firmly seated in the cigarette lighter/
auxiliary power socket.4. Check the adaptor fuse by unscrewing the ribbed end of the adaptor
and examining it. If required, replace with a 1-amp fuse only. If your cigarette lighter adaptor does not have a removable end cap, then it isequipped with an internal fuse that resets itself after it is left unpow-ered for a period of time.
Caution: Refrain from usingfood or drinks near the RoadyReceiver. Spilling food or drinkson the unit could damage it.
2524
Roady Guide keys 4" x 4" 8/5/03 1:40 PM Page 25

If this happens:
You do not receive all XMchannels. Cause: Your RoadyReceiver is not activated.
The audio sounds distorted
The audio level is too low
You cannot tune to a channel
No song title or artist name displays
You should:
Contact XM as described in “GettingStarted: Activating Roady” on page 6.
Reduce audio-output level as describedunder “Menu Commands and Settings:Audio Level” on page 13.
Increase audio-output level as described in“Menu Commands and Settings: AudioLevel” on page 13.
Verify that you are authorized to receivethat channel as part of your subscriptionwith XM and that you have not asked XMto block that channel on your Roady unit.
Nothing is wrong with your receiver. Thisis normal on many talk and news channelswhere there is no song playing. Also, this information may not yet be in thechannel lineup for some selections.
Sectio
n 6
27
If you see this on the display:
NO SIGNAL Cause: The XM signal is being blocked.
ANTENNA
OFF AIR Cause: The channel selected is notcurrently broadcasting.
You should:
The message should disappear assoon as you move out of anobstructed area such as an indoorgarage. If the problem persists,make sure your antenna is mountedoutside and on top of your car witha clear view of the sky.
Make sure antenna is correctlyattached to the receiver and thatantenna cable is undamaged andfree from kinks. Turn the RoadyReceiver off and back on to resetthis message.
Tune in to another channel.
26
Roady Guide keys 4" x 4" 8/5/03 1:40 PM Page 27

29
XM Satellite Radio Limited Consumer Warranty Delphi Product and Service Solutions (“Delphi”) warrants all XM SatelliteRadio Products sold by Delphi (“Products”) to be free of defects in materialand workmanship, subject to the following conditions.
The duration of Delphi’s warranty with respect to Delphi XM Satellite RadioProducts is limited to one (1) year from the date of sale to the originalconsumer purchaser.
No other express warranties are made with respect to any Product. All
implied warranties, including warranties of merchantability and fitness for
a particular purpose are limited to the warranty period set forth above.
This warranty is not transferable and applies only to the original consumer
purchaser of the Product.
Delphi will, as its sole obligation under this warranty, replace or repair, at itsoption, any Product that does not conform to this warranty. Under no circum-stances will Delphi be liable for any incidental or consequential damagesunder this warranty or any implied warranties.
Delphi will not be responsible for damage resulting from any (i) deviationfrom Delphi’s operating instructions as printed in Delphi’s catalog or on anypackaging, labels or other literature provided with a Product, (ii) installation ofa Product in a manner which is inconsistent with Delphi’s written instructions,(iii) alteration or modification of a Product, (iv) misuse, (v) neglect, (vi) abuse,(vii) accident, (viii) normal wear and tear, (ix) commercial use, (x) service byanyone other than a Delphi authorized repair facility, or (xi) other improperapplication, installation or operation of the Product.
Sectio
n 6
Sectio
n 7
Contacting Product Technical Support and Customer ServiceFor additional information in solving problems with your Roady Receiver, contact Delphi at 1.877.GO DELPHI (1.877.463.3574) Monday—Friday.• Customer Service: 8:00 am—4:30 pm Eastern Standard Time• Technical Support: 8:00 am—8:00 pm Eastern Standard Time
Customer Service and Technical Support is also available at www.delphi.com.
Technical Information
DimensionsRoady Receiver . . . . . . . . 3.97 in. W x 2.37 in. H x 1 in. D
(101 mm x 61 mm x 25.4 mm)
WeightRoady Receiver . . . . . . . . 5.1 oz.
(144.6 g)
Inputs/Outputs Antenna. . . . . . . . . . . . . . . RF SMB connectorPower. . . . . . . . . . . . . . . . . P13 connector, 6V DC, 600 mA average, ( )
positive polarityAudio output . . . . . . . . . . 3.5 mm diameter ministereo jack
28
Roady Guide keys 4" x 4" 8/5/03 1:40 PM Page 29

Sectio
n 7
How you (the Customer) can get service: To obtain warranty service during the first thirty (30) days after the date of purchase, you must return the defective Product with the original receipt to theoriginal place of purchase. To obtain warranty service during the remainder ofthe warranty period, you must contact Delphi by phone at 1.877.GO DELPHI(1.877.463.3574) or by fax at 1.866.790.3675.
When contacting Delphi by fax, please include a letter detailing your com-plaint and provide a daytime phone number where you can be reached. Iffurther clarification or additional information is required from Delphi, youmay call Delphi at 1.877.GO DELPHI (1.877.463.3574).
If warranty service is needed at any time during the warranty period, the
purchaser will be required to furnish a sales receipt/proof of purchase
indicating the date of purchase, amount paid, and place of purchase.
Customers who fail to provide such proof of purchase will be charged
for the repair of any Product.
How state law relates to the warranty: Some states do not allow limitations on how long implied warranties last, orthe exclusion or the limitation of incidental or consequential damages. So theabove limitations or exclusions may not apply to you. This warranty givesyou specific legal rights. You may also have other rights that may vary fromstate to state.
NO PERSON IS AUTHORIZED BY DELPHI TO MODIFY OR ADD TO THIS
LIMITED WARRANTY.
30
Roady Guide keys 4" x 4" 8/5/03 1:40 PM Page 31