Riva CRM Integration Server - Omnidownloads.omni-ts.com/documentation/Riva... · Welcome to the...
54
Riva CRM Integration Server for Novell GroupWise Administrator Guide Revised: August 26, 2010 © 2002-2008 Omni Technology Solutions Inc. Page 1 of 54 This Guide This Guide This Guide This Guide Welcome to the Administrator Guide for Omni’s Riva CRM Integration Server for GroupWise Server for implementation on a Windows operating system. Riva CRM Integration Serverfor GroupWise provides transparent, server-side, bi-directional synchronization of appointments, tasks, notes and address book information between GroupWise and CRM and third-party line-of-business applications. Opportunities, quotes, cases and other CRM supported module information are synchronized to GroupWise. Users can use the Omni ConnectBar to edit, review or delete CRM opportunities, quotes and cases directly from the GroupWise client.
Transcript of Riva CRM Integration Server - Omnidownloads.omni-ts.com/documentation/Riva... · Welcome to the...

Riva CRM Integration Server for Novell GroupWise Administrator Guide
Revised: August 26, 2010 © 2002-2008 Omni Technology Solutions Inc. Page 1 of 54
This GuideThis GuideThis GuideThis Guide
Welcome to the Administrator Guide for Omni’s Riva CRM Integration Server for GroupWise Server for implementation on a Windows operating system.
Riva CRM Integration Serverfor GroupWise provides transparent, server-side, bi-directional synchronization of appointments, tasks, notes and address book information between GroupWise and CRM and third-party line-of-business applications. Opportunities, quotes, cases and other CRM supported module information are synchronized to GroupWise. Users can use the Omni ConnectBar to edit, review or delete CRM opportunities, quotes and cases directly from the GroupWise client.

Riva CRM Integration Server for GroupWise Admin Guide
www.omni-ts.com
Revised: August 26, 2010 © 2002-2008 Omni Technology Solutions Inc. Page 2 of 54
Table of ContentsTable of ContentsTable of ContentsTable of Contents
How Riva CRM Integration Server Works ............................................................................ 4
System Requirements ......................................................................................................... 4
Minimum Requirements ................................................................................................ 4
Recommended Requirements for 100 User Environment ................................................... 4
GroupWise System Requirements .................................................................................. 4
Install and Configure Riva CRM Integration Server ............................................................. 5
Step 1 – Install the Riva CRM Server ................................................................................... 5
Download and Extract Riva CRM .................................................................................... 5
Perform a Check for Updates ........................................................................................ 5
Step 2 – Create the Riva CRM eDirectory Connection .......................................................... 6
System Requirements for eDirectory .............................................................................. 6
Create an eDirectory Connection to an eDirectory Tree Hosting GroupWise ......................... 6
Step 3 – Create the Riva CRM GroupWise Connections ...................................................... 10
System Requirements for GroupWise ........................................................................... 10
Riva CRM GroupWise Connection Methods .................................................................... 10
Create an Enterprise Connection to a Target GroupWise System ...................................... 11
Create a Direct / Private Connection to a Target GroupWise System ................................ 16
Step 4 – Configure Riva Connection to the Target CRM System ......................................... 19
System Requirements for Supported CRM ..................................................................... 19
Create the Riva CRM Connection ................................................................................. 19
Step 5 – License Riva CRM ................................................................................................ 21
Step 6 – Create and Configure the CRM Integration Policy ................................................ 25
System Requirements for Supported CRM ..................................................................... 25
Type of Riva CRM Connection Methods ......................................................................... 25
Email Address Settings Requirements .......................................................................... 26
Configure “Use Impersontation” Support – SugarCRM Community Edition ........................ 26
Configure “Use Impersontation” Support – Microsoft Dynamics CRM ................................. 27
How to Enable Universal Password and NMAS ............................................................... 27
Configuration Requirments for SharePoint Server Integration .......................................... 28
Create and Configure the CRM Synchronization Policy .................................................... 28
Step 7 – Run & Verify Initial Synchronization ................................................................... 37
Synchronizing Data Between GroupWise and Your CRM Solution ...................................... 42
Current Synchronization Options ................................................................................. 42
Using the Omni ConnectBar ........................................................................................ 43
Using SmartConvert and AssignTo ............................................................................... 44
Use “Create New” to Archive Email to the CRM Account ............................................ 45
Use “Assign New” to Archive Email to a Quote, Opportunity or Case ........................... 45
Use “Create New” to Create a New Quote, Opportunity or Case .................................. 45
Microsoft SharePoint to GroupWise Synchronization ....................................................... 46

Riva CRM Integration Server for GroupWise Admin Guide
www.omni-ts.com
Revised: August 26, 2010 © 2002-2008 Omni Technology Solutions Inc. Page 3 of 54
Policy Management Tasks Explained ................................................................................. 47
Making Changes to an Existing CRM Synchronization Policy ............................................ 47
Restarting the Riva CRM Agent Service ........................................................................ 47
Using Riva CRM Integration Server Logs ....................................................................... 48
Managing the GroupWise Accounts in the Policy ............................................................ 49
Utilizing Multiple CRM Synchronization Policies .............................................................. 49
How to Permanently Remove Synchronized Data in the GroupWise Client ......................... 50
Riva CRM Management Tasks ............................................................................................ 50
License Modes for Riva CRM Integration Server ............................................................. 50
How to Apply Replacement Licences to Riva CRM Integration Server ................................ 50
How to Apply Additional Licences to Riva CRM Integration Server .................................... 51
How to Update Riva CRM Integration Server ................................................................. 51
How to Uninstall Riva CRM Integration Server ............................................................... 51
Support for Riva CRM Desktop Edition ................................................................................ 53
Reporting a Technical Issue ........................................................................................ 53
Upgrade and Support Maintenance Agreements ............................................................. 53
Free Support ............................................................................................................. 53
Contacting Support .................................................................................................... 54
Online Resources ....................................................................................................... 54

Riva CRM Integration Server for GroupWise Admin Guide
www.omni-ts.com
Revised: August 26, 2010 © 2002-2008 Omni Technology Solutions Inc. Page 4 of 54
How Riva How Riva How Riva How Riva CRM CRM CRM CRM Integration ServerIntegration ServerIntegration ServerIntegration Server WorksWorksWorksWorks
Riva is a combination of three key components that work together:
1. Riva Riva Riva Riva InterfaceInterfaceInterfaceInterface ---- used to configure the Riva eDirectory and other connectors. Used to configure the GroupWise Trusted Application, configure the CRM Connector and configure the CRM Synchronization Policy(ies).
2. Riva CRM AgentRiva CRM AgentRiva CRM AgentRiva CRM Agent Service Service Service Service – is a service that runs the CRM synchronization agent. This agent is installed and configured the first time you save a CRM Integration Module policy. See below for information on how to manually uninstall the service.
3. Riva CRM Agent Service Monitor Riva CRM Agent Service Monitor Riva CRM Agent Service Monitor Riva CRM Agent Service Monitor ---- provides real-time summary or full synchronization information.
System RequirementsSystem RequirementsSystem RequirementsSystem Requirements
Riva CRM Integration Server for GroupWise makes use of the Riva application which must be installed and configured on a host Windows system.
Minimum RequirementsMinimum RequirementsMinimum RequirementsMinimum Requirements
• Riva Host System OS:Riva Host System OS:Riva Host System OS:Riva Host System OS: Windows XP, Windows 7, Windows server 2003 / 2008 / R2 (x86 or x64)
• Software Requirements:Software Requirements:Software Requirements:Software Requirements: Microsoft .NET Framework 2.0 SP2 or higher must be installed.
• Minimum Processor (CPU):Minimum Processor (CPU):Minimum Processor (CPU):Minimum Processor (CPU): Intel P4 / AMD Athlon XP (supports x86 and x64 architectures)
• Minimum Memory (RAM)Minimum Memory (RAM)Minimum Memory (RAM)Minimum Memory (RAM): 256 MB (in addition to host system requirements)
• Minimum Disk SpaceMinimum Disk SpaceMinimum Disk SpaceMinimum Disk Space: 500 MB (above Operating System requirements)
• Installed SoftwareInstalled SoftwareInstalled SoftwareInstalled Software: Novell Client for Windows 4.91+ (x86) or 2.x (x64), applicable GroupWise client for the version of GroupWise server, ConsoleOne 1.36f+ with the GroupWise snap-ins.
Recommended Requirements for 100 User EnvironmentRecommended Requirements for 100 User EnvironmentRecommended Requirements for 100 User EnvironmentRecommended Requirements for 100 User Environment
• Riva Host System OS:Riva Host System OS:Riva Host System OS:Riva Host System OS: Dedicated Windows server 2003 / 2008 / R2 (x86 or x64)
• Software Requirements:Software Requirements:Software Requirements:Software Requirements: Microsoft .NET Framework 3.5 SP1
• Processor (CPU):Processor (CPU):Processor (CPU):Processor (CPU): Intel P4 / AMD Athlon XP (supports x86 and x64 architectures)
• Memory (RAM)Memory (RAM)Memory (RAM)Memory (RAM): 256 MB (in addition to host system requirements)
• Disk SpaceDisk SpaceDisk SpaceDisk Space: 500 MB (above Operating System requirements) plus 50MB per user
GroupWise System RequirementsGroupWise System RequirementsGroupWise System RequirementsGroupWise System Requirements
• GroupWise Client 7.0.3+ must be installed on the Windows host computer.
• LDAP connectivity to the eDirectory server that hosts the LDAP Server and LDAP Group objects that support the GroupWise system and SOAP connectivity to the GroupWise post office agent(s).
• GroupWise server 7.0.2 or higher running on NetWare, Windows or Linux servers. The Post Offices being serviced by Riva CRM Integration Server must have SOAP enabled and the SOAP port must not be restricted by a firewall. “AssignTo” functionality requires GroupWise 7.0.3.
Riva CRM Integration Server for GroupWise Admin Guide
www.omni-ts.com
Revised: August 26, 2010 © 2002-2008 Omni Technology Solutions Inc. Page 5 of 54
Install and Configure Install and Configure Install and Configure Install and Configure RivaRivaRivaRiva CRM Inte CRM Inte CRM Inte CRM Integration Servergration Servergration Servergration Server
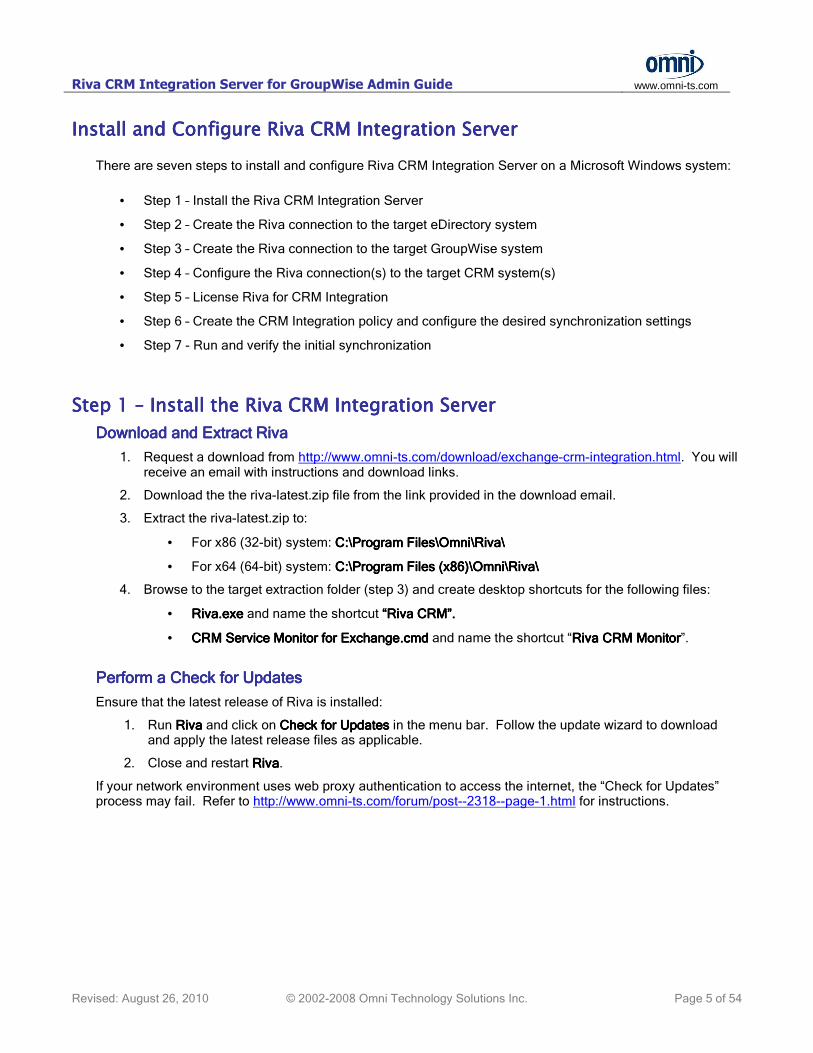
There are seven steps to install and configure Riva CRM Integration Server on a Microsoft Windows system:
• Step 1 – Install the Riva CRM Integration Server
• Step 2 – Create the Riva connection to the target eDirectory system
• Step 3 – Create the Riva connection to the target GroupWise system
• Step 4 – Configure the Riva connection(s) to the target CRM system(s)
• Step 5 – License Riva for CRM Integration
• Step 6 – Create the CRM Integration policy and configure the desired synchronization settings
• Step 7 - Run and verify the initial synchronization
Step 1 Step 1 Step 1 Step 1 –––– Install the Riva CRM Integration Server Install the Riva CRM Integration Server Install the Riva CRM Integration Server Install the Riva CRM Integration Server
Download and Extract RivaDownload and Extract RivaDownload and Extract RivaDownload and Extract Riva
1. Request a download from http://www.omni-ts.com/download/exchange-crm-integration.html. You will receive an email with instructions and download links.
2. Download the the riva-latest.zip file from the link provided in the download email.
3. Extract the riva-latest.zip to:
• For x86 (32-bit) system: C:C:C:C:\\\\Program FiProgram FiProgram FiProgram Filesleslesles\\\\OmniOmniOmniOmni\\\\RivaRivaRivaRiva\\\\
• For x64 (64-bit) system: C:C:C:C:\\\\Program Files (x86)Program Files (x86)Program Files (x86)Program Files (x86)\\\\OmniOmniOmniOmni\\\\RivaRivaRivaRiva\\\\
4. Browse to the target extraction folder (step 3) and create desktop shortcuts for the following files:
• Riva.exeRiva.exeRiva.exeRiva.exe and name the shortcut “Riva CRM”“Riva CRM”“Riva CRM”“Riva CRM”....
• CRM Service Monitor for Exchange.cmdCRM Service Monitor for Exchange.cmdCRM Service Monitor for Exchange.cmdCRM Service Monitor for Exchange.cmd and name the shortcut “Riva CRM MonitorRiva CRM MonitorRiva CRM MonitorRiva CRM Monitor”.
Perform a Check for UpdatesPerform a Check for UpdatesPerform a Check for UpdatesPerform a Check for Updates
Ensure that the latest release of Riva is installed:
1. Run RivaRivaRivaRiva and click on Check for UpdatesCheck for UpdatesCheck for UpdatesCheck for Updates in the menu bar. Follow the update wizard to download and apply the latest release files as applicable.
2. Close and restart RivaRivaRivaRiva.
If your network environment uses web proxy authentication to access the internet, the “Check for Updates” process may fail. Refer to http://www.omni-ts.com/forum/post--2318--page-1.html for instructions.

Riva CRM Integration Server for GroupWise Admin Guide
www.omni-ts.com
Revised: August 26, 2010 © 2002-2008 Omni Technology Solutions Inc. Page 6 of 54
Step 2 Step 2 Step 2 Step 2 –––– Create theCreate theCreate theCreate the Riva CRM Riva CRM Riva CRM Riva CRM eDirectoryeDirectoryeDirectoryeDirectory Connection Connection Connection Connection
System Requirements for eDirectorySystem Requirements for eDirectorySystem Requirements for eDirectorySystem Requirements for eDirectory
Common system requirements:
• Certified Directory SystemsCertified Directory SystemsCertified Directory SystemsCertified Directory Systems: eDirectory tree, 8.5 or higher on NetWare, SLES OES or Windows server.
• Software Requirements (Riva CRM Server):Software Requirements (Riva CRM Server):Software Requirements (Riva CRM Server):Software Requirements (Riva CRM Server): Latest Novell client (to match the version or eDirectory). ConsoleOne with the GroupWise and LDAP snap-ins installed on the server - required primarily for trouble shooting.
• Logon CredentialsLogon CredentialsLogon CredentialsLogon Credentials: To configure the eDirectory connection and the GroupWise Trusted Application Key, Riva requires an account with Supervisor rights to the eDirectory system and the file system (NSS) hosting the GroupWise primary domain wpdomain.db wpdomain.db wpdomain.db wpdomain.db file to register the Trusted Application Key.
• Protocols:Protocols:Protocols:Protocols: Firewalls must allow LDAP between the Riva CRM server and the eDirectory server.
How to How to How to How to CreateCreateCreateCreate an an an an eDirectoryeDirectoryeDirectoryeDirectory Connection to Connection to Connection to Connection to thethethethe eDirectory Tree Hosting GroupWiseeDirectory Tree Hosting GroupWiseeDirectory Tree Hosting GroupWiseeDirectory Tree Hosting GroupWise
1. Start the Riva application. Under "Setup" and click on the "Novell eDirectory" link in the "Connection Wizards" box. This will start the eDirectory connection wizard.
2. At the "Welcome to Novell eDirectory Connection Wizard" windows click Next >Next >Next >Next > to continue.
3. At the "Target Information" window provide the information for the eDirectory authentication server (which server do the users authenticate to):
• Specify the DNS name (preferred) or IP address for the eDirectory LDAP authentication server.
• Ensure that the "Enable SSL" option is checked (recommended). Click NextNextNextNext > > > > to continue.
4. In the “Authentication Information” window, specify the LDAP context name of the eControl master service account that has supervisor rights to the root of the eDirectory tree.

Riva CRM Integration Server for GroupWise Admin Guide
www.omni-ts.com
Revised: August 26, 2010 © 2002-2008 Omni Technology Solutions Inc. Page 7 of 54
5. In the “Collect “Ldap Group Distinguished Name” window, click the select >> elect >> elect >> elect >> button.
6. In the “eDirectory Tree Browser” window, browse to and select the LDAP Group for the server that you authenticated to in Step 4. Click the OKOKOKOK button.
7. In the “Collect “Ldap Group Distinguished Name” window, click the Next >> Next >> Next >> Next >> button.

Riva CRM Integration Server for GroupWise Admin Guide
www.omni-ts.com
Revised: August 26, 2010 © 2002-2008 Omni Technology Solutions Inc. Page 8 of 54
8. In the “Results for matched/Not Matched Attribute List and map” window, ensure that the “Skip Mapping Step” option is not checked and click Next >.Next >.Next >.Next >.
9. In the “Results for matched/Not Matched Class List and map” window, ensure that the “Skip Mapping Step” option is not checked and click Next >.Next >.Next >.Next >.
10. In the “Refresh eDirectory LDAP Server” window, click Next Next Next Next >....
11. In the “eDirectory connection successful” window, click FinishFinishFinishFinish. This should auto start the GroupWise Connection Wizard. Click CancelCancelCancelCancel.
12. This will create an eDirectory connection in the Riva application under SetupSetupSetupSetup.
Double-click the eDirectory connection to open an Edit window.

Riva CRM Integration Server for GroupWise Admin Guide
www.omni-ts.com
Revised: August 26, 2010 © 2002-2008 Omni Technology Solutions Inc. Page 9 of 54
13. Under the General General General General tab, ensure that the username for the connection is correct.
Note: Note: Note: Note: If the username is incorrect, close the Connection Edit window, right-click the connection and choose RemoveRemoveRemoveRemove. Re-run the eDirectory connection wizard to recreate an eDirectory connection.
14. Under the Connection Targets Connection Targets Connection Targets Connection Targets tab, select the target connection and click the Test the connection Test the connection Test the connection Test the connection target target target target link.
Click OKOKOKOK to close the test result window.

Riva CRM Integration Server for GroupWise Admin Guide
www.omni-ts.com
Revised: August 26, 2010 © 2002-2008 Omni Technology Solutions Inc. Page 10 of 54
15. Under the Options Options Options Options tab, click both Check Check Check Check buttons to verify that the Attribute and Class mappings are complete.
16. Click Save to close the Connection Edit window.
Step Step Step Step 3333 –––– CreateCreateCreateCreate Riva CRM Riva CRM Riva CRM Riva CRM GroupWiseGroupWiseGroupWiseGroupWise Connections Connections Connections Connections
System Requirements for System Requirements for System Requirements for System Requirements for GroupWiseGroupWiseGroupWiseGroupWise
Common system requirements:
• Certified Messaging SystemsCertified Messaging SystemsCertified Messaging SystemsCertified Messaging Systems: Novell GroupWise 8+ and 7.0 SP3 + (with SOAP enabled Post Offices).
• Software Requirements (Riva CRM Server):Software Requirements (Riva CRM Server):Software Requirements (Riva CRM Server):Software Requirements (Riva CRM Server): GroupWise client (to match the GroupWise server version). Latest Novell client (to match the version or eDirectory).
• Logon CredentialsLogon CredentialsLogon CredentialsLogon Credentials: To configure the eDirectory connection and the GroupWise Trusted Application Key, Riva requires an account with Supervisor rights to the eDirectory system and GroupWise primary domain to register the Trusted Application Key. A second option for the Groupwise connector is to use an account that has Read/Write GroupWise proxy access to the accounts that will be synchronised by Riva.
• Protocols:Protocols:Protocols:Protocols: Firewalls must allow SOAP protocols between the Riva CRM server and the GroupWise server(s) configured in the Riva GroupWise connections.
Riva CRM Riva CRM Riva CRM Riva CRM GroupWiseGroupWiseGroupWiseGroupWise Connections Methods Connections Methods Connections Methods Connections Methods
Riva CRM uses the following types of GroupWise connection methods:
• Enterprise ConnectionEnterprise ConnectionEnterprise ConnectionEnterprise Connection: Riva can connect to GroupWise using SOAP and a trusted application key. The GroupWise client needs to be installed on the Riva CRM server, SOAP needs to enabled on the GroupWise Post Office and the GroupWise domains need to be installed on NSS accessible volumes.
• Direct / Private ConnectionDirect / Private ConnectionDirect / Private ConnectionDirect / Private Connection: Riva can connect to GroupWise using a direct connection using a GroupWise account that has proxy access to the accounts that will be synchronized by Riva CRM (used if GroupWise trusted application key access is not possible).

Riva CRM Integration Server for GroupWise Admin Guide
www.omni-ts.com
Revised: August 26, 2010 © 2002-2008 Omni Technology Solutions Inc. Page 11 of 54
How to How to How to How to CreateCreateCreateCreate a a a annnn EnterpriseEnterpriseEnterpriseEnterprise Connection to a Target Connection to a Target Connection to a Target Connection to a Target GroupWiseGroupWiseGroupWiseGroupWise System System System System
1. Start the Riva CRM application.
2. In the Riva application, under SetupSetupSetupSetup on the menu bar, click the Novell GroupWiseNovell GroupWiseNovell GroupWiseNovell GroupWise Connection Wizard.
3. At the Welcome Welcome Welcome Welcome window, ensure that Enterprise ConnectiEnterprise ConnectiEnterprise ConnectiEnterprise Connectionononon is selected and click Next >Next >Next >Next >.
4. At the Trusted Application Key Trusted Application Key Trusted Application Key Trusted Application Key window, ensure that Create a new Trusted Application Key Create a new Trusted Application Key Create a new Trusted Application Key Create a new Trusted Application Key is selected and click Next >Next >Next >Next > and proceed to step 5, OR ensure that Manually Provide an existing Trusted Application Key Manually Provide an existing Trusted Application Key Manually Provide an existing Trusted Application Key Manually Provide an existing Trusted Application Key is selected if a key is available, click Next > Next > Next > Next > and proceed to step 10.
5. At the Welcome to the Trusted Apoplication KeyWelcome to the Trusted Apoplication KeyWelcome to the Trusted Apoplication KeyWelcome to the Trusted Apoplication Key window, click Next >Next >Next >Next >.
6. At the Collect Trusted Application ParametersCollect Trusted Application ParametersCollect Trusted Application ParametersCollect Trusted Application Parameters window:
• Primary Domain PathPrimary Domain PathPrimary Domain PathPrimary Domain Path:::: provide the UNC path or mapped drive path to the location of the wpdomain.db wpdomain.db wpdomain.db wpdomain.db file located on an NSS accessible volume.
• ApplicationApplicationApplicationApplication Name: Name: Name: Name: provide a suitable name for the application key name e.g. RivaGWKeyRivaGWKeyRivaGWKeyRivaGWKey
Click Next >.Next >.Next >.Next >.
7. At the Collect Trusted Application Options Collect Trusted Application Options Collect Trusted Application Options Collect Trusted Application Options window, click Next >Next >Next >Next >.
8. At the Generation Generation Generation Generation Successful Successful Successful Successful window, click Save to disk . . . Save to disk . . . Save to disk . . . Save to disk . . . and save the application key information to a .txt file in the same location as the wpdomain.db file.

Riva CRM Integration Server for GroupWise Admin Guide
www.omni-ts.com
Revised: August 26, 2010 © 2002-2008 Omni Technology Solutions Inc. Page 12 of 54
Click Save Save Save Save and OKOKOKOK.
9. In the Generation Successful Generation Successful Generation Successful Generation Successful window, click FinishFinishFinishFinish.
10. In the “Trusted Application Key” Tes“Trusted Application Key” Tes“Trusted Application Key” Tes“Trusted Application Key” Test t t t window, ensure that the correct Trusted Application Name and Key information is provided.
Provide the DNS name or IP address of a GroupWise Post Office and the account name for a GroupWise account that has supervisory rights to the GroupWise system. Click Next >Next >Next >Next >.

Riva CRM Integration Server for GroupWise Admin Guide
www.omni-ts.com
Revised: August 26, 2010 © 2002-2008 Omni Technology Solutions Inc. Page 13 of 54
11. At the Choose Detection Type Choose Detection Type Choose Detection Type Choose Detection Type window, click Next >Next >Next >Next >.
12. At the Choose an eDirectory Connection Choose an eDirectory Connection Choose an eDirectory Connection Choose an eDirectory Connection window, ensure that the correct eDirectory tree is selected and click Next >Next >Next >Next >.
13. At the GroupWise Connections DetectedGroupWise Connections DetectedGroupWise Connections DetectedGroupWise Connections Detected window, an error window may open if GroupWise post offices that are not configured for SOAP are detected.
Click OKOKOKOK.
14. At the GroupWise Connections DetectedGroupWise Connections DetectedGroupWise Connections DetectedGroupWise Connections Detected window, highlight those GroupWise domains and post offices that do not host accounts that will be synchronized with CRM, and click the Remove Remove Remove Remove button to move those GroupWise objects to the bottom list box.
Click Next >Next >Next >Next >.
15. At the Internet Addressing Internet Addressing Internet Addressing Internet Addressing window, select the preferred address format from the drop-down list.

Riva CRM Integration Server for GroupWise Admin Guide
www.omni-ts.com
Revised: August 26, 2010 © 2002-2008 Omni Technology Solutions Inc. Page 14 of 54
Click Next >Next >Next >Next >.
16. At the Internet Addressing Internet Addressing Internet Addressing Internet Addressing window, select the preferred address format from the drop-down list. At the Automatic Configuration Results Automatic Configuration Results Automatic Configuration Results Automatic Configuration Results window, click FinishFinishFinishFinish.
17. This will create a set og GroupWise connections.
18. Open the primary GroupWise Post Office connection under “Setup” by double-clicking the connection object.
19. Under the “General” tab, confirm that the correct account details are recorded:
Confirm that the GroupWise trusted application key name is displayed as the “Username”.

Riva CRM Integration Server for GroupWise Admin Guide
www.omni-ts.com
Revised: August 26, 2010 © 2002-2008 Omni Technology Solutions Inc. Page 15 of 54
20. Under the “Options” tab: ensure that the correct “Address Format” option is selected and:
• Internet Domains: Internet Domains: Internet Domains: Internet Domains: specify the preferred email domain address configured for the post office, e.g. @[email protected]@[email protected]
• Address FormatAddress FormatAddress FormatAddress Format: : : : select from the drop-down list the primary address format configured for the post office.
• Domain UNC PDomain UNC PDomain UNC PDomain UNC Path:ath:ath:ath: specify the UNC path to the wpdomain.db wpdomain.db wpdomain.db wpdomain.db file of the primary domain.
21. Click the Save Save Save Save button to save the Options settings.
22. Re-open the GroupWise Primary Post Office connection object.
23. Under OptionsOptionsOptionsOptions select all of the GroupWise Post Offices and Domain in the list box and click SaveSaveSaveSave. This will copy the settings to all of the rest of the GroupWise connection objects.

Riva CRM Integration Server for GroupWise Admin Guide
www.omni-ts.com
Revised: August 26, 2010 © 2002-2008 Omni Technology Solutions Inc. Page 16 of 54
24. Re-open the GroupWise Primary Post Office connection object.
25. Under Test Trusted KeyTest Trusted KeyTest Trusted KeyTest Trusted Key, ensure that “This connection already has the Trusted Key” line exists. Type in the name for a GroupWise account and click the Test KeyTest KeyTest KeyTest Key button.
In the “Success” window, click the OK OK OK OK button. In the “Connection Edit” window, click the SaveSaveSaveSave button.
How to How to How to How to CreateCreateCreateCreate a Direct a Direct a Direct a Direct / Private / Private / Private / Private Connection to a Target Connection to a Target Connection to a Target Connection to a Target GGGGroupWiseroupWiseroupWiseroupWise System System System System
This procedure requires that a suitable GroupWise client is installed on the Windows system hosting the Riva CRM server. Use this procedure for connection to a GroupWise server when trusted application keys are not available:
1. Start the Riva CRM application.
2. Under “Setup” on the menu bar, click the Novell GroupWiseNovell GroupWiseNovell GroupWiseNovell GroupWise Connection Wizard.
3. At the Welcome Welcome Welcome Welcome window, ensure that Direct / Private ConnectionDirect / Private ConnectionDirect / Private ConnectionDirect / Private Connection is selected and click Next >Next >Next >Next >.
4. At the Welcome to Riva’s GroupWise Wizard Welcome to Riva’s GroupWise Wizard Welcome to Riva’s GroupWise Wizard Welcome to Riva’s GroupWise Wizard window, click Next >Next >Next >Next >.
5. At the Enter the Enter the Enter the Enter the information to information to information to information to connectconnectconnectconnect to GroupWise to GroupWise to GroupWise to GroupWise window:

Riva CRM Integration Server for GroupWise Admin Guide
www.omni-ts.com
Revised: August 26, 2010 © 2002-2008 Omni Technology Solutions Inc. Page 17 of 54
• Host:Host:Host:Host: provide the DNS name of the target Exchange server e.g. https://demo3https://demo3https://demo3https://demo3----ex07.omnidevlabs.comex07.omnidevlabs.comex07.omnidevlabs.comex07.omnidevlabs.com
• Primary Mailbox Primary Mailbox Primary Mailbox Primary Mailbox – choose Default Default Default Default unless otherwise advised by Omni technical support to select and identify User SpecifiedUser SpecifiedUser SpecifiedUser Specified.
Click Next >.Next >.Next >.Next >.
6. At the GroupWise Wizard complete GroupWise Wizard complete GroupWise Wizard complete GroupWise Wizard complete window, click FinishFinishFinishFinish. This will create a private GroupWise connection object.
7. Double-click the GroupWise connection object to open the Connection Edit window.
8. Under the General General General General tab, confirm that only the Connection Name and Username fields are populated with the correct connection information.

Riva CRM Integration Server for GroupWise Admin Guide
www.omni-ts.com
Revised: August 26, 2010 © 2002-2008 Omni Technology Solutions Inc. Page 18 of 54
9. Under the Connection Targets Connection Targets Connection Targets Connection Targets tab, select the target connection and click Test the connection targetTest the connection targetTest the connection targetTest the connection target.
Click OKOKOKOK.
Riva CRM Integration Server for GroupWise Admin Guide
www.omni-ts.com
Revised: August 26, 2010 © 2002-2008 Omni Technology Solutions Inc. Page 19 of 54
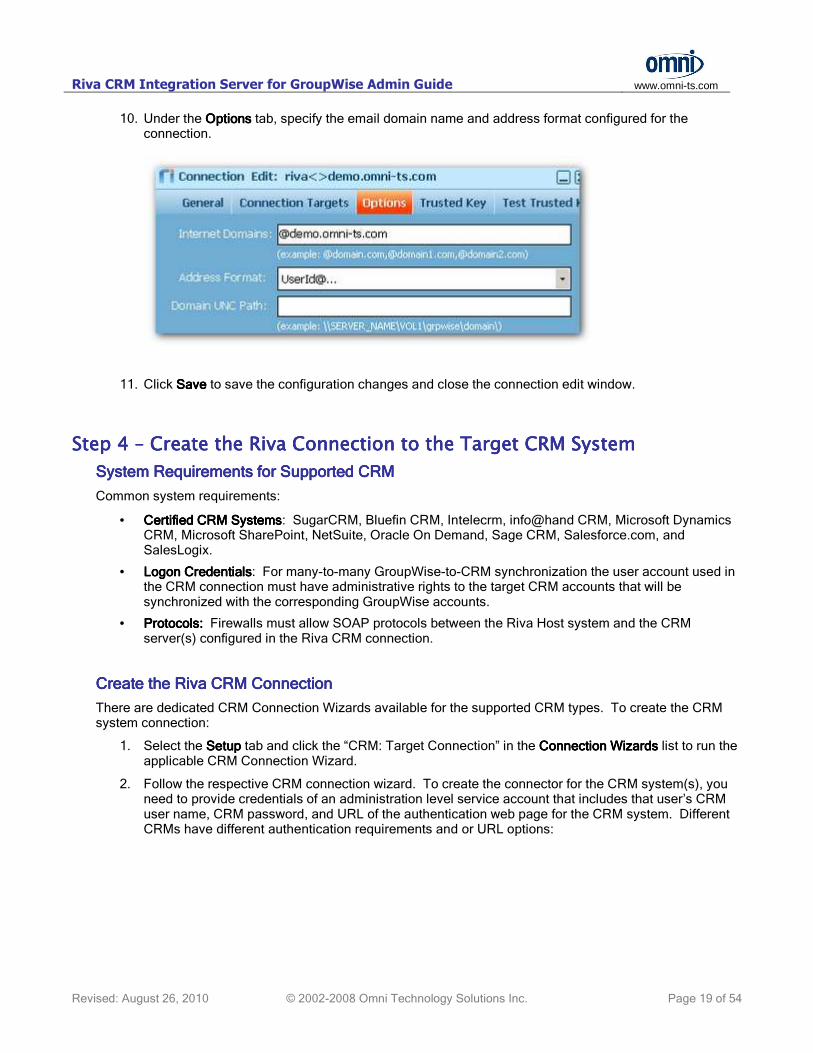
10. Under the Options Options Options Options tab, specify the email domain name and address format configured for the connection.
11. Click Save Save Save Save to save the configuration changes and close the connection edit window.
Step 4 Step 4 Step 4 Step 4 –––– Create the Riva Connection to the Target CRM System Create the Riva Connection to the Target CRM System Create the Riva Connection to the Target CRM System Create the Riva Connection to the Target CRM System
System Requirements forSystem Requirements forSystem Requirements forSystem Requirements for Supported CRM Supported CRM Supported CRM Supported CRM
Common system requirements:
• Certified CRM SystemsCertified CRM SystemsCertified CRM SystemsCertified CRM Systems: SugarCRM, Bluefin CRM, Intelecrm, info@hand CRM, Microsoft Dynamics CRM, Microsoft SharePoint, NetSuite, Oracle On Demand, Sage CRM, Salesforce.com, and SalesLogix.
• Logon CredentialsLogon CredentialsLogon CredentialsLogon Credentials: For many-to-many GroupWise-to-CRM synchronization the user account used in the CRM connection must have administrative rights to the target CRM accounts that will be synchronized with the corresponding GroupWise accounts.
• Protocols:Protocols:Protocols:Protocols: Firewalls must allow SOAP protocols between the Riva Host system and the CRM server(s) configured in the Riva CRM connection.
Create the Riva CRM ConnectionCreate the Riva CRM ConnectionCreate the Riva CRM ConnectionCreate the Riva CRM Connection
There are dedicated CRM Connection Wizards available for the supported CRM types. To create the CRM system connection:
1. Select the SetupSetupSetupSetup tab and click the “CRM: Target Connection” in the Connection Wizards Connection Wizards Connection Wizards Connection Wizards list to run the applicable CRM Connection Wizard.
2. Follow the respective CRM connection wizard. To create the connector for the CRM system(s), you need to provide credentials of an administration level service account that includes that user’s CRM user name, CRM password, and URL of the authentication web page for the CRM system. Different CRMs have different authentication requirements and or URL options:

Riva CRM Integration Server for GroupWise Admin Guide
www.omni-ts.com
Revised: August 26, 2010 © 2002-2008 Omni Technology Solutions Inc. Page 20 of 54
SugarCRM, info@hand CRM, Microsoft Dynamics CRM, Microsoft SharePoint Server, SageCRM.com and Bluefin CRM use the URL the user would normally login through a browser, e.g. http://crm.mycompany.comhttp://crm.mycompany.comhttp://crm.mycompany.comhttp://crm.mycompany.com
The Microsoft CRM connection wizard uses a CRM URL that can include organization identifiers e.g.
http://mscrm.mycompany.com/organization
In this example, the CRM connection will authenticate to the Microsoft CRM server hosted at “http://mscrm.omnihttp://mscrm.omnihttp://mscrm.omnihttp://mscrm.omni----ts.comts.comts.comts.com” and the organization “OmniLabsOmniLabsOmniLabsOmniLabs” where the full web browser URL would be http://mscrm.omnihttp://mscrm.omnihttp://mscrm.omnihttp://mscrm.omni----ts.com/OmniLabsts.com/OmniLabsts.com/OmniLabsts.com/OmniLabs

Riva CRM Integration Server for GroupWise Admin Guide
www.omni-ts.com
Revised: August 26, 2010 © 2002-2008 Omni Technology Solutions Inc. Page 21 of 54
For Salesforce.com. the URLs are embedded into the connection wizard so you need to pick one of the connection types and use the credentials of an admin CRM account:
• Production (Encrypted – https) – used in most environments
• Production (Not encrypted – http) – used for trouble shooting
• Sandbox (Encrypted – https) – used for development testing
3. Click Next>Next>Next>Next> and FinishFinishFinishFinish.
Step Step Step Step 5555 –––– License Riva CRM License Riva CRM License Riva CRM License Riva CRM
Once the GroupWise and CRM connections have been created, run the License Request Wizard to create a license request file and submit the request electronically or email the resulting file to Omni to receive the licence:
1. Click the Request License Request License Request License Request License on the menu bar, or if the selection is not available, under Policies Policies Policies Policies click on Enterprise CRM IntegrationEnterprise CRM IntegrationEnterprise CRM IntegrationEnterprise CRM Integration to open the pane that displays the “CRM Synchronization” policy. Right-click Exchange Exchange Exchange Exchange CRM Synchronization CRM Synchronization CRM Synchronization CRM Synchronization and select Request License Request License Request License Request License to start the License Request Wizard.
Riva CRM Integration Server for GroupWise Admin Guide
www.omni-ts.com
Revised: August 26, 2010 © 2002-2008 Omni Technology Solutions Inc. Page 22 of 54
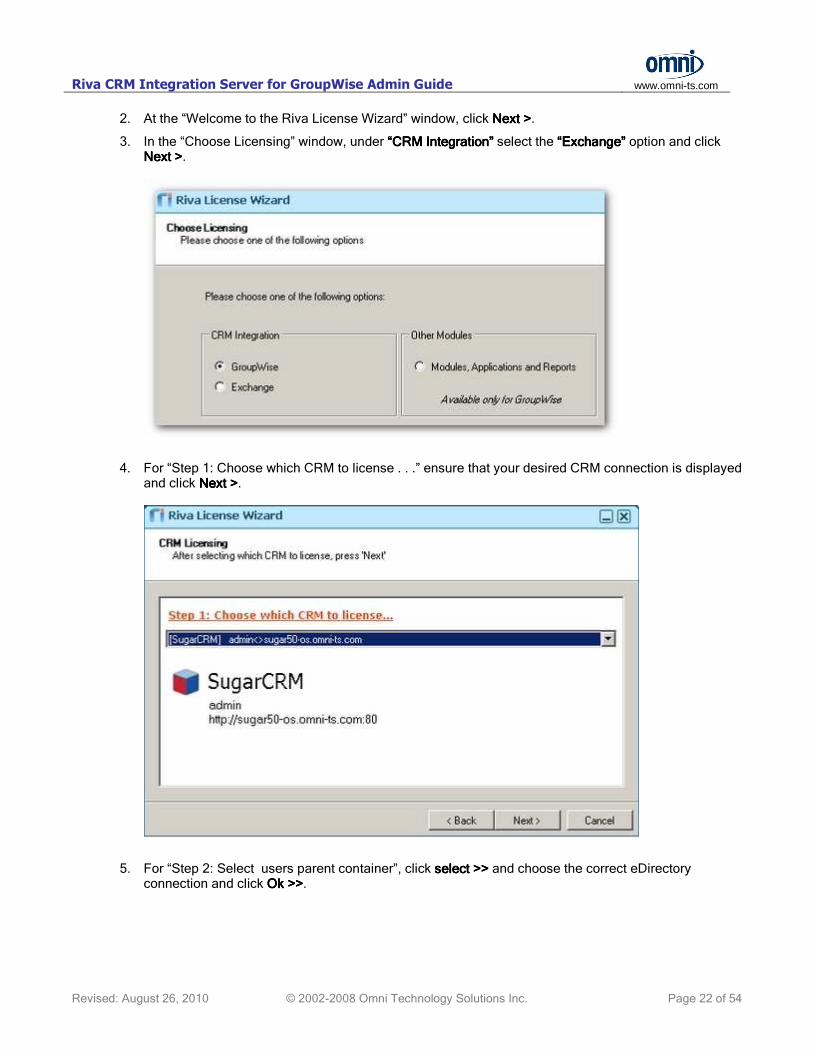
2. At the “Welcome to the Riva License Wizard” window, click Next >Next >Next >Next >.
3. In the “Choose Licensing” window, under ““““CRM IntegrationCRM IntegrationCRM IntegrationCRM Integration” ” ” ” select the ““““ExchangeExchangeExchangeExchange”””” option and click Next >Next >Next >Next >.
4. For “Step 1: Choose which CRM to license . . .” ensure that your desired CRM connection is displayed and click Next >Next >Next >Next >.
5. For “Step 2: Select users parent container”, click select >>select >>select >>select >> and choose the correct eDirectory connection and click Ok >>Ok >>Ok >>Ok >>.

Riva CRM Integration Server for GroupWise Admin Guide
www.omni-ts.com
Revised: August 26, 2010 © 2002-2008 Omni Technology Solutions Inc. Page 23 of 54
For “Step 3: Enter the number of users to license” enter the number of user accounts to license. For a trial license, the recommended number is 10. Click Next >Next >Next >Next >.
6. In the “Contact Information”, fill in the information and click Next >Next >Next >Next >.

Riva CRM Integration Server for GroupWise Admin Guide
www.omni-ts.com
Revised: August 26, 2010 © 2002-2008 Omni Technology Solutions Inc. Page 24 of 54
7. In the “Submit Request Electronically?” window click YesYesYesYes. Riva will attempt to upload the license request to the Omni License Request server.
8. If the license request upload was successful, Riva will show a successful “Completed” window.
If the license request upload was not successful, Riva will open a “Completed” window prompt you to send the file that was created to [email protected], Note the path to the LicenseRequest(date).request file. You will receive a license file by email.
After you receive the license, save a copy of the Riva .license file to the \\\\Licenses Licenses Licenses Licenses folder inside your Riva installation directory. You will need to close and restart the Riva application for the license to take effect.

Riva CRM Integration Server for GroupWise Admin Guide
www.omni-ts.com
Revised: August 26, 2010 © 2002-2008 Omni Technology Solutions Inc. Page 25 of 54
Step Step Step Step 6666 –––– Create and Configure the CRM Create and Configure the CRM Create and Configure the CRM Create and Configure the CRM SynchronizationSynchronizationSynchronizationSynchronization Policy Policy Policy Policy
System Requirements for Supported CRMSystem Requirements for Supported CRMSystem Requirements for Supported CRMSystem Requirements for Supported CRM
Common system requirements:
• CertifiedCertifiedCertifiedCertified CRM Systems CRM Systems CRM Systems CRM Systems: SugarCRM, Bluefin CRM, Intelecrm, info@hand CRM, Microsoft Dynamics CRM, Microsoft SharePoint, NetSuite, Oracle On Demand, Sage CRM, Salesforce.com, and SalesLogix.
• Logon CredentialsLogon CredentialsLogon CredentialsLogon Credentials: For many-to-many GroupWise-to-CRM synchronization the user account used in the CRM connection must have administrative rights to the target CRM accounts that will be synchronized with the corresponding Exchange accounts.
• Protocols:Protocols:Protocols:Protocols: Firewalls must allow MAPI or SOAP protocols between the Riva Host system and the CRM server(s) configured in the Riva Exchange connections.
Types of Riva CRM Connection MethodsTypes of Riva CRM Connection MethodsTypes of Riva CRM Connection MethodsTypes of Riva CRM Connection Methods
Each Riva CRM Synchronization policy supports four different types of CRM connection methods. In order of preferred use, they are:
• Use Impersonation (PrimarUse Impersonation (PrimarUse Impersonation (PrimarUse Impersonation (Primary method) y method) y method) y method) – allows Riva to act as a trusted system account and act on behalf of a user without requiring knowledge of the user password. This is the most secure, scalable and preferred option. The user’s GroupWise username must match the user’s CRM login name. The CRM account used to originally create the CRM Connection must be an administrator level account for this method to work. Not all CRMs support this method:
o SugarCRM 4SugarCRM 4SugarCRM 4SugarCRM 4, 5 5 5 5, 6, 6, 6, 6 Pro and Enterprise Pro and Enterprise Pro and Enterprise Pro and Enterprise – natively supported.
o SugarCRM 4.x Open Source / 5.xSugarCRM 4.x Open Source / 5.xSugarCRM 4.x Open Source / 5.xSugarCRM 4.x Open Source / 5.x Community Edition Community Edition Community Edition Community Edition – requires addition of custom Omni SoapSudo.php in the SugarCRM installation. (See “Configure Use Impersonation Support – SugarCRM Community Edition” below).
o Info@handInfo@handInfo@handInfo@hand – version 5.3.3+ or requires addition of custom Omni SoapSudo.php in the Info@hand installation. (See “Configure Use Impersonation Support – SugarCRM Community Edition” below).
o Bluefin CRM Bluefin CRM Bluefin CRM Bluefin CRM – version 5.3.2 or higher, natively supported.
o Intellicrm Intellicrm Intellicrm Intellicrm – natively supported.
o Microsoft SharePoint Server Microsoft SharePoint Server Microsoft SharePoint Server Microsoft SharePoint Server – natively supported.
o MicroMicroMicroMicrosoft Dynamics CRM (Version 3 and 4) soft Dynamics CRM (Version 3 and 4) soft Dynamics CRM (Version 3 and 4) soft Dynamics CRM (Version 3 and 4) – natively supported but requires configuration using MMC. (See “Configure Use Impersonation Support – Microsoft Dynamics CRM” below).
o Microsoft SharePoint Server Microsoft SharePoint Server Microsoft SharePoint Server Microsoft SharePoint Server – natively supported.
o Sage CRM Sage CRM Sage CRM Sage CRM – natively supported
o SSSSalesforce.com alesforce.com alesforce.com alesforce.com – view single sign-on information at http://www.omni-ts.com/crm-integration/salesforce-sso.html
• Use the configured CRM account (Tertiary method) Use the configured CRM account (Tertiary method) Use the configured CRM account (Tertiary method) Use the configured CRM account (Tertiary method) – used when you want to synchronize a single CRM account to many GroupWise accounts. Can also be used to synchronize single user accounts but requires creating a unique CRM connection and CRM Integration Policy for each user. This method will synchronize the single CRM account used in the CRM Connection Wizard to multiple GroupWise accounts.
• Use NMAS to extract LDAP password (Secondary method)Use NMAS to extract LDAP password (Secondary method)Use NMAS to extract LDAP password (Secondary method)Use NMAS to extract LDAP password (Secondary method) – uses NMAS user names and passwords to authenticate to target CRM accounts. NMAS user names/passwords must match CRM user names/passwords. This option requires that:
Riva CRM Integration Server for GroupWise Admin Guide
www.omni-ts.com
Revised: August 26, 2010 © 2002-2008 Omni Technology Solutions Inc. Page 26 of 54
o NMAS Universal Password be configured,
o the eDirectory and CRM user name be the same, and
o the user CRM password match the Universal Password.
This is the preferred connection method for Salesforce.comSalesforce.comSalesforce.comSalesforce.com. Refer to “How to Enable Universal Password and NMAS” below for detailed instructions.
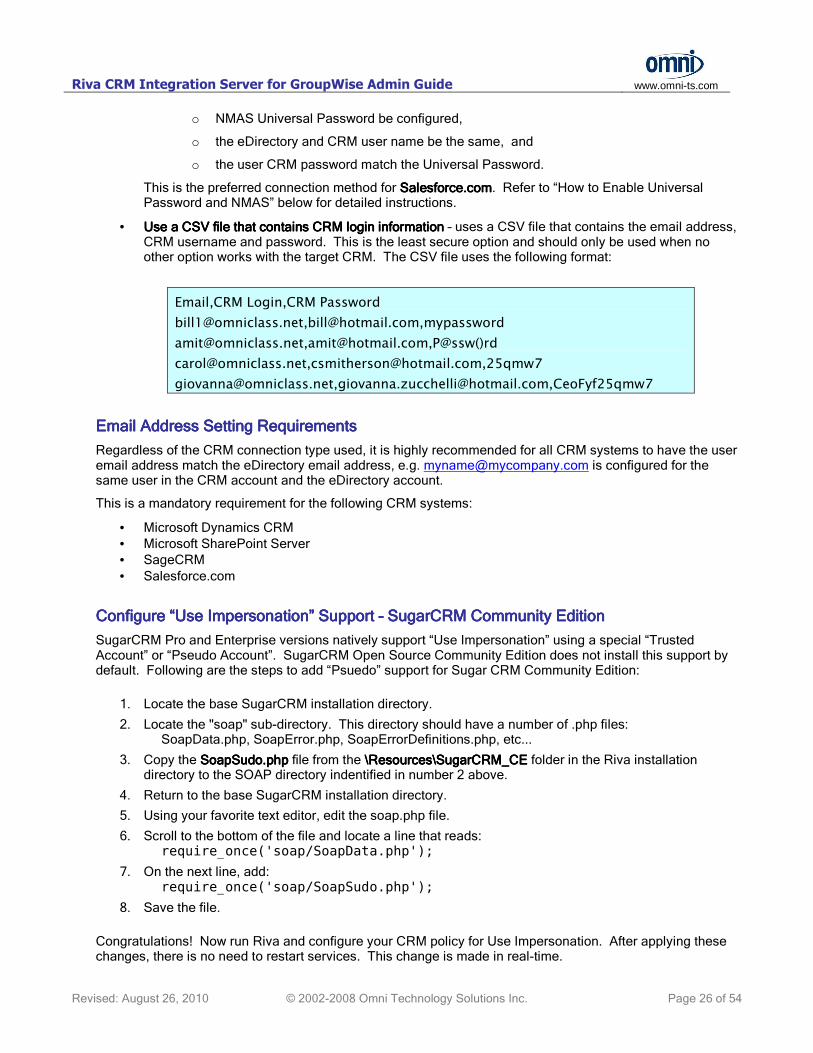
• Use a CSV file that contains CRM login information Use a CSV file that contains CRM login information Use a CSV file that contains CRM login information Use a CSV file that contains CRM login information – uses a CSV file that contains the email address, CRM username and password. This is the least secure option and should only be used when no other option works with the target CRM. The CSV file uses the following format:
Email,CRM Login,CRM Password
[email protected],[email protected],mypassword
[email protected],[email protected],P@ssw()rd
[email protected],[email protected],25qmw7
[email protected],[email protected],CeoFyf25qmw7
Email Address Setting RequirementsEmail Address Setting RequirementsEmail Address Setting RequirementsEmail Address Setting Requirements
Regardless of the CRM connection type used, it is highly recommended for all CRM systems to have the user email address match the eDirectory email address, e.g. [email protected] is configured for the same user in the CRM account and the eDirectory account.
This is a mandatory requirement for the following CRM systems:
• Microsoft Dynamics CRM
• Microsoft SharePoint Server
• SageCRM
• Salesforce.com
Configure “Use Impersonation” Support Configure “Use Impersonation” Support Configure “Use Impersonation” Support Configure “Use Impersonation” Support –––– SugarCRM Community Edition SugarCRM Community Edition SugarCRM Community Edition SugarCRM Community Edition
SugarCRM Pro and Enterprise versions natively support “Use Impersonation” using a special “Trusted Account” or “Pseudo Account”. SugarCRM Open Source Community Edition does not install this support by default. Following are the steps to add “Psuedo” support for Sugar CRM Community Edition:
1. Locate the base SugarCRM installation directory.
2. Locate the "soap" sub-directory. This directory should have a number of .php files: SoapData.php, SoapError.php, SoapErrorDefinitions.php, etc...
3. Copy the SoapSudo.phpSoapSudo.phpSoapSudo.phpSoapSudo.php file from the \\\\ResourcesResourcesResourcesResources\\\\SugarCRM_CESugarCRM_CESugarCRM_CESugarCRM_CE folder in the Riva installation directory to the SOAP directory indentified in number 2 above.
4. Return to the base SugarCRM installation directory.
5. Using your favorite text editor, edit the soap.php file.
6. Scroll to the bottom of the file and locate a line that reads: require_once('soap/SoapData.php');
7. On the next line, add: require_once('soap/SoapSudo.php');
8. Save the file.
Congratulations! Now run Riva and configure your CRM policy for Use Impersonation. After applying these changes, there is no need to restart services. This change is made in real-time.

Riva CRM Integration Server for GroupWise Admin Guide
www.omni-ts.com
Revised: August 26, 2010 © 2002-2008 Omni Technology Solutions Inc. Page 27 of 54
Configure “Use Impersonation” Support Configure “Use Impersonation” Support Configure “Use Impersonation” Support Configure “Use Impersonation” Support –––– Microsoft Dynamics CRM Microsoft Dynamics CRM Microsoft Dynamics CRM Microsoft Dynamics CRM
To use the "User Impersonation" CRM connection method, the user account (with administrator privileges) that was used to configure the Microsoft CRM Connection Wizard must be added to the PrivUserGroupPrivUserGroupPrivUserGroupPrivUserGroup in Microsoft Active Directory. This group is created by default during the Microsoft CRM installation and setup.
The "trusted" connection account must be associated with a licensed Microsoft CRM user and have access to query the Users module.
How to Enable Universal Password and NMHow to Enable Universal Password and NMHow to Enable Universal Password and NMHow to Enable Universal Password and NMASASASAS
BackgroundBackgroundBackgroundBackground - Certain CRM systems do not support a "Trusted Account" or "Pseudo Account" to allow Riva CRM Integration Server to transparently access multiple CRM accounts. Examples of these systems include SugarCRM Community Edition, Microsoft Dynamics CRM and Salesforce.com. Riva CRM can leverage Novell's Universal Password to overcome this CRM limitation. Administrators use Novell Modular Authentication Services (NMAS) to create a Universal Password policy that is assigned to the context of the users whose accounts are being accessed by Riva in the CRM. The following three conditions are required to complete the process to support NMAS password access for CRMs that don't support a "Trusted Account":
• NMAS Universal Password be configured
• The GroupWise and CRM account names must be the same
• The eDirectory and CRM passwords must be the same
This configuration allows Riva CRM Integration Server to transparently access the multiple GroupWise and CRM accounts to be synchronized. If your CRM supports LDAP Authentication, we highly recommend enabling this functionality. This simplifies password management and allows your CRM to use the eDirectory login and password.

Riva CRM Integration Server for GroupWise Admin Guide
www.omni-ts.com
Revised: August 26, 2010 © 2002-2008 Omni Technology Solutions Inc. Page 28 of 54
Enable NMASEnable NMASEnable NMASEnable NMAS - Follow the applicable Novell instructions to install and enable Novell Modular Authentication Service (NMAS). Create/Assign Universal Password PolicyCreate/Assign Universal Password PolicyCreate/Assign Universal Password PolicyCreate/Assign Universal Password Policy - use the following steps to create and assign Universal Password Policy to support Riva CRM Integration Server:
1. Login to iManager (http://ipaddress-of-server/nps) as the admin user.
2. Under "Roles and Tasks", select "Passwords" > "Password Policies".
3. Click "New..." to run the create password policy wizard.
4. For Step 1 of 8: provide a "Policy Name", and "Description" (optional) and "Password Change Message" (optional). Click "Next >>".
5. For Step 2 of 8: select "Yes" and check "Enable the Advanced Password Rules (go to Step 3)". Click "View Options" and make desired changes. For Riva CRM Integration Server, we recommend that you accept the default options. Click "Next >>".
6. For Step 3 of 8: make any necessary changes to support your environment and click "Next >>".
7. For Step 4 of 8: select either Yes or No (the default is "No" which will skip steps 5 and 6). Click "Next >>".
8. For Step 7 of 8: Click the magnify glass icon, browse and select the different containers of users that will be assigned this universal password policy. Click "Next >>".
9. For Step 8 of 8: Click "Finish" and "Close".
Configuration Requirements for SharePoint Server IntegrationConfiguration Requirements for SharePoint Server IntegrationConfiguration Requirements for SharePoint Server IntegrationConfiguration Requirements for SharePoint Server Integration
There are two key configuration requirements to ensure that data synchronization between GroupWise and Microsoft SharePoint Server will work:
• Use ImpersonationUse ImpersonationUse ImpersonationUse Impersonation must be selected as the CRM connection method, and
• The user’s eDirectory email address value and SharePoint account email value must be identical.
Create and Configure the CRM Synchronization PolicyCreate and Configure the CRM Synchronization PolicyCreate and Configure the CRM Synchronization PolicyCreate and Configure the CRM Synchronization Policy
From the Policies Policies Policies Policies tab, select the Enterprise CRM Integration Enterprise CRM Integration Enterprise CRM Integration Enterprise CRM Integration category and click the Settings Settings Settings Settings button to configure the synchronization settings:
1. Under the GeneralGeneralGeneralGeneral tab, select the desired CRM connection.

Riva CRM Integration Server for GroupWise Admin Guide
www.omni-ts.com
Revised: August 26, 2010 © 2002-2008 Omni Technology Solutions Inc. Page 29 of 54
. Click the add >> add >> add >> add >> link to browse the eDirectory tree and select the desired objects to synchronize with. Click Ok >> Ok >> Ok >> Ok >> to add the objects to the “GroupWise Accounts” list box. Note Note Note Note - It is a best practice to select each eDirectory user or a group object that represent the users to be synchronized. If you change the members of a selected group object, the Riva CRM Agent will need to be restarted to read the modified membership list.
Ensure that the Enabled Enabled Enabled Enabled option is not checkedis not checkedis not checkedis not checked and click the Sync Start Time Sync Start Time Sync Start Time Sync Start Time tab.

Riva CRM Integration Server for GroupWise Admin Guide
www.omni-ts.com
Revised: August 26, 2010 © 2002-2008 Omni Technology Solutions Inc. Page 30 of 54
2. Under the Sync Start Time Sync Start Time Sync Start Time Sync Start Time tab, set the desired start date to synchronize active items to user GroupWise clients. In Demo mode, you cannot set this value. Riva will only synchronize the last 7 days of historical data. In Licensed mode, Riva will synchronize all items from the CRM that have been modified or created since the Synchronization Start Time.
3. Under the Scheduling Scheduling Scheduling Scheduling tab, set the “Peak” and “Off-Peak” synchronization frequency values from the available drop-down lists. Also click Edit Peak Times . . . Edit Peak Times . . . Edit Peak Times . . . Edit Peak Times . . . and Edit Blackout Times . . . Edit Blackout Times . . . Edit Blackout Times . . . Edit Blackout Times . . . links to specify the “Peak” days and time ranges and “Blackout” days and time ranges. Riva will not synchronize any data during the “Blackout” period.
• Peak Times Peak Times Peak Times Peak Times – recommend to set the start time for one hour prior to normal office starting hours and one hour after normal closing hours.
• Blackout Times Blackout Times Blackout Times Blackout Times - set the blackout time to prevent Riva from communicating with GroupWise during system maintenance and backup times.

Riva CRM Integration Server for GroupWise Admin Guide
www.omni-ts.com
Revised: August 26, 2010 © 2002-2008 Omni Technology Solutions Inc. Page 31 of 54
4. Under the AddreAddreAddreAddress Bookss Bookss Bookss Bookssss tab, specify the name of the CRM address books that will be created in the GroupWise account and indicate which type of address book objects to synchronize between GroupWise and the CRM system.
Riva will create two new contact books: <Addres<Addres<Addres<Address Book name> | Contacts s Book name> | Contacts s Book name> | Contacts s Book name> | Contacts and <Address Book <Address Book <Address Book <Address Book name> | Leads. name> | Leads. name> | Leads. name> | Leads. We recommend setting the “Address Book name” field to identify the CRM solution. In this example Riva will create a SugarCRM | Contacts SugarCRM | Contacts SugarCRM | Contacts SugarCRM | Contacts and a SugarCRM | LeadsSugarCRM | LeadsSugarCRM | LeadsSugarCRM | Leads in the GroupWise client. Options to consider include:
• Synchronize Contacts Synchronize Contacts Synchronize Contacts Synchronize Contacts – uncheck to disable contact synchronization.
• Synchronize Leads Synchronize Leads Synchronize Leads Synchronize Leads – uncheck to disable lead synchronization.
• Synchronize Organizations Synchronize Organizations Synchronize Organizations Synchronize Organizations – uncheck to disable lead synchronization.
• Filter by security Filter by security Filter by security Filter by security – (default) contact and leads will be synchronized on the basis of visibility to the user. If the user can see the contact or lead in CRM, then it will synchronize from CRM to GroupWise.
• Filter by ownershipFilter by ownershipFilter by ownershipFilter by ownership – contacts and leads will be synchronized on the basis of ownership (assignment to the target CRM user). Only those contacts and leads that are ‘assigned’ to the user will be synchronized from CRM to Exchange.
5. Under the CalendarCalendarCalendarCalendar tab, specify the name of the CRM calendar that will be created in the GroupWise account and indicate the type of calendar items to sync between GroupWise and the CRM system.
Riva CRM Integration Server for GroupWise Admin Guide
www.omni-ts.com
Revised: August 26, 2010 © 2002-2008 Omni Technology Solutions Inc. Page 32 of 54
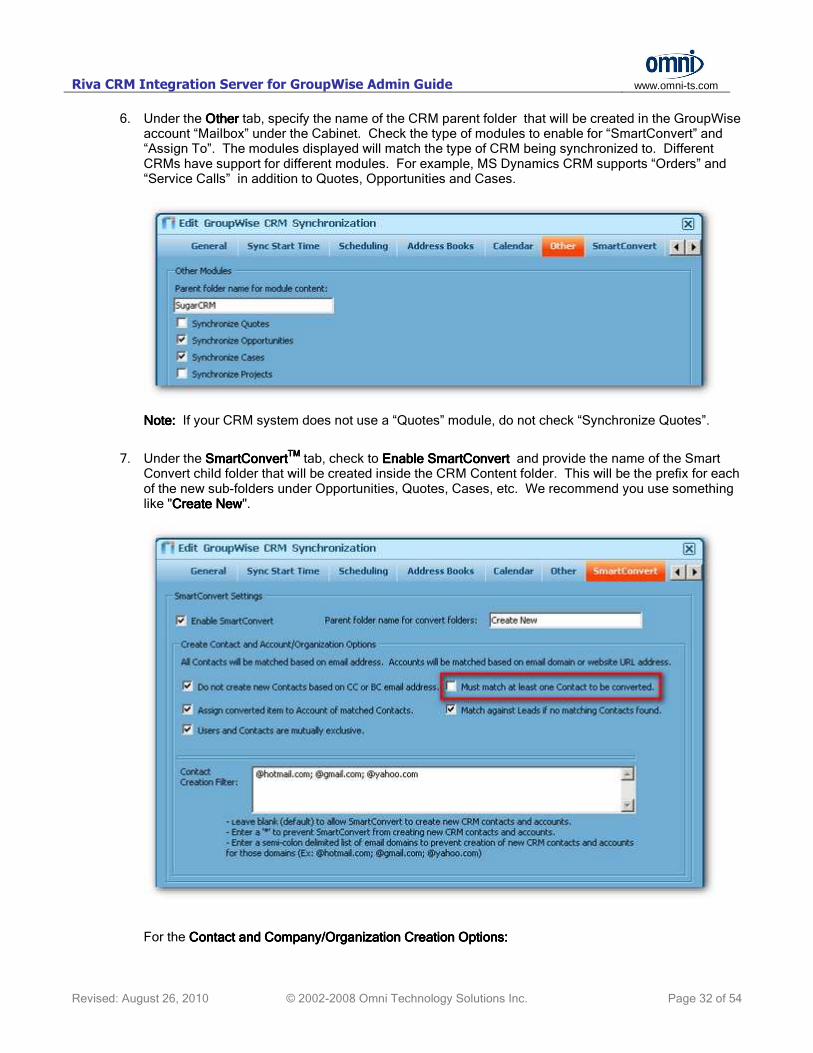
6. Under the OtherOtherOtherOther tab, specify the name of the CRM parent folder that will be created in the GroupWise account “Mailbox” under the Cabinet. Check the type of modules to enable for “SmartConvert” and “Assign To”. The modules displayed will match the type of CRM being synchronized to. Different CRMs have support for different modules. For example, MS Dynamics CRM supports “Orders” and “Service Calls” in addition to Quotes, Opportunities and Cases.
Note: Note: Note: Note: If your CRM system does not use a “Quotes” module, do not check “Synchronize Quotes”.
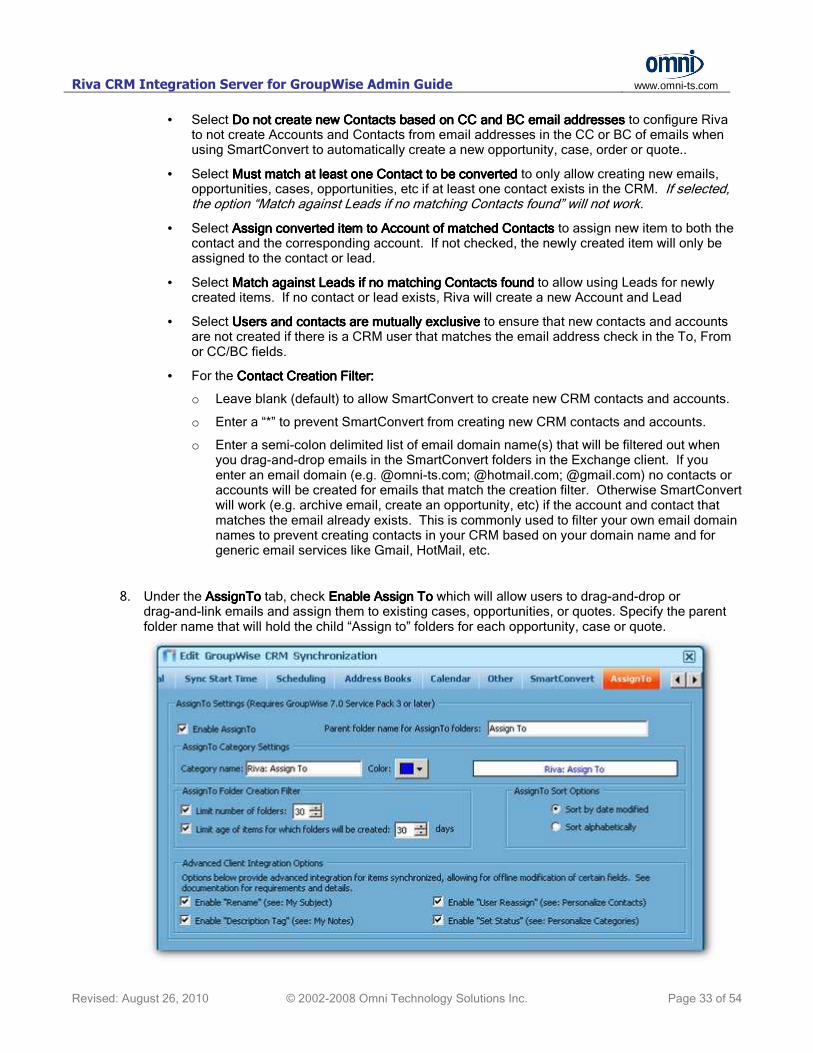
7. Under the SmartConvertSmartConvertSmartConvertSmartConvertTMTMTMTM
tab, check to Enable SmartConvertEnable SmartConvertEnable SmartConvertEnable SmartConvert and provide the name of the Smart Convert child folder that will be created inside the CRM Content folder. This will be the prefix for each of the new sub-folders under Opportunities, Quotes, Cases, etc. We recommend you use something like "Create NewCreate NewCreate NewCreate New".
For the Contact and Company/Organization Creation Options:Contact and Company/Organization Creation Options:Contact and Company/Organization Creation Options:Contact and Company/Organization Creation Options:
Riva CRM Integration Server for GroupWise Admin Guide
www.omni-ts.com
Revised: August 26, 2010 © 2002-2008 Omni Technology Solutions Inc. Page 33 of 54
• Select Do not create new Contacts based on CC and BC email addresses Do not create new Contacts based on CC and BC email addresses Do not create new Contacts based on CC and BC email addresses Do not create new Contacts based on CC and BC email addresses to configure Riva to not create Accounts and Contacts from email addresses in the CC or BC of emails when using SmartConvert to automatically create a new opportunity, case, order or quote..
• Select Must match at least one Contact to be converted Must match at least one Contact to be converted Must match at least one Contact to be converted Must match at least one Contact to be converted to only allow creating new emails, opportunities, cases, opportunities, etc if at least one contact exists in the CRM. If selected, the option “Match against Leads if no matching Contacts found” will not work.
• Select Assign converted item to Account of matched Contacts Assign converted item to Account of matched Contacts Assign converted item to Account of matched Contacts Assign converted item to Account of matched Contacts to assign new item to both the contact and the corresponding account. If not checked, the newly created item will only be assigned to the contact or lead.
• Select Match against Leads ifMatch against Leads ifMatch against Leads ifMatch against Leads if no matching Contacts found no matching Contacts found no matching Contacts found no matching Contacts found to allow using Leads for newly created items. If no contact or lead exists, Riva will create a new Account and Lead
• Select Users and contacts are mutually exclusive Users and contacts are mutually exclusive Users and contacts are mutually exclusive Users and contacts are mutually exclusive to ensure that new contacts and accounts are not created if there is a CRM user that matches the email address check in the To, From or CC/BC fields.
• For the Contact Creation Contact Creation Contact Creation Contact Creation Filter:Filter:Filter:Filter:
o Leave blank (default) to allow SmartConvert to create new CRM contacts and accounts.
o Enter a “*” to prevent SmartConvert from creating new CRM contacts and accounts.
o Enter a semi-colon delimited list of email domain name(s) that will be filtered out when you drag-and-drop emails in the SmartConvert folders in the Exchange client. If you enter an email domain (e.g. @omni-ts.com; @hotmail.com; @gmail.com) no contacts or accounts will be created for emails that match the creation filter. Otherwise SmartConvert will work (e.g. archive email, create an opportunity, etc) if the account and contact that matches the email already exists. This is commonly used to filter your own email domain names to prevent creating contacts in your CRM based on your domain name and for generic email services like Gmail, HotMail, etc.
8. Under the AssignToAssignToAssignToAssignTo tab, check Enable Assign To Enable Assign To Enable Assign To Enable Assign To which will allow users to drag-and-drop or drag-and-link emails and assign them to existing cases, opportunities, or quotes. Specify the parent folder name that will hold the child “Assign to” folders for each opportunity, case or quote.

Riva CRM Integration Server for GroupWise Admin Guide
www.omni-ts.com
Revised: August 26, 2010 © 2002-2008 Omni Technology Solutions Inc. Page 34 of 54
Under Assign to CategoryAssign to CategoryAssign to CategoryAssign to Category Settings Settings Settings Settings, assign a category name to identify the opportunities, cases, orders and quotes that are going to have "Assign To" folders created. The default category name is “Assign To”“Assign To”“Assign To”“Assign To”. Because this option creates a new category and because categories are not available in the GroupWise client until the client is restarted, users will need to restart the client after the first initialization has occurred to see these features. Once assigned, the name and colour of the "Assign To" category cannot be changed. Under the Opportunities, Quotes and Cases folders, for each of the Opportunities, Quotes and Cases that have the category applied, you will see an "Assign To" folder. This "Assign To" folder will include a link to the related master email under the Opportunities, Quotes or Cases folders. For Assign To Folder Creation FilterAssign To Folder Creation FilterAssign To Folder Creation FilterAssign To Folder Creation Filter:
• Select Limit the number of folders Limit the number of folders Limit the number of folders Limit the number of folders and set the value (default is 30). This will limit the maximum number of Assign To children folders to 30. As a given opportunity, case or quote is modified in the CRM, it will be synchronized to the appropriate “Assign To” folder and the oldest folder in the list (based on date/time) may be removed. Modify this value to match the number of open cases, opportunities, etc that can be comfortable managed and used in the Outlook client.
• Select Limit age of items for which folders will be created to Limit age of items for which folders will be created to Limit age of items for which folders will be created to Limit age of items for which folders will be created to and set the number of days (default is 30). When an opportunity, case or quote ages beyond the limit, the Assign To folder for that opportunity, case or quote will be removed from Exchange account. Simply update an opportunity, case or quote that is outside the date range for the Assign To folder to be re-created. Modify this value to match the average length of your sales cycles.
WarningWarningWarningWarning – if you uncheck both of the “Folder Creation Filters” all active opportunities, cases and quotes will be synchronized to the GroupWise client and a corresponding “Assign To” folder will be created for each item.
For Assign To Sort OptionsAssign To Sort OptionsAssign To Sort OptionsAssign To Sort Options specify the preferred sort order for displaying items in the Outlook client. For Advanced Client Integration OptionsAdvanced Client Integration OptionsAdvanced Client Integration OptionsAdvanced Client Integration Options, enable the advanced integration options:
Applies to the following options under the Personalize Personalize Personalize Personalize tab of a specific email that will be assigned to a case, quote, opportunity, etc:
Riva CRM Integration Server for GroupWise Admin Guide
www.omni-ts.com
Revised: August 26, 2010 © 2002-2008 Omni Technology Solutions Inc. Page 35 of 54
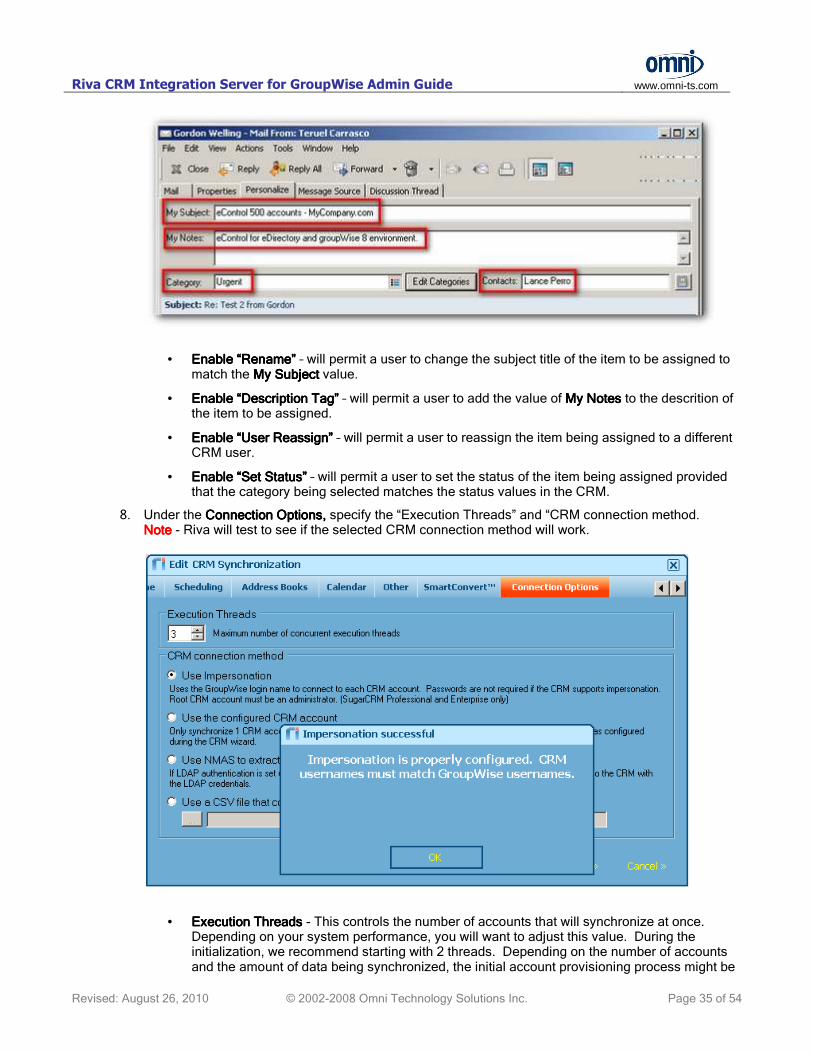
• Enable “Rename” Enable “Rename” Enable “Rename” Enable “Rename” – will permit a user to change the subject title of the item to be assigned to match the My Subject My Subject My Subject My Subject value.
• Enable “Description Tag” Enable “Description Tag” Enable “Description Tag” Enable “Description Tag” – will permit a user to add the value of My Notes My Notes My Notes My Notes to the descrition of the item to be assigned.
• EnablEnablEnablEnable “User Reassign” e “User Reassign” e “User Reassign” e “User Reassign” – will permit a user to reassign the item being assigned to a different CRM user.
• Enable “Set Status” Enable “Set Status” Enable “Set Status” Enable “Set Status” – will permit a user to set the status of the item being assigned provided that the category being selected matches the status values in the CRM.
8. Under the Connection OptionsConnection OptionsConnection OptionsConnection Options,,,, specify the “Execution Threads” and “CRM connection method. NoteNoteNoteNote - Riva will test to see if the selected CRM connection method will work.
• Execution Threads Execution Threads Execution Threads Execution Threads - This controls the number of accounts that will synchronize at once. Depending on your system performance, you will want to adjust this value. During the initialization, we recommend starting with 2 threads. Depending on the number of accounts and the amount of data being synchronized, the initial account provisioning process might be
Riva CRM Integration Server for GroupWise Admin Guide
www.omni-ts.com
Revised: August 26, 2010 © 2002-2008 Omni Technology Solutions Inc. Page 36 of 54
intensive. After your accounts have been initialized, the number of threads value can be increased to a higher value.
• CRM Connection MethodsCRM Connection MethodsCRM Connection MethodsCRM Connection Methods – (refer to ““““RivaRivaRivaRiva CRM Connection Methods” CRM Connection Methods” CRM Connection Methods” CRM Connection Methods” above) specify the desired CRM connection method.
o Use Impersonation (Primary method) Use Impersonation (Primary method) Use Impersonation (Primary method) Use Impersonation (Primary method) – uses the GroupWise username to connect to each CRM account. The user's GroupWise username must match the CRM login name. Passwords are not required as the connection uses the credentials of the CRM service account used in the CRM connection. The CRM account used in the CRM Connection Wizard must be an administrator level account. This is the most secure, scalable and preferred option. Not all CRM solutions are supported. Some CRM systems need special configuration.
o Use the configured CRM account (Tertiary method) Use the configured CRM account (Tertiary method) Use the configured CRM account (Tertiary method) Use the configured CRM account (Tertiary method) – used when you want to synchronize a single CRM account to many GroupWise accounts. Can also be used to synchronize single user accounts but requires creating a unique CRM connection and CRM Integration Policy for each user. It will only synchronize the CRM account used in the CRM Connection.
o Use NMAS to extract LDAP password (Secondary method)Use NMAS to extract LDAP password (Secondary method)Use NMAS to extract LDAP password (Secondary method)Use NMAS to extract LDAP password (Secondary method) – if LDAP authentication is setup, this method uses NMAS usernames and passwords to authenticate to target CRM accounts. NMAS usernames/passwords must match CRM usernames/passwords. Requires special configuration of eDirectory and GroupWise.
o Use a CSV file that contains CRM login information Use a CSV file that contains CRM login information Use a CSV file that contains CRM login information Use a CSV file that contains CRM login information – uses a CSV file that contains the email address, CRM username and password. Least secure option and used when no other option works with the target CRM.
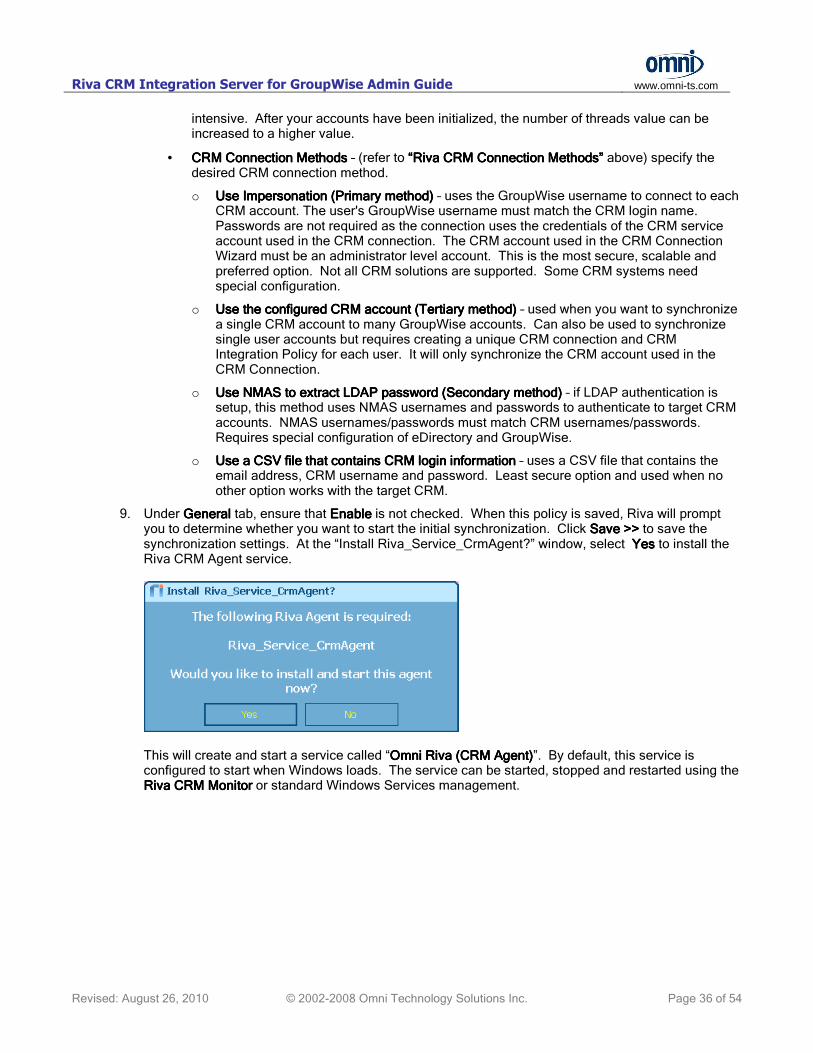
9. Under General General General General tab, ensure that EnableEnableEnableEnable is not checked. When this policy is saved, Riva will prompt you to determine whether you want to start the initial synchronization. Click Save >>Save >>Save >>Save >> to save the synchronization settings. At the “Install Riva_Service_CrmAgent?” window, select Yes Yes Yes Yes to install the Riva CRM Agent service.
This will create and start a service called “Omni Riva (CRM Agent)Omni Riva (CRM Agent)Omni Riva (CRM Agent)Omni Riva (CRM Agent)”. By default, this service is configured to start when Windows loads. The service can be started, stopped and restarted using the Riva CRM MonitorRiva CRM MonitorRiva CRM MonitorRiva CRM Monitor or standard Windows Services management.

Riva CRM Integration Server for GroupWise Admin Guide
www.omni-ts.com
Revised: August 26, 2010 © 2002-2008 Omni Technology Solutions Inc. Page 37 of 54
Step 7 Step 7 Step 7 Step 7 –––– Run & Verify Initial Synchronization Run & Verify Initial Synchronization Run & Verify Initial Synchronization Run & Verify Initial Synchronization
Carefully consider what date you want to choose for the initial synchronization. When doing an initial synchronization, a significant amount of network traffic is created to copy the data from the CRM system to the users' Exchange accounts to create the new Contact and Leads address books, the CRM calendar and the CRM content folders. If you are initializing a large number of users, we recommended the initial synchronization be performed during quiet hours. You might want to adjust your Blackout Times during the first initialization so it can occur during the night.
To start initial synchronization:
1. In Riva, edit the CRM Synchronization policy, check EnabledEnabledEnabledEnabled, and click Save >>Save >>Save >>Save >>. This will auto-start the Riva CRM Agent service.
2. If you open the Riva CRM Service Monitor, (see step 6 above) you will see the users specified in the CRM Synchronization policy. If you check View all Activity MonitorsView all Activity MonitorsView all Activity MonitorsView all Activity Monitors an individual synchronization monitor window will open for each user in the list.
Users can verify a successful initial synchronization by confirming the appropriate Contacts, Calendar and other synchronized modules were created in the GroupWise account:

Riva CRM Integration Server for GroupWise Admin Guide
www.omni-ts.com
Revised: August 26, 2010 © 2002-2008 Omni Technology Solutions Inc. Page 38 of 54
The “Address BooksAddress BooksAddress BooksAddress Books” configuration creates both a “<“<“<“<CRM CRM CRM CRM name> | Leadsname> | Leadsname> | Leadsname> | Leads” and a “<“<“<“<CRM CRM CRM CRM name> | Contactsname> | Contactsname> | Contactsname> | Contacts” in the user’s GroupWise address book in the GroupWise client:
• “Leads” from the CRM will be in “<“<“<“<CRM CRM CRM CRM name> | Leadsname> | Leadsname> | Leadsname> | Leads”.
o If the user makes a change to a lead in the CRM, that change will be synchronized to the GroupWise address book.
o Changes made in this GroupWise address book will be synchronized back to the “Leads” in the target CRM system. If the user creates a new GroupWise contact in “<“<“<“<CRM CRM CRM CRM name> | Leadsname> | Leadsname> | Leadsname> | Leads”, it will be created in the target CRM system.
o If the user converts the lead to a contact in the CRM system, that entry will be removed from the “<“<“<“<CCCCRM RM RM RM name> | Leadsname> | Leadsname> | Leadsname> | Leads” and a new contact and account will be created in “<“<“<“<CRM CRM CRM CRM name> | name> | name> | name> | ContactsContactsContactsContacts” during the next synchronization cycle.
• “Contacts” and “Accounts” from the target CRM system will appear as contacts and organizations in “<“<“<“<CRM CRM CRM CRM name> | Contactsname> | Contactsname> | Contactsname> | Contacts”

Riva CRM Integration Server for GroupWise Admin Guide
www.omni-ts.com
Revised: August 26, 2010 © 2002-2008 Omni Technology Solutions Inc. Page 39 of 54
The “CalenderCalenderCalenderCalender” configuration creates a sub calendar in the GroupWise account:
• Leaving the “CRM Calendar” checked will display CRM calendar items in the user’s primary calendar.
• Un-check the “CRM Calendar” to notnotnotnot display CRM calendar items in the user’s primary calendar. The user would select the “CRM Calendar” sub-calendar to view the CRM calendar items.
• Appointments and phone calls from the CRM system will appear as appointments in the CRM Calendar. Changes made in the GroupWise CRM calendar will be synchronized back to the target CRM system. Changes made in the CRM system will be synchronized to the GroupWise CRM calendar.
• Tasks that have not been completed will be synchronized from the CRM system into the GroupWise calendar. Tasks marked as completed will not appear in GroupWise.

Riva CRM Integration Server for GroupWise Admin Guide
www.omni-ts.com
Revised: August 26, 2010 © 2002-2008 Omni Technology Solutions Inc. Page 40 of 54
The “OtherOtherOtherOther” configuration creates a “CRM Content” folder immediately below the root of the “Cabinet” folder. Individual child folders will be created below “CRM Content” for Quotes, Opportunities, and Cases.
The “SmartConvertSmartConvertSmartConvertSmartConvert” configuration creates a “Create New . . .” folders within the “CRM Content” folder structure that is used to archive email or create new quotes, opportunities and cases.
The “SmartConvertSmartConvertSmartConvertSmartConvert” will create a “Create New Email” which is used to archive email and create accounts and contacts based on the adressees of the email if a matching account and contact does not exist.
Within each type of CRM object (quotes, opportunities and cases) a “Create New” folder is added to permit creating new quotes, opportunities and cases using the drag ‘n drop. See “Using SmartConvert” for more details.
Riva CRM Integration Server for GroupWise Admin Guide
www.omni-ts.com
Revised: August 26, 2010 © 2002-2008 Omni Technology Solutions Inc. Page 41 of 54
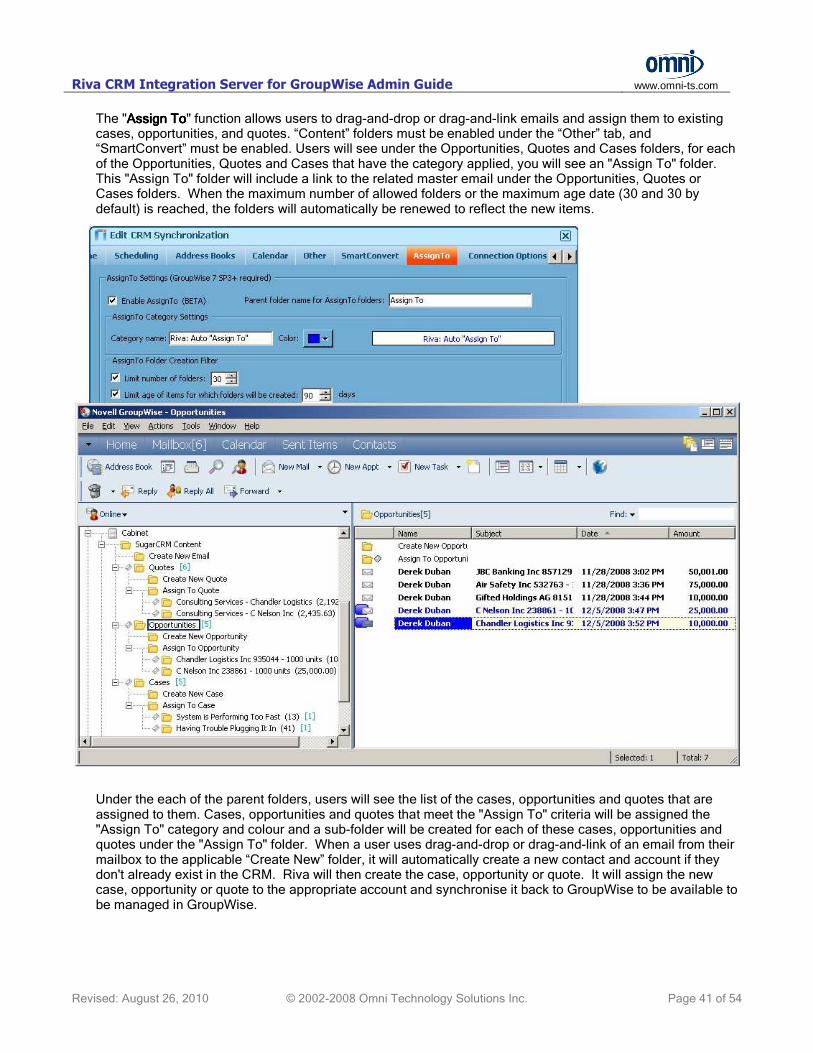
The "Assign ToAssign ToAssign ToAssign To" function allows users to drag-and-drop or drag-and-link emails and assign them to existing cases, opportunities, and quotes. “Content” folders must be enabled under the “Other” tab, and “SmartConvert” must be enabled. Users will see under the Opportunities, Quotes and Cases folders, for each of the Opportunities, Quotes and Cases that have the category applied, you will see an "Assign To" folder. This "Assign To" folder will include a link to the related master email under the Opportunities, Quotes or Cases folders. When the maximum number of allowed folders or the maximum age date (30 and 30 by default) is reached, the folders will automatically be renewed to reflect the new items.
Under the each of the parent folders, users will see the list of the cases, opportunities and quotes that are assigned to them. Cases, opportunities and quotes that meet the "Assign To" criteria will be assigned the "Assign To" category and colour and a sub-folder will be created for each of these cases, opportunities and quotes under the "Assign To" folder. When a user uses drag-and-drop or drag-and-link of an email from their mailbox to the applicable “Create New” folder, it will automatically create a new contact and account if they don't already exist in the CRM. Riva will then create the case, opportunity or quote. It will assign the new case, opportunity or quote to the appropriate account and synchronise it back to GroupWise to be available to be managed in GroupWise.

Riva CRM Integration Server for GroupWise Admin Guide
www.omni-ts.com
Revised: August 26, 2010 © 2002-2008 Omni Technology Solutions Inc. Page 42 of 54
Synchronizing Data Between GroupWise and Your CRM SolutionSynchronizing Data Between GroupWise and Your CRM SolutionSynchronizing Data Between GroupWise and Your CRM SolutionSynchronizing Data Between GroupWise and Your CRM Solution
Current Synchronization OptionsCurrent Synchronization OptionsCurrent Synchronization OptionsCurrent Synchronization Options
Riva CRM Integration Server is a synchronization application that runs on a Windows or Linux workstation or server. There are no changes required on the user workstations, browsers, BlackBerry or GroupWise Mobile Server devices.
BiBiBiBi----directional Synchronization. directional Synchronization. directional Synchronization. directional Synchronization. The following bi-directional synchronization options are currently available:
• Address Book contacts (users in CRM) and organizations (accounts in CRM). Riva creates a “Contacts” and a “Leads” address book in the GroupWise client
• Appointments
• Tasks - only uncompleted tasks will be synchronized. Completed tasks will be removed from the GroupWise client calendar views during the next Riva synchronization cycle.
With bi-directional synchronization, the user can make a change in GroupWise or in the CRM interface and the data will synchronize in both directions during the next Riva synchronization cycle. UniUniUniUni----directional Synchronizationdirectional Synchronizationdirectional Synchronizationdirectional Synchronization. The following uni-directional (from CRM to GroupWise only) are currently available:
• CRM phone calls will appear as appointments in GroupWise
• CRM Quotes (read-only & HTML ConnectBar view)
• CRM Opportunities (read-only & HTML ConnectBar view)
• CRM Cases (read-only & HTML ConnectBar view)

Riva CRM Integration Server for GroupWise Admin Guide
www.omni-ts.com
Revised: August 26, 2010 © 2002-2008 Omni Technology Solutions Inc. Page 43 of 54
Using the Omni ConnectBarUsing the Omni ConnectBarUsing the Omni ConnectBarUsing the Omni ConnectBartmtmtmtm
When users view quotes, opportunities, and cases in the "CRM Content" folder in HTML view, they will be able to read, edit or delete those items using the Omni ConnectBar
tm. When the user chooses one of the
ConnectBar options in the GroupWise client, it will open the CRM web applicable form in their default web browser directly to the opportunity, quote or case that was selected.
Changes made are saved directly in the CRM databases and synchronized back to the GroupWise account during the next Riva synchronization cycle.

Riva CRM Integration Server for GroupWise Admin Guide
www.omni-ts.com
Revised: August 26, 2010 © 2002-2008 Omni Technology Solutions Inc. Page 44 of 54
Using SmartConvertUsing SmartConvertUsing SmartConvertUsing SmartConverttmtmtmtm and AssignTo and AssignTo and AssignTo and AssignTotmtmtmtm
SmartConvert
tm and AssignTo
tm provide users with a drag-and-drop or drag-and-link capability. Users can
drag-and-link and email to archive a copy of the email to the CRM account and contact, or to the opportunity, quote or case, or to create a new opportunity, quote or case. If the account and contact do not exist, Riva will create an account and contact in the CRM system.
The difference between the different drag methods is:
• DragDragDragDrag----andandandand----drop drop drop drop – the user drags and drops the email to the applicable Riva CRM generated folder in the user’s GroupWise client tree view. When Riva performs a data synchronization, those drag-and-drop emails will be removed from the user’s mailbox and are not recoverable.
• DragDragDragDrag-andandandand----linklinklinklink – the user performs a right-click drag-and-drop and chooses “Link To” from the pop-up menu that appears. This creates a link to the source email which is left in the original folder the drag-and-drop action was originated from. When Riva performs a data synchronization, those drap-and-drop links will be removed, but the original email items will remain in the user’s mailbox.
When you drag-and-drop or drag-and-link an email into a Riva generated SmartConvert tm
or AssignTo tm
folder, the following process occurs:
• Riva's SmartConvert process extracts the email address and account information from the To:, From:, CC: and BCC: fields. It then removes any addressees that are filtered out in the Riva SmartConvert settings.

Riva CRM Integration Server for GroupWise Admin Guide
www.omni-ts.com
Revised: August 26, 2010 © 2002-2008 Omni Technology Solutions Inc. Page 45 of 54
• It checks the CRM to see whether the email addresses exist in the CRM.
• If the email addresses exist, SmartConvert will automatically create the email, quote, opportunity or case and assign it to the correct email addresses and companies.
• If the email addresses don't exist in the CRM, SmartConvert checks whether the companies exist using the email domain name as the comparison field.
• If the companies don't exist, SmartConvert creates the companies (using the domain name as the company name), creates the contacts (using the first and last names and email address) and associates the contacts with the appropriate companies.
• SmartConvert then creates the archived email, quote, opportunity or case and assigns it to the newly created contacts and/or companies.
• Because SmartConvert uses the domain name in the Company web site to determine whether a company exists, to prevent duplicates, it is critical to have the company web site information entered for all Company accounts.
Use “Create New” To Archive Email to the AccountUse “Create New” To Archive Email to the AccountUse “Create New” To Archive Email to the AccountUse “Create New” To Archive Email to the Account –––– by using drag-and-drop or drag-and-link of an email item over the “Create New Email” folder immediately below the “CRM Content” folder, Riva will archive a copy of the email to the Account and Contact.
Use “Assign New” To Archive Email to a Quote, Opportunity or Use “Assign New” To Archive Email to a Quote, Opportunity or Use “Assign New” To Archive Email to a Quote, Opportunity or Use “Assign New” To Archive Email to a Quote, Opportunity or CaseCaseCaseCase –––– by using drag-and-drop or drag-and-link of an email item over the “Assign To” folder for a specific quote, opportunity or case, Riva will archive a copy of the email to that quote, opportunity or case.
Use “Create New” To Create a New Quote, Opportunity or CaseUse “Create New” To Create a New Quote, Opportunity or CaseUse “Create New” To Create a New Quote, Opportunity or CaseUse “Create New” To Create a New Quote, Opportunity or Case –––– by using drag-and-drop or drag-and-link of an email item over the “Create New” folder immediately below either the “Quotes” folder or “Opportunities” folder or “Cases” folder, Riva will use that email item to create a new quote, opportunity or case in the CRM system.

Riva CRM Integration Server for GroupWise Admin Guide
www.omni-ts.com
Revised: August 26, 2010 © 2002-2008 Omni Technology Solutions Inc. Page 46 of 54
Microsoft SharePoint to GroupWise SynchronizationMicrosoft SharePoint to GroupWise SynchronizationMicrosoft SharePoint to GroupWise SynchronizationMicrosoft SharePoint to GroupWise Synchronization
SharePoint calendar, contact and task lists are synchronized to GroupWise.
SynchronizationSynchronizationSynchronizationSynchronization Synchronization between Microsoft SharePoint and GroupWise is different than standard CRM systems:
• Riva will create Address Books in GroupWise that match the Contact Lists in SharePoint. Riva will create Calendars in GroupWise that match the Calendars in SharePoint. Riva will create folders in the SharePoint content (below the Cabinet in GroupWise) to match the lists that exist in SharePoint.
• Riva supports bi-directional synchronization of address books and tasks between GroupWise and SharePoint. All changes in one application are synchronized to the other.
• Traditionally, the SharePoint account is linked to an Active Directory account. SharePoint and/or Active Directory native permissions control user access to SharePoint® calendars, tasks, projects, lists, etc.
• Because SharePoint calendars are “shared calendars”, synchronisation is uni-directional from SharePoint® to GroupWise. Changes made in GroupWise to SharePoint® appointments are not synchronised to SharePoint®

Riva CRM Integration Server for GroupWise Admin Guide
www.omni-ts.com
Revised: August 26, 2010 © 2002-2008 Omni Technology Solutions Inc. Page 47 of 54
Policy ManagementPolicy ManagementPolicy ManagementPolicy Management Tasks Explained Tasks Explained Tasks Explained Tasks Explained
Making Changes to an Existing CRM Making Changes to an Existing CRM Making Changes to an Existing CRM Making Changes to an Existing CRM SynchronizSynchronizSynchronizSynchronizationationationation Policy Policy Policy Policy
Certain key factors should be kept in mind when making changes to an existing Riva CRM synchronization policy:
• Changes made to an existing Riva CRM synchronization policy will not be applied unless the Riva CRM Agent Service is restarted. Restarting this service loads the new CRM synchronization policy into memory on the hosting server
• Certain changes, such as adding multiple new GroupWise accounts to the policy can cause quite a bit of network traffic. We recommend changes that can result in lots of traffic be implemented during quiet hours.
• Changes that are made to policy settings will affect all GroupWise accounts assigned to the policy being changed. If you only need to make changes to only certain GroupWise accounts, remove those accounts from the policy and create a new policy to manage them with.
• A best practice is to use eDirectory groups to identify GroupWise accounts rather than adding/removing individual users from the Riva list. Adding or removing users from eDirectory groups will not be applied by until the Riva CRM Agent service is restarted.
Restarting the Riva CRM Agent ServiceRestarting the Riva CRM Agent ServiceRestarting the Riva CRM Agent ServiceRestarting the Riva CRM Agent Service
There are four ways to restart the Riva CRM Agent service:
• Make a change to an existing Riva CRM synchronization policy. When the policy is saved, the Riva CRM Agent service will auto-restart.
• In the Riva CRM Service Monitor application, click the Restart Restart Restart Restart button or the Stop Stop Stop Stop and Start Start Start Start buttons to restart the service.
• From a command prompt type:
o net stop “Omni Riva (CRM Agent)” net stop “Omni Riva (CRM Agent)” net stop “Omni Riva (CRM Agent)” net stop “Omni Riva (CRM Agent)” – to stop the service
o net start “Omni Riva (CRM Agent)” net start “Omni Riva (CRM Agent)” net start “Omni Riva (CRM Agent)” net start “Omni Riva (CRM Agent)” – to start the service

Riva CRM Integration Server for GroupWise Admin Guide
www.omni-ts.com
Revised: August 26, 2010 © 2002-2008 Omni Technology Solutions Inc. Page 48 of 54
• Use Microsoft MMC “Services” console to stop and start the service.
Using Using Using Using Riva CRM Integration Server Riva CRM Integration Server Riva CRM Integration Server Riva CRM Integration Server LogsLogsLogsLogs
You can refer to the following logs for information on Riva CRM Integration Server to assist with trouble-shooting:
• Look at the Riva log files in the \\\\LogsLogsLogsLogs folder to see a record of the synchronization cycles and any errors that occurred during a synchronization cycle.
• There are logs maintained for each user in the \\\\CRM Integration LogsCRM Integration LogsCRM Integration LogsCRM Integration Logs folder

Riva CRM Integration Server for GroupWise Admin Guide
www.omni-ts.com
Revised: August 26, 2010 © 2002-2008 Omni Technology Solutions Inc. Page 49 of 54
Managing GroupWise Accounts in the PolicyManaging GroupWise Accounts in the PolicyManaging GroupWise Accounts in the PolicyManaging GroupWise Accounts in the Policy
The recommended practice is to use eDirectory groups to identify GroupWise accounts to be managed by a CRM synchronization policy.
If changes are made to the membership of a group being used in a Riva CRM policy, those changes will not be applied until the Riva CRM Agent service is restarted. Riva is not aware when eDirectory group membership changes, so the Riva CRM Agent service needs to be restarted.
Utilizing Multiple Riva CRM Synchronization PoliciesUtilizing Multiple Riva CRM Synchronization PoliciesUtilizing Multiple Riva CRM Synchronization PoliciesUtilizing Multiple Riva CRM Synchronization Policies
Riva permits the creation of multiple CRM synchronization policies using the same CRM connection.
WARNINGWARNINGWARNINGWARNING ---- Ensure that the same GroupWise account is not assigned to two or more CRM synchronization policies that connect to the same CRM system. Duplicate items will be created in the target CRM system and/or the user’s GroupWise account. Riva cannot verify that a GroupWise user is assigned to more than one CRM synchronization policy.
Riva can support applying multiple CRM synchronization policies. You would use this strategy when:
• Different groups of GroupWise accounts need different CRM synchronization settings for synchronization frequency, names of CRM synchronization folders, or different modules being synchronized to different groups of users. Sales people will not necessarily need support or service requests synchronized to their accounts and support staff won't need opportunities or quotes synchronized to theirs,
• Certain GroupWise accounts need to synchronize data to two or more CRM or 3rd
party applications. For example, your senior sales execs might need access to SugarCRM (for Canadian sales), Microsoft CRM (for US sales) and Microsoft SharePoint Server whereas support staff might only need access to one system.
When the Riva CRM Agent service reads multiple CRM synchronization policies, it will build a combined synchronization schedule based on all of the policies.
Riva administrators can optimize CRM policies by adjusting synchronization interval frequencies and execution threads to best meet the needs of users while maintaining acceptable levels of server performance.

Riva CRM Integration Server for GroupWise Admin Guide
www.omni-ts.com
Revised: August 26, 2010 © 2002-2008 Omni Technology Solutions Inc. Page 50 of 54
How to How to How to How to Permanently Remove Permanently Remove Permanently Remove Permanently Remove SynchronizSynchronizSynchronizSynchronizeeeed Data from the GroupWise Clientd Data from the GroupWise Clientd Data from the GroupWise Clientd Data from the GroupWise Client
Riva administrators may need to remove Riva CRM synchronized content from a GroupWise client when an employee leaves the company. Remove the user from the original Riva CRM Synchronization Policy. Create a second Riva CRM Synchronization Policy for clearing accounts and set the initial Sync Date to years in the future. Add the user to this policy and save it. When the Riva CRM Agent service restarts, the data will be removed from the GroupWise account, leaving only the empty address books and CRM synchronization folders in the Cabinet.
RivaRivaRivaRiva CRM CRM CRM CRM Management TasksManagement TasksManagement TasksManagement Tasks
License Modes for Riva CRM License Modes for Riva CRM License Modes for Riva CRM License Modes for Riva CRM Integration ServerIntegration ServerIntegration ServerIntegration Server
Riva CRM Integration Server supports the following license modes and type of licences:
• Demo ModeDemo ModeDemo ModeDemo Mode – Riva CRM Integration Server will operate in “Demo” mode when no .license file have been applied to the Riva application. “Demo” mode includes the following limitations:
o “Sync Start Time” “Sync Start Time” “Sync Start Time” “Sync Start Time” is disabled. Riva is limited to initially synchronizing 7 days of active CRM data before the policy is created and saved.
o this mode allows for a maximum of 50 of each type of object (lead, contact, account, task, appointment, opportunity, and case) to be created in CRM Content calendars/folders and contact book in the GroupWise client for each user assigned to the policy.
• Trial LicensTrial LicensTrial LicensTrial Licenseeee – allows full CRM synchronization functionality for the period for which the license was issued. When the license expires, data will no longer be synchronized between GroupWise and the CRM system. Trial licenses are normally limited to 10 users for 30 days.
• Perpetual LicensePerpetual LicensePerpetual LicensePerpetual License – allows full CRM synchronization functionality. 30 days of support is provided. Annual support can be purchased and renewed. If support in the license expires, Riva CRM will continue to function but Riva cannot be upgraded to the latest release and technical support is no longer available.
• Subscription LicenseSubscription LicenseSubscription LicenseSubscription License – allows full CRM functionality and full support for a fixed 365 day period. The license must be renewed on an annual basis. Riva CRM will cease to function when the subscription date expires.
How to How to How to How to Apply Replacement Licences to Apply Replacement Licences to Apply Replacement Licences to Apply Replacement Licences to Riva CRM Riva CRM Riva CRM Riva CRM Integration ServerIntegration ServerIntegration ServerIntegration Server
Riva uses cumulative license files. That means that two or more .license files can be saved into the \\\\LicensesLicensesLicensesLicenses folder and Riva will load all licences into memory when it starts. Riva will not be able to perform a “Check for Updates” if there is an expired licence in the \\\\LicensesLicensesLicensesLicenses folder. Riva might also encounter difficulties when “Trial” and “Full” .license files for the same policy are stored in the \\\\Licenses Licenses Licenses Licenses folder. Use the following steps are used to apply replacement license files:
1. Unload the Riva application and stop the Riva CRM Agent Service.
2. Remove all existing files from the \Licenses folder.
3. Save replacement .license files in to the \Licenses folder.
4. Start the Riva application and the Riva CRM Agent Service.

Riva CRM Integration Server for GroupWise Admin Guide
www.omni-ts.com
Revised: August 26, 2010 © 2002-2008 Omni Technology Solutions Inc. Page 51 of 54
How to Apply Additional Licences to Riva CRM How to Apply Additional Licences to Riva CRM How to Apply Additional Licences to Riva CRM How to Apply Additional Licences to Riva CRM Integration ServerIntegration ServerIntegration ServerIntegration Server
If you are adding new or additional .license files to increase existing license counts and license another Riva module, use this procedure to update the license files:
1. Unload the Riva application and stop the Riva CRM Agent Service.
2. Save new or additional .license files in to the \Licenses folder.
3. Start the Riva application and the Riva CRM Agent Service.
How to Update Riva CRM IntegraHow to Update Riva CRM IntegraHow to Update Riva CRM IntegraHow to Update Riva CRM Integration tion tion tion ServerServerServerServer
Updates to Riva CRM Integration Server can include updates to the Riva CRM Agent Service. If you are licensed for Riva CRM and select the “Check for Updates” option, if a new version is available, you will be prompted to download the update. If you select Yes, Riva will automatically:
1. Download the update to the computer hosting Riva.
2. Stop the “Omni Riva (CRM Agent)” service if it is running.
3. Uninstall the service.
4. Apply the update.
5. Advise that Riva has been updated and require that it be restarted.
6. It is recommended that both the Riva application (interface) and the Riva CRM Agent Service Monitor interface be unloaded and restarted.
How to How to How to How to Uninstall Riva CRM Integration Uninstall Riva CRM Integration Uninstall Riva CRM Integration Uninstall Riva CRM Integration ServerServerServerServer
There is no uninstaller for Riva. Uninstalling Riva CRM Integration Server requires disabling CRM synchronization policies, stopping and removing the Riva CRM Agent service, and deleting the Riva installation directories. To completely remove Riva CRM Integration Server:
1. (Optional) If Riva is no longer going to be used, it will be necessary to remove CRM synchronized data from GroupWise accounts and client applications. Follow the steps in “How to Permanently Remove Synchronized Data from the GroupWise Client” for all Riva CRM user accounts. The Riva CRM Agent service needs to be restarted and all Riva CRM policies need to run at least once to ensure that data is removed.
2. Stop the Riva CRM Agent service. This can be done by stopping the service in “Services” using Microsoft Management Console (MMC), or by using the net stop command.
3. Uninstall the Riva CRM Agent service by typing the Omni.Riva.CrmAgent.exe Omni.Riva.CrmAgent.exe Omni.Riva.CrmAgent.exe Omni.Riva.CrmAgent.exe ––––uninstalluninstalluninstalluninstall from the active application folder in the Riva installation in a command.prompt window.

Riva CRM Integration Server for GroupWise Admin Guide
www.omni-ts.com
Revised: August 26, 2010 © 2002-2008 Omni Technology Solutions Inc. Page 52 of 54
4. Close the Riva application and the Riva CRM Monitor application.
5. (Optional) If Riva is going to be installed on a different Windows system, you will want to save a copy of the Riva installation folder structure and all files.
6. Delete the Riva installation folder structure and delete all Riva related icon shortcuts and menu selections manually created.
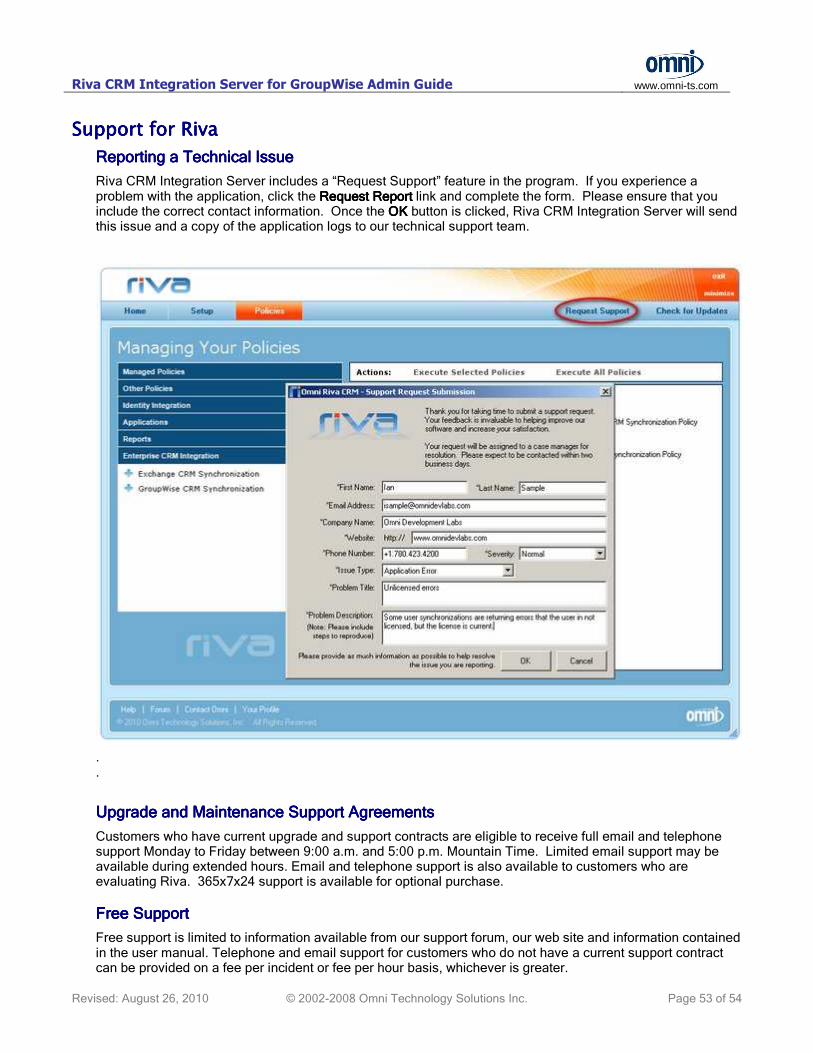
Riva CRM Integration Server for GroupWise Admin Guide
www.omni-ts.com
Revised: August 26, 2010 © 2002-2008 Omni Technology Solutions Inc. Page 53 of 54
Support for Support for Support for Support for RivaRivaRivaRiva
Reporting a Technical IssueReporting a Technical IssueReporting a Technical IssueReporting a Technical Issue
Riva CRM Integration Server includes a “Request Support” feature in the program. If you experience a problem with the application, click the RequestRequestRequestRequest Report Report Report Report link and complete the form. Please ensure that you include the correct contact information. Once the OK OK OK OK button is clicked, Riva CRM Integration Server will send this issue and a copy of the application logs to our technical support team.
.
.
Upgrade and Upgrade and Upgrade and Upgrade and MaiMaiMaiMaintenance ntenance ntenance ntenance Support Support Support Support AgreementsAgreementsAgreementsAgreements
Customers who have current upgrade and support contracts are eligible to receive full email and telephone support Monday to Friday between 9:00 a.m. and 5:00 p.m. Mountain Time. Limited email support may be available during extended hours. Email and telephone support is also available to customers who are evaluating Riva. 365x7x24 support is available for optional purchase.
Free SupFree SupFree SupFree Supportportportport
Free support is limited to information available from our support forum, our web site and information contained in the user manual. Telephone and email support for customers who do not have a current support contract can be provided on a fee per incident or fee per hour basis, whichever is greater.

Riva CRM Integration Server for GroupWise Admin Guide
www.omni-ts.com
Revised: August 26, 2010 © 2002-2008 Omni Technology Solutions Inc. Page 54 of 54
Contacting SupportContacting SupportContacting SupportContacting Support
You can contact support using the following methods. Please include as many details as possible when requesting support:
Use the “Contact Us” link in the top right corner of any page of our website and complete the online form.
Call or fax us: Phone: 1111----780780780780----423423423423----4200420042004200 Fax: 1-780-423-4711
Online ResourcesOnline ResourcesOnline ResourcesOnline Resources
Online resources for Riva include:
• Product Website: www.rivacrmintegration.com
• Flash Tutorials: www.rivacrmintegration.com/integration/videos/
• Support Forum: Go to www.omni-ts.com/Forum and:
o Select the RivaRivaRivaRiva CRM Integration CRM Integration CRM Integration CRM Integration Server Server Server Server for for for for GroupWiseGroupWiseGroupWiseGroupWise forum.
o “RivaRivaRivaRiva CCCCRM RM RM RM Integration for GroupWiseIntegration for GroupWiseIntegration for GroupWiseIntegration for GroupWise Tips Tips Tips Tips” available at http://www.omni-ts.com/forum/post--2187--page-1.html is a collection of forum articles to provide troubleshooting and advanced management steps for Riva CRM integration.
• Online Documentation and Knowledgebase: kb.omni-ts.com