RIGHT WHALE NECROPSY PROTOCOL - National … OF CONTENTS Introduction Acknowledgments Securing and...
54
copyright Peabody Essex Museum RIGHT WHALE NECROPSY PROTOCOL William McLellan 1 Sentiel Rommel 2,1 Michael Moore 3 D. Ann Pabst 1 1 Biological Sciences and Center for Marine Science University of North Carolina at Wilmington 601 South College Road Wilmington, NC 28403 2 Florida Fish & Wildlife Conservation Commission Florida Marine Research Institute Marine Mammal Pathobiology Laboratory 3100 54 th Avenue South St Petersburg, FL 33711 3 Biology Department Woods Hole Oceanographic Institution Woods Hole, MA 02543 Contract Report to the: Marine Mammal Health and Stranding Response Program Office of Protected Species National Marine Fisheries Service 1335 East West Highway Silver Spring, MD 20910 1
Transcript of RIGHT WHALE NECROPSY PROTOCOL - National … OF CONTENTS Introduction Acknowledgments Securing and...

copyright Peabody Essex Museum
RIGHT WHALE NECROPSY PROTOCOL
William McLellan1
Sentiel Rommel2,1
Michael Moore3
D. Ann Pabst1
1Biological Sciences and Center for Marine Science
University of North Carolina at Wilmington 601 South College Road Wilmington, NC 28403
2Florida Fish & Wildlife Conservation Commission
Florida Marine Research Institute Marine Mammal Pathobiology Laboratory
3100 54th Avenue South St Petersburg, FL 33711
3Biology Department
Woods Hole Oceanographic Institution Woods Hole, MA 02543
Contract Report to the:
Marine Mammal Health and Stranding Response Program Office of Protected Species
National Marine Fisheries Service 1335 East West Highway Silver Spring, MD 20910
1
TABLE OF CONTENTS Introduction Acknowledgments Securing and Retrieving the Carcass Beach Equipment Check List Heavy Equipment and People Necropsy Gear Tissues CollectionRight Whale Necropsy Techniques/Tips Conducting a Right Whale Necropsy Condition Code
Right Whale Human Interaction and External Observation Data Sheets Right Whale Blubber Thickness Data Sheet Right Whale Morphometrics Data Sheet Right Whale Gross Necropsy Report Specimen Collection Data Sheet
Researcher Request Form Researchers Interested in Right Whales Tissues/Data Selected Bibliography Introduction
Large whale strandings present logistical problems in proportion to their mass.
Often researchers, municipalities and State and Federal governments are stretched to the
point of breaking as much as the lines that are used to tow the carcass ashore. Evidence is
mounting that human induced mortality is the cause of a significant proportion of the
whales that are stranding or found floating at sea (Moore et al. in press). For example,
from 1970-1998, vessel strikes accounted for 35% (15 of 43) of documented right whale
(Eubalaena glacialis) mortalities. This percentage increased to 47% (8 of 17%) for the
years 1991-1998 (Knowlton and Kraus 2001). The US Marine Mammal Commission has
stated that ship strikes now pose a serious threat to the recovery of northern right whales
(Marine Mammal Commission 1999; see also Laist et al. 2001).
Large whale entanglements in fishing gear have also increased in recent years.
This negative impact is considered such a serious threat to right whales that hundreds of
volunteers have been trained and are participating in efforts to remove gear from
swimming whales along the US and Canadian Atlantic coast. These efforts are now
requiring many days, and the Herculean efforts, of these volunteers and yet the problem
2

still continues to grow. The Center for Coastal Studies (CCS Provincetown, MA)
website, dedicated to documenting disentanglement efforts along the western Atlantic,
has daily updates as to the status of entangled large whales (see
http://www.coastalstudies.org). It must be stated that investigating a live entangled or
stranded right whale must only be undertaken with the collaboration, cooperation, and
supervision of experienced veterinarians, Federal and State government managers and
field personnel. Do not at any time approach these situations by yourself or without
discussions with just about everyone that you can think of.
Much of the information regarding ship strikes and entanglements has been
generated from investigations of stranded or floating carcasses. For example, along the
mid-Atlantic, stranding investigations lead to the determination that 30% (6 of 20) of
stranded humpback whales (Megaptera novaeangliae) were killed by ship strikes
between 1985-1992 (Wiley et al. 1994). A review of historical strandings databases led
Laist et al. (2001) to suggest that that ship strikes “can significantly affect small
populations of whales, such as the northern right whale in the western North Atlantic.”
The key to determining cause of death in these investigations was conducting a thorough
and systematic necropsy of the stranded whale.
The protocol that follows is an attempt to formalize the investigation of right
whale strandings. A necropsy, by itself, is no different if conducted on a rodent or a right
whale. The goal is to determine the cause of death. In addition, data can and should be
collected on the health, age, reproductive status, and contaminant loads (among a
multitude of other individual studies) of these rare and protected mammals. This protocol
is a first attempt to bring together a number of separate researcher’s individual styles and
experiences in handling the logistical problems of conducting a large whale necropsy.
Any additional ideas, or just as important, ideas that did not work or proved dangerous,
are welcome. This is a process that develops with each necropsy and with the level of
data that is necessary and available to collect. In the end, it is the quality and consistency
of the data collected by the necropsy team that will generate health and life history
information and mortality determinations. These data will help provide managers with the
evidence necessary to mitigate against ship strikes and fisheries interactions.
3

Valuable additional information on conducting marine mammal necropsies and
necropsies in general is available by reviewing the following documents (complete
references are included in the Literature Cited section):
Manual of Procedures for the Salvage and Necropsy of Carcasses of the West
Indian Manatee (Trichechus manatus). Bonde et al. 1983.
Marine Mammals Ashore. Geraci & Lounsbury 1993.
Gross necropsy and specimen collection protocols. Rowles et al. 2001.
Veterinary Necropsy Protocol for Military Working Dogs and Pathology
Specimen Submission Guidelines. Department of the Navy.
Marine Forensics Manual, Part 1 Marine Mammals. Galloway & Ahlquist ????.
National Contingency Plan for Response to Unusual Marine Mammal Mortality
Events. U.S. Department of Commerce.
Draft Contingency Plan for Hawaiian Monk Seal Mortality Events. Yochem, P.K.
Acknowledgments
This work was first developed as a way to standardize data collection during right
whale necropsies - an all too common event. Amy Knowlton (NEAq) has assisted all who
have been involved in right whale necropsies for the past decade and we thank her for her
helpful attitude - under the circumstances. A small but dedicated team has been
responding to large whale strandings for years on the US east coast including Susan
Barco, Bob Bonde, Cindy Driscoll, Greg Early, Katie Touhey, Jim Mead, Mark Swingle,
David St Aubin, Charley Potter, and Victoria Thayer. We have learned much from all of
their contributions. Specific comments on this protocol were sought from Bob Bonde,
Frances Gulland, Jim Mead, Mark Swingle and David St. Aubin. Steve Raverty provided
an excellent comprehensive review and added significantly to the coverage of
microbiology and infectious diseases. We thank them for their time and dedication to this
tough problem. Development of this protocol was funded by the Office of Protected
Resources, National Marine Fisheries Service. We all thank Teri Rowles for her tireless
efforts towards research to conserve and protect marine mammals in all corners of the
globe. The Peabody Essex Museum granted use of the copyrighted image on the cover.
This protocol is dedicated to the memory of David St. Aubin, “keep your stick on the
ice”.
4
Securing and Retrieving the Carcass
Most right whale carcasses are now initially reported as floating offshore. It is
rare to have a right whale carcass actually strand without prior knowledge that it is
floating near to far offshore. As it is the current policy to secure and tow all floating right
whales to shore, the following steps, often undertaken concurrently, are necessary before
the necropsy begins.
Generally, the carcass will be reported by a passing freighter, an offshore fishing
vessel, the Coast Guard or Navy. In most cases the report will contain Lat/Long
coordinates, but these will be hours to days old and the carcass will have to be re-located.
This will need to be done before attempts are made to tow the whale to a suitable location
for necropsy, and is generally best conducted from a fixed wing aircraft or Coast Guard
helicopter (your regional stranding coordinator should take the lead on all of these
negotiations). Be aware that current protocols for conducting offshore flights are under
review and revision. It cannot be overstated that these types of flights are some of the
most dangerous flying that can be done. The combination of changing weather
conditions, uncertain flight tracks and times and the potential to use inexperienced pilots
all combine to make these efforts non-risk averse. The relocation should also verify the
species ID, size and general condition of the carcass. If possible, a VHF tag should be
secured on the carcass to aid in the final recovery process.
The next step is to determine an appropriate landing site for the carcass, and prior
permission must be obtained to land the carcass. The site would ideally have easy access
to equipment and personnel, but also have the ability to be secured as the necropsy and
clean up process could easily take two to three days to complete. In remote locations, the
ability to get equipment to the site (but see below) will be weighted as the highest
priority. This might require that the carcass will be towed for a significantly longer period
that simply a straight line to shore. A list of addition site parameters also would include:
1. agreement with local municipality to land the whale and make sure they are
aware of all of the possible odor and crowd problems.
2. minimal damage to wildlife and shore on the beach
3. availability of disposal site for soft and hard tissues: burial, landfill, towing
back offshore
5

4. ability to get heavy equipment to the site and have enough area to maneuver
during both low and high tides.
5. establish a perimeter around they whale that will keep the public safely away
from cables, lines and tissues that can, and will, break with bone crushing
force.
6. arrange for the local fire department to hose down the site with
environmentally friendly detergents that will decrease the residual odors.
Once a necropsy site is secured the actual process of towing can begin. Taking a
large whale under tow can prove extremely stressful on the vessel, captain and crew.
Currents, winds, odor, all must be accounted for when maneuvering a carcass towards a
beach. An adult right whale can weight up to 100,000kg, therefore the towing vessel
should be generally larger than the whale being towed. Ideally it will have a towing post,
but if not, care should be taken to secure the towing harness to the strongest attached
piece of the vessel- do not tow it by cleats alone! Begin by passing a small line under the
peduncle with a float attached to the end, or with a weight than can be retrieved with a
boat hook on the opposite side of the peduncle. This line will then allow you to pass the
heavy tow stap and secure tightly around the peduncle and against the leading edge of the
flukes. At this point the whale can be safely taken under-tow. The whale should only be
towed flukes-first. Post a watch to monitor the condition of the towing equipment and
warn close approaching vessels to keep a safe distance.
If at all possible, arrange to land the whale on the beach at high tide. A large
hydraulic backhoe or bulldozer with winch is sufficient to initially move the whale up the
beach. If available equipment will be unable to move the whale up above the beach line
then placing it high on the beach will allow at least 6-8 hours of work to be conducted
during falling and rising tides. Right whale necropsies are often a race against tissue
decomposition. As soon as the whale is secured on the beach a team of people should
begin measuring and photographing the outside of the whale which will allow the internal
examination to begin as soon as is possible.
To keep the beach as clean and organized as possible, and to lessen the confusion
of multiple people wandering around, it is suggested that you set up work-stations around
the whale. The public will be asking many questions- set up an outreach coordination
6
table and staff it with a person that can help get the message of endangered right whales
out. The necropsy will be going on at two or three locations on the whale- set up a table
where datasheets, film, cameras, notes, etc. can be organized. Parts and pieces of all types
will be coming off the whale- set up a table with preservatives and histological equipment
for easier processing, and set up a tarp on the beach where skeletal elements can be
organized, described and photographed and then securely covered at night.
Beach Equipment Check List
Heavy Equipment and People
The ability to conduct a thorough necropsy of a large whale depends on the ability
to deliver large equipment and a team of willing participants to the site. A minimum of a
front-end/backhoe loader (if possible a loader with clam-shell/4-in-one front bucket) and
a team of 5-10 people are needed to attempt such an undertaking. Larger equipment is
sometimes helpful, but only if the operator is able to precisely finesse the equipment in
very dangerous tight working quarters. An operator that is unable to communicate
effectively with the necropsy team (and vice versa) is dangerously unacceptable. It is
reasonably safe to have 2-3 teams of 3-4 people each dissecting and undertaking the
necropsy, but at different ends of the animal! Great care should be taken to not have more
knives cutting on the carcass than can be safely monitored. In each of these teams one
person will be cutting, two will be assisting by pulling tissues and collecting samples and
one will be recording data. Each member of each team should constantly identify and
update an avenue of escape from the carcass should the tissue mass they are working on
slip from the line, the line break, or a wave engulfs the whole carcass. It is the first
author’s worse necropsy nightmare to fall from the top of a large whale carcass onto a
knife that is being used to dissect below.
Safety Equipment Many large whale necropsies are conducted, by necessity, in extremely remote
locations. While this makes logistics to and from the site challenging it also requires an
honest appraisal of the potential risks to personnel conducting the necropsy. As a general
rule you should be prepared to treat many small wounds on site and the potential for
serious injury always exists in the slippery business of conducting a large whale
necropsy. The authors have been involved with treating wounds from; small cuts and
7
abrasions to severe knife lacerations that required transport to a hospital for numerous
stitches, to severe hypothermia, to potential concussions while conducting necropsies.
We are aware of leg fractures and severe shoulder dislocations as well. It must be
mentioned that there exists the possibility of transferring zoonotic agents (Brucella, etc.)
from the live animal or fresh carcass to the investigative team. These risks can be reduced
by the use of facemasks, thorough washing of hands and body, and by disinfecting
instruments after the necropsy.
While we do not condone conducting necropsies in the dark, quite often you will
find yourself out on the beach in the dark trying to secure the carcass, or collecting
morphometrics, or cleaning up after the necropsy. In these cases it is useful to have a few
commercially available headlamps to extend the day- though as mentioned above, it is
extremely dangerous to work with heavy equipment in the dark. Along with the duties of
conducting a thorough whale necropsy you must stay aware of what your assistants are
doing, what the public is doing and how these actions may place them in harms way.
With this caveat in mind we suggest the following safety equipment.
First aid kit with multiple small and large bandages The addition of a “Severe Injury” kit is not unwise including large compression
bandages, tourniquets, and shock treatments Eyewash canisters containing sterile solution In northern regions, space blankets Sharps containers The following is a list of equipment that has been found to be useful in dealing
with a right whale necropsy. More equipment is quite often helpful, although very
thorough necropsies have been conducted with much less gear.
Necropsy Gear
Hand-held GPS Digital camera (w/ disc space for at least 100 images) OR SLR camera w/ 28-70 lens, macro lens, 2x rolls of each; 50 Fujichrome, 64 Kodachrome, 200 Ektrachrome
Hi 8 video camera and video tape for 8 hours Extra batteries for all above electronic equipment Photo ID board to insert in all photo images 2- metric tapes, 30 m long (note: check end to see where numbers start) 2-3 data clipboards (Rubbermaid makes a plastic rust-proof model) 30m of 2cm braided line (examine for any abrasions or weak spots and remove)
8
30m of 1cm line (examine for any abrasions or weak spots and remove) 1 very heavy (10cm wide) nylon towing strap- e.g. used by large vessel travel lifts
4-6 high quality knives w/ 12” blades and blade guard between blade and handle 4-6 high quality knives w/ 8” blades 4-6 high quality knives w/ 6” blades 2- diamond “flat” steels 2- “draw through” knife sharpeners 2- ball shears or large boning shears 4- 2’ long metal meat hooks 4- 8” long metal meat hooks 4- scalpel handles and a box of blades (take care loading blades onto handles) 4- large rat-tooth forceps 4- small forceps 2-4 15cm plastic rulers 2- 30cm plastic rulers 2- plastic “turkey basters” for collecting urine and fecal samples A meter long bow saw used for trimming tree branches A long pry bar used for carpentry Aerobic and Anaerobic culturettes 100 tyvek tags for labeling Fine point and large indelible ink Sharpies Permanent ink pens #2 pencils for recording data onto datasheets and histo cassettes Several plastic 5 gallon buckets to store and wash gear 2- rolls of duct-tape 2 boxes of 2 gallon ziplock bags with-on label 2 boxes of 1 gallon ziplock bags with-on label 2 boxes of 1 liter ziplock bags with-on label large box of heavy garbage bags 2- large plastic cutting boards for cutting and photographing tissues Set of sawhorses and 2’x 8’ section of plywood to make workstation 1- box each of large, medium, small latex gloves 4- pairs of fish cutting gloves in each of above sizes Boots, coveralls and rain gear 2 headlamps 5- medium to large coolers
2 For dry equipment storage for transport 2 For tissue containment on site and transport (get ½ full w/ slush ice) 1 For food cooler for drinks, etc (do not mix w/ above)
2- large plastic transport boxes 1 For transport of rain gear and boots 1 For plastic trash bags and Ziplocs
4-5 scrub brushes for cleaning gear Dawn dishwashing soap Safety glasses for those “going deep” into the whale
9
Tissue and Fluid Collection 20L cube of 10% buffered formalin with pour spigot 2 gallons of 95% alcohol 6-8 plastic 1L jars w/ wide mouths
2-boxes of large Ziplocs 2-boxes of small Ziplocs 2- bread box size waterproof plastic boxes for gross tissue collection
Histo cassettes 10 60cc plastic syringes 10 20cc plastic syringes 10 16-gauge needles
Blood, urine, swab, etc collection protocols are included under individual headings and should follow specific protocols of the requesting researcher.
Much of the dissection equipment above can be purchased from a quality meat
packing supply business. Catalogues from Koch Industries, Kansas City, can be ordered
by calling 1-800-456-5624. Other scientific equipment can be ordered from Baxter
Scientific or Fisher Scientific among others. Forestry Suppliers (1-800-647-5364) have
numerous items (clipboards, tyvek tags, “rite in the rain” notebooks) that are designed for
the rigors of fieldwork.
To facilitate a convenient and safe transport system for dissection equipment,
purchase one 8’ section of 6” PVC pipe and 6 end caps w/ screw on covers. Cut the pipe
into 3’, 3’, and 2’ sections and mastic the ends onto the pipe. These will become safe
means of transporting long knives and hooks to the site and can be filled w/ seawater and
soap and “less clean” gear on the way back from the beach to wash the gear. They are
nearly indestructible, and can be thrown in pickup truck beds or into boats for transport to
and from the site. Also look for canvas “bucket buddies” (available through Forestry
Suppliers) that fit over plastic spackling buckets. They allow a bucket to be filled w/
water to keep gear clean and store smaller items in the numerous pockets. This one item
will drastically cut down the amount of equipment that is inevibly lost on sandy beaches
during a large whale necropsy. There is nothing more dangerous that having large knives
lying around on a beach.
10

Right Whale Necropsy Techniques And A Few Helpful Tips
Before you get started, take a few extra minutes to prepare yourself and your team
for the necropsy. Gather all of the people that will be involved in the necropsy and
conduct a pre-necropsy briefing to identify the procedures that will be conducted, the
samples that will be collected and specific tasks individuals will accomplish. It is
suggested that you set up individual teams with one prosector, one or more assistants, one
recorder and one videographer per team, and as many teams operating as you feel are safe
or needed. Take a moment to talk with the heavy equipment operators. Tell them that
they will be working around small fragile people with their large equipment, but that the
job needs to get done and more work that machinery can do, the less work for the people.
It is also suggested that you conduct a post-necropsy de-briefing. Items covered should
include; the physical requirements of the necropsy, did you have enough and the right
kind of people; samples and data collected, do you need to alter protocols; and external
logistics, was it a good place to conduct a necropsy and control the flow of people,
products and press.
It is suggested that you wear good rubber boots and rain pants. Take a moment to
duct-tape the folded rain pants onto the rubber boots just above the ankle when first
putting them on. This will allow you to essentially wade into the necropsy and not allow
“fluids” to drain back into your rubber boots, or up the inside of the rain pants. As
inevitable splashes will occur, it is suggested those doing the internal exam wear goggles
to reduce the potential of eye infections.
All data sheets should be filled out with either an indelible ink pen or when the
weather is less enjoyable, a #2 pencil will still write on a wet data sheet. We have found it
useful to have single-sided data sheets printed on Rite in the Rain paper, heavy bond
cotton paper or mylar. Rite in the Rain is best. Cotton paper can be written on even
completely soaked and will dry to a useable data sheet. Mylar is nearly indestructible, but
special care must be taken to dry wet data sheets or they will fuse into one slippery mass
on the drive home. With this in mind, set each day’s data sheets aside to dry and start new
sheets on each day. These can be collated and transcribed during final report writing. If
data sheets become splattered with biological fluids they can be sprayed with a mild
formalin solution and dried for permanent storage.
11

All tags should be made of high quality mylar or heavy bond paper (if tag is not
going to be immersed in fluids). As with data sheets above, tags should be labeled with
indelible ink pens or Sharpies, but can be written on with #2 pencil even when drenched,
though will smear if not handled carefully. Indelible Sharpies will survive normal
chemicals (10% NBF, 70% ETOH) if allowed to dry before submersing. When collecting
tissue samples in bags, place the sample in one bag, then place that bag within another
bag with the tag between the two bags (for extra security place the tag in a small bag as
well). This will keep the tag clean and legible indefinitely. We have recently added a
commercial vacuum sealer to store all of our tissues after we return from the beach.
These units are available with a wide variety of bag sizes and have kept frozen stored
tissues in pristine condition for many months. Additionally, these vacuum-sealed tissues
are much easier to ship through overnight shipments as they will not leak when properly
sealed and packaged.
Set up a trash bag when first getting started. Deposit all gloves, used bags and
trash in bag to keep beach site clean. When finished the necropsy and disposal of the
carcass check the site for any remaining equipment. Set up sharps containers for disposal
of glass, knives and scalpels. People will potentially be back walking on this site in bare
feet soon after the necropsy so look extra hard for knives and scalpels. Fill in any pools of
remaining fluid with sand to keep pets from rolling in the offal. If possible get the local
fire department to hose the beach down with a mild environmentally friendly detergent. If
the site is very public spread a few bottles of bleach over the necropsy site to help wash
the beach and keep lingering odors down to a minimum.
Conducting a Right Whale Necropsy
The following is a step-down (or step-through the animal) procedure for
conducting a right whale necropsy. The procedures are based on filling out data sheets
that are included in the protocol.
Condition Code
The following is a review of the carcass condition codes from Geraci and
Loundsbury (1993) and characteristics that identify each code. Condition code should be
12

noted when the animal is first observed and again when the necropsy begins. In the case
of a whale being towed to shore for hours the condition of the carcass may deteriorate
dramatically. It should be noted that large whales generally decompose faster than
smaller cetaceans. Deep body tissues will be “pressure cooked” until they are
unrecognizable, while more superficial areas that are exposed to cooling water (peduncle,
dorsal head, appendages) will appear “fresh” for up to days after death.
Condition 1: Animal is alive when first reported/investigated. Condition 2: Freshly Dead. Eyes still moist, skin not sunburned, little scavenger damage, no bloating, organs should be pristine, red blood flows from recent wounds. Carcass should be near normal mammalian temperatures (36-37o C). Condition 3: Moderately decomposed. Bloating with tongue distended, epidermis sloughing, extensive sunburn, eyes sunken, organs are identifiable but friable, fluid/lipid pours from cuts to the blubber and muscle. Condition 4: Severely decomposed. Carcass has collapsed due to organ decomposition, organs liquefied, blubber and muscle easily torn and falls from bone. Condition 5: Mummified or skeletal remains. Carcass is a bag of bones wrapped in gas- filled blubber. Large whales do not easily dissipate deep body heat after death, due to the large volume
of tissue that is wrapped in insulative blubber, the thermal inertia of that tissue mass
(Brodie and Pasche 1985, Innes 1986). Immediately after death blood stops transferring
heat from deep tissues to the cooling radiators of the appendages and caudal peduncle. At
this point the whale starts to literally cook from within. Collecting deep-body
temperatures, especially from freshly dead animals, could be helpful in interpreting time
of death. These temperatures should be collected by inserting a long puncture probe deep
beneath the blubber to nearly the level of the vertebral column at a dorsal, mid-thoracic
site.
Right Whale Human Interaction and External Observation Data Sheets
The investigation of human interactions with marine mammals is a recent
development. While strandings of marine mammals have been investigated for decades
(Fraser 1934) fisheries interactions with smaller marine mammals did not receive
13
attention until the late twentieth century (Hare and Mead, 1987, Kuiken, 1994). Large
whale stranding response protocols were formalized in 1997 by the U.S. Southeast
Regional Stranding Network (Blaylock et al. 1997). The U.S. Atlantic coast stranding
network has been trained to investigate evidence of fishery interactions with small
cetaceans (Read and Murray 2000) and has begun to report these findings in the scientific
literature (e.g. Cox et al. 1998, Friedlaender et al. 2001). In small cetaceans, the quality
and interpretation of data collected is directly related to the condition of the carcass (Cox
et al. 1998). A fresh, non-frozen, carcass will yield the best interpretation of the potential
for human interaction.
A thorough investigation of the external surfaces of the animal is required. An
excellent review of the criteria used for diagnosing fisheries interactions in cetaceans is
found in Kuiken (1994). In all necropsies, notes should be collected from observations of
the leading edges of the appendages and other areas of where lines could become
entangled on the whale. The baleen should be investigated for areas of fractures or
abrasion that might indicate that the animal had been carrying line. In many instances the
only evidence of entanglement will be found in abrasions of the epidermis along the
leading edges and base of the appendages or fractures of the baleen. The entangling line
will have come loose from the floating dead carcass or has been actively removed from
the carcass by “concerned individuals”. While external examination of the lesions
associated with fishery interactions might be difficult to impossible in severely
decomposed carcasses, thorough investigation of all large whale strandings will aid in our
understanding of the potential for human interactions.
Collisions between vessels and large whales have been shown to be a significant
cause of mortality in right whales (Knowlton and S.D. Kraus, 2001; Kraus, 1990; Laist,
et al. 2001). The investigation of possible ship-strike during a necropsy requires a
significant allocation of time and the energies of a number of people and/or agencies.
Cetaceans are wrapped in blubber, a lipid and connective tissue rich tissue, which acts as
a cushion to most blunt trauma injuries. The external examination of a vessel strike
carcass might show only mild abrasions of the epidermis, while dissection of the tissues
deep to the blubber may show muscle tearing, hemorrhage and compound bone fractures.
As a general rule, vessel strike as the cause of death in large whales cannot be ruled out
14
unless the whole carcass has been dissected down to the bone including the skull, ribs and
vertebral column.
Documentation should be made of all evidence of human interaction using the
Human Interaction and External Observation Data Sheets. Any skin lesions should be
recorded on a separate External Observation Data Sheet and lesions sampled in 10%
NBF. As a general rule when sampling for histopathology, tissues should be no more than
1cm in thickness but can be up to 2-3cm in width. This is to allow sufficient perfusion of
fixative through the tissue, but to permit a view of both the lesion and normal
surrounding tissues. Additionally, samples should be immersed into formalin at least 10x
times the volume of the samples. Make specific notation if the lesion is fresh (as in a
wound) or healed (as in a scar). Collect a genetic sample of a minced 1 x 3cm section of
epidermis fixed in a super-saturated salt solution of 10% DMSO in water. Additional
genetic samples can be collected from liver, heart muscle, pericardium and endometrium
in DMSO if carcass condition warrants it. Recently, researchers have been requesting
frozen epidermis samples in plastic to be used to determine hormone levels, contaminants
and genetics. Collect a 10x10cm section of epidermis and freeze in a Ziploc bag and
place on ice immediately and transfer to a –80oC freezer as soon as possible.
Photo and video documentation of the necropsy is of the utmost importance.
Ensure that all evidence of human interactions are carefully and multiply documented.
Take time to set-up clear photographs, including a label with the ID and notation of what
tissue, to document any human interaction evidence, other lesions, etc. The importance
of high quality photo and video documentation cannot be overstated.
Different species of cyamids may be found on different locations of a right whale.
Cyamids should be collected from all locations from the carcass, kept separate, and the
location on the whale recorded on a copy of the External Observation Data Sheet and
in/on the sample (see specific cyamid collection protocol under Current Tissue and
Data Requests section).
Right Whale Morphometric Data Sheet
The next step in the necropsy is to collect external length and girth measurements.
A right whale specific morphometrics data sheet is provided as an appendix that can be
15
removed and used. All lengths should be made parallel to the long axis of the animal,
unless otherwise noted on the data sheet. With a large whale, girth measurements are
usually made on only ½ of the animal from the dorsal to ventral midline and multiplied
by 2. We have discovered that this technique yields imprecise measurements of totals
girth in small cetaceans (McLellan, unpublished data). We suggest making every effort
to collect whole girth measurements by digging under the whale or dragging lines, and
then the measuring tape, under the whale at the appropriate sites. Though, if ½ girth
measurements are taken, record that clearly on the data sheet.
Right Whale Blubber Thickness Data Sheet
Blubber’s condition (e.g. thickness, lipid content) can offer insights into the
nutritional status and overall condition of cetaceans (e.g. Cox et al. 1998, Koopman et al.
2002, Koopman 1998, Lockyer et al. 1984, Struntz et al. 2004). Because blubber has
differing functions and depth profiles at different positions along the body (Doidge 1990,
Koopman et al. 2002, Pabst et al. 1999, Struntz et al. 2004) a comprehensive collection
of blubber thicknesses across the entire body surface will provide the best description of a
whale’s nutritional status and body condition. To aid in collecting these systematic data, a
right whale specific blubber data sheet has been developed.
The sheet identifies nine landmarks along the length of the whale where multiple
blubber thicknesses, measured around the animal’s girth, should be collected. Begin
collecting data by determining which side of the animal has the most complete blubber
and record the side examined. Locate the nuchal crest on top of the skull behind the
blowholes, which will be the cranial-most landmark. Locate the following landmarks at
the axilla, umbilicus, anus, and insertion of flukes. In an effort to collect blubber
thickness at ca 1m intervals along the body (in adult right whales), regions between these
landmarks should be subdivided into the intervals noted on the data sheet. These regions
are consistent with those collected in small cetaceans (see Koopman 1998) and will
provide valuable future comparisons among cetaceans. After the nine landmarks have
been identified, make a longitudinal cut at the dorsal and ventral midlines. Then, at each
landmark, make a transverse cut through the blubber (i.e. in a straight line perpendicular
to the long axis of the body) from the dorsal midline to the ventral midline, cutting
16

completely through the blubber to the sub-dermal sheath. The cross-sectional cuts should
then be subdivided into seven equidistant positions around the animal’s girth from the
dorsal to ventral midline and blubber thicknesses collected at those sites. The first
location is on the dorsal midline, the fourth will be the lateral midline (transverse
processes) and the seventh will be on the ventral midline, with 2 equidistant sites between
each of these. Separate thicknesses should be recorded for epidermis (the dark pigmented
external surface) and blubber (the white fiber and lipid rich hypodermis). Record
thicknesses to the nearest mm.
Right Whale Gross Necropsy Report
The following is a gross necropsy report to be filled out while the necropsy is
underway. Make notations of all findings during the necropsy. If there will be multiple
teams collecting data during the necropsy the Necropsy Report can be taken apart and
individual pages used as a rough division of labor. It is absolutely necessary to assign an
individual as the data recorder for each team conducting the necropsy. This individual
will allow the prosector to safely work while narrating observations to the recorder. An
additional person with photographic skills is helpful and can be assigned the duty of
taking stills and video of all findings.
The report is designed to prompt the team to make specific observations of all
organ systems. If an organ/tissue appears normal, do not leave the data sheet blank, but
note that there were no visible lesions (NVL). If an organ/tissue was not examined (N/E),
note that on the data sheet as well and explain why (e.g. autolysis). If the tissue or body
part was missing (i.e. flipper removed by propeller cut) mark it as not applicable (N/A)
and note why. Fill in all fields with some type of notation. It will make the necropsy more
valuable for future investigators if they can determine what you did during the necropsy.
As a general statement, large whale morphology and health assessment characteristics are
not well known. Specific observations on tissue morphology, fat distribution, and gross
body condition, to name but a few, will prove valuable to the understanding of these rare
events. Simply put, writing down more information is better! Fields are described below
and an unused necropsy report that can be removed and copied is attached as an
appendix. A review of the recent chapters by Rommel & Lowenstine (2001) on gross and
17

microscopic anatomy, and Rowles et al. (2001) on gross necropsy and specimen
collection protocols is suggested as background before beginning the necropsy.
Before beginning the narrative label all of the pages of the necropsy report (and
all additional pages of notes) with the Field Number.
18
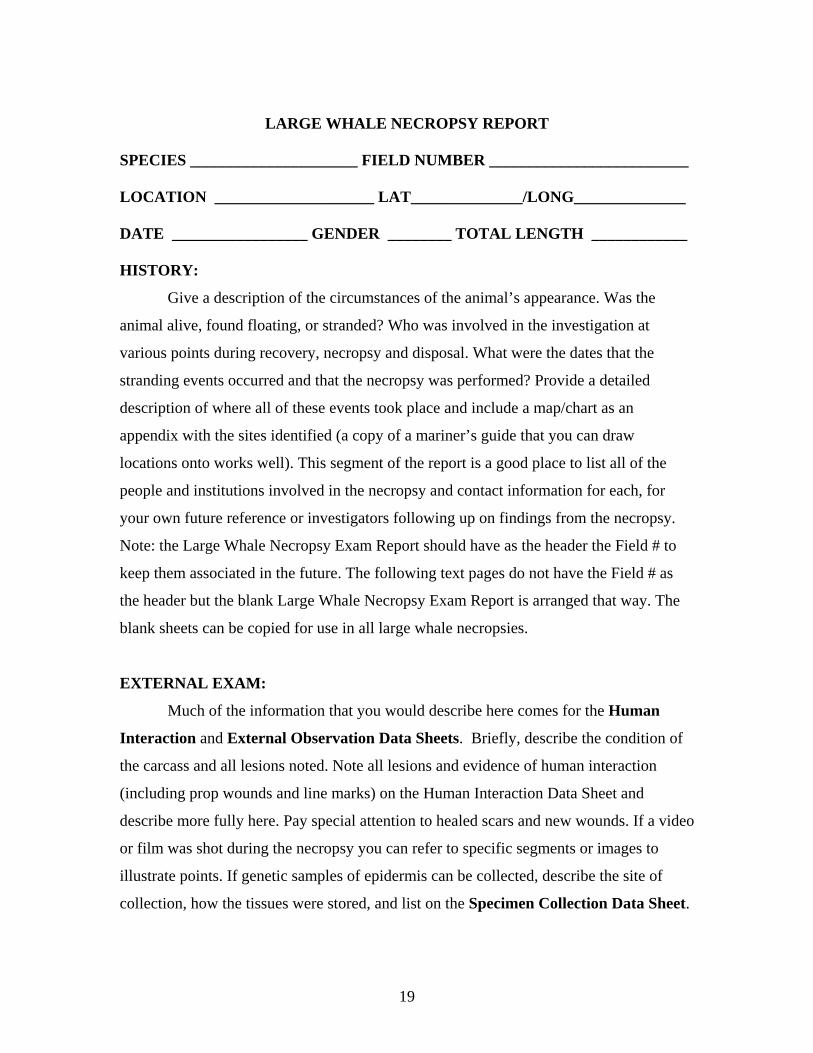
LARGE WHALE NECROPSY REPORT
SPECIES _____________________ FIELD NUMBER _________________________ LOCATION ____________________ LAT______________/LONG______________ DATE _________________ GENDER ________ TOTAL LENGTH ____________ HISTORY:
Give a description of the circumstances of the animal’s appearance. Was the
animal alive, found floating, or stranded? Who was involved in the investigation at
various points during recovery, necropsy and disposal. What were the dates that the
stranding events occurred and that the necropsy was performed? Provide a detailed
description of where all of these events took place and include a map/chart as an
appendix with the sites identified (a copy of a mariner’s guide that you can draw
locations onto works well). This segment of the report is a good place to list all of the
people and institutions involved in the necropsy and contact information for each, for
your own future reference or investigators following up on findings from the necropsy.
Note: the Large Whale Necropsy Exam Report should have as the header the Field # to
keep them associated in the future. The following text pages do not have the Field # as
the header but the blank Large Whale Necropsy Exam Report is arranged that way. The
blank sheets can be copied for use in all large whale necropsies.
EXTERNAL EXAM:
Much of the information that you would describe here comes for the Human
Interaction and External Observation Data Sheets. Briefly, describe the condition of
the carcass and all lesions noted. Note all lesions and evidence of human interaction
(including prop wounds and line marks) on the Human Interaction Data Sheet and
describe more fully here. Pay special attention to healed scars and new wounds. If a video
or film was shot during the necropsy you can refer to specific segments or images to
illustrate points. If genetic samples of epidermis can be collected, describe the site of
collection, how the tissues were stored, and list on the Specimen Collection Data Sheet.
19

Flippers:
The proximal leading edge of the flipper and the axilla are common sites of
entanglement with fishing gear or line. In some cases the entanglement is severe enough
that the flipper has been literally “cut-off” by the sawing action of the line. In other cases
the entanglement has restricted circulation enough to cause localized necrosis and/or loss
of flipper tissues. The leading edge and axilla should be carefully investigated for
evidence of abrasion or necrosis. Tissue samples should be collected from any suspected
sight of entanglement to determine if pre- or postmortem. As multiple tissue samples may
be collected from the flippers and flukes, make sure to separately label each sample so
they may be correlated to corresponding lesions. In this case it is valuable to sketch the
sites where samples are taken on an additional External Observation Data Sheet, and
correlate the samples with the sites of lesions. Ensure that lesions are thoroughly photo
and video documented. As the flipper is disarticulated from the scapula, examine the joint
for roughened or abraded/missing articular cartilage.
Flukes:
As with the flippers, the leading edges of the flukes are very common sites of
fishing gear or line entanglement. It is not uncommon in a vessel strike for the ships
propeller to remove a (small or large) portion of a fluke as the animal is attempting to
dive. As noted above tissue samples should be collected from all trauma sites to fully
interpret the extent of the entanglement or strike, and those areas should be fully
documented.
INTERNAL EXAM:
After all of the external morphometrics, human interaction protocols, photographs
and external tissues have been collected the internal exam can begin (but see below, point
#3). After the blubber thicknesses have been measured the blubber can be stripped, or
flensed, from the carcass. At the nuchal crest cut a round hole in the cranial most blubber
strip that is big enough to get your hand through. Run a line through the hole and tie a
loose bowline knot at the end of the line. Run a piece of 2”x 2”x 12” piece of through the
hole to “toggle” the line. This toggle can easily be removed from the line and the line
pulled through the blubber after it has been flensed from the carcass, and be easily placed
20
in the next strip of blubber. This toggle system distributes the pulling load, and should be
done in place of tying a line around the blubber. Tying onto blubber should never be
done, as a line can pull through the blubber at unpredictable points and will create a very
dangerous situation.
A necropsy presents an endless string of observations and decisions of what is
normal/abnormal and what should or should not be sampled. The following parameters
are relevant:
1.Condition code 2 right whales are extremely rare. If one is encountered, sample
it exhaustively and redundantly. In some cases there will be extreme differences
in tissue condition from one side of the whale to the other, depending on how the
whale was floating, and possible extent of trauma or scavenger damage. More
autolyzed tissues are less valuable, but should be sampled whenever possible. In
general, tissues should be collected and preserved in 10% NBF for histology and
frozen for future diagnostics. Samples could prove valuable years or even decades
after they were collected, for studies that have not even been designed yet.
2. Sample any obvious lesion, irrespective of condition. The tissues can always
be discarded, but never collected after the fact.
3. Information on the reproductive tract is vital. As soon as the pertinent external
measurements and photographs are collected begin the necropsy there.
4. All tissues must be labeled redundantly with Field #, date, species, location,
and organ. Begin with the sample in a bag inside another bag with a Tyvek label
in a separate bag between these two will protect the tag for future identification.
Put a Tyvek tag inside of all wet fluid containers as well as writing the
information on the top/side of the container.
BLUBBER:
Blubber thickness should be measured at multiple sites (see Right Whale Blubber
Thickness Data Sheet) along one side of the animal. After the blubber has been
measured and sampled it should be flensed to expose the subdermal connective tissue
sheath and axial muscle. The blubber should be investigated for evidence of blunt force
trauma including adipocyte fracture, bleeding, localized bruising, gross tearing and/or
21
necrosis. Blubber will act as a shock absorber that will limit signs of gross trauma, but
that force will be transferred to the deeper tissues of the subdermal sheath and axial
muscle. A mild external abrasion to the blubber may actually mask gross muscle trauma
and massive internal bleeding when the blubber has been removed.
MUSCULOSKELETAL SYSTEM
Axial Muscle:
The axial muscles should be completely flensed from the vertebral column so that each
skeletal element can be examined. The dorsal, epaxial muscles will be exposed after the
blubber is flensed free of the carcass, and will, thus, be the first axial muscle to be
investigated. The hypaxial muscles will not be exposed until the thoracic and abdominal
cavities are opened and organs dissected free from the carcass. For both large axial
muscle masses, areas of free-flowing blood, torn muscle fibers and/or necrosis should be
recorded. A general ranking of muscle tissue decomposition along the vertebral column
should be noted. To ensure that the muscle is fully investigated, serial transverse cuts
should be made through the muscle every 1-2 m, and the cut surfaces of the muscle
inspected. In all headings below, any suspected hemorrhage or edema should be
described, photographed sampled in 10% NBF formalin for histological examination.
Axial Skeleton
By the end of the necropsy, the complete vertebral column should be flensed clean of
tissue. In each of the following vertebral segments any bone fractures should be recorded
and sampled. The articular surfaces of the vertebrae should be investigated and any
lesions noted.
Thoracic Vertebrae:
Lumbar Vertebrae:
Caudal Vertebrae:
Ribs & Sternum:
All of the ribs should be removed, flensed clean and examined for old healed and new
fractures. If working with heavy equipment the ribs can be removed in one complete
section. To accomplish this, tie a line on three to four caudal ribs and pull lightly with the
22

equipment/winch. Disarticulate the ribs from the vertebrae working forward from the
caudal to cranial ribs. If done in this way the ribcage can be laid out on the beach and
video shot to document the location and extent of fractures. Care should be taken in the
interpretation of fractured ribs. Large whales do not have the thoracic skeletal structure to
support their mass when they strand on a beach. Rib fractures are an extremely common
finding of large whale necropsies. Rib fractures just proximal to the sight of articulation
with the vertebrae (at the apex of the bend) are consistent with “green-stick” fractures of
long bones. If the fracture opens away on the lateral aspect of the rib it was likely caused
by the weight of the animal itself bending the “bow” of the rib cage when first grounded.
Fractures that open into the body are more likely caused by external forces impacting the
animal. Pre-mortem fractures are also usually associated with hemorrhage and edema.
Pelvics:
The paired pelvic rudiments are frequently lost while flensing the abdominal muscle. As
the need to investigate the reproductive tract of right whales is an immediate concern,
task a reliable person to remember to collect the pelvics. As right whales often have
accessory hind limbs, completely flense, describe, photograph and collect the pelvic
vestiges.
Cranium:
The skull should be completely flensed of tissue. Many large whale necropsies have had
no significant findings until the skull was investigated. A minor strike to the head of a
whale may render the animal temporarily unconscious. It must be noted that cetaceans are
voluntary breathers - they have to be conscious to recognize when the blowhole has
parted the ocean surface and only then will they breath. If a whale is rendered
unconscious they will stop breathing and may never resume breathing again. In addition,
any mandibular fracture of a baleen whale could be life threatening. The forces that act
upon a whale mandible as the animal passes immense volumes of seawater through its
mouth must be incredible. Even a relatively “small” fracture could render the whale
unable to eat and while the immediate trauma may not cause the animals death a
protracted period of starvation would still ultimate lead to the animal’s demise.
23

DIGESTIVE SYSTEM
Mouth:
The mouth should be investigated for evidence of vomited foodstuffs. Also check
condition of skin surfaces around angle of mouth for line abrasions and the remaining
oral cavity for evidence of traumatic bone fractures.
Baleen:
Look for fractured or missing baleen that would be consistent with carrying line in the
mouth.
Tongue:
Look at dorsal and ventral surfaces for evidence of line abrasion.
Esophagus:
The esophagus may contain line or fishing gear that has become entangled around the
epiglottis. Investigate the entire esophagus for foreign items.
Fore Stomach:
Investigate the entire stomach lining for ulcerations. If foodstuffs are present collect a
sub-sample in a clean Ziploc bag. Do not wash the foodstuffs with any water because
this may compromise future biotoxin analyses. Collect a clean sample of fluid from the
stomach with a turkey baster and freeze.
Main Stomach:
Investigate lining for ulcerations and parasites. Collect sub-sample of foodstuffs.
Pyloric Chambers:
Investigate lining for ulcerations and parasites.
Duodenum:
Investigate lining for ulcerations and parasites.
Intestine:
If time is available, run the entire intestine. Note ulcerations and collect any parasites.
Recent studies have found significant numbers of intestinal parasites that leads to severe
diarrhea. Samples of feces should be collected and frozen.
Colon:
Examine and collect fecal samples if available. Be sure to note where sample was
collected from (e.g. colon vs. anus).
24
Anus:
Examine and collect fecal samples if available. Be sure to note where sample was
collected from (e.g. colon vs. anus).
Describe food-stuffs found in GI Tract:
Describe parasites found in GI Tract:
Describe samples collected for biotoxin analysis:
In recent years biotoxins have been linked to numerous marine mammal mortalities.
Samples of stomach and lower GI tract contents should be collected with a turkey baster
and stored in sterile plastic tubes, or in large volumes in Ziploc bags for analysis.
Liver:
Inspect and record the surface features of the liver, including shape, color, visceral
peritoneal condition, and note any irregularities and lesions. Note any adhesions, and
describe sharpness of caudal margins. Make serial transverse or longitudinal cuts
through the liver, inspect cut surfaces and describe tissue color, texture and presence of
any obvious lesions and parasites. Investigate the common bile ducts for parasites.
Pancreas:
Inspect and record the surface features, including shape, color, visceral peritoneal
condition, and note any irregularities and lesions. Note any adhesions. Make serial
longitudinal cuts through the pancreas, inspect cut surfaces and describe tissue color,
texture and presence of any obvious lesions and parasites. Note also condition of the
associated lymph nodes.
Mesenteric lymph node:
CIRCULATORY SYSTEM
Heart:
Before opening the heart, an attempt should be made to collect blood from either the
heart or aorta. Blood can be drawn into a syringe and frozen for bacteriology and
25
serology. Inspect and note the general condition of the heart and valves, presence of any
associated fat, and any lesions or abnormalities. Measure both left and right ventricular
wall thickness and the thickness of the interventricular septum at midlevel of the heart.
Collect interventricular septum, and papillary muscle, and epicardial coronary vessels in
formalin to assess vascular injury.
Great Vessels:
Inspect and note general condition, presence of free-flowing blood or clots. Record
intraluminal surface condition of large vessels.
Cranial Circulation:
Spinal Circulation:
The blood supply to the brain of cetaceans surrounds and runs adjacent to the spinal cord.
Minor translations of the thoracic vertebrae and larger movements of the skull in relation
to the vertebral column have the potential to occlude the brain circulation. Special care
should be taken to investigate the deep circulation surrounding the spinal cord and
describe any masses of loose blood or circulatory damage.
RESPIRATORY SYSTEM Blowholes: Inspect the blowholes for foreign debris, rocks, sand, etc. Nares: If possible inspect the internal nares for evidence of inflamed epithelium. Larynx: Inspect the larynx for any sign of dislocation from the internal nares. Trachea: Lungs: Inspect and record condition of visceral pleura, note any irregularities in surface color
and texture. Note any adhesions. Remove each lung by severing the primary bronchus.
Note the color, consistency and volume of any fluid and collect an aseptic syringe full of
fluid. Dissect down the bronchi, and note any contents, including froth, blood, parasites.
26
Make serial transverse cuts through the lung tissue and describe tissue color, texture and
presence of any obvious lesions and parasites. Note also condition of the associated
lymph nodes and collect histopath samples. Collect both lung and associated lymphatic
tissues for histopathology (10% NBF) and for bacteriology (swabs) and molecular
studies (frozen).
Bronchi: Collect samples for histology from the cartilaginous rings and tissue just deep to the
rings.
Alveoli:
Collect significant sections of lung tissue from the terminal airways, fixed in 10% NBF
and frozen.
URINARY SYSTEM
Kidneys:
Inspect and record the surface features, including shape, color, parietal peritoneal
condition, and note any irregularities and lesions. Dissect up the ureter to examine
internal kidney structure, note any lesions and parasites. Make serial transverse cuts
through the kidney and describe tissue color, and presence of any obvious lesions and
parasites.
Ureters:
Bisect the ureter from the kidney to the bladder and note any irregularities and lesions.
Bladder:
Dissect the bladder free at its distal end. Note the presence of any urine and collect with
a sterile syringe. If possible, singe the surface of the bladder with a heated piece of metal
before inserting the syringe. Open the bladder and note any lesions.
Urethra:
REPRODUCTIVE SYSTEM
FEMALE
Ovaries:
27

Uterine Horns:
Uterus:
Cervix:
Vagina:
Mammaries:
MALE
Testes:
Epididymis:
Vas Deferens:
Prostate:
Seminal Vesicles:
Penis:
ENDOCRINE & HEMOLYMPHATIC SYSTEMS
Thymus:
Dissect free, inspect and sample.
Thyroid:
Dissect free, inspect and sample.
Parathyroid:
Dissect free, inspect and sample.
Adrenals:
Dissect free, inspect and sample.
Pituitary:
Collect after brain has been removed
Spleen:
Lymph Nodes:
28
CENTRAL NERVOUS SYSTEM
Brain:
The brain is generally too autolyzed to collect on large whales that have been dead for
even a few hours. But, if an extremely fresh or euthanized specimen is presented, it is
imperative that all efforts be focused on exposing the back of the skull and sawing
through the calvarium. In this case, a large bow saw or reciprocating handsaw will be
necessary. Start by cutting along the cranial-ventral margin of the occipital condyles.
Continue dorsally beside the condyles for approximately 0.4 meters then join the two
lateral cuts with a single straight dorsal cut. A pry bar and axe will be needed to “pop”
the calvarium free. At this point the brain can be gently separated from the dura mater
and completely removed. If this procedure does provide you with a whole brain,
immediately place the brain on ice and contact your regional or the national stranding
coordinator. Prepare a person to take the brain and immediately transfer it to a Fed Ex
location for shipment. This will be your first priority. All other tissues can be collected
and dealt with on site.
Spinal Cord:
Collect cross-section in 10% NBF
SENSORY ORGANS
Eyes:
Ears:
Bulla/Periotics:
Specific notations should be made of the tissues surrounding the ear structures. With care
the intact bulla and periotic can be removed and should be collected for CT scanning.
CONCLUSIONS:
Concise review of lesions noted. Include notes of what important tissues were collected,
where those tissues are being held, and who the contact is for those tissues. It is suggested
that you remind yourself of who wanted information from this necropsy and who might
contribute to the final version of the necropsy report.
29
CAUSE OF DEATH FROM FIELD DETERMINATION:
This report was generated by:
State your name, and the best address and contact information for you.
Remember, these necropsy reports might not become important until many years after the
initial investigation. The more thorough and complete the necropsy report is during the
initial observations, the more value it will have when finally analyzing the results of
many separate necropsy investigations at some point in the future.
30

SPECIMEN COLLECTION DATASHEET
TISSUE TEST
CONDUCTEDSAMPLE
SIZE TYPE OF
PRESERVATION CHECK IF
COLLECTED Blubber Toxicology 10x10cm
through whole depth
Frozen in aluminum
Lipid analysis Thoracic
10x10cm through depth
Frozen in plastic
Lipid analysis Peduncle
10x10cm through depth
Frozen in plastic
Health Assessment
2x 10cm through depth
10%NBF
Any lesions 1 x 3cm 10% NBF Histopath 1cm cubes 10% NBF Trauma x-section
through wound 10% NBF
Liver
Toxicology 100g- 2 sites collected
Frozen in plastic
Histopath 1cm cubes 10% NBF Trauma x-section
through wound 10% NBF
Kidney Toxicology 100g- 2 sites collected
Frozen in plastic
Histopath 1cm cubes 10% NBF Any lesions 1 x 3cm 10% NBF Trauma x-section
through wound 10% NBF
Heart Right atrium Right ventricle Left Atrium Left ventricle
Histopath
2x2cm taken through depth
10% NBF
Any lesions 1 x 3cm 10% NBF Trauma x-section
through wound 10% NBF
Lung Morbillivirus 2x2cm cube 10%NBF Morbillivirus 2x2cm cube Frozen in plastic Histopath 1cm cubes 10% NBF Any lesions 1 x 3cm 10% NBF Trauma x-section
through wound 10% NBF
31

Pancreas Histopath 1cm cubes 10% NBF Any lesions 1 x 3cm 10% NBF Trauma x-section
through wound 10% NBF
Mammary Histopath 1cm cubes 10% NBF Any lesions 1 x 3cm 10% NBF Trauma x-section
through wound 10% NBF
Toxicology 100g Frozen in plastic Muscle Histopath 1cm cubes 10% NBF Any lesions 1 x 3cm 10% NBF Trauma x-section
through wound 10% NBF
Health Assessment
Collect 3cm x-section of axial muscle
Frozen in plastic
Lymphatics PCR Fresh Frozen Any lesions 1 x 3cm 10% NBF Blood Bacteriology Sterile syringe Frozen Serology Sterile syringe Frozen Urine Toxicology Sterile syringe Sterile vial
Frozen
Uterus Life History Whole- minus
sampling below Frozen
Any lesions 1 x 3cm 10% NBF Brucella x-sections Frozen Uterine Horn Life History 2cm ring 10% NBF Brucella x-sections Frozen Fetus Reproduction Whole Frozen Ovaries & Assoc. Tissue Mesosalpynx
Life History Whole 10% NBF
PCR Fresh Frozen Testes Life History 2cm cube 10% NBF PCR Collect one testis
whole Frozen
32

Bone Trauma x-section through fracture
10% NBF
Any lesions 1 x 3cm 10% NBF Stomach Contents
Life History Sub-sample 70% ETOH
Biotoxin Sub-sample No water Frozen in plastic
ADD OTHER SAMPLES BELOW
33
Researcher Request Form
The following is a standardized form for specific tissues requests from right
whales. Completed forms should be forwarded to the right whale necropsy coordinator.
RIGHT WHALE SAMPLE REQUEST: Specific tissue or data requested to be
collected
REQUESTING AGENCY OR INDIVIDUAL: Give specific individual(s) making
request.
CONTACT INFORMATION: Include email and phone numbers. Give specific details
for necropsy personnel to contact the requesting individual including evening/home, cell
phone, or pager phone numbers. Necropsies are often conducted at all hours in all
conditions. Should questions arise about tissue collection or condition of the tissue the
necropsy coordinator should be able to contact the requesting individual at any point.
AVAILABLE FOR PARTICIPATION IN NECROPSY? Give areas that the requester
can respond to the right whale necropsy and collect data/tissues.
SAMPLE COLLECTION TECHNIQUE: Give a specific protocol for collecting the
requested tissue/data. Protocol should include tissue type and amount, location and
dissection approach.
MATERIALS NEEDED: If special fixation materials are needed they should be
provided prior to the necropsy or make specific arrangements with the necropsy team
leader prior to the necropsy.
SEND SAMPLES TO: Give address for tissues and general guidelines for when
delivery is possible. Include a phone number to call to make arrangements for tissue
delivery. In general, a Fed Ex # is helpful for sending tissues, and is very helpful to track
tissues should they become lost during shipping.
34

Researchers Interested in Right Whales Tissues/Data
The Following is a list of current Right Whale Sample Requests.
35
Literature Cited Best. P.B., V.M. Peddenmors, and N. Rice. in press. Mortalities of right whales and
related anthropogenic factors in South African waters, 1963-1998. Journal of Cetacean Research and Management.
Blaylock, R.A., B.G., Mase, and C.P. Driscoll. 1995. Final Report on the Workshop to Coordinate Large Whale Stranding Response in the Southeast US, SEFSC Contribution, MIA-96/97-43, 32 pp.
Bonde, R.K., O’Shea, T.J., and C.A. Beck. 1983. Manual of procedures for the salvage and necropsy of carcasses of the West Indian manatee (Trichechus manatus), PB 83-255272, National Technical Information Service, Springfield, VA, 175 pp.
Brodie, P. and Paasche, A. 1985. Thermoregulation and energetics of fin and sei whales based on postmortem, stratified temperature measurements. Canadian Journal of Zoology 63: 2267-2269.
Caswell, H., Fujiwara, M. and S. Brault. 1999. Declining survival probability threatens the North Atlantic right whale. Proceedings of the National Academy of Science. USA. 96:3308-3313.
Cox, T.M., Read, A.J., Barco, S.G., Evans, J., Gannon, D., Koopman, H.N., McLellan, W.A., Murray, K., Nicolas, J., Pabst, D.A., Potter, C.W., Swingle, M., Thayer, V.G., Touhey, K.M., and A.J. Westgate 1998. Documenting the bycatch of harbour porpoises in coastal gill net fisheries from stranded carcasses. Fisheries Bulletin, 96:727-734.
Department of the Army. 2001. Veterinary necropsy protocol for military working dogs and pathology specimen submission guidelines. Technical Bulletin No. MED 283.
Doidge DW. 1990. Integumentary heat loss and blubber distribution in the beluga, Delphinapterus leucas, with comparisons to the narwhal, Monodon monoceros. In: Smith TG, St. Aubin DJ, Geraci JR, editors. Advances in research on the beluga whale, Delphinapterus leucas Can. Bull. Fish. Aquat. Sci. 224: 129-140.
Fraser, F.C. 1934. Report on cetacea stranded on the British coasts from 1927 to 1934. The British Museum (Natural History). William Clowes & Sons, Ltd. London. 41 pp. + maps.
Friedlaender, A.S., McLellan, W.A., and Pabst, D.A. 2002. Characterizing an interaction between coastal bottlenose dolphins and the spot gillnet fishery in southeastern North Carolina, U.S.A. Journal of Cetacean Research and Management. 3(3):293-303.
George, J.C., Bada, J., Zeh, J., Scott, L., Brown, S.E., O’Hara, T., and R. Suydam. 1999. Age and growth estimates of bowhead whales (Balaena mysticetus) via aspartic acid racemization. Canadian Journal of Zoology, 77:571-580.
Geraci, J.R., and V.J. Loundsbury. 1993. Marine Mammals Ashore: A Field Guide for Strandings. Texas A & M Sea Grant Program, Galveston, 305 pp.
Geraci, J.R., and V.J. Loundsbury. 1997. Draft Contigency Plan for Manatee Die-offs. Prepared for Florida Department of Environmental Protection, Florida Marine Research Institute, Division of Marine Resources, St. Petersburg, FL, 4 September 1997.
Hare, M.P. and J.G. Mead. 1987. Handbook for the determination of adverse human-marine mammal interactions. NWAFC Processed Report 87-06, U.S. Department of Commerce, Washington, D.C. 35 pp.
36

Innes, S. 1986. How fast should a large whale cool? Canadian Journal of Zoology 64: 2064-2065.
Knowlton, A.R., and S.D. Kraus. 2001. Mortality and serious injury of northern right whales (Eubalaena glacialis) in the western North Atlantic Ocean. Journal of Cetacean Research and Management (Special Issue) 2: 193-208.
Koopman, H.N., 1998. Topographical distribution of the blubber of harbour porpoises (Phocoena phocoena). Journal of Mammalogy. 79:260-270.
Koopman, H.N., D.A. Pabst, W.A. McLellan, R.M. Dillaman, and A.J. Read. 2002. Changes in blubber distribution and morphology associated with starvation in the harbour porpoise (Phocoena phocoena): Evidence for regional differences in blubber structure and function. Physiological and Biochemical Zoology. 75(5):498-512.
Kraus, S.D. 1990. Rates and potential causes of mortality in North Atlantic right whales (Eubalaena glacialis). Canadian Journal of Zoology 72:1297-1305.
Kraus, S.D., P.K. Hamilton, R.D. Kenney, A. Knowlton and C.K. Slay. 2001. Status and trends in reproduction of the North Atlantic right whale. Journal of Cetacean Research and Management (Special Issue) 2.
Kuiken, T. 1994. Review of the criteria for the diagnosis of by-catch in cetaceans. Proceedings of the European Cetacean Society workshop on cetacean pathology, 2 March 1994. 38-43 pp.
Laist, D.W., A.R. Knowlton, J.G. Mead, A.S. Collet, and M. Podesta. 2001. Collisions between ships and whales. Marine Mammal Science 17(1):35-75.
Lockyer, C.H., McConnell, L.C., Waters, T.D. 1984. The biochemical composition of fin whale blubber. Canadian Journal of Zoology 62: 2553-2562.
Marine Mammal Commission. 1999. Marine Mammal Commission annual report: 1998. Marine Mammal Commission, Bethesda, MD 20814. 239 pp.
Martin, A.R., S.K. Katona, D. Matilla, D. Hembree, and T.D. Waters. 1984. Migration of humpback whales between the Caribbean and Iceland. Journal of Mammalogy, 65:330-333.
McLellan, W.A., H.N. Koopman, S.A. Rommel, A.J. Read, C.W. Potter, J.R. Nicolas, A.J. Westgate, and D.A. Pabst. 2002. Ontogenetic allometry and body composition of harbour porpoises (Phocoena phocoena, L.) from the western north Atlantic. Journal of Zoology, London 257:457-472.
Moore, M.J., A.R. Knowlton, S.D. Kraus, W.A. McLellan and R.K. Bonde. in press. Morphometry, gross morphology and available histopathology in north Atlantic right whale (Eubalaena glacialis) mortalities (1970 to 2002). Journal of Cetacean Research and Management.
National Marine Fisheries Service. 1991. Recovery Plan for the Northern Right Whale (Eubalaena glacialis). Prepared for the Right Whale Recovery Team for the National Marine Fisheries Service, Silver Spring, Maryland. 86 pp.
Galloway, S.B. and J.E. Ahlquist (eds.) Marine Forensics Manual, Part 1 Marine Mammals. National Marine Fisheries Service, Southeast Fisheries Science Center, Charleston Laboratory, Charleston, SC 29422. 90 pp.
Pabst, D.A., J.L. Hamilton, W.A. McLellan, T.M. Williams, and J.M. Gosline. 1999. Streamlining dolphins: designing soft-tissue keels. Proceedings of the Eleventh
37

International Symposium on Unmanned, Untethered Submersible Technology. Autonomous Undersea Systems Institute.
Read, A.J., and K.T. Murray. 2000. Gross evidence of human-induced mortality in small cetaceans. U.S. Department of Commerce, NOAA Technical Memo., NMFS-OPR-15,21 pp.
Rommel, S.A. and L. Lowestine. 2001. Gross and Microscopic Anatomy. Pp. 129-164 In L.A. Dierauf and F.M.D. Gulland (eds.) CRC Handbook of Marine Mammal Medicine, Second Edition. CRC Press, Boca Raton, FL.
Rowles, T.K., F.M. Van Dolah, and A.A. Hohn. 2001. Gross necropsy and specimen collection protocols. Pp. 449-470 In L.A. Dierauf and F.M.D. Gulland (eds.) CRC Handbook of Marine Mammal Medicine, Second Edition. CRC Press, Boca Raton, FL.
Struntz, D.J., W.A. McLellan, R.M. Dillaman, J.E. Blum, J.R. Kucklick. and D.A. Pabst. 2004. Blubber development in bottlenose dolphins (Tursiops truncatus). Journal of Morphology. 259:7-20.
Swingle, W. M., S.G. Barco, T.D. Pitchford, W.A. McLellan, and D.A. Pabst. 1993. Appearance of juvenile humpback whales feeding in the nearshore waters of Virginia. Marine Mammal Science, 9(3):309-315.
Waring, G.T., Quintal, J.M., Swartz, S.L.(Editors) with contributions from Clapham, P.J., Cole, T.V.N., Fairfield, C.P., Hohn, A., Palka, D.L., Rossman, M.C., U.S. Fish and Wildlife Service, and C. Yeung. 2001. U.S. Atlantic and Gulf of Mexico Marine Mammal Stock Assessments -- 2001. NOAA Technical Memorandum NMFS-NE-168.
Wilkinson, D.E. 1996. National contingency plan for response to unusual marine mammal mortality events. U.S. Dep. Commer., NOAA Tech. Memo. NMFS-OPR-9, 118p.
Wiley, D.N., R.A. Asmutis, T.D. Pitchford, and D.P. Gannon, 1995. Stranding and mortality of humpback whales, Megaptera novaeangliae, in the mid-Atlantic and southeast United States, 1985-1992. Fisheries Bulletin, 93:196-205.
Yochem, P.K. Draft. Contingency Plan for Hawaiian Monk Seal Unusual Mortality Events. Prepared for National Marine Fisheries Service, Southwets Fisheries Science Center, Honolulu Laboratory. HSWRI Technical Report No. 2002-328.
38
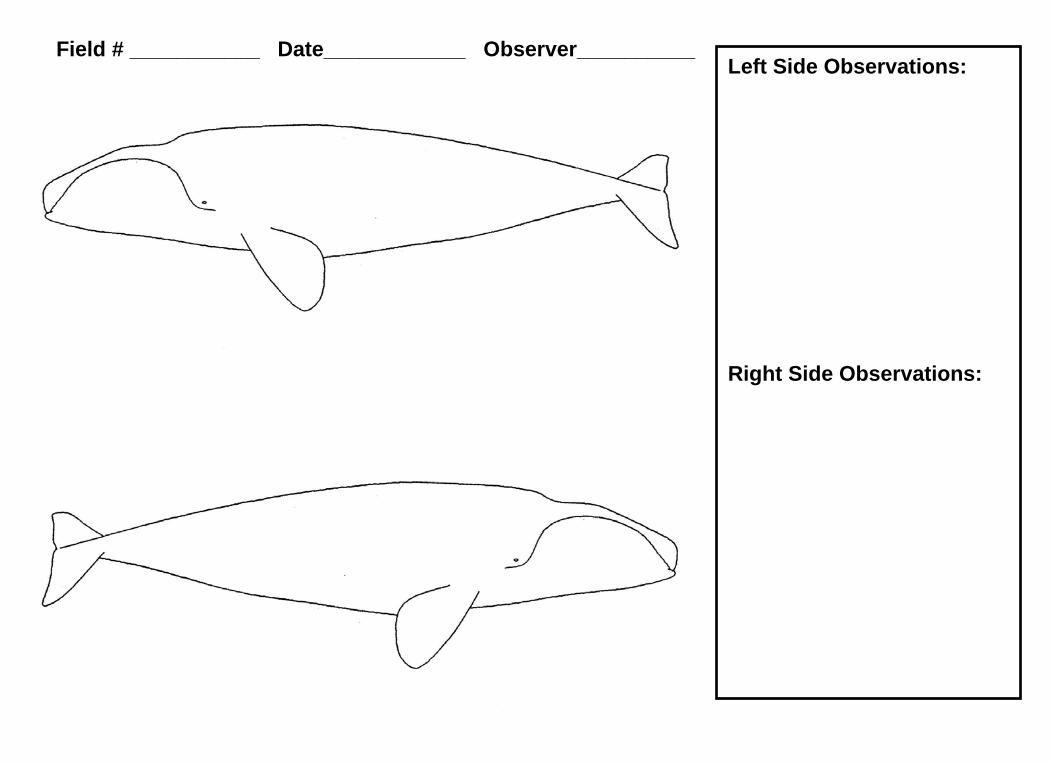
Field # ___________ Date____________ Observer__________Left Side Observations:
Right Side Observations:
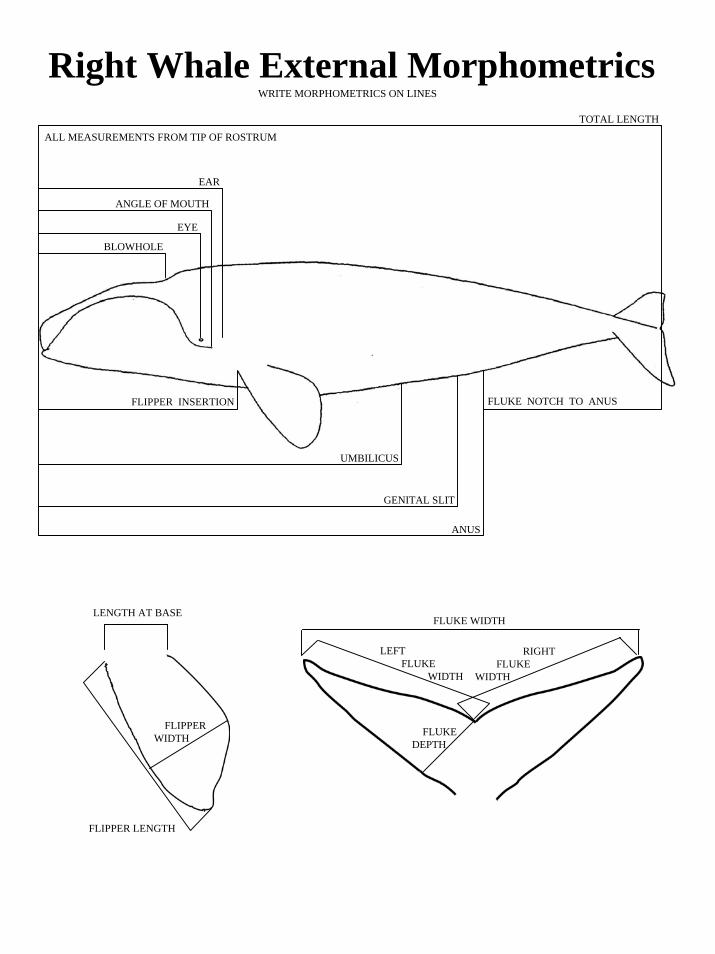
Right Whale External MorphometricsWRITE MORPHOMETRICS ON LINES
UMBILICUS
GENITAL SLIT
ANUS
FLUKE NOTCH TO ANUSFLIPPER INSERTION
EAR
ANGLE OF MOUTH
EYE
BLOWHOLE
TOTAL LENGTH
ALL MEASUREMENTS FROM TIP OF ROSTRUM
LENGTH AT BASE
FLIPPER LENGTH
FLIPPER WIDTH
FLUKE WIDTH
LEFT FLUKE
WIDTH
RIGHTFLUKE
WIDTH
FLUKEDEPTH

RIGHT WHALE BLUBBER THICKNESS
Field # _________ Side Examined _______ Observer __________ Date __________
NuchalCrest Axilla
1/3Axilla-
UmbilicusUmbilicus
1/2Umbilicus-
AnusAnus
1/2Anus-Notch
Insertion
______ ______ ______ ______ ______ ______ ______ ______ ______1
A B C D E F GH
I
A B C D E F G H I2/3
Axilla-Umbilicus
Dorsal
12
3
45
6
7
______ ______ ______ ______ ______ ______ ______ ______ ______2
______ ______ ______ ______ ______ ______ ______ ______ ______3
______ ______ ______ ______ ______ ______ ______ ______ ______4
______ ______ ______ ______ ______ ______ ______ ______ ______5
6 ______ ______ ______ ______ ______ ______ ______ ______ ______
7 ______ ______ ______ ______ ______ ______ ______ ______ ______Ventral
Circumference with blubber
______ ______ ______ ______ ______ ______ ______ ______ ______
Circumference w/out blubber
______ ______ ______ ______ ______ ______ ______ ______ ______
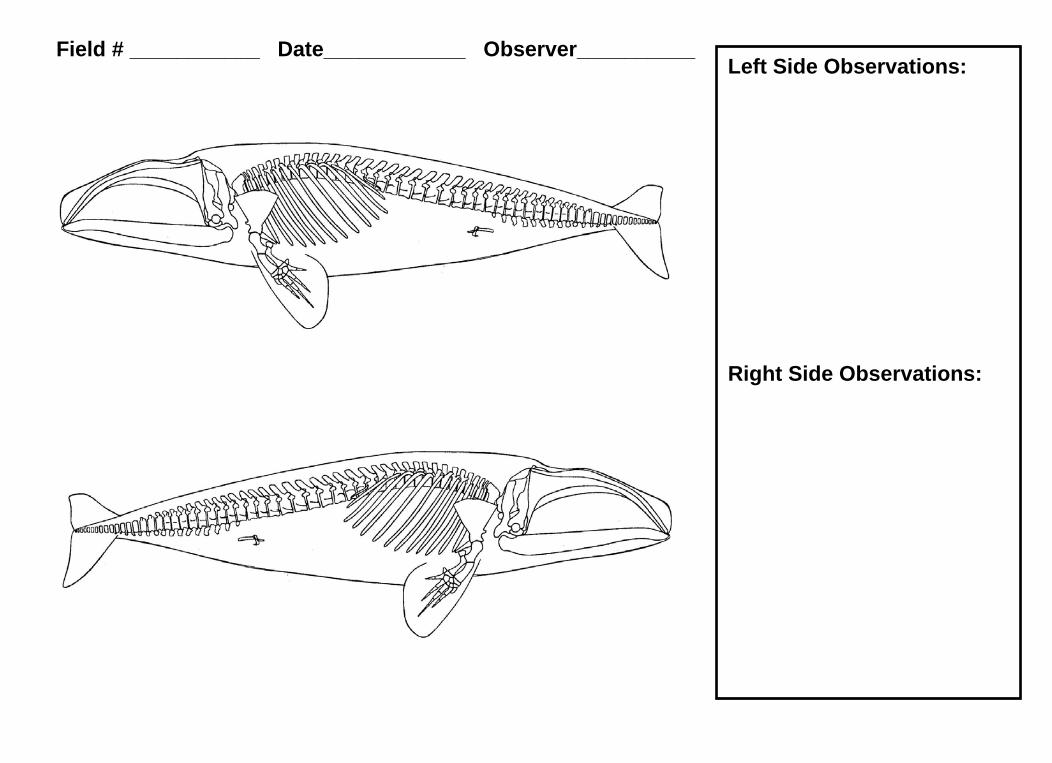
Field # ___________ Date____________ Observer__________Left Side Observations:
Right Side Observations:

Field # ___________ Date____________ Observer__________Left Side Observations:
Right Side Observations:

RIGHT WHALE NECROPSY REPORT SPECIES _____________________ FIELD NUMBER _________________________ LOCATION ____________________LAT______________/LONG_______________ DATE _______________ GENDER _________ TOTAL LENGTH _____________ HISTORY: EXTERNAL EXAM: INTERNAL EXAM:
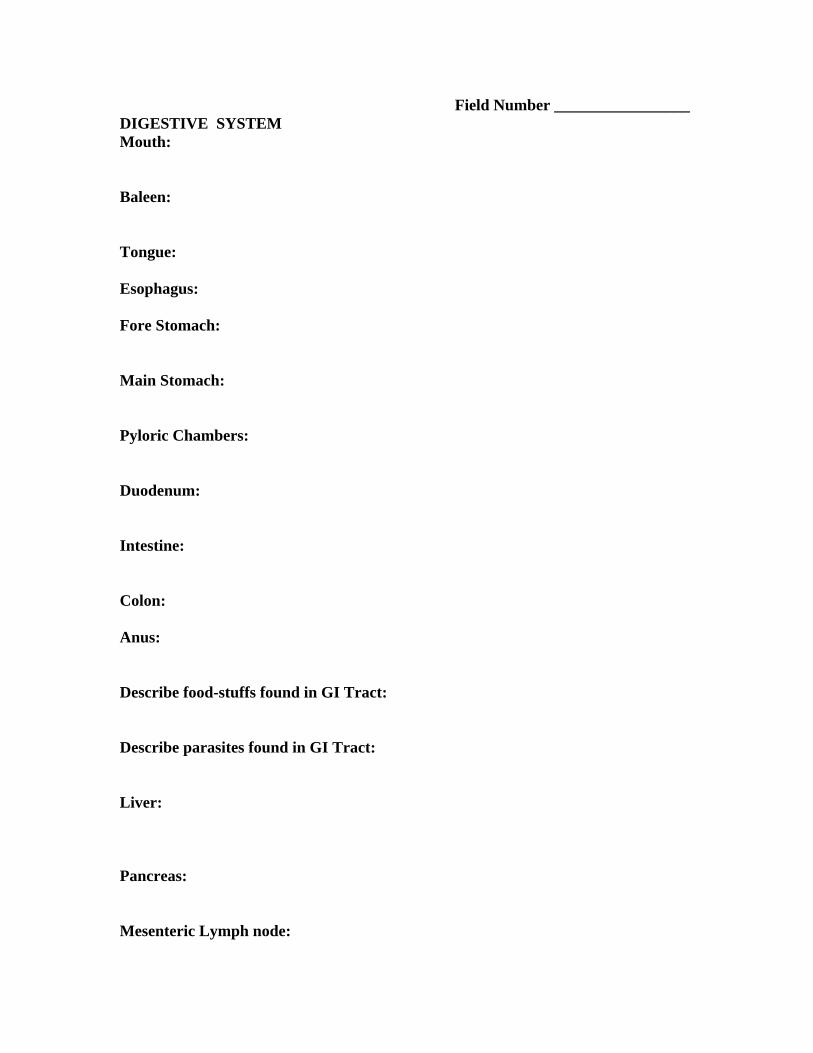
Field Number _________________ DIGESTIVE SYSTEM Mouth: Baleen: Tongue: Esophagus: Fore Stomach: Main Stomach: Pyloric Chambers: Duodenum: Intestine: Colon: Anus: Describe food-stuffs found in GI Tract: Describe parasites found in GI Tract: Liver: Pancreas: Mesenteric Lymph node:
Field Number _________________ BLUBBER: MUSCULOSKELETON Axial Muscle: Axial Skeleton Thoracic Vertebrae: Lumbar Vertebrae: Caudal Vertebrae: Ribs & Sternum: Flippers: Flukes:
Field Number _________________ Cranium: CIRCULATORY SYSTEM Heart: Great Vessels: Cranial Circulation: Spinal Circulation: RESPIRATORY SYSTEM Blowholes: Nares: Larynx: Trachea: Lungs: Bronchi: Alveoli:
Field Number _________________ URINARY SYSTEM Kidneys: Ureters: Bladder: Urethra: ENDOCRINE & HEMOLYMPHATIC SYSTEMS Thymus: Thyroid: Parathyroid: Adrenals: Pituitary: Spleen: Lymph Nodes:

Field Number _________________ REPRODUCTIVE SYSTEM FEMALE Ovaries: Uterine Horns: Uterus: Cervix: Vagina: Mammaries: MALE Testes: Epididymis: Vas Deferens: Prostate: Seminal Vesicles: Penis:
Field Number _________________ CENRTRAL NERVOUS SYSTEM Brain: Spinal Cord: SENSORY ORGANS Eyes: Ears: CONCLUSIONS: CAUSE OF DEATH FROM FIELD DETERMINATION: This report was generated by:

Field Number _________________ ADDITIONAL OBSERVATIONS

Evaluation of Human Interaction
Field Number __________ Species__________________________ Date________ Location_________________________ Code 1 2 3 4 5 External Examination A. Body Condition : Emaciated specimens often exhibit sunken epaxial musculature and neck Emaciated________ Not Emaciated________ CBD________ N/E________ B. Net or Line Marks: Indicate Y/N/CBD/NE for each area and carefully describe net or line marks: Head ______ D.Fin______ L.Flipper______ R.Flipper______ Peduncle_____Other__ C.Fishing Gear Present on Animal (Yes) or (No) D. Gear Retained (Yes) or (No) E. Penetrating Wounds : Yes____ No____ CBD____ N/E____ F. Mutilations : Body Slit or Mutilated? Yes____ No____ CBD____ N/E____ G. Hemorrhaging / Bruising : Yes____ No____ CBD____ N/E____ Describe extent and area : ________________________________________________________________________ ________________________________________________________________________ Internal Examination A. Sub-Dermal Hemorrhaging : Yes____ No____ CBD____ N/E____ Describe extent and area : ________________________________________________________________________ ________________________________________________________________________
B. Broken Bones : Yes____ No____ CBD____ N/E____ Describe : ____________________________________________________________________________ ____________________________________________________________________________ D. Stomach Contents Retained : Yes ____ No____ E. Histopathology Samples Retained : Yes ____ No____ F. Gross Pathology : Yes____ No____ CBD____ N/E____ Describe : ___________________________________________________________________________ ___________________________________________________________________________ *CBD - Can not be determined *N/E - Not Examined

Histopathology Checklist Blubber/Epidermis Lung Trauma sites Trachea Abrasion sites Left Atrium Left Ventricle Right Atrium Right Ventricle Aorta Pulmonary Artery Esophagus Fore Stomach Main Stomach Pyloric Stomach Duodenum Intestine Colon Liver Pancreas Spleen Kidney Ureter Bladder Adrenal Ovary Uterine Horn Testis Epididymis Prostate Penis Thoracic Spinal Cord Lumbar Spinal Cord Caudal Spinal Cord Pre Scap Lymph Mediastinal Lymph Colonic Lymph Thymus Thyroid Axial muscle Nuchal fat Pituitary Brain

RIGHT WHALE SAMPLE REQUEST: REQUESTING AGENCY OR INDIVIDUAL: CONTACT INFORMATION: AVAILABLE FOR PARTICIPATION IN NECROPSY? SAMPLE COLLECTION TECHNIQUE: MATERIALS NEEDED: SEND SAMPLES TO: