RIGHT-ANGLE POLAR ALIGNMENT SCOPE (RAPAS ... be re-used). Use the same screws to attach the RAP1200,...
6
1 RIGHT-ANGLE POLAR ALIGNMENT SCOPE (RAPAS) INSTRUCTIONS Congratulations on your receipt of our new polar alignment scope and your new-found freedom from neck strain. The Astro-Physics Right-Angle Polar Scope has been machined to a very high level of accuracy. The optics and reticle are also very precisely centered and collimated and require no further adjustment. The RAPAS operation is simplicity itself. Utilizing the App on your smart device or computer, you will simply move the real Polaris (or Sigma Octans in the southern hemisphere) to the position on the reticle that is shown in the App by adjusting the altitude and azimuth knobs of the mount. That is it...You are now polar aligned. In order to achieve the greatest degree of accuracy, it will be necessary to level your mount in the east-west direction. The north-south leveling is not important, as you will make corrections with the altitude adjuster. As with all polar alignment techniques, it is important to note that you may experience slight changes in the accuracy of alignment when equipment configurations are changed or if the alignment is done prior to loading the counterweights and mounting your scopes. This is due to flexures of the mount, of the pier and of the ground on which it sits. The highest precision is obtained if the RAPAS is used with the same equipment configuration each time. Important Note: The use of secondary alignment routines following a RAPAS alignment may decrease your polar alignment accuracy! DO NOT do Polaris or 2-Star alignments following the RAPAS alignment! Attaching the RAPAS Adapter to Your Mount: With the exception of the Mach1GTO (serial # M10670 and later), 1100GTO and 1600GTO, it will be necessary to replace your mount’s polar axis rear plate with the new RAPAS Adapter (except the 900 mounts which simply add the adapter to the existing rear plate). Each mount type has an adapter designed specifically for it. Please note that the new adapter will add some dimension to the rear of your mount. This may require a slight modification to the foam lining of carry cases. Mach1GTO (serial # M10670 and later), 1100GTO and 1600GTO The Mach1GTO (serial # M10670 and later), 1100GTO and 1600GTO mounts have been designed to receive the Right- Angle Polar Scope with no modification needed. Simply remove the Cap and the three place-holder screws and insert the scope. Then lock it in place with the three thumbscrews. Be sure the RAPAS is fitting flush to the mount’s rear plate (snugging with a Phillips #2 screwdriver may help). Follow “The Basics for Aligning the RAPAS Adapter” below in order to precision adjust the rear plate of these two mount types to gain greater accuracy. 1200 mounts (Illustration page 2) – Use RAP1200 Start by removing the 1200 mount’s threaded Polar Axis Rear Cap (M12660 or M12666) and the Polar Alignment Scope Plug (M4037), if it has one. (Neither of these two parts will be used with the new configuration.) When unscrewing the Polar Alignment Scope Plug (M4037) be sure to ONLY remove the M4037. Do not allow the bearing thrust plate behind it to turn! Next, remove the three Allen screws that attach the existing rear plate (this plate will not be re-used). Use the same screws to attach the RAP1200, being careful to orient the adapter so that the two RAPAS alignment holes (these are not through-holes) are towards the top. Secure the adapter in place and you are finished. This adapter must always remain attached to the mount. Only the RAPAS itself will be removed. Reference the above photos left and right. Attachment Screws (3) Thumbscrews (3) Push Screws (3) Push Screw (3) Alignment Holes RAPAS Attachment Holes Adapter Attachment Hole (3) Eyepiece - focusable with reticle Illuminator - adjustable brightness Optical Tube with 25 mm f/8 lens Attachment Thumb Screws (3) DO NOT LOOSEN SCREW(s) M4037
Transcript of RIGHT-ANGLE POLAR ALIGNMENT SCOPE (RAPAS ... be re-used). Use the same screws to attach the RAP1200,...

1
RIGHT-ANGLE POLAR ALIGNMENT SCOPE (RAPAS) INSTRUCTIONS
Congratulations on your receipt of our new polar alignment scope and your new-found freedom from neck strain. The Astro-Physics Right-Angle Polar Scope has been machined to a very high level of accuracy. The optics and reticle are also very precisely centered and collimated and require no further adjustment.
The RAPAS operation is simplicity itself. Utilizing the App on your smart device or computer, you will simply move the real Polaris (or Sigma Octans in the southern hemisphere) to the position on the reticle that is shown in the App by adjusting the altitude and azimuth knobs of the mount. That is it...You are now polar aligned.
In order to achieve the greatest degree of accuracy, it will be necessary to level your mount in the east-west direction. The north-south leveling is not important, as you will make corrections with the altitude adjuster.
As with all polar alignment techniques, it is important to note that you may experience slight changes in the accuracy of alignment when equipment configurations are changed or if the alignment is done prior to loading the counterweights and mounting your scopes. This is due to flexures of the mount, of the pier and of the ground on which it sits. The highest precision is obtained if the RAPAS is used with the same equipment configuration each time.
Important Note: The use of secondary alignment routines following a RAPAS alignment may decrease your polar alignment accuracy! DO NOT do Polaris or 2-Star alignments following the RAPAS alignment!
Attaching the RAPAS Adapter to Your Mount:With the exception of the Mach1GTO (serial # M10670 and later), 1100GTO and 1600GTO, it will be necessary to replace your mount’s polar axis rear plate with the new RAPAS Adapter (except the 900 mounts which simply add the adapter to the existing rear plate). Each mount type has an adapter designed specifically for it. Please note that the new adapter will add some dimension to the rear of your mount. This may require a slight modification to the foam lining of carry cases.
Mach1GTO (serial # M10670 and later), 1100GTO and 1600GTOThe Mach1GTO (serial # M10670 and later), 1100GTO and 1600GTO mounts have been designed to receive the Right-Angle Polar Scope with no modification needed. Simply remove the Cap and the three place-holder screws and insert the scope. Then lock it in place with the three thumbscrews. Be sure the RAPAS is fitting flush to the mount’s rear plate (snugging with a Phillips #2 screwdriver may help). Follow “The Basics for Aligning the RAPAS Adapter” below in order to precision adjust the rear plate of these two mount types to gain greater accuracy.
1200 mounts (Illustration page 2) – Use RAP1200 Start by removing the 1200 mount’s
threaded Polar Axis Rear Cap (M12660 or M12666) and the Polar Alignment Scope Plug (M4037), if it has one. (Neither of these two parts will be
used with the new configuration.) When unscrewing the Polar Alignment Scope Plug (M4037) be sure to ONLY remove the M4037. Do not allow the bearing thrust plate behind it to turn! Next, remove the three Allen screws that attach the existing rear plate (this plate will
not be re-used). Use the same screws to attach the RAP1200, being careful to orient the adapter so that the two RAPAS alignment holes (these are not through-holes) are towards the top. Secure the adapter in place and you are finished. This adapter must always remain attached to the mount. Only the RAPAS itself will be removed. Reference the above photos left and right.
Attachment Screws (3)
Thumbscrews (3)
Push Screws (3)Push Screw (3)
AlignmentHoles
RAPASAttachment Holes
AdapterAttachmentHole (3)
Eyepiece - focusablewith reticle
Illuminator - adjustablebrightness
Optical Tube with25 mm f/8 lens
Attachment ThumbScrews (3)
DO
NO
T LO
OSE
NSC
REW
(s)
M4037

2
DO NOT REMOVEPlate
DO NOT TURNBearing Thrust Plate
Remove Screws (3)Remove
Polar Axis Rear Cap(M9403 or M12666)
RemovePolar Alignment ScopePlug (M4037) (if present)
900 MOUNTS (900HDA, 900QMD, 900SMD AND 900GTO)
1200 MOUNTS (1200DA white, 1200QMD, 1200SMD AND 1200GTO)
DO NOT TURNBearing Thrust Plate
Remove Screws (3)Remove
Polar Axis Rear Cap(M12660 or M12666)
RemovePolar Alignment ScopePlug (M4037) (if present)
REMOVEPlate
3
900 mounts (Illustration page 2) – Use RAP900Start by removing the 900 mount’s Polar Axis Rear Cap (M9403 or M12666) and the Polar Alignment Scope Plug (M4037), if it has one. (Neither of these two parts will be used with the new configuration.) When unscrewing the Polar Alignment Scope Plug (M4037) be sure to ONLY remove the M4037. Do not allow the bearing thrust plate behind it to turn! Next, remove the three Allen screws that secure the existing rear plate. Be careful that you do not alter its orientation (the holes must continue to line up to the threaded holes beneath). The old plate
must remain in place and will be sandwiched between the rear of the axis and the new adapter. Use the new 10-32 x 5/8” screws (longer than the originals) that
are supplied to attach the RAP900 to the existing rear plate. Be careful to orient the adapter so that the single RAPAS alignment hole (it is not a through-hole) is towards the top. Secure the adapter in place and you are finished. This adapter
must always remain attached to the mount. Only the RAPAS itself will be removed. Reference the above photos left and right.
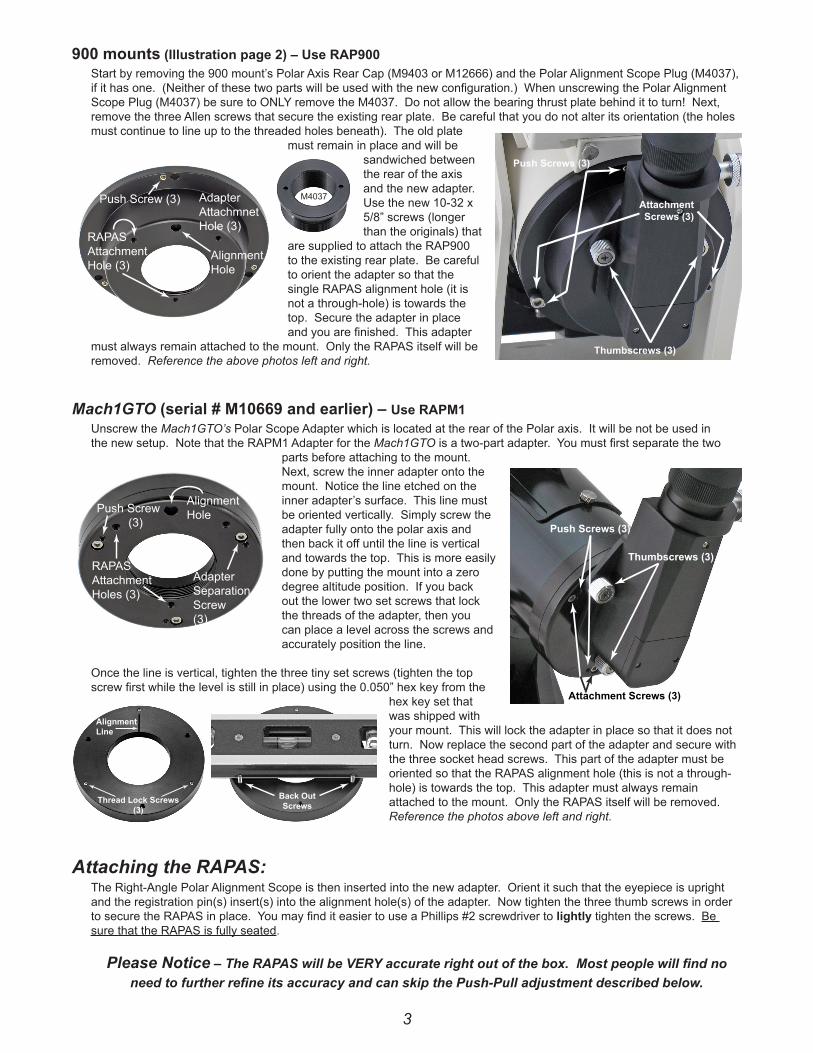
Mach1GTO (serial # M10669 and earlier) – Use RAPM1Unscrew the Mach1GTO’s Polar Scope Adapter which is located at the rear of the Polar axis. It will be not be used in the new setup. Note that the RAPM1 Adapter for the Mach1GTO is a two-part adapter. You must first separate the two
parts before attaching to the mount. Next, screw the inner adapter onto the mount. Notice the line etched on the inner adapter’s surface. This line must be oriented vertically. Simply screw the adapter fully onto the polar axis and then back it off until the line is vertical and towards the top. This is more easily done by putting the mount into a zero degree altitude position. If you back out the lower two set screws that lock the threads of the adapter, then you can place a level across the screws and accurately position the line.
Once the line is vertical, tighten the three tiny set screws (tighten the top screw first while the level is still in place) using the 0.050” hex key from the
hex key set that was shipped with your mount. This will lock the adapter in place so that it does not turn. Now replace the second part of the adapter and secure with the three socket head screws. This part of the adapter must be oriented so that the RAPAS alignment hole (this is not a through-hole) is towards the top. This adapter must always remain attached to the mount. Only the RAPAS itself will be removed. Reference the photos above left and right.
Attaching the RAPAS:The Right-Angle Polar Alignment Scope is then inserted into the new adapter. Orient it such that the eyepiece is upright and the registration pin(s) insert(s) into the alignment hole(s) of the adapter. Now tighten the three thumb screws in order to secure the RAPAS in place. You may find it easier to use a Phillips #2 screwdriver to lightly tighten the screws. Be sure that the RAPAS is fully seated.
Please Notice – The RAPAS will be VERY accurate right out of the box. Most people will find no need to further refine its accuracy and can skip the Push-Pull adjustment described below.
AlignmentHolePush Screw
(3)
AdapterSeparationScrew(3)
RAPASAttachmentHoles (3)
Thumbscrews (3)
Push Screws (3)
Attachment Screws (3)
AlignmentLine
Thread Lock Screws(3)
Back OutScrews
Thumbscrews (3)
Push Screws (3)
AttachmentScrews (3)
AlignmentHole
Push Screw (3) AdapterAttachmnetHole (3)
RAPASAttachmentHole (3)
M4037

4
Explanation of the Push-Pull Adjustment System:Our CNC machining tolerances are measured in the 10,000ths of an inch (a very, very tiny amount). When you assemble a number of parts, the tolerance variations are not added, but rather multiplied. Hence, the need to be able to make tiny angle adjustments for precision. Remember, one arc second is the same as a dime placed at a distance of 2.5 miles! Most users may never need to adjust the plate from its factory position, but the “push-pull” system is available to allow precise adjustments.
The three set screws “push” against the rear plate of the R.A. axis. They do so to change the angle of the RAPAS attachment plate. The three attachment screws “pull” the set screw tips tight against the rear plate in order to fix the adjustment plate at the corrected angle.
By using the appropriate “push” screws (set screws) and “pull” screws (attachment screws) on the mount adapter plate you will align the pole star on the polar scope reticle. It will take a little trial and error to learn which screw moves the star which direction.
If you have multiple Astro-Physics mounts and you have made the adjustments (described below) to each of the adapters, then you will be able to swap the RAPAS between all of your mounts with high-precision and repeatable results.
The Basics for Aligning the RAPAS Adapter and/or Polar Axis Rear Plate:Use the RAPAS before deciding whether it is necessary to make these adjustments to the Adapter / Rear Plate.
1. To achieve the greatest accuracy, it is important to level the mount in the East-West direction. This ensures that the RAPAS is positioned vertically (so that alignment is repeatable).
2. After attaching the adapter plate and the polar scope, use the polar scope to position Polaris (N. Hemisphere) or Sigma Octans (S. Hemisphere) on the reticle at the proper hour angle. The mount will be quite close to polar aligned at this point. See the following handy alignment Apps for proper Polaris (or Sigma Octans) placement:
a) Astro-Physics Polar Alignment Scope Utility - now a part of the AP V2 ASCOM driver (you must use version v5.05.10 or later); the AP V2 ASCOM driver can be found by linking through the AP website. The full V2 ASCOM driver needs to be installed, but the “AP Right Angle Polar Alignment Scope” utility can be accessed as a stand-alone application by navigating through Windows: Start → Programs → Astro-Physics → ASCOM Driver → AP Right Angle Polar Alignment Scope.
b) iPhone/iPad/iPod Touch App - Astro-Physics PolarAlign App
c) Windows Phone App - AP Polar Align App
d) Android Phone App - Polar Finder App
3. Perform a precise drift alignment using your telescope. If your alignment is not perfect, then you will make the RAPAS less accurate by adjusting it. Please see the following section for the preferred Drift Alignment procedure.
4. Using only the Push-Pull Screw Adjustment System on the RAPAS adapter (Do Not Use the mount’s altitude-azimuth adjusters), bring Polaris (or Sigma Octans) back to the appropriate hour angle. Remember, Polaris’ position is con-stantly changing. Adjustment is made by loosening two attachment screws while pushing with its paired set screw. Always keep one attachment screw tight so that the adjustment does not become sloppy. Note the direction of star movement when you push with a set screw and work accordingly. Little by little you will move the polar alignment star to its proper position. Finish by making sure that the attachment screws are tight.
After this initial drift alignment and adjustment, the mount will not need to be drift aligned again, even if the polar scope is removed at the end of a session and replaced at the next session. The fit of the polar scope is accurate enough to re-create the same polar alignment to a high degree of accuracy with each subsequent use. Likewise, it will be possible to swap the RAPAS between different mounts since it is the adapter plates that makes the adjustment for each mount.
Important Reminder: The RAPAS Adapter must always remain attached to the scope. Only the RAPAS, itself, is removed.
5
Drift Alignment - R.A. Correction Method:Classic drift align minimizes only Dec. drift over most of the sky. However, that results in significant R.A. drift at the zenith. Drift in R.A. increases the closer you are to the Earth’s equator. Why was this classic method of drift align developed? It was developed this way because in times past most equatorial mounts had only right ascension drives and no way to adjust declination drift. If you could eliminate Dec. drifting, then all you needed was a drive corrector for the R.A. motor that would allow you to adjust the right ascension drive rate to compensate for the R.A. drift, and you had a fairly nice unguided system and could take images.
Note: Align your CCD guide camera to be square with the R.A and Dec. axes of your mount. Know which axis is R.A. and which is Dec. Assume nothing…test it.
The modified drift align is as follows: Do the classic Dec. align at the celestial equator/meridian using the azimuth knobs. Don’t worry about R.A. drift, just zero out Dec. drift there.
Note: Set your guiding aggressiveness to 0%. Watch only the Dec. line on the guiding graph. Adjust the mount’s azimuth until the star stays on the line and does not drift.
Once that is done, go to a star near the zenith (usually on the East side within 1/2 hour of the meridian) and align the altitude axis by zeroing out the R.A. drift. Done this way, the two adjustments are independent and don’t interfere with each other. The adjustment can be done in about 15 minutes.
Note: Set your guiding aggressiveness to 0%. Make sure that PEM is turned on with a good PE curve. Absolute encoders are even better! Watch only the R.A. line on the guiding graph. Adjust the mount’s altitude (only pushing upward) until the star stays on the line and does not drift.
What you will end up with is no R.A. and no Dec. drifting at the zenith. This near zero drift zone will extend approximately 30 degrees in either direction, giving you a 4 hour drift-free window for imaging. Depending on focal length and pixel scale, you might get round stars in a typical 10 - 20 minute exposure as much as 45 degrees from the zenith.
So, you can do drift align either way: align on the pole with classic drift align or align on the refracted pole with the R.A. method. The former will minimize Dec. drift over a large area of the sky; the latter will minimize R.A. and Dec. drift at the higher parts of the sky where most imaging takes place. Everywhere else you will need to guide.
Note: Making and using a Pointing/Tracking model in APCC Pro following the polar align process will improve results even further.
Several things to keep in mind ● Before you begin you will want to level the mount so that as you make adjustments in either azimuth or
altitude, adjusting one will not affect the other.
● Make sure that all aspects of your mount and scope are tight (rings, scope and mount fasteners, focuser and camera, etc.). If you are using a mirrored scope, be sure that the mirror is locked (if available) to minimize flex and flop.
● You must make the azimuth adjustment first so that you can then make the altitude adjustment accurately; otherwise, the azimuth adjustment will change your altitude setting and it will have to be re-done.
● The altitude adjustment must always be finalized by pushing upwards against gravity with the locking knobs quite snug (not to be further tightened). If you overshoot, then you should loosen the knobs and lower the altitude and repeat the upward adjustment.
Using the RAPAS without a Smart Device or ComputerIt is possible to use the RAPAS even if you do not have a smart device or computer in the field. All you will need is arithmetic skills. Very simply:
Local Sidereal Time – Polaris R.A. (JNOW) = Polaris Hour Angle (RAPAS Reticle)

6
It is not necessary to be super precise (round seconds to nearest minute). The LST can be obtained from your GTO Keypad. Go to the Main Menu screen and press button “4”. The LST appears at the bottom of the screen. Use that LST time and subtract 2h 48m 54s (Polaris JNOW R.A.) and position Polaris on the RAPAS reticle at the hour angle that is your answer.
Example: 5h 53m 54s (LST) – 2h 48m 54s (Polaris R.A.) = 3h 5m 0s (Polaris on reticle H.A.)
Practice performing the calculation while you are at home with your computer or smart device and then check your answer to ensure that you understand the process.
Focusing Procedure The RAPAS is pre focused before it is shipped. However, it may need to be tweaked when set up for use, depending on the individual’s eye. The following instructions will make focusing an easy and quick process. Reference the illustration below.
1. Rotate the focusable eyepiece until the reticle lines look sharp to your eye. This step can best be done during daylight or while looking at an artificial light source. This must be done first before proceeding.
2. Install the RAPAS and look at Polaris or firmly rest the RAPAS on a steady support and look at any bright star to deter-mine if the star appears to be in sharp focus. If it appears to be sharp, then you are done; if not, please proceed to the next step.
3. If the star does not appear to be sharp after adjusting the focus in step 1, then you can tweak the infinite focus by ad-justing the front optical tube that inserts into the mount. Loosen the knurled ring that holds the front optical tube, then turn the tube, screwing it in or out to focus. Retighten the knurled ring and you are done.
Realigning the Reticle’s North-South OrientationThe Right-Angle Polar Alignment Scope is sent to you pre-aligned. However, due to shipping or other eventualities, there may be times when it loses its alignment. Do not fret, as it is a simple procedure to reposition it.
In the illustration to the right please notice the screw at the back of the scope ominously labeled “Do Not Loosen Screw”. This will be your chance to strike out against the establishment and defy the rules! Loosening this screw allows the entire lens/reticle assembly to rotate. Note: some models may have a second screw in the front.
1. The procedure is simple, but needs to be done at night when you are able to see Polaris in the reticle.
2. Be sure that your mount is level east-west.
3. Use your azimuth adjuster to move Polaris to the center of the reticle.
4. Slightly loosen the forbidden “Do Not Loosen” screw(s) so that the assembly can be rotated to orient the reticle.
5. Using your altitude adjuster knob, raise and lower the mount so that Polaris moves up and down. The idea is that when Polaris travels up and down along the line by changing the altitude adjuster only, then the line is oriented exactly north-south.
6. The “Do Not Loosen” screw(s) can now be tightened and all will be as it once was.
Changing the Illuminator Batteries:The illuminator ships with two GPA76 button-style batteries pre-installed. These are 1.5 volt alkaline batteries that can be found under different manufacturer product numbers through cross reference charts. When the need arises the batteries can be easily changed by unscrewing the two halves of the illuminator where the tapered section joins the slender section. Please see photo at right. The batteries are both inserted into the narrow section with the negative (-) side towards the eyepiece and the positive (+) side towards the tapered On/Off switch.
Eyepiece - focusablewith reticle
Illuminator - adjustablebrightness
Optical Tube with25 mm f/8 lens
Attachment ThumbScrews (3)
DO
NO
T LO
OSE
NSC
REW
(s)
12-13-17