Riever Tower
3
Reiver’s Tower House Introduction This is not a model for the inexperienced. I have designed it for strength (I will use it on a Wargames table) and the interlocking castings that give it that strength do make construction rather awkward. The finishing details are optional and so I haven’t included them in these plans. Any finish that gives the model an air of ‘reality’ will do. The chimney and garderobe project too far from the wall line but I accepted this as a trade-off between reality and ease of construction. As with most larger models, this is best built by forming the lower parts of the 4 main walls separately and then assembling those on a base-board before building up the remainder of the walls. I then built the gable ends as separate items ( it was easier to do the shaping of the stepped gables that way) and attached them to the walls once completed. All part references are taken from the original numbering system as used by Thomas Salter on their plans. I have summarised these in a file which should be available on the Linka World site and on the Linkabuildings Yahoo web-group. When I have time I will extend these plan sheets with photos taken during its construction. 32 34 61 31 151 149 33 30 37 38 2 4 4 3 3 1 4 60 10 4 Part No. Castings 4 128 15 36 22 20 8 6 Cut 13 of part 30 into two pieces. large slate roof all these from the stone moulds Castings Required
-
Upload
brian-smee -
Category
Documents
-
view
8 -
download
3
description
Linka Plans
Transcript of Riever Tower

Reiver’s Tower HouseIntroductionThis is not a model for the inexperienced. I have designed it for strength (I will use it on a Wargames table) and the interlocking castings that give it that strength do make construction rather awkward.The finishing details are optional and so I haven’t included them in these plans. Any finish that gives the model an air of ‘reality’ will do. The chimney and garderobe project too far from the wall line but I accepted this as a trade-off between reality and ease of construction.
As with most larger models, this is best built by forming the lower parts of the 4 main walls separately and then assembling those on a base-board before building up the remainder of the walls. I then built the gable ends as separate items ( it was easier to do the shaping of the stepped gables that way) and attached them to the walls once completed.
All part references are taken from the original numbering system as used by Thomas Salter on their plans. I have summarised these in a file which should be available on the Linka World site and on the Linkabuildings Yahoo web-group.
When I have time I will extend these plan sheets with photos taken during its construction.
32 34 61 31 151 149 33 30 37 382 4 4 3 3 1 4 60 10 4
Part No.Castings
4
128 153622 208
6 Cut 13 of part 30into two pieces.
largeslateroof
all these from the stone moulds
Castings Required
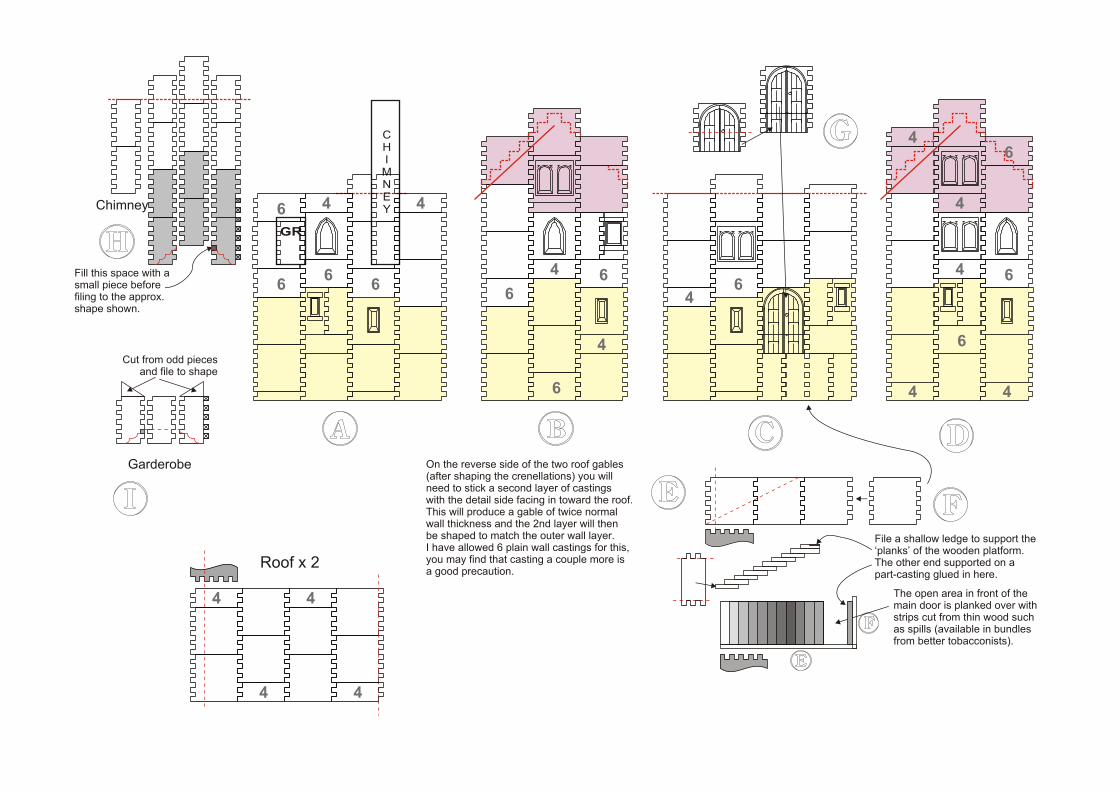
CHIMNEY
GR
Garderobe
Chimney
4
4
4
4
4
44
4
4
4
4
6
66
6
6
6
6
66
6
6
6
6
Fill this space with asmall piece beforefiling to the approx.shape shown.
Cut from odd piecesand file to shape
File a shallow ledge to support the‘planks’ of the wooden platform. The other end supported on apart-casting glued in here.
The open area in front of themain door is planked over withstrips cut from thin wood suchas spills (available in bundlesfrom better tobacconists).
On the reverse side of the two roof gables(after shaping the crenellations) you willneed to stick a second layer of castingswith the detail side facing in toward the roof.This will produce a gable of twice normalwall thickness and the 2nd layer will thenbe shaped to match the outer wall layer.I have allowed 6 plain wall castings for this,you may find that casting a couple more isa good precaution.
4
4 4
4
Roof x 2

Building Instructions1) Assemble and glue the lower 2 or 3 layers of each of the main walls (shown in light
yellow) of the tower as separate pieces. Make sure that each section will fit correctly into its neighbour. Leave to set thoroughly.
2) On a suitably sized base board, assemble the sections made in step 1 and glue them to each other and to the baseboard. Use 4 of the 90 degree roof gables (part 36) at the lower corners to make sure that the assembly is square at all corners. Leave to set thoroughly.
3) Gradually build up the walls, working a few castings at a time, until all 4 walls are at the height just below the pink gable sections. Add the remaining 4 corner pieces near the top of the walls for added strength.
4) While the walls are setting assemble the gable sections (pink) separately. As before, ensure that these will fit with the wall they are to go onto.
5) Now is the time to put in the shutters and any glazing on the windows. If you leave it any later they will be difficult to get at. Add these BEHIND the castings, don’t try and shape them to fit inside the openings.
6) Once the gable sections are dry, cut the crenellations to form the Dutch gables (as shown by the dashed red lines - the solid red line is the line of the bottom of the roof). Cut these a little over their proper size, to allow filing to size once the second layer is added.
7) Add the rear face to the gable sections gluing the second layer with the detail faces outwards (so that the stone detail is on both sides of the double-thick wall). Make sure that all the inner wall up to the edge of the longer walls and where it will show above the roof line is without gaps. This may require the odd small filler piece.
8) While the gables are setting you can construct the stair well to the front of the building by making part (E). Glue it first and cut it only after it is fully dry. Cut one step (for now) and use it as the bottom step to position part (E) as it is joined to the pierced casting under the main door with part (F). Glue this in place to the main wall and to the baseboard.
9) Once the second layer is dry, trim it level with the crenellations on the outer face and file so that it looks like a solid wall. You will need to mark some mortar lines so that these are consistent across the full thickness of the wall.
10) Once the gables are complete they can be fixed to the short walls.
All the 4 walls and stair well are now complete. Leave the model to set thoroughly at this point as it will need a fair amount of handling for the next steps.
11) Trim the side pieces of the Garderobe (I) as shown and assemble this in place starting with the left side inserted into the pierced casting already in the rear wall. Leave this to set before moving the model again.
12) While this is setting cut the 9 other steps and gently try each to ensure that it will fit between the two walls. The top piece needs to have a filed down ledge as shown in the diagram. When assembled the steps should overlap so that 2 courses of stonework are visible at each step.
13) Once the Garderobe is dry, attach the steps two or three at a time, allowing to dry in between.
14) Cut the lower two sides of the chimney (H) as shown and assemble the first two layers (in grey) as for the Garderobe. Take care with this, I found this to be quite a difficult job. It may be safer to assemble the two layers separately.
15) While this is setting assemble and glue the two roof sections. Make certain that the joints on the two top edges match each other.
16) Finish building up the remainder of the chimney.17) Cut the roof sections to size once completely dry. Cut them a bit oversize and file to fit
the model, this prevents embarrassing gaps appearing when the roof is fitted. Bevel the top edges so that a reasonable fit at the peak is achieved. Bevel the lower edges so that you don’t have a thick edge to your roof.
18) Carefully mark the cut-out in the rear roof section to fit around the chimney. Cut and file this to fit. Do this gradually to ensure a good fit.
19) Mark the lower roof line on the inside of the gables (the heavy red lines) and cut short strips of wood (Balsa will do fine) to stick UNDER those to support the roof. When these are dry, stick the roof in place.
20) Cut the gables for the Garderobe and stick in place. Make them a little oversized and file to fit after they have dried.
The basic parts of your model are now completed but you will now need to add the detailing such as a roof for the Garderobe, a ridge for the roof, planking at the top of the steps and any detailing around the base of the tower such as rocks.