Rider'sManual(USModel) K1200S - BMW Apparel€¦ · Overview Chapter 2 of this Rider's Man-ual will...
164
BMW Motorrad Rider's Manual (US Model) K 1200 S
-
Upload
nguyenkhanh -
Category
Documents
-
view
218 -
download
1
Transcript of Rider'sManual(USModel) K1200S - BMW Apparel€¦ · Overview Chapter 2 of this Rider's Man-ual will...

BMW Motorrad
Rider's Manual (US Model)
K1200S

Motorcycle/Retailer Data
Motorcycle data
Model
Vehicle identification number
Color number
First registration
Registration number
Retailer Data
Contact in Service
Ms./Mr.
Phone number
Retailer's address/phone number(company stamp)

Welcome to BMW
We congratulate you on yourchoice of a motorcycle fromBMW and welcome you to thecommunity of BMW riders.Familiarize yourself with yournew motorcycle so that youcan ride it safely and confi-dently in all traffic situations.Please read this Rider's Man-ual carefully before startingto use your new BMW motor-cycle. It contains importantinformation on how to oper-ate the controls and how tomake the best possible useof all your BMW's technicalfeatures.In addition, it contains infor-mation on maintenance andcare to help you maintain yourmotorcycle's reliability andsafety, as well as its value.If you have any questionsconcerning your motorcycle,
your authorized BMW motor-cycle retailer will gladly pro-vide advice and assistance.
We wish you many miles ofsafe and enjoyable riding
BMW Motorrad.

Table of Contents
You can also use the index atthe end of this Rider's Manualto find a specific topic.1 General instructions . . . 5
Overview . . . . . . . . . . . . . . . . . 6Abbreviations andsymbols . . . . . . . . . . . . . . . . . . 6Equipment . . . . . . . . . . . . . . . 7Technical data. . . . . . . . . . . . 7Currency . . . . . . . . . . . . . . . . . 7
2 Overviews . . . . . . . . . . . . . 9
General view, left side . . . 11General view, rightside. . . . . . . . . . . . . . . . . . . . . 13Underneath seat . . . . . . . . . 14Left handlebar fitting . . . . . 15Handlebar fitting, right . . . 16Instrument cluster . . . . . . . 17Headlight . . . . . . . . . . . . . . . 18
3 Status indicators . . . . . 19
Multifunction display . . . . . 20Warning and indicatorlights . . . . . . . . . . . . . . . . . . . 20ABS warning light . . . . . . . 20Function indicators . . . . . . 20General warningindicators . . . . . . . . . . . . . . . 21ABS warningindicators . . . . . . . . . . . . . . . 28
4 Operation. . . . . . . . . . . . . 35
Ignition switch andsteering lock . . . . . . . . . . . . 36Electronic immobilizer . . . . 37Hazard warningflashers . . . . . . . . . . . . . . . . . 38Tripmaster . . . . . . . . . . . . . . 39Onboard computerOE . . . . 41Clock . . . . . . . . . . . . . . . . . . . 44Emergency ON/OFFswitch . . . . . . . . . . . . . . . . . . 45Heated hand gripsOE . . . . . 45Clutch . . . . . . . . . . . . . . . . . . 46Brakes . . . . . . . . . . . . . . . . . . 46Lights . . . . . . . . . . . . . . . . . . . 47
Headlight . . . . . . . . . . . . . . . 48Turn indicators . . . . . . . . . . 49Seat . . . . . . . . . . . . . . . . . . . . 50Helmet holder . . . . . . . . . . . 52Luggage loops . . . . . . . . . . 53Mirrors . . . . . . . . . . . . . . . . . . 53Spring preload . . . . . . . . . . 53Shock absorbers . . . . . . . . 54Electronic suspensionadjustment ESAOE . . . . . . . 55Tires . . . . . . . . . . . . . . . . . . . . 57
5 Riding . . . . . . . . . . . . . . . . 59
Safety instructions . . . . . . . 60Checklist . . . . . . . . . . . . . . . . 62Starting . . . . . . . . . . . . . . . . . 62Starting off . . . . . . . . . . . . . . 65Running in . . . . . . . . . . . . . . 65Parking yourmotorcycle . . . . . . . . . . . . . . 69Refueling . . . . . . . . . . . . . . . . 76General brake system. . . . 77Brake system with BMWIntegral ABS. . . . . . . . . . . . . 77

6 Accessories . . . . . . . . . . 81
General instructions . . . . . 82Onboard socket . . . . . . . . . 82Luggage . . . . . . . . . . . . . . . . 85CaseOA . . . . . . . . . . . . . . . . . 86Flat tire kitOA . . . . . . . . . . . . 89
7 Maintenance . . . . . . . . . 91
Maintenance - GeneralInformation . . . . . . . . . . . . . . 92Toolkit . . . . . . . . . . . . . . . . . . 92Contents of supplementalsetOA . . . . . . . . . . . . . . . . . . . 92Overview of supplementalset . . . . . . . . . . . . . . . . . . . . . . 92Engine oil . . . . . . . . . . . . . . . 92General brake system. . . . 94Brake pads. . . . . . . . . . . . . . 95Brake fluid . . . . . . . . . . . . . . 97Clutch . . . . . . . . . . . . . . . . . 100Tires . . . . . . . . . . . . . . . . . . . 100Rims . . . . . . . . . . . . . . . . . . . 101Wheels. . . . . . . . . . . . . . . . . 101Front wheel stand . . . . . . 108Rear-wheel stand . . . . . . . 110Lamps . . . . . . . . . . . . . . . . . 111
Jump starting . . . . . . . . . . 117Battery . . . . . . . . . . . . . . . . . 119
8 Care . . . . . . . . . . . . . . . . . 123
Care products . . . . . . . . . . 124Washing yourmotorcycle . . . . . . . . . . . . . 124Cleaning sensitivemotorcycle parts . . . . . . . 125Paint care . . . . . . . . . . . . . . 126Protective waxcoating . . . . . . . . . . . . . . . . 126Storing motorcycle . . . . . 126Returning motorcycle touse . . . . . . . . . . . . . . . . . . . . 126
9 Technical data . . . . . . . 129
Troubleshootingchart . . . . . . . . . . . . . . . . . . . 130Threaded fasteners . . . . . 131Engine . . . . . . . . . . . . . . . . . 132Riding specifications . . . . 134Clutch . . . . . . . . . . . . . . . . . 134Transmission . . . . . . . . . . . 134Rear-wheel drive . . . . . . . 135Running gear . . . . . . . . . . . 135Brakes . . . . . . . . . . . . . . . . . 136
Wheels and tires . . . . . . . . 136Electrical system . . . . . . . 137Frame. . . . . . . . . . . . . . . . . . 139Dimensions . . . . . . . . . . . . 139Weights . . . . . . . . . . . . . . . . 140
10 Service . . . . . . . . . . . . . 141
BMW Motorradservice . . . . . . . . . . . . . . . . . 142BMW Motorrad servicequality . . . . . . . . . . . . . . . . . 142BMW Motorcycle ServiceCard - breakdownservice on the road . . . . . 143BMW Motorrad servicenetwork . . . . . . . . . . . . . . . . 143Maintenance work . . . . . . 143Maintenanceschedules . . . . . . . . . . . . . . 144Confirmation ofmaintenance work . . . . . . 145Confirmation ofservice . . . . . . . . . . . . . . . . . 150

General instructions
Overview. . . . . . . . . . . . . . . . . . . . . . . . 6
Abbreviations and symbols . . . . . . 6
Equipment . . . . . . . . . . . . . . . . . . . . . . 7
Technical data . . . . . . . . . . . . . . . . . . 7
Currency . . . . . . . . . . . . . . . . . . . . . . . . 7
15
z Ge
ne
ral in
str
uc
tio
ns

Overview
Chapter 2 of this Rider's Man-ual will provide you with aninitial overview of your motor-cycle. All maintenance andrepair work carried out onyour motorcycle will be doc-umented in Chapter 10. Forgenerous treatment of claimssubmitted after the warrantyperiod has expired, proof ofthe maintenance performed isessential.Should you want to sell yourBMW one day, please also re-member to turn over the Rid-er's Manual to the new owner;it is an important part of yourmotorcycle.
Abbreviations and
symbols
Indicates warnings thatyou must comply with for
reasons of your safety and thesafety of others, and to pro-tect your motorcycle againstdamage.
Special information onoperating and inspecting
your motorcycle as well asmaintenance and adjustmentprocedures.
Indicates the end of anitem of information.
Instruction.
Result of an activity.
Reference to a pagewith more detailed in-formation.
OE Optional equipmentBMW equipment avail-able only as a factoryinstalled option.
OA Optional accessoriesBMW optional acces-sories can be pur-chased and retrofittedat your authorizedBMW motorcycle re-tailer.
EWS Electronic immobilizer.
ESA Electronic SuspensionAdjustmentElectronic suspensionadjustment.
DWA Anti-theft alarm.
ABS Anti-Lock Brake Sys-tem.
16
z Ge
ne
ral in
str
uc
tio
ns

Equipment
When you ordered your BMWmotorcycle, you chose vari-ous items of custom equip-ment. This Rider's Manualdescribes optional equipment(OE) offered by BMW and se-lected optional accessories(OA). This explains why themanual may also contain de-scriptions of equipment whichyou have not ordered. Pleasenote, too, that your motorcy-cle might not be exactly asillustrated in this manual onaccount of country-specificdifferences.If your BMW is equipped withoptions or accessories notdescribed in this Rider's Man-ual, then this equipment isdescribed in a separate oper-ating manual.
Technical data
All dimensions, weights andperformance specificationsin the Rider's Manual referto the standards of theDeutsche Institut für Normunge.V. (DIN) and comply withits tolerance specifications.Versions for individualcountries may differ.
Currency
The high safety and qualitystandards of BMW motorcy-cles are maintained by con-stant development work ondesigns, equipment and ac-cessories. Because of this,your motorcycle may differfrom the information suppliedin the Rider's Manual. Norcan errors and omissions beentirely ruled out. We hopeyou will appreciate that noclaims can be entertained on
the basis of the data, illustra-tions or descriptions in thismanual.
17
z Ge
ne
ral in
str
uc
tio
ns

18
z Ge
ne
ral in
str
uc
tio
ns

Overviews
General view, left side . . . . . . . . . 11
General view, right side . . . . . . . . 13
Underneath seat . . . . . . . . . . . . . . 14
Left handlebar fitting . . . . . . . . . . . 15
Handlebar fitting, right . . . . . . . . . 16
Instrument cluster . . . . . . . . . . . . . 17
Headlight . . . . . . . . . . . . . . . . . . . . . 18
29
z Ove
rvie
ws
210
z Ove
rvie
ws

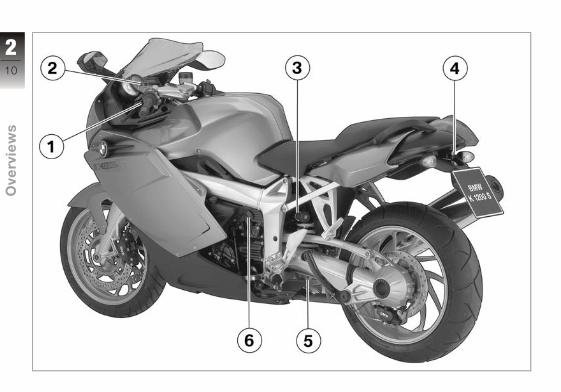
General view, left side
1 Adjusting headlight range( 49)
2 Clutch fluid reservoir( 100)
3 Adjuster, spring preload,rear ( 54)
4 Seat lock beneath rearlight ( 50)
5 Rear shock absorberdamping adjustment( 54)
6 Onboard socket ( 82)
211
z Ove
rvie
ws

212
z Ove
rvie
ws

General view, right
side
1 Display for engine oil lev-el ( 92)
2 Fill location on fuel tank( 76)
3 Battery compartment( 120)
4 Brake-fluid reservoir,front ( 97)
5 Type plate on rear crosstube
6 Vehicle identificationnumber (VIN), on frontright side panel
7 Brake-fluid reservoir, rear( 98)
213
z Ove
rvie
ws

Underneath seat
1 Helmet holder under seat( 52)
2 Toolkit ( 92)3 Filler neck, engine oil ( 94)
214
z Ove
rvie
ws

Left handlebar fitting
1 Tripmaster/Onboardcomputer button (OE)( 39) ( 41)
2 ESA button ( 55)3 Pushbutton, horn4 Button for left turn indi-
cator and hazard warningflashers ( 49) ( 38)
5 Switch, high-beam head-light and headlight flash-er ( 47)
215
z Ove
rvie
ws

Handlebar fitting, right
1 Emergency ON/OFFswitch ( 45)
2 Pushbutton, starter( 62)
3 Heated hand grips switch( 45)
4 Button for right turn indi-cator and hazard warningflashers ( 49) ( 38)
5 Off button for turn indica-tor and hazard warningflashers ( 50) ( 39)
216
z Ove
rvie
ws

Instrument cluster
1 Speedometer2 Tachometer3 Warning and indicator
lights ( 20)4 Multifunction display
( 20)5 Anti-theft alarm indicator
light (OE) and sensor forinstrument lighting
6 Adjustment of clock( 44)
The instrument-clusterlighting has automatic
day and night switchover.
217
z Ove
rvie
ws

Headlight
1 High-beam headlights2 Low-beam headlight3 Side light
218
z Ove
rvie
ws

Status indicators
Multifunction display . . . . . . . . . . . 20
Warning and indicator lights. . . . 20
ABS warning light . . . . . . . . . . . . . 20
Function indicators . . . . . . . . . . . . 20
General warning indicators. . . . . 21
ABS warning indicators . . . . . . . . 28
319
z Sta
tus in
dic
ato
rs

Multifunction display
1 Clock2 Area for warning symbols
( 21)3 Area for onboard com-
puter displays4 Gear indicator ( 20)5 Engine temperature indi-
cator ( 21)6 Area for ESA displays
( 56)7 Display, Tripmaster
( 39)8 Fuel gauge ( 20)
Warning and indicator
lights
1 Indicator light, left turnindicator
2 Indicator light, high-beamheadlight
3 Warning light, general4 Indicator light, neutral5 ABS warning light6 Indicator light, right turn
indicator
ABS warning light
In some countries a differentdisplay of the ABS warninglight is possible.
Alternative display ofABS warning light.
Function indicators
Fuel capacity
The horizontal bars un-der the gas pump sym-
bol indicated the remainingfuel quantity.
Gear
Engaged gear is indicat-ed.
If no gear is engaged, thegear indicator displays 0; the'neutral' indicator light alsolights up.
320
z Sta
tus in
dic
ato
rs
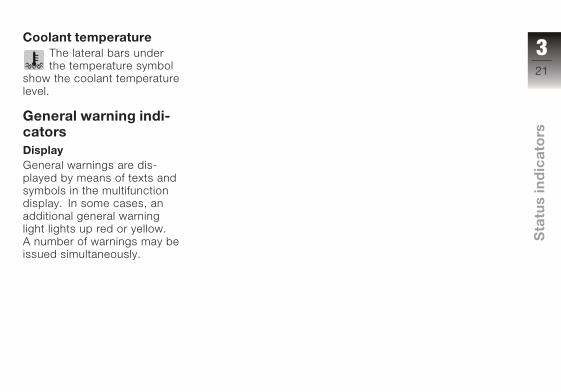
Coolant temperature
The lateral bars underthe temperature symbol
show the coolant temperaturelevel.
General warning indi-
cators
Display
General warnings are dis-played by means of texts andsymbols in the multifunctiondisplay. In some cases, anadditional general warninglight lights up red or yellow.A number of warnings may beissued simultaneously.
321
z Sta
tus in
dic
ato
rs

Overview of warning indicators
Display Meaning
Lights up yellow The warningEWS! isindicated
Electronic immobilizer is active( 24)
Lights up yellow The warningFUEL! isindicated
Fuel down to reserve ( 24)
Lights up red Coolant temperature too high ( 24)
Lights up yellow Is indicated Engine electronics ( 25)
Lights up red Is indicated Engine oil pressure insufficient( 25)
Lights up red Is indicated Battery charge current insufficient( 26)
Lights up yellow The warningLAMPR! isindicated
Rear bulb defective ( 26)
The warningLAMPF! isindicated
Front bulb defective ( 26)
322
z Sta
tus in
dic
ato
rs

Display Meaning
Lights up yellow The warningLAMPS! isindicated
Bulbs defective ( 27)
Is indicated Ice warning ( 27)
Is displayed withnote DWA
Anti-theft alarm battery weak ( 27)
Lights up yellow Is displayed withnote DWA
Anti-theft alarm battery drained( 27)
323
z Sta
tus in
dic
ato
rs

Electronic immobilizer is
active
General warning lightlights up yellow.
The warning EWS! is indicat-ed.The key being used is not au-thorized for starting, or com-munication between the keyand engine electronics is dis-rupted.
Remove other ignition keyslocated on the ignition key.Use the reserve key.Have the defective key re-placed, preferably by an au-thorized BMW motorcycleretailer.
Fuel down to reserve
General warning lightlights up yellow.
The warning FUEL! is indi-cated.
A fuel shortage can leadto misfiring and to the
engine dying unexpectedly.Misfiring can damage the cat-alytic converter, and the en-gine dying unexpected canlead to accidents.Do not drive until the fuel tankis completely empty.
The Tripmaster indicatesthe probable residual
operating range.
At the most, the fuel tankstill contains the reserve fu-el quantity.
Reserve fuel quantity1.1 galRefueling ( 76)
Coolant temperature too
high
General warning lightlights up red.
The coolant tempera-ture indicator flashes 10
times.
Continued driving withan overheated engine
can result in engine damage.Always observe the measureslisted below.
The coolant temperature istoo high.
Continued driving is pos-sible; ride in the part-loadrange to cool down the en-gine.In traffic jams, switch off theengine, but keep the ignitionon so that the radiator fancontinues to operate.Should the coolant tem-perature frequently be toohigh, have the fault recti-fied as quickly as possibleby a specialized workshop,preferably an authorizedBMW motorcycle retailer.
324
z Sta
tus in
dic
ato
rs

Engine electronics
General warning lightlights up yellow.
Engine electronics sym-bol is displayed.
The engine is runningin emergency operating
mode. Engine power may bereduced, and this can causehazardous situations, particu-larly if you attempt to overtakeother road users.Adapt your style of riding tothe reduced level of enginepower.
The engine-electronics con-trol unit has diagnosed a fault.In exceptional cases, the en-gine stops and can no longerbe started. Otherwise, theengine runs in emergency op-erating mode.
Continued driving is pos-sible, however the accus-
tomed engine performancemay not be available.Have the fault rectified assoon as possible by a spe-cialized workshop, prefer-ably an authorized BMWmotorcycle retailer.
Engine oil pressure insuffi-
cient
General warning lightlights up red.
Engine oil pressure sym-bol is displayed.
The oil pressure in the lubri-cating oil circuit is too low.
The warning on insuffi-cient engine oil pressure
is no substitute for the func-tion of an oil-level indicator.The correct engine oil levelcan only be checked at the oilsight glass.
The cause of the warning oninsufficient engine oil pres-sure can be an insufficientengine oil level.
Checking engine oil level( 92)Topping up engine oil( 94)
If the warning on insufficientengine oil pressure appearsdespite a correct engine oillevel:
In addition to an insuf-ficient engine oil level,
other problems in the enginecan lead to the warning on in-sufficient engine oil pressure.Continuing to ride in thesecases can cause engine dam-age.If this warning appears, donot continue to ride eventhough the engine oil levelmight be correct.
325
z Sta
tus in
dic
ato
rs
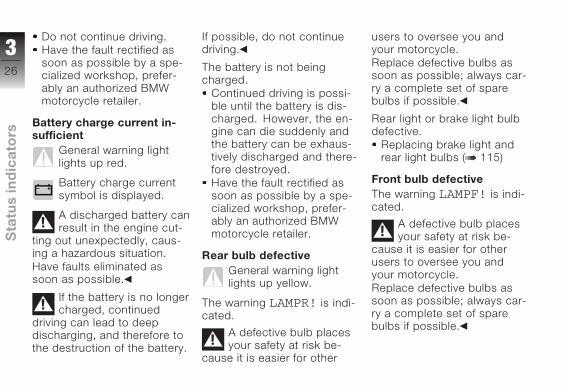
Do not continue driving.Have the fault rectified assoon as possible by a spe-cialized workshop, prefer-ably an authorized BMWmotorcycle retailer.
Battery charge current in-
sufficient
General warning lightlights up red.
Battery charge currentsymbol is displayed.
A discharged battery canresult in the engine cut-
ting out unexpectedly, caus-ing a hazardous situation.Have faults eliminated assoon as possible.
If the battery is no longercharged, continued
driving can lead to deepdischarging, and therefore tothe destruction of the battery.
If possible, do not continuedriving.
The battery is not beingcharged.
Continued driving is possi-ble until the battery is dis-charged. However, the en-gine can die suddenly andthe battery can be exhaus-tively discharged and there-fore destroyed.Have the fault rectified assoon as possible by a spe-cialized workshop, prefer-ably an authorized BMWmotorcycle retailer.
Rear bulb defective
General warning lightlights up yellow.
The warning LAMPR! is indi-cated.
A defective bulb placesyour safety at risk be-
cause it is easier for other
users to oversee you andyour motorcycle.Replace defective bulbs assoon as possible; always car-ry a complete set of sparebulbs if possible.
Rear light or brake light bulbdefective.
Replacing brake light andrear light bulbs ( 115)
Front bulb defective
The warning LAMPF! is indi-cated.
A defective bulb placesyour safety at risk be-
cause it is easier for otherusers to oversee you andyour motorcycle.Replace defective bulbs assoon as possible; always car-ry a complete set of sparebulbs if possible.
326
z Sta
tus in
dic
ato
rs
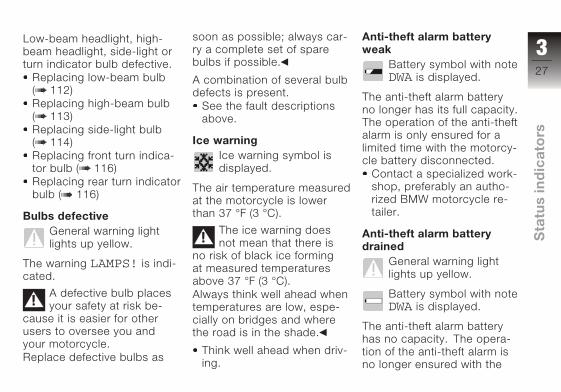
Low-beam headlight, high-beam headlight, side-light orturn indicator bulb defective.
Replacing low-beam bulb( 112)Replacing high-beam bulb( 113)Replacing side-light bulb( 114)Replacing front turn indica-tor bulb ( 116)Replacing rear turn indicatorbulb ( 116)
Bulbs defective
General warning lightlights up yellow.
The warning LAMPS! is indi-cated.
A defective bulb placesyour safety at risk be-
cause it is easier for otherusers to oversee you andyour motorcycle.Replace defective bulbs as
soon as possible; always car-ry a complete set of sparebulbs if possible.
A combination of several bulbdefects is present.
See the fault descriptionsabove.
Ice warning
Ice warning symbol isdisplayed.
The air temperature measuredat the motorcycle is lowerthan 37 °F (3 °C).
The ice warning doesnot mean that there is
no risk of black ice formingat measured temperaturesabove 37 °F (3 °C).Always think well ahead whentemperatures are low, espe-cially on bridges and wherethe road is in the shade.
Think well ahead when driv-ing.
Anti-theft alarm battery
weak
Battery symbol with noteDWA is displayed.
The anti-theft alarm batteryno longer has its full capacity.The operation of the anti-theftalarm is only ensured for alimited time with the motorcy-cle battery disconnected.
Contact a specialized work-shop, preferably an autho-rized BMW motorcycle re-tailer.
Anti-theft alarm battery
drained
General warning lightlights up yellow.
Battery symbol with noteDWA is displayed.
The anti-theft alarm batteryhas no capacity. The opera-tion of the anti-theft alarm isno longer ensured with the
327
z Sta
tus in
dic
ato
rs

motorcycle battery discon-nected.
Contact a specialized work-shop, preferably an autho-rized BMW motorcycle re-tailer.
ABS warning indica-
tors
Display
ABS warnings are indicatedby a combination of thegeneral warning light andthe ABS warning light. Bothwarning lights can light upcontinuously or flash at a rateof one or four flashes persecond.The ABS warning lightis shown in two versionsdepending on country:
Country version 1.
Country version 2.
The warning indicators in thischapter are described usingcountry version 1.
328
z Sta
tus in
dic
ato
rs

Overview of warning indicators
Display Meaning
Lights up red Brake switch defective ( 30)
Flashes 1x persecond
Pull-away test not completed ( 30)
Flashes 4x persecond
Self-diagnosis not completed ( 30)
Lights up red Lights up ABS warning lights defective ( 31)
Lights up red Flashes 1x persecond
ABS function not available ( 31)
Lights up red Flashes 4x persecond
Residual braking function active( 31)
Flashes red 1xper second
Flashes 1x persecond
Brake fluid level in wheel brake cir-cuit too low ( 32)
Flashes red 4xper second
Flashes 4x persecond
ABS error ( 33)
329
z Sta
tus in
dic
ato
rs

Brake switch defective
General warning lightlights up red.
There is a defect in thebrake system which can
lead to delayed braking ac-tion, and therefore to acci-dents.Brake early, as delayed brak-ing action must be expect-ed.
The brake switch is defectiveor incorrectly adjusted. TheBMW Integral ABS detectsthe driver's request for brak-ing by the pressure buildupfrom the brake levers. Theremay be an unusual responsefrom the brakes.
Continue driving is possible.However, the brakes maybehave in an unaccustomedmanner.Have the fault rectified assoon as possible by a spe-
cialized workshop, prefer-ably an authorized BMWmotorcycle retailer.
Pull-away test not complet-
ed
ABS warning light flash-es once per second.
Without the ABS func-tion, the wheels may
lock up during very hard brak-ing, resulting in accidents.Avoid hard braking wheneverpossible.
The ABS function is not avail-able, as the pull-away testhas not yet been completed.
Continue driving is possible.However, the ABS functionis not available up to theend of the pull-away test.Do not use emergencybraking if possible until thepull-away test has beencompleted.
Self-diagnosis not complet-
ed
ABS warning light flash-es four times per sec-
ond.
Without the ABS func-tion, the wheels could
lock during very hard brak-ing. Without servo-assistedbrakes, considerably greaterforce is required to brake.The altered braking behaviorcan lead to accidents.Avoid hard braking whenev-er possible. Brake early, asincreased braking force is re-quired.
Only the residual brakingfunction is available in bothbrake circuits, becauseself-diagnosis has not beencompleted.
Continue driving is possible.The ABS function and theservo assistance are not
330
z Sta
tus in
dic
ato
rs

available until the end of theself-diagnosis.As soon as possible, do notoperate the brake lever sothat the self-diagnosis canbe completed.
ABS warning lights defec-
tive
General warning lightlights up red.
ABS warning light ON.
ABS warnings not avail-able. The failure of func-
tions of the BMW IntegralABS cannot be displayed.Unexpected braking behav-ior, and therefore accidentsmay result.Brake early and avoid hardbraking whenever possible,as functions of the BMW Inte-gral ABS may have failed.
The controller of the ABSwarnings is defective. ABSfaults cannot be displayed.
Continue driving is possible.However, any ABS faultswhich occur cannot be dis-played.Have the fault rectified assoon as possible by a spe-cialized workshop, prefer-ably an authorized BMWmotorcycle retailer.
ABS function not available
General warning lightlights up red.
ABS warning light flash-es once per second.
Without the ABS func-tion, the wheels may
lock up during very hard brak-ing, resulting in accidents.Avoid hard braking wheneverpossible.
The ABS function is unavail-able in at least one brake cir-cuit.
Continue driving is possible.However, the ABS functionis not available.Have the fault rectified assoon as possible by a spe-cialized workshop, prefer-ably an authorized BMWmotorcycle retailer.
Residual braking function
active
General warning lightlights up red.
ABS warning light flash-es four times per sec-
ond.
Without the ABS func-tion, the wheels could
lock during very hard brak-ing. Without servo-assistedbrakes, considerably greaterforce is required to brake.
331
z Sta
tus in
dic
ato
rs

The altered braking behaviorcan lead to accidents.Avoid hard braking whenev-er possible. Brake early, asincreased braking force is re-quired.
Only the residual brakingfunction is available in at leastone brake circuit.
Continue driving is possible.The ABS function and theservo assistance are notavailable.Have the fault rectified assoon as possible by a spe-cialized workshop, prefer-ably an authorized BMWmotorcycle retailer.
Brake fluid level in wheel
brake circuit too low
General warning lightflashes red once per
second.
ABS warning light flash-es once per second.
The ABS wheel brakecircuit is a closed sys-
tem; you cannot check thefluid level in this circuit at thebrake-fluid reservoirs.
Triggers for the warning"Brake fluid level too low"can be extremely worn brakepads etc.
Checking front brake padthickness ( 95)Checking brake pad thick-ness at rear ( 96)
Worn brake pads canconsiderably increase
the braking distance, andtherefore lead to accidents.Brake early.
Worn brake pads candamage the brake disks.
Think well ahead and brake
carefully; avoid severe brak-ing.
Have worn brake pads re-placed as soon as possibleby a specialized workshop,preferably an authorizedBMW motorcycle retailer.
If the brake pad thickness issufficient, the brake systemmust be checked for properoperation and leaks.
Switch off Ignition, then op-erate handbrake lever andfootbrake lever consecutive-ly.The following functionsmust be available:Brake pressure present atboth brake levers.Brakes acting on bothwheels.No escaping brake fluid isvisible.
332
z Sta
tus in
dic
ato
rs

There is a defect in thebrake system that can
lead to reduced braking ac-tion.Brake early.
If the functions are active,further driving is possible.However, bear in mind thata loss of brake fluid thatcannot be detected mightbe the cause of the warn-ing.Have the fault rectified assoon as possible by a spe-cialized workshop, prefer-ably an authorized BMWmotorcycle retailer.
If a fault has been determinedduring the operating and leaktest:
There is a defect in thebrake system that can
lead to accidents.Do not continue driving.
Do not continue driving.Inform a specialized work-shop, preferably an autho-rized BMW motorcycle re-tailer.
ABS error
General warning lightflashes red four times
per second.
ABS warning light flash-es four times per sec-
ond.
At least two faults have oc-curred in the brake system. Inat least one brake circuit onlythe residual braking functionis available and the fluid lev-el in the brake system is toolow.
Please see the fault de-scriptions above.
333
z Sta
tus in
dic
ato
rs

334
z Sta
tus in
dic
ato
rs

Operation
Ignition switch and steeringlock . . . . . . . . . . . . . . . . . . . . . . . . . . . 36
Electronic immobilizer . . . . . . . . . 37
Hazard warning flashers . . . . . . . 38
Tripmaster . . . . . . . . . . . . . . . . . . . . 39
Onboard computerOE . . . . . . . . . . 41
Clock . . . . . . . . . . . . . . . . . . . . . . . . . 44
Emergency ON/OFF switch . . . . 45
Heated hand gripsOE . . . . . . . . . . 45
Clutch . . . . . . . . . . . . . . . . . . . . . . . . 46
Brakes . . . . . . . . . . . . . . . . . . . . . . . . 46
Lights . . . . . . . . . . . . . . . . . . . . . . . . . 47
Headlight . . . . . . . . . . . . . . . . . . . . . 48
Turn indicators . . . . . . . . . . . . . . . . 49
Seat . . . . . . . . . . . . . . . . . . . . . . . . . . 50
Helmet holder . . . . . . . . . . . . . . . . . 52
Luggage loops . . . . . . . . . . . . . . . . 53
Mirrors . . . . . . . . . . . . . . . . . . . . . . . . 53
Spring preload . . . . . . . . . . . . . . . . 53
Shock absorbers . . . . . . . . . . . . . . 54
Electronic suspensionadjustment ESAOE . . . . . . . . . . . . . 55
Tires . . . . . . . . . . . . . . . . . . . . . . . . . . 57
435
z Op
era
tio
n

Ignition switch and
steering lock
Keys
You receive one master keyand one spare key. If a key islost, please note the informa-tion on the electronic immobi-lizer (EWS) ( 37).
Ignition key and steeringlock, tank filler cap lock
and seat lock are all operat-ed with the same key. Caseswith locks for the same keyas the cases available as op-tional accessories can be or-dered on request.
Switching on ignition
Turn key to position 1.Side lights and all functioncircuits switched on.Engine can be started.Pre-ride check isperformed. ( 63)ABS self-diagnosis is per-formed. ( 64)
Switching off ignition
Brake servo assistanceis not available when the
ignition is off.Do not switch off the ignitionwhile the motorcycle is beingridden.
Turn key to position 2.Light switched off.Handlebars not locked.Key can be removed.Electrically powered acces-sories remain operational fora limited period of time.Battery can be rechargedvia onboard socket.
436
z Op
era
tio
n

Locking handlebars
When you prop themotorcycle on the
side stand, the surface ofthe ground will determinewhether it is better to turn thehandlebars to the left or right.However, the motorcycleis more stable on a levelsurface with the handlebarsturned to the left than withthe handlebars turned to theright.On level ground, always turnthe handlebars to the left toset the steering lock.
Turn handlebars to full leftor right lock position.Turn key to position 3 whilemoving handlebars slightly.Ignition, lights and all func-tion circuits switched off.Handlebars locked.Key can be removed.
Electronic immobilizer
Theft protection
The electronic immobilizerhelps protect your BMW mo-torcycle from theft, and thisenhanced security is at yourdisposal without any needfor you to set parameters oractivate additional systems.The engine of a motorcycleequipped with this electron-ic immobilizer can be startedonly with the keys that be-long to the motorcycle. Youcan also have your authorizedBMW motorcycle retailer barindividual keys, for example
if a particular key is lost. Theengine cannot be started witha key that has been barred.
Electronics in key
An electronic component isintegrated into each of yourkeys. The motorcycle's elec-tronics exchange certain con-tinuously changing signalswith the electronics in thekey; these signals are specificto your motorcycle and theyare transmitted via the ringantenna in the ignition lock.The ignition is not enabled forstarting until the key has beenrecognized as "authorized" foryour motorcycle.
A spare key attachedto the same ring as the
ignition key used to start theengine could "irritate" theelectronics, in which case theenabling signal for starting isnot issued. The warning EWS
437
z Op
era
tio
n

is shown in the multifunctiondisplay.Always store the spare keyseparately from the ignitionkey.
Replacement and extrakeys
You can obtain replacementkeys only through an autho-rized BMW motorcycle retail-er. The keys are part of anintegrated security system, sothe retailer is under an obli-gation to check the legitimacyof all applications for replace-ment/extra keys. If you wantto have a lost key barred, youmust bring along all otherkeys that belong to the mo-torcycle. A key that has beenbarred can subsequently becleared and reactivated foruse.
Hazard warning flash-
ers
Switching on hazard
warning flashers
Switch on ignition.
Press button for left turn in-dicator 1 and right turn indi-cator 2 simultaneously.
The hazard warningflashers place a strain
on the battery. Do not usethe hazard warning flashersfor longer than absolutelynecessary.
If a turn indicator buttonis pressed with the igni-
tion switched on, the flashingfunction replaces the emer-gency flashing function aslong as the button is pressed.If the turn indicator buttonis released, the emergencyflasher function becomes ac-tive again.
Hazard warning flashers inoperation.Left/right turn indicatorlights flash.Switch off ignition.Hazard warning flasherscontinue to operate.Left/right turn indicatorlights off.
438
z Op
era
tio
n

Switching off hazardwarning flashers
Press turn-indicator cancelbutton 3.Hazard warning flashers areswitched off.Alternative: Press button forleft turn indicator 1 and rightturn indicator 2 simultane-ously.Hazard warning flashers areswitched off.
Tripmaster
Tripmaster operation
The operation of the Tripmas-ter described in the followingcan also be carried out withthe button 1 in the instrumentcluster as an alternative.
Selecting readings
Switch on ignition.
When you switch onthe ignition, the infor-
mation shown by the Trip-master when the ignition wasswitched off always reappearson the multifunction display.
Press Tripmaster button 1
once briefly.
The following sequence isshown in the display field ofthe Tripmaster:
Total distance coveredTripmeter 1 (Trip I)
439
z Op
era
tio
n

Tripmeter 2 (Trip II)Residual range
Resetting tripmeter
Switch on ignition.Select desired tripmeter.
Press and hold Tripmas-ter button 1 until displaychanges.Tripmeter is reset to zero.
Residual range
The residual operatingrange 1 is displayed togetherwith the lettering RANGE onlyafter the reserve fuel levelis reached. It is calculatedon the basis of your styleof riding and the amount offuel in the tank; the readingindicates the estimateddistance you can travel beforethe fuel supply runs out.If the motorcycle is restingon its side stand, the level inthe tank cannot be measuredcorrectly, so this estimate of
residual operating range willbe inaccurate.When refueling, fuel is notregistered by the Tripmas-ter until the quantity added ismore approx. a gallon (sever-al liters).
The determined residu-al range is an approxi-
mate reading. BMW Motorradtherefore recommends thatyou do not try to use the fullresidual range before refuel-ing.
440
z Op
era
tio
n

Onboard computerOE
Onboard computer but-ton
On motorcycles withan onboard computer,the onboard computer(BC) button 1 replaces theTripmaster button on thehandlebar fitting.
In this case the Tripmastercan only be operated withthe button 1 in the instrumentcluster. The display of the op-erating range is assumed bythe onboard computer.
Selecting readings
Switch on ignition.
Press BC button 1 once ineach case.
The following sequence isshown in the display field ofthe onboard computer:
ClockResidual range
441
z Op
era
tio
n
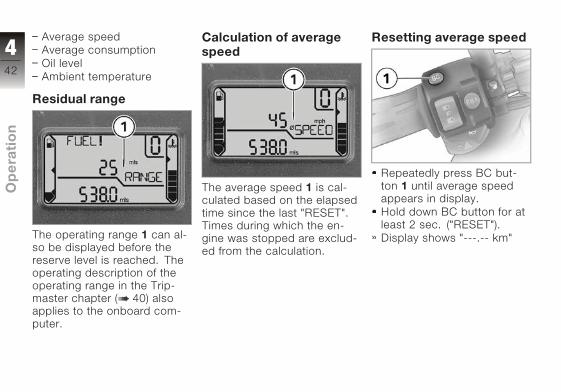
Average speedAverage consumptionOil levelAmbient temperature
Residual range
The operating range 1 can al-so be displayed before thereserve level is reached. Theoperating description of theoperating range in the Trip-master chapter ( 40) alsoapplies to the onboard com-puter.
Calculation of averagespeed
The average speed 1 is cal-culated based on the elapsedtime since the last "RESET".Times during which the en-gine was stopped are exclud-ed from the calculation.
Resetting average speed
Repeatedly press BC but-ton 1 until average speedappears in display.Hold down BC button for atleast 2 sec. ("RESET").Display shows "---.-- km"
442
z Op
era
tio
n

Calculation of averageconsumption
The average consumption 1 iscalculated by dividing the dis-tance covered since the last"RESET" by the correspond-ing amount of fuel used.
Resetting average con-sumption
Repeatedly press BC but-ton 1 until average con-sumption appears in dis-play.Hold down BC button for atleast 2 seconds ("RESET").Display shows "--.- mpg".
Ambient temperature
The current ambient tempera-ture 1 is displayed.
An ice warningappears if the ambient-
temperature reading dropsbelow 37 °F (3 °C). Thedisplay automatically switchesfrom any other mode to thetemperature reading when thetemperature drops below thisthreshold for the first time.The reading flashes until youselect some other displaymode.
443
z Op
era
tio
n

Clock
Setting clock
The setting of the clock de-scribed in the following canalso be carried out with theTripmaster button 1 as an al-ternative.
Setting clock
Switch on ignition.
Attempting to set theclock while riding the
motorcycle can lead to ac-cidents.Adjust the clock only whenthe motorcycle is stationary.
Press and hold button 1 un-til display changes.Hours reading 2 starts toflash.Press button 1.The hour increments by oneeach time you press thebutton.Press and hold button 1 un-til display changes.
Minutes reading 3 starts toflash.Press button 1.The minute increments byone each time you pressthe button.Press and hold button 1 un-til display changes.The display stops flashing.Clock setting ended.
444
z Op
era
tio
n

Emergency ON/OFF
switch
1 Emergency ON/OFFswitch.
Actuating the emergen-cy ON/OFF switch while
driving can cause the rearwheel to lock up, resulting ina fall.Do not operate the emergen-cy ON/OFF switch while rid-ing.
The engine can be easily andquickly switched off using theemergency ON/OFF switch.
The engine can only bestarted in the operating
position.
If the emergencyON/OFF switch is
operated with the ignitionswitched on, the BMWIntegral ABS continues tofunction.
A Operating positionB Engine switched off.
Heated hand gripsOE
1 Heated hand grips switch
The handlebar grips can beheated at two different levels.The heated hand grips optioncan only be activated whenthe engine is running.
The increase in powerconsumption caused by
the heated hand grips candrain the battery if you areriding at low engine speeds.If the battery is inadequate-ly charged, the heated hand
445
z Op
era
tio
n
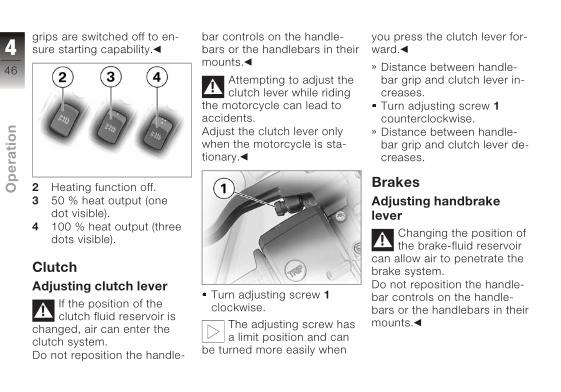
grips are switched off to en-sure starting capability.
2 Heating function off.3 50 % heat output (one
dot visible).4 100 % heat output (three
dots visible).
Clutch
Adjusting clutch lever
If the position of theclutch fluid reservoir is
changed, air can enter theclutch system.Do not reposition the handle-
bar controls on the handle-bars or the handlebars in theirmounts.
Attempting to adjust theclutch lever while riding
the motorcycle can lead toaccidents.Adjust the clutch lever onlywhen the motorcycle is sta-tionary.
Turn adjusting screw 1
clockwise.
The adjusting screw hasa limit position and can
be turned more easily when
you press the clutch lever for-ward.
Distance between handle-bar grip and clutch lever in-creases.Turn adjusting screw 1
counterclockwise.Distance between handle-bar grip and clutch lever de-creases.
Brakes
Adjusting handbrake
lever
Changing the position ofthe brake-fluid reservoir
can allow air to penetrate thebrake system.Do not reposition the handle-bar controls on the handle-bars or the handlebars in theirmounts.
446
z Op
era
tio
n

Attempting to adjust thebrake lever while riding
the motorcycle can lead toaccidents.Adjust the brake lever onlywhen the motorcycle is sta-tionary.
Turn adjusting screw 1
clockwise.
The adjusting screw hasa limit position and can
be turned more easily whenyou press the handbrakelever forward.
Distance between handle-bar grip and handbrakelever increases.Turn adjusting screw 1
counterclockwise.Distance between handle-bar grip and handbrakelever decreases.
Lights
Switching on side lights
The side lights switch on au-tomatically when the ignitionis switched on.
The side lights are astrain on the battery.
Do not leave the ignitionswitched on longer thanabsolutely necessary.
Switching on low-beamheadlight
The low-beam headlightswitches on automaticallywhen you start the engine.
With the engine switchedoff, you can switch on
the lights by switching on thehigh-beam headlight with theignition switched on or by op-erating the headlight flasher.
Switching on high-beamheadlight
Press top part of switch 1
for high-beam headlight.
447
z Op
era
tio
n

High-beam headlightswitched on.Move switch 1 for high-beam headlight to centerposition.High-beam headlightswitched off.Press bottom part ofswitch 1 for high-beamheadlight.High-beam headlight isswitched on as long asswitch is pressed (headlightflasher).
Switching on side lights
Switch off ignition.
You can switch on theparking lights only imme-
diately after switching off theignition.
Press and hold left turn in-dicator switch 1 until sidelight is switched on.
Switching off side lights
Switch on ignition.Side lights switched off.
Headlight
Adjusting headlight forRHD/LHD traffic
When riding in countrieswhere traffic drives on the op-posite side of the road to thatin which the motorcycle wasregistered, the asymmetrical
low headlight beam will dazzleoncoming traffic.Have the headlight adjustedto the relevant conditions by aspecialized workshop, prefer-ably an authorized BMW mo-torcycle retailer.
Ordinary adhesive tapedamages the plastic
lens.Only use special plastic adhe-sive film for body applicationsfrom specialized retailers.
Headlight range andspring preload
The headlight range gener-ally remains constant due tothe adjustment of the springpreload to the loading state.Spring preload adjustmentmay only be insufficient whenthe motorcycle is very heav-ily loaded. In this case, the
448
z Op
era
tio
n

headlight range must be ad-justed to the weight.
Consult a specializedworkshop, preferably
an authorized BMW motorcy-cle retailer, if you are unsurewhether the headlight basicsetting is correct.
Headlight range adjust-ment
1 Headlight range adjust-ment
In the case of very high pay-loads, the available spring
preload adjustment mightnot be adequate. To avoiddazzling oncoming traffic, theheadlight adjustment can becorrected by adjusting theswivel lever.
A Neutral positionB Position with heavy pay-
load
Turn indicators
Switching on left-hand
turn indicator
Switch on ignition.
Press left-hand turn indica-tor button 1.
After driving for approx.ten seconds or after cov-
ering a distance of approx.650 ft (200 m), the turn in-dicators are automaticallyswitched off.
Left-hand turn indicatorswitched on.Indicator light for left-handturn indicator flashes.
Switching on right-hand
turn indicator
Switch on ignition.
449
z Op
era
tio
n

Press right-hand turn indi-cator button 2.
After driving for approx.ten seconds or after cov-
ering a distance of approx.650 ft (200 m), the turn in-dicators are automaticallyswitched off.
Right-hand turn indicatorswitched on.Indicator light for right-handturn indicator flashes.
Switching off turn indica-tors
Press turn-indicator cancelbutton 3.Turn indicator switched off.Turn indicator lights in indi-cator light panel are off.
Seat
Removing seat
Make sure the ground islevel and firm and park themotorcycle.
Turn the key counterclock-wise in the seat lock.
When doing so, press theseat downwards for sup-port.
450
z Op
era
tio
n

Raise the seat at the rear.
If the seat is laid on arough surface, the seat
edges may be damaged.Lay the seat on the referenceside on a smooth, clean sur-face, e.g. on the tank.
Let go of the key and pullthe seat from the retainingbracket towards the rear.
Installing seat
If too much pressure isapplied in the forward
direction, there is a dangerthat the motorcycle will bepushed off its stand.Make sure that the motorcy-cle is steady on its stand.
Push seat forward into re-taining brackets 1.
Press the seat firmly down-wards beyond the detent.The seat can be heard tolock into place.
451
z Op
era
tio
n

Helmet holder
Helmet holder under seat
The helmet holders 1 and 2
are located under the seat.A motorcycle helmet with chinstrap can be attached to thehelmet holders 1. If cases arefitted or if the chin strap is tooshort, a steel cable can beused to secure the motorcy-cle helmet to the helmet hold-er 2.
Using helmet holder
Make sure the ground islevel and firm and park themotorcycle.Removing seat ( 50)
The helmet catch canscratch the paneling.
When hooking on the helmet,watch the position of the hel-met lock.
Hook helmet into helmetholder 2 using steel cableavailable as an optional ac-cessory.
On the right-hand sideof the motorcycle, the
helmet could be damaged byheat from the end muffler.Only attach the helmet to theleft-hand side of the motorcy-cle.
Pull steel cable through hel-met and hook it into hold-er 2.
You can obtain a suit-able steel cable from
your authorized BMW motor-cycle retailer.
452
z Op
era
tio
n
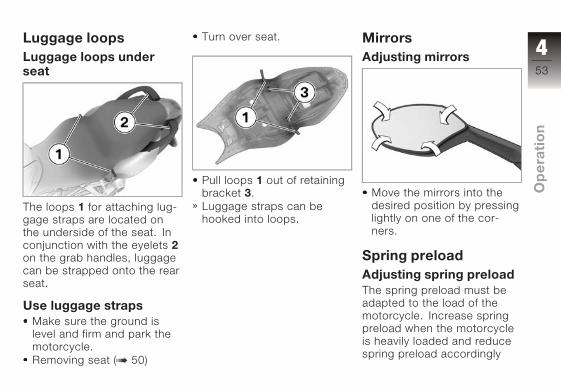
Luggage loops
Luggage loops underseat
The loops 1 for attaching lug-gage straps are located onthe underside of the seat. Inconjunction with the eyelets 2
on the grab handles, luggagecan be strapped onto the rearseat.
Use luggage straps
Make sure the ground islevel and firm and park themotorcycle.Removing seat ( 50)
Turn over seat.
Pull loops 1 out of retainingbracket 3.Luggage straps can behooked into loops.
Mirrors
Adjusting mirrors
Move the mirrors into thedesired position by pressinglightly on one of the cor-ners.
Spring preload
Adjusting spring preload
The spring preload must beadapted to the load of themotorcycle. Increase springpreload when the motorcycleis heavily loaded and reducespring preload accordingly
453
z Op
era
tio
n
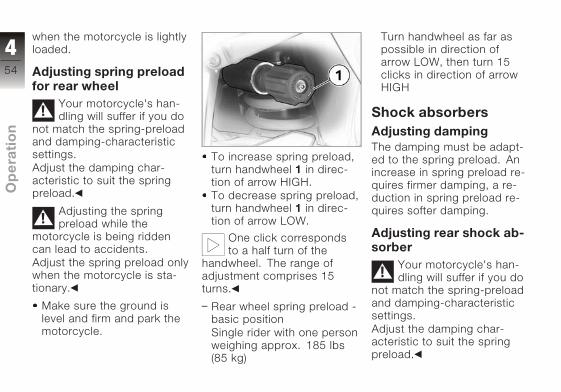
when the motorcycle is lightlyloaded.
Adjusting spring preload
for rear wheel
Your motorcycle's han-dling will suffer if you do
not match the spring-preloadand damping-characteristicsettings.Adjust the damping char-acteristic to suit the springpreload.
Adjusting the springpreload while the
motorcycle is being riddencan lead to accidents.Adjust the spring preload onlywhen the motorcycle is sta-tionary.
Make sure the ground islevel and firm and park themotorcycle.
To increase spring preload,turn handwheel 1 in direc-tion of arrow HIGH.To decrease spring preload,turn handwheel 1 in direc-tion of arrow LOW.
One click correspondsto a half turn of the
handwheel. The range ofadjustment comprises 15turns.
Rear wheel spring preload -basic positionSingle rider with one personweighing approx. 185 lbs(85 kg)
Turn handwheel as far aspossible in direction ofarrow LOW, then turn 15clicks in direction of arrowHIGH
Shock absorbers
Adjusting damping
The damping must be adapt-ed to the spring preload. Anincrease in spring preload re-quires firmer damping, a re-duction in spring preload re-quires softer damping.
Adjusting rear shock ab-sorber
Your motorcycle's han-dling will suffer if you do
not match the spring-preloadand damping-characteristicsettings.Adjust the damping char-acteristic to suit the springpreload.
454
z Op
era
tio
n

Make sure the ground islevel and firm and park themotorcycle.
Adjust rear shock absorber,using a screwdriver to turnadjusting screw 1.
To increase damping, turnadjusting screw 1 in direction of arrow H.To decrease damping, turnadjusting screw 1 in direction of arrow S.
The range of adjustmentcomprises three and
a half turns of the adjustingscrew.
Basic setting for rear-wheeldampingSingle rider with one personweighing approx. 185 lbs(85 kg)
Turn adjusting screw as faras possible in direction ofarrow H, then turn one andone-half turn in direction ofarrow S
Electronic suspension
adjustment ESAOE
Settings
Using the electronicsuspension adjustment ESAyou can conveniently adjustyour motorcycle to variousdriving conditions. Threespring preloads can becombined with three damping
455
z Op
era
tio
n

settings to optimally adaptthe motorcycle to the loadand the road surface. Thedamping setting is displayedin the multifunction displayin the area 1, and the springpreload in the area 2.The display of the tripmasteris hidden for the duration ofthe ESA display.
Calling up settings
Switch on ignition.
Press button 1.Current setting is displayed.
Display goes out automati-cally after a few seconds.
Adjusting damping
Switch on ignition.
Press button 1.Current setting is displayed.Press button 1 once briefly.
Starting from the currentstate, the display is in thefollowing order:COMF comfortable dampingNORM normal dampingSPORT sporty damping
If button 1 is not pressedfor a longer time, dampingis set as indicated. Duringsetting procedure, displayflashes.
Adjusting spring preload
Start engine.
Press button 1.Current setting is displayed.Press and hold button 1
once.
The spring preload can-not be adjusted while the
motorcycle is being ridden.
456
z Op
era
tio
n

Starting from the currentstate, the display is in thefollowing order:
One-up
One-up with luggage
Two-up (with luggage)
If button 1 is not pressedfor a longer time, springpreload is set as indicated.During setting procedure,display flashes.
Tires
Checking tire pressures
Incorrect tire pressureworsens handling of the
motorcycle and can lead toaccidents.Ensure proper tire pressure.
At high road speeds, tirevalves have a tendency
to open as a result of centrifu-gal force.To avoid a sudden loss of tirepressure, use a metal valvecap with rubber sealing ringon the rear wheel and tightenit securely.
Incorrect tire pressurereduces the life of the
tires.Ensure proper tire pressure.
Check correct tire pressureusing following data.Front-wheel tire pressure36.3 psi (In cold state)Rear-wheel tire pressure42.1 psi (In cold state)
In case of insufficient tirepressure:
Correct air pressure.
457
z Op
era
tio
n

458
z Op
era
tio
n

Riding
Safety instructions . . . . . . . . . . . . . 60
Checklist . . . . . . . . . . . . . . . . . . . . . . 62
Starting . . . . . . . . . . . . . . . . . . . . . . . 62
Starting off . . . . . . . . . . . . . . . . . . . . 65
Running in . . . . . . . . . . . . . . . . . . . . 65
Parking your motorcycle . . . . . . . 69
Refueling . . . . . . . . . . . . . . . . . . . . . 76
General brake system . . . . . . . . . 77
Brake system with BMW IntegralABS . . . . . . . . . . . . . . . . . . . . . . . . . . 77
559
z Rid
ing
Safety instructions
Rider's equipment
Do not ride without the cor-rect clothing. Always wear:
HelmetRider's suitGlovesBoots
This applies even to shortjourneys, and to every seasonof the year. Your authorizedBMW motorcycle retailer willbe glad to advise you on thecorrect clothing for every pur-pose.
Speed
If you ride at high speed, al-ways bear in mind that vari-ous boundary conditions canadversely affect the handlingof your motorcycle:
Settings of the spring-strutand shock absorber systemImbalanced loadLoose clothingInsufficient tire pressurePoor tire treadEtc.
Correct loading
Overloading and unevenloading can diminish the
riding stability of the motorcy-cle.Do not exceed the grossweight limit and observe theloading information.
Alcohol and drugs
Even small amounts ofalcohol or drugs will ad-
versely affect your perceptionand your ability to assess sit-uations and make decisions,and slow down your reflexes.Medication can exacerbatethese effects.
Do not ride your motorcy-cle after consuming alcohol,drugs and/or medication.
Risk of poisoning
Exhaust fumes contain car-bon monoxide, which is col-orless and odorless but highlytoxic.
Inhaling exhaust fumestherefore represents a
health hazard and can evencause loss of consciousnesswith fatal consequences.Do not inhale exhaust fumes.Do not run the engine inclosed rooms.
High voltage
Touching live parts ofthe ignition system with
the engine running can causeelectric shock.Do not touch parts of the igni-
560
z Rid
ing

tion system when the engineis running.
Catalytic converter
If misfiring causes unburnedfuel to enter the catalytic con-verter, there is a danger ofoverheating and damage.For this reason, observe thefollowing points:
Do not run the fuel tank dryDo not run the engine withthe spark-plug cap removedStop the engine immediatelyif it misfiresUse unleaded fuel onlyComply with all specifiedmaintenance intervals.
Unburned fuel will de-stroy the catalytic con-
verter.Note the points listed for pro-tection of the catalytic con-verter.
Risk of fire
Temperatures at the exhaustare high.
Flammable materials(e.g. hay, leaves, grass,
clothing and luggage, etc.)could ignite if allowed tocome into contact with thehot exhaust pipe.Make sure that no highlyflammable materials cancome in contact with the hotexhaust system.
Cooling would beinadequate if the engine
were allowed to idle fora lengthy period with themotorcycle at a standstill:overheating would result.In extreme cases, themotorcycle could catch fire.Do not run the engine for un-necessary periods when themotorcycle is stationary. Afterstarting, ride off immediately.
Tampering with the con-trol unit of the electronic
engine-management sys-tem
Tampering with con-trol unit of electronic
engine-management systemcan damage the motorcycleand cause accidents.Do not tamper with thecontrol unit of the electronicengine-managementsystem.
Tampering with con-trol unit of electronic
engine-management sys-tem can result in mechanicalloads that the motorcycle'scomponents are not designedto withstand. Damage causedin this way is not covered bythe warranty.Do not tamper with thecontrol unit of the electronic
561
z Rid
ing
engine-managementsystem.
Checklist
Use the following checklistto check important functions,settings and wear limits be-fore you ride off.
BrakesFront and rear brake fluidlevelsClutchClutch fluid levelShock absorber setting andspring preloadTread depth and tire pres-sureFirm seating of cases andluggage
At regular intervals:Engine oil level (every timeyou refuel)Brake pad wear (during ev-ery third stop for refueling)
Starting
Side stand
You cannot start themotorcycle with the sidestand extended and a gearengaged. The engine willswitch itself off if you startit with the transmission inneutral and then engage agear before retracting the sidestand.
Transmission
You can start the enginewhen the transmission is inneutral or if you pull the clutchwith a gear engaged. Switchon the ignition before youpull the clutch. When thetransmission is in neutral, thegreen neutral indicator lightis on and the gear indicatorin the multifunction displayshows 0.
Starting engine
If you switch on the igni-tion while the brakes are
applied, then start the engineand ride off immediately, theBMW Integral ABS remainsin its residual braking func-tion mode. Self-diagnosisis performed as soon as thebrake levers are in their fullyreleased positions for the firsttime. During this period, nei-ther the ABS function nor thepower braking assistance isavailable.When you start the en-gine, wait until the ABSself-diagnosis has beenperformed.
Switch on ignition.
562
z Rid
ing

Emergency ON/OFFswitch 1 in operatingposition A.Switch on ignition.Pre-ride check isperformed. ( 63)ABS self-diagnosis is per-formed. ( 64)
Press starter button 1.
At extremely low tem-peratures it may be nec-
essary to operate the throt-tle twist grip during starting.At ambient temperatures be-low 32 °F (0 °C), actuate theclutch after switching on theignition.
The start attempt is au-tomatically interrupted
if battery voltage is too low.Recharge the battery beforeyou start the engine, or usejump leads and a donor bat-tery to start.
Engine starts.Consult the troubleshootingchart if the engine refusesto start. ( 130)
Pre-ride check
After switching on the igni-tion, the instrument clustercarries out a general warn-ing light test. In the processthe warning light first lightsup yellow and then red forchecking. This test, calleda "Pre-ride check", is indicat-ed by the lettering CHECK!in the display. If the engineis started during the test, thetest is canceled.Phase 1
General warning lightlights up yellow.
The note CHECK! is indi-cated.
563
z Rid
ing

Phase 2
General warning lightlights up red.
The note CHECK! is indi-cated.
If the general warning light isnot shown:
If the general warninglight cannot be dis-
played, several malfunctionscannot be indicated.Watch the display of the gen-eral warning light in red andyellow.
Have the fault rectified assoon as possible by a spe-cialized workshop, prefer-ably an authorized BMWmotorcycle retailer.
ABS warning lights
The ABS warning lightis shown in two versionsdepending on country:
Country version 1.
Country version 2.
The following description ismade based on country ver-sion 1.
ABS self-diagnosis
The BMW Integral ABS per-forms self-diagnosis and apull-away test to ensure itsoperability. Self-diagnosisis performed automatical-ly when you switch on theignition. Self-diagnosis isnot performed unless bothbrake levers are in their fullyreleased positions.Phase 1
Self-diagnosis is performed.General warning lightlights up red.
ABS warning light flash-es four times per sec-
ond.
Phase 2
Self-diagnosis is complete.ABS warning light flash-es once per second.
If it was not possible to endself-diagnosis:
Release the brake lever assoon as possible.
If an error message is shownafter self-diagnosis is com-pleted:
Read the meaning of thisdisplay in the chapter "Dis-plays".
The ABS warning lightdoes not go out until af-
ter completion of the starting-off test.
564
z Rid
ing
Starting off
Starting on grades
Engage gear.Release clutch lever andbrake lever.Switch on ignition.
ABS warning light flash-es once per second.
The ABS warning light goesout after completion of thepull-away test.
If an error message is shownafter the pull-away test iscompleted:
Read the meaning of thisdisplay in the chapter "Dis-plays".
Running in
The first 600 miles(1,000 km)
While running in motorcy-cle, vary throttle openingand engine-speed rangefrequently.Try to do most of your rid-ing during this initial periodon twisting, fairly hilly roads,avoiding high-speed main
roads and highways if pos-sible.
Exceeding the specifiedengine speeds while run-
ning in will lead to increasedengine wear.Adhere to the specified en-gine run-in speeds.
Do not exceed engine run-in speeds.Engine run-in speeds7000 min-1
Do not accelerate at fullthrottle.Avoid low engine speeds atfull load.After 300 - 750 miles (500 -1,200 km), have the first in-spection performed.
Brake pads
New brake pads must "beddown" and therefore do notachieve their optimum fric-tion levels during the first 300
565
z Rid
ing
Wait for ABS self-diagnosisto complete.Operate brake and clutch.Starting engine.
Pre-ride check isperformed. ( 63)
ABS pull-away test
After starting off, the BMWIntegral ABS checks the ABSsensors.

miles (500 km). This initial re-duction in braking efficiencycan be compensated for byexerting greater pressure onthe levers.
New brake pads can ex-tend stopping distance
by a significant margin.Brake early.
Tires
New tires have a smooth sur-face. This must be rough-ened by riding in a restrainedmanner at various heel an-gles until the tires are run in.This running in procedure isessential if the tires are toachieve maximum grip.
Tires do not have theirfull grip when new and
there is a risk of accident atextreme heeling angels.Avoid extreme heeling an-gels.
566
z Rid
ing

567
z Rid
ing
568
z Rid
ing

Parking your motorcy-
cle
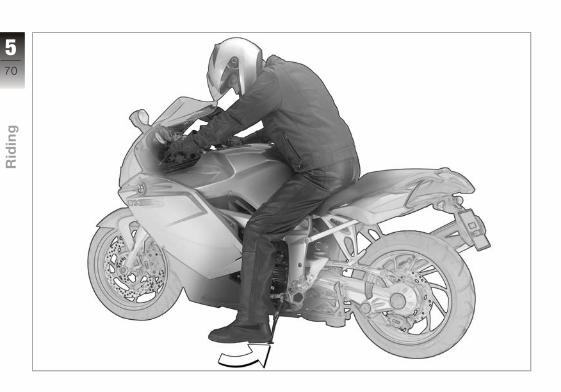
Placing on side stand
If the ground is soft oruneven, there is no guar-
antee that the motorcycle willrest firmly on the stand.Always check that the groundunder the stand is level andfirm.
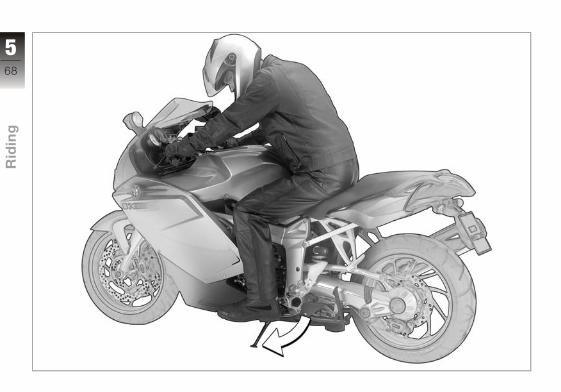
Switch off engine.Pull handbrake lever.Hold motorcycle upright andbalanced.Use your left foot to extendside stand fully (arrow).
The side stand is de-signed to support only
the weight of the motorcycle.Do not lean or sit on the mo-torcycle with the side standextended.
Slowly lean motorcycle toside until its weight is takenby stand and dismount toleft.
When you prop themotorcycle on the
side stand, the surface ofthe ground will determinewhether it is better to turn thehandlebars to the left or right.However, the motorcycleis more stable on a levelsurface with the handlebarsturned to the left than withthe handlebars turned to theright.On level ground, always turnthe handlebars to the left toset the steering lock.
Turn handlebars to full leftor right lock position.Check that motorcycle isstanding firmly.
On a grade, the motor-cycle should always face
uphill; select 1st gear.569
z Rid
ing
570
z Rid
ing

Removing from side
stand
Unlock steering lock.
Brake servo assistanceis not available when the
ignition is off; the motorcyclecan start to roll.Especially on inclines, switchon the ignition and wait forthe ABS self-diagnosis.
Switch on ignition.Wait for ABS self-diagnosisto complete.From left, grip handlebarswith both hands.Pull handbrake lever.Swing your right leg overthe seat and lift the motor-cycle to the upright posi-tion.Hold motorcycle upright andbalanced.
An extended side standcan catch on the ground
when the motorcycle is mov-ing and lead to a fall.Retract the side stand beforemoving the vehicle.
Sit on the motorcycle anduse your left foot to retractthe side stand.
571
z Rid
ing

572
z Rid
ing

Placing on center
standOA
If the ground is soft oruneven, there is no guar-
antee that the motorcycle willrest firmly on the stand.Always check that the groundunder the stand is level andfirm.
Switch off engine.Dismount and keep lefthand on left handlebar grip.With your right hand, takehold of the passenger grabhandle or rear frame.Place right foot on extendedarm of center stand, andpress stand down until itscurved feet touch ground.Place full weight of body oncenter stand while pullingmotorcycle toward rear (ar-row).
Excessive movementscould result in the cen-
ter stand retracting, and themotorcycle would topple as aresult.Do not sit on the motorcyclewhile it is resting on the cen-ter stand.
Check that motorcycle isstanding firmly.
573
z Rid
ing

574
z Rid
ing

Pushing off center
standOA
Brake servo assistanceis not available when the
ignition is off; the motorcyclecan start to roll.Especially on inclines, switchon the ignition and wait forthe ABS self-diagnosis.
Switch on ignition.Wait for ABS self-diagnosisto complete.Place your left hand on theleft handlebar grip.With your right hand, takehold of the passenger grabhandle.Push motorcycle forward offcenter stand.Make sure that center standis fully retracted.
575
z Rid
ing

Refueling
Fuel is highly flammable.Fire at the fuel tank can
result in fire and explosion.Do not smoke. Never bringa naked flame near the fueltank.
Fuel expands when ex-posed to heat. When the
tank is overfilled, fuel can es-cape and get onto the rearwheel. This results in a dan-ger of falling.Do not fill the tank past thebottom edge of the fillerneck.
Fuel attacks plastic sur-faces, making them dull
or unsightly.Wipe spilled fuel off plasticparts immediately.
Leaded fuel will destroythe catalytic converter!
Use only unleaded fuel.
Make sure the ground islevel and firm and park themotorcycle.
Open protective cap.Open fuel tank cap with ig-nition key by turning coun-terclockwise.Fill tank with fuel of qualitylisted below.Recommended fuel type
Premium grade unleadedfuel98 ROZ
Fuel types can be used withpoorer performance andconsumption
Super unleaded95 ROZ
Usable fuel quantity5 galReserve fuel quantity1.1 gal
Close fuel tank cap with firmpressure.Remove key and close pro-tective cap.
576
z Rid
ing
General brake system
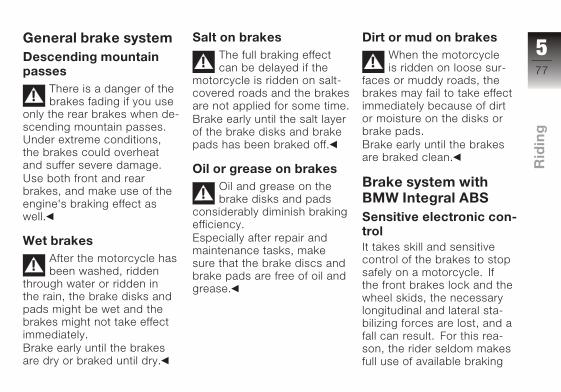
Descending mountainpasses
There is a danger of thebrakes fading if you use
only the rear brakes when de-scending mountain passes.Under extreme conditions,the brakes could overheatand suffer severe damage.Use both front and rearbrakes, and make use of theengine's braking effect aswell.
Wet brakes
After the motorcycle hasbeen washed, ridden
through water or ridden inthe rain, the brake disks andpads might be wet and thebrakes might not take effectimmediately.Brake early until the brakesare dry or braked until dry.
Salt on brakes
The full braking effectcan be delayed if the
motorcycle is ridden on salt-covered roads and the brakesare not applied for some time.Brake early until the salt layerof the brake disks and brakepads has been braked off.
Oil or grease on brakes
Oil and grease on thebrake disks and pads
considerably diminish brakingefficiency.Especially after repair andmaintenance tasks, makesure that the brake discs andbrake pads are free of oil andgrease.
Dirt or mud on brakes
When the motorcycleis ridden on loose sur-
faces or muddy roads, thebrakes may fail to take effectimmediately because of dirtor moisture on the disks orbrake pads.Brake early until the brakesare braked clean.
Brake system with
BMW Integral ABS
Sensitive electronic con-trol
It takes skill and sensitivecontrol of the brakes to stopsafely on a motorcycle. Ifthe front brakes lock and thewheel skids, the necessarylongitudinal and lateral sta-bilizing forces are lost, and afall can result. For this rea-son, the rider seldom makesfull use of available braking
577
z Rid
ing

performance in an emergen-cy.The BMW Integral ABS pro-vides improved braking de-celeration by means of lockup protection for both wheelsand braking force distribu-tion by means of the integralbraking function. Making fulluse of the motorcycle's tech-nical braking capacity willminimize braking distancesnoticeably, even when roadconditions are poor. Whendriving straight ahead, BMWIntegral ABS enables safe, re-liable braking optimized forthe respective conditions.
Reserves for safety
But remember: the potential-ly shorter braking distanceswhich BMW Integral ABS per-mits must not be used as anexcuse for careless riding.ABS is primarily a means of
ensuring a safety margin ingenuine emergencies.Take care when cornering.When you apply the brakeson a corner, the motorcycle'sweight and momentum takeover and even BMW IntegralABS is unable to counteracttheir effects.
Partially integral brake
Your motorcycle is equippedwith a partially integral brakeconfiguration. Both front andrear brakes are applied simul-taneously when you pull thehandbrake lever. The foot-brake lever acts only on therear brake.The electronic controller inthe BMW Integral ABS regu-lates braking-force distribu-tion between front and rearwheels. Braking-force distri-bution depends on load andis recalculated every time the
ABS controller comes into ac-tion.
Brake booster
On braking, BMW IntegralABS boosts the brake forceon the wheel by means of ahydraulic pump. By boostingthe braking force in this way,BMW Integral ABS achieveshigher braking efficiency thanstandard brake systems.
ABS anti-lock brakingsystem
ABS prevents the wheelslocking under braking, thuscontributing significantly toroad safety.
Rear wheel lift
Even under severe braking,a high level of tire grip canmean that the front wheeldoes not lock up until verylate, if at all. Consequently,
578
z Rid
ing

ABS does not intervene untilvery late, if at all. Under thesecircumstances the rear wheelcan lift off the ground, and theoutcome can be a highsidingsituation in which the motor-cycle can flip over.
Severe braking cancause the rear wheel to
lift off the ground.Bear in mind that ABS can-not be relied on in all circum-stances to prevent the rearwheel from lifting clear of theground.
Residual braking func-tion
With the ignition switched off,during the self-diagnosis andin the event of a fault in theBMW Integral ABS, the brakecircuits concerned only havethe residual braking function.The residual braking functionis the braking power with-
out the hydraulic servo as-sistance of the BMW IntegralABS. Under these circum-stances, therefore, you mustapply considerably higherpressure to the brake leversin question in order to applythe brakes, and lever travelis longer. When the residu-al braking function is active,the ABS function is unavail-able in the brake system inquestion. When the residu-al braking function is active,the integral braking functionis partially or entirely unavail-able.
Without the ABS func-tion, the wheels could
lock during very hard brak-ing. Without servo-assistedbrakes, considerably greaterforce is required to brake.The altered braking behaviorcan lead to accidents.Avoid hard braking whenev-
er possible. Brake early, asincreased braking force is re-quired.Have the fault rectified assoon as possible by a spe-cialized workshop, preferablyan authorized BMW motorcy-cle retailer.
As the residual brakingfunction means that the
lever path before the brakepressure is built up can belonger, BMW Motorrad rec-ommends that a larger leverpath be set at the handbrakelever.
In the case of residualbraking function in both
brake circuits, no pump noisecan be heard when the brakelever is operated.
579
z Rid
ing

580
z Rid
ing

Accessories
General instructions . . . . . . . . . . . 82
Onboard socket . . . . . . . . . . . . . . . 82
Luggage . . . . . . . . . . . . . . . . . . . . . . 85
CaseOA . . . . . . . . . . . . . . . . . . . . . . . 86
Flat tire kitOA . . . . . . . . . . . . . . . . . . 89
681
z Ac
ce
sso
rie
s

General instructions
BMW Motorrad recommendsthe use of parts and acces-sories for your motorcyclethat are approved by BMWfor this purpose.Genuine BMW parts and ac-cessories and other productswhich BMW has approvedcan be obtained from yourauthorized BMW motorcycleretailer, together with expertadvice on their installationand use.These parts and productshave been tested by BMW forsafety, function and suitability.BMW accepts product liabilityfor these products.Conversely, BMW is unable toaccept any liability whatsoev-er for parts and accessorieswhich it has not approved.
BMW cannot evaluatewhether every product of
other manufacturers is suit-able for use on BMW motor-cycles without presenting asafety risk. Nor is this guaran-tee provided when the officialapproval of a specific coun-try has been granted. Testsconducted by these instancescannot make provision for alloperating conditions experi-enced by BMW motorcyclesand, consequently, they arenot sufficient in some circum-stances.Use only parts and acces-sories approved by BMW foryour motorcycle.
Whenever you are planningmodifications, comply with allthe legal requirements. Themotorcycle must not infringeon national road-vehicle con-struction and use regulations.
Onboard socket
Ratings
The supply to the socket 1 iscut off automatically if batteryvoltage is low or the load ex-ceeds the maximum rating of5 A.
Operating electrical ac-
cessories
You can start using electri-cal accessories only whenthe ignition is switched on.The accessory remains oper-ational if the ignition is subse-quently switched off. Approx.
682
z Ac
ce
sso
rie
s

15 minutes after switchingoff the ignition and/or duringthe restart operation, the on-board socket is switched offto take the load off the vehicleelectrical system.
Cable routing
The cables from the onboardsocket to the auxiliary devicemust be routed in such a waythat they:
Do not impede the riderDo not restrict or obstructthe steering angle and han-dling characteristicsCannot be trapped
Improperly routed cablescan impede the rider.
Route the cables asdescribed above.
683
z Ac
ce
sso
rie
s

684
z Ac
ce
sso
rie
s

Luggage
Correct loading
Overloading and unevenloading can diminish the
riding stability of the motorcy-cle.Do not exceed the grossweight limit and observe theloading information.
Adjust setting of springpreload, damping charac-teristic and tire pressures tosuit total weight.Ensure that the case vol-umes on the left and rightare equal.Make sure weight is uni-formly distributed betweenright and left.Pack heavy items of lug-gage downwards and in-wards.Max. load in each case (leftand right): 18 lbs (8 kg).
Max. load in tank rucksack11 lbs (5 kg). 6
85
z Ac
ce
sso
rie
s

CaseOA
Release levers
There is a release lever onthe left and right of each caselock.The gray lever marked OPENis used to open and close thecases.The black lever marked RE-LEASE is used to remove andattach the cases.
Opening case
Turn lock barrel vertical todriving direction.Case can be opened.
Cases secured.Key can be removed.
Pull gray release lever(OPEN) upward.Lock straps 1 open.Pull gray release lever(OPEN) upward again.Pull case lid 2 out of retain-er.Case completely opened.
Closing case
Press catches 1 of case lidinto the retainers 2.The catches can be heardto lock into place.
686
z Ac
ce
sso
rie
s
Adjusting case volume
Close case lid.
Close the lock straps.

Turn lock strap buckles 1
of lock straps outward.Pull out the lock straps up-wards.The maximum volume hasbeen set.
Close the lock straps.Press the lock strapsagainst the case body.The case volume is adaptedto the contents.
Removing case
Turn case lock 45° relativeto driving direction.Key cannot be removed.Cases locked.Cases can be removed.Pull black release lever (RE-LEASE) upward.
687
z Ac
ce
sso
rie
s
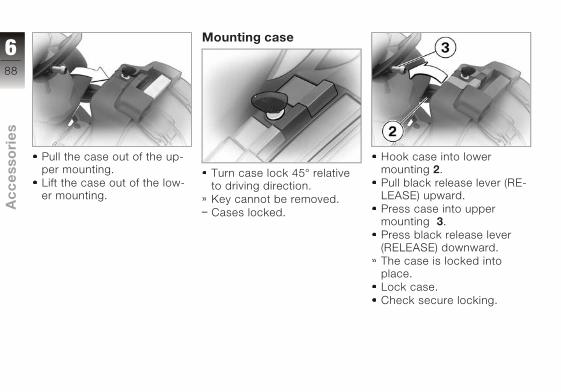
Pull the case out of the up-per mounting.Lift the case out of the low-er mounting.
Mounting case
Turn case lock 45° relativeto driving direction.Key cannot be removed.Cases locked.
Hook case into lowermounting 2.Pull black release lever (RE-LEASE) upward.Press case into uppermounting 3.Press black release lever(RELEASE) downward.The case is locked intoplace.Lock case.Check secure locking.
688
z Ac
ce
sso
rie
s

Secure hold
If a case wobbles or is diffi-cult to fit, it has to be adapt-ed to the gap between theupper and lower mounting.To achieve this, the height ofthe lower bracket on the casecan be changed.
Adapting case
Open case.
Unfasten screws 1.Adjust height of bracket.Tighten screws 1.
Flat tire kitOA
Use
The space for the flat tire kitis located under the left-handside panel.The repair procedure andsafety precautions are con-tained in the description in-cluded with in the flat tire kit.
Removing flat tire kit
Make sure the ground islevel and firm and park themotorcycle.Removing seat ( 50)
Remove screws 1.Removing side panel.
To protect the side panelfrom scratches, lay it on
the seat.
Open the securing strapand remove the flat tire kit.
689
z Ac
ce
sso
rie
s

690
z Ac
ce
sso
rie
s
Maintenance
Maintenance - GeneralInformation. . . . . . . . . . . . . . . . . . . . 92
Toolkit . . . . . . . . . . . . . . . . . . . . . . . . 92
Contents of supplementalsetOA . . . . . . . . . . . . . . . . . . . . . . . . . 92
Overview of supplementalset . . . . . . . . . . . . . . . . . . . . . . . . . . . . 92
Engine oil . . . . . . . . . . . . . . . . . . . . . 92
General brake system . . . . . . . . . 94
Brake pads. . . . . . . . . . . . . . . . . . . . 95
Brake fluid . . . . . . . . . . . . . . . . . . . . 97
Clutch . . . . . . . . . . . . . . . . . . . . . . . 100
Tires . . . . . . . . . . . . . . . . . . . . . . . . . 100
Rims . . . . . . . . . . . . . . . . . . . . . . . . . 101
Wheels . . . . . . . . . . . . . . . . . . . . . . 101
Front wheel stand . . . . . . . . . . . . 108
Rear-wheel stand . . . . . . . . . . . . 110
Lamps . . . . . . . . . . . . . . . . . . . . . . . 111
Jump starting . . . . . . . . . . . . . . . . 117
Battery . . . . . . . . . . . . . . . . . . . . . . . 119
791
z Ma
inte
na
nc
e
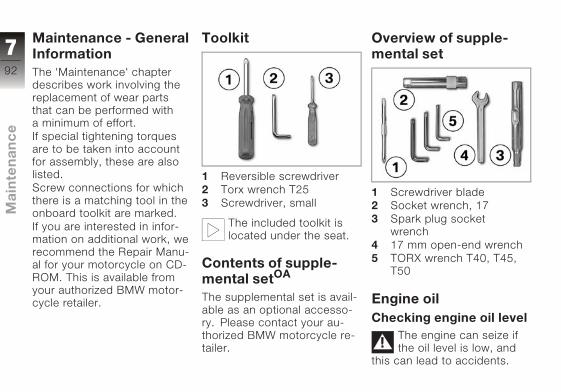
Maintenance - General
Information
The 'Maintenance' chapterdescribes work involving thereplacement of wear partsthat can be performed witha minimum of effort.If special tightening torquesare to be taken into accountfor assembly, these are alsolisted.Screw connections for whichthere is a matching tool in theonboard toolkit are marked.If you are interested in infor-mation on additional work, werecommend the Repair Manu-al for your motorcycle on CD-ROM. This is available fromyour authorized BMW motor-cycle retailer.
Toolkit
1 Reversible screwdriver2 Torx wrench T253 Screwdriver, small
The included toolkit islocated under the seat.
Contents of supple-
mental setOA
The supplemental set is avail-able as an optional accesso-ry. Please contact your au-thorized BMW motorcycle re-tailer.
Overview of supple-
mental set
1 Screwdriver blade2 Socket wrench, 173 Spark plug socket
wrench4 17 mm open-end wrench5 TORX wrench T40, T45,
T50
Engine oil
Checking engine oil level
The engine can seize ifthe oil level is low, and
this can lead to accidents.
792
z Ma
inte
na
nc
e
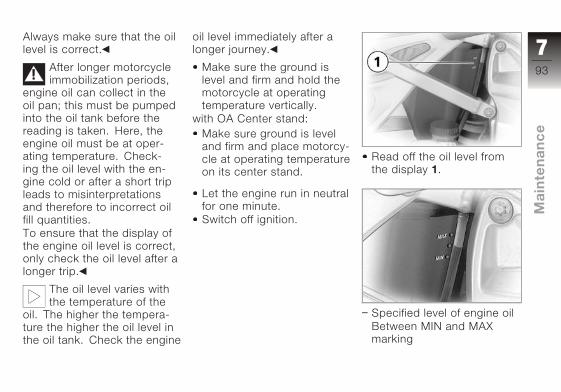
Always make sure that the oillevel is correct.
After longer motorcycleimmobilization periods,
engine oil can collect in theoil pan; this must be pumpedinto the oil tank before thereading is taken. Here, theengine oil must be at oper-ating temperature. Check-ing the oil level with the en-gine cold or after a short tripleads to misinterpretationsand therefore to incorrect oilfill quantities.To ensure that the display ofthe engine oil level is correct,only check the oil level after alonger trip.
The oil level varies withthe temperature of the
oil. The higher the tempera-ture the higher the oil level inthe oil tank. Check the engine
oil level immediately after alonger journey.
Make sure the ground islevel and firm and hold themotorcycle at operatingtemperature vertically.
with OA Center stand:Make sure ground is leveland firm and place motorcy-cle at operating temperatureon its center stand.
Let the engine run in neutralfor one minute.Switch off ignition.
Read off the oil level fromthe display 1.
Specified level of engine oilBetween MIN and MAXmarking
793
z Ma
inte
na
nc
e

If oil level is below MIN mark:Top up engine oil.
If oil level is above MAX mark:Drain off engine oil.
Topping up engine oil
Make sure the ground islevel and firm and park themotorcycle.Removing seat ( 50)
Both too little and toomuch engine oil can lead
to engine damage.Always make sure that the oillevel is correct.
Wipe area around filler neckclean.Unscrew cap of fill openingfor engine oil 1.Add engine oil up to speci-fied level.
Draining engine oil
Press retainer of clearhose 2 on left and right andpull out of oil tank upwards.Pull clear hose downwardout of frame and drain en-gine oil into a suitable con-tainer until specified level isreached.
Insert the clear hose in theoil tank and lock into place.Store or dispose of excessengine oil in line with soundenvironmental principles.
General brake system
Operating safety
A properly functioning brakesystem is a basic require-ment for the road safety ofyour motorcycle.Do not ride the motorcycle ifyou have any doubts aboutthe dependability of the brakesystem.In this case, have the brakesystem checked by a certifiedworkshop, preferably by anauthorized BMW motorcycleretailer.
794
z Ma
inte
na
nc
e

Incorrect working prac-tices endanger the relia-
bility of the brakes.Have all work on the brakesystem performed by a certi-fied workshop, preferably byan authorized BMW motorcy-cle retailer.
Checking brake opera-tion
Switch on ignition.Wait for ABS self-diagnosisto complete.Pull handbrake lever.Pressure point must beclearly perceptible.Hydraulic pump must beheard to run.Press footbrake lever.Pressure point must beclearly perceptible.Hydraulic pump must beheard to run.
with OE Elimination of BMWMotorrad Integral ABS:
Pull handbrake lever.Pressure point must beclearly perceptible.Press footbrake lever.Pressure point must beclearly perceptible.
Brake pads
Checking front brake padthickness
Continuing to use brakepads beyond the mini-
mum pad thickness leads toreduced braking power andunder certain circumstancesto brake damage.In order to ensure the operat-ing reliability of the brake sys-tem, make sure that the brakepads are not worn beyondtheir minimum thickness.
Make sure the ground islevel and firm and park themotorcycle.
Visually inspect left andright brake pads to ascer-tain their thickness.
795
z Ma
inte
na
nc
e
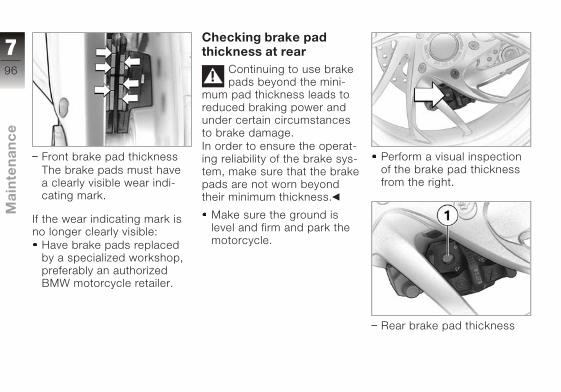
Front brake pad thicknessThe brake pads must havea clearly visible wear indi-cating mark.
If the wear indicating mark isno longer clearly visible:
Have brake pads replacedby a specialized workshop,preferably an authorizedBMW motorcycle retailer.
Checking brake padthickness at rear
Continuing to use brakepads beyond the mini-
mum pad thickness leads toreduced braking power andunder certain circumstancesto brake damage.In order to ensure the operat-ing reliability of the brake sys-tem, make sure that the brakepads are not worn beyondtheir minimum thickness.
Make sure the ground islevel and firm and park themotorcycle.
Perform a visual inspectionof the brake pad thicknessfrom the right.
Rear brake pad thickness
796
z Ma
inte
na
nc
e
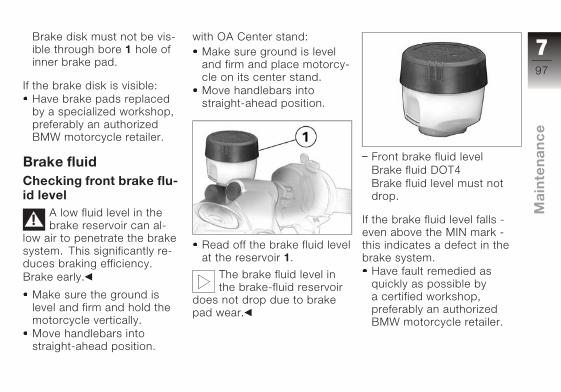
Brake disk must not be vis-ible through bore 1 hole ofinner brake pad.
If the brake disk is visible:Have brake pads replacedby a specialized workshop,preferably an authorizedBMW motorcycle retailer.
Brake fluid
Checking front brake flu-id level
A low fluid level in thebrake reservoir can al-
low air to penetrate the brakesystem. This significantly re-duces braking efficiency.Brake early.
Make sure the ground islevel and firm and hold themotorcycle vertically.Move handlebars intostraight-ahead position.
with OA Center stand:Make sure ground is leveland firm and place motorcy-cle on its center stand.Move handlebars intostraight-ahead position.
Read off the brake fluid levelat the reservoir 1.
The brake fluid level inthe brake-fluid reservoir
does not drop due to brakepad wear.
Front brake fluid levelBrake fluid DOT4Brake fluid level must notdrop.
If the brake fluid level falls -even above the MIN mark -this indicates a defect in thebrake system.
Have fault remedied asquickly as possible bya certified workshop,preferably an authorizedBMW motorcycle retailer.
797
z Ma
inte
na
nc
e

with OE Elimination of BMWMotorrad Integral ABS:
Read off the brake fluid levelat the reservoir 1.
In the event of brake padwear, the brake fluid lev-
el in the brake-fluid reservoirfalls.
Front brake fluid levelwith OE Elimination of BMWMotorrad Integral ABS:Brake fluid DOT4Brake fluid level must notfall below MIN mark.
If brake fluid level drops be-low permissible level:
Have fault remedied asquickly as possible bya certified workshop,preferably an authorizedBMW motorcycle retailer.
Checking rear brake fluidlevel
A low fluid level in thebrake reservoir can al-
low air to penetrate the brakesystem. This significantly re-duces braking efficiency.Brake early.
Make sure the ground islevel and firm and park themotorcycle.
Read off the brake fluid levelat the reservoir 1.
798
z Ma
inte
na
nc
e

The brake fluid level inthe brake-fluid reservoir
does not drop due to brakepad wear.
Rear brake fluid levelBrake fluid DOT4Brake fluid level must notdrop.
If the brake fluid level falls -even above the MIN mark- this indicates a fault in thebrake system.
Have fault remedied asquickly as possible bya certified workshop,
preferably an authorizedBMW motorcycle retailer.
with OE Elimination of BMWMotorrad Integral ABS:
Read off the brake fluid levelat the reservoir 1.
In the event of brake padwear, the brake fluid lev-
el in the brake-fluid reservoirfalls.
Rear brake fluid levelwith OE Elimination of BMWMotorrad Integral ABS:Brake fluid DOT4Brake fluid level must notfall below MIN mark.
If brake fluid level drops be-low permissible level:
Have fault remedied asquickly as possible bya certified workshop,preferably an authorizedBMW motorcycle retailer.
799
z Ma
inte
na
nc
e
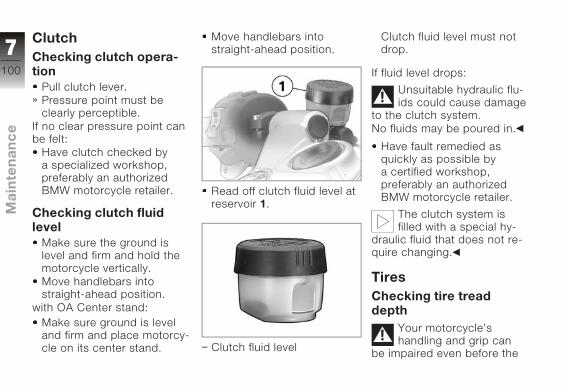
Clutch
Checking clutch opera-tion
Pull clutch lever.Pressure point must beclearly perceptible.
If no clear pressure point canbe felt:
Have clutch checked bya specialized workshop,preferably an authorizedBMW motorcycle retailer.
Checking clutch fluidlevel
Make sure the ground islevel and firm and hold themotorcycle vertically.Move handlebars intostraight-ahead position.
with OA Center stand:Make sure ground is leveland firm and place motorcy-cle on its center stand.
Move handlebars intostraight-ahead position.
Read off clutch fluid level atreservoir 1.
Clutch fluid level
Clutch fluid level must notdrop.
If fluid level drops:
Unsuitable hydraulic flu-ids could cause damage
to the clutch system.No fluids may be poured in.
Have fault remedied asquickly as possible bya certified workshop,preferably an authorizedBMW motorcycle retailer.
The clutch system isfilled with a special hy-
draulic fluid that does not re-quire changing.
Tires
Checking tire treaddepth
Your motorcycle'shandling and grip can
be impaired even before the
7100
z Ma
inte
na
nc
e

tires wear to the minimum tiretread depth permitted by law.Have the tires changed ingood time before they wearto the minimum permissibletread depth.
Make sure the ground islevel and firm and park themotorcycle.Measure tire tread depthin main tread grooves withwear indicating marks.
Tires have wear indica-tors integrated into the
main tread grooves. If the tiretread has worn down to thelevel of the marks, the tire iscompletely worn. The loca-tions of the marks are indi-cated on the edge of the tire,e.g. by the letters TI, TWI orby an arrow.
If tire tread depth no longercomplies with legally requiredminimum tread depth:
Replace tire.
Rims
Checking rims
Make sure the ground islevel and firm and park themotorcycle.Visually inspect rims for de-fects.Have damaged rimschecked and, if necessary,replaced by a specializedworkshop, preferably anauthorized BMW motorcycleretailer.
Wheels
Approved wheels andtires
For each size of tire BMWMotorrad tests certain makes,and approves those that itcertifies as roadworthy. IfBMW Motorrad has not ap-proved the wheels and tires, itcannot assess their suitabilityor provide any guarantee ofroad safety.Use only wheels and tires ap-proved by BMW Motorrad foryour type of motorcycle.You can obtain detailed infor-mation from your authorizedBMW motorcycle retailer oron the Internet at www.bmw-motorrad.com.
Removing front wheel
Place motorcycle on anauxiliary stand; BMW Motor-
7101
z Ma
inte
na
nc
e
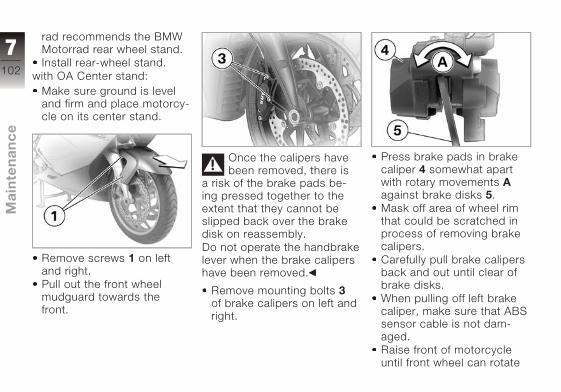
rad recommends the BMWMotorrad rear wheel stand.Install rear-wheel stand.
with OA Center stand:Make sure ground is leveland firm and place motorcy-cle on its center stand.
Remove screws 1 on leftand right.Pull out the front wheelmudguard towards thefront.
Once the calipers havebeen removed, there is
a risk of the brake pads be-ing pressed together to theextent that they cannot beslipped back over the brakedisk on reassembly.Do not operate the handbrakelever when the brake calipershave been removed.
Remove mounting bolts 3
of brake calipers on left andright.
Press brake pads in brakecaliper 4 somewhat apartwith rotary movements A
against brake disks 5.Mask off area of wheel rimthat could be scratched inprocess of removing brakecalipers.Carefully pull brake calipersback and out until clear ofbrake disks.When pulling off left brakecaliper, make sure that ABSsensor cable is not dam-aged.Raise front of motorcycleuntil front wheel can rotate
7102
z Ma
inte
na
nc
e
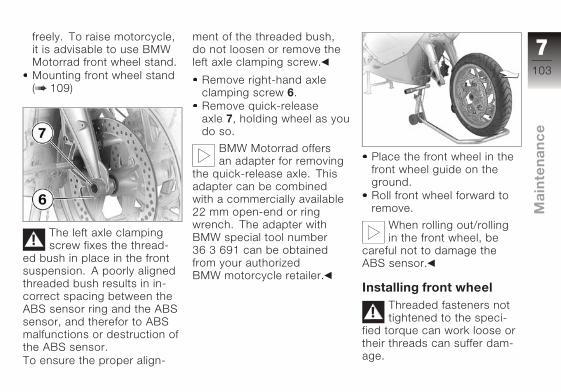
freely. To raise motorcycle,it is advisable to use BMWMotorrad front wheel stand.Mounting front wheel stand( 109)
The left axle clampingscrew fixes the thread-
ed bush in place in the frontsuspension. A poorly alignedthreaded bush results in in-correct spacing between theABS sensor ring and the ABSsensor, and therefor to ABSmalfunctions or destruction ofthe ABS sensor.To ensure the proper align-
ment of the threaded bush,do not loosen or remove theleft axle clamping screw.
Remove right-hand axleclamping screw 6.Remove quick-releaseaxle 7, holding wheel as youdo so.
BMW Motorrad offersan adapter for removing
the quick-release axle. Thisadapter can be combinedwith a commercially available22 mm open-end or ringwrench. The adapter withBMW special tool number36 3 691 can be obtainedfrom your authorizedBMW motorcycle retailer.
Place the front wheel in thefront wheel guide on theground.Roll front wheel forward toremove.
When rolling out/rollingin the front wheel, be
careful not to damage theABS sensor.
Installing front wheel
Threaded fasteners nottightened to the speci-
fied torque can work loose ortheir threads can suffer dam-age.
7103
z Ma
inte
na
nc
e

Always have the security ofthe fasteners checked by aspecialized workshop, prefer-ably an authorized BMW mo-torcycle retailer.
During the followingwork, parts of the front
brake, in particular of theBMW Integral ABS, can bedamaged.Take care not to damage thebrake system, in particular theABS sensor with cable andthe ABS sensor ring.
The front wheel must beinstalled right way round
to rotate in the correct direc-tion.Observe the direction of rota-tion arrows on the tires or onthe rim.
Roll front wheel into frontwheel guide.
When rolling out/rollingin the front wheel, be
careful not to damage theABS sensor.
Raise the front wheel, installthe quick-release axle 7 andtighten with the appropriatetightening torque.Quick-release axle inthreaded bush37 lb/ftTighten the right-hand axleclamping screw 6 withthe appropriate tighteningtorque.Clamping screw on quick-release axle in wheel carrier14 lb/ftRemove front wheel stand.
7104
z Ma
inte
na
nc
e
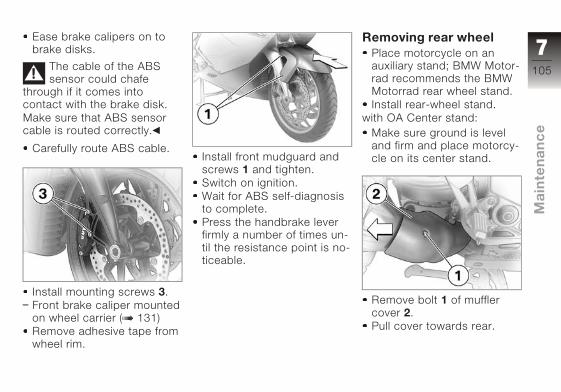
Ease brake calipers on tobrake disks.
The cable of the ABSsensor could chafe
through if it comes intocontact with the brake disk.Make sure that ABS sensorcable is routed correctly.
Carefully route ABS cable.
Install mounting screws 3.Front brake caliper mountedon wheel carrier ( 131)Remove adhesive tape fromwheel rim.
Install front mudguard andscrews 1 and tighten.Switch on ignition.Wait for ABS self-diagnosisto complete.Press the handbrake leverfirmly a number of times un-til the resistance point is no-ticeable.
Removing rear wheel
Place motorcycle on anauxiliary stand; BMW Motor-rad recommends the BMWMotorrad rear wheel stand.Install rear-wheel stand.
with OA Center stand:Make sure ground is leveland firm and place motorcy-cle on its center stand.
Remove bolt 1 of mufflercover 2.Pull cover towards rear.
7105
z Ma
inte
na
nc
e

Remove clamp 3 on muffler.Do not remove sealinggrease from clamp.
Remove bolt 4 of end muf-fler bracket on rear footrest.Turn end muffler out.
Engage first gear.
Remove mounting bolts 5 ofrear wheel, holding wheel asyou do so.When using the BMW Mo-torrad rear wheel stand: re-move the lock washer.
Lower the rear wheel to theground.Roll rear wheel out towardrear.When using the BMW Mo-torrad rear wheel stand: re-mount the lock washer.
Installing rear wheel
Threaded fasteners nottightened to the speci-
fied torque can work loose ortheir threads can suffer dam-age.Always have the security ofthe fasteners checked by aspecialized workshop, prefer-
7106
z Ma
inte
na
nc
e
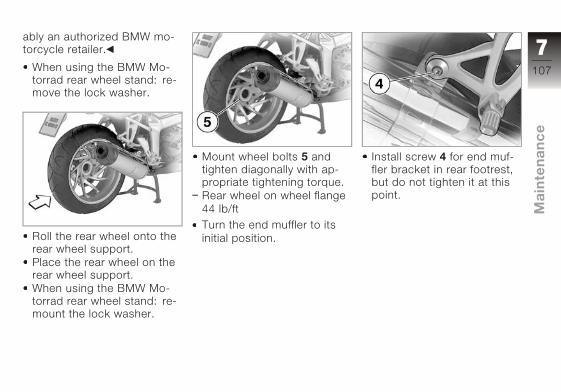
ably an authorized BMW mo-torcycle retailer.
When using the BMW Mo-torrad rear wheel stand: re-move the lock washer.
Roll the rear wheel onto therear wheel support.Place the rear wheel on therear wheel support.When using the BMW Mo-torrad rear wheel stand: re-mount the lock washer.
Mount wheel bolts 5 andtighten diagonally with ap-propriate tightening torque.Rear wheel on wheel flange44 lb/ftTurn the end muffler to itsinitial position.
Install screw 4 for end muf-fler bracket in rear footrest,but do not tighten it at thispoint.
7107
z Ma
inte
na
nc
e
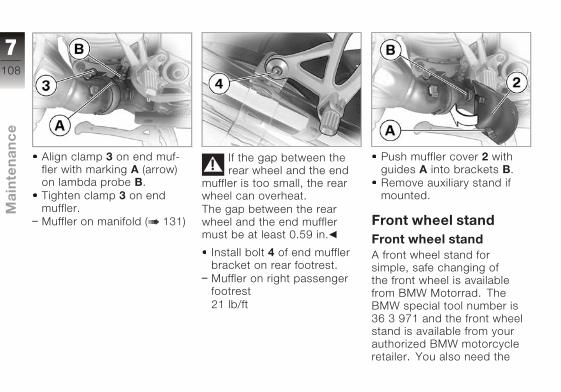
Align clamp 3 on end muf-fler with marking A (arrow)on lambda probe B.Tighten clamp 3 on endmuffler.Muffler on manifold ( 131)
If the gap between therear wheel and the end
muffler is too small, the rearwheel can overheat.The gap between the rearwheel and the end mufflermust be at least 0.59 in.
Install bolt 4 of end mufflerbracket on rear footrest.Muffler on right passengerfootrest21 lb/ft
Push muffler cover 2 withguides A into brackets B.Remove auxiliary stand ifmounted.
Front wheel stand
Front wheel stand
A front wheel stand forsimple, safe changing ofthe front wheel is availablefrom BMW Motorrad. TheBMW special tool number is36 3 971 and the front wheelstand is available from yourauthorized BMW motorcycleretailer. You also need the
7108
z Ma
inte
na
nc
e

adapters with the BMWspecial tool number 36 3 973.
The BMW Motorradfront wheel stand is
not designed for holdingmotorcycles without a centeror other auxiliary stands. Amotorcycle standing on thefront wheel stand and the rearwheel alone can fall over.Place the motorcycle on thecenter stand or an auxiliarystand before lifting it with theBMW Motorrad front wheelstand.
Mounting front wheelstand
Place motorcycle on anauxiliary stand; BMW Motor-rad recommends the BMWMotorrad rear wheel stand.Install rear-wheel stand.
with OA Center stand:Make sure ground is leveland firm and place motorcy-cle on its center stand.
Loosen adjusting screws 1.Push two mounting pins 2
far enough apart that frontsuspension fits betweenthem.Use locating pins 3 to setfront wheel stand to desiredheight.Center front wheel standrelative to front wheel andpush it against front axle.
Push two mounting pins 2
through triangles of brakecaliper support toward in-side so that front wheel canstill be rolled through.
In the case of BMW Inte-gral ABS, the ABS sen-
sor ring can be damaged.Only push the mounting pinso far inward that it does nottouch the sensor ring of theBMW Integral ABS.
Tighten adjusting screws 1.
7109
z Ma
inte
na
nc
e

If the motorcycle is rest-ing on the center stand:
The motorcycle is raised toofar at the front, the centerstand lifts off the ground andthe motorcycle can tip over tothe side.When raising the motorcycle,make sure that the centerstand remains on theground.
Apply uniform pressureto push front wheel standdown and raise motorcycle.
Rear-wheel stand
Rear-wheel stand
In order to be able to worksafely on motorcycles withoutcenter stands, BMW Motorradoffers a rear wheel stand. TheBMW special tool number is36 3 980 and the rear wheelstand are available from yourauthorized BMW motorcycleretailer.
Installing rear-wheelstand
Set the desired height of therear wheel stand using thebolts 1.Remove the lock washer 2;to do so, press the unlockbutton 3.
7110
z Ma
inte
na
nc
e

Push the rear wheel standfrom the left into the rearaxle.Apply the retaining diskfrom the right; to do so,press the unlock button.Place your left hand on theleft grab handle of the mo-torcycle 4 and your righthand on the lever of the rearwheel stand 5.
Raise the motorcycle, simul-taneously pressing the leverdownwards until the motor-cycle stands vertically.
Press the lever onto theground.
Lamps
General instructions
The failure of a bulb is sig-naled in the display by thelamp defect symbol. If thebrake or rear light fails, thegeneral warning light alsolights up in yellow. If the rearlight fails, the brake light isused as a substitute in thatthe luminosity of the secondglow filament is reduced torear light level. Failure of therear light is nevertheless indi-cated in the display.
A defective bulb placesyour safety at risk be-
cause it is easier for otherusers to oversee you andyour motorcycle.Replace defective bulbs assoon as possible; always car-ry a complete set of sparebulbs if possible.
7111
z Ma
inte
na
nc
e

The bulb is pressurizedand can cause injury if
damaged.Wear eye and hand protectionwhen replacing bulbs.
An overview of the bulbtypes installed in your
motorcycle is provided in thechapter "Technical Data".
Do not touch the glassof new bulbs with your
fingers. For installation, usea clean, dry cloth. Dirt de-posits, in particular oil andgrease, interfere with heat ra-diation from the bulb. Over-heating and therefore shortservice life of the bulbs arethe consequence.
Replacing low-beambulb
If it is not standing firm-ly, the motorcycle could
topple in the course of theoperations described below.Make sure that the motorcy-cle is steady on its stand.
To achieve better acces-sibility, turn the handle-
bars to the left.
Make sure the ground islevel and firm and park themotorcycle.Switch off ignition.
Release cover 1 by turningcounterclockwise and re-move it.
Disconnect plug 2.
Remove spring wire brack-ets 3 from their detents onleft and right and fold themup.
7112
z Ma
inte
na
nc
e

Remove bulb 4.Install bulb in reverse order.Use a clean, dry cloth tohold new bulb.
When assembling, makesure that lug 5 points up-wards.
Replacing high-beambulb
If it is not standing firm-ly, the motorcycle could
topple in the course of theoperations described below.Make sure that the motorcy-cle is steady on its stand.
To achieve better acces-sibility, turn the handle-
bars to the left.
Make sure the ground islevel and firm and park themotorcycle.Switch off ignition.
Release cover 1 by turningcounterclockwise and re-move it.
7113
z Ma
inte
na
nc
e
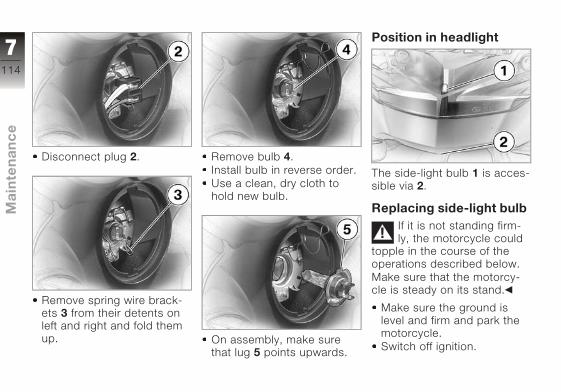
Disconnect plug 2.
Remove spring wire brack-ets 3 from their detents onleft and right and fold themup.
Remove bulb 4.Install bulb in reverse order.Use a clean, dry cloth tohold new bulb.
On assembly, make surethat lug 5 points upwards.
Position in headlight
The side-light bulb 1 is acces-sible via 2.
Replacing side-light bulb
If it is not standing firm-ly, the motorcycle could
topple in the course of theoperations described below.Make sure that the motorcy-cle is steady on its stand.
Make sure the ground islevel and firm and park themotorcycle.Switch off ignition.
7114
z Ma
inte
na
nc
e

Pull off connector 3 beneathheadlight.Remove bulb holder 4 fromheadlight housing by turningit counterclockwise.Twist bulb 5 out of bulb holder.Install bulb in reverse order.Use a clean, dry cloth tohold new bulb.
Replacing brake light
and rear light bulbs
If it is not standing firm-ly, the motorcycle could
topple in the course of theoperations described below.Make sure that the motorcy-cle is steady on its stand.
Make sure the ground islevel and firm and park themotorcycle.Removing seat ( 50)Switch off ignition.
Remove the screw 1.
Pull bulb housing towardrear until it is clear of hold-ers 2.
Turn bulb holder 3 counter-clockwise to remove it frombulb housing.
7115
z Ma
inte
na
nc
e

Press bulb into its socketand turn it counterclockwiseto remove.Install brake and tail light inreverse order.Use a clean, dry cloth tohold new bulb.
Replacing front turn indi-
cator bulb
If it is not standing firm-ly, the motorcycle could
topple in the course of theoperations described below.Make sure that the motorcy-cle is steady on its stand.
Make sure the ground islevel and firm and park themotorcycle.Switch off ignition.
Remove the screw 1.
Pull the lamp housing onthe screw connection sideout of the mirror housing.
Remove bulb holder 2 fromlamp housing by turning itcounterclockwise.Remove bulb 3 from bulbholder.Install bulb in reverse order.Use a clean, dry cloth tohold new bulb.
Replacing rear turn indi-cator bulb
If it is not standing firm-ly, the motorcycle could
topple in the course of theoperations described below.
7116
z Ma
inte
na
nc
e

Make sure that the motorcy-cle is steady on its stand.
Make sure the ground islevel and firm and park themotorcycle.Switch off ignition.
Remove the screw 1.
Pull the lamp housing onthe screw connection sideout of the turn indicatorhousing.
Press bulb 2 into fitting 3
and remove it by turning itcounterclockwise.Install turn indicator bulb inreverse order.Use a clean, dry cloth tohold new bulb.
Jump starting
The wires leading to theonboard socket do not
have a load-capacity ratingadequate for jump-startingthe engine. Excessively highcurrent can lead to a cable
7117
z Ma
inte
na
nc
e

fire or damage to the motor-cycle electronics.Do not use the onboard sock-et to jump-start the motorcy-cle.
Touching live parts ofthe ignition system with
the engine running can causeelectric shock.Do not touch parts of the igni-tion system when the engineis running.
A short-circuit can resultif the crocodile clips of
the jump leads are acciden-tally brought into contact withthe motorcycle.Use only jump leads fittedwith fully insulated crocodileclips at both ends.
Jump-starting with adonor-battery voltage
higher than 12 V can damagethe motorcycle electronics.The battery of the donor ve-
hicle must have a voltage of12 V.
If it is not standing firm-ly, the motorcycle could
topple in the course of theoperations described below.Make sure that the motorcy-cle is steady on its stand.
Make sure the ground islevel and firm and park themotorcycle.When jump-starting the en-gine, do not disconnect thebattery from the onboardelectrical system.Remove screws.Take out the battery com-partment lid in a forwardand upward direction.Run the engine of the donorvehicle during jump-starting.Begin by connecting oneend of red jumper leadto positive terminal ofdischarged battery and
he other end to positiveterminal of donor battery.Then connect one end ofblack jumper lead to nega-tive terminal of donor bat-tery, and other end to neg-ative terminal of dischargedbattery.Start engine of motorcyclewith discharged battery inusual way; if engine refusesto start, wait a few minutesbefore repeating attempt toprotect starter and donorbattery.Allow both engines to idlefor a few minutes beforedisconnecting jumper leads.Disconnect the jump leadfrom the negative terminalsfirst, then disconnect thesecond lead from the posi-tive terminals.Mount battery compartmentcover and install screws 1.
7118
z Ma
inte
na
nc
e

To start the engine, donot use start sprays or
similar items.
Battery
Maintenance instructions
Correct upkeep, rechargingand storage will prolong thelife of the battery and are es-sential if warranty claims areto be considered.Compliance with the pointsbelow is important in order tomaximize battery life:
Keep the surface of the bat-tery clean and dryDo not open the batteryDo not top up with waterBe sure to read and com-ply with the instructions forcharging the battery on thefollowing pagesDo not turn the battery up-side down
If the battery is notdisconnected, the
onboard electronics (clocketc.) will drain the battery.This can cause the batteryto run flat. If this happens,warranty claims will not beaccepted.During periods when the mo-torcycle is not being used, ofmore than four weeks, dis-connect the battery from themotorcycle or connect a trick-le charger to the battery.
BMW Motorrad has de-veloped a trickle-charger
specially designed for com-patibility with the electronicsof your motorcycle. Using thischarger, you can keep thebattery charged during longperiods when the motorcy-cle is not being used with-out having to disconnect thebattery from the motorcycle'sonboard systems. You can
obtain additional informationfrom your authorized BMWmotorcycle retailer.
Charging connected bat-
tery
Charging the connect-ed battery directly at the
battery terminals can damagethe motorcycle electronics.To charge the battery via thebattery terminals, disconnectthe battery first.
If you switch onthe ignition and the
multifunction display andindicator lights fail to lightup, the battery is completelyflat. Attempting to charge acompletely flat battery via theonboard socket can causedamage to the motorcycle'selectronics.Always charge a completelydrained battery directly at the
7119
z Ma
inte
na
nc
e

terminals of the disconnectedbattery.
Charging the battery viathe onboard socket is
only possible with suitablechargers. Unsuitable charg-ers can result in damage tothe motorcycle electronics.Use BMW chargers withthe part numbers 71 607 688 864 (220 V) or71 60 7 688 865 (110 V).If in doubt, charge thedisconnected battery directlyat the terminals.
Charge disconnected bat-tery via onboard socket.
The motorcycle'sonboard electronics
know when the battery is fullycharged. The onboard socketis switched off when thishappens.
Comply with operating in-structions of charger.
If you are unable tocharge the battery via
the onboard socket, youmay be using a charger thatis not compatible with yourmotorcycle's electronics.In this case, please chargethe battery directly at theterminals of the disconnectedbattery.
Charging disconnectedbattery
Charge battery using a suit-able charger.Comply with operating in-structions of charger.Once battery is fullycharged, disconnectcharger terminal clips frombattery terminals.
In the case of longer pe-riods when the motor-
cycle is not being used, thebattery must be rechargedregularly. See the instruc-
tions for caring for your bat-tery. Always fully recharge thebattery before returning it touse.
Removing battery
If it is not standing firm-ly, the motorcycle could
topple in the course of theoperations described below.Make sure that the motorcy-cle is steady on its stand.
Make sure the ground islevel and firm and park themotorcycle.
7120
z Ma
inte
na
nc
e

Remove screws 1.Take out the battery com-partment lid in a forwardand upward direction,
An incorrect disconnec-tion sequence increase
the risk of short-circuiting.Always observe the propersequence.
Remove negative cable 2
first.Then remove the positivebattery cable 3.
Unscrew screws 4 and pullretaining bracket towardrear.Lift battery upwards; if it isdifficult to move, moving itback and forth will help.
Installing battery
If it is not standing firm-ly, the motorcycle could
topple in the course of theoperations described below.Make sure that the motorcy-cle is steady on its stand.
7121
z Ma
inte
na
nc
e
while watching detents 2.

Make sure the ground islevel and firm and park themotorcycle.Switch off ignition.Place the battery in the bat-tery compartment, positiveterminal on the right in thedirection of travel.
Push retaining strap overbattery and install screws 4.
An incorrect connectionsequence increases the
risk of short-circuiting.Always observe the propersequence.Never install the battery with-out the protective cap.
First install the positive bat-tery cable 3.Then install the negativebattery cable 2.Mount battery compartmentcover.
Install battery compartmentcover while watching de-tents 2.Install screws 1.Switch on ignition.Fully open the throttle onceor twice.The engine managementsystem records the throttle-valve position.Setting clock ( 44)
7122
z Ma
inte
na
nc
e

Care
Care products . . . . . . . . . . . . . . . . 124
Washing your motorcycle . . . . . 124
Cleaning sensitive motorcycleparts . . . . . . . . . . . . . . . . . . . . . . . . . 125
Paint care . . . . . . . . . . . . . . . . . . . . 126
Protective wax coating. . . . . . . . 126
Storing motorcycle . . . . . . . . . . . 126
Returning motorcycle touse . . . . . . . . . . . . . . . . . . . . . . . . . . 126
8123
z Ca
re

Care products
We recommend that you usethe cleaning and care prod-ucts you can obtain from yourauthorized BMW motorcy-cle retailer. The materials inBMW Care Products havebeen tested in laboratoriesand in practice; they provideoptimized care and protectionfor the materials used in yourmotorcycle.
The use of unsuitablecleaning and care prod-
ucts can damage motorcyclecomponents.For cleaning, do not useany solvents such asnitro-thinners, cold cleaningagents, fuel or similar, and donot use cleaning agents thatcontain alcohol.
Washing your motor-
cycle
We recommend that you useBMW insect remover to soft-en and wash off insects andresilient dirt on painted partsprior to washing the motorcy-cle.To prevent stains, donot wash the motorcycleimmediately after it has beenexposed to strong sunlightand do not wash it in the sun.Make sure that the motor-cycle is washed frequently,especially during the wintermonths.To remove road salt, cleanthe motorcycle with cold wa-ter immediately after everytrip.
After the motorcycle hasbeen washed, ridden
through water or ridden inthe rain, the brake disks and
pads might be wet and thebrakes might not take effectimmediately.Brake early until the brakesare dry or braked until dry.
Warm water intensifiesthe effect of salt.
Only use cold water to re-move road salt.
The high pressure ofsteam cleaners can
damage seals, the hydraulicbrake system, the electricalsystem and the seat.Do not use a steam jet orhigh-pressure cleaning equip-ment.
8124
z Ca
re

Cleaning sensitive mo-
torcycle parts
Plastics
Clean plastic parts with waterand BMW plastic care emul-sion. This includes in particu-lar:
WindshieldsHeadlight lens made ofplasticCovering glass of instru-ment clusterBlack, unpainted parts
If plastic parts arecleaned using unsuitable
cleaning agents, the surfacescan be damaged.Do not use cleaning agentsthat contain alcohol, solventsor abrasives to clean plasticparts.'Fly sponges' or sponges withhard surfaces can also lead toscratches.
Soften stubborn dirt anddead insects by covering
the affected areas with a wetcloth.
Windshield
Clean off dirt and insects witha soft sponge and plenty ofwater.
Fuel and chemical sol-vents attack the wind-
shield material; the windshieldbecomes cloudy or dull.Do not use cleaning agents.
Chrome
Especially in the case of roadsalt, carefully clean chromeparts with a great deal of wa-ter and BMW auto shampoo.Use chrome polish for addi-tional treatment.
Radiator
Clean the radiator regular-ly to prevent overheating ofthe engine due to inadequatecooling.For example, use a gardenhose with low water pressure.
Cooling fins can be benteasily.
When cleaning the radiator,ensure that the fins are notbent.
Rubber
Treat rubber components withwater or BMW rubber protec-tion coating agent.
Using silicone sprays forthe care of rubber seals
can cause damage.Do not use silicon sprays orother care products that con-tain silicon.
8125
z Ca
re
Paint care
Washing the motorcycleregularly will help counteractthe long-term effects ofsubstances that damagethe paint, especially if yourmotorcycle is ridden in areaswith high air pollution ornatural sources of dirt, e.g.tree resin or pollen.However, remove particularlyaggressive materials imme-diately; otherwise changes inthe paint or discoloration canoccur. These include spilledfuel, oil, grease, brake fluid aswell as bird droppings. BMWvehicle polish or BMW paintcleaner are recommendedhere.Contamination on the paintfinish is particularly easy tosee after the motorcycle hasbeen washed. Remove thistype of soiling with cleaningnaphtha or spirit on a clean
cloth or cotton ball. We rec-ommend removing tar spotswith BMW tar remover. Thenadd a protective wax coat-ing to the paint at these loca-tions.
Protective wax coat-
ing
For the protective wax coat-ing of paint, we recommendusing only BMW auto wax oragents that contain carnaubaor synthetic waxes.The best way to see whetherthe paint has to be protectedis that water no longer formspearls.
Storing motorcycle
Clean motorcycle.Remove battery.Spray brake and clutchlever, and main and side
stand pivots with a suitablelubricant.Coat bare metal andchrome-plated parts withan acid-free grease (e.g.Vaseline).Park motorcycle in a dryroom so that both wheelsare unloaded.
Before storing thevehicle, have the engine
oil and the oil filter elementchanged by a certifiedworkshop, preferably anauthorized BMW motorcycleretailer. Combine work forstoring/returning to use withmaintenance service or aninspection.
Returning motorcycle
to use
Remove protective waxcoating.Clean motorcycle.
8126
z Ca
re

Install a charged battery.Before starting: Observechecklist.
8127
z Ca
re

8128
z Ca
re

Technical data
Troubleshooting chart . . . . . . . . 130
Threaded fasteners . . . . . . . . . . . 131
Engine . . . . . . . . . . . . . . . . . . . . . . . 132
Riding specifications . . . . . . . . . 134
Clutch . . . . . . . . . . . . . . . . . . . . . . . 134
Transmission . . . . . . . . . . . . . . . . . 134
Rear-wheel drive . . . . . . . . . . . . . 135
Running gear . . . . . . . . . . . . . . . . . 135
Brakes . . . . . . . . . . . . . . . . . . . . . . . 136
Wheels and tires . . . . . . . . . . . . . 136
Electrical system . . . . . . . . . . . . . 137
Frame . . . . . . . . . . . . . . . . . . . . . . . 139
Dimensions . . . . . . . . . . . . . . . . . . 139
Weights . . . . . . . . . . . . . . . . . . . . . . 140
9129
z Te
ch
nic
al d
ata

Troubleshooting chart
Engine does not start at all or is very difficult to startPossible cause Remedy
Emergency ON/OFF switch activated. Emergency ON/OFF switch in operating posi-tion.
Side stand extended and gear engaged. Retract side stand ( 62).
Gear engaged and clutch not operated Place transmission in neutral or disengageclutch( 62).
Clutch disengaged with ignition switched off. Switch on ignition first, then disengage clutch.
No fuel in tank. Refueling ( 76)
Battery not adequately charged. Charging connected battery ( 119)
9130
z Te
ch
nic
al d
ata

Threaded fasteners
Activity Type of threaded fastener Tighteningtorques
Front wheel
Front brake caliper mounted onwheel carrier
M8 x 32 - 10.9 22 lb/ft (Left)
M8 x 32 - 10.9 22 lb/ft (Right)
Clamping screw on quick-releaseaxle in wheel carrier
M8 x 30 14 lb/ft
Quick-release axle in threadedbush
M24 x 1.5 37 lb/ft
Rear wheel
Muffler on right passenger footrest M8 x 30 21 lb/ft
Muffler on manifold M8 - 10.9 self-locking, Optimoly TA 26 lb/ft
Rear wheel on wheel flange M10 x 43 x 1.25 44 lb/ft
M10 x 40 x 1.25 44 lb/ft
9131
z Te
ch
nic
al d
ata

Engine
Type
Engine design Transverse-mounted four-cylinder, four-strokeinline engine, angled 55° toward front. Withfour valves per cylinder, actuated by two over-head camshafts and trailing valve levers; liq-uid cooled, electronic fuel injection, integratedsix-speed cassette transmission, dry-sumplubrication
Technical data
Effective displacement 1157 cc
Cylinder bore 3.1 in
Piston stroke 2.3 in
Compression ratio 13:1
Rated output 167 hp, - at engine speed: 10250 min-1
with OE Power reduction: 101 hp, - at engine speed: 7000 min-1
with OE Power reduction: 107 hp, - at engine speed: 8750 min-1
Maximum torque 96 lb/ft, - at engine speed: 8250 min-1
Permissible maximum engine speed 11000 min-1
Idle speed 1150±50 min-1
9132
z Te
ch
nic
al d
ata

Fuel
Recommended fuel type Premium grade unleaded fuel98 ROZ
Fuel types can be used with poorer perfor-mance and consumption
Super unleaded95 ROZ
Fuel tank capacity 5 gal, Usable1.1 gal, Of that reserve
Engine oil
Total engine oil capacity 3.7 quarts, With filter change0.5 quarts, Difference between Min and Max
Lubricant Castrol GPS 10W-40 (SAE 10W40; API SG;JASO MA)
Oil grades Mineral engine oils of the API classificationSF to SH. BMW Motorrad does not recom-mend using oil additives, as these can worsenclutch operation.
Permissible viscosity classes
SAE 5 W->30 -4...68 °F, Winter operation
SAE 10 W-40 14...86 °F, At low temperatures
9133
z Te
ch
nic
al d
ata

Riding specifications
Top speed >124 mph
Acceleration 0-62 mph (0-100 km/h) 2.8 s
Clutch
Clutch design Multi-disk oil-bath clutch
Transmission
Transmission design Claw-shifted 6-speed cassette transmissionintegrated in engine housing
Gear ratios
Overall gear ratio in 1st gear 2.521
Overall gear ratio in 2nd gear 1.842
Overall gear ratio in 3rd gear 1.455
Overall gear ratio in 4th gear 1.287
Overall gear ratio in 5th gear 1.143
Overall gear ratio in 6th gear 1.015
9134
z Te
ch
nic
al d
ata

Rear-wheel drive
Rear-wheel drive design Shaft drive with bevel gears
Gear ratio of rear-wheel drive 2.82:1
Running gear
Front suspension design Double leading link
Total suspension travel of front suspension 4.5 in, Static4.9 in, Dynamic
Rear suspension design Single-tube gas pressure shock-absorber
Total suspension travel of rear-wheel suspen-sion
5.3 in, On wheel
9135
z Te
ch
nic
al d
ata

Brakes
Front brake design Hydraulic two-disk brake with 4-piston fixedcalipers and floating brake disks
Front brake-pad material Sintered metal
Rear brake design Hydraulic disk brake with 2-piston floatingcaliper and fixed brake disk
Rear brake-pad material Organic
Wheels and tires
Front wheel design Cast aluminum, MT H2
Front-wheel rim size 3.50" x 17"
Front-wheel tire designation 120/70 ZR 17
Rear wheel design Cast aluminum, MT H2
Rear-wheel rim size 6.00" x 17"
Rear-wheel tire designation 190/50 ZR17
Tire pressures
Front-wheel tire pressure 36.3 psi, In cold state
Rear-wheel tire pressure 42.1 psi, In cold state
9136
z Te
ch
nic
al d
ata

Electrical system
Rated load of onboard socket 5 A
Fuses All circuits are electronically protected, soplug-in fuses are no longer necessary. If anelectronic fuse trips and de-energizes a cir-cuit, the circuit is active as soon as the ig-nition is switched on after the fault has beenrectified.
Type
Battery design AGM (Absorptive Glass Matt) battery
Technical data
Battery nominal voltage 12 V
Battery nominal capacity 14 Ah
Battery low-temperature test current 100 A
Technical data
Spark plug manufacturer and designation Bosch YR5DDE
Spark-plug electrode gapNew
0.03 in
Spark-plug electrode gapWear limit
No wear limit, spark plug is replaced aftermaintenance interval
9137
z Te
ch
nic
al d
ata

Bulbs
High-beam headlight bulb - standard designa-tion
Halogen bulb H7
High-beam headlight bulb - voltage 12 V
High-beam headlight bulb - wattage 55 W
Low-beam headlight bulb- standard designa-tion
Halogen bulb H7
Low-beam headlight bulb - voltage 12 V
Low-beam headlight bulb - wattage 55 W
Side-light bulb standard designation W5W
Side-light bulb voltage 12 V
Side-light bulb wattage 5 W
Tail light/brake light bulb standard designation P21W
Tail light/brake light bulb voltage 12 V
Tail light/brake light bulb wattage 21 W
Front turn indicator bulb standard designation W16W
Front turn indicator bulb voltage 12 V
Front turn indicator bulb wattage 10 W
License-plate light bulb standard designation W5W
License-plate light bulb voltage 12 V
9138
z Te
ch
nic
al d
ata

License-plate light bulb wattage 5 W
Frame
Main frame design Composite with IHU/extruded section anddiecasting
Location of type plate On rear cross frame tube
Location of vehicle identification number (VIN) At front right on frame side-section
Dimensions
Overall motorcycle length 86.7 in
Maximum width 35.6 in, Across mirrors
Maximum height 47.7 in, DIN unladen weight
Seat height for driver 32.3 in, Without driver
with OE Low driver's seat: 31.1 in, Without driver
Wheelbase in normal-load position 61.9 in, Full tank of gas, with rider: 187 lbs
Ground clearance 5.7 in, In normal-load position, full tank of gas,with rider: 187 lbs
9139
z Te
ch
nic
al d
ata
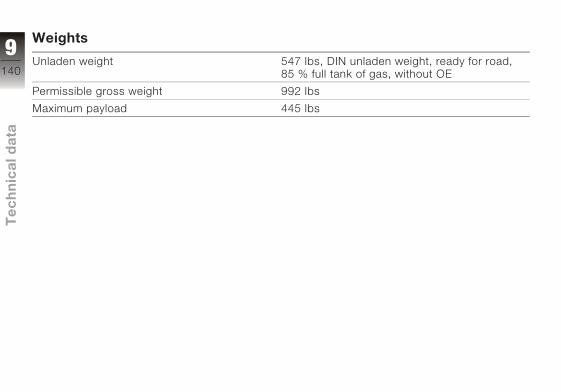
Weights
Unladen weight 547 lbs, DIN unladen weight, ready for road,85 % full tank of gas, without OE
Permissible gross weight 992 lbs
Maximum payload 445 lbs
9140
z Te
ch
nic
al d
ata

Service
BMW Motorrad service . . . . . . . 142
BMW Motorrad servicequality . . . . . . . . . . . . . . . . . . . . . . . 142
BMW Motorcycle Service Card- breakdown service on theroad . . . . . . . . . . . . . . . . . . . . . . . . . 143
BMW Motorrad servicenetwork . . . . . . . . . . . . . . . . . . . . . . 143
Maintenance work . . . . . . . . . . . . 143
Maintenance schedules . . . . . . . 144
Confirmation of maintenancework . . . . . . . . . . . . . . . . . . . . . . . . . 145
Confirmation of service . . . . . . . 150
10141
z Se
rvic
e

BMW Motorrad ser-
vice
Advanced technologyrequires specially adaptedmethods of maintenance andrepair.
If this maintenance andrepair work is performed
inexpertly, there is a dangerof damage and associatedsafety risks.BMW recommends only hav-ing work carried out on yourmotorcycle by an authorizedBMW motorcycle retailer or aworkshop which works withpersonnel trained in accor-dance with BMW specifica-tions.
You can contact your BMWmotorcycle retailer for infor-mation on the contents ofBMW Service, inspectionsand the Annual Inspection.
Have all maintenance andrepair work carried out con-firmed in the "Service" chap-ter in this manual.Your authorized BMW mo-torcycle retailer is suppliedwith all the latest technical in-formation and therefore pos-sesses the necessary tech-nical know-how. BMW Mo-torrad therefore recommendsthat you consult your autho-rized BMW motorcycle retaileron all questions concerningyour motorcycle.
BMW Motorrad service
quality
BMW Motorrad stands notonly for good handling and ahigh degree of reliability, butalso for an excellent quality ofservice.To ensure that your BMWis always in optimum condi-tion, we recommend that you
have the maintenance workrequired for your motorcyclecarried out, preferably by yourauthorized BMW motorcycleretailer. For generous treat-ment of claims submitted af-ter the warranty period hasexpired, evidence of regularmaintenance is essential.Certain signs of wear, more-over, may otherwise not benoticed until it is too late tocorrect them at moderatecost. The workshop person-nel at BMW motorcycle retail-ers are familiar with your mo-torcycle and can take actionbefore minor problems canturn into major trouble. Byhaving the necessary repairsdone properly and in goodtime, you save time and mon-ey in the long run.
10142
z Se
rvic
e

BMW Motorcycle Ser-
vice Card - breakdown
service on the road
With all new BMW motorcy-cles, the BMW Motorrad Ser-vice Card protects you in theevent of a breakdown withan extensive range of ser-vices such as breakdown as-sistance, motorcycle trans-portation etc. (differing regu-lations are possible in individ-ual countries). In the case ofa breakdown, you contact theMobile Service of BMW Mo-torrad. Here you will find ourspecialists ready to help withboth advice and action.Important country-specificcontact addresses and therelevant after-sales serviceorganization phone numbersas well as information on Mo-bile Service and the dealer-ship network can be found in
the "Service Kontakt / ServiceContact" brochures.
BMW Motorrad service
network
With our worldwide servicenetwork we support you andyour motorcycle in over 100countries around the globe.In Germany alone, you havethe best possible access toapproximately 200 authorizedBMW motorcycle retailers.All information on the inter-national dealership networkis contained in the "ServiceContact Europe" brochureand "Service Contact Africa,America, Asia, Australia andOceania".
Maintenance work
Intervals
Some maintenance tasksmust be performed after acertain time, others dependon the distance covered bythe motorcycle.
BMW Running-in Check
The BMW running-in checkhas to be performed whenthe motorcycle has coveredbetween 300 miles (500 km)and 750 miles (1,200 km).
BMW Annual Inspection
Some maintenance workmust be carried out at leastonce a year. Other tasksdepend on the distance themotorcycle has covered.
10143
z Se
rvic
e

BMW Service
After the first 6,000 miles(10,000 km) and everyadditional 12,000 miles(20,000 km) (24,000 miles,36,000 miles, 48,000 milesetc. (40 000 km, 60 000km, 80 000 km etc.)) if thisdistance is covered within ayear.
BMW Inspection
After the first 12,000 miles(20,000 km) and everyadditional 12,000 miles(20,000 km) (24,000 miles,36,000 miles, 48,000 milesetc. (40 000 km, 60 000km, 80 000 km etc.) if thisdistance is covered within ayear.
Maintenance sched-
ules
The maintenance schedule foryour motorcycle depends onthe equipment installed, andon the motorcycle's age andthe distance it has covered.Your authorized BMW motor-cycle retailer will be happy tosupply a copy of the currentmaintenance schedule foryour motorcycle on request.
Every authorized BMWmotorcycle retailer has a
fixed scale of charges basedon labor times and carefullycalculated hourly rates. Fuel,lubricants and similar sub-stances, filters, gaskets etc.are charged separately.
10144
z Se
rvic
e

Confirmation of maintenance work
BMW Pre-deliveryCheck
Carried out properly inaccordance with work-shop specifications.
Date, stamp, signature
BMW Running-inCheck
Carried out properly inaccordance with work-shop specifications.
at miles:
Brake fluid changedWithout BMW Inte-gral ABSWith BMW IntegralABS
Wheel circuitControl circuit
Date, stamp, signature
10145
z Se
rvic
e

BMW Service
BMW Annual In-spectionBMW ServiceBMW Inspection
Carried out properly inaccordance with work-shop specifications.
at miles:
Brake fluid changedWithout BMW Inte-gral ABSWith BMW IntegralABS
Wheel circuitControl circuit
Date, stamp, signature
BMW Service
BMW Annual In-spectionBMW ServiceBMW Inspection
Carried out properly inaccordance with work-shop specifications.
at miles:
Brake fluid changedWithout BMW Inte-gral ABSWith BMW IntegralABS
Wheel circuitControl circuit
Date, stamp, signature
BMW Service
BMW Annual In-spectionBMW ServiceBMW Inspection
Carried out properly inaccordance with work-shop specifications.
at miles:
Brake fluid changedWithout BMW Inte-gral ABSWith BMW IntegralABS
Wheel circuitControl circuit
Date, stamp, signature
10146
z Se
rvic
e

BMW Service
BMW Annual In-spectionBMW ServiceBMW Inspection
Carried out properly inaccordance with work-shop specifications.
at miles:
Brake fluid changedWithout BMW Inte-gral ABSWith BMW IntegralABS
Wheel circuitControl circuit
Date, stamp, signature
BMW Service
BMW Annual In-spectionBMW ServiceBMW Inspection
Carried out properly inaccordance with work-shop specifications.
at miles:
Brake fluid changedWithout BMW Inte-gral ABSWith BMW IntegralABS
Wheel circuitControl circuit
Date, stamp, signature
BMW Service
BMW Annual In-spectionBMW ServiceBMW Inspection
Carried out properly inaccordance with work-shop specifications.
at miles:
Brake fluid changedWithout BMW Inte-gral ABSWith BMW IntegralABS
Wheel circuitControl circuit
Date, stamp, signature
10147
z Se
rvic
e

BMW Service
BMW Annual In-spectionBMW ServiceBMW Inspection
Carried out properly inaccordance with work-shop specifications.
at miles:
Brake fluid changedWithout BMW Inte-gral ABSWith BMW IntegralABS
Wheel circuitControl circuit
Date, stamp, signature
BMW Service
BMW Annual In-spectionBMW ServiceBMW Inspection
Carried out properly inaccordance with work-shop specifications.
at miles:
Brake fluid changedWithout BMW Inte-gral ABSWith BMW IntegralABS
Wheel circuitControl circuit
Date, stamp, signature
BMW Service
BMW Annual In-spectionBMW ServiceBMW Inspection
Carried out properly inaccordance with work-shop specifications.
at miles:
Brake fluid changedWithout BMW Inte-gral ABSWith BMW IntegralABS
Wheel circuitControl circuit
Date, stamp, signature
10148
z Se
rvic
e

BMW Service
BMW Annual In-spectionBMW ServiceBMW Inspection
Carried out properly inaccordance with work-shop specifications.
at miles:
Brake fluid changedWithout BMW Inte-gral ABSWith BMW IntegralABS
Wheel circuitControl circuit
Date, stamp, signature
BMW Service
BMW Annual In-spectionBMW ServiceBMW Inspection
Carried out properly inaccordance with work-shop specifications.
at miles:
Brake fluid changedWithout BMW Inte-gral ABSWith BMW IntegralABS
Wheel circuitControl circuit
Date, stamp, signature
BMW Service
BMW Annual In-spectionBMW ServiceBMW Inspection
Carried out properly inaccordance with work-shop specifications.
at miles:
Brake fluid changedWithout BMW Inte-gral ABSWith BMW IntegralABS
Wheel circuitControl circuit
Date, stamp, signature
10149
z Se
rvic
e

Confirmation of service
The table is intended as proof of maintenance, warranty and repair work, the installed optionalaccessories and any special campaign (recall) work carried out.
Work carried out at miles: Date
10150
z Se
rvic
e

Work carried out at miles: Date 10151
z Se
rvic
e

AAbbreviations and symbols, 6Anti-theft alarm, 17
BBattery
Battery charging-currentwarning indicator, 26Charging connectedbattery, 119Charging disconnectedbattery, 120Installing, 121Removing, 120
Brake fluidChecking front level, 97Checking rear level, 98
Brake padsChecking front, 95Checking rear, 96
BrakesTechnical data, 136
CCase
Adapting, 89Adjusting, 86Closing, 86Mounting, 88Opening, 86Removing, 87
Clock, 20Adjusting, 17Setting, 44
ClutchFluid reservoir, 11, 13Technical data, 134
Commissioning, 126Confirmation of maintenance
work, 145Coolant
Coolant-temperaturewarning indicator, 24Temperature display, 21
EElectrical system
Technical data, 137Emergency ON/OFF
switch, 16, 45Engine
Engine-electronics warningindicator, 25Technical data, 132Temperature display, 20
Engine oilChecking level, 92Engine oil-pressure warningindicator, 25Technical data, 133Topping up, 94
ESA, 55Adjusting damping, 56Adjusting spring preload, 56Calling up settings, 56
EWSWarning indicator, 24
FFlat tire kit, 89
11152
z Ind
ex

FrameTechnical data, 139
Front wheel standMounting, 109
FuelQuantity indicator, 20Refueling, 76Reserve-quantity warningindicator, 24Technical data, 133
Fuses, 137
GGear indicator, 20
HHandlebar fittings
General view, left , 15General view, right, 16
Hazard warning flashers, 15,16Switching off, 39Switching on, 38
HeadlightAdjusting headlightrange, 48High-beam headlight, 18Low-beam headlight, 18Side lights, 18
Headlight flasher, 15Heated hand grips, 16, 45High-beam headlight, 15Horn, 15
IIgnition
Switching off, 36Switching on, 36
ImmobilizerWarning indicator, 24
Indicator lights, 17Instrument cluster
Lighting sensor, 17Overview, 17
JJump starting, 117
LLamps
Bulb-defect warningindicator, 26, 27General instructions, 111Replacing brake lightbulbs, 115Replacing front turnindicator bulb, 116Replacing high-beambulb, 113Replacing low-beambulb, 112Replacing rear lightbulbs, 115Replacing rear turn indicatorbulb, 116Replacing side-lightbulb, 114Technical data, 138
11153
z Ind
ex

LightsSwitching off side lights, 48Switching on high-beamheadlight, 47Switching on low-beamheadlight, 47Switching on side lights, 47,48
MMotorcycle
General view of left side, 11General view of rightside, 13returning to use, 126Storing, 126
Multifunction display, 17, 20
OOnboard computer
Ambient temperature, 43Average consumption, 43Average speed, 42Button, 15
Resetting average con-sumption, 43Resetting averagespeed, 42Residual range, 42Selecting readings, 41Tripmaster operation, 41
Onboard socket, 11, 13Overview of warning indica-
tors, 22, 29
PPre-ride check, 63
RRear shock absorber system
Adjusting, 11, 13, 54Rear suspension preload
Adjusting, 11, 13, 54Rear-wheel drive
Technical data, 135Rear-wheel stand
Mounting, 110Refueling, 76
ReserveWarning indicator, 24
Residual range, 40, 42Running gear
Technical data, 135
SSeat
Installing, 51Lock, 11, 13Removing, 50
Service, 142Side stand
During starting, 62Speedometer, 17Starter, 16Steering lock, 37Storing, 126
TTachometer, 17Technical data
Brakes, 136Bulbs, 138Clutch, 134Electrical system, 137
11154
z Ind
ex

Engine, 132Engine oil, 133Frame, 139Fuel, 133Rear-wheel drive, 135Running gear, 135Transmission, 134Wheels and tires, 136
TiresChecking air pressure, 57Checking tread depth, 100Technical data, 136
ToolkitOverview of basic set, 92Overview of supplementalset, 92
Torques, 129Transmission
During starting, 62Technical data, 134
Tripmaster, 20Operation, 39Resetting tripmeter, 40Residual range, 40Selecting readings, 39
Troubleshooting chart, 130Turn indicators
Left, 15, 49Right, 16, 49Switching off, 16, 50
WWarning indicators, 20
Display, 21Warning lights, 17Wheels
Installing front wheel, 103Installing rear wheel, 106Removing front wheel, 101Removing rear wheel, 105Technical data, 136
11155
z Ind
ex

Details described or illustrat-ed in this booklet may differfrom the motorcycle's actualspecification as purchased,the accessories fitted or thenational-market specification.No claims will be entertainedas a result of such discrepan-cies.Dimensions, weights,fuel consumption andperformance data are quotedto the customary tolerances.The right to modify designs,equipment and accessories isreserved.Errors and omissions except-ed.
© 2005 BMW MotorradNot to be reproduced eitherwholly or in part without writ-ten permission from BMWMotorrad, After Sales.Printed in Germany.

The most important data for a filling station stop can be found in the following chart.
Fuel
Recommended fuel type Premium grade unleaded fuel98 ROZ
Minimum octane number 95 ROZ
Fuel tank capacity 5 gal, Usable1.1 gal, Of that reserve
Tire pressures
Front-wheel tire pressure 36.3 psi, In cold state
Rear-wheel tire pressure 42.1 psi, In cold state
BMW recommends
BMW Motorrad
Order No.:01 47 7 698 34708.20053rd Edition The Ultimate Riding
Machine

7 Reporting Safety Defects
If you believe that your vehicle has a defect which could cause a crash or could cause injury or death, you should immediately inform the National Highway Traffic Safety Administration (NHTSA) in addition to notifying BMW of North America, LLC.
If NHTSA receives similar complaints, it may open an investigation, and if it finds that a safety defect exists in a group of vehicles, it may order a recall and remedy campaign. However, NHTSA cannot become involved in
individual problems between you, your dealer, or BMW of North America, LCC.
To contact NHTSA, you may call the Vehicle Safety Hotline toll-free at 1–888–327–4236 (TTY: 1–800–424–9153); go to http://www.safercar.gov; or write to: Administrator, NHTSA, 400 Seventh Street, SW., Washington, DC 20590. You can also obtain other information about motor vehicle safety from http://www.safercar.gov.
BMW MotorradOrder No: 01 47 7 706 697 08.2006
Please attach this sticker to the inside back cover page of your Rider’s Manual

E1
BM
W M
oto
rrad
In
teg
ral A
BS
Information on BMW Motorrad Integral ABS
How does ABS work?The maximum braking force which can be transferred to the road surface is partially dependent on the coefficient of friction of the road surface. Gravel, ice, snow and wet road surfaces offer a considerably poorer coefficient of friction than a dry, clean layer of asphalt. The lower the coeffi-cient of friction of the road surface is, the longer the braking distance will be.If the maximum transferrable braking force is exceeded when the driver increases the brake pressure applied, the wheels begin to lock and the driving stability is lost,
resulting in a danger of falling. Before this situation occurs,the ABS intervenes and adjusts the brake pressure to the maximum transferrable braking force. As a result, the wheels continue to turn and the driving stability is maintained regardless of the road surface condition.
What happens on uneven road surfaces?Wavy ground or uneven road surfaces can briefly result in a loss of contact between the tire and the road surface, and the transferrable braking force decreases to zero. If the brakes are applied in this situation, the ABS must reduce the brake pressure to
ensure driving stability when contact with the road surfaceis restored. At this point in time the BMW Motorrad Integral ABS must assume extremely low coefficients of friction (gravel, ice or snow) so that the wheels turn in every imaginable case and the driving stability is ensured. After the actual conditions are detected, the system adjusts the brake pressure to the optimum value.
What must be observed during driving safety training?Compared to normal braking, braking during which the ABS must intervene in a regulating manner requires a consider-
Info_I_ABS_us_yyyyyyy.fm Seite 1 Dienstag, 19. Juli 2005 3:01 15

BM
W M
oto
rrad
In
teg
ral A
BS
E2
ably increased amount of cur-rent, which places a heavy load on the battery. During normal driving the bat-tery is constantly charged, and therefore has a sufficient capacity.During driving breaks of several weeks, a trickle-charger available from an authorized BMW Motorrad retailer should be connected or the battery should be dis-connected and recharged before the next time the motorcycle is driven.During driving-safety training courses an unusually high number of ABS-controlled braking actions take place within a short time. Between those actions there are waiting and evaluation phases during which the motorcycle is not
driven. The battery is heavily loaded by the ABS controlactions, however at the same time it is not recharged, as vir-tually no driving takes place. In isolated cases, braking actions of this kind in this artificially produced situation during which the brake lever is pulled with maximum force and extremely quickly, in com-bination with a decreasing electrical system voltage, push the ABS to technical limits at which the control function is no longer fulfilled.Field observations by BMW Motorrad show that no com-parable situations occur in road traffic or during circuit training.During safety training the fol-lowing instructions must be followed:
• Observe the warning and control lights before each braking exercise
• Drive a longer distance after a maximum of five braking exercises to charge the battery
• Switch off consumers like seat and hand grip heaters, radio, navigation system and accessories connected to the sockets
• Switch off the ignition during breaks and conversations. If the engine is switched off with the emergency ON/OFF switch, the light and all elec-tronic systems remain switched on and load the battery
Info_I_ABS_us_yyyyyyy.fm Seite 2 Dienstag, 19. Juli 2005 3:01 15

E3
BM
W M
oto
rrad
In
teg
ral A
BS
How can the shortest braking distance be achieved?During braking the dynamic load distribution between the front and rear wheel changes. The heavier braking is, the higher the load on the front wheel. The greater the wheel load, the more braking force can be transferred.To achieve the shortest possi-ble braking distance, the front brake must be operated quickly and with increasing force. This optimally utilizes the dynamic load increase on the front wheel. At the same time, the clutch should also be disengaged.With the "forced braking" often practiced, during which the brake pressure is generated
as quickly as possible and with maximum force, the dynamic load distribution is unable to follow the increase in deceleration and the brake force cannot be completely transferred to the road sur-face. To prevent locking of the front wheel, the ABS must intervene and reduce the brake pressure, which increases the braking distance.
What happens when the ABS control function fails?A fault in the BMW Motorrad Integral ABS is indicated by a corresponding warning in the instrument cluster.If only the ABS control function fails, the integral system and the brake booster continue tooperate. If these systems also
fail, the residual braking func-tion is activated. In this case, the forces to be applied to the brake levers are considerably higher and the required lever travel increases.The residual braking function is a mechanical function and is always available when the BMW Motorrad Integral ABS fails, regardless of the battery charging level. It meets all requirements of the worldwide legislation on the brake design of motor vehicles and enables the rider to brake the motor-cycle. When driving with the residual braking function, the following instructions must be followed:• Adjust the brake levers to
the maximum travel
Info_I_ABS_us_xx.fm Seite 3 Freitag, 22. Juli 2005 10:09 10

BM
W M
oto
rrad
In
teg
ral A
BS
E4
• Always brake with the front and rear brakes
• In clear situations, carry out test braking to learn the response behavior of the brakes
• Observe the condition of the road surface and adapt the braking force applied accordingly
• As it is an emergency running function, you should drive to a specialized workshop, preferably an authorized BMW Motorrad retailer, as quickly as possible
How important is regular maintenance?
Any technical system is always only as good as
its maintenance status.To ensure that the BMW Motorrad Integral ABS is in optimum condition with regardto maintenance, the specified inspection intervals must always be complied with.
How is the BMW Motorrad Integral ABS designed?The BMW Motorrad Integral ABS ensures the driving stability of the motorcycle on any surface within the physical limits of driving. The system is not optimized for special requirements resulting under extreme weather conditions on offroad terrain or on racing circuits.
BMW Motorrad
Order No.:01 47 7 699 27707.20051st edition US/RF The Ultimate
Riding Machine
Info_I_ABS_us_xx.fm Seite 4 Freitag, 22. Juli 2005 10:09 10