
Rick Barba - Internet Archive
183
Rick Barba primagames.com ® ™
Transcript of Rick Barba - Internet Archive

Rick Barbaprimagames.com®
™

<i>
CONTENTSCONTENTS
Prima’s Official Strategy Guide
Rick Barba
Prima GamesA Division of Random House, Inc.
3000 Lava Ridge CourtRoseville, CA 95661
(916) 787-7000www.primagames.com

The Prima Games logo is a registered trademark of Random House, Inc.,registered in the United States and other countries. Primagames.com is aregistered trademark of Random House, Inc., registered in the United States.
™ & ©2001 Twentieth Century Fox Film Corporation. All rights reserved. No part of thisbook may be reproduced or transmitted in any form or by any means, electronic ormechanical, including photocopying, recording, or by any information storage or retrievalsystem without written permission from Prima Games. Prima Games is a division ofRandom House, Inc. Sierra is a trademark of Sierra On-Line, Inc.
Product Manager: Jennifer CrotteauProject Editor:Terri M. Stewart
All products and characters mentioned in this book are trademarks of their respectivecompanies.
Acknowledgments:Thanks to Paul Pawlicki, Glenn Dphrepaulezz, and David Farkas and the rest of the QAteam at Fox for your insider information. Also thanks to Terri and Jennifer at Prima.
Important:Prima Games has made every effort to determine that the information contained in thisbook is accurate. However, the publisher makes no warranty, either expressed or implied,as to the accuracy, effectiveness, or completeness of the material in this book; nor doesthe publisher assume liability for damages, either incidental or consequential, that mayresult from using the information in this book.The publisher cannot provide informationregarding game play, hints and strategies, or problems with hardware or software.Questions should be directed to the support numbers provided by the game and devicemanufacturers in their documentation. Some game tricks require precise timing and mayrequire repeated attempts before the desired result is achieved.
ISBN 0-7615-3748-1Library of Congress Catalog Card Number: 2001095682

<iii>
CONTENTSCONTENTSContentsIntroduction.................................................................................................................xiv
Part I: General Strategy .......................................1
Chapter 1: Marine Tactics..................................................2General Tactics ......................................................................................................
Keep an Eye Out for Gear ...............................................................................2Keep an Eye (and Ear) to That Motion Tracker ................................................2Do Most Fighting from Medium to Long Range................................................3Avoid Close Quarters—If You Can’t, Use a Shotgun or Flamethrower ..............3Beware of Holes, High or Low.........................................................................3In Combat, Keep Moving .................................................................................4When the Coast is Clear, Stop to Recharge and Explore ..................................4Don’t Show Your Back.....................................................................................4Learn to Fight while Running Backward .........................................................4Master the “Strafe-and-Shoot”Technique........................................................4Always Strafe around Corners ........................................................................5Be Smart about Consuming Medikit and Armor Pickups...................................5Use Your Image Intensifier for Quick Scans Only.............................................5Toss Your Greetings into Suspect Areas...........................................................5
Weapons..............................................................................................................5Combat Knife..................................................................................................6M4A4 Pistol....................................................................................................6Shotgun..........................................................................................................6M-41A Pulse Rifle...........................................................................................7M-56 Smartgun...............................................................................................7M-240 Flamethrower ......................................................................................8M-6B Rocket Launcher ...................................................................................8M-92 Grenade Launcher .................................................................................8M-90 Minigun .................................................................................................9WY 102 Sniper Rifle........................................................................................9
Tools and Equipment ..........................................................................................10

Prima’s Official Strategy Guide
<iv>
Combat Tips .......................................................................................................10Fighting Aliens .............................................................................................10Fighting Predators........................................................................................11Fighting Guards and Other Marines...............................................................11
Chapter 2: Predator Tactics...........................................12General Tactics ..................................................................................................12
Learn to Cycle Through Vision Modes Quickly ...............................................12Devote Every Lull to Medicomp and Energy Sift Recharging .........................13When Hunting Human Prey, Cloak and Follow ................................................13Avoid Water When Cloaked ...........................................................................13Don’t Waste Energy Cloaking Against Aliens .................................................13Against Aliens, Use the Backpedal and Fire Technique with
Electromagnetic Vision Mode ..................................................................14Play the Angles with Your Speargun ..............................................................14
Weapons ............................................................................................................14Wristblades..................................................................................................14Combistick ...................................................................................................15Plasma Pistol ...............................................................................................15Speargun ......................................................................................................16Plasmacaster ...............................................................................................16Disc..............................................................................................................17Netgun..........................................................................................................17Remote Bomb................................................................................................18
Tools ...............................................................................................................18Medicomp and Energy Sift............................................................................18Charge Emittor .............................................................................................18
Special Abilities .................................................................................................19Vision Modes ................................................................................................19The Crouch-Leap ..........................................................................................19
Combat Tactics ..................................................................................................19Fighting Marines ..........................................................................................19Fighting Aliens .............................................................................................20Fighting Other Predators ..............................................................................21

<v>
CONTENTSCONTENTS
Chapter 3: Alien Tactics...................................................22Alien Types ........................................................................................................22
Facehugger ..................................................................................................23Chestburster ................................................................................................23Drone and Runner .........................................................................................24Praetorian ....................................................................................................24Predalien......................................................................................................25
General Tactics ..................................................................................................25Use Your Speed to Get Close .........................................................................25But Don’t Slug It Out.....................................................................................26Avoid Open Spaces........................................................................................26Use the Element of Surprise .........................................................................26Run Away......................................................................................................26Stun Folks and Eat Heads .............................................................................26Pounce on More Dangerous Enemies.............................................................27Conserve Cowering Food ..............................................................................27Think Vertically ............................................................................................27Travel the Odd Angles ...................................................................................27
Attacks ..............................................................................................................28Claws ...........................................................................................................28Jaws (Headbite Only) ....................................................................................28Tail...............................................................................................................28Pounce .........................................................................................................29
How to Replenish Alien Health ...........................................................................29Special Abilities .................................................................................................29
Wall-walk .....................................................................................................29Vision Modes ................................................................................................30
Combat Tactics ..................................................................................................30Fighting Marines ..........................................................................................30Fighting Predators........................................................................................30Fighting Other Aliens ....................................................................................30

Prima’s Official Strategy Guide
<vi>
Chapter 4: Multiplayer Tips............................................31Play the Single-Player Missions .........................................................................31Know the Species...............................................................................................31Learn the Locale ...............................................................................................31Know the Rules ..................................................................................................32
Standard Deathmatch ...................................................................................32Team Deathmatch .........................................................................................32Hunt .............................................................................................................33Survivor .......................................................................................................33Overrun ........................................................................................................34Evac.............................................................................................................34
Understand Ping.................................................................................................34Keep Moving ......................................................................................................35. . . Unless You Find a Good Sniper Post ...............................................................35Grab the Good Stuff ...........................................................................................36Mine Popular Pathways......................................................................................36Be Unpredictable................................................................................................36Run Backward from Aliens .................................................................................36Keep Enemies in Front .......................................................................................36Get Behind Your Enemies....................................................................................36
Special Marine Multiplayer Tips ...............................................................................37Be Environmentally Aware .................................................................................37Know Your Weapons ...........................................................................................37
Special Alien Multiplayer Tips ..................................................................................37Waste No Time Engaging Enemies ......................................................................37Avoid Frontal Assaults against Well-Armed Enemies...........................................37Pounce Around the Map .....................................................................................38Use the “Circle Claw”Tactic ...............................................................................38
Part II: Single-Player Walkthroughs ...........39
Chapter 5: Marine Missions...........................................40Mission 1: Unwelcome Guests ............................................................................40
Tactical Overview.........................................................................................40

<vii>
CONTENTSCONTENTS
Objective: Locate the Primary Operations Complex.......................................41Exterior: Canyon Gate..............................................................................41First Building: Base Hallways...................................................................41Control Room...........................................................................................42Garage.....................................................................................................42Canyon ....................................................................................................42Top of the Canyon....................................................................................43
Objective: Power Up the Auxiliary Generator.................................................43East Landing Bay.....................................................................................43
Objective: Activate the Landing Beacon........................................................44Control Tower: Level 1 (Ground)...............................................................44Control Tower: Level 2 (Landing Beacon) .................................................44
Objective: Report to Commander McCain ......................................................45Landing Bay: Exterior ..............................................................................45
Objective: Locate the Security Station and Activate Automatic Defenses ......45Level 1 (Entry) ........................................................................................45Level 2 (Ramp) ........................................................................................46Level 3 (Barracks) ...................................................................................46Level 4 (Barracks) ...................................................................................46Defense Control Room .............................................................................47
Objective: Return to the Landing Bay............................................................47Defense Control Room .............................................................................47Ventilation Ducts .....................................................................................48Bathroom Area.........................................................................................48
Objective: Rendezvous with White Team .......................................................48Level 2 (Corridors) ..................................................................................48Level 1 (Exit) ..........................................................................................49
Objective: Locate Sergeant Hall ...................................................................49POC Exterior: Alleys.................................................................................49Infested Base: Level 1 (Hive Tunnel) ........................................................50Level 2 (Alien Egg Room).........................................................................50
Objective: Return to the APC ........................................................................51Mission 2: Collateral Damage .............................................................................52

Prima’s Official Strategy Guide
<viii>
Tactical Overview.........................................................................................52Objective: Open Containment Tunnel 1 ..........................................................52
Security Tunnel Entrance.........................................................................52Containment Tunnels................................................................................53
Objective: Open Containment Tunnel 2 ..........................................................53Objective: Open Containment Tunnel 3 ..........................................................54Objective: Open Containment Tunnel 4 ..........................................................54Objective: Open Containment Tunnel 5 ..........................................................55Objective: Shut Down the Security System....................................................57
Mission 3: Betrayal ............................................................................................59Tactical Overview.........................................................................................59Objective: Proceed to Communication Terminal .............................................59
Detention Call..........................................................................................60Objective: Locate Your Team .........................................................................60
Iris Door Shafts .......................................................................................60Ventilation Duct.......................................................................................61
Objective: Escape the Pods...........................................................................61Deck 24 (Quarantined Area) .....................................................................61Deck 23 (Quarantined Area) .....................................................................62Surface Analysis Lab ...............................................................................62Implantation Lab .....................................................................................62Animal Storage Area ................................................................................63Ventilation Duct.......................................................................................63Specimen Storage (Facehuggers!) ............................................................63
Objective: Activate Emergency Security Override .........................................64Egg Stasis Pools ......................................................................................64
Objective: Proceed to the Main Lift..............................................................65Objective: Locate Implantation Lab 2 ...........................................................65
Deck 22 ...................................................................................................66Deck 21 ...................................................................................................66
Objective: Obtain Security Badge..................................................................66Deck 22 ...................................................................................................67Deck 21 ...................................................................................................67

<ix>
CONTENTSCONTENTS
Implantation Labs....................................................................................68Objective: Return to the Main Lift ................................................................69Objectives: Find New Gear and a Way Out of the Pods ..................................69
Central Control Room ..............................................................................69Pod Skywalks ..........................................................................................69Pod Cargo Area........................................................................................70
Mission 4: A Long Detour....................................................................................71Tactical Overview.........................................................................................72Objective: Rendezvous with White Team in Landing Bay 3 .............................72
Infested Base: Maintenance Tunnels ........................................................72Landing Facility ......................................................................................74
Objective: Locate the Security Station and Activate Automatic Defenses ......75Storage Room ..........................................................................................75Security Station.......................................................................................76Storage Room ..........................................................................................77Hallways .................................................................................................77
Mission 5: Price of Admission.............................................................................78Tactical Overview.........................................................................................78Objective: Rendezvous with White Team in Landing Bay 3 .............................78
Cargo Elevator Shaft ...............................................................................78Courtyard/Level 1 ...................................................................................79
Objective: Continue to Landing Bay 3 to Reboot Guidance Computers and Enable Evacuation ..................................................................................80Alley: Fight the Predator .........................................................................81
Mission 6: Loose Ends........................................................................................82Tactical Overview.........................................................................................82Objective: Find a Minigun to Take Out Armored Praetorians ..........................83
POC Landing Facility ...............................................................................83Dropship Hangar Area ..............................................................................84
Objective: Clear the Landing Bay of Alien Contamination ..............................85Dropship Hangar ......................................................................................85
Mission 7: Savior................................................................................................86Tactical Overview.........................................................................................86Objective: Locate Your Team .........................................................................86

Prima’s Official Strategy Guide
<x>
Dig Site: Entry .........................................................................................86Geothermal Reactors ...............................................................................87Empress Chamber ....................................................................................89The Final Walkway ..................................................................................90
Chapter 6: Predator Missions.......................................91Mission 1: Hunt ..................................................................................................91
Tactical Overview.........................................................................................91Objective: Practice Rudimentary Skills—Wristblades and Crouch-Leaping .....91
Forest Area 1 (Ruins)...............................................................................92Forest Area 2 (Ladder) ............................................................................93Green Lakes ............................................................................................94
Objective: Prove Your Skill with the Combistick ............................................95Forest Area 3 (Flytraps) ..........................................................................95Forest Area 4 (Swamp) ............................................................................95Waterfall/Shelter Area.............................................................................96
Objective: Prove Your Skill with the Disc ......................................................96Forest Area 5 (Bunker) ............................................................................97Praetorian Spires.....................................................................................98
Mission 2:Trap...................................................................................................98Tactical Overview.........................................................................................98Objective: Pursue Your Abducted Clan Mates.................................................98
Canyon Area ............................................................................................99Forest Areas............................................................................................99
Mission 3: Interloper ........................................................................................100Tactical Overview.......................................................................................100Objective: Rescue Your Clan Mates .............................................................101
Loading Area (Beneath the Forward Pods) .............................................101Pod Interior (Warehouse).......................................................................102Storage Area..........................................................................................103
Objective: Escape the Core.........................................................................103Base of Power Core ...............................................................................103
Mission 4: Unexpected Allies ............................................................................105Tactical Overview.......................................................................................105

<xi>
CONTENTSCONTENTS
Objective: Find a Mask, Weapons, and Tools.................................................105Implantation Lab ...................................................................................106Research Area .......................................................................................106Gas Storage Room..................................................................................108Energy Deck ..........................................................................................108Energy Lab ............................................................................................109
Objective: Escape the Pods.........................................................................110Pod Cargo Area ......................................................................................110
Mission 5: Old Debts.........................................................................................112Tactical Overview.......................................................................................112Objective: Find High Ground and Signal Your Clan........................................112
Tunnel ...................................................................................................112Underground Cave System......................................................................112Canyon Lava Flows................................................................................114Cavern of Spires ....................................................................................115
Objective: Power Up the Transmitter ...........................................................117Auxiliary Landing Pad (Top of Canyon)...................................................117
Mission 6: New Target ......................................................................................119Tactical Overview.......................................................................................119Objective: Descend to the Hive Entrance to Intercept Rykov ......................119
Excavation Site......................................................................................119Artifact Room ........................................................................................120Jockey Tunnels .......................................................................................121
Mission 7:Trophy .............................................................................................123Tactical Overview.......................................................................................123Objective: Find Your Mask—Pursue Rykov..................................................123
Entrance to the Dig Site.........................................................................123The Hive ................................................................................................125Egg Chambers........................................................................................126Ancient Ruins (Empress Chamber)..........................................................128Final Battle: Rykov ................................................................................129

Prima’s Official Strategy Guide
<xii>
Chapter 7: Alien Missions.............................................130Mission 1: Birth................................................................................................130
Tactical Overview.......................................................................................131Objective: Escape from this Vessel .............................................................131
Smuggler Ship........................................................................................131Objective: Find an Isolated Host for Implantation .......................................132
Landing Facility: Ventilation Duct ..........................................................132Storage Room ........................................................................................133Laboratory Area.....................................................................................134Crew Quarters .......................................................................................135
Objective: Feed to Grow—Find a Small Mammal.........................................136Landing Facility (Alleys) ........................................................................136
Mission 2: Surprise...........................................................................................137Tactical Overview.......................................................................................138Objective: Return to the Hive......................................................................138
Garage Area...........................................................................................138Landing Bay...........................................................................................139Laser Beam and Sentry Gun Hallway......................................................140Animal Observation Area ........................................................................140Cafeteria Area .......................................................................................140Landing Pad 2........................................................................................141Vehicle Maintenance Garage..................................................................142
Mission 3: Escape ............................................................................................143Tactical Overview.......................................................................................143Objective: Return to the Hive......................................................................143
Gun Turret Checkpoint ...........................................................................143Water Treatment Area ............................................................................145Ventilation Fan Control Area ..................................................................146Elevator Shaft Area ...............................................................................146
Objective: Defeat the Predator ...................................................................147Power Core............................................................................................147
Mission 4: Vengeance .......................................................................................149Tactical Overview.......................................................................................149

<xiii>
CONTENTSCONTENTS
Objective: Liberate the Artificial Hive.........................................................149Pod Outer Decks ....................................................................................149Predator/Alien Research Area ................................................................150Office/Conference Areas........................................................................151Implant Prep Area..................................................................................152Specimen Room......................................................................................153
Objective: Escape! ......................................................................................154Pod Core................................................................................................155
Mission 5: Abduction ........................................................................................155Tactical Overview.......................................................................................155Objective: Eliminate the Human Threat .......................................................155
Canyon ..................................................................................................156Hive Tunnels ..........................................................................................156First Bomb.............................................................................................156Second Bomb .........................................................................................157Hive Pipe (Turret Guns)..........................................................................157Third Bomb ............................................................................................158Hive Tunnels ..........................................................................................158
Mission 6: Pursuit ............................................................................................159Tactical Overview.......................................................................................159Objective: Prevent the Humans from Escaping with the Empress ................159
Access Tunnels (Upper Level).................................................................159Access Tunnels (Lower Level) ................................................................160Steam Compressor Room........................................................................161Access Tunnels (Upper Level).................................................................162
Mission 7: Freedom ..........................................................................................162Tactical Overview.......................................................................................162Objective: Prevent the Humans from Escaping with the Empress ................162
Cargo Lift Area......................................................................................162Generator Control ..................................................................................163Damaged Room ......................................................................................164Landing Bay Lift....................................................................................165
Objective: Disable the Landing Pad Hydraulics............................................165

Prima’s Official Strategy Guide
<xiv>
I NTRODUC T I ONWelcome to Prima’s Official Strategy Guide for Aliens versus Predators 2, the chilling sequel to oneof 1999’s biggest hits. Featuring three interwoven and riveting story lines—one for each of threespecies—and enhanced by Monolith’s stunning LithTech 3-D engine, this game marries the cinematicto game technology in original and truly creepy ways. In essence, it offers three games in one. Eachcharacter type—Marine, Predator, and Alien—has its own inimitable style of play. Each has adifferent set of movements, abilities, weapons and attacks, strengths, and weaknesses.The tacticalcombinations are nearly limitless. And that’s where this guide comes in.
Part 1: General StrategyWhether you plan to sample the single-player missions or leap fangs and guns into multiplayermadness, this section offers everything you need to know about all three character types.Thisoverview covers basic combat tips, weapons, special abilities, and tactics for battling each species.Check out “Chapter 4: Multiplayer Tips,” for some insider advice from those who best know the game.
Part 2: Single-Player MissionsThis section gives detailed, step-by-step solution paths through the 21 missions (seven for eachspecies) that comprise the single-player component of Aliens versus Predator 2. Use this guide’stable of contents to find the area where you’re stuck.Then turn to the corresponding section of “Part2” to get the answers you need.

PART 1: GENERAL STRATEGY

Prima’s Official Strategy Guide
<2>
MAR I NE TA C T I C SMarines are human and therefore vulnerable. After all, underneath all that equipment, is soft, fleshytissue. Unlike their enemies, Marines have few inherent strengths or abilities. As a species, comparedto both Alien and Predator, the Marine is slow and weak with limited optical perception.
Fig. 1-1. Marines have physical limitations, but theirarsenal is second to none.
However, human intelligence and ingenuity levels theplaying field. As a Marine, your weaponry is truly fearsome,your armor is moderately tough, and your range of attack issuperior. Being slow doesn’t matter when you have a Minigunthat tears the hide off any living creature in one short burst.
General TacticsFighting smart is the key to Marine success. Due to your natural limitations, you must put yourself insituations that maximize strengths and minimize weaknesses.
Keep an Eye Out for GearThe mighty Marine arsenal does you little good on the floor, noris it particularly effective without proper ammo. Scan everyroom you visit for weapons, ammo, armor, and health items.Unlike Aliens, who need only food, Marines must be constantlyvigilant to maintain combat readiness.
Fig. 1-2. Marines rely on stuff left by others torepair health and keep guns loaded.
Keep an Eye (and Ear) to That Motion TrackerYour Motion Tracker gives you an advantage in situational awareness. White dots on its display andthe sound of its ping gives you early warning of an attack. Swinging around so the dots are alignedwith the center vertical line of the tracking screen will put the intruder right in front of you.You’reready to open fire the moment you make visual contact.

The Motion Tracker is a tremendous tool, but keep two things in mind: First, it tracks only movingenemies. An Alien hanging motionless on the ceiling doesn’t register on the Motion Tracker displayuntil it drops on your head. (Fortunately, Aliens are hyperactive and rarely stand still.) Second, movingenemies are displayed in a 180-degree frontal arc.To keep track of enemy movements to your rear,occasionally spin around.
Remember, although the Motion Tracker is valuable, it’s not a substitute for old-fashioned eyeballreconnaissance. If enemies lurk above or below your horizontal plane, you may find the display hardto interpret. Keep your eyes primarily on your environment, glancing at the Motion Tracker for supple-mental information from time to time.
Do Most Fighting from Medium to Long RangeAgain, a Marine’s biggest strength is the killer arsenal. Its great range and power are unmatched byanything available to Predator or Alien. From the basic Pulse Rifle to the lethal Minigun, yourweapons put out some awesome firepower. More importantly, their accuracy and power barely lessenas you get farther from your target. Aliens have no long-rangeweapons, and the Predator’s plasma weapons emit relativelyslow projectiles that are easy to dodge at range.
Take advantage of this: Particularly against Aliens but alsoagainst Predators, keep attackers at a distance.This lets youdeal death without taking much (or any) damage. Standing toe-to-toe and slugging it out is rarely a good idea—maybe evennever a good idea—for the Marine. It plays into the enemies’strengths, not yours.
Fig. 1-3. Fight from a distance to avoid close-quarter confrontations.
Avoid Close Quarters—If You Can’t, Use a Shotgun orFlamethrowerSmall rooms negate many of a Marine’s weapons advantages.Your own explosives (grenades, rockets)can hurt you, but sometimes range isn’t possible of course. In winding tunnels or small rooms, youmay not have the time or space to separate from suddenly appearing targets. In that case, your bestweapon is the Shotgun. Aliens in particular splatter nicely with one Shotgun blast. Just remember tostep back from their acid blood spills. A Flamethrower, too, has great lethality—without the toxicsplatter of Alien blood.
Beware of Holes, High or LowWall-walking Aliens love to burst shrieking from out-of-reach places. Mark all high and lowpassages—grates, vents, ducts, alcoves, any holes—in each area.
<3>
CHAPTER 1:MARINE TACTICS
CHAPTER 1:MARINE TACTICS

Prima’s Official Strategy Guide
<4>
In Combat, Keep MovingThis is standard advice for any action game: Stationary targets are soon dead targets.This especiallyapplies to a Marine facing a drooling swarm of cat-quick Alien drones or a plasma-slinging Predator.The more you move, the less damage you take, but movement should be unpredictable. Run forwardand back, zigzag across open spaces, and slide side to side. Do anything to keep enemies fromdrawing an easy bead on you.
When the Coast Is Clear, Stop to Recharge and ExploreRelax after combat. Quickly assess your health. Look around. Search for pickup items. Get the lay ofthe land.You may come back this way later. When exploring, be slow and methodical so you don’t misspickup items or obscure passages.
Don’t Show Your BackHey, you’re a Marine. As a matter of honor, you don’t turn tailand run from a fight. It’s also a poor combat choice. Predatorsare somewhat faster than you, and Aliens are much faster.Thus,running away is not a good option—unless you like getting yourbutt chewed as you die.
Again, a Marine’s greatest asset is weaponry.To use yourbig guns, you must face the enemy.You shouldn’t stand in oneplace and slug it out either. But if you let Aliens or Predatorsget on your six, it nullifies your weapons advantage.
Fig. 1-4. Master the art of shooting whilebackpedaling from Alien swarms.
Learn to Fight while Running BackwardOn the other hand, a tactical retreat in the face of overwhelming numbers isn’t cowardly. In fact,against Alien swarms, it’s the only way to stay alive. Marines should backpedal while shooting; mostenemies are faster and doggedly pursue.
In the single-player game, you generally trigger enemy swarms when you cross a line into a newarea. Whenever you move into new territory, keep a finger on the Move Backward key (the default isS ). If you hear the distinctive snarl of Aliens ahead, start backpedaling right away. Fire when thebeasts come into sight. If you back into an obstacle, whip your mouse sideways to swing your view 90degrees, then run backward again—firing, always firing.
Master the “Strafe-and-Shoot” TechniquePure movement is a defensive tactic, but movement combined with outgoing fire is a killer offense. Inan exchange with enemies other than multiple Aliens, use the basic strafe-and-shoot tactic—that is,slide sideways while keeping your target centered in your crosshair to dodge attacks without actuallyturning away from your enemy.
<5>
This technique is particularly effective against Predators and human enemies. Again, it’s lesseffective against Aliens, who tend to swarm and hit you from all sides.
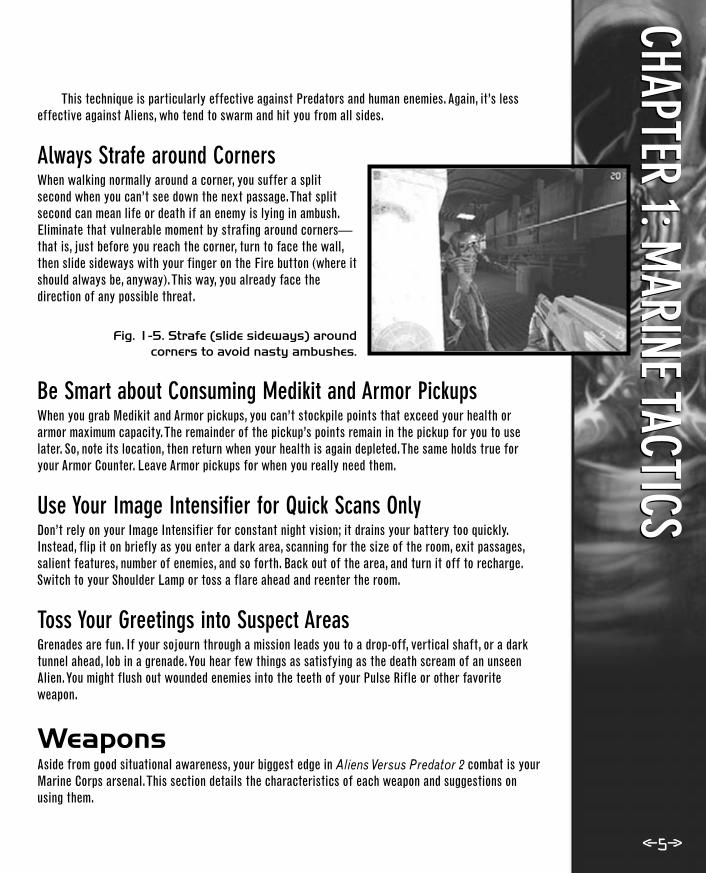
Always Strafe around CornersWhen walking normally around a corner, you suffer a splitsecond when you can’t see down the next passage.That splitsecond can mean life or death if an enemy is lying in ambush.Eliminate that vulnerable moment by strafing around corners—that is, just before you reach the corner, turn to face the wall,then slide sideways with your finger on the Fire button (where itshould always be, anyway).This way, you already face thedirection of any possible threat.
Fig. 1-5. Strafe (slide sideways) around corners to avoid nasty ambushes.
Be Smart about Consuming Medikit and Armor PickupsWhen you grab Medikit and Armor pickups, you can’t stockpile points that exceed your health orarmor maximum capacity.The remainder of the pickup’s points remain in the pickup for you to uselater. So, note its location, then return when your health is again depleted.The same holds true foryour Armor Counter. Leave Armor pickups for when you really need them.
Use Your Image Intensifier for Quick Scans OnlyDon’t rely on your Image Intensifier for constant night vision; it drains your battery too quickly.Instead, flip it on briefly as you enter a dark area, scanning for the size of the room, exit passages,salient features, number of enemies, and so forth. Back out of the area, and turn it off to recharge.Switch to your Shoulder Lamp or toss a flare ahead and reenter the room.
Toss Your Greetings into Suspect AreasGrenades are fun. If your sojourn through a mission leads you to a drop-off, vertical shaft, or a darktunnel ahead, lob in a grenade.You hear few things as satisfying as the death scream of an unseenAlien.You might flush out wounded enemies into the teeth of your Pulse Rifle or other favoriteweapon.
WeaponsAside from good situational awareness, your biggest edge in Aliens Versus Predator 2 combat is yourMarine Corps arsenal.This section details the characteristics of each weapon and suggestions onusing them.
CHAPTER 1:MARINE TACTICS
CHAPTER 1:MARINE TACTICS

Prima’s Official Strategy Guide
<6>
Combat Knife
Fig. 1-6. Combat Knife
A limited combat weapon, the Knife is nonetheless valuablewhen fighting Predators. If you get tangled in a Predator’s net(fired by his Netgun), start slashing with your Knife to get outquickly.
M4A4 Pistol
Fig. 1-7. M4A4 Pistol
This is a good weapon against even tough enemies.Your M4A4Pistol features both antipersonnel and antiarmor ammo. It lacksthe range of bigger weapons, but in a pinch, it does fine. In fact,in one single-player mission, you pack only a Pistol as you facea powerful Predalien—and the little gun admirably serves you.
ShotgunFig. 1-8. Shotgun
The ultimate infighting weapon, your Shotgun also has goodrange. It packs a punch that shreds a typical Alien in one shot,and it’s nice in tight quarters where Aliens love to lurk.However, the punch has a drawback: it tends to splatter toxicAlien blood. So shoot and step back, shoot and step back, andthen, as your capping move, shoot and step back.
One other thing about the Shotgun: its primary ammo, shells,is deadly against standard Aliens, but doesn’t penetrate armoredfoes well. Against other Marines in multiplayer, and AlienPraetorians (whose hardened shells provide a type of armoredprotection), use slugs. As the game manual points out, slugs areideal for taking down armored targets.

<7>
M-41A Pulse Rifle
Fig. 1-9. M-41A Pulse Rifle
Probably your most trusty sidekick, the M-41A Pulse Riflecombines good range and power with rapid-fire capabilityperfect for melees.This rifle also features a built-in grenadelauncher that delivers powerful pulse grenades with excellentlong-range accuracy.That combination provides much versatility.The automatic-fire function spits out 99 rounds per clip—justwhat you need when facing multiple Aliens.The Alt-Fire grenadedelivery (the default is the right mouse button) is a nice anti-Predator weapon that can punch holes in armor and inflict area damage too. Just remember the tipfrom the game manual—use Pulse Rifle grenades sparingly—that ammo is hard to find.
In general, your more advanced weapons offer better benefits against specific threats, but yourPulse Rifle covers the entire gamut. With this gun, feel confident walking into any situation.
M-56 Smartgun
Fig. 1-10. M-56 Smartgun
This weapon lays down a rapid-fire blanket of caseless rounds.With 150 rounds per clip, you can put a lot of flying metal in theair without frequent reloads. It has excellent range too.That,combined with its motion-tracking function, lets you destroymultiple targets at a distance, quickly and accurately.
The Smartgun has some limitations. In multiplayer, itsweight forces you to a walking speed, reducing the effec-tiveness of your backpedaling technique. When Aliens manage topenetrate your fire, they often get in a few slashesbefore you take them out. Second, Smartgun shells don’tpierce armor well, so the gun loses effectivenessagainst durable enemies.
The Smartgun also automatically switches to directfire mode (no tracking) when you activate your ImageIntensifier, but this isn’t much of a liability. Direct firemode is just as withering as tracking fire—you justmust aim better!
CHAPTER 1:MARINE TACTICS
CHAPTER 1:MARINE TACTICS
Prima’s Official Strategy Guide
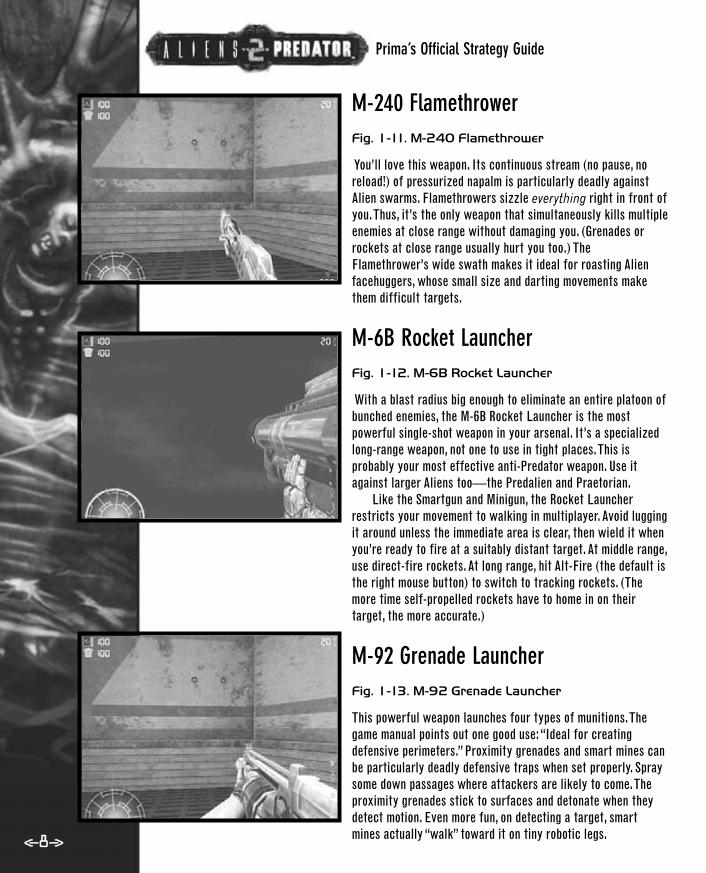
M-240 FlamethrowerFig. 1-11. M-240 Flamethrower
You’ll love this weapon. Its continuous stream (no pause, noreload!) of pressurized napalm is particularly deadly againstAlien swarms. Flamethrowers sizzle everything right in front ofyou.Thus, it’s the only weapon that simultaneously kills multipleenemies at close range without damaging you. (Grenades orrockets at close range usually hurt you too.) TheFlamethrower’s wide swath makes it ideal for roasting Alienfacehuggers, whose small size and darting movements makethem difficult targets.
M-6B Rocket LauncherFig. 1-12. M-6B Rocket Launcher
With a blast radius big enough to eliminate an entire platoon ofbunched enemies, the M-6B Rocket Launcher is the mostpowerful single-shot weapon in your arsenal. It’s a specializedlong-range weapon, not one to use in tight places.This isprobably your most effective anti-Predator weapon. Use itagainst larger Aliens too—the Predalien and Praetorian.
Like the Smartgun and Minigun, the Rocket Launcherrestricts your movement to walking in multiplayer. Avoid luggingit around unless the immediate area is clear, then wield it whenyou’re ready to fire at a suitably distant target. At middle range,use direct-fire rockets. At long range, hit Alt-Fire (the default isthe right mouse button) to switch to tracking rockets. (Themore time self-propelled rockets have to home in on theirtarget, the more accurate.)
M-92 Grenade LauncherFig. 1-13. M-92 Grenade Launcher
This powerful weapon launches four types of munitions.Thegame manual points out one good use:“Ideal for creatingdefensive perimeters.” Proximity grenades and smart mines canbe particularly deadly defensive traps when set properly. Spraysome down passages where attackers are likely to come.Theproximity grenades stick to surfaces and detonate when theydetect motion. Even more fun, on detecting a target, smartmines actually “walk” toward it on tiny robotic legs.<8>

<9>
Timed grenades are more useful for offensive purposes, but only in certain circumstances.Because they bounce off surfaces (unless they hit a target) while their timers beep towarddetonation, you can launch timed grenades down suspicious-looking shafts and vents, around corners,or into dark rooms and tunnels—anywhere you suspect enemies lurk.
Two warnings: First, all grenades have a large blast radius, so don’t use them near yourself.Second, the launch delivery is slow. Fast-moving foes will make human hash of you if you try to use aGrenade Launcher in a typical fight. Save it for the special uses mentioned.
M-90 Minigun
Fig. 1-14. M-90 Minigun
This is the big boy in your armory.The M-90 Minigun spewslethal high-caliber ammo from its rapid-fire, rotating multibarrelhousings. Designed to punch holes in armored vehicles, it cankill absolutely anything—Predator, Praetorian, Predalien—withone short burst. But several drawbacks make it useful only forthe toughest confrontations.
First, it’s heavy, so maneuvering at anything faster than awalk is impossible in multiplayer.You may obliterate everythingin front of you, but nimble Aliens don’t usually camp in your gun sight very long. Second, although itsammo belt holds 900 rounds, it expends them quickly. (You run dry in about 20 seconds.) Learn to firein short bursts to conserve ammunition. Again, save the Minigun for your biggest, baddest enemies. Inthe single-player game, for example, it’s the best way to eliminate the imposing Alien Empress.
WY 102 Sniper Rifle
Fig. 1-15. WY 102 Sniper Rifle
This slow-firing weapon has only 30 rounds and is a poor choicein standard combat. But what a sweet range! Its Alt-Fire (thedefault is the right mouse button) function, which activates ascope, gives you accuracy within millimeters over greatdistances. Its high-caliber bullet usually guarantees a one-shotkill. With lots of practice, this weapon can be used effectively atall ranges. Use your WY 102 Sniper Rifle when you don’t want tomiss a distant stationary target.
CHAPTER 1:MARINE TACTICS
CHAPTER 1:MARINE TACTICS

Prima’s Official Strategy Guide
<10>
Tools and EquipmentMarine tools are pretty straightforward.The Motion Tracker and its use were discussed earlier in thischapter.The other two tools provide access to areas that are locked tight.The Welding Torch burnsthrough padlocks and bolts on certain doors.The Hacking Tool lets you override some electronicsecurity systems. (You must access the system circuitry; if you can’t open a switch panel to see acircuit board, you won’t get the yellow crosshair that indicates a “hackable” system.)
When you’re stuck, move your cursor over lock panels and door bolts to see if one of the toolcrosshairs appears.
There are three items that help Marines see better in the dark passageways of the infestedresearch facility and the Hive. First, the flare burns under all conditions, so throw one down a darktunnel before you enter. Can be used with any weapon.The other two items drain power from yourbattery.The Shoulder Lamp casts a beam of light wherever you look. Even more powerful is the ImageIntensifier, which boosts all light levels. But the Intensifier rapidly drains your battery, so you mustfrequently stop and turn it off to recharge.
Combat Tips
Fighting Aliens
Fig. 1-16. Keep your distance from Aliens. Fire while backpedaling to string them out and avoidacid splatter.
Aliens only hurt you at closerange, so keep your distance anduse quick-firing, quick-loading
weapons. (Slow reload is the kiss of death against Aliens.) Of course,“Keep your distance!” is easier said than done. Aliens are very fast, andthey close distance with amazing alacrity. When they converge on atarget, they hit from all sides—even from above and below.
To counter Alien speed, find open spaces if possible, and use thebackpedaling technique almost exclusively. Packs of Aliens often stringout in a ragged line as they pursue, making it easy to pick them off.Long passageways and corridors, even if narrow, make good Alienkilling grounds. Strafing techniques are somewhat less effectiveagainst the agile, pouncing bugs.Against the powerful Praetorian, you need an armor-piercing weapon.The Minigun is best, but grenades, rockets, and the Alt-Fire ammo forboth your Shotgun (slugs) and Pistol (tungsten core bullets) penetratearmor too.
For more tips about fighting the different varieties of Aliens, seethe “Alien Types” section in “Chapter 3: Alien Tactics.”

<11>
Fighting Predators
Fig. 1-17. Bring out the big guns against Predators,and keep moving, dodging, and sliding.
In single-player missions, Aliens usually swarm, but encounterswith Predators are one-on-one affairs.The Predator’soverwhelming strength and vicious Combistick make infightingwith him a losing proposition. Unlike the Alien, the Predator hasdecent midrange weapons. If you simply backpedal in a straightline, he’ll toast you with his Plasma Pistol or Plasmacaster.
Keep your distance and strafe! Dodge from side to side, oreven “circle-strafe”—that is, strafe while keeping the target insight, which slides you in a wide circle around him. Heavierweapons such as your Grenade and Rocket Launchers (or thepulse grenades from your Pulse Rifle Alt-Fire) work best.
Fighting Guards and Other Marines
Fig. 1-18. Other Marines have the same killerarsenal, so get in the first shot.
In multiplayer games, you face other Marines and mercenarysoldiers hired by the Weyland-Yutani Corporation.Takeadvantage of the very weaknesses you compensate for whenplaying as a Marine. Pick off slow humans with sniper fire fromhigh ground, or hide in the darkness to exploit human visionlimitations. Above all, get in the first lick.The combination ofpowerful weapons, lack of mobility, and average armor all add up to short, bloody battles when a Marine encounters other Marines.
CHAPTER 1:MARINE TACTICS
CHAPTER 1:MARINE TACTICS

Prima’s Official Strategy Guide
<12>
PREDATOR TA C T I C SPredator culture is based on the hunt.Thus, your skills as aPredator are aggressive by nature.You are the hunter, yourenemies the hunted.You seek trophies of your exploits—skulls,to be precise.You are durable and powerful, you have versatileweapons and abilities, and your technology furnishes you withremarkable tools. But your prey has some inherent advantagestoo.This chapter examines Predator strengths and weaknessesand gives you tips on how best to match your foes.
Fig. 2-1. The Predator is strong, durable, with nosingle glaring weakness.
General TacticsBeing a Predator is fun.You have amazing abilities and get to roar a lot. But for some reason, yourenemies don’t enjoy being hunted.They fight back, and darned if they aren’t good at it. So rememberthe following tips.
Learn to Cycle Through Vision Modes QuicklyThe Predator’s three special Vision modes easily provide yourbiggest tactical advantage in combat.They are:Thermal vision(Blue: highlights and tracks humans), Electrovision (Red:highlights and tracks Aliens), and Predtech vision (White:highlights and tracks Predators; offers best night vision). Whencombined with tracking weapons (Plasmacaster or Disc), theseVision modes give you significant sight and targetingadvantages.
Fig. 2-2. Thermal vision mode, establishes humantargets in sharp relief against a blue background.
Keep in mind that the specificity that makes them so effective also has a drawback.You can’tmix modes; only one can be active at a time. Worse, you can’t assign single keystrokes to each mode.You must cycle through all four modes (including Normal mode) with your Next Vision Mode (thedefault is V ) and Previous Vision Mode (the default is B ) keys. So practice cycling until you burnthe mode order into your mind and can flip quickly and unconsciously to the necessary Vision mode.

Devote Every Lull to Medicomp and Energy Sift RechargingMedicomp and Energy Sift devices provide another huge advantage to the Predator. Aliens must seekfood (human prey) to replenish health, and Marines need Medikits and Armor pickups to stay strong.But Predators can heal themselves and replenish energy supplies anytime, anyplace, anywhere.
After the adrenal rush and heat of combat, it’s too easy to forget to recharge. So make it a habitto use your Medicomp and Energy Sift whenever you get a quiet moment in a secured location. (Formore on how to best use these devices, see the “Tools” section later in this chapter.)
When Hunting Human Prey, Cloak and FollowCloaking is easily the biggest advantage the Predator has overhumans. But humans carry Motion Trackers that can indicate theposition of cloaked targets. Remember two important things:First, Motion Trackers do exactly what the name indicates—track motion. Second, these devices cast an invisible eye in a180-degree arc in front of the human.This suggests twoimportant tactics when stalking human prey.
Fig. 2-3. He can’t see you, but he can draw a goodbead with his Motion Tracker. So don’t move.
First, if you are cloaked and you suddenly find yourself face-to-face with a heavily armed (andthey’re all heavily armed) Marine or guard—that is, if you can see any of the front half of hisbody—his tracker can pick up your movements. So what do you do? Freeze! Your signaturedisappears from his Motion Tracker display. Sure, it is hard to freeze; it violates basic hunterinstincts. But the human’s weapons are very powerful and likely better than yours.
Your next step in this scenario leads to the second point. Wait, frozen, until the Marine moveson, turning his back. Now you can follow undetected because his Motion Tracker “sees” only in afrontal arc, leaving him blind to the back. Always stay behind human targets to get the full benefit ofyour cloaking. Stealth is a killer advantage, so don’t squander it.
Avoid Water When CloakedThis is a simple tip: Water disables your cloaking device.
Don’t Waste Energy Cloaking Against AliensAliens navigate as much by sense of smell as sight. When you cloak, Aliens lose sight of you, but theycan still sense you. It’s not possible to hide from Aliens using a Cloaking Field Generator.
<13>
CHAPTER 2:PREDATOR TACTICSCHAPTER 2:PREDATOR TACTICS

Prima’s Official Strategy Guide
Against Aliens, Use the Backpedal and Fire Technique withElectromagnetic Vision Mode“Chapter 1: Marine Tactics” discussed this when describing the best tactic for Marine versus Alienencounters. It applies to Predators as well. However, because Predators are faster than humans, thebackpedal technique works even better. Again, when you see or hear an Alien pack attack, switch toAlien Electrovision (Red) mode, plant a finger on the Run Backwards key (the default is S ), and openfire with your Plasmacaster.The gun locks in on the nearest Alien and guides each blast home. If youback into an obstacle, quickly swivel 90 degrees and backpedal again, firing.
Play the Angles with Your Speargun
Fig. 2-4. With your Zoom feature, pick off enemies around corners by targeting just a small piece of them.
Combat in Alien versus Predator 2 is nerve-racking at times,as combat should be. Nothing chills like the suspicion that abrain-sucking Alien or a Marine with a Minigun lurks just aroundthe corner. But sometimes you can see him before he sees you.Approach corners from a wide angle and slide slowly sideways,and you can often target a piece of a waiting enemy—an arm, aleg, sometimes even a sliver of head—in your Spearguncrosshair.Then take him out before he knows what hit him.
WeaponsWhile your arsenal may not be quite as expansive or formidable as a Marine’s, it is certainlyimpressive. Predators have a good selection to choose from in terms of range, power, and utility.
Wristblades
Fig. 2-5. Wristblades
Obviously, Wristblades are close-combat weapons.Though they aren’t as lethalas your Combistick, these razor-sharp blades, combined with your naturalPredator strength, shred an Alien in one good swipe and most humans in one ortwo. Against human targets, the Wristblades’ advantage is that they don’tremove your cloaking.You can sneak up behind a Marine and dispatch him withstealth. Of course, Aliens “see” right through your cloaking, plus they shed toxicblood, so avoid close combat with bugs.
<14>

<15>
Here are three quick notes about Wristblades: First, they use no energy, so they’re alwaysavailable. Second, their Alt-Fire (the default is the right mouse button) jab strike is more powerfulwhen charged by holding down the Alt-Fire key for a moment.Third, the Alt-Fire jab is one way tocollect trophies. Just move the target cursor over the head of a vanquished foe, jab, and listen to yourroar of delight.
CombistickFig. 2-6. Combistick
This jagged spear is the Predator’s favorite and certainly most effective close-combat weapon. Its huge swipes quickly cut through enemies, and direct headhits yield instant trophies. Like Wristblades, the Combistick doesn’t drawanything from your energy stores, thus it doesn’t affect cloaking. Few thingsare more fun than sneaking up behind an unsuspecting victim and beheadinghim with one joyful swing.
The Combistick is lethal to both humans and Aliens. It reaches farther thanWristblades, so you can whack an Alien from farther away, avoiding the acidicblood splatter. But the Combistick’s slow swing makes it less than effective against swarmingopponents, particularly speedy Alien drones. So use it primarily in one-on-one duels with Marines orother Predators in multiplayer games.
Plasma PistolFig. 2-7. Plasma Pistol
The Plasma Pistol is a trusty mid-range weapon with a good combination ofpunch and accuracy. It fires a powerful encapsulated plasma charge that causessplash damage in a small radius. One hit dispatches most enemies.The primaryFire button (the default is the left mouse) zings a single charge in a straightline, while the Alt-Fire button (the default is the right mouse) lobs threesuccessive stun charges in a downward-curving arc.This lobbing action is niceif you suspect enemies lurk over a rise, on the other side of a crate, or down avertical shaft.
Keep in mind that the Plasma Pistol is a mid-range weapon. Hits on closetargets hurt you with the splash damage, and the plasma projectile is too slowto hit distant targets before they dodge—especially in multiplayer action if savvy opponents guideyour onscreen enemies.The Plasma Pistol also stuns other Predators when they are hit by it.
CHAPTER 2:PREDATOR TACTICSCHAPTER 2:PREDATOR TACTICS

Prima’s Official Strategy Guide
<16>
Speargun
Fig. 2-8. Speargun
The Speargun is a Predator’s long-range sniper weapon. Its view scope featuresthree Zoom levels, so you can hit distant targets with excellent accuracy.The gun fires rapidly and is effective at any range. With only nine spears perclip and limited clips available (only three to start), be somewhat frugal withyour shots.
However, you can actually retrieve spears. When you eliminate prey withyour Speargun, walk over the carcass to pick up any spears (you hear aretrieval “click”). If the victim is an Alien, wait until the acid dissipates. Notealso that a head shot yields a trophy and a lusty roar.
Plasmacaster
Fig. 2-9. Plasmacaster
The Plasmacaster is your best bet for an “all-the-time” weapon. It dealseffectively with threats at any range, although its splash damage canhurt you at close range. Add in the ability to track targets and vary thepower of its charged projectiles, and you have a versatile shouldercannon.The Plasmacaster’s basic characteristics follow:
�Tap the Fire button for a quick shot. Each dealsmoderate damage and uses one energy unit. With a full store of energy, you can squeeze off 54 quick shots.
� One Plasmacaster quick shot kills almost any Alien except for big boys suchas the Praetorian and Predalien, while you generally need two or more quickshots for Marines.
� Hold down the Fire button for a second or two to unleash a superchargedshot that deals serious damage. Few things survive this type of direct hit,and anything in its large blast radius takes damage (including you, if you’retoo close).
�You can also “pre-charge” a shot—that is, hold down your Alt-Fire button fora second, which supercharges the next shot you unleash with the Fire button.(See units of energy disappear from your Energy Counter on the right side ofthe screen during this pre-charge.)

� Each full supercharged shot uses five energy units, giving you about 11 suchshots from a full energy store.
�To create a midsize supercharged shot that uses only three units of energy,hold down the Alt-Fire button for less than a second until just one unit ofenergy disappears from your Energy Counter. Your next Plasmacaster shotuses three energy units.
When you’re in a special Vision mode, the Plasmacaster locks on the nearest highlighted target.You see a visual depiction of this lock-on process—three sides of a triangle snap into place aroundthe target.The Plasmacaster auto aims, and when you fire, the plasma projectile tracks to the target.
The biggest drawback of the Plasmacaster is that, as with your other energy weapons, its usedisables your Cloaking Field Generator. Against Aliens, this is no loss, but against humans, use it onlywhen your stealth options are limited.
Disc
Fig. 2-10. Disc
The Disc is one of the most powerful single-shot weapons. It has tremendousrange, one hit takes down almost anything, and it tracks targets, locking on thenearest available target in the current Vision mode.You really can’t miss whenyou toss a Disc with a tracking lock.
But remember its limitations. First, you get only one Disc.That’s right—ifyou lose it (and it happens), it’s gone, never to return. Second, the Disc eatsenergy, so it disables cloaking when you use it.Third, and most limiting, eachDisc toss and return takes a considerable amount of time, in a combat timeframe, anyway. When multiple enemies attack, you can hit only one at a time,with several seconds elapsing between each toss.That doesn’t work against Alien swarms.
Think of the Disc as a near-infallible sniper weapon.
Netgun
Fig. 2-11. Netgun
The Netgun is a low-tech equivalent of a stun gun. Nets fired by this device (it’smore a “device” than a “weapon”) knock down and incapacitate targets for ashort time. Most enemies extricate themselves in roughly 10 seconds, whichgives you time to take trophies from the helpless victims.The Alien drone (theadolescent bug), however, is so hyperactive and claw-happy that nets tend toshred before taking hold.
CHAPTER 2:PREDATOR TACTICSCHAPTER 2:PREDATOR TACTICS
<17>

Prima’s Official Strategy Guide
<18>
Remote Bomb
Fig. 2-12. Remote Bomb
An old-fashioned booby trap dressed up in fancy duds, thisexplosive device is a multiplayer favorite. Drop or toss itanywhere; it usually sticks where you aim, although rugged,rocky surfaces can cause it to ricochet until it strikes a bettersurface. Step carefully past the bomb, then lure enemies overthe spot.
This is a good path-clearing device too.Toss it into suspectareas—tunnels, mines, shafts, and dark rooms or hallways—and press your Alt-Fire button to detonate a cheery inferno. ARemote Bomb explodes automatically if it strikes a livingtarget. Sling it into a slavering Alien pack and waste the whole lot.
Tools
Medicomp and Energy SiftThe Medicomp and Energy Sift serve similar purposes and are best used in conjunction. Use theEnergy Sift anywhere at anytime to completely recharge your energy stores.The Medicomp restoresfull health. It does, however, draw from your energy stores. So if you’re badly hurt, the Medicomp candrain energy to almost nothing. If you’re low on energy, too, the Medicomp won’t work.
Fig. 2-13. Activate the Energy Sift and Medicompdevices in secure areas. While in use, both devicesdisable cloaking and draw enemy attention.]
This is the best sequence: Wait until you reach a quietplace with no enemies nearby. If both health and energy arelow, use the Energy Sift to build energy, then use the Medicompto heal. Fire up the Energy Sift a second time to charge to fullpower.You’re done, with full health and full energy—so go backto skinning people and spearing heads.
Charge EmittorThe Predator’s Charge Emittor is the equivalent of the Marine Hacking Tool, though a bit cruder.Whereas the Marine device overrides security lock codes with sophisticated electronics, the ChargeEmittor simply shorts out security devices—if you can get at the circuit boards. Zapping its circuitsautomatically opens a door.
<19>
Special Abilities
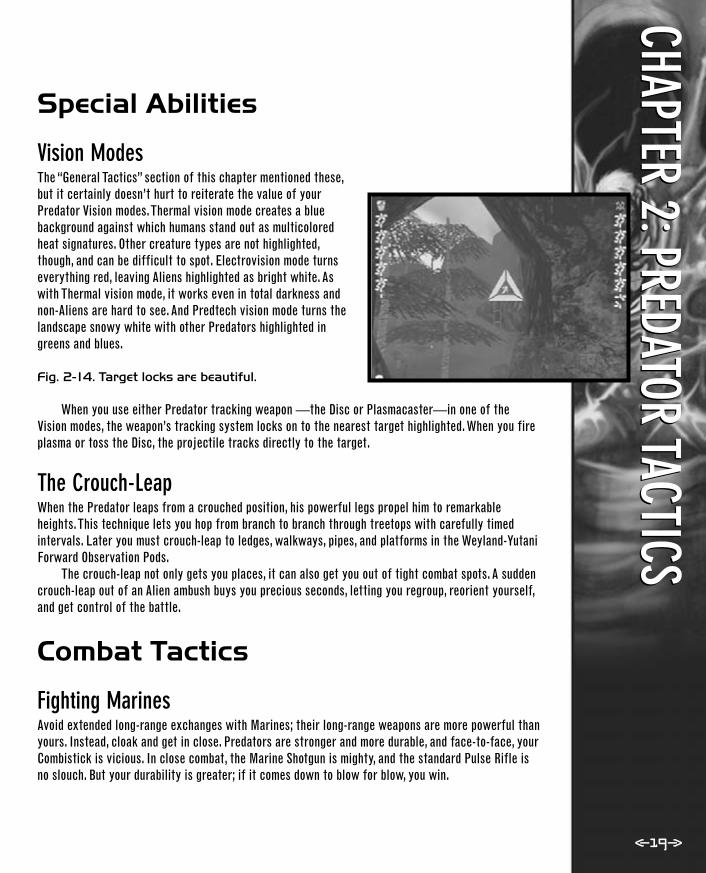
Vision ModesThe “General Tactics” section of this chapter mentioned these,but it certainly doesn’t hurt to reiterate the value of yourPredator Vision modes.Thermal vision mode creates a bluebackground against which humans stand out as multicoloredheat signatures. Other creature types are not highlighted,though, and can be difficult to spot. Electrovision mode turnseverything red, leaving Aliens highlighted as bright white. Aswith Thermal vision mode, it works even in total darkness andnon-Aliens are hard to see. And Predtech vision mode turns thelandscape snowy white with other Predators highlighted ingreens and blues.
Fig. 2-14. Target locks are beautiful.
When you use either Predator tracking weapon —the Disc or Plasmacaster—in one of theVision modes, the weapon’s tracking system locks on to the nearest target highlighted. When you fireplasma or toss the Disc, the projectile tracks directly to the target.
The Crouch-LeapWhen the Predator leaps from a crouched position, his powerful legs propel him to remarkableheights.This technique lets you hop from branch to branch through treetops with carefully timedintervals. Later you must crouch-leap to ledges, walkways, pipes, and platforms in the Weyland-YutaniForward Observation Pods.
The crouch-leap not only gets you places, it can also get you out of tight combat spots. A suddencrouch-leap out of an Alien ambush buys you precious seconds, letting you regroup, reorient yourself,and get control of the battle.
Combat Tactics
Fighting MarinesAvoid extended long-range exchanges with Marines; their long-range weapons are more powerful thanyours. Instead, cloak and get in close. Predators are stronger and more durable, and face-to-face, yourCombistick is vicious. In close combat, the Marine Shotgun is mighty, and the standard Pulse Rifle isno slouch. But your durability is greater; if it comes down to blow for blow, you win.
CHAPTER 2:PREDATOR TACTICSCHAPTER 2:PREDATOR TACTICS
Prima’s Official Strategy Guide
<20>
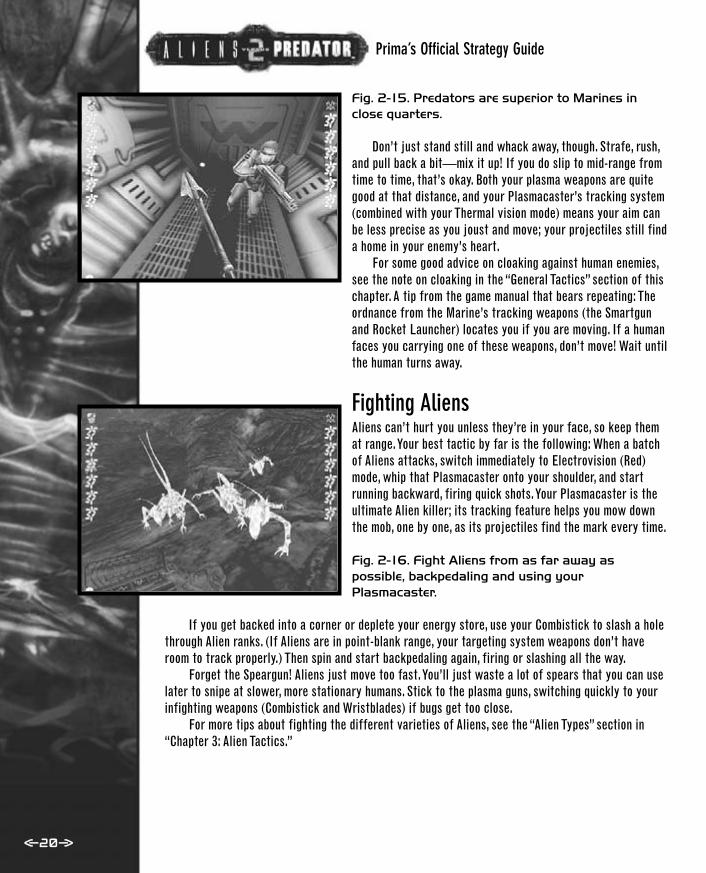
Fig. 2-15. Predators are superior to Marines inclose quarters.
Don’t just stand still and whack away, though. Strafe, rush,and pull back a bit—mix it up! If you do slip to mid-range fromtime to time, that’s okay. Both your plasma weapons are quitegood at that distance, and your Plasmacaster’s tracking system(combined with your Thermal vision mode) means your aim canbe less precise as you joust and move; your projectiles still finda home in your enemy’s heart.
For some good advice on cloaking against human enemies,see the note on cloaking in the “General Tactics” section of thischapter. A tip from the game manual that bears repeating:Theordnance from the Marine’s tracking weapons (the Smartgunand Rocket Launcher) locates you if you are moving. If a humanfaces you carrying one of these weapons, don’t move! Wait untilthe human turns away.
Fighting AliensAliens can’t hurt you unless they’re in your face, so keep themat range.Your best tactic by far is the following: When a batchof Aliens attacks, switch immediately to Electrovision (Red)mode, whip that Plasmacaster onto your shoulder, and startrunning backward, firing quick shots.Your Plasmacaster is theultimate Alien killer; its tracking feature helps you mow downthe mob, one by one, as its projectiles find the mark every time.
Fig. 2-16. Fight Aliens from as far away aspossible, backpedaling and using yourPlasmacaster.
If you get backed into a corner or deplete your energy store, use your Combistick to slash a holethrough Alien ranks. (If Aliens are in point-blank range, your targeting system weapons don’t haveroom to track properly.) Then spin and start backpedaling again, firing or slashing all the way.
Forget the Speargun! Aliens just move too fast.You’ll just waste a lot of spears that you can uselater to snipe at slower, more stationary humans. Stick to the plasma guns, switching quickly to yourinfighting weapons (Combistick and Wristblades) if bugs get too close.
For more tips about fighting the different varieties of Aliens, see the “Alien Types” section in“Chapter 3: Alien Tactics.”

<21>
Fighting Other PredatorsYour fellow species members are powerful and durable, just like you. So in Predator versus Predatorbattles, cloak and hope your opponent isn’t in Predtech vision mode, so you can sneak in the first hit.Try the Disc or a Plasmacaster supercharged shot as your opening salvo. Soon you’ll both be inPredtech mode, slinging vision-specific tracking shots. Don’tforget to keep moving! You can even dodge plasma projectilesguided by a target lock if you’re on your toes. As you tradeblasts, strafe from side to side.Then make a rush, and try to slipbehind your foe, hopefully breaking out of any tracking lock.
Fig. 2-17. Other Predators are just like you—only alittle uglier, of course.
CHAPTER 2:PREDATOR TACTICSCHAPTER 2:PREDATOR TACTICS

Prima’s Official Strategy Guide
<22>
AL I EN TA C T I C SFrom the first time you saw the original movie Alien, youwanted to be one, just for a little while. Open your mouth—surprise!—out comes another mouth with slavering razor teeth.Not to mention the acid blood.
Fig. 3-1. Have you ever seen a tongue with teeth? Ifyou’re an Alien, you see it in the mirror every day.
Well, here’s your chance. In the Alien missions, you start as a creepy little facehugger, then eatyour way out of some guy’s chest as a chestburster.Then it’s on to adulthood.You might ask how anAlien should act. What are my special powers and abilities? Read on.
Alien TypesBefore we dive into tactics, take a closer look at this species. Aliens come in a variety of shapes andsizes, and each variety has somewhat different abilities. In Alien versus Predator 2’s single-playermissions, you play as an Alien who undergoes the transformation from facehugger to chestburster todrone. In the Marine and Predator missions, you face those varieties, plus tangle with Alien runners,Praetorians, and Predaliens.
The Alien has a double gestation life cycle that begins with the large eggs in the various eggnurseries throughout the game. From that egg pops the scorpion-like “facehugger,” with a singlepurpose in its very short life span—to find a viable host in whom to implant an embryo. When it findsa suitable target, the facehugger (via his wonderful facehug) inserts anembryo down the throat and into the body cavity of its generous host.Doesn’t that sound pleasant?
Soon the facehugger, having served its purpose, shrivelsinto a carcass and falls away. Days later the embryo producesa larval Alien creature known affectionately as a “chest-burster.” It is roughly the equivalent of a caterpillar in themetamorphic cycle. Limbless, it scurries around seekingfood, food, and more food. In days, this creature molts, andfrom the snakelike skin emerges an adolescent Alien,complete with claws and the overlapping double jaw thatmakes headbiting so easy.
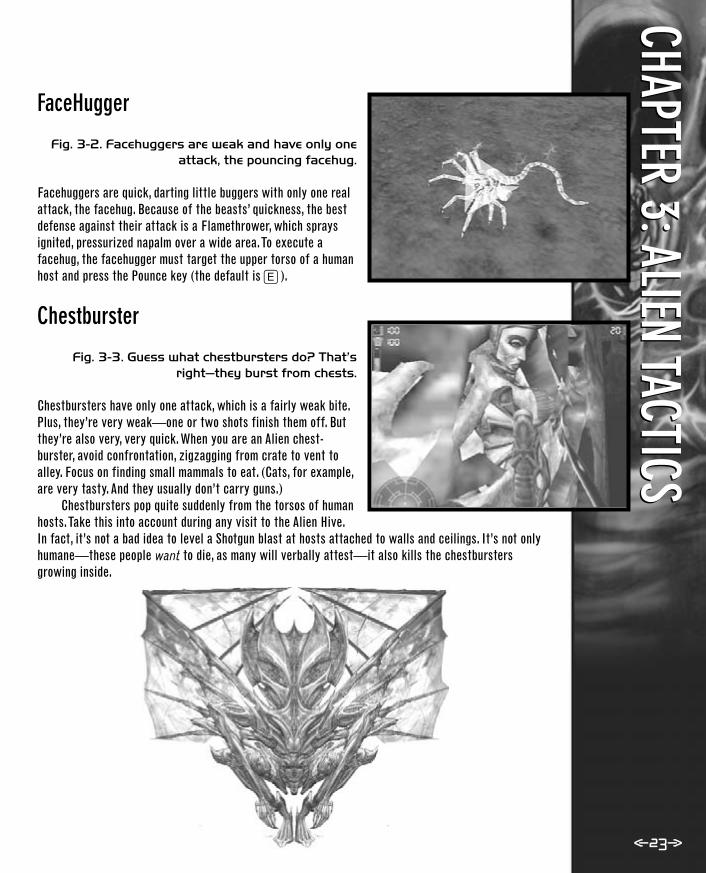
FaceHugger
Fig. 3-2. Facehuggers are weak and have only oneattack, the pouncing facehug.
Facehuggers are quick, darting little buggers with only one realattack, the facehug. Because of the beasts’ quickness, the bestdefense against their attack is a Flamethrower, which spraysignited, pressurized napalm over a wide area.To execute afacehug, the facehugger must target the upper torso of a humanhost and press the Pounce key (the default is E ).
Chestburster
Fig. 3-3. Guess what chestbursters do? That’sright—they burst from chests.
Chestbursters have only one attack, which is a fairly weak bite.Plus, they’re very weak—one or two shots finish them off. Butthey’re also very, very quick. When you are an Alien chest-burster, avoid confrontation, zigzagging from crate to vent toalley. Focus on finding small mammals to eat. (Cats, for example,are very tasty. And they usually don’t carry guns.)
Chestbursters pop quite suddenly from the torsos of humanhosts.Take this into account during any visit to the Alien Hive.In fact, it’s not a bad idea to level a Shotgun blast at hosts attached to walls and ceilings. It’s not onlyhumane—these people want to die, as many will verbally attest—it also kills the chestburstersgrowing inside.
<23>
CHAPTER 3:ALIEN TACTICSCHAPTER 3:ALIEN TACTICS
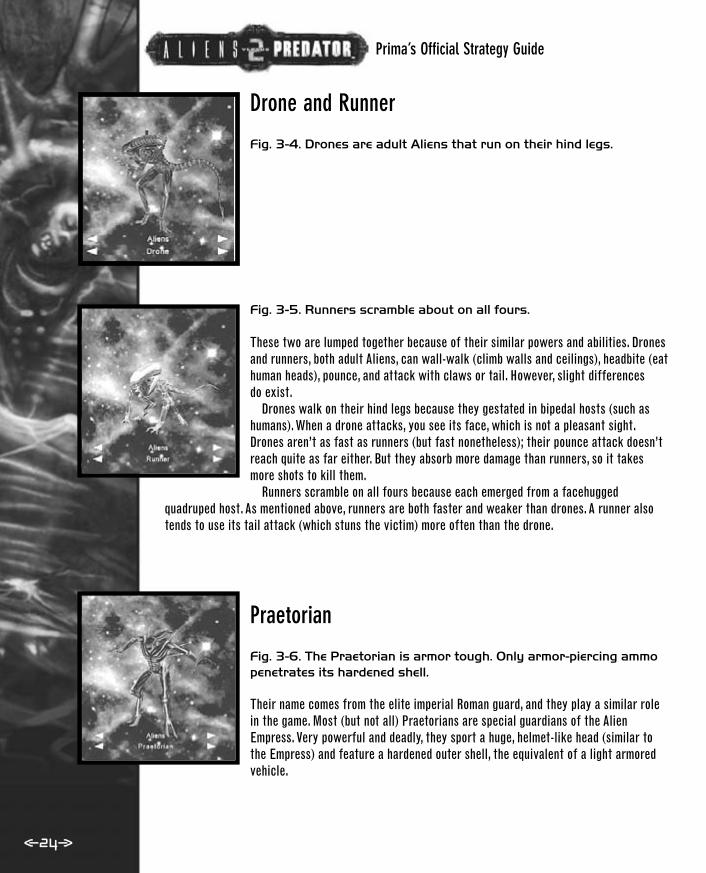
Prima’s Official Strategy Guide
<24>
Drone and Runner
Fig. 3-4. Drones are adult Aliens that run on their hind legs.
Fig. 3-5. Runners scramble about on all fours.
These two are lumped together because of their similar powers and abilities. Dronesand runners, both adult Aliens, can wall-walk (climb walls and ceilings), headbite (eathuman heads), pounce, and attack with claws or tail. However, slight differences do exist.
Drones walk on their hind legs because they gestated in bipedal hosts (such ashumans). When a drone attacks, you see its face, which is not a pleasant sight.Drones aren’t as fast as runners (but fast nonetheless); their pounce attack doesn’treach quite as far either. But they absorb more damage than runners, so it takesmore shots to kill them.
Runners scramble on all fours because each emerged from a facehuggedquadruped host. As mentioned above, runners are both faster and weaker than drones. A runner alsotends to use its tail attack (which stuns the victim) more often than the drone.
Praetorian
Fig. 3-6. The Praetorian is armor tough. Only armor-piercing ammopenetrates its hardened shell.
Their name comes from the elite imperial Roman guard, and they play a similar rolein the game. Most (but not all) Praetorians are special guardians of the AlienEmpress. Very powerful and deadly, they sport a huge, helmet-like head (similar tothe Empress) and feature a hardened outer shell, the equivalent of a light armoredvehicle.

<25>
As a result, small arms fire doesn’t penetrate the Praetorian hide. Only armor-piercing ammoworks—rockets and secondary ammo for the Pulse Rifle (grenades), Pistol (tungsten core bullets),and Shotgun (slugs), and of course, the mighty Minigun.The Praetorian cannot wall-walk; but, it has allthe other attacks of an adult Alien—claw, tail, headbite, and pounce.
It is slightly weaker (absorbing less damage before dying) than its cousin, the Predalien.
Predalien
Fig. 3-7. The brutally tough Predalien is half-Predator, half-Alien.
The Predalien is a genetically engineered crossbreed of the Predator and Alien. It hasno headbite attack, but its pounce attack is an absolute killer. Essentially, thePredalien looks like a Predator with a tail. Its Predator genetics make it much moredurable than the standard adult Alien—tougher even than the Praetorian. Even itsroar is more Predator than Alien. But its Alien roots give it the ability to wall-walkand launch tail and claw attacks.
General TacticsAlien tactics are very different from those of the other two species, human and Predator.Take thefollowing advice to heart if you want to survive.
Use Your Speed to Get CloseYour only weapons are attached to your spiky body—claws, teeth, and tail. So you must deal damagein close combat. But that’s okay—you are, by far, the fastest creature in the game. In fact, thevelocity of your pounce attack is downright astounding. Fullyuse your mobility. Hit enemies before they can react. Marines godown fast, but Predators are tougher, and they’re viciousinfighters. So you may have to get in some licks, make a tacticalretreat, then try again.
Fig. 3-8. You must get close to inflict damage. Butdon’t stay very long.
CHAPTER 3:ALIEN TACTICSCHAPTER 3:ALIEN TACTICS

Prima’s Official Strategy Guide
<26>
But Don’t Slug It OutAliens are built for ambush and quick kills. So don’t try to hold your ground mano y mano, tradingblows with an enemy.You’ll lose that fight. Instead, circle, dodge, rush, pounce—or just run away totry again from a different angle. (See the “Run Away” section later in this chapter.) Your lack ofdurability means sure death in a static slugfest.
Avoid Open SpacesYou might think a big, open room would be an attractive field of operation for a speedy Alien, but youwould be dead wrong. Open space means you must travel farther before making contact. Remember,you have no long-range weapons—not one. So while you show your dazzling moves in the open, enemyMarines or Predators unload big guns in your direction.
Meet enemies in tight spaces at close range. If a Marine approaches across, say, an open cavernor landing bay, take immediate evasive action. Find a protected corner or ledge, and let him close thespace himself when he foolishly pursues.Then drop in close for the kill.
Use the Element of Surprise
Given your superior quickness, even alert foes have troublerecovering from a surprise Alien attack. Seek stationary,inattentive prey. Lurk in dark spaces and around corners, orhang on walls and ceilings above doors and other passages.Sneak up on victims from behind whenever you can.
Fig. 3-9. Hang from walls or ceilings neardoorways, then drop on unsuspecting prey.
Run AwayYes, you’re a single-minded killing machine. But you’re not very durable compared to your enemies.Youdamage easily, so if you get hurt in a fight, particularly against multiple opponents, break off theengagement. (Your speed makes this easy to do cleanly.) Hide in a place that plays to your strengths,and wait on a wall or ceiling for your pursuers. Or just seek other, less aware prey.
Stun Folks and Eat HeadsYour best source of energy is the head of a living human. Headbites are hard to execute againstmoving targets, however. So give a quick Alt-Fire punch of your tail to stun your victim. While hestands there wobbling, line up your jaws and bite off a nice cranium crunchy. We talk about this morein the “Attacks” section.

<27>
Pounce on More Dangerous EnemiesYour pounce is a gruesome thing. When you pounce on an opponent, his chemicals splatter in everydirection, leaving nothing behind—not even enough for a snack. Sure, heads are nourishing and tasty,but some enemies are too dangerous to risk killing with a headbite or claws.You must incapacitatefoes brandishing Miniguns, Smartguns, or Flamethrowers as soon as possible. And nothing kills asquickly and efficiently as a pounce attack.
Conserve Cowering FoodOne cool thing about being a hideously scary hell beast is thatsome people—puny, unarmed people—collapse with fear at themere sight of you. Perhaps they realize that flight is impossible,perhaps not. Whatever, they cower at your feet. Essentially,this gives you a free lunch. Line up your headbite at leisure and munch.
Fig. 3-10. Prey on the cowering helpless only whenyou have low health. Otherwise, leave them to
consume later.
But this is an important tip: cowering scientists and lab technicians aren’t going anywhere, evenif you pass by. So if your Health Counter is at or near 100 percent, eating a head is waste; it’s likecramming down a big milkshake after stuffing yourself with pizza. Let the poor souls cower in peacefor a while. If you take serious damage later, return, stare at them for a few seconds with pitilessindifference, and then eat their heads.
Think VerticallyAn Alien’s favorite hideout and means of moving about is thestandard air duct. Anytime you see a grate or vent, chances aregood you can claw your way inside. (If a grate is breakable, yourclaws appear on the side of the screen when you face thatgrate.) Other good avenues of Alien travel include elevator andmaintenance shafts, fan ducts, and straight up walls.
Fig. 3-11. Look for vents and shafts, high and low,when navigating through an area.
Travel the Odd AnglesYou must almost alter the way you perceive space to fully adjust to Alien wall-walking. Remember,this ability means that if surfaces (even narrow ones such as poles or struts) connect to something,you can get to it. High balconies or ceiling crawl spaces—nothing is beyond your reach. Rooms, inessence, become one big floor, from top to bottom. Once you get the hang of it, it’s really quiteliberating—and fun.
CHAPTER 3:ALIEN TACTICSCHAPTER 3:ALIEN TACTICS

Prima’s Official Strategy Guide
<28>
AttacksAs we mentioned many times, Aliens have no long-range weapons—other than, perhaps, the projectionof fear across a room, causing helpless people to cower shamelessly. (The fear effect doesn’t work onarmed opponents.) But that doesn’t mean Aliens lack potent attacks.
ClawsClaws are your primary means of attack. One tap of the Fire button prompts a heinous double swipe.Hold down the Fire button for a rapid shredding with both claws. Clawing may be your weakestattack, but it still hits hard. One good swipe takes down most humans or completely shatters annoyingturret guns.Your amazing claw speed also complements your overall quickness. Simply hold down theFire button as you rush and circle your foe, keeping him off balance while tearing him apart withrazor-sharp, lightning-quick jabs.
Jaws (Headbite Only)
Brains are good food. For Aliens, human brains provide abalanced, nutritious diet with the greatest health benefit. Soheadbite your enemies whenever possible. Line up yourcrosshair on the target’s head until your inner teeth appear atthe top and bottom of the screen.Then pop the Fire button for adelicious, if somewhat grisly, snap of the jaws.
Fig. 3-12. Headbiting works only when the teethappear at the top and bottom of the screen.
This powerful attack scores an instant kill, but it’s not easy to line up in the heat of battle. Evenslow enemies like Marines move a little.The focus required forces you to halt your own freneticmovements, giving enemies a clean shot. Remember, a corpse’s head still gives you a decent energyboost. Consider the tradeoffs before you sell out for a headbite on a breathing target.
TailYour tail attack can stun or kill, depending on how you execute it. A quick punch or two of the Alt-Firebutton (the default is the right mouse button) stuns your target, leaving them disoriented andwobbling for a moment.This leaves the target vulnerable to your headbite, which again, restores themost health when your victim is still alive. If you hold down the Alt-Fire button, your tail “charges” foran extra-strength attack. When you let go, the tail hits with about five times the force of the quicktail punch.

<29>
This supercharged attack is good against more powerful foes such as the Predator, but it stillrequires three or four good hits. Hold down the Alt-Fire button as you dart toward your enemy,release to strike, then dart to safety, charging the tail again. As always, don’t stand in one place totrade blows!
PounceThis fearsome attack kills quickly, but leaves nothing behind for health consumption. Line up yourtarget, and press your Pounce key (the default is E ) to unleash a brutal, snarling lunge that tearsany human into ribbons.This attack is most useful when you’re trapped or hemmed in or if you want aquick sure kill against a heavily armed foe.
Remember that after a pounce, you must pause for a couple seconds to regain your strength.
How to Replenish Alien Health
Fig. 3-13. Dead heads aren’t as nutritious as living ones, but they’re better than
just clawing the corpse.
Clawing corpses gives you a small dose of health, but the bestdose comes from a headbite on a living target, which you canexecute only with your jaws (see the following section).Thenext best dose of health comes from a headbite on a corpse, soif you unleash your claw attack, don’t go wild! Continuous clawing totally shreds a victim into tinychunks, leaving no head. Instead, complete the kill with a claw swipe or two, then line up yourheadbite on the remains.Then you can claw the headless corpse for a small additional health dose.
We told you being an Alien was fun! For more on Alien attacks, read the following section,“Special Abilities.”
Special AbilitiesAliens have other unique abilities.This is a quick look at what makes Alienhood so special.
Wall-walkAlien claws cling to almost any surface. (Two forms of Aliens, the Praetorian and chestburster, cannotwall-walk.) When you toggle on your Wall-walk function (the default is F ), you climb straight upwalls or even scurry across ceilings as easily as if you were walking across the floor.
This can be disorienting, however.“What’s up, what’s down?” Fortunately, you have a built-inGravity Sense that appears as blue directional arrows around the edges of the screen. An arrow at thebottom means you’re on the floor; at the top means you’re on the ceiling.Two arrows at the sides ofthe screen indicate you are perpendicular to gravity—that is, hanging on a wall.
CHAPTER 3:ALIEN TACTICSCHAPTER 3:ALIEN TACTICS

Prima’s Official Strategy Guide
<30>
Vision Modes
Aliens have two Vision modes.The Hunt mode is normal vision,except other creatures emit a colored aura. Humans appearwith a blue aura, Predators with green, and other Aliens withred.You can see these auras even in total darkness or when acreature (such as the Predator) is cloaked. Unlike thePredator’s enemy-specific Vision modes, the Alien Hunt visionmode highlights all enemies, all the time.
Fig. 3-14. The Navigate vision mode is perfect fornight vision.
The Navigate vision mode intensifies the brightness of even the darkest areas, making it yournight vision mode. Aliens move through many vents, shafts, and other badly lit places, so you’ll useNavigate mode frequently. Note that the brightness washes out creature auras, so you lose thatbenefit. However, most dark ducts and other passages that call for your Navigate vision mode are freeof other creatures.
Combat Tactics
Fighting MarinesMarines are fairly easy to kill if you get to them. But Marine weapons are lethal against Aliens at anyrange; their long-range salvos are particularly troublesome, because you can’t retaliate or evendistract from a distance. So the key to victory against human opponents is close combat. Get in tightbefore he can unleash his arsenal! This means stealth, sneak or flank attacks, and avoidance of well-lit open areas. Never wander into the center of a big room when fighting a Marine.
Fighting PredatorsPredators are far more durable than Marines, so even the stealthiest surprise attack is unlikely to killone outright. Hit-and-run tactics work best. Dart in, strike with a supercharged tail, and dart out. Findcover and wait for the Predator to approach.Then repeat the process. If you find yourself cornered,unleash a pounce attack, then hurry away.
Fighting Other AliensAlien versus Alien battle is some of the most interesting we’ve seen in multiplayer gaming.These are clawing, spinning, biting grudge matches, with victory usually going to the player who lands thefirst solid hit.The key to any Alien victory is to strike first, and this is even more true against another Alien.

<31>
CHAPTER 4:MULTIPLAYER TIPS
CHAPTER 4:MULTIPLAYER TIPS
MULT I PLAYER T I PSMultiplayer action in any game is wild and unpredictable. No “expert” can lay out an infallibleprescription for success, because every game, every player, every Internet or network connection isdifferent—you get the idea.The variables increase almost exponentially with every new joystickjockey who jumps into the fray.
However, in this chapter we point out a few truths about multiplayer gaming in general andAliens versus Predator 2 in particular. Veteran gamers will recognize many tips presented here, butit never hurts to review. Special thanks to Fox Interactive testers Glenn Dphrepaulezz and DavidFarkas for their generous help in compiling these multiplayer tips.
Play the Single-Player MissionsWhat better way to master all the basics of Aliens versus Predator 2 than to play the excellentsingle-player missions for all three species? First, they’re a blast.The stories are compelling, theaction fast and furious.Think of it as pre-season training, although the missions are very challenging,some of the toughest we’ve ever faced. Beating Aliens versus Predator 2’s single-player missions isan accomplishment in its own right, but it also introduces you to some basics and unique features ofthis particular game.
For example, Alien movement can be disorienting at first. Mastering the Alien wall-walk andinterpreting the Gravity Sense display takes practice. It also takes time to adjust to fighting withoutranged weapons; Aliens have only teeth, claws, tail, and their fearsome pounce attack. Players used toslinging the intense long-range guns found in most first-person shooters must make big adjustments.
Know the SpeciesIn other words, read the “Tactics” chapters of this guide. Learn the characteristics of the threespecies you can play.The true beauty of Aliens versus Predator 2 is that it’s really three games inone. Each species attacks, defends, and even moves differently than its two counterparts.This makesfor some wonderfully diverse scenarios in the single-player missions and some wild and unpredictableaction in the multiplayer arena.
The bottom line is that you can’t just perfect a single style of attack or defense.You need atleast three of each. Indeed, Aliens and Marines are so different that someone playing as a Predatorbetter master two distinct (and nearly opposite) fighting styles—and be ready to shift between themat a moment’s notice.
Learn the LocaleIn multiplayer gaming, nothing is more crippling than ignorance of your environment. Even playerswith lightning reflexes and total mastery of a character’s nuances suffer mightily when they don’tknow where pickups lie, where choke points are, or where the high ground looms. Players with lesserskill can tear you to shreds because they get all the good stuff, camp in the best sniper lairs, or layProximity Grenades and Remote Bombs in places you’re likely to wander through.

Prima’s Official Strategy Guide
<32>
Before you jump into unfamiliar territory, try this: Host your own multiplayer games to exploremaps on your own.You don’t need (or want) other players yet. Study the layout; find the secret areas,the open expanses Aliens should avoid, and the tight spots Marines should avoid.Take note of whereall the good gear is.
Once you have a basic sense of direction, run at top speed through the map time and time againto get the feel of moving at game speed through its unique architecture. When you are oriented in allareas of the map—that is, able to move instinctively to new locations without thinking “Where am Inow?” or “How do I get to that item/area from here?”—you’re ready to drop into a game using thatmap, as long as you know the rules in play (see the next tip).
Know the RulesYou can have great fighting skills and a cartographer’s knowledge of the current map, yet still suck ifyou don’t know the rules of that particular game.The original shipping version of Aliens versusPredator 2 offers six multiplayer game types, each with a wide variety of settings and limits set bythe person hosting the game. (See the game manual for a detailed explanation of each game type.)Always take a few minutes to consider the rules and develop a game plan before you leap into a multi-player match.
Standard DeathmatchThe name says it all—deathmatch, standard—that is, everybody against everybody else.This is afree-for-all with only one objective: get more frags (kills) or points than anyone else. Each game canend in one of several ways set by the game’s host—when the game reaches a maximum time limit, orwhen one player reaches a certain maximum value (frags or points).
TipsAs the manual points out, this is a very fast game.The key: If you see your enemy first, you have theupper hand. Either kill him, or withdraw. Keep moving, especially side to side.Take advantage of thedifferent species. For example, Predators often get lazy and use only one vision mode. If you are anAlien, and you see a Predator hunting a human, you know that he’s probably using Thermal visionmode and not paying attention to you.
Team DeathmatchThis is a team game, obviously. It follows thebasic free-for-all Deathmatch rules but pitsteams of similar species against each other—Alien versus Marine versus Predator.You scoreby killing members of other species. If youaccidentally (or purposely!) kill one of your ownspecies, you subtract one frag and points fromyour team score.

<33>
CHAPTER 4:MULTIPLAYER TIPS
CHAPTER 4:MULTIPLAYER TIPS
TipsStay together! This applies to all three species. Use all the classes—this is particularly true forAliens. Alien teams should let the Praetorian and Predalien (the largest and most durable Aliens)distract foes while faster allies finish them off. Marines should use Smartguns and fire trackingrockets with the Rocket Launcher to find cloaked Predators, and drop proximity grenades and smartmines to protect your rear.
HuntIn this game, one or more players are designated as Hunter, and everyone else is Prey. Only Hunterscan accumulate frags (kills). If a Prey kills a Hunter, the two mutate into each other and respawn tonew locations—that is, the Prey becomes the Hunter race, and Hunter becomes Prey.The gamecontinues until the maximum number of frags or the maximum time limit is reached.
One other note:The host sets the ratio between the two teams. (The default setting puts theratio of Hunters to Prey at 1:2.) If players drop out, changing the ratio, the game automaticallymutates players to restore the host-specified ratio.
TipsWhen you are the Hunter, remember that no one else can score, so take your time and maximize yourkills. When you are Prey, try not to kill other Prey characters.This hurts your score and makes iteasier for the Hunter to kill you.
SurvivorSurvivor starts in a “tag” mode where it’s every man for himself.The first person killed becomes aMutant, everyone else becomes a Survivor, and game play moves to the “survive” mode. For eachsecond you stay alive as a Survivor, you gain 1 point. When a Mutant kills a Survivor, the Mutant gets10 points and the Survivor respawns as a Mutant. But if a Mutant kills another Mutant, or a Survivorkills another Survivor, the killer loses 10 points. (A Survivor who accidentally kills himself also turnsinto a Mutant, but gains or loses no points.) The round is over when all Survivor players are killed andthus respawned as Mutants.The player with the highest score wins.
TipsDying is no penalty for Mutants; you only gain points for Survivor kills. So Mutant tactics should beaggressive, almost reckless. Because Survivors are scored for time and Mutants are scored for kills,Mutant players want to end the round as quickly as possible. Survivors, on the other hand, should takeevasive measures. If pinned down, Survivors should work together, using Team Deathmatch tactics offire and cover.

Prima’s Official Strategy Guide
<34>
OverrunThis is a team-based game played for a set number of rounds. Players divideinto two groups, Attackers and Defenders. Each round lasts for a fixed periodof time, and there is no respawning—if killed, you are out until the nextround. If at least one Defender survives the timed round, the Defendersget one point per team member still alive. If all Defenders are eliminated,the Attackers get one point per team member still alive.The team with themost points at the end of all rounds is the winner.
TipsWork together to concentrate fire on targeted enemies. If you eliminateone or two opposing players without losing any from your own team, youcan usually mop up the other enemies quite quickly. Learn the mapsbeforehand. Good Overrun teams ambush their enemies at the key chokepoints.
EvacEvac is another team-based game played for a set number of rounds.Players split up into two groups, Attack and Evac.The Evac team must evacuate one or more of itsmembers before the round ends.To evacuate, a team member must reach the map’s Evac Zone andstay there—alive—for ten seconds. Attackers must prevent Evac players from evacuating before theround ends. Attackers also win by killing all of the Evac team. Each round lasts for a fixed period oftime, and there is no respawning—if killed, you are out until the next round.
TipsTactics are the same as in Overrun and other team-based games.Teams work together to concentratefire on targeted enemies. Even moderately skilled teams can overwhelm undermanned opponentseasily, so your goal is to eliminate one or two opposing players quickly, without losing any from yourown team. Obviously, the Attack team should post a strong squad in unobstructed free-fire positionsaround the map’s Evac Zone.This squad should emphasize power over mobility.
Understand PingThis excellent discussion of “ping” comes courtesy of Joe Grant Bell, fellow Prima Games writer andauthor of Prima’s Official Strategy Guide for this game’s predecessor, Aliens versus Predator.
If you play on a LAN (Local Area Network), chances are good that everyone’s on equal footing.But on the Internet, you may be at a terrible disadvantage.Typical modem connections suffer fromlatency—the delay in back-and-forth data transmissions from computer to computer. Ideally, youwant a fast, latency-free connection to the host computer (the “server”).
Connection speed is usually measured in “ping”—the time it takes for the data signal to travelto the server and back to your computer. Ping is measured in milliseconds; larger numbers mean alonger delay. Hence, you want your ping to be as low as possible.

<35>
CHAPTER 4:MULTIPLAYER TIPS
CHAPTER 4:MULTIPLAYER TIPS
A player with a direct connection to the Internet—for example, a T1 data line at a university—usually has great ping, often less than 100. Players with ISDN, DSL, and cable modems can also breakinto that exalted territory. But regular modems connected to standard phone lines usually get stuckwith pings between 200 and 500, although pings around 100 are possible under ideal circumstances.
If you play on a modem, connect to a server that offers a reasonably good ping. Anything over300 is a real liability, and anything over 400 is virtually unplayable. Consider your opponents’ ping aswell: a ping of 300 isn’t so bad if your opponents have the same; it’s terrible if they all have pingapproaching zero.You sometimes can improve ping and latency issues by getting a better modem andoptimizing your dial-up Internet connection with various utility programs, but phone line quality canlimit both.
The bottom line: understand ping and how it affects the game. Seek games in which you have agood comparative ping, and understand that the guy who keeps beating you might not be a betterplayer; he might just have a better ping. If that’s so, look for a game you can connect to faster or thathas players connected at speeds near or below yours.
Keep MovingThis is another age-old multiplayer adage that bears repeating again and again like a mantra: Don’tstand still! Unless, of course, you are a cloaked Predator hiding from a human. Otherwise, keepmoving, keep dodging, keep zigging and zagging, even if the current room seems deserted. Chancesare someone is drawing a bead on you even as we speak.
. . . Unless You Find a Good Sniper PostThere’s always an exception to every rule. Movement is always good in multiplayer gaming: the moreactive you are, the better. But every once in a while, it pays to stay put for a few seconds. Find aprotected perch overlooking juicy pickups or a doorway or other critical passageway, train a big gun downward and wait, then wait some more.When you hear the first sounds of approaching life,open fire.
That said, it should be noted that “camping” is almost universally despised in the multiplayergaming community. But there’s a reason for this hatred: sometimes camping works. It doesn’t work for
long, of course. Once they discover your perch, those burnedhit it with a fiery vengeance. Don’t push your luck.
After a few sniper kills, return to roaming anddodging.
Prima’s Official Strategy Guide
<36>
Grab the Good StuffThere’s more to movement than just dodging enemy fire. Constantly explore for pickups, particularlyif you’re a Marine. Never stop your search for equipment, ammo, and health items. Always look toupgrade your current weapon to something more powerful. Greed is a good thing in multiplayer action:You can never have enough good stuff.
Mine Popular PathwaysAs you get to know each map, you learn where opponents want or need to go. Doorways, shafts, andpickup items all see enemy use sooner or later. An alternative to camping over such areas is to plantRemote Bombs or fire Proximity Grenades around the area. Savvy gamers look for them, so be creativein your placement.
Be UnpredictableRookies often learn this seemingly obvious tip the hard way.Yes, you should run and dodge. But don’trun and dodge the same way over and over. Some people get into predictable patterns—back andforth, back and forth, always the same—and veteran gamers will quickly recognize this error andadjust their firing leads accordingly.
Run Backward from AliensKeep backpedaling. . . unless you’re an Alien, of course. Aliens have no weapons other than what’sattached (claws, teeth, tail), so they must advance and close the space.The previous Marine andPredator chapters explain that your best combat tactic against Aliens is to run backward while firing.
For more specific tips on how each species should fight the others, check the ends of Chapters1, 2, and 3.
Keep Enemies in FrontThis is common sense, but we must state it: You can’t shoot enemies who aren’t in your sights.Enemies at your rear laugh, getting ready to smite the poor fool who lacks situational awareness.Aliens particularly love to dart behind you; Predators cloak and hit from the rear too.“Backsidedefense” is easy to forget in a wooly battle with multiple enemies crashing a single area. But don’t letyourself get caught in a unidirectional exchange. Keep spinning and moving, squeezing off shots onthe run, and making it hard for anyone to tap your spine with a Combistick.
Get Behind Your EnemiesThis is the corollary of the previous tip, of course. Few things are more satisfying then finding a clearshot at the tucked tail of your enemy. Good Predator players use their powerful crouch-leap to hopcompletely over a foe, executing a 180-degree spin in midair to land facing the foe’s back.

<37>
CHAPTER 4:MULTIPLAYER TIPS
CHAPTER 4:MULTIPLAYER TIPS
Special Marine Multiplayer TipsBe Environmentally AwareAs a Marine, you’re the slowest and most item-dependent of the trio. Keep an eye out for where yourfavorite weapons spawn, and waste no time getting there.
Know Your WeaponsIn multiplayer games, the weight of your super-weapons (the Minigun, Smartgun, and RocketLauncher) creates a handicap that restricts your movement to a walking speed.This reduces theeffectiveness of your backpedaling technique.
Special Alien Multiplayer TipsAlien tactics offer some unique challenges to even veteran multiplayer gamers. Most online gaminginvolves big guns and ranged weapons. Aliens have neither. But bugs do have some slick advantages.Read the following tips, courtesy of Fox tester David Farkas.
Waste No Time Engaging EnemiesAs a bug, your first and probably biggest advantage is that you start off fully armed to the teeth, nopun intended. With your claws, tail, and pounce attack ready, get out there fast and begin killing asquickly as possible. If you wait around, giving your enemies time to pick up their favorite weapons,you’re going to be in for a much tougher battle. Never think twice about taking advantage of theunarmed or the freshly spawned.
Avoid Frontal Assaults against Well-Armed EnemiesThe Alien’s second-biggest advantage is speed and agility. Don’t bother going head up with a fully-armed Marine or Predator—you’ll end up a trophy. Unless your opponent is unarmed, avoid face-to-face confrontations at all costs. Instead, use your speed and pounce attack to outmaneuver your opponents, attacking from behind every chance you get.

Prima’s Official Strategy Guide
<38>
Pounce Around the MapThe Alien pounce attack is not only extremely lethal, but is also the best way to navigate around anymultiplayer map. It is truly the Alien trump card—but of course, nothing comes without a price. Dueto its destructive power, your pounce eviscerates the unlucky opponent on the receiving end, leavingyou without a corpse for health replenishment. Also, the recuperative pause between pounces leavesyou high and dry at inopportune moments. It’s not uncommon to pounce into battle only to findyourself outnumbered with no way to quickly escape.
Use the “Circle Claw” TacticOften a multiplayer melee leaves you with no time to carefully line up headbites, pounces, or tailstuns. Sometimes the best attack is to simply get up close and personal, and let your claws fly. In aclose-range melee, keep your crosshair centered on your target and strafe sideways, holding yourprimary Fire key down.This moves you in a circular pattern around your victim. Remember that yourclaw attack also replenishes your health, but only on corpses. Simply claw a dead body repeatedly,until nothing is left.

PART 2: S I NGLE-PLAYER M I SS I ONS

Prima’s Official Strategy Guide
<40>
MAR I NE M I SS I ONS The assault vessel USS Verloc orbits the planet LV-1201, a forbidding swirl of gale-force winds,extreme electrical activity, and general seismic instability. Aboard the Verloc, Marines under thecommand of Major Thomas McCain gather in the dropship bay, preparing for a planet-side search-and-rescue operation.You are Corporal Frosty Harrison, a tough Corps veteran.Your team includesSergeant Hall, the section leader; Johnson, the dropship pilot; Shugi, your APC (Armored PersonnelCarrier) driver; Jones, the communications tech specialist; and Duke and Blackwell, fellow grunts.
Fig. 5-1. Prepare to assume the persona of Cpl.Frosty Harrison, U.S. Marine Corps.
Commander McCain briefs you on your mission. Six weeksago, the Weyland-Yutani Corporation lost contact with itsresearch facility on LV-1201.Your job is to secure the site andfind out what happened. Duke describes the facility’s basiclayout: two heavily fortified installations—a PrimaryOperations Complex (POC) and Forward Observation Pods,connected by a secured tunnel network.
Mission 1: Unwelcome GuestsThe stormy descent into the canyon jams your dropship’s stabilizer and fries the antenna. McCaindeploys you, Shugi, and Blackwell to find the facility’s landing bay. His orders:“We need that windshear radar up and the landing site clear and powered. Once you’ve done that, activate the beacon.”
Tactical Overview<This mission is linear in structure; in fact, it’s almost impossible to get off
the critical path. You can’t unlock locked doors, although you must hack one(the very first) open with your Hacking Tool.
<Your first task is to find a landing facility and get it operational. Throwswitches to power up an auxiliary generator and the landing beacon, thenactivate the defense grid.
<The grid activation riles up Aliens, and sealed doors force you to find analternate return route through ventilation ducts.
<Aliens hit you in small groups—usually one or two at a time—so combat ismanageable for beginners.

Objective: Locate the Primary Operations ComplexThis first task is a no-brainer.You start behind Shugi and Blackwell at a base entrance.
Exterior: Canyon Gate� Proceed through boxes and shattered vehicles to
the door. Blackwell asks you to “run a bypass.”� Face the entry panel to the right of the door.� Move your cursor over the panel’s control pad.
The cursor turns into the Activate crosshair (agreen box around a crosshair).
Fig. 5-2. Activate these entry panels to open doors throughout the complex.
Some require hacking.
� Press your Use key (the default is E but you can program any key in theOptions/Controls menu). This opens the panel, and the cursor turns into theyellow crosshair.
�You must override the entry code. Press your Hack key—the default is H for“hack”—to wield the instrument.
The Hacking Tool allows Marines to communicate with, and override some,electronic security systems.
� Making sure the crosshair is visible, press and hold your primary Fire button(the default is the left mouse button) until the panel reads “BypassingSecurity Protocol.” The door slides open.
� Enter the base.
First Building: Base Hallways� Round the first corner. An explosion seals off the
doorway behind you. You’re on your own now.� Move forward to the red-lit intersection, turn left,
and proceed to the door.� Approach the door entry panel. You hear a horrible
scream! If you open and get through the doorquickly, you see a base guard killed by a seeminglyinvisible entity.
� Continue down the hall, and take the first left. You hear anotherscream. . . and the next door slides shut as you approach.
� Open the door and enter the control room.
CHAPTER 5:MARINE M
ISSIONSCHAPTER 5:M
ARINE MISSIONS
NOTE
CAUTIONAvoid those steamjets! They burn youand degrade yourarmor.
<41>

Prima’s Official Strategy Guide
Control RoomA horrible sight awaits you. Unfortunate skinned victims hang from compartments ripped open in theceiling. What’s going on here? What sort of creature is capable of such brutality?
� Pick up the PDA (Personal Digital Assistant) from the chair under thehanging bodies and read the note from “Xavier.”
� Walk to the red-lit alcove in the corner, and look down at the trap door. (Thecursor changes to the Activate crosshair.)
� Press your Use key to force the trap door open, and then drop into thegarage.
Garage� Approach the garage door with its control panel to the right. � Activate the panel to open the door. Exit the garage into the canyon.
CanyonDead ahead lies a bridge over a steep, river-hewn chasm. On thefar side rises the blinking tower of a non-operational windshear radar installation. In the far canyon wall, you see the doorto the Crew Quarters.The Main Landing Facility sits atop thecanyon wall.
Fig. 5-3. Projectiles slam into the canyon bridgewhen you emerge from the garage. Follow the signup the hill to the Primary Operations Complex.
�Your exit from the garage triggers an attackfrom an unseen assailant.
� Move forward slowly and carefully! Threeprojectiles take chunks of the bridge, and a fourth blast knocks a truck completely off the span.
Note the signs for the Tunnel Access Gate 1 (Southern Landing)and the Primary Operations Complex (Northern Landing).Thedoor entry control to the Tunnel Access Gate 1 just ahead islocked.
<42>

�Turn right and follow the arrow up the hill to the Primary Operations Complex.� As you move, something drops from the sky with a loud shriek. It’s a dead
guy! Where did he come from? � Continue up the hill to see a truck hit by another projectile. It tumbles
sideways down the slope and explodes.� Continue, climbing the narrow ravine out of the canyon. You hear Hall report
as her team reaches the southeast entrance of the POC.
Top of the Canyon� Approach the door of the Main Landing Facility. Two more skinned bodies
hang from a wire. Something is collecting human skins as trophies. Don’tmiss the Pulse Rifle near them on the ground. Picking it up gives you moreclips of ammo for your own Pulse Rifle.
� Open the hatch of the door control panel. Use your Hacking Tool to bypassthe door’s security protocol. Also read the note tacked nearby on the wall.
� Enter the facility. This is part of the POC, so you’ve achieved your firstmission objective.
Objective: Power Up the Auxiliary GeneratorYou find yourself in a dark landing bay—just the sort of place Johnson needs to land her dropship. Alarge facility surrounds the bay. Hall reports that her team reached the power core, but someoneneeds to reset the local relays in each sector. So to get the landing bay lit and operational, you mustfind and activate the facility’s auxiliary generator.
Note the message at the bottom of the screen that reads “ReceivingTransmission: Objectives Updated.” Press and hold t to see your newobjective.
East Landing Bay� Follow the wall on the left to the opening in the ground.� Climb down the ladder (or hop into the trench), and follow the long corridor
around many turns to its end. Ignore the flapping insect; it won’t harm you,so don’t waste ammo on it. Keep an eye out for a PDA just beyond the bluepipe stretched across the floor.
NOTE
<43>
CHAPTER 5:MARINE M
ISSIONSCHAPTER 5:M
ARINE MISSIONS

Prima’s Official Strategy Guide
Fig. 5-4. Descend the ladder in the landing bay,follow the twisting corridors, and pull this switch topower up the auxiliary generator.
� Pull the System Charge Switch on the far wallto power up the generator. You hear Jonesacknowledge your success, then Johnson asksyou to get the landing beacon online.
� Retrace your route to the landing bay. Becareful!
Objective: Activate the Landing BeaconIn the bay, the landing pad lights are flashing, and the facility mechanisms are lit and active. But youmust still fire up the beacon for the dropship. Let’s go!
Control Tower: Level 1 (Ground)� In the landing bay, follow the left wall to the next door. Open it, enter the
facility, then proceed down the corridor and turn left. A sign at the end of thehall reads “Control Tower.”
� Open the shattered Landing Pad 2 Cargo Access door, and step into the room. �Turn right and follow the wall to the elevator
(next to the Level 1 sign). Open the Ammo Boxto get 10 more flares, and then find the PulseRifle ammo pickup on the nearby shelf. Returnto the elevator.
� Push the call button to bring the elevator toLevel 1. Enter and press the button inside toride to Level 2.
Fig. 5-5. This elevator takes you to Level 2 of thelanding facility.
Control Tower: Level 2 (Landing Beacon)� Exit the elevator and use the computer on the desk to the left to read another
desperate message. Then examine the nearby table to find a topo map of theNorthern Landing Area. Follow the hall to the left.
� Approach the workstation labeled “Landing Beacon Control.”� Move the cursor over the workstation’s center panel—the cursor
becomes the Activate crosshair—and press your Use key to activate the landing beacon.<44>
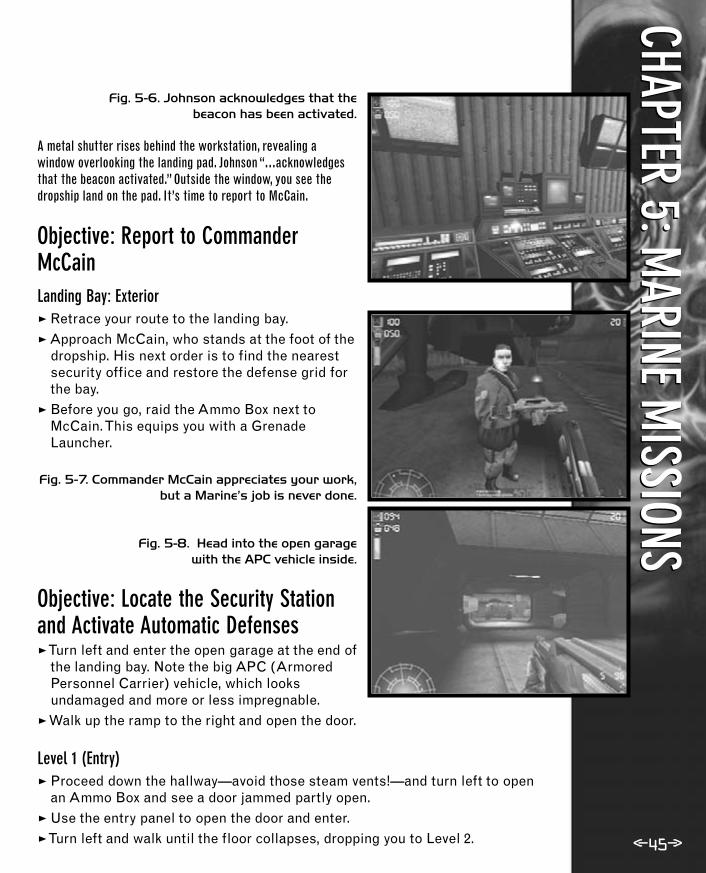
Fig. 5-6. Johnson acknowledges that the beacon has been activated.
A metal shutter rises behind the workstation, revealing awindow overlooking the landing pad. Johnson “...acknowledgesthat the beacon activated.” Outside the window, you see thedropship land on the pad. It’s time to report to McCain.
Objective: Report to CommanderMcCainLanding Bay: Exterior� Retrace your route to the landing bay.� Approach McCain, who stands at the foot of the
dropship. His next order is to find the nearestsecurity office and restore the defense grid forthe bay.
� Before you go, raid the Ammo Box next toMcCain. This equips you with a GrenadeLauncher.
Fig. 5-7. Commander McCain appreciates your work,but a Marine’s job is never done.
Fig. 5-8. Head into the open garage with the APC vehicle inside.
Objective: Locate the Security Stationand Activate Automatic Defenses�Turn left and enter the open garage at the end of
the landing bay. Note the big APC (ArmoredPersonnel Carrier) vehicle, which looksundamaged and more or less impregnable.
� Walk up the ramp to the right and open the door.
Level 1 (Entry)� Proceed down the hallway—avoid those steam vents!—and turn left to open
an Ammo Box and see a door jammed partly open. � Use the entry panel to open the door and enter.�Turn left and walk until the floor collapses, dropping you to Level 2.
CHAPTER 5:MARINE M
ISSIONSCHAPTER 5:M
ARINE MISSIONS
<45>

Prima’s Official Strategy Guide
<46>
Level 2 (Ramp)� Follow the corridor as it turns right, then open the first door on the right.
Cross the room, keeping an eye out for a Medikit on the floor.� Open the door at the far end of the room and exit. Follow the corridor to the
overturned desk. Continue around the corner, and open the first door on theleft. (This door sits opposite two pipes labeled “Natural Gas” and “Steam.”)
� Grab the Armor pickup, read the disturbing PDA memo on the desk, then drop down the hole in the floor so you land on the crate one level below. (The hole continues for two levels, so step off carefully to fall only one level.)
Fig. 5-9. Don’t miss these valuable Armor andMedikit pickups as you roam.
Level 3 (Barracks)�This is a barracks, and it’s a mess. Find the Flare Pouch (a belt holding
10 flares) in the middle of the room. If you have less than 20 flares left, pick it up.
� Jump down the hole to the next level.
Level 4 (Barracks)�Traverse the boxes to the door on the far end of the room.� Open the door and emerge into the corridor. (You should again see pipes
labeled “Natural Gas” and “Steam.”)�Turn right and round the corner to find an Ammo Box. Then come back
around the corner, hustle through the steam hazards (ouch!), and follow the corridor to its end, where you find a dead soldier. Pick up his droppedShotgun.
� Backtrack, turning right just before you reach the steam vents, and open the door.
TIP If you haven’t already done so, activate your Shoulder Lamp(the default is G ).
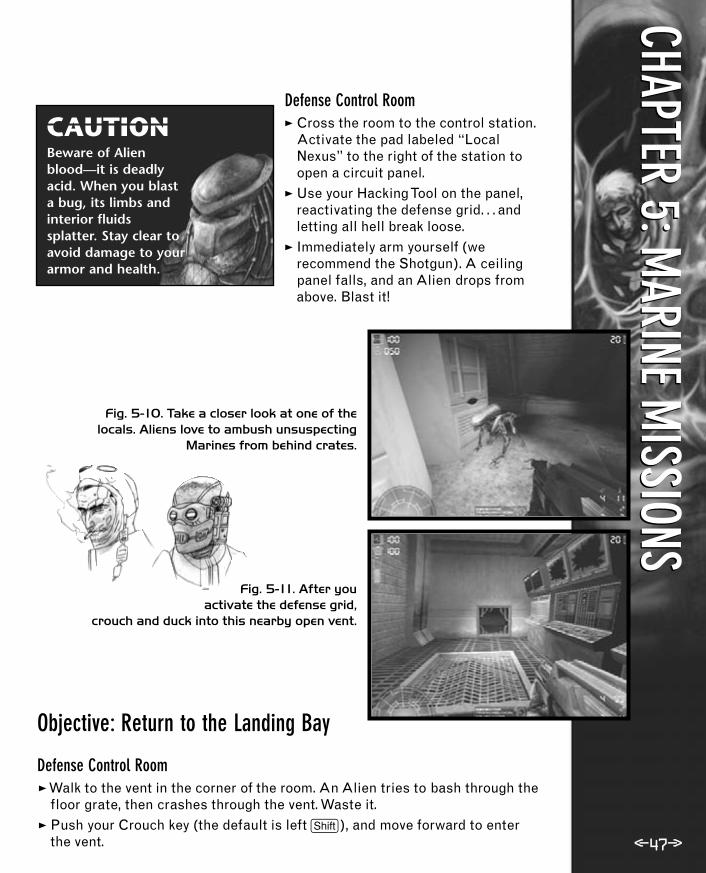
<47>
Defense Control Room� Cross the room to the control station.
Activate the pad labeled “LocalNexus” to the right of the station toopen a circuit panel.
� Use your Hacking Tool on the panel,reactivating the defense grid. . . andletting all hell break loose.
� Immediately arm yourself (werecommend the Shotgun). A ceilingpanel falls, and an Alien drops fromabove. Blast it!
Fig. 5-10. Take a closer look at one of the locals. Aliens love to ambush unsuspecting
Marines from behind crates.
Fig. 5-11. After youactivate the defense grid,
crouch and duck into this nearby open vent.
Objective: Return to the Landing Bay
Defense Control Room� Walk to the vent in the corner of the room. An Alien tries to bash through the
floor grate, then crashes through the vent. Waste it.� Push your Crouch key (the default is left s), and move forward to enter
the vent.
CAUTIONBeware of Alienblood—it is deadlyacid. When you blasta bug, its limbs andinterior fluidssplatter. Stay clear toavoid damage to yourarmor and health.
CHAPTER 5:MARINE M
ISSIONSCHAPTER 5:M
ARINE MISSIONS

Prima’s Official Strategy Guide
<48>
Ventilation Ducts
� After the drop, take the first left, then follow the vent around two right turns,a left, and another pair of rights. An Alien bursts from a grate in the floor.
Kill it and drop through the grate.
� Follow the lower duct as it turns right and thenleft to an intersection. Turn left and go to theladder. (You can turn right to find a FlarePouch around the corner, but it’s risky.) Watchout for Aliens! Grab the Medikit at the base ofthe ladder. When you reach the ladder, climbquickly!
Fig. 5-12. Climb this ladder at the end of the ventilation ducts.
Bathroom Area� At the top of the ladder, crouch to exit into the bathroom. An Alien drops
from the ceiling. Kill it and scour the room for pickup items. Be sure to checkthe lockers as well. You find the dogtags of the dead security guard whosePDA messages you’ve been reading.
� Exit via the small hallway and step into the next room, which is filled with boxes.
� Search for items—a box of shotgun shells and another PDA message—andwatch out for another Alien lurking behind a crate. Exit through the far doorinto a central stairwell.
� Climb the stairs to Level 3 to find a Medikit. Climb the stairs to Level 2 to findan Ammo Box. Open the door behind the Ammo Box, and step into the hall.
Objective: Rendezvous with White TeamLevel 2 (Corridors)� Beware of a pack of Aliens bursting through the high wall vent down the hall
to your left. Turn right, go to the next corner, and turn left. . . then braceyourself for a major attack. An Alien squad rushes up the corridor lookingfor brain food. Good luck!
TIP Be careful! Aliens burst out of grates or drop down verticalshafts as you move along the ducts. It’s best to keep your
Shoulder Lamp lit and your rapid-fire M-41A Pulse Rifle (in slot 4) ready.

<49>
� Continue past the fallen pipes around the next corner to the left, and fend offanother Alien attack. Proceed past the overturned desk. At the end of thehall, yet another Alien bursts through a gate to your left. Open fire!
� Open the door at the end of the hall. Cross the room and exit through thedoor into the next hallway. Go left (where more Aliens attack) and climb theramp to Level 1.
Level 1 (Exit)� At the top of the ramp, turn right, run through
the half-open door, and blast the last twoAliens. Take the next right, exiting through thedoor into the APC garage.
� Walk down the ramp, and approach the APC totrigger a cutscene: Harrison takes the bigvehicle to a rendezvous with the White Team.
Fig. 5-13. When you reach the APC garage, you’re safe. . . for the moment.
You (Harrison) learn that Aliens snatched Sergeant Hall, and you get an idea:“These things areparasites.They need hosts.They’ll want her alive.”
Objective: Locate Sergeant HallDespite Duke’s protests, you decide to use your motion tracker to find Hall: “I’m not leaving withouther. If our data’s right, they’ll take her for incubation.That’s their weakness.”
POC Exterior: Alleys� Pull out a nice, big gun. From your starting
point, go straight and follow the alley. Dukereports that you’re heading toward the MainPersonnel Quarters.
� Get ready for bugs and keep an eye out forpickup items along the way. Follow the alleyaround to the right, take a left, fight your waypast the striped barriers to the next inter-section (marked by the North Gate sign), and turn left.
Fig. 5-14. Find and open this security door just beyond the East Gate sign.
CHAPTER 5:MARINE M
ISSIONSCHAPTER 5:M
ARINE MISSIONS

Prima’s Official Strategy Guide
� Proceed past a small door on the left and a sign that reads “East Gate” onthe right, heading for the big door ahead. (If you go down the alley behind theEast Gate sign, you find a dumpster, some pickup items, more Aliens, and agruesome surprise.)
� Open the big door and the second security door just inside. Step into thealley. Continue around the corner, and follow the ramp to the Alien Hiveentrance.
Infested Base: Level 1 (Hive Tunnel)Fig. 5-15. This is your entry point into the infestedpart of the base—the Alien Hive.
� Follow the Hive tunnel through open doorwaysinto the facility, watching for pickup items andattacking Aliens along the way. Pass a white-litdoor on the left and a red-lit door on the right.Continue around the corner, and find the low,red-lit passage on the left.
� Crouch under the passage to approach thedoor. Note the poor woman on the left wall.Open the door and enter, prepared to fight off amultiple Alien attack.
�Turn left and examine the walls for more people being good hosts. If you talkto them, several howl and produce Alien spawn (“chestbursters”). Blast thelittle larvae, and move past the Level 1 sign to the elevator. (Watch out forthe hole in the floor.)
� Push the elevator button and ride to Level 2.
Level 2 (Alien Egg Room)� Move forward into the room. Jones and Duke offer a few cautionary words.
Destroy all the eggs before you get close, or nasty little Alien facehuggersleap out.
� Approach Sergeant Hall, attached to a wall in the back alcove, and attemptto free her. An Alien chestburster explodes from her abdomen!
<50>
TIP Note that you can now see Hall’s life signs, indicated by a reddot on your motion tracker.

Fig. 5-16. This is a fun moment. An Alien chest-burster explodes from Hall’s thoracic cavity.
� Kill the Alien chestburster that crawls out of Hall.
� Run!
Objective: Return to the APCThe next steps retrace your route all the way back to the APC,where you started. But now the Aliens are ticked off andswarming. After you fight your way out of the Hive, you faceinsurmountable numbers.
� Be careful! Several angry Aliens drop from the ceiling just outside the eggroom, so leave with guns blazing.
�Take the elevator back up. Head to the right, and move carefully along thetunnels until you exit the Hive.
� Just run! A mob of Aliens chases you, and your only hope is to sprint directlyback to the APC. After you climb the ramp, take the next left, and runthrough the security door, shutting it behind you. Aliens—lots of Aliens—areclumped on the other side. Whew!
Fig. 5-17. Don’t try to fight the Alien mob on your tail. Their numbers are
limitless, so just run straight to the APC.
� Open the next security door, and sprint straightdown the alley. It’s useless to turn and fight!Turn right at the corner, run past the stripedbarriers, and go right, then left to the APC.Don’t stop running until you trigger thecutscene!
�You made it (barely). Watch the APC pull awayfrom the Aliens.
Fig. 5-18. Cpl. Harrison escapes in the APC. . .with a grisly vision of hell locked
in his consciousness.
<51>
CHAPTER 5:MARINE M
ISSIONSCHAPTER 5:M
ARINE MISSIONS
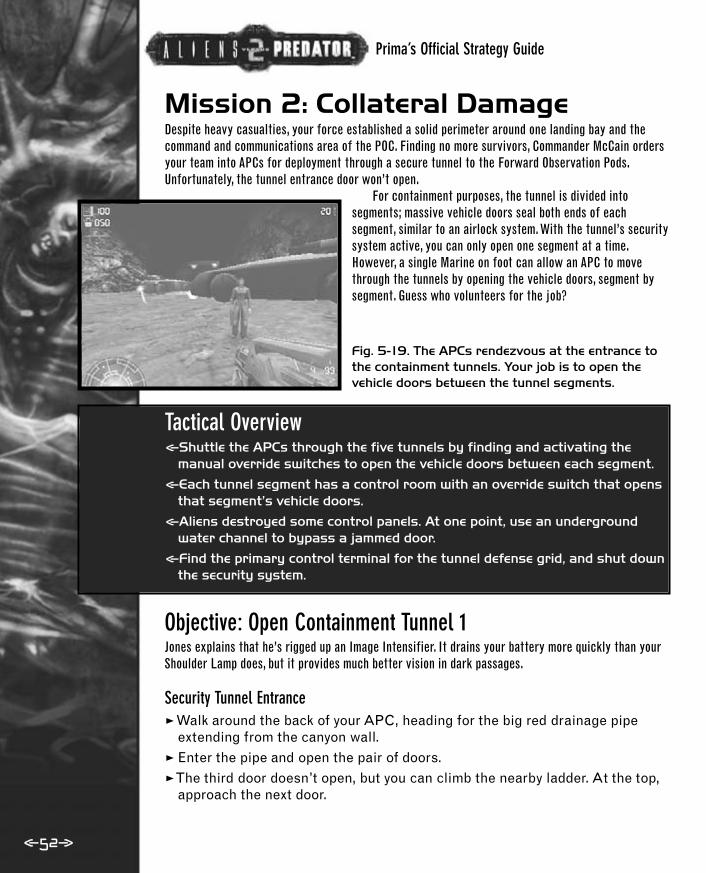
Prima’s Official Strategy Guide
<52>
Mission 2: Collateral DamageDespite heavy casualties, your force established a solid perimeter around one landing bay and thecommand and communications area of the POC. Finding no more survivors, Commander McCain ordersyour team into APCs for deployment through a secure tunnel to the Forward Observation Pods.Unfortunately, the tunnel entrance door won’t open.
For containment purposes, the tunnel is divided intosegments; massive vehicle doors seal both ends of eachsegment, similar to an airlock system. With the tunnel’s securitysystem active, you can only open one segment at a time.However, a single Marine on foot can allow an APC to movethrough the tunnels by opening the vehicle doors, segment bysegment. Guess who volunteers for the job?
Fig. 5-19. The APCs rendezvous at the entrance tothe containment tunnels. Your job is to open thevehicle doors between the tunnel segments.
Tactical Overview<Shuttle the APCs through the five tunnels by finding and activating the
manual override switches to open the vehicle doors between each segment.<Each tunnel segment has a control room with an override switch that opens
that segment’s vehicle doors.<Aliens destroyed some control panels. At one point, use an underground
water channel to bypass a jammed door.<Find the primary control terminal for the tunnel defense grid, and shut down
the security system.
Objective: Open Containment Tunnel 1Jones explains that he’s rigged up an Image Intensifier. It drains your battery more quickly than yourShoulder Lamp does, but it provides much better vision in dark passages.
Security Tunnel Entrance� Walk around the back of your APC, heading for the big red drainage pipe
extending from the canyon wall.� Enter the pipe and open the pair of doors.�The third door doesn’t open, but you can climb the nearby ladder. At the top,
approach the next door.
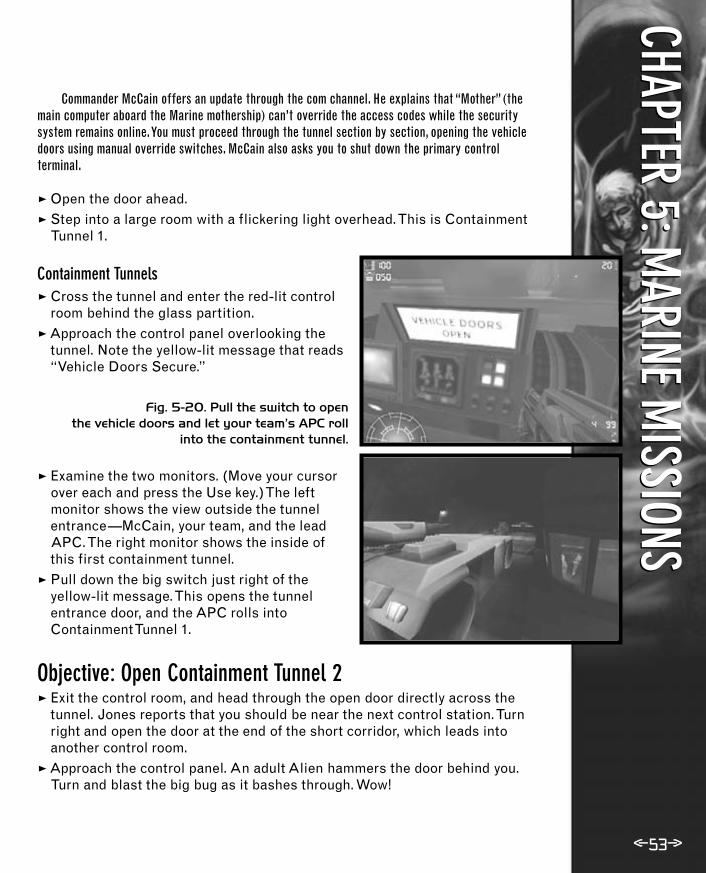
<53>
Commander McCain offers an update through the com channel. He explains that “Mother” (themain computer aboard the Marine mothership) can’t override the access codes while the securitysystem remains online.You must proceed through the tunnel section by section, opening the vehicledoors using manual override switches. McCain also asks you to shut down the primary controlterminal.
� Open the door ahead.� Step into a large room with a flickering light overhead. This is Containment
Tunnel 1.
Containment Tunnels� Cross the tunnel and enter the red-lit control
room behind the glass partition.� Approach the control panel overlooking the
tunnel. Note the yellow-lit message that reads“Vehicle Doors Secure.”
Fig. 5-20. Pull the switch to open the vehicle doors and let your team’s APC roll
into the containment tunnel.
� Examine the two monitors. (Move your cursorover each and press the Use key.) The leftmonitor shows the view outside the tunnelentrance—McCain, your team, and the leadAPC. The right monitor shows the inside ofthis first containment tunnel.
� Pull down the big switch just right of theyellow-lit message. This opens the tunnelentrance door, and the APC rolls intoContainment Tunnel 1.
Objective: Open Containment Tunnel 2� Exit the control room, and head through the open door directly across the
tunnel. Jones reports that you should be near the next control station. Turnright and open the door at the end of the short corridor, which leads intoanother control room.
� Approach the control panel. An adult Alien hammers the door behind you.Turn and blast the big bug as it bashes through. Wow!
CHAPTER 5:MARINE M
ISSIONSCHAPTER 5:M
ARINE MISSIONS

Prima’s Official Strategy Guide
�The vehicle door switch doesn’t work, but hack the exposed circuit panel toits right. Use your Hacking Tool on the panel until McCain says, “Good job,Harrison.” Pull the switch and watch the APC crawl into the next tunnel.
Objective: Open Containment Tunnel 3� Open the door to your left, and exit the
control room.� Move slowly down the dark corridor, gun ready.
Two adult Aliens lurk in the control room at theother end, one around each corner. When theycharge, back up firing.
Fig. 5-21. After you throw the third override switch,annoyed Aliens rush up the corridor behind you.
� In the third control room, throw the manual override switch, and immediatelyturn around. One Alien drops from the ceiling behind you, and more rushdown the dark corridor.
� After you polish them off, go to the door to the side of the room. (An angryAlien bashes at the floor grate, but can’t get through.)
Objective: Open Containment Tunnel 4� Want to save a few bullets? Sprint around the next corner (where a dead guy
lays on the floor), and run straight toward the APC. Hungry Aliens pop out ofa vent. If you run around the front of the APC, your buddies gun down yourpursuers. Nice cover, fellas!
�The next control room is to the right of the APC. Its entry door is back up thetunnel a bit. Find the door and enter the controlroom.� As you enter, something explodes on the far
end of the room—consoles fall, and moreAliens burst through a grate. Gun them downfrom a healthy distance.
Fig. 5-22. Don’t miss the Smartgun on the floor inthe fourth control room.
<54>

<55>
� Pick up the Smartgun and a box of Smartgun ammo. You find a Medikit here too.
� Pull the override switch to send the APC to the next door.
Objective: Open Containment Tunnel 5� Exit the control room, blast some Aliens, and re-cross the tunnel to the
stairs. Climb the stairs, turn right, and go through the next door.� Help yourself to the Ammo Box to get the
Welding Torch. Continue past the big steaminggrate toward the next door. An Alien pounds itfrom the other side. Dang! Now it’s jammed.
�Turn around and walk back to the metal hatchwith the striped outline.
� Press T to wield your Welding Torch, and thenmove directly above one of the two bolts.
Fig. 5-23. Torch the bolts to open this hatch. Thenhop down into the passage below.
� Place your cursor over the bolt. When it turns into the blue Welding Torchcrosshair, press your Fire button to torch the bolt.
� Repeat the process on the second bolt. The hatch falls into the darkness below.
� Arm yourself, hit V to use your Image Intensifier, and hop into the hole.� An Alien quickly runs at you—blast it! Switch from the Image Intensifier to
your Shoulder Lamp (for less battery drain), and head down the passage tothe steam vent. Look for pickup items (andAliens) in the dark area behind the vent.
� Continue to the far end of the passage andclimb the ladder. Now you’re on the other sideof the jammed door.
� At the end of the passage is the Water PumpControl Switch. When you turn it, this passagefills with water, so you better have a plan first.
Fig. 5-24. Exit the dark underground passage viathis open ceiling hatch.
CHAPTER 5:MARINE M
ISSIONSCHAPTER 5:M
ARINE MISSIONS

Prima’s Official Strategy Guide
<56>
� Follow the corridor around the corner, and open the next door.� Arm yourself with the Smartgun, and cross the grate bridge. When you reach
the other side, a floor vent bursts open, and Alien drones flood out. Thin theirranks with Smartgun firepower.
� Approach the now-open floor vent. �The next door entry panel is damaged and doesn’t open the door, so hop into
the open floor vent. Follow the passage to the ladder, blasting Aliens alongthe way. Climb the ladder to the landing overlooking the containment tunnel.
� Cross the landing to the control room door, which is disabled. Rats! Jonestells you to find another way. Go back to the ladder leading up, and climb itinto the ventilation duct system.
Fig. 5-25. Ventilation ducts and vent systems areAliens’ favorite hiding spots.
� Proceed down the long duct to the open grate. Beware: an Alien lurks below.
� Jump through the open grate into the next control room, and immediatelyback up, firing. The Alien drops to attack.
� Goodies! Much-needed Armor, Medikit, and Ammo Box pickups sit here.Grab what you need, and go to the control panel. Open the vehicle doors,and watch the APC lumber into the next segment. It blasts some Alienscongregating in the tunnel area.
TIP If you can see the Alien below from the ventilation grate, hit itfrom above before you jump down.

<57>
Objective: Shut Down the Security System� Exit via the nearby door, step onto the tunnel road, and blast any remaining
Aliens in the tunnel.�Turn left and head toward the APC.� Go through the doorway to the right of the APC, and follow the long corridor
through open doors and past the ladder to the stairs. (A poor soldier getspulled into a vent over the stairway. Gross!) Brace for Alien attacks along the way.
� Descend the stairs and move to the next open doorway. The APC automat-ically rolls past and stops.
� Cross the tunnel and walk through the broken door to the left of the APC. Asyou enter, you see another soldier pulledscreaming under a console.
� Approach the control panel. McCain points outthat it’s trashed, but Duke finds a service tunnelthat should lead to the main station.
� Grab the Armor, Ammo, and Medikit pickups,climb down the nearby ladder into the servicetunnel, and open the door at the bottom.Darkness! This is another good place to useyour Image Intensifier.
Fig. 5-26. Your Image Intensifier comes in handy in pitch black tunnels.
� Step through to the intersection and turn right.(Duke also lets you know which way to turn.)Follow the passage to the next door.
� Open the door and step through. An Alienonslaught awaits, around the corner to the left!Fight smart, shooting while backing up.
Fig. 5-27. This bug squad hunkers just around thecorner in the service tunnel.
CHAPTER 5:MARINE M
ISSIONSCHAPTER 5:M
ARINE MISSIONS

Prima’s Official Strategy Guide
<58>
� After you win, proceed to the ladder. Duke tells you to head straight up. Do so.
�You emerge in the final tunnel segment. An unmanned industrial powerloader stands nearby. Aliens hang out here too, so be careful.
� Cross the tunnel to the Security Control Room door. It’s jammed too! Noticethe explosive canisters nearby.
Fig. 5-28. Shoot these explosive canisters to blastyour way into the Security Control Room.
� Move back across the tunnel for safety, then shoot the canisters to blow thedoor open. Cool!
� Enter and head for the rear right corner of the room. Find the computer panelthat reads “Status: Locked.”
� Use your Hacking Tool to access thecomputer. Suddenly, alarms soundand a message flashes on themonitors: “Warning: VirusDetected.” The APC rolls intothe tunnel, guns ablaze.

<59>
Mission 3: BetrayalMeet the odd occupants of the Forward Observation Pods.Vassili Rykov is a former Marine and is now head of the IronBears, a Russian mercenary unit that provides security for thisinstallation. Dr. Eisenberg, director of research, claims the Podsare safe, but Rykov is angry because he lost men when you tookdown the tunnel defense grid. After your team leaves, Rykov hasa suspicious exchange with a soldier—apparently,“rosters”were changed to cover up certain fatalities.
Fig. 5-29. Rykov and Eisenberg run the show atthis mysterious corporate research facility.
Tactical Overview<Escape the detention block by overpowering guards and recovering
weapons and tools.<Find and kill a powerful mutant strain of Alien known as a Predalien.<Proceed through various shafts to the Implantation Lab, and find a
concealed drop into the Animal Storage area. Make contact with a spy whowants you to find a computer disk.
<Traverse Alien egg stasis pools to the crew quarters and find an elevatorsecurity pass. Use the elevator to find a disk in an Implantation Lab.
<Find a way out of the Pod. Move back and forth across skywalks until youfind a freight elevator that takes you to the Cargo Storage area. Workyour way to the cargo lift to escape.
Objective: Proceed to Communication TerminalAs he told Rykov and Eisenberg, Commander McCain wants to reestablish a communication link withhis White Team at the POC. He wants you to modify Pod software to use the booster transmitter youset up in the security tunnels.You need a communication terminal.
�You start at a desk. Talk to Technician Stiles, who is tapping on the keyboard.Follow his directions: Open the door on your right, and then open the door tothe right of the ladder. Bear left when you reach the junction, and go straightto the room labeled “Communications” at the end of the hall.
� Open the door and enter to trigger a cutscene.
CHAPTER 5:MARINE M
ISSIONSCHAPTER 5:M
ARINE MISSIONS

Prima’s Official Strategy Guide
<60>
Harrison walks in and starts talking at the communication terminal. Note the last incomingmessage before the terminal fails:“Rosters have been altered. Scientists already dead.Your team isin. . .”. A female mercenary soldier named Dunya walks in and suggests an “interface with the rootsystem.” Sounds good. But as Harrison follows her, she stuns him and the lights go out.
Fig. 5-30. Your encounter with Dunya puts you incold sleep and a detention cell.
Detention CellHarrison awakens on a cot in a detention cell—no uniform, noweapons. A conversation with a cell mate reveals you’re now aprisoner. Worse: a prisoner bound for Prep Room B.You don’thave time to find out what that means, because the convicttries to jump the guard that comes for Harrison—and takes afew bullets.
Objective: Locate Your Team� When he’s shot, the convict drops his Combat Knife. Quickly run to pick it
up! Knife the guard, take his Pistol, and arm yourself with it.� Proceed into the passage and ride the lift. Turn right and shoot the guard in
the next guardroom. Return to the first guardroom to find an Ammo Box withmore Pistol bullets and 10 flares and a Medikit.
� Open the only working exit door, and climb the ladder in the next room. Atthe top, use the switch to open the iris-like door above you. Hurry! Anotherguard arrives and fires his Pistol up the shaft at you. (Alternatively, waituntil the guard arrives, kill him and grab his Pistol ammo, then continue upthe ladder.)
Iris Door Shafts� Keep climbing the vertical shaft to the next switch, and open another iris
door above you. Climb to a third switch, and open a third iris door, this oneleading into a horizontal shaft. Crouch to get into the shaft.
�Turn left, crawl to the end of the shaft, and open another iris door. Anelevator rises on the far side of a big atrium. Another elevator car stops justoutside your door.
� Step onto the platform, underneath an elevator car. You hear a voice aboveyou: “Like we don’t have enough problems already. We still have a bugrunning around somewhere on Level 12.”
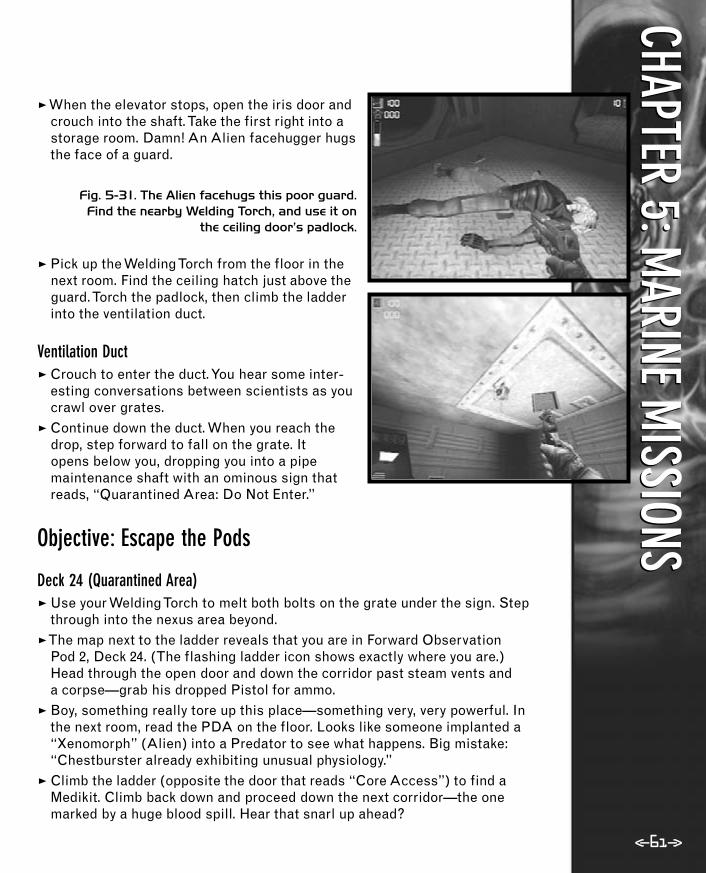
<61>
� When the elevator stops, open the iris door andcrouch into the shaft. Take the first right into astorage room. Damn! An Alien facehugger hugsthe face of a guard.
Fig. 5-31. The Alien facehugs this poor guard. Find the nearby Welding Torch, and use it on
the ceiling door’s padlock.
� Pick up the Welding Torch from the floor in thenext room. Find the ceiling hatch just above theguard. Torch the padlock, then climb the ladderinto the ventilation duct.
Ventilation Duct� Crouch to enter the duct. You hear some inter-
esting conversations between scientists as youcrawl over grates.
� Continue down the duct. When you reach thedrop, step forward to fall on the grate. It opens below you, dropping you into a pipemaintenance shaft with an ominous sign thatreads, “Quarantined Area: Do Not Enter.”
Objective: Escape the Pods
Deck 24 (Quarantined Area)� Use your Welding Torch to melt both bolts on the grate under the sign. Step
through into the nexus area beyond.�The map next to the ladder reveals that you are in Forward Observation
Pod 2, Deck 24. (The flashing ladder icon shows exactly where you are.)Head through the open door and down the corridor past steam vents and a corpse—grab his dropped Pistol for ammo.
� Boy, something really tore up this place—something very, very powerful. Inthe next room, read the PDA on the floor. Looks like someone implanted a“Xenomorph” (Alien) into a Predator to see what happens. Big mistake:“Chestburster already exhibiting unusual physiology.”
� Climb the ladder (opposite the door that reads “Core Access”) to find aMedikit. Climb back down and proceed down the next corridor—the onemarked by a huge blood spill. Hear that snarl up ahead?
CHAPTER 5:MARINE M
ISSIONSCHAPTER 5:M
ARINE MISSIONS

Prima’s Official Strategy Guide
<62>
� Follow this corridor to the juncture and bear right. Find the Pistol ammo atthe end of the hall, then come back to the juncture and take the other fork.
� Open the door at the end of the hall. You see a scientist brutally draggedbeneath another door. That door is now jammed shut, so go down the ladderto the next deck.
Deck 23 (Quarantined Area)� At the ladder’s bottom, open the door on your right and proceed down the
corridor. Bear left at the junction and explore. �The Predalien bursts through the ceiling at a random place. Back away and
empty your Pistol into the massive beast. � Proceed to the nearby door labeled “Surface Analysis Lab.”
Surface Analysis Lab
Fig. 5-32. Find the padlocked floor grate justoutside the door.
� Look to your left. The floor grate beneath thesparking panel has a padlock.
� Use your Welding Torch on the padlock to openthe grate. Drop into the subfloor and crouch toenter the vertical maintenance shaft.
� Climb down the ladder and open the iris seal below you. Climb down to findanother iris seal on the side of the shaft. Open it and crouch to enter thehorizontal vent.
� Crawl down the vent. (The game automatically loads a new level here. Presst to read McCain’s updated log. He thinks you’re dead!)
� Crawl over the drop-off in front of you to fall into the Implantation Lab.
Implantation LabA vicious Predator lies in suspended animation, encased in a chamber.You land right on top of him.

<63>
Fig. 5-33. Activate the switch (right) to raise the Predator chamber (left), revealing
an opening in the floor.
� Go to the right-hand side of the room, and findthe control pad on the wall near the chair.Activate the pad and turn to see the Predatorchamber tilt vertically. Hey, the guy’s awake in there! He watches you as you move across the room.
� Go to the opposite side of the room to findanother PDA tucked inside one of the panels onthe console.
� Go behind the chamber, and drop down through the opening to a lab.
Animal Storage AreaTwo scientists spot you and sound the alarm.They point out that you’re in Animal Storage.Thatdoesn’t sound too good. Get out of there.
�Turn and hustle to the door. Open it and run down the ramp. �You have two options here: If your health is good,
post yourself beside the door, and gun down theguards who burst through. Nab ammo from theirdropped Pistols, and find another Ammo Box fullof napalm around the corner in the next room.Then proceed to the following step.
� Otherwise, quickly hop onto the canisters onthe back of the vehicle, shoot the grate on thewall to open it, and crouch-jump into the duct.
Fig. 5-34. Shoot out the wall grate, hop onto thevehicle, and crouch-jump forward into the ducts.
Ventilation Duct� Climb the short ladder, and follow the duct past the spinning fan (watch out for
the blades) to the padlocked hatch. Melt the padlock with the Welding Torch.� Continue down the duct to another padlocked hatch, where you hear a
conversation. Torch the padlock and move through the hatch.
Specimen Storage (Facehuggers!)� Wield your Pistol, dropping down on the right side. Run around the corner to
the right, gun down the armed guard, and run into the room behind him.
CHAPTER 5:MARINE M
ISSIONSCHAPTER 5:M
ARINE MISSIONS

Prima’s Official Strategy Guide
� Climb the ladder to trigger a cutscene. A voicethrough your com system asks you to “get a package” from Implantation Lab 2. Inexchange, the voice says he’ll put you in contact with your team.
�When the cutscene ends, open the nearbyAmmo Box to get the flares.
Fig. 5-35. Meet a mysterious contact in theSpecimen Storage control booth. Then unleash afew specimens on the security units below.
�Turn around and activate the panel that reads“Specimen Stasis Online,” which releases afew “specimens”—Alien facehuggers—into theroom below. That ought to keep the guardsbusy. Go right and activate the Belt Relay unit.(This is what the voice meant by “down thebelt, buddy.”)
� Return to the specimen room. Guards in A.P.E.(Acid Protective Environmental) suits sprayfacehuggers with Flamethrowers. One of thosemight be nice, so if you’re feeling lucky, try togun down a guard and grab his Flamethrower.Follow the right wall to the conveyor belt.Crouch and step onto the conveyor, riding tothe egg-filled pool.
Objective: Activate Emergency Security Override
Egg Stasis Pools� Avoiding eggs, work your way across the pool
to the underwater drainage tunnel (surroundedby a low metal gate). Pull out your WeldingTorch when you step into the tunnel.
Fig. 5-36. Find this entrance to the egg pooldrainage tunnel—and dive in.
� Run—you’re underwater! Hurry to the gate andtorch the padlock. Hustle through, take the firstright, and climb up the ladder. <64>

� Pull the switch labeled “System Charge” to override the security lockdown,which unfortunately, also shuts down the stasis for the egg pits.
Objective: Proceed to the Main Lift� Climb up the tall ladder in the alcove.� Find a locked Ammo Box; torch its padlock. Keeping your torch active, climb
back down and return to the underwater drainage tunnel. Quickly torch thepadlock on the next underwater gate to the right.
� Hurry through the gate—switch to your Pistol as you go—and hop out of thetunnel to find yourself in a second egg stasis pool.
�Take your advisor’s advice: Run like hell through the eggs to the ladder in theroom’s rear right corner.
� At the top of the ladder, turn right and hurry through the open door.� If you go to the end of the hall, the door leads right back into Animal Storage.
Been there, done that. Instead, take the first left, and climb the ladder at theend of the short hall. At the top, open the door and go left into the controlbooth overlooking Animal Storage.
� Move across the control booth to the corridoron the other side. Follow the corridor until anelevator door slides open on your left. This isthe main lift. Kenji suggests you ride theelevator up to reach the Implantation Lab.
Fig. 5-37. This is one result of your SpecimenStorage area antics.
� Before you hop on the lift, look through thewindow to the right. See the chaos you createdin the Specimen Storage area?
� Step onto the main lift. The doors close behind you. Push the control buttonto ride up. (A new section of the game loads here.)
Objective: Locate Implantation Lab 2Many doors are locked on these levels, so you must take a roundabout route to Implantation Lab 2,traveling up and down between Decks 21 and 22 several times.
<65>
CHAPTER 5:MARINE M
ISSIONSCHAPTER 5:M
ARINE MISSIONS

Prima’s Official Strategy Guide
<66>
Deck 22� Open the elevator door and step into the
corridor. Be sure you’re armed with the Pistol.Guards roam the halls, looking for you. Turn leftand open the door into the nexus. Take theladder down to Deck 21.
Fig. 5-38. This is a map of Deck 21. Many doorsare locked, so follow the walkthrough.
Deck 21You’re in a nexus with three doors, but only one is unlocked—the one marked “Crew Quarters, EastWing.”As you approach it, Kenji says,“Check the crew quarters.There’s an emergency panel at theend of the hall. Hack it and you can gain access.” Unfortunately, you no longer have your Hacking Tool.Let’s go find it, shall we?
Fig. 5-39. This Conference Room leads to severalkey areas of Deck 21.
� Open the door, step through, and take the firstleft into the Conference Room with the biground table. (See Fig. 5-39.) Gun down theguards, and proceed left to thedoor marked “Core Access.”Open the pair of doors, crossthe bridge, open another pairof doors, and step into theintersection.
� Directly ahead is the Ovomorph Implantation LabCheck Point (labeled “G” on the Deck 21 map). As youapproach its door, Kenji says it has an internal lift, butyou need a security pass to use it. This gives you anew objective.
Objective: Obtain Security Badge�Turn left and open the door into another nexus. Watch
out for guards!� Climb the ladder to Deck 22. More Pistol-wielding
guards attack you.

<67>
Deck 22
Fig. 5-40. This is a map of Deck 22. Many doors are locked,
so follow the walkthrough.
� Looking from the ladder, go through the opendoor on the left. Proceed down the hall to thefirst room on the right, a control room.
Fig. 5-41. Recover your Hacking Tool here, sitting on a small cart in the back.
� Enter the control room, and find your HackingTool on a small cart in the back of the room.Watch out for a synthetic scientist lurking in here.
� Exit and go left, back to the nexus. Descend theladder to Deck 21.
Deck 21� From the ladder, go through the open door, taking the first right to the Core
Access door. (Beware the multiple guards on the way!) Cross the core,returning to the Conference Room with the round table. Exit right, turn left,and walk to the emergency panel at the end of the hall on the right side.
� Open the panel. Use your Hacking Tool on the circuit until you see themessage “Local Area Security Override.”
CHAPTER 5:MARINE M
ISSIONSCHAPTER 5:M
ARINE MISSIONS

Prima’s Official Strategy Guide
<68>
Fig. 5-42. Hack the security override switch tounlock the crew quarters.
� Before seeking the security card, procurebigger firepower. Directly across the hall is theLocker Room. Enter and open all the lockers.(You must open some with the Hacking Tool.)You should find many ammo clips, napalm,boxes of shells, and a nice Shotgun.
� Proceed through the following door to findanother set of crew quarters.
�Take the security card, which is randomlyplaced in one of the four crew quarters.
� Exit and return to the room with the internallift—that is, go down the hall to theConference Room, go through all four of theCore Access doors, and enter the OvomorphImplantation Lab Check Point directly ahead.
� Kill the guards and take the lift to theImplantation Lab area.
Implantation Labs
Fig. 5-43. The spy’s disk sits on a desk in thecontrol station overlooking an Implantation Lab.
� Exit the lift and follow the corridor to thecontrol station. Grab the disk from the deskon the right. Kenji says he’ll meet you near theexit lift: “After we make the trade, I’ll help youfind your friends.”
� Return to the lift and ride up to Deck 21.

<69>
Objective: Return to the Main Lift� Get ready for a bunch of Guards! From the room with the lift, fight your way
through the first two Core Access doors, cross the core bridge, and gothrough the two doors into the Conference Room.
� Exit through the right-hand door, turn right into the nexus, and climb theladder to Deck 22. Go through the open door on the opposite side of thenexus, and take your first right.
� Open the main lift door, enter, and push the button.�The main lift drops, but it shudders to a halt in midtransit. Use your Hacking
Tool to access the panel. The door opens and you face an iris door.� Open the iris door, crouch, and jump forward into the duct. Crawl to the end
to load another section of the mission.
Objectives: Find New Gear and a Way Out of the Pods
Central Control Room� Open the door, turn right, and enter the Central
Control Room. As you move toward the far door,Kenji reports a problem and says he can’t meetyou right now.
� Move around the room, opening console panelsto find pickup items stashed inside.
� Open the last computer console on the right toreveal a maintenance passage.
Fig. 5-44. Open the computer console (circled) in the Central Control
Room to find a maintenance passage to the Pod skywalks.
� Move down the passage and hop across the hole to get the Medikit. Thendrop down the hole, and approach the panel labeled “Sentry Gun Access.”Open the panel and use your Hacking Tool to access the system.
� A floor panel drops to your left. Hop down and open the door next to you.
Pod Skywalks� Fight your way across the skywalk, and go through the door at the other end.
Guards abound here! Turn right and enter another door. In the next room, usethe door directly ahead. Go down the corridor, taking the first door on theright to another skywalk.
CHAPTER 5:MARINE M
ISSIONSCHAPTER 5:M
ARINE MISSIONS

Prima’s Official Strategy Guide
� Don’t cross this second skywalk. Instead, turnleft and climb the ladder. Emerge onto aplatform atop the skywalk.
� Run across the skywalk’s glass ceiling. Whenyou reach the far platform, Kenji points out acatwalk to your right. It’s hard to see, but it’sthere. Step directly onto it from the platform;you don’t have to jump.
Fig. 5-45. This narrow catwalk takes you aroundthe Pod to a hatch.
� Follow the catwalk around the Pod. Be careful at the corners! At the end, hopto another platform, and open the floor hatch. Drop down, open the securitydoor, and step into the hallway.
�Turn left and go through the next security door. Turn right and go through yetanother security door. Walk down the corridor to the left, and then open thebig elevator door on the right side.
� Enter the freight elevator and activate the panel.
Pod Cargo AreaIt’s not so easy to get out of a Pod, is it? You exit the freightelevator into the Pod’s four-tiered cargo loading area, standingon the fourth and highest tier. Below, guards armed with PulseRifles patrol in a state of high alert.
Fig. 5-46. Descend a series of ladders to reach thebottom of the Pod cargo area.
�Veer slightly left from the freight elevator to theladder, and climb down to the third tier. Move tothe other side of the ladder, then descend to thesecond tier.
�Walk carefully around the edge of the secondtier, drop down to the first tier behind crates,and pick off the guards near where a huge chunkof the cargo area is blasted away! Snatch theirPulse Rifles and ammo (including pulsegrenades). <70>

<71>
� Hurry! Run around the lift and grab all the good stuff piled up on the crate—Armor (at last!), Medikit, Rocket Launcher, and other goodies.
� Behind you, the cargo lift rises to reveal Ivan, Rykov’s right-hand man,wearing a mighty Exosuit. The Exosuit is the military version of an industrialpower loader (it has weapons instead of forklift arms).
Fig. 5-47. Quickly grab your stuff, spin around, and lay into Ivan’s Exosuit with rockets
and pulse grenades.
�This is tough fight. Keep moving, and keepslamming Ivan with rockets and pulsegrenades.
� After Ivan finally goes down, step onto themain lift to end the mission.
Mission 4: A Long DetourAs Harrison rides the cargo lift out of the Pod, he learns “Kenji” is in fact a young woman namedTomiko, a communications technician intent on exposing Eisenberg’s hideous genetic modificationexperiments. Kenji is actually her brother’s name—who shebelieves was murdered.The disk you carry contains proof of thisand other transgressions.
Your team (the Blue Team), including Commander McCain—is on its way to the Alien Hive. But you can’t reach the Hive; thetunnels are now sealed off. So your goal is to rendezvous withWhite Team in the POC’s landing facility.You commandeer an APCand drive to the POC perimeter. Signs of Alien infestation areeverywhere.
Fig. 5-48. “Kenji” is actually Tomiko, a womanlooking to avenge her brother’s death and expose
Eisenberg’s genetic modification research.
CHAPTER 5:MARINE M
ISSIONSCHAPTER 5:M
ARINE MISSIONS

Prima’s Official Strategy Guide
<72>
Tactical Overview<Fight through teeming hordes of Aliens in the creepy darkness of a
maintenance tunnel. You face adult Aliens as well as drones, facehuggers,and chestbursters.
<Power up another auxiliary generator, then activate the automated defensesof the complex.
<Journey down to Level 3 and escape an angry Praetorian via a padlocked vent.
Objective: Rendezvous with White Team in Landing Bay 3That’s one infested base—it’s crawling with big, ugly bugs. It’s also dark and creepy and full ofgruesome sights. Let’s have some fun.
Infested Base: Maintenance Tunnels� Get ready for a brutal melee. Walk in the direction the APC points. When
you reach the far side of the yard, Aliens bash through the metal cap of a maintenance tunnel. Then a hole in the ground sprouts bugs. Use theFlamethrower here, spewing pressurized napalm right down the hole.
� Climb down the ladder into the tunnel. At thebottom, open the nearby door to a dark hallway.Don’t rush in, though! Eggs full of facehuggers,plus one Alien drone, infest the room beyond.
� Use your Image Intensifier and pop the eggsfrom the doorway.
Fig. 5-49. Use your Image Intensifier to get a quick overview when you first enter a new room or hallway.
TIP The early part of this mission is the time to use your ImageIntensifier. Remember, the goggles drain your battery quickly,
so frequently stop and turn them off to recharge.
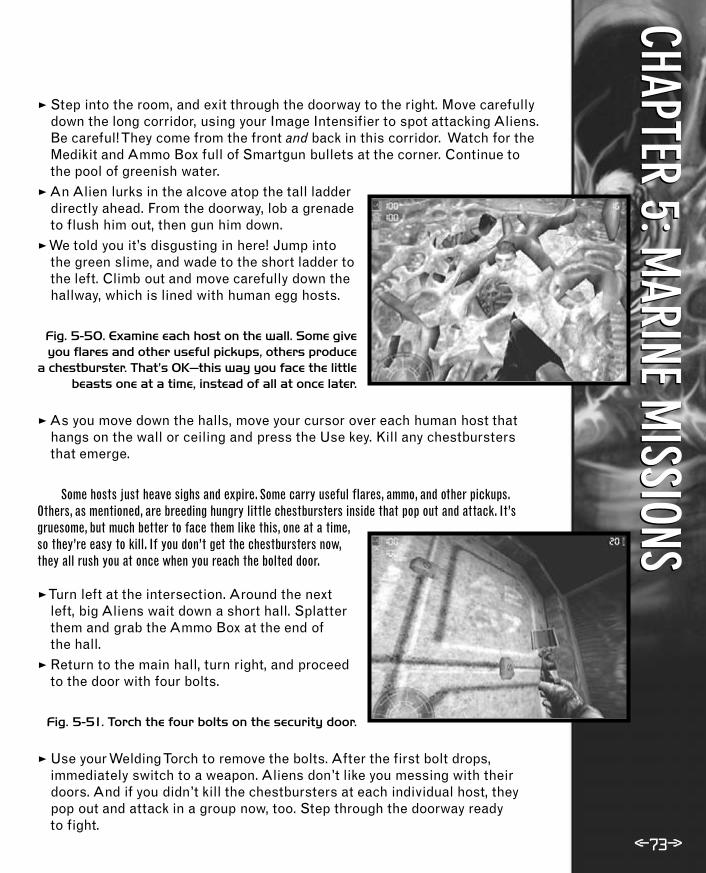
<73>
� Step into the room, and exit through the doorway to the right. Move carefullydown the long corridor, using your Image Intensifier to spot attacking Aliens.Be careful! They come from the front and back in this corridor. Watch for theMedikit and Ammo Box full of Smartgun bullets at the corner. Continue tothe pool of greenish water.
� An Alien lurks in the alcove atop the tall ladderdirectly ahead. From the doorway, lob a grenadeto flush him out, then gun him down.
� We told you it’s disgusting in here! Jump intothe green slime, and wade to the short ladder tothe left. Climb out and move carefully down thehallway, which is lined with human egg hosts.
Fig. 5-50. Examine each host on the wall. Some giveyou flares and other useful pickups, others produce
a chestburster. That’s OK—this way you face the littlebeasts one at a time, instead of all at once later.
� As you move down the halls, move your cursor over each human host thathangs on the wall or ceiling and press the Use key. Kill any chestburstersthat emerge.
Some hosts just heave sighs and expire. Some carry useful flares, ammo, and other pickups.Others, as mentioned, are breeding hungry little chestbursters inside that pop out and attack. It’sgruesome, but much better to face them like this, one at a time,so they’re easy to kill. If you don’t get the chestbursters now,they all rush you at once when you reach the bolted door.
�Turn left at the intersection. Around the nextleft, big Aliens wait down a short hall. Splatterthem and grab the Ammo Box at the end of the hall.
� Return to the main hall, turn right, and proceedto the door with four bolts.
Fig. 5-51. Torch the four bolts on the security door.
� Use your Welding Torch to remove the bolts. After the first bolt drops,immediately switch to a weapon. Aliens don’t like you messing with theirdoors. And if you didn’t kill the chestbursters at each individual host, theypop out and attack in a group now, too. Step through the doorway ready to fight.
CHAPTER 5:MARINE M
ISSIONSCHAPTER 5:M
ARINE MISSIONS

Prima’s Official Strategy Guide
<74>
� Climb the ladder to find the Ammo Box full of flares and Smartgun bullets.Go back down and open the door on the right.
� Proceed to a second door, which opens to a big egg room. Destroy the eggs(if you’re short of ammo, run past them) and any facehuggers that pop out.
� Get ready for hell and climb the ladder, where Tomiko tells you to reset thePower Relay to activate the doors.
� Veer left and run for the ramp leading down. Hustle down the ramp toanother dark corridor.
� Again, the key here is speed. Using your Shoulder Lamp or Image Intensifier(and tossing an occasional flare when your battery runs down), sprint downthe long hallway to the generator. Quickly pull the switch, scoop the goodsout of the nearby Ammo Box, and sprint back to the ramp.
� Climb the ramp and double back to the door in the far wall. Open it andhustle through to escape—and trigger the load of a new game section.
Landing Facility
Fig. 5-52. At last! Don’t miss these items in the firstcorridor of the landing facility.
� Follow the hallway to the right. At the next turn,find the pickup items to your left, then continuedown the hall to open the next door.
� Follow the walkway. As you approach the rampdown, Tomiko reports that a hall on the secondfloor leads to a Security Station where you canget the sentry guns online. “That should makethings a little easier,” she says.
� Descend the ramp to Level 2.
TIP Hurry! The longer you take to find and activate the powergenerator, the more Aliens you must fight.

<75>
Objective: Locate the Security Station and Activate Automatic DefensesAt the bottom of the ramp you find a pair of ladders.The nearest ladder is intact and drops to Level 3.But the far ladder is broken, so you can’t reach the rest of the Level 2 walkway.
Fig. 5-53. Jump across the gap to the brokenladder, then find the storage room to power up an
auxiliary generator.
� Make a running jump to the far ladder. It’s noteasy, but don’t give up. You’ll make it eventually.
� Climb the ladder and follow the corridor to thethird door on the right. Open it and step into thestorage room.
Storage Room� Head for the padlocked gate across the room.
Torch the padlock to open the gate, enter, andopen the striped power box. Pull the SystemCharge Switch to fire up the generator.
� Exit the gate, turn left, walk around the scaffoldwith crates, and hop onto the low gratedplatform to the right of the crates on theground. (Don’t miss the Ammo Box in thecorner.) Note that one big crate blocks the nextdoor. Also note that a crane hangs from aceiling track nearby.
� From the platform, hop to the lowest level of thescaffold. Cross it and hop to the crate on thefloor near the edge. Hop up two more crates,and turn right to face the control platform.
Fig. 5-54. Jump from the first level of the scaffold (left) to the crates (center),
and then to the control platform (right).
� Step onto the control platform. Be sure tocheck out the row of lockers; use your HackingTool or weapon to open the two locked ones.One holds napalm and the other an Armorpickup. Also, an Ammo Box sits at the end ofthe platform.
CHAPTER 5:MARINE M
ISSIONSCHAPTER 5:M
ARINE MISSIONS
1
2
3

Prima’s Official Strategy Guide
� Find the control panel with the display that reads “Crane Sequence Halted.”Pull the switch handle to activate the crane. This triggers an Alien attack;bugs drop from a ceiling grate over the platform. Spill their acid blood.
� Hustle back across the room to see the crane at work, hauling boxes andfreeing passage to the door under the sign that reads “Danger: RestrictedArea.” Unfortunately, you also see a squad of vicious Aliens burst into theroom. Keep moving and pick them off one by one.
� Open the newly uncovered door, and exit the storage room.� Follow the hallway around the corner and stop. Aliens drop from a ceiling
grate when you move forward again. Back up shooting when you hear themburst through.
� Proceed to the red-lit door around the next corner. It’s locked. Tomiko saysshe can override it, but she needs a few seconds—15, to be exact.Meanwhile, Alien runners scurry up behind you.
� Fight off Aliens until Tomiko opens the door. Rush through into the Level 2Security Station.
Security Station
The striped switch handle across the room controls thefacility’s automated defenses, but it’s enclosed in a bulletproofplastic case. Now what?
Fig. 5-55. This Level 2 Security Control Room letsyou pull a switch to reactivate the entire facility’sautomated sentry guns.
� Go up the stairs to activate the SecurityStation console. This raises the plastic casearound the handle.
� Return to the switch handle and pull it toactivate the automated defenses. (You also see a cutscene of a security door openingsomewhere.) Good job! It’s time to get back to your original objective: Rendezvous withWhite Team.
� Run back down the corridors to the storage room.
<76>
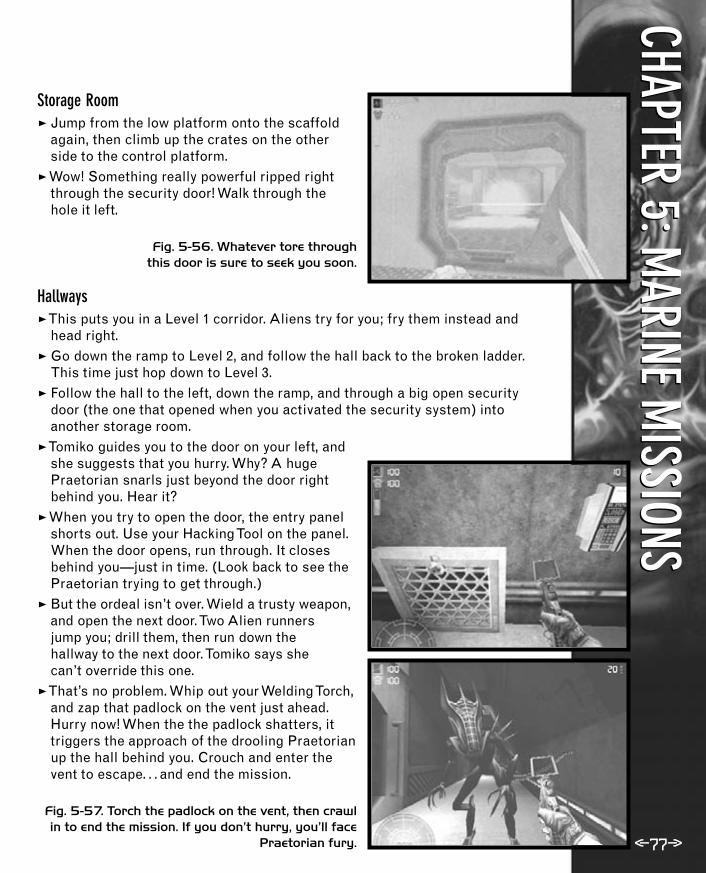
Storage Room� Jump from the low platform onto the scaffold
again, then climb up the crates on the otherside to the control platform.
� Wow! Something really powerful ripped rightthrough the security door! Walk through thehole it left.
Fig. 5-56. Whatever tore through this door is sure to seek you soon.
Hallways�This puts you in a Level 1 corridor. Aliens try for you; fry them instead and
head right. � Go down the ramp to Level 2, and follow the hall back to the broken ladder.
This time just hop down to Level 3.� Follow the hall to the left, down the ramp, and through a big open security
door (the one that opened when you activated the security system) intoanother storage room.
�Tomiko guides you to the door on your left, andshe suggests that you hurry. Why? A hugePraetorian snarls just beyond the door rightbehind you. Hear it?
� When you try to open the door, the entry panelshorts out. Use your Hacking Tool on the panel.When the door opens, run through. It closesbehind you—just in time. (Look back to see thePraetorian trying to get through.)
� But the ordeal isn’t over. Wield a trusty weapon,and open the next door. Two Alien runners jump you; drill them, then run down the hallway to the next door. Tomiko says she can’t override this one.
�That’s no problem. Whip out your Welding Torch,and zap that padlock on the vent just ahead.Hurry now! When the the padlock shatters, ittriggers the approach of the drooling Praetorianup the hall behind you. Crouch and enter thevent to escape. . . and end the mission.
Fig. 5-57. Torch the padlock on the vent, then crawlin to end the mission. If you don’t hurry, you’ll face
Praetorian fury.
CHAPTER 5:MARINE M
ISSIONSCHAPTER 5:M
ARINE MISSIONS
<77>

Prima’s Official Strategy Guide
Mission 5: Price of AdmissionLed by Commander McCain, the Blue Team moves through theaccess tunnels near the Alien Hive, hoping to find and tracktransmitter signals from a research team that disappeared. Asthe mission opens, one of Rykov’s combat synthetics (apowerful synthetic soldier) places a transmitter somewhere.Then Jones, your Marine squadmate, picks up the signal. What’sgoing on? It looks like a setup.
Fig. 5-58. Jones picks up a transmitter signal thatis “very strong and very close.” But is it a phony?
Tactical Overview<You face a few Aliens early and late in this mission, but the big fight is
with a Predator.<Go up the elevator shaft to Level 1 of the POC’s landing facility. Find the
Landing Control and Communication Center.<Defeat the Predator who hunts you.
Objective: Rendezvous with White Team in Landing Bay 3You carry over this primary objective from the last mission.You’re near the landing bay now, at thebottom of a big cargo elevator shaft.
Cargo Elevator Shaft� Go straight ahead through the gap, then turn right to climb the ladder. Move
up a few rungs, and hop onto the cargo lift to your left.� Arm yourself with a good close-in weapon—the Shotgun, for example.
� Use the switch to ride up in the elevator. As the liftrises, turn left to face the front railing of thelift. . . and get ready.
After a short ride, Aliens cut the power, and the lift stops betweenLevels 2 and 1. Without warning, a dead Marine drops from above—avictim of the Predator—and suddenly Aliens attack, dropping ontoyour lift.
CAUTIONThis mission isimpossible if you stayon the cargo liftafter it stops. Alienhordes don’t desistuntil you hop ontothe maintenance lift.
<78>

<79>
Fig. 5-59. When the elevator stops, hop over therailing onto the maintenance lift.
� Hop over the railing the moment the lift stops. Itexplodes behind you, so step onto the narrowmaintenance lift, and hurry to the left to shieldyourself behind the vertical beam.
� After the explosion, walk carefully along theledge to the maintenance ladder, and climb tothe top.
� Step into the hallway, turn right, and proceedinto the courtyard.
Courtyard/Level 1� Follow the courtyard to the right and around the corner. Sprint to the right-
most door in the far wall with a free finger on your Use key, because youneed to open the door quickly. The Predator stands on a wall to your left,firing plasma projectiles at you if you wait too long. (You can’t fight him here;he disappears quickly.)
�The doorway leads to a Level 1 hallway. Turn thefirst corner to the left, proceed down the red-lithall (avoiding that steam vent!), and turn right atthe next corner, where the sign reads “Level 1.”
� Open the door ahead.
Tomiko chimes in with some unsettling thoughts. She says thelanding bay is just ahead, but you must get there fast “beforethat thing finds a way to you.”
Fig. 5-60. Slip into this room to find an Ammo Boxin the rear corner.
� Proceed up the hallway and around the left turn. Enter the room labeled“Landing Pad Cargo Access.”
� Look in the monitors of the check station to see the gruesome scene in theCommunication Center area. Also find an Ammo Box behind crates in theback right corner.
� Exit the room and turn left, moving down the hallway. Tomiko guides you upthe stairs to your right, but before you get there, another body flies down—and you hear more horrible sounds as well.
� Climb the stairs, but don’t run down the hall through the arcing electricalcurrents! Instead, turn right into the room labeled “Communication Center.”
CHAPTER 5:MARINE M
ISSIONSCHAPTER 5:M
ARINE MISSIONS

Prima’s Official Strategy Guide
<80>
Fig. 5-61. You always find guys hanging around theCommunication Center.
Fig. 5-62. Pull this switch to stop the electricalcurrent in the hallway.
�Two skinned guys hang from the ceiling, andTomiko points out that the console is fried.Look out the window to see a Marine from White Team exploded by Predator plasmaprojectiles. Damn!
� Go to the Power Relay Station 1 switch; thedisplay reads “Power Drain Present.” Pull theswitch to halt the power drain. This stops thearcing currents in the hallway.
� Exit the room.
Objective: Continue to Landing Bay 3 to Reboot GuidanceComputers and Enable EvacuationThis Predator is frightening in its power and savagery. With the Landing Bay 2 guidance systemcontrols destroyed, you must move on to another bay.
�Turn right and follow the hallway in which the electrical currents stoppedwhen you pulled the switch.
� Open the door and step onto the landing bay platform to see two moreMarines splattered by Predator fire. It’s not a good day for White Team.
�Tomiko says to head for the APC doors below on the left. Don’t waste time—the Predator is on the prowl!
� Go to the left end of the platform, jump down, and sprint to the nearby APCdoor. Immediately open it and run inside.

<81>
Alley: Fight the PredatorIt had to happen sooner or later. After dozens of Alien encounters, you knew you would eventually seea Predator face to face.This is it, so get ready and save your game.
� Enjoy this quick breather. Wield a strongweapon with a decent range; the Pulse Rifle isgood because of its Alt-Fire mode as a pulsegrenade launcher. Your Rocket Launcher shouldbe useful too.
� Open the door and move into the alley beyond.The Predator is atop the far wall with a clearshot at you, so sprint directly across the streetto cut off his angle.
Fig. 5-63. Stick to the walls of the alley: they leanout, cutting off shot angles from enemies above.
� Move down the alley along the wall. Stick close to the walls, duckingfrequently behind crates or down alcoves for cover. Use your motion trackerto track the Predator’s location.
� At first the hunter shoots plasma projectiles from above. Keep moving downthe alley, from crate to alcove, trying to survivehis initial Plasmacaster salvos.
� Eventually, the Predator leaps to street level toget more personal in his combat. This is whereyou get in your licks. Find a good stand ofboxes, and strafe out and in, launching pulsegrenades, rockets, or (at closer range) Shotgun blasts.
Fig. 5-64. Use crates in the alley for hide-and-seek strafing shots—slide out,
shoot, and quickly slide back in.
� Keep an eye on the motion tracker! Even whenyou’re safe behind a box, you can monitor wherethe Predator goes. Keep cover between you andhim. Don’t let him hit you with his heinousCombistick swipes, but don’t give him a clearshot from a distance either—he’s very, veryaccurate.
CHAPTER 5:MARINE M
ISSIONSCHAPTER 5:M
ARINE MISSIONS

Prima’s Official Strategy Guide
<82>
Fig. 5-65. This is the perfect fighting distance from a Predator. Any closer, and that Spear pierces you; any farther, and the beast switches to his Shoulder Cannon.
�When you finally kill the Predator, breathe ofsigh of relief. But this mission’s combat isn’tquite over yet. Keep your trigger finger ready,and proceed to the end of the alley.
� Aliens burst from a door down the alley to yourleft. Take them down with a Smartgunfusillade—it seems easy after the Predator,doesn’t it?—and approach the open doorway toend the mission.
Mission 6: Loose EndsLed by McCain, Blue Team penetrates the Hive tunnels, finds a“survivor” from the missing research team—and they don’t likewhat they see.The Marines are in an egg chamber, where eggimplant victims hang on the walls. Meanwhile, Corporal Harrison(you) continues to seek contact with White Team in the POClanding facility.
Fig. 5-66. Blue Team traced the signal to the Hiveegg chamber.
Tactical Overview
<You fight an assortment of Aliens, plus a pair of powerful Praetorianwarriors.
<Progress through several skirmishes between Marines and Aliens as youseek more powerful weapons to use against Praetorians.
<Face down two Praetorians in separate battles.<Clear all bugs from the landing pad for the arriving Marine dropship.

<83>
Objective: Find a Minigun to Take Out Armored PraetoriansRead the excerpt from the Weyland-Yutani journal on Praetorians when you press the Objectives key(the default is t ).You find that much of your current arsenal is largely useless if you run into aferocious Hive warrior.Their hardened shells make them the equivalent of a light armored vehicle;small arms fire doesn’t penetrate.
POC Landing Facility� Open the door and enter to find more unfor-
tunate members of Blue Team.� Walk down the hall, listening to sounds of
fighting. Hustle down the stairs to see a trio ofMarines fight a losing battle against Aliendrones. (You can join in the battle, but there’sno hope for your fellow soldiers.)
Fig. 5-67. Your trek through the facility leads you into several fierce fights
between Aliens and Marines.
� Continue around the corner to see a second Marine/Alien battle. The goodguys lose again. Mop up the bugs, pick up weapon ammo, and move on.
� Climb the nearby stairs, and open the door on the left. Yet another battlerages down the hall. Guess what happens? Yes, Harrison, you seem to be thekiss of death today.
� Descend the ladder at the railing, and proceed down the hall to the left.Around the next corner, another Marine bites the dust. Head down the hall tothe next door and open it.
� Go down the stairs; as you descend, you hear ahowl. Follow the dark, narrow corridor past the blue floor lamp, and take a hard right into a hallway.
� Follow the hallway to a red-lit ladder. Shoot outthe grate at the top, and climb through into a large hangar with a landing bay.
Fig. 5-68. Don’t let this puny grate stop you fromreaching the dropship hangar. Just shoot it open!
CHAPTER 5:MARINE M
ISSIONSCHAPTER 5:M
ARINE MISSIONS
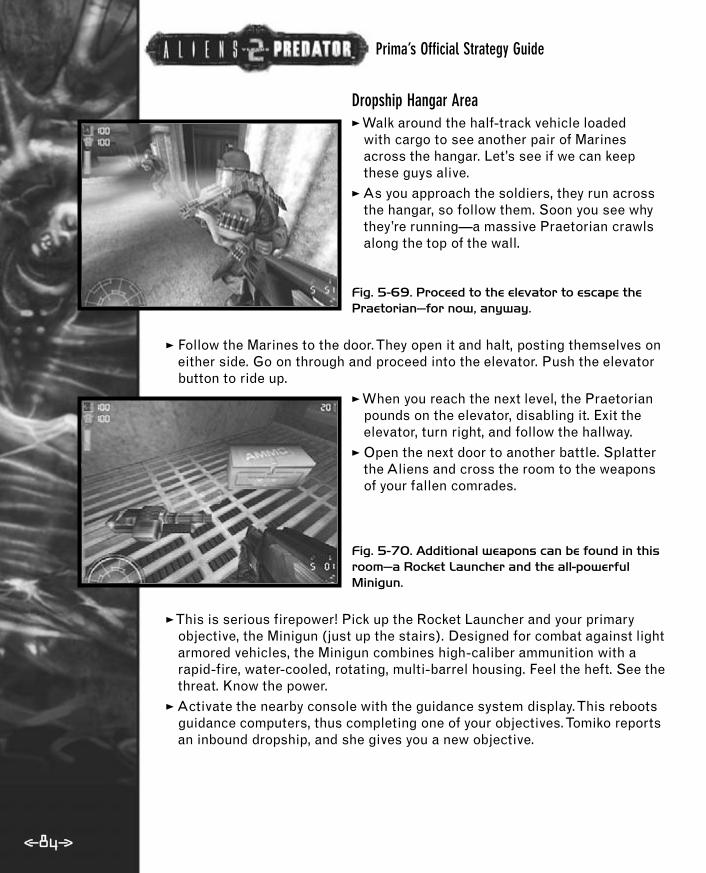
Prima’s Official Strategy Guide
<84>
Dropship Hangar Area�Walk around the half-track vehicle loaded
with cargo to see another pair of Marinesacross the hangar. Let’s see if we can keepthese guys alive.
� As you approach the soldiers, they run acrossthe hangar, so follow them. Soon you see whythey’re running—a massive Praetorian crawlsalong the top of the wall.
Fig. 5-69. Proceed to the elevator to escape thePraetorian—for now, anyway.
� Follow the Marines to the door. They open it and halt, posting themselves oneither side. Go on through and proceed into the elevator. Push the elevatorbutton to ride up.
�When you reach the next level, the Praetorianpounds on the elevator, disabling it. Exit theelevator, turn right, and follow the hallway.
� Open the next door to another battle. Splatterthe Aliens and cross the room to the weaponsof your fallen comrades.
Fig. 5-70. Additional weapons can be found in thisroom—a Rocket Launcher and the all-powerfulMinigun.
�This is serious firepower! Pick up the Rocket Launcher and your primaryobjective, the Minigun (just up the stairs). Designed for combat against lightarmored vehicles, the Minigun combines high-caliber ammunition with arapid-fire, water-cooled, rotating, multi-barrel housing. Feel the heft. See thethreat. Know the power.
� Activate the nearby console with the guidance system display. This rebootsguidance computers, thus completing one of your objectives. Tomiko reportsan inbound dropship, and she gives you a new objective.

<85>
Objective: Clear the Landing Bay of Alien Contamination� Arm yourself with the Minigun, hit your Alt-Fire button to pre-spin the
barrels, and lumber back toward the elevator.
� Round the corner. There’s the Praetorian! But youhave your Minigun pre-spun and ready to punchbug armor. Just one quick burst turns the bigfellow into a puddle of acidic soup. What a gun!
Fig. 5-71. Praetorians are tough, but your Minigunis tougher. Much, much tougher.
� Jump through the hole in the floor made by thenow-deceased Praetorian. Save your Minigunfor the next Praetorian; switch to your favoriteAlien-killer weapon such as the Pulse Rifle orShotgun.
� As soon as you drop through the floor, directly in front of you is a door thatmust be hacked to enter. Inside you will find anassortment of additional weapons and ammo.
� Go through the open door down the hall. Youhear the roar of the dropship’s approach.
� Retrace your route through the dark hallway,around the corner into the blue-lit corridor, andclimb the ladder into the hangar. This time,however, Aliens stream at you, one afteranother.
Fig. 5-72. The dropship can’t land until you clearout the infestation—particularly the big Praetorian.
Dropship Hangar � Before you round the half-track cargo vehicle, pull out your Minigun, and hit
Alt-Fire to pre-spin the barrels again. Then blast the Praetorian on thelanding pad so your dropship can touch down. Watch out for other lesserAliens making runs at you, too.
� When the dropship lowers her ramp, walk up to end the mission.
TIP The Minigun takes a few seconds to rotate to full firingcapacity. Remember that its Alt-Fire mode pre-spins the barrels
so you can fire immediately when ready.
CHAPTER 5:MARINE M
ISSIONSCHAPTER 5:M
ARINE MISSIONS
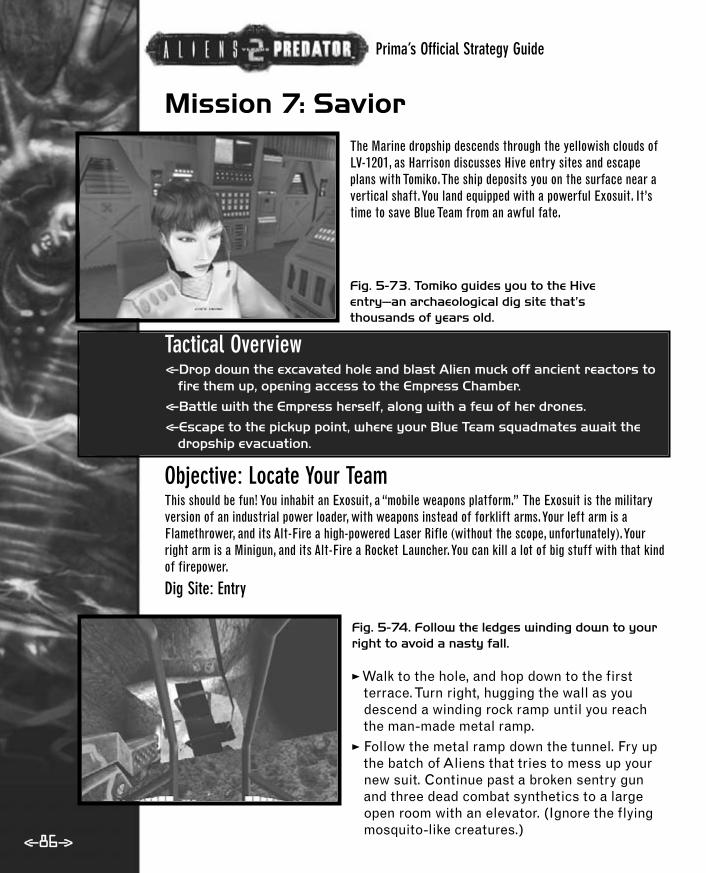
Prima’s Official Strategy Guide
Mission 7: SaviorThe Marine dropship descends through the yellowish clouds ofLV-1201, as Harrison discusses Hive entry sites and escapeplans with Tomiko.The ship deposits you on the surface near avertical shaft.You land equipped with a powerful Exosuit. It’stime to save Blue Team from an awful fate.
Fig. 5-73. Tomiko guides you to the Hive entry—an archaeological dig site that’s thousands of years old.
Tactical Overview<Drop down the excavated hole and blast Alien muck off ancient reactors to
fire them up, opening access to the Empress Chamber.<Battle with the Empress herself, along with a few of her drones.<Escape to the pickup point, where your Blue Team squadmates await the
dropship evacuation.
Objective: Locate Your TeamThis should be fun! You inhabit an Exosuit, a “mobile weapons platform.” The Exosuit is the militaryversion of an industrial power loader, with weapons instead of forklift arms.Your left arm is aFlamethrower, and its Alt-Fire a high-powered Laser Rifle (without the scope, unfortunately).Yourright arm is a Minigun, and its Alt-Fire a Rocket Launcher.You can kill a lot of big stuff with that kindof firepower.
Dig Site: Entry
Fig. 5-74. Follow the ledges winding down to yourright to avoid a nasty fall.
�Walk to the hole, and hop down to the firstterrace. Turn right, hugging the wall as youdescend a winding rock ramp until you reachthe man-made metal ramp.
� Follow the metal ramp down the tunnel. Fry upthe batch of Aliens that tries to mess up yournew suit. Continue past a broken sentry gunand three dead combat synthetics to a largeopen room with an elevator. (Ignore the flyingmosquito-like creatures.)
<86>

Fig. 5-75. Pull this switch to power the elevator.
� Walk behind the elevator, and pull the SystemCharge Switch to power up the lift.
� Board the elevator, push the button, and ridedown to the geothermal reactor level. As youride, face the back gate of the elevator car—theone next to the button. The gate opens whenyou reach the bottom. . . and Aliens attack.
Geothermal Reactors
Fig. 5-76. Use your Flamethrower to charbroil anyAliens that rush you in numbers.
� Get your Flamethrower ready. When the gateopens, toast Aliens.
� Exit the elevator and proceed to the walkwaythat encircles a huge central structure. Aliensand combat synthetics battle nearby; polish offwhoever survives. Note the spinning ring at thetop of the structure.
� Follow the walkway to the right and enter thefirst tunnel. Watch for Aliens as you walk to aroom with another central, pillar-like structure.
Tomiko calls this a steam-powered portal. Alien crud clogs the centralpillar; the ring at the top doesn’t spin like the one in the main room.Note also the thin tubes of hardened Alien ooze connecting thecentral pillar to the lighted side supports. (See this better with yourImage Intensifier.) Maybe that’s why the turbine ring isn’t spinning.
Fig. 5-77. Use your Image Intensifier to spot thin Alientubes (marked here in white) that jam the reactor
ring. Then blast all eight of them with rockets.
� Press 2 to activate your Exosuit’s right weapon arm.
� Carefully target the thin tubes (see Fig. 5-77),and use your Alt-Fire button to blast them withrockets (one apiece should work).
� Move around the pillar, blasting all sevenremaining tubes.
CAUTIONBe careful on thewalkways around thepillars! If you fall offthe edge, you die.
<87>
CHAPTER 5:MARINE M
ISSIONSCHAPTER 5:M
ARINE MISSIONS

Prima’s Official Strategy Guide
�When the last tube shatters, the ring spins and explosions shatter the Alienmuck that clogs the core.� Return to the main room, and proceed around
to another tunnel leading to another muck-covered turbine.
� As before, rocket all eight thin tubes at the topto release the turbine ring. Both turbines arehumming now. Be careful, though. An angryPraetorian scrambles at you, seeking retribution.Minigun him down!
Fig. 5-78. When both turbines are spinning, thisportal to the Hive opens.
� Return to the main room, ready to face a slavering horde of angry Aliens. Thecentral pillar now pounds up and down like a piston. Wow! Also, a new portalto the left is open.
� Head down the newly opened portal with your Minigun ready to rock. Blastthe Praetorian and his many minions. You reach a big hole in the floor of thetunnel. A giant stalk of the Hive, draped by that now-familiar Alienlatticework, juts up from below. This leads down to the Alien EmpressChamber. As expected, it's heavily guarded, so flame on!
� We hope you enjoyed your Exosuit experience, because it's about to end.That's right—in a moment, you'll be a small, slow, fleshy, and very lightlyarmed Marine surrounded by some of the biggest, scariest, Alien honchosthis side of Cleveland.
� Step forward onto the Hive latticework. Down you go!�Try to enjoy your screaming drop as you crash through several cushioning
layers of lattice and land in a shallow pool ofwater.
Fig. 5-79. You can't avoid the fall into the Hive. Ittrashes your Exosuit, leaving you with only yourCombat Knife and Pistol.
The Exosuit keeps you alive, but the impact disables it, leavingyou with nothing but a Combat Knife and your Pistol. At thebottom, you hear Blue Team's radio chatter; it sounds likethey're getting desperate. Better get moving.
� Follow the dark tunnel to an open chamber witha big central stalk and numerous crisscrossingstruts. Walk around the central stalk to anothertunnel on the opposite side.
<88>
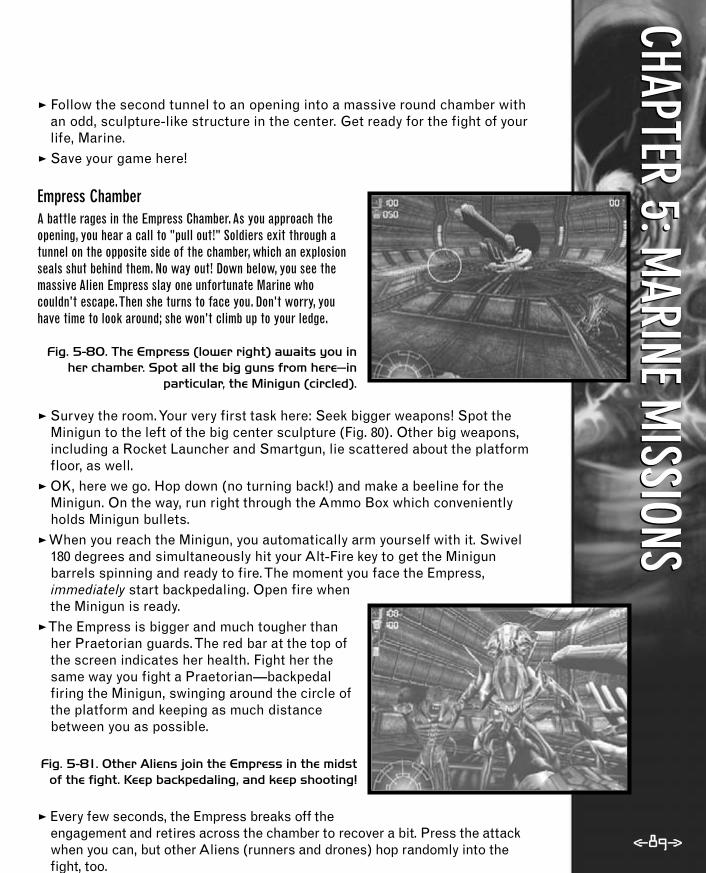
� Follow the second tunnel to an opening into a massive round chamber withan odd, sculpture-like structure in the center. Get ready for the fight of yourlife, Marine.
� Save your game here!
Empress ChamberA battle rages in the Empress Chamber. As you approach theopening, you hear a call to "pull out!" Soldiers exit through atunnel on the opposite side of the chamber, which an explosionseals shut behind them. No way out! Down below, you see themassive Alien Empress slay one unfortunate Marine whocouldn't escape.Then she turns to face you. Don't worry, youhave time to look around; she won't climb up to your ledge.
Fig. 5-80. The Empress (lower right) awaits you inher chamber. Spot all the big guns from here—in
particular, the Minigun (circled).
� Survey the room. Your very first task here: Seek bigger weapons! Spot theMinigun to the left of the big center sculpture (Fig. 80). Other big weapons,including a Rocket Launcher and Smartgun, lie scattered about the platformfloor, as well.
� OK, here we go. Hop down (no turning back!) and make a beeline for theMinigun. On the way, run right through the Ammo Box which convenientlyholds Minigun bullets.
�When you reach the Minigun, you automatically arm yourself with it. Swivel180 degrees and simultaneously hit your Alt-Fire key to get the Minigunbarrels spinning and ready to fire. The moment you face the Empress,immediately start backpedaling. Open fire whenthe Minigun is ready.
�The Empress is bigger and much tougher thanher Praetorian guards. The red bar at the top ofthe screen indicates her health. Fight her thesame way you fight a Praetorian—backpedalfiring the Minigun, swinging around the circle ofthe platform and keeping as much distancebetween you as possible.
Fig. 5-81. Other Aliens join the Empress in the midstof the fight. Keep backpedaling, and keep shooting!
� Every few seconds, the Empress breaks off theengagement and retires across the chamber to recover a bit. Press the attackwhen you can, but other Aliens (runners and drones) hop randomly into thefight, too.
CHAPTER 5:MARINE M
ISSIONSCHAPTER 5:M
ARINE MISSIONS
<89>

Prima’s Official Strategy Guide
<90>
� Keep backpedaling around the central platform to pick up all-important AmmoBoxes, a Smartgun, a Rocket Launcher, a Flamethrower, and a Pulse Rifle. Thisgives you enough firepower to deal with the horrific Alien onslaught.
�The death of the Empress triggers a huge explosion that unblocks the tunnelexit. (A big thanks to your Blue Team mates here.) Switch to the Pulse Rifle(if you picked it up already) so you can run, and go!
� Run into the tunnel to see a walkway leading upward. You see three Blue Teamsoldiers escaping. Follow them, fighting a rearguard action. But don't miss thebig cache of Smartgun ammo just beyond the Empress Chamber exit.
The Final Walkway� Switch to your Smartgun and backpedal up the walkway, using its tracking ability
to pick off Alien runners and drones one at a time.� At the walkway's crest, you drop off a short ledge.
(You might not see it coming as you backpedal, butdon't worry, it's a safe drop.) The path continues intothe distance, where the dropship hovers. Keepbackpedaling toward the dropship, blasting Aliensas you go.
Fig. 5-82. Decimate Alien attack waves until thedropship finally stabilizes and drops its ramp.
Uh oh! Johnson can't get the dropship stabilized enough to drop itsramp.You'll have to fight off a few more waves of Aliens.This positionon a long walkway gives you one advantage—the bugs must run agood distance before they reach you. And a powerful Sniper Rifle sitson the ground near the dropship.
� Back all the way to the end of the walkway and pick up the Sniper Rifle.(Careful! Don't back off the walkway's end!) Use the Sniper Rifle to pick offonrushing Aliens from a good distance.
� When the dropship suddenly opens fire—an explosion rocks the distant ledgewhen this happens—turn around to see the dropship ramp finally lower. Gotoward it to end the mission. Hurry! A final pair of huge Praetorians rushesdown the walkway behind you!
� Congratulations, Marine. Watch the bittersweet cutscene.
TIP Remember, the best combat tactic for a Marine is to runbackward firing, then swivel and repeat. Continue tobackpedal, putting distance between you and your buggy tormentors.
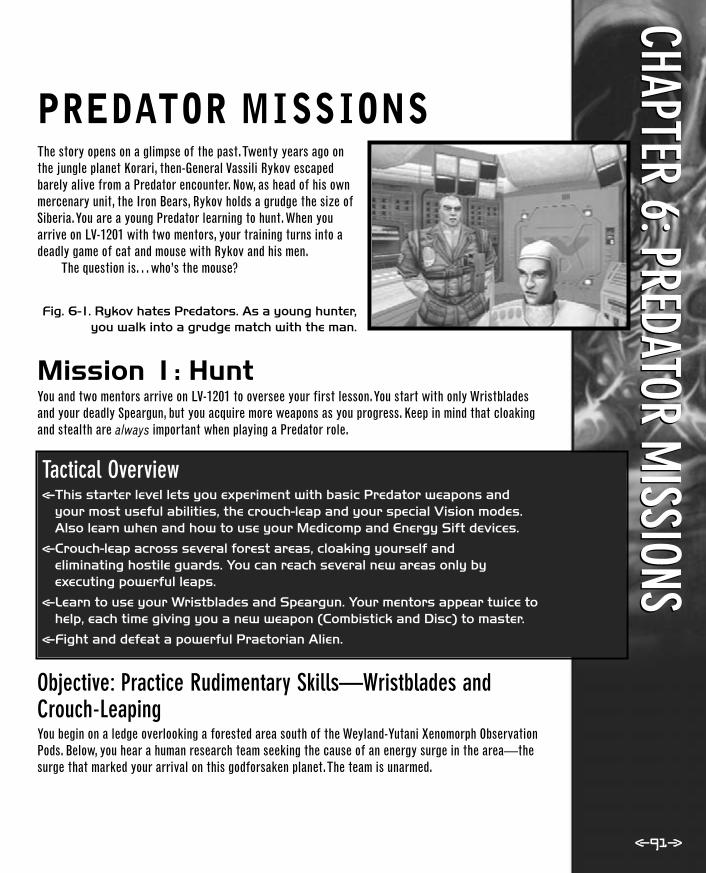
<91>
PREDATOR MI SS I ONSThe story opens on a glimpse of the past.Twenty years ago onthe jungle planet Korari, then-General Vassili Rykov escapedbarely alive from a Predator encounter. Now, as head of his ownmercenary unit, the Iron Bears, Rykov holds a grudge the size ofSiberia.You are a young Predator learning to hunt. When youarrive on LV-1201 with two mentors, your training turns into adeadly game of cat and mouse with Rykov and his men.
The question is. . . who’s the mouse?
Fig. 6-1. Rykov hates Predators. As a young hunter,you walk into a grudge match with the man.
Mission 1: HuntYou and two mentors arrive on LV-1201 to oversee your first lesson.You start with only Wristbladesand your deadly Speargun, but you acquire more weapons as you progress. Keep in mind that cloakingand stealth are always important when playing a Predator role.
Tactical Overview<This starter level lets you experiment with basic Predator weapons and
your most useful abilities, the crouch-leap and your special Vision modes.Also learn when and how to use your Medicomp and Energy Sift devices.
<Crouch-leap across several forest areas, cloaking yourself and eliminating hostile guards. You can reach several new areas only byexecuting powerful leaps.
<Learn to use your Wristblades and Speargun. Your mentors appear twice tohelp, each time giving you a new weapon (Combistick and Disc) to master.
<Fight and defeat a powerful Praetorian Alien.
Objective: Practice Rudimentary Skills—Wristblades andCrouch-Leaping You begin on a ledge overlooking a forested area south of the Weyland-Yutani Xenomorph ObservationPods. Below, you hear a human research team seeking the cause of an energy surge in the area—thesurge that marked your arrival on this godforsaken planet.The team is unarmed.
CHAPTER 6:PREDATOR MISSIONS
CHAPTER 6:PREDATOR MISSIONS

Prima’s Official Strategy Guide
<92>
Forest Area 1 (Ruins)Fig. 6-2. These odd, barren trees provide a primarymeans of transport in the first two Predatormissions. Toggle on your Crouch mode, and leapfrom branch to branch.
� Press C to cloak. You hit targets from afar withyour Speargun, but you must get in close forkills with your Wristblades. Guards deal yousignificant damage if you approach themuncloaked.
� Step forward through the hanging vines.Crouch-leap across the thick-branched trees tothe far side of the forest. This is mostly forpractice; the exit from the area is on theground.
� Drop onto unsuspecting scientists for quickkills with your Wristblades. When they detectyou, however, they run like hell for the tunnelthat leads from the forest area. Some may alsocower with fear.
Fig. 6-3. Add another skull to the trophy case.
You collect “trophies” (skulls) by spearing heads of fallen victims with yourWristblades Alt-Fire attack. Sure, it’s gruesome, but you’re a Predator, sostart acting like one.
� After the scientists flee (or are dead), uncloak to save energy, and practicemore crouch-leaps through the trees.
� Activate your Energy Sift device (the default is T) to replenish energy. Thencloak again and move cautiously into the tunnel on the far end of the forest.
TIP Predators leap tremendous distances in Crouch mode. But youcan’t run fast while crouching, so you must toggle in and out
of Crouch mode quickly. Set your Crouch toggle key to one that is easy to reach.
NOTE

Fig. 6-4. After you secure each area, use yourEnergy Sift device to replenish your energy.
Remember, the Sift device is bright and loud anddisables your Cloaking Field Generator.
Forest Area 2 (Ladder)Trees dominate this area too, but some Weyland-Yutani guardsare posted here.To hit them from a distance, try the combinationof your Zoom ability (thanks to the optics in your Predatormask) with the long-range accuracy of your Speargun.
� Again, cloak before you enter the tunnel to this area.� Arm yourself with the Speargun. (The default puts it in the slot activated by
the 4 hotkey.) � Switch to human Thermal (blue) vision mode. The background turns blue,
with humans brightly lit in multicolored hues. Move slowly around the curvein the tunnel until you see the guard on the floor of the forested area. If herushes you, take him out with Wristblades. Otherwise, carefully target hishead using your Zoom ability (the default is u) and fire your Speargun.
� From the tunnel, find the sniper on the ledge above the ladder. Then Zoom inuntil you can easily target his head. (See Fig. 6-5.)
TIP Cloaking slowly drains your energy, so monitor your energystores (upper right of the screen) and recharge with your
Energy Sift device when you get low. Recharge only in protected areas; your Cloaking Field Generator doesn’t work while the Sift device is enabled.
TIP Don’t forget to cloak before you enter each new area. Andremember that the Speargun doesn’t affect your Cloaking
Field Generator.
CHAPTER 6:PREDATOR MISSIONS
CHAPTER 6:PREDATOR MISSIONS
<93>
TIP Speargun shots to the head are “trophy shots”—that is, youget one point added to your trophy tally at the lower left corner of the screen, plus you can get your spear back. Use
human Thermal vision mode to look for the victim’s head afterward. That’s right—you can retrieve used Speargun
ammo from speared heads! (This only works after trophy shots.)

Prima’s Official Strategy Guide
Fig. 6-5. Use Thermal vision mode with your Zoom to easily target the sniper high in the second forest area. Hit his head with the Speargun to win a trophy.
� Step into the forest area and try to find bothspeared heads to retrieve your spear ammo.Then uncloak, return to Normal vision, and useyour Medicomp device (the default is G) to healyourself if you took any damage. Use your EnergySift to replenish energy, and climb the ladder tothe ledge. (Or you can hunt down any remainingdefenseless scientists and spear their heads fortrophies using your Wristblades Alt-Fire punch.)
� Cloak and follow the long, twisting tunnel to the next open area.
Green Lakes�You’re cloaked, right? From the tunnel,
use Thermal vision mode and Zoomwith your Speargun to pick off thepair of guards in the open. Be sure toretrieve your spears from their heads,if you scored trophy shots. (This is thelast time we’ll remind you.)
�Two more guards are on the ridge tothe left. Cloak and move across thenarrow land bridge toward the twowhite hives. Don’t attack the guards,
however; as you approach the ridge, one of yourPredator mentors appears and Combisticks both.
Fig. 6-6. One of your mentors hands you thePredator Combistick, a nice weapon for infighting.
� Follow the path and crouch-leap up, to yourmentor on the rock arch. He holds out thePredator Combistick. Walk to him to take theCombistick; your companion cloaks and runsoff. (You can watch him go if you use yourPredtech vision mode.)
CAUTIONWatch out for theflytrap-like plant inthe grove near thehives. It emits a toxicvapor that hurtswhen you’re in thevicinity. You’ll runinto more soon. (SeeFig. 6-7 to see whatit looks like.)
TIP Using your Medicomp to heal yourself saps energy. Use theEnergy Sift device to replace energy depleted by healing
before moving on.
<94>

� Continue up the path through the tunnel.
Objective: Prove Your Skill with the Combistick
Forest Area 3 (Flytraps)No human enemies lurk here, but several deadly flytrap plants are scattered across the forest floor.Your goal is to leap across the treetops to the ledge on the opposite side of the area.There’s anotherledge around to the right that also leads to where you want to go, but the ledge straight acrossprovides easier access (and no swimming).
Fig. 6-7. Noxious flytrap fumes can hurt you from afar, so quickly leap across the
forest area where they dwell. Or drop down andwhack them to pieces with your new Combistick.
� Emerge through the hanging vines of the tunnelentrance. Crouch-leap across the tree branchesto the ledge on the far side. If you fall, whacknearby flytraps with your Combistick. You take alittle damage, but eliminate the noxious plants.Watch out for the gigantic mosquito-likecreatures, too. They will attack if you get too close.
Forest Area 4 (Swamp) � Cloak and follow the tunnel to the next forest area, which is swampy with
shallow water surrounding the trees. Three armed guards patrol the swamp. � Remember, water disables your Cloaking Field
Generator! So, hop across the treetops and pickoff the guards with your Speargun.
� Now crouch-leap unmolested to the ledge onthe far side. Follow the short tunnel to a cliffwith a y-shaped pond below. Again, don’tforget that the water uncloaks you.
Fig. 6-8. Crouch-leap toward the left fork of thepond below to land in shallow water with an easy
wade to shore.
TIP Using your Combistick doesn’t uncloak you, so it’s a nice stealth weapon.
CHAPTER 6:PREDATOR MISSIONS
CHAPTER 6:PREDATOR MISSIONS
<95>

Prima’s Official Strategy Guide
� Crouch-leap down the pond’s left fork (see Fig. 6-8), and exit the water ontothe path. (Leap far enough, and you don’t have to swim.) Again, don’t forgetthat the water uncloaks you.
� Cloak before you enter the cave! Guards patrol the other side and detectmovement when you approach. Take out as many as you can, but let any whorun away escape. (You’ll see why in a moment.) Proceed to the next area.
Waterfall/Shelter Area� Follow the path across the land bridge. A Predator companion stands on an
embankment over more fallen guards.� Approach the Predator to pick up the Disc he leaves. Your compatriot cloaks
and leaves. Cloak yourself too: Three more guards patrol ahead.
Objective: Prove Your Skill with the DiscYour Predator Disc is an almost infallible long-range weapon. It kills almost anything with one toss,and when combined with your Vision modes, it “locks in” on the nearest mode-specific target (visuallyindicated by a triangular targeting reticule that snaps into place around the target) and tracks to it
when tossed. So you rarely, if ever, miss a shot. Its drawback, ofcourse, is the long lag between shots.� Switch to human Thermal (blue) vision mode.
Arm yourself with the Disc, and proceed,cloaked, past the embankment. When the threeguards make their run, pick them off from adistance. Fun! After each toss, hit your DiscRetrieve key (the default is F) to recall the disc.
� Climb the hill and veer left toward themanmade tower at the top. You come upon anunderground shelter. (See Fig. 6-9.)
Fig. 6-9. Explore this underground installation to learn some disturbing backstory.
� Descend the ladders and wander through the underground installation,reading the logs on each level. They tell a horrible story.
� Exit the shelter, go down toward the cluster of hives, and turn left to see thewaterfall.
�Walk to the abandoned radio that sits on a box near the water, and listen toh
TIP Remember that using your Disc disables your cloak. Don’tforget to recloak after each Disc toss.
<96>

<97>
Oh no! It sounds as if Rykov’s men captured a pair of“specimens” that sound suspiciously like your Predatorbuddies. Note the reference to the successful use of EMPs.You hear Rykov order a pullback, with squads retreating tothe APC.You’d better see what’s going on.
Fig. 6-10. Climb past the waterfall, but staycloaked. More guards patrol ahead.
� Cloak and climb the path that winds behindthe waterfall. Two more guards are at the top of the path. Pick them off withyour Disc or Speargun before getting too close—the best spot is just pastthe waterfall—then continue up the path.
� Proceed through the cave until you emerge behind more hanging vines. Cloak!
Forest Area 5 (Bunker)� Five mean guards patrol the forest floor here, so pick off as many as you can
from the ledge with your Disc. Then hop down—cloaked, of course—andsneak up on the others with your Combistick.
� Stay cloaked and head for the cave at the far end of the forest. (Some guardsmay have retreated into the cave.) As you pass another abandoned radio, youhear a command to pull back and “get the specimens out of here.” It soundslike they’re ready to haul off your mentors.
� Emerge from the cave in a swamp full of weirdtowering spires. In the water, Aliens and guardsknock heads. Don’t interfere; let them thin eachother’s ranks. When the battle is over, finish offwhoever survives.
Fig. 6-11. A powerful Praetorian prowls the spiresand ledges of this eerie area.
� Use the Medicomp and Energy Sift device tobring your vitals back to 100 percent.
� Switch to Alien Electromagnetic (red) vision mode, and arm yourself with the Disc.
CHAPTER 6:PREDATOR MISSIONS
CHAPTER 6:PREDATOR MISSIONS

Prima’s Official Strategy Guide
<98>
Praetorian Spires� Weave through the spires to the far end of the swamp.
� Eventually, you hear the terrifying shriek of a huge Praetorian, a powerful breed of Alien. When you see him, toss your Disc and back away.
�This is a tough fight. Try to avoid turning yourback to the beast; he’s faster than you and hitsfrom behind. Hack him up with your Combistickwhen he gets close! Good luck.
Fig. 6-12. Use your Alien Electromagnetic visionmode to keep the big Praetorian easy to see.
Mission 2: TrapYour Predator mentors are now contained specimens en route tothe Pods.That’s not good. And here you are—young and on yourown for the first time. Predators may be brutal, mercilesskillers, but they’re also loyal to one another. So your job in thismission is to track the convoy.
Fig. 6-13. Follow that APC! It carries your unconscious clan mates.
Tactical Overview<Follow the APC that carries your clan mates.<Crouch-leap across a pair of forested areas, avoiding or killing guard units
deployed beneath.
Objective: Pursue Your Abducted Clan MatesYou stand on a hilltop, watching the APC that holds your mates roll off into the distance. Just beforeyou lose sight of it, the APC bears left.

Canyon Area� Walk left along the edge of the canyon and
through the cave. When you emerge, the APCpasses right to left on the road below.
� Cloak and arm yourself with the Combistick.Move down the slope, following the APC’s path.
� Two guards converse behind some crates by abig tree. Sneak up and stick them, then use thecrates to hop into the tree branches.
Fig. 6-14. Sneak up on these guards and take themout. You need the crate as a leap platform.
� Still cloaked, leap from the top branches to the narrow ledge and turn left.Proceed to the second flowering plant and veer right. Continue up the pathto a fork; take the right fork, and follow it until you see the big tree below(next to a bunker entrance).
� Stay cloaked! A guard is on the opposite ledge. Hop carefully down onto thenearest branch, leap to the high branches, and pick off the guard with yourDisc or Speargun. Then leap over to the ledge.
� Follow the cave to a forest area.
Forest AreasA big squad of Rykov’s goons tromps the forest floor. Best bet:keep your distance.
� Cloak and pick off the guards below from theledge and tree branches. Or ignore them,stealthily tree-hopping to the far ledge.
Fig. 6-15. Where are those dropships going? Whatare they up to? No good, no doubt.
� Run through the winding cave to the cliff, turn right,and run along the cliff edge. (This is a good place toreplenish health and energy.) As you run, twodropships roar past, flying down the canyon. Cloakand continue through the next cave.
CHAPTER 6:PREDATOR MISSIONS
CHAPTER 6:PREDATOR MISSIONS
CAUTIONIn the second forestarea a powerful combatsynthetic prowls with a Smartgun. Also, watchout for a single sniperon the tree branch with the ladder.
<99>

Prima’s Official Strategy Guide
<100>
� A guard commander orders snipers to shootyou on sight, so make sure you aren’t seen.Combistick the commander, then move to theledge and pick off the entire squad one by onewith your Disc. (Again, remember to recloakeach time you toss the Disc.)
Fig. 6-16. You must execute some tough leaps to getto the highest branches of this tree.
� After you dispatch the guards, crouch-leap across branches to the biggesttree in the corner, next to the ledge. You can reach the big tree’s lowestbranches; from there, hop up to its middle level, then its top level. Fromthere, leap across to the ledge.
� Follow the cave to end the mission.
Mission 3: Interloper
After tracking the APC carrying your clan mates to the ForwardObservation Pods, you now face the formidable task of gettinginside the massive installation. Huge lifts rise from cementplatforms straight into each Pod.They look like your ticket in,but first you must reach one.
Fig. 6-17. The Pods seem impenetrable, suspendedby struts in the canyon walls.
Tactical Overview<You face the usual guards, some automated sentry guns, and a tough new
variant of synthetic soldier.<Infiltrate the Pods via a cargo lift.<Move up the tiers of the Pod cargo hold. Find the stairs that lead into the
Pod core area.<Crouch-leap up ledges, ramps, pipes, and other precarious perches to the top
of the power core.

Objective: Rescue Your Clan MatesTo rescue your mates, you must reach the lift that takes you into thePod. But the place is crawling with guards and sentry guns, and deadlycombat synthetics (synthetic soldiers) man a central watchtowerwith powerful guns. Stay cloaked and undetected the entire time, oryou’ll take withering enemy fire.
Fig. 6-18.The sentry
guns are deadly, but
theirturrets
don’t rotatefar—staybehind or
to the sideof the guns.
Loading Area (Beneath the Forward Pods)� Cloak! Move down the hillside, veering to the right toward the black
water pool.� Hop over the fence near the water. Dead ahead an APC sits behind a
flashing red light. A pair of guards patrols around the vehicle.� You are cloaked, aren’t you? Veer to the left of the APC and guards, angling
toward the fallen Pod. (You can hear the guards’ conversation.) When youreach the concrete lift platform, turn right to face the APC and guards.
� Walk around the left side of the big crate behind the APC, and head towardtwo more chatting guards near the raised platform.
� Veer to the right of the second pair, cross another concrete lift platform, thenrun toward the huge lift hanging from the Pod.Water surrounds the lift; you can’t wade acrosswithout disabling your Cloaking FieldGenerator, which could be disastrous.
Fig. 6-19. Use the stalled jeep (foreground) as a leap platform to
get across the water to the cargo lift.
CAUTIONRemember! Waterdisables yourCloaking Field. Avoidthe dark poolsaround the liftplatforms.
CAUTIONThe green-litautomated securityguns around thecomplex detect youwhether you’recloaked or not, butonly if you walk infront of them.
CHAPTER 6:PREDATOR MISSIONS
CHAPTER 6:PREDATOR MISSIONS
<101>

Prima’s Official Strategy Guide
<102>
� Make a big crouch-leap to the jeep stalled in the water, then again to theother side of the water.
� Run over to the lift, which is loaded with crates. Step aboard and eliminatethe patrolling guards. When the last guard drops, the lift rises and the nextsection of the game loads.
Pod Interior (Warehouse)� Make sure you’re cloaked, then eliminate the
guards. It’s time for some serious crouch-leaping. Hop onto a pile of crates stacked threehigh in the corner (see Fig. 6-20). Leap straightto the second tier.
Fig. 6-20. Use this stack of crates to crouch-leap tothe second tier of the Pod cargo hold.
� Fight your way to the opposite end of the tier.See the pair of large crates? Hop onto the onenearest the tier’s edge. Turn and leap to thethird level.
� Eliminate more guards. Follow the tier away from the ladder to get aroundbehind the nasty turret gun and destroy it. The go to the central platform andapproach the pair of control panels. (This is an excellent place to hit &,
your Quick Save key.)� Use the control panel to the left to activate the
crane beyond. Wait a couple seconds, then leapdirectly over the control panel to the box beingraised by the crane. Ride the box to the top,turn around, and leap onto the fourth tier.
Fig. 6-21. This control panel on the third cargo tierraises a crane arm that holds a box. Crouch-leapover the panel to the rising box to reach the fourthcargo tier.
� As you rose, an elevator door slammed shut. Walk around the elevator to thecall button panel and open it.
� Dispatch the guard hiding behind the boxes.� Hack the controls: Press H to bring up your Charge Emittor, move the cursor
over the panel to get the Charge Emittor crosshair, then hold down the Firebutton until you override the controls.
� A ladder drops down behind you. Climb it to the catwalk.

<103>
� Walk to the elevator shaft, jump on top of the elevator, and open theemergency door. Look at that poor blubbering fool.
� Drop into the elevator, which automatically takes you to a storage area.
Storage Area� Several guards roam this area, including a very
tough combat synthetic with a Smartgun, sodispatch them. Move around the outerperimeter to the left from the elevator area. (Ifyou go right, you walk directly into firing radii oftwo turret guns just around the corner.)
� Continue until you find the lift (marked by astriped border).
Fig. 6-22. Take this lift to the level with the stairwell.
� Step aboard the lift, and ride to another level of the storage area.Exterminate more pesky guards here, then (from the lift) turn left and goaround the corner to an automatic door that opens into a stairwell.
� Climb the stairs to trigger another game load and a new objective.
Objective: Escape the CorePod personnel shut down the main lift and isolate you in the power core. It’s time to do some powerleaping.The only way out is to leap up structures to an Evacuation Room at the top of the core.
Base of Power Core� Cloak and climb the stairs with a good
infighting weapon handy—the Combistick, for example. Whack any guards in your way, and climb to the second door, which automat-ically opens.
� Step into the corridor. Guards seem to beeverywhere. Stay cloaked!
Fig. 6-23. Make mincemeat of the Pod minions. Stay cloaked as much as you can.
CHAPTER 6:PREDATOR MISSIONS
CHAPTER 6:PREDATOR MISSIONS

Prima’s Official Strategy Guide
<104
� Your current overall goal: Crouch-leap your way up to the Evacuation Roomat the top of the power core.
� From the stairwell, go through the left door. Turn right and walk around to thelift. Step onto it, look down, and activate it to rideup another level.� The elevator in front of you is shut down, so
walk around either side, and leap up to a ledgethat runs around the shaft.
� Follow the ledge until you see a steam ventabove connecting the elevator shaft to thepower core. (See Fig. 6-24.) Leap onto thesteam vent.
Fig. 6-24. Leap from the ledge on the elevator shaftto the steam vent.
� Face away from the shaft, and leap to the narrow ledge on the power core’scentral tower. Turn left and walk along the narrow ledge around the corner
until it opens wider. � Be sure you’re cloaked before you continue,
then take a big leap across to the brown slattedplatform. Be careful! Guards and a combatsynthetic (see Fig. 6-25) patrol the ramp aboveyou. Leap up to the ramp.
Fig. 6-25. Combat synthetics are tough, carry bigguns—and bleed white blood.
� In this area, four ramps extend from a centralplatform. Ladders rise near the end of tworamps. Hop onto either ladder, and climb to thecatwalk at the top.
� Tough combat synthetics patrol this top level,so spill their white blood. Then follow thecatwalk to another ladder that leads to adoorway with a red sign that reads “Evacuate.”
� Climb the ladder and enter the room.
Fig. 6-26. This is your final destination in Mission3: Interloper—the Evacuation Room at the top of the core.
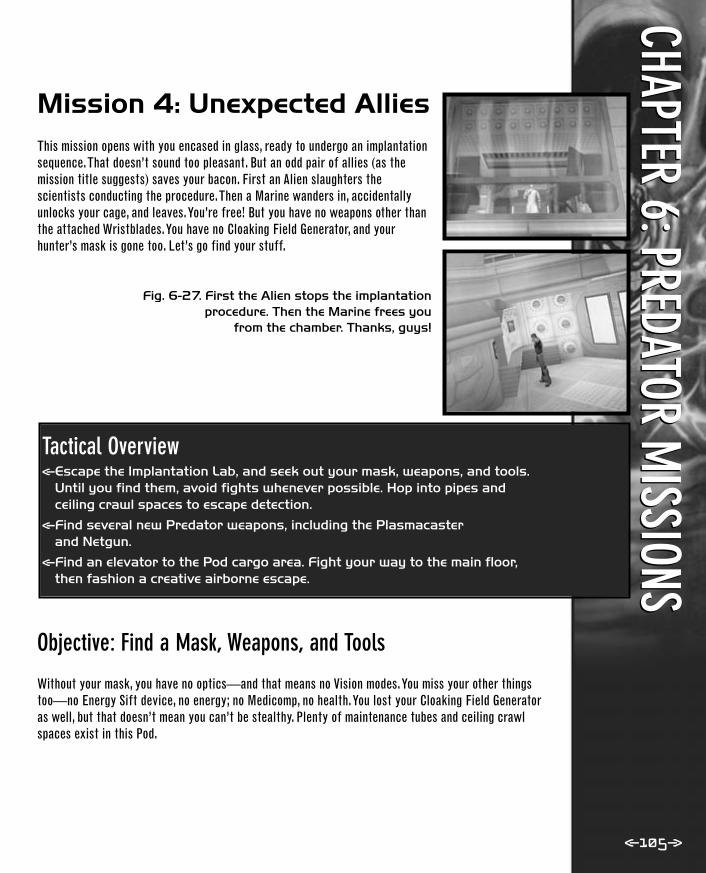
<105>
Mission 4: Unexpected AlliesThis mission opens with you encased in glass, ready to undergo an implantationsequence.That doesn’t sound too pleasant. But an odd pair of allies (as themission title suggests) saves your bacon. First an Alien slaughters thescientists conducting the procedure.Then a Marine wanders in, accidentallyunlocks your cage, and leaves.You’re free! But you have no weapons other thanthe attached Wristblades.You have no Cloaking Field Generator, and yourhunter’s mask is gone too. Let’s go find your stuff.
Fig. 6-27. First the Alien stops the implantation procedure. Then the Marine frees you
from the chamber. Thanks, guys!
Tactical Overview<Escape the Implantation Lab, and seek out your mask, weapons, and tools.
Until you find them, avoid fights whenever possible. Hop into pipes andceiling crawl spaces to escape detection.
<Find several new Predator weapons, including the Plasmacaster and Netgun.
<Find an elevator to the Pod cargo area. Fight your way to the main floor,then fashion a creative airborne escape.
Objective: Find a Mask, Weapons, and Tools
Without your mask, you have no optics—and that means no Vision modes.You miss your other thingstoo—no Energy Sift device, no energy; no Medicomp, no health.You lost your Cloaking Field Generatoras well, but that doesn’t mean you can’t be stealthy. Plenty of maintenance tubes and ceiling crawlspaces exist in this Pod.
CHAPTER 6:PREDATOR MISSIONS
CHAPTER 6:PREDATOR MISSIONS

Prima’s Official Strategy Guide
Implantation Lab
Fig. 6-28. Hack open the elevator switch to get a lift.
� Hop out of the case, and go left to the elevatorcall switch. It’s locked. Override its circuits byopening the panel and using your ChargeEmittor. The lift door opens.
� Step into the lift, and use the switch to ride upto the control booth area.
� Approach the exit door and hear some guard’s voices. Remember, you haveno Medicomp for healing, so take them out fast. The moment the door opens,swing those Wristblades.
� Open the next door, and step into the hallway.Another guard stands around the corner to theright. Avoid fights for now, so turn left andfollow the corridor to the next door.
� Open the door and go to the ladder. Climbdown to the next iris seal, open it, and continuedown. Be careful! A guard waits at the bottom.
Fig. 6-29. This guard waits at the bottom of theladder in the maintenance tube.
Research Area� Follow the corridor to the left. Through the next doorway, a guard rushes you.
Kill him fast and proceed into a large room with a window at the left.� Approach the window to see and hear Rykov
give orders to a subordinate. (See Fig. 6-30.)Look carefully to see some Predatorparaphernalia sitting on a table—a mask and a Netgun.
Fig. 6-30. Rykov gives orders next to a table thatholds a mask and a Netgun (circled).
<106>

<107>
Fig. 6-31. To open the door ahead, crouch-leap ontothe striped ledge, then between the two big pipes tothe alcove under a blinking red light. Zap the circuit
panel with your Charge Emittor.
� Face the far door (see Fig. 6-31), opposite ofwhere you entered. Then crouch-leap to thenarrow ledge above the hall entry (just abovethe striped line). Crouch-leap again, straight upbetween the two curved pipes, into a highalcove under the blinking red light.
� Face the wall and smash the circuit panel with aquick punch. Then use your Charge Emittor to blast the circuits. This opensthe security door below.
� Drop down, go through the newly opened door, and creep down the hall tothe left. Note the two guards through a window on your left. Two more guardswait ahead. You can’t avoid this second pair, so make a slashing rush to takethem out.
� In the next room, kill or ignore the cowering technician, and nab a pack ofRemote Bombs from the cart.
� Remember, two more guards stand in the next room. Use your ChargeEmittor to blast the circuit panel to the left of the big Weyland-Yutani logo.This opens the door behind you.
� Toss a Remote Bomb through the newly openeddoor, then press Alt-Fire to detonate it.
� Enter the room beyond to score a Predatormask (you can use your Vision modes again!)and a Netgun. The moment you do, more guardsattack. Zap them with nets, then brisklyWristblade all three helpless victims. (The netsonly last a few seconds, so hurry!)
Fig. 6-32. Nets from your Netgun immobilize victims for a few seconds. Take advantage of
the time—and be merciless.
� Backtrack through the room where you found the Remote Bombs. Continue through the newly opened door, and proceed to the ladder in the computer room.
� Climb the ladder and follow the red-lit pipe to trigger a new game section.After the game load, you’re still in the pipe and it’s very dark.
CHAPTER 6:PREDATOR MISSIONS
CHAPTER 6:PREDATOR MISSIONS

Prima’s Official Strategy Guide
� Switch to Predtech vision mode, and turn left at the juncture. Before youdrop out of the pipe, listen to the conversation below. The guards commenton the unusual valve functions in the gas storage system.
Gas Storage Room� Drop from the pipe, killing the guards.� Turn both valves—System Charge and System
Purge. The gas tanks behind you explode,knocking a sizable hole in the wall.
� Go through the hole, proceed down the stairs,and open the next door into a hallway.
Fig. 6-33. Throw the System Charge and theSystem Purge Switches to cause a gas explosionthat knocks a passage in the nearby wall.
Energy Deck
Fig. 6-34. Find your Combistick and a CloakingField Generator in the energy labs.
� Quickly sprint around the corner to the rightinto a research office, and grab the Combistickand a Cloaking Field Generator from the desk.Guards approach down the hall, so hit Cimmediately to cloak, then stick the attackers.
� Walk to the end of the hall, and open the door,entering a big reception area. Open the largesecurity door on your left.
� Enter the extensive energy laboratory.
<108>

Energy LabOne of your Predator mentors lies on a table at the far end ofthe room. Wires and electrodes radiate from his head.Your firstquestions might be, Where’s his stuff? Can I take his stuff?
� Turn around and hop onto the stairs that lead toa containment cylinder, which is currentlypowered down. Inside, on the cylinder’s floor,you find some great goodies—an Energy Siftdevice (which you probably sorely need rightnow), a Plasmacaster, and a Medicomp.
� Watch out for guards that appear as soon asyou take the equipment.
Fig. 6-35. One of your mentors is wired forresearch. He would want you to take his stuff, so
grab it from the containment chamber that’s upthose big stairs.
� Take time to heal, replace energy, and toss afew plasma bolts for fun and practice.
� Cross the room and climb the smaller staircase.Open the sliding door to the glass observationbooth, then face the back door.
� Guards patrol on the other side of the door, so get ready. Wield yourPlasmacaster, and press your Alt-Fire to charge up for a big plasma shot.Open the door and fire at the guards. You should get them both with one shot.
If you move down the hallway, you hear people cowering behind locked doors. Why are they sonervous? Are they hiding things in there? Knowing humans,they probably stashed some of your missing stuff in one ofthose rooms.
� Crouch-leap into the opening in the ceiling atthe corner. Follow the long crawl space to thealcove on the left, where you find a circuit box.
� Knock off the cover with your Wristblades, thenoverride the circuit with your Charge Emittor.
Fig. 6-36. Hack this circuit in the ceiling crawl space to open a room below where
you find your Speargun.
CHAPTER 6:PREDATOR MISSIONS
CHAPTER 6:PREDATOR MISSIONS
<109>

Prima’s Official Strategy Guide
� Exit the alcove and move left to the opening.Cloak, drop down, and stick the guard. Then godown the hallway and through the open door onthe left to find your Speargun. See? Humansalways try to keep your stuff.
� Proceed down the hallway and through theopen doorway on the left, just past theflickering hall light.
� Eliminate any guards. Cross the room and stepinto the elevator shaft to trigger another gameload.. .and an interesting cutscene.
Fig. 6-37. Apparently, Rykov and Eisenberg aren’tthe best buddies.
Objective: Escape the Pods
Pod Cargo Area� Ride the cargo elevator until it stops. (You are on top of the car. Through the
grate, you can see two soldiers inside the elevator.) Then get ready for someserious combat.
� Step forward and hop up to the ledge. Below, the two soldiers and anannoying turret gun are posted at the elevator door.
� Cloak and drop straight down. If you hop too far out, the turret gun nails you,but a straight drop puts you behind its firing radius. Smash it immediately,
then end a pair of mercenary careers.� You stand on the top tier of the Pod’s massive
cargo hold. Walk forward from the elevator,veering right (not left!).
� Walk to the end of the tier, and drop to the nexttier. If you drop down here rather than off theopposite edge, you avoid turret gunfire.
Fig. 6-38. Leap off the top tier from this edge toavoid crippling turret gunfire.
TIP Stay cloaked throughout this final combat sequence. Whenever you find a safe place, recharge health and energy, cloak, and
head out again.
<110>

<111>
� The next lower tier features three turret guns. Toavoid their firing radius, work clockwise around thetier, smashing the guns and eliminating guards.
� Once you clear this tier of threats, try to do somesniping. Pull out your Plasmacaster (the default is 5 ).
� Carefully move to the front edge of the tier, andfire supercharged shots at zoomed-in targetsbelow. Slide forward and backward and movefrom side to side to avoid taking hits from theannoying combat synthetics with their RocketLaunchers. With patience, you eliminate them too.
� Once you eliminate all human and synthetictargets, destroy all four turret guns on the tierone level below you. Again, use your zoom for“can’t-miss” plasma shots. Then find the spoton this tier’s back edge where you can drop atier farther down.
Fig. 6-39. Target the explosive canisters next to theAPC to blow a hole in the wall.
� Now you can drop to the cargo hold’s main floorand wreak some real havoc. Target the explosivecanisters next to the APC with yourPlasmacaster. (Keep your distance, of course!)A huge explosion rips a hole in the outer wall,and down goes the APC. Cool!
� Run to the hole, and stand near the edge.� Outside, a Marine dropship hovers into position
just outside the gaping hole. Wait until itmaneuvers right below you. Then take a bigcrouch-leap onto the ship to end the mission.
Fig. 6-40. Leap down onto the dropship to findairborne passage out of the Pods.
CAUTIONDon’t get too closeto the inner edge ofthe tier’s circle.Combat syntheticsbelow launch rocketsat you every timeyou get in theirsights.
CHAPTER 6:PREDATOR MISSIONS
CHAPTER 6:PREDATOR MISSIONS

Prima’s Official Strategy Guide
<112>
Mission 5: Old DebtsThat Marine dropship nicely battered into a nearby canyontunnel.You’re ready to negotiate a labyrinth of caves as youseek a way up to the canyon heights.There, perhaps, you canrendezvous with your clanmates.
Fig. 6-41. You have Rykov and Technician Stilesworried now. Will nothing stop you?
Tactical Overview<Battle many, many Aliens in this mission, including a pair of thundering
Predaliens. Use Alien Electromagnetic (red) vision mode with a trackingweapon such as the Plasmacaster.
<Traverse an underground maze of tunnels in the canyon to an old elevator.<Activate a transmitter at an auxiliary landing pad, and find access to the
Hive excavation site.
Objective: Find High Ground and Signal Your Clan
Tunnel� Turn right and open the low gate.� Leap into the hole.
Underground Cave System� You drop into a pool of water in a cavern far below. Hop onto the shore, and
move toward the twin caves ahead.� Switch to Alien Electromagnetic (red) vision mode. It provides decent vision
in the darkness and lets tracking weapons such as the Plasmacaster lockonto Alien targets. (And trust us, you have many Alien targets in thismission.)
� If you get lost or can’t distinguish features in a cave, switch to Predtech(white) vision mode, your best night vision mode. But remember, you won’tsee Alien attackers clearly, and you can’t use the tracking features ofweapons.

<113>
Fig. 6-42. Alien Electromagnetic (red) vision modewith a good Plasmacaster makes an effective
Alien-killing combo.
� Take either cave; they meet in a few feet. At thenext fork, however, leap onto a low ledge to theleftmost cave (left of the cave where steamrises from a crevice).
� Proceed down the tunnel past glowing cave lilyplants to a big cavern with a shallow lake undera dome-shaped top.
Fig. 6-43. This lake under the dome-shaped roof isyour first underground destination. Cross it to the
cave (circled) behind the rightmost steaming crevice.
� Drop down to the lake. As you do, prepare for an onslaught of Aliens. Thefirst wave comes straight across the water, but other waves attack frombehind you too. So fight from the middle of the lake. The more room you haveto maneuver and see them coming, the better. Remember, the best tactic isto backpedal and fire your Plasmacaster in Electromagnetic vision mode.
TIP If quarters are tight, arm yourself with a good whackingweapon such as the Combistick. But in open caverns and
exterior landscapes, a Plasmacaster is much more useful, letting you decimate onrushing packs of Aliens from a distance.
TIP If you use the Plasmacaster, you use up energy. Don’t forget to recharge with the Energy Sift device between waves
of attackers.
CHAPTER 6:PREDATOR MISSIONS
CHAPTER 6:PREDATOR MISSIONS

Prima’s Official Strategy Guide
<114>
� After you cannon several waves of bugs, note the two Predator corpses lyingin the water. Both have exit holes in their chests, meaning both served ashosts to Alien spawn. That means a pair of Predaliens is probably lurking inthe area.
� Steer between the two steaming vents (Fig. 6-43) on the lake’s far side. Hop onto the low wallnear the steaming vent on the right.
� Enter the circular cave mouth behind theglowing cave lily plant. In general (not always),these lilies mark the best route through thecaverns.
Fig. 6-44. These glowing cave lily plants make goodsignposts and generally mark the correct path.
� Straight ahead, you reach an intersection. Veerslightly left—again, toward the tunnel with theglowing lily. At the next fork, veer left again.
� Emerge in a cavern with another lake (Fig. 6-45).This one has two rock formations rising fromthe water—one low, one high.
� Crouch-leap onto the higher rock formation.Crouch-leap over to the nearest ledge (the onewith trees above it) to exit the underground area.
Fig. 6-45. This is the second underground lake. Use the taller rock formation as a launchpad out of the caverns.
Canyon Lava Flows� Follow the gray lava flow uphill through the rock arch. Aliens attack in twos
and threes. This is the perfect place to combine Electromagnetic vision modewith your Plasmacaster, which locks on the nearest target. Pick off Alienrunners before they get close.
� Keep an eye on your energy status. Use the Energy Sift device during lulls inthe Alien attack.
� After you pass under the rock arch (Fig. 6-46), find a small tunnel entrance(marked by two cave lilies) to the right of the lava flow.

<115>
Fig. 6-46. After you pass under this arch, look for the next passage—
a small tunnel to your right that’s marked by cave lilies.
� Go through the tunnel.� When you emerge, start blasting the next wave
of Aliens.
This is a tough fight if you stay near the tunnel; you can’t seebugs until they’re almost on top of you, making yourPlasmacaster’s tracking function almost useless. So veer rightand head in the direction the Aliens are attacking from. Once you get over a small rise, you see themapproach from a distance and pick them off well before they reach you.
� Turn around and walk up the gray lava flow.� Don’t worry when the ground gives way beneath you. It’s all part of the plan!
Cavern of SpiresYou fall down a vast subterranean cavern into a pool of water surrounded by weird spires.Thegreen bar at the screen’s bottom shows how much air you have left.You have plenty, so just swim to the surface.
� Swim to the side, and leap out of the water. Uh-oh.Hear that? It’s the creepy hybrid howl of a Predalien.In fact, two of them are in this area.
� You need a lot of plasma energy for this battle. If yourenergy is low, recharge now with the Energy Siftdevice.
� Find the exit cave. This is how: Two glowing cave liliesgrow near the pool’s edge. Approach the one on theright. In the distance above and behind it, you can seea patch of purplish light on a spire of rock.
� Climb toward the purple light (more glowing lilies lightthe way), and continue between two spires with a lilybetween them to the cave opening directly ahead.
� We recommend that you switch to Predtech visionmode here for best visual acuity.
� Follow the cave, veering left until it reveals a big pipe.Walk along the pipe to the right until you reach aladder at the water’s edge (Fig. 6-47), then climb ontop of the pipe.
CHAPTER 6:PREDATOR MISSIONS
CHAPTER 6:PREDATOR MISSIONS

Prima’s Official Strategy Guide
<116>
Fig. 6-47. This pipe leads across the lake to an oldpump station.
� Get ready! Walk across the water on the pipe.As you go, switch back to Electromagneticvision mode, because about halfway across,two howling Predaliens trap you on the pipe,one in front and one behind.
� The pipe gives you no maneuverability, so wesuggest you run past the Predalien (and justsuffer the damage) and hustle back to theshore you just left. (If you’re really good,backpedal across the pipe, firing tracking shotsfrom your Plasmacaster all the way.)
� Once ashore, you have room to maneuver. Killthe Predaliens, then climb onto the pipe againand cross to the far shore. Another wave ofbugs drops from the heights and quickly hits.
� Walk through the remains of the pump station.Be careful! The empty containment pool is nowan Alien egg hatchery. Watch out forfacehuggers. (If you want, hop on the pool’sledge and blast all the eggs. The fewer Aliens,the better!)
Fig. 6-48. The old containment pool is a breedingground for facehuggers.
� Continue up the lava flow behind the pump station, veering left toward ahuge, circular cave opening. (You can’t miss it, especially in your Predtechvision mode.)
� Move through the cave until you see an opening to the right. Belowyou see the bony remains of a frighteningly gigantic creature.Turn hard right and follow the glowing lilies to anotherpool of water.
� Walk through the water to the elevator. Go around the left side of the elevator, and throw the emergency power supplyswitch. The elevator still doesn’t work, but you’re getting there.

<117>
Fig. 6-49. The elevator (right) needs emergencypower, and the circuit box (left) needs hacking.
� Walk toward the circuit box by the pool. Thistriggers a small explosion. Use your ChargeEmittor to hack the circuit inside the box to getthe elevator operating.
� Enter the elevator and press the button to takea long ride to the canyon top.
Objective: Power Up the Transmitter
Auxiliary Landing Pad (Top of Canyon)Well, you certainly found high ground, but you still want to signal your clan.This area appears to be anold auxiliary landing site. No doubt there’s a landing beacon or transmitter somewhere. When you stepout of the elevator, a Marine dropship roars overhead, disappearing into the distance.
Fig. 6-50. The Primary Antenna control is in theroom beyond this half-opened door.
� Enter through the door to your left. Descend thestairs and follow the hall to the half-openeddoor on the left.
� Enter the room and throw the switch on the far wall that reads “PrimaryAntenna.” Return upstairs and cross the landing pad to the big gate at thefar end.
CHAPTER 6:PREDATOR MISSIONS
CHAPTER 6:PREDATOR MISSIONS
TIP Be sure your energy is 100 percent and Electromagnetic visionmode is active.
TIP Step through the half-opened door, then quickly back out totrigger the Alien assault. Pick them off through the doorway with your Plasmacaster.
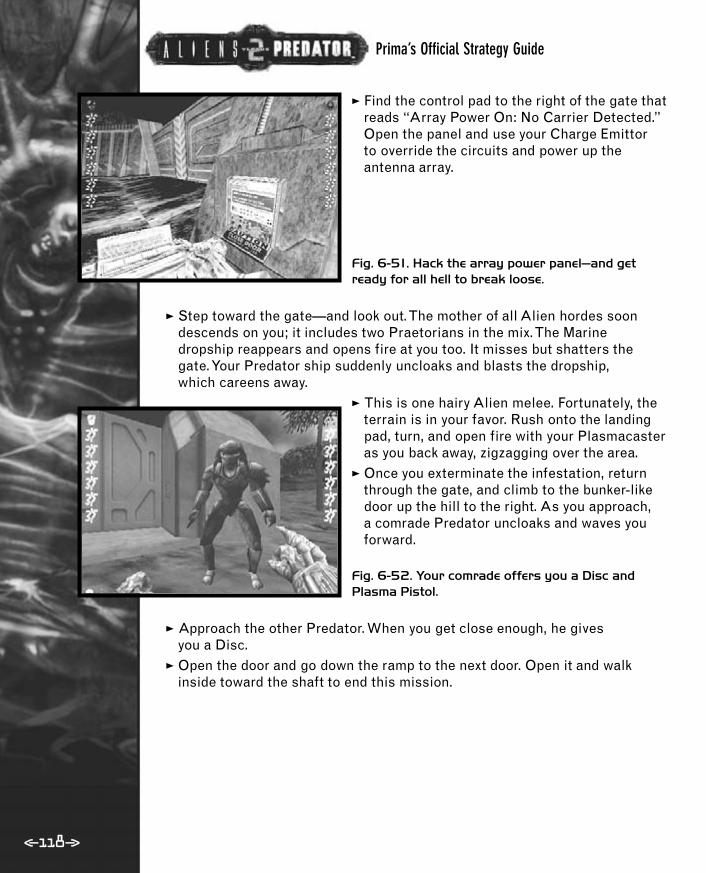
Prima’s Official Strategy Guide
<118>
� Find the control pad to the right of the gate thatreads “Array Power On: No Carrier Detected.”Open the panel and use your Charge Emittor to override the circuits and power up theantenna array.
Fig. 6-51. Hack the array power panel—and getready for all hell to break loose.
� Step toward the gate—and look out. The mother of all Alien hordes soondescends on you; it includes two Praetorians in the mix. The Marine dropship reappears and opens fire at you too. It misses but shatters the gate. Your Predator ship suddenly uncloaks and blasts the dropship, which careens away.
� This is one hairy Alien melee. Fortunately, theterrain is in your favor. Rush onto the landingpad, turn, and open fire with your Plasmacasteras you back away, zigzagging over the area.
� Once you exterminate the infestation, returnthrough the gate, and climb to the bunker-likedoor up the hill to the right. As you approach, a comrade Predator uncloaks and waves youforward.
Fig. 6-52. Your comrade offers you a Disc andPlasma Pistol.
� Approach the other Predator. When you get close enough, he gives you a Disc.
� Open the door and go down the ramp to the next door. Open it and walkinside toward the shaft to end this mission.

<119>
Mission 6: New TargetRykov wants to buy his team time to pull out. His hatred for yourspecies is almost palpable, and he knows you’re coming. Afterall, he has your clan mask.
Fig. 6-53. Rykov takes your incursion personally. It looks like you’re headed for
an old-fashioned showdown.
Tactical Overview<This mission features a difficult mix of human and Alien enemies. You also
encounter an area that is heavily guarded by turret guns.<Penetrate a heavily guarded excavation site, and find a way to underground
jockey tunnels.<Reach the Hive entrance.
Objective: Descend to the Hive Entrance to Intercept Rykov
Excavation Site
Your enemies alternate between Alien and human in this mission. Stay cloaked when possible, but remember that cloaking doesn’t work against Aliens.
� Crouch-leap to the large vent opening in the shaft above. Follow the vent tothe next chamber, and leap down to see a ladder.
� Cloak and switch to human Thermal (blue) vision mode.� Climb down the ladder. Be careful! An armed guard is at the bottom with a
maintenance worker. Kill both quickly.� Open the big gate, and leap down the hole. Follow the overhead pipes to the
switch. Open the switch panel to reveal the circuit board, then use yourCharge Emittor to hack the circuits. This opens the door across from the big gate.
NOTE
CHAPTER 6:PREDATOR MISSIONS
CHAPTER 6:PREDATOR MISSIONS

Prima’s Official Strategy Guide
<120>
Fig. 6-54. This switch opens a door across fromthe gate.
� Return to the space beneath the big gate, turn,and crouch-leap to the newly opened door (Fig.6-54). Guards patrol here, so be ready for afight.
� Go right, proceeding into the next room, thenturn left to see more guards. Eliminate themand move forward to find a floor grate.
� You have a choice here: You can continue to themain door beyond, which is unlocked, and enterthe artifact room. Or you can open the floorgrate beyond the fallen guards, and take anunderground route into the site.
Normally, we like stealth, but in this case, the easier approach isprobably the direct one through the door.The artifact room islined with deadly turret guns as well as guards, so slip in behindthem (avoiding their firing radius) from the doorway. However,there is something of interest down the grate.
� Open the grate and hop down. On one side ofthe room, you find some rare Predator pickupitems—spears for your Speargun and nets foryour Netgun. Crouch-leap back up through thegrate, and proceed to the door by the “SentryGun Warning” sign.
� You might want to use your Energy Sift devicehere to recharge.
� Cloak and switch to Thermal vision mode. Wieldyour Plasmacaster, then open the door.
Fig. 6-55. Take this warning very seriously. Theartifact room beyond this door features sixscreamin’ turret guns.
Artifact RoomSeveral guards patrol the area, but again, the rapid-fire sentry guns that ignore your Cloaking Fieldare more dangerous.Two guns are installed on a high balcony, so you must look high and low to nailthem all.

<121>
� From the doorway where you entered, pick offthe guards around the site with tracking plasmaprojectiles. When finished, switch to Predtechvision mode so you can see the turret gunsbetter.
� Move left along the wall, picking off all six turret guns. Stick to the walls to avoidtaking fire.
Fig. 6-56. Plaster yourself to the walls as you movearound the artifact room. Each turret gun’s
targeting radius ends just before the wall.
� Once you silence the guns and guards, go tothe open door one corner down from the dooryou entered. Move to the lift, and press thebutton to ride up.
� Walk around the first corner, and listen to theconversation about the excavation. Then rush inand end the conversation in classic Predatorstyle. (Trophies!)
� Pull the switch labeled “Cargo CraneEmergency Release.” The crane drops a crate,which knocks a hole in the floor.
Fig. 6-57. Pull the crane release switch to dump the crate and uncover a passage.
� Go back down the lift and into the dig site. Adoor opens in the ground, revealing a shaft thatdrops down to darkness. What now?
� Of course, all you can do is take a leap of faithinto the shaft.
Jockey Tunnels� You land in a short tunnel. An Alien attacks!
Kill it and proceed down the tunnel. At the end,spot and launch Plasmacaster fire at moreAliens across the way.
� Drop to the floor, go left, walk past the support,and climb the ladder on your right. Walk to the end of the ramp, and hop down(thus avoiding the 13,800 volts of the electrified fence).
CHAPTER 6:PREDATOR MISSIONS
CHAPTER 6:PREDATOR MISSIONS

Prima’s Official Strategy Guide
<122>
Fig. 6-58. You probably don’t want to touch that.
� Aliens lurk in the tunnel ahead, so switch to Electromagnetic vision mode, and wield your Plasmacaster. Move forward and blast the bugs.
� Continue down the water-filled jockey tunnel,and get ready for a unique challenge. Ahead,two human guards patrol a high tram stationplatform. Aliens also infest the area, waiting foryou. You must do some quick Vision modeswitching as you battle both at the same time.
� Our advice is the following: Cloaked and armed with your Plasmacaster,switch to Electromagnetic vision mode and approach the tram station. Walkalong the curve of the tunnel wall, not in the water—remember, waterdisables your Cloaking Field Generator.
� Once the Aliens attack, quickly backpedal down the tunnel, firing plasma allthe way. Using the plasma weapon disables your Cloaking Field Generator,but you quickly back out of the guards’ weapon range while you pick off theAlien runners. Then switch to Thermal vision mode, cloak, move back downthe tunnel (staying out of the water), and hit the humans.
� Turn right at the tram station, switch back to Electromagnetic vision mode,and follow the jockey tunnel. Another squad of Aliens launches a frontalassault.
� Enter the open doorway on the right side of the tunnel. Follow the longcorridor as it slopes down and then turns a corner. Stop before you step outof the passage. In the next room, three Aliens hang high on the wall abovethe doorway. If you look up and back through the doorway with yourPlasmacaster ready, you can nail them long before they reach you.
� In the next room, approach the hole carefullyand look down. See the series of ledges? Hopand crouch-leap from ledge to ledge to thebottom. Line up each leap and drop carefullybefore you attempt it.
Fig. 6-59. Line up your descent down the hole. Thesecond drop (seen here) is particularly tricky—inchout very carefully, or you miss the ledge.
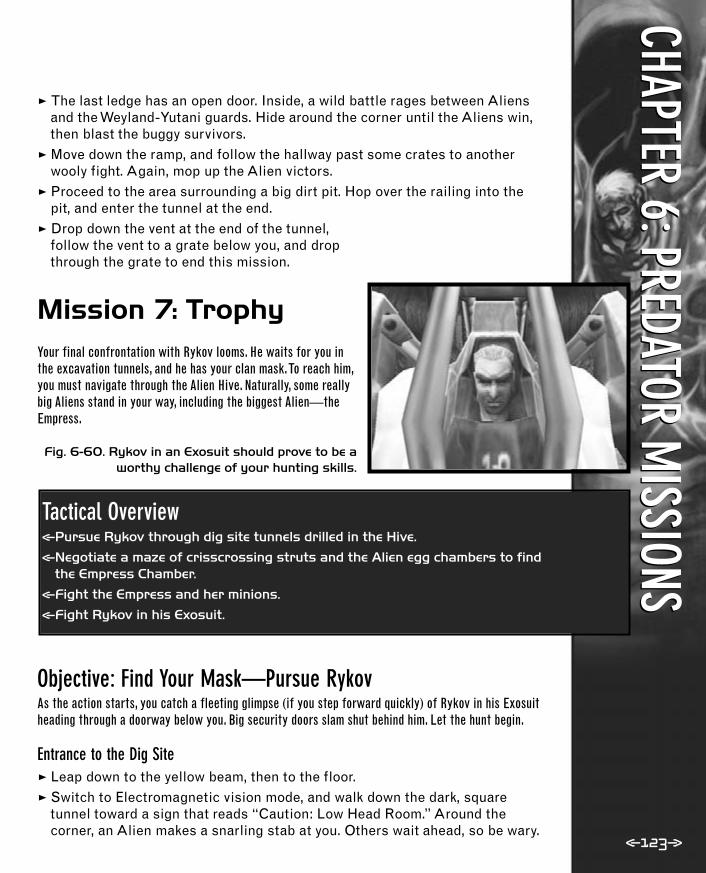
<123>
� The last ledge has an open door. Inside, a wild battle rages between Aliensand the Weyland-Yutani guards. Hide around the corner until the Aliens win,then blast the buggy survivors.
� Move down the ramp, and follow the hallway past some crates to anotherwooly fight. Again, mop up the Alien victors.
� Proceed to the area surrounding a big dirt pit. Hop over the railing into thepit, and enter the tunnel at the end.
� Drop down the vent at the end of the tunnel,follow the vent to a grate below you, and dropthrough the grate to end this mission.
Mission 7: TrophyYour final confrontation with Rykov looms. He waits for you inthe excavation tunnels, and he has your clan mask.To reach him,you must navigate through the Alien Hive. Naturally, some reallybig Aliens stand in your way, including the biggest Alien—theEmpress.
Fig. 6-60. Rykov in an Exosuit should prove to be aworthy challenge of your hunting skills.
Tactical Overview<Pursue Rykov through dig site tunnels drilled in the Hive.<Negotiate a maze of crisscrossing struts and the Alien egg chambers to find
the Empress Chamber.<Fight the Empress and her minions.<Fight Rykov in his Exosuit.
Objective: Find Your Mask—Pursue RykovAs the action starts, you catch a fleeting glimpse (if you step forward quickly) of Rykov in his Exosuitheading through a doorway below you. Big security doors slam shut behind him. Let the hunt begin.
Entrance to the Dig Site� Leap down to the yellow beam, then to the floor.� Switch to Electromagnetic vision mode, and walk down the dark, square
tunnel toward a sign that reads “Caution: Low Head Room.” Around thecorner, an Alien makes a snarling stab at you. Others wait ahead, so be wary.
CHAPTER 6:PREDATOR MISSIONS
CHAPTER 6:PREDATOR MISSIONS

Prima’s Official Strategy Guide
� Follow the pipe along the floor to the lowpassage, and crouch to get through. Keepfollowing the pipe as it twists back and forthuntil you reach a red-lit room.
� Go behind the big tank (pipes run into it) tofind the remains of an unfortunate clanmate.His sad fate is obvious: you see the facehuggercarcass in the water and a hole in his chestfrom the larval emergence.
Fig. 6-61. Your clanmate met a terrible end, but heleft needed items. Don’t miss the Smart Bombs andspear pack nearby.
� Pick up the items he dropped—Smart Bombs, spears for your Speargun, anda Plasma Pistol. Now you possess the entire complement of Predatorweaponry. Turn around and retrace your route, following the pipe back towhere you started.
� Leap on the crate directly in front of you as you emerge from the opening.Smash open the grate, follow the vent, and smash the grate at the other end.
� Drop into the vehicle tunnel. An industrialpower loader suit stands abandoned, and bothvehicle doors are locked.
� Approach the sentry gun access panel, andopen it to reveal the circuitry. Use your ChargeEmittor to fry the circuits. Hey, the dooropened.
Fig. 6-62. Fry the sentry gun panel to open thetunnel Rykov went in.
� Head straight down the vehicle tunnel. This iswhere you started the level. But another door isopen now—the one Rykov disappeared into—revealing a big hole in the wall.
� Switch to Electromagnetic vision mode, andfollow the drilled tunnel. Packs of Aliens comeat you, so be combat ready. One attacker is aPredalien.
Fig. 6-63. A couple of tough Predaliens lurk in thedrill area.<124>

� You emerge in a room with equipment and asquare hole. Another Predalien roars at you!Down the hole is the massive drill. You can’t useit, but it will be in the way later if you don’t moveit. (We could let you learn the hard way, but darnit, this is a strategy guide.)
� Walk around the drill pit to the control with thedisplay that reads “Drill Platform Lowered.”Pull the switch to raise the drill.
Fig. 6-64. Raise the drill and head down the otherdrilled passageway ahead. This saves you from
backtracking later.
� Facing the drill, turn right and walk down the other drilled passageway.Aliens make some weak runs on the way—but chaos reigns when you reachthe end of the passage.
� Explosions ring out, combat synthetics sprint past, and below a truckcarrying the Alien Empress roars down a ramptoward the far tunnel door.
� A howling platoon of Aliens burst from the Hivechasing the truck. The combat synthetics and a pairof turret guns make bug meat out of them.
� Fight the tough combat synthetics, who are armedwith Smartguns.
� Leap down past the big red pipe labeled “Steam.”Turn around and walk underneath the pipe,crouching to follow the red-lit passage.
� At the end of the pipe, a room opens up. This wasblocked until you raised the drill. Continue into thedrilled tunnel across the room.
� Aliens (including a Praetorian) swarm thistunnel, so activate Electromagnetic visionmode. Keep following the tunnel until a newsection of the game loads.
The Hive
Fig. 6-65. These struts crisscross beneath the Hive’s massive Alien sac. Hop
and climb to an exit near the top.
CAUTIONDon’t forget aboutthe two turret gunsat the end of thetunnel. You’re out oftheir range whenyou duck under thesteam pipe, butdon’t wander too close.
CHAPTER 6:PREDATOR MISSIONS
CHAPTER 6:PREDATOR MISSIONS
<125>
Prima’s Official Strategy Guide
<126>
You overlook a pool of yellow ooze with about a dozen crisscrossing struts above. Suspended abovethe struts is the Alien sac, the core of sustenance in the Hive.The ooze below is deadly sac fluid.Traverse the struts until you reach a tunnel entrance near the top of the chamber:
1. Turn right and walk around the pool. Hop onto the first strut.2. Turn left, go to the strut that crosses over, and hop onto it. You’re on the
second strut.3. Turn left, go to the end of the strut, turn left again, and hop onto the
third strut.4. Turn left, go to the strut that crosses overhead, and hop onto it. (It’s
actually easier to leap up on the other side, but you can make it fromeither side.) You’re on the fourth strut.
5. Turn right, walk to the end of the strut, and leap onto the fifth strut.6. Turn right and hop onto the sixth strut.7. Turn right, move along the strut under one that crosses overhead, and
continue to the gap. At the gap, drop onto the strut below. This is theseventh strut.
8. Turn right and follow the strut to the wall. Turn left and hop onto theeighth strut.
9. Turn left and move along the strut until you reach another strut thatblocks the path. Hop onto this ninth strut.
10. Step across the ninth strut, and on the other side, drop right back downonto the eighth strut.
11. Follow the strut under the strut that crosses overhead. At the wall, turnaround and leap onto the crossing strut. You’re on the tenth strut.
12. Move about halfway along the tenth strut to the strut that passesunderneath. Drop down the left side onto the eleventh strut.
13. Walk straight ahead on the strut (away from the tenth strut) into a smokycave opening to exit the room.
Egg ChambersAny place where a species keeps their eggs is probably heavily defended. Many Alien runners anddrones swarm and bite and make your hunt miserable for a while. Save your game frequently, and re-juice yourself with the Medicomp and Energy Sift device after you defeat each wave.
Four egg chambers interconnect in a roughly circular arrangement. Each oneteems with Aliens. If you follow the walkthrough, you visit only two of thefour rooms.
NOTE

<127>
Fig. 6-66. The Alien egg chambers interconnect andare heavily guarded.
� Enter the smoky entrance, and proceed to asection with crisscrossing struts. The firstAlien wave attacks when you reach thissection. Recharge with Medicomp and EnergySift device after you smash this wave.
� Continue past the struts to the first eggchamber, where a second, bigger wave of Alienshits you. After you eliminate the threat, crossthe egg pits, and exit the chamber through theonly other low passage (opposite where youentered).
� Pay close attention. You reach a juncture a shortdistance down the next tunnel. Either directioneventually takes you where you want to go, butfollow the left branch, which is more direct andavoids some Alien encounters.
� You reach a second egg chamber. Fight offanother stout Alien challenge, then cross theegg pits to the passage on the opposite side.
Fig. 6-67. When you find this section of tunnel, withtwo struts, you’re almost out.
� Follow this tunnel to another juncture. Again, bear left. This leads you intoanother section with struts—this one has only two (see Fig. 6-67). MoreAliens attack here, including a nasty facehugger. Don’t lose track of the littlebugger in the chaos.
TIP Use your Electromagnetic vision mode in these Hive tunnels. If you lose your bearings, switch to Predtech vision mode until you get reoriented, then switch back.
CHAPTER 6:PREDATOR MISSIONS
CHAPTER 6:PREDATOR MISSIONS

Prima’s Official Strategy Guide
� Continue past the struts to an opening thatlooks out on an amazing sight—a massiveunderground structure, clearly un-Alien innature, although some Alien-built struts irreg-ularly extend from it (see Fig. 6-68).
Fig. 6-68. Hop into the middle of the three bigopenings—the infested one.
Ancient Ruins (Empress Chamber)� Climb the ramp to the ledge beneath the three big openings. Which one
leads onward? Walk underneath the center opening, the one infested withAlien ooze. Several Aliens drop down to attack,which is a good sign you picked the right hole.� Crouch-leap to a ledge under the center
opening, then crouch-leap again to enter the hole.
� Follow the tunnel to a big cavern full of criss-crossing struts. Aliens! Kill them and cross thecavern to the passage on the opposite side.
Fig. 6-69. In the water room, leap up a series ofplatforms to reach the ancient hallway.
� Follow the passage to a water-filled cavern with a huge central stalk thatrises to a lattice-like roof. Walk around the stalk to see a block platform.
� Crouch-leap onto the platform. Turn right andleap onto another, higher platform. From there,leap straight up to the ledge to end up in a vasthallway.
� Follow the hallway to the open, egg-filled arenaunder the huge Alien sac. Hop down and sayhello to the Empress.
Fig. 6-70. Descend to the arena beneath themassive Alien sac for your penultimate battle—withthe smiling Empress and her little helpers.
<128>

� Backpedal and slice the Empress with heinous Combistick swipes when shegets close. She’s tough by herself, of course, but her court soon appears.
� Once you wipe out her minions, recharge on the run (it’s not easy), and thenconcentrate on the Empress.
� When she finally goes down, walk down the slightly sunken edge of thearena to the wall section that’s different in texture. Whack the wallrepeatedly with your Combistick until the latticework shatters, revealing atunnel.
� Be sure your health and energy are 100 percentand save your game. Then follow the windingtunnel to a big underground chamber.
Final Battle: Rykov
Fig. 6-71. Get in the first licks. Fire one super-charged Plasmacaster blast before Rykov spots
you and a second before he can answer.
� Rykov is waiting for you. This is an old-fashioned shoot-out. Rykov’s Exosuitis powerful, but somewhat slow, especially after all those Aliens you faced inthe Hive.
� The red bar at the top of the screen measures Rykov’s health. It recedes asyou render damage.
� Pause at the entrance where Rykov waits, and zoom in on his Exosuit. Try tounleash at least two supercharged blasts from your Plasmacaster before hecan wheel on you and open fire with those wicked arm guns. This “headstart” puts you in a good position.
� You’ll have the best success with plasmaweapons, particularly supercharged hits fromyour Plasmacaster. Rykov disappears behindthe pillars on occasion; use those times to fireup your Energy Sift device and Medicomp.
� When Rykov’s health bar runs out, you win!
Fig. 6-72. Victory!
CHAPTER 6:PREDATOR MISSIONS
CHAPTER 6:PREDATOR MISSIONS
<129>

Prima’s Official Strategy Guide
<130>
AL I EN M I SS I ONS The Alien missions open with an unsettling image: Dr. ArnaudEisenberg is curled on the floor, bloody and scared. Somethingpounds violently on a nearby door.The scene suddenly shifts toa smuggling vessel, the Aurora, gliding toward LV-1201. Cut to atense conversation between Eisenberg, director of the Weyland-Yutani corporate research facility, and a female auditor for theCommittee, a governmental body that oversees researchactivities.
The auditor seeks signs of progress, and Eisenberg pointsout considerable strides in deciphering Alien chemistry. But thewoman accuses him of conducting unauthorized research. Sheadds,“There’s even a rumor you want to try to harness andcontrol the Hive.”
Fig. 7-1. The Committee wants results from Dr.Eisenberg. Meanwhile, his staff seems to beinvolved in illegal smuggling operations.
The scene shifts back to the Aurora, where the smugglercaptain receives a large box to ship. He loadsit carelessly; when he’s called out, the boxtips to the floor and breaks open. Guesswho’s inside? That’s right: you.
Mission 1: BirthWelcome to life as a disgusting, scaly, scorpion-like bug. It’s not an easy life.Alien facehuggers are quick but vulnerable. Watchful humans run away(locking doors behind them), or if armed, they open fire (killing you with afew shots). When they spot you, security teams immediately rush to thesite.Thus the key to success is total stealth. Avoid all confrontation untilyou find a sleeping target in whom to deposit an embryo.

<131>
TIP The far end of the fuel arm and the ducts beyond are darkareas—good places to use your Navigate vision mode. Hit your
Vision mode key (the default is V ) to toggle between Hunt and Navigate modes.
Tactical Overview<You spend most of the mission in the dark, so you should negotiate the
terrain in Navigate vision mode.<Exit the smuggler ship via the fuel arm attached to the landing facility.<Wall-walk up and down through various vents and ducts to a laboratory,
then sneak past the scientists.<Find another vent leading to the crew quarters. Face-hug a sleeping human
to deposit your embryo.<As a chestburster, zigzag through alleyways, avoiding contact with
guards, until you reach a Live Animal Storage area full of tasty snacks.
Objective: Escape from this VesselYou begin life as a lowly, newly hatched face-hugger.Your ultimate goal is to find a nice host toattach to. But first you must escape this smuggling vessel. If you watched the opening cutsceneclosely, you saw the Aurora taking fuel from the landing facility via a fueling arm.
Smuggler Ship
Fig. 7-2. That ladder behind your egg crate (seen here in Navigate mode) is your first
destination. Wall-walk to the top.
�Turn and walk around your egg crate to theladder. Hit your Wall-walk toggle key (thedefault is G), and climb the ladder to the upper compartment.
� Enter the cargo hold at the right and turn right.You see the fuel arm connected to the ship.Scurry down it all the way to its end.
CHAPTER 7:ALIEN MISSIONS
CHAPTER 7:ALIEN MISSIONS

Prima’s Official Strategy Guide
<132>
Objective: Find an Isolated Host for Implantation
Landing Facility: Ventilation DuctNote the hint given when you press t for your objectives:“Find an isolated host for implantation.”Go find some unconscious joker hanging out by himself.
� At the end of the fuel arm, switch to Navigatevision mode to see in the dark, then crawl downto the floor beneath the blue pipe.
� Follow the blue pipe to its end. Another, higherblue pipe extends ahead. Crawl into the ventsurrounding that second pipe.
Fig. 7-3. In Navigate mode, follow the blue fuel pipesto exit the ship to the landing facility.
� Follow the duct to the end, dropping into alarger, red-lit tunnel. Switch from Navigatevision mode to verify the red lights. Follow thetunnel to the dark room at the end, and switchback to Navigate mode.
� Look up to see the spinning fan. (See Fig. 7-4.)Climb toward the fan, straight up the wall intothe vertical vent above. Before you reach thefan, another vent passage appears. Follow it.
Fig. 7-4. Climb up the air duct toward the spinningfan to find the next vent.
�Turn left through the half-open grate into another roomful of blue pipes.Crawl over the big floor grate to the other end of the room. (You hear anexchange between the soldiers below.) Enter the vent on the right.
� Scuttle to the end, where a sign reads “Iris Seal 20.” Below, you hear another exchange. That commander is a real jerk—someone needs to hug his ugly mug.

<133>
Fig. 7-5. As you crawl over ceiling grates, listen to conversations below.
� Climb the wall behind the Iris Seal sign to thevent just above the sign. Angle down the nextpassage to the long ceiling grate. (The nastycommander continues to abuse his men below.)
� Go halfway down the grate, and turn left intothe vent. A sign on the left reads, “TunnelFlares Repository.” Proceed to the brokengrate, and crawl into a closet with a wall ofshelves. (See Fig. 7-6.)
Fig. 7-6. Climb just past the first Iris Seal sign, and find the broken grate that finally
lets you out of the duct system.
Storage Room
� Exit the closet into the storeroom. Two techsenter, talking about someone hacking thesystem to make database changes to dutyrosters, specimen samples, and so on. Scurryacross the floor into the big opening under theVentilation Shaft Access sign.
� It’s dark, so use Navigate vision mode. Headdown to the next vent, and follow it into a pipe-lined room with signs reading “Hot Pipes: Do Not Touch.” Turn left and crawl up the wall to avoid the jet of steam escaping from a burst pipe.
CHAPTER 7:ALIEN MISSIONS
CHAPTER 7:ALIEN MISSIONS

Prima’s Official Strategy Guide
Fig. 7-7. Maneuver around this steam jet to avoiddamage.
�Turn the corner and climb through the U-shaped opening in the metal gate. Climb alongthe length of the tank to the corridor beyond.
� Follow the corridor around the corner intoanother long duct. Crawl through the vent,exiting into a small room with a brokenelectrical current sparking wildly. Proceed tothe right, around the grate, to avoid thesparking current and reach another vent.
� Follow the twisting duct until you exit onto another ceiling grate.
Laboratory Area� Scientists below chat about tours and
hazard pay. Maneuver directly overthe table, then toggle off your Wall-walk key to drop. If you land right onthe table, they don’t see you!
� With Wall-walk mode off, veer behindthe specimen case, and drop to thefloor. Sneak into the hall.
�Turn right, going straight down thehall. At the next turn, look up to seethe vertical duct in the ceiling. (SeeFig. 7-8.) Toggle on Wall-walk, climb tothe ceiling fan, and crawl into theshaft above it.
Fig. 7-8. Wall-walk and climb into the vertical shaftabove the door.
CAUTIONAny human can be agood host, but youmust find a solitary,isolated victim. Face-hugging a humanwith a companionmeans certain failure;the companionreports the implantattempt and you are destroyed.
<134>

Fig. 7-9. After you emerge from the shaft, look for this opening left of the door.
� Above the opening, another duct branches off.Follow that duct to the next vent. Crawl downthe wall to a corridor lined with pipes. (Again,the pipes are blue in Navigate vision mode.)
� Scurry toward the door at the farthest end ofthe corridor (where the pipes are straight). Left of the door, near the floor (see Fig.7-9),crawl through an opening that leads to yetanother duct.
Crew Quarters� Follow the duct through a vent to another hallway. Don’t go through yet! Two
repairmen discuss a door that’s “fried” andother topics.
� Exit the vent and turn right. Run straight downthe hall under the “Crew Quarters 1A” sign andthrough the broken, half-open door. You may bespotted here, so hurry—and don’t stop! A guywith a Flamethrower might be hot on your tail.
Fig. 7-10. Hurry through this half-open door, and take a right at the next intersection to
throw off possible pursuers.
� At the intersection, go around the corner to the right to throw off the pursuit. Enter the open door on the right. You should see a guard commander sleeping in a chair. Hey, isn’t that the jerk we’ve seen abusing his subordinates?
� Approach the guard commander and aimyourself at his upper body.
� Press your Pounce key (the default is E) tofacehug the poor bastard. Land on his face andimplant your embryo.
Fig. 7-11. Aim for this sleeping fool’s upper body,and pounce to facehug the host.
<135>
CHAPTER 7:ALIEN MISSIONS
CHAPTER 7:ALIEN MISSIONS
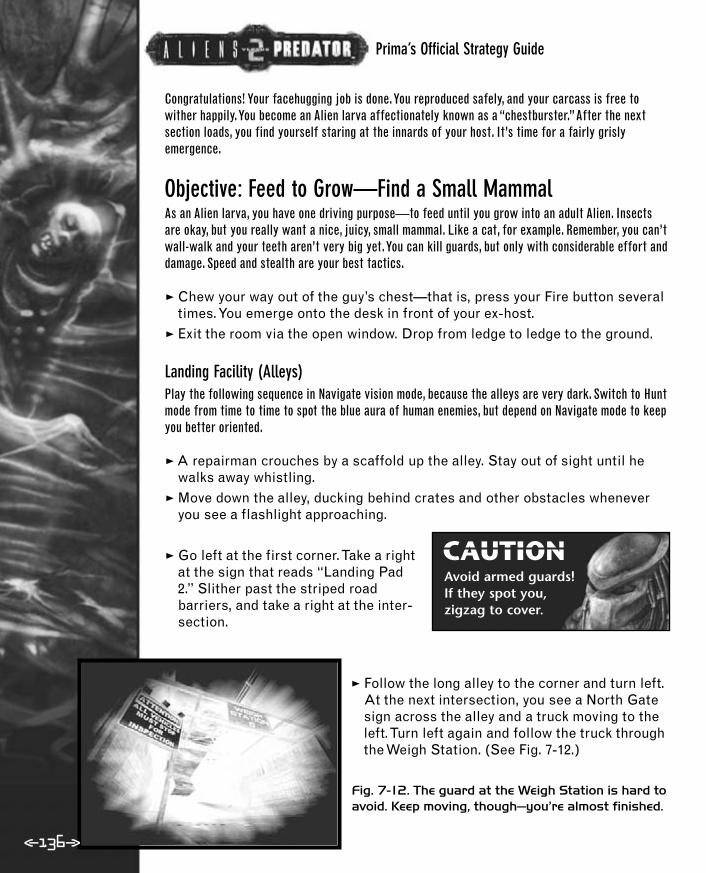
Prima’s Official Strategy Guide
Congratulations! Your facehugging job is done.You reproduced safely, and your carcass is free towither happily.You become an Alien larva affectionately known as a “chestburster.”After the nextsection loads, you find yourself staring at the innards of your host. It’s time for a fairly grislyemergence.
Objective: Feed to Grow—Find a Small MammalAs an Alien larva, you have one driving purpose—to feed until you grow into an adult Alien. Insectsare okay, but you really want a nice, juicy, small mammal. Like a cat, for example. Remember, you can’twall-walk and your teeth aren’t very big yet.You can kill guards, but only with considerable effort anddamage. Speed and stealth are your best tactics.
� Chew your way out of the guy’s chest—that is, press your Fire button severaltimes. You emerge onto the desk in front of your ex-host.
� Exit the room via the open window. Drop from ledge to ledge to the ground.
Landing Facility (Alleys)Play the following sequence in Navigate vision mode, because the alleys are very dark. Switch to Huntmode from time to time to spot the blue aura of human enemies, but depend on Navigate mode to keepyou better oriented.
� A repairman crouches by a scaffold up the alley. Stay out of sight until hewalks away whistling.
� Move down the alley, ducking behind crates and other obstacles wheneveryou see a flashlight approaching.
� Go left at the first corner. Take a rightat the sign that reads “Landing Pad2.” Slither past the striped roadbarriers, and take a right at the inter-section.
� Follow the long alley to the corner and turn left.At the next intersection, you see a North Gatesign across the alley and a truck moving to theleft. Turn left again and follow the truck throughthe Weigh Station. (See Fig. 7-12.)
Fig. 7-12. The guard at the Weigh Station is hard toavoid. Keep moving, though—you’re almost finished.
CAUTIONAvoid armed guards!If they spot you,zigzag to cover.
<136>

�The guard patrolling the Weigh Station is difficult toavoid, but the truck provides some cover. If theguard spots you, sprint down the alley, zigzagging.Turn left at the next intersection and run.
� At the final intersection, an industrial power loaderstands to the left. Veer left around crates, then workfrom crate to crate toward the truck and a signthat reads “Landing Pad 2 Cargo Access.” (SeeFig. 7-13.) Proceed past the truck.
Fig. 7-13. The food you seek isjust beyond the truck.
� Find the Live Animals sign on the right. Movealong the fence until you find a low opening.
� Slip into the yard with the animal pens to beginfeasting.
Mission 2: SurpriseIt’s time for some head-chomping action. As a young drone, youhave new needs—serious food, for one.To replace health losttaking damage from human enemies, you must eat them. Itseems only fair, doesn’t it?
Remember, you gain the greatest health from aheadbite on a living victim. As the game manualso glibly states, “The headbite provides valuablenutrients and chemicals to the Alien.” The nextbest health boost comes from a headbite on adead victim. You also get a minimal health boostfrom clawing a dead victim (headless orotherwise). So, claw corpses, but only after youbite off their heads.
Fig. 7-14. That’s you—the skinny guy with all the teeth.
CAUTIONDon’t hide behindthe fuel canisters inthe intersection! Ifhit, they blow up.
CHAPTER 7:ALIEN MISSIONS
CHAPTER 7:ALIEN MISSIONS
NOTE
<137>

Prima’s Official Strategy Guide
Tactical Overview<You face soldiers armed with various weapons, including guys in A.P.E.
(Acid Protective Environmental) suits with deadly Flamethrowers.<Travel across big courtyards (open areas are always dangerous for Aliens),
devouring victims.<Seek vents low and high as you move through the complex to a vehicle
maintenance area.
Objective: Return to the HiveYou are a gleaming new bug with new abilities—particularly a remarkably violent pounce maneuver(the default is E ) that slices through human flesh.You’ve also developed a vicious headbite and agnawing hunger.
Fig. 7-15. Keep your energy up (measured by thebar at screen bottom) with your patented headbite.
Garage Area� Burst out of hiding, slaying anything that
moves. Try a few headbites to gain maximumhealth, especially on cowering victims. Tail-stuna few targets too. Use your lightning quickpounce to hit well-armed enemies who hurt you.
� Exit the area through the open garage door(with a striped border). At the end of thecorridor, another door automatically opens. Twoguards are posted there; quickly finish them off.
TIP Use your tail attack (your Alt-Fire button) to stun victims. Itsvenomous barb immobilizes your prey, making a headbite
much easier.
<138>

Fig. 7-16. Cowering targets are easy meat. Use your tail attack to stun victims too.
� Step into the large courtyard. Another easyvictim, a mechanic, works on the truck to theleft across the yard. Give him a good headbite,but watch out for two armed guards whoemerge from the open alley across thecourtyard.
� Enter the open alley, and follow it to a barentrance (marked by a green sign). Two drunkschat and depart as you approach. Eat them, butbe careful; one has a pistol.
Fig. 7-17. Chew these two drunks just outside thefamous “Bar.” Only one is armed.
�Your attack attracts more heavily armed guardsup the alley. Duck behind the bar entrance,which juts slightly into the alley. Wait until theguards are in reach, then slash.
� Continue down the alley to the landing bay.
Landing Bay� A dropship unloads in the bay. Two men, one
armed, work at the top of the ship’s entry ramp.It’s lunchtime! Of course, other guards patrolthe area too.
� Proceed past the smoking truck into the widecorridor, and turn the corner. Approach the nextdoor, but don’t enter yet.
Fig. 7-18. This smoking truck conveniently jams adoor off the landing bay, letting you proceed.
TIP Remember, as an alien you possess no ranged weapons—thatis, you have no way to attack from a distance. So sneak
around, find cover, and attack when targets come within a pounce or two.
<139>
CHAPTER 7:ALIEN MISSIONS
CHAPTER 7:ALIEN MISSIONS

Prima’s Official Strategy Guide
Laser Beam and Sentry Gun HallwayYou better take the sign seriously:“This Area Is Monitored byAutomated Sentry Guns. Use Extreme Caution.” If you strolldown the hall, ceiling guns track and shoot you. But that’s notall: All those red lights lining the hallway are laser beams. Ifyou switch to Navigate vision mode, you can clearly see thebeams. So what’s a bug to do?
Fig. 7-19. Sentry guns and laser beams—somebody doesn’t want visitors. Slip past by wall-walking down the ceiling.
� It’s time to climb. Toggle on your Wall-walk key, step into the hallway, andthen turn and climb the wall to the ceiling.
� Climb along the ceiling to the far end of the hall. Apparently, the sentry gunsare programmed to target those walking on the floor. Fools!
Animal Observation Area�Turn the corner to another Live Animal Storage area. The attendant is
unarmed, but an armed soldier stands guard around the corner to the right.Eat their heads!
� Another attendant cowers in the Animal Observation chamber, the largeroom just beyond the cage area. Have a snack and wall-walk up to thesurrounding balcony.
� Exit through a short hall to the balcony of another big Observation chamber,where another guard and more deliciously helpless scientists hang out. Wall-walk to the floor, and eat the guy cowering there. More guards attack,so be wary.
� Climb to the ceiling of this second chamber, and crawl through an openinginto the ceiling crawl space.
� Enter the broken grate by the flickering redlight, and go down the vent. A new section ofthe game loads.
Cafeteria AreaYou end up in the crawl space above one of the facility’scafeterias.You hear a conversation below.
Fig. 7-20. Things can get hairy in the cafeteria.These guards are heavily armed and aggressive.
<140>

�Turn right, moving along the wall to enter the hole in the far right corner. Youend in a crawl space over a second cafeteria.
� Jump down and chew up whoever is in sight. Exit via the stairs at the far end.Climb to the hallway and turn right.
� A maintenance man works on a grate on the right side of the hall. Eat his tastyhead. Adding insult to injury, bash in the grate he was fixing and crawl inside.
� Wall-walk up the duct, and follow it across thepipes outside into the next building. It ends inanother hallway.
� Drop down, killing people for food. Run downthe hall, around the corner past the Level 2 andLanding Pad 2 signs, until you find theMaintenance Access shaft.
�To enter the shaft, you must destroy a panel in theroom to the left of the Maintenance Access shaft.
Fig. 7-21. This Maintenance Access shaft takes youto the landing pad’s cargo area.
� Climb down the shaft—a new game level loads—and exit into the service pit.Claw through the grate above you, wipe out resistance, and run down thehall. Turn left at the corner, kill the two guards, and enter the door labeled“Section 4 Security” to your right.
Landing Pad 2� Move through the control room (snacking on a guard and an operator en
route), and step into the pad’s cargo hold. As you do so, two guys in A.P.E.suits attack from behind. Slice them up, then sneak across the cargo area.
The A.P.E. (Acid Protective Environmental) suit protects Rykov’s mercenarysoldiers from both Alien acid blood and facehuggers. The suit itself hasresistance to molecular acid, and the design of the suit prevents afacehugger from wrapping its tail around the neck of the wearer, making itimpossible for a facehugger to properly execute a “facehug.”
�Why should you sneak? Because another A.P.E. suit-wearing commandowaits on the far end, this one wielding a Flamethrower. Flame is particularlylethal to Aliens. Duck and weave through the cargo crates, if necessary,looking for an opportunity to headbite him.
CHAPTER 7:ALIEN MISSIONS
CHAPTER 7:ALIEN MISSIONS
NOTE
<141>

Prima’s Official Strategy Guide
Fig. 7-22. Don’t get burned by guys in A.P.E. suits.Bite their heads off before they toast you.
� After fire boy’s cranium slides down yourgullet, approach the door behind his carcass.(See Fig. 7-23.) It’s closed and locked, but notparticularly sturdy. Claw it three or four timesto create a big hole and go through.
Fig. 7-23. Sometimes you just have to make yourown way through life.
� Follow the Level 1 hallway to the left, and take aright at the T-intersection. Follow the hallaround the next left turn, and headbite the twohelpless technicians ahead. Continue down thehallway until. . . uh oh, the door seals shutbehind you.
Vehicle Maintenance Garage�The garage features two lifts for vehicle repair work. Stealthily head for
them. Several guards are posted, waiting for you. � Eviscerate them. Then hop into the pit beneath the raised lift, and enter the
shaft that connects to the other lift.� Claw open the grate, and hop into the duct. Follow the duct to a room-like pit
with a big vehicle lift above. Stairs lead out, but a guard with a deadlyMinigun is posted on a platform at the top. The Minigun can kill you with a hitor two, so avoid taking any damage. Whip around the corner and pounceunder the striped edge beneath his platform to cut off the gunner's shotangle. Then sneak carefully around the right side of the platform, hop up, andhit your Pounce key again to eviscerate him.
� A guard with a Pulse Rifle opens fire far down the platform. Remember,open spaces and big guns give a decided advantage to humans. So hop offthe platform and run along its ledge to cross the room out of his gunsight.Then hop up and eat hearty.
� Face the door behind the platform. Wall-walk to the red-lit grate above thedoor, claw it open, and enter the vent to end the mission.
<142>

<143>
Fig. 7-24. The vent above the door on the left isyour passage out of this mission.
Mission 3: EscapeYou still seek the Hive and your bug brethren, but to do that, youmust get outdoors. Fortunately, as the opening cutscene depicts,the security units don’t want to “overreact” and call downadditional firepower. As the guard commander puts it,“This isn’tthe first time one of those bastards got out of its cage.” So ifyou stay wary and stealthy, you can maneuver without meetingoverwhelming forces.
Fig. 7-25. The POC security force commanderdoesn’t want to overreact to a “single contagion.”
That contagion would be you.
Tactical Overview<Aside from the usual assortment of guards,
you run into automated gun turrets and apowerful Predator at the end of the mission.
<Move through the facility via air ducts andcrawl spaces to bypass guard checkpointsand sentry guns.
<Find the central elevator shaft, and crawl down to the ground level.Proceed to the power core area.
<Defeat the Predator in the core.<Escape the facility via the core outflow pipes.
Objective: Return to the HiveAs an Alien, you’re pretty single-minded, in an insectile sort of way.You seek only to survive, eat, andcongress with your own species. But you’re pretty smart for a bug. All that brain-eating pays off,apparently.
Gun Turret CheckpointThis first challenge is timed. A man kneels in the hallway beyond two doorways.The moment youcross the threshold of the second doorway, a timer starts. In about ten seconds, the man activates adeadly gun turret.
� Kill the man before he finishes his task, and smash the gun turret for spite.� Moments after you strike, two other guards approach and open fire from the
doorway to your left. Pounce to either side of the door, and whip around thecorner to eat some heads.
CHAPTER 7:ALIEN MISSIONS
CHAPTER 7:ALIEN MISSIONS

Prima’s Official Strategy Guide
<144>
� A ramp leads to another open door. Don’t godown there! Soldiers and three automated gunturrets form a checkpoint beyond the doorway,and attacking it is suicidal. Instead, walkcarefully (or wall-walk) to the narrow ledgeabove the door.
� Claw through the grate.
Fig. 7-26. A full frontal assault against threesentry guns and five armed guards is totallykamikaze. Instead, find a way through air vents andcrawl spaces to get behind the guns.
� Follow the short vent to the ceiling crawl space. Move to the left end of thecrawl space, and enter the duct.
� Follow the duct to another ceiling crawl space.
As you approach this next crawl space, you hear a radio status report from a containment team.They know you’re moving through the air ducts! The voice orders the guards to set up turrets in thecrawl spaces—”we need to keep it contained in the corridors.”The only way out is through two
spinning ceiling fans, but if you try to drop, the fan blades sliceyou up.
� Go to either end of the crawl space. A wirebundle connects the main power source to thefan’s circuit box.
� Slash the wire bundle to disable a fan. Itdoesn’t matter which fan you disable; bothventilate the same room.
Fig. 7-27. Claw apart the wiring between the twowall boxes to cut power to the nearby fan.
� Drop through the disabled fan, and run behind the big, box-like power units.Use the units for cover as you pick off the guards who rush into the room.
� Move out into the hall, and destroy the two nearby sentry guns. They’re easyto smash; they can’t rotate a full 360 degrees to hit you, so approach themfrom behind.
�The third gun across the room covers only the right side of the room. Soapproach along the room’s left wall and smash it. Then rush up the ramp toeliminate the remaining guards.

<145>
Fig. 7-28. Always approach these fellas frombehind. They can’t rotate around to shoot you.
� Return to the main room, and smash the floorgrate in the corner between the two doorways.Hop in the air vent and follow it.
� At the vent’s juncture, wall-walk up and followthe duct to a large vertical shaft. (It looks like asmall room.)
� Wall-walk up the shaft to the fan, then turn intothe vent that branches off at the top.
� As you approach the grate at the duct’s end,you hear a Predator roar and frightened soldiers talking. It sounds like you’renot the only beast loose in the complex.
� Claw through the grate, and drop onto the ledge.
Water Treatment AreaThe ledge overlooks a series of water treatment canals and troughs.You must get to the grate nearthe distant left end of the long canal. Several guards patrol the area below, and you can tangle withthem if you want, but it’s easier to slip past them in the water.
� Wall-walk to the water’s edge. You hear anxious guards trying to pinpoint your location.
� Hop in the water, and follow the canal to the left. Note how the canal widensinto alcoves at regular intervals.
�Turn into the last alcove on the right to find the grate on the wall.
Fig. 7-29. To get out of the canal area, wall-walk upto the grate and slash it open.
� Wall-walk up the grate to the end of the canal.Claw the grate open.
� Follow the duct, wall-walking when necessary,until you reach a grate overlooking a giant fanand a pair of guards at a barricaded door.
CHAPTER 7:ALIEN MISSIONS
CHAPTER 7:ALIEN MISSIONS

Prima’s Official Strategy Guide
<146>
Ventilation Fan Control Area� Claw through the grate, slay the guards, and exit via the opening under the
huge fan. (Don’t take the corridor to the right—it leads to a sentry gun andmore heavily armed guards.)
� Headbite the defenseless but tastymaintenance guy, and head into the shaft to theright. Continue through another fan housing,proceeding until the shaft angles downward.Wall-walk down, following the shaft until itopens into a wide room.
Fig. 7-30. For fun, slash power boxes to disable thetwo fans in the room above you, but it doesn’taffect the critical path in this walkthrough.
� Wall-walk into the ceiling vent in the opposite left corner of the room. At thetop, smash the thin metal plate, and emerge into the room above.
� Hustle up the sloped ladder into another ceiling crawl space. Move along thewall to get behind the sentry gun to destroy it. Then, of course, eat thecowering technician’s head.
� Exit into the vent opening near where the sentry gun stood. Follow the vent toanother crawl space, turn left, and enter the next vent. Follow it to a grate—and a new game section loads.
Elevator Shaft AreaLook out from your grate at the big central elevator shaft of the Primary Operations Complex. A guardbelow reports that he locked the shaft door.“There’s no way it’s getting out of here,” he says.Thisman obviously doesn’t know the resolve of a really big bug.
� Claw through the grate, and wall-walkto the floor. Sneak around the corner,and slice up the guards.
�You can’t call an elevator, so wall-walk down the elevator shaft—yes, all the way to the bottom, avoiding the lift as it rises.
CAUTIONBe careful! As youdescend, a pair ofguards rides up.When you see theirlift rising (see Fig. 7-31), clamber toone side and letthem pass.

<147>
Fig. 7-31. Wall-walk down the central elevator shaft, avoiding the lift
carrying two guards as it rises past you.
� At the bottom of the shaft, exit through thehallway and go down the ramp to the inter-section. You can either take the easier way(right) or the harder way (left). (Both paths endin the same place, but the left path takes youpast killer sentry guns.) In this walkthrough, weturn right.
� Follow the corridor around turns, chewing upguards on the way to a control booth overlooking a concourse with big wallstruts. In the booth, shatter any window and wall-walk to the floor.
� Don’t go up the ramp! It leads back to where you started. Instead, exitthrough the door to the right that opens and spews out guards. Kill them andfollow the hallway down.
� When you reach the door at the bottom of the ramp, somebody yells, “Sealthe gate!” The door at the top of the hallway slams shut. You’re trapped!
� Proceed to the large open room.
Objective: Defeat the Predator
Fig. 7-32. The Predator can blast you from afar or spear you up close
with its Combistick. Circle, pounce, bite, and retreat!
Power CoreDo you hear that roar? It’s not good.That’s a Predator, and it’s alot tougher than the mercenary soldiers you’ve fought. Peekover the ledge to see it roaming the floor below. Don’t linger,though. It slings plasma bolts at you when it sights you.
� Save your game here!� Walk down the ramp toward either elevator, then wall-walk down the shaft
near the outside wall. This keeps you shielded from plasma blasts.� Aliens must fight up close. If you get too far away, the Predator blasts you
with painful plasma bolts.
CHAPTER 7:ALIEN MISSIONS
CHAPTER 7:ALIEN MISSIONS

Prima’s Official Strategy Guide
<148>
�The Predator wields a vicious Combistick forinfighting too. So you absolutely must keepmoving, pouncing, running, and circling. Yourpounce and headbite attacks deal seriousdamage, but the Predator can absorb a lot. He’s much stronger and more powerful thanyou, but you’re much faster than him.
�When you deal your final blow, the Predatoractually emits a low-pitched laugh. Don’t be amused. He’s about to self-destruct, so run for cover!
Fig. 7-33. When the Predator laughs and falls, youwin! But get back fast. He’s about to self-destructand blow a hole in the floor.
� After the Predator explodes, wall-walk down the hole created by the blast.Crawl into the open doorway.
� Proceed down the hallway, take the first left, and continue into the next atrium.
� Hop down, veer right, and wall-walk up to wherethe pipes enter the opening in the wall oppositethe ladder. (See Fig. 7-34.) Follow the longpassage to finally reach the cheery wastelandof LV-1201.
Fig. 7-34. There’s the passage out. Follow those pipes!
CAUTIONHustle away from thedying Predatorbefore he self-destructs! Hidearound a corner orbehind a crate forprotection.

Mission 4: VengeanceSix weeks later: After contacting your species in the wilds ofLV-1201, you were “chosen” to lead a rescue mission to theForward Observation Pods complex.Your overall objective is tofree the Aliens that are confined for experimental purposes inan artificial Hive there. As the only Alien escapee, you havespecialized knowledge of human activities, patterns, tactics, andweaponry.Your species mates, and your Empress, look to you forleadership.
Fig. 7-35. Dmitri is outside the Pods when thepower fails. The brief lapse lets you slip into the
installation from above.
Tactical Overview<You face the usual assortment of armed mercenaries.<Use the familiar means of navigation—vents, ducts, crawl spaces, and
shafts—to reach the central elevator shaft. From there, infiltrate theresearch area.
<Free the mutant Predalien from the Implantation Lab to create access toother areas.
<Traverse offices (including Dr. Eisenberg’s) and the implantation prep areato a specimen storage room, where you can “burn” a passage down to theartificial Hive.
<Free your fellow bugs, and find an escape route through the central core shaft.
Objective: Liberate the Artificial Hive
Pod Outer Decks�You start in a small repair conduit—a shaft with
closed iris seals above and below. Wall-walk upto the hole, and enter a sub-floor crawl space.(You should see a guard on patrol above.)
� Proceed down the passage under the floor. Veerright at the juncture. At the next juncture, veerright again.
Fig. 7-36. Much early navigation is on catwalks and crawl spaces such as this one.
CHAPTER 7:ALIEN MISSIONS
CHAPTER 7:ALIEN MISSIONS
<149>
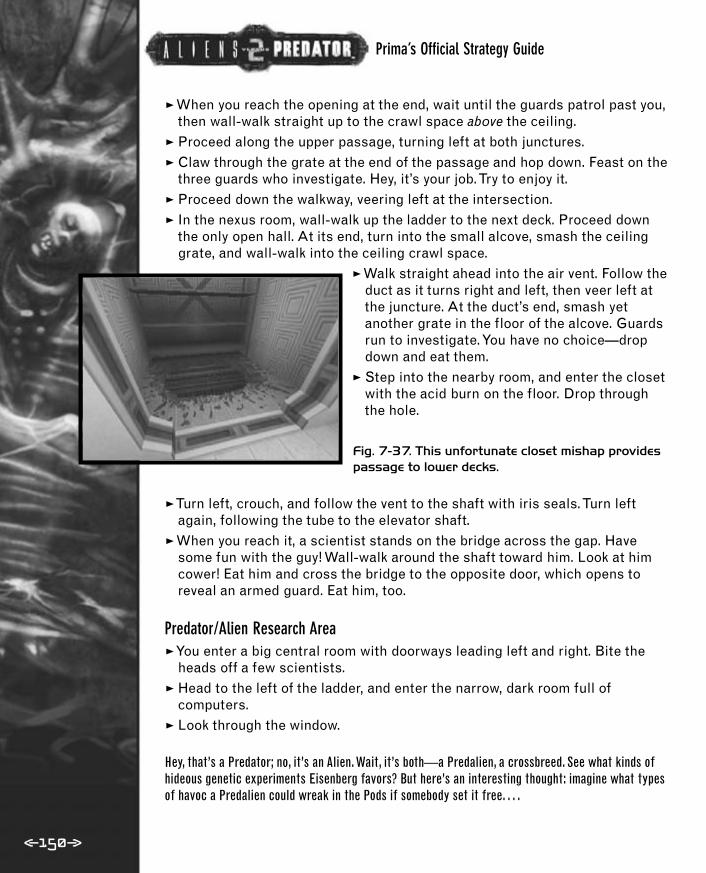
Prima’s Official Strategy Guide
<150>
� When you reach the opening at the end, wait until the guards patrol past you,then wall-walk straight up to the crawl space above the ceiling.
� Proceed along the upper passage, turning left at both junctures.� Claw through the grate at the end of the passage and hop down. Feast on the
three guards who investigate. Hey, it’s your job. Try to enjoy it.� Proceed down the walkway, veering left at the intersection.� In the nexus room, wall-walk up the ladder to the next deck. Proceed down
the only open hall. At its end, turn into the small alcove, smash the ceilinggrate, and wall-walk into the ceiling crawl space.
�Walk straight ahead into the air vent. Follow theduct as it turns right and left, then veer left atthe juncture. At the duct’s end, smash yetanother grate in the floor of the alcove. Guardsrun to investigate. You have no choice—dropdown and eat them.
� Step into the nearby room, and enter the closetwith the acid burn on the floor. Drop throughthe hole.
Fig. 7-37. This unfortunate closet mishap providespassage to lower decks.
�Turn left, crouch, and follow the vent to the shaft with iris seals. Turn leftagain, following the tube to the elevator shaft.
� When you reach it, a scientist stands on the bridge across the gap. Havesome fun with the guy! Wall-walk around the shaft toward him. Look at himcower! Eat him and cross the bridge to the opposite door, which opens toreveal an armed guard. Eat him, too.
Predator/Alien Research Area�You enter a big central room with doorways leading left and right. Bite the
heads off a few scientists. � Head to the left of the ladder, and enter the narrow, dark room full of
computers.� Look through the window.
Hey, that’s a Predator; no, it’s an Alien. Wait, it’s both—a Predalien, a crossbreed. See what kinds ofhideous genetic experiments Eisenberg favors? But here’s an interesting thought: imagine what typesof havoc a Predalien could wreak in the Pods if somebody set it free. . . .
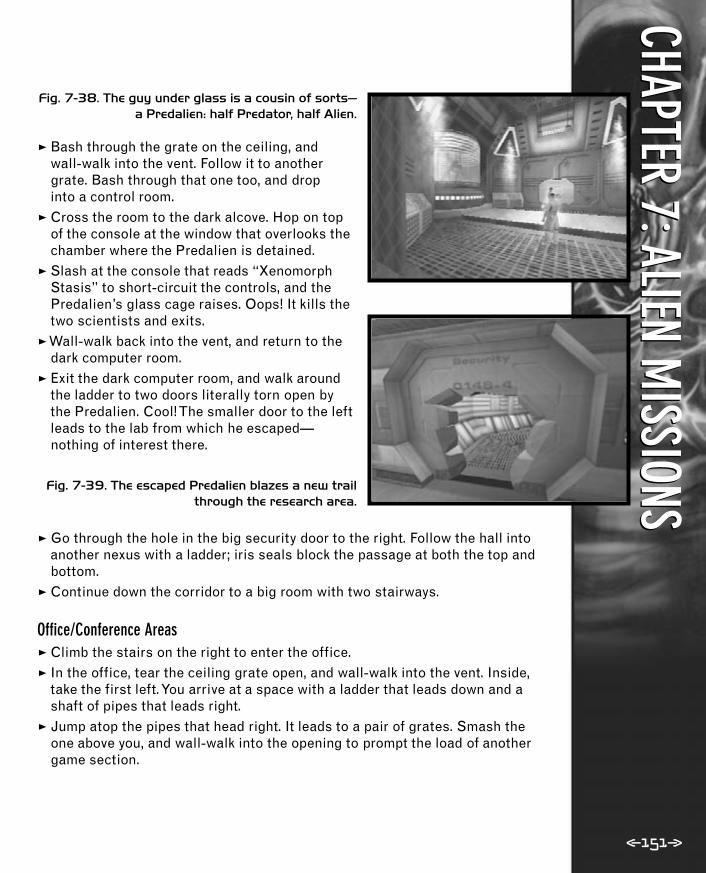
<151>
Fig. 7-38. The guy under glass is a cousin of sorts—a Predalien: half Predator, half Alien.
� Bash through the grate on the ceiling, and wall-walk into the vent. Follow it to anothergrate. Bash through that one too, and drop into a control room.
� Cross the room to the dark alcove. Hop on topof the console at the window that overlooks thechamber where the Predalien is detained.
� Slash at the console that reads “XenomorphStasis” to short-circuit the controls, and thePredalien’s glass cage raises. Oops! It kills thetwo scientists and exits.
� Wall-walk back into the vent, and return to thedark computer room.
� Exit the dark computer room, and walk aroundthe ladder to two doors literally torn open bythe Predalien. Cool! The smaller door to the leftleads to the lab from which he escaped—nothing of interest there.
Fig. 7-39. The escaped Predalien blazes a new trailthrough the research area.
� Go through the hole in the big security door to the right. Follow the hall intoanother nexus with a ladder; iris seals block the passage at both the top andbottom.
� Continue down the corridor to a big room with two stairways.
Office/Conference Areas� Climb the stairs on the right to enter the office.� In the office, tear the ceiling grate open, and wall-walk into the vent. Inside,
take the first left. You arrive at a space with a ladder that leads down and ashaft of pipes that leads right.
� Jump atop the pipes that head right. It leads to a pair of grates. Smash theone above you, and wall-walk into the opening to prompt the load of anothergame section.
CHAPTER 7:ALIEN MISSIONS
CHAPTER 7:ALIEN MISSIONS

Prima’s Official Strategy Guide
<152>
This triggers a disturbing cutscene. When Dr. Eisenberg receivesword of a “contaminant isolated in the maintenance system,” hebarricades his office and suffers a flashback to the scene atthe beginning of the Alien missions. In the flashback, a rescueteam bursts into Eisenberg’s underground bunker to a scene ofcarnage—and the doctor’s odd comment:“I didn’t have achoice.”What the hell does that mean?
Fig. 7-40. Dr. Eisenberg’s past holds something dark.
Back in the present, Rykov and his soldiers arrive, and the mercenary leader stands withcontempt over the cowering doctor, calling him a coward. Eisenberg recovers quickly though, intoningthe ominous phrase “We have work to do.”
�You lurk in a dark closet. Slip into the main reception area, and eat the headof the fellow tapping at his keyboard. Cautiously go to the open door beyondthe desk—guards attack from the next room.
� Step through the open door into a conference room with a long table andchairs. Move through the next door into a large office—Eisenberg’s office!(You can tell by the flashing light and the attempts to barricade entries.)
� Approach the stairs; voices speak of a possible evacuation. Climb the stairsinto a security control room with nine monitors on one wall. . . and theneliminate the two guards you just heard. Be careful! One has a Shotgun, theother a Smartgun.
� Wall-walk onto the ceiling, and claw the fan grate twice to rip it open. Crawlthrough and turn into the duct, following it until you reach a grate lookinginto a small auditorium. A speaker assesses the current situation. Thesepuny humans plan to "extract" your Empress—an effort led by a strike teamof combat synthetics! They believe her capture will neutralize your Hive.
� Continue along the duct until it drops into another repair room featuringanother tasty technician.
� Enter the maintenance shaft, turn right, and proceed to the next opening. Wall-walk down the ladder, then crawl into the next opening, an alcove full of fans.
� Find the vent that leads up near the tubular fan. Follow it to an elevatoralcove. Step into the hallway to hear scientists talking. Glance through theobservation glass to see the Predator in his chamber.
Implant Prep Area� Proceed into the computer area, and eat the scientist checking his notes.
Step toward the entry door and look up. Crawl into the hole in the openceiling panel.

<153>
�You’re in yet another maintenance shaft. Traverse the tubes until you end inanother crawl space. Find the small hole in the floor, claw it open, and dropinto the room.
� Munch some food. (Don’t miss the guy hidingbehind the desk.) Then get ready to fight. Stepthrough the open door.
Specimen Room
Fig. 7-41. Some of your species float in bigspecimen jars.
� Guards and scientists scurry all over. Afterthinning their ranks, note the specimen jars.
� Climb one of the yellow ladders to a catwalk.The lift on the ceiling track holds containers ofacid. But how could you know that? You’re just astupid Xenomorph.
� Proceed to the control podium near the lift, andrip it apart, tearing out the wiring.
Fig. 7-42. Slash up the control podium for thenearby lift. Slamming across the room, the lift
dumps acid on the floor, burning a passage to theartificial Hive.
This violent act propels the lift down its track, but it moves too quickly—the lift breaks and dropsthe containers.They shatter, burning a hole in the floor.That looks like a passage, doesn’t it?
� Jump down the hole you just burned open. Dropdown decks until you land at a control panelthat reads “Xenomorph Hive.” Through theglass, you can see your brothers awaitingliberation.
� Whack on the console controls. Yes! Youliberated the artificial Hive. Now save yourself.
Fig. 7-43. Let those boys loose! They look hungry.
CHAPTER 7:ALIEN MISSIONS
CHAPTER 7:ALIEN MISSIONS

Prima’s Official Strategy Guide
Objective: Escape!�Your liberation of the Hive triggers the appearance of a pair of guards.
Disengage their heads from their bodies. From the Hive control panel, travelleft until you reach the alcove with a ladder inside on the left.
� Descend the ladder and step around the corner to the red-lit hallway. Someof your poor buddies get splattered by a pair of turret guns on the ceiling.Wait until the guns stop firing, and walk toward them. They target you, butthey don’t shoot!
�Turn left at the guns, and follow the corridor tothe control room. Two puny humans argue about“purging” your kin. End that foolish notion bydevouring the organs associated with thought.
Fig. 7-44. Smash the Power Relay Station to“compromise Hive integrity.”
� Smash the control box labeled “Power Relay Station.” You hear a warning:“Artificial Hive integrity compromised.” Excellent!
� Go through the newly opened door around the corner.�The cowering scientists look tasty, but keep on your toe-claws; two more
armed guards rush in and open fire from the catwalk above.� Bash open the trapdoor on the floor under the catwalk, and drop into the
pipe-filled crawl space.� Go to the opening around the
corner. Toggle on your Wall-walkfunction before exiting; theopening leads right into the huge central shaft that rises the length of the Pod core.
<154>

Pod Core
Fig. 7-45. Crawl up the central core through the gap at the top of the shaft. Don’t hit
any of the spinning fans!
� Crawl straight up the shaft. Kill the guard onthe top bridge, and continue climbing towardthe ventilation fans at the top of the shaft.
� One of the fans is missing; sparks mark whereit once hung. Crawl through that gap to escapethe Pod.
Mission 5: AbductionDr. Eisenberg’s nefarious plan unfolds. As this mission opens, hestands before your royal Empress, who looks pretty hanging inher egg sac. A soldier in an A.P.E. suit and carrying aFlamethrower puts the heat to Her Highness, and her survivalinstincts kick in. Meanwhile, out in the Hive tunnels, Eisenberg’smen place bombs to cut the Empress off from her minions.Yourjob: Stop them!
Fig. 7-46. Eisenberg plans to abduct your Empress.
Tactical Overview<You fight guards, combat synthetics, and turret guns in this mission.<Enter the Hive to destroy the timer devices for three powerful bombs set to
seal off the tunnels.<Follow the truck that carries off the Empress.
Objective: Eliminate the Human ThreatPush t to check your objectives, and you get a very usefultip: Combat synthetics emit no scent, thus, your Hunt visionmode doesn’t show them with a colored aura. In the dark tunnelsof the Hive, this makes combat synthetics difficult to spot.
Fig. 7-47. Combat synthetics, being inorganic, emit no scent and thus, no colored hue in your
Hunt vision mode.
CHAPTER 7:ALIEN MISSIONS
CHAPTER 7:ALIEN MISSIONS
<155>
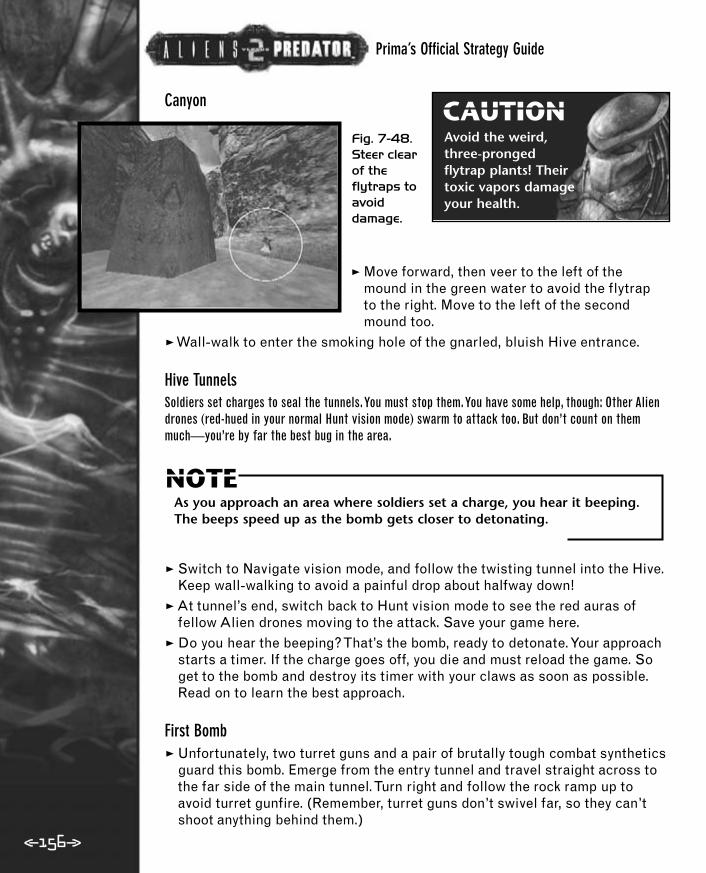
Prima’s Official Strategy Guide
<156>
Canyon
Fig. 7-48.Steer clearof theflytraps toavoiddamage.
� Move forward, then veer to the left of themound in the green water to avoid the flytrap to the right. Move to the left of the secondmound too.
� Wall-walk to enter the smoking hole of the gnarled, bluish Hive entrance.
Hive TunnelsSoldiers set charges to seal the tunnels.You must stop them.You have some help, though: Other Aliendrones (red-hued in your normal Hunt vision mode) swarm to attack too. But don’t count on themmuch—you’re by far the best bug in the area.
As you approach an area where soldiers set a charge, you hear it beeping.The beeps speed up as the bomb gets closer to detonating.
� Switch to Navigate vision mode, and follow the twisting tunnel into the Hive.Keep wall-walking to avoid a painful drop about halfway down!
� At tunnel’s end, switch back to Hunt vision mode to see the red auras offellow Alien drones moving to the attack. Save your game here.
� Do you hear the beeping? That’s the bomb, ready to detonate. Your approachstarts a timer. If the charge goes off, you die and must reload the game. Soget to the bomb and destroy its timer with your claws as soon as possible.Read on to learn the best approach.
First Bomb� Unfortunately, two turret guns and a pair of brutally tough combat synthetics
guard this bomb. Emerge from the entry tunnel and travel straight across tothe far side of the main tunnel. Turn right and follow the rock ramp up toavoid turret gunfire. (Remember, turret guns don’t swivel far, so they can’tshoot anything behind them.)
CAUTIONAvoid the weird,three-prongedflytrap plants! Theirtoxic vapors damageyour health.
NOTE

<157>
Fig. 7-49. Each bomb’s timer/detonator sits on topof dynamite piles. Slash them before they blow.
�You arrive right on top of the bomb. Drop down,slay the combat synthetic, and smash thebeeping timer. Eliminate any other livingenemies, and destroy the turret guns frombehind.
� Continue up the main tunnel. You soon seeactivity in a passage branching to the right.Ignore it and stay in the main tunnel.
Second Bomb� Stop when you round a curve and see green lights ahead! Wait a few
seconds, and let your glowing red cousins eliminate the combat syntheticsposted there.
�Two more deadly turret guns are cleverly placed on rock platforms beloweither side of the path ahead. Don’t try to wall-walk up the side of the path toavoid detection—these guns will hurt you.
� Instead, hustle straight up the middle of the path, and destroy the bomb timer.
� Continue along the main tunnel.
Hive Pipe (Turret Guns)� Stop again when you see several Aliens hanging motionless near a large pit.
If you proceed past the pit, two turret guns will make you wish you hadn’t.Behind the guns, a section of the tunnelcollapsed, blocking your passage. It looks likesomeone’s charge detonated after all.
� Look in the pit. Several struts suspend a large,pipe-like section of the Hive over a pool ofwater below. Wall-walk down until you’redirectly over this “Hive pipe,” then toggle offWall-walk to drop onto it.
Fig. 7-50. Drop onto this big pipe-like segment of the Hive.
�Toggle Wall-walk back on (just to be safe). Do you see the red hue of anAlien compatriot on top of the Hive pipe? Follow him into a smoky caveentrance near one side of the pipe.
CHAPTER 7:ALIEN MISSIONS
CHAPTER 7:ALIEN MISSIONS

Prima’s Official Strategy Guide
<158>
� Follow the tunnel into a large cavern wherethree more Aliens sit. Continue past them intothe large tunnel opening. Wall-walk to climb thesteep passage.
� Proceed up the large tunnel until you emerge ina shallow pit. Climb out to see the Empress’segg sac—but no Empress.
Fig. 7-51. The Empress is gone, leaving her egg sackbehind. Those heartless humans!
� Enter the smaller tunnel to the right of the egg sac. Follow the first curve ofthe tunnel, then stop when you see a green light ahead.
� Save your game here.
Third Bomb� As you round the curve, the green light turns red, and the bomb timer starts
beeping. Two soldiers and a combat synthetic with a Shotgun try to stop youfrom destroying the last timer.
�There’s no real trick to this one—you just have to be good. Fortunately, youhave help. Three other Aliens join in the attack; let them draw fire while yourun for the bomb.
� Unfortunately, another combat synthetic rushes to hit you after you destroythe timer. So after you defuse the bomb, run behind your species mates, andlet them help you take on the new enemies.
Hive Tunnels� After you shatter the bomb timer and eliminate
all the soldiers, proceed along the lighted pathto the next tunnel.
Fig. 7-52. Don’t slip up and let this last turret gunget you after you’ve come so far.
� Stay to the left! A turret gun guards the tunnelentrance, but Eisenberg’s men placed it poorly;it can’t rotate to cover the left side of the path.
� Enter the tunnel to end this mission.

<159>
Mission 6: PursuitEisenberg and his henchmen transport the Empress back to thePOC, planning to use a Marine dropship to haul her to the USSVerloc.You must penetrate the access tunnel system, then trackdown the truck bearing your queen to captivity.
Fig. 7-53. Dr. Eisenberg wants this dropship totransport your Empress off the planet.
Tactical Overview<You face mercenary guards and combat synthetics.<Traverse the access tunnels, using ventilation ducts to move from level
to level.<Engage in a brutal showdown with a pair of combat synthetics wielding
Miniguns.
Objective: Prevent the Humans from Escaping with theEmpressThis objective is your sole focus for the rest of the game.You start in the Hive tunnel, where youended the last mission.Your Xenomorph pals are gone, so you’re on your own again. Expect brutalcombat at almost every step of this mission.
Access Tunnels (Upper Level)� Move down the tunnel until it changes from Alien to human form. The human
“archaeological dig” into the Hive began here.�The soldier in the A.P.E. suit on the catwalk ahead is tough to reach quickly
without taking damage. Also, two killer turret guns cover the approach to thepassage below him. This is a challenging fight.
� Wall-walk up the wall on the left, then crawl for cover to the big pipe thatextends from the wall.
CHAPTER 7:ALIEN MISSIONS
CHAPTER 7:ALIEN MISSIONS

Prima’s Official Strategy Guide
<160>
Fig. 7-54. Get behind the turret guns (circled) bywall-walking.
� Defeat the A.P.E. suit and stay on his catwalk. � Move to the corner of the catwalk near the ramp
leading to it, then carefully wall-walk down. Getas close to the corner as possible to descendout of the guns’ target radii.
� Slip behind the turret guns. They can’t hurt younow, but bash them anyway, just for spite.Proceed into the access tunnels.
� Round the first corner to the left, andrip open the third of three big floorgrates. Hop into the crawl space, andget ready for blistering combat. Dropthrough the open ceiling panel.
Access Tunnels (Lower Level)
�Three soldiers open fire the moment you drop.You land in an area with little cover, so hit theground running. This is a tough fight; forgetabout headbiting these guys until they’re dead.Move fast and pounce for quick kills.
�Tear open the circuit box for the nearby securitydoor (it’s to the right of the “Automated SentryGun” warning sign) to open the door.
Fig. 7-55. Open several doors by smashing circuit boxes.
� More armed goons patrol a balcony through the doorway. Eliminate them andpeek over the railing to see the APC and more guards below. Hop onto theAPC, and use it and nearby crates for cover.
� Open the security door in front of the APC by smashing its circuit box.� Follow the tunnel to the left, where three more guards attack. Take the next
right, and stop when you see water dripping into a puddle on the floor.
CAUTIONEnemies abound inthis mission. Assumethat you’ll meet one around everycorner and in every new area.

<161>
Fig. 7-56. When you reach the water puddle, findthe damaged grate above for further access.
� Look up to see a pair of grates on the wallabove the door. The left grate is red-lit anddamaged. Wall-walk up to it, and slash your waythrough. Enter the vent and proceed to a pair ofvent openings. Take either one; they lead to thesame place.
� Smash through the damaged grate at the end ofthe vent, and drop into a short maintenancetunnel. Climb into the fan shaft above.
�The spinning fan blocks your exit, so destroy all three power boxes. (A pinklight marks each box.) When the fan stops, quickly climb through its blades,because two armed guards await.
� Run straight up the tunnel to see the truck carrying the Empress drive by. Butif you try to follow them, numerous guards and a pair of turret guns blockyour route. Few Aliens could survive such an onslaught.
� Instead, bypass some of that heat by veering into the dead-end hall to theleft. Claw your way into the floor grate.
Steam Compressor RoomThis route avoids the turret guns and some guards. At this point, you can probably use the break. Butit’s not exactly a picnic here either, so stay sharp.
� Follow the duct to another grate, and slash intoa room full of huge compressor tanks. Twoguards attack on the ground, while anothermans a post on a catwalk. These guys won’tleave you alone until you eat their heads, sooblige them.
Fig. 7-57. Find and smash the control box to blow one of these compressor tanks,
which knocks a hole in the wall.
� Climb the catwalk, and smash the control box at the end to explode one ofthe tanks. Go through the hole in the wall, and follow the rough tunnel to abroken chain-link fence.
� Rush through the fence hole to defeat the guards, then head left from youremergence point around the corner, and wall-walk to the upper level passage(above the red-lit vehicle door).
CHAPTER 7:ALIEN MISSIONS
CHAPTER 7:ALIEN MISSIONS
Prima’s Official Strategy Guide
<162>
Access Tunnels (Upper Level)� Smash the circuit box to open the door. Surprise! More guards—kill them.
Head down the tunnel into a wider area.� A soldier with a Smartgun waits.� Save your game here!� Smash the circuit box to open the next door. This attracts still more guards.
How many brains must a bug eat to get a little peace around here?� Continue to the open, arena-like area, and defeat the combat synthetic
bearing a powerful M-90 Minigun. As you can imagine, this is a brutally toughfight. Sprint immediately for cover behind the stacks of crates. Pouncewhenever possible to inflict the greatest damage, then dive back for cover.Good Luck. Go through the open door to end this mission.
Mission 7: FreedomHere we go—the final mission.That Predator you just sidestepped is roaming the complex with avengeance. No doubt you'll meet again. In the meantime, your job is to sabotage Eisenberg's plan. Adropship is coming for your Empress. Do what you can to disrupt its landing.
Tactical Overview<Climb into the POC, and follow the garage and vehicle tunnels to an area
ravaged by a Predator.<Escape the Predator's attack via a hazardous waste pipe.<Find the landing pad control area, which is a maze of control rooms under
the landing bay.<Knock out two sets of landing hydraulics controls.<Disable the wind shear radar.<Disable the landing beacon to disrupt the dropship's approach.<Engage in a final confrontation, first with a pair of deadly Predators and
then with Dr. Eisenberg—and save your Empress!
Objective: Prevent the Humans from Escaping with theEmpressCargo Lift Area� Wall-walk up the rails to the heavy lift platform. Be ready to pounce when
you crawl over the edge: Two soldiers guard the top.� Walk to the next door, and wall-walk up to the ceiling grate. Smash it and
crawl to the hallway above.

� Follow the red-lit corridor to a floor grate. A guard below discusses sentryguns. Rip open the grate and drop through. Slay the guards and smash thesentry gun control panel on the wall. (It controls a ceiling gun down the hall.)
� Move down the hall and around the corner to a large garage.
Generator Control
Fig. 7-58. Head down this hole to open a vehicledoor farther along your route.
� Go down the U-shaped hole labeled “GeneratorControl.” Continue into the generator room.
� Beware of the combat synthetic in the cornerwith the Pulse Rifle. Kill him and approach thecontrol panel that reads “Vehicle DoorsSecure.” Whack it to pieces. You just madesome doors very insecure.
� Return to the garage, and wall-walk to the surrounding walkway where a trioof very tough guards is stationed. Proceed through the cement arch, turnright, and walk through the next arch.
� Just through the second arch, destroy the sentry gun panel on the right-handwall. Hop over the railing and go through the Vehicle Doors—the ones youopened by destroying the panel in the Generator Control Room. Did you justhear a Predator growl?
� Go straight under the red ceiling light, and turnleft to move up the ramp. At the top, witness aPredator attack on two guards. (One guard maysurvive, so be ready to fight.)
� Wall-walk to the upper balcony. and go rightunder another red light. Around the corner, twoguards shoot at the unseen Predator. Sneak upbehind them, and give them a surprise.
Fig. 7-59. What are you guys shooting at? Do youmind if I eat your heads?
TIP Smash every sentry gun control panel you find.
CHAPTER 7:ALIEN MISSIONS
CHAPTER 7:ALIEN MISSIONS
<163>
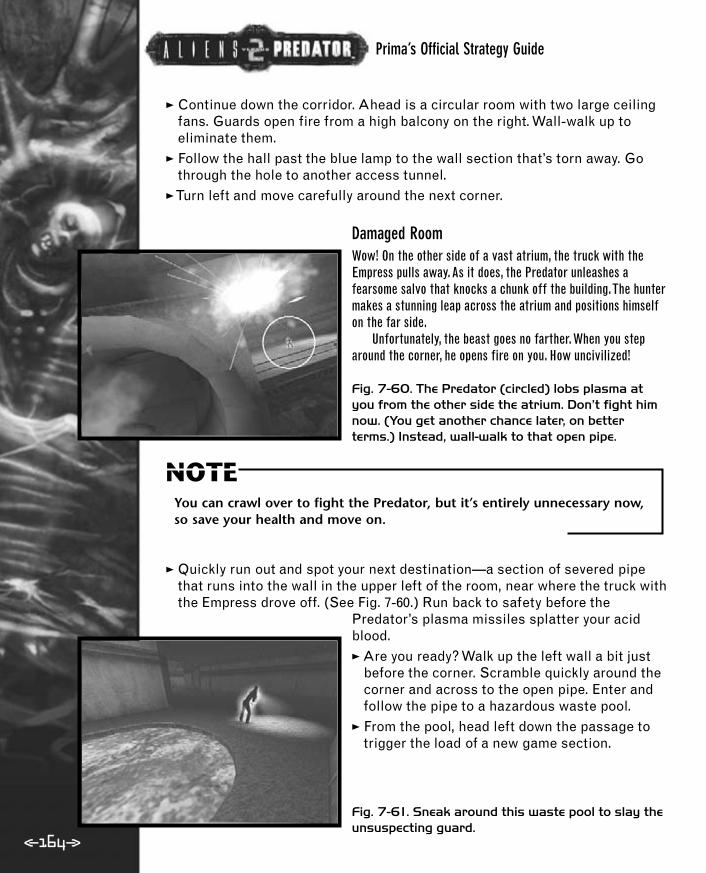
Prima’s Official Strategy Guide
� Continue down the corridor. Ahead is a circular room with two large ceilingfans. Guards open fire from a high balcony on the right. Wall-walk up toeliminate them.
� Follow the hall past the blue lamp to the wall section that’s torn away. Gothrough the hole to another access tunnel.
�Turn left and move carefully around the next corner.
Damaged RoomWow! On the other side of a vast atrium, the truck with theEmpress pulls away. As it does, the Predator unleashes afearsome salvo that knocks a chunk off the building.The huntermakes a stunning leap across the atrium and positions himselfon the far side.
Unfortunately, the beast goes no farther. When you steparound the corner, he opens fire on you. How uncivilized!
Fig. 7-60. The Predator (circled) lobs plasma atyou from the other side the atrium. Don’t fight himnow. (You get another chance later, on betterterms.) Instead, wall-walk to that open pipe.
You can crawl over to fight the Predator, but it’s entirely unnecessary now,so save your health and move on.
� Quickly run out and spot your next destination—a section of severed pipethat runs into the wall in the upper left of the room, near where the truck withthe Empress drove off. (See Fig. 7-60.) Run back to safety before the
Predator’s plasma missiles splatter your acidblood.� Are you ready? Walk up the left wall a bit just
before the corner. Scramble quickly around thecorner and across to the open pipe. Enter andfollow the pipe to a hazardous waste pool.
� From the pool, head left down the passage totrigger the load of a new game section.
Fig. 7-61. Sneak around this waste pool to slay theunsuspecting guard.
NOTE
<164>

Landing Bay Lift� Claw a bigger hole through a broken part of the
chain-link fence.
Fig. 7-62. Tear through this damaged part of the fence.
Fig. 7-63. Climb the elevator rails up the shaft beyond.
�Wall-walk up one of the vertical rails of theelevator shaft. Be careful! Two guards open fireat the first level.
�Two turret guns are installed on the secondlevel. Stay on a rail, and you’ll be out of theguns’ limited target radii.
� Find the wall grate near the ceiling of the shaft,and break through into the vent. Follow the vent andburst through the grate at its end.
� Proceed along the railing around the open area tothe door on the other side. It’s locked, but there’sanother floor grate nearby. Bust through and followthe vent to another grate.
Objective: Disable the Landing PadHydraulics
Fig. 7-64. This is where you reach the landingcontrol area under the landing pad. A long, loopingcorridor connects doorways ahead and to the left.
CAUTIONBefore you smashthis grate, make sureyou’re prepared forwhat’s ahead.
<165>
CHAPTER 7:ALIEN MISSIONS
CHAPTER 7:ALIEN MISSIONS

Prima’s Official Strategy Guide
<166>
�The room beyond features two yellow hydraulic pumps and (more impor-tantly) a guard in an A.P.E. suit to the left. He’s behind a sturdy chain-linkfence, so pounce over it and attack. Or immediately sprint to your right
around a bulletproof glass partition, and wait forhim to come closer.� After you gut the shooter, prey on a couple of
cowering workers for some easy healthrestoration.
� Climb the stairs left of the pumps. Follow thepassage to its end, fighting guys in A.P.E. suitsall the way.
� All of the side doors are locked, so continue tothe end of the passage, where you see a circuitbox on the wall under a “Maintenance Access”sign. Smash the box to open the door to yourleft. (This also opens another door nearby.)
Fig. 7-65. Use these various signs to stay oriented.
� Step past an emergency eyewash tub and turnright, heading through the other newly openeddoor.
� In the big room, turn right and move to thecontrol panel labeled “Landing Hydraulics 2.”Smash the circuit box on the left. Turn around tosee the smoky damage you caused. Excellent!
� Exit via the door you entered, turn left past theeyewash tub, and go back down the hall to thefirst door on your left, which is now open.
Fig. 7-66. Destroy both landing hydraulics control panels.
� Enter another big room and smash the circuitbox for Landing Hydraulics 1. A worried voicereports that hydraulics are gone, so they can’textend the landing. That’s too bad.
� Exit via the door you entered and turn left.Follow the hallway past the “Refueling SystemAccess” sign and the door labeled “CrewLockers.” Be careful now! Just around thecorner, two well-armed combat synthetics lurkin front of a newly opened door labeled “FlightTelemetry Relay.” Splatter some white blood,then go through the doorway.

<167>
Fig. 7-67. This door is locked, but that grate to theleft is an Alien’s dream passage.
�The inner Flight Telemetry Relay door is locked,but a weak grate on the nearby wall looksinviting. Smash it, wall-walk up the vent toanother grate, and smash that one too.
� Crawl into the control room. Eat the technician(they always taste good) as Dr. Eisenbergexclaims, “Predator on the landing!” Outsidethe window on the landing pad, Predatorplasma projectiles rain down on a few moreguards.
�Turn, and with great relish, attack the computer console that reads “FlightTelemetry Relay.” A voice cries, “Wind shear and landing data lost!” Gosh,that’s too bad. Let’s find something else tobreak, shall we?
� Go back through the vent, and return to thehallway. Aha! The door to the landing paddirectly across the hall is now open. Walk upthe ramp to trigger the load of a a new gamesection. And definitely save your game here.
� Predators—two of them! One’s on the landingpad, the other’s high up on the surroundingstructure. Wall-walk up one of the landing pad’scorner towers, pounce across to the pad, andattack the Predator there.
Fig. 7-68. Keep your claws active during the fight with the first Predator. The second
one keeps trying to net you.
Fig. 7-69. When fighting Predators, stay close, butnot too close. Rapid pouncing attacks, followed by
quick little retreats, work best.
This is the grand finale, so expect one tough melee.The guy uphigh keeps bagging you with his Netgun, so keep firing yourclaws to slice the netting while you spar with the fellow on thelanding pad. After you defeat the first Predator, the secondcrouch-leaps down for some revenge. Keep moving and use your speed, but stay close. If you back toofar off, Predators switch from Combistick to ranged weapons such as Plasmacasters.
CHAPTER 7:ALIEN MISSIONS
CHAPTER 7:ALIEN MISSIONS

Prima’s Official Strategy Guide
<168>
� After the second Predator goes down, Eisenberg calls his thugs to prep yourEmpress for departure. Wall-walk to the platform at the end of the bay.
There’s your Empress, imprisoned in the truckbed.� A guard opens the Control Tower’s outer door!
Slay him and rush inside. The inner door islocked, but a vent lies to the right. Smashthrough the grate, and crawl into the control room.
Fig. 7-70. After you beat the Predators, a guardfoolishly opens the door to the Control Tower. Fightyour way to the booth, and smash the landingbeacon control to cripple the dropship.
� Eliminate the final two guards. Smash thecontrol console under the display that reads“Landing Beacon Control.”
�Well done! Watch the hapless dropshipflounder without a beacon guiding it. You hearEisenberg cry, “Destroy the Empress! She willnot gloat over me!” You’d better get back downthere.
�Take the vent back down to the platform, andwatch Eisenberg approach across the landingpad. Go get him, Xenomorph.