
RI Stormwater Management Guidance for Individual Single-Family Residential Lot Development
17
1 of 17 Updated 2/13/2013 State of Rhode Island Stormwater Management Guidance for Individual Single-Family Residential Lot Development Section 300.6 of the RI Coastal Resources Management Program (RICRMP) and Rule 7.12 of the DEM Rules and Regulations Governing the Administration of the RI Freshwater Wetlands Act require stormwater management for projects on individual single-family residential lots that create 600 square feet or more of new impervious roof surface area, and all new driveway and parking areas. This document provides guidance for meeting those requirements, and may also be used by applicants under the jurisdiction of CRMC Freshwater Wetlands in the Vicinity of the Coast. The guidance provided in this document may not be used to meet stormwater requirements for residential subdivisions or any project types other than individual single-family residential lot development. CRMC Supplemental Stormwater Application Requirements: Completed CRMC application (4 copies) including all forms, fees and required enclosures. 8.5 x 11 inch site plan that depicts the information detailed in the checklist under Step 5 on page of this document. DEM Application Requirements: Completed DEM Application package including all forms, fees and required enclosures (see DEM Rules 7.00 and either 9.00 or 10.00 as applicable) Ensure site plans (DEM Rule 7.03) include all elements detailed in the checklist under Step 5 on page 17 of this document. Residential Stormwater Management Overview A single residential lot might not be the most obvious source of pollution problems, but behind a suburban landscape, there may be activities that can threaten water quality. Pollutants commonly present on residential lots include pesticides fertilizers used in landscaping. Other pollutants may include sediment from erosion-prone areas, yard waste such as leaves and grass clippings, pet waste and oil and gas from driveway surfaces. Even runoff from rooftops can contain pollutants known to occur in rainfall. These have the potential to be transported in stormwater to surface water bodies, posing risks to the environment and human health. While the contribution from an individual yard may seem small, the cumulative effects of stormwater runoff coming from hundreds or thousands of homes within a watershed can be significant. Reducing the amount of stormwater that leaves your property as runoff helps to prevent pollutants from reaching our streams, lakes, ponds and coastal waters. Rule Applicability Under RICRMP Section 300.6 and DEM Rule 7.12, applicants for individual single-family residential projects are required to treat the water quality volume, or one inch of stormwater runoff from any new rooftop impervious surfaces of 600 square feet or greater in size, and all new driveways and parking areas. This guidance document describes stormwater management practices for reducing runoff volumes and pollutant levels. It also provides guidance for designing, installing and maintaining stormwater management practices that meet the requirements for new or enlarged single-family dwellings, driveways and parking areas. The practices discussed in this document are part of a stormwater management approach known as low impact development or LID. This document is meant to be used as a generalized guide to help applicants meet storm water management requirements on individual single-family residential lots. For more complex projects, and for more detailed information on the design of storm water management practices, see the most recent version of the Rhode Island Stormwater Design and Installation Standards Manual for additional information at www.dem.ri.gov/pubs/regs/regs/water/swmanual.pdf .
Transcript of RI Stormwater Management Guidance for Individual Single-Family Residential Lot Development

1 of 17 Updated 2/13/2013
State of Rhode Island Stormwater Management Guidance for Individual Single-Family Residential Lot Development
Section 300.6 of the RI Coastal Resources Management Program (RICRMP) and Rule 7.12 of the DEM Rules and Regulations Governing the Administration of the RI Freshwater Wetlands Act require stormwater management for projects on individual single-family residential lots that create 600 square feet or more of new impervious roof surface area, and all new driveway and parking areas. This document provides guidance for meeting those requirements, and may also be used by applicants under the jurisdiction of CRMC Freshwater Wetlands in the Vicinity of the Coast.
The guidance provided in this document may not be used to meet stormwater requirements for residential subdivisions or any project types other than individual single-family residential lot development.
CRMC Supplemental Stormwater Application Requirements:Completed CRMC application (4 copies) including all forms, fees and required enclosures. 8.5 x 11 inch site plan that depicts the information detailed in the checklist under Step 5 on page of this document.
DEM Application Requirements: Completed DEM Application package including all forms, fees and required enclosures (see DEM Rules 7.00 and either 9.00 or 10.00 as applicable) Ensure site plans (DEM Rule 7.03) include all elements detailed in the checklist under Step 5 on page 17 of this document.
Residential Stormwater Management Overview
A single residential lot might not be the most obvious source of pollution problems, but behind a suburban landscape, there may be activities that can threaten water quality. Pollutants commonly present on residential lots include pesticides fertilizers used in landscaping. Other pollutants may include sediment from erosion-prone areas, yard waste such as leaves and grass clippings, pet waste and oil and gas from driveway surfaces. Even runoff from rooftops can contain pollutants known to occur in rainfall. These have the potential to be transported in stormwater to surface water bodies, posing risks to the environment and human health. While the contribution from an individual yard may seem small, the cumulative effects of stormwater runoff coming from hundreds or thousands of homes within a watershed can be significant. Reducing the amount of stormwater that leaves your property as runoff helps to prevent pollutants from reaching our streams, lakes, ponds and coastal waters.
Rule Applicability
Under RICRMP Section 300.6 and DEM Rule 7.12, applicants for individual single-family residential projects are required to treat the water quality volume, or one inch of stormwater runoff from any newrooftop impervious surfaces of 600 square feet or greater in size, and all new driveways and parking areas. This guidance document describes stormwater management practices for reducing runoff volumes and pollutant levels. It also provides guidance for designing, installing and maintaining stormwater management practices that meet the requirements for new or enlarged single-family dwellings, driveways and parking areas. The practices discussed in this document are part of a stormwater management approach known as low impact development or LID. This document is meant to be used as a generalized guide to help applicants meet storm water management requirements on individual single-family residential lots. For more complex projects, and for more detailed information on the design of storm water management practices, see the most recent version of the Rhode Island Stormwater Design and Installation Standards Manual for additional information at www.dem.ri.gov/pubs/regs/regs/water/swmanual.pdf.

Avoid, Reduce, and Manage Stormwater Impacts
There are a few steps to follow when managing stormwater on a residential lot. First, avoid the negative impacts of stormwater to the extent possible. Protect undisturbed open space and existing vegetation by minimizing land disturbance and making your construction footprint as small as possible on the parcel. Avoid impacts to natural drainage areas and limit soil compaction to the structural footprint only.
Next, reduce impacts by minimizing the amount of stormwater runoff that flows off your lot. Eliminating or reducing the size of rooftops, driveways and other paved surfaces will reduce the amount of stormwater runoff that is generated from these impervious surfaces. Plant native shrubs and trees and low-maintenance, drought-resistant turf grasses that require less irrigation, fertilizers, and pesticides. Use sustainable landscaping practices to promote plant health and limit the amount of chemicals applied to the landscape.
Finally, manage any stormwater runoff from the site that cannot be eliminated by directing it to pervious areas or stormwater management practices that will allow the water to infiltrate into the ground. The following sections provide guidance for designing, installing and maintaining practices that can be used to manage and treat stormwater runoff. To meet the applicable stormwater requirements, these practices must be designed to capture and treat the water quality volume, or 1 inch of runoff from all new contributing impervious surfaces. By designing stormwater practices in this way, they will capture 90% of the average annual volume of runoff generated.
*Please note that municipal stormwater management requirements may differ from, and may not be compliant with state requirements.
Steps to Meet Stormwater Permit Requirements for Single-family Residential Projects
Step 1: Determine the surface area (ft2) of new rooftop and driveway areas; Step 2: Choose potential storm water management practice locations based on required regulatory
setbacks. If you plan to install infiltration trenches or dry wells, it is in your interest to have a professional determine the depth to the Seasonal High Groundwater Table (SHGWT) to ensure proper functioning of the stormwater practice
Step 3: Select appropriate storm water treatment practice(s) based on your site conditions and required elements for each practice. You may have to install more than one practice to meet your stormwater management requirements;
Step 4: Size the selected stormwater treatment practice(s) to meet the water quality volume (WQv)requirement using drainage area and soil texture information;
Step 5: Prepare a site plan depicting location of all proposed stormwater treatment practices, drainage areas, stormwater flow paths to each practice and other required elements detailed in the checklist on page 17 of this document.
Step 1: Determine the surface area of new rooftop and driveway areas
The purpose of this step is to calculate the surface area in square feet of all new rooftop, driveway and parking area surfaces associated with your project. Determine the area of new rooftops, driveways and parking areas by multiplying the length times the width. Alternatively for new homes or garages, use the footprint area of the building as measured from the site plan. If the total new rooftop area is greater than 600 square feet, then proceed to Step 2. For all new driveway and parking areas regardless of size, proceed to Step 2.
2 of 17 Updated 2/13/2013

3 of 17 Updated 2/13/2013
Step 2: Choose potential storm water management practice locations based on required setbacks. If needed, get a professional soil evaluation to determine soil drainage and texture ;
When choosing locations for your stormwater management practices, be sure each location meets the required minimum separation distances, or setbacks, listed in Table 1 below.
Table 1. Minimum Setback Distances for Rain Gardens, Infiltration Trenches, Dry Wells and Permeable Pavement Practices on Single-Family Residential Lots
Landscape Feature Required Setback (ft) for Infiltration Trenches and
Dry Wells
Required Setback (ft) for Rain Gardens and
Permeable Paving Practices Public Drinking Water Supply Well – Drilled (rock), Driven, or Dug 200 200
Public Drinking Water Supply Well – Gravel Packed, Gravel Developed 400 400
Private Drinking Water Wells 50 25Surface Water Drinking Water Supply Impoundment with Supply Intake 100 100
Tributaries that Discharge to the Surface Drinking Water Supply Impoundment 50 50
All Other Surface Waters 50 50Up-gradient from Natural slopes > %15 25 25Down-gradient from Building Structures 10 10Up-gradient from Building Structures 10 10Onsite Wastewater Treatment Systems (OWTS) 15 15Coastal features, coastal buffer zones, regulated freshwater wetlands As applicable As applicable
To ensure proper functioning of a stormwater management practice, you must make sure it is located in an area with adequate soil drainage. Improper siting of stormwater management practices can cause extended ponding or overall failure of the practice, which can lead to flooding and possibly mosquito breeding problems on your site. To test a potential site, a 6 to 8 inch deep hole may be dug and filled with water. If the water does not drain within 12 hours, the location is not appropriate for a stormwater management practice. You can also have potential stormwater practice locations inspected by a professional licensed soil evaluator, registered professional engineer or certified soil scientist. If you plan to install an infiltration trench or dry well, you should determine the depth to the Seasonal High Groundwater Table (SHGWT). This is especially advisable if there is a known or suspected shallow depth to SHGWT anywhere on the site. Determinations of depth to the SHGWT are best done by a professional engineer, licensed soil evaluator or certified soil scientist. Alternatively, refer to a prior determination of the depth to SHGWT such as may appear on a prior onsite wastewater treatment system plan. The depth to SHGWT is not required when the selected practice is a Qualifying Pervious Area (QPA), vegetated swale, rain garden or permeable surface construction. Notify your local Dig Safe system (1-888-DIG-SAFE) at least three business days before you dig.
Additional soil testing guidelines are provided in Appendix H of the RI Stormwater Design and Installation Standards Manual.

4 of 17 Updated 2/13/2013
Step 3: Select appropriate stormwater treatment practices based on your site conditions and the required elements of each practice.
Now that you have identified locations that are appropriate for stormwater management practices, you will need to select the type of practice to be installed at each location. Table 2 below lists LID stormwater management practices that may be applied on residential lots to meet the requirements for individual single-family residential projects. Each of these practices is explained in further detail in Sections A through E, which include design information to help you determine whether the practice is appropriate for your site. You may need to select more than one practice to meet your stormwater management requirements. The minimum criteria and required elements for each practice are derived from the specifications in the most recent version of the RI Stormwater Design and Installation Standards Manual.
Table 2. Residential stormwater management practices and their applicability
LID Practice Can be used to treat runoff from rooftops
Can be used to treat runoff from driveways
Qualifying Pervious Area (QPA) Vegetated Swale
Rain Garden Infiltration Trench
Dry Well Permeable Surface Construction
Step 4: Size the selected stormwater treatment practice(s) to meet the water quality volume (WQv)requirement
After selecting the appropriate stormwater treatment practices for your site from Step 3 above, you’ll need to size each practice to accommodate the water quality volume, or the first one inch of runoff from the contributing impervious surface. Use the sizing guidance in sections A through E for each stormwater management practice. You will need to determine the drainage area, or the area of impervious surface that drains to each practice. For example, if a practice will receive runoff from a single downspout that drains ¼ of a rooftop, you would calculate the drainage area by dividing the entire roof area by 4 (see Figure 1. below). To determine the water quality volume from each drainage area, multiply the drainage area in square feet by 0.083 (ft./in.).
Next, if you are proposing a vegetated swale, rain garden, infiltration trench or dry well, you will need to determine the texture of the soil at your chosen stormwater management practice locations (soil texture is not required for QPAs or permeable surface construction). This information will be used to determine the size of each practice. Texture can be determined by a soil professional in conjunction with the SHGWT depth determination, or you can send a sample for textural classification to a soil testing laboratory. Alternatively, you can make the conservative assumption that the soil is silty, and size your practices accordingly. This assumption will maximize the size of each practice. Additional soil testing guidelines are provided in Appendix H of the RI Stormwater Design and Installation Standards Manual.

Stormwater Management Practices for Individual Single-Family Residential Lots
A. Qualifying Pervious Areas
Qualifying Pervious Areas (QPAs) are natural or restored upland vegetated areas that meet specific requirements such as maximum slope and soil characteristics, which can be used to infiltrate storm water runoff. Wetland areas or coastal features may not be used as QPAs, with the exception of perimeter or riverbank wetlands as defined in DEM Rules Section 4.00. For individual single-family residential lot applications, QPAs must be areas of vegetation that are not highly managed or fertilized. Lawn areas may not be used as QPAs for individual single-family residential projects. In general, QPAs are relatively flat with well-drained soils, and receive small volumes of runoff as sheet (unconcentrated) flow. To utilize this practice, simply direct storm water flow to an area that meets the criteria in Table 3 below.
Table 3. Minimum Criteria for Qualifying Pervious Areas on Single-Family Residential Lots DrainageArea and Size
The rooftop, driveway or parking area draining to any one QPA cannot exceed 1,000 ft2.
For roof runoff, the length of the flow path through the QPA shall be equal to or greater than the contributing rooftop area divided by 13.3. The width of the QPA shall be equal to or greater than the length of the contributing rooftop area.
For driveway runoff, the length and width of the QPA shall be no less than the length and width of the driveway. For example, if a driveway is 15 feet wide and 40 feet long, the QPA width shall be no less than 15 feet wide and 40 feet long.
In locations where there is a history of groundwater seepage and/or basement flooding, QPAs should not be utilized.
Location
The flow path through the QPA must be 25 feet from any onsite wastewater treatment system (OWTS).
The slope of the QPA shall be less than or equal to 5.0%.
Although they may abut, there shall be no overlap between QPAs. For example, the runoff from two 1,000 ft2 sections of roof must be directed to separate QPAs. They shall not be directed to the same area.
Conveyance Lawn areas may not be used as QPAs for individual single-family residential lots. Stormwater runoff may be conveyed across a lawn area to a QPA provided the area of lawn between the discharge point and the QPA is less than 25 feet wide.
Wetlands and coastal features may not be used as QPAs, however part or all of an upland buffer zone, perimeter wetland or riverbank wetland (as defined in DEM Rules Section 4.00) may be used as a QPA. Activities such as planting or alteration of vegetation within a coastal buffer zone will require additional written approval from CRMC.
To prevent basement seepage, at a minimum, runoff must be directed away from the building foundation and be infiltrated at the QPA at least 10 feet away from the foundation.
Downspouts must discharge at least 10 feet away from the nearest impervious surface to prevent reconnection to any storm sewers.
Downspouts must include appropriate provisions, such as a splash block or level spreader to induce non-erosive sheet flow.
5 of 17 Updated 2/13/2013

Where a gutter/downspout system is not used, the rooftop runoff must be designed to sheet flow at low velocity away from the structure housing the roof, and enter the QPA as sheet flow.
6 of 17 Updated 2/13/2013
*Construction and maintenance activities within a coastal buffer zone will require additional written approval from CRMC
Runoff from driveways may be directed over soft shoulders, through curb cuts or level spreaders to QPAs. Measures must be employed at the discharge point to the QPA to prevent erosion and the runoff must enter the QPA as sheet flow.
Construction* To prevent compaction of the soil in the QPA, construction vehicles must not be allowed to drive over the area. If it becomes compacted, the soil must be suitably amended, tilled, and re-vegetated once construction is complete to restore infiltration capacity.
If you are restoring an area by planting to create an eligible QPA, use approved native plants from the RI Coastal Plant Guide (www.uri.edu/cels/ceoc/coastalPlants/CoastalPlantGuide.htm) or Appendix B of the RI Stormwater Design and Installation Standards Manual. Additional planting guidance can be found in the CRMC Coastal Buffer Zone Planting Guide (http://www.crmc.ri.gov/coastallandscapes/Coastal_Buffer_Planting_Guide.pdf).
Maintenance* The QPA must be inspected and maintained at least yearly to remove deposited sediment and address any ponding or erosion, and replant vegetation within the QPA that has died.
Figure 1.

7 of 17 Updated 2/13/2013
B. Vegetated Swales
Vegetated swales are open vegetated channels that are designed to capture and treat stormwater runoff. They are similar in concept and construction to a rain garden, except for their long, narrow shape and longitudinal slope. They are typically vegetated with grasses (see Appendix B, Section B.6 of the RI Stormwater Design and Installation Standards Manual for planting guidance). They may be used as a stand-alone stormwater management practice or as a conveyance to other practices.
Table 4. Required Elements for Vegetated Swales on Single-Family Residential Lots Conveyance Vegetated swales shall be designed with moderate side slopes flatter than 3:1 for most
conditions.Vegetated swales shall have a maximum longitudinal slope of 4% (e.g. 4 foot drop over a horizontal distance of 100 feet).
Treatment The average surface ponding depth shall be no more than a 8 inches deep. The bottom width shall be no less than 2 feet and no greater than 8 feet wide A maximum ponding depth of 1 ft should be maintained at the longitudinal midpoint of the vegetated swale and a maximum depth of 18 inches at the end point.
Swales should contain a 2 – 4 inch amended soil layer and a 2 – 3 inch mulch layer. The amended soil layer of a vegetated swale should be a 50/50 mixture of the excavated native soils and mature organic compost.
Vegetation Grasses or sedges are typically used in vegetated swales, but other native plants can be used as well. Please refer to the RI Coastal Plant Guide (www.uri.edu/cels/ceoc/coastalPlants/CoastalPlantGuide.htm) and modify the selection for native plants suited to rain gardens.
Maintenance Vegetated swales shall be inspected annually and should be inspected after large storm events.Eroded side slopes and channel bottoms shall be stabilized as necessary. If the surface of the dry swale becomes clogged to the point that standing water is observed on the surface 48 hours after precipitation events, the bottom shall be roto-tilled or cultivated to break up any hard-packed sediment, and then reseeded. Vegetation in dry swales shall be mowed as required to maintain minimum grass heights in the 4-6 inch range. Every five years, the channel bottom of dry swales should be scraped to remove sediment and to restore original cross section and infiltration rate, and should be seeded to restore ground cover, where necessary.
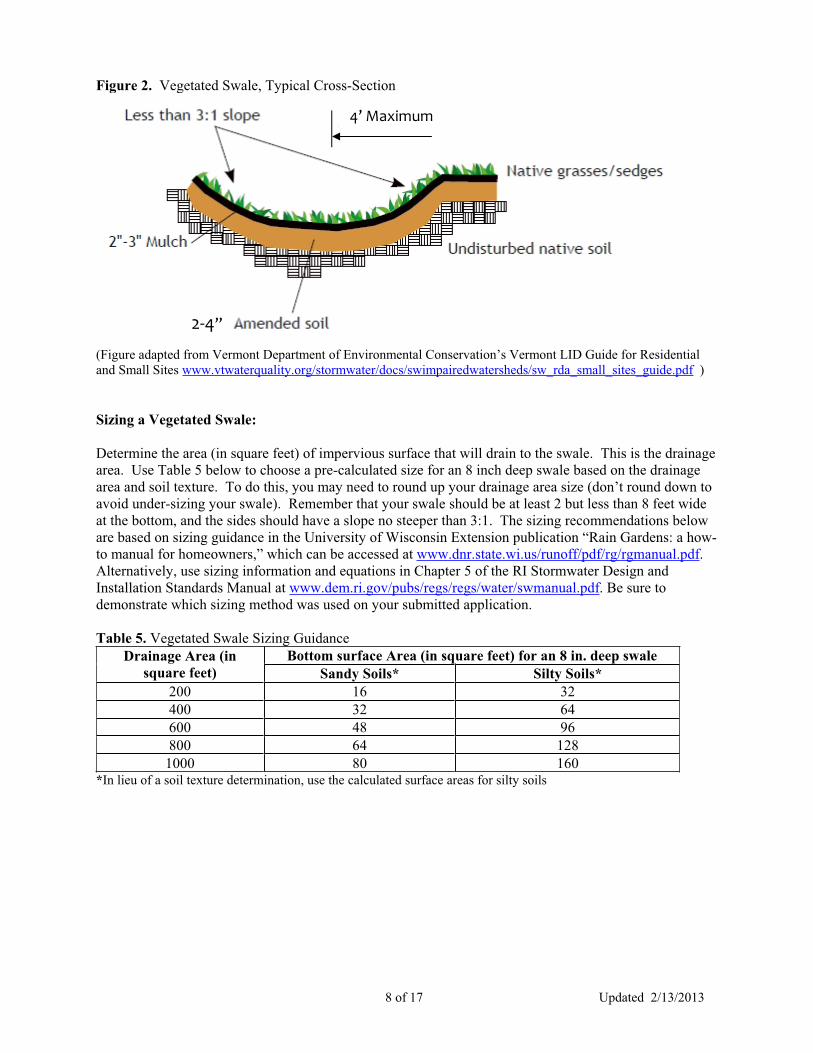
Figure 2. Vegetated Swale, Typical Cross-Section
4’ Maximum
2 4”
(Figure adapted from Vermont Department of Environmental Conservation’s Vermont LID Guide for Residential and Small Sites www.vtwaterquality.org/stormwater/docs/swimpairedwatersheds/sw_rda_small_sites_guide.pdf )
Sizing a Vegetated Swale:
Determine the area (in square feet) of impervious surface that will drain to the swale. This is the drainage area. Use Table 5 below to choose a pre-calculated size for an 8 inch deep swale based on the drainage area and soil texture. To do this, you may need to round up your drainage area size (don’t round down to avoid under-sizing your swale). Remember that your swale should be at least 2 but less than 8 feet wide at the bottom, and the sides should have a slope no steeper than 3:1. The sizing recommendations below are based on sizing guidance in the University of Wisconsin Extension publication “Rain Gardens: a how-to manual for homeowners,” which can be accessed at www.dnr.state.wi.us/runoff/pdf/rg/rgmanual.pdf.Alternatively, use sizing information and equations in Chapter 5 of the RI Stormwater Design and Installation Standards Manual at www.dem.ri.gov/pubs/regs/regs/water/swmanual.pdf. Be sure to demonstrate which sizing method was used on your submitted application.
Table 5. Vegetated Swale Sizing Guidance Bottom surface Area (in square feet) for an 8 in. deep swale Drainage Area (in
square feet) Sandy Soils* Silty Soils* 200 16 32400 32 64600 48 96800 64 128
1000 80 160*In lieu of a soil texture determination, use the calculated surface areas for silty soils
8 of 17 Updated 2/13/2013
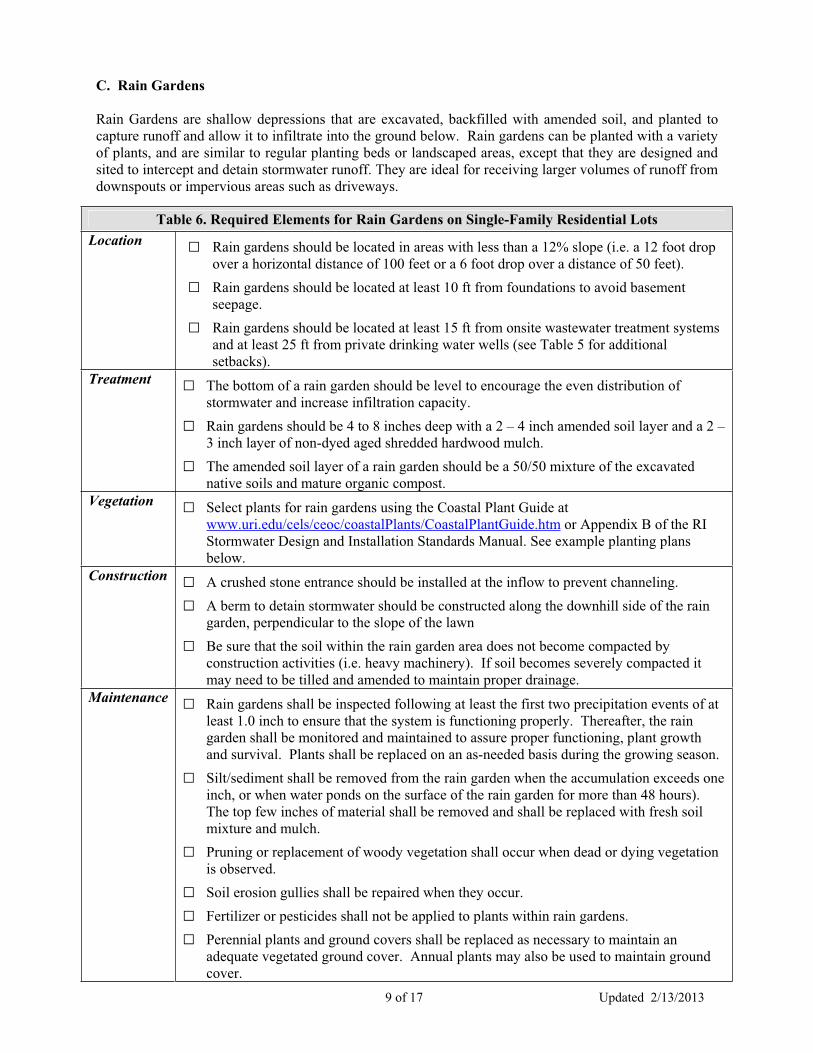
C. Rain Gardens
Rain Gardens are shallow depressions that are excavated, backfilled with amended soil, and planted to capture runoff and allow it to infiltrate into the ground below. Rain gardens can be planted with a variety of plants, and are similar to regular planting beds or landscaped areas, except that they are designed and sited to intercept and detain stormwater runoff. They are ideal for receiving larger volumes of runoff from downspouts or impervious areas such as driveways.
Table 6. Required Elements for Rain Gardens on Single-Family Residential Lots
Rain gardens should be located in areas with less than a 12% slope (i.e. a 12 foot drop over a horizontal distance of 100 feet or a 6 foot drop over a distance of 50 feet).
Location
Rain gardens should be located at least 10 ft from foundations to avoid basement seepage.Rain gardens should be located at least 15 ft from onsite wastewater treatment systems and at least 25 ft from private drinking water wells (see Table 5 for additional setbacks).
Treatment The bottom of a rain garden should be level to encourage the even distribution of stormwater and increase infiltration capacity. Rain gardens should be 4 to 8 inches deep with a 2 – 4 inch amended soil layer and a 2 – 3 inch layer of non-dyed aged shredded hardwood mulch. The amended soil layer of a rain garden should be a 50/50 mixture of the excavated native soils and mature organic compost.
Vegetation Select plants for rain gardens using the Coastal Plant Guide at www.uri.edu/cels/ceoc/coastalPlants/CoastalPlantGuide.htm or Appendix B of the RI Stormwater Design and Installation Standards Manual. See example planting plans below.
A crushed stone entrance should be installed at the inflow to prevent channeling. Construction
A berm to detain stormwater should be constructed along the downhill side of the rain garden, perpendicular to the slope of the lawn Be sure that the soil within the rain garden area does not become compacted by construction activities (i.e. heavy machinery). If soil becomes severely compacted it may need to be tilled and amended to maintain proper drainage.
Maintenance Rain gardens shall be inspected following at least the first two precipitation events of at least 1.0 inch to ensure that the system is functioning properly. Thereafter, the rain garden shall be monitored and maintained to assure proper functioning, plant growth and survival. Plants shall be replaced on an as-needed basis during the growing season. Silt/sediment shall be removed from the rain garden when the accumulation exceeds one inch, or when water ponds on the surface of the rain garden for more than 48 hours). The top few inches of material shall be removed and shall be replaced with fresh soil mixture and mulch. Pruning or replacement of woody vegetation shall occur when dead or dying vegetation is observed.Soil erosion gullies shall be repaired when they occur. Fertilizer or pesticides shall not be applied to plants within rain gardens.Perennial plants and ground covers shall be replaced as necessary to maintain an adequate vegetated ground cover. Annual plants may also be used to maintain ground cover.
9 of 17 Updated 2/13/2013

Sizing a Rain Garden
Determine the area of impervious surface that will drain to your rain garden. This is the drainage area. Use Tables 7 and 8 below to choose a pre-calculated size based on the drainage area, soil texture and depth. To do this, you may need to round up your drainage area size (don’t round down to avoid under-sizing your rain garden). The sizing recommendations below are based on sizing guidance in the University of Wisconsin Extension publication “Rain Gardens: a how-to manual for homeowners,” which can be accessed at clean-water.uwex.edu/pubs/pdf/rgmanual.pdf . Alternatively, use sizing information and equations in Chapter 5 of the RI Stormwater Design and Installation Standards Manual at www.dem.ri.gov/pubs/regs/regs/water/swmanual.pdf. Be sure to demonstrate which sizing method was used on your submitted application.
Tables 7. and 8. Rain Garden Sizing Guidance Rain Garden Surface Area in Sandy Soils (Sands, Loamy Sands and Sandy Loams) (square feet)
Drainage Area (Square feet) for 4 inch deep garden for 6 inch deep garden for 8 inch deep garden 100 19 15 8200 38 30 16300 57 45 24400 76 60 32500 95 75 40600 114 90 48700 133 105 56800 152 120 64900 171 135 72
1000 190 150 80
Rain Garden Surface Area in Silty Soils (Loams and Silt Loams) (square feet) Drainage Area (Square
feet) for 4 inch deep garden for 6 inch deep garden for 8 inch deep garden 100 34 25 16200 68 50 32300 102 75 48400 136 100 64500 170 125 80600 204 150 96700 238 175 112800 272 200 128900 306
*In lieu of a soil texture determination, use the calculated surface areas for silty soils
225 1441000 340 250 160
Rain Garden Dimensions and Shape
The length of the rain garden should be perpendicular to the slope of the lawn, and overall it should be twice as long as it is wide. This allows the garden to catch as much runoff as possible. Rounded or curvy shapes are the most effective, just be sure to approximate the required area from the table. Depending upon your site, it may be easier to break up stormwater flows to create multiple, smaller rain gardens than one larger one.
10 of 17 Updated 2/13/2013

Rain Garden Installation
The best time to install a rain garden is in the spring, when digging will be easier and plants will be more likely to thrive. Be sure that the bottom of the rain garden is level and at the appropriate depth, and that you create a berm on the downhill side to retain stormwater (see Figure 3. below).
Figure 3. Digging the Rain Garden and Creating a Berm
Rain Garden Plant Selection
Plants that tend to do well in rain gardens are those that tolerate wet conditions, but also very dry conditions. Use the Rhode Island Coastal Plant Guide at www.uri.edu/cels/ceoc/coastalPlants/CoastalPlantGuide.htm to select appropriate species (filter your selection for “Rain Garden”) then create a planting plan to lay out where each plant will go. Below are two example planting plans for residential rain gardens, but feel free to create your own. To ensure proper functioning of the rain garden, your planting plan should include a minimum of three different plant species, including shrubs as well as herbaceous species. Additional guidance for plant selection can be found in Appendix B of the RI Stormwater Design and Installation Standards Manual or in the CRMC Coastal Buffer Zone Planting Guide at www.crmc.ri.gov/coastallandscapes/Coastal_Buffer_Planting_Guide.pdf. Submit your planting plan and a list of the species to be planted with your application.
11 of 17 Updated 2/13/2013

Figure 4. Rain Garden Example - Planting Plan 1
Figure 5. Rain Garden Example - Planting Plan 2
12 of 17 Updated 2/13/2013
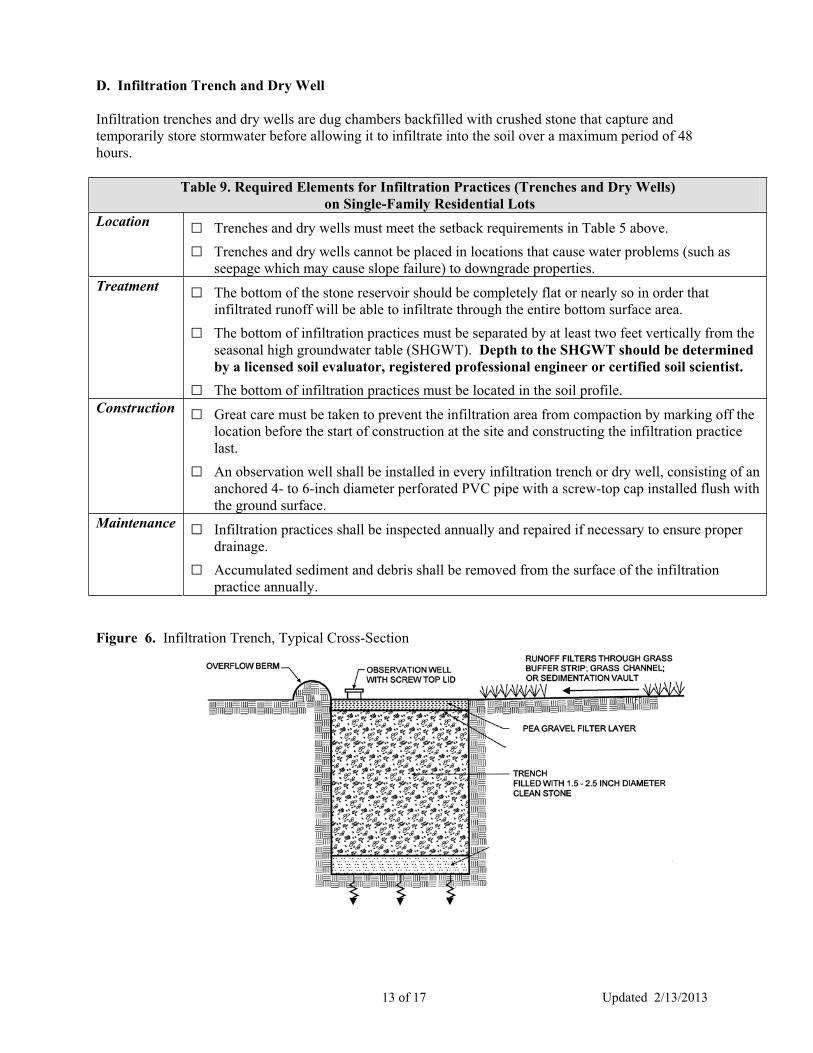
D. Infiltration Trench and Dry Well
Infiltration trenches and dry wells are dug chambers backfilled with crushed stone that capture and temporarily store stormwater before allowing it to infiltrate into the soil over a maximum period of 48 hours.
Table 9. Required Elements for Infiltration Practices (Trenches and Dry Wells) on Single-Family Residential Lots
Location Trenches and dry wells must meet the setback requirements in Table 5 above. Trenches and dry wells cannot be placed in locations that cause water problems (such as seepage which may cause slope failure) to downgrade properties.
Treatment The bottom of the stone reservoir should be completely flat or nearly so in order that infiltrated runoff will be able to infiltrate through the entire bottom surface area. The bottom of infiltration practices must be separated by at least two feet vertically from the seasonal high groundwater table (SHGWT). Depth to the SHGWT should be determined by a licensed soil evaluator, registered professional engineer or certified soil scientist.The bottom of infiltration practices must be located in the soil profile.
Great care must be taken to prevent the infiltration area from compaction by marking off the location before the start of construction at the site and constructing the infiltration practice last.An observation well shall be installed in every infiltration trench or dry well, consisting of an anchored 4- to 6-inch diameter perforated PVC pipe with a screw-top cap installed flush with the ground surface.
Construction
Infiltration practices shall be inspected annually and repaired if necessary to ensure proper drainage.
Maintenance
Accumulated sediment and debris shall be removed from the surface of the infiltration practice annually.
Figure 6. Infiltration Trench, Typical Cross-Section
13 of 17 Updated 2/13/2013
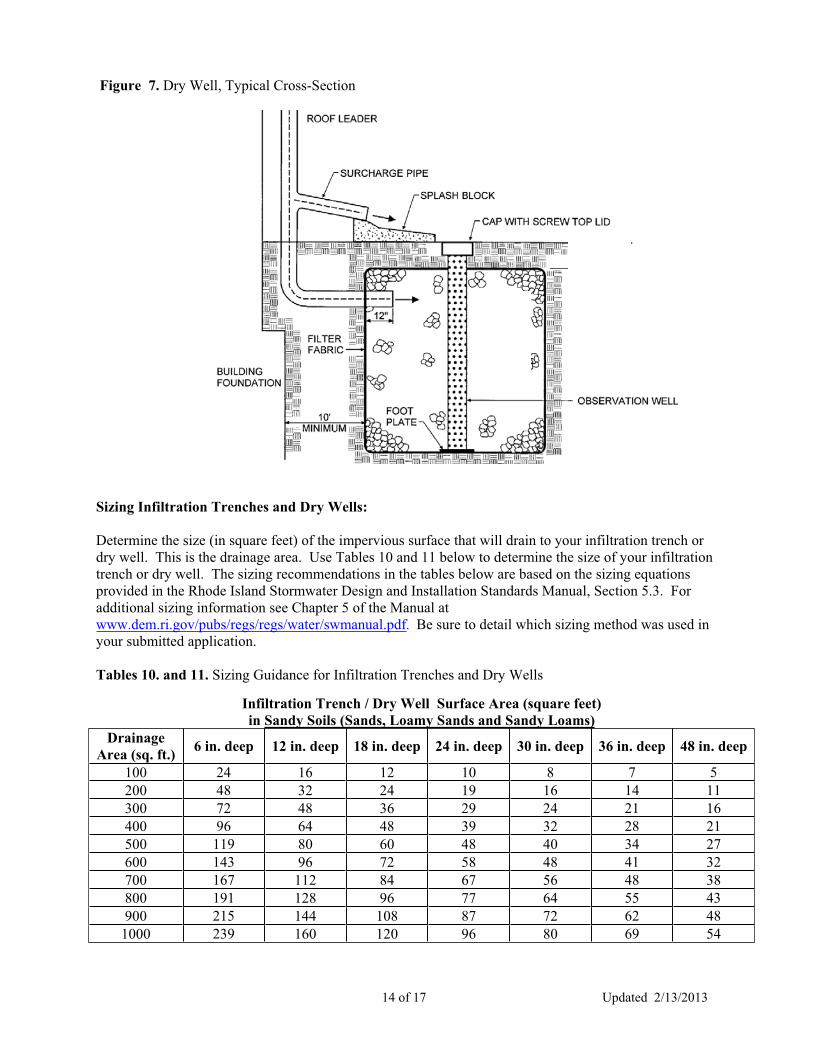
Figure 7. Dry Well, Typical Cross-Section
Sizing Infiltration Trenches and Dry Wells:
Determine the size (in square feet) of the impervious surface that will drain to your infiltration trench or dry well. This is the drainage area. Use Tables 10 and 11 below to determine the size of your infiltration trench or dry well. The sizing recommendations in the tables below are based on the sizing equations provided in the Rhode Island Stormwater Design and Installation Standards Manual, Section 5.3. For additional sizing information see Chapter 5 of the Manual at www.dem.ri.gov/pubs/regs/regs/water/swmanual.pdf. Be sure to detail which sizing method was used in your submitted application.
Tables 10. and 11. Sizing Guidance for Infiltration Trenches and Dry Wells
Infiltration Trench / Dry Well Surface Area (square feet) in Sandy Soils (Sands, Loamy Sands and Sandy Loams)
DrainageArea (sq. ft.) 6 in. deep 12 in. deep 18 in. deep 24 in. deep 30 in. deep 36 in. deep 48 in. deep
100 24 16 12 10 8 7 5200 48 32 24 19 16 14 11300 72 48 36 29 24 21 16400 96 64 48 39 32 28 21500 119 80 60 48 40 34 27600 143 96 72 58 48 41 32700 167 112 84 67 56 48 38800 191 128 96 77 64 55 43900 215 144 108 87 72
14 of 17 Updated 2/13/2013
62 481000 239 160 120 96 69 5480

Infiltration Trench / Dry Well Surface Area (square feet) in Silty Soils (Loams and Silt Loams)Drainage
Area (sq. ft.) 6 in. deep 12 in. deep 18 in. deep 24 in. deep 30 in. deep 36 in. deep 48 in. deep
100 38 21 15 11 9 8 6200 76 43 30 23 18 15 12300 114 64 44 34 28 23 18400 152 85 59 45 37 31 23500 190 107 74 57 46 39 29600 229 128 89 68 55 46 35700 267 149 104 79 64 54 41800 305 171 119 91 74 62 47900 343 192 133 102 83
15 of 17 Updated 2/13/2013
70 531000 381 213 148 113 7792 59
E. Permeable Paving and Pavers
Permeable paving practices capture and temporarily store the water quality volume before allowing it to infiltrate into the soil. The two major types include porous asphalt or concrete and paver systems. For individual single-family residential projects only, crushed stone may be used without a grid system provided it meets the required elements below.
Porous asphalt and concrete resemble traditional asphalt or concrete pavement but they have a 10%--25% void space and are constructed over an open-graded stone base course that doubles as the stormwater reservoir before it infiltrates into the subsoil. Porous asphalt and concrete must be designed and installed in accordance with specifications in Appendix F of the RI Stormwater Design and Installation Standards Manual. Pavers include permeable blocks, solid blocks with open-cell joints, as well as open-cell grids filled with either gravel or with sandy soil and then planted with turf, set on a prepared open-graded stone base course that also serves as a reservoir for the stormwater before it infiltrates into the subsoil.

16 of 17 Updated 2/13/2013
Table 12. Required Elements for Permeable Paving and Pavers on Residential Lots Feasibility Soil infiltration rate must be at least 0.5 inches per hour as determined by a soil professional
or lab analysis. A professional soil textural analysis is required for permeable paving practices.Separation from groundwater table and bedrock must be at least 2 feet.
Location Permeable pavement practices must meet the setbacks in Table 5 above Permeable paving should be located in areas with less than 5% slope.
Treatment The water quality volume must exfiltrate through the floor of the practice in the soil horizon Permeable paving systems shall be designed to fully de-water the entire water quality volume within 24 hours after the storm event The bottom of the stone reservoir should be completely flat, or nearly so, to allow runoff to infiltrate through the entire bottom surface area.
Vegetation The site shall be completely stabilized before any flow is directed to the practice. Pavers that are planted with grass require species with deep root systems.
Construction Pavers should be professionally installed in accordance with the manufacturer’s specifications. Additional information on paver systems including a list of approved installers can be found at Interlocking Concrete Pavement Institute website at: www.icpi.org.Permeable blocks must have a minimum void ratio of 15% and meet the minimum criteria in Section 5.4 of the RI Stormwater Design and Installation Standards Manual. Solid blocks with open-cell joints must meet the minimum criteria in Section 5.4 of the RI Stormwater Design and Installation Standards Manual. For crushed stone driveway construction, the crushed stone used must be ¾ inch to 1½ inch diameter, washed, angular crushed stone installed to a minimum depth of 3 inches. The grade of the finished driveway shall not be higher than the adjacent ground elevation.
Maintenance The surface of permeable paving or pavers shall be monitored after storms to ensure it drains properly. The surface shall be inspected annually for deterioration and repaired as needed. Maintenance shall be performed according to the manufacturer’s specifications for paver systems. Paver grids planted with grass shall be mowed on a regular basis and reseeded as necessary. Use of sand and salt on permeable paving and pavers shall be minimized. Porous asphalt or concrete driveways shall not be repaved or resealed with impermeable products.Crushed stone shall be replaced or re-grading performed as necessary in crushed stone driveways to maintain a minimum 3” depth of stone and a level surface.
17 of 17 Updated 2/13/2013
Step 5: Prepare a site plan depicting location of all proposed stormwater treatment practices, drainage areas, stormwater flow paths to each practice and other required elements as detailed in the checklist below
The site plan submitted with the CRMC or DEM application should clearly show:
New rooftop and driveway areas, with total area in square feet. Location of all stormwater management (LID) practices. Area of rooftop / driveway / parking area draining to each stormwater management practice,Location of collection points (such as downspouts), and direction of overland flowpath or other conveyance measures to stormwater practices. Location of buffer zones, freshwater wetlands, coastal features and other natural vegetationDepth to Seasonal High Ground Water Table (SHGWT) if proposing infiltration trenches or dry wells (depth to SHGWT not needed for QPAs, vegetated swales, rain gardens or permeable surface construction).
Planting plan and plant list if proposing rain garden. See Appendix B of the RI Stormwater Installation Standards Manual, the CRMC Rhode Island Coastal Plant Guide at www.uri.edu/cels/ceoc/coastalPlants/CoastalPlantGuide.htm or the CRMC Coastal Buffer Zone Planting Guide at www.crmc.ri.gov/coastallandscapes/Coastal_Buffer_Planting_Guide.pdf for guidance