
Reverse Side INSTRUCTION BOOKLET - · PDF file · 2007-04-18interlock mechanism. ....
15
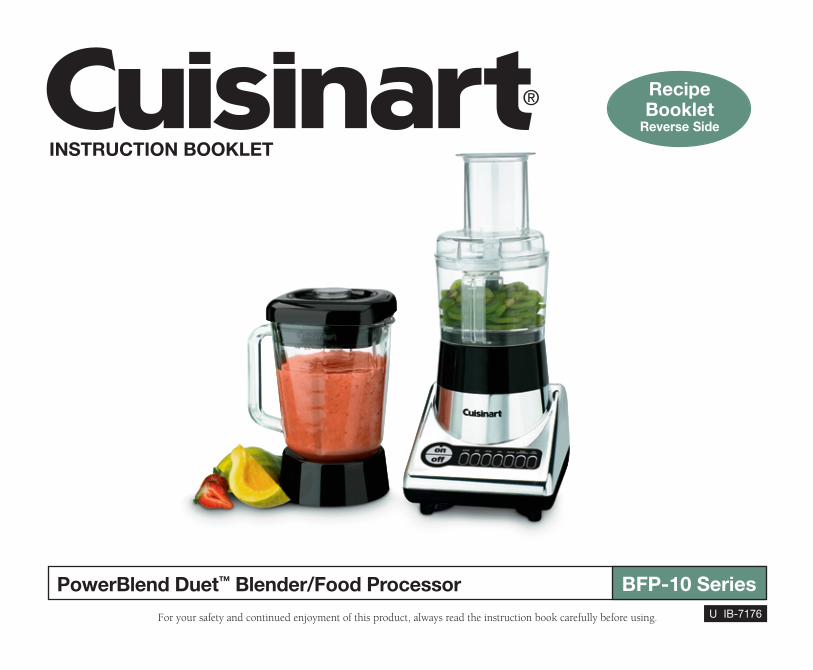
INSTRUCTION BOOKLET For your safety and continued enjoyment of this product, always read the instruction book carefully before using. PowerBlend Duet ™ Blender/Food Processor BFP-10 Series Recipe Booklet Reverse Side U IB-7176
Transcript of Reverse Side INSTRUCTION BOOKLET - · PDF file · 2007-04-18interlock mechanism. ....
INSTRUCTION BOOKLET
For your safety and continued enjoyment of this product, always read the instruction book carefully before using.
PowerBlend Duet™ Blender/Food Processor BFP-10 Series
RecipeBooklet
Reverse Side
U IB-7176

�
IMPORTANT SAFEGUARDSWhen using an electrical appliance, basic safety precautions should always be followed, including the following:
1. READ ALL INSTRUCTIONS BEFORE USING.
�. To protect against the risk of electrical shock, do not put motor base of PowerBlend Duet™ appliance in water or other liquid.
3. Close supervision is necessary when any appliance is used by or near children. Cuisinart does not recommend the use of this appliance by children.
4. Always unplug from outlet when not in use, before putting on or taking off parts, and before cleaning or removing contents from blender jar or food processor work bowl.
WARNING: Never put hands into the blender jar/food processor work bowl or container, or handle the blades with appliance plugged in.
5. Avoid contact with moving parts.
6. Do not operate any appliance with a damaged cord or plug, or after the appliance malfunctions, or is dropped or damaged in any manner. Return appliance to nearest Cuisinart service facility for examination, repair, and/or mechanical or electrical adjustment.
7. The use of attachments, other than those recommended by Cuisinart, including canning or ordinary jars not recommended or sold by Cuisinart, may cause fire, electrical shock, or risk of injury to persons.
8. Do not use outdoors.
9. Do not let cord hang over edge of counter or table or touch hot surfaces, which could damage the cord.
10. Keep hands and utensils out of jar/food processor work bowl during use, to reduce the risk of severe injury to persons or damage to appliance itself. A rubber or plastic spatula may be used but must be used only when the appliance is turned OFF.
11. When motor base is in ON mode, and LED lights are flashing or glowing, do not touch cutting assembly, interfere with blade movement or remove blender jar cover. Accidentally touching a speed button may activate the blender.
12. BLADES ARE VERY SHARP. HANDLE CAREFULLY. Store out of reach of children.
13. To reduce the risk of injury, never place chopping blade/cutting assembly on base unless the blender jar or food processor work bowl is properly attached.
14. Always operate blender or food processor with the cover in place.
15. Never leave your blender or food processor unattended while it is running.
16. When blending HOT liquids in blender jar, remove measured pour lid (center piece of cover) to allow steam to escape.
17. Twist on locking ring firmly. Injury can result if moving blades accidentally become exposed.
18. Do not use an extension cord with this unit. Doing so may result in fire, electrical shock, or personal injury.
19. Regarding your cord set: A longer cord has been provided so that you will have flexibility in positioning your Cuisinart® PowerBlend Duet™ near an electrical outlet. Exercise care when using the longer cord to avoid entangling or tripping over the cord. The longer cord should be arranged so that it will not drape over the counter or tabletop, where it can be pulled on by children or tripped over. Excess cord should be stored in the cord storage area at the back of the blender base, to avoid injury caused by the longer cord.
�0. Be certain the food processor cover is securely locked in place before operating appliance. Never operate without the cover locked securely in place.
21. Do not attempt to defeat the food processor cover interlock mechanism.
��. Never feed food into processor by hand. Always use the food pusher.
�3. Make sure the blade or disc has come to a full stop before removing cover.
�4. This food processor attachment is to be used only with Cuisinart® BFP-10 series blenders. Do not use with any other manufacturer’s blender base.
This appliance is intended for household use only.

3
�5. Wash the blender jar, food processor work bowl, food processor chopping blade, locking ring, and covers before first use.
26. WARNING: TO REDUCE THE RISK OF ELECTRICAL SHOCK OR FIRE, DO NOT REMOVE THE BASE PANEL. NO USER SERVICEABLE PARTS ARE INSIDE. REPAIR SHOULD BE DONE ONLY BY AUTHORIZED PERSONNEL.
27. WARNING: FLASHING LIGHT INDICATES READY TO OPERATE. DO NOT TOUCH BLADES.
SAVE THESE INSTRUCTIONS FOR HOUSEHOLD USE ONLYNOTICEThis appliance has a polarized plug (one prong is wider than the other). To reduce the risk of electric shock, this plug will fit into a polarized outlet only one way. If the plug does not fit fully into the outlet, reverse the plug.
If it still does not fit, contact a qualified electrician. Do not modify the plug in any way.
Maximum rating of 500 watts is based on the jar attachment, which draws the greatest power. Other recommended attachments may draw significantly less power.
UNPACKING INSTRUCTIONS1. Place the gift box containing your Cuisinart® PowerBlend Duet™
on a flat, sturdy surface before unpacking.
�. Remove the instruction booklet and other printed material from top of corrugated insert.
3. Next, remove the top corrugated insert containing the fill cap.
4. Carefully lift the blender base from box and set aside.
5. Carefully lift the top corrugated insert of the food processor accessory. It containing the adapter stem, and slicing/shredding disc. Carefully remove slicing /shredding disc as it is very sharp, then remove adapter stem.
6. Remove the bottom corrugated insert containing the blender jar assembly. Be careful not to tip the jar when removing.
7. Last, remove any additional literature from the box.
CONTENTSImportant Safeguards . . . . . . . . . . . . . . . . . . . . . . . . . . . . . . . . . �
Unpacking Instructions . . . . . . . . . . . . . . . . . . . . . . . . . . . . . . . . 3
BLENDER
Parts and Features . . . . . . . . . . . . . . . . . . . . . . . . . . . . . . . . . 4
Assembly . . . . . . . . . . . . . . . . . . . . . . . . . . . . . . . . . . . . . . . . 5
Helpful Reminders. . . . . . . . . . . . . . . . . . . . . . . . . . . . . . . . . . 5
Operating Instructions . . . . . . . . . . . . . . . . . . . . . . . . . . . . . . 5
Quick Reference Guides . . . . . . . . . . . . . . . . . . . . . . . . . . . . 6
Cleaning and Care. . . . . . . . . . . . . . . . . . . . . . . . . . . . . . . . . . 7
Dos and Don’ts . . . . . . . . . . . . . . . . . . . . . . . . . . . . . . . . . . . 7
FOOD PROCESSOR
Parts and Features . . . . . . . . . . . . . . . . . . . . . . . . . . . . . . . . . 8
Assembly for Chopping, Puréeing & Mixing . . . . . . . . . . . . . 8
Assembly for Slicing & Shredding . . . . . . . . . . . . . . . . . . . . . 9
Operating Instructions . . . . . . . . . . . . . . . . . . . . . . . . . . . . . . 9
Chop, Purée & Mix . . . . . . . . . . . . . . . . . . . . . . . . . . . . . . . . 10
Adding Food While Processing. . . . . . . . . . . . . . . . . . . . . . . 10
Removing Processed Food . . . . . . . . . . . . . . . . . . . . . . . . . 10
Cleaning and Storing. . . . . . . . . . . . . . . . . . . . . . . . . . . . . . . 11
Guidelines for Preparing Foods for Chopping . . . . . . . . . . . 11
Guidelines for Preparing Foods for Slicing and Shredding . 1�
Warranty. . . . . . . . . . . . . . . . . . . . . . . . . . . . . . . . . . . . . . . . . . . 13

4
INTRODUCTIONYou’ll love everything your PowerBlend Duet™ lets you do. You can prepare a whole meal in this combo blender/food processor. This super-size blender and genuine Cuisinart® food processor have preprogrammed functions to guarantee perfect results whether you’re slicing cucumbers, chopping meat, or puréeing peaches. Does the time consuming tasks, so you have time for the fun stuff!
BLENDER PARTS AND FEATURES1. 2-oz. Measured Pour Lid
Allows you to measure and add ingredients neatly without removing the cover.
2. Cover Just press on; no turning or twisting required. Tightfitting seal resists leakage.
3. 56-oz. Glass Jar Has a unique, sturdy, widemouth design.
4. Leakproof Rubber Gasket (not shown) Holds the glass jar snugly in position for safe operation.
5. High-Quality Cutting Assembly with Patented Stainless Steel Blades (not shown) Is strong enough for all blender tasks, including tough jobs, from ice crushing to chopping delicate herbs.
Note: Blades are very sharp...handle carefully.
6. Collar Collar is self-aligning so that the glass blender jar slides easily into position, eliminating the frustration of twisting and turning the blender jar to lock it into place.
7. Heavy-Duty Motor Base Motor base is so sturdy and stable, it will not “walk” on your counter – even during ice crushing! The motor is strong enough to handle all blending tasks, including crushing ice without liquid, and is backed by a three-year limited warranty.
8. 7-Speed Touchpad Control with Indicator Lights Easy to use, read and clean. Seven speeds give you great versatility – use low speeds for delicate blending all the way up to high speeds for cheese, garlic, or lemon zest. The red LED lights clearly indicate what blender speed you are using.
8a. Ice Crush Button (Blender Only) Activates the ice crushing speed. This button is preset to the best speed for crushed ice. However, you can crush ice at any speed. The food processor attachment is not intended to crush ice. Use the blender jar for this.
8b. Pulse Button Allows you to pulse at any speed from high to low, so you can blend ingredients only as much as needed.
8c. Food Processor Button Is preset to the best speed for all food processing tasks. Always use this button when food processing. This speed may also be used with blender jar.
9. Slip-Proof Feet Prevent movement during use and prevent damaging marks on countertops or tables.
10. Hidden Cord Storage Compartment (not shown) Keeps countertop safe and neat by conveniently storing excess cord.
11. Impact-Resistant Plastic Housing Is crafted of the finest quality materials to resist staining, cracking, and odors.
12. Innovative Cuisinart Design Combined with power, performance, sturdiness, and easy cleanup, makes this blender a winner.
1
2
3
6
7
8
8b 8c
9
8a

5
BLENDER ASSEMBLY To use your Cuisinart® PowerBlend Duet™, begin by assembling the blender jar.
1. Turn the blender jar (a) upside down, and place it flat on a sturdy surface.
�. Position the rubber gasket (b) on the round opening on the bottom of the blender jar.
3. Turn the cutting assembly (c) upside down, and place the blade end in the blender jar opening.
Note: Blades are very sharp... handle carefully.
4. Secure the rubber gasket and cutting assembly in position by placing the smaller opening of the locking ring (d) on top of the cutting assembly. Engage threads by twisting the locking ring clockwise until tightened. Make sure locking ring is tightly fastened to blender jar. Once assembled, turn the blender jar right side up.
5. Push the cover onto the top of the blender jar. Push the measured pour lid into the cover.
6. Place the blender jar on the motor base so that the jar markings are facing you and the handle is positioned to one side.
7. Plug in power cord. Your blender is now ready to be used.
HELPFUL REMINDERS • Once the cover is in position, ingredients can be added during
blending by simply lifting the measured pour lid, adding ingredients, and replacing the measured pour lid.
• Cover should always be in place while the unit is ON.
• Warning: Do not place blender jar on base while motor is running.
• Do not twist locking ring from blender jar when removing blender jar from base. Simply lift blender jar from motor base.
• Boiling liquid or solid frozen foods (with the exception of ice cubes or ½" pieces of frozen fruit) should never be placed in the blender jar.
• Do not place ice, frozen foods or very cold liquids in a blender jar which has come directly from a hot dishwasher.
• Do not place very hot liquids or foods in a blender jar which has come directly from the freezer. Boiling liquids should cool for 5 minutes before being placed in blender jar.
• Follow Cleaning and Care instructions on page 7 prior to your first use.
BLENDER OPERATING INSTRUCTIONS1. Place the motor base of your Cuisinart® PowerBlend Duet™ on
a flat, sturdy surface. It is important that the surface be clean and dry. Follow the instructions for assembling the blender jar (see previous section). Once the jar is assembled and is in position on the motor base, plug the Cuisinart® PowerBlend Duet™ into an electrical outlet.
�. Add all necessary ingredients to the blender jar, and replace the cover. You may add more ingredients by lifting the measured pour lid and dropping ingredients through the fill area. Replace the measured pour lid after adding ingredients. Do not put hands into blender jar with blender plugged in.
NOTES: Add liquid ingredients first, then follow with solid ingredients. This will provide more consistent blending and prevent unnecessary stress on the motor.
To remove blender jar cover, lift edge of cover upward. Lifting measured pour lid will not remove cover.
3. TO START BLENDING: Press the On button. The red On LED light will flash, indicating that the blender is turned on but no speed has been selected.
4. PRESS THE DESIRED BLENDING SPEED: Both the On indicator light and the activated speed indicator light will glow. The blender will now be functioning at the desired speed. It is possible to switch speeds without pressing the Off button, by simply pushing the next desired speed button.
a
b
c
d

6
5. TO STOP THE BLENDING PROCESS: Re-press the activated speed button. The blending process will stop. The red On indicator light will continue to flash to let you know that the blender is still on and can be reactivated by pushing the desired speed button. The blender can be completely deactivated and stopped at any speed by pushing the Off button. You will need to press the On button again to continue blending.
6. PULSE MODE: While the blender is turned on, you can create a burst of power for quick, efficient blending, by activating the pulse function. To do so, first push the Pulse button, which will
cause the pulse indicator light to flash. Next, push and release the desired speed button. Repeat as desired. You determine the duration of each pulse. While pulsing, all indicator lights (the on, the pulse, and the desired speed lights) will glow. The pulse function can be used to break apart larger pieces of food or to control the texture of food when chopping. The pulse function is also effective in starting the blending process when you do not want continuous power, or when processing items which do not require an extended amount of blending.
7. TO CRUSH ICE: The PowerBlend Duet™ motor is strong enough to crush ice without liquid at any speed; however, for your convenience, we have preset the best speed for ice crushing. To give you greater control, the ice crush function automatically operates as a pulse function. To crush ice, place ice cubes in the blender jar, and place the cover and the measured pour lid on the blender jar. Press the On button. Press the Ice Crush button in short pulses until ice is crushed to desired consistency. See the Recipe Tips section in recipe booklet for more details.
8. TO DISLODGE FOOD: Use a rubber or plastic spatula to help remove food lodged around the cutting assembly. DO NOT USE SPATULA UNTIL YOU HAVE TURNED THE BLENDER OFF.
QUICK REFERENCE GUIDEFOR BLENDER FUNCTION
To Activate Blender Press On – The blender is in On mode.
To Begin Blending Press desired speed button.
To Change Speeds Press desired speed button.
To Pulse In On mode press Pulse, then press and release desired speed button as needed.
To Crush Ice In On mode, press and release Ice Crush button as needed.
To Stop Blending (and Deactivate Blender) Press Off Button.
To Stop Blending (in Pulse or Ice Release button. Crush Mode)
To Stop Blending in Stir, Chop, Mix, Purée, Press Speed button again. This will or Food Processor Mode return the blender to On mode. Press Off button to turn blender off.
QUICK REFERENCE GUIDEFOR BLENDER SPEED
Refer to this guide to choose the best speed for your desired result.
Ingredient/Recipe Speed ResultReconstituting frozenorange juice concentrate Stir Smooth and full-bodied
Mayonnaise Stir Thick and creamy
Salad dressings Stir Desired consistencyNuts Chop Coarse to fine
Whipping cream Mix Thick topping
Bread crumbs Mix Uniformly fine
Grating citrus zest Purée Uniformly fine
Soups Purée Uniformly smooth
Milk shakes Food Processor Smooth and creamy
Baby food Food Processor Smooth and creamy
Health drinks Food Processor Smooth and creamyFrozen cocktails Food Processor Thick and slushy
Grinding hard cheese Food Processor Coarse to fine
Ice Ice Crush Snowy

7
Replace the cover and measured pour lid and continue blending, if necessary. Make sure spatula is not inside the blender jar before blending.
9. WHEN FINISHED BLENDING: Press the Off button and unplug the blender from the electrical outlet. Never remove the blender jar from the motor base until the blender is off. Do not twist locking ring from blender jar when removing jar from motor base. Simply lift blender jar from motor base. Do not place hands into blender jar with blender plugged in.
CLEANING AND CAREAlways unplug your Cuisinart® PowerBlend Duet™ from the electrical outlet before cleaning. The blender is made of corrosion-resistant parts, which are easy to clean. Before first use and after every use, clean each part thoroughly. Periodically check all parts before reassembly. If any part is damaged or blender jar is chipped or cracked, DO NOT USE BLENDER.
Remove the blender jar from the motor base by lifting straight up and away. Twist off the locking ring by turning counterclockwise. Remove the cutting assembly and rubber gasket. Wash in warm soapy water; rinse and dry thoroughly. Place the locking ring in the upper rack of the dishwasher or wash in warm water.
CAUTION: Handle the cutting assembly carefully. It is SHARP and may cause injury. Do not attempt to remove blades from cutting assembly.
Remove the blender jar cover and the measured pour lid. Wash in warm, soapy water; rinse and dry thoroughly, or place in the upper rack of the dishwasher. The blender jar should be washed in warm soapy water and rinsed and dried thoroughly. The blender jar can also be placed upside down in the dishwasher.
Finally, wipe the motor base clean with a damp cloth to remove any residue, and dry thoroughly. Never submerge the motor base in water or other liquid, or place in the dishwasher.
Tip: You may wish to clean your blender cutting assembly as follows: Squirt a small amount of dishwashing liquid into assembled blender jar and fill halfway with warm water. Run on Stir for 15 seconds. Repeat using clean tap water. Empty blender jar and carefully disassemble parts. Wash cutting assembly, gasket and locking ring in warm, soapy water. Rinse and dry all parts thoroughly.
DO’s AND DON’Ts WHEN USING YOUR BLENDER
DO:• Make sure the electrical outlet is rated at the same voltage as
that stated on the bottom of the blender motor base.
• Always use the motor base on a clean, sturdy and dry surface.
• Always add liquid ingredients to the blender jar first, then add remaining ingredients. This will ensure that ingredients are uniformly mixed.
• When using either blender or food processor, cut most foods into cubes approximately ½" to 1" to achieve a more uniform result. Cut all cheeses into pieces no larger than ½".
• When using blender, use the measured pour lid to measure liquid ingredients such as alcohol. Replace measured pour lid after ingredients have been added.
• When using either blender or food processor, use a rubber or plastic spatula as needed, only when the blender is turned OFF. Never use metal utensils, as damage may occur to the blender jar/work bowl or cutting assembly.
• Place blender cover on firmly. Always operate the blender with the cover on.
• Make sure locking ring is tightly attached to blender jar.
• Always remove locking ring, cutting assembly, and rubber gasket before cleaning.
• When scraping the blender jar with a spatula, remove the food from the sides of the blender jar and place it in the center of the blender jar, over the cutting assembly.
• When chopping fresh herbs, garlic, onion, zest, bread crumbs, nuts, etc., make sure the blender jar and cutting assembly are completely dry.
• If food tends to stick to the sides of the blender jar or food processor work bowl during use, pulse in short bursts.

1
2
3
4
5
6
7
8
8
DON’T: • Don’t store food or liquids in your blender jar.
• When using blender, don’t place cutting assembly and locking ring onto motor base without the blender jar attached.
• Blender or food processor will not mash potatoes, knead dough, or beat egg whites.
• Don’t remove blender jar or food processor bowl while unit is ON. Keep the blender jar or food processor cover on while blending.
• Don’t twist locking ring from blender jar when removing blender jar from motor base. Simply lift blender jar from motor base.
• Don’t overprocess foods. Blender or food processor will achieve most desired results in seconds, not minutes.
• Don’t overload blender or food processor. If the motor stalls, turn OFF immediately, unplug the unit, and remove a portion of the food; then continue.
• Don’t use any utensil inside the blender jar or food processor bowl while the motor is ON.
• Don’t use any container or accessories not recommended by Cuisinart. Doing so may result in injury.
• Don’t place hands inside the blender jar or food processor bowl when blender is plugged in.
• Don’t add boiling liquids or frozen foods (except ice cubes or ½" pieces of frozen fruit) to glass blender jar. Boiling liquids should cool for 5 minutes before being placed in blender jar.
• The food processor accessory is not intended to crush ice. This could damage the chopping blade and will damage work bowl.
FOOD PROCESSOR PARTS AND FEATURES 1. Food pusher with oil dispenser 2. Work bowl cover with feed tube 3. Stainless steel chopping blade 4. Stainless steel reversible slicing/
shredding disc5. Adapter stem 6. Clear work bowl 7. Gearbox collar8. Motor base
Used for both the blender jar and the food processor bowl
FOOD PROCESSOR ASSEMBLYPlease note that the bowl and collar will fit on the base in eight different positions. The handle can be in front or on either side and the feed tube in front, back, or on either side. Directions for use reference a certain position for instructional purposes only.
1. Hold gearbox collar in one hand and work bowl handle in the other. Twist bowl clockwise onto collar.
�. Place collar with bowl onto motor base with handle facing front.
Now follow directions below for either:
a) chopping, puréeing and mixing or
b) slicing and shredding
a) CHOPPING, PURÉEING & MIXING
1. Place chopping blade over shaft in work bowl. Chopping blade should slide easily to the bottom of the bowl. Lower blade will almost touch bottom of bowl.
9
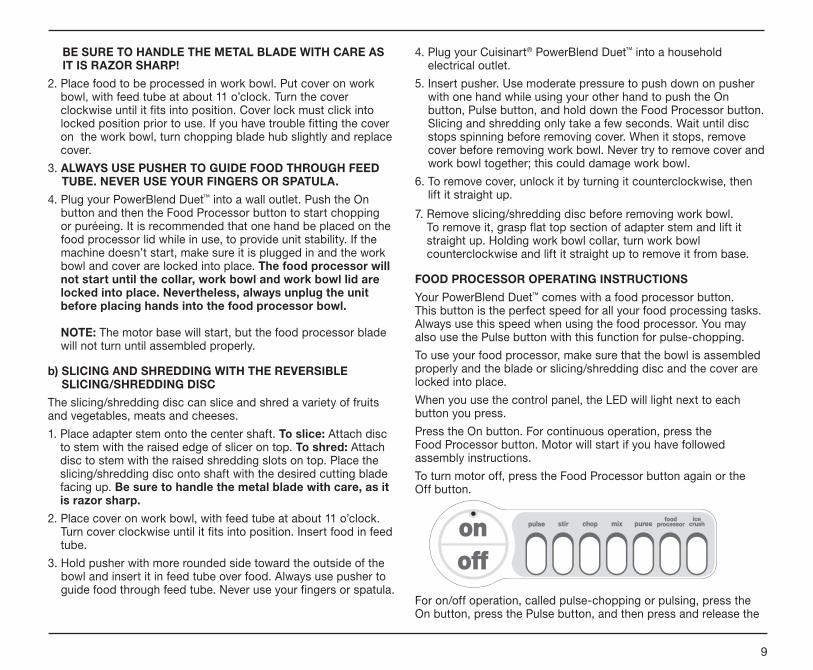
BE SURE TO HANDLE THE METAL BLADE WITH CARE AS IT IS RAZOR SHARP!
�. Place food to be processed in work bowl. Put cover on work bowl, with feed tube at about 11 o’clock. Turn the cover clockwise until it fits into position. Cover lock must click into locked position prior to use. If you have trouble fitting the cover on the work bowl, turn chopping blade hub slightly and replace cover.
3. ALWAYS USE PUSHER TO GUIDE FOOD THROUGH FEED TUBE. NEVER USE YOUR FINGERS OR SPATULA.
4. Plug your PowerBlend Duet™ into a wall outlet. Push the On button and then the Food Processor button to start chopping or puréeing. It is recommended that one hand be placed on the food processor lid while in use, to provide unit stability. If the machine doesn’t start, make sure it is plugged in and the work bowl and cover are locked into place. The food processor will not start until the collar, work bowl and work bowl lid are locked into place. Nevertheless, always unplug the unit before placing hands into the food processor bowl. NOTE: The motor base will start, but the food processor blade will not turn until assembled properly.
b) SLICING AND SHREDDING WITH THE REVERSIBLE SLICING/SHREDDING DISC
The slicing/shredding disc can slice and shred a variety of fruits and vegetables, meats and cheeses.
1. Place adapter stem onto the center shaft. To slice: Attach disc to stem with the raised edge of slicer on top. To shred: Attach disc to stem with the raised shredding slots on top. Place the slicing/shredding disc onto shaft with the desired cutting blade facing up. Be sure to handle the metal blade with care, as it is razor sharp.
�. Place cover on work bowl, with feed tube at about 11 o’clock. Turn cover clockwise until it fits into position. Insert food in feed tube.
3. Hold pusher with more rounded side toward the outside of the bowl and insert it in feed tube over food. Always use pusher to guide food through feed tube. Never use your fingers or spatula.
4. Plug your Cuisinart® PowerBlend Duet™ into a household electrical outlet.
5. Insert pusher. Use moderate pressure to push down on pusher with one hand while using your other hand to push the On button, Pulse button, and hold down the Food Processor button. Slicing and shredding only take a few seconds. Wait until disc stops spinning before removing cover. When it stops, remove cover before removing work bowl. Never try to remove cover and work bowl together; this could damage work bowl.
6. To remove cover, unlock it by turning it counterclockwise, then lift it straight up.
7. Remove slicing/shredding disc before removing work bowl. To remove it, grasp flat top section of adapter stem and lift it straight up. Holding work bowl collar, turn work bowl counterclockwise and lift it straight up to remove it from base.
FOOD PROCESSOR OPERATING INSTRUCTIONS
Your PowerBlend Duet™ comes with a food processor button. This button is the perfect speed for all your food processing tasks. Always use this speed when using the food processor. You may also use the Pulse button with this function for pulse-chopping.
To use your food processor, make sure that the bowl is assembled properly and the blade or slicing/shredding disc and the cover are locked into place.
When you use the control panel, the LED will light next to each button you press.
Press the On button. For continuous operation, press the Food Processor button. Motor will start if you have followed assembly instructions.
To turn motor off, press the Food Processor button again or the Off button.
For on/off operation, called pulse-chopping or pulsing, press the On button, press the Pulse button, and then press and release the

10
Food Processor button the desired number of times. Motor runs as long as you hold the Food Processor button down. The motor stops when you release control switch. Try it a few times.
You control the duration and frequency of pulses by the length of time you hold the Food Processor button down and the rate at which you press it. Pulses should be short bursts. Allow enough time between pulses to let food in work bowl fall to bottom.
Always use the Food Processor button for pulse/chopping. Never turn cover back and forth to start and stop processor.
USING THE POWERBLEND DUET™ BLENDER/FOOD PROCESSOR TO CHOP, PURÉE, AND MIX
Refer to Food Processor Assembly instructions on pages 8–9.
1. Cut food into ¾" pieces. You will get a more even chop if you start with pieces that are all the same size. Put pieces into work bowl with metal blade in place. You can put in up to 1 cup of food at a time. If you want to process more, do it in batches.
�. Put on cover, lock it and insert pusher. It is recommended that one hand be placed on the food processor lid while in use, to provide unit stability. Press the On button, press the Pulse button, and the Food Processor button (to pulse), then release. Repeat two to three times. Each time blade stops, let food pieces drop to the bottom of bowl before pulsing again. This ensures that the blade will chop them at every pulse. Watch what happens to the food. With pulse/chopping technique, you can get an even chop without danger of overprocessing. Check texture by looking through work bowl. Be careful not to overprocess. For a coarse chop, pulse only a few times.
3. If you want a finer chop or purée, press the On button and then the Food Processor button and let machine run continuously until the food is chopped as fine as you want it. Check frequently through clear cover or bowl to avoid chopping too fine. Use a plastic spatula to scrape down any pieces that stick to inside of bowl.
Onions and other food with a high water content turn into a smooth purée very quickly. Do not overchop – look at food frequently through work bowl.
To purée, follow same procedure as for chopping, but let machine run until food is a smooth purée.
New users are often surprised at how fast the processor works. You will quickly get used to its great speed.
These are some conditions that affect your results:
• Size of pieces you put in bowl – all should be about the same size.
• Amount of food you process – don’t add too much.
• Type of processing you choose – continuous or pulse/chopping.
ADDING FOOD WHILE PROCESSING
To add liquid while the machine is running, pour it through the open feed tube. This is especially useful when making mayonnaise or dressings.
A small hole in the pusher allows you to add liquids in a very slow, steady stream – useful when making sauces.
When you want to add small pieces of food like cheese, meat or garlic cloves while machine is running, drop them through open feed tube.
To prevent spills when adding sugar and other dry ingredients, use a funnel.
REMOVING PROCESSED FOOD
Before removing processed food, press Off button and wait for blade to stop spinning. Then remove cover by turning it counterclockwise. Never try to remove cover and work bowl together; this can damage work bowl.
It is important not to let metal blade fall out of work bowl as you empty it.
Here are two ways to prevent it from falling out:
1. Before tilting bowl, use spatula to remove food from around blade. Carefully remove blade by the plastic hub.
�. Hold top of blade in place with finger or spatula while pouring out processed food.
At this point, you may either lift the work bowl off motor base, or hold the collar at the base and turn the handle of the bowl counterclockwise and lift blade straight up.
NOTES: Occasionally, a piece of food may become wedged between the blade and the work bowl. If this happens, remove the

11
cover, lift the blade out carefully and remove the wedged piece. Empty the bowl, reinsert the blade and lock the cover into place. Process smaller amounts of the food at one time.
Don't store food or liquids in the food processor work bowl.
CLEANING AND STORING YOUR POWERBLEND DUET™ FOOD PROCESSOR ATTACHMENT Store the chopping blade and slicing/ shredding disc as you would sharp knives – out of the reach of children.
The work bowl, cover, pusher, chopping blade, and slicing/shredding disc are top shelf dishwasher-safe. When placing parts in your dishwasher, insert the work bowl upside down. Remember where you place the sharp blade and disc, and be certain to unload the dishwasher carefully.
The gearbox collar is not immersible. To clean, just wipe with a damp cloth.
If you wash the blades and discs by hand, do it carefully. Avoid leaving them in soapy water where they may disappear from sight. To clean the metal blade, fill the work bowl with soapy water, hold the blade by its plastic center and move rapidly up and down on the center shaft of the bowl. Use of a spray hose is also effective. If necessary, use a brush.
The work bowl should not be placed in a microwave oven.
General Guidelines for Preparing Foods for Chopping
THE FOOD HOW TO PREPARE IT
Fruits and vegetables Peel and core if necessary. Remove large, hard pits and seeds. Cut into ¾" pieces and process up to 1 cup at a time.
Meat, poultry and fish These should be very cold but not frozen. First, cut into ¾" pieces. Put up to ½ pound in work bowl. If you want to chop or purée more, do it in batches of not more than ½ pound each. Pulse/chop or run continuously until desired consistency is reached. Check texture every � or 3 seconds to avoid overprocessing.
Bread, crackers or cookies Break into 1" pieces and process continuously until texture for crumbs is fine. For seasoned crumbs, chop with herbs. For buttered crumbs, dribble melted butter through feed tube while processing – 1 teaspoon melted butter for each slice of bread.
Crumb crusts Chop crackers or cookies as described in preceding paragraph. Add sugar, spices and butter and cut into pieces, as specified by recipe. Pulse/chop until combined.
Hard cheese “grated” If it’s too hard to cut with a knife, don’t try to chop it – it may damage blade. First cut into ¾" pieces. Pulse/chop until pea-sized, then process continuously. You can chop it as coarse or as fine as you want. Simply run machine longer for finer chop. Process up to 3 ounces at one time.
Whipping cream Processor-whipped cream works well for most purposes. It is excellent as a topping for desserts or hot drinks. Cream must be at refrigerator temperature. You can whip up to 1 cup at a time. Do not use food processor whipped cream to prepare soufflés or other foods where volume is required.
Parsley and other fresh herbs Work bowl and metal blade must be clean and dry. Remove stems; use leaves only. Dry herbs completely. The more herbs you chop at once, the finer chop you can get. Chopped herbs keep for several days in the refrigerator in airtight bags, or can be frozen for months.
1�
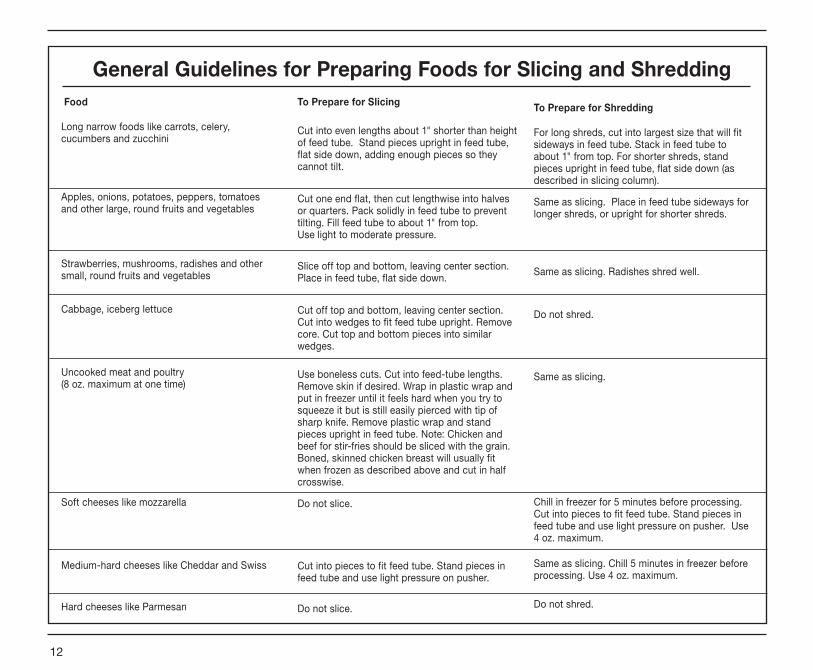
Food
Long narrow foods like carrots, celery, cucumbers and zucchini
Apples, onions, potatoes, peppers, tomatoes and other large, round fruits and vegetables
Strawberries, mushrooms, radishes and other small, round fruits and vegetables
Cabbage, iceberg lettuce
Uncooked meat and poultry (8 oz. maximum at one time)
Soft cheeses like mozzarella
Medium-hard cheeses like Cheddar and Swiss
Hard cheeses like Parmesan
To Prepare for Slicing
Cut into even lengths about 1" shorter than height of feed tube. Stand pieces upright in feed tube, flat side down, adding enough pieces so they cannot tilt.
Cut one end flat, then cut lengthwise into halves or quarters. Pack solidly in feed tube to prevent tilting. Fill feed tube to about 1" from top. Use light to moderate pressure.
Slice off top and bottom, leaving center section. Place in feed tube, flat side down.
Cut off top and bottom, leaving center section. Cut into wedges to fit feed tube upright. Remove core. Cut top and bottom pieces into similar wedges.
Use boneless cuts. Cut into feed-tube lengths. Remove skin if desired. Wrap in plastic wrap and put in freezer until it feels hard when you try to squeeze it but is still easily pierced with tip of sharp knife. Remove plastic wrap and stand pieces upright in feed tube. Note: Chicken and beef for stir-fries should be sliced with the grain. Boned, skinned chicken breast will usually fit when frozen as described above and cut in half crosswise.
Do not slice.
Cut into pieces to fit feed tube. Stand pieces in feed tube and use light pressure on pusher.
Do not slice.
To Prepare for Shredding
For long shreds, cut into largest size that will fit sideways in feed tube. Stack in feed tube to about 1" from top. For shorter shreds, stand pieces upright in feed tube, flat side down (as described in slicing column).
Same as slicing. Place in feed tube sideways for longer shreds, or upright for shorter shreds.
Same as slicing. Radishes shred well.
Do not shred.
Same as slicing.
Chill in freezer for 5 minutes before processing. Cut into pieces to fit feed tube. Stand pieces in feed tube and use light pressure on pusher. Use 4 oz. maximum.
Same as slicing. Chill 5 minutes in freezer before processing. Use 4 oz. maximum.
Do not shred.
General Guidelines for Preparing Foods for Slicing and Shredding

13
WARRANTY INFORMATIONThis warranty is available to consumers only. You are a consumer if you own a Cuisinart® PowerBlend Duet™ Blender/Food Processor which was purchased at retail for personal, family or household use. Except as otherwise required under applicable law, this warranty is not available to retailers or other commercial purchasers or owners.
We warrant that your Cuisinart® PowerBlend Duet™ Blender/Food Processor will be free of defects in materials and workmanship under normal home use for 3 years from the date of original purchase.
We suggest you complete and return the enclosed product registration card promptly to facilitate verification of the date of original purchase. However, return of the product registration card does not eliminate the need for the consumer to maintain the original proof of purchase in order to obtain the warranty benefits. In the event that you do not have proof of purchase date, the purchase date for purposes of this warranty will be the date of manufacture.
If your Cuisinart® PowerBlend Duet™ Blender/Food Processor should prove to be defective within the warranty period, we will repair or, if we think necessary, replace it. To obtain warranty service, please call our Customer Service Center toll-free at 1-800-7�6-0190 or write to: Cuisinart 150 Milford Road East Windsor, NJ 085�0
To facilitate the speed and accuracy of your return, enclose $10.00 for shipping and handling. (California residents need only supply a proof of purchase and should call 1-800-7�6-0190 for shipping instructions.) Please be sure to include your return address, description of the product's defect, product serial number, and any other information pertinent to the return. Please pay by check or money order.
NOTE: For added protection and secure handling of any Cuisinart® product that is being returned, we recommend you use a traceable, insured delivery service. Cuisinart cannot be held responsible for in-transit damage or for packages that are not delivered to us. Lost and/or damaged products are not covered under warranty.
Your Cuisinart® PowerBlend Duet™ Blender/Food Processor has been manufactured to the strictest specifications and has been designed for use only with authorized accessories and replacement parts. This warranty expressly excludes any defects or damages caused by accessories, replacement parts or repair service other than those authorized by Cuisinart.
This warranty does not cover any damage caused by accident, misuse, shipment or other than ordinary household use.
This warranty excludes all incidental or consequential damages. Some states do not allow the exclusion or limitation of these damages, so they may not apply to you.
CALIFORNIA RESIDENTS ONLY
California law provides that for In-Warranty Service, California residents have the option of returning a nonconforming product (A) to the store where it was purchased or (B) to another retail store which sells Cuisinart® products of the same type. The retail store shall then, according to its preference, either repair the product, refer the consumer to an independent repair facility, replace the product, or refund the purchase price less the amount directly attributable to the consumer’s prior usage of the product. If the above two options do not result in the appropriate relief to the consumer, the consumer may then take the product to an independent repair facility if service or repair can be economically accomplished. Cuisinart and not the consumer will be responsible for the reasonable cost of such service, repair, replacement, or refund for nonconforming products under warranty.
California residents may also, according to their preference, return nonconforming products directly to Cuisinart for repair or, if necessary, replacement by calling our Consumer Service Center toll-free at 800-7�6-0190. Cuisinart will be responsible for the cost of the repair, replacement, and shipping and handling for such nonconforming products under warranty.
BEFORE RETURNING YOUR CUISINART® PRODUCT
Important: If the nonconforming product is to be serviced by someone other than Cuisinart’s Authorized Service Center, please remind the servicer to call our Consumer Service Center to ensure that the problem is properly diagnosed, the product serviced with the correct parts, and to ensure that the product is still under warranty.

14
Any trademarks or service marks of third parties used herein are the trademarks or service marks of their respective owners.
©�006 CuisinartCuisinart® is a registered
trademark of Cuisinart
150 Milford RoadEast Windsor, NJ 085�0
Printed in China
06CU�63�6

Version no.: BFP10 IB-7176
Size: 216mm(W) x 178mm (H) Total Pages: 32 pages
Material: Cover : 157gsm Matt Artpaper Inside : 120gsm Gloss Artpaper
Coating: Varnishing in cover
Color: Cover:4C + 1C (Black) Inside:1C + 1C (Black)
Date: 09-15-2006
P. O. No. 0609000 (09-00-2006_OP)
Coordinator: Astor You Printer: Chung Tai