Rev. 1 - Champion Trike Kits Honda Harley Davidson · Rev. 1 Champion Motorcycle ... 5.1 Sidecar...
16
Sidecar Installation Guide Harley Davidson FLH Model 2009 - Up Rev. 1 Champion Motorcycle Accessories International, Inc. dba Champion Sidecars 11841 Monarch Street, CA 92841 (800) 875-0949 (714) 847-0949 Fax (714) 847-1539 www.championtrikes.com
-
Upload
truongkhanh -
Category
Documents
-
view
224 -
download
1
Transcript of Rev. 1 - Champion Trike Kits Honda Harley Davidson · Rev. 1 Champion Motorcycle ... 5.1 Sidecar...
Sidecar Installation Guide
Harley Davidson FLH Model
2009 - Up
Rev. 1
Champion Motorcycle Accessories International, Inc. dba Champion Sidecars
11841 Monarch Street, CA 92841 (800) 875-0949 (714) 847-0949 Fax (714) 847-1539
www.championtrikes.com

INDAIN SIDECAR GUIDE
CHAMPION TRIKES
Installation Guide – HD FLH Sidecar 2000-2008 Page 2 of 16 Revision 1
Tech. Writing By Kurt Larson
Table of Contents 1 General Information .............................................................................................................................................3
1.1 Installation Information ................................................................................................................................3 1.2 For Your Safety ...........................................................................................................................................3 1.3 Important Safety Precautions .....................................................................................................................3 1.4 Specifications ..............................................................................................................................................4 1.5 Maintenance ...............................................................................................................................................4
1.5.1 Paint ........................................................................................................................................................4 1.5.2 Wheel Bearing ........................................................................................................................................4 1.5.3 Tire and Tire Air Pressure .......................................................................................................................4 1.5.4 Shock Suspension ..................................................................................................................................4 1.5.5 Sidecar Removal and Reinstallation .......................................................................................................4
1.6 Wiring Description .......................................................................................................................................5 2 Removal of Original Parts ...................................................................................................................................5 3 Installation ...........................................................................................................................................................6 4 Brakes .............................................................................................................................................................. 12 5 Electrical Installation ......................................................................................................................................... 13
5.1 Sidecar ..................................................................................................................................................... 13 5.2 T.I.L.T. Option .......................................................................................................................................... 14 5.3 Electrical (OEM Plug) .............................................................................................................................. 15
6 Driving a Sidecar .............................................................................................................................................. 15 6.1 General Sidecar Questions ..................................................................................................................... 15

INDAIN SIDECAR GUIDE
CHAMPION TRIKES
Installation Guide – HD FLH Sidecar 2000-2008 Page 3 of 16 Revision 1
Tech. Writing By Kurt Larson
1 General Information
The Champion Trikes Sidecar Kit is designed with the utmost consideration for safety, quality and ease of installation. The
kit comes complete with all necessary hardware and fasteners. It is recommended that the installer obtain an OEM service
manual for the vehicle on which the sidecar kit is to be installed. Please review the installation instructions before installing
the kit.
1.1 Installation Information
The information contained in this installation guide is intended for use by technicians of advanced to professional skill levels.
Attempting installation without the proper training, tools and equipment may result in damage to the vehicle, cause unsafe
conditions, or cause personal injury to you and/or others.
a. Altered or Changed from OEM Warning
1.2 For Your Safety
Because this guide is intended for technicians of advanced to professional skill levels, we do not provide warnings about
many basic shop safety practices. If you have not received shop safety training or do not feel confident about your knowledge
of safety practices, we recommend that you do not attempt to perform the procedures described in this guide.
Some of the most important general safety precautions are given below. Champion Trikes cannot warn you of every
conceivable hazard that can arise. Only you can decide whether or not you should perform a given task.
1.3 Important Safety Precautions
a. Make sure you have a clear understanding of all basic shop safety practices and that you wear appropriate clothing and
use safety equipment. Be especially careful of the following:
Read all directions before you begin, and make sure you have the tools, the parts and the skills required to perform
the tasks safely and completely.
Protect your eyes by using proper safety glasses, goggles or face shields anytime you hammer, drill, grind, pry or
work around pressurized air or liquids, and springs or other stored-energy components.
Use other protective wear when necessary, for example gloves or safety shoes. Handling hot or sharp parts can cause
severe burns or cuts.
Protect yourself and others when you have a vehicle up in the air. Anytime you lift a vehicle, either by hoist or a
jack, make sure that it is securely supported.
b. Make sure the engine is turned off before you begin work.
Carbon Monoxide poisoning from exhaust gases: Be sure there is adequate ventilation whenever you run the engine.
Burns from hot parts: Let the engine and exhaust system cool before working on those areas.
Injury from moving parts: If running the engine, keep hands, fingers and clothing away from moving/rotating parts.
c. Gasoline vapor and hydrogen gases from batteries are explosive. To reduce the possibility of fire or explosion, be
careful when working near gasoline and batteries.
d. Use only nonflammable solvent, not gasoline, to clean parts

INDAIN SIDECAR GUIDE
CHAMPION TRIKES
Installation Guide – HD FLH Sidecar 2000-2008 Page 4 of 16 Revision 1
Tech. Writing By Kurt Larson
e. Never drain or store gasoline in an open container.
f. Keep all cigarettes, sparks or flame away from the battery and all fuel related parts.
1.4 Specifications
Escort(E) Daytona(D) Legend (L) Vintage (V)
Tire (E)(D) 145SR13 DUNLOP
Wheel Bearings (E)(D) #L44643 bearings L44610 race
Wheel Bearings Seal (E)(D) #AD7128EO
Brake Pads (E)(D)(L) #220018 Brembo
Shock Progressive Escort#6602-007 Daytona#6602-011
T.I.L.T Actuator (All) 20A at 1500 lbs.
1.5 Maintenance
1.5.1 Paint Champion uses only PPG paint products for maximum quality and finish. Your sidecar is painted using only base
coat/clear coat urethane finishes. This finish is hand polished at the factory and requires very little maintenance
except normal wash and wax. It is advisable not to wax your sidecar for roughly three to four weeks after receiving
it in order for the paint to cure thoroughly.
1.5.2 Wheel Bearing The wheel bearings used on your sidecar are automotive grade tapered wheel bearings. It is advisable to check the
wheel bearing adjustment periodically, and to clean and re-pack the bearings roughly every 3000 miles. These
bearings and seals are available at most automotive part stores.
1.5.3 Tire and Tire Air Pressure The tire used on your Daytona or Escort sidecar is manufactured by the Dunlop Tire Co. and is available at most tire
centers. This tire is manufactured to automotive stress and wear factors that are much higher then those you will
ever experience with your sidecar. There is a good chance that through normal use of your sidecar you will never
wear out the tire tread, but you must inspect the tire periodically for air pressure, dry rot and sidewall damage. The
manufacturer recommended air pressure for this tire is 28 lbs. psi, but because of the light duty application this tire
is being used for, you may want to experiment with the tire pressure to enhance the suspension comfort. Tire
pressure for the Legend/Vintage should be maintained at 40 PSI.
1.5.4 Shock Suspension The shock suspension used on the Daytona, Legend, Vintage and the Escort sidecar are manufactured by
Progressive Suspension. Progressive Suspension has a reputation for manufacturing high quality aftermarket
motorcycle shocks and springs. Although the sidecar is shipped to you from the factory with the shock spring set at
it’s softest setting, there are a total of five performance adjustments you can set your shock spring at.
1.5.5 Sidecar Removal and Reinstallation To remove the sidecar from the motorcycle first remove the two ½" bolts connecting the struts to their upper eye
mounting positions. Be sure to have someone support the motorcycle as you remove the last of the ½" bolts . Now
with the side stand in it’s down position lean the motorcycle to the left so it rests on the side stand. Now with the
sidecar frame supported with a jack or dolly remove the two lower 5/8" bolts connecting the lower mounting
positions. Disconnect the wiring harness plug, brake quick coupler, and steering damper if you are using one. Now
slide the sidecar away from the motorcycle. (IMPORTANT NOTE)(UNLESS IT IS YOUR INTENT TO RE-

INDAIN SIDECAR GUIDE
CHAMPION TRIKES
Installation Guide – HD FLH Sidecar 2000-2008 Page 5 of 16 Revision 1
Tech. Writing By Kurt Larson
ALIGN THE SIDECAR DO NOT LOOSEN ANY OF THE JAM NUTS OR PINCH BOLTS DURING
REMOVAL OF THE SIDECAR) To reinstall the sidecar reverse the process.
1.6 Wiring Description
(Most applications require the removal of the seat.)
1.7.1 Fuse link
When connecting wires directly to the positive terminal of the battery always use a fused connection to prevent fire
or damage to motorcycle and sidecar if a short occurs.
1.7.2 Ground
The ground wire should be connected directly to the battery ground or negative terminal or to another suitable frame
ground. The ground connection on the sidecar is not connected to the sidecar frame, however the sidecar frame is
connected to the motorcycle frame.
1.7.3 Accessories
This should be attached to the switched accessory terminal of your bike. If you are already using this circuit, it
would be advisable to use the accessory terminal to control a relay that feeds this. This will prevent overloading the
accessory circuit on your bike.
1.7.4 Canopy Switch on Bike (Daytona Sidecar) -This goes to a momentary switch installed anywhere on the bike to open the canopy latch. It is
recommended that the power to this switch comes from switched power on the bike , thus only allowing the canopy
to be opened when the bike is switched on.
1.7.5 TILT There are a total of 6 wires involved in the TILT system. The red and black wires of the second harness need to go
to the positive and negative terminal of the battery respectively. This is because of the high current draw. The switch
is momentary only and therefore cannot cause unnecessary drain on the battery. You must run the power for this
through a 20 amp fuse. The yellow and purple wires from the switch are connected directly to the yellow and pink
wires from the harness using the butt connectors provided.
Mount the switch in a convenient location on the left side of your fairing. The switch should be mounted so that
moving it to the left or away from the sidecar causes the sidecar to lift and the motorcycle to lean to the left. Moving
the switch to the right or toward the sidecar should cause the sidecar to lower and cause motorcycle to lean to the
right.
2 Removal of Original Parts
1. Seat
2. Right side exhaust shield
3. Right upper side panel
4. Right footpeg/rear floorboard
5. Right hard bag
6. Left upper side panel

INDAIN SIDECAR GUIDE
CHAMPION TRIKES
Installation Guide – HD FLH Sidecar 2000-2008 Page 6 of 16 Revision 1
Tech. Writing By Kurt Larson
7. If you have purchased theT.I.L.T option remove the gas tank to run the tilt swtich wiring through the OEM wiring
harness.
3 Installation a. In Figure 1, the major components are itemized followed by a table for descriptions.
Figure 1
Table 1
Item Description
1 Damper and Bracket
2 Rear Lower Support
3 Front Upper Mount
4 Lower Support Frame
5 Rear Frame Mount
6 Rear Strut (Short)
7 Front Strut (Long)
b. Attach the Rear Strut Support to bike frame using 3/8-16 x 1-3/4” HHCS, with lock washer, and washer as shown
in??. Remove the two screws from the RHS rear crash bar. Slide the Rear Frame Mount onto the bike with the
indicated hardware. Keep all hardware loose. See Figure 2.

INDAIN SIDECAR GUIDE
CHAMPION TRIKES
Installation Guide – HD FLH Sidecar 2000-2008 Page 7 of 16 Revision 1
Tech. Writing By Kurt Larson
Figure 2
c. Insert the bracket between the OE frame and the crash bar. Use 3/8-16x1-3/4” BHCS with lock washer and washer.
Keep hardware loose. See Error! Reference source not found. for other hardware used to install the Rear
Frame Mount. Keep hardware loose.
Figure 3 Figure 4
d. Remove the 1/2" screw from the Rear Frame Mount and install the Rear Lower Support using the 1/2” screw with
lock washer and washer. On the LHS, use a 7/16-14x1-3/4” HHCS, with lock washer, and washer. See Figures 5 and
6.

INDAIN SIDECAR GUIDE
CHAMPION TRIKES
Installation Guide – HD FLH Sidecar 2000-2008 Page 8 of 16 Revision 1
Tech. Writing By Kurt Larson
Figure 5
Figure 6
e. After installing the rear component torque all hardware. See the following table for torque specifications.
Table 2
Hardware Torque (ft-lbs)
3/8-16 HHCS 40
3/8-16 BHCS 30
3/8-24 HHCS 50
7/16-14 HHCS 60
1/2-13 HHCS (without Nylock Nut) 90
1/2-20 HHCS 72
INDAIN SIDECAR GUIDE
CHAMPION TRIKES
Installation Guide – HD FLH Sidecar 2000-2008 Page 9 of 16 Revision 1
Tech. Writing By Kurt Larson
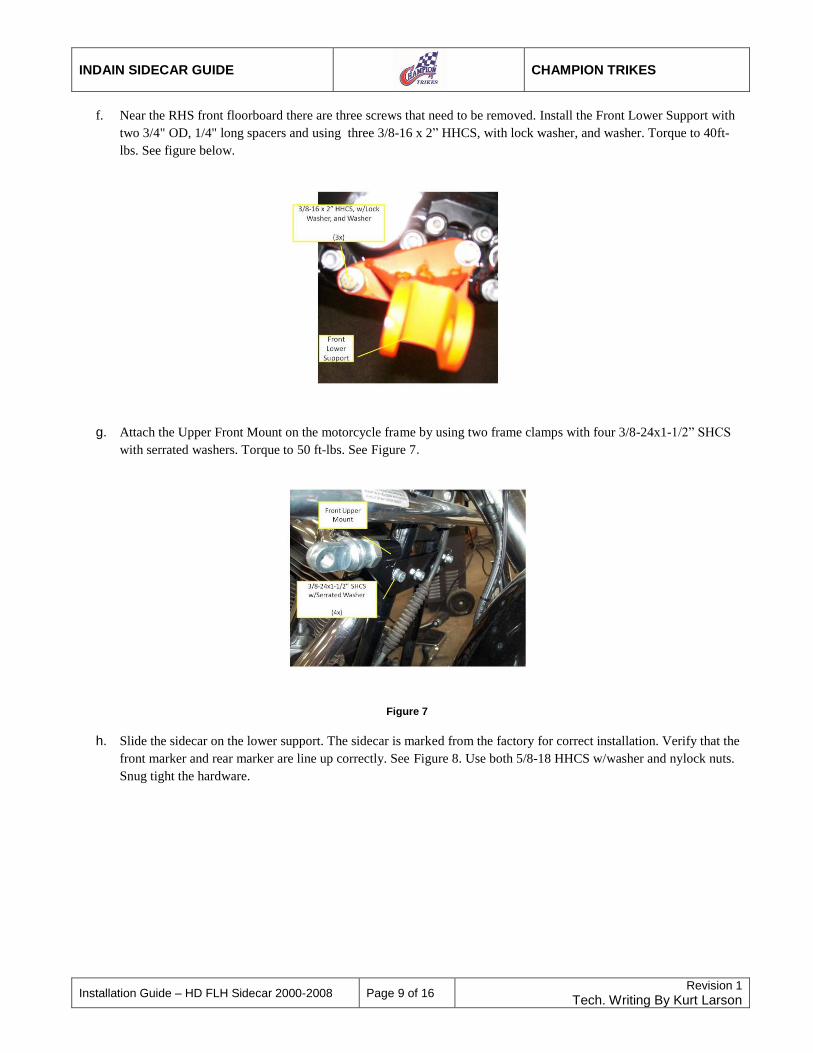
f. Near the RHS front floorboard there are three screws that need to be removed. Install the Front Lower Support with
two 3/4" OD, 1/4" long spacers and using three 3/8-16 x 2” HHCS, with lock washer, and washer. Torque to 40ft-
lbs. See figure below.
g. Attach the Upper Front Mount on the motorcycle frame by using two frame clamps with four 3/8-24x1-1/2” SHCS
with serrated washers. Torque to 50 ft-lbs. See Figure 7.
Figure 7
h. Slide the sidecar on the lower support. The sidecar is marked from the factory for correct installation. Verify that the
front marker and rear marker are line up correctly. See Figure 8. Use both 5/8-18 HHCS w/washer and nylock nuts.
Snug tight the hardware.

INDAIN SIDECAR GUIDE
CHAMPION TRIKES
Installation Guide – HD FLH Sidecar 2000-2008 Page 10 of 16 Revision 1
Tech. Writing By Kurt Larson
Front
Front Rod EndRear Rod End
Rear Marker
Front Marker
Figure 8
i. Attach the front strut and rear strut onto the sidecar and motorcycle. Both struts are pre-measured from factory for
easy installation but may require quarter turn for the alignment to the eye on upper mount and eye on sidecar frame.
The long strut is installed on the front of the motorcycle and the short strut is attached to the rear. For both struts,
place a washer between the strut and the upper/lower suspension mount eye. See Figure 9 and 9
Figure0. Torque the 1/2-20x2-1/4” HHCS w/washers and nylock nut to 90ft-lbs.
Note: The best approach to install the struts is to mount the rear and then match the front strut.
Figure 9 Figure 10
j. Remove the OEM hardware from the RHS fork tube housing. Attach the provided steering damper to the housing,
using M10 SHCS, w/lock washers and washers. See figure below. Torque the M10 screws to 40ft-lbs.

INDAIN SIDECAR GUIDE
CHAMPION TRIKES
Installation Guide – HD FLH Sidecar 2000-2008 Page 11 of 16 Revision 1
Tech. Writing By Kurt Larson
k. Attach the mount bracket for the steering damper onto the sidecar by using the 1/2-20 HHCS w/washers and nylock
nut. Snug tight the 1/2” bolts. Note: 1/2” bolts will be addressed later. Attach the steering damper to the mount
using a 3/8-24 jam nut and two washers. Torque to 43ft-lbs. See figure below for details.
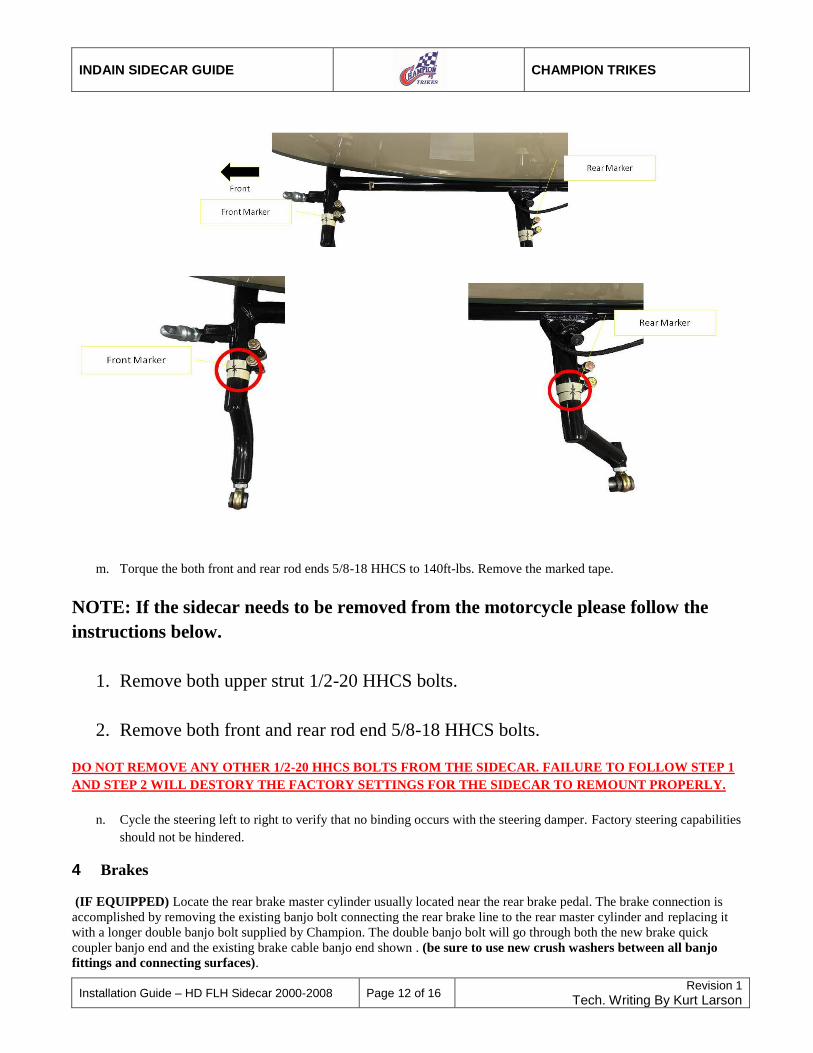
l. Recheck the front marker and rear marker on the sidecar and sidecar mounts are lined up correctly. Torque all four
1/2-20 HHCS pinch bolts w/washers and nylock nuts to 65ft-lbs. See figures below.
INDAIN SIDECAR GUIDE
CHAMPION TRIKES
Installation Guide – HD FLH Sidecar 2000-2008 Page 12 of 16 Revision 1
Tech. Writing By Kurt Larson
m. Torque the both front and rear rod ends 5/8-18 HHCS to 140ft-lbs. Remove the marked tape.
NOTE: If the sidecar needs to be removed from the motorcycle please follow the
instructions below.
1. Remove both upper strut 1/2-20 HHCS bolts.
2. Remove both front and rear rod end 5/8-18 HHCS bolts.
DO NOT REMOVE ANY OTHER 1/2-20 HHCS BOLTS FROM THE SIDECAR. FAILURE TO FOLLOW STEP 1
AND STEP 2 WILL DESTORY THE FACTORY SETTINGS FOR THE SIDECAR TO REMOUNT PROPERLY.
n. Cycle the steering left to right to verify that no binding occurs with the steering damper. Factory steering capabilities
should not be hindered.
4 Brakes (IF EQUIPPED) Locate the rear brake master cylinder usually located near the rear brake pedal. The brake connection is
accomplished by removing the existing banjo bolt connecting the rear brake line to the rear master cylinder and replacing it
with a longer double banjo bolt supplied by Champion. The double banjo bolt will go through both the new brake quick
coupler banjo end and the existing brake cable banjo end shown . (be sure to use new crush washers between all banjo
fittings and connecting surfaces).
INDAIN SIDECAR GUIDE
CHAMPION TRIKES
Installation Guide – HD FLH Sidecar 2000-2008 Page 13 of 16 Revision 1
Tech. Writing By Kurt Larson
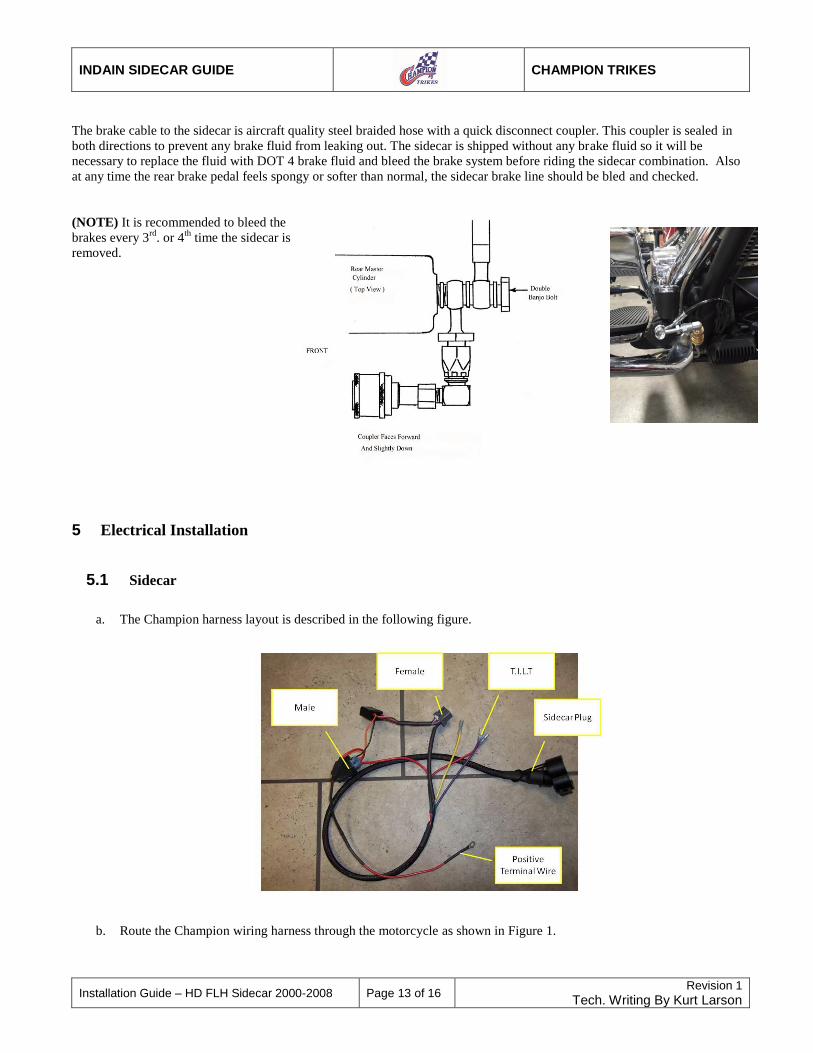
The brake cable to the sidecar is aircraft quality steel braided hose with a quick disconnect coupler. This coupler is sealed in
both directions to prevent any brake fluid from leaking out. The sidecar is shipped without any brake fluid so it will be
necessary to replace the fluid with DOT 4 brake fluid and bleed the brake system before riding the sidecar combination. Also
at any time the rear brake pedal feels spongy or softer than normal, the sidecar brake line should be bled and checked.
(NOTE) It is recommended to bleed the
brakes every 3rd
. or 4th
time the sidecar is
removed.
5 Electrical Installation
5.1 Sidecar
a. The Champion harness layout is described in the following figure.
b. Route the Champion wiring harness through the motorcycle as shown in Figure 1.
INDAIN SIDECAR GUIDE
CHAMPION TRIKES
Installation Guide – HD FLH Sidecar 2000-2008 Page 14 of 16 Revision 1
Tech. Writing By Kurt Larson
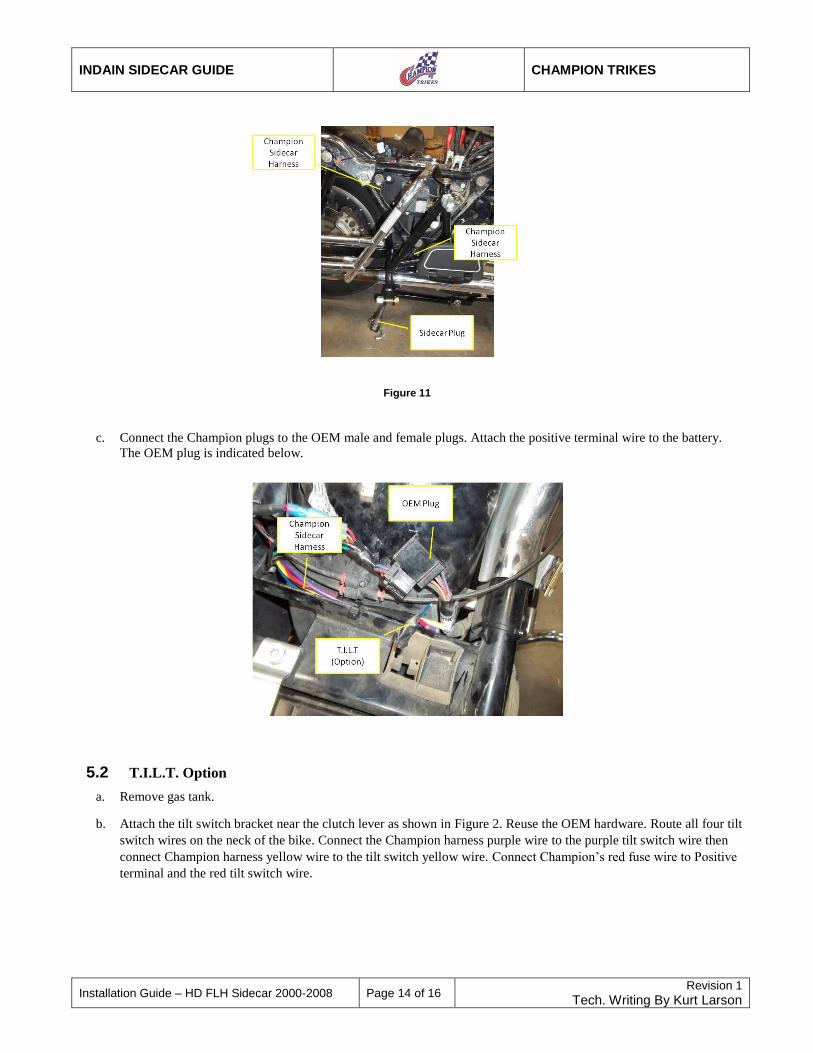
Figure 11
c. Connect the Champion plugs to the OEM male and female plugs. Attach the positive terminal wire to the battery.
The OEM plug is indicated below.
5.2 T.I.L.T. Option
a. Remove gas tank.
b. Attach the tilt switch bracket near the clutch lever as shown in Figure 2. Reuse the OEM hardware. Route all four tilt
switch wires on the neck of the bike. Connect the Champion harness purple wire to the purple tilt switch wire then
connect Champion harness yellow wire to the tilt switch yellow wire. Connect Champion’s red fuse wire to Positive
terminal and the red tilt switch wire.

INDAIN SIDECAR GUIDE
CHAMPION TRIKES
Installation Guide – HD FLH Sidecar 2000-2008 Page 15 of 16 Revision 1
Tech. Writing By Kurt Larson
Figure 12
c. Disconnect the OEM plug and connect the Champion male and female plugs to the OEM plug. Attach the negative
wire to the negative terminal.
d. Install the removed gas tank onto the Harley Davidson motorcycle.
5.3 Electrical (OEM Plug)
OEM Plug Layout
Plug Number Wire Color Description
1 Brown RHS Turn Signal
2 Orange/White Accessory
3 Purple LHS Turn Signal
4 N/A -
5 Black Ground
6 Red/White Brake
7 Blue Running
8 N/A -
6 Driving a Sidecar NEW OWNER DRIVING AND SAFETY PRECAUTIONS
It is important to know that driving a sidecar will be nothing like riding a solo motorcycle. So take my advice and forget most
of the twenty years of experience you have spent riding motorcycles and be prepared to spend some time to change habits and
learn some new tricks.
6.1 General Sidecar Questions
1. It is normal for a sidecar to feel different during a left or right turn.
2. It is NOT recommended to drive a sidecar with a passenger on the rear of the motorcycle without either a passenger
in the sidecar or sufficient weight in the sidecar.
INDAIN SIDECAR GUIDE
CHAMPION TRIKES
Installation Guide – HD FLH Sidecar 2000-2008 Page 16 of 16 Revision 1
Tech. Writing By Kurt Larson
3. A sidecar could lift while making a hard right-hand turn without sufficient weight in the sidecar. To prevent the
sidecar from lifting either reduce speed on the right- hand turn or increase the weight in the sidecar.
4. It is normal to feel a slight movement in steering when reducing or increasing the acceleration of the rig.
5. Champion does NOT recommend the use of a EZ Steer product and a steering damper at the same time.
6. Champion does NOT recommend and advises against removing the sidecar to ride the motorcycle solo if an EZ
Steer option has been added to the sidecar rig.
7. It is common to experience increases the wear on the motorcycles rear tire if the sidecar has been installed. An
automobile tire can replace the motorcycle tire which will increase the life of the tire but it is NOT recommended to
ride the motorcycle solo after adding the automobile tire to the rear wheel of the motorcycle.
8. Changes in the sidecar passenger weight will affect the handling of a sidecar and without Champions T.I.L.T. device
the sidecar may require some minor adjustments to compensate for the weight. The T.I.L.T device will allow the
driver to adjust the sidecar rig for weight and road crown changes. The adjustments can be made as the vehicle is
driven.
9. It is common to experience some low speed wobbling (after installing the sidecar) in the steering without the use of
either a steering damper or Champions EZ Steer products.