RetinaNetworkSecurityScanner · Retina.exeCLISwitches 79 RunReportsfromtheCLI 80...
98
Retina Network Security Scanner User Guide
Transcript of RetinaNetworkSecurityScanner · Retina.exeCLISwitches 79 RunReportsfromtheCLI 80...

Retina Network Security Scanner
User Guide

Revision/Update Information: January 2017Software Version: Retina Network Security Scanner 6.1Revision Number: 0
CORPORATE HEADQUARTERS
5090 N. 40th StreetPhoenix, AZ 85018Phone: 1 818-575-4000
COPYRIGHT NOTICECopyright © 2017 BeyondTrust Software, Inc. All rights reserved.The information contained in this document is subject to change without notice.
No part of this document may be photocopied, reproduced or copied or translated in any manner to anotherlanguage without the prior written consent of BeyondTrust Software.
BeyondTrust Software is not liable for errors contained herein or for any direct, indirect, special, incidental orconsequential damages, including lost profit or lost data, whether based on warranty, contract, tort, or any otherlegal theory in connection with the furnishing, performance, or use of this material.
All brand names and product names used in this document are trademarks, registered trademarks, or trade namesof their respective holders. BeyondTrust Software is not associated with any other vendors or products mentionedin this document.

Contents
Introduction 6
Documentation Set for Retina Network Security Scanner 6
Overview 7
Architectural Overview 8Scanning Process 9Typical Bandwidth Usage 10
Changing the Retina Home Page View 11
Getting Started 12
Quick Scanning 12
Managing Credentials 15
Creating a Stored Credential 15Creating an SSH Credential 16Creating Oracle Credentials 18Creating SNMP Credentials 18Creating a Credential Group 19
Defining Address Groups 20
Using the Always Address Group 20Creating Address Groups 20
Managing Ports 22
Creating a Port Group 22Reviewing Port Number 23
Running Discovery Scans 24
Configuring a Discovery Scan 24Running a Discovery Scan 25Scheduling a Discovery Scan 25Adding Audits to Address Groups 26Clearing Discovery Scan Data 27
Running Audit Scans 28
Configuring Audit Scans 28Selecting Targets and Output Types 28Selecting Ports 29Selecting Audits 29Selecting Audit Options 30Setting Credentials 32
Running Scans 33Scanning Immediately 33
Contents
Retina Network Security Scanner 3 © 2017. BeyondTrust Software, Inc.
Scheduling Scans 34Scanning File Contents on Windows Targets 35
Exporting Scan Results to CyberScope 36Running aWireless Scan 38Deleting Scan Jobs 39Aborting Large Scans 39
Remediating Vulnerabilities 41
Generating Remediation Reports 41Reviewing Remediation Reports 43Using CVSS Scores 44
Generating Reports 45
Running Executive Reports 45Running Summary Reports 46Running Vulnerability Export Reports 47Running Access Reports 48Running PCI Compliance Reports 48
Adding Your Logo to PCI Compliance Reports 49Running a Dashboard Report 50Running an Alert Report 50Running a Consolidated Remediation Report 51
Running the Report to Display Superseded Audit IDs 52Customizing Reports 52
Customizing Audits 54
Searching the Audit Database 54Changing Risk Levels 55Modifying Customizable Settings 55Resetting Audits to Default Values 56Running Audit Customization Reports 57Viewing Modified Audits 57Creating Custom Audits 57
Updating the Retina Database 60Viewing Custom User Created Audits 61Modifying Audit Groups 61Exporting Audits 61
Creating Custom Audit Modules 62Editing Custom Audit Modules 62
Run Database Application Scans 64
Running Database Application Scans 64Review Database Application Vulnerabilities 64Preparing Database Applications for Scans 65
Preparing Your MySQL Database for Scans 65
SCAP Scanning 66
Copying SCAP Content (Optional) 66
Contents
Retina Network Security Scanner 4 © 2017. BeyondTrust Software, Inc.

Running SCAP Scans 66Using the Local Scan Service 66Configuring a SCAP Scan 66Saving Scan Results as PDF 68
Viewing SCAP Scan Results 68Converting SCAP Output to ARF Format 68
Setting Retina Options 70
Generating Log Files 70Automatically Check for Updates 70Enabling Event Routing 71Scanning Multiple Targets Simultaneously 72Setting Timeout Values 73Setting Scan Restrictions 73Enabling Central Policy 73
Configuring Email Notification for Events 75
Setting Alerts 75
OS Fingerprinting 76
Updating TCP OS Fingerprints 76
Exploiting Vulnerabilities 77
Exploiting a Vulnerability 77Integrating with Metasploit 78
Running Retina from the Command Line 79
Retina.exe CLI Switches 79Run Reports from the CLI 80
Retina.Report.Console.exe CLI 81
Parameters 81Examples 81
Retina PowerShell Module CLI 81RetRPC_client.exe CLI 82
Starting a Scan from the CLI 84
Database and XML Schema 87
Retina RTD Schema 87
Troubleshooting Retina 98
Submitting Support Files 98
Contents
Retina Network Security Scanner 5 © 2017. BeyondTrust Software, Inc.
IntroductionThis guide shows system administrators and security administrators how to configure and use BeyondTrust RetinaNetwork Security Scanner (RNSS). This guide provides an overview of how Retina works and instructions for Retinaconfiguration and use.
The following sections include a list of documentation for the product and where to get additional productinformation and technical assistance.
Documentation Set for Retina Network Security ScannerThe complete Retina Network Security Scanner documentation set includes the following:
l Retina Network Security Scanner Installation Guidel Retina Network Security Scanner User Guidel Retina Network Security Scanner Help
Introduction
Retina Network Security Scanner 6 © 2017. BeyondTrust Software, Inc.

OverviewRetina Network Security Scanner provides vulnerability testing for multiple platforms, assessment of vulnerabilitiesand the ability to create your own audits. In addition, Retina allows you to proactively secure your networks againstthe most critical vulnerabilities by incorporating the most up-to-date vulnerabilities database. Since vulnerabilityaudits are added continually, this database is updated at the beginning of each session.
Using Retina, you can:
• Scan in parallel using the Retina queuing system to perform 30 unique audits of one machine.
• Perform the majority of scans without administrative rights. This allows you to quickly and easily secure yourglobally distributed networks.
• Create custom audit scans to enforce your internal security policies, such as deployments and machineconfigurations.
Retina uses Access or any ODBC data store for storage and a management and aggregation server to controlremote scanners. In addition, multi-user authentication, summary and executive reporting capabilities and acomprehensive tracking system are available.
Overview
Retina Network Security Scanner 7 © 2017. BeyondTrust Software, Inc.

Architectural OverviewRetina's primary components are:
• Retina Engine Windows Service — retinaengine.exe provides the scanner and is comprised of:
– Scanner — performs the discovery and auditing. It reads and writes data to the Queue Manager and writesdata to the Named Pipe. Externally it reads from and writes to the RTD (Scan Results Database) files andwrites the Scanner log.
– Queue Manager — controls the scanning order. It communicates through queue files with the Scannerand reads data from and writes data to the RPC Interface. In addition, it retrieves jobs from the Scheduler.
– Scheduler — tracks and queues scheduled jobs. It reads data from and writes data to the RPC Interface,writes data to the Named Pipe and calls the Product Updater directly at scheduled times.
– Remote Procedure Call (RPC) Interface — provides the main control and communication from the serviceto the other executables and data stores. It is the main control and communication interface from theservice to other executables, and data stores. The RPC interface receives data and control informationinternally from the Queue Manager and Scheduler and externally from the RPC Client. In addition, it writesand forwards data instructions to the Queue Manager, Scheduler and Named Pipe.
– Named Pipe — provides the primary data interface for external functions. It receives response data fromthe Engine and forwards data to the RTD, RPC Client and Retina User Interface or command line.
• Retina User Interface — The retina.exe provides the local access to the functions of the engine. The UImanages Discover and Audit scans and scheduling and options by communicating with the engine using theRPC client. It reads data from and writes data to the RTD and writes to the UI and Message logs.
• RPC Client — Receives and forwards data from the UI or other applications to the RPC interface. In addition,the RetRPC_Client.exe is the return conduit for data to the UI.
• Application Bus— Provides the data channel for information and control sequences to and from the engine. Itreads and forwards data from the RTD to the Events Client.
• Events Client — Forwards data to the Events Server, if Retina is integrated with the centralized console.
• Product Updater — Communicates with the BeyondTrust servers to ensure the application and audit data filesare current.
Overview
Retina Network Security Scanner 8 © 2017. BeyondTrust Software, Inc.

Scanning ProcessDuring the scanning process, you enter the job information using the Retina interface. The interface writes the jobinformation to a job file and a scan request. The scan request is passed to the scanner or Retina Engine Service.
Note: The following details on how a scan works is provided for information only.Do not change the Retina database tables.
The scanner receives the job file and begins the audit process. An audit scan consists of:
• Targeting – builds a scan list from the address group and Discovery options. Retina ascertains if the target is adevice as well as the applications or services on the device.
• Port Scanning – determines the open, closed or filtered ports on each device.
• Detecting Operating System – performs registry checks, NetBIOS, ICMP fingerprinting or TCP fingerprinting todetermine the target's operating system.
• Auditing – runs an audit of each port with the specified protocols. This is to access the vulnerabilitiesassociated with the service on that port.
Initially Retina retrieves the list of IPs to be scanned and builds and writes its target list to the eeye_groups table.The job list contains the job start and stop information. Retina then begins running the scan.
As targets are scanned, the host completed entries are removed from the queue file. If the host is powered downfor any reason, this ensures that a scan will complete.
At the conclusion of the scan, the scanner writes Completed to the eeye_groups table in the scan results database(RTD). If the user aborts the job, the scanner writes Aborted to that table.
Overview
Retina Network Security Scanner 9 © 2017. BeyondTrust Software, Inc.
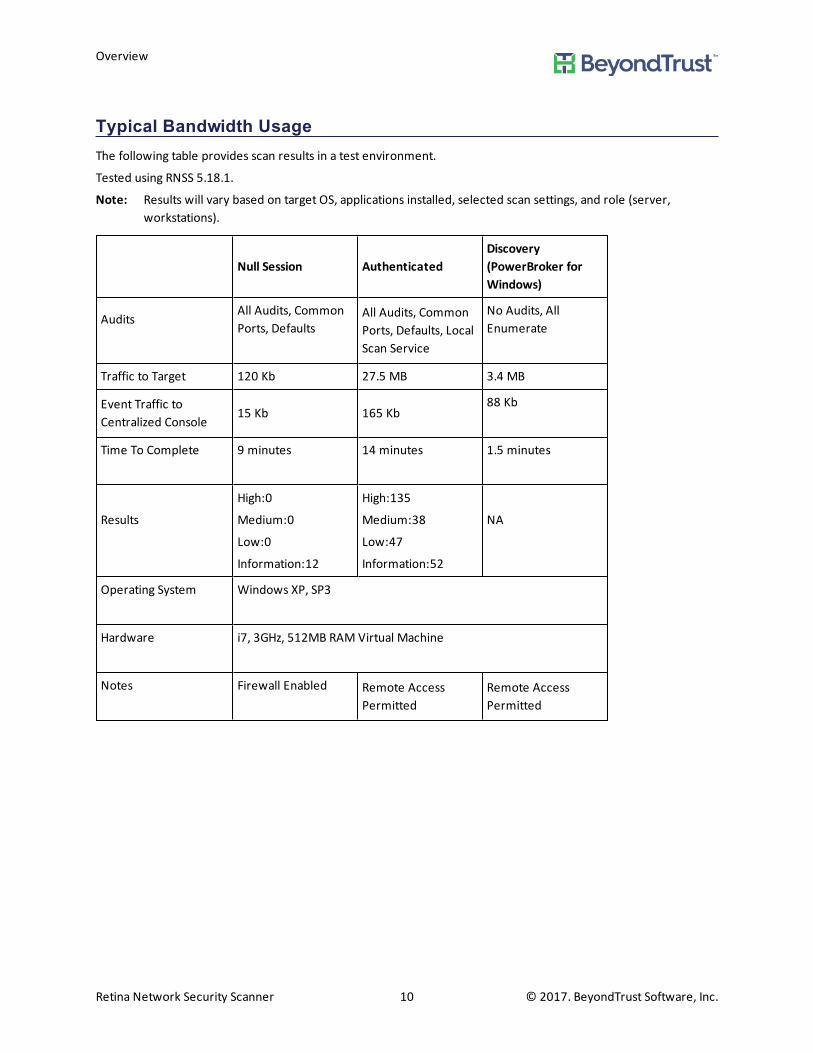
Typical Bandwidth UsageThe following table provides scan results in a test environment.
Tested using RNSS 5.18.1.
Note: Results will vary based on target OS, applications installed, selected scan settings, and role (server,workstations).
Null Session AuthenticatedDiscovery(PowerBroker forWindows)
AuditsAll Audits, CommonPorts, Defaults
All Audits, CommonPorts, Defaults, LocalScan Service
No Audits, AllEnumerate
Traffic to Target 120 Kb 27.5 MB 3.4 MB
Event Traffic toCentralized Console
15 Kb 165 Kb88 Kb
Time To Complete 9 minutes 14 minutes 1.5 minutes
Results
High:0
Medium:0
Low:0
Information:12
High:135
Medium:38
Low:47
Information:52
NA
Operating System Windows XP, SP3
Hardware i7, 3GHz, 512MB RAM Virtual Machine
Notes Firewall Enabled Remote AccessPermitted
Remote AccessPermitted
Overview
Retina Network Security Scanner 10 © 2017. BeyondTrust Software, Inc.

Changing the Retina Home Page ViewYou can add an explorer view and quick scan bar to the Retina home page.
To change the view:
1. Select View > QuickScan or View > Explorer Bar.
Changing the Retina Home Page View
Retina Network Security Scanner 11 © 2017. BeyondTrust Software, Inc.
Getting StartedYou can perform a quick scan by accepting the defaults. This allows the Retina scanner to locate responsive nodes,then launch pre-defined scans against the targets. The result is a list of vulnerabilities and remediation that can beviewed online or exported and saved.
Note: You must have administrator rights to run Retina scans on target assets.
Quick ScanningUsing the Retina templates, you can quickly scan based on an individual IP address or sequential range of IPaddresses. You then generate a remediation report in Remediate pane and generate and view the data online oroffline using the Reports pane.
You can create a scan template, then use that template later rather than recreating the settings each time you wantto run a scan. Go through the Scan Job Wizard on the Tools menu to create a template. For more information onthe options available, see Configuring Audit Scans.
To run a quick scan:
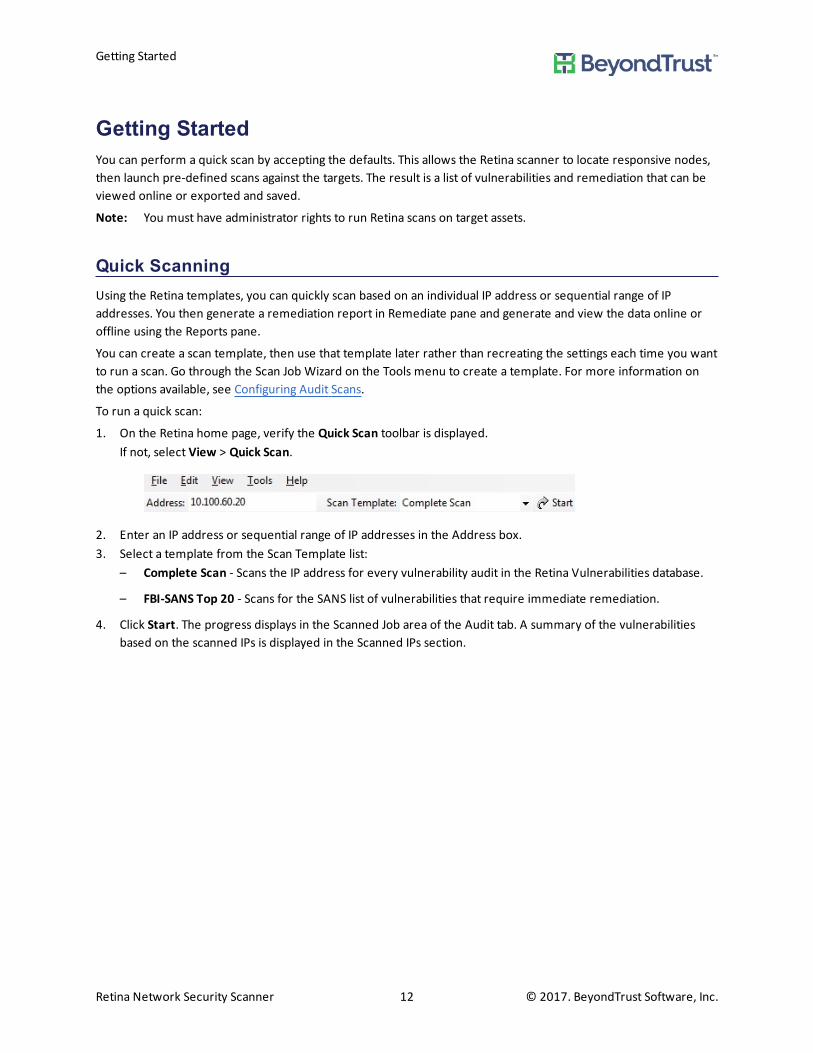
1. On the Retina home page, verify the Quick Scan toolbar is displayed.If not, select View > Quick Scan.
2. Enter an IP address or sequential range of IP addresses in the Address box.3. Select a template from the Scan Template list:
– Complete Scan - Scans the IP address for every vulnerability audit in the Retina Vulnerabilities database.
– FBI-SANS Top 20 - Scans for the SANS list of vulnerabilities that require immediate remediation.
4. Click Start. The progress displays in the Scanned Job area of the Audit tab. A summary of the vulnerabilitiesbased on the scanned IPs is displayed in the Scanned IPs section.
Getting Started
Retina Network Security Scanner 12 © 2017. BeyondTrust Software, Inc.

The following details are included in the scan results. Note that results are only displayed when assets are detectedduring the scan.
Getting Started
Retina Network Security Scanner 13 © 2017. BeyondTrust Software, Inc.

GeneralProvides information on address, report date, ping response, time to live, traceroute, and last logged on user.
HardwareLists disk drive, memory, network card, processor, video, and manufacturerinformation.
AuditsLists the severity from critical to information and categorized as registry, Windows,IP services, web servers, remote access, anti-virus and miscellaneous.
Machine
Lists the machine by domain name, credentials, operating system, remote date,remote MAC, NetBIOS info, remote time, role, event auditing, number of open,closed, and filtered TCP and UDP ports.
For a virtual machine, lists the virtual machine vendor, name, current snapshot, andUUID.
Ports Describes the TCP and UDP ports.
Processes
Lists all the processes running on the target system and can include the followingdetails: product name, file version, file description, file location, command line,memory usage, process ID, parent process, parent process ID, DLLs loaded, mutex,MD5/SHA1 hash, company name, verified signer, and user name.
ServicesLists the network services for the IP address. Common network services include:authentication servers, directory services, email and printing.
Shares Lists all locations on a network that allow multiple users to have a centralized space.
Software Lists all software installed on the target system.
Users Lists all the users found on the target system.
User Groups Lists all the groups found on the target system.
5. To view the results in a report, select the Report tab.6. Select the job name, then click Generate. The report is displayed. You can also view the report in Microsoft
Word and web browsers.
Getting Started
Retina Network Security Scanner 14 © 2017. BeyondTrust Software, Inc.

Managing CredentialsWhen you run a scan, you can select a stored credential. Using credentials with administrative rights for a scanprovides more complete scan results.
In Retina, you can:
• Create a stored credential
• Create a credential group
• Add credentials to the group
Creating a Stored CredentialYou can create a stored credential and select the credential when running the scan. You can also add the credentialto a credential group.
You can create the following credential types:
• SSH. See Creating an SSH Credential.
• Windows
• MySQL
• Microsoft SQL Server
• Oracle. See Creating Oracle Credentials.
• SNMP. See Creating SNMP Credentials.
A credential type is only used against scan targets that match the credential criteria.
Use the following procedure to create Any, Windows, MySQL, and SQL Server credentials.
To create a stored credential:
1. Select Tools > Credential Management.2. Select a credential type from the list.3. On the Credentials Management dialog box, enter the user account information: username, password,
description. The Default Credential check box is only available for type Any.4. If you are creating Microsoft SQL Server credentials, select the authentication type.
Managing Credentials
Retina Network Security Scanner 15 © 2017. BeyondTrust Software, Inc.

5. Click Add.6. Continue to add credentials as needed.7. After you add stored credentials, you can select a credential when configuring a scan:
8. Click Close.9. Default credentials are always used in a scan and are not displayed in the list.
Creating an SSH CredentialYou can create Public Key Encryption credentials to connect to SSH-configured targets. You can select a credentialthat contains a public/private key pair used for SSH connections.
DSA and RSA key formats are supported.
Optionally, when configuring SSH, you can use sudo. Using sudo, you can access scan targets that are not configuredto allow root accounts to log on remotely. You can log on as a normal user and sudo to a more privileged account.Additionally, you can use sudo to elevate the same account to get more permissions.
If you are using PowerBroker UNIX/Linux, you can elevate privileges using pbrun.
To create an SSH credential:
Managing Credentials
Retina Network Security Scanner 16 © 2017. BeyondTrust Software, Inc.
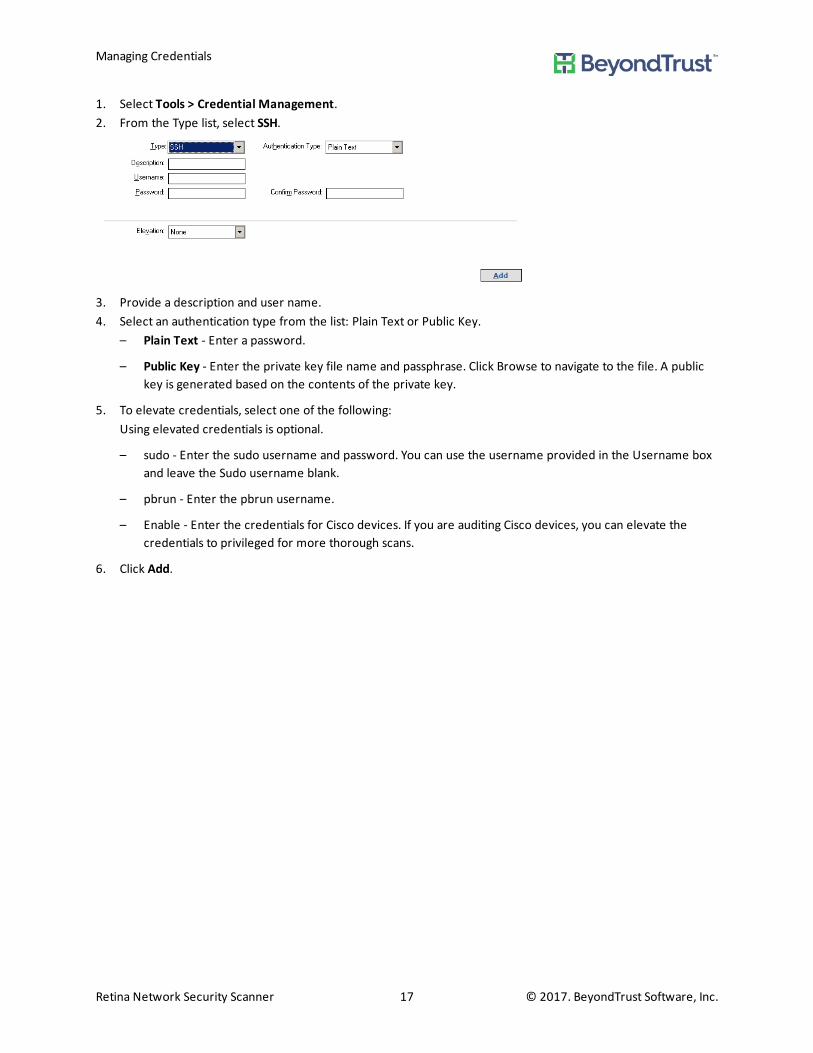
1. Select Tools > Credential Management.2. From the Type list, select SSH.
3. Provide a description and user name.4. Select an authentication type from the list: Plain Text or Public Key.
– Plain Text - Enter a password.
– Public Key - Enter the private key file name and passphrase. Click Browse to navigate to the file. A publickey is generated based on the contents of the private key.
5. To elevate credentials, select one of the following:Using elevated credentials is optional.
– sudo - Enter the sudo username and password. You can use the username provided in the Username boxand leave the Sudo username blank.
– pbrun - Enter the pbrun username.
– Enable - Enter the credentials for Cisco devices. If you are auditing Cisco devices, you can elevate thecredentials to privileged for more thorough scans.
6. Click Add.
Managing Credentials
Retina Network Security Scanner 17 © 2017. BeyondTrust Software, Inc.

Creating Oracle CredentialsIf you are scanning Oracle databases, you can create Oracle credentials.
The tsanames.ora file is updated automatically after you create an Oracle credential.
To create Oracle credentials:
1. Select Tools > Credential Management.2. From the Type list, selectOracle.3. Provide a user name, description, and password.4. Select an access level from the list: Standard, SYSDBA, or SYSOPER.5. Select additional connection options:
– Connect To - Select from: Database SID, Named Service.
– Protocol - Select a protocol: TCP, TCPS, NMP.
– Host - Enter the host name where the Oracle database resides.
– Database SID - Enter the database SID.
– Port Number - Enter a port number.
6. Review your settings.
7. Click Save.
Creating SNMP CredentialsIf you are scanning devices that are managed using an SNMP community, you can add your community stringshere.
To add an SNMP community string:
1. Select Tools > Credential Management.2. From the Type list, select SNMP.3. Enter a description and the community string.4. Click Add.
Managing Credentials
Retina Network Security Scanner 18 © 2017. BeyondTrust Software, Inc.

Creating a Credential GroupBefore you can create a credential group, you must first create stored credentials.
Note that credential groups cannot be used for XCCDF scans.
To create a credential group:
1. Select Tools > Credential Groups.2. Click New.3. Enter a group name and click OK.
If there is more than one group name in the list, ensure the correct group is selected.
4. Select the check boxes for the stored credentials that you want to add to the group.
5. Click Close.After you add a credential group, you can select the group when configuring a scan:
Managing Credentials
Retina Network Security Scanner 19 © 2017. BeyondTrust Software, Inc.

Defining Address GroupsTo ensure repeatable scans Retina uses address groups to sort assets by IP address, IP range, CIDR notation ornamed host.
You can create, modify and delete address groups, attach IP addresses, omit specific IP addresses and selectcredentials.
Note: If you are migrating from Retina 4 to Retina 5, you can import your address group data by clicking Importand selecting your .rti files.
To access address groups:
1. On the main toolbar, select Tools > Address Groups. The Address Group Modification window is displayed.
Using the Always Address GroupYou can create an address group and name it Always. Retina is designed to recognize this address group name andincludes the group in every scan (regardless if the group is selected in the scan job).
You can populate the Always address group with IP addresses that you want to scan and those that you want toignore. The Always address group is recommended for IP addresses that you never want to include in a scan (selectthe Omit check box when creating the address group to ignore IP addresses).
For more information, see Creating Address Groups.
Creating Address GroupsCreate an address group that includes particular IP addresses that you want in an audit. You can also include IPaddresses in an address group that you want to ignore during the scan.
After you create an address group, you can select the address group as your target type when you are setting up anaudit scan. See Configuring Audit Scans.
To create an address group:
1. On the Address Group window, click New.2. Enter the name, then click OK. The Address Group Modification window displays the new name in the Address
Group list.3. Add IP addresses to an address group by selecting the address group, then entering the target type as:
– IP Address - Scans using a single IP address.
– IP Range - Scans using a range of IP addresses.
– CIDR Notation - Scans using a Classless Inter-Domain Route or Supernet.
– Named Host - Scans using the DNS or NetBIOS.
4. If you store credentials in Retina, you can select credentials for the address group in the Credentials list box.5. To disable a specific target type, select the Omit This Entry check box. The IP address will be skipped, but
remain in the database.6. Click Add. The target types are added to the address group.
Defining Address Groups
Retina Network Security Scanner 20 © 2017. BeyondTrust Software, Inc.

7. To save the address group, click Close.
Defining Address Groups
Retina Network Security Scanner 21 © 2017. BeyondTrust Software, Inc.

Managing PortsWhile there are preconfigured port groups available for scanning, you can create port groups that are specific toyour scanning requirements.
You can create and change port and port group details.
Creating a Port GroupTo create a port group:
1. From the Tools menu, select Port Groups.2. Click New.3. Enter a name for the group.4. Select Single Port or Port Range and set the port numbers.5. Select from the following options:
– Protocol - Select the port protocol: Both, TCP, or UDP.
– Omit this entry - Excludes the port from protocol detection and scanning.
– Perform Protocol Detection - Excludes the ports from a scan. The ports are excluded even if during thedependence check one of the excluded ports is included. The check box is selected by default.
– Perform Audits - When selected, run the audit on the port if the port is found during the port scan. Thecheck box is selected by default.
6. Click Add.7. Click Close.
Managing Ports
Retina Network Security Scanner 22 © 2017. BeyondTrust Software, Inc.
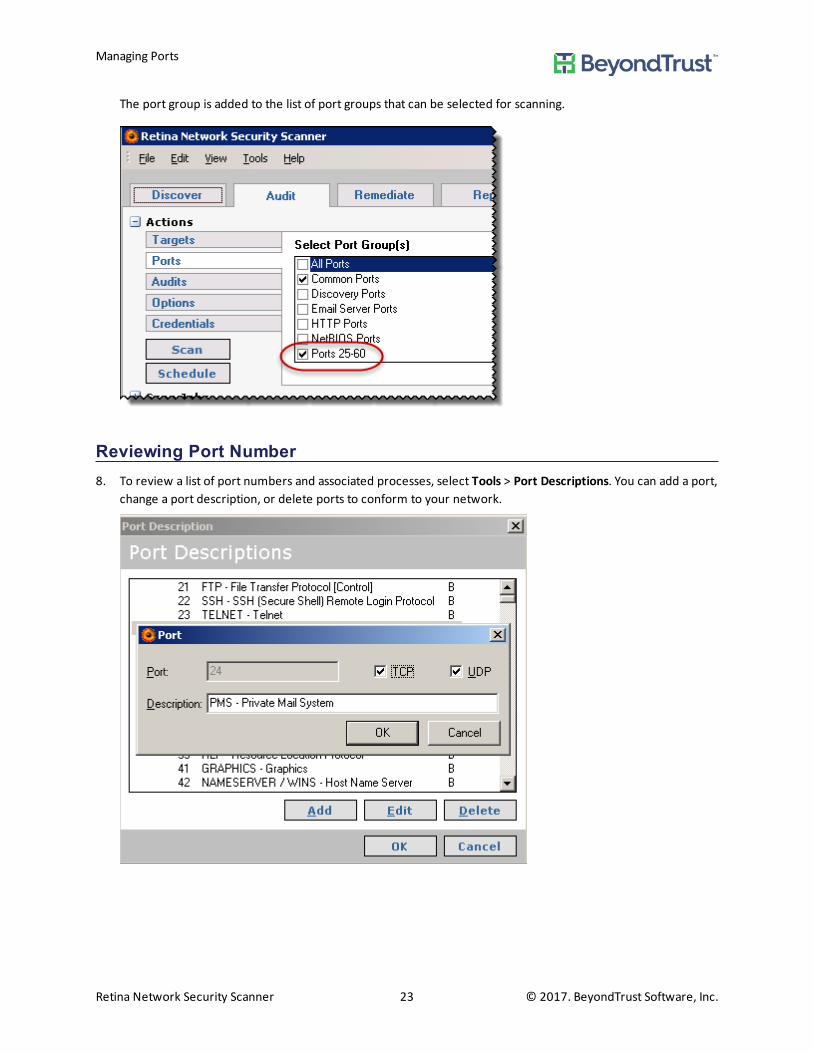
The port group is added to the list of port groups that can be selected for scanning.
Reviewing Port Number8. To review a list of port numbers and associated processes, select Tools > Port Descriptions. You can add a port,
change a port description, or delete ports to conform to your network.
Managing Ports
Retina Network Security Scanner 23 © 2017. BeyondTrust Software, Inc.
Running Discovery ScansThe Discovery scan allows you to locate network devices, such as workstations, routers, laptops and printers, anddetermine if a single or multiple IP addresses are active. In addition, the scan results can provide data on an outsidesource attempting to exploit your network.
You can periodically repeat the discovery scans to verify the status of devices and programs and the delta betweenthe current and previous scan.
Note: Administrator rights are required to run Retina scans.
To access discovery scans:
1. On the Retina home page, select the Discover tab. The Discovery page is displayed.
Configuring a Discovery ScanTo configure discovery scans:
1. On the Discovery pane, select the target type in the Target Type list box.– IP Address - Scans using a single IP address.
– IP Range - Scans using a range of IP addresses.
– CIDR Notation - Scans using a Classless Inter-Domain Route or Supernet. Each IP address has a networkprefix that identifies a gateway.The length of the network prefix is also specified and varies depending on the number of bits that areneeded rather than any arbitrary class assignment structure.
– Named Host - Scans using the DNS or NetBIOS.
– Address Group - The group contains any combination of computer IP addresses, IP address ranges, subnetsor other groups.
– Advanced Addresses - Scans using subnet IP address.
2. Click Options, then select the type of information to scan:– ICMP Discovery - Determines the Internet Control Message Protocol.
– TCP Discovery on Ports - Determines the Transmission Control Protocol message packets. You can entermultiple ports by using comma separators.
The default port list includes: 21,22,23,25,80,110,139,443,445,554,1433,3389
– UDP Discovery - Determines the User Datagram Protocol.
– Perform OS Detection - Determines the operating system of the target.
– Get Reverse DNS - Scans for reverse Domain Name System (rDNS) and retrieves the domain name for thetarget's IP address.
– Get NetBIOS Name - Scans for a Network Basic Input/Output System.
– Get MAC Address - Scans for the Media Access Control address or unique hardware number.
Running Discovery Scans
Retina Network Security Scanner 24 © 2017. BeyondTrust Software, Inc.
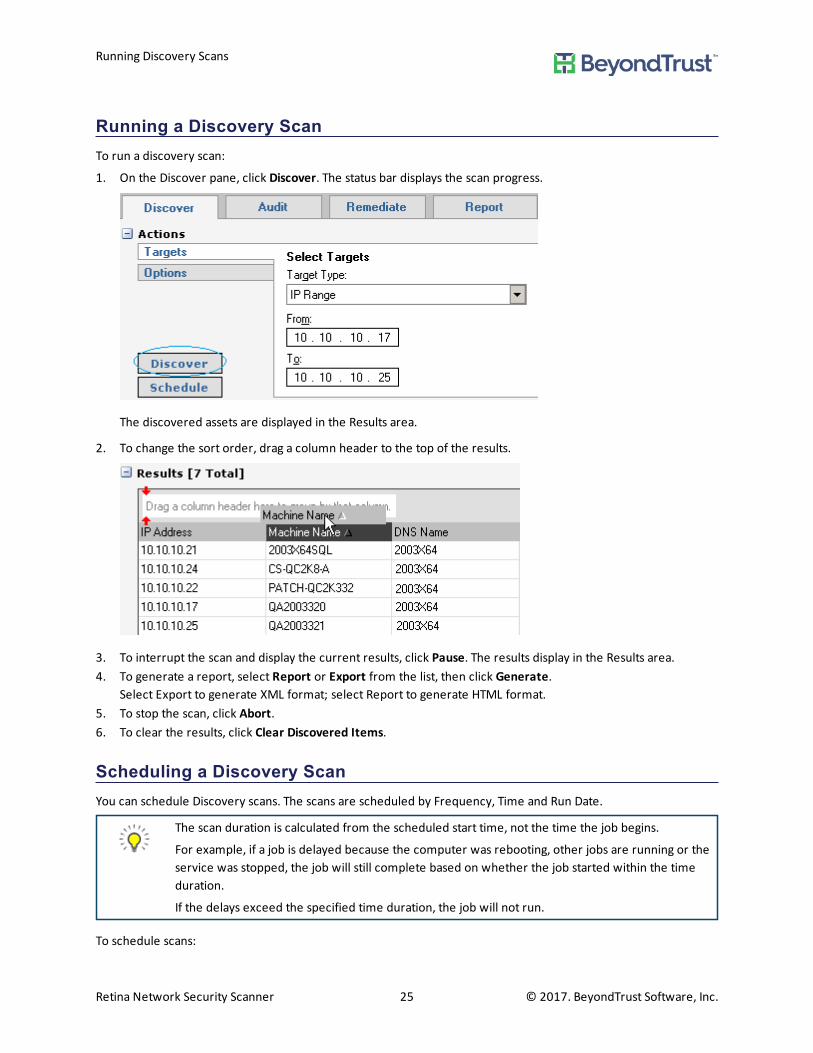
Running a Discovery ScanTo run a discovery scan:
1. On the Discover pane, click Discover. The status bar displays the scan progress.
The discovered assets are displayed in the Results area.
2. To change the sort order, drag a column header to the top of the results.
3. To interrupt the scan and display the current results, click Pause. The results display in the Results area.4. To generate a report, select Report or Export from the list, then click Generate.
Select Export to generate XML format; select Report to generate HTML format.5. To stop the scan, click Abort.6. To clear the results, click Clear Discovered Items.
Scheduling a Discovery ScanYou can schedule Discovery scans. The scans are scheduled by Frequency, Time and Run Date.
The scan duration is calculated from the scheduled start time, not the time the job begins.
For example, if a job is delayed because the computer was rebooting, other jobs are running or theservice was stopped, the job will still complete based on whether the job started within the timeduration.
If the delays exceed the specified time duration, the job will not run.
To schedule scans:
Running Discovery Scans
Retina Network Security Scanner 25 © 2017. BeyondTrust Software, Inc.
1. Click the Discover tab, and click Schedule. The Scan Job Scheduler window is displayed.2. Enter a name.
For Discover scan jobs, the default job name is Discovery Scan. This cannot be changed.
3. Select the start time and date.4. Select the frequency:
– Once - Schedules jobs to run one time. From the Start list, select the time and date.
– Daily - Schedules jobs for weekdays only, every x number of days or by the start date. From the Start list,select the time and date, then select Every Day, Weekdays or Every x days and specify the number ofdays.
– Weekly - Schedules jobs every x number of weeks or by the start date. From the Start list, select the timeand date, then select the number of weeks and the day of the week.
– Monthly - Schedules jobs every nth weekday of the month or by the start date. From the Start list, selectthe time and date. Select either the day of the month by day number or the day of the week and theweek, then select the months.
For example, you can schedule a job for the 26th day of August and September or the Second Thursday inApril and June.
5. To limit the schedule to a specific time duration, select the Abort the scan if it runs longer than checkbox. Enter the number of minutes the job can run after the scheduled start time.
6. Click OK.
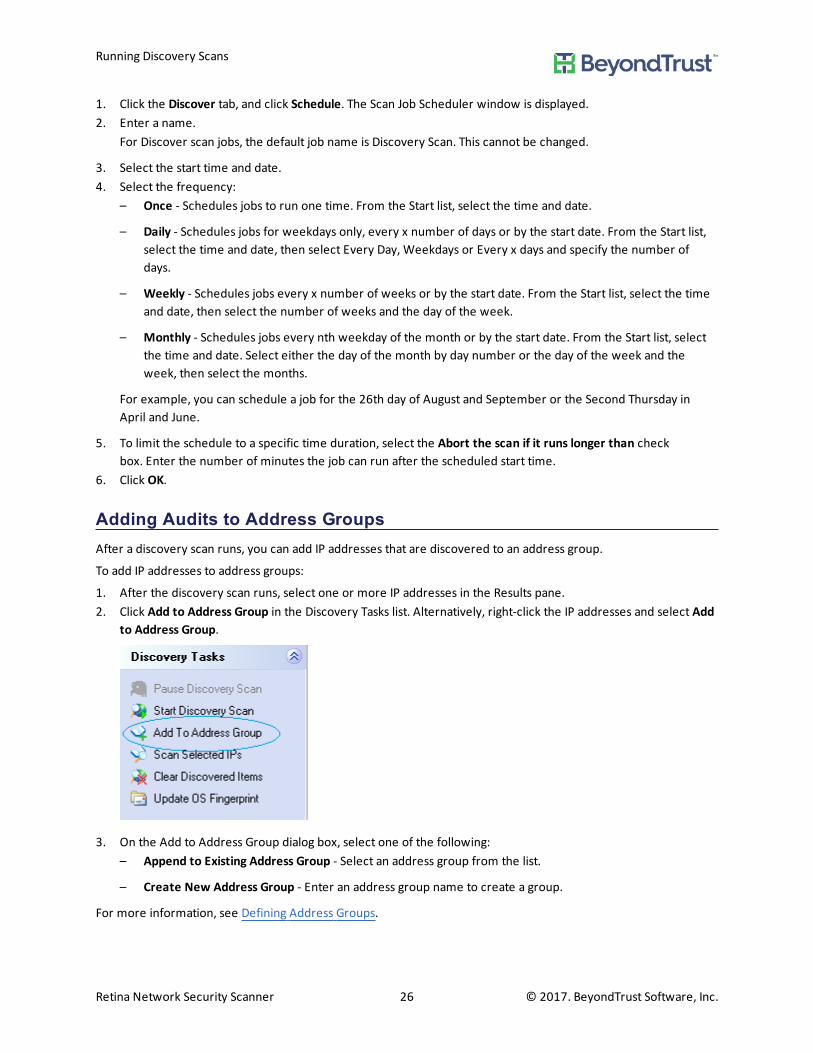
Adding Audits to Address GroupsAfter a discovery scan runs, you can add IP addresses that are discovered to an address group.
To add IP addresses to address groups:
1. After the discovery scan runs, select one or more IP addresses in the Results pane.2. Click Add to Address Group in the Discovery Tasks list. Alternatively, right-click the IP addresses and select Add
to Address Group.
3. On the Add to Address Group dialog box, select one of the following:– Append to Existing Address Group - Select an address group from the list.
– Create New Address Group - Enter an address group name to create a group.
For more information, see Defining Address Groups.
Running Discovery Scans
Retina Network Security Scanner 26 © 2017. BeyondTrust Software, Inc.

Clearing Discovery Scan DataYou can clear the discovery scan data from the database.
To clear the scan data:
1. From the Discovery Tasks list, select Clear Discovered Items.Alternatively, right-click a discovered item in the Results pane and select Clear Discovered Items.
2. To clear all discovered assets from the list, click Yes.
Running Discovery Scans
Retina Network Security Scanner 27 © 2017. BeyondTrust Software, Inc.

Running Audit ScansRetina can scan any device with an IP address if the route between Retina and the IP address can be established.Retina can be used to scan internally within a DMZ or from outside inward.
You can scan VMWare ThinApp images.
For more information about how a scan works, see Scanning Process.
Configuring Audit ScansYou can define your scan parameters, then create a group to ensure scanning the same targets at a later date. Youcan schedule audit scans to track the vulnerability assessments.
Note: You can create an address group called Always that is included in all scans. For more information, seeUsing the Always Address Group.
You can run a scan without administrative rights on each target asset; however, administrative rights ensure morecomplete scan results.
Selecting Targets and Output Types
To select the target and output types:
1. On the Retina home page, select the Audit tab. The Audit page displays Actions, Scan Jobs and Scanned IPs.2. In the Actions area, click Targets. The Target pane displays.3. From the Target Type list, select the target type:
– IP Address - Scans using an individual IP address. The default displays the scanner's IP address.
– IP Range - Scans using a range of IP addresses. The default displays the network and subnet address fromyour workstation.
– CIDR Notation - Scans using a Classless Inter-Domain Route or Supernet. Each IP address has a networkprefix that identifies a gateway.The length of the network prefix is also specified and varies depending on the number of bits that areneeded rather than any arbitrary class assignment structure.
– Named Host - Scans using the domain name system (DNS) or NetBIOS.
– Address Group - The group contains any combination of IP addresses, IP address ranges, subnets or othergroups.
– Advanced - Scans using any combination of nonconsecutive IP addresses, IP ranges, CIDR notation, namedhosts or address groups. The addresses are separated by a single space.
4. From the Output Type list, select one of the following:– File - To store scan results in a file.
– DSN - To store results to a system database. To restore results in a specific DSN, create the DSN usingODBC Data Source Administrator in Windows Administrative Tools.
If no file or DSN is defined, Retina stores multiple results in a single file.
5. Enter a file name and job name.
Running Audit Scans
Retina Network Security Scanner 28 © 2017. BeyondTrust Software, Inc.

Selecting PortsThere are preconfigured port groups available. You can add or remove ports from a port group.
You can create a port group and add ports. See Managing Ports.
To select a port group:
1. On the Ports pane, select a port group. You can select more than one port group.
Selecting AuditsWhen you select audit group scan settings, you can:
• Select one or more audit groups to include in the scan
• Change the audits in an audit group as you configure the scan settings.
To search the audit database, see Searching the Audit Database.
To select the audits for the scan:
1. Select the Audit tab, then select Audits.2. Scroll through the list and select audit groups.
3. To change the audit groups, clickModify. The Audit Group Modification window is displayed.4. To create an audit group, click New, then type the group name and click OK. The audit group name is
displayed.5. To add audits to the group:
a. Select the Automatically enable new audits in this group check box to automatically add all auditsreceived when you update your database with the latest audits.
b. Select an audit group then select the check boxes for the audits that you want to add to the group.c. Right-click an audit and select Enable All; all audits in the audit group are selected.d. Shift+select audits to select more than one audit. Right-click and select Enable Selected.
Running Audit Scans
Retina Network Security Scanner 29 © 2017. BeyondTrust Software, Inc.

6. To change an existing audit group, select or clear audit check boxes.7. To save changes, click Close.To restore the default settings for an audit group, click Reset. Click Yes on the confirmation dialog box. The defaultaudits for the currently selected audit group are reset.
Selecting Audit OptionsTo select audit options:
1. Select the Audit tab.2. SelectOptions.
3. Select scan options from the following list:– Perform OS Detection - Determines the operating system of the target.
– Get Reverse DNS - Scans for reverse Domain Name System (rDNS) and retrieves the domain name for thetarget's IP address.
– Get NetBIOS Name - Determines the Network Basic Input/Output System.
– Get MAC Address - Retrieves the Media Access Control address or unique hardware number.In addition, Retina can use the MAC address to detect if a target is running in a virtualized environment.
– Perform Traceroute - Determines the paths that packets travel to the target.
– Enumerate [parameter] Using NetBIOS - Uses the NetBIOS protocol to determine and list audits specifiedin the Audit Group.The parameters include registry, users, shares, files, hotfixes, named pipes, machine information, auditpolicy, per-user registry settings, groups, processes, user and group privileges and hardware.
– Enumerate Users - Find and enumerate users on the target assets.
– Enumerate Shares - Using NetBIOS, finds and enumerates shared folders and resources on the targetasset.
– Enumerate Groups - Lists groups on target asset, includes SID, group scope, and group type information.
– Enumerate Processes - Lists the processes running on the target asset.
– Enumerate Services - Lists the services running on the target asset.
Running Audit Scans
Retina Network Security Scanner 30 © 2017. BeyondTrust Software, Inc.
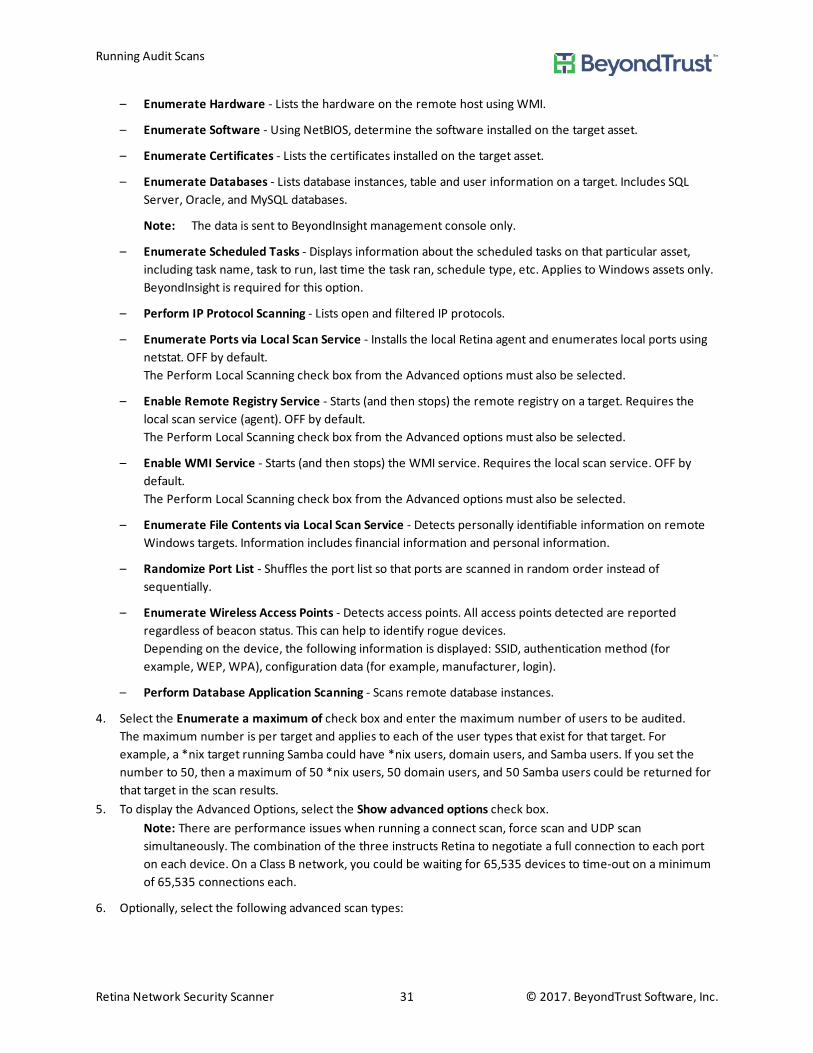
– Enumerate Hardware - Lists the hardware on the remote host using WMI.
– Enumerate Software - Using NetBIOS, determine the software installed on the target asset.
– Enumerate Certificates - Lists the certificates installed on the target asset.
– Enumerate Databases - Lists database instances, table and user information on a target. Includes SQLServer, Oracle, and MySQL databases.
Note: The data is sent to BeyondInsight management console only.
– Enumerate Scheduled Tasks - Displays information about the scheduled tasks on that particular asset,including task name, task to run, last time the task ran, schedule type, etc. Applies to Windows assets only.BeyondInsight is required for this option.
– Perform IP Protocol Scanning - Lists open and filtered IP protocols.
– Enumerate Ports via Local Scan Service - Installs the local Retina agent and enumerates local ports usingnetstat. OFF by default.The Perform Local Scanning check box from the Advanced options must also be selected.
– Enable Remote Registry Service - Starts (and then stops) the remote registry on a target. Requires thelocal scan service (agent). OFF by default.The Perform Local Scanning check box from the Advanced options must also be selected.
– Enable WMI Service - Starts (and then stops) the WMI service. Requires the local scan service. OFF bydefault.The Perform Local Scanning check box from the Advanced options must also be selected.
– Enumerate File Contents via Local Scan Service - Detects personally identifiable information on remoteWindows targets. Information includes financial information and personal information.
– Randomize Port List - Shuffles the port list so that ports are scanned in random order instead ofsequentially.
– Enumerate Wireless Access Points - Detects access points. All access points detected are reportedregardless of beacon status. This can help to identify rogue devices.Depending on the device, the following information is displayed: SSID, authentication method (forexample, WEP, WPA), configuration data (for example, manufacturer, login).
– Perform Database Application Scanning - Scans remote database instances.
4. Select the Enumerate a maximum of check box and enter the maximum number of users to be audited.The maximum number is per target and applies to each of the user types that exist for that target. Forexample, a *nix target running Samba could have *nix users, domain users, and Samba users. If you set thenumber to 50, then a maximum of 50 *nix users, 50 domain users, and 50 Samba users could be returned forthat target in the scan results.
5. To display the Advanced Options, select the Show advanced options check box.Note: There are performance issues when running a connect scan, force scan and UDP scansimultaneously. The combination of the three instructs Retina to negotiate a full connection to each porton each device. On a Class B network, you could be waiting for 65,535 devices to time-out on a minimumof 65,535 connections each.
6. Optionally, select the following advanced scan types:
Running Audit Scans
Retina Network Security Scanner 31 © 2017. BeyondTrust Software, Inc.
– Enable Connect Scan Mode - Run if other methods, such as a slow dial-up, are unreliable. The operatingsystem is negotiating a full connection to each device. Because multiple port scanning methods are notused, Retina cannot determine a number of items, such as operating system.
– Enable Force Scan - Run if the targeted devices are not going to answer SYN or ICMP scanning. ForcesRetina to run protocol discovery on each port of each device to determine the protocol. This should onlybe used in a highly locked down network where the standard port scanning methods will be filtered orblocked. Force Scan should not be used in IP ranges.Note: Using Force Scan assumes the selected target is live. Each selected target counts against yourlicense count.
– Extended UDP Scan - Runs a complete scan on all User Datagram Protocol without timing out. ForcesRetina to expect an answer. The IP will eventually timeout.
An extended UDP scan can take longer when the Windows target has Windows Firewall turned on. Turnoff Windows Firewall for the duration of the scan.
– Disable Tarpit Detection - Stops tarpit detection. A TCP tarpit program intentionally reduces the size ofdata packets to slow communication transmissions. This can cause incorrect scan results.To scan systems running tarpits, set the tarpit to allow unimpeded connections from the Retina scanner.
– Randomize Target List - Shuffles IP addresses so that targets are scanned in random order instead ofsequentially by IP address.
– Perform Local Scanning - Uses the local scan agent to assist with the scan. This check box must be selectedwhen selecting the Enumerate Ports via Local Scan Service, Enable Remote Registry Service, and EnableWMI Services check boxes.
– Disable OS Backport Detection - Runs all remote audits on all targets including operating systems wherethere might be backported banners. By default, Retina will skip some remote audits when a backportedbanner is detected to avoid a false positive on that target.
– Enable Smart Credentials - When there is more than one credential selected for a scan, the Retinascanner determines the best credential to use for each target. For example, a target asset might have SQLServer installed. For that particular target you would want the SQL Server credential used. In this case,using Smart Credentials ensures the SQL Server credential is used (if set in the scan settings. See SettingCredentials). Enable Smart Credentials is turned on by default.
Setting CredentialsCredentials are used to secure access to the target assets, such as networks, workstations, servers, and printers.You can run a scan without administrative rights on each target asset; however, administrative rights ensure morecomplete scan results.
To run a fully credentialed scan of a UNIX device, you must enable SSH access using the root oradmin username.
To run a fully credentialed scan of aWindows device, NetBIOS access is required. NetBIOS isenabled by default.
To specify credentials:
1. Select the Audit tab, then select Credentials.2. Select the credentials to use for this scan:
Running Audit Scans
Retina Network Security Scanner 32 © 2017. BeyondTrust Software, Inc.

– Null Session - Requires no credentials.
– Stored - Provides a selection list of stored credentials.To create a stored credential, click Add. For more information, see Creating Stored Credentials.
– Single-use - Allows a single session for one user based on user name and password.
– Credential Group - Select a group from the list.For information about credential groups, see Creating a Credential Group.
Running ScansYou can scan the target immediately or schedule the scan for a later date.
The Scan Jobs section displays active, completed, and scheduled scans.
You can rescan, delete, and refresh the list of scans.
Scanning ImmediatelyTo scan the targets now:
1. Select the Audit tab.2. Click Scan.3. You are prompted to enter a scan name and credentials. Enter the scan name or credentials (both are
optional).The audit begins. You can view the scan progress details in the Status bar, including: IP address scanned, type ofscan, and update messages.
4. After the scan runs, select a vulnerability in the Scanned IP section to view more details such as descriptionand fix information. Use the legend as a quick aid to interpret vulnerability severity level.
Running Audit Scans
Retina Network Security Scanner 33 © 2017. BeyondTrust Software, Inc.
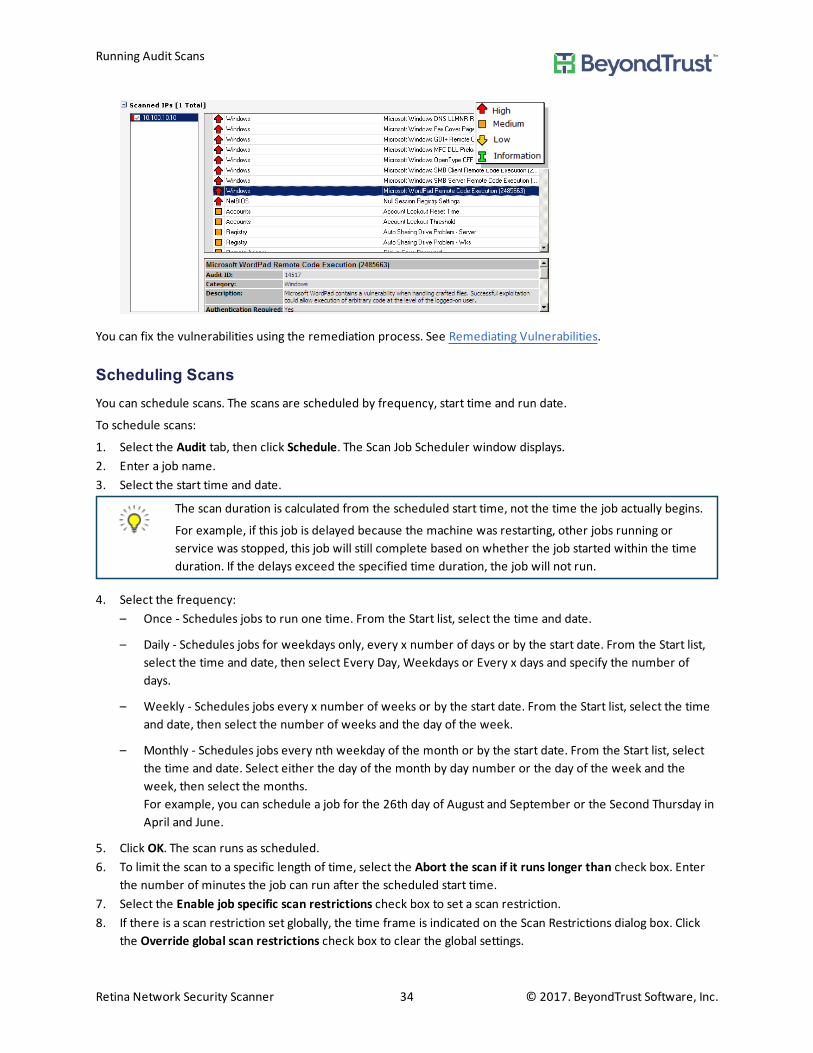
You can fix the vulnerabilities using the remediation process. See Remediating Vulnerabilities.
Scheduling ScansYou can schedule scans. The scans are scheduled by frequency, start time and run date.
To schedule scans:
1. Select the Audit tab, then click Schedule. The Scan Job Scheduler window displays.2. Enter a job name.3. Select the start time and date.
The scan duration is calculated from the scheduled start time, not the time the job actually begins.
For example, if this job is delayed because the machine was restarting, other jobs running orservice was stopped, this job will still complete based on whether the job started within the timeduration. If the delays exceed the specified time duration, the job will not run.
4. Select the frequency:– Once - Schedules jobs to run one time. From the Start list, select the time and date.
– Daily - Schedules jobs for weekdays only, every x number of days or by the start date. From the Start list,select the time and date, then select Every Day, Weekdays or Every x days and specify the number ofdays.
– Weekly - Schedules jobs every x number of weeks or by the start date. From the Start list, select the timeand date, then select the number of weeks and the day of the week.
– Monthly - Schedules jobs every nth weekday of the month or by the start date. From the Start list, selectthe time and date. Select either the day of the month by day number or the day of the week and theweek, then select the months.For example, you can schedule a job for the 26th day of August and September or the Second Thursday inApril and June.
5. Click OK. The scan runs as scheduled.6. To limit the scan to a specific length of time, select the Abort the scan if it runs longer than check box. Enter
the number of minutes the job can run after the scheduled start time.7. Select the Enable job specific scan restrictions check box to set a scan restriction.8. If there is a scan restriction set globally, the time frame is indicated on the Scan Restrictions dialog box. Click
the Override global scan restrictions check box to clear the global settings.
Running Audit Scans
Retina Network Security Scanner 34 © 2017. BeyondTrust Software, Inc.

9. Click the squares to set the restricted time frame, and then click OK.10. If a scan is running when the scan restriction time starts, you can abort or pause the running scan. Select
Aborted or Paused.11. Click OK.
Scanning File Contents on Windows TargetsYou can run scans on Windows remote targets to detect personally identifiable information, including:
Financial• Actuality Report
• Credit card numbers, including the following card providers: AMEX cards, Diners Club, Discover Card, JCB,MasterCard, Maestro, Visa
• Credit card tracks. The audit includes all track types (1, 2, 3)
• Financial Report (English)
• IBAN Numbers (46 countries)
Note that actual credit card numbers are not reported in the scan information; only that the information isdetected. For example, the scan might detect a file that contains an American Express credit card number; thescan output indicates the file name and the credit card type, but not the credit card number.
PersonalThe following personal information can be detected: DNA sequence, Email address, Driver License (51states/territories), Phone number, Social Security Number, ZIP Code (USA), ZIP Code+4 (USA)
File typesThe following list of file types can be scanned:
• Text Files (TXT)
• Log Files (LOG)
• XML Files (XML)
Running Audit Scans
Retina Network Security Scanner 35 © 2017. BeyondTrust Software, Inc.
• Comma Separated Values (CSV)
• Microsoft Word 1997-2003 (DOC)
• Microsoft Word 2007+ (DOCX)
• Microsoft Excel 1997-2003 (XLS)
• Microsoft Excel 2007+ (XLSX)
• Microsoft PowerPoint 1997-2003 (PPT)
• Microsoft PowerPoint 2007+ (PPTX)
• Adobe Personal Document Format 1.2 – 1.7 (PDF)
• Rich Text Format (RTF)
• OpenOffice OpenDocument Text (ODT – as OpenXML)
• OpenOffice OpenDocument Spreadsheets (ODS – as OpenXML)
• OpenOffice OpenDocument Presentation (ODP – as OpenXML)
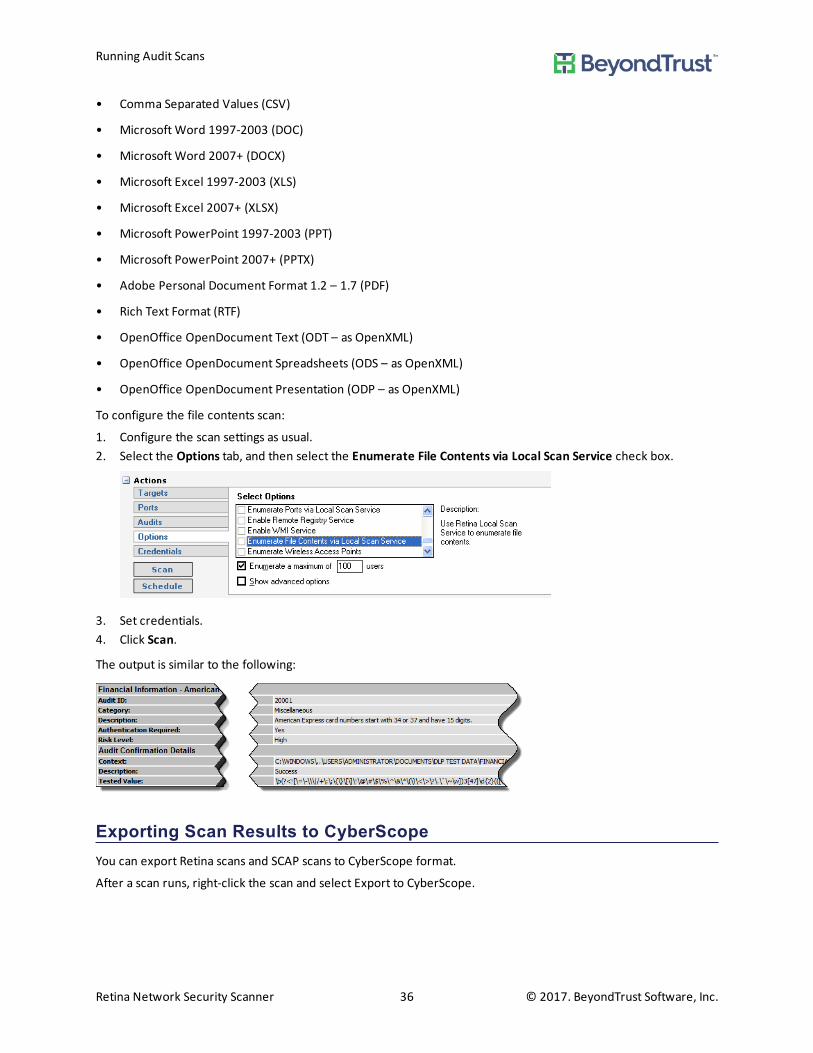
To configure the file contents scan:
1. Configure the scan settings as usual.2. Select the Options tab, and then select the Enumerate File Contents via Local Scan Service check box.
3. Set credentials.4. Click Scan.
The output is similar to the following:
Exporting Scan Results to CyberScopeYou can export Retina scans and SCAP scans to CyberScope format.
After a scan runs, right-click the scan and select Export to CyberScope.
Running Audit Scans
Retina Network Security Scanner 36 © 2017. BeyondTrust Software, Inc.

Running Audit Scans
Retina Network Security Scanner 37 © 2017. BeyondTrust Software, Inc.
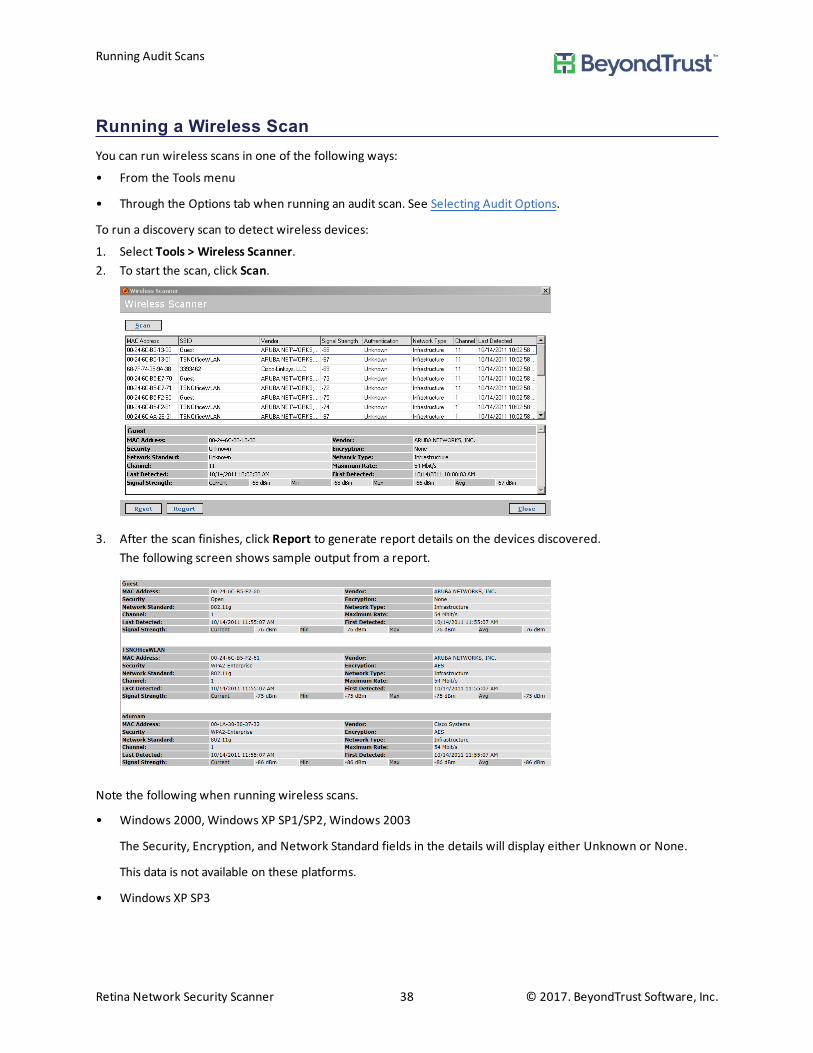
Running a Wireless ScanYou can run wireless scans in one of the following ways:
• From the Tools menu
• Through the Options tab when running an audit scan. See Selecting Audit Options.
To run a discovery scan to detect wireless devices:
1. Select Tools > Wireless Scanner.2. To start the scan, click Scan.
3. After the scan finishes, click Report to generate report details on the devices discovered.The following screen shows sample output from a report.
Note the following when running wireless scans.
• Windows 2000, Windows XP SP1/SP2, Windows 2003
The Security, Encryption, and Network Standard fields in the details will display either Unknown or None.
This data is not available on these platforms.
• Windows XP SP3
Running Audit Scans
Retina Network Security Scanner 38 © 2017. BeyondTrust Software, Inc.
If the WZC service is not running, Windows XP SP3 behaves as above. When the service is running, the Securityand Encryption fields reflect the correct values.
In the Network Standard field, the value 802.11g is displayed for 802.11n devices since the drivers areunaware of the 802.11n standard.
• Windows Vista, Windows 7
If the WLAN AutoConfig service is not running, wireless scanning fails.
When the service is running, all values are returned correctly.
• Windows 2008, Windows 2008 R2
For Windows 2008 and 2008 R2, add the Wireless LAN Service feature in the Server Manager for WLANsupport to be enabled.
Once this feature is added, scans will run as described in the Windows Vista, Windows 7 section.
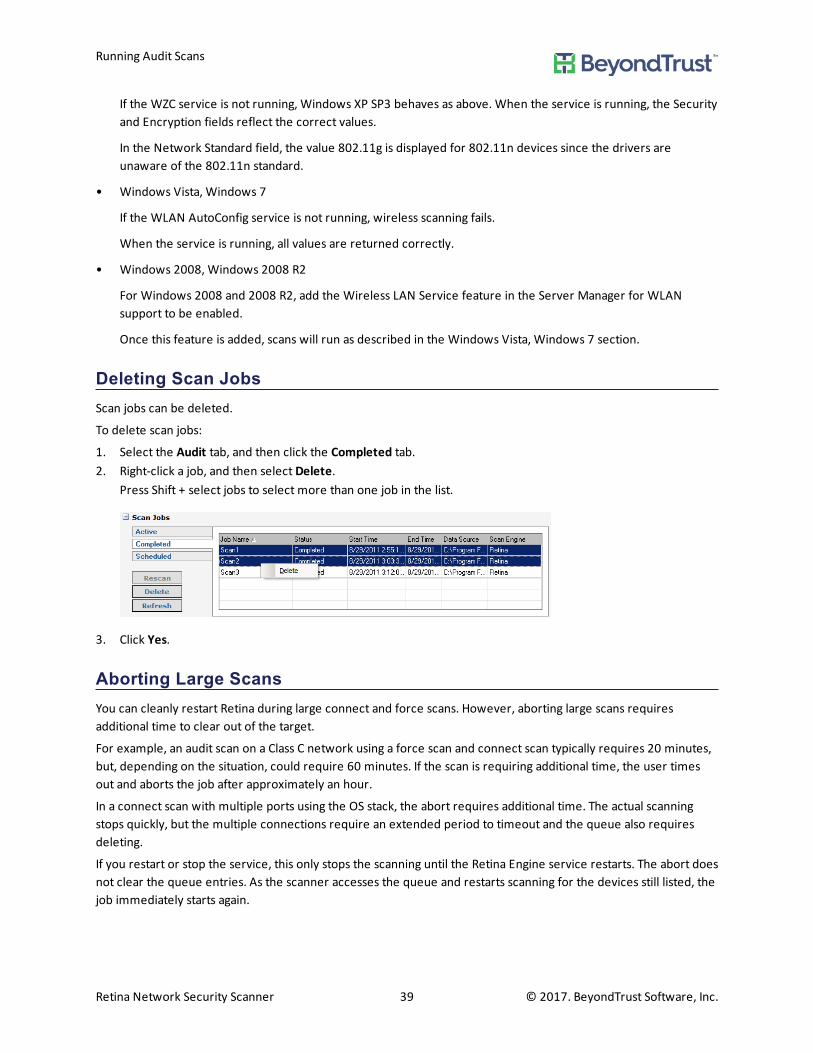
Deleting Scan JobsScan jobs can be deleted.
To delete scan jobs:
1. Select the Audit tab, and then click the Completed tab.2. Right-click a job, and then select Delete.
Press Shift + select jobs to select more than one job in the list.
3. Click Yes.
Aborting Large ScansYou can cleanly restart Retina during large connect and force scans. However, aborting large scans requiresadditional time to clear out of the target.
For example, an audit scan on a Class C network using a force scan and connect scan typically requires 20 minutes,but, depending on the situation, could require 60 minutes. If the scan is requiring additional time, the user timesout and aborts the job after approximately an hour.
In a connect scan with multiple ports using the OS stack, the abort requires additional time. The actual scanningstops quickly, but the multiple connections require an extended period to timeout and the queue also requiresdeleting.
If you restart or stop the service, this only stops the scanning until the Retina Engine service restarts. The abort doesnot clear the queue entries. As the scanner accesses the queue and restarts scanning for the devices still listed, thejob immediately starts again.
Running Audit Scans
Retina Network Security Scanner 39 © 2017. BeyondTrust Software, Inc.
To preclude this, the best solution is abort the scan job and wait for the abort process to complete. If the job iscausing another problem on the network, then aborting the job and unplugging the network is the next bestsolution. Though without the network connection, the abort could take even longer.
To abort the job and place the scan in a known state:
1. Click Abort.2. Stop the Retina service (net stop retinaengine).3. If the scan will be continued in the future, rename or move queue.xml. If not, delete it.4. Open the associated .RTD file, locate the job name in the eeye_groups and set the status to aborted or
Completed. This allows the retention of data. If not, delete the RTD file.5. Restart the RetinaEngine.6. Delete the following files to place Retina in a clean state for troubleshooting:
– Retina 5\queue*.
– Retina 5\targetlog.*
– Retina 5\schedule.xml
– Retina 5\jobs*.*
– Retina 5\scans\*.rtd
– Retina 5\scans\*.ldb
– Retina 5\scans\scanrequests\*.xml
– Retina 5\scans\jobs\*.xml
– Retina 5\temp\*.*
– Retina 5\logs\*.*
Running Audit Scans
Retina Network Security Scanner 40 © 2017. BeyondTrust Software, Inc.

Remediating VulnerabilitiesYou can access the jobs scanned in the Audit tab and generate a Remediation Report that lists the vulnerabilityinformation and recommends methods to fix the vulnerability as well as the Risk Level, Severity Code, PCI SeverityLevel.
Generating Remediation ReportsNote: On systems with a low monitor resolution (1024x768), you might need to disable the Explorer Bar to see
all of the remediation report options. From the View menu you can turn off the Explorer Bar.
To create a remediation report:
1. Click the Remediate tab, and select the job name in the Scan Jobs area. The Remediate pane displays theInclude in Report section.The data to include in the Remediation report changes based on the filter.
2. Select filtering options:– Group Report By list - Vulnerability, Machine, CVE
– Sort Machines By list - IP Address, Name
– Sort Vulnerabilities By list - Risk, Name
3. Select the specific vulnerabilities or machines.4. Select the Options tab. The Options pane displays the section headings and creation details.
5. In the Include box, select the headings to include in the report:– Page Breaks - Displays the information into standard 8-1/2 x 11” pages.
– Job Metrics - Provides a summary of the scan.
Remediating Vulnerabilities
Retina Network Security Scanner 41 © 2017. BeyondTrust Software, Inc.

– Confidentiality Page - Adds the following text to the cover page:The following report contains company confidential information. Do not distribute, email, fax, or transfervia any electronic mechanism unless it has been approved by the recipient company's security policy. Allcopies and backups of this document should be saved on protected storage at all times. Do not share anyof the information contained within this report with anyone unless they are authorized to view theinformation. Violating any of the previous instructions is grounds for termination.
– Expand URLs - Provides links and website address in the Related Links section.
– Notes area - Provides blank space for adding notes.
– Detailed Audit Status - Displays the detailed audit status.
6. In the Creation Details section, select the Include Creation Details Page check box to include a created bypage.In the Report Created By and Report Create For text box, enter the names or other text information.
7. In the Include by Risk section, select the type of vulnerabilities to include:– Information - Details host information that does not necessarily represent a security threat, but can be
useful to the administrator to assess the security.
– Low - Defines risks associated with specific or unlikely circumstances.
– Medium - Describes serious security threats that would allow a trusted but non-privileged user to gainaccess to sensitive information.
– High - Indicates vulnerabilities that severely impact the overall safety and usability of the network.
8. In the Include by Exploitability section, select the check boxes.Note: You must select at least one option from the Exploitability section to run the remediation report.
– Exploitable - Includes a flag in the report that the vulnerability can be exploited.
– Not Exploitable - Includes a flag in the report that the vulnerability can not be exploited.
9. Click Generate. The Remediate report displays in the Results pane.
10. On the Remediate Tasks pane, select viewing and printing options:
Remediating Vulnerabilities
Retina Network Security Scanner 42 © 2017. BeyondTrust Software, Inc.
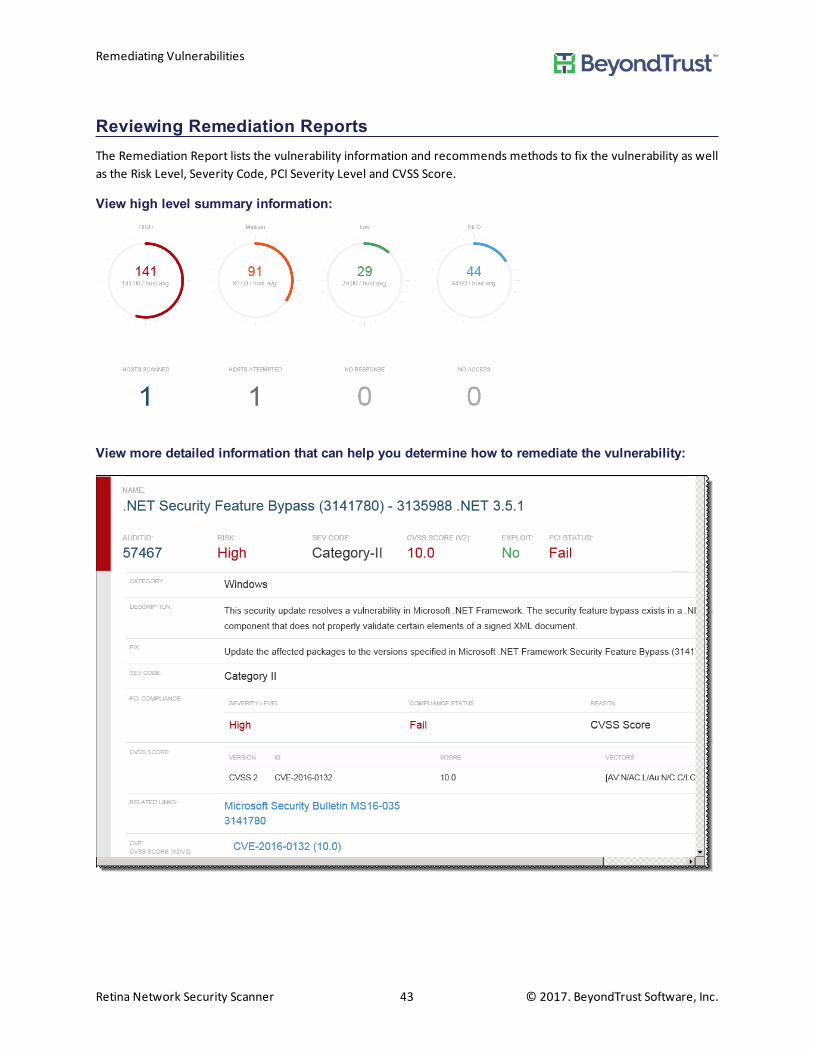
Reviewing Remediation ReportsThe Remediation Report lists the vulnerability information and recommends methods to fix the vulnerability as wellas the Risk Level, Severity Code, PCI Severity Level and CVSS Score.
View high level summary information:
View more detailed information that can help you determine how to remediate the vulnerability:
Remediating Vulnerabilities
Retina Network Security Scanner 43 © 2017. BeyondTrust Software, Inc.
Using CVSS ScoresRetina uses the Common Vulnerability Scoring System (CVSS) to provide the CVSS score and a vector that describesthe components from which the score was calculated. The CVSS vectors always include the base metric and maycontain temporal metrics.
An example of how the CVSS Score displays is:
CVSS Score: 9.3 [AV:N/AC:M/Au:N/C:c/I:C/A:C]
In the HTML format, the 9.3 is a hyperlink that displays the CVSS Version 2 Scoring Page where you can refine theCVSS base score.
Remediating Vulnerabilities
Retina Network Security Scanner 44 © 2017. BeyondTrust Software, Inc.

Generating ReportsYou can generate the following reports:
Executive report provides an overview of your network and graphs of vulnerabilities.
• Summary report provides a more detailed overview of vulnerabilities and fixes.
• Vulnerability Export report summarizes vulnerabilities for reporting purposes.
• Access report lists assets that are inaccessible.
• PCI Compliance report details the vulnerability results of PCI security scans.
• Dashboard report provides a high-level overview of a scan.
Running Executive ReportsThe Executive Report provides an overview of the vulnerabilities discovered on your network. You can sort thedata by scan summary, vulnerabilities by audit categories and vulnerabilities discovered on ports, running services,operating systems, user accounts and network shares.
To generate an Executive report:
1. Select the Report tab.2. From the Report Type list, select Executive.3. Select the report category check boxes that you want in the report:
– Scan Summary - Provides a recap listing the scanner name, version, start time and date, duration, nameand status. In addition, you can view the number of machines scanned, total number of vulnerabilities andhigh, medium, low and information vulnerabilities and credentials.The vulnerabilities by host and number, percentage and average of vulnerabilities by risk display in graphs.
– Vulnerabilities by Categories - Provides an overview of vulnerabilities by audit categories. The data is alsoprovided in a graph.
– Top/Bottom Vulnerabilities - Displays the highest or lowest number of vulnerabilities, sorted by auditcategories. The data is also provided in a graph.
– Top/Bottom Open Ports - Displays vulnerabilities, sorted by audit categories, affecting the highest orlowest number of open ports.
– Top/Bottom Running Services - Displays vulnerabilities, sorted by audit categories, affecting the highest orlowest number of services.
– Top/Bottom Operating Systems Summary - Displays vulnerabilities, sorted by audit categories, affectingthe highest or lowest number of operating systems.
– Top/Bottom User Accounts - Displays vulnerabilities, sorted by audit categories, affecting the highest orlowest number of user accounts.
– Top/Bottom Network Shares - Displays vulnerabilities, sorted by audit categories, affecting the highest orlowest number of user accounts.
– Glossary - Displays a list of terms.
4. In the Creation Details section, select the Include Creation Details Page check box to include a created bypage.
Generating Reports
Retina Network Security Scanner 45 © 2017. BeyondTrust Software, Inc.

5. Enter the report details that you want to include in the report.6. Click Generate. The Executive report is displayed in the Results pane.7. Use the Report Tasks pane to do the following:
– Save Report - Saves as a text or html file.
– Print Report - Prints to default printers.
– View in Microsoft Word - Opens report in Word.
– View in Web Browser - Opens report in default web browser.
Running Summary ReportsSummary reports provide a detailed overview of vulnerabilities and recommends methods to fix the vulnerabilityand the Risk Level, Severity Code, PCI Severity Level and CVSS Score. You can define the details, such as ports,services, shares and users, and output type as screen, HTML or text.
To generate a summary report:
1. Select the Report tab.2. From the Report Type list, select Summary.3. From the Output Type list, select Screen, HTML, or Text.4. In the Include in Report list box, select the job names.5. SelectOptions. The Options pane is displayed.6. In the Include box, select the headings to include in the report:
– General - Provides summary of the scan information, such as IP address, report date, ping response, timeto live and operating system.
– Audits Vulnerable - Lists the discovered vulnerabilities by Audit ID, Risk Level, CVSS, BugTraq and CVE.
– Certificates - Displays information about the certificates on the target.
– Job Metrics - Provides a summary of the scan.
– Ports - Lists the TCP and UDP ports.
– Services - Lists the network services for the IP address. Common network services include authenticationservers, directory services, email and printing.
– Shares - Lists all locations on a network that allow multiple users to have a centralized space.
– Users - Lists all the users discovered on the target system.
– Software - Lists all software programs discovered on the target system.
7. Click Generate.8. Use the Report Tasks pane to do the following:
– Save Report - Saves as a text or html file.
– Print Report - Prints to default printers.
– View in Microsoft Word - Opens report in Word.
– View in Web Browser - Opens report in default web browser.
Generating Reports
Retina Network Security Scanner 46 © 2017. BeyondTrust Software, Inc.

Running Vulnerability Export ReportsVulnerability export reports provide an overview of audits and hosts. You can define the details, such as ports,services, shares and users, and output type as screen, HTML or text.
To generate a report:
1. Select the Report tab.2. From the Type list, select Vulnerability Export.3. From the Output Type list, select Screen, HTML, XML or CSV. Screen displays in a separate window. HTML,
XML, and CSV prompt you to save the file.4. SelectOptions.5. Select the check boxes for the information that you want to include in the report.
6. To include a summary of the scan, select the Job Metrics check box.7. Click Generate.8. Use the Report Tasks pane to do the following:
– Save Report - Saves as a text or html file.
– Print Report - Prints to default printers.
– View in Microsoft Word - Opens report in Word.
– View in Web Browser - Opens report in default web browser.
If you select the CPE check box, the operating system is displayed as a CPE reference in the General section of thereport output. CPE can also be viewed on the Summary report.
Generating Reports
Retina Network Security Scanner 47 © 2017. BeyondTrust Software, Inc.

Running Access ReportsAn Access report lists machines that are flagged with no ssh access or no remote registry audits. You can view thereport on screen or in an HTML format.
To generate a report:
1. Select the Report tab.2. From the Report Type list, select Access Report.3. From the Output Type list, select Screen or HTML. Screen displays in a separate window. HTML prompts you to
save the file.4. From the Sort Field list, select to sort the report by: IP, NetBIOS, DNS Name,MAC, Access Info or Scan Info.5. SelectOptions. The Options pane is displayed.6. To include a summary of the scan, select the Job Metrics check box.7. Click Generate.8. Use the Report Tasks pane to do the following:
– Save Report - Saves as a text or html file.
– Print Report - Prints to default printers.
– View in Microsoft Word - Opens report in Word.
– View in Web Browser - Opens report in default web browser.
Running PCI Compliance ReportsPayment Card Industry Data Security Standard (PCI DSS) specifies security requirements for merchants and serviceproviders that store, process, or transmit cardholder data. PCI Security Scans are run over the Internet by anApproved Scanning Vendor (ASV). The PCI requires all Internet-facing IP addresses to be scanned forvulnerabilities.
Retina supports PCI DSS 1.1, 1.2 and 2.0 scoring. In version 1.2 severity levels are High, Medium, and Low. Eachseverity level corresponds to a range of CVSS scores. The scan passes or fails based on the CVSS score.
Severity CVSS Score Scan StatusHigh 7 - 10 FailMedium 4 - 6.9 FailLow 0 - 3.9 Pass
Severity Level Description
The PCI Compliance report contains the following information:
• A summary section that displays the vulnerability, sorted by severity then maximum CVSS score. CVE-IDs arealso included.
• A status of Fail or Pass.
• A vulnerability reference section that includes CVE-IDS, CVSS scores, PCI severity, and PCI status.
To generate a report:
1. Select the Report tab.2. From the Report Type list, select PCI Compliance.3. SelectOptions. The Options pane is displayed.
Generating Reports
Retina Network Security Scanner 48 © 2017. BeyondTrust Software, Inc.

4. In the Service Provider area, enter the company name and certificate number. ClickModify to add moreinformation for the company.
5. In the Customer area, type the name of the company being scanned. ClickModify to add more information forthe customer.
6. In the Include area, select the following:– Attestation of Scan Compliance - Select the check box to include an introduction that is required when
submitting a report to the PCI Council.
– Special Notes per Target - Select the check box to add a blank table to the report. Add special findings tothe table that need to be addressed.Clear the check box to omit the table.
– PCI Self-Assessment Questionnaire - Select the check box to include the self-assessment questionnaire.
The questionnaire allows you or your customer to analyze the security based on the requirementsincluded in the PCI Data Security Standard. The applicable questionnaire (A, B, C, C-VT or D) depends onhow the organization handles sales transactions.
Click the More Info link to visit the PCI Security Standards web site.
7. Click Generate.8. Use the Report Tasks pane to do the following:
– Save Report - Saves as a text or html file.
– Print Report - Prints to default printers.
– View in Microsoft Word - Opens report in Word.
– View in Web Browser - Opens report in default web browser.
Adding Your Logo to PCI Compliance ReportsYou can replace the BeyondTrust logo on the title page of the PCI Compliance report with your company logo. Theimage must be in a .jpg format. The image size can vary; however, as a guideline, the default logo is 400 x 260pixels.
To print your logo on the report:
1. Access the following directory:%Retina 5%\Database\Reports\Templates\PCICompliance\assets
2. Replace the provider_logo.jpg file with your image file.The new logo is displayed the next time you run the PCI report.
Generating Reports
Retina Network Security Scanner 49 © 2017. BeyondTrust Software, Inc.

Running a Dashboard ReportA dashboard report provides a high-level overview of the scan, including: overall score, scan summary details, scanengine information, target response summary, and vulnerability overview.
Running an Alert ReportDisplays alerts detected on an asset. Alerts are organized in the report by asset.
The scan results indicate if alerts are detected on an asset:
To generate a summary report:
1. Select the Report tab.2. From the Report Type list, select Alert.3. Click Generate.
The following screen capture shows an example of an alert.
Generating Reports
Retina Network Security Scanner 50 © 2017. BeyondTrust Software, Inc.

Running a Consolidated Remediation ReportThe Consolidated Remediation report displays only the current applicable audits. Any audits that are superseded bynew audits are not indicated in the report.
For example, there are 5 audits (1–5) for Microsoft Word. Audits 2 and 4 are superseded by 5. In the ConsolidatedRemediation report only audits 1, 3, and 5 are displayed. If you run the Remediation report, all 5 audits aredisplayed.
To generate a report:
1. Select the Report tab.2. From the Type list, select Consolidated Remediation.3. From the Group Report by list, select one of the following: Vulnerability or Machine.4. Click the Options tab.5. Select the Consolidated Audit List check box to display the list of superseded Audit IDs.
Generating Reports
Retina Network Security Scanner 51 © 2017. BeyondTrust Software, Inc.

6. Click Generate.
Running the Report to Display Superseded Audit IDsWhen you select the Consolidated Audit List check box in the report options, the output will look similar to thefollowing. The superseded Audit IDs are displayed in the report.
Customizing ReportsYou can change the presentation of reports. You can customize the product title, logo, colors, and PCI logo.
A logo image must be in a .jpg format.
To change the report presentation:
1. Select Tools > Customize Reports.2. Change the default values to your preferences, and then click OK.
Generating Reports
Retina Network Security Scanner 52 © 2017. BeyondTrust Software, Inc.

Click Reset to change customizations to the default settings.
Generating Reports
Retina Network Security Scanner 53 © 2017. BeyondTrust Software, Inc.

Customizing AuditsYou can customize existing audits, create new audits or write custom audit modules to meet the needs of yournetwork security.
Retina customized audits will be overwritten by customized audits created from the centralized console.
Audit types are:
• Customizable Audits – Displays audits that can be modified.
• Modified Audits – Displays audits that you modified.
• User Created Audits – Displays audits defined using the Audit wizard.
Before modifying the audit parameters, research the details associated with a vulnerability.Modifying audit parameters could impact the accuracy of the scans.
To customize audit settings:
1. In the main toolbar, select Tools > Customize Audits. The Audit Customization window is displayed.2. You can filter the audit type.
Note: You can refresh the Audit Customization window at any time. Select Clear All Groups, Clear All Filters,or Reset Grid to Default Settings.
Searching the Audit DatabaseYou can search the audit database for specific risk levels, categories or audit groups.
To search the audit database:
1. Enter search text in the Look For box.The results display audits containing any portion of the search criteria.
2. Depending on your search, enter filtering parameters for the following columns: Audit ID, Name, Category,Risk, and Modified.
3. To group the search parameters, move the header columns to the area above the columns.Click the heading name to change the sort order.
Customizing Audits
Retina Network Security Scanner 54 © 2017. BeyondTrust Software, Inc.
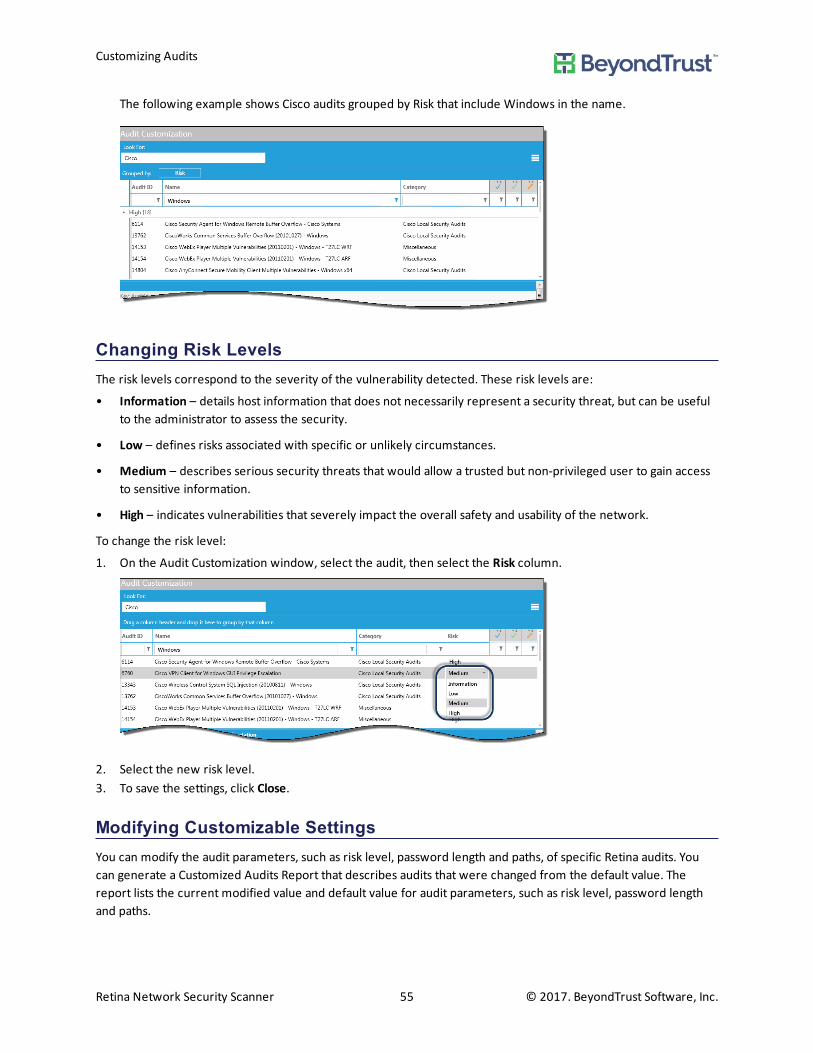
The following example shows Cisco audits grouped by Risk that include Windows in the name.
Changing Risk LevelsThe risk levels correspond to the severity of the vulnerability detected. These risk levels are:
• Information – details host information that does not necessarily represent a security threat, but can be usefulto the administrator to assess the security.
• Low – defines risks associated with specific or unlikely circumstances.
• Medium – describes serious security threats that would allow a trusted but non-privileged user to gain accessto sensitive information.
• High – indicates vulnerabilities that severely impact the overall safety and usability of the network.
To change the risk level:
1. On the Audit Customization window, select the audit, then select the Risk column.
2. Select the new risk level.3. To save the settings, click Close.
Modifying Customizable SettingsYou can modify the audit parameters, such as risk level, password length and paths, of specific Retina audits. Youcan generate a Customized Audits Report that describes audits that were changed from the default value. Thereport lists the current modified value and default value for audit parameters, such as risk level, password lengthand paths.
Customizing Audits
Retina Network Security Scanner 55 © 2017. BeyondTrust Software, Inc.

Note: Before modifying the audit parameters, research the details associated with the vulnerability. Modifyingaudit parameters could impact the accuracy of the scans.
To customize an audit:
1. On the Audit Customization window, click the edit button. The audits that can be customized are displayed.
2. Select the audit, then click Edit.You can also double-click the audit. You cannot change the description and default value properties.
3. Enter a new value.4. Click OK. The Audit Customization window is displayed. The Audit Details section will not change.5. To verify the audit customization, click Report. The Customized Audits Report is displayed. All audit changes are
displayed in the Customized Values section. The Audit Details section will not change.6. To save changes, click Close.
Resetting Audits to Default ValuesIf you change values on the Audit Customization window for a particular audit, you can reset the value later to thedefault value.
To change audits to the default settings:
1. On the Audit Customization window, select an audit.2. Click Reset. The Reset Audits message indicates the number of audits that you selected.
3. The check boxes are selected by default. To retain the current settings for risk levels or audit variables, clearthe respective check box.
4. Click OK. The audits are reset to the default values.
Customizing Audits
Retina Network Security Scanner 56 © 2017. BeyondTrust Software, Inc.
Running Audit Customization ReportsThe Customized Audit report describes audits that were changed from the default values.
The report details the current modified value and default value for the audit parameters, including risk level.
To view a report:
1. On the Audit Customization window, click Report. The report displays in a web browser window.
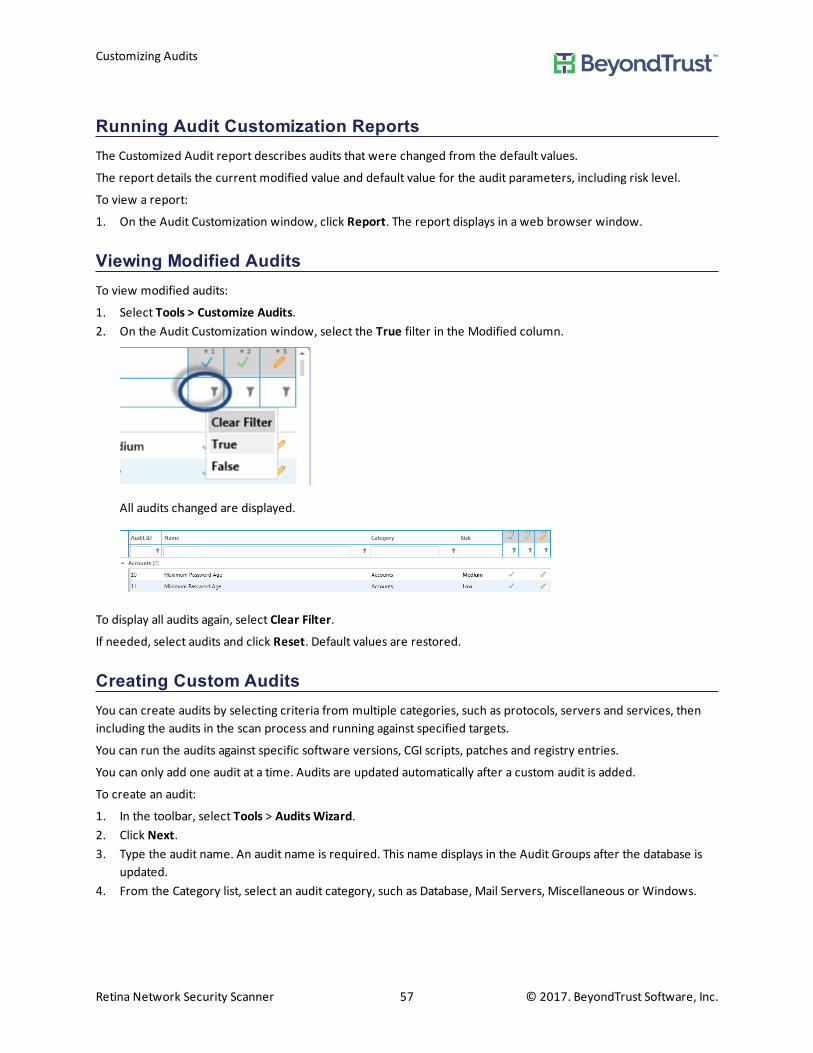
Viewing Modified AuditsTo view modified audits:
1. Select Tools > Customize Audits.2. On the Audit Customization window, select the True filter in the Modified column.
All audits changed are displayed.
To display all audits again, select Clear Filter.
If needed, select audits and click Reset. Default values are restored.
Creating Custom AuditsYou can create audits by selecting criteria from multiple categories, such as protocols, servers and services, thenincluding the audits in the scan process and running against specified targets.
You can run the audits against specific software versions, CGI scripts, patches and registry entries.
You can only add one audit at a time. Audits are updated automatically after a custom audit is added.
To create an audit:
1. In the toolbar, select Tools > Audits Wizard.2. Click Next.3. Type the audit name. An audit name is required. This name displays in the Audit Groups after the database is
updated.4. From the Category list, select an audit category, such as Database, Mail Servers, Miscellaneous or Windows.
Customizing Audits
Retina Network Security Scanner 57 © 2017. BeyondTrust Software, Inc.

5. From the Risk Level list, select the severity level that corresponds to the severity of the vulnerability:– Save Report - Saves as a text or html file.
– Print Report - Prints to default printers.
– View in Microsoft Word - Opens report in Word.
– View in Web Browser - Opens report in default web browser.
6. In the Vulnerability Description box, describe the vulnerability.7. In the Vulnerability Fix box, describe how to remediate, investigate or mitigate the vulnerability.8. Click Next. The Audit Type page displays.9. Select the type of audit, and then click Next:
– Banner - Determines vulnerabilities by scanning the banner information, such as firewall name, IPaddresses and server name.
– CGI Script - Determines vulnerabilities by scanning the common gateway interface that passes aWebuser's request to an application program and to receive data back to forward to the user.
– Registry - Detects vulnerabilities by scanning registry entries and values.
– Service Pack - Hotfix – Determines vulnerabilities by scanning service packs, hotfixes and patches.
– File Version - Verifies the software version.
– File Checksum - Determines vulnerabilities based on file checksum comparisons. Supported valuesinclude: MD5, SHA1, SHA256. Network performance issues might occur if you use this feature. Use thisfeature with caution.
– Remote Check - Verifies if a specific Unix program or patch is installed on an operating system.
The Audit Details page displays parameters based on the audit type that you select in step 9.
10. Enter the information for the audit type, and then click Next.– Banner Audit Details - Select the Banner protocol, and then type the banner name.
– CGI Script audit details - Type the URL path to the script name. Select the Path, Key, or Value from themenu.
– Registry - Select the OS that the vulnerability affects. Note that the registry path cannot contain theselected Hive value.
Customizing Audits
Retina Network Security Scanner 58 © 2017. BeyondTrust Software, Inc.

– Service Pack - Hotifx - Determines vulnerabilities by scanning service packs, hotfixees, and patches.
– File version - Verifies the software version.
– File Checksum - Select the file checksum from the list.
Enter a file name, checksum value, and file version. Use an asterisk (*) to compare all file versions.
– Remote Check - Verifies if a specific Unix program or patch is installed on an operating system.
11. On the Vulnerabilities page, enter the BugTraq ID, CVE ID, or CCE ID.Enter the web site that provides solutions and more information for the vulnerability.
Entering information on this page is optional.
Some audits that ship with Retina include BugTraq, CVE, and CCE information. Access the information later onthe Audit Groups window.
Customizing Audits
Retina Network Security Scanner 59 © 2017. BeyondTrust Software, Inc.
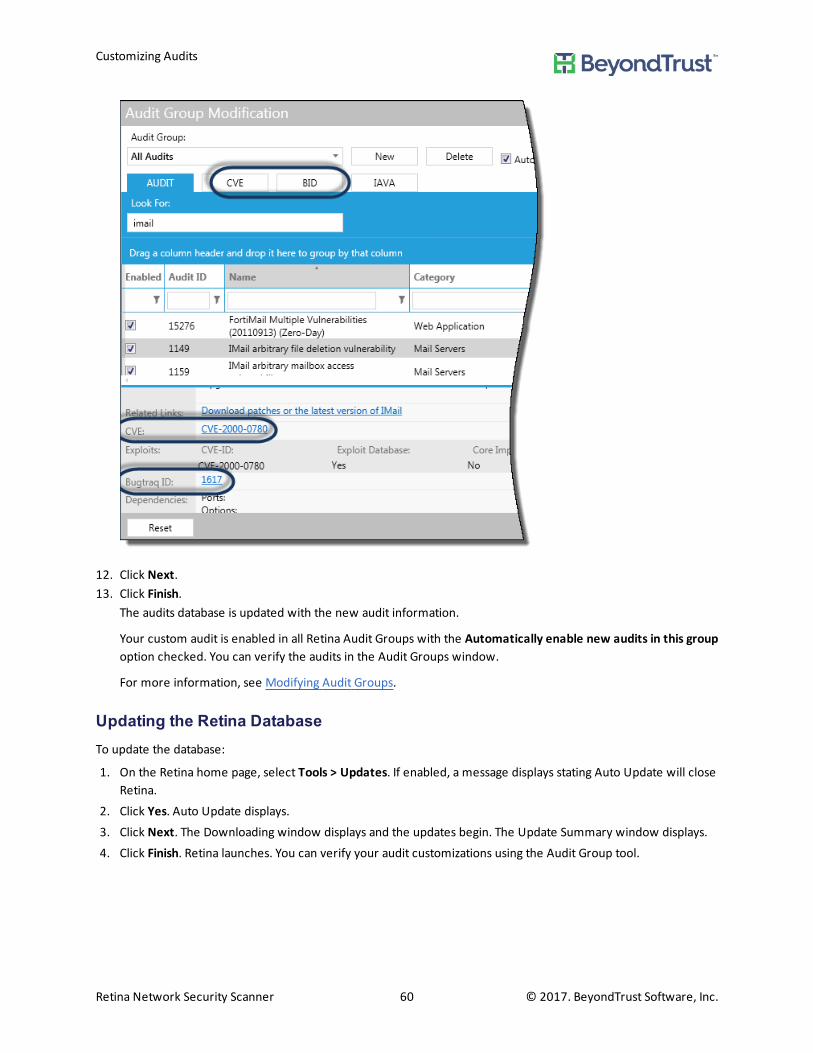
12. Click Next.13. Click Finish.
The audits database is updated with the new audit information.
Your custom audit is enabled in all Retina Audit Groups with the Automatically enable new audits in this groupoption checked. You can verify the audits in the Audit Groups window.
For more information, see Modifying Audit Groups.
Updating the Retina DatabaseTo update the database:
1. On the Retina home page, select Tools > Updates. If enabled, a message displays stating Auto Update will closeRetina.
2. Click Yes. Auto Update displays.3. Click Next. The Downloading window displays and the updates begin. The Update Summary window displays.4. Click Finish. Retina launches. You can verify your audit customizations using the Audit Group tool.
Customizing Audits
Retina Network Security Scanner 60 © 2017. BeyondTrust Software, Inc.
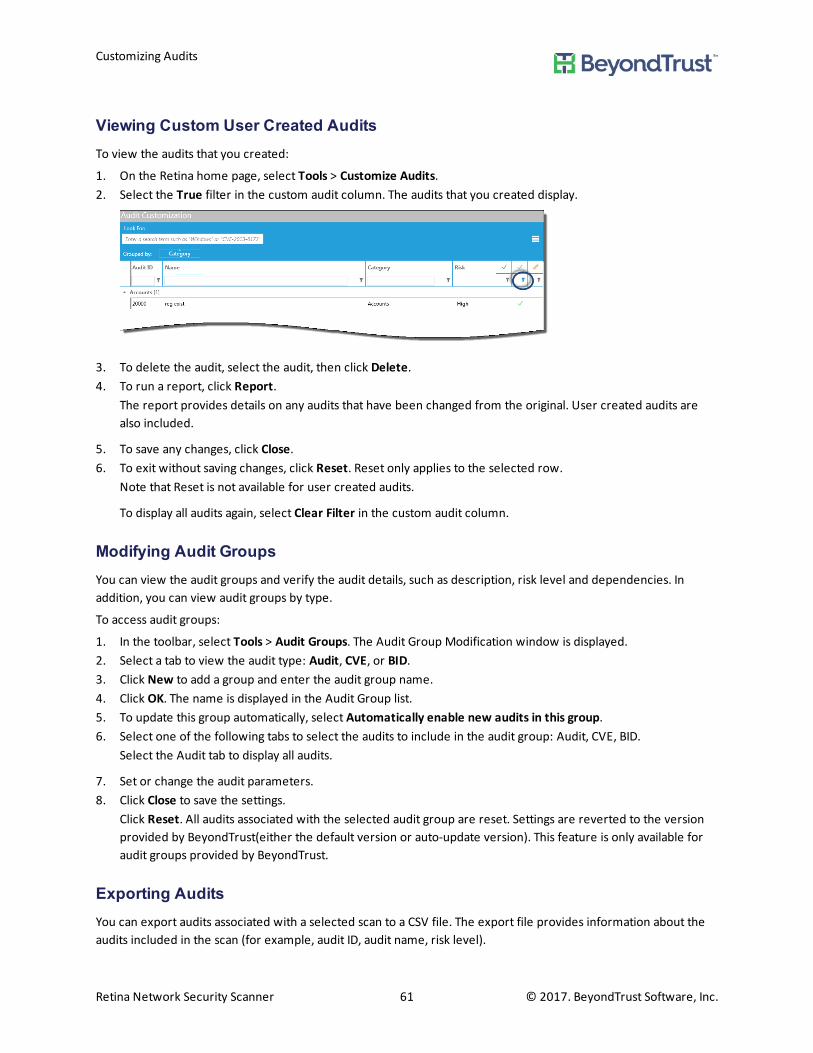
Viewing Custom User Created AuditsTo view the audits that you created:
1. On the Retina home page, select Tools > Customize Audits.2. Select the True filter in the custom audit column. The audits that you created display.
3. To delete the audit, select the audit, then click Delete.4. To run a report, click Report.
The report provides details on any audits that have been changed from the original. User created audits arealso included.
5. To save any changes, click Close.6. To exit without saving changes, click Reset. Reset only applies to the selected row.
Note that Reset is not available for user created audits.
To display all audits again, select Clear Filter in the custom audit column.
Modifying Audit GroupsYou can view the audit groups and verify the audit details, such as description, risk level and dependencies. Inaddition, you can view audit groups by type.
To access audit groups:
1. In the toolbar, select Tools > Audit Groups. The Audit Group Modification window is displayed.2. Select a tab to view the audit type: Audit, CVE, or BID.3. Click New to add a group and enter the audit group name.4. Click OK. The name is displayed in the Audit Group list.5. To update this group automatically, select Automatically enable new audits in this group.6. Select one of the following tabs to select the audits to include in the audit group: Audit, CVE, BID.
Select the Audit tab to display all audits.
7. Set or change the audit parameters.8. Click Close to save the settings.
Click Reset. All audits associated with the selected audit group are reset. Settings are reverted to the versionprovided by BeyondTrust(either the default version or auto-update version). This feature is only available foraudit groups provided by BeyondTrust.
Exporting AuditsYou can export audits associated with a selected scan to a CSV file. The export file provides information about theaudits included in the scan (for example, audit ID, audit name, risk level).
Customizing Audits
Retina Network Security Scanner 61 © 2017. BeyondTrust Software, Inc.
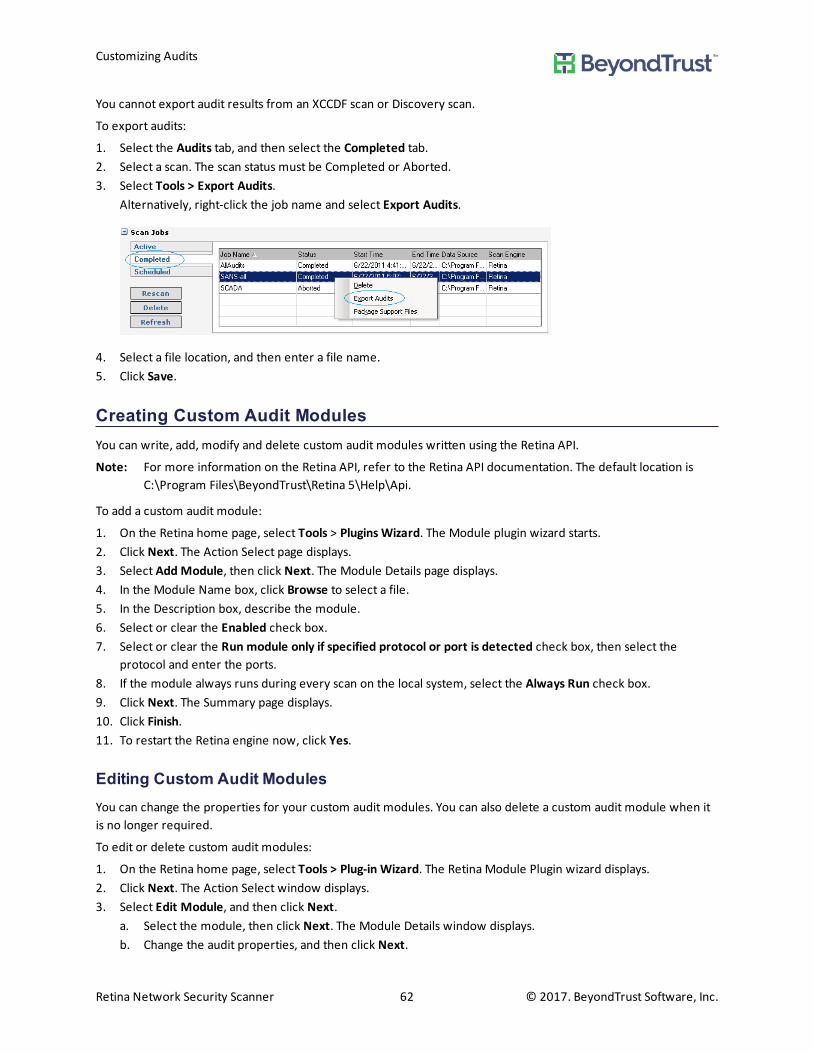
You cannot export audit results from an XCCDF scan or Discovery scan.
To export audits:
1. Select the Audits tab, and then select the Completed tab.2. Select a scan. The scan status must be Completed or Aborted.3. Select Tools > Export Audits.
Alternatively, right-click the job name and select Export Audits.
4. Select a file location, and then enter a file name.5. Click Save.
Creating Custom Audit ModulesYou can write, add, modify and delete custom audit modules written using the Retina API.
Note: For more information on the Retina API, refer to the Retina API documentation. The default location isC:\Program Files\BeyondTrust\Retina 5\Help\Api.
To add a custom audit module:
1. On the Retina home page, select Tools > Plugins Wizard. The Module plugin wizard starts.2. Click Next. The Action Select page displays.3. Select Add Module, then click Next. The Module Details page displays.4. In the Module Name box, click Browse to select a file.5. In the Description box, describe the module.6. Select or clear the Enabled check box.7. Select or clear the Run module only if specified protocol or port is detected check box, then select the
protocol and enter the ports.8. If the module always runs during every scan on the local system, select the Always Run check box.9. Click Next. The Summary page displays.10. Click Finish.11. To restart the Retina engine now, click Yes.
Editing Custom Audit ModulesYou can change the properties for your custom audit modules. You can also delete a custom audit module when itis no longer required.
To edit or delete custom audit modules:
1. On the Retina home page, select Tools > Plug-in Wizard. The Retina Module Plugin wizard displays.2. Click Next. The Action Select window displays.3. Select Edit Module, and then click Next.
a. Select the module, then click Next. The Module Details window displays.b. Change the audit properties, and then click Next.
Customizing Audits
Retina Network Security Scanner 62 © 2017. BeyondTrust Software, Inc.

c. Review the settings, and then go to step 5.4. Select Remove Module, and then click Next.
a. Select the module to remove, and then click Next.b. Review the settings, and then go to step 5.
5. Click Finish.6. To restart the Retina engine now, click Yes.
Customizing Audits
Retina Network Security Scanner 63 © 2017. BeyondTrust Software, Inc.

Run Database Application ScansDatabase application scanning gives you the ability to scan Microsoft SQL Server, MySQL and Oracle databases forvulnerabilities.
Database application scanning is disabled by default. A complete scan of a remote database server may significantlyincrease the time required to audit a remote target.
Running Database Application ScansTo add database application auditing to your scan:
1. Select the Audit tab, and selectOptions.2. Scroll through the list and select the Perform Database Application Scanning check box.3. Select Audits.4. Select the Databases check box.
5. On the Audit pane, click Scan to run the scan now.
Review Database Application VulnerabilitiesDatabase application vulnerabilities are treated as a standard vulnerability type. The vulnerabilities are displayed inthe scan and report results in the same way as other vulnerabilities.
Run Database Application Scans
Retina Network Security Scanner 64 © 2017. BeyondTrust Software, Inc.
Preparing Database Applications for ScansYou can set your database applications as targets for scanning.
To ensure that your database can be successfully scanned by Retina, review the following section on MySQL toprepare your database.
Preparing Your MySQL Database for ScansReview your MySQL settings and ensure the following is in place:
• Verify the latest GA release of MySQL ODBC driver is installed on the scanner system.
– Go to Administrator tools.
– Run Data Sources (ODBC).
– Select the Drivers tab.
– Search for the MySQL driver.
If no driver is found, then download and install the newest GA released MySQL driver from the MySQLwebsite.
• Ensure a remote connection can be established to the target database using the ‘mysql’ tool provided in aMySQL database installation.
Run Database Application Scans
Retina Network Security Scanner 65 © 2017. BeyondTrust Software, Inc.

SCAP ScanningYou can run scans based on the Extensible Configuration Checklist Description Format (XCCDF) and OpenVulnerability and Assessment Language (OVAL) specifications.
The steps to running SCAP scans are:
• Copy SCAP Content (Optional)
• Run the SCAP Scan Wizard
• View the scan results
• Export the scan results
Copying SCAP Content (Optional)Because Retina includes more than 150 SCAP benchmarks covering various operating systems, databases andapplications, it is unlikely that you will need to manually add SCAP content. If, however, you want to scan with abenchmark that is not included with Retina, copy its SCAP Data Stream Content (such as FDCC checklists) to theRetina benchmarks directory.
For new installations of Retina 6.0 or later, the usual location is:
C:\Program Files (x86)\BeyondTrust\Retina\Database\XCCDF\Benchmarks
For systems on which a Retina version prior to 6.0 is installed, the typical location is:
C:\Program Files (x86)\BeyondTrust\Retina 5\Database\XCCDF\Benchmarks
Note that on 32-bit Windows systems, the top-level directory will be the ”C:\Program Files” directory, rather thanthe “C:\Program Files (x86)” directory shown above. Note also that the directory portion preceding “Database”(“C:\Program Files (x86)\BeyondTrust\Retina”) is referenced by “%Retina%” in the paragraphs below.
When copying SCAP content, include all items associated with the SCAP content, including XCCDF, OVAL andsupporting XML files.
Running SCAP ScansNote that credential groups cannot be used for SCAP scans.
Using the Local Scan ServiceBy default, SCAP scanning will deploy the Retina Local Scan Service dissolvable engine on the scan target toimprove the accuracy of scan results. For some combinations of benchmark and target operating system, not usingthe Local Scan Service can lead to error findings for Password Policy and Audit Policy checks, so we highlyrecommend keeping the Local Scan Service enabled. Note that the Local Scan Service is only present on the targetduring an assessment and is removed on completion. Moreover, it is only deployed when using benchmarks,including those for mostWindows operating systems, for which it is known to improve scan results.
Configuring a SCAP ScanGo through the SCAP Job Wizard to select the scan job settings.
SCAP Scanning
Retina Network Security Scanner 66 © 2017. BeyondTrust Software, Inc.

Note: Avoid scanning duplicate IP addresses until the previous scan running on those IPs are completed. Thisreduces load and network traffic on those machines.
To run a SCAP scan:
1. On the Retina home page, select Tools > SCAP Job Wizard. The SCAP Job Wizard displays.2. Click Next. The Target Selection window displays.3. Select the target assets. The Address field changes based on your selection.
– Single IP - Scans using a single IP address.
– IP Range - Scans using a range of IP addresses.
– CIDR Notation - Scans using a Classless Inter-Domain Route or Supernet. Each IP address has a networkprefix that identifies a gateway.The length of the network prefix is also specified and varies depending on the number of bits that areneeded rather than any arbitrary class assignment structure.
– Named Host - Scans using the DNS or NetBIOS.
– Address Groups - Select one or more address groups that contain any combination of computer IPaddresses, IP address ranges, subnets or other groups.
– Advanced - Typically, this is used to scan individual targets in an IP range or CIDR block, but this field canalso include names, ranges and CIDRs. Address entries should be separated with a space. For example,“10.102.25.10 curly.corp.int-eeye.com 10.202.6.0/24”.
– Single IP (IPv6) - Enter a single IPv6 address. This capability was introduced in Retina 6.1.0.
4. Click Next. The Credential Selection page displays.5. Select the credentials, and then click Next.
The best results are obtained using credentials that have Administrator rights on the target machine..
– Null Session - Requires no credentials.
– Stored - Provides a selection list of stored credentials.To create a stored credential, click Add. For more information, see Creating Stored Credentials.
– Single-use - Allows a single session for one user based on user name and password.
Note that it is possible to select multiple credentials, in which case the SCAP Scan Engine will attempt touse the most appropriate credential for each target.
6. Select XCCDF benchmark(s), and then click Next.The XCCDF Benchmark Selection page displays the XCCDF files from the %Retina5%\Database\XCCDF\Benchmarks folder. If no benchmarks are displayed, ensure that the XCCDF files are inthis directory. Note that it is possible to select multiple benchmarks, in which case the SCAP Engine willevaluate all applicable combinations of benchmark and scan target specified in this job.
7. Select profile(s), and then click Next.For each selected benchmark, the wizard will display a corresponding Profile Selection page. These pages willbe displayed consecutively.
8. On the Details Selection page, type a name for the scan job and then select the following settings:– Create output files when target platform does not match benchmark platform - Turn this setting off so
that output files will not be created if the target platform does not match the benchmark platform.
SCAP Scanning
Retina Network Security Scanner 67 © 2017. BeyondTrust Software, Inc.

– Perform Local Scanning - Local scanning uses a dissolvable agent that is deployed on the target for theduration of the scan. This applies primarily to Windows operating system scans and secondarily to scans ofRed Hat 5 and 6 targets using older STIG benchmarks.
– Enable Remote Registry Service - Turn on the Windows Remote Registry service. If the dissolvable agentstarts the Remote Registry service, then it will stop it after completing the scan.
9. Click Next.10. Schedule the scan to run immediately once or specify a frequency, time and date.11. Click Next. The Success window displays. The scan will run as scheduled.12. Click Finish.13. To verify the job is running, select the Audit tab.
In the Scan Jobs section, select Active, Completed or Scheduled to track the job progress.
Saving Scan Results as PDFYou can save the scan results as a PDF file. The PDF includes all results in the scan.
To save the scan results to a PDF file:
1. Select the Audit tab, and then select the Completed tab.2. Select a completed SCAP scan.3. Select File > Save Report As.4. Type a name for the report, and then click Save.
Viewing SCAP Scan ResultsTo view a report of the scan results:
1. Select the Audit tab.2. Select a scan from the Completed list.3. Select an IP address from the Scanned IPs list.
Note that if the scan used multiple benchmarks, then “IP addresses” will be displayed with the benchmarkname (with spaces removed) concatenated to the IP address. For example, “127.0.0.1-CIS_Microsoft_Windows_8.1_Benchmark”.
Converting SCAP Output to ARF FormatYou can use the command line interface (CLI) to convert SCAP output to the Assessment Results Format (ARF).
The supported output schemas are: ARF 0.41 Micro, ARF 0.41 Full, and ARF 1.1 NIST (Beta).
The CLI parameters are:
• ARF type: MicroARF, FullARF, NISTARF
• SCAP scan instance ID (obtained from Windows explorer as shown below)
SCAP Scanning
Retina Network Security Scanner 68 © 2017. BeyondTrust Software, Inc.

From the command line, run the following:
C:\Program Files (x86)\BeyondTrust\Retina 5\Tools> BenchmarkReports <Report Type> <SCAP scan instance ID>
When run from the Tools directory shown above, the report is saved in the following directory:
C:\Program Files (x86)\BeyondTrust\Retina 5\Reports\Temp\XCCDF
SCAP Scanning
Retina Network Security Scanner 69 © 2017. BeyondTrust Software, Inc.

Setting Retina OptionsYou can configure general parameters such as logging, auto update, and timeout values.
To access options:
1. On the toolbar, select Tools > Options. The Options and Settings window displays.You can set the following options:
– General - set appearance, logging and auto updating parameters.
– Event Routing - enable event logging and specify the audits to log.
– Scanner - modify the scan engine performance and set ping and data timeout values.
– Management - enable Central Policy and set policy parameters.
Note that if you click Reset then all tab values are reset.
Generating Log FilesRetina generates log files, including:
• RetinaStatus.log
• RetinaUI.log
The log files are saved to %Retina 5%\Logs.
Logging is turned on by default.
To turn off logging:
1. Select Tools > Options.2. Select the General tab.3. In the Logging section, clear the Generate a log file of Retina operations check box.4. Click OK.
Automatically Check for UpdatesScheduling updates ensures you proactively secure your network against the latest vulnerabilities.
To automatically check for updates:
1. Select Tools > Options.2. Select the General tab.3. Select when to check for updates:
– Check for updates according to a Schedule - Select a start time and frequency.
– Check for updates when launching Retina - Set the number of seconds to wait before starting theupdater.
4. Click OK.
Setting Retina Options
Retina Network Security Scanner 70 © 2017. BeyondTrust Software, Inc.

Enabling Event RoutingEvent routing enables Retina to send the scan data, such as port, services and general scan information, to acentralized console. You can view the information on the centralized console.
Note: If you are managing scans using a centralized console, you must enable event routing.
To enable event routing:
1. Select Tools > Options.2. Select the Event Routing tab.3. Select the Enable Event Routing to Centralized Console check box.4. From the Log Audits of [information] Risk and Greater list, select the risk level. Audits contain a risk level that
corresponds to the severity of the vulnerability detected. Selecting Information causes all risk levels to belogged. These risk levels are:– Information - Details host information that does not necessarily represent a security threat, but can be
useful to the administrator to assess the security.
– Low - Defines risks associated with specific or unlikely circumstances.
– Medium - Describes serious security threats that would allow a trusted but non-privileged user to gainaccess to sensitive information.
– High - Indicates vulnerabilities that severely impact the overall safety and usability of the network.
5. Select the check boxes for the log categories to include.
Setting Retina Options
Retina Network Security Scanner 71 © 2017. BeyondTrust Software, Inc.
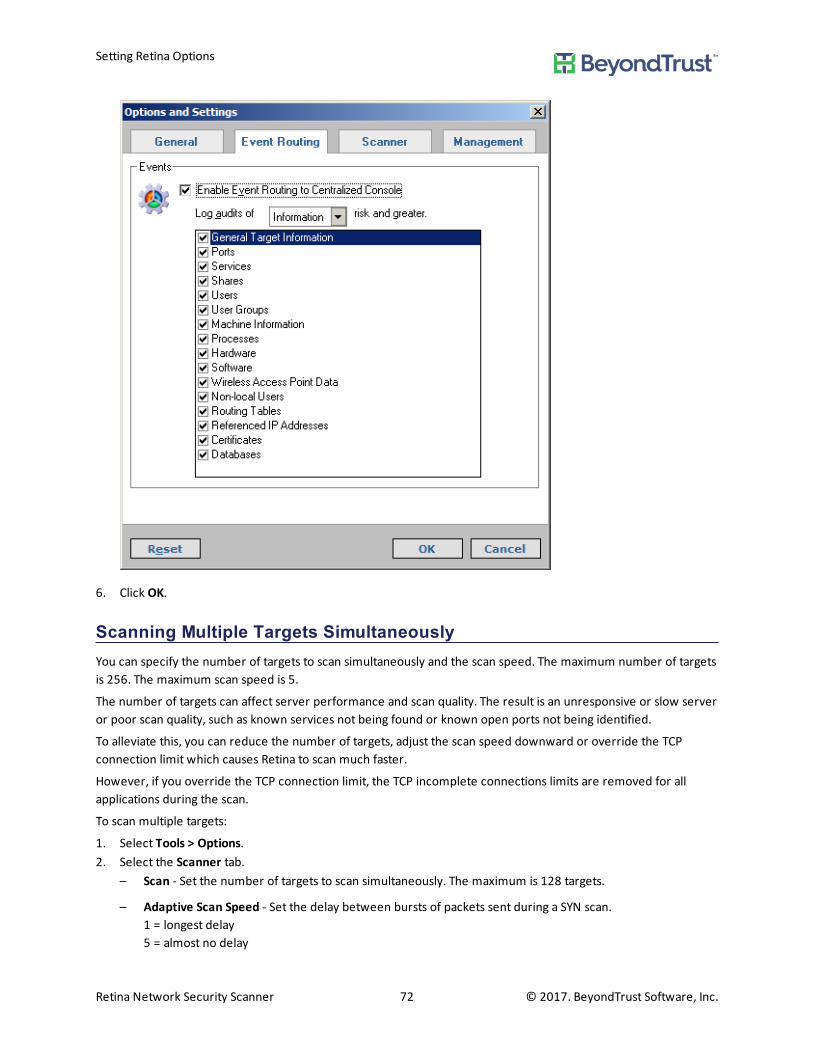
6. Click OK.
Scanning Multiple Targets SimultaneouslyYou can specify the number of targets to scan simultaneously and the scan speed. The maximum number of targetsis 256. The maximum scan speed is 5.
The number of targets can affect server performance and scan quality. The result is an unresponsive or slow serveror poor scan quality, such as known services not being found or known open ports not being identified.
To alleviate this, you can reduce the number of targets, adjust the scan speed downward or override the TCPconnection limit which causes Retina to scan much faster.
However, if you override the TCP connection limit, the TCP incomplete connections limits are removed for allapplications during the scan.
To scan multiple targets:
1. Select Tools > Options.2. Select the Scanner tab.
– Scan - Set the number of targets to scan simultaneously. The maximum is 128 targets.
– Adaptive Scan Speed - Set the delay between bursts of packets sent during a SYN scan.1 = longest delay5 = almost no delay
Setting Retina Options
Retina Network Security Scanner 72 © 2017. BeyondTrust Software, Inc.

– Enable TCP connection limit override - Select the check box limit TCP connection overrides.Note: The TCP Connection Limit Override is available on Windows XP SP2 and later and Windows 2003SP1 only. This selection is not available for Windows NT or Windows 2000.
3. Click OK.
Setting Timeout ValuesConfiguring ping and data timeout values allows Retina to compensate for network latency.
If pings are not returning in time for Retina to detect them, increase the ping timeout value.
If Retina is not receiving complete data from devices or hosts when services are under heavy load, increase thedata timeout value.
To set timeout values:
1. On the Options page, select the Scanner tab.2. Enter timeout values for ping and data operations. The default is 3 seconds.3. Click OK.
Setting Scan RestrictionsYou can configure time based scan restrictions. Set scan restrictions on a global level or job level.
Configure scan restrictions at the job level on the Schedule tab. For more information, see Scheduling Scans.
To set a scan restriction on all scans:
1. Select Tools > Options.2. Click the Scanner tab.3. Select the Enable global scan restrictions check box, and then click Configure.4. Click the squares to set the restricted time frame.5. Select the check box to allow job level scan restrictions.6. If a scan is running when a scan restriction time starts, you can abort or pause the running scan. Select Aborted
or Paused.If you choose Paused, the scan resumes after the scan restriction ends.
7. Click OK.
Enabling Central PolicySpecifying a Central Policy allows a centralized console to manage Retina remotely. You must enter the location ofthe centralized console server.
To specify a Central Policy:
1. Select Tools > Options.2. Select the Management tab.3. Select the Enable Central Policy check box.
Note that changes to customized audits are lost if you subscribe to Central Policy.
4. From the Central Policy Type list, select either Version 1 or Version 2.
Setting Retina Options
Retina Network Security Scanner 73 © 2017. BeyondTrust Software, Inc.

If you select Version 1, the minutes that pass before Retina checks for policy updates is set at 15 minutes. Thetime cannot be changed.
Note: If the centralized console is on the same system, you can type localhost in the Central Policy Server box.The Password and Confirm Password boxes remain blank.
5. Enter the server name in the Central Policy Server box.6. Type the password in the Password and Confirm password boxes.7. Enter the agent name.8. To test the connection, click Test.9. Click OK.
Setting Retina Options
Retina Network Security Scanner 74 © 2017. BeyondTrust Software, Inc.

Configuring Email Notification for EventsYou can configure email notifications to alert users when particular events occur. You can select the events that willtrigger the email alert.
Setting AlertsEmail alerts can be delivered to selected users when certain events occur, such as Job Start, Job Stop, and High RiskAudit. Alerts can be triggered by actions occurring, such as Event Logs, SMTP, SMMP and SysLog.
To set alerts:
1. Select Tools > Alerting. The Alerting window displays.2. Click the Events tab, and then select the check boxes for the events that trigger an alert.3. Click the Actions tab. Select the actions that you want to occur in response to the event.4. Expand Event Log. You can enable event logs and system logs for the selected events. The logs are sent to the
email address set in the SMTP section.a. Select True from the Enabled field.b. In the Host field, enter the domain name or IP address.
5. Expand SMTP. You can specify the mail server.a. To activate alerts, select True in the Alert Enabled field.b. To activate reports, select True in the Reports Enabled field.c. In the Relay field, enter the SMTP server.d. In the Sender field, enter the From field for the email message.e. In the Recipient field, enter the To field for the email message.
6. Expand SNMP.a. Select True from the Enabled list.b. Enter the host and community.
7. Expand SYSLOG.a. Select True from the Enabled list.b. Enter the host. Syslog alerts use UDP port 514. To use an another port, add ":port number" to the end of
the Syslog IP address.c. Select the priority and facility.
8. Click OK.
Configuring Email Notification for Events
Retina Network Security Scanner 75 © 2017. BeyondTrust Software, Inc.

OS FingerprintingYou can run a wizard to capture the TCP fingerprint for a selected IP address.
Updating TCP OS FingerprintsYou can change TCP OS fingerprints.
To modify TCP OS fingerprints:
1. On the Audit page, right-click a completed IP address to display the submenu, then selectUpdate OSFingerprint.
Or
SelectUpdate OS Fingerprints on the Tasks pane.
The Retina OS Fingerprint Wizard displays.
2. Click Next. The Operating System Selection window displays.3. To select an existing fingerprint, select the One of the detected operating systems is correct check box, then
select the operating system and click Next.4. To enter a new fingerprint, select the None of the detected operating systems are correct check box, then
click Next. The Operating System Details window displays.5. Enter the operating system identification, such as description, vendor, application name, version and revision.6. To email the fingerprint to BeyondTrust, select the Email Fingerprint to BeyondTrust check box. Your email
client launches and mails the fingerprint to [email protected].
OS Fingerprinting
Retina Network Security Scanner 76 © 2017. BeyondTrust Software, Inc.
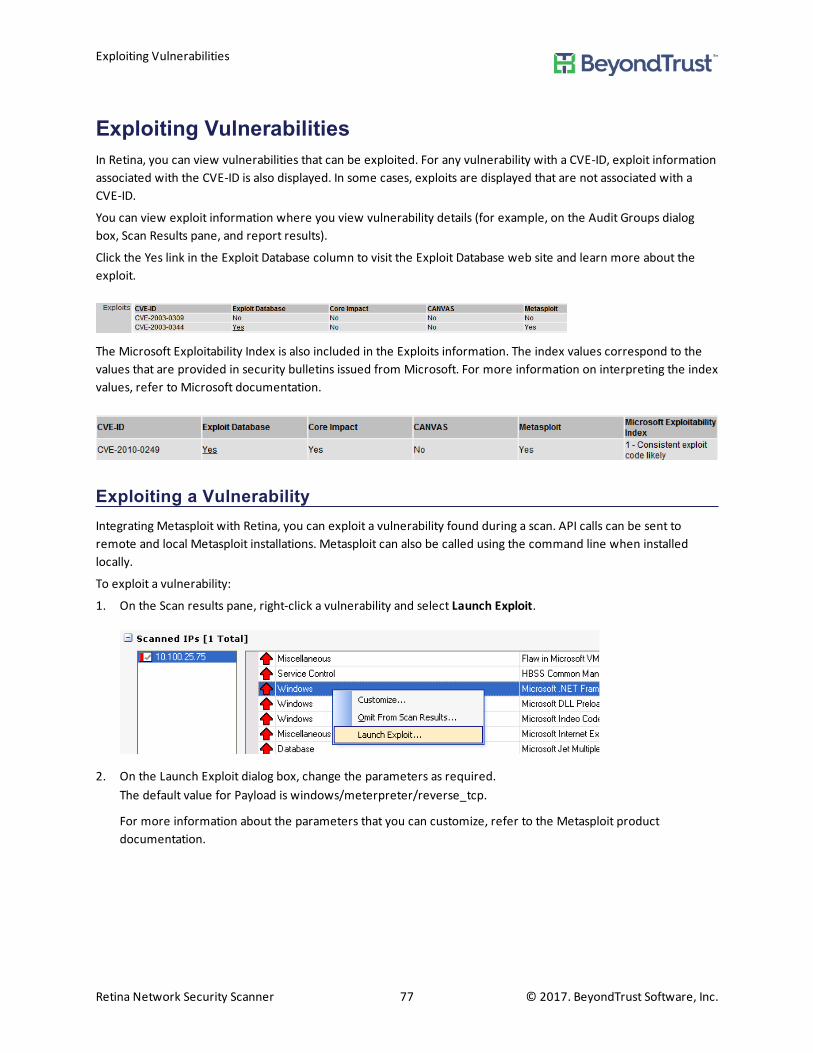
Exploiting VulnerabilitiesIn Retina, you can view vulnerabilities that can be exploited. For any vulnerability with a CVE-ID, exploit informationassociated with the CVE-ID is also displayed. In some cases, exploits are displayed that are not associated with aCVE-ID.
You can view exploit information where you view vulnerability details (for example, on the Audit Groups dialogbox, Scan Results pane, and report results).
Click the Yes link in the Exploit Database column to visit the Exploit Database web site and learn more about theexploit.
The Microsoft Exploitability Index is also included in the Exploits information. The index values correspond to thevalues that are provided in security bulletins issued from Microsoft. For more information on interpreting the indexvalues, refer to Microsoft documentation.
Exploiting a VulnerabilityIntegrating Metasploit with Retina, you can exploit a vulnerability found during a scan. API calls can be sent toremote and local Metasploit installations. Metasploit can also be called using the command line when installedlocally.
To exploit a vulnerability:
1. On the Scan results pane, right-click a vulnerability and select Launch Exploit.
2. On the Launch Exploit dialog box, change the parameters as required.The default value for Payload is windows/meterpreter/reverse_tcp.
For more information about the parameters that you can customize, refer to the Metasploit productdocumentation.
Exploiting Vulnerabilities
Retina Network Security Scanner 77 © 2017. BeyondTrust Software, Inc.
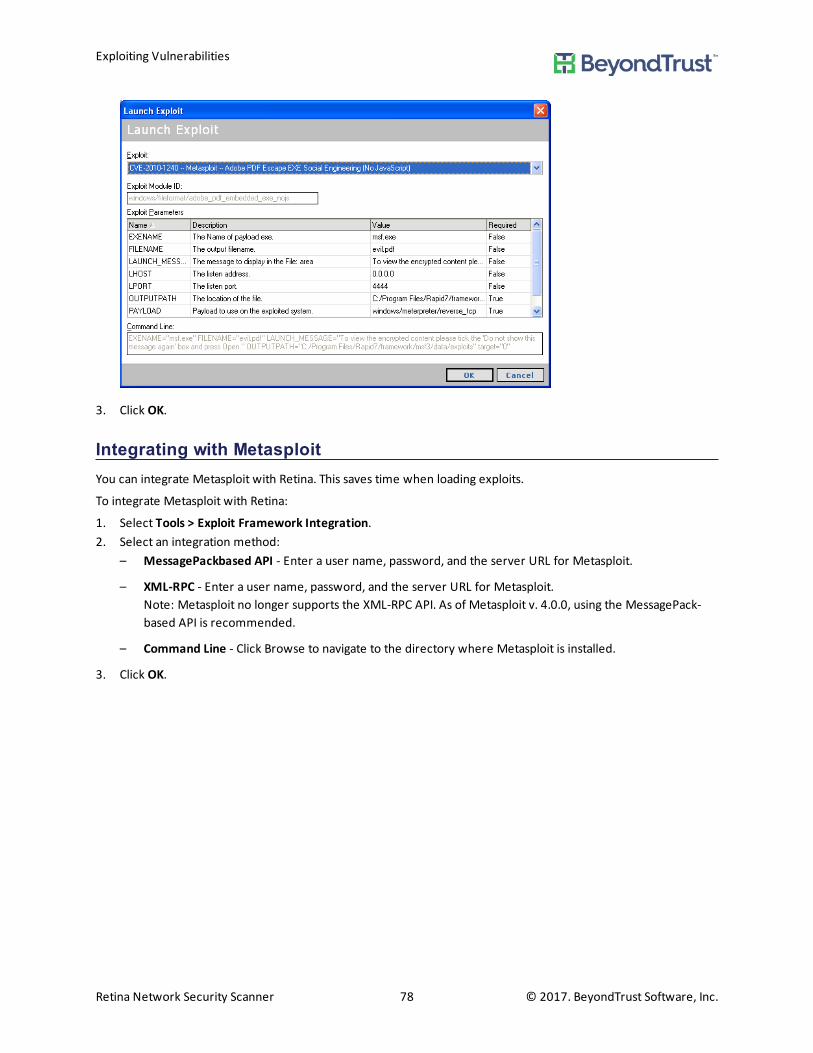
3. Click OK.
Integrating with MetasploitYou can integrate Metasploit with Retina. This saves time when loading exploits.
To integrate Metasploit with Retina:
1. Select Tools > Exploit Framework Integration.2. Select an integration method:
– MessagePackbased API - Enter a user name, password, and the server URL for Metasploit.
– XML-RPC - Enter a user name, password, and the server URL for Metasploit.Note: Metasploit no longer supports the XML-RPC API. As of Metasploit v. 4.0.0, using the MessagePack-based API is recommended.
– Command Line - Click Browse to navigate to the directory where Metasploit is installed.
3. Click OK.
Exploiting Vulnerabilities
Retina Network Security Scanner 78 © 2017. BeyondTrust Software, Inc.

Running Retina from the Command LineRetina has two command line interfaces (CLI):
• Retina.exe
• Retina RPC client
In the following sections, %Retina% is the Retina Install Directory.
Retina.exe CLI SwitchesUsing the Retina.exe CLI, you can:
• Run a scan.
• Run a report.
The Retina.exe syntax is:
Retina.exe /<Option Name>
You do not need to specify the full path or file extension for an Addressgroup or Scantemplate.
Example:
C:\Program Files\BeyondTrust\Retina 5\ScanTemplates\CompleteScan.xml
This scan template only needs to be specified as /scantemplate="CompleteScan"
Addressgroups and Scantemplates referenced in the command line need to be valid XML files located in %Retina5%\Groups\Addresses and %Retina 5%\ScanTemplates, respectively.
Parameter Description
? Display Retina command line options.
Iprange Nmap-style IP range. Addressgroup overrides this value.
AddressgroupName of the address group file used in the scan. This value overridesiprange.
Scantemplate Name of the scan template file used for the scan.
OutputfileName of output RTD file being generated. Use "*" to have Retina auto-assigna name based on the current timestamp. DSN overrides this value.
DSN Name of the DSN used for data storage. This value overrides outputfile.
Noupdate Suppresses the launch of Sync-It.exe.
Quietmode Suppresses all dialog boxes.
Minimize Launches Retina minimized to the system tray.
PolicyName of the scan template file used for the scan. Identical to scantemplate.Used for backward compatibility with Retina 4.
Status Name of the Retina scan status file.
Not Supported — report, hostoutputfile and activityid
Running Retina from the Command Line
Retina Network Security Scanner 79 © 2017. BeyondTrust Software, Inc.

Run Reports from the CLIYou can run reports from the CLI. The output types include HTML and XML.
ParametersRun Retina.exe from the Retina installation directory with the following parameters:
Retina /rpttype target rtd [jobname]
Parameter Description
"rpttype"
rptdisc = Discovery
rptexec = Executive
rptrem = Remediation
rptsum = Summary
rptvuln = Vulnerability Report (HTML)
rptacc = Access
rptpci = PCI Compliance
rptvulnxml = Vulnerability Export (XML)
rptvulncsv = Vulnerability Export (CSV)
rptreg = Regulatory Compliance
"target" HTML output full path and filename, including extension.
If spaces exist in the path, the target should display in quotes.
"rtd"Full path and filename to the source RTD.
If spaces exist in the path, the target should display in quotes. The rtd is notrequired for Discovery reports.
"jobname"
Name of the job in the RTD that generates a report. This is optional.
If this is omitted or more than one job with that name exists within the RTD,then the latest job will be used as the source.
If spaces exist in the path, the target should display in quotes. The jobname is notrequired for Discovery reports.
Examples• Generating a summary report for the latest job in an RTD
Retina /rptsum “c:\reports\summary\latest_job.html” “c:\program files\BeyondTrust\retina5\scans\latest.rtd”
• Generating a Discovery reportRetina /rptdisc “c:\reports\discovery\latest_disc.html”
• Generating an Executive report for latest job named “WAN”:Retina /rptexec “c:\reports\executive\WAN_exec.html” “c:\program files\BeyondTrust\retina5\scans\network.rtd” “WAN”
Running Retina from the Command Line
Retina Network Security Scanner 80 © 2017. BeyondTrust Software, Inc.
Retina.Report.Console.exe CLIRetina.Report.Console.exe can be used to run Dashboard, PCI Compliance, Regulatory Compliance, Remediation,Vulnerability Export, XML Assessment, and Alert reports.
Note: The XML Assessment report is not available from within the user interface. It can only be created via theRetina.Report.Console.exe CLI.
Parameters
Parameter Description
<ReportType>Report type to be generated. Valid values include Compliance, Dashboard, PCI,Remediation, VulnerabilityExport, XmlAssessment, Alert, Executive, Discovery,Consolidated
-f | --filename Output file name prefix (no extension).
-j | --jobid OPTIONAL. JobId of scan.
-g | --groupid OPTIONAL. GroupId of scan.
-r | --rtdfile OPTIONAL. Name of results database (RTD) file.
-s | --scanname OPTIONAL. Name of scan job.
-x | --xmloptions OPTIONAL. Full path to options XML file.
-d | --details OPTIONAL. Include detailed audit status.
-d | --related descriptions OPTIONAL. Include related descriptions.
-d | --console OPTIONAL. Output the details of the report to the console.
- p | --pdf OPTIONAL. Output the report to a PDF file.
Note: For examples of XML options file, refer to the sample files which are located by default in C:\ProgramFiles\BeyondTrust\Retina 5\Reports\Options\Samples\
ExamplesGenerate a Remediation report from the “DailyScan” RTD file.Retina.Report.Console.exe Remediation –r "DailyScan.rtd" –f"C:\Reports\RemediationReport.html"
Generate an XML assessment report via Job ID:Retina.Report.Console.Exe XmlAssessment -j "1732F56FA0D94EB3BACEE662AE3CD93B"-f "c:\Reports\Xml\XmlAssessment.xml"
Retina PowerShell Module CLIThe Retina PowerShell module (Retina.PowerShell.dll) can be used to programmatically control Retina via aPowerShell interface. Interfaces are included to control configuration, scan jobs, and reporting.
Retina.Report.Console.exe CLI
Retina Network Security Scanner 81 © 2017. BeyondTrust Software, Inc.

For more information on PowerShell interfaces, refer to the Retina PowerShell Integration Guide. The defaultlocation is C:\Program Files\BeyondTrust\Retina 5\Help\Retina PowerShell Integration Guide.pdf.
RetRPC_client.exe CLIUsing the RetRPC_client.exe CLI, you can:
• Run scans
• Monitor scan jobs
• Start, stop, and restart the Retina service
• Clean the job queue
The Retrpc_client.exe syntax is:
retrpc_client <command> <args>
Retrpc_client.exe returns no debug or other data to the command line; all errors and data are sent to the Retinalogs.
Parameter Description
StartScan <scan name>
Starts <scan name>, where <scan name> is the name of a scanrequest file in %Retina%\Scans\ScanRequests. Scan requests havexml extensions.If <scan name> was previously scheduled, no action istaken. If <scan name> is an immediate job, the job is queued.Thereturn text is in the format:Started scan <jobinstance>:<jobid>Started scanB7BBAEB8B8E34BDC9034AE88FE8ECEB3:4FF2FAA7D95B4034B03DA10E11AEF82B
StopScan <jobid>Stops <jobid> where <jobid> is the name of a scan request file in%Retina%\Scans\ScanRequests. Scan requests have xml extensions.
If <jobid> is not running, no action is performed.
PauseScan <jobid>Pauses <jobid> where <jobid> is the name of a scan request file in%Retina%\Scans\ScanRequests. Scan requests have xml extensions.
If <jobid> is not running, or paused, no action is performed.
UnpauseScan <jobid>Continues <jobid> where <jobid> is the name of a scan request file in%Retina%\Scans\ScanRequests. Scan requests have xml extensions.
If <jobid> is not running, or not paused, no action is performed.
ModifySchedule <scan name>
Forces a change in the time of a scheduled job <scan name> where<scan name> is the name of a scan request file in%Retina%\Scans\ScanRequests.
Scan requests have xml extensions.
StopSchedule <jobid>
Deletes <scan name> where <scan name> is the name of a scanrequest file in %Retina%\Scans\ScanRequests. Scan requests havexml extensions.
Deletes all occurrences of <scan name> because it removes thescanrequest.
Retina.Report.Console.exe CLI
Retina Network Security Scanner 82 © 2017. BeyondTrust Software, Inc.
Parameter Description
DelCredentials <description> Deletes the credentials for <description>.
SetCredentials <username><password> <description>
Creates a credential <user name> with password <password>. If<user name> exists, it is overwritten.
If a credential is used here, it will be available in the Retina UI.
GetEngineStatus [/num]
GetJobStatus <[jobinstance]:jobid>[/num]
Returns the status of the specified job.
jobid - The job to check the status of.
/num - Optional parameter to return the numeric representation ofthe result:
1 Queued
2 Active
3 Complete
4 Pausing
5 Paused
6 Aborting
7 Aborted
8 Error
The exit code of the program is set to the corresponding value of thestatus.
ConfigReinitializes the retina configuration values from%Retina%\retinaconfig.xml.
WriteConfig <file name>
TestREM <server> <password> <agentname> [WCF|REM3]
FixIt <audit id> <host ip> <credentialname>
Performs a Fixit operation identified by <audit id> against host <hostip>.
It can optionally use <credential name> to authenticate.
Stop Stops the Retina service.
Start Starts the Retina service.
Restart Restarts the Retina service.
PipeClientActs as a simple pipe client by seeing all the xml output that theinterface would see.
Dump [path]Creates a dump snapshot of the engine in it's current state. path -Optional path for dump file. The default directory is Retinalogs\Exceptions
Retina.Report.Console.exe CLI
Retina Network Security Scanner 83 © 2017. BeyondTrust Software, Inc.

Parameter Description
Clean<Queue|Schedule|Logs|Scans|All>
Removes the following files: Queue file and stops all jobs Schedulefiles All RTD files All scan requests All scan jobs All temp files All logfiles
Starting a Scan from the CLIBefore you can run a scan from the RetRPC_client CLI, you must first create a scan in Retina. This scan generates ajobID that you need to run a scan from the CLI.
Use the following procedure to create a scan job.
To create a scan from Retina:
1. Select Tools > Scan Job Wizard.2. On the Target Selection page, select the target assets, and then click Next.3. On the Credential Selection page, selectUse Specific Credentials.4. On the Credential Type list, select Stored.5. Select the credentials to use for the scan, and then click Next.
6. Select port settings, and then click Next.7. On the Audit Selection page, select Custom Audit Settings, select the audits to use for the scan, and then click
Next.8. On the Audit Selection page, select the audits, and then click Next.9. On the Option Selection page, select scan settings. For more information, see Selecting Audit Options.10. On the Output Selection page, select Database, select the output DSN, and then click Next.11. On the Details Selection page, enter a name for the scan job and select the check box Save as a scan
template. Click Next.12. On the Schedule Selection page, click Next. By default, Run Now is selected.13. On the last page, click Finish. The job will run now.14. To see the job ID, go to:
Retina.Report.Console.exe CLI
Retina Network Security Scanner 84 © 2017. BeyondTrust Software, Inc.

%Retina 5%\Scans\ScanRequests\
A job ID, similar to the following, will be used in the command line for future scans. Do not include _RetinaScanRequest in the command line.
Command Line Sample:
retrpc_client startscan "C:\Program Files\BeyondTrust\Retina 5\Scans\ScanRequests\<job_id>.xml"
Retina.Report.Console.exe CLI
Retina Network Security Scanner 85 © 2017. BeyondTrust Software, Inc.


Database and XML SchemaThis appendix provides information about the Retina database and XML schema.
Retina RTD SchemaTable 1. eeye_Activity
Identifier Field Type Description
ID_ String [32] Unique record identifier for each scanned IP address.
GroupID String [32]
Unique ID assigned per scan.
Used to group multiple ID_ fields.
The ID is a generated GUID used by each table as the Activity_ID.
DTS SmallDateTime Date and time stamp indicating the scan start.
dtsScanEnd SmallDateTime Date and time stamp indicating the scan completion.
RunStat String [255]Status of last scan.
Indicates success, aborted or empty for unknown reason.
ActivityModule String [255]Scanner that is currently the activity module in Retina.
Extensions will be added as modules are added to Retina.
IP String [255] IP address of target being scanned.
RequesterIP String [255] Reserved for future use
RequesterMac String [255] Reserved for future use
Table 2. eeye_Alerts
Identifier Field Type Description
ID_ String [32]Unique record identifier for each scanned IPaddress.
ActivityID String [32] Link to eeye_activity:ID_
Path1 String [255] Subsystem, e.g., “Remote Agent”
Path2 String [255] Blank or internal classification, such as “Error”
Path3 String [255] Not Used
DisplayField String [255] Data label, such as “SSH Credentials”
ValueField String [255] Optional further explanation of DisplayField
Risk Integer Not Used
Database and XML Schema
Retina Network Security Scanner 87 © 2017. BeyondTrust Software, Inc.

Table 3. eeye_AuditExtend
Identifier Field Type Description
ID_ String [32] Unique record identifier
ActivityID String [32] Link to eeye_Activity:ID_
Audit_ID String [32] Link to eeye_Audit:ID_
Rthnum Long Integer Audit ID as referenced in audits.xml.
PosNeg Long Integer0: Target NOT vulnerable
1: Target vulnerable
context String [255] Context of the instance of the audit (share name, user name)
Checked Long Integer0: Audit NOT performed against target.
1: Audit performed against target.
Description String [255] Description of data that was checked for on the remote target.
TestedValue String [255] Data that was checked for on the remote target.
FoundValue String [255] Data that was found on the remote target.
Table 4. eEye_Audits
IdentifierFieldType
Description
ID_String[32]
Unique record identifier.
ActivityIDString[32]
Link to eeye_activity:ID_
path1String[255]
Audit Type:
Field format: [risk][Name].rth
Where:
[risk] is a single digit number expressing the risk (0..9)
[Name] is the audit name that corresponds to the Name element in the audits.xml.
To input every possible value for this field, construct this format of string for each entry inthe name and risk elements of audits.xml.
Users and integrators should not need this field.
path2String[255]
Audit ID as referenced in audits.xml.
path3String[255]
Reference to RTH file.
Contains Audits\<category>\<rth name>.rth.
Integrators should not need this file.
DisplayFieldString[255]
Audit Category
Database and XML Schema
Retina Network Security Scanner 88 © 2017. BeyondTrust Software, Inc.

IdentifierFieldType
Description
ValueFieldString[255]
Audit Name
Risk Integer
0: Info
1 – 3: Low
4 – 6: Medium
7 – 9: High
Table 5. eeye_Devices
Identifier Field Type Description
ID_ String [32] Unique Record Identifier
ActivityID String [32] Links to eeye_activity:ID_
path1 String [255] Device Type
path2 String [255] Not Used
path3 String [255] Not Used
DisplayField String [255] Device Name
ValueField String [255] Device Description
Risk Integer Not Used
Table 6. eeye_Groups
Identifier Field Type Description
ID_ String [32] Job ID
Name String [255] Job Name
ScanStart Date/Time Date time job started
ScanEnd Date/Time Date time job ended
Status String [50] Job status as Completed, Aborted, Running or Paused
Table 7. eeye_Hardware
Identifier FieldType Description
ID_ String [32] Unique record identifier
ActivityID String [32] Link to eeye_activity:ID_
Path1 String [255] Hardware category and instance count
Path2 String [255] Internal data label classification
Path3 String [255] Not Used
DisplayField String [255] Data label, such as “Drive Description” or “Processor”
Database and XML Schema
Retina Network Security Scanner 89 © 2017. BeyondTrust Software, Inc.
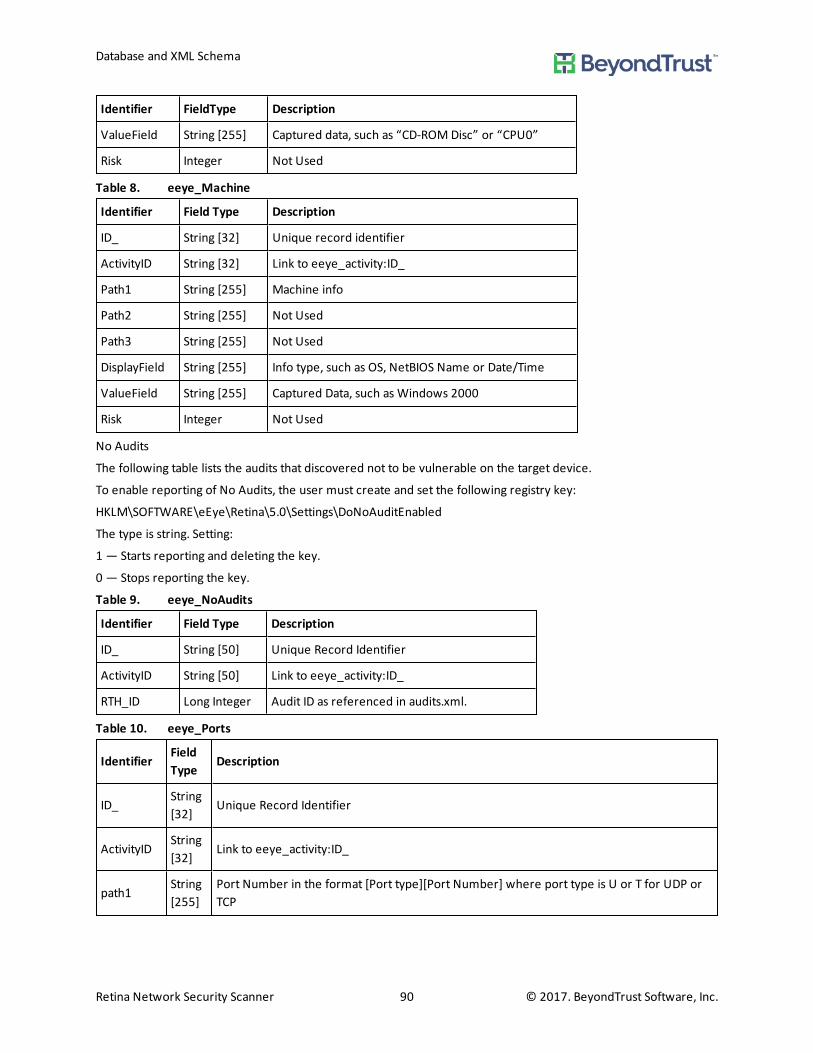
Identifier FieldType Description
ValueField String [255] Captured data, such as “CD-ROMDisc” or “CPU0”
Risk Integer Not Used
Table 8. eeye_Machine
Identifier Field Type Description
ID_ String [32] Unique record identifier
ActivityID String [32] Link to eeye_activity:ID_
Path1 String [255] Machine info
Path2 String [255] Not Used
Path3 String [255] Not Used
DisplayField String [255] Info type, such as OS, NetBIOS Name or Date/Time
ValueField String [255] Captured Data, such as Windows 2000
Risk Integer Not Used
No Audits
The following table lists the audits that discovered not to be vulnerable on the target device.
To enable reporting of No Audits, the user must create and set the following registry key:
HKLM\SOFTWARE\eEye\Retina\5.0\Settings\DoNoAuditEnabled
The type is string. Setting:
1 — Starts reporting and deleting the key.
0 — Stops reporting the key.
Table 9. eeye_NoAudits
Identifier Field Type Description
ID_ String [50] Unique Record Identifier
ActivityID String [50] Link to eeye_activity:ID_
RTH_ID Long Integer Audit ID as referenced in audits.xml.
Table 10. eeye_Ports
IdentifierFieldType
Description
ID_String[32]
Unique Record Identifier
ActivityIDString[32]
Link to eeye_activity:ID_
path1String[255]
Port Number in the format [Port type][Port Number] where port type is U or T for UDP orTCP
Database and XML Schema
Retina Network Security Scanner 90 © 2017. BeyondTrust Software, Inc.

IdentifierFieldType
Description
path2String[255]
If blank, DisplayField and ValueField contain the port number and protocol.
If State, ValueField expresses the port state as Open, Closed, or Filtered.
If Version, ValueField contains the port banner.
The meaning of the banner varies based on protocol.
If HTTP services, the banner is the Server HTTP response header field.
If SMB, the banner is an identifier for the service, such as the operating system "Windows5.1" for XP, or "Samba" for hosts running Samba.
If FTP, SMTP, Telnet or miscellaneous, the banner is the greeting string sent back whenRetina connects to the service.
path3String[255]
Not Used
DisplayFieldString[255]
Port info [port type]:[port number];
Port State for State
Detected Protocol for Proto
Version for Version
ValueFieldString[255]
Port specific Field Value, such as name of service; open or closed; name of protocol orNetBIOS version string.
Risk Integer Not Used
Table 11. eeye_Processes
Identifier Field Type Description
ID_ String [32] Unique Record Identifier
ActivityID String [32] Link to eeye_activity:ID_
path1 String [255] Process Number
path2 String [255] PID, PIDParent, or StartTime
path3 String [255] Not Used
DisplayField String [255] “Process “[Process Number], “Process ID”, “Parent PID”, or “Start Time”
ValueField String [255] Name of process, Process ID, Parent Process ID or time the process was started.
Risk Integer Not Used
Table 12. eeye_Protocols
IdentifierFieldType
Description
ID_String[32]
Unique Record Identifier
Database and XML Schema
Retina Network Security Scanner 91 © 2017. BeyondTrust Software, Inc.

IdentifierFieldType
Description
ActivityIDString[32]
Link to eeye_activity:ID_
path1String[255]
IP Protocol Number: 0 to 255
path2String[255]
If blank, ValueField contains the Protocol Name
If State, ValueField expresses the protocol state as Open or Open/Filtered.
If Reason, ValueField contains the reason for detection, such as: icmp-response, syn-ack,tcp-response, udp-respone or no-response
path3String[255]
Not Used
DisplayFieldString[255]
“IP: XXX”, “Response Type” or “Protocol State”
ValueFieldString[255]
Protocol name, state or reason for detection
Risk Integer Not Used
Table 13. eeye_ReportNvp
Identifier Field Type Description
GroupID String [32] Unique Record Identifier
Key String [50]
Value Memo
Table 14. eeye_Services
Idenitifer Field Type Description
ID_ String [32] Unique Record Identifier
ActivityID String [32] Link to eeye_activity:ID_
path1 String [255]The short name of the service.
For a process enumeration, it is the 8-digit zero-padded process ID in hexadecimal.
path2 String [255] Includes the service attribute names.
path3 String [255] Not Used
DisplayField String [255]Short name of the service or Process [pid].
For a process, where [pid] is a 5-or-more-character,space-padded process ID number.
ValueField String [255]For services [STOPPED] or [RUNNING] followed bythe long name of the service, or, for process, theexecutable name.
Database and XML Schema
Retina Network Security Scanner 92 © 2017. BeyondTrust Software, Inc.
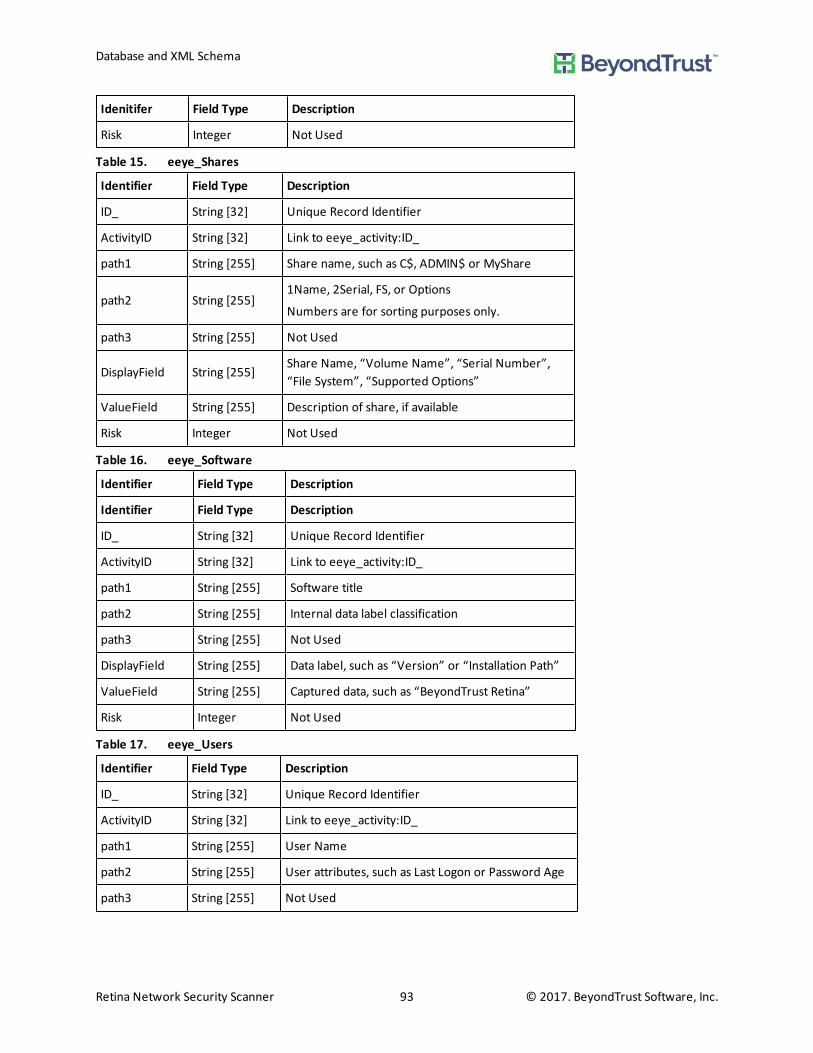
Idenitifer Field Type Description
Risk Integer Not Used
Table 15. eeye_Shares
Identifier Field Type Description
ID_ String [32] Unique Record Identifier
ActivityID String [32] Link to eeye_activity:ID_
path1 String [255] Share name, such as C$, ADMIN$ or MyShare
path2 String [255]1Name, 2Serial, FS, or Options
Numbers are for sorting purposes only.
path3 String [255] Not Used
DisplayField String [255]Share Name, “Volume Name”, “Serial Number”,“File System”, “Supported Options”
ValueField String [255] Description of share, if available
Risk Integer Not Used
Table 16. eeye_Software
Identifier Field Type Description
Identifier Field Type Description
ID_ String [32] Unique Record Identifier
ActivityID String [32] Link to eeye_activity:ID_
path1 String [255] Software title
path2 String [255] Internal data label classification
path3 String [255] Not Used
DisplayField String [255] Data label, such as “Version” or “Installation Path”
ValueField String [255] Captured data, such as “BeyondTrust Retina”
Risk Integer Not Used
Table 17. eeye_Users
Identifier Field Type Description
ID_ String [32] Unique Record Identifier
ActivityID String [32] Link to eeye_activity:ID_
path1 String [255] User Name
path2 String [255] User attributes, such as Last Logon or Password Age
path3 String [255] Not Used
Database and XML Schema
Retina Network Security Scanner 93 © 2017. BeyondTrust Software, Inc.

Identifier Field Type Description
DisplayField String [255]User attributes, such as Last Logon, Password Age orname
ValueField String [255]Detected values for attributes and description, ifavailable.
Risk Integer Not Used
Table 18. eeye_WinGroups
Identifier Field Type Description
ID_ String [32] Unique Record Identifier
ActivityID String [32] Link to eeye_activity:ID_
path1 String [255] User group name
path2 String [255] User group attributes, such as SID
path3 String [255] Not Used
DisplayField String [255] User group attributes
ValueField String [255]Detected values for attributes and description, ifavailable.
Risk Integer Not Used
Table 19. Sample eeye_Device Entries
Path DisplayField ValueField
Date Report Date Date and time the device was discovered
Address Address IP address of the device
Traceroute Traceroute Comma separated list of IP addresses denoting hops to host
Time To Live Time To Live TTL from ping response
Ping Ping Response Message indicating whether or not the device responded
Ping2 Avg Ping Response Average number of milliseconds between ping and reply
DNS Domain Name Reverse-lookup DNS or NetBIOS name of host
Table 20. Sample eeye_Machine Entries
path1 path2 DisplayField ValueField
zOpen Open PortsDisplays the number of open TCP portsdetected on the target device
OSDETECT OS Detected
Retina’s description of the machine’soperating system
Entries depend on how the OS was detected.
- Discovered using Windows registry, theregistry information is entered.
Database and XML Schema
Retina Network Security Scanner 94 © 2017. BeyondTrust Software, Inc.

path1 path2 DisplayField ValueField
- Discovered using NetBIOS, the string in theNetBIOS return data is entered.
- Discovered using ICMP discovery, the stringcontained in the fingerprint.xml file located inthe <RetinaInstallation>\Database\Reference\ICMPOSD_FP directory is entered.
- Discovered using TCP fingerprinting, thestring from the retfp file located in the <RetinaInstallation>\Database\Reference directory isentered.
OSDETECT OS OS Name NetBIOS name, if available.
OSDETECT MethodDetectionMethod
The OS discovery method, such as registry,NetBIOS, ICMP or TCP.
OSDETECT Vendor Vendor Company that develops or distributes the OS
OSDETECT Version Version OS version number
OSDETECT Type Device TypeEither Workstation for Windows devices ordevices defined in the ICMP or TCP footprints.
RDATE Remote Date Target device system date in GMT
RTIME Remote Time Target device system time in GMT
RMAC Remote MACTarget’s MAC address on the networkinterface being scanned
RNBNAMENetBIOSName
NetBIOS name of target
RNBGROUPNetBIOSDomain
DNSDomainName
IP domain name of the target
zTCPOpenOpen TCPPorts
Number of open TCP ports discovered on thetarget device
zUDPOpenOpen UDPPorts
Number of open UDP ports discovered on thetarget device
XAuditingEventAuditing
Enabled
XAuditing 00000000Audit systemevents
Success or Failure
Database and XML Schema
Retina Network Security Scanner 95 © 2017. BeyondTrust Software, Inc.

path1 path2 DisplayField ValueField
XAuditing 00000001Audit logonevents
Success or Failure
XAuditing 00000002Audit objectaccess
Success or Failure
XAuditing 00000003Auditprivilege use
Success or Failure
XAuditing 00000004Audit processtracking
No Auditing
XAuditing 00000005Audit policychange
Success or Failure
XAuditing 00000006Audit accountmanagement
Success or Failure
XAuditing 00000007
Auditdirectoryserviceaccess
Success or Failure
XAuditing 00000008Audit accountlogon events
Success or Failure
Risk Risk Integer Not Used
Table 21. Sample eeye_User Entries
path2 ValueField
a1AccountDisabled If account is disabled, True
a1AccountLocked If account is locked out, True
a1Fullname If user's password never expires, True
a1UF_DONT_EXPIRE_PASSWD
Full name of user
a1UF_PASSWD_CANT_CHANGE
If user cannot change his password, True
b1Lastlogon Last time user logged in or Never
c1Lastlogoff Last time user logged off or Unknown
d1PasswordAge Age of user's current password in days
e1Expires Time when user account expires or Never
e1Homedir User's home directory
f1Homedrive User's home drive
g1Logonserver Name of server where logon requests are sent
Database and XML Schema
Retina Network Security Scanner 96 © 2017. BeyondTrust Software, Inc.

path2 ValueField
h1Maxstorage User's storage limit or Unlimited
numlogons Number of times user has logged on or Unknown
Privilege User's privilege level: Guest, User or Administrator
Profilepath Path to user's profile
PWexpiredIf user's password has expired, Yes
If user’s password has not expired, No
RIDRID component, such as last number, of user's SIDidentifier
Workstations List of workstations where user is allowed to log on
z1BadPWcountNumber of bad login attempts allowed before user lock-out or Unlimited
z2Countrycode Country or region code for the user's language
Risk Integer
OS returns information in WinGroups.
Group is the name of the group.
Z8GroupMember is a list of CRLF group names that the user belongs to.
Zones are the Internet zones the user is allowed access to.
Database and XML Schema
Retina Network Security Scanner 97 © 2017. BeyondTrust Software, Inc.

Troubleshooting RetinaYou can create a package of files that you email to BeyondTrust Technical Support.
Submitting Support FilesTo help troubleshoot debug problems, you can package support files to send to the BeyondTrust online supportsystem. These files are saved in aWinZip format.
The Retina Support Tool automatically captures the support log files associated with the selected scan using thefollowing two methods.
To create a support package from the Help Menu:
• From the main menu, select Help > Package Support Files.
The support tool packages all debug files.
To create a support package from the Completed pane:
1. Select the Audit tab.2. Select Completed in the Scan Jobs section.3. Right-click a completed scan and select Package Support Files.4. The support tool captures the log files from the selected scan.
Troubleshooting Retina
Retina Network Security Scanner 98 © 2017. BeyondTrust Software, Inc.


![All-Trans-Retinyl Palmitate [CASRN 79-81-2] · All-Trans-Retinyl Palmitate CASRN 79-81-2 RTECS NO. VH6860000 . ... Ethanol sol. sol. ... pathway for chemical decomposition of all-](https://static.fdocuments.us/doc/165x107/5c7b201d09d3f293308bd3f5/all-trans-retinyl-palmitate-casrn-79-81-2-all-trans-retinyl-palmitate-casrn.jpg)