Retail-Man User Manual
225
RetailMan POS The Easy Business Solution to Fully control Your Business. © EziSolution Systems, 2011
Transcript of Retail-Man User Manual

RetailMan POSThe Easy Business Solution to Fully control Your Business.
© EziSolution Systems, 2011

p2
© EziSolution Systems, 2011
Table of Contents
RetailMan 6Introduction 7Quick Start 8Function Keys 10Support and Contacts 12Main Menu 13 User Interface 13 Other Languages Support 14POS 15 Point Of Sale 15 Touch Screen Payment 18 Quick Menu Buttons 20 POS Docket Re-Print 23 POS List 24 Start/End Day 25 Point Of Sales Reports 26 Summary Income Report 26 Daily Sales Report 27 Staff Sales Report 28 Group Sales Report 29 Hourly Sales Report 30Sales 31 Invoicing 31 Quotations 36 Lay-away / Lay-by 37 Credit Note 38 Consignment Out 39 Payments Received 40 Add / Modify Clients 42 Email 45 Bulk E-mail 46 Labels Printing 48 Sales Reports 49 List of Clients 49 Invoices List Report 50 Summary Sales Report 51 Aged Clients Report 52 Clients' Statements 53 Sales Analysis Report 54 Back Orders Report 55 Sales Tax Report 56 Bank Deposit 57 Sales Payments Report 58 Sales By Client 59 Sales By Product 60 Client Sales/Product 61 Product Sales/Client 62 Sales by Sales Rep 63Stock 64 Add / Modify Stock Card 65

p3
© EziSolution Systems, 2011
Details Tab 65 History 67 Equivalent Part Numbers 68 Package Contents 69 Kit 70 Stock Groups Maintenance 73 Global Stock Maintenance 74 Stock Quantity Adjustment 75 Stock Reports 76 Item Enquiry 76 Transactions Enquiry 77 Quantities Report 78 Selling Prices Report 79 Cost Price Report 80 Slow Moving Items Report 81 Out Of Stock Report 82 Stock Reorder Report 83 Stock Take Report 84 Stock Value Report 85 Items' History 86Purchase Menu 87 Purchasing 87 Payments To Suppliers 90 Add/Modify Suppliers 92 E-mail Broadcast 93 Purchase Reports 94 List of Suppliers Report 94 Purchases List Report 95 Purchase Orders Report 96 Summary Purchase Report 97 Aged Suppliers Report 98 Suppliers' Statements 99 Purchase Analysis Report 100 Back Orders Report 101 Stock On Order Report 102 Purchases Tax Report 103 Purchase Payments Report 104Payroll 105 Sign In / Out 105 Process Payroll 108 Add/Modify Staff 109 Payroll Parameters 110 Payroll Slips Report 111 Payroll Report 113 Sign In/Out Report 114Accounts 115 Chart of Accounts 115 Journal Posting 117 Entry Posting 119 Bank Reconciliation 121 Accounting Reports 122 Chart of Accounts Report 122 Daily Entries Report 123 Daily Balances Report 124

p4
© EziSolution Systems, 2011
Monthly Balances Report 125 Statement Of Account 126 Trial Balance Report 127 Trading Profit / Loss Report 128 Balance Sheet Report 129Diary 130 Diary Screen 130Telephone 132 Telephones Directory 132Maintenance 133 Files Reindex 133 System Setup 135 Company Setup 135 General Setup 136 Sales Setup 137 Stock Setup 140 Purchase Setup 141 Point Of Sale Setup 143 Payments Setup 146 Loyalty 148 Locations 150 Hardware Setup 151 POS printer 152 Cash Drawer 154 Pole Display 156 Electronic Scale 157 Barcode Scanner 159 Credit Cards 160 Import / Export Files 162 Restore Data From Backup 164 Users Settings 165 Modify User 166 Security 168 Settings 169 Sales 171 POS 172 e-Mail 174 Tax File Maintenance 176 Default Accounts Setup 177 Clear Data files 178 Data Files Statistices 179Versions History 180 Version 1.8 181 Version 1.80 181 Version 1.80.1 182 Version 1.80.2 183 Version 1.80.3 184 Version 1.80.4 185 Version 1.80.5 186 Version 1.80.6 187 Version 1.80.64 188 Version 1.80.73 189 Version 1.81 190 Version 1.9 191

p5
© EziSolution Systems, 2011
Version 1.90 191 Version 1.90.09 192FAQ 194 Barcode Printing 194 Cash Drawer Setup 196 Cannot load 32-bit DLL repinv3.frx 199 Error Access Printer Spooler 200 Issuing a discount on invoice or POS total 201 POS printer setup 202 Pole Display Setup 204 Network Printing 207 Network Setup 210 System Freeze 214 Serial Number Tracking 215 Supported Hardware 216

p6
© EziSolution Systems, 2011
RetailMan
RetailMan POS, the easiest way to take full control of yourbusiness
-o-

p7
© EziSolution Systems, 2011
Introduction
Retail ManPOS System makes it easy for users with only a partial accounting background tostart entering information on the computer without worrying too much about debit and creditprinciples.
The whole idea behind the system is that it is very similar to the paperwork side of thebusiness, but much faster. This can save the business thousands of dollars in m any waysincluding:
Increase profit and decrease work load
Boost sales using the built in emailing system
Stock Control
Faster debit collection
On-time payment to creditors
Smaller accountants bills
Faster tax returns
Track staff sales and give rewards based on performance
And more . . .
The user interface of the system is very simple and errors made during data-entry can becorrected as easily as they are made.
All needed information is always at your fingertips therefore saving you tim e.
The Retail ManPOS System System runs under the operating system Windows 9x, 2000, XP,Vista, Windows 7, Windows 2003/2008 and most network systems that are Windowscompatible. It is year 2000 compliant and has no end-of-period posting.
The multi-user version, ships with the ability for the data to be accessed by several users atthe same time.
Retail ManPOS System now comes with internet support. The user can email the clients,suppliers or contacts directly from within with great ease. It also supports email broadcasting,giving the user a very valuable quick and inexpensive advertising tool.
A full copy of the user manual can be downloaded from our web site, to do that, go to HELP >ABOUT and click on the web site link on the about page.
-o-

p8
© EziSolution Systems, 2011
Quick Start
Trying to implement an electronic accounting and stock control system in the business can beoverwhelming. You are probably asking yourself "Where do I start first?".
This quick start guide gives you a clear step-by-step approac h with a minimum of fuss.
The overall task is broken into separate, simple steps that you can follow in sequence toachieve the required result.
Step 1
Select Maintenance > System Setup to set up your company name and other details. Refer tothe corresponding section below for further information
Step 2
Decide which users are going to be using the system and their access levels.
When first installed. Retail ManPOS System comes with five users. Users 1 and 2 have access toall parts of the system.
If you need to make the system secure, you should allocate a password to each user at theearliest opportunity.
If you do not need security on the system, simply blank the password of the master user.
To assign security, select Maintenance> Users File Maintenance, and add or remove users asyou need.
You can give users one of four possible access levels. These are:
0 No access
1 Read only
2 Read and Write
3 Full access (Read, write, Modify, and Delete)
Note: The first two users will always have a full access to all parts of the system regardless ofwhat their access levels are set to.
Note: Use Ctrl + F12 to change users from anywhere in the system
Step 3
Select Sales, then Add/Modify Clients to add the client details. You are recom mended tocreate a client name called CASH SALES for all cash sales.
Step 4
Select Purchase, then Add/Modify Suppliers to add supplier details. You are rec ommended tocreate a supplier name called CASH PURCHASE for all cash purchases
Step 5
You will need to add stock to the system, you can do that in a number of ways, but make surewhen you enter new stock to include the items part number (or barcode), item details, sellingprice and most importantly the cost pric e, this is the minimum amount of information to

p9
© EziSolution Systems, 2011
properly handle the stock.
To add stock, you can do so from the Stock > Add/Modify Screen or from the Maintenance >Import/Export Files Screen, then once the stock data is entered, you can start buying andselling.
-o-

p10
© EziSolution Systems, 2011
Function Keys
Use the following function keys for speed and simplicity:
F1 : Activate help system.
This function key activates the Windows style built-in help. It is active throughout the system .
F2 : Save Transaction.
The F2 function key is used in the data entry forms throughout the system and allows theuser to use the keyboard to save the entered data by pressing F2.
F3 : Print Transaction.
The F3 function key is used to print reports, invoices, quotes, purchase orders and more.
To choose the printer destination, you have to use the mouse and right click on the F3 Printkey to access the printer dialog box.
F4 : Delete Transaction (Invoicing & Purchasing).
The F4 function key is used to delete transactions in the data entry screens such as invoicing,purchasing and more. The system will ask for delete confirmation before proceeding.
F5 : Process Payment (Invoicing & Purchasing).
Pressing the F5 function key in the invoicing the purchasing screens will activate the paymentscreen to pay a single invoice or purchase.
F7 : Produce a list of outstanding invoices in invoic ing and purchasing
Pressing F7 in the invoicing or purchasing screens will produce a list of all invoices orpurchases for the past 12 months. To view a list of invoices for either one c lient or supplier,enter the client or supplier code before pressing F7 in the invoic ing or purchasing screen.
F8 : Search by for serial number.
Pressing F8 will prompt the user to supply a serial number to search for. The serial numberhas to be exactly as entered, otherwise the search will fail. If you have more than one serialnumber for 2 different items, you can use the UP/DOWN arrow keys to scroll through them.
F9 : Search by Part Number.
Pressing F9 will prompt the user to supply a part number to search for, if the part number didnot exist, the system will display the stock list with the nearest part number highlighted.
Shift+F9 : Search by Equivalent Part Number
Pressing the SHIFT and F9 combination will prompt the user to supply an equivalent partnumber to search for.
F10 : Search by Part Details
Pressing F10 will prompt the user to enter an item details to search for, You can enter the firstfew letters of the item details and the system will produce the stock list sorted by item detailswith the search string or its nearest at the top of the list.

p11
© EziSolution Systems, 2011
SHIFT+F10 : Search by Parts Other Details
Pressing the SHIFT and F10 key combination will prompt the user to enter the item otherdetails to search for. To view the items other details in the stock search list, it should havebeen enabled from the Maintenance > System Setup > Stock menu
F11 : Calendar.
Pressing F11 will show the calendar with the current date highlighted. Use the arrow keys tomove between dates, then press <Enter> to transfer the date from the calendar to a datefield.
F12 : Calculator
Pressing F12 key will open the Windows calculator. Pressing F12 again will open anotherinstance of the Windows calculator.
<Alt>+F12 : Open Cash Drawer if connected
Pressing Alt and F12 key combination will open the cash drawer if installed and connected. Toinstall a cash drawer, go to Maintenance > System Setup > Hardware.
<Ctrl>+F12 : Change user
Press the Control and F12 keys combination allows the system to change the logged in user, ifan invalid password was entered 3 times, the system will close down.
<Shift>+F12 : Print Labels in Invoicing & Purchasing screens
Use this key combination to print labels and bar codes for your stock items. The output can bedirected to any printer and can be started from any position on the page by choosing the rowand column values.
Print (F3) and Windows Print Dialog Box
To print to the default printer, select Print (F3) anywhere this print button is available,
If you right-click on the Print (F3) button, the Windows print dialog will be displayed.
This will allow you to choose the printer/destination. This could be a local printer, networkprinter or a fax. (to send invoices, quotes or purchase orders as a fax, you need to have amodem installed or connected to your system with fax software on your system. Windowscomes with a fax software you can use. Otherwise, there are many packages that you can useas Fax Software.
-o-

p12
© EziSolution Systems, 2011
Support and Contacts
EziSolution Systems are the authors of Retail ManPOS System and can be contacted via e-mail at:
For help and support : [email protected]
or for sales enquiries: [email protected]
We respond to all e-mails within 24 hours. Although e-mail is a great communication medium it isnot 100% reliable and if for any reason you do not receive a reply within 24 hours, please assumethat we have not received it and e-mail us at our backup address: [email protected].
For users on Gold support, you can contact us using skype on: Ezisolution
Ordering Retail ManPOS System
Ordering online is the quickest way to receive your License Key.
Please note that it normally takes up to 24 hours for the license key to be emailed back to you.
When ordering, make sure to enter the business name as you want it to appear on the invoices, thelicense key is generated based on that name.
Paypal
You can pay using Paypal, make the payment to [email protected]
Paying via Bank Transfer
If you prefer to pay directly via bank transfer, you can email us with your request.
-o-

p13
© EziSolution Systems, 2011
Main Menu
User InterfaceOnce a valid password is entered, the system displays the main menu screen, with theoptions displayed horizontally at the top of the screen. You can use the left and rightArrows to move between the options, and use the Enter key to access that option.The system comes with two built-in interfaces the user can choose from as shown below
BIG BUTTONS INTERFACE
This interface is suitable for touch screens and also for quick mouse clicking
MENU and TOOLBARS INTERFACE
You can change the user interface by going to MAINTENANCE > USER SETTINGS >SETTINGS and choose the Menu and Toolbars option to use a menu style interfacewith toolbars for quick access to the frequently used items.
The navigation with this interface differs slightly from the previous one, you have to usethe ALT+the underlined letter on the menu followed by the first letter of number of theoption, or you can use the mouse and either click on the toolbar or the desired menu item .
You can further change the look of the system by changing the system colors or evenhave a picture on the main menu by changing the display as needed. Note that if youdecide to add a picture to the desktop, make sure the picture file path is correct for all computerson the network.An example of that, if you have a server and the program is instsalled on drive c:, it is best to copythe picture to the program folder and enter the file name without any paths. This way it will alwaysbe correct for all stations connected to the server.
-o-

p14
© EziSolution Systems, 2011
Other Languages SupportThe system allows each user to choose his/her own language file, so someone can be workingon the system in Spanish, while the other user uses English, yet another user use Arabic andso on.If the language file you need is not there, you can add it in and edit the language file to yourlikning by clicking on the edit button and editing the Captions to show the new language.
-o-

p15
© EziSolution Systems, 2011
POS
Point Of Sale
The Point of Sale screen is where the checkout operator does all the sales. Select POS fromthe main menu to display the Point of Sale screen.
Point of Sale screen fields:
Date: Today’s date, this can be disabled from MAINTENANCE > USER SETTINGS > POS, tostop uses from changing today's date.
Number: This is the sales number that will auto increment..
Client Name: Enter either the client code or client name, otherwise leave blank if you do notwish to track sales to this client.
Balance: This will display the current balance for the c lient.
Points: This will display the number of un-redeemed points earned by this c lient.
The way to enter transactions in to the grid, is by either pressing the button on the touchscreen, or clicking on the button using the mouse, typing on the keyboard, or using a barcodescanner to scan item barcodes.
Part No.: Enter or scan the item or bar code. This field can take of up to 20 characters(letters and numbers). If you entered a code that does not exist, you will be shown a list ofitems starting with the code next to the one you have entered. You can scroll up or down,

p16
© EziSolution Systems, 2011
then select the one you want by pressing the Enter key. The item code of what you haveselected is transferred to the sales screen.
Part Details: If you have enabled description editing (refer to the Maintenance Menu,Users Settings, Settings Button, POS Setup tab), the cursor stops at the description field,to allow the operator to modify it. If you leave the part number field blank, and enter an itemdescription, the system will display the stock file for you to make a choice.
Qty: This field lets you to enter the quantity sold. It defaults to 1.
If you have enabled Qty field editing (refer to the Maintenance Menu,UsersSettings, Settings Button, POS Setup tab), then the cursor stops on the Qty fieldand waits for the operator to change the quantity if needed.
If you have not enabled Qty field editing, the cursor skips the Qty field. However, theoperator can still edit that field by mouse clicking on the qty field.
Amount $: This field displays the retail price of the item being sold.
If you have enabled the edit option, the operator can change the price.
If you have not enabled the edit option, the operator cannot change the price.
Tax: The tax code as recorded for the item in the stock file, is displayed. The operator canchange this manually to another valid tax code.
Disc. : The operator can enter a discount amount or percentage, To change the amount topercentage, enter the % sign after the value.
NOTE: Clicking the Descount% Header allows you to add a discount to all the items in the gridat once.
Total $: As each item is entered, the line item total will be displayed in the Total $ field.
To end the transaction, you can use one of the following methods:
1 - Enter the amount paid by the client in the PART NUMBER field, then press F2 to Save or F3to Print, doing so will save the payment as being paid by the default payment which you canset from MAINTENANCE > SYSTEM SETUP > PAYMENTS. You can assign some of the buttons to be fixed amounts paid, such as the $10,20,50 and$100 notes, so when you press on that button, the system will save the amount as the onebeing paid.
2 - Press either F2 or F3, the system will pay the exact sale amount using the defaultpayment method, then save or print the transac tion.
3 - Press the PAYMENT Button (F5) which will take you to the multi-payment screen and youcan choose to pay the transaction with one or more payment types before saving or printing.
To re-print a docket (or print it as a Gift Voucher), press the Print Button (F3) whilethe POS screen is blank.
Hit F7 to reprint or delete a sales docket. To enable or disable deletion, refer to theMaintenance Menu, Users Settings, Settings Button, POS Setup tab .
Station Number: The default station number, shown at the top of the screen, is 1. Tochange the station number (say to 2), add the required station number as a parameter to the

p17
© EziSolution Systems, 2011
shortcut as follows:
1. On the desktop, right click on the shortcut to display the pop-up menu.
2. Select Properties.
3. Select the Shortcut tab.
4. The path to the Retail ManPOS System program will be displayed in the Target field.
5. Click at the end of the path to make sure it is no longer highlighted.
6. At the end of the path, type a space then the param eter (required station number).
7. The path will now look something like this: C:\RMAN\RMAN.EXE 2
8. Click OK to close the shortcut and save the change.
-o-

p18
© EziSolution Systems, 2011
Touch Screen PaymentThis screen is activated if you press F5 after completing the POS transaction. It can be usedwith touch screen, mouse or keyboard and will accept multiple payment options for the samePOS transaction.
Note that if you have the rounding on, the rounding will occur on the payments which hasrounding enabled.Use the keypad to enter the amounts, or press the payment tabs to quickly fill the paymentfield. so if you want to pay by credit card, press the 0 button to zero the cash field, then pressthe C/Card button to fill the Credit Card field with the full amount. Once done, press F2 tosave or F3 to save and print.
To enter a different currency payment, click on the Cash option which will give you a dropdown list of all the available currencies.If you need to add a new currency, Right Click on the Cash Option and you will get theCurrency file that will enable you to add/modify the currencies and their exchange rates.Make sure to enable the users to allow them to edit the currency screen.

p19
© EziSolution Systems, 2011
To add a new currency, just enter it on the first line then save.To modify, just over-write the text and click save
-o-

p20
© EziSolution Systems, 2011
Quick Menu Buttons
The quick menu buttons are used to speed the selling process by allowing the user to useeither a touch screen or a mouse to process sold items.
The user MUST have the ALLOW QUICK MENU BUTTON EDIT security flag set to enable theuser to edit, this setting is accessed from MAINTENANCE > USER SETTINGS > Click on theSETTINGS button, then choose the POS tab.
The Quick Menu allows up to 50 buttons per menu, all menus and buttons can beprogrammed as follows:
Menu Button
To assign and program a Menu Button, use the SHIFT and Right mouse click on the buttonyou wish to assign as a menu button, the following screen will appear:
You can then assign a menu name, icon and color, then save.
To use the menu color for all the buttons in that menu, use the Control + Shift + MouseClick Key on the menu button.
Item ButtonYou can press CONTROL + Right Mouse Click on any button to modify the contents andicon of that button to suit your business.

p21
© EziSolution Systems, 2011
Please note that changing the Retail Price from here will change the item Retail price in thestock card.
TEXT ButtonYou can assign any button as a text button to include any text inc luding money paid.
Enclosing the text in square brackets will force the system to use that text to fill the gridfields when that button is pressed.
FUNCTION KEY BUTTON
To assign a function key to a menu button, enter the text enclosed by < >

p22
© EziSolution Systems, 2011
-o-

p23
© EziSolution Systems, 2011
POS Docket Re-PrintPressing F3 or clicking the Print button will allow you to re-print previously entered POStransactions. The system will pre-fill the document number with the last docket number, youcan then send the printout to the docket printer or to the default Windows printer
Clicking on the Docket Button will print the docket, clicking on the Gift Button, will print a giftdocket with no prices, pressing F3 or clicking on the Print button will print a full invoic e.
If you need to print a Gift Docket, once you click on the Gift Print button, the system willallow you to change the text on the docket to allow for more personalised service to yourclients.
-o-

p24
© EziSolution Systems, 2011
POS ListPressing F7 or clicking on the POS List key will display the POS list for today, you c an thenre-print any of the listed transactions on either the docket printer or the default Windowsprinter, or you can delete any of these transactions, provided you have the authority to do so.
Note that you can disable the display of the total of sales and their amount from theMAINTENANCE > USER SETTINGS > SETTINGS button > POS tab
-o-

p25
© EziSolution Systems, 2011
Start/End Day
The Start / End of Day screen is used to perform the cash reconciliation at the end of day. Theuser has to enter the amounts that are in the cash drawer at the start of day, and also theamounts that are in the cash drawer at the end of the trading day. Then using the secondPOS report ( POS Sales Report), the user can print the cash reconciliation report that willshow any discrepancy in the amounts present at the end of day. Any positive amountsindicate a surplus, while negative amounts indicate a shortfall that should be investigated.
Date: Enter today's date
Station Number: The default station number is 1, however, if you have a multi-user license,you need to enter each station number and amounts separately.
Day Start: Enter the amounts at the start of each day by counting the money in the till forthat station.
Counted: You have to enter the amounts at the end of the trading day for each station, thenonce done, you can then run POS report 2 to list the correct amounts.
-o-

p26
© EziSolution Systems, 2011
Point Of Sales Reports
Summary Income Report
Description: This report displays the sales summary by payment type for a given period.
Report request screen fields:
Location: This field will only appear on the Multi-Location version of the program.
From Date & To Date: Enter the first to last dates you want the report to cover.
-o-

p27
© EziSolution Systems, 2011
Daily Sales Report
Description: Reports on Sales for the specified date.
Choose report type:
Detailed report: Every item on every sale is listed.
Summary report: Total amount for each sale is listed.
Report Size: Choose narrow for a 40 column report, wide for an 80 column.
Date: Enter the date you want the report for.
Station No: Enter the station number or leave blank for all stations
-o-

p28
© EziSolution Systems, 2011
Staff Sales Report
Description: Sales for the staff members over a specified period in detailed, summary, oritemized format.
Report request screen fields:
Staff Name: Choose the staff name from the dropdown list, or leave blank to report on allstaff members.
From Date & To Date: Enter the first to last dates you want the report to cover.
Totals/Summary/Detailed: Select as required.
-o-

p29
© EziSolution Systems, 2011
Group Sales Report
Description: Product group sales over a specified time span, in Totals, summary, or detailedformat.
Report request screen fields:
From Date & To Date: Enter the first to last dates you want the report to cover.
Totals/Summary/Detailed: Select as required.
-o-

p30
© EziSolution Systems, 2011
Hourly Sales Report
Description: This report dispays the Hourly Sales over a specified time span, it allows theuser to know which hours of the day are the busy ones so as to be able to allocate staffaccordingly to better serve the customers and yet save money on unwanted staff time.
Location: This option only appears on the Multi-Location version, leave blank for alllocations, or choose location.
Date Range: enter date range to report on.
Day of Week: Tick all required days to report on.
-o-

p31
© EziSolution Systems, 2011
Sales
Invoicing
The Invoicing screen is used to enter client invoices, Quotations, Lay-bys / Layaways andcredit notes (or sales returns)
Code: Enter the client’s code and hit Enter. If the code you entered is not found, the systemwill display the Clients List and you can scroll up or down and choose the one you want.
If you cannot remember the client code, then leave it empty, enter the client name or part ofthe name and press Enter.
Pressing Enter on the client name will position the cursor in the grid and you can startentering item, if you wish to set focus to the other fields in the top of the screen, then use theTAB key instead of the Enter key
Type: Choose from drop down options Invoice, Quotation, Layby or Credit Note orConsignment out.
Number: To enter a new invoice, press Enter on the invoice number field. A new invoice withthe next number in sequence will be created. To recall an existing invoice, type in the oldinvoice number. This invoice will be recalled. You can then modify it or delete it.
NOTE: The invoice number range is 1 to 99999999
Date: The default is today’s date. Change this if you need to.

p32
© EziSolution Systems, 2011
Note: Right mouse click on any date field and select a date interactively from a calendar.
Ref. no: Enter the client’s reference number such as order number.
For backorders, enter ‘BO’+Existing invoice number (for example, BO123) this will issue anew invoice which recalls the back orders on
that previous invoice. In this case the invoice details will be displayed on the list part of thescreen.
Salesperson: Select the salesperson’s name from the drop down list of users.
Source: Choose the sales source (such as word of mouth or TV Ad), you will then be able toproduce a report of where are your clients are coming from.
Note: You can edit the source file by pressing Control+Right Mouse Clien on the Sourcefield, this will bring up the Source file and you can add, edit or delete entries.
Terms: Enter the invoice terms, such as COD, 7, 14, 90 days, etc.
Currency: You can choose a different currency if the currency option is enabled.
Note: To modify the curreny file, use Control+Right click on the currency field.
Invoice line items columns:
Part No: Enter the item part number. If you enter only a part of the code, the system willdisplay the Stock List where you can choose an item by pressing Enter on the one you want.To enter a non-stock item, Enter an asterisk * in the code field. To enter text, tab to the itemdetails and type it in. You can enter a serial number to the previous item by entering the text S/N in the part number field and then enter the serial number in the details field, the systemwill add the serial number to the serial numbers file.
The part number also accepts equivalent part numbers for the same item, so if you have anitem that you buy from different suppliers with each supplier having their own part number,you can enter all these part numbers in the Equivalent Part Numbers section in the StockCard, then you can use any of these part numbers to sell the same part.
Details: If you entered a valid code, this field will be filled automatically. If you entered a *,the system allows you to type in the item description yourself. If you wish to enter text ritems that do not show on the invoice printout, then start the text with >
Quantity: Enter the quantity being sold. If the qty in negative, it indicates that you arereturning that item to the stock.
B/Order: If the required quantity is more than you have in stock, the system allows you toenter a back order if you have the backorder option enabled. To enable this option, selec tMaintenance, then System Setup, then select the Sales tab, and check Force Backorder.
Amount: This field is filled automatically as part of the item details. However, you can overtype this.
Tax: If the stock card has the tax code included, this field will be filled automatically,otherwise select the appropriate code from the drop down list.
Disc.: Enter the item discount. Discounts can be in percentage or amount, the discount type(as percentage or amount) can be setup from Maintenance > System Setup > Sales tab
Note if you have setup the discount as an amount, but while entering the invoice you wantto enter a percentage discount (say 20%) just enter 20 followed by the % sign and thesystem will calculate the discount amount for you.

p33
© EziSolution Systems, 2011
Totals: The system calculates and displays the total amount automatically.
Continue entering line items as required until the order is filled. When you have c ompletedthe invoice, select one of the following:
Save (F2): Save the invoice. Right click on this button will save the invoice, and also save aPDF copy of it in the C:\temp folder and will display that invoice on screen.
Print (F3): Save and print the invoice. Hint: You can send the invoice to a different printer oreven fax it by right clicking the print button and choosing the destination.
Email: This will email the invoice directly to the client. The c lient must have the email fieldfilled with a valid email address. If you are using a dialup modem, you need to connect toyour ISP first. For ADSL users, the system will send the email as an attachment.
Delete (F4): Delete the invoice.
Payment(F5): Pay or part pay the invoice. Note that the system will auto-fill the paymentnumber with the last payment number + 1, you can choose the payment date, amount,payment method, details and the account to send to. If there are two or m ore persons on thenetwork doing payments at the same time, the one who saves first will save that paym entnumber and the next one will increment the payment number before saving automatically.
If you press the F5 button with no items in the grid, the system will display a deposit screenand allows you to receive money from the client as a deposit.

p34
© EziSolution Systems, 2011
F7: Display a list of invoices or quotes for the previous 12 months. If you wish to see invoic esfor a particular client, enter the client Code/name in the invoicing screen first before pressingthe F7 function key.
Exit (Esc): Close the Invoice screen without saving. The invoice is discarded.
Shift+F12: Print labels for the items you just entered. To be able to print part numbers asbarcodes, you must install the barcode font that comes with Retail ManPOS System by eithercopying the file to C:\WINDOWS\FONTS, or by Control Panel >Fonts >ADD New Font.
Import: Click this option to import data from an external data file or right c lick to use aremote scanner and scan stock items.
If you have enabled the Multi-Currency option, you will notice that you have a Currenc yoption on the top left hand section of the screen.
Choosing a currency will change the currency headings of most of the screen, however, thepayment will always be in the local currency.

p35
© EziSolution Systems, 2011
-o-
p36
© EziSolution Systems, 2011
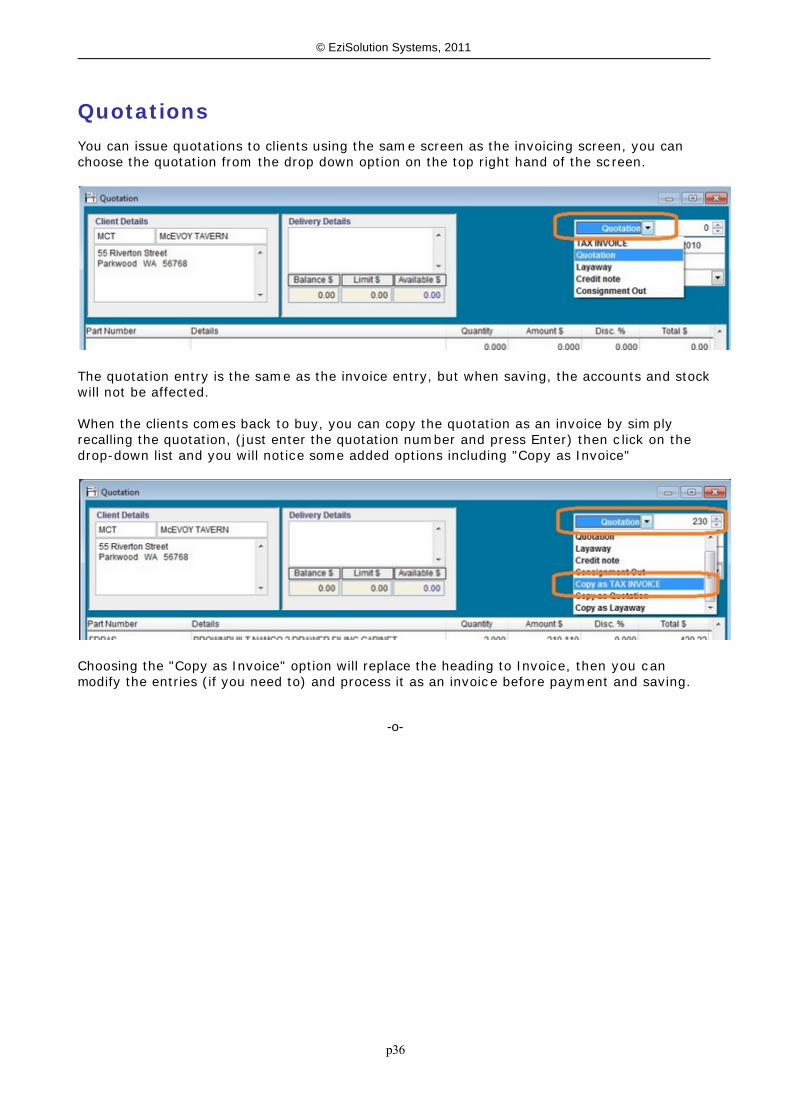
QuotationsYou can issue quotations to clients using the same screen as the invoicing screen, you canchoose the quotation from the drop down option on the top right hand of the sc reen.
The quotation entry is the same as the invoice entry, but when saving, the accounts and stockwill not be affected.
When the clients comes back to buy, you can copy the quotation as an invoice by simplyrecalling the quotation, (just enter the quotation number and press Enter) then c lick on thedrop-down list and you will notice some added options including "Copy as Invoice"
Choosing the "Copy as Invoice" option will replace the heading to Invoice, then you canmodify the entries (if you need to) and process it as an invoice before payment and saving.
-o-

p37
© EziSolution Systems, 2011
Lay-away / Lay-byLay-aways / Lay-bys are used to sell to clients but the client will not take possession of thegoods sold until the full payment is made.It is basically a promise from the client to buy the said goods, within a c ertain period of timefor a promise from the seller to hold these goods for that c lient for that same period of time.The client will have to pay some money towards this contract, and if the client fails to showup at the end of that period, then the seller can keep all or some of that money.To start processing a lay-away, choose the Lay-away / Lay-by option from the drop-down listfrom the invoicing screen, then process the transaction as usual.
The way this works is the client comes in and brings you the goods they want to buy, theypay a minimum amount for you to keep these goods for them , then within the agreed period,the client comes in at regular intervals and make more payments towards these goods, andwhen they pay the full amount, the lay-away is changed to an invoice by the system .
Note that the transaction number is the same as the invoice number, and at the end, whenthe client pays the full amount of the Lay-away, the system will automatically change thetransaction type from Lay-away to Invoice.
Every time the client comes back to part pay for the lay-away, just recall the lay-awaynumber and press the payment button to process a part payment, if you can't recall henumber, just enter the client code or name, then press the F7 to see all their transactions,choose the correct one and press Enter. (Make sure to change the transaction type first beforepressing the F7)
-o-

p38
© EziSolution Systems, 2011
Credit NoteThis screen is used to return stock bought by clients who decided they do not want the stockand want it returned.You can choose this option from the Drop-down list
Note that you can do stock sales returns by using the Invoice and enter the Qty in negative,this is useful especially if you are returning stock as well as selling new stoc k for the sameclient, so using the Invoice to process the returns makes more sense than using the CreditNote.
Also note that when using the credit note to return stock, the qty MUST be entered as apositive number and not as a negative number, entering the Qty in negative will be as if youare selling it and not returning it to the stock.
-o-

p39
© EziSolution Systems, 2011
Consignment OutThis screen is used to send stock to clients or resellers who want to have the stock but notpay for it until they sell it.So issuing a consignment out will take stock out, but will not debit your c lient with thatamount.
To issue a consignment out, choose the Consignment out option from the drop down list inthe Invoicing screen.
-o-

p40
© EziSolution Systems, 2011
Payments Received
The Payments Received screen is used to pay a batch of invoices. Invoices can be fully orpartly paid.
Payment No.: To enter a new payment, press Enter on the Payment No. field, A newpayment record with the next number in sequence will be created.
To recall an existing payment, type in the old payment number. This payment will be recalled.You can then modify it or delete it.
NOTE: The payment number range is 1 to 99999999
Payment Date: The default is today’s date. Change this at will.
HINT: Right mouse click on any date field and select a date interac tively from a calendar.
Client Name: Enter the client’s name.
Payment Details: Enter payment the details. The field is pre-filled with the paymentmethod.
From Invoice Date: Enter an optional start date for the invoices you want to pay.
To Invoice Date: Enter an optional end date for the invoices you want to pay.
These two fields will filter the invoices into this date range and display them on theOutstanding Invoices list.
Amount: Enter the amount being paid, you can choose more than one type of payment. Ifyou are part paying some invoice, you MUST change the PAYMENT TODAY am ount in the grid.

p41
© EziSolution Systems, 2011
But to save the transaction, the total amount paid must equal the paid amounts.
Account: The system will post the paid amounts to the default accounts that you configuredin the system setup screen, if you wish to send the payment to a different account, right clickon the payment button and choose a different account for the chart of accounts.
Outstanding Invoices columns:
No.: This is just a line item number. Each line is numbered off starting with 1 at the top.
Invoice #: The invoice number as it was saved.
Date: The date of the invoice.
Total $: The total currency value outstanding on this invoice.
Paid $: This is what has been paid already.
Payment Today $: Enter the amount being paid spread over the list of outstanding invoic es.These can be part payments. The total of this column is displayed at the bottom right. Thismust agree exactly with the value in the Amount field on the left of the screen. If you try tosave with the amounts not in agreement, you will receive a warning message.
Continue entering invoice payments on each line as required. When you have finished selec teither press:
Save (F2): Save the payment. Note that the total of this Paid $ column must agree exactlywith the value in the Amount field. The Save button is disabled until you have achieved this.
Print (F3): Saves and print the payment.
Hint: Right mouse-click on Print to choose the destination, such as a different printer.
Email: Saves the payment and emails the client with the payment receipt.
Delete (F4): Delete the payment.
Close (Esc): Discard any changes or additions to the payment and position the cursor to thetop.
-o-

p42
© EziSolution Systems, 2011
Add / Modify Clients
Select Add/Modify Clients to add, modify or delete details on the list of your c lients.
By typing the name of the client, the system displays the name in the top field, and the listfollows your entry. Pressing <ENTER> will take you to the Modify screen.
New(F2) Shows the New Client Screen.
Print(F3) Prints envelope with the client name and address details.
Labels: This will print client labels, you can choose the range of labels and the label form at.
Email Opens the Send Email screen, enter the required fields before sending.
Bulk Email: This option will allow you to send bulk emails to all clients with valid emailaddresses.
Delete(F4) Allows you to delete the client. However, the client will not be deleted, but sim plyadd ’~’ to the front of the code and name so as not to appear in the normal list. This will stopusers from deleting clients who have trading history.
When you have made the required changes, select Save (F2) to save the changes and returnto the previous screen.
To add a new client, select New (F2) from the Clients List screen. The New Client screen willbe displayed for you to enter the details. This screen is similar to the Edit Client Detailsscreen.

p43
© EziSolution Systems, 2011
Client Type: Choose either business or individual
Code: Enter a unique code of up to ten alphanumeric characters
Title: Clients title (Mr., Mrs. Etc.)
Client Name: The name of the person, company or business.
If you choose type Individual, the system asks for the client Surname, Name and date ofbirth.
NOTE: Code and Client Name fields must be filled.
Address: Enter the client's address.
Telephone: Enter the client's telephone numbers.
Mobile: Enter the c lient's mobile numbers.
Fax: Enter the client's fax number.
Salesperson: You can associate a sales-person with each client, so when you issue aninvoice, the sales person's name appears on the invoice automatically.
Join Loyalty: Ticking this option will cause the system to add one point for each one dollarspent by the client, you can then decide on how much money to give to the client in the formof a STORE CREDIT to redeem these points.
Total Points: This shows the total loyalty points the clients has accum ilated, you canover-ride this field.

p44
© EziSolution Systems, 2011
Delivery Address: Enter the Delivery address if there is one, this is an optional field.
http://: Enter the client's web address if they have one. Clicking on that button will openyour web browser on that address.
Email: Enter the Cleint's email address, this email address will be used when you email theclient their invoices or statements. Clicking on that button will open your email client withthat email address.
No Bulk Email: Tick if you do not wish to inc lude the client email when you send bulk emailsto your clients.
Notes: Enter notes regarding the client of up to 100 characters.
Contact: Enter the contact name if there is one.
Pricing: Enter the pricing type for that client as Retail, Trade, Wholesale, Reseller or Qtydiscount. This field is tied with the stock cards and will display the price assigned for eachstock item or service.
If you choose the qty discount option, the price will be changed according to the qty bought ofeach item.
Price Include Tax: Tick if the selling price includes the sales tax, untick to exclude.
Trading Terms: enter the trading terms for the client such as the number of days before thepayment is due or a text such as COD (cash on delivery).
Credit Limit: Enter a credit limit to enable the system to warn you if the client exceed thatlimit. If you do not want the system to issue unpaid invoice, enter a small negative amount(such as -1) to clock the system from issueing unpaid invoices for that client.
Start Trading: Enter Start trading date of the client.
Stop Trading: Filling this date field will prevent the system from issuing new invoices as ofthat date.
-o-

p45
© EziSolution Systems, 2011
EmailThis option allows you to send email to individual clients, suppliers or contacts.
To be able to send the email, you must have setup the email screen settings correctly in theUser Settings under the Maintenance > User settings > Settings button > Email Tab Section.Each user of the system must have their own email setup parameters such as senders nameand email address.
-o-

p46
© EziSolution Systems, 2011
Bulk E-mail
This menu option allows you to send bulk email to contacts, with or without file attachm ents.
No. of Recipients: This field displays the number of email recipients. If the file contains alarge number of entries, it may take a short while to display this sc reen. To change thenumber of recipients, click on the box next to the field, the system will display the list withthe names and email addresses and a tick box next to them, to un-tick them all, right mouseclick on the column header, to tick them all, left click the column header; or individually tickor un-tick, once finished, click on the Close button at the bottom to return to the send emailscreen.
Carbon Copy: Enter the email address to send a copy to.
Sender’s Name: Enter your name. If you have entered your name in the email setup screenunder the Maintenance menu, your name will automatically appear in this field.
Sender’s Email: Enter your email address in this field.
Ask for Receipt: Tick this box to allow the recipient to automatically send you a receiptacknowledgment before reading your email.
Subject: Enter the email subject line. If the subject line was left blank, the system will warnyou before sending the email.
Attachment: This must be a valid file name. You can have more than one attachment byseparating the file names with a semicolon. Tick the box next to the field for the system toallow you to graphically choose the attachment files.
Message Type: You can choose to send your message as a text written in the following editbox, or as a file. If you choose a file, The system will disable the edit box and allow you toenter a file name in the following field. The file must be of type text, .HTM, .HTML or .RTF;

p47
© EziSolution Systems, 2011
otherwise, an error message will be displayed if you try to send the em ail with a wrong filetype.
Message File: This field will initially be disabled. Once you choose a file message type, it willbe enabled. You can only have one entry and of the types mentioned above.
Message Text: If you have chosen a text message type, you can manually enter a textmessage of variable length.
General notes on sending emails
For users with dial-up connection (using a standard modem), you need to manually connectthe modem using the dial-up icon under Windows before you are able to send emails. Tryingto send emails, when there is no connection, will result in error messages being displayed. Ifyou are an ADSL user, the system will use the ADSL connection without any intervention onyour part since it is always open.
Note also that you need to setup the email screen under the maintenance section before youare able to send any emails. (see Email Setup Tab under the Maintenance Menu)
-o-

p48
© EziSolution Systems, 2011
Labels PrintingClicking Labels on the List Screen will enable you to print labels which iclude the code as abarcode and the name ad address for the clients, suppliers and contacts.
From Label No.: This is an optional field, leave blank to print all ticked labels, or use it inconjunction with the To Label No. to print a range of labels. This is handy if you wish to printlabels in small batches.
Label Name: Choose the label stationary to print on.
Starting Row: Enter the printing starting label row.
Starting Column: Enter the printing starting column.
To tick or untik all entries, click on the header of the grid next to the name heading.
Screen (F2): Click or press F2 to view on screen
Print (F3): click or press F3 to send to printer, Right Click to choose a different printer.
-o-

p49
© EziSolution Systems, 2011
Sales Reports
List of Clients
Description: List of selected clients, printed as either a landscape or portrait
Report request screen fields:
Type: Choose Client type.
Report Type: Choose report type of landscape or portrait.
State: Enter state code (WA, NSW, etc), or leave blank for all states.
-o-
p50
© EziSolution Systems, 2011
Invoices List Report
Description: List of invoices for a given period, client, or part number.
Report request screen fields:
Choose report type
Part Number: Enter a part number to list invoices that inc lude this item. Leave this fieldblank to include invoices for all parts.
Client Name: Enter a client name to list invoices that have been issued to that client. Leavethis field blank to include invoices for all clients.
Report Type: Choose either detailed of Summary.
Status: Choose invoice status, such as paid, unpaid or all.
From Date: Enter start date you want the report to cover.
To Date: Enter end date you want the report to cover.
HINT: Right mouse click on any date field and select a date interac tively from a calendar.
-o-

p51
© EziSolution Systems, 2011
Summary Sales Report
Description: Summary of sales over a given number of months.
Report request screen fields:
For the Period: Select the start month and year
To the Period: Select the end month and year.
NOTE: For a report spanning only one month, enter the same in both fields
-o-

p52
© EziSolution Systems, 2011
Aged Clients Report
Description: List of clients with amounts owing, categorized into periods of current, 30, 60and 90+ days.
Report request screen fields:
For the Period: Select the start month and year the report is to cover.
State: Enter a state code to restrict the report to that state. Leave this field blank to includeall clients regardless of state
Include Addresses: Check this box if you want addresses in the report.
Show 0 Balance: Check this box if you want the report to include clients with a zero balance.
-o-

p53
© EziSolution Systems, 2011
Clients' Statements
Description: Detailed client’s statements showing all the outstanding invoices and the paymentsmade during a particular period of time
Report request screen fields:
Name: Enter the client name if you want to report on only one client, or leave blank to reporton all clients with outstanding invoices.
From Date: Report start date.
To Date: Report end date.
Include Paid Invoices: Check to include payments made during the report period, uncheckto list outstanding invoices only.
Detailed Statement: Check to produce a detailed statement showing the payments.
Leftmost Column: Check or uncheck to include or exclude each client. To uncheck all clients,right mouse click on the header of the left column. To check all clients with outstandinginvoices, click on the header again.
Notes to Appear on Statement: You may wish to send the report to a defaulting client. Addany remarks to be included in this field
-o-

p54
© EziSolution Systems, 2011
Sales Analysis Report
Description: Sales analysis for a particular period of time, broken down by salesdepartments.
Report request screen fields:
Report Type: Choose report type.
Year Ending: Choose month / year end date date.
Report Format: Choose Graph or Text. For graphical report, office must be installed.
-o-

p55
© EziSolution Systems, 2011
Back Orders Report
Description: List of back orders sorted by item and client.
Report request screen fields:
Part Number: Enter a part number. If you enter an incomplete part number, the Stock Listwill be displayed fro you to select from. Leave this field blank for all part numbers.
Client Name: Enter a client name. If you enter an incomplete name, the Clients List will bedisplayed for you to select from. Leave this field blank for all clients.
Sort Order: Select either Part Number of Client Name depending on which order you want.
-o-

p56
© EziSolution Systems, 2011
Sales Tax Report
Description: Tax collected in a given period of time, on either a cash or accrual basis,detailed or summary.
Tax Name: “Tax” can be GST, VAT, or TAX, depending on the country you are in. Select thespecific tax name according to your location as follows: Go to the Maintenance menu, selectSystem Setup, and then go to the General tab. Set the Tax Name field appropriately. Theword “Tax” will become whatever you have chosen.
Report request screen fields:
From Date: Report start date.
To Date: Report end date.
Detailed/Summary & Cash/Accrual:
Select according to requirements.
-o-

p57
© EziSolution Systems, 2011
Bank Deposit
Description: Banking slip for a particular time span.
Report request screen fields:
From Date: Start date.
To Date: End date.
Bank Name: Enter the bank you are making the deposit to.
Account Name: Enter the account details you are making the deposit to.
Branch Number: Branch code or Sort code
Account Number: Enter your account number.
NOTE: Information entered in these fields will be redisplayed in the future.
-o-

p58
© EziSolution Systems, 2011
Sales Payments Report
Description: List of payments and the way they were allocated on invoices. Primarily used toverify payments entered.
Report request screen fields:
Client: Select one client from the dropdown list, or leave this field blank for all clients.
From Date: Start date.
To Date: End date.
-o-

p59
© EziSolution Systems, 2011
Sales By Client
Description: Sales details broken down by client, for one or more clients, over a time span.
Report request screen fields:
From Client Code: Lowest client number to be included in the report.
To Client Code: Highest client number to be included in the report.For a single client, enter the same number in both fields.
From Date: Start date.
To Date: End date.
Sales Rep.: Select one user from the dropdown list, or leave blank for all sales reps.
State: Enter a state code, or leave blank for all states.
Show 0 Sales: Check this option if you want to include zero sales in the report
-o-

p60
© EziSolution Systems, 2011
Sales By Product
Description: Sales details broken down by stock group and/or product, for one or more stockgroups and/or products, over a time span.
Report request screen fields:
Stock Group: Select a stock group from the dropdown list, or leave blank for all stockgroups.
From Part No & To Part No: Enter the range of part numbers to be reported. For a singlepart number, put this in the From field, or leave both fields blank for all part numbers.
From Date: Start date.
To Date: End date.
Value $ / Quantity: Select according to the order required for the report.
Show 0 Sales: Check if you want zero sales included in the report.
-o-

p61
© EziSolution Systems, 2011
Client Sales/Product
Description: Products bought by a specified client over a time span.
Report request screen fields:
Client Name: Enter the clients name, or select from the Clients List.
From Date: Start date.
To Date: End date.
Value $ / Quantity: Report on either currency value or quantity.
-o-

p62
© EziSolution Systems, 2011
Product Sales/Client
Description: what range of products have been sold to all clients over a time span!!
Report request screen fields:
From Part No. & To Part No.: Enter the range of part numbers to be reported. For a singlepart number put this in both fields.
Stock Group: Select a stock group from the dropdown list, or leave blank for all stockgroups.
From Date: Start date.
To Date: End date.
Sales Rep: Select a user from the dropdown list, or leave blank for all sales reps.
-o-

p63
© EziSolution Systems, 2011
Sales by Sales Rep
Description: Sales report, broken down by sales representative over a specified time span.
Report request screen fields:
From Date: Start date.
To Date: End date.
Show 0 Sales: Check if you want zero sales included in the report.
-o-

p64
© EziSolution Systems, 2011
Stock

p65
© EziSolution Systems, 2011
Add / Modify Stock Card
Details Tab
Retail Price $: Enter the retail price of the item.
Retail Qty.: Enter the quantity that applies to the retail price.
Trade Price $: Enter the trade price of the item.
Trade Qty: Enter the quantity that applies to the trade price.
Wholesale Price $: Enter the wholesale price.
Wholesale Qty: Enter the quantity that applies to the wholesale price.
Reseller: Enter the Reseller's price
Reseller Qty: Enter the reseller qty
The above prices and their sell qty are to be used to allocate different prices for differnetclients, the client can be assigned as a Retail, Trade, WholeSale, Reseller or a QtyDiscount client
If the client is assigned as a Trade client, then the trade prices will show up on his invoic eautomatically, but if he was assigned as a Qty discount client, then the pric e will changeaccording to the quantity he buys, so if he buys a qty of up to 4 of the exam ple above, thesystem will apply the retail price of $64.99, however, if he buys 5 or more (up to 9), then theTrade price of $62 will apply, if he buys 10 or more then the whole sale price of $60 will

p66
© EziSolution Systems, 2011
apply. Setting up of the client price type is done from the Add/Modify Clients Screen
Bundle Price and Qty: Enter the total price for the bundle (2 or more of the same item)such as $125 for 2 as shown above
On Special and date range: Enter the Special price and the date range that this specialprice apply in. This price will over-ride the other prices.
The information on the right of the screen is updated through the stock transac tions (Salesand Purchases) and cannot be changed manually Except the LAST COST field.
To start entering quantities in stock, you must use purchasing with the supplier as ‘BroughtForward Stock’
Bin Location: Optionally, use this field to locate the stock in a large store.
Tax Code: Choose the tax details from a drop down list.
Sales Account: Choose an optional sales account, if no account was chosen, .the system willpost the sale to the default sales account.
Purchase A/C: Choose an optional purchase account. This is useful in posting expenses suc has telephone charges, electricity etc. to its’ proper expense account. If left blank, the systemwill post the purchase to the default purchase account.
Reorder Level: Enter a minimum stock quantity value which if the stock level falls below thisquantity, the system can report it.
Reorder Qty: Enter the quantity to order when the level falls below the m inimum stock level.
On Special: Enter an optional special discount price.
From & To: Enter the dates over which the special discount price is to be available tocustomers.
Last Cost: Enter the last item cost for a new item.
-o-

p67
© EziSolution Systems, 2011
History
History Tab:
This displays the past months performance of each item.
-o-

p68
© EziSolution Systems, 2011
Equivalent Part Numbers
This allows you to enter several suppliers’ part numbers for equivalent parts you buy fromdifferent suppliers.
Each line item on the list represents an alternative supplier for the part spec ified in the fieldsat the top of the screen.
No.: This is just a line item number. Each line is numbered off starting with 1 at the top.
Part Numbers: The alternative supplier’s own part number. these part numbers areinterchangeable with the main part number, so you can enter any of these part numbers onthe invoice, pos or purchase and the system will display this part number for you.
Supplier Name: The name of the alternative supplier.
Last buy: The date you last purchased this part from this alternative supplier.
Cost: The current price charged by this alternative supplier.
Note that in the POS, sales and purchase, you can use any of these numbers to recall thatpart.The nice part about this feature is when you issue a purchase or a purchase order, you c anenter any part number and if the supplier you are buying from has his own number, then thesystem will recall that part number and display it under the part number column in thepurchase regardless which part number you used to recall the item. This will help you sendyour suppliers their correct part numbers.
-o-

p69
© EziSolution Systems, 2011
Package Contents
The Package Contents tab is enabled only when Package is checked.
Each line item on the list represents one of a number of possibly different items contained inthe package. For example, a computer can be supplied as a package comprising several itemssuch as case, monitor, keyboard, mouse, and so on. These items will be shown as line itemson this tab.
Part Number: The part number of the item in the package.
Description: The item’s description.
Quantity: The number of these items supplied in a single package.
Cost $: The cost to you.
Sell $: The cost to your customer.
-o-
p70
© EziSolution Systems, 2011
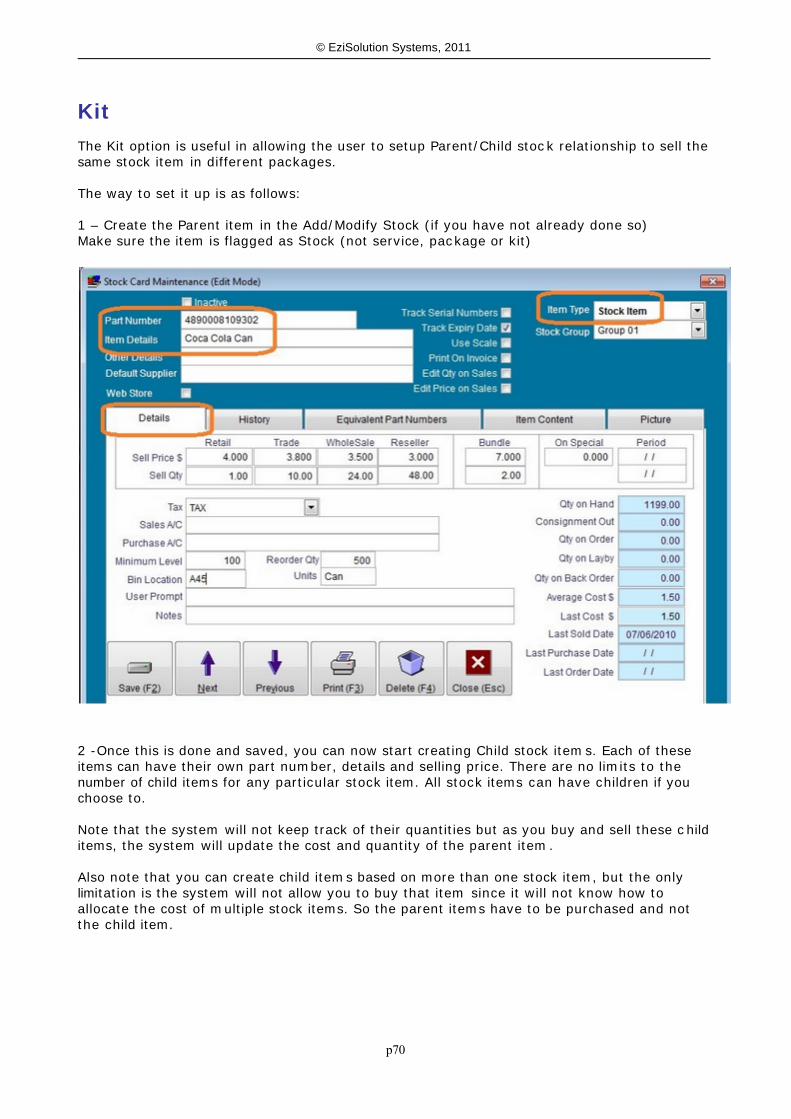
KitThe Kit option is useful in allowing the user to setup Parent/Child stoc k relationship to sell thesame stock item in different packages.
The way to set it up is as follows:
1 – Create the Parent item in the Add/Modify Stock (if you have not already done so)Make sure the item is flagged as Stock (not service, package or kit)
2 -Once this is done and saved, you can now start creating Child stock items. Each of theseitems can have their own part number, details and selling price. There are no limits to thenumber of child items for any particular stock item. All stock items can have children if youchoose to.
Note that the system will not keep track of their quantities but as you buy and sell these c hilditems, the system will update the cost and quantity of the parent item.
Also note that you can create child items based on more than one stock item, but the onlylimitation is the system will not allow you to buy that item since it will not know how toallocate the cost of multiple stock items. So the parent items have to be purchased and notthe child item.

p71
© EziSolution Systems, 2011

p72
© EziSolution Systems, 2011
-o-

p73
© EziSolution Systems, 2011
Stock Groups Maintenance
Select Stock Groups Maintenance to add, modify or delete from the group file. This file isused in conjunction with the stock file to group items into categories to make reporting easier.
Select New to add a new group.
Select Edit to change the details of an existing group.
Code: The alphanumeric group code.
Group Name: The group name.
-o-

p74
© EziSolution Systems, 2011
Global Stock Maintenance
Select Global Stock Maintenance to change reorder levels, reorder quantities, prices, taxcodes, raise prices by a percentage, and so on over a range of part numbers, or one groupcode in a single operation.
Maintenance Type:
Select one of the following from the dropdown list according to the type of maintenance youwant to do:
Re-Order Level
Re-Order Quantities
Retail Price %
Trade Price %
Wholesale Price %
TAX Code
Discount%
From Part No.: The first part number you want this to apply to.
To Part No. & Group Name: Enter a combination of part numbers and group code to restrictthe range to those parts you want to maintain.
-o-

p75
© EziSolution Systems, 2011
Stock Quantity Adjustment
Select Stock Quantity Adjustment to change the stock quantities on a specified range ofpart numbers or a group.
From Part No.: First part number of the range.
To Part No. & Group: Use a combination of part numbers and group codes to restrict thepart numbers to what you want.
Bin Location: This is an alternative way to select a range of parts.
Post to Account: Enter an account name or number of the account to be used for posting onthese parts. This is validated against the Accounts List.
Item list:
Part No.: The part number and items details are displayed to show you
Item Details: which parts you are working with.
Qty on Hand: The quantity is recalculated when you change Counted.
Counted: Change this field to the actual stock count.
Difference: The difference is recalculated when you change Counted.
Select Save (F2) to save the updated stock quantities.
Select Cancel (Esc) to close the screen without saving.
-o-

p76
© EziSolution Systems, 2011
Stock Reports
Item Enquiry
Description: Report on the sale or purchase of an item over a specified time span.
Report request screen fields:
Item Details: Enter the item details you wish to the report for use.
F9 Search Part No: Enquire on item code.
F10 Search Part Name: Enquire on item details.
Stock Group: Choose Group, or leave blank for all groups.
From Date: Start date for the report.
To Date: End date for the report.
Sales / Purchase: Sales will report the sales transactions.
Purchase will report the purchase transactions.
Detail / Summary: Select according to the level of detail you want.
-o-

p77
© EziSolution Systems, 2011
Transactions Enquiry
Description: Report showing the transactions of all items over a specified time span.
Report request screen fields:
From Date: Start date for the report.
To Date: End date for the report.
Sales / Purchase:
Sales will report the sales transactions
Purchase will report the purchase transactions.
-o-

p78
© EziSolution Systems, 2011
Quantities Report
Description: Report of stock items and their current quantities in stock, for a spec ified rangeof part numbers.
Report request screen fields:
From Part No.: Enter first part number.
To Part No.: Enter last part number.
Group: Enter a group code to report on.
Leave this field blank for all groups.
Sort Order: Select from the dropdown list:
- Group & Part Number
- Group & Details
Include 0 Qty: Check this option if you want to include stock with a zero quantity in thereport.
-o-

p79
© EziSolution Systems, 2011
Selling Prices Report
Description: Report of the selling prices of the stock items.
Report request screen fields:
From Part No.: Enter first part number.
To Part No.: Enter last part number.
Group: Enter a group code to report on.
Leave this field blank for all groups.
Sort Order: Select from the dropdown list:
- Group & Part Number
- Group & Details
Include 0 Qty: Check this option if you want to include stock with a zero quantity in thereport.
-o-

p80
© EziSolution Systems, 2011
Cost Price Report
Description: Report of the last and average cost of stock items, sorted by item code.
Report request screen fields:
From Part No.: Enter first part number.
To Part No.: Enter last part number.
Group Code: Enter a group code to report on. Leave this field blank for all groups.
Sort Order: Select from the dropdown list:
- Group & Part Number
- Group & Details
-o-

p81
© EziSolution Systems, 2011
Slow Moving Items Report
Description: Report on all items that have not been sold after a specified date.
Report request screen fields:
From Part No.: Enter first part number.
To Part No.: Enter last part number.
Group Code: Enter a group code to report on, or leave blank for all groups.
Sort Order: Select from the dropdown list:
- Group & Part Number
- Group & Details
Last Sold Date: Enter the date in which the items have not been sold after.
-o-

p82
© EziSolution Systems, 2011
Out Of Stock Report
Description: Report of all items where the stock quantities have fallen to zero or below.
Report request screen fields:
From Part No.: Enter first part number.
To Part No.: Enter last part number.
Group Code: Enter a group code to report on, or leave blank for all groups.
Sort Order: Select from the dropdown list:
- Group & Part Number
- Group & Details
-o-

p83
© EziSolution Systems, 2011
Stock Reorder Report
Description: This report is used to list all of the items which it’s quantities has fallen belowthe minimum order level.
Report request screen fields:
From Part No.: Enter first part number.
To Part No.: Enter last part number.
Group Code: Enter a group code to report on, or leave this field blank for all groups.
Sort Order: Select from the dropdown list:
- Group & Part Number
- Group & Details
-o-

p84
© EziSolution Systems, 2011
Stock Take Report
Description: Also called the Stock Cost Report. Lists the current stock quantities andprices.
Report request screen fields:
From Part No.: Enter first part number.
To Part No.: Enter last part number.
Group Code: Enter a group code to report on, or leave this field blank for all groups.
Sort Order: Select from the dropdown list:
- Part Number
- Item Details
- Group & Part Number
- Group & Details
-o-

p85
© EziSolution Systems, 2011
Stock Value Report
Description: Displays the actual current stock take. You can display the stock take for eithera specified group or all groups.
Report request screen fields:
From Part No.: Enter first part number.
To Part No.: Enter last part number.
Group Code: Enter a group code to report on, or leave this field blank for all groups.
Sort Order: Select from the dropdown list:
- Group & Part Number
- Group & Details
-o-

p86
© EziSolution Systems, 2011
Items' History
Description: History of sales and purchases of a specified range of items over a specifiedtime span.
Report request screen fields:
From Part No.: Enter first part number.
To Part No.: Enter last part number.
Group Code: Enter a group code to report on, or leave this field blank for all groups.
From Date: Start date for the report.
To Date: End date for the report.
-o-

p87
© EziSolution Systems, 2011
Purchase Menu
Purchasing
Select Purchasing to enter cash and creditor invoices or purchase orders. Once you haveentered an invoice it will automatically update stock quantities, supplier statements, accountfiles and supplier history file.
The following function keys are active in this screen:
F9 Search the stock list by item code (item number)
F10 Search stock file by item details
Code: Enter Supplier Code. If not found, the system displays the Suppliers List and you canscroll up or down and choose a supplier.
Hint: If you cannot remember the supplier code, go down to the supplier name field and enterthe supplier name or part of the name.
Name & Address: Filled automatically from the Suppliers List. You may overtype/alter thedetails if you wish.
Terms: Enter Invoice trading terms (7days, 14 days etc.).
Delivery Details: Enter any additional details needed on the invoice/delivery docket.
Tax Inclusive: Controls whether or not tax is included in the price
Pur./Order: Select Purchase or Order from the dropdown list.
Hint: To change to a Purchase Order, hit the letter O key on this field.
Number: To enter a new number, press Enter on the number field. A new entry with thenext number in sequence will be created.
To recall an existing number, type in the old number. This entry will be recalled. You can thenmodify it or delete it.
NOTE: The number range is 1 to 99999999
Date: The default is today’s date. Change this at will.
Ref_no: Enter the supplier’s reference number, such as the supplier's invoice number.
Salesman: Enter the Salesman’s code.
Invoice or Order line item details:
Part Number: Enter the item part number. If only a part of the code is entered, you will beshown the Stock List. Choose one by pressing Enter on the desired item. To enter a non stockitem, Enter a ‘*’ in the code field and you will then be able to enter text in the item Detailsfield.
Details: If you entered a valid code in the Part Number field, the item details will be filledautomatically.
If you entered a ‘*’ in the Part Number field, you can type in the item description.

p88
© EziSolution Systems, 2011
Quantity: Enter number of items or weight, etc .
B/Order: If the required quantity cannot be supplied due to lack of stock, the system allowsyou to enter a back order. Note that the back order option must be enabled. For furtherinformation refer to Maintenance, System Setup, Sales.
Amount $: This is calculated automatically, but you can override the price supplied by thesystem.
Tax: Enter a tax code, for example, ‘G’ for GST. Refer to Maintenance, Tax FileMaintenance for further details.
Disc %: Enter the item discount.
Total $: Calculated automatically.
Other fields: With the cursor positioned on the part number field of a particular line item,these fields below display details about this part.
Bin: The part location in store.
On Hand: The stock quantity currently in stock.
Total Qty: The total number bought.
Retail $, Trade $ & W/Sale $:
The Retail, Trade, and Wholesale currency values can be overtyped if you wish.
Subtot $, Tax $, Paid $ & Total $:
The subtotal, Tax, Paid and Total currency values will be recalculated automatically.
Continue entering line items until the invoice or order is complete, then select either:
Save (F2): Save the invoice. You can right click this button to view on screen and save asPDF ot HTM file.
Print (F3): Saves and prints the invoice.
Hint: Right mouse-click on Print to choose the destination - either a different printer or faxthe invoice.
Email: Saves the document and emails it to the supplier.
Delete (F4): Delete the invoice.
Exit (Esc): Discard any changes or additions to the invoice and position the cursor to the top.
Shift+F12: Print labels.
Payment (F5): Pay or part pay. Selecting Payment allows you to enter the invoice paymentor part payment.
The payment screen will be displayed:
Payment No.: Filled automatically.
Date: The default is today’s date. Change this at will.
Amount: Enter amount paid.

p89
© EziSolution Systems, 2011
Payment Method: Select Cash, Check, Credit Card, etc, from the dropdown list.
Details: Enter the payment details.
Account: Enter the payable account. Type in either the account name or the code. This willbe verified against the Accounts List.
-o-

p90
© EziSolution Systems, 2011
Payments To Suppliers
Select Payments To Suppliers to pay a batch of invoices. Invoices can be fully or partlypaid.
Payment No.:
To enter a new payment, press Enter on the Payment No. field, A new payment record withthe next number in sequence will be created. To recall an existing payment, type in the oldpayment number. This payment will be recalled. You can then modify it or delete it. NOTE:The payment number range is 1 to 99999999.
Payment Date: The default is today’s date. Change this at will.
Supplier’s Name: Enter the supplier’s Name.
Amount $: Enter amount paid.
Paid By: Enter payment mode, Cash, Credit Card, etc, from the dropdown list.
Details: Enter the payment details. This field defaults to the payment mode. Change this atwill.
Account: Enter the payable account. Type in either the account name or the code. This willbe verified against the Accounts List. Enter ? to obtain the list to select from.
Outstanding Invoices fields:
No.: This is just a line item number. Each line is numbered off starting with 1 at the top.
Invoice #: The invoice number as it was saved.
Date: The date of the invoice.
Total $: The total value outstanding on this invoice.
Paid $: This is what has been paid already.
Due $: Enter the amount being paid spread over the list of outstanding invoices. These canbe part payments. The total of this column is displayed at the bottom right. This must agreeexactly with the value in the Amount field on the left of the screen. If you try to save withthe amounts not in agreement, you will receive a warning message. Continue entering invoicepayments on each line as required. When you have finished selec t either:
Save (F2): Save the payment. Note that the total of this Paid $ column must agree exactlywith the value in the Amount field. The Save button is disabled until you have achieved this.
Print (F3): Saves and print the payment.
Hint: Right mouse-click on Print to choose the destination, such as a different printer
Email: Saves the payment and emails a Remittance Advice to the supplier.
Delete (F4): Delete the payment.
Close (Esc): Discard any changes or additions to the payment and position the cursor to thetop.
-o-

p91
© EziSolution Systems, 2011

p92
© EziSolution Systems, 2011
Add/Modify Suppliers
Select Add/Modify Suppliers to add, modify or delete supplier details
Scroll the list and select the supplier record with your mouse.
To quickly find a supplier, simply start typing the supplier name. The list will change to followyour entered information.
Select Edit to modify the details of an existing supplier. This will display the Edit SupplierDetails screen.
Supplier Code: Each supplier is given a code of up to six alphanumeric characters. This fieldmust be filled.
Salutation: Mr., Mrs. etc.
Supplier Name: The name of the company or organization. This field must be filled.
Business No.: Business Number.
Address: The supplier’s address.
Contact Name: Person you normally deal with.
Telephone: Enter telephone number.
Mobile: Enter Mobile number.
Fax: Enter Fax number.
Email: Enter email address.
http://: Enter web page address, pressing http:// tab will open web page.
No Bulk Email: Tick to remove from bulk email list when email broadcasting.
Remarks: Any useful information.
Payment terms: COD, 7,14, 30 days, etc.
Credit Limit: Enter the credit limit amount before the system issues a warning.
Other fields:
Purchases $: Snapshot of your trading.
Due $: History with that supplier.
Select Save to save the changes. This will return you to the previous screen.
To add a new supplier, select New (F2) from the Suppliers List screen. The New Supplierscreen will be displayed for you to enter the details. This sc reen is similar to the Edit SupplierDetails screen.
-o-

p93
© EziSolution Systems, 2011
E-mail Broadcast
This menu option allows you to send bulk email to contacts, with or without file attachm ents.
No. of Recipients: This field displays the number of email recipients. If the file contains alarge number of entries, it may take a short while to display this sc reen. To change thenumber of recipients, click on the box next to the field, the system will display the list withthe names and email addresses and a tick box next to them, to un-tick them all, right mouseclick on the column header, to tick them all, left click the column header; or individually tickor un-tick, once finished, click on the Close button at the bottom to return to the send emailscreen.
Sender’s Name: Enter your name. If you have entered your name in the email setup screenunder the Maintenance menu, your name will automatically appear in this field.
Sender’s Email: Enter your email address in this field.
Ask for Receipt: Tick this box to allow the recipient to automatically send you a receiptacknowledgment before reading your email.
Subject: Enter the email subject line. If the subject line was left blank, the system will warnyou before sending the email.
Attachment: This must be a valid file name. You can have more than one attachment byseparating the file names with a semicolon. Tick the box next to the field for the system toallow you to graphically choose the attachment files.
Message Type: You can choose to send your message as a text written in the following editbox, or as a file. If you choose a file, The system will disable the edit box and allow you toenter a file name in the following field. The file must be of type text, .HTM, .HTML or .RTF;otherwise, an error message will be displayed if you try to send the em ail with a wrong filetype.
Message File: This field will initially be disabled. Once you choose a file message type, it willbe enabled. You can only have one entry and of the types mentioned above.
Message Text: If you have chosen a text message type, you can manually enter a textmessage of variable length.
General notes on sending emails
For users with dial-up connection (using a standard modem), you need to manually connectthe modem using the dial-up icon under Windows before you are able to send emails. Tryingto send emails, when there is no connection, will result in error messages being displayed. Ifyou are an ADSL user, the system will use the ADSL connection without any intervention onyour part since it is always open.
Note also that you need to setup the email screen under the maintenance section before youare able to send any emails. (see Email Setup Tab under the Maintenance Menu)
-o-

p94
© EziSolution Systems, 2011
Purchase Reports
List of Suppliers Report
Description: List of suppliers in either as a full page report or as envelope labels.
Report request screen fields:
State: State Code or leave blank for all states.
-o-

p95
© EziSolution Systems, 2011
Purchases List Report
Description: List of purchase invoices over a specified time span, for one or more suppliers.
Report request screen fields:
Part Number & Supplier Name: Enter a part number and/or supplier name to filter the datafor the report. Leave either or both fields. Blank for all parts and/or all suppliers.
HINT: Right mouse click on supplier name field to get a supplier list.
From Date: Start date for the report.
HINT: Right mouse click on any date field and select a date interac tively from a calendar.
To Date: End date for the report.
Report Type: Select Detailed or Summary according to the level of detail you want.
Status: Choose purchases status.
-o-

p96
© EziSolution Systems, 2011
Purchase Orders Report
Description: List of purchase orders over a given time period.
Report request screen fields:
Part Number & Supplier Name: Enter a part number and/or supplier name to filter the datafor the report. Leave either or both fields. Blank for all parts and/or all suppliers.
From Date: Start date for the report.
To Date: End date for the report.
Report Type: Select Detailed or Summary according to the level of detail you want.
-o-

p97
© EziSolution Systems, 2011
Summary Purchase Report
Description: List of purchases over a specified period of time.
Report request screen fields:
For the Period & To the Period: Select month and year in each field to cover the period youwant the report to cover.
-o-

p98
© EziSolution Systems, 2011
Aged Suppliers Report
Description: List of suppliers with amounts owing categorised into current, 30, 60 and 90+days periods.
Report request screen fields:
For the Period: Select the month and year to report on.
State: Enter a state code or leave blank to report on all states.
Include addresses: Check if you want the report to include addresses.
Show 0 Balance: Check if you want the report to include zero balances.
-o-

p99
© EziSolution Systems, 2011
Suppliers' Statements
Description: Detailed supplier’s statements showing all outstanding invoices and thepayments made over a specified time period.
Report request screen fields:
Name: Enter the supplier name if you want to report on only one supplier, or leave blank toreport on all suppliers with outstanding invoices. This will fill the list below with suppliersaccordingly.
From Date: Start date for the report.
To Date: End date for the report.
Include Paid Invoices: Check to include payments made during the report period, Uncheckto list outstanding invoices only.
Detailed Statement: Check for a detailed statement showing the payments.
Notes to Appear on Statement: Notes entered here will appear on the report.
Columns on the list of suppliers:
Leftmost column: Include or exclude suppliers for the report by checking or un-checkingeach supplier. Hint: To uncheck all checked suppliers, right mouse click on the header of theleft column. To check all suppliers with outstanding invoices, left c lick header.
Name & Phone: Details filled automatically to help you identify the suppliers.
Current Balance $: Shows current outstanding balance.
-o-

p100
© EziSolution Systems, 2011
Purchase Analysis Report
Description: Purchases analysis over a specified time period, broken down by each purchasedepartment.
Report request screen fields:
From Date: Start date for the report.
To Date: End date for the report.
-o-

p101
© EziSolution Systems, 2011
Back Orders Report
Description: List of back orders sorted by either part number or supplier.
Report request screen fields:
Part Number & Supplier Name: Enter a part number and/or supplier name to filter the datafor the report. Leave either or both fields blank for all parts and/or all suppliers.
Sort Order: Select Part Number or Supplier Name depending on the order you want thereport in.
-o-

p102
© EziSolution Systems, 2011
Stock On Order Report
Description: Also called the Purchase Orders Report. List of items on order.
Report request screen fields:
From Part No. & To Part No: Restricts the report to a specified range of part numbers, orleave blank for all.
Group Code: Restricts the report to one group or leave blank for all groups.
Sort Order: Select from the dropdown list:
- Group & Part Number
- Group & Details
-o-

p103
© EziSolution Systems, 2011
Purchases Tax Report
Description: Tax paid over a specified period of time, on either cash or accrual basis,detailed or summary.
Report request screen fields:
From Date: Start date for the report.
To Date: End date for the report.
Detailed/Summary & Cash/Accrual: Select according to requirements.
-o-

p104
© EziSolution Systems, 2011
Purchase Payments Report
Description: List of payments and the way they were allocated on invoic es. It is primarilyused to verify payments entered.
Report request screen fields:
Supplier: Select a supplier from the dropdown list (or type in the supplier c ode or name).Leave this field blank for all suppliers.
From Date: Start date for the report.
To Date: End date for the report.
-o-

p105
© EziSolution Systems, 2011
Payroll
Sign In / OutSign In/Out screen is used to sign staff in and out. the staff member has to sign in when theyfirst arrive at work and start their shift, then have to sign out when they are done. Thesystem will then keep track of their work time, and based on it, it can calculate their wages ifthey are on an hourly rate.
Staff Number: Enter the staff index number to sign in or out. Once that is done, the systemwill display the staff name and clicking on the sign in / out button will do the signing in orout. Entering the numbers -199, -299 and -399 will allow the Master User to perform specialmaintenance functions as discussed below.
If you need to edit old log in / out entries, you must login as the Master User, then enter thenumber -199 in the staff number field, a list of all the log in / out entries will appear andallows you to modify or delete.

p106
© EziSolution Systems, 2011
You can also change the log in and log out message that appears to the staff when they log inor out, to modify the log in message, enter the number -299 in the Staff Number when loggedas the Administrator to modify the log in message, or -399 to modify the Log out message. Tosuppress the messages from appearing, just blank the whole message.

p107
© EziSolution Systems, 2011
-o-

p108
© EziSolution Systems, 2011
Process PayrollThe Process Payroll screen is used to process the weekly staff payroll figures.
Choose the payroll date to process, then choose the staff m ember to process its pay, thenenter the hours worked and the rest of the amounts as required.The system will then calculate the payroll amount based on the tax table and payrollparameters.
Save: Clicking the Save button will save the entry and the cursor goes back to the grid tochoose a new staff member.
Print: Clicking the Print button will save and print the entry and the cursor goes back to thegrid to choose a new staff member.
Delete: The system will delete the entry
-o-

p109
© EziSolution Systems, 2011
Add/Modify StaffThe Add / Modify Staff is the screen to use to add new staff m embers or edit old data.
Enter all the relevant data in this screen, leaving the rest blank. The data required are thestaff name, rate amounts and the work type, residency and tax scale.
-o-

p110
© EziSolution Systems, 2011
Payroll Parametersthe Payroll Parameters screen is used to enter the payroll parameters that will dec ide on howto calculate the pay amounts for the staff members.
This information is country specific, so if you need more configuration, you will need tocontact us for this.
-o-

p111
© EziSolution Systems, 2011
Payroll Slips ReportThe Pay slips Retport is used to produce the pay slips to give to the staff m ember with theirpay.
Staff Name: Choose the staff name or leave blank to print the slips for all staff membersDate: Enter the Pay Date
p112
© EziSolution Systems, 2011
-o-

p113
© EziSolution Systems, 2011
Payroll ReportThe Payroll Report is used to report on paid payroll during a chosen time period.
Staff Name: Enter the Employee name, or leave blank to include allFrom/to Date: Enter the date range to be included in the reportReport Type: Enter the report type of either Summary or detailed.
-o-

p114
© EziSolution Systems, 2011
Sign In/Out ReportThe Sign In/Out report is used to print out the time sheet for a particular period of time
Staff Name: Enter the staff name to report on or leave blank for all staff membersFrom/To Date : Enter the date range to report on
-o-

p115
© EziSolution Systems, 2011
Accounts
Chart of Accounts
Select Chart of Accounts to display, add, modify or delete an account from the chart ofaccounts. Most chart of accounts are made of ten headings
Heading: Example:
1. Current Assets Bank, cash in hand
2. Fixed Assets Office Building
3.Intangible Assets Shares, Goodwill
4.Current Liabilities Creditors, Overdraft
5.Long TermLiabilities Loans
6.Financed By Shareholders, Capital
7.Sales Cash Sale, Credit Sale
8.Cost of Sales Purchases
9.Expenses Advertising, CarExpenses
10.Other Income Commission Received
Under each heading there are subheadings that can be added, modified or deleted.
Select Account screen fields are displayed to help you find and identify any that need to bechanged:
Code:
Each account must have a unique code.
Name:
The name of the account.
Group:
The group this account is in. Groups are numbered 1-11.
Type:
T=Title H=Header P=Posting
Roll:
Roll the account balance at the end of the accounting year.
To modify an account, use the up and down arrow keys to position the cursor on the accountyou want and press the Enter key or select Edit. This will display the Edit Accounts screen.

p116
© EziSolution Systems, 2011
Make the required changes by typing in the Edit Account screen fields:
Account Code:
Up to six characters to uniquely identify the account.
Account Details:
Account name.
Group:
Account group 1 to 11.
Type:
H = account that cannot be posted to
P = posting account such as ‘Bank Account’
Roll Balance:
Y = Balance Sheet Accounts (1 to 6) to carry them forward to next year.
N = Trading, Profit & Loss Accounts. When you roll the balance of an ac count, it will show innext year’s balances as a starting balance for the following year.
When you have made the required changes, select one of the following:
Save:
Save the changes and return to the previous screen.
Cancel:
Abandon the changes without saving and return to the previous sc reen.
To add a new account, select New. This will display the Add New Account screen which issimilar to the Edit Account screen.
To delete an account, use the up and down arrow keys to position the cursor on the accountyou want and then press the Delete key or select Delete.
-o-

p117
© EziSolution Systems, 2011
Journal Posting
Select Journal Posting to post transactions that occur in the business. The posting has twosides, the Account Name and Current Balance fields at the top of the screen show one sideand the accounts on the screen listing below represent the other side.
Journal Voucher screen fields:
Journal Number: To create a new journal entry, press Enter on the Journal Number field. Anew journal entry with the next number in sequence will be created.
To recall an existing journal entry, type in the old journal number. This journal entry will berecalled. You can then modify it or delete it.
Account Code: Enter the account code, or double clock to choose from the chart of accountssorted by the code.
Account Name: Enter account name or double click to list the chard of account by name. Youcan then choose the account you want by pressing Enter on the account.
Current Balance $: The balance of the top account.
The following assumes you are entering transactions on a journal entry. If you have rec alledan old entry, you will be able to deduce from the following how to modify transactions.
All the following transactions will affect the selected account, so if the am ount entered ispositive, it will add to the account balance, if negative it will subtract from it.
List columns in the Journal Voucher screen:
Accont Code: Enter the account code that will post against the top account, double click forthe chart of accounts.
Account Name: If you can’t remember the account number, then enter the account name. If

p118
© EziSolution Systems, 2011
the system finds the name it will display it and the cursor moves to the details field.
Details: Enter the transaction details such as cheque number.
Date: Enter the transaction date.
Amount: Enter the amount, either positive or negative. A positive amount will add to thebalance of the top account, while a negative will take away from that balance. Continueentering transactions onto the list as required. When you have finished, select one of thefollowing:
Save: Save the journal entry with the assigned number.
Print: Save and print.
Delete: Delete the journal entry. This is usually to delete an old entry.
Close: Abandon any changes and additions without saving.
The above screen shows an example of how to do the daily banking when depositing thecontent of the cash drawer to the bank account/
-o-

p119
© EziSolution Systems, 2011
Entry Posting
Select Entry Posting to post multiple entries to the accounts. It is usually used for non-directcash transactions such as adjustments between two or more accounts.
Entry Voucher screen fields:
Entry Number: To create a new entry, press Enter on the Entry Number field. A new entrywith the next number in sequence will be created. To recall an existing entry, type in the oldentry number. This entry will be recalled. You can then modify it or delete it.
Date: Enter the date.
Account Name: Enter the account name or code. The column will be filled with the accountname automatically.
Details: Enter the transaction details such as cheque number.
Debit $: Enter the amount in the debit side.
Credit $: Enter the amount in the credit side. Note you can either enter the debit or creditsides for the same account, not both.
Total $: The computer keeps track of the running totals.
Note: Before you can save the transaction both debit and credit amounts must be equal.
Continue entering transactions onto the list as required. When you have finished, selec t oneof the following:
Save: Save the entry with the assigned number.
Print: Save and print.
Delete: Delete the entry. This is usually to delete an old entry.

p120
© EziSolution Systems, 2011
Close: Abandon any changes and additions without saving.
-o-

p121
© EziSolution Systems, 2011
Bank Reconciliation
Select Bank Reconciliation to reconcile the accounts entries such as cash or bank.
There is a temporary account used to hold all cash, check, and credit card income. This is avery effective method of keeping track of the bank account. This account is called ‘Cash onHand’. The balance of the Cash on Hand account must be zero after depositing the period’sincome into the bank. This way, your bank statement will always match your computergenerated bank statement.
Accounts Reconciliation screen fields:
Account: Enter either the number or name of the account you need to rec oncile.
Once a valid account number has been entered, the account and all its non-reconciledtransactions with the debits and credits will be displayed on the list part of the sc reen.
Note that when reconciling the bank statement, the debit and credit sides appear reversed.This is normal and should be this way because the bank ’s statement is showing thetransactions from the bank’s point of view.
To reconcile a transaction, check the leftmost column of the transaction with a mouse click orby pressing the space bar. The totals at the bottom will be adjusted accordingly.
When all the transactions have been reconciled, select one of the following:
Save: Save the reconciled accounts
Print: Print and save
Delete: Un-checks all checked items.
Close: Close the screen without saving. This will not restore the checked items.
Once saved, the reconciled transactions will not appear on this screen the next tim e unlessthat transaction was modified or re-entered.
-o-

p122
© EziSolution Systems, 2011
Accounting Reports
Chart of Accounts Report
This report will produce the chart of accounts which can be viewed on screen, printed or sentto a file.
Show Account Codes: Check this box if you want the report to include the account codes.
-o-

p123
© EziSolution Systems, 2011
Daily Entries Report
Description: Listing of detailed daily entries over a specified time span, for one or alltransaction types.
Report request screen fields:
Transaction type: Select from the dropdown list, or leave blank for all types of transaction.
From Date: Start date for the report.
To Date: End date for the report.
-o-

p124
© EziSolution Systems, 2011
Daily Balances Report
Description: List of debit and credit daily balances of posting accounts
Report request screen fields:
From Account: Starting account code for the report.
To Account: Ending account code for the report. Leave this field blank for only one account.
From Date: Start date for the report.
To Date: End date for the report.
-o-

p125
© EziSolution Systems, 2011
Monthly Balances Report
Description: Monthly credit and debit balances of the posting accounts for the entireaccounting year.
Report request screen fields:
From Account: Starting account code for the report.
To Account: Ending account code for the report. Leave this field blank for only one account.
For the Year: Select the year for the report.
No. of Months: Enter the number of months the report is to cover.
-o-

p126
© EziSolution Systems, 2011
Statement Of Account
Description: All transactions for an account over a specified period of time.
Report request screen fields:
From Account: Starting account code for the report.
To Account: Ending account code for the report. Leave this field blank for only one account.If you include more than one account, the system produces the statements in account order.
From Date: Start date for the report.
To Date: End date for the report.
Show Zero Balance:
Y if you need to show accounts that have no transaction
N if not.
-o-
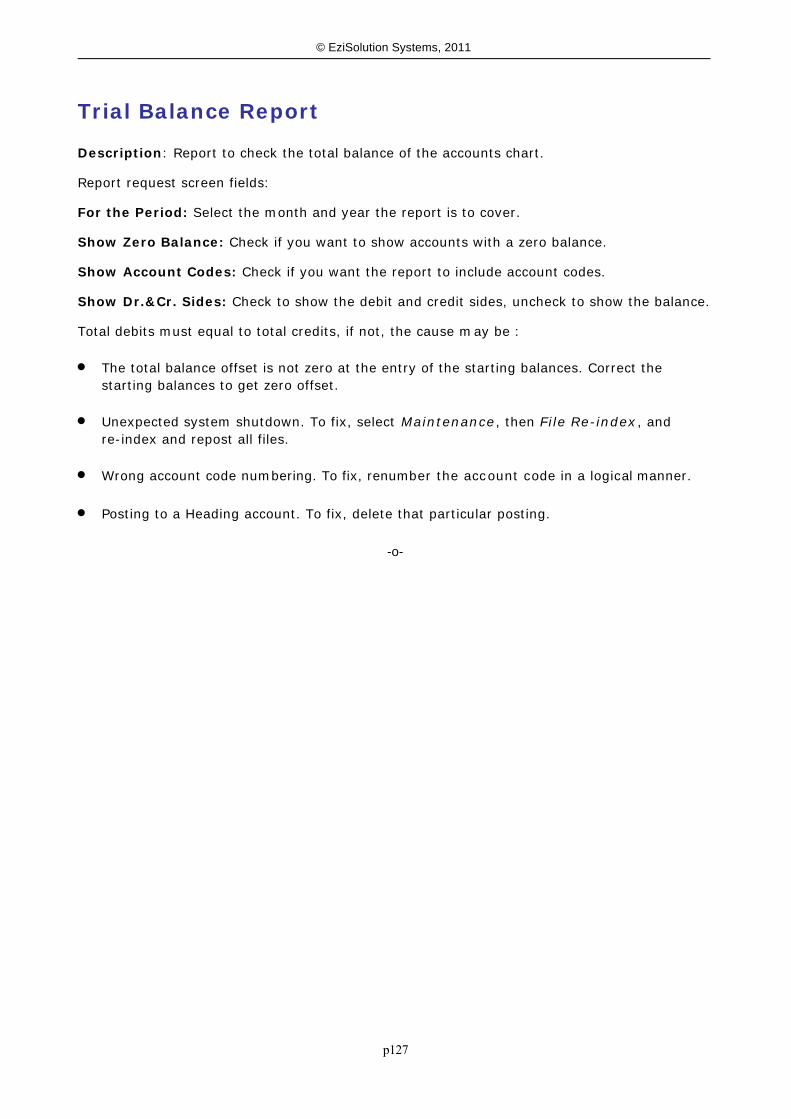
p127
© EziSolution Systems, 2011
Trial Balance Report
Description: Report to check the total balance of the accounts chart.
Report request screen fields:
For the Period: Select the month and year the report is to cover.
Show Zero Balance: Check if you want to show accounts with a zero balance.
Show Account Codes: Check if you want the report to include account codes.
Show Dr.&Cr. Sides: Check to show the debit and credit sides, uncheck to show the balance.
Total debits must equal to total credits, if not, the cause may be :
The total balance offset is not zero at the entry of the starting balances. Correct thestarting balances to get zero offset.
Unexpected system shutdown. To fix, select Maintenance, then File Re-index, andre-index and repost all files.
Wrong account code numbering. To fix, renumber the account code in a logical manner.
Posting to a Heading account. To fix, delete that particular posting.
-o-

p128
© EziSolution Systems, 2011
Trading Profit / Loss Report
Description: This report is used to find out the gross and net profit/loss inc urred during aspecified period of the accounting year.
Report request screen fields:
For the Period: Select the month and year the report is to cover.
Show 0 Balance: Check to view the accounts with a zero balance, uncheck to suppressthem.
Show Account Codes: Check if you want account codes.
-o-

p129
© EziSolution Systems, 2011
Balance Sheet Report
Description: The net worth of the business.
Report request screen fields:
For the Period: Select the month and year the report is to cover.
Show 0 Balance: Check to view the accounts with a zero balance, uncheck to suppressthem.
Show Account Codes: Check if you want account codes.
-o-

p130
© EziSolution Systems, 2011
Diary
Diary
The diary comprises three sections:
Appointments
The Appointments section has the headings Time and Details and occupies the left side ofthe screen. This area displays appointments and notes that apply for the partic ular dateselected on the interactive calendar. To enter appointments, you do not type directly intothese fields, but use the New push button. Refer to Push Buttons further on in this sectionfor more information on how to enter appointments.
Notes
The Notes section is positioned at the top right. You can type directly into this area. Unlike thepages of a paper diary, what you write in here is displayed regardless of the date selec ted onthe Interactive Calendar. This means that your notes are always visible.
Interactive Calendar
The interactive calendar is positioned at the bottom right. When you first go to the Diary,today’s date is selected. To view your appointments for other dates, select the dateinteractively using your mouse.
Push Buttons

p131
© EziSolution Systems, 2011
New: To add an appointment, select New. The New Appointment screen will be displayed.Enter the appointment details.
New Appointment screen fields:
Type:
Select from the dropdown list. The choices are:
- Once: The appointment occurs once only.
- Daily: The appointment occurs every day at this time.
- Weekly: The appointment occurs every week on this day.
- Day of Month: The Appointment occurs on a certain day of month.
- Monthly: The appointment occurs on this date every month.
- Yearly: The appointment occurs on this date every year.
Date: The date defaults to today’s date regardless of the date selected on the interactivecalendar. Change this to your appointment date.
Time: Enter the time of your appointment.
Details: Type the appointment details. You can type in up to 50 characters.
Today: Pressing this button takes the user back to today’s date.
Search: You can search for any string of text in the appointments file .
List: The list can be sorted by appointment type for a range of dates.
Close (Esc): Closes the Diary and returns you to the main menu.
-o-

p132
© EziSolution Systems, 2011
Telephone
Telephones Directory
Use Telephones to find, add, modify, or delete entries in your telephone direc tory.
The directory allows you to record the following information in each entry:
Name, Address, Phone number, Mobile number, Fax number and Email address and more.
Modify: Position the cursor on the Telephone Directory at the entry you wish to change, thenselect Modify. This will display the Modify Directory Entry screen (similar to the Add NewEntry screen) with the details in the appropriate fields. Change these at will, then selec t Saveto save the changes, or Cancel to abandon the changes without saving.
New: Add a new entry.
Type in the required details and select Save to save the entry, or select Cancel to abandonthe details without saving. This will return you to the Telephone Directory screen where youwill see the new entry, if saved, displayed along with the old ones in nam e order.
Envelope (F3): Position the cursor on the Telephone Directory at the entry you wish to print,then select Print or hit F3. This will print the name and address details on an envelope.
Delete (F4): Position the cursor on the Telephone Directory at the entry you wish to delete,then select Delete or hit F4. This does not actually delete the entry, but moves it to the endof the list, prefixing the name with a tilde (~). For example, if you delete an entry for JohnDoe, it will be renamed to ~John Doe.
To restore a deleted entry, search at the end of the list for (example) ~John Doe. Then useModify (F6) to change the name back to John Doe.
Email: Choose this option to email the person in the directory entry
Bulk email: Choose this option to bulk email all the entries in the telephone direc tory. (Referto Clients Email Broadcast for instructions)
Please note that under the Group field, you can group your entries any way you wish, byeither text or numbers. This field will be used to filter out emails and printouts.
Close (Esc): Close the telephone directory and return to the main menu.
-o-

p133
© EziSolution Systems, 2011
Maintenance
Files Reindex
Use Files Reindex under the following conditions:
After an unexpected power blackout, surge, or brownout. This inc ludes unintentionallyturning off your computer without going through the normal shutdown sequence. Attention: If anything like this happens, you are strongly rec ommended to reindex allfiles. Failure to do so may produce unexpected results.
If the index files were deleted by mistake.
After a data restore operation.
If the system starts to behave strangely in any way. Typically, this could include notbeing able to find data that you know should be there.
Recalculate Cost Price: Only tick this option if you need the system to recalculate the costprice for all of your stock item from day one.
Repost Clients Transactions: Ticking this option will fix any problems that may haveoccurred in posting clients transactions. This will repost all the individual transac tions to the

p134
© EziSolution Systems, 2011
totals file and can be done any time you notice a problem with client amounts.
Repost Suppliers Transactions: Ticking this option will fix any problems that may haveoccurred in posting suppliers transactions. This will repost all the individual transac tions tothe totals file and can be done any time you notice a problem with suppliers amounts.
Repost Stock Transactions: Ticking this option will fix any problems that may haveoccurred in posting stock transactions. This will repost all the individual transac tions to thestock file and can be done any time you notice a problem with stock quantities.
Pack Selected Files: This option will remove any deleted or modified transactions. Note thatthe system keeps track of all deletions/modifications to all transaction files with eachtransaction tagged with user number, station number, date and time, so in case of trail audit,you can see all the changes that took place from the last pack. Once packed, all these recordsare lost.
Sequence of operations:
You must be the only user signed on to Retail ManPOS System. All other users, includingpeople on a network, must sign off Retail ManPOS System.
It is advisable to backup your data before the files reindex takes place.
Select the file or files you think may need to be re-indexed, or selec t all after abnormalshutdown, by checking boxes appropriately.
Select Proceed to start the re-indexing. This may take several minutes depending on theamount of data stored and the speed of your computer.
Do not interrupt your computer until you see the Indexing Done message.
Choose Pack Selected Files if you need to remove all of the deleted information from thedatabase.
-o-

p135
© EziSolution Systems, 2011
System Setup
Company Setup
Use the Company tab to enter the business name and details that will be printed on all thereports and invoices the system produce.
Business Name: Enter your business name, note that when you receive the product key withyour business name, the business name can not be changed, otherwise, the program willrevert to the demonstration mode.
Location: Enter the business location, this is useful for the multi-location version.
Address: Enter your company contact and address details.
Business Logo File: Enter the optional logo file.
Note: if you plan to run the multi-user version, then you must provide the absolute pathnames such as \\Server\Server_c\logos\mylogo.bmp, otherwise, if you store the logo file inthe program folder, then you only need to provide the logo file name without any pathsattached such as MyLogo.bmp or Acme.jpg
-o-

p136
© EziSolution Systems, 2011
General Setup
Use the General tab to set up storage locations on your computer, and to set currency andtax details appropriate to the country you are in.
Decimal in Amount: The number of places of currency decimals, such as $123.45
Amount Format: Enter the amount format in the form of 999,999.99, if it was left blank, itwill default to 999,999,999.99
Currency Symbol: Examples: $, £, ¥
Accounting Year Start: Enter the accounting year start date, this has to be done only once,the system will use the day and month and will automatically roll the year.
Date Format: Choose date format dd=Day, mm=month yy or yyy= year
Stationary Size: Choose the stationary size to be used for printing. Letter size is used in theUSA, while A4 is used in the rest of the world.
Temporary Files Path: Enter the temporary files path folder name (default is c:\temp) fortemporary files needed while in use. These files are deleted automatically as soon as they areno longer required.
-o-

p137
© EziSolution Systems, 2011
Sales Setup
Use the Sales tab to set up the invoicing options.
Invoice Screen Setup
Prices Inclusive of TAX: Determines whether or not the invoiced prices include or excludeTax. If ticked, the amounts shown on the invoice will be including tax, otherwise, tax will beadded to the sale price.
Choose Sales Account: When this is checked, the Post To field on the Invoicing screen isvisible. This allows you to post the whole invoice amount to a particular account. When this isnot checked, the Post To field on the Invoicing screen is not visible and the whole invoic e isposted to the default Sales account.
Remind if Below Min Qty: Issue a warning if stock levels fall below the spec ified minimum.
Warn if no stock: Issue a warning if there is a zero stock level.
Warn if price too low: Issue a warning if the price is lower than the cost p[rice.
Block Sale if no stock: check to block the sale is the stock qty is zero or below.
Force backorder: Issue a backorder automatically if stock levels fall below thepredetermined minimum.
Force Cash Sale if No Credit: If selling to a client with no available credit, then force it as acash sale.
Make Quote as Default: Sets the default such that when you select Sales, then Invoice,the Invoice/Quote option defaults to Quote.
Track Sales Sources: Allows the user to choose a sale source for each sale from a dropdown list.

p138
© EziSolution Systems, 2011
Allow Currency Change: Allows user to change defult currency when selling.
Give Change when overpaid: Tick to treat sale as a cash sale, if client pays more than theinvoice total, then system will treat extra payment as a change. If un-ticked, amount giesagainst client's account as an overpayment.
Default Qty Value: Enter the default quantity the system will automatically enter as youprocess sales, default is 1.
Decimals in Qty Field: Enter the number of decimals in the quantity field, zero for wholenumbers such as 123, 1 for one decimal such as 123.1, 2 if you are selling in lb such as123.05 anf 3 if you are selling in Kg such as 123.275
Decimals in Disc. Field: Enter the number of decimals in the Discount field, zero for nodecimals such as 25, 1 for one dec imal such as 25.5. Maximum is 3 decimals.
Decimals in Tax Field: Enter the number of decimals in the tax field.
Invoice Printout
Enable Backorder Column: Tick to enable the use of the back order column on the screenand printout.
Enable Discount Column: Tick to enable the discount column, Tick the % to force thediscount as a percentage discount. Note that if you do not tick the % option, then thediscount will be in amount value, however, you can always process the discount as apercentage by pressing the % after you enter the discount amount in the discount column.
Enable Tax Code Column: Tick force the system to show the tax code for each item sold.
Enable Tax Amount Column: Tick force the system to show the tax amount for each itemsold, this will also allow you to change the tax amount.
Enable Tax Total: Tick force the system to show the tax total for the whole invoice.
Print Part No. on Invoice: Tick to print the part numbers on invoice.
Print back orders on Invoice: Include back orders on invoices.
Print Bin on Invoice: Tick to print bin location of each item on the invoice. This is a handyfeature if you have a large number of items as it will allow you to quickly locate the items.
Report Format File Name: Leave blank to use the default file, otherwise, if you are using acustom invoice format file, then enter the name here (with the extension of FRX), Make sureyou include the absolute path if you are on a network (such as \\Server\c\Rman\MyInvoice.FRX) or if the file is in the Rman folder, then just enter thefile name with no path (such as MyInvoice.FRX)
Invoice Title: Enter the invoice title such as "TAX Invoice"
Copies to Print: Determines how many copies of invoices are printed.
Print Invoice as Docket: Enabeling this option will cause the system to print the invoice asa Docket.
Invoice Message: Allows you to type in text that will be printed on footer of the invoice.
The same can be done for the Quote, Layby/Layaway and Returns.

p139
© EziSolution Systems, 2011
-o-

p140
© EziSolution Systems, 2011
Stock Setup
Use the Stock tab to set up the stock costing on sales and stock enquiry screen.
Stock Costing on Sales: This option group are radio buttons. You can select only oneoption.
Don’t Cost on Sale: Select this option to prevent posting the cost of each sale to theaccounts.
Use Last Cost: Select this option to post the last stock cost to the accounts.
Use Average Cost: Select this option to post the last stock cost to the accounts.
First in First Out Cost: Select this option to post to the accounts on a first in first out basis.
Extra Stock Groups: This option enables of up to three extra optional stock groups that canbe named by the user.
-o-

p141
© EziSolution Systems, 2011
Purchase Setup
Use the Purchase tab to set defaults and other values associated with purchases andpurchase orders.
Purchase Screen Setup
Choose Purchase Account: When this is checked, the Post To field on the Purchasing screenis visible. This allows you to post the whole Purchase amount to a particular account. Whenthis is not checked, the Post To field on the Purchasing screen is not visible and the wholepurchase is posted to the default account.
Allow Currency Change: Displays the currency Rate field on the Purchasing screen.
Copy Supplier’s Tel & Fax to P/O: Include the supplier’s contact details in the DeliveryDetails field of the Purchasing screen.
Make P/O as Default: On the Purchasing screen, set the default for Pur./Order field toOrder.
Default Qty Value: Sets the default quantities for purchase or purchase order items.
Decimals in cost: You can modify the number of decimals in the cost price in the purchasescreen.
Purchase Copies to Print: The number of copies of purchase invoices to be printed.
P/Orders Copies to Print: The number of copies of purchase orders to be printed.
Purchase Printout Setup
Enable Expiry Date: Choosing this option will display the expiry date c olumn in the

p142
© EziSolution Systems, 2011
purchasing screen, this is useful when you need to track the expiry dates of the purc hasedproducts. The assumption with this feature is First in First out, that is the stock you buy firstis assumed is sold first, this will eliminate entering expiry dates on sales
Enable Backorder Column: Tick to enable the use of the back order column on the screenand printout.
Enable Discount Column: Tick to enable the discount column, Tick the % to force thediscount as a percentage discount. Note that if you do not tick the % option, then thediscount will be in amount value, however, you can always process the discount as apercentage by pressing the % after you enter the discount amount in the discount column.
Enable Tax Code Column: Tick force the system to show the tax code for each item.
Enable Tax Amount Column: Tick force the system to show the tax amount for each itembought, this will also allow you to change the tax amount.
Enable Tax Total: Tick force the system to show the tax total for the whole purchase.
Purchase Order Message: Allows you to enter a message that will be printed on allpurchase orders.
-o-

p143
© EziSolution Systems, 2011
Point Of Sale Setup
Use the P.O.S tab to set defaults and other values associated with point of sales and docketprintout.
POS Screen Setup
Sets up the behavior of the POS screen.
Ask for User No on each line of sale: Tick to allow the user to supply a user number oneach line item, this is useful if more than one staff member serves the same customer on thesame sale.
Ask for User Number on Save: Tick to force the user to supply a user number before savingthe transaction, each sale is then tagged with their number.
Collate Similar Part Numbers: Choosing this option will group same part numbers togetheras if entered on one line. This is useful in many cases but may not work properly in othercases where you sell the same item with different prices, such as when you sell one at fullprice and the next item as half price.
Allow Multi-Currency Payment: Tick if you plan to accept cash foriegn currencies as pospayments, this will allow you to choose the currency in the cash payment section of the posscreen. You will need to make sure the exchange rate is updated on regular bases, you c anedit the currency file by pressing Control+Right Mouse Click on the currency field.
Allow Layby/Layaway Sales: Tick this option if you plan to use Laby/Layaway sales in thepos screen.

p144
© EziSolution Systems, 2011
Allow Credit Sales: Tick to allow selling your repeat clients on account, you will notice anadded Account payment type appearing the pos payments screen for eligible clients.
Force Print on Credit Sales: Tick to force the system to print sales docket for credit sales,this to allow the staff to clooect the client signature on your copy of the docket as a proof ofsale.
Enable Quick Buttons: Tick to enable the quick menu and item buttons in the pos sc reen,this will facilitate faster sales process as it allows the user to press buttons instead of lookingfor the fast moving items. You can choose the number of rows (maximum of 6) and columns(Maximum of 10).
Random Weight Barcodes: this option will allow the system to process barcodes that areprinted on some scales with variable weights. These types of scales usually sit in eac hdepartment (not on the checkout) and the customer comes in, buys a certain type of itemthat is sold by weight, the staff member weighs the item, prints the barcode and sticks it onthe item, then when the client goes to the checkout, the staff m ember reads the barcode, thesystem will then be able to know the item code and its weight/price. The scales c an beprogrammed to print the barcodes in few different formats, and you will need to match theseformats with the format option from the drop-down list. noting that D=Dept. P= Part No.C=Checkdigit W=Weight (in lbs or Kgs) A=Amount (price)
Decimals in Weight: This is the number of decimal places the weight has, its 2 for lbs and 3for Kgs.
POS Docket Setup
Company Name: Enter the company name as you want it to appear on the docket/receipt
Docket Header: Enter the receipt/docket header which may include the address, telephonenumber, email address and any other relevant information.
Print as Invoice: Ticking this option will print the docket/receipt as a full invoice on theWindows default printer.
Format File Name: This will allow you to modify the way the receipt look, the format filesare a normal text files that you can modify from within the program, they have the extention.POS. If you choose to modify the receipt printout, the rest of the options will be inactive.
Print Transaction No.: Tick if you want the printed docket to contain the transactionnumber.
Print Part Number: Tick to print the part number on the receipt.
Print Subtotal: Tick to print the subtotal on the receipt.
Print Discount Total: Tick if you want to print the discount total on the receipt .
Print Tax Total: Tick if you want to print the Tax total on receipt .
Print Client Address: Tick if you need to print the repeat client address on the receipt.
Docket Footer: Enter the text to appear at the receipt footer, you can include the staff nameby including the variable <STAFF> in the text.
Copies to Print: Enter Number of docket/receipts copies to print, the default is 1.

p145
© EziSolution Systems, 2011
Docket Printer Currency Symbol: Enter the currency symbol to print on the receipt, forsome printer you will need to enter the ascii code for some currencies such as the £ which is156.
No of Lines to Skip: Enter number of lines to skip after printing .
-o-

p146
© EziSolution Systems, 2011
Payments Setup
Use the Payments tab to set the default payments methods (up to 9). And also the accountsto post to when the sales or purchase payments are processed.
Payment Name: Enter Payment names keeping the cash as the top name
Sales Account: Enter the sales Account Code or Account Name from the chart of accounts,this will cause the system to post payment to that account on a sale.
Purchase Account: Enter the Purchase Account Code or Account Name from the chart ofaccounts, this will cause the system to post payment to that account on a purchase.
Deposit: Tick all the rows that you want to appear in a bank deposit slip.
Default: Choose one payment to be used as the default payment method by your client.
Round: Tick all the payments to be rounded up or down, usually its the cash payment toallow for better cash handling.
Open Till: Will cause the system to open the cash drawer if that payment method was used.
Type: This column is used to identify the Credit Card, Debit Card and Gift Card salespayments. This option is used if you plan to use the on-line credit c ard processing option.
You will need to have the following for this to work:
1. Have a merchant account with any bank
2. Choose a credit card processor from Maintenance > Hardware Setup > Credit Card
3. Install the credit card processor software

p147
© EziSolution Systems, 2011
Rounding: If you plan to round sale amounts, you can choose rounding up or down and theamount to round to.
-o-

p148
© EziSolution Systems, 2011
LoyaltyThe loyalty points is used to reward clients who buy from you with a set number of points foramount spent, then once the client accumulates a set number of points, the system will issuethem with a store credit for a certain amount that is determined by you. This will help youwith client loyalty and give the clients more incentives to buy from you and to keep comingback. You can assign how many loyalty points each stock or service item is worth, this can be set inthe stock file.
To setup the loyalty points system, there are few steps to take, the first is to create aPayment Type called Loyalty (created in the payments screen) and it should post to anexpense account such as Discounts Given.
Points to Redeem: Enter the number of points the client will need to accumulate before thesystem issue them with the store credit voucher.
For the Amount of: Enter the amount to be used as store credit for that number of points.
Days to Expiry: Enter the number of days before the store credit expires, zero for no expiry.
Payment Name: This is a drop down list that displays the payment types, you must choosethe Loyalty payment type that we have created in step one, note that the loyalty paym entoption will be disabled in the POS screen for any client who does not have enough loyaltypoints to spend.
Note that the system will keep track of the loyalty points for the client and will automaticallyissue the loyalty points voucher when the number of points are reached or exceeded theallotted number of points (in this case 500).
Docket Header and Footer: Enter the text you wish to display on the loyalty points headerand footer.

p149
© EziSolution Systems, 2011
You also have to make sure that you properly setup any client you wish to join to the loyaltypoints, by enabling the loyalty points flag in the client card as shown below.
-o-

p150
© EziSolution Systems, 2011
LocationsThis option will only appear in the Multi-location version.
Path to Save Export Data: This is used on the remote location, the default is OutBox.
Path to Import Data From: This used on the Server or head office that collects data from allthe remote stores
How does it work:
The program will save all the transactions from the remote locations on the local hard disk inthe sub folder OutBox, then these files need to be sent (by VPN, FTP or any other way) to thesub folder InBox on the server before it is imported in to the main system.
-o-

p151
© EziSolution Systems, 2011
Hardware Setup
Use the Hardware Setup to set defaults and other values associated with hardware usedsuch as docket printers, cash drawers and pole displays.
-o-

p152
© EziSolution Systems, 2011
POS printer
This option allows the adding of a POS printer to the system as shown below.
Pos printer 2 is used to print a second copy on a remote printer such as in restaurants to thekitchen.
Labels Printer: Choose the printer from a drop down list, if the printer is not listed there,The labels printer can be used to print labels and barcodes
POS Printer: Choose the printer from a drop down list, if the printer is not listed there, youmay choose a compatible mode, most pos printers can emulate the Epson T88II
Windows Driver: Choose a POS printer Windows Driver from the drop down list. This isnormally created by the Windows User from the Control Panel > Printers and Faxes screen.Make sure to name the printer drivers a meaningful name and also test the driver by printingto the printer using the Print Test Page button in Windows. If the printer does not print underWindows, then it will not work in the program.
Print Header Logo: This is an optional field that will allow the POS printer to print thecompany logo on the docket. Most new POS printers store graphic s in their built-in NVmemory (Non-Volatile Memory) using the software that c omes with them, and then using thecorrect control codes, it will allow the user to place the com pany logo on the sales docket thusenhancing the business image.
You will need to consult your printer manual on the control codes to use to print the logo

p153
© EziSolution Systems, 2011
Note: the control codes can be entered in the format xx yy zz or xx,yy,zz , where xx, yyand zz are the codes in Decimals, you can use Hex by preceding the numbers by 0x
Double Width On: This allows the company name to be printed in large font. Note that if thecompany name is too long (more than 40 characters) its best not to print it in large font.
Double Width Off: This turns off the large print
Auto Cutter On: This is used with POS printers that have the auto paper cutter to force theprinter to cut the docket after it is printer, most printers with auto cutters have two modes ofcutting, a full cut and a partial cut.
print Footer Logo: This is the same as the header logo, and can be used to print such thingsas advertisements, specials, discount vouchers etc., the graphics bitmap has to be uploadedto the printer memory at a new location to allow the program to use it.
Graphics Support: This option is for future use.
POS Printer2
This option is used to allow the user to print using 2 printers, such as pos station and backstation
-o-

p154
© EziSolution Systems, 2011
Cash DrawerThis option is used to setup the cash drawer that is connected to the system through eitherthe serial port, POS printer port or USB Port.Please note that cash drawers that connect to the POS printer port are the easiest to setupand also the cheapest to buy.
Connection Type: Available cash drawer connection type options are:- No Cash Drawer: Choose this option if you have no cash drawer connected to the system POS Printer: Choose this option if the cash drawer is connected through the pos printer
using RJ-45 cable Serial Port: Choose this option if the drawer is connected to the computer using RS-232
Serial Cable. Once you choose this option, a new drop down option will appear and youmust enter the serial port Windows Driver which you should have created using theGeneric Printer Driver. Make sure to set the serial port parameters to match those of theprinter's. If you are not sure what those parameters are, you can usually force the printerto display them by pressing one or more of the printer's buttons and switc h it on while youkeep pressing these buttons.

p155
© EziSolution Systems, 2011
USB Port: Choose this option if drawer is connected to a USB port, you will need to load
the driver that comes with the drawer for it to work External Program: This option allows you to use an external executable program to open
the cash drawer. You will need to provide the name of the external program (see examplebelow). Make sure this program opens the drawer if you run it from DOS or Windows.
Open Drawer Sequence: Enter the decimal codes to open the cash drawer in the format ofaa bb cc ..., you can enter the Hex code as 0xaa 0xbb 0xcc
Password Protect to Open Drawer: Tick this option if you wish to force the user to enterhis/her password to open the cash drawer.
-o-

p156
© EziSolution Systems, 2011
Pole DisplayThis option is used to setup the optional Customer Pole Display which shows the items soldand their amounts, the total of the sale, the tendered amount and the change to be returnedto the customer.
Pole Display driver: Choose the Pole Display Driver from the drop-down list of the printerdrivers, this list is created by the Windows users as described here
Home Code: Enter the home Code in ASCII format (the default is 11), the home code is usedto force the cursor to the top left hand side of the display.
CR Key Code: Enter the Carriage Return Key code in ASCII format. The default is 13), thiscode is used to skip to the next line.
Welcome Text: Enter the welcome text that appears on the pole display
Currency Symbol: Enter the currency symbol. Some currency characters will not displayproperly on the pole display, so its ASCII equivalent must be entered to overc ome thislimitation. An example of that is the Sterling Pound sign £, you can use the value 156 to allowthe display to show the £.
-o-

p157
© EziSolution Systems, 2011
Electronic ScaleThis option is used to setup the optional electronic scale that is connected to the system usingthe serial port.
Scale Name: Choose the scale name from the drop-down list, if your scale type does notappear, you can email us with your scale type and its control codes and we will add it to thelist.
Com Port: Enter the scale communications port, leave it zero for no scale.
Baud Rate: Choose the scale baud rate from the drop down list. from the scale.
Parity: Choose the scale Parity, such as N- No Parity, O- Odd Parity, or E- Even Parity.
Bits: Choose the data bits of either 7 or 8
Stop Bits: Choose the stop bits of 0, 1 or 2
NOTE: The communications parameters must match the actual scale parameters, otherwise,you will not get the proper readings from the scale.
Enabling Weight: Enter the control codes for enabling the weight, the code can be enteredin Decimals or preceded by "0x" for Hex such as shown in the screen example above.
Disable Weighing: Enter the control codes for disabling the weighing, this is to stop thescale from sending data to the computer when not suppose to.
Weight Start Position: Enter the start of the weight position to bypass the control codes thescales sends with the weight.
Weight Digits: Enter the weight number of digits (normally 5 for Kg and 4 for lbs)

p158
© EziSolution Systems, 2011
Factor: Enter the number to multiply with to get the correct reading, (0.001 for Kg and 0.01for lbs)
-o-

p159
© EziSolution Systems, 2011
Barcode ScannerThis option is used to setup a barcode scnner connected to the system.Please note barcode scanners connected to the Keyboard or USB ports do not need any setup,they should just work.However, a serial barcode scanner needs to be setup with the correct serial port parameters.
Connection Type: Enter connection type of the scanner, options are Keyboard, USB andSerial, Some scales come with integrated barcode scanner so it will have the sameparameters as the scale.
Serial Port Parameters: Enter the correct serial port Parameters.
Extra Characters: some barcode scanner will read extra characters at the start and end ofthe barcode, you must identify thier number and enter the correc t information here to allowthe system to read the barcode properly.
-o-

p160
© EziSolution Systems, 2011
Credit CardsThe credit cards option allows you to setup and process Credit Cards, Debit Cards and GiftCards from within the program without the need to a telephone line or bank equipm ent, thussaving you substantial sum of money every year. An added benefit of the c redit cardprocessing is speed, elimination of entry errors, no equipment hire from your bank, one lesstelephone line rental as the processing is done on-line and cheaper rates.
The system comes with built in credit card processor (CCP) companies that you can choosefrom.Before you are able to work with credit cards, you must contact either us or the chosen CCPto arrange for the following:
1 - You must have a murchant account with your own bank (or any other bank)
2 - You Must install the CCP's software, the CCP will help you download and install (or installit for you).
3 - you must get a swipe device such as a keyboard with a credit card reader or a magneticcard reader which can read tracks 1 and 2

p161
© EziSolution Systems, 2011
4 - If you need to process debit cards, then you will need to get a Debit Card Reader.
4 - Setup the hardware according to the CCP recommendations.
Once all the above is done, you will be able to accept credit cards and process credit cards(including Visa, Master Card, Amex, JCB, Diners Club, Discover, Union Pay, Bank Debit Cardsand Gift Cards)
-o-

p162
© EziSolution Systems, 2011
Import / Export Files
This menu item allows the import or export of data to and from the database files used by thesystem.
EXPORTING DATA:
Data File to Export From : Choose the data file to export from.
Choose Data Fields Required : Choose the required fields by moving them to the box onthe right.
Operation : Choose Export to export one of many database files to a number of differentformats.
File Type : Choose the file type you are exporting to. Valid formats are EXCEL, CSV and TABDELIMITED.
File to Export To : The system fills in the default destination file, it uses the C:\TEMP folderto store the exported file. You can choose to accept this choice or change it to a differentfolder. Note that the file path and name must not contain any spaces, otherwise the exportwill fail and an error message generated. Once this is done, the system will display a grid withall of the data to be exported, you can choose to change the data in the grid without affectingthe database. You can also stop any row from being exported by simply clicking on the leftmost column and un-check. Click on the Export button to export the data.
Note: Make sure when you export to a file, that there is no file with the same name that isopen, otherwise you will get an error message and the export will fail.
IMPORTING DATA :
Data File to Import To : : Choose the data file to import to. Imprting Stock file, you willneed to provide the part number. Importing existing data will only refresh that data and willnot cause duplicates.
Choose Data Fields Required : Choose the required fields by moving them to the box onthe right. Make sure to match the import data with the import fields.
Operation : Choose the Import option
File Type : Choose the file type you are importing from, the valid formats are EXCEL, CSVand TAB DELIMITED.
Note: Importing from Excel files may cause problems, especially with new types of Excelfiles as they contain too many hidden control characters to be used by their programs, so its

p163
© EziSolution Systems, 2011
advisable to convert the Excel files to CSV files (Just save as CSV from Excel), this willeliminate too many problems including the importing part numbers as digits.
File to Import From : Enter the file name including the full path of the file you are importingfrom, Make sure the data matches the field names in the grid, otherwise, you will getincorrect data in your data files. If there is a c olumn you are not importing, make sure tohave blank fields in the source file. Also, make sure to enter a valid file name, the file nameand path must not contain spaces.
To choose the file name interactively, double click on the file field.
To exclude any row from being imported, un-tick the first c olumn in the grid.
You can change data being imported by over writing the data in the grid, this will not c hangethe data in the original file.
Note: Make sure when you import from a file, that this file is not open, otherwise you willget an error message and the import will fail.
-o-

p164
© EziSolution Systems, 2011
Restore Data From BackupThis option is used to restore the data that was earlier backed up when exiting the system .Note that restoring will wipe out all the data that was entered from the time the backup wasdone up until now, so you must be very careful when you perform a restore. Lost data c an notbe recalled so it must be entered manually. Backing up regularly and under different filenames is the best insurance for a good data integrity.
Restore is usually done if there was a disaster that caused data loss.
Make sure to reindex the files after the restore. You are also advised to check on the dataafter the restore is done to make sure all is OK.
-o-

p165
© EziSolution Systems, 2011
Users Settings
Use Users Settings option to do the following operations:
Create a new user
Delete an existing user
Set a user’s file access permissions.
Setup the proper user interface
You must be the Master user, or have been granted permission to do these functions, by themaster user.
-o-

p166
© EziSolution Systems, 2011
Modify UserThis screen is used to add/modify users and their settings, note that users file is not the sam eas the staff file. A staff member can have one or more user accounts with different setting foreach account, this will facilitate better use and security for the system .
To Modify the user basic information, click on the Modify button to get the following screen:

p167
© EziSolution Systems, 2011
The above screen stores the basic user information such as name and contact details, once allthe information is correct, just click on the save button to save.
-o-

p168
© EziSolution Systems, 2011
SecurityClicking on the Security button will display the following screen, which allows the systemadministrator to assign the security settings for each user.This screen allows security of down to the menu level, you will need to assign a security valueof between 0 to 3 for each menu item, 0 being no access and 3 for full access.
First you must assign a password for the user, followed by security levels for each and everyscreen.To make sure the password works, you will need to assign a password to the very first user(Master User), otherwise, the password will be inactive and these settings will not apply.
-o-

p169
© EziSolution Systems, 2011
SettingsThe Settings button is used to configure the user interface, and email settings for eachsystem user, clicking on the settings button will show the following sc reen:
User Interface: the interface tab is used to configure the user interface, a choice between amenu and toolbars
or Big Buttons interface (which is more suitable for touch screens)
the colors of screens, a background picture to the main menu, show tips and also the abilityto choose and modify a language file. To modify the text on the user interface, choose alanguage file, then click on the edit button, then you can edit any text to appear on thevarious screens.
Language file: You can also change the interface language for each user, thus allowing eachuser to work with his/her own language, the system comes with some default languages but ifyou need to change the language to one that is not on the system , you can just create a newfile and edit the file your self, this can also work if you need to change any text on theinterface to say whatever you want.
If you need to create a new language file for your specific country, copy the following files as

p170
© EziSolution Systems, 2011
follows:
If you need to create a German Language File copy the ENGLISH.LNG and ENGLISH.CDX filesand rename them as GERMAN.LNG and GERMAN.CDX, then choose the German language fileand edit the text in there to make it German, then you will notice that all text on all sc reenswill now show German.
Desktop Picture File: This will display any picture file you have on the main menu.
Note that if you are running a network version and need to enter a pic ture file, make sureto enter the full path name of the picture such as \\Server\Serverc\Rman\ezi_blue.jpg or youcan just remove the path name and just enter the file name if that file is residing in the samefolder you start the program from.
Show Tips on Startup: Tick to show random tips whn you start up the program.
Open Diary on Startup: Tick to display the diary when you first enter the program.
Show Tool Tips: Tick to force the system to show you tool tips on all screens to help youlearn the system.
-o-

p171
© EziSolution Systems, 2011
SalesThe Sales tab is used to configure the sale screens for each system user.
Choose the proper settings for each user, making sure to save after finishing.This screen is user specific, so each user can have his/her own settings.
Invoicing Screen
Disable Date Change: Tick to block user from changing the invoice date when entering newinvoices.Disable Price Change: Tick to block user from changing the selling price when entering newinvoices.Disable discount Column: Tick to block user from adding discount.Show total profit: Tick to show total profit as you enter the invoice
Cash DrawerAllow Open Cash Drawer: Tick to allow user to open Cash drawer.
Stock Enquiry screen
Is used to check on stock items and is valid throughout the system, you can configure it toshow different prices for different users based on their security levels.
-o-

p172
© EziSolution Systems, 2011
POSThe POS tab is used to configure the POS screen and its behavior, you can allow the user toedit or block a cell, you can also hide a cell such as the tax c olumn
Choosing Skip will speed up the sales process but will still allow the user to go bac k andchange the field if need be.note that you can set a stock item in the stock card to force price and quantity editing even ifthe column is sat to disable in this screen, this is required for such items that do not have afixed quantity or price to be edited by the user.
If you choose disable to a particular field, the user will not be able to modify the content ofthat field. However, you can switch between users using the CONTROL+F12 to allow anotheruser with more authority to change settings on the fly.
Allow Qty Discount: This setting is used in conjunction with the stock card by setting theprice for a volume discount, so if you assign a Retail price for up to 3 items and the Tradeprice for qty of 4 to 10, so if the customer buys 4 or more, the system will automaticallychange the price from the Retail to the Trade Price.
Allow Deletion: this option will allow the user to delete POS transac tion including theirpayments, note however, the system will keep a log of all deleted transactions including thetime and date of deletion, the active user and the amounts deleted.
Allow Quick Menu Buttons Edit: Enabeling this option will allow the use to edit the quic kbuttons in the POS screen
Show Total Sales Amount on POS List: Choosing this option will show the suer the totalsale and their amounts.
Block user from changing entered data: This option will prevent the user from changingor deleting any data once entered in the pos screen.
Disable the Hold Button: This option will block the user from using the Hold button.
Block Sales Return: This option will block entering negative quantities.

p173
© EziSolution Systems, 2011
Disable F7 Sales List: This option will block the F7 function key from displaying the sales listin the pos screen for that day.
Disable POS Re-print: This option will diable the re-printing of pos dockets after they havebeen saved.
-o-

p174
© EziSolution Systems, 2011
e-MailThe e-mail tab allows you to configure the email account for every system user.
From Name: Enter the name you want to appear on your rec ipient email.
From email Address: Enter the staff email address
Reply to Address: Enter a different email address if exist for the recipient to reply to.
SMTP Domain: Normally is left blank, but sometimes, you may need to fill it with the sametext as the SMTP Server. Leave it blank for Gmail.
SMTP Server: Enter your SMTP server, normally in the form of mail.ispname.com, if notsure, you can check your email client to see it in there.
Note that you must use your own Internet Service Provider (ISP) SMTP. Thiswill cause the email to go through your ISP which is a lot faster and more secure.
Most ISP's have an online help to show you how to setup your email SMTP. Ifyou are using Gmail, enter "smtp.gmail.com"
SMTP Port: enter 25 as default, some ISPs may use a different port, if you are using Gmail,enter 465. If you are using Gmail to send emails, you will need to tick the ServerAuthentication optin and enter the User Name as your Gmail account ([email protected]) and your Gmail password
Timeout: Enter the timeout is seconds
Attachment: Enter the attachment type you want the system to send as.
Server Authentication: Choose this if your ISP offers Server Authentication, which willrequire a user name and password, most ISP's do not support this feature whic h allows theuser
to use their email account from different locations by simply usingtheir user name and password, so if in doubt, leave this off, otherwise, ask your ISP.
Gmail requires Server Authentication Ticked, with the user name as<user>@gmail.com and the password. Default email Message: Enter the default email Message, you will be able to modify it

p175
© EziSolution Systems, 2011
before you send an email
-o-

p176
© EziSolution Systems, 2011
Tax File Maintenance
Select Tax File Maintenance to set up taxes and rates appropriate to your country.
Retail ManPOS System allows the users to choose the tax system used in their country. Theoptions are: No tax applicable, one tax system (such as USA, Australia and the UK), or a twotaxes system (such as Canada).
To setup the system for a NO TAX system, keep both TAX NAME fields empty.
For a Single Tax System, enter the default tax name in the TAX1 field, it is usually TAX, VAT,GST etc, then you have to enter the different taxes applicable in the grid below.
For a Two Taxes System, enter the names of these taxes in the TAX NAME fields TAX1 andTAX2, then you also have to enter the tax codes and tax % in the grid below.
In some instances, the tax may not be a percentage, but a dollar value (such as fuel tax,which is charged at a certain amount per liter or gallon), in this case, when you enter the taxcode in the grid, precede that with a Dollar sign $ such as $T. When the system sees the $sign on calculating the tax, it will multiply the quantity by the tax amount, instead ofcalculating the percentage.
To add a new tax code, select New. This will position the cursor on a blank line at the end ofthe list. Set the values of the three columns to your needs.
To change an existing tax code, position the cursor on the code you want to change andselect Edit. This will allow you to change the fields of this code.
Select Close to return to the previous screen and save your changes.
-o-

p177
© EziSolution Systems, 2011
Default Accounts Setup
Select Default Accounts Setup to determine which accounts are to be used for posting if noaccount is specified. This applies to Invoicing, Purchasing and Payments.
Enter a valid account name in each field. The accounts must be in the Chart of Accounts andmust also be Posting Accounts.
You can obtain the Accounts List to select from interactively by one of the following methods:
When you have finished, select one of the following:
Save: Save the changes and return to the previous screen.
Close: Abandon the changes and return to the previous screen without saving.
The system comes with pre-configured accounts and should be kept as is if you are not surewhat to do.
-o-

p178
© EziSolution Systems, 2011
Clear Data filesThis option is used to clear data files, all cleared data will be permanently erased with littlechance of recalling it, and the time taken to erase data is very fast, so be very careful in usingthis option. Use it only if you need to erase all of your data (such as when you first start andwant to remove all the test data that you created. Also make sure to lock this option to allother users of the system using the security settings discussed above in the user settingsscreen.
To clear data, tick the required files, then you have to enter the MASTER USER password. Ifthe Master User does not have a password, then you must assign a password before you areable to clear data.
-o-

p179
© EziSolution Systems, 2011
Data Files StatisticesThis option will display vital information on the data files used by the system including thenumber of records per file, each file size and the last date the files was updated.
-o-

p180
© EziSolution Systems, 2011
Versions History

p181
© EziSolution Systems, 2011
Version 1.8
Version 1.80Legend
= New Feature = Improvement = Resolved Issue
Version Released
1.80 20-Oct-2007
Added Quick Menu Buttons to POS Screen
Added Hourly sales Report to POS reports
Changed interface to Purchase and Sales screens, new screens allowresizing of the whole screen, change grid fields and faster data entry
Added Staff Sign In/Out with report
Added Payroll Module with payroll slip printout
Improved stock Search Procedure
Added Sales Source feature in the POS and Sales Screens
Improved Lay-by procedure with better printout
Added Gift Voucher Docket printout in the POS screen
Modified the Payments screens to allow multiple payments
Resolved Rounding issues in sales and purchas screens
Added an accounting error checking report when reindexing theaccounts transactions file
Improved main screen sizing to fit any screen size over 800x600
-o-

p182
© EziSolution Systems, 2011
Version 1.80.1Legend
= New Feature = Improvement = Resolved Issue
Version Released
1.81 29-Oct-2007
Added Stock Expiry Date report
fixed bug with Default Quote in Sales Screen
-o-

p183
© EziSolution Systems, 2011
Version 1.80.2Legend
= New Feature = Improvement = Resolved Issue
Version Released
1.80.2 9-Nov-2007
Added DOB date filters to Clients report
Added Location Filter to Stock Enquiry Report for the multi-locationsversion
Removed Zap file query from Statements report and fixed minorbugs
-o-

p184
© EziSolution Systems, 2011
Version 1.80.3Legend
= New Feature = Improvement = Resolved Issue
Version Released
1.80.4 20-Nov-2007
Modified Clients Entry Screen
Modified Suppliers Entry Screen
Fixed bug in number of copies to be printed in invoice
-o-

p185
© EziSolution Systems, 2011
Version 1.80.4Legend
= New Feature = Improvement = Resolved Issue
Version Released
1.80.4 28-Nov-2007
Fixed POS Daily Report bug
Modified some reports to properly display in Excel Files
Fixed average stock cost price calculation bug
-o-

p186
© EziSolution Systems, 2011
Version 1.80.5Legend
= New Feature = Improvement = Resolved Issue
Version Released
1.80.5 15-Jan-2008
Fixed POS Daily Report bug
Added Drill Down (History) option in Clients List
Added Drill Down (History) option in Suppliers List
Added Drill Down (History) option in Stock Enquiry Screen
Fixed bug in Recalling Accounts in Purchase and Invoice screen
Fixed Voluntary Super bug in Payroll
-o-

p187
© EziSolution Systems, 2011
Version 1.80.6Legend
= New Feature = Improvement = Resolved Issue
Version Released
1.80.6 28-Feb-2008
Fixed POS currency Pole Display bug
Added Old POS screen option
Modified Delivery Print Button in Invoice List to change printer
Added Ability to hide text on POS and Invoice Printouts
Added Ability to block printing of client address on POS Docket
Fixed bug in calculating Stock Average Cost
Fixed Monthly Totals bug in Client Statements
Added Invoice Cost Price Recalculation in re-Indexing
-o-
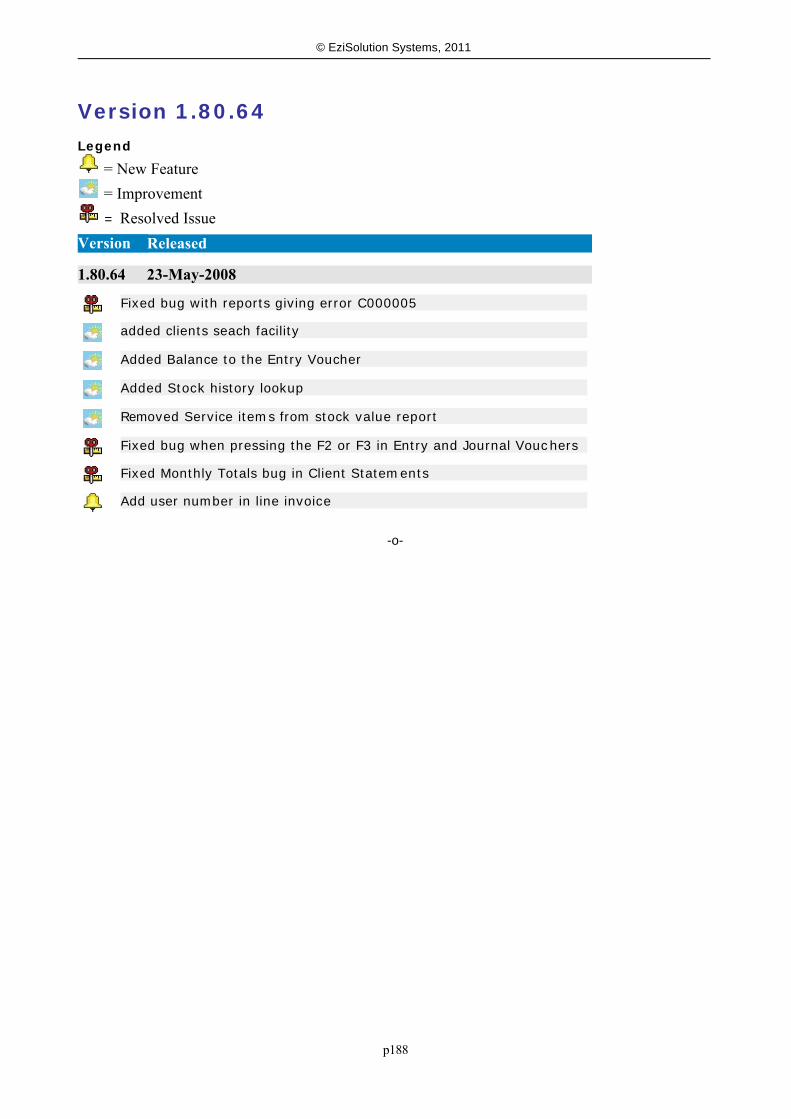
p188
© EziSolution Systems, 2011
Version 1.80.64Legend
= New Feature = Improvement = Resolved Issue
Version Released
1.80.64 23-May-2008
Fixed bug with reports giving error C000005
added clients seach facility
Added Balance to the Entry Voucher
Added Stock history lookup
Removed Service items from stock value report
Fixed bug when pressing the F2 or F3 in Entry and Journal Vouchers
Fixed Monthly Totals bug in Client Statements
Add user number in line invoice
-o-

p189
© EziSolution Systems, 2011
Version 1.80.73Legend
= New Feature = Improvement = Resolved Issue
Version Released
1.80.73 23-Nov-2008
Fixed bug with FIFO cost price
Fixed bug in Invoice when using discounted price
Fixed bug in the invoice screen relating to the discount column
Fixed Monthly Totals bug in Client Statements
Fixed problem when docket printing an item that has { in details(gives error # 10)Added % Discount option in POS, Sales and Purchase
Block collate feature if item has the edit price flag set
Added extra digit to the stock prices in the stock card maintenance
Moved the Hardware Maintenance to its own menu
Added Stock Merge button on the Stock List
Add a new Account Button in the POS payment screen
-o-

p190
© EziSolution Systems, 2011
Version 1.81Legend
= New Feature = Improvement = Resolved Issue
Version Released
1.81 20-May-2009
Fixed bug when pressing F7 in POS screenFixed bug in POS toremove hold files when doneFixed Bug in POS to remove hold files when done
Added % Discount on Client card
Changed Email Library to a newer version
Add Multi-Currency Payments in POS
Add Foreign Currency in Sales screen
Add Foreign Currency in Purchase screen
-o-

p191
© EziSolution Systems, 2011
Version 1.9
Version 1.90Legend
= New Feature = Improvement = Resolved Issue
Version Released
1.90 01-Mar-2010
Fixed bug in Stock Value Report
Fixed Backup Bug that stopped open files from being restored.
Fixed bug that leaves temp files after aborting emailing.
Fixed bug in Payments screen
Fixed bug when saving POS after recalling a hold transaction
Added Install support for Windows Vista and Windows 7
Changed Programming Language to a newer one
Added a new price brakcet in the stock and debtors files for resellers
Added Takeaway feature for quick buttons
Add Foreign Currency in Purchase screen
Added filter to recall stock to be ordered by suppliers in the importbutton
Added more controls to the scale setup
Added Payment amounts and types to Staff Sales Report in POSmenu
Added Zip to backup and restore
Serial numbers can now be entred on one line as follows:Multiple serial numbers in series First_serial - Last_SerialNote that they must be seperated by space,dash and spaceMultiple serials can be serial1,serial2, serial3 (seperate by
comma)
-o-

p192
© EziSolution Systems, 2011
Version 1.90.09Version 1.90.9 01/2011Added credit card processingAdded Serial barcode scanner supportadded hex support to control codesFixed bug in Stock Transfer screen and reportFixed bug that was introduced in earlier versions in the Loyalty Points in both the POS andInvoicing Screen
Version 1.90.8 09/2010Activated the Archive feature in the Maintenance SectionAdded Automatic station allocation without using the shortc uts for multi-user versionsFixed bug in importing Stock qtys in the import/export stock dataFixed bug in Tax reportsrestored the database integrity check to the default.
Version 1.90.7 07/2010Added Account code to Journal and Entry Vouchers in the accounting sectionAdded detailed reports in the Trial balance accounting reportAdded detailed reports in the Profit & Loss accounting reportAdded detailed reports in the Balance Sheet accounting reportAdded the ability to group posting accounts under heading accounts in the chart of accountsAdded BIN sort option to stock take reportFixed bug in invoice payment screen
Version 1.90.6 07/2010Added individual points to the stock itemsfixed bug in calculating the holiday and sick hours on the pay slip
Version 1.90.5 06/2010Added Profit diplay in Invoice for selected usersFixed bug in POS screen to display package pricingFixed bug in purchase returns reportFixed bug when pressing the discount header in POS screen
Version 1.90.4 06/2010Set reports to open at max screenAdded a new procedure to fix corrpted data files in the pack option in the Files reindexingprocedureFixed bug in printing 2nd line on invoiceAdded more options to the Random Weight barcodesAdded decimal option in the weight for the Random Weight barcodes to handle both lb and kgFix bug when printing using an external printer that changes the default pathAdded an option to block reprint on pos screenAdding Archive option to compact old dataModified Selling prices report to add resellers, on special prices and other details optionAdded a default labels printer option in Hardware SetupAdded Data Files Statistics in the Maintenance SectionFixed bug in stock History file when modifying sales and purchases
Version 1.90.3 04/2010
Added option to exclude cost price and profit from invoice list reportAdding option to customise POS docket printout.Fixed bug in Groups sales report to filter by group

p193
© EziSolution Systems, 2011
Fixed bug in pos screen when collate flag is active
-o-

p194
© EziSolution Systems, 2011
FAQ
Barcode PrintingTo Setup the barcode font, click on Windows START > SETTINGS > CONTROL PANEL >FONTS
Choose Install new font, then change the folder to C:\RMAN or C:\EZI_W (depending on whichsoftware you are using) Double click on the folder, you will notice a font Barc128c (True Type)appearsin the List of Fonts window, highlight that font and click OK

p195
© EziSolution Systems, 2011
The system will tell you the font is already installed,
click OK, then click Close, This will install the new font properly. You can now view or printbarcodesfrom the software.
-o-

p196
© EziSolution Systems, 2011
Cash Drawer SetupCash drawers can either connect to a serial or USB port (such as COM1 or COM2,USB1, etc) or it can connect to the POS docket printer. You must enter the correct open drawer command for the drawer to open, Use Shift +F12 to test.
To setup a cash drawer with a serial or USB interface, follow the following steps:Click START > SETTINGS > PRINTERS > ADD NEW PRINTER
Choose the com port used by the cash drawer (com1, com2 etc.)

p197
© EziSolution Systems, 2011
Click Next and choose the GENERIC / TEXT Printer
Then rename to the device name used. Once this is done, the device name shouldappear in the HARDWARE Setup screen.

p198
© EziSolution Systems, 2011
Once this is done, go to MAINTENANCE > HARDWARE Setup and adjust the settings asshown.
-o-

p199
© EziSolution Systems, 2011
Cannot load 32-bit DLL repinv3.frxSystem produce the following error when starting up:
Error Number: 1753
Error Message: Cannot load 32-bit DLL repinv3.frx.
This error is due to a Windows protection setting which can be modified from CONTROL PANEL> SYSTEM > Choose the ADVANCED TAB > Click on the SETTINGS button under thePERFORMANCE Heading > Click on the DATA EXECUTION PREVENTION TAB, thenchoose the TURN ON DEP FOR ESSENTIAL WINDOWS PROGRAMS AND SERVICESONLY, or if you do choose the TURN ON DEP FOR ALL PROGRAM AND SERVICESEXCPET THOSE I SELECT:, then you have to add the RMAN.EXE in the box as shown below.
-o-

p200
© EziSolution Systems, 2011
Error Access Printer Spooler
When trying to print a receipt from the receipt printer it gives following error: Error 1957(error accessing printer spooler)
This error is normally is generated when the user changes the name of the Windows POSprinter.
to fix, the use must go to Windows > Printer and Faxes Panel, remove the old POS printerdriver and re-install it, (making sure NOT to make it the default Windows Printer). Then go int the program, go to MAINTENANCE > SYSTEM SETUP > HARDWARE and choose the newlyinstalled driver for the POS printer, then save.
-o-

p201
© EziSolution Systems, 2011
Issuing a discount on invoice or POS totalIf you need to issue a total discount on the total sum of the invoice, you will need to do thefollowing:
1 - Create a new service item from the Stock Add/Modify screen, the part number of that itemmust be the discount amount, so if you need to give a 5% discount, the part number must be-5%, you can enter any details such as "5% discount"
2 - Entering the -5% service item in the invoice or POS will cause the system to give a 5%discount for all the items preceding the -5% discount line. This is much more flexible thanhaving a total discount at the bottom of the screen for two reasons, the first is for allowingthe user to give a total discount on some items and not others, so the user enters all theitems that need to be discounted on the top, then enter the discount then continue withundiscounted items, the second reason is the user can use reports to see how m any times anitem discount has been given and how much it was.
-o-

p202
© EziSolution Systems, 2011
POS printer setupTo setup a POS printer connected to the local computer, go to Windows > Start > controlPanel > Printers and Faxes the add new printer
Choose the port used by the POS printer (com1, com2, Lpt1, Lpt2, USB1 etc.)

p203
© EziSolution Systems, 2011
Click Next and choose the GENERIC / TEXT Printer
Then rename the name to be used Such as Epson TM III. Once this is done, the devicename should appear in the HARDWARE Setup screen
Warning: Make sure not to make the POS printer as the Default Windows Printer, youMUST use a proper report printer driver to print and display your reports correctly.
-o-

p204
© EziSolution Systems, 2011
Pole Display Setup
To setup a Customer Pole Display with a serial or USB interface, follow the followingsteps:Click START > SETTINGS > PRINTERS > ADD NEW PRINTER
Choose the com or USB port used by the Pole Displ;ay (com1, com2 etc.)

p205
© EziSolution Systems, 2011
Click Next and choose the GENERIC / TEXT Printer
Then rename to the device name used. Once this is done, the device name shouldappear in the HARDWARE Setup screen.

p206
© EziSolution Systems, 2011
Once this is done, go to MAINTENANCE > SYSTEM SETUP > HARDWARE and adjust thesettings as shown in the following screen.
-o-

p207
© EziSolution Systems, 2011
Network Printing
Network PrintingTo setup network printers, you have to setup the network users and stations first
To setup a network point of sale printer, choose where the POS printer is needed to belocated, then create a printer driver on that system (it has to be GENERIC, TEXT) then make it sharable. On the other stations under Windows, click START >SETTINGS > PRINTERS & FAXES and click ADD ANEW PRINTER
Choose A network printer, or a printer attached to another computer

p208
© EziSolution Systems, 2011
Click Next to browse for a printer
Select the printer you want to use and click next

p209
© EziSolution Systems, 2011
Next open the program then go to MAINTENANCE > SYSTEM SETUP > HARDWAREand under the POS Printer chose the printer you just created and save
Note that you should not make the POS printer your default Windows printer, even if youdo not have another printer connected to the system, the reason for that is you will haveproblem printing all other reports since the system uses the default Windows printer fontto print the reports, and the POS printer fonts are very limited, so you must always installa standard printer as your default Windows printer.
-o-

p210
© EziSolution Systems, 2011
Network SetupSERVER SETUP
To make the system run on a network, do the following steps:Decide which computer is going to act as a serverSet up the hard disk of that machine to be sharable, to do that, double click on MyComputer, Right Click on the Hard Disk Drive Icon, click Sharing and Security and thengive the drive a share name Such as (C ) and make it fully sharable, if successful, youwill see a hand under the Hard drive icon.Create a short cut on each station as follows (let us assume you server name isSERVER and the drive share name is C) in the short cut enter\\SERVER\C\RMAN\RMAN.EXE and in the START IN field in the short cut properties youmust also enter \\SERVER\C\RMAN .
An easier way to setup the station is to locate the Rman folder on the server, openthat folder, locate the Rman.exe program, right click it and choose the "Send toDesktop (Create Short-cut)" option.
There is another way to do the same thing but instead of using the Absolute Path

p211
© EziSolution Systems, 2011
Names, use instead mapped network drives , to do that :follow the first three steps as aboveOn each station, Double Click on Network Neigbourhood (for Windows 98) or (MyNetwork Places ) in 2000 or XPOnce you see the server, double click on the server icon, then you should see thesharable drive on the serverRight click on that sharable drive, and click Map Network Drive, then choose a networkdrive letter such as NTick the Connect at logon, and save this settingCreate a short cut and browse to the RMAN directory on the server, then save.
Either ways will work fine, the only thing you have to watch for is the network drivemapping in the second method may drop out if the server was not available when youstart the stations, so you have to re-install it. The first method is more consistent and willwork each and every time.
Workstations Setup
To setup each station to have its own peripheral devices such as POS printers, reportprinters, cash drawers and so on, you have to add the number of each station as aparameter to the program name in the program desktop short cut. The stations has to be numbered 1, 2, 3, 4 etc, then the short cut has to have the stationnumber as follows :For station number 2, the TARGET field in the short cut should look something likeC:\RMAN\RMAN.EXE 2 (RMAN.EXE is the program name for Retail Man)
Note that version 1.90.08 and above does automatic allocation of station numbers, so noneed to incluse the station number, but you can force the system to use a particularstation number by including the station number in the short-cut.

p212
© EziSolution Systems, 2011
Or

p213
© EziSolution Systems, 2011
-o-

p214
© EziSolution Systems, 2011
System Freeze
If you are running the program on a network, you may experience what look like freeze (but itsactually trying to look for files) if you have included the path names that are valid on one systembut not on the others that are networked.
Here is an example:
RMAN is installed on Machine called Server and you enter the logo file path asC:\RMAN\MyLogo.jpg
Now, if you run this from the server, it will work fine, but if you run it from the network, it will betrying to look for a file called MyLogo.jpg on the local drive but it can't find it. The system willgive you an error. But if you have entered a Desktop Picture file under the User Maintenancesection and the path is valid for one system but not the rest, then a delay of 1 to 5 minutes willhappen every time the main menu gets focus (which will look like a freeze) To fix, use theabsolute file names such as \\Server\DriveC\RMAN\MyLogo.jpg (replace the computer, hard drivenames according to your network), or simply enter the file name without path such as MyLogo.jpg
If the above does not apply, then there may be other reasons including:
1 - Computer Hardware failure (mainly hard disk drive or memory)
2 - System is heating up due to faulty fans or poor air flow circulation in the system
3 - Viruses or Trojans
4 - Windows file corruption
To check if it is a hardware or software problem (this is a quick test and is generally true but notalways):
When the system freezes, pressing the Num Lock key few times should turn the Number Lock ledon the keyboard on and off, if it doesn't then its a hardware problem, otherwise, it could be asoftware problem.
-o-

p215
© EziSolution Systems, 2011
Serial Number Tracking
Make sure to tick the Track serial number option in the stock card, then when you enter thestock item and press the Enter or Tab key on the Qty field, the system automatically generatethe text S/N under the part number column, you can then enter the serial numbers in thedetails column, if you have many serial numbers, they can be entered on the same line(separated by commas) such as 12345,12346,12347, or on different lines, but you mustmake sure you enter the text 'S/N' in the part number for the system to recognize it as a validserial.You can also enter a series of consecutive serial numbers such as 12345, 12346,12347,12348 by simply entering the first and last serial numbers separated by a "space,dash, space" such as 12345 - 12348
The system will be able to report on the serial number using the F8 function key as shown
-o-

p216
© EziSolution Systems, 2011
Supported HardwareRetailMan can use the following hardware (Other hardware with the same connection typesand specs will also work fine):
Recommended POS Printers
Must have a minimum of 40 column wide printout.
Connection Type: Serial (suitable if the printer far away from the computer) Parallel USB
Printing Type: Thermal (faster, quiet, no ink ribbons needed) Dot Matrix
Brands: Epson Star Samsung Posiflex
Recommended Barcode Scanner:
There are two types of barcode scanners, Laser and CCD, CCD type is cheaper but the laser ismuch better as it can scan from some distance away.

p217
© EziSolution Systems, 2011
Connection Type: Keyboard USB Serial (Not recommended)
Brands: Posiflex DATALOGIC PSC METROLOGIC
Recommended Customer Pole Display:
Two Lines of 20 Characters each.
Connection Type: Serial USB
BrandsPOSIFLEXEPSONSamsung
Recommended Touch Screen:
Minimum Screen Resolution of 800x 600 but larger is better

p218
© EziSolution Systems, 2011
Brands ELO (or any brand using Elo Tecnology) LG LIYI (or any brand using Liyi Technology)
Recommended Cash Drawer:
Connection Type: Serial Printer Driven (Needs POS printer to operat)
Brands POSIFLEX EPSON CITIZEN
Recommended Barcode Printers
The best solution for printing Barcodes is to use the reports printer (laser or inkjet) toprint your barcodes. Laser printers are recommended because they are faster, c heaper torun and produce a better quality barcodes. The built in barcode labels can be used and thebarcode labels stationary is widely available. However, if you do require a barc ode printer,then Zebra is a good way to go.

p219
© EziSolution Systems, 2011
Electronic Scales
Connection type: Serial USB
Brands NCR Mettler Toledo TEC and many others
-o-

p220
© EziSolution Systems, 2011
Index
- A -Add / Modify Clients 42Add/Modify Staff 109Add/Modify Suppliers 92Aged Clients Report 52Aged Suppliers Report 98
- B -Back Orders Report 55, 101Balance Sheet Report 129Bank Deposit 57Bank Reconciliation 121Barcode Printing 194Barcode Scanner 159Bulk E-mail 46
- C -Cannot load 32-bit DLL repinv3.frx 199Cash Drawer 154Cash Drawer Setup 196Chart of Accounts 115Chart of Accounts Report 122Clear Data Files 178Client Sales/Product 61Clients' Statements 53Company Setup 135Consignment Out 39Cost Price Report 80Credit Cards 160Credit Note 38
- D -Daily Balances Report 124Daily Entries Report 123Daily Sales Report 27Data Files Statistices 179Default Accounts Setup 177Details Tab 65Diary Screen 130
- E -e-Mail 174Electronic Scale 157

p221
© EziSolution Systems, 2011
Email 45Entry Posting 119Equivalent Part Numbers 68Error Access Printer Spooler 200
- F -Files Reindex 133Function Keys 10
- G -General Setup 136Global Stock Maintenance 74Group Sales Report 29
- H -Hardware Setup 151History 67Hourly Sales Report 30
- I -Import / Export Files 162Introduction 7Invoices List Report 50Invoicing 31Issuing a discount on invoice or POS total 201Item Enquiry 76Items' History 86
- J -Journal Posting 117
- K -Kit 70
- L -Labels Printing 48Lay-away / Lay-by 37List of Clients 49List of Suppliers Report 94Locations 150Loyalty 148

p222
© EziSolution Systems, 2011
- M -Modify User 166Monthly Balances Report 125
- N -Network Printing 207Network Setup 210
- O -Other Languages Support 14Out Of Stock Report 82
- P -Package Contents 69Payments Received 40Payments Setup 146Payments To Suppliers 90Payroll Parameters 110Payroll Report 113Payroll Slips Report 111Point Of Sale 15Point Of Sale Setup 143Pole Display 156Pole Display Setup 204POS 172POS Docket Re-Print 23POS List 24POS printer 152POS printer setup 202Process Payroll 108Product Sales/Client 62Purchase Analysis Report 100Purchase Orders Report 96Purchase Payments Report 104Purchase Setup 141Purchases List Report 95Purchases Tax Report 103Purchasing 87
- Q -Quantities Report 78Quick Menu Buttons 20Quick Start 8Quotations 36
- R -Restore Data From Backup 164

p223
© EziSolution Systems, 2011
RetailMan 6
- S -Sales 171Sales Analysis Report 54Sales By Client 59Sales By Product 60Sales by Sales Rep 63Sales Payments Report 58Sales Setup 137Sales Tax Report 56Security 168Selling Prices Report 79Serial Number Tracking 215Settings 169Sign In / Out 105Sign In/Out Report 114Slow Moving Items Report 81Staff Sales Report 28Start/End Day 25Statement Of Account 126Stock Groups Maintenance 73Stock On Order Report 102Stock Quantity Adjustment 75Stock Reorder Report 83Stock Setup 140Stock Take Report 84Stock Value Report 85Summary Income Report 26Summary Purchase Report 97Summary Sales Report 51Suppliers' Statements 99Support and Contacts 12Supported Hardware 216System Freeze 214
- T -Tax File Maintenance 176Telephones Directory 132Touch Screen Payment 18Trading Profit / Loss Report 128Transactions Enquiry 77Trial Balance Report 127
- U -User Interface 13Users Settings 165
- V -Version 1.80 181Version 1.80.1 182Version 1.80.2 183Version 1.80.3 184

p224
© EziSolution Systems, 2011
Version 1.80.4 185Version 1.80.5 186Version 1.80.6 187Version 1.80.64 188Version 1.80.73 189Version 1.81 190Version 1.90 191Version 1.90.09 192

© EziSolution systemsw w w .Retailmanpos.com