Retail deployment book by vijay sharma
50
Microsoft Dynamics AX 2012 R3 Retail Deployment Retail Deployment Practice Microsoft Dynamics AX 2012 R3 Retail Deployment Guide Vijay Sharma –Software Consultant 17/03/2015
-
Upload
vijay-sharma -
Category
Software
-
view
167 -
download
3
Transcript of Retail deployment book by vijay sharma
Microsoft Dynamics AX 2012 R3 Retail Deployment Retail Deployment Practice Microsoft Dynamics AX 2012 R3 Retail Deployment Guide Vijay Sharma ndashSoftware Consultant 17032015
Vijay Sharma-Software Consultant Page 1
Install retail components in AX 2012 R3 In AX 2012 R3 we recommend that you install Retail components in the following order
1 Install Retail Headquarters 2 Install Commerce Data Exchange Real-time Service (Retail Transaction
Service) 3 Install Commerce Data Exchange Async Server 4 Install Commerce Data Exchange Async Client 5 Install a Retail channel database 6 Install the POS components that you require
o Install Retail POS o Install the Retail Channel Configuration Utility (Retail Store Database
Utility) o Install Retail Modern POS o Install Retail Server o Install Retail Hardware Station
7 Install a Retail online store (e-commerce) 8 Install optional components
o Install Commerce Data Exchange Synch Service (Retail Store Connect)
o Install the Retail mass deployment toolkit o Install Retail SDK (Retail POS Plug-ins)
Install retail components in AX 2012 R2 and AX 2012 Feature Pack To use the retail components in Microsoft Dynamics AX 2012 Feature Pack you must select the Extensions model file when you install the Microsoft Dynamics AX database For more information about how to install model files see Install the Microsoft Dynamics AX databases In AX 2012 R2 and AX 2012 Feature Pack the available components differ from AX 2012 R3 Most importantly you must install Synch Service instead of installing Async Client and Async Server For more information see Deployment topologies for Retail and Install Commerce Data Exchange Synch Service (Retail Store Connect) Install Retail essentials Retail essentials is a retail-centric configuration option for Microsoft Dynamics AX Retail essentials provides a simplified streamlined user experience that is optimized for organizations that use only the retail management functions of Microsoft Dynamics AX
Important
To install Retail essentials you must slipstream Microsoft Dynamics AX 2012 R3
Vijay Sharma-Software Consultant Page 2
Cumulative Update 8
Install Retail essentials at headquarters Install Retail essentials at the store or at the point of sale
Install Retail Headquarters The Retail Headquarters component installs runtime components that are required to enable key aspects of Retail functionality such as the screen layout designer This component must be installed on the Application Object Server (AOS) computer and on Microsoft Dynamics AX client computers Before you install Retail Headquarters
On the computer where you plan to install this component run the prerequisite validation utility to verify that system requirements have been met For information about how to run the prerequisite validation utility see Check prerequisites For more information about the hardware and software requirements for Microsoft Dynamics AX see the system requirements
Before you install Retail Headquarters we recommend that you install the AOS Microsoft Dynamics AX clients and the Microsoft Dynamics AX databases with all required models
Install Retail Headquarters Use this procedure to install Retail Headquarters If you install other Microsoft Dynamics AX components at the same time the installation pages vary depending on the components that you are installing
1 Start Microsoft Dynamics AX Setup Under Install select Microsoft Dynamics AX components
2 Advance through the first wizard pages 3 On the Modify Microsoft Dynamics AX installation page click Add or
modify components and then click Next 4 On the Add or modify components page select Retail headquarters and
then click Next 5 On the Prerequisite validation results page resolve any errors For more
information about how to resolve prerequisite errors see Check prerequisites When no errors remain click Next
6 On the Ready to install page click Install 7 After the installation is completed click Finish to close the wizard
After you install Retail Headquarters After you install the Retail Headquarters component on AOS computers and Microsoft Dynamics AX client computers you must initialize the retail configuration
1 Open the Microsoft Dynamics AX client 2 Click Retail gt Setup gt Parameters gt Retail parameters 3 Click Initialize 4 Close the Microsoft Dynamics AX client 5 In Windows open the Services control panel 6 Restart the Microsoft Dynamics AX Object Server service
Vijay Sharma-Software Consultant Page 3
Install Commerce Data Exchange Real-time Service (Retail Transaction Service) This topic explains how to install Commerce Data Exchange Real-time Service Real-time Service is an integrated service that provides real-time communication between Microsoft Dynamics AX and retail channels Real-time Service enables individual point of sale (POS) computers and online stores to retrieve specific data from Microsoft Dynamics AX in real time At the head office install Real-time Service on the communications server Deployment steps vary depending on the version that you are installing
In AX 2012 R3 and AX 2012 R2 Real-time Service is a Windows Communication Foundation (WCF) service that must be installed on a website in Internet Information Services (IIS)
In AX 2012 Feature Pack Real-time Service is a Windows service that is called Retail Transaction Service
When you install this component the Retail Salt Utility is also installed The Retail Salt Utility provides extra encryption for the passwords and credentials that are associated with the Retail system The following sections are included in this topic
Before you install Real-time Service Install Real-time Service by using Setup (AX 2012 R3) Install Real-time Service by using Windows PowerShell (AX 2012 R3) Install Real-time Service (AX 2012 Feature Pack or AX 2012 R2) Deploy Real-time Service (required for AX 2012 R2 only) After you install and deploy Real-time Service
Before you install Real-time Service Create the service account that will be used as the application pool identity for
the Real-time Service website In AX 2012 Feature Pack this account is used as the identity for the Windows service For more information about the requirements for this account see Create service accounts
Because this component uses Secure Sockets Layer (SSL) encryption you must install a server certificate that was issued by a trusted certification authority (For test environments you can create a self-signed certificate in IIS) When you run Setup you will need to enter the thumbprint for the certificate To view the thumbprint in IIS Manager double-click the certificate and click the Details tab
On the computer where you plan to install this component run the prerequisite validation utility to verify that system requirements have been met For information about how to run the prerequisite validation utility see Check prerequisites For more information about the hardware and software requirements for Microsoft Dynamics AX see the system requirements
Real-time Service requires NET Business Connector The NET Business Connector enables Real-time Service to interact with instances of Microsoft Dynamics AX Application Object Server (AOS) If NET Business Connector is not already installed it is selected automatically when you select to install Real-time Service
Vijay Sharma-Software Consultant Page 4
Install Real-time Service by using Setup (AX 2012 R3) Use this procedure to install Real-time Service for AX 2012 R3 If you install other Microsoft Dynamics AX components at the same time the installation pages vary depending on the components that you are installing To deploy Real-time Service on multiple computers in a cluster you can run Setup on each computer Alternatively you can use the Retail mass deployment toolkit to deploy Real-time Service from a central location For information about how to set up an IIS cluster see the Network Load Balancing Deployment Guide For more information about mass deployment see Mass deploy Retail components by using System Center Configuration Manager
1 Start Microsoft Dynamics AX Setup Under Install select Microsoft Dynamics AX components
2 Advance through the first wizard pages 3 If the Setup Support files have not yet been installed on this computer
the Select a file location page is displayed The Setup Support files are required for installation Provide a file location or accept the default location and then click Next On the Ready to install page click Install
4 On the Select an installation option page click Microsoft Dynamics AX and then click Next
5 On the Select installation type page click Custom installation and then click Next
6 On the Select components page select Real-time Service and then click Next
7 On the Prerequisite validation results page resolve any errors For more information about how to resolve prerequisite errors see Check prerequisites When no errors remain click Next
8 If you are installing on a 64-bit operating system the Select a file location page is displayed Select the location in which to install 32-bit versions of Microsoft Dynamics AX files and then click Next
9 On the Select a display language page select the language in which to run Microsoft Dynamics AX for the first time
Note
NET Business Connector is a kind of Microsoft Dynamics AX client Therefore if NET Business Connector is the first client that you install on a computer Setup requires that you set the display language
10 On the Specify a location for configuration settings page specify whether you want NET Business Connector to access configuration information from the registry on the local computer or from a shared configuration file If you want to use a shared configuration file you must enter the network location of the file Click Next
11 On the Connect to AOS instance page enter the name of the computer that runs the instance of AOS to connect to You can optionally specify the name of the AOS instance and the TCPIP port number Click Next
Vijay Sharma-Software Consultant Page 5
Note
If you entered information about the AOS connection for other Microsoft Dynamics AX components that are installed on this computer this page is not displayed Subsequent installations on the same computer reuse the existing AOS connection
12 On the Specify Business Connector proxy account information page enter the password for the proxy account that is used by NET Business Connector Click Next
13 On the Configure Real-time Service page select the check box to configure Real-time Service by using Setup If you clear this check box the application files are installed but Real-time Service is not configured If yoursquore configuring Real-time Service enter the following information
o Application name ndash The name of the web application that hosts Real-time Service
o Website name ndash The name of the website that hosts Real-time Service
o App pool name ndash The name of the application pool that Real-time Service runs in We recommend that you specify separate application pools if multiple Retail components are installed on the same computer Multiple web applications can share an application pool if resources on the computer are limited However if the shared application pool fails all of the applications that use it will stop responding In addition if one application is heavily used it can negatively affect the performance of the other applications in the pool
o User name and Password ndash The credentials for the application pool identity
o HTTPS port ndash The port on which Real-time Service receives secure HTTP requests You can specify any available port Verify that the port is open in Windows Firewall
Caution
To avoid conflicts with the Default Web Site on the computer we recommend that you do not use the default HTTPS port (443) A nonstandard port number also helps make the website more secure
o TCP port ndash The port on which Real-time Service receives TCP requests You can specify any available port Verify that the port is open in Windows Firewall
o SSL certificate thumbprint ndash The thumbprint for your Secure Sockets Layer (SSL) encryption certificate You must obtain a valid registered certificate from a provider
Vijay Sharma-Software Consultant Page 6
14 On the Prerequisite validation results page resolve any errors For more information about how to resolve prerequisite errors see Check prerequisites When no errors remain click Next
15 On the Ready to install page click Install 16 After the installation is completed click Finish to close the wizard
Set up a Real-time Service profile By setting up a profile for Commerce Data Exchange Real-time Service you enable a point of sale (POS) device or a store to retrieve or update real-time data from Microsoft Dynamics AX Real-time Service acts as an agent for a device or a store The POS device and the store never access the remote AOS instance itself In Microsoft Dynamics AX 2012 R2 and Microsoft Dynamics AX 2012 Feature Pack Real-time Service is also used by Commerce Data Exchange Synch Service to upload status messages to Microsoft Dynamics AX The following information is included in this topic
Set up a Real-time Service profile Assign a Real-time Service profile to a retail store (AX 2012 R3) Assign a Real-time Service profile to an online store Assign a Real-time Service profile to a register (AX 2012 R2 and AX 2012
Feature Pack) Set up a Real-time Service profile
1 Click Retail gt Setup gt Retail scheduler gt Channel integration gt Real-time Service profiles
2 Select an existing profile or press CTRL+N to create a new profile 3 Enter a name and a description for the profile 4 On the Connection FastTab enter the following information
o Server ndash Enter the server name or IP address where Real-time Service is running
o Port ndash Enter the port number that the web service for Real-time Service uses A port number is associated with each communication protocol that is bound to the web site By default the port number for the nettcp protocol is 808 and the port number for the https protocol is 9081
o Protocol ndash Select the communication protocol that Real-time Service uses By default the protocol is nettcp but the https protocol is also supported To use the https protocol you must modify the webconfig file for the web site
o Web application name ndash Enter the name of the web application that hosts Real-time Service
o Common name ndash Enter the common name for the certificate that is used to establish an encrypted channel with Real-time Service To find the common name right-click the server certificate in IIS Manager and choose View The common name for the certificate is
Vijay Sharma-Software Consultant Page 7
displayed on the Details tab in the Subject field This is usually the name of the domain for which the certificate was issued If yoursquore using a self-signed certificate the common name is usually the name of the computer for which the certificate was issued
o Passphrase ndash Enter the passphrase that is used to authenticate the connection
o Language ndash Select the language that will be used for error messages You do not have to select the same language as the AOS uses However you must select a language for which you have a Microsoft Dynamics AX license
o Real-time Service version ndash If the service has a different release version than Microsoft Dynamics AX select the version of this instance of the service
5 On the Settings FastTab select the Commerce Data Exchange Real-time Service staff check box to enable the POS system to validate the operator logon through the service
Assign a Real-time Service profile to a retail store (AX 2012 R3) So that point of sale devices can retrieve or update information from Microsoft Dynamics AX in real time you must assign each retail store a Real-time Service profile
Note
The following procedure applies only to AX 2012 R3
For more information about how to set up a retail store see Set up a retail store
1 Click Retail gt Common gt Retail channels gt Retail stores 2 Double-click the store to modify and then click the Maintain button 3 In the Stores form click the General FastTab 4 Under Profiles in the Real-time Service profile field select the appropriate
Real-time Service profile 5 To synchronize profile settings with the channel database run the predefined
1070 job or run the job that you have set up to synchronize store data Assign a Real-time Service profile to an online store So that online stores can retrieve or update information from Microsoft Dynamics AX in real time you must assign each online store a Real-time Service profile For more information about how to set up an online store see Set up an online store
1 Click Retail gt Common gt Retail channels gt Online stores 2 Double-click the online store to modify and then click the Maintain button 3 In the Online store form click the General FastTab 4 Under Profiles in the Real-time Service profile field select the appropriate
Real-time Service profile 5 To synchronize profile settings with the channel database in Microsoft
Dynamics AX 2012 R3 run the predefined 1070 job or run the job that you have set up to synchronize online channel data
Vijay Sharma-Software Consultant Page 8
To synchronize profile settings with the channel database in Microsoft Dynamics AX 2012 R2 run the predefined A-1075_OC job or run the job that you have set up to synchronize online channel data
Assign a Real-time Service profile to a register (AX 2012 R2 and AX 2012 Feature Pack) So that POS registers can retrieve or update information from Microsoft Dynamics AX in real time you must assign each POS register a Real-time Service profile
Note
The following procedure applies only to AX 2012 R2 and AX 2012 Feature Pack
For more information about how to set up a POS register see Set up registers
1 Click Retail gt Setup gt POS gt POS registers 2 Double-click the register to modify and then click the Maintain button 3 In the POS registers form click the General FastTab 4 Under Profiles in the Real-time Service profile field select the appropriate
Real-time Service profile 5 To synchronize profile settings with the channel database run the predefined
A-1090 job or run the job that you have set up to synchronize register data Install Commerce Data Exchange Async Server Commerce Data Exchange Async Server is part of the asynchronous system that shares data between the Microsoft Dynamics AX database and channel databases Async Server is installed at headquarters and communicates with Microsoft Dynamics AX In addition to Async Server Commerce Data Exchange includes Commerce Data Exchange Async Client which is installed at channels and communicates with the channel database When you install Async Server the Retail Salt Utility is also installed The Retail Salt Utility provides extra encryption for the passwords and credentials that are associated with the Microsoft Dynamics AX 2012 for Retail system To deploy Async Server on multiple computers in a cluster you can run Setup on each computer Alternatively you can use the Retail mass deployment toolkit to deploy Async Server from a central location For information about how to set up an Internet Information Services (IIS) cluster see the Network Load Balancing Deployment Guide For information about how to use the mass deployment toolkit see Mass deploy Retail components by using System Center Configuration Manager The following sections are included in this topic
Before you install Async Server Install Async Server by using Setup Install Async Server by using Windows PowerShell After you install AsyncServer
Vijay Sharma-Software Consultant Page 9
Before you install Async Server
Determine how many instances of Async Server you want to install and on which computers In a basic deployment of Retail one instance of Async Server is installed at headquarters Operations in a large organization might scale more efficiently if you install multiple Async Server instances either on a single server or on multiple servers For more information see Deployment topologies for Retail
Caution
Although a single instance of Async Server can manage all communications for the organization excessive load or network latency might decrease performance
Select a service account to run the application pool for Async Server For information about the requirements for this account see Create service accounts
Because this component uses Secure Sockets Layer (SSL) encryption you must install a server certificate that was issued by a trusted certification authority (For test environments you can create a self-signed certificate in IIS) When you run Setup you will need to enter the thumbprint for the certificate To view the thumbprint in IIS Manager double-click the certificate and click the Details tab If you deploy Async Server with a self-signed certificate this certificate must be trusted by the computer running the corresponding Async Client component
On the computer where you plan to install this component run the prerequisite validation utility to verify that system requirements have been met For information about how to run the prerequisite validation utility see Check prerequisites For more information about the hardware and software requirements for Microsoft Dynamics AX see the system requirements
The SQLCMD utility is required to install Async Server This utility is typically installed with Microsoft SQL Server If a version of SQL Server is not installed on the computer where you install Async Server you can download and install Microsoft Command Line Utilities 11 for SQL Server to meet this requirement
Vijay Sharma-Software Consultant Page 10
Install Async Server by using Setup Use this procedure to install Async Server by using the Setup wizard If you install other Microsoft Dynamics AX components at the same time the installation pages vary depending on the components that you are installing
1 Start Microsoft Dynamics AX Setup Under Install select Microsoft Dynamics AX components
2 Advance through the first wizard pages 3 If the Setup Support files have not yet been installed on this computer
the Select a file location page is displayed The Setup Support files are required for installation Provide a file location or accept the default location and then click Next On the Ready to install page click Install
4 On the Select an installation option page click Microsoft Dynamics AX 5 On the Select installation type page click Custom installation and then
click Next 6 On the Select components page select Async Server and then click Next 7 On the Prerequisite validation results page resolve any errors For more
information about how to resolve prerequisite errors see Check prerequisites When no errors remain click Next
8 On the Configure Async Server page select the check box to configure Async Server by using Setup If you clear this check box the application files are installed but Async Server is not configured If yoursquore configuring Async Server enter the following information
o Application name ndash The name of the web application that hosts Async Server
o App pool name ndash The name of the application pool that the web application runs under We recommend that you specify separate application pools if multiple Retail components are installed on the same computer Multiple web applications can share an application pool if resources on the computer are limited However if the shared application pool fails all of the applications that use it will stop responding In addition if one application is heavily used it can negatively affect the performance of the other applications in the pool
o Website name ndash The name of the website that Async Server runs on o User name and Passwordndash The credentials for the application pool
identity o HTTPS port ndash The port on which Async Server receives HTTPS
requests You can specify any available port Verify that the port is open in Windows Firewall and record the port number The port is used to create the URL for Async Server in the following format httpsltserver namegtportltweb application namegt This URL is required when you configure instances of Async Client that connect to this instance of Async Server
Vijay Sharma-Software Consultant Page 11
Caution
To avoid conflicts with the Default Web Site on the computer we recommend that you do not use the default HTTPS port (443) A nonstandard port number also helps make the website more secure
o TCP port (optional) ndash The port on which Async Server receives TCP requests Specify a TCP port if your environment uses high-performance data synchronization You can specify any available port Verify that the port is open in Windows Firewall
o AOS service user ndash The user account that the instance of Microsoft Dynamics AX Application Object Server (AOS) runs as
o SSL certificate thumbprint ndash The thumbprint for the Secure Sockets Layer (SSL) encryption certificate You must obtain a valid registered certificate from a provider
9 On the Select a database to use with Async Server page create a new
message database for Async Server If you install a subsequent instance of Async Server for load balancing you must select the same message database
Note
You must set up a separate message database for each partition in Microsoft Dynamics AX
10 On the Prerequisite validation results page resolve any errors For more information about how to resolve prerequisite errors see Check prerequisites When no errors remain click Next
11 On the Ready to install page click Install 12 After the installation is completed click Finish to close the wizard
After you install Async Server After you install Async Server you must complete the following tasks
Set message database information in the Retail scheduler parameters form Then click the Sync metadata button For more information see Enter parameters for Retail Scheduler
Create a scheduler profile for Async Server For more information see Set up a profile for Async Server
Set up working folders For more information see Specify working folders for Commerce Data Exchange
Vijay Sharma-Software Consultant Page 12
Install Commerce Data Exchange Async Client
Commerce Data Exchange Async Client is part of the asynchronous system that shares data between the Microsoft Dynamics AX database and channel databases Async Client is installed at the channel and communicates with the channel database In addition to Async Client Commerce Data Exchange includes Commerce Data Exchange Async Server Async Server is installed at headquarters and communicates with the Microsoft Dynamics AX database When you install Async Client the Retail Salt Utility is also installed The Retail Salt Utility provides extra encryption for the passwords and credentials that are associated with the Microsoft Dynamics AX 2012 for Retail system The Async Client Configuration Tool is also installed together with Async Client This tool lets you test connections and specify whether to use streaming The streaming option is ideal for initial high-speed data synchronization However for ongoing synchronization the non-streaming option is more reliable To deploy Async Client on multiple computers in an environment you can use the Retail mass deployment toolkit to deploy Async Client from a central location Before you install Async Client
Determine how many instances of Async Client you want to install and on which computers In a basic deployment of Retail one instance of Async Client is installed for each channel database If you want to install more than one instance of Async Client on a single computer you must run the Windows PowerShell installation scripts manually for subsequent installations Select a service account for Async Client For information about the requirements for service accounts see Create service accounts
Create the channel database that will be used with this instance of Async Client When you install a channel database the groups that have permissions on the database are created During the Async Client installation the service user is added to this group see Install a Retail channel database
On the computer where you plan to install this component run the prerequisite validation utility to verify that system requirements have been met For information about how to run the prerequisite validation utility see Check prerequisites For more information about the hardware and software requirements for Microsoft Dynamics AX see the system requirements
The SQLCMD utility is required to install Async Client This utility is typically installed with Microsoft SQL Server If a version of SQL Server is not installed on the computer where you install Async Client you can download and install Microsoft Command Line Utilities 11 for SQL Server to meet this requirement
Install Async Client by using Setup
Vijay Sharma-Software Consultant Page 13
Use this procedure to install Async Client by using the Setup wizard If you install other Microsoft Dynamics AX components at the same time the installation pages vary depending on the components that you are installing
1 Start Microsoft Dynamics AX Setup Under Install select Microsoft Dynamics AX components
2 Advance through the first wizard pages 3 If the Setup Support files have not yet been installed on this computer
the Select a file location page is displayed The Setup Support files are required for installation Provide a file location or accept the default location and then click Next On the Ready to install page click Install
4 On the Select an installation option page click Microsoft Dynamics AX 5 On the Select installation type page click Custom installation and then
click Next 6 On the Select components page select Async Client and then click Next 7 On the Prerequisite validation results page resolve any errors For more
information about how to resolve prerequisite errors see Check prerequisites When no errors remain click Next
8 On the Configure Async Client page select the check box to configure Async Client by using Setup If you clear this check box the application files are installed but Async Client is not configured If yoursquore configuring Async Client enter the following information
o Async Server URL ndash The URL for the instance of Async Server Typically the URL is in the format httpsltserver namegtportltweb application namegt If Async Server is installed in a cluster that has a load balancer enter the URL to the service on the load balancer
o Channel database ID ndash The identifier in Microsoft Dynamics AX for the channel database that is used by the selected instance of Async Client
o User name and Password (Async Server connection) ndash The credentials for the user that connects to Async Server These credentials must match the credentials that are specified in the channel database profile Credentials are case sensitive The credentials are used to identify and authenticate Async Client
o User name and Password (Async Client) ndash The credentials for the user that runs the Windows service for Async Client The user does not have to be a domain account The user can be a member of a workgroup on the local computer Credentials are case sensitive
Optionally click Test connection to verify that Async Client is configured correctly For information about how to troubleshoot errors that you might encounter seeTroubleshoot issues in Async Server or Async Client Click Next
9 On the Select or specify a database to use with Async Client page enter server and database information for the message database and the channel database that will be used by Async Client Then click Next You can connect to an existing channel database only Setup does not create a new channel database if you enter a channel database name that doesnrsquot exist If you specify a message database name that doesnrsquot exist Setup creates a new message database
Vijay Sharma-Software Consultant Page 14
10 On the Prerequisite validation results page resolve any errors For more information about how to resolve prerequisite errors see Check prerequisites When no errors remain click Next
11 On the Ready to install page click Install 12 After the installation is completed click Finish to close the wizard
After you install Async Client 1 Use the Async Client Configuration Tool to test the connections to Async
Server the channel database and the channel message database You can also use the utility to set advanced options For more information see Configure settings for Async Client
2 After you have determined that all connections are working run the distribution schedule that sends data to each channel database Click Retail gt Setup gt Retail scheduler gt Channel integration gt Channel database Click Full data sync and then select the Full sync distribution schedule
Install a Retail channel database
This topic explains how to create a retail channel database by using Setup or Windows PowerShell Channel databases hold retail data for one or more retail channels such as online stores or brick-and-mortar stores Typically there is one channel database per retail store location that uses Retail POS or Modern POS or per e-commerce installation The channel database for a Retail POS is typically located at a brick-and-mortar store whereas the channel databases for Modern POS or e-commerce installations are typically located at the head office The data for a channel can be included in more than one channel database You can also use the Retail Channel Configuration Utility to create a channel database
Note
Channel databases are used only with Microsoft Dynamics AX 2012 R3 In earlier versions of Microsoft Dynamics AX the store database provided the functionality now provided by the channel database
To deploy channel databases from a central location use the Retail mass deployment toolkit together with System Center Configuration Manager Before you install a retail channel database
On the computer where you plan to install this component run the prerequisite validation utility to verify that system requirements have been met For information about how to run the prerequisite validation utility see Check prerequisites
Vijay Sharma-Software Consultant Page 15
Note
Regardless of the version of Microsoft SQL Server that you are installing on the prerequisite validation utility requires that you install the SQL Server 2008 R2 version of SQL Server Shared Management Objects (SMO) From the location that is provided in the prerequisite details install the package that is appropriate for your architecture (either x86 or x64)
Make sure that Microsoft SQL Server is set up correctly for Microsoft Dynamics AX 2012 for Retail databases For more information see Configure SQL Server for the Retail databases
We recommend that you install Commerce Data Exchange Async Server and Commerce Data Exchange Real-time Service in the environment before you install channel databases
Install a retail channel database by using Setup Use this procedure to install a retail channel database by using the Setup wizard If you install other Microsoft Dynamics AX components at the same time the installation pages vary depending on the components that you are installing
1 Start Microsoft Dynamics AX Setup Under Install select Microsoft Dynamics AX components
2 Advance through the first wizard pages 3 If the Setup Support files have not yet been installed on this computer
the Select a file location page is displayed The Setup Support files are required for installation Provide a file location or accept the default location and then click Next On the Ready to install page click Install
4 On the Select an installation option page click Microsoft Dynamics AX 5 On the Select installation type page click Custom installation and then
click Next 6 On the Select components page select Retail channel database and then
click Next 7 On the Prerequisite validation results page resolve any errors For more
information about how to resolve prerequisite errors see Check prerequisites When no errors remain click Next
8 On the Create a channel database page select the Configure Retail Channel database option to configure a channel database by using Setup If you clear this option the application files are installed but a channel database is not configured If yoursquore configuring a channel database enter the name of the server on which to create the database and the name of the database
Note
Vijay Sharma-Software Consultant Page 16
If yoursquore using a named instance of SQL Server enter the server name in the format ServerNameInstanceName
9 On the Prerequisite validation results page resolve any errors For more information about how to resolve prerequisite errors see Check prerequisites When no errors remain click Next
10 On the Ready to install page click Install 11 After the installation is completed click Finish to close the wizard
After you install a retail channel database After you install a channel database you must complete the following tasks
Set up a Retail scheduler profile for the database For more information see Set up a channel database profile
On each register where you install Retail POS configure Retail POS to use the channel database by using the Retail Channel Configuration Utility For more information see Configure database connections for a POS register by using the Retail Channel Configuration Utility
Optional Add the database to a data group For more information see Create a channel data group
Set up a channel database profile
A channel database profile provides the information that enables Microsoft Dynamics AX to communicate with a retail channel database
Note
The information in this topic applies only if you are using Microsoft Dynamics AX 2012 R3
1 Click Retail gt Setup gt Retail scheduler gt Channel integration gt Channel database
2 Click New to create a new channel database profile 3 Enter the following information
o Channel database ID ndash Type a name for the profile o Channel data group ndash Select a channel data group for the database
When you run a distribution schedule a data package is generated for each data group All channel databases in a data group subscribe to the same data A data group can contain one or more databases but a database can belong to only one data group
o User name and Password ndash Enter the user name and password that Async Client uses to communicate with Async Server The user name is case-sensitive You must use a unique user name for each channel database profile The user name and password that you enter are created and used only for the channel database profile The user is not
Vijay Sharma-Software Consultant Page 17
required to exist in Microsoft Dynamics AX in Active Directory or on the local operating system
o Async Server profile ndash Select the Async Server profile to use with the database
4 On the Retail channel FastTab click Add to select the channels that use this database
5 If you are using features that require Retail Server such as Modern POS enter channel database information in the Retail Server FastTab Enter the name of the server that hosts the channel database and enter the name of the channel database
6 If you are using Synch Service for compatibility with an earlier version of Retail POS the Synch Service FastTab is displayed For more information about how to use earlier versions of Retail POS see the Support for Previous POS Versions white paper
7 To synchronize all data for the channel database click Full data sync and then select the distribution schedule that is named Full sync
Configure database connections for a POS register by using the Retail Channel Configuration Utility
The Retail Channel Configuration Utility (formerly named Retail Store Database Utility) can be used to configure database connections for a point of sale (POS) or Retail Modern POS register This utility can also be used to install both a channel database and a POS register on the same computer so that the database and register can be used in a development environment You must install the Retail Channel Configuration Utility on each computer where you want to use it Use the Setup wizard for Microsoft Dynamics AX to install the utility For more information see Install the Retail Channel Configuration Utility (Retail Store Database Utility) The procedures in this topic assume that you have installed a supported version of Microsoft SQL Server on the computer where you plan to run the Retail Channel Configuration Utility For a list of operating systems and SQL Server versions that are supported see the Microsoft Dynamics AX system requirements The Retail Channel Configuration Utility can also be used to install a channel database on a shared database server or an offline database on a POS computer For more information see Create a channel database or an offline database (AX 2012 R3) or Create a store database or an offline database (AX 2012 R2 and AX 2012 Feature Pack) Configure a database connection for a POS register (AX 2012 R3) Complete the following procedure to configure the channel database connection for a POS register To log on to Microsoft Dynamics AX for Retail POS the register must have access to the channel database For information about additional parameters for POS registers see Set up registers
1 On a POS computer start the Retail Channel Configuration Utility 2 Click Configure Retail POS and Retail Offline Sync Service 3 In the Identification section of the form complete the information in the
following fields
Vijay Sharma-Software Consultant Page 18
o Store ID ndash Type the ID of the store that the POS register is associated with The store must be listed in the Retail stores form (Click Retail gt Common gt Retail channels gt Retail stores)
o Register ID ndash Type a unique ID for the POS register The POS register must be listed in the POS registers form (Click Retail gt Setup gt POS gt POS registers)
o Legal entity ndash Type the applicable company code 4 In the Channel database section of the form complete the information in the
following fields o Server name ndash Select or type the name of the server that hosts the
channel database o Database name ndash Type the name of an existing channel database
5 Optional Test the connection 6 Click Apply to configure the POS register
Configure a POS register without an offline database (AX 2012 R2) Complete the following procedure to configure the database connections for a POS register that doesnrsquot include an offline database To log on to Microsoft Dynamics AX for Retail POS the register must have access to the store database For information about additional parameters for POS registers see Set up registers
1 On a POS computer click Start gt All Programs gt Microsoft Dynamics AX gt Retail Database Utility gt Retail Database Utility to open the Retail POS configurationform
2 In the Database section of the form select Configure store database Complete the information in the following fields
o Store server name ndash Select or type the name of the server that hosts the store database
o Store database name ndash Type the name of an existing store database 3 Optional Test the connection 4 In the Database section of the form select Configure offline database 5 In the Identification section of the form complete the information in the
following fields o Store ID ndash Type the ID of the store that the POS register is associated
with The store must be listed in the Retail stores form (Click Retail gt Common gt Retail channels gt Retail stores)
o Register ID ndash Type a unique ID for the POS register The POS register must be listed in the POS registers form (Click Retail gt Setup gt POS gt POS registers)
o Data area ID ndash Type the applicable company code 6 In the Offline database section of the form leave the fields blank 7 Click Continue to configure the POS register
Configure a channel database and a POS register on a single computer You can install Retail components on a single computer for development In this case you must run the Retail Channel Configuration Utility two times in the following order to install both a channel database and a POS register
1 In AX 2012 R3 create the channel database as described in the topic Create a channel database or an offline database (AX 2012 R3) In AX 2012 R2 create the store database as described in the topic Create a store database or an offline database (AX 2012 R2 and AX 2012 Feature Pack)
2 Configure the POS register as described earlier in this topic
Vijay Sharma-Software Consultant Page 19
Install Retail POS Retail POS is a component that is required for the day-to-day operation of Retail at a store When you install the Retail POS component the Retail Salt Utility is also installed The Retail Salt Utility provides extra encryption for the passwords and credentials that are associated with the Retail system At the store install this component on each register computer If you plan to use a stand-alone database server at the store you must also install Retail POS on the database server even if Retail POS will not be used on that computer This step is required to set up the database Additionally install Retail POS on a communications server if that computer will also be used to process transactions In AX 2012 R3 you can use the Retail mass deployment toolkit to deploy Retail POS to a large number of client computers For more information see Mass deploy Retail components by using System Center Configuration Manager Before you install Retail POS
On the computer where you plan to install this component run the prerequisite validation utility to verify that system requirements have been met For information about how to run the prerequisite validation utility see Check prerequisites For more information about the hardware and software requirements for Microsoft Dynamics AX see the system requirements
Important
Install Microsoft Sync Framework hotfix 2703853 on all computers on which you install the Retail POS This hotfix can prevent potential data loss when synchronizing Retail offline databases with the channel database
Install Retail POS Use this procedure to install Retail POS If you install other Microsoft Dynamics AX components at the same time the installation pages vary depending on the components that you are installing
1 Start Microsoft Dynamics AX Setup Under Install select Microsoft Dynamics AX components
2 Advance through the first wizard pages 3 If the Setup Support files have not yet been installed on this computer
the Select a file location page is displayed The Setup Support files are required for installation Provide a file location or accept the default location and then click Next On the Ready to install page click Install
4 If yoursquore installing AX 2012 R3 in the Select an installation option page click Microsoft Dynamics AX
Vijay Sharma-Software Consultant Page 20
5 On the Select installation type page click Custom installation and then click Next
6 On the Select components page select Retail POS and then click Next 7 On the Prerequisite validation results page resolve any errors For more
information about how to resolve prerequisite errors see Check prerequisites When no errors remain click Next
8 On the Ready to install page click Install 9 After the installation is completed click Finish to close the wizard
After you install Retail POS 1 If an offline database is required create and configure the offline database for
each POS register by using the Retail Channel Configuration Utility For more information see Create a channel database or an offline database (AX 2012 R3) or Create a store database or an offline database (AX 2012 R2 and AX 2012 Feature Pack)
2 Configure Retail POS database connections by using the Retail Channel Configuration Utility For more information see Configure database connections for a POS register by using the Retail Channel Configuration Utility
3 Configure Retail POS for your business For more information see Point of Sale
Configure database connections for a POS register by using the Retail Channel Configuration Utility [AX 2012] The Retail Channel Configuration Utility (formerly named Retail Store Database Utility) can be used to configure database connections for a point of sale (POS) or Retail Modern POS register This utility can also be used to install both a channel database and a POS register on the same computer so that the database and register can be used in a development environment You must install the Retail Channel Configuration Utility on each computer where you want to use it Use the Setup wizard for Microsoft Dynamics AX to install the utility For more information see Install the Retail Channel Configuration Utility (Retail Store Database Utility) The procedures in this topic assume that you have installed a supported version of Microsoft SQL Server on the computer where you plan to run the Retail Channel Configuration Utility For a list of operating systems and SQL Server versions that are supported see the Microsoft Dynamics AX system requirements The Retail Channel Configuration Utility can also be used to install a channel database on a shared database server or an offline database on a POS computer For more information see Create a channel database or an offline database (AX 2012 R3) or Create a store database or an offline database (AX 2012 R2 and AX 2012 Feature Pack) Configure a database connection for a POS register (AX 2012 R3) Complete the following procedure to configure the channel database connection for a POS register To log on to Microsoft Dynamics AX for Retail POS the register must have access to the channel database For information about additional parameters for POS registers see Set up registers
1 On a POS computer start the Retail Channel Configuration Utility 2 Click Configure Retail POS and Retail Offline Sync Service
Vijay Sharma-Software Consultant Page 21
3 In the Identification section of the form complete the information in the following fields
o Store ID ndash Type the ID of the store that the POS register is associated with The store must be listed in the Retail stores form (Click Retail gt Common gt Retail channels gt Retail stores)
o Register ID ndash Type a unique ID for the POS register The POS register must be listed in the POS registers form (Click Retail gt Setup gt POS gt POS registers)
o Legal entity ndash Type the applicable company code 4 In the Channel database section of the form complete the information in the
following fields o Server name ndash Select or type the name of the server that hosts the
channel database o Database name ndash Type the name of an existing channel database
5 Optional Test the connection 6 Click Apply to configure the POS register
Configure a POS register without an offline database (AX 2012 R2) Complete the following procedure to configure the database connections for a POS register that doesnrsquot include an offline database To log on to Microsoft Dynamics AX for Retail POS the register must have access to the store database For information about additional parameters for POS registers see Set up registers
1 On a POS computer click Start gt All Programs gt Microsoft Dynamics AX gt Retail Database Utility gt Retail Database Utility to open the Retail POS configurationform
2 In the Database section of the form select Configure store database Complete the information in the following fields
o Store server name ndash Select or type the name of the server that hosts the store database
o Store database name ndash Type the name of an existing store database 3 Optional Test the connection 4 In the Database section of the form select Configure offline database 5 In the Identification section of the form complete the information in the
following fields o Store ID ndash Type the ID of the store that the POS register is associated
with The store must be listed in the Retail stores form (Click Retail gt Common gt Retail channels gt Retail stores)
o Register ID ndash Type a unique ID for the POS register The POS register must be listed in the POS registers form (Click Retail gt Setup gt POS gt POS registers)
o Data area ID ndash Type the applicable company code 6 In the Offline database section of the form leave the fields blank 7 Click Continue to configure the POS register
Configure a channel database and a POS register on a single computer You can install Retail components on a single computer for development In this case you must run the Retail Channel Configuration Utility two times in the following order to install both a channel database and a POS register
1 In AX 2012 R3 create the channel database as described in the topic Create a channel database or an offline database (AX 2012 R3) In AX 2012 R2
Vijay Sharma-Software Consultant Page 22
create the store database as described in the topic Create a store database or an offline database (AX 2012 R2 and AX 2012 Feature Pack)
2 Configure the POS register as described earlier in this topic Install the Retail Channel Configuration Utility (Retail Store Database Utility) Install the Retail Channel Configuration Utility on computers where you must create a channel database or configure a Retail POS connection to a channel database A channel database may be created either on a stand-alone database server or on a POS computer This topic explains how to install the Retail Channel Configuration Utility by using the Setup wizard
Note
Retail components are available only with Microsoft Dynamics AX 2012 R3 AX 2012 R2 and AX 2012 Feature Pack In AX 2012 R2 and AX 2012 Feature Pack Retail Channel Configuration Utility was called Retail Store Database Utility
The Retail Channel Configuration Utility can be used to complete the following tasks
Configure Retail POS and Offline Sync Service Create a channel database Create or re-provision an offline database
Before you install the Retail Channel Configuration Utility On the computer where you plan to install this component run the
prerequisite validation utility to verify that system requirements have been met For information about how to run the prerequisite validation utility see Check prerequisites For more information about the hardware and software requirements for Microsoft Dynamics AX see the system requirements
Install Microsoft Sync Framework hotfix 2703853 on all computers on which you install Retail POS or Retail Modern POS
Important
This hotfix can prevent potential data loss when synchronizing Retail offline databases with the channel database
Install the Retail Channel Configuration Utility (AX 2012 R3)
Vijay Sharma-Software Consultant Page 23
Use this procedure to install the Retail Channel Configuration Utility for AX 2012 R3 If you install other Microsoft Dynamics AX components at the same time the installation pages vary depending on the components that you are installing
1 Start Microsoft Dynamics AX Setup Under Install select Microsoft Dynamics AX components
2 Advance through the first wizard pages 3 If the Setup Support files have not yet been installed on this computer
the Select a file location page is displayed The Setup Support files are required for installation Provide a file location or accept the default location and then click Next On the Ready to install page click Install
4 On the Select an installation option page click Microsoft Dynamics AX and then click Next
5 On the Select installation type page click Custom installation and then click Next
6 On the Select components page select Retail Channel Configuration Utility and then click Next
7 On the Prerequisite validation results page resolve any errors For more information about how to resolve prerequisite errors see Check prerequisites When no errors remain click Next
8 On the Ready to install page click Install 9 After the installation is completed click Finish to close the wizard
Install the Retail Store Database Utility (AX 2012 Feature Pack and AX 2012 R2) Use this procedure to install the Retail Store Database Utility for AX 2012 Feature Pack or AX 2012 R2 If you install other Microsoft Dynamics AX components at the same time the installation pages vary depending on the components that you are installing
1 Start Microsoft Dynamics AX Setup Under Install select Microsoft Dynamics AX components
2 Advance through the first wizard pages 3 If the Setup Support files have not yet been installed on this computer
the Select a file location page is displayed The Setup Support files are required for installation Provide a file location or accept the default location and then click Next On the Ready to install page click Install
4 On the Select installation type page click Custom installation and then click Next
5 On the Select components page select Retail Store Database Utility and then click Next
6 On the Prerequisite validation results page resolve any errors For more information about how to resolve prerequisite errors see Check prerequisites When no errors remain click Next
7 On the Configure Retail store databases and POS page select the check box if you want to create store databases and associate them with a POS system
o To create a store database enter the name of the server where you want to create the database and then enter a name for the new database When creating a shared store database do not enter anything in the Offline database name or Offline server name fields After you have created the shared store database you can open the Retail Store
Vijay Sharma-Software Consultant Page 24
Database Utility to designate this database as an offline database but you cannot perform both actions at the same time
o To create an offline database enter the name of the server where you want to create the database and then enter a name for the new database
o Enter POS identification information
Important
Dummy values are required in the Identification fields because of a known issue
o In the Store ID field type the ID of the store that the POS terminal is associated with The store record does not need to be created before you complete this step However the ID must match later when the record is created and the profile is linked
o In the Terminal ID field type a unique ID for the POS terminal The terminal ID that you enter must be listed in the POS terminals form
o In the Company field type the applicable company code 8 On the Prerequisite validation results page resolve any errors For more
information about how to resolve prerequisite errors see Check prerequisites When no errors remain click Next
9 On the Ready to install page click Install 10 After the installation is completed click Finish to close the wizard
After you install the Retail Channel Configuration Utility For information about how to use the Retail Channel Configuration Utility see the following topics
Create a channel database or an offline database (AX 2012 R3) Create a store database or an offline database (AX 2012 R2 and AX 2012
Feature Pack) Configure database connections for a POS register by using the Retail
Channel Configuration Utility Install Retail Modern POS
Retail Modern POS is a point of sale application designed for Windows 81 computers laptops and more It is touchscreen ready and low on overhead while providing the full functionality of an integrated interface with Retail This section includes the information about how to install and configure Retail Modern POS
Important
Vijay Sharma-Software Consultant Page 25
The RTM release of Modern POS was delivered in Microsoft Dynamics AX 2012 R3 Cumulative Update 8 If you installed a pre-release copy of Modern POS you must uninstall the pre-release application prior to installing the RTM application that is included in AX 2012 R3 CU8
Before you install Retail Modern POS
If you installed a pre-release copy of Modern POS you must completely uninstall the pre-release application prior to installing the RTM application that is included in AX 2012 R3 CU8
Retail Modern POS clients must be able to connect to a computer that is running Microsoft Dynamics AX Retail Server or to a channel database Requirements for connecting through a Retail Server include
o Verify that Retail Server is installed on a computer at the head office o Locate the URL for your Retail Server installation You must specify
this URL Setup for device activation By default the URL is in the format httpsltserver namegtportltname of web applicationgtv1 as it will be required for device activation
Important
Install Microsoft Sync Framework hotfix 2703853 on all computers on which you install the Retail Modern POS This hotfix can prevent potential data loss when synchronizing Retail offline databases with the channel database
In AX 2012 R3 CU8 set up a register and a device to represent the Modern POS computer or device For more information see Setting up Retail Modern POS Be sure to select a Modern POS Windows 8 layout for the register and a Windows 8 client or Windows 8 phone device type
You do not have to install Retail Modern POS in a domain You can install it as part of a work group on a single computer
Verify that WinJS and VCLibs libraries are installed on the device where you want to install this component For more information see Manually install Retail Modern POS prerequisites
Install Retail Modern POS Use this procedure to install the default Microsoft Dynamics AX Retail Modern POS app on a supported device If you install other Microsoft Dynamics AX components at the same time the installation pages vary depending on the components that you are installing For information about how to install a customized Retail Modern POS app on a supported device see the next section in this topic
Vijay Sharma-Software Consultant Page 26
Note
If you installed a pre-release copy of Modern POS you must completely uninstall the pre-release application prior to installing the RTM application that is included in AX 2012 R3 CU8
1 Start Microsoft Dynamics AX Setup Under Install select Microsoft Dynamics AX components
2 Advance through the first wizard pages 3 If the Setup Support files have not yet been installed on this computer
the Select a file location page is displayed The Setup Support files are required for installation Provide a file location or accept the default location and then click Next On the Ready to install page click Install
4 On the Select components page select Retail Retail Modern POS and then click Next
5 On the Prerequisite validation results page resolve any errors For more information about how to resolve prerequisite errors see Check prerequisites When no errors remain click Next
6 After the installation is completed click Finish to close the wizard
Note
If you install Retail Modern POS on a Windows 81 Professional or non-domain joined computer Setup might prompt you to provide an enterprise side-loading key This key is included with your Enterprise Volume License
Install a customized Retail Modern POS app on a computer The Retail SDK includes source samples and tools to help you customize the Retail Modern POS app for Windows 81 If you customize a Retail Modern POS app then you must use on the following methods to side-load it to supported devices
Windows Intune System Center Configuration Manager A third-party mobile device management service Create a custom installer to deploy the app Install the app by using Windows PowerShell scripts
For more information about customizing and installing a customized Retail Modern POS app see Retail Modern Point of Sale in the Retail Modern POS documentation roadmap After you install Retail Modern POS Start the Microsoft Dynamics AX Retail Modern POS app In the Device Activation page enter information about the register and device for the Windows
Vijay Sharma-Software Consultant Page 27
81 computer or device and credentials for a manager of the store that the register is associated with If you are connecting through Retail Server enter its URL If you encounter connectivity issues after installing see the topic Troubleshoot connectivity problems for Retail Modern POS devices Uninstall Retail Modern POS You can uninstall Retail Modern POS either by running AxSetupexe and selecting the component for removal or by uninstalling it from Add or Remove Programs
Note
If multiple Windows users have been using an installation of Retail Modern POS we recommend that you start with a reimaged computer whenever possible Alternatively you must explicitly remove the application for every user that logged in to the computer Do this by right-clicking the application on the Start screen When that is complete you can remove the installer from Add or Remove Programs
Install Retail Server Retail Server provides services and business logic for Retail Modern POS (point of sale) clients To deploy Retail Server on multiple computers in a cluster you can run Setup on each computer or you can manually copy the web application to each computer Alternatively you can use Retail mass deployment toolkit with System Center Configuration Manager to deploy Retail Server from a central location For more information see Mass deploy Retail components by using System Center Configuration Manager This topic includes the following sections
Before you install Retail Server Install Retail Server by using Setup Install Retail Server by using Windows PowerShell
Before you install Retail Server
Be aware that you do not have to install Retail Server in a domain You can install it as part of a work group on a single computer
Create a service account This service account is used for the identity of the application pool for Retail Server This account does not have to be a domain account It can be a work group account For more information see Create service accounts
On the computer where you plan to install this component run the prerequisite validation utility to verify that system requirements have been met For information about how to run the prerequisite validation utility see Check prerequisites For more information about the hardware and software requirements for Microsoft Dynamics AX see the system requirements
Vijay Sharma-Software Consultant Page 28
Because this component uses Secure Sockets Layer (SSL) encryption you must install a server certificate that was issued by a trusted certification authority (For test environments you can create a self-signed certificate in IIS) When you run Setup you will need to enter the thumbprint for the certificate To view the thumbprint in IIS Manager double-click the certificate and click the Details tab
Install Retail Server by using Setup Use this procedure to install Retail Server If you install other Microsoft Dynamics AX components at the same time the installation pages vary depending on the components that you are installing
1 Start Microsoft Dynamics AX Setup Under Install select Microsoft Dynamics AX components
2 Advance through the first wizard pages 3 If the Setup Support files have not yet been installed on this computer
the Select a file location page is displayed The Setup Support files are required for installation Provide a file location or accept the default location and then click Next On the Ready to install page click Install
4 On the Select installation type page click Custom installation and then click Next
5 On the Select components page select Retail Server and then click Next 6 On the Prerequisite validation results page resolve any errors For more
information about how to resolve prerequisite errors see Check prerequisites When no errors remain click Next
7 On the Configure Retail Server page enter the following information about the web site where Retail Server will run
o Configure Retail Server ndash On the Configure Retail Server page select the check box to configure Retail Server by using Setup If you clear this option the application files are installed but Retail Server is not configured If yoursquore configuring Retail Server enter the following information
o Application name ndash The name of an existing web application in your server environment or the name of an application that you want Setup to create
o Website name ndash The name of an existing web site in your server environment or the name of a site that you want Setup to create
o App pool name ndash The name of an existing web application pool in your server environment or the name of an application pool that you want Setup to create
o User name and Password ndash The credentials for the application pool identity The user does not have to be a domain account It can be a member of a work group on the local computer
o HTTP port and HTTPS port ndash You can specify any available ports Verify that these ports are open in Windows firewall Also make a note of these port numbers The port is used to create the URL for Retail Server in the format httpsltServerNamegtPortltWebApplicationNamegt This URL is required to activate Retail Modern POS devices that connect to Retail Server
Vijay Sharma-Software Consultant Page 29
Important
We strongly recommend that you use an HTTPS port for Retail Server
Caution
To avoid conflicts with the Default Web Site on the computer we recommend that you do not use the default HTTPS port (443) A nonstandard port number also helps make the website more secure
o SSL certificate thumbprint ndash The thumbprint for your Secure Sockets Layer (SSL) encryption certificate
8 On the Select a database to use with Retail Server page select an existing database To create a new channel database you must install the Retail channel database component
9 On the Prerequisite validation results page resolve any errors For more information about how to resolve prerequisite errors see Check prerequisites When no errors remain click Next
10 On the Ready to install page click Install 11 After the installation is completed click Finish to close the wizard
After you install Retail Server You must create a channel profile and a channel database profile for Retail Server in the Microsoft Dynamics AX client For more information see Set up a channel profile and Set up a channel database profile After you create the channel and channel database profiles you can verify Retail Server configurations by opening a store in the Retail channels gt Retail stores form In the Profiles section verify that the Channel profile and the Live channel database fields display the correct channel profile values After Retail Server is deployed and configured you can deploy Microsoft Dynamics AX Retail Modern POS on supported clients For more information see Install Retail Modern POS Install Retail Hardware Station Microsoft Dynamics AX Retail Hardware Station provides services for Microsoft Dynamics AX Retail Retail Modern POS (point of sale) clients and peripherals such as printers cash drawers or payment devices that enable these devices to communicate with Microsoft Dynamics AX Retail Server This section includes the following information about how to install and configure Hardware Station
Before you begin
Vijay Sharma-Software Consultant Page 30
Install Hardware Station by using Setup Install Hardware Station by using Windows PowerShell
Before you begin
Be aware that you do not have to install Hardware Station in a domain You can install it as part of a work group on a single computer
Create a service account This service account is used for the identity of the application pool for Hardware Station This account does not have to be a domain account It can be a work group account For more information see Create service accounts
On the computer where you plan to install this component run the prerequisite validation utility to verify that system requirements have been met For information about how to run the prerequisite validation utility see Check prerequisites For more information about the hardware and software requirements for Microsoft Dynamics AX see the system requirements
Because this component uses Secure Sockets Layer (SSL) encryption you must install a server certificate that was issued by a trusted certification authority (For test environments you can create a self-signed certificate in IIS) When you run Setup you will need to enter the thumbprint for the certificate To view the thumbprint in IIS Manager double-click the certificate and click the Details tab
Install Hardware Station by using Setup Use this procedure to install Hardware Station If you install other Microsoft Dynamics AX components at the same time the installation pages vary depending on the components that you are installing
1 Start Microsoft Dynamics AX Setup Under Install select Microsoft Dynamics AX components
2 Advance through the first wizard pages 3 If the Setup Support files have not yet been installed on this computer
the Select a file location page is displayed The Setup Support files are required for installation Provide a file location or accept the default location and then click Next On the Ready to install page click Install
4 On the Select installation type page click Custom installation and then click Next
5 On the Select components page select Retail Hardware Station and then click Next
6 On the Prerequisite validation results page resolve any errors For more information about how to resolve prerequisite errors see Check prerequisites When no errors remain click Next
7 On the Configure Retail Hardware Station page enter the following information about the web site where Hardware Station will run
o Configure Hardware Station On the Configure Hardware Station page select the check box to configure Hardware Station by using Setup If you clear this option the application files are installed but Hardware Station is not configured If yoursquore configuring Hardware Station enter the following information
Vijay Sharma-Software Consultant Page 31
o Application name ndash The name of an existing web application or the name of an application that you want Setup to create
o Website name ndash The name of an existing web site or the name of a site that you want Setup to create
o App pool name ndash The name of an existing web application pool in your server environment or the name of an application pool that you want Setup to create
o User name and Password ndash The credentials for the application pool identity The user does not have to be a domain account It can be a member of a work group on the local computer
o HTTP port and HTTPS port ndash You can specify any available ports Verify that these ports are open in Windows firewall
Important
We strongly recommend that you use an HTTPS port for Hardware Station
Caution
To avoid conflicts with the Default Web Site on the computer we recommend that you do not use the default HTTPS port (443) A nonstandard port number also helps make the website more secure
o SSL certificate thumbprint ndash The thumbprint for your Secure Sockets Layer (SSL) encryption certificate
o Retail Server URL ndash The URL specified when Retail Server was installed By default the URL is created by using the following parameters httpsltFully Qualified Server NamegtPortltWebApplicationNamegtv1
8 On the Prerequisite validation results page resolve any errors For more information about how to resolve prerequisite errors see Check prerequisites When no errors remain click Next
9 On the Ready to install page click Install 10 After the installation is completed click Finish to close the wizard
After you install Hardware Station
Vijay Sharma-Software Consultant Page 32
For information about how to install Modern POS see Install Retail Modern POS To install Retail Server see Install Retail Server See also Install a Retail online store (e-commerce) This topic describes how to install a Microsoft Dynamics AX Retail online store The Retail online store is also called the Microsoft Dynamics AX e-commerce store This topic includes procedures for single server and server farm deployments You can install the online store by using Setupexe or by using Windows PowerShell scripts Both options are described in this topic After you complete the installation procedures described in this topic a starter store is deployed in your computing environment You can then configure customize and rebrand the starter store to meet your needs This topic includes the following sections
Before you begin Install the Retail online store by using Setup Deploy the Retail online store by using Windows PowerShell Next steps for developers Uninstall an online store
Before you begin You must complete the following tasks before you deploy the Microsoft Dynamics AX Retail online store
Task Details
Verify that your computing environment meets all system requirements
Verify that the SharePoint server(s) that will host the Retail online store meet the following requirements 16 GB of RAM recommended 10 GB of RAM and 4 processors minimum
Verify that the SQL server is not running SQL Express The retail online store is not supported with SQL Express
For more information about system requirements see Hardware and software requirements
Install URL Rewrite
Verify that you installed the URL Rewrite Module 20 (64-bit) on each SharePoint server
Deploy and configure SharePoint
Deploy and configure SharePoint Server 2013 Service Pack 1 or later (Enterprise edition) For more information see Overview of SharePoint 2013 installation and configuration
Download and install all cumulative updates for SharePoint Server 2013 To improve update installation times use the PowerShell script described in this MSDN blog
Verify that Microsoft Dynamics AX and all updates are
Install Microsoft Dynamics AX 2012 Apply updates and hotfixes
Vijay Sharma-Software Consultant Page 33
installed in your computing environment
Verify that Microsoft Dynamics AX Retail features are installed in your computing environment
You must install the following Retail features Retail headquarters Commerce Data Exchange components Retail SDK Retail channel database
For more information see Install retail components
Prepare the developer environment
Set up the development environment for a Retail online store
Verify that SharePoint application pools are running in IIS
Verify that all SharePoint application pools are running in IIS Manager
Important
If the SharePoint Web Services Root application pool is stopped you must start it
Verify that required SharePoint services are running
In SharePoint Central Administration click Application Management gt Service Applications gt Manage Services on Server and verify that at a minimum the following services are running
Central Administration Managed Metadata Web Service Microsoft SharePoint Foundation Workflow Timer Service Microsoft SharePoint Foundation Web Application Search Host Controller Service Search Query and Site Settings Service SharePoint Server Search
Verify role requirements
If you did not install and configure Microsoft Dynamics AX verify that you are a member of the system administrator role in Microsoft Dynamics AX
If you did not install and configure SharePoint verify that you are a member of the farm administrator role in SharePoint and that you have administrator access to each site collection in
Vijay Sharma-Software Consultant Page 34
the farm If you did not install and configure Microsoft SQL Server
Microsoft Dynamics AX or SharePoint verify that you are a member of the sysadmin role on the Microsoft Dynamics AX databases and all SharePoint databases
Create domain user accounts
Verify or create the following domain accounts You will specify these accounts when you deploy the Retail online store later in this topic
Product Catalog Web App Pool User This account must be a member of the SharePoint Farm Administrators group so that it can edit properties in the root web site This account will be specified later in this topic
StoreFront Web App Pool User This account must be a member of the SharePoint Farm Administrators group so that it can edit properties in the root web site This account will be specified later in this topic
STS Web App Pool User This account must be a member of the SharePoint Farm Administrators group so that it can edit properties in the root web site This account was specified when you installed SharePoint It is the account under which the Security Token Service application pool runs in IIS Manager
Retail Job User This account was specified when you installed SharePoint It is the account under which the SharePoint Timer Service runs
Acquire Secure Sockets Layer (SSL) certificates
Encryption settings The Retail store publishing portal uses SSL encryption For production environments you must register your domain and obtain a valid registered SSL certificate from a provider For developer and evaluation environments you can use a self-signed certificate For information about how to work with certificates see Certificate Overview
Verify SQLCMD utility
The SQLCMD utility is required to install the Retail online store This utility is typically installed with Microsoft SQL Server If a version of SQL Server is not installed on the computer where you install the online store you can download and install Microsoft Command Line Utilities 11 for SQL Server to meet this requirement
Verify warehouse requirement
You cannot configure a Microsoft Dynamics AX Retail store (online store or brick-and-mortar store) to use a warehouse that is managed by the Warehouse Management module The module was introduced in AX 2012 R3 You can configure a Retail online store to use a warehouse that is managed by the Inventory Management module
Verify SharePoint Managed Metadata connection properties You must verify that the SharePoint Managed Metadata connection required options are enabled
Vijay Sharma-Software Consultant Page 35
1 In SharePoint Central Administration under Application Management click Manage service applications
2 Highlight the Managed Metadata Service Connection row and then click Properties
3 Verify that the following options are selected
4 Save your changes 5 If you are installing Microsoft Dynamics AX 2012 R3 Cumulative Update 8
you must also complete the following steps a In Central Administration under Application Management
click Manage Service Applications b Click Managed Metadata Service
Vijay Sharma-Software Consultant Page 36
c In the Term Store Management tool add the user name in the Term Store Administrators field Ensure that the user name is the same as the service account for SharePoint Timer Service
d Click Check Names and then click Save
Prepare your developer environment for signing updated source code After you install the online store as described in this topic you will be ready to customize the store you deployed The process of customizing the Retail online store requires that you recompile the source code in the Visual Studio projects After you recompile the fully-qualified name of the rebuilt assemblies will be different than the assemblies originally provide by Microsoft Before you can recompile the assemblies you must provide a code signing key file (also called a strong name key file) to sign the customized code If your business has a code signing key file (snk file) you can reuse this file If you do not have a code signing key file Visual Studio can create one for you You must create a new project and enable code signing Then create a second project that references the dll of the output of the first project You can locate the thumbprint in the assembly reference of the csproj file in the second project When you have the snk file you must do the following
1 Save the file in the Retail SDK folder and give it a name Namesnk 2 Edit the UpdateAssemblyIdentitiesps1 file in the Retail SDK folder You must
update the version number and the thumbprint of the key file (lines 97 98) 3 Update the source code to use the strong name certificate by executing the
UpdateAssemblyIdentitiesps1 script This script can take several minutes to complete
Additional steps and recommendations for developers are described in the Next steps for developers section in this topic Install the Retail online store by using Setup You can install the Retail online store by using Microsoft Dynamics AX Setup or by using Windows PowerShell scripts If you prefer to install the Retail online store manually see ldquoInstall the Retail online store by using Windows PowerShellrdquo in this topic If you install other Microsoft Dynamics AX components at the same time the installation pages vary depending on the components that you are installing
1 Start Microsoft Dynamics AX Setup Under Install select Microsoft Dynamics AX components
2 Advance through the first wizard pages 3 If the Setup Support files have not yet been installed on this computer
the Select a file location page is displayed The Setup Support files are required for installation Provide a file location or accept the default location and then click Next On the Ready to install page click Install
4 On the Select installation type page click Custom installation and then click Next
5 On the Select components page select Retail online channel and then click Next
Vijay Sharma-Software Consultant Page 37
6 On the Prerequisite validation results page resolve any errors For more information about how to resolve prerequisite errors see Check prerequisites When no errors remain click Next
7 On the Configure a Microsoft Dynamics AX Retail online store page enter the following information about the web site where the online store will run
o On the Configure the Retail online channel page select the check box to configure online store by using Setup If you clear this option the application files are installed but the online store is not deployed or configured If yoursquore configuring the online store enter the following information
o Storefront to deploy Select a Retail starter store to deploy The Contoso starter store is modeled after an online electronics retailer The Fabrikam starter store is modeled after an online clothing retailer
o Database server The name of the server that will host the Retail online store databases
o Channel database name The name of the Retail channel database If this database does not exist you must cancel Setup and install a Retail channel database
o User name and Password The credentials for a domain account that has permission to create web applications and execute PowerShell scripts in SharePoint
o Pfx file path The path to the Pfx file for the SSL certificate o Password The password for the Pfx file o Channel operating unit number A channel operating unit number is
specified when you create an online channel in the Microsoft Dynamics AX client You must create the channel before you deploy the Retail online store To locate this operating unit number click Retail gt Retail channels gt Online Stores
8 On the Prerequisite validation results page resolve any errors For more information about how to resolve prerequisite errors see Check prerequisites When no errors remain click Next
9 On the Ready to install page click Install 10 After the installation is completed click Finish to close the wizard
If the deployment succeeded proceed to the Verify deployment section in this document If the deployment failed check the Microsoft Dynamics AX log file and the Windows event logs for information For additional troubleshooting support see the ldquoTroubleshooting deployment issuesrdquo section in Troubleshoot installation issues for a Retail online store Configure Facebook integration The Retail online store can authenticate users who sign in to your site by using their Facebook credentials This section describes how to configure your environment for Facebook authentication
Facebook integration is optional However if you do not want to use Facebook authentication then you must disable this feature in the oob-topologyxml file If you do not disable it the deployment scripts fail For more information see Disable Facebook integration later in this topic
Vijay Sharma-Software Consultant Page 38
Create a Facebook application Use the following procedure to create a Facebook application that enables Facebook logon to your site
1 Logon to the Facebook developer site 2 Register as a developer on the Facebook developer site 3 Click Create New App and then follow the prompts to create a new
application 4 In the Select how your application integrates with Facebook section click
the Website with Facebook Login option and specify the Site URL 5 Click Save Changes 6 On the applications landing page select the application that you just created 7 In the oob-settingsxml file search for FacebookApplicationId Replace the
value with the Facebook ID Retain the quotation marks 8 In the oob-settingsxml file search for FacebookApplicationSecret Replace
the value with the secret you created for your Facebook application Retain the quotation marks
9 Save your changes in the oob-settingsxml file Certificates Use the following procedure to create certificates for Facebook authentication For production environments you must register your domain and obtain a valid registered SSL certificate from a provider For developer and evaluation environments you can use a self-signed certificate For information about how to work with certificates see Certificate Overview
1 Search in the oob-settingsxml file for the parameters listed in the following table Enter a value for each parameter For each value retain quotation marks (ldquordquo) but remove percent signs ()
Parameter What to enter
FacebookApplicationId The ID created when you registered a Facebook application
FacebookApplicationSecret
The secret specified when you registered a Facebook application
FacebookCertificateDirectory
The source directory where Microsoft Dynamics AX retrieves the pfx file for the SSL certificate This value can be a network share
FacebookCertificateLocalCopyDirectory
The destination folder where Microsoft Dynamics AX stores a local copy of the certificate This location cannot be the same as the StoreFrontPublicSSLCertDirectory value
FacebookSigningCertificateCerFileName
Enter a value with the name of the certificate cer file in the form value= CertificateName cer
FacebookSigningCertificatePfxFileName
Enter a value with the name of the certificate pfx file in the form value= CertificateName pfx
FacebookSigningCertificatePfxPassword
This is a password for a test certificate For production environments do not enter a password here It will be
Vijay Sharma-Software Consultant Page 39
prompted during deployment This password cannot contain any restricted XML characters such as the following exclamation point () greater than sign (lt) less than sign (gt) ampersand (amp) apostrophe (lsquo) or a quotation mark (ldquo)
FacebookSigningCertificateThumbprint
The thumbprint for your Secure Sockets Layer (SSL) encryption certificate You must obtain a valid registered certificate from a provider Because this component uses Secure Sockets Layer (SSL) encryption you must install a server certificate that was issued by a trusted certification authority (For test environments you can create a self-signed certificate in IIS) You will need to paste the thumbprint for the certificate into the settings file To view the thumbprint in IIS Manager double-click the certificate and click the Details tab We recommend that you paste the thumbprint into a text file and remove all spaces before you paste it into the settings file
Caution
A thumbprint can contain hidden characters at the beginning of the thumbprint value You must delete these extra characters before you paste the thumbprint into the settings file
FacebookSignInUrl The page that will contact Facebook to authenticate users For example httpwww[StoreFront_Name]com[StoreFrontUrlPort_Public][PublishingPortalRelativePath]pagesLoginaspx
FacebookSslCertificateAuthorityCerFileName
Enter the file name
FacebookSslCertificateAuthorityThumbprint
Enter the thumbprint Remove all spaces
Vijay Sharma-Software Consultant Page 40
2 Save your changes in the oob-settingsxml file
Note
You can enable Facebook integration in developer environments that are not using a fully registered domain name (for example wwwDomainNamecom) To do this you must create host file entries on each computer that will browse the online store The URL for host file entries must be in the form httpwwwDomainNamecomsitesRetailPublishingPortal
Update the prerequisite script for Facebook A known issue in this version of the Microsoft Dynamics AX Retail online store can cause an installation to fail if you configure Facebook as an identity provider If you plan to use Facebook as an identity provider perform the following procedure before you install the online store If you do not plan to use Facebook as an identity provider you can skip this procedure
1 Open the following folder CProgram Files (x86)Microsoft Dynamics AX60Retail Online Channeltools
2 Open the Install-Prerequistesps1 file in Microsoft Visual Studio 3 Search for line 155
RoboCopy $trustedIdentityTokenIssuerConfigCertificateDirectory $certificateLocalCopyDirectory $trustedIdentityTokenIssuerConfigSigningCertificateCerFileName $trustedIdentityTokenIssuerConfigSigningCertificatePfxFileName
4 Replace that line with the following RoboCopy $trustedIdentityTokenIssuerConfigCertificateDirectory $certificateLocalCopyDirectory $trustedIdentityTokenIssuerConfigSigningCertificateCerFileName $trustedIdentityTokenIssuerConfigSigningCertificatePfxFileName $trustedIdentityTokenIssuerConfigSslCertificateAuthorityCerFileName
5 Save your changes Disable Facebook integration If you do not want to enable Facebook authentication for your Retail online store you must disable it as described in the following procedure If you previously enabled and configured Facebook authentication you can also use this procedure to disable it
1 Open the oob-topologyxml file in Microsoft Visual Studio or a text editor such as Notepad
Vijay Sharma-Software Consultant Page 41
2 Search in the oob-topologyxml file for the parameter listed in the following table Enter a value for each parameter For each value retain quotation marks (ldquordquo) but remove percent signs ()
Search for Enter
ltTrustedIdentityTokenIssuer id=Facebook install=true deleteifexists=truegt
Change both flags to ldquofalserdquo For example ltTrustedIdentityTokenIssuer id=Facebook install=false deleteifexists=falsegt
3 Save your changes in the oob-topologyxml file If any of these checks fail the script will not perform the installation Verify deployment If all deployment scripts completed without errors use this section to help verify the online store deployment If the deployment scripts returned errors see Troubleshoot installation issues for a Retail online store Verify that the Connector Service is running After a successful deployment the Retail Publishing Connector Service 1 is running in SharePoint Central Administration At this point the service displays an error ldquoNo channel configuration could be found in the databaserdquo which means that the channel has not been configured in Microsoft Dynamics AX yet For information about configuring a channel see the section titled Set up the online store in Microsoft Dynamics AX in the Online Store Use the following procedure to verify that the Dynamics AX Publishing Connector service is running
1 In SharePoint Central Administration under System Settings click Manage services on server
2 Verify that the Retail Publishing Connector Service 1 is running 3 In SharePoint Central Administration click Monitoring and then click Check
job status 4 Verify that you see jobs listed for the C1 Application for Retail Store Front ndash
Internal and the Out of box Store front ndash Public Verify that site collections exist and can be browsed After a successful deployment you can view the Retail online store web applications and site collections in SharePoint Central Administration If you specified different URLs for your web applications you must adjust the URLS below accordingly
Note
If you installed the Fabrikam starter store change port values below from the 40000 range to the 50000 range For example The Contoso starter store product catalog site is httpServerName40001sitesRetailProductCatalog The Fabrikam starter store product catalog site is httpServerName50001sitesRetailProductCatalog
Vijay Sharma-Software Consultant Page 42
1 In SharePoint Central Administration click Application Management and then click View all site collections
2 On the C1 Application for Retail Store Front ndash Internal web application copy the httpServerName40001sitesRetailProductCatalog URL and paste it into a browser Verify that the Welcome to your product catalog site displays
3 In SharePoint Central Administration click the Web application drop-down list and then click Change web application
4 Click the Out of box Store front ndash Public web application 5 In the URL section verify that you see the following URLs
httpServerName40002sitesRetailPublishingPortal httpServerName40002
6 Copy and paste each URL into a browser Verify that you see the Contoso electronic superstore site and the Contoso electronic superstore sign-in site If the sign-in site displays a certificate warning click Continue to this web site This warning appears if you used a self-signed certificate
Verify that you can create and sign-in with a new forms-based user account You should be able to register a new user account and logon from the public URL By completing the sign-up process you verify SQL Server connectivity SSL port settings and SSL certificate bindings
1 Paste the public URL into a browser and press Enter For example httpServerName40002sitesRetailPublishingPortal
2 Click Register a new account 3 Enter an email address and a strong password in the required fields and then
click Create account Note that if you see more than one email and password field on the page it means that you executed the Deploy-FarmSolutionsps1 script multiple times on this server This is a known issue To create the forms-based user account you must enter the email address and strong password in each field Also note that you receive an error after you register the account because the online channel has not been configured in Microsoft Dynamics AX
4 Browse the public portal site again (http ServerName40002sitesRetailPublishingPortal)
5 Click the Sign In link and enter the information for the account that you just created The system logs you onto the Contoso electronics site as a registered user
Verify that you can browse the public URL If you registered a domain you should be able to browse the web address for your site For example you should be able to browse httpwwwltyour_domaingtcomsitesRetailPublishingPortal If you have not yet registered the domain then you must create a hosts file entry and disable proxy settings in your browser (if applicable) before you attempt to browse the web address Next steps for developers
Step Detail
Review the quick guide for customizing the online store
See Quick Guide How to customize a Microsoft Dynamics AX for Retail online store
Vijay Sharma-Software Consultant Page 43
Set up the online channel
After you deploy the Microsoft Dynamics AX Retail online store you must setup the online channel in Microsoft Dynamics AX See the Online store setup checklist The checklist is available in the Microsoft Dynamics AX client Retail gt Setup gt Online store setup checklist
Note
If the online channel has already been set up in Microsoft Dynamics AX then you only need to publish the channel and publish a catalog For information see Publish an online store in Set up an online store and Publish a catalog in Key tasks Create retail product catalogs
Customize and rebrand the starter store
See the Extend section of the Online Store
Deploy a second online store
Install multiple Microsoft Dynamics AX Retail online stores
Deploy to production
See Deploy your solution to a production environment in Quick Guide How to customize a Microsoft Dynamics AX for Retail online store
Uninstall an online store The method that you use to uninstall an online store varies depending on the method you used to install the store
Caution
Before you uninstall we strongly recommend that you back up your SharePoint farm If you dont follow the instructions completely your content database may be corrupted
Uninstall if you used Setup to install If you installed an online store by using Setup then you can either run Setup again to remove it or use Control Panel gt Add or Remove Programs
Vijay Sharma-Software Consultant Page 44
Uninstall if you installed with Windows PowerShell If you used settings and topology files to configure the online store then Run the undeploy script from the Microsoft Dynamics Windows PowerShell prompt The following example removes the default instance deployed by Setup CProgram Files (x86)Microsoft Dynamics AX60Retail Online ChannelToolsUnDeployRetailOnlineChannelps1 -TopologyXmlFilePath oob-topology-updatedxml -SettingsXmlFilePath oob-settings-updatedxml To remove a non-default instance change the name of the xml file in the parameters to the appropriate file CProgram Files (x86)Microsoft Dynamics AX60Retail Online ChannelToolsUnDeployRetailOnlineChannelps1 -TopologyXmlFilePath oob-topology-updatedFabrikamxml -SettingsXmlFilePath oob-settings-updatedFabrikamxml
Note
If you have multiple online channels you must use run the script with the appropriate settings and topology file for each online channel
Uninstall if you installed with Windows PowerShell and no longer have the original settings and topologies file Use the following procedure if you installed with a settings file but no longer have the file
1 In SharePoint Central Administration under System Settings click Manage Farm Features
2 Clear Claims Provider Logging Service and Publishing Job If these features are not present skip this step
Note
Site level features will be automatically uninstalled when we uninstall the parent solutions
3 In Central Administration under System Settings click Manage Farm Solutions For each of the following solutions choose to retract immediately and then click OK
o Publisher Job o StoreFront o Common Global Modules
Vijay Sharma-Software Consultant Page 45
Note
This package is shared across all instances of storefront
Note
While you are completing these steps an IIS reset will occur and Central Administration might become unavailable If so wait and try again
4 After all the solutions have been retracted remove the solution for each entry a In Central Administration under Manage Web Applications delete all of the Web Applications by clicking Delete and then clicking Delete Web Application b Click Yes when you are prompted to delete content databases and to delete IIS web sites This step can take some time to complete Install Commerce Data Exchange Synch Service (Retail Store Connect) Commerce Data Exchange Synch Service is a service that shares data among retail components These components include the head office stores and individual point of sale (POS) terminals When you install Synch Service the Retail Salt Utility is also installed The Retail Salt Utility provides extra encryption for the passwords and credentials that are associated with the Retail system
Note
Retail components are available with Microsoft Dynamics AX 2012 R3 Microsoft Dynamics AX 2012 R2 and Microsoft Dynamics AX 2012 Feature Pack In AX 2012 Feature Pack Synch Service is called Retail Store Connect In AX 2012 R3 Synch Service has been replaced by Commerce Data Exchange Async Server and Commerce Data Exchange Async Client In AX 2012 R3 deploy this component only if you must support earlier versions of Microsoft Dynamics AX for Retail POS while you upgrade (N-1) For more information seeScenario Upgrade a Retail system
To deploy Synch Service on multiple computers in an environment you can run Setup on each computer Before you install Synch Service
Vijay Sharma-Software Consultant Page 46
Determine how many instances of Synch Service you want to install and on which computers In a basic deployment of Retail one instance of Synch Service is installed at the head office and one instance is installed at each store In this scenario the head-office instance communicates with Microsoft Dynamics AX Application Object Server (AOS) and a store instance communicates with the store database Operations in a large organization might scale more efficiently if you install multiple Synch Service instances at each site either on a single server or on multiple servers For more information see Run multiple instances of Synch Service
Caution
Although a single instance of Synch Service can manage all communications for the organization excessive load or network latency might decrease performance
If Retail Scheduler will be used on a Microsoft Dynamics AX client computer to run jobs and send data to stores install Synch Service on the client system
Determine whether you want to use Network Load Balancing (NLB) and Internet Protocol security (IPsec) Retail supports NLB for data that comes from the store to Microsoft Dynamics AX but not for outgoing data If yoursquore using multiple instances of Synch Service NLB can distribute incoming data among them but all instances must have the same service name If IPsec is enabled we recommend that you not use NLB
Select a service account for the Synch Service service For information about the requirements for service accounts see Create service accounts
On the computer where you plan to install this component run the prerequisite validation utility to verify that system requirements have been met For information about how to run the prerequisite validation utility see Check prerequisites For more information about the hardware and software requirements for Microsoft Dynamics AX see the system requirements
At the head office NET Business Connector must be installed on the same computer as Synch Service Synch Service uses NET Business Connector to communicate with AOS
Install Synch Service Use this procedure to install Synch Service If you install other Microsoft Dynamics AX components at the same time the installation pages vary depending on the components that yoursquore installing
1 Start Microsoft Dynamics AX Setup Under Install select Microsoft Dynamics AX components
2 Advance through the first wizard pages 3 If the Setup Support files have not yet been installed on this computer
the Select a file location page is displayed The Setup Support files are required for installation Provide a file location or accept the default location and then click Next On the Ready to install page click Install
Vijay Sharma-Software Consultant Page 47
4 If yoursquore installing AX 2012 R3 on the Select an installation option page click Microsoft Dynamics AX
5 On the Select installation type page click Custom installation and then click Next
6 On the Select components page select Synch Service and then click Next
7 On the Configure Commerce Data Exchange Synch Service page select the check box to configure Synch Service by using Setup If you clear this check box the application files are installed but Synch Service is not configured
o To create a message database for Synch Service enter the name of the server on which to create the database and then enter a name for the new database
o To configure the service account for Synch Service enter a user name and password
If you want to change this information later or configure other settings such as a port and a service name you must use the Synch Service Settings Wizard For more information see Configure settings for Synch Service
8 On the Prerequisite validation results page resolve any errors For more information about how to resolve prerequisite errors see Check prerequisites When no errors remain click Next
9 On the Ready to install page click Install 10 After the installation is completed click Finish to close the wizard
Install retail mass deployment toolkit The Retail mass deployment toolkit lets you use System Center Configuration Manager to deploy retail components Install the toolkit on the computer where the Configuration Manager console is installed To export retail topologies from Microsoft Dynamics AX the toolkit must be able to connect to Microsoft Dynamics AX via NET Business Connector To run all other toolkit operations that require Configuration Manager you must install the toolkit on the same computer as the central administration site for Configuration Manager if Configuration Manager has multiple primary sites If Configuration Manager has only one primary site install the toolkit on the same computer as the primary site You canrsquot use the toolkit on the computer for a secondary site
Note
The Retail mass deployment toolkit is available only with Microsoft Dynamics AX 2012 R3
Before you install the Retail mass deployment toolkit On the computer where you plan to install this component run the
prerequisite validation utility to verify that system requirements have been
Vijay Sharma-Software Consultant Page 48
met For information about how to run the prerequisite validation utility see Check prerequisites For more information about the hardware and software requirements for Microsoft Dynamics AX see the system requirements
Install the Retail mass deployment toolkit Use this procedure to install the Retail mass deployment toolkit If you install other Microsoft Dynamics AX components at the same time the installation pages vary depending on the components that you are installing
1 Start Microsoft Dynamics AX Setup Under Install select Microsoft Dynamics AX components
2 Advance through the first wizard pages 3 If the Setup Support files have not yet been installed on this computer
the Select a file location page is displayed The Setup Support files are required for installation Provide a file location or accept the default location and then click Next On the Ready to install page click Install
4 On the Select an installation option page click Microsoft Dynamics AX 5 On the Select installation type page click Custom installation and then
click Next 6 On the Select components page select Retail mass deployment toolkit
and then click Next 7 On the Connect to an AOS instance page enter information about the
instance of Microsoft Dynamics AX Application Object Server (AOS) to connect to Click Next
8 On the Prerequisite validation results page resolve any errors For more information about how to resolve prerequisite errors see Check prerequisites When no errors remain click Next
9 On the Ready to install page click Install 10 After the installation is completed click Finish to close the wizard
After you install the Retail mass deployment toolkit Follow these steps to initialize the toolkit
1 Share the content root folder By default the folder is located at CProgram Files (x86)Microsoft Dynamics AX60Retail Scaleout DeploymentConfigManagerContent Note the folder location You must enter the Universal Naming Convention (UNC) path of this location when you run the initialization command
2 Run the following command in the toolkit 3 RetailConfigMgrToolkitexe -o CreateApplications -contentRootFolder ltUNC
Path to the content root foldergt 4 You are prompted to confirm that the application will open specific ports on
your behalf on target computers Press Y to confirm Install Retail SDK (Retail POS Plug-ins) The Retail Software Development Kit (SDK) includes sample code and templates that can be used to customize Retail for Microsoft Dynamics AX For information about how to customize your Retail implementation see Retail SDK
Vijay Sharma-Software Consultant Page 49
Note
Retail components are available only with Microsoft Dynamics AX 2012 R3 AX 2012 R2 and AX 2012 Feature Pack In AX 2012 Feature Pack the Retail SDK component is called Retail POS Plug-ins
Before you install Retail SDK On the computer where you plan to install this component run the prerequisite validation utility to verify that system requirements have been met For information about how to run the prerequisite validation utility see Check prerequisites For more information about the hardware and software requirements for Microsoft Dynamics AX see the system requirements Install Retail SDK Use this procedure to install Retail SDK If you install other Microsoft Dynamics AX components at the same time the installation pages vary depending on the components that you are installing
1 Start Microsoft Dynamics AX Setup Under Install select Microsoft Dynamics AX components
2 Advance through the first wizard pages 3 If the Setup Support files have not yet been installed on this computer
the Select a file location page is displayed The Setup Support files are required for installation Provide a file location or accept the default location and then click Next On the Ready to install page click Install
4 If yoursquore installing AX 2012 R3 in the Select an installation option page click Microsoft Dynamics AX
5 On the Select installation type page click Custom installation and then click Next
6 On the Select components page select Retail SDK and then click Next 7 On the Prerequisite validation results page resolve any errors For more
information about how to resolve prerequisite errors see Check prerequisites When no errors remain click Next
8 On the Ready to install page click Install 9 After the installation is completed click Finish to close the wizard
The Retail SDK is installed in the documents folder of the user who ran the installation
httpstechnetmicrosoftcomen-uslibraryhh575234aspx
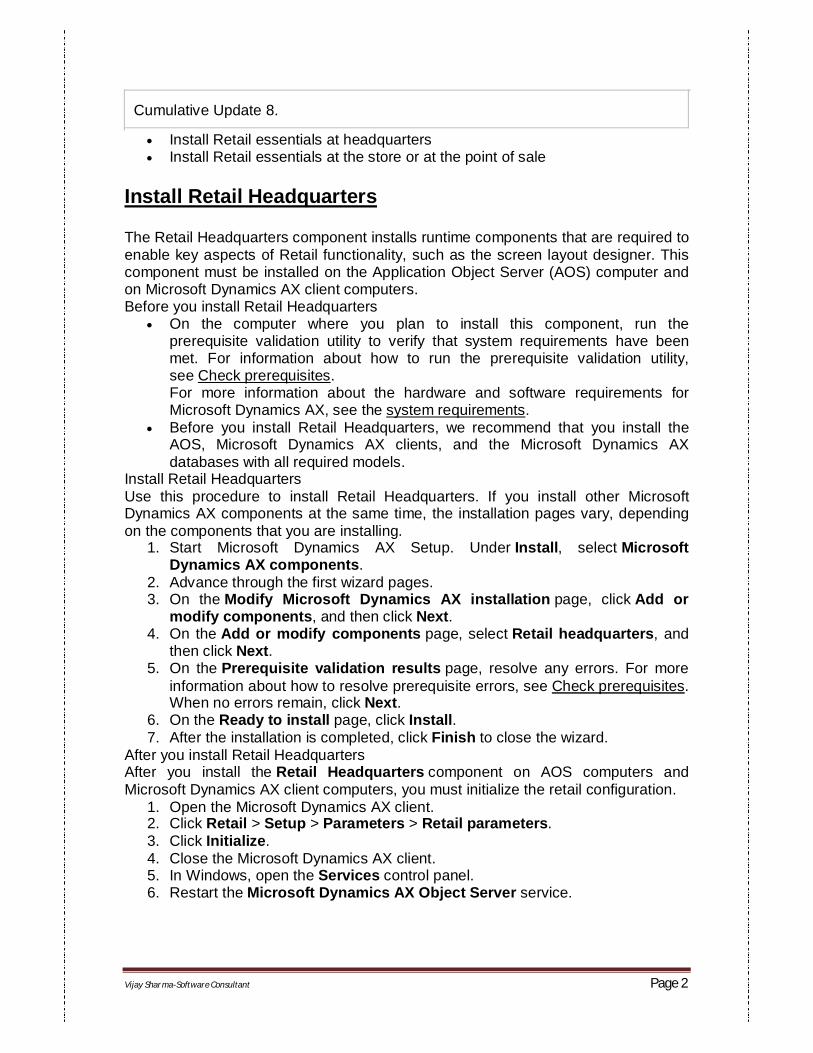
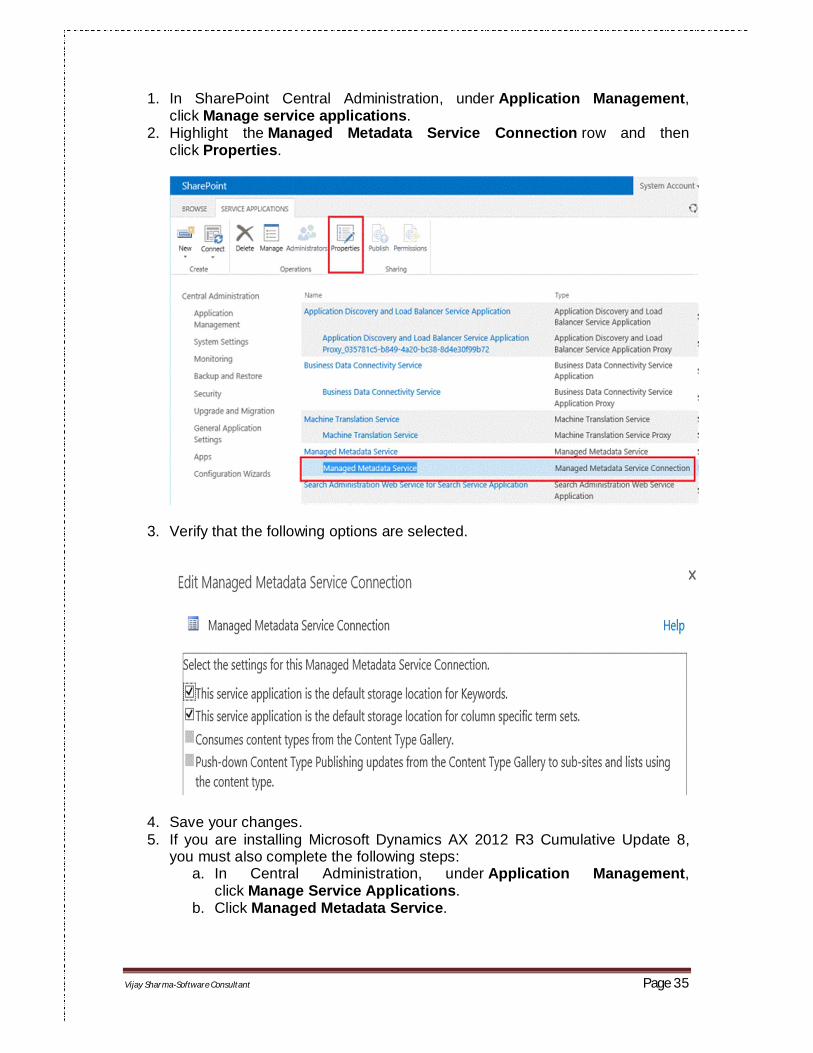
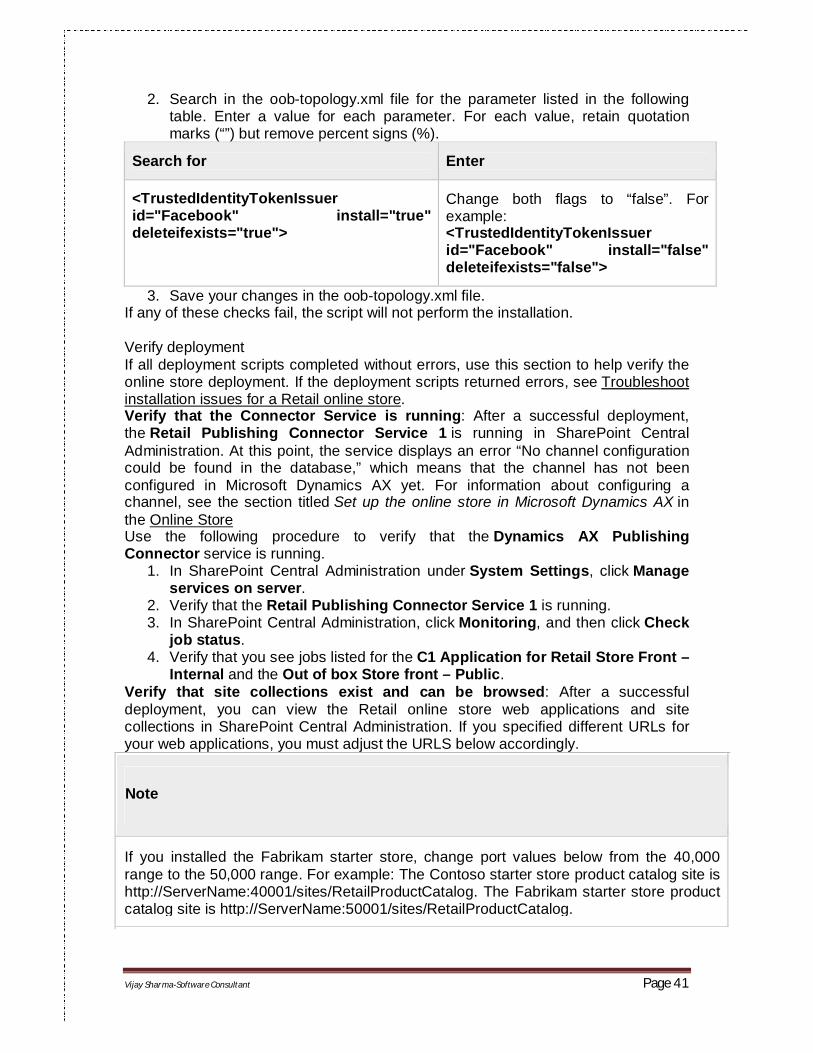
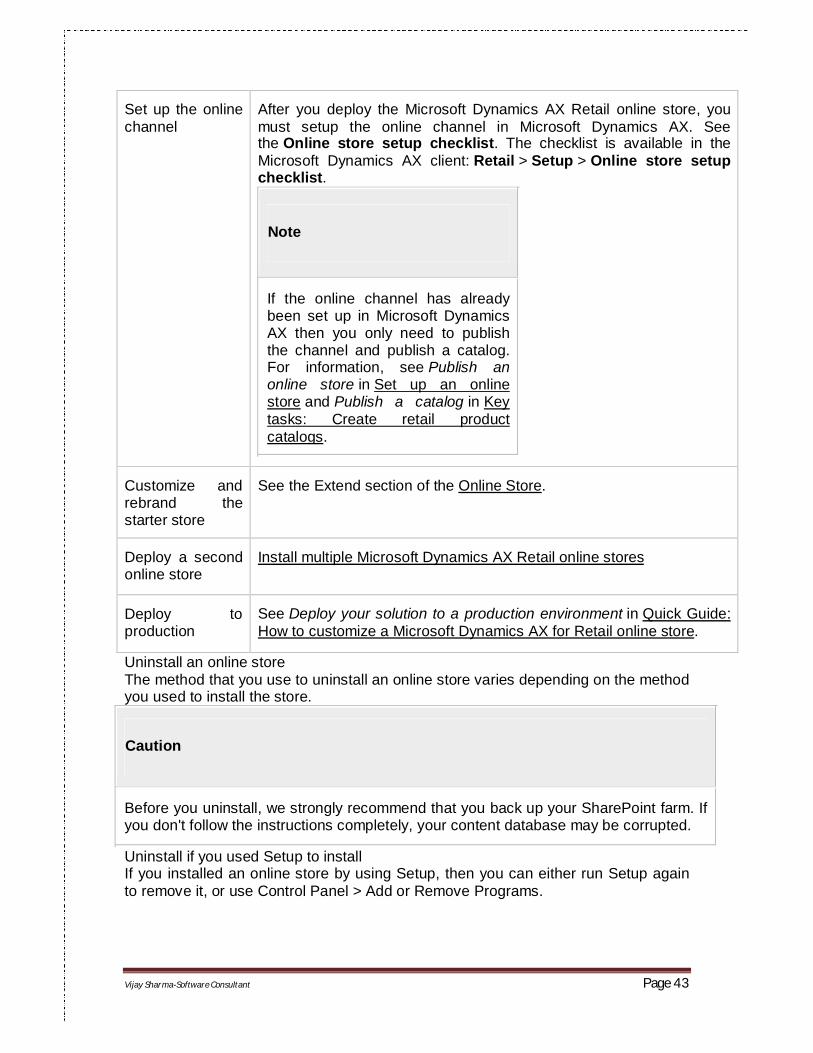


![[DIRECTION MATTERS]2021/01/29 · DAILY CAUSE LIST FOR DATED : 29-01-2021 Court No. 1 (Hearing Through Video Conferencing) 2 Crl.A. No. 1031/2015 II-A VIJAY SINGH @ VIJAY KR. SHARMA](https://static.fdocuments.us/doc/165x107/60f81ccc5284c870f819c03f/direction-matters-20210129-daily-cause-list-for-dated-29-01-2021-court.jpg)