
Restaurant Manager, Version 17dealer.rmpos.com/rm17doc/pdf/Installation_Instructions.pdf · In...
35
Restaurant Manager, Version 17 Installation Instructions for Windows NT/XP Pro/Win 7/2003 Server/WePOS/POS Ready Networks Updated Feb 2012 John Raffenbeul
Transcript of Restaurant Manager, Version 17dealer.rmpos.com/rm17doc/pdf/Installation_Instructions.pdf · In...

Restaurant Manager, Version 17
Installation Instructions for Windows NT/XP Pro/Win 7/2003 Server/WePOS/POS Ready Networks
Updated Feb 2012
John Raffenbeul

CONTENTS Introduction............................................................................................................................ 4
Hardware Requirements......................................................................................................... 4
Single User System ............................................................................................................ 4
Multi-user (Networked) System ........................................................................................... 5
Fileserver/ Manager Workstation...................................................................................... 5
POS Workstations ........................................................................................................... 5
Optional POS Station Hardware, depending on requirements ........................................... 5
General Recommendations................................................................................................. 6
Computer/User names ........................................................................................................... 6
Software Installation ............................................................................................................... 6
Full Software Installation Overview ...................................................................................... 7
Setting up RESTAURANT MANAGER ............................................................................. 7
Security Key (dongle) Installation ................................................................................... 10
End User License Agreement ........................................................................................ 14
Demo Software Installation ............................................................................................... 15
Default Configuration ........................................................................................................ 15
Centralized Program Control (RMSTART) ............................................................................. 16
Print Server Setup (RMSpool) .............................................................................................. 17
PRINT SPOOLER SETUP(SPLSETUP) ......................................................................... 18
Serial/ Parallel Printers .................................................................................................. 19
Advanced Settings for Serial/ Parallel Printers ................................................................ 19
Running RMSpool ......................................................................................................... 23
Testing RMSpool........................................................................................................... 24
Adding Printer in RM BackOffice .................................................................................... 26
Credit Card Server (RMCCWIN) ........................................................................................... 27
Gift Card Server ................................................................................................................... 27
Caller ID Interface ................................................................................................................ 28
Kitchen Display System Interface.......................................................................................... 28
REDUNDANCY SETUP ....................................................................................................... 29
POS Station Setup ............................................................................................................... 29
Synchronizing Time.............................................................................................................. 30
Installing Touch Screen Drivers ............................................................................................ 30

Installing Local Check/Receipt Printers ................................................................................. 31
Installing Customer Displays................................................................................................. 32
Installing Cash Drawers ....................................................................................................... 32
Installation Tips .................................................................................................................... 33
Basic Troubleshooting .......................................................................................................... 33
Orders do not get printed on prep-printers. ..................................................................... 33
Receipts do not get printed on receipt printers ................................................................ 34
Credit Card cannot be processed ................................................................................... 34
Cannot open Cash Drawer ............................................................................................ 34
Notes .................................................................................................................................. 34

INTRODUCTION This document gives step by step instructions on installing RESTAURANT MANAGER, Version 17 on a Windows 7 Pro, XP Pro or Windows 2003 Server based network. It is assumed that all the system hardware is installed and that the network has been previously established and verified for proper operation. For most installations, we recommend you use the fileserver solely as a Fileserver and Print Server, and use another PC as a Manager Workstation. Note: Windows 2000 is no longer supported by Microsoft and u is deemed PCI-non compliant IMPORTANT: ASI provides this documentation as an aid to configuring the underlying operating system required to run Restaurant Manager. However our tech support is limited to issues related to Restaurant Manager program configuration and use. For issues relating to the Windows operating system, Network configuration please contact Microsoft tech support and/or a certified network engineer.
Note: Please visit the document covering Windows 7 installation tips if you are planning on
using this Windows operating system.
HARDWARE REQUIREMENTS This section covers the basic hardware requirements necessary to run Restaurant Manager in
either a single user or networked system. Where ASI Dealers are given some latitude to the
brands they choose, ASI does have a list of certified hardware and a list of certified vendors
that is constantly being updated on the ASI website. The information listed in this topic should
be considered as a basic minimum when selecting hardware. Please note, however, that many
of the topics mentioned in this chapter are covered in greater detail in a separate publication,
The RESTAURANT MANAGER™ POS System will operate on computers that meet the
specifications detailed below.
SINGLE USER SYSTEM If you are using a single computer to run both the POS and RM BackOffice Modules, you will
need:
Processor: Intel or AMD Processor 2ghz or faster
OS: Windows 2003 Professional, XP Pro, Windows 7 (see note below)
RAM Min 1GB (2GB suggested- with some configurations or with certain 3rd party software)
Hard drive: 20GB- Additional memory for storing data files. (Allow 10 Megabytes per month and multiply by the number of months you wish to store on the hard drive.)
Network Card
Battery Backup: Powervar, Smart Power or other professional grade UPS .

MULTI-USER (NETWORKED) SYSTEM
FILESERVER/ MANAGER WORKSTATION For installations that will be running 3 or more POS stations, we strongly recommend a
dedicated fileserver to enhance the performance and integrity of the system. For smaller
installations, the Fileserver can double as the Manager Workstation.
Processor: Intel or AMD Processor 2ghz or faster
OS: Windows 7 Pro, XP Pro, Windows 2003 (Workgroup Server, not Domain Controller) Windows 7 Pro.
RAM Min 1GB (2GB suggested- with some configurations or with certain 3rd party software)
Hard drive: 20GB min- Additional memory for storing data files. (Allow 10 Megabytes per month and multiply by the number of months you wish to store on the hard drive.
Network Card
Battery Backup: Powervar, Smart Power or other professional grade UPS
POS WORKSTATIONS The minimum hardware requirements for a POS workstation computer are:
Processor: Intel or AMD Processor 1ghz or faster
OS: Windows 7 Pro, XP Pro/ WEPOS/POS Ready
RAM 256MB
Flash Compact: 2GB
Hard drive: 10GB
Network Card
Battery Backup: Powervar, Smart Power or other professional grade UPS
Note: Windows 7 is not recommended for sites using the Write-on and Online Ordering
applications. The main issue concerns RMServices. This application runs but does not appear
visible in the systray.
Please not that Restaurant Manager™ will run on machines that are not as sophisticated as
those listed, but these specs are what ASI recommends you build your system on.
OPTIONAL POS STATION HARDWARE, DEPENDING ON REQUIREMENTS:
• Check/Receipt Printer • Cash Drawer(s) • Customer (pole) display • Magnetic Stripe Reader (strongly recommended) • Fingerprint reader • Kitchen Display Unit • Bar Code Scanner(s

General Recommendations System equipment must run off dedicated power lines and/or be outfitted with power protection.
In addition, because even small electrical spikes can corrupt data communicated across
networks, it is recommended that the Advantage Database Server be installed on networked
systems.
To secure data and maintain system operation in the event of catastrophic failure of the hard
drive, it is recommended that the redundancy interface be installed on networked systems.
And to improve support services, it is recommended that resellers install an application that
allows remote access to the system (PC Anywhere or one of various web-based applications).
COMPUTER/USER NAMES We recommend you name the computer used as the fileserver RMSERVER, and the point of sale stations as STATION<n>, where n corresponds to the station number. If the fileserver is also used as a POS station, we recommend you begin your station numbering with 2, reserving 1 for the fileserver.
SOFTWARE INSTALLATION
GENERATE NEW ENCRYPTION KEY
In Restaurant Manager version 17, all sensitive information such as passwords and credit card data are encrypted using a Triple-DES encryption algorithm. Like any other encryption algorithm, Triple-DES uses an encryption key to encrypt and decrypt the data. The encryption key is securely stored in the file KEY.DES, located in the RM working folder.
PCI security demands all default passwords and cryptographic material be removed. New installations must generate a new encryption key to comply with PA_DDS 2.7.A. This is a simple process that must be done while the session is closed and takes no more than a few minutes. From the RM BackOffice Module.
1. Go to Setup and click "Backoffice" on the drop down menu.
2. Click "Security Tab"
3. Click “Generate new encryption key.”
The system will automatically generate a random encryption key and update the necessary system and data files, re-encrypting all encrypted data with the new key
It is important that this file not be deleted or tampered with as it will cause all encrypted data in the system to become un-readable. You should also make sure to include this file in any system backups. Restoring a backup without this file would cause passwords and stored credit cards to be un-readable.
To ensure that credit card information is not compromised, it is mandatory that a new encryption key is generated at least once per year.

FULL SOFTWARE INSTALLATION OVERVIEW Full software is considered to be the installation of Restaurant Manager complete with security
key. Restaurant Manager is software that requires installation on a single computer hardware
drive. It is from this computer that all stations will communicate. Software installation can be
done using an installation CD or by downloading the latest software version build from the ASI’s
(resellers only) website under Dealer Services >Tech Support > Patches and Utilities.
SETTING UP RESTAURANT MANAGER Use the following instruction based upon your hardware configuration:
From Manager Workstation Setup
The Manager Workstation MUST be logged on to the fileserver and mapped to C drive on
fileserver (ex: as F:) before installing RESTAURANT MANAGER. If the fileserver has two drives
and you wish to install on the second drive then you must map to that drive. If using a parallel
key, connect it to the parallel port before running the installation disc.
IMPORTANT: If you are using a USB Security Key (Dongle), it MUST NOT be attached to the
Computer until the RESTAURANT MANAGER software has been completely installed and the
Keylok Installer has been run.
1. Insert CD. The Restaurant Manager Main Options Screen should appear.

If it does not, from the RUN option under Windows START button, type a:\rmwin\setup
<Enter>. “A” in the command would represent the drive letter of the CD drive.
2. Select Install Restaurant Manager, and follow the instructions on the screen.
3. When prompted for the destination directory, select one on the fileserver (e.g.
F:\RMWIN). You MUST NOT install RESTAURANT MANAGER on the local drive.
4. Choose the Setup Type you wish to install:
Demo Installation with Sample Data- Install Restaurant Manager with sample menu
and information. Does not require a security key. Prints to screen by default. You will
need to run Sysmerge.exe if you want the convert a demo software into a “live
software”.
Full Installation- Installs a fully functional version of Restaurant Manager. You will
need the configuration diskette included with the CD and a security key to complete
installation. This is commonly referred to as “live software”.

Full Installation with Sample Data- Installs a fully functional version of Restaurant
Manager with sample menu and information. You will need the configuration diskette
included with the CD and a security key to complete installation.
If choosing one of the two full installation choices, you will need the system configuration
file or disk (sysncnfg.scr or Syscnfg.asi). If the software was not shipped with a
configuration disk (floppy) you may obtain the necessary Syscnfg file from the ASI
website under the dealer page > Tech Support > Download SCR Files.
5. Use default name or type in a new name for the folder that will be installed in Windows
Start > Programs Folder.

From Fileserver
1. If using a parallel key, connect it to the parallel port.
2. Insert CD. The Restaurant Manager Main Options Screen should appear. If it does not,
from the RUN option under Windows START button, type a:\rmwin\setup <Enter>. “A” in
the command would represent the drive letter of the CD drive.
3. Select Install Restaurant Manager, and follow the instructions on the screen.
4. Use the default destination directory if you want to install on the c drive when prompted.
Otherwise, select the path of installation if you are installing the software on another
drive.
SECURITY KEY (DONGLE) INSTALLATION Every Restaurant Manager software disc comes with a security key. The security key is a piece
of hardware that can be ordered as either a parallel key or a USB key. As more computers are
being shipped without parallel ports, USB may be preferred. . Each security key is configured
with a unique serial number that is licensed directly to the restaurant that purchased the system
from the reseller. If the security key is removed, the system will continue to run for a short
period. The replacement of the security key will be the full value of the initial software price. It is
important to inform the end user the importance of the security key.
USB Key Installation
If your system came with a USB key, connect it to a free USB port on the Fileserver AFTER
installing RESTAURANT MANAGER but not before you run the Keylok Security Key Installation.
The Keylok Security Key Installation executable is found in the RMWIN folder > security folder >
Keylock folder > Install
Left click on the Install icon and the choose the USB Dongle option under the Dongle Type field.
Choose on of the three options under the Instalation Type field.
Stand- Alone Workstation- the security key (dongle) and the application are both
installed on the same computer (most common installation).
Server- Security key installed on one computer, allowing the application installed on
other computer(s) on a network. Clients to share the device. Note: a client may also be
installed on the File Server.
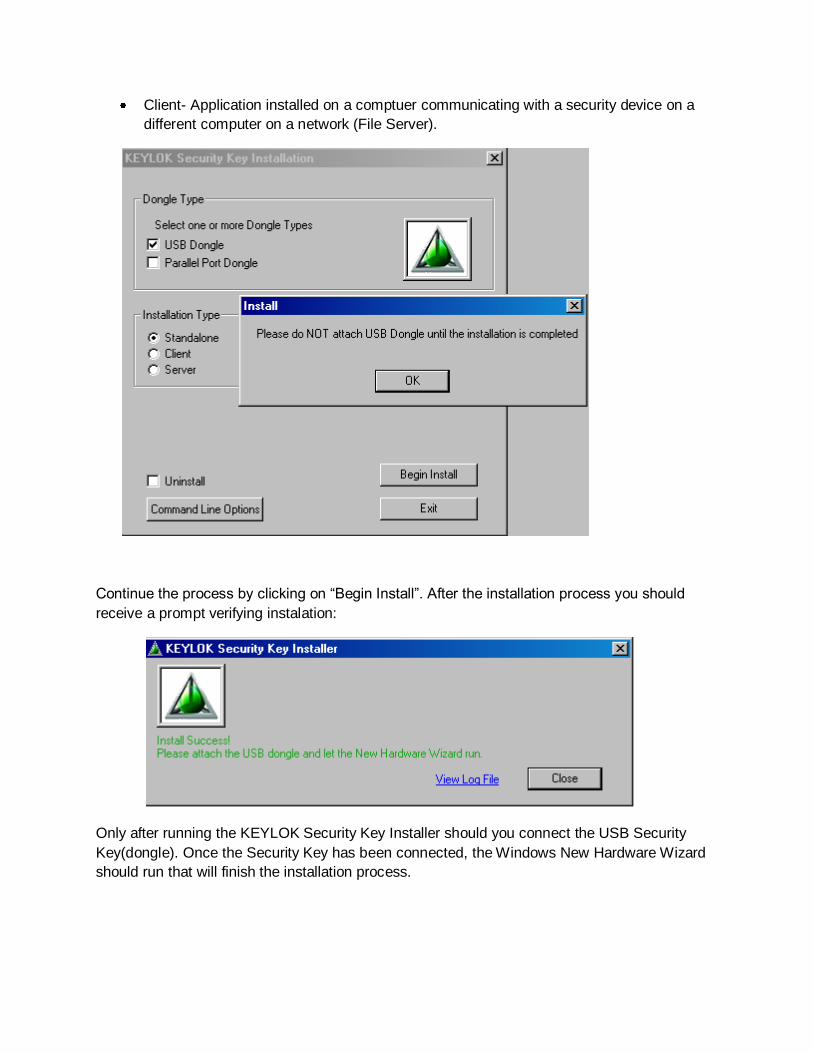
Client- Application installed on a comptuer communicating with a security device on a
different computer on a network (File Server).
Continue the process by clicking on “Begin Install”. After the installation process you should
receive a prompt verifying instalation:
Only after running the KEYLOK Security Key Installer should you connect the USB Security
Key(dongle). Once the Security Key has been connected, the Windows New Hardware Wizard
should run that will finish the installation process.

Parallel Key Installation
If your system came with a Parallel key, connect it to the parallel port on the computer before
carrying out the Restaurant Manager installation. After software installation, go to the RMWIN
folder > security folder > Keylock folder > Install.
Left click on the Install icon and the choose the “Parallel Port Dongle” option under the Dongle
Type field. Choose on of the three options under the Instalation Type field:
Stand- Alone Workstation- the security key (dongle) and the application are both
installed on the same computer (most common installation).
Server- Security key installed on one computer, allowing the application installed on
other computer(s) on a network. Clients to share the device. Note: a client may also be
installed on the File Server.
Client- Application installed on a comptuer communicating with a security device on a
different computer on a network (File Server).
Continue the process by clicking on “Begin Install”. After installation the following message
should appear:
Security.exe Installation
The security executable is the application that Restaurant Manager uses to verify the existence
of the dongle. You will receive a warning message in the event of the security key removal.
This is meant as a safe guard against the accidental or intentional removal of the security key
device. The POS system will continue to run for a short period without the security key but will
eventually halt the program all together until the re-connecting of the device.
You will not be able to run any Restaurant Manager program, including RM BackOffice and RM
POS, if the secrurity.exe is not running. You must run the Security.exe application on the
computer you have the security key installed on. To run the Security.exe application, you can
add a shortcut from the Windows Startup folder with the path X:\RMWIN\SECURITY.exe.
Alternatively, you can add the security.exe application to the Restaurant startup utility,
RMSTART.exe by use of RMSTARTSETUP.exe. See Below
Using Temp Code on New Installations
Dealers may choose to use a temporary code prior to receiving the physical security key
(dongle). The advantage to using a temp code in lieu of a security key is it will expedite the
programming process. Enter the temp code by:

1. Right click on the security key icon (located in the systray).
2. Click on the “Enter Temporary Code” on the pop up screen.
3. Enter code in field box, press “OK” button.
You will need to attach the security key when in final possession. The system will continue to
use the temp code even after the security key is attached. It is important to use the following
instructions to verify the system is operating with the live key:
1. Right click on the security key icon (located in the systray).
2. Click on the “Remove Temporary Code” on the pop up screen.
A green check mark should indicate the new security is recognized. If it is not recognized try the
following steps:
1. Remove key and restart security (x:\rmwin\security.exe)
2. Right click on the security key icon on the systray and verify the “Key Status” as "key not
found"
3. Close ASI Security
4. Restart security (x:\rmwin\security.exe)
a. Right click on the security key icon (located in the systray).
b. Click on the “Enter Temporary Code” on the pop up screen.
c. Enter code in field box, press “OK” button.
5. Exit security and reconnect key
6. Restart security (x:\rmwin\security.exe)
A green check mark should indicate the security key is recognized.
Note: Open a support ticket (dealers only) if these steps should fail and use the temp code to
keep the system running
Reseller may obtain the temp code by going to the Patches and Utilities page on the reseller
webpage and select the “Daily Security Code” hyperlink.

END USER LICENSE AGREEMENT During installation procedures technicians are prompted to indicate whether they accept the
terms of the End User License Agreement. Because the technician is not the licensed End
User, they are obligated to DECLINE this prompt.
After the technician has installed and configured the software to the user’s specification -- but
BEFORE the POS software is used to process a single sale -- the End User License Agreement
prompt must be recalled so the licensed user can accept the agreement. Authorized Restaurant
Manager resellers are legally responsible for ensuring that each end user accepts the terms of
this agreement before using the software to operate their business.
Users must click on the ACCEPT button to indicate their acceptance of the terms of this
agreement.

DEMO SOFTWARE INSTALLATION Restaurant Manager is software that requires installation on a computer hardware drive.
Installation of Restaurant Manager can be done from a disc or be downloaded from the ASI
website. Full software installation or demo installation is done from the same application. The
main difference between the two is, the demo program is intended more for dealer
demonstrations and training purposes. Sales, employee records, and customer information is
based on a demo date. The demo program does not require a security key. The demo software
can be setup in a networked environment.
Software installation can be done using an installation CD or by downloading the latest software
version build from the ASI’s (resellers only) website under Dealer Services >Tech Support >
Patches and Utilities. The installation is performed exactly as the full installation procedures with
the exception being the “Setup Type” prompt. You must choose the “Demo Installation with
Sample Data” option.
Default Configuration When installing the RESTAURANT MANAGER™ software you have the option of loading
sample data and default configuration settings. Installing the sample data and default
configuration allows you to experiment with system functions and features before configuring
your own system. The default configuration runs in “demo mode” which means all printer output
is displayed onscreen.
Even if you do not wish to experiment with the sample data, it is recommended that you load the
default configuration and use it as a starting point for configuring your own system. In this case
you should delete the sample data after loading the default configuration.
NOTE: When you load a demo version of Restaurant Manager™ on a stand alone
computer, the default configuration recognizes your computer “Station 1”. To adjust the
configuration of your demo system you must adjust the Station 1 settings on the Station
Configuration Setup Form. If there is no special configuration for Station 1, then you must
adjust the Master Configuration.
Once the software has been loaded, you can change the configuration of the system. All
changes to the system are done in the RM BackOffice.

CENTRALIZED PROGRAM CONTROL (RMSTART) ASI provides a utility to centrally program the applications to run on each networked computer upon boot-up. This reduces the amount of time to setup each POS workstation, by only requiring you to add one shortcut to the Windows startup folder on each computer. How it Works A configuration program, RMSTARTSETUP, is used to define the programs that must be started on each computer every time it boots up. For example, on the Fileserver you would want to launch RESTAURANT MANAGER’S Time Server and Credit Card Interface, say. On POS Station 2, you might launch RESTAURANT MANAGER’S spooler as well as the POS program.
Open RMStart Setup by going to Start > Programs > Restaurant Manager Version 17.0 >
Central Program Control (aka RMStart Setup).
Defining Applications to Run
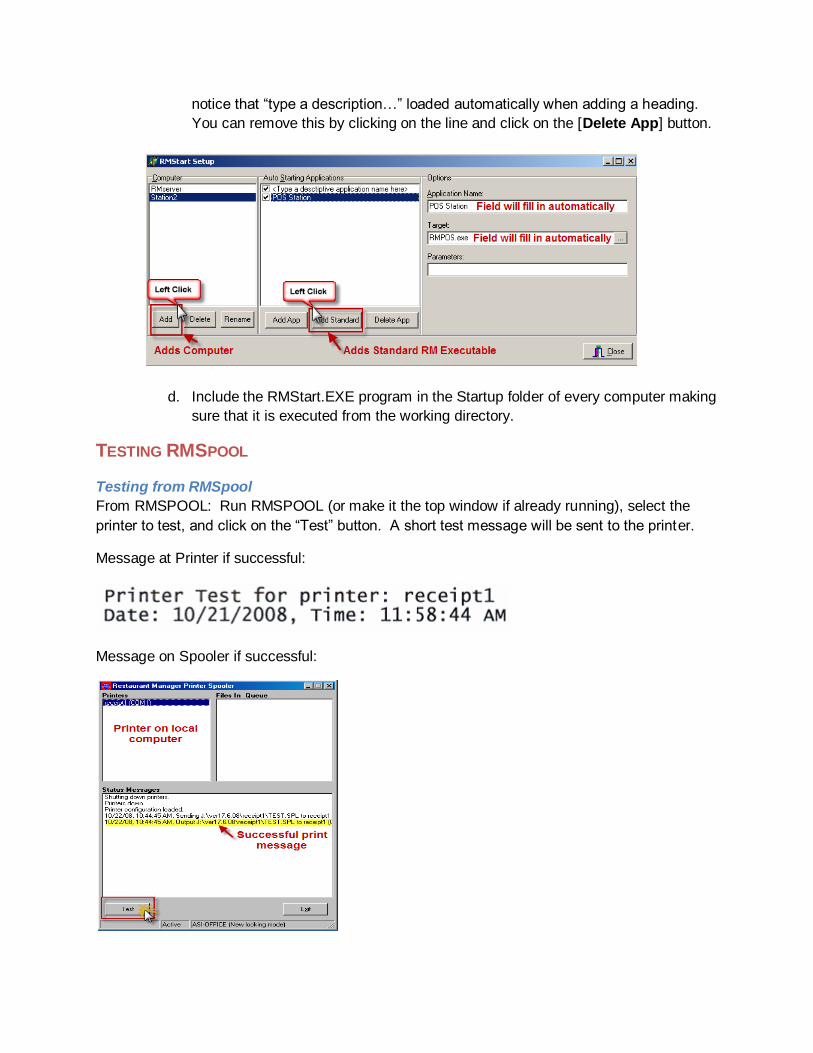
1. Under the computer heading, click on the [Add] button. Type in the computer name.
2. Check the boxes of the applications you wish this computer to launch upon boot-up.
3. While highlighted on a station, click on the [Add Standard] button under the Auto
Starting Applications heading. Choose the “Printer Spooler” option in the drop down
menu. When adding an application to a station the first time you may notice that “type a
description…” loaded automatically when adding an application. You can remove this by
clicking on the line and click on the [Delete App] button.
4. Repeat the process for all computers on the network.
5. Include the RMStart.EXE program in the Startup folder of every computer making sure
that it is executed from the working directory.

PRINT SERVER SETUP (RMSPOOL) ASI has developed its own print spooler (RMSpool) for use with the RESTAURANT
MANAGER™ POS System. RMSpool resolves problems occasionally encountered with
standard Microsoft print spoolers and greatly simplifies the installation and testing of shared
printers from a central location. You can use RMSpool (RMspool.exe) to setup shared printers
without actually accessing the Windows Printer Folder.
RMSPOOL uses a master Printer Definition File (SPLSETUP.exe) to define all the shared
printers on the network. In the definition file, a printer is uniquely identified by a Computer
Name, a Printer Name and a standard Parallel or Serial Port. When RMSpool is run on a
computer with assigned shared printers, the assigned printers for that computer are immediately
available to all other computers on the network.
A Master Printer Definition file is used to define all the shared printers on the network. In the definition file a printer is uniquely identified by a Computer Name, a Printer Name and a standard Parallel or Serial Port. When RMSPOOL is run on a computer with assigned shared printers, the assigned printers for that computer are immediately available to all other computers on the network.
Correct operation of the Print Spooler is so critical that you must follow both the Setup and the
Testing procedures below to ensure that the Print Spooler is working correctly on your system.
Setup The Restaurant Manager print spooler consists of two programs – SPLSETUP.EXE, the spooler setup utility, and RMSPOOL.EXE the spooler itself. Both programs are copied to the Restaurant Manager working directory during program installation. These programs must be executed from that directory. 1- Run the Restaurant Manager Print Spooler Configuration program (SPLSETUP) and enter the Printer Name, Computer Name and Port for all the printers being shared on the network. For serial (COM) ports, enter the appropriate communications settings. Note that the printer names must be unique. 2- Include the RMSPOOL.EXE program in the Startup folder of every computer with assigned shared printers, making sure that it is executed from the Restaurant Manager working directory Note that if all shared printers are driven from one computer, you will only have to run RMSPOOL on that computer. See the “Connecting POS Stations to Shared Printers (Restaurant Manager Spooling)” section for instructions on how to configure POS stations to print on the printers controlled by the Restaurant Manager spoolers. VERY IMPORTANT: 1) The Restaurant Manager spooler sends printer information directly to the assigned serial and parallel ports without going through the Windows printer drivers. This means that it cannot be used for printer outputs, such as the printing of Gift Certificates that require the Windows printer
Note: To maintain backward compatibility, RESTAURANT MANAGER™ still supports the Windows and DOS defined devices. A special symbol (# sign) is used to differentiate Restaurant Manager defined printers

driver. In general, it should only be used for prep-area printers. 2) To avoid device conflict, the assigned ports should only be used with the Restaurant Manager Spooler. Make sure that any defined windows printers are not using assigned ports by either removing them, or changing the port.
PRINT SPOOLER SETUP(SPLSETUP) Both the Spooler and Configuration programs are located in the working directory where the
entire RESTAURANT MANAGER™ application is stored. These programs must always be
executed from the working directory.
To configure RMSPOOLER (RMSpool.exe) from the Windows desktop:
1) Go to Start > Programs > Restaurant Manager Version xxx > Printer Spooler Setup
2) Type in a unique printer name in the RM Printer Name field. It is suggested that you use
a new that relates to the station it will be connected to or the function that it will serve.
This will help differentiate printers when doing the setup in the station configuration.
3) Type in the computer name the printer will be attached to in the Computer Name field.
The rest of the fields to be filled in are determined by which type of printer is being used:
Serial/Parallel
IP
Windows
USB

The different printer types and installation instructions are discussed below.
SERIAL/ PARALLEL PRINTERS Serial printers may be preferred at the station and can be used system wide. However, if using
RM Redundancy, IP printers are suggested. When installing a serial printer, continue with the
following instructions:
1. In the Spooler Setup, type in a unique name of the printer in the RM Printer Name
field.
2. In the Spooler Setup, type in the computer name that will service this device in the
Computer Name field
3. In the Spooler Setup, choose the “COM/LPT Printer” setting in the Printer Type field
4. Choose the appropriate com port in the Port Field.
5. Serial Port Settings- These fields will be filled in by default. Make sure these settings
match your port settings in Windows Device Manager. These setting might have to be
adjusted depending on the printer connectors being used.
ADVANCED SETTINGS FOR SERIAL/ PARALLEL PRINTERS
Code Page Translation
For serial and parallel printers there is now a code page translation option. This is used for
languages with other character sets. RMPOS by default works with Windows code pages which
are different than DOS code pages used by printers. This option allows you to specify the
source code page used by RMPOS (should be a windows code page) and a target code page

used by the printer. RMSPOOL will then translate the print job from the windows code page to
the dos code page before sending it to the printer.
Send Data to Printer in Blocks
This sends the print job to the printer in blocks and then pauses. This option is useful for sites
that do not have support for full hardware handshaking. You can get status of the printer via the
hardware lines and then use this option to make sure the printer buffer does not get full. You
specify the amount of data to send and the pause length. The defaults are set up for a serial
Epson printer.
Override Computer Name Detection
You can override what printers to load on the command-line by using the /COMPUTERNAME:
parameter. This option is useful for temporarily switching printers from one machine to another.
Use this option as follows:
RMSPOOL /COMPUTERNAME: NAMETOLOAD
IP Printers
IP Printers are preferred (not required) when using RM Redundancy: if the RMserver should
fail, the remote printers should still work providing the issue is not a power outage. For cost
saving measures some installations have employed IP for kitchen printers while using
serial/parallel printers for receipt printers connected to the POS station. Since IP printers are on
the “network”, some sort of network device is required (e.g. switch or router). Most installations
will place the network device near the fileserver but it may be placed anywhere within the store.
If installing an IP printer continue with the following instructions:
1. In the Spooler Setup, type in a unique name of the printer in the RM Printer Name
field.
2. In the Spooler Setup, type in the computer name that will service this device in the
Computer Name field
3. In the Spooler Setup, choose the “IP Printer” setting in the Printer Type field
4. The data field will change when choosing “IP Printer”. Enter the IP address for the
printer being used in the Printer IP Address field.
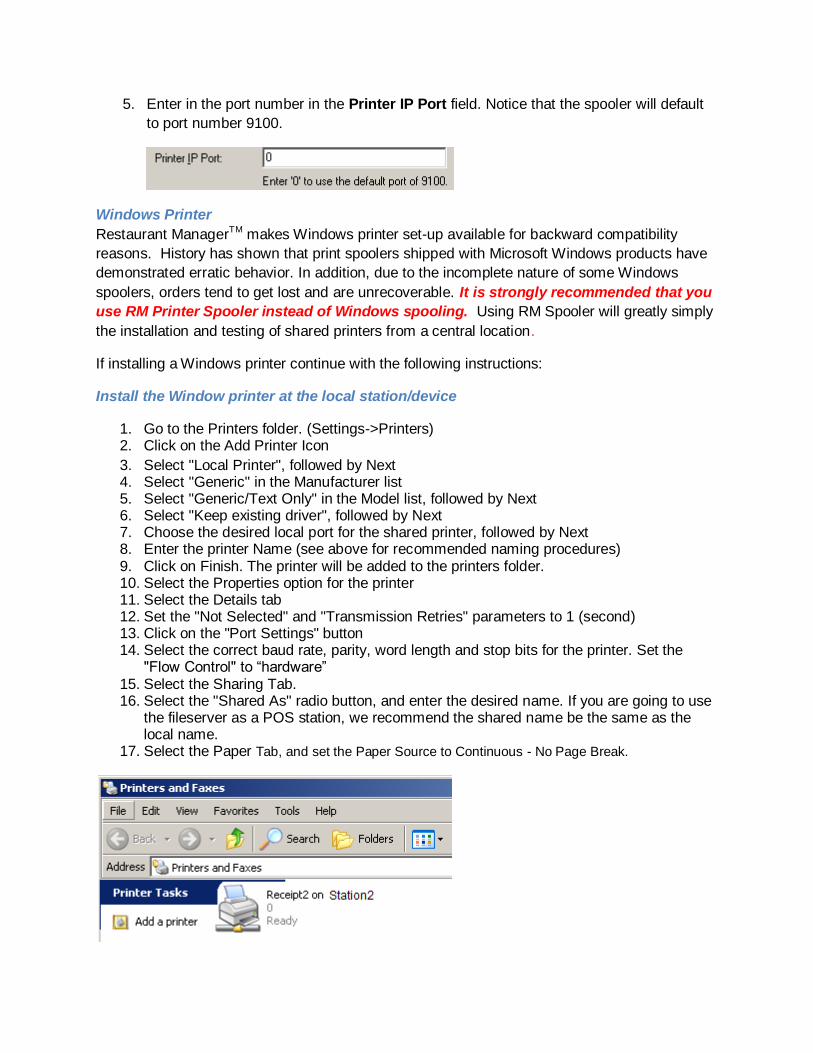
5. Enter in the port number in the Printer IP Port field. Notice that the spooler will default
to port number 9100.
Windows Printer
Restaurant ManagerTM makes Windows printer set-up available for backward compatibility
reasons. History has shown that print spoolers shipped with Microsoft Windows products have
demonstrated erratic behavior. In addition, due to the incomplete nature of some Windows
spoolers, orders tend to get lost and are unrecoverable. It is strongly recommended that you
use RM Printer Spooler instead of Windows spooling. Using RM Spooler will greatly simply
the installation and testing of shared printers from a central location.
If installing a Windows printer continue with the following instructions:
Install the Window printer at the local station/device
1. Go to the Printers folder. (Settings->Printers) 2. Click on the Add Printer Icon
3. Select "Local Printer", followed by Next 4. Select "Generic" in the Manufacturer list 5. Select "Generic/Text Only" in the Model list, followed by Next 6. Select "Keep existing driver", followed by Next 7. Choose the desired local port for the shared printer, followed by Next 8. Enter the printer Name (see above for recommended naming procedures) 9. Click on Finish. The printer will be added to the printers folder. 10. Select the Properties option for the printer 11. Select the Details tab 12. Set the "Not Selected" and "Transmission Retries" parameters to 1 (second) 13. Click on the "Port Settings" button 14. Select the correct baud rate, parity, word length and stop bits for the printer. Set the
"Flow Control" to “hardware” 15. Select the Sharing Tab. 16. Select the "Shared As" radio button, and enter the desired name. If you are going to use
the fileserver as a POS station, we recommend the shared name be the same as the local name.
17. Select the Paper Tab, and set the Paper Source to Continuous - No Page Break.

Spooler Setup
1. In the Spooler Setup, type in a unique name of the printer in the RM Printer Name
field.
2. In the Spooler Setup, type in the computer name that will service this device in the
Computer Name field
3. In the Spooler Setup, choose the “Windows Printer ” setting in the Printer Type field
4. Using the drop down menu in the Windows Printer Name field, choose the desired
printer
5. The rest of the fields will fill in by default. However, you can change settings if needed.

IMPORTANT: The RESTAURANT MANAGER spooler sends printer information directly
to the assigned serial and parallel ports WITHOUT going through the Windows printer
drivers. This means that it cannot be used for printer output that requires a Windows
printer driver, such as the printing of Gift Certificates. In general, RMSPOOL should only
be used for prep-area printers. To avoid device conflict, the assigned ports should only be
used with the RESTAURANT MANAGER Spooler. Make sure that any defined windows
printers are not using assigned ports by either removing them, or changing the port. The
RESTAURANT MANAGER™ Spooler does not work correctly with parallel ports that
have a security device attached to them.
USB Printers
You may wish to use USB printers for local receipt printers. These printers have greater
drawbacks: printing logos are more difficult to setup. Follow the same instructions for a
Windows printer setup if you choose to use USB printers.
RUNNING RMSPOOL RMSpool must be installed on all computers with a printer attached. Printers will not work if
RMSpool.exe is not installed on the local machine. RMSpool can be installed using one of two
methods:
1. Include the RMSPOOL.EXE program in the Startup folder of every computer with
assigned shared printers, making sure that it is executed from the working directory.
Note that if all shared printers are driven from one computer, you will only have to run
RMSPOOL on that computer.
2. RMStart- Restaurant ManagerTM uses a program to load RM executable files called
RMStart. RMStart Setup (RMStartSetup.exe) is the program used to load starting
applications. Several different RM executables can be programmed in RM Start Setup
but for our purposes here, we will limit our example to RMSpool. To run load RMSpool
automatically using RMStart:
a. Open RMStart Setup by going to Start > Programs > Restaurant Manager
Version xxx > Central Program Control (aka RMStart Setup).
b. Under the computer heading, click on the [Add] button. Type in the computer
name.
c. Click on the [Add Standard] button under the Auto Starting Applications
heading. Choose the “Printer Spooler” option in the drop down menu. You may
**NOTE: The new RM Spool Setup program allows Windows printers to be incorporated into the Restaurant Manager Spooler. This is geared mainly towards USB printers which must be setup using the drivers that came from printer manufacturer and not as Windows Generic/Text. To incorporate a Windows printer into RM Spool, simply select the Windows Printer under Printer Type and for the Windows Printer name, select the printer from the list of printers.
notice that “type a description…” loaded automatically when adding a heading.
You can remove this by clicking on the line and click on the [Delete App] button.
d. Include the RMStart.EXE program in the Startup folder of every computer making
sure that it is executed from the working directory.
TESTING RMSPOOL
Testing from RMSpool
From RMSPOOL: Run RMSPOOL (or make it the top window if already running), select the
printer to test, and click on the “Test” button. A short test message will be sent to the printer.
Message at Printer if successful:
Message on Spooler if successful:

Testing from RMSpool Setup
From the SPLSETUP configuration program: Select the printer to test, and click on the “Test”
button. A short test message will be sent to the printer. Use this test method when there are
multiple computers sharing printers, and if you wish to test all the printers from one location.
Note: that RMSPOOL must be running on all the computers that are sharing printers.
Check RMSpool Print Jobs after pressing the [TEST] button, check to make sure that the
printer(s) printed the correctly.
If Testing Fails
Check the following if the print test fails:
Power is on at printer
Connectors are properly connected
Printers connected to correct ports at station
Printers assigned to right port in RMSpool
Port settings match between RMSpool Setup and Windows Device Manager
RMSpool is running at computer
Printer added correctly in RM BackOffice
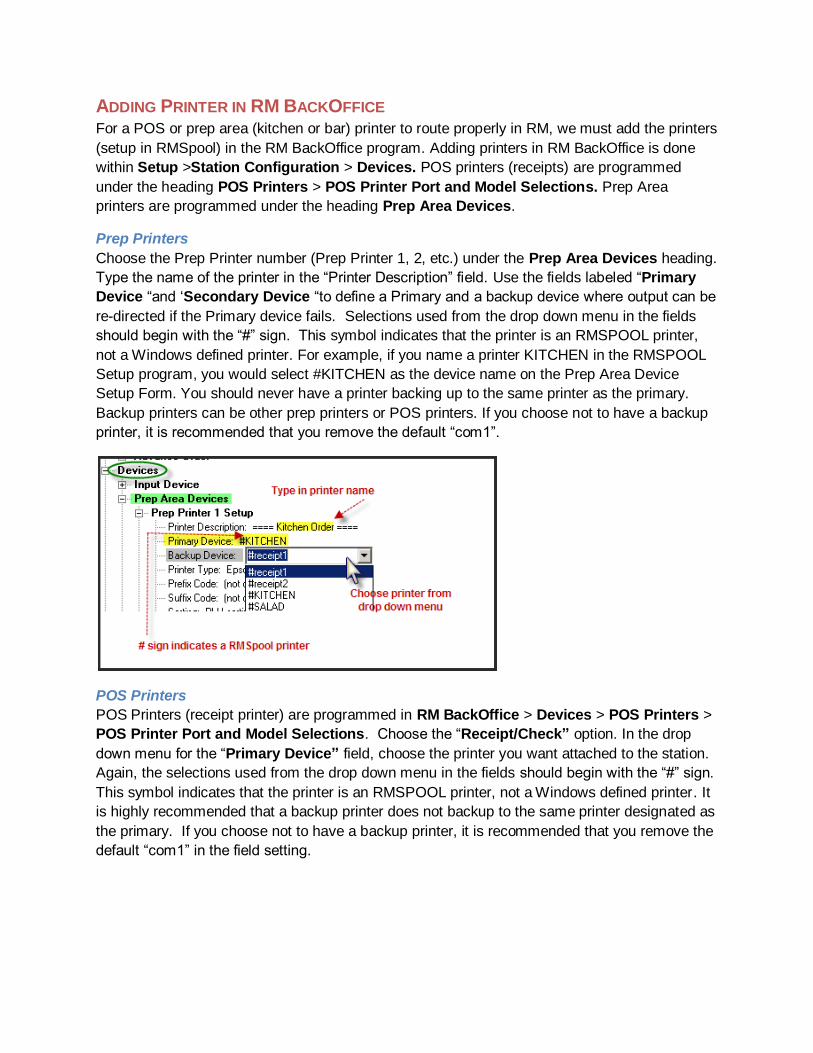
ADDING PRINTER IN RM BACKOFFICE For a POS or prep area (kitchen or bar) printer to route properly in RM, we must add the printers
(setup in RMSpool) in the RM BackOffice program. Adding printers in RM BackOffice is done
within Setup >Station Configuration > Devices. POS printers (receipts) are programmed
under the heading POS Printers > POS Printer Port and Model Selections. Prep Area
printers are programmed under the heading Prep Area Devices.
Prep Printers
Choose the Prep Printer number (Prep Printer 1, 2, etc.) under the Prep Area Devices heading.
Type the name of the printer in the “Printer Description” field. Use the fields labeled “Primary
Device “and ‘Secondary Device “to define a Primary and a backup device where output can be
re-directed if the Primary device fails. Selections used from the drop down menu in the fields
should begin with the “#” sign. This symbol indicates that the printer is an RMSPOOL printer,
not a Windows defined printer. For example, if you name a printer KITCHEN in the RMSPOOL
Setup program, you would select #KITCHEN as the device name on the Prep Area Device
Setup Form. You should never have a printer backing up to the same printer as the primary.
Backup printers can be other prep printers or POS printers. If you choose not to have a backup
printer, it is recommended that you remove the default “com1”.
POS Printers
POS Printers (receipt printer) are programmed in RM BackOffice > Devices > POS Printers >
POS Printer Port and Model Selections. Choose the “Receipt/Check” option. In the drop
down menu for the “Primary Device” field, choose the printer you want attached to the station.
Again, the selections used from the drop down menu in the fields should begin with the “#” sign.
This symbol indicates that the printer is an RMSPOOL printer, not a Windows defined printer. It
is highly recommended that a backup printer does not backup to the same printer designated as
the primary. If you choose not to have a backup printer, it is recommended that you remove the
default “com1” in the field setting.

CREDIT CARD SERVER (RMCCWIN) ASI provides an optional program that interfaces with a number of 3rd party devices/programs to provide integrated Credit Card Authorization. The program (rmccwin.exe) is run on the computer connected to the device/program, and allows any POS station to process credit cards. Version 17 supports the following 3rd party interfaces:
1. Mercury Payment Systems (MPS) Payment Server. Requires internet connection. See MPS-RM Installation Guide.htm for instructions on how to setup this software.
2. Datatran “smart” modem, made by Datacap. See DataTran Installation Instructions for instructions on how to setup this device.
3. VeriFone’s PCCharge Payment Server. See PCCharge Installation Instructions for instructions on how to setup this software.
4. VeriFone’s PAYWare PC. See PAYWare PC Installation Guide for instructions on how to setup this specific software.
Note ASI does provide specific instructions on how to install credit card third party software. It is recommended that you read each credit card software instructions prior to installation.
GIFT CARD SERVER The ASI Credit Card server is also used to provide centralized gift card handling via ASI’s Centralized Gift Card service and a number of 3rd party web applications. ASI Gift Card Server requires internet connection. See RM Centralized Gift Cards Users Manual.pdf for instructions on how to setup this software. Mercury Payment Systems (MPS) Gift Card Server requires internet connection. See MPS-RM Gift Cards for instructions on how to setup this software. Givex Gift Card Server. See Givex interface setup for instructions on how to setup this software. Note: PAYWare PC does not support the use of third party interfaces.

First Data Gift Card setup: Go to Tech Notes and Manuals, Web Services, and select First Data
Gift Card Installation Instructions. Note: PAYWare PC does not support the use of third party
interfaces.
Valutech Gift Card setup: Go to Tech Notes and Manuals, Web Services, and select Valuetech Gift Card Installation Instructions. Note: PAYWare PC does not support the use of third party interfaces.
CALLER ID INTERFACE Caller-ID is an optional service provided by the phone company which allows the recipient of a
phone call to view the phone number of the calling party. This service can be useful in home
delivery operations where the customer phone number must be entered with the transaction.
ASI’s Restaurant Manager provides an interface that bridges the Caller ID provided by the
phone company, a Caller ID unit needed to convert the information, and the RM software.
Restaurant Manager’s Caller ID Interface must be purchased separately as part of the
‘Hardware Interface”. Restaurant Manager interfaces with practically any caller ID unit that
outputs the caller id information via a standard RS232 serial port. Instead of typing in the phone
number, the user can touch the appropriate phone line button on the screen to enter the phone
number automatically. This saves time and reduces errors.
Currently, ASI's Caller ID Server program is pre-configured to work with two different Caller ID
boxes:
CallerID.com –Whozzcalling
Telecomp
ASI is constantly updating its list for certified product vendors and certified hardware. It is best
you consult these lists to verify the current status of a vendor and product.
Detailed setup instructions for Caller ID can be found here on the Tech Notes and Manuals
page in the Caller ID Installation Guide.
KITCHEN DISPLAY SYSTEM INTERFACE RM now includes the necessary software to drive a KDS system in real time. Although we currently only support MicroPlus’ KDS, other systems will be added to the list in future releases. See the User’s manual for more information on how to setup ASI’s KDS interface. For specifics on the MicroPlus hardware, go to: Real Time KDS For specifics on Logic Control hardware, go to: Intellikitchen
**NOTE: This information is also available under Tech Notes and Manuals Section:

http://dealer.rmpos.com
REDUNDANCY SETUP To prevent the system from failing when the primary server goes down, it is now possible with
Restaurant Manager to implement File Redundancy System. To get more information on this,
please go to RMFailSafe Rundancy on the Tech Notes & Manuals page on the Dealer pages at
www.rmpos.com.
POS STATION SETUP
Connecting to Network
The following steps below are general recommendations. Naming conventions may vary if
needed (i.e. workgroup name). However, passwords and mapped network drives should be
consistent on all POS stations. The instructions below reflect a Windows 7 Pro setup. Exact
steps may vary depending on your operating system but the concept remains the same.
Windows Installation
1. Install Win 7 /XP/ WePOS/POS Ready 2. Do NOT install any components if asked. 3. When asked for the station identification, name the machine “station<n>”. Where n is
the station number. 4. Click on Start-> Control Panel > Programs and Features and select “Turn Windows
features on or off” Disable any unneeded functions (i.e. Games). Hit OK but do not restart the computer if asked.
Note: It is recommended that stations be purchased with Win 7 /XP/ WePOS/POS Ready preloaded.
Setup Workgroup
1. Right click on Computer and select Properties 2. Select change settings 3. Click on “Change” and do the following
a. Verify the computer name b. Set the workgroup to RM c. Then hit OK to exit. Do not reboot.
Setup User Account
1. Click on Start-> Control Panel > User Accounts 2. Select “Change Your Account Name”
a. Enter “posuser” b. Click “Change Name button
3. While in the User Account window select “Change your account type” a. Click “Administrator”

b. Click Change Account Type button. 4. While in the User Account window select “Change your password”
a. Enter “posuser” for password b. Exit from password menu
5. While in the User Account window select “Change User Account Control Settings a. Move the slider to the lowest possible setting (Never Notify) b. Click OK
6. Close User Accounts and return the default Window screen.
Login without Password
1. Open the Run menu (press WIN + R on keyboard) 2. Enter “control userpasswords2” and click “OK” 3. Select “posuser” on the User Name list in the User Account window uncheck the option
“Users must enter a user name and password to use this computer ” “and press “OK”
At this point you will need to restart the computer.
Map Network Drive
1. Open Windows Explorer by double clicking on the Computer icon on the Desktop. 2. Click on Tools menu and select Map Network Drive. 3. In the Map Network Drive window select the drive letter from the dropdown list adjacent
to Drive. 4. Choose F:\ as the network drive. 5. Click the Browse button and navigate to the rmwin folder on the rmserver 6. Check the box that reads “Reconnect on logon”. 7. Press Finish
SYNCHRONIZING TIME Using RMTIME.EXE
Version 17 comes with a Time Server (RMTIME.EXE) that you should use to enforce time
synchronization with the fileserver on all the POS stations. This method has the advantage of
periodically updating the POS station times (as compared to it only being updated when the
station boots up.)
To implement RMTIME:
1) Add a shortcut to RMTIME.EXE to the Windows startup folder of the fileserver so that i t will run every time the fileserver is booted up.
2) Enable clock synchronization under Setup->Stations->Miscellaneous->PC Clock.
INSTALLING TOUCH SCREEN DRIVERS In general, you should save the touch screen driver installation as the last step. This to avoid losing use of the mouse (right mouse button is disabled once the touch screen drivers are active.)
MicroTouch- XP Pro, Windows 7, POS Ready, or WePOS drivers supplied with the touch screen.

Elographic - XP Pro, Windows 7, POS Ready, or WePOS drivers supplied with the touch screen.
TouchSystems - XP Pro, Windows 7, POS Ready, or WePOS drivers supplied with the touch screen.
INSTALLING LOCAL CHECK/RECEIPT PRINTERS Printers used exclusively by the station they are connected to are referred to as Local Printers. These can be parallel or serial type printers. For local printers, RESTAURANT MANAGER does not require that a printer driver be installed.
You can use the DOS Port name (COM1-8, LPT1-3.) However, you must ensure that all stations have the printer attached to the same port, or create separate station configurations for those stations using a different port.
If using a serial printer, you must set the communication parameters as follows:
Select the System Icon (Start->Settings->Control Panel->System) Click on the Device Manager Tab Locate the port you wish to configure under Ports (COM and LPT) and click on it. Click on the Properties Button Select the Port Setting tab. Select the correct baud rate, parity, word length and stop bits for the printer. Set the
"Flow Control" to “hardware”
The main advantage in using DOS device names resides in immediate printer status detection.
Connecting POS Stations to Shared Printers (Restaurant Manager Spooling)
Under Station Configuration ->Devices in the Restaurant Manager Backoffice program, enter the desired printer names for the prep area printers, prefixed with a # sign. The # sign prefix indicates that a RMSPOOL instead of a Windows defined printer is to be used. For example, if you name a printer KITCHENP in the RMSPOOL Configuration program, you would enter #KITCHENP as the device name. See the “Printer Server Setup (Restaurant Manager Spooling)” section for instructions on setting up a Restaurant Manager Print Spooler.
Connecting POS Stations to Shared Printers (Windows Spooling)
IMPORTANT: ASI strongly recommends you use the new Restaurant Manager Printer
Spooler instead of the Windows spooler. This section is provided for backward compatibility and for special situations when you might require Windows spooling services. See the “Print Server Setup (Restaurant Manager Spooling)” section for more information.
Understanding Printer Redirection
Under Windows, all printer output must be channeled via a local printer device. A local printer may or may not be “attached” to a printer located on a remote machine. A local printer need not physically exist to define a local printer driver. Attaching a local printer to a remote printer is referred to as redirecting the printer output.
Establishing Remote Printing (XP Pro, Win 7 or WePOS)

To establish remote printing do the following:
1. Define the printers to be shared on the file or print server (see above) (e.g. KITCHENPR, BARPR)
2. At each POS station, define a printer (Generic Text type) for each shared printer that needs to be accessed. Establish a connection to the shared printer by checking the “Network” option during the printer setup process. We recommend you give the local printer the same name as the shared printer. This will simplify the Station Configuration under Restaurant Manager.
3. Test the connection. 4. In Restaurant Manager, under Station Configuration -> Devices -> Remote Printers,
enter the LOCAL printer name for the remote printers being used.
Example:
On the system fileserver we add a local Windows Printer naming it KITCHENPRT and attach it to local port COM2. The printer is made shareable.
On a POS Workstation we add a Windows Printer and also name it KITCHENPRT. We DO NOT attach it to a local port, but to the networked printer defined above, KITCHENPRT
In Restaurant Manager we configure Remote Printer 1 as KITCHENPRT.
Thus, when the POS Workstation prints to Remote Printer 1, the flow is as follows:
Remote Printer 1 KITCHENPRT (local) KITCHENPRT (on Print Server) COM2
Note that both KITCHENPRTs must be defined with the Generic Text Printer driver.
INSTALLING CUSTOMER DISPLAYS External Customer Displays that attach to a serial port (COM1-8), are driven directly by RESTAURANT MANAGER. Simply enter the port name under Station Configuration, and configure the port as described above for local printers.
INSTALLING CASH DRAWERS For cash drawers that attach directly to a serial port (COM1-8), follow the same procedures as described under Installing Local Check/Receipt printers. Then insert the trigger codes for the cash drawer under Printer Codes, in Station Configuration.
The following document will explain Installing Compulsory Cash Drawers
http://www.actionsystems.com/TechSupport/Compulsory%20Cash%20Drawer.htm
How to setup dual cash drawers:
Here are the steps to setup Dual Cash Drawers under RM:
1. Create a printer type called Cash Drawer B in PRTCODES.DBF database. You can open this file by going in to DOS, c:\rmwin and typing dbu prtcodes.dbf

2. Then in Backoffice, under station configuration, under Devices, Printer Codes, select that new printer type and enter the Cash Drawer B codes into "Open Cash Drawer" field. For example, for Epson TMT88 it would be 27 112 1 50 200
3. Then again under Devices, POS Cash Drawers, Generic Cash Drawer Setup, for Cash Drawer B, enter the printer name (same as Cash Drawers A) for Primary Device. Then for Printer Type enter the new printer type you created in prtcodes.dbf: Cash Drawer B
INSTALLATION TIPS • Always burn in and stage installation in office before delivering to customer
• Write down how each POS is configured from a-z, i.e. IP addresses, computer system name (check list)
• Cloning/ghosting: get one machine to work and ghost its image to the other stations
• Have a menu template for different types of restaurants (i.e. bar, pizza stores)
• Have a Cat5 Cable tester
• Label/color code cables
• Use UPS/line conditioners on each and every device connected to the system (don’t forget hubs, switches, office printers, and credit card boxes……….)
• Use similar hardware
• Configure and Run RMSTART.EXE
Before the system leaves the office:
• Have a data backup system
• Install pcAnywhere (or other remote connectivity application) not just on server but also on stations to access site remotely
• Make sure all components work from a-z
Before going live:
• Sysgen.exe
BASIC TROUBLESHOOTING
ORDERS DO NOT GET PRINTED ON PREP-PRINTERS. Possible Reasons:
Printers are not setup correctly under RMSpooler Setup Printers are not setup correctly under Backoffice > Station Configuration > Devices >
Pre-printers

Menu items do not have correct printers assigned Printer is out of paper Incorrect printer cable Bad COM or LPT Port Defective Printer
RECEIPTS DO NOT GET PRINTED ON RECEIPT PRINTERS Possible Reasons:
Printers are not setup correctly under RMSpooler Setup or under Windows Spooler Printers are not setup correctly under Backoffice > Station Configuration > Devices >
POS printers Printer is out of paper Incorrect printer cable Bad COM or LPT Port Defective Printer
CREDIT CARD CANNOT BE PROCESSED Possible Reasons:
Credit Cards are not setup correctly under Backoffice > Station Configuration > Miscellaneous > Credit Card Processing
RMCCWIN.EXE is not running Credit Cards are not enabled under System Configuration
CANNOT OPEN CASH DRAWER Possible Reasons:
Cash Drawer is not setup correctly under Backoffice > Station Configuration > Devices > Cash Drawers
Incorrect Cash Drawer open codes under Backoffice > Station Configuration > Devices > Printer Codes
Incorrect Cable Defective Drawer Cash Tray requires initialization, but not initialized No signal is sent to the Cash Drawer via printer
Cash Drawer is locked Cash Drawer cable is not snuggly connected, so it won’t fire when given signal
NOTES 1) Windows NT does not provide 2-way printer/job status information; hence automatic backup printers cannot be implemented. In case of failure, you must manually configure Restaurant Manager to use a
backup printer. To implement automatic backup printers, you must have the shared printers attached to a
Windows 95 machine.
2) Spool data format must be set to EMF on originating computer to ensure proper printing on printers
attached to Windows NT machines.
3) Some check printers interpret the Form Feed character sent by the POS. Disable by setting the paper
option for the printer to Continuous - No Page Break. This setting is found under the Paper Tab in Printer

Properties. If this does not work, you can try setting the page length to 1 using printer codes. E.g. For the
Star SP312, 27 67 01.
4) Unexplained problems writing to shared printer on NT Workstation. Solution: Delete and then Add
problem printer on NT Workstation.
5) If using MicroTouch screens make sure that at least one copy on the drivers are included or that you
have access to their web site to download.
If you have remote printing problems...
A common problem with Windows 95 printing is that sometimes a job will "hang up" in the queue, not allowing subsequent jobs to print. Following are some suggestions on how to fix the problem.
1) Make sure machine sharing printers is set up as a server. Control Panel-> System->Performance->File System->Typical role of this machine.
2) Apparently Windows 95 doesn't like running the remote printers @ 9600 baud. Symptoms are spurious "disconnects" and printer send errors. To resolve, set baud rate to 2400.
3) Check handshaking. We recommend hardware handshaking (DTR/DTS), however if locking persists, it's worth trying the XON/XOFF configuration. Note that both the Windows 95 and the printers must implement the same handshaking protocol.
4) Make sure the print server does not make use of COM4 (Some Plug and Play modems will automatically use this port.) For some mysterious reason this can cause problems.
5) Use a faster machine for remote printing.