Resource Scheduler User Training · Resource Scheduler User Training Office of School Services and...
30
Resource Scheduler User Training Office of School Services and Room Reservations Room S3-104 (508) 856-2264 Compiled by Heidi Beberman and Karen J. Zirpola-Miller 4/10/2013
Transcript of Resource Scheduler User Training · Resource Scheduler User Training Office of School Services and...

Resource Scheduler User Training Office of School Services and Room Reservations
Room S3-104
(508) 856-2264
Compiled by Heidi Beberman and Karen J. Zirpola-Miller
4/10/2013

Table of Contents
1. Training URL Pg. 3
2. Logging in the first time Pg.4
3. Resource Scheduler Home Page Pg. 5
4. Quick Links Pg. 6
5. Reservation Wizard: Step-by-Step for a single event reservation Pg. 7-12
6. Approvals Pg. 13
7. Options from the Reservations Details Page Pg. 14
8. Copy Feature Pg. 15
9. Home Page Tools Pg. 16-18
10. Reservation Wizard: Step-by-Step for a recurring event reservation Pg. 19-24
11. Conflicts! Pg. 25
12. Revising a single event reservation Pg. 26
13. Revising a recurring event reservation Pg. 27
14. Ad Hoc – adding a single date to a reservation Pg. 28
15. Deleting a reservation Pg. 29
2

Copy and Paste the training URL below to the web browser:
http://qa-resourcescheduler.umassmed.edu/resourcescheduler/
THIS URL IS THE TRAINING SITE ONLY –
USE THIS LINK TO PRACTICE ENTERING RESERVATIONS ONLY. IT IS NOT THE LIVE SITE.
3

Logging in the first time:
1. Copy and paste the Resource Scheduler Training Link (on previous page) into the web browser. It will open the Resource Scheduler General Options page.
2. Enter email address (required)
3. Enter 10 digit phone number (required)
4. Enter Business unit and Account code, both are the same (either UMMS or UMMHC)
3. Enter department and click submit to return to the Resource Scheduler Home Page.
4. The Resource Scheduler Home Page is personalized to each user and becomes a personal desktop listing of all the users’ reservations (My Reservations).
Note: If Resource Scheduler appears difficult to see, by changing the Screen size %, it can be enlarged.
i. Go to View
ii. Scroll down to Zoom
iii. Select the % - 125% works best
4

Resource Scheduler Home Page
1. The Resource Scheduler Home Page is divided into five sections
2. On the left side under UMass Medical School is the list of Resources/Rooms
3. On the right side there are four components.
a. Quick Links - One click access to all reservation information
b. Welcome - UMMS Logo
c. My Favorites – Daily availability at a glance for the rooms the user selects as favorites
d. My Reservations – a listing of all reservations by date the user has created or is the requested for
5

3
Quick Links 1. Reservation Wizard
The link used to enter all reservations
2. Search Reservations
The link to define the criteria for searching reservations
3. Display Resource Availability
The link to check availability for a specific date
4. Reservation Quick List
The link to search reservations for a specific date and time
6

4
From the Resource Scheduler Home Page:
1. Click on Reservation Wizard - at the top of the page or under Quick Links. (The information entered here will define the search of available rooms for an event.)
2. To find all available rooms for an event, skip down to Start Date. Click on the calendar icon to the
right of Start Date and select the date by clicking on it.
3. Select a Start Time and End Time (pull down menu for am and pm).
4. The End Date will fill in automatically with the same date as the Start Date.
5. Under Recurring the default is None, this is the setting for a single reservation.
6. Click Submit at the bottom of the page.
7. Click Next and the Search Results page will open with all available rooms.
7
5
1. The Search Results page displays a list of available rooms for the date and time selected. The white area on the right is the time being requested.
2. By hovering the mouse over the “i” (information icon) to the left of each room a description page opens with a description and a picture of the room at the bottom (by clicking on it, it will remain open to scroll up and down).
3. Select a room or rooms by clicking on the box to the left of each room.
4. At the top of the page, fill out the Reservation Name, #Of Attendees, and Color (a pull down menu - choose
one that best describes the event).
5. Click Submit at the bottom of the page.
6. The Reservation Confirmation page opens with the details of the reservation. NOTE: The Faculty Conference Room (FCR) requires a half hour set up and breakdown time that is automatically added to the reservation. If there is an event immediately before or following the time being booked (see arrow above), an error message will appear “Resources Not Available” and the start or end time of the event will have to be adjusted. (The red arrow indicates there is an event in the Faculty Conference room beginning at 11:00 a.m. – the orange block. The time being requested is 9:00 to 11:00, which is the white field, and the FCR shows as available. Because the FCR requires the set up and break down time, in order to reserve it, the event end time must be 10:00 a.m. to allow a half hour breakdown before set up begins for the next event at 10:30)
8

6
Click Edit
1. On the left side under Primary Information the Reservation Title and Created By information is listed.
2. Below that is the Reservation Description with date and time.
3. On the right side is the Reference Number and Resources (rooms).
4. There are four tabs at the bottom of the page. PIM (Personal Information Manager - used to download the
reservation to Outlook), Edit, Finished and Print.
5. Click on the Edit button to open the Reservation Details page in order to complete the required fields.
9
7
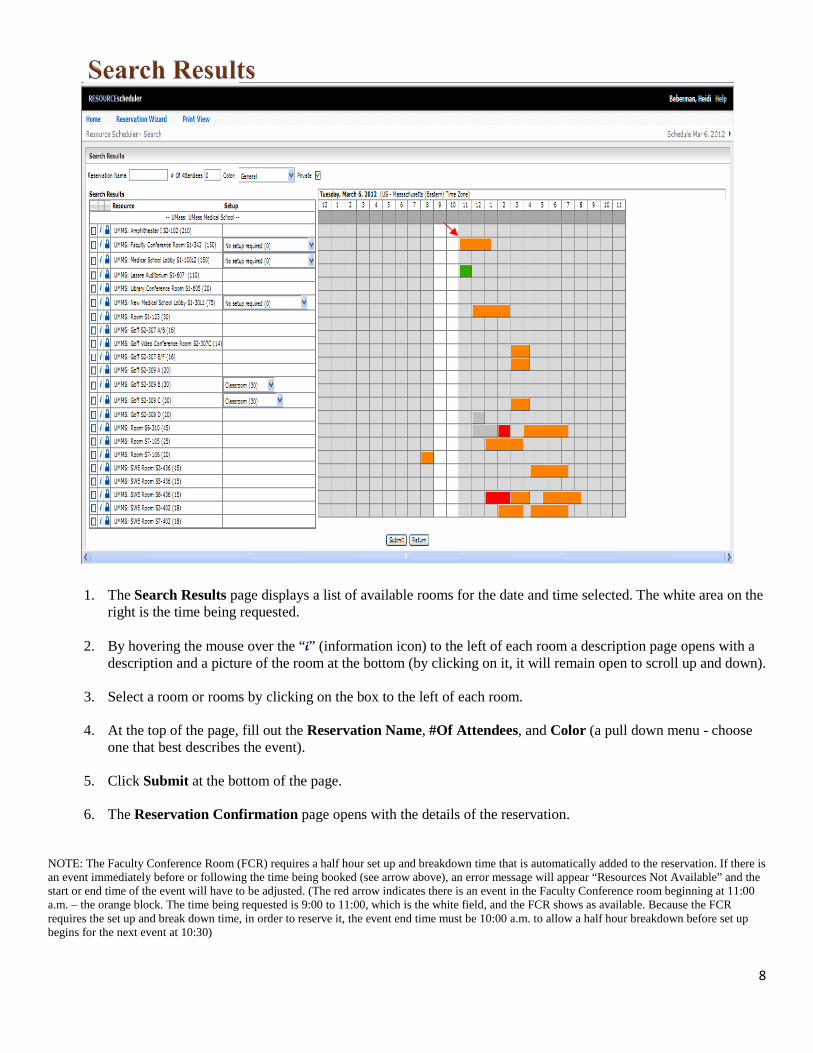
Reservation Details
The required fields (under Options) must be filled out first – they are in RED print.
1. Account Code – a pull down menu, select UMMS or UMMHC.
2. Second Contact – a contact other than yourself, who can be contacted if there are any questions concerning the event
3. Contact Phone – a full phone number, including area code, is required (i.e. 508-856-2264)
4. Catering Needed – a pull down menu – select yes or no
5. A/V Needed - a pull down menu – select yes or no
6. Reservation Types – select one that best describes the event 7. On Behalf of (see next page)
For approval all required fields MUST be filled out.
10

8
1. On the bottom left of the Reservation Details page, click On Behalf of to display the Edit button.
2. Click Edit.
3. A box will open requesting to Save the Changes? (required information entered under Options), click OK.
4. Requested For is required. It should be filled out with the name of the person who requested the reservation or it can be the same as the person creating the reservation. Requested By is not required (see notes below).
5. The On Behalf of information can be entered manually, selected from the Resource Scheduler User List or the
Personal Address Book.
Note: A ‘Requested For’ contact (only if selected from the Resource Scheduler User list) will be able to see the reservation under My Reservations on that user’s Home Page and has permission to make changes. The user who created the reservation will also see it under My Reservations.
A ‘Requested By’ user does not see the reservation under My Reservations and does not have permission to make changes.
11

9
1. To select from the Resource Scheduler User List click on it. The list of users will open. 2. Type in the last name under Value and click Show Users. Check Requested For or Requested By to the
left of the contact’s name.
3. Click Close Window.
4. Check whether the contact should be sent emails.
5. Click Submit to complete this section and return to the Reservation Details Page.
6. If the room being requested is the FCR, the ASC MPR or one of the Lobbies, the Reservation Description field must be filled out with the details of the event prior to approval.
7. Click Save and Done, the Reservation Confirmation page will open.
8. Click Finished, the Reservation Wizard will open. To create a new reservation click Clear.
9. To return to the Home Page, click Home on the top left of the page.
10. All reservations created will be listed by date under My Reservations.
12

10
1. All reservations place a hold on the room(s) selected pending approval by room reservations. 2. To view a reservation to see if it’s pending or approved, click on the reservation from your Home Page. The
Reservation Details page will open.
3. If the reservation is pending, the word Pending is noted to the right of each resource/room.
4. Also, on the bottom right left corner of the page, the notation (This reservation is pending approval).
5. When the reservation is approved, the word Pending is replaced with Approved to the right of the resource/room and the notation (This reservation is pending approval) will be gone.
6. In addition, an email is generated to notify the user.
Note: The ‘?’ on the calendar view page in front of the reservation name is a visual indicator that the reservation is pending approval. Once the reservation is approved the ‘?’ mark goes away.
13

Emailing and other options from the Reservation Details Page
Emailing a reservation to participants:
1. To email a reservation to all participants, open the Reservation Details Page. Under Description and People click To:
2. Participants can be entered manually entered or selected from the Resource Scheduler User List or the Personal Address Book. Complete the Name, Company (department), Email and Phone of all participants.
3. On a recurring reservation, go to the bottom of the page and click whether the participants are to be added to Only
This Reservation or This and All Future Instances.
4. Click Submit and return to the Reservation Details Page.
5. On the top right corner of the page, click Email, to the right of the envelope icon.
6. The Edit Email Notification page will open. Confirm the email addresses are correct and click Submit. An email will be sent with the details of the reservation to all the participants. On a recurring reservation, all the dates on the reservation will be sent.
7. To the left of Email, there’s a Print button that will print the entire reservation.
8. To the right of Email, there’s a Download button. This feature will Download the reservation to the user’s
Outlook Calendar by following the prompts.
14

1. From the Reservation Details page, Copy is on the bottom left of the page, click it.
2. The Copy Reservation page opens.
3. On the bottom left, check which items from the existing reservation are to be copied:
a. Copy Attendees and Visitors
b. Copy Requested For/By
c. Copy Option Information
4. Under Time on the top right, the time of the reservation will be the same as the copied reservation (it can be
changed). A new Start and End date must be selected by clicking the calendar icon and selecting a date.
5. The Resources/Rooms will be the same as the copied reservation
6. Click Copy on the bottom right of the page.
7. The Reservation Details page for the copied reservation will open.
8. Click Save and Done and the copied reservation is complete.
9. The copied reservation can be found under My Reservations on the Home Page.
15

11
My Favorites -This feature allows users to see daily availability of their favorite rooms.
1. Double click on a room from the Home Page – on the left side of the page, under UMass Medical School. Scroll down to the yellow star in front of :
Add this to my favorites …
2. Click Add this to my favorites.
3. Click Home on the top left of the page under RESOURCEScheduler to return to the Home Page. The room will
be listed under My Favorites.
4. By adding a room to My Favorites, the user has daily availability of that room at a glance.
5. By clicking the blue arrow to the right of the date the availability for future dates will be displayed.
6. At the bottom of My Favorites and My Reservations, is the word More… click on it to open the page.
7. On the Home Page, the word Help is on the top right hand corner of Resource Scheduler, click it and there is a User Welcome Page for on-line help. There is also a search feature to find answers to specific questions.
16

12
1. From the Home Page, click on user name in the top right hand corner.
2. From the General Options page, click on Personal Address Book
3. Create a personal address book of frequently used contacts or meeting attendees by clicking on Create New Contact on the top right of the screen.
4. Enter the information and click Submit at the bottom of the page.
5. The contact will be displayed in the user’s Personal Address Book.
17

13
A key feature of Resource Scheduler is the information icon, a blue “i”
1. By hovering the mouse over the “i” throughout the program, a description field opens.
2. By hovering the mouse over the “i” next to a reservation name (Try this from the Home Page) a description field with the reservation details will be displayed.
3. By hovering the mouse over the “i” next to a resource/room, a description field will open with a list of all the
features in the room. By clicking on it, it will remain open so you can scroll up and down to see the features and a photograph of the room.
4. By hovering the mouse over the “i” next to a user name (Try this from the Reservation Details Page) a
description field with the user’s contact information will be displayed.
18

14
From the Resource Scheduler Home Page:
1. Click Reservation Wizard - at the top of the page or under Quick Links. (The information entered here will define the search of available rooms for the event.)
2. To find all available rooms for an event, skip down to Start Date. Click the calendar icon to the right of Start
Date and select the date by clicking on it.
3. Enter the first date of the reservation by clicking on the calendar icon to the right of Start Date. Choose the date by clicking on it. The End Date should be the same as the start date.
4. Select a Start Time and End Time for the event (from the pull down menu).
5. The End Date will fill in automatically with the same date as the Start Date.
6. Skip down to Recurring and select the type of recurring event.
19

Choosing the type of recurring event
15
1. Under RECURRING, the default is None.
2. Select 1 of 3 recurring options: Daily, Weekly or Monthly.
3. For Daily select: a. Every 1 Day(s) OR b. Every Weekday
4. For Weekly select:
a. Every 1 Week (s) b. Check off the day(s) of the week
5. For Monthly select:
a. The 1st day of every 1 month(s) b. The 1st Sunday of every 1 month (s)
6. Then select the date the event is recurring Until by clicking on the calendar icon to the right. If the last date of the
recurring reservation is June 25th, choose June 26th as an end date so that June 25th will be included in the reservation.
7. Click Next and the Search Results page will be displayed.
20

16
1. A list of available rooms for the dates and time selected will open. A room will only show if it’s available for all dates on a recurring reservation. If there are no rooms available for all dates, see * below.
2. By hovering the mouse over the “i”, a full description of each room will open (by clicking on it, it will remain open to scroll up and down).
3. Select a room or rooms by clicking on the box to the left of the each.
4. At the top of the page, fill out the Reservation Name, #Of Attendees, and Color (a pull down menu).
5. Click Submit at the bottom of the page.
6. The Reservation Confirmation page will open with the details of the reservation.
7. Click Edit to open the Reservation Details page.
*If there are no rooms available for all dates requested, enter the reservation as a single reservation (pg.5). From the Reservation Details Page, click (Options) after Repeat under Date and Time. The Recurring page opens. Make the event recurring from here by selecting Daily, Weekly, or Monthly and then selecting the Until date. This will create a recurring reservation with all the dates, and put the dates the room is not available, in Conflict (see page 25on how to resolve conflicts). A new room will have to be selected for the dates in Conflict.
21
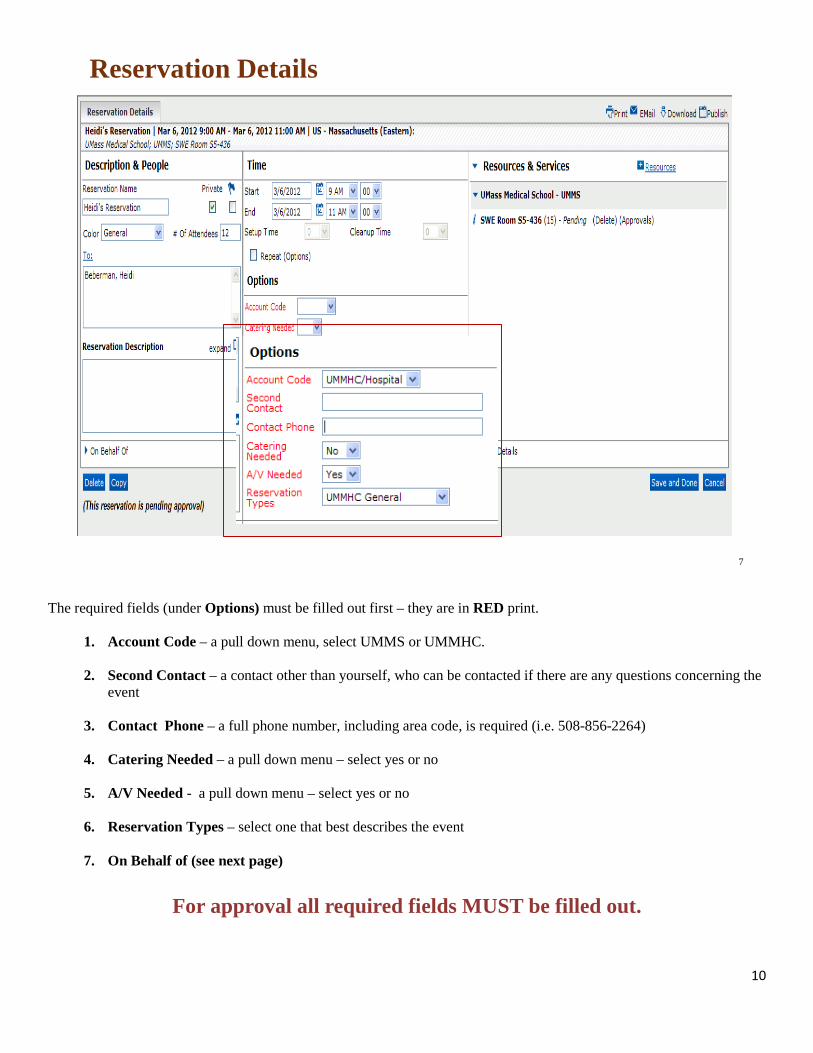
Feature for recurring reservations only
1. Fill out the required fields under Options first (they are in red print).
2. Before clicking On Behalf of – notice the new features at the bottom of the page below Reservation History. One of these two options must be selected anytime a change is made to the reservation.
3. Choose Only This Reservation to make a change to the date displayed on the reservation details page
only.
4. Choose This and All Future Instances to make a change to all dates on the recurring reservation, from the date displayed, forward.
22

On Behalf of
1. On the bottom left of the Reservation Details page, click On Behalf of to display the Edit button.
2. Click Edit.
3. A screen will open asking to Save the Changes (the required information entered first), click OK.
4. Requested For is required. It should be filled out with the name of the person who requested the reservation or it can be the same as the person creating the reservation. Requested By is not required (see notes below).
5. The On Behalf of information can be entered manually, selected from the Resource Scheduler User
List or the Personal Address Book.
Note: A ‘Requested For’ contact (if selected from the Resource Scheduler User list) will be able to see the reservation under My Reservations on that user’s Home Page and has permission to make changes to the reservation. The user who created the reservation will also see it under My Reservations.
A ‘Requested By’ user does not see the reservation under My Reservations and does not have permission to make changes.
23

19
1. Under Time, below Repeat (Options) the details of the recurring event are described.
2. To see a list of dates on a recurring reservation, click (Options) after Repeat , the Recurring Options page will open.
3. The list of dates on the recurring reservation is displayed. Next to each date is a green check mark.The green
checkmark indicates the date is scheduled and there have been no changes to the reservation on that date.
4. When a change is made to the reservation on a single date, the green check mark is replaced by a green star.
5. If there is a conflict, there will be a red exclamation mark. The red exclamation indicates the date is not scheduled. A different room must be selected and then the room in conflict must be deleted to resolve the conflict.
6. If the room being requested is the FCR, the ASC MPR or one of the Lobbies, fill out the Reservation
Description with a description of the event prior to approval.
7. Click Save and Done, the Reservation Confirmation page will open.
8. Click Finished and then click Home to return to the Home Page.
24
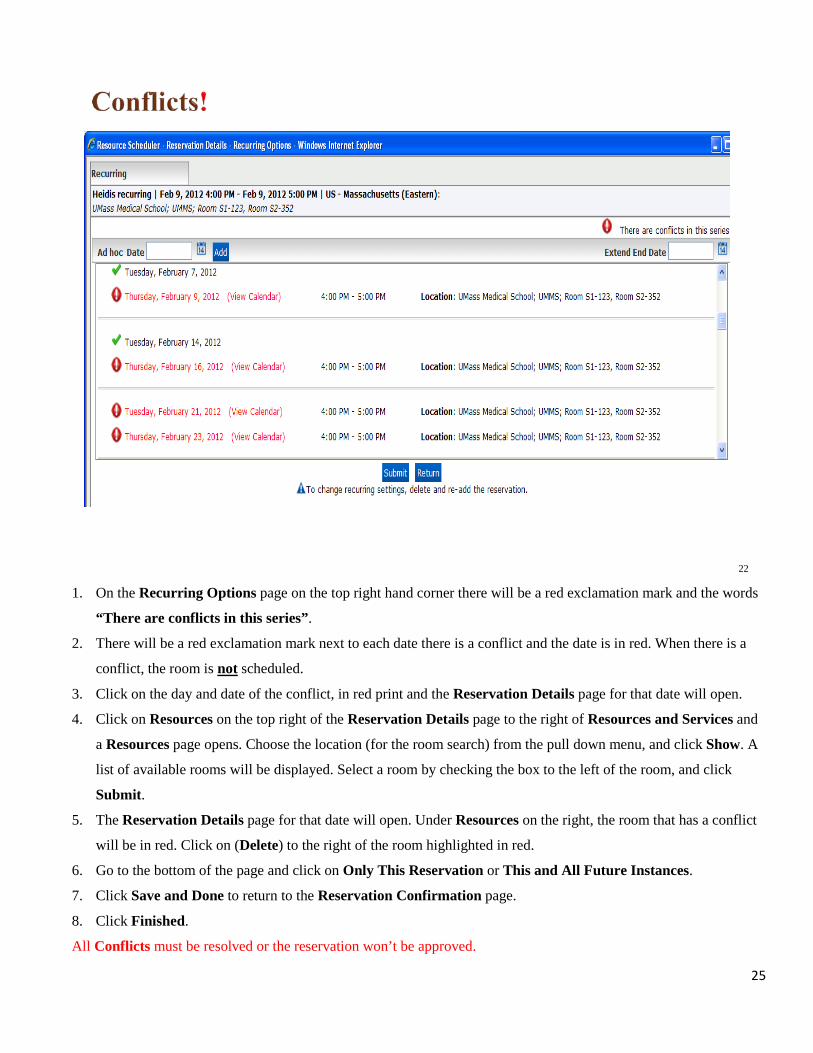
22
1. On the Recurring Options page on the top right hand corner there will be a red exclamation mark and the words
“There are conflicts in this series”.
2. There will be a red exclamation mark next to each date there is a conflict and the date is in red. When there is a
conflict, the room is not scheduled.
3. Click on the day and date of the conflict, in red print and the Reservation Details page for that date will open.
4. Click on Resources on the top right of the Reservation Details page to the right of Resources and Services and
a Resources page opens. Choose the location (for the room search) from the pull down menu, and click Show. A
list of available rooms will be displayed. Select a room by checking the box to the left of the room, and click
Submit.
5. The Reservation Details page for that date will open. Under Resources on the right, the room that has a conflict
will be in red. Click on (Delete) to the right of the room highlighted in red.
6. Go to the bottom of the page and click on Only This Reservation or This and All Future Instances.
7. Click Save and Done to return to the Reservation Confirmation page.
8. Click Finished.
All Conflicts must be resolved or the reservation won’t be approved.
25

20
1. To make changes to a reservation, open to the Reservation Details page. Changes can be made to the following: time, date, contact information, event name, room selection, # of attendees, etc.
2. To change a room, click Resources to the right of Resources and Services and a Resources page opens. Choose
the location from the pull down menu, and click Show. A list of available rooms will be displayed. Select a room by checking off the box to the left of the room, and click Submit.
3. To remove a room, click (Delete) to the right of the room to be released. A room cannot be deleted until a new
room is chosen.
4. When finished making all changes click Save and Done to return to the Reservation Confirmation page.
5. Click Finished and the changes are complete. To review any changes, go to the Home Page and find the reservation under My Reservations.
26

20
1. To make changes to a reservation, open the Reservation Details page. Changes can be made to the following: time, date, contact information, event name, room selection, # of attendees, etc.
2. When (Options) is clicked, a “Do you wish to save the changes you made on this page?” screen will appear. On a recurring reservation, determine whether the changes are to be made to This and All Future Instances on a reservation, or Only This Reservation and select the appropriate box at the bottom of the page before answering OK to save.
3. To make a change for all dates on a recurring reservation, the change must be made on the first day of the reservation, and then This and All Future Instances must be selected. If a change is made on a date, other than the first date, and This and All Future Instances is selected, the change will only be made to future dates, not dates prior to the date of the change.
4. To make a change for one day only on a recurring reservation, select Only This Reservation, at the bottom of the Reservation Details page.
5. To change a room, click Resources to the right of Resources and Services and a Resources page opens. Choose the location from the pull down menu, and click Show. A list of available rooms will be displayed. Select a room by checking off the box to the left of the room, and click Submit.
6. To remove a room, click on (Delete) to the right of the room to be released. A room cannot be deleted until a new room is selected.
7. When finished making all changes click Save and Done to return to the Reservation Confirmation page. 8. Click Finished and the changes are complete. To review any changes, go to the Home Page and find the
reservation under My Reservations.
27

21
Ad Hoc - Adding a single date to a reservation
1. Ad Hoc allows the user to add a single date to a reservation, single event or recurring.
2. From the Reservation Details page, click on Options, the recurring page will open. Select Ad Hoc, by clicking on the circle to the left of it. Select the date to be added by clicking on the calendar icon to the right of Date, below the words Ad Hoc. Select the date, and click Add. The recurring details page will open. (Ad Hoc is the only way to add a single date to a recurring reservation).
3. The Ad Hoc date selected will be displayed in the list of recurring dates on the reservation with the same
room and time as the first date on the reservation. Click Return and then click Save and Done.
4. An Ad Hoc date is added to a single event reservation the same way. A single event reservation can also be changed to a recurring event. Click on Options, the recurring page will open. Choose the type of recurring event; daily, weekly or monthly. Choose the frequency of the recurrence and the when the reservation is recurring until, by choosing a date from the calendar icon. Click Submit at the bottom of the page and the Reservation Details page will open. If there are no changes, click Save and Done.
5. The Reservation Confirmation page will open. Click Finished and then Home to return to the Home Page.
28

23
Deleting a reservation
1. To delete a single event reservation, click Delete in the bottom left hand corner of the Reservation Details page.
2. A “Continue with delete of this schedule?” screen will open. Click OK, the reservation is deleted.
3. On recurring event reservations, before clicking delete, select Only this reservation or This and all future instances. If Only this reservation is selected, it will only delete the date open to the Reservation Details page. If This and all future instances is selected, the date open and all future dates on the reservation will be deleted.
29

To begin booking rooms log on to Resource Scheduler from the room reservations home page on the School Intranet:
http://www.umassmed.edu/roomreservations/index.aspx
Click “Book a Room” and follow steps 1 thru 4 on page 4 of this handout.
30