RESOLV WMS - Achieve IT Solutionsachieveits.com/assets/whitepapers/Resolv 9.2 HANA - WMS Users...
320
RESOLV WMS USER MANUAL PRESENTED BY ACHIEVE IT SOLUTIONS
Transcript of RESOLV WMS - Achieve IT Solutionsachieveits.com/assets/whitepapers/Resolv 9.2 HANA - WMS Users...

RESOLV WMS
USER MANUAL
PRESENTED BY
ACHIEVE IT SOLUTIONS

Copyright 2010, 2011, 2016 by Achieve IT Solutions These materials are subject to change without notice. These materials are provided by Achieve IT Solutions for informational purposes only, without representation or warranty of any kind, and Achieve IT Solutions shall not be liable for errors or omissions with respect to the materials. The use and copying of this document and the associated computer software is subject to Achieve IT Solutions customer registration agreement. Any other use is prohibited. Resolv +Mobility is a trademark of Achieve IT Solutions. SAP Business One is a trademark of SAP AG. All other trademark or service marks are the property of their respective owners.
Achieve IT Solutions 640 Belle Terre Road Building B Port Jefferson, NY 11777 631-543-3200
Resolv WMS is part of the Achieve One Suite, which has been certified by SAP as conforming to SAP’s standards for Business One add-on solutions.

Table of Contents 36TResolv WMS36T .................................................................................................................................... 1
36TPrerequisites36T ............................................................................................................................... 1 36TWarehouse Codes & Bin Locations36T ..................................................................................... 1 36TBin Location Field Activation 36T............................................................................................... 2 36TWarehouse Sublevel Codes 36T ................................................................................................ 2 36TUnits of Measure and Weight 36T ............................................................................................. 2
36TMaster Data36T ............................................................................................................................ 2 36TReceiving Bin Location 36T ........................................................................................................ 2 36TRestrictions36T ......................................................................................................................... 3 36TBarcodes 36T .............................................................................................................................. 3
36TConfiguration36T .............................................................................................................................. 4 36TTo Access Resolv WMS Configuration 36T .................................................................................... 4
36T2D Barcodes36T ........................................................................................................................ 6 36TMaster 2D-1D Barcodes 36T .............................................................................................................. 7 36TTo Setup a Barcode Template 36T ..................................................................................................... 7 36TUser Settings and Authorizations 36T ............................................................................................. 10
36TTo Access Settings 36T ................................................................................................................. 10 36TTo Activate a Mobile User License 36T ........................................................................................ 13
36TResolv Mobile Login Page 36T ......................................................................................................... 16 36TFields36T ..................................................................................................................................... 17
36T1. Company 36T ....................................................................................................................... 17 36T2. Employee36T....................................................................................................................... 18 36T3. Password36T ....................................................................................................................... 19 36T4. Warehouse36T .................................................................................................................... 19 36T5. Language36T ....................................................................................................................... 20 36T6. Remember me36T .............................................................................................................. 21
36TCompany List36T ............................................................................................................................. 22 36TTo search for a SAP Business One Company 36T......................................................................... 22
36TResolv WMS User Preferences & Settings 36T ................................................................................ 24 36TSettings36T .................................................................................................................................. 24
36TCompact Mode36T.................................................................................................................. 24 36TTheme Select36T ..................................................................................................................... 25 36TLanguage36T ........................................................................................................................... 25
36TUser Preferences36T ................................................................................................................... 26 36THide Finished 36T ..................................................................................................................... 26 36TQuick Scan 36T ......................................................................................................................... 26 36TWarehouse36T ........................................................................................................................ 27
36TAbout36T ..................................................................................................................................... 27 36TLogout36T ................................................................................................................................... 28
36TMain Menu36T ................................................................................................................................ 29 36TMain Menu access as follows: 36T .............................................................................................. 29

36TPicking Menu:36T.................................................................................................................... 29 36TReceiving Menu:36T ............................................................................................................... 30 36TInventory Menu:36T ............................................................................................................... 30 36TProduction Menu:36T ............................................................................................................. 30 36TCounting Menu: 36T ................................................................................................................ 30 36TAnalytics' Menu:36T ............................................................................................................... 30
36TPicking36T ........................................................................................................................................... 31 36TPicking Menu36T ............................................................................................................................. 31
36TMenu Overview36T ..................................................................................................................... 31 36TPick List Generation 36T .......................................................................................................... 32
36TAll Pick Lists36T ............................................................................................................................... 33 36TTo access All Pick Lists36T ........................................................................................................... 33
36TAll Pick List Processing36T .............................................................................................................. 35 36TSelect a Pick List to process 36T .................................................................................................. 35
36TAll Pick List Lookup 36T .................................................................................................................... 38 36TSearch By36T ............................................................................................................................... 38 36TSort By36T ................................................................................................................................... 40
36TAll Pick List Entry 36T ....................................................................................................................... 42 36TProcessing a Pick List Entry 36T ................................................................................................... 42
36TAll Pick List Details36T ..................................................................................................................... 45 36TSorting for All Pick Lists 36T ............................................................................................................. 48
36TAccessing Pick List Sorting 36T..................................................................................................... 48 36TSales Order Pick Lists36T ................................................................................................................ 51
36TTo access Sales Order Pick Lists 36T ............................................................................................ 51 36TSales Order Pick List Processing 36T ................................................................................................ 53
36TSelect a Sales Order Pick List to process 36T ............................................................................... 53 36TSales Order Pick List Lookup 36T ..................................................................................................... 56
36TSearch By36T ............................................................................................................................... 56 36TSort By36T ................................................................................................................................... 58
36TSales Order Pick List Entry 36T ......................................................................................................... 60 36TProcessing a Sales Order Pick List Entry36T ................................................................................ 60
36TSales Order Pick List Details 36T ...................................................................................................... 63 36TSales Order Pick List Sorting 36T ...................................................................................................... 66
36TAccessing Sales Order Pick List Sorting 36T ................................................................................. 66 36TReserve Invoice Pick Lists36T .......................................................................................................... 69
36TTo access Reserve Invoice Pick Lists36T ..................................................................................... 69 36TReserve Invoice Pick List Processing36T ......................................................................................... 71
36TSelect a Reserve Invoice Pick List to process 36T ........................................................................ 71 36TReserve Invoice Pick List Lookup 36T .............................................................................................. 74
36TSearch By36T ............................................................................................................................... 75 36TSort By36T ................................................................................................................................... 76
36TReserve Invoice Pick List Entry36T .................................................................................................. 78 36TProcessing a Reserve Invoice Pick List Entry 36T ......................................................................... 78

36TReserve Invoice Pick List Details36T ............................................................................................... 81 36TReserve Invoice Pick List Sorting36T ............................................................................................... 84
36TAccessing Reserve Invoice Pick List Sorting 36T .......................................................................... 84 36TPacking - Feature is not yet available 36T ....................................................................................... 86
36TTo access Packing36T .................................................................................................................. 86 36TReceiving36T ....................................................................................................................................... 88
36TReceiving Menu36T......................................................................................................................... 88 36TMenu Overview36T ..................................................................................................................... 88
36TPurchase Order Generation 36T .............................................................................................. 88 36TPurchase Order Receiving 36T ......................................................................................................... 89
36TTo access a Purchase Order to Receive 36T ................................................................................ 89 36TPurchase Order Receiving Processing36T ....................................................................................... 91
36TSelect a Purchase Order to Receive 36T ...................................................................................... 91 36TPurchase Order Lookup 36T ............................................................................................................ 94
36TSearch By36T ............................................................................................................................... 95 36TSort By36T ................................................................................................................................... 96
36TPurchase Order Receiving Entry 36T ............................................................................................... 99 36TProcessing a Purchase Order Receiving Entry 36T ...................................................................... 99
36TPurchase Order Receiving Details 36T ........................................................................................... 102 36TSorting for Purchase Order Receiving36T ..................................................................................... 104
36TAccessing Purchase Order Receiving Sorting 36T ...................................................................... 104 36TContainer Receiving 36T ................................................................................................................ 106 36TContainer Receiving Processing 36T .............................................................................................. 108
36TSelect a Container to Receive 36T ............................................................................................. 108 36TContainer Lookup36T .................................................................................................................... 111
36TSearch By36T ............................................................................................................................. 112 36TSort By36T ................................................................................................................................. 113
36TContainer Receiving Entry 36T ....................................................................................................... 115 36TProcessing a Container Receipt 36T .......................................................................................... 115
36TContainer Receiving Details 36T .................................................................................................... 118 36TSorting for Container Receiving36T .............................................................................................. 119
36TAccessing Container Receiving Sorting 36T ............................................................................... 119 36TInventory36T ..................................................................................................................................... 121
36TInventory Menu36T ...................................................................................................................... 121 36TMenu Overview36T ................................................................................................................... 121
36TGoods Issue36T ............................................................................................................................. 123 36TAccessing Goods Issue 36T ........................................................................................................ 123
36TTo Process a Goods Issue 36T ................................................................................................ 124 36TSorting for Goods Issue 36T ........................................................................................................... 128
36TAccessing Goods Issue Sorting 36T ............................................................................................ 128 36TGoods Receipt36T ......................................................................................................................... 130
36TAccessing Goods Receipt 36T .................................................................................................... 130 36TTo Process a Goods Receipt 36T ............................................................................................ 131

36TSorting for Goods Receipt 36T ....................................................................................................... 135 36TAccessing Goods Receipt Sorting 36T ........................................................................................ 135
36TWarehouse Transfers36T .............................................................................................................. 137 36TTo access Warehouse Transfers 36T ......................................................................................... 137
36TTo Process a Warehouse Transfer 36T .................................................................................. 138 36TReminder:36T .................................................................................................................... 142
36TSorting for Warehouse Transfers 36T ............................................................................................ 144 36TAccessing Warehouse Transfers Sorting 36T ............................................................................. 144
36TBulk Bin Transfers36T ................................................................................................................... 146 36TTo access Bulk Bin Transfers 36T ............................................................................................... 146 36TTo Process a Bulk Bin Transfer 36T ............................................................................................ 147
36TITR Receiving 36T ........................................................................................................................... 149 36TSelect a ITR to Receive36T ........................................................................................................ 149
36TITR Receipt Processing36T ............................................................................................................ 151 36TSelect a ITR to Receipt to Process 36T ....................................................................................... 151
36TITR Receiving Lookup36T .............................................................................................................. 154 36TSearch By36T ............................................................................................................................. 155 36TSort By36T ................................................................................................................................. 156
36TITR Receiving Entry36T.................................................................................................................. 159 36TProcessing a ITR Receiving Entry 36T ........................................................................................ 159
36TITR Receiving Detail36T ................................................................................................................. 162 36TSorting for ITR Receiving 36T ......................................................................................................... 164
36TAccessing ITR Receiving Sorting36T .......................................................................................... 164 36TITR Pick Lists 36T ............................................................................................................................ 166
36TTo access a ITR Pick Lists36T ..................................................................................................... 166 36TPick List Generation 36T ........................................................................................................ 167
36TITR Pick List Processing36T ........................................................................................................... 168 36TSelect a ITR Pick List to process 36T .......................................................................................... 168
36TITR Pick List Lookup 36T ................................................................................................................. 171 36TSearch By36T ............................................................................................................................. 172 36TSort By36T ................................................................................................................................. 173
36TITR Pick List Entry36T .................................................................................................................... 176 36TProcessing a ITR Pick List Entry36T ........................................................................................... 176
36TITR Pick List Details36T .................................................................................................................. 179 36TSorting for ITR Pick Lists 36T .......................................................................................................... 182
36TAccessing ITR Pick List Sorting36T ............................................................................................ 182 36TBin Maintenance36T ..................................................................................................................... 184
36TAccessing Bin Maintenance 36T ................................................................................................ 184 36TTo Maintain a Bin 36T ................................................................................................................ 185
36TProduction36T ................................................................................................................................... 188 36TProduction Menu36T .................................................................................................................... 188
36TMenu Overview36T ................................................................................................................... 188 36TProduction Order Pick Lists 36T ..................................................................................................... 189

36TTo access Production Order Pick Lists 36T................................................................................. 189 36TProduction Order Pick List Lookup 36T.......................................................................................... 191
36TSearch By36T ............................................................................................................................. 192 36TSort By36T ................................................................................................................................. 193
36TProduction Order Pick List Processing 36T .................................................................................... 195 36TSelect a Production Order Pick List to process 36T ................................................................... 195
36TProduction Order Pick List Entry 36T ............................................................................................. 198 36TProcessing a Pick List Entry 36T ................................................................................................. 198
36TProduction Order Pick List Details 36T .......................................................................................... 201 36TSorting for Production Order Pick Lists 36T ................................................................................... 202
36TAccessing Production Order Pick List Sorting 36T ..................................................................... 202 36TProduction Receipt 36T ................................................................................................................. 204
36TSelect Production Order to Receive 36T .................................................................................... 204 36TProduction Receipt Processing 36T ............................................................................................... 206
36TSelect a Production Order to Receive 36T ................................................................................. 206 36TProduction Receipt Lookup 36T ..................................................................................................... 208
36TSearch By36T ............................................................................................................................. 209 36TSort By36T ................................................................................................................................. 210
36TProduction Order Receipt Entry 36T .............................................................................................. 212 36TProcessing a Production Order Receiving Entry 36T ................................................................. 212
36TProduction Receipt Details 36T ..................................................................................................... 215 36TSorting for Production Receipt 36T ............................................................................................... 216
36TAccessing Production Receipt Sorting 36T ................................................................................ 216 36TCounting36T ...................................................................................................................................... 218
36TCounting Menu36T ....................................................................................................................... 218 36TMenu Overview36T ................................................................................................................... 218
36TBin Count36T ................................................................................................................................. 220 36TTo Process a Bin Count 36T ........................................................................................................ 220
36TBin Count Detail36T ...................................................................................................................... 222 36TTo delete or edit a Bin Count prior to posting 36T .................................................................... 222
36TCycle Count36T ............................................................................................................................. 225 36TTo Process a Cycle Count 36T .................................................................................................... 225
36TCycle Count Detail36T ................................................................................................................... 228 36TTo delete or edit a Cycle Count prior to posting 36T................................................................. 228
36TPhysical Count36T ......................................................................................................................... 231 36TTo Process a Physical Count 36T ................................................................................................ 231
36TPhysical Count Detail36T .............................................................................................................. 234 36TTo delete or edit a Physical Count prior to posting 36T ............................................................ 234
36TAnalytics36T ...................................................................................................................................... 237 36TAnalytics Menu - This feature is not yet available 36T .................................................................. 237
36TMenu Overview36T ................................................................................................................... 237 36TAnalytical Reports - This feature is not yet available 36T ............................................................. 238 36TCurrent Status - This feature is not yet available 36T ................................................................... 239

36TKPI Cockpit - This feature is not yet available 36T ......................................................................... 240 36TWaving36T ........................................................................................................................................ 241
36TWave Creation 36T ........................................................................................................................ 241 36TTo Generate a Wave36T ........................................................................................................... 241
36TWaving with the Wizard 36T.......................................................................................................... 247 36TPick List Generation Wizard 36T ................................................................................................ 247
36TWaving - WMS View36T ................................................................................................................ 252 36TWaving Batched Items 36T ............................................................................................................ 253 36TWaving Serialized Items 36T .......................................................................................................... 258
36TBatches & Serials36T ......................................................................................................................... 262 36TBatch Entry In36T .......................................................................................................................... 262
36TAdding a Batch 36T .................................................................................................................... 262 36TSerial Entry In36T .......................................................................................................................... 265
36TAdding a Serial Number 36T ...................................................................................................... 265 36TBatch Entry Out36T ....................................................................................................................... 268
36TAdding a Batch 36T .................................................................................................................... 268 36TSerial Entry Out36T ....................................................................................................................... 271
36TAdding a Serial Number 36T ...................................................................................................... 271 36TUsability Functions36T ...................................................................................................................... 274
36TQuick Search36T ........................................................................................................................... 274 36TSorting36T ..................................................................................................................................... 274
36TTo Use Quick Search 36T ........................................................................................................... 274 36TItem Search / Sort 36T ............................................................................................................... 275
36TSorting for Item Search 36T ................................................................................................... 276 36TBin Search36T ........................................................................................................................... 277
36TSorting for Bin Search 36T ..................................................................................................... 278 36TBatch Search36T ....................................................................................................................... 279
36TSorting for Batch Search 36T ................................................................................................. 280 36TSerial Number Search 36T ......................................................................................................... 280
36TSorting for Serial Number Search36T ................................................................................... 281 36TItem Name Search 36T ............................................................................................................... 282
36TQuick Scan 36T ............................................................................................................................... 284 36TColumn Settings36T ...................................................................................................................... 290
36TColumn Settings36T .................................................................................................................. 290 36TColumn Layout36T .................................................................................................................... 291
36TBin Lookup36T .............................................................................................................................. 293 36TSearch By36T ............................................................................................................................. 294
36THide Finished 36T ........................................................................................................................... 296 36TRemarks36T .................................................................................................................................. 298
36TSAP Business One Form Settings 36T ................................................................................................ 301 36TSales Documents36T ..................................................................................................................... 301
36TSAP Business One - Recommended Form Settings36T ............................................................. 301 36TPick ID Setting36T ................................................................................................................. 303

36TPurchasing Documents36T ........................................................................................................... 305 36TSAP Business One - Recommended Form Settings36T ............................................................. 305

1
Resolv WMS
Prerequisites
This topic is designed to identify the standard SAP Business One fields and functions that should be considered when designing your Warehouse Management implementation. Some of the configurations will be required, while other significantly enhance the overall functionality. For your convenience, and a better understanding of the options presented throughout this document, when available we have included direct links to the relevant SAP Business One Help chapters. When enabling warehouse and bin functionality in SAP Business One, consideration must be given to all inventory related business requirements. Such considerations should include but are not limited to; processes, units of measure, inventory movements and cycle counts.
Warehouse Codes & Bin Locations
To utilize a warehouse within Resolv Mobile, the warehouse setup in SAP Business One must be bin enabled. Click here for more information, please see the topic 36TUWorking with Bin Locations U36T in help.sap.com. Consideration should be given to how many warehouse codes are created. If there is more than one warehouse and there will be inventory transfers, it is recommended to create an in-transit warehouse to work in conjunction with the WMS Inventory Transfer Request functionality. If Multiple Branch functionality is enabled, you may require more than one in-transit warehouse. Other considerations would be the creation of virtual warehouses that are actually in the same physical locations versus zones in a physical location. The business requirements on how inventory needs to be reported and managed should be both known and considered prior to configuring SAP Business One or Resolv WMS. Another consideration when configuring warehouse codes in how the Bin Location Tab is configured. This tab includes options that can impact the functionality of Resolv WMS. The Bin Location Code Separator controls the characters that will appear in the bin codes. Depending on the devices being used, certain characters are easier to enter. Configurations related to the Automatic Allocation on Issue and Receipt, the use of Receiving Bin Locations and the use and or enforcement of Default Bin Locations should all be reviewed.

2
Bin Location Field Activation
Bin Location Field Activation configures the different levels within the warehouse and names each level accordingly. This configuration defines the strategic design of the warehouse and should be carefully predefined prior to activation.
Warehouse Sublevel Codes
After the number and name of the warehouse sublevels have been determined in the Bin Location Field Activation, another significant task that should be carefully considered is the creation and set up of valid values within each level. This step is critically important for achieving the desired level of reporting in SAP Business One and is ultimately used to generate each Bin Code.
Units of Measure and Weight
During Inventory configuration in SAP Business One; special consideration should be given to the different units of measure and weights applicable to your business. Inventory items can be managed by different units of measure if defined. The unit of measure conversion can also include item weight. Definition should be given to how items will be purchased, stocked and sold. Multiple units of measure can be grouped together and defined as a set based on conversion rules. Consideration should also be given to barcode values by units of measure.
Master Data
SAP Business One Master Data records are the foundation for which Resolv WMS was built. Several settings can and will impact the process flow and usage within Resolv WMS. Special consideration and a full understanding should be given to the following:
Receiving Bin Location
The SAP Business One setting for Receiving Bin Location designates a bin that will be used for certain functions such as receiving and put away. It is important to understand the functionality prior to implementation.

3
Restrictions
SAP Business One has the ability to put restrictions on bins for things such as batches, items and transactions. These standard SAP Business One restrictions are upheld within Resolv WMS and should also be considered prior to implementation.
Barcodes
Bins can have barcodes as well as item master records, units of measure and weights. Although SAP Business One ensures each value is unique; special consideration should be given to how each value compares to the Barcode values. Ideally, all barcode values should be unique and distinct from each other. Barcodes should also contain characters that are a part of the symbols of the barcode labels that your material and scanning devices support. Back to: Introduction Go to: User Settings and Authorizations

4
Configuration
Resolv WMS works in conjunction with SAP Business One and requires Configuration. The system will display the below message should a user attempt to Login prior to Configuration.
To Access Resolv WMS Configuration
1. Log into SAP Business One. 2. From the Main Module go to - Administration > Resolv Setup > Resolv Mobile > Mobile Configuration.

5
The Mobile Configuration window will then appear. 3. Enter in the Server IP Address. 4. Click okay.

6
2D Barcodes
To set a Default 2D Barcode in Resolv WMS a barcode template must first be created in SAP Business One. For more information on barcode template creation, please refer the chapter titled Barcodes.

7
Master 2D-1D Barcodes
The Master 2D-1D Barcode screen allows you to set up templates for scanning 1D and 2D matrix style barcodes on the handhelds. Support for the barcode scanning is dependent upon the hardware device capabilities.
To Setup a Barcode Template
1. Log into SAP Business One. 2. From the Main Module go to - Administration > Resolv Setup > Resolv Warehouse Management > Master 2D-1D Barcodes.

8
The Master 2D-1D Barcodes window will open.

9
1. Define a template Code. 2. Define the Name of the template. 3. Choose the delimiter for the barcode from the drop-down list. 4. Click New Position. 5. Use the drop-down list to select the table that will need to be read from the barcode. 6. Use the drop-down list to select the field that will need to be read from the barcode. Repeat steps 3 thru 5 as needed.
7. Click when completed. 8. Return to the Configuration Chapter to view placement of the template. You can add or remove lines by using the New Position and Delete Position boxes on the right.

10
User Settings and Authorizations
Resolv WMS works in conjunction with SAP Business One and must first be configured before User Settings and Authorizations can be applied. To access Resolv WMS employees must have a SAP Business One Employee Number in conjunction with a Resolv WMS module subscription. Once the above prerequisites have been established; the below SAP settings must be implemented prior to granting users access to Resolv WMS.
To Access Settings
1. From the Main Module > Human Resources > Employee Master Data.
2. Click on the Mobile tab.

11
The Security tab will open listing all available Resolv WMS modules. 3. Click on the boxes to select the modules that correspond with your Resolv WMS subscriptions. 4. Click okay.

12
6. Click on the Options tab and select a Default Warehouse if applicable. When you select a Default Warehouse for an employee all warehouse fields in Resolv WMS will populate accordingly. Users will only be able to perform transactions and perform Lookups in the Default Warehouse assigned to them. To allow an employee or super user access to perform transactions in multiple warehouses, check the Default Warehouse Override box. Checking this box allows a user to change the default warehouse in Resolv WMS if needed. Please see the Resolv WMS User Preferences & Settings chapter for more information. 7. Click okay.

13
To Activate a Mobile User License
1. From the Main Module > Administration > Resolv Setup > Resolv Mobile > Mobile User License.

14
2. Check off the boxes that correspond to the user's subscription. 3. Click okay.

15
As shown in the below figure, a user's SAP Business One Employee Number will be the Employee ID number used to log into Resolv WMS.

16
Resolv Mobile Login Page
This is the first page a user will see when working with the system. All fields must be entered to access Resolv WMS.
Please note the button displayed in the upper right hand corner of your screen. Clicking on this button will provide users with the Resolv WMS version that was installed and currently being used at your facility. For faster assistance with any support issues, please provide our Support Team with your Resolv WMS Version number.

17
Fields
1. Company
The SAP Business One Company is a database that stores all business transactions and data for a single organization. To search for the SAP Business One Company that corresponds with your organization click on
the icon. The system will display a list of available companies. Click on the SAP Business One Company that corresponds with your organization, the field will populate and return you to the Login Page.

18
2. Employee
In this field a user must enter the unique Employee Number that was created for them in SAP Business One. The Employee Number in SAP Business One and the Employee ID number in the Resolv WMS must match.
To open a list of authorized employees, click on the icon. Click on an employee to select, the field will populate and return you to the Login Page.

19
3. Password
This field requires the unique password assigned to each employee and is also linked to their SAP Business One Employee Number.
4. Warehouse
The warehouse field requires a unique alphanumeric identification code created in SAP Business One which identifies a storage area or warehousing complex.
To open a list of warehouses click on the icon. The system will display a list of available warehouses. Click on the SAP Business One warehouse that corresponds with your location, the field will populate and return you to the Login Page.

20
5. Language
Here a user can select his or her language of preference.
To view a list of available languages click the icon. Click on the language you wish to display, the field will populate and return you to the Login Page.

21
6. Remember me
The system will save a user's login credentials if there is a in this field.
7. Click . You will then be taken to the Main Menu.

22
Company List
The SAP Business One Company is a database that stores all business transactions and data for a single organization. It is the smallest organizational unit for which individual financial statements are created according to the relevant legal requirements. A company can include one or more company codes.
To search for a SAP Business One Company
1. From the Login Page, click on the icon that appears at the end of the Company field.
2. The system will display a list of available companies.

23
3. Click on the SAP Business One Company that corresponds with your organization, the system will populate the field and return you to the Login Page.

24
Resolv WMS User Preferences & Settings
After logging into Resolv WMS users have the ability to define both their preferences and settings. User Preferences and Settings can be accessed from any screen where the users name / identification appears. Simply click on the user's name and the User Preferences and Settings drop box will appear.
Settings
Click on and the Configure User Settings window will open. Users can configure the following:
Compact Mode
When turned on, this feature will automatically adapt the Resolv WMS screen to be compatible with any device.

25
Theme Select
Here a user can change the menu colors the systems displays.
Language
Users can select their language of preference. This setting may also be changed on the Login Page when a user signs into the system.

26
User Preferences
Click on and the Configure User Preferences widow will open. Users can set the Hide Finished and Quick Scan features as automatic defaults in lieu of activating them within individual transactions. Warehouse settings are configured in SAP Business One per employee and can only be changed if authorized. Please see the User Setup and Authorizations chapter for more information.
Hide Finished
The Hide Finished feature is available and can be activated during any receiving or entry process. It is very useful when processing large orders. When activated, the Hide Finished feature hides all rows that have already been processed and only displays those left that require entry.
Quick Scan

27
The Quick Scan feature enables users to quickly process document rows with speed and accuracy. When activated, there is no need to key in any duplicate information to access the next item row in any given pick or receipt.
Warehouse
The Warehouse feature enables users to set the SAP Business One warehouse that corresponds to the location they are working in. Users will be restricted to transactional lines and inventory data that is in the user's signed in warehouse.
About
Clicking on will provide users with the Resolv WMS version that was installed and currently being used at your facility. For faster assistance with any support issues, please provide our Support Team with your Resolv WMS Version number.

28
You may also access the software version by clicking on the button displayed in the upper right hand corner of the Login Page.
Logout
To exit Resolv WMS click on button.

29
Main Menu
Resolv WMS supports a menu structure that provide users with a familiar consistent solution when accessing daily transactions. The Main Menu provides overall access to a series of 6 function specific sub-menus. Each sub-menu can be assigned to authorized personnel and or departments based on the specific needs of your business.
Main Menu access as follows:
Picking Menu:
All Pick Lists

30
Sales Order Pick Lists Reserve Invoice Pick Lists Packing
Receiving Menu:
Purchase Order Receiving Container Receiving
Inventory Menu:
Goods Issue Goods Receipt Warehouse Transfers Bulk Bin Transfers ITR Pick Lists (Internal Transfer Request) ITR Receiving (Internal Transfer Receiving) Bin Maintenance
Production Menu:
Production Order Pick Lists Production Order Receiving
Counting Menu:
Bin Count Cycle Count Physical Count
Analytics' Menu:
Analytical Reports Current Status KPI Cockpit

Picking
Picking Menu
Menu Overview
The Picking Menu consists of four sub-menus which gives users the flexibility of managing their daily workload.
All Pick Lists - This menu will allow the user to view all outstanding picks for both Sales Order and Reserve Invoices
Sales Order Picks Lists - This menu will only display outstanding picks related to Sales Orders

Reserve Invoice Pick Lists - This menu will only display outstanding picks related to Reserve Invoices
Packing - This feature is not yet available
Pick List Generation
Sales orders and Reserve Invoices are generated in SAP Business One. 23TClick here for more information, please see the topic 23T 23TCreating Sales Documents23T in help.sap.com. Picks are released from the Pick & Pack Manager in SAP Business One to Resolv WMS. Click here for more information, please see topic Working With Pick and Pack in help.sap.com.

All Pick Lists
To access All Pick Lists
1. From the Main Menu click on the Picking Menu.
2. Click on the All Pick Lists Sub-Menu.

Please see the All Pick List Processing Chapter for details on how to complete a All Pick List Entry.

All Pick List Processing
The system requires confirmation of both the Pick Quantity and Bin location for each row within a document. Each row within a Pick List is referred to as a Pick. Pick rows are independent of the document number and may be posted individually or as a group.
Select a Pick List to process
1. From the Main Menu click on the Picking Menu.
2. Click on the All Pick Lists Sub-Menu.

3. Use the All Pick List Lookup feature or key in a Pick List number and hit enter to begin processing. In the below example we have chosen to process Pick List 57. The below document consists of 3 different rows also referred to as pick rows or picks.

4. Click on the row you wish to confirm and the system will direct you to the All Pick List Entry screen.

All Pick List Lookup
1. The All Pick List Lookup feature can be accessed from the All Pick List Sub-Menu.
2. Click on the icon at the end of the Pick List field to access the All Pick List Lookup screen.
The system will then display a list of all open Pick Lists.
3. To select a Pick List for processing, click on the row. To return to the previous screen, click the back arrow.
Search By
The All Pick Lists Lookup Screen offer a variety of Search By methods

1. To view and select a Search By method, click on the icon from the All Pick List Lookup screen. A Search By window will appear. 2. Select the radio button that corresponds with your desired search method. 3. Click the to confirm your chosen search method.
As shown below, you will then be returned to the All Pick List Lookup Screen. 4. Enter the data that corresponds with your search method into the search field.

5. Hit enter or click on the icon and your results will be displayed.
To remove filter click on the .
Sort By
The All Pick List Lookup Screen also offers an Ascending / Descending Sort By method. 1. To view and select a Sort By method, click on the icon from the All Pick List Lookup screen. A Lookup sort window will appear. 2. Click on a radio button to select which way you would like your sort results to be displayed. 3. Click on a radio button to select what sort method you would like to use.

4. Click and the system will return you to the All Pick List Lookup screen displaying all data as selected.
Note: Selections made will save as defaults per user but can be changed at any time.

All Pick List Entry
A Pick List Entry confirms both the bin location and quantity of goods being removed from a warehouse. Designed with understanding and increased flexibility the Pick List Entry Screen allows a user to view the details of any given Pick. For example, a user can access the originating Order Number created in SAP Business One. This feature allows for better communication between warehouse personnel and office administration, should questions regarding a Pick arise. Please see the All Pick List Details Chapter for additional information. In addition, a user may view all active bin locations for any given row by accessing the Bin Lookup screen. This feature is useful when a Picker does not find the sufficient inventory needed in a given location to complete his or her Pick and must look for an alternate. Picking an item from an alternate location will not change the original location shown on the Pick List screen but it can be viewed in the item row details screen. Please see the Bin Lookup Chapter for additional information.
Processing a Pick List Entry
1. Confirm that the bin location displayed on the screen matches the bin location that the item was picked from. If the location does not match, either manually enter or choose the correct location from the Bin Lookup Screen. Note: It is possible to select multiple bin locations for a single pick row. 2. Enter in the physical quantity picked from the corresponding bin location. 3. If prompted, enter in or select any applicable Serial / Batch numbers. Please see Serial Entry Out or Batch Entry Out Chapters for additional information.
4. Click the button.

Once added, the system will return you back to the All Pick List screen. 5. If applicable, select the next row to be processed and complete steps 1 thru 4.
6. Click when completed and the system will display the following message.

7. Click Yes to POST the records back to SAP Business One. A system message will then appear to confirm if your transaction was successful or not.
8. Click to acknowledge system message. 18TRows can be ADD'ed, FINISH'ed and POST'ed individually. Note: A very useful function when processing large orders is Hide Finished. Please see the Hide Finished chapter for more information.
Note: Should a user choose to the entry, the system will ask you to confirm your actions by displaying the below message requiring acknowledgement.

All Pick List Details
The All Pick List Details screen can be accessed during a All Pick List Entry. In today's busy warehouse environment Pickers may be interrupted during a Pick or find a stock discrepancy that has to be communicated back to office staff. Details can be viewed at either the document header or item row level making communication fast, accurate and effective. Details at the header level will display general information about the Pick List. For example, users can see if the Pick List contains picks for multiple orders or a single order. If applicable, Pick List Remarks will also be displayed. Examples of item row Details include the ability to view the associated SAP Business One Document Number, Business Partner Name, associated Pick and Pack Remarks, Picker and item row status.
To view details at the header level, click on the icon
As shown below, the All Pick List Details screen will then open.

To view the details/status of any given item row within a Pick, click on the row you wish to view.
The All Pick List Entry window will then open.
Click the button to view row specifics.

Below we can see that 20 pieces of item number 3-01910 was released to be picked for Sales Order number 421. The Picker has only picked 10 pieces from bin location 02-A-3. To complete this Pick row, he must pick an additional 10 pieces.

Sorting for All Pick Lists
The All Pick List screen features an ascending / descending sort method. This feature gives users the flexibility to view data in multiple ways. Users can select the method in which they wish to sort by and then have the data displayed in either ascending or descending order.
Accessing Pick List Sorting
1. Click on the from any Pick List screen.
This will open the Sorting for Pick List screen. 2. Click on a radio button to select which way you would like your sort results to be displayed. 3. Click on a radio button to select what sort method you would like to use.

4. Click and the system will return you to the All Pick List screen displaying all data as selected.

Please note: Sorting selections made will save as defaults per user but can be changed at can be.

Sales Order Pick Lists
To access Sales Order Pick Lists
1. From the Main Menu click on the Picking Menu.
2. Click on the Sales Order Pick Lists Sub-Menu.

Please see the Sales Order Pick List Processing Chapter for details on how to complete a Sales Order Pick List Entry.

Sales Order Pick List Processing
The system requires confirmation of both the Pick Quantity and Bin location for each row within a document. Each row within a Pick List is referred to as a Pick. Pick rows are independent of the document number and may be posted individually or as a group.
Select a Sales Order Pick List to process
1. From the Main Menu click on the Picking Menu.
2. Click on the Sales Order Pick Lists Sub-Menu.

3. Use the Sales Order Pick List Lookup feature or key in a Pick List number and hit enter to begin processing. In the below example we have chosen to process Sales Order Pick List: 146. The below document consists of 3 different rows also referred to as pick rows or picks.

4. Click on the row you wish to confirm and the system will direct you to the Sales Order Pick List Entry Screen.

Sales Order Pick List Lookup
1. The Sales Order Pick List Lookup feature can be accessed from the Sales Order Pick List Sub-Menu.
2. Click on the icon at the end of the Sales Order Pick List field to access the Sales Order Pick List Lookup screen.
The system will then display a list of all open Sales Order Pick Lists.
3. To select a Sales Order Pick List for processing, click on the row. To return to the previous screen, click the back arrow.
Search By
The Sales Order Pick List Lookup Screen offers a variety of Search By methods.

1. To view and select a Search By method, click on the icon from the Sales Order Pick List Lookup screen. A Search By window will appear. 2. Select the radio button that corresponds with your desired search method. 3. Click the to confirm your chosen search method.
As shown below, you will then be returned to the Sales Order Pick List Lookup Screen. 4. Enter the data that corresponds with your search method into the search field.

5. Hit enter or click on the icon and your results will be displayed.
To remove filter click on the .
Sort By
The Sales Order Pick List Lookup Screen also offers a Ascending / Descending Sort By method. 1. To view and select a Sort By method, click on the icon from the Sales Order Pick List Lookup screen. A Lookup sort window will appear. 2. Click on a radio button to select which way you would like your sort results to be displayed. 3. Click on a radio button to select what sort method you would like to use.
4. Click and the system will return you to the Sales Order Pick List Lookup screen displaying all data as selected.
Note: Selections made will save as defaults per user but can be changed at any time.

Sales Order Pick List Entry
A Sales Order Pick List Entry confirms both the bin location and quantity of goods being removed from a warehouse. Designed with understanding and increased flexibility the Sales Order Pick List Entry Screen allows a user to view the details of any given Pick. For example a user can access the originating Order Number created in SAP Business One. This feature allows for better communication between warehouse personnel and office administration, should questions regarding a Pick arise. Please see the Pick List Details Chapter for additional information. In addition, a user may view all active bin locations for any given row by accessing the Bin Lookup screen. This feature is useful when a Picker does not find the sufficient inventory needed in a given location to complete his or her Pick and must look for an alternate. Picking an item from an alternate location will not change the original location shown on the Pick List screen but it can be viewed in the item row details screen Please see the Bin Lookup Chapter for additional information.
Processing a Sales Order Pick List Entry
1. Confirm that the bin location displayed on the screen matches the bin location that the item was picked from. If the location does not match, either manually enter or choose the correct location from the Bin Lookup Screen. Note: It is possible to select multiple bin locations for a single pick row. 2. Enter in the physical quantity picked from the corresponding bin location. 3. If prompted, enter in or select any applicable Serial / Batch numbers. Please see Serial Entry Out or Batch Entry Out Chapters for additional information.
4. Click the button.

Once added, the system will return you back to the Sales Order Pick List screen. 5. If applicable, select the next row to be processed and complete steps 1 thru 4.
6. Click when completed and the system will display the following message.
7. Click Yes to POST the records back to SAP Business One. A system message will then appear to confirm if your transaction was successful or not.

8. Click to acknowledge system message. 18TRows can be ADD'ed, FINISH'ed and POST'ed individually. Note: A very useful function when processing large orders is Hide Finished. Please see the Hide Finished chapter for more information.
Note: Should a user choose to the entry, the system will ask you to confirm your actions by displaying the below message requiring acknowledgement.

Sales Order Pick List Details
The Sales Order Pick List Details screen can be accessed during a Sales Order Pick List Entry. In today's busy warehouse environment Pickers may be interrupted during a Pick or find a stock discrepancy that has to be communicated back to office staff. Details can be viewed at either the document header or item row level making communication fast, accurate and effective. Details at the header level will display general information about the Pick List. For example, users can see if the Pick List contains picks for multiple orders or a single order. If applicable, Pick List Remarks will also be displayed. Examples of item row Details include the ability to view the associated SAP Business Once Document Number, Business Partner Name and associated Pick and Pack Remarks.
To view details at the header level, click on the icon.
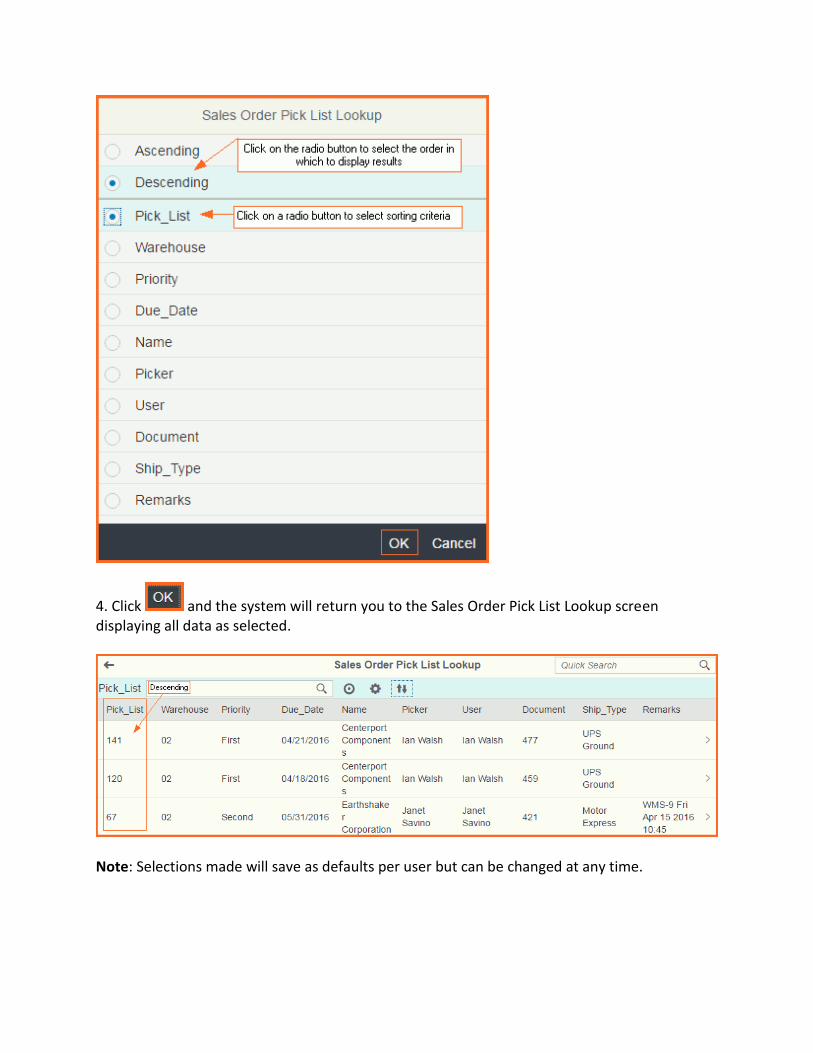
As shown below, the Sales Order Pick List Details screen will then open.
To view the details/status of any given item row within a Pick, click on the row you wish to view.
The Sales Order Pick List Entry window will then open.
Click the button to view row specifics.

Below we can see that 1 piece of item number 2-02015 was released to be picked for Sales Order number 486. The item still need to be Picked, the Pick row is still open.

Sales Order Pick List Sorting
The Sales Order Pick List screen features an ascending / descending sort method. This feature gives users the flexibility to view data in multiple ways. Users can select the method in which they wish to sort by and then have the data displayed in either ascending or descending order.
Accessing Sales Order Pick List Sorting
1. Click on the from any Sales Order Pick List screen.
This will open the Sorting for Sales Order Pick List screen. 2. Click on a radio button to select which way you would like your sort results to be displayed. 3. Click on a radio button to select what sort method you would like to use.

4. Click and the system will return you to the Sales Order Pick List screen displaying all data as selected.

Please note: Sorting selections made will save as defaults per user but can be changed at any time.

Reserve Invoice Pick Lists
To access Reserve Invoice Pick Lists
1. From the Main Menu click on the Picking Menu.
2. Click on the Reserve Invoice Pick Lists Sub-Menu.

Please see the Reserve Invoice Pick List Processing Chapter for details on how to complete a Reserve Invoice Pick List Entry.

Reserve Invoice Pick List Processing
The system requires confirmation of both the Pick Quantity and Bin location for each row within a document. Each row within a Pick List is referred to as a Pick. Pick rows are independent of the document number and may be posted individually or as a group.
Select a Reserve Invoice Pick List to process
1. From the Main Menu click on the Picking Menu.
2. Click on the Sales Order Pick Lists Sub-Menu.

3. Use the Reserve Invoice Pick List Lookup feature or key in a Pick List number and hit enter to begin processing. In the below example we have chosen to process Reserve Invoice Pick List: 142. The below document consists of 1 row also referred to as pick row or pick.

4. Click on the item row to confirm and the system will direct you to the Reserve Invoice Pick List Entry Screen.

Reserve Invoice Pick List Lookup
1. The Reserve Invoice Pick List Lookup feature can be accessed from the Reserve Invoice Pick List Sub-Menu.
2. Click on the icon at the end of the Reserve Invoice Pick List field to access the Reserve Invoice Pick List Lookup screen.
The system will then display a list of all open Reserve Invoice Pick Lists.
3. To select a Reserve Invoice Pick List for processing, click on the row.

To return to the previous screen, click the back arrow.
Search By
The Reserve Invoice Pick List Lookup Screen offers a variety of Search By methods.
1. To view and select a Search By method, click on the icon from the Reserve Invoice Pick List Lookup screen. A Search By window will appear. 2. Select the radio button that corresponds with your desired search method. 3. Click the to confirm your chosen search method.
As shown below, you will then be returned to the Reserve Invoice Pick List Lookup Screen. 4 Enter the data that corresponds with your search method into the search field.

5. Hit enter or click on the icon and your results will be displayed.
To remove filter click on the .
Sort By
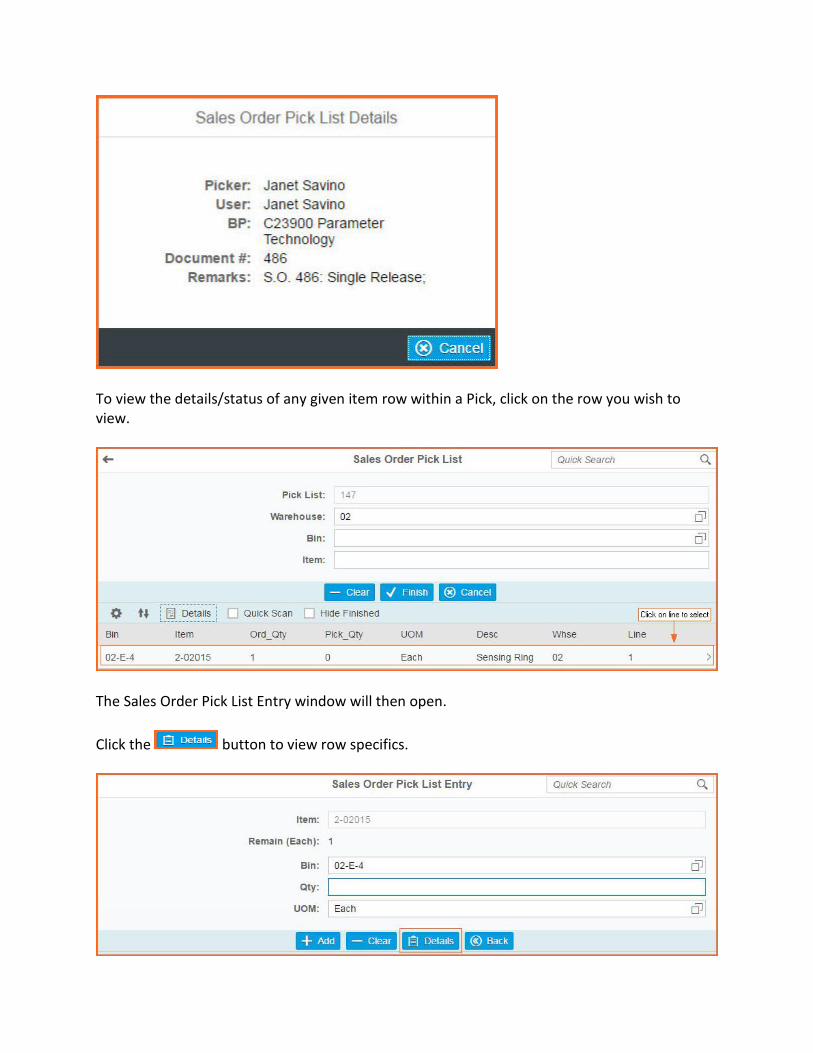
The Reserve Invoice Pick List Lookup Screen also offers a Ascending / Descending Sort By method. 1. To view and select a Sort By method, click on the icon from the Reserve Invoice Pick List Lookup screen. A Lookup sort window will appear. 2. Click on a radio button to select which way you would like your sort results to be displayed. 3. Click on a radio button to select what sort method you would like to use.

4. Click and the system will return you to the Reserve Invoice Pick List Lookup screen displaying all data as selected.
Note: Selections made will save as defaults per user but can be changed at any time.

Reserve Invoice Pick List Entry
A Reserve Invoice Pick List Entry confirms both the bin location and quantity of goods being removed from a warehouse. Designed with understanding and increased flexibility the Reserve Invoice Pick List Entry Screen allows a user to view the details of any given Pick. For example a user can access the originating Order Number created in SAP Business One. This feature allows for better communication between warehouse personnel and office administration, should questions regarding a Pick arise. Please see the Pick List Details Chapter for additional information. In addition, a user may view all active bin locations for any given row by accessing the Bin Lookup screen. This feature is useful when a Picker does not find the sufficient inventory needed in a given location to complete his or her Pick and must look for an alternate. Picking an item from an alternate location will not change the original location shown on the Pick List screen but it can be viewed in the item row details screen Please see the Bin Lookup Chapter for additional information.
Processing a Reserve Invoice Pick List Entry
1. Confirm that the bin location displayed on the screen matches the bin location that the item was picked from. If the location does not match, either manually enter or choose the correct location from the Bin Lookup Screen. Note: It is possible to select multiple bin locations for a single pick row. 2. Enter in the physical quantity picked from the corresponding bin location. 3. If prompted, enter in or select any applicable Serial / Batch numbers. Please see Serial Entry Out or Batch Entry Out Chapters for additional information.
4. Click the button.

Once added, the system will return you back to the Reserve Invoice Pick List screen. 5. If applicable, select the next row to be processed and complete steps 1 thru 4.
6. Click when completed and the system will display the following message.
7. Click Yes to POST the records back to SAP Business One. A system message will then appear to confirm if your transaction was successful or not.

8. Click to acknowledge system message. 18TRows can be ADD'ed, FINISH'ed and POST'ed individually. Note: A very useful function when processing large orders is Hide Finished. Please see the Hide Finished chapter for more information.
Note: Should a user choose to the entry, the system will ask you to confirm your actions by displaying the below message requiring acknowledgement.

Reserve Invoice Pick List Details
The Reserve Invoice Pick List Details screen can be accessed during a Reserve Invoice Pick List Entry. In today's busy warehouse environment Pickers may be interrupted during a Pick or find a stock discrepancy that has to be communicated back to office staff. Details can be viewed at either the document header or item row level making communication fast, accurate and effective. Details at the header level will display general information about the Pick List. For example, users can see if the Pick List contains picks for multiple orders or a single order. If applicable, Pick List Remarks will also be displayed. Examples of item row Details include the ability to view the associated SAP Business Once Document Number, Business Partner Name and associated Pick and Pack Remarks.
To view details at the header level, click on the icon.
As shown below, the Reserve Invoice Pick List Details screen will then open.

To view the details/status of any given item row within a Pick, click on the row you wish to view.
The Reserve Invoice Pick List Entry window will then open.
Click the button to view row specifics.

Below we can see that 3 pieces of item number 3-01914 was released to be picked for Reserve Invoice number 369. The item still need to be Picked, the Pick row is still open.

Reserve Invoice Pick List Sorting
The Reserve Invoice Pick List screen features an ascending / descending sort method. This feature gives users the flexibility to view data in multiple ways. Users can select the method in which they wish to sort by and then have the data displayed in either ascending or descending order.
Accessing Reserve Invoice Pick List Sorting
1. Click on the from any Reserve Invoice Pick List screen.
This will open the Sorting Reserve Invoice Pick List screen. 2. Click on a radio button to select which way you would like your sort results to be displayed. 3. Click on a radio button to select what sort method you would like to use.
4. Click and the system will return you to the Reserve Invoice Pick List screen displaying all data as selected.
Please note: Sorting selections made will save as defaults per user but can be changed at any time.

Packing - Feature is not yet available
To access Packing
1. From the Main Menu click once on the Picking Menu.
2. Click once on the Packing Sub-Menu.


Receiving
Receiving Menu
Menu Overview
The Receiving Menu consists of two sub-menus which gives users the flexibility of managing their daily workload.
Purchase Order Receiving - This menu will display all incoming Purchase Orders awaiting receipt
Container Receiving - Allows for multiple purchase orders, from multiple vendors to be received and processed from within a single in-bound shipment
Purchase Order Generation
Purchase Orders are generated in SAP Business One. Click here for more information, please see the topic Creating Purchasing Documents in help.sap.com.

Purchase Order Receiving
To access a Purchase Order to Receive
1. From the Main Menu click on the Receiving Menu.
2. Click on the Purchase Order Receiving Sub-Menu.

Please see the Purchase Order Receiving Processing Chapter for details on how to complete a Purchase Order Receiving Entry.

Purchase Order Receiving Processing
The system requires confirmation of both the Received Quantity and Bin location for each row within a document. Each row within a document is referred to as a Receipt. Receipts are independent of the document number and may be posted individually or as a group.
Select a Purchase Order to Receive
1. From the Main Menu click on the Receiving Menu.
2. Click on the Purchase Order Receiving Sub-Menu.

3. Use the Purchase Order Lookup feature or key in a Purchase Order number and hit enter to begin processing. In the below example we have chosen to process Document # 474. The below document consists of 2 different rows also referred to as receipts.

4. Click on the row you wish to receive and the system will direct you to the Purchase Order Receiving Entry Screen.

Purchase Order Lookup
1. The Purchase Order Lookup feature can be accessed from the Purchase order Receiving screen.
2. Click on the Icon at the end of the Document # field to access the Purchase Order Lookup screen.
The system will then display a list of all open Purchase Orders.

3. To select a Purchase Order for processing, click on the row. To return to the previous screen, click the back arrow.
Search By
The Purchase Order Lookup Screen offers a variety of Search By methods.
1. To view and select a Search By method, click on the icon from the Purchase Order Lookup screen. A Search By window will appear. 2. Select the radio button that corresponds with your desired search method. 3. Click the to confirm your chosen search method.
As shown below, you will then be returned to the Purchase Order Lookup screen. 4. Enter the data that corresponds with your search method into the search field.

5. Hit enter or click on the icon and your results will be displayed.
To remove filter click on the .
Sort By
The Purchase Order Lookup Screen also offers a Ascending / Descending Sort By method. 1. To view and select a Sort By method, click on the icon from the Purchase Order Lookup screen. A Lookup sort window will appear.

2. Click on a radio button to select which way you would like your sort results to be displayed. 3. Click on a radio button to select what sort method you would like to use.
4. Click and the system will return you to the Purchase Order Lookup screen displaying all data as selected.

Please note: Sorting selections made will save as defaults per user but can be changed at any time.
Purchase Order Receiving Entry
A Purchase Order Receiving Entry confirms the quantity of goods being received into the warehouse and allows for automatic or manual allocation directly to a bin location. Bin Location Management settings have an effect on business process and are managed in SAP Business One. Bin location settings made in SAP Business One will either automatically display a pre-defined bin location or leave the field blank requiring manual entry. It is possible to select multiple bin locations for a single receipt row. Click here for more information, please see the topic Working with Bin Locations in help.sap.com. A user may view all bin locations for any given row by accessing the Bin Lookup screen. This feature is useful when a receiver does not find the sufficient storage needed in a given location to complete his or her receipt. Please see the Bin Lookup Chapter for additional information.
Processing a Purchase Order Receiving Entry
1. If applicable; enter the bin location you wish receive the item into. 2. Enter in the physical quantity of item being received to the specified bin location. 3. If prompted, enter in or select any applicable Serial / Batch numbers. Please see Serial Entry In or Batch Entry In Chapters for additional information.
4. Click the button.

Once added, the system will return you back to the Purchase Order Receiving Entry screen. 5. If applicable, select the next row to be processed and complete steps 1 thru 4. Note: If enabled, the Quick Scan function will return you back to a blank Purchase Order Receiving Entry screen. This feature allows for faster processing of Receipts containing multiple rows. Please see the Quick Scan chapter for more information.
6. Click .
The system will display the following message.

7. Click Yes to POST the records back to SAP Business One. A system message will then appear to confirm if your transaction was successful or not.
8. Click to acknowledge system message. 18TRows can be ADD'ed, FINISH'ed and POST'ed individually. Note: A very useful function when processing large orders is Hide Finished. Please see the Hide Finished chapter for more information.
Note: Should a user choose to the entry, the system will ask you to confirm your actions by displaying the below message requiring acknowledgement.

Purchase Order Receiving Details
The Purchase Order Receiving Details screen can be accessed during a Purchase Order Receiving Entry. In today's busy warehouse environment receivers are often interrupted while processing a receipt. This feature allows receivers to view the status of any incomplete line by simply clicking on the
button. Business example: Joey, a receiver in the warehouse is in the middle of processing a receipt when he is interrupted by a trucker that is dropping off a delivery. Joey off loads the truck and sends the trucker on his way however 20 minutes have since passed and he is not quite sure where he left off on his last entry.
A simple click of the button will provide Joey with the details he needs to continue.
As shown below, Joey can see that he in fact only processed 50 out of the 100 pieces prior to being interrupted by the trucker.

Joey can also view the bin locations that he had selected. Should he need to make any
changes, he may click on the button to re-enter his data or he may select the button to continue where he left off.

Sorting for Purchase Order Receiving
Purchase Order Receiving features an ascending / descending sort method. This feature gives users the flexibility to view data in multiple ways. Users can select the method in which they wish to sort by and then have the data displayed in either ascending or descending order.
Accessing Purchase Order Receiving Sorting
1. Click on the from the Purchase Order Receiving screen.
This will open the Sorting for Purchase Order Receiving screen. 2. Click on a radio button to select which way you would like your sort results to be displayed. 3. Click on a radio button to select what sort method you would like to use.

4. Click and the system will return you to the Purchase Order Receiving screen displaying all data as selected. Please note: Sorting selections made will save as defaults per user but can be changed at column.

Container Receiving
1. From the Main Menu click on the Receiving Menu.
2. Click on the Container Receiving Sub-Menu.

Please see the Container Receiving Processing Chapter for details on how to complete a Container Receiving Entry.

Container Receiving Processing
Select a Container to Receive
1. From the Main Menu click on the Receiving Menu.
2. Click on the Container Receiving Sub-Menu.

3. Use the Container Lookup feature or key in a Document number and hit enter to begin processing. In the below example we have chosen to process Document # 4.
4. Click on the row you wish to receive and the system will direct you to the Container Receiving Entry screen.


Container Lookup
1. The Container Lookup feature can be accessed from the Container Receiving screen.
2. Click on the Icon at the end of the Document # field to access the Container Lookup screen.
The system will then display a list of all open Containers.

3. To select a Container for processing, click on the row. To return to the previous screen, click the back arrow.
Search By
The Container Lookup Screen offers a variety of Search By methods.
1. To view and select a Search By method, click on the icon from the Container Lookup screen. A Search By window will appear. 2. Select the radio button that corresponds with your desired search method. 3. Click the to confirm your chosen search method.
As shown below, you will then be returned to the Container Lookup screen. 4. Enter the data that corresponds with your search method into the search field.

5. Hit enter or click on the icon and your results will be displayed.
To remove filter click on the .
Sort By
The Container Lookup Screen also offers a Ascending / Descending Sort By method. 1. To view and select a Sort By method, click on the icon from the Container Lookup screen. A Lookup sort window will appear. 2. Click on a radio button to select which way you would like your sort results to be displayed.

3. Click on a radio button to select what sort method you would like to use.
4. Click and the system will return you to the Container Lookup screen displaying all data as selected.
Please note: Sorting selections made will save as defaults per user but can be changed at any time.

Container Receiving Entry
Processing a Container Receipt
1. If applicable; enter the bin location you wish receive the item into. 2. Enter in the physical quantity of item being received to the specified bin location. 3. If prompted, enter in or select any applicable Serial / Batch numbers. Please see Serial Entry In or Batch Entry In Chapters for additional information.
4. Click the button.
Once added, the system will return you back to the Container Receiving screen. 5. If applicable, select the next row to be processed and complete steps 1 thru 4. Note: If enabled, the Quick Scan function will return you back to a blank Container Receiving Entry screen. This feature allows for faster processing of Receipts containing multiple rows. Please see the Quick Scan chapter for more information.
6. Click .

The system will display the following message.
7. Click Yes to POST the records back to SAP Business One. A system message will then appear to confirm if your transaction was successful or not.

8. Click to acknowledge system message. 18TRows can be ADD'ed, FINISH'ed and POST'ed individually. Note: A very useful function when processing large orders is Hide Finished. Please see the Hide Finished chapter for more information.
Note: Should a user choose to the entry, the system will ask you to confirm your actions by displaying the below message requiring acknowledgement.

Container Receiving Details
The Container Order Receiving Details screen can be accessed during a Container Receiving Entry. In today's busy warehouse environment receivers are often interrupted while processing a receipt.
This feature allows receivers to view the status of any line by simply clicking on the button.
As seen below, 25 out of the 30 pieces ordered have been received into bin location 02-A-3.

Sorting for Container Receiving
Container Receiving features an ascending / descending sort method. This feature gives users the flexibility to view data in multiple ways. Users can select the method in which they wish to sort by and then have the data displayed in either ascending or descending order.
Accessing Container Receiving Sorting
1. Click on the from the Container Order Receiving screen.
This will open the Sorting for Container Receiving screen. 2. Click on a radio button to select which way you would like your sort results to be displayed. 3. Click on a radio button to select what sort method you would like to use.

4. Click and the system will return you to the Container Receiving screen displaying all data as selected. Please note: Sorting selections made will save as defaults per user but can be changed at any time.

Inventory
Inventory Menu
Menu Overview
The Inventory Menu consists of seven sub-menus which gives users the flexibility of managing their daily workload.
Goods Issue - Allows a user to create a physical outbound movement of goods or material out of the warehouse
Goods Receipt - Allows a user to create a physical inbound movement of goods or material into the warehouse
Warehouse Transfers - Allows a user to transfer inventory either from a virtual warehouse of from one bin location to another
Bulk Bin Transfers - Allows a user to transfer all material from one bulk location to another

ITR Pick Lists - This menu allows a user to pick and process all Inventory Transfer Requests
ITR Receiving - This menu allows a user to receive all incoming Inventory Transfer Requests
Bin Maintenance - This menu allows a user to adjust the Min / Max levels of bin locations as needed

Goods Issue
The Goods Issue function is a fast and simple way of reducing stock in the warehouse.
Accessing Goods Issue
1. From the Main Menu click on the Inventory Menu.
2. Click on the Goods Issue Sub-menu.

To Process a Goods Issue
1. Enter in or search for and select the Warehouse code that the goods are being issued from. 2. Enter in or search for and select the Bin location that the goods will be removed from. 3. Enter in or search for and select the Item number to be issued. Note: To reduce data entry time and ensure accuracy, Goods Issue processing comes equipped with the ability to scan batch or serial numbers into the item number field. 4. Enter in the Quantity to be removed. 5. Confirm that the Unit of Measure (UOM) is correct. If not, enter in or search for and select the correct UOM. 6. If prompted, enter in or select any applicable serial / batch numbers. Please see Serial Entry Out or Batch Entry Out Chapters for additional information.

7. Click . Once added, the system will return you back to the Goods Issue screen. 8. If applicable, add any additional items to be issued and complete steps 1 thru 7. Note: If enabled, the Quick Scan function will return you back to the Goods Issue screen. This feature allows for faster processing of multiple goods being issued from the same warehouse and bin location. Please see the Quick Scan chapter for more information. As seen in the below figure the system will display all data entered for review.
To edit displayed data click once on the at the end of the row. The system will open up the Goods Issue Detail screen.

Here a user can edit any data entered or delete data in it's entirety.
To return to the Goods Issue screen simply click the button. If you choose to Edit or Delete data, the system will ask you to confirm your actions by displaying the below messages.
9. Click the button and the system will display the following message.
10. Click Yes to POST the records back to SAP Business One. A system message will then appear to confirm if your transaction was successful or not.

11. Click the button to acknowledge system message.
Note: Should a user choose to the entry, the system will ask you to confirm your actions by displaying the below message requiring acknowledgement.

Sorting for Goods Issue
The Goods Issue screen features an ascending / descending sort method. This feature gives users the flexibility to view data in multiple ways. Users can select the method in which they wish to sort by and then have the data displayed in either ascending or descending order.
Accessing Goods Issue Sorting
1. Click on the from the Goods Issue screen.
This will open the Sorting for Goods Issue screen. 2. Click on a radio button to select which way you would like your sort results to be displayed.

3. Click on a radio button to select what sort method you would like to use.
4. Click and the system will return you to the Goods Issue screen displaying all data as selected. Please note: Sorting selections made will save as defaults per user but can be changed at any time.

Goods Receipt
The Goods Receipt function is a fast and simple way of increasing stock in the warehouse without referencing a preceding document.
Accessing Goods Receipt
1. From the Main Menu click on the Inventory Menu.
2. Click on the Goods Receipt Sub-menu.

To Process a Goods Receipt
1. Enter in or search for and select the Warehouse code that the goods are being received into. 2. Enter in or search for and select the Bin location that the goods will be stored in. 3. Enter in or search for and select the Item number being received. 4. Enter in the Quantity to be added. 5. Confirm that the Unit of Measure (UOM) is correct. If not, enter in or search for and select the correct UOM. 6. If prompted, enter in or select any applicable serial / batch numbers. Please see Serial Entry In or Batch Entry In Chapters for additional information.

7. Click . 8. If applicable, add any additional items to be issued and complete steps 1 thru 7. Note: If enabled, the Quick Scan function will return you back to the Goods Receipt screen. This feature allows for faster processing of multiple goods being received into the same warehouse and bin location. Please see the Quick Scan chapter for more information. As seen in the below figure the system will display all data entered for review.

To edit displayed data click once on the at the end of the row. The system will open up the Goods Receipt Detail screen.
Here a user can edit any data entered or delete data in it's entirety.
To return to the Goods Receipt screen simply click the button. If you choose to Edit or Delete data, the system will ask you to confirm your actions by displaying the below messages.
9. Click the button and the system will display the following message.

10. Click Yes to POST the records back to SAP Business One. A system message will then appear to confirm if your transaction was successful or not.
11. Click the button to acknowledge system message.
Note: Should a user choose to the entry, the system will ask you to confirm your actions by displaying the below message requiring acknowledgement.

Sorting for Goods Receipt
The Goods Receipt screen features an ascending / descending sort method. This feature gives users the flexibility to view data multiple ways. Users can select the method in which they wish to sort by and then have the data displayed in either ascending or descending order.
Accessing Goods Receipt Sorting
1. Click on the from the Goods Issue screen.
This will open the Sorting for Goods Receipt screen. 2. Click on a radio button to select which way you would like your sort results to be displayed.

3. Click on a radio button to select what sort method you would like to use.
4. Click and the system will return you to the Goods Issue screen displaying all data as selected. Please note: Sorting selections made will save as defaults per user but can be changed at any time.

Warehouse Transfers
Warehouse Transfers allow users to transfer inventory quickly and efficiently. Transfers can performed either between a warehouses or from one bin location to another bin location within a warehouse.
To access Warehouse Transfers
1. From the Main Menu click on the Inventory Menu.
2. Click on the Warehouse Transfers Sub-menu.
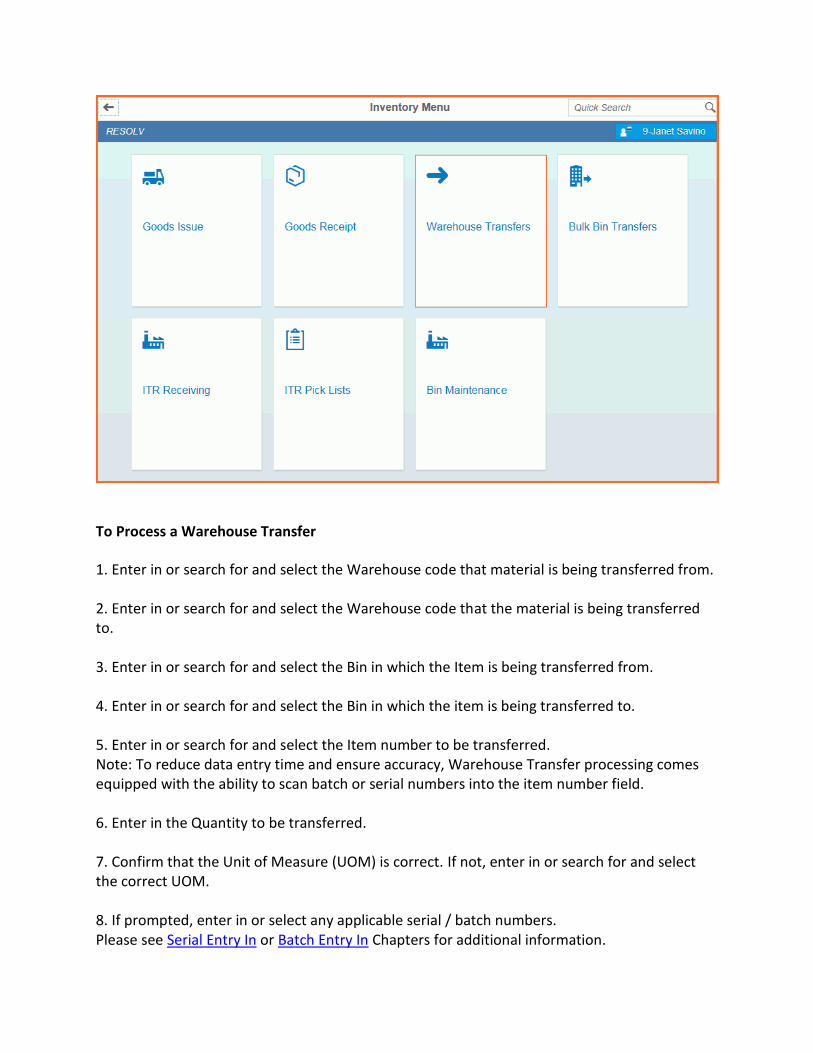
To Process a Warehouse Transfer
1. Enter in or search for and select the Warehouse code that material is being transferred from. 2. Enter in or search for and select the Warehouse code that the material is being transferred to. 3. Enter in or search for and select the Bin in which the Item is being transferred from. 4. Enter in or search for and select the Bin in which the item is being transferred to. 5. Enter in or search for and select the Item number to be transferred. Note: To reduce data entry time and ensure accuracy, Warehouse Transfer processing comes equipped with the ability to scan batch or serial numbers into the item number field. 6. Enter in the Quantity to be transferred. 7. Confirm that the Unit of Measure (UOM) is correct. If not, enter in or search for and select the correct UOM. 8. If prompted, enter in or select any applicable serial / batch numbers. Please see Serial Entry In or Batch Entry In Chapters for additional information.

9. Click . Once added, the system will return you back to the Warehouse Transfers screen. 10. If applicable, add any additional items to be transferred and complete steps 1 thru 9. Note: If enabled, the Quick Scan function will return you back to the Warehouse Transfers screen defaulting in all data with the exception of the item and quantity. This feature allows for faster processing of multiple goods being transferred from the same warehouse and bin location to the same warehouse and bin location. Please see the Quick Scan chapter for more information. As seen in the below figure the system will display all data entered for review.

To edit displayed data click once on the at the end of the row. The system will open up the Warehouse Transfers Detail screen.
Here a user can edit any data entered or delete data in it's entirety.
To return to the Warehouse Transfers screen simply click the button.

If you choose to Edit or Delete data, the system will ask you to confirm your actions by displaying the below messages.
11. Click the button and the system will display the following message.
12. Click Yes to POST the records back to SAP Business One. A system message will then appear to confirm if your transaction was successful or not.
13. Click the button to acknowledge system message.

Note: Should a user choose to the entry, the system will ask you to confirm your actions by displaying the below message requiring acknowledgement.
Reminder:
As mentioned in the Prerequisites chapter, WMS respects all bin restriction settings made in SAP Business One. Click here for more information, please see the topic Working with Bin Locations in help.sap.com.

Any attempt to perform a Warehouse Transfer that does not respect these settings will yield the below error in WMS.

Sorting for Warehouse Transfers
The Warehouse Transfers screen features an ascending / descending sort method. This feature gives users the flexibility to view data multiple ways. Users can select the method in which they wish to sort by and then have the data displayed in either ascending or descending order.
Accessing Warehouse Transfers Sorting
1. Click on the from the Warehouse Transfers screen.
This will open the Sorting for Warehouse Transfers screen. 2. Click on a radio button to select which way you would like your sort results to be displayed. 3. Click on a radio button to select what sort method you would like to use.

4. Click and the system will return you to the Warehouse Transfers screen displaying all data as selected. Please note: Sorting selections made will save as defaults per user but can be changed at column.

Bulk Bin Transfers
The Bulk Bin Transfer feature allows a user to simply move all items from one Bin Location to another without the added hassle of inputting item numbers or quantities.
To access Bulk Bin Transfers
1. From the Main Menu click on the Inventory Menu.
2. Click on the Bulk Bin Transfers Sub-Menu.

To Process a Bulk Bin Transfer
1. Enter in or search and select the Warehouse code that the transfer is to be made in. 2. Enter in or search and select the Bin location that you wish to transfer all items from. 3. Enter in or search and select the Bin Location that you wish to transfer all the items to.
4. Click the button and the system will display the following message.

5. Click Yes to POST the records back to SAP Business One. A system message will then appear to confirm if your transaction was successful or not.
8. Click button to acknowledge system message.
Note: Should a user choose to the entry, the system will ask you to confirm your actions by displaying the below message requiring acknowledgement.

ITR Receiving
Inventory Transfer Receiving (ITR) confirms the transfer of inventory from one warehouse into another.
Select a ITR to Receive
1. From the Main Menu click on the Inventory Menu.
2. Click on the ITR Receiving Sub-Menu.

3. Use the ITR Document Lookup feature or key in a Document number and hit enter to begin processing.

ITR Receipt Processing
The system requires confirmation of both the Received Quantity and Bin location for each row within a document. Each row within a document is referred to as a receipt. Receipts are independent of the document number and may be posted individually or as a group.
Select a ITR to Receipt to Process
1. From the Main Menu click on the Inventory Menu.
2. Click on the ITR Receiving Sub-Menu.

3. Use the ITR Receiving Document Lookup feature or key in a ITR Document number and hit enter to begin processing. In the below example we have chosen to process Document # 30. The below document consists of 2 rows also referred to as receipts.

4. Click once on the row you wish to confirm and the system will direct you to the ITR Receiving Entry Screen.

ITR Receiving Lookup
1. The ITR Document Lookup feature can be accessed from the ITR Receiving screen.
2. Click on the Icon at the end of the Document # field to access the ITR Lookup screen.
The system will then display a list of all open ITR's.

3. To select a ITR for processing, click on the row. To return to the previous screen, click the back arrow.
Search By
The ITR Lookup Screen offers a variety of Search By methods.
1. To view and select a Search By method, click on the icon from the ITR Lookup screen. A Search By window will appear. 2. Select the radio button that corresponds with your desired search method. 3. Click the to confirm your chosen search method.

As shown below, you will then be returned to the ITR Lookup screen. 4. Enter the data that corresponds with your search method into the search field.
5. Hit enter or click on the icon and your results will be displayed.
To remove filter click on the .
Sort By

The ITR Lookup Screen also offers an Ascending / Descending Sort By method. 1. To view and select a Sort By method, click on the icon from the ITR Lookup screen. A Lookup sort window will appear. 2. Click on a radio button to select which way you would like your sort results to be displayed. 3. Click on a radio button to select what sort method you would like to use.
4. Click and the system will return you to the ITR Lookup screen displaying all data as selected.

Please note: Sorting selections made will save as defaults per user but can be changed at any time.
ITR Receiving Entry
A ITR Receiving Entry confirms the quantity of goods being received into the warehouse and allows for automatic or manual allocation directly to a bin location. Bin Location Management settings have an effect on business process and are managed in SAP Business One. Bin location settings made in SAP Business One will either automatically display a pre-defined bin location or leave the field blank requiring manual entry. It is possible to select multiple bin locations for a single receipt row. Click here for more information, please see the topic Working with Bin Locations in help.sap.com. A user may view all bin locations for any given row by accessing the Bin Lookup screen. This feature is useful when a receiver does not find the sufficient storage needed in a given location to complete his or her receipt. Please see the Bin Lookup Chapter for additional information.
Processing a ITR Receiving Entry
1. If applicable; enter the bin location you wish receive the item into. 2. Enter in the physical quantity of item being received to the specified bin location. 3. If prompted, enter in or select any applicable serial / batch numbers. Please see Serial Entry In or Batch Entry In Chapters for additional information.
4. Click the button.

Once added, the system will return you back to the ITR Receiving Entry screen. 5. If applicable, select the next row to be processed and complete steps 1 thru 4. Note: If enabled, the Quick Scan function will return you back to a blank Pick List Entry screen. This feature allows for faster processing of pick lists containing multiple rows. Please see the Quick Scan chapter for more information.
6. Click .

The system will display the following message.
7. Click Yes to POST the records back to SAP Business One. A system message will then appear to confirm if your transaction was successful or not.
8. Click to acknowledge system message. 18TRows can be ADD'ed, FINISH'ed and POST'ed individually. Note: A very useful function when processing large orders is Hide Finished. Please see the Hide Finished chapter for more information.
Note: Should a user choose to the entry, the system will ask you to confirm your actions by displaying the below message requiring acknowledgement.

ITR Receiving Detail
The ITR Receiving Detail screen can be accessed during a ITR Receiving Entry. In today's busy warehouse environment receivers are often interrupted while processing a receipt. This feature allows receivers to view the status of any incomplete line by simply clicking on the
button during the receipt of any given line.
As shown below, 2pcs out of the 5pcs have been processed and are allocated to bin location 01-3PLSHIP.

To make changes, click on the button to clear the screen and re-enter data or select
the button to continue processing.

Sorting for ITR Receiving
The ITR Receiving screen features an ascending / descending sort method. This feature gives users the flexibility to view data multiple ways. Users can select the method in which they wish to sort by and then have the data displayed in either ascending or descending order.
Accessing ITR Receiving Sorting
1. Click on the from the ITR Receiving screen.
This will open the Sorting for ITR Receiving screen. 2. Click on a radio button to select which way you would like your sort results to be displayed. 3. Click on a radio button to select what sort method you would like to use.

4. Click and the system will return you to the ITR Receiving screen displaying all data as selected. Please note: Sorting selections made will save as defaults per user but can be changed at can be.

ITR Pick Lists
The Inventory Transfer Request (ITR) is a document that allows the transfer of inventory from one warehouse to another. It can also be used as a transfer of inventory out to a customer for consignment purposes.
To access a ITR Pick Lists
1. From the Main Menu click on the Inventory Menu.
2. Click on the ITR Pick Lists Sub-Menu.

Pick List Generation
Inventory Transfer Requests are generated in SAP Business One. Click here for more information, please see the topic Inventory Transfers in help.sap.com.

ITR Pick List Processing
The system requires confirmation of both the Pick Quantity and Bin location for each row within a document. Each row within a document is referred to as a Pick. Pick rows are independent of the document number and may be posted individually or as a group.
Select a ITR Pick List to process
1. From the Main Menu click on the Inventory Menu.
2. Click on the ITR Pick Lists Sub-Menu.

3. Use the ITR Pick List Lookup feature or key in a ITR Pick List number and hit enter to begin processing. In the below example we have chosen to process Pick List 154. The below document consists of 1 row also referred to as a pick row or pick.

4. Click on the row to being processing and the system will direct you to the ITR Pick List Entry Screen.

ITR Pick List Lookup
1. The ITR Pick List Lookup feature can be accessed from the ITR Pick List Entry screen.
2. Click on the icon at the end of the Pick List field to access the ITR Pick List Lookup screen.
The system will then display a list of all open ITR Pick Lists.

3. To select a ITR Pick List for processing, click on the row. To return to the previous screen, click the back arrow.
Search By
The ITR Pick List Lookup Screen offer a variety of Search By methods
1. To view and select a Search By method, click on the icon from the ITR Pick List Lookup screen. A Search By window will appear. 2. Select the radio button that corresponds with your desired search method. 3. Click the to confirm your chosen search method.
As shown below, you will then be returned to the ITR Pick List Lookup screen. 4. Enter the data that corresponds with your search method into the search field.

5. Hit enter or click on the icon and your results will be displayed.
To remove filter click on the .
Sort By
The ITR Pick List Lookup Screen offers a Ascending / Descending Sort By method. 1. To view and select a Sort By method, click on the icon from the Lookup screen. A Lookup sort window will appear. 2. Click on a radio button to select which way you would like your sort results to be displayed. 3. Click on a radio button to select what sort method you would like to use.

4. Click and the system will return you to the ITR Pick List Lookup screen displaying all data as selected.

Please note: Sorting selections made will save as defaults per user but can be changed at any time.

ITR Pick List Entry
A ITR Pick List Entry confirms both the bin location and quantity of goods being removed from a warehouse. Designed with understanding and increased flexibility the Pick List Entry Screen allows a user to view the details of any given pick. For example, a user can access the originating Order # and Pick ID# created in SAP Business One. This feature allows for better communication between warehouse personnel and office administration, should questions regarding a pick arise. Please see the Pick List Details Chapter for additional information. In addition, a user may view all active bin locations for any given row by accessing the Bin Lookup screen. This feature is useful when a Picker does not find the sufficient inventory needed in a given location to complete his or her Pick and must look for an alternate. Picking an item from an alternate location will not change the original location shown on the Pick List screen but it can be viewed in the item row details screen Please see the Bin Lookup Chapter for additional information.
Processing a ITR Pick List Entry
1. Confirm that the Bin location displayed on the screen matches the Bin location that the item was picked from. If the location does not match, either manually enter or choose the correct location from the Bin Lookup Screen. Note: It is possible to select multiple bin locations for a single pick row 2. Confirm that the Bin To locations on the screen matches the bin location that the item is going to. If the location does not match, either manually enter or choose the correct location from the Bin Lookup Screen. 3. Enter in the physical quantity of item picked from the corresponding Bin location. 4. If prompted, enter in or select any applicable serial / batch numbers. Please see Serial Entry Out or Batch Entry Out Chapters for additional information.
5. Click the button.

Once added, the system will return you back to the ITR Pick Lists screen. 6. If applicable, select the next row to be processed and complete steps 1 thru 5. Note: If enabled, the Quick Scan function will return you back to a blank Pick List Entry screen. This feature allows for faster processing of pick lists containing multiple rows. Please see the Quick Scan chapter for more information.
6. Click when completed and the system will display the following message.

7. Click Yes to POST the records back to SAP Business One. A system message will then appear to confirm if your transaction was successful or not.
8. Click to acknowledge system message. 18TRows can be ADD'ed, FINISH'ed and POST'ed individually. Note: A very useful function when processing large orders is Hide Finished. Please see the Hide Finished chapter for more information.
Note: Should a user choose to the entry, the system will ask you to confirm your actions by displaying the below message requiring acknowledgement.

ITR Pick List Details
The ITR Pick List Details screen can be accessed during ITR Pick List Entry. In today's busy warehouse environment Pickers may be interrupted during a pick or find a stock discrepancy that has to be communicated back to office staff. Details can be viewed at either the document header or item row level making communication fast, accurate and effective. Details at the header level provide warehouse staff with the ability to view the associated SAP Business One Document Number, Business Partner Name, Pick and Pack Remarks, User Name and assigned Picker.
To view this information on the button as seen below.
Note: Remarks originate from SAP Business One order creation under the Logistics tab in the field titled Pick and Pack Remarks.

To view the details / status of any given row within a pick, click on the row you wish to view. The Pick List Entry window will then open.
Click the button to view row specifics.

Below we can see that 20 pieces of item number 3-01916 was released to be picked for ITR Document 38. The Picker has not yet completed the pick for this row.

Sorting for ITR Pick Lists
ITR Pick Lists features an ascending / descending sort method. This feature gives users the flexibility to view data in multiple ways. Users can select the method in which they wish to sort by and then have the data displayed in either ascending or descending order.
Accessing ITR Pick List Sorting
1. Click on the from the ITR Pick List screen.
This will open the Sorting for Pick Lists screen. 2. Click on a radio button to select which way you would like your sort results to be displayed. 3. Click on a radio button to select what sort method you would like to use.

4. Click and the system will return you to the ITR Pick List screen displaying all data as selected. Please note: Sorting selections made will save as defaults per user but can be changed at can be.

Bin Maintenance
Accessing Bin Maintenance
1. From the Main Menu click on the Inventory Menu.
2. Click on the Bin Maintenance Sub-menu.

To Maintain a Bin
1. Enter in or search and select the Warehouse code that the bin is located in. 2. Enter in or search and select the Bin location that you wish to maintain. 3. Make any necessary changes.

4. Click the button and the system will display the following message.
5. Click Yes to POST the records back to SAP Business One. A system message will then appear to confirm if your transaction was successful or not.
6. Click button to acknowledge system message.
Note: Should a user choose to the entry, the system will ask you to confirm your actions by displaying the below message requiring acknowledgement.


Production
Production Menu
With MRP planning in mind, Resolv WMS has segregated all Production Order Pick Lists and Receipts into their own module. This simple segregation helps better manage the many demands of both the internal and external customer.
Menu Overview
The Production Menu consists of two sub-menus which gives users the flexibility of managing their daily workload.
Production Order Pick Lists - This menu will display all outstanding picks for production orders
Production Receipt - This menu will display all finished production orders that are ready to be received

Production Order Pick Lists
The Production Order Pick List provides the warehouse with a list of items/components needed by the production department to manufacture an item for resale.
To access Production Order Pick Lists
1. From the Main Menu click on the Production Menu.
2. Click on the Production Order Pick Lists Sub-Menu.

Please see the Production Order Pick List Processing Chapter for how to complete a Production Order Pick List Entry.

Production Order Pick List Lookup
1. The Production Order Pick List Lookup feature can be accessed from the Production Order Pick List Sub-Menu.
2. Click on the icon at the end of the Production Order Pick List field to access the Production Order Pick List Lookup screen.
The system will then display a list of all open Production Order Pick Lists.
3. To select a Pick List for processing, click on the row.

To return to the previous screen, click the back arrow.
Search By
The Production Order Pick List Lookup Screen offer a variety of Search By methods
1. To view and select a Search By method, click on the icon from the ITR Pick List Lookup screen. A Search By window will appear. 2. Select the radio button that corresponds with your desired search method. 3. Click the to confirm your chosen search method.
As shown below, you will then be returned to the ITR Pick List Lookup screen. 4. Enter the data that corresponds with your search method into the search field.

5. Hit enter or click on the icon and your results will be displayed.
To remove filter click on the .
Sort By
The Production Order Pick List Lookup screen also offers a variety of Sort By methods. 1. To view and select a Sort By method, click on the icon from the Production Order Pick List Lookup screen. A Lookup sort window will appear. 2. Click on a radio button to select which way you would like your sort results to be displayed. 3. Click on a radio button to select what sort method you would like to use.

4. Click and the system will return you to the Production Order Pick List Lookup screen displaying all data as selected.
Please note: Sorting selections made will save as defaults per user but can be changed at any time.

Production Order Pick List Processing
The system requires confirmation of both the Pick Quantity and Bin location for each row within a document. Each row within a pick list is referred to as a Pick. Pick rows are independent of the document number and may be posted individually or as a group.
Select a Production Order Pick List to process
1. From the Main Menu click on the Production Menu.

2. Click on the Production Order Pick Lists Sub-Menu.
3. Use the Production Order Pick List Lookup feature or key in a Production Order Pick List number and hit enter to begin processing. In the below example we have chosen to process Pick List 69. The below document consists of 2 different rows also referred to as pick rows or picks.

4. Click on the row you wish to confirm and the system will direct you to the Pick List Entry Screen.

Production Order Pick List Entry
A Production Order Pick List Entry confirms both the bin location and quantity of goods being removed from a warehouse. Designed with understanding and increased flexibility the Pick List Entry Screen allows a user to view the details of any given pick. For example, a user can access the originating Order # and Pick ID# created in SAP Business One. This feature allows for better communication between warehouse personnel and office administration, should questions regarding a pick arise. Please see the Pick List Details Chapter for additional information. In addition, a user may view all active bin locations for any given row by accessing the Bin Lookup screen. This feature is useful when a Picker does not find the sufficient inventory needed in a given location to complete his or her Pick and must look for an alternate. Picking an item from an alternate location will not change the original location shown on the Pick List screen but it can be viewed in the item row details screen Please see the Bin Lookup Chapter for additional information.
Processing a Pick List Entry
1. Confirm that the bin location displayed on the screen matches the bin location that the item was picked from. If the location does not match, either manually enter or choose the correct location from the Bin Lookup Screen. Note: It is possible to select multiple bin locations for a single pick row. 2. Enter in the physical quantity picked from the corresponding bin location. 3. If prompted, enter in or select any applicable Serial / Batch numbers. Please see Serial Entry Out or Batch Entry Out Chapters for additional information.
4. Click the button.

Once added, the system will return you back to the Production Order Pick Lists screen. 5. If applicable, select the next row to be processed and complete steps 1 thru 4. Note: If enabled, the Quick Scan function will return you back to a blank Pick List Entry screen. This feature allows for faster processing of pick lists containing multiple rows. Please see the Quick Scan chapter for more information.

6. Click when completed and the system will display the following message.
7. Click Yes to POST the records back to SAP Business One. A system message will then appear to confirm if your transaction was successful or not.
8. Click to acknowledge system message. 18TRows can be ADD'ed, FINISH'ed and POST'ed individually. Note: A very useful function when processing large orders is Hide Finished. Please see the Hide Finished chapter for more information.
Note: Should a user choose to the entry, the system will ask you to confirm your actions by displaying the below message requiring acknowledgement.

Production Order Pick List Details

Sorting for Production Order Pick Lists
Production Order Pick Lists features an ascending / descending sort method. This feature gives users the flexibility to view data in multiple ways. Users can select the method in which they wish to sort by and then have the data displayed in either ascending or descending order.
Accessing Production Order Pick List Sorting
1. Click on the from the Production Order Pick List screen.
This will open the Sorting for Pick Lists screen. 2. Click on a radio button to select which way you would like your sort results to be displayed. 3. Click on a radio button to select what sort method you would like to use.

4. Click and the system will return you to the Production Order Pick List screen displaying all data as selected. Please note: Sorting selections made will save as defaults per user but can be changed at column.

Production Receipt
The system requires confirmation of both the Received Quantity and Bin location for each row within a document. Each row within a document is referred to as a receipt. Pick rows are independent of the document number and may be posted individually or as a group.
Select Production Order to Receive
1. From the Main Menu click on the Production Menu.
2. Click on the Production Receipt Sub-Menu.

Please see the Production Receipt Processing Chapter for how to complete a Production Receipt.

Production Receipt Processing
Select a Production Order to Receive
1. From the Main Menu click on the Production Menu.
2. Click on the Production Receipt Sub-Menu.

3. Use the Production Order Receipt Lookup feature or key in a Document number and hit enter to begin processing.

Production Receipt Lookup
1. The Production Order Receipt Lookup feature can be accessed from the Production Order Receipt screen.
2. Click on the icon at the end of the Document # field to access the Production Receipt Lookup screen.
The system will then display a list of all open Production Order Receipts.
3. To select a Production Receipt for processing, click on the row. To return to the previous screen, click the back arrow.

Search By
The Production Order Lookup Screen offers a variety of Search By methods.
1. To view and select a Search By method, click on the icon from the Production Order Lookup screen. A Search By window will appear. 2. Select the radio button that corresponds with your desired search method. 3. Click the to confirm your chosen search method.
As shown below, you will then be returned to the Production Order Lookup screen. 4. Enter the data that corresponds with your search method into the search field.
5. Hit enter or click on the icon and your results will be displayed.

To remove filter click on the .
Sort By
The Production Order Lookup Screen also offers a variety of Sort By methods. 1. To view and select a Sort By method, click on the icon from the Production Order Lookup screen. A Lookup sort window will appear. 2. Click on a radio button to select which way you would like your sort results to be displayed. 3. Click on a radio button to select what sort method you would like to use.
4. Click and the system will return you to the Production Order Lookup screen displaying all data as selected.

Please note: Sorting selections made will save as defaults per user but can be changed at any time.

Production Order Receipt Entry
A Production Receipt Entry confirms the quantity of goods being received into the warehouse and allows for automatic or manual allocation directly to a bin location. Bin Location Management settings have an effect on business process and are managed in SAP Business One. Bin location settings made in SAP Business One will either automatically display a pre-defined bin location or leave the field blank requiring manual entry. It is possible to select multiple bin locations for a single receipt row. Click here for more information, please see the topic Working with Bin Locations in help.sap.com. A user may view all bin locations for any given row by accessing the Bin Lookup screen. This feature is useful when a receiver does not find the sufficient storage needed in a given location to complete his or her receipt. Please see the Bin Lookup Chapter for additional information.
Processing a Production Order Receiving Entry
1. If applicable; enter the bin location you wish receive the item into. 2. Enter in the physical quantity of item being received to the specified bin location. 3. If prompted, enter in or select any applicable Serial / Batch numbers. Please see Serial Entry In or Batch Entry In Chapters for additional information.
4. Click the button.

Once added, the system will return you back to the Production Order Receipt screen. 5. If applicable, select the next row to be processed and complete steps 1 thru 4. Note: If enabled, the Quick Scan function will return you back to a blank Pick List Entry screen. This feature allows for faster processing of Receipts containing multiple rows. Please see the Quick Scan chapter for more information.
6. Click .
The system will display the following message.

7. Click Yes to POST the records back to SAP Business One. A system message will then appear to confirm if your transaction was successful or not.
8. Click to acknowledge system message. 18TRows can be ADD'ed, FINISH'ed and POST'ed individually. Note: A very useful function when processing large orders is Hide Finished. Please see the Hide Finished chapter for more information.
Note: Should a user choose to the entry, the system will ask you to confirm your actions by displaying the below message requiring acknowledgement.

Production Receipt Details
Type topic text here.

Sorting for Production Receipt
The Production Receipt screen features an ascending / descending sort method. This feature gives users the flexibility to view data multiple ways. Users can select the method in which they wish to sort by and then have the data displayed in either ascending or descending order.
Accessing Production Receipt Sorting
1. Click on the from the Production Receiving screen.
This will open the Sorting for Production Order screen. 2. Click on a radio button to select which way you would like your sort results to be displayed. 3. Click on a radio button to select what sort method you would like to use.

4. Click and the system will return you to the Production Receipt screen displaying all data as selected. Please note: Sorting selections made will save as defaults per user but can be changed at column.
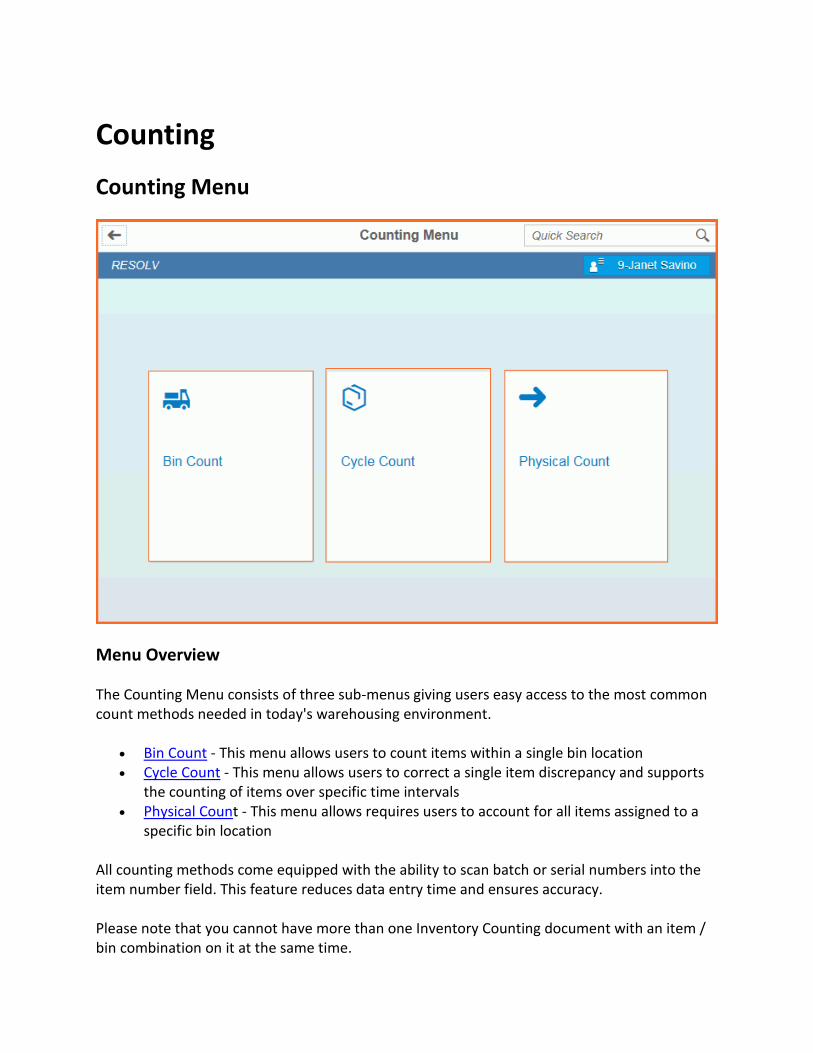
Counting
Counting Menu
Menu Overview
The Counting Menu consists of three sub-menus giving users easy access to the most common count methods needed in today's warehousing environment.
Bin Count - This menu allows users to count items within a single bin location Cycle Count - This menu allows users to correct a single item discrepancy and supports
the counting of items over specific time intervals Physical Count - This menu allows requires users to account for all items assigned to a
specific bin location All counting methods come equipped with the ability to scan batch or serial numbers into the item number field. This feature reduces data entry time and ensures accuracy. Please note that you cannot have more than one Inventory Counting document with an item / bin combination on it at the same time.

As shown below, the system will display a message alerting users of any outstanding counts when applicable.

Bin Count
Bin count allows users to enter a count for all items in a specified bin location. When complete, the system will take the counts and automatically create a standard SAP Business One Inventory Posting document for the bin.
To Process a Bin Count
1. Enter in or search and select the Warehouse code that the bin is located in. 2. Enter in or search and select the bin location that you will be counting. 3. Enter in or search and select the item that you will be counting. 4. Enter in the count quantity. 5. Confirm that the UOM is correct.
6. Click .
The system will then display data as entered.

Repeat steps 3 thru 5 for all items in the specified bin location. To delete or edit a Bin Count please see the Bin Count Detail chapter.
7. Click when completed and the system will display the following message.
8. Click Yes to POST the records back to SAP Business One. A system message will then appear to confirm if your transaction was successful or not.

Bin Count Detail
To delete or edit a Bin Count prior to posting
1. Click on the row of the item you wish to delete or edit.
The Bin Count Detail screen will open.
2. Click on the Edit button to adjust count details. The system will ask you to confirm your actions by displaying the below message requiring acknowledgement.

3. Click YES to continue. The Bin Count screen will re-open the selected count row. 4. Make any necessary adjustments.
5. Click when complete and follow thru with the remaining Bin Count processing steps.
Should you choose to Delete an entry. The system will ask you to confirm your actions by displaying the below message prior to removing the row.


Cycle Count
Cycle Count is used as a item specific physical inventory procedure that is performed during regular intervals to ensure accuracy in the warehouse and to meet legal requirements. Cycle count intervals depend on fields that you define and maintain in SAP Business One for products that you want to include in cycle counting. Cycle Count procedures require the creation and use of standard SAP Cycle Codes. Once created a Cycle Code must be assigned to each item in the Item Master. Click here for more information, please see the topic Inventory Cycles -Setup in help.sap.com. A Cycle Count can also be performed at any time to fix a discrepancy if found while working in the warehouse. NOTE: Inventory Counting documents generated from WMS will remain open in SAP Business One until a SAP Inventory Posting Document is created.
To Process a Cycle Count
1. Enter in or search and select the Warehouse code that the bin is located in. 2. Enter in or search and select the bin location that you will be counting from. 3. Enter in or search and select the item that you will be counting. 4. Enter in the count quantity. 5. Confirm that the UOM is correct.
6. Click .

The system will then display data as entered. Repeat steps 3 thru 5 for all items in the specified bin location. To delete or edit a Cycle Count please see the Cycle Count Detail chapter.
7. Click when completed and the system will display the following message.
8. Click Yes to POST the records back to SAP Business One. A system message will then appear to confirm if your transaction was successful or not.

To delete or edit a count. 1. Click on the row of the item you wish to delete or edit. The Bin Count Detail screen will open allowing you to make any necessary changes.

Cycle Count Detail
To delete or edit a Cycle Count prior to posting
1. Click on the row of the item you wish to delete or edit.
The Cycle Count Detail screen will open.
2. Click on the Edit button to adjust count details. The system will ask you to confirm your actions by displaying the below message requiring acknowledgement.

3. Click YES to continue. The Cycle Count screen will re-open the selected count row. 4. Make any necessary adjustments.
5. Click when complete and follow thru with the remaining Cycle Count processing steps.
Should you choose to Delete an entry. The system will ask you to confirm your actions by displaying the below message prior to removing the row.


Physical Count
A Physical Count allows users to account for all items in a selected bin location. Once a bin is selected to be counted a user must account for all items within that specified bin location before moving on to another bin location. If any item within the specified bin location is not counted, the system will assume the quantity to be zero and record it as so. NOTE: Inventory Counting documents generated from WMS will remain open in SAP Business One until a SAP Inventory Posting Document is created.
To Process a Physical Count
1. Enter in or search and select the Warehouse code that the bin is located in. 2. Enter in or search and select the bin location that you will be counting. 3. Enter in or search and select the item/ that you will be counting. 4. Enter in the count quantity. 5. Confirm that the UOM is correct.
6. Click .

The system will then display data as entered. Repeat steps 3 thru 5 for all items in the specified bin location. To delete or edit a Physical Count please see the Physical Count Detail chapter.
7. Click when completed and the system will display the following message.
8. Click Yes to POST the records back to SAP Business One. A system message will then appear to confirm if your transaction was successful or not.

To delete or edit a count. 1. Click on the row of the item you wish to delete or edit. The Bin Count Detail screen will open allowing you to make any necessary changes.

Physical Count Detail
To delete or edit a Physical Count prior to posting
1. Click on the row of the item you wish to delete or edit.
The Physical Count Detail screen will open.
2. Click on the Edit button to adjust count details. The system will ask you to confirm your actions by displaying the below message requiring acknowledgement.

3. Click YES to continue. The Physical Count screen will re-open the selected count row. 4. Make any necessary adjustments.
5. Click when complete and follow thru with the remaining Physical Count processing steps.
Should you choose to Delete an entry. The system will ask you to confirm your actions by displaying the below message prior to removing the row.


Analytics
Analytics Menu - This feature is not yet available
Menu Overview
The Analytics Menu consists of three sub-menus giving users a data visualization to help describe, predict and improve warehousing performance.
Analytical Reports - Current Status - KPI Cockpit -

Analytical Reports - This feature is not yet available

Current Status - This feature is not yet available

KPI Cockpit - This feature is not yet available

Waving
Wave Creation
A wave can consist of either a single order or multiple orders. Sales Orders, Production Orders, Reserve Invoices and Internal Transfer Requests can be grouped together in the system and then released in waves for picking, based upon user defined selected criteria. Waving is the process of releasing orders to the warehouse floor in groups. Waiving optimizes the picking process by allowing multiple orders to be picked simultaneously.
To Generate a Wave
1. Log into SAP Business One. 2. From the Inventory Module, select Pick and Pack, then Pick and Pack Manager. The Pick and Pack Manager - Selection Criteria screen will then open.

3. From the Status drop-down list select > Open.
4. From the Group drop-down list you may either select > None or Document. Group selection will determine how your selected data will be displayed in upcoming steps of the overall process. Selecting None will display each item on a separate row. Selecting Document will display each document on a separate row.

5. In the Manage field check off which document types you wish to view for processing.
6. Use the drop-down lists and range fields to filter data according to your business requirements. SAP Business One offers a wide range of selection criteria. Pick Lists can be filtered and split by business partner, document type, a specific document, item, item group or ship to method etc. Click here for more information, please see topic Pick and Pack Manager - Selection Criteria in help.sap.com.
Click drop down arrow to view additional options.

7. In the Warehouses area, select the applicable warehouse or warehouses.
8. In the Sort by drop-down list; select the way in which you wish to view the open orders. Note: This selection will determine the priority of item allocation based on available quantities.
9. Choose the button and the Pick and Manger will open a new window know as the Open draw view. In this view the system will display all open orders based on the selection criteria previously made.

Click here for more information, please see topic Pick and Pack Manager - Open Drawer in help.sap.com. 10. To create a wave simply select which orders you wish to release to the warehouse for picking.
11. Click on the button. SAP will the open up the Pick List Generation Window. The Pick List Generation Wizard further enables users to strategically define pick list generation based on selected user defined warehouse parameters. For further instructions please refer to the chapter titled Waving with the Wizard.
If you have chosen an order that includes an item that is managed by either batch or serial number the system will prompt the user to select which batch / serial numbers should be released to the pick. For more information please refer to the chapters on Waving Serialized Items & Waving Batched Items. Additional drawers in the Pick and Pack Manager are used to view order status, create Deliveries and A/R Invoice documents.

Click here for more information, please see the topic Pick and Pack Manager - Open Drawer in help.sap.com. Click here for more information, please see the topic Pick and Pack Manager - Picked Drawer in help.sap.com.

Waving with the Wizard
Waving / releasing orders to the warehouse floor in groups optimizes the picking process by allowing multiple orders to be picked simultaneously.
Pick List Generation Wizard
The Pick List Generation Wizard Opens from the Pick and Pack Manager after a user selects documents to be released for picking. As shown below; SAP Business One guides users step-by-step through the Pick List generation process.
The Pick List Generation Wizard enables users to release waves based on Bin Location attributes and Warehouse Sublevels.

Click here for more information, please see the topic Pick List Generation, Step 1 : Bin Location Selection in help.sap.com.
A second set of parameters allows users to further split Pick Lists prior to generation. Here users can select how items in the pick lists are automatically allocated from the bin locations. Click here for more information, please see the topic Pick List Generation Wizard, Step 2 : Pick List Generation Parameters in help.sap.com.

Once parameter selection has been completed the Wizard will display a summary of the pick list prior to generation. In this step users can assign pick lists and pick dates to specific Pickers before the generating the final picks. Note: To accommodate any changes after Pick List generation, Resolv WMS will update the Pick List user and Pickers name to the actual user signed into the Hand Held performing the Pick. Click here for more information, please see the topic Pick List Generation Wizard, Step 3 : Pick List Details in help.sap.com.
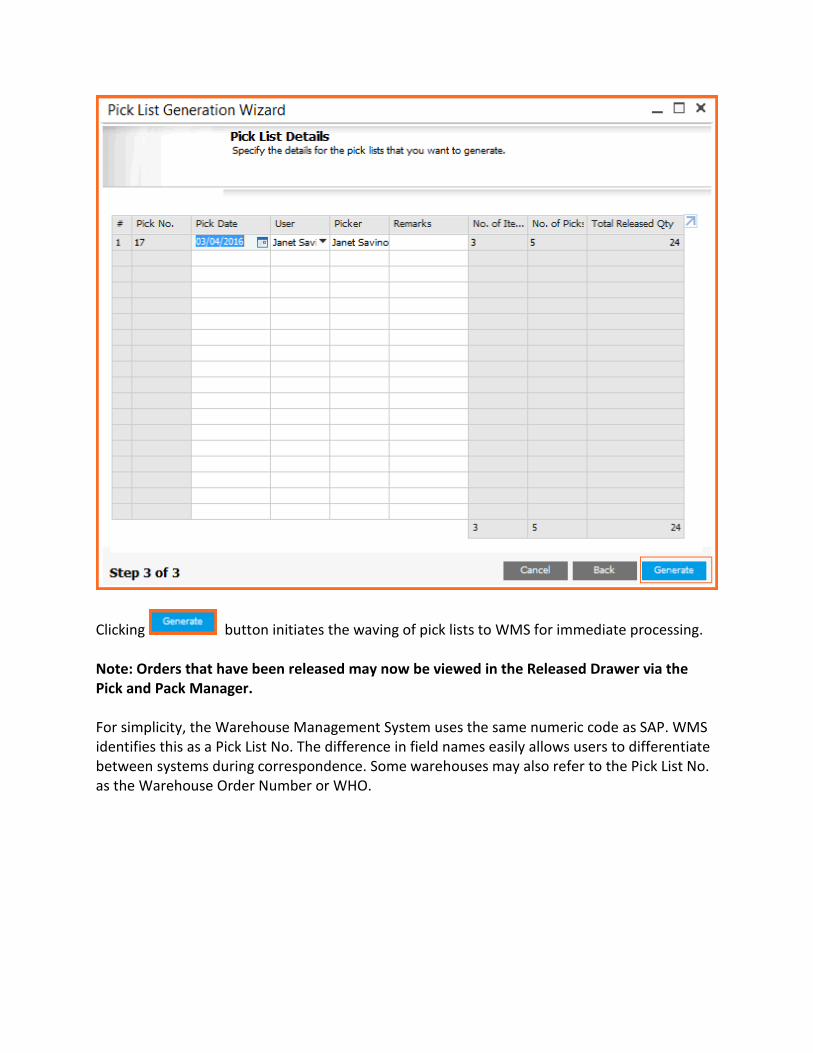
Clicking button initiates the waving of pick lists to WMS for immediate processing. Note: Orders that have been released may now be viewed in the Released Drawer via the Pick and Pack Manager. For simplicity, the Warehouse Management System uses the same numeric code as SAP. WMS identifies this as a Pick List No. The difference in field names easily allows users to differentiate between systems during correspondence. Some warehouses may also refer to the Pick List No. as the Warehouse Order Number or WHO.
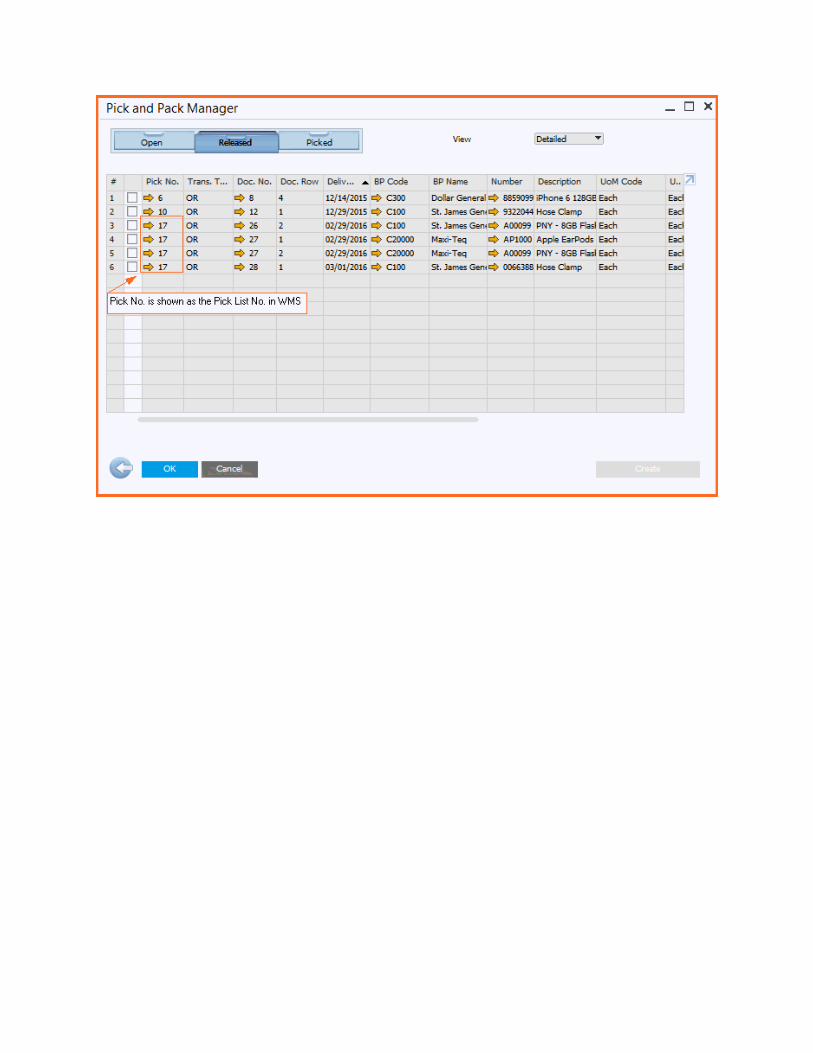

Waving - WMS View
Wave - A wave can consist of either a single order or multiple orders. Sales Orders, Production Orders, Reserve Invoices and Internal Transfer Requests can be grouped together in the system based upon user defined selection criteria and then released in waves for picking. Waving / releasing orders to the warehouse floor in groups optimizes the picking process by allowing multiple orders to be picked simultaneously. A wide range of Selection Criteria supports the flexibility needed in today's fast paced customer oriented environment. Click here for more information, please see topic Pick and Pack Manager - Selection Criteria in help.sap.com. When orders are waved, the WMS system will assign a document number to the group of orders. The system will then group all items to be picked in a logical fashion within the assigned Pick List.

Waving Batched Items
If you manage items by Batch, SAP Business One allows a user to assign batch numbers to items prior to pick list generation. 1. Select documents to be released.
When selecting a document that contains an item that is managed by Batch, the Batch Number Selection screen will automatically open.

2. Here you may either select a specific batch number to be picked or you can have the system choose for you. To select a specific batch number, you may do one of the following:
Click on the row to highlight the batch number you wish to ship then click the to move it into the selected Batch Number field.
If you have no preference you may click on the button and the system will allocate a batch number.
3. Click .

The system will display your selection.
4. Click to confirm your selection.

You will then be returned to the Pick and Pack Manager Open Draw.
5. Click .


Waving Serialized Items
If you manage items by serial number, SAP Business One allows a user to assign serial numbers to items prior to pick list generation. 1. Select documents to be released. When selecting a document that contains an item that is managed by serial number, the Serial Number Selection screen will automatically open.
2. Here you may either select a specific serial number to be picked or you can have the system choose for you. To select a specific serial number you may do one of the following:
Click on the row to highlight the serial number you wish to ship then click the to move it into the Selected Serial Number field.
If you have no preference you may click on the button and the system will allocate a serial number.

3. Click .
The system will display your selection.
4. Click to confirm your selection.

You will then be returned to the Pick and Pack Manager Open Draw.
5. Click .
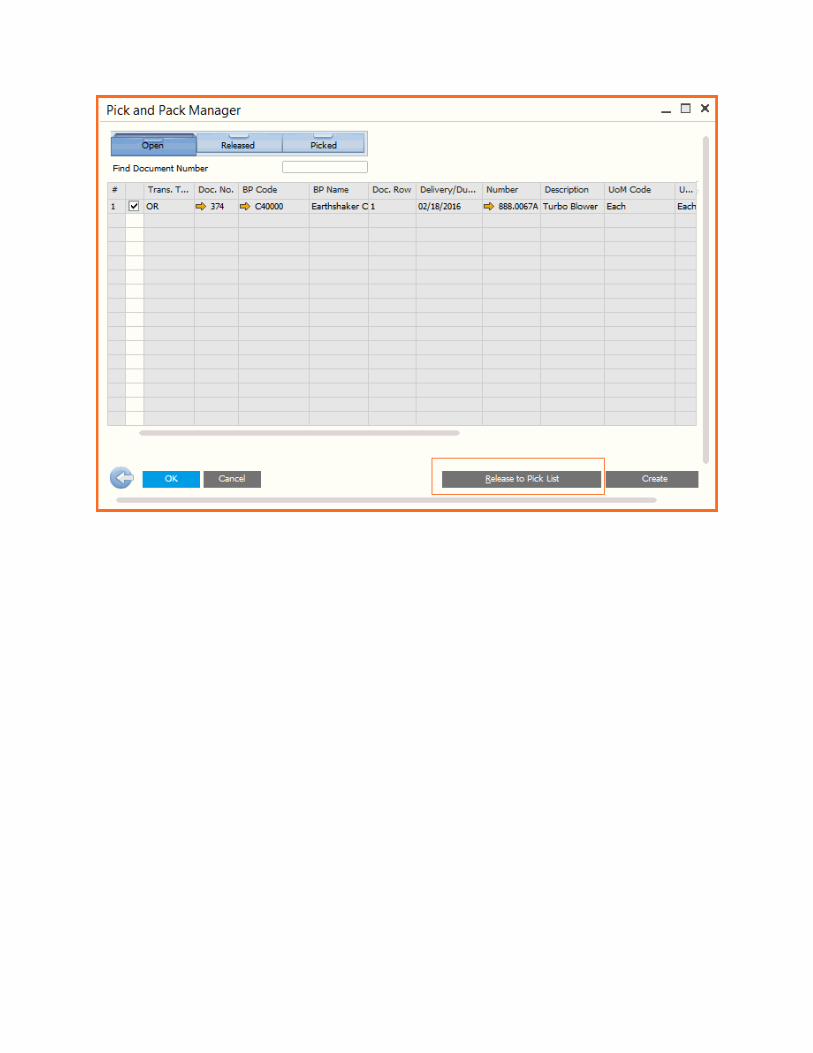

Batches & Serials
Batch Entry In
Batch numbers identify a quantity of material or substance that has a uniform quality and character. Settings made to items and processes in SAP Business One will prompt the WMS user to key in the required batch information. Click here for more information, please see the topic Managing Batch Numbers in help.sap.com. When executing any inbound transaction for an item which is managed by batch numbers the
system will display a button.
Adding a Batch
1. Click on . The system will the open up the Batch Entry In screen.
2. Enter in the required information needed, then click .

As seen below, the system will display the data entered.
3. Click to accept data as entered.

The system will then redirect you back to you back to your receipt. Complete steps 1 thru 3 for any additional pieces if applicable. Note: The system will give warning of any duplicate batch number entry.

Serial Entry In
Serial numbers are unique identifiers to a specific item. Settings made to items and processes in SAP Business One will prompt the WMS user to either key in pre-existing serial numbers or create new ones. Click here for more information, please see the topic Managing Serial Numbers in help.sap.com. When executing any inbound transaction for an item which is managed by a serial number the
system will display a button.
Adding a Serial Number
1. Click on . The system will the open up the Serial Entry In screen.
2. Enter in the required information needed, then click .

As seen below, the system will display the data entered.
3. Click to accept data as entered.

The system will then redirect you back to you back to your receipt. Complete steps 1 thru 3 for any additional pieces if applicable. Note: The system will give warning of any duplicate serial number entry.

Batch Entry Out
Batch numbers identify a quantity of material or substance that has a uniform quality and character. Settings made to items and processes in SAP Business One will prompt the WMS user to key in the batch number being removed from inventory. Click here for more information, please see the topic Managing Batch Numbers in help.sap.com. When executing any outbound transaction for an item which is managed by a batch number
the system will display a button prompting users to confirm which Batch Number should be removed.
Adding a Batch
1. Click on the system will the open up the Batch Entry Out screen.
2. Enter in or search for and select the batch number to be removed. 3. Enter in the quantity to be removed.
4. Click .

As shown below, the system will display the data entered.
4. Click on the button to continue.

The system will then redirect you back to you back to your entry. Complete steps 1 thru 4 for any additional pieces if applicable. Note: The system will give warning of any duplicate batch number entry.

Serial Entry Out
Serial numbers are unique identifiers to a specific item. Settings made to items and processes in SAP Business One will prompt the WMS user to key in the serial number being removed from inventory. Click here for more information, please see the topic Managing Serial Numbers in help.sap.com. When executing any outbound transaction for an item which is managed by a serial number the
system will display a button prompting users to confirm which serial number should be removed.
Adding a Serial Number
1. Click on The system will the open up the Serial Entry Out screen.
2. Enter in or search for and select the serial number to be removed. The Item quantity will default in.
3. Click .

As shown below, the system will display the data entered.
4. Click on the button to continue. The system will then redirect you back to you back to your receipt. Complete steps 1 thru 4 for any additional pieces if applicable.

Note: The system will give warning of any duplicate serial number entry.

Usability Functions
Quick Search
Achieve IT Solutions understands the many different search types needed on a daily basis in today's warehousing environment. Quick Search provides users with the flexibility to access multiple search methods from the convenience of one search field that can be accessed from the right hand corner of any Resolv WMS screen. Users have the ability to search by the following methods:
Item Number Bin Location Serial Number Batch Number Item Name
Sorting
Quick Search also features an ascending / descending sort method. This feature gives users the flexibility to view data in multiple ways. Users can select the method in which they wish to sort by and then have the data displayed in either ascending or descending order.
After your Quick Search results are displayed, click on the to access the available sorting options,
To Use Quick Search
1. Click in the field. 2. Type in your selected search criteria.
3. Hit enter or click on the icon to display your search results. Once displayed you will notice multiple icons.

4. Click on the icon that corresponds with the information you are looking to obtain. For easy identification, Resolve alters the coloring and underlines the icon of the screen being displayed. Below we have provided you with examples of the results each search method offers.
Item Search / Sort
Note: To view batch/serial numbers simply click the box that says Display Batch/Serial Numbers

Sorting for Item Search

Bin Search
Note: To view batch/serial numbers simply click the box that says Display Batch/Serial Numbers

Sorting for Bin Search

Batch Search

Sorting for Batch Search
Serial Number Search

Sorting for Serial Number Search

Item Name Search
Note: Simply type in the key word or words for a item you wish to search for and the system will provide you with a list of all relevant information

Locate and click on the item row to then view the related Search Details.

Quick Scan
The Quick Scan feature is available and can be activated during any receiving or entry process. To enable the Quick Scan feature, click in the box. The system will then display a check mark in the box to confirm activation. This feature may also be set as a default for users. Please see the Resolv WMS User Preferences & Setting Chapter for more information. When activated during any receiving process the Quick Scan feature enables users to quickly select and process document rows with speed and accuracy. There is no need to return to the main receiving screen, users can select the next item for receipt directly from receiving entry screen. Please see below for examples: Example: Receiving Quick Scan - Not activated After adding a item row, users are returned to the main page of the document being processed.
Users must then select the next row to be processed before they are returned to the Receiving Entry screen.

Example: Receiving Quick Scan - Activated After adding a item row, users are returned to a blank Entry screen.
To select the next item to be processed simply click on in the item field.

As shown below a window will then open listing all open items. Click on the item you want to process.
The system will then populate all information into the Receiving Entry screen. Users only need to verify data and add key in Qty before adding.

In addition, when activated during any Picking or Receiving process the Quick Scan feature enables users to quickly process batch and serial number controlled items with speed and accuracy. There is no need to return to the main document, users can process additional batch or serial numbers directly from the Entry screen. Please see below for examples: Example: Quick Scan - Not activated When processing a batch order serial number controlled item, users must key in the Qty and then add either the batch or serial number.
After the batch or serial numbers are selected they must be added to the Entry.

The system will the return users to the main document. Users would then have to re-select the line to key data in for any remaining quantities.
Example: Picking Quick Scan - Activated

After adding batch or serial number information users are returned directly to the batch or serial entry screen if additional quantities require processing.

Column Settings
Column Settings allow users to customize screen layouts in a format that best supports their specific job function. Users may remove unwanted or irrelevant columns from being displayed on their screen. Users may also choose the layout of the columns they wish to view.
Column Settings
1. Column Settings can be accessed anywhere you see the icon.
2. Click on the to display column settings options.
3. Click in the boxes of the columns you wish to display. The system will mark each box with a check to confirm your selection.

4. To apply setting click OK.
Column Layout
To customize your column layout: 1. Highlight the column you wish to move. 2. Click on the up or down arrows to arrange your chosen display.

3. To apply settings click OK.
You may return to the system default settings at any time by clicking on the back arrow .

Bin Lookup
A very simple yet powerful feature that gives users the flexibility to view and select an alternate or additional bin location when processing transactions. 1. The Bin Lookup feature can be accessed from any Bin location field.
2. Choose the icon at the end of the Bin field to access the Bin Lookup screen. In the below business example a user working in Pick List Entry needs to confirm that 25 pieces of item 3-01911 have been picked. The system suggests that the 25 pieces be removed from Bin 02-A-0, however only 1 piece was found in that location. The Picker then accesses Bin Lookup to see if the remaining 24 pieces needed are being stored in a different bin location.
Here we see two different Bin locations in for item 3-01911. The Picker finds the remaining balance needed to complete his pick in bin location 02-A-2.

3. To select an alternate Bin location click on the icon at the end of the row. The system will then populate all pertinent data and redirect you back to your screen of origin for immediate processing.
Search By
1. To search for a Bin by a specific Item, Warehouse Number, Quantity or Unit of Measure, click
on the icon. A Search By window will appear. 2. Select the radio button that corresponds with your desired search method. 3. Enter in an Item, Warehouse Number, Quantity or Unit of Measure into the search field and your results will be displayed. To remove filter click on the .


Hide Finished
The Hide Finished feature is available and can be activated during any receiving or entry process. It is very useful when processing large orders. When activated, the Hide Finished feature hides all rows that have already been processed and only displays those left that require entry. To enable the Hide Finished feature, click in the box. The system will then display a check mark in the box to confirm activation. This feature may also be set as a default for users. Please see the Resolv WMS User Preferences & Setting Chapter for more information. Example: Hide Finished - Not activated - Displays all rows within a Pick List or receipt.

Example: Hide Finished - Activated - Displays only incomplete rows that need to be processed.

Remarks
Designed with understanding the importance of communication, the Purchase Order Receiving Entry Screen comes equipped with a Remarks button. This feature enables Receivers to record any information they feel is pertinent to a receipt. When a goods receipt is completed the remarks can then be viewed by office personnel in SAP Business One.
To access this feature, click on .
As shown below, a window will open allowing users to type in any Remarks they feel are necessary.

Remarks can be view in SAP Business One from either the originating Purchase Order or the GRPO. To view Remarks right click in the footer of either document and the below window will appear.
Click on the line that says Opening and Closing Remarks to view.


SAP Business One Form Settings
Sales Documents
SAP Business One - Recommended Form Settings
SAP Business One provides each user with the option to define which fields and or columns they wish to have displayed and or activated. This option enables users to view frequently needed fields at a glance and can be changed at any time. To easily view the status of an order being processed thru Resolv WMS and effectively communicate with warehouse staff we recommend that users include the following selections in their settings:
Click here for more information, please see topic Form Settings in help.sap.com. Below is an example of the different statuses displayed in SAP Business One allowing users to track the progression of an order being processed through the Resolv WMS. 1. Status of newly created sales order.

2. The Logistics Manager or designated employee releases open Sales Order(s) to the warehouse via the Pick and Pack Manager. 3. Once released, the status within the originating SAP Business One sales order will update.
4. The order is then picked resulting in the below status change.

5. After the delivery has been completed, the Row Status will close.
Pick ID Setting
When orders are waved, a pick list number will be assigned to the group of orders.

The system groups all items to be picked in a logical fashion within the assigned pick list number. The Pick ID number shown below corresponds with the pick list number that was generated by the system when the order was released to Resolv WMS. To have warehouse staff easily locate a specific sales order it is helpful to provide them with the Pick ID assigned.

Purchasing Documents
SAP Business One - Recommended Form Settings
SAP Business One provides each user with the option to define which fields and or columns they wish to have displayed and or activated. This option enables users to view frequently needed fields at a glance and can be changed at any time. To easily view the status of an order being received thru Resolv WMS we recommend that users include the following selections in their settings:
Click here for more information, please see topic Form Settings in help.sap.com Below is an example of the different statuses displayed in SAP Business One allowing users to track receipts as they are being processed through Resolv WMS. 1. Status of newly created purchase order.

After a purchase order entry receipt is completed in Resolv WMS the system will generate a Goods Receipt PO and update the Row Status of the originating document.
2. To access the system generated Goods Receipt PO simply right click in either the header or footer of the originating PO and select the Relationship Map.

The Relationship Map will display all documents related to the transaction.

3. To open and view the associated Good Receipt PO, double click on the icon.


4. To see if the warehouse documented any pertinent information in regards to the receipt. Right click in the footer, then select Opening or Closing Remarks.

If necessary, additional text may be added and updated.