RESILMOUNT A96R SOUND ISOLATION CLIPS...RESILMOUNT A96R SOUND ISOLATION CLIPS INSTRUCTION AND SAFETY...
4
RESILMOUNT A96R SOUND ISOLATION CLIPS INSTRUCTION AND SAFETY MANUAL www.soundproofinglosangeles.com (888) 927-7495 RESILMOUNT A96R SOUND ISOLATION CLIPS Installation Guide
Transcript of RESILMOUNT A96R SOUND ISOLATION CLIPS...RESILMOUNT A96R SOUND ISOLATION CLIPS INSTRUCTION AND SAFETY...

RESILMOUNT A96R SOUND ISOLATION CLIPSINSTRUCTION AND SAFETY MANUAL
www.soundproofinglosangeles.com (888) 927-7495
RESILMOUNT A96R SOUND ISOLATION CLIPS
Installation Guide
RESILMOUNT A96R SOUND ISOLATION CLIPSINSTRUCTION AND SAFETY MANUAL
wwwxsoundproofinglosangelesxcomvvvvvvvvkTTTWvGLOMO/G1
Lvofv/
INSTRUCTION AND SAFETY MANUALa
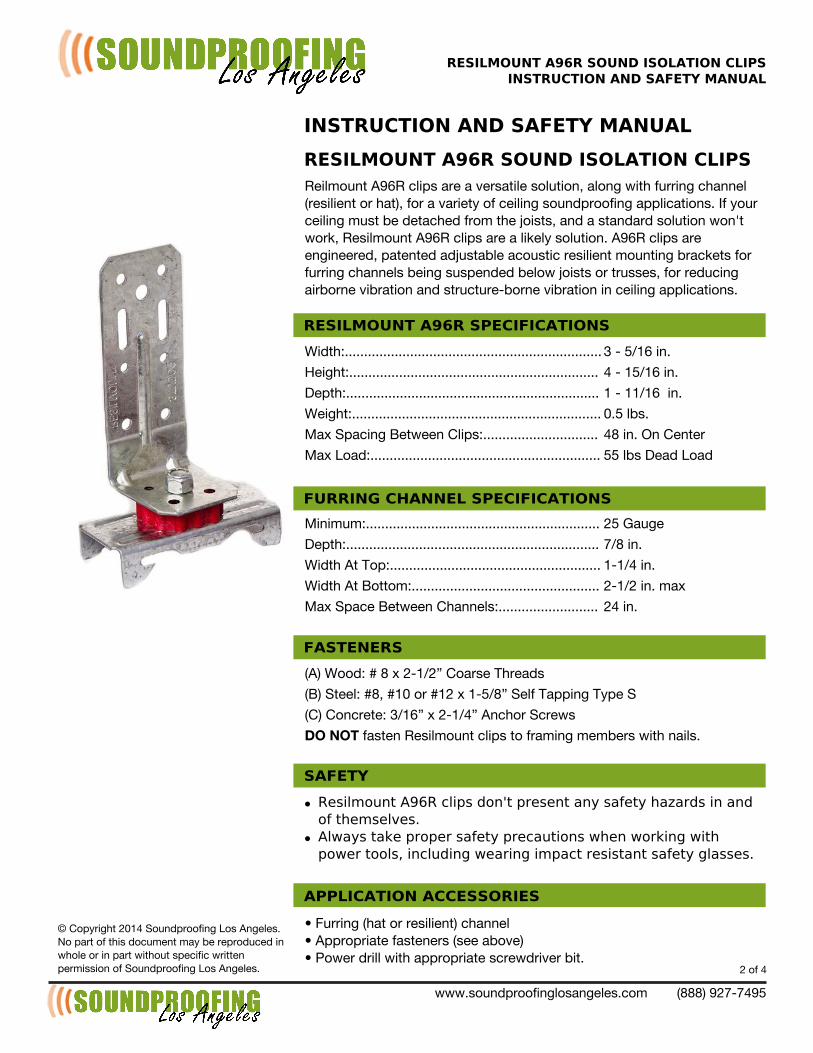
RESILMOUNT A96R SOUND ISOLATION CLIPSReilmountvAG0RvclipsvarevavversatilevsolutionDvalongvwithvfurringvchannelkresilientvorvhatWDvforvavvarietyvofvceilingvsoundproofingvapplicationsxvIfvyourvceilingvmustvbevdetachedvfromvthevjoistsDvandvavstandardvsolutionvwon'tvworkDvResilmountvAG0RvclipsvarevavlikelyvsolutionxvAG0RvclipsvarevengineeredDvpatentedvadjustablevacousticvresilientvmountingvbracketsvforvfurringvchannelsvbeingvsuspendedvbelowvjoistsvorvtrussesDvforvreducingvairbornevvibrationvandvstructureMbornevvibrationvinvceilingvapplicationsx
Width#xxxxxxxxxxxxxxxxxxxxxxxxxxxxxxxxxxxxxxxxxxxxxxxxxxxxxxxxxxxxxxxxxxx
Height#xxxxxxxxxxxxxxxxxxxxxxxxxxxxxxxxxxxxxxxxxxxxxxxxxxxxxxxxxxxxxxxxx
Depth#xxxxxxxxxxxxxxxxxxxxxxxxxxxxxxxxxxxxxxxxxxxxxxxxxxxxxxxxxxxxxxxxxx
Weight#xxxxxxxxxxxxxxxxxxxxxxxxxxxxxxxxxxxxxxxxxxxxxxxxxxxxxxxxxxxxxxxxx
MaxvSpacingvBetweenvClips#xxxxxxxxxxxxxxxxxxxxxxxxxxxxxx
MaxvLoad#xxxxxxxxxxxxxxxxxxxxxxxxxxxxxxxxxxxxxxxxxxxxxxxxxxxxxxxxxxxx
3vMv1SC0vinx
/vMvC1SC0vinx
CvMvCCSC0vvinx
Bx1vlbsx
/TvinxvOnvCenter
11vlbsvDeadvLoad
RESILMOUNT A96R SPECIFICATIONS
Minimum#xxxxxxxxxxxxxxxxxxxxxxxxxxxxxxxxxxxxxxxxxxxxxxxxxxxxxxxxxxxxx
Depth#xxxxxxxxxxxxxxxxxxxxxxxxxxxxxxxxxxxxxxxxxxxxxxxxxxxxxxxxxxxxxxxxxx
WidthvAtvTop#xxxxxxxxxxxxxxxxxxxxxxxxxxxxxxxxxxxxxxxxxxxxxxxxxxxxxxx
WidthvAtvBottom#xxxxxxxxxxxxxxxxxxxxxxxxxxxxxxxxxxxxxxxxxxxxxxxxx
MaxvSpacevBetweenvChannels#xxxxxxxxxxxxxxxxxxxxxxxxxx
L1vGaugev
OSTvinxv
CMCS/vinx
LMCSLvinxvmax
L/vinxv
FURRING CHANNEL SPECIFICATIONS
kAWvWood#vyvTvxvLMCSL”vCoarsevThreads
kBWvSteel#vyTDvyCBvorvyCLvxvCM1ST”vSelfvTappingvTypevS
kCWvConcrete#v3SC0”vxvLMCS/”vAnchorvScrews
DO NOTvfastenvResilmountvclipsvtovframingvmembersvwithvnailsx
FASTENERS
Resilmount A96R clips don't present any safety hazards in and of themselves.Always take proper safety precautions when working with power tools, including wearing impact resistant safety glasses.
•
•
SAFETY
APPLICATION ACCESSORIES
•vFurringvkhatvorvresilientWvchannel•vAppropriatevfastenersvkseevaboveW•vPowervdrillvwithvappropriatevscrewdrivervbitx
©vCopyrightvLBC/vSoundproofingvLosvAngelesxNovpartvofvthisvdocumentvmayvbevreproducedvinvwholevorvinvpartvwithoutvspecificvwrittenvpermissionvofvSoundproofingvLosvAngelesx
RESILMOUNT A96R SOUND ISOLATION CLIPSINSTRUCTION AND SAFETY MANUAL
wwwCsoundproofinglosangelesCcomWWWWWWWW"LLLzWT/SvSNTF
CEILING INSTALLATION GUIDE
yWofWN
INSTALLATION NOTES
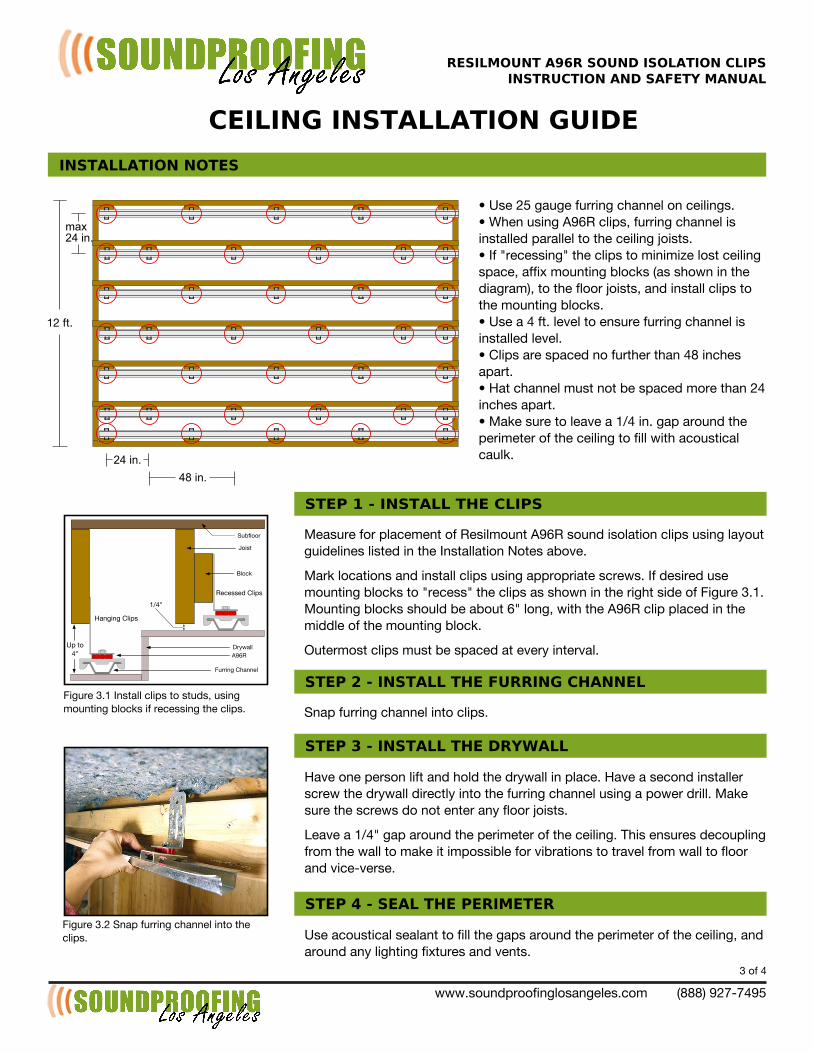
•WUseW/FWgaugeWfurringWchannelWonWceilingsC•WWhenWusingWATORWclipskWfurringWchannelWisWinstalledWparallelWtoWtheWceilingWjoistsC•WIfW6recessing6WtheWclipsWtoWminimizeWlostWceilingWspacekWaffixWmountingWblocksW"asWshownWinWtheWdiagramzkWtoWtheWfloorWjoistskWandWinstallWclipsWtoWtheWmountingWblocksC•WUseWaWNWftCWlevelWtoWensureWfurringWchannelWisWinstalledWlevelCW•WClipsWareWspacedWnoWfurtherWthanWNLWinchesWapartCW•WHatWchannelWmustWnotWbeWspacedWmoreWthanW/NWinchesWapartC•WMakeWsureWtoWleaveWaW1HNWinCWgapWaroundWtheWperimeterWofWtheWceilingWtoWfillWwithWacousticalWcaulkC
STEP 1 - INSTALL THE CLIPS
MeasureWforWplacementWofWResilmountWATORWsoundWisolationWclipsWusingWlayoutWguidelinesWlistedWinWtheWInstallationWNotesWaboveCa
MarkWlocationsWandWinstallWclipsWusingWappropriateWscrewsCWIfWdesiredWuseWmountingWblocksWtoW6recess6WtheWclipsWasWshownWinWtheWrightWsideWofWFigureWyC1CWMountingWblocksWshouldWbeWaboutWO6WlongkWwithWtheWATORWclipWplacedWinWtheWmiddleWofWtheWmountingWblockCa
OutermostWclipsWmustWbeWspacedWatWeveryWintervalC
STEP 2 - INSTALL THE FURRING CHANNEL
SnapWfurringWchannelWintoWclipsC
STEP 3 - INSTALL THE DRYWALL
HaveWoneWpersonWliftWandWholdWtheWdrywallWinWplaceCWHaveWaWsecondWinstallerWscrewWtheWdrywallWdirectlyWintoWtheWfurringWchannelWusingWaWpowerWdrillCWMakeWsureWtheWscrewsWdoWnotWenterWanyWfloorWjoistsCa
LeaveWaW1HN6WgapWaroundWtheWperimeterWofWtheWceilingCWThisWensuresWdecouplingWfromWtheWwallWtoWmakeWitWimpossibleWforWvibrationsWtoWtravelWfromWwallWtoWfloorWandWvicevverseC
STEP 4 - SEAL THE PERIMETER
UseWacousticalWsealantWtoWfillWtheWgapsWaroundWtheWperimeterWofWtheWceilingkWandWaroundWanyWlightingWfixturesWandWventsC
FigureWyC/WSnapWfurringWchannelWintoWtheWclipsC
max 24 in.
24 in.
1/WftC
48 in.
FigureWyC1WInstallWclipsWtoWstudskWusingWmountingWblocksWifWrecessingWtheWclipsC
HangingWClips
RecessedWClips
Subfloor
Joist
ATOR
Block
FurringWChannel
DrywallUpWtoN6
1HN6
RESILMOUNTBA96RBSOUNDBISOLATIONBCLIPSINSTRUCTIONBANDBSAFETYBMANUAL
www.soundproofinglosangeles.com////////(888)/927-7495
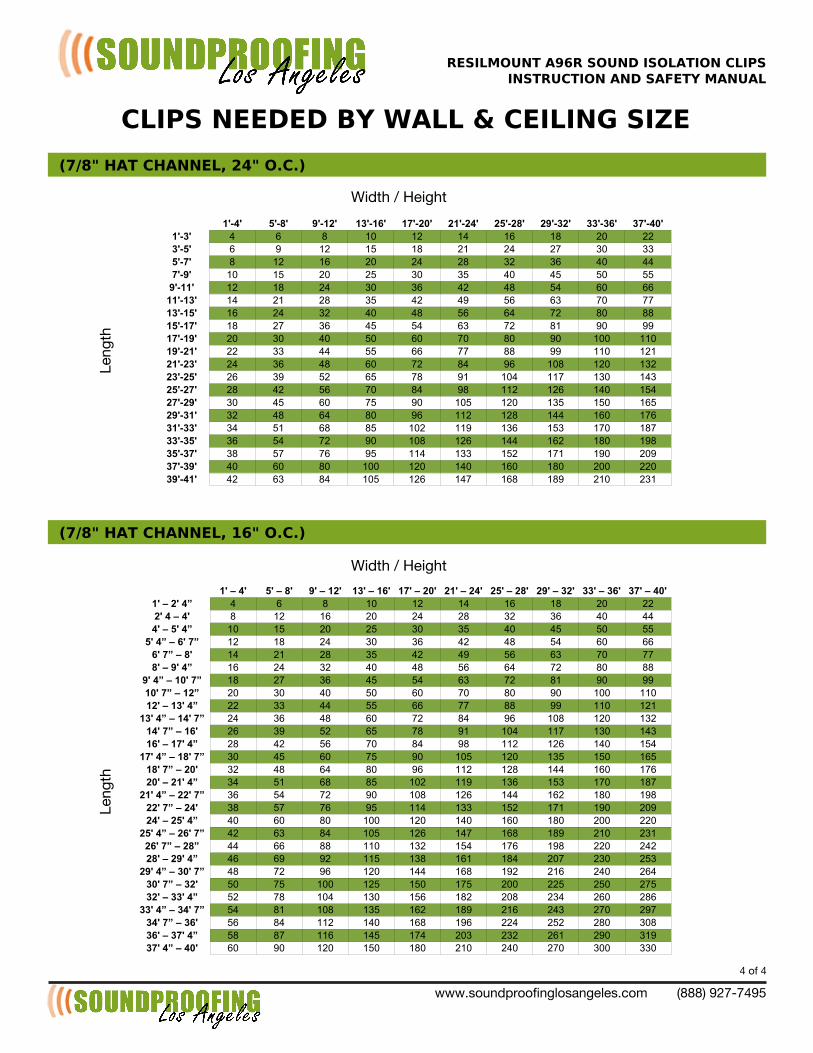
(7/8&BHATBCHANNEL,B16&BO.C.)
(7/8&BHATBCHANNEL,B24&BO.C.)
CLIPSBNEEDEDBBYBWALLB&BCEILINGBSIZE
1'-4' 5'-8' 9'-12' 13'-16' 17'-20' 21'-24' 25'-28' 29'-32' 33'-36' 37'-40'1'-3' 4 6 8 10 12 14 16 18 20 223'-5' 6 9 12 15 18 21 24 27 30 335'-7' 8 12 16 20 24 28 32 36 40 447'-9' 10 15 20 25 30 35 40 45 50 55
9'-11' 12 18 24 30 36 42 48 54 60 6611'-13' 14 21 28 35 42 49 56 63 70 7713'-15' 16 24 32 40 48 56 64 72 80 8815'-17' 18 27 36 45 54 63 72 81 90 9917'-19' 20 30 40 50 60 70 80 90 100 11019'-21' 22 33 44 55 66 77 88 99 110 12121'-23' 24 36 48 60 72 84 96 108 120 13223'-25' 26 39 52 65 78 91 104 117 130 14325'-27' 28 42 56 70 84 98 112 126 140 15427'-29' 30 45 60 75 90 105 120 135 150 16529'-31' 32 48 64 80 96 112 128 144 160 17631'-33' 34 51 68 85 102 119 136 153 170 18733'-35' 36 54 72 90 108 126 144 162 180 19835'-37' 38 57 76 95 114 133 152 171 190 20937'-39' 40 60 80 100 120 140 160 180 200 22039'-41' 42 63 84 105 126 147 168 189 210 231
Leng
th
Width///Height
1' – 4' 5' – 8' 9' – 12' 13' – 16' 17' – 20' 21' – 24' 25' – 28' 29' – 32' 33' – 36' 37' – 40'1' – 2' 4” 4 6 8 10 12 14 16 18 20 222' 4 – 4' 8 12 16 20 24 28 32 36 40 444' – 5' 4” 10 15 20 25 30 35 40 45 50 55
5' 4” – 6' 7” 12 18 24 30 36 42 48 54 60 666' 7” – 8' 14 21 28 35 42 49 56 63 70 778' – 9' 4” 16 24 32 40 48 56 64 72 80 88
9' 4” – 10' 7” 18 27 36 45 54 63 72 81 90 9910' 7” – 12” 20 30 40 50 60 70 80 90 100 11012' – 13' 4” 22 33 44 55 66 77 88 99 110 121
13' 4” – 14' 7” 24 36 48 60 72 84 96 108 120 13214' 7” – 16' 26 39 52 65 78 91 104 117 130 14316' – 17' 4” 28 42 56 70 84 98 112 126 140 154
17' 4” – 18' 7” 30 45 60 75 90 105 120 135 150 16518' 7” – 20' 32 48 64 80 96 112 128 144 160 17620' – 21' 4” 34 51 68 85 102 119 136 153 170 187
21' 4” – 22' 7” 36 54 72 90 108 126 144 162 180 19822' 7” – 24' 38 57 76 95 114 133 152 171 190 20924' – 25' 4” 40 60 80 100 120 140 160 180 200 220
25' 4” – 26' 7” 42 63 84 105 126 147 168 189 210 23126' 7” – 28” 44 66 88 110 132 154 176 198 220 24228' – 29' 4” 46 69 92 115 138 161 184 207 230 253
29' 4” – 30' 7” 48 72 96 120 144 168 192 216 240 26430' 7” – 32' 50 75 100 125 150 175 200 225 250 27532' – 33' 4” 52 78 104 130 156 182 208 234 260 286
33' 4” – 34' 7” 54 81 108 135 162 189 216 243 270 29734' 7” – 36' 56 84 112 140 168 196 224 252 280 30836' – 37' 4” 58 87 116 145 174 203 232 261 290 31937' 4” – 40' 60 90 120 150 180 210 240 270 300 330
Leng
th
Width///Height
4/of/4