ReportCaster End User's Manual - BluJay...
148
ReportCaster End User's Manual Version 7 Release 7.02 DN4501007.1110
-
Upload
truonghanh -
Category
Documents
-
view
219 -
download
0
Transcript of ReportCaster End User's Manual - BluJay...
ReportCaster End User's ManualVersion 7 Release 7.02
DN4501007.1110
Cactus, EDA, EDA/SQL, FIDEL, FOCUS, Information Builders, the Information Builders logo, iWay, iWay Software,Parlay, PC/FOCUS, RStat, TableTalk, Web390, and WebFOCUS are registered trademarks, and DataMigrator andMagnify are trademarks of Information Builders, Inc.
Adobe, the Adobe logo, Acrobat, Adobe Reader, Flash, Adobe Flash Builder, Flex, and PostScript are either registeredtrademarks or trademarks of Adobe Systems Incorporated in the United States and/or other countries.
Due to the nature of this material, this document refers to numerous hardware and software products by theirtrademarks. In most, if not all cases, these designations are claimed as trademarks or registered trademarks by theirrespective companies. It is not this publisher’s intent to use any of these names generically. The reader is thereforecautioned to investigate all claimed trademark rights before using any of these names other than to refer to theproduct described.
Copyright © 2011, by Information Builders, Inc. and iWay Software. All rights reserved. Patent Pending. This manual,or parts thereof, may not be reproduced in any form without the written permission of Information Builders, Inc.

WebFOCUS
Contents
Preface................................................................................................................7Documentation Conventions..............................................................................................8
Related Publications..........................................................................................................9
Customer Support.............................................................................................................9
Information You Should Have.............................................................................................9
User Feedback................................................................................................................11
Information Builders Consulting and Training.....................................................................11
1. Introducing ReportCaster..............................................................................13Overview of ReportCaster.................................................................................................14
The ReportCaster Development Interface..........................................................................14
Considerations When Using ReportCaster.........................................................................15
2. Creating and Maintaining Distribution Lists.................................................17About Distribution Lists...................................................................................................18
Creating a Distribution List...............................................................................................19
Editing and Deleting a Distribution List.............................................................................22
Bursting a Report............................................................................................................24
Bursting Guidelines and Limitations..........................................................................26
Specifying Multiple E-mail Addresses................................................................................28
3. Creating a ReportCaster Schedule................................................................31About the Scheduling Tool...............................................................................................32
Creating a Schedule........................................................................................................33
Copying Tab Contents..............................................................................................35
Frequency Options...........................................................................................................35
The Once Run Interval..............................................................................................36
The Minutes Run Interval.........................................................................................36
The Hourly Run Interval............................................................................................37
The Daily Run Interval..............................................................................................38
The Weekly Run Interval...........................................................................................38
ReportCaster End User's Manual 3
The Monthly Run Interval..........................................................................................39
The Yearly Run Interval............................................................................................41
The Custom Run Interval..........................................................................................41
Applying a Secondary Run Interval.............................................................................43
About Tasks...................................................................................................................44
WF Server Procedure Task Options............................................................................46
Standard Reports and My Reports Task Options........................................................47
URL Task Options....................................................................................................48
File Task Options.....................................................................................................49
FTP Task Options.....................................................................................................49
Distribution Options........................................................................................................52
Distributing Scheduled Output Using E-mail...............................................................53
Distributing Scheduled Output Using FTP or SFTP.......................................................60
Notification Options.........................................................................................................64
Setting On Error and Always Notification....................................................................65
4. Maintaining a Schedule.................................................................................67About Maintaining a Schedule..........................................................................................68
Editing a Schedule..........................................................................................................69
Cloning a Schedule.........................................................................................................70
Deleting a Schedule........................................................................................................72
Viewing a Log Report.......................................................................................................73
Purging the Log File.........................................................................................................75
Setting Schedule Blackout Dates.....................................................................................77
Creating, Changing, and Deleting an Execution ID..............................................................79
5. Tracking ReportCaster Schedules.................................................................83Using Schedule Logs.......................................................................................................84
Troubleshooting Log Reports....................................................................................89
Checking the Schedule Status..........................................................................................89
A. ReportCaster Formats for Scheduled Output...............................................91AHTML...........................................................................................................................92
ALPHA............................................................................................................................92
COM..............................................................................................................................92
4 WebFOCUS
Contents

COMMA..........................................................................................................................93
COMT.............................................................................................................................93
DFIX...............................................................................................................................94
DHTML...........................................................................................................................94
DOC...............................................................................................................................95
EXCEL............................................................................................................................95
EXL07............................................................................................................................96
EXL2K............................................................................................................................96
EXL2K FORMULA.............................................................................................................97
EXL2K PIVOT...................................................................................................................97
EXL2K TEMPLATE............................................................................................................98
EXL97............................................................................................................................98
Flash..............................................................................................................................99
GIF.................................................................................................................................99
HTML...........................................................................................................................100
HTML ODP....................................................................................................................100
JPEG............................................................................................................................100
PDF..............................................................................................................................101
PNG.............................................................................................................................101
PPT..............................................................................................................................102
PPT Template................................................................................................................102
PS...............................................................................................................................102
SVG.............................................................................................................................103
TAB..............................................................................................................................104
TABT............................................................................................................................104
VISDIS.........................................................................................................................104
WK1.............................................................................................................................104
WP...............................................................................................................................105
XML.............................................................................................................................105
B. Working With Distribution Lists in the HTML User Interface.......................107Accessing the Distribution or Address Book List Interface................................................108
Creating a Distribution or Address Book List....................................................................109
Editing a Distribution List...............................................................................................116
ReportCaster End User's Manual 5
Contents
Deleting a Distribution List.............................................................................................117
C. Maintaining a Schedule Using the HTML User Interface.............................119About the Schedules Interface.......................................................................................120
Editing a Schedule in the HTML User Interface................................................................121
Cloning a Schedule.......................................................................................................123
Deleting a Schedule......................................................................................................125
Viewing a Log Report.....................................................................................................126
Purging the Log File.......................................................................................................132
Schedule Blackout Dates...............................................................................................134
Checking the Status of a Scheduled Job.........................................................................137
Creating, Updating, and Deleting an Execution ID............................................................138
Reader Comments...........................................................................................147
6 WebFOCUS
Contents

WebFOCUS
Preface
This documentation describes how a Managed Reporting Analytical user or a BusinessIntelligence Dashboard user can create schedules to automatically distribute output fromStandard Reports or their own My Reports to specified recipients.
How This Manual Is Organized
This manual includes the following chapters:
ContentsChapter/Appendix
Provides an introduction to ReportCaster and its mainfeatures, and describes the scheduling andmaintenance tools available to the End User.
Introducing ReportCaster1
Describes how you can edit the properties of aschedule, delete a schedule, clone a schedule, orrun a schedule immediately once you have createdit.
Creating and MaintainingDistribution Lists
2
Describes how to schedule a ReportCaster job.Creating a ReportCasterSchedule
3
Describes how to check the status of a schedule,edit the properties of a schedule, clone and deletea schedule, and run a log report to obtain additionalinformation. Also describes purging log records andexplains how to create, update, and delete yourExecution IDs.
Maintaining a Schedule4
Describes how to obtain details about a schedulethrough log reports and job status information.
Tracking ReportCasterSchedules
5
Provides descriptions, suggested uses, andconsiderations about each ReportCaster outputformat.
ReportCaster Formats forScheduled Output
A
ReportCaster End User's Manual 7
ContentsChapter/Appendix
Discusses how to create, edit, and delete aDistribution List using the HTML User Interface.
Working With DistributionLists in the HTML UserInterface
B
Discusses how to edit the properties of a schedule,clone a schedule, delete a schedule, check the statusof a schedule, or run a log report to obtain informationabout a schedule. Describes purging log records andhow to create, update, and delete your Execution IDs.
Maintaining a ScheduleUsing the HTML UserInterface
C
Documentation ConventionsThe following table lists and describes the conventions that apply in this manual.
DescriptionConvention
Denotes syntax that you must enter exactly as shown.THIS TYPEFACE
or
this typeface
Represents a placeholder (or variable), a cross-reference, or animportant term.
this typeface
Indicates a default setting.underscore
Highlights a file name or command. It may also indicate a button,menu item, or dialog box option you can click or select.
this typeface
Indicates keys that you must press simultaneously.Key + Key
Indicates two or three choices; type one of them, not the braces.{ }
Indicates a group of optional parameters. None is required, butyou may select one of them. Type only the parameter in thebrackets, not the brackets.
[ ]
Separates mutually exclusive choices in syntax. Type one of them,not the symbol.
|
Indicates that you can enter a parameter multiple times. Type onlythe parameter, not the ellipsis points (...).
...
8 WebFOCUS
Documentation Conventions

DescriptionConvention
Indicates that there are (or could be) intervening or additionalcommands.
.
.
.
Related PublicationsTo view a current listing of our publications and to place an order, visit our TechnicalDocumentation Library, http://documentation.informationbuilders.com. You can also contactthe Publications Order Department at (800) 969-4636.
Customer SupportDo you have any questions about this product?
Join the Focal Point community. Focal Point is our online developer center and more than amessage board. It is an interactive network of more than 3,000 developers from almostevery profession and industry, collaborating on solutions and sharing tips and techniques,http://forums.informationbuilders.com/eve/forums.
You can also access support services electronically, 24 hours a day, with InfoResponseOnline. InfoResponse Online is accessible through our World Wide Web site,http://www.informationbuilders.com. It connects you to the tracking system and known-problem database at the Information Builders support center. Registered users can open,update, and view the status of cases in the tracking system and read descriptions of reportedsoftware issues. New users can register immediately for this service. The technical supportsection of www.informationbuilders.com also provides usage techniques, diagnostic tips,and answers to frequently asked questions.
Call Information Builders Customer Support Service (CSS) at (800) 736-6130 or (212) 736-6130. Customer Support Consultants are available Monday through Friday between 8:00a.m. and 8:00 p.m. EST to address all your questions. Information Builders consultants canalso give you general guidance regarding product capabilities and documentation. Pleasebe ready to provide your six-digit site code number (xxxx.xx) when you call.
To learn about the full range of available support services, ask your Information Buildersrepresentative about InfoResponse Online, or call (800) 969-INFO.
Information You Should HaveTo help our consultants answer your questions effectively, be prepared to provide the followinginformation when you call:
ReportCaster End User's Manual 9
Preface

Your six-digit site code (xxxx.xx).
Your WebFOCUS configuration:
The front-end you are using, including vendor and release.
The communications protocol (for example, TCP/IP or HLLAPI), including vendor andrelease.
The software release.
Your server version and release. You can find this information using the Versionoptionin the Web Console.
The stored procedure (preferably with line numbers) or SQL statements being used inserver access.
The Master File and Access File.
The exact nature of the problem:
Are the results or the format incorrect? Are the text or calculations missing ormisplaced?
The error message and return code, if applicable.
Is this related to any other problem?
Has the procedure or query ever worked in its present form? Has it been changed recently?How often does the problem occur?
What release of the operating system are you using? Has it, your security system,communications protocol, or front-end software changed?
Is this problem reproducible? If so, how?
Have you tried to reproduce your problem in the simplest form possible? For example, ifyou are having problems joining two data sources, have you tried executing a querycontaining just the code to access the data source?
Do you have a trace file?
How is the problem affecting your business? Is it halting development or production? Doyou just have questions about functionality or documentation?
10 WebFOCUS
Information You Should Have
User FeedbackIn an effort to produce effective documentation, the Documentation Services staff welcomesyour opinions regarding this manual. Please use the Reader Comments form at the end ofthis manual to communicate suggestions for improving this publication or to alert us tocorrections. You can also use the Documentation Feedback form on our Web site,http://documentation.informationbuilders.com/feedback.asp.
Thank you, in advance, for your comments.
Information Builders Consulting and TrainingInterested in training? Information Builders Education Department offers a wide variety oftraining courses for this and other Information Builders products.
For information on course descriptions, locations, and dates, or to register for classes, visitour World Wide Web site (http://www.informationbuilders.com) or call (800) 969-INFO tospeak to an Education Representative.
ReportCaster End User's Manual 11
Preface
12 WebFOCUS
Information Builders Consulting and Training
WebFOCUS
Introducing ReportCaster1Topics:
Using ReportCaster, Managed ReportingAnalytical Users can schedule anddistribute Standard Reports or their ownMy Reports. Reports can be distributedto a printer, to a Managed Reportingfolder, to the Report Library, ordistributed through e-mail. In addition, ifyou are a Managed Reporting AnalyticalUser with Advanced privileges, you canalso schedule Managed ReportingCustom Reports.
Overview of ReportCaster
The ReportCaster DevelopmentInterface
Considerations When UsingReportCaster
ReportCaster End User's Manual 13
Overview of ReportCasterAs a Managed Reporting Analytical User with ReportCaster scheduling and library privileges,you can use ReportCaster to schedule a Standard Report or My Report to be distributedeither through an e-mail, to a printer, to a Managed Reporting folder, or to the Report Library.To change or request ReportCaster privileges, see the Managed Reporting Administrator.
ReportCaster scheduling options allow you to customize the distribution of your reports. Youcan designate when the report will be distributed and choose the format in which the reportwill be delivered, for instance, as a text file, an HTML active report, or as a Microsoft Excelspreadsheet or PowerPoint presentation. You can distribute the report to a single recipientor to several recipients. By creating a Distribution List you can specify a group of recipients,for example, all managers in a department, and conveniently reuse the list in current orfuture schedules. Instead of Distribution Lists, Access Lists are used for distributions tothe Report Library to specify multiple recipients who are allowed to view your report.
You can also specify the priority at which ReportCaster should process your schedule, andwhether or not to send notification regarding the schedule status. Another ReportCasterscheduling option, bursting a report, allows you to break a report into sections, distributeeach section as a separate report, and designate the recipient of each section.
The ReportCaster Development interface (or the ReportCaster HTML User Interface accessedfrom Managed Reporting) enables Managed Reporting Analytical Users to create and maintainDistribution Lists and Access Lists, manage schedules, run log reports, and purge the logfile. Additionally, you can create, update, and delete an Execution ID, which is a valid userID that is used to run a schedule on a specified server.
This section describes how to access the ReportCaster End User scheduling and managementtools.
The ReportCaster Development InterfaceThe ReportCaster Development Interface allows you to manage your schedules and performmaintenance tasks. From this interface you can view the status of a schedule, purge thelog report, create a Distribution List and a Library Access List, edit or delete a schedule,and view schedule blackout dates.
You can access the ReportCaster Development Interface from:
The Business Intelligence Dashboard by selecting Tools, then ReportCaster in Dashboardbanner.
From the WebFOCUS Welcome Page, by selecting the ReportCaster, ReportCasterDevelopment link.
14 WebFOCUS
Overview of ReportCaster

The ReportCaster Development interface opens, as shown in the following image.
From the ReportCaster Development Interface, you can:
Create and maintain a Distribution List that you can then assign to scheduled reports.
Create and maintain a Library Access List that you can then assign to scheduled reportsthat are distributed to the Report Library.
Create schedules, and edit, clone, or delete schedules that you own. You can also runa log report to obtain information about a schedule, and purge the log file to conservespace.
View the dates on which schedules cannot run or be set to run.
Check the status of a scheduled job.
Create, update, and delete an Execution ID.
You can access the Report Library from the Business Intelligence Dashboard by selectingTools, then Library in Dashboard banner.
Considerations When Using ReportCasterThe following are important considerations when using ReportCaster:
ReportCaster interfaces are Section 508 compliant. This includes the ReportCasterScheduling tool, the Development Interface, the Administration Interfaces, and the ReportLibrary, as well as the legacy tools and interfaces.
Although ReportCaster End Users can only view and perform actions on their own objects(Schedules, Distribution Lists, Log Files, Access Lists, and Execution IDs), ReportCasterAdministrators can view and perform actions on all user objects.
The language in which the ReportCaster user interfaces are presented is controlled by asetting in the WebFOCUS Administration Console.
ReportCaster Administrators can customize the ReportCaster environment and theScheduling Tool to present the options that are specific to your organization.
ReportCaster End User's Manual 15
1. Introducing ReportCaster
16 WebFOCUS
Considerations When Using ReportCaster

WebFOCUS
Creating and Maintaining Distribution Lists2Topics:
When creating a schedule, you candistribute scheduled output to a singlerecipient, or to several recipients. If youare distributing output to severalrecipients, you may want to create a listconsisting of multiple recipients. The listof multiple recipients can then beassigned to any schedule.
About Distribution Lists
Creating a Distribution List
Editing and Deleting a Distribution List
Bursting a Report
If the entire report is not relevant tothose receiving it, you can specifysections of the report to be sent usingthe burst option. Each recipient on yourDistribution List can receive differentsections of the report depending on theindividual burst values you specify.
Specifying Multiple E-mail Addresses
ReportCaster End User's Manual 17

About Distribution ListsA Distribution List is an easy way to distribute content to multiple recipients by citing a listthat contains the individual recipients rather than entering each recipient separately into aschedule. You can create a series of lists that target specific recipients relevant to yourorganization. These lists can be used and reused with any ReportCaster schedule. DistributionLists can be made available to all ReportCaster users (public lists) or restricted for your ownuse (private lists).
A ReportCaster schedule can distribution content to multiple recipients through a:
Distribution List using the ReportCaster Address Book interface. For more information,see Creating a Distribution List on page 19.
External distribution file created in a text file that is accessible to the ReportCasterDistribution Server.
Dynamic distribution list by executing a WebFOCUS procedure against a data sourcewhere destinations are stored.
A Distribution List can be a list of:
E-mail addresses that will receive ReportCaster content.
FTP file names that will receive ReportCaster content.
Printers that will receive ReportCaster content.
As a ReportCaster user, you can view any public Distribution List, but are restricted to editingonly the lists that you own.
To access the Distribution Lists interface from the ReportCaster Development Interface,click the Address Book tab. The following image shows an example of the Address Booktab.
From the Address Book you can:
Create a new Distribution List.
Clone a Distribution List.
Delete a Distribution List.
18 WebFOCUS
About Distribution Lists
If you are a ReportCaster user, you must own the list to delete it.
Filter the list of Distribution Lists displayed in the Address Book tab. You can filter by thedistribution method (E-mail, FTP, or printer) and by the access (Public, Private).
This section explains how to create and edit Distribution Lists, and how to use the burstfeature with a Distribution List. This section also explains how to create an external anddynamic Distribution List.
Creating a Distribution List
How to:
Create a Distribution List
When you create a Distribution List, you specify a name for the Distribution List, select thedistribution method (E-mail, FTP, or printer), the destinations to which the report is distributed,the optional burst values, and whether public or private access is applied.
For more information about bursting reports, see Bursting a Report on page 24.
How to Create a Distribution ListProcedure:
To create a Distribution List:
1. In the ReportCaster Development Interface Address Book tab, click New.
ReportCaster End User's Manual 19
2. Creating and Maintaining Distribution Lists

The New Distribution List window opens, as shown in the following image.
2. In the Name field, type a descriptive name for the Distribution List.
3. From the Access drop-down list, select Public or Private.
Only the owner and ReportCaster administrators can view a Private Distribution List,whereas, all ReportCaster users can view a Public Distribution List. The values in theAccess drop-down list are dependent on your ReportCaster configuration.
4. From the Distribution Method drop-down list, select the distribution method of the list.Email is the default value.
If you select E-mail, you must provide a list of e-mail addresses and, optionally,burst values associated with an address. For details on entering burst values, seeBursting a Report on page 24.
In the Address field, specify the e-mail addresses of the recipients (for example,[email protected]). Be careful typing this information because there is no editchecking. The maximum number of e-mail addresses you can specify in a DistributionList is 9999. You can specify a maximum of 800 characters within a single Addressline.
You can specify multiple e-mail addresses within a single Address field. For moreinformation, see Specifying Multiple E-mail Addresses on page 28.
If you select FTP, you must specify the names of the FTP files that will hold thereport (including the extension) and, optionally, burst values associated with FTP file.
20 WebFOCUS
Creating a Distribution List
The extension specified here should be appropriate for the format selected whencreating the schedule. For example, if you selected Excel or EXL2K on a Windowsplatform, the file should be drive:\directory\filename.xls. The maximum number ofFTP files you can specify in a Distribution List is 9999. For details on entering burstvalues, see Bursting a Report on page 24 and Considerations When Distributing aBurst Report Using FTP on page 25.
When using FTP to transfer Cascading Style Sheet (CSS) files from any platform toz/OS UNIX and the z/OS UNIX httpd.conf file contains the default MIME type of 8-bitfor CSS files, then the CSS files must be transferred in binary mode.
If you select Printer, you must specify the printers that will receive the distributionand, optionally, burst values associated with the printer. For details on entering burstvalues, see Bursting a Report on page 24.
In the Printer input field, specify the printer using the following format:
queue@printserver
where:
queue
Is the name of the printer queue.
printserver
Is the host name or IP address of the printer.
Although ReportCaster supports specifying only the print server (host name or IPaddress), we recommend that you specify both the print queue and print server.(ReportCaster differentiates between the printer queue and the printer server bydetecting the presence of the '@' separator.)
5. Click Save.
6. If you are finished creating a Distribution List, click Close.
Note: To create another list, you must close the New Distribution List window for the listyou just created, then click New to open a refreshed New Distribution List window.
ReportCaster End User's Manual 21
2. Creating and Maintaining Distribution Lists

You can also create a new list by cloning an existing list and modifying it. To do this, in theAddress Book tab, select an existing Distribution List and click Clone. The Clone windowopens, as shown in the following image.
Type a name for the cloned Distribution List and click OK. The cloned Distribution List appearsin the Distribution List column in theAddress Book tab. You can then edit the DistributionList to contain the properties you want.
Editing and Deleting a Distribution List
How to:
Edit a Distribution List
ReportCaster users can only edit the Distribution Lists that they own.
How to Edit a Distribution ListProcedure:
To edit a Distribution List:
1. In the ReportCaster Development Interface Address Book tab, select the DistributionList you want to edit and click Open, or double-click the list.
22 WebFOCUS
Editing and Deleting a Distribution List

A window opens displaying the properties of the selected Distribution List, as shown inthe following image.
2. From this window, you can perform the following:
Change the name of the Distribution List by typing a new name in the Name field.
Change the value of the existing Distribution List entries. For example, you can makethe Distribution List Private instead of Public, or change the Distribution Method.
Add or copy and paste burst values and addresses, files, or printer names. Selectthe row you want to copy, click Copy, place the cursor where you want to paste, thenclick Paste.
Delete a Distribution List entry. Select the item to be deleted, then click Delete.
3. When you have completed your changes, click Save.
To exit the editing window without making changes, click Close.
ReportCaster End User's Manual 23
2. Creating and Maintaining Distribution Lists
Bursting a Report
In this section:
Bursting Guidelines and Limitations
Reference:
Considerations When Distributing a Burst Report Using FTP
Instead of distributing an entire report, you can use the ReportCaster burst feature to breaka report into sections to be distributed separately. Bursting enables you to target relevantsections of a report to individual users. Each report section is saved as a separate file.
WF Server Procedures, Standard Reports, and My Reports support bursting. If you aredistributing a burst tabular report, the burst value is determined by the first BY field. If youare distributing a burst graph report, the burst value is determined by the second BY field.The burst value is automatically determined by the internal matrix, which is a memory areathat stores each database field value and calculates values referenced by the TABLE orGRAPH request.
You can send several report sections to one recipient by specifying the destination of thatrecipient (e-mail addresses, FTP files, or printers) for each section you want to send. Youcan send several report sections to one destination, or you can send one report section toseveral destinations. The burst values you specify in the Distribution List must exist in thedata source you are reporting against.
Note: If you want to burst a report, you must enable bursting when you create a Task for aschedule. The burst values specified in the Burst Value column in the Distribution List windoware ignored unless the Task specifies to burst the report.
24 WebFOCUS
Bursting a Report
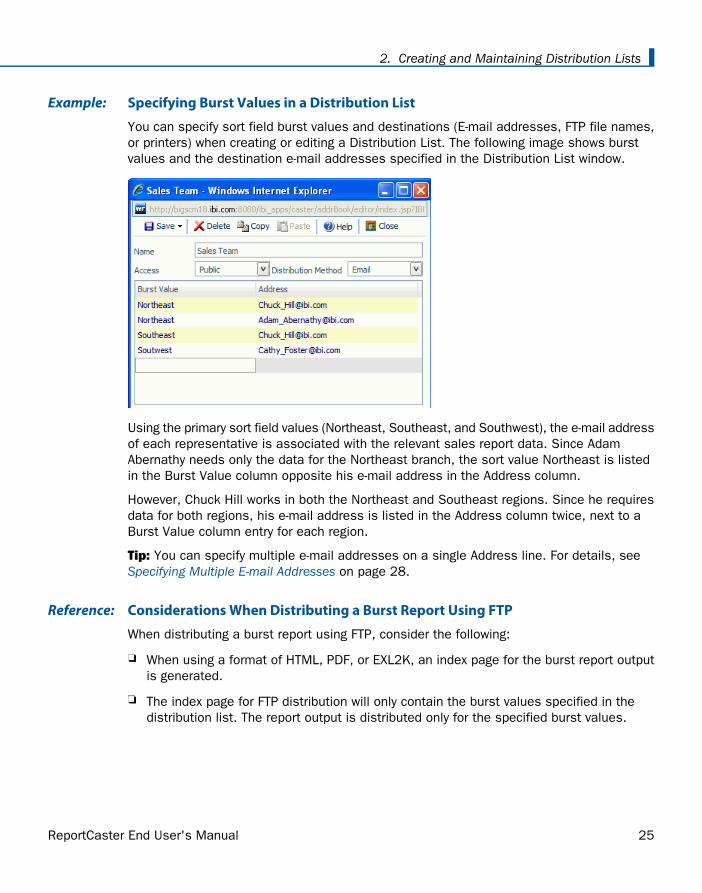
Specifying Burst Values in a Distribution ListExample:
You can specify sort field burst values and destinations (E-mail addresses, FTP file names,or printers) when creating or editing a Distribution List. The following image shows burstvalues and the destination e-mail addresses specified in the Distribution List window.
Using the primary sort field values (Northeast, Southeast, and Southwest), the e-mail addressof each representative is associated with the relevant sales report data. Since AdamAbernathy needs only the data for the Northeast branch, the sort value Northeast is listedin the Burst Value column opposite his e-mail address in the Address column.
However, Chuck Hill works in both the Northeast and Southeast regions. Since he requiresdata for both regions, his e-mail address is listed in the Address column twice, next to aBurst Value column entry for each region.
Tip: You can specify multiple e-mail addresses on a single Address line. For details, seeSpecifying Multiple E-mail Addresses on page 28.
Considerations When Distributing a Burst Report Using FTPReference:
When distributing a burst report using FTP, consider the following:
When using a format of HTML, PDF, or EXL2K, an index page for the burst report outputis generated.
The index page for FTP distribution will only contain the burst values specified in thedistribution list. The report output is distributed only for the specified burst values.
ReportCaster End User's Manual 25
2. Creating and Maintaining Distribution Lists
The index page links for burst report output distributed using FTP are incorrect whenspecifying BASEURL in the scheduled procedure. This is because ReportCaster does notparse and evaluate the procedure code of the scheduled job. To resolve this, move thedistributed files to the BASEURL directory or specify the fully qualified directory path ofthe distributed output in the index page.
On z/OS, burst report output distributed using FTP is created in sequential data setshaving the following qualifiers:
High-level Qualifier: User ID specified for the FTP Server.
Additional Qualifiers: Location value in the Distribution tab and file(s) supplied ina Distribution List.
To send burst output to a partitioned data set, specify an existing partitioned data setas Location and specify member names, without extensions, in the Distribution List Filecolumn. For example, highlevelqualilfier.location.file.
On z/OS, do not use an index name that is the same as the data (input) file from whichyou are reporting. If you specify an index name that is the same as the DDNAME in theDYNAM for your data file, the data file is overwritten with the report output.
On z/OS, the index page is generated with extra characters preceding the burst values.The links on the page to the report sections are correct.
Bursting Guidelines and LimitationsThis section provides detailed information to assist you in defining burst values.
When a report is burst, all data values generated for each burst section are returned to theReportCasterDistribution Server.
For the Managed Reporting and Library distribution methods, each burst section isdistributed to Managed Reporting or the Report Library. Each burst section may be viewedby the owner of the schedule. Library user access to burst report sections is restrictedas per the authorization (owner, public, access list) specified in the schedule informationand Managed Reporting security if the scheduled report is a Managed Reporting procedure.
For the e-mail and printer distribution methods, specific burst sections are distributedbased on the burst values specified when creating the Distribution List, Distribution File,Single Address, or Dynamic Address Listused by the schedule.
The following are guidelines and limitations that apply to theReportCaster burst feature:
Case. Burst values are case-sensitive.
26 WebFOCUS
Bursting a Report

Keywords. Burst values can contain the following keywords:
Wildcard Characters. Use an asterisk (*) and a question mark (?) as wildcards torepresent characters at the beginning, end, or middle of the burst values. The asteriskrepresents one or more characters, while the question mark represents any singlecharacter. Precede each instance of a burst value using a wildcard with the wildcardkeyword enclosed in brackets followed by a colon, [wildcard]:, as shown in the followingexamples.
[wildcard]:abc* = all values that start with 'abc'.
[wildcard]:a?c = all three-character values that start with 'a' and end with 'c'.
[wildcard]:a?c* = all values that start with 'a' and have a 'c' as the third character.
Java Regular Expressions. Use to identify strings of text. Precede each instanceof a burst value using a Java regular expression with the regular expression keywordenclosed in brackets followed by a colon, [regexp]:, as shown in the following examples.
[regexp]:[bcr]at = values that are bat, cat, or rat.
[regexp]:[^bcr]at = any value that is not bat, cat, or rat.
Default Distribution. You can provide a default destination for burst values that arenot specified in the Distribution List. To do this, enter the following in the burst valuecolumn of the Distribution List.
[elsesend] = reports for burst values not contained in the Distribution List will be sentto the named recipient.
The following are example entries in an e-mail distribution list that illustrate the use ofthe wildcard and default distribution keywords in burst values.
AddressBurst Value
[email protected][wildcard]:*an*
[email protected][elsesend]:
Using a scenario where the report is burst on the Country field that contains values ofGermany, USA, France, Canada, Italy, Chile, England, and Japan, then:
Report information for Germany, France, Canada, England, and Japan will be deliveredto [email protected].
Report information for England will be delivered to [email protected].
ReportCaster End User's Manual 27
2. Creating and Maintaining Distribution Lists
Report information for USA, Italy, and Chile will be delivered to [email protected].
Formats. The formats that support bursting are AHTML (except for FML reports), ALPHA,COM, COMMA, COMT, DHTML (except for FML reports), DFIX, DOC, EXL2K, EXL2KFORMULA, EXL2K TEMPLATE, EXL97, GIF, HTML and HTML ODP (except for FML reports),JPEG, PDF, PNG, PPT, PS, SVG, TAB, TABT, and WP. Each burst section of the report willbe named burstvalue_filename.format (for example, Northeast_Sales.pdf).
ACROSS command. This command is not evaluated as a primary sort field. To burst areport, you must also include a BY field. Bursting occurs on the BY field.
FML reports. Bursting an FML report is supported only if the request has a BY field.
Coordinated Compound Reports. ReportCaster can burst and distribute coordinatedcompound reports developed using the Document Composer in Developer Studio inDHTML, PDF, and PPT formats. Compound reports that are not coordinated cannot beburst.
TABLEF. No internal sort processing is performed. The specification of a BY field requiresthat the data already be sorted in the data source.
ON TABLE SUBHEAD/ON TABLE SUBFOOT. Creates a SUBHEAD for only the first pageof the report, and a SUBFOOT for only the last page of the report. When bursting a report,the SUBHEAD and SUBFOOT should occur for each sort break. Therefore, specify theprimary sort field in place of TABLE in the ON command. For example:
ON primarysortfield SUBHEAD
AnV field types. Bursting is not supported on a field with the AnV (where n is an integervalue) field type.
Specifying Multiple E-mail AddressesWhen creating a schedule, distribution list, external distribution file, or dynamic distributionlist, you can specify multiple e-mail addresses within a single field, row, or record.
When creating a schedule, distribution list, or dynamic distribution list, you can separateeach e-mail address with a comma or a semicolon.
When creating an external distribution file, multiple e-mail addresses within a single record(line) must be separated by a semicolon (separation of e-mails by a comma is not supportedbecause a comma is the delimiter character between the e-mail address and burst value).
The multiple e-mail addresses will appear in the To line of a single e-mail when the scheduledoutput is distributed.
Note:
28 WebFOCUS
Specifying Multiple E-mail Addresses
To distribute separate e-mails for each address, specify the e-mail addresses on separatelines within the distribution list, external distribution file, or dynamic distribution list.
Specifying Multiple Burst E-mail AddressesExample:
If you are using the default configuration (Packet Email = YES), one e-mail is distributed formultiple burst values specified for the same e-mail address. The e-mail address valuesspecified on each row are treated as a string that is a key. If there are multiple rows withthe same address value (key), one e-mail is distributed with all the burst values. For example,consider the following Distribution List:
Burst Value Address
A [email protected];[email protected] [email protected] [email protected]
In this example, [email protected] receives two e-mails when the scheduled output isdistributed. In the first e-mail, [email protected]; [email protected] appears in the e-mail Toline and one attachment is distributed for burst value A. In the second e-mail,[email protected] appears in the To line and two attachments are distributed, one for burstvalue B and one for burst value C.
If you are using the configuration that specifies to distribute a single e-mail for each row(Packet Email = NO), then the following behavior occurs for our example. Three separate e-mails are distributed. In the first e-mail, [email protected]; [email protected] appears on theTo line and one attachment is distributed for burst value A. The second e-mail is sent [email protected] with one attachment for burst value B. The third e-mail is sent [email protected] with one attachment for burst value C.
If a schedule has multiple tasks and Packet Email = BURST, then for each burst value theoutput of all of the tasks is combined and distributed. In our example, three separate e-mails are distributed. In the first e-mail, [email protected]; [email protected] appears on theTo line and all output from the multiple tasks for burst value A are distributed. The seconde-mail is sent to [email protected] with all output from all tasks for burst value B. The thirde-mail is sent to [email protected] with all output from all tasks for burst value C.
Another consideration is when using the default configuration (Packet Email = YES) and thesame burst value is specified multiple times for the same Address (key) value. For example,consider the following Distribution List:
Burst Value Address
A [email protected];[email protected] [email protected] [email protected]
ReportCaster End User's Manual 29
2. Creating and Maintaining Distribution Lists

In this Distribution List, only two e-mails are distributed for [email protected]. In the first e-mail, [email protected]; [email protected] appears in the To line and the attachment is forburst value A. In the second e-mail, [email protected] appears in the To line and theattachment is for burst value B. The third row in the Distribution List is ignored since itcontains the same key and the same burst value, B, as the second row.
As a best practice, be sure to review your distribution information to make sure you havenot duplicated the same burst and address value pairs.
Specifying Multiple Non-Burst E-mail AddressesExample:
Consider the following sample Distribution List, which does not contain burst values:
Address
[email protected];[email protected]
[email protected];[email protected];[email protected]
In this Distribution List, an e-mail is distributed for each address line regardless of whetherPacket Email is set to YES or NO. This is because each address value is unique. For thefirst e-mail, [email protected]; [email protected] appears in the To line and the attachmentis for the full report. The second e-mail is distributed to [email protected], and so on.
If one of the address lines is repeated in the Distribution List (for example, if [email protected] added as the sixth line in the example Distribution List), the behavior would work asfollows. If Packet Email = YES, only one e-mail is distributed for [email protected]. However,if Packet Email = NO, two separate e-mails are distributed to [email protected].
30 WebFOCUS
Specifying Multiple E-mail Addresses
WebFOCUS
Creating a ReportCaster Schedule3Topics:
A ReportCaster schedule allows you tospecify when to run a report, what formatthe output will take, and how it will bedistributed.ReportCaster schedules arecreated with the Scheduling tool.
About the Scheduling Tool
Creating a Schedule
Note: This section describes all of theoptions available in the ReportCasterScheduling tool. If your administrator hascustomized the ReportCasterenvironment or the Scheduling tooltemplate, your version of the Schedulingtool may not include all of these options.
Frequency Options
About Tasks
Distribution Options
Notification Options
ReportCaster End User's Manual 31

About the Scheduling ToolA ReportCaster schedule directs the execution of a report. The ReportCaster Scheduling toolprovides the options needed to define the parameters of a schedule, such as, when a reportwill run, what format the output will take, and where the output will be distributed.
The Scheduling tool is accessed from:
The Business Intelligence Dashboard by right-clicking a Standard Report or My Reportand selecting Schedule from the drop-down list.
The ReportCaster Development Interface by selecting the Schedules tab and clickingNew.
The following image shows the Scheduling tool. It consists of a toolbar with options to Save,Run, or Exit the schedule, a field to provide description of the report that you are scheduling,and a series of tabs from which you access the schedule options.
The Scheduling tool tabs partition the options into the following categories:
Frequency. Provides the options related to the time interval to run the schedule.
Task. Allows you to view the task associated with the schedule, and create new tasksfor the schedule.
Distribution. Provides a drop-down list of distribution methods and their correspondingdistribution options.
Notification. Provides the options to set up notification of the schedule status.
Advanced. Provides options to set the schedule priority level, and selections to enableor delete the schedule.
32 WebFOCUS
About the Scheduling Tool
Creating a Schedule
In this section:
Copying Tab Contents
How to:
Create a Schedule
This section provides the overall procedure to create a new schedule for a report. Somesteps in the procedure contain details on the associated options, while other steps directyou to a separate section that contains detailed descriptions of the options and additionalinformation, such as tips in making a selection.
How to Create a ScheduleProcedure:
To create a ReportCaster Schedule:
1. Open the Scheduling tool, as described earlier in this section.
2. In the Description field at the top of the tool, type a name for the schedule. This is arequired field.
3. Make the following selections in the Frequency tab.
a. From the Run Interval drop-down list, select the time interval that the schedule willuse to run the report.
You can set the interval to run the schedule once, or every specified minutes, hours,days, weeks, months, years, or according to a custom interval.
b. From the Start Schedule options, select the date (from the drop-down calendar) andtime you want the schedule to begin running.
Note: To change the time setting, select either the hour or minutes and use thearrows to increase or decrease the value.
c. If applicable to the Run Interval selection, from the End Schedule options, selectthe date and time you want the schedule to stop running.
d. If applicable to the Run Interval selection, from the Every option, use the up anddown arrows to set the number of times you want the schedule to run for the selectedinterval, for example, three times each month.
e. Select the remaining options associated with the chosen run interval. For adescription of the run interval options, see Frequency Options on page 35.
ReportCaster End User's Manual 33
3. Creating a ReportCaster Schedule

4. In the Task tab, the Task Type, Task Name, Report, WF Reporting Server, and ExecutionId options are populated according to the report you selected to schedule. In this tab,you can add additional tasks, pre-processing and post-processing procedures, andparameters, as described in About Tasks on page 44.
5. In the Distribution tab, select the method to distribute the report from the Distributereport by drop-down list. The distribution methods are:
FTP
SFTP
Printer
Managed Reporting
Report Library
Select the appropriate distribution options. For options related to each distributionmethod, see Distribution Options on page 52.
6. In the Notification tab, select whether or not you want to send a notification when theschedule runs and under what conditions to send it. The notification options are:
Never.
Always. Send a notification each time the schedule runs.
On Error. Only send a notification when there is an error running the schedule.
7. In the Advanced tab, select the following options:
Priority Level for the Job. Use the drop-down list to select the priority for runningthe job, with 1 being the highest priority and 5 the lowest priority. The default prioritylevel is 3.
The ReportCaster Distribution Server queue sorts scheduled jobs by priority and thenby time. If multiple jobs share the same priority and time, ReportCaster arbitrarilyschedules the jobs.
Enabled (Scheduled job runs at specified time). Select this option to activatethe schedule to run.
Delete this schedule if it is not scheduled to run again. This option is usefulfor test purposes.
8. To save the schedule, click Save in the Scheduling tool toolbar.
34 WebFOCUS
Creating a Schedule
Copying Tab ContentsFor your convenience, you can copy the entire contents of one tab, for example, theDistribution tab, to the corresponding tab in another schedule.
To do this, right-click anywhere in the tab that you want to copy and select Copy tab name,for example, Copy Distribution. Then right-click in the corresponding tab of the schedule youare copying the content to and select Paste tab name, for example, Paste Distribution. Thetab is refreshed and updated with the copied content.
Frequency Options
In this section:
The Once Run Interval
The Minutes Run Interval
The Hourly Run Interval
The Daily Run Interval
The Weekly Run Interval
The Monthly Run Interval
The Yearly Run Interval
The Custom Run Interval
Applying a Secondary Run Interval
You can schedule a report to run just once or repeatedly, for example, twice a week or thelast Thursday of every month. This section describes the options available in the SchedulingTool Frequency tab when the schedule is set to the following run intervals:
Once
Minute(s)
Hour(s)
Day(s)
Week(s)
Month(s)
Year(s)
Custom
ReportCaster End User's Manual 35
3. Creating a ReportCaster Schedule

Note: ReportCaster administrators can define dates on which schedules cannot run or beset to run. These are known as schedule blackout dates.
The Once Run IntervalThe Once option in the Run Interval drop-down list sets the job to execute immediately. Youcan modify the date or time if you do not want the schedule to run immediately. You canspecify the date and time you want the schedule to run using the Start Schedule options,as shown in the following image.
To select a date, choose a date from the drop-down date calendar. To select a time, selecteither the hour or minutes and use the up and down arrows to increase or decrease thevalue.
The Minutes Run IntervalThe Minute(s) option in the Run Interval drop-down list, sets the schedule to run every nminutes.
36 WebFOCUS
Frequency Options
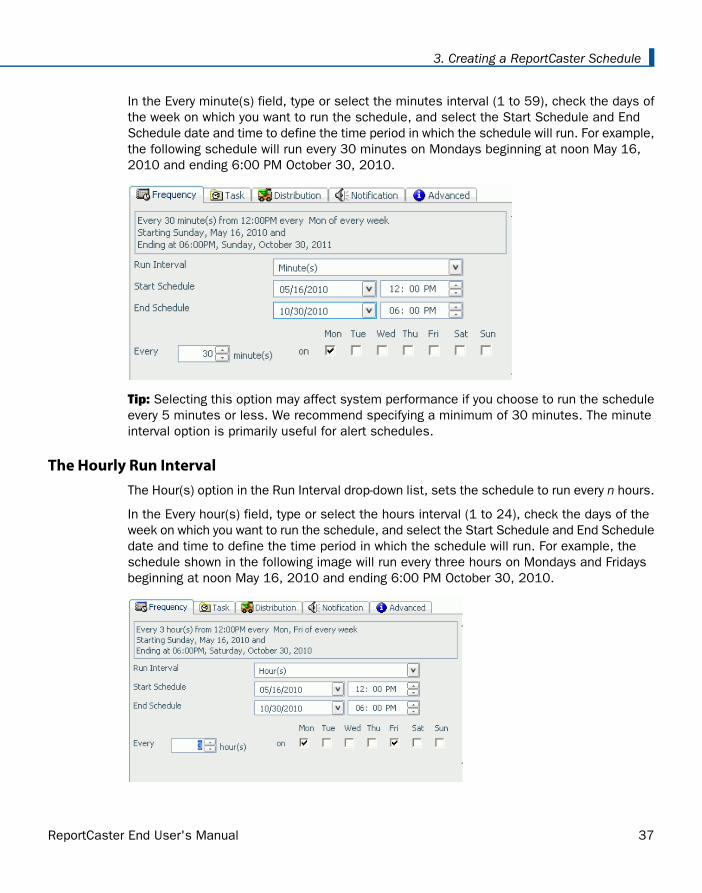
In the Every minute(s) field, type or select the minutes interval (1 to 59), check the days ofthe week on which you want to run the schedule, and select the Start Schedule and EndSchedule date and time to define the time period in which the schedule will run. For example,the following schedule will run every 30 minutes on Mondays beginning at noon May 16,2010 and ending 6:00 PM October 30, 2010.
Tip: Selecting this option may affect system performance if you choose to run the scheduleevery 5 minutes or less. We recommend specifying a minimum of 30 minutes. The minuteinterval option is primarily useful for alert schedules.
The Hourly Run IntervalThe Hour(s) option in the Run Interval drop-down list, sets the schedule to run every n hours.
In the Every hour(s) field, type or select the hours interval (1 to 24), check the days of theweek on which you want to run the schedule, and select the Start Schedule and End Scheduledate and time to define the time period in which the schedule will run. For example, theschedule shown in the following image will run every three hours on Mondays and Fridaysbeginning at noon May 16, 2010 and ending 6:00 PM October 30, 2010.
ReportCaster End User's Manual 37
3. Creating a ReportCaster Schedule
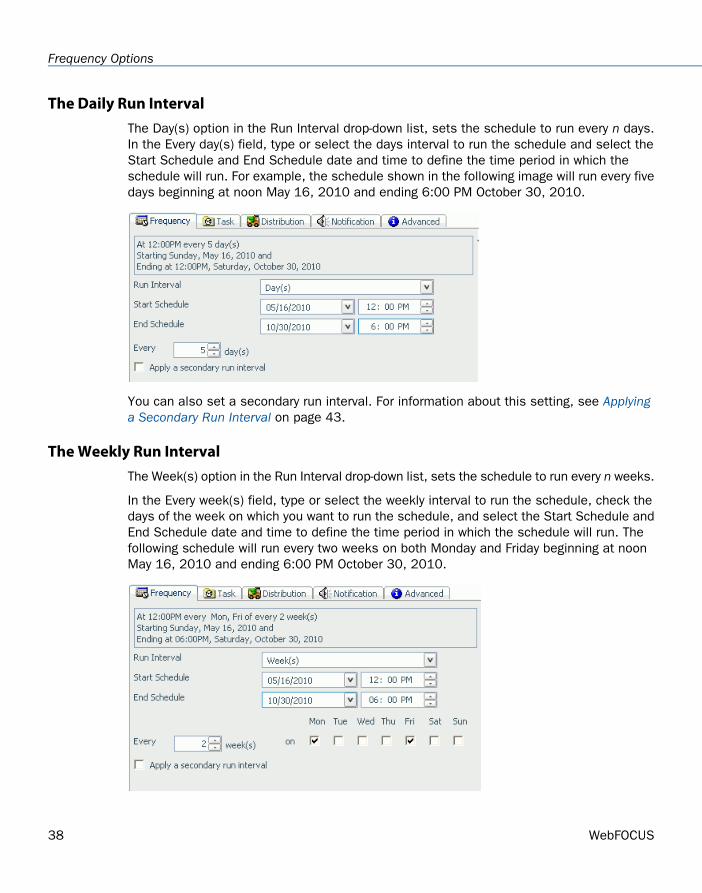
The Daily Run IntervalThe Day(s) option in the Run Interval drop-down list, sets the schedule to run every n days.In the Every day(s) field, type or select the days interval to run the schedule and select theStart Schedule and End Schedule date and time to define the time period in which theschedule will run. For example, the schedule shown in the following image will run every fivedays beginning at noon May 16, 2010 and ending 6:00 PM October 30, 2010.
You can also set a secondary run interval. For information about this setting, see Applyinga Secondary Run Interval on page 43.
The Weekly Run IntervalThe Week(s) option in the Run Interval drop-down list, sets the schedule to run every n weeks.
In the Every week(s) field, type or select the weekly interval to run the schedule, check thedays of the week on which you want to run the schedule, and select the Start Schedule andEnd Schedule date and time to define the time period in which the schedule will run. Thefollowing schedule will run every two weeks on both Monday and Friday beginning at noonMay 16, 2010 and ending 6:00 PM October 30, 2010.
38 WebFOCUS
Frequency Options
Important: When selecting the Week(s) interval, set the Start Schedule to the date of thefirst day (current or future) of the week you want the schedule to run. If you select the currentdate, then you must make sure that the Start Schedule time is later than the current timewhen you save the schedule. If the Start Schedule time is less than or equal to the currenttime, the calculation for the next run time results in the schedule not running on the currentdate.
You can also set a secondary run interval. For information about this setting, see Applyinga Secondary Run Interval on page 43.
The Monthly Run IntervalThe Month(s) option in the Run Interval drop-down list, sets the schedule to run every nmonths. You can then refine the monthly interval with one of the following options. Note thatthese options are mutually exclusive.
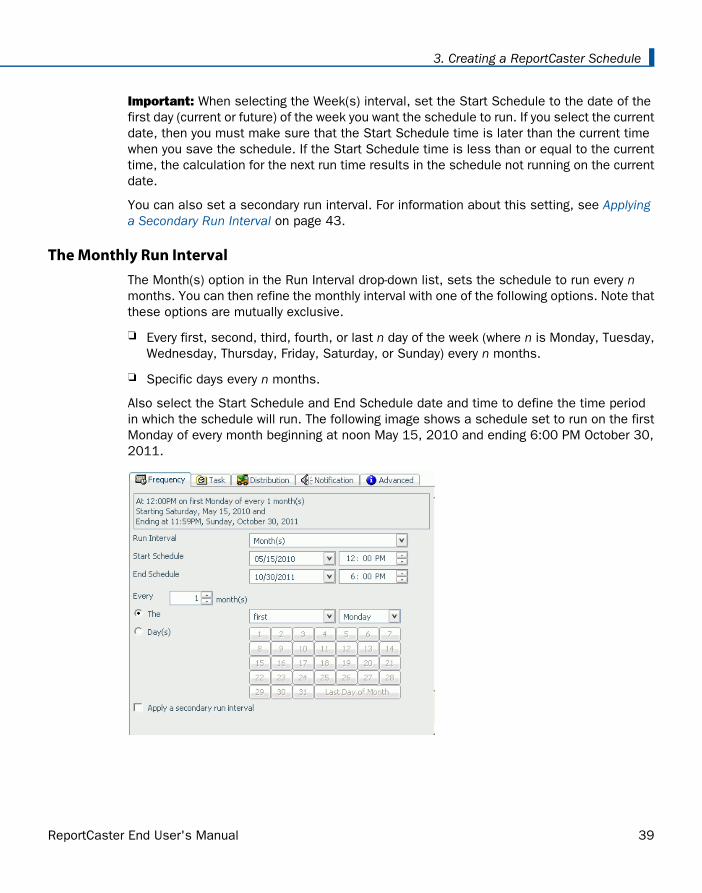
Every first, second, third, fourth, or last n day of the week (where n is Monday, Tuesday,Wednesday, Thursday, Friday, Saturday, or Sunday) every n months.
Specific days every n months.
Also select the Start Schedule and End Schedule date and time to define the time periodin which the schedule will run. The following image shows a schedule set to run on the firstMonday of every month beginning at noon May 15, 2010 and ending 6:00 PM October 30,2011.
ReportCaster End User's Manual 39
3. Creating a ReportCaster Schedule
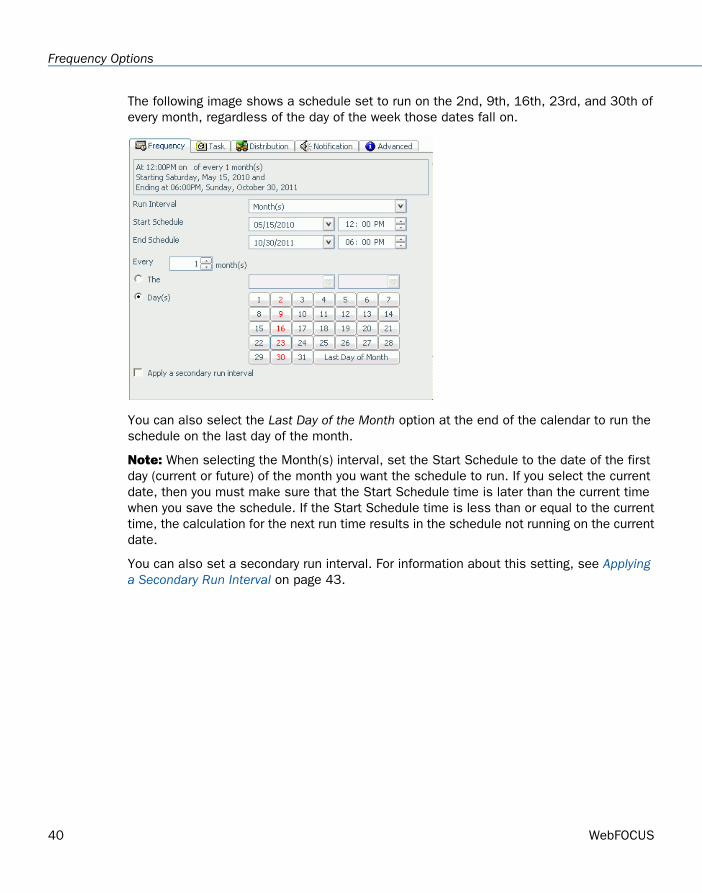
The following image shows a schedule set to run on the 2nd, 9th, 16th, 23rd, and 30th ofevery month, regardless of the day of the week those dates fall on.
You can also select the Last Day of the Month option at the end of the calendar to run theschedule on the last day of the month.
Note: When selecting the Month(s) interval, set the Start Schedule to the date of the firstday (current or future) of the month you want the schedule to run. If you select the currentdate, then you must make sure that the Start Schedule time is later than the current timewhen you save the schedule. If the Start Schedule time is less than or equal to the currenttime, the calculation for the next run time results in the schedule not running on the currentdate.
You can also set a secondary run interval. For information about this setting, see Applyinga Secondary Run Interval on page 43.
40 WebFOCUS
Frequency Options
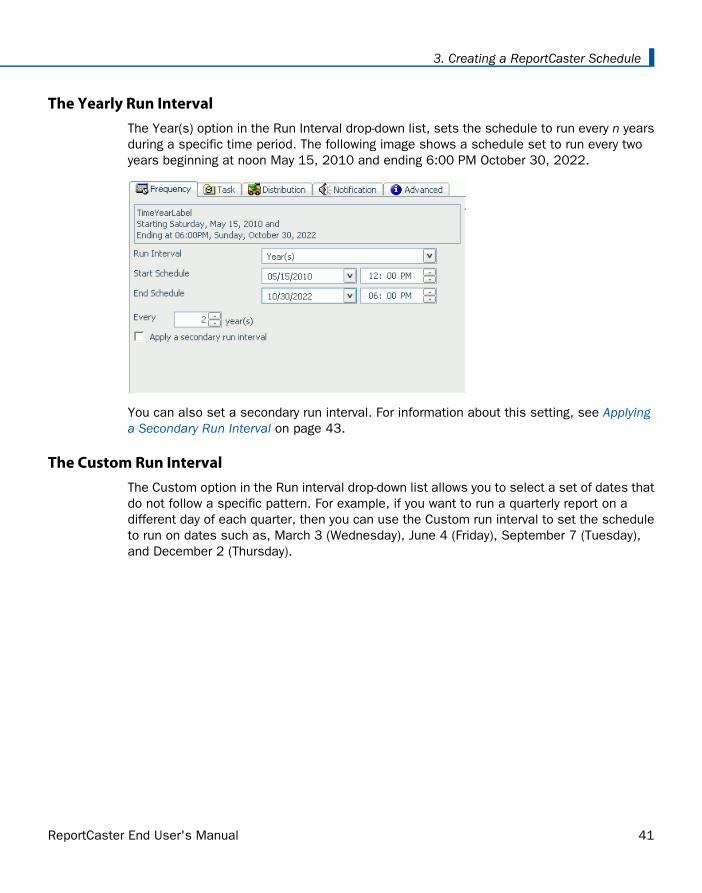
The Yearly Run IntervalThe Year(s) option in the Run Interval drop-down list, sets the schedule to run every n yearsduring a specific time period. The following image shows a schedule set to run every twoyears beginning at noon May 15, 2010 and ending 6:00 PM October 30, 2022.
You can also set a secondary run interval. For information about this setting, see Applyinga Secondary Run Interval on page 43.
The Custom Run IntervalThe Custom option in the Run interval drop-down list allows you to select a set of dates thatdo not follow a specific pattern. For example, if you want to run a quarterly report on adifferent day of each quarter, then you can use the Custom run interval to set the scheduleto run on dates such as, March 3 (Wednesday), June 4 (Friday), September 7 (Tuesday),and December 2 (Thursday).
ReportCaster End User's Manual 41
3. Creating a ReportCaster Schedule

The following image shows the Custom Run Interval options, which includes Start Schedule(initially set to the current date and time) and the End Schedule date and time options, theCustom calendar, and the Custom Date List node that appears in the right pane.
Define the time period in which the schedule will run by selecting the Start Schedule dateand time, and the End Schedule date and time. Select the specific days on which to run theschedule by clicking on the day in the calendar. (Use the forward and back buttons at thetop of the calendar to move through the months and years.) As you select a date, it appearsin the Custom Date List. (If it does not already exist, a folder for the year and month of thedate you select is automatically created under the Custom Date List node.) The followingimage shows an example of a selection of Custom dates in the calendar and the CustomDate List.
To remove a date from the list, click that date in the calendar. The date is no longerhighlighted in the calendar and will not appear in the Custom Date List.
42 WebFOCUS
Frequency Options

You can also set a secondary run interval. For information about this setting, see Applyinga Secondary Run Interval on page 43.
Applying a Secondary Run IntervalThe Apply a secondary run interval option allows you to create a secondary run interval withinthe day the schedule runs. You can apply the secondary run interval every n minutes or hoursfor a specified number of hours and minutes or until a specified time. This option is availablefor schedules that run every day(s), week(s), month(s), or year(s).
The secondary run interval will not be validated when the schedule is created. Instead,validation is performed every time the next run time of the schedule is calculated whenrunning within the secondary run interval. The secondary run interval cannot exceed the nextrun time for the primary run interval. For example, a daily schedule cannot have a secondaryrun interval greater than Every 1 day(s). If a secondary run interval is scheduled to run afterthe next primary run interval of the schedule, the secondary run interval is stopped and anerror message appears. This error message is also written to the log file.
When you select Apply a secondary run interval, the options related to this setting appearin the Frequency section. The following image shows an example of set secondary run intervaloptions.
The Apply secondary run interval options are:
Every n [minutes|hours]. Applies the secondary run interval every n minutes or hours(in this example every 10 minutes) within the day the schedule runs.
Until Time. The time up until which the secondary run interval will be applied. In thisexample, the schedule will be rerun every 10 minutes until 4:00 P.M.
Lasts for n hour(s) n minute(s). The duration, specified in hours and minutes, duringwhich the secondary run interval will be applied. This option and the Until time option aremutually exclusive, so, in this example, this option is inactive.
Note: When a schedule is updated, the next run time is recalculated based only on theprimary run interval. This means that if a schedule that includes a secondary run interval isupdated before the secondary schedule is able to run, then the secondary run interval isignored and the NEXTRUNTIME is calculated based on the primary interval.
ReportCaster End User's Manual 43
3. Creating a ReportCaster Schedule
For example, a schedule exists that is set to run daily at 2:00 PM with a secondary runinterval of every 10 minutes from 2:00 PM to 3:00 PM. When the schedule runs at 2:00PM, the NEXTRUNTIME is reset to run at 2:10, which honors the secondary run interval. Ifthis schedule is updated at 2:03 PM, the NEXTRUNTIME is recalculated to be 2:00 PM thenext day, rather than 2:10 PM on the current day.
About Tasks
In this section:
WF Server Procedure Task Options
Standard Reports and My Reports Task Options
URL Task Options
File Task Options
FTP Task Options
How to:
Schedule Pre-Processing and Post-Processing Procedures
Reference:
Selecting a Report Format
When creating a schedule, you must create a Task to be distributed by ReportCaster. If youare scheduling a report from Dashboard, the task that appears in the schedule is that report.You then have the option to add more tasks, or pre-processing and post-processingprocedures to the schedule. The task types are:
WF Server Procedure. Schedules the distribution of a WebFOCUS report that resideson a specified WebFOCUS Reporting Server.
Standard Reports. Schedules the distribution of a WebFOCUS report that resides in aManaged Reporting Standard Reports folder.
My Reports. Schedules the distribution of a WebFOCUS report that resides in a ManagedReporting My Reports folder.
URL. Schedules the contents of a URL to specified recipients. To drill-down on theinformation within the contents of the URL, the links must have a fully qualified path, ora defined root URI in the page. When performing a drill down, the most current informationis retrieved since all drill downs are executed in real time.
44 WebFOCUS
About Tasks
File. Schedules the distribution of a file to which the ReportCaster Distribution Serverhas read access. When scheduling a file, you must type the fully qualified path and filename (for example, d:\reportcaster77\filename.doc) of the file. For example, if you wantto distribute a Word document, you can send the static file to ReportCaster recipients.
FTP. Schedules the retrieval of a file from any FTP server.
When you access the Scheduling tool by right-clicking a Standard Report or My Report fromthe Dashboard, the Task tab options are predefined with the selected report. You cancomplete the available task options, such as defining parameter values, and selectingwhether or not to burst the report.
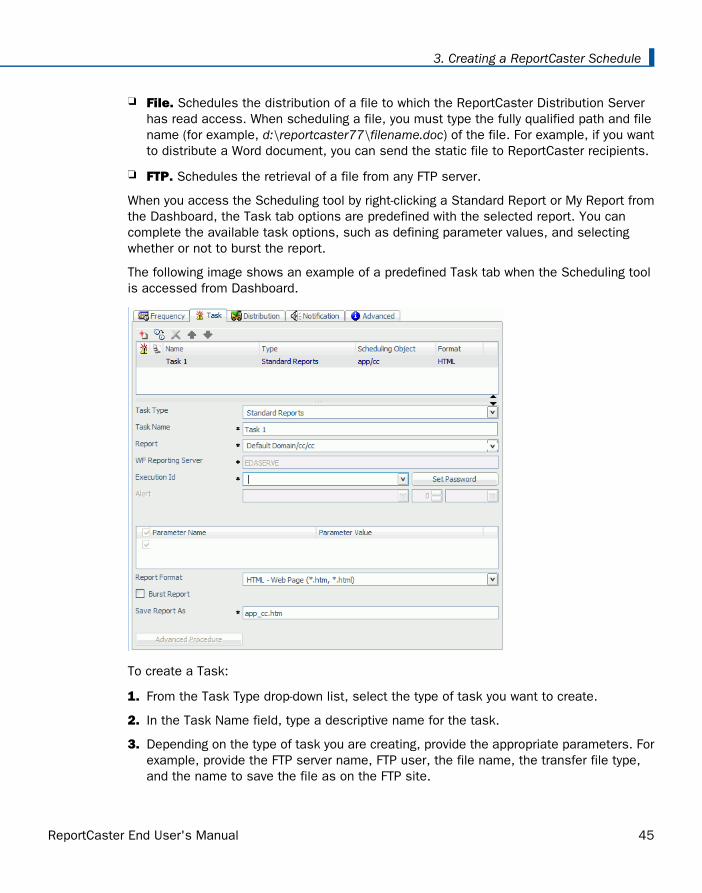
The following image shows an example of a predefined Task tab when the Scheduling toolis accessed from Dashboard.
To create a Task:
1. From the Task Type drop-down list, select the type of task you want to create.
2. In the Task Name field, type a descriptive name for the task.
3. Depending on the type of task you are creating, provide the appropriate parameters. Forexample, provide the FTP server name, FTP user, the file name, the transfer file type,and the name to save the file as on the FTP site.
ReportCaster End User's Manual 45
3. Creating a ReportCaster Schedule

4. If applicable, select report parameters, the report format, and whether or not the reportis burst.
5. If applicable, add pre-processing and post-processing procedures to the scheduled job.
6. Click Save.
WF Server Procedure Task OptionsThe options available when you select the WF Server Procedure Task Type are:
Task Name. Type a name that describes the task you are creating, for example, SalesReport.
WF Reporting Server. From the drop-down list, select the server from which you wantto select a report.
Execution Id. From the Execution Id drop-down list, specify an ID that is authorized toexecute procedures on the server specified in the WF Reporting Server field.
If the Execution Id field is not grayed out, and you will be using an ID that you previouslyused for a Task on the selected server, you can select the ID (for example, rcadmin) fromthe drop-down list.
If the Execution Id field is not grayed out and you will be using a new ID, you can typethe new ID and click Set Password. The Password Editor opens. Type a password for theId in the Password field and retype it in the Confirm password field, then click OK.
To change the password for an existing Execution Id, click Change Password. The PasswordEditor opens, where you can type a new password and click OK.
Note: The Execution Id is added to the ReportCaster Repository and is viewable intheReportCaster Console.
Procedure Name. From the Procedure Name drop-down menu, navigate through the WFServer Procedure tree and select the WebFOCUSserver procedure that you want toschedule.
Parameter Name and Value. Optionally, if your report has parameters or you want toschedule pre-processing or post-processing procedures, click Advanced. For moreinformation, see How to Schedule Pre-Processing and Post-Processing Procedures on page50.
Report Format. From the Report Format drop-down list, select the report format. HTMLis the default value. For guidelines on selecting a report format, see Selecting a ReportFormat on page 51.
46 WebFOCUS
About Tasks
Burst Report. If you want to burst the report, select the Burst Report check box. Theburst feature enables you to break a report into sections and distribute the sectionsseparately. Burst values may be specified in a Distribution List, distribution file, or bycreating a dynamic distribution list. For more information about bursting, see Bursting aReport on page 24.
Save Report As. Type a file name to identify the report when it is distributed.
Standard Reports and My Reports Task OptionsThe options available when you select either Standard Reports or My Reports Task Type are:
Task Name. Type a name that describes the task you are creating, for example, SalesReport.
Report. From the Report drop-down menu, navigate to the report you want to schedule.
WF Reporting Server. From the drop down list, select the server from which you wantto select a report.
Execution Id. From the ID drop-down list, specify an ID that is authorized to executeprocedures on the server specified in the WF Reporting Server field.
If the Execution Id field is not grayed out, and you will be using an ID that you previouslyused for a Task on the selected server, you can select the ID (for example, rcadmin) fromthe drop-down list.
If the Execution Id field is not grayed out and you will be using a new ID, you can typethe new ID and click Set Password. The Password Editor opens. Type a password for theID in the Password field and retype it in the Confirm password field, then click OK.
To change the password for an existing ID, click Change Password. The Password Editoropens, where you can type a new password and click OK.
Note: The Execution ID is added to the ReportCaster Repository and is viewable in theReportCaster Console.
Alert. (Standard Reports only) Click Alert to specify alert schedule options. If you arescheduling an alert, the Alert button will be activated.
The Alert Schedule dialog box opens. Select one of the following options:
Automatically Reset. After the alert is triggered, reactivate the alert when thecondition is no longer true. The system will keep checking the condition after the alerthas been triggered. As soon as the condition is no longer true, it will reactivate thealert.
Continue After Alert. After the alert has been triggered, reactivate the alertimmediately.
ReportCaster End User's Manual 47
3. Creating a ReportCaster Schedule
Deactivate Schedule After Alert. Deactivate the schedule after the alert is triggered.This is the default value.
Delay. Restart the alert after a specified period. You can specify to restart the alertafter a maximum of 99 hour(s), day(s), week(s), month(s), or year(s).
Caution: An alert schedule distributes e-mails to your mail server more frequentlythan expected when the schedule interval is less than the time it takes to run theprocedure and the Delay option is selected. Be sure to set the schedule interval to atime period greater than the time it takes to run the scheduled procedure.
Parameter Name and Value. Optionally, if your report has parameters or you want toschedule pre-processing or post-processing procedures, click Advanced. For moreinformation, see How to Schedule Pre-Processing and Post-Processing Procedures on page50.
Report Format. From the Report Format drop-down list, select the report format. HTMLis the default value. For guidelines on selecting a report format, see Selecting a ReportFormat on page 51.
Burst Report. If you want to burst the report, select the Burst Report check box. Theburst feature enables you to break a report into sections and distribute the sectionsseparately. Burst values may be specified in a Distribution List, distribution file, or bycreating a dynamic distribution list. For more information about bursting, see Bursting aReport on page 24.
Save Report As. Type a file name to identify the report when it is distributed.
URL Task OptionsThe options available when you select the URL Task Type are:
Task Name. Type a name that describes the task you are creating, for example, SalesReport.
URL Address. In the URL Address field, type the fully qualified path of the URL addressyou want to schedule (for example, http://www.informationbuilders.com).
Note that you can also specify parameter names and associated values using the followingformat:
www.address.com?¶meter1_name=parameter1_value¶meter2_name=parameter2_value
The maximum length of this field is 1200 characters.
Execution Id. From the Execution ID drop-down list, select an execution ID that isauthorized to execute a URL on a secured Web server.
To change the password for an existing ID, click Change Password. The Password Editoropens, where you can type a new password and click OK.
48 WebFOCUS
About Tasks

Note: The Execution Id is added to the ReportCaster Repository and is viewable in theReportCaster Console.
Parameter Name and Value. Optionally, if your URL has parameters, you can providethem in these fields.
Save Report As. Type a file name to identify the task when it is distributed.
File Task OptionsThe options available when you select the File Task Type are:
Task Name. Type a name that describes the task you are creating, for example, SalesReport.
File. Type the name of the file you want to schedule.You must type the fully qualifiedpath (for example, d:\reportcaster77\filename.doc) of the file. In addition, the file mustbe accessible to the ReportCaster Distribution Server.
Save Report As. Type a name for the content to be distributed. Be sure to include theextension. For example, you might save this report as hrletter.doc, therefore, this file willbe distributed as hrletter.doc.
Delete the file after it is distributed. Select this option to delete the file once it hasbeen distributed.
Note: If a schedule has multiple tasks and one of the tasks fails, then the file will notbe deleted. This is true even when the file is distributed successfully.
FTP Task OptionsThe options available when you select the FTP or SFTP Task Type are:
Task Name. Type a name that describes the task you are creating, for example, SalesReport.
FTP Server Name. Specify the name of the FTP server from which you will retrieve thefile.
FTP User. Specify the user ID and password you will use to gain access to the FTP Server.
File Name. Specify the name of the file you want to schedule. You can browse to thefile or type the fully qualified path to the file on the FTP server. An example of a fullyqualified path on Windows is C:\Reports\Inventory\NEstores.xls, and on UNIX is/Docs/Specs/proto5.txt.
File Transfer Type. From the File Transfer Type drop-down list, select Binary (for non-textfiles) or ASCII (for text files). Binary is the default value.
ReportCaster End User's Manual 49
3. Creating a ReportCaster Schedule

Save Report As. Type a name for the content to be distributed. Be sure to include theextension. For example, you might save this report as hrletter.doc, therefore, this file willbe distributed as hrletter.doc.
Delete File. Select this option if you want the schedule to run once and then be deletedon the FTP server. Note that the FTP user ID must be authorized to delete the file on theFTP server.
Note: If a schedule has multiple tasks and one of the tasks fails, then the file will notbe deleted. This is true even when the file is distributed successfully.
How to Schedule Pre-Processing and Post-Processing ProceduresProcedure:
If you are scheduling a report Task that is a WF Server Procedure, Standard Report, or MyReport, you can schedule a maximum of two pre-processing and post-processing procedures.The pre-processing and post-processing procedures that you schedule must reside on theWebFOCUS Reporting Server.
To schedule pre-processing and post-processing procedures for a Task:
1. Click Advanced Procedure. The Advanced Procedures window opens, as shown in thefollowing image.
2. Select the following information:
a. Pre-processing Procedures:
First. From the drop-down list, select the first pre-processing procedure. ReportCasterwill run this procedure immediately preceding the scheduled Task.
Second. From the drop-down list, select the second pre-processing procedure.ReportCaster will run this procedure immediately after the first pre-processingprocedure, but before the scheduled Task.
50 WebFOCUS
About Tasks
b. Post-processing Procedures:
First. From the drop-down list, select the first post-processing procedure.ReportCaster will run this procedure immediately following the scheduled Task.
Second. From the drop-down list, select the second post-processing procedure.ReportCaster will run this procedure immediately after the first post-processingprocedure.
3. Click OK to return to the Task tab.
Selecting a Report FormatReference:
Use the following guidelines when selecting a format:
The report format specified in the Report Format field overrides the format statement inthe procedure, except for specialized formats (EXL2K FORMULA, EXL2K PIVOT, EXL2KTEMPLATE, PPT TEMPLATE, DFIX). When a report uses a specialized format, the formatselection in the report schedule must match that specified in the report.
There are limitations on what formats are valid for certain options. For instance, not allformats are supported for bursting or printing.
The formats that support bursting are AHTML (except for FML reports), ALPHA, COM,COMMA, COMT, DHTML (except for FML reports), DFIX, DOC, EXL07, EXL2K, EXL2KFORMULA, EXL2K TEMPLATE, EXL97, Flash/Flex, GIF, HTML and HTML ODP (exceptfor FML reports), JPEG, PDF, PNG, PPT, PS, SVG,TAB, TABT, and WP.
The formats that support printing are DOC, PDF (when ReportCasteris configured toallow PDF to be printed and the printer has the appropriate driver), PS, and WP.
When scheduling a procedure that was created using Graph Assistant or AdvancedGraph Assistant and:
an image format (JPEG, GIF, PNG, SVG) was chosen as the output format, thenyou must select an image format as the schedule output.
the PDF/SVG or PDF/GIF format was chosen as the output format, then you mustselect PDF as the schedule output.
The HTML ODP format can only be distributed to the Report Library.
If the report is a Coordinated Compound PDF Report, then you can select any supportedcompound format (AHTML, DHTML, EXL2K, Flash/Flex, PDF, or PPT), but keep in mindthat not all of these formats support bursting.
ReportCaster End User's Manual 51
3. Creating a ReportCaster Schedule
When scheduling a chart or graph report, the available formats will depend on which toolwas used to create the report. When the report was created using:
Graph Assistant or Advanced Graph Assistant, then the available formats are GIF,JPEG, PDF, PNG, and SVG.
Report Assistant or InfoAssist, then the available formats are all formats except GIF,JPEG, PDF, PNG, and SVG.
Power Painter, then the available formats are AHTML, DHTML, EXL2K, EXL2K PIVOT,Flash, PDF, and PPT.
If the FEX was created using an editor, then all formats that the ReportCasteradministrator set to appear in the formats option list will be available.
Distribution Options
In this section:
Distributing Scheduled Output Using E-mail
Distributing Scheduled Output Using FTP or SFTP
The Distribution tab in the Scheduling Tool provides the options available for distributing thescheduled report. You can distribute a report using one of the following methods:
FTP
SFTP
Printer
Managed Reporting
Report Library
This section describes the options available for each distribution method.
52 WebFOCUS
Distribution Options

Distributing Scheduled Output Using E-mail
How to:
Distribute Scheduled Output Using E-mail
Reference:
E-mail Distribution Examples
When you distribute a report through e-mail, you can include the report in the body of the e-mail (known as an inline e-mail message) or send it as an attachment. Distributing a reportas an inline e-mail message is particularly useful when the report is distributed to mobiledevices, fax machines, or through e-mail systems that do not support attachments. You canalso distribute a report to a Fax machine, as explained later in this section.
Note:
The availability of the inline message option when you create a schedule depends on theInline Report Distribution setting in the ReportCaster Server Configuration tool.
The display of a report that is distributed as an inline e-mail message can be affectedby settings in the e-mail client.
ReportCaster End User's Manual 53
3. Creating a ReportCaster Schedule

The following image shows the e-mail distribution options in the Distribution tab of theScheduling Tool.
How to Distribute Scheduled Output Using E-mailProcedure:
1. From the Distribute report by drop-down list, select Email.
2. In the Mail Server Name field, the SMTP e-mail server specified in the ReportCasterServer Configuration tool appears. You can accept the default e-mail server, or typeanother name for the e-mail server that will distribute the scheduled output. ReportCasterrequires the SMTP server domain name, not its IP address.
3. From the drop-down list that appears under Mail Server Name, select the method inwhich you will provide the e-mail addresses that will receive the distribution. The optionsare:
54 WebFOCUS
Distribution Options

Distribution List. The report will be sent to all e-mail addresses in the selectedDistribution List. To select a Distribution List, click the icon next to the DistributionList field. The Distribution List Selection dialog box opens. In the display pane, double-click the folder with your ID. The display pane lists the e-mail Distribution Lists thatare public and that you own. The following image is an example of the DistributionList Selection dialog box displaying a group of Distribution List belonging to specificuser ID.
Note: While in the Distribution List Selection dialog box, you can view additionalinformation about the Distribution Lists in the display pane by selecting Details fromthe far-right icon, and edit an existing Distribution List (select a list and click theOpen icon). You can also create a Distribution List by clicking the New icon. Forinformation on creating Distribution Lists, see Creating and Maintaining DistributionLists on page 17.
Click the Distribution List you want to use. It will appear in the Dist. List Name field.Then click OK. The Distribution List name appears in the Schedule Distribution Listfield.
Distribution File. Type the full path and file name of the external distribution fileyou want to use for this schedule. The path and file must be accessible to theReportCaster Distribution Server.
Email Address(es). The report will be sent to a single e-mail address or multiplee-mail addresses. Type the e-mail address in the accompanying text box. ReportCastercannot validate the e-mail address. An incorrect or unresolved address may not benoted in the log file. This is dependent upon the ability of the SMTP mail server tovalidate the e-mail address. The SMTP mail server returns undeliverable e-mailmessages to the reply address you specify for the schedule.
ReportCaster End User's Manual 55
3. Creating a ReportCaster Schedule

Tip:
You can specify multiple e-mail addresses in the Email Address(es) field. Separateeach e-mail address with a comma or a semicolon. The e-mail addresses willappear in the To line of a single e-mail when the scheduled output is distributed.Each individual e-mail address can be a maximum of 130 characters accordingto the SMTP specification. The total maximum length of this field is 800 characters.For more information, see Specifying Multiple E-mail Addresses on page 28.
Additionally, you can use group mail lists (defined on your mail server) with theEmail Address(es) option. Group mail lists enable you to distribute a report ornotification to multiple recipients without having to maintain multiple e-mailaddresses in the ReportCaster Repository. The format of the group mail list isdependent upon the mail server being used. For example, if you are using aMicrosoft Exchange Server and your group mail list is defined as #group1, youwould enter group1@listdomain in the Email Address(es) field. If the group maillist contains a space within its name, it must be enclosed within quotation marks.For more information, see your mail server administrator.
Dynamic Address. A dynamic address enables you to return in memory either a listof burst values and destinations, or only a list of destinations from a data source(for example, a flat file, SQL database, FOCUS data source, or LDAP). To select aDynamic Address, click the icon next to the Dynamic Address field. The Select DynamicAddress Procedure dialog box opens, as shown in the following image.
In this dialog box, select or type a value for the WF Server Name, Execution Id,password to access the server, and the procedure name that creates the DynamicAddress.
Then click OK. The designated dynamic address procedure appears in the Schedule,Dynamic Address field.
56 WebFOCUS
Distribution Options
4. In the From field, type any value (for example, the name of the person creating theschedule). This field is not required by ReportCaster, but may be required by your e-mailsystem.
5. In the Reply Address, type a valid e-mail address. If recipients reply to the e-mail, theirmessages are sent to this address. If your e-mail system is unable to deliver the content,the undeliverable output message is also returned to this address. This field is requiredby ReportCaster.
6. In the Subject field, type the text you want to appear in the e-mail subject line. Thisinformation is not required by ReportCaster, but may be needed by your e-mail system.The value you entered in the schedule Description field is used as the default Subjectvalue.
When creating a schedule, you can place multiple parameters and burst values fromthe scheduled procedure in an e-mail subject line. This allows the subject to bedynamically created in order to personalize e-mails to recipients. Parameters referencedin the subject line must be stored with the schedule information in the ReportCastertables.
Parameters must be specified in the format '&parmname' (where parmname is the nameof the parameter). Burst values must be specified using the syntax '%BURST'.
Note:
The parameter name cannot be the name of an existing report procedure. You canspecify an unlimited number of parameters.
If you have multiple burst values in a Distribution List, only the first value sent to theReportCaster Distribution Server is included in the subject.
For an example of specifying parameters and burst values in an e-mail subject line, seeE-mail Distribution Examples on page 57.
7. Specify whether or not you want the report to be sent as an e-mail attachment or withinthe body of the e-mail (inline) by selecting or clearing the Send Report as an Attachmentoption. (The availability of the inline option depends on your ReportCaster configuration.)
If you select the Send Report as an Attachment option, you can also:
a. Type a message to appear in the e-mail body.
b. Zip the attachment by selecting the Add the Reports to Zip File option. Provide aname for the file in the Zip File Name field.
E-mail Distribution ExamplesReference:
This section provides an example of using burst values and multiple parameters whensending the report in an e-mail, and distributing a report to a Fax machine using e-mail.
ReportCaster End User's Manual 57
3. Creating a ReportCaster Schedule

Specifying Parameters and Burst Values in an E-mail Subject FieldExample:
The following schedule specifies burst values and multiple parameters in the e-mail subjectline.
The following image shows an example of a resulting e-mail subject line.
Distributing a Report to a Fax Machine Using E-mailExample:
To distribute an inline e-mail message to a fax machine, you must register your e-mail addresswith a third-party e-mail distribution provider. The features offered by providers, (such assupported area codes and file formats), in addition to requirements on the structure of e-mail parameter values, may vary. It is important that you select a provider whose featuresare compatible with ReportCaster.
Note: You cannot distribute an e-mail attachment to a Fax machine.
The following example shows how to distribute a report directly to a fax machine. The e-mailaddress, [email protected], was registered with the e-mail distribution provider calledemfax.com. During the processing of the request, ReportCaster generates the scheduledreport output and then distributes it using the e-mail address of emfax.com. The reply addressspecified in ReportCaster is the registered e-mail address that is validated by emfax.com.If the e-mail address is valid, emfax.com distributes the report to the fax number12129999999. The validation of the registered e-mail address is performed by emfax.com,not by ReportCaster.
Note: The syntax used in this illustration is specific to this example. The required syntaxfor your provider may be different.
58 WebFOCUS
Distribution Options
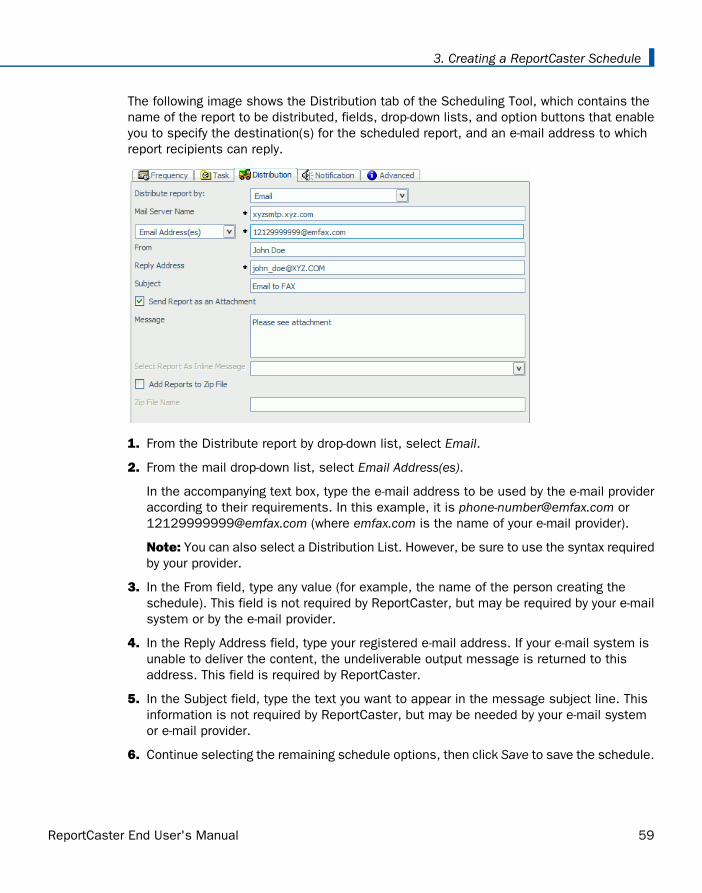
The following image shows the Distribution tab of the Scheduling Tool, which contains thename of the report to be distributed, fields, drop-down lists, and option buttons that enableyou to specify the destination(s) for the scheduled report, and an e-mail address to whichreport recipients can reply.
1. From the Distribute report by drop-down list, select Email.
2. From the mail drop-down list, select Email Address(es).
In the accompanying text box, type the e-mail address to be used by the e-mail provideraccording to their requirements. In this example, it is [email protected] [email protected] (where emfax.com is the name of your e-mail provider).
Note: You can also select a Distribution List. However, be sure to use the syntax requiredby your provider.
3. In the From field, type any value (for example, the name of the person creating theschedule). This field is not required by ReportCaster, but may be required by your e-mailsystem or by the e-mail provider.
4. In the Reply Address field, type your registered e-mail address. If your e-mail system isunable to deliver the content, the undeliverable output message is returned to thisaddress. This field is required by ReportCaster.
5. In the Subject field, type the text you want to appear in the message subject line. Thisinformation is not required by ReportCaster, but may be needed by your e-mail systemor e-mail provider.
6. Continue selecting the remaining schedule options, then click Save to save the schedule.
ReportCaster End User's Manual 59
3. Creating a ReportCaster Schedule
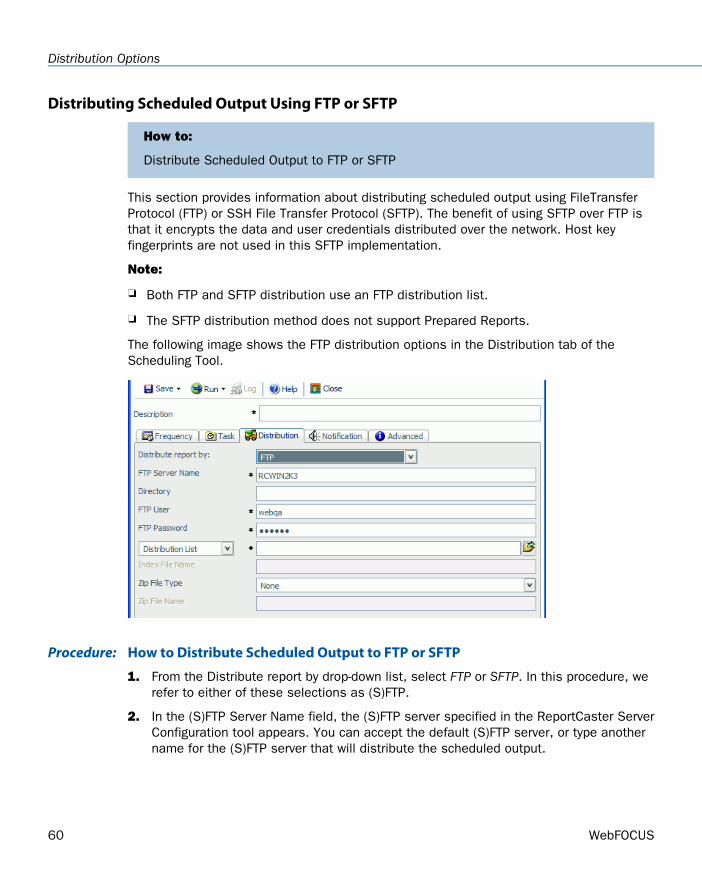
Distributing Scheduled Output Using FTP or SFTP
How to:
Distribute Scheduled Output to FTP or SFTP
This section provides information about distributing scheduled output using FileTransferProtocol (FTP) or SSH File Transfer Protocol (SFTP). The benefit of using SFTP over FTP isthat it encrypts the data and user credentials distributed over the network. Host keyfingerprints are not used in this SFTP implementation.
Note:
Both FTP and SFTP distribution use an FTP distribution list.
The SFTP distribution method does not support Prepared Reports.
The following image shows the FTP distribution options in the Distribution tab of theScheduling Tool.
How to Distribute Scheduled Output to FTP or SFTPProcedure:
1. From the Distribute report by drop-down list, select FTP or SFTP. In this procedure, werefer to either of these selections as (S)FTP.
2. In the (S)FTP Server Name field, the (S)FTP server specified in the ReportCaster ServerConfiguration tool appears. You can accept the default (S)FTP server, or type anothername for the (S)FTP server that will distribute the scheduled output.
60 WebFOCUS
Distribution Options
In this field, you can also designate a port for the (S)FTP server other than the defaultassignment using the syntax:
hostname:port
3. In the Directory field, type the destination to which the output will be sent.
You cannot create new Prepared Reports. However, all previously created PreparedReports will be supported.
For WF Server Procedures and Managed Reporting reports other than PreparedReports, specify the (S)FTP logon directory and path of the user ID to whose accounton the (S)FTP server the report will be sent.
If left blank, this specifies that WF Server Procedures distributed using (S)FTP willbe sent to the home directory of the (S)FTP user.
If the (S)FTP server resides on an OpenVMS file system, use UNIX-style directoryspecifications.
If the (S)FTP server resides on a z/OS UNIX system in data set mode, you must typea forward slash (/) as the first character for the directory.
If the (S)FTP server resides on a VM system, you must type ./ for the directory. Thiswill send reports to the default VM minidisk of the (S)FTP user.
Note: When scheduling a Managed Reporting report from Domain Builder for (S)FTPdistribution, the maximum number of characters that can be specified for the directoryis 64, including the full path name.
4. In the (S)FTP User and (S)FTP Password fields, type the user ID and password for the(S)FTP server account to which the scheduled output will be sent. You can specify adefault (S)FTP user ID and password within the ReportCaster Server Configuration tool.
5. From the drop-down list that appears under (S)FTP Password, select Distribution List,Distribution File, File Name, or Dynamic Address.
ReportCaster End User's Manual 61
3. Creating a ReportCaster Schedule

Distribution List. The report will be sent to all (S)FTP addresses in the selectedDistribution List. To select a Distribution List, click the icon next to the DistributionList field. The Distribution List Selection dialog box opens. In the display pane, double-click the folder with your ID. The display pane lists the (S)FTP Distribution Lists thatare public and that you own. The following image is an example of the DistributionList Selection dialog box displaying a group of Distribution List belonging to specificuser ID.
Note: While in the Distribution List Selection dialog box, you can view additionalinformation about the Distribution Lists in the display pane by selecting Details fromthe far-right icon, and edit an existing Distribution List (select a list and click theOpen icon). You can also create a Distribution List by clicking the New icon. Forinformation on creating Distribution Lists, see Creating and Maintaining DistributionLists on page 17.
Click the Distribution List you want to use. It will appear in the Dist. List Name field.Then click OK. The Distribution List name appears in the Schedule Distribution Listfield.
Distribution File. Type the full path and file name of the external distribution fileyou want to use for this schedule. The path and file must be accessible to theReportCaster Distribution Server.
File Name. Type the name of the FTP file. ReportCaster cannot validate the FTP file.The burst option is not supported with this distribution option. The maximum lengthof this field is 800 characters.
62 WebFOCUS
Distribution Options

Dynamic Address. A dynamic address enables you to return in memory either a listof burst values and destinations, or only a list of destinations from a data source(for example, a flat file, SQL database, FOCUS data source, or LDAP). To select aDynamic Address, click the icon next to the Dynamic Address field. The Select DynamicAddress Procedure dialog box opens, as shown in the following image.
In this dialog box, select or type a value for the WF Server Name, Execution Id,password to access the server, and the procedure name that creates the DynamicAddress.
Then click OK. The designated dynamic address procedure appears in the Schedule,Dynamic Address field.
6. In the optional Index File Name field, specify a name for the index file of the report.(Availability of this option is dependent on your ReportCaster configuration.)
Note: For WF Server Procedures, if you are going to specify that the report is to be burst,type the name of the file in which you want the index page to be created.
The name of the index must be typed in the case specific to your operating system.
The following table lists the case you should use for a specific operating system:
Operating SystemCase
z/OSUppercase
Windows
UNIX
Lowercase
Note: Index pages for burst report output contain only the burst values specified in theDistribution List.
ReportCaster End User's Manual 63
3. Creating a ReportCaster Schedule
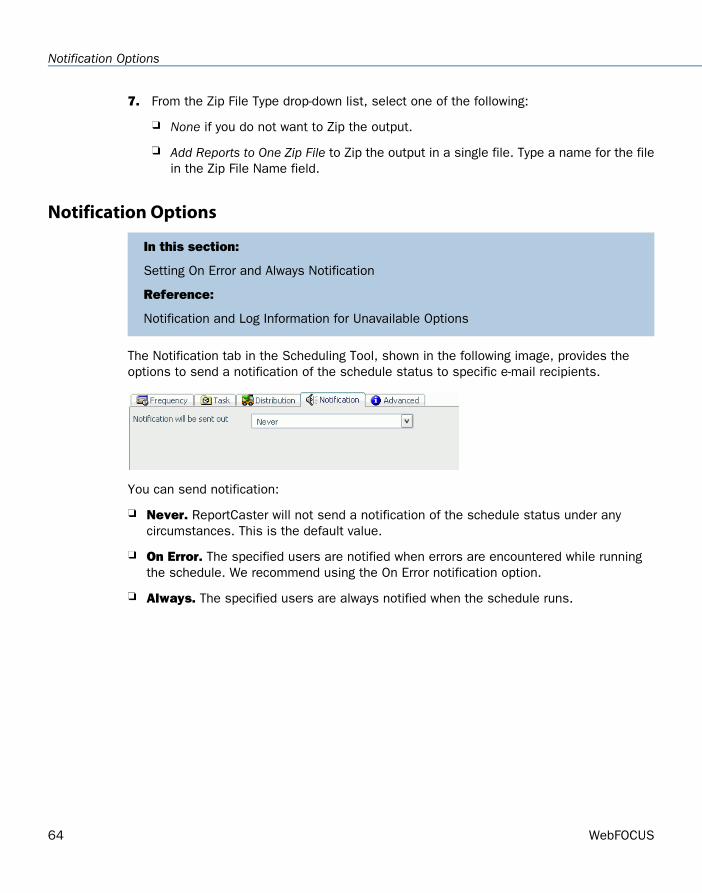
7. From the Zip File Type drop-down list, select one of the following:
None if you do not want to Zip the output.
Add Reports to One Zip File to Zip the output in a single file. Type a name for the filein the Zip File Name field.
Notification Options
In this section:
Setting On Error and Always Notification
Reference:
Notification and Log Information for Unavailable Options
The Notification tab in the Scheduling Tool, shown in the following image, provides theoptions to send a notification of the schedule status to specific e-mail recipients.
You can send notification:
Never. ReportCaster will not send a notification of the schedule status under anycircumstances. This is the default value.
On Error. The specified users are notified when errors are encountered while runningthe schedule. We recommend using the On Error notification option.
Always. The specified users are always notified when the schedule runs.
64 WebFOCUS
Notification Options
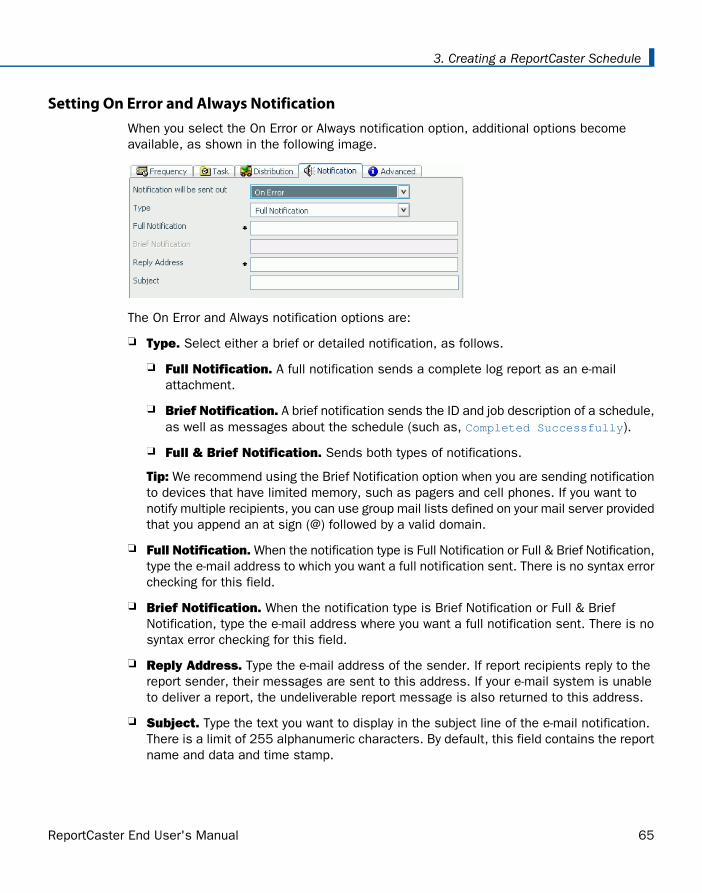
Setting On Error and Always NotificationWhen you select the On Error or Always notification option, additional options becomeavailable, as shown in the following image.
The On Error and Always notification options are:
Type. Select either a brief or detailed notification, as follows.
Full Notification. A full notification sends a complete log report as an e-mailattachment.
Brief Notification. A brief notification sends the ID and job description of a schedule,as well as messages about the schedule (such as, Completed Successfully).
Full & Brief Notification. Sends both types of notifications.
Tip: We recommend using the Brief Notification option when you are sending notificationto devices that have limited memory, such as pagers and cell phones. If you want tonotify multiple recipients, you can use group mail lists defined on your mail server providedthat you append an at sign (@) followed by a valid domain.
Full Notification. When the notification type is Full Notification or Full & Brief Notification,type the e-mail address to which you want a full notification sent. There is no syntax errorchecking for this field.
Brief Notification. When the notification type is Brief Notification or Full & BriefNotification, type the e-mail address where you want a full notification sent. There is nosyntax error checking for this field.
Reply Address. Type the e-mail address of the sender. If report recipients reply to thereport sender, their messages are sent to this address. If your e-mail system is unableto deliver a report, the undeliverable report message is also returned to this address.
Subject. Type the text you want to display in the subject line of the e-mail notification.There is a limit of 255 alphanumeric characters. By default, this field contains the reportname and data and time stamp.
ReportCaster End User's Manual 65
3. Creating a ReportCaster Schedule

Notification and Log Information for Unavailable OptionsReference:
When schedules with unavailable Task Types or distribution methods are not permitted torun, an error notification is triggered. The full and brief notifications and the log report informsyou that the ReportCaster administrator or the owner of the schedule must change theunavailable Task Types or distribution methods in the schedule.
When schedules with unavailable Task Types or distribution methods are permitted to run,normal job occurs and a message appears in the log report indicating that your ReportCasteradministrator is allowing existing schedules using the unavailable Task Types or distributionmethods to run.
66 WebFOCUS
Notification Options
WebFOCUS
Maintaining a Schedule4Topics:
The ReportCaster Development Interfaceprovides access to your existingschedules and allows you to edit theproperties of a schedule, clone aschedule, delete a schedule, or run a logreport to obtain information about aschedule. Additionally, you can purge logrecords to conserve space in the log file,view the dates on which you cannot runor set schedules to run, check the statusof your scheduled jobs, and create,update, and delete your Execution IDs.
About Maintaining a Schedule
Editing a Schedule
Cloning a Schedule
Deleting a Schedule
Viewing a Log Report
Purging the Log File
Setting Schedule Blackout DatesAs a ReportCaster administrator, you canuse the ReportCasterDevelopmentInterface to manage your own schedulesand the schedules of the users that youare administering. This includes viewing,cloning, and deleting schedules, runninglog reports and purging log records toconserve space in the log file. Inaddition, you can create, delete, andupdate passwords of Execution IDs.
Creating, Changing, and Deleting anExecution ID
ReportCaster End User's Manual 67
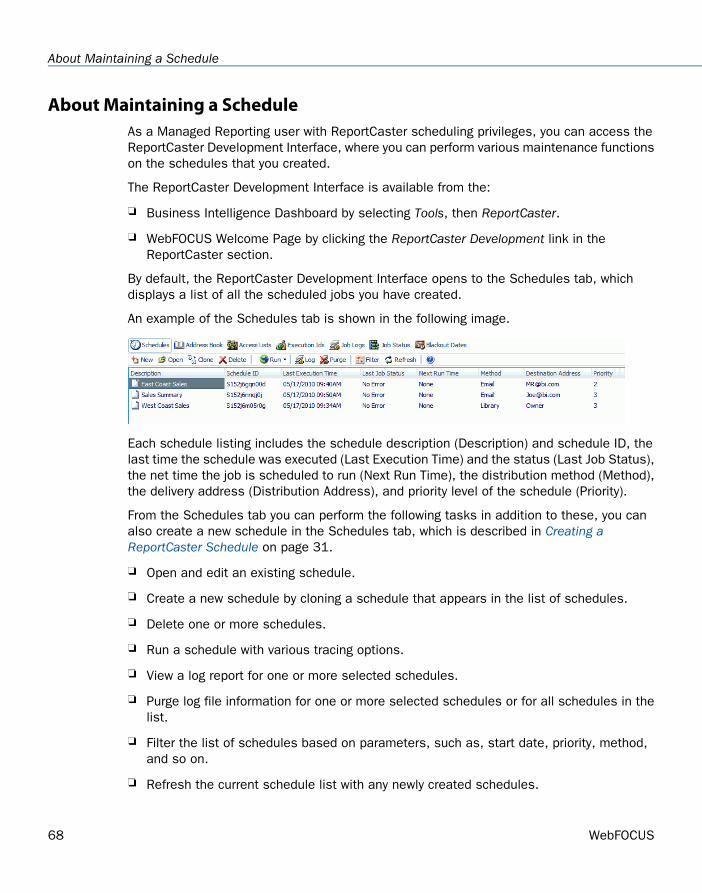
About Maintaining a ScheduleAs a Managed Reporting user with ReportCaster scheduling privileges, you can access theReportCaster Development Interface, where you can perform various maintenance functionson the schedules that you created.
The ReportCaster Development Interface is available from the:
Business Intelligence Dashboard by selecting Tools, then ReportCaster.
WebFOCUS Welcome Page by clicking the ReportCaster Development link in theReportCaster section.
By default, the ReportCaster Development Interface opens to the Schedules tab, whichdisplays a list of all the scheduled jobs you have created.
An example of the Schedules tab is shown in the following image.
Each schedule listing includes the schedule description (Description) and schedule ID, thelast time the schedule was executed (Last Execution Time) and the status (Last Job Status),the net time the job is scheduled to run (Next Run Time), the distribution method (Method),the delivery address (Distribution Address), and priority level of the schedule (Priority).
From the Schedules tab you can perform the following tasks in addition to these, you canalso create a new schedule in the Schedules tab, which is described in Creating aReportCaster Schedule on page 31.
Open and edit an existing schedule.
Create a new schedule by cloning a schedule that appears in the list of schedules.
Delete one or more schedules.
Run a schedule with various tracing options.
View a log report for one or more selected schedules.
Purge log file information for one or more selected schedules or for all schedules in thelist.
Filter the list of schedules based on parameters, such as, start date, priority, method,and so on.
Refresh the current schedule list with any newly created schedules.
68 WebFOCUS
About Maintaining a Schedule

Note: You can initiate these tasks by either selecting a schedule and clicking the specifictask icon in the toolbar, or by right-clicking a schedule and making the appropriate selectionfrom the drop-down menu.
Editing a Schedule
How to:
Edit a Schedule
From the Schedule tab, you can edit your own previously created schedules at any time.
How to Edit a ScheduleProcedure:
To edit a schedule:
1. Select the schedule you want to edit and click Open, or double-click the schedule. Theselected schedule opens in the ReportCaster Scheduling tool, as shown in the followingimage.
2. Make the required changes to the schedule. For details on the Scheduling tool options,see Creating a ReportCaster Schedule on page 31.
3. Click Save.
Considerations When Editing a ScheduleReference:
The following are considerations when editing a schedule:
ReportCaster End User's Manual 69
4. Maintaining a Schedule
If a schedule already exists and your ReportCaster administrator changes the availableoptions, the existing schedule runs as previously defined, regardless of the changes.However, if you attempt to specify unavailable options (Task Types, distribution methods,report formats, or Library Distribution Options) when editing a schedule, a message isdisplayed informing you that the options available for scheduling have been changed byyour ReportCasteradministrator. Information is then displayed that describes the change(s)that you must make for the schedule to use available options. Changes to the schedulecannot be saved until the schedule uses available options.
If you selected once for the run interval, the schedule runs immediately unless you changethe Start Time to a time later than the current time. All other run intervals run at the nextrun time of the schedule.
If you want your selected schedule(s) to run immediately, click Run. A new schedule IDis created for the job. Be advised that this results in multiple entries in the Report Libraryfor scheduled output distributed to the library.
Cloning a Schedule
How to:
Clone a Schedule
For your convenience, you can clone an existing schedule for use as a template to create anew schedule. The cloned schedule is automatically disabled, so you must enable it for use.
How to Clone a ScheduleProcedure:
To clone a schedule:
1. In the Schedules tab, select the schedule you want to clone.
2. Click Clone.
70 WebFOCUS
Cloning a Schedule
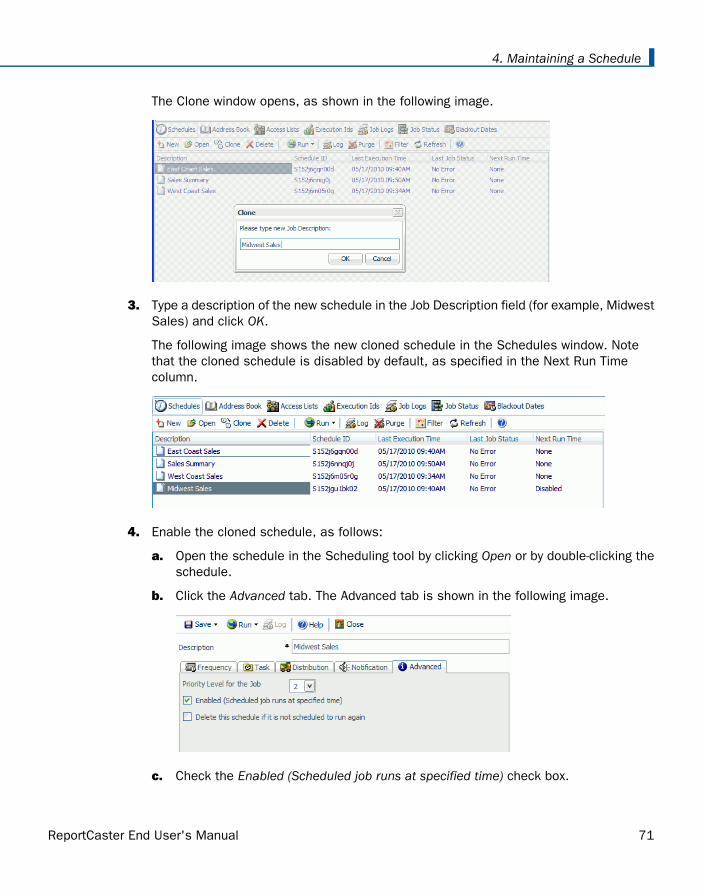
The Clone window opens, as shown in the following image.
3. Type a description of the new schedule in the Job Description field (for example, MidwestSales) and click OK.
The following image shows the new cloned schedule in the Schedules window. Notethat the cloned schedule is disabled by default, as specified in the Next Run Timecolumn.
4. Enable the cloned schedule, as follows:
a. Open the schedule in the Scheduling tool by clicking Open or by double-clicking theschedule.
b. Click the Advanced tab. The Advanced tab is shown in the following image.
c. Check the Enabled (Scheduled job runs at specified time) check box.
ReportCaster End User's Manual 71
4. Maintaining a Schedule

d. Make any other changes you want to the schedule and then click Save.
e. Click Close to return to the Schedules tab.
5. Click Refresh.
The cloned schedule appears as active in the list of schedules, as shown in the followingimage.
Deleting a Schedule
How to:
Delete a Schedule
From the Schedules tab, you can delete schedules at any time using the following procedure.
How to Delete a ScheduleProcedure:
To delete one or more schedules:
1. In the Schedules tab, select the schedule(s) you want to delete.
Note: To select multiple schedules, use the Shift key and Control (Ctrl) key as in astandard Windows interface.
The following image shows the Sales Summary and Midwest Sale schedules selectedin the Schedules window.
72 WebFOCUS
Deleting a Schedule
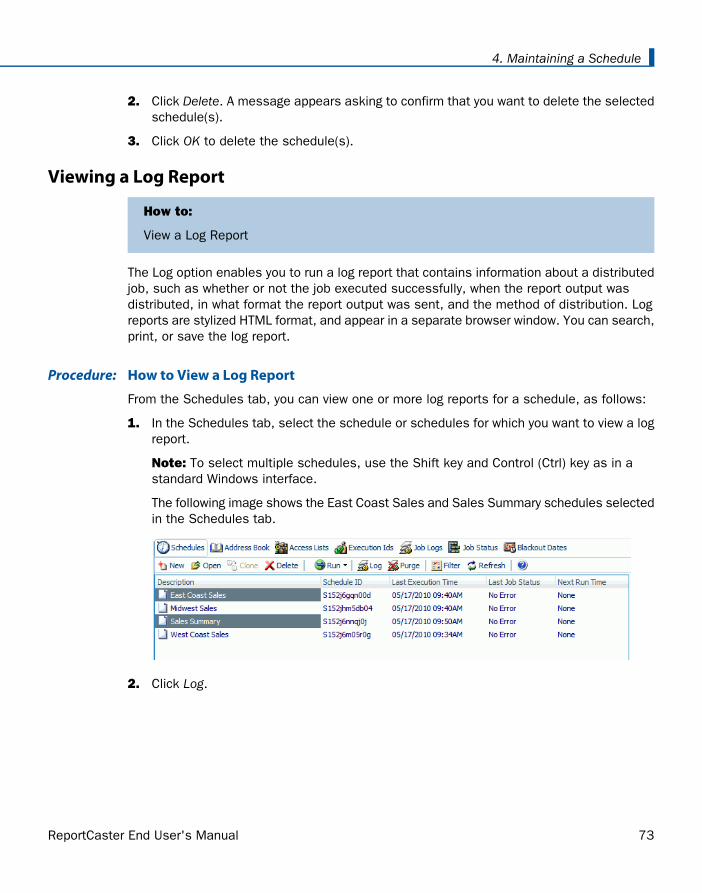
2. Click Delete. A message appears asking to confirm that you want to delete the selectedschedule(s).
3. Click OK to delete the schedule(s).
Viewing a Log Report
How to:
View a Log Report
The Log option enables you to run a log report that contains information about a distributedjob, such as whether or not the job executed successfully, when the report output wasdistributed, in what format the report output was sent, and the method of distribution. Logreports are stylized HTML format, and appear in a separate browser window. You can search,print, or save the log report.
How to View a Log ReportProcedure:
From the Schedules tab, you can view one or more log reports for a schedule, as follows:
1. In the Schedules tab, select the schedule or schedules for which you want to view a logreport.
Note: To select multiple schedules, use the Shift key and Control (Ctrl) key as in astandard Windows interface.
The following image shows the East Coast Sales and Sales Summary schedules selectedin the Schedules tab.
2. Click Log.
ReportCaster End User's Manual 73
4. Maintaining a Schedule
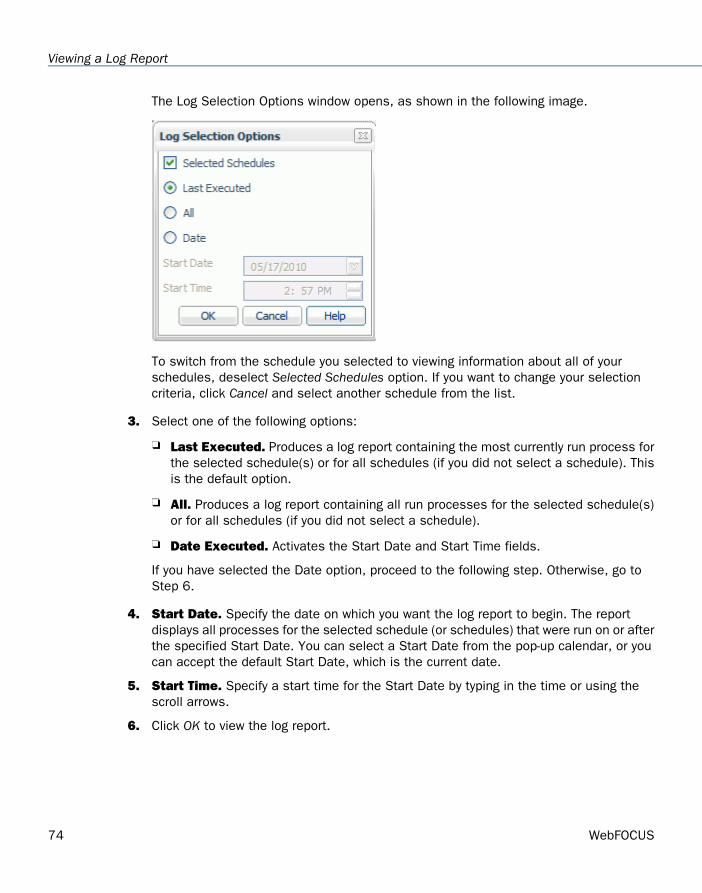
The Log Selection Options window opens, as shown in the following image.
To switch from the schedule you selected to viewing information about all of yourschedules, deselect Selected Schedules option. If you want to change your selectioncriteria, click Cancel and select another schedule from the list.
3. Select one of the following options:
Last Executed. Produces a log report containing the most currently run process forthe selected schedule(s) or for all schedules (if you did not select a schedule). Thisis the default option.
All. Produces a log report containing all run processes for the selected schedule(s)or for all schedules (if you did not select a schedule).
Date Executed. Activates the Start Date and Start Time fields.
If you have selected the Date option, proceed to the following step. Otherwise, go toStep 6.
4. Start Date. Specify the date on which you want the log report to begin. The reportdisplays all processes for the selected schedule (or schedules) that were run on or afterthe specified Start Date. You can select a Start Date from the pop-up calendar, or youcan accept the default Start Date, which is the current date.
5. Start Time. Specify a start time for the Start Date by typing in the time or using thescroll arrows.
6. Click OK to view the log report.
74 WebFOCUS
Viewing a Log Report
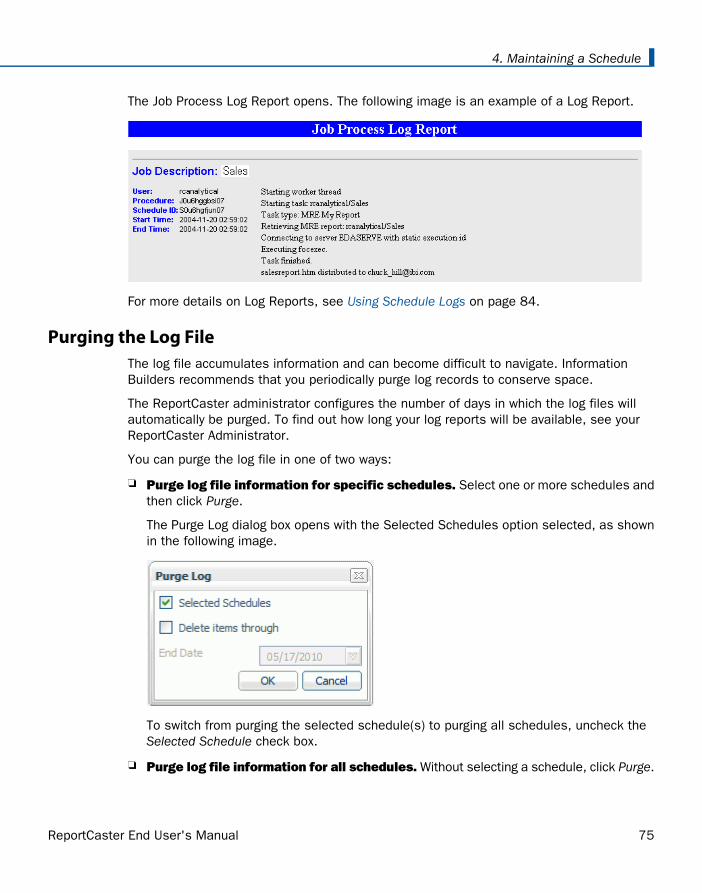
The Job Process Log Report opens. The following image is an example of a Log Report.
For more details on Log Reports, see Using Schedule Logs on page 84.
Purging the Log FileThe log file accumulates information and can become difficult to navigate. InformationBuilders recommends that you periodically purge log records to conserve space.
The ReportCaster administrator configures the number of days in which the log files willautomatically be purged. To find out how long your log reports will be available, see yourReportCaster Administrator.
You can purge the log file in one of two ways:
Purge log file information for specific schedules. Select one or more schedules andthen click Purge.
The Purge Log dialog box opens with the Selected Schedules option selected, as shownin the following image.
To switch from purging the selected schedule(s) to purging all schedules, uncheck theSelected Schedule check box.
Purge log file information for all schedules. Without selecting a schedule, click Purge.
ReportCaster End User's Manual 75
4. Maintaining a Schedule
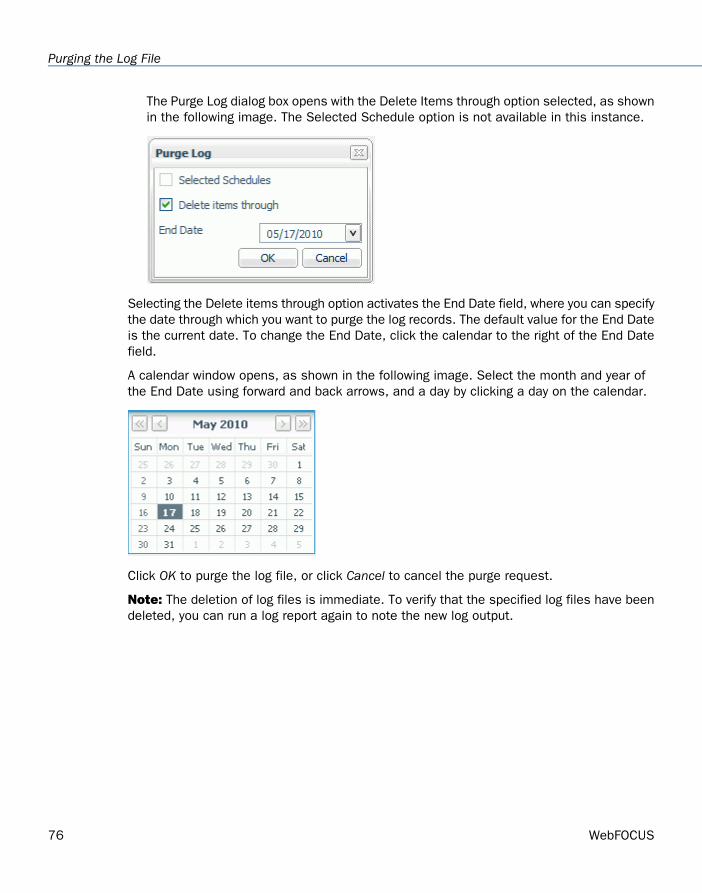
The Purge Log dialog box opens with the Delete Items through option selected, as shownin the following image. The Selected Schedule option is not available in this instance.
Selecting the Delete items through option activates the End Date field, where you can specifythe date through which you want to purge the log records. The default value for the End Dateis the current date. To change the End Date, click the calendar to the right of the End Datefield.
A calendar window opens, as shown in the following image. Select the month and year ofthe End Date using forward and back arrows, and a day by clicking a day on the calendar.
Click OK to purge the log file, or click Cancel to cancel the purge request.
Note: The deletion of log files is immediate. To verify that the specified log files have beendeleted, you can run a log report again to note the new log output.
76 WebFOCUS
Purging the Log File

Setting Schedule Blackout Dates
Reference:
Schedule Behavior for Blackout Dates
Schedule blackout dates are those dates on which schedules will not run and cannot be setto run. As a ReportCaster user, you can view schedule blackout dates that have been setfor all users (global dates) and those set for the groups to which you belong. OnlyReportCasteradministrators and Managed Reporting Group Administrators can define, update,and delete schedule blackout dates.
To view schedule blackout dates, in theReportCaster Development Interface, select theBlackout Dates tab. The Schedule Blackout Dates interface, shown in the following image,provides a calendar and a list of groups to which you belong in the left pane. The right panedisplays a list of schedule blackout dates for the selected group. The Blackout Dates tabinitially opens to the Global group.
To view the schedule blackout dates for a particular group, select that group in the left pane.The list of blackout dates in the calendar and right pane refresh to display the selectedgroup blackout dates, which are shaded in yellow, along with the global blackout dates,shaded in gray.
ReportCaster End User's Manual 77
4. Maintaining a Schedule

You can change the month or year using the arrows at the top of the calendar. Click Refreshto load the latest blackout dates. Dates only appear as available or unavailable. You cantoggle between exposing and hiding the left pane by clicking the arrow in the top-right cornerof the pane. The following image shows the display with the left pane hidden.
Schedule Behavior for Blackout DatesReference:
Blackout dates are enforced during schedule creation and at run time:
When creating or editing one of the date fields in a schedule,ReportCaster dynamicallychecks the first upcoming date on which the schedule will run to ensure that this datehas not been blacked out. If there is a conflict with the date, an error message appearsand the schedule cannot be saved until the conflict is resolved by either changing theschedule date or by not blacking out the date.
At run time, each schedule is checked against the list of blackout dates. If a blackoutdate has been defined for the scheduled date, the schedule will not run. If notificationis enabled, a notification is distributed indicating that the schedule did not run becauseof a defined blackout date.
Note: Schedule blackout dates for a specific user include the global blackout dates andthe blackout dates assigned to the group(s) to which the user belongs.
78 WebFOCUS
Setting Schedule Blackout Dates
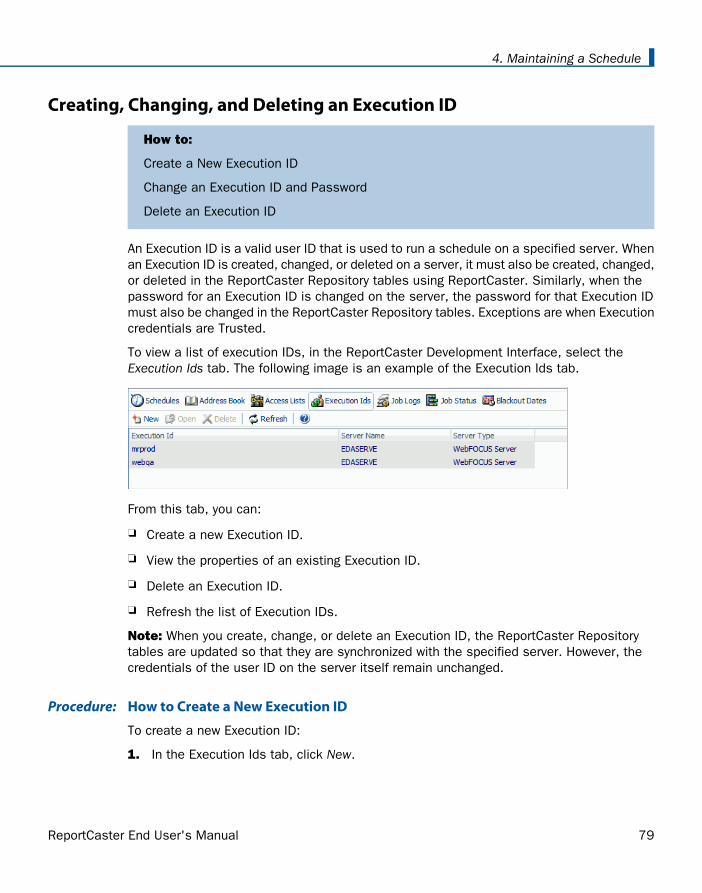
Creating, Changing, and Deleting an Execution ID
How to:
Create a New Execution ID
Change an Execution ID and Password
Delete an Execution ID
An Execution ID is a valid user ID that is used to run a schedule on a specified server. Whenan Execution ID is created, changed, or deleted on a server, it must also be created, changed,or deleted in the ReportCaster Repository tables using ReportCaster. Similarly, when thepassword for an Execution ID is changed on the server, the password for that Execution IDmust also be changed in the ReportCaster Repository tables. Exceptions are when Executioncredentials are Trusted.
To view a list of execution IDs, in the ReportCaster Development Interface, select theExecution Ids tab. The following image is an example of the Execution Ids tab.
From this tab, you can:
Create a new Execution ID.
View the properties of an existing Execution ID.
Delete an Execution ID.
Refresh the list of Execution IDs.
Note: When you create, change, or delete an Execution ID, the ReportCaster Repositorytables are updated so that they are synchronized with the specified server. However, thecredentials of the user ID on the server itself remain unchanged.
How to Create a New Execution IDProcedure:
To create a new Execution ID:
1. In the Execution Ids tab, click New.
ReportCaster End User's Manual 79
4. Maintaining a Schedule
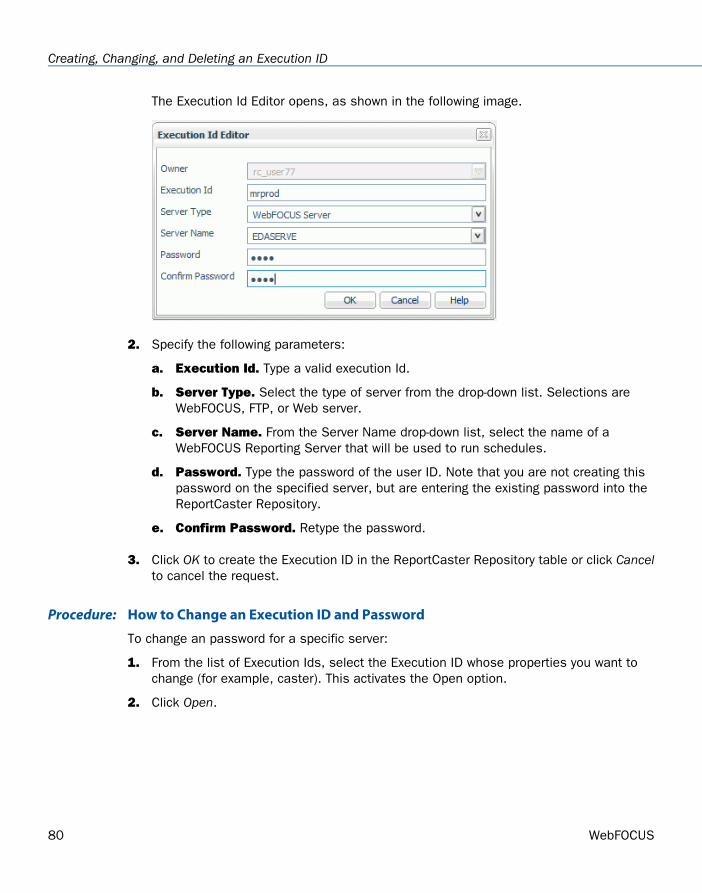
The Execution Id Editor opens, as shown in the following image.
2. Specify the following parameters:
a. Execution Id. Type a valid execution Id.
b. Server Type. Select the type of server from the drop-down list. Selections areWebFOCUS, FTP, or Web server.
c. Server Name. From the Server Name drop-down list, select the name of aWebFOCUS Reporting Server that will be used to run schedules.
d. Password. Type the password of the user ID. Note that you are not creating thispassword on the specified server, but are entering the existing password into theReportCaster Repository.
e. Confirm Password. Retype the password.
3. Click OK to create the Execution ID in the ReportCaster Repository table or click Cancelto cancel the request.
How to Change an Execution ID and PasswordProcedure:
To change an password for a specific server:
1. From the list of Execution Ids, select the Execution ID whose properties you want tochange (for example, caster). This activates the Open option.
2. Click Open.
80 WebFOCUS
Creating, Changing, and Deleting an Execution ID

The Execution Id Editor opens, as shown in the following image.
3. Specify the following information:
a. Password. Enter the password for the Execution ID. This password must match thecurrent password for this user ID on the server that appears in the Server Namefield.
b. Confirm Password. Reenter the password.
Changing the password using ReportCaster does not change the password on thespecified server.
How to Delete an Execution IDProcedure:
To delete an Execution ID:
1. Select the Execution ID you want to delete.
2. Click Delete. A message appears asking for confirmation to delete the selected ExecutionID.
3. Click OK.
After the Execution ID is deleted, a scheduled job that requires this Execution ID on thespecified server is not run unless the schedule is modified to use a valid Execution ID. Ifyou modify the Execution credentials for a single schedule that specifies the deleted ExecutionID, ReportCaster makes this modification for all schedules that specify the deleted ExecutionID.
ReportCaster End User's Manual 81
4. Maintaining a Schedule

82 WebFOCUS
Creating, Changing, and Deleting an Execution ID
WebFOCUS
Tracking ReportCaster Schedules5Topics:
Information about a schedule, such asdate, time, execution status, andrecipients of a distributed job can beaccessed by running a log report andchecking the job status.
Using Schedule Logs
Checking the Schedule Status
ReportCaster End User's Manual 83
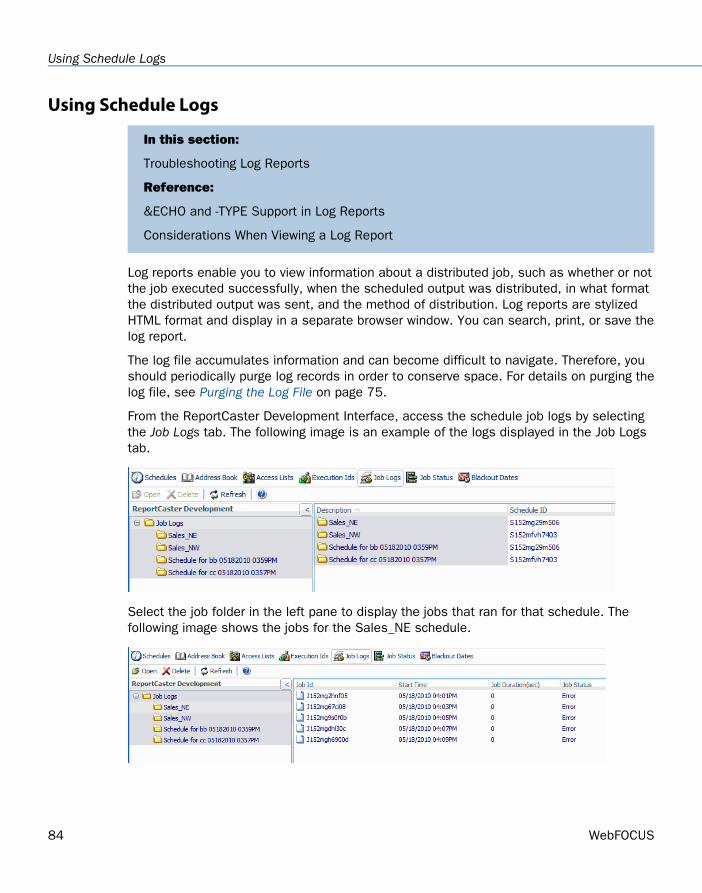
Using Schedule Logs
In this section:
Troubleshooting Log Reports
Reference:
&ECHO and -TYPE Support in Log Reports
Considerations When Viewing a Log Report
Log reports enable you to view information about a distributed job, such as whether or notthe job executed successfully, when the scheduled output was distributed, in what formatthe distributed output was sent, and the method of distribution. Log reports are stylizedHTML format and display in a separate browser window. You can search, print, or save thelog report.
The log file accumulates information and can become difficult to navigate. Therefore, youshould periodically purge log records in order to conserve space. For details on purging thelog file, see Purging the Log File on page 75.
From the ReportCaster Development Interface, access the schedule job logs by selectingthe Job Logs tab. The following image is an example of the logs displayed in the Job Logstab.
Select the job folder in the left pane to display the jobs that ran for that schedule. Thefollowing image shows the jobs for the Sales_NE schedule.
84 WebFOCUS
Using Schedule Logs
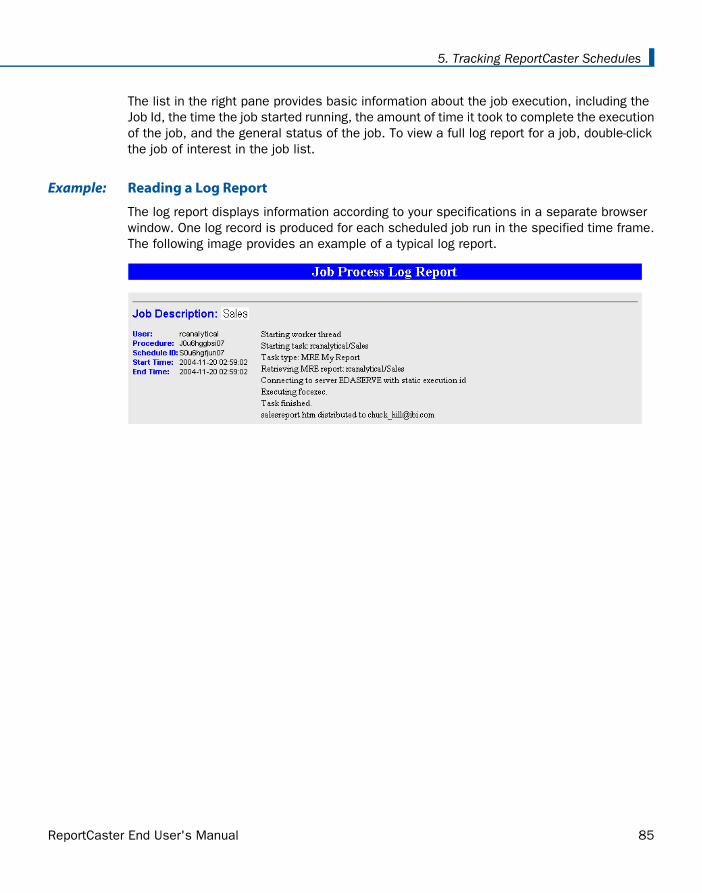
The list in the right pane provides basic information about the job execution, including theJob Id, the time the job started running, the amount of time it took to complete the executionof the job, and the general status of the job. To view a full log report for a job, double-clickthe job of interest in the job list.
Reading a Log ReportExample:
The log report displays information according to your specifications in a separate browserwindow. One log record is produced for each scheduled job run in the specified time frame.The following image provides an example of a typical log report.
ReportCaster End User's Manual 85
5. Tracking ReportCaster Schedules

If you chose to view log reports for multiple schedules, the Job Process Log Report containsa log record for each schedule you selected. The following image shows an example of alog report for multiple schedules.
The log report first lists the job description for the record, which is the unique descriptionidentifier that you specified when you created the schedule. Underneath the Job Description,the left column of the log report includes the following information:
User. ReportCaster user ID, indicating the owner of the schedule.
Procedure. Unique key generated by ReportCaster that identifies a specific executionof a scheduled job.
Schedule ID. Unique key generated by ReportCaster that was assigned to the job whenit was scheduled.
Start Time. Date and time the job started running.
End Time. Date and time the job finished running.
In the second column, the log report specifies messages consisting of the following:
General information, such as the method of distribution for a particular job (for example,e-mail distribution).
86 WebFOCUS
Using Schedule Logs
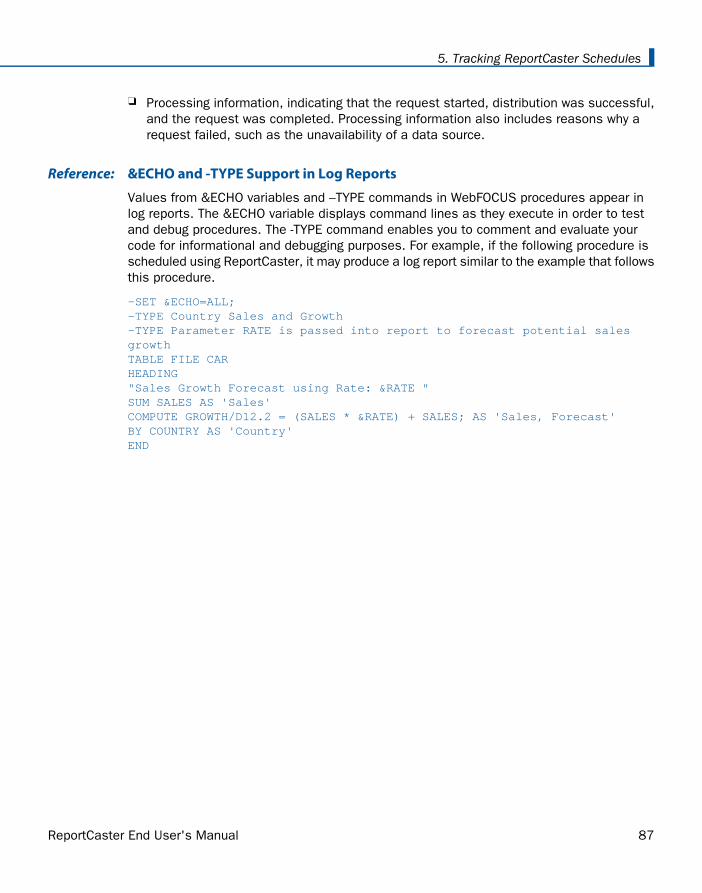
Processing information, indicating that the request started, distribution was successful,and the request was completed. Processing information also includes reasons why arequest failed, such as the unavailability of a data source.
&ECHO and -TYPE Support in Log ReportsReference:
Values from &ECHO variables and –TYPE commands in WebFOCUS procedures appear inlog reports. The &ECHO variable displays command lines as they execute in order to testand debug procedures. The -TYPE command enables you to comment and evaluate yourcode for informational and debugging purposes. For example, if the following procedure isscheduled using ReportCaster, it may produce a log report similar to the example that followsthis procedure.
-SET &ECHO=ALL;-TYPE Country Sales and Growth -TYPE Parameter RATE is passed into report to forecast potential sales growthTABLE FILE CARHEADING"Sales Growth Forecast using Rate: &RATE "SUM SALES AS 'Sales' COMPUTE GROWTH/D12.2 = (SALES * &RATE) + SALES; AS 'Sales, Forecast' BY COUNTRY AS 'Country'END
ReportCaster End User's Manual 87
5. Tracking ReportCaster Schedules
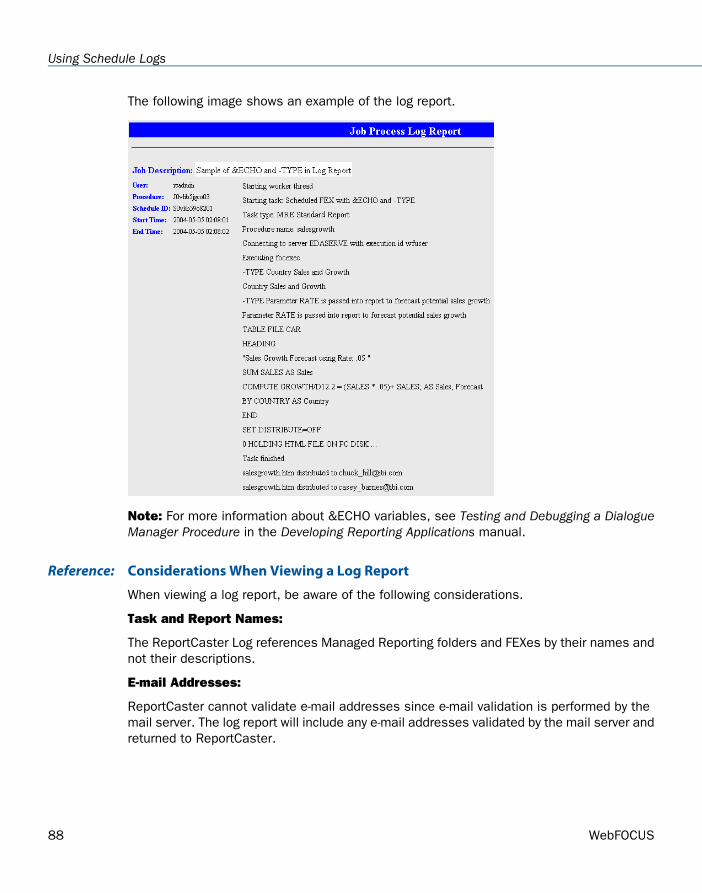
The following image shows an example of the log report.
Note: For more information about &ECHO variables, see Testing and Debugging a DialogueManager Procedure in the Developing Reporting Applications manual.
Considerations When Viewing a Log ReportReference:
When viewing a log report, be aware of the following considerations.
Task and Report Names:
The ReportCaster Log references Managed Reporting folders and FEXes by their names andnot their descriptions.
E-mail Addresses:
ReportCaster cannot validate e-mail addresses since e-mail validation is performed by themail server. The log report will include any e-mail addresses validated by the mail server andreturned to ReportCaster.
88 WebFOCUS
Using Schedule Logs

Burst Reports:
If a valid burst value is omitted in a Distribution List, Distribution File, or Dynamic AddressList, ReportCaster treats the blank value as if it is a valid burst value, and no entriesindicating a blank burst value appear in the log file. This will significantly reduce the sizeof the log file, particularly when the database contains many values for the primary fieldand only a small subset of those values are burst.
If a burst value is specified in a Distribution List, Distribution File, or Dynamic AddressList and it is not found in the database, the following message appears in the log file:
Burst Value: value is not in the database.
When a report is successfully burst, the log file will include the following message foreach burst value:
FILE filename SUCCESSFULLY DISTRIBUTED TO destination FOR burst value.
Unavailable Options:
When schedules with unavailable Task Types or distribution methods are not permitted torun, error notification is triggered. Information is included in the full and brief notificationsand in the log report that your ReportCaster administrator or the owner of the schedule mustchange the unavailable Task Types or distribution methods in the schedule.
When schedules with unavailable Task Types or distribution methods are permitted to run,normal job execution occurs and a message appears in the log report indicating that yourReportCaster administrator is allowing existing schedules using the unavailable Task Typesor distribution methods to run.
Troubleshooting Log ReportsIf you do not receive a log report because there is an insufficient amount of memory available,this may be because the report is too large or you have too many windows open. Werecommend closing all windows and attempting to run the log report again. If you are stillunsuccessful, rerun a schedule that successfully created a log report. If you are successfulin running the log report, this confirms that the original log report that did not run was toolarge to be processed. Contact your ReportCaster administrator to help you troubleshootthis issue.
Checking the Schedule StatusAnother resource for tracking schedules is the schedule job status. The schedule statusprovides a list of scheduled jobs that are in the ReportCaster Distribution Server queue.Status information includes the schedule ID, the time it started running, and the status ofthe job.
ReportCaster End User's Manual 89
5. Tracking ReportCaster Schedules
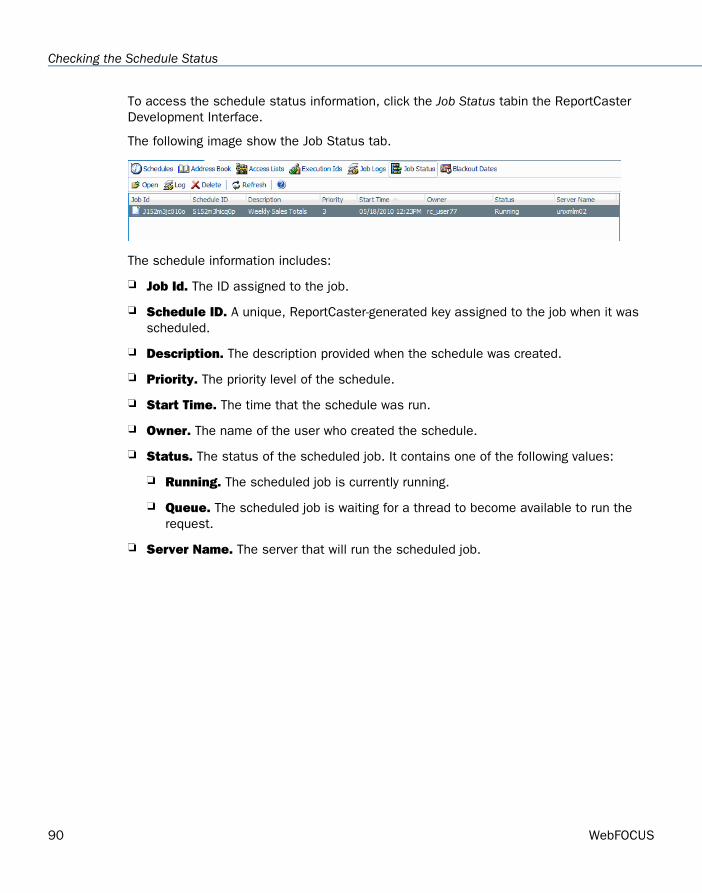
To access the schedule status information, click the Job Status tabin the ReportCasterDevelopment Interface.
The following image show the Job Status tab.
The schedule information includes:
Job Id. The ID assigned to the job.
Schedule ID. A unique, ReportCaster-generated key assigned to the job when it wasscheduled.
Description. The description provided when the schedule was created.
Priority. The priority level of the schedule.
Start Time. The time that the schedule was run.
Owner. The name of the user who created the schedule.
Status. The status of the scheduled job. It contains one of the following values:
Running. The scheduled job is currently running.
Queue. The scheduled job is waiting for a thread to become available to run therequest.
Server Name. The server that will run the scheduled job.
90 WebFOCUS
Checking the Schedule Status
WebFOCUS
ReportCaster Formats for Scheduled OutputAWhen you create a schedule, you specify the format for the scheduled output. This section describes eachformat available to ReportCaster, and includes suggestions for using the format and considerations thatyou should be aware of when distributing that format.
Topics:GIF
AHTML HTML
ALPHA HTML ODP
COM JPEG
COMMA PDF
COMT PNG
DFIX PPT
DHTML PPT Template
DOC PS
EXCEL SVG
EXL07 TAB
EXL2K TABT
EXL2K FORMULA VISDIS
EXL2K PIVOT WK1
EXL2K TEMPLATE WP
EXL97 XML
Flash
ReportCaster End User's Manual 91
AHTMLFormat: AHTML (.htm, .html)
Description: Provides customizable options for creating HTML formatted reports that enableusers to experience features normally found in Excel workbooks.
Suggested Uses: Report Library, e-mail for display in a Web browser.
Considerations:
Bursting is supported except for FML reports.
Can only be distributed as an e-mail attachment. Inline e-mail messages are not supported.
ALPHAFormat: ALPHA (.ftm, .txt)
Description: Saves scheduled output as fixed-format character data.
Suggested Uses: For display in a text document, for further reporting in WebFOCUS, andas a transaction file for modifying a data source.
Considerations:
When created as a HOLD file, a corresponding Master File is created.
Bursting is supported.
COMFormat: Com (.cvs)
Description: Saves scheduled output as a variable-length text file in comma-delimited formatwith character values enclosed in double quotation marks. Blanks within fields are notretained.
This format is required by certain software packages, such as Microsoft Access.
Suggested Uses: For further processing in a database application. This format type canbe imported into applications, such as Excel or Lotus.
Considerations:
This format type does not create a Master File.
Bursting is supported.
Can be opened in the Report Library with Excel.
92 WebFOCUS
AHTML

Smart date fields and dates formatted as I or P fields with date format options are treatedas numeric and are not enclosed in double quotation marks in the output file. Datesformatted as alphanumeric fields with date format options are treated as alphanumericand enclosed in double quotation marks.
Continental decimal notation (CDN=ON|SPACE|QUOTE) is not supported. A comma withina number is interpreted as two separate columns by a destination application, such asMicrosoft Access.
COMMAFormat: COMMA (.csv)
Description: Saves scheduled output as a variable-length text file in comma-delimited formatwith character values enclosed in double quotation marks. All blanks within fields are retained.
This format is required by certain software packages, such as Microsoft Access.
Suggested Uses: For further processing in a database application. This format type canbe imported into applications, such as Excel or Lotus.
Considerations:
This format type does not create a Master File.
Bursting is supported.
Can be opened in the Report Library with Excel, or you can open COMMA reports in Lotus1-2-3 by right-clicking the report and saving it as a COMMA file outside of the library.
Smart date fields and dates formatted as I or P fields with date format options are treatedas numeric and are not enclosed in double quotation marks in the output file. Datesformatted as alphanumeric fields with date format options are treated as alphanumericand enclosed in double quotation marks.
Continental decimal notation (CDN=ON|SPACE|QUOTE) is not supported. A comma withina number is interpreted as two separate columns by a destination application, such asMicrosoft Access.
COMTFormat: COMT (.csv)
Description: Adds titles to a COMMA file. Saves scheduled output as a variable-length textfile in comma-delimited format with character values enclosed in double quotation marks.All blanks within fields are retained.
This format is required by certain software packages, such as Microsoft Access.
ReportCaster End User's Manual 93
A. ReportCaster Formats for Scheduled Output
Suggested Uses: For further processing in a database application. This format type canbe imported into applications, such as Excel or Lotus.
Considerations:
This format type does not create a Master File.
Bursting is supported.
Cannot be opened in the Report Library with Excel.
Smart date fields and dates formatted as I or P fields with date format options are treatedas numeric and are not enclosed in double quotation marks in the output file. Datesformatted as alphanumeric fields with date format options are treated as alphanumericand enclosed in double quotation marks.
Continental decimal notation (CDN=ON|SPACE|QUOTE) is not supported. A comma withina number is interpreted as two separate columns by a destination application, such asMicrosoft Access.
DFIXFormat: DFIX (.ftm, .txt)
Description: Allows you to define any character to act as the delimiter (DELIMITER = yourchoice of character), include quotation marks around alpha fields (ENCLOSURE = “), andinclude column titles (HEADER = YES/NO).
The following is an example of a PCHOLD statement that specifies the pipe character (|) asthe delimiter, adds quotation marks around alpha fields, and does not include column titlesor headings.
ON TABLE PCHOLD AS OUT1 FORMAT DFIX DELIMITER | ENCLOSURE “ HEADER NO
Suggested Uses: Use in files that require custom (non-standard) delimiters.
Considerations:
Missing data is indicated by showing no data. If you specified an enclosure, then missingalpha fields are indicated by ““. Missing numeric fields are indicated by two delimiters.
Bursting is supported.
DHTMLFormat: DHTML (.htm, .mht)
Description: Supports hyperlinks and other World Wide Web features. Retains StyleSheetformatting.
94 WebFOCUS
DFIX

Along with the features of the HTML format, DHTML supports the Web archive format (.mht).An .mht file can contain multiple reports and graphs and is utilized for WebFOCUS CoordinatedCompound Reports.
Suggested Uses: Report Library, e-mail for display in a Web browser.
Considerations:
Bursting is supported except for FML reports.
Can be distributed as an e-mail attachment and be sent as an inline e-mail messagewhenthe output is .htm, but not when the output is .mht.
Will returntwo possible formats:
The scheduled procedure (FOCEXEC) outputs an HTML file when the request does notcontain the SET HTMLARCHIVE=ON command.
The scheduled procedure (FOCEXEC) outputs a Web archive file (.mht) when the SETHTMLARCHIVE=ON is specified.
DOCFormat: DOC (.txt)
Description: Scheduled output opens as a plain-text word processing document. Text canbe opened by any word processing application. Retains ASCII form feed characters to correctlydisplay page output.
Suggested Uses: Word Processing applications, printing unformatted reports, e-mail, ReportLibrary.
Considerations:
Does not retain most formatting. Does not support hyperlinks or alerts.
Can be distributed as an e-mail attachment or as an inline e-mail message.
Bursting is supported.
Must be using Microsoft Office 2000 at a minimum release level of 9.0.3821 SR-1 inorder to open in the Report Library.
EXCELFormat: EXCEL (.xls)
Description: For Excel 2000 and earlier, scheduled output opens as a Microsoft Excelspreadsheet file.
Suggested Uses: E-mail, Report Library.
ReportCaster End User's Manual 95
A. ReportCaster Formats for Scheduled Output
Considerations:
Any version of Microsoft Excel must be installed.
Cannot use the print distribution method.
Does not support bursting reports or alerts.
Does not retain headings, footings, subheads, or subfoots.
The format is binary.
Must be using Microsoft Office 2000 at a minimum release level of 9.0.3821 SR-1 inorder to open in the Report Library.
When ReportCaster distributes EXCEL reports created with a TABLE request containingBY HIGHEST primarysortfield syntax, the report contains page breaks on each primarysort field value.
EXL07Format: EXL07 (.xls)
Description: Scheduled output opens within Excel 2007.
Supports most StyleSheet attributes, allowing for full report formatting.
Suggested Uses: E-mail, Report Library.
Considerations: When scheduling a report to be distributed in this format, ensure thateither the FEX or the ReportCaster configuration setting, Excel server URL, specify theapplication server that will zip the Excel 2007 file components for distribution. The Excelserver URL in the FEX will override the value in the Configuration tool.
EXL2KFormat: EXL2K (.xls)
Description: Scheduled output opens within Excel 2000 or higher.
Supports most StyleSheet attributes, allowing for full report formatting.
Suggested Uses: E-mail, Report Library.
Considerations:
Microsoft Excel 2000 or higher must be installed.
Must be using Microsoft Office 2000 at a minimum release level of 9.0.3821 SR-1 inorder to open in the Report Library.
The format is ASCII.
96 WebFOCUS
EXL07
All EXL2K output with an .xht extension is dynamically changed to .xls for e-mail or FTPdistribution. You must edit your Web server MIME table so that the .xls extension isascii/application data instead of binary.
Bursting is supported.
EXL2K FORMULAFormat: EXL2K FORMULA (.xls)
Description: Scheduled output opens within Excel 2000 or higher.
Contains Excel formulas that calculate and display the results of any type of summedinformation, such as column totals, row totals, and sub-totals.
Suggested Uses: E-mail, Report Library.
Considerations:
Microsoft Excel 2000 or higher must be installed.
Must be using Microsoft Office 2000 at a minimum release level of 9.0.3821 SR-1 inorder to open in the Report Library.
The format is ASCII.
All EXL2K output with an .xht extension is dynamically changed to .xls for e-mail or FTPdistribution. You must edit your Web server MIME table so that the .xls extension isascii/application data instead of binary.
Bursting is not supported.
EXL2K PIVOTFormat: EXL2K PIVOT (.xls)
Description: Scheduled output opens within Excel 2000 or higher.
Used to analyze complex data much like the OLAP tool in WebFOCUS. It allows you to dragand drop data fields within a PivotTable, providing different views of the data, such as sortingacross rows or columns.
Suggested Uses: E-mail, Report Library.
Considerations:
Microsoft Excel 2000 or higher must be installed.
Must be using Microsoft Office 2000 at a minimum release level of 9.0.3821 SR-1 inorder to open in the Report Library.
ReportCaster End User's Manual 97
A. ReportCaster Formats for Scheduled Output

The format is ASCII.
The procedure you are scheduling must contain the SET WEBARCHIVE=ON command.This command ensures that the WebFOCUS Reporting Server creates a single output filerather than a main file and a cache file.
All EXL2K output with an .xht extension is dynamically changed to .xls for e-mail or FTPdistribution. You must edit your Web server MIME table so that the .xls extension isascii/application data instead of binary.
Bursting is not supported.
EXL2K TEMPLATEFormat: EXL2K TEMPLATE (.xls)
Description: Scheduled output opens within Excel 2002 or higher.
Excel templates that are populated with data from scheduled output.
Suggested Uses: E-mail, Report Library.
Considerations:
The scheduled procedure must contain a PCHOLD statement such as the following:
ON TABLE PCHOLD FORMAT EXL2K TEMPLATE templatename
Must be using Windows XP or Windows 2003.
Microsoft Excel 2002 or higher must be installed.
The format is ASCII.
All EXL2K output with an .mht extension is dynamically changed to .xls for e-mail or FTPdistribution. You must edit your Web server MIME table so that the .xls extension isascii/application data instead of binary.
Bursting is supported.
EXL97Format: EXL97 (.xls)
Description: Scheduled output opens as an Excel97 spreadsheet file, an HTML-baseddisplay format that supports report formatting and drill-downs.
Suggested Uses: E-mail, Report Library.
Considerations:
Microsoft Excel 97 or higher must be installed.
98 WebFOCUS
EXL2K TEMPLATE

Must be using Microsoft Office 2000 at a minimum release level of 9.0.3821 SR-1 inorder to open in the Report Library.
Bursting is supported.
FlashFormat: Flash
Description: This format provides portability and interactive enhancements to active reports.
Suggested Uses: Report Library, e-mail for display in a Web browser.
Considerations:
Bursting is not supported.
Most commonly used browsers recognize an active report in the Flash format as aShockwave Flash Object.
To enable Flash output, configure Java services on the WebFOCUS Reporting Server witha Java Heap Size of 512 MB or higher.
GIFFormat: GIF (.gif)
Description: Scheduled output opens as a graph image in GIF format.
Suggested Uses: E-mail, Report Library.
Considerations:
Only works with procedures that contain GRAPH FILE syntax.
Bursting is supported and is performed on the second BY field in the GRAPH FILE request.
Drill-downs are not supported since the GIF format creates a static image.
You cannot distribute multiple images within a single report when using the GIF format.Instead, use the PDF format to distribute multiple images within a single report.
To distribute a GIF report on UNIX or z/OS, edit the schbkr script file and add the followingcode after the #!/bin/ksh line:
DISPLAY=IP_Address export DISPLAY TERM=xterm export TERM
where:
IP_Address
Is the IP address of the machine that is running the xterm.
ReportCaster End User's Manual 99
A. ReportCaster Formats for Scheduled Output

Note: This step is necessary only if you are distributing a graph created by a WebFOCUSGRAPH FILE request (WF Server Procedure, Standard Report, My Report), and is notnecessary if you are distributing a file.
HTMLFormat: HTML (.htm, .html)
Description: Supports hyperlinks and other World Wide Web features. Retains StyleSheetformatting.
Suggested Uses: Report Library, e-mail for display in a Web browser.
Considerations:
Bursting is supported except for FML reports.
Can be distributed as an e-mail attachment or as an inline e-mail message.
HTML ODPFormat: HTML ODP (.htm, .html)
Description: This is an HTML format with On-demand Paging, which saves the report to theWeb server and delivers the output to you one page at a time. HTML supports hyperlinksand other World Wide Web features, and retains StyleSheet formatting.
Suggested Uses: On-demand Paging is only available for reports distributed to the ReportLibrary.
Considerations:
Bursting is supported except for FML reports.
Do not use the ON TABLE SET WEBVIEWTARG command in a report scheduled fordistribution to the Report Library in the HTML ODP format.
JPEGFormat: JPEG (.jpg, .jpeg, .jpe, .jfif)
Description: Scheduled output opens as a graph image in JPEG format.
Suggested Uses: E-mail, Report Library.
Considerations:
Only works with procedures that contain GRAPH FILE syntax.
Bursting is supported and is performed on the second BY field in the GRAPH FILE request.
100 WebFOCUS
HTML
Drill-downs are not supported since the JPEG format creates a static image.
PDFFormat: PDF (.pdf)
Description: Appearance of the scheduled output is preserved in an electronic documentwhen printed using Adobe Acrobat or distributed to a printer that has an appropriate driver.Retains all relevant StyleSheet formatting.
Suggested Uses: E-mail, printing, Report Library.
Considerations:
Does not support hyperlinks in e-mail attachments. Recipient must have an Adobe Acrobatapplication to view.
The z/OS USS (UNIX System Services) platform requires the Web server configurationfile to have the MIME setting for PDF set to binary in mime.wfs.
Printing is supported when ReportCaster is configured to allow PDF to be printed and theprinter has the appropriate driver.
Bursting is supported.
When ReportCaster distributes PDF reports created with a TABLE request containing BYHIGHEST primarysortfield syntax, the report contains page breaks on each primary sortfield value.
When distributing a PDF report to a Managed Reporting Repository on z/OS, the PDFreport cannot be viewed in Managed Reporting. As a workaround, save the PDF file toyour local machine and then view the PDF using Adobe Acrobat. This limitation is due toz/OS being an EBCDIC-based platform and PDF being an ASCII-based format.
The PDF Drill-Through feature is supported.
PNGFormat: PNG (.png)
Description: Scheduled output opens as a graph image. These graphs are bit-mapped andcan support 16 million colors. In addition, PNG graphs have lossless compression (data isdecompressed 100% back to the original). Therefore, saving, altering, and re-saving a PNGdoes not degrade its overall quality. For these reasons, PNG graphs are superior to GIFgraphs.
Suggested Uses: E-mail, Report Library.
ReportCaster End User's Manual 101
A. ReportCaster Formats for Scheduled Output

Considerations:
Only works with procedures that contain GRAPH FILE syntax.
Bursting is supported and is performed on the second BY field in the GRAPH FILE request.
Drill-downs are not supported, as this format creates a static image.
PPTFormat: PPT (.ppt)
Description: Generates a new PowerPoint file in the Web archive format.
Suggested Uses: E-mail, Report Library.
Considerations:
Bursting is supported.
PPT can be output as a single report and can also include as many graphs as desiredembedded in the StyleSheet of the report (TABLE). In addition, a single PPT report canbe placed inside an existing PPT template.
PPT can be used with SAVE, HOLD, or PCHOLD commands.
PPT TemplateFormat: PPT Template (.ppt)
Description: Generates a new PowerPoint file in the Web archive format.
PPT Templates that are populated with data from scheduled output.
Suggested Uses: E-mail, Report Library.
Considerations:
PPT can be output as a single report and can also include as many graphs as desiredembedded in the StyleSheet of the report (TABLE). In addition, a single PPT report canbe placed inside an existing PPT template.
PPT Template can be used with SAVE, HOLD, or PCHOLD commands.
PSFormat: PS (.ps)
Description: Appearance of the scheduled output is preserved in an electronic documentwhen printed using PostScript. Retains all relevant StyleSheet formatting.
102 WebFOCUS
PPT

Suggested Uses: Printing.
Considerations:
Does not support hyperlinks.
Printers must support PostScript. Recipient must have an application (for example,GhostView) that supports PostScript.
Distribution to Managed Reporting is not supported.
Bursting is supported.
SVGFormat: SVG (.svg)
Description: Scheduled output opens as a graph image. This file format, based on ExtensibleMarkup Language (XML), presents powerful, interactive images.
Suggested Uses: E-mail, Report Library.
Considerations:
Recipient must have an SVG viewer, such as Adobe SVG Viewer for Windows. To downloadAdobe SVG Viewer for Windows, go to http://www.adobe.com.
Only works with procedures that contain GRAPH FILE syntax.
Bursting is supported and is performed on the second BY field in the GRAPH FILE request.
Drill-downs are not supported, as this format creates a static image.
SVG graphs delivered by e-mail or to Managed Reporting from a z/OS ReportCasterDistribution Server cannot be opened. To resolve this issue, edit the ReportCasterDistribution Server sendmodes.xml file (located in the /cfg directory) and change the<mode> value from binary to text. For example:
<sendmode> <extension>svg</extension> <mode>text</mode> <mime>image/svg+xml</mime></sendmode>
ReportCaster End User's Manual 103
A. ReportCaster Formats for Scheduled Output

TABFormat: TAB (.tab, .tsv, .txt)
Description: Scheduled output opens in tab-delimited format.
This format is required by certain software packages, such as Microsoft Access.
Suggested Uses: E-mail, Report Library.
Considerations: Bursting is supported.
TABTFormat: TABT (.tab, .tsv, .txt)
Description: Scheduled output opens in tab-delimited format, including column headingsin the first row.
This format is required by certain software packages, such as Microsoft Access.
Suggested Uses: E-mail, Report Library.
Considerations: Bursting is supported.
VISDISFormat: (.txt)
Description: This file is used as input to Visual Discovery controls on a Web page.
Suggested Uses: Visual Discovery Reports.
Considerations:
Bursting is not supported.
Only FTP and SFTP distribution options are supported.
WK1Format: WK1 (.wk1)
Description: Scheduled output opens within Lotus 1-2-3, Excel.
Suggested Uses: E-mail.
Considerations:
Lotus 1-2-3 or Excel must be installed. Internet Explorer 5.5 or higher is the preferredbrowser.
In the mime.wfs configuration file:
104 WebFOCUS
TAB
Specify no in the Redirect column to launch Lotus 1-2-3.
Specify yes in the Redirect column to launch Excel.
The format is binary.
Cannot use the print distribution method.
Does not support bursting reports or alerts.
Does not retain headings, footings, subheads, or subfoots.
Cannot be opened in the Report Library. However, you can open WK1 reports in Lotus1-2-3 by right-clicking the report and saving it as a WK1 file outside of the library.
WPFormat: WP (.txt, .wp)
Description: Scheduled output opens as a plain-text word processing document in the Webbrowser. Text can be opened by any word processing application.
Suggested Uses: Word processing applications, printing unformatted reports, e-mail, ReportLibrary.
Considerations:
Does not retain page breaks or most formatting.
Does not support hyperlinks or alerts.
Can be distributed as an e-mail attachment or as an inline e-mail message.
Bursting is supported.
XMLFormat: XML (.xml)
Description: Scheduled output opens in XML format, a markup language that is derivedfrom the Standard Generalized Markup Language (SGML).
Suggested Uses: Describing and exchanging data for applications on different systems.
Considerations: Bursting is not supported.
ReportCaster End User's Manual 105
A. ReportCaster Formats for Scheduled Output

106 WebFOCUS
XML

WebFOCUS
Working With Distribution Lists in the HTMLUser Interface
BTopics:
This section explains how to create andmaintain Distribution Lists using theHTML User Interface. When creating aschedule, you can distribute reportoutput to a single recipient or severalrecipients. If you are creating a scheduleto be distributed to several recipients,you may want to create a DistributionList. A Distribution List consisting ofmultiple recipients and can be assignedto several schedules.
Accessing the Distribution or AddressBook List Interface
Creating a Distribution or AddressBook List
Editing a Distribution List
Deleting a Distribution List
If the entire report is not relevant tothose receiving it, you can specifysections of the report to be sent usingthe burst option. Each person on yourDistribution List can receive differentsections of the report depending on theindividual burst values you specify.
If you are distributing to the ReportLibrary, you must create an Access Listinstead of a Distribution List.
ReportCaster End User's Manual 107

Accessing the Distribution or Address Book List InterfaceA Distribution List is an easy way to distribute reports or content to multiple recipients byciting a list that contains the individual recipients. You can create a series of lists to targetspecific groups of people in an organization. Distribution and Address Book Lists can bereused as often as needed, and assigned to multiple schedules.
From the ReportCaster HTML User Interface, click the Distribution List option. AllDistribution Lists to which you have access (public lists and your own private lists) appear.Each Distribution List contains columns specifying its properties. Sorting is available foreach column by clicking the column heading. In addition, the interface includes toolbar iconsthat enable you to perform tasks on each Distribution List.
The following image shows the Distribution List pane of the ReportCaster HTML User Interface,with the available options and data fields.
From the Distribution List pane and the Address Book tab, you can:
Create a new Distribution List. For more information, see Creating a Distribution or AddressBook List on page 109.
Edit the properties of a Distribution List. For more information, see Editing a DistributionList on page 116.
Delete a Distribution List. For more information, see Deleting a Distribution List on page117.
Refresh the window so that it contains the latest Distribution List information.
Open the online Help.
108 WebFOCUS
Accessing the Distribution or Address Book List Interface

Creating a Distribution or Address Book List
How to:
Create a Distribution List
Retrieve E-mail Addresses for a Distribution List Using Address Search
Reference:
Considerations When Creating a Printer Distribution List
When you create a Distribution List, you specify the name of the Distribution List, thedistribution method (e-mail or printer), the destinations to which the report is distributed,the optional burst values, and whether public or private access is applied.
How to Create a Distribution ListProcedure:
To create a Distribution List:
1. From the Distribution List pane, click New.
The following image shows the available options, input fields, and drop-down lists in theDistribution List pane.
2. In the Distribution List field, specify a name for your Distribution List (for example, SalesTeam).
ReportCaster End User's Manual 109
B. Working With Distribution Lists in the HTML User Interface

3. From the Access drop-down list, select Public (default) or Private.
Only the owner and ReportCaster Administrators can view a Private Distribution List,whereas every ReportCaster user can view a Public Distribution List.
4. From the Distribution Method drop-down list, select Email (default) or Printer.
5. If you are bursting a report, specify individual sort values in the Burst Value field. Theburst value is case-sensitive, can be a maximum of 75 characters, and, when used withkeywords, can contain wild cards and Java regular expressions.
The burst value for a tabular report is the first BY field, which is the primary sort field.The burst value for a graph report is the second BY field. The burst value specified mustexist in the data source that the scheduled job reports against.
For more information, see Bursting a Report on page 24.
6. In the Destination field, specify the destinations to which the report is distributed:
If you selected Email as the distribution method, type the e-mail addresses of therecipients (for example, [email protected]). Be careful typing this information becausethere is no edit checking.
Note: If the Email Delivery, Restrict Email Domains option is set to yes in theReportCaster Server Configuration tool, then only those e-mail domains (the portionof the e-mail address following the at symbol) listed in Allowed Email Domains (alsoin the Server Configuration tool) are valid e-mail recipients.
If you selected Printer as the distribution method, specify the printer using thefollowing format
queue@printserver
where:
queue
Is the name of the printer queue.
printserver
Is the host name or IP address of the printer.
Although ReportCaster supports specifying only the host name (or IP address), werecommend that you specify both the printer queue and the host name (or IP address)when distributing ReportCaster output to a printer. ReportCaster differentiates betweenthe printer queue and the printer host name (or IP address) when the at sign (@) ispresent as the separator.
You can specify a maximum of 800 characters within a single Destination line.
Note:
110 WebFOCUS
Creating a Distribution or Address Book List
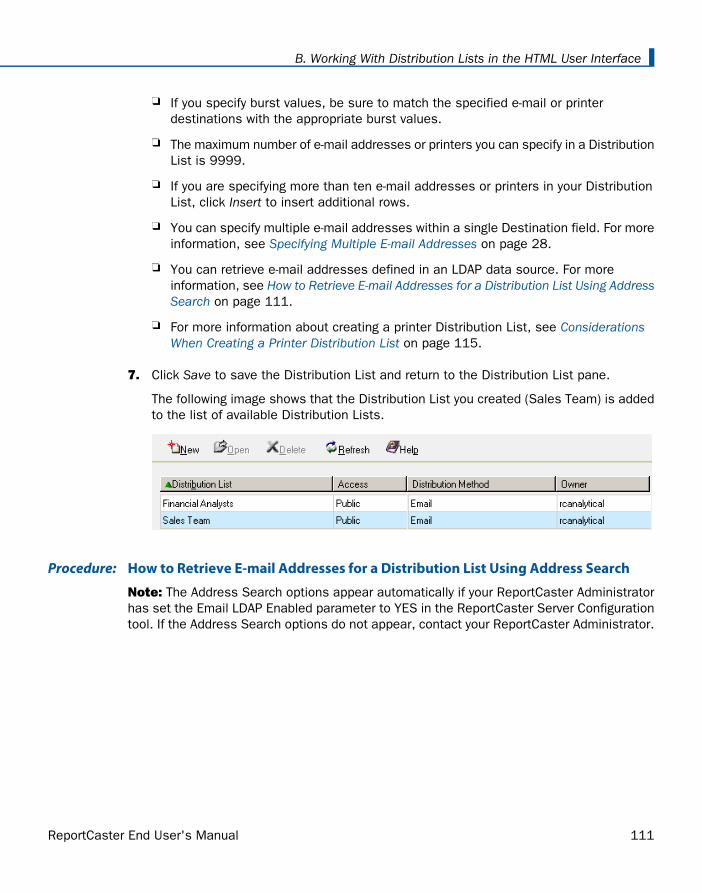
If you specify burst values, be sure to match the specified e-mail or printerdestinations with the appropriate burst values.
The maximum number of e-mail addresses or printers you can specify in a DistributionList is 9999.
If you are specifying more than ten e-mail addresses or printers in your DistributionList, click Insert to insert additional rows.
You can specify multiple e-mail addresses within a single Destination field. For moreinformation, see Specifying Multiple E-mail Addresses on page 28.
You can retrieve e-mail addresses defined in an LDAP data source. For moreinformation, see How to Retrieve E-mail Addresses for a Distribution List Using AddressSearch on page 111.
For more information about creating a printer Distribution List, see ConsiderationsWhen Creating a Printer Distribution List on page 115.
7. Click Save to save the Distribution List and return to the Distribution List pane.
The following image shows that the Distribution List you created (Sales Team) is addedto the list of available Distribution Lists.
How to Retrieve E-mail Addresses for a Distribution List Using Address SearchProcedure:
Note: The Address Search options appear automatically if your ReportCaster Administratorhas set the Email LDAP Enabled parameter to YES in the ReportCaster Server Configurationtool. If the Address Search options do not appear, contact your ReportCaster Administrator.
ReportCaster End User's Manual 111
B. Working With Distribution Lists in the HTML User Interface
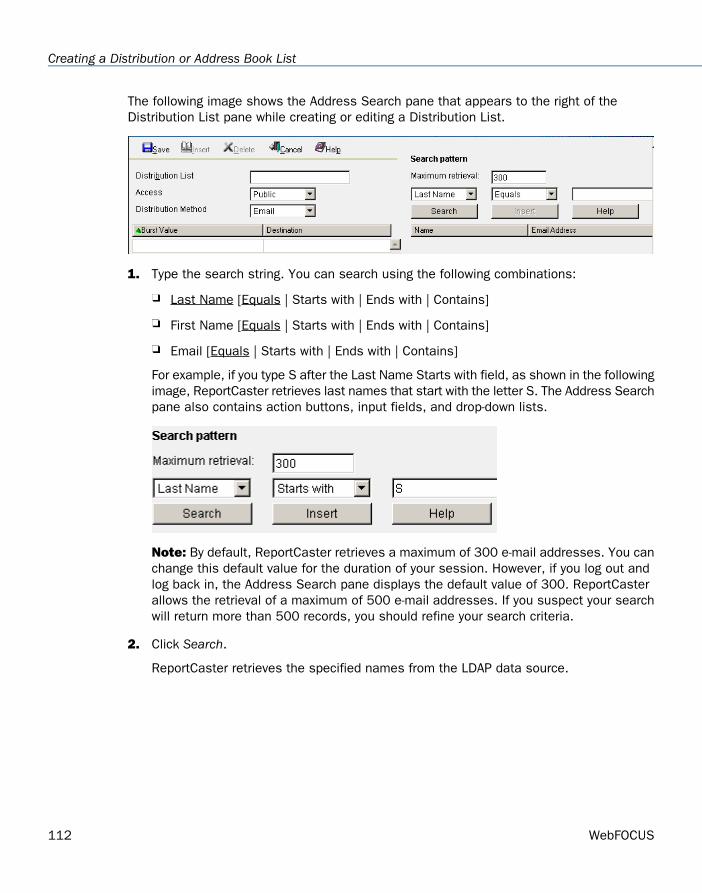
The following image shows the Address Search pane that appears to the right of theDistribution List pane while creating or editing a Distribution List.
1. Type the search string. You can search using the following combinations:
Last Name [Equals | Starts with | Ends with | Contains]
First Name [Equals | Starts with | Ends with | Contains]
Email [Equals | Starts with | Ends with | Contains]
For example, if you type S after the Last Name Starts with field, as shown in the followingimage, ReportCaster retrieves last names that start with the letter S. The Address Searchpane also contains action buttons, input fields, and drop-down lists.
Note: By default, ReportCaster retrieves a maximum of 300 e-mail addresses. You canchange this default value for the duration of your session. However, if you log out andlog back in, the Address Search pane displays the default value of 300. ReportCasterallows the retrieval of a maximum of 500 e-mail addresses. If you suspect your searchwill return more than 500 records, you should refine your search criteria.
2. Click Search.
ReportCaster retrieves the specified names from the LDAP data source.
112 WebFOCUS
Creating a Distribution or Address Book List

The following image shows retrieved search data under the Name and Email Addresscolumn headings in the Address Search pane.
3. Select an e-mail address you want to use in your Distribution List.
ReportCaster End User's Manual 113
B. Working With Distribution Lists in the HTML User Interface
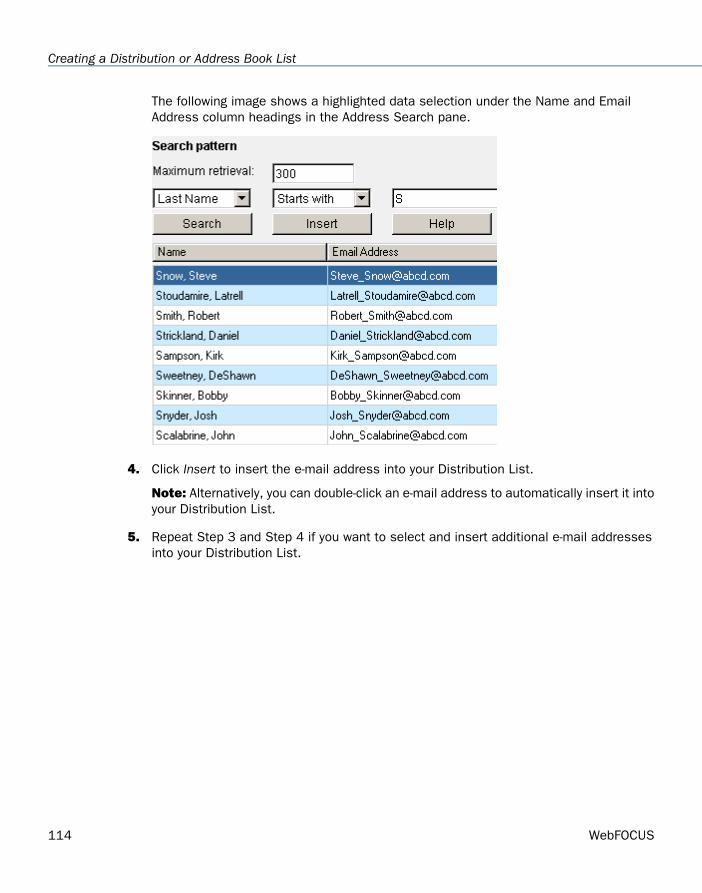
The following image shows a highlighted data selection under the Name and EmailAddress column headings in the Address Search pane.
4. Click Insert to insert the e-mail address into your Distribution List.
Note: Alternatively, you can double-click an e-mail address to automatically insert it intoyour Distribution List.
5. Repeat Step 3 and Step 4 if you want to select and insert additional e-mail addressesinto your Distribution List.
114 WebFOCUS
Creating a Distribution or Address Book List
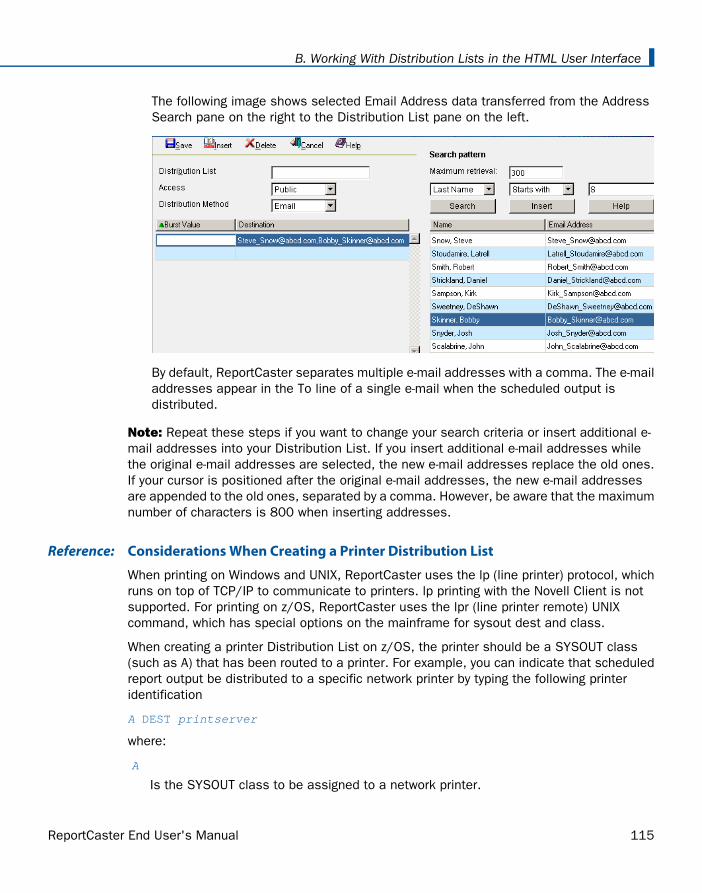
The following image shows selected Email Address data transferred from the AddressSearch pane on the right to the Distribution List pane on the left.
By default, ReportCaster separates multiple e-mail addresses with a comma. The e-mailaddresses appear in the To line of a single e-mail when the scheduled output isdistributed.
Note: Repeat these steps if you want to change your search criteria or insert additional e-mail addresses into your Distribution List. If you insert additional e-mail addresses whilethe original e-mail addresses are selected, the new e-mail addresses replace the old ones.If your cursor is positioned after the original e-mail addresses, the new e-mail addressesare appended to the old ones, separated by a comma. However, be aware that the maximumnumber of characters is 800 when inserting addresses.
Considerations When Creating a Printer Distribution ListReference:
When printing on Windows and UNIX, ReportCaster uses the lp (line printer) protocol, whichruns on top of TCP/IP to communicate to printers. lp printing with the Novell Client is notsupported. For printing on z/OS, ReportCaster uses the lpr (line printer remote) UNIXcommand, which has special options on the mainframe for sysout dest and class.
When creating a printer Distribution List on z/OS, the printer should be a SYSOUT class(such as A) that has been routed to a printer. For example, you can indicate that scheduledreport output be distributed to a specific network printer by typing the following printeridentification
A DEST printserver
where:
A
Is the SYSOUT class to be assigned to a network printer.
ReportCaster End User's Manual 115
B. Working With Distribution Lists in the HTML User Interface
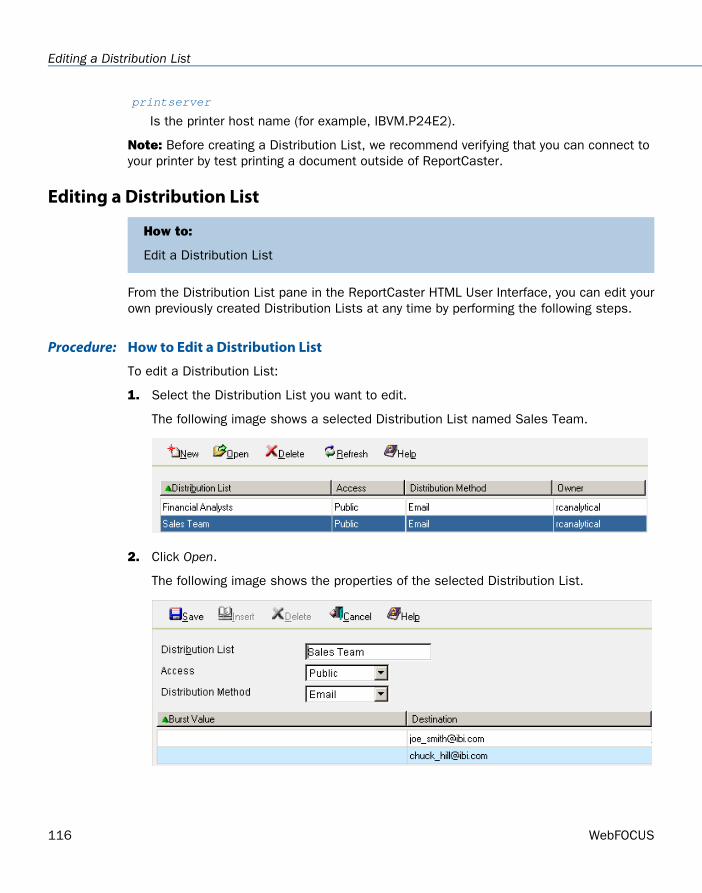
printserver
Is the printer host name (for example, IBVM.P24E2).
Note: Before creating a Distribution List, we recommend verifying that you can connect toyour printer by test printing a document outside of ReportCaster.
Editing a Distribution List
How to:
Edit a Distribution List
From the Distribution List pane in the ReportCaster HTML User Interface, you can edit yourown previously created Distribution Lists at any time by performing the following steps.
How to Edit a Distribution ListProcedure:
To edit a Distribution List:
1. Select the Distribution List you want to edit.
The following image shows a selected Distribution List named Sales Team.
2. Click Open.
The following image shows the properties of the selected Distribution List.
116 WebFOCUS
Editing a Distribution List

3. You can perform the following functions:
Copy the Distribution List by changing its name. The original Distribution List remainsunaltered.
Change the values of already existing entries. For example, you can make theDistribution List Private instead of Public or you can change the destinations.
Insert additional Burst values and Destinations by clicking Insert. A new row appearswhere your cursor is positioned, enabling you to insert additional entries.
Delete Burst Values and Destinations by selecting the row and clicking Delete.
4. After you have made the necessary changes to your Distribution List, click Save to savethe changes.
Deleting a Distribution List
How to:
Delete a Distribution List
From the Distribution List pane in the ReportCaster HTML User Interface, you can deleteyour own Distribution Lists at any time by performing the following steps.
How to Delete a Distribution ListProcedure:
To delete a distribution list:
1. Select the Distribution List you want to delete.
The following image shows a selected Distribution List named Sales Team.
2. Click Delete. A message appears asking for confirmation to delete the list. Click OK todelete the Distribution List.
ReportCaster End User's Manual 117
B. Working With Distribution Lists in the HTML User Interface

118 WebFOCUS
Deleting a Distribution List
WebFOCUS
Maintaining a Schedule Using the HTML UserInterface
CTopics:
The ReportCaster Interface, accessedfrom either Dashboard (select Tools, thenReportCaster) or the WebFOCUSWelcome Page (ReportCasterDevelopment), provides the samefunctionality as the ReportCaster HTMLUser Interface with a different look andfeel. This section explains the optionsand features of maintaing a schedulefrom the ReportCaster HTML UserInterface perspective, but can be usedto work with the current ReportCasterInterface.
About the Schedules Interface
Editing a Schedule in the HTML UserInterface
Cloning a Schedule
Deleting a Schedule
Viewing a Log Report
Purging the Log File
Schedule Blackout DatesBoth interfaces provides access to yourexisting schedules and allows you to editthe properties of a schedule, clone aschedule, delete a schedule, or run a logreport to obtain information about aschedule. Additionally, you can purge logrecords to conserve space in the log file,view the dates on which you cannot runor set schedules to run, check the statusof your scheduled jobs, and create,update, and delete your Execution IDs.
Checking the Status of a ScheduledJob
Creating, Updating, and Deleting anExecution ID
ReportCaster End User's Manual 119
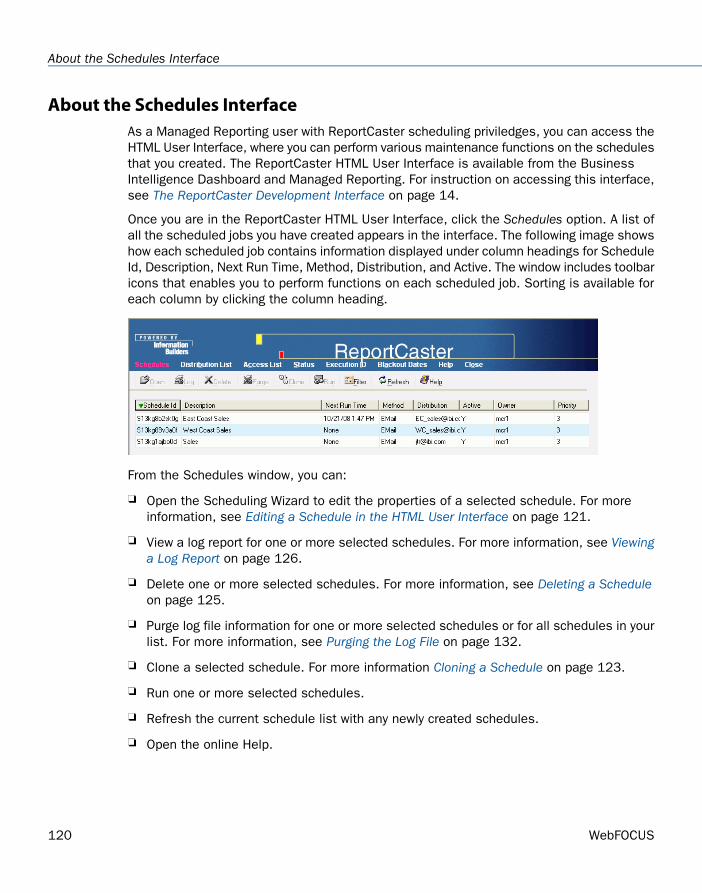
About the Schedules InterfaceAs a Managed Reporting user with ReportCaster scheduling priviledges, you can access theHTML User Interface, where you can perform various maintenance functions on the schedulesthat you created. The ReportCaster HTML User Interface is available from the BusinessIntelligence Dashboard and Managed Reporting. For instruction on accessing this interface,see The ReportCaster Development Interface on page 14.
Once you are in the ReportCaster HTML User Interface, click the Schedules option. A list ofall the scheduled jobs you have created appears in the interface. The following image showshow each scheduled job contains information displayed under column headings for ScheduleId, Description, Next Run Time, Method, Distribution, and Active. The window includes toolbaricons that enables you to perform functions on each scheduled job. Sorting is available foreach column by clicking the column heading.
From the Schedules window, you can:
Open the Scheduling Wizard to edit the properties of a selected schedule. For moreinformation, see Editing a Schedule in the HTML User Interface on page 121.
View a log report for one or more selected schedules. For more information, see Viewinga Log Report on page 126.
Delete one or more selected schedules. For more information, see Deleting a Scheduleon page 125.
Purge log file information for one or more selected schedules or for all schedules in yourlist. For more information, see Purging the Log File on page 132.
Clone a selected schedule. For more information Cloning a Schedule on page 123.
Run one or more selected schedules.
Refresh the current schedule list with any newly created schedules.
Open the online Help.
120 WebFOCUS
About the Schedules Interface

Note: When you select a schedule in the ReportCaster HTML User Interface, the Open, Log,Delete, and Clone options are enabled. As an alternative to selecting items in the toolbar,you can use Alt-O for Open, Alt-L for Log, Alt-D for Delete, and Alt-C for Clone.
Editing a Schedule in the HTML User Interface
How to:
Edit a Schedule
Reference:
Considerations When Editing a Schedule
From the Schedule window in the ReportCaster HTML User Interface, you can edit your ownpreviously created schedules at any time using the following procedure.
How to Edit a ScheduleProcedure:
To edit a schedule:
1. In the Schedules window, select the schedule you want to edit.
The following image shows the Schedules window with a schedule named Sales selected.
2. Click Open or double-click the schedule.
ReportCaster End User's Manual 121
C. Maintaining a Schedule Using the HTML User Interface
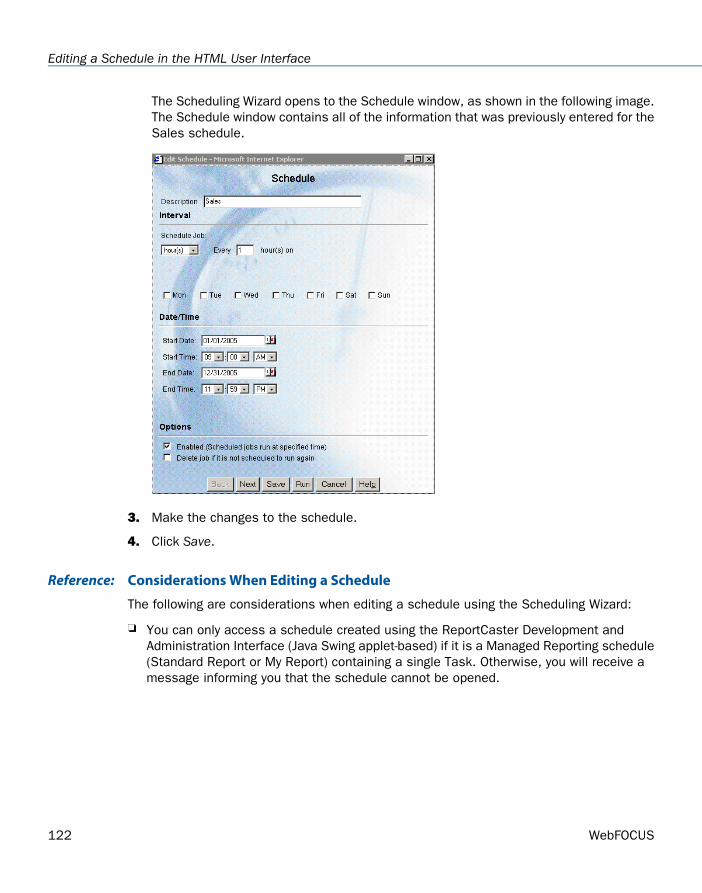
The Scheduling Wizard opens to the Schedule window, as shown in the following image.The Schedule window contains all of the information that was previously entered for theSales schedule.
3. Make the changes to the schedule.
4. Click Save.
Considerations When Editing a ScheduleReference:
The following are considerations when editing a schedule using the Scheduling Wizard:
You can only access a schedule created using the ReportCaster Development andAdministration Interface (Java Swing applet-based) if it is a Managed Reporting schedule(Standard Report or My Report) containing a single Task. Otherwise, you will receive amessage informing you that the schedule cannot be opened.
122 WebFOCUS
Editing a Schedule in the HTML User Interface

If a schedule already exists and your ReportCaster Administrator changes the availableoptions, the existing schedule runs as previously defined, regardless of the changes.However, if you attempt to specify unavailable options (Task Types, distribution methods,report formats, or Library Distribution Options) when editing a schedule, a message isdisplayed informing you that the options available for scheduling have been changed byyour ReportCaster Administrator. Information is then displayed that describes the change(s)that you must make for the schedule to use available options. Changes to the schedulecannot be saved until the schedule uses available options. In addition, a Custom RunInterval cannot be opened with this tool.
If you selected once for the run interval, the schedule runs immediately unless you changethe Start Time to a time later than the current time. All other run intervals run at the nextrun time of the schedule.
If you want your selected schedule(s) to run immediately, click Run. A new schedule IDis created for the job. Be advised that this results in multiple entries in the Report Libraryfor scheduled output distributed to the library.
Cloning a Schedule
How to:
Clone a Schedule
From the Schedules window in the ReportCaster HTML User Interface, you can clone yourown previously created schedules at any time using the following procedure.
How to Clone a ScheduleProcedure:
To clone a schedule:
1. In the Schedules window, select the schedule you want to clone.
The following image shows the Sales schedule selected in the Schedules window.
2. Click Clone.
ReportCaster End User's Manual 123
C. Maintaining a Schedule Using the HTML User Interface
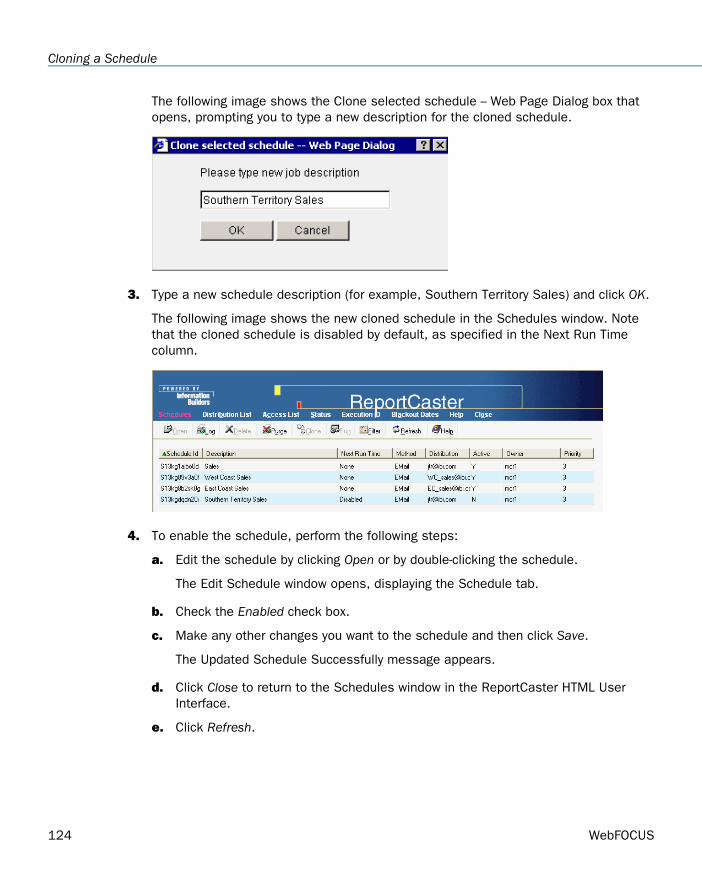
The following image shows the Clone selected schedule -- Web Page Dialog box thatopens, prompting you to type a new description for the cloned schedule.
3. Type a new schedule description (for example, Southern Territory Sales) and click OK.
The following image shows the new cloned schedule in the Schedules window. Notethat the cloned schedule is disabled by default, as specified in the Next Run Timecolumn.
4. To enable the schedule, perform the following steps:
a. Edit the schedule by clicking Open or by double-clicking the schedule.
The Edit Schedule window opens, displaying the Schedule tab.
b. Check the Enabled check box.
c. Make any other changes you want to the schedule and then click Save.
The Updated Schedule Successfully message appears.
d. Click Close to return to the Schedules window in the ReportCaster HTML UserInterface.
e. Click Refresh.
124 WebFOCUS
Cloning a Schedule
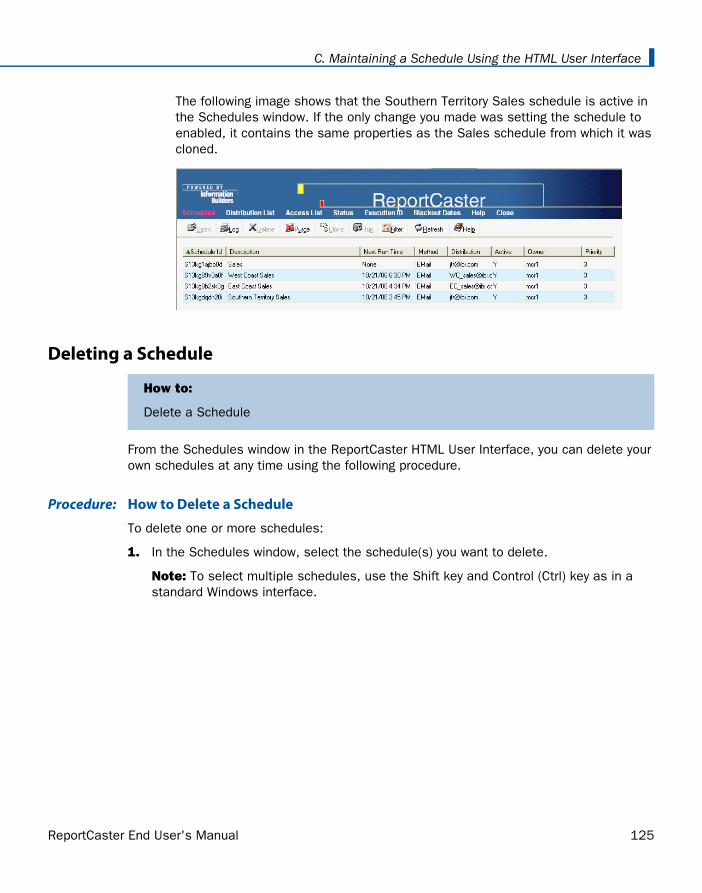
The following image shows that the Southern Territory Sales schedule is active inthe Schedules window. If the only change you made was setting the schedule toenabled, it contains the same properties as the Sales schedule from which it wascloned.
Deleting a Schedule
How to:
Delete a Schedule
From the Schedules window in the ReportCaster HTML User Interface, you can delete yourown schedules at any time using the following procedure.
How to Delete a ScheduleProcedure:
To delete one or more schedules:
1. In the Schedules window, select the schedule(s) you want to delete.
Note: To select multiple schedules, use the Shift key and Control (Ctrl) key as in astandard Windows interface.
ReportCaster End User's Manual 125
C. Maintaining a Schedule Using the HTML User Interface

The following image shows the Sales and East Coast Sale schedules selected in theSchedules window.
2. Click Delete. A message appears asking for confirmation to delete the selectedschedule(s).
3. Click OK to delete the schedule(s).
Viewing a Log Report
How to:
View a Log Report
Reference:
&ECHO and -TYPE Support in Log Reports
Considerations When Viewing a Log Report
Troubleshooting ReportCaster Log Reports
Information about the date, time, execution status, and recipients of a distributed reportjob can be accessed using the Log icon. The Log icon enables you to run a log report thatcontains information about a distributed job, such as whether or not the job executedsuccessfully, when the report output was distributed, in what format the report output wassent, and the method of distribution. Log reports are stylized HTML format, and appear ina separate browser window. You can search, print, or save the log report.
How to View a Log ReportProcedure:
From the Schedules window in the ReportCaster HTML User Interface, you can view one ormore log reports for a schedule by performing the following steps:
1. In the Schedules window, select the schedule(s) for which you want to view the logreport(s).
126 WebFOCUS
Viewing a Log Report
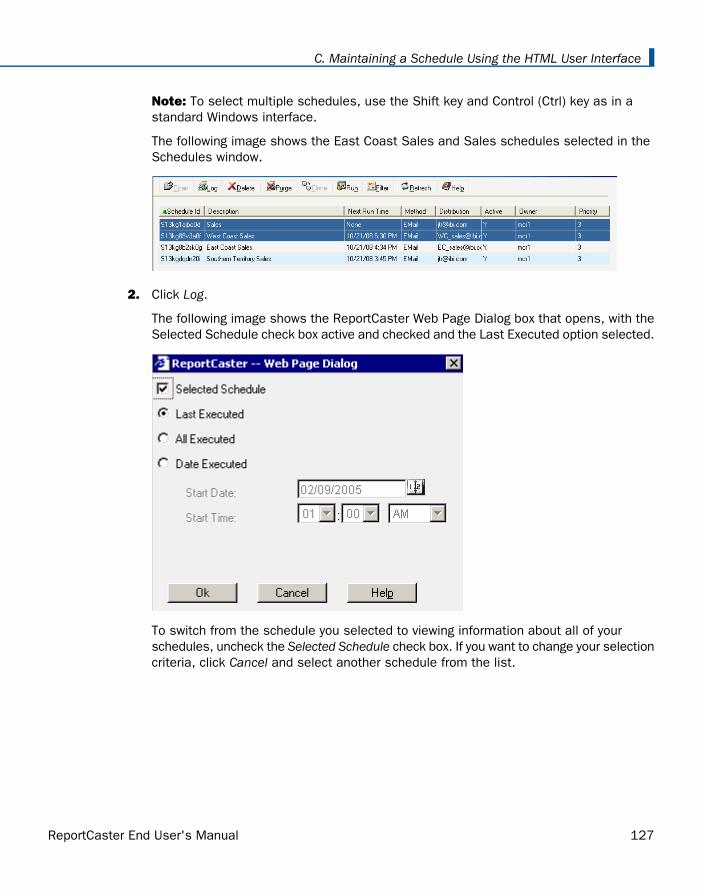
Note: To select multiple schedules, use the Shift key and Control (Ctrl) key as in astandard Windows interface.
The following image shows the East Coast Sales and Sales schedules selected in theSchedules window.
2. Click Log.
The following image shows the ReportCaster Web Page Dialog box that opens, with theSelected Schedule check box active and checked and the Last Executed option selected.
To switch from the schedule you selected to viewing information about all of yourschedules, uncheck the Selected Schedule check box. If you want to change your selectioncriteria, click Cancel and select another schedule from the list.
ReportCaster End User's Manual 127
C. Maintaining a Schedule Using the HTML User Interface
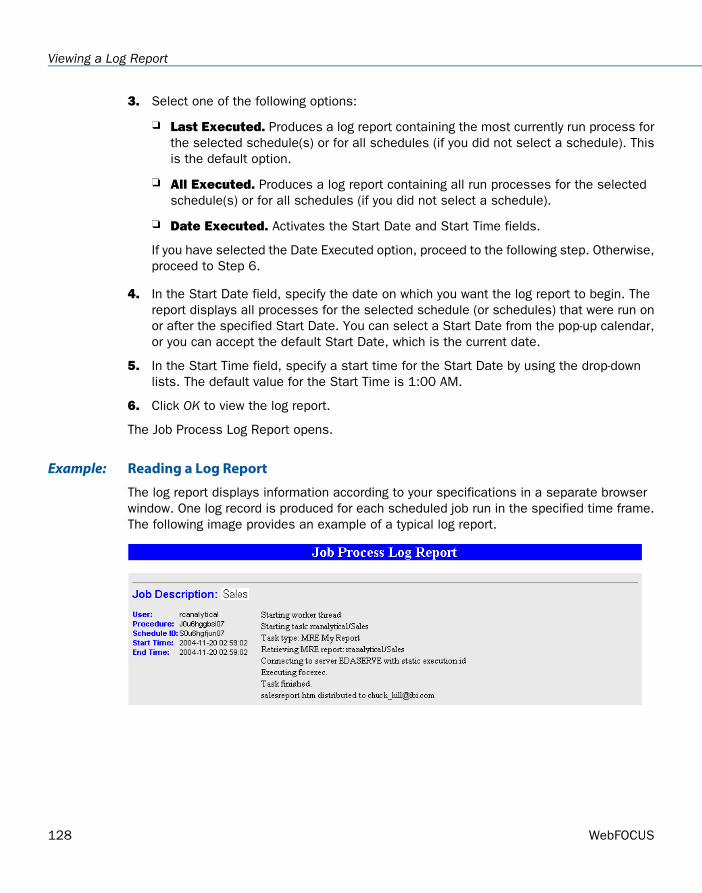
3. Select one of the following options:
Last Executed. Produces a log report containing the most currently run process forthe selected schedule(s) or for all schedules (if you did not select a schedule). Thisis the default option.
All Executed. Produces a log report containing all run processes for the selectedschedule(s) or for all schedules (if you did not select a schedule).
Date Executed. Activates the Start Date and Start Time fields.
If you have selected the Date Executed option, proceed to the following step. Otherwise,proceed to Step 6.
4. In the Start Date field, specify the date on which you want the log report to begin. Thereport displays all processes for the selected schedule (or schedules) that were run onor after the specified Start Date. You can select a Start Date from the pop-up calendar,or you can accept the default Start Date, which is the current date.
5. In the Start Time field, specify a start time for the Start Date by using the drop-downlists. The default value for the Start Time is 1:00 AM.
6. Click OK to view the log report.
The Job Process Log Report opens.
Reading a Log ReportExample:
The log report displays information according to your specifications in a separate browserwindow. One log record is produced for each scheduled job run in the specified time frame.The following image provides an example of a typical log report.
128 WebFOCUS
Viewing a Log Report

If you chose to view log reports for multiple schedules, the Job Process Log Report containsa log record for each schedule you selected. The following images shows an example of alog report for multiple schedules.
The log report first lists the job description for the record, which is the unique descriptionidentifier that you specified when you created the schedule. Underneath the Job Description,the left column of the log report includes the following information:
User. ReportCaster user ID, indicating the owner of the schedule.
Procedure. Unique key generated by ReportCaster that identifies a specific executionof a scheduled job.
Schedule ID. Unique key generated by ReportCaster that was assigned to the job whenit was scheduled.
Start Time. Date and time the job started running.
End Time. Date and time the job finished running.
In the second column, the log report specifies messages consisting of the following:
General information, such as the method of distribution for a particular job (for example,e-mail distribution).
ReportCaster End User's Manual 129
C. Maintaining a Schedule Using the HTML User Interface
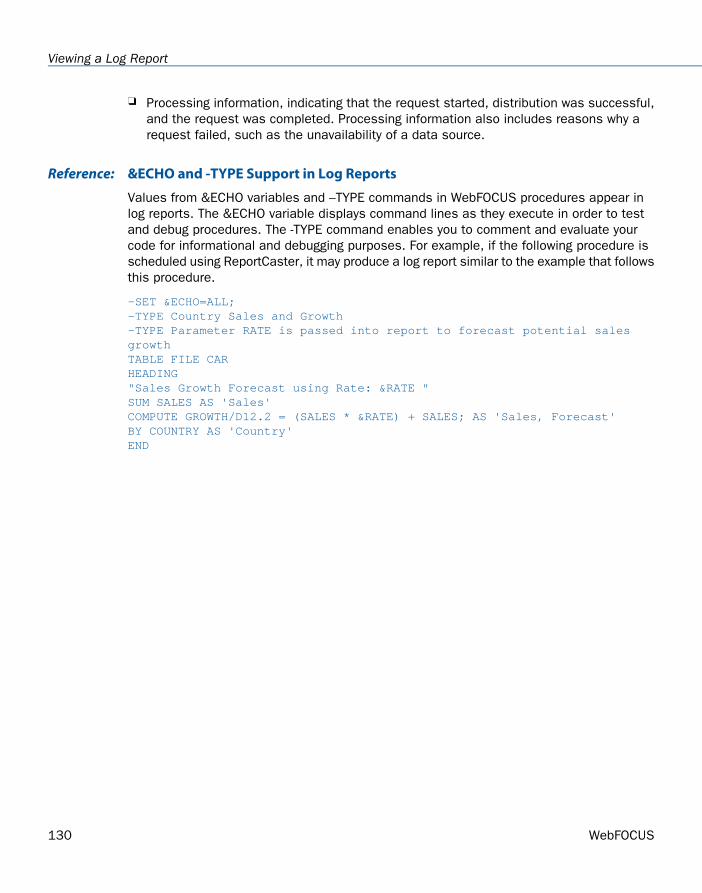
Processing information, indicating that the request started, distribution was successful,and the request was completed. Processing information also includes reasons why arequest failed, such as the unavailability of a data source.
&ECHO and -TYPE Support in Log ReportsReference:
Values from &ECHO variables and –TYPE commands in WebFOCUS procedures appear inlog reports. The &ECHO variable displays command lines as they execute in order to testand debug procedures. The -TYPE command enables you to comment and evaluate yourcode for informational and debugging purposes. For example, if the following procedure isscheduled using ReportCaster, it may produce a log report similar to the example that followsthis procedure.
-SET &ECHO=ALL;-TYPE Country Sales and Growth -TYPE Parameter RATE is passed into report to forecast potential sales growthTABLE FILE CARHEADING"Sales Growth Forecast using Rate: &RATE "SUM SALES AS 'Sales' COMPUTE GROWTH/D12.2 = (SALES * &RATE) + SALES; AS 'Sales, Forecast' BY COUNTRY AS 'Country'END
130 WebFOCUS
Viewing a Log Report

The following image shows an example of the log report.
Note: For more information about &ECHO variables, see Testing and Debugging a DialogueManager Procedure in the Developing Reporting Applications manual.
Considerations When Viewing a Log ReportReference:
When viewing a log report, be aware of the following considerations.
Task and Report Names:
The ReportCaster Log references Managed Reporting folders and FEXes by their names andnot their descriptions.
E-mail Addresses:
ReportCaster cannot validate e-mail addresses since e-mail validation is performed by themail server. The log report will include any e-mail addresses validated by the mail server andreturned to ReportCaster.
ReportCaster End User's Manual 131
C. Maintaining a Schedule Using the HTML User Interface
Burst Reports:
If a valid burst value is omitted in a Distribution List, Distribution File, or Dynamic AddressList, ReportCaster treats the blank value as if it is a valid burst value, and no entriesindicating a blank burst value appear in the log file. This will significantly reduce the sizeof the log file, particularly when the database contains many values for the primary fieldand only a small subset of those values are burst.
If a burst value is specified in a Distribution List, Distribution File, or Dynamic AddressList and it is not found in the database, the following message appears in the log file:
Burst Value: value is not in the database.
When a report is successfully burst, the log file will include the following message foreach burst value:
FILE filename SUCCESSFULLY DISTRIBUTED TO destination FOR burst value.
Unavailable Options:
When schedules with unavailable Task Types or distribution methods are not permitted torun, error notification is triggered and information is included in full and brief notificationsand in the log report that your ReportCaster Administrator or the owner of the schedule mustchange the unavailable Task Types or distribution methods in the schedule.
When schedules with unavailable Task Types or distribution methods are permitted to run,normal job execution occurs and a message appears in the log report indicating that yourReportCaster Administrator is allowing existing schedules using the unavailable Task Typesor distribution methods to run.
Troubleshooting ReportCaster Log ReportsReference:
If you do not receive a log report because there is an insufficient amount of memory available,this may be because the report is too large or you have too many windows open. InformationBuilders recommends closing all windows and attempting to run the log report again. If youare still unsuccessful, rerun a schedule that successfully created a log report. If you aresuccessful in running the log report, this confirms that the original log report that did notrun was too large to be processed. Contact your ReportCaster Administrator to help youtroubleshoot this issue.
Purging the Log FileThe log file accumulates information and can become difficult to navigate. InformationBuilders recommends that you periodically purge log records to conserve space.
The ReportCaster Administrators configures the number of days in which the log files willautomatically be purged. To find out how long your log reports will be available, see yourReportCaster Administrator.
132 WebFOCUS
Purging the Log File

You can purge the log file in one of two ways:
Purge log file information for specific schedules. Select one or more schedules andthen click Purge.
The Purge Log Web Page Dialog box opens with the Selected Schedule check box activeand checked, and the Delete Items through check box inactive and unchecked, as shownin the following image.
To switch from purging the selected schedule(s) to purging all schedules, uncheck theSelected Schedule check box.
Purge log file information for all schedules. Without selecting a schedule, click Purge.The Purge Log Web Page Dialog box opens.
The Purge Log Web Page Dialog box opens with the Selected Schedule check box inactiveand unchecked, and the Delete Items through check box active and checked, as shownin the following image.
Selecting the Delete Items through check box activates the End Date field, where you canspecify the date through which you want to purge the log records. The default value for theEnd Date is the current date. To change the End Date, click the calendar to the right of theEnd Date field.
ReportCaster End User's Manual 133
C. Maintaining a Schedule Using the HTML User Interface

The Calendar Web Page Dialog box opens, as shown in the following image. In this dialogbox, select the month and year of the End Date using drop-down lists, and a day by clickinga day on the calendar.
Click OK to purge the log file, or click Cancel to cancel the purge request.
Note: To verify that the specified log files have been deleted, you can run a log report againto note the new log output. The deletion of log files is immediate.
Schedule Blackout Dates
Reference:
Schedule Behavior for Blackout Dates
Schedule blackout dates are those dates on which schedules will not run and cannot be setto run. As a ReportCaster user, you can view schedule blackout dates that have been setfor all users (global dates) and those set for the groups to which you belong. OnlyReportCaster Administrators and Managed Reporting Group Administrators can define,update, and delete schedule blackout dates.
134 WebFOCUS
Schedule Blackout Dates
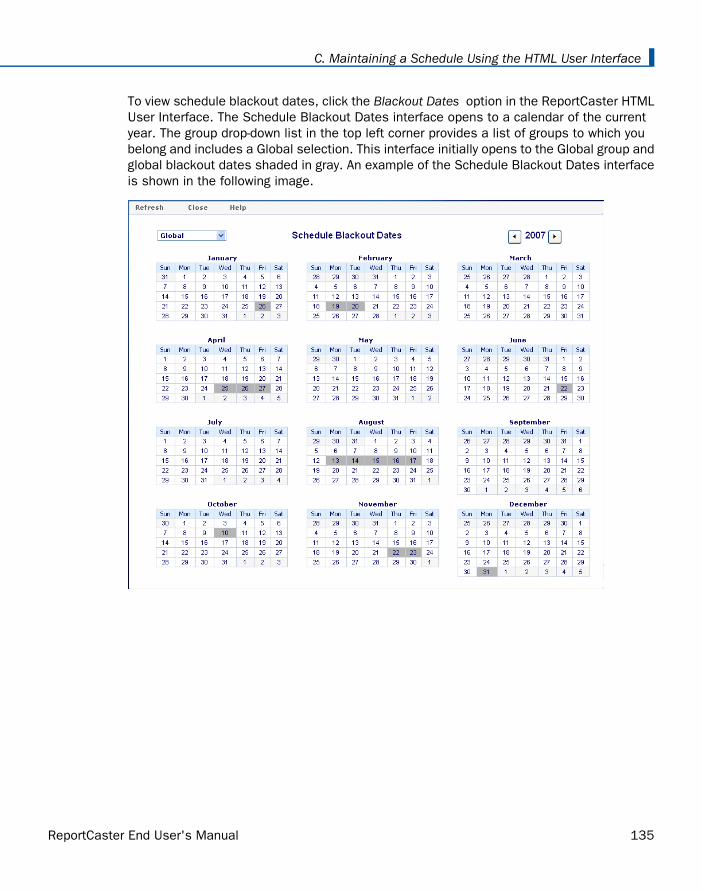
To view schedule blackout dates, click the Blackout Dates option in the ReportCaster HTMLUser Interface. The Schedule Blackout Dates interface opens to a calendar of the currentyear. The group drop-down list in the top left corner provides a list of groups to which youbelong and includes a Global selection. This interface initially opens to the Global group andglobal blackout dates shaded in gray. An example of the Schedule Blackout Dates interfaceis shown in the following image.
ReportCaster End User's Manual 135
C. Maintaining a Schedule Using the HTML User Interface

To view the schedule blackout dates for a particular group, select that group from the drop-down list. The calendar refreshes and in addition to the global blackout dates, it displaysthe group blackout dates in yellow. The following image shows a partial calendar of ScheduleBlackout Dates interface for a selected group. For the month of April, it shows group blackoutdates on the 23rd and 24th, and global blackout dates on the 25th through the 27th.Schedules cannot be run or set to run on these dates.
You can change the year using the arrows at the top right corner of the screen. Click Refreshto load the latest blackout dates. Dates only appear as available or unavailable.
Click Close to exit the HTML User Interface.
Schedule Behavior for Blackout DatesReference:
Blackout dates are enforced during schedule creation and at runtime:
When creating or editing one of the date fields in a schedule, ReportCaster dynamicallychecks the first upcoming date on which the schedule will run to ensure that this datehas not been blacked out. If there is a conflict with the date, an error message appearsand the schedule cannot be saved until the conflict is resolved by either changing theschedule date or by not blacking out the date.
At run time, each schedule is checked against the list of blackout dates. If a blackoutdate has been defined for the scheduled date, the schedule will not run. If notificationis enabled, a notification is distributed indicating that the schedule did not run becauseof a defined blackout date.
136 WebFOCUS
Schedule Blackout Dates

Note: Schedule blackout dates for a specific user include the global blackout dates andthe blackout dates assigned to the group(s) to which the user belongs.
Checking the Status of a Scheduled JobFrom the ReportCaster HTML User Interface, click the Status menu option to generate a listof your scheduled jobs that are in the ReportCaster Distribution Server queue.
The following image shows how each scheduled job contains information displayed undercolumn headings for Schedule Id, Description, Priority, Start Time, Owner, and Status. Sortingis available for each column by clicking the column heading.
The Status column contains one of the following values:
Run. The scheduled job is currently running.
Queue. The scheduled job is waiting for a thread to become available to run the request.
After you have generated a status list of scheduled jobs, you can:
Select a scheduled job with a status of Queue and click Remove. The schedule is removedfrom the queue if it is still in the queue, and the Status list is refreshed.
Select a scheduled job with a status of Queue to enable the Update Priority button. Inthe New Priority field, you can change the priority of the scheduled job using the drop-downlist. Click Update Priority to change the priority of the scheduled job if it is still in thequeue.
Click Refresh to refresh the current list of schedules to show any new jobs that are inthe ReportCaster Distribution Server queue. You can automate this process by selectinga value (for example, 10 Seconds) from the Auto Refresh drop-down list.
Click Help to open the online Help.
ReportCaster End User's Manual 137
C. Maintaining a Schedule Using the HTML User Interface
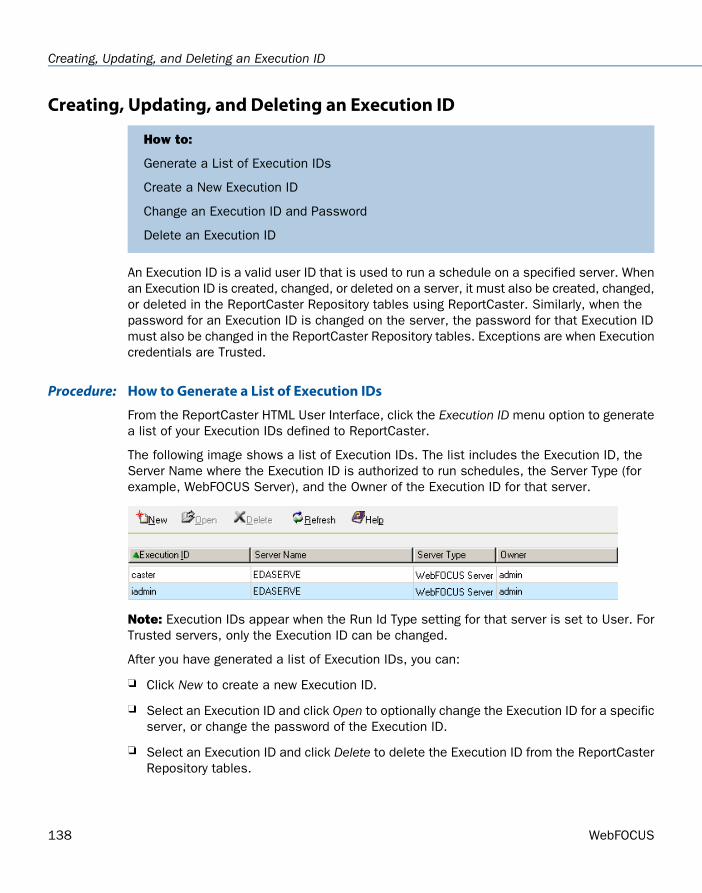
Creating, Updating, and Deleting an Execution ID
How to:
Generate a List of Execution IDs
Create a New Execution ID
Change an Execution ID and Password
Delete an Execution ID
An Execution ID is a valid user ID that is used to run a schedule on a specified server. Whenan Execution ID is created, changed, or deleted on a server, it must also be created, changed,or deleted in the ReportCaster Repository tables using ReportCaster. Similarly, when thepassword for an Execution ID is changed on the server, the password for that Execution IDmust also be changed in the ReportCaster Repository tables. Exceptions are when Executioncredentials are Trusted.
How to Generate a List of Execution IDsProcedure:
From the ReportCaster HTML User Interface, click the Execution ID menu option to generatea list of your Execution IDs defined to ReportCaster.
The following image shows a list of Execution IDs. The list includes the Execution ID, theServer Name where the Execution ID is authorized to run schedules, the Server Type (forexample, WebFOCUS Server), and the Owner of the Execution ID for that server.
Note: Execution IDs appear when the Run Id Type setting for that server is set to User. ForTrusted servers, only the Execution ID can be changed.
After you have generated a list of Execution IDs, you can:
Click New to create a new Execution ID.
Select an Execution ID and click Open to optionally change the Execution ID for a specificserver, or change the password of the Execution ID.
Select an Execution ID and click Delete to delete the Execution ID from the ReportCasterRepository tables.
138 WebFOCUS
Creating, Updating, and Deleting an Execution ID

Click Refresh to refresh the current list with any newly created Execution IDs.
Click Help to open the online Help.
Note: When you create, change, or delete an Execution ID it updates the ReportCasterRepository tables so that they are synchronized with the specified server. However, thecredentials of the user ID on the server itself remain unchanged.
How to Create a New Execution IDProcedure:
To create a new Execution ID:
1. Click the Execution ID menu option.
2. Click New.
The following image shows the ReportCaster Web Page Dialog box that opens, whichcontains fields that enable you to create a new Execution ID and password, and assignthe ID and password to a server.
3. Specify the following parameters:
a. Execution ID. Type a valid user ID for the server.
b. Server Name. From the Server Name drop-down list, select the name of aWebFOCUS Reporting Server that will be used to run schedules.
c. Password. Type the password of the user ID. Note that you are not creating thispassword on the specified server, but are entering the existing password into theReportCaster Repository.
d. Confirm Password. Retype the password.
ReportCaster End User's Manual 139
C. Maintaining a Schedule Using the HTML User Interface
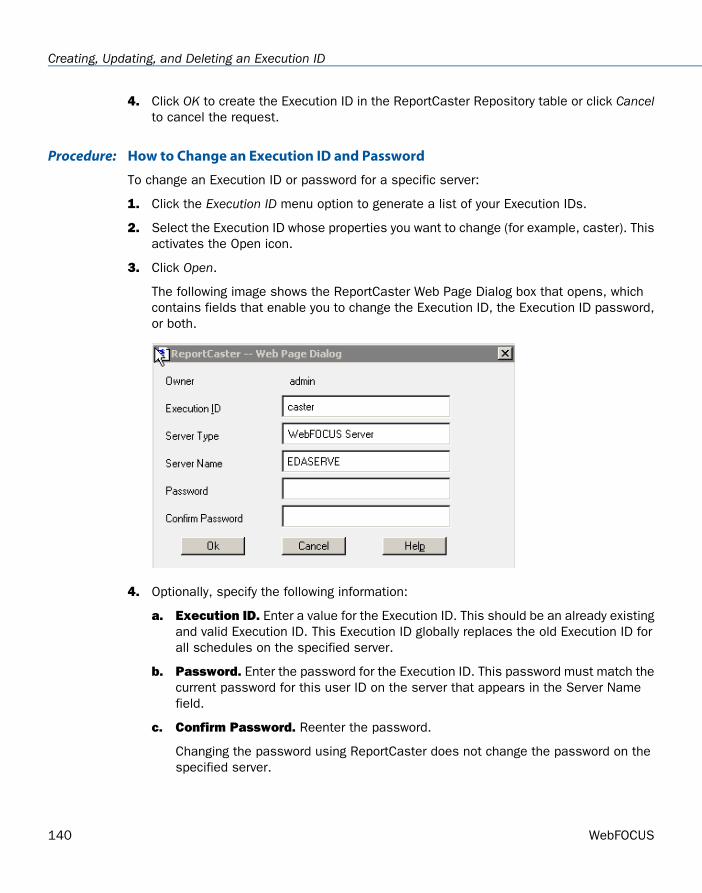
4. Click OK to create the Execution ID in the ReportCaster Repository table or click Cancelto cancel the request.
How to Change an Execution ID and PasswordProcedure:
To change an Execution ID or password for a specific server:
1. Click the Execution ID menu option to generate a list of your Execution IDs.
2. Select the Execution ID whose properties you want to change (for example, caster). Thisactivates the Open icon.
3. Click Open.
The following image shows the ReportCaster Web Page Dialog box that opens, whichcontains fields that enable you to change the Execution ID, the Execution ID password,or both.
4. Optionally, specify the following information:
a. Execution ID. Enter a value for the Execution ID. This should be an already existingand valid Execution ID. This Execution ID globally replaces the old Execution ID forall schedules on the specified server.
b. Password. Enter the password for the Execution ID. This password must match thecurrent password for this user ID on the server that appears in the Server Namefield.
c. Confirm Password. Reenter the password.
Changing the password using ReportCaster does not change the password on thespecified server.
140 WebFOCUS
Creating, Updating, and Deleting an Execution ID
5. Click OK to change the Execution ID or password values in the ReportCaster Repositorytables. A message appears confirming that the values have been changed.
How to Delete an Execution IDProcedure:
To delete an Execution ID:
1. Click the Execution ID menu option to generate a list of your Execution IDs.
2. Select the Execution ID you want to delete.
3. Click Delete. A message appears asking for confirmation to delete the selected ExecutionID.
4. Click OK.
After the Execution ID is deleted, a scheduled job that requires this Execution ID on thespecified server is not run unless the schedule is modified to use a valid Execution ID. Ifyou modify the Execution credentials for a single schedule that specifies the deleted ExecutionID, ReportCaster makes this modification for all schedules that specify the deleted ExecutionID.
ReportCaster End User's Manual 141
C. Maintaining a Schedule Using the HTML User Interface

142 WebFOCUS
Creating, Updating, and Deleting an Execution ID

WebFOCUS
Index
-TYPE commands 87, 130
&ECHO variables 87, 130
508 support 15
AAddress Search option 111
distribution lists 111
AHTML format 92
ALPHA format 92
Analytical Users 13
B
blackout dates for schedules 77, 134
burst values 29, 58, 110specifying in an e-mail subject line 58
bursting reports 24, 25, 26, 29considerations for FTP reports 25guidelines and limitations 26
C
cloning schedules 123
COM format 92
COMMA format 93
COMT format 93
considerations when using ReportCaster 15
creating a distribution list 19, 109
D
deleting a distribution list 117
deleting a schedule 72, 125
DFIX format 94
DHTML format 94
display formats 91
distributing reports 13, 58, 115by e-mail 58by fax 58to printers 115
distribution files 28, 58
Distribution List 14
distribution lists 13, 19, 22, 28, 73, 107, 108, 109, 111, 115, 116, 117, 126
accessing an LDAP Address Book 111creating 19, 109, 115deleting 117editing 22, 73, 116, 126specifying multiple addresses in a field 28
distribution methodsFTP 25
DOC format 95
dynamic address lists 28
Dynamic Language Switch 15
Ee-mail 58
attachments 58inline reports 58
editing a distribution list 116
ReportCaster End User's Manual 143

editing a schedule 69, 121, 122
editing a schedule with unavailable options 70, 123
editing distribution lists 22
EXCEL 97 format 98
EXCEL format 95
Execution ID 14
Execution IDs 79, 80, 138, 139, 140, 141changing 80, 140creating 139deleting 141generating a list of 138
EXL2K format 96
EXL2K FORMULA format 97
EXL2K PIVOT format 97
EXL2K TEMPLATE format 98
external distribution files 28, 58
F
faxing reports 58
Flash format 99
format types 91
FTPconsiderations for bursting reports 25
G
GIF format 99
H
Help option 14
HTML format 100
HTML User Interface 13, 14, 119
HTML-ODP format 100
I
inline e-mail reports 58
J
jobs 24
JPG format 100
L
LDAP integration 111
Library Access List 14
localization for ReportCaster 15
log files 75, 86, 129, 132purging 75, 132
log reports 73, 85, 86, 88, 89, 126, 128, 129, 131, 132
considerations 88, 131reading 85, 128troubleshooting 89, 132viewing 73, 126
M
maintaining a schedule 68, 120
multiple e-mail addresses 28
My Reports 13
N
notification and log information for unavailable
options 89, 132
144 WebFOCUS
Index
Pparameters 58
specifying in an e-mail subject line 58
PDF format 101
PNG format 101
post-processing procedures 50
PPT format 102
PPT Template format 102
pre-processing procedures 50
printers 115distributing reports to 115
procedures 50
Procedures tab 50
PS (PostScript) format 102
purging log files 75, 132
R
report formats 91
ReportCaster HTML User Interface 13, 14, 119
ReportCaster Scheduling Wizard 13
reports 24, 25, 26, 73, 107, 126bursting 24, 25, 26distributing 24tracking 73, 126
retrieving e-mail addresses using Address Search
111
S
schedule blackout dates 14, 77, 134
scheduleschecking status 137cloning 123
schedules (continued)deleting 72, 125editing 69, 121, 122maintaining 68, 120
Scheduling Wizard 13
section 508 support 15
specifying multiple e-mail addresses 28
specifying procedures 50
Status option 137
SVG format 103
T
TABT format 104
U
unavailable options in ReportCaster 70, 89, 123,
132
V
VISDIS format 104
W
WK1 format 104
WP format 105
X
XML format 105
ReportCaster End User's Manual 145
Index

Z z/OS UNIX system 115
146 WebFOCUS
Index

WebFOCUS
Reader Comments
In an ongoing effort to produce effective documentation, the Documentation Services staffat Information Builders welcomes any opinion you can offer regarding this manual.
Please use this form to relay suggestions for improving this publication or to alert us tocorrections. Identify specific pages where applicable. You can contact us through the followingmethods:
Documentation Services - Customer SupportMail:Information Builders, Inc.Two Penn PlazaNew York, NY 10121-2898
(212) 967-0460Fax:
http://www.informationbuilders.com/bookstore/derf.htmlWeb form:
Name:
Company:
Address:
Telephone: Date:
Email:
Comments:
Information Builders, Two Penn Plaza, New York, NY 10121-2898 (212) 736-4433ReportCaster End User's Manual DN4501007.1110Version 7 Release 7.02
Creating Reports With WebFOCUS Language
Version 7 Release 6
Information Builders
Two Penn Plaza
New York, NY 10121-2898
Printed on recycled paper in the U.S.A.
ReportCaster End User's ManualVersion 7 Release 7.02