
REPORT BUILDER - GL180 Software Gestionale online · Centura logo, Centura Web ... Functions ... To...
134
REPORT BUILDER™ Business Reporting
Transcript of REPORT BUILDER - GL180 Software Gestionale online · Centura logo, Centura Web ... Functions ... To...

REPORT BUILDER™ Business Reporting

2
Report Builder™: User’s Guide
The software described in this book is furnished under a license agreement and may be used only in accordance with the terms of the
agreement.
Last updated: February 25, 2016.
Legal Notice
Copyright © 2014-2016 Gupta Technologies, Inc. All rights reserved.
Gupta, Gupta Technologies, the Gupta logo, Gupta Powered, the Gupta Powered logo, ACCELL, Centura, Centura Ranger, the
Centura logo, Centura Web Developer, Component Development Kit, Connectivity Administrator, DataServer, DBIntegrator,
Development Kit, eWave, Fast Facts, NXJ, Object Nationalizer, Quest, Quest/Web, QuickObjects, RDM, Report Builder, RPT Report
Writer, RPT/Web, SQL/API, SQLBase, SQLBase Exchange, SQLBase Resource Manager, SQLConsole, SQLGateway, SQLHost,
SQLNetwork, SQLRouter, SQLTalk, Team Developer, Team Object Manager, TD Mobile, Velocis, VISION, Web Developer and
WebNow! are trademarks of Gupta Technologies and may be registered in the United States of America and/or other countries.
SQLWindows is a registered trademark and TeamWindows, ReportWindows and EditWindows are trademarks exclusively used and
licensed by Gupta Technologies.
The product described in this document is distributed under licenses restricting its use, copying, distribution, and
decompilation/reverse engineering. No part of this document may be reproduced in any form by any means without prior written
authorization of Gupta Technologies Corporation and its licensors, if any.
THE DOCUMENTATION IS PROVIDED “AS IS” AND ALL EXPRESS OR IMPLIED CONDITIONS, REPRESENTATIONS
AND WARRANTIES, INCLUDING ANY IMPLIED WARRANTY OF MERCHANTABILITY, FITNESS FOR A PARTICULAR
PURPOSE OR NON-INFRINGEMENT, ARE DISCLAIMED, EXCEPT TO THE EXTENT THAT SUCH DISCLAIMERS ARE
HELD TO BE LEGALLY INVALID. GUPTA TECHNOLOGIES, INC. SHALL NOT BE LIABLE FOR INCIDENTAL OR
CONSEQUENTIAL DAMAGES IN CONNECTION WITH THE FURNISHING, PERFORMANCE, OR USE OF THIS
DOCUMENTATION. THE INFORMATION CONTAINED IN THIS DOCUMENTATION IS SUBJECT TO CHANGE
WITHOUT NOTICE.
This document may describe features and/or functionality not present in your software or your service agreement. Contact your
account representative to learn more about what is available with this Gupta Technologies® product.
Gupta Technologies, Inc.
1420 Rocky Ridge Drive, Suite 380
Roseville, CA 95661
Gupta Technologies.com

3
Table of Contents
Introducing Report Builder ........................................................................................................................ 8
Building reports ..........................................................................................................................................................................8
Types of reports..........................................................................................................................................................................8
Multi-column reports .............................................................................................................................................................8
Form letters ............................................................................................................................................................................9
Break group summary reports ................................................................................................................................................9
Two pass totals reports ..........................................................................................................................................................9
Input cross tabular reports .....................................................................................................................................................9
Report templates .......................................................................................................................................................................9
Parts of a report template ................................................................................................................................................... 10
Running existing reports ......................................................................................................................................................... 11
Examples of running Report Builder from a command line ................................................................................................. 12
Where to get more information ............................................................................................................................................. 12
Creating Reports ...................................................................................................................................... 13
Report data sources ................................................................................................................................................................ 13
Data source requirements ................................................................................................................................................... 13
Using an integrated query ................................................................................................................................................... 13
Using SQLWindows as a data source ................................................................................................................................... 13
Importing Quest files ........................................................................................................................................................... 14
Defining a query ...................................................................................................................................................................... 16
Source property page .......................................................................................................................................................... 16
Conditions property page .................................................................................................................................................... 18
Sort property page .............................................................................................................................................................. 18
Group By property page ...................................................................................................................................................... 19
SQL property page ............................................................................................................................................................... 20
Result property page ........................................................................................................................................................... 20
Input data types ...................................................................................................................................................................... 21
Input Items .......................................................................................................................................................................... 21
Input variables ..................................................................................................................................................................... 22
Input totals .......................................................................................................................................................................... 23
Input crosstabs .................................................................................................................................................................... 24
Assigning objects to pictures .................................................................................................................................................. 25
Static objects ....................................................................................................................................................................... 26
Input objects ....................................................................................................................................................................... 27
Variable objects ................................................................................................................................................................... 27
Report Builder Workspace ....................................................................................................................... 28

4
Report Builder work area and object tree .............................................................................................................................. 28
Rulers .................................................................................................................................................................................. 29
Menus and toolbars ............................................................................................................................................................ 30
Viewing your report ................................................................................................................................................................ 32
Design mode ........................................................................................................................................................................ 32
Preview mode...................................................................................................................................................................... 33
Scroll toolbar ....................................................................................................................................................................... 34
Report objects ......................................................................................................................................................................... 35
Background text .................................................................................................................................................................. 35
Rich Text .............................................................................................................................................................................. 35
Lines .................................................................................................................................................................................... 36
Fields ................................................................................................................................................................................... 37
Boxes ................................................................................................................................................................................... 37
Pictures................................................................................................................................................................................ 38
Graphs ................................................................................................................................................................................. 38
Crosstab reports .................................................................................................................................................................. 40
Moving report objects ......................................................................................................................................................... 41
Cutting, copying, or pasting report objects ......................................................................................................................... 42
Watermarks ............................................................................................................................................................................. 42
Picture Watermark .............................................................................................................................................................. 42
Dynamic Watermark ........................................................................................................................................................... 43
Text Watermark .................................................................................................................................................................. 43
Conditional Watermark ....................................................................................................................................................... 43
Designing Report Templates ..................................................................................................................... 44
Planning your report ............................................................................................................................................................... 44
Getting started with report templates ................................................................................................................................ 44
Design mode and preview mode ......................................................................................................................................... 44
Setting up the report template ............................................................................................................................................... 44
Importing a template .......................................................................................................................................................... 45
Setting up your report page layout ..................................................................................................................................... 45
Entering input items ............................................................................................................................................................ 46
Entering the break groups ................................................................................................................................................... 47
Adding lines and creating fields ........................................................................................................................................... 47
Formatting the field contents ............................................................................................................................................. 49
Creating Formulas ................................................................................................................................... 51
About the Formula Editor ....................................................................................................................................................... 51
Formula Editor features ...................................................................................................................................................... 51
Using the Formula Editor ........................................................................................................................................................ 53

5
Creating formulas ................................................................................................................................................................ 53
Editing formulas .................................................................................................................................................................. 55
Parenthetical expressions in formulas ................................................................................................................................ 55
Assigning formulas .............................................................................................................................................................. 55
Functions ................................................................................................................................................................................. 56
Description of functions ...................................................................................................................................................... 56
Report Programming with ActiveX ............................................................................................................ 60
Report Builder and development tools ................................................................................................................................... 60
Using Report Builder with SQLWindows ............................................................................................................................. 60
How does it work? ............................................................................................................................................................... 60
Design options ........................................................................................................................................................................ 61
Creating the report window object ........................................................................................................................................ 61
Activating the report window object ...................................................................................................................................... 61
Automation Object Hierarchy ................................................................................................................................................. 62
ReportBuilderApplication automation object ...................................................................................................................... 62
ReportBuilderDocuments automation object ..................................................................................................................... 62
ReportBuilderDocument automation object ....................................................................................................................... 63
ReportBuilderInput automation object ............................................................................................................................... 67
ReportBuilderVariable automation object........................................................................................................................... 67
ReportBuilderTotal automation object ................................................................................................................................ 68
ReportBuilderXTab automation object ................................................................................................................................ 68
ReportBuilderExpression automation object ....................................................................................................................... 69
ReportBuilderGroup automation object .............................................................................................................................. 70
ReportBuilderBlock automation object ............................................................................................................................... 70
ReportBuilderLine automation object ................................................................................................................................. 71
ReportBuilderField automation object ................................................................................................................................ 73
ReportBuilderPicture automation object............................................................................................................................. 74
ReportBuilderQueryTable automation object ..................................................................................................................... 75
ReportBuilderQueryColumn automation object ................................................................................................................. 75
ReportBuilderQueryJoinkey automation object .................................................................................................................. 76
ReportBuilderQueryConditions automation object ............................................................................................................. 76
ReportBuilderQueryHaving automation object ................................................................................................................... 77
ReportBuilderQueryOrderby automation object ................................................................................................................. 77
Using ReportBuilder ActiveX from the SQLWindows Controls Palette .................................................................................... 78
Report Builder Tutorials ........................................................................................................................... 79
Form letter report tutorial ...................................................................................................................................................... 79
Creating and formatting a new report ................................................................................................................................. 79
Formatting the form letter .................................................................................................................................................. 80

6
Multi-column report tutorial .................................................................................................................................................. 82
Creating and formatting a new report ................................................................................................................................. 83
Formatting the multi-column report ................................................................................................................................... 83
Break group report tutorial ..................................................................................................................................................... 86
Defining a query and creating a default report................................................................................................................... 86
Improving the report layout and readability ....................................................................................................................... 87
Selecting the break groups .................................................................................................................................................. 88
Adding lines ......................................................................................................................................................................... 88
Adding and formatting fields ............................................................................................................................................... 88
Formatting the input items ................................................................................................................................................. 90
Coloring lines ....................................................................................................................................................................... 91
Adding a bottom border ...................................................................................................................................................... 91
Two pass totals report tutorial ................................................................................................................................................ 91
About the two pass total report tutorial ............................................................................................................................. 92
Generating a default report................................................................................................................................................. 92
Creating input totals ............................................................................................................................................................ 93
Formatting the report header ............................................................................................................................................. 94
Formatting the page header ................................................................................................................................................ 96
Formatting the COMPANY_NAME header ........................................................................................................................... 96
Formatting the INVOICE_NO header ................................................................................................................................... 97
Basic cross tabular report tutorial .......................................................................................................................................... 98
Creating a new report ......................................................................................................................................................... 99
Creating the crosstab ........................................................................................................................................................ 100
Inserting the crosstab and formatting the report .............................................................................................................. 101
Advanced cross tabular report tutorial ................................................................................................................................. 103
Creating a new report ....................................................................................................................................................... 104
Selecting breakgroups ....................................................................................................................................................... 104
Formatting the report template ........................................................................................................................................ 104
Creating the formulas and totals for your crosstab ........................................................................................................... 105
Defining the InvoicebyQuarter crosstab ............................................................................................................................ 107
Creating the column header .............................................................................................................................................. 108
Creating the statistic header ............................................................................................................................................. 109
Incorporating the Crosstab and Headers ........................................................................................................................... 109
Report Builder ActiveX interface tutorial .............................................................................................................................. 111
What you will build ............................................................................................................................................................ 111
Starting a new application in SQLWindows ....................................................................................................................... 112
Creating a report query ..................................................................................................................................................... 114
Setting up the report query ............................................................................................................................................... 115

7
Formatting the report ....................................................................................................................................................... 118
Setting the font and orientation ........................................................................................................................................ 119
Running the report ............................................................................................................................................................ 123
Glossary .................................................................................................................................................124

8
Introducing Report Builder
You can use Report Builder to design reports. This chapter describes:
• Our approach to building reports.
• Some of the reports you can build.
• Designing report templates you can use repeatedly with different data sources.
Building reports
Use Report Builder to design and generate reports consisting of data from various sources. With Report Builder,
you create report templates to design, test, print, and manage reports.
When you save a Report Builder file, you actually save an encoded representation of all the objects, their formats,
and their locations on the report template. As you edit the template, Report Builder writes the representation in the
background and saves the changes to file when you save the report template.
Report Builder is different from other report generators because it is not tied to a single data source. Instead, it can
accept and use data from SQLWindows and other applications.
Development tools such as SQLWindows can help you create complex report applications using function calls and
messages. Report Builder asks for rows of input data, and your application provides the data. Throughout the
procedure, you can interactively display, change, and print the report. Alternatively, Report Builder can directly
connect to a database, issue a query, and fetch the rows as data for the report all by itself.
Application developers can view or modify a report’s design during designtime, and users view the report at
runtime. You modify the report design directly through the use of the Report Builder designer workspace, or
programmatically through the Report Builder interface to development tools.
For tutorials demonstrating how to build reports with SQLWindows and Report
Builder, read Chapter 7.
Types of reports
With Report Builder, you can create many types of reports. Among these are:
• Multi-column (mailing labels) reports.
• Form letters.
• Break group summary reports.
• Two pass totals reports.
• Input cross tabular reports.
For more, read Chapter 7, Report Builder Tutorials
Multi-column reports
Use multi-column reports to create a report with two or more columns across the page such as mailing labels or
telephone directories, and various other reports where information can be broken into narrow columns.

9
Form letters
A form letter lets you create a template that contains most of the text in the body of a letter. However, some
information, like the customer name must be unique to each letter. Report Builder integrates the unique information
with the repeated information to create a personalized form letter.
Break group summary reports
Report Builder can create templates for reports that subdivide data into logical units called break groups. Often you
want data summaries by these groups. You can sort data in a way that best fits your report.
For example, a company may have regional offices, departments within each region, and one or more managers
within each department. When creating a break group summary report, the company could logically sort these
groups of data in order of regions, departments, and managers, that is, from the larger group to the smaller group.
Report Builder lets you summarize each break group. When you define break groups, it automatically adds the break
group block captions for the break group where you can add a title for the break group in the header and a summary
in the footer.
Two pass totals reports
Two-pass totals, also known as input totals, are another form of input data that Report Builder can use. With two pass
totals, Report Builder pre-calculates specified totals or other aggregate types of calculations, and provides the result
as input to your report. All input totals are numeric variables that can be assigned to a field, or used by a formula in
Report Builder.
With two pass totals reports, Report Builder can pass the data twice to the report. In the first pass, Report Builder
calculates the input totals and in the second pass it formats the report, putting those totals wherever you want to see
them. The advantage over a one pass report is that with two-pass totals are not restricted to appearing directly after
the data.
Input cross tabular reports
Use crosstab reports to gather cross tabular statistics on your report’s input rows. The crosstab feature summarizes
the information your report receives.
Cross tab reports generate a two dimensional matrix of numeric data based on the categories and data you provide.
The size of this matrix depends on the number of unique occurrences of each column and row category you use in
your cross tabs definition.
You can have from 1 - 8 row categories and from 1 - 8 column categories in your crosstab. The greater the number
of row and column categories, the larger and more complex your crosstab matrix will be.
Report templates
To create a report with Report Builder, you must build a template. Your template contains all the instructions
needed to format and display the data provided by other applications or database queries. The input data Report
Builder uses is not stored with the template and must be made available by an external source.
Report Builder simplifies the process of creating templates by providing a graphical interface that lets you use
keyboard commands or a mouse to build fields, lines, boxes, blocks, and break groups. You can import graphic
images and format all report elements using a variety of font styles, sizes, borders, and alignment.

10
Parts of a report template
As you create and design your report template, you need to understand the basic elements of a report. A report is
made up of various components which control how and where the Report Builder presents and stores the data.
Elements of a Report Template
Block Groups Lines
Block Group Captions Fields
Headers Boxes
Footers Pictures
Break Groups Background Text
Detail Block Graphs
Input Items Crosstab reports
Block groups are made up of a paired header and footer, and their related lines and associated fields, pictures, and
boxes. Report Builder generates a block group for the following headers and footers:
Report Header Page Header Break Header
Report Footer Page Footer Break Footer
Field
Background
Text
Block Group Captions appear in a rectangle attached to the block group. These captions are the headings or
titles of each block group.
Headers are optional and come in three types: report, group, and page:
• Report Headers appear only once in the report (at the beginning) and contain a report’s title.
• Page Headers contain messages, page numbers, references, page totals, and so on. In preview mode, they
appear once at the top of every page except the first page where the report header appears. If no report
header is defined, the page header also appears on the first page.
• Group Headers appear before the first line of a group of records when you define them and prints each
time a break group changes.
Footers are optional and come in three types: report, page, and group.

11
• Report Footers often contain report totals and summary information.
• Page Footers are located on the bottom margin of each page and typically contain the report page number,
page totals, and the date.
• Group Footers appear after the last line of a group of records if you define group footers, and are printed
each time a new break group changes.
Break Groups group information into subunits such as region or department. Break groups are also used for
subtotaling and pagination. Each break group must have an input item that tells the report when to break as the item
changes.
Detail Blocks print information from a group of individual rows (called a block) showing the data as it is sorted
from the database. Report Builder has only one detail block per template.
Input Items are the individual data elements in a report. An input item is the same as a data field in a record, or a
column item in a database table.
All the input items together make up an input row, in the report template. Input items can also come from different
sources and occur at different frequencies, such as once in a report header or more frequently in detail blocks. An
input item can contain data such as a name, comments, a birth date, or a dollar amount, but requires a name and a
data type.
As SQLWindows, or a query, passes input items from a data source to a report template, it moves the data as input
items. For example, if you link a table to your report template, the columns in the table become input items in the
report template.
Lines are added to block groups and detail blocks with the line tool in the Tools menu. Lines can either be blank or
contain objects such as fields, boxes, pictures, or background text. You can add various borders to lines.
Lines can have features such as page break before, column break before, and blank line suppression. Page break
before creates a new page before the line prints. Column break before does the same thing with columns. Blank line
suppression lets you hide blank lines from your printed output.
Fields contain or define the textual information of a report. Fields can contain different types of information
including text, input items, or formulas. Fields can also have a fixed or dynamic width and can be enclosed in
borders.
Boxes are objects you create using the box tool. Use the box tool to draw a frame around one or more fields, an
entire report block, or a group of lines. Once a box has been created, you can re-size it, or move it to any location in
the same block.
Pictures can contain graphics and long text (imported as an object). Once you draw your picture object, you can
re-size it and move it to any location within the same block group.
Background Text contains fixed text only. You can use background text to:
• Label the objects in your report template.
• Write column headers for the input items in your detail block.
• Write report and page headers and footers.
You can format background text with all character formats available in the report ruler in the same manner that you
format report fields. (Read more about the report ruler in Chapter 3.)
Graphs opens a default graph that you can modify by using its tool palette.
Crosstabs opens a crosstab wizard to help you create and set up a crosstab report template.
Running existing reports
Your applications can call the Report Builder executable to launch reports that have already been designed and
saved. A series of command-line arguments supply enough information to run the report without user intervention.
The name of the executable varies with the version of Team Developer. Presently it is named REPBI63.EXE.
Command-line arguments include:

12
• /d or -d: Database name
• /u or -u: User name
• /a or -a: Database password
• /p or -p: Printer name
• /pt or -pt: Print-to name
• /h or -h or /? or -? or /help or -help: Presents a help screen showing argument usage.
• /ini : Configuration file name. Indicates which copy of the configuration file (often named SQL.INI)
should be used for database connectivity information. Optional.
Most arguments are not case-sensitive, but "p" and "pt" are case-sensitive. You can place a blank between the
argument tag and the value, but it is not required. For example, "/disland" and "/d island" will both work. If the
report uses a database query, and you do not supply all the arguments necessary to connect to the database, a
connection dialog will pop up when the report begins and the user will need to complete the database name, user
name, and/or password.
Examples of running Report Builder from a command line
REPBI63.EXE /ini "c:\my documents\myconfig.ini"
Starts Report Builder with a blank "No report" workspace. Uses file myconfig.ini for database connectivity information.
REPBI63.EXE "%USERPROFILE%\Team Developer 6.3\samples\formltr.cqt"
Starts Report Builder, loads report formltr.cqt, then pauses and prompts the user for database user ID and password., then executes the report and shows it in a separate window. The user is prompted because there is not enough information supplied for Report Builder to make the database connection on its own.
REPBI63.EXE "%USERPROFILE%\Team Developer 6.3\samples\formltr.cqt" /d island /u
sysadm /a sysadm
Starts Report Builder, loads report formltr.cqt, then executes the report and shows it in a separate window.
REPBI63.EXE /p "%USERPROFILE%\Team Developer 6.3\samples\formltr.cqt" /u sysadm /a
sysadm
Starts Report Builder, loads report formltr.cqt, then prints it to the current default printer.
REPBI63.EXE /pt "%USERPROFILE%\Team Developer 6.3\samples\formltr.cqt" "SnagIt 6"
"SnagIt 6 Printer" "SnagIt6" /d island /u sysadm /a sysadm
Starts Report Builder, loads report formltr.cqt, then prints it to the printer name, printer driver, and printer port that are specified in the three arguments following the report file name.
Where to get more information
You can find more information on building reports from the Gupta online help. The online help provides procedures
on how to use Report Builder and detailed descriptions on how to use the keyboard, mouse, commands, functions,
dialog box options, icons, and screen regions. Press the F1 key to access online help.

13
Creating Reports This chapter introduces you to the report data that Report Builder uses to populate the templates you design. This
chapter describes:
• Report data sources.
• Importing Quest files.
• Defining a query.
• Input items, variables, totals, and crosstabs.
• Procedures for entering input data into report objects.
Report data sources
Before you can create a new report, you must specify a source of data for the report. Report Builder can accept data
from several different sources, including:
• An integrated query.
• Gupta SQLWindows or other applications.
• Quest files (.QQT).
Data source requirements
When you do not use an integrated query, you must provide the following information about each input item in the
input row:
• The name of every input item. Use of spaces and special characters are limited. The underscore is the
only special character that is valid. Spaces in the middle of character strings are invalid, unless you use a
double quote around the name that contains the space. Trailing or leading spaces are automatically
striped out.
• The data type of each input item. It can be a character string, number, a date/time value, or an object.
• The order in which input items are organized in the input row.
• The sort order of your input rows. This sets the break group order of your report. In addition, you must
presort all source data in break group order before you provide it to Report Builder.
Using an integrated query Within Report Builder, define a database query, execute it, and the results of the query populate the report.
Using SQLWindows as a data source
SQLWindows developers or developers using other similar applications need only create applications that pass data
to the report template; they do not need to create or format a report within the application.
SQLWindows interfaces with Report Builder by:
• Providing rows of data (input rows) for you to format and use in the report templates.
• Providing report input variables for you to use.
• Using functions to create, view, print, or close your reports. (Read the SQLWindows Function Reference
manual or the Gupta Team Developer online help for more information on functions.)

14
Because Report Builder is not dependent on a single source of input data, it is possible for you to develop and test
your report templates and SQLWindows applications independently.
Importing Quest files
You can import your Quest files into Report Builder to use as report templates going forward. The following
procedures show you how to do this.
Open a Quest Query
1. To open a Quest Query Template file, select Open from the File menu in Report Builder.
The Open Report dialog appears.
2. In the Files of Type field, select Quest Query files (*.QQT).
3. Browse to your query file, highlight it, and click Open.
Report Builder will execute the Query and display a default report. If you have a Quest Report file that was
linked to the query, you can open it now.
Open a linked Quest report
1. Select Import Template from the Edit menu. The following dialog appears:
2. Click No if you do not wish to save the default report. The Reset Detail Fields dialog box appears.
This box is warning you that you may need to rematch the data columns of the query with the input items of
the report template.
3. Click Yes. The Save Report File dialog appears.

15
4. Click No unless you want to continue working with the Default Report. The Open Report dialog appears.
5. In the Files of type field, select Report Template Files (*.QRP) and select your report template so the file
name appears in the File name field.
6. Click Open. The report template appears.

16
Defining a query
To define a query is to select one or more database tables and then specify how the data will be displayed. You must
define a query before you can create a report.
The Define Query property pages allow you to define the queries for your report. You select the Define Query
property pages when you create a new report (File, New), or when you wish to define a query from an existing
report (Report, Define Query).
These are the Define Query property pages as they appear initially.
To select a property page, click on the tab at the top of the property page. There are six property pages that you
can use:
Source select tables or views.
Conditions defines the conditions that must be met for the data to be included in the result set.
Sort defines how the data will be sorted in the report.
Group By defines how the data will be grouped in the report.
Group Conditions defines the conditions which decide how the data will be grouped in the report.
SQL displays the SQL that will be generated to create the query.
Result displays the actual data that will be returned.
Source property page
Use the Source property page to select the table(s) or view(s) for your query.
The source property page initially shows the available servers (e.g., SQLBase, Oracle, Sybase, Informix, etc.) on
the left-hand side of the page. This is the Source property page.

17
To select a table
1. Double-click on the desired server.
The databases associated with the selected server appear.
Note: If you do not see the database you wish to connect to, you may need to add it to the list manually. To do this, right-click on the desired server. Select Add to List... from the context menu. The Add to List dialog box appears. Use the Server tab to add a new server to the list by name (this applies only to SQLBase database servers, or DB servers if you are using Gupta SQLHost to connect to DB2). Use the Database tab to add a new database to the list by name.
2. Double-click on the desired database.
The Connect To dialog appears.
3. Enter a User Name and Password on the Connect To dialog and click OK.
Note: Before you can select tables from the ISLAND database, you must log in. Use sysadm as the login name and password as shown below.
The tables and views associated with the selected database appear under the database.
4. Double-click on the desired table(s) or view(s), or drag the desired table(s) or view(s) over to the right-hand
side of the screen.
You can select multiple tables or views. When you select more than one table or view, the links between the tables or view are displayed. If you wish to change the links between the tables or views, click on the button with the equal sign (=). When you select a table or view, the columns that can appear within the table or view are displayed.
5. Select the columns that you wish to appear in your report.
All the columns that can appear within the selected table are displayed. You can select/deselect a column by clicking the box next to the column A check mark appears next to the columns that will appear in the report.

18
Conditions property page
Use the Conditions property page to define the conditions that must be met for data to be included in your report’s
result set. Use each line of the table to enter a condition that will restrict the results when the rows for the table are
fetched from the database.
This is the Conditions property page.
To define a condition
1. Select a Column or Formula.
To select a column, place your cursor in the Column/Formula field and click the left mouse button. A list of the
available columns associated with the selected table are displayed. To select a formula, click the Formulas
button, select the desired formula from the Formula Editor screen, and click OK.
2. Select an operator.
To select an operator, place your cursor in the Op field and click the left mouse button. A list of the available
operators is displayed.
3. Enter a value
You can either enter a value or double-click on a cell in the Values column to access the Condition Value
screen. The Condition Value screen helps you to select a value for the condition.
Note: Use AND or OR to group multiple conditions together.
Sort property page
Use the Sort property page to specify how you want to sort the data in your report (that is, the order in which rows
appear when fetched from the database).
This is the Sort property page

19
To define how you wish to sort the data
1. Select the columns and/or formulas by which you wish to sort.
To select a column, place your cursor in the Sort By field, click the left mouse button, and select a column
from the list that appears. To select a formula, click the Formulas button, select the desired formula form the
Formula Editor screen, and click OK.
2. Specify whether the data should be sorted in ascending or descending order.
To select how the data will be sorted, place your cursor in the Asc/Desc field, click the left mouse button,
and select either Asc or Desc.
Group By property page
Use the Group By property page to define how to group the data in your report. The Group By property page allows
you to create a summary query. Typically, you will specify a Group By when you want to summarize data. Select
the column(s) and/or formula(s) by which you wish to group the data.
This is the Group By property page.

20
To select a column
Place your cursor in the Group By field, click the left mouse button, and select a column from the list that appears.
To select a formula
Click the Formulas button, select the desired formula from the Formula Editor property page, and click OK.
Note: Using the Group By property page may change the columns and formulas that you have already added to the query.
SQL property page
The SQL property page displays the SQL that will be generated to create the query. This is the SQL property page.
Select the values you wish to include in the SQL by clicking next to one of the following options under the Value
Pick List Options section of the page:
• List no database values
• List all unique values
• List a maximum of
If you wish to include unique rows only, click the box next to Include unique rows only under the Query Results
section of the property page. If you wish to copy the SQL to the clipboard, select the data under the SQL Statement
section of the property page and click the Copy to Clipboard push button.
Result property page
Based on the information you have entered in the other property pages on the Define Query screen, the Result
property page displays the actual data that will be returned in your report.
This is the Results property page.

21
Input data types
The data Report Builder accepts is called report inputs. You can use a variety of input data to populate your report
templates. These variations include:
• Input items
• Input variables
• Input totals
• Input crosstabs
Each kind of report input listed above provides a different type of information for the report to use.
Input Items are similar to a data field in a record or a column in a database table. The combined input items make
up an input row. Report Builder processes one input row at a time. The input row is updated after every input fetch.
You must define the name and data type of each input item received by your report and enter the input items in the
same order they appear in your input row.
Input Variables are values set in Report Builder by your application. Unlike input items, input variables do not
need to be updated with each input fetch.
Input Totals let you display aggregate statistics in your report fields. Input items or formulas are evaluated to
return an aggregate value. This aggregate value is used as an input to the report. All formulas are evaluated and
statistics accumulated immediately after each input row is fetched. You can calculate sums, averages, percentages,
and so on, before or during report generation with input totals.
Input Cross Tabs is an advanced report feature that you can use to gather cross tabular statistics on the report
template’s input rows. All category items are evaluated and statistics accumulated immediately after each input row
is fetched. The resulting matrix is used as input to your report.
Input Items Input items define the data elements used by the report. Input items are one of the following four main data types:
• A string, that is, any combination of alphanumeric characters.
• A number, being numerical value of up to 22 digits.
• A date or time, which has a three-part data value (dd/MM/yy or hh:mm:ss).
• An object, meaning a picture.
Note: All input rows must be sorted in break group order before you provide them as input data to Report Builder. If you add, modify, or delete input items from your report, you must also change the result set of the corresponding linked application so that your report can receive a matching set of data.

22
Defining input items
Every item in the input row must be assigned a unique name Report Builder can use to refer to it. You must define
the input item names in the same order they appear in the input row.
Before using the Input Items command in the Report, Format menu, you must know the format and layout of
your input row. To define your input items, you need the following information:
• A name for each input item. (All input items in the input row must be listed, even if you do not plan to use
all of them in your report template.)
• The data type (String, Number, Date/Time, or Object) of each item.
• The order in which the input items appear in the input row.
Entering input item names
This is one of the first procedures you must perform when creating a new report. Enter input item names for each
report that receives and uses data from an external source, that is, from a database or an application program.
Note: If you have created or imported a query, Report Builder automatically generates the report inputs for you.
Enter the names of all the input items that make up your input row and enter the input items in the same order they
appear in the input row. Your report uses this information to read the data from the data source.
Refer to the naming rules on page 2 of this Chapter as a guide to naming your input items.
1. Right-click on the input items node in the left pane and choose New.
This dialog box lists all of the currently defined input items. If you have not defined the input items, the Input
Name text box is empty.
2. Enter the input item name in the Input Name box.
3. Select the data type of the input item.
You can choose String, Number, Date/Time, or Object.
4. Click New to add the input item in the Input Names list box.
5. Repeat Steps 2 through 4 for all the remaining input items in the input row.
You must enter the input items in the order they appear in the input row.
Use the Up and Down arrow buttons to change the order of the input items as necessary.
6. Click OK to apply all changes to the report and to close the dialog box.
Click Cancel to close the dialog box without saving any changes.
Input variables
Input variables are another type of input data that your report uses. Unlike input items which are passed with every
report fetch, input variables are passed to your report only when they are set by the application. For example, you
can use input variables to pass information like a graphic image to your report template each time a break group
footer is printed.

23
Like input items, input variables must be one of four data types:
• String
• Number
• Date/Time
• Object
SQLWindows applications use input variables in the report to send information to, and return information from the
report engine. SQLWindows does this by using functions to modify your report.
Refer to the SQLWindows Function Reference for information about the SalReport functions.
Defining input variables
Use the following procedure to define the input variable values your SQLWindows application passes to your
report.
Defining input variables for your report
1. Right-click on input variables in the left pane.
Report Builder opens the property page with a list of all defined input variables. The list is empty if you did not
define any input variables.
2. Enter the input variable name in the Variable Name text box.
The names you assign to input variables must be unique among Items, Variables, Totals, and Cross Tabs.
3. Select the data type of the input variable.
You can choose from String, Number, Object, or Date/Time.
4. Click New to add the input variable name in the Variable Names list box.
5. Repeat Steps 2 through 4 for any other input variables you want to include.
6. Click OK to apply all changes and exit the dialog box.
Click Cancel to exit the dialog box without saving any changes.
Input totals Report Builder pre-calculates specified totals or other aggregate types of calculations, and provides the result as
input totals to your report. Input totals can also be two-pass totals. All input totals are numeric variables assigned to
a field, or used by a formula in your report template.
Use the Format Totals dialog box to define, modify, and delete the input totals in your report. You can assign
input totals to fields, just like input items and input variables.
In the Define Total dialog box, set the pre-process flag ON to have the totals calculations performed before your
report output is generated. If you do this, the report data is passed once to the report engine and processed twice
by the report. The first pass calculates your report input totals, the second pass formats the report.
Alternatively, you can set the pre-process flag OFF. If you do this, the report engines calculates the totals on an
on-going basis as the report data is fetched for the first and only time.

24
Defining input totals for your report 1. Right-click on Input Totals in the left pane.
2. Click New to create a new input total using the Format Totals dialog box.
3. Enter a name for your new input total.
The name cannot have spaces in it. The only special character that is allowed is the underscore.
4. From the Formula drop down list box, select the item you want to evaluate.
The items in the Formula drop down list box must first be defined. If you do not define a formula, it shows only
inputs. The item in this list box can be any numeric formula or an input item.
Pressing the Formula push button opens the Formula Editor dialog box where you define formulas.
5. Select the type of statistic you want to calculate from the Statistic drop down list box.
Each input total can evaluate one statistic. Select Value if you want to display the last value of the item you
selected in the Formula list box.
6. Choose when you want to zero your totals from the Restart Event drop down list.
This list box shows all the break group items. Report Builder restarts totals calculations whenever the selected
break group changes.
7. Repeat steps 5 to 9 to create all your input totals.
8. Click the Pre-Process check box if you want Report Builder to calculate your totals before it formats your
report.
Use this if you plan to display break group totals at the beginning of a break group (for example, in the break
group header) rather than at the end of the break group. By setting Pre-Process ON, you ensure a valid total
display at the beginning of the break group.
9. Close the open dialog boxes to return to your report template.
Adding input totals to your template
1. Drop fields in the report template for each one.
Drop the fields in appropriate locations in your template. If you have totals for a certain break group, you can
draw the fields in the appropriate header or footer blocks.
2. Assign the input totals to each field.
Right click on the field and select Properties then use the Edit button to assign the total to the field.
3. Select Report, Preview to view your report with the input totals.
Input crosstabs
Use the input crosstabs feature to gather cross tabular statistics on your report input rows and to summarize the
information your report template receives.

25
The Cross Tabs Data Collector generates a two-dimensional matrix of numeric data based on the categories and
data you provide. The size of this matrix depends on the number of unique occurrences of each column and row
category you use in your crosstabs definition.
You can have from 1 to 8 row categories and from 1 to 8 column categories in your crosstab report. The greater the
number of row and column categories, the larger and more complex your crosstab matrix is.
You must identify each crosstab with a unique name. A report can contain any number of crosstabs.
Formatting your crosstab matrix
Your crosstab computations result is a two-dimensional numeric matrix that you assign to any field in your report
template. You must set Dynamic Line Wrapping ON for the field containing your input crosstab matrix since you
cannot determine the size of your crosstab matrix until all calculations are complete. See the Format Fields
command in the Report Builder online help for more information on this feature. Use the crosstab wizard to format
your crosstab matrix.
Crosstab Formula Editor functions
Get information on the number and names of the rows and columns in your crosstab matrix by using the following
report functions in the Formula Editor.
XTabGetColHeadings returns a tab-separated string of column names for the crosstab matrix. Each column name
is a unique combination of the values returned by your column categories. You need to use this function to build a
label for each combination of column categories in your crosstab.
XTabGetRowHeadings returns a tab separated multi-line string of row names for the crosstab matrix. Each row
name is a unique combination of the values returned by your row categories. You need to use this function to build a
label for each combination of column categories in your crosstab.
XTabGetColCount returns the number of columns generated by this input crosstab matrix.
XTabGetRowCount returns the number of rows generated by this input crosstab matrix.
In addition, Report Builder provides several functions that let you format the two- dimensional matrix generated by
crosstab calculations. Apply these functions against the crosstab matrix.
StrTabSeparate returns a string with a tab inserted between each word. You can use this function to tab separate
each column of your crosstab matrix.
StrTabColSuppress returns a string with repeating column values suppressed. It does not suppress repeating
tabs. You can use this function with your crosstab matrix to suppress repeating column titles.
StrTabRowSuppress returns a string with repeating row values suppressed. You can use this function with your
crosstab matrix to suppress repeating row titles in your matrix.
For more information on functions, refer to Chapter 5, Creating Formulas, or the Gupta online help.
Assigning objects to pictures
Use the picture object in Report Builder to display graphic images. You enable the Report, Format, Picture
command when you select a picture object in your report template. If you select multiple pictures, Report Builder
disables the command.
Use the Picture command in the Format menu to set the width, style, scaling, and contents of your picture object.
You can also draw borders around the contents of the picture object.
With the Picture command, you control the:
• Scaling of the picture.
• Graphic items imported into your report.
• Dimensions of your graphic.
Pictures contain graphic items. You can assign one of three categories of information to a report picture object:

26
• Static objects are any type of object that do not change in the report, from graphics to text blocks. You
can copy graphic items to your report and place them in a picture. The graphics appear in both design and
preview modes.
Report Builder lets you import a number of different graphic formats, such as .BMP, .DIB, .GIF, .TIFF,
.PCX, .WMF, and .JPG.
• Input objects are any input items with a data type of OBJECT. This information passes to your report
from a SQLWindows application.
• Variable objects are any report input variables with a data type of OBJECT. This information passes to
the report by a SQLWindows application.
Static objects
Report Builder accepts a large variety of graphic formats as input into your picture object.
Importing a static object to your report
1. Choose your picture object and select Report, Format, Picture to open the Format Picture property pages.
You can also right-click on the picture object, then select Properties from the context menu, to open this
dialog box.
2. Set the picture dimensions on the Appearance property page. You can also drag the borders of your picture
object to resize it.
3. Accept the default Static option on the Picture property page.

27
This tells Report Builder that you are going to import an object, but are not going to link the template to the
application in which the object was created.
4. Click the Paste From push button to open the Paste From dialog box.
5. Select a file type from the List Files of Type list box at the bottom of the dialog box.
This list box shows all the file formats you can import into your report template. When you select a file type,
Report Builder lists all the files in that format under the File Name text box.
6. Select the file you want to import and click OK to return to the Format Picture dialog box.
7. Select the type of border you want to surround your object and click OK.
Report Builder imports the contents of the selected file into your report. You can see this object in both design
and preview modes of the report.
Input objects
You can assign input items with an Object data type to your report picture objects.
Assigning inputs to your picture object
1. Double-click the picture object to open the Format Picture dialog box.
2. Set your picture dimensions in the Appearance property page.
3. Click Item in the Object group box to indicate that the content of this picture comes from an input item.
4. Select the input item you want from the appropriate drop down list box and click OK.
5. Report Builder assigns the selected input item to the picture object.
You can see the contents of the picture object when you are in preview mode for the report.
Variable objects
You can assign input variables with an Object data type to your report picture objects.
Assigning variables to your picture object
1. Select your picture object and choose Format, Picture.
2. Set your picture dimensions in the Dimensions group box.
3. Click Variable in the Object group box to indicate that the content of this picture comes from an input variable.
4. Select the input variable you want from the appropriate drop down list box and click OK.
5. Report Builder assigns the selected input variable to the picture object.
You can see the contents of the picture object when you are in preview mode for the report.

28
Report Builder Workspace The Report Builder workspace is the area where you create report templates. This chapter describes the following:
• Report work area and the object tree
• Rulers
• Menus and toolbars
• Viewing reports
• Report objects and how to modify them
Report Builder work area and object tree
When you create a new report template, you do so in the report work area. The work area appears initially with the
following components:
• Report Header block caption
• Page Header block caption, with the data and column headings based on the query
• Detail Block caption with fields for the query data
• Page Footer block caption, with the page number
• Report Footer block caption
Report Builder adds new header and footer block captions to the report template as you define break groups. The
report work area is shown below.
Report Window
Object Tree
Report Work Area
The object tree displays all of the currently-defined report objects, such as:
• Input Items
• Input Variables
• Formulas
• Totals
• Crosstabs
• Break Groups

29
The object tree organizes the report objects into folders. It lets you list and display the properties of objects, and
allows you to drag and drop objects into your reports.
When it is displayed, the object tree appears in a frame to the left of the report window. You can define whether to
display the object tree by selecting Object Tree on the View menu.
To display the contents of a folder, double-click on the folder for the desired object. For example, to display all the
currently-defined input items, double-click on the input items folder.
To access a property page for an input item, input variable, formula, total, crosstab, or break group, select the item,
click the right mouse button, and select Properties from the popup menu.
To add an object to your report, position the pointer over the object that you wish to place into your report. While
pressing the left mouse button, drag the object to the line on the report where you want it to be, then release the
mouse button.
Rulers Two rulers appear at the top of the workspace:
1. The line ruler displays the margins and paper size of your report. This ruler is only displayed if ruler is
checked in the view menu, and you are in Report Design mode.
2. The tab ruler shows the width of the currently-selected field or background text object. Tabs for a field can be
changed by manipulating the graphical tab icons on the tab ruler. This ruler is only displayed when a report
object is selected in the design layout and tab ruler in the view menu is selected.
The rulers are shown below.
Line Ruler
Tab Ruler
Line ruler
This ruler displays the margins and paper size of your current report. The top border of the ruler line also displays
the grid increments when the Grid is on.
When you drag a Report Builder object across a line, Report Builder displays a black box in the Ruler Line. This
black box has the same width and location as the selected Report Builder Objects ruler to precisely position Report
Builder objects in your Report Builder template.
Tab ruler
When enabled from the View menu, the tab ruler displays in the bottom half of the Report Builder ruler. You can set
and control the tabs for a field by manipulating the graphical tab icons on the tab ruler. The tab ruler also shows the
width of the currently-selected field or background text object.
The tab ruler is an alternative to using the Report, Format, Tabs property page. Double-click on any tab icon to
open the Report, Format, Tabs property page.
Note: The tab ruler will not appear unless the line ruler is also selected.
When you select a field or background text, the tab ruler shows the size of the field, all the tabs that are assigned to
it, the tab justification, and the width of each tab.
Each tab icon (shown at the left) is made up of a:

30
Head (pointed arrow). The tab head shows the beginning of the tab. Click and drag the head to change the starting
position of the tab. Normal tabs have a single arrowhead and are shown in black. A master repeating tab has a
double arrow head and is shown in a bright blue color. All subsequent representations of repeating tabs are shown
with a truncated arrow head, a gray color, and cannot be directly modified.
Body (straight line). The tab body shows the width of the tab. Click and drag the tab body to move the tab to a new
location without changing its size.
Tail (right angle). The tab tail shows the end of the tab. Click and drag the tail to change the ending position of the
tab.
Justification Icon. The tab justification icon is a small arrow within the tab body. This arrow can point right (right
justified), down (center justified), or left (left justified).
To add tabs, left click on the tab ruler to add a new tab in this field. By default, Report Builder always inserts a left
justified repeating tab.
To delete tabs, select a tab icon and drag it off the tab ruler to delete that tab.
To repeat tabs, ctrl-right click on a tab to toggle repeating tabs on and off. Repeating tabs are shown in bright blue
with a double arrow head. All new tabs are created as repeating tabs by default.
To change tab justification, click the right mouse button over an existing tab. This is an easy way to change the
justification (right justified, left justified, and centered) of a tab.
To size and position the tab, drag the tab head towards the tail of the preceding tab. Report Builder shrinks the size
of the preceding tab to make room for your change. When you drag the tail of a tab towards the head of the next tab,
Report Builder pushes all subsequent tabs to the right. This does not cause resizing of subsequent tabs.
To view or hide the tab ruler, choose the View Tab Ruler command to view or hide the tab ruler. A check mark
beside this command indicates that the tab ruler is currently selected.
Menus and toolbars As you design your reports, you can execute commands from the menu bar, context menus (the pop-up menus that
appear when you click the right mouse button), and toolbars. The menu bar contains the five available pull-down
menus and their commands.
For example, the Edit menu has commands that let you cut, copy, and paste text or other objects. There are also
keyboard shortcuts listed beside many of the commands.
You may press Esc at any time to exit both the menu and the menu bar. You may get on-line help by doing either of
the following:
• Select Help, Contents or,
• Press F1 to see the help for that command or dialog box.
The Report Builder toolbar provides 13 of the most common functions to make it more convenient to design
reports. It may be turned on or off from the View, Toolbars menu and moved anywhere on the screen. The Report
Builder toolbar is shown below.

31
New Report creates a new report and prompts you to define a query for the report.
Open Report opens an existing report or query
Save Report saves the current report to a file. The saved report has a default file extension of .CQT.
Cut removes a selected object from the Report Builder template and places it in the Clipboard. This
command works only when an object is selected.
Copy copies the selected object from the Report Builder template to the Clipboard. This command works
only when an object is selected.
Paste inserts the contents of the Clipboard at the insertion point in the current report.
Copy SQL copies the SQL generated by the query to the clipboard.
Print sends the current report to the printer.
Import imports a template.
Export exports a template.
Define Query opens the Define Query property page.
Toggle Mode switches between the Report Builder’s design and preview modes.
Zoom enlarges or reduces the size of the report. This command is available only in preview mode.
Tools toolbar
As you develop your report template, you add objects such as boxes, fields, lines to the work area. The Tools
toolbar allows you to add these objects to your template. Like the Report Builder toolbar, the Tools toolbar can be
turned on or off from the View, Toolbars menu and can be moved anywhere on the screen. The tools and
commands on the Tools toolbar are also available in the Report, New menu. The Tools toolbar is shown below.
• Select Tool selects objects in the Report Builder template
• Background Tool enters background text in the template.
• Field Tool draws fields in the template.
• Box Tool inserts new boxes in the template.
• PictureTool adds new picture objects to your report.
• LineTool adds lines to the template.
• Graph Tool inserts a graph into the template.
• Crosstab Tool inserts crosstabs in the template.
• Reset Cursor automatically causes Report Builder to return to the selector tool after each use of another
tool.

32
Note: The Tools toolbar is available only in design mode.
Context menus
If you click the right mouse button over a report object, a context menu appears. The context menus provide a copy
of the same commands you would see if you pulled down a menu from the menu bar. The example of a context
menu you will see in design mode is shown below. In this example, the Field tool is being selected.
Viewing your report
View your report either in design mode or in preview mode. Each new report template begins in design mode.
Preview mode shows you how your report appears when it is printed.
Design mode
Design mode displays your report template, so that you can add lines, fields, boxes, and graphics to your report
layout by using tools from either the Report or context menus, or the Tool toolbar. You can also include input
items, formulas, break groups, and other report elements by using the object tree.
A report in design mode is shown below. This same report is shown in Preview mode on page 3-11.

33
To view different parts of the work area, use the vertical or horizontal scroll bars, or press the Page Up or Page
Down key to view different parts of the window.
Each template shows block caption bars and objects associated with each block group. Many menu commands in
the Report menus are enabled in design mode and disabled in preview mode.
The design window is independent of your data source, so you can design your report template before linking data to
the report.
Preview mode
In preview mode, you cannot modify the layout of the report or change any of the report inputs; you can only see
how the report looks when it contains data.
Viewing your report in preview mode
1. Select Report, Report Preview.
The report work area is replaced by the report. If you are linked to a query, the data appears in the window. The
graphic below shows the preview mode of the report shown in Design mode on page 3-10.

34
2. Select Report, Report Design to return to the design window.
Use preview mode to see what your report looks like when it prints. Because you cannot edit a report in preview
mode, the report ruler disappears and the commands that effect the design and layout of the report page are
disabled.
The First, Next, Previous, Last, and Goto commands in the View menu, are active only in preview mode to view
different pages of the report. These commands are also available from the Scroll toolbar.
Scroll toolbar
In Report Preview, you can select the Scroll toolbar from the View, Toolbars menu. The Scroll toolbar is shown
below.
First Page Go To Page
Previous Page Last Page
Next Page
The arrows let you page through the report. They correspond to the First, Next, Previous, Last, and Go To Page
commands in the View menu.
First Page displays the first page of the current report.
Previous Page displays the previous page of the current report.
Next Page displays the next page of the current report.
Last Page displays the last page of the current report.
Go to Page allows you to select and go to any page in the current report.
Note: The Last Page arrow or command may take some time to execute if you are working with a large amount of data.

35
Report objects
Each element in the report template is an object. Some objects are:
• Background Text, such as page headers and footers, column headers, and labels of other objects.
• Lines, in headers, footers, or detail blocks.
• Fields, containing content for report inputs, literal text, and formulas.
• Boxes that surround groups of fields or entire blocks.
• Pictures, containing graphics or other objects
• Graphs, containing business charts.
• Crosstab Reports to display two-dimensional matrices of report data.
You create report objects with the object tools in the Report or context menu, or the tool toolbar. Use the Format
property pages to modify the format for many of the report objects.
Background text
Use the background text tool to enter literal text in your report template. You can use background text to label:
• The objects in your report template.
• Column headers for the input items in your detail block.
• Report and page headers and footers.
Inserting a background text object
1. Select the Background Text command from the Report, New menu, the context menu, or background text tool
from the Tool toolbar.
The pointer changes to the background text icon.
2. Place the tool where you want to add a static label and press the left mouse button to insert the new object.
3. Enter the label information and press Enter.
Note: Entering literal text in a field, with single quotes around the text, provides the same result as using the background text field.
You can format background text with character formats such as bolding, italics, underline, strikeout, fonts, sizing,
borders, tab setting and alignment. You can apply many of these options using the object’s property page.
Rich Text A rich text control can be populated with text of various colors, styles, sizes, fonts, etc., as well as images.
Inserting a Rich Text object
1. Select Rich Text from the Report menu, Tool Box section. The pointer changes to the rich text icon.
2. Place the tool where you want to add a Rich Text field and press the left mouse button to insert the new object.
3. Enter the data source and press Enter.
Changing Rich Text Properties
1. Choose the Select Tool from the Report menu, Tool Box section.
2. Right-click on the Rich Text object. Make sure the object is selected, and not the text within the object.

36
3. Select Properties.
The Properties dialog box will display. Change properties as desired.
Lines The line tool lets you insert new lines into the report template. There are four ways to insert new lines:
• Use the Line tool in the Tools menu.
• Use the Insert Line command from the Tools menu.
• Select a block caption and press the Insert key.
• Select any item and press the Insert key to add a line to the bottom item selected.
Apply formatting to any line by using the Line command from the Report Format menu or by right clicking a line
and choosing Properties with the selector tool to open the Format Line dialog box.
Note: Normally the Report Header block prints at the top of page one, and the Page Header block prints at the top of all subsequent pages. However, if there are no lines present in the Report Header block, the Page Header will print at the top of page one.
Inserting a line using the line tool
1. Select the line tool from the Report, New menu, the context menu, or line tool from the Tool toolbar.
The pointer changes to the line tool icon.
2. Place the line tool where you want to add the new line.
To insert a new line above a line, click above the center of the line. To insert a new line below a line, click below
the center of the line.
3. Press the left mouse button to insert the new line.
4. Continue inserting lines as necessary.
Deleting a line
1. Choose the selector tool, either from the tool palette or the Tools menu.
The pointer changes to the selector tool.
2. Select the line you want to delete from the report design window.
To select more than one line, press and hold the Shift key as you click successive lines. To select all lines in a
block, hold down Ctrl and click on the caption block. To select a line under other objects, press CTRL and left-
click.

37
3. Select Cut from the Edit menu, press Ctrl+x, then press the Delete key.
Report Builder deletes the selected line, and all the objects on the line.
Fields Use this tool to create the fields in your report. Every field must contain content of one of the following types:
• Report inputs, including input items, variables, totals, and crosstabs.
• Literal strings, created by entering text directly into the field inside single quotes.
• Formulas created using the Formula Editor and assigned from the object tree.
Inserting a field into the report template
1. Select the field tool from the Report, New menu, the context menu, or from the Tool toolbar.
2. Position the pointer where you want the field to appear and click the left mouse button.
Use the vertical line in the ruler to position the field on the line. Report Builder always creates new fields with
dynamic width. Change the field size using the mouse.
3. To enter the field content value, enter the text you want in the field using single quotes around the text.
You must enclose all literal text entries within single quotes. You can assign report inputs or existing formulas
by selecting them from the object tree, then dragging them to the report.
Note: Using the background text field provides the same result as entering literal text in a field.
4. Press Enter to save the new contents of the field.
The field remains selected until you click elsewhere in the report window.
Resizing a field with the resizing cursor
1. Position any tool over the right or left edge of the field.
The cursor changes to the two-headed arrow so you can now resize the field.
2. Click and drag the edge of the field to change its width.
As you drag, a vertical line in the ruler shows your exact position.
3. Release the left mouse button when the field is the desired width.
4. Repeat Steps 2 and 3 for the opposite edge if you want to resize the other side of the field.
5. Click anywhere outside of the field to deselect it.
Deleting a field
1. Select the selector tool.
2. Select the field you want to delete from the report template.
Press Shift+Click to select multiple fields.
3. Select Edit, Cut, press Ctrl+x, or press the Delete key to remove the selected field.
Boxes
Create boxes around a group of fields or an entire block using the box tool. Use the Format Box dialog box to
move, resize, and reformat the boxes. Right click on a box to open the Format Box dialog box.
Boxes are fixed in size. If the text inside a box grows, the box does not automatically grow to accommodate the
extra text. If you want a box around a field with a dynamic width or with line wrapping, use field borders instead
of boxes.
Creating a box
1. Select the box tool from the Report, New menu, the context menu, or from the Tool toolbar.

38
2. Position the pointer where you want the starting corner of the box.
The box must be within the boundaries of the block, so you must start drawing from within a line.
3. Click and drag the mouse, holding down the left button, to create the box.
Report Builder displays an outline, showing the size of the box, as you drag. When you release the mouse, the
gray outline is white and the box is filled until you select another object on the template, or click anywhere
outside the box.
Resizing a box with the resizing cursor
1. Position any tool over the edge of the box to be resized.
The cursor changes to the horizontal, two-headed arrow so you can resize the box.
2. Drag the edge of the box to enlarge or reduce its size.
3. Click anywhere outside of the box to deselect it.
Deleting a box
1. Select the selector tool.
2. Select the box you want to delete from the template.
Press Shift+Click to select multiple boxes.
3. Select Edit, Cut, press Ctrl+x, or press the Delete key.
Report Builder deletes the selected boxes.
Pictures Create picture objects in your report template by using the picture tool. Picture objects contain graphic images.
Use the Report, Format, Picture... dialog box to move, resize, or reformat a selected picture. Right click the picture
object to open this dialog box. You can assign static objects, input items, or input variables with an object data type
as its contents.
Creating a picture object
1. Select the picture tool.
2. Position the pointer where you want the starting corner of the picture to begin.
You must place the picture within the boundaries of the block, so draw the picture from within a line.
3. Press and drag the mouse, holding down the left button, to create the picture.
Report Builder displays a gray outline, showing the size of the picture, as you drag. When you release the mouse,
the gray outline is white and the picture is filled.
Graphs Graphs in Report Builder provides the following business graphics functionality:
• True 3D graphs
• Statistics and curve fitting
• Formulas for the graph titles
• Elevation, rotation, and perspective control
• Font control over titles and labels
• Color controls for graph elements and backgrounds
• Axis styles

39
• Grid styles and control
Creating a graph object
This procedure shows you how to create and format a graph in your report.
1. Use the line tool to add several lines to the Detail Block.
2. In the design window, click the graph tool on the tool palette and drop a graph object on your report.
The graph control window on your report displays a sample graph with a tool bar above it.
3. Right click on Graph control and then click on Properties menu item and then click on "QuickGraph
Properties" button to open Quick Graph property dialog box.
Note: You can access other property pages with the other toolbar buttons, but only the "magnifying glass" button allows you to access the Data Source tab, which MUST be customized first in order for other property changes to take effect.
4. Before making any other changes in the graph, select a data source in the Data Source tab:
5. After you have chosen a data source, use the two Labels tabs to indicate which input items you would like on
each axis.
6. Customize the graph according to your preferences.

40
Crosstab reports
Use the crosstab tool to open a wizard to help you create a crosstab in your report. Before creating your crosstab,
you must define the input item names in the same order they appear in the data source’s input rows.
Creating a crosstab object
1. Define the input items in the Format Input Items dialog box.

41
2. Add a line in the Report Footer block.
3. Select the crosstab tool and click the tool on the line in the Report Footer block to open the crosstabs wizard.
All the inputs you defined in Step 1 are listed in this wizard.
4. Enter data for each step of the wizard and click Next to move on to the next step.
The wizard asks you for the row, column, and cell values. In addition you will define the statistic the crosstab
uses. (Sum is the default.) Select summary statistics, column and row headings, and name the crosstab.
5. Click OK when you are at the Final step to add the crosstab object to the Report Footer block.
Report Builder adds a crosstab icon and the name of the crosstab in the crosstab object.
6. Click OK.
7. Select Report, Preview to preview the data in your crosstab.
Moving report objects
All mouse cursors become the move cursor when they are placed over a moveable object in the design window.
The only exception is when you have just created a new field. In that case, the cursor remains an insertion point
until you enter text, choose a report input (literals, variables, cross tabs, or totals) or formula, or press Enter.
Moving a report object
1. Select the object you want to move.
Press Shift+Click to select multiple objects. The cursor changes to a four-headed arrow indicating that you can
move the object in any direction.
2. Drag the object to another position within the same report block, or use Cut and Paste commands from the
Edit menu to move an object to another block.
3. Release the mouse button and click anywhere to deselect the object.

42
Cutting, copying, or pasting report objects
Cut, copy, or paste any report object by using the commands in the Edit menu. For example, you can move a field
from one block to another or paste it in more than one place. You can also change the field after you have cut,
copied, or pasted it elsewhere in the report template.
Watermarks
You can place a watermark in the background of your report by clicking "Water Mark" in the Report Menu. In the
dialog box that is displayed, select whether you would like No Watermark (default), a Picture Watermark, Input
Item/Variable or a Text Watermark. You can also specify condition formula to determine whether show watermark
or not.
Picture Watermark
You can use any of the following file types as the source for a picture watermark: BMP, DIB, GIF, TIFF, PCX,
WMF, and JPEG. To select a file, click "Paste From" in the Report Watermark dialog box, select the file type, and
then select a file.
By default, the image is resized to fit in the background of the report. If you’d rather specify a size (in percentage of
the original file dimensions), choose from the "Scale" dropdown list.
The image will automatically be faded slightly. Check the "Washout" checkbox if you would like the image to be
faded more noticeably.

43
Dynamic Watermark The user can dynamically set the watermark of a report via an input variable. The user can have a watermark
dynamically assigned, and not hard-coded into the QRP/CQT. When the WaterMark ribbon button in
ReportBuilder is clicked, the Report Watermark dialog box opens with now a fourth radio button "Input Variable,”
which has a combo box showing all of the input variables of the datatype "object". The user then can call the Sal
function SalReportSetObjectVar to pass in the image to be used as the watermark.
Text Watermark
The text that will appear in a text watermark is specified within the Report Watermark dialog box (default text is
"ASAP"). You can change this text, choose a font and size, select a color, change the vertical/horizontal orientation
of the watermark, and specify whether you would like the watermark to be washed out. Unlike a picture watermark,
text watermarks are NOT faded unless specified by a check in the "Washout" checkbox. In order to avoid illegibility
due to report contents overlapping with a dark watermark, choose a light color and/or check the "Washout" box.
The watermark will appear in the center of the report.
Note: "Default" orientation of a text watermark is diagonal, as represented below.
Conditional Watermark The user can display watermarks, conditionally based on the value of a report "formula." This new setting will be
in the Report Watermark dialog box, opened by clicking on the Watermark button on the ribbon bar (Report ribbon
group). There will be a drop-down menu with the caption "Conditional Display." The dropdown will contain the
names of the report formulas. If a conditional display formula is provided, the formula will be evaluated for each
report page to determine whether or not that page should display the watermark.

44
Designing Report Templates This chapter first provides step-by-step procedures on how to modify templates. It describes the following procedures:
• Planning your report
• Setting up the report template
• Formatting the field contents
Planning your report
Before you even open a report template, you should have an idea of the kind of report you want to create. Do you
want to generate form letters, print mailing labels, or display tabular statistics? You can create all these types of
reports with Report Builder.
You should also decide whether you want to include calculated values (formulas) or graphics in your report. In
addition, you must know what your source of data is. Read Chapter 2, Creating Reports.
The procedures in this chapter discuss issues you will want to consider when deciding what kind of report you want
to design.
Getting started with report templates
This section begins the step-by-step procedures for creating a report template. The procedures you learn (defining
inputs, formatting fields, and so on) are the same procedures you will use most often when you build a report
template.
For additional information on using Report Builder, press the F1 key for the Team Developer in-build help, which
contains Report Builder help.
Design mode and preview mode Report Builder has two modes; Design mode and Preview mode. You do not enter a mode until you either open a
report file or define a query. While you create report templates, you need to be in Design mode. While in Design
mode, you can add all report objects such as fields, lines, boxes, and graphics. You can also format these objects
and arrange them as required. Design mode is also where you can link your report to data sources.
To verify that you are in Design mode, click on the Report menu and see if the Design Mode option is disabled. If
so, this means it is already selected and you are in Design mode. If Preview Mode is disabled, then you are in
Preview mode. Select Design Mode to continue modifying your template.
Setting up the report template
In Chapter 2, you defined queries that tell Report Builder how to populate your report. A default report is created
every time you create a query. You can format this default report to display the data in an orderly fashion.
You can also create a report template without first creating a query. Using the Import and Export items in the Edit
menu, you can use the same report template to format data from several different queries, as long as the query data
matches the report inputs.
In this section, you tell Report Builder how to format your report template. Report Builder uses the .CQT file
format which combines a query and a report template. When .CQT files are used, the query is executed, the data is
fetched, and a report is generated as specified in the report template.

45
Report Builder also supports the older .QRP file format which just contains a report template. With .QRP files, the
data for a report must be provided by the application or a Quest Query template (.QQT) file. To use .QRP files with
Report Builder, use the Import and Export menu items under the Edit menu, or the equivalent toolbar buttons.
Importing a template
To start a new .QRP report, do one of the following:
• Select "New QRP" from the File menu (version 6.0 and later).
OR
• Import the NEWREP.QRP template file located in your Team Developer directory:
1. Select Edit, Import Template to display the Open dialog.
2. If you use File, Open to get this dialog, you will be asked to define a query.
3. Browse to the Team Developer #.#/Templates directory and select NEWREP.QRP.
An unpopulated report template appears.
Setting up your report page layout
The page layout specifications are those that you apply to the page when it prints or when you preview the page
layout.
In this procedure, you set the page properties for your report. This information is required to begin working on a
template so defaults are provided. You can change these settings at any time in Design mode.
1. Select Report, Format Report to display the Properties pages.
There are four tabbed pages available:
• General, to select grid and display options.
If you do not select the Use Default Printer option, your reports will print on the last selected printer.
• Page Layout, to select page margins and columns for the report.

46
Page margins control the print area within each report. Most laser printers require at least 1/2 inch margins
on all sides.
The number of columns applies to the Detail and Break Group blocks only. It has no effect on the report
block groups or the page block groups.
If you specified only one column, Reports ignores the field. If you specified multiple columns, the space
between each column on the page.
• Paper Source, to select which source (printer drawer) should be used for printing the first page and which
source should be used for printing all subsequent pages.
• Page Size, to select paper dimensions and orientation.
You can click on any of the available page sizes or choose Custom and enter a width and height if your
printer can handle non-standard paper sizes.
The portrait option displays and prints the report taller than wider. The report prints across the page.
Landscape rotates the page 90 degrees. The page is wider than it is tall and is printed across the length of
the page.
2. Set display options (for this procedure, use the default settings) and click OK to close the dialog box and save
the settings.
Notice that default settings are already selected. You can change these to customize your report template.The
default settings are 8 1/2” by 11" paper, with 1" top and bottom margins, and 1.25" left and right margins on a
1/8” grid. The paper orientation of the page is portrait.
Entering input items
In this procedure, you specify the name and data type of each input item in your input row. Enter input items in
exactly the same order as they appear in the input row. The information you provide is used by the report engine to
populate the template with input rows from the data source.
1. Select Report, Format, Input, Input Items to open the Format Input Items dialog.
Use this dialog to name, order, and assign data types to the input items.
2. Type an input name in the Input Name field, then select a data type from the radio buttons provided below it.
Enter these names and their data types in the following order:
Input Name Data Type
Region String
Department String
Name String
Hiredate Date/Time
Salary Number

47
Click New after you enter each input item to save your entry and start the next one.
Note: You must enter the input items in the order that they appear in the input row. If you entered your input items in the wrong order, use the up and down arrow buttons under the Input Names list box to re-order the list.
3. Click OK when you finish entering all the input items.
Entering the break groups
Break groups are determined by the order your data is sorted in the data source file. BOTH the list order of your
break groups and the sort order of your input data must match exactly.
For example, if you want your report to break on region and department, then your input data must be sorted first by
region, then by department, before you link the data to your report template.
1. Select Report, Format, Break Groups to open the Format Break Groups dialog box.
2. Select the break groups you want to use, in the correct order.
Double-click on an item name to select the break group item; this automatically copies it to the Break Groups
list box. You can have a maximum of eight break groups in each report template.
For our report, select the break group items Region and Department, in that order.
If you select break group items in the wrong order, use the arrow keys below the
Break Groups list box to re-order them.
3. Click OK when you finish.
Your report work area changes when you add new break groups. Reports adds new header and footer block
captions to your report template for each break group you selected.
Adding lines and creating fields
Inserting a line
Use this procedure to insert lines in your report template.
1. Select the detail block caption by clicking on it with the selector tool.
2. Select Report, New, Line to insert a line in the block group.
Creating fields
Use this procedure to create fields in your report template. Fields can hold different types of contents.
These include:
literal text typed characters within single quotes (’).
input items drag each item from the object tree in the left pane, or type them in.
formulas created by, or chosen from the Formula Editor.

48
Assigning literal text to a field
1. Select Report, New, Field.
2. Click the left mouse button anywhere on a line to add a field.
The insertion point appears within the new field.
3. Type’Salaries by Region and Department’ in your field (include the single quote marks) and press Enter when
you finish entering the literal text.
You can now see the literal text in the line.
Assigning an input item to a field
1. Double-click the Input Items folder in the left pane of your report template to open it.
2. Drag each item to a line in your report.
Your report template might look like this:
Assigning a formula or a function to a field
1. Insert a new line in the Detail Block, then add a new field on the line.
2. Select the field, right-click to bring up the object menu, and select Properties.
The first tab in the Properties dialog is the Field tab. Click Edit Field Formula to open the Formula Editor
dialog box.
3. Scroll through the Functions list box and double-click on StrProper.
This function creates an initial cap on the first letter of the region name, and leaves the remaining letters in lower
case. When you double-click on the function, the Formula Editor places StrProper(String) in the text box at
the top of the dialog box.
4. Highlight the function parameter String, then double-click on Region in the Data Items list box.

49
This replaces the word String with the word Region.
5. Name the formula InitCap and click OK to assign the formula to your field.
6. Click OK in the Properties dialog.
The function format is displayed as the field contents. The Formula Name shows in the field.
Formatting the field contents
Use the following procedures to learn how to format the field contents. These formats include:
• Assigning fonts.
• Justifying field contents.
• Bolding, underlining, etc. field contents.
• Suppressing repeating values.
For more detailed information, including formatting procedures and options, refer to the Gupta online help by
pressing F1 while the application is open.
You can do simple formatting of colors and borders quickly by using the dropdowns in the toolbar ribbon. But to
get more complete formatting, such as conditional formatting, you need to use the menu items described below.
Assigning a different font
1. Select a field. Right-click on the field, then select Properties from the object menu.
It is unnecessary for text to be in a field to format it. You can also select one or more fields at a time.
2. Select the Font tab.
The Font list box displays all the available fonts in your system.
3. Select the font you want to use by clicking it. You can also indicate style and point size in this tab.
Conditional formatting
You can make the choice of font conditional by using the controls in the Conditional Display portion of the tab.
Choose an existing formula or create a new one. At runtime, if the formula evaluates to TRUE (non-zero for a
number, non-empty for a string), the specified font will be used; otherwise, the default font will be used. If there is
nothing entered in the Conditional Display controls, the specified font will always be used.
You can also specify a font style (bold, italic, etc.), and make the font style conditional just as described above.
In the Colors tab in the same dialog, you can make each color selection conditional in the same way.

50
Justifying the field contents
1. Select one or more fields.
2. Right-click on the field, then select Properties from the object menu. Observe the
Justify radio button group in the Field tab.
Suppressing repeating values
1. Select one or more fields.
2. Right-click on the field, then select Properties from the object menu. Select the
Behavior tab.
3. Check the Suppress check box and indicate whether at page break
When you select this option, Reports prints the first occurrence of the value, then suppresses all repeating
occurrences until the value changes.
4. Click OK to suppress the repeating values and close the dialog box.
Exporting (saving) your template
It is a good idea to periodically save your report template. You must name your file the first time you save the report
template.
1. Select Edit, Export.
2. Select the destination directory for your new report template.
3. Type in Region as the name of the new report in the text box.
You do not need to enter the extension. Report Builder automatically adds a file extension type of .QRP when
it saves the report.
4. Click Save to save the report and return to your open template.

51
Creating Formulas This chapter provides instructions on how to use the Formula Editor to create formulas for the report fields. Specifically, this
chapter describes:
• The types of functions available.
• How to create a formula.
• How to edit a formula.
• How to assign a formula.
• Aggregate and non-aggregate functions.
About the Formula Editor
The Formula Editor is a tool in Report Builder that lets you create formulas in report fields. A formula can be a
mathematical expression or statement that is made up of arithmetic operators, functions, data items, and constants.
A formula can also be string or date/time.
The Formula Editor lets you:
• Create formulas for the report fields.
• Create formulas to control lines and blocks in cross tabs and totals.
• Modify long literal text in a report field.
The formulas you create with the Formula Editor can be:
• Assigned to a field in your report template.
• Displayed in their own columns of a query result set.
• Passed as an argument to a query or report function.
• Simple or complex mathematical formulas.
Formula Editor features
The Formula Editor lets you create formulas for your reports using report functions. Refer to the Gupta online help
for a complete list and description of functions you can use with the Formula Editor.
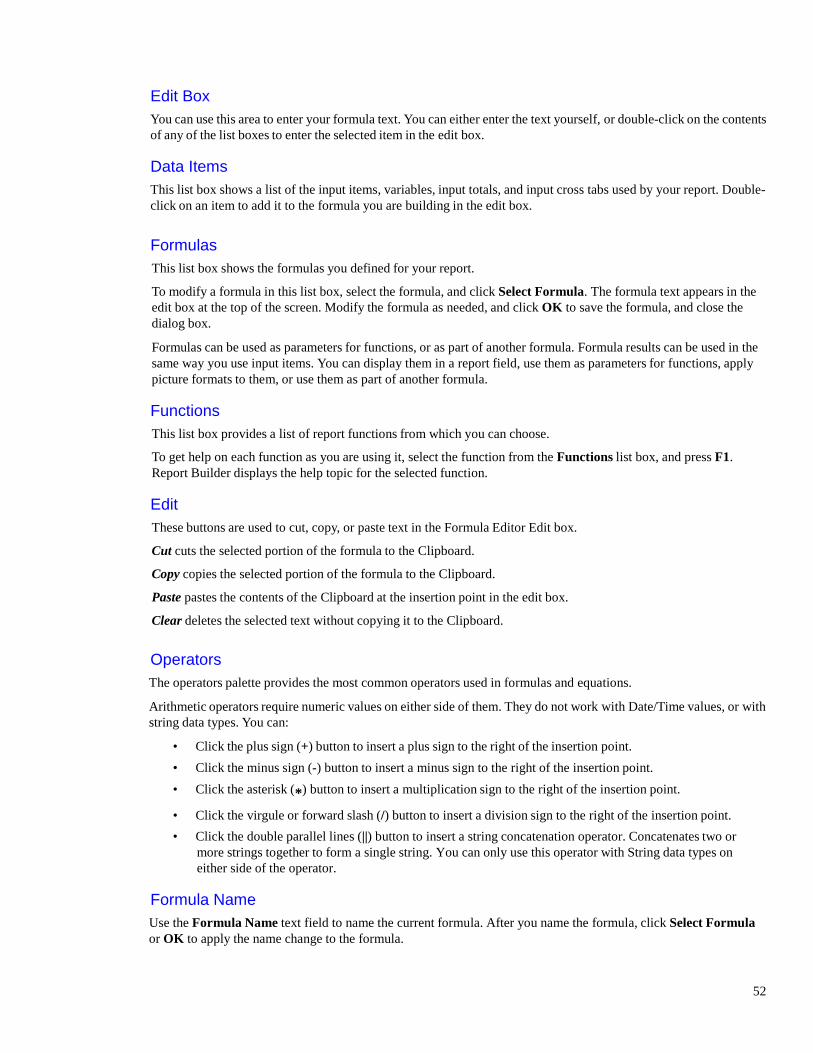
52
Edit Box
You can use this area to enter your formula text. You can either enter the text yourself, or double-click on the contents
of any of the list boxes to enter the selected item in the edit box.
Data Items
This list box shows a list of the input items, variables, input totals, and input cross tabs used by your report. Double-
click on an item to add it to the formula you are building in the edit box.
Formulas
This list box shows the formulas you defined for your report.
To modify a formula in this list box, select the formula, and click Select Formula. The formula text appears in the
edit box at the top of the screen. Modify the formula as needed, and click OK to save the formula, and close the
dialog box.
Formulas can be used as parameters for functions, or as part of another formula. Formula results can be used in the
same way you use input items. You can display them in a report field, use them as parameters for functions, apply
picture formats to them, or use them as part of another formula.
Functions
This list box provides a list of report functions from which you can choose.
To get help on each function as you are using it, select the function from the Functions list box, and press F1.
Report Builder displays the help topic for the selected function.
Edit
These buttons are used to cut, copy, or paste text in the Formula Editor Edit box.
Cut cuts the selected portion of the formula to the Clipboard.
Copy copies the selected portion of the formula to the Clipboard.
Paste pastes the contents of the Clipboard at the insertion point in the edit box.
Clear deletes the selected text without copying it to the Clipboard.
Operators
The operators palette provides the most common operators used in formulas and equations.
Arithmetic operators require numeric values on either side of them. They do not work with Date/Time values, or with
string data types. You can:
• Click the plus sign (+) button to insert a plus sign to the right of the insertion point.
• Click the minus sign (-) button to insert a minus sign to the right of the insertion point.
• Click the asterisk (*) button to insert a multiplication sign to the right of the insertion point.
• Click the virgule or forward slash (/) button to insert a division sign to the right of the insertion point.
• Click the double parallel lines (||) button to insert a string concatenation operator. Concatenates two or
more strings together to form a single string. You can only use this operator with String data types on
either side of the operator.
Formula Name
Use the Formula Name text field to name the current formula. After you name the formula, click Select Formula
or OK to apply the name change to the formula.

53
Numeric Pad
This pad is equivalent to the number pad on your keyboard. You can use it to enter numeric values in the edit box.
Alternatively, you can use the number pad on your keyboard to directly enter the numbers with Num Lock on.
Select Formula
This button serves two purposes:
• It displays the formula text in the edit box. You can select a formula from the Formulas list box, then click
the Select Formula button to display it in the edit box.
• It saves formula changes and continues to let you work in the Formula Editor after creating or modifying a
formula.
Show Formula Text
Click this button to open the Formula Text dialog box. This floating dialog box lets you view the syntax of any
formula in the Formulas list box. You cannot edit the selected formula until you click Select Formula again.
(...)
Click this button to place parentheses around the selected portion of the formula.
Delete
Click this button to delete the selected formula from the Formulas list box.
OK
Click OK to execute the changes to the formulas and close the dialog box.
Cancel
Click this button to cancel any changes and close the dialog box.
Using the Formula Editor
Opening the Formula Editor
You can right click on a formula in the object tree in the left pane of Report Builder, then select New from the
context menu, to bring up the Formula Editor. Or follow these steps:
1. Open a report in design mode. If your report is in preview mode, select Report, Report Design.
2. Right click on a field and choose Properties.
3. Click on the Edit Field Formula button.
Creating formulas
Formulas are created in the scrollable edit box that stretches across the top of the Formula Editor dialog box. You
can type directly into this text box or double-click data items, operators, functions, and other formulas from the
various list boxes to enter data in the edit box.
Creating a formula
This procedure assumes the Formula Editor is open. If not, open it now. Refer to the previous procedure for
instructions on opening the Formula Editor.
1. Select a function from the Functions list box.

54
Double-click on the function name to display it in the Formula Editor edit box. One or a series of parameters
also appears in the edit box with the selected function. Each data type represents a parameter that must be
defined. For example, “Number” means you need to enter a data item that is a number data type.
2. Enter the parameters required (if any) by the selected function.
Replace each parameter with the appropriate value. Refer to the specific information on each function in the
online help, for parameter details.
You can use any of the data items from the Data Items list box or you can enter a literal string, date, or
number.
3. Enter the formula name in the Formula Name text box.
A default name already exists (Formula1, Formula2, etc.). You can keep this name or give it a more descriptive
one.
4. Click OK when finished.
If you assign the results of the function to a report field, the field contains the format of the results, while the
Content box shows the formula name or the formula structure.
Creating formulas with operators
The following procedures tell you how to create a formula with operators. Operators let you add, subtract, multiply,
divide, and concatenate input items, dates, strings, numbers, or other formulas. Arithmetic operators can be
combined with functions. The operands of a mathematical statement can have different data types. Below are some
examples:
• DateTime + Number = Date/Time
• DateTime - Number = Date/Time
• DateTime - DateTime = Number of days
The Date Arithmetic keywords are:
• DAY(S)
• HOUR(S)
• MINUTE(S)
• SECOND(S)
• MONTH(S)
• YEAR(S)
Arithmetic operators do not work on character values. The concatenate operator only works with character values.
Suppose you want to concatenate the NAME column in GUEST_WT with the string, is a good sales prospect.
When you concatenate a string, you are adding to it or linking it with another string. To add the string, is a good
sales prospect, you need to create a formula with the concatenate operator.
Creating a formula with an operator
This procedure assumes the Formula Editor is open. If not, open it now.
1. Select an item from the Data Items list box.
Double-click on the name to select and move it to the formula edit box at the top of the dialog.
2. Click on an operator in the Operators group box.
The operator appears next to the data item you selected in Step1.
3. Select a second item from the Data Items list box by double-clicking on the name to select and move it to the
formula edit box.

55
Be sure items in the operation have the same data type. Date/Time and number combinations are valid.
4. Enter a name for the formula in the Formula Name text box, if required.
Report Builder already assigned a name to the formulas as Formula1, Formula2, etc. You can keep this name or
give it a more descriptive name.
5. Click OK to save the changes and close the Formula Editor.
Editing formulas
Sometimes you may want to modify a formula you already created. The Formula Editor contains an edit box and
editing buttons that let you copy already created formulas, paste them into the edit box, delete or add sections to
eliminate the need of retyping entire formulas over.
The following procedures assume you created some formulas and that the Formula Editor is open.
Editing an existing formula
1. Select a formula name from the Formulas list box.
Click a formula name once to highlight it. If you decide that you want to create a new formula and not edit an
existing one, select New Formula instead.
2. Click Select Formula.
This makes the formula current and displays the formula in the edit box.
3. Make any required changes to the formula.
You can use the Copy, Cut, or Paste buttons when editing. The information in the text box must be selected
before the edit buttons are enabled. You can also type any changes directly into the edit box.
4. Click OK to save the changes and close the Formula Editor.
Parenthetical expressions in formulas
When you have three or more data items listed in the edit box of the Formula Editor, you might find it necessary to
set some of the items off in parentheses. By doing so, Report Builder differentiates which calculation or function to
perform first and last by evaluating the inner formula before the outer formula, unless there is more than one set of
parentheses.
Adding a parenthetical expression to a group of formulas
1. Define a formula with three or more data items, mathematical operators, or functions in the Formula Editor
dialog box and select the part of the formula you want in parentheses.
With the mouse button held down, drag over the selected items in the formula text box.
2. Click (...).
The selected portion of the formula becomes enclosed in parentheses.
3. Make any additional changes and click OK.
Assigning formulas
When you assign formulas to a report object, you are telling Report Builder where to put the results of the formula.
Assigning a formula to a report field
1. Select or create a field in which the results of the formula are to be displayed.
2. Right click on a formula in the object tree in the left pane, then select New to open the Formula Editor.

56
3. Create a formula for the field and return to the report template.
Be sure the field in step 1 is still highlighted.
4. Select the formula in the object tree in the left pane and drag it to the field in your report.
Report Builder applies the formula you select to the highlighted field. The field contents show the formula or
the format of the formula. When you print the report, the results of the selected formula are printed in the
selected field.
Note: You can condition the printing of lines based on the value of a formula. If you use a formula that prevents the printing of page header lines on page one of a report, but page header lines do print on some of the subsequent pages, there may be a problem with the appearance of data printed in the detail blocks. Report Builder determines how much space is available for the detail blocks based on the layout of the first page of a report. If subsequent pages need more space for header printing than page one does, some detail data could be lost "behind" the header data.
Functions
With functions, you can retrieve a value for a data item, string, number, date, or time. Every function you use has a
unique name that identifies the operation it performs. Each function contains from zero to several parameters.
Parameters are denoted with data type in the function. The parameters can be strings, numbers, dates, the value of a
data item, or the result of other functions. Parameters define what kind of information the function requires. Report
Builder provides the following types of functions:
• Aggregate functions let you summarize data for entire columns by calculating a single value from an entire
column of data. Aggregate functions can be applied to input items only. To create aggregate statistics on
formulas, use Totals.
• Non-Aggregate functions return a value for each row in a column instead of calculating a single value from
a column group or a break group.
• String functions manipulate string data types. The output of a string function can be a string, date, or a
number. Some functions yield a TRUE or FALSE. TRUE is expressed as the number one (1) and FALSE
is expressed as zero (0).
• Date/Time functions return information about date and/or time values or they can calculate a date/time
result. A date/time parameter can either be a date input item or function.
• Math functions take numeric values as parameters. The parameters can be number input items, literals, or
functions.
• Special functions provide special capabilities such as selecting a value based on a correlation, assigning
page numbers to a report, and sorting with an international character set.
Description of functions
The Formula Editor provides a large collection of functions to aid you in creating complex formulas. A brief
description of each report function is provided in this section. The functions are grouped into two categories,
aggregate and non-aggregate. Aggregate functions accept only input items as input parameters. Non-aggregate
functions accept input items, numbers, totals, variables, cross tabs, literals or the results of other functions as input
parameters.
Aggregate functions
Average Returns the average of a single column within a break group.
Count Returns a count of the number of input rows read for a single break group.
Maximum Returns the maximum value of a column. Applies to items within a single break
group.
Minimum Returns the minimum of a group of column values. Applies to items within a
single break group.

57
ReportAverage Calculates and returns the average of a single column for the entire report.
ReportCount Returns a count of the number of input rows read for the entire report.
ReportMaximum Returns the maximum value of column for the entire report.
ReportMinimum Returns the minimum value in a group of column values for the entire report.
ReportSum Returns the sum of the values in single column for the entire report.
Sum Returns the sum of the values in a column for break groups.
Non-aggregate functions
CurrentDate Returns system-generated current date. The date will be formatted in the locale
language specified under Regional Settings, if .the "Enable Intl Date Display"
checkbox has been checked from the Format Report menu item, General tab.
CurrentTime Returns the system-generated current time.
DateAddDay Adds or subtracts the specified number of days from the indicated start date.
DateConstruct Returns a date/time value using the input parameters that you provide.
DateDay Returns a number representation of the day of the month (1 to 31) from the input
date/time value.
DateHour Returns a numeric representation of the hour (0 to 23) from the input date/time
value.
DateIFF Returns a specific date based on the value provided by the nInput parameter.
DateMinute Returns a numeric representation of the minute (0 to 59) from the input date/time
value.
DateMonth Returns a numeric representation of the month (1 to 12) from the input date/time
value.
DateMonthBegin Returns a date/time value with the first day of the month represented by the
input date.
DateMonthEnd Returns a date/time value with the last day of the month represented by the
input date.
DateSecond Returns a numeric representation of the seconds (0 to 59) from the input date/time
value.
DateToStr Converts a date/time parameter to a value with a string data type, and returns a
string literal.
DateToStrPicture Formats the date with the picture format you specified, and returns this formatted
string.
DateToStrPictureIntl Formats the date with the picture format you specified, and returns this formatted
string. The output date is converted to locale language as specified in Regional
Settings.
DateYear Returns a numeric representation of the Year from the input date/time value.
NumberAbsolute Returns the absolute value of a numeric input.
NumberCountryFmt Returns a string representation of the input number, in the default international
format set by Windows.
NumberIFF Returns a number, in the default international format set by Windows.
NumberMod Returns the numeric modulo of the function. That is, it returns the remainder
of a division operation.

58
NumberRound Returns the input number rounded to the specified precision.
NumberToCurrency Converts the input number to the default international currency format set in
Windows.
NumberToStr Converts the input number to a string format, with the specified number of
decimal places.
NumberToStrPicture Returns a string value of a number formatted in the specified picture
format.
NumberTruncate Truncates the input number to the specified number of decimal places.
PageNumber Returns the current page number of the report.
Power Returns the input number raised to the specified number.
ReportDevice Returns the name of the printer device to which your report is currently connected.
ReportDriver Returns the name of the printer driver to which your report is currently connected.
ReportFileName Returns the filename of your current report.
ReportPort Returns the name of the physical port to which your printer is currently connected.
StrCase Searches a comma delimited string, and returns the substring specified by
the case element.
StrCompare Compares the contents of String1 to the contents of String2.
StrlFF Returns a specific string based on the value provided by the value parameter.
StrLeft Extracts and returns the specified number of characters from the left side of the
input string.
StrLength Returns the length of the string.
StrLower Returns the input string with all characters in lower case.
StrLTrim Removes the leading white space from the input string, and returns the new value.
StrMid Returns a substring of string, of the length specified by you, and begins
extraction at start.
StrPad Maintains the string length at the specified size by either truncating the string, or
adding blanks to its length.
StrProper Starts each word in the input string with a capital letter, followed by lower case
letters.
StrRepeat Returns a value where the input string is repeated the specified number of
times
StrReplace Returns a string where a specific section of the input string has been replaced with
the replacement string.
StrRight Extracts and returns the specified number of characters from the right side of
the input string.
StrRTrim Returns the input string with all trailing white space removed.
StrScan Searches for a specified character or characters and returns its location (offset) in
the input string.
StrSpaces Returns a string with the specified number of blanks.
StrTabColSuppress Returns a string with repeating column values suppressed.
StrTabRowSuppress Returns a string with repeating row values suppressed.
StrTabSeparate Returns a tab separated string, with a tab replacing each space between words.

59
StrToDate Converts a string to date/time format.
StrToNumber Converts a string to number format.
StrTranslate Converts a string to number format.
StrTrim Returns a string with all extra white space removed (trimmed).
StrUpper Capitalizes all the letters in the input string.
TotalPages Returns an integer representing the highest page number in the entire report.
Note that if you use the Reset Pages feature in the Format Report dialog, General
tab, then this number represents the highest page number for the current break
group only.
Note that input items and variables can not be used in report header or footer.
WeekDay Returns the week day of the date as a number.
XTabGetColCount Returns the number of columns in a tab delimited matrix.
XTabGetColHeadings Returns a tab separated string of column names for the cross tab matrix.
XTabGetRowCount Returns the number of rows in a matrix.
XTabGetRowHeadings Returns a tab separated string of row names for the cross tab matrix.

60
Report Programming with ActiveX This chapter provides a reference for Report Builder’s ActiveX interface, helping you program reports using Gupta Team
Developer. It discusses the following topics:
• Report Builder and development tools
• Design options
• Creating the report window object
• Activating the report window object
• Automation Object Hierarchy
• Using Report Builder ActiveX from the SQLWindows Controls Palette
The Report Builder ActiveX interface tutorial on page 7-53 shows you how to build a report that incorporates features of the
ActiveX interface.
Report Builder and development tools
You can use Report Builder in conjunction with a number of application development tools, such as Gupta
SQLWindows and Visual Basic. The tutorial in chapter 7 assumes you are using SQLWindows.
Using Report Builder with SQLWindows
SQLWindows calls report templates through the use of SAL (Scalable Application Language) function calls. With
this interface, SQLWindows can easily print, display, or otherwise interact with the templates you create.
When you are ready to create a report, first design a template in Report Builder, then use various function calls to
produce different results. For instance, you can use SalReportPrint to print a report, or SalReportView to view a
report on screen.
How does it work?
Report Builder can request and then receive data from SQLWindows applications, perform calculations on the input
data, format the data, and then generate a report for printing or viewing.
For example, suppose a SQLWindows application contains data for a mileage log. In this situation, you can create a
report template that defines how you want the data to appear. You control the font type and size, any sizing
conventions, and whether or not to add pictures (bitmaps) with the report. When SQLWindows makes a call to
SalReportView, for example, SQLWindows displays the report using the information in the report template.
A call made to SalReportView To view the report
Report Builder begins asking for rows of data
SQLWindows returns the rows of data to Report Builder
SQLWindows Report Builder
Call SalReportView

61
Because the report template and the SQLWindows application are independent of each other, you do not need to
create one before the other. The SQLWindows application uses a SalReport function to specify when in the
application to start generating a report.
After you design the report template, export it as a .QRP file. When SQLWindows calls the report engine, it is
requesting a report based on the template you designed.
Design options
The report window object in SQLWindows exposes methods in an ActiveX automation server. You have a great
deal of flexibility in how you use these methods in reporting activities. You can control exactly what a user can or
cannot do with a report. Some approaches you can take in designing report applications are suggested below.
• In the simplest case, you can use the report window’s Define Query dialog at designtime, and run the report
at runtime, hiding the report window’s toolbar.
SQLWindows stores both the report template and the query in the outline. The template corresponds to a
Report Builder 1.1 *.QRP file. The template and query together correspond to a Report Builder 1.5 *.CQT
file.
• To give the user more flexibility, you can create an initial report at designtime and display the toolbar at
runtime and then, for example, let the user change the content of the report through the Define Query
dialog, change the formatting of the report, or add computed values.
• Instead of exposing the Define Query dialog at designtime, you can display a custom dialog at runtime where
you gather information from the user that you use, for example, to build a WHERE clause in a SELECT
statement.
• If the data source is not a SQL database, you can expose the toolbar and let the user design the report at
runtime. The application would take the report, export it to an *.QRP file, and then call SalReport*
functions to populate the report with the data.
Creating the report window object
To follow this example, you must have installed Gupta Team Developer and must be familiar with use of the
outline.
To use the Report Builder ActiveX automation server, add its include library:
1. Select the Libraries item in the outline.
2. In the Add Next Level list in Coding Assistant, select "Report Builder".
SQLWindows adds a File Include statement to the outline with the name of the
Report Builder *.APL file.
To create a top-level instance of the report window, create an instance of cReportBuilderWindow as you would
create an instance of any other top-level window class. For example, you can select cReportBuilderWindow from
the New submenu or from the Coding Assistant.
To create a child instance of cReportBuilderWindow, click its button in the ActiveX toolbar and draw it on a form
window or dialog as you would any other child object class.
Activating the report window object
To activate the report window object, double click it. Once is it activated, you see the Report Builder toolbar.

62
Automation Object Hierarchy
Report Builder ActiveX Automation Objects offer an extensive ActiveX interface to Report Builder which allows
any ActiveX Automation container with programming support to create and run queries and reports. The Report
Builder Document automation object is an ActiveX class. Each Report Builder ActiveX Automation Object, with
the exception of the ReportBuilderDocument automation object, is represented by a functional class. Each
functional class has member functions, which are called methods. The automation interface is structured in such a
way that virtually every component of a report—fields, lines, blocks, groups, inputs and query definitions—is
represented by an automation object.
Below is a list of Report Builder's automation objects, with indentation indicating ownership.
ReportBuilderApplication
ReportBuilderDocuments
ReportBuilderDocument
ReportBuilderInput
ReportBuilderVariable
ReportBuilderTotal
ReportBuilderXtab
ReportBuilderExpression
ReportBuilderGroup
ReportBuilderBlock
ReportBuilderLine
ReportBuilderField
ReportBuilderPicture
ReportBuilderQueryTable
ReportBuilderQueryColumn
ReportBuilderQueryJoinkey
ReportBuilderQueryConditions
ReportBuilderQueryHaving
ReportBuilderQueryOrderby
ReportBuilderApplication automation object
The ReportBuilderApplication automation object can be created from COM. It represents the Report Builder
application. When a ReportBuilderApplication automation object is created, Report Builder is launched with no
open reports.
Methods
Name Purpose
ActiveDocument Returns the ReportBuilder.Document object for the active document.
Documents Returns the ReportBuilder.Documents object.
Hide Hides the Report Builder main window.
Quit Shuts down Report Builder.
Show Displays the Report Builder main window.
ReportBuilderDocuments automation object
The ReportBuilderDocuments automation object is derived from the ReportBuilderApplication automation object.
Using this object, you can create new documents, open existing documents, and locate an already open document.
Methods

63
Name Purpose
Add Adds and returns a new empty ReportBuilder.Document.
Application Returns a ReportBuilder.Application object.
Count Returns the count of documents.
Item Returns the ReportBuilder.Document by index or name.
Open Opens a report file and returns the ReportBuilder.Document object.
ReportBuilderDocument automation object
The ReportBuilderDocument automation object represents the main Report Builder automation interface. In Report
Builder automation, the report document is the top- level embedded object which is placed in a form to create a
report. The ReportBuidlerDocument object contains all the top level calls for both the query and report side of the
report document.
ReportBuilderDocument event interface
The ReportBuilderDocument object has an event interface. This interface creates events for the report generation
notifies.These events are fired whenever report pages are generated (when the report is viewed or printed).
The ReportBuilderDocument event interface can fire the events shown in the table below.
Event Fired when
GenerationNotify Each block is generated for a page when a report is previewed or printed
FetchFirst First report input data fetch when a report is previewed or printed
FetchNext Each fetch of report input data after the first fetch
FetchInputData Each report input for each row fetch
Note: The fetch events are fired only if the user has called the document’s SetFetchOverride member.
Methods
Name Purpose
AddColumnFormula Adds a formula to a column in the report
AddCondition Adds a query condition object to the report
AddGroupby Adds a group by clause to the report
AddHaving Adds a query having an object to the report
AddJoinkey Adds a query join key object to the report
AddOrderby Adds a query order by object to the report
AddTable Adds a query table object to the report
AppendReportInput Adds an input item to the end of the list of input items in the report
AreLongsInQuery Indicates that there are long varchar columns in the report query.
CloseConnection Closes the database connection
CompileQuery Forces a compile of the query
CreateReportBreakGroup Creates a new break group object

64
CreateReportBreakGroupID Creates a new break group ID: a unique identifier for the break group
CreateReportExp Creates a new expression object to be used in the report
CreateReportGroup Creates a new group object
CreateReportSkeleton Creates a “skeleton,” which is a default report window with report, page, and
detail groups
CreateReportTotal Creates a new Total object
CreateReportVariable Creates a new Variable object
CreateXTab Creates a new cross tab (XTab) object
DefineQuery Displays the Report Builder Define Query dialog
ExecuteQuery Executes a query
ExportReportTemplate Exports an existing Report Builder template
GetAccessName Gets the database access name
GetAvailableColumns Gets a comma separated list of table names and a count of the number of tables
available in the database to which the report is connected
GetAvailableTables Gets a comma separated list of columns and a count of the number of columns
available in the database to which the report is connected
GetCanPrint Determines if there is a printer defined for the report to print to
GetColumn Gets a query column object from a query
GetColumnCount Gets the number of columns in the query
GetColumns Gets the number of columns in the report
GetColumnsGutter Gets the width of the space between columns
GetColumnWidth Gets the width of a column
GetCondition Gets a query condition object
GetConditionsCount Gets the number of conditions in a query
GetCurrentPage Gets the current page number
GetDatabase Gets the name of the database to which the report is connected
GetDefaultAdjust Gets the current default text adjust value
GetDefaultFont Gets the default font and the font attributes of the report
GetDescription Gets the report file description
GetFastDisplay Gets the Fast Display property setting
GetFileName Gets the file name used to save the report
GetGrid Returns the Report Builder grid setting
GetGridUnits Gets the unit of measure of the grid marks
GetGroupby Gets a Group By column from the report
GetGroupbyCount Gets a count of the number of Group By columns in the report
GetHaving Gets a Having object from the report
GetHavingCount Gets the total number of queries having objects in a report
GetInputs Gets a comma separated list of inputs items and a count of the number of input
items in a report

65
GetInputFromName Gets an input item using its name as an identifier
GetJoinkey Gets a join key from a query
GetJoinkeyCount Gets the total number of join keys in a report
GetLoginName Gets the login name of the user connected to the database
GetOrderby Gets an order by object from a query
GetOrderbyCount Gets the total number of orderbys in a query
GetOrientation Gets the page orientation constant
GetPageMargins Gets the page margins for a report
GetPageSize Gets the width and height of a page
GetPassword Gets the database login password of the report user
GetPrinterDevice Gets the printer device associated with the report
GetPrinterDriver Gets the printer driver associated with the report
GetPrinterPort Gets the printer port currently associated with the report
GetReportExpByIndex Gets an Expression automation object using the Expression index as an identifier
GetReportExpCount Gets the number of Expression objects in a report
GetReportExpFromName Gets a Expression object using its name as an identifier
GetReportExpFromText Gets an expression object using its text as an identifier
GetReportGroup Gets a Group object
GetReportTotalByName Gets a Total automation object using its name as an identifier
GetSQL Gets the SQL statement associated with a query
GetTable Gets a query table object
GetTableCount Gets the number of QueryTable automation objects in the report
GetTotals Gets a comma-separated list of input totals and a count of the number of total in
the report
GetUseDefaultPrinter Gets the setting of the Use Default Printer option
GetVariables Gets a comma-separated list of input variables and a count of the number of
input variables in the report
GetVariableFromName Gets a Variable object using its name as a identifier
GetXTabs Gets a comma-separated list of input cross tab and a count of the number of
input cross tab (XTabs) in the report
GetXTabFromName Gets a crosstab (XTab) object using its name as an identifier
GotoFirstPage Displays the first page of the report
GotoLastPage Displays the last page of the report
GotoNextPage Displays the next page of the report
GotoPage Displays the specified page of the report
GotoPreviousPage Displays the previous page of the report
HasReport Determines if a top-level window contains an embedded report
HasReportGroup Indicates that a report contains a group.

66
ImportReportTemplate Imports an existing Report Builder template
InDesignMode Puts the report in design mode
InsertReportInput Inserts a new Input object after an existing one
IsActualSize Determines whether the report displays all objects in the size at which they print
IsConnected Determines if the report is connected to a database
IsNormalQuery Determines if the query is normal (as opposed to summary)
IsQueryExecuted Determines if the query has been executed
IsReportModified Determines if the report has been modified
MatchInputsToQuery Matches input items
OpenConnection Opens a connection from the report to a database
OpenConnectionAs Opens a connection from the report to the database using the specified login
name and password
OpenReportFile Opens the specified report file
Print Prints the report
RegenerateSQL Regenerates the SQL for a report query when the query has been modified.
ResetPreview Resets the display of the report preview
ResynchQuery Resynchronizes the query
SavePagesAs Saves the report's pages to an alternative file type
SaveReportFile Saves a report file
SetAccessName Sets the database access name for the user
SetActualSize Displays the objects in the report at their actual size (the size at which they
print)
SetColumns Sets the number of columns in a report
SetColumnsGutter Sets the width of space between columns
SetDatabase Sets the database to which the report is connected
SetDefaultAdjust Sets the default text justification of the fields
SetDefaultFont Sets the report’s default font
SetDescription Sets the report file description
SetDesignMode Sets the report to design mode
SetFastDisplay Processes the report faster when it is previewed
SetGrid Turns grid rounding on or off
SetGridUnits Sets the number of 1/16 inch grid units
SetLoginName Sets the Login Name for the report user connected to the database
SetOrientation Sets the printer page orientation
SetPageMargins Sets the report's page left, top, right and bottom margins
SetPageSize Sets the report page width and height
SetPassword Sets the database Password of the report user to connect to the database
SetPrintAbortLine1 Sets the replacement text of the first centered-text field of the Cancel Print dialog

67
SetPrintAbortTitle Sets the replacement text for the Cancel Print dialog box title
SetPrinter Sets the printer to which the report prints
SetQueryNormal Sets the query to normal (as opposed to summary)
SetReportAbortLine2 Sets the replacement text of the second centered-text field of the Cancel Print
dialog
SetReportModified Indicates that the report has been modified
SetUseDefaultPrinter Sets the report to automatically print on the default printer
ReportBuilderInput automation object
The ReportBuilderInput automation object is used to define a report’s input items. In Report Builder, input items are
the same as a data field in a record, or a column item in a database table. All the input items that you define together
make up an input row. Report Builder processes one input row at a time. The input row is updated after every input
fetch. The input items must be entered in the same order they appear in your input row. If they are not, your report
results may not appear as you expected. Use the ReportBuilderInput automation object to define the name and the
data type of each input item that is received by the report.
Methods
ReportBuilderInput methods.
Name Purpose
Destroy Destroys a input item
GetDataType Gets the data type of a input item
GetID Gets the unique identifier of a input item
GetIndex Gets the zero-based index of a input item
GetName Gets the name of a input item
GetNext Gets the next input item from the input row
GetPrevious Gets the previous input item from the input row
SetDataType Sets the data type of the input item
SetIndex Sets the zero-based index of the input item to reorder it in the list of input items
SetName Sets the name of the input item
ReportBuilderVariable automation object
The ReportBuilderVariable automation object is used to get and set input variable properties. In Report Builder,
input variables are similar to input items. Like input items, the name and the data type of each input variable needs
to be defined. An input variable can assume any value of a specified data type. Unlike input items, the order of
definition is not important and input variables do not need to be updated with each input fetch.
Methods
ReportBuilderVariable methods.
Name Purpose
Destroy Destroys a variable

68
GetDataType Gets the data type of a variable
GetID Gets the unique identifier of a variable
GetIndex Gets the zero-based index of a variable
GetName Gets the name of a variable
GetValue Gets the value of a variable
SetDataType Sets the data type of a variable
SetName Sets the name of a variable
SetValue Sets the value of a variable
ReportBuilderTotal automation object
The ReportBuilderTotal automation object is used to get and set input total properties. In Report Builder, input
totals, also known as two-pass totals, let you calculate and display aggregate statistics about your input items and
formulas. Input items or formulas are evaluated to return an aggregate value. This aggregate value is an input to the
report, and can be assigned to any Report Builder field. All formulas are evaluated and statistics accumulated
immediately after each input row is fetched.
Methods
Name Purpose
Destroy Destroys a total
GetID Gets the unique identifier of a total
GetExp Gets a total expression
GetName Gets the name of a total
GetPreProcess Gets the report's pre-process setting
GetReset Gets the reset setting associated with a report total
GetType Gets the type of report total
SetExpID Sets the unique identifier for a report total expression
SetExpText Sets the text of a report total expression
SetPreProcess Turns on the report total's pre-process setting
SetReset Sets the reset setting associated with a report total
SetType Sets the type of a report total
ReportBuilderXTab automation object
The ReportBuilderXTab automation object is used to gather cross tabular statistics on a report's input rows. A report
can contain numbers of cross tab and cross tabs (XTabs) can contain numbers of row and column categories. All
category items are evaluated and statistics accumulated immediately after each input rows is fetched. The resulting
two-dimensional matrix is based on the data provided and the categories selected. The greater the number of row and
column categories you select, the larger and more complex your crosstab (XTab) matrix is.
Each crosstab (XTab) object must be given a unique name. The crosstab (XTab) matrix is an input to the report and
crosstab (XTab) objects can be assigned to any field in a report. The crosstab results (that is, the contents of the
matrix) will vary depending on where the crosstab (XTab) is placed in the report.

69
Methods
These are the ReportBuilderXTab methods.
Name Purpose
Destroy Destroys a crosstab
GetCellExp Gets an expression from a crosstab cell
GetCellPicture Gets the picture format for a crosstab cell
GetColumnCount Gets the number of columns in a crosstab cell
GetColumnExp Gets an expression object from a crosstab column
GetColumnHeader Gets the header from a crosstab column
GetName Gets the name of a crosstab
GetReset Gets the reset setting associated with a crosstab
GetRowCount Gets the number of rows in a crosstab
GetRowExp Gets an expression object from a crosstab row
GetRowHeader Gets the header from a crosstab row
GetStat Gets a crosstab statistic type
GetStatHeadDefault Gets the default crosstab statistic header
GetStatHeader Gets a crosstab statistic header
GetStatOrder Returns the crosstab (XTab) statistics order.
GetSummaries Gets the summary statistics for a crosstab object
GetUseDefaultStatHead Returns the statistic property which can be set so that Report Builder uses a
default statistic header for a crosstab statistic.
SetCellPicture Sets the picture name in a crosstab cell.
SetColumnExpID Sets the expression ID for a crosstab column.
SetColumnExpText Sets the expression text for a crosstab column.
SetColumnHeader Sets the header for a crosstab column.
SetReset Sets the reset setting associated with a crosstab
SetRowExpID Sets the expression ID for a crosstab row.
SetRowExpText Sets the expression text for a crosstab row.
SetRowHeader Sets the header for a crosstab row.
SetStat Sets a crosstab statistic.
SetStatHeader Sets the statistic header for a crosstab.
SetStatOrder Sets the order of crosstab statistics.
SetSummaries Sets the summary statistics for a crosstab (XTab) object.
ReportBuilderExpression automation object
The ReportBuilderExpression automation object is used to handle expressions in a report. In Report Builder,
expressions are items or a combination of items and operators that yield a single value. An expression can be the
result of a function, a variable, a constant or two or more expressions connected with an operator.

70
Methods
ReportBuilderExpression methods.
Name Purpose
GetDataType Gets the data type of a expression
GetID Gets the unique identifier of a expression
GetIndex Gets the zero-based index of a expression
GetName Gets the name of a expression
GetText Gets the text of a expression
IsSimple Indicates that a expression is literal
IsSimpleInput Indicates that the input item associated with a expression is literal
ReportBuilderGroup automation object
The ReportBuilderGroup automation object is used to create, get and set a report's group properties. In Report
Builder, a group is a paired set of header and footer blocks. This includes all the lines, fields, pictures, and boxes
belonging to these groups. Report Builder generates a block group for every break group in a report, as well as for
the Page, Report, and Detail blocks of a report.
Methods
ReportBuilderGroup methods.
Name Purpose
CreateBlock Creates a new group
Destroy Destroys a group
GetBlock Gets a group
GetID Gets the unique identifier of a group
GetInput Gets a input
GetKeep Gets the keep type for a group
GetType Gets type of group
HasBlock Determines whether a group object contains a block
SetKeep Sets the keep type for a group
ReportBuilderBlock automation object
The ReportBuilerBlock automation object is used to define and manipulate report blocks. In Report Builder, a block
is a group of related lines and objects in the report. A report is comprised of several types of blocks, such as header
blocks, footer blocks, and detail blocks. Multiple lines of Report Builder objects can be placed in each block. The
lines and objects contained in a block are referred to as a block group. The ReportBuilderBlock automation object
allows for the formatting of blocks with features such as Keep on Page, Keep in Column, Break on Column or Page,
and Minimum Block Height.

71
Methods
ReportBuilderBlock methods.
Name Purpose
AppendLine Adds a line to the end of a block
CreatePicture Creates a picture
GetFirstPicture Gets the first picture in a block
GetFormula Gets a formula in the form of a expression object from a block
GetGroup Gets a group
GetID Gets the unique identifier of a block
GetKeep Gets the keep type for a block
GetLine Gets a line object and its zero-based index from a block
GetLineCount Gets the number of lines in a block
GetMinHeight Gets the minimum height of a block
GetType Gets the type of block
HasFormula Determines whether a block has a formula
HasPicture Determines whether a block has a picture
InsertLine Inserts a line into a block
SetFormula Sets a formula in a block
SetFormulaText Sets the text in a formula contained by a block
SetKeep Sets the keep type for a block
SetMinHeight Sets the minimum height of a block
ReportBuilderLine automation object The ReportBuilderLine automation object is used to create, get and set a report's line attributes. Line properties
and display characteristics which may be manipulated using this object include:
• Suppress Line Spacing, which adds a blank line to the bottom of a block group.
• Suppress Blank Line, which is available for all blocks in a report except lines in the Page Header and Page
Footer blocks.
• Conditional Line or Conditional Display, which suppresses line printing when the results of a selected
formula evaluate to a zero, a null string, or a null date.
• Alternate Background, which may be used to create barred reports.
• Background and Border Color for the line.
• Page Break Before or Column Break Before, which adds a page break or column break before a line is
printed.
• Borders, which places a border around a line.
• Minimum height, which is used to specify a minimum line height. Report Builder calculates the minimum
height of a line based on the largest font used in that line; however, you can specify a minimum line height.
When the contents of a field on in this line are larger than the defined minimum line height, Report
Builder increases the height of the line to accommodate it.

72
Methods
ReportBuilderLine methods.
Name
Purpose
CreateField Adds a field to the report
Destroy Destroys a line
GetAscent Gets the maximum ascent of all field fonts on the line
GetBackgroundAlternate Gets the alternate background property of a line
GetBackgroundColor Gets the background color of a line
GetBlankSuppress Gets the blank line suppress property for a line
GetBlankSuppressConcat Gets the concatenate suppressed blank line space property of a line
GetBlock Gets a block from a line
GetBorderColor Gets the border color of a line
GetBorders Gets the border measurements of a line
GetEject Gets the eject property of a line
GetField Gets a field object from a line
GetFieldCount Gets the number of fields in a line
GetFormula Gets a formula in the form of a expression object from a line
GetHeight Gets the height of a line
GetID Gets the unique identifier of a line
GetIndex Gets the zero-based index of a line
GetMinHeight Gets the minimum height of a line
GetTop Gets the designtime vertical offset from the top of the block
SetBackgroundAlternate Sets the alternate background property of a line
SetBackgroundColor Sets the background color of a line
SetBlankSuppress Sets the suppress blank line space property of a line
SetBlankSuppressConcat Sets the concatenate suppressed blank line space property
SetBorderColor Sets the border color of a line
SetBorders Sets the borders around a line
SetEject Sets the line eject property
SetFormulaID Sets the unique identifier of formula in a line or field
SetFormulaText Sets the text in a formula contained by a line
SetMinHeight Sets the minimum height of a line

73
ReportBuilderField automation object
The ReportBuilderField automation object is used to create, get and set a report's field attributes. Report fields
are contained in report lines and they can hold literals, input items, input variables, input totals, input cross tabs, or
formulas. Field properties and displays characteristics which may be manipulated using this object include:
• Position
• Width
• Format
• Justification
• Conditional Display
Methods
ReportBuilderField methods.
Name Purpose
Destroy Destroys a field
GetAdjust Gets the text adjust setting
GetBackgroundColor Gets the background color of a field
GetBorderColor Gets the border color of a field
GetBorders Gets the borders around a field
GetDropDown Gets the number of drop down continuation lines in a report
GetExp Gets a field expression
GetFont Gets the font of a field
GetFormula Gets a formula in the form of a expression object from a field
GetID Gets the unique identifier of a field
GetIndex Gets the zero-based index of a field
GetLeft Gets the position of the field from the left margin
GetLine Gets a line object
GetName Gets the name of a field
GetPicture Gets the format string used to format number and date/
time values associated with a picture
GetSuppressGroupBreak Gets the suppress repeating values reset on a break group
GetSuppressPageBreak Gets the suppress repeating values reset on a page break
GetSuppressRepeating Gets the suppress repeating values reset on a field
GetTab Gets a crosstab settings
GetTabsCount Gets the number of cross tabs in a report
GetTextColor Gets the text color of a field object
GetWidth Gets the width of a field
LinkFields Links another field to a field
SetAdjust Sets the text adjust property for a field
SetBackgroundColor Sets the background color of a field

74
SetBorderColor Sets the border color of a field
SetBorders Sets the borders around a field
SetDropDown Sets the number of drop down continuation lines associated with a field
SetDropDownDynamic Sets dynamic drop down for a field
SetExpID Sets the unique identifier for a field
SetExpText Sets the text of a field
SetFont Sets the font for the text in a field
SetFormulaID Sets the unique identifier of formula in a line or field
SetFormulaText Sets the text in a formula contained by a line
SetLeft Sets the position from the left page margin for a field
SetPicture Sets the string used to format number and date/time values in a field
SetSuppressGroupBreak Sets the suppress repeating values reset on a break group
SetSuppressPageBreak Sets the suppress repeating values reset on a page break
SetSuppressRepeating Sets the suppress repeating values property
SetTab Sets the crosstab properties of a field
SetTextColor Sets the text color of a field
SetWidth Sets the width of a field
SetWidthDynamic Sets the field width to dynamic
SetXTabTabs Sets the tabs for a crosstab formula in a field
ReportBuilderPicture automation object
The ReportBuilderPicture automation object is used to get and set report picture properties. In Report Builder,
pictures can be static graphic images or objects. If the report picture is not a static graphic image, then you may
assign input items or input variables to the picture object.
Picture attributes which may be set using this object include:
• Picture Contents
• Location and Size
• Picture Fit
• Scale
• Border and Corners
• Background and Border Color
Methods
ReportBuilderPicture methods.
Name Purpose
ClearPictureInputOrVariable Removes the input item or input variable associated with a picture
Destroy Destroys a picture
GetBlock Gets a picture
GetBorder Gets the type of border of a picture

75
GetID Gets the unique identifier of a picture
GetNextPicture Gets the next picture
GetPictureFile Gets the file name of a picture
GetPictureInput Gets the input item associated with a picture
GetPictureInputVariableType Gets the data type of a picture when the picture is an input or variable
GetPictureVariable Gets the input variable associated with a picture
GetRect Gets the bounding rectangle measurements for a picture
GetScale Gets the type of scaling and the X and Y
coordinates associated with the display of a picture
HasNextPicture Determines whether a report contains more than one picture
SetBorder Sets the border type of a picture
SetPictureFile Sets the name value of a file associated with a picture
SetPictureInputOrVariable Sets the picture object to the input or variable picture
SetRect Sets the bounding rectangle measurements for a picture
SetScale Sets the type of scaling and the X and Y coordinates associated with the
display of a picture
ReportBuilderQueryTable automation object
The ReportBuilderQueryTable automation object is used to get information related to the tables in a report
query.
Methods
Name Purpose
AddColumn Adds a column to the query
GetAvailableColumns Gets a comma separated list of table names and a count of the number of tables in
the query
GetCreator Gets the creator (owner) of a table
GetName Gets the name of a query
GetQualifiedName Gets the qualified reference name of a query
GetQualifyFlag Gets the qualify flag of a query
ReportBuilderQueryColumn automation object
The ReportBuilderQueryColumn automation object is used to get and set information related to the columns in
a report query.
Methods
ReportBuilderQueryColumn methods.
Name Purpose
GetDataType Gets the data type of a column

76
GetFormula Gets a formula associated with a column
GetName Gets the name of a column
GetQualifiedName Gets the qualified reference name of a column
GetSQLExpression Gets the text of the SQL which defines an expression
GetTable Gets a table
GetTableName Gets the name of a column’s table
IsDerived Determines whether the column is derived
IsUnique Determines whether the column is a unique key
ReportBuilderQueryJoinkey automation object
The ReportBuilderQueryJoinkey automation object is used to get and set information related to the joinkeys
in a report query.
Methods
Name Purpose
GetColumn1 Gets the first column in a query
GetColumn2 Gets the second column in a query
GetOperator Gets a query operator
GetOuter1 Gets the left outer join of a query
GetOuter2 Gets the right outer join of a query
GetTable1 Gets the first table in a query
GetTable2 Gets the second table in a query
IsOr Determines whether a joinkey is an Or conjunction operator
ReportBuilderQueryConditions automation object
The ReportBuilderQueryConditions automation object is used to get information related to the conditions in
a report query.
Methods
ReportBuilderQueryConditions methods.
Name Purpose
GetColumn1 Gets the first column in a condition
GetColumn2 Gets the second column in a condition
GetDataType Gets the data type of a condition
GetMode1 Gets the query condition mode of a condition
GetMode2 Gets the second query condition mode of a condition
GetOpConstant Gets the op constant of a condition
GetOperand1 Gets the first operand of a condition

77
GetOperand2 Gets the second operand of a condition
GetOperator Gets a condition operator
GetOr Gets the result of an Or conjunction operator in a condition
GetTable1 Gets the first table in a condition
GetTable2 Gets the second table in a condition
ReportBuilderQueryHaving automation object
The ReportBuilderQueryHaving automation object is used to get information related to the Having clause in a
report query.
Methods
ReportBuilderQueryHaving methods.
Name Purpose
GetColumn1 Gets the first column in a having clause
GetColumn2 Gets the second column in a having clause
GetDataType Gets the data type of a having clause
GetMode1 Gets the query condition mode of a having clause
GetMode2 Gets the second query condition mode of a having clause
GetOpConstant Gets the OpConstant of a having clause
GetOperand1 Gets the first operand of a having clause
GetOperand2 Gets the second operand of a having clause
GetOperator Gets a having clause operator
GetOr Gets the result of an Or conjunction operator in a having clause
GetTable1 Gets the first table in a having clause
GetTable2 Gets the second table in a having clause
ReportBuilderQueryOrderby automation object
The ReportBuilderQueryOrderby automation object is used to get information related to the Order By in a
report query.
Methods
Name Purpose
GetColumn Gets the order by column of the report query
IsAscending Determines whether the sort of a query order by is in ascending order

78
Using ReportBuilder ActiveX from the SQLWindows Controls Palette
The SQLWindows Controls Palette contains a button labeled "Report". If you select this button, then drag over an
area of a layout window, SQLWindows inserts an instance of the Report Builder ActiveX interface. You are then
able to do actual design work on the report, either by importing an existing report template or by creating an entirely
new template, including database queries. You can also preview the report at design time.
Most of the design tools available in the Report Builder workspace described in chapters 3 and 4 are also available
to you while working in the Report Builder ActiveX control inside SQLWindows. But they may be less intuitive
and convenient to use in SQLWindows. In addition, much of the runtime support provided by the Report Builder
workspace, where reports are run in standalone top-level windows, is missing when a report is run from inside an
ActiveX control. You can provide this extra runtime support, but you must do so by adding SAL code that
intercepts report events, controls movement from one page of the report to another, and modifies the report
template. You would use techniques similar to those demonstrated in the tutorial in chapter 7.
In summary, it is fast and easy to put a Report Builder report inside your SQLWindows application using the
ActiveX control, but significant work is required to bring its functionality up to the same level as a report that runs
in the Report Builder workspace.

79
Report Builder Tutorials
This chapter contains the following tutorials that help you learn how to use the various Report Builder features:
Form letter report tutorial
Multi-column report tutorial
Break group report tutorial
Two pass totals report tutorial
Basic cross tabular report tutorial
Advanced cross tabular report tutorial
Report Builder ActiveX interface tutorial
Form letter report tutorial
Many companies need to create form letters. For example, a company may need to send a letter to customers to
inform them of an upcoming sale.
You can use Report Builder to create form letters that contain the basic information you want to repeat in each
letter. Then, you can personalize the letter by including unique information like the customer name and address by
using data from a database.
The Form Letter Report tutorial guides you through the procedures for building your own form letter.
In this tutorial, you create a form letter for an imaginary company named Island T-Shirts. The form letter is
addressed to the various contacts at companies that have ordered T-shirts from Island T-shirts. The information
needed for this form letter tutorial is contained in the ISLAND database.
A copy of the completed form letter report (formltr.cqt) is available in the Gupta, Samples directory.
Creating and formatting a new report
Complete the following steps to create a new report:
1. Launch Report Builder.
When Report Builder completes loading, a new report opens.
2. Select Report, Define Query.
The Define Query dialog box displays.
3. Double-click SQLBase, and then double-click the ISLAND database.
The Connect to dialog box displays.
4. Enter sysadm in the User and Password fields. Click OK.
5. Double-click the COMPANY and CONTACT database tables. Click OK.
Report Builder generates a default report using the data from the selected tables.
6. Select Report, Report Design to switch to design mode.
7. Click the Select tool, and then delete all of the lines from the Page Header, Detail Block, and the Page Footer.

80
8. Select Report, Format, Report.
On the Page Size tab, set the following:
• Paper Style - Letter
• Orientation - Portrait
Click OK.
9. Using the Line tool, insert 25 lines in the Detail Block of your report.
In this tutorial, we use only the Detail Block of the report template.
10. Using the Select tool, right-click the Detail block caption and select Properties from the pop-up menu.
In the Keep field, select On Page. This keeps the contents of each form letter together on one page. Click OK.
11. Save the report.
You have now created a new report and completed some of the basic report formatting. Next, you format the form
letter template.
Formatting the form letter Complete the following steps to format the form letter:
1. Using the Background text tool, enter Island T-Shirts on the first line of the Detail Block.
2. Right-click the text, and select Properties from the pop-up menu.
3. On the Text tab, set the following:
• Width: Maximum
• Justify: Left
4. On the Font tab, set the following:
• Font: Arial
• Weight: Bold
• Size: 18
Click OK.
5. Enter the following on the next two lines of the Detail block:
• 303 State Street
• Santa Barbara, CA 93510
Right-click the two text blocks and set the following:
• Width: Maximum
• Justify: Left
• Font: Arial
• Weight: Regular
• Size: 10
Click OK.

81
6. Skip one line after the address and then, using the Field tool, add a field on the left margin of the report.
7. Using the Select tool, right-click the field and select Properties from the pop-up menu.
8. Click Edit Field Formula.
The Formula Editor dialog box displays. Double-click the CurrentDate function and then click OK.
9. On the Field tab, enter MMMM d, yyyy in the Format field.
This returns a date like March 4, 1992.
10. Click OK.
11. Open the Input Items folder in the left window, and then drag and drop the following input items. Place the
input items on separate lines, starting on the second line beneath the date (These fields display the customer
address.):
CONT_FIRST_NAME CONT_LAST_NAME (Place these fields next to each other on the same
line.)
COMPANY_NAME
ADDRESS CITY STATE ZIP (Place these fields next to each other on the same line.)
CONT_PHONE
Using the Report, Format, Link Fields command, link the CONT_FIRST_NAME and CONT_LAST_NAME
input items, and link the CITY, STATE, and ZIP input items.
12. Using the Report, Align, Left Sides command, align the input items with the left margin.
13. Select all of the company contact input items and then select Report, Format, Fields. Set the following:
• Width: Dynamic
• Justify: Left
• Font: Arial
• Weight: Regular
• Size: 10
Click OK.
14. Select Report, Report Preview to see how your form letter report appears at this stage.
15. Select Report, Report Design to return to your report template.

82
16. Enter the following as background text. Enter each as a separate text block on a separate line. Skip lines
between paragraphs:
Island T-Shirts is discounting its stock next month for its annual post-
Christmas sale. We will discount all orders by 40%. All of our popular T-
Shirt styles are for sale during this event.
We value your business. All orders exceeding a quantity of 200 will receive
an additional 10% discount.
Thank you for your time
Cynthia Bishop
Marketing Manager
Island T-Shirts
17. Select all of the fields you have just created and then select Report, Format, Background Text. Set the
following:
• Width: Dynamic
• Justify: Left
• Font: Arial
• Size: 10
18. Select Report, Report Preview.
Congratulations! You have completed a form letter report.
A copy of the completed form letter report (formltr.cqt) is available in the Gupta, Samples directory.
Multi-column report tutorial
Using Report Builder, it is easy to design and print labels. You can create your own address labels, diskette labels,
video labels, file labels, and so on. You can set the size, contents, and can even include graphics.

83
To create a labels template, you need to build a multi-column report. This tutorial guides you through the process
for building a multi-column report for mailing labels. The labels template uses the Avery standard 3 column address
labels.
Like all report templates, you must provide the data to populate your label template. This data can come from any
of a variety of databases. For this tutorial, you use the data in the ISLAND database.
A copy of the completed multi-column report (multi.cqt) is available in the Gupta, Samples directory.
Creating and formatting a new report
Complete the following steps to build a mailing labels report:
1. Launch Report Builder.
Report Builder opens with an empty report window.
2. Select Report, Define Query.
The Define Query dialog box opens.
3. Double-click SQLBase on the Source tab.
The SQLBase Server launches and the ISLAND database displays on the Source tab.
4. Double-click the ISLAND database.
The Connect to dialog box opens.
5. Enter sysadm in the User and Password fields. Click OK.
The ISLAND database tables display.
6. Double-click the COMPANY database table.
The table displays in the right-hand window.
7. Click OK.
Report Builder creates a new default report. It opens in Preview mode.
8. Save the report.
You have now launched Report Builder and created a default report. In the next section, you are going to format the
mailing label report.
Formatting the multi-column report Complete the following steps to format the multi-column report:
1. If you are not in design mode, select Report, Report Design.
2. Select Report, Format, Report.
The Properties dialog box is displayed.
3. On the Page Size tab, set the following:
• Paper Style: Letter.
• Orientation: Portrait.
4. On the Page Layout tab, set the following:
• Top: 1
• Bottom: 0.25
• Left: 0.5
• Right: 0.5

84
• Number of columns: 3
• Spacing Between Columns: 0.25
This sets up your report template as a multi-column report with three columns. Click OK.
5. If it is not already displayed, select View, Toolbars, Tools Toolbar.
6. Click the Select tool. Delete all of the lines from the Page Header, Detail Block, and Page Footer.
7. Using the Line tool, insert 6 new lines in the Detail Block of your report template.
8. Using the Select tool, right-click the Detail block caption, and choose Properties from the pop-up menu.
The Properties dialog box is displayed. Set the following:
• Force Minimum Height: 1
• Keep: In Column
Click OK.
This keeps the contents of each mailing label together in one block. Report Builder starts a label at the top of the
next column when there is not enough space in the current column for the entire label.
9. Using the Picture tool, draw a small picture object and align it to the left side of the Detail Block.
10. Right-click the picture object and select Properties.
The Properties dialog box opens.
You can use this dialog box to assign a graphic, OLE object, input item, or input variable (with an object data
type) to this picture object. We are going to assign a static graphic item.
11. On the Picture tab, select Static and click Paste From.
The Paste From dialog box opens.
12. Select the bitmap or other graphic you want to use in your label. For this tutorial, you can use the graphic titled
hris.bmp located in the Gupta, Samples directory. Click Open.

85
You return to the Properties dialog box.
13. On the Appearance tab, you can specify the position and size of the picture object.
You can also add a border to the picture object from this tab. If you are using the hris.bmp graphic, set the
border to None.
14. On the Scale tab you can adjust the size of the graphic within the Picture object.
Select one of the following:
• Scale: Manually set the size of the graphic.
• Size to Fit: Size the graphic to the dimensions of the picture object.
• Size for Best Fit: Size the graphic to roughly that of the picture object, but retain the graphic’s
original proportions. If you are using the hris2.bmp graphic, select this radio button.
15. Click OK to return to the report template.
Report Builder displays the graphic inside the picture object.
16. Drag and drop the following input items to the Detail Block.
• COMPANY_NAME
• ADDRESS
• CITY
• STATE
• ZIP
17. Place the CITY and STATE fields next to each other on the same line.
18. Select both the CITY and STATE fields (Select multiple fields by holding down Shift and clicking each item.).
19. Right-click one of the fields and select Format, Link Fields.
20. Select all the fields except the STATE field, right click on one of the selected fields, and select Align, Left
Sides from the pop-up menu.
21. Select all of the fields and then select Report, Format, Fields. Set the following:
• On the Field tab, set Width to Dynamic Width.
• On the Font tab, set Font to Arial Regular and Size to 9.
Click OK.
22. Select Report, Report Preview to view the mailing labels. Select Report, Report Design to return to your
report template.
23. You can continue to format these labels by using bolding, italics, different fonts, and so on.
Congratulations! You have successfully completed the multi-column report tutorial and have created a mailing
labels report template.
A copy of the completed multi-column report (multi.cqt) is available in the Gupta, Samples directory.

86
Break group report tutorial
You can use Report Builder to produce reports that subdivide information into logical units called break groups. You
can perform summary calculations (averages, totals, counts, maximums, and minimums) on the data in each of the
break groups, and display these summaries in your report. Typically, you would want to see these summary values
whenever a break group changes.
For example, you may receive numerous invoices from various companies. You could use a break group report to list
all of the invoices from each company, along with the detail of each invoice.
A copy of the completed break group report (breakg.cqt) is available in the Gupta, Samples directory.
In this tutorial, you create a break group report using the ISLAND database. You begin this procedure by defining a
query and creating a default report.
Defining a query and creating a default report
Complete the following steps to define a query and create a default report:
1. Launch Report Builder.
Report Builder starts and a new report window is opened.
2. Select Report, Define Query.
The Define Query dialog box opens.
3. Double-click SQLBase.
4. Double-click the ISLAND database.
5. In the Connect to dialog box, enter sysadm in both the User and Password fields. Click OK.
6. Double-click the INVOICE table and the INVOICE_ITEM table. When you select more than one table,
Report Builder displays the link between the tables.

87
7. Select the Sort tab.
8. Click the top Sort By field. A pop-up list of available columns appears. Select COMPANY_NAME.
9. Click the top Asc/Desc field. Select Asc from the pop-up list.(Asc for ascending order, Desc for descending
order)
10. Click the next Sort By field, and select INVOICE.INVOICE_NO. Asc appears in the Asc/Desc field.
11. Click the next Sort By field, select ITEM_NO. Asc appears in the Asc/Desc field.
12. You have now successfully defined the query for your report. Click OK.
A default report is generated using the query you defined. You can now modify the report to improve its layout
and readability.
Improving the report layout and readability
Complete the following steps to improve the layout and readability of your report:
1. Select Report, Report Design.
2. Select the Select tool.

88
3. Select and delete all of the lines under the Page Header, Detail Block, and Page Footer captions.
4. Select Report, Format, Report.
5. Select the Page Size tab. Change the Paper Style popup menu to Letter. Click OK.
6. Save the report.
Selecting the break groups
Complete the following steps to select the break groups:
1. Select Report, Format, Break Groups to open the Format Break Group dialog box.
2. Select the break groups you want to use by double-clicking the items in the Input Items list. For this report,
select the break group items COMPANY_NAME and INVOICE.INVOICE_NO, in that order.
3. Click OK.
Adding lines
Complete the following steps to add lines to the report:
1. Select the Line tool.
2. Add the following number of lines to the indicated block groups:
• 3 lines to the header COMPANY_NAME block group.
• 5 lines to the header INVOICE.INVOICE_NO block group.
• 1 line to the Detail block group.
• 2 lines to the footer INVOICE.INVOICE_NO block group.
• 2 lines to the footer COMPANY_NAME block group.
Adding and formatting fields
Complete the following steps to add and format fields to the report:
1. Select the Background Text tool.
2. Click in the left-most corner of the first line of the COMPANY_NAME header block group. A new
background text object is added.

89
3. Enter Company Name: in this field.
4. Using the Select tool, right-click on the Company Name: text and select the Properties menu item. Select the
Font tab. In the Font popup menu, select Bold. Click OK.
5. In the left pane, open the Input Items folder. The tree expands to display the list of available input items. Drag
the COMPANY_NAME input item to the right pane and drop it to the right of the Company Name text block.
6. Insert the background text Company ID: and the input item COMPANY_ID on the second line of the header
COMPANY_NAME block group.
7. Under the header INVOICE.INVOICE_NO block group, add the following background text and input items:
Invoice Number: INVOICE.INVOICE _NO
Employee ID: EMPLOYEE_ID
Invoice Date: INVOICE_DATE
Status: STATUS
Amount Paid: AMOUNT_PAID
Date Paid: DATE_PAID
Arrange the background text and input items in the manner shown below.
8. In the INVOICE.INVOICE_NO block group, leave the second to last line blank, and enter the following
background text objects on the last line:
• Item Number
• Style ID
• Style
• Color
• Quantity
• Item Price
9. On the first line of the Detail Block group, drag and drop the following input items:
• ITEM_NO
• STYLE_ID
• STYLE
• COLOR
• QUANTITY
• ITEM_PRICE
10. Left align the Item Number background text object with the ITEM_NO input item by shift clicking both and
selecting the Report, Align, Left Sides menu item. Left align the remaining background text objects and input
items.
11. Select all of the background text objects. (You can select multiple background text items by pressing Shift and
clicking each item.)
12. Right-click one of the background text objects, and select Properties from the pop- up menu.
Set the following:

90
• Font: Arial
• Weight: Bold
• Size: 10
13. Save the report.
Formatting the input items
Complete the following steps to format the input items:
1. The input items in this report share the same font format.
Set the following:
• Font: Arial
• Weight: Regular
• Size: 10
To change the font format: right-click the input item, select Properties from the pop-up window, and select the
Font tab on the Properties dialog box.
Note: You can save time by Shift-clicking all of the input items, right-clicking one of the selected input items, and selecting Properties from the pop-up menu. Changing the font settings from the Properties dialog box in this manner changes the font settings for all of the selected input items.
2. Select each of the following input items:
• COMPANY_ID
• INVOICE.INVOICE_NO
• ITEM_NO
• STYLE_ID
• QUANTITY
Open the Properties dialog box. On the Field tab, set the Format popup menu to #0.
3. On the Field tab of the Properties dialog box, set the Format popup menu to M/d/yy for each of the following
input items:
• INVOICE_DATE
• DATE_PAID
4. Right Click on the AMOUNT_PAID input item and select the Properties menu item. In the Format popup
menu, select $#,##0.00;($#,##0.00). Click OK.
5. Right Click on the ITEM_PRICE input item and select the Properties menu item.
In the Format popup menu, select $#,##0.00;($#,##0.00). Select the Justify Right radio button. Click OK.

91
Coloring lines
Complete the following steps to change the color of the lines in the COMPANY_NAME block:
1. Right-click on the Company Name line in the header COMPANY_NAME block and select the Properties
menu item.
2. Select the Color tab and change the Background Color to Lt. Gray.
3. Click OK.
4. Repeat steps 1-3 now on the Company ID line in the header COMPANY NAME block group.
Adding a bottom border
Complete the following steps to add a border to the bottom of the footer INVOICE.INVOICE_NO block group:
1. Right-click on the topmost line in the footer INVOICE.INVOICE_NO block group and select the Properties
menu item.
2. Select the Borders tab and select Single from the Bottom popup menu.
3. Click OK.
To see the finished report, select Report, Report Preview.
Congratulations! You have successfully built a query, embedded it in a break group report, and formatted the report.
A copy of the completed break group report (breakg.cqt) is available in the Gupta, Samples directory.
Two pass totals report tutorial
With Report Builder you can quickly generate summary totals for specific break groups. This type of output is
called two-pass totals because, in the first pass Report Builder calculates the totals, and in the second pass it places
the calculations in appropriate fields, formats the report, processes other calculations, and creates the report.

92
For example, your company may receive numerous invoices from various companies. You want a report that shows
all the invoices received from each company. Using a two-pass totals report, you can list the amount paid for all the
invoices of each company before listing the amount paid for each individual invoice.
In the two-pass totals report tutorial, you create a report that displays an amount paid total for the entire report as
well as a total for a company break group, so that the company amount paid total displays before the details of each
break group.
Report Builder automatically adds header and footer break group block captions to your report once you define your
break groups.
A copy of the completed two-pass totals report (twopass.cqt) is available in the Gupta, Samples directory.
About the two pass total report tutorial
When you complete this tutorial, Report Builder displays the following: the total amount paid for all invoices in the
report header, the total amount paid by each company in the company name header block, and some data on each
invoice in the invoice header block.
Generating a default report
The first step needed to create a two pass totals report is to generate a default report. For this tutorial, you use the
INVOICE table from the Island database.
Complete the following steps to generate a default report:
1. Launch Report Builder.
Report Builder starts and a new report window is opened.
2. Select Report, Define Query.
The Define Query dialog box opens.
3. Double-click SQLBase in the left-hand window.
4. Double-click the ISLAND database.
The Connect to dialog box opens.
5. Enter sysadm in the User and Password fields. Click OK.
6. Double-click INVOICE in the tables list. Click OK.
A default report generates displaying the INVOICE item data.
7. Save the report.

93
Setting up the report and selecting break groups
Complete the following steps to set up the report and select break groups:
1. Select View, Toolbars, Tools Toolbar. The Tools toolbar displays.
2. Click the Select tool.
3. Select and delete all of the lines under the Page Header, Detail Block, and Page Footer captions.
4. Select Report, Format, Report.
The Properties dialog box displays.
5. On the Page Size tab, set the Paper Style to Letter. Click OK.
6. Select Report, Format, Break Groups.
The Format Break Groups dialog box displays.
7. Double-click the COMPANY_NAME and INVOICE_NO input items.
Make sure that the COMPANY_NAME input item is listed first in the Break Groups window. Click OK.
You have now setup your report and selected break groups. Next, create the input totals.
Creating input totals In this section, you create two new input totals: Report_Total_Paid and Company_Total_Paid. These input totals
generate the total amount paid figures used in the report header block and the company header block.
Complete the following steps to create the input totals:
1. Select Report, Format, Input, Totals.
The Format Totals dialog box displays.
2. Click New.
The Define Total dialog box displays. Set the Define Total values as follows:
• In the Name field, type Report_Total_Paid.
Note: Input total names cannot contain spaces.

94
• In the Formula field, select AMOUNT_PAID from the pull-down menu.
• In the Statistic field, select Sum.
• In the Restart Event field, select First Fetch.
• Check Pre-Process.
3. Click OK.
The Format Totals dialog box displays.
4. Click New.
The Define Total dialog box displays. Set the Define Total values as follows:
• In the Name field, enter Company_Total_Paid.
Note: Input total names cannot contain spaces.
• In the Formula field, select AMOUNT_PAID from the pull-down menu.
• In the Statistic field, select Sum.
• In the Restart Event field, select COMPANY_NAME.
• Check Pre-Process.
5. Click OK.
The Format Totals dialog box displays.
6. Click Close.
7. Save the report.
You have now created the report input totals. Next, format the report header.
Formatting the report header
The report header includes a title, a subtitle, and the total amount paid for all of the invoices.
Complete the following steps to format the report header:
1. Select the Line tool from the Tools toolbar.
2. Insert six lines under the Report Header caption.
The Report Header group currently has no lines. To add lines to a blank group, click the Report Header group
line.
3. Select Report, New, Background Text.
4. Insert a Background Text Object on the second line under the Report Header caption, type Two Pass Total
Report, and press Enter.
5. Right-click on the Two Pass Total Report text and select Properties from the pop- up menu.
The Properties dialog box displays. Set the following:

95
• On the Text tab, set Width to Maximum and Justify to Center.
• On the Font tab, set the font to Arial, the font weight to Bold, and size 18.
6. Click OK.
7. Click on the third line using the Background Text tool, type Total Amount Paid by Company, and
press Enter.
8. Right-click on the Total Amount Paid by Company text and select Properties from the pop-up menu.
The Properties dialog box displays. Set the following:
• On the Text tab, set Width to Maximum and Justify to Center.
• On the Font tab, set the font to Arial, the font weight to Bold, and size 16.
9. Click OK.
10. Click on the fifth line, type Report Total Amount Paid: and press Enter.
11. Right-click on the Report Total Amount Paid text and select Properties from the pop-up menu.
The Properties dialog box displays. Set the following:
• On the Text tab, set Justify to Left.
• On the Font tab, set the font to Arial, Regular, and size 10.
12. Click OK.
13. Align the text with the left margin.
14. Open the Totals folder in the left-hand window.
It displays the input totals you created in the Creating input totals section: Report_Total_Paid and
Company_Total_Paid.
15. Drag and drop the Report_Total_Paid input total next to the Report Total Amount Paid text.
16. Right-click on the Report_Total_Paid input item and select Properties from the pop-up menu.
The Properties dialog box displays. Set the following:
• On the Field tab, set Justify to Left, and set the Format field to $#,##0.00;($#,##0.00).
• On the Font tab, set the font to Arial, Regular, and size 10.
17. Click OK.
18. Save the report.
You have now formatted the report header and inserted the first input total. Next, format the page header.

96
Formatting the page header
The page header appears at the top of each page starting with the second page. Complete the following steps to
format the page header:
1. Select the Line tool from the Tools toolbar.
2. Add two lines to the Page Header.
3. Select Report, New, Background Text.
4. Click on the first line of the page header, type Total Amount Paid by Company, and press Enter.
5. Right-click on the Total Amount Paid by Company text and select Properties from the pop-up menu.
The Properties dialog box displays. Set the following:
• On the Text tab, set Width to Maximum and Justify to Center.
• On the Font tab, set the font to Arial, the font weight to Bold, and size 16.
6. Click OK.
7. Save the report.
You have now formatted the page header. Next, format the COMPANY_NAME header.
Formatting the COMPANY_NAME header The heading of the COMPANY_NAME break group consists of two background text fields, an input item, and an
input total. The background text fields remain constant throughout your report, but the data for the input item and
input total changes as the companies change.
Complete the following steps to format the COMPANY_NAME header:
1. Select Line tool from the Tools toolbar.
2. Add four lines to the COMPANY_NAME header.
3. Click the select tool, right-click the first line, and select Properties from the pop- up menu.
The Properties dialog box is displayed.
4. On the Borders tab, select Double from the Bottom pop-up menu. Click OK.
5. Select Report, New, Background Text.
6. Click on the second line of the COMPANY_NAME header, type Company Name: and press Enter.
7. Click on the third line of the COMPANY_NAME header, type Total Amount Paid by Company: and
press Enter.
8. Select both of the COMPANY_NAME header text blocks. (To select multiple text blocks, hold down the Shift
key when left-clicking.)
9. Right-click on the selected text and select Properties from the pop-up menu.
The Properties dialog box displays. Set the following:
• On the Text tab, click the Left radio button in the Justify box.
• On the Font tab, set the font to Arial, Regular, and size 10.
10. Click OK.
11. Indent the selected text approximately 0.25" (0.5 cm) from the left margin.
12. Right-click on the selected text and select Align, Left Sides from the pop-up menu.
13. Open the Input Items folder in the left-hand window.

97
14. Drag the COMPANY_NAME input item from the Input Items folder to the right- hand window and drop it next
to the Company Name text.
15. Drag the Company_Total_Paid input total from the Totals folder and drop it next to the Total Amount Paid by
Company text.
16. Select both the input item and the input total, right-click on them, and select Properties from the pop-up menu.
The Properties dialog box displays. Set the following on the Font tab: Font Arial Regular, Size 10.
17. Select just the Company_Total_Paid input total and set the following property: on the field tab set the Format
field to $#,##0.00;($#,##0.00).
18. Click OK.
19. Save the report.
20. Select Report, Report Preview to see a preview of the two-pass total report.
You have inserted the second input total and formatted the COMPANY_NAME header. Next, format the
INVOICE_NO header.
Formatting the INVOICE_NO header
The INVOICE_NO header includes background text and a couple of invoice input items. Complete the following
steps to format the INVOICE_NO header:
1. Using the Line tool, add five lines to the INVOICE_NO header.
2. Using the Select tool, right-click the first line and select Properties.
3. On the Borders tab, select Single from the Top pop-up menu. Click OK.
4. Using the Background Text tool, add the following text to the first four lines.
• Invoice Number:
• Status:
• Date Paid:
• Amount Paid:
5. Format all of the background text using the following settings:
• Justify: Left
• Font: Arial
• Weight: Bold
• Size: 10
6. Indent the four text blocks approximately 0.5" (1 cm) from the left margin.

98
7. Select all four text blocks, right-click on the selected text, and select Align, Left Sides from the pop-up menu.
8. Drag and drop the following input items next to their respective captions:
• INVOICE_NO
• STATUS
• DATE_PAID
• AMOUNT_PAID
9. Format all of the input items using the following settings:
• Justify: Left
• Font: Arial
• Weight: Regular
• Size: 10
10. Select all four input items, right-click on the selected items, and select Align, Left Sides from the pop-up menu.
11. Deselect the input items, right-click the INVOICE_NO input item, and select Properties from the pop-up
menu.
12. On the Field tab, set the Format field to #0, and click OK.
13. Right-click the DATE_PAID field, and select Properties from the pop-up menu.
14. On the Field tab, enter MM/dd/yy in the Format field, and click OK.
15. Right-click the AMOUNT_PAID input item and select Properties.
16. On the Field tab, set the Format field to $#,##0.00;($#,##0.00), and click OK.
17. Save the report.
18. Select Report, Report Preview to see a preview of the completed two-pass total report.
Congratulations! You have created a two pass total report.
A copy of the completed two-pass totals report (twopass.cqt) is available in the Gupta, Samples directory.
Basic cross tabular report tutorial
Crosstabs is a special feature that allows you to gather and display cross tabular statistics on your report data.
Crosstabs generates a two dimensional matrix of numeric data. The value of the matrix is based on the categories

99
you select and the data you provide. The size of this matrix depends on the number of unique occurrences of the
column and row categories you select for your crosstabs definition.
You can have up to eight row and eight column categories in your crosstab. Remember, the greater the number of
row and column categories, the larger and more complex your crosstab matrix is. (If you have a very large and
complex crosstab, the matrix might not fit in the defined page size.) Your report can contain any number of
crosstabs.
You must identify each crosstab with a unique name.
A copy of the completed basic cross tabular report (bascross.cqt) is available in the Gupta, Samples directory.
In this tutorial, we are going to build a basic cross tabular report. You will use the ISLAND database, in particular
the data provided in the INVOICE and INVOICE_ITEM tables. You begin this process by creating a new report.
Creating a new report
Complete the following steps to create a new report:
1. Launch Report Builder.
Report Builder starts and a new report window is opened.
2. Select Report, Define Query.
The Define Query dialog box opens.
3. Double-click SQLBase on the source tab.
The ISLAND database displays.
4. Double-click the ISLAND database.
The Connect to dialog box opens.
5. Enter sysadm in the User and Password fields. Click OK.
6. Double-click the INVOICE and INVOICE_ITEM database tables.
The INVOICE and INVOICE_ITEM database tables appear in the right-hand window.
7. Click OK.
A default report generates.
8. If the report is not in design mode, select Report, Report Design.
9. Select View, Toolbars, Tools Toolbar. The Tools toolbar displays.
10. Click the Select tool.
11. Select and delete all of the lines under the Page Header, Detail Block, and Page Footer captions.
12. Select Report, Format, Report.
The Properties dialog box displays.
13. On the Page Layout tab, set the Left and Right margin fields to 0.5 inches.
14. On the Page Size tab, set the Paper Style to Legal, and select the Landscape radio button in the Orientation box.
Click OK.
15. Save the report.
You have now created a new report and completed some of the basic report formatting. Next you create the
crosstab.

100
Creating the crosstab
Complete the following steps to create the crosstab:
1. Select Report, Format, Input, Crosstabs.
The Format Crosstabs dialog box displays.
2. Click Create New Crosstab.
The Quick Crosstabs - Define Rows dialog box displays.
• Double-click COMPANY_NAME in the Categories window. The item appears in the Selected Row
Categories window.
• In the Heading Options box, insure that the Show and Suppress Repeating checkboxes are checked.
• In the Sort Order box, insure that the Ascending radio button is selected.
3. Click Next.
The Quick Crosstabs - Define Columns dialog box displays.
• Double-click STYLE in the categories window. The item appears in the Selected Column Categories
window.
• In the Heading Options box, insure that the Show and Suppress Repeating checkboxes are checked.
• In the Sort Order box, insure that the Ascending radio button is selected.
4. Click Next.
The Quick Crosstabs - Select Cell Value dialog box displays.
Double-click QUANTITY in the Values box. The item appears in the Cell Value field.
5. Click Next.
The Quick Crosstabs - Define Statistics dialog box displays.
• Insure that the value in the Selected box is Sum.
• Deselect the Default Headings checkbox.
• Delete any text from the Heading field.
• Set the Format field value to #0.

101
6. Click Next.
The Quick Crosstabs - Define Summary Statistics dialog box displays.
7. In the Summary Statistics box, check the Columns, Rows, and Matrix checkboxes.
8. Click Next.
The Quick Crosstabs - Final dialog box displays.
9. Enter Company_Style in the Crosstab Name field.
10. Set the Restart Event field to First Fetch.
11. Click OK.
The Format Crosstabs dialog box displays.
12. Click Close.
13. Save the report.
Inserting the crosstab and formatting the report Complete the following steps to insert the crosstab and format the report:
1. Select the Line tool.
2. Add 6 lines to the Report header.
3. Add 3 lines to the Report footer.
4. Select Report, New, Background Text.
5. Insert a Background Text Object on the second line under the Report Header caption, type Cross Tabular
Report, and press Enter.
6. Right-click on the Cross Tabular Report text and select Properties from the pop- up menu.
The Properties dialog box displays. Set the following:
• On the Text tab, click the Center radio button in the Justify box.
• On the Font tab, set the font to MS Sans Serif, the font weight to Bold, and size 24.
7. Click OK.
8. Expand the text object so that all of the text is visible.

102
9. Insert a Background Text Object on the third line under the Report Header caption, type Quantities of
Shirt Styles Ordered, and press Enter.
10. Right-click on the Quantities of Shirt Styles Ordered text and select Properties from the pop-up menu.
The Properties dialog box displays. Set the following:
• On the Text tab, click the Center radio button in the Justify box.
• On the Font tab, set the font to MS Sans Serif, the font weight to Bold, and size 18.
11. Click OK.
12. Roughly center the two text blocks in the Report Header.
13. Select Report, New, Field.
14. Add a new field to the fifth line of the Report Header.
15. Using the Select tool, right-click the new field and select Properties from the pop-up menu.
The Properties dialog box displays.
16. On the Field tab, click Edit Field Formula.
The Formula Editor dialog box displays.
17. Double-click CurrentDate in the Functions scroll list, and then click OK.
The Properties dialog box displays.
18. On the Field tab in the Format field, enter MMMM dd, yyyy.
19. On the Font tab, set the font to Times New Roman, Regular, Size 10.
20. Click OK.
21. Open the Crosstabs folder in the left-hand window.
22. Drag and drop the Company_Style cross tab to the second line of the Report Footer.
23. Right-click the Company_Style crosstab and select Properties from the pop-up menu.
The Properties dialog box displays.
The size of your crosstab matrix depends on the amount of input data, the number of column and row categories,
and the number of statistics you select.
Since you cannot know how large this matrix will be, Report Builder automatically sets the crosstab field width
(on the Field tab) to Dynamic, and sets Line Wrapping (on the Behavior tab) to Dynamic, with Overlay Existing
Lines deselected. With these settings, Report Builder automatically calculates the appropriate width for your
crosstab field, and adds as many new lines as needed to show your entire crosstab. All subsequent report lines
are pushed down the page.
If you do not set these options, Report Builder displays only the FIRST line of your crosstab matrix.
• Set the Font to Times New Roman, Regular, Size 7.
• On the Tabs tab, select the second tab listed in the window.
• Enter 1 in the Width field.

103
Report Builder repeats this tab setting as many times as is needed for your crosstab.
If you enter multiple tab settings in this dialog box, and check Repeat Tabs, then Report Builder
repeats the group of tabs as many times as it needs. You would do this if you have multiple statistics in
your crosstab, and want to format a different tab width for each statistic type.
• Click Apply, and then click OK.
24. Save the report.
25. Select Report, Report Preview to see a preview of the completed Cross Tabular Report.
Congratulations! You have successfully created a Cross Tabular Report. In the next tutorial, you will learn to use
the advanced formatting features of Cross Tabular Reports.
A copy of the completed basic cross tabular report (bascross.cqt) is available in the Gupta, Samples directory.
Advanced cross tabular report tutorial
In this tutorial, we are going to build a cross tabular report that incorporates many of the advanced features of
Report Builder. The report includes a crosstab and custom formatted column and statistic headers. The crosstab and
crosstab headers use a number of formulas that demonstrate some of the ways you can interpret data from a
database. The report uses data from the ISLAND database.
A copy of the completed advanced cross tabular report (advcross.cqt) is available in the Gupta, Samples directory.
You begin building the advanced cross tabular report by creating a new report.

104
Creating a new report
Complete the following steps to create a new report:
1. Launch Report Builder.
Report Builder starts and a new report window is opened.
2. Select Report, Define Query.
The Define Query dialog box opens.
3. Double-click SQLBase on the source tab.
The ISLAND database displays.
4. Double-click the ISLAND database.
The Connect to dialog box opens.
5. Enter sysadm in the User and Password fields. Click OK.
6. Double-click the INVOICE and INVOICE_ITEM database tables.
The INVOICE and INVOICE_ITEM database tables appear in the right-hand window.
7. Click OK.
A default report generates.
8. If the report is not in design mode, select Report, Report Design.
9. If the Tools toolbar is not displayed, select View, Toolbars, Tools Toolbar.
10. Click the Select tool.
11. Select and delete all of the lines under the Page Header, Detail Block, and Page Footer captions.
12. Save the report.
You have created a new report. In the next section, you select the report breakgroups.
Selecting breakgroups
Complete the following steps to select break groups for the advanced crosstabs report:
1. Select Report, Format, Break Groups.
The Format Break Groups dialog box opens.
2. Double-click COMPANY_NAME and INVOICE.INCOICE_NO in the Input Items list.
Make sure the COMPANY_NAME input item is listed first in the Break Groups list.
3. Click OK.
You have now selected the report breakgroups. In the next section, you format the advanced cross tabular report
template.
Formatting the report template
Complete the following steps to format the advanced cross tabular report template:
1. Select Report, Format, Report.
The Properties dialog box opens.

105
2. On the Page Layout tab, set the Left and Right margin fields to 0.25 inches.
3. On the Page Size tab, set the Paper Style to Legal. In the Orientation box, select the Landscape radio button.
Click OK.
When working with large crosstabs, using a larger paper size and the landscape orientation can allow you to
print the report on a single page.
4. Using the line tool, add lines to the following block captions.
• Report Header - add 4 lines
• Report Footer - add 5 lines
5. Using the Background Text tool, enter the following text in the top two lines of the Report Header block. Set
the indicated attributes to the specified background text.
• Invoice Totals by Company and Quarter – Width Maximum, Justify Center, Font
Arial, Bold, Size 14
• Advanced Cross Tabular Report - Width Maximum, Justify Center, Font Arial, Bold,
Size 12
6. Select View, Groups. Hide the Page, Detail, COMPANY_NAME, and INVOICE.INVOICE_NO groups by
double-clicking each group in the View Groups list. Click OK.
Your report template now shows just the Report Header and Report Footer blocks. Hiding the unused block
groups helps to reduce the clutter on your window.
7. Save the report.
Select Report, Preview to see how your report looks in Preview mode. Select Report, Design to return to
Design mode.
You have now formatted your report template. In the next section, you create the formulas and totals used in the
crosstab.
Creating the formulas and totals for your crosstab
You need to create the following formulas and input totals for your crosstab:
• Invoice_Quarter formula
• Item_Total formula
• Company_Total input total
Creating the Invoice_Quarter formula
The Invoice_Quarter formula translates the date an invoice was received into the quarter an invoice was received.
You use this formula in the crosstab as a column category.

106
Complete the following steps to create the Invoice_Quarter formula:
1. Right-click on the Formulas folder in the left-hand window and select New.
The Formula Editor dialog box opens.
2. Double-click DateQuarter in the Functions list.
DateQuarter(DateTime) appears in the top window with DateTime selected.
3. Double-click INVOICE_DATE in the Data Items list.
4. Enter Invoice_Quarter in the Formula Name field.
5. Click OK.
Creating the Item_Total formula
The Item_Total formula returns the total cost of the total quantity of items ordered on a particular invoice. You use
this formula in the Company_Total input total.
Complete the following steps to create the Item_total formula:
1. Right-click on the Formulas folder in the left-hand window and select New.
The Formula Editor dialog box opens.
2. Double-click ITEM_PRICE in the Data Items list.
3. Click the multiplication operator in the Operators box.
4. Double-click QUANTITY in the Data Items list.
5. Enter Item_Total in the Formula Name field.
6. Click OK.
Creating the Company_Total input total
The Company_Total input total returns the total cost of all the items ordered by a particular company during a
particular time period. You configure the crosstab you create in this tutorial to display the company totals by quarter.
You use the Company_Total input total as the cell value in the crosstab.
Complete the following steps to create the Company_Total input total:
1. Select Report, Format, Input, Totals.
The Format Totals dialog box opens.
2. Click New.
The Define Total dialog box opens.
3. Enter Company_Total in the Name field.
4. Select Item_Total() from the Formula list.
5. Select Sum from the Statistic list.
6. Select INVOICE.INVOICE_NO from the Restart Event list.
7. Check the Pre-Process checkbox.
8. Click OK.
9. Click Close on the Format Totals dialog box.
You have now created all of the formulas and input totals needed for the crosstab. In the next section, you
incorporate these formulas in the advanced crosstab.

107
Defining the InvoicebyQuarter crosstab
The InvoicebyQuarter crosstab displays a list of all the companies stored in the ISLAND database with invoices.
The invoices are totaled for each company by quarter. The crosstab includes statistics for the maximum, minimum,
and sum of the invoices for each company for each quarter. The data in the ISLAND database spans one year.
Complete the following steps to define the InvoicebyQuarter crosstab:
1. Select Report, Format, Input, Crosstabs.
The Format Crosstabs dialog box opens.
2. Click Create New Crosstab.
The Quick Crosstabs - Define Rows dialog box opens.
• Double-click COMPANY_NAME in the Categories window. The item appears in the Selected Row
Categories list.
• In the Heading Options box, insure that the Show and Suppress Repeating checkboxes are checked.
• In the Sort Order box, insure that the Ascending radio button is selected.
3. Click Next.
The Quick Crosstabs - Define Columns dialog box opens.
• Double-click Invoice_Quarter() in the Categories list. The item appears in the Selected Column
Categories list.
• In the Heading Options box, insure that the Show and Suppress Repeating checkboxes are
unchecked.
• In the Sort Order box, insure that the Ascending radio button is selected.
4. Click Next.
The Quick Crosstabs - Select Cell Value dialog box opens.
Double-click Company_Total in the Values list. The item appears in the Cell Value field.
5. Click Next.
The Quick Crosstabs - Define Statistics dialog box opens.
6. Select the following values from the Statistics list:
• Maximum
• Minimum
• Sum
Insure that the values appear in that order in the Selected list.

108
7. In the Selected list, select each of the values and complete the following:
• Deselect the Default Headings checkbox.
• Delete any text from the Heading field.
8. Click Next.
The Quick Crosstabs - Define Summary Statistics dialog box opens.
9. In the Summary Statistics box, check the Columns, Rows, and Matrix checkboxes.
10. Click Next.
The Quick Crosstabs - Final dialog box opens.
11. Enter InvoicebyQuarter in the Crosstab Name field.
12. Set the Restart Event field to First Fetch.
13. Click OK.
The Format Crosstabs dialog box displays.
14. Click Close.
15. Save the report.
Creating the column header You create the column header in two steps:
• You create a formula named QuarterHeader that pulls the column heading information from the
InvoicebyQuarter crosstab.
• You then create a formula named ColumnHeader that displays the column header but prevents the header
from repeating.
Creating the QuarterHeader formula
You use the QuarterHeader formula as a part of the ColumnHeader formula. The QuarterHeader formula extracts
the column headings from the InvoicebyQuarter crosstab and completes some of the formatting.
Complete the following steps to create the QuarterHeader formula:
1. Right-click the Formulas folder in the left-hand window and select New.
The Formula Editor dialog box opens.
2. Double-click XTabGetColHeadings in the Functions list.
XTabGetColHeadings(String, Number, String) appears in the top window.
3. Substitute InvoicebyQuarter from the Data Items list for the first String in the parenthesis.
4. Enter 1 for the Number.
5. Enter 'Quarter #0' for the second String.
The final formula should appear as follows: XTabGetColHeadings(InvoicebyQuarter, 1, 'Quarter #0')
6. Enter QuarterHeader in the Formula Name field.
7. Click OK.
Creating the ColumnHeader formula
The ColumnHeader formula takes the header information generated by the QuarterHeader formula, displays each
unique header once, and then prevents the header from repeating under the remaining statistic headings.
Complete the following steps to create the ColumnHeader formula:

109
1. Right-click the Formulas folder in the left-hand window and select New.
The Formula Editor dialog box opens.
2. Double-click StrTabColSuppress in the Functions list.
StrTabColSuppress(String) appears in the top window.
3. Substitute QuarterHeader from the Formulas list for String.
The final formula should appear as follows: StrTabColSuppress(QuarterHeader())
4. Enter ColumnHeader in the Formula Name field.
5. Click OK.
You have now created the formulas needed to generate the column header. Next you create the formula that
generates the crosstab statistic headers.
Creating the statistic header
You generate the statistic headers for your advanced crosstabs report using a formula named StatisticHeader.
Complete the following steps to create the StatisticHeader formula:
1. Right-click the Formulas folder in the left-hand window and select New.
The Formula Editor dialog box opens.
2. Double-click StrTabSeparate in the Functions list.
StrTabSeparate(String) appears in the top window.
3. Substitute StrRepeat from the Functions list for String.
StrRepeat(String, Number) appears in the place of String.
4. Enter 'Maximum Minimum Sum ' in place of String.
5. Substitute XTabGetColCount from the Functions list for Number.
XTabGetColCount(String) appears in place of Number.
6. Substitute InvoicebyQuarter from the Data Items list for String.
7. Enter +1 after the first close parenthesis after InvoicebyQuarter.
The final Statistic Header formula should appear as follows: StrTabSeparate(StrRepeat( 'Maximum Minimum
Sum ', XTabGetColCount(InvoicebyQuarter)+1))
8. Enter StatisticHeader in the Formula Name field.
9. Click OK.
Incorporating the Crosstab and Headers Complete the following steps to incorporate the crosstab and crosstab headers in the advanced crosstabs report:
1. Drag and drop the InvoicebyQuarter crosstab from the Crosstabs folder to the second to last line of the Report
Footer. Place the crosstab at the left margin of the footer.
2. Right-click the InvoicebyQuarter crosstab and select Properties from the pop- up menu.
On the Font tab, set the following:
• Font: Arial
• Weight: Regular
• Size: 6

110
Click OK.
3. Drag and drop the StatisticHeader from the Formulas folder to the first line of the Report footer.
4. Right-click the StatisticHeader and select Properties from the pop-up menu.
On the Font tab, set the following:
• Font: Arial
• Weight: Bold
• Size: 9
Click OK.
5. Drag and drop the ColumnHeader from the Formulas folder to the second line of the Report footer.
6. Right-click the ColumnHeader and select Properties from the pop-up menu.
On the Font tab, set the following:
• Font: Arial
• Weight: Bold
• Size: 7
On the Borders tab, set the following:
• Bottom: Single
Click OK.
7. Select both the StatisticHeader and the ColumnHeader.
8. Select Report, Align, Left Sides.
9. Select the InvoicebyQuarter crosstab, and adjust the tabs using the GUI tab ruler.
• Adjust the first tab so that it is about 1.1” wide.
• Adjust the second tab so that it is about 0.8” wide. It should also be a repeating tab
Ruler
Tab Ruler
10. Select both the StatisticHeader and the ColumnHeader, and then move them 1.6” from the left hand margin.
Use the ruler at the top of the report to help make the adjustment.
11. Select both the StatisticHeader and the ColumnHeader, and then add a single tab using the GUI tab ruler.
To use the tab ruler to create a tab:
• Click and hold in the tab ruler at the location where you want to start the tab.
• Drag the cursor to just below the tab ruler.
Report Builder creates a new tab.
12. Adjust the tab so that it is about 0.8” wide.

111
13. Check the formatting of the headers and crosstab in preview mode. You might need to adjust the tabs to
properly align the headers and crosstab columns.
Note: Adjusting the tabs as little as 1/16” can make the difference between the headers being closely aligned with the data in the crosstab columns, and the headers and crosstab data being misaligned by a wide margin.
Congratulations! You have just created a crosstab, formatted crosstab headers, and incorporated both the crosstab
and headers in the advanced crosstab report.
A copy of the completed advanced cross tabular report (advcross.cqt) is available in the Gupta, Samples directory.
Report Builder ActiveX interface tutorial
You can use Report Builder in conjunction with a number of development environments, including Microsoft
Visual Basic and Gupta SQLWindows.
This chapter shows you how to create a report containing break groups and totals using the Report Builder ActiveX
automation interface to SQLWindows. In this tutorial you:
• Create the report
• Create the matching report query
• Format the report
• Run the report
To follow this tutorial and build this report, you must have installed Gupta Team Developer and be familiar with the
outline. The sample application referred to is provided in the Gupta Samples directory of that product.
What you will build
Let’s take a look at the finished application that you are about to build.
1. Open SQLWindows. Select Open from the File menu.
2. In the open dialog, find ReportBreakGroupTutorial.app in the Samples directory. Double-click it.
3. In SQLWindows, select Go from the Debug menu.
The Customer Invoice Report opens.

112
The report displays the invoice totals by item, by invoice, and by company. The report includes a fully functional
toolbar you can use to manipulate the report.
Now let’s begin building this report.
Starting a new application in SQLWindows
Opening a standard application template
1. In SQLWindows, select New from the File menu.
The Templates dialog box is displayed.
2. Select the standard starter application, newapp.app. Click OK.
3. When the Application1 outline appears, click the Outline tab in the lower right portion of the window (the
Tab view).
Your desktop should appear as follows:

113
Adding a library and a form window to your report 1. Select the Coding Assistant from the Tools menu.
The Coding Assistant appears as a floating menu.
2. Select Libraries in the Outline.
When making selections from the Outline, make sure to click on the diamonds in front of the topic. A black
diamond indicates an existing subset, white diamonds have no subset.
3. Double-click File Include..., in the lower part of the Coding Assistant.
4. Select ReportBuilder.apl from the Open dialog that appears.
Note: ReportBuilder.apl is usually found in the \Gupta directory.
5. Click on the diamond of File Include: ReportBuilder.apl in the outline.
Now you can view the two files automatically included in the application. Notice that the files appear in blue on
your screen. A blue file indicates that the file is read-only, and derived from something else.
Adding cReportBuilderWindow to the application
Put an instance of the Form Window Class - cReportBuilderWindow - in your application.
1. Click Libraries in the Outline.
2. Double-click cReportBuilderWindow in the Add Same Level section of the Coding Assistant.
3. Name cReportBuilderWindow: frmReport
Your outline hierarchy should look like the one shown below.
Type here

114
Creating a report query
Creating the function RunReport
1. Click Functions in the Outline.
2. Double-click Function in the Coding Assistant.
3. In the Outline, at the blinking cursor, type: RunReport
This function creates a report query and a report document to match the query.
Adding local variables
1. Click Local variables in the Outline.
2. Double-click ReportBuilder_IReportBuilder in the Coding Assistant.
3. In the Outline, at the blinking cursor, type: objReport.
4. Add another Local variable; click Local variables in the Outline.
5. Double-click Boolean in the Coding Assistant.
6. In the Outline, at the blinking cursor, type: bOK.
You have just created the main report builder application interface. Keep in mind that ReportBuilder_IReport
Builder: objReport will be the top-level Report Builder document at the top level of the screen.
Initializing the report object from the ActiveX control
1. Click Actions in the Outline.
2. In the Coding Assistant, double-click If, then double-click frmReport.GetReportObject.
3. In the Outline, in the parenthesis, replace the term Object with objReport.
4. Press Enter.
Creating a skeleton report
1. In the Coding Assistant, double-click Call in the lower part of the Coding Assistant.
2. Select UDV Functions from the list box at the top of the Coding Assistant.
3. Double-click objReport.CreateReportSkeleton in the Coding Assistant.
4. In the Outline, replace the term Boolean with bOK.
5. Press Enter.
Setting the report to design mode
1. Double-click Call in the Coding Assistant.
Double-click objReport.SetDesignMode.
2. In the Outline, replace the term Boolean, in parenthesis, with TRUE.
3. Press Enter.
Matching report inputs to the query columns
The first statement calls the second statement that we will be defining. The first statement CreateQuery - creates
the report query. The second statement calls the Report Builder Document method MatchInputsToQuery, which is
used to match the report inputs to the query columns which will get created when the CreateQuery function is
called.
1. Click Call objReport.SetDesignMode(TRUE) in the Outline, then double-click If in the Coding Assistant.
2. In the Outline, at the end of If, type: CreateQuery( objReport )

115
3. Click If CreateQuery( objReport ) in the Outline, then double-click on Call in the lower part of the Coding
Assistant.
4. Double-click objReport.MatchInputsToQuery in the Coding Assistant.
5. Press Enter.
6. Double-click Call in the Coding Assistant.
7. At the end of Call type: CreateReport( objReport )
8. Press Enter.
9. Double-click Call in the Coding Assistant.
10. Double-click objReport.SetDesignMode
11. Replace the term Boolean with FALSE in the Outline.
12. Press Enter.
Your Outline should look like this.
Setting up the report query
Add a second function, CreateQuery to the form. This function creates a report query, adds query columns, links
the query tables, and sorts the query columns.
1. In the outline, click Functions.
2. In the coding assistant, double-click Function.
3. At the blinking cursor, type: CreateQuery
4. Press Enter.
Giving the function a Boolean return
1. In the outline, click Returns.
2. In the Coding Assistant, double-click Boolean. Press Enter.

116
Defining a parameter
1. In the outline, click Parameters.
2. In the Coding Assistant, double-click ReportBuilder_IReportBuilder: objReport.
Adding local variables
1. Click Local Variables.
2. In the Coding Assistant, double-click Boolean, then type: bOK. Press Enter.
Note: Always press Enter after finishing a line in the outline. This positions you cursor where it needs to be for the next entry.
3. In the Coding Assistant, double-click ReportBuilder_QueryTable, then type: objTable1. Press Enter.
4. In the Coding Assistant, double-click ReportBuilder_QueryTable, then type: objTable2. Press Enter.
5. In the Coding Assistant, double-click ReportBuilder_QueryColumn, then type: objCol1. Press Enter.
6. In the Coding Assistant, double-click ReportBuilder_QueryColumn, then type: objCol2. Press Enter.
7. In the Coding Assistant, double-click ReportBuilder_QueryJoinkey, then type: cJoinkey. Press Enter.
8. In the Coding Assistant, double-click ReportBuilder_QueryOrderby, then type: cOrderby. Press Enter.
Setting the database to ISLAND
1. Click Actions.
2. In the Coding Assistant, double-click Call, the type: objReport.SetDatabase( 'ISLAND' )
3. Press Enter.
Opening the database connection
Enter the following If statement at the same level as the previous Call statement. This will open a connection to the
database.
If objReport.OpenConnection( bOK )
1. Click Actions.
2. In the coding Assistant, double-click If, then type: objReport.OpenConnection( bOK )
3. Press Enter.
Calling column information into the report
You need to make a lot of calls to bring information into specific columns in the report. All of these calls need to go
one level in from the If statement above. Use this procedure to add each call:
1. In the coding Assistant, double-click Call in the lower part of the Coding Assistant.
2. Type the name of the function (e.g., objReport.AddTable).
3. In the parenthesis after the function, replace the parameter names with the text shown below.
4. Press Enter.
Here are the calls and descriptions of what they do.
The first two calls add the two query tables - INVOICE and INVOICE_ITEM:
Call objReport.AddTable('INVOICE', 'SYSADM', objTable1 )
Call objReport.AddTable('INVOICE_ITEM', 'SYSADM', objTable2 )
Two calls add the COMPANY_ID column from the INVOICE table and add the column as an Order By:
Call objTable1.AddColumn('COMPANY_ID', objCol1)
Call objReport.AddOrderby(objCol1, TRUE, cOrderby)

117
Two calls add the INVOICE_NO column from the INVOICE table and add the column as an Order By:
Call objTable1.AddColumn('INVOICE_NO', objCol1) Call objReport.AddOrderby(objCol1,
TRUE, cOrderby)
Two calls add the Joinkey object which links the two tables on the INVOICE_NO column:
Call objTable2.AddColumn('INVOICE_NO', objCol2)
Call objReport.AddJoinkey( objTable1, objTable2, objCol1, objCol2, '=', FALSE,
FALSE, FALSE, cJoinkey)
Six calls add the rest of the columns for the report query:
Call objTable1.AddColumn('COMPANY_NAME', objCol1)
Call objTable1.AddColumn('INVOICE_DATE', objCol1)
Call objTable2.AddColumn('QUANTITY', objCol2)
Call objTable2.AddColumn('ITEM_PRICE', objCol2) Call objTable2.AddColumn('STYLE',
objCol2)
Call objTable2.AddColumn('COLOR', objCol2)
The last two calls execute the report query:
Call objReport.RegenerateSQL( TRUE, bOK ) Call objReport.CompileQuery( TRUE, bOK )
Finish the query.
1. In the Coding Assistant, double-click If, then type: bOK.
2. Press Enter.
3. In the lower part of the Coding Assistant, double-click Call, then type: objReport.ExecuteQuery( )
4. Press Enter.
5. In the Coding Assistant, double-click Return and type: TRUE
6. Click If bOK
7. In the Coding Assistant, double-click Return and type: TRUE
Let’s look at the outline for this function. Yours should look like this:

118
Formatting the report
You need one more function to create this report. This function creates a break group report with totals on Quantity.
1. In the outline, click Functions.
2. In the coding assistant, double-click Function.
3. At the blinking cursor, type: CreateReport
4. Press Enter.
Defining a parameter
1. Click Parameters.
2. In the Coding Assistant, double-click ReportBuilder_IReportBuilder, and type: objReport.
Adding local variables
Use this procedure to add the variables below:
1. Click Local Variables.
2. In the Coding Assistant, double-click the variable (e.g., ReportBuilder_ReportGroup.
3. In the outline, after the variable, type the name (e.g., objGroup). These are the variables to add:
ReportBuilder_ReportGroup: objGroup ReportBuilder_ReportInput: objInput
ReportBuilder_ReportBlock: objBlock ReportBuilder_ReportLine: objLine
ReportBuilder_ReportField: objField ReportBuilder_ReportTotal: objTotal
ReportBuilder_ReportExpression: objExpression Number: InputID
Number: nExpID

119
Boolean: bOK Number: nHeight Number: nWidth Number: nEscapement Number:
nOrientation Number: nWeight Boolean: bItalic Boolean: bUnderline Boolean:
bStrikeOut Number: nCharSet
Number: nOutPrecision Number: nClipPrecision Number: nQuality
Number: nPitchAndFamily
String: sFaceName
So far, the outline for this function looks like this:
Setting the font and orientation
A number of calls are needed to format the report. First call GetDefaultFont, to get the report's default font. This
will be used to easily modify the default font as needed. Then set the report's orientation to landscape
1. Click Actions.
Note: Remember, after you double-click Call in the Coding Assistant, you must type the rest of the function directly into the code. Since this is a lot of typing, you can also copy the calls from the outline in ReportBreakGroupTutorial.app and paste them into your outline.
2. Add two calls:
Call objReport.GetDefaultFont( nHeight, nWidth, nEscapement, nOrientation, nWeight,
bItalic, bUnderline, bStrikeOut, nCharSet, nOutPrecision, nClipPrecision,
nQuality, nPitchAndFamily, sFaceName, bOK )
Call objReport.SetOrientation( Orientation_Landscape, bOK )
Creating a break group
You need to add another four calls to create a break group for COMPANY_ID and set the default font to bold and
twice the size.

120
Add these calls under Actions for CreateReport.
Call objReport.GetInputFromName( 'COMPANY_ID', objInput )
Call objInput.GetID( InputID )
Call objReport.CreateReportBreakGroupID( ReportGroupType_Break01,InputID, objGroup)
Call objReport.SetDefaultFont( nHeight * 2, nWidth,nEscapement, nOrientation,
nWeight * 2, bItalic, bUnderline, bStrikeOut, nCharSet, nOutPrecision,
nClipPrecision, nQuality, nPitchAndFamily, sFaceName, bOK)
Creating the group header block
Ten calls will create the group header block, append a line and add the COMPANY_ID and COMPANY_NAME
fields. It looks like this:
Add these calls under Actions for CreateReport.
Call objGroup.CreateBlock( BlockType_Header, objBlock )
Call objBlock.AppendLine( objLine )
Call objLine.SetBorders(2,2,2,2,bOK)
Call objLine.SetBackgroundColor( COLOR_Gray, FALSE, bOK )
Call objLine.SetBorderColor( COLOR_DarkBlue, bOK )
Call objLine.CreateField( objField )
Call objField.SetExpText( 'COMPANY_ID', bOK )
Call objField.SetPicture( '#0', bOK )
Call objLine.CreateField( objField )
Call objField.SetExpText( 'COMPANY_NAME', bOK )
Creating the group footer block
The following calls all define the details of the footer block, append a line, create a report total on QUALITY and
add a field for the total. It looks like this:
Add these calls under Actions for CreateReport.
Call objGroup.Create Block( BlockType_Footer, objBlock )
Call objBlock.AppendLine( objLine )
Call objLine.SetBorders(2,2,2,2,bOK)
Call objLine.SetBackgroundColor( COLOR_Gray, FALSE, bOK )
Call objLine.SetBorderColor( COLOR_DarkBlue, bOK )
Call objReport.CreateReportTotal( 'TotalCompQuantity', objTotal )
Call objTotal.SetExpText( 'QUANTITY', bOK )
Call objTotal.SetType( TotalType_Sum, bOK )
Call objTotal.SetReset( TotalReset_Break01, bOK )
Call objLine.CreateField( objField )
Call objField.SetExpText( '\'Totals\'', bOK )
Call objLine.CreateField( objField )
Call objField.SetExpText( 'TotalCompQuantity', bOK )
Call objField.SetLeft( 4000, bOK )
Call objField.SetWidth( 1500, bOK )
Call objField.SetAdjust( Adjust_Right, bOK )
Call objField.SetPicture( '#0', bOK )
Call objField.SetBackgroundColor( COLOR_DarkBlue, FALSE, bOK )
Call objField.SetTextColor( COLOR_Cyan, bOK )
Creating a break group
Two more calls create a break group for INVOICE_NO and set the default font to bold and 1 1/2 the size.
Add these calls under Actions for CreateReport.

121
Call objReport.CreateReportBreakGroup(
ReportGroupType_Break02,'SYSADM.INVOICE.INVOICE_NO', objGroup)
Call objReport.SetDefaultFont( nHeight * 1.5, nWidth,nEscapement, nOrientation,
nWeight * 2, bItalic, bUnderline, bStrikeOut, nCharSet, nOutPrecision,
nClipPrecision, nQuality, nPitchAndFamily, sFaceName, bOK )
Creating the group header block
The following calls create the group header block, append a line and add a literal text, INVOICE_NO and
INVOICE_DATE fields:
Add these calls under Actions for CreateReport.
Call objGroup.CreateBlock( BlockType_Header, objBlock )
Call objBlock.AppendLine( objLine )
Call objLine.SetBorders(1,1,1,1,bOK)
Call objLine.SetBackgroundColor( COLOR_LightGray, FALSE, bOK )
Call objLine.SetBorderColor( COLOR_DarkGreen, bOK )
Call objLine.CreateField( objField )
Call objField.SetExpText( '\'Invoice\'', bOK )
Call objLine.CreateField( objField )
Call objField.SetExpText( 'SYSADM.INVOICE.INVOICE_NO', bOK )
Call objField.SetPicture( '#0', bOK )
Call objField.SetLeft( 1000, bOK )
Call objLine.CreateField( objField )
Call objField.SetExpText( 'INVOICE_DATE', bOK )
Call objField.SetPicture( 'MMM d, yyyy', bOK )
Call objField.SetLeft( 2000, bOK )
Creating the group footer block
The following calls create the group footer block, append a line, create a report total on QUANTITY and add a field
for the total. It looks like this:
Add these calls under Actions for CreateReport.
Call objGroup.CreateBlock( BlockType_Footer, objBlock )
Call objBlock.AppendLine( objLine )
Call objLine.SetBorders(1,1,1,1,bOK)
Call objLine.SetBackgroundColor( COLOR_LightGray, FALSE, bOK )
Call objLine.SetBorderColor( COLOR_DarkGreen, bOK )
Call objReport.CreateReportTotal( 'TotalInvoiceQuantity', objTotal )
Call objTotal.SetExpText( 'QUANTITY', bOK )
Call objTotal.SetType( TotalType_Sum, bOK )
Call objTotal.SetReset( TotalReset_Break02, bOK )
Call objLine.CreateField( objField )
Call objField.SetExpText( '\'Totals\'', bOK )
Call objLine.CreateField( objField )
Call objField.SetExpText( 'TotalInvoiceQuantity', bOK )
Call objField.SetLeft( 4000, bOK )
Call objField.SetWidth( 1500, bOK )
Call objField.SetAdjust( Adjust_Right, bOK )
Call objField.SetPicture( '#0', bOK )
Call objField.SetBackgroundColor( COLOR_DarkGreen, FALSE, bOK )
Call objField.SetTextColor( COLOR_LightGreen, bOK )
Setting the default font

122
This call sets the default font back to what it was to start with for working with the detail block:
Add this call under Actions for CreateReport.
Call objReport.SetDefaultFont( nHeight, nWidth, nEscapement, nOrientation,
nWeight, bItalic, bUnderline, bStrikeOut, nCharSet, nOutPrecision,
nClipPrecision, nQuality, nPitchAndFamily, sFaceName, bOK)
Getting a line
These calls get the one pre-existing line in the detail group/block. Add these calls under Actions for CreateReport.
Call objReport.GetReportGroup( ReportGroupType_Detail, objGroup )
Call objGroup.GetBlock( BlockType_Detail, objBlock )
Call objBlock.GetLine( 0, objLine )
Call objLine.SetBackgroundColor( COLOR_LightPeriwinkle, FALSE, bOK )
Call objLine.SetBackgroundAlternate( TRUE, bOK )
Adding fields
These calls add the STYLE, COLOR, ITEM_PRICE and QUANTITY fields to the detail line. It looks like this:
Add these calls under Actions for CreateReport.
Call objLine.CreateField( objField )
Call objField.SetExpText( 'STYLE', bOK )
Call objLine.CreateField( objField )
Call objField.SetExpText( 'COLOR', bOK )
Call objField.SetLeft( 2000, bOK )
Call objLine.CreateField( objField )
Call objField.SetExpText( 'ITEM_PRICE', bOK )
Call objField.SetLeft( 3000, bOK )
Call objField.SetWidth( 1000, bOK )
Call objField.SetAdjust( Adjust_Right, bOK )
Call objField.SetPicture( '#0.00', bOK )
Call objLine.CreateField( objField )
Call objField.SetExpText( 'QUANTITY', bOK )
Call objField.SetLeft( 4000, bOK )
Call objField.SetWidth( 1500, bOK )
Call objField.SetAdjust( Adjust_Right, bOK )
Call objField.SetPicture( '#0', bOK )
Call objField.SetBorders( 1,1,1,1,0, bOK )
Call objField.SetBorderColor( COLOR_Red, bOK )
Getting the font
This final call gets and modifies the font for the QUANTITY field. Add this call under Actions for CreateReport.
Call objField.GetFont( nHeight, nWidth, nEscapement, nOrientation, nWeight, bItalic,
bUnderline, bStrikeOut, nCharSet, nOutPrecision, nClipPrecision, nQuality,
nPitchAndFamily,sFaceName, bOK )
Sending a message to run the report
Under Message Actions for the form (frmReport), place the following:
1. Click Message Actions.
2. In the lower part of the Coding Assistant, double-click On.
3. In the Coding Assistant, double-click SAM_CreateComplete.
4. Click On SAM_CreateComplete.

123
5. In the lower part of the Coding Assistant, double-click Call, then type: RunReport( ).
You are code complete!
Running the report
You can now save your report and run it.
1. Select Go from the Debug menu.
2. When SQLWindows asks you if you want to save the application, click Yes.
3. In the Save As dialog, save the application with any name you choose, such as CustomerInformation.app.
The report displays.
Congratulations! You have completed the ActiveX interface tutorial and now have a working ActiveX interface
report.

124
Glossary
action bar
An alternative term for menu bar. The horizontal bar containing the names of all the application menus. It appears just
below the title bar of the application window.
active document
The Windows environment lets you have multiple applications open at a time. However, only one application can be
active at any one time. The active document can be identified by the different colored title bar at the top of the document
window.
active printer
An installed printer that has been assigned to a printer port with the File Printer Setup command. Many printers can be
assigned to a single printer port, but only one can be active at a time.
active window
The window or icon that is currently selected. The next keystroke or command you execute applies to this window. If a
window is active, it appears in front of all other windows, and its title bar is a different color from the inactive windows.
aggregate function
A function that lets you summarize data for an entire column, or group of rows. It produces a single value from a column
of data.
In a query, you only use an aggregate function with grouped data. The function outputs a summary row for each grouped
set of data.
Reports use aggregate functions to provide summary data within each break group, or to generate cross tab and total
values.
alphanumeric
A character string that is made up of alphabets and numbers. You cannot perform numeric operations on alphanumeric
strings.
Application Control menu
This is the icon at the far left corner of the title bar of the application, and is indicated by a space bar icon within a
rectangular box. You may use this menu to move, change the size of, and close the application window. You can also use
this menu to move to another open application via the Switch To command.
application window
The main window for an application. It contains the application title bar, menu bar, and main work space. You can open
one report template at a time.
arguments
Information required by a function in the Formula Editor. Most functions require at least one argument. Most arguments
are NUMERIC, STRING, or LOGICAL values. These values can come from a constant value, another formula, a column
name, or an input item.
background text
Text or character string that defines itself and is not used as a label for something else in the Report Template. All
background text in Report Builder must be enclosed by single quotes (' ').
blank line
A line in Report Builder that either has no fields or for which there is no data that prints in those fields. Use the Format
Line, Suppress Line Spacing command to suppress the printing of this line.
block
All the lines, fields, pictures, and boxes that belong to a block caption. A report is comprised of many types of blocks
such as header blocks, footer blocks, and detail blocks.
block caption

125
The heading for a block. It is shown as a title within a rectangle above each set of block group lines. The block
caption displays the number of lines within its block when a block is collapsed with the Collapse All Blocks
command.
block group
Is made up of a paired header and footer block, with all their associated lines, fields, pictures, and boxes. A
block group is generated for every break group, as well as for the Page, Report, and Detail blocks of a report.
block lines
Are all the lines that belong to a block and that lie immediately beneath that block caption heading. Block lines
can be collapsed or expanded from view by clicking on the arrow beside the block caption name.
box tool
Creates and inserts boxes in the Report Builder template. You can choose the box tool by clicking the right
mouse button until the tool appears, or by choosing the Tools Box command from the menu bar.
box
A graphical rectangle that can be used to frame a group of fields, lines, or a block. You can change the density
of the box lines by using the Format Box command. Use the box tool to draw your box.
break group item
The name of the input item which serves as a break group identifier. When this item changes, page breaks,
summary calculations, and total calculations for that break group are performed. Break group items are defined
with the Format Break Groups command.
break groups
Break groups divide the report into logical subunits. They are frequently used for subtitling and pagination
purposes. A report begins a new unit when the Break Group Item changes.
break item
The input item which acts as a break group identifier. When this item changes, summary and total calculations
for that group can be performed.
browse bar
A horizontal bar just below the activity bar when the activity is in Field view. The browse bar lets you move up
and down the rows in a table, viewing each row one at a time within the Field view.
browse mode
Displays the information from a database table. You can view the information, but cannot change or modify it
in any way. However, you can change the sort order of the display, and copy all or part of it to the Clipboard.
calculated field
A report field whose contents are based on the results of a formula you specified. Use the Formula Editor on the
ruler to create and assign a formula to a calculated field.
CHAR
The data type assigned to alphanumeric information. You must specify a length for columns of this data type. In
SQLBase, the maximum length allowed is 254 characters.
click
Press and release the mouse button (usually the left mouse button).
Clipboard
This is a temporary storage area for cut or copied graphics and text. You can paste the contents of the Clipboard
into Report Builder, or to an external application.
column
Columns make up the structure of a table, and define the type of data in the table. They are made up of data
items of a single type.
command
A word or phrase, usually found in a menu, that carries out an action when it is chosen.

126
concatenated index
A database index made up of two or more columns in a table. When more than one column is specified for an
index, the second column is ordered within the first, the third within the second, and so on. Each column can
be sorted in ascending or descending order.
content
The contents of a field in Report Builder can be an input item, background text, or a formula. Box contents can
be other fields, empty space, or a graphic image. All fields have content.
Comma Separated Values (.CSV)
The .CSV file format is commonly used to store data. This format uses a comma ( , ) to separate fields. If a field
contains a comma as part of its text, then that comma is enclosed in double quotation marks ( " ). CSV files are
generally saved with an extension of .CSV. Report templates can use the data in .CSV files.
current report
The active report which is currently open in Report Builder. All commands, selections, and so on used at this
time apply to the current report.
data item
A single piece of information you cannot divide. A data item occupies one cell in database table.
data table
Relational databases are made up of data tables. A data table is organized into rows and columns. Each row in a
data table is the equivalent of a record in a flat file, and each column element (or cell) is the equivalent of a
single field. A database can have any number of data tables.
data type
Defines the type of data in a table column, or in a field in a report.
Columns can be assigned data types of CHAR, VARCHAR, LONG VARCHAR, DATE, DATETIME, TIME,
DECIMAL, DOUBLE PRECISION, FLOAT, INTEGER, NUMBER, REAL, and SMALLINT.
Fields in a report can be STRING, NUMBER, or DATE/TIME. database
Databases are collections of related information organized in a logical manner for ease of retrieval and storage.
This information can be accessed by application programs like Report Builder.
DATE
A data type that specifies a three part date value (dd/MM/yy).
DATE/TIME
A data type that specifies a date and time value. Any data item that represents a date or a time must be assigned
this data type for Report Builder.
DB2
A relational database management system offered by IBM Corporation that uses SQL (Structured Query
Language). It runs in the IBM mainframe environment, and is accessible to Report Builder via SQLHost.
DECIMAL
A data type for a number with a decimal point. You must specify the precision and scale. You can specify up to
15 decimal digits of precision.
design mode
In design mode you can design the report format, layout, inputs, titles, etc. To view the report as it appears
when printed, you must go into the Report Preview mode.
detail lines
The lines associated with each block caption. Detail lines can be blank or can contain fields, pictures, and
boxes.
dialog box
A rectangular box that either requests or provides information. Dialog boxes often provide options for you to
choose from in order to execute a command. Other dialog boxes provide warning messages, and explanations.
direction keys

127
The four arrow keys on your keyboard. These keys move the cursor or insertion point to different locations on
the screen. Each key has an arrow on it showing the direction in which the cursor moves. Each key is named for
the direction the key points; up arrow, down arrow, left arrow, and right arrow.
document window
This is the work space within an application window. Each document window contains a single document.
DOUBLE PRECISION
A data type for double precision floating point numbers.
drag
To press and hold down the left mouse button while moving the mouse.
drop down list box
A single line list box that opens to display a list of choices. One choice displays until the down arrow button is
clicked to show the remainder of choices.
edit mode
Displays the information from a database table. You can view, add, modify, sort, select, copy, and delete this
information while you are in edit mode.
field tool
Use this tool to draw fields in your report template. You can select the tool by clicking the right mouse button
until the tool appears, or choose it with the Tools Field command.
field
Fields are report objects that you can use when you build your report template. All fields in Report Builder
have contents. They can contain literals, input items, input variables, input totals, input cross tabs, tabbed text,
or formulas.
Fields in Report Builder can be fixed length, or dynamic. (Dynamic fields change in length to accommodate
the size of the input item they have to hold.)
flat file
A simple file where each data item is separated from the next by commas, tabs, or some other delimiter. Each
line of the file is equivalent to a single input row (or record). Flat files can have dictionary information in their
headers.
FLOAT
A data type for a floating point number of any precision or scale up to 22 digits.
fonts
The design of the characters you print on screen or paper. The Report Builder default font is Helvetica 10
point, but Report Builder supports all standard Windows fonts.
format or picture format
Also referred to as Picture Format. You can use picture formats to specify how you want field contents to
appear on a printed page or in the columns of a table or form.
You can format the contents of a field or column by using the picture format characters. For example,
yy/MM/dd can also be shown as
dd-MM-yy. Use the Format Field function in Report Builder ruler
or the Column Settings command in the View menu for tables and queries. Report fields can also be formatted
with font types, sizes, and styles.
formula
A mathematical statement or expression, such as 4*(salary - 500). In Report Builder, use the Formula Editor to
create formulas and assign their values to fields in your report template.
All the formulas you create are listed in the Content list box of the ruler, and within various Report Builder
dialog boxes.
function

128
A function takes information that you provide, processes it, and then returns new information for you to use. It
is an arithmetic, string, or date/time relationship that has been predefined for you by Report Builder. Functions
are available for your use in Report Builder, and can be accessed from the Formula Editor in these two activities.
group footer
The area of the report that is printed after the last line of a group of records. It can contain summary or total
information for that group of lines.
group header
Information in the group header block of a report prints before the detail lines for that break group. It is
generally used to identify the next group of detail lines.
groups
A set of information arranged into related groups, where the members of each group have a common
characteristic. Groups in Report Builder typically have both a Header Block and a Footer Block. For example,
all employees in Department A can belong to one “group”.
Gupta SQLWindows
A client-server application development system from Gupta Technologies that is used with SQL databases. It
runs under the Microsoft Windows environment.
heading
A title at the top of a report section, such as a page header, break group header, or column header. A pictorial
representation of an application or document when it is minimized. Double-click on an application icon to
restore it to a full size application window.
input cross tabs
Input cross tabs are one of the four forms of input that Report Builder accepts. (The others are input items, input
variables, and input totals.) Input cross tabs are cross tabular statistics that are generated by Report Builder.
The Cross Tabs Collector processes each input row of information to calculate the input cross tab. You can
assign input cross tabs to any field in your report template.
input item
Input items are one of the four forms of input that Report Builder accepts. (The others are input cross tabs,
input variables, and input totals.). Input items are the equivalent of a data field in a data record or a column
item in a database table.
Input items are provided to Report Builder, Gupta Team Developer applications, or a .CSV file.
input item name
A name you assign to each input item, that uniquely identifies it.
input row
The basic unit of information in a file. It is the equivalent of a record in a data file and is made up of input
items (data fields). Input rows must be updated with each input fetch to Report Builder.
input total
Input totals are one of the four forms of input that Report Builder accepts. (The others are input items, input
variables, and input cross tabs.) Input totals are aggregate values that Report Builder calculates. Input totals are
also known as two-pass totals.
The Input Total Collector processes each input row of information to calculate the input total. You can assign
input totals to any field in your report template.
input variable
Data that is provided to Report Builder on a one time basis by a Gupta Team Developer application. Unlike
input items, input variables do not have to be updated after each input fetch. Define input variables with the
Format Input Variables command.
insertion point
The location where the contents of the Clipboard or your typed text or graphics are inserted. The insertion point
generally appears as a flashing vertical bar in the application or document window. It can be positioned with

129
either the mouse or the keyboard navigation keys. The text you type is inserted to the left of the insertion bar,
and the bar moves to the right as you type.
INTEGER
A data type for whole numbers with no decimal point. It can have up to 10 digits of precision.
item fields
Contain input items with data from a data file or database.
join
This is a type of query that retrieves data from two or more tables. Rows are selected when data from one
column of a table matches columns from another table. When a join is specified, only the rows that match the
join specifications display.
join key
A specific field used to link the contents of two tables together. Rows are selected when the value of the join key
in Table A matches the value of the join key in Table B.
key
A column or set of columns in an index used to identify a row in a database table. A key value can be used to
locate a row.
keyboard direction keys
The four arrow keys on your keyboard. These keys move the cursor or pointer to different locations on the
screen. Each key has an arrow on it showing the direction in which the cursor will move. Each key is named for
the direction the key points, up arrow, down arrow, left arrow and right arrow.
key icon
An icon used to represent a table link in the current query. Choose the Query
Link Table command to see this.
line tool
Creates and inserts lines in your Report Builder template. It can be selected by clicking the right mouse button
until the tool appears, or chosen with the Tools Line command from the menu bar. Link establishes
communication between two files. When data changes in one file, the linked file is updated, either
automatically or on demand. This term is frequently used with OLE.
link hand
Attaches the link hand to the operator list box. This is found in the Link Tables and Build Conditions dialog
boxes of the Query menu.
list box
A box that provides a list of items from which you can make a selection. For example, a list of available files in
a directory, or a list of fonts as shown in this example. Generally, you select one item from a list box. However,
some list boxes let you make more than one choice. Boxes with long lists can also have a vertical scroll bar.
LITERAL
Text information that you type directly into a field in the Report Builder template, or in the Edit box of the
Formula Editor. All literal information must be enclosed in single quotes (' ').
literal date
A Date/Time value that you type into the Formula Editor. Supported date styles include:
Date
MMM d, yyyyyyyy-MM-dd MMM dd,yyyyd MMM, yyyy MMMM d,yyyyd MMMM,yyyy
MMMMM dd,yyyydd MMMMM,yyyy
MM/dd/yyMM-dd-yy M/dd/yyM/d/yy MM/d/yyMM/d/yy
Time is optional, and follows any of the above formats with a single space between the date and time. Seconds
and Milliseconds are optional. Acceptable formats for time are:
Time

130
hh[.mm[.ss[.mmmmmm]]]
hh[.mm[.ss]] AM|PM (AM PM can be added to any time value that has milliseconds)
LONG VARCHAR
A variable length, alphanumeric data type used in column definitions. It is used for text that may be longer than
254 characters in length. You do not have to specify a column length for this data type.
menu
A grouped listing of commands that drop down from the menu bar. Select a menu command by clicking on it.
menu bar
A horizontal bar containing the names of all the application menus. It appears just below the title bar of the
application window.
menu title
A word or phrase in the menu bar that identifies a group of commands. Clicking a menu title highlights the title
and displays a list of commands.
move pointer
Lets you move fields, pictures, and boxes with a block.
network
A group of PC's, terminals, mainframes, printers, etc., that connect to each other via data transmission lines.
Networks let unrelated devices communicate to each other. Report Builder uses networks to access information
on databases that are not local, and to print reports generated by Gupta Team Developer.
NUMBER
A data type that is used to represent a numeric value of up to 22 digits of precision. You do not have to define
precision or scale for this data type.
Use this data type for any numeric input item in Report Builder. Use the Format
Input Items command to define the data types of input items and input variables.
Object
Input Items or variables that have been assigned an Object data type can hold OLE objects. You can assign
input items with an Object data type to any Picture field.
objects or objects
An object can be a field, box, picture, or a block in the report template.
Object data type
An input item, or input variable, that is defined with an OBJECT data type to contain OLE Objects.
ORACLE
A relational database produced by Oracle Corporation. Report Builder can access and manipulate data from this
database type through SQLNetwork.
operator
Operators are used by Report Builder Formula Editor dialog box to create formulas that limit the type and
quantity of data retrieved from the database. Operators available to you include: =, NOT =, >, >=, <, <=, NOT
<, NOT >, IN, BETWEEN, LIKE, NOT LIKE, NULL, NOT NULL.
page edge
The actual physical edge of the defined paper size.
page footer
The portion of the report that is printed once at the bottom of every page. It can contain messages, page
numbers, references, page totals, and so on. Line wrapping is not allowed in the page footer.
page header
The portion of the report that is printed once at the top of each page. It can contain report titles, dates, column
headings, company logo, and so on.

131
page margin
Determines where the main body of the report prints. The margins apply to the entire report.
page preview mode
Page preview mode displays the generated report as it appears when printed. To perform further modifications
on the report, you must go into Design mode.
palette
A floating palette that can be placed anywhere within the Report Builder window. The tool palette contains the
selector tool, the field tool, the box tool, the line tool, and so on.
parameter
A variable that can have different values assigned to it. For functions, a parameter can be an input item, a
numeric string, a literal, or the result of another function.
picture
A graphical rectangle in the report or form template you can use to contain graphic items or OLE objects. You
can change the size, shape, and contents of the picture object with the Format Picture command. Pictures are
drawn with the Picture tool.
precision
Defines the total number of digits in a column.
point size
A measurement used to describe character size. There are 72 points to an inch.
preview mode
Page preview mode displays the generated report as it appears when printed. To perform further modifications
on the report, you must go into Design mode.
pull-down
An alternative term used for menu. When you select a choice from the menu bar, a pull-down containing a list
of options appears.
push button
An object found in rulers, menu bars, and dialog boxes. Clicking a button results in the performance of a
specific activity.
radio button
One of a fixed set of choices that are mutually exclusive to each other. When one is selected, the other choices
are disabled.
range
Defines a set of values that are to be returned by a query. The set can be explicitly defined by using the IN
operator, which compares a value to a collection of values and returns only those that match the defined
collection. The set can also be implicitly defined by using the BETWEEN operator, which returns all values
that lie between the defined range.
REAL
The data type for a single precision floating point number.
Report Builder
Report Builder generates reports with an easy-to-use graphical interface. A variety of tools and commands let
you quickly design and format complex reports.
report objects
Report Builder provides a number of report objects that you can add to your report template. These objects are:
Fields
Fields can contain input items, input variables, input totals, input cross tabs, and formulas.
Lines
You can add lines to any report block group. Lines contain fields, pictures, and boxes.
Boxes

132
You can use boxes to frame lines, block groups, and fields. Boxes are drawn to the report background and do
not overlay the objects they surround.
Pictures
You can use picture objects to contain static bitmaps, textual data, or OLE
objects.
report template
A visual and graphic representation of the specifications you have defined for your report. It shows how the
data appears in your report by using graphic elements to represent fields, lines, objects, break groups, and
formulas.
result set
The collection of data that is the result of a query to the database.
ribbon
The horizontal bar containing icons for commonly used functions and commands. All items available on the
ribbon also appear as commands in the Menu bar. The ribbon is shown just below the Menu bar.
router
A special file provided to you that lets Report Builder communicate with databases in your hard drive, or with
databases accessed via a communication network.
row
A set of related columns that describe a single record in a table.
ruler view
Click this button to toggle the ruler to start between the left margin of the report template, and left edge of the
report paper.
ruler
The ruler is a horizontal scale that lies just below the Menu bar in the report window. It is divided into inches,
and displays report margins, icons for field alignment, list boxes for setting font type, font size, and format text
boxes that display the current position, width, and format of a selected field, as well as an easily accessed list of
the contents of all the fields in your report template, and a Formula Editor.
scale
Defines the maximum number of digits to the right of the decimal point.
scroll bars
A bar that appears at the right side, and sometimes at the bottom of a window. Dialog boxes and list boxes can
also have scroll bars. The scroll bar contains a scroll arrow at either end of the bar, and a scroll box that moves
within the scroll bar. Mouse users can click parts of the scroll bar to scroll through the document.
select
To mark or choose an item. The selected object is affected by your next action. A
selected object appears in reverse video, or is enclosed by a dashed line.
select conditions
Defines the criteria by which rows are selected from a table. The select conditions appear in the Where clause
of a SQL query. It may include sorts, conditions, predicates, etc.
select statement
A SQL database statement which defines the conditions you must meet in order to retrieve a row from a table.
selected data
Appears visually different from unselected data. Generally, it is highlighted against a dark background.
selector tool
A marking device that shows where you are in an application or document window. The type of tool
determines the action you are going to perform. For example, the insertion point indicates where information is
inserted, the box tool inserts a box at the indicated point on a report, etc.

133
server
A computer on a network that provides services and facilities to client applications.
SMALLINT
A data type for numeric data with no decimal point. It can have up to five digits of precision.
SQL
Structured Query Language is a language used for the management of data in a relational database. These
commands let the user retrieve, add, update, or delete data.
SQLBase
A relational database by Gupta Technologies that lets users access, create, and update data. Report Builder
communicates directly with SQLBase.
SQLRouter
A Gupta Technologies client application that talks to a gateway through a router program. The router enables a
logical connection between a client and the gateway. Once this connection is established on the LAN, the client
application can use the router to send SQL request to the gateway and receive the results.
SQLTalk
An interactive user interface for SQLBase by Gupta Technologies. It is used to manage SQLBase. SQLTalk has
a complete implementation of SQL and many extensions. SQLTalk is a client application.
SQLHost
A family of tools produced by Gupta Technologies. These tools connect client applications to DB2, SQL
Server, Oracle, OS/2EE Database Manager, and other database engines.
status bar
Displays information on the bottom of the screen about the currently active command, or about the currently
active dialog box.
string
A data type that refers to an input item that is made up of characters, numbers, or words. All alphanumeric input
items must be assigned this data type. Use the Format Input Items command to assign this data type to input
items in Report Builder.
switchset button
This button appears in the Browse bar of a table in Field view. Use the SwitchSet button to move between the
Edit and Insert portions of the Table when you are in Field view.
system catalogs
Relational databases keep track of information about themselves in a group of tables called the system tables or
system catalogs. These tables contain information about every defined table, column, view, and index in the
current database. Look in the system catalogs to find out the names, descriptions, and sizes of the tables, views,
or columns in your database.
Tab Delimited Format
A common format used by a number of word processing programs. Each column item is separated from the next
by a tab. Each row is separated from the next row by a paragraph marker. Microsoft Winword for Windows is
an example of an application that can accept data in this format.
table
This is the basic storage structure of a relational database. It is a two dimensional structure made up of rows and
columns.
text box
A box within a dialog box or ruler where you type information needed to carry out a command or action.
TIME
A data type that specifies a three-part time value (hh:mm:ss).
title bar

134
A horizontal bar at the top of a window that contains the title of the application or dialog. On some windows,
the title bar may also contain the document control box, and maximize and minimize buttons. A window with a
title bar can be moved to another location on the screen.
total field
A field which is created to contain calculated summary and total information. Use the Formula Editor on the
Report Builder ruler to assign a formula to a total field. Total fields are generally placed in group and page
footers.
undo
Reverses the last action carried out by the user. It is generally used when editing or modifying data, or when
formatting a report. It can be found in the Edit menu, or from the keyboard using the key combination Alt-
Backspace.
unique columns
Unique Columns are a column or group of columns which uniquely identify each row of a table.
user ID
Also known as authorization-ID. A unique name that identifies a user to the system. Associated with each user
ID is a password. VARCHAR
The data type assigned to alphanumeric information. You must specify a length for columns of this data type. In
SQLBase, the maximum length allowed is 254 characters.
views
A logical representation of data from one or more tables. It may include all or only some of the columns from
each table. Single table views let you add, delete, or modify data in the table. You cannot modify data from a
multi-table view.
window
A rectangular area on your screen in which you can view an application or a document. You can open, close,
move, and change the size of most windows. Multiple windows can be opened on the desktop at the same time.
Windows can be enlarged to fill the entire screen, or reduced to icons.
work area
The area in a Report Builder window where you can view, enter, change, or delete data and information.