Repairing Apple Studio Display M2454 LCD Main Board Service- User...Repairing Apple Studio Display...
5
Repairing Apple Studio Display M2454 LCD Main Board Tools used in this guide 2mm Hex Screwdriver Phillips #2 Screwdriver Step 1 - LCD Main Board Locate the four hex head screws located on the corners of the back panel. Remove the screws with a 2mm hex screwdriver. Step 2 Locate the three 2mm hex screws located on the back stand of the monitor. These screws must be removed with the 2mm hex screwdriver in order for the back panel to be removed. Repairing Apple Studio Display M2454 LCD Main Board © 2010 iFixit — CC BY-NC-SA www.iFixit.com Page 1 of 5
-
Upload
hoangkhanh -
Category
Documents
-
view
220 -
download
0
Transcript of Repairing Apple Studio Display M2454 LCD Main Board Service- User...Repairing Apple Studio Display...

Repairing Apple Studio Display M2454 LCD Main Board
Tools used in this guide2mm Hex Screwdriver Phillips #2 Screwdriver
Step 1 - LCD Main Board Locate the four hex head screws located on the corners of the back panel.
Remove the screws with a 2mm hex screwdriver.
Step 2 Locate the three 2mm hex screws located on the back stand of the monitor.
These screws must be removed with the 2mm hex screwdriver in order for the back panel to be removed.
Repairing Apple Studio Display M2454 LCD Main Board
© 2010 iFixit — CC BY-NC-SA www.iFixit.com Page 1 of 5

Step 3 Pull the clear back panel cover off.Be sure to feed the cable through the back panel so no damage occurs.
Step 4 Now remove the back panel under the clear cover.Again, feed the cable through the panel so no damage occurs.
Step 5 Remove the phillips head screw holding the back panel spacer with the phillips head screwdriver.
Repairing Apple Studio Display M2454 LCD Main Board
© 2010 iFixit — CC BY-NC-SA www.iFixit.com Page 2 of 5

Step 6 Remove the two phillips head screws near the cable attachment with the phillips head screwdriver.
Step 7 To remove the metal plate covering the circuitry you need to push the cover towards the base of the monitor.If done correctly the tabs holding the plate should be detached and the plate will easily pop off.
Step 8 Now that the circuitry is exposed the boards can be seen and replaced.The LCD Main Board is the largest board in the center of the device with seven external connections.
Repairing Apple Studio Display M2454 LCD Main Board
© 2010 iFixit — CC BY-NC-SA www.iFixit.com Page 3 of 5
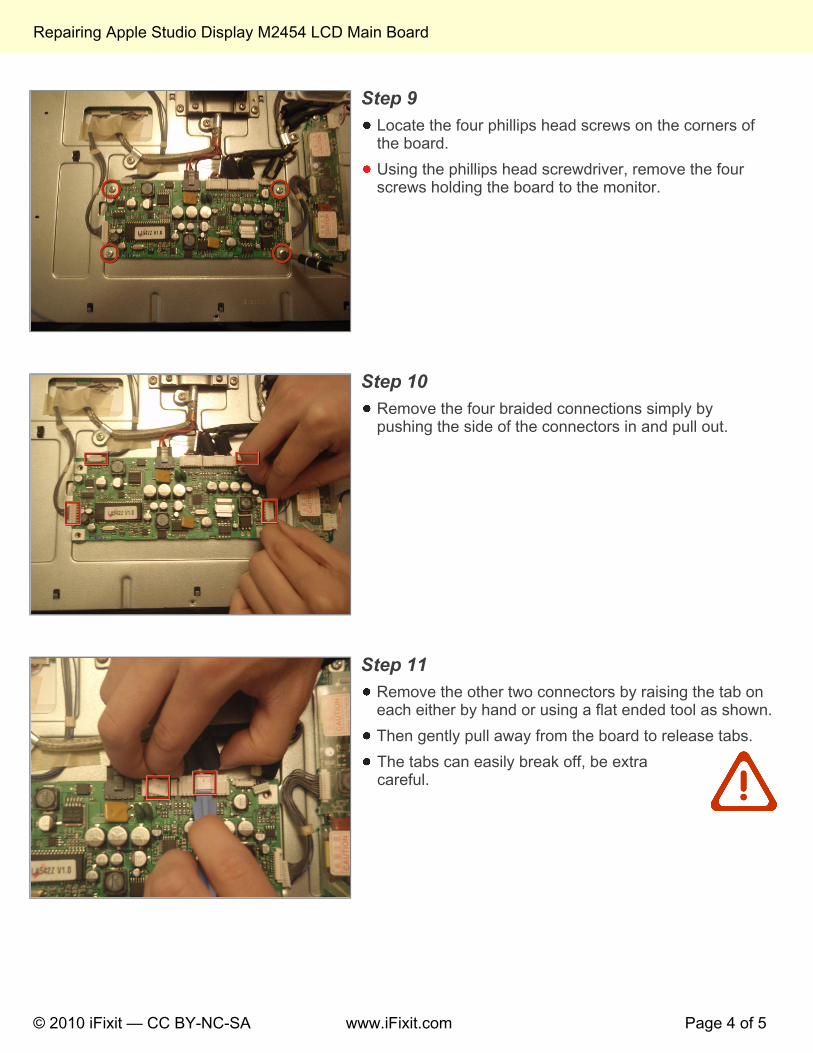
Step 9 Locate the four phillips head screws on the corners of the board.Using the phillips head screwdriver, remove the four screws holding the board to the monitor.
Step 10 Remove the four braided connections simply by pushing the side of the connectors in and pull out.
Step 11 Remove the other two connectors by raising the tab on each either by hand or using a flat ended tool as shown.Then gently pull away from the board to release tabs.The tabs can easily break off, be extra careful.
Repairing Apple Studio Display M2454 LCD Main Board
© 2010 iFixit — CC BY-NC-SA www.iFixit.com Page 4 of 5

Step 12 Remove the final black connector by pressing down on the back of the tab on the connector and then pull away from the board.Be careful when holding onto the board while removing this connector or you risk pulling the board away too quickly and damaging the connector.
Step 13 With all the connectors removed the board can be lifted away.Now the new board can be attached by following the previous steps in reverse.
Repairing Apple Studio Display M2454 LCD Main Board
© 2010 iFixit — CC BY-NC-SA www.iFixit.com Page 5 of 5