REHEATING TEMPERATURE IN GAUGE MEDIATION MODELS AND COMPRESSED PARTICLE SPECTRUM
Upload
yves-de-ryckelCategory
view
221download
0
7/23/2019 Repair Vintage Temperature Gauge
http://slidepdf.com/reader/full/repair-vintage-temperature-gauge 1/7
Yves – YLG80 – Belgium – www.avi‐plus.com
An easy method to repair a Temperature Gauge.
After a few unsuccessful trials, here is the description of an easy method to repair and refill a broken
temperature gauge.
The parts you need to restore your original Temperature gauge are shown on the following picture :
‐ Old sensor
‐ The gauge with a piece of capillary tube and the connecting sleeve or termination
‐ A capillary tube if you cannot afford to use the remaining length on your broken gauge.
‐ Ether or a Start Pilot spray
‐ ‐52°C spray used to debug electronic circuits. (see ether refill paragraph)
‐ a piece of heat shrinkable sleve (about 4 – 5 mm dia.)
You will need to buy a new capillary tube (length of about 22’’ and external diameter of a .078 to .08 ‘’)(ebay)
and a new binding wrap. (I’ve found a long capillary tube from an old gas/butane refrigator safety switch)
7/23/2019 Repair Vintage Temperature Gauge
http://slidepdf.com/reader/full/repair-vintage-temperature-gauge 2/7
Yves – YLG80 – Belgium – www.avi‐plus.com
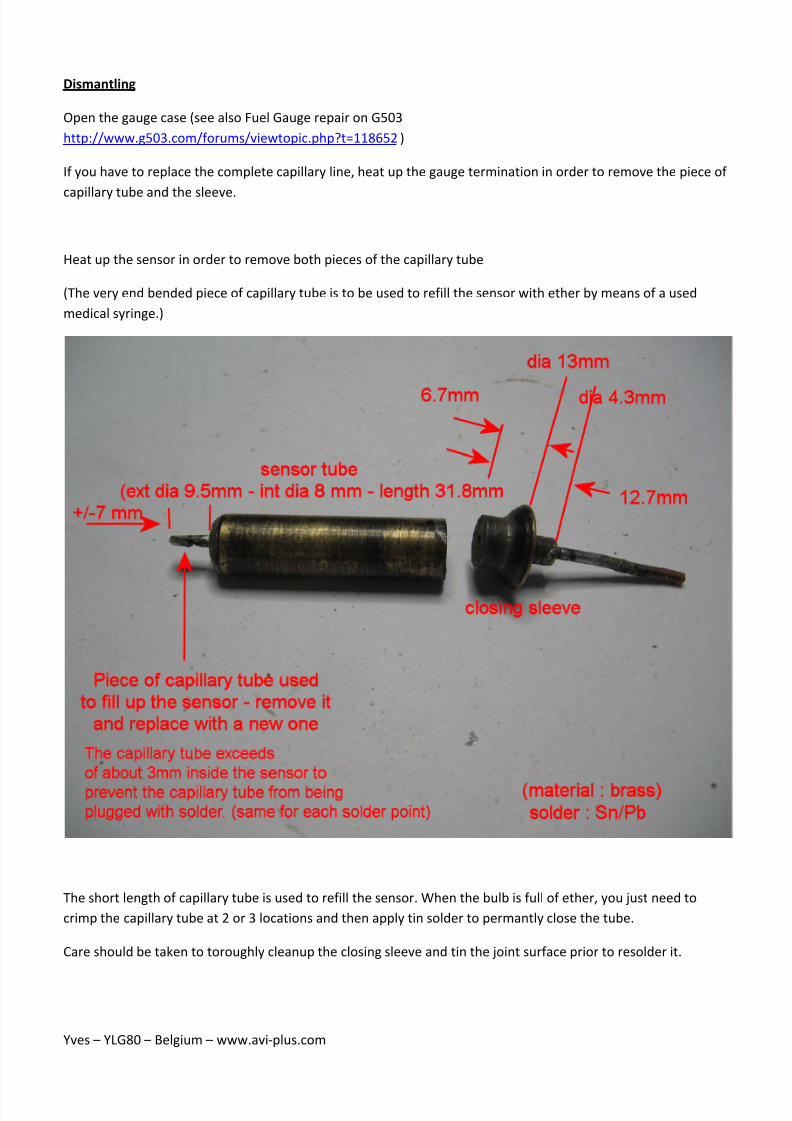
Dismantling
Open the gauge case (see also Fuel Gauge repair on G503
http://www.g503.com/forums/viewtopic.php?t=118652 )
If you have to replace the complete capillary line, heat up the gauge termination in order to remove the piece of
capillary tube
and
the
sleeve.
Heat up the sensor in order to remove both pieces of the capillary tube
(The very end bended piece of capillary tube is to be used to refill the sensor with ether by means of a used
medical syringe.)
The short length of capillary tube is used to refill the sensor. When the bulb is full of ether, you just need to
crimp the capillary tube at 2 or 3 locations and then apply tin solder to permantly close the tube.
Care should be taken to toroughly cleanup the closing sleeve and tin the joint surface prior to resolder it.

7/23/2019 Repair Vintage Temperature Gauge
http://slidepdf.com/reader/full/repair-vintage-temperature-gauge 3/7
Yves – YLG80 – Belgium – www.avi‐plus.com
The only critical things are:
a perfect cut of the capillary tube . I’ve used my Proxxon drill (or the well known Dremel if you want)
with a cutting disc.(do not use cutting pliers !) This is a copper tube, so it’s not difficult to cut.
Avoid plugging the capillary tube with tin. Do this :
Perfectly solder the sensor in order to avoid any ether leaks.
Don’t suffer from the Murphy law :
Do not forget to insert the capillary tube into the wire/flat wrap
AND the
threaded
brass
plug
AND
the
gauge
can
BEFORE
soldering
the
elements
!
Here is a picture of how it looks like before refilling the gauge (pic. 2)

7/23/2019 Repair Vintage Temperature Gauge
http://slidepdf.com/reader/full/repair-vintage-temperature-gauge 4/7
Yves – YLG80 – Belgium – www.avi‐plus.com
Use tin solder with flux (like the electronic solder) – remove the flux excess once the soldering is complete.
Use a blow torch with fine tip like this or a powerfull soldering iron (100‐150W).
This could also be done with a hot gun in the High Power position.
Once you are playing with ether, do no longer use any equipment with an open flame.
If you have missed the refill and decide to to remove the capillary termination and restart the refill proces,
don’t forget not to use open flame because there is likely still a small quantity of ether in the gauge.
Contrary to what I’ve read, you can repeat the process several times as long as you don’t modify the bourdon
spring mechanism.
Precautions:
ALWAYS HEAT UP THE METAL PARTS AND NOT THE SOLDER !
Apply tin first on your soldering iron (wet tip)
Heat up
the
sleeves
or
bulb
rather
than
the
capillary
tube
itself.
The capillary tube will heat up as well and when you apply the solder against the capillary tube and/or the
sleeve, it will melt and enter in the sleeve hole.
When you solder the capillary tube to the closing sleeve, you should see the solder suddently entering in the
sleeve. This insure that the tube is soldered inside the sleeve.
Never blow up the solder joint to accelerate the cooling. Let it cool down naturally.
When everything has been soldered, verify that you have not plugged the capillary tube. Blow air from the gauge
side and
see
bubbles
in
water
from
the
filling
end.
Plug the filling end with you finger, blow again through the capillary tube and verify if there are no leaks from
the bulb.
Your sensor should somewhat look like this : (see next page)

7/23/2019 Repair Vintage Temperature Gauge
http://slidepdf.com/reader/full/repair-vintage-temperature-gauge 5/7
Yves – YLG80 – Belgium – www.avi‐plus.com
Note : I’ve tested the quantity to fill in the bulb (with methanol) before soldering everything.
You will need approx 2.5 ‐3 ml of ether.
To refill the gauge we will need ether.
Ether is likely difficult to buy nowadays and you could use a Start Pilot spray .
They are using ether to help starting engines.
Ether is really very difficult to handle as it evaporates at more or less than 35°C. (boiling point).
It’s also a very good organic solvant which does not really help in our matter.
So you would better work in a cold room. (I’ve completed the operation in my garage while the T° was about
6°C.)
(I’ve even
worked
just
above
an
horizontal
deep
freezer
(‐18°C)
during
my
other
tests.
It
just
take
2 or
3 minutes
to do the operation. )
7/23/2019 Repair Vintage Temperature Gauge
http://slidepdf.com/reader/full/repair-vintage-temperature-gauge 6/7
Yves – YLG80 – Belgium – www.avi‐plus.com
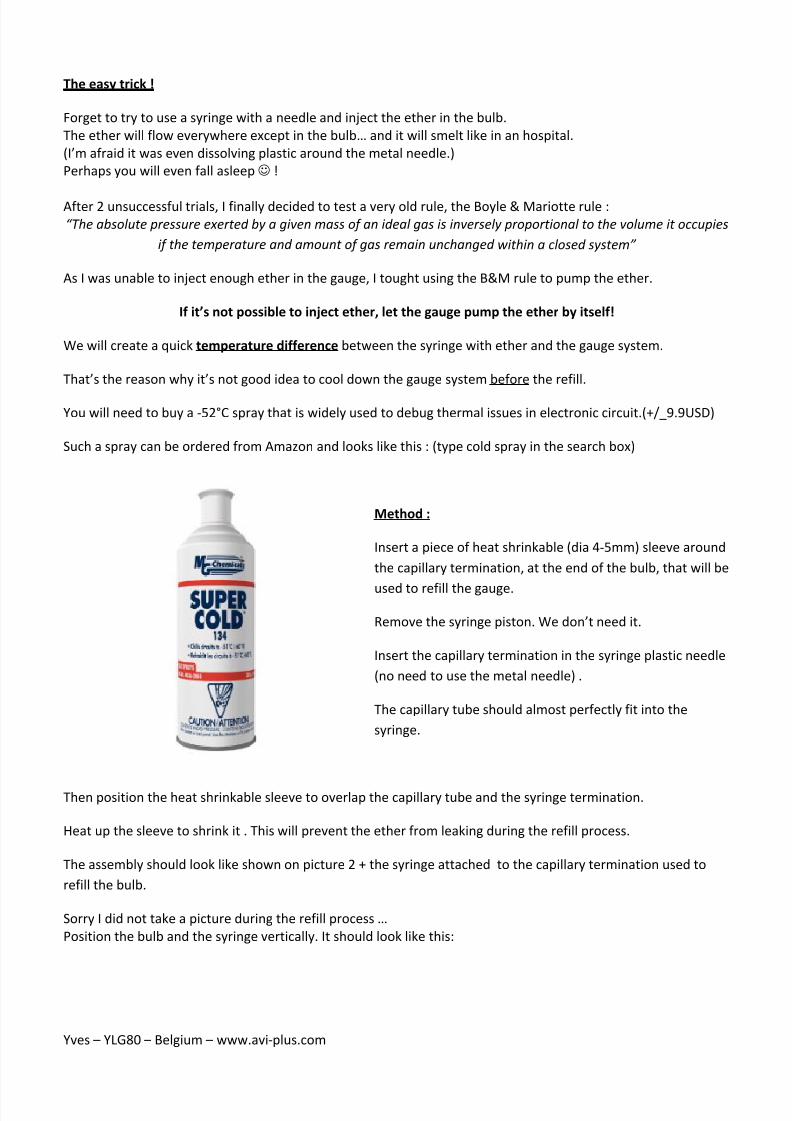
The easy trick !
Forget to try to use a syringe with a needle and inject the ether in the bulb.
The ether will flow everywhere except in the bulb… and it will smelt like in an hospital.
(I’m afraid it was even dissolving plastic around the metal needle.)
Perhaps you will even fall asleep !
After 2 unsuccessful trials, I finally decided to test a very old rule, the Boyle & Mariotte rule :
“The absolute pressure exerted by a given mass of an ideal gas is inversely proportional to the volume it occupies
if
the
temperature
and
amount
of
gas
remain
unchanged within a closed system”
As I was unable to inject enough ether in the gauge, I tought using the B&M rule to pump the ether.
If it’s not possible to inject ether, let the gauge pump the ether by itself!
We will create a quick temperature difference between the syringe with ether and the gauge system.
That’s the reason why it’s not good idea to cool down the gauge system before the refill.
You will need to buy a ‐52°C spray that is widely used to debug thermal issues in electronic circuit.(+/_9.9USD)
Such a spray can be ordered from Amazon and looks like this : (type cold spray in the search box)
Method :
Insert a piece of heat shrinkable (dia 4‐5mm) sleeve around
the capillary termination, at the end of the bulb, that will be
used to
refill
the
gauge.
Remove the syringe piston. We don’t need it.
Insert the capillary termination in the syringe plastic needle
(no need to use the metal needle) .
The capillary tube should almost perfectly fit into the
syringe.
Then position the heat shrinkable sleeve to overlap the capillary tube and the syringe termination.
Heat up the sleeve to shrink it . This will prevent the ether from leaking during the refill process.
The assembly should look like shown on picture 2 + the syringe attached to the capillary termination used to
refill the bulb.
Sorry I did not take a picture during the refill process …
Position the bulb and the syringe vertically. It should look like this:
7/23/2019 Repair Vintage Temperature Gauge
http://slidepdf.com/reader/full/repair-vintage-temperature-gauge 7/7
Yves – YLG80 – Belgium – www.avi‐plus.com
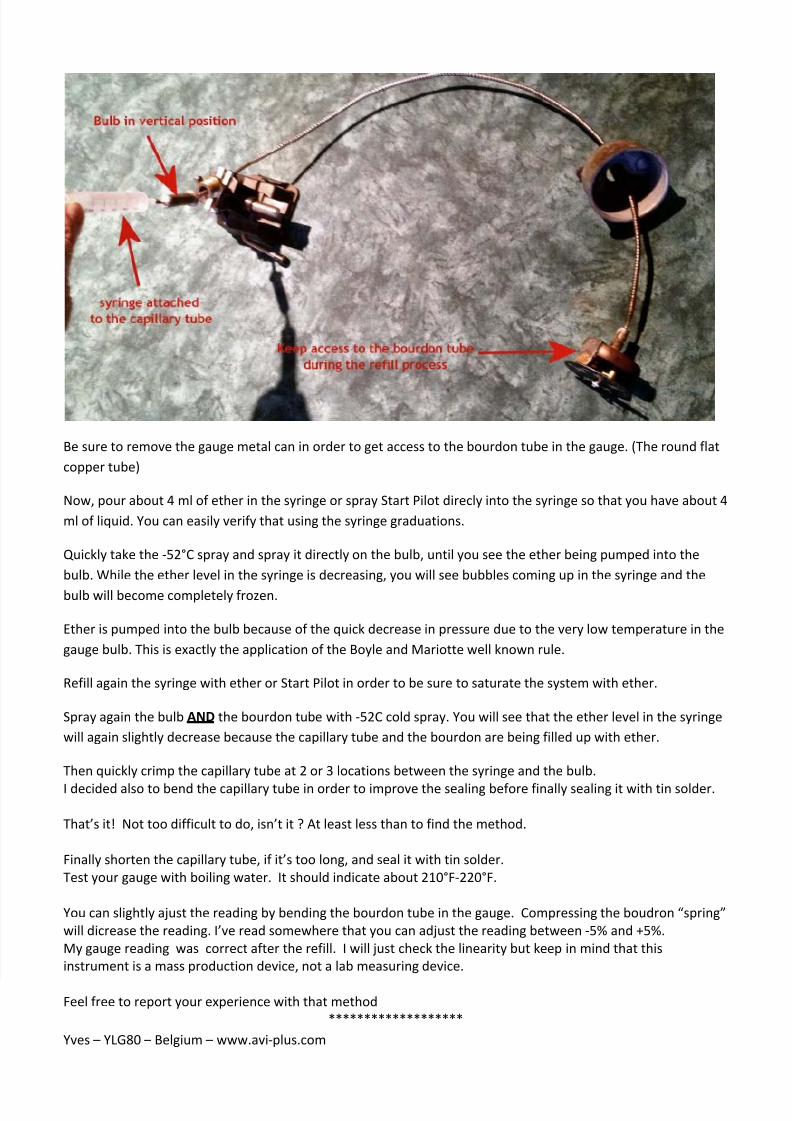
Be sure to remove the gauge metal can in order to get access to the bourdon tube in the gauge. (The round flat
copper tube)
Now, pour about 4 ml of ether in the syringe or spray Start Pilot direcly into the syringe so that you have about 4
ml of liquid. You can easily verify that using the syringe graduations.
Quickly take the ‐52°C spray and spray it directly on the bulb, until you see the ether being pumped into the
bulb. While the ether level in the syringe is decreasing, you will see bubbles coming up in the syringe and the
bulb will
become
completely
frozen.
Ether is pumped into the bulb because of the quick decrease in pressure due to the very low temperature in the
gauge bulb. This is exactly the application of the Boyle and Mariotte well known rule.
Refill again the syringe with ether or Start Pilot in order to be sure to saturate the system with ether.
Spray again the bulb AND the bourdon tube with ‐52C cold spray. You will see that the ether level in the syringe
will again slightly decrease because the capillary tube and the bourdon are being filled up with ether.
Then quickly crimp the capillary tube at 2 or 3 locations between the syringe and the bulb.
I decided
also
to
bend
the
capillary
tube
in
order
to
improve
the
sealing
before
finally
sealing
it
with
tin
solder.
That’s it! Not too difficult to do, isn’t it ? At least less than to find the method.
Finally shorten the capillary tube, if it’s too long, and seal it with tin solder.
Test your gauge with boiling water. It should indicate about 210°F‐220°F.
You can slightly ajust the reading by bending the bourdon tube in the gauge. Compressing the boudron “spring”
will dicrease the reading. I’ve read somewhere that you can adjust the reading between ‐5% and +5%.
My gauge reading was correct after the refill. I will just check the linearity but keep in mind that this
instrument is a mass production device, not a lab measuring device.
Feel free to report your experience with that method
*******************