Remote Control of ROMES using a Pocket PC · 2016-11-30 · Remote Control of ROMES using a Pocket...
82
Subject to change – Michael Manert, March 2006 – 1SP51_01E Rohde & Schwarz® Products: ROMES Remote Control of ROMES using a Pocket PC Application Note This Application Note describes how to configure a PDA (Pocket PC) and a notebook to remotely control the notebook running Rohde & Schwarz ROMES SW using wireless network techniques.
Transcript of Remote Control of ROMES using a Pocket PC · 2016-11-30 · Remote Control of ROMES using a Pocket...
Subject to change – Michael Manert, March 2006 – 1SP51_01E
Rohde & Schwarz® Products: ROMES
Remote Control of ROMES using a Pocket PC
Application Note This Application Note describes how to configure a PDA (Pocket PC) and a notebook to remotely control the notebook running Rohde & Schwarz ROMES SW using wireless network techniques.
Remote Control of ROMES using a Pocket PC
1SP51_01E 2 Rohde & Schwarz
Contents 1 Introduction.............................................................................................. 3 2 Definitions and Trademarks .................................................................... 4 3 Remote Control Tools ............................................................................. 4
Microsoft's Remote Desktop .............................................................. 5 Configuration of the computer running ROMES®......................... 5
Enable remote desktop............................................................ 5 Set Computer Name................................................................ 8
Configure the firewall on the notebook ....................................... 10 Configuration of the PDA ............................................................ 12 Using Remote Desktop on a PDA .............................................. 13
Entering a remote session ..................................................... 13 Disconnection from a remote session ................................... 17
Using Remote Desktop on a Notebook ...................................... 17 Entering a remote session ..................................................... 17 Disconnection from a remote session ................................... 19
NetOp............................................................................................... 20 Configuration of the Notebook .................................................... 20 Configuration of the PDA ............................................................ 21 Using NetOp ............................................................................... 22
Entering a remote session ..................................................... 22 Disconnection from a remote session ................................... 25
VNC.................................................................................................. 26 Installation of the server and client on a notebook...................... 26 Installation of the client on a PDA ............................................... 35 Sample remote session on a notebook ...................................... 36 Sample remote session on a PDA.............................................. 37
4 Network-Connection between PDA and Notebook ............................... 44 Bluetooth ® personal area network, PAN ........................................ 44
PDA is server .............................................................................. 44 Opening the connection......................................................... 57
Set IP-Address of Notebook ....................................................... 59 Wireless LAN according IEEE 802.11 (WiFi, WLAN)...................... 62
Configuration............................................................................... 62 Setting the IP-Address (optional) ........................................... 62 Settings on the Notebook ...................................................... 63
Defining the network ......................................................... 63 Adding the wireless network to the notebook ................... 67
Settings on the PDA............................................................... 73 Wired LAN........................................................................................ 82
5 Literature ............................................................................................... 82 6 Ordering information ............................................................................. 82
Remote Control of ROMES using a Pocket PC
1SP51_01E 3 Rohde & Schwarz
1 Introduction For optimization of mobile communication networks, drive tests with coverage measurement systems are being performed. The coverage measurement platform provided by Rohde & Schwarz is based on ROMES®, which is the application software to define and setup measurement devices, acquire and store the measurement data and displaying measured data during the measurement period and a later replay.
Additional drivers are used for attaching different measurement devices, such as the Rohde & Schwarz Radio Network Analyzer TSMU or test mobiles from different manufacturers. Depending on the required measurement tasks, ROMES® can be configured freely to adapt to the user’s needs.
As long as the measurements are performed in an outdoor environment using a vehicle traveling around, size of the measurement system is not a problem. As more and more measurements are performed in an indoor environment by walking around, size, weight and mechanical handling is an issue of interest. ROMES® can be used in a light weight configuration, which is small enough to be carried in a back pack. Measurements can be performed for more than four hours, only limited by the operating time of the controlling notebook.
When moving around, the operator must ensure that the measurements are working properly and enter some data into the computer such as the current position or start / stop the measurement. Since the notebook must be connected to the test mobiles and PN-scanner via cables, handling of the notebook is somewhat tedious. This, and the fact, that even light weighted notebooks grow heavy after two or more hours, lead to the desire to control ROMES® with a PDA. While it is not possible to run ROMES® on the PDA itself, it is possible to control the notebook with ROMES® remotely.
This application note describes, how to setup a wireless LAN connection between a PDA and a notebook. Furthermore, some useful packages with which ROMES® running on the notebook can be controlled using the PDA.
Section 3, “Remote Control Tools” on page 4 describes which to use and how to select each of them. This section assumes, that a LAN connection has been set-up and configured correctly.
Section 4, “Network-Connection between PDA and Notebook” on page 44 describes how to configure and set-up the LAN connection used for the remote control tools.
All screen shots shown in this application note have been made using a notebook running Windows XP (SP2) and an iPAQ hx4700. The iPAQ operating system is based on German language due to technical reasons. However, the screens will look similar and will be recognized in other languages, too.
Remote Control of ROMES using a Pocket PC
1SP51_01E 4 Rohde & Schwarz
2 Definitions and Trademarks
host the notebook computer or tablett PC running ROMES® PDA personal data assistant, the computer used to controll
ROMES® remotely Pocket PC ® an operation system running on the PDA; copyright by
Micosoft corporation LAN Local area network Bluetooth A wireless standard, mainly for ad-hoc connections such as
audio head-sets, computer – mobile phone, computer – printe etc.; defined and maintained in the Bluetooth interest goup
PAN Personal Area Network, an ad-hoc network used in Bluetooth
WLAN Wireless LAN, defined in IEEE Standard 802.11 WiFi Wireless Fidelity VNC Virtual network computing
Table 1: Definitions used in the document
3 Remote Control Tools
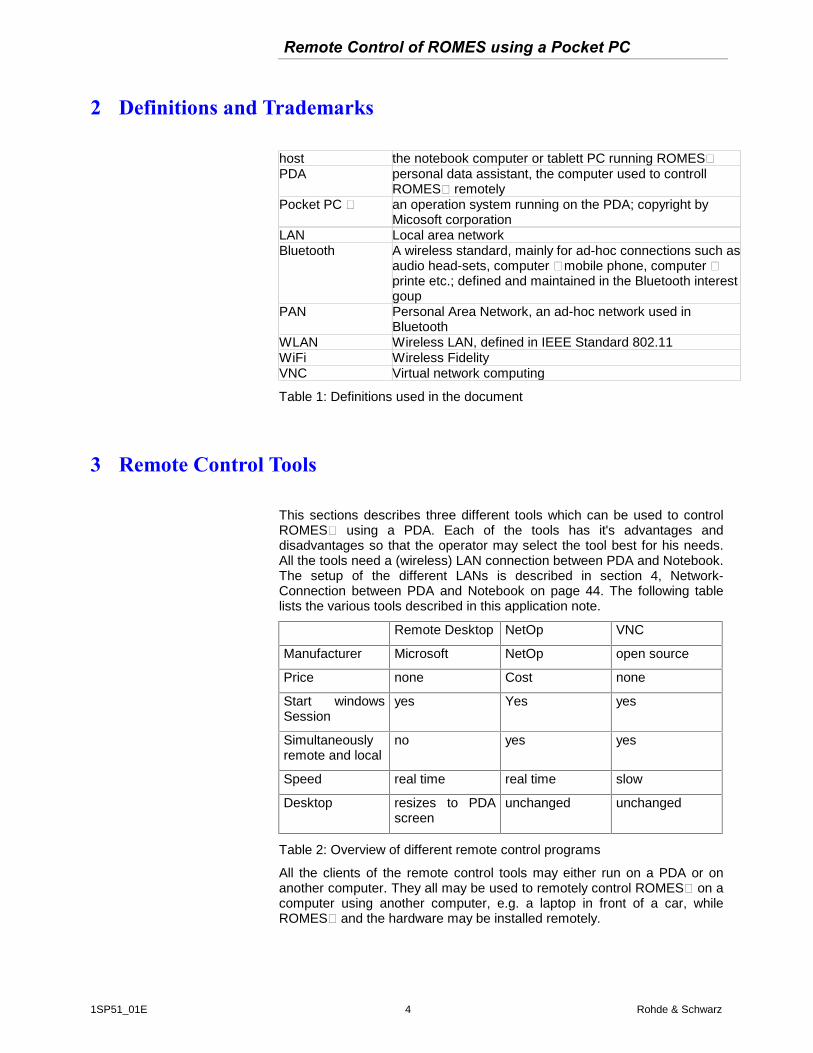
This sections describes three different tools which can be used to control ROMES® using a PDA. Each of the tools has it's advantages and disadvantages so that the operator may select the tool best for his needs. All the tools need a (wireless) LAN connection between PDA and Notebook. The setup of the different LANs is described in section 4, Network-Connection between PDA and Notebook on page 44. The following table lists the various tools described in this application note.
Remote Desktop NetOp VNC
Manufacturer Microsoft NetOp open source
Price none Cost none
Start windows Session
yes Yes yes
Simultaneously remote and local
no yes yes
Speed real time real time slow
Desktop resizes to PDA screen
unchanged unchanged
Table 2: Overview of different remote control programs
All the clients of the remote control tools may either run on a PDA or on another computer. They all may be used to remotely control ROMES® on a computer using another computer, e.g. a laptop in front of a car, while ROMES® and the hardware may be installed remotely.
Remote Control of ROMES using a Pocket PC
1SP51_01E 5 Rohde & Schwarz
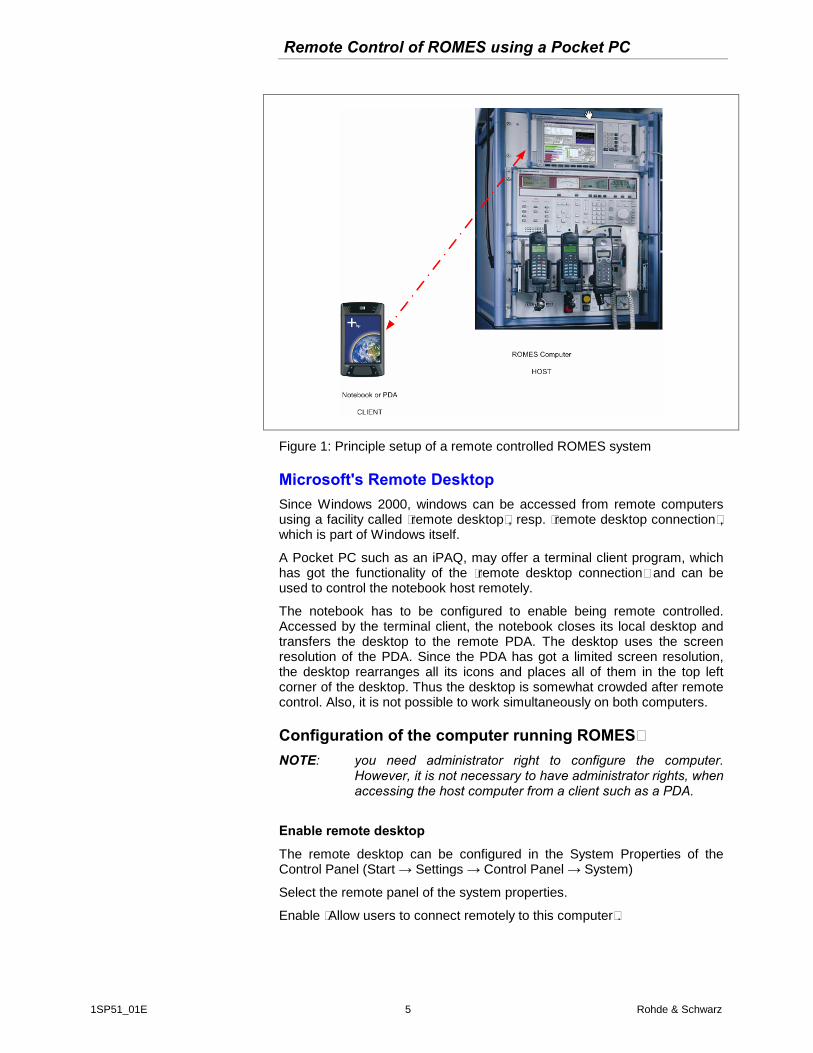
Figure 1: Principle setup of a remote controlled ROMES system
Microsoft's Remote Desktop Since Windows 2000, windows can be accessed from remote computers using a facility called “remote desktop“, resp. “remote desktop connection“, which is part of Windows itself.
A Pocket PC such as an iPAQ, may offer a terminal client program, which has got the functionality of the “remote desktop connection“ and can be used to control the notebook host remotely.
The notebook has to be configured to enable being remote controlled. Accessed by the terminal client, the notebook closes its local desktop and transfers the desktop to the remote PDA. The desktop uses the screen resolution of the PDA. Since the PDA has got a limited screen resolution, the desktop rearranges all its icons and places all of them in the top left corner of the desktop. Thus the desktop is somewhat crowded after remote control. Also, it is not possible to work simultaneously on both computers.
Configuration of the computer running ROMES® NOTE: you need administrator right to configure the computer.
However, it is not necessary to have administrator rights, when accessing the host computer from a client such as a PDA.
Enable remote desktop
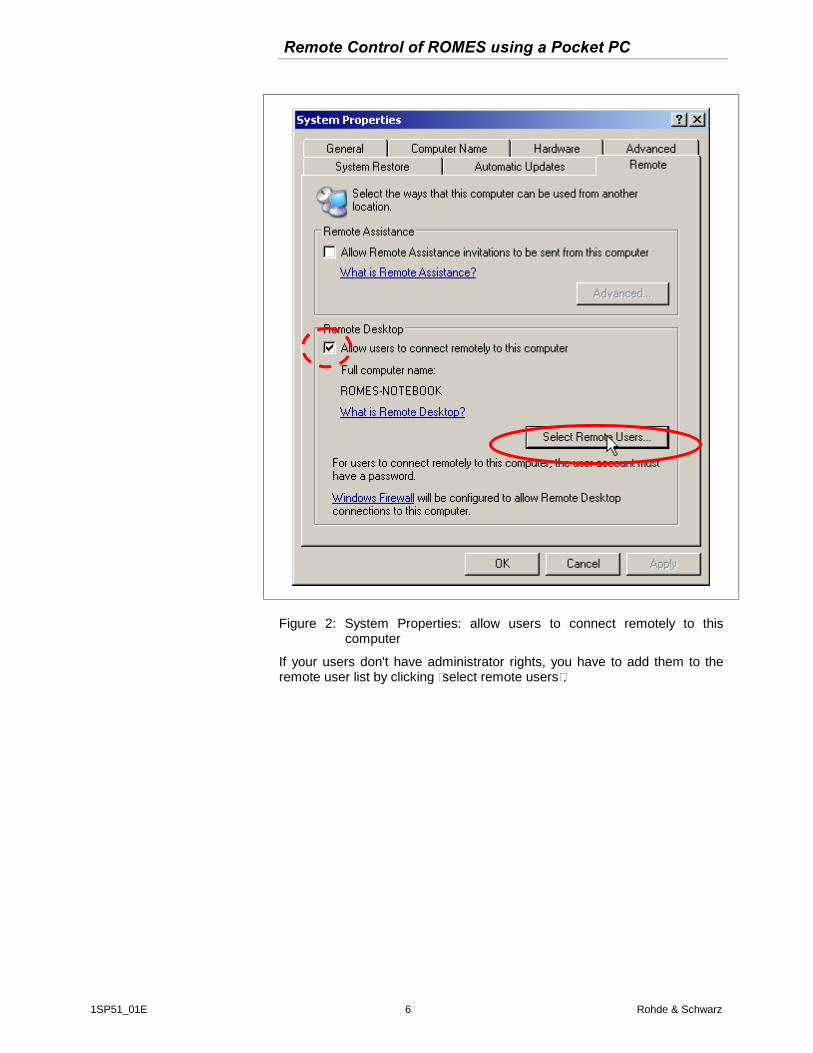
The remote desktop can be configured in the System Properties of the Control Panel (Start → Settings → Control Panel → System)
Select the remote panel of the system properties.
Enable “Allow users to connect remotely to this computer”.
Remote Control of ROMES using a Pocket PC
1SP51_01E 6 Rohde & Schwarz
Figure 2: System Properties: allow users to connect remotely to this computer
If your users don't have administrator rights, you have to add them to the remote user list by clicking “select remote users”.
Remote Control of ROMES using a Pocket PC
1SP51_01E 7 Rohde & Schwarz
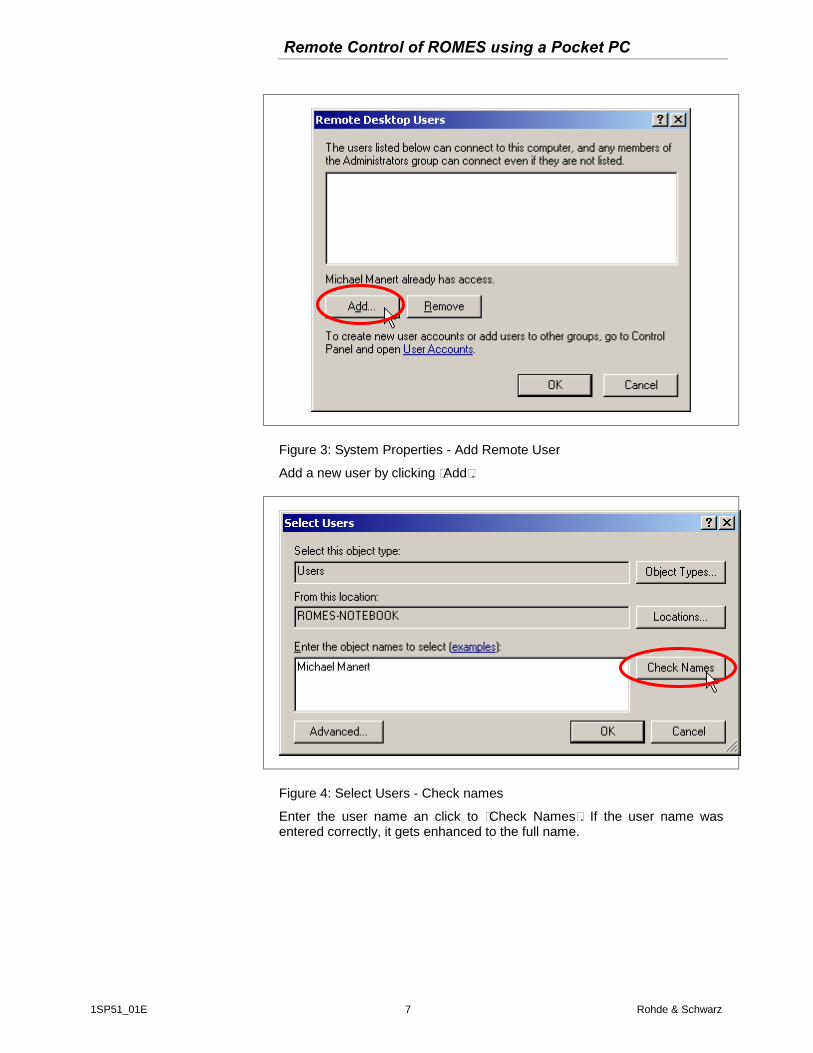
Figure 3: System Properties - Add Remote User
Add a new user by clicking “Add“.
Figure 4: Select Users - Check names
Enter the user name an click to “Check Names“. If the user name was entered correctly, it gets enhanced to the full name.
Remote Control of ROMES using a Pocket PC
1SP51_01E 8 Rohde & Schwarz
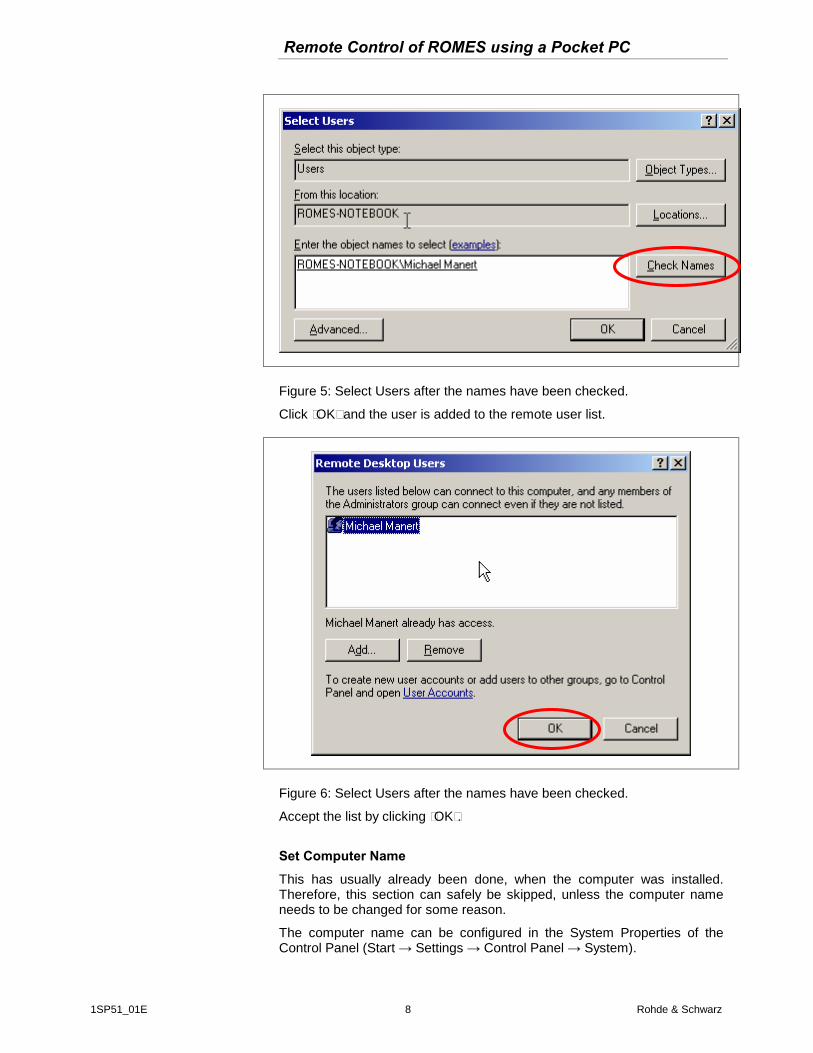
Figure 5: Select Users after the names have been checked.
Click “OK“ and the user is added to the remote user list.
Figure 6: Select Users after the names have been checked.
Accept the list by clicking “OK“.
Set Computer Name
This has usually already been done, when the computer was installed. Therefore, this section can safely be skipped, unless the computer name needs to be changed for some reason.
The computer name can be configured in the System Properties of the Control Panel (Start → Settings → Control Panel → System).
Remote Control of ROMES using a Pocket PC
1SP51_01E 9 Rohde & Schwarz
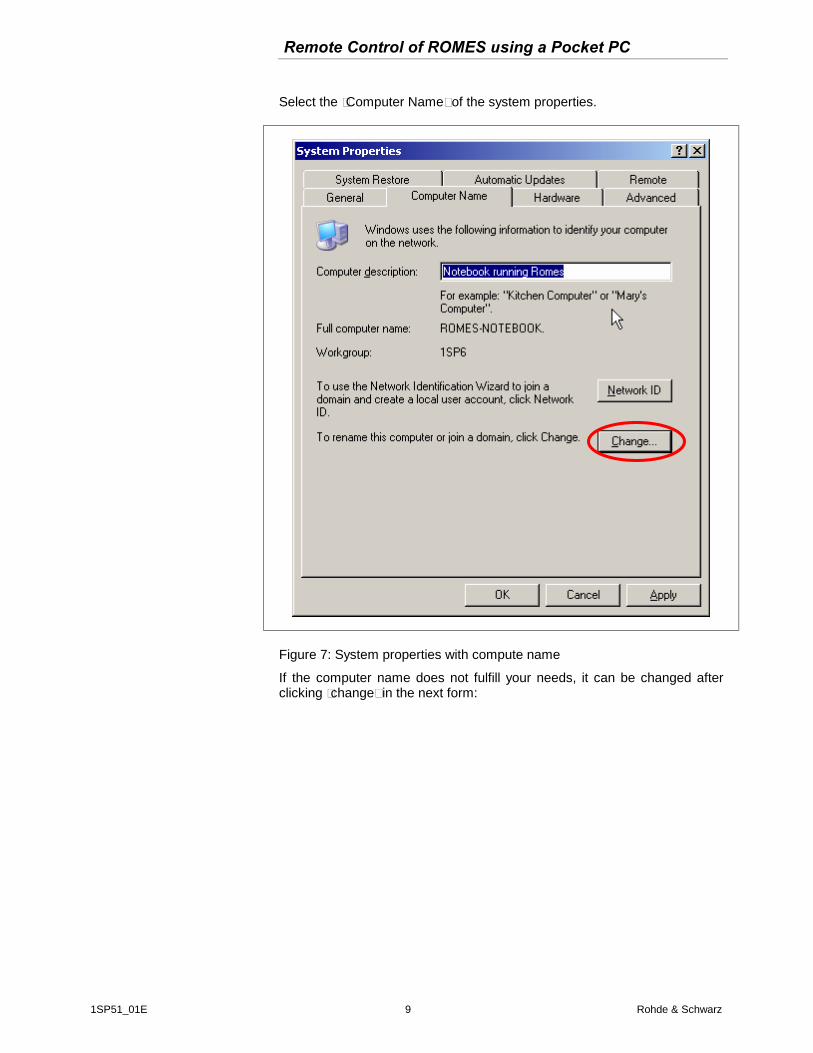
Select the “Computer Name“ of the system properties.
Figure 7: System properties with compute name
If the computer name does not fulfill your needs, it can be changed after clicking “change“ in the next form:
Remote Control of ROMES using a Pocket PC
1SP51_01E 10 Rohde & Schwarz
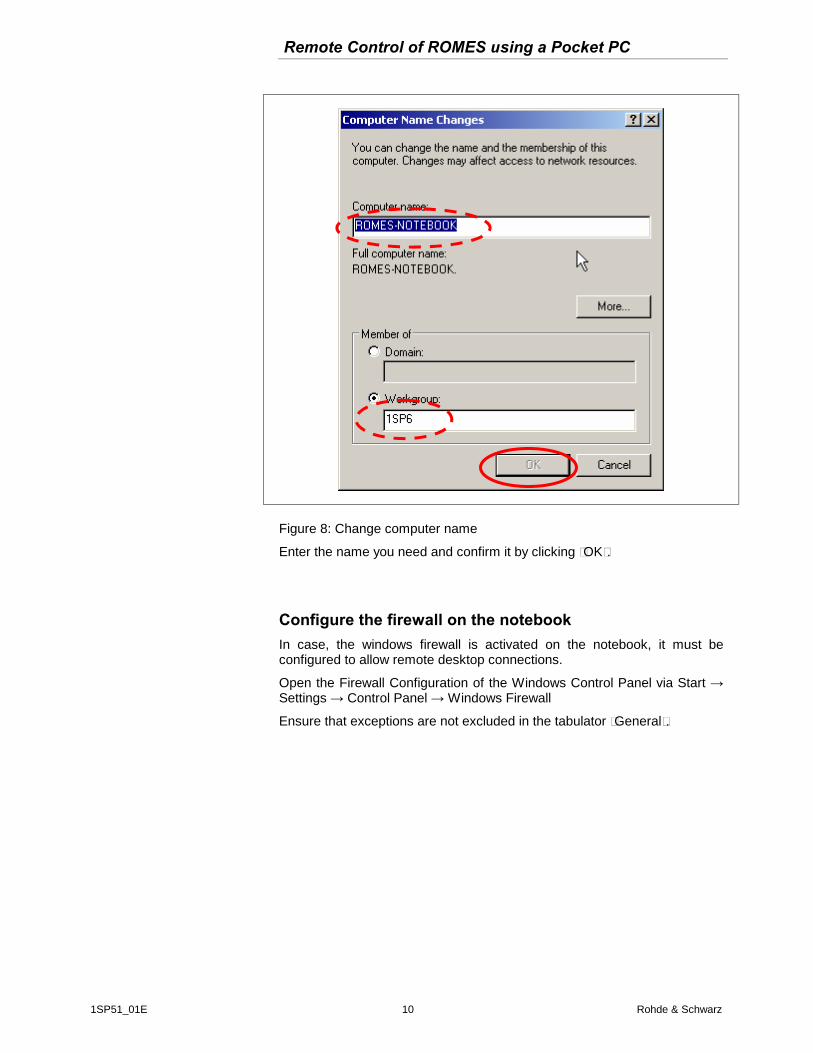
Figure 8: Change computer name
Enter the name you need and confirm it by clicking “OK“.
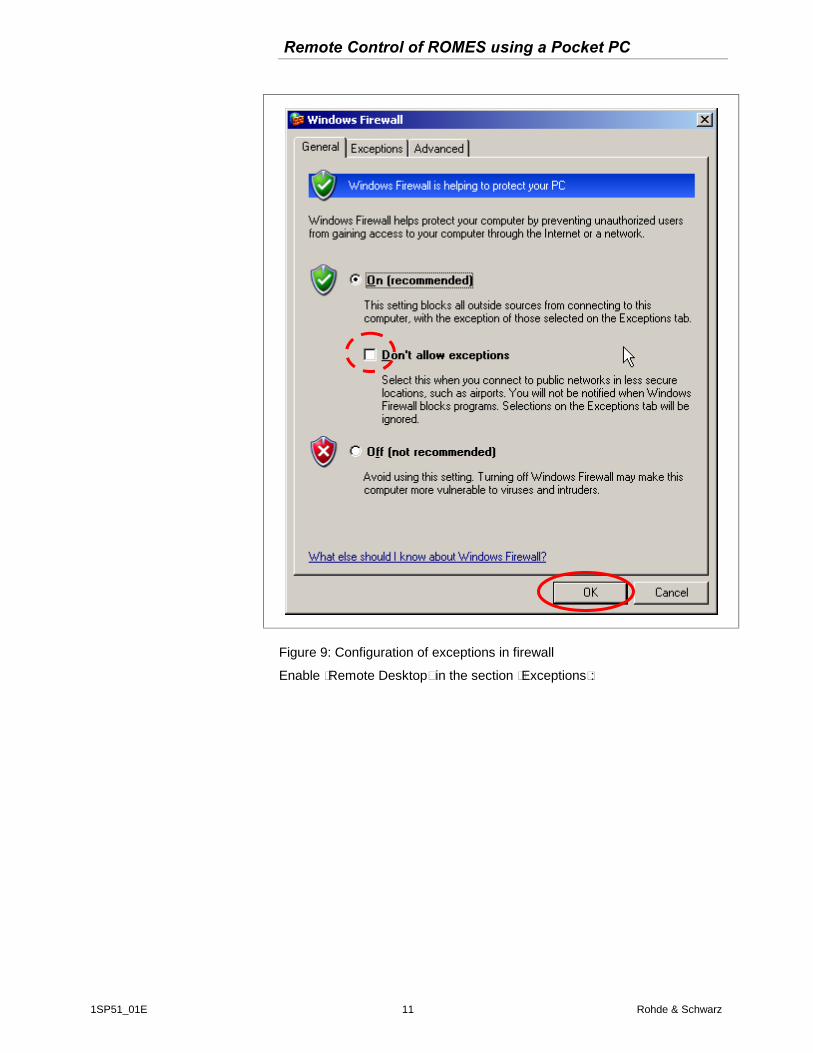
Configure the firewall on the notebook In case, the windows firewall is activated on the notebook, it must be configured to allow remote desktop connections.
Open the Firewall Configuration of the Windows Control Panel via Start → Settings → Control Panel → Windows Firewall
Ensure that exceptions are not excluded in the tabulator “General“.
Remote Control of ROMES using a Pocket PC
1SP51_01E 11 Rohde & Schwarz
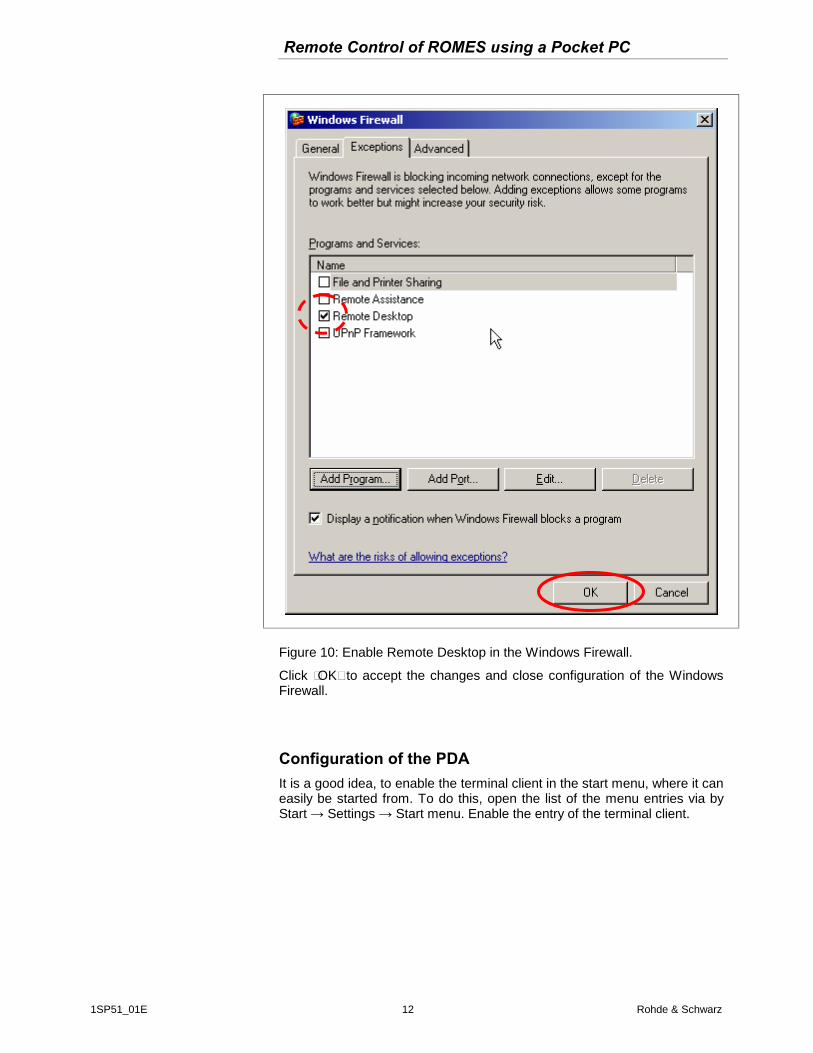
Figure 9: Configuration of exceptions in firewall
Enable “Remote Desktop“ in the section “Exceptions“:
Remote Control of ROMES using a Pocket PC
1SP51_01E 12 Rohde & Schwarz
Figure 10: Enable Remote Desktop in the Windows Firewall.
Click “OK“ to accept the changes and close configuration of the Windows Firewall.
Configuration of the PDA It is a good idea, to enable the terminal client in the start menu, where it can easily be started from. To do this, open the list of the menu entries via by Start → Settings → Start menu. Enable the entry of the terminal client.
Remote Control of ROMES using a Pocket PC
1SP51_01E 13 Rohde & Schwarz
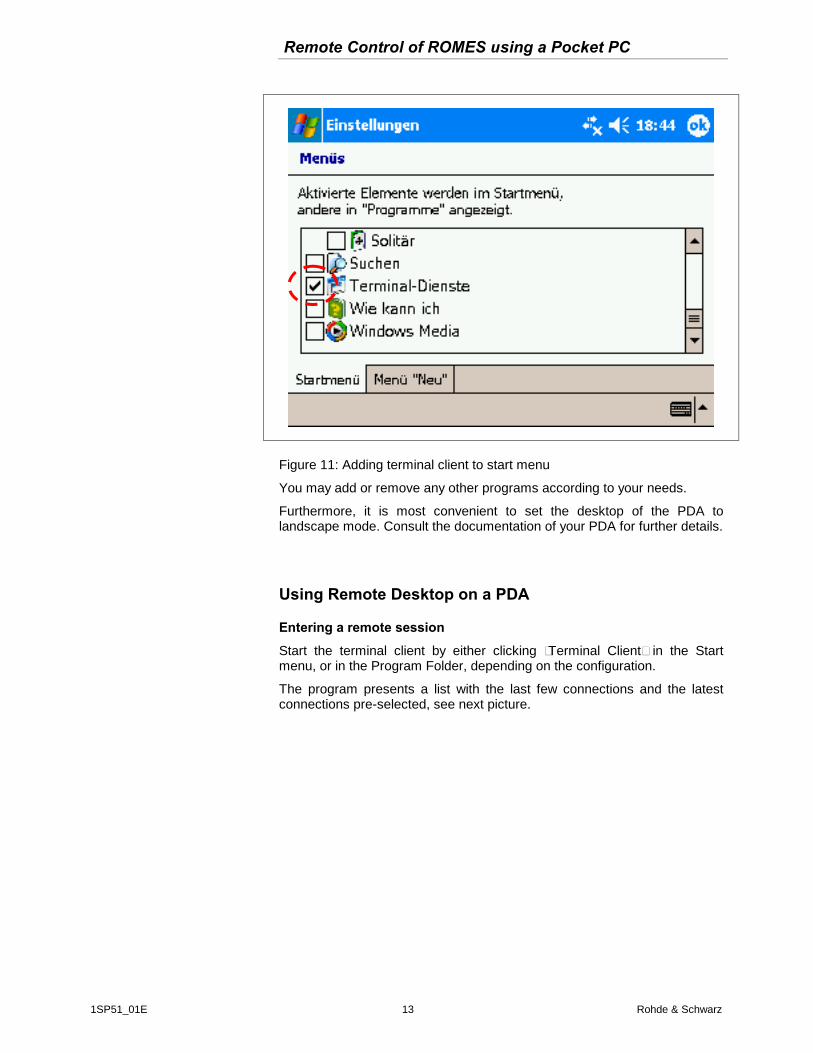
Figure 11: Adding terminal client to start menu
You may add or remove any other programs according to your needs.
Furthermore, it is most convenient to set the desktop of the PDA to landscape mode. Consult the documentation of your PDA for further details.
Using Remote Desktop on a PDA
Entering a remote session
Start the terminal client by either clicking “Terminal Client“ in the Start menu, or in the Program Folder, depending on the configuration.
The program presents a list with the last few connections and the latest connections pre-selected, see next picture.
Remote Control of ROMES using a Pocket PC
1SP51_01E 14 Rohde & Schwarz
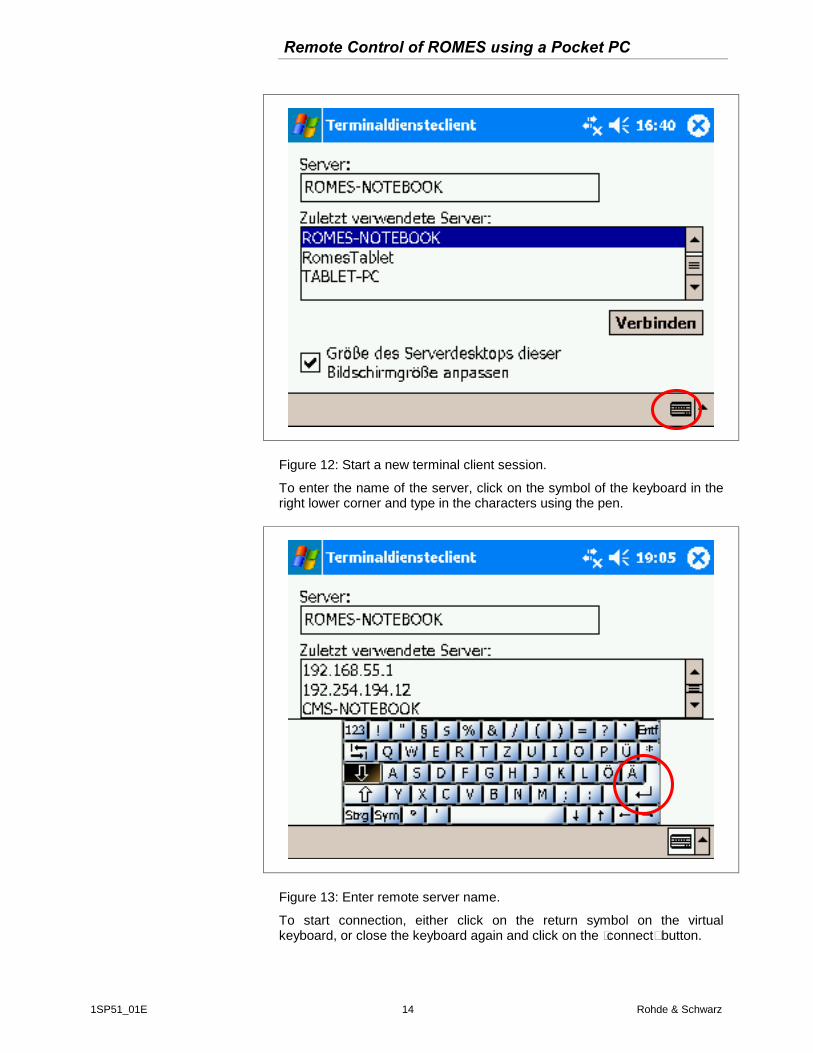
Figure 12: Start a new terminal client session.
To enter the name of the server, click on the symbol of the keyboard in the right lower corner and type in the characters using the pen.
Figure 13: Enter remote server name.
To start connection, either click on the return symbol on the virtual keyboard, or close the keyboard again and click on the “connect” button.
Remote Control of ROMES using a Pocket PC
1SP51_01E 15 Rohde & Schwarz
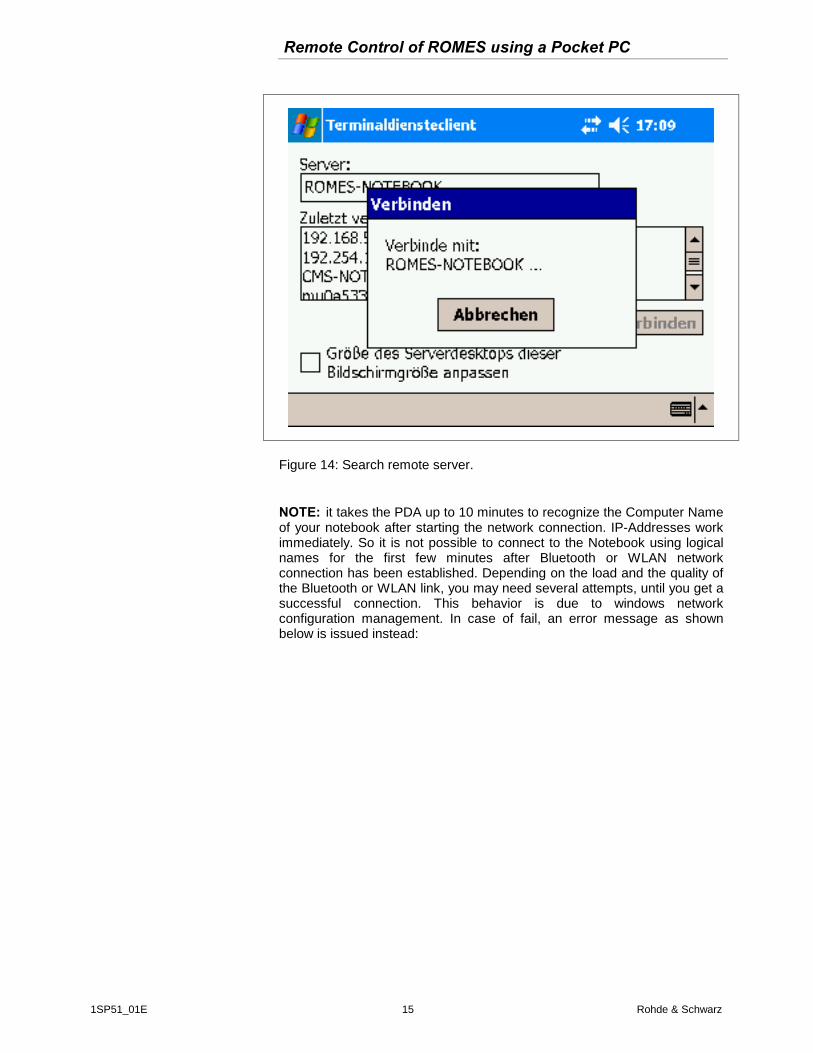
Figure 14: Search remote server.
NOTE: it takes the PDA up to 10 minutes to recognize the Computer Name of your notebook after starting the network connection. IP-Addresses work immediately. So it is not possible to connect to the Notebook using logical names for the first few minutes after Bluetooth or WLAN network connection has been established. Depending on the load and the quality of the Bluetooth or WLAN link, you may need several attempts, until you get a successful connection. This behavior is due to windows network configuration management. In case of fail, an error message as shown below is issued instead:

Remote Control of ROMES using a Pocket PC
1SP51_01E 16 Rohde & Schwarz
Figure 15: Connection failed.
After all, you should get the login screen of windows anyway. Open the virtual keyboard to type in the user name and password.
Figure 16: Login screen of windows.
Click on return key of the virtual keyboard of windows to log in.
Remote Control of ROMES using a Pocket PC
1SP51_01E 17 Rohde & Schwarz
Disconnection from a remote session
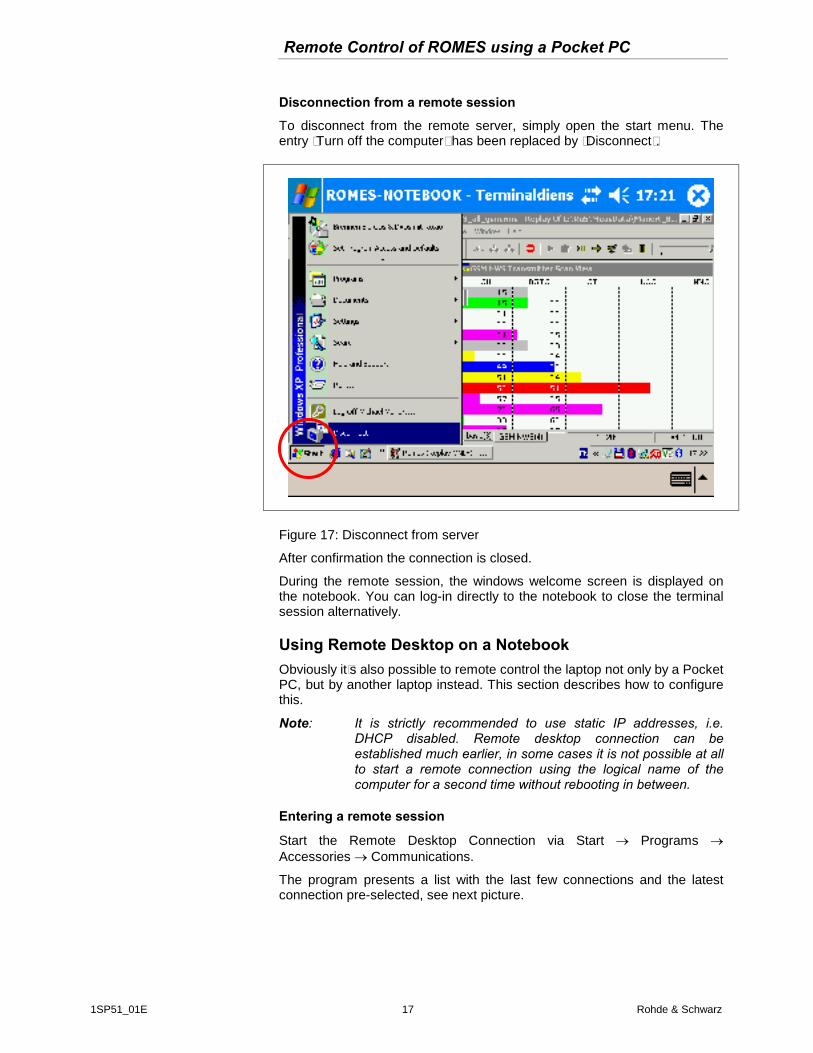
To disconnect from the remote server, simply open the start menu. The entry “Turn off the computer” has been replaced by “Disconnect”.
Figure 17: Disconnect from server
After confirmation the connection is closed.
During the remote session, the windows welcome screen is displayed on the notebook. You can log-in directly to the notebook to close the terminal session alternatively.
Using Remote Desktop on a Notebook Obviously it’s also possible to remote control the laptop not only by a Pocket PC, but by another laptop instead. This section describes how to configure this.
Note: It is strictly recommended to use static IP addresses, i.e. DHCP disabled. Remote desktop connection can be established much earlier, in some cases it is not possible at all to start a remote connection using the logical name of the computer for a second time without rebooting in between.
Entering a remote session
Start the Remote Desktop Connection via Start Programs Accessories Communications.
The program presents a list with the last few connections and the latest connection pre-selected, see next picture.
Remote Control of ROMES using a Pocket PC
1SP51_01E 18 Rohde & Schwarz
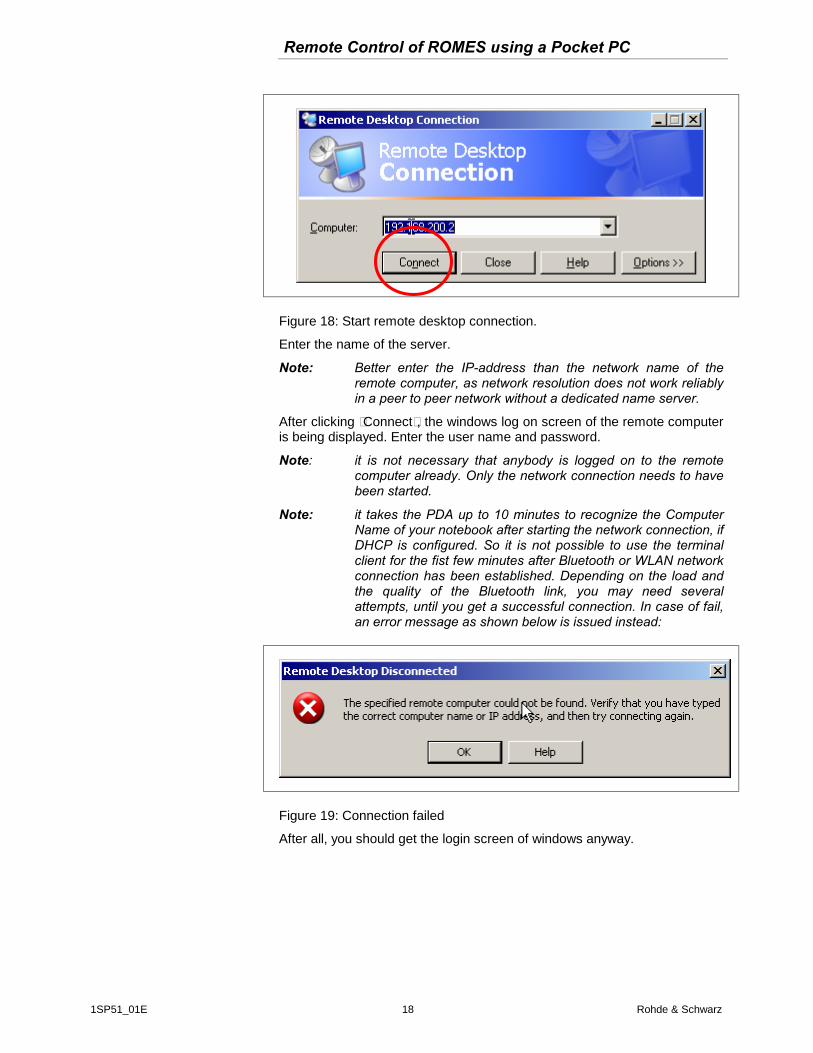
Figure 18: Start remote desktop connection.
Enter the name of the server.
Note: Better enter the IP-address than the network name of the remote computer, as network resolution does not work reliably in a peer to peer network without a dedicated name server.
After clicking “Connect”, the windows log on screen of the remote computer is being displayed. Enter the user name and password.
Note: it is not necessary that anybody is logged on to the remote computer already. Only the network connection needs to have been started.
Note: it takes the PDA up to 10 minutes to recognize the Computer Name of your notebook after starting the network connection, if DHCP is configured. So it is not possible to use the terminal client for the fist few minutes after Bluetooth or WLAN network connection has been established. Depending on the load and the quality of the Bluetooth link, you may need several attempts, until you get a successful connection. In case of fail, an error message as shown below is issued instead:
Figure 19: Connection failed
After all, you should get the login screen of windows anyway.
Remote Control of ROMES using a Pocket PC
1SP51_01E 19 Rohde & Schwarz
192.168.200.2
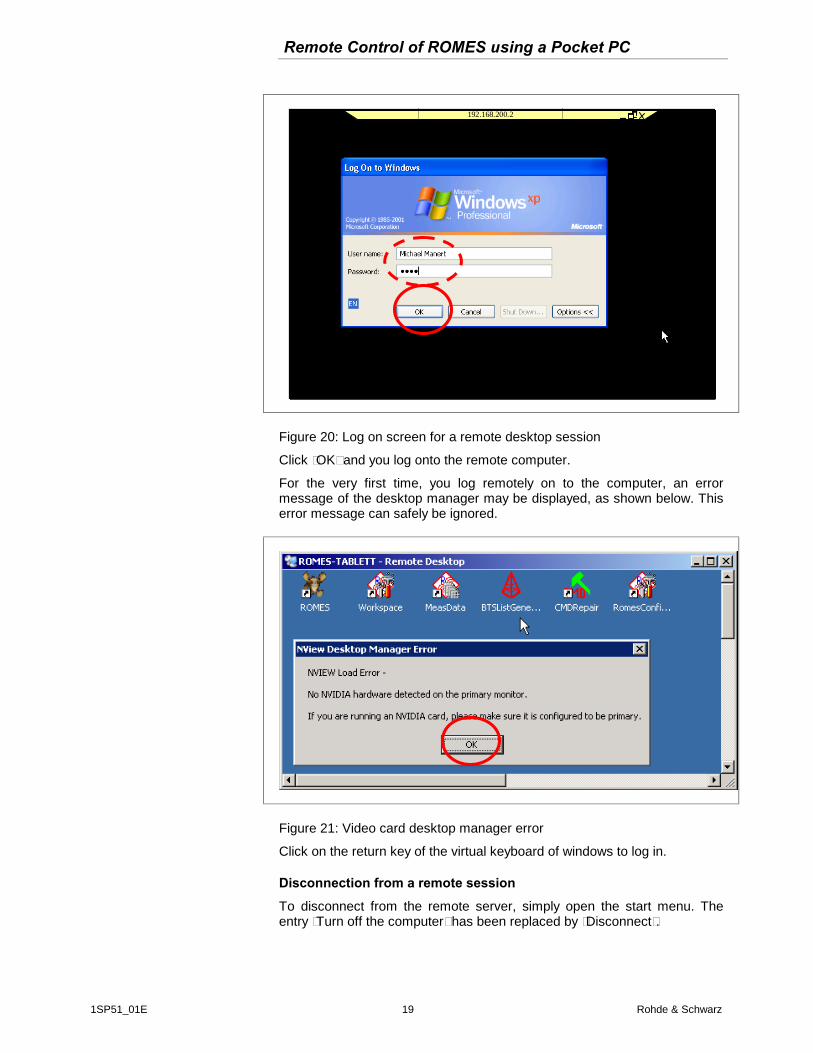
Figure 20: Log on screen for a remote desktop session
Click “OK” and you log onto the remote computer.
For the very first time, you log remotely on to the computer, an error message of the desktop manager may be displayed, as shown below. This error message can safely be ignored.
Figure 21: Video card desktop manager error
Click on the return key of the virtual keyboard of windows to log in.
Disconnection from a remote session
To disconnect from the remote server, simply open the start menu. The entry “Turn off the computer” has been replaced by “Disconnect”.
Remote Control of ROMES using a Pocket PC
1SP51_01E 20 Rohde & Schwarz
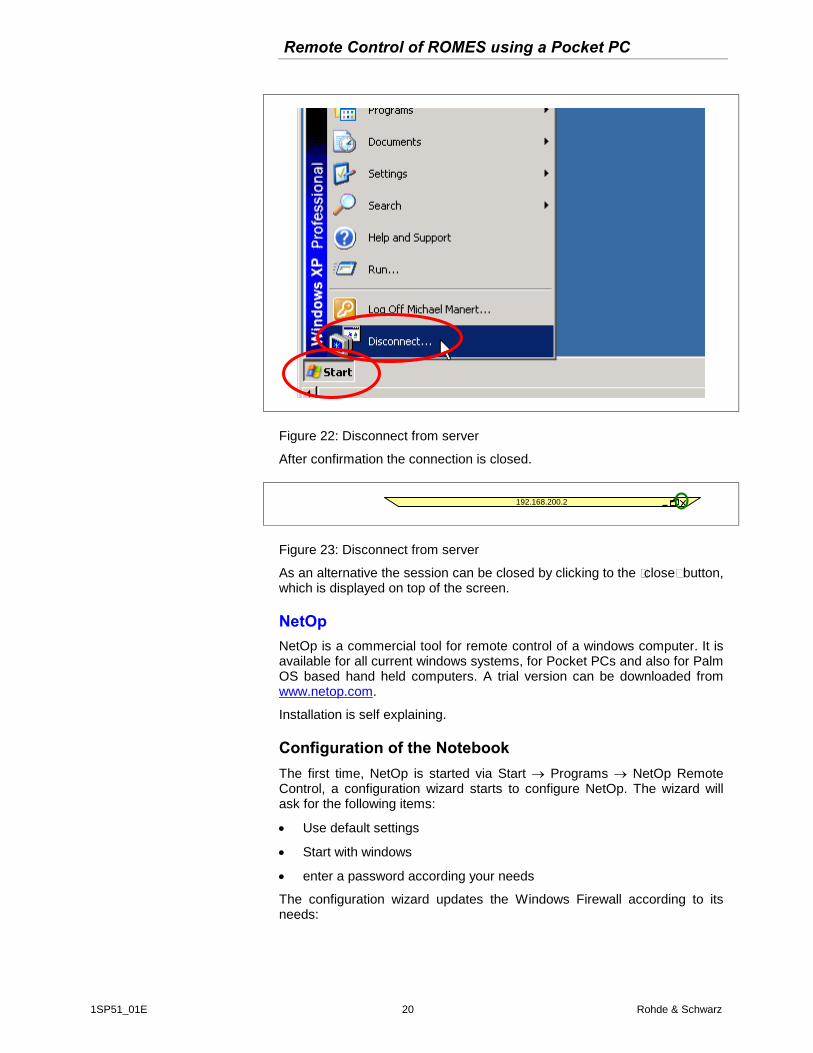
Figure 22: Disconnect from server
After confirmation the connection is closed.
Figure 23: Disconnect from server
As an alternative the session can be closed by clicking to the “close” button, which is displayed on top of the screen.
NetOp NetOp is a commercial tool for remote control of a windows computer. It is available for all current windows systems, for Pocket PCs and also for Palm OS based hand held computers. A trial version can be downloaded from www.netop.com.
Installation is self explaining.
Configuration of the Notebook The first time, NetOp is started via Start Programs NetOp Remote Control, a configuration wizard starts to configure NetOp. The wizard will ask for the following items:
Use default settings
Start with windows
enter a password according your needs
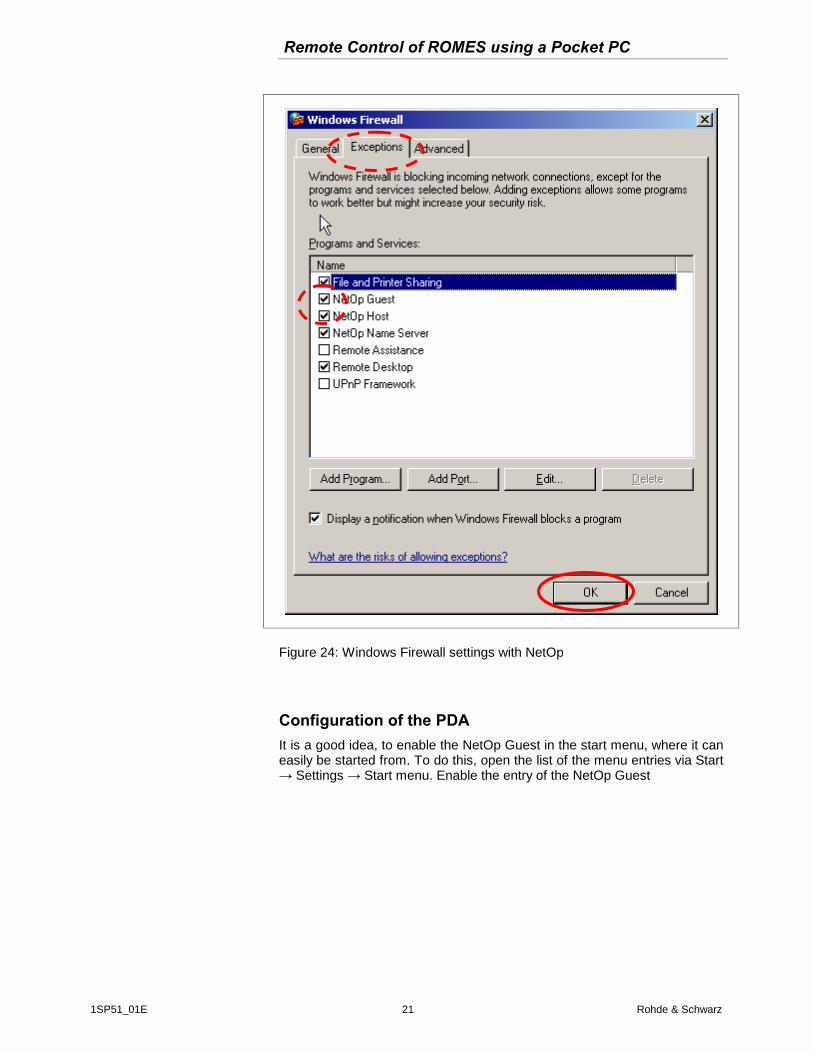
The configuration wizard updates the Windows Firewall according to its needs:
192.168.200.2
Remote Control of ROMES using a Pocket PC
1SP51_01E 21 Rohde & Schwarz
Figure 24: Windows Firewall settings with NetOp
Configuration of the PDA It is a good idea, to enable the NetOp Guest in the start menu, where it can easily be started from. To do this, open the list of the menu entries via Start → Settings → Start menu. Enable the entry of the NetOp Guest
Remote Control of ROMES using a Pocket PC
1SP51_01E 22 Rohde & Schwarz
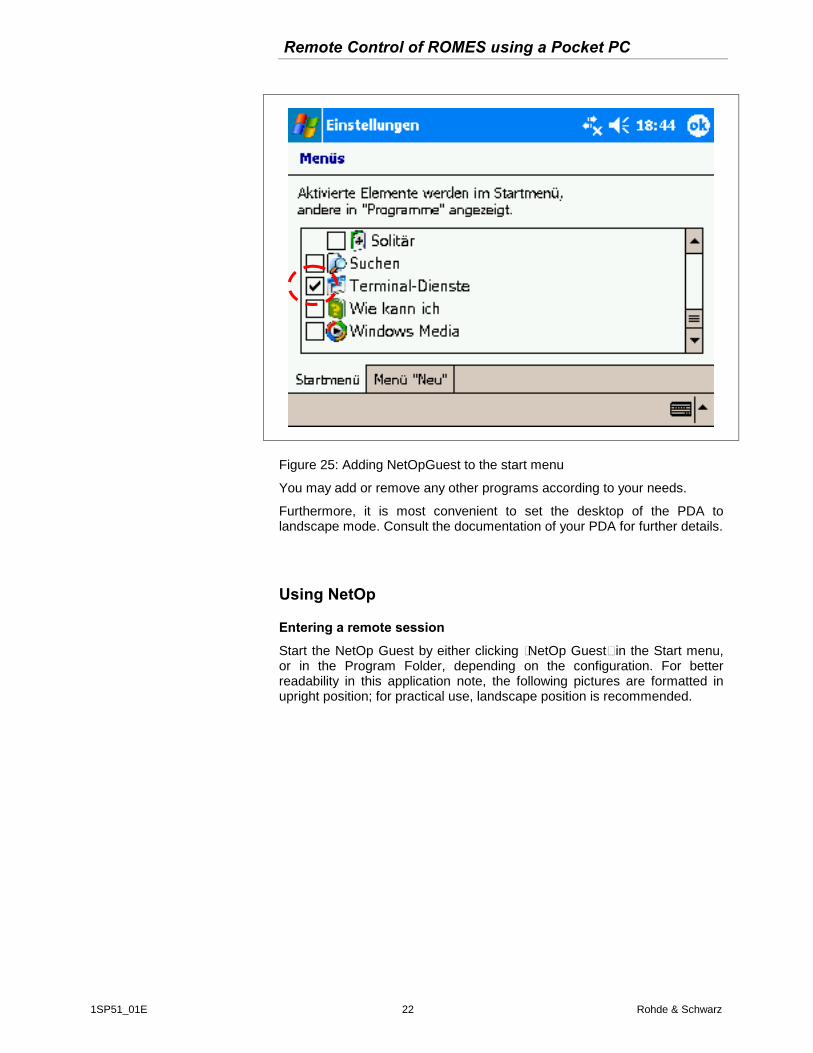
Figure 25: Adding NetOpGuest to the start menu
You may add or remove any other programs according to your needs.
Furthermore, it is most convenient to set the desktop of the PDA to landscape mode. Consult the documentation of your PDA for further details.
Using NetOp
Entering a remote session
Start the NetOp Guest by either clicking “NetOp Guest“ in the Start menu, or in the Program Folder, depending on the configuration. For better readability in this application note, the following pictures are formatted in upright position; for practical use, landscape position is recommended.
Remote Control of ROMES using a Pocket PC
1SP51_01E 23 Rohde & Schwarz
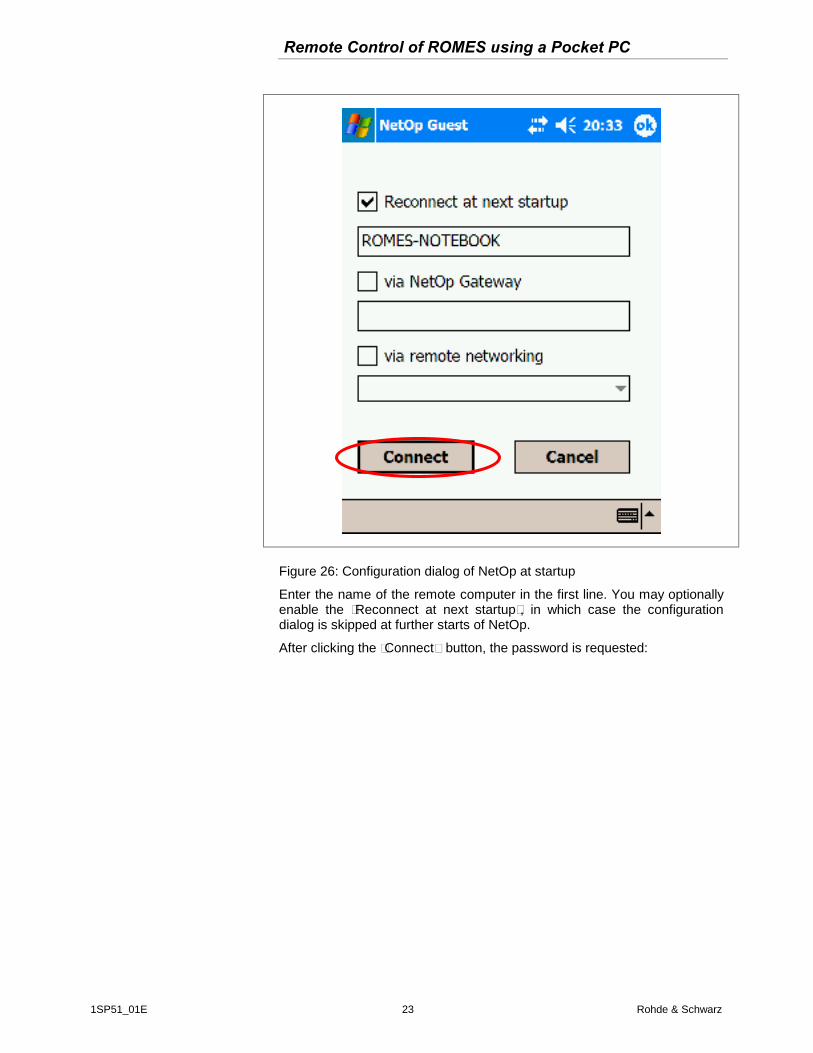
Figure 26: Configuration dialog of NetOp at startup
Enter the name of the remote computer in the first line. You may optionally enable the “Reconnect at next startup”, in which case the configuration dialog is skipped at further starts of NetOp.
After clicking the “Connect” button, the password is requested:
Remote Control of ROMES using a Pocket PC
1SP51_01E 24 Rohde & Schwarz
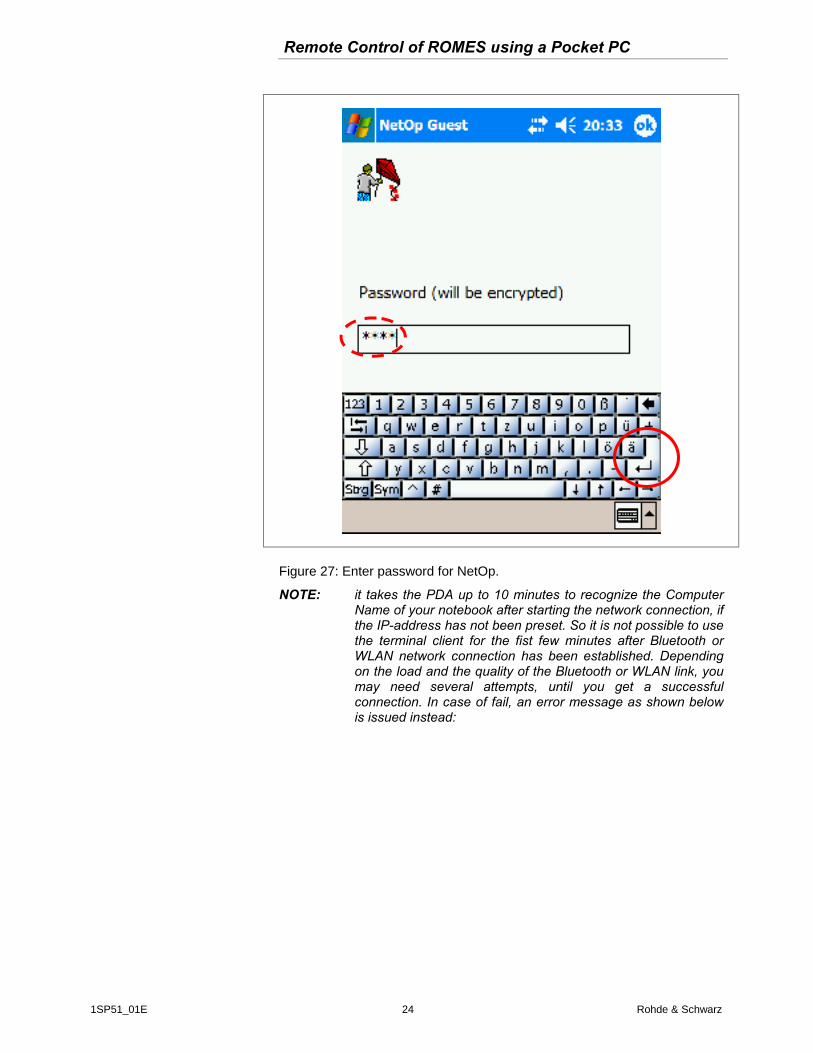
Figure 27: Enter password for NetOp.
NOTE: it takes the PDA up to 10 minutes to recognize the Computer Name of your notebook after starting the network connection, if the IP-address has not been preset. So it is not possible to use the terminal client for the fist few minutes after Bluetooth or WLAN network connection has been established. Depending on the load and the quality of the Bluetooth or WLAN link, you may need several attempts, until you get a successful connection. In case of fail, an error message as shown below is issued instead:
Remote Control of ROMES using a Pocket PC
1SP51_01E 25 Rohde & Schwarz
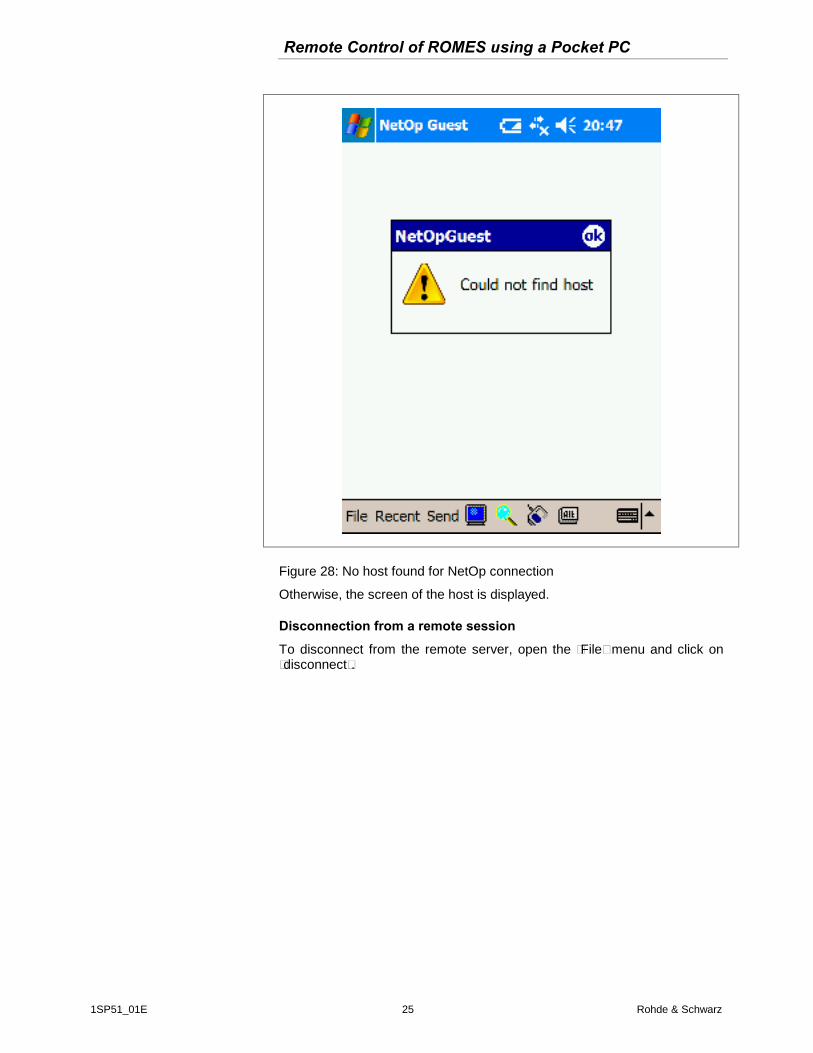
Figure 28: No host found for NetOp connection
Otherwise, the screen of the host is displayed.
Disconnection from a remote session
To disconnect from the remote server, open the “File” menu and click on “disconnect”.
Remote Control of ROMES using a Pocket PC
1SP51_01E 26 Rohde & Schwarz
Figure 29: Disconnect a NetOp session
As long as NetOp is not closed again, in the menu “Recent”, a session to the Notebook can be reopened.
VNC VNC (virtual computer networking) is a program suite for remote controlling computers. It is available for various UNIX systems, for Macintosh, for Windows and for Windows CE and Pocket PC. Most of the suites are freeware or supply at least a personal version. In this application note, UltraVNC is described, which can be found on ultravnc.sourceforge.net, and which is GPL copyrighted.
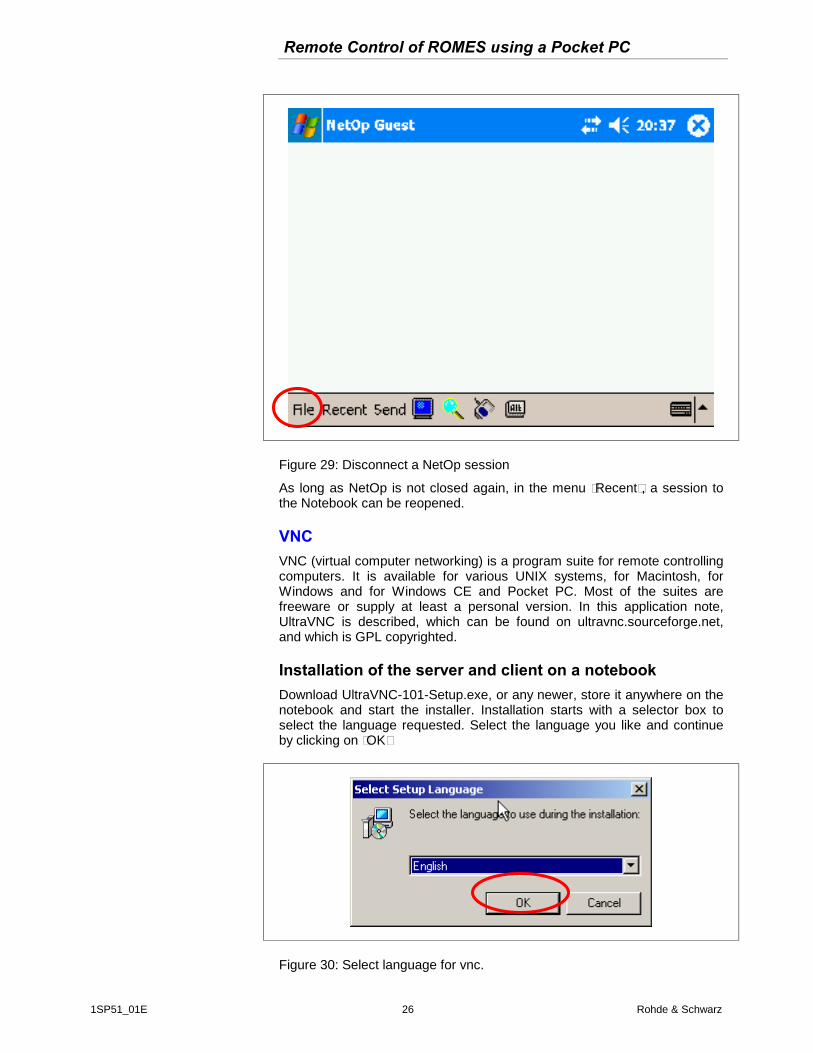
Installation of the server and client on a notebook Download UltraVNC-101-Setup.exe, or any newer, store it anywhere on the notebook and start the installer. Installation starts with a selector box to select the language requested. Select the language you like and continue by clicking on “OK”
Figure 30: Select language for vnc.
Remote Control of ROMES using a Pocket PC
1SP51_01E 27 Rohde & Schwarz
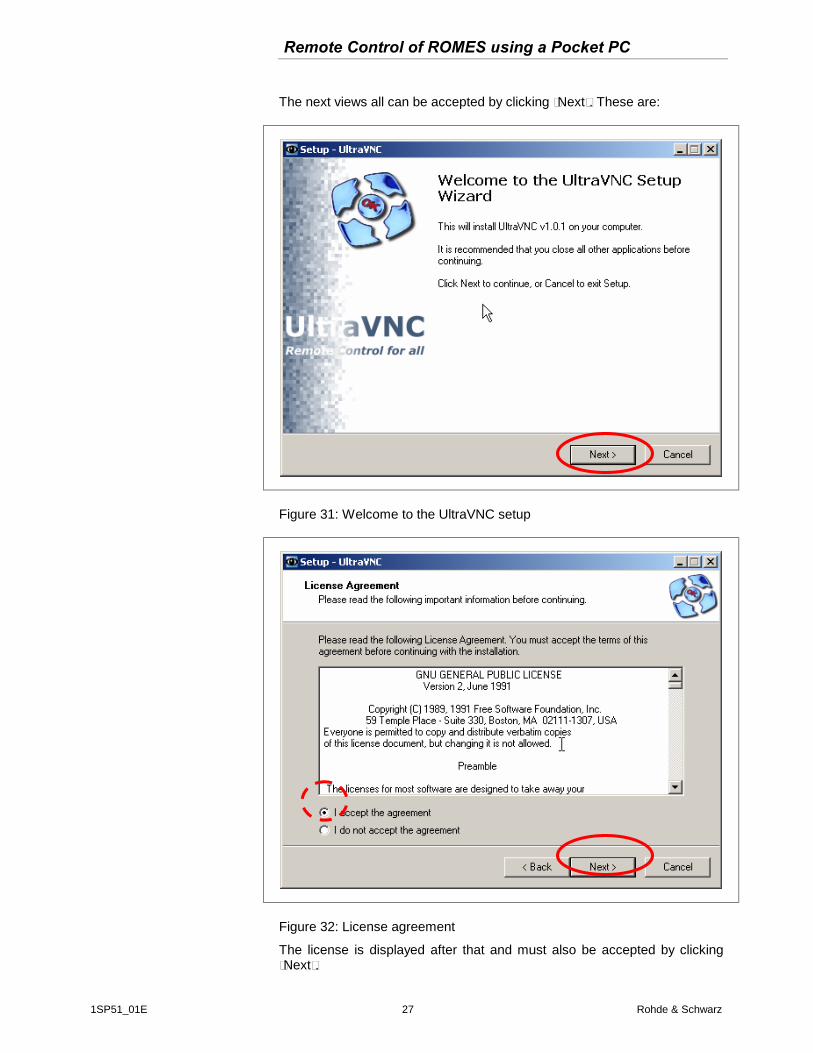
The next views all can be accepted by clicking “Next”. These are:
Figure 31: Welcome to the UltraVNC setup
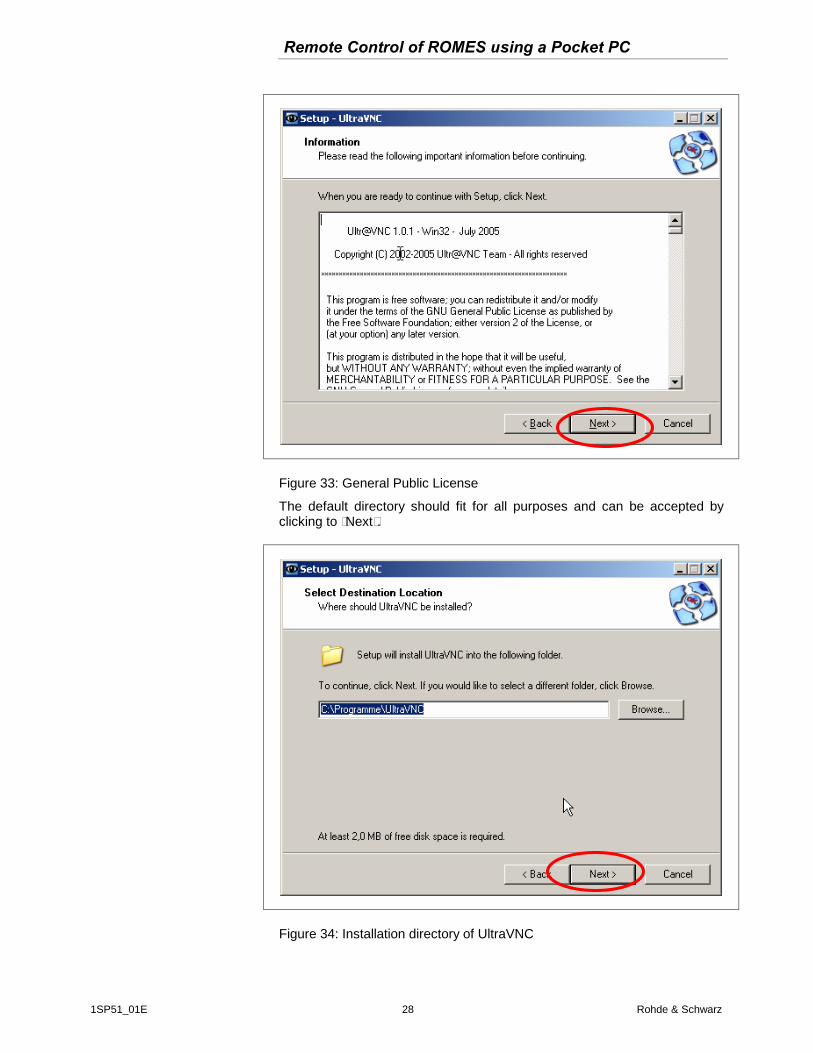
Figure 32: License agreement
The license is displayed after that and must also be accepted by clicking “Next”.
Remote Control of ROMES using a Pocket PC
1SP51_01E 28 Rohde & Schwarz
Figure 33: General Public License
The default directory should fit for all purposes and can be accepted by clicking to “Next”.
Figure 34: Installation directory of UltraVNC
Remote Control of ROMES using a Pocket PC
1SP51_01E 29 Rohde & Schwarz
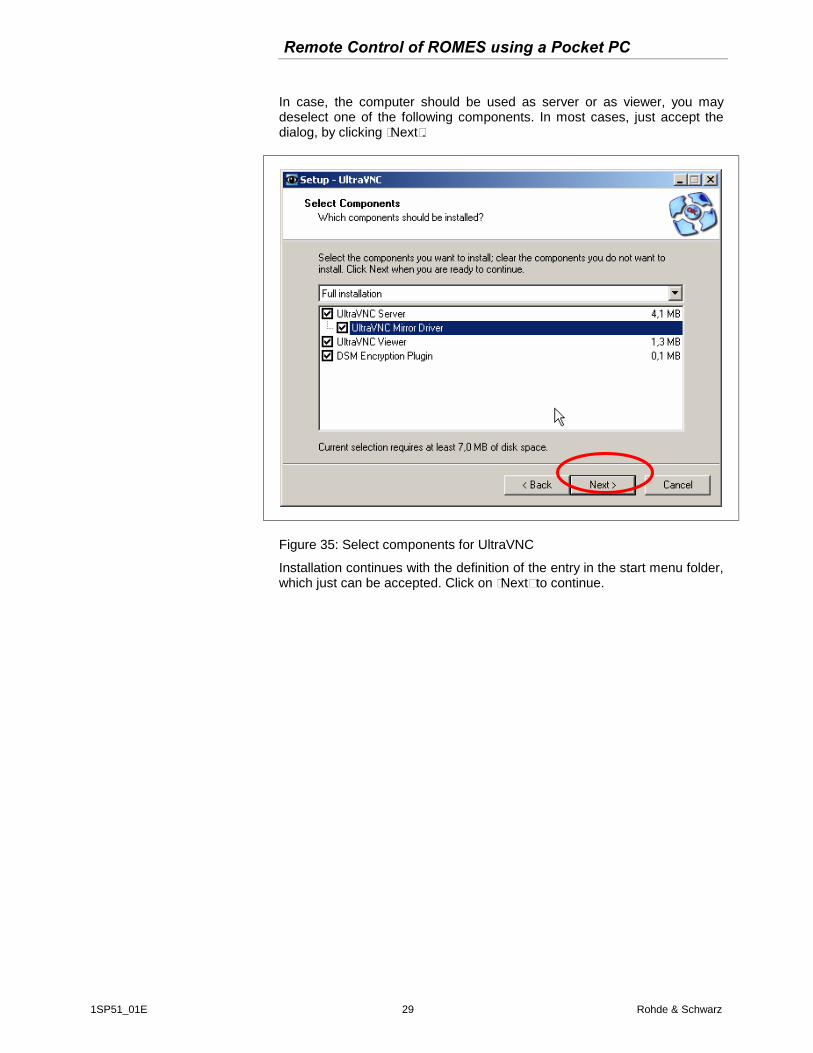
In case, the computer should be used as server or as viewer, you may deselect one of the following components. In most cases, just accept the dialog, by clicking “Next”.
Figure 35: Select components for UltraVNC
Installation continues with the definition of the entry in the start menu folder, which just can be accepted. Click on “Next” to continue.
Remote Control of ROMES using a Pocket PC
1SP51_01E 30 Rohde & Schwarz
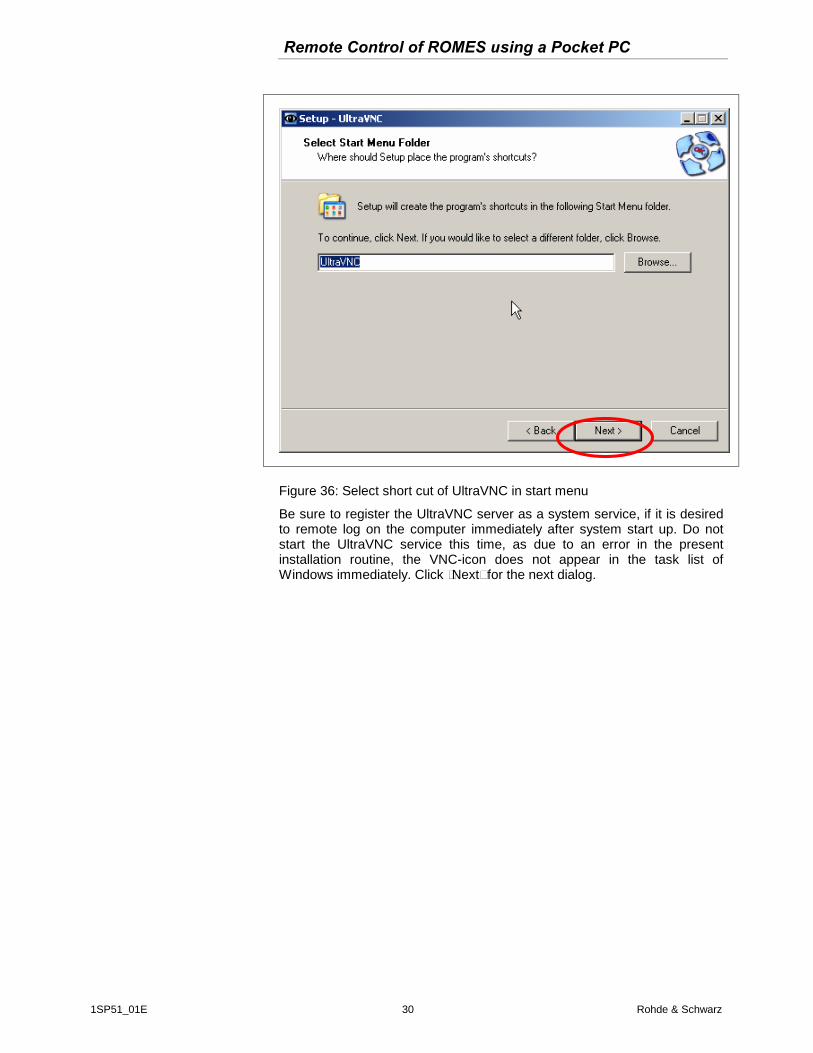
Figure 36: Select short cut of UltraVNC in start menu
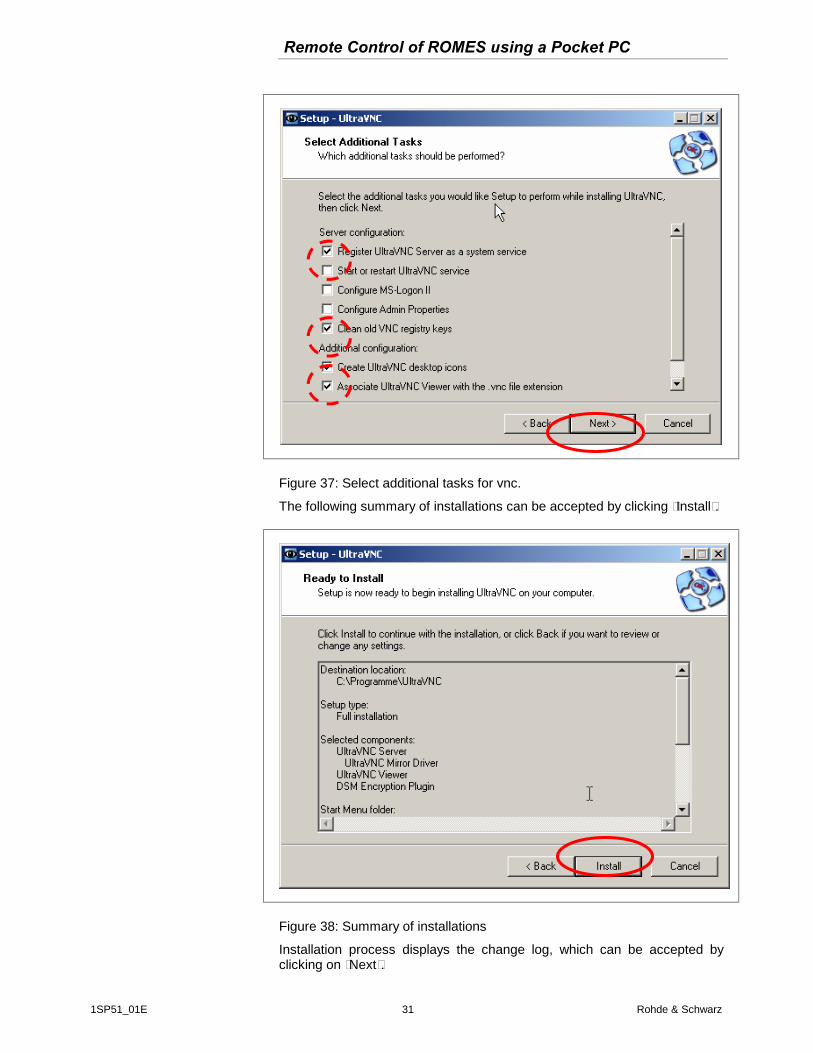
Be sure to register the UltraVNC server as a system service, if it is desired to remote log on the computer immediately after system start up. Do not start the UltraVNC service this time, as due to an error in the present installation routine, the VNC-icon does not appear in the task list of Windows immediately. Click “Next” for the next dialog.
Remote Control of ROMES using a Pocket PC
1SP51_01E 31 Rohde & Schwarz
Figure 37: Select additional tasks for vnc.
The following summary of installations can be accepted by clicking “Install”.
Figure 38: Summary of installations
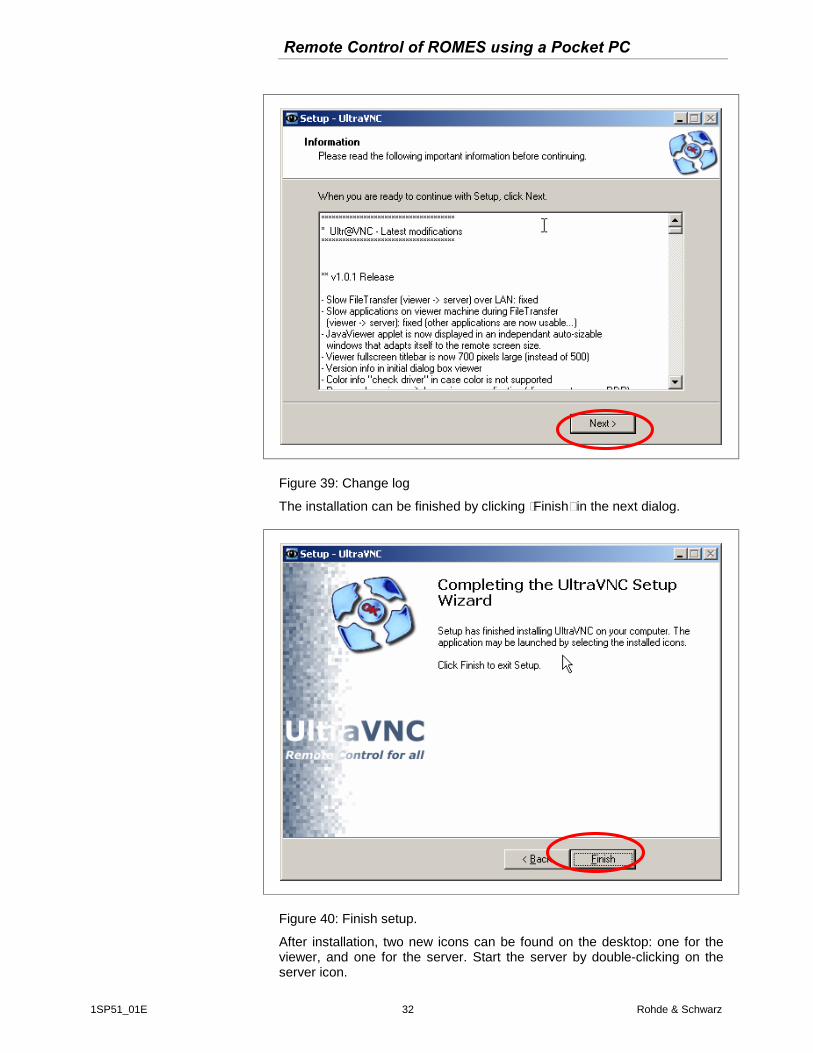
Installation process displays the change log, which can be accepted by clicking on “Next”.
Remote Control of ROMES using a Pocket PC
1SP51_01E 32 Rohde & Schwarz
Figure 39: Change log
The installation can be finished by clicking “Finish” in the next dialog.
Figure 40: Finish setup.
After installation, two new icons can be found on the desktop: one for the viewer, and one for the server. Start the server by double-clicking on the server icon.
Remote Control of ROMES using a Pocket PC
1SP51_01E 33 Rohde & Schwarz
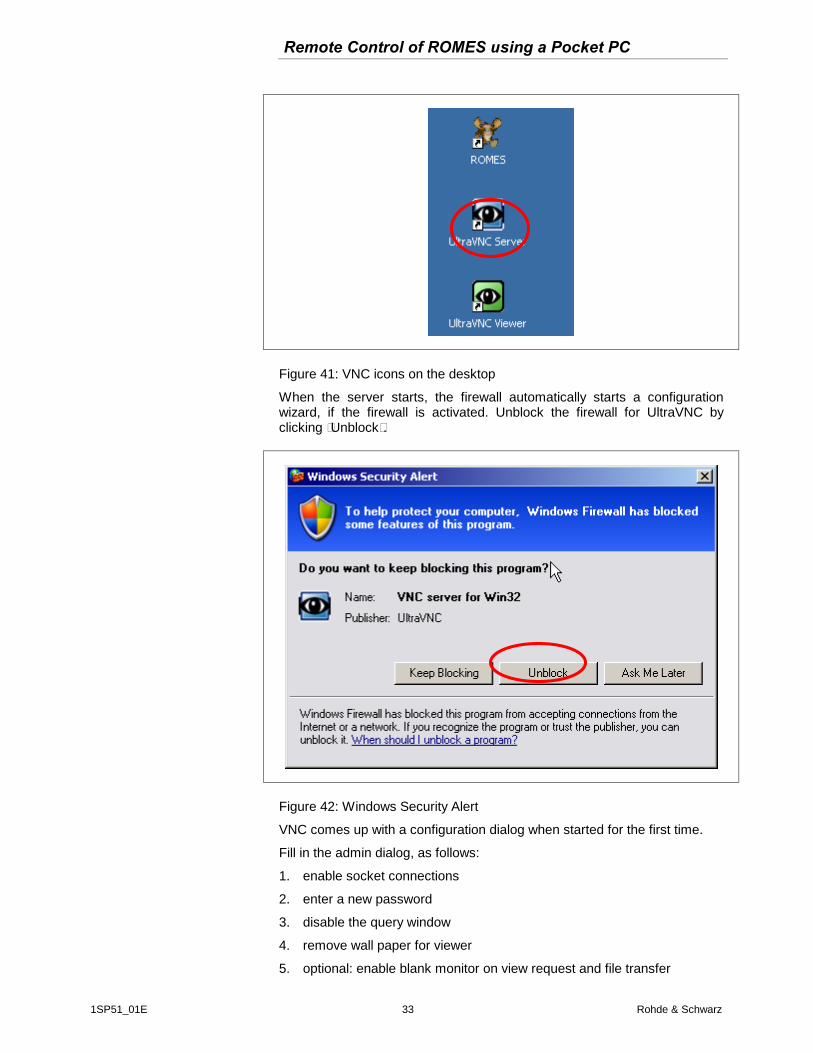
Figure 41: VNC icons on the desktop
When the server starts, the firewall automatically starts a configuration wizard, if the firewall is activated. Unblock the firewall for UltraVNC by clicking “Unblock”.
Figure 42: Windows Security Alert
VNC comes up with a configuration dialog when started for the first time.
Fill in the admin dialog, as follows:
1. enable socket connections
2. enter a new password
3. disable the query window
4. remove wall paper for viewer
5. optional: enable blank monitor on view request and file transfer
Remote Control of ROMES using a Pocket PC
1SP51_01E 34 Rohde & Schwarz
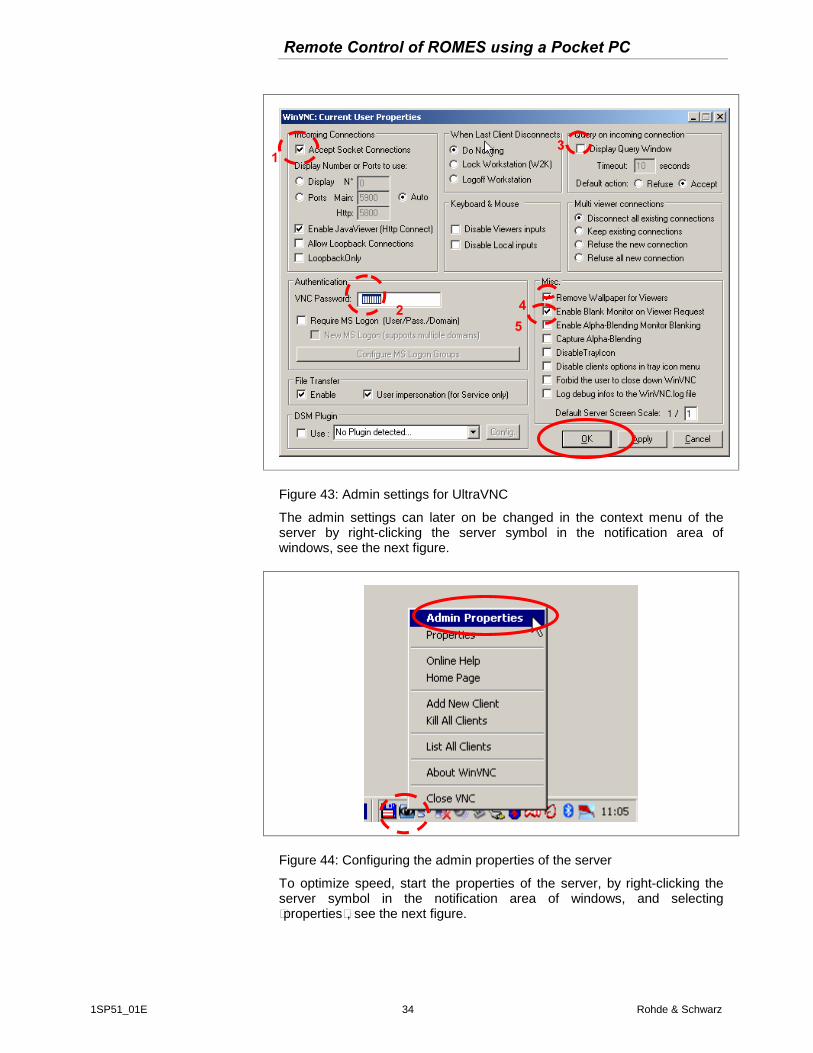
Figure 43: Admin settings for UltraVNC
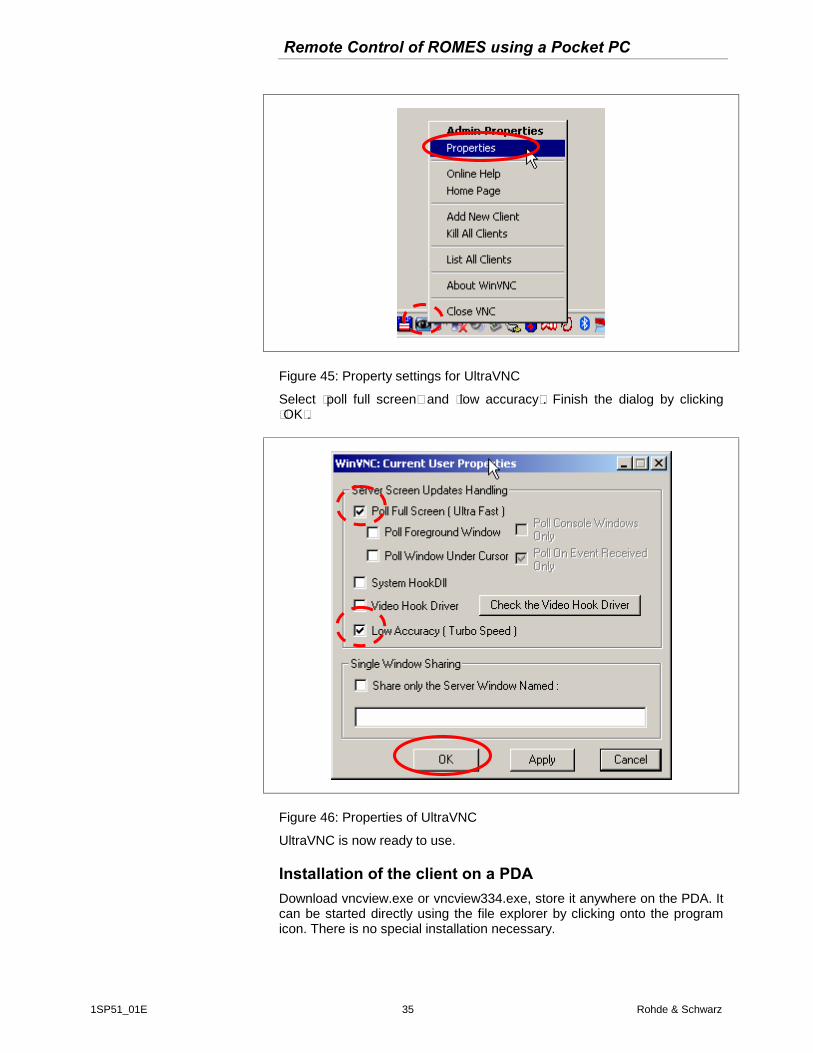
The admin settings can later on be changed in the context menu of the server by right-clicking the server symbol in the notification area of windows, see the next figure.
Figure 44: Configuring the admin properties of the server
To optimize speed, start the properties of the server, by right-clicking the server symbol in the notification area of windows, and selecting “properties”, see the next figure.
1
2
3
4 5
Remote Control of ROMES using a Pocket PC
1SP51_01E 35 Rohde & Schwarz
Figure 45: Property settings for UltraVNC
Select “poll full screen” and “low accuracy”. Finish the dialog by clicking “OK”.
Figure 46: Properties of UltraVNC
UltraVNC is now ready to use.
Installation of the client on a PDA Download vncview.exe or vncview334.exe, store it anywhere on the PDA. It can be started directly using the file explorer by clicking onto the program icon. There is no special installation necessary.
Remote Control of ROMES using a Pocket PC
1SP51_01E 36 Rohde & Schwarz
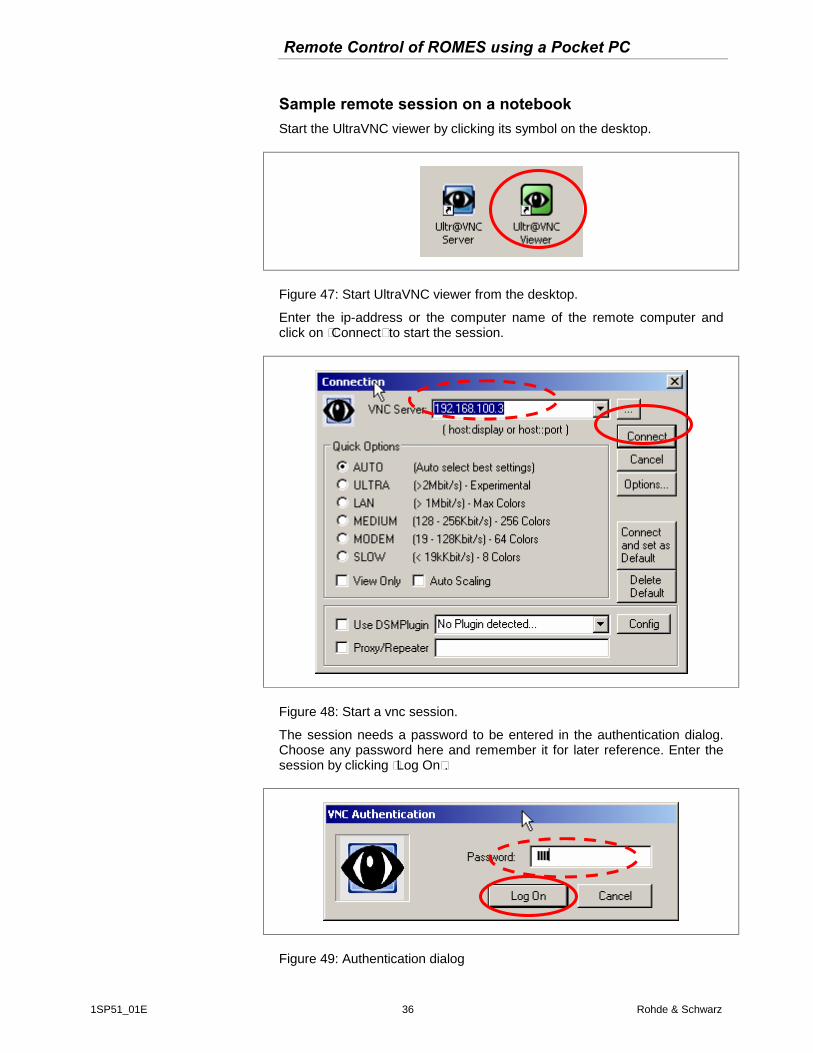
Sample remote session on a notebook Start the UltraVNC viewer by clicking its symbol on the desktop.
Figure 47: Start UltraVNC viewer from the desktop.
Enter the ip-address or the computer name of the remote computer and click on “Connect” to start the session.
Figure 48: Start a vnc session.
The session needs a password to be entered in the authentication dialog. Choose any password here and remember it for later reference. Enter the session by clicking “Log On”.
Figure 49: Authentication dialog
Remote Control of ROMES using a Pocket PC
1SP51_01E 37 Rohde & Schwarz
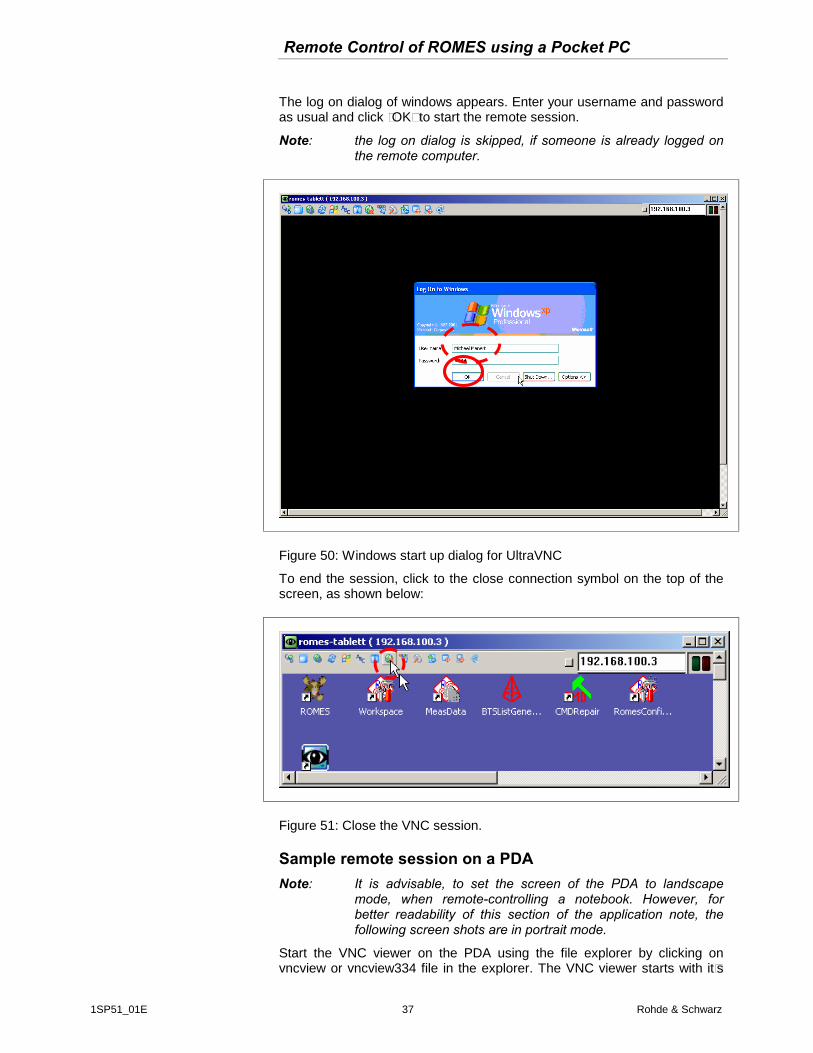
The log on dialog of windows appears. Enter your username and password as usual and click “OK” to start the remote session.
Note: the log on dialog is skipped, if someone is already logged on the remote computer.
Figure 50: Windows start up dialog for UltraVNC
To end the session, click to the close connection symbol on the top of the screen, as shown below:
Figure 51: Close the VNC session.
Sample remote session on a PDA Note: It is advisable, to set the screen of the PDA to landscape
mode, when remote-controlling a notebook. However, for better readability of this section of the application note, the following screen shots are in portrait mode.
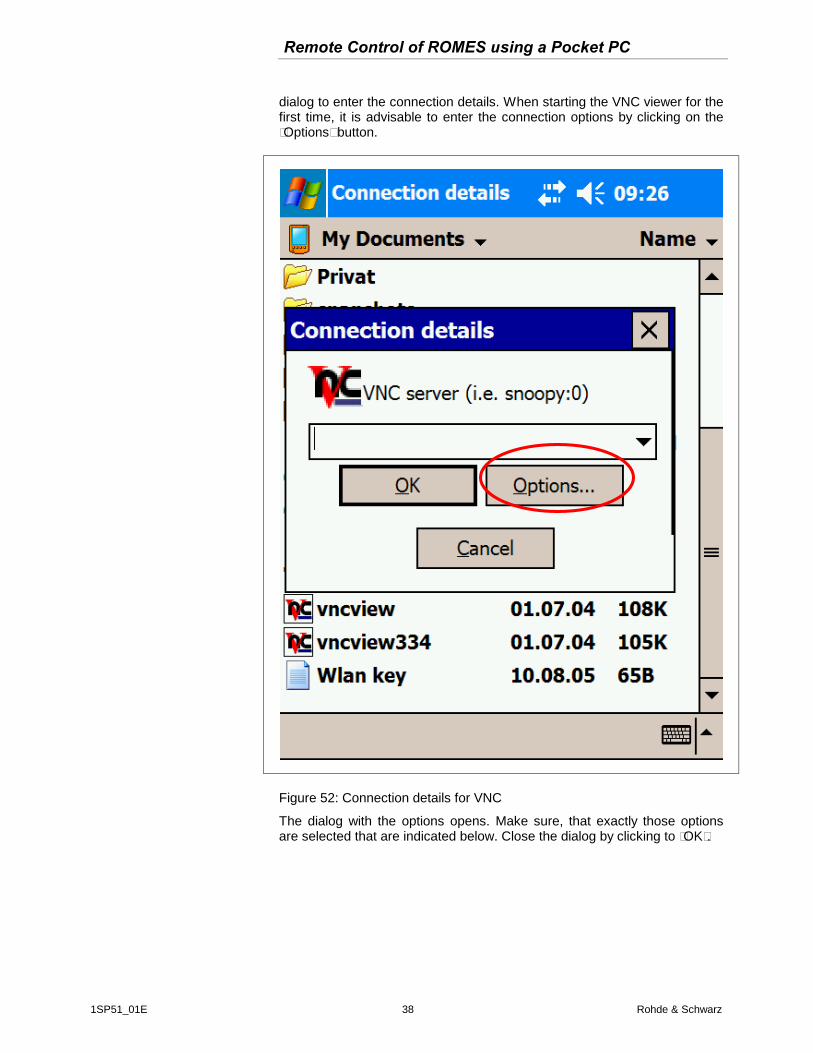
Start the VNC viewer on the PDA using the file explorer by clicking on vncview or vncview334 file in the explorer. The VNC viewer starts with it’s
Remote Control of ROMES using a Pocket PC
1SP51_01E 38 Rohde & Schwarz
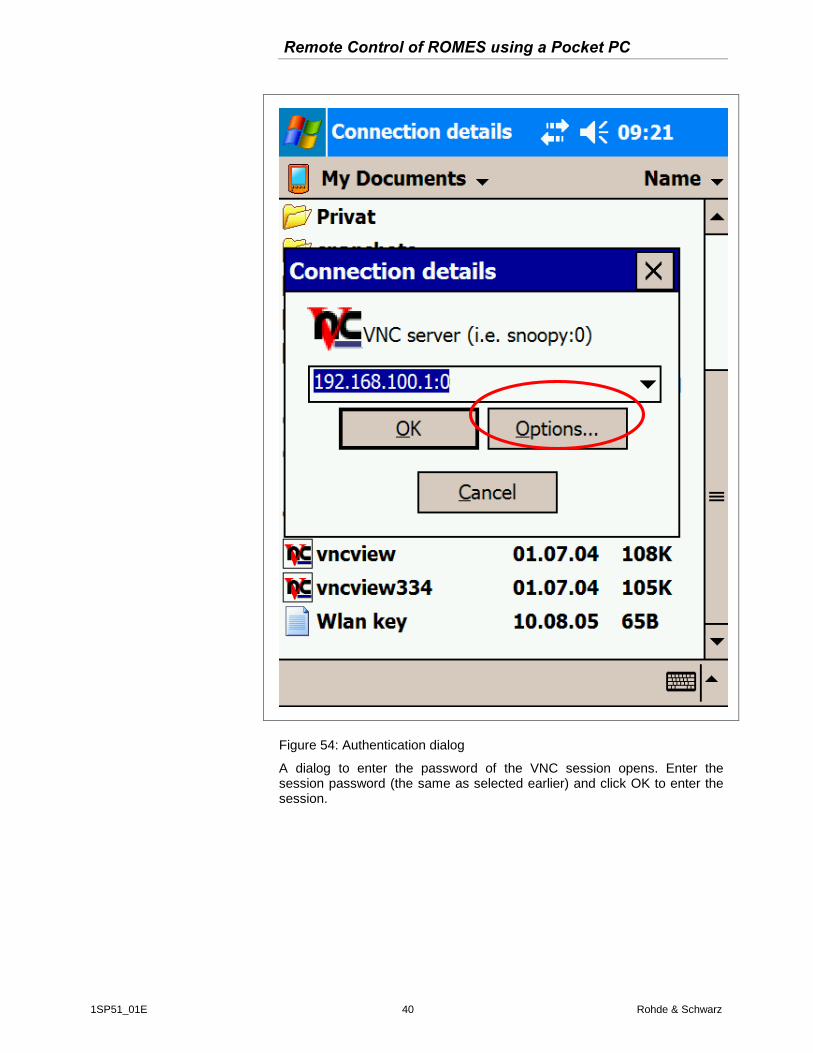
dialog to enter the connection details. When starting the VNC viewer for the first time, it is advisable to enter the connection options by clicking on the “Options” button.
Figure 52: Connection details for VNC
The dialog with the options opens. Make sure, that exactly those options are selected that are indicated below. Close the dialog by clicking to “OK”.
Remote Control of ROMES using a Pocket PC
1SP51_01E 39 Rohde & Schwarz
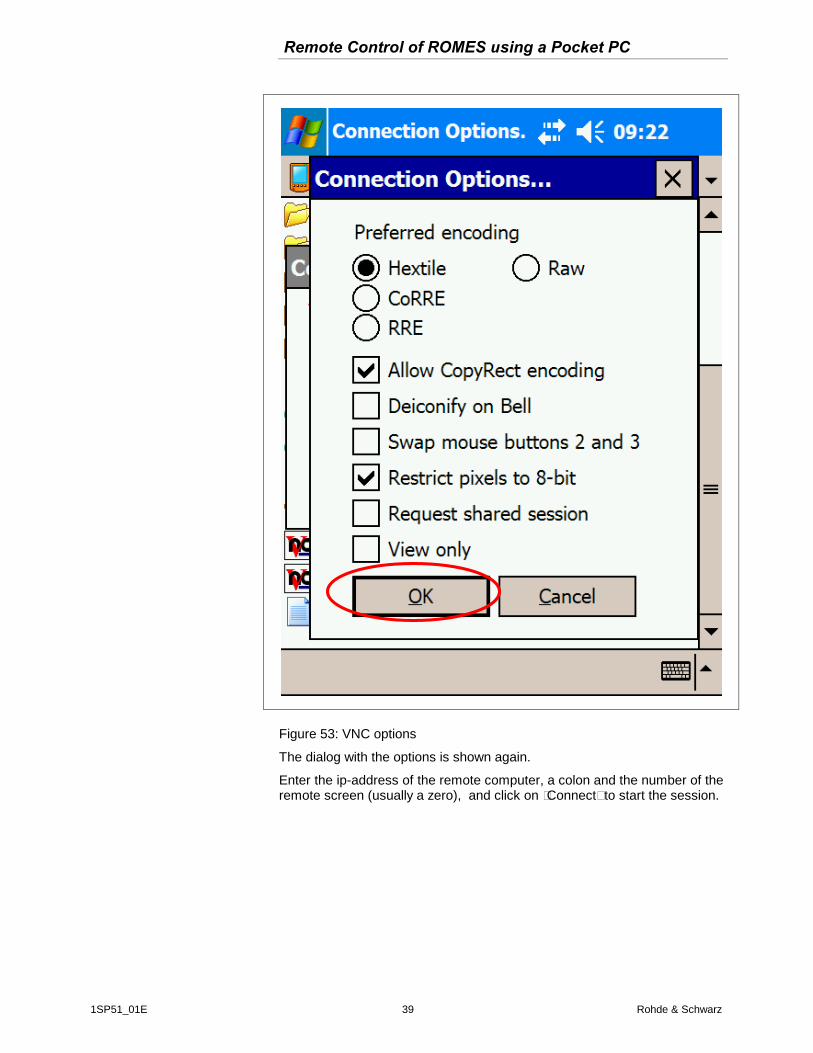
Figure 53: VNC options
The dialog with the options is shown again.
Enter the ip-address of the remote computer, a colon and the number of the remote screen (usually a zero), and click on “Connect” to start the session.
Remote Control of ROMES using a Pocket PC
1SP51_01E 40 Rohde & Schwarz
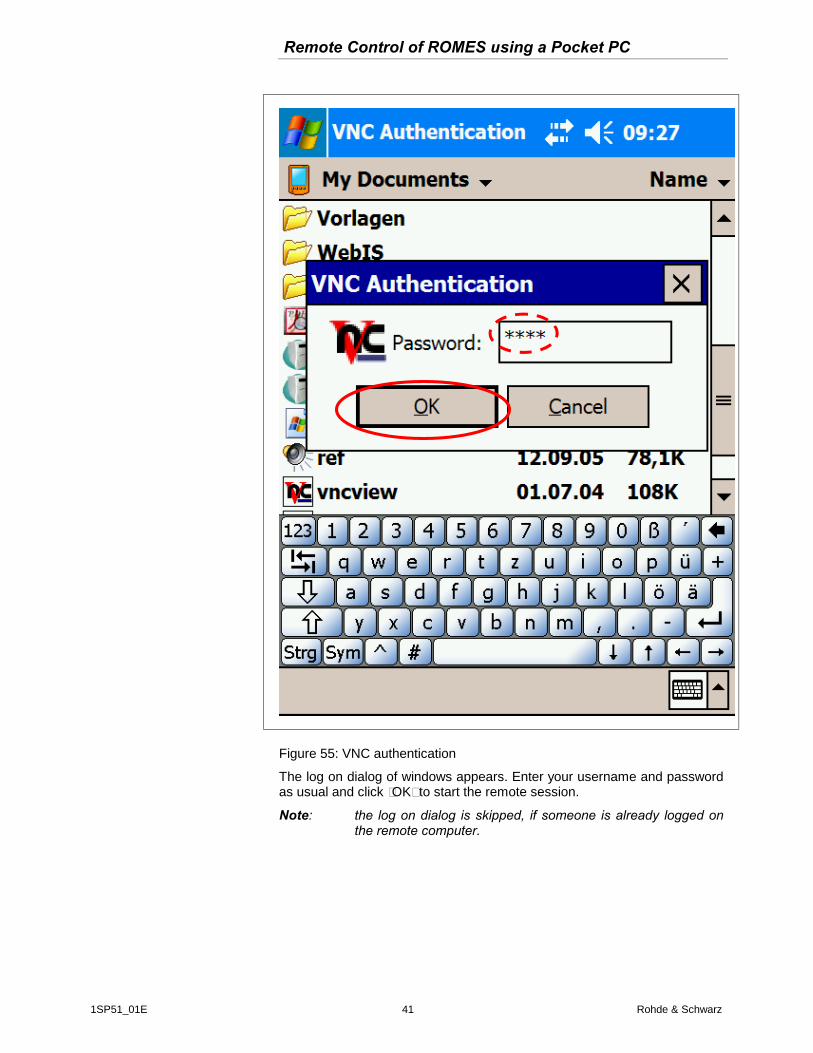
Figure 54: Authentication dialog
A dialog to enter the password of the VNC session opens. Enter the session password (the same as selected earlier) and click OK to enter the session.
Remote Control of ROMES using a Pocket PC
1SP51_01E 41 Rohde & Schwarz
Figure 55: VNC authentication
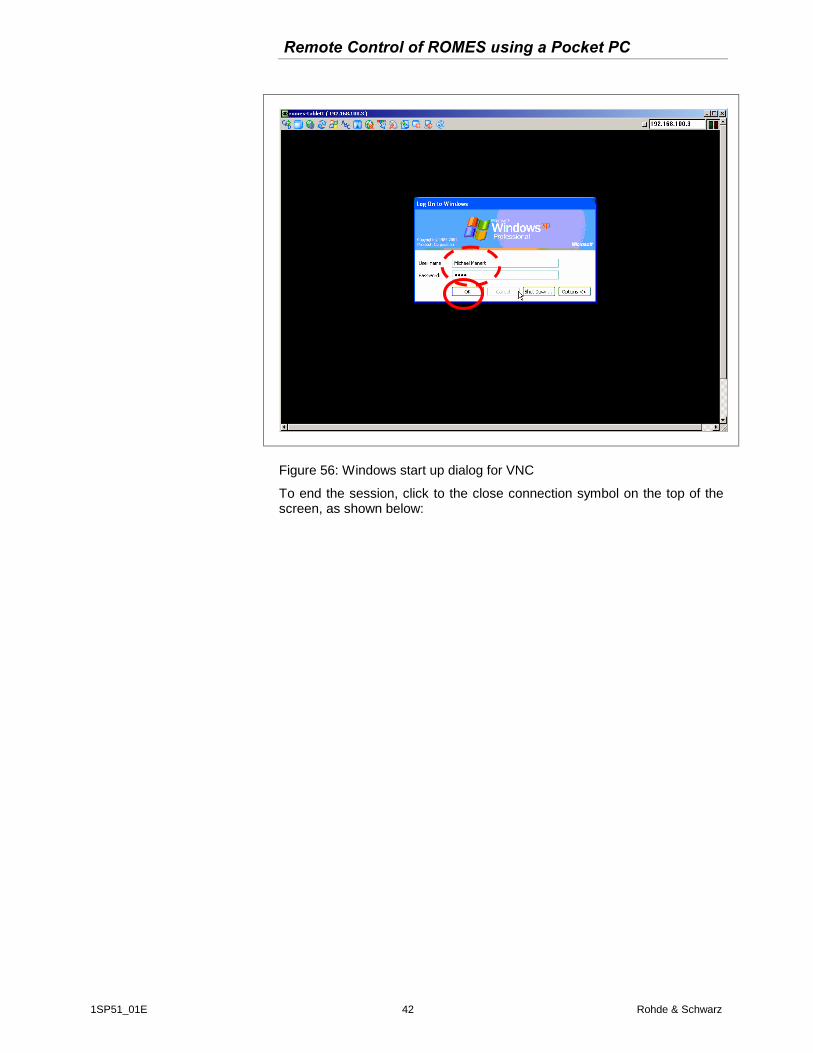
The log on dialog of windows appears. Enter your username and password as usual and click “OK” to start the remote session.
Note: the log on dialog is skipped, if someone is already logged on the remote computer.
Remote Control of ROMES using a Pocket PC
1SP51_01E 42 Rohde & Schwarz
Figure 56: Windows start up dialog for VNC
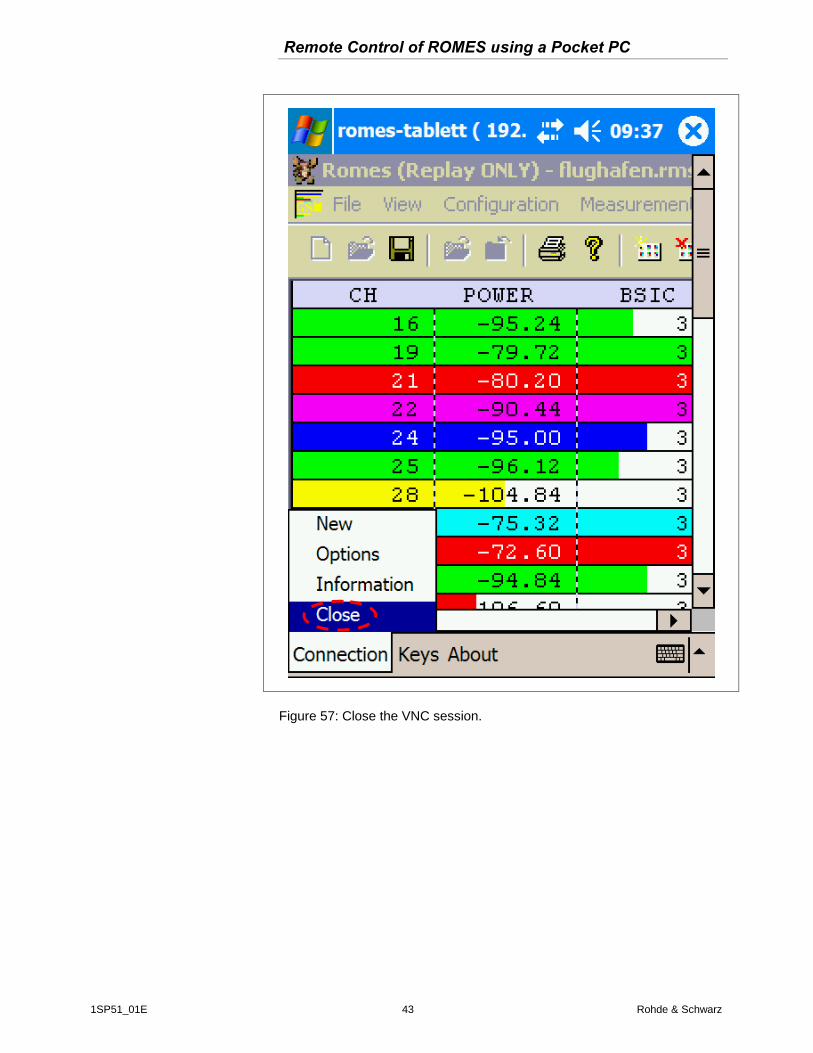
To end the session, click to the close connection symbol on the top of the screen, as shown below:
Remote Control of ROMES using a Pocket PC
1SP51_01E 43 Rohde & Schwarz
Figure 57: Close the VNC session.
Remote Control of ROMES using a Pocket PC
1SP51_01E 44 Rohde & Schwarz
4 Network-Connection between PDA and Notebook
Each of the remote control programs described above needs a (wireless) network connection established between the PDA and the host computer running ROMES®. This chapter describes how to configure and setup the most common Bluetooth connections and the WLANs according to IEEE 802.11.
This section assumes, that the device drivers for Bluetooth or WLAN have been installed according to the installation procedures described in the respective manuals.
Bluetooth is less battery consuming on host and PDA than WLAN and does not interfere with WLAN measurements made by ROMES®, so it is the preferred solution. However it is more difficult to configure Bluetooth, and it is less secure.
Bluetooth ® personal area network, PAN A personal area network in Bluetooth consists of exactly one server and one or more clients, which may log into the network. Depending on the installed Bluetooth system, either the notebook or the PDA must be configured as the host.
A Bluetooth connection must be configured once on both devices before the Bluetooth connection can be used.
The standard driver of MS Windows does not provide the functionality of a PAN server. So only the PDA server configuration is described in this application note. However, a notebook acting as a server would be preferred, as in this case, a remote login into the notebook would be necessary, like it is in a WLAN configuration as well.
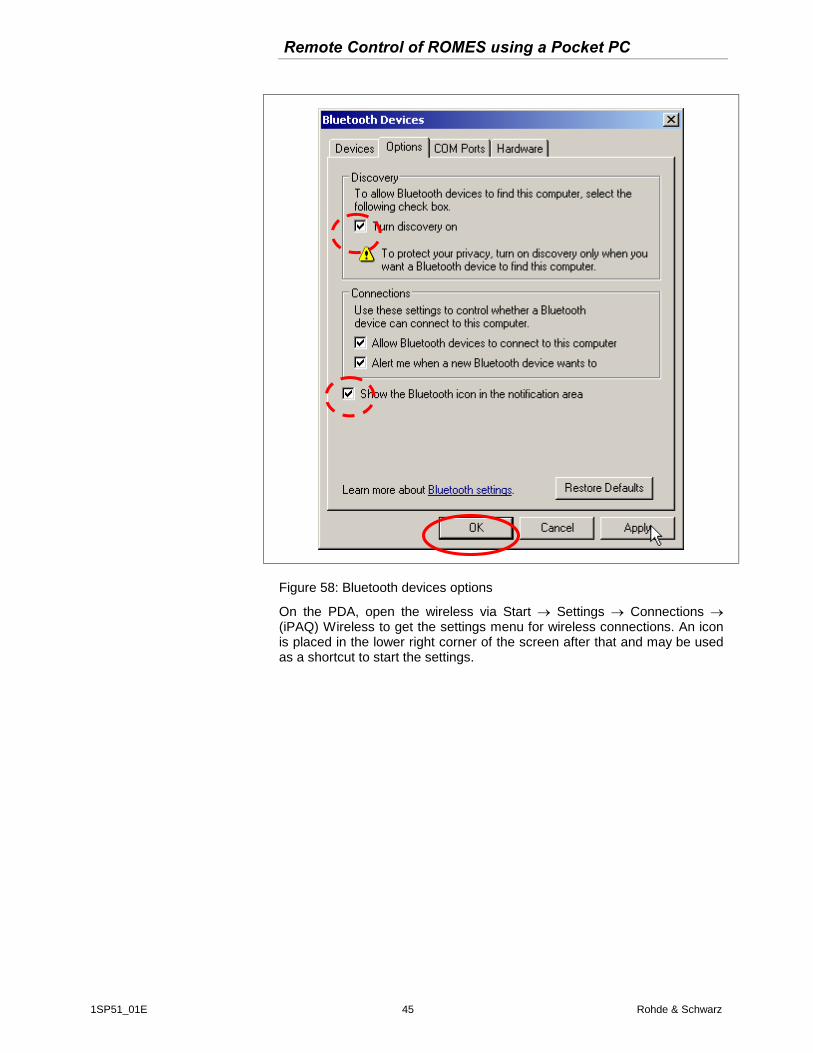
PDA is server On the host, open the “Bluetooth devices“ in the Control Panel (Start → Settings → Control Panel). In tabular “Options“, enable “Turn discovery on“, so that your PDA can find the host.
Optionally, also enable “Show the Bluetooth icon in the notification area“.
Remote Control of ROMES using a Pocket PC
1SP51_01E 45 Rohde & Schwarz
Figure 58: Bluetooth devices options
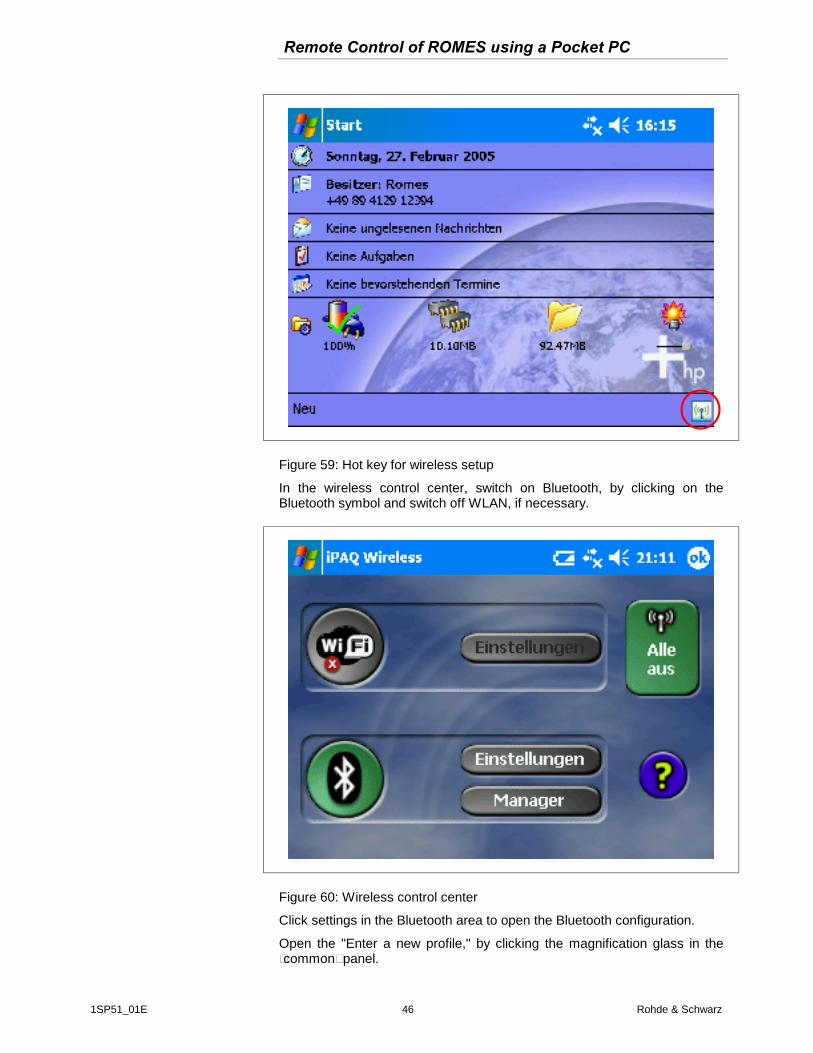
On the PDA, open the wireless via Start Settings Connections (iPAQ) Wireless to get the settings menu for wireless connections. An icon is placed in the lower right corner of the screen after that and may be used as a shortcut to start the settings.
Remote Control of ROMES using a Pocket PC
1SP51_01E 46 Rohde & Schwarz
Figure 59: Hot key for wireless setup
In the wireless control center, switch on Bluetooth, by clicking on the Bluetooth symbol and switch off WLAN, if necessary.
Figure 60: Wireless control center
Click settings in the Bluetooth area to open the Bluetooth configuration.
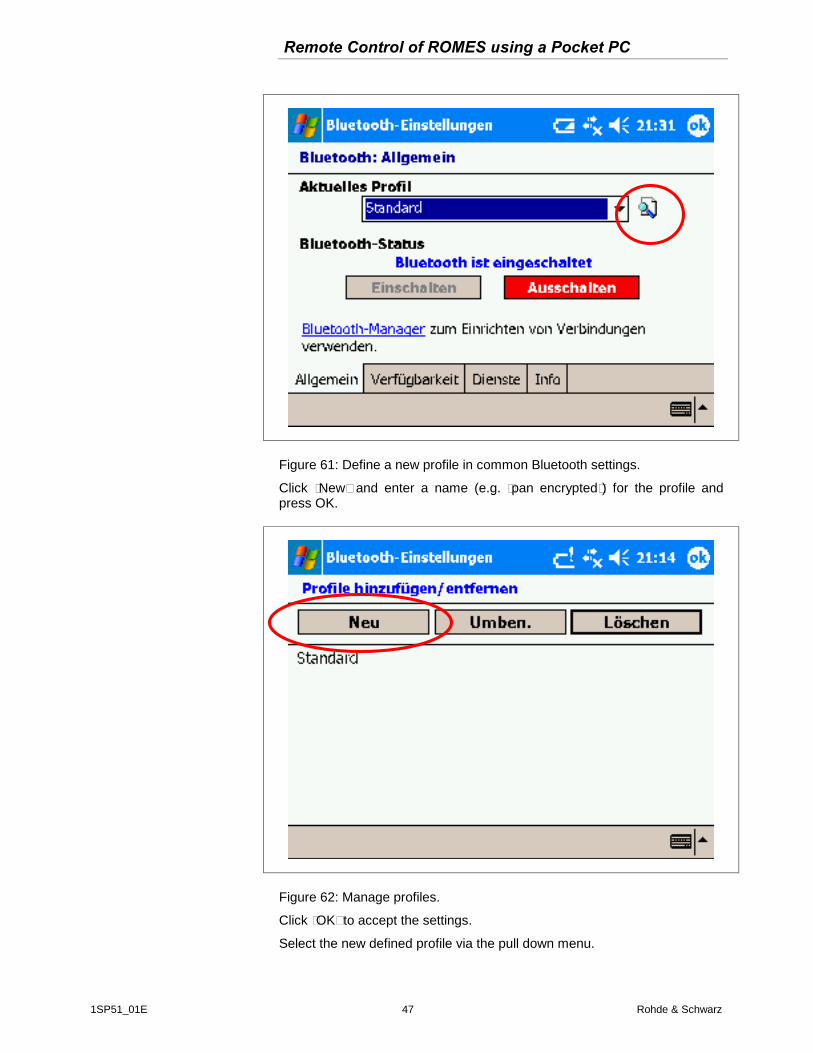
Open the "Enter a new profile," by clicking the magnification glass in the “common” panel.
Remote Control of ROMES using a Pocket PC
1SP51_01E 47 Rohde & Schwarz
Figure 61: Define a new profile in common Bluetooth settings.
Click “New” and enter a name (e.g. “pan encrypted”) for the profile and press OK.
Figure 62: Manage profiles.
Click “OK” to accept the settings.
Select the new defined profile via the pull down menu.
Remote Control of ROMES using a Pocket PC
1SP51_01E 48 Rohde & Schwarz
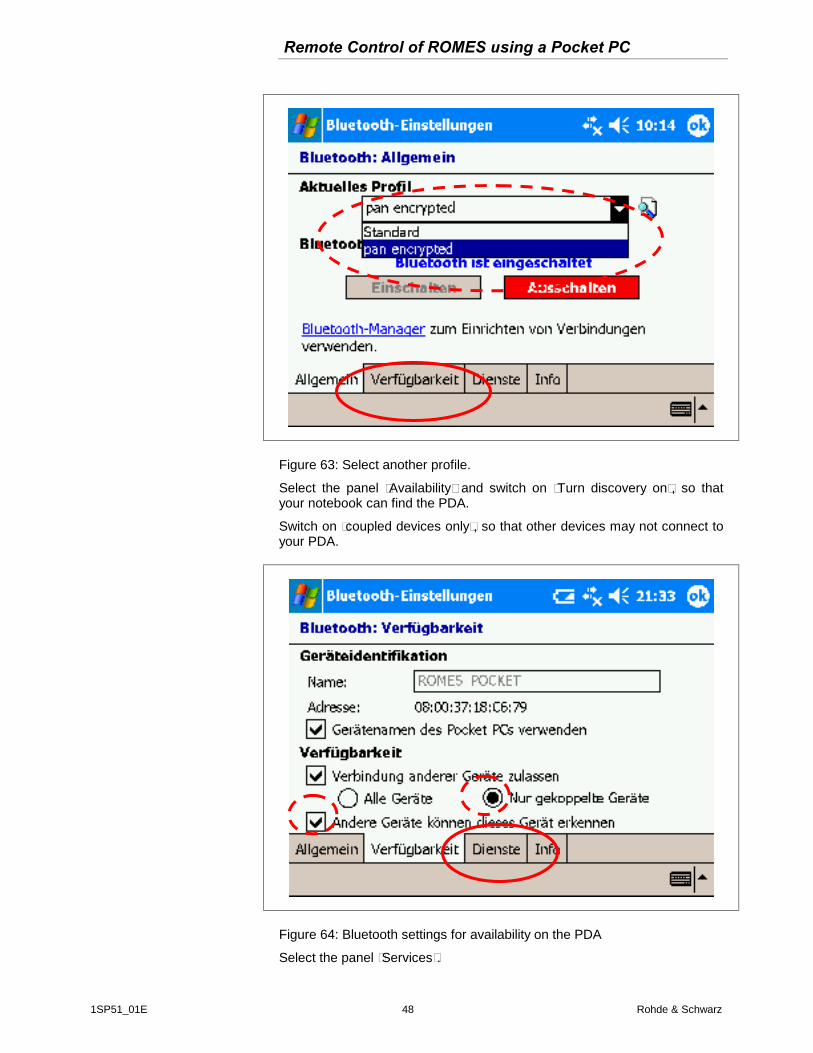
Figure 63: Select another profile.
Select the panel “Availability” and switch on „Turn discovery on“, so that your notebook can find the PDA.
Switch on “coupled devices only”, so that other devices may not connect to your PDA.
Figure 64: Bluetooth settings for availability on the PDA
Select the panel “Services”.
Remote Control of ROMES using a Pocket PC
1SP51_01E 49 Rohde & Schwarz
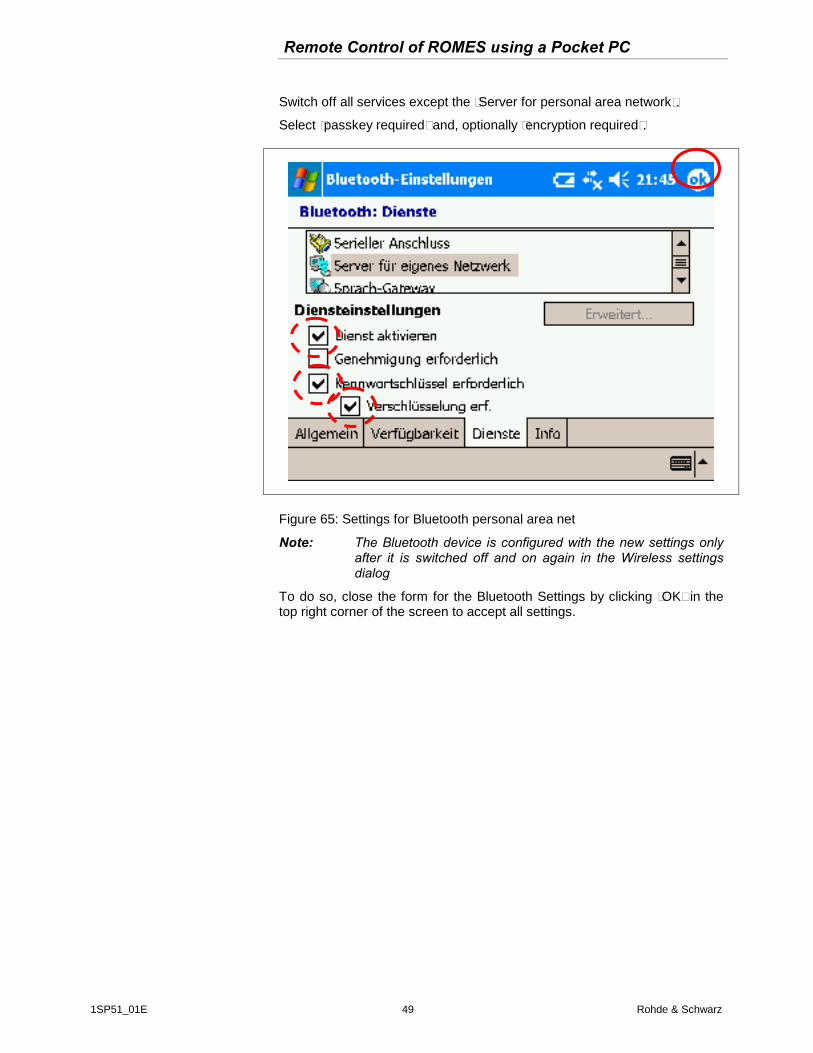
Switch off all services except the “Server for personal area network“.
Select “passkey required” and, optionally “encryption required”.
Figure 65: Settings for Bluetooth personal area net
Note: The Bluetooth device is configured with the new settings only after it is switched off and on again in the Wireless settings dialog
To do so, close the form for the Bluetooth Settings by clicking “OK” in the top right corner of the screen to accept all settings.
Remote Control of ROMES using a Pocket PC
1SP51_01E 50 Rohde & Schwarz
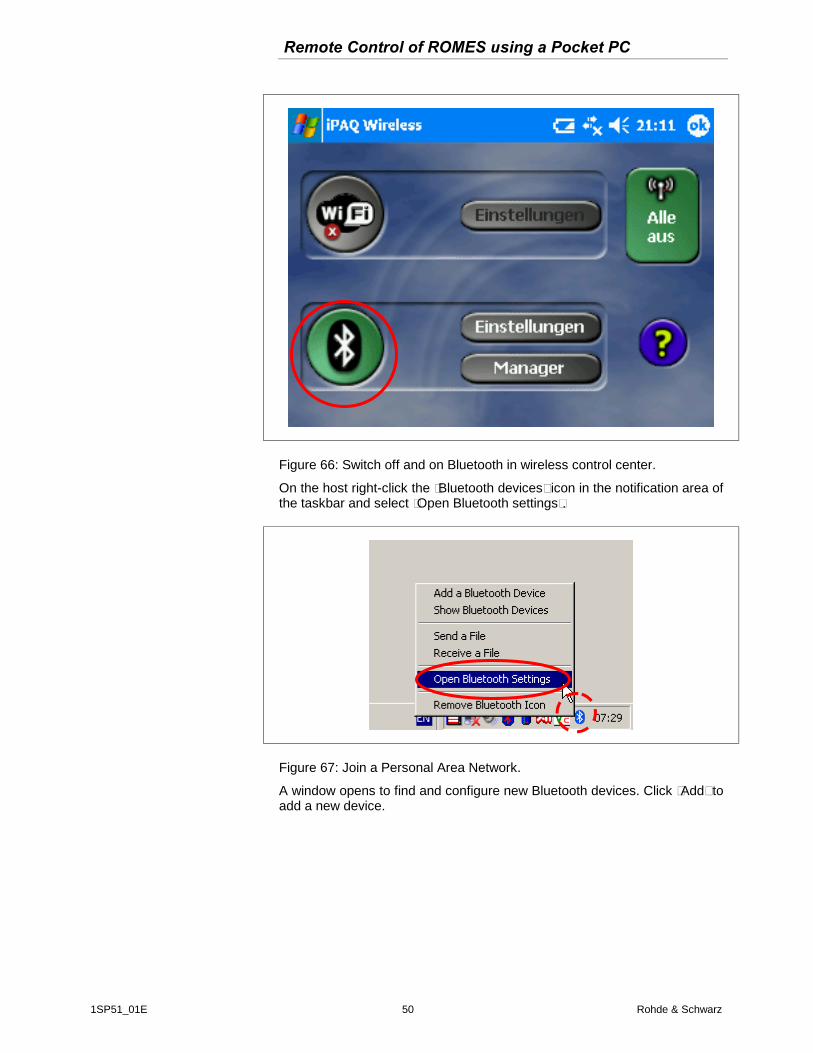
Figure 66: Switch off and on Bluetooth in wireless control center.
On the host right-click the “Bluetooth devices” icon in the notification area of the taskbar and select “Open Bluetooth settings”.
Figure 67: Join a Personal Area Network.
A window opens to find and configure new Bluetooth devices. Click “Add” to add a new device.
Remote Control of ROMES using a Pocket PC
1SP51_01E 51 Rohde & Schwarz
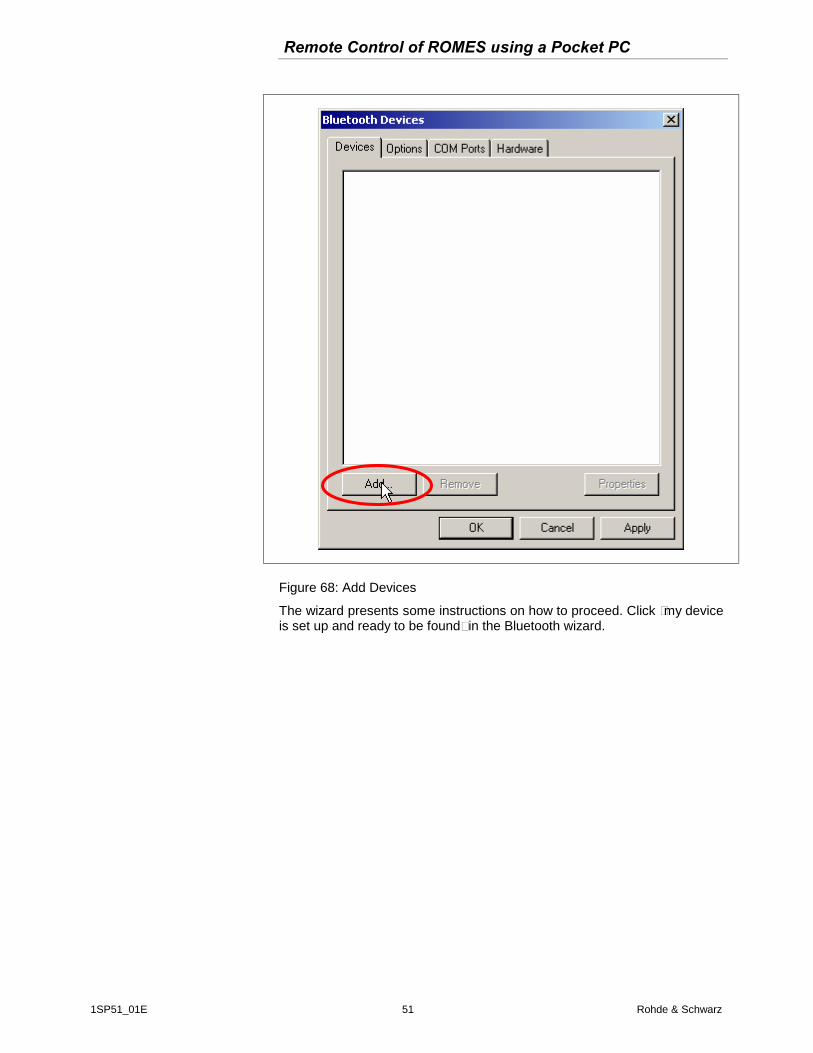
Figure 68: Add Devices
The wizard presents some instructions on how to proceed. Click “my device is set up and ready to be found“ in the Bluetooth wizard.
Remote Control of ROMES using a Pocket PC
1SP51_01E 52 Rohde & Schwarz
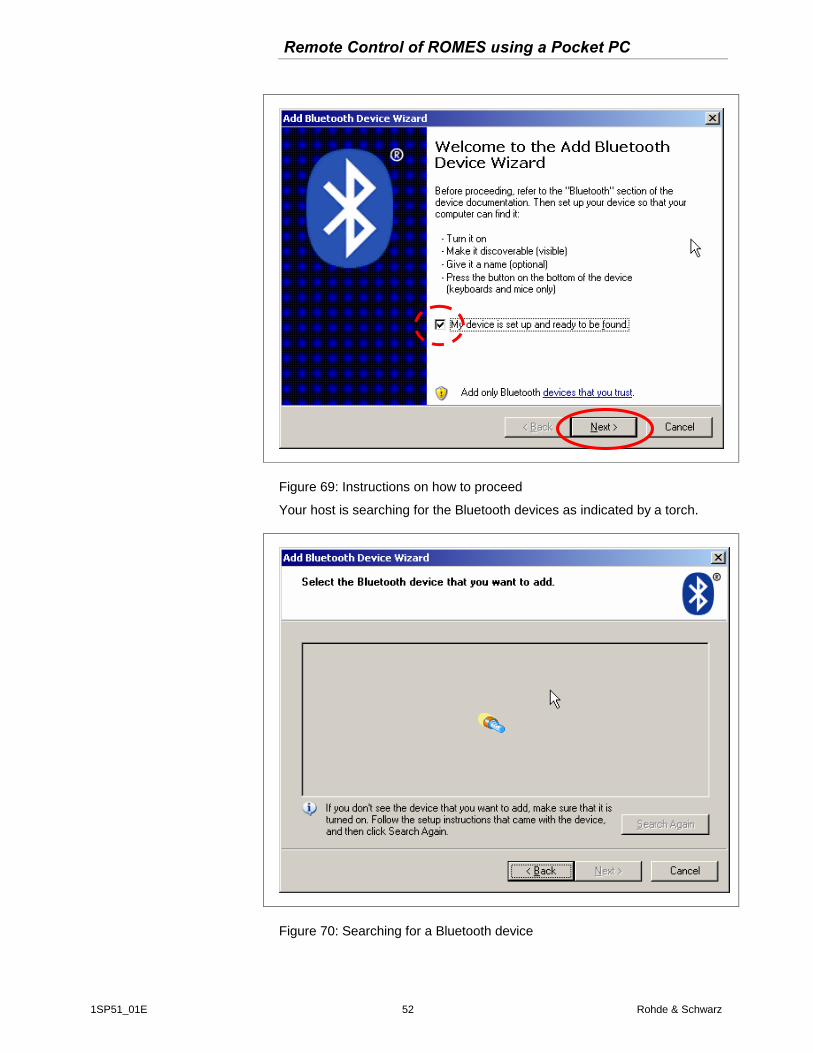
Figure 69: Instructions on how to proceed
Your host is searching for the Bluetooth devices as indicated by a torch.
Figure 70: Searching for a Bluetooth device
Remote Control of ROMES using a Pocket PC
1SP51_01E 53 Rohde & Schwarz
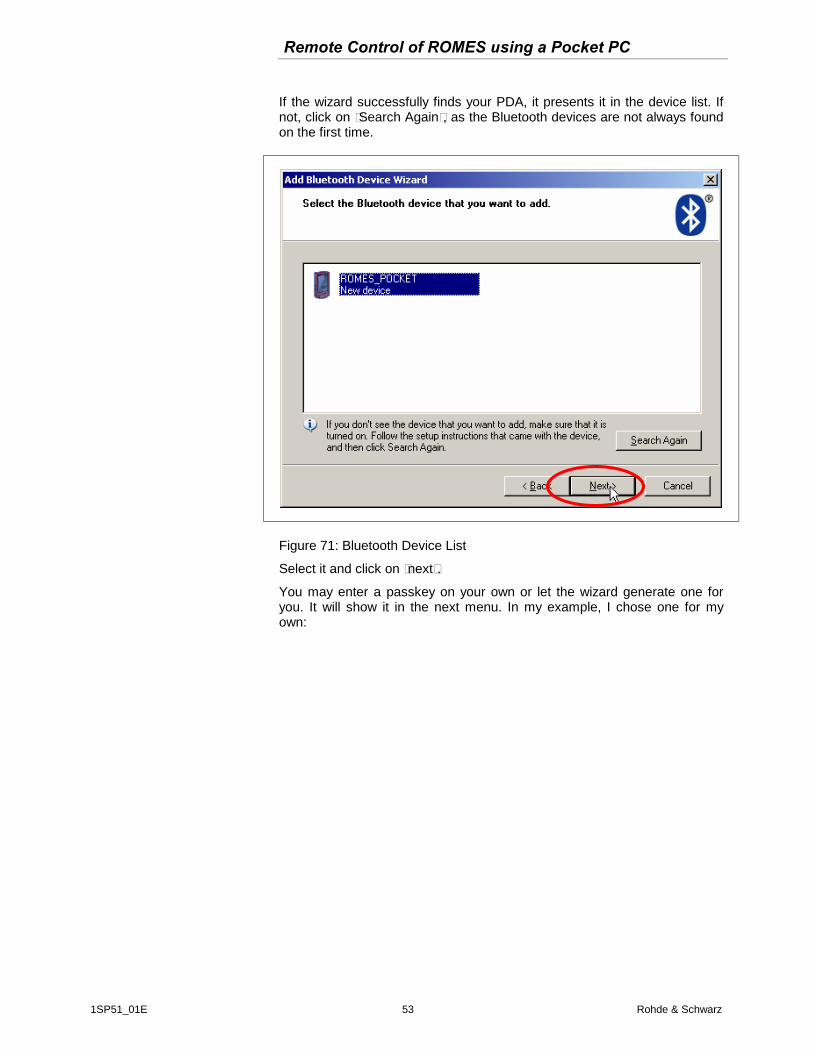
If the wizard successfully finds your PDA, it presents it in the device list. If not, click on “Search Again”, as the Bluetooth devices are not always found on the first time.
Figure 71: Bluetooth Device List
Select it and click on “next“.
You may enter a passkey on your own or let the wizard generate one for you. It will show it in the next menu. In my example, I chose one for my own:
Remote Control of ROMES using a Pocket PC
1SP51_01E 54 Rohde & Schwarz
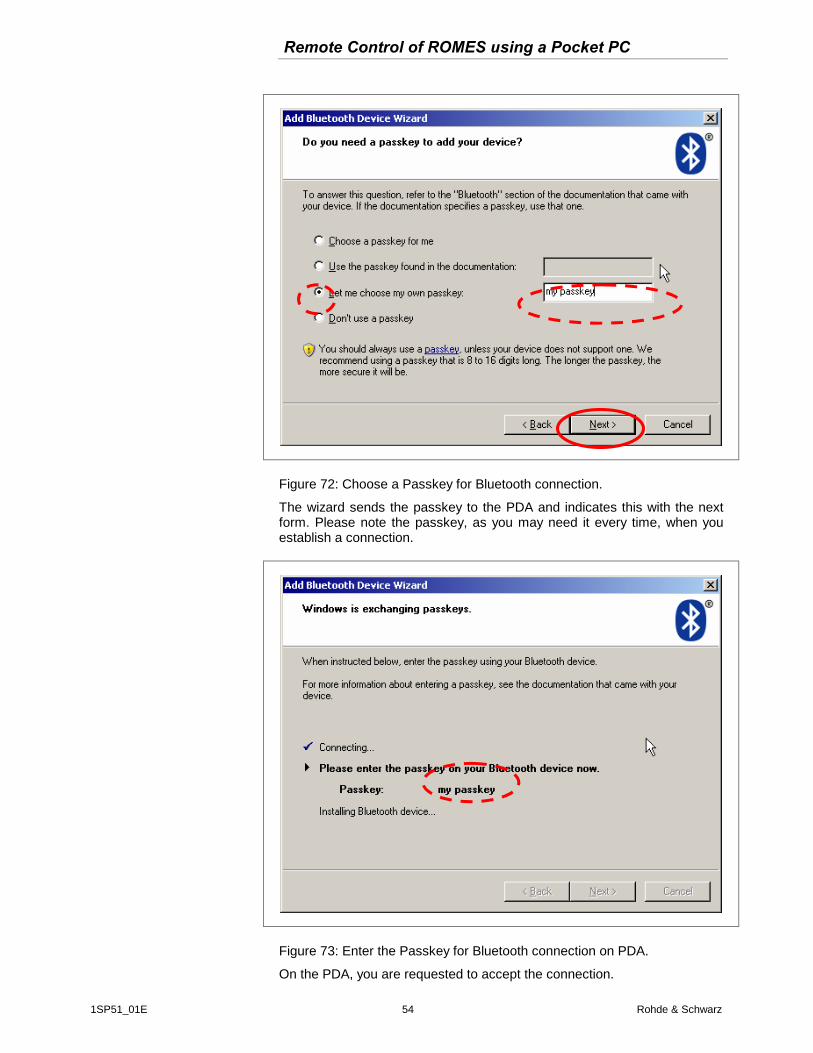
Figure 72: Choose a Passkey for Bluetooth connection.
The wizard sends the passkey to the PDA and indicates this with the next form. Please note the passkey, as you may need it every time, when you establish a connection.
Figure 73: Enter the Passkey for Bluetooth connection on PDA.
On the PDA, you are requested to accept the connection.
Remote Control of ROMES using a Pocket PC
1SP51_01E 55 Rohde & Schwarz
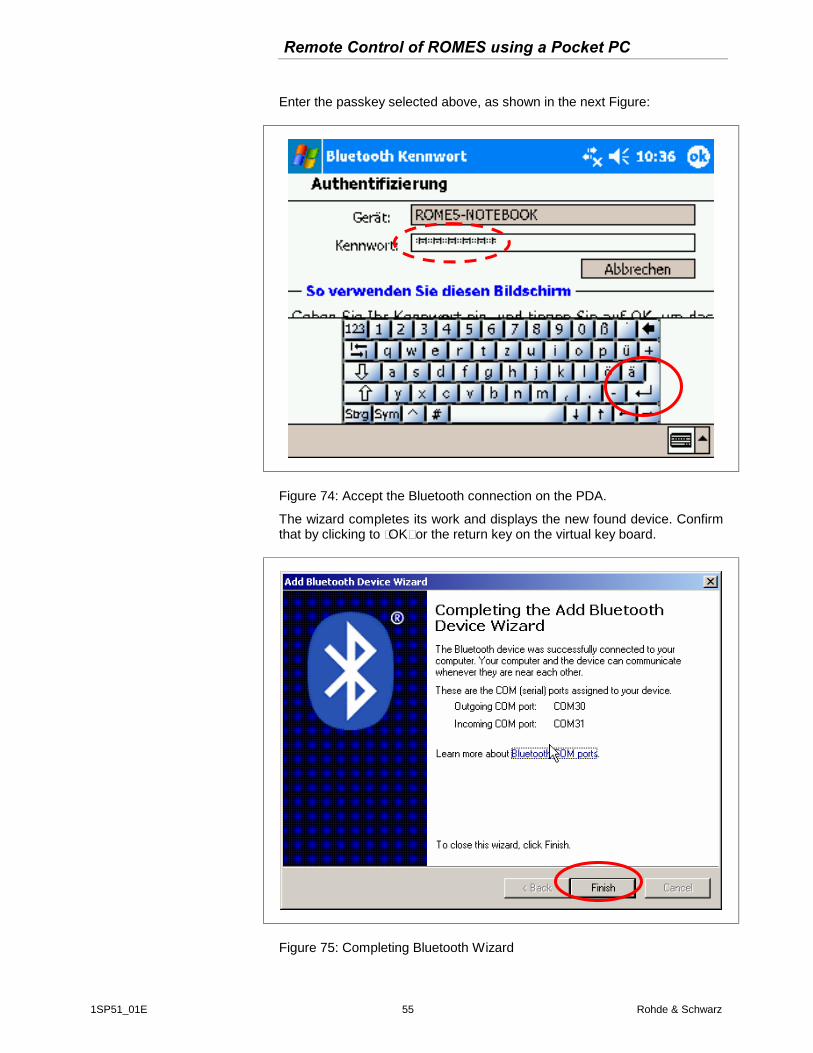
Enter the passkey selected above, as shown in the next Figure:
Figure 74: Accept the Bluetooth connection on the PDA.
The wizard completes its work and displays the new found device. Confirm that by clicking to “OK” or the return key on the virtual key board.
Figure 75: Completing Bluetooth Wizard
Remote Control of ROMES using a Pocket PC
1SP51_01E 56 Rohde & Schwarz
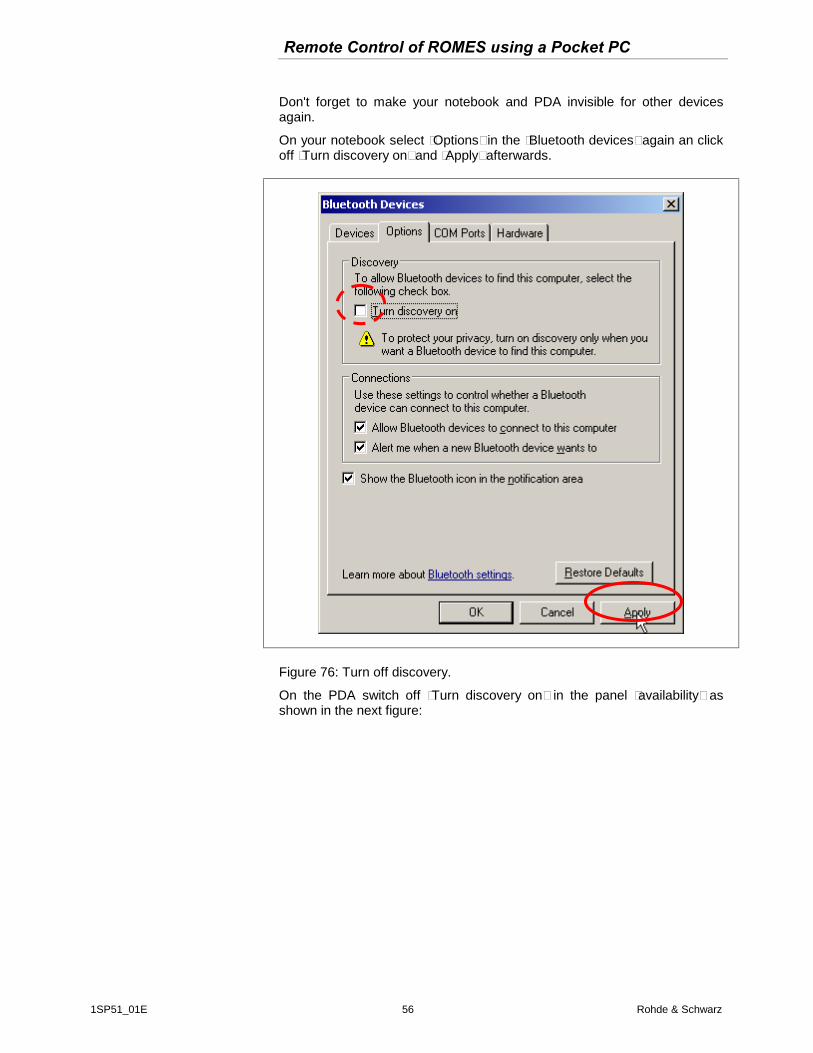
Don't forget to make your notebook and PDA invisible for other devices again.
On your notebook select “Options“ in the “Bluetooth devices“ again an click off “Turn discovery on“ and “Apply“ afterwards.
Figure 76: Turn off discovery.
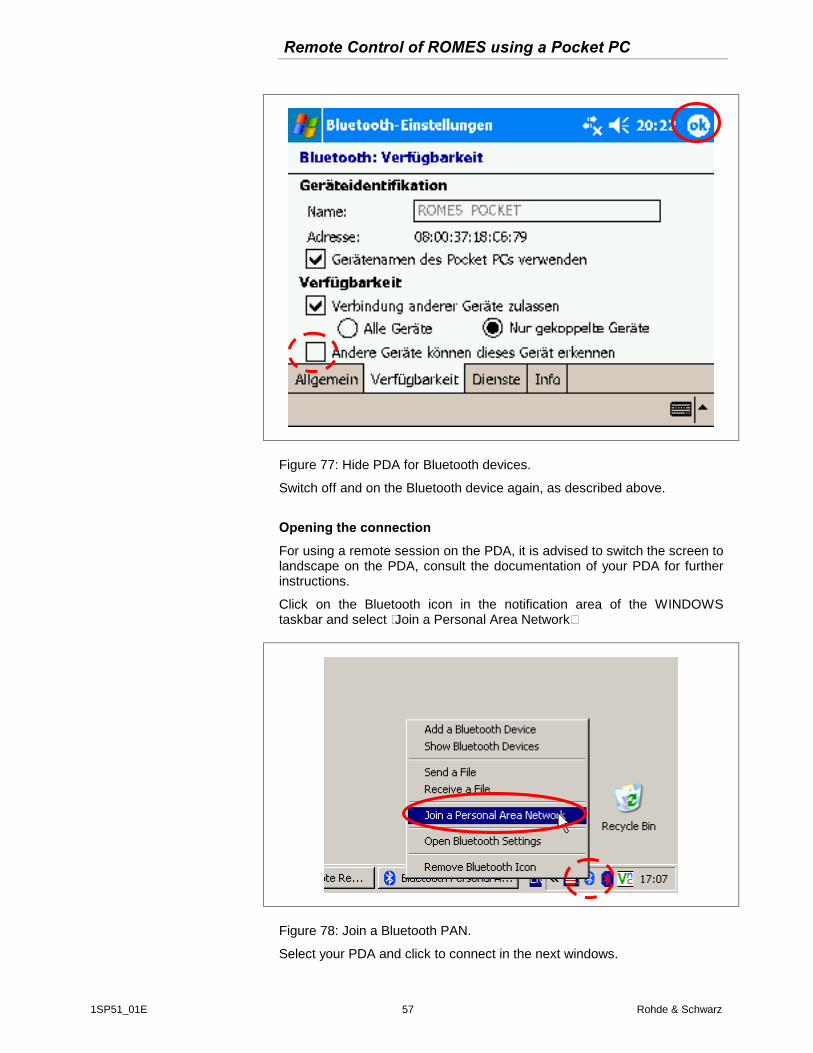
On the PDA switch off “Turn discovery on“ in the panel “availability“ as shown in the next figure:
Remote Control of ROMES using a Pocket PC
1SP51_01E 57 Rohde & Schwarz
Figure 77: Hide PDA for Bluetooth devices.
Switch off and on the Bluetooth device again, as described above.
Opening the connection
For using a remote session on the PDA, it is advised to switch the screen to landscape on the PDA, consult the documentation of your PDA for further instructions.
Click on the Bluetooth icon in the notification area of the WINDOWS taskbar and select “Join a Personal Area Network“
Figure 78: Join a Bluetooth PAN.
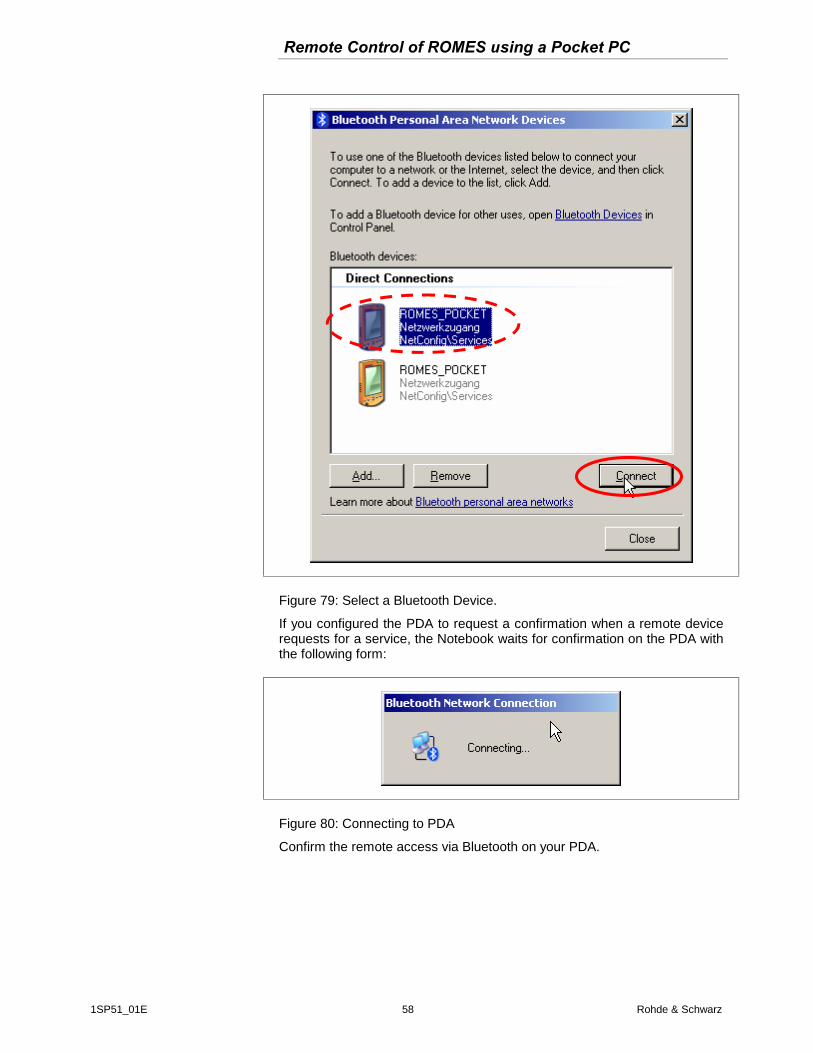
Select your PDA and click to connect in the next windows.
Remote Control of ROMES using a Pocket PC
1SP51_01E 58 Rohde & Schwarz
Figure 79: Select a Bluetooth Device.
If you configured the PDA to request a confirmation when a remote device requests for a service, the Notebook waits for confirmation on the PDA with the following form:
Figure 80: Connecting to PDA
Confirm the remote access via Bluetooth on your PDA.
Remote Control of ROMES using a Pocket PC
1SP51_01E 59 Rohde & Schwarz
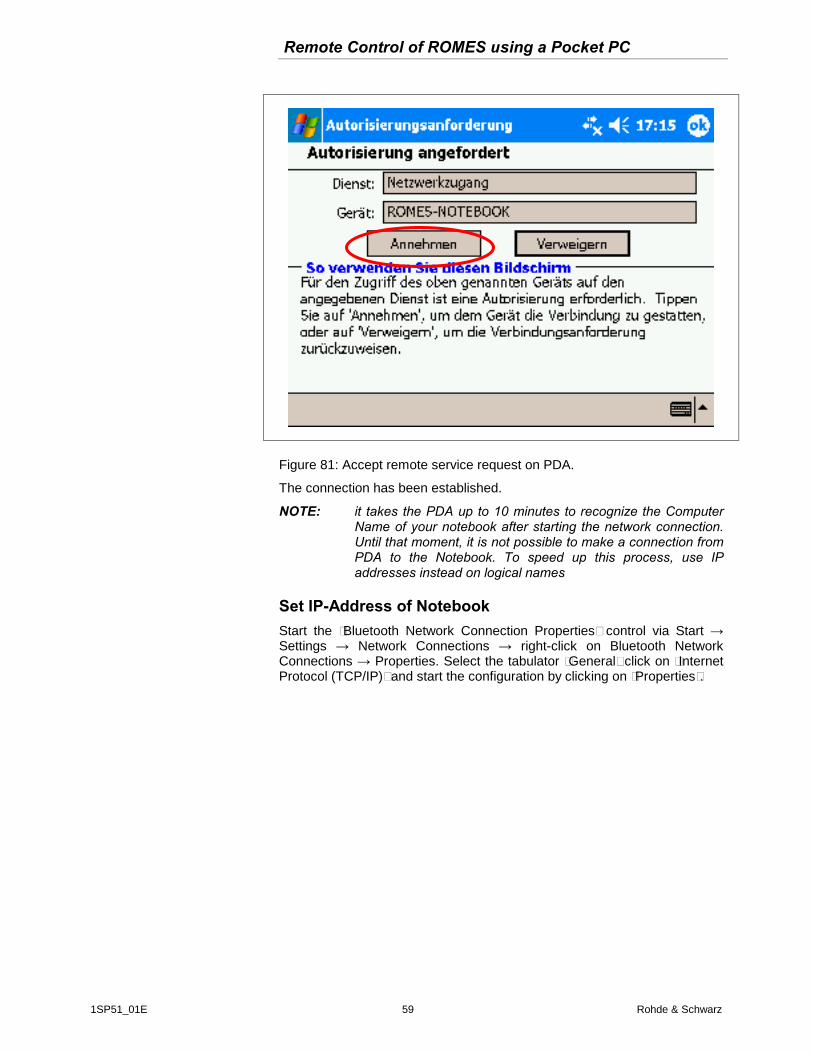
Figure 81: Accept remote service request on PDA.
The connection has been established.
NOTE: it takes the PDA up to 10 minutes to recognize the Computer Name of your notebook after starting the network connection. Until that moment, it is not possible to make a connection from PDA to the Notebook. To speed up this process, use IP addresses instead on logical names
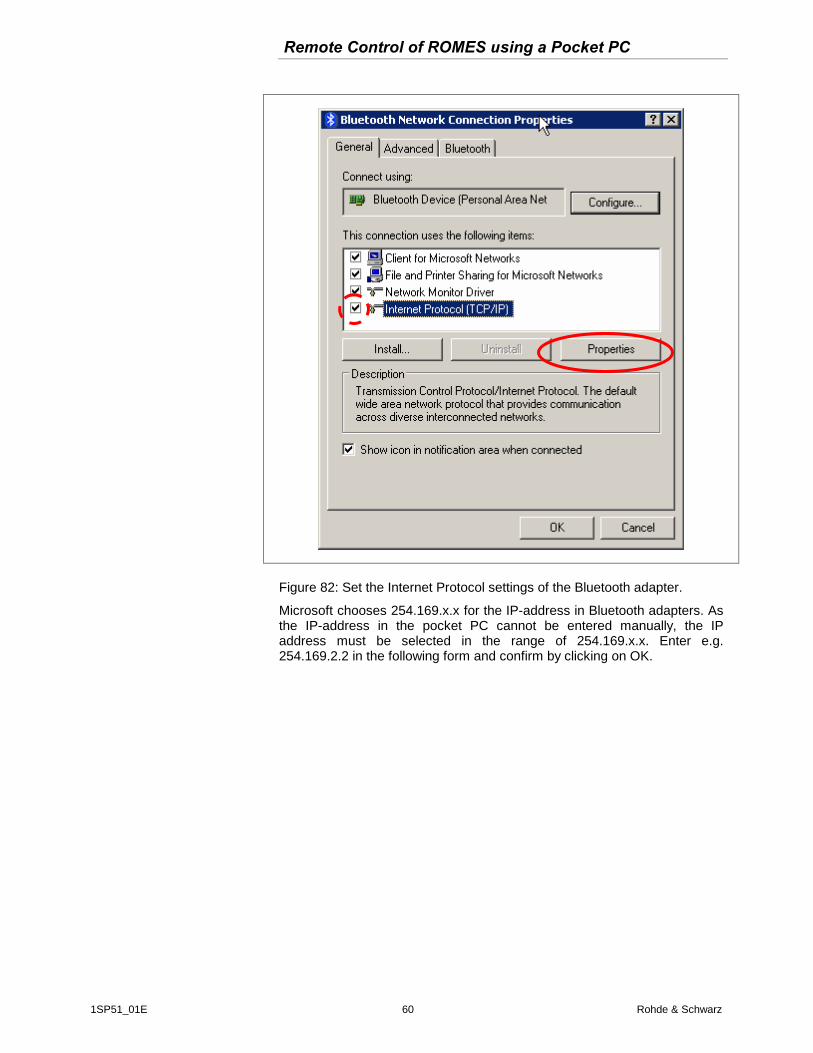
Set IP-Address of Notebook Start the “Bluetooth Network Connection Properties” control via Start → Settings → Network Connections → right-click on Bluetooth Network Connections → Properties. Select the tabulator “General” click on “Internet Protocol (TCP/IP)” and start the configuration by clicking on “Properties”.
Remote Control of ROMES using a Pocket PC
1SP51_01E 60 Rohde & Schwarz
Figure 82: Set the Internet Protocol settings of the Bluetooth adapter.
Microsoft chooses 254.169.x.x for the IP-address in Bluetooth adapters. As the IP-address in the pocket PC cannot be entered manually, the IP address must be selected in the range of 254.169.x.x. Enter e.g. 254.169.2.2 in the following form and confirm by clicking on OK.
Remote Control of ROMES using a Pocket PC
1SP51_01E 61 Rohde & Schwarz
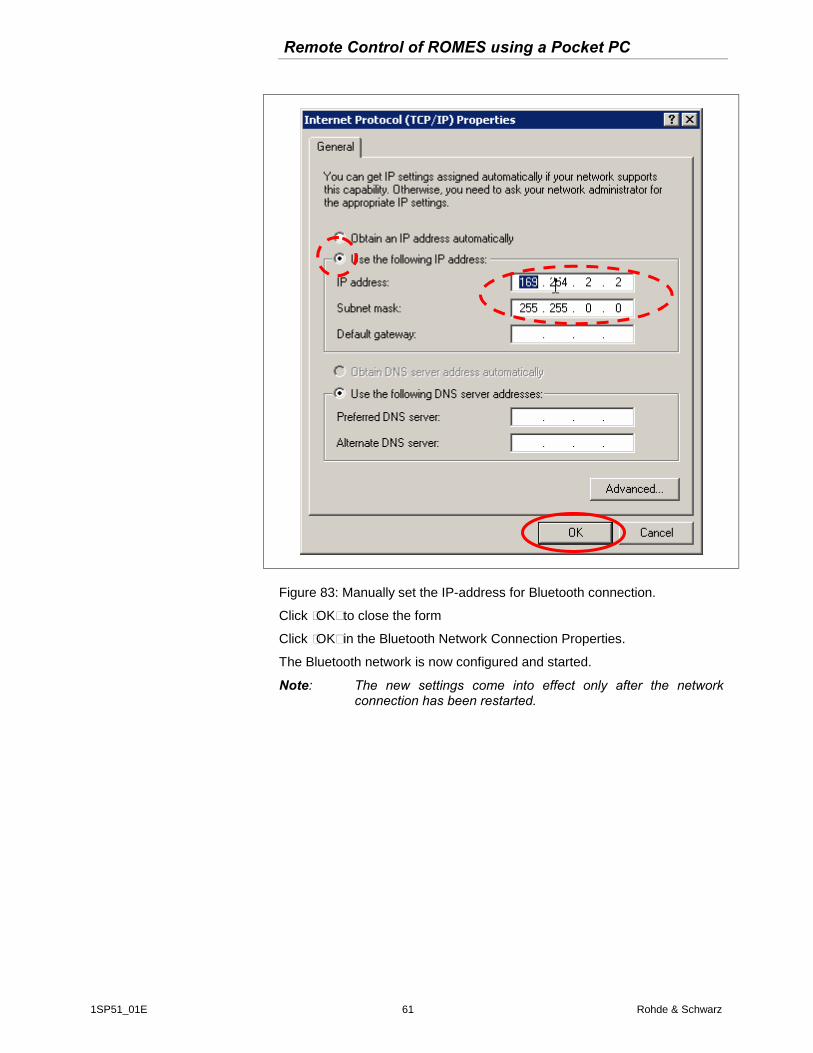
Figure 83: Manually set the IP-address for Bluetooth connection.
Click “OK” to close the form
Click “OK” in the Bluetooth Network Connection Properties.
The Bluetooth network is now configured and started.
Note: The new settings come into effect only after the network connection has been restarted.
Remote Control of ROMES using a Pocket PC
1SP51_01E 62 Rohde & Schwarz
Wireless LAN according IEEE 802.11 (WiFi, WLAN)
Configuration WiFi must be configured in the following steps
Configuration of the network adapter (IP-configuration) (optional)
Definition of the Network
Adding the computers to the network
NOTE: ensure, that WiFi is enabled on your host computer. This must be done either in the BIOS settings or using a switch somewhere on your computer. Consult your manual for further explanation. In case you fail do this, the wireless LAN just does not work, no detailed error message will be given.
NOTE: In case a new WiFi network is found, both the laptop and the Pocket CP tend to automatically drop the current connection and jump to the network recently found. This is quite annoying in a measurement situation. Please use Bluetooth LAN in these circumstances.
Setting the IP-Address (optional)
IP addresses are used within networks to address the computers. The IP-address of each computer joining the network must be unique within the network. Many network use a DHCP-server to automatically assign a network-IP to each computer entering the network. If no DHCP-server is present, the computers can assign IP-addresses to themselves. But this procedure takes several minutes and must be restarted every time a computer enters the network. Alternatively, IP-addresses may be assigned statically (=manually) to the computers, i.e. to the various network adapters of each computer in the network. This section describes, how to assign IP-addresses to the network adapters.
First, a set of IP-addresses must be selected. There are several addresses reserved for private use:
class subnet mask address range
A 255.0.0.0 10.0.0.0 10.255.255.255
B 255.255.0.0 172.16.0.0 172.31.255.255
C 255.255.255.0 192.168.0.0 192.168.255.255
Table 3: IP-addresses reserved for private use
Choose an IP-address according to your wish; see an example below:
computer subnet mask address
notebook 255.255.255.0 192.168.100.1
PDA 255.255.255.0 192.168.100.2
Table 4: Example of assignment of private IP-addresses
The addresses must be configured for all of the network adapters; the configuration is described below in the settings of WLAN, see Figure 96: Manually set the IP-address, page 73 and Figure 104: Internet Protocol Settings (IP) of the WiFi adapter, page 80, and can be done later.
Remote Control of ROMES using a Pocket PC
1SP51_01E 63 Rohde & Schwarz
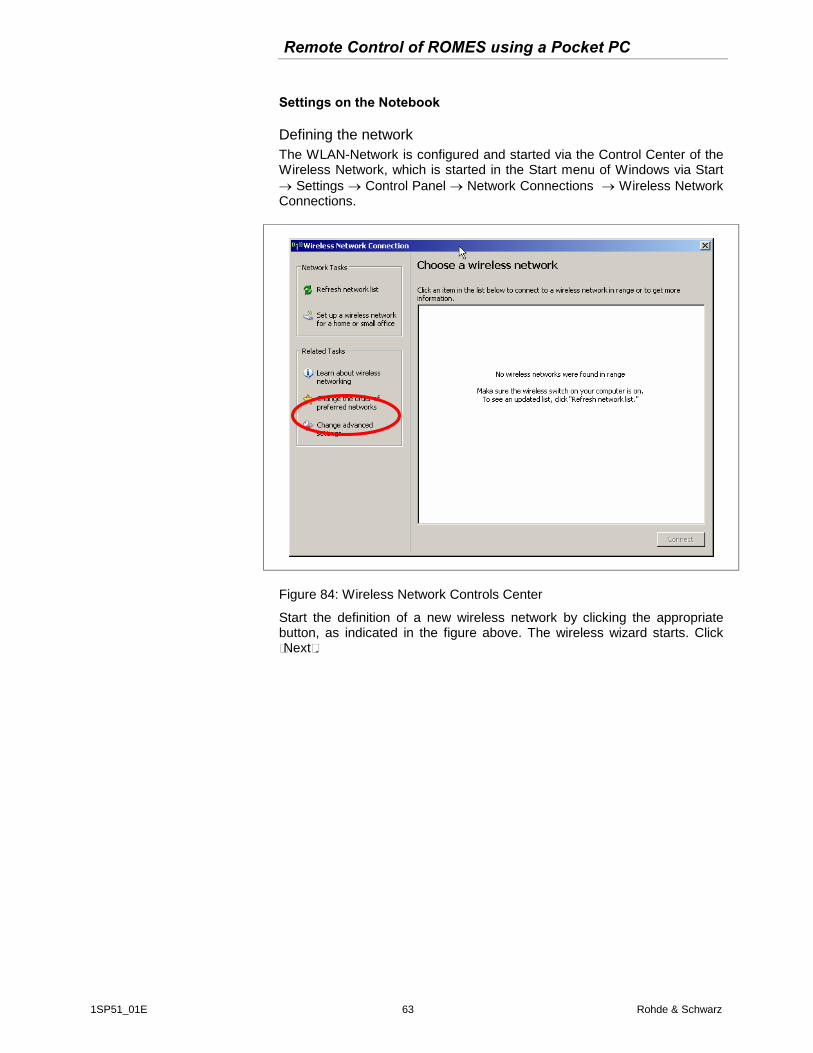
Settings on the Notebook
Defining the network The WLAN-Network is configured and started via the Control Center of the Wireless Network, which is started in the Start menu of Windows via Start Settings Control Panel Network Connections Wireless Network Connections.
Figure 84: Wireless Network Controls Center
Start the definition of a new wireless network by clicking the appropriate button, as indicated in the figure above. The wireless wizard starts. Click “Next”.
Remote Control of ROMES using a Pocket PC
1SP51_01E 64 Rohde & Schwarz
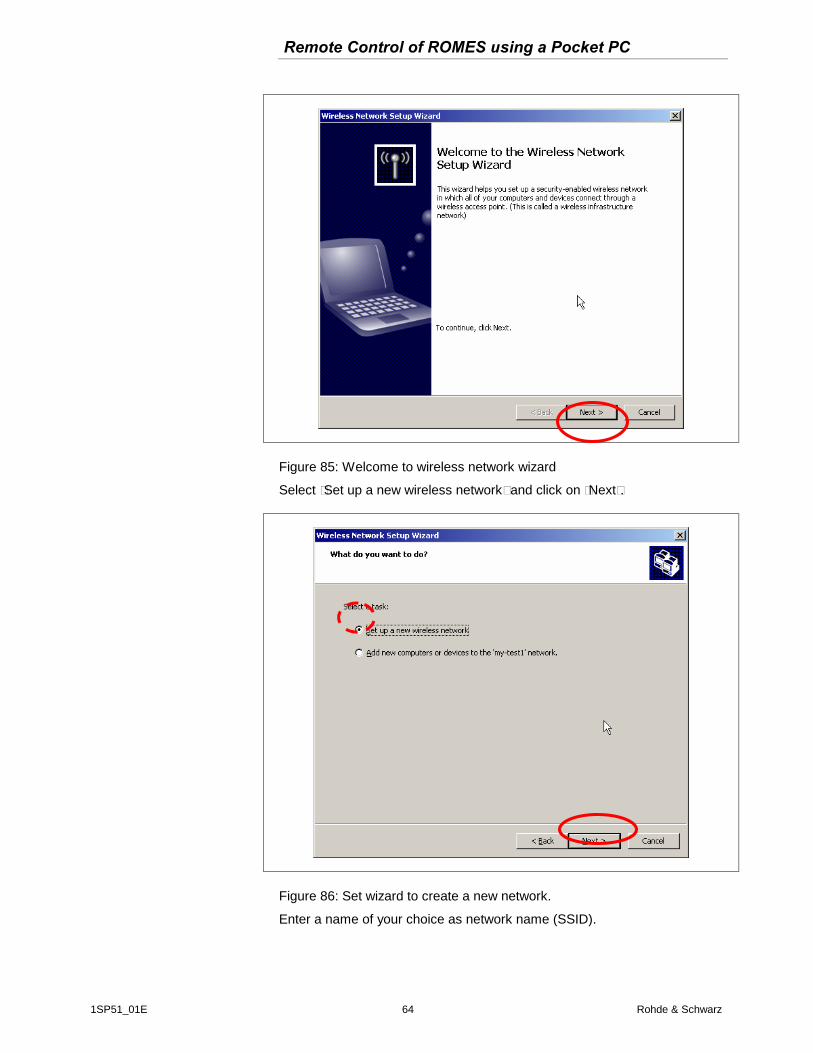
Figure 85: Welcome to wireless network wizard
Select “Set up a new wireless network” and click on “Next”.
Figure 86: Set wizard to create a new network.
Enter a name of your choice as network name (SSID).
Remote Control of ROMES using a Pocket PC
1SP51_01E 65 Rohde & Schwarz
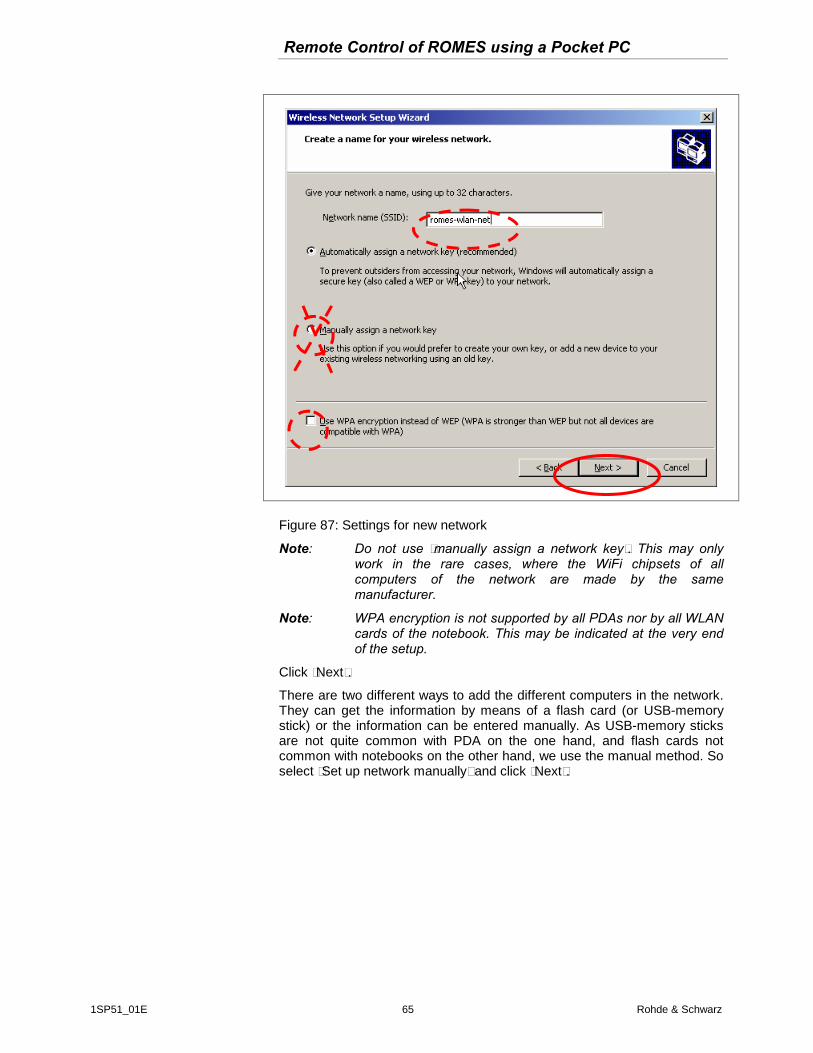
Figure 87: Settings for new network
Note: Do not use “manually assign a network key”. This may only work in the rare cases, where the WiFi chipsets of all computers of the network are made by the same manufacturer.
Note: WPA encryption is not supported by all PDAs nor by all WLAN cards of the notebook. This may be indicated at the very end of the setup.
Click “Next”.
There are two different ways to add the different computers in the network. They can get the information by means of a flash card (or USB-memory stick) or the information can be entered manually. As USB-memory sticks are not quite common with PDA on the one hand, and flash cards not common with notebooks on the other hand, we use the manual method. So select “Set up network manually” and click “Next”.
Remote Control of ROMES using a Pocket PC
1SP51_01E 66 Rohde & Schwarz
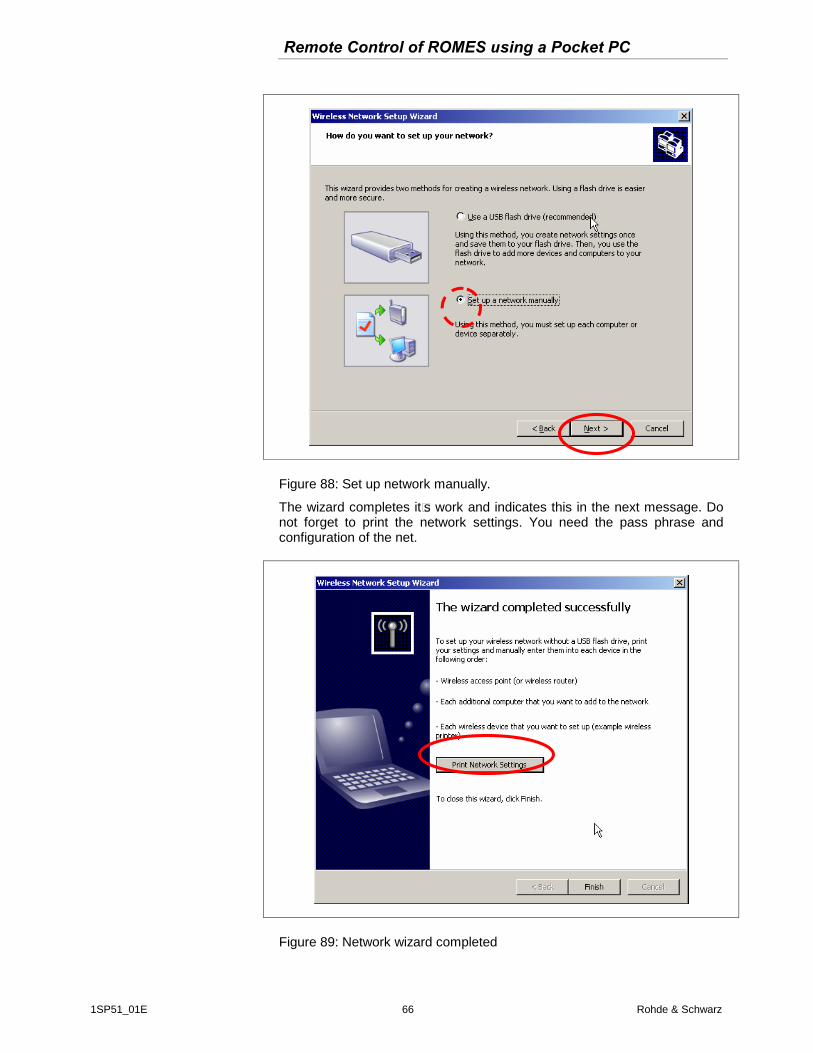
Figure 88: Set up network manually.
The wizard completes it’s work and indicates this in the next message. Do not forget to print the network settings. You need the pass phrase and configuration of the net.
Figure 89: Network wizard completed
Remote Control of ROMES using a Pocket PC
1SP51_01E 67 Rohde & Schwarz
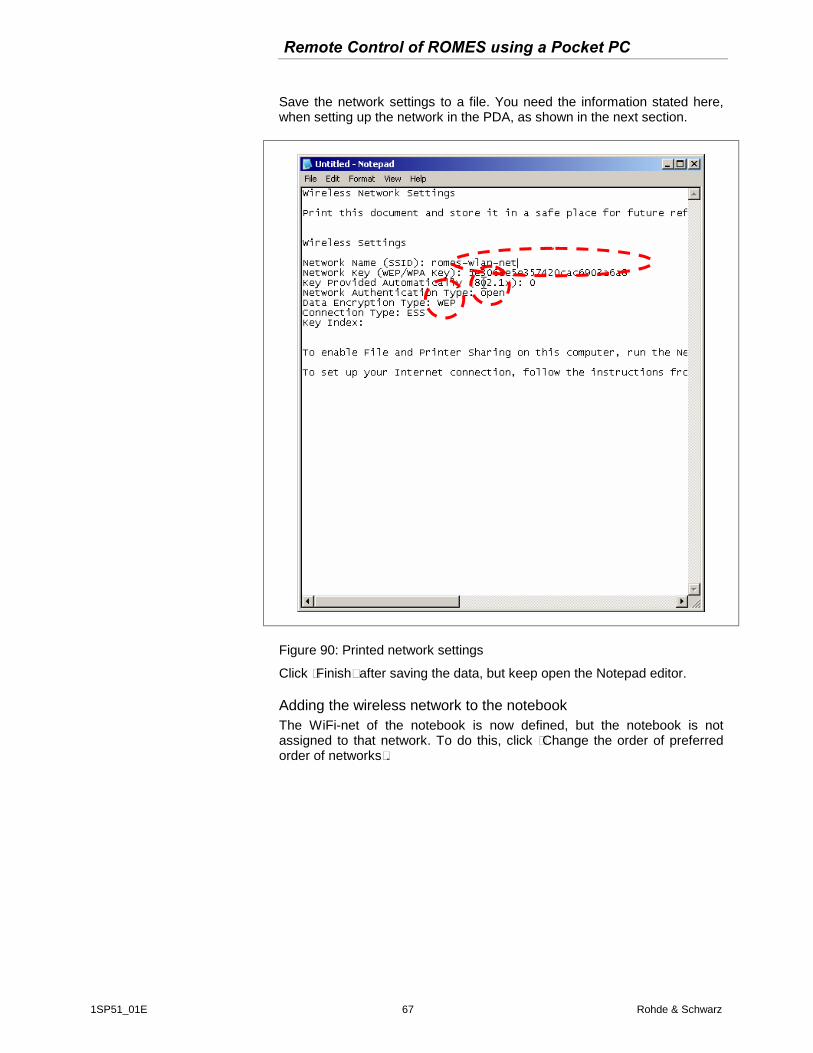
Save the network settings to a file. You need the information stated here, when setting up the network in the PDA, as shown in the next section.
Figure 90: Printed network settings
Click “Finish” after saving the data, but keep open the Notepad editor.
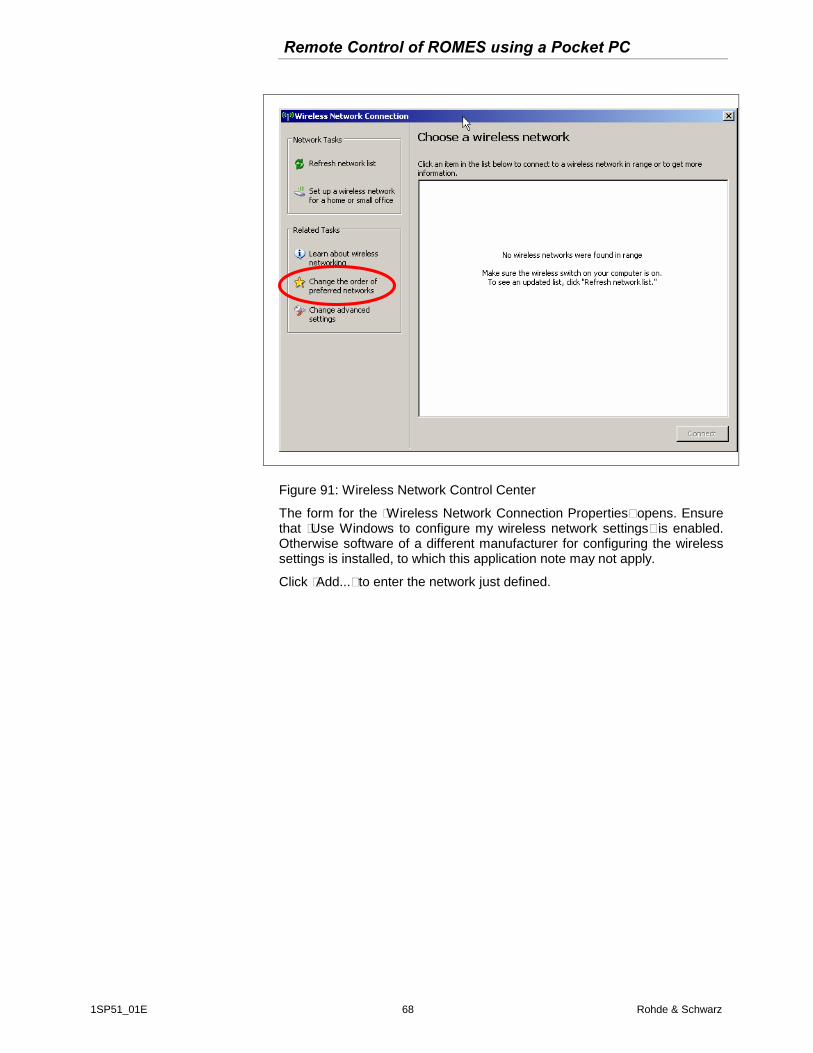
Adding the wireless network to the notebook The WiFi-net of the notebook is now defined, but the notebook is not assigned to that network. To do this, click “Change the order of preferred order of networks”.
Remote Control of ROMES using a Pocket PC
1SP51_01E 68 Rohde & Schwarz
Figure 91: Wireless Network Control Center
The form for the “Wireless Network Connection Properties” opens. Ensure that “Use Windows to configure my wireless network settings” is enabled. Otherwise software of a different manufacturer for configuring the wireless settings is installed, to which this application note may not apply.
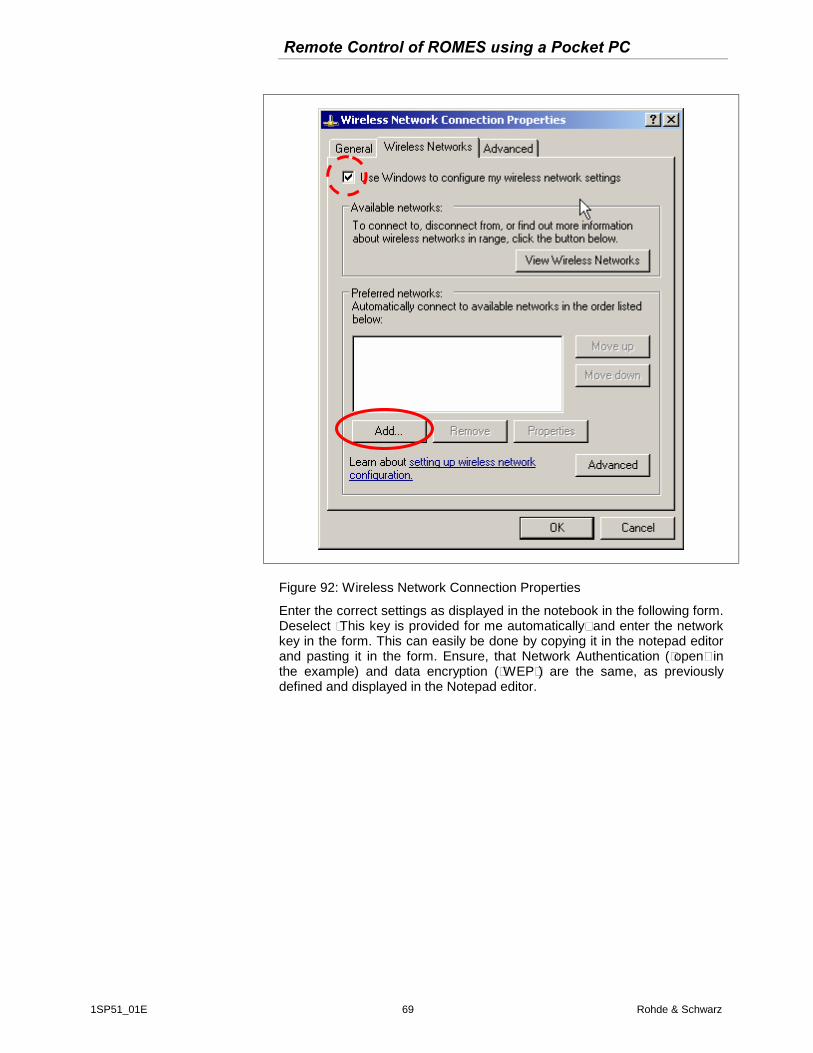
Click “Add...” to enter the network just defined.
Remote Control of ROMES using a Pocket PC
1SP51_01E 69 Rohde & Schwarz
Figure 92: Wireless Network Connection Properties
Enter the correct settings as displayed in the notebook in the following form. Deselect “This key is provided for me automatically” and enter the network key in the form. This can easily be done by copying it in the notepad editor and pasting it in the form. Ensure, that Network Authentication (“open” in the example) and data encryption (“WEP”) are the same, as previously defined and displayed in the Notepad editor.

Remote Control of ROMES using a Pocket PC
1SP51_01E 70 Rohde & Schwarz
Figure 93: Network properties of the ROMES WLAN net
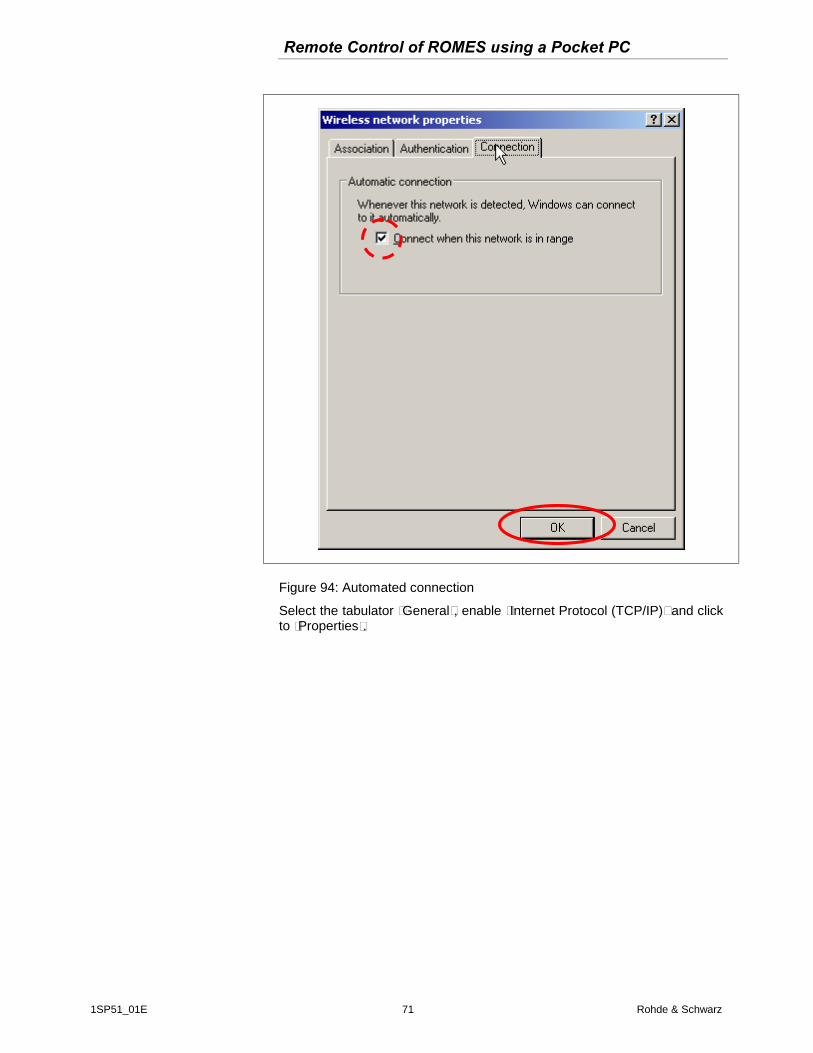
Enter the tabular “Connection” in the form and ensure, that “Connect, when this network is in range” is enabled. With this setting, a network connection is established automatically, whenever the PDA is nearby. Thus, a remote control session can be started, even if no one is logged into the notebook.
Remote Control of ROMES using a Pocket PC
1SP51_01E 71 Rohde & Schwarz
Figure 94: Automated connection
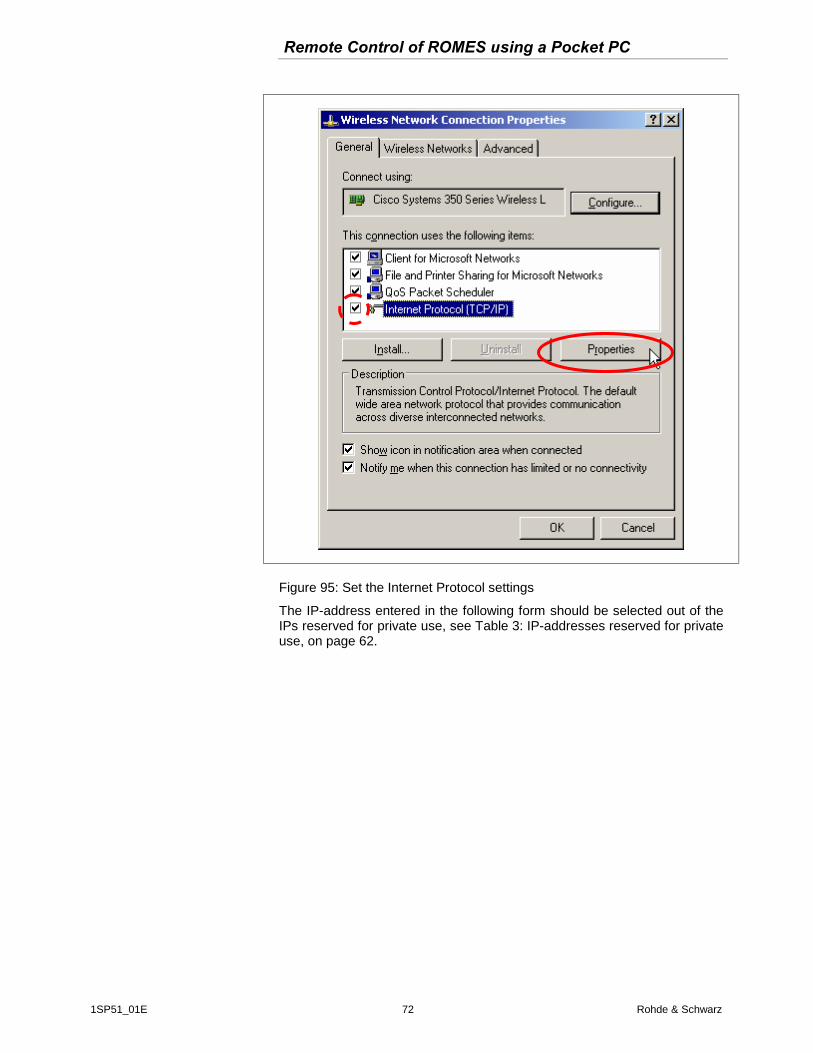
Select the tabulator “General”, enable “Internet Protocol (TCP/IP)” and click to “Properties”.
Remote Control of ROMES using a Pocket PC
1SP51_01E 72 Rohde & Schwarz
Figure 95: Set the Internet Protocol settings
The IP-address entered in the following form should be selected out of the IPs reserved for private use, see Table 3: IP-addresses reserved for private use, on page 62.
Remote Control of ROMES using a Pocket PC
1SP51_01E 73 Rohde & Schwarz
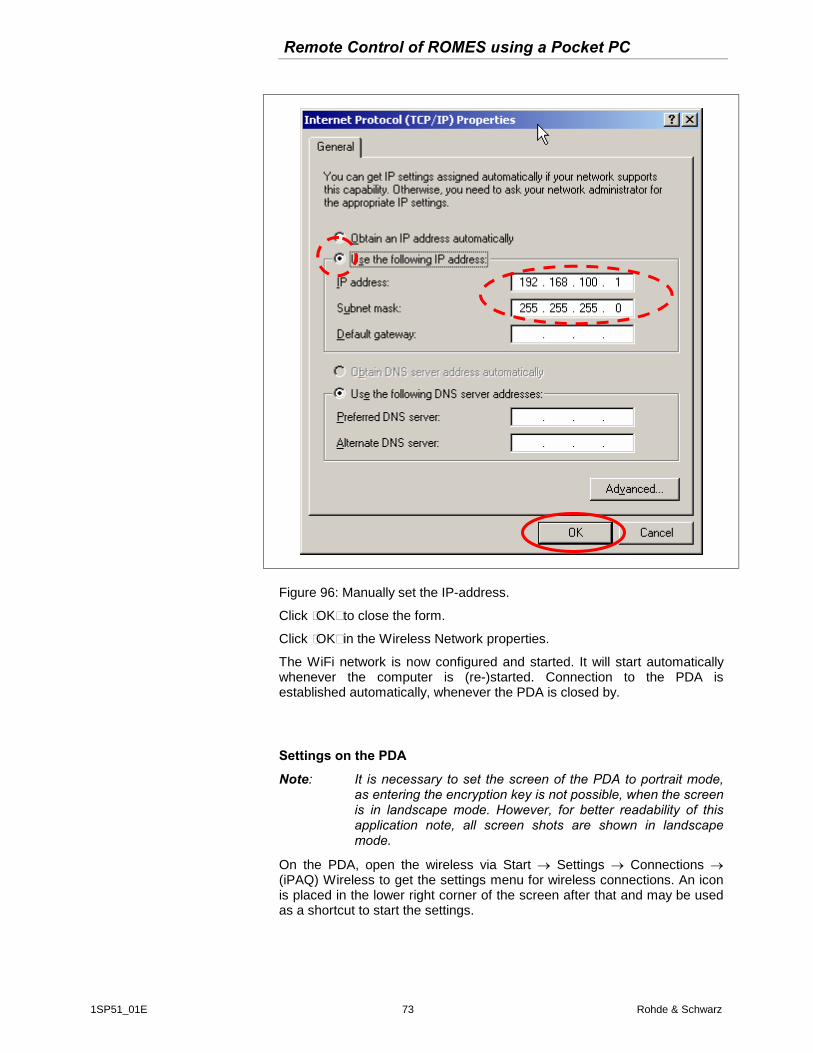
Figure 96: Manually set the IP-address.
Click “OK” to close the form.
Click “OK” in the Wireless Network properties.
The WiFi network is now configured and started. It will start automatically whenever the computer is (re-)started. Connection to the PDA is established automatically, whenever the PDA is closed by.
Settings on the PDA
Note: It is necessary to set the screen of the PDA to portrait mode, as entering the encryption key is not possible, when the screen is in landscape mode. However, for better readability of this application note, all screen shots are shown in landscape mode.
On the PDA, open the wireless via Start Settings Connections (iPAQ) Wireless to get the settings menu for wireless connections. An icon is placed in the lower right corner of the screen after that and may be used as a shortcut to start the settings.
Remote Control of ROMES using a Pocket PC
1SP51_01E 74 Rohde & Schwarz
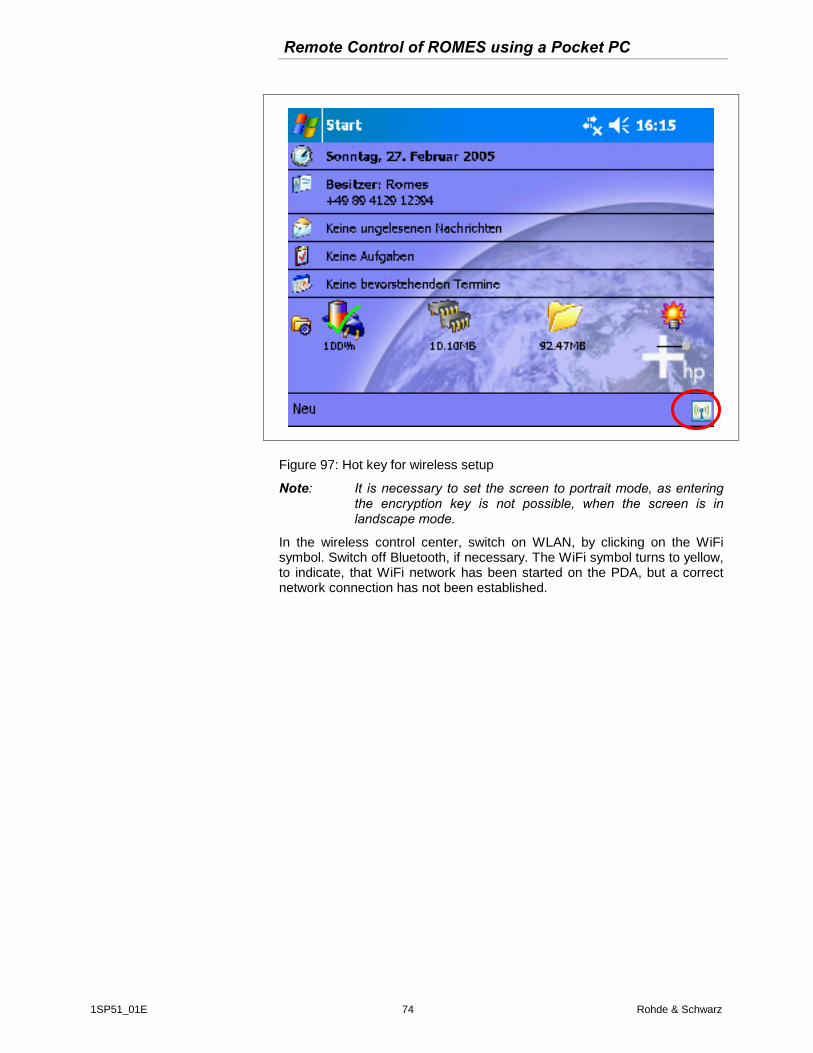
Figure 97: Hot key for wireless setup
Note: It is necessary to set the screen to portrait mode, as entering the encryption key is not possible, when the screen is in landscape mode.
In the wireless control center, switch on WLAN, by clicking on the WiFi symbol. Switch off Bluetooth, if necessary. The WiFi symbol turns to yellow, to indicate, that WiFi network has been started on the PDA, but a correct network connection has not been established.
Remote Control of ROMES using a Pocket PC
1SP51_01E 75 Rohde & Schwarz
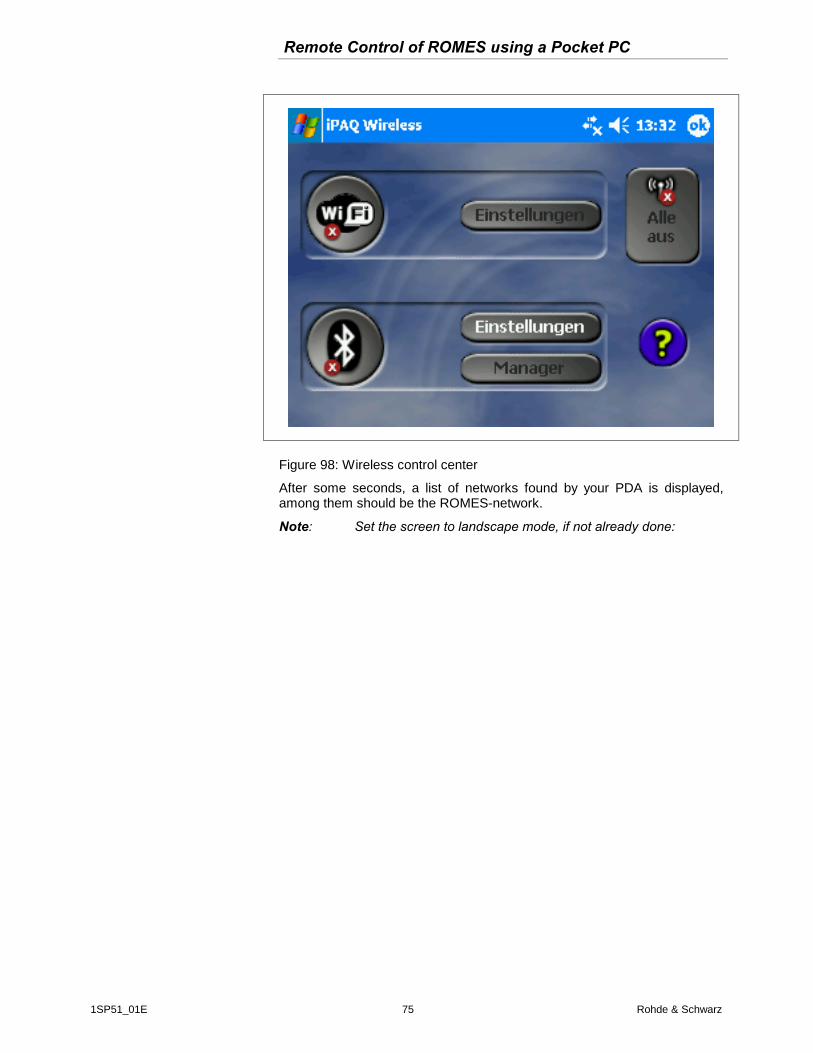
Figure 98: Wireless control center
After some seconds, a list of networks found by your PDA is displayed, among them should be the ROMES-network.
Note: Set the screen to landscape mode, if not already done:
Remote Control of ROMES using a Pocket PC
1SP51_01E 76 Rohde & Schwarz
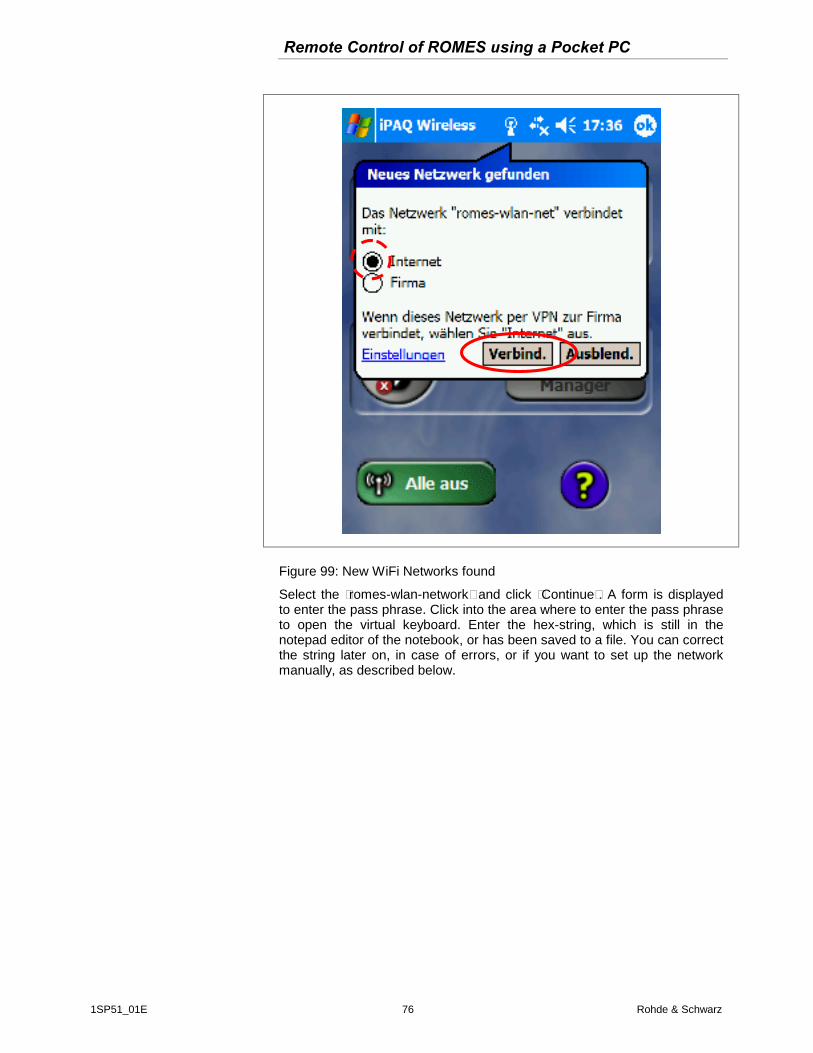
Figure 99: New WiFi Networks found
Select the “romes-wlan-network” and click “Continue”. A form is displayed to enter the pass phrase. Click into the area where to enter the pass phrase to open the virtual keyboard. Enter the hex-string, which is still in the notepad editor of the notebook, or has been saved to a file. You can correct the string later on, in case of errors, or if you want to set up the network manually, as described below.
Remote Control of ROMES using a Pocket PC
1SP51_01E 77 Rohde & Schwarz
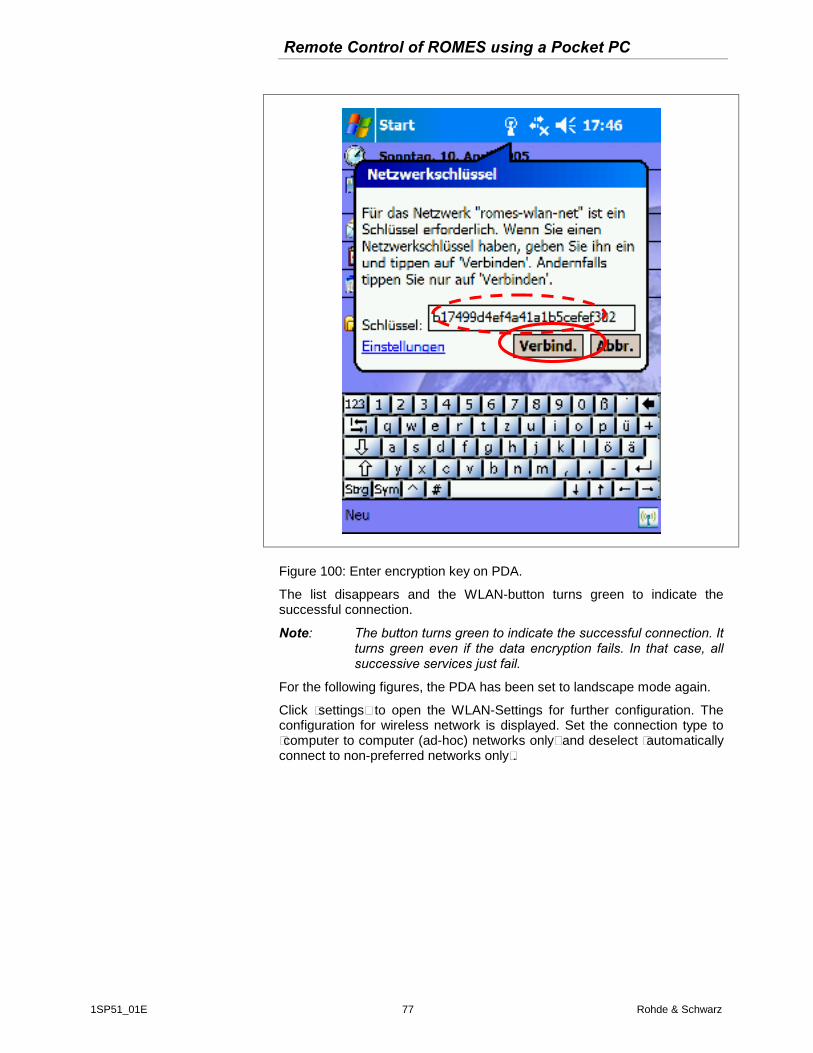
Figure 100: Enter encryption key on PDA.
The list disappears and the WLAN-button turns green to indicate the successful connection.
Note: The button turns green to indicate the successful connection. It turns green even if the data encryption fails. In that case, all successive services just fail.
For the following figures, the PDA has been set to landscape mode again.
Click “settings” to open the WLAN-Settings for further configuration. The configuration for wireless network is displayed. Set the connection type to “computer to computer (ad-hoc) networks only” and deselect “automatically connect to non-preferred networks only”.
Remote Control of ROMES using a Pocket PC
1SP51_01E 78 Rohde & Schwarz
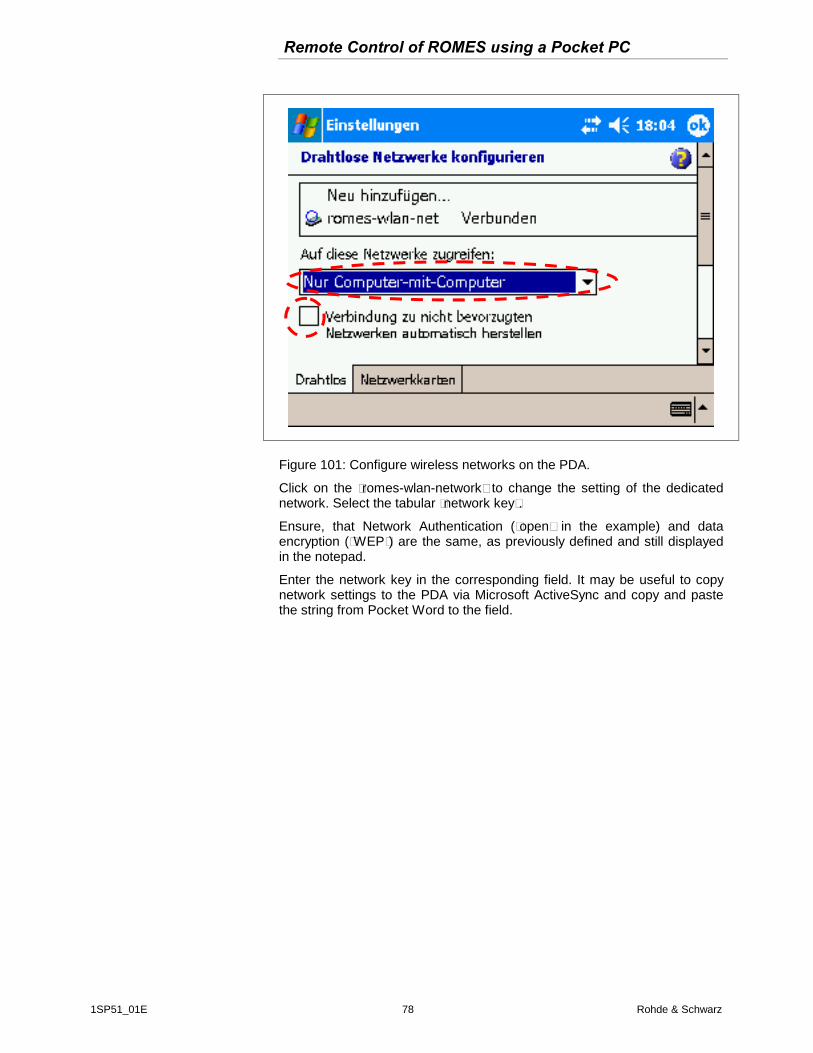
Figure 101: Configure wireless networks on the PDA.
Click on the “romes-wlan-network” to change the setting of the dedicated network. Select the tabular “network key”.
Ensure, that Network Authentication (“open” in the example) and data encryption (“WEP”) are the same, as previously defined and still displayed in the notepad.
Enter the network key in the corresponding field. It may be useful to copy network settings to the PDA via Microsoft ActiveSync and copy and paste the string from Pocket Word to the field.
Remote Control of ROMES using a Pocket PC
1SP51_01E 79 Rohde & Schwarz
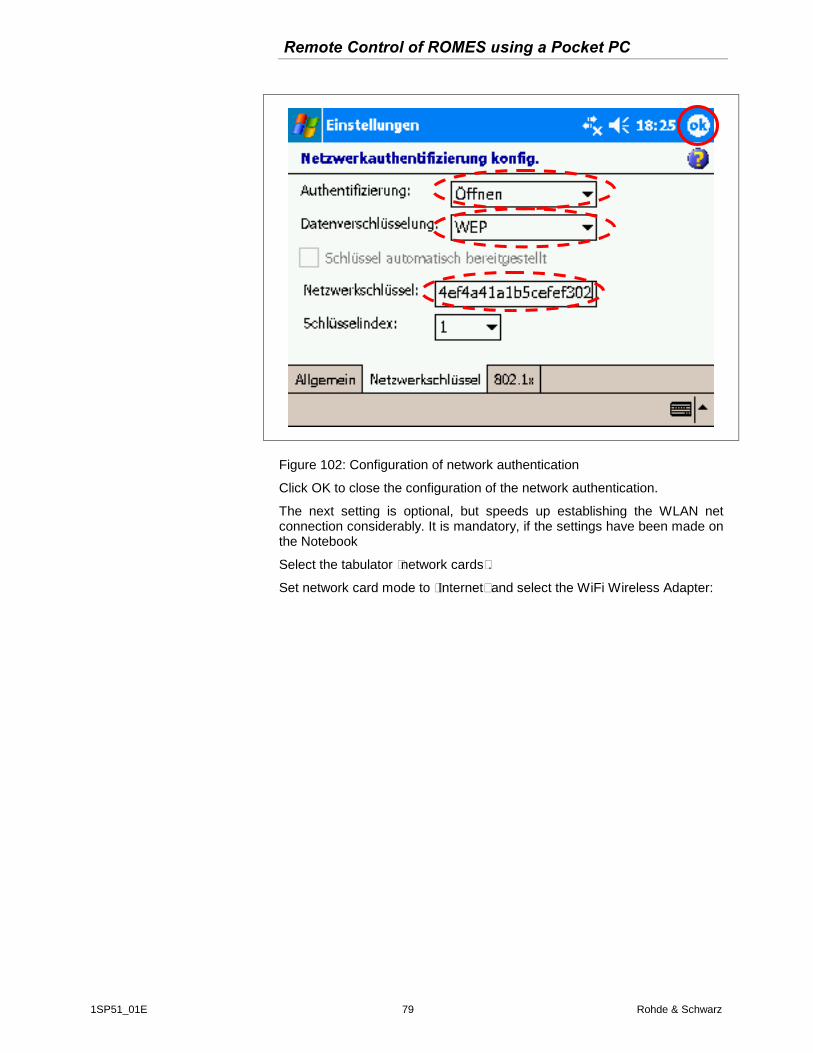
Figure 102: Configuration of network authentication
Click OK to close the configuration of the network authentication.
The next setting is optional, but speeds up establishing the WLAN net connection considerably. It is mandatory, if the settings have been made on the Notebook
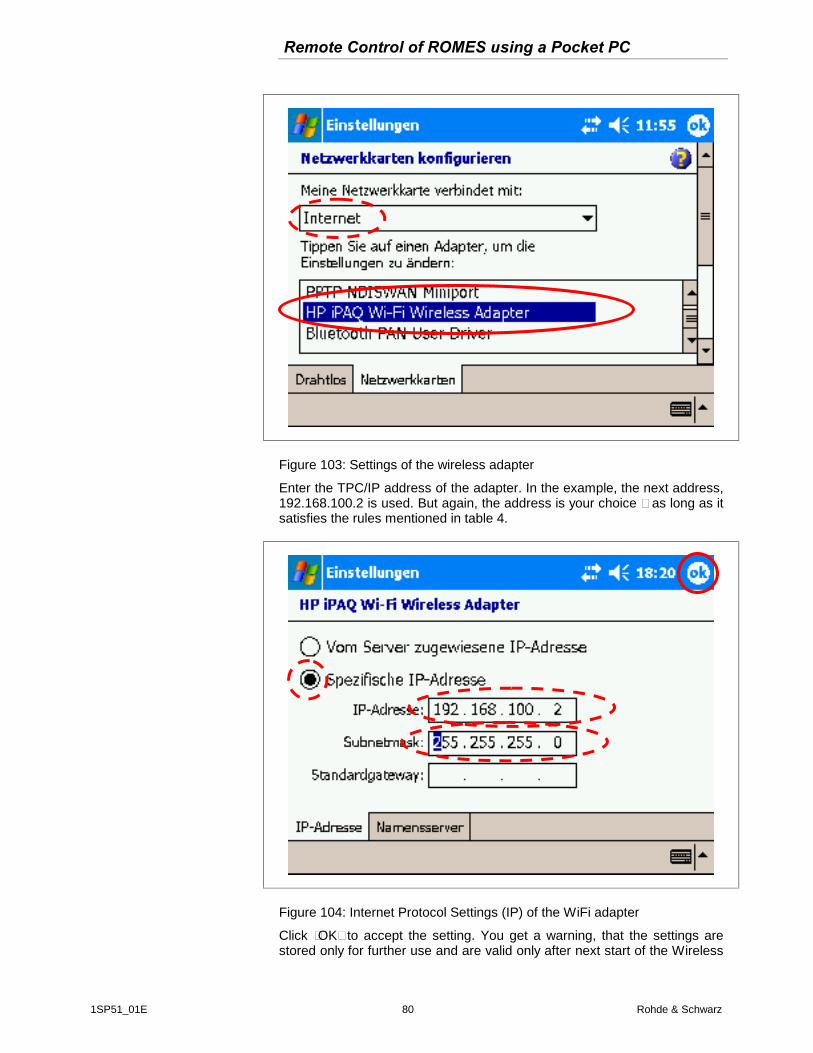
Select the tabulator “network cards”.
Set network card mode to “Internet” and select the WiFi Wireless Adapter:
Remote Control of ROMES using a Pocket PC
1SP51_01E 80 Rohde & Schwarz
Figure 103: Settings of the wireless adapter
Enter the TPC/IP address of the adapter. In the example, the next address, 192.168.100.2 is used. But again, the address is your choice – as long as it satisfies the rules mentioned in table 4.
Figure 104: Internet Protocol Settings (IP) of the WiFi adapter
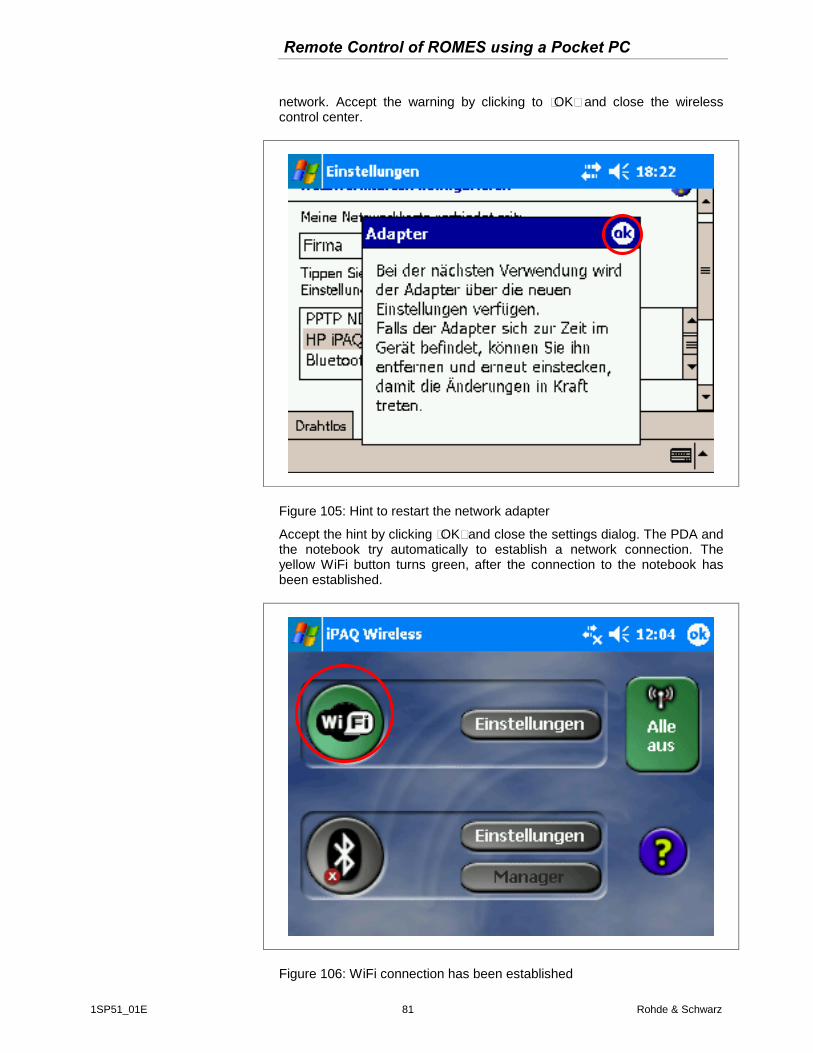
Click “OK” to accept the setting. You get a warning, that the settings are stored only for further use and are valid only after next start of the Wireless
Remote Control of ROMES using a Pocket PC
1SP51_01E 81 Rohde & Schwarz
network. Accept the warning by clicking to “OK” and close the wireless control center.
Figure 105: Hint to restart the network adapter
Accept the hint by clicking “OK” and close the settings dialog. The PDA and the notebook try automatically to establish a network connection. The yellow WiFi button turns green, after the connection to the notebook has been established.
Figure 106: WiFi connection has been established
Remote Control of ROMES using a Pocket PC
1SP51_01E 82 Rohde & Schwarz
Wired LAN Setup is not described in this application note, since most commonly used.
Examples for use of wired LAN is to remote control a ROMES computer are:
Setup a vehicle from laboratory
Monitoring ROMES
5 Literature [1] Mobile Messungen in GSM-Netzen mit bisher unerreichter Qualität.
Neues von Rohde & Schwarz (2005); Nr.: 186, S. 4-6
[2] R&S® ROMES 3: Daten aus Versorgungsmessungen erfassen, analysieren und visualisieren. Neues von Rohde & Schwarz (2000); Nr: 166, S. 29-33
6 Ordering information Type of instrument ROMES 1143.7991.30 ROMES DRIVE TEST SOFTWARE PLATFORM V3.5x;
*** For Operating System Windows XP Professional *** WITH GPS DRIVER & DATA EXPORT MODULES USB HARDLOCK INCLUDED
TSMU 1153.6000.02 TSMU RADIO NETWORK ANALYZER RF FRONTEND FOR DRIVE TEST SYSTEMS; 12 V DC POWER SUPPLY, IEEE 1394 CONNECTOR; REQUIRES ROMES APPLICATION SOFTWARE
TSMU-Z3 1153.6900.02 INDOOR BACK-PACK SYSTEM FRAME WITH ACCU PACK 3000mAh/12 V; BATTERY CHARGER; INCL. 2ND BATTERY, FIXTURE FOR 2 MOBILES (WITHOUT EXT. ANTENNA CONNECTION), USB HUB, INTERFACE CABLES
The Pocket PC is not offered by Rohde & Schwarz.
ROHDE & SCHWARZ GmbH & Co. KG . Mühldorfstraße 15 . D-81671 München . Postfach 80 14 69 . D-81614 München .
Tel (089) 4129 -0 . Fax (089) 4129 - 13777 . Internet: http://www.rohde-schwarz.com
This application note and the supplied programs may only be used subject to the conditions of use set forth in the download area of the Rohde & Schwarz website.