Remote Control of HMP - · PDF fileReplace the content on external events, ... Remote Control...
22
Remote Control of HMP SpinetiX Technical Documentation Document version: 2.3 Firmware version: 2.2.6 SpinetiX S.A. Rue des Terreaux 17, 1003 Lausanne, Switzerland T +41 21 341 15 50 | F +41 21 311 19 56 | info@spinetix.com | www.spinetix.com
Transcript of Remote Control of HMP - · PDF fileReplace the content on external events, ... Remote Control...
Remote Control of HMP
SpinetiX Technical Documentation
Document version: 2.3
Firmware version: 2.2.6
SpinetiX S.A.
Rue des Terreaux 17, 1003 Lausanne, Switzerland
T +41 21 341 15 50 | F +41 21 311 19 56 | [email protected] | www.spinetix.com
Remote Control of HMP - SpinetiX Technical Documentation v2.3
© SpinetiX S.A. All rights reserved. Page 2 of 22
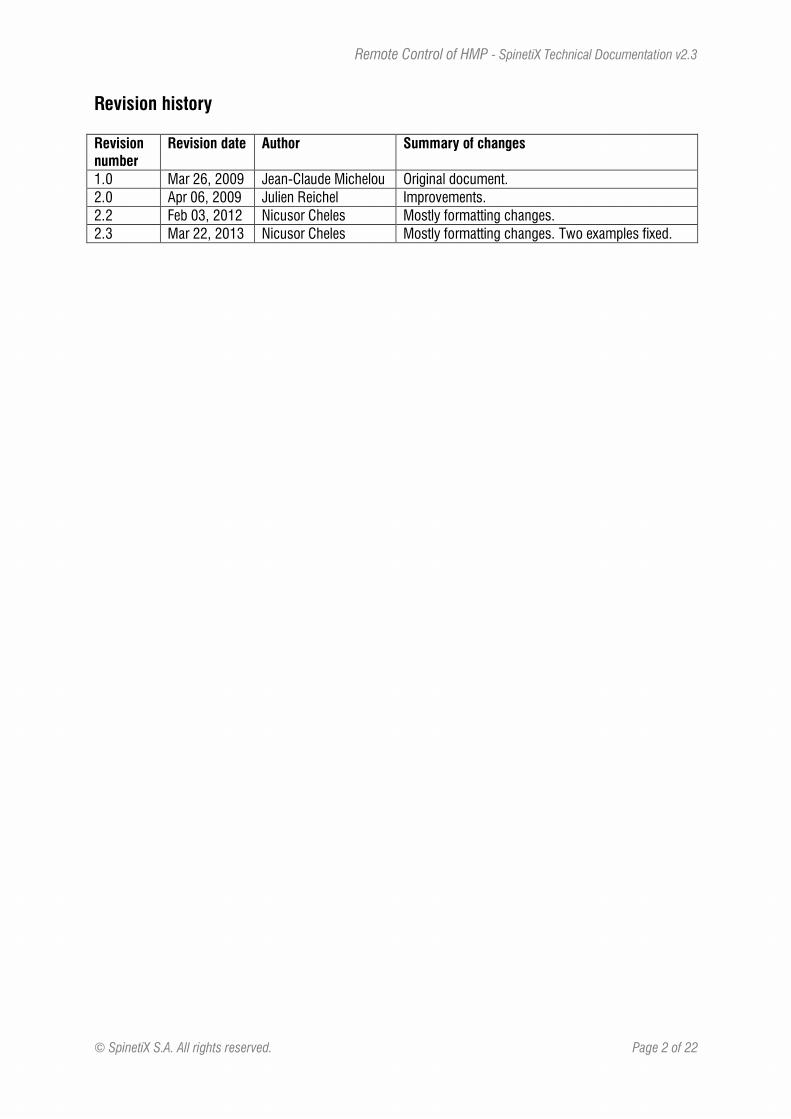
Revision history
Revision
number
Revision date Author Summary of changes
1.0 Mar 26, 2009 Jean-Claude Michelou Original document.
2.0 Apr 06, 2009 Julien Reichel Improvements.
2.2 Feb 03, 2012 Nicusor Cheles Mostly formatting changes.
2.3 Mar 22, 2013 Nicusor Cheles Mostly formatting changes. Two examples fixed.
Remote Control of HMP - SpinetiX Technical Documentation v2.3
© SpinetiX S.A. All rights reserved. Page 3 of 22
Notices and Disclaimer
The specifications and information regarding the products in this manual are subject to change without
notice. All statements, information, and recommendations in this manual are believed to be accurate but are
presented without warranty of any kind, express or implied. Users must take full responsibility for their
application of any products. The software license and limited warranty for the accompanying product are set
forth in the information packet that is shipped with the product and are incorporated herein by this reference.
If you are unable to locate the software license or limited warranty, contact your SpinetiX representative for a
copy.
NOTWITHSTANDING ANY OTHER WARRANTY HEREIN, ALL DOCUMENT FILES AND SOFTWARE OF THESE
SUPPLIERS ARE PROVIDED “AS IS” WITH ALL FAULTS. SPINETIX DISCLAIMS ALL WARRANTIES,
EXPRESSED OR IMPLIED, INCLUDING, WITHOUT LIMITATION, THOSE OF MERCHANTABILITY, FITNESS
FOR A PARTICULAR PURPOSE AND NON-INFRINGEMENT OR ARISING FROM A COURSE OF DEALING,
USAGE, OR TRADE PRACTICE.
In no event shall SpinetiX or its suppliers be liable for any indirect, special, consequential, or incidental
damages, including, without limitation, lost profits or loss or damage to data arising out of the use or inability
to use this manual, even if SpinetiX or its suppliers have been advised of the possibility of such damages.
"SpinetiX" and “HMP Hyper Media Player” are registered trademarks and the logo and all graphic designs
are trademarks of SpinetiX S.A. Other product and company names appearing in SpinetiX S.A. products and
materials are used for identification purposes only and may be trademarks or registered trademarks of their
respective companies. Registered and unregistered trademarks used in any SpinetiX S.A. products and
materials are the exclusive property of their respective owners.
End-User Software License Agreement and Hardware Limited Warranty Agreement
The SpinetiX End-User Software License Agreement and Hardware Limited Warranty Agreement can be
found under http://www.spinetix.com/legal.

Remote Control of HMP - SpinetiX Technical Documentation v2.3
© SpinetiX S.A. All rights reserved. Page 4 of 22
Table of Contents
Notices and Disclaimer ............................................................................................................................................................ 3
Support Wiki keywords .......................................................................................................................................................... 5
1. Introduction ....................................................................................................................................................................... 5
2. Remote control of content .......................................................................................................................................... 6
2.1. When to use .............................................................................................................................................................. 6
2.2. How to use ................................................................................................................................................................. 6
2.3. Triggering a content switch over network ............................................................................................... 7
2.4. Switching content with the serial port........................................................................................................ 9
2.5. Switching content with a USB HID device .............................................................................................. 10
2.6. Switching content from another device .................................................................................................. 11
2.7. Switching content using SpinetiX Messenger....................................................................................... 12
3. Remote control of playback .................................................................................................................................... 13
3.1. When to use ........................................................................................................................................................... 13
3.2. How to use .............................................................................................................................................................. 13
3.3. Interactive pause/resume over TCP ......................................................................................................... 14
3.4. Interactive pause/resume using HTTP GET ......................................................................................... 14
3.5. Interactive pause/resume from a device................................................................................................ 15
3.6. Timed pause/seek/resume ........................................................................................................................... 16
3.7. Getting feedback on the playback progress .......................................................................................... 17
3.8. Knowing the current position with extra accuracy ........................................................................... 17
4. Remote triggers ............................................................................................................................................................. 17
4.1. Triggering a text overlay ................................................................................................................................. 17
4.2. Triggering a video or image overlay ......................................................................................................... 18
4.3. Triggering an alternative content............................................................................................................... 20
4.4. Triggering an SVG animation ........................................................................................................................ 21

Remote Control of HMP - SpinetiX Technical Documentation v2.3
© SpinetiX S.A. All rights reserved. Page 5 of 22
Support Wiki keyword:
Keyword
Support Wiki keyword:
Shared variables
Support Wiki keywords
If a particular section from this documentation has more
information on the Support Wiki (http://support.spinetix.com),
this is illustrated by a banner, like the one on the right, containing a
keyword that you can enter in the search box to find additional
content on the wiki.
1. Introduction
This technical documentation covers various methods that you can use to remote control the
HMP (Hyper Media Player). You can control the content source, the playback of animations,
video or audio (for instance you can pause a video based on the user input), you can display
messages or contextual animations on an external event and many more.
From the connectivity point of view, there are three ways to control the HMP:
The network. The command might come from a PC, from a web page or from another
HMP.
The serial port of the HMP. A dedicated protocol file must be written to translate
RS232 command to a series of actions to be performed by the HMP.
The USB port of the HMP. Human Interface Devices (HID) such as keyboards or remote
pointers can be used to control the HMP.
From the software point of view, you can use the Hyper Media Director (HMD) templates, the
shared variables mechanism and / or custom JavaScript code.
The Shared Variables concept is detailed in another technical
documentation, which is recommended to be read in order to better
understand the information provided in the next pages.
All examples presented in this technical documentation follow the same structure:
For IP control, the commands will be sent over TCP with the telnet utility from the
command line or from sample client-side scripts in HTML pages.
For the serial port examples, we assume a simple protocol where each command is a
single character, so it can be exercised easily by connecting a PC on the serial port and
sending the right keys.
Remote Control of HMP - SpinetiX Technical Documentation v2.3
© SpinetiX S.A. All rights reserved. Page 6 of 22
Support Wiki keyword:
Interactivity
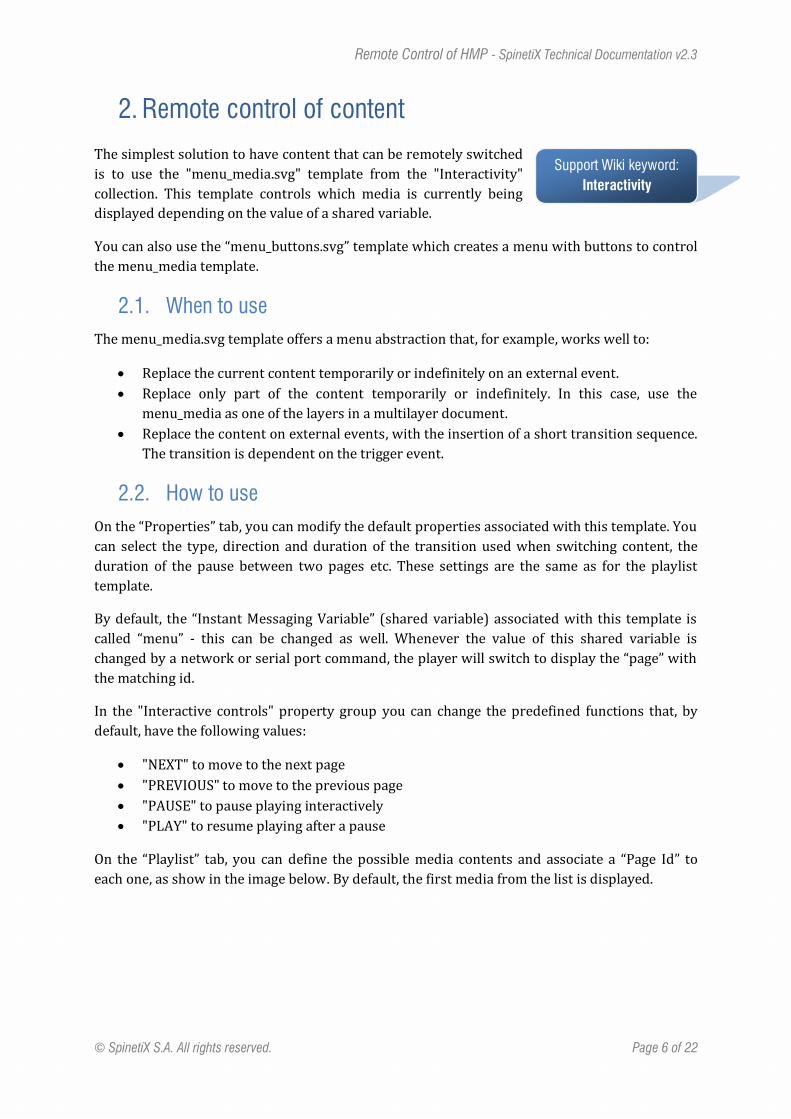
2. Remote control of content
The simplest solution to have content that can be remotely switched
is to use the "menu_media.svg" template from the "Interactivity"
collection. This template controls which media is currently being
displayed depending on the value of a shared variable.
You can also use the “menu_buttons.svg” template which creates a menu with buttons to control
the menu_media template.
2.1. When to use
The menu_media.svg template offers a menu abstraction that, for example, works well to:
Replace the current content temporarily or indefinitely on an external event.
Replace only part of the content temporarily or indefinitely. In this case, use the
menu_media as one of the layers in a multilayer document.
Replace the content on external events, with the insertion of a short transition sequence.
The transition is dependent on the trigger event.
2.2. How to use
On the “Properties” tab, you can modify the default properties associated with this template. You
can select the type, direction and duration of the transition used when switching content, the
duration of the pause between two pages etc. These settings are the same as for the playlist
template.
By default, the “Instant Messaging Variable” (shared variable) associated with this template is
called “menu” - this can be changed as well. Whenever the value of this shared variable is
changed by a network or serial port command, the player will switch to display the “page” with
the matching id.
In the "Interactive controls" property group you can change the predefined functions that, by
default, have the following values:
"NEXT" to move to the next page
"PREVIOUS" to move to the previous page
"PAUSE" to pause playing interactively
"PLAY" to resume playing after a pause
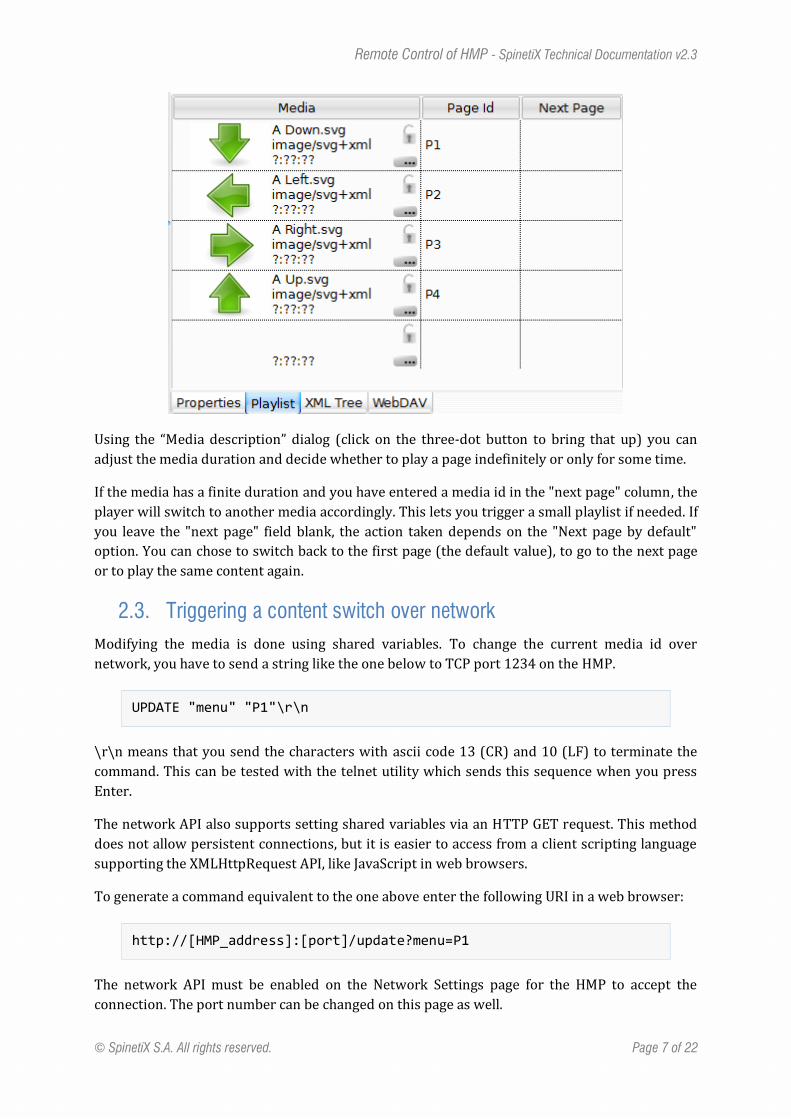
On the “Playlist” tab, you can define the possible media contents and associate a “Page Id” to
each one, as show in the image below. By default, the first media from the list is displayed.
Remote Control of HMP - SpinetiX Technical Documentation v2.3
© SpinetiX S.A. All rights reserved. Page 7 of 22
Using the “Media description” dialog (click on the three-dot button to bring that up) you can
adjust the media duration and decide whether to play a page indefinitely or only for some time.
If the media has a finite duration and you have entered a media id in the "next page" column, the
player will switch to another media accordingly. This lets you trigger a small playlist if needed. If
you leave the "next page" field blank, the action taken depends on the "Next page by default"
option. You can chose to switch back to the first page (the default value), to go to the next page
or to play the same content again.
2.3. Triggering a content switch over network
Modifying the media is done using shared variables. To change the current media id over
network, you have to send a string like the one below to TCP port 1234 on the HMP.
UPDATE "menu" "P1"\r\n
\r\n means that you send the characters with ascii code 13 (CR) and 10 (LF) to terminate the
command. This can be tested with the telnet utility which sends this sequence when you press
Enter.
The network API also supports setting shared variables via an HTTP GET request. This method
does not allow persistent connections, but it is easier to access from a client scripting language
supporting the XMLHttpRequest API, like JavaScript in web browsers.
To generate a command equivalent to the one above enter the following URI in a web browser:
http://[HMP_address]:[port]/update?menu=P1
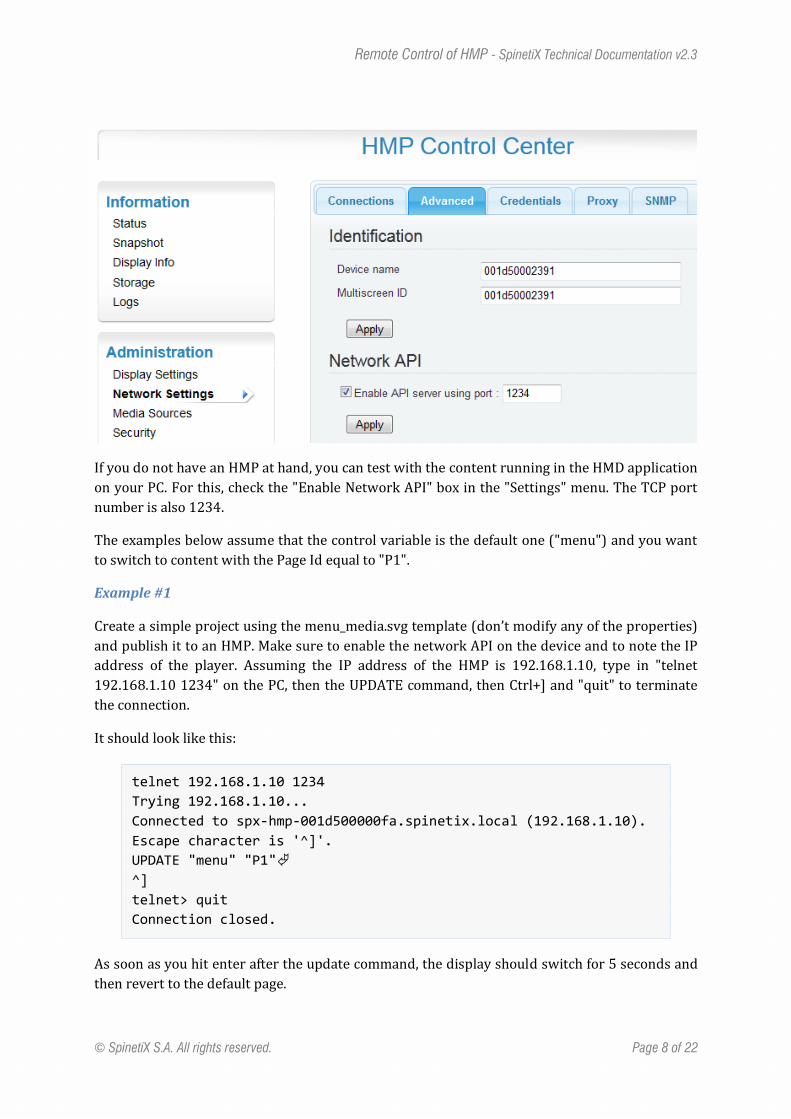
The network API must be enabled on the Network Settings page for the HMP to accept the
connection. The port number can be changed on this page as well.
Remote Control of HMP - SpinetiX Technical Documentation v2.3
© SpinetiX S.A. All rights reserved. Page 8 of 22
If you do not have an HMP at hand, you can test with the content running in the HMD application
on your PC. For this, check the "Enable Network API" box in the "Settings" menu. The TCP port
number is also 1234.
The examples below assume that the control variable is the default one ("menu") and you want
to switch to content with the Page Id equal to "P1".
Example #1
Create a simple project using the menu_media.svg template (don’t modify any of the properties)
and publish it to an HMP. Make sure to enable the network API on the device and to note the IP
address of the player. Assuming the IP address of the HMP is 192.168.1.10, type in "telnet
192.168.1.10 1234" on the PC, then the UPDATE command, then Ctrl+] and "quit" to terminate
the connection.
It should look like this:
telnet 192.168.1.10 1234
Trying 192.168.1.10...
Connected to spx-hmp-001d500000fa.spinetix.local (192.168.1.10).
Escape character is '^]'.
UPDATE "menu" "P1"
^]
telnet> quit
Connection closed.
As soon as you hit enter after the update command, the display should switch for 5 seconds and
then revert to the default page.

Remote Control of HMP - SpinetiX Technical Documentation v2.3
© SpinetiX S.A. All rights reserved. Page 9 of 22
Support Wiki keyword:
RS232
To test the HTTP GET method with the previous example, enter the following URI in a web
browser:
http://192.168.1.10:1234/update?menu=P1
Example #2
The GET method can also be embedded in an HTML page. The example below will let you switch
the document each time you click on the button.
<html>
<script>
function set( name, value ) {
var request = new XMLHttpRequest();
request.open("GET", "http://192.168.1.10:1234/update?" +
encodeURIComponent(name) + "=" + encodeURIComponent(value),
false);
request.send();
}
</script>
<body>
<form>
<button onclick="set('menu','P1')">Click</button>
</form>
</body>
</html>
2.4. Switching content with the serial port
For more information about the serial port protocol, please refer to
the serial port technical documentation.
To change the current media via the serial port, you need to do the
following:
Create a protocol file (.fsm) describing the actions to be performed depending on the
input on the serial port.
o The protocol file should trigger an <update> action on the variable when
matching the input on the serial port.
Upload the protocol file to the HMP using the RS232 / USB IO page from Control Center.
Enable the protocol file by selecting it in the protocols drop-box.
Click the “Apply” button.
Send messages to the HMP using the serial connection.

Remote Control of HMP - SpinetiX Technical Documentation v2.3
© SpinetiX S.A. All rights reserved. Page 10 of 22
Example
For instance the sample below will trigger an update of the menu variable when the string '1' or
'2' is received on the serial port.
<?xml version="1.0" encoding="utf-8"?>
<protocol xmlns='http://www.spinetix.com/namespace/1.0/spx'
xml:id='test' desc='protocol' target='monitor' startup='start'>
<state xml:id='start'>
<onInput match="1" >
<update name='menu' value='L1' />
</onInput>
<onInput match="2" >
<update name='menu' value='L2' />
</onInput>
</state>
</protocol>
2.5. Switching content with a USB HID device
You can change the current media with any USB device of the HID (Human Interface Device)
class, like USB keyboard, IR remote controls etc.
The keystroke.svg template lets you associate keystrokes with a request to update the value of
the shared variable that controls the current media. You should have only one keystroke.svg
template, preferably as the background layer of the top index.svg, because if you have multiple
layers which accept keyboard events, you'll have to make sure the right one gets the focus. This
template has no displayable content and is fully transparent.
You specify the mapping from key to value in the "Key Identifiers" table. The syntax for the key
identifiers is documented in the SVG Tiny 1.2 specification. It has been extended to let you prefix
them with "modifiers", so as to match on the key stroke only if some other control key is down at
the same time. The valid modifiers are: Ctrl, Alt, Shift, AltGr and Meta. For instance to match a
stroke on "A" while the holding the Control key down, the key identifier is "Ctrl+A".
In the image below, a mapping is made for the key codes sent by common USB remote controls
used for PowerPoint presentations, while Ctrl+A combination triggers the alternate content of
the sample.

Remote Control of HMP - SpinetiX Technical Documentation v2.3
© SpinetiX S.A. All rights reserved. Page 11 of 22
2.6. Switching content from another device
It is possible to change a variable remotely from another device simply by creating a shared
variable object with the name of the control variable suffixed by the @ sign and the hostname or
IP address of the target device, and if not using the default port, followed by a colon and the port
number. For instance for the control variable "menu" on the device "target", the variable name is
"menu@target".
To generate this command you can use the 'menu_buttons.svg' template located in the
Interactivity folder. This template let you configure 'buttons' and associate each button with a
given action. This template can be used to control local or remote shared variables depending on
presence of the sign @ in the variable name.
Example #1
The example below shows the configuration of the file to control the value of the variable 'menu'
located on the remote 192.168.1.10 host.

Remote Control of HMP - SpinetiX Technical Documentation v2.3
© SpinetiX S.A. All rights reserved. Page 12 of 22
Example #2
It is also possible to use JavaScript directly in the SVG code to control the value of the shared
variable. The sample code below assumes that we want to control the content on 192.168.1.10
by clicking on a rectangle.
<?xml version="1.0" encoding="UTF-8"?>
<svg xmlns="http://www.w3.org/2000/svg"
xmlns:ev="http://www.w3.org/2001/
xml-events" viewBox="0 0 1280 720" viewport-fill="white">
<rect x="540" y="260" width="200" height="200" fill="blue">
<handler ev:event="click">
<![CDATA[
var v=createSharedVariable( "[email protected]" );
v.set( "P1" );
]]>
</handler>
</rect></svg>
2.7. Switching content using SpinetiX Messenger
It is possible to change a variable remotely from a PC using the SPX Messenger application. The
application can be found under the start menu, in the SpinetiX folder. Using this application you
can easily test the shared variable behavior.
Once the application has been started you can select any number of shared variables to be
watched or modified. To add a new shared variable press the 'Add Variable' button and type the
name of the variable to be watched. Make sure you use the complete name of the variable,
including the host name. Use 'localhost' as host name if you want to test your content on the
local PC (e.g. menu@localhost).
In the example below the variable 'menu' on the host '192.168.1.10' is being watched. The
current value for the variable is 'P1'.

Remote Control of HMP - SpinetiX Technical Documentation v2.3
© SpinetiX S.A. All rights reserved. Page 13 of 22
To modify a variable, simply enter the new value in the Value column and press Enter. Then
watch the changes on the screen.
3. Remote control of playback
The playback.svg template from the "Interactivity" directory acts as a transparent container for
a single media and lets you control its playback. Using this template you can pause and restart
any type of document including animations, playlists and video.
3.1. When to use
You can use it to control the main document or for individual medias. It supports the following
operations:
pausing and resuming playback
changing the current the time position
synchronized control of the same media on multiple screens
control from multiple clients over the network and/or serial port
3.2. How to use
The control is based on a shared variable, the default name of which is "playback". In its basic
usage it takes two values: "PLAY" or "PAUSE".
For playback control on multiple screens or better resilience, an optional timestamp can follow
the PLAY or PAUSE string. It is defined as the time position in seconds where playback should
pause or resume. This extra parameter enables unambiguous control over the timeline. If the
variable is stored in a central server, this let you control the playing (or pause) time even if the
target device was off or has restarted in between two commands. It also enables frame accurate
synchronization of playback on multiple targets as well as control over the current time position.

Remote Control of HMP - SpinetiX Technical Documentation v2.3
© SpinetiX S.A. All rights reserved. Page 14 of 22
The timestamp can also be specified as a relative percentage of the total duration of the media if
followed by a percent sign. For instance to jump to the middle of the media, the value is: PLAY
50%.
3.3. Interactive pause/resume over TCP
To test, create a project based on the playback.svg template and drop a video media inside,
setting it to repeat indefinitely.
To pause interactively the media, send the following command over TCP:
UPDATE "playback" "PAUSE"
To resume play back, send the following command:
UPDATE "playback" "PLAY"
Playback will pause, respectively resume, at the time the command is sent. Because of latency,
the media may appear to step back in time a fraction of seconds when pausing. This can be
avoided entirely by specifying a timestamp in the future for the variable update.
3.4. Interactive pause/resume using HTTP GET
You can control the published project directly from a browser using the HTTP GET interface. The
following example assumes that the device is using the 192.168.1.10 IP address and the default
port (1234) for the network API.
To pause interactively the media, type the following command in your browser:
Remote Control of HMP - SpinetiX Technical Documentation v2.3
© SpinetiX S.A. All rights reserved. Page 15 of 22
http://192.168.1.10:1234/update?playback=PLAY
To resume play back, send the following command:
http://192.168.1.10:1234/update?playback=PAUSE
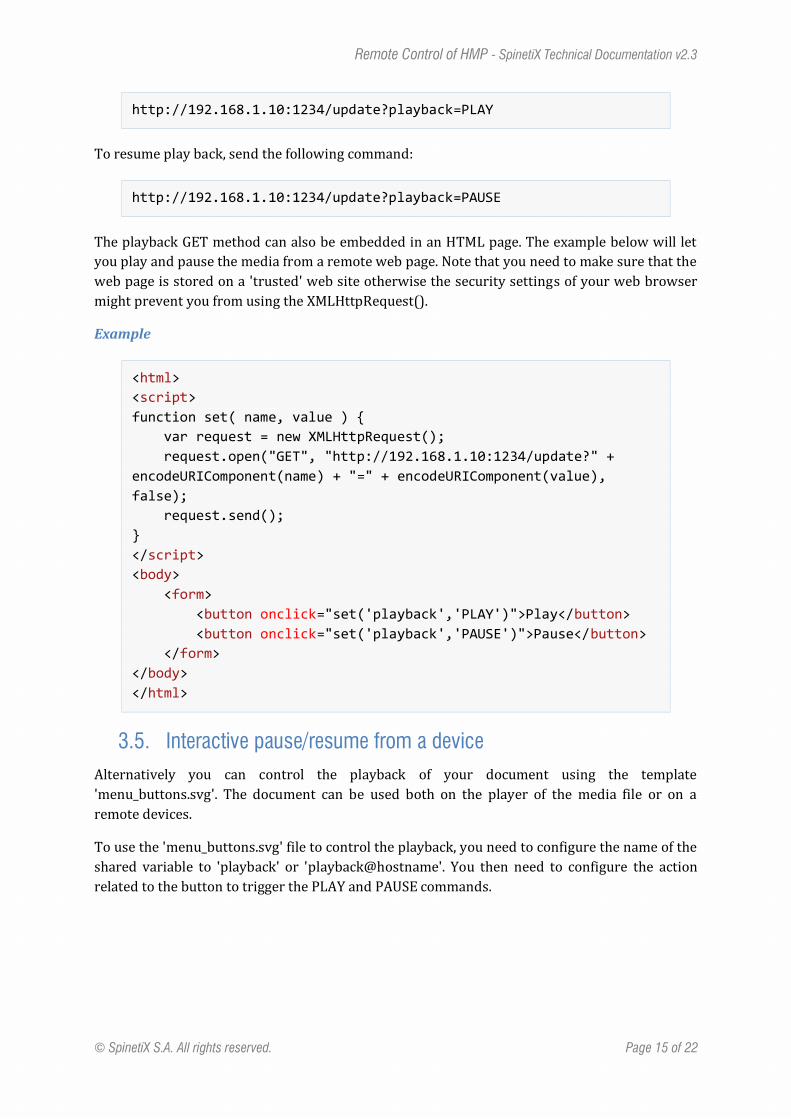
The playback GET method can also be embedded in an HTML page. The example below will let
you play and pause the media from a remote web page. Note that you need to make sure that the
web page is stored on a 'trusted' web site otherwise the security settings of your web browser
might prevent you from using the XMLHttpRequest().
Example
<html>
<script>
function set( name, value ) {
var request = new XMLHttpRequest();
request.open("GET", "http://192.168.1.10:1234/update?" +
encodeURIComponent(name) + "=" + encodeURIComponent(value),
false);
request.send();
}
</script>
<body>
<form>
<button onclick="set('playback','PLAY')">Play</button>
<button onclick="set('playback','PAUSE')">Pause</button>
</form>
</body>
</html>
3.5. Interactive pause/resume from a device
Alternatively you can control the playback of your document using the template
'menu_buttons.svg'. The document can be used both on the player of the media file or on a
remote devices.
To use the 'menu_buttons.svg' file to control the playback, you need to configure the name of the
shared variable to 'playback' or 'playback@hostname'. You then need to configure the action
related to the button to trigger the PLAY and PAUSE commands.

Remote Control of HMP - SpinetiX Technical Documentation v2.3
© SpinetiX S.A. All rights reserved. Page 16 of 22
3.6. Timed pause/seek/resume
To change the time position of the media, you can change the playback variable at any time and
set it to "PLAY" with a time position. For instance, to seek at 6.5 seconds from the start of the
media, send the following command:
UPDATE "playback" "PLAY 6.5"
To pause the playback at a precise position, say at 7 seconds, you would send the following
command:
UPDATE "playback" "PAUSE 7"
This is equivalent to a position seek plus pause operation.
If you wish to resume playback, just send a PLAY command with the same position as the last
PAUSE.
It is also possible to use a relative position depending on the content duration to control the
pause and play time. In this case the position should be specified in %.
For instance, to seek at 10% from the start of the media, send the following command:
Remote Control of HMP - SpinetiX Technical Documentation v2.3
© SpinetiX S.A. All rights reserved. Page 17 of 22
Support Wiki keyword:
Synchronized
UPDATE "playback" "PLAY 10%"
3.7. Getting feedback on the playback progress
It is possible to activate optional reports that will periodically update some shared variables. To
do so, open the "Optional reports" property group and set the "Send updates" property to "on".
You can control the periodicity of the updates and the names of the shared variables that receive
these reports. By default, the following shared variables are set:
"playbackProgress": Relative progress as a percentage of the media duration;
"playbackStatus": Playback status;
"playbackTimePosition": Absolute time position;
"playbackMediaDuration": Reports the duration of the media.
Note that if the controlled media is set to loop, the progress percentage resets to zero when the
media loops, while the absolute time position does not.
3.8. Knowing the current position with extra accuracy
The HMP are precisely synchronized and this is useful to generate
multiscreen content for instance. This feature let you easily deduce
the time position of the controlled media. The time position is known
with better than one frame precision based on the difference between
the time you send the PLAY command and the current time. Note that you must make sure that
the devices are configured with an NTP time server so they synchronize with UTC.
In order to use the play / pause commands with time position you need to deduce the current
position. When sending a play command to resume playback, you can simply copy it from the
current value of the playback variable.
4. Remote triggers
Remote triggers let you display some text, image, video or animation on the HMP controlled
from a remote server. For instance, you can display a message on all the HMP of a building or a
“GOAL!” message on the screen of the stadium. The same procedure can be used to control which
image or video is displayed from a remote server.
4.1. Triggering a text overlay
The best way to trigger the temporary display of a text overlay is to use the news.svg template
from the "News" collection. In order to configure the new template for this purpose, follow the
steps below:
Select a name of a shared variable which you'll use to set the text message.
In the "RSS Feed Source" property, enter the name of the shared variable followed by
@localhost.
Select TXT for the "Feed Type" property.

Remote Control of HMP - SpinetiX Technical Documentation v2.3
© SpinetiX S.A. All rights reserved. Page 18 of 22
Set how long you want the message to display in the "Item Duration" property.
Set the "Looping" property to “off”.
Switch to edit mode and use a text area with [SPX][title] as the content, at the location
where you want the message to appear.
Insert the news template as a new layer in the main document.
The template will remain transparent until you set some text for the chosen variable. Whenever
you will update the content of this variable, your message will show for the configured duration.
Example
The image below shows HMD playing such news template using the variable
'message@localhost' to control the message. SpinetiX Messenger is used to trigger the message.
You can also use directly the Network API, like in the previous example, to trigger the update of
the text.
4.2. Triggering a video or image overlay
You can follow the same method as above to display an image, video or animation instead of text.
You can find below two examples of doing this with or without considering the content of the
shared variable.
Example #1
If the media is known in advance you can ignore the content of the variable and just use the
shared variable update event as a trigger.
To display videos and / or images based on a shared variable trigger, follow the steps below:

Remote Control of HMP - SpinetiX Technical Documentation v2.3
© SpinetiX S.A. All rights reserved. Page 19 of 22
Use the news template together with a shared variable as within the previous example.
Switch to the edit mode and create your layout using your videos and / or images.
o Note that you don't need to use [SPX][title] tag in your document since you are
not interested in the content of the shared variable.
o If you plan to play a video make sure that the duration of the slide is longer than
the duration of the video.
The videos or images will be displayed for the duration of the slide each time the trigger
is received.
The example below shows a video trigged whenever the variable 'message@localhost' is
modified. The item duration has been set to 'indefinite' so that the video is played fully at each
trigger.
Example #2
Alternatively you can use the content of the variable as a filename or URI for the image. In this
case follow the step below:
Use the news template together with a shared variable as for the previous examples.
Go to the Layers tab and insert a new media.
Remote Control of HMP - SpinetiX Technical Documentation v2.3
© SpinetiX S.A. All rights reserved. Page 20 of 22
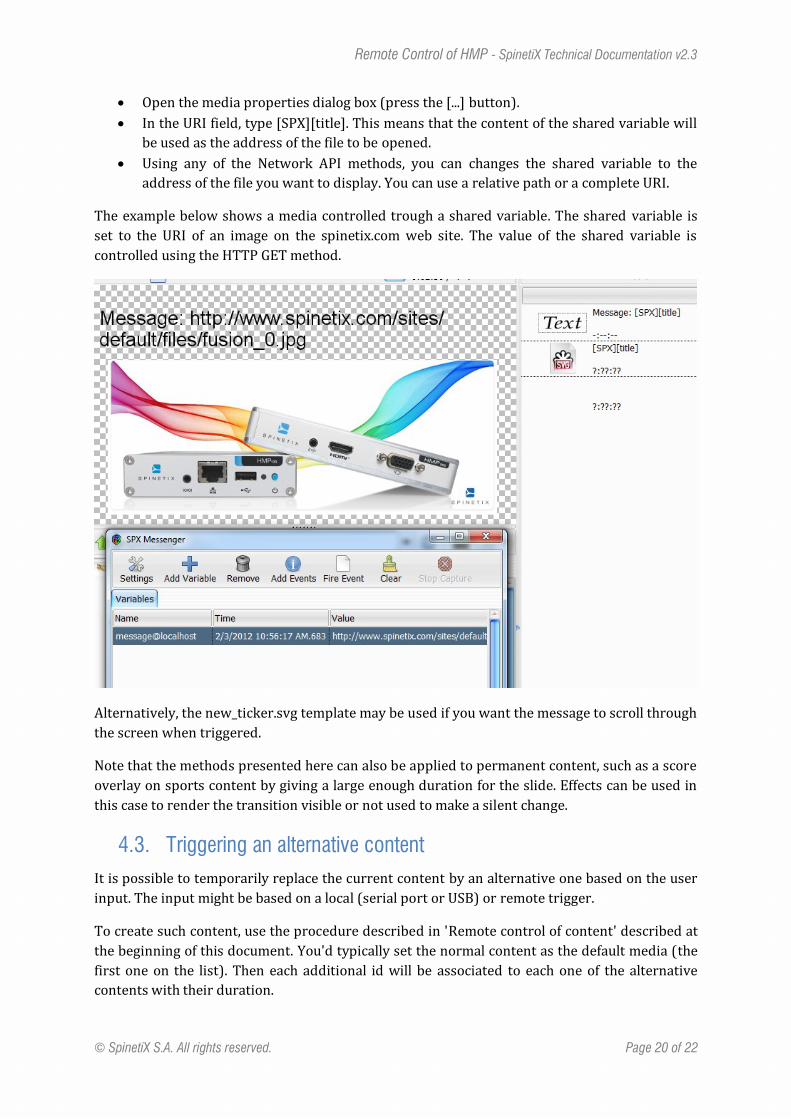
Open the media properties dialog box (press the [...] button).
In the URI field, type [SPX][title]. This means that the content of the shared variable will
be used as the address of the file to be opened.
Using any of the Network API methods, you can changes the shared variable to the
address of the file you want to display. You can use a relative path or a complete URI.
The example below shows a media controlled trough a shared variable. The shared variable is
set to the URI of an image on the spinetix.com web site. The value of the shared variable is
controlled using the HTTP GET method.
Alternatively, the new_ticker.svg template may be used if you want the message to scroll through
the screen when triggered.
Note that the methods presented here can also be applied to permanent content, such as a score
overlay on sports content by giving a large enough duration for the slide. Effects can be used in
this case to render the transition visible or not used to make a silent change.
4.3. Triggering an alternative content
It is possible to temporarily replace the current content by an alternative one based on the user
input. The input might be based on a local (serial port or USB) or remote trigger.
To create such content, use the procedure described in 'Remote control of content' described at
the beginning of this document. You'd typically set the normal content as the default media (the
first one on the list). Then each additional id will be associated to each one of the alternative
contents with their duration.
Remote Control of HMP - SpinetiX Technical Documentation v2.3
© SpinetiX S.A. All rights reserved. Page 21 of 22
Support Wiki keyword:
Synchronized
To trigger the display of an alternative content, set the control variable (default name is "menu")
to the corresponding id. Once the media has been played, the content will revert to the normal
media which will play again from the beginning.
It might be desirable for the main media not to start over each time it is reopened. In this case
two scenarios are possible.
The main media resume its playback, as if paused during the alternative content.
The main media continue playing, as if playing in the background during the alternative
content.
The first scenario can be controlled using the 'Resume where left' parameters of the
menu_media.svg template. Settings this parameter to 'on' will prevent the main media from
restarting each time it is opened.
For the second scenario, the main media must be placed in a
schedule file. It is also possible to use the begin attribute on the
<svg> element of the main media. This is the same procedure as the
one needed to create synchronized content explained in the
synchronized content user guide.
4.4. Triggering an SVG animation
For more advanced effects, you can design your custom SVG document to include animations
that will be triggered remotely over the network.
To do this, you design the animations as if they are triggered by time, but use "indefinite" as the
begin attribute. In a <script> element you instantiate a shared variable for remote control and
add an update listener on that variable. Finally, from its callback function, use the
beginElement() or beginElementAt() methods of the smil::ElementTimeControl interface to
trigger the animation.
Example #1
In the sample below, a rectangle is set to move through the screen from left to right when then
the "kick" shared variable is set to "go".

Remote Control of HMP - SpinetiX Technical Documentation v2.3
© SpinetiX S.A. All rights reserved. Page 22 of 22
<?xml version="1.0" encoding="UTF-8"?>
<svg xmlns="http://www.w3.org/2000/svg" viewBox="0 0 1280 720"
dur="indefinite" viewport-fill="white">
<script><![CDATA[
var anim=document.getElementById( "anim" );
var v=createSharedVariable( "kick" );
v.addUpdateListener( function () { anim.beginElement(); } );
]]></script>
<rect x="0" y="260" width="200" height="200" fill="blue">
<animateTransform xml:id="anim" attributeName="transform"
begin="indefinite" type="translate" to="1080,0" dur="3s"
fill="freeze"/>
</rect>
</svg>
Example #2
You can also use the content of the shared variable to modify the document on the fly.
For instance in the example below a rectangle will flash for once second each time the variable is
updated and its color is set to the content of the variable.
<?xml version="1.0" encoding="UTF-8"?>
<svg xmlns="http://www.w3.org/2000/svg" viewBox="0 0 1280 720"
dur="indefinite" viewport-fill="white">
<script><![CDATA[
var anim=document.getElementById( "anim" );
var rect=document.getElementById( "rect" );
var v=createSharedVariable( "kick" );
v.addUpdateListener( function ( sv ) {
rect.setAttribute( "fill", sv.value );
anim.beginElement();
} );
]]></script>
<rect xml:id="rect" display="none" x="540" y="260" width="200"
height="200" fill="blue">
<animate xml:id="anim" attributeName="display"
begin="indefinite" to="inherit" dur="1s"/>
</rect>
</svg>