Release 0 - Read the Docs · Things are similar in linux except the vast majority of software exist...
37
raspberry-pi Documentation Release 0.0 Greg Loyse Nov 16, 2017
Transcript of Release 0 - Read the Docs · Things are similar in linux except the vast majority of software exist...
raspberry-pi DocumentationRelease 0.0
Greg Loyse
Nov 16, 2017

Contents
1 Overview 31.1 Layers of Abstraction . . . . . . . . . . . . . . . . . . . . . . . . . . . . . . . . . . . . . . . . . . 31.2 General Purpose Computing . . . . . . . . . . . . . . . . . . . . . . . . . . . . . . . . . . . . . . . 31.3 Tinkering . . . . . . . . . . . . . . . . . . . . . . . . . . . . . . . . . . . . . . . . . . . . . . . . . 31.4 Open Source . . . . . . . . . . . . . . . . . . . . . . . . . . . . . . . . . . . . . . . . . . . . . . . 4
2 Getting Started 52.1 Hardware Components . . . . . . . . . . . . . . . . . . . . . . . . . . . . . . . . . . . . . . . . . . 62.2 Exercise . . . . . . . . . . . . . . . . . . . . . . . . . . . . . . . . . . . . . . . . . . . . . . . . . 72.3 Start up . . . . . . . . . . . . . . . . . . . . . . . . . . . . . . . . . . . . . . . . . . . . . . . . . . 72.4 System configuration raspi-config . . . . . . . . . . . . . . . . . . . . . . . . . . . . . . . . . . . . 72.5 Exercise . . . . . . . . . . . . . . . . . . . . . . . . . . . . . . . . . . . . . . . . . . . . . . . . . 82.6 Starting the Desktop . . . . . . . . . . . . . . . . . . . . . . . . . . . . . . . . . . . . . . . . . . . 82.7 Exercise . . . . . . . . . . . . . . . . . . . . . . . . . . . . . . . . . . . . . . . . . . . . . . . . . 92.8 Recap . . . . . . . . . . . . . . . . . . . . . . . . . . . . . . . . . . . . . . . . . . . . . . . . . . . 9
3 Navigation 113.1 echo Hi - Print to screen . . . . . . . . . . . . . . . . . . . . . . . . . . . . . . . . . . . . . . . . . 113.2 Location . . . . . . . . . . . . . . . . . . . . . . . . . . . . . . . . . . . . . . . . . . . . . . . . . 113.3 Users . . . . . . . . . . . . . . . . . . . . . . . . . . . . . . . . . . . . . . . . . . . . . . . . . . . 123.4 Navigation . . . . . . . . . . . . . . . . . . . . . . . . . . . . . . . . . . . . . . . . . . . . . . . . 123.5 Building a file system . . . . . . . . . . . . . . . . . . . . . . . . . . . . . . . . . . . . . . . . . . 123.6 man the docs & less . . . . . . . . . . . . . . . . . . . . . . . . . . . . . . . . . . . . . . . . . . . 133.7 Exercise . . . . . . . . . . . . . . . . . . . . . . . . . . . . . . . . . . . . . . . . . . . . . . . . . 133.8 Exercise . . . . . . . . . . . . . . . . . . . . . . . . . . . . . . . . . . . . . . . . . . . . . . . . . 133.9 Installing tree . . . . . . . . . . . . . . . . . . . . . . . . . . . . . . . . . . . . . . . . . . . . . . . 133.10 executing a file . . . . . . . . . . . . . . . . . . . . . . . . . . . . . . . . . . . . . . . . . . . . . . 143.11 Exercise: . . . . . . . . . . . . . . . . . . . . . . . . . . . . . . . . . . . . . . . . . . . . . . . . . 143.12 Recap . . . . . . . . . . . . . . . . . . . . . . . . . . . . . . . . . . . . . . . . . . . . . . . . . . . 14
4 Operating Systems 174.1 Exercise . . . . . . . . . . . . . . . . . . . . . . . . . . . . . . . . . . . . . . . . . . . . . . . . . 174.2 System specs . . . . . . . . . . . . . . . . . . . . . . . . . . . . . . . . . . . . . . . . . . . . . . . 174.3 Exercise . . . . . . . . . . . . . . . . . . . . . . . . . . . . . . . . . . . . . . . . . . . . . . . . . 184.4 Modules & Devices . . . . . . . . . . . . . . . . . . . . . . . . . . . . . . . . . . . . . . . . . . . 184.5 Exercise . . . . . . . . . . . . . . . . . . . . . . . . . . . . . . . . . . . . . . . . . . . . . . . . . 194.6 Processes . . . . . . . . . . . . . . . . . . . . . . . . . . . . . . . . . . . . . . . . . . . . . . . . . 19
i

4.7 Exercise . . . . . . . . . . . . . . . . . . . . . . . . . . . . . . . . . . . . . . . . . . . . . . . . . 204.8 Networking . . . . . . . . . . . . . . . . . . . . . . . . . . . . . . . . . . . . . . . . . . . . . . . . 204.9 Exercise . . . . . . . . . . . . . . . . . . . . . . . . . . . . . . . . . . . . . . . . . . . . . . . . . 20
5 Files 215.1 The nano editor . . . . . . . . . . . . . . . . . . . . . . . . . . . . . . . . . . . . . . . . . . . . . . 215.2 Exercise . . . . . . . . . . . . . . . . . . . . . . . . . . . . . . . . . . . . . . . . . . . . . . . . . 215.3 Deleting files & directories . . . . . . . . . . . . . . . . . . . . . . . . . . . . . . . . . . . . . . . . 215.4 Text as ASCII . . . . . . . . . . . . . . . . . . . . . . . . . . . . . . . . . . . . . . . . . . . . . . 225.5 Exercise . . . . . . . . . . . . . . . . . . . . . . . . . . . . . . . . . . . . . . . . . . . . . . . . . 225.6 Compiling C programs . . . . . . . . . . . . . . . . . . . . . . . . . . . . . . . . . . . . . . . . . . 225.7 Exercise . . . . . . . . . . . . . . . . . . . . . . . . . . . . . . . . . . . . . . . . . . . . . . . . . 225.8 Recap . . . . . . . . . . . . . . . . . . . . . . . . . . . . . . . . . . . . . . . . . . . . . . . . . . . 23
6 Scratch 256.1 Exercise . . . . . . . . . . . . . . . . . . . . . . . . . . . . . . . . . . . . . . . . . . . . . . . . . 25
7 Python 27
8 Electronics 298.1 GPIOs . . . . . . . . . . . . . . . . . . . . . . . . . . . . . . . . . . . . . . . . . . . . . . . . . . 298.2 Our project . . . . . . . . . . . . . . . . . . . . . . . . . . . . . . . . . . . . . . . . . . . . . . . . 308.3 A Breadboard . . . . . . . . . . . . . . . . . . . . . . . . . . . . . . . . . . . . . . . . . . . . . . . 308.4 Light up LED . . . . . . . . . . . . . . . . . . . . . . . . . . . . . . . . . . . . . . . . . . . . . . . 318.5 Blinking LED . . . . . . . . . . . . . . . . . . . . . . . . . . . . . . . . . . . . . . . . . . . . . . 318.6 Exercise . . . . . . . . . . . . . . . . . . . . . . . . . . . . . . . . . . . . . . . . . . . . . . . . . 328.7 Exercise . . . . . . . . . . . . . . . . . . . . . . . . . . . . . . . . . . . . . . . . . . . . . . . . . 328.8 Resources . . . . . . . . . . . . . . . . . . . . . . . . . . . . . . . . . . . . . . . . . . . . . . . . . 32
9 Resources 33
ii
raspberry-pi Documentation, Release 0.0
Contents:
Contents 1

raspberry-pi Documentation, Release 0.0
2 Contents

CHAPTER 1
Overview
Welcome to our session. What follows are our essential teaching goals. The high level take away.
1.1 Layers of Abstraction
In a sense all a computer can do is store 0s and 1s, move them around, and add.
Yet the computers of today (software and hardware) are incredibly complex.
This complexity is managed by using layers of abstraction.
We will see how you can use computers creatively by designing and implementing layers of abstraction; combiningsimple components to build ever more complex and useful building blocks.
1.2 General Purpose Computing
The components of a Raspberry Pi are similar to those you will find in any modern device (phone, tablet, laptop,desktop...).
We focus on the concepts that can be translated to all other devices and operating systems. Android, iOs, Windows,Mac OSX, and the various Linuxes.
1.3 Tinkering
What sets the Raspberry Pi apart is that it exposes as much as possible and deliberately tries to get you to play.
It is the antithesis of the design princple don’t make me think.
The intention is to encourage tinkering in a safe environemnt that exposes far more of the innner workings than themore protected mainstream experiences that other devices provide.
3
raspberry-pi Documentation, Release 0.0
You can’t break anything that can’t be fixed! If you do break something, congratulations you have done somethingcretive and it is a leaning opportunity awaits.
1.4 Open Source
Open source broadly means that a the author(s) grant permission for anyone to freely read, modify, and build theirsoftware or hardware designs.
Linux and GNU really speerheaded the movement. It is now quite common place. Android, a linux variant, is opensource. However the majority of our devices aren’t.
This is one of the reasons why the Raspberry Pi is so accessible. There are no locked doors. How far you explore islimited only by your interest.
4 Chapter 1. Overview

5
raspberry-pi Documentation, Release 0.0
CHAPTER 2
Getting Started
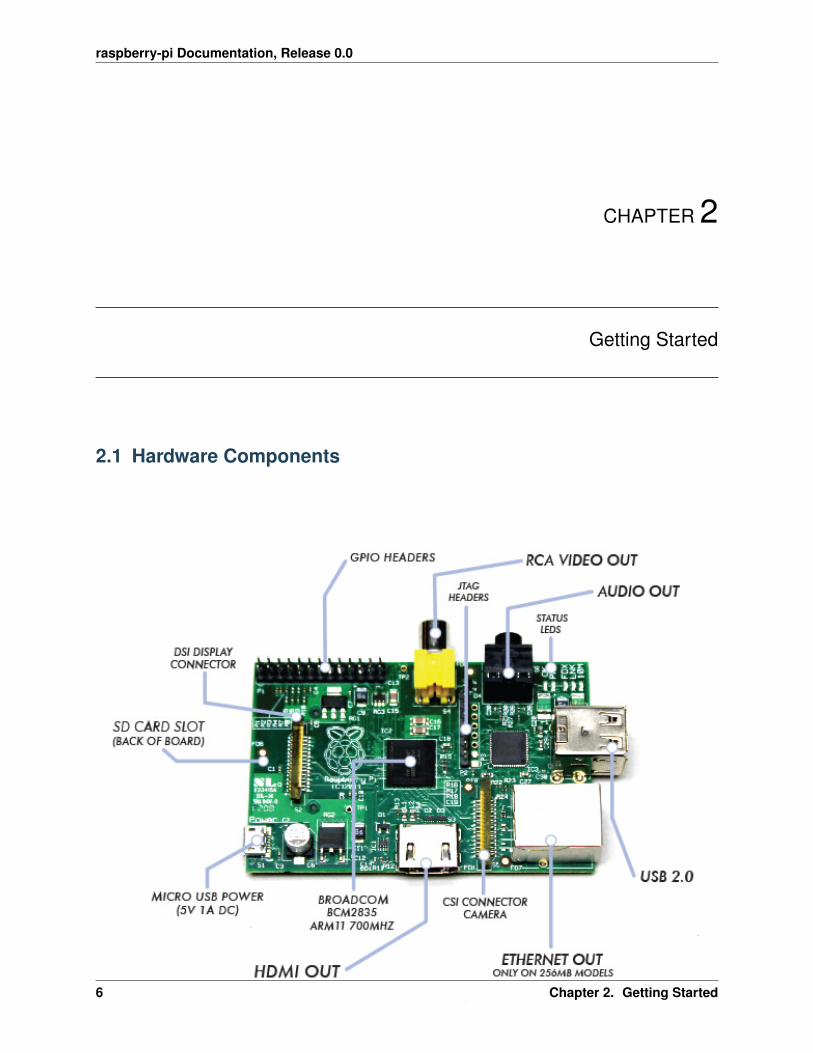
2.1 Hardware Components
6 Chapter 2. Getting Started

raspberry-pi Documentation, Release 0.0
2.2 Exercise
Which components do you expect to find in the following computers:
• desktop
• laptop
• mobile
• tablet
What makes the Raspberry Pi special?
2.3 Start up
There is no power on/off button. You simply add or remove power.
After the computer is finished loading the operating system you land in the shell.
Shell welcome message:
Linux raspberrypi 3.12.22+ #691 PREEMPT Wed Jun 18 18:29:58 BST 2014 armv6l
The programs included with the Debian GNU/Linux system are free software;the exact distribution terms for each program are described in theindividual files in /usr/share/doc/*/copyright.
Debian GNU/Linux comes with ABSOLUTELY NO WARRANTY, to the extentpermitted by applicable law.Last login: Tue Oct 14 18:43:45 2014 from 192.168.0.6pi@raspberrypi ~ $
The pi@raspberrypi ~ $ is called a prompt. You type commands after the ‘$’.
2.4 System configuration raspi-config
Type:
pi@raspberrypi ~ $ startx
and you will get:
------ Raspberry Pi Software Configuration Tool (raspi-config) ------| Setup Options || || 1 Expand Filesystem Ensures that all of the SD card || 2 Change User Password Change password for the default || 3 Enable Boot to Desktop/ScratchChoose whether to boot into a de || 4 Internationalisation Options Set up language and regional set || 5 Enable Camera Enable this Pi to work with the || 6 Add to Rastrack Add this Pi to the online Raspbe || 7 Overclock Configure overclocking for your || 8 Advanced Options Configure advanced settings || 9 About raspi-config Information about this configura || |
2.2. Exercise 7
raspberry-pi Documentation, Release 0.0
| || <Select> <Finish> || |---------------------------------------------------
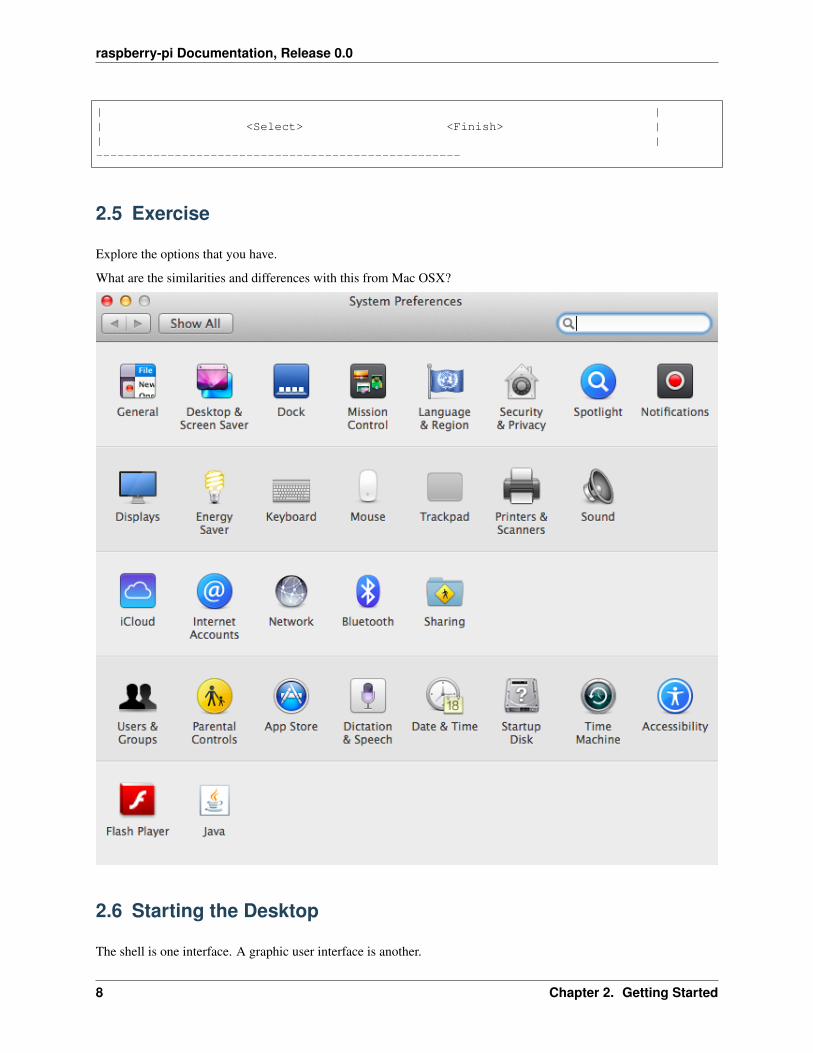
2.5 Exercise
Explore the options that you have.
What are the similarities and differences with this from Mac OSX?
2.6 Starting the Desktop
The shell is one interface. A graphic user interface is another.
8 Chapter 2. Getting Started
raspberry-pi Documentation, Release 0.0
Type this to start the GUI:
pi@raspberrypi ~ $ startx
2.7 Exercise
We are going to focus on using the shell (command line).
Find:
• the Terminal
• a browser
• anything else you would typically use.
2.8 Recap
• The Raspberry Pi is a general purpose computer.
• However it exposes a lot that is typically hidden.
• Use raspi-config for a convenient way to configure your computer.
• Use startx to start the GUI
We will return to hardware later in the electronics section.
2.7. Exercise 9
raspberry-pi Documentation, Release 0.0
10 Chapter 2. Getting Started
CHAPTER 3
Navigation
The GUI is a visual metaphor for interacting with a computer. Images represent things such as files, programs, andfolders. Windows act as containers where programs live.
The command line or shell is another way of doing the same. Instead of using a mouse and clicking, we type com-mands. In many use cases it is far more powerfull than a GUI.
We are going to introduce the basics of this programming language. Keep in mind the equivalent GUI way of doingthings.
3.1 echo Hi - Print to screen
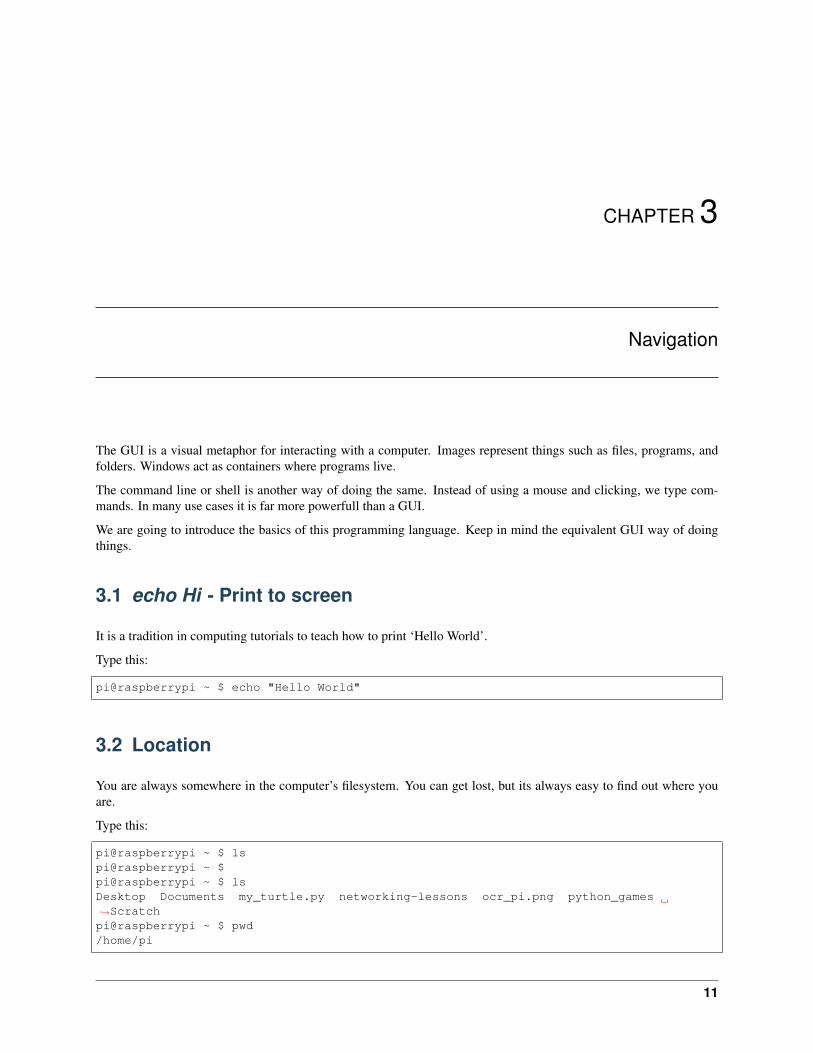
It is a tradition in computing tutorials to teach how to print ‘Hello World’.
Type this:
pi@raspberrypi ~ $ echo "Hello World"
3.2 Location
You are always somewhere in the computer’s filesystem. You can get lost, but its always easy to find out where youare.
Type this:
pi@raspberrypi ~ $ lspi@raspberrypi ~ $pi@raspberrypi ~ $ lsDesktop Documents my_turtle.py networking-lessons ocr_pi.png python_games→˓Scratchpi@raspberrypi ~ $ pwd/home/pi
11

raspberry-pi Documentation, Release 0.0
Note the prompt helps you remember where you are. Here ~ represents the current users’ home directory.
3.3 Users
You are a user. Every user needs a name. The default users is pi.
If you ever forget who you are, ask:
pi@raspberrypi ~ $ whoami
3.4 Navigation
Just like we are used to navigating using our mouse and clicking on folders, we can do the same in the shell.
Type the following. At each step explain what it is doing:
pi@raspberrypi ~ $ cd python_games/home/pipi@raspberrypi ~/python_games $ pwd/home/pi/python_gamespi@raspberrypi ~/python_games $ ls[... lots of files, many ending in .py ...]
Note navigation gets easier if you keep a mental image in your head of where you are. Visually, a file system is justlike a tree. There is a root and the branches are folders, the files are leafs. We will install a program to help.
Note also that the prompt tells you where you are relative to the home directory. Your home directory is your users’home. An absolute location is the location of a file or folder in terms of the root of the computer’s file system.
Note: We will drop the pi@raspberrypi part of the prompt from now on.
3.5 Building a file system
Lets build a file structure to manage a music collection:
~ $ mkdir music~ $ cd music~/music $ ls~ $ ls~/music $ mkdir rock classical jazz~/music $ lsclassical jazz rock~/music $ cd rock~/music/rock $ ls~/music/rock $ touch albums.txt~/music/rock $ lsrock.txt~/music/rock $ cat rock.txt~/music/rock $ echo "Beatles - The White Album - 1968" > rock.txt~/music/rock $ cat rock.txtBeatles - The White Album - 1968~/music/rock $ cd ..
12 Chapter 3. Navigation
raspberry-pi Documentation, Release 0.0
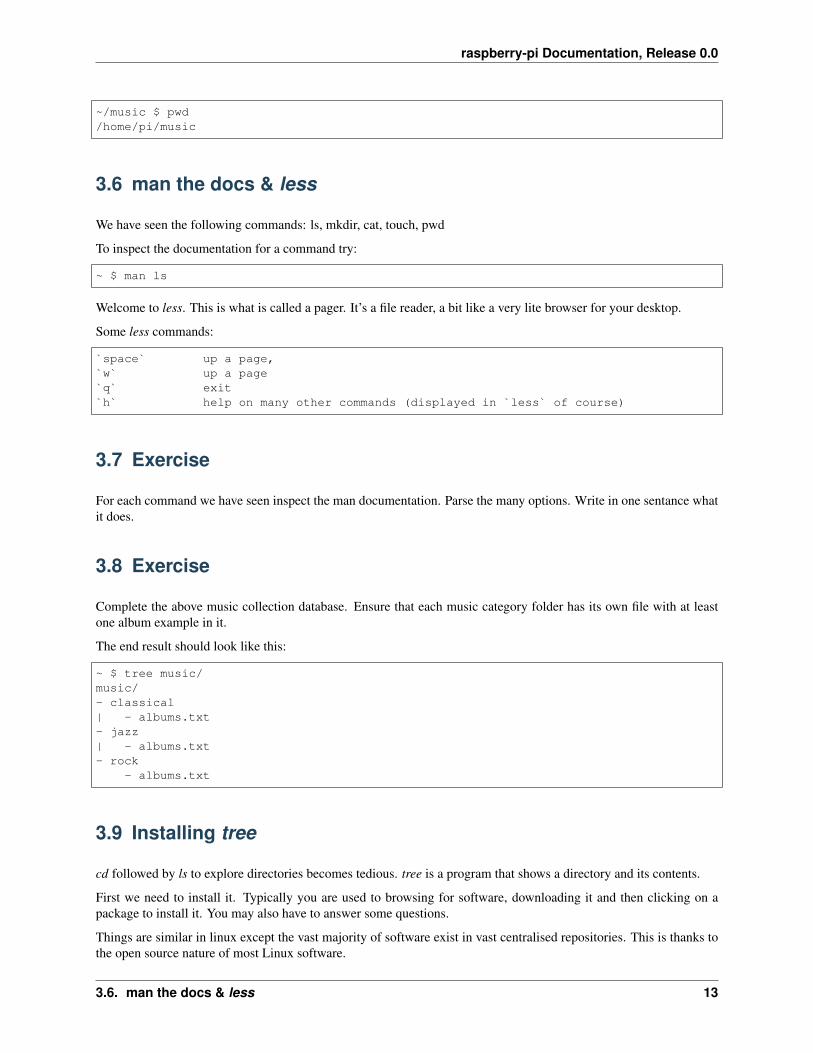
~/music $ pwd/home/pi/music
3.6 man the docs & less
We have seen the following commands: ls, mkdir, cat, touch, pwd
To inspect the documentation for a command try:
~ $ man ls
Welcome to less. This is what is called a pager. It’s a file reader, a bit like a very lite browser for your desktop.
Some less commands:
`space` up a page,`w` up a page`q` exit`h` help on many other commands (displayed in `less` of course)
3.7 Exercise
For each command we have seen inspect the man documentation. Parse the many options. Write in one sentance whatit does.
3.8 Exercise
Complete the above music collection database. Ensure that each music category folder has its own file with at leastone album example in it.
The end result should look like this:
~ $ tree music/music/- classical| - albums.txt- jazz| - albums.txt- rock
- albums.txt
3.9 Installing tree
cd followed by ls to explore directories becomes tedious. tree is a program that shows a directory and its contents.
First we need to install it. Typically you are used to browsing for software, downloading it and then clicking on apackage to install it. You may also have to answer some questions.
Things are similar in linux except the vast majority of software exist in vast centralised repositories. This is thanks tothe open source nature of most Linux software.
3.6. man the docs & less 13

raspberry-pi Documentation, Release 0.0
http://www.raspbian.org/RaspbianRepository
In Linux we use apt-get to install new software:
sudo apt-get install tree
Not any user can install software. The sudo part is to have permissions to install new software. You may need to enteryour password.
Now we can take a look at our creation:
tree music
3.10 executing a file
So far we have been programming interactively, executing one command at a time. It would be useful to groupcommands so that they can be executed together. It would also be useful so as not to forget the useful sequence ofcommands.
We do this by writing commands in a file and executing that file.
Create a file named make-jazz.sh and insert this:
mkdir jazzcd jazztouch albums.txtecho "Miles Davis - Kind of Blue - 1959" > albums.txt
To execute make-jazz.sh you will have to specify that it is executable:
chomod +x make-jazz.sh
Now we should be able to run the program:
./make-jazz.sh
The ./ prefix indicates where to find the program to the shell. Effectively it means run the make-jazz.sh commandwhich is here (.).
3.11 Exercise:
Using a file, program the creation of your music collection.
Tip: You will have to put a lot of what we did above into the file.
3.12 Recap
Using the command line, we have seen:
• How to locate ourselves and navigate the file system using ls, pwd, cd, tree
• Create and remove folders and files using mkdir, deldir, touch, rm
• Print stuff to the line using echo, cat
14 Chapter 3. Navigation
raspberry-pi Documentation, Release 0.0
• Read files and documentation using man, less
3.12. Recap 15
raspberry-pi Documentation, Release 0.0
16 Chapter 3. Navigation
CHAPTER 4
Operating Systems
Lets explore some of the concepts that an operating system provides.
We will focus on OSs abstractions over:
• Hardware - Both computer and devices
• Processes - An environment for processes to live and die in
4.1 Exercise
In which level have all of the programs we have run so far existed?
4.2 System specs
Explore these commands:
uname -a # kernel version & sys architecturehead -n /etc/issue # distro name & versioncat /proc/partitions # all partitionsgrep MemTotal /proc/meminfo # total RAMgrep "model name" /proc/cpuinfohdparm -i /dev/sdahwinfolshw
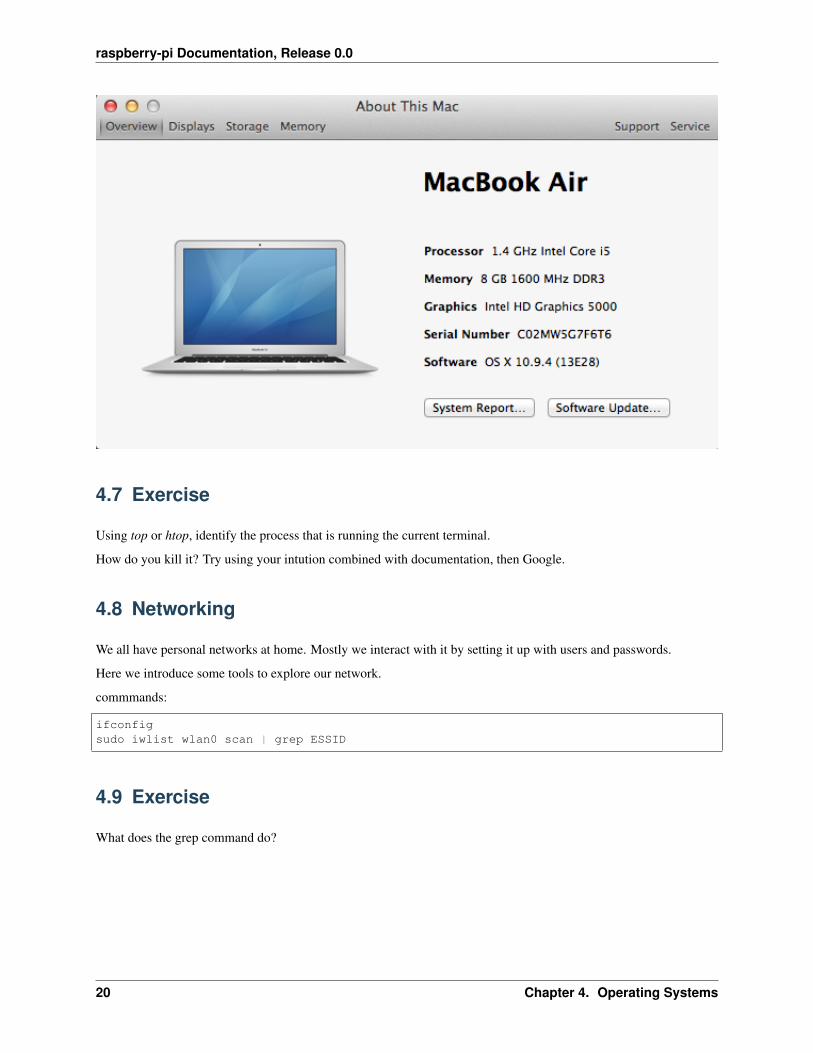
All operating systems provide similar information in some way.
For example on Mac OSX.
17

raspberry-pi Documentation, Release 0.0
4.3 Exercise
How do you find the same information using the GUI?
4.4 Modules & Devices
List the current modules:
lsmopi@raspberrypi ~ $ lsmodModule Size Used byjoydev 9096 0evdev 10497 3snd_bcm2835 18169 0snd_soc_bcm2708_i2s 5486 0regmap_mmio 2818 1 snd_soc_bcm2708_i2ssnd_soc_core 128166 1 snd_soc_bcm2708_i2sregmap_spi 1913 1 snd_soc_coresnd_pcm_dmaengine 5481 1 snd_soc_coresnd_pcm 81518 3 snd_bcm2835,snd_soc_core,snd_pcm_dmaenginesnd_page_alloc 5168 1 snd_pcmregmap_i2c 1657 1 snd_soc_coresnd_compress 8136 1 snd_soc_core8192cu 551136 0leds_gpio 2055 0d
Note the last one leds_gpio.
List the current usb devices:
18 Chapter 4. Operating Systems

raspberry-pi Documentation, Release 0.0
pi@raspberrypi ~ $ lsusbpi@raspberrypi ~ $ lsusbBus 001 Device 002: ID 0424:9514 Standard Microsystems Corp.Bus 001 Device 001: ID 1d6b:0002 Linux Foundation 2.0 root hubBus 001 Device 003: ID 0424:ec00 Standard Microsystems Corp.Bus 001 Device 004: ID 7392:7811 Edimax Technology Co., Ltd EW-7811Un 802.11n→˓Wireless Adapter [Realtek RTL8188CUS]Bus 001 Device 006: ID 1c4f:0016 SiGma MicroBus 001 Device 005: ID 15d9:0a4c Trust International B.V. USB+PS/2 Optical Mouse
Some names are useful. For example you can clearly identify the wireless adapter and mouse. But which one is mykeyboard?
4.5 Exercise
Determine the device that is used as a keyboard.
How can you do this in a way that is guaranteed to work even if naming is ambiguous?
Even if you disconnect all of these and run lsusb (you’d have to be logged in remotely to do this of course) there willstill be some usb devices listed. Why? Where are these devices?
The list of modules returned by lsmod is long and confusing. Google some of them and try to identify their purpose.Make sure to know what 8192cu does.
Knowing what you know now, how would you problem solve a usb wireless device not working?
4.6 Processes
Commands:
tophtop # requires installing
Process managment on Mac OSX:
4.5. Exercise 19
raspberry-pi Documentation, Release 0.0
4.7 Exercise
Using top or htop, identify the process that is running the current terminal.
How do you kill it? Try using your intution combined with documentation, then Google.
4.8 Networking
We all have personal networks at home. Mostly we interact with it by setting it up with users and passwords.
Here we introduce some tools to explore our network.
commmands:
ifconfigsudo iwlist wlan0 scan | grep ESSID
4.9 Exercise
What does the grep command do?
20 Chapter 4. Operating Systems
CHAPTER 5
Files
Computers fundamentally only process 0s and 1s. In order for them to be useful we need to find ways to representthings that are relevant to us.
Files are the basic unit of storage. When we save to file, the information persists even after the power is switched off.
There are many types of files and many different ways to represent types of things that are relevant to us. Examplesare images, videos, sound files...
We are going to look at one of the ways to represent text.
5.1 The nano editor
There are many editors available. Perhaps the most common is Microsoft Word. Nano is much more basic.
We use simple editors as we are working at a lower level of abstraction than those typically provided by documenteditors such as Windows or Open Office.
launch nano:
namo
The list of nano commands are at the bottom. ^ signifies the Ctrl key. Exit is denoted as ^X this translates to Ctrl + X.
5.2 Exercise
Create a file named file, enter some text and save it.
5.3 Deleting files & directories
Here are some commands to delete:
21
raspberry-pi Documentation, Release 0.0
rm my_filermdir my_dir
5.4 Text as ASCII
Computers need some way of representing roman characters. An industry standard which has been in use for quitesome time is ASCII.
You can get some documenation on ASCII by typiing:
man ascii
Lets create a file and use hexdump to inspect it:
echo "hi" > filehexdump -C file00000000 68 69 0a |hi.|00000003
5.5 Exercise
What do the numbers 68 69 0a represent? Map them to characters using man ascii as reference
5.6 Compiling C programs
C is a programming language. Most Linux software is written in it.
We will touch very briefly on how to compile a C file. The goal is just to give a flavour of whats going on. We don’twant any hidden magic.
Run through with outputs as comments:
cd /opt/vc/src/hello_worldls # Makefile world.cnano world.cmakels # hello_world.bin Makefile world.c./hello_world.bin # Hello world!
5.7 Exercise
Using less read the README file in /opt/vc/src/.
Find other programs that you’d like to compile and run.
hello_teapot and hello_video are recommended.
run hexdump on some to ensure they are just ASCII files.
Do poke around!
22 Chapter 5. Files

raspberry-pi Documentation, Release 0.0
5.8 Recap
We know how to:
• edit files with nano
• rename or delete files and directories with mv, rm, rmdir
• inspect a file almost at its lowest level
• we have a notion of how to represent characters in binary
• we can compile C programs
5.8. Recap 23

raspberry-pi Documentation, Release 0.0
24 Chapter 5. Files

CHAPTER 6
Scratch
A pedagogical tool for introducing programming.
It is fully graphical. You click and drag instructions into the editor and tweak certain paramters.
Its lots of fun and excellent for kids.
6.1 Exercise
Using either:
• scratch in the browser http://scratch.mit.edu/
• scratch on the desktop
Create an animation of the cat going round in a square.
Then Draw a square.
Use the control panel to refactor your solution and reduce the repeated instructions.
25

raspberry-pi Documentation, Release 0.0
26 Chapter 6. Scratch
CHAPTER 7
Python
A full featured professional programming language.
Python is a great first language. It has replaced Java as the number one teaching language at universities. It is used inindustry a lot.
It is also popular in industry. Google, Instagram, Facebook... and many others use it. It is almost a defacto standardthe sciences and very popular in finance.
Click here for an intro to some of its imperative features
27
raspberry-pi Documentation, Release 0.0
28 Chapter 7. Python
CHAPTER 8
Electronics
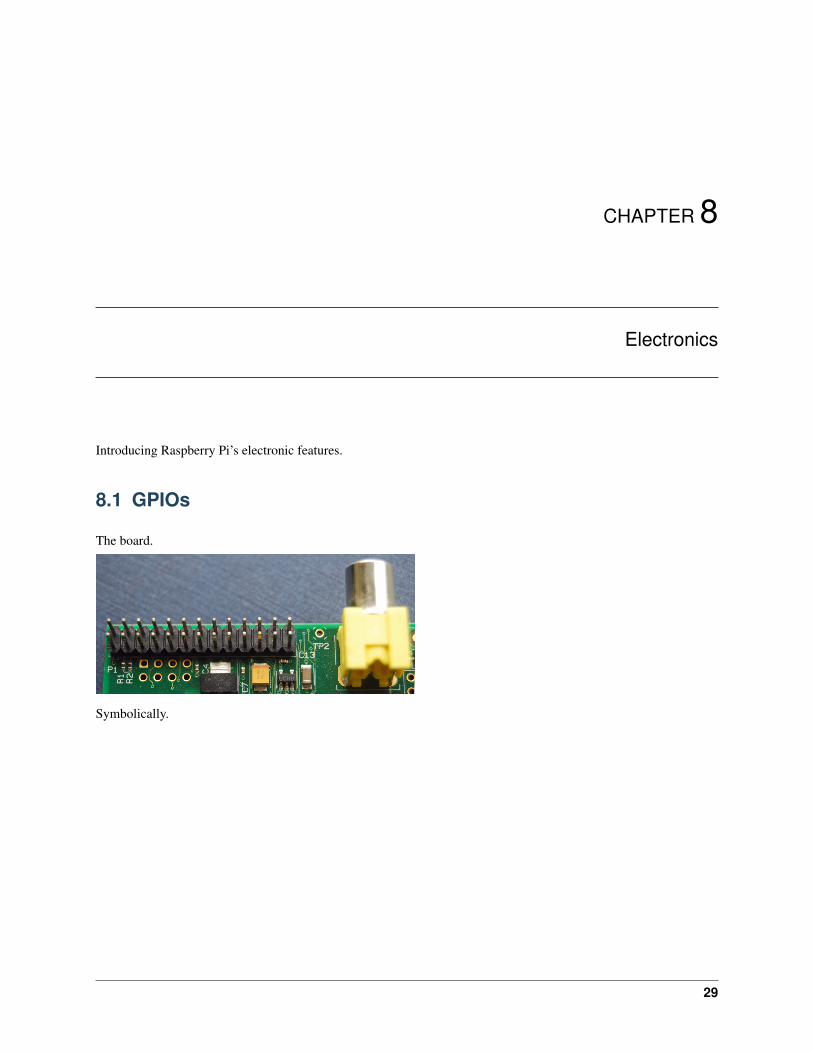
Introducing Raspberry Pi’s electronic features.
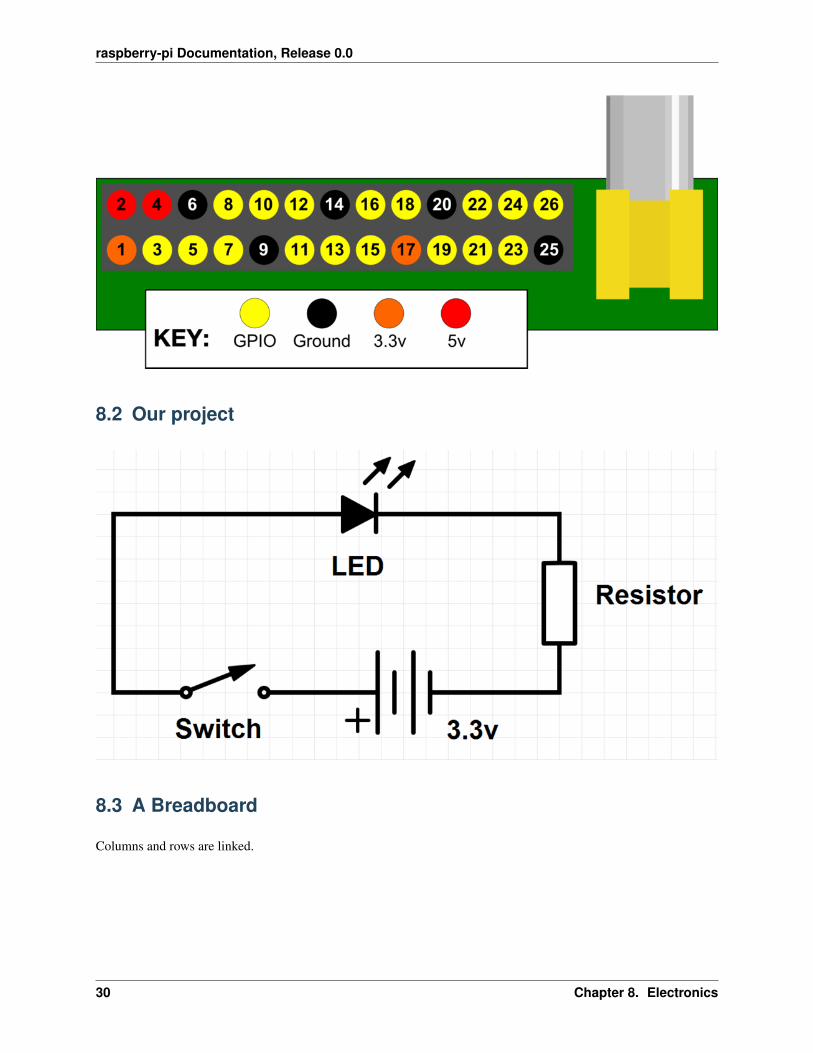
8.1 GPIOs
The board.
Symbolically.
29
raspberry-pi Documentation, Release 0.0
8.2 Our project
8.3 A Breadboard
Columns and rows are linked.
30 Chapter 8. Electronics

raspberry-pi Documentation, Release 0.0
8.4 Light up LED
Hook up the following:
• wire: 1 Rpi (3.3v) <-> row 26
• LED: row 26 + (longer leg) <-> row 25 - (shorter leg)
• resistor: row 25 <-> - col
• wire: - col <-> 6 Rpi (ground)
8.5 Blinking LED
Python to control BPIO
switch 1 Rpi (3.3v) to 7
Type:
pi@raspberrypi ~ $ sudo ipythonIn [1]: import RPi.GPIO as GPIOIn [2]: GPIO.setmode(gpio.BOARD)In [3]: GPIO.setup(7, gpio.OUT)In [4]: GPIO.output(7, True)In [5]: GPIO.output(7, False)
8.4. Light up LED 31

raspberry-pi Documentation, Release 0.0
Note we have to be superuser to operate the GPIOs.
Type:
pi@raspberrypi ~ $ sudo ipythonIn [1]: import RPi.GPIO as GPIOIn [2]: from time import sleepIn [3]: GPIO.setmode(GPIO.BOARD)In [4]: GPIO.setup(7, GPIO.OUT)In [5]: for _ in range(5):
....: GPIO.output(7, True)
....: sleep(1)
....: GPIO.output(7, False)
....: sleep(1)
....:
8.6 Exercise
Put the above into a script and run it.
8.7 Exercise
‘Blinking Big Ben’
Make a program to communicate the time via LED.
Decide which unit of time to measure. Maybe every 2 minutes.
8.8 Resources
• Source for some of the material
• Quick Reaction Game
32 Chapter 8. Electronics

CHAPTER 9
Resources
Here are a list of resources:
33

![SuccessStory - Booklet - Anglais v2 STU[2] · An improved customer experience throughout the in-store path Centralised content management Substantial cost-savings thanks to the elimination](https://static.fdocuments.us/doc/165x107/5ecd5df8a9671c5f1d4b8bed/successstory-booklet-anglais-v2-stu2-an-improved-customer-experience-throughout.jpg)