Register Online! S’inscrire en ligne ! (voir page 14 ... · Vitrine intelligente Model/Modèle...
28
P/N 07.04.880.00 © 2018 Hatco Corporation Intelligent Heated Display Cabinet Vitrine intelligente Model/Modèle IHDCH-45 Installation and Operating Manual Manuel d’installation et d’utilisation Do not operate this equipment unless you have read and understood the contents of this manual! Failure to follow the instructions contained in this manual may result in serious injury or death. This manual contains important safety information concerning the maintenance, use, and operation of this product. If you’re unable to understand the contents of this manual, please bring it to the attention of your supervisor. Keep this manual in a safe location for future reference. English = p 2 WARNING No opere este equipo al menos que haya leído y comprendido el contenido de este manual! Cualquier falla en el seguimiento de las instrucciones contenidas en este manual puede resultar en un serio lesión o muerte. Este manual contiene importante información sobre seguridad concerniente al mantenimiento, uso y operación de este producto. Si usted no puede entender el contenido de este manual por favor pregunte a su supervisor. Almacenar este manual en una localización segura para la referencia futura. ADVERTENCIA Ne pas utiliser cet équipement sans avoir lu et compris le contenu de ce manuel ! Le non-respect des instructions contenues dans ce manuel peut entraîner de graves blessures ou la mort. Ce manuel contient des informations importantes concernant l’entretien, l’utilisation et le fonctionnement de ce produit. Si vous ne comprenez pas le contenu de ce manuel, veuillez le signaler à votre supérieur. Conservez ce manuel dans un endroit sûr pour pouvoir vous y référer plus tard. Français = p 14 AVERTISSEMENT hatcocorp.com Register Online! (see page 2) S’inscrire en ligne ! (voir page 14)
Transcript of Register Online! S’inscrire en ligne ! (voir page 14 ... · Vitrine intelligente Model/Modèle...

P/N 07.04.880.00 © 2018 Hatco Corporation
Intelligent Heated Display CabinetVitrine intelligente
Model/Modèle IHDCH-45
Installation and Operating ManualManuel d’installation et d’utilisation
Do not operate this equipment unless you have read and understood the contents of this manual! Failure to follow the instructions contained in this manual may result in serious injury or death. This manual contains important safety information concerning the maintenance, use, and operation of this product. If you’re unable to understand the contents of this manual, please bring it to the attention of your supervisor. Keep this manual in a safe location for future reference.
English = p 2
WARNINGNo opere este equipo al menos que haya leído y comprendido el contenido de este manual! Cualquier falla en el seguimiento de las instrucciones contenidas en este manual puede resultar en un serio lesión o muerte. Este manual contiene importante información sobre seguridad concerniente al mantenimiento, uso y operación de este producto. Si usted no puede entender el contenido de este manual por favor pregunte a su supervisor. Almacenar este manual en una localización segura para la referencia futura.
ADVERTENCIANe pas utiliser cet équipement sans avoir lu et compris le contenu de ce manuel ! Le non-respect des instructions contenues dans ce manuel peut entraîner de graves blessures ou la mort. Ce manuel contient des informations importantes concernant l’entretien, l’utilisation et le fonctionnement de ce produit. Si vous ne comprenez pas le contenu de ce manuel, veuillez le signaler à votre supérieur. Conservez ce manuel dans un endroit sûr pour pouvoir vous y référer plus tard.
Français = p 14
AVERTISSEMENT
hatcocorp.com
Register Online!(see page 2)
S’inscrire en ligne !(voir page 14)

2 Form No. IHDCH45M-0518
EnglishCONTENTSImportant Owner Information ..............................................2Introduction ...........................................................................2Important Safety Information ..............................................3Model Description ................................................................4Model Designation ...............................................................4Specifications .......................................................................5
Plug Configurations .............................................................5Electrical Rating Chart .........................................................5Dimensions ..........................................................................5Water Supply Specifications ................................................5
Installation .............................................................................6General ................................................................................6Removing the Atomizer Pans ..............................................7Installing the Atomizer Pans ................................................7
Operation ...............................................................................8General ................................................................................8Using the Timers .................................................................8Changing the Cabinet Settings............................................8Changing the Timer Settings ...............................................9Changing Between Celsius and Fahrenheit ........................9Updating the Firmware ........................................................9
Maintenance ........................................................................10General ..............................................................................10Daily Cleaning ...................................................................10Monthly Cleaning ...............................................................10
Troubleshooting Guide ...................................................... 11Alert Message Guide ......................................................... 11
Options and Accessories ..................................................12Limited Warranty ................................................................13Authorized Parts Distributors ...........................Back Cover
IMPORTANT OWNER INFORMATIONRecord the model number, serial number, voltage, and purchase date of the unit in the spaces below (specification label located on the back of the unit). Please have this information available when calling Hatco for service assistance.
Model No. ________________________________________
Serial No. _________________________________________
Voltage ___________________________________________
Date of Purchase ___________________________________
Register your unit!Completing online warranty registration will prevent delay in obtaining warranty coverage. Access the Hatco website at www.hatcocorp.com, select the Support pull-down menu, and click on “Warranty”.
BusinessHours: 7:00 am to 5:00 pm Central Standard Time (CST)
(Summer Hours: June to September— 7:00 am to 5:00 pm CST Monday–Thursday 7:00 am to 4:00 pm CST Friday)
Telephone: 800-558-0607; 414-671-6350
E-mail: [email protected]
24 Hour 7 Day Parts and ServiceAssistance available in the United Statesand Canada by calling 800-558-0607.
Additional information can be found by visiting our web site at www.hatcocorp.com.
INTRODUCTIONHatco Intelligent Heated Display Cabinets are designed to hold prepared foods for prolonged periods of time while maintaining that “just-made” quality. Intelligent Heated Display Cabinets provide the best environment for food products by regulating the air temperature while at the same time balancing the humidity level. The use of controlled, moisturized heat maintains serving temperature and food texture longer than conventional dry holding equipment.
The air flow pattern is designed to maintain consistent cabinet temperature without drying out foods. The precise combination of heat and humidity creates a “blanket” effect around the food. The air flow rate enables the cabinet to recover temperature rapidly after opening and closing a door.
Hatco Intelligent Heated Display Cabinets are products of extensive research and field testing. The materials used were selected for maximum durability, attractive appearance, and optimum performance. Every unit is inspected and tested thoroughly prior to shipment.
This manual provides the installation, safety, and operating instructions for Intelligent Heated Display Cabinets. Hatco recommends all installation, operating, and safety instructions appearing in this manual be read prior to installation or operation of a unit.
Safety information that appears in this manual is identified by the following signal word panels:
WARNINGWARNING indicates a hazardous situation which, if not avoided, could result in death or serious injury.
CAUTIONCAUTION indicates a hazardous situation which, if not avoided, could result in minor or moderate injury.
NOTICENOTICE is used to address practices not related to personal injury.

3Form No. IHDCH45M-0518
English IMPORTANT SAFETY INFORMATION
WARNINGMake sure all operators have been instructed on the safe and proper use of the unit.
This unit is not intended for use by children or persons with reduced physical, sensory, or mental capabilities. Ensure proper supervision of children and keep them away from the unit.
This unit has no “user-serviceable” parts. If service is required on this unit, contact an Authorized Hatco Service Agent or contact the Hatco Service Department at 800-558-0607 or 414-671-6350.
CAUTIONBURN HAZARD: • Some exterior surfaces on the unit will get hot. Use
caution when touching these areas. • Do not remove or adjust atomizer pans when unit is
hot. Allow unit to cool completely before working with atomizer pans.
Locate unit at proper counter height in an area that is convenient for use. Location should be level to prevent unit or its contents from falling accidentally and strong enough to support the weight of the unit and contents.
The National Sanitation Foundation (NSF) requires that units over 36″ (914 mm) in width or weighing more than 80 lbs. (36 kg) either be sealed to or raised above the installation surface.
Do not move or relocate the unit for cleaning. The unit is bulky and heavy.
Transport unit in upright position only. Before moving unit, secure all glass surfaces, doors, and support arms with tape. Failure to do so may result in damage to unit or personal injury.
NOTICEDo not locate unit in area with excessive air movement around unit. Avoid areas that may be subject to active air movements or currents (i.e., near exhaust fans/hoods, air conditioning ducts, and exterior doors).
Use non-abrasive cleaners and cloths only. Abrasive cleaners and cloths could scratch finish of unit, marring its appearance and making it susceptible to soil accumulation.
IMPORTANT—DO NOT use paper towel or glass cleaner to clean plastic surfaces such as sliding doors. Paper towel and glass cleaner may scratch the material. Wipe off plastic surfaces using a soft, clean, water-dampened cloth.
Use detachable hose sets supplied with unit. Do not use old hose sets.
Clean unit daily to avoid malfunctions and maintain sanitary operation.
WARNINGELECTRIC SHOCK HAZARD: • Plug unit into a properly grounded electrical receptacle
of the correct voltage, size, and plug configuration. If plug and receptacle do not match, contact a qualified electrician to determine and install proper voltage and size electrical receptacle.
• Turn OFF power switch, unplug power cord, and allow unit to cool before performing any cleaning, adjustments, or maintenance.
• DO NOT submerge or saturate with water. Unit is not waterproof. Do not operate if unit has been submerged or saturated with water.
• Unit is not weatherproof. Locate unit indoors where ambient air temperature is a minimum of 70°F (21°C).
• This unit is not “jet-proof” construction. Do not use jet-clean spray to clean this unit.
• Do not steam clean or use excessive water on unit. • Do not pull unit by power cord. • Discontinue use if power cord is frayed or worn. • Do not attempt to repair or replace a damaged power
cord. Cord must be replaced by Hatco, an Authorized Hatco Service Agent, or a person with similar qualifications.
• This unit must be serviced by qualified personnel only. Service by unqualified personnel may lead to electric shock or burn.
• Use only Genuine Hatco Replacement Parts when service is required. Failure to use Genuine Hatco Replacement Parts will void all warranties and may subject operators of the equipment to hazardous electrical voltage, resulting in electrical shock or burn. Genuine Hatco Replacement Parts are specified to operate safely in the environments in which they are used. Some aftermarket or generic replacement parts do not have the characteristics that will allow them to operate safely in Hatco equipment.
FIRE HAZARD: • Install unit on non-combustible surface only. • Locate unit a minimum of 1″ (25 mm) from combustible
walls and materials. If safe distances are not maintained, discoloration or combustion could occur.
• Do not place anything on top of unit.
Make sure food product has been heated to the proper food-safe temperature before placing in unit. Failure to heat food product properly may result in serious health risks. This unit is for holding pre-heated food product only.Hatco Corporation is not responsible for actual food product serving temperature. It is the responsibility of the user to ensure that food product is held and served at a safe temperature.The light fixtures in this unit have safety shields covering the light bulbs to meet National Sanitation Foundation (NSF) standards. To avoid personal injury and/or food contamination, always operate the unit with the safety shields properly installed.
Read the following important safety information before using this equipment to avoid serious injury or death and to avoid damage to equipment or property.

4 Form No. IHDCH45M-0518
EnglishMODEL DESCRIPTION
Power I/O(on/off) Switch
CoolingFan Inlet
SlidingDoors
USBPort Water
InletFitting
OverflowDrain Pipe
Cooling FanOutletTouchscreen
Controller
Adjustable ProductSupport Arm
BasePieces
Front and Rear view of Model IHDCH-45
Hatco Intelligent Heated Display Cabinets are constructed of stainless steel and aluminum with tempered glass top, front, side, and door panels. Access to the cabinet is through rear sliding doors. Units are available with a black, powdercoated finish or in stainless steel.All models feature a touchscreen controller, a lighted Power I/O (on/off) switch, an air heating/circulation system, a humidity system, a USB port, and LED display lights. The inside of the cabinet features removable base pieces and four adjustable product support arms. Units are equipped with a 6ʹ (1829 mm) power cord with plug.
NOTE: A water filter is included with the unit to install on the water supply line before it enters the unit.
NOTE: Refer to the OPTIONS AND ACCESSORIES section for details on available accessories and factory-installed options.
MODEL DESIGNATION
I H D C H - xxIntelligent
Heated Display CabinetHumidified
Width (inches)

5Form No. IHDCH45M-0518
English
ModelWidth
(A)Depth
(B)Height
(C)Base
Width (D)Base
Depth (E)Support Arm Diameter (F)
Riser Diameter (G)*
IHDCH-45 45-1/4″ (1149 mm)
28-3/8″ (721 mm)
30-3/16″ (766 mm)
45″ (1143 mm)
27″ (686 mm)
14 to 19-1/2″ (356 to 495 mm)
12″ (305 mm)
Heated Chamber Dimensions = 44-1/8″ W x 25-1/2″ D x 22-5/8″ H (1121 x 648 x 574 mm)Food Product Riser Height = 1-1/4″ (32 mm) *
Model Voltage Watts Amps Plug Configuration Shipping WeightIHDCH-45 208
309014.9
NEMA 6-20P 200 lbs. (91 kg)240 12.9
SPECIFICATIONSPlug ConfigurationsUnits are supplied from the factory with an electrical cord and plug installed (plugs are supplied according to the application).
WARNINGELECTRIC SHOCK HAZARD: Plug unit into a properly grounded electrical receptacle of the correct voltage, size, and plug configuration. If plug and receptacle do not match, contact a qualified electrician to determine and install proper voltage and size electrical receptacle.
NOTE: Specification label located on the back of the unit. See label for serial number and verification of unit electrical information.
NEMA 6-20P
Plug Configurations
NOTE: Receptacle not supplied by Hatco.
Electrical Rating Chart
Dimensions
A B
E
F
3-1/2"(88 mm)
3-3/4"(95 mm)
4"(102 mm)
G
D
C
Front View Side View
* Available as an accessory.
Water Supply SpecificationsWater Pressure = 20 psi (138 kPa) minimum, 50 psi (345 kPa) maximum
6 Form No. IHDCH45M-0518
EnglishINSTALLATIONGeneralHatco Intelligent Heated Display Cabinets are shipped with most components installed and ready for operation. Care should be taken when unpacking shipping carton to avoid damage to unit and the components enclosed. The following installation instructions must be performed before connecting electricity and operating the cabinet.
WARNINGELECTRIC SHOCK HAZARD: Unit is not weatherproof. Locate unit indoors where ambient air temperature is a minimum of 70°F (21°C).
FIRE HAZARD: • Locate unit a minimum of 1″ (25 mm) from combustible
walls and materials. If safe distances are not maintained, discoloration or combustion could occur.
• Do not place anything on top of unit.
CAUTIONLocate unit at proper counter height in an area that is convenient for use. Location should be level to prevent unit or its contents from falling accidentally and strong enough to support the weight of the unit and contents.
The National Sanitation Foundation (NSF) requires that units over 36″ (914 mm) in width or weighing more than 80 lbs. (36 kg) either be sealed to or raised above the installation surface.
1. Remove the unit from the shipping carton. 2. Remove tape and protective film from all surfaces of unit.NOTE: To prevent delay in obtaining warranty coverage,
complete online warranty registration. See the IMPORTANT OWNER INFORMATION section for details.
3. Place the unit in the desired location. Two or more people are required for this procedure.
• Locate the unit in an area where the ambient air temperature is constant and a minimum of 70°F (21°C). Avoid areas that may be subject to active air movements or currents (i.e., near exhaust fans/hoods, air conditioning ducts, and exterior doors/openings).
• Make sure the unit is at the proper counter height in an area convenient for use.
• Make sure the countertop is level and strong enough to support the weight of the unit and food product.
4. Seal the unit to the countertop using an NSF-approved sealant.
NOTE: A shut-off valve must be installed on the water supply line immediately upstream from the water filter and unit.
NOTE: Incoming water pressure for the unit must be between 20 psi (138 kPa) and 50 psi (345 kPa). If incoming pressure is too high, a pressure regulator must be installed upstream from the water filter. See OPTIONS AND ACCESSORIES for details.
5. Connect the on-site water supply from the shut-off valve to the included water filter.
NOTE: Make sure to note the flow direction arrow on the water filter, which should be pointing toward the unit.
6. Flush the water filter to remove loose carbon particles. Residual particles from a new filter can affect the humidity system.
a. Connect the included 1/4″ clear tubing to the water outlet on the filter, and place the opposite end of the tube into a waste container.
b. Turn on the water supply and flush the filter into the container until the water is clear of carbon particles.
7. Connect the 1/4″ clear tubing from the water outlet on the filter to either fitting on the included water strainer.
• The fittings on the water strainer are “push-in”-style connections for 1/4″ plastic tubing.
8. Connect the water strainer to the 1/4″ water inlet fitting on the back of the unit.
• The water inlet fitting is a “push-in”-style connection for 1/4″ plastic tubing.
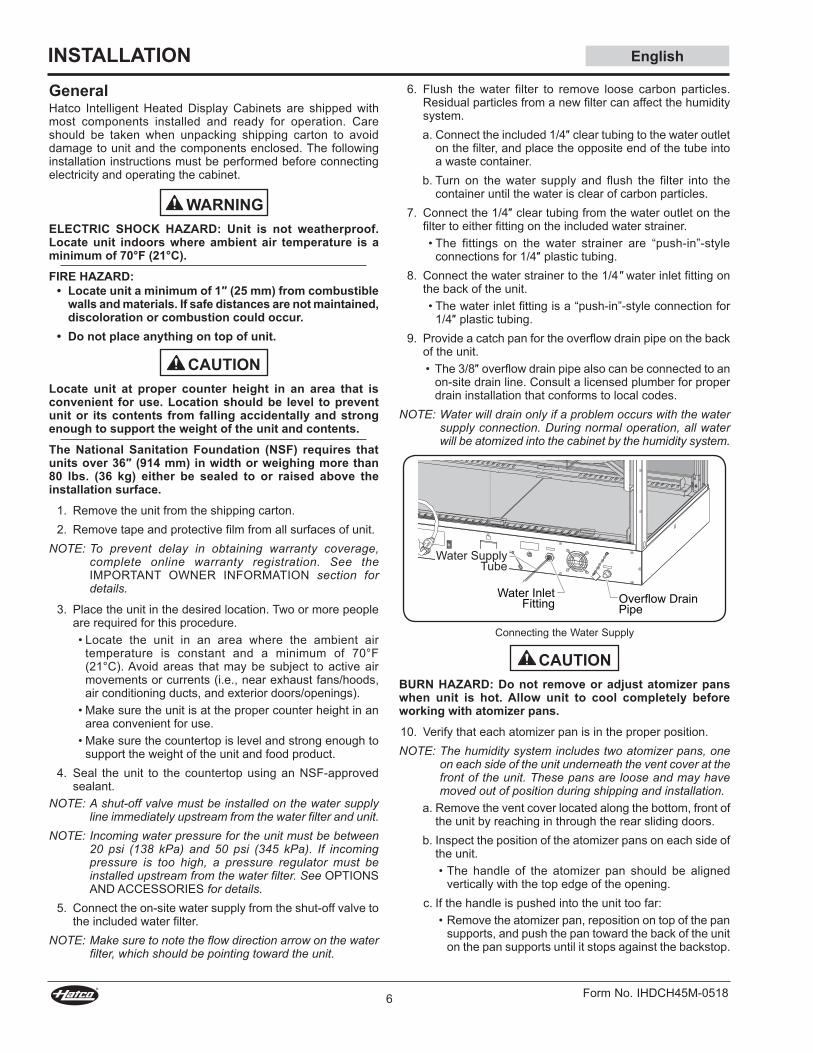
9. Provide a catch pan for the overflow drain pipe on the back of the unit.
• The 3/8″ overflow drain pipe also can be connected to an on-site drain line. Consult a licensed plumber for proper drain installation that conforms to local codes.
NOTE: Water will drain only if a problem occurs with the water supply connection. During normal operation, all water will be atomized into the cabinet by the humidity system.
Water InletFitting
Water SupplyTube
Overflow DrainPipe
Connecting the Water Supply
CAUTIONBURN HAZARD: Do not remove or adjust atomizer pans when unit is hot. Allow unit to cool completely before working with atomizer pans.
10. Verify that each atomizer pan is in the proper position. NOTE: The humidity system includes two atomizer pans, one
on each side of the unit underneath the vent cover at the front of the unit. These pans are loose and may have moved out of position during shipping and installation.
a. Remove the vent cover located along the bottom, front of the unit by reaching in through the rear sliding doors.
b. Inspect the position of the atomizer pans on each side of the unit.
• The handle of the atomizer pan should be aligned vertically with the top edge of the opening.
c. If the handle is pushed into the unit too far: • Remove the atomizer pan, reposition on top of the pan
supports, and push the pan toward the back of the unit on the pan supports until it stops against the backstop.

7Form No. IHDCH45M-0518
English INSTALLATION d. If the handle extends out into the opening: • Push the atomizer pan toward the back of the unit until
it stops against the backstop.
AtomizerPans
Front glass and productsupport arms removedfor clarity.
FrontVent Cover
(removed throughsliding door)
Pan Handlealigned withtop edge ofopening.
Top edgeof opening
Checking the Atomizer Pans
Atomizer Pan
Pan Support
Heating Element
Front glass removedfor clarity.
Atomizer Pan Location
11. Turn on the water supply and check for leaks. 12. Install the four product support arms in the desired
positions. To install a product support arm: a. Align the hooks on the end of the arm with the desired
slots on the support bracket. b. Insert the hooks into the slots, and lower the support arm
until it stops. 13. Plug the unit into a properly grounded electrical receptacle
of the correct voltage, size, and plug configuration. See the SPECIFICATIONS section for details.
Removing the Atomizer PansUse the following procedure to remove the two atomizer pans located underneath the vent cover at the front of the unit.
1. Make sure the Power I/O (on/off) switch is in the O (off) position, the power cord is unplugged, and the unit is cool.
2. Remove the vent cover located along the bottom, front of the unit by reaching in through the rear sliding doors.
3. Locate the atomizer pans inside the opening at the front of the unit, one on each side.
• The atomizer pans sit on pan supports directly above a heating element.
4. Remove the atomizer pans. To remove a pan: a. Reach inside the front opening and grab the pan handle. b. Start pulling the pan toward the front of the unit while
angling the pan up. c. Continue to lift and angle the pan up until it is clear of the
front opening.
Front Opening
Atomizer Pan
Removing/Installing the Atomizer Pans
Installing the Atomizer PansUse the following procedure to install the atomizer pans.
1. Make sure the Power I/O (on/off) switch is in the O (off) position, the power cord is unplugged, and the unit is cool.
2. If it is present, remove the vent cover located along the bottom, front of the unit by reaching in through the rear sliding doors.
3. Install the atomizer pans. To install a pan: a. Hold the pan by the handle and at an angle above the
front opening. b. Lower the pan into the opening and set the front edge of
the pan onto the pan supports located directly above the heating element.
c. Push the pan toward the back of the unit on the pan supports until it stops against the backstop.
NOTE: If the atomizer pan does not stop, it was installed improperly. Repeat step 3 of this procedure.
d. Make sure the handle of the atomizer pan is aligned vertically with the top edge of the opening.

8 Form No. IHDCH45M-0518
English
GeneralUse the following procedures to operate a Hatco Intelligent Heated Display Cabinet.
WARNINGRead all safety messages in the IMPORTANT SAFETY INFORMATION section before operating this equipment.
Make sure food product has been heated to the proper food-safe temperature before placing in unit. Failure to heat food product properly may result in serious health risks. This unit is for holding pre-heated food product only.
CAUTIONBURN HAZARD: Some exterior surfaces on the unit will get hot. Use caution when touching these areas.
Startup 1. Verify that the unit is plugged into a properly grounded
electrical receptacle of the correct voltage, size and plug configuration. See the SPECIFICATIONS section for details.
2. Verify that the atomizer pans are installed correctly (see INSTALLATION section for details). NOTICE: Never operate unit without atomizer pans in proper position.
3. Verify that the unit is connected to the on-site water supply (see INSTALLATION section for details).
Power I/O(on/off) Switch
SlidingDoorTouchscreen
Controller
Controls
4. Move the Power I/O (on/off) switch to the I (on) position.
0:40:00 0:40:00
0:40:00 0:40:00
0:40:00 0:40:00
• The display lights will turn on, the heating and humidity systems will start up.
• The touchscreen controller will energize and show the Home Screen. The Home Screen shows the available timers that correspond with each product position inside the cabinet.
NOTE: The and keys will appear in red during preheating. Once the cabinet reaches the operating setpoints, the keys will change to green.
5. Allow the unit 60 minutes to reach operating temperature and humidity setting before loading the cabinet with pre-heated food product.
NOTE: The cabinet can hold pizzas with a maximum diameter of 18″ (457 mm).
180˚ 17%
• Touch the key to show the current air temperature and relative humidity (RH) inside the cabinet. Touch the key to return to the timers on the Home Screen.
NOTE: The cabinet is pre-set at the factory to an air temperature of 180°F (82°C) and 17% relative humidity.
6. Refer to the “Adjusting the Settings” procedure in this section to change the air temperature and relative humidity (RH) settings, if necessary.
Shutdown 1. Move the Power I/O (on/off) Switch to the O (off) position
and allow the unit to cool completely. 2. Perform the “Daily Cleaning” procedure in the
MAINTENANCE section of this manual.
Using the TimersUse the following procedure to use timers for the product in the cabinet.
1. Make sure the Home Screen with the available timers is shown on the display. If not, touch the key.
NOTE: The position of the timers on the screen corresponds with the position of the product in the cabinet, when viewing from the operator side.
0:35:43 0:21:15
0:39:55 0:05:05
0:00:00 0:40:00
Timer at zerohighlighted in red.
2. Start the desired timer(s). • Touch a timer to start a
countdown from the pre-set time setting.
• Touch and hold a timer for three seconds to turn off and reset the timer.
• When a timer has ten seconds remaining, it will be highlighted in flashing red. When a timer reaches zero, the red highlight on the timer will remain solid until it is reset by the operator.
Changing the Cabinet SettingsUse the following procedure to set or change the air temperature and humidity settings of the cabinet. The cabinet is pre-set at the factory to an air temperature of 180°F (82°C) and 17% relative humidity.
1. Move the Power I/O (on/off) switch to the I (on) position. • The unit will turn on and the touchscreen controller will
energize and show the Home Screen.
OPERATION

9Form No. IHDCH45M-0518
English OPERATION
ServiceFirmware Usage
Control Timers
Testmode TempHumid
2. Touch the key. • Enter the password "248"
using the number keys that appear.
• The Service screen will appear on the display.
3. Touch the TEMPHUMID key on the Service screen to access the air temperature and relative humidity settings.
4. Adjust the air temperature and/or relative humidity settings.
180˚ 17%
• Touch the red or key on the left side of the display to set the desired air temperature.
• Touch the blue orkey on the right side of the display to set the desired relative humidity (RH).
NOTE: Air temperature and humidity settings may vary depending upon product make-up and consistency.
5. Touch the key to save the settings and return to the Home Screen.
Changing the Timer SettingsUse the following procedure to change the time setting on each of the product timers. 1. Move the Power I/O (on/off) switch to the I (on) position. • The unit will turn on and the touchscreen controller will
energize and show the Home Screen. 2. Touch the key. • Enter the password "248" using the number keys that
appear. • The Service screen will appear on the display. 3. Touch the TIMERS key on the Service screen to access
the Timers screen.
Timers
Select Config(Max 8 timers)
MaxSetting
NOTE: The check boxes on the Timers screen correspond with each available product timer, when viewing unit from the operator side. Touch the appropriate check box to toggle the timer between visible and invisible on the Home screen.
4. Touch the MAXSETTING key on the Timers screen to access the timer settings.
0:40 0:400:40 0:400:40 0:40
Set
a. Touch the SET key to highlight the first timer setting.
b. Touch the red or key on the display to change the timer setting.
c. Touch the next desired timer setting to make it active for change, and repeat the previous step to change the setting.
d. Touch the DONE key when timer setting changes are complete.
5. Touch the key to save the settings and return to the Home Screen.
Changing Between Celsius and FahrenheitUse the following procedure to change the air temperature unit of measure between Celsius and Fahrenheit.
1. Move the Power I/O (on/off) switch to the I (on) position. • The unit will turn on and the touchscreen controller will
energize and show the Home Screen.
ServiceFirmware Usage
Control Timers
Testmode TempHumid
2. Touch the key. • Enter the password "248"
using the number keys that appear.
• The Service screen will appear on the display.
3. Touch the CONTROL key on the Service screen to access the Control Settings screen.
4. Choose the desired unit of measure on the “Units” line:
Control Settings
Units F C
Version 01.00.27
• Touch the ”F” box to select Fahrenheit.
• Touch the ”C” box to select Celsius.
NOTE: The box for the active unit of measure is highlighted in green.
5. Touch the key to save the settings and return to the Home Screen.
Updating the FirmwareUse the following procedure to perform a firmware update on the touchscreen controller. 1. Move the Power I/O (on/off) switch to the I (on) position. • The unit will turn on and the touchscreen controller will
energize and show the Home Screen. 2. Touch the key. • Enter the password "248" using the number keys that
appear. • The Service screen will appear on the display. 3. Touch the FIRMWARE key on the Service screen to access
the Firmware Update screen.
Firmware Update
Plug-in the USB stick, thenpress the Update button.
Update
4. Insert the USB drive into the USB port next to the controller, and touch the UPDATE key on the Firmware Update screen.
• The update will begin. When complete, the touchscreen controller will restart and show the Home screen.

10 Form No. IHDCH45M-0518
EnglishMAINTENANCEGeneralHatco Intelligent Heated Display Cabinets are designed for maximum durability and performance, with minimum maintenance.
WARNINGELECTRIC SHOCK HAZARD: • Turn OFF power switch, unplug power cord, and
allow unit to cool before performing any cleaning, adjustments, or maintenance.
• DO NOT submerge or saturate with water. Unit is not waterproof. Do not operate if unit has been submerged or saturated with water.
• This unit is not “jet-proof” construction. Do not use jet-clean spray to clean this unit.
• Do not steam clean or use excessive water on unit. • Use only Genuine Hatco Replacement Parts when
service is required. Failure to use Genuine Hatco Replacement Parts will void all warranties and may subject operators of the equipment to hazardous electrical voltage, resulting in electrical shock or burn. Genuine Hatco Replacement Parts are specified to operate safely in the environments in which they are used. Some aftermarket or generic replacement parts do not have the characteristics that will allow them to operate safely in Hatco equipment.
This unit has no “user-serviceable” parts. If service is required on this unit, contact an Authorized Hatco Service Agent or contact the Hatco Service Department at 800-558-0607 or 414-671-6350.
Daily CleaningTo maintain performance and preserve the finish of the cabinet, it is recommended that the unit be cleaned daily.
NOTICEUse non-abrasive cleaners and cloths only. Abrasive cleaners and cloths could scratch finish of unit, marring its appearance and making it susceptible to soil accumulation. 1. Move the Power I/O (on/off) switch to the O (off) position
and unplug the power cord. Allow the unit to cool. 2. Remove and clean all internal components. • Components include risers, product supports arms, front
and rear vent covers, crumb trays (located directly below the front and rear vent covers), and the decorative base pieces.
• Clean and sanitize the components in a 3-compartment sink, and allow to air dry.
NOTE: The above listed components are dishmachine-safe. Not all dishmachine detergents have been tested. If a noticeable change in color or gloss occurs, an alternate detergent should be used.
3. Wipe down all interior and exterior metal surfaces using a clean, damp, non-abrasive cloth. A non-abrasive cleaner may be used for difficult stains. Hard to reach areas should be cleaned using a small brush and mild soap.
4. Clean the glass top, front, and side panels using a standard glass cleaner.
5. Clean the polycarbonate sliding doors using soft, microfiber cleaning cloths, mild soap, and water. NOTICE: Do not use paper towel or glass cleaner on plastic surfaces—scratching or damage may occur.
6. Spray all interior and exterior surfaces with sanitizing solution and allow to air dray.
7. Reassemble the unit.
Front glass removed for clarity.All components removedthrough rear sliding door.
Front VentCover
BasePieces
Front Crumb Tray(under vent cover)
RearCrumb
Tray
Rear Vent Cover
Removing/Installing Components
Monthly CleaningUse the following procedure for periodic cleaning and deliming of the atomizer pans.NOTE: The lime and mineral content of the water used for
daily operation will determine how often the deliming procedure must be performed.
NOTE: Perform this procedure when the unit will not be used for a period of time, such as the end of the day.
1. Move the Power I/O (on/off) switch to the O (off) position and unplug the power cord. Allow the unit to cool completely.
2. Perform steps 2–5 of the “Daily Cleaning” procedure. 3. Remove both atomizer pans (refer to the “Removing the
Atomizer Pans” procedure in the INSTALLATION section of this manual).
4. Fill an appropriate container with a mixture of 75% water and 25% white vinegar. Do not use flavored vinegar.
5. Place both atomizer pans into the vinegar solution and allow to soak for several hours, preferably overnight.
6. Remove both atomizer pans from the vinegar solution and clean using warm, soapy water and a soft cloth.
7. Rinse both atomizer pans with clean water, and allow to air dry.
8. Install the cleaned atomizer pans into the unit (refer to the “Installing the Atomizer Pans” procedure in the INSTALLATION section of this manual).
9. Spray all interior and exterior surfaces with sanitizing solution and allow to air dry.
10. Reassemble the unit.

11Form No. IHDCH45M-0518
English
Symptom Probable Cause Corrective ActionUnit operates, but is not circulating air inside cabinet.
Blower motor(s) defective. Contact Authorized Service Agent or Hatco for assistance.
The correct voltage may not be supplied to blowers.
Contact Authorized Service Agent or Hatco for assistance.
Unit is plugged in, but nothing works. No power to unit. Check electrical receptacle and verify that power supply matches specifications on unit. If receptacle is not working, check circuit breaker and reset, or plug unit into a different known working receptacle.
Power cord connections are loose or disconnected.
Contact Authorized Service Agent or Hatco for assistance.
Power cord is damaged. Contact Authorized Service Agent or Hatco for assistance.
Defective Power I/O (on/off) switch. Contact Authorized Service Agent or Hatco for assistance.
Unit is not producing any “hot air” inside cabinet.
Safety high-limit is tripped or open. Contact Authorized Service Agent or Hatco for assistance.
Incorrect voltage supplied to heating element. Contact Authorized Service Agent or Hatco for assistance.
Blower motor(s) not working. Contact Authorized Service Agent or Hatco for assistance.
Air heating element(s) defective. Contact Authorized Service Agent or Hatco for assistance.
Unit is heating, but is not producing humidity inside cabinet.
Unit has not been operating for at least 30 minutes.
Allow at least 30 minutes after unit is turned on for humidity cycle to start. Then, allow another 30 minutes to reach humidity setting. Every time power is turned off, unit requires 30 minutes after it is turned on for humidity cycle to start.
Humidity setting too low. Increase the humidity setting (see OPERATION section).
Water supply is off or not connected. Make sure unit is connected to water supply and the shut-off valve is open.
Incorrect voltage supplied to water heating elements or heating elements defective.
Contact Authorized Service Agent or Hatco for assistance.
Alert Message GuideTouch SNOOZE to postpone an Alert Message for five minutes and return to operation. Touch DISABLE to reset an Alert Message. Always investigate and correct the causes of an Alert Message.
TROUBLESHOOTING GUIDE
WARNINGThis unit must be serviced by trained and qualified personnel only. Service by unqualified personnel may lead to electric shock or burn.
WARNINGELECTRIC SHOCK HAZARD: Turn OFF power switch, unplug power cord, and allow unit to cool before performing any cleaning, adjustments, or maintenance.
Alert Message TroubleshootingCorrective Action
(if Troubleshooting fails to fix)Error
SNOOZE DISABLE
Low Cabinet Temp
Make sure doors are closed. Contact Authorized Service Agent or Hatco for assistance.
Error
SNOOZE DISABLE
Low Cabinet Humidity
Make sure water supply is connected and turned on. Allow 60 minutes for cabinet to reach humidity setting.
Contact Authorized Service Agent or Hatco for assistance.
Error
SNOOZE DISABLE
Bad Probe Connection
Defective temperature probe. Contact Authorized Service Agent or Hatco for assistance.
Error
SNOOZE DISABLE
PCB Temp Too High
Make sure inlet and outlet openings for the cooling fan are not blocked and air flow is not restricted. Restart cabinet.
Contact Authorized Service Agent or Hatco for assistance.

12 Form No. IHDCH45M-0518
EnglishTROUBLESHOOTING GUIDETroubleshooting Questions?If you continue to have problems resolving an issue, please contact the nearest Authorized Hatco Service Agency or Hatco for assistance. To locate the nearest Service Agency, log onto the Hatco website at www.hatcocorp.com, select the Support pull-down menu, and click on “Find A Service Agent”; or contact the Hatco Parts and Service Team at:
Telephone: 800-558-0607 or 414-671-6350e-mail: [email protected]
OPTIONS AND ACCESSORIESSign HoldersThree different sign holders are available as accessories: floor sign holder, left pan sign holder, and right pan sign holder. The floor sign holder rests on the base pieces inside the cabinet. The left pan sign holder and right pan sign holder are installed on the product support arms.
FloorSign Holder
Left PanSign Holder
Right PanSign Holder
Food Product RiserA circular, stainless steel food product riser is available as an accessory. Food product risers sit directly on the base pieces inside the cabinet to allow additional food display options. Two risers fit inside the cabinet.
Water Pressure Regulator KitA water pressure regulator kit is available as an accessory. A water pressure regulator is required when the incoming water pressure is greater than 50 psi (345 kPa). The water pressure regulator kit includes a pressure regulator, pressure gauge, and shutoff valve.

13Form No. IHDCH45M-0518
English
1. PRODUCT WARRANTYHatco warrants the products that it manufactures (the “Products”) to be free from defects in materials and workmanship, under normal use and service, for a period of one (1) year from the date of purchase when installed and maintained in accordance with Hatco’s written instructions or 18 months from the date of shipment from Hatco. Buyer must establish the Product’s purchase date by registering the Product with Hatco or by other means satisfactory to Hatco in its sole discretion.Hatco warrants the following Product components to be free from defects in materials and workmanship from the date of purchase (subject to the foregoing conditions) for the period(s) of time and on the conditions listed below:
a) One (1) Year Parts and Labor PLUS One (1) Additional Year Parts-Only Warranty: Conveyor Toaster Elements (metal sheathed) Drawer Warmer Elements (metal sheathed) Drawer Warmer Drawer Rollers and Slides Strip Heater Elements (metal sheathed) Display Warmer Elements (metal sheathed air heating) Holding Cabinet Elements (metal sheathed air heating) Heated Well Elements — HW and HWB Series (metal sheathed)
b) Two (2) Year Parts and Labor Warranty: Induction Ranges
c) One (1) Year Parts and Labor PLUS Four (4) Years Parts-Only Warranty: 3CS and FR Tanks
d) One (1) Year Parts and Labor PLUS Nine (9) Years Parts-Only Warranty on: Electric Booster Heater Tanks Gas Booster Heater Tanks
e) Ninety (90) Day Parts-Only Warranty: Replacement Parts
THE FOREGOING WARRANTIES ARE EXCLUSIVE AND IN LIEU OF ANY OTHER WARRANTY, EXPRESSED OR IMPLIED, INCLUDING BUT NOT LIMITED TO ANY IMPLIED WARRANTY OF MERCHANTABILITY OR FITNESS FOR A PARTICULAR PURPOSE OR PATENT OR OTHER INTELLECTUAL PROPERTY RIGHT INFRINGEMENT. Without limiting the generality of the foregoing, SUCH WARRANTIES DO NOT COVER: Coated incandescent light bulbs, fluorescent lights, heat lamp bulbs, coated halogen light bulbs, halogen heat lamp bulbs, xenon light bulbs, LED light tubes, glass components, and fuses; Product failure in booster tank, fin tube heat exchanger, or other water heating equipment caused by liming, sediment buildup, chemical attack, or freezing; or Product misuse, tampering or misapplication, improper installation, or application of improper voltage.
2. LIMITATION OF REMEDIES AND DAMAGESHatco’s liability and Buyer’s exclusive remedy hereunder will be limited solely, at Hatco’s option, to repair or replacement using new or refurbished parts or Product by Hatco or a Hatco-authorized service agency (other than where Buyer is located outside of the United States, Canada, United Kingdom, or Australia, in which case Hatco’s liability and Buyer’s exclusive remedy hereunder will be limited solely to replacement of part under warranty) with respect to any claim made within the applicable warranty period referred to above. Hatco reserves the right to accept or reject any such claim in whole or in part. In the context of this Limited Warranty, “refurbished” means a part or Product that has been returned to its original specifications by Hatco or a Hatco-authorized service agency. Hatco will not accept the return of any Product without prior written approval from Hatco, and all such approved returns shall be made at Buyer’s sole expense. HATCO WILL NOT BE LIABLE, UNDER ANY CIRCUMSTANCES, FOR CONSEQUENTIAL OR INCIDENTAL DAMAGES, INCLUDING BUT NOT LIMITED TO LABOR COSTS OR LOST PROFITS RESULTING FROM THE USE OF OR INABILITY TO USE THE PRODUCTS OR FROM THE PRODUCTS BEING INCORPORATED IN OR BECOMING A COMPONENT OF ANY OTHER PRODUCT OR GOODS.
LIMITED WARRANTY

14 Formulaire n° IHDCH45M-0518
FrançaisSOMMAIREInformations Importantes pour le Propriétaire ................14Introduction .........................................................................14Consignes de Sécurité Importantes .................................15Description du Modèle .......................................................16Désignation du Modèle ......................................................16Caractéristiques Techniques ............................................17
Configuration des fiches ....................................................17Tableau des valeurs nominales électriques ......................17Dimensions ........................................................................17Caractéristiques de l’approvisionnement en eau ..............17
Installation ...........................................................................18Généralités ........................................................................18Retrait des plateaux atomiseurs ........................................19Installation des plateaux atomiseurs .................................19
Mode d’emploi ....................................................................20Généralités ........................................................................20Utilisation des minuteurs ...................................................21Modifier les réglages de la vitrine ......................................21Modifier les réglages du minuteurs ...................................21Basculement entre Celsius et Fahrenheit .........................22Mise à jour du logiciel ........................................................22
Maintenance ........................................................................23Généralités ........................................................................23Nettoyage quotidien ...........................................................23Nettoyage mensuel ............................................................23
Guide de Dépannage ..........................................................24Guide des messages d’alerte ............................................25
Options et accessoires ......................................................25Garantie Limitée .................................................................26Distributeurs de pièces autorisés ........Couverture Arrière
INFORMATIONS IMPORTANTES POUR LE PROPRIÉTAIRENotez le numéro de modèle, le numéro de série, la tension et la date d’achat de l’appareil dans les espaces ci-dessous (étiquette de spécification située sur le côté de l’appareil). Veuillez avoir cette information à portée de la main si vous appelez Hatco pour assistance.
Modèle No. ______________________________________
Numéro de série __________________________________
Voltage _________________________________________
Date d’achat _____________________________________
Enregistrez votre appareil!Remplissez la garantie en ligne pour éviter les retards pour faire jouer la garantie. Accédez au site Web Hatco www.hatcocorp.com, sélectionnez le menu déroulant Support (Assistance), puis cliquez sur « Warranty » (Garantie).
Horairesouvrables: 7h00 à 17h00 Heure du Centre des États-Unis (CST) (Horaires d’été : juin à septembre— 7h00 à 17h00 CST du lundi au jeudi 7h00 à 16h00 CST le vendredi)
Téléphone : 800-558-0607; 414-671-6350
Courriel : [email protected]
Service d'assistance et de pièces derechange disponible 7j/7, 24h/24 auxÉtats-Unis et au Canada en composantle 800-558-0607.
Des renseignements supplémentaires sont disponibles sur notre site Web à www.hatcocorp.com.
INTRODUCTIONLes vitrines chauffantes intelligentes de Hatco sont conçues pour conserver des plats préparés pendant des périodes relativement longues, tout en maintenant leur fraîcheur intacte. Les vitrines chauffantes intelligentes de Hatco offrent le meilleur environnement pour conserver les produits alimentaires en régulant la température de l’air tout en maintenant un niveau d’humidité équilibré. L’utilisation d’une chaleur humide et contrôlée permet de maintenir la température de service et de préserver la texture des aliments plus longtemps qu’avec un équipement traditionnel de conservation des aliments au sec.Le schéma de flux d’air est conçu pour maintenir une température constante dans la vitrine sans assécher les aliments. L’association précise de la chaleur et de l’humidité crée un effet de « couverture » autour des aliments. L’intensité du flux d’air permet à la température interne de la vitrine de se restabiliser rapidement après l’ouverture et la fermeture de la porte.Les vitrines chauffantes intelligentes de Hatco sont issues de recherches avancées et de tests intensifs en situation. Les matériaux utilisés ont été sélectionnés afin de garantir une durée de vie maximale, un design attractif et des performances optimales. Chaque unité est inspectée et testée minutieusement avant d’être expédiée.
Ce manuel fournit les instructions d’installation, de sécurité et le mode d’emploi des vitrines chauffantes intelligentes. Hatco vous recommande de lire l’ensemble des instructions d’installation, de sécurité et de fonctionnement fournies dans ce manuel avant d’installer et d’utiliser l’appareil.Les consignes de sécurité qui apparaissent dans ce manuel sont identifiées par les mots indicateurs suivants :
AVERTISSEMENTAVERTISSEMENT indique une situation dangereuse qui, si elle n’est pas évitée, peut provoquer la mort ou des bless-ures graves.
ATTENTIONATTENTION indique une situation dangereuse qui, si elle n’est pas évitée, peut provoquer des blessures légères ou moyennes.
AVISAVIS est utilisé pour des questions sans rapport avec des blessures corporelles.

15Formulaire n° IHDCH45M-0518
Français CONSIGNES DE SÉCURITÉ IMPORTANTES
AVERTISSEMENTLes luminaires de cet appareil sont dotés d’écrans de protection couvrant les ampoules, afin de satisfaire aux normes NSF (National Sanitation Foundation). Pour éviter toute blessure des personnes ou contamination des aliments, utilisez toujours l’appareil avec ses écrans de protection correctement installés.Assurez-vous que tous les utilisateurs ont reçu des instructions sur une utilisation sûre et adéquate de l’appareil.Cet appareil n’est pas conçu pour être utilisé par des enfants ou des personnes dont les capacités physiques, sensorielles ou mentales sont limitées. Ne laissez pas les enfants sans surveillance et maintenez-les à l’écart de l’appareil.Cet appareil ne contient aucune pièce réparable par l’utilisateur. Si cet appareil doit être réparé, contactez un réparateur Hatco agréé ou le Service après-vente Hatco au 800-558-0607 ou 414-671-6350.
ATTENTIONRISQUE DE BRÛLURES : • Certaines surfaces extérieures de l’unité deviendront chaudes.
Soyez prudent lorsque vous touchez ces surfaces. • Ne retirez pas les plateaux atomiseurs et ne les réglez pas
lorsque l’appareil est chaud. Laissez l’appareil refroidir complètement avant d’effectuer toute opération sur les plateaux atomiseurs.
Placez l’appareil à une hauteur adaptée au comptoir, à un emplacement pratique à utiliser. L’emplacement doit être plan pour éviter que l’appareil ou son contenu ne tombent accidentellement, et suffisamment solide pour supporter le poids de l’appareil et de son contenu.La National Sanitation Foundation (NSF) exige que les appareils d’une largeur supérieure à 914 mm (36ʺ) ou pesant plus de 36 kg (80 lb) soient fixés sur le plan de travail ou installés au-dessus de ce dernier. Ne déplacez pas et ne bougez pas l’appareil pour le nettoyer. L’appareil est volumineux et lourd.L’unité doit rester droite durant son transport. Avant de transporter l’appareil, fixez fermement toutes les surfaces vitrées, les portes et les bras de support avec de l’adhésif. Si cette consigne n’est pas respectée, des dommages corporels ou matériels pourraient survenir.
AVISL’appareil ne doit pas être installé à un endroit présentant des déplacements d’air excessifs. Évitez les zones pouvant être soumises à des déplacements d’air ou à des courants d’air actifs (proximité de ventilateurs d’extraction/de hottes d’aspiration, de conduites de climatisation et de portes extérieures).Utilisez uniquement des nettoyants non abrasifs et des chiffons doux. Les chiffons et nettoyants abrasifs risquent de rayer la finition de l’appareil, d’altérer son apparence et de le rendre vulnérable à l’accumulation de saleté.IMPORTANT—N’UTILISEZ JAMAIS une serviette en papier ou un nettoyant pour vitres sur les surfaces en plastique telles que les portes coulissantes. Les serviettes en papier et le nettoyant pour vitres peuvent rayer l’équipement. Essuyez les surfaces en plastique à l’aide d’un chiffon doux, propre et humide.Utilisez des ensembles de tuyaux amovibles fournis avec l'appareil. Ne pas utiliser de vieux ensembles de tuyaux.Nettoyez l’unité quotidiennement pour éviter les dysfonctionnements et assurer un fonctionnement sain.
AVERTISSEMENTRISQUE DE DÉCHARGE ÉLECTRIQUE : • Branchez l’appareil à une prise correctement reliée à la terre
et possédant le voltage, la dimension et la configuration adéquats. Si la fiche et la prise ne correspondent pas, contactez un électricien qualifié afin de déterminer et d’installer une prise électrique possédant la taille et la tension adéquate.
• Mettez l’interrupteur marche/arrêt hors tension, débranchez le cordon d’alimentation et laissez l’unité refroidir avant d’effectuer tout nettoyage, réglage ou entretien.
• NE PAS immerger ou mouiller abondamment. L’élément n’est pas étanche. Ne pas allumer l’appareil s’il a été immergé ou mouillé abondamment.
• L’appareil n’est pas étanche. Placez l’appareil à l’intérieur dans une zone dont la température ambiante est au minimum de 21°C (70°F).
• L’appareil n’est pas conçu pour résister aux jets sous pression. N’utilisez pas un pulvérisateur à jet sous pression pour le nettoyer.
• Ne nettoyez pas l’unité à la vapeur et n’utilisez pas de l’eau en quantité excessive.
• Ne tirez pas l’unité par le cordon d’alimentation. • Interrompez l’utilisation de l’unité si le cordon d’alimentation
est effiloché ou usé. • N’essayez jamais de réparer ou de remplacer un cordon
d’alimentation endommagé. Celui-ci devra être remplacé par Hatco, un agent de service agréé par Hatco ou une personne possédant des qualifications similaires.
• L’entretien de cet appareil doit être effectué uniquement par le personnel qualifié. Tout entretien réalisé par des personnes non qualifiées peut entraîner des décharges électriques ou provoquer des brûlures.
• Utilisez exclusivement des pièces de rechange authentiques Hatco lorsque cela est nécessaire. L’utilisation de toute autre pièce entraînera l’annulation de toutes les garanties et pourrait exposer les utilisateurs à des tensions électriques dangereuses pouvant mener à des électrocutions ou à des brûlures. Les pièces authentiques Hatco sont conçues pour fonctionner de manière sûre et adaptée dans l’environnement dans lequel elles sont utilisées. Certaines pièces de rechange génériques ne disposent pas de caractéristiques leur permettant de fonctionner en toute sécurité dans des appareils Hatco.
RISQUE D’INCENDIE : • Installer l'appareil sur une surface non-combustible seulement. • Placez l’appareil à au moins 25 mm (1ʺ) des murs et produits
combustibles. Si ces distances de sécurité ne sont pas respectées, une décoloration ou une combustion peut se produire.
• Ne posez rien sur l’appareil.
Hatco Corporation n’est pas responsable de la température réelle à laquelle les aliments sont servis. Il est de la responsabilité de l’utilisateur de s’assurer que les produits alimentaires sont maintenus et servis à une température sans danger.
Assurez-vous que la nourriture a été chauffée à une température adaptée à une alimentation saine avant de la placer dans l’appareil. Le non-chauffage des aliments à une température appropriée peut poser un grand risque pour la santé. Cet appareil n’est destiné qu’à maintenir des aliments préchauffés au chaud.
Lisez l’information de securite importante suivante avant d’utiliser cet équipement pour éviter des dommages ou la mort sérieux et pour éviter d’endommager l’équipement ou la propriété.

16 Formulaire n° IHDCH45M-0518
FrançaisDESCRIPTION DU MODÈLE
Interrupteurd'alimentation I/O
(marche/arrêt)
Entréeventilateur de
refroidissement
Portescoulissantes
PortUSB
Raccordd’entréeen eau
Conduited’écoulementdu trop-plein
Sortieventilateurde refroidissementPanneau
de commandeà écran tactile
Bras de supportde produits réglable
Piècesde base
Vues avant et arrière du modèle IHDCH-45
Les vitrines chauffantes intelligentes Hatco sont construites en acier inoxydable et en aluminium avec un sommet, une façade et des panneaux latéraux en verre trempé. Des portes arrière coulissantes permettent l’accès à l’armoire. Les appareils sont proposés avec un revêtement noir poudré ou en acier inoxydable.
Tous les modèles disposent d’un panneau de commande à écran tactile, d’un interrupteur d’alimentation lumineux I/O (marche/arrêt), d’un système de circulation et de chauffage de l’air, d’un système de régulation de l’humidité, d’un port USB et d’indicateurs à DEL. L’intérieur de l’armoire présente des pièces de base amovibles et quatre bras de support ajustables. Les appareils sont équipés d’un câble d’alimentation de 1829 mm (6ʹ) équipé d’une fiche.
NOTA: Un filtre à eau est inclus. Il doit être monté sur la canalisation d’alimentation en eau en amont de l’appareil.
NOTA: Référez-vous à la section OPTIONS ET ACCESSOIRES section présentant les détails sur les accessoires disponibles et les options installées en usine.
DÉSIGNATION DU MODÈLE
I H D C H - xxIntelligent
Armoire de présentationchauffanteHumidifié
Largeur (pouces)

17Formulaire n° IHDCH45M-0518
Français
Modéle Tension Intensité Amps Configurations de FichesPoids
d’embarquementIHDCH-45 208
309014.9
NEMA 6-20P 91 kg (200 lbs.)240 12.9
ModéleLargeur
(A)Profundeur
(B)Hauteur
(C)Largeur de la
base (D)Profondeur de
la base (E)Diamètre du bras
de support (F)Diamètre du support (G) *
IHDCH-45 1149 mm (45-1/4″)
721 mm (28-3/8″)
766 mm (30-3/16″)
1143 mm (45″)
686 mm (27″)
356 to 495 mm (14 to 19-1/2″)
305 mm (12″)
Dimensions de la chambre chauffée = 1121 W x 648 D x 574 H mm (44-1/8″ x 25-1/2″ x 22-5/8″)Rehausseur de produits alimentaires = 32 mm (1-1/4″) *
CARACTÉRISTIQUES TECHNIQUESConfiguration des fichesLes appareils sont livrés avec un câble d’alimentation et une prise installés (les prises fournies varient selon les applications).
AVERTISSEMENTRISQUE DE DÉCHARGE ÉLECTRIQUE : Branchez l’appareil à une prise correctement reliée à la terre et possédant le voltage, la dimension et la configuration adéquats. Si la fiche et la prise ne correspondent pas, contactez un électricien qualifié afin de déterminer et d’installer une prise électrique possédant la taille et la tension adéquate.
NOTA: Étiquette de spécifications sur le dos de l’appareil. Consultez l’étiquette pour connaître le numéro de série et vérifier les caractéristiques électriques de l’appareil.
NEMA 6-20P
Configuration des fiches
NOTA: Les prise électriques ne sont pas fournies par Hatco.
Tableau des valeurs nominales électriques
Dimensions
A B
E
F
88 mm(3-1/2")
95 mm(3-3/4")
102 mm(4")
G
D
C
Vue de face Vude de côté
* Disponible comme accessoire.
Caractéristiques de l’approvisionnement en eauPression d’eau = 138 kPa (20 psi) minimum, 345 kPa (50 psi) maximum

18 Formulaire n° IHDCH45M-0518
Français
GénéralitésLes vitrines chauffantes intelligentes Hatco sont livrées prêtes à l’emploi, avec la plupart de leurs composants pré-installés. Veillez à ne pas endommager l’appareil ou ses composants lors du déballage du carton d’expédition. La procédure d’installation suivante doit être respectée avant de brancher l’électricité et d’utiliser l’appareil.
AVERTISSEMENTRISQUE DE DÉCHARGE ÉLECTRIQUE: L’appareil n’est pas étanche. Placez l’appareil à l’intérieur dans une zone dont la température ambiante est au minimum de 21°C (70°F).
RISQUE D’INCENDIE : • Placez l’appareil à au moins 25 mm (1ʺ) des murs et
produits combustibles. Si ces distances de sécurité ne sont pas respectées, une décoloration ou une combustion peut se produire.
• Ne posez rien sur l’appareil.
ATTENTIONPlacez l’appareil à une hauteur adaptée au comptoir, à un emplacement pratique à utiliser. L’emplacement doit être plan pour éviter que l’appareil ou son contenu ne tombent accidentellement, et suffisamment solide pour supporter le poids de l’appareil et de son contenu.La National Sanitation Foundation (NSF) exige que les appareils d’une largeur supérieure à 914 mm (36ʺ) ou pesant plus de 36 kg (80 lb) soient fixés sur le plan de travail ou installés au-dessus de ce dernier. 1. Retirez l’appareil du carton. 2. Retirez le ruban et l’emballage de protection de toutes les
surfaces de l’appareil.NOTA: Pour éviter des retards dans l’obtention de la couverture
de la garantie, complétez l’enregistrement en ligne de votre garantie. Lisez la section INFORMATIONS IMPOR-TANTES POUR LE PROPRIETAIRE pour plus de détails.
3. Placez l’appareil à l’emplacement souhaité. Cette procédure nécessite au moins deux personnes.
• Placez l’appareil dans une zone dont la température ambiante est constante (21°C [70°F] minimum). Évitez les zones pouvant être soumises à des déplacements d’air ou à des courants d’air actifs (proximité de ventilateurs d’extraction/de hottes d’aspiration, de conduites de climatisation et de portes ou autres ouvertures vers l’extérieur).
• Assurez-vous que l’appareil est placé à une hauteur appropriée dans une zone facilitant son utilisation.
• Veillez à ce que le comptoir soit à plat et assez résistant pour supporter le poids de l’appareil et des produits alimentaires.
4. Sceller l’appareil au plan de travail avec une pâte étanchéifiante approuvée NSF.
NOTA: Une vanne de fermeture doit être installée sur la conduite d’arrivée d’eau immédiatement en amont du filtre à eau et de l’appareil.
NOTA: La pression d’eau d’arrivée pour cet appareil doit être comprise entre 138 kPa (20 psi) et 345 kPa (50 psi). Si la pression à l’arrivée est trop forte, un régulateur de pression doit être installé en amont du filtre à eau. Voir OPTIONS ET ACCESSOIRES pour obtenir plus de détails.
INSTALLATION 5. Raccordez l’alimentation en eau du site de la vanne de
fermeture au filtre à eau fourni.NOTA: Assurez-vous de respecter le sens d’écoulement de
l’eau indiqué par une flèche sur le filtre. Celle-ci doit être orientée en direction de l’appareil.
6. Rincez le filtre à eau pour en retirer d’éventuelles particules de carbone. Les particules résiduelles d’un filtre neuf peuvent affecter le système d’humidification.
a. Raccordez le tube transparent de 1/4ʺ à la sortie du filtre, et placez l’autre extrémité du tube dans un seau.
b. Ouvrez l’eau et rincez le filtre jusqu’à ce que l’eau ne contienne plus de particules de carbone.
7. Brancher letube transparent de 6 mm (1/4″) de la sortie d’eau sur le filtre à l’un des raccords sur la crépine à eau incluse.
• Les raccords sur la crépine à eau sont des raccordements « à enclencher » pour le tube en plastique de 6 mm (1/4″).
8. Brancher la crépine à eauau raccord d’entrée d’eau de 6 mm (1/4″) sur la partie arrière de l’appareil.
• Le raccord d’entrée d’eau est une connexion à enclencher pour tubes de plastique de 1/4ʺ.
9. Prévoyez un bac de récupération pour le conduite d’écoulement au trop-plein situé à l’arrière de l’appareil.
• Le conduite d’écoulement du trop-plein 3/8" peut également être raccordé à une conduite d’évacuation du site d’installation. Faites appel à un plombier professionnel pour installer le tube d’évacuation conformément aux normes de plomberie locales.
NOTA: De l’eau ne s’écoulera que si un problème survient au niveau de la connexion d’alimentation en eau. En fonctionnement normal, toute l’eau sera atomisée dans la vitrine par le système d’humidification.
Tubed’alimentation
en eau
Raccordd'entrée en eau Conduite d’écoulement
du trop-plein
Raccordement de l’alimentation en eau
ATTENTIONRISQUE DE BRÛLURES: Ne retirez pas les plateaux atomiseurs et ne les réglez pas lorsque l’appareil est chaud. Laissez l’appareil refroidir complètement avant d’effectuer toute opération sur les plateaux atomiseurs. 10. Vérifiez que chaque plateau atomiseur est situé à
l’emplacement correct.NOTA: Le système d’humidification comprend deux plateaux
atomiseurs, un de chaque côté de l’appareil, sous le capot de ventilation à l’avant de l’appareil. Ces plateaux sont mobiles. Ils ont pu se déplacer durant l’expédition et l’installation.
a. Retirez le capot de ventilation situé le long de la façade de l’appareil, en bas, en passant par les portes coulissantes arrières.

19Formulaire n° IHDCH45M-0518
Français
b. Vérifiez la position des plateaux atomiseurs de chaque côté de l’appareil.
. • La poignée du plateau atomiseur doit être alignée verticalement avec le bord supérieur de la fenêtre.
c. Si la poignée est enfoncée trop loin dans l’appareil : • Retirez le plateau atomiseur, replacez-le sur les
supports prévus à cet effet et poussez-le vers l’arrière de l’appareil sur les supports jusqu’à la butée.
d. Si la poignée dépasse de la fenêtre : • Poussez le plateau atomiseur vers l’arrière de
l’appareil jusqu’à la butée. Bras de supportpour produit et vitreavant retiré pourplus de clarté.
Capot deventilation avant
(retiré par lesportes coulissantes)
Plateauxatomiseurs
Poignée d’unplateau alignéesur le bordsupérieur dela fenêtre.
Bordsupérieur
de lafenêtre
Vérification des plateaux atomiseurs
Plateau atomiseur
Supportde plateau
Élément chauffant
Vitre avant nonreprésentée pourune meilleurevisibilité.
Disposition d’un plateau atomiseur
11. Ouvrez l’alimentation en eau et recherchez les fuites éventuelles.
12. Installez les quatre bras de support de produits dans les positions souhaitées. Pour installer un bras de support de produit :
a. Alignez les crochets situés à l’extrémité d’un bras sur les encoches souhaitées des ferrures de support.
b. Insérez les crochets sur les encoches, puis baissez le bras de support jusqu’à ce qu’il atteigne sa position.
13. Placez les supports de produits sur la base décorative. 14. Branchez l’appareil à une prise de courant mise à la terre
et présentant la tension, la taille et la configuration de fiche adéquates. Consultez la section CARACTÉRISTIQUES TECHNIQUES pour plus de détails
Retrait des plateaux atomiseursRespectez la procédure suivante pour retirer les deux plateaux atomiseurs situés sous le capot de ventilation à l’avant de l’appareil.
1. Assurez-vous que l’interrupteur d’alimentation I/O (marche/arrêt) est sur la position O (arrêt), que le câble d’alimentation est débranché et que l’appareil est froid.
2. Retirez le capot de ventilation situé le long de la façade de l’appareil, en bas, en passant par les portes coulissantes arrières.
3. Placez les plateaux atomiseurs dans les fenêtres prévues à l’avant de l’appareil, un de chaque côté.
• Les plateaux atomiseurs sont posés sur des supports juste au-dessus d’un élément chauffant.
4. Retirez les plateaux atomiseurs. Pour retirer un plateau : a. Saisissez la poignée du plateau par la fenêtre avant. b. Commencez par tirer le plateau vers l’avant de l’appareil
tout en l’inclinant vers le haut. c. Continuez à le soulever et à l’incliner jusqu’à ce qu’il
passe par la fenêtre avant.
Fenêtre avant
Plateau atomiseur
Retrait/installation des plateaux atomiseurs
Installation des plateaux atomiseursRespectez la procédure suivante pour installer les plateaux atomiseurs.
1. Assurez-vous que l’interrupteur d’alimentation I/O (marche/arrêt) est sur la position O (arrêt), que le câble d’alimentation est débranché et que l’appareil est froid.
2. S’il est installé, retirez le capot de ventilation situé le long de la façade de l’appareil, en bas, en passant par les portes coulissantes arrières.
INSTALLATION

20 Formulaire n° IHDCH45M-0518
Français
GénéralitésRespectez les procédures suivantes pour utiliser une vitrine chauffante intelligente Hatco.
AVERTISSEMENTLire tous les messages de sécurité de la section CONSIGNES DE SÉCURITÉ IMPORTANTES avant d’utiliser ce matériel.
Assurez-vous que la nourriture a été chauffée à une température adaptée à une alimentation saine avant de la placer dans l’appareil. Le non-chauffage des aliments à une température appropriée peut poser un grand risque pour la santé. Cet appareil n’est destiné qu’à maintenir des aliments préchauffés au chaud.
ATTENTIONRISQUE DE BRÛLURES : Certaines surfaces extérieures de l’unité deviendront chaudes. Soyez prudent lorsque vous touchez ces surfaces.Mise en service 1. Veillez à ce que l’appareil soit branché sur une prise
électrique correctement reliée à la terre et présentant une tension, une taille et une configuration de fiche correctes. Consultez la section CARACTÉRISTIQUES TECHNIQUES pour plus de détails.
2. Vérifiez que les plateaux atomiseurs sont installés correctement (voir la section INSTALLATION pour plus d’informations). AVIS : Ne mettez jamais l’appareil en service sans que les plateaux atomiseurs soient placés en position correcte.
3. Vérifiez que l’appareil est raccordé à l’alimentation en eau du site (voir la section INSTALLATION pour plus d’informations).
4. Mettez l’interrupteur d’alimentation I/O (marche/arrêt) en position « I » (marche).
0:40:00 0:40:00
0:40:00 0:40:00
0:40:00 0:40:00
• Les voyants s’allument et les systèmes de chauffage et d’humidification se mettent en marche.
• Le panneau de commande à écran tactile s’allume et affiche l’écran d’accueil. L’écran d’accueil affiche les minuteurs disponibles correspondants à la position de chaque produit placé dans la vitrine.
NOTA: Les touches et s’allument en rouge au cours du préchauffage. Lorsque la vitrine atteint les valeurs de fonctionnement, les touches s’allument en vert.
INSTALLATION
Interrupteurd'alimentation I/O
(marche/arrêt) Portecoulissante
Panneau de commandeà écran tactile
Commandes
5. Laissez 60 minutes à l’appareil pour atteindre sa température de fonctionnement et ses valeurs d’humidité avant de remplir la vitrine avec des produits alimentaires préchauffés.
NOTA: La vitrine peut accueillir des pizzas d’un diamètre maximal de 457 mm (18ʺ).
82˚ 17%
• Appuyez sur la touchepour afficher la température ambiante et l’humidité relative (RH) de l’intérieur de la vitrine. Pressez la touche pour revenir aux minuteurs de l’écran d’accueil.
NOTA: La vitrine est préréglée en usine pour une température ambiante de 82°C (180°F) et 17% d’humidité relative.
6. Reportez-vous à la procédure « Réglage des paramètres » dans cette section pour changer les valeurs de température ambiante et d’humidité relative (RH), selon les besoins.
Arrêt 1. Mettez l’interrupteur d’alimentation I/O (marche/arrêt) en
position « O » (arrêt) et attendez que l’appareil refroidisse. 2. Effectuez la procédure de « Nettoyage quotidien » décrite
dans la section MAINTENANCE de ce manuel.
MODE D’EMPLOI
3. Installez les plateaux atomiseurs. Pour installer un plateau : a. Hold the pan by the handle and at an angle above the
a. Tenez le plateau incliné par la poignée au-dessus de la fenêtre avant.
b. Baissez le plateau en direction de la fenêtre et placez la partie avant sur le support situé juste au-dessus de l’élément chauffant.
c. Poussez le plateau vers l’arrière de l’appareil sur le support jusqu’à la butée.
NOTA: Si le plateau atomiseur n’est pas arrêté par la butée, il n’a pas été installé correctement. Répétez l’étape 3.
d. Assurez-vous que la poignée du plateau atomiseur est alignée verticalement avec le bord supérieur de la fenêtre.

21Formulaire n° IHDCH45M-0518
Français
Utilisation des minuteursRespectez la procédure suivante pour utiliser les minuteurs pour les produits placés en vitrine.
1. Assurez-vous que l’écran d’accueil avec les moniteurs disponibles est affiché. Dans le cas contraire, appuyez sur la touche .
NOTA: La position des minuteurs sur l’écran correspond à celle des produits dans la vitrine, vue depuis le côté opérateur.
0:35:43 0:21:15
0:39:55 0:05:05
0:00:00 0:40:00
Minuteur à zéroallumé en rouge.
2. Démarrez le(s) minuteur(s) souhaité(s).
• Pressez un minuteur pour démarrer un compte à rebours à partir de la durée présélectionnée.
• Pressez un minuteur et maintenez- le appuyé durant trois secondes pour l’éteindre et le réinitialiser.
• Lorsqu’il ne reste que 10 secondes avant le terme d’un minuteur, il clignote en rouge. Lorsqu’un minuteur atteint zéro, la lumière rouge reste allumée jusqu’à ce que l’opérateur réinitialise le minuteur.
Modifier les réglages de la vitrineRespectez la procédure suivante pour régler la température ambiante et les paramètres d’humidité de la vitrine. La vitrine est préréglée en usine pour une température ambiante de 82°C (180°F) et 17% d’humidité relative.
1. Mettez l’interrupteur d’alimentation I/O (marche/arrêt) en position « I » (marche).
• L’appareil et le panneau de commande à écran tactile s’allument, l’écran d’accueil s’affiche.
2. Pressez la touche .
ServiceFirmware Usage
Control Timers
Testmode TempHumid
• Saisissez le mot de passe "248" au moyen du clavier numérique qui apparaît.
• Le menu Service (entretien) apparaît sur l’affichage.
3. P ressez l a t ouche TEMPHUMID sur l’écran Service pour accéder aux paramètres de température ambiante et d’humidité relative.
4. Réglez la température ou l’humidité relative.
82˚ 17%
• Pressez les touchesou rouges à gauche de l’affichage pour régler la température souhaitée.
• Pressez les touchesou bleues à droite de l’affichage pour régler l’humidité relative souhaitée.
NOTA: Les réglages de température et d’humidité peuvent varier selon la consistance et la composition des aliments.
5. Pressez la touche pour enregistrer ces paramètres et revenir à l’écran d’accueil.
Modifier les réglages du minuteursSuivez la procédure suivante pour modifier la programmation de chacun des minuteurs correspondant aux produits.
1. Mettez l'interrupteur d'alimentation I/O (marche/arrêt) en position « I » (marche).
• L’appareil et le panneau de commande à écran tactile s’allument, l’écran d’accueil s’affiche.
2. Pressez la touche . • Saisissez le mot de passe "248" au moyen du clavier
numérique qui apparaît. • Le menu Service (entretien) apparaît sur l'affichage. 3. Pressez la touche TIMERS sur l’écran Service pour
accéder à l’écran Timers (minuteurs).
Timers
Select Config(Max 8 timers)
MaxSetting
NOTA: Les cases sur l'écran Timers (minuteurs) correspondent à chacun des aux produits disponibles, vous faites face à l’appareil. Pressez la case appropriée pour faire passer le minuteur de visible à invisible sur l’écran d’accueil.
4. Pressez la touche MAXSETTING sur l’écran Timers (minuteurs) pour accéder au réglage de l’heure.
0:40 0:400:40 0:400:40 0:40
Set
a. Appuyez sur la touche SET pour mettre en surbrillance le premier réglage de l’heure.
b. Appuyez sur le rouge ou sur la touche sur l’écran
pour changer le réglage de l’heure.
c. Appuyez sur le réglage minuteur du suivant pour l’activer, et répéter l’étape précédente pour modifier le paramétrage.
d. Appuyez sur la touche DONE quand tous les changements sont terminés.
5. Pressez la touche pour enregistrer ces paramètres et retourner à l’écran d’accueil.
MODE D’EMPLOI

22 Formulaire n° IHDCH45M-0518
Français
Basculement entre Celsius et FahrenheitRespectez la procédure suivante pour basculer l’unité de mesure de la température de Fahrenheit en Celsius et inversement.
1. Mettez l’interrupteur d’alimentation I/O (marche/arrêt) en position « I » (marche).
• L’appareil et le panneau de commande à écran tactile s’allument, l’écran d’accueil s’affiche.
ServiceFirmware Usage
Control Timers
Testmode TempHumid
2. Pressez la touche . • Saisissez le mot de passe
"248" au moyen du clavier numérique qui apparaît.
• Le menu Service (entretien) apparaît sur l’affichage.
3. Pressez la touche CONTROL sur l’écran Service pour accéder aux paramètres de contrôle.
4. Choisissez l’unité de mesure souhaitée sur la ligne « Units » (unités) :
Control Settings
Units F C
Version 01.00.27
• Pressez la case « F » pour choisir les degrés Fahrenheit.
• Pressez la case « C » pour choisir les degrés Celsius.
NOTA: La case de l’unité de mesure active est éclairée en vert.
5. Pressez la touche pour enregistrer ces paramètres et revenir à l’écran d’accueil.
Mise à jour du logicielSuivez la procédure suivante pour réaliser une actualisation du logiciel sur le panneau de commande à écran tactile.
1. Mettez l’interrupteur d’alimentation I/O (marche/arrêt) en position « I » (marche).
• L’appareil et le panneau de commande à écran tactile s’allument, l’écran d’accueil s’affiche.
2. Pressez la touche . • Saisissez le mot de passe "248" au moyen du clavier
numérique qui apparaît. • Le menu Service (entretien) apparaît sur l'affichage. 3. Pressez la touche du firmware (logiciel) sur l’écran Service
pour accéder à l’écran de mise à jour du logiciel.
Firmware Update
Plug-in the USB stick, thenpress the Update button.
Update
4. Insérez le périphérique USB dans le port USB à côté du contrôleur, et appuyez sur la touche UPDATE (de mise à jour) sur l’écran de mise à jour du logiciel.
• La mise à jour va démarrer. Une fois terminée, le panneau de commande à écran tactile va redémarrer et afficher l’écran d’accueil.
MODE D’EMPLOI

23Formulaire n° IHDCH45M-0518
Français MAINTENANCEGénéralitésLes vitrines chauffantes intelligentes Hatco sont conçues pour offrir une durabilité et des performances maximales avec un minimum d’entretien.
AVERTISSEMENTRISQUE DE DÉCHARGE ÉLECTRIQUE : • Mettez l’interrupteur marche/arrêt hors tension,
débranchez le cordon d’alimentation et laissez l’unité refroidir avant d’effectuer tout nettoyage, réglage ou entretien.
• NE PAS immerger ou mouiller abondamment. L’élément n’est pas étanche. Ne pas allumer l’appareil s’il a été immergé ou mouillé abondamment.
• L’appareil n’est pas conçu pour résister aux jets sous pression. N’utilisez pas un pulvérisateur à jet sous pression pour le nettoyer.
• Ne nettoyez pas l’unité à la vapeur et n’utilisez pas de l’eau en quantité excessive.
• Utilisez exclusivement des pièces de rechange authentiques Hatco lorsque cela est nécessaire. L’utilisation de toute autre pièce entraînera l’annulation de toutes les garanties et pourrait exposer les utilisateurs à des tensions électriques dangereuses pouvant mener à des électrocutions ou à des brûlures. Les pièces authentiques Hatco sont conçues pour fonctionner de manière sûre et adaptée dans l’environnement dans lequel elles sont utilisées. Certaines pièces de rechange génériques ne disposent pas de caractéristiques leur permettant de fonctionner en toute sécurité dans des appareils Hatco.
Cet appareil ne contient aucune pièce réparable par l’utilisateur. Si cet appareil doit être réparé, contactez un réparateur Hatco agréé ou le Service après-vente Hatco au 800-558-0607 ou 414-671-6350.
Nettoyage quotidienPour garantir les meilleures performances et préserver l’aspect de la vitrine, il est recommandé de nettoyer l’appareil quotidiennement.
AVISUtilisez uniquement des nettoyants non abrasifs et des chiffons doux. Les chiffons et nettoyants abrasifs risquent de rayer la finition de l’appareil, d’altérer son apparence et de le rendre vulnérable à l’accumulation de saleté. 1. Mettez l’interrupteur d’alimentation I/O (marche/arrêt) en
position « O » (arrêt) et débranchez le câble d’alimentation. Laissez l’unité refroidir.
2. Retirez tous les composants intérieurs et nettoyez-les. • Les composants incluent les supports, les bras de
support, les capots de ventilation avant et arrière, les plateaux ramasse-miettes (situés directement sous les capots de ventilation avant et arrière) et les éléments de base décoratifs.
• Nettoyez et désinfectez les composants dans un évier à 3 compartiments, puis laissez sécher à l’air.
NOTA: Les composants énumérés ci-dessus sont compatibles avec les lave-vaisselle. Toutefois, tous les produits de nettoyage pour lave-vaisselle n’ont pas été testés. Si vous constatez un changement de coloration ou de brillance, changez de produit de nettoyage.
3. Essuyez toutes les surfaces métalliques intérieures et extérieures à l’aide d’un chiffon propre humide non abrasif. Vous pourrez utiliser un nettoyant non-abrasif pour éliminer les tâches difficiles. Les recoins difficiles d’accès doivent être nettoyés à l’aide d’une petite brosse et de savon doux.
4. Nettoyez les panneaux de verre du dessus, de la façade et des côtés à l’aide d’un nettoyant pour vitres traditionnel.
5. Nettoyez les portes coulissantes en polycarbonate à l’aide d’un chiffon doux en microfibres, de savon doux et d’eau. AVIS : N’utilisez pas de serviette en papier ou de nettoyant pour vitres sur des surfaces en plastique. Leur contact pourrait rayer ou endommager votre matériel.
6. Pulvérisez une solution désinfectante sur toutes les surfaces intérieures et extérieures et laissez sécher à l’air libre.
7. Remontez toutes les pièces.
Capot deventilation avant
Piècesde base
Plateau ramasse-miettes avant(sous le capot de ventilation)
Capot de ventilation arrière
Vitre avant non représentée pourune meilleure visibilité. Tous lescomposants peuvent être retiréspar les portes coulissantes arrières.
Plateauramasse-miettes
arrière
Retrait/installation des composants
Nettoyage mensuelObservez la procédure suivante pour le nettoyage et le détartrage périodiques des plateaux atomiseurs.NOTA: La concentration en calcaire et en minéraux de l’eau
utilisée quotidiennement pour le fonctionnement de l’appareil déterminera la fréquence de détartrage..
NOTA: Réalisez cette opération lorsque l’unité ne doit pas être utilisée pendant un certain temps (en fin de journée, par exemple).
1. Mettez l’interrupteur d’alimentation I/O (marche/arrêt) en position « O » (arrêt) et débranchez le câble d’alimentation. Laisser refroidir complètement l’appareil.
2. Effectuez les étapes 2 à 5 de la procédure de « Nettoyage quotidien ».
3. Retirez les deux plateaux atomiseurs (reportez-vous à la procédure « Retrait des plateaux atomiseurs » de la section INSTALLATION du présent manuel).

24 Formulaire n° IHDCH45M-0518
Français
Symptômes Cause Probable Action CorrectriceL’appareil fonctionne mais l’air ne circule pas dans la vitrine.
Moteur(s) soufflant(s) défectueux. Contacter un agent de service agréé ou Hatco pour obtenir de l’aide.
La tension fournie au ventilateur est peut-être incorrecte.
Contacter un agent de service agréé ou Hatco pour obtenir de l’aide.
L’appareil est branché mais rien ne fonctionne.
Pas d’alimentation au niveau de l’appareil.. Vérifier la prise électrique et vérifier que l’alimentation électrique correspond aux spécifications de l’appareil. Si la prise ne fonctionne pas, vérifier le disjoncteur et le réinitialiser, ou brancher l’appareil sur une prise différente.
Les branchements du cordon d’alimentation sont desserrés ou débranchés.
Contacter un agent de service agréé ou Hatco pour obtenir de l’aide.
Le cordon d’alimentation est endommagé. Contacter un agent de service agréé ou Hatco pour obtenir de l’aide.
Interrupteur d’alimentation I/O (marche/arrêt) défectueux.
Contacter un agent de service agréé ou Hatco pour obtenir de l’aide.
L’appareil ne produit pas d’« air chaud » dans la vitrine.
La limite de sécurité est enclenchée ou ouverte.
Contacter un agent de service agréé ou Hatco pour obtenir de l’aide.
Tension incorrecte fournie à l'élément de chauffage.
Contacter un agent de service agréé ou Hatco pour obtenir de l’aide.
Le(s) moteur(s) soufflant(s) ne fonctionne(nt) pas.
Contacter un agent de service agréé ou Hatco pour obtenir de l’aide.
Élément(s) chauffant(s) défectueux. Contacter un agent de service agréé ou Hatco pour obtenir de l’aide.
L’appareil chauffe mais ne produit pas d’humidité dans la vitrine.
L’appareil ne fonctionne plus depuis au moins 30 minutes.
Attendre au moins 30 minutes après mise en route de l’appareil pour que le cycle d’humidification démarre. Puis, attendre encore 30 minutes pour atteindre les valeurs nominales d’humidification. Chaque fois que l’alimentation est coupée, l’appareil a besoin de 30 minutes après sa mise en service pour que le cycle d’humidification démarre.
Humidité trop faible. Augmenter le paramètre d’humidité (voir la section MODE D’EMPLOI).
L’alimentation en eau est coupée ou non raccordée.
S’assurer que l’appareil est raccordé à l’alimentation en eau et que la vanne est ouverte.
Tension incorrecte fournie aux éléments de chauffage de l’eau ou éléments de chauffage défectueux.
Contacter un agent de service agréé ou Hatco pour obtenir de l’aide.
MAINTENANCE
AVERTISSEMENTLa réparation de cet appareil doit être confiée exclusivement à du personnel qualifié. Les réparations par des personnes non qualifiées peuvent provoquer des d écharges électriques et des brûlures.
AVERTISSEMENTRISQUE DE DÉCHARGE ÉLECTRIQUE: Mettez l’interrupteur marche/arrêt hors tension, débranchez le cordon d’alimentation et laissez l’unité refroidir avant d’effectuer tout nettoyage, réglage ou entretien.
GUIDE DE DÉPANNAGE
4. Remplissez un réservoir adapté d’un mélange de 75 % d’eau et de 25 % de vinaigre blanc. N’utilisez pas de vinaigre parfumé.
5. Placez les deux plateaux atomiseurs dans la solution vinaigrée et laissez-les tremper plusieurs heures, de préférence toute la nuit.
6. Retirez les deux plateaux atomiseurs de la solution vinaigrée et nettoyez-les à l’eau chaude et au savon avec un chiffon doux.
7. Rincez les deux plateaux atomiseurs à l’eau claire et laissez sécher.
. 8. Installez les plateaux atomiseurs propres dans l’appareil (reportez-vous à la procédure « Installation des plateaux atomiseurs » de la section INSTALLATION du présent manuel).
9. Pulvérisez une solution désinfectante sur toutes les surfaces intérieures et extérieures et laissez sécher à l’air libre.
10. Remontez toutes les pièces.

25Formulaire n° IHDCH45M-0518
Français
Guide des messages d’alertePressez SNOOZE (reporter) pour différer un message d’alerte de cinq minutes et revenir au fonctionnement normal. Pressez DISABLE (désactiver) pour réinitialiser un message d’alerte. Déterminez toujours les raisons d’un message d’alerte et prenez des mesures correctives.
Message d’alerte DépannageAction corrective (si le dépannage ne
parvient pas à résoudre la panne)Error
SNOOZE DISABLE
Température vitrine basse
S’assurer que les portes sont fermées. Contacter un agent de service agréé ou Hatco pour obtenir de l’aide.
Error
SNOOZE DISABLE
Humidité vitrine basse
S’assurer que l’alimentation en eau est raccordée et ouverte. Attendre 60 minutes pour que les paramètres d’humidité de la vitrine soient nominaux.
Contacter un agent de service agréé ou Hatco pour obtenir de l’aide.
Error
SNOOZE DISABLE
Mauvaise connexion sonde
Sonde de température défectueuse. Contacter un agent de service agréé ou Hatco pour obtenir de l’aide.
Error
SNOOZE DISABLE
Température PCB trop élevée
S’assurer que les ouvertures d’entrée et de sortie du ventilateur de refroidissement ne sont pas obstruées et que l’air circule librement. Redémarrer l’appareil.
Contacter un agent de service agréé ou Hatco pour obtenir de l’aide.
GUIDE DE DÉPANNAGE
Vous avez des questions en ce qui concerne les pannes?Si le problème persiste, veuillez contacter l’agence d’entretien agréée Hatco la plus proche ou Hatco pour obtenir une assistance. Pour trouver l’agence d’entretien la plus proche, rendez-vous sur le site Internet de Hatco (www.hatcocorp.com) et sélectionnez le menu déroulant Support (Assistance), puis cliquez sur « Find A Service Agent » (trouver un agent d’entretien); ou contactez l’équipe d’entretien et de pièces détachées de Hatco :Numéro de téléphone: 800-558-0607 or 414-671-6350Courriel: [email protected]
OPTIONS ET ACCESSOIRESPorte-affichesTrois porte-affiches différents sont disponibles en guise d’accessoires : un porte-affiches au sol, un porte-affiches pour le côté gauche et un porte-affiches pour le côté droit. Le porte-affiches au sol repose sur les pièces de base dans l’armoire. Les porte-affiches pour les côtés gauche et droit sont installés sur les bras de support.
Porte-affichesau sol
Porte-affichespour le
côté gauche
Porte-affichespour le
côté droit
Support pour produits alimentairesUn support pour produits alimentaires circulaire et en acier inoxydable est disponible comme accessoire. Les supports pour produits alimentaires reposent directement sur les pièces de base dans l’armoire pour permettre une meilleure visualisation des aliments. L’armoire peut contenir deux supports.
Kit de régulateur de pression de l’eauUn kit de régulateur de pression de l’eau est disponible comme accessoire. Un régulateur de pression de l’eau est nécessaire lorsque la pression de l’arrivée d’eau est supérieure à 345 kPa (50 psi). Le kit de régulateur de pression de l’eau comprend un régulateur de pression, une jauge de pression, et une vanne d’arrêt.

26 Formulaire n° IHDCH45M-0518
FrançaisGARANTIE LIMITÉE1. GARANTIE DU PRODUITHatco garantit que les produits qu’il fabrique (les « Produits ») sont exempts de défauts de matériel et de fabrication, dans des conditions normales d’utilisation et de maintenance, pour une période d’un (1) an à partir de la date d’achat à condition que l’appareil soit installé et entretenu conformément aux instructions écrites de Hatco ou 18 mois après la date de l’expédition par Hatco. L’acheteur doit prouver la date d’achat du Produit par l’enregistrement de ce dernier auprès de Hatco ou par d’autres moyens satisfaisants pour Hatco, à sa seule discrétion.Hatco garantit que les composants du Produit suivants sont exempts de défauts de matériel et de fabrication à partir de la date d’achat (sous réserve des conditions précédentes) pour la ou les périodes de temps et en fonction des conditions listées ci-dessous :a) Garantie d’un (1) an pour les pièces et la main- d’œuvre PLUS un (1) an supplémentaire pour les pièces uniquement : Éléments du grille-pain à convoyeur (enveloppe métallique) Éléments des tiroirs chauffants (enveloppe métallique) Tiroirs, roues et glissières des tiroirs chauffants Éléments des rampes chauffantes (enveloppe métallique) Éléments des vitrines chauffantes (enveloppe métallique, air chauffant) Éléments des armoires de stockage (enveloppe métallique, air chauffant) Éléments des compartiments chauffants — série HW et HWB (enveloppe métallique)b) Garantie de deux (2) ans pour les pièces et la main-d’œuvre : Gammes à inductionc) Garantie d’un (1) an pour les pièces et la main-d’œuvre PLUS quatre (4) ans pour les pièces uniquement : Cuves 3CS et FRd) Garantie d’un (1) an pour les pièces et la main-d’œuvre PLUS neuf (9) ans pour les pièces uniquement : Cuves des appareils de chauffage d’appoint électriques Cuves des appareils de chauffage d’appoint à gaz e) Garantie de quatre-vingt-dix (90) jours pour les pièces uniquement : Pièces de rechange
LES GARANTIES PRÉCÉDENTES SONT EXCLUSIVES ET REMPLACENT TOUTES AUTRES GARANTIES, EXPRESSES OU IMPLICITES, COMPRENANT, MAIS NE SE LIMITANT PAS, À TOUTES GARANTIES IMPLICITES DE QUALITÉ MARCHANDE OU DE FINALITÉ PARTICULIÈRE OU TOUS BREVETS OU TOUTES AUTRES ATTEINTES AUX DROITS DE LA PROPRIÉTÉ INTELLECTUELLE. Sans restreindre la portée générale des énoncés précédents, CES GARANTIES NE COUVRENT PAS LES ÉLÉMENTS SUIVANTS : ampoules d’éclairage à incandescence enduites, lumières fluorescentes, ampoules de lampes chauffantes, ampoules d’éclairage à halogène enduites, ampoules de lampes chauffantes au xénon, tubes d’éclairage DEL, composants en verre et fusibles ; défaut de produit dans la cuve d’un appareil de chauffage d’appoint, dans un échangeur de chaleur à tubes à ailettes ou tout autre équipement de chauffage d’eau causé par la calcification, l’accumulation de sédiments, la réaction d’un produit chimique ou le gel ; ou une mauvaise utilisation, une manipulation ou une mauvaise application, une installation inappropriée du Produit ou l’utilisation d’une tension inappropriée.
2. LIMITES DES RECOURS ET DES DOMMAGESLa responsabilité de Hatco et la seule voie de recours de l’Acheteur prévues par les présentes seront limitées exclusivement, au gré de Hatco, à la réparation ou au remplacement à l’aide de pièces ou de Produits nouveaux ou remis à neuf par Hatco ou un centre de réparation agréé par Hatco (sauf si l’Acheteur se situe hors des États-Unis, du Canada, du Royaume-Uni ou de l’Australie, auquel cas la responsabilité de Hatco et la seule voie de recours de l’Acheteur seront limitées exclusivement au remplacement des pièces concernées par la garantie) à l’égard de toute revendication effectuée dans les délais de garantie applicables mentionnés ci-dessus. Hatco se réserve le droit d’accepter ou de rejeter toute réclamation en partie ou dans son intégralité. Dans le cadre de cette Garantie limitée, « remis à neuf » signifie une pièce ou un Produit dont les caractéristiques techniques d’origine ont été restaurées par Hatco ou un centre de réparation agréé par Hatco. Hatco n’acceptera aucun retour de Produits sans qu’il n’ait auparavant donné son accord écrit, et tous ces retours approuvés doivent être effectués aux seuls frais de l’Acheteur. HATCO NE SERA PAS TENU RESPONSABLE, DANS AUCUNE CIRCONSTANCE, DES DOMMAGES CONSÉCUTIFS OU INDIRECTS, COMPRENANT, MAIS NE SE LIMITANT PAS, AUX COÛTS DE MAIN-D’ŒUVRE OU PERTES DE PROFITS DUS À UNE UTILISATION OU À UNE IMPOSSIBILITÉ D’UTILISER LES PRODUITS OU DUS AU FAIT QUE LES PRODUITS ONT ÉTÉ INTÉGRÉS DANS OU QU’ILS SONT DEVENUS UN COMPOSANT DE TOUT AUTRE PRODUIT OU BIEN.

27Form No. IHDCH45M-0518
English NOTES

Printed in U.S.A. May 2018 P/N 07.04.880.00 Form No. IHDCH45M-0518
AUTHORIZED PARTS DISTRIBUTORS • DISTRIBUTEURS DE PIÈCES AUTORISÉS
ALABAMAJones McLeod Appl. Svc. Birmingham 205-251-0159
ARIZONAService Solutions Group Phoenix 602-234-2443Byassee Equipment Co. Phoenix 602-252-0402
CALIFORNIAIndustrial Electric Commercial Parts & Service, Inc. Huntington Beach 714-379-7100Chapman Appl. Service San Diego 619-298-7106P & D Appliance Commercial Parts & Service, Inc. S. San Francisco 650-635-1900
COLORADOHawkins Commercial Appliance Englewood 303-781-5548
FLORIDAWhaley Foodservice Repair Jacksonville 904-725-7800Whaley Foodservice Repair Orlando 407-757-0851B.G.S.I. Pompano Beach 954-971-0456Comm. Appliance Service Tampa 813-663-0313
GEORGIATWC Services Mableton 770-438-9797Heritage Service Group Norcross 866-388-9837Southeastern Rest. Svc. Norcross 770-446-6177
HAWAIIBurney’s Comm. Service, Inc. Honolulu 808-848-1466Food Equip Parts & Service Honolulu 808-847-4871
ILLINOISParts Town Lombard 708-865-7278Eichenauer Elec. Service Decatur 217-429-4229Midwest Elec. Appl. Service Elmhurst 630-279-8000Cone’s Repair Service Moline 309-797-5323
INDIANAGCS Service Indianapolis 800-727-8710
IOWAGoodwin Tucker Group Des Moines 515-262-9308
KENTUCKYService Solutions Group Lexington 859-254-8854Service Solutions Group Louisville 502-451-5411
LOUISIANAChandlers Parts & Service Baton Rouge 225-272-6620
MARYLANDElectric Motor Service Baltimore 410-467-8080GCS Service Silver Spring 301-585-7550
MASSACHUSETTSAce Service Co., Inc. Needham 781-449-4220
MICHIGANBildons Appliance Service Detroit 248-478-3320Commercial Kitchen Service Bay City 989-893-4561Midwest Food Equip. Service Grandville 616-261-2000
MINNESOTAGCS Service Minnetonka 800-822-2303 x20365
MISSOURIGeneral Parts Kansas City 816-421-5400Commercial Kitchen Services St. Louis 314-890-0700Kaemmerlen Parts & Service St. Louis 314-535-2222
NEBRASKAAnderson Electric Omaha 402-341-1414
NEVADABurney’s Commercial Las Vegas 702-736-0006Hi. Tech Commercial Service N. Las Vegas 702-649-4616
NEW JERSEYJay Hill Repair Fairfield 973-575-9145Service Plus Flanders 973-691-6300
NEW YORKAlpro Service Co. Maspeth 718-386-2515Appliance Installation Buffalo 716-884-7425Duffy’s Equipment Services, Inc. Buffalo 800-836-10143Wire Northern Plattsburgh 800-634-5005Duffy’s Equipment Services, Inc. Sauquoit 800-836-1014J.B. Brady, Inc. Syracuse 315-422-9271
NORTH CAROLINAAuthorized Appliance Charlotte 704-377-4501
OHIOAkron/Canton Comm. Svc. Inc. Akron 330-753-6634Service Solutions Group Cincinnati 513-772-6600Commercial Parts and Service Columbus 614-221-0057Electrical Appl. Repair Service Brooklyn Heights 216-459-8700E. A. Wichman Co. Toledo 419-385-9121
OKLAHOMAHagar Rest. Service, Inc. Oklahoma City 405-235-2184Krueger, Inc. Oklahoma City 405-528-8883
OREGONRon’s Service, Inc. Portland 503-624-0890
PENNSYLVANIAElmer Schultz Services Philadelphia 215-627-5401FAST Comm. Appl. Service Philadelphia 215-288-4800Appliance Installation & Service Pittsburgh 412-809-0244K & D Service Co. Harrisburg 717-236-9039Electric Repair Co. Reading 610-376-5444
RHODE ISLANDMarshall Electric Co. Providence 401-331-1163
SOUTH CAROLINAWhaley Foodservice Repair Lexington 803-996-9900
TENNESSEECamp Electric Memphis 901-527-7543
TEXASGCS Service Fort Worth 800-433-1804Armstrong Repair Service Houston 713-666-7100Cooking Equipment Specialist Mesquite 972-686-6666Commercial Kitchen Repair Co. San Antonio 210-735-2811
UTAHLa Monica’s Rest. Equip. Service Murray 801-263-3221
VIRGINIADaubers Norfolk 757-855-4097Daubers Springfield 703-866-3600
WASHINGTON3Wire Restaurant Appliance Seattle 800-207-3146
WISCONSINA.S.C., Inc. Madison 608-246-3160A.S.C., Inc. Milwaukee 414-543-6460
CANADAALBERTAKey Food Equipment Service Edmonton 780-438-1690
BRITISH COLUMBIAKey Food Equipment Service Vancouver 604-433-4484Key Food Equipment Service Victoria 250-920-4888
MANITOBAAir Rite, Inc. Winnipeg 204-895-2300
NEW BRUNSWICKEMR Services, Ltd. Moncton 506-855-4228
ONTARIOR.G. Henderson Ltd. Toronto 416-422-5580Choquette - CKS, Inc. Ottawa 613-739-8458
QUÉBECChoquette - CKS, Inc. Montreal 514-722-2000Choquette - CKS, Inc. Québec City 418-681-3944
UNITED KINGDOMMarren Group Northants +44(0)1933 665313
HATCO CORPORATIONP.O. Box 340500
Milwaukee, WI 53234-0500 U.S.A.800-558-0607 414-671-6350
Register your unit online!See IMPORTANT OWNER INFORMATION
section for details.
S’inscrire en ligne!Lisez la section INFORMATIONS IMPORTANTES
POUR LE PROPRIETAIRE pour plus de informations.