RegiStax 5 Introduction - Manual - Astronomie.beastronomie.be/registax/registax5usermanual.pdf ·...
51
RegiStax 5 Manual 21 mar 2009 (V1.1) RegiStax 5 Introduction This is the 1 st version of a manual for RegiStax 5. This manual was written at the end of RegiStax 5 de- velopment. The examples presented in this manual are based on image-sequences that were kindly supplied by Bob Pilz (Moonimages) Damian Peach (Saturn) and Sylvain Weiller (Mars). INTERFACE We have been developing RegiStax 5 based on the framework of RegiStax 4. Many of the functions you are used to from RegiStax 4 are still available and can also easily be found in the interface. In the im- age below you can see several parts of the new interface. You will also see many changes. After startup the first major change is the interface. To allow more flexibility in designing a rather complicated interface and to allow the user to keep things simple we had to redesign the interface again. The image below shows the major features of the new interface. The names in CAPITALS refer to naming-conventions that will be used throughout this manual to state where a control can be found. 1)The program BUTTONBAR, this bar has functionality that is always avail- able. 2)The TABPAGES, they show the 5 processing stages of RegiStax. The blue-tabpage is the ACTIVE tabpage. Green tabpages can be opened and grey tabpages are not (yet) available. 3)The TABPAGE-CONTROLS, these are controls that will be available at all times when the user is active at a tabpage (processing stage). 4)FUNCTION TABS, on the leftside (and for wavelets also on the right- side) you can find FUNCTION TABS. The topmost tab contains the func- tions that a user will use most often. 5)FUNCTION TAB – GROUP Every function tab can have one or more groups of functions. The groups have a CAPTIONBAR on top that states the name of the group and sometimes has additional buttons/controls. The GROUPS can be resized by the user. The “downward or upward” chevrons in the groups (in the example you see these on the rightside of the groupheader that states “align settings”) allow minimizing and maximizing between user set defaults. If the user wants to minimize the group this can also be done by simply moving the groupheaders. The groups can also be dragged to be located at a higher/lower position in the FUNCTIONTAB. These settings are recorded and stored, when you start RegiStax again it will be us- ing the settings of the last time you used the program. 6)TOOLWINDOW. Several of the functions in RegiStax will make a toolwindow pop up with additional controls or graphs. The toolwindows can be placed at any location the user finds usefull. The locations and size of the toolwindows are recorded and stored, when you start RegiStax again it will be using the settings of the last time you used the program. Page 1 of 51
-
Upload
trinhquynh -
Category
Documents
-
view
215 -
download
1
Transcript of RegiStax 5 Introduction - Manual - Astronomie.beastronomie.be/registax/registax5usermanual.pdf ·...

RegiStax 5 Manual 21 mar 2009 (V1.1)
RegiStax 5
Introduction
This is the 1st version of a manual for RegiStax 5. This manual was written at the end of RegiStax 5 de-velopment. The examples presented in this manual are based on image-sequences that were kindly supplied by Bob Pilz (Moonimages) Damian Peach (Saturn) and Sylvain Weiller (Mars).
INTERFACEWe have been developing RegiStax 5 based on the framework of RegiStax 4. Many of the functions you are used to from RegiStax 4 are still available and can also easily be found in the interface. In the im-age below you can see several parts of the new interface. You will also see many changes. After startup the first major change is the interface. To allow more flexibility in designing a rather complicated interface and to allow the user to keep things simple we had to redesign the interface again. The image below shows the major features of the new interface. The names in CAPITALS refer to naming-conventions that will be used throughout this manual to state where a control can be found.
1)The program BUTTONBAR, this bar has functionality that is always avail-able.
2)The TABPAGES, they show the 5 processing stages of RegiStax. The blue-tabpage is the ACTIVE tabpage. Green tabpages can be opened and grey tabpages are not (yet) available.
3)The TABPAGE-CONTROLS, these are controls that will be available at all times when the user is active at a tabpage (processing stage).
4)FUNCTION TABS, on the leftside (and for wavelets also on the right-side) you can find FUNCTION TABS. The topmost tab contains the func-tions that a user will use most often.
5)FUNCTION TAB – GROUPEvery function tab can have one or more groups of functions. The groups have a CAPTIONBAR on top that states the name of the group and sometimes has additional buttons/controls. The GROUPS can be resized by the user. The “downward or upward” chevrons in the groups (in the example you see these on the rightside of the groupheader that states “align settings”) allow minimizing and maximizing between user set defaults. If the user wants to minimize the group this can also be done by simply moving the groupheaders. The groups can also be dragged to be located at a higher/lower position in the FUNCTIONTAB. These settings are recorded and stored, when you start RegiStax again it will be us-ing the settings of the last time you used the program.
6)TOOLWINDOW. Several of the functions in RegiStax will make a toolwindow pop up with additional controls or graphs. The toolwindows can be placed at any location the user finds usefull. The locations and size of the toolwindows are recorded and stored, when you start RegiStax again it will be using the settings of the last time you used the program.
Page 1 of 51
RegiStax 5 Manual 21 mar 2009 (V1.1)
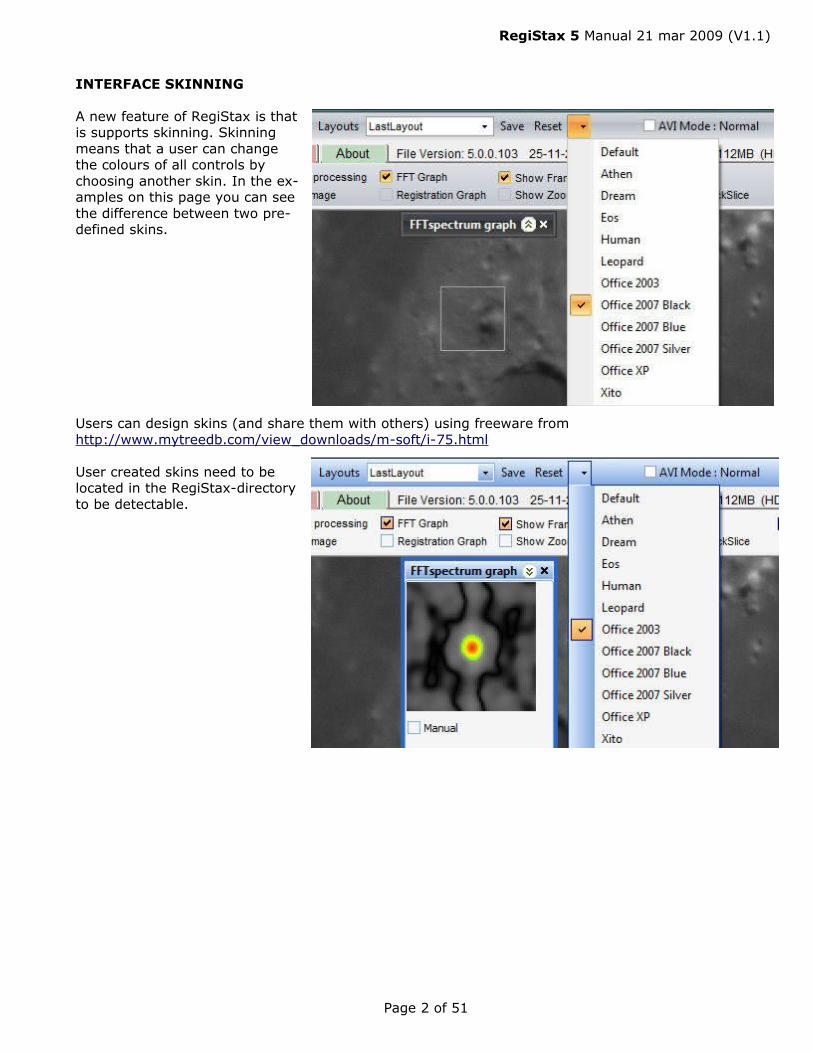
INTERFACE SKINNING
A new feature of RegiStax is that is supports skinning. Skinning means that a user can change the colours of all controls by choosing another skin. In the ex-amples on this page you can see the difference between two pre-defined skins.
Users can design skins (and share them with others) using freeware from http://www.mytreedb.com/view_downloads/m-soft/i-75.html
User created skins need to be located in the RegiStax-directory to be detectable.
Page 2 of 51

RegiStax 5 Manual 21 mar 2009 (V1.1)
General changes
Compared to RegiStax4 the following parts of RegiStax have changed:− new support for RAW-DSLR (Nikon, Canon, Minolta, DNG) images− better support for TIFF and FITS images− supports AVI's larger than 1Gb− can process up to 50 000 frames − can process up to 500 alignpoints− allows variable alignboxes (user defined)− aligns/optimizes alignpoints simultaneous (in V4 sequential)− allows filtering of images before alignment− allows masking of wavelets to prevent noise− allows denoising/deringing− allows full preview of large images at all stages− allows projectsaveing/loading− allows image-derotation− allows processing of region-of-interest− prevents alignboxes/alignpoints of drifting away− allows the user to move large images (when viewing them) using the
rightmousebutton down and dragging.
Page 3 of 51

RegiStax 5 Manual 21 mar 2009 (V1.1)
How to Process images in RegiStax 5 ?
In the explaination below you can see how processing images in RegiStax 5 works. Several of the more advanced and sometimes complex controls are used in this manual but this is not a definitive guide to all controls. The second part of this manual will list all available controls with the associated functionality explained.
The general workflow during the usage of registax can be divided in the following steps:
1) Loading Images2) Setting Alignpoints3) Aligning4) Optimizing5) Stacking6) Processing with wavelets
Step1. LOAD IMAGES
RegiStax allows the users three main ways to select and use images.
a)Load images using the SELECT-button
b)Load images using the MRU-button
c)Load images using Drag&Drop
a). Load images using the SELECT-buttonThis is the most used option, after pressing SELECT a dialog will be presented to the user. The dialog will allow the user to load the followingsingle frame filetypes:
BMP, JPG, FIT(8,16,32 bits integer and 32 bits floating), TIF(16 bits uncompressed), PNG(8, 16 bits) and the followingDSLR-RAW image formats: CRW, CR2, NEF, DNG, MRW.
For single frame formats the user can choose a single file by simply clicking on the filename in the dialog. When a file is choosen a preview can be seen in the dialog. Double-clicking the filename will load the file into RegiStax and process it also. Most of the time the user will however want to user multiple images in RegiStax to align and stack. This can be achieved by selecting all the filenames in the dialog using the default windows functionality for selecting multiple features in a list. Using the shift-key pressed a group of files can be selected by the user. The user starts this by selecting the first filename of the group then press the shift-key (keep it pressed) and then bring the cursor to the filename at the end of the group that needs to be selected. The user can also select files using the ctrl-key (keep it pressed), every file that is to be included in the selection needs to be selected (clicked). After selecting the files press the "OPEN" button in the selection dialog. The filenames will now be loaded (not the files themselves !) into RegiStax.
multiple frame filetypes:
Page 4 of 51

RegiStax 5 Manual 21 mar 2009 (V1.1)
AVI, SER (8..16 bits) and RFL (RegiStax Framelist format).All these formats have multiple-frames in one file and thus are the easiest way to process large groups of images. The RFL format is new and was added to allow users to use large groups of single frame filetype images without the need to select all individual files again. RFL-files can be created when a group of files is saved as a framelist from the Framelist-window (Show Framelist).
b). Load images using MRU (most recently used)This is new in RegiStax. The MRU-button will show (when pressed) the last 10 files loaded into RegiStax. If a groups of single-frame files was selected only the 1st filename will be shown and selecting that filename will NOT loading the group again. So only AVI,SER and RFL filenames in the MRU-list will directly lead to the loading of a group of frames. All other formats will lead to loading a single frame.
c). Load images using Drag&DropDrag and drop was used in previous versions of RegiStax by users that had problems selecting many frames in the RegiStax dialog. The user opens RegiStax and also opens a separate windows explorer dialog. In that dialog the user selects all the files of a single-format filetype he/she wants to process. After selecting the files the user drags the files to the registax window and drops them overthere. Several groups can be dropped onto RegiStax in succession to create a larger group.
Page 5 of 51

RegiStax 5 Manual 21 mar 2009 (V1.1)
Step 2. SET ALIGNPOINTS
In RegiStax V4 the user allready had several ways to set Alignpoints. In RegiStax V5 we have exten-ded these options. There are 3 ways of setting alignpoints:
a)Setting Alignpoints by hand
b)Let RegiStax estimate Alignpoints
c)A mix of both
PreparationsThe image to the right shows the Align options area at startup. Before you set alignpoints you need to decide to either go with the default (1 alignpoint) or use multi (many alignpoints) or no alignpoints at all.
Before you start setting alignpoints, select a good frame in the image-sequence that looks better than average. If you have a large amount of drifting dont select a frame that is too far into the set of frames as this might give problems during the start of aligment. In RegiStax V4 the referenceframe was allways the frame the user had located in the sequence of images to position the alignpoints on. In RegiStax V5 we allow the user to load a referenceframe which serves two purposes, first off all it allows the user to find the best alignpoints better (for instance using the estimate-alignpoints function) and secondly it can be a far better reference for the topology of the image.
When using the default method, the user can only set one alignpoint. The user also needs to set the alignboxsize (the area used to estimate quality and estimate the alignment). The last used alignboxsize will be default at startup. If the "User set Alignbox" is checkmarked the size of the alignbox set by the user will be used. The user will see -when positioning an alignpoint - a double box in this case. The outerbox is the nearest default alignboxsize, thats the area that will be used for image-quality estimation and the inner alignbox is the area that will be used for alignment. This allows the user to use small alignboxes that align properly but also will estimate image-quality based on a good amount of pixels. Most other features are merely usefull in multi-point alignment. The examples below are therefore aimed at explaining the ways to set multipoints.
Additionally in V5, the user can load a separate reference frame (bmp, png). This frame will serve the same purpose as a chosen reference frame but can be loaded directly into the software and will NOT be a part of the final stacked image. The advantage of such a reference-frame is that it can be true in terms of topology (location of features and space between them) and also have a good image-quality. The reference frame needs to have exactly the same size (pixels) as the images that are being processed. A good way to construct a separate reference frame is to do an initial processing with only a few widely scattered align points, and then to create and save an unsharpened image containing only a handfull of frames.
a) Setting Alignpoints by handThis is the method we allready had at hand in previous versions. The user selects Multi in the alignmentmethod box and a multi-alignpanel pops up.
This panel will show the alignpoints and also allows the user to load alignpoints and save them also for later usage. A new feature is the maximum-drift setting. This is very usefull in multipoint-alignment. If any of the alignpoints drifts away more then the user-set amount of pixels (relative to alignpoint# 1) it will be restricted to the shift of alignpoint #1. We refer to Alignpoint #1 as the Master-Alignpoint. Below the save/load point buttons a new control is visible. When openend (use the arrowbutton on the rightside) it will show the available saved sets of alignmentpoints that have the same name as the file that is being processing. So if you work on an AVI called MOON.avi and save your alignpoints with
Page 6 of 51

RegiStax 5 Manual 21 mar 2009 (V1.1)
names like MOON100points or MOON4x64 Registax will show those alignmentpoint-files since they have MOON in their name. Everything else is much as before.
Now the user can set points by hand, simply set the alignboxsize and position a point at a location that looks rich in contrast. After setting a point the panel shows the X,Y position and the size of the alignbox (FFT). The user can set many boxes of the same size but also can mix them, just select another alignboxsize and position the larger/smaller boxes. Its often wise to make sure that the master-alignpoint (#1) is located at the richest area in terms of contrast. Also the alignbox of the master-alignpoint should not be small, 64x64 is the smallest usefull for this point. The user can also use the User-set alignbox sizes mixed. In the image to the right you can see we set alignpoint 1 using a 64x64 box, alignpoint 2 has a 128x128 alignbox and alignpoint 3 has something special. The alignbox for alignpoint 3 is 64x64 in size but it also has a ZP (zeropadding) value of 11. This means that on all sides of this alignbox 11 pixels will not be used during alignment. The alignbox is therefor 64x64 for quality estimation and 42x42 for alignment. Smaller alignmentboxes are considered better to align on finer details. When you use a lot of user-set alignpoints its wise to record them, when saving them (save points) be aware that RegiStax also saves the number of reference-frame you have been using to position. So if you load the points again they will be at the same location and on the same imageframe.
b) Let RegiStax estimate AlignpointsIn RegiStax V4 we had a way to estimate alignpoints, the method uses was however not very powerfull. In RegiStax V5 you will see things are a lot better.To estimate alignpoints you need to select the ESTIMATE tab in the multi-alignmentpanel (next to alignpoints). When pressed you see the panel to the right. There are many controls you can use and most of them are recorded, so next time you dont need to set them again ! Starting from the top we have the button "SET MASTER ALIGNPOINT" .When pressed the user can position a master-alignpoint based on the size of the alignbox or user-set alignbox. This point will alignpoint #1 and when you estimate the other points they will not overwrite this point and also keep their distance. Next control is the Method, we have method1, method2 and matrix. The matrix will setup a set of alignboxes arranged as a matrix, the user can set both the number (X,Y) and the size of the alignboxes. The default X,Y of 2 will setup a scheme of 2 x 2 = 4 alignboxes all 64x64 pixels large. This can sometimes be usefull. But most of the time we will be using method 1 or 2, they work slightly different and the user has to find out what works best for the user's images. The method uses the threshold, detectionlimit, radius to calculate possible alignpoints. Increasing the threshold (range 2-15) or detectionlimit will lower the number of alignpoints. The detectionlimit will block setting alignpoints on pixels with an intensity lower than the detectionlimit. The radius calculates the alignpoint strength based on an area around the pixel. A larger area will create less alignpoints. The minimum distance and free space to edge control how close alignpoints are allowed to be near to each other. When calculating the best alignpoints RegiStax orders the points on strenght and then works from the strongest to the weakes found alignpoint. If the next alignpoint-candidate is too close to either the edge of another (stronger) alignpoint it will be neglected. Finally we also have "variable sized alignbox". In this mode RegiStax will mix alignbox sizes to create a scheme with minimal overlap between alignboxes. WHen you are not happy with the estimates, simply change the settings and press estimate again.
Page 7 of 51

RegiStax 5 Manual 21 mar 2009 (V1.1)
This example shows how the scheme looks when not using variable sized alignboxes. Notice that alignbox1 is highlighted.
This example shows how the scheme looks when using variable sized alignboxes. The overlap between boxes is minimal this way. In large smooth areas few alignboxes appear and near to rich areas many boxes appear.
c) A mix of bothA user can simply first set a group of alignboxes/points using the estimate method and then still add several points by hand or remove points. Adding them is like we are used to and they are based on the alignboxsize used. To remove an alignbox you have to double-click using the RIGHT-MOUSE button.
Page 8 of 51

RegiStax 5 Manual 21 mar 2009 (V1.1)
Step 3. ALIGNING
The alignment stage will be used to do an initial registration of the alignpoint(s). This registration will be refined during the optimizer stage. A good initial alignment will make the workload for the optimizer smaller (best solution found more easily/faster), so this is an important stage for any subsequent processing.
In RegiStax V4 the user already had several ways to set Alignpoints. In RegiStax V5 we have extended the options for the user. There are 3 ways of setting alignpoints, by hand, let RegiStax estimate them or a mix of both. In the text below you can see more about this we explain three ways of aligning images:
a)Simple Aligning b)Aligning using Gravity-Centrec)Aligning using filters
a) Simple AligningThis is more or less the same as the previous RegiStax versions. The main difference is that multi-point alignment will be done in one single processing run. In V4 every alignpoint would be processed in seperate runs during alignment, so for 50 alignpoints that would mean all images had to be loaded 50 times. Loading images is time-consuming and slows down processing. In V5 we have therefore changed this to a simultaneous alignment of all alignpoints. That speeds up alignment of multi-points considerably, using the new maximum amount of alignpoints (500) is however still timeconsuming ! During alignment you will see the alignpoints at every image in the sequence, when an alignpoint drifts off compared to the "master alignpoint #1" it will blink in red during alignment. RegiStax will limit the drift to the value set by the user (see Setting Alignpoints). During alignment you will see in the statusbar on the lower-right how much time RegiStax estimates that will be needed to finish alignment.
To start alignment just press the ALIGN button in the TABPAGE-CONTROLS.
b)Aligning using Gravity-CentreSometimes we are dealing with images that are difficult to align, think off a solar image that nearly fills the whole image but hardly has any features (eg. solar spots). In Registax V4 aligning these images is hardly possible. In V5 we have developed "gravity-centre" alignment, this type of alignment calculates the "centre of gravity" in each image based. You can use this form of alignment as a single option, the gravity-centre will then also be used as the alignpoint, but you can also use (and its adviced) this form of alignment with multiple alignpoints. The alignpoints can be set as we normally do but the "gravity-centre" will serve as the master alignpoint. Again, alignpoints will be limited in drifting away from the position of the gravity-centre point during alignment. During optimizing the gravity-centre will NOT be used. Although this method was mainly developed for aligning large solar/full moon images it
Page 9 of 51

RegiStax 5 Manual 21 mar 2009 (V1.1)
can also be usefull in several other occasions. For instance if you have a large series of an object (planet/moon/ISS) that is jumping around over an otherwise dark image erratically. The gravity centre can easily find the object as long as there are no other objects coming in/out of the scene. A bright object on a dark background works best when using this method. After setting “centre of gravity” and setting the alignpoints the ALIGN button starts alignment.
c) Aligning using filtersSome images are difficult to align due to noise, little contrast or other image-artefacts.
RegiStax V5 has a set of 4 different filters that can be used (together) to pre-process images before they are aligned, the filters can be used in conjunction with both normal and gravity-centre alignment. The filters are active both during alignment and optimizing but NOT during stacking.
The filters are called by setting the “filters” checkbox which is located just below the slider on the alignmentpage.
The filters are :- Blur :uses a gaussian blur with a radius set by the user to blur the image. This is often usefull for images that have "static" noise. This type of noise is less random than normal noisy and can lock the alignment onto a pattern. When static noise is present after stacking and using wavelets the user oftenl see diagonal lines. Aligning/optimizing with the blur-filter can prevent this from happening.
- Gamma: sometimes the features a user wants to align on are very dim. Setting the gamma value of the image different can help in improving the contrast.
- Stretch: this allows the user to clip (stretch) the intensity values of the image. Everything below the low-value will be 0(black) and everything above the high-value will be 255 (white). Especially raising the low-value can be helpfull to erase background noise.
- Negative this simple creates a negative image, some users use this to make dim/dark areas better visible to position alignpoints.
Again alignment is started by pressing the ALIGN button
Page 10 of 51

RegiStax 5 Manual 21 mar 2009 (V1.1)
When alignment has finishedAfter alignment is finished the user has to choose how many frames will be used. This choice will limit all processing during optimizing/stacking and wavelet-enhancement. If you find out you chose too little frames at the stacking stage, you will need to start alignment all over again. Choosing too many (for instance all) will cost more optimizing/stacking time but will allow you to search for the best stacksize. You choose the number of images used for further processing by dragging the slider below the previewimage to the number of images you want to have used for every alignpoint. If you select 200 frames this means RegiStax will find for every alignpoint the 200 BEST frames, there is a difference with V4 at this point. In V4 RegiStax would use the 200 best frames for alignpoint #1 and for all the other alignpoints it would use also 200 frames but they were not selected on quality. In V5 we have improved this functionality, now each alignpoint gets the X best frames available.
Page 11 of 51

RegiStax 5 Manual 21 mar 2009 (V1.1)
Press the Limit button the moment you have decided how many frames will be used. This will automatically take you to the Optimizer-page.
WARNING: After pressing LIMIT you cannot start alignment again. Before pressing Limit it is possible to start alignment again if you are unhappy with the results of alignment.
Page 12 of 51

RegiStax 5 Manual 21 mar 2009 (V1.1)
Step 4. OPTIMIZING
The optimizer is used to “optimize” the estimated shifts for every alignpoint in every frame the users has selected. We explain in more detail how to use the optimizer in 2 often used modes:
a)Simple optimizingb)Using Create Referencec) Simple optimizingOn the optimizer page we are presented with several choices. The most important for basic optimizing are the "optimizer settings". Below we describe the functionality of the most used settings.
- Fast optimizer: this is the successor to the single-run optimizer from V4. But its a lot better and can be used instead of the older method. The older method tries finding the best alignment position in a grid of possible positions set by the user -search area. If the user sets a search area of 4 that means the optimizer will be testing a grid of positions 4 positions shifted in any directions. This means an 9x9 grid of positions gets tested for each alignpoint. The Fast optimizer does not use the setting of the search area but searches in a "clever" way. Therefore we can allow it to search in larger area, the search area for this method is 51x51 positions but it can search those a lot faster. If you dont trust the result, unchecking the fast optimizer will ensure you will find the best alignment shift but not fast !
-Optimizer style : for backward compatibility we have left V4style optimizing available. V4style means that every alignpoint gets treated separately. So for 50 alignpoints the optimizer will run 50 rounds and every frame will be loaded 50 times. In V5style (the new default) all alignpoints are optimized at the same moment. You will be able to see the aligned area for up to 3 alignpoints during optimizing.
-Optimizer difference: The optimizer tries to find the best shift by minimizing the difference between the aligned area on the frame that is getting processed and the referenceframe. The actual difference can be calculated in 2 ways, squared or absolute. When using squared the intensity difference between 2 pixels is squared and summed for the alignmentarea. When using absolute the difference between 2 pixels is calculated but if the difference is negative it will be treated as a positive difference, again all the differences are summed for the alignmentarea. In V4 we only had squared available, in V5 absolute can also be used. Theoretically there is no clear sign of either method being the "absolute" best. If large scale user testing will point in a certain direction this website will be mentioning it.
-Optimizer limits :These are mainly valid when not using the fast optimizer, the optimize-until setting is a threshold. If at the end of the optimizer-run the total sum of differences (all frames) has descreased more than the set value (in %) another run of the optimizer will try to optimize even further. The other control was allready explained under "fast optimizer".
-Graphs : These are the optional graphs the user can see during optimizing.
Usage When the user has set the optimizer choices (or left the defaults on) you can either press the "optimize & stack" button or the "optimize" button. Using the last choice will keep you on the optimizer-page, you can change settings and try again or go whenever you want manually to the stacking-page by clicking on the (green) stack-tab. The “optimize and stack” option will start the optimizer and after the optimizer is finished it will also proceed to the stackingpage, then it will
Page 13 of 51

RegiStax 5 Manual 21 mar 2009 (V1.1)
stack all the frames and you will be ending up at the wavelets.
Create Reference (all above settings of optimizer controls also apply to create reference)Sometimes the user wants to optimize using a much improved reference-frame, especially when the individual images show loads of noise or distortion this can a be wise way to operate. The Create Reference procedure can make a good referenceframe often using only a few frames (10s). The user simply sets the number of frames that need to be stacked for each alignpoint. This is different compared to V4, in V4 the user would set the number of frames to used for the referenceframe. If the user would select 50 frames in V4 that would select the best 50 frames for alignpoint #1 and all other points would get the same 50 frames. In V5 setting 50 frames/alignpoint will make Registax select the 50 best frames for each alignpoint, the total amount of frames will therefore be (a lot) larger than 50. When you use many alignpoints be aware that this will force RegiStax to use a lot of frames to create a reference-frame. After setting the number of frames/alignpoint press “Create”. Then the optimizer is launched and based on your settings will optimize the frames, after that it starts stacking the frames. After stacking the users ends up at the waveletspage. You can set the wavelets to increase the amount of details in the image, make sure that you are not also increasing the noise !! You can better proceed using a slightly blurred referenceframe than a referenceframe with excessive noise since that might "mislead" the alignment. After setting the wavelets or other settings press “Continue”. That will bring you back to the optimizer-page. You can now continue using the simple optimizer-procedure as described above. If any of the filter-options (see alignment) was used the reference-frame will also be filtered using these options.
Step 5. STACKING
The stacking stage is one of the least changed sections in RegiStax 5. There are 2 modes of stacking, default stacking (no special controls needed) and Sigma-clip stacking.
Default StackingDefault stacking is very simple, you only have to press the STACK Button. RegiStax will stack all the frames and after stacking is finished you can go the the waveletspage (the tab has become green).
A few common used controls:- expand to maximum imagesize: when this is selected the final stacked image will be larger than your original images. It will be enlarged so that all shifts (present in the stacked images) of images will be visible. −Fast method : when stacking multiple-alignpoint frames RegiStax needs to decide for each frame where every “section” around an alignpoint starts/ends for that frame. Using “fast method” will make estimating these sections faster, only once during stacking this will be estimated and this will be used to select which areas need to be stacked in each frame. This is necessary since not every frame we used is amongst the best X frames for a given alignpoint. By default fast method is ON.- Feather : when stacking image with multiple alignpoints the sections for adjacent alignpoints might be shifted slightly different. This can create overlap (not a problem) or gaps when stacking. The feather feature enlarges each section with a few pixels in all directions which ensures that more overlap between adjacent sections is guaranteed. Its wise to use it when stacking multiple points.
Sigma-clip StackingSigma Clip stacking is mainly used to remove effects from hotpixels or “cosmic rays”. You can set this mode by pressing the “ACTIVE” button in the caption of the SIGMA-STACKING group. Every frame will first be used to estimate – for each pixel – extreme values. After that initial run every frame will be stacked again but the extreme values will NOT be stacked. The sigma-setting sets the level of the
Page 14 of 51

RegiStax 5 Manual 21 mar 2009 (V1.1)
extreme-value cutoffs, a sigma higher than 3 will only detect few or even no frames above/below the cut-offs.
Step 6. WAVELETS
Many things have been changed and added to the WAVELETS section. The default functionality however (using the wavelet sliders etc) has more or less stayed the same. We explain some of the functions available. If any of the functions becomes used its button will remain in a “highlight” state until the function is closed or the button is pressed again. The buttons “toggle” the state of the toolwindows.
Most of the functions are located on the rightside FUNCTIONTAB group called “functions”.-Histogram :This opens the histogram window and allows the user to stretch the histogram.-Gamma : This opens the gamma window, functionality as in V4.-(NEW)Colour Mixing : this opens a special window which allows the user to create a B/W image from a colour image. Additionally when LRGB stacking was used the user can also mix the colours. This replaces the old LRGB controls.
-view zoomed: This opens the zoom-panel. The user can set the area to inspect with the zoom-panel by pressing the CTRL-key and moving the mouse. Once the CTRL key is released the zoom-area will stay locked at that location. The zoompanel shows a 2x zoomed version of the original image.
-(NEW)view compare: this is a new control that allows the user to inspect what happens when changing settings in wavelets or other controls. After the button is pressed the toolwindow will popup. It shows a set of controls on top of the toolwindow. The leftmost control allows the user to show the active image into either the TOP or BOTTOM image of the toolwindow. There are 3 sections in the toolwindow, a TOP image, a BOTTOM image and completely below the DIFFERENCE image. The 2nd and 3rd control allows the user to use the compare function using either 1x or 2x magnification. Every time you change one of the controls, the difference-image on the bottom will show the difference. Positioning the area you want to compare is done in the same fashion as for the zoom-toolwindow. Press CTRL and move the mouse to position the area to be inspected. After that, set your wavelets or any other control to a value you want to use as a default. Then change the TOP to BOTTOM (or vice versa) and change the wavelets controls again. You will see the effects of your each of your actions directly.
-view stacksize: when used this will show -in red – how many frames were used for every pixel in the image. This can be helpful when inspecting images that show odd effects (edges, smearing).
-Resize image: this function can be used to save your images in a different size than the original (smaller/bigger)
-RGB align: sometimes the colour-channels in an image-sequence were displaced slightly (often due to chromatic effects/errors either in the camera/telescope used or due to atmospheric effects). This function will estimate a “best” shift to combine the RGB channels.
-RGB balance: when images show a colour-cast and/or a white-balance that looks not ok you can use this toolwindow to change the way the colours are mixed.
-(NEW)Masking: this function was added at the last stages of development, therefore it might not by functioning allways as expected. The idea behind masking is that the user can either load or create a mask that can limit the way wavelets enhance the image. For instance when you enhance the craterwalls on a lunar image sometimes you could enhance the craterwall further but at the same moment noise would be also “enhanced” on the craterfloor. This control allows you to limit effect of the the wavelets mainly to the craterwalls keeping the craterfloor noisefree. There are currently 2 methods available to create masks, LO-HI clipping and LO-HI gradient. Lo-Hi Clipping simply sets the lo/hi values of any image above and below which wavelets will be ineffective. This is used in conjunction with the feather setting on the same toolwindow. The feather controls how the wavelets are limited above and below the LO-HI settings. If you use for instance a LO setting of 50 with a feather of 20 all original image-intensity values lower then 50 will show limited effects of the wavelets. The limitation will
Page 15 of 51

RegiStax 5 Manual 21 mar 2009 (V1.1)
increase from 50 downto 50-20=30. Below value 30 wavelets have NO effects anymore, at value 40 wavelets are 50% effective. The functionality of LO-HI gradient is much alike this, the routine however is completely different. Instead of clipping above/below an intensity value RegiStax uses calculated gradient values. The gradient is calculated based on the differences between pixels and their surrounding. Pixels with a large difference (absolute) with their surrouding pixels get a higher value than pixels in equal intensity areas. This allows often better control of the mask. Think of 2 lunar craters with different average image-intensity values, in the LO-HI Clipping method it will be difficult to have the wavelets not effective on each craterfloor since they are different intensities. The LO-HI Gradient will not be affected by the difference in average intensity and will allow less effects on the craterfloors.
-(NEW)Denoise/Dering: Another new function. This function allows the user to limit the noise in the image by reducing effects of the wavelets in layer 1. The user can set the amount (%) of wavelets that need to be controlled, this amount corresponds to the % of all available pixels that are NOT effectively showing the effects of the wavelets. In the same toolwindow deringing is available, the tool calculates areas of very high gradient and allows the user to limit the effects of the wavelets on the “dark” or “bright” side of the gradient. The “dark” side of the gradient is the area between the topic and the surrounding darker area, for instance for stars (this tool is very effective for that) if you only use the “dark side” and limit the functionality of the wavelets the outside surrounding of the star will not be affected by the wavelets. The “bright side” controls in the same fashion but on the “inside” pixels of the star. For stars often limiting the dark-side is enough, but for instance for lunar craters that have been overlit during recording you might need to use both controls to limit deringing. For both controls its adviced to use them together with the view compare toolbox, that will allow you to inspect the changes in more detail -Waveletfilter : this function is already available in RegiStax for several versions. Allows the user to manually control the filters used to enhance the images.
-(NEW)Show Linegraph; sometimes users want to know how things change on the images in a more graphical way. Linegraph allows you to inspect the image-intensities on a line between 2 points. The user can set these points by pressing the CTRL and clicking the left-mouse button. After 2 points have been set the line of intensities between them will be displayed. The user can then changes wavelets or other controls, pressing UPDATE in the toolwindow will update the graph. It will show up to 4 different lines at a time. You can clear the graph by pressing clear.
-(under constructionNEW)Create Stackslice This was developed to allow the user to inspect the effect of different stacksizes on imagequality without the need to go back to the stacking page and stacking again. You NEED to set this at the stacking-page, there you will feed a control “calculate stackslice”. After that has been set and STACKING has been pressed you can use the “create stackslice” function. When the button is pressed you will see a slider appearing above the waveletimage. That slider can be used to control the number of frames for the area around alignpoint#1 after changing the position of the slider you will see what it does to the area. Using less frames will show less noise, you can – using this tool – try to find a good combination of the number of frames and the waveletsettings you want to use. When a good combination has been found return to the stackingpage, uncheck the “calculate stackslice” function and set the number of frames you want to stack either using the stackgraph or using the stacklist.
Page 16 of 51

RegiStax 5 Manual 21 mar 2009 (V1.1)
REGISTAX CONTROLS
This is the RegiStax 5 guide to all controls.
Page 17 of 51

RegiStax 5 Manual 21 mar 2009 (V1.1)
BUTTONBARThis set of buttons/controls is visible at all times during RegiStax processing.
SELECTPressing this button will open the file-selection-dialog, you can choose – depending on the filetypes , single of multiple files to be processed;
MRU (Most Recently Used) (BUTTON)When pressed, this shows the last 10 filenames that were used, and allows you to load that file again. When you use groups of BMP’s these will not be loaded through this control unless you save the list of BMP-filenames as a RegiStax Frame List (option in the frame-list window). PROJECT (BUTTON)This button will light up when a project is available for the current SER/AVI/RFL (RegiStax Framelist) file that is getting processed. Projectfiles carry the same names as the original files that were used for processing. Currently the user cannot save projectfiles using other names. Loading Projectfiles also will only work if the projectfile has the same name as the file that is getting processed.
When the Project Button is pressed a menu opens with these options: LOAD - If enabled this indicates that a default PROJECTFILE was previously and is available to be loaded.
LOAD as - Will open a dialog for the user to select a previously saved projectfile. NO checks are made if the projectfile was saved using the same set of images.SAVE - Allows the user to SAVE the alignment/optimizer data for later re-usage or for seeing analysis. Saving can be done after ALIGNMENT and/or after OPTIMIZING. Saving can also be done after running CREATE-REFERENCE and/or optimizing. Projectfiles can be saved for SER/AVI without additional actions. Projectfiles for single-format files (BMP,JPEG etc) can only be saved if the user has SAVED the set of frames as a RegiStax FrameList (save from the framelist window).SAVE as – Will allow the user to save a project with a user defined name.
Note: Project SAVE for single-frame formats is ONLY possible after the user has first saved a framelist (see framelistwindow). Project LOADING for single-frame formats will require loading the FRAMELIST first.
FLAT/DARK/REFERENCE (BUTTON)Pressing this button opens a menu with the following options:-LOAD DARKFRAMEAllows the user to select a DARKFRAME, will activate USE DARKFRAME and show the filename.-USE DARKFRAMEAllows the user to activate/deactivate the loaded DARKFRAME.-USE RAW-DARKFRAMEWill use the DARKFRAME as a RAW DARKFRAME (for RAW Webcam images!)-CREATE DARKFRAMECreates a darkframe from the current set of images (no alignment, only stacking).- NUMERICAL CONTROL (DARKFRAMEFACTOR)Allows the user to control the way a darkframe works. Normal darkframes shoulduse factor 1.00 (default). When this is decreased the darkframe has less effects.
-LOAD FLATFIELDAllows the user to select a FLATFIELD, will activate USE FLATFIELDand show the filename.-USED FLATFIELDAllows the user to activate/deactivate the loaded FLATFIELD.-CREATE FLATFIELD
Page 18 of 51

RegiStax 5 Manual 21 mar 2009 (V1.1)
Creates a flatfield from the current set of images (no alignment, only stacking).
-LOAD REFERENCEFRAME/USE REFERENCEFRAMEAllows the user to - temporarily - load a separate frame to be used as a referenceframeduring alignment/optimizing. The file choosen (single frame BMP/PNG) will be positionedat the 1st position of the slider during the setting of alignpoints (APs). After ALIGN is pressed the normal first frame of the set of images is used again and the referenceframe is only usedas a reference. The referenceframe must have the same size as the other frames.Suggested use : You would like to use multi APs on a planetary AVI but individual frames are too poor for alignment to be successfull. Then you align in single AP or gravity mode, process with wavelets and save the best resulting image possible. In the next session you will load this result as a referenceframe, place or estimate the APs and process now in multi mode. You may get a better result than with a single AP.
LAYOUTS (BUTTON)Pressing this button allows the user to choose from 2 options-SAVE LAYOUTThis allows the user to save the current setup of toolwindows (location and size) for later usage.-RESET TO DEFAULTThis will reset all the settings of the layout to the defaults.COMBOBOX : The user can choose previously saved layouts from this field
SET SKIN (BUTTON)Pressing this button will show a menu of pre-defined skins for RegiStax, users can designskins (and share them with others) using freeware fromhttp://www.mytreedb.com/view_downloads/m-soft/i-75.html Skins need to be located in the RegiStax-directory to be useable.
AVI-NORMAL/EXTENDED (DISPLAY ONLY)This will display NORMAL for AVI's <1Gb and EXTENDED for larger AVI's. Larger AVI's are processed with a different routine, and this display shows the user if the AVI is larger than 1Gb. When users process a larger AVI in windows Vista, it might be necessary to set the “Vista LargeAVI” checkbox - the circumstances under which this is needed have not been totally determined at this time. If when loading a Large AVI in windows Vista does not work properly, first try to set this field.
CANCEL (& Restart)Pressing this button will stop any action as soon as possible. Be aware that some actions will need to be finished first in order to not crash the application. You can also restart RegiStax automatically when you press Cancel.
In general restarting RegiStax after using CANCEL is strongly advised. After cancelling RegiStax, the application has been found to be less stable.
BATCHRegiStax allows the users to control RegiStax with commands. The commands can be saved/loaded for later usage. The setup is mainly usefull (currently) for AVI, SER image and RegiStaxFramelist (RFL) processing. The batch-processor does NOT check if the sequence of actions planned by the user in the batchfile is logical. It simply reads every batchcommand and starts the associated processing. When the batch-file is opened, the user can see which commands are used during normal processing. These commands will be written in the left-window of the batch-tool. The user can copy these to the right-window. Commands in the right-window will be processed when pressing the RUN button. Users can also save/load batchfiles. You can even start RegiStax with a batchfilename in the commandline and it will load and process that file. The command-list (see below) is also available as buttons (in between the left and right window). When a command-button is pressed the text belonging to the command will be written in the right-window.
The current command-list is:
Page 19 of 51

RegiStax 5 Manual 21 mar 2009 (V1.1)
SELECT xxxxxWhen xxxxx is specified the file will be loaded and the specified directory will be used for mostother commands (for instance saving). When xxxxx is not specified the user will be asked toselect a userfile.
LOADRAP xxxxxWhen xxxxx is specified, a RegiStaxAlignPoints file is loaded. A directory name should NOT be specified. When xxxxx is not specified the user will be asked to select a file.
ALIGNStarts the alignmentprocess.
LIMIT xxxxxLimits the number of frames selected for optimizing/stacking. xxxxx sets the number of frames.
CREATEREF xxxxxStarts the CREATE-REFERENCE procedure and uses xxxxx frames per alignpoints.
OPTIMIZEStarts the optimizer.
OPTIMIZE_STACKOptimizes and Stacks.
STACKStarts stacking
SAVESTACK xxxxx.yyySaves the stacked image to filename xxxxx with extension yyy. No directory should be usedin the filename. When xxxxx.yyy is not specified the user will be asked to set the filename.
LOADWVS xxxxxAllows the user to load a wavelet-scheme. Wavelet-schemes set the type of wavelets(gaussian, default), the size of the waveletlayers, the setting of gaussian wavelet-filters (per layer) and also all the slider-positions.
SAVEWAVELET xxxxx.yyySaves the wavelet image to filename xxxxx with extension yyy. No directory should be usedin the filename. When xxxxx.yyy is not specified the user will be asked to set the filename.
REALIGNStarts the realignoption from the wavelet-page which turns the current waveletimage into a referenceimage.
PAUSEStops Batchprocessing temporarily so the user can set controls. Batch processing can resumed by pressing the "CONTINUE" button on the Batch window.
Page 20 of 51

RegiStax 5 Manual 21 mar 2009 (V1.1)
ALIGNPAGE
TABCONTROLS
Colour This will be automatically set if the “autodect” feature is on, the user can set this also on/off. Processing in colour with B/W images has NO advantage and will be more time-consuming.LRGBWhen colour-images are used RegiStax allows the user to create a Luminance-layer (L). Setting this control will prepare the usage of a luminance-layer. This can also be done at the stacking-stage.Full Image (NEW) This will enlarge or shrink the current image to fit in the screenwindow of RegiStax. This does NOT decrease the images that are used during any of the processing-stages. Its merely a control to allow the user to see the full image. When the user uses a large image without Full Image on you can drag the image (press the rightmousebutton and hold, drag)ZoomWhen pressed the user will be shown an area around the current cursorposition in a separate toolwindow with a 2x enlarged image. This makes positioning alignpoints accurately easier. During alignment this window will serve another purpose, it will be showing alignpoints where alignment-warnings have appeared. When the user uses “misalign warnings” the image in this window will be showing where the original alignpoint (on the referenceframe) is located.FFT GraphThis is only usefull during the initial setup of the alignpoints, setting this will show a 2D image of the FFT (Fast Fourier Transform) graph that will be used during alignment. Ideally the user should see an area with redpixels in the middle of the graph.Registration GraphThis graph will show the “powerspectrum” and the quality-estimates during the positioning of alignpoints and during alignment. After alignment this graph is more important as it will show both the quality and the registration differences (compared to the reference-frame).Framelist When this is checkmarked the user will see a toolwindow with additional controls, the controls let the users (only for single-frame image formats) load/save groups of images in one time. All the frames are presented in a normal order (the user can sort this before alignment) or after alignment in a quality-sorted order. Selecting a frame in the framelist will display the frame on screen.
EXTENDED MODETo process LARGE AVI's RegiStax uses a so-called “extended-mode” . Unfortunately different operating systems and AVIs seem to react different so we have had to create a rather complex control.The extended-mode control has 2 settings, “default” and “vista”. Vista users are adviced to use the “vista” setting.
Use Extended Mode ForThis is the complex part of the extended mode function. The default setting is “>2Gb”. On most PCs this will mean that any AVI smaller then 2Gb will be processed normal and any larger than 2GB will be in extended mode. Other settings are “>1Gb”, extended processing for any AVI larger than 1Gb, “never” extended mode is not used and “always”. We will try to add a page to the RegiStax webpage with settings that are used for several AVI-types (codecs) on different operating systems.
Page 21 of 51

RegiStax 5 Manual 21 mar 2009 (V1.1)
ALIGNPAGEAlignment options TAB1) Alignment group Alignment MethodDefault is alignment using 1 alignpoint, Multi uses up to 500 alignpoints and None will NOT align the images.Alignbox sizeThese are the default sizes alignboxes can have, alignboxes are used to estimate the quality of the image around an alignpoint and also to estimate the shifts between frames.User set Alignbox (NEW) New in V5 is the option for users to use Alignboxes of any given size. When this is set the user will see (when setting the alignpoint) 2 boxes, the outerbox corresponds to the next higher default Alignbox size and the inner box is the user defined alignbox. During alignment the outerbox will be used to estimate image-quality and the inner box will be used to estimate image-movement.Align manuallySetting this will ask the user to click on the alignpoint(s) for every image in the sequence. Only usefull for images with unpredictable movementsAlign using Centre of Gravity (NEW) Setting this will introduce alignment by Centre of Gravity. Centre of Gravity will be shown for the image currently on screen. Especially for aligning planetary or other images that are “objects” in a dark space (eg. ISS) this is a very powerfull addition. It will follow the objects and also find them independent of any large movements (sudden camera-movement). This option can be used in conjuction with both default (1pt) Alignment as with multi-point alignment. In Multi-Alignment the “centre of gravity” will be treated as the Master alignpoint, all other points will be aligned according to the expected shift the Master alignpoint has.Lum threshold (NEW) This control works in conjunction with the Centre of Gravity alignment, the value reported is a cut-off value. Any pixel with a luminance below this value will not be considered during the gravity-alignment . This is helpful to reduce effects from noisy backgrounds.De-Rotate and Save derotated JPEG (NEW) Setting De-Rotate will only be usefull when 2 or more alignpoints are used. RegiStax will estimate rotation on alignpoint#1 and alignpoint#2, if possible try to position these points (for de-rotation) as far as possible apart. Using the Save derotated JPEG option will (during stacking) save all selected frames after derotation as JPEG.Region of interest button (NEW) This allows the user to specify a Region of Interest (ROI). During alignment/optimizing this region is not limiting processing but the stacking and wavelets will be limited to this region.Scan frames button (NEW) After specification of at least one alignpoint, the user can use SCANFRAMES to analyse the drift and quality of the images. After the SCANFRAMES procedure has finished, the user will be able to see at every choosen frame which area is common to all images. When setting the alignpoints it is wise to limit then to the “scanarea”. SCANFRAMES also estimates image-quality and orders the images in that order. The 1st image is estimated the best in quality (at the specified align point) and can probably be used as a referenceframe.
Page 22 of 51

RegiStax 5 Manual 21 mar 2009 (V1.1)
2) Quality settings groupThe quality settings group allows the user to select a quality-estimator. Current available are:-Classic -Human-Compress-Local contrast-Gradient (V4 Default)-Gradient 2 (V5 Default)-BlurdifIn V5 we have choosen to make Gradient2 the new default estimator.Use pre-blurring (NEW) Using this control will blur each image slightly before estimating quality, blurring images has advantages when noise is clearly visible. Visible noise can “trick” the quality-estimators into estimating high quality for noisy images.Lowest qualityWhen people use “automatic processing” this setting will be used to decide how many frames will be used for further processing. The value is relative to the highest estimated quality in the image-sequence. If the user sets 65 this means images with a quality equal or higher than 65% of the highest quality-image will be part of the selection. In V5 we have added some functionality. After alignment you can use the value to step through the images in steps of 5% of quality (or jump to a user set value).
3) Tracking settings groupTrack objectThis is by default on, if off the program will restrict its alignment to the window of the 1st alignbox. When this is on the program will remember the shift of the previous image when estimating the shift of the current image. In most cases this is good enough to estimate alignment. Predict trackSometimes the object on a set of frames moves in a predictable manner and faster than track-object is able to trace. Setting predict track can be usefull in those cases. However if the object does NOT move in a preditable (linear) way do not set this control.Misalign detectlevel (NEW) This value is used to trigger (if the other controls are used) misalignment warnings. Lowering this control will create less warnings. The value corresponds to the correlation between the alignment of 2 consequtive images (maximum is 1). Misalign warning/Ignore misaligned framesOnly when misalign arning is active messages will be shown. If ignore misaligned frames is also on this will mean that any frame that creates a misalignment warning (even if it is not shown) will be de-activated for further processing.
4) Processing area groupThis control sets the size of the processing area that is used at the wavelet-page. Using a large area will demand more memory and a slower response to actions at the waveletpage. The button “hold settings” will record the last used setting of the user.
Page 23 of 51

RegiStax 5 Manual 21 mar 2009 (V1.1)
ALIGNPAGEQuality settings TAB
All settings on this page correspond to the quality-estimator set on the Alignment options TAB. On the top we see which filter is currently Active, in this case it is the V5 default Gradient2.
For filters Classic/Human there are 2 modes, the filterssettings can be estimated automatically (default) of by the user (uncheck Automatic).For these 2 methods the filters correspond to limiting the quality-estimator to use only part of the information from the so-called “powerspectrum”. The “powerspectrum” is shown as a red-line during alignment in the registration-graph.
For Compression the factor corresponds to a JPEG-compression factor. Compression saves the image in the alignbox (for each alignpoint) as a jpeg-file using the compression factor. The filesize of the resulting jpeg-file is used as an estimate of the image-quality
GradientThe V4 default gradient measures difference in intensities between adjacent pixels within a given radius. The default is 2 and normally this should not be changed.
Blurdif. This method blurs the image with a gaussian filter before estimating image-quality (much alike gradient)
The new Gradient 2 has NO user controlled settings.
Page 24 of 51

RegiStax 5 Manual 21 mar 2009 (V1.1)
ALIGNPAGEOptions TAB This tab has most of the additional controls (less often used) available.1) Save imageIf the user wants to use a default sub-directory to save images (after processing) this control can be used. The sub-directory will be created in the directory where the original images were found. 2) TIFF/FIT stretchTiff/FIT images are 16/32 bit formatted image-files that are often not using the full span of bits available. For instance camera’s recording in 10 bits will save the result in a 16bit file, this however creates rather dim images (10bits has a maximum image-intensity of 4095 and 16 bits has a maximum of 65535). Setting this conttrol to YES will automatically stretch FITS/TIFF, setting NO will use the original intensities even if the result looks dark. At the wavelet-stage this can be easily changed by changing the histogram. Using the “Always ask” option will let RegiStax ask everytime you are using TIFF/FIT images if you want them stretched or not.3) LuminanceAt several stages during processing RegiStax uses (this is only the case for colour-images) the luminance channel . Luminance is calculated using the settings from this group. The default values can be called back using the “reset” button.4) Additional settingsAutocheckThis will check if a new version of RegiStax is available on the internet every time (maximum once a day) the program is started.Maximize during messagesSome users minimize RegiStax during processing, when RegiStax asks the user for information this setting will maximize the program.Autodetect Colour/BWIf this is on RegiStax will check (for each image loaded) if there are 3 channels and if the data in these channels is different. If so it will set colour or B/W processing automatically. Messages during optimizing/create-referenceThis allows the users to prevent certain messages to pop-up.5) Debayer groupDebayer RAW-DSLR (NEW) This is still experimental but will allow the user to debayer images from DSLR-camera’s internally. Only for Nikon and Canon this has been tested to some extent, debayering internally improves often the amount of details available.Use Debayer and MethodThis controls if and how images are debayered, there are 4 debayer methods. The letter-combination stands for the colours used in the debayer-matrix for the 2 topmost pixels. This is a camera-dependent setting so once a user knows which setting suits his camera (will be shown on screen) this should be used at all times.
Page 25 of 51

RegiStax 5 Manual 21 mar 2009 (V1.1)
ALIGNPAGE Toolwindows
Active options (NEW) This toolwindow only displays which special settings are used, the window is visible on all registax-stages unless the user uses the X-button to close the window.
FFT GRAPH ToolwindowThe FFT graph can be used to inspect if a choosen alignpoint is good enough for alignment. When an alignpoint is good to be used for alignment a clear red-circle should be visible in the middle of the FFT-graph. When this red-circle is very large the FFT filter should be changed, the same is valid for a very small circle of red pixels.
Page 26 of 51

RegiStax 5 Manual 21 mar 2009 (V1.1)
ALIGNPAGE Toolwindows
When the user selects MULTI in the Alignment-method box the MultiAlignpanel will pop-up.This toolwindow allows the user to load alignpoints/save alignpoints/create alignpoints. It has 2 tabs inside the toolwindow.
Tab AlignpointsThis is the default view after selecting Multi. If a set of saved alignpoints exists with a name equal to the file being processed that file (Registax AlignPointfile – RAP) will be loaded autmatically.Multi A-method (Multi alignmethod)The default mode during alignment is Multi-Quantity, this will ensure that each alignpoint will get the best (in terms of imagequality) frames. When Single is selected all alignpoints will be using the same frames.Maximum drift (NEW) The maximum drift setting is a new control. During alignment the shift found for each alignpoint will be compared to the shift of alignpoint#1. If any of the alignpoints drifts more than the user-set amount away from alignpoint#1 it will be corrected. This ensures that no alignpoints can start drifting away. It is adviced to keep this value relatively small. Setting it to zero will mean that RegiStax will ONLY align using alignpoint#1, all other alignpoints get the same shift-estimation. During optimisation each alignpoint will still be estimated.Show alignmentzonesWhen this is active you will not only see the alignpoints but also the zones that are associated to each alignpoint. These zones will be the part of each image during stacking that will be used from a frame if that frame is selected for an alignpoint.SAVE/LOAD pointsPressing either of these buttons allows the user to save the current set of alignpoints (including the referenceframe-number) or load a previously saved set of alignpoints.Alignpointfiles:This control will show if any alignpoint-files (RAP) exist with a name that starts with the same text as the file that is being processed. Selected alignpointfile (Frames300b.RAP)We have 5 alignpointfiles that have a name starting with the name of the file we are processing. The selected alignpointfile is Frames300B.RAP.Alignpoints:This shows how many alignpoints are in the current set.Alignpoint gridThis grid shows X, Y, FFT and ZP for each alignpoint. FFT is the alignboxsize associated with this alignpoint. If a user-set alignboxsize was used you will see a ZP value. ZP stands for zeropadded, the user-set alignboxsize is FFT-2*ZP. During alignment the FFT alignbox will be used to estimate quality, the smaller user-set alignbox will be used to estimate image-shifts. The user can select a row of the grid and the associated FFTalignbox and user-set alignbox will be shown in yellow on screen. Using the DELETE button on the aligngrid will remove an alignpoint.
Page 27 of 51

RegiStax 5 Manual 21 mar 2009 (V1.1)
Tab EstimateIn V4 we already had a simple alignpoint estimator, in V5 functionality has changed and improved considerably. Set Master AlignpointRegiStax uses a system with a master alignpoint during multi-point alignment. Alignpoint#1 is the master alignpoint. This button allows the user to create a masteralignpoint and will prevent RegiStax from overwriting that point again during alignpoint-estimation. After pressing the button you should position an alignbox (preferable NOT a user-defined size) on the most contrast-rich area in your image. This will be recorded and shown in the alignpoint-grid using the letter M in the location where you normally would see the alignpoint number.MethodCurrently we have 3 methods to create alignpoints. Matrix is actually not a real alignpoint-estimator method but simply generates a matrix of alignpoints using the user set alignbox (or user-defined).Method 1 and 2 are two different ways to estimate possible alignpoint locations. Method 2 is currently seen as the best method.Variable sized alignbox When this is on during alignpoint estimation RegiStax will ensure that no alignbox has a lot of overlap with adjacent alignpoints. This can be very effective in creating small alignboxes for areas with fine details and creating larger alignboxes for the other areas. Estimate AlignpointsPressing this button will start the estimator, depending on the setting it will detect up to 500 alignpoints. The points will be shown on the screen. If you have too many/too little points you simply change the settings and press estimate-alignpoints again. If a master-alignpoint was created this will not be overwritten.Threshold/Detectionlimit/RadiusThese controls are used to limit the number of alignpoints used. The alignpoint estimator first checks for each pixel in the image the differences in intensity with 15 surrounding pixels. Raising threshold and/or detectionlimit will decrease the number of alignmentpoints. You should – for your type of images – find a setting that you feel works good. Based on these settings up to 50 000 pixels in each image can be selected to estimate alignpoints. If you set the threshold and/or detectionlimit too low you might get a warning. The radius-setting comes into play after the pixels have been selected, radius groups “selected” pixels together before the alignpoints are estimated. Assigning a larger radius will limit the amount of alignpoints but they will most likely be better in terms of “interesting features”.Minimum distance between pointsWe do not want alignpoints to overlap too much, using minimum distance will ensure that each alignpoint is at least X pixels away from the next. RegiStax starts by setting the strongest (in terms of interesting features) alignpoints first working down the list of possible alignpoints and checking if they are not to close to a better alignpoint. Free space to edge Often we do not want alignpoints to be too close to the edge, this setting ensures the outer-edge of the alignboxes is X pixels away from the edges of your image. MatrixThe controls here are simply how the matrix will be created, the free-space to edge control also works for matrix. The X and Y specify how many alignpoints will be created and FFT-size states the size of the alignbox.
Page 28 of 51

RegiStax 5 Manual 21 mar 2009 (V1.1)
ALIGNPAGE Toolwindows
Registrationgraph toolwindowThe image above shows the registrationgraph before and during alignment. The red line in the graph is the so-called ‘powerspectrum”. The powerspectrum was used as the basic tool for image-quality estimation in the first versions of RegiStax. Currently most users do not use the qualitymethods (classic,human) associated with this graph anymore. The graph shows a relative histogram of image-features. When the histogram has a large tail to the right this either has to do with noise or very good imagequality (fine details). The frame-quality stated is the frame-quality of the alignmentbox for alignpoint #1 using the user-selected quality-estimator.
The graph below shows how the registrationgraph looks like after alignment has been done. Images are ordered according to the quality-estimate for alignpoint #1 (red line) and also the difference (in image-intensity) between the referenceframe and the frames in the sequence are shown in green. The same type of graph will be seen during optimisation.
Page 29 of 51

RegiStax 5 Manual 21 mar 2009 (V1.1)
ALIGNPAGE Toolwindows
Framelist toolwindowWhen the user has checkmarked “show framelist” the framelist toolwindow will pop up. Depending on the type of images used only part of the buttons shown below will be visible. When a user uses single-frame files (BMP,JPEG,PNG,TIF,DSLR-RAW,FIT) a set of 7 buttons will show up. The “SORT”, “SAVE”,”LOAD” and “ADD” buttons are only available for single-frame files. When using AVI/SER or RFL (saved list of imagefilenames) only the leftmost buttons will be shown.Check all/Check noneSets all checkboxes for all frames to active/inactive Empty listRemoves all the frames (only for single format) from the framelistSortSorts the frames on the filenamesSaveSaves the list of filenames in a registax-framelist (RFL) file.LoadLoads a list of filenames from a RFL-fileAddAllows the user to add more files
The image on the left shows a framelist before alignment and on the right after alignment. The images are now ordered on quality. In both cases the user can inspect images by simply moving the cursors through the filenames.
New V5 featureBefore alignment you can assign (not for AVI/SER) filenames in the framelist to a colour-channel. To do this you select the frame and then press R,G,B or L to assign the file to the Red,Green,Blue or Luminance channel. The effects of this are not visible before stacking has finished. The filenames in the stacklist will show if files are assigned to the channels. Restoring the original state of the filename (no assignment) can be done by pressing the X on the keyboard on a selected frame.
Page 30 of 51

RegiStax 5 Manual 21 mar 2009 (V1.1)
OPTIMIZEPAGE1) Optimizer settingsThese are the most used settings during the optimisation of images. Fast optimizer (NEW/UPDATED) In v4 we allready had a fast optimizer (single run) available but the quality was not as good as the default optimizer. In V5 the quality of the fast optimizer is much improved. It will try to find a “best” solution in an area of 25 pixels around the alignboxes (in all directions). When you do not use Fast optimizer RegiStax will be using the Search-area setting and will be doing a full-scale search for the best shift. Optimizer-Style (NEW) In V4 we optimized every alignpoint in a separate sequence, this control is just available for those people that still prefer that option. The new V5 optimizer style will process all alignpoints simultaneouslywhich reduces processing-time dramatically. As a feedback the user will be shown for up to 3 alignpoints how the reference and current alignbox area in the images look.Optimizer-Difference (NEW) In all previous RegiStax version the difference between the pixels in the reference-frame and the frame that is getting aligned/optimized was recorde as a squared difference. RegiStax 5 allows you also to use the absolute difference between the pixels. Currently there is no clear default advantage of either method.GraphsThe difference-graph is most often used during optimisation as it shows the progress during optimizing. The movements graphs shows how much the images shift during the sequence.
2) Create a reference (updated)This procedure is used to create a referenceframe before the user starts optimizing. A reference-frame will be created using the number of frames specified for each alignpoint, this means that for multi-point alignment this will lead to substantial more frames than the specified number. However during stacking only those sections of the frames that correspond to the best X frames for an alignpoint will be used.
3) Resample/DrizzleResampling and Drizzling are 2 techniques to enlarge the final image-result. Using them will limit certain options. Resampling has 4 methods (Bell, Bspline, Lanczos, Mitchell). The factor setting is valid for both techniques. 4) FilteringA set of 8 pre-defined filters are availble to be used during optimisation. Each filter will change the image just before it enters the optimiser using the filtersettings. The set of 9 controls allow the user to also create different filters. Pre-filtering can be helpful for images that lack contrast or have too much noise.
Page 31 of 51
RegiStax 5 Manual 21 mar 2009 (V1.1)
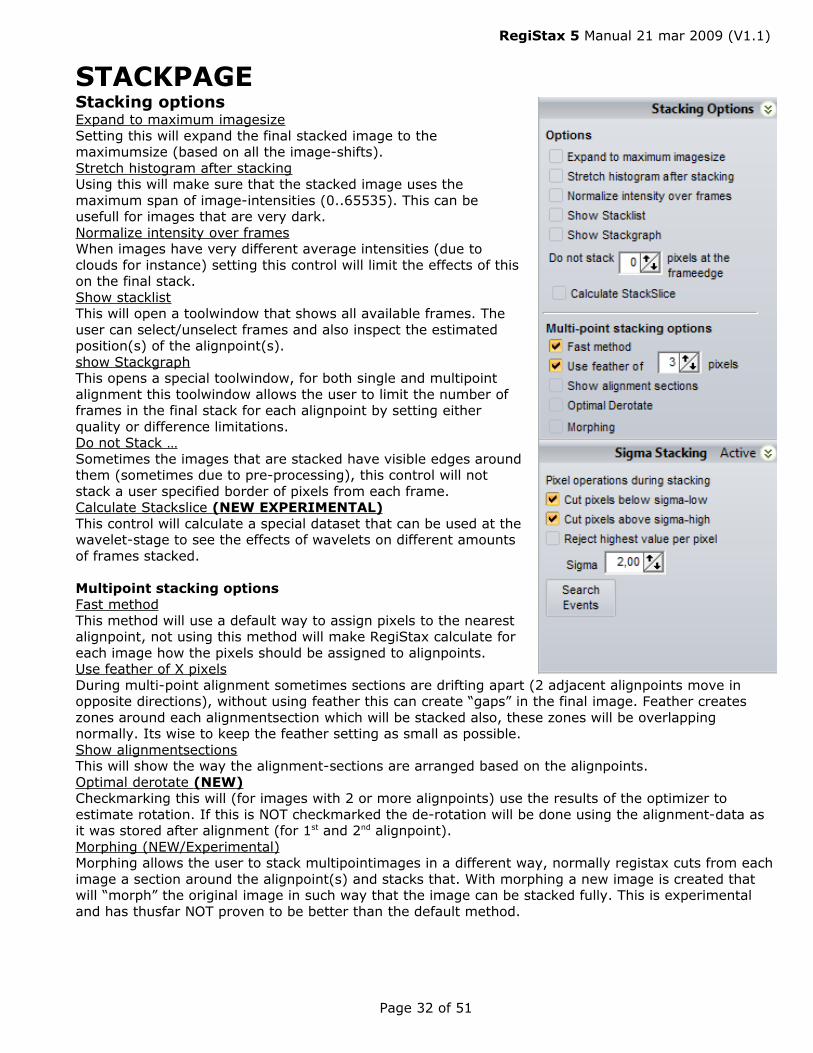
STACKPAGEStacking optionsExpand to maximum imagesizeSetting this will expand the final stacked image to the maximumsize (based on all the image-shifts).Stretch histogram after stackingUsing this will make sure that the stacked image uses the maximum span of image-intensities (0..65535). This can be usefull for images that are very dark.Normalize intensity over framesWhen images have very different average intensities (due to clouds for instance) setting this control will limit the effects of this on the final stack.Show stacklistThis will open a toolwindow that shows all available frames. The user can select/unselect frames and also inspect the estimated position(s) of the alignpoint(s).show StackgraphThis opens a special toolwindow, for both single and multipoint alignment this toolwindow allows the user to limit the number of frames in the final stack for each alignpoint by setting either quality or difference limitations.Do not Stack … Sometimes the images that are stacked have visible edges around them (sometimes due to pre-processing), this control will not stack a user specified border of pixels from each frame.Calculate Stackslice (NEW EXPERIMENTAL) This control will calculate a special dataset that can be used at the wavelet-stage to see the effects of wavelets on different amounts of frames stacked.
Multipoint stacking optionsFast methodThis method will use a default way to assign pixels to the nearest alignpoint, not using this method will make RegiStax calculate for each image how the pixels should be assigned to alignpoints.Use feather of X pixelsDuring multi-point alignment sometimes sections are drifting apart (2 adjacent alignpoints move in opposite directions), without using feather this can create “gaps” in the final image. Feather creates zones around each alignmentsection which will be stacked also, these zones will be overlapping normally. Its wise to keep the feather setting as small as possible.Show alignmentsectionsThis will show the way the alignment-sections are arranged based on the alignpoints.Optimal derotate (NEW) Checkmarking this will (for images with 2 or more alignpoints) use the results of the optimizer to estimate rotation. If this is NOT checkmarked the de-rotation will be done using the alignment-data as it was stored after alignment (for 1st and 2nd alignpoint).Morphing (NEW/Experimental)Morphing allows the user to stack multipointimages in a different way, normally registax cuts from each image a section around the alignpoint(s) and stacks that. With morphing a new image is created that will “morph” the original image in such way that the image can be stacked fully. This is experimental and has thusfar NOT proven to be better than the default method.
Page 32 of 51

RegiStax 5 Manual 21 mar 2009 (V1.1)
Sigma StackingSigma Stacking is used to create a stacked image with less noise and no effects from hot-pixels, dead-pixels, cosmic-ray effects. The name sigma comes from statistical theory where it is used to describe a histogram. For instance sigma 3 corresponds to selecting 99% of all available frames for a given pixel. RegiStax will stack the images twice, in the first run it estimates (for every pixel) the average pixel intensity and the variance. Based on these 2 variables and using the sigma cut-off values are calculated for each pixel. If a pixel in a frame is higher or lower than the cutoff the user can prevent it from being stacked. Cut pixels below sigma-lowMakes the low-sigma-active, when you have dead-pixels this is a good way to remove the effects of them.Cut pixels above sigma-highMakes high-sigma active, when you have hot-pixels or cosmic-rays in the images this will remove the effects of them.Reject highest value per pixelIf only a few frames have hotpixels/cosmic rays this might be enough to remove them from the stack.Sigma This controls the amount of frames selected for the final stack, a lower sigma will remove more frames from the stack. Sigma’s above 3 will nearly always have all frames in the stack and are therefore not usefull.
Search EventsThis opens a specialistic toolwindow (text to be written)
Page 33 of 51

RegiStax 5 Manual 21 mar 2009 (V1.1)
Create AVI FileSometimes RegiStax users want to save a registered set of images into an AVI-file. The Create AVI file group has all controls to do this.
Creating a registered AVI
Codec (NEW) In previous versions RegiStax would save the avi uncompressed which can result in very large files. Now we allow the user to select a codec from the available set of the users-computer. The user needs to set the compression-quality before saving the file. For most codecs compression-quality is at its lowest at 0 and at its highest at 10000. But this can be very different for your codec, to use this feature be sure that you know how your codec uses compression.
Image sizeThe avi that is saved can either be only the alignment-area (alignpoint #1) or the area which will have the full image on all frames in it. This maximum area will be a lot bigger if your set of frames has a lot of movement.
as BMPThis saves the result not as an AVI but as a set of BMPframes with a sequential number.
Sort on qualityWhen this is set the frames will be saved in order of decreasing image-quality based on the quality-estimates of alignpoint#1.
SAVE REGISTEREDPressing this will start the saving procedure.
Creating an integrated AVIThis procedure allows the user to create a new AVI with less noise or with less frames.
Average of X framesThis sets the number of frames that will be used together
MethodMoving average will create a new AVI where each frame is build using the number of frames set. For each new frame the set of frames to build it changes, so frame 1 in the new AVI will be (when using 5 frames) build using a stack of frame 1…5, frame 2 will be a stack of frame 2..6 etcCompressedWill create an AVI with far less frames, compressing with 5 frames means that frame 1 of the new AVI is a stack of 1..5, frame 2 is a stack of 6..10 etc.
SAVE INTEGRATEDPressing this will start the saving procedure.
Page 34 of 51

RegiStax 5 Manual 21 mar 2009 (V1.1)
STACKPAGE Toolwindows
Stacklist
The stacklist allows the user to inspect the frames that have been aligned/optimized. The user can select a file in the stacklist to check if the image-quality is as expected and to check where the alignpoints are located. If the user decides a frame is not good enough to be stacked just uncheck the frame in the stacklist. IMPORTANT: when you stop using the stacklist be aware that the position your cursor is set on the stacklist also limits the stacksize. You can see the stacksize in the statusbar, its always wise to position the cursor at the lowest position in the stacklist.
Page 35 of 51

RegiStax 5 Manual 21 mar 2009 (V1.1)
STACKPAGE Toolwindows
Alignmentsections
This toolwindow allows the user to inspect the distribution of the alignment-sections. This tool often is used when a user sees – after stacking – that one of the alignpoints shows signs of misalignment (diffused areas). At the waveletpage you can find out which alignpoint is in the area that shows the misalignment, you can then step back to the stack-page and call the alignment-sections. In this toolwindow you can simply “uncheck” any of the alignpoints and during stacking these will not be used anymore. The effect of the size/position of the alignmentsections will also be directly visible.
Page 36 of 51

RegiStax 5 Manual 21 mar 2009 (V1.1)
STACKPAGE Toolwindows
StackgraphThis tool can be used to limit the number of frames that are stacked. In single point alignment the lowergraph will not be visible. Functionality of the uppergraph in single point alignment is comparable to the functionality of the lower-graph in multi-point alignment. We will therefore only describe the functionality for multi-point alignment.
The uppergraph has several controls to limit the number of frames. Most used is the slider below the graph, when you set this slider to a number of frames (look at the statusbar) all alignpoints will be set to this number of frames. So when you want to globally change the number of frames/alignpoint start with setting the slider in the upper-graph. The other control in the uppergraph (limit to maximim-frameno) can also be used to limit the number of frames. Be aware that – when you use a lot of alignpoints – it sometimes takes a bit of time to sort out which frames are used for each alignpoint.
The lowergraph allows the user to select an alignpoint (with the alignpoint control) and then inspect and change the frames used for this point. The lower slider works alike the slider in the uppergraph and limits frames on estimated-imagequality (red part of the graph). The left-side slider allows the user to limit based on the recorded differences(green part of the graph). The settings of these sliders are recorded for each alignpoint, so when you return to the same alignpoint the sliders will return to the position you have set them unless you have used the uppergraph to change all settings. Additionally the lower-slider allows you to check the frame at the slider-position in the graph . You can inspect this frame by pressing space when the slider is actively used. You will see the frame, the alignpoints and the specific alignpoint you are working on.
Page 37 of 51

RegiStax 5 Manual 21 mar 2009 (V1.1)
WAVELETPAGEThese are the common controls available at the waveletpage.
AutomaticWhen this is set every change in the settings of for instance the wavelet-schemes will be directly visible. Normally this setting does not have be be on.Hold wavelet settingThis setting keeps your wavelet-settings between sessions, if you load a new set of frames the settings will not be reset.Show processing areaThe corners of the processing area are show when this is on.Show alignment pointsWhen this setting is active all alignpoints will be shown and their number and number of stacked frames will be written in the alignbox. Show full imageSetting this active will either enlarge or shrink the image so it fits fully on the screen. This has no effect on the image.WaveletfilterRegiStax uses two wavelet-types, default and Gaussian. Default refers to the first RegiStax versions. Gaussian was developed in later versions and is the default. Gaussian filtering gives the user finer control over the details that get enhanced.WaveletschemeTwo waveletschemes are available. Dyadic will set a scheme where each layer uses filters twice the size of the lower layer(1,2,4,8,16,32). Linear allows the user to control the way the layers increase in size. The layerfilter-size is based on the “initial” layer and will increase in each next layer by the Step-increment. In the default setting initial-layer=1 and step-increment=0, this will make all layers have the same initial-filtersize. In conjunction with gaussian the user can still change the layers separately using the gaussian-filter controls (in the image at the default value of 0.1) Layer 1 ...6 and PreviewThese are the most used controls on the wavelet-page, Each layer has a set of details associated with that layer (based on the filter) that will be enhanced when the slider is moved to the right. Rightclicking on a slider resets the value. You can also uncheck a layer to remove that set of details from the final image. You can inspect the details in each layer by pressing the preview-button. The previewbutton also carries the value of the layer-slider. In gaussian the user can set the gaussian filtersize. Small filters will create a layer with very fine details and larger filters will create layers with more blurred imagedata. Users should experiment with settings they feel are working best for their images. Each set of images (depending on many factors) might need different (but sometimes alike) settings. Load/save schemesThis allows the user to save all wavelet-settings into a file for later usage. Loading a scheme will directly change the settingsAvailable schemesAt startup registax checks the registax-directory for the availability of schemes, the user can open the control below the available schemes text and select a scheme. Selecting a scheme will directly show the effects of that scheme on the image. This control allows the user to step through a few previously recorded schemes to find a good startingpoint for the image-enhancement using wavelets.
Page 38 of 51

RegiStax 5 Manual 21 mar 2009 (V1.1)
WAVELETPAGEThese are the main controls that are visible on the rightside on the waveletpage. These controls can be hidden by pressing the “>>”-button that is visible (not on this screenprint) to the right of the functionsgroup.FunctionsgroupMost of the commonly used additional functions of RegiStax are available from this group. Most of these buttons will call a toolwindow that will show up on screen. These toolwindows are described in more detail in the toolwindow-part of the waveletpage controls.
Contrast/BrightnessThese are controls you will find in many image-processing programs. The settings for contrast/brightness can be controlled using the slider and/or using the numerical-values. Rightclicking on the slider resets it. Clicking on the reset-button resets all settings (also the numerical values). The hold-button will not change the settings when the user starts a new processing-run (loading images etc).
To ClipboardSometimes we want to inspect how our images change when using different settings, this is one of the tools that can help you do this. When you have set the wavelet-settings (and anything else) for a first trial press the “to clipboard” button. This will copy the present image onto the clipboard.Now change anything you wish in the wavelet or other settings, pressing difference will show you where this image is different from the stored (clipboard) image. You can also switch (toggle) between the current and clipboard-image by clicking on the toggle-control.
Page 39 of 51

RegiStax 5 Manual 21 mar 2009 (V1.1)
WAVELETPAGE Toolwindows
Histogram
This histogramtool can be used to inspect the luminance (and for colour-images also the RGB) values in the image. If the user wants to change the part of the histogram that is visible in the image you can change the settings of the sliders (left and right) or change the numerical values in the left-right controls (low and high).
After pressing Stretch the image will make adapt to the user set values. You can reset back to the original values by pressing the reset button on top.
Other controls: - Log based graph : sometimes the histogram has values in a large part of the range but only for a few pixels. The histogram graph then hardly shows them. Using log-based graphs you can easier see where the intensities range from.- smoothing value : The histogram-graph will be smoothed to show an nice and easy to understand graph, you can set smoothing to 1 to get a non-smoothed histogram.
Page 40 of 51

RegiStax 5 Manual 21 mar 2009 (V1.1)
WAVELETPAGE Toolwindows
Gamma
The gamma-toolwindow allows the user to change the intensities of the stacked and enhanced image. Normally the gamma is a straight line. This means that every pixel-intensity (X-axis), will be translated to the same value when using gamma. This also corresponds to gamma=1. The user can change the gamma by either moving the red-dot in the graph (press the left-mousebutton above the red-dot and – whilst keeping the button pressed- move the dot to another location). In the graph below we can see the new graph and the effect this has had on the image. The graph is everywhere above the X=Y line in the graph so all original image-intensities are raised. The user can add additional points to the graph (by right-clicking in the graph), deleting a point can be done by left-clicking on an existing point with the ctrl-button pressed. The user can – instead of using the graph- also use the gamma setting to create a gamma-graph. Pressing reset (on the top of the toolwindow) will reset all the settings. If the graph was used the setting of the graph (points) can be saved for later usage using the Save button on top of the toolwindow. The load button can be used to restore previously saved settings.
Page 41 of 51

RegiStax 5 Manual 21 mar 2009 (V1.1)
WAVELETPAGE Toolwindows
Colour-mixingThe colour mixer allows the user to change the appearance of colour images and even improve image-quality by mixing. This is done by creating a Luminance layer from the RGB layers. When this is ticked the wavelets will be working on a luminance-channel instead of on the 3 separate RGB channels. Sharpening will be done on the luminance and the final image keeps the same colour by mixing the luminance with the original RGB colourvalues. In the image below you can see what happens in this saturn image (by Damian Peach) when we use the green layer as a luminance. Any mix of colour can be made to find what you think is best.
You can also directly create a B/W image from a colour-image based on the LRGB mix by simply setting Create B/W image. Finally there is a “use luminance” checkbox, this should only be used when a real luminance channel was loaded using special luminance-files.
Page 42 of 51

RegiStax 5 Manual 21 mar 2009 (V1.1)
WAVELETPAGE Toolwindows
Zoomwindow
The zoomwindow can be used to inspect in more detail how processing works out for a specific area on the screen. The zoom is always 2x enlarged and can be set to use Bell, bspline, lanczos or mitchell as resampling/enlarging method. You can reposition the location that is visible in the zoomwindow when you press the CTRL-button and move the mouse. When you want to keep a location in view simply release the CTRL-button.
StackviewThe stackview is used to check if multi-point alignment has worked as expected, it will show in red the differences in amount of stacked frames for each alignpoint. In the above image the edges are clearly visible since feather was used during stacking. All the sections between the feathered areas should be showing equal intensities of red unless the user specifically wanted different amounts of stacked frames for certain alignpoints. The edges between alignpoint sections should be well-defined, when they look very wide for a given alignpoint section this can point to misalignment.
Page 43 of 51

RegiStax 5 Manual 21 mar 2009 (V1.1)
WAVELETPAGE Toolwindows
Comparepanel (NEW)This is a new toolwindow that allows the user to inspect the effects of using wavelets and other controls on the image.After startup of the tool you will see an image as shown to the right. The tool shows a 3-panel image, the top and middle part of the image are user-controlled. You can decide what will be shown in those panels, the lower panel shows the difference between the lower panel and the upperpanel
compare the effects of different wavelet-settings on the image is done by using the 3 controls on the top. The leftmost control tells (top/bottom) where the active image (on screen) is copied to when it changes. The middle control tells if the copy should be at normal(1x) or 2x enlarged size and the third control (only usefull for 2x enlargement) tells which method is used to enlarge. Start by setting the wavelet-settings (or anything else) at a starting position. You can relocate the position of the area you are seeing by pressing CTRL and moving the mouse, when you release the CTRL button that area will be shown/compared.Now switch the active panel that is being used from top to bottom. You will see the middlepanel change and the lowerpanel will go black (since top and bottom are the same).
In this case we have first relocated the area we are viewing and an then switched back to the top. We also changed the settings of the wavelet-sliders (too much) and the image shows on top how the current image looks, in the middle how it was and below the difference between the 2 images. Red mans the image got darker and green means the image got lighter.
You can copy the results to/from the clipboard with the ->Clip button.
Page 44 of 51

RegiStax 5 Manual 21 mar 2009 (V1.1)
Resize toolwindow
The resize toolwindow can be used to save (in 8 bits !!) a copy of the current image on either the wavelet-page or the final-page. The user can flip the image on the X/Y axis and resize at some standard rations using the predefined % settings. Alternatively the user can enter the X and Y dimensions of the final image, this will allow resizing in different ratio's for X and Y. After setting the values in the numerical control the user should press “Use settings to see the image change dimensions. There are 4 filtertypes available to resample the image (bell, b-spline, lanczos and mitchell). RegiStax will record the filter you have choosen.
Page 45 of 51

RegiStax 5 Manual 21 mar 2009 (V1.1)
MaskingThis is a very new functionality for RegiStax. Users would like to have the wavelets sharpen only certain areas. In a lunar image users for instance like to sharpen the craters and craterlets but would like to keep the craterfloor rather smooth. After starting the tool you will be shown a histogram (see above). This histogram shows the luminance-values of the stacked image. All luminances are rescaled to fit into a 0..255 range, even if you are using 16bit files the histogram lo-hi values will rescaled be 0 and 255. But this has no effects on the final image. The slider below the histogram can be used to set the low and high values, wavelets will only be active for pixels with a luminance between the 2 slider-settings. Only areas that are shown in red (the mask) will be affected by wavelets. The low and high numerical control have the same function as the 2 slidercontrols. They will react to changes of the slider, the slider will NOT react on a change of the numerical controls. Another important control is the Feather. The feather is used to create a transition from pixels that have NO effects from the wavelets and pixels that have the FULL effects from the wavelets. Any value lower than the low-value and higher than the high-value but within the “feather”-range will be showing partial effects from wavelets (linear function). The mask for these values is not shown in bright red but a shaded red. There are 2 methods available Clipping and Gradient. Clipping limits the pixels that are affected by wavelets by luminance-thresholds. Gradient is more sensitive and lets the user select areas with high and low gradients in luminance. The idea behind this is that an area with low gradient is probably less interesting to enhance with wavelets. Think of the 1st method (clipping) when we have 2 crater-floors with very different average luminance. The 1st method will not be able to mask both of the floors without also masking part of the craterwalls of the darker crater. The gradient method doesnt look at average intensity but looks at the changes in intensity around a pixel. Often the gradient method is therefore the most powerfull. The user can
actively change the way the mask is displayed/used. By using the Use Mask/Toggle and the show controls either the mask, the image with wavelets and no masking or the image with wavelets and masking is shown. When you remove the mask-tool from the screen its function is also cleared !
Page 46 of 51

RegiStax 5 Manual 21 mar 2009 (V1.1)
Denoise/Dering windowAnother new toolwindow, the functionality is rather simple. You can either control the noise that is visible when using wavelet-layer 1 or you can limit the effects of deringing in general.DenoisingAlthough a numerical value is shown, there is no standardisation possible. Denoising works on the waveletvalues that are associated to wavelet-layer 1. If you see noise in wavelet-layer 1 and you plan to use that layer to enhance/sharpen the image this control can be usefull. The effects are directly visible on screen if the denoising checkbox is checkmarked and the slider is moved to the right. How much denoising you prefer is a personal choice.DeringingThe deringing control works for all waveletlayers. We have created a 2 sided approach, deringing that happens on the dark-side of a brightened area and deringing that happens on the brightside of a darkened area. The wavelets can enhance certain parts of the image a lot but also create de-ringing at locations where very sharp changes in luminance in the image appears. This is the case around stars or moons near planets. When you use the wavelets to enhance part of the image you will see that at some stage a darkened area appears around the star. Using deringing with the darkside option can then be used to limit that effect. The other case (a brightned part near a dark feature) is less often apparent. Both controls have settings that show numerical values, these values are only usefull in combination with the image you are processing. There are no “best” settings since the effects these tools have on the final image is greatly depending on the stack used and the image-quality (noise) of the individual frames.
Page 47 of 51

RegiStax 5 Manual 21 mar 2009 (V1.1)
RGB Align toolWINDOWSometimes images have shifted colour-layers after stacking, this can be the case due to using different files for each colour-layer and less then perfect alignment/optimisation or due to atmospheric effects. The RGB Align tool is a very simple tool to improve the image quality. In the image above I have shifted (to show the functionality) the R layer 4 positions to the right. This gives a red-edge. To let RegiStax estimate a best shift that makes a better colour composition you need to first set the area it is active on. You can either show the area and them move (checkmark move area) or – and this is adviced – you can simply set “define area” and then draw with the mouse a box around the area you want to use to estimate the shifts between the colour-channels. After drawing the area you will see a green-box and a yellow box.The green box is the area you have been drawing and the yellow box is the area that will be used to find the best shift for each colour-channel. After defining the area press “estimate”. After some time (watch the progressbar in the statusbar) the image will be updated and the estimated shifts for each channel will become active. If the estimates are not good you can always try and improve using the up/down/left /right buttons for both the red and blue channel.
Page 48 of 51

RegiStax 5 Manual 21 mar 2009 (V1.1)
RGB Balance
This tool allows the users to change the way intensity of the colours is mixed to form an RGB colour image. The graph shows a histogram for each of the colours (Red, Green and Blue). Pressing the Auto-balance function will start a procedure that estimates the best colour mix to get a good white-balance. This is however not always a good way to set the colours. If the estiamate is wrong its probably wise to reset to the original values. The 3 sliders will move each colour-channel to the left-right in the histogram. This is comparable to changing the brightness for a channel. The 3 colourweights will compress/expand the histogram, this is comparable to a using contrast on a colour-channel. Using these controls can sometimes be a good way to remove a “colour-cast” from your images, in that case the settings used can probably be usefull again when processing images from the same camera.
Page 49 of 51

RegiStax 5 Manual 21 mar 2009 (V1.1)
Wavelet filter
The wavelet-filter tool allows the user to set the wavelet-filters for the default filter (top part of the tool) and set the gaussian filters for all layers in a controlled manner (instead of changing 6 wavelet-tools you can achieve the same using 2 controls.The default wavelet filter is t 5x5 pixels large and will be used to create sharpenend images, Must users do not changes the filters but this tool allows you to change (change the values of the filter-matrix) and load/store the filters. Changes are not recorded so at startup the default filter will be used. The Centre: 51% shows how much of the original-pixels luminance is still present after a pixel is “convoluted” with this filter. With a value of 51% you can guess that the pixels will be influencd a lot by the surrounding pixels in the 5x5 matrix. Using higher central values will make the effects of wavelets less aggressive and better controllable.
The gaussian fiilters are by default 0.10, this control allows you to set all of the filters directly and in an organised manner. The initial value will be used for the 1st layer, the 2nd layer will be given a filtersize that is the same as the initial-value but with a step (fraction) added. So intial 0.1 with step 0 will set all 6 layers to 0.1 Initial 0.1 with step 0.1 will set layer 1 to 0,1, layer 2 to 0.11, layer 3 to 0.12 etc. Each layer gets layer1*0.1 added in this case.
Page 50 of 51

RegiStax 5 Manual 21 mar 2009 (V1.1)
Line graph toolAnother new tool to inspect our data. This tool allows you to inspect luminance values in the wavelet-image on a lineseqment. The linesegment is set by pressing the CTRL button and then setting a first (green) point by clicking with the leftmouse button and a 2nd point by clicking (still CTRL pressed) with the mouse. After clicking a graph will show the luminance-intensities. When you change the wavelet or other settings and press “update” you will get a new graph added. You can have up to 3 graphs visible in the image, after 3 times the 1st graph will be overwritten. You can also clear the 3 graphs by pressing the clear button. The numerical control can be used to have thicker graphs (line).
Page 51 of 51