REFERENCE GUIDEdownload.makerbot.com/mini/MB_Mini_ReferenceGuide.pdfthis reference guide to...
38
REFERENCE GUIDE
Transcript of REFERENCE GUIDEdownload.makerbot.com/mini/MB_Mini_ReferenceGuide.pdfthis reference guide to...

REFERENCE GUIDE

The product may differ slightly from the images and instructions in this guide as we continue to improve the MakerBot
Replicator Mini. Please see www.makerbot.com/um_rep_mini for the latest version of the guide.
VERSION 3
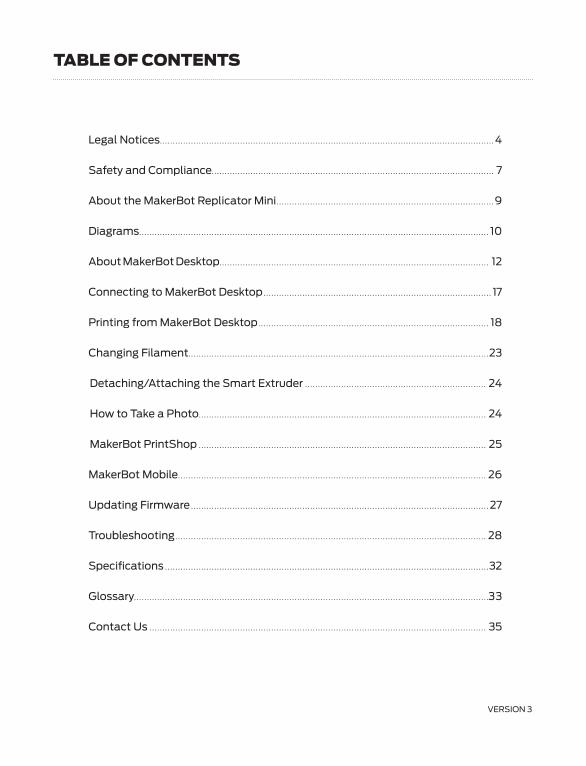
Legal Notices . . . . . . . . . . . . . . . . . . . . . . . . . . . . . . . . . . . . . . . . . . . . . . . . . . . . . . . . . . . . . . . . . . . . . . . . . . . . . . . . . . . . . . . . . . . . . . . . . . . . . . . . . . . . . . . . . . . . . . . . . . . . . . . . . 4
Safety and Compliance . . . . . . . . . . . . . . . . . . . . . . . . . . . . . . . . . . . . . . . . . . . . . . . . . . . . . . . . . . . . . . . . . . . . . . . . . . . . . . . . . . . . . . . . . . . . . . . . . . . . . . . . . . . . . 7
About the MakerBot Replicator Mini . . . . . . . . . . . . . . . . . . . . . . . . . . . . . . . . . . . . . . . . . . . . . . . . . . . . . . . . . . . . . . . . . . . . . . . . . . . . . . . . . . . . 9
Diagrams . . . . . . . . . . . . . . . . . . . . . . . . . . . . . . . . . . . . . . . . . . . . . . . . . . . . . . . . . . . . . . . . . . . . . . . . . . . . . . . . . . . . . . . . . . . . . . . . . . . . . . . . . . . . . . . . . . . . . . . . . . . . . . . . . . . . . . . 10
About MakerBot Desktop . . . . . . . . . . . . . . . . . . . . . . . . . . . . . . . . . . . . . . . . . . . . . . . . . . . . . . . . . . . . . . . . . . . . . . . . . . . . . . . . . . . . . . . . . . . . . . . . . . . . . . . . 12
Connecting to MakerBot Desktop . . . . . . . . . . . . . . . . . . . . . . . . . . . . . . . . . . . . . . . . . . . . . . . . . . . . . . . . . . . . . . . . . . . . . . . . . . . . . . . . . . . . . . . . 17
Printing from MakerBot Desktop . . . . . . . . . . . . . . . . . . . . . . . . . . . . . . . . . . . . . . . . . . . . . . . . . . . . . . . . . . . . . . . . . . . . . . . . . . . . . . . . . . . . . . . . . 18
Changing Filament . . . . . . . . . . . . . . . . . . . . . . . . . . . . . . . . . . . . . . . . . . . . . . . . . . . . . . . . . . . . . . . . . . . . . . . . . . . . . . . . . . . . . . . . . . . . . . . . . . . . . . . . . . . . . . . . . . . . 23
Detaching/Attaching the Smart Extruder . . . . . . . . . . . . . . . . . . . . . . . . . . . . . . . . . . . . . . . . . . . . . . . . . . . . . . . . . . . . . . . . . . . . . . 24
How to Take a Photo . . . . . . . . . . . . . . . . . . . . . . . . . . . . . . . . . . . . . . . . . . . . . . . . . . . . . . . . . . . . . . . . . . . . . . . . . . . . . . . . . . . . . . . . . . . . . . . . . . . . . . . . . . . . . . . 24
MakerBot PrintShop . . . . . . . . . . . . . . . . . . . . . . . . . . . . . . . . . . . . . . . . . . . . . . . . . . . . . . . . . . . . . . . . . . . . . . . . . . . . . . . . . . . . . . . . . . . . . . . . . . . . . . . . . . . . . . . 25
MakerBot Mobile . . . . . . . . . . . . . . . . . . . . . . . . . . . . . . . . . . . . . . . . . . . . . . . . . . . . . . . . . . . . . . . . . . . . . . . . . . . . . . . . . . . . . . . . . . . . . . . . . . . . . . . . . . . . . . . . . . . . . . . 26
Updating Firmware . . . . . . . . . . . . . . . . . . . . . . . . . . . . . . . . . . . . . . . . . . . . . . . . . . . . . . . . . . . . . . . . . . . . . . . . . . . . . . . . . . . . . . . . . . . . . . . . . . . . . . . . . . . . . . . . . . . 27
Troubleshooting . . . . . . . . . . . . . . . . . . . . . . . . . . . . . . . . . . . . . . . . . . . . . . . . . . . . . . . . . . . . . . . . . . . . . . . . . . . . . . . . . . . . . . . . . . . . . . . . . . . . . . . . . . . . . . . . . . . . . . . . 28
Specifications . . . . . . . . . . . . . . . . . . . . . . . . . . . . . . . . . . . . . . . . . . . . . . . . . . . . . . . . . . . . . . . . . . . . . . . . . . . . . . . . . . . . . . . . . . . . . . . . . . . . . . . . . . . . . . . . . . . . . . . . . . . . . 32
Glossary. . . . . . . . . . . . . . . . . . . . . . . . . . . . . . . . . . . . . . . . . . . . . . . . . . . . . . . . . . . . . . . . . . . . . . . . . . . . . . . . . . . . . . . . . . . . . . . . . . . . . . . . . . . . . . . . . . . . . . . . . . . . . . . . . . . . . . . . .33
Contact Us . . . . . . . . . . . . . . . . . . . . . . . . . . . . . . . . . . . . . . . . . . . . . . . . . . . . . . . . . . . . . . . . . . . . . . . . . . . . . . . . . . . . . . . . . . . . . . . . . . . . . . . . . . . . . . . . . . . . . . . . . . . . . . . . . . 35
TABLE OF CONTENTS
REFERENCE4
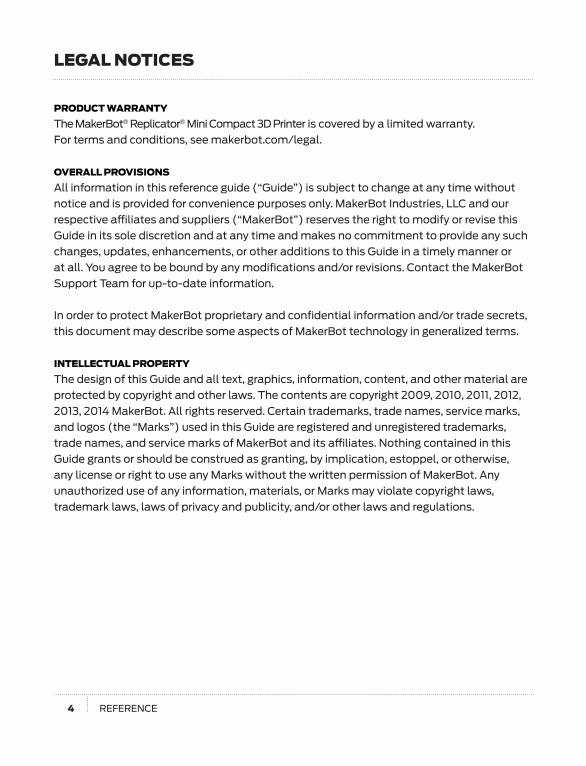
PRODUCT WARRANTY
The MakerBot® Replicator® Mini Compact 3D Printer is covered by a limited warranty.
For terms and conditions, see makerbot.com/legal.
OVERALL PROVISIONS
All information in this reference guide (“Guide”) is subject to change at any time without
notice and is provided for convenience purposes only. MakerBot Industries, LLC and our
respective affiliates and suppliers (“MakerBot”) reserves the right to modify or revise this
Guide in its sole discretion and at any time and makes no commitment to provide any such
changes, updates, enhancements, or other additions to this Guide in a timely manner or
at all. You agree to be bound by any modifications and/or revisions. Contact the MakerBot
Support Team for up-to-date information.
In order to protect MakerBot proprietary and confidential information and/or trade secrets,
this document may describe some aspects of MakerBot technology in generalized terms.
INTELLECTUAL PROPERTY
The design of this Guide and all text, graphics, information, content, and other material are
protected by copyright and other laws. The contents are copyright 2009, 2010, 2011, 2012,
2013, 2014 MakerBot. All rights reserved. Certain trademarks, trade names, service marks,
and logos (the “Marks”) used in this Guide are registered and unregistered trademarks,
trade names, and service marks of MakerBot and its affiliates. Nothing contained in this
Guide grants or should be construed as granting, by implication, estoppel, or otherwise,
any license or right to use any Marks without the written permission of MakerBot. Any
unauthorized use of any information, materials, or Marks may violate copyright laws,
trademark laws, laws of privacy and publicity, and/or other laws and regulations.
LEGAL NOTICES
REFERENCE 5
DISCLAIMERS
MakerBot does not warrant the accuracy or completeness of the information, products,
or services provided by or through this Guide and assumes no responsibility for any
typographical, technical, or other inaccuracies in this Guide, which is provided “as is”
and without any express or implied warranties of any kind, including warranties of
merchantability, fitness for a particular purpose, or non-infringement of intellectual
property. MakerBot makes no warranties to those defined as “consumer” in the
Magnuson-Moss Warranty-Federal Trade Commission Improvement Act. In
connection with your use of this Guide, MakerBot shall not be liable to you for any
damages whatsoever, be they direct, economic, commercial, special, consequential,
incidental, exemplary, or indirect damages, even if MakerBot has been advised of the
possibility of such damages, including without limitation, loss of business revenue
or earnings, lost data, or lost profits. MakerBot assumes no responsibility, nor will be
liable, for any damages to, or any viruses or malware that may infect, your computer,
telecommunication equipment, or other property caused by or arising from your
downloading of any information or materials related to this Guide. The foregoing
exclusions do not apply to the extent prohibited by law; please refer to your local laws
for any such prohibitions.
LEGAL NOTICES
WELCOME TO THE REFERENCE MANUAL FOR THE MAKERBOT REPLICATOR MINI COMPACT 3D PRINTER.
The MakerBot®
Replicator®
Mini is super easy to use, but it’s also packed with brand-new features. Use this reference guide to familiarize yourself with the capabilities of your new MakerBot Replicator Mini and the MakerBot Desktop App. For help with setting up your MakerBot Replicator Mini, please refer to the Quick Start Guide that came with it, or download a copy at makerbot.com/support.
REFERENCE 7
SAFETY AND COMPLIANCE
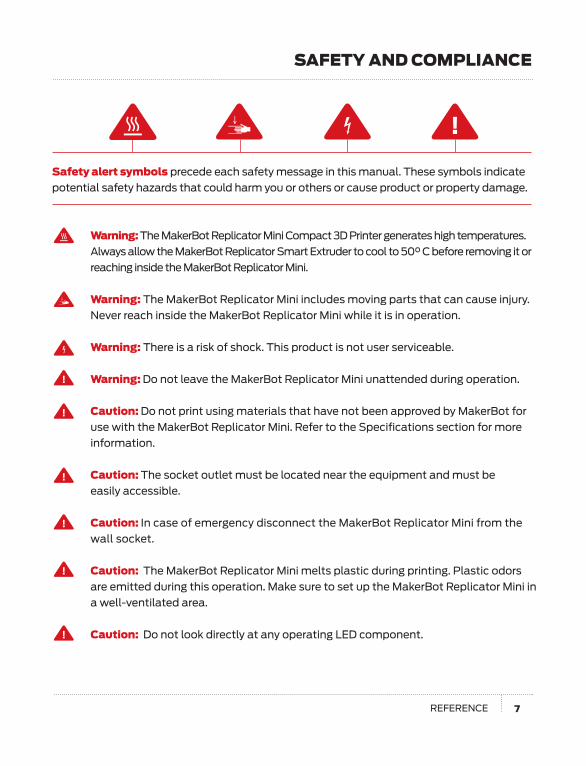
Safety alert symbols precede each safety message in this manual. These symbols indicate
potential safety hazards that could harm you or others or cause product or property damage.
Warning: The MakerBot Replicator Mini Compact 3D Printer generates high temperatures.
Always allow the MakerBot Replicator Smart Extruder to cool to 50° C before removing it or
reaching inside the MakerBot Replicator Mini.
Warning: The MakerBot Replicator Mini includes moving parts that can cause injury.
Never reach inside the MakerBot Replicator Mini while it is in operation.
Warning: There is a risk of shock. This product is not user serviceable.
Warning: Do not leave the MakerBot Replicator Mini unattended during operation.
Caution: Do not print using materials that have not been approved by MakerBot for
use with the MakerBot Replicator Mini. Refer to the Specifications section for more
information.
Caution: The socket outlet must be located near the equipment and must be
easily accessible.
Caution: In case of emergency disconnect the MakerBot Replicator Mini from the
wall socket.
Caution: The MakerBot Replicator Mini melts plastic during printing. Plastic odors
are emitted during this operation. Make sure to set up the MakerBot Replicator Mini in
a well-ventilated area.
Caution: Do not look directly at any operating LED component.
REFERENCE8
SAFETY AND COMPLIANCE
RADIO AND TELEVISION INTERFERENCE
This equipment has been tested and found to comply with the limits for a Class B digital
device, pursuant to Part 15 of the Federal Communications Commission (FCC) rules.
These limits are designed to provide reasonable protection against harmful interference
in a residential installation. This equipment generates, uses and can radiate radio
frequency energy and, if not installed and used in accordance with the instructions, may
cause harmful interference to radio communications. However, there is no guarantee
that interference will not occur in a particular installation. If this equipment does cause
harmful interference to radio or television reception, which can be determined by turning
the equipment off and on, the user is encouraged to try to correct the interference by one or
more of the following measures:
• • Reorient or relocate the receiving antenna.
• • Increase the separation between the equipment and the receiver.
• • Connect the equipment to an outlet on a circuit different from that to which the
receiver is connected.
• • Consult the dealer or an experienced radio/TV technician for help.
You may also find helpful the following booklet, prepared by the FCC: “How to Identify and
Resolve Radio-TV Interference Problems.” This booklet is available from the U.S. Government
Printing Office, Washington, DC 20402.
Changes and modifications not expressly approved by the manufacturer or registrant of this
equipment can void your authority to operate this equipment under FCC rules.
MANUFACTURER
MakerBot Industries, LLC
One MetroTech Center, 21st Floor
Brooklyn, NY 11201
347.334.6800
REFERENCE 9
ABOUT THE MAKERBOT REPLICATOR MINI
The MakerBot Replicator Mini makes solid, three-dimensional objects out of PLA Filament.
First, use MakerBot Desktop to translate 3D design files into instructions for the MakerBot
Replicator Mini. Then transfer those instructions to the MakerBot Replicator Mini via USB
cable or over a Wi-Fi network. With the touch of a button, the MakerBot Replicator Mini will
melt MakerBot PLA Filament and squeeze it out onto the build plate in thin lines to build your
object layer by layer. This method of 3D printing is called fused deposition modeling.

REFERENCE10
DIAGRAMS
MAKERBOT REPLICATOR MINI FRONT VIEW
1. Filament Spool Pocket
2. Gantry
4. Build Plate
5. Action Button
1
2
4
5
3
3. Filament Guide Tube

REFERENCE 11
MAKERBOT REPLICATOR MINI SIDE VIEW
7. Power Input Port 9. Extruder Assembly
6. Power Switch 8. USB Port
DIAGRAMS
9
6
7
8
REFERENCE12
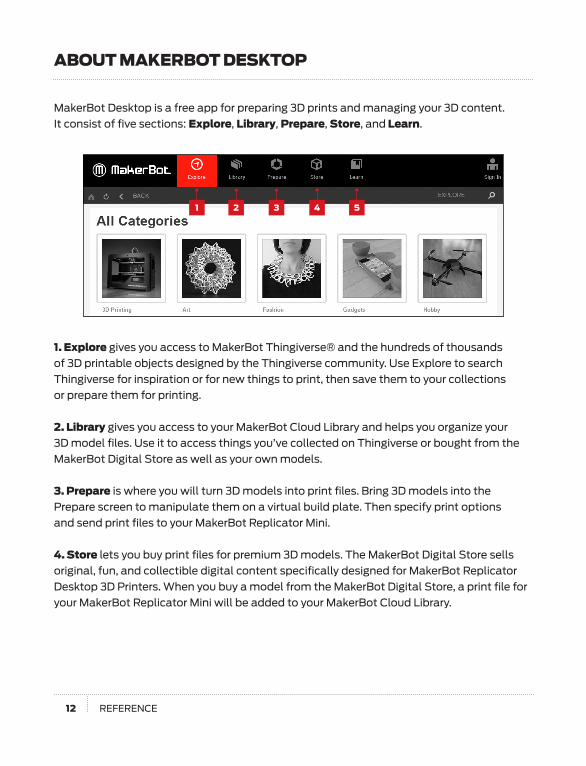
MakerBot Desktop is a free app for preparing 3D prints and managing your 3D content.
It consist of five sections: Explore, Library, Prepare, Store, and Learn.
1. Explore gives you access to MakerBot Thingiverse® and the hundreds of thousands
of 3D printable objects designed by the Thingiverse community. Use Explore to search
Thingiverse for inspiration or for new things to print, then save them to your collections
or prepare them for printing.
2. Library gives you access to your MakerBot Cloud Library and helps you organize your
3D model files. Use it to access things you’ve collected on Thingiverse or bought from the
MakerBot Digital Store as well as your own models.
3. Prepare is where you will turn 3D models into print files. Bring 3D models into the
Prepare screen to manipulate them on a virtual build plate. Then specify print options
and send print files to your MakerBot Replicator Mini.
4. Store lets you buy print files for premium 3D models. The MakerBot Digital Store sells
original, fun, and collectible digital content specifically designed for MakerBot Replicator
Desktop 3D Printers. When you buy a model from the MakerBot Digital Store, a print file for
your MakerBot Replicator Mini will be added to your MakerBot Cloud Library.
ABOUT MAKERBOT DESKTOP
1 2 3 4 5
REFERENCE 13
ABOUT MAKERBOT DESKTOP
5. Learn provides video tutorials on common processes such as Exporting Files,
Preparing to Print, and Exploring Thingiverse. Look for new tutorials with each update
of MakerBot Desktop. You can also replay the MakerBot Desktop walkthrough in
the Learn tab.
Use Store and Explore to find 3D models, Library to keep them organized, and Prepare to
send them to your MakerBot Replicator Mini for printing. Use Learn to view tutorials.
REFERENCE14
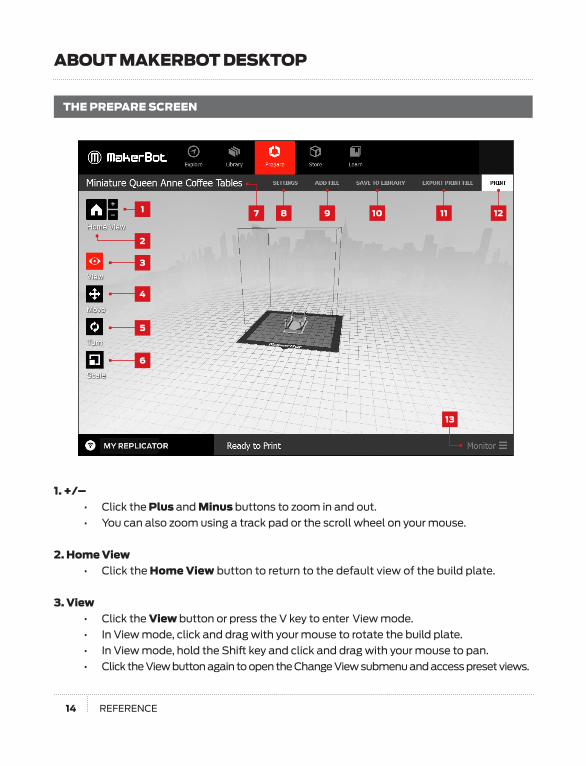
1. +/–• • Clickthe Plus and Minus buttons to zoom in and out.
• • Youcanalsozoomusingatrackpadorthescrollwheelonyourmouse.
•2. Home View
• • Clickthe Home View button to return to the default view of the build plate.
•3. View
• • ClicktheView button or press the V key to enter View mode.
• • InViewmode,clickanddragwithyourmousetorotatethebuildplate.
• • InViewmode,holdtheShiftkeyandclickanddragwithyourmousetopan.
• • ClicktheViewbuttonagaintoopentheChangeViewsubmenuandaccesspresetviews.
THE PREPARE SCREEN
ABOUT MAKERBOT DESKTOP
3
1
2
4
5
6
8 9 10 11 12
13
7
REFERENCE 15
ABOUT MAKERBOT DESKTOP
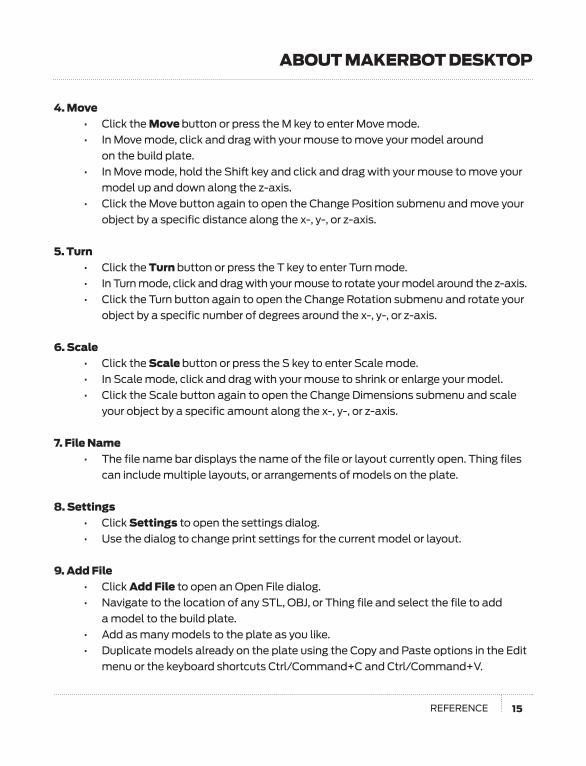
4. Move• • ClicktheMove button or press the M key to enter Move mode.
• • InMovemode,clickanddragwithyourmousetomoveyourmodelaround
on the build plate.
• • InMovemode,holdtheShiftkeyandclickanddragwithyourmousetomoveyour
model up and down along the z-axis.
• • ClicktheMovebuttonagaintoopentheChangePositionsubmenuandmoveyour
object by a specific distance along the x-, y-, or z-axis.
•5. Turn
• • ClicktheTurn button or press the T key to enter Turn mode.
• • InTurnmode,clickanddragwithyourmousetorotateyourmodelaroundthez-axis.
• • ClicktheTurnbuttonagaintoopentheChangeRotationsubmenuandrotateyour
object by a specific number of degrees around the x-, y-, or z-axis.
6. Scale• • ClicktheScale button or press the S key to enter Scale mode.
• • InScalemode,clickanddragwithyourmousetoshrinkorenlargeyourmodel.
• • ClicktheScalebuttonagaintoopentheChangeDimensionssubmenuandscale
your object by a specific amount along the x-, y-, or z-axis.
•7. File Name
• • Thefilenamebardisplaysthenameofthefileorlayoutcurrentlyopen.Thingfiles
can include multiple layouts, or arrangements of models on the plate.
8. Settings• • ClickSettings to open the settings dialog.
• • Usethedialogtochangeprintsettingsforthecurrentmodelorlayout.
9. Add File• • ClickAdd File to open an Open File dialog.
• • NavigatetothelocationofanySTL,OBJ,orThingfileandselectthefiletoadd
• a model to the build plate.
• • Addasmanymodelstotheplateasyoulike.
• • DuplicatemodelsalreadyontheplateusingtheCopyandPasteoptionsintheEdit
menu or the keyboard shortcuts Ctrl/Command+C and Ctrl/Command+V.
REFERENCE16
ABOUT MAKERBOT DESKTOP
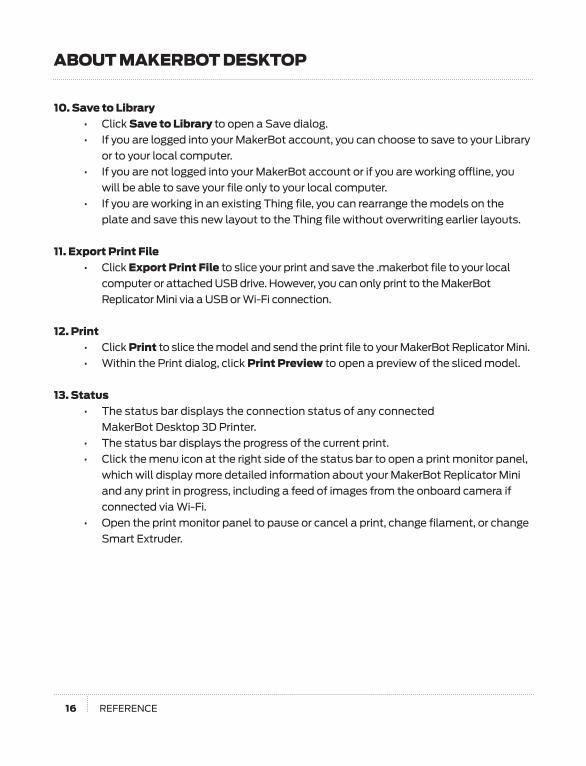
10. Save to Library• • ClickSave to Library to open a Save dialog.
• • IfyouareloggedintoyourMakerBotaccount,youcanchoosetosavetoyourLibrary
or to your local computer.
• • IfyouarenotloggedintoyourMakerBotaccountorifyouareworkingoffline,you
will be able to save your file only to your local computer.
• • IfyouareworkinginanexistingThingfile,youcanrearrangethemodelsonthe
plate and save this new layout to the Thing file without overwriting earlier layouts.
11. Export Print File• • ClickExport Print File to slice your print and save the .makerbot file to your local
computer or attached USB drive. However, you can only print to the MakerBot
Replicator Mini via a USB or Wi-Fi connection.
•12. Print
• • ClickPrint to slice the model and send the print file to your MakerBot Replicator Mini.
• • WithinthePrintdialog,clickPrint Preview to open a preview of the sliced model.
•13. Status
• • Thestatusbardisplaystheconnectionstatusofanyconnected
MakerBot Desktop 3D Printer.
• • Thestatusbardisplaystheprogressofthecurrentprint.
• • Clickthemenuiconattherightsideofthestatusbartoopenaprintmonitorpanel,
which will display more detailed information about your MakerBot Replicator Mini
and any print in progress, including a feed of images from the onboard camera if
connected via Wi-Fi.
• • Opentheprintmonitorpaneltopauseorcancelaprint,changefilament,orchange
Smart Extruder.
REFERENCE 17
CONNECTING TO MAKERBOT DESKTOP
You can connect your MakerBot Replicator Mini to MakerBot Desktop via USB cable or Wi-Fi
at any time.
USB CABLE1. Locate the included USB cable.
2. Insert the USB-B end of the cable into the port on the side of your MakerBot Replicator Mini
and insert the USB-A end of the cable into a USB port on your computer. MakerBot Desktop
will automatically detect your MakerBot Replicator Mini.
WI-FI1. Follow the steps above for connecting via USB cable.
2. In MakerBot Desktop, go to the Devices menu and select Device Preferences.
3. Click Wi-Fi Settings.
4. Select your network from the dropdown menu and enter your password. Your MakerBot
Replicator Mini will automatically be connected to your Wi-Fi network.
5. Go back to the Devices menu and select Connect to a New Device.
6. Select your MakerBot Replicator Mini from the list of available devices. Your MakerBot
Replicator Mini should now be connected to MakerBot Desktop via Wi-Fi.
REFERENCE18
PRINTING FROM MAKERBOT DESKTOP
1 CHOOSING YOUR MODEL
You can download a model from Thingiverse or the MakerBot Digital Store, open a 3D
printableSTL,OBJ,orThingfilefromanysource,oraccessobjectsthatarealreadysavedin
your MakerBot Cloud Library.
FINDING A MODEL ON THINGIVERSE1. In MakerBot Desktop, click on the Explore tab. Click Explore at the right to browse
available models, or use the search bar to look for something specific.
2. Click the thumbnail or name of any Thing to go to the Thing page.
3. On the Thing page, scroll down and click on Thing Files to see available files.
4. Choose which part or version you want to print and click the Prepare button next
to the file name. MakerBot Desktop will open the file and take you to the Prepare tab. The file
you selected will appear on the build plate.
5. To add an additional model from the same Thing to your layout, return to the Explore tab and
click Prepare next to the name of the additional file. The new model will be added to the plate.
FINDING A MODEL IN THE MAKERBOT DIGITAL STORE1. In MakerBot Desktop, click on the Store tab.
2. Browse the Digital Store collections or use the search bar to find a model by name.
3. Once you’ve found a model or series you’d like to purchase, click BUY NOW.
4. If you haven’t already, set up your billing information.
5. Confirm your purchase. A print file for your purchased model will appear in your
MakerBot Cloud Library.

REFERENCE 19
PRINTING FROM MAKERBOT DESKTOP
IMPORTING A MODEL FROM YOUR LOCAL COMPUTER Youcanopenany3D-printableSTL,OBJ,orThingfileinMakerBotDesktop.
1. In MakerBot Desktop, click on the Prepare tab.
2. Click Add File.
3. Navigate to the location of your file and click Open. The model will appear on the build plate.
CHOOSING A MODEL FROM YOUR MAKERBOT CLOUD LIBRARY1. In MakerBot Desktop, click on the Library tab.
2.ClickoneofthefoldersattheleftsideofthescreentoseeitemsavailableinyourLibrary.
3. Click on a list item and then click Prepare. MakerBot Desktop will open the file and take
you to the Prepare tab. The file you selected will appear on the build plate.
REFERENCE20
PRINTING FROM MAKERBOT DESKTOP
2 PREPARING YOUR MODEL
Use the Prepare Screen to manipulate your model, such as changing its orientation or
scaling it to a new size. You can also add more models to the layout. Then, to change
any print settings before you print, click the Settings button.
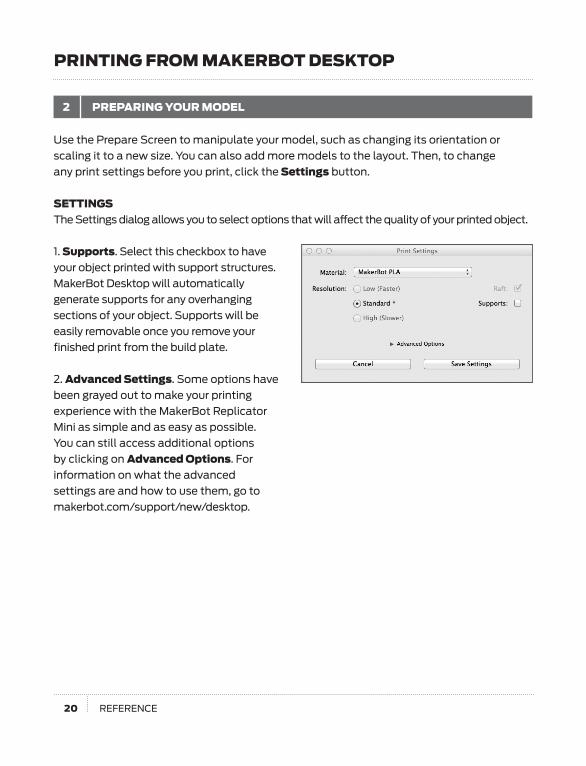
SETTINGS The Settings dialog allows you to select options that will affect the quality of your printed object.
1. Supports. Select this checkbox to have
your object printed with support structures.
MakerBot Desktop will automatically
generate supports for any overhanging
sections of your object. Supports will be
easily removable once you remove your
finished print from the build plate.
2. Advanced Settings. Some options have
been grayed out to make your printing
experience with the MakerBot Replicator
Mini as simple and as easy as possible.
You can still access additional options
by clicking on Advanced Options. For
information on what the advanced
settings are and how to use them, go to
makerbot.com/support/new/desktop.
REFERENCE 21
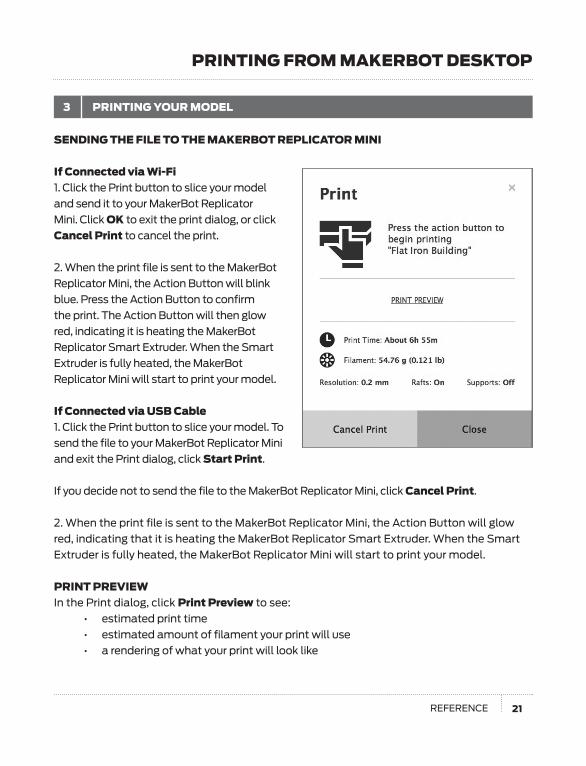
SENDING THE FILE TO THE MAKERBOT REPLICATOR MINI
If Connected via Wi-Fi1. Click the Print button to slice your model
and send it to your MakerBot Replicator
Mini. Click OK to exit the print dialog, or click
Cancel Print to cancel the print.
2. When the print file is sent to the MakerBot
Replicator Mini, the Action Button will blink
blue. Press the Action Button to confirm
the print. The Action Button will then glow
red, indicating it is heating the MakerBot
Replicator Smart Extruder. When the Smart
Extruder is fully heated, the MakerBot
Replicator Mini will start to print your model.
If Connected via USB Cable 1. Click the Print button to slice your model. To
send the file to your MakerBot Replicator Mini
and exit the Print dialog, click Start Print.
If you decide not to send the file to the MakerBot Replicator Mini, click Cancel Print.
2. When the print file is sent to the MakerBot Replicator Mini, the Action Button will glow
red, indicating that it is heating the MakerBot Replicator Smart Extruder. When the Smart
Extruder is fully heated, the MakerBot Replicator Mini will start to print your model.
PRINT PREVIEWIn the Print dialog, click Print Preview to see:
• • estimatedprinttime
• • estimatedamountoffilamentyourprintwilluse
• arenderingofwhatyourprintwilllooklike
••
PRINTING FROM MAKERBOT DESKTOP
3 PRINTING YOUR MODEL
REFERENCE22
PRINTING FROM MAKERBOT DESKTOP
HOW TO PAUSE OR CANCEL A PRINTTo Pause: While the MakerBot Replicator Mini is printing, press the Action Button once to
pause. The Action Button color will turn from red to blue. Press the Action Button again to
resume printing. You can also pause by opening the print monitor panel in MakerBot Desktop
and then clicking Pause.
To Cancel: While the MakerBot Replicator Mini is heating or printing, press and hold the
Action Button to cancel the print. You can also cancel by opening the print monitor panel in
MakerBot Desktop and then clicking Cancel.
REMOVE RAFTWhen your print finishes, wait for the Smart Extruder to cool, then remove the build plate
from the MakerBot Replicator Mini. Remove the print from the build plate, and peel off the
raftfromthebottomoftheprint.EveryobjectprintedonyourMakerBotReplicatorMini
willbebuiltonaraft.Theraftactsasabaseforyourprintandanysupportstructures,and
ensuresthateverythingadhereswelltothebuildplate.Theraftwillbeeasilyremovable
once you remove your finished print from the build plate.
SHARE ON THINGIVERSE If you are printing a file from Thingiverse, it’s nice to let the model’s designer know. In the
Explore tab of MakerBot Desktop, click on View in Browser, which will open up your default
web browser to the model’s thing page. Then click I Made One. You’ll have the opportunity
to upload photos of your print and add a description. When you’re ready, click Create to link
your photos to the original design’s thing page.
Caution:NeverturnofftheMakerBotReplicatorMiniduringorimmediatelyafterprinting.
Wait until the Smart Extruder has cooled to 50° C before powering down.
4 POST PRINT STEPS
REFERENCE 23
CHANGING FILAMENT
•HOW TO CHANGE FILAMENTYou can change filament at any time when the MakerBot Replicator Mini is not heating up
or printing.
To Load • • Intheprintmonitorpanel,clickChange. Then click Load. The Smart Extruder will
start to heat up. When the Smart Extruder is fully heated, the extruder motor will
start to turn.
• • Whenyouhearthemotorturning,graspthetopoftheextruderassemblyandpush
• the free end of filamant into the loading tube at the top of the Smart Extruder. Keep
pushing on the filament until you feel the Smart Extruder pulling it in.
• • Waituntilyoubegintoseeplasticemergingfromtheextrudernozzle.Thenclick
• Done to stop the process.
To Unload• • Intheprintmonitorpanel,clickChange. Then click Unload. The Smart Extruder
will start to heat up. When the Smart Extruder is fully heated, it will go through a
two-part unloading process.
• • RemovethefilamentfromyourSmartExtruderonlywhenMakerBotDesktop
• directs you to. Then click Done.
Tips • Beforeloading,cuttheendofyourfilamenttocreateacleanedge.
• Beforeremovingthecurrentfilamentspool,unclipthefilamentguidetubefrom
the spool pocket.
• Clipthefilamentguidetubebackintoplaceafterinsertinganewfilamentspool.
• Clearawayanyexcessextrudedfilamentbeforeprinting.

REFERENCE24
DETACHING/ATTACHING THE SMART EXTRUDER
If you need to remove the Smart Extruder from your MakerBot Replicator Mini, first unload
any filament. Wait for the Smart Extruder to cool to 50° C, then pull it away from the extruder
carriage.
To attach the Smart Extruder, press it against the back of the extruder carriage, with the
connector pins facing the extruder carriage. Magnets will lock the Smart Extruder into
place. If MakerBot Desktop doesn’t recognize the Smart Extruder, open the print monitor
panel and click Attach Smart Extruder.
HOW TO TAKE A PHOTO
You can take a photo of your print at any time using the built-in camera in the MakerBot
Replicator Mini. Open the print monitor panel in MakerBot Desktop, mouse over the camera
view, and click Take a Photo. MakerBot Desktop will take a photo and let you save it to your
local computer. You must be connected to a Wi-Fi network to use the camera.
Warning: Always use caution when handling the Smart Extruder. Never remove the
SmartExtruderduringorimmediatelyafterprinting.WaituntiltheSmartExtruderhas
cooled to 50° C before handling it.
REFERENCE 25
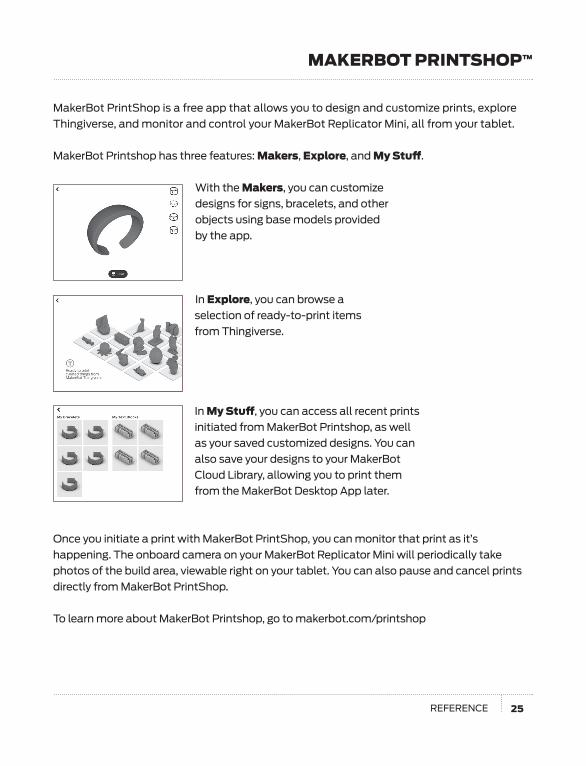
MAKERBOT PRINTSHOP™
MakerBot PrintShop is a free app that allows you to design and customize prints, explore
Thingiverse, and monitor and control your MakerBot Replicator Mini, all from your tablet.
MakerBot Printshop has three features: Makers, Explore, and My Stuff.
With the Makers, you can customize
designs for signs, bracelets, and other
objects using base models provided
by the app.
In Explore, you can browse a
selection of ready-to-print items
from Thingiverse.
In My Stuff, you can access all recent prints
initiated from MakerBot Printshop, as well
as your saved customized designs. You can
also save your designs to your MakerBot
Cloud Library, allowing you to print them
from the MakerBot Desktop App later.
Once you initiate a print with MakerBot PrintShop, you can monitor that print as it’s
happening. The onboard camera on your MakerBot Replicator Mini will periodically take
photos of the build area, viewable right on your tablet. You can also pause and cancel prints
directly from MakerBot PrintShop.
To learn more about MakerBot Printshop, go to makerbot.com/printshop
REFERENCE26
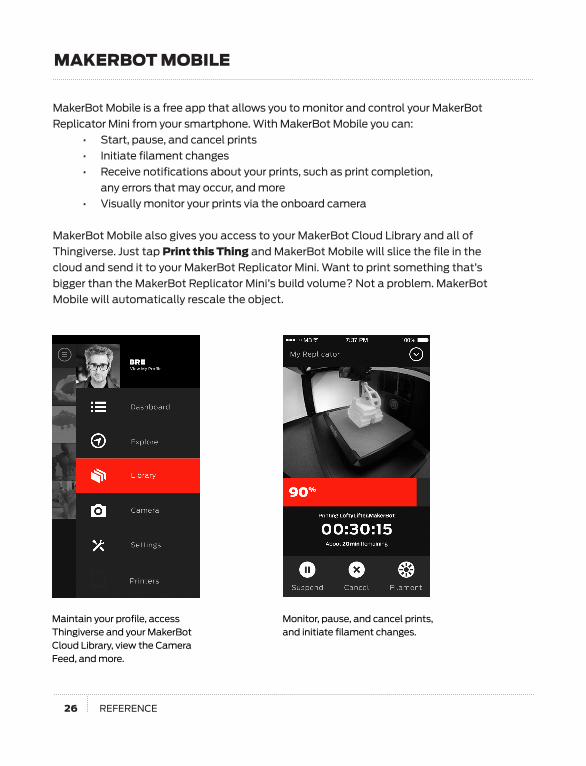
MAKERBOT MOBILE
MakerBot Mobile is a free app that allows you to monitor and control your MakerBot
Replicator Mini from your smartphone. With MakerBot Mobile you can:
• • Start,pause,andcancelprints
• • Initiatefilamentchanges
• • Receivenotificationsaboutyourprints,suchasprintcompletion,
any errors that may occur, and more
• • Visuallymonitoryourprintsviatheonboardcamera
•MakerBot Mobile also gives you access to your MakerBot Cloud Library and all of
Thingiverse.JusttapPrint this Thing and MakerBot Mobile will slice the file in the
cloud and send it to your MakerBot Replicator Mini. Want to print something that’s
bigger than the MakerBot Replicator Mini’s build volume? Not a problem. MakerBot
Mobile will automatically rescale the object.
Maintain your profile, access Thingiverse and your MakerBot Cloud Library, view the Camera Feed, and more.
Monitor, pause, and cancel prints, and initiate filament changes.
REFERENCE 27
UPDATING FIRMWARE
FirmwareisthesoftwarethatrunsonyourMakerBotReplicatorMini.Keepingyourfirmware
up to date will help ensure that your MakerBot Replicator Mini is in the best possible working
order. Firmware updates allow MakerBot to add new features to your MakerBot Replicator
Mini and improve old ones.
If a new firmware version has become available since the last time you connected your
MakerBot Replicator Mini to MakerBot Desktop, MakerBot Desktop will alert you. To check
for an available firmware update at any time, go to Devices > Update Firmware.
REFERENCE28
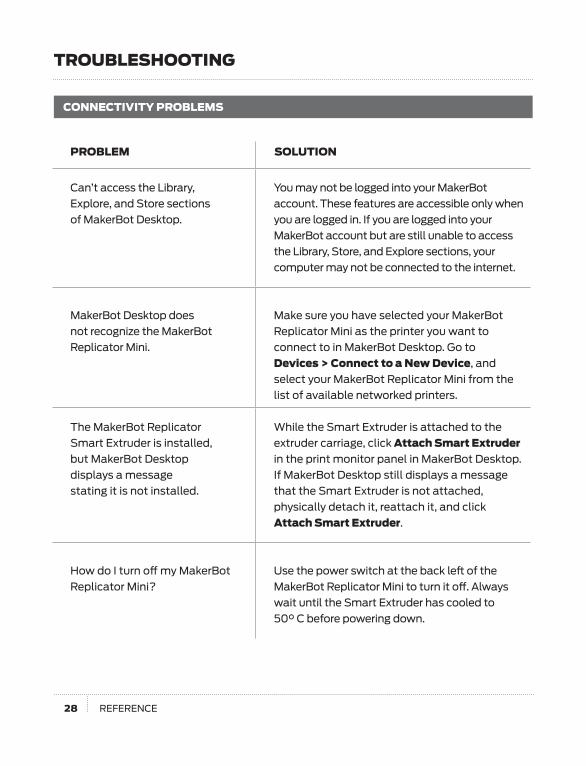
TROUBLESHOOTING
CONNECTIVITY PROBLEMS
PROBLEM SOLUTION
Can’t access the Library,
Explore, and Store sections
of MakerBot Desktop.
You may not be logged into your MakerBot
account. These features are accessible only when
you are logged in. If you are logged into your
MakerBot account but are still unable to access
the Library, Store, and Explore sections, your
computer may not be connected to the internet.
MakerBot Desktop does
not recognize the MakerBot
Replicator Mini.
Make sure you have selected your MakerBot
Replicator Mini as the printer you want to
connect to in MakerBot Desktop. Go to
Devices > Connect to a New Device, and
select your MakerBot Replicator Mini from the
list of available networked printers.
The MakerBot Replicator
Smart Extruder is installed,
but MakerBot Desktop
displays a message
stating it is not installed.
While the Smart Extruder is attached to the
extruder carriage, click Attach Smart Extruder
in the print monitor panel in MakerBot Desktop.
If MakerBot Desktop still displays a message
that the Smart Extruder is not attached,
physically detach it, reattach it, and click
Attach Smart Extruder.
How do I turn off my MakerBot
Replicator Mini?
Usethepowerswitchatthebackleftofthe
MakerBot Replicator Mini to turn it off. Always
wait until the Smart Extruder has cooled to
50° C before powering down.
REFERENCE 29
TROUBLESHOOTING
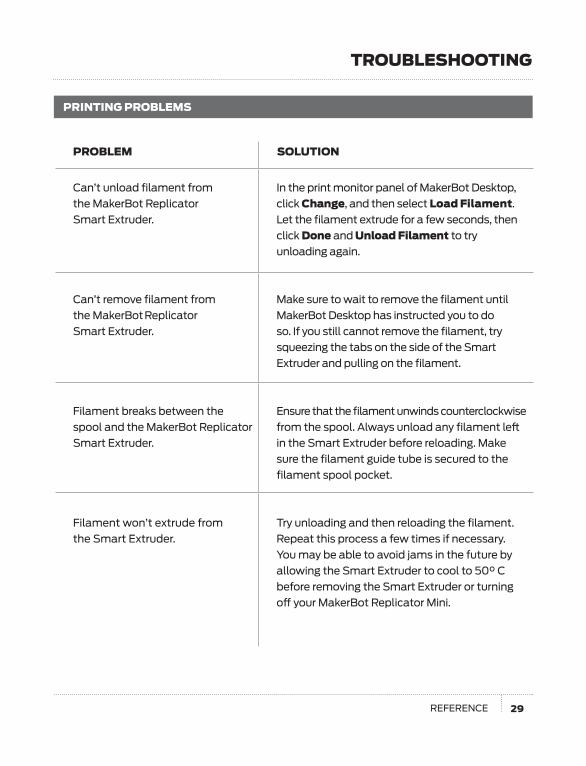
PRINTING PROBLEMS
PROBLEM SOLUTION
Can’t unload filament from
the MakerBot Replicator
Smart Extruder.
In the print monitor panel of MakerBot Desktop,
click Change, and then select Load Filament.
Let the filament extrude for a few seconds, then
click Done and Unload Filament to try
unloading again.
Can’t remove filament from
the MakerBot Replicator
Smart Extruder.
Make sure to wait to remove the filament until
MakerBot Desktop has instructed you to do
so. If you still cannot remove the filament, try
squeezing the tabs on the side of the Smart
Extruder and pulling on the filament.
Filament breaks between the
spool and the MakerBot Replicator
Smart Extruder.
Ensure that the filament unwinds counterclockwise
fromthespool.Alwaysunloadanyfilamentleft
in the Smart Extruder before reloading. Make
sure the filament guide tube is secured to the
filament spool pocket.
Filament won’t extrude from
the Smart Extruder.
Try unloading and then reloading the filament.
Repeat this process a few times if necessary.
You may be able to avoid jams in the future by
allowing the Smart Extruder to cool to 50° C
before removing the Smart Extruder or turning
off your MakerBot Replicator Mini.
REFERENCE30
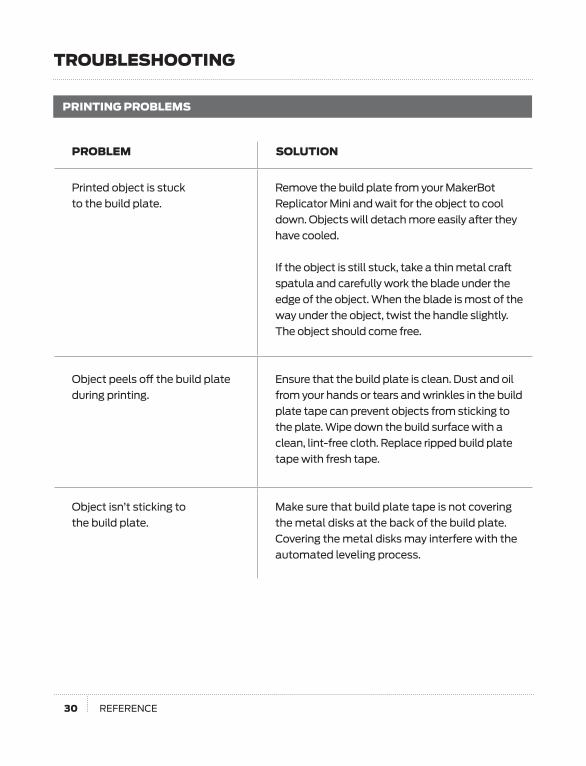
TROUBLESHOOTING
PROBLEM SOLUTION
Printed object is stuck
to the build plate.
Remove the build plate from your MakerBot
Replicator Mini and wait for the object to cool
down.Objectswilldetachmoreeasilyafterthey
have cooled.
Iftheobjectisstillstuck,takeathinmetalcraft
spatula and carefully work the blade under the
edge of the object. When the blade is most of the
way under the object, twist the handle slightly.
The object should come free.
Object peels off the build plate
during printing.
Ensure that the build plate is clean. Dust and oil
from your hands or tears and wrinkles in the build
plate tape can prevent objects from sticking to
the plate. Wipe down the build surface with a
clean, lint-free cloth. Replace ripped build plate
tape with fresh tape.
Object isn’t sticking to
the build plate.
Make sure that build plate tape is not covering
the metal disks at the back of the build plate.
Covering the metal disks may interfere with the
automated leveling process.
PRINTING PROBLEMS
REFERENCE 31
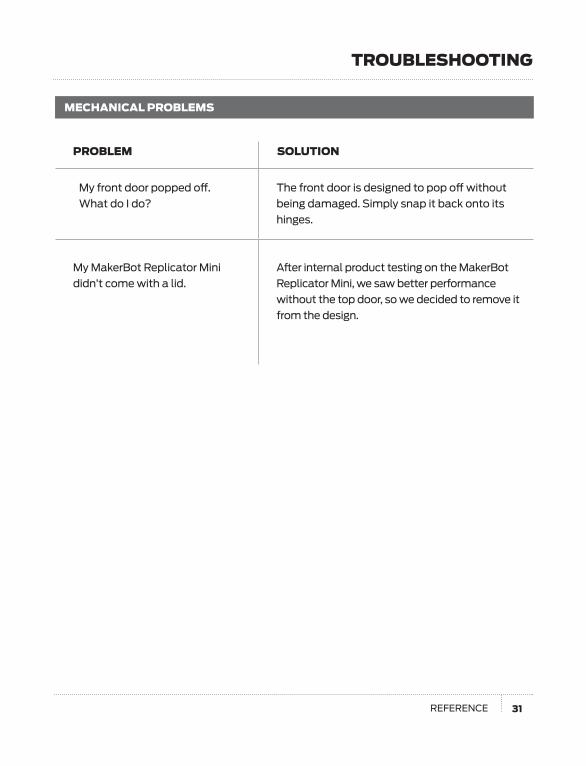
TROUBLESHOOTING
MECHANICAL PROBLEMS
PROBLEM SOLUTION
My front door popped off.
What do I do?
The front door is designed to pop off without
being damaged. Simply snap it back onto its
hinges.
My MakerBot Replicator Mini
didn’t come with a lid.
AfterinternalproducttestingontheMakerBot
Replicator Mini, we saw better performance
without the top door, so we decided to remove it
from the design.
REFERENCE32
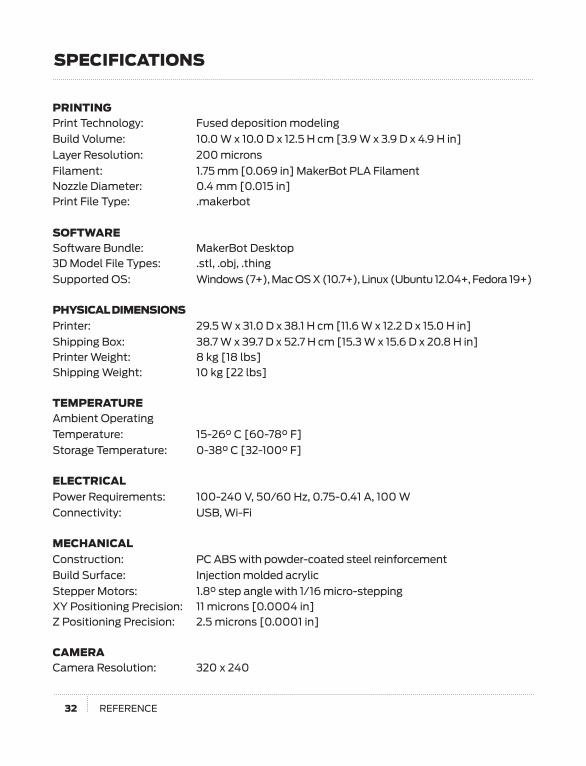
SPECIFICATIONS
PRINTINGPrint Technology: Fused deposition modeling
Build Volume: 10.0 W x 10.0 D x 12.5 H cm [3.9 W x 3.9 D x 4.9 H in]
Layer Resolution: 200 microns
Filament: 1.75 mm [0.069 in] MakerBot PLA FilamentNozzle Diameter: 0.4 mm [0.015 in]Print File Type: .makerbot
SOFTWARESoftwareBundle: MakerBotDesktop3D Model File Types: .stl, .obj, .thing
Supported OS: Windows (7+), Mac OS X (10.7+), Linux (Ubuntu 12.04+, Fedora 19+)
PHYSICAL DIMENSIONSPrinter: 29.5 W x 31.0 D x 38.1 H cm [11.6 W x 12.2 D x 15.0 H in]
Shipping Box: 38.7 W x 39.7 D x 52.7 H cm [15.3 W x 15.6 D x 20.8 H in]Printer Weight: 8 kg [18 lbs]Shipping Weight: 10 kg [22 lbs]
TEMPERATUREAmbient Operating
Temperature: 15-26° C [60-78° F]
Storage Temperature: 0-38° C [32-100° F]
ELECTRICALPower Requirements: 100-240 V, 50/60 Hz, 0.75-0.41 A, 100 W
Connectivity: USB, Wi-Fi
MECHANICALConstruction: PC ABS with powder-coated steel reinforcement
Build Surface: Injection molded acrylic
Stepper Motors: 1.8° step angle with 1/16 micro-steppingXY Positioning Precision: 11 microns [0.0004 in]Z Positioning Precision: 2.5 microns [0.0001 in]
CAMERACamera Resolution: 320 x 240
REFERENCE 33
GLOSSARY
BUILD PLATE: The acrylic surface on which
the MakerBot Replicator Mini builds an object.
BUILD PLATE TAPE: Masking tape used
as a build surface for objects printed with
MakerBot PLA Filament. You can find build
plate tape sized for the MakerBot Replicator
Mini at store.makerbot.com
EXTRUDER ASSEMBLY: The MakerBot
Replicator Smart Extruder installed in the
extruder carriage.
EXTRUDER CARRIAGE: The part of the
extruder assembly that sits on the gantry
and moves back and forth. When the Smart
Extruder is installed in the extruder carriage,
the extruder assembly is complete.
EXTRUDER NOZZLE: The opening on
the end of the Smart Extruder from which
heated MakerBot PLA Filament emerges
to be spread onto the build plate.
FIRMWARE: Thesoftwarethatrunsonyour
MakerBot Replicator Mini.
GANTRY: The apparatus that allows the
extruder assembly to move around.
LAYOUT: An arrangement of 3D models on
the build plate.
.MAKERBOT: The format of print files for
your MakerBot Replicator Mini. Print files
contain instructions for your MakerBot
Desktop 3D printer.
MAKERBOT ACCOUNT: The username
and password you will use to sign in to the
MakerBot Desktop app and to log on to
Thingiverse and other MakerBot sites.
MAKERBOT CLOUD LIBRARY: The part of
MakerBot Desktop where you can store and
organize your own design files as well as any
files you have downloaded from or collected
on Thingiverse.
MAKERBOT DESKTOP:Freesoftware
for use with your MakerBot Replicator
Desktop 3D Printer. MakerBot Desktop
will help you discover, manage, share,
and print 3D models.
MAKERBOT DIGITAL STORE: A digital
store where you can download premium
3D content.
MAKERBOT PLA FILAMENT: Polylactic
acid filament. PLA is a corn-based
thermoplastic. MakerBot PLA Filament is
the material from which you make objects
on the MakerBot Replicator Mini.
REFERENCE34
GLOSSARY
MAKERBOT REPLICATOR MINI: The MakerBot Replicator Mini Compact
3D Printer.
.OBJ: A file format used for 3D models.
PRINT PREVIEW: The feature in the Print
dialog that provides an estimated print time,
estimated amount of filament your print will
use, and a rendering of what your print will
look like.
RAFT: A plastic base printed on the build
plate and used as a printing surface for your
printed object. All models printed on the
MakerBot Replicator Mini will be printed
witharaft.
SETTINGS DIALOG: The dialog that allows
you to select options that will affect the
quality of your printed object.
SLICING: The process of turning a 3D model
into a print file containing instructions for
your MakerBot 3D printer. The MakerBot
Replicator Mini uses print files with the
extension .makerbot.
SMART EXTRUDER: The MakerBot
Replicator Smart Extruder draws the
filament from the spool, melts it, and pushes
it through a nozzle onto the build plate.
.STL: A widely used file format for
3D models.
SUPPORTS: Automatically generated
support structures used to prop up any
sections of a print that will not stand alone.
.THING: A file format used by MakerBot
Desktop that stores additional information
about your 3D model files, such as
orientation and location on the build plate.
THINGIVERSE: MakerBot Thingiverse, an
online community for sharing 3D design files.
USB CABLE: A cable that allows your
computer to communicate with your
MakerBot Replicator Mini.
REFERENCE 35
CONTACT US
Support makerbot.com/supportOur website has extensive documentation and
troubleshooting information about your
MakerBot Replicator Mini. It’s a great resource
when you want to try to solve issues quickly on
your own.
makerbot.com/support/submit-a-case/At MakerBot, we take pride in offering expert,
responsive, friendly customer support to
our customers around the world. If you need
help resolving an issue with your MakerBot
Replicator Mini, open a case with the MakerBot
Support Team at the web address above.
Sales [email protected] learn about other MakerBot products,
including MakerBot PLA Filament, please email
the address above, or call our Sales Team at
347. 334.6800.
Feedback [email protected] general questions, or to tell us what’s on
your mind, send an email to the address above.
We love to hear from you, and using this email
address helps keep our Sales and Support lines
free for customers in need.
REFERENCE36
NOTES

REFERENCE 37
NOTES

MakerBot One MetroTech Center, 21st Floor, Brooklyn, NY [email protected] makerbot.com
WE CAN’T WAIT TO SEE WHAT YOU MAKE!


![MakerBot Replicator 2 - tecnocopia.ch · MakerBot ® Replicator ™2 ... MAKERBOT ® REPLICATOR ... support@makerbot.com [Mon–Sat, 9 AM–6 PM ET]. ·ach of our support team members](https://static.fdocuments.us/doc/165x107/5bd6f9ce09d3f29b748c4b24/makerbot-replicator-2-makerbot-replicator-2-makerbot-replicator.jpg)