REEFKEEPING 101 - MarineAquariummarineaquarium.gr/downloads/ReefKeeping101.pdf · What's a Reef...
170
REEFKEEPING 101 http://www.reefcorner.com/reef%20keeping_101.htm
-
Upload
nguyenliem -
Category
Documents
-
view
212 -
download
0
Transcript of REEFKEEPING 101 - MarineAquariummarineaquarium.gr/downloads/ReefKeeping101.pdf · What's a Reef...

REEFKEEPING 101
http://www.reefcorner.com/reef%20keeping_101.htm

Preface
There are many books available that give instructions on the basics and theory of reef keeping. In general, they try to be everything to everyone and in the process they keep their information so general as to be almost useless. Too much unfiltered information is almost as bad as no information at all. Worse yet, many of these books are seriously outdated in a hobby that makes new breakthroughs every year. They hype the latest fad that was in vogue at the time of publishing. This manual takes the opposite approach. It is the filtered version. It is light on theory and heavy on specifics. Theory is explored just in as much detail as is important to keeping a successful reef tank. I have made the assumption that most individuals who are reading this manual also have at least one standard book on reef keeping which fills in any gaps in this theoretical knowledge. I will provide links to important technical documents where appropriate for those who would like more in-depth reading on particular subjects.
The other reason for the format of this manual is simple. It is meant to supplement and if necessary replace the knowledgeable pet store that sells reef supplies. Such stores are far too scarce and individuals often make the mistake of assuming that if a store sells reef supplies, the store personnel must know what they are doing! Sadly, more often than not, this is not the case.
The goal of this manual is to help you establish a thriving reef tank that suits your interests.
For the uninitiated, a reef tank more than any other type of aquaria, is an enclosed ecosystem which depends on a carefully balance system that maintains high water quality and which permits the keeping of sensitive reef organisms in captivity. A reef tank, more so than any other pet hobby I am aware of, requires careful planning and maintenance to be successful. The upshot is that the potential rewards of the hobby are equally great. If you want a hobby where you can spend a few dollars to get it setup and then basically ignore the tank except to throw some dry flake food into it once a day and maybe clean the glass every week or two, then keep looking, because this is not it! However, if you want a hobby where you can really immerse yourself in it, are interested in learning some of the biology of a living reef and can invest a not insignificant amount of time in the hobby, you will probably become hooked like many of us do. Also be forewarned that this is not an inexpensive hobby. Although there are things that can be done to minimize costs somewhat, it will never be cheap.
1

What's a Reef Tank?
That is a good question. In general, most people are familiar with freshwater or saltwater fish only tanks, but the notion of a reef tank is a bit foreign to them. Upon first inspection, the uninitiated reaction is that a reef tank looks like a bunch of rocks with plant like things in it and an insufficient number of fish.
One major difference between a reef tank and all other types of aquaria is that a careful ecological balance must be struck among its inhabitants to maintain the proper water quality and control predation within certain boundaries.
The cornerstone of this balanced ecosystem is rock that is obtained from the ocean that harbors a myriad of life forms, which form the lower portions of this ecosystem. This rock is called ‘live rock’ based on the fact that it contains various living organisms on and within its structure. These organisms range from bacteria to sponges, fan worms, tunicates, macro algae, snails, crabs, shrimp, soft corals or even hard corals. Pretty much anything that grows on a rock in the ocean can be on the live rock when it gets introduced into the reef tank. Some of this life cannot stand the transition between ocean and tank and dies off in a process called ‘curing’ the live rock. There are also things that may come with the live rock that are not desirable, such as certain forms of algae, predatory shrimp or crabs, etc. The important thing is that live rock establishes a diversity of life forms within the tank that would be impossible to achieve through only intentional introduction of organisms.
The other element that defines a reef tank is the inclusion of corals or other reef dwelling invertebrates such as anemones. The first reaction many people have to a reef tank is “where are all the fish?”. Fish always take 2nd billing to the invertebrates in a reef tank. The reason is two-fold. One is that the fish population must be maintained within certain boundaries to keep the ecological balance. The other is that the corals or other invertebrates are really the main stars of this type of tank. If a person desires the highest possible fish density, then a fish only (FO) tank or a fish only with live rock (FOWLR) tank is the best approach to take. These tanks can be crammed (relatively speaking) with fish and mechanical filters and large water changes used to manage the waste byproducts produced by the fish to a level that keeps it within tolerance levels of the fish. This tolerance level is much higher in fish than what corals can tolerate, so this approach is not viable when corals are involved. Another consideration is that many of the popular saltwater fish cannot be placed in a reef tank because they are predators of the invertebrates or small fishes the reef tank houses or are otherwise destructive in the typical carefully landscaped reef tank.
2

Lastly, the inclusion of invertebrates, many of which are photosynthetic, mandates different lighting than is required in a fish only tank. They may also require supplementation of compounds in the saltwater that they require for health and growth.
Types of Reef Tanks
When setting up your first tank, it is helpful to know what your end goal is since some of the equipment required for the various setups is different. For instance, if you buy a lighting system for a soft and LPS tank and then decide you want to change to add SPS, you will probably need to upgrade your lighting, which can be expensive. Everyone goes through this, but the more that you can avoid it, the more money you will save yourself. The type of reef you want to construct will also help you to determine things like the optimum tank size to start with.
Cost may help you decide on which type of tank to setup. In general, low light, lagoon, soft and LPS coral tanks can be less expensive to setup than SPS and high light clam tanks. Nice reef tanks are never cheap to setup and you should be prepared for this. Failure in this hobby is often a result of trying to go cheap. Not to say that there are not ways to approach the hobby that are more or less expensive. Going the inexpensive route usually means limiting your inhabitants you attempt to keep.
A lot of dollars are also wasted in this hobby as well, such as buying specimens that have no chance of survival in your tank, purchasing an ineffectual protein skimmer which quickly has to be replaced, buying a lighting system only to have to upgrade it as your interest change, or buying the next great snake oil on the market for $20 a bottle.
You can also think of tanks as falling into 3 basic types.
Low demand systems Moderate demand systems High demand systems.
The demand level relates to the water and lighting demands of the specimens kept, the amount of effort required to maintain the system parameters and to some extent the amount of cost required to meet the demands of the specimens kept.
3
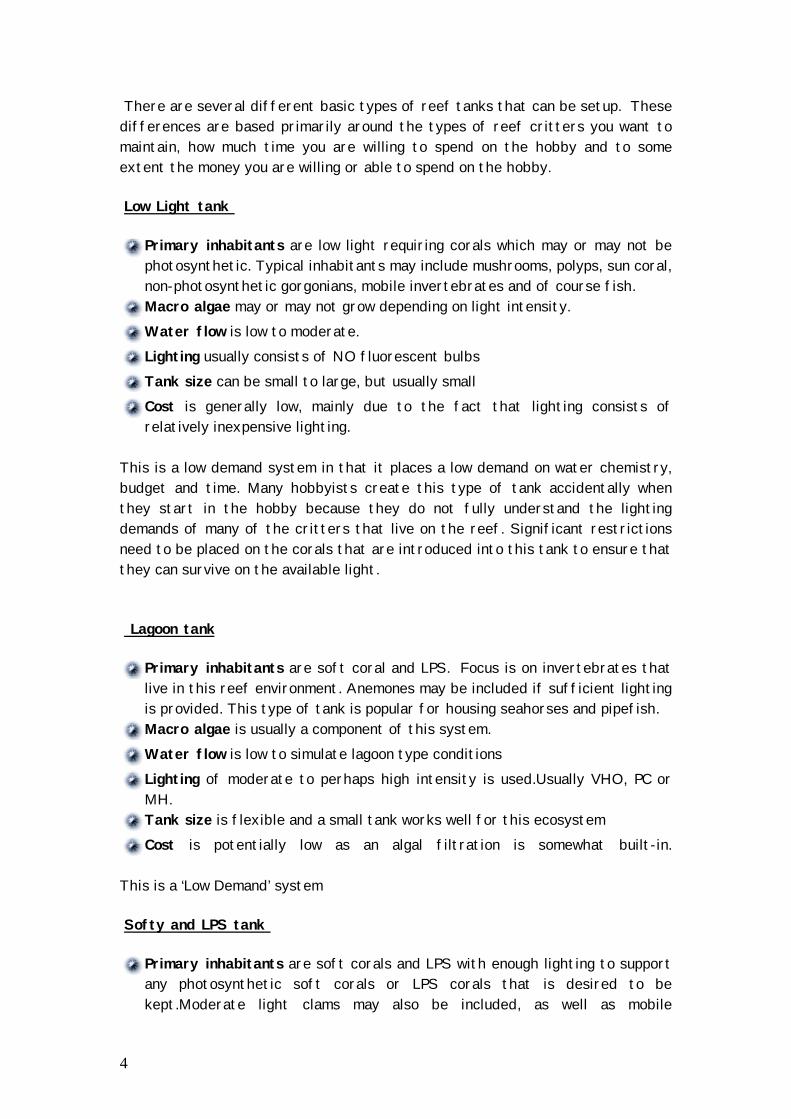
There are several different basic types of reef tanks that can be setup. These differences are based primarily around the types of reef critters you want to maintain, how much time you are willing to spend on the hobby and to some extent the money you are willing or able to spend on the hobby.
Low Light tank
Primary inhabitants are low light requiring corals which may or may not bephotosynthetic. Typical inhabitants may include mushrooms, polyps, sun coral,non-photosynthetic gorgonians, mobile invertebrates and of course fish. Macro algae may or may not grow depending on light intensity. Water flow is low to moderate. Lighting usually consists of NO fluorescent bulbs Tank size can be small to large, but usually small Cost is generally low, mainly due to the fact that lighting consists ofrelatively inexpensive lighting.
This is a low demand system in that it places a low demand on water chemistry, budget and time. Many hobbyists create this type of tank accidentally when they start in the hobby because they do not fully understand the lighting demands of many of the critters that live on the reef. Significant restrictions need to be placed on the corals that are introduced into this tank to ensure that they can survive on the available light.
Lagoon tank
Primary inhabitants are soft coral and LPS. Focus is on invertebrates thatlive in this reef environment. Anemones may be included if sufficient lightingis provided. This type of tank is popular for housing seahorses and pipefish. Macro algae is usually a component of this system. Water flow is low to simulate lagoon type conditions Lighting of moderate to perhaps high intensity is used.Usually VHO, PC orMH. Tank size is flexible and a small tank works well for this ecosystem Cost is potentially low as an algal filtration is somewhat built-in.
This is a ‘Low Demand’ system
Softy and LPS tank
Primary inhabitants are soft corals and LPS with enough lighting to supportany photosynthetic soft corals or LPS corals that is desired to bekept.Moderate light clams may also be included, as well as mobile
4

invertebrates and fish. High light clams may be included in lighting intensityis high. Macro algae is usually excluded as it may become a nuisance, but somepeople like the look it adds to the tank. Water flow is moderate to simulate a reef slope condition. Wave maker maybe used. Lighting of moderate or high intensity is used depending on coral or clamstypes kept. Usually PC, VHO or MH Tank size can be small to large Cost can range from moderate to high primarily depending on the lightingsystem selected.
This is a ‘Moderate Demand’ system
SPS and Clam tank
Primary inhabitants are SPS corals and high light requiring clams. Althoughsofties and LPS may be kept also, these are usually minor components of thesystem. Macro algae (especially Caulerpa species) should be excluded, as it willbecome a nuisance. Halimeda is one of the few macro algaes that isacceptable in this type of tank. Water flow requirements are high.Wavemaker capability is normally used tosimulate reef crest conditions. Lighting of highest intensity is used, usually Metal Halide. Tank size tends to run on the larger side of the scale. This is mainly due tothe fact that the higher cost of setup makes it more difficult to justifythat cost on a small tank. Also, some items such as MH lighting tend to makemore sense on larger tanks due to possible heating concerns, etc. Cost is high due to need for high intensity lighting, high agitated watermotion. Specimen cost can also be higher when dealing with SPS corals andclams, but this is not necessarily true.
This is a “High Demand” system and places the highest demands on maintaining water chemistry, budget and usually the hobbyists time.
Mixed tank
It is possible to mix and match these systems somewhat. An SPS and softie tank for instance is fairly common, although care has to be taken to ensure the inhabitants don’t start turf wars. It is also natural for some systems to evolve from one type toward another over time as the hobbyist gains experience and their interests change.
5

It is important to have a goal for what you want your reef tank to evolve into because the end goal will dictate your equipment and specimen selections going forward. Although it is normal to evolve your thinking as you progress in this hobby, you can save both money and frustration by taking as clear a path as possible at the onset.
One good way to do this is to find a tank that demonstrates what you want to achieve and use that as your basic model as you plan your requirements.
Choosing Suppliers
Finding a good supplier for your reef specimens is very important. There are two primary issues at hand. Do they carry quality specimens and maintain them in good health until sale and are they able to provide advice which is more helpful than harmful?
First Hand Experience
Within my local area, there were 5 pet stores that carried reef supplies. Here is a synopsis of my experiences with these stores early in my ‘formative’ years.
Pet store #1 got me started with my first reef tank. They happened to be the closest to my house and they had a nice looking reef tank on display. At least it looked like a nice reef tank to me. I had not seen any except in magazines and books. I setup my tank based upon their suggestions as well as information that I had gotten out of some fairly outdated books. I did quite a bit of research on filtration requirements and built my own wet/dry filter, bought a protein skimmer and built my own light hood based upon information in a well regarded book on reef tanks. My tank started out OK, but quickly got onto the wrong side of some serious hair algae. Specimens in the tank did not thrive. Some seemed to survive well enough, while others just faded away. Not surprisingly, that nice display tank at the pet store also fell into similar disarray. The hair algae monster took over and the tank was dismantled. So was my tank.
Pet store #2 and #3 keep a couple of fairly nice looking reef tanks that they sell specimens out of. Both tanks have low lighting to keep algae at bay and specimens mercifully wait for someone to take them home to hopefully better conditions. If a specimen stays in one of the tanks too long, it generally starts to look poor. There are of course the exceptions. These are specimens that happen to like these types of conditions.
6
Pet store #4 setup a large 300 gallon reef tank. This was a new pet store and I carefully watched the evolution of their display tank. The tank was setup with large amounts of live rock and large amounts of Caulerpa and yellow tangs to cycle the tank. 3 months later, the tank still had live rock, caulerpa and yellow tangs in it. 6 months later the store had closed down.
Pet store #5…. As I walked into this pet store for the first time, the first thing I saw was the most gorgeous reef tank I had ever seen. It was every bit as impressive as those pictures you see in magazines and books. This was not a tank filled with rocks and some specimens perched on them. This was a tank with virtually every surface covered with hard corals and soft corals. Xenia was growing up the glass like a weed and SPS corals had grown together over time! It was obvious that this tank has been a stable, thriving environment for years! Within 5 minutes of walking into this store, I knew I had found a pet store upon whose advice I could depend on. They had obvious unspoken proof that they knew what they are talking about. Further investigation revealed that the business was family owned and operated. All personnel there are avid reef keepers in their own right. If they have helpers who are less knowledgeable helping out and you ask a question which they do not know, they call over someone who can answer it. This store specializes in reef tanks even though they do sell some freshwater specialty items and reptiles and amphibians.
In-Store Display Tank
Most good pet stores that carry reef supplies will maintain a display reef tank of their own. The long term health of their own tank(s) gives you a direct correlation on how well they really understand reef keeping. The key words here are ‘long term health’. Frequently a poor quality pet store that has difficulty in maintaining their own tank, will tear it down every few months and then set it back up to keep it looking OK. You might see it soon after setup and make the false assumption that they know what they are doing. Monitor the tank over the next few months and see if the specimens are thriving and algae is kept under control.
Another thing to watch for is a display tank in which the specimens are for sale. This tank may look OK, but since the specimens are constantly being rotated in and out of the tank, you cannot tell if they are thriving or merely surviving until someone hopefully takes them home before they die. These tanks are often seriously under lighted which prevents algae blooms, but which also would prevent many of the specimens from surviving long term.
If a pet store does not have a nice display tank, it does not mean you should not necessarily do business with them at some level, but it does mean that you should regard any suggestions on how to maintain a reef tank suspect. After all, if they can’t or choose not to keep a high quality reef tank themselves, how can
7
you have any confidence that they are talking from experience rather than from something they read in a book. Worse yet, they may be telling you something only to sell whatever product they have sitting on their shelves and unfortunately, there are a lot of expensive snake oils being sold in this hobby to the unsuspecting hobbyist.
Observe the specimen tanks
A quality pet store takes pride in their specimen tanks as well as their display tanks. There should not be a lot of dead or dying fish in the tanks. Some mortality is to be expected since the animals are always subjected to considerable stress during shipment to the store, but it should not be excessive or due to obvious disease symptoms. Corals, clams and other light requiring specimens should be under adequate lighting to maintain them in good health. Typical specimen tanks are fairly narrow and shallow and 2 VHO type fluorescent lamps running the length of the tanks is usually the minimum lighting needed for long term health of the specimens. High light requiring specimens such as SPS corals and Tridacna clams should only be kept under Metal Halide or large amounts of VHO/PC type lighting.
LFS or Mail order?
The term LFS is short for ‘Local Fish Store’. This is your local pet store that carries at least some reef tank supplies. If a quality LFS exists in your area, it is the preferred way to buy your specimens. You can observe them prior to purchase for health and color.
A version of LFS are the large retail chain stores such as Petco. These stores seldom have reef knowledgeable personnel on staff, although there are some exceptions. Their livestock typically is inferior health wise from the smaller LFS. While it is OK to purchase livestock through them if it is healthy, I would not recommend depending on getting any significant useful advice.
Mail order is becoming more and more popular in this hobby for purchasing both supplies and livestock. It has several advantages. One is that dry goods i.e. non-livestock items, are generally considerably cheaper than at the LFS. Also, they may have a better selection of livestock than you are able to find locally. As an example, a popular power head sells at the LFS here for about $45. I can purchase the same one mail order for $18. One thing to be cautious of is that mail order items may also have shipping charges applied. This can add significantly to the cost of the goods, especially for livestock that require next day priority delivery service from UPS or FedEx. Dry goods orders are generally fairly cheap to ship. When purchasing livestock, you obviously are not going to be able to see the exact item that you are purchasing, so you are more at the mercy of the company you are buying from. I have provided some links in the links section of on-line suppliers that I have first hand knowledge of as being
8

good businesses to do business with. I have also listed some that have been less than stellar performers when I have dealt with them.
My rule of thumb is the following:
If a good quality LFS exists in your area, try to buy as much as you can through them. Remember that this is a hobby for you, but it is their livelihood and the more they sell, the better they will be able to stock their store. Good advice is invaluable, as is being able to hand select your specimens. Use mail order for specimens that you cannot easily get locally or when significant cost savings can be obtained on dry goods, especially items that you purchase over and over such as supplements.
Tank Selection
Selection of your tank can be one of the most important and expensive decisions that you will make in this hobby.
Tank Material:
Reef tanks are constructed of either acrylic or glass. Each type of tank has advantages and disadvantages which are listed below:
Acrylic vs. glass
Pros
Very light weight. Easier to move when empty which can be important forlarge tanks and the final installation will be slightly lighter. Acrylic is more transparent than glass. Large glass tanks tend to have agreenish tint to the glass unless special very expensive iron free glass isused for the front pane. This is sometimes called Sapphire glass. Acrylic is a better thermal barrier than glass. Acrylic is less likely to shatter catastrophically if it takes a hard blow. Acrylic has no glued seams that may fail over time. Acrylic is easier to drill for plumbing hookups
9

Cons
#1 problem is that acrylic can be easily scratched when cleaning the insideof the tank. All acrylic tanks will get covered with small scratches overtime. This are not too noticeable as long as you avoid accidentally getting apiece of sand or coralline algae between the cleaning device you are using andthe acrylic which can cause large scratches.
Costs differences between the two depend largely on the size of the tank. Small tanks are always cheaper when using glass. As the tank size increases, the cost advantage starts to swing toward the acrylic tanks. Typically this occurs if you go above a 180 gallon tank size which is the largest standard glass tank.
Tank Size
This is a major decision point when setting up a reef tank that will dictate many of your future decisions. The conventional wisdom for reef tanks is the bigger the better. Unfortunately, the bigger the tank, the more expensive it is to setup and the more expensive mistakes tend to be. One the other hand, if you go too small, you will quickly outgrow the tank and it can be a little more touchy to keep consistent water parameters due to its small water volume.
Here are my recommendations:
For someone who wants to get into the hobby in a small way either due to finances or not yet sure if this is what you want to do with your spare time, a 29gal tank is a good size. It is big enough to house a reasonable array of specimens, and is fairly easy to light because it can use 24" long fluorescent tubes or a single metal halide bulb. It is also tall enough to give some vertical feel to the reef. A tank of this size is usually made of glass and an inexpensive external overflow can be used to connect to a sump below the tanks. When starting with this size of reef, you should be prepared to upgrade if the reef bug really bites you. Tanks smaller than a 29 can be used, but they start to limit what you can do with them. A 20 gallon long for instance does not give you enough height to build a decent reef structure, but it would be OK for a lagoon type setup.
A moderate size tank that works well is in the 70 gallon range. This size of tank usually has a width of 18" which allows for good aquascaping of the reef. It is large enough to build a decent long term reef that you will not quickly outgrow unless the reef bug bites hard.. The common 55 gallon size works OK, but it is only 13" wide which does not allow for as nice of a reef structure to be built.
Moving up a notch, the 120 gallon size tank is a very nice size for a reef. It is 4’ long x 2’ x 2’. The two foot width allows for great aquascaping and the two foot height allows for a nice tall reef structure while still being manageable to get
10

ones hands down to the bottom of the tank to do maintenance or arrange corals. Being four foot long, it is generally easier to find a spot to put it than with a longer tank. It is also at the upper end of what 2 MH lamps or 4’ fluorescent lamps will adequately light. It is also at the point in tank sizes just before you have to start giving serious consideration to floor loading. A 120 gallon tank will weigh in excess of 1000lbs.
Moving up from here, there are some guidelines to keep in mind.
One approach is to keep a two foot height and width and extend the lengthout. Up to 8 feet is common. Once you go past that length, the price tends togo up rapidly. If the budget allows, a wider tank is almost always better than a narrowtank. 30" width is a great size and some people go 36"-48" or wider if spaceand budget allow for it. Taller tanks tend to look nice, but consideration has to be given to how youwill service the tank. Once you can no longer reach the bottom, this suddenlybecomes difficult. If you are planning on using a DSB (Deep Sand Bed), whichis typically 6" or so deep, this will take up that amount of tank depth and youmay want to go with a deeper tank than you normally would to compensate.Another thing to bear in mind is that the higher the tank, the thicker theglass or acrylic needs to be and hence the more expensive the tank will get. Taller tanks require higher intensity lights to provide adequate lighting tothe bottom of the tanks. One general rule of thumb is that 175W MHlighting may be adequate for an 18" deep tank. A 24" deep tank my require250W MH to achieve the same light penetration and a 30" deep tank mayrequire 400W MH lamps. If you are contemplating an unusual shape, such as a hex or corner tank,keep in mind that the lighting may be more difficult. Typically MH is the onlylighting option, because fluorescent bulbs will not fit over the tank.
Another point to keep in mind when selecting a tank is to maximize the ratio of water surface area to tank volume as much as possible. This is usually a cosmetic tradeoff. The more surface area, the better the gaseous exchange between the water and air will be. Tanks will large sumps and protein skimmers are less of an issue in this regard since these items aid greatly in the air/water exchange process.
11

Lighting
Most of the specimens kept in a reef tank, other than fish or mobile invertebrates, are photosynthetic. That is, they receive part or all of their nutritional requirements from the lighting that they receive. This is accomplished by the fact that they have symbiotic algae which lives within the tissues of their bodies. The algae utilize the light for photosynthesis and the coral benefits from the byproducts of this process. If insufficient lighting is provided, the algae will die or slow down their activities and these animals will slowly starve to death. Also, some of the colors of photosynthetic corals and clams are attributed to the symbiotic algae and the coloration a specimen will often increase under higher intensity lighting.
Lighting is probably the biggest decision in setting up a reef tank. You can skimp on virtually everything else, but not this one unless you are willing to limit the inhabitants of your reef to those which can tolerate the lower quality light that you can provide. Like the size of your tank, your budget may determine for you the quality of light that you can give your reef. You cannot just walk into a pet store and buy that nice looking aquarium and expect the fluorescent hood that comes with it to work for your reef tank because it won’t.
Lighting has two important characteristics that you must consider, intensity and color. Intensity is the brightness of the light and relates to how much energy the lighting is putting into the tank environment. Color of the light is also important as the photosynthetic processes that are occurring in the tank are targeted to work optimally with the color of the light normally available on the reef.
Lighting Intensity
Intensity of the light relates to how much light energy is present at the surface of the water. There are a number of ways of calculating the amount of light you have or need in your tank, which are described below.
One of the more popular units of measure being used in literature now is the PAR (Photosynthetically Available Radiation). PAR relates to the amount of energy provided in the spectrum that is useful for photosynthesis. Unfortunately, there is no easy way for the hobbyist to directly measure PAR. This rating is most commonly used to compare the efficiency of one lamp to another.
The best way to actually measure the amount of light is to use a light meter made for this purpose. This type of meter measures lighting intensity in a unit of measure called Lux. A light meter will cost around $100 dollars. In general, the goal is to achieve a minimum of approximately 25,000 Lux at the surface of
12

the water if keeping SPS corals with 20,000 to 40,000 being typical. Lower light tanks can get away with less. Measuring the light intensity using a light meter gives a completely accurate indication of how much light is really reaching your tank, however it is not really necessary.
One way to ballpark your lighting requirement is to use a watts-per-gallon calculation. This method is not as popular as it use to be since it does not take some variables into consideration such as tank depth or the efficiency of the light source, but it is still useful. You obtain this number by dividing the watts of lighting in your light fixture by the gallons of capacity in your tank. For a high light intensity tank, you should use a figure of 8-10 watts/gallon as your basic target. A lower light tank can get by with approximately 3-6 watts/gallon.. How does this compare with the typical lighting supplied by a tank manufacturer? As an example, a 55 gallon tank with one 4-foot long 40 watt fluorescent light which is a typical store bought configuration would have a watts per gallon of 40W x 1 bulbs = 40W total / 55 gallons = 0.75 watts per gallon! Now consider that you should aim for approximately 8 watts per gallon in your reef tank. For this 55 gallon tank, you would need about 55 gallon x 8 watts/gallon = 440W! That is about 11 times the amount of light provided by the store bought hood! Since it is physically impossible to put 11 40watt tubes above a 55 gal tank, it should be obvious that we need to find more efficient lighting schemes for our tank. If a low light tank is the target, you can see that the absolute minimum to achieve 3 watts/gallon would be 40W x 4 bulbs = 160W total / 55 gal = approximately 3 watts per gallon.
A better approach, especially when dealing with Metal Halide lamps is to size the lamps by the depth of the tank and determine the number of lamps by the square footage of the tank surface.
175W MH is suitable for up to 18” deep tank
250W MH for 18” to 24” deep
400W MH for anything deeper than about 24”
These are ballpark estimates only for a moderate intensity tank. High intensity lighting might make use of 400 watt MH on tanks as shallow as 18".
The other factor is the number of lights and the rule of thumb is that a MH lamp will illuminate approximately a 2’ x 2’ area of the tank. A 4-foot long tank would require 2 MH lamps. This is true whether the tank is 18” wide or 24” wide. A 6 foot long tank would require 3 lamps and an 8 foot long tank would require 4 lamps. If the tank is a more square configuration, the same basic rules apply. A 5-foot long tank that is 36 wide has 15 sq./ft. of surface area. Since each lamp can cover approximately 4 sq./ft., 4 lamps would be the appropriate number to use.
13

Other major factors that affect the intensity of the light are:
The distance of the light from the surface of the water. The light drops off by the square root of the distance. Lights 4" above the water provide significantly more light into the water than lights 16" above the water. The only things that prevent the lights from being mounted with minimal spacing is heat buildup in the water, possible damage to the lights from water splashes and possible damage to the tank itself if it is made of acrylic or if it has a plastic brace near the lighting that can be damaged from the heat. Oh, and possible damage to your arm when you try to service the tank.
Depth of the water has a significant affect. In any given tank, the lightingwill be brightest at the surface of the water and decrease with depth. Coloration of the water due to dissolved organics can block considerableamounts of light. A good quality reflector which directs light otherwise lost in the canopyback to the water surface can have a significant affect on the amount oflight entering the tank. Any surface between the light and the water surface will reduce the lightintensity, especially if dirt, algae or salt covered.
Lighting Color
The color of the lighting must simulate the sun at some depth in the ocean. Sunlight in shallow water has not been affected much, but as the water deepens, the red and yellows of the light are absorbed while the blues and violet colors stay relatively strong. At 15 feet down on a reef, the light is tinted slightly blue. At 50 feet, the light is strongly blue and the overall intensity is lower.
Color of lighting is typically referred to using the Degrees Kelvin scale. The lower the degrees Kelvin, the more yellow/red the color will be. This is also referred to as a low color temperature. The higher the degrees Kelvin, the bluer the color will be and is referred to as a high color temperature.
We can relate this to our tank in the following manner. The lower color temperature lights simulate a shallow reef, while a higher color temperature light simulates a reef in deeper water. Lighting on the market typically starts out at about 5500 °K. There are even some being sold that have a 4300 °K color temperature. These have more yellow caste to them most people prefer. I recommend that a minimum of a 6500 °K light be used to simulate a shallow reef. These are often supplemented with blue lights called Actinic lights to give a slightly higher color temperature (bluer color). These actinic lights are also useful for simulating low light sunrise and sunset conditions in your reef. Other lights have a rating of 10,000 °K which give a crisp, bluish/white light which simulates a depth of about 15 feet. There are other lights that have a rating of
14
12,000 to 20,000 K which give a deeper blue light which simulates a fairly deep reef.
In general, there is a tradeoff between the color temperature of the lamp and the intensity of the light it produces. The rule is, the higher the color temperature of the lamp, the lower the intensity of its light output. A 250W 6500K lamp will tend to have more light intensity than a 250W 10K lamp for instance. 10K lamps are the optimal compromise between the look and intensity for many reef tanks. 12K and above are gaining popularity, but frequently have a strong enough blue tint to them that some people do not like them. The intensity is also pretty low.
Another consideration when choosing a metal halide bulb is the CRI (Color Rendition Index) The CRI index relates to how well the light reproduces the true colors of an object. This number ranges from 0-100 with the natural sunlight registering 100. Artificial lighting rarely exceeds 95 and is often lower. Most 10K lamps have a CRI of around 95 and thus do a better job of reproducing the true colors of the coral and other specimens than most other lighting.
Types of lighting useful for a reef tank fall into three primary categories, fluorescent, power compact and Metal Halide.
Fluorescent Lights
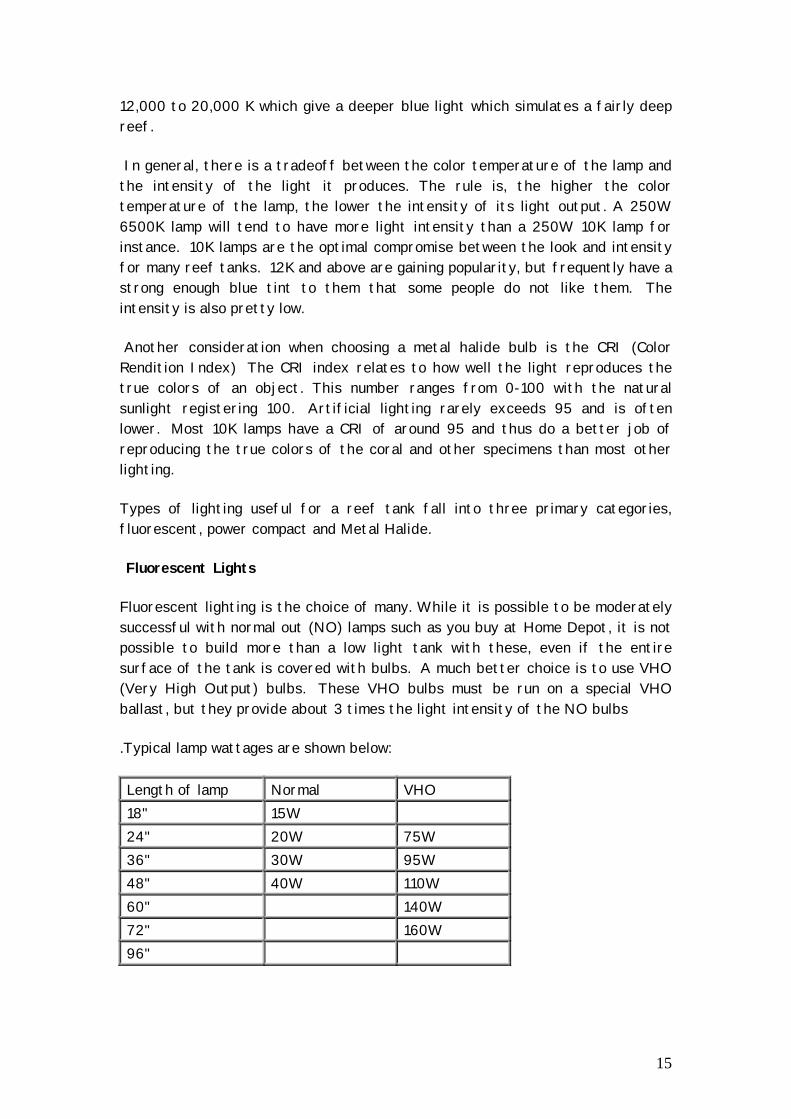
Fluorescent lighting is the choice of many. While it is possible to be moderately successful with normal out (NO) lamps such as you buy at Home Depot, it is not possible to build more than a low light tank with these, even if the entire surface of the tank is covered with bulbs. A much better choice is to use VHO (Very High Output) bulbs. These VHO bulbs must be run on a special VHO ballast, but they provide about 3 times the light intensity of the NO bulbs
.Typical lamp wattages are shown below:
Length of lamp Normal VHO 18" 15W 24" 20W 75W 36" 30W 95W 48" 40W 110W 60" 140W 72" 160W 96"
15

Let’s use our 55 gal tank as an example. Two 4-ft VHO lamps put out 220W which gives us about 4 watts/gal. This is sufficient for a low light tank. Four 4-ft VHO lamps put out 440W and gives us about 8 watts/gal which is enough for a high light tank. Four NO bulbs over the same tank will provide about 160W or 3 watts/gal which is a marginal level even for a low light tank.
Actinic bulbs which have a strong blue color are almost always mixed with daylight bulbs in VHO setups in about a 50-50 mix.
Power Compact Lights
PC lights are really just another form of fluorescent light. The bulb is essentially a skinny fluorescent tube that has been bent into a U-shape with both connections on one end of the bulb. They tend to have a higher light output for the same wattage of bulb than the equivalent VHO bulb. PC lights are also available in small sizes making them a good choice for very small tanks. Common wattages available include 9W, 13W, 55W and 96W.
Some of the PC bulbs on the market have had poor reliability, perhaps because they are supported on only one end.
The new incandescent bulb replacement tubes at the local Home Dept are forms of PC. Their color is pretty yellow, but they have some use for growing macro algae or non-cosmetic lighting of tanks.
Metal Halide Lights
Metal halide (MH) lights are the big guns in the world of reef keeping. Optimum lighting conditions for a high light reef is best achieved with MH lighting, especially if the reef is to be an SPS/Clam tank. MH lighting comes in many sizes from 70W to 400W and even higher. They are small compared to fluorescent lights and allow for a higher density of lighting over the reef. They are a pinpoint source of light, which gives them better punch (penetration) in deeper tanks. Being a pinpoint source of light also means that they simulate the effect of water ripple shadows similar to a natural reef, which most people find very enjoyable. Metal Halide is generally the optimum way to light a reef tank although you can frequently get away with less intense lighting systems depending on the livestock which are kept.
MH Types
There are primarily 3 types of MH lighting. Single-ended MH bulbs, Double-ended MH bulbs (HQI) and Mercury Vapor (MV). MV is technically not the same technology as MH, but some of the newer bulbs such as the Iwasaki’s have performance levels which put them into the same ballpark as normal MH.
16

Single-Ended MH These are the most common MH lighting available. They use a large light bulb looking socket which they screw into called a Mogul socket. These bulbs come with an outer glass envelope which blocks the large amounts of UV radiation that these bulbs produce. Double-Ended MH HQI lamps require a double-ended socket for mounting. These bulbs do not have UV shielding and this needs to be provided as part of their mounting, otherwise the UV can burn the corals. These lamps tend to have some of the best color and efficiency performance, but also tend to be a little more trouble to deal with.
Mercury Vapor Mercury Vapor lamps are usually a very yellowish color. There is now a version made by Iwasaki that produces a fairly good white color. It is rated at 6500K color temperature, but seem to be very variable with some bulbs appearing very yellow and some being a very nice white. These bulbs are becoming fairly popular since they put out a higher level of PAR relative to normal MH. Some people find the color a little too yellow, but this can be minimized by supplementing with Actinic blue lighting. These bulbs tend to be cheaper as well. Most MH installations also include Actinic fluorescent lamps as well in order to provide dawn and dusk lighting conditions.
Metal Halide Ballasts
Metal halide lamps require a ballast to drive them. The ballast provides the high voltage needed to ignite the lamp and the drive voltage required to keep the lamp running. The ballast is remotely mounted from the lamps due to weight and heating concerns. There are two primary types of ballasts available. One is called a TAR ballast. These are low tech, heavy, large, low efficiency, low cost, but reliable devices and then there are Electronic ballasts that are high tech, relatively light and small, higher efficiency, higher cost and sometimes failure prone. The ballast you chose will be determined by the type of lamp you are planning to run (Single-ended, HQI or MV) and whether you prefer the low tech (TAR) or high tech (electronic) approach to ballast construction.
A popular TAR ballast on the market is the PFO ballast. It has the benefit that you can get two ballasts in one housing, which is convenient (but bulky and heavy). Advance is another common TAR ballast.
Popular electronic ballasts include Ice Cap, E-Ballast and Sun Seeker.
17

Lighting Costs
Lighting costs can vary widely depending on how much work you are willing to do yourself and where you buy the parts. Prices below are ballpark MO pricing.
For our hypothetical 55 gal tanks, a four bulb VHO lamp system will cost approximately $175 for the ballast, $100 or so for four bulbs, $50 for holders and electrical connectors and some more money for reflectors. PC lighting cost would be similar.
For an equivalent MH lighting system, I would chose a dual 175W ballast ($175), two 175 10K lamps ($200) and reflectors ($60). The metal halide system will tend to be a little more expensive. Note that the wattage of the two 175W MH lamps is 350 watts total. This seems like less than the 440W VHO, but MH is a more efficient technology than VHO and you will actually get more usable light from the MH.
Lighting Related Heat Concerns
Lighting systems can sometimes generate enough heat to cause excessive temperatures in your tank. The more wattage of light you have over your tank, the more heat it is producing. A misperception about MH lighting is that it generates more heat than fluorescents. Actually, MH lighting is more efficient and hence generates less heat for the equivalent light output. Since this heat is concentrated in a small area instead of over a long bulb, the MH bulb itself does get hotter and can be a serious burn hazard if contacted.
Heating from the lighting system can be managed via fans in the hood which cool blow air across the water surface and other fans which extract the hot air out of the hood. You do not want to blow the air directly at the lamps as that is now what you are trying to cool and excessively cooling MH lighting can shorten its lifespan and decrease its light output. In worse case scenarios, an external water chiller may be required to keep tank temperatures down.
Further Reading:
Shedding Light On The Reef By R. Harker Photosynthesis and Photoadaptation By S. Joshi Spectral Analysis of Metal Halide Lamps: Part I 400 watt lamps (new)
18

Bu S. Joshi & D. Morgan Spectral Analysis of Metal Halide Lamps: Part II 400 watt lamps (used) By S. Joshi & D. Morgan Spectral Analysis of Metal Halide Lamps: Part III 250 watt lamps By S. Joshi & D. Morgan Reflecting On Lighting By R. Harker DIY Guide to Compact Fluorescents By S. Joshi
Filtration
Hobbyists moving to reef tanks from the freshwater or even saltwater fish only tanks are frequently puzzled over the apparent lack of massive power filters that they are familiar with in the other hobbies. Reef tanks require a degree of finesse rather than sheer brute force when it comes to filtration. Whereas the other hobbies typically are trying to achieve crystal clear water via removal of all particulate matter and rely upon water changes to dilute pollution, reef tanks are trying to achieve crystal CLEAN water through removal of all pollutants at a level that water changes alone could not accomplish.
What does this mean? In simple terms:
The hobbyists wants to remove as much biological waste from the water aspossible before it enters the nitrogen cycle. What waste does enter the nitrogen cycle gets processed quickly andcompletely from Ammonia to Nitrite to Nitrate and finally to harmless gasesthat can escape into the atmosphere.
There are a number of ways to try to achieve these goals, which are outlined below.
Wet / Dry Filter
Old school was that a filtration device called a wet / dry filter was necessary for success with reef tanks. In fact, there are many still being sold today.
19

Wet/dry filters are large acrylic or grass filters that become the sump for the tank and include a tower area in which return water from the tank is trickled or sprayed over a plastic media. The logic was that oxygen loving bacteria would colonize the media and convert the waste products generated by the tank into relatively harmless nitrates. This was the 'dry' portion of the filter. The 'wet' portion typically included a sponge for mechanical filtration and space for heater, carbon and possibly a protein skimmer. They in fact accomplished this mission, but have several important downsides. Tanks with wet/dry filters frequently have problems with nitrates continually increasing, only to have the nitrates drop to zero when the wet/dry filter is removed. Why this might be, is not fully understood, but it is a well established phenomenon. The conversion of wastes to nitrates is accomplished efficiently, but the final step to convert it to harmless gases is not and therefore the nitrates accumulate in the system. Also, the mechanical filtration that is sometimes employed in wet/dry filters is counter productive. Reef tanks house countless organisms whose lives depend on filtering the water. Mechanical filtration is redundant and counterproductive in the long-term.
Long story short, do not spend money on a wet/dry filter. If you already have one and are having problems with nitrate accumulation, slowly remove the biomedia until the unit serves as simply a sump.
Protein Skimmer
The first step in clean water is removal of pollutants before they enter the nitrogen cycle. Mechanical filtration of visible particulate matter in the water may seem like the best way to achieve this, but it is not. Much of the visible matter is harmless flocculent while the harmful stuff is invisibly dissolved in the water column. This is where protein skimming comes into play.
A protein skimmer operates on the principal that protein and other organic wastes tend to collect at the water surface due to the affinity to having half their molecule in the air and half in the water. This is why scum forms on the water surface. A bubble floating in the water tends to collect these wastes for the same reason.
A protein skimmer consists of a reaction chamber through which tank water is mixed with fine air bubbles. These bubbles collect the wastes onto their surface through natural processes as the bubbles rise through the chamber. The bubbles collect and carry the waste products up toward to the top of the reaction chamber. As these waste products rise in the chamber, a foam is created which is eventually pushed up through a tube and into a collection vessel. These organic wastes are mostly fish wastes and the protein skimmer does a good job of removing them before they have to go through the biological
20

breakdown cycle. A person only has to see and smell the output from the protein skimmer to realize how much gunk these things do remove from the water.
Protein skimmers are constructed in several different ways.
Originally, skimmers were constructed of a tall acrylic tube with a wooden air stone in the bottom. Wood was used to provide the fine air bubbles necessary to make the skimmer work properly. The water was forced to travel down the tube while the air bubbles were trying to rise up through the water. These skimmers worked well and are still in use in small quantities today. Their downside is primarily the need to occasionally replace the airstone and the need for a fairly high pressure air pump.
Most skimmers sold today are called venturi skimmers. These skimmers remove the need for the air stone and air pump by creating the bubbles through a venturi effect. Water is forced via a water pump under pressure through a restriction which has a small air hole in it called a venturi valve. The restriction causes a vacuum to be created and air is sucked in through the small hole and mixes with the water. Venturi skimmers can create a more turbulent water column than airstone based skimmers and do not require as tall a reaction chamber to achieve the same affect and therefore can be easier to fit under the tank stand.
Protein skimmers have been in the hobby for quite some time and have proven their value in almost all situations. It is highly recommended that protein skimming be provided on any reef. Although it is possible to setup a reef tank with a skimmer, there is no downside to providing one unless you are trying to setup a tank which houses specimens from more turbid waters, such as Goniopora which might benefit from increased nutrient levels in the water.
Protein skimmers can either be purchased as in-sump models or hang-on-tank (HOT) models. In-sump models are generally more powerful and should be used if a sump is used on the tank. If no sump is used, then a HOT is the only other option. Some of these hang on models are ineffective enough to make them mostly worthless unfortunately.
Protein skimmers also have the incidental, but very valuable side benefit of providing a high degree of gas exchange and oxygenation of the water.
Algae Filtration
A method of filtration that has found favor with those who prefer the natural approach. The logic behind this approach is that algae will consume nitrates and
21

other water pollutants as they grow and subsequent frequent pruning of the algae will export those nutrients outside of the tank. The algae employed is usually one or more of the Caulerpa species, although any algae, including hair algae, will perform the same function. Unless the tank is a lagoon tank, the algae is normally grown outside the main display tank either in the sump or a refugium if one is used. Simply adding a small light over the sump and and throwing some Caulerpa in gets this process started.
Downside to this method includes the fact that Caulerpa algae can go sexual and disintegrate almost overnight, dumping a heavy biological load back into the system. Frequent pruning seems to help minimize the chance of this occurrence. Algae growth can also leach chemicals back into the water that tend to yellow the water. Carbon can be used to minimize this problem.
Deep Sand Beds
Sand beds with medium to find grain particles that are over about 1" in depth create oxygen poor conditions in their deeper layers that are conducive to growing the type of bacteria needed to convert nitrates to harmless gases. DSB's take this strategy to extremes through the use of sand beds that are generally 4" to 6" in depth. At this point, they enter the realm of intentional (vs. incidental) filters and so are included here. Old school is that deep substrates will allow noxious gases, like hydrogen sulfide, to form in the anaerobic areas that can cause problems in the tank. Current thinking is that this is not a major concern and that this setup closely approximates what occurs in the substrate in the ocean. DSB's, and for that matter any substrate, should not be disturbed more than necessary. At one point, vacuuming the substrate was a common practice to keep it clean. Current thinking is that the sand bed should not be disturbed more than necessary to allow it to create and maintain the anaerobic regions. The sand bed also becomes populated with worms and other organisms that further help to recycle wastes within the tank.
The downside to this method is primarily that the DSB can consume large amounts of the tank vertical depth and be somewhat unsightly where it is in view along the front glass of the tank. For this reason, some DSBs are being setup in sumps where it's work can be done out of view of the main display tank.
Carbon
Carbon is frequently employed in reef tanks as an adjunct to other filtration methods. Carbon can be from a natural mined source similar to coal, or can be produced through extremely high temperature processing of coconut shells or
22

similar. Carbon absorbs compounds in the water that can discolor the water improving the look and light penetration. It can also absorb other compounds that might be otherwise harmful to the tank. Some reef keepers are concerned that it might also remove useful components as well, but the benefits seem to outweigh any likely negatives. Carbon is recommended to be used continually in small quantities. For instance, a quantity of about 1/2 cup for a 55 gallon tank would be appropriate. The carbon should be replaced about once a month to keep it effective. Some people only use GAC a few days a month to minimize it absorption of any good compounds, but the sudden change in water clarity and composition this method imposes on the tank does not make much sense and is counter to the goal of maximizing water stability within the reef environment.
When using carbon, it is very important to chose a high grade version which is typically called GAC (Granulated Activated Carbon). GAC is fairly soft and has small rice grain particle sizes that increase absorption rate. High quality versions also minimize any phosphates or other contaminates that they might otherwise contain since they are organic in nature. The small grains of GAC require that it be contained in a mesh bag or similar to prevent the particles from migrating around. It is also important to not put loose GAC in direct water flow as there is evidence that tumbling GAC can create small carbon particles that enter the tank and can be somewhat detrimental to the tank inhabitants. If used in a high water flow area, ensure the GAC is tightly packed to prevent its movement, otherwise a quieter part of the sump where the water can circulate gently around the GAC is the best place to locate it.
The carbon typically sold in LFS for freshwater use that is very hard and has very large particle size should not be used in reef tanks. They are fairly ineffectual and may have unwanted contaminates.
Here is an example of a typical high quality GAC
23

Other Contraptions
Hang-on style power filters have little value in a reef tank and should generally not be used, although on a small tank an outside power filter can sometimes be used to house a small heater and carbon outside the tank and provide water flow in the tank. In that case, the filter portion of the outside filter is left unused. There are some outside filters which are designed specifically for reef tanks that include a small protein skimmer and these are generally ineffectual enough to be mostly useless.
Under tank power filters are also generally not used, although they sometimes are used for holding GAC, or other filter media that might be used on occasion.
UV sterilizers were quite popular for a while and are still used by some hobbyists. They work on the principal that a stream of water is passed through an enclosed tube and over a intense UV light source which kills any organisms that it comes into contact with, effectively sterilizing the water. The value is dubious at best although a case may be made for it when the water has parasites or similar that need to be dealt with.
Utilizing ozone to sterilize water was popular at one time, but is little used today. Ozone is a gas which is formed in the presence of an electrical field and has a very noticeable odor to it. The smell associated with lighting or other electrical arcs is ozone. Ozone, unlike UV, it is not limited to a small reaction chamber and has far reaching side affects. Ozone is a strong oxidant and it can easily damage delicate membranes such as fish gills.
Current reef keeping theory is that a healthy tank automatically helps to fight bad organisms in the water and such preventative measures such as UV sterilizers and ozone are unnecessary and potentially bad. Unlike fish only tanks that seem to frequently have massive fish infections from parasites and bacteria which must be controlled via medication or mechanical means, reef tanks that are in good health rarely have significant disease problems.
Further Reading:
Build Your Own Foam Fractionator By L. Jackson Granular Activated Carbon: Part 1 By R. Harker Granular Activated Carbon: Part 2 By R. Harker
24

Substrates
Substrate is the sand or gravel that covers the bottom of the tank. Substrate can be cosmetic, a place for critters to burrow and dig through and it can also be an important adjunct to the biological ecosystem within the reef tank. Old school was that a bare bottom tank was important so that all detritus could easily be removed. That is no longer true and you will not find many bare bottom tanks around these days. Today, there are 4 main types of substrates in use:
a. 1" layer or so of coarse crushed coral gravel. b. 1-2" of layer of smaller medium grain sized aragonite or coral sand c. Plenum system – which consists of a stratified fairly deep sand bed over
a open area (plenum). d. DSB – Deep Sand Bed, which is a deep 4"-6" or deeper sand bed made up
of a mix of coral sand sizes, mostly fairly fine.
Coarse Crushed Coral Gravel
The coarse coral gravel substrate is falling out of favor. The large particle size allows excessive amounts of food to fall into the crevices and this substrate does not provide a very good biological zone. Many tanks are setup with this substrate through lack of knowledge, but it should not be used even though this is sometimes the only substrate sold at the LFS. Coarse gravel CAN be used in the reef tank if it is used in combination with finer sand.
1.5"- 3" Medium Grain Substrate
The 1.5"- 3" deep, moderate particle size (1-2mm) coral or aragonite sand substrate is probably the most common and has been around for some time. Finer sand beds over about 1 1/2" start to have the ability to act as nitrate reduction areas. My tanks mainly rely on this type and there are many successful tanks constructed around this type of substrate. This setup also has the advantage that it does not consume excessive amounts of the tank depth like the following two options can. This is probably the easiest, safest and cheapest route to take. Of course reef keepers hardly ever take that route since there is always a better way of doing things right around the corner (or so we hope).
Plenum System
Plenum Systems – were made popular in the 90’s. They have a somewhat complicated construction in which a porus platform is constructed inside the tank that provides about 2" of water dead-space under the sand. The platform is covered with screen to prevent the sand from filling this void but allows water to pass through. The platform is then covered with successive layers of
25

different sizes of sand to form approximately a 4" depth. The logic is that the dead water space provides a nutrient sink and will prevent nitrates from accumulating. This substrate type is starting to lose favor in the reefing hobby for several reasons. One is that it is complicated to setup correctly. Another is that there are many tanks using this system which do not seem to be performing any better than simpler systems and lastly, there have been reports that disturbing the sand bed has caused entire tanks to crash. I will not go into detail on this method since I believe it is a poor choice, but if you are interested in pursuing it, there is a monthly article in FAMA which can get you started.
Deep Sand Bed (DSB)
DSB's are the newest thing to hit the substrate scene. These consist of one more layers of fairly fine sand that is piled deeply in the bottom of the tank. In some ways, it is similar to a plenum system, but without the plenum and the sand depth is usually deeper. The only known downside to the DSB system is that it occupies a lot of the tank depth and can be somewhat unsightly when viewed from the front. The benefits are reputed to be many. The major one is that it’s depth encourages a wider range of biological processes to occur in the tank than you get with thinner sand beds. This mostly relates to the substrates ability to reduce nitrates to harmless compounds. There are no known long-term problems with DSB substrates yet, unlike plenums, but the technique is still fairly new. To minimize the cosmetic impact, some reef keepers are implementing DSB's in external tanks or sumps. Whether you should use a DSB is mostly dependent on what kind of reef keeper you are. If you want a fairly easy, nice cosmetic setup, I would recommend staying with option ‘b’ above. On the other hand, if you’re a tinkerer and want to be leading edge and you have the tank depth to accommodate it, then DSB is worth looking into. The article 'Muddy Waters' by Dr. Shimek in the Further Reading section below is excellent reading on this topic.
Live Sand
There is one last spin to the substrate question and that is the topic of 'Live Sand'. Live sand is sand that comes from the ocean presumably with all the varied sand dwelling organisms still in it. The idea is to use some amount of live sand to 'seed' the remaining substrate with sand dwelling organisms. In concept, live sand makes perfect sense to create a thriving sand bed with a myriad of organisms in it in the reef tank very quickly. Many current hobbyists swear by the value of live sand. I am somewhat doubtful as to exactly how much benefit there is to be gained by its addition for two basic reasons. First, any 'dead' substrate seems to quickly be populated by organisms from the live rock. Second, much of the live sand I have seen appears to be pretty sterile looking sand which is stored in conditions that would preclude much of the larger life
26

forms from surviving. If you decide to go this route, make an effort to get as fresh of sand as possible to get the most value for your money.
Further Reading:
Muddy Waters: Sand Beds By R. Shimek
An Objective Look at Substrates By R .Harker
Reef Aquaria Compromises: Live Sand By B.Stark
Making Saltwater
Saltwater is a major component of the reef tank. Virtually all reef tanks use a dry salt mix to create the saltwater used in them. This is not concentrated salt from the ocean, but instead is a carefully formulated salt developed from scratch. For those who live in the tropics (I used to live in Hawaii), you can collect fresh saltwater, but you have to be careful to do this away from sources of pollution. Saltwater from cold water areas is generally unsuitable since they often contain a high zooplankton component that will rapidly deteriorate in the tropical temperatures of the reef tank. There is also the chance that salinity will vary widely if there is freshwater runoff near the collection site.
There are a number of brands of salt mix on the market to chose from. I have used several different ones including Tropic Marin, Instant Ocean, Corallife and Kent. Probably one of the best is also one of the cheapest (how often does that happen?) and that is Instant Ocean. It is easy to pick one of the higher priced, fancier looking brands, but it is not necessary. Analysis of the salt mixes that have been performed by others have shown that Instant Ocean (IO) as it is often referred to has as optimal a formulation as any of the other salts and is better than most. IO has a sister brand called Reef Crystals that is more expensive and has elevated levels of calcium when mixed. The added cost of this product does not make much sense since these levels can easily be adjusted using cheaper methods.
When mixing the saltwater, it is very important to use purified water. Most public and well water sources contain excessive amounts of chemicals, elements and compounds that can cause problems in the reef tank. Common undesirable additives that frequently come free with water include phosphates, nitrates and
27

silicates, all of which can cause excessive algae growth. This becomes even more important for replacement water (water which must be replaced due to evaporation). Since the chemicals do not evaporate, they tend to get added with each water addition and accumulate in the system over time. So even if the basic water concentration of impurities is OK, they can still accumulate to levels that are not OK. Some people have found that they can use tap water as-is without problems, but you should not do this unless you are willing to take a significant risk. I have learned this lesson the hard way.
There are a number of ways to get purified water. One way is to go down to the local grocery and buy water sold as distilled or purified. This works fine, especially for small tanks where water consumption is minimal. You generally pay $.50 to $1.00 per gallon for water in this form. Another way to obtain purified water is to buy it from your LFS, if they provide it as a service. Most LFS have purification equipment to supply their own needs and are happy to sell the excess, usually for around $.25/gal. Most people, however, eventually bite the bullet and buy their own water purification system. The ones typically sold at home improvement centers are not very well suited for our application as they provide incomplete filtration. It is better to purchase a system designed for the purpose of purifying water for reef tanks. These systems are called RO (Reverse Osmosis) or RO/DI (Reverse Osmosis / DeIonization) filters. The addition of the DI unit provides enhanced filtration and is usually required to remove silicates that can cause unwanted diatom growth. These systems typically produce between about 25 and 100 gallons a day of purified water. The cost of the system is dependent on the gals/day rating of the filter and the number of filtration stages it has. A 25 gallon a day unit produces about 1 gallon of purified water an hour. It also produces perhaps 10 gallons of waste water in that same hour. This waste water can be used for other purposes and will be slightly harder than the normal tap water.
Further Reading:
Understanding Seawater By Randy-Holmes Farley
The Composition Of Several Synthetic Seawater Mixes By M. Atkinson & C. Bingman
28

Nitrogen Cycle
Nitrogen cycle in reef aquaria refers to the process by which biological waste by-products are converted from toxic substances to harmless compounds through the actions of bacteria. In a properly setup tank, this process occurs naturally through the actions of bacteria that colonize different areas of the tank. Establishing this process in the first place is known as 'cycling' the tank.
There is probably nothing that causes a new hobbyist more consternation than dealing with getting a new tank properly cycled. It is the first hurdle that the hobbyist must confront and successfully overcome in their quest for the perfect reef tank. Although the science behind what is going on is quite complicated, the process can be understood and controlled with only a basic understanding of the principals involved.
First, an understanding of the steps involved in the nitrogen cycle is required in order for the hobbyist to successfully monitor the cycle and know when the tank has successfully completed its cycle.
The nitrogen cycle is composed of 4 basic steps.
Ammonia: Ammonia (NH3) initially enters the system via biological waste. These wastes may come from fish poop or dead organisms which are decaying in the tank. These wastes mineralize into the compound ammonia. Ammonia is a very toxic compound. Bacteria which colonize rock and sand surfaces utilize ammonia as food and convert it into a new compound called nitrite. Ammonia should always measure zero in a fully cycled tank.
Nitrite: Nitrite (NO2) is only slightly less toxic than ammonia. Fortunately, there are other types of bacteria that also colonize sand and rock surfaces which consume nitrites as food and convert them into nitrates. Nitrites should always measure zero in a fully cycled tank.
Nitrate: Nitrate (NO3) is a relatively harmless compound. Nitrates tend to accumulate in the reef system if it is not setup correctly. Fish can tolerate fairly high nitrate levels, but most corals do not. Nitrate is also a plant fertilizer, so its accumulation can lead to algae problems. The brute force way to control nitrates is to do large water changes and therefore dilute the nitrate levels, but there is a better, more natural way to deal with nitrates. Nitrates in a fully cycled tank should ideally remain at zero, but up to about 20ppm is acceptable. Higher levels may lead to issues with coral health or algae growth in the tank. Some corals may actually benefit from the higher nitrate levels, but they are atypical.
29

Nitrogen: In a properly setup reef tank, the nitrates can be further processed by special types of bacteria which convert the nitrates into harmless nitrogen gases which escape into the atmosphere. When the process includes this step, the nitrogen cycle is completed and the tank will maintain zero nitrates without significant water changes or the requirement for specialized external equipment to remove it from the system. The key to this final step is to provide oxygen poor areas of sand or rock. The bacteria which perform this last step of the process only live in oxygen poor (anaerobic) areas of the tank. The surest way to establish these anaerobic areas is to include a sand bed that has sufficient depth and sufficiently small particle size to restrict water flow in the lower areas of the bed.
Establishing the nitrogen cycle in the reef tank
It should be somewhat obvious that to establish the bacteria which convert ammonia to nitrites, a source of ammonia must be added to the tank. Once these bacteria start producing nitrites, the bacteria which convert nitrites into nitrates can start to establish themselves and of course, once nitrates are available, the nitrate converting bacteria can start to establish themselves, providing the hobbyist has taken steps to provide a suitable oxygen poor home for them.
The 'trick' to establishing the nitrogen cycle in the tank is to do it without endangering any tank inhabitants. This generally means that the part of the cycle which converts ammonia to nitrate should be established before any specimens are added. Fortunately a ready supply of ammonia is introduced with the live rock that is introduced into the system. As the live rock goes through its curing process, the decaying life forms on the rock provide the starter fuel for ammonia and nitrite consuming bacteria to colonize the rock. When live rock is being cured and this process is getting setup, toxic levels of ammonia and nitrite can form and specimens cannot be introduced until it is verified that both ammonia and nitrite have dropped to zero levels through the use of test kits. Typically, while this process in occurring, the hobbyist will measure an increase in ammonia and then it will start to drop as ammonia consuming bacteria start to grow. The hobbyist will then measure an increase in nitrites as the ammonia gets converted to nitrite. As the nitrite consuming bacteria start to grow, the nitrite level will also start to fall. When both ammonia and nitrite levels fall to zero levels, the cycling is complete. Typically, the nitrates will be high at this stage and the water that was involved in establishing the cycle should be replaced with new saltwater.
Once the live rock is cured, the basic tank cycle has been established and the live rock can be stacked in its final arrangement in the tank. Even though the basic bacteria types have been established, the number of bacteria will fluctuate depending on the bioload of the system. Also, there is probably not
30

much bacterial colonization of the sand bed at this point. Therefore it is important to increase the bioload of the system slowly so that the bacteria colonies can grow to match the load of the system. If a lot of fish are added to a newly cycled tank, the sudden increase in waste products will cause a new mini cycle to start all over and since there are specimens in the tank, they are at risk of death or injury due to the ammonia or nitrite spikes that will occur. Corals and clams do not generally add bioload to the system, so they can be added more freely than fish or other critters that require constant feeding.
The final part of the nitrogen cycle (converting nitrates to nitrogen gas) has to be established after the tank is setup. The first thing that a hobbyist must do is to ensure that the reef tank provides oxygen poor regions in the live rock and sand. Old school was that this was to be avoided at all costs due to the concern over noxious gases, such as hydrogen sulfide, being formed. This concern seems to be overly exaggerated and can probably be ignored for the most part. It is important however, that once these oxygen poor zones are created, that they not be unduly disturbed.
To setup these anaerobic regions I recommend the following:
Provide a substrate of sand which is no larger than 1-2mm and which can be finer. With this size of sand, a sand bed with approximately 2" of depth should be provided. This is sufficient to ensure that the deeper areas of the sand bed will become anaerobic and allow nitrate processing bacteria to colonize it. This is an area in which DSB's (deep sand beds) are often recommended. However the same thing can be accomplished without the 4-6" deep sand beds which are recommended by DSB advocates. Going against common wisdom in the literature these days, placing live rock directly on top of the substrate also helps to create these anaerobic regions. Many hobbyist spend a lot of effort to provide frameworks to keep the live rock off the sand to allow full circulation, but I believe this effort ismisguided. For instance, I see people suspending their live rock on PVC pipe so that they get full water circulation and then they install a DSB to establish oxygen poor zones. Seems counter productive to me. The same thing can be accomplished by placing the live rock directly on a 2" deep sand bed. It is easier and it occupies less of the tank depth.
There are also some things to avoid that can tend to impair the nitrate conversion process:
Do not use a wet/dry filter with biomedia such as bioballs. It has been established that these filters do a good job of converting wastes into nitrate, but their use tends to cause nitrates to accumulate in the system. The reason why is not well understood, but many hobbyist have been able to cure nitrate problems by removing the biomedia from their filters. One
31

school of thought is that when nitrates are created in the sand bed, they are created near the nitrate converting bacteria in the lower regions of the sand bed and therefore get processed more readily. It is recommended thatanyone who is running a wet/dry and who has nitrate accumulation problems should consider slowly removing the biomedia over the course of a couple of weeks to give time for the system to adjust. Do not use coarse crushed coral for the substrate. The large particle size allows too much water circulation which does not allow the necessary anaerobic regions to develop. Do not disturb the deeper regions of the sand bed any more than necessary. This obviously disturbs the anaerobic regions. This typically means that you don't want to use a siphon to clean the sand bed. If you must for some reason, try to limit this actively to a small region of the tank only (10%?) so that the majority of the filtration process stays intact. A light stirring of the upper portion of the sand bed through the actions of sand sifter creatures or through the actions of the hobbyist are fine. Do not overfeed the tank. Once a tank is established, the primary source of inputs into the nitrogen cycle are introduced through feeding of the tank. Although a reef tank does not need to be starved, like early authors tend to state, feeding excessive amounts of food can aggravate the process and should be looked at as a variable that can be controlled if nitrates tend to accumulate. Some people like to feed heavily and this can often be tolerated as long as the food is increased slowly so that the bacteria colonies have time to grow to a size sufficient to process the increased bioload.
Salinity
Salinity is a measure of the concentration of dissolved salts in water. Normal seawater tends to run in the range of 1.021 to 1.025 with the Red Sea area having a slightly higher level of up to 1.027.
Salinity can be measured in the reef tank using a device called a hydrometer. This device basically depends on the principal that a higher concentration of dissolved salts in water causes the water to become more dense and therefore will cause an object floated on it to displace less water and therefor rise higher. A typical hydrometer is a glass tube with gradations marked along a stem. The device is floated in the water to be measured and the level of the water on the tube is read off the gradations. The same principal is used on devices which use a floating swing arm to take the measurement. The swing arm hydrometers are
32

becoming popular due to their ease of use, but many low cost ones being sold are very difficult to get repeatable, much less accurate readings.
Glass Hydrometer
This is a typical glass hydrometer. It must be floated in the tank, which can be difficult if there is much current, or some tank water must be placed in a deep tube and the hydrometer floated in that. Accuracy depends upon brand. The one shown has been proven to be poor and two hydrometers I compared measure .003 difference! which is too much.
eSHa Marinomat Hydrometer
Swing Arm Hydrometer. This is a high quality, medium cost unit from Germany. It is very easy to use as the water is suctioned up into a reading cavity using a hand compressed bulb and it is temperature compensated. I highly recommend this hydrometer.
I recommend that you keep your salinity in the range of 1.024 to 1.025 which is towards the upper end of the normal salinity range. The higher concentration of dissolved salts provides a higher concentration of the elements the corals use for growth. This level also provides some margin of safety if the salinity level swings up or down a little. High salinity levels of 1.027 may have an adverse affect on SPS coloration from my observation although I have never seen this published anywhere before. Another consideration is that if you purchase most of your specimens from a particular source, you may want to somewhat match the salinity of your tank to that source to minimize the shock that your new specimens experience when being introduced to your tank. Large sudden changes in salinity are probably the number one reason that some specimens, especially echinoderms, sometimes die within a couple of days of introduction.
Things that affect the tank salinity level after initial setup include:
Salts lost through protein skimming effluent. Salts lost due to bagging of specimens or other exporting of the saltwater. Salts gained through the addition of the saltwater when adding new specimens (which you should not do). Salts gained through the use of additives used to increase Calcium and Alkalinity levels, but which may have the indirect effect of slowly increasing salinity. 2-part additives such as C-Balance and B-Ionic can cause this. Salinity levels can also change over time depending on how carefully you mix replacement water.
33

Checking salinity should ideally be done weekly and can easily be adjusted during your weekly water change (if you follow recommendations to make small frequent water changes). This adjustment is made by adding a little more or less than the normal amount of salt to the new replacement water. To lower salinity, you can also just remove some saltwater and replace it with freshwater. To increase the salinity, you should never dump undissolved salt into the tank. These salts can irritate or even kill specimens that it comes into contact with. They should always be predissolved prior to addition to the tank. Lastly, if you find you need to make a large change in salinity (over about 0.001), you should do so slowly over the course of a couple of days, to avoid stressing the tank inhabitants.
Further Reading:
Natural Reef Salinities and Temperatures By Dr Shimek
Temperature
This is an area that has recently been going through some changes.
Old school was that a temperature of 74ºF -76ºF was optimum based primarily on the fact that oxygen concentration levels are naturally higher in water that is kept at lower temperatures. Over the last couple of years, many hobbyists have started running their tanks considerably warmer. Average is now around 78ºF -82ºF with some even starting to run them at 84ºF or even higher. The logic is that many of the natural reefs have water temperature up in this range and that running a reef tank cooler only unnecessarily stresses the animals. Also, most tanks now have good surface skimming overflows, significant water flow within the tank and through the sump and high powered protein skimmers all of which contribute greatly to providing good oxygen saturation and gas exchange.
I have experience with temperatures between 75ºF and 84ºF in my own tanks either through design or incident.. My small micro reef tank is kept at around 76ºF -77ºF. I think that this may help with the stability of the tank somewhat. For larger tanks, I use and recommend a temperature of around 80ºF. This gives you some headroom if you have high-powered lighting or environmental conditions that tend to heat the tank in the summer. I try to keep my tanks from exceeding 82ºF. I have noticed that some of my specimens start to show stress if the water temperature gets over about 84ºF. This stress may be more a result of rapid temperature change though, than the absolute temperature. In
34

other words, a reef tank is probably going to be happier at a consistent 84ºF then when being subjected to a swing of 80ºF to 84ºF every day.
Probably more important than keeping an exact temperature is to maintain a stable temperature. Some swing is OK and 2 degrees is fine for instance. If your tank water temperature is swinging up to 4 or 5 degrees during a day due to heating lights or from some other reason, you should try to reduce this swing if possible to reduce stress on the critters.
If the swing is caused by a temperature drop at night or during periods of the room the tank is in being very cool, then you may need to increase your heater size to compensate. It is often helpful to use two smaller heaters rather than one large one.
You can size them to get more total heating power i.e. it’s easier to buy two 300W heaters than one 500W. If one fails to operate, your other one will keep the tank from getting cold enough to cause serious damage If one sticks ‘on’, it will not overheat the tank as quickly and you will have a better chance of detecting and correcting the problem before serious damage is done.
On the other hand, if the temperature rises during the day due to room temperatures increasing or heat from lighting or water pumps, then you can attempt to cool the water somehow. The cheapest way is generally to use muffin fans in the tank hood. One should be positioned that blows outside (the hood) air across the water surface to increase cooling effects of evaporation and another that exhausts hot air from the hood. A cooling fan in the hood should not be placed to blow directly on the lamps itself since that is not what you are really trying to cool. A fan blowing across the sump will also decrease water temperature due to increased evaporation. A more direct and controllable way to reduce water temperature is through the use of a water chiller. These work well, but are expensive and usually cost somewhere between $500 - $1000.
Further Reading:
Natural Reef Salinities and Temperatures By Dr. Shimek
Reef Tank Temperatures — Another View By R. Harker
35
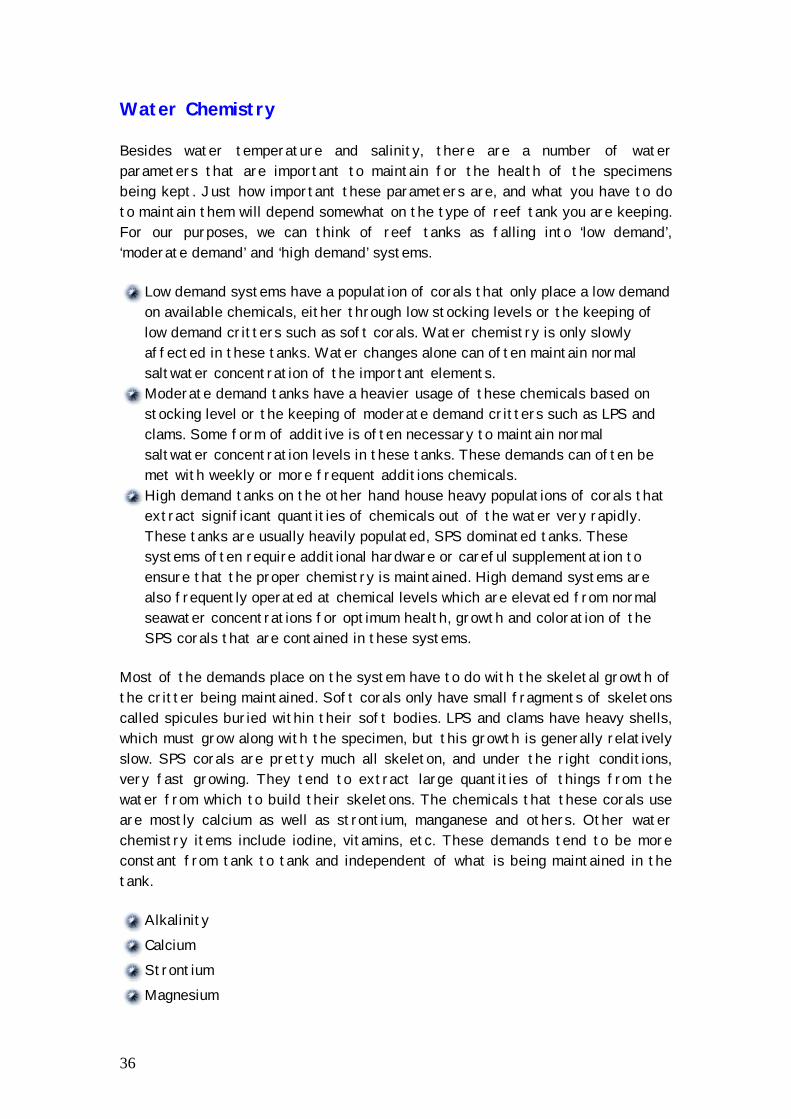
Water Chemistry
Besides water temperature and salinity, there are a number of water parameters that are important to maintain for the health of the specimens being kept. Just how important these parameters are, and what you have to do to maintain them will depend somewhat on the type of reef tank you are keeping. For our purposes, we can think of reef tanks as falling into ‘low demand’, ‘moderate demand’ and ‘high demand’ systems.
Low demand systems have a population of corals that only place a low demand on available chemicals, either through low stocking levels or the keeping of low demand critters such as soft corals. Water chemistry is only slowly affected in these tanks. Water changes alone can often maintain normal saltwater concentration of the important elements. Moderate demand tanks have a heavier usage of these chemicals based on stocking level or the keeping of moderate demand critters such as LPS and clams. Some form of additive is often necessary to maintain normal saltwater concentration levels in these tanks. These demands can often be met with weekly or more frequent additions chemicals. High demand tanks on the other hand house heavy populations of corals that extract significant quantities of chemicals out of the water very rapidly. These tanks are usually heavily populated, SPS dominated tanks. These systems often require additional hardware or careful supplementation to ensure that the proper chemistry is maintained. High demand systems are also frequently operated at chemical levels which are elevated from normal seawater concentrations for optimum health, growth and coloration of the SPS corals that are contained in these systems.
Most of the demands place on the system have to do with the skeletal growth of the critter being maintained. Soft corals only have small fragments of skeletons called spicules buried within their soft bodies. LPS and clams have heavy shells, which must grow along with the specimen, but this growth is generally relatively slow. SPS corals are pretty much all skeleton, and under the right conditions, very fast growing. They tend to extract large quantities of things from the water from which to build their skeletons. The chemicals that these corals use are mostly calcium as well as strontium, manganese and others. Other water chemistry items include iodine, vitamins, etc. These demands tend to be more constant from tank to tank and independent of what is being maintained in the tank.
Alkalinity Calcium Strontium Magnesium
36

Iodine Vitamins, etc.
The good news is that most of these chemicals can be measured using test kits. The bad news is that most of these chemicals can be measured using test kits. What I mean by that is some people can drive themselves to distraction measuring and trying to optimize the water parameters. For people with low demand tanks, this is not really very necessary as the tank will tend to reach a point of equilibrium if frequent small water changes are made. My small 20 gallon low to moderate demand system has been in operation for about 3 years and I have measured no water parameters (other than salinity and temp) for the last 6 months or so. It is useful and informative to take frequent (weekly?) measurements initially until the hobbyist understands the tanks dynamics.
On the other side of the coin are the high demand tanks. These tanks can and will rapidly alter water chemistry due to heavy usage by the inhabitants. It can be difficult to achieve a truly balanced supplementation routine in these systems, so frequent monitoring of the water chemistry and making adjustments to compensate can be very important. My 70 gallon tank was a high demand system which I found necessary to use additives daily and to measure water chemistry weekly to keep it carefully balanced.
Iodine and vitamin supplements
There are a great number of products on the market which promise to replenish iodine, vitamins and all kinds of misc. trace elements Which are depleted through protein skimming or biological activity. There is little proof that these supplements are really required. Iodine is generally accepted to be an important trace element to supplement, but my own results have been that it does not seem to make much difference. The all in one trace replenishers are often vague as to what they actually have in them. In most cases, heavy usage of these products can promote algae growth. If you utilize these types of products, try to select one that at least has an analysis listed so you know what your putting in your tank. There are many expensive products with wild, but vague claims on the market 'snake oil' that don't list their contents and there is much speculation that in at least some cases, they may do more harm than good. If you use these products (and many reef hobbyists do), do not overdose and discontinue if you have any significant algae outbreaks.
37

Seachem Reef Plus
If you are going to use one of these supplements, Reef Plus is not a bad one to chose. It does contain iodine and has all ingredients listed. It's main down-side is that it must be kept refrigerated.
Alkalinity / Calcium
I have grouped these two together, because they are inexplicably linked chemistry wise and need to be considered as a whole.
A common mistake made in this hobby is monitoring and adjusting calcium levels without paying much attention to alkalinity levels. This is somewhat understandable given that the need for calcium in the tank, especially a high demand tank is fairly obvious. What is not so obvious is that the requirement to maintain good alkalinity levels is even higher and the interaction that exists between calcium levels and alkalinity levels inexplicably tied together. I am a firm believer that alkalinity levels are more critical than calcium levels, so boosting calcium while letting alkalinity do its own thing is not the way to go. There is also the unfortunate fact that calcium and alkalinity levels tend to counteract each other where increasing calcium forces alkalinity to decrease and vice versa, even if this is not what is desired.
Normal seawater has a calcium level of about 380 and an alkalinity level of 2.8. These levels work fine in low and some moderate demand tanks where there is not a lot of calcium consuming inhabitants. In tanks that have fast growing calcium consuming critters such as SPS corals and clams, it is generally better to maintain elevated levels of both calcium and alkalinity. This tends to improve growth, coloration and general health of the specimens. Calcium levels in the range of 400 to 450 are preferred with up to 500 being acceptable. Alkalinity levels of 3.2 to 4.5 is preferred.
Water changes alone are sufficient to maintain normal seawater levels (depending on what level the salt mix provides) in low and some moderate demand tanks. In order to elevate the levels or even maintain normal seawater
38

levels in high demand tanks requires that the levels be supplemented somehow. This is where it can get to be a little tricky. There are five basic ways to accomplish this task
Kalkwasser – a dry alkaline powder that is mixed with water and dripped 2-part supplements – liquid supplements that provide both a calcium and alkalinity component in balanced proportions. Liquid supplements - Individual supplements that can be mixed and matched to try to accomplish the goal Dry supplements - Individual supplements that can be mixed and matched as above. Calcium Reactor – High tech machinery approach.
Kalkwasser
Kalk is the oldest and one of the still commonly used means to maintain calcium levels and alkalinity. Kalk is a dry powered form of lye that is mixed with water to create a solution rich in calcium that has a very high pH. This solution is allowed to settle and the clear portion of the solution is siphoned off and dripped into the sump slowly so as not to upset the pH of the tank water. This is usually dipped in overnight when pH of the tank tends to be lowest.
Many experienced reef keepers swear by the use of Kalk. My results have been less than satisfactory and I don’t recommend it for several reasons.
The powdered form of Kalk is very caustic and has to be handled carefully. Being a fine powder, it tends to wander about more than it should. The solution must be mixed. There are many formulas from shaking it up in a capped bottle to using a powerhead, to using a powerhead on a timer. Everyone swears by their specific method. Whatever method is chosen must exclude as much air as possible to prevent precipitation. Half the users state that the solution must be allowed to settle for an extended period and only the clear portion of the solution used in the tank, others maintain that you must use the milky version to get adequate results. Group A says that using the milky version causes precipitation in the tank. The solution has the tendency to develop a crust on it that should not be added to the tank, which only complicates the process more. The amount that can be added is limited to the amount of makeup water that the tank needs. Many users try to accelerate evaporation so that they can add more Kalk, which is another thing to worry about. Many users who can’t keep their levels adjusted with the Kalk alone supplement with other additives anyway. My personal experience has been that Kalk seems to often cause a drop in
39

Alkalinity, which is not a good thing. It is easy to accidentally overdose and suddenly shift the chemistry of the tank water, especially in small tanks.
The main good thing about Kalk is it is relatively cheap compared to most other options. There is also evidence that Kalk can help to participate phosphates out of the water.
If you want to try Kalk, go for it, but keep a close eye on your tank readings. I won’t attempt to give a formula to use, because I was never very successful using it, so I obviously don’t know what the correct formula is.
Kent Marine Kalkwasser
Common form of Kalkwasser
2 Part Liquid Supplements
There are two common 2-part supplements on the market. B-Ionic and C-Balance. These both come as liquid additives in 2 parts (hence the name). One part is to add calcium and trace elements, the other part is a buffer/alkalinity component. These additives seem to work fairly well in low to moderate demand tanks where they are used to maintain existing levels. In high demand tanks, they sometimes seem unable to handle the demand and the levels fall, even when large quantities of the additives greater than the recommended maximum are used. As the quantity is increased, there can be a tendency for these supplements to cause the sand to clump and form a solid rock like structure which is not a desirable thing to have happen. 2-part supplements elevate salinity, so when using large quantities, you will need to keep an eye on the salinity and adjust it occasionally. The other downside to the 2-part supplements is that the cost can get very expensive when you are going through it fast. I recommend 2-part supplements in low to moderate demand tanks where the amount required is moderate and you are only trying to maintain water parameters and not adjust them. They are probably the easiest supplement to use.
40

C-Balance
Two part Calcium/Alkalinity supplement
B-Ionic
Two part Calcium/Alkalinity supplement
Liquid Calcium Supplements
There are a number of liquid calcium products on the market. Most have names like ‘turbo’ or similar. The main issue with these products are that they do not take alkalinity into account and a common mistake is to measure calcium only and using one of these products to adjust to the level you want without realizing the alkalinity levels are dropping. Simple fact is that alkalinity level is more critical than the calcium level. Usage of these products requires that you monitor alkalinity as well and use a buffering product to maintain alkalinity levels.
Reef Pure Concentrated Calcium Supplement
Common form of liquid calcium supplement
Dry Calcium/Alkalinity products
These are what I used to use in my high demand tank. Using these products, I was able to adjust and maintain whatever levels I wanted to without clumping
41

the sand or having the pH get out of whack, so I have become a big fan of them and recommend them highly.
I used 'Reef Builder' to maintain alkalinity and 'Reef Advantage' for Calcium, magnesium and strontium supplementation.
Being in dry powder form, they need to be dissolved in water before adding to the tank. I personally mix my buffer in the AM and drip it in before I go to work. I mix the calcium component and drip it in before I go to bed at night. The addition of the two components should be separated by at least 30 minutes per the Seachem literature, probably to prevent precipitation. I drip it into where my tank overflow is in the sump so that it gets quickly mixed into the water. My own 70 gallon high demand tank required about 7tsp. of Reef Builder and 5tsp. of Reef Advantage each day to maintain my Alkalinity around 4 meq/L and calcium around 450ppm. Obviously the amount appropriate for any particular tank must be determined through testing of the water.
Seachem Reef Advantage
Calcium, Magnesium, Strontium supplement
Seachem Reef Builder
Alkalinity supplement
Seachem Reef Calcium
Polygluconate calcium.
42

Calcium Reactor
This is the new gadget on the block. It is composed of a cylindrical tube containing aragonite chips. Water is pumped through the tube and aragonite media in a recirculating fashion. Carbon dioxide from a compressed air tank is then slowly bubbled through the water and aragonite column. The carbon dioxide creates an acidic condition that dissolves some of the aragonite into the water. A small dribble of water is released from the reactor and allowed to drain into the sump. The water exiting the reactor is rich in calcium and helps to maintain the alkalinity of the system. Depending on the reactor media used, Strontium and Magnesium are also maintained at proper levels. The water leaving the reactor has a low pH. Some systems utilize a 2nd stage on the reactor which serves the purpose of dissolving additional minerals with the same amount of CO2, thus conserving CO2 consumption and perhaps more importantly, it helps to raise the pH of the effluent so that it has less effect on the pH of the tank.
Calcium reactors are becoming very popular on high demand systems. Although they require some dialing in, once setup they are relatively low maintenance. You no longer have to mix supplements by hand every day and since they run continually, the tank parameters will be maintained at a more consistent level than once a day additions can achieve. It also has the benefit that it will not cause calcium deposits on pumps, etc. as the other methods can.
So what’s the downside? Primarily cost. Calcium Reactor systems require a reactor chamber, a pressure regulator and a compressed air tank, plus CO2, aragonite media, a bubble counter to see how fast the CO2 is being dispensed, etc. A typical system will run about $500 - $600. Of course, the other additives tend to be fairly expensive over time whereas the calcium reactor is more of a one-time hit. The other potential negative to a calcium reactor is that it can depress the pH level of the tank. This can generally be controlled fairly easily.
I would highly recommend a calcium reactor for high demand SPS tanks. It may be overkill for low to moderate demand tanks.
Here is a basuc calcium reactor setup. The cylinder on the left contains the aragonite media, a recirculating pump and a small bubble counter which allows you to control the rate of CO2 injection. The tank on the right is a CO2 tank with a regulator. This is a 10# tank which is on the large side. If cabinet space is limited, smaller 5# and 2# bottles are available.
43

This shot shows the reactor above in its operating location under the tank stand.
Here is a sump shot that shows the 2nd stage that I added to the reactor.
Water Changes
Here is another topic that has many schools of thought and no easy answer.
Some people take the tact of minimal water changes, believing that aged reef tank water takes on a chemistry that should not be disturbed. This is often more a pride thing than anything else. It feels good to be able to maintain an ecosystem for extended periods of time with minimal influences from the external world. The end tank result is less important to the hobbyist than how they got that result. When I have run a tank without water changes, the tank seems to do OK for a period of time and then starts to decline. This decline is characterized by the corals taking on a less robust look. LPS corals tend to not open as fully for instance. This change is gradual over time and not immediately obvious, due possibly to the fact that the corals are consuming some of the elements in the water. Although there are trace element replacement additives you can add to the tank, they only replace the major elements that are known to be consumed in the reef tank in quantity such as strontium or magnesium. There is no doubt that other traced elements available in newly mixed seawater are also consumed to some extent and we do not yet know what those are, so they are not replaced. The only way to replace those elements currently is through replacement of some portion of the tank water.
Other people take the tact that massive water changes should be made to dilute any possible pollution in the tank. Large water exchange regimens can get somewhat complex. These often revolve around premixing large quantities of water, heating it up to the correct temperature, aerating it to increase its oxygen content, shutting down the circulation system, draining a significant portion of the tank water and then replacing it with the new water without
44

exposing the corals for too long of time to the air. The obvious question here is why the hobbyist must dilute pollution in their tank, since a properly balanced system should not have pollution per se. Large water changes (around 25% of tank volume) can be helpful as a remedy to help correct an out of control situation in the tank, but depending on it to maintain basic water parameters over time usually indicates that the tank is not properly setup. The usual reason for large water changes is to try to dilute elevated nitrate levels, but controlling nitrates with water changes is a losing proposition, as you are only addressing the symptom of the problem and not treating the problem itself, which is insufficient nitrate processing within the tank. A properly setup reef tank should have zero or near zero nitrates with or without significant water changes. Large water changes cannot easily be made without subjecting the tank inhabitants to at least some amount of stress via temperature change, salinity change or other water chemistry change. Also, large water changes can tend to undo water chemistry alterations that have been made intentionally, such as increased Alkalinity levels. It tends to go against one of the primary rules of reef keeping which is to maintain a stable environment.
As with most extreme views, the best course of action for most hobbyist’s lies somewhere in between these two viewpoints. Small frequent water changes seem to provide good results on several fronts.
This size of water change can usually be made with water volume available in the sump, thereby removing the problem of exposing the corals to the air or requiring circulation systems to be shut down. The percentage is small enough that it cannot significantly alter the water parameters even if the chemistry, salinity or temperature match is off somewhat. This quantity of exchange does not require the replacement water to undergo extensive premixing, aeration or even heating if the water addition is made slowly.
My 20 gallon desk tank which keeps Softies, LPS and clams receives a 1 gallon water change a week which equates to a 5% change. This tank receives no other additives and this 5% water change provides all that the corals appear to need. The seawater is mixed in a 1 gallon jug by simply adding the salt and shaking it, checking salinity level and then letting sit for a short period.
My old 70 gallon tank which houses all types of specimens, but is predominately an SPS coral tank, gets a 1 to 3 gallon water change a week which equates to about a 1.5% to 4% water change. This tank also gets other supplements to maintain high calcium and alkalinity levels which water changes alone could not provide. The same basic approach to mixing the water is taken as with the 20. Just multiply the process by a jug or two more.
45

Obviously, very large tanks may require a slightly more complex process based simply on the volume of water that must be handled. In that case, a clean trash can (reserved for this purpose) or similar can be pressed into service to provide an adequate mixing container volume.
My 225 gets 5 gallons changed each week currently, but I will probably increaset that to 10 gallons/week in the near future. I utilize an empty 200 gallon salt mix bucket. I keep a heater and small power head in it. I add 5 gallons of RO/DI water and turn the heater and power head on. I then dump in the salt and let it run for 30-60 minutes or until the water temp comes up to that of the tank. I do a quick check on the salinity and adjust if necessary. I then turn off the pump and heater and siphon the contents into the sump of the tank.
Further Reading:
To Change or Not To Change Water — That Is The Question By Terry Siegel
Test Kits
What should you test? The answer to this question really depends on the type of reef you are keeping. I personally no longer test the water of my 20 gallon low to moderate demand desk tank. It receives no supplements, so there is nothing to cause it to get out of whack. I do occasionally check salinity levels since they can slowly change over time. On the other hand, I monitor conditions in my high demand tank every week and adjust as required to maintain optimum conditions.
During initial tank setup, you should test for the products of ammonia, nitrite and nitrate as verification that the nitrogen cycle has been completed. After this initial phase is complete, there is usually no reason to check for ammonia or nitrites again unless something gets totally out of whack. Nitrate levels should normally be at or about zero, but some reef keepers have a problem with these levels increasing, so you may want to check nitrates on occasion to make sure they are not elevating. If they do, you will need to take action to keep these levels under control.
Alkalinity and Calcium levels are very important to check, especially in moderate and high demand tanks. The other parameter that is frequently monitored is pH. This will tend to fluctuate between night and day. Monitoring it may help to
46

catch an out of balance condition, but I don’t personally spend a great amount of time monitoring this parameter since it tends to stay in the OK range.
There are test kits to monitor other water parameters such as phosphates, silicates, copper and the like. There is usually no reason to continually test for these compounds. Diatom growth is a perfect indicator of silicates for instance, so use their growth or lack of it as a way to easily check this parameter. Excessive green algae growth can be an indication of excessive phosphates.
Test Kits
Which ones to use is an important decision. There are many brands on the market and they are definitely not all of equal quality. There are some that tend to be inaccurate enough as to cause panic, consternation and frustration over out of whack chemistry levels that are in fact only faulty test kits and not faulty water conditions. Unfortunately, some of the poorest performing kits are the most commonly sold.
I use and recommend Salifert test kits. These kits are medium priced, high quality kits that give good repeatable results.
Another quality line is the LaMotte Test kits. These tend to be more expensive and a little more complex in operation, but are quality kits. The one pictured here is an Alkalinity kit that is actually designed for pool use, so you have to divide the result by 50 to get normal meq/l numbers.
The one brand that I recommend staying away from is the Red Sea Test Kit line. I have bought several and had them read wildly different numbers. They can cause the hobbyist to incorrectly treat their tanks and possibly cause harm. I have heard the same issue expressed by many other hobbyists.
I personally use Seachem test kits for silcates, phosphates and iodine, but I cannot attest to their accuracy as they always read zero.
If your LFS does not carry a quality brand, you may need to order these through mail order.
47

Acclimation
Acclimating new specimens to your reef tank can be an important first step in a successful transplant from where ever you got the specimen to your home tank.
There are a number of water parameters or tank conditions that you may want or need to slowly adjust your new specimen to. How critical this acclimation process is depends on the type of specimen it is as well as the difference between the conditions the specimen was used to compared to the conditions found in your tank. The major parameters that may require acclimation include:
Temperature of the water Salinity of the water pH of the water Significantly increased lighting intensity
Acclimating to water conditions
If you buy the majority of your livestock from the same source, and you can match your basic water parameters to theirs, the acclimation process is more likely to be a success.
Acclimating for temperature. All specimens should be floated in their shipping bag for 15-30 minutes in the sump or tank to allow the water temperature in the shipping bag to slowly adjust to match your tank. This is generally considered the ‘minimum’ acclimation requirement and all specimens should go through it. This is especially important if the specimen was subjected to unusually low or high temperatures due to shipment.
Acclimating for salinity and any other water chemistry parameters. This is important if there is more than about a 0.001 difference between the water the specimen is in and your tank. Fish are generally fairly tolerant of water differences, but some invertebrates such as echinoderms can be extremely sensitive and acclimation can easily make the difference between success and almost instant death of the specimen. You usually won’t know what the water difference is, so it is generally best to assume that there is a significant difference and make allowances for it. To acclimate for salinity (as well as all other water parameters such as pH), you will need to slowly add tank water to the water in the shipping bag. How quickly this is done depends on the specimen type.
For fish, many people just equalize the temperature and call it good, but if you want to be extra cautious, take the approach of allowing the temperature to equalize for about 15minutes, then open the shipping bag and add enough tank water to about double the volume of water in the bag. After about 15 minutes
48
more, you can put the fish into the tank. You should not add the water from the shipping bag, as it may contain copper or other undesirable contaminates. I personally just restrict the end of the bag enough to let the later flow out into a pitcher while keeping the fish in the bag. Once all the water is out, the fish can be slipped out of the bag and into the water. I believe that this is easier on the fish then putting them into a bowl and netting them back out as the net can abrade the skin of the fish. Some people like to keep a quarantine tank in which they put new fish for a couple of weeks to ensure that they are disease free and eating before they put them into the main tank since it is almost impossible to catch a fish to remove it for treatment in a tank full of live rock. These quarantine tanks are sometimes routinely treated with copper to help kill any parasites. I personally am not a fan of automatically subjecting all fish to a semi-toxic bath in copper, nor do I want to risk adding the copper to the reef tank through fish transfers, etc., so I do not bother to use a quarantine tank, but an untreated one for general observation and possible treatment is a good idea if you have the facilities to set one up.
All corals, whether they are SPS, LPS or soft types seem to do well with the same 2-step acclimation process as described for fish, except that the specimen can simply be lifted out of the water and placed in the reef tank at the end of the process. Another step that can be added for SPS corals is to use a coral dip. This is a solution that you can add to the bag that will supposedly kill unwanted bacteria. I sometimes use this solution and it is difficult to know if does much good or not. Anecdotally, twice I have received frags, which almost immediately bleached. In both cases, I procured another frag from the same source and this time treated it with the coral dip. In both cases the second frag lived. My feeling is that it doesn’t seem to hurt and may in fact help.
Mobile invertebrates such as shrimp, snails, starfish, sea urchins, sea cucumbers, etc. can be the most delicate when subjected to water changes. For this reason, the acclimation process is generally extended over a longer period of time with smaller water additions. The ideal case is to setup a system where a slow drip of tank water can be added to the shipping bag for a period of 1 to 2 hours. At the end of that time, the volume of water in the bag should have about tripled. If there is not enough room, some of the water in the bag should be removed and discarded. Alternately smaller quantities of water can be added by hand every 10 minute or so to accomplish the same basic task. This same process can be used with other types of specimens as well if you want to err on the cautious side.
Shrimp can almost instantly die and brittle starts can fragment their arms upon being placed in the tank if not properly acclimated. If you have these problems soon after introduction of the specimen into your tank, you need to review how you are acclimating them. Even the lowly snail is a fairly delicate creature and
49

seldom gets the acclimation they should. That is why people sometimes have high mortality rates of their snails soon after introduction into the tank.
The one exception to not adding the shipping bag water to the tank is when working with sponges. Sponges should never be exposed to the air as it can get trapped in the structure of the sponge and cause it to die. After acclimation, the entire contents of the shipping bag should be lowered into the tank and the sponge removed underwater.
Lighting
The other important acclimation consideration is your lighting. This only applies to sedentary critters like coral or clams. Obviously fish and mobile invertebrates can adjust their surroundings. If the lighting in your tank is similar to or less than the tank the specimen was in, you do not need to worry lighting acclimation. On the other hand, if you are using a high powered lighting system, especially high wattage MH lights, then care needs to be exercised when adding the specimen to the tank. They can be burned by the sudden increased light intensity. In the case of SPS corals, the coral can quickly bleach or die even though these corals love the light. In this case, the usual acclimation process is to place any new specimens at the bottom of the tank for a period of about a week to adjust to the basic lighting system. The light intensity at the bottom of the tank will be less than the intensity up on the reef structure. The coral or clam can then be placed into its final position after this week is up. Some people recommend inching the specimen up to its final spot over many weeks, but I have never found this necessary and is sometimes impractical.
Typical acclimation of SPS corals
Here the corals have arrived safely home from the LFS. Notice that the SPS corals are rubberbanded to pieces of styrofoam. A good LFS should always do this as it helps protect the coral from damage.
Here the bags have been opened and placed into the sump in a location where they won't fall over. In this case, I added about 1/2 cup water every 15 minutes for over 1 1/2 hour period. The tank these frags came out of had a low salinity of 1.021 and my tank is about 1.025, so slow acclimation was in order.
This is the coral dip I sometimes use. These particular frags are very good quality and I wanted to be very careful with them, so I used the dip as directed. The dip is added to the bagged specimens (10 drops to the liter) and allowed to sit for about 8 minutes. This dip should not be added to
50
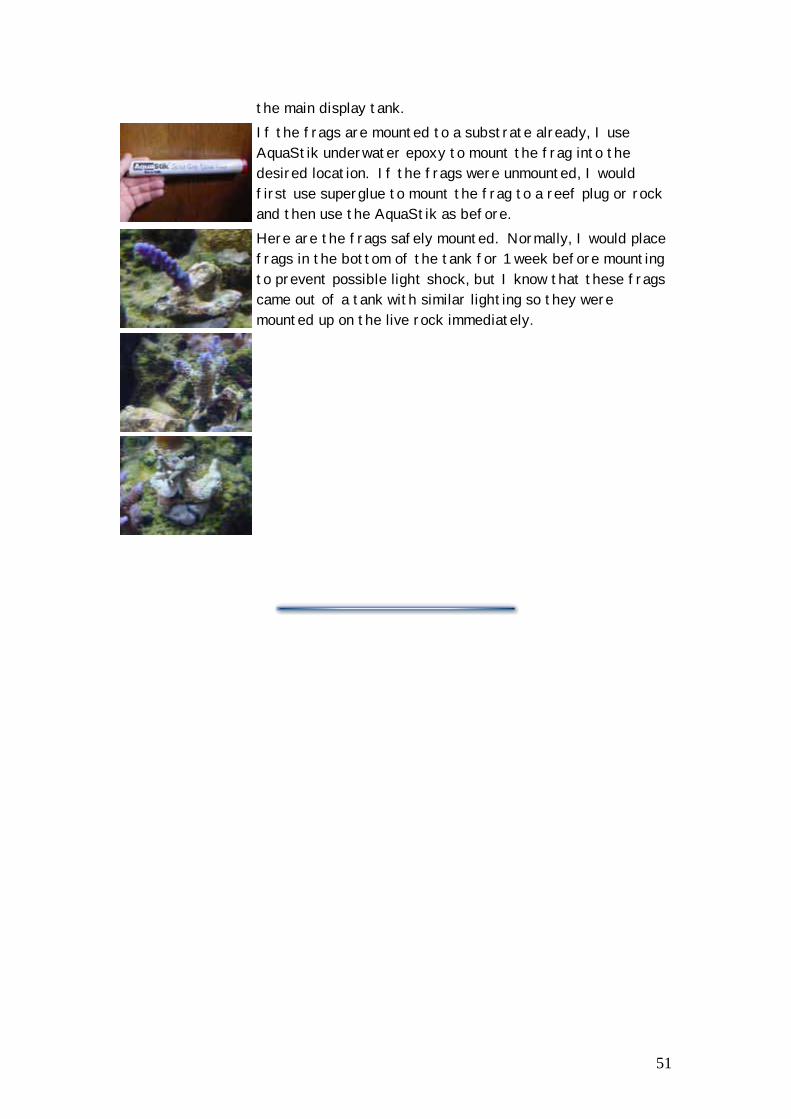
the main display tank.
If the frags are mounted to a substrate already, I use AquaStik underwater epoxy to mount the frag into the desired location. If the frags were unmounted, I would first use superglue to mount the frag to a reef plug or rock and then use the AquaStik as before.
Here are the frags safely mounted. Normally, I would place frags in the bottom of the tank for 1 week before mounting to prevent possible light shock, but I know that these frags came out of a tank with similar lighting so they were mounted up on the live rock immediately.
51

Introduction to Fish
Fish are the only vertebrates kept in the reef tank. Selection of fish for the reef tank has to take in several considerations.
• Is it going to eat any of the invertebrates you are trying to keep? • Will it get along with the other fish in the reef community you are
keeping? • Will it grow too large or otherwise be disruptive to the reef community
you are keeping? • Can you provide for its nutritional or other specialized requirements? • Does it add value i.e. a herbivorous fish will help to keep algae under
control? • Overall fish bioload of the tank.
Reef tanks provide the opportunity to keep fish in a more natural environment and fish tend to be healthier and have less outbreaks of disease when kept in a reef tank. This is good, since you cannot treat fish for disease in the reef tank and they are almost impossible to catch and remove for treatment outside the tank because of all the hiding places the live rock affords.
Fish that feed on other fish, large crustaceans or corals are generally unsuitable for the reef tank for obvious reasons.
Some fish do not tolerate others of their own kind very well. Tangs are notorious for this problem. Even though tangs are some of the best reef inhabitants, adding more than one requires attention to how closely the new tang looks like the current inhabitant. The more they look alike, the more likely there is to be trouble. Other fish tend to just be aggressive in general and may chase and harass any other fish around it.
Some fish tend to get too large for the reef tank. This is mostly a concern when setting up a small tank less than about 70 gallons, but some fish really need tanks greater than about 125 gallons to do well long-term. Other fish may burrow through or sift the sand looking for food and may dislodge the live rock structure. Other fish, such as the Dragon Wrasse will actually pick up small pieces of rock and flip them over looking for morsels of food living beneath.
52

Some fish have very specialized nutritional requirements. The most common example is the Mandarin fish. These fish generally only eat small crustaceans and other life which grow in the wild and in the sand and rocks of reef tanks. The good news is that a reef tank finally provides the ability to keep these fish in healthy condition, the bad news is that it requires about a 70 gallon tank to grow enough natural food for one Mandarin fish. Other fish have other specialized needs. Some sift through the sand for their food and may not get enough nutrition if they will not also accept prepared foods.
It is good to include some herbivorous fish, such as tangs, in the reef tank to help keep algae in check. These fish contribute to the community by getting at least part of their nutrition from the tank itself. Other fish, such as clownfish for instance, tend to eat only food that is provided by the reef keeper and as such add more of a biological load to the tank.
Fish, unlike corals or clams, tend to pollute their environment so care must be taken to not over-load the system. The common logic has been to keep fish load extremely low and to feed lightly to minimize the effect of the fish on the tank. Recently, there is evidence to suggest that high demand systems can more rapidly utilize the wastes from the fish and allow for a higher fish stocking level than has normally been kept. To generalize, a new tank should restrict the fish stocking to low levels. As the tank matures, the stocking level can be increased slowly while care is taken to ensure the tank is not getting overstocked. What overstocked means is obviously a loaded question and I will propose that somewhere between about 2" and 3" of fish per 10 gallons of tank volume is getting up there.
See acclimation procedure for further information on introducing fish to the tank.
53

Fishes Database
Copperbanded Butterflyfish
Chelmon rostratus
Decorator Goby
Istigobius decoratus
Yellow Tang
Zebrasoma flavescens
Blackfinned Shrimp Goby
Cryptocentrus pavoninoides
Kole Tang
Ctenochaetus strigosus
BlueSpotted Jawfish
Opistognathus sp.
Hippo Tang
Paracanthurus hepatus
Mandarin Dragonet
Pterosynchiropus splendidus
Ocellaris Clownfish
Amphiprion ocellaris
Neon Goby
Gobiosoma oceanops
Royal Gramma
Gramma loreto
Scissortail Goby
Ptereleotris evides
Sixline Wrasse
Pseudocheilinus hexataenia
Blue Green Chromis
Chromis viridis
54

Copperbanded Butterflyfish
Scientific Name: Chelmon rostratus Family: Chaetodontidae Common Names: Copperbanded Butterflyfish
Description: The Copperbanded Butterflyfish is very easily recognized by the copper colored vertical bands over a silver body, a black eye spot near its dorsal fin and a long pointed snout. Natural Environment: Comes from reefs in the Pacific and Indian Oceans. Copperbanded butterflyfish are not yet propagated in captivity. Care: Reef Suitability: The Copperbanded is a very attractive fish and a great addition to a reef tank. Butterflyfish in general tend to be viewed as potential coral eaters, but Copperband butterflyfish are generally reef safe. They will tend to deplete the tank of any small fan worms however. They are sometimes used in the control of the pest aiptasia anemone. This is a hit and miss affair. Some specimens will eat them and some do not. A visitor to the ReefCorner has had success with teaching his Copperbanded to eat aiptasia by putting chunks of food he like to eat into the aiptasia. As the Copperbanded went for the food it would also get a taste of the aiptasia. Eventually it learned to eat them without
55

this prompt. Seems like a good thing to try if you find yourself in this position. Disposition: Very non-aggressive fish. It can be bullied by more aggressive fish, so be on the lookout for this when introducing a new fish. Only one should be kept per tank to prevent fighting. Feeding: The Copperbanded will get part of its nutrition from feeding on the small life forms found on live rock. It is especially fond of small fan worms. They will also usually take smallish meaty foods such as frozen brine shrimp or blood worms. Keep in mind that they have very small mouths and will usually not attempt to eat the larger foods that are offered. Getting them to feed on a nutritionally balanced diet is often the most difficult part of being successful with this fish. Stubborn fish may accept live foods or opened clams. Copperbanded butterflyfish may compete for food with other live rock foragers such as Mandarins. Hardiness: The Copperbanded can be a somewhat delicate fish, but once successfully acclimated, seems to do well. Good nutrition is key. Temperature: Does well within normal reef tank temperature ranges of 75-84°F. Size: Copperbanded butterflyfish can get up to 8 in., but are usually found at about 1/2 that size in the home tank. Minimum tank size should be about 55 gallons to provide for its live rock grazing.
56

Yellow Tang
Scientific Name: Zebrasoma flavescens Family: Acanthuridae Common Names: Yellow Tang
Description: Yellow Tangs are a solid bright yellow color with yellow eyes and have a white spine on the side of their body near their tail that they use for defense and offense.
Natural Environment: Comes from reefs in the Pacific Ocean. Yellow Tangs are not captive breed at this time. Care: Reef Suitability: Yellow tangs are very good reef tank inhabitants. They are very aware of their surroundings and may be aggressive towards some other fish.
Disposition: Can be aggressive to other tangs or fish that have a tang like shape such as Butterflyfish, but otherwise tend to be good community fish. When attacking other fish, they extend the spine near their tail and attempt to slash the other fish with it. Hence the common family name of Surgeonfish. This animosity to other fish is primarily a concern in smaller tanks and in those cases, you might have to limit yourself to one tang like fish or ensure that the other fish are introduced first so the Tang will not feel like its territory is being
57

violated. On the other hand, a large school of Yellow Tangs will also exist peacefully, but this is only feasible in a large tank.
Feeding: Yellow tangs are largely herbivores and require a fair amount of vegetables in their diet to thrive. In reef tanks, this is partially accommodated by micro algae and macro algae growing in the tank. The primary foods fed should also consist of a good portion of vegetable matter, although the Tang enjoys most meaty foods as well.
Hardiness: Hardy once acclimated, but very black spot and Ick prone, especially on newly introduced specimens. This often seems to disappear of its own accord in a reef environment if the fish is in otherwise good condition..
Temperature: Does well within normal reef tank temperature ranges of at least 75-84°F.
Size: Yellow Tangs can get up to about 6" in length and are typically 4"-5" in captivity. A single specimen can be kept in a tank of 50 gallons or larger. Keeping them with similar fish should not be attempted in less than about a 70 gallon tank.
58

Kole Tang
Scientific Name: Ctenochaetus strigosus Family: Acanthuridae Common Names: Goldring Bristletooth, YellowEye Tang, YellowEye Surgeonfish, Yelloweye Bristletooth
Description: Kole Tangs have an understated, but attractive brown body color with a hint of purple and many lighter horizontal yellow or blue stripes forming a delicate and attractive pin-strip pattern with a pattern of dots around the face. The eyes are yellow with a bright yellow ring around the eye which help give it it's common names.
Natural Environment: Indo-Pacific Ocean
Care: Reef Suitability: Kole tangs are excellent reef tank inhabitants and one of the less aggressive tangs. Tends to get along fairly well with other tangs, but may bicker with others of its own kind.
Disposition: Like all Tangs, Kole Tangs can be somewhat mean to other tangs or fish that have a tang like shape such as Butterflyfish, but otherwise tend to be good community fish. Kole Tangs tend to be one of the least aggressive
59

members of the tang family and may be bullied by more aggressive tangs. When attacking other fish, they extend the spine near their tail and attempt to slash the other fish with it. Hence the common family name of Surgeonfish.
Feeding: Kole tangs are mainly herbivores and require a fair amount of vegetables in their diet to thrive. Their mouth is used as a rasp to scrap micro algae off the rocks using many small teeth which give them the common name of Bristletooth. In reef tanks, their diet is at least partially accommodated by micro algae growing in the tank. The primary foods fed should also consist of a good portion of vegetable matter such as zucchini, nori or similar, although they enjoy some meaty foods as well.
Hardiness: Hardy once acclimated, but prone to black spot and Ick, especially on newly introduced specimens. This often seems to disappear of its own accord in a reef environment if the fish is in otherwise good condition.
Temperature: Does well within normal reef tank temperature ranges of at least 75-84°F.
Size: Kole Tangs can grow up to about 7" in length in the wild and are typically 4"-5" in captivity.
60

Pacific Blue Tang
Scientific Name: Paracanthurus hepatus Family: Acanthuridae Common Names: Hippo Tang; Palette Surgeonfish; yellowtail Tang; Regal Tang; Pacific Blue Tang
Description: Hippo tangs are a very colorful light blue with a prominent yellow tail. There is a black line which extends from the eye along the back to the tail and extends to the tip of the tail. A second black line extends from behind the gill slit back to the tail. The dorsal and anal fins are also edged in black. Adults develop a red tinge to the dorsal fins and develop a yellowish belly. A whitish spot can also develop on the side of the fish. As the fish grows, dots similar to freckles form on the face.
Natural Environment: Indo-Pacific Indo-Pacific Care: Reef Suitability: Excellent reef inhabitant, but somewhat delicate. Safe with any invertebrates. Specimens are commonly available at a very small size as in one of the thumbnails above.
61

Disposition: Hippo tangs are generally peaceful community fish, though they may bicker with other Tangs in the tank. They are frequently found in groups as juveniles, but it is best to keep a single fish when they get larger or they may quarrel. They like to wedge themselves into a hole in the rock when they sleep at night.
Feeding: Hippo Tangs tend to have a more meaty diet than many tangs. Normal meaty foods such as mysid shrimp and bloodworms are taken, but may appreciate occasional feedings of Nori or other algae foodstuffs.
Hardiness: Considered to be a fairly delicate fish and not good for beginners as it is susceptible to Ick and lateral line disease and requires a large tank. Good nutrition is a key to maintaining this specimen.
Temperature: Does well within normal reef tank temperature ranges of 75-84°F.
Size: Hippo tangs can reach about 12" in length when fully grown, though they generally don't reach that full size in captivity. While frequently sold as cute little 1" babies that look suitable for a nano reef, keep in mind that the adults really need about a 6' long tank to be happy.
62

Ocellaris Anemonefish
Scientific Name: Amphiprion ocellaris Family: Pomacentridae Common Names: Ocellaris Clownfish, False Percula Clownfish
Description: Ocellaris clowns are recognized by an orange background and 3 white bars that ring the fish. Their fins are edged in black except for the dorsal fin. The white areas may have a thin black line around the perimeter. True Percula Clownfish have a thicker black border around the white areas. The orange coloration is light and even when they are small. As the fish mature, they may darken on the upper 2/3's of their body to an orange brown.
Natural Environment: Comes from reefs in the Eastern Indian and Western Pacific Oceans. Ocellaris Clowns are almost all captive breed at this time. Care: Reef Suitability: Ocellaris Clowns are good reef tank inhabitants. A common misperception is that they need to have an anemone to be happy. They will tend to adopt the next best thing which might be something like a Sarcophyton or Xenia as shown to the right. Ocellaris Clownfish are some of the more prolific breeders in a reef tank. If several are housed together, two will frequently pair up and start spawning every couple of weeks. The female is the larger of the
63
pair and will be obviously full of eggs if spawning is near. It is interesting to watch the parents spawn and care for the eggs. The young hatch at night after about 2 weeks, but never make it past their first day of life unless the hobbyist removes them from the tank and rears them separately. Their small size and territorial behavior makes them suitable for a small tank, though they may bully less aggressive fish.
Disposition: Can be somewhat pugnacious and territorial, especially when guarding a nest. They don't usually chase other fish very far, so their tank mates learn to avoid their home turf. Mixing with other clownfish species is generally not recommended as it can be a bit of a hit and miss affair as to whether problems will arise.
Feeding: Ocellaris Clownfish will eat any meaty food offerings such as mysid shrimp, bloodworms, brineshrimp and frozen meaty preparations.. They will also readily take flake foods.
Hardiness: Extremely hardy and ick resistant. The smallest clown in the picture above survived the following ordeal: It unknowingly got sucked into the overflow box a week before the tank was dismantled. The overflow was shut down for 3 more days with no heat during winter as the tank inhabitants were moved to a new tank. When the overflow box was drained into the sink, out came the fish into the garbage disposal. It was quickly fished out and carried downstairs to the new tank where it was promptly dropped onto the carpet and then finally into the tank. After a week in the overflow and 3 days in unheated, unoxygenated water in an overflow, a trip down the disposal and onto the carpet, the fish survived just fine. That was several years ago and he hasn't grown much, but seems healthy. He's the only fish we have named. He's called 'Lucky'.
Temperature: Does well within normal reef tank temperature ranges of 75-84°F.
Size: Ocellaris Clowns can get up to 4 in., but usually don't get more than about 3" in the home tank. Minimum tank size should be about 20 gallon for a pair.
64

Royal Gramma
Scientific Name: Gramma loreto Family: Grammidae Common Names: Royal Gramma, Fairy Basslet
Description: Royal Grammas are a very colorful and distinctive fish in which the front half of its body is a deep purple and the back half a bright yellow. The purple coloration may appear blue under some lighting conditions as shown to the right. A black line streaks through the eye. The Bi-color Pseudochromis has a similar color pattern, but it is a lighter, more pastel color and does not have the black streak through the eye or the black spot on the dorsal fin. The male tends to be larger than the female.
Natural Environment: Comes from the Caribbean region of the Atlantic Ocean. Care: Reef Suitability: Excellent reef inhabitant. Very good beginner fish.
Disposition: Royal Grammas tend to stake out a cave in the rockwork which they use as home base. They come out into the open to feed, but tend to dart back into the rockwork when startled. Royal grammas tend to not bother or be bothered by other fish, but will vigorously guard their favorite hiding places.
65

They will open their mouths very wide in a threatening gesture to ward off intruders. May be kept in groups given enough room so that they are not crowed. Royal Grammas will breed in the reef tank
Feeding: Eats most standard meaty and flake foods.
Hardiness: Very hardy. Very disease resistant.
Temperature: Does well within normal reef tank temperature ranges of 75-84°F.
Size: Royal Grammas reach about 3" maximum and tend to stay in one area of the tank which makes them good candidates for small reefs tanks.
66

Sixline Wrasse
Scientific Name: Pseudocheilinus hexataenia Family: Labridae Common Names: Sixline Wrasse, 6-Line Wrasse
Description: The Sixline wrasse is a small, attractive member of the wrasse family. Main part of body is blue with 6 horizontal gold stripes. The head and belly may have a purple hue to it and the base of the tail is green. The eyes have two white horizontal strips through them. The body is robust looking in a healthy specimen
Natural Environment: Comes from the Indio-Pacific region. Care: Reef Suitability: Sixline wrasses are excellent additions to a reef tank. Their small size makes them especially suitable for smaller tanks. They spend the day foraging the life rock looking for food, but never bother corals. They are a shy species and are normally seen constantly darting in and out of the rockwork. They need plenty of hiding places to feel comfortable. They have been reported to eat the parasitic snails (family Pyramidellidae) that sometimes infest clams as well as some nuisance flatworms. Large specimens have been reported to eat ornamental shrimps. I have never witnessed any such behavior in my own tanks.
67

Disposition: Very non-aggressive to larger fish. May occasionally bully smaller fish, especially other wrasses, but usually results in nothing serious. Several may be kept in a tank if adequate space is provided.
Feeding: Will constantly feed off the live rock during the day. Also takes most small meaty foods such as brine shrimp, mysid shrimp, bloodworms and meaty frozen food preparations.
Hardiness: Very hardy once acclimated.
Temperature: Does well within a normal reef tank temperature ranges of at least 76-84°F.
Size: Can get up to about 3" in length.
Breeding: Not currently breed in captivity.
68

Decorated Goby
Scientific Name: Istigobius decoratus Family: Gobiidae Common Names: Decorated Goby
Description: The Decorated Goby is a subtly attractive fish with a pattern of small black and orange spots over its body. A row of larger black spots along its lateral line help to identify it.
Natural Environment: Comes from reefs in the Indo-Pacific. Decorator Gobies are not captive breed at this time.
Care: Reef Suitability: Excellent reef inhabitant. Stays on the substrate. Light sand sifter which helps to keep the sand bed clean, but not so much that they bury other inhabitants like many sand sifters can..
Disposition: Completely non-aggressive and unbothered by other fish, except its own kind. Only one should be kept per tank.
69
Feeding: Decorator Gobies get some of their nutritional requirements from sifting through the sand, but unlike some other sand sifting gobies they will readily take almost any meaty foods that are offered.
Hardiness: Very hardy.
Temperature: Does well within normal reef tank temperature ranges of 75-84°F.
Size: Decorator Gobies can get up to about 5" in length. Their size and disposition makes them suitable inhabitants for fairly small reef tanks.
70

Blackfinned Shrimp Goby
Scientific Name: Cryptocentrus pavoninoides Family: Common Names: Blackfinned Shrimp Goby; BlueSpotted Watchman Goby
Description: A large head and mouth give this fish a bull-dog looking appearance. The body is a light olive green color with large dark green vertical bands with numerous small blue spots especially around the head. The dorsal fin is prominent with an attractive orange color and 4 black spots. The bottom fins are dark and formed into a shape for easy perching on rocks and the sand to survey its surroundings.
Natural Environment: Western Pacific Ocean
Care: Reef Suitability: An excellent reef inhabitant though not seen very commonly for some reason. Staying on or very close to the bottom. A substrate in when to burrow under rocks is much appreciated. Doesn't bother corals, but might be a menace to some small crustaceans that it can fit in its sizeable mouth.
Disposition: More peaceful than its appearance might suggest. Gets along well with other reef inhabitants and more than one may be kept in a tank. Likes to stake out a small territory on the sand under a rock ledge for protection and
71

tends to stay very close to home. Might be a little aggressive to other fish invading its territory. The specimen pictured here shares an area under a rock with a brittle star and frequently two sally light-foot crabs. At feeding time, it can be quite the free-for-all.
Feeding: Eats all standard meaty foods including Formula 1, brine shrimp, mysid shrimp, chunks of table shrimp and bloodworms. Likes larger mouthfuls.
Hardiness: Seems to be very hardy.
Temperature: Does well within normal reef tank temperature ranges of at least 76-84°F.
Size: Can grow up to about 5" long.
72

BlueSpotted Jawfish
Scientific Name: Opistognathus rosenblatti Family: Opistognathidae Common Names: BlueSpotted Jawfish
Description: The Bluespotted Jawfish is an extremely attractive fish. Its head is yellowish brown which gradually blends into a darker, almost black body. The long dorsal fin is yellow and the body is covered with large bright blue spots. There is a wide variance between specimens in how dark the body is. It is a very personable fish which often becomes the favorite of the hobbyists who keep it.
Natural Environment: Tropical Eastern Pacific Ocean.
The Bluespotted Jawfish became virtually impossible to get for a number of years when the collecting area was closed to collection. In 2001, a new collection area was discovered and the fish is once again becoming available in the hobby.
Care: Reef Suitability: Bluespotted Jawfish are good reef inhabitants. Their burrowing habits require a deep enough substrate to burrow in. 3" is probably the minimum for them to be able to burrow reasonably well. Some authors state
73

a minimum of 10" substrate, but that is not a requirement to be successful with this fish. Because of their constant desire to burrow, they may tend to bury corals which are placed on the sand and can make a nuisance of themselves.
Disposition: Relatively non-aggressive, but protective of its burrow which they stay near to unless they are darting after food. They are usually left unbothered by other fish, but larger aggressive fish may make it hard for them to feed as they may be hesitant to leave their burrows. Should be kept one per tank as they will fight unless it is a male/female pair in a large tank.
Feeding: They will readily take most meaty foods that are offered. Since they do not usually venture far from the bottom, the hobbyist needs to ensure that the Jawfish gets its fair share of the food. Many become quite bold and will compete well with the other fish for its food. A well fed Bluespotted Jawfish with have a noticeably plump, even bloated looking, belly after a good feeding. If the fish is shy at first and not feeding well, you should place some food down close to it using a turkey baster or similar tool.
Hardiness: Fairly hardy if the specimen is healthy when acquired. There appears to be quite a few specimens coming into the trade which are in poor health. A number have died soon after introduction with the symptom of large whitish spots appearing and in some cases the skin has appeared to slough off. Could be a result of a bacteria infection brought on by shipment trauma. They have a reputation for being jumpers and many perish after going carpet surfing.
Temperature: Does well within normal reef tank temperature ranges of at least 76 to 84.
Size: The Bluespotted Jawfish grows to about 4" in length.
74

Mandarin Dragonet
Scientific Name: Pterosynchiropus splendidus Family: Callionymidae Common Names: Mandarin Dragonet, Mandarin Goby, Green Mandarinfish. Stripped Mandarinfish, Psychedelic fish
Description: The Mandarin Dragonet can simply not be confused with any other fish. It has arguably the most attractive coloration and pattern of any commonly kept reef fish. The scale-less body of the fish is a blue or green color which has orange wavy lines across it. The tail is bright red with blue edging. Other colors can be found in the pattern as well. These fish are also sometimes called Psychedelic fish due to its rather bizarre coloration. The male Mandarin tends to be larger than the female and has a large pointed dorsal fin that is only rarely displayed. Although commonly called Mandarin Goby, they are in fact not gobies, but rather belong to the family known as dragonet's.
Natural Environment: Comes from the Philippine area and westward to Australia. Found in groups or pairs, often on sandy bottoms between reef crests. Care: Reef Suitability: Mandarin fish are one of the most commonly sold fish, yet they are unfortunately one of the most likely to perish in the average reef tank. The reason for this is their very finicky feeding habits. Many mandarins
75

will only eat live amphipods and copepods (pods) which are found in sufficient numbers only in larger and well established reef tanks. The minimum tank requirement is generally stated as 55 gallon with 50lbs or more of live rock. This is based on feeding requirements and not space requirements as the Mandarin is a very slow, docile fish. Perhaps more important than tank size is how heavily feed and nutrient rich a tank is, since this type of tank will generally support a higher pod population than tanks run under more lean conditions.
Disposition: Very non-aggressive to other fish and other fish seem to pay them no attention. 2 males will fight, so they should only be kept singly or in male/female pairs. Mandarins spend their days carefully checking over the live rock and sand looking for tasty tidbits to eat.
Feeding: As noted above, feeding can be a major issue with Mandarins. Some will take foods such as frozen brine shrimp and bloodworms. Others will refuse to take anything but live foods. Mandarins are extremely slow and hover, much like a hummingbird using their front fins while looking for food. Even Mandarins that take prepared foods have a hard time competing with faster fish for the morsels. One suggestion I have heard that makes good sense, especially in smaller tanks that don't support a large pod population is to build something called a 'pod pile'. This is a few small rocks stacked into a pile into which small pieces of shrimp or similar food can be inserted every couple of days. This pile of rocks provides shelter and a food supply for the pods which allows them to rapidly breed and provide food for the Mandarin.
Hardiness: Very hardy under the right conditions when starting with a healthy specimen which is feeding. They seem to be very resistant to parasitic diseases such as Ick, apparently due to their thick slime coating. Unfortunately, most Mandarins are kept under conditions in pet stores that cause them to slowly starve. Look for sunken bellies before purchasing. Some specimens seem to waste away to the point where they cannot survive, even when put into good conditions. If possible, select a specimen that is eating fozen food.
Temperature: Does well within normal reef tank temperature ranges of at least 76-82°F.
Size: Mandarins can get up to about 3" in length.
Breeding: Mandarins have reportedly spawned in reef tanks. The fry are very small and require a first food which is smaller than rotifers. The picture above shows a male and female pair. The male is in full display mode while courting the female.
76

Neon Goby
Scientific Name: Gobiosoma oceanops Family: Gobiidae Common Names: Neon Goby
Description: The Neon Goby is a attractive small slim fish which is easily recognized by the iridescent blue strips along the top half of their body which is black. The belly is white in color. There are a yellow and black stripped version as well. A similar looking goby called the Sharknose Goby has a yellow face, though the rest of the body looks similar to the Neon Goby.
Natural Environment: Comes from the tropical Western Atlantic and the Gulf of Mexico; predominant in Florida reefs. Care: Reef Suitability: Neon Gobies are very good reef tank inhabitants. They are cleaner fish and will readily service larger fish in the tank by cleaning parasites from their skin. This can be seen in the picture above where a neon goby is working over an Achilles Ttang that is infected with an ectoparasite. Their small size can make them susceptible to being sucked through overflows or eaten by other fish. Their cleaner status normally prevents them from becoming a meal.
77

Disposition: Relatively non-aggressive, except to their own kind. They will engage in high speed chases around the tank, but these appear to be mostly harmless affairs. Each Neon Goby will stake out their own territory if more than one is kept in a tank. They will frequently setup a cleaning station where the larger fish will come when they want the Neons attention. The larger fish will signal their desire to be cleaned by assuming a tilted posture or with a color change as can be seen in the picture of the Achilles Tang being cleaned above.
Feeding: Neon Gobies get some of their nutritional requirements from cleaning other fish, but it is hard to make a living in a normal reef tank. They will readily accept small meaty foods that are offered. Their mouths are fairly small, so only small foods are given any attention.
Hardiness: Very hardy, but naturally short lived. They may only live for about a year naturally.
Temperature: Does well within normal reef tank temperature ranges of at least 75-84°F. Due to natural habitat, they may tend to do best at the lower range of temperature.
Size: Neon Gobies can get up to about 2.5" in length in the wild. They are normally found at about 1"-2" in length in the home aquarium Their size makes them suitable inhabitants for small reef tanks.
Breeding: Neon Gobies will readily pair up and breed in the reef tank. Many store bought specimens are breed in captivity.
78

Scissortail Goby
Scientific Name: Ptereleotris evides Family: Gobiidae Common Names: Blackfin Dartfish, Scissortail Goby
Description: The Scissortail Goby is a attractive slim fish which is easily recognized by their light bluish-gray front half and black back half coloration. They also have large dark gray dorsal and anal fins with black edging as well as the characteristic black 'scissors' coloration on their tail.
Natural Environment: Indo-Pacific, Indian Ocean and the Red Sea. Care: Reef Suitability: Scissortail Gobies make very good reef tank inhabitants. They like to burrow under rocks in the sand, but they spend the majority of their time in the middle of the tank cruising for food.
Disposition: Very non-aggressive. They tend to get along with with their own kind as well as other fish in the tank. They prefer to have the company of their own kind and live in pairs in the wild as adults and small groups as juveniles.
79

Feeding: Scissortail Gobies accept any meaty foods that are offered. They will also take flake food as it sinks. They are mid water feeders and will eat the food as it falls through the water column.
Hardiness: Very hardy.
Temperature: Does well within normal reef tank temperature ranges of 75-84°F.
Size: Scissortail Gobies can get up to about 5" in length.
Breeding: Scissortail Gobies are aquacultured. They are frequently captive raised from larval fish caught in the wild.
80

Blue Green Chromis
Scientific Name: Chromis viridis Family: Pomacentridae (Damselfish) Common Names: Blue Green Chromis
Description: The Blue Green Chromis is a understated, but attractive smallish fish which is easily recognized by the uniform iridescent green coloring over their entire body. There is a similar species called the Green Chromis which can be differentiated by a black spot at the base of the pectoral fins.
Natural Environment: Comes from the Indo-pacific and Red Sea areas. Care: Reef Suitability: Green Chromis are very good reef tank inhabitants. They do best when kept in groups of 3 or more specimens. They will tend to shoal together in the middle to upper portion of the tank. Sometimes considered a beginners fish due to low cost and hardiness, but they can form very attractive schools in a large reef tank. They like to nestle down in a coral head to sleep at night or if frightened. Although they are relatively small fish, they should not be housed in very small tanks due to their active open water swimming habits.
81

Disposition: Relatively non-aggressive, they tend to not bother or be bothered by other fish. This can't be said for many of its damselfish relatives.
Feeding: Blue Green Chromis will eat most meaty foods of suitable size as well as dry flakes.
Hardiness: Very hardy.
Temperature: Does well within normal reef tank temperature ranges of at least 75-84°F.
Size: Green Chromis can get up to about 4" in length in the wild. They are normally found at about 1"-2" in length in the home aquarium
Breeding: Blue Green Chromis will sometimes breed in the reef tank.
82

Introduction to Mobile Inverts
Mobile invertebrates are a diverse group that covers all of the self propelled tank inhabitants such as snails, shrimp, crabs, star fish, etc. Being mobile, they can find the conditions within the tank that suit them, so the main trick is getting them successfully introduced into the tank.
Guidelines to buying mobile invertebrates:
• Check the specimen to ensure that it shows good activity for its kind. Obviously expectations for a snail would be lower than for, say a shrimp.
• Verify all appendages are present. Loss of a limb in crustaceans is usually not a big issue since they grow back, but if the appendage is lost due to a fight or poor conditions, the specimen may not be very healthy. Starfish can also grow back an arm and brittle stars in particular are subject to casting off an arm when they are not happy. Again, if the specimen otherwise appears healthy it is probably safe to purchase it.
• A few specimens, such as banded coral shrimp cannot be kept more than one per tank unless they are a mated pair.
Keep in mind that mobile invertebrates are the most susceptible organisms to lax acclimation procedures. They seem less able to handle changes in salinity and other water parameters and usually benefit from extended acclimation procedures. Please review the acclimation sheet if you need more information on this topic.
Get Sheet Common Name Scientific Name
Banded Coral Shrimp Stenopus bipidus
Peppermint Shrimp Lysmata wurdemanni
83

Sally Lightfoot Crab Percnon gibbesi
Emerald Crab Mithrax sculptus
Blue-legged Hermit
Red Hermit Crab
Turbo Snail Turbo sp.
Astraea Snail Astraea sp.
Cerith Snail Cerithium sp.
Nerite Snail Nerita sp.
84

Banded Coral Shrimp
Scientific Name: Stenopus bispidus Family: Crustaceans Common Names: Banded Coral Shrimp, Candycane Shrimp
Description: The Banded Coral shrimp is easily recognized by the red & white bands that circle its body and and very long front claws and very long white antennae. It belongs to the cleaner shrimp family which sometimes picks parasites off of fish. I observed one of my Banded Coral shrimp engage in cleaner behavior with a yellow tang only once. It is a very striking specimen.
Natural Environment: Pacific Ocean. Not currently breed in captivity.
Care: Reef Suitability: The Banded Coral shrimp usually does fine in a reef tank. It does not usually eat its reef tank mates, but they can be somewhat aggressive and pull at corals to get food out of the corals tentacles and mouths. I have kept them with all forms of reef tank inhabitants including clams, SPS, LPS, softies and other shrimp and have never had a problem. They will normally stay back in the rockwork and come out only to forage and feed, mostly at night. The only possible casualty that I have observed is with a Peppermint shrimp, but it may have already been deceased rather than killed by the Banded Coral shrimp.
85

Disposition: Will aggressively go after food, but otherwise are fairly docile. You can not keep more than one in a tank unless they are a known mated pair or else they will fight to the death.
Feeding: They spend their day scavenging and usually learn to come out during normal feeding times and get their share. They will eat any of the meaty foods offered.
Hardiness: Very hardy
Temperature: Does well within normal reef tank temperature ranges of 75-84°F.
Size: Body length of about 3" with antennae that are about the same length.
86

Peppermint Shrimp
Scientific Name: Lysmata wurdemanni Family: Crustaceans Common Names: Peppermint Shrimp
Description: The Peppermint shrimp is attractively but inconspicuously colored, usually a light pink to red in color. The body has darker small red stripes along its body.
Natural Environment: Tropical western Atlantic
Care: Reef Suitability: There are several different types of shrimp sold as "Peppermint" shrimp. The ones illustrated here are the true Lysmata wurdenmanni which are completely reef safe. Other shrimp sold under the same name may not be completely safe in the reef tank. Peppermint shrimp are mostly nocturnal, reclusive, fairly non-descript and their main claim to fame is that they will usually eat the pest anemone Aiptasia. The picture at the bottom shows a Peppermint Shrimp attempting to make a meal out of an dieing clam, but they do not seem to bother healthy clams.
87

Disposition: Seem to be fairly benign and do not seem to bother the other tank inhabitants (except Aiptasia). They will use their long stiff antennae to ward off curious fish.
Feeding: They spend their night scavenging and will learn to come out during normal feeding times and get their share, but they will always remain fairly wary. They will eat any of the meaty foods offered. Of course, if you have Aiptasia in the tank, you will not want to directly feed them in order to encourage them to eat the pest anemones. The larger shrimp tend to be better predators of Aiptasia than the small ones.
Hardiness: Very hardy. They will frequently breed in the reef tank, but the larvae do not normally survive.
Temperature: Does well within normal reef tank temperature ranges of at least 76-84°F.
Size: Body length of about 2" with antennae that are about the same length.
88

Sally Lightfoot Crab
Scientific Name: Percnon gibbesi Family: Crustaceans Common Names: Sally Lightfoot Crab, Nimble Spray Crab
Description: The Sally Lightfoot crab is easily recognized by it's green-brown carapace and yellow markings and bands around the joints of its legs. It has two front antennae which are constantly moving.
The name of Sally Lightfoot is actually a misnomer. True Sally Lightfoot crabs are found in the Galapagos Islands region. They are red and dwell mostly outside the water.
Natural Environment: Tropical western Atlantic
Care: Reef Suitability: The Sally Lightfoot is a good scavenger for reef tanks. They are primarily algae eaters and spend the day constantly picking at the live rock. They are very active tank inhabitants.
Disposition: Generally get along well with other tank inhabitants and other Sally Lightfoot crabs. Being very active creatures, they tend to walk over corals and
89

disturb them at times, but this does not cause any damage. They will also compete aggressively with other animals for food.
Feeding: They spend the day foraging for algae and misc. scraps that may come their way. As with all scavengers, Sally Lightfoot crabs are opportunistic feeders and may be guilty of eating sick or injured fish. There is some evidence that larger specimens may become eaters of healthy fish or shrimp, but more likely the specimen had already died before the crab got a hold of it and all the hobbyist sees is a crab with a dead specimen in its claws.
Hardiness: Very hardy. Sometimes may have problems with molting the shell. Lack of adequate iodine in the water may lead to this condition.
Temperature: Does well within normal reef tank temperature ranges of 75-84°F.
90

Emerald Crab
Scientific Name: Mithrax sculptus Family: Crustaceans Common Names: Emerald Crab, Mithrax Crab
Description: The Emerald crab is easily recognized by it's green heavily sculpted body and large heavy claws. It has noticeable hairs visible on its hind legs.
Natural Environment: Tropical western Atlantic
Care: Reef Suitability: The Emerald crab is a good scavenger for reef tanks. They are primarily herbivores, but like most crabs emeralds have the ability to eat things they shouldn't, and are occasionally accused of picking at corals. They are primarily nocturnal and usually spend the day hidden in a crevice, coming out at night to feed.
Disposition: Generally get along well with other tank inhabitants. In general, the larger the crab, the more likely they are to become a problem in the tank.
Feeding: They are primarily nocturnal algae eaters and spend their nights eating various algae's in the reef tank including hair algae, macro algae and even bubble
91
algae which is their main claim to fame. I would not count on them for a total control solution for bubble algae, but they can play a part.
Hardiness: Very hardy providing they have algae on which to feed..
Temperature: Does well within normal reef tank temperature ranges of at least 75-84°F.
92

Blue-legged Hermit Crab
Scientific Name: Family: Crustaceans Common Names: Blue-Legged Hermit Crab
Description: The Blue-Legged Hermit crab is easily recognized by it's bright blue legs. This hermit crab remains small.
Natural Environment: ?
Care: Reef Suitability: The Blue-Legged Hermit is the most commonly sold reef scavenger hermit. They do serve the role of being a scavenger well and help to keep the algae in the tank under control. Blue-Legged Hermits are known to occasionally kill and eat snails, but it is not a blood-bath.
Disposition: Typical hermit snail attitude. As noted, the Blue-Legged Hermit has been known to kill snails and are frequently seen to harass them, although the snail can usually shake them off without too much problem. Like all hermit crabs, they house the soft part of their body in empty snail shells, so have a few extra empty shells in the tank may reduce aggression.
93

Feeding: They spend the day foraging for algae and misc. scraps that may come their way.
Hardiness: Very hardy
Temperature: Does well within normal reef tank temperature ranges of 75-84°F.
94

Red Hermit Crab
Scientific Name: Family: Crustaceans
Description: The Red Hermit crab is a solid dark red with light yellow markings on the tips of the claws and eye stalks. It can grow to a fairly large size and develops large pincher claws.
Natural Environment: ? Care: Reef Suitability: The Red Hermit crab can grow to fairly large size, but does not seem cause any significant amount of damage and does not appear to prey on snails like some hermits. Due to their size, they may uproot loose corals and rocks. They do serve as scavengers and help to keep the algae in the tank under control.
Disposition: Typical hermit snail attitude. This hermit does not appear to be as aggressive as the blue-legged hermit.
Feeding: They spend the day foraging for algae and misc. scraps that may come their way.
Hardiness: Very hardy
Temperature: Does well within normal reef tank temperature ranges of 75-84°F.
95

Turbo Snail
Astraea on Left, Turbo on Right
Turbo Bottom View
Scientific Name: Turbo sp. Family: Mollusca
Description: Turbo snails have a fairly blunter shell and grow to about 3" which is larger than Astraea snails. The shell is a black color unless covered with coralline algae.
Natural Environment: ? Care: Reef Suitability: Turbo snails are one of the best herbivores to include in the reef tank. They do get fairly large and can knock over loose items in the tank with their bulldozer ways.
Disposition: Mild mannered as a snail can get.
Feeding: Turbo snails are herbivores and spend the day foraging for algae. They are not effective against long hair algae, but help to mow any short algae and keep it under control.
Hardiness: Very hardy once acclimated, but snails frequently die shortly after introduction due to lack of proper acclimation.
Temperature: Does well within normal reef tank temperature ranges of 75-84°F.
96
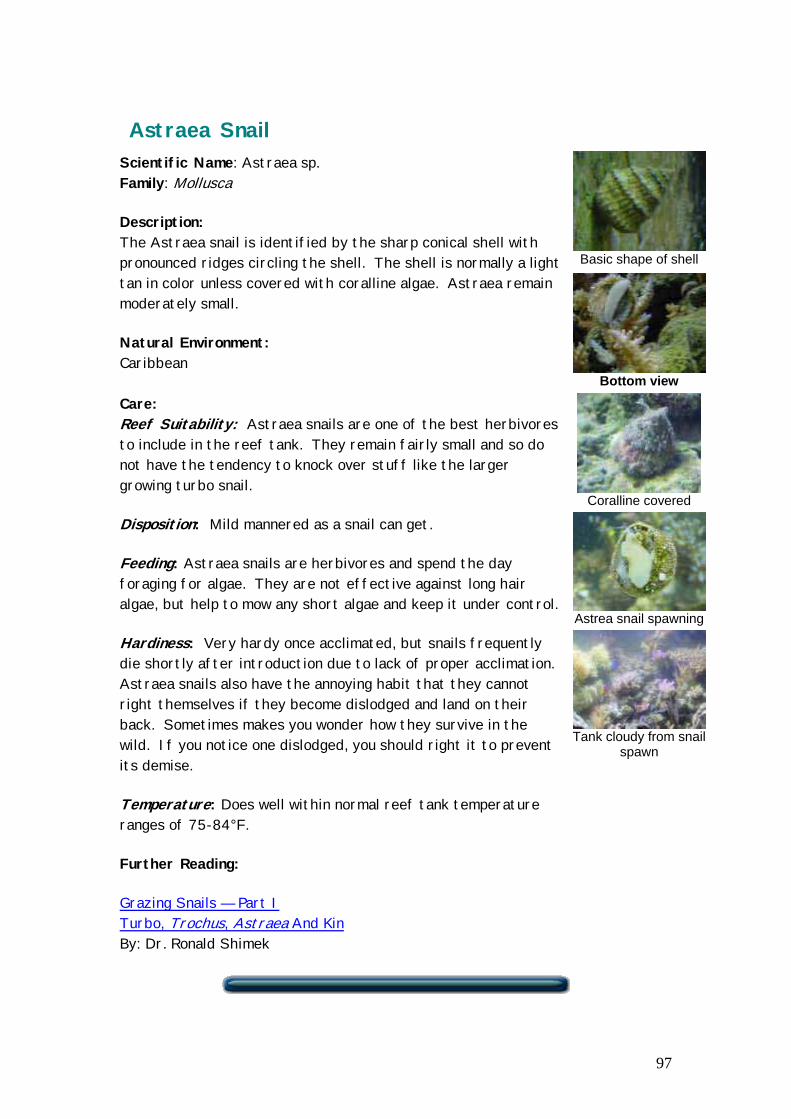
Astraea Snail
Basic shape of shell
Bottom view
Coralline covered
Astrea snail spawning
Tank cloudy from snail spawn
Scientific Name: Astraea sp. Family: Mollusca
Description: The Astraea snail is identified by the sharp conical shell with pronounced ridges circling the shell. The shell is normally a light tan in color unless covered with coralline algae. Astraea remain moderately small.
Natural Environment: Caribbean Care: Reef Suitability: Astraea snails are one of the best herbivores to include in the reef tank. They remain fairly small and so do not have the tendency to knock over stuff like the larger growing turbo snail.
Disposition: Mild mannered as a snail can get.
Feeding: Astraea snails are herbivores and spend the day foraging for algae. They are not effective against long hair algae, but help to mow any short algae and keep it under control.
Hardiness: Very hardy once acclimated, but snails frequently die shortly after introduction due to lack of proper acclimation. Astraea snails also have the annoying habit that they cannot right themselves if they become dislodged and land on their back. Sometimes makes you wonder how they survive in the wild. If you notice one dislodged, you should right it to prevent its demise.
Temperature: Does well within normal reef tank temperature ranges of 75-84°F.
Further Reading:
Grazing Snails — Part I Turbo, Trochus, Astraea And Kin By: Dr. Ronald Shimek
97

Cerith Snail
Scientific Name: Cerithium sp. Family: Mollusca Common Names: Cerith Snail
Description: Cerith Snails are small, less than an inch long, with a very pointed shell. Shell coloration is variable and often coralline algae covered. The body of the snail can be black in color.
Natural Environment: Caribbean waters
Care: Reef Suitability: Cerith snails are good herbivores to include in the reef tank. They remain very small and will not disturb any of the landscaping. They are
98

sometimes included as a hitchhiker on live rock. The are not effective against the hair algae monster, but may help with diatoms and cyanobacteria and add to the diversity of the cleanup crew when used with other types of snails.
Disposition: Mild mannered as a snail can get.
Feeding: Cerith snails are herbivores and spend the day foraging for algae.
Hardiness: Very hardy and long lived.
Temperature: Does well within normal reef tank temperature ranges of 75-84°F.
99

Nerite Snail
Scientific Name: Nerita sp. Family: Mollusca Common Names: Nerite Snail
Description: Nerite Snails are smallish, less than an inch long, with a very rounded shell. Shell coloration is variable and often coralline algae covered usually has some type of stripe or spots on a white or tan shell. The specimen above is mostly covered with green coralline algae, but the natural shell coloration can be seen at the growing edge of the shell.
Natural Environment: Caribbean intertidal waters Care: Reef Suitability: Nerite snails are good herbivores to include in the reef tank. They remain fairly small and do not disturb the landscaping. They are sometimes included as a hitchhiker on live rock. They add to the diversity of the cleanup crew and are used in conjunction with other snails. They do sometimes have the unfortunate tendency to wander out of the tank due to their intertidal nature.
100

Disposition: Mild mannered as a snail can get.
Feeding: Nerite snails are herbivores and spend the day foraging for algae.
Hardiness: Very hardy and long lived.
Temperature: Does well within normal reef tank temperature ranges of 75-84°F.
101

Introduction to Clams
Tridacnid clams are the most commonly kept clams in the reef aquarium. This is the family of clams the include the largest clams in the ocean and most get moderately large (6") to very large (3' or more). Coloration varies from species to species, but most are very attractively colored. They all survive off symbiotic algae called zooxanthellae that lives within their tissues and require no feeding. Related bivalves sometimes sold at the LFS include flame scallops and oysters of various types. These are all filter feeders and are generally not very suitable for the reef tank.
Click to enlarge
The picture above shows a T. squamosa on the left, and two T. maxima tridacnid clams. The middle picture is a T. derasa. The picture on the right is a T. gigas, the giant killer clam of folk lore.
All tridacnid clams require at least moderate lighting and some require very intense lighting. Ensure that tank has sufficient lighting to support the type of clam you are thinking about buying. If lighting is insufficient, the clam may show very high mantle extension. Although this may look like a happy clam, in fact it can indicate that the clam is trying to extend its mantle for maximum light gathering due to inadequate lighting conditions. Clams in the wild do not show much mantle extension.
Guidelines to buying tridacnid clams
• Choice specimens that respond to a shadow or touch. The clams should shut it's shell with some amount of force.
• Inspect the mantle. It should extend past the edge of the shell and not have tears, holes or obvious damage to it.
• Look for gapping. This is when the clam opens it's shell very wide with little or no mantle extension. The intake siphon opening is frequently widely distended as well. This is frequently associated with low response to stimuli. Gapping is a sign of a sick clam that should not be purchased.
• Ensure you have the lighting to support the type of clam you are contemplating buying.
• Keep in mind that some types of tridacnid clams can get large fairly quickly, especially T. gigas and T. derasa. A T. derasa calm can grow from a length of 2" to 8" in 12 to 18 months.
102

When placing the clam in the aquarium, there are some general guidelines to follow
• Position the clam where it cannot be stung by any of its neighbors. Clams are not very tolerant of bothersome neighbors.
• Ensure you place the clam on a suitable substrate. If it is positioned up on the live rock, it should be kept in place by rocks or similar or the clam may 'jump' from its position using it's foot and tumble down the live rock.
• No clams like a lot of water current, although some are more tolerant of this than others.
• Watch the clam after introduction to ensure it is not being molested by any of the fish or invertebrate inhabitants. A new clam will frequently have tasty stuff on its shell that is new to the tank and so it is not uncommon for fish to show an interest in it when first introduced and should not be a cause for concern as long as they do not bite at and tear the mantle.
Click to enlarge
The picture above shows the new white growth area at the edge of the mantle which is typical of a healthy fast growing clam.
Click to enlarge
Clams will occasionally expel a brown or green stringy looking material from their exhalant siphon as shown in the picture above. This is not a cause for concern and appears to be the way in which the clam expels excess zooxanthellae or possibly other waste products.
Click to enlarge
103
Clams will sometimes spawn in the reef aquarium. The photos above show two Derasa clams spawing in a reef tank. The two clams can be seen in the picture on the right. Spawning in a reef tank does not result in any viable baby clams being produced.
See acclimation procedure for further information on introducing Clams and other specimens to the tank.
Further Reading:
Getting Up-To-Date on Zooxanthellae By Eric Borneman
Variations in tridacnid shell formation By Daniel Knop Reef Tank Design for Giant Clam Lovers By Daniel Knop How to Choose Healthy Giant Clams at the Aquarium Store By Daniel Knop Placing Giant Clams in the Reef Tank By Daniel Knop Gamete Release by Giant Clams in Aquaria By Daniel Knop Fish “Bullies” in the Giant Clam Tank By Daniel Knop Cunning and Malicious: Parasites and Predators of Giant Clams By Daniel Knop
104

Get Sheet Common Name(s) Scientific Name
Gigas Clam Giant Clam Tridacna gigas
Maxima Clam Tridacna maxima
Crocea Clam Tridacna crocea
Derasa Clam Tridacna derasa
Squamosa Clam Tridacna squamosa
105

Gigas Clam
Specimen courtesy of Upscales
Scientific Name: Tridacna gigas Family: Clams / Bivalves Common Names: Gigas Clam, Giant Clam
Description: The T. gigas clam is the largest of the clams kept in reef tanks. They are actually the largest clams in the wild as well. They have large, smooth, heavy ribbed (4 or 5 ribs) shells without scutes. The edge of the shell is often very sharp. The mantle is usually a golden brown, yellow or olive green with numerous iridescent blue or green spots, particularly around the edges. The center of the mantle frequently has clear spots. There are no tentacles on the incurrent opening. Large T. gigas cannot completely close their shells. Maximum size is over 3 feet.
Natural Environment: Indo-Pacific in fairly deep water locations (30-60 feet) Care: Hardiness: T. gigas is a hardy clam which does well in reef tanks given good water conditions and the room to grow. It is the fastest growing clam and can
106

easily outgrown its tank. Due to its deep water natural habitat, it may be more sensitive to water parameter changes than the other Tridacna clams.
Lighting: Moderate to relatively high lighting is suitable. T. gigas does not really like the most intense lighting conditions that suit some clams and should be carefully acclimated to higher lighting conditions such as metal halides. The clam above is housed under 400W 10K MH lamps.
Water Current: Low water currents are preferred.
Temperature: Does well within normal reef tank temperature ranges of 75-82°F. May be sensitive to the upper temperature range due to its natural deep water natural habitat.
Aggressiveness: None
Feeding: Primarily photosynthetic. They may benefit from feedings of phytoplankton, but it is not required.
Supplements: Proper calcium levels (400-450 ppm) are important for growth as is maintaining good alkalinity levels.
Tank Positioning: Position on the substrate in the bottom of the tank in a low to moderate water flow area.
Further Reading:
Tridacna gigas - Gruesome Monster or Harmless Tank Inhabitant? By Daniel Knop
107
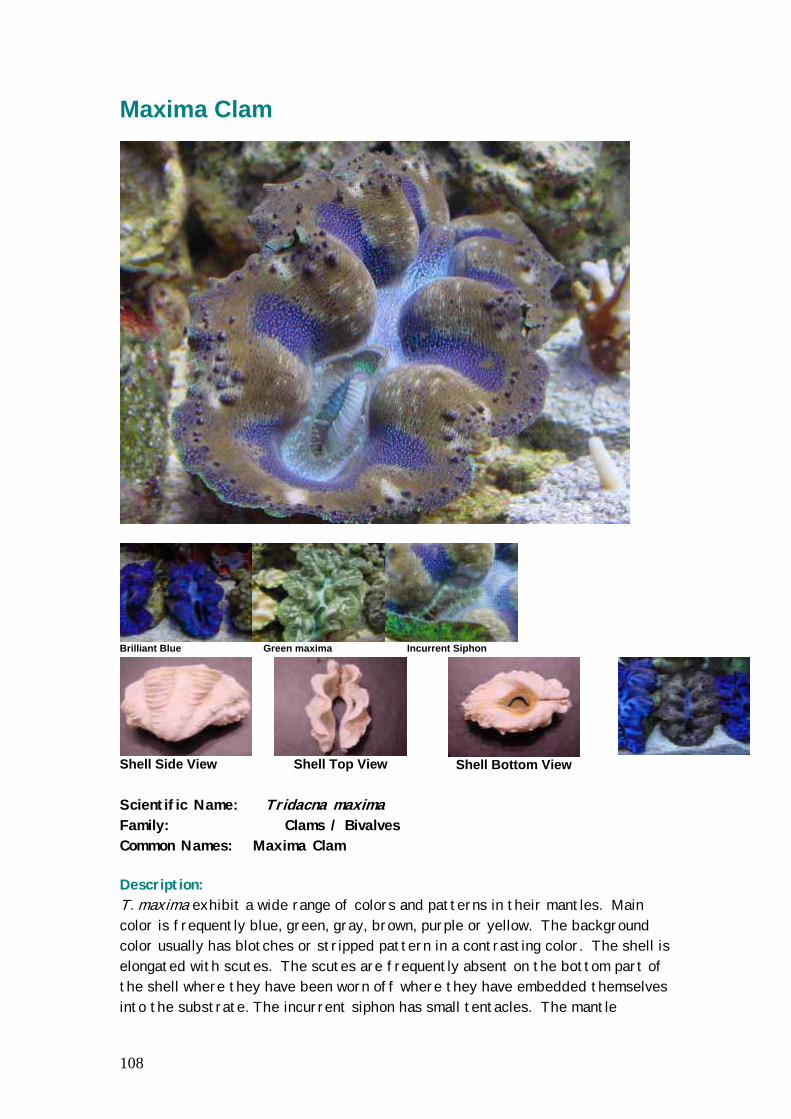
Maxima Clam
Brilliant Blue Green maxima Incurrent Siphon
Shell Side View
Shell Top View
Shell Bottom View
Scientific Name: Tridacna maxima Family: Clams / Bivalves Common Names: Maxima Clam
Description: T. maxima exhibit a wide range of colors and patterns in their mantles. Main color is frequently blue, green, gray, brown, purple or yellow. The background color usually has blotches or stripped pattern in a contrasting color. The shell is elongated with scutes. The scutes are frequently absent on the bottom part of the shell where they have been worn off where they have embedded themselves into the substrate. The incurrent siphon has small tentacles. The mantle
108

sometimes has protuberances, usually only along the edge. Maximum size is approximately 14". Easily confused with T. crocea.
Natural Environment: Indo-Pacific in reef top, shallow water, high current areas where they embed themselves partially into the substrate (rock or rubble) attached by their strong byssus filaments. They are also sometimes found at depths of up to 45 feet. T. maxima clams in the hobby are both wild caught and farmed.
Care: Hardiness: T. maxima is a moderately hardy clam which usually does well in reef tanks given strong lighting and clear water conditions with low to moderate water flow.
Lighting: Requires fairly intense lighting, preferably MH. The clam coloration can change depending upon lighting conditions. The top clam was solid blue under 6.5K lighting and the grey edging occurred once the lighting was changed to 10K. All clams in these pictures are kept under 400W 10K MH lighting.
Water Current: Low to moderate.
Temperature: Does well within normal reef tank temperature ranges of 75-84°F.
Aggressiveness: None
Feeding: Primarily photosynthetic. They may benefit from feedings of phytoplankton, but it is not required.
Supplements: Proper calcium levels (350-500 milligrams per liter) are important for growth as is maintaining good alkalinity levels.
Tank Positioning: Position on the substrate in the bottom of the tank in a low to moderate water flow area. Can also be positioned on live rock if care is taken to locate it so that it cannot move and fall from its perch.
Further Reading:
Tridacna maxima — Widespread and Hardy
109

Crocea Clam
Scientific Name: Tridacna crocea Family: Clams / Bivalves Common Names: Crocea Clam, Burrowing Clam
Description: The T. crocea clam is one of the most attractive clams and is easily confused with T. maxima. Color can be a combination of blue, purple, yellow, green, brown, gold or orange in various patterns. The mantle usually has numerous iridescent blue, yellow or green blotches or lines. T. crocea has a very large abyssal gland (larger than T. maxima). This gland is used to anchor the clam in the strong water currents they inhabit. The shell is thicker than other clams, relatively small folds on the side of the shell and small scutes usually on the upper portions of the shell only. Incurrent siphon has very fine tentacles. T. crocea is the smallest of the 'giant' clams and reaches a maximum length of 6-9".
Natural Environment: Indo-Pacific in shallow areas near shore where they burrow themselves into the substrate and coral heads. Only the top of the shell and mantle are visible once embedded. T. crocea clams can be either wild caught or tank raised. Tank raised specimens usually have larger scutes.
Care: Hardiness: T. crocea is a fairly delicate clam and is probably one of the
110

hardest to keep in captivity. Adequate lighting is key to keeping these clams healthy.
Lighting: Intense lighting is required to attempt to keep these clams. MH lighting is preferred. T. crocea clams require more intense lighting than any of the other clams. Under insufficient lighting, the mantle coloration may fade or turn brown. Extensive mantle extension may indicate a lack of light as the clam attempts to maximize the lighting exposure by extending to the fullest extent possible. Since Crocea are shallow water species, they will probably tend to do best with lower Kelvin lighting (6K - 10K)
Water Current: Moderate to high (but not direct) water currents suit it well.
Temperature: Does well within normal reef tank temperature ranges of 75-84°F.
Aggressiveness: None
Feeding: Primarily or totally photosynthetic. They may benefit from feedings of phytoplankton, but it is not necessary to feed them
Supplements: Proper calcium levels (400-450 ppm) are important for growth as is maintaining good alkalinity levels.
Tank Positioning: Can be position on the substrate in the bottom of the tank in a moderate water flow area if intense lighting is provided. Otherwise position higher up in the tank in a secure location where it is not in danger of falling (jumping) in order to ensure it gets adequate lighting.
Further Reading:
Tridacna crocea — Pearls of the Reef By Daniel Knop
111

Derasa Clam
Scientific Name: Tridacna derasa Family: Clams / Bivalves Common Names: Derasa Clam
Description: The T. derasa clam usually have a very conspicuous stripped or wavy line mantle pattern consisting of orange, yellow, black blue and white colors. The shell is heavy, but plain, without any significant scutes or ribbing. The incurrent siphon has large tentacles. The byssal opening is fairly narrow. T. derasa can grow rapidly in the reef tank, easily growing from 2" to 5" or 6" in a years time. T. derasa is one of the largest of the giant clams and reaches a maximum length of about 24".
Natural Environment: Indo-Pacific in shallow, wave protected, clear water areas as a juvenile. T. derasa loses its byssus gland as an adult when it reaches about 12" in length and moves to deeper waters apparently via water currents and lives freely on the substrate in lagoons. T. derasa clams in the hobby are all captive bred.
Care: Hardiness: T. derasa is a very hardy species and a good clam for the beginning hobbyist, provided reasonably strong lighting, clear water conditions and stable salinity is provided..
112

Lighting: Moderate to Intense lighting can be used with these clams although they seem to due better with lighting on the brighter end of the scale. Being shallow water species, they may do best with lower Kelvin lighting (6K to 10K).
Water Current: Low to moderate. Although they come from low water current areas in nature, they seem to tolerate moderate water flow well.
Temperature: Does well within normal reef tank temperature ranges of at least 75-84°F.
Aggressiveness: None
Feeding: Primarily photosynthetic. They may benefit from feedings of phytoplankton, but it is not required.
Supplements: Proper calcium levels (400-450 ppm) are important for growth as is maintaining good alkalinity levels.
Tank Positioning: Position on the substrate in the bottom of the tank in a low to moderate water flow area if intense lighting is provided. Otherwise position higher up in the tank in a secure location where it is not in danger of falling..
Further Reading:
Tridacna derasa — Beautifully Colored and Quite Hardy By Daniel Knop
113

Squamosa Clam
Scientific Name: Tridacna squamosa Family: Clams / Bivalves Common Names: Squamosa Clam
Description: T. squamosa color is frequently brown with colored spots or wavy lines. Blue and green spotted specimens are sometimes seen. The shell is heavy and fairly symmetrical with large prominent widely spaced scutes. The incurrent siphon has large branched tentacles. The mantle extends well over the edge of the shell . Maximum size is approximately 16".
Natural Environment: Indo-Pacific in sheltered deeper (30-50 feet) waters such as deep water lagoons or reef walls. T. squamosa clams in the hobby are both wild caught and farmed.
Care: Hardiness: T. squamosa is a hardy clam which usually does well in reef tanks.
Lighting: Requires moderate to intense lighting. T. squamosa is one of the more light tolerant clams
114

Water Current: Low to moderate.
Temperature: Does well within normal reef tank temperature ranges of 75-84°F.
Aggressiveness: None
Feeding: Primarily photosynthetic. They may benefit from feedings of phytoplankton, but it is not required.
Supplements: Proper calcium levels (400-450 ppm) are important for growth as is maintaining good alkalinity levels.
Tank Positioning: Position on the substrate in the bottom of the tank in a low to moderate water flow area. Can also be positioned on live rock if care is taken to locate it so that it cannot move and fall from its perch.
Further Reading:
Wonderful Color Patterns of Tridacna squamosa By Daniel Knop
115

Introduction to Soft Coral
Soft corals are so named for the fact that they have no obvious skeletal support like LPS or SPS corals do. Soft corals have calcareous spicules embedded within their tissues that provide support for their soft bodies. Soft corals tend to be some of the hardiest corals for the reef tank, tolerant of less than ideal conditions and are often a good choice for the beginning hobbyist. There are some soft corals, such as carnation corals that require feeding and are more difficult to keep. Some soft corals can grow quite large and some hobbyist specialize in large tanks with dramatic large soft coral specimens.
Soft corals are the most easy going group as far as getting along with their neighbors goes. Most do not posses any obvious stinging ability, but some do have the ability to engage in a type of chemical warfare which is used to clear out adjacent space for the coral to grow into.
Guidelines to buying soft corals:
• Look for expansion of the coral and it's polyps as a sign of a happy and healthy soft coral. Many soft corals have noticeable polyps when they are fully expanded.
• Look for areas of degeneration. These may appear as black areas or areas with a jelly like appearance. These should generally be avoided, although the specimen can sometimes be saved by cutting away the fouled area.
See acclimation procedure for further information on introducing Soft corals to the tank.
116

Get Sheet Common Name(s) Scientific Name
Green Finger Coral Sinularia Sinularia sp.
Gold Crown Toadstool Sarcophyton alcyonidae
Yellow Leather ?
Pulsating Xenia Xenia elongata
Sea Mats Palythoa sp.
Button Polyps Zooanthus sp.
Ricordea Ricordea florida
117

Sinularia Coral
Large Multi-branched Colony
Scientific Name: Sinularia sp. Classification: Soft Coral Common Names: Sinularia, Green Finger Coral
Description: Sinularia corals are similar in shape to colt corals (Cladiella) and tree corals (Nepthea). Sinularia corals can be identified by the fact that the growth originates from a single heavy stalk unlike Nepthea and the polyps are less feathery than in colt corals. Green Sinularia is a very attractive bright greenish yellow in color. The intensity of the coloration is affected by the amount of lighting the coral receives. The branches are covered with small polyps. Sinularia can grow quite large. The specimen above is about 15" high, has grown to be several separate adults and has been pruned heavily several times. This coral is about 4 years old.
Natural Environment: ? This coral is normally collected in the wild, but it is easily propagated. Care: Hardiness: Sinularia is very hardy and tolerates a range of conditions. On occasion, a specimen will start dissolve in one or more spots as shown in the picture above. The cause is unknown. The best approach if this occurs is to cut
118

out the bad portion of the coral. Lighting: While Sinularia will tolerant lower lighting levels, it does best under intense lighting. The specimen shown here is growing under 10K 400W MH lamps. It has also been grown very successfully under standard 175W mercury vapor lighting.
Water Current: Sinularia likes moderate water flow. Seem to do well under wave maker water conditions where the branches get swayed gently back and forth.
Temperature: Does well within a range of at least 75º to 84º F.
Aggressiveness: Moderate. Although they do not seem to directly sting neighbors, their proximity to some other coral can cause the other corals to recede. The specimen here is in direct contact with a hammer coral and neither coral seems to harm the other. Sheer size as the specimen grows can also tend to shadow its neighbors.
Feeding: Sinularia are photosynthetic and does not require direct feeding. Unknown if they would take any form of phytoplankton or zooplankton.
Supplements: No special requirement are noted. Normal acceptable water parameters seem to suit it just fine.
Tank Positioning: No special requirements other than keeping them in low to moderate water flow.
Propagation:: Sinularia are easily propagated by cutting a branch off using a sharp knife or scissors. This piece can be 'planted' in a gravel bed in low water flow and they will attach to gravel particles within a couple of weeks. They can then be superglued to a suitable substrate such as a reef plug. Starts can also be directly attached to the substrate using rubberbands or string as long as care is taken prevent the rubber band from cutting through the soft tissue of the coral.
119

Gold Crowned Toadstool
Scientific Name: Sarcophyton alcyonidae Classification: Soft Coral - Leather Coral Common Names: Gold Crowned Toadstool, Sarcophyton
Description: Toadstools belong to the large group of leather corals. They are light brown in color. The coral has a large heavy stock with a rounded wavy cap similar to a mushroom. The cap is covered with tentacles which have lighter, golden colored polyps at their tips. These tentacles may be extended during the day or night. Toadstool corals can grow quite large and some tank specimens exceed several feet in diameter.
Natural Environment: ? This coral is normally collected in the wild, but it is easily propagated. Care: Hardiness: Toadstools tend to be very hardy corals. They will sometimes withdraw their tentacles and get a waxy look to their surface for periods of time of up to a week or more. This is normal as the animal periodically sloughs off a layer of skin. Very extended periods of withdrawal can indicate that the coral is not happy with its environment. Usage of Phosguard and similar aluminum based phosphate binding agents can cause the leather coral to withdraw as well. This doesn't seem to cause long term problems for the coral.
120
Lighting: Very tolerant of lighting conditions. Does well from moderate lighting up to very intense.
Water Current: Toadstools like a low to moderate water flow that gently waves their tentacles like a field of wheat in the wind.
Temperature: Does well within a range of at least 75º to 84º F.
Aggressiveness: Very low. Sheer size as the specimen grows can shadow or crowd its neighbors.
Feeding: Toadstools are photosynthetic and do not require direct feeding.
Supplements: No special requirement are noted. Normal acceptable water parameters seem to suite it just fine.
Tank Positioning: No special requirements other than keeping them out of forceful water flow.
Propagation:: Toad corals are easily propagated by cutting the cap off and dividing it into multiple sections. The stalk will start to regrow a crown within a couple of weeks. The sectioned crown pieces can be placed on a gravel bed in low water flow and they will attach to gravel particles within a couple of weeks. They can then be superglued to a suitable substrate such as a reef plug.
121

Yellow Leather Coral
Scientific Name: ? Classification: Soft Coral Common Names: Yellow Leather Coral
Description: Yellow leather coral has a convoluted crown atop a single sturdy stalk. The crown is covered with small cream colored polyps.
Natural Environment: ? This coral is normally collected in the wild, but it is easily propagated. Care: Hardiness: Leather corals tend to be very hardy corals. They will sometimes withdraw their tentacles and get a waxy look to their surface for periods of time of up to a week or more. This is normal as the animal sloughs off a layer of skin. Very extended periods of withdrawal can indicate that the coral is not happy with its environment.
122

Lighting: Does well from moderate lighting up to very intense. Yellow leathers seem to do better under the higher intensity lighting.
Water Current: Leather corals like a low to moderate water flow.
Temperature: Does well within a range of at least 75º to 84º F.
Aggressiveness: Very low.
Feeding: Leather corals are photosynthetic and do not require direct feeding. It is unknown if they will take zooplankton or phytoplankton.
Supplements: No special requirement are noted. Normal acceptable water parameters seem to suite it just fine.
Tank Positioning: No special requirements other than keeping them out of forceful water flow.
Propagation:: Easily propagated by cutting a section of the cap off and dividing it into small pieces about 1/4" in size. The pieces can be placed on a gravel bed in low water flow and they will attach to gravel particles within a couple of weeks. They can then be superglued to a suitable substrate such as a reef plug.
123

Pulsating Xenia
Scientific Name: Xenia elongata Classification: Soft Coral Common Names: Xenia, Pulsating Xenia
Description: Pulsating Xenia has sturdy stalks up to 3" long which are tan in color. The end of the stalk is covered with a crown of feathery polyps, each carried on a stem approximately 1"-2" long. The polyps open and close in an attractive pulsing or pumping motion. Groups of these stalks form colonies that can spread into large mats. Xenia is one of the few corals that actually smells bad when removed from the water.
Natural Environment: ? Most specimens are captive grown Care: Hardiness: Xenia is an interesting family of coral as far as hardiness is concerned. Some hobbyist cannot seem to keep this coral alive and others find it to be a fast growing 'weed' coral. Although there are some guidelines which can be followed to improve the chance of success, no one fully understands what will guarantee success with this coral. Even a colony that has been thriving in a tank for an extended period of time can quickly go into decline and die for no obvious reason.
124

Lighting: Requires moderate to strong lighting. Usually, brighter is better although some hobbyist appear to have very good success with lower light levels.
Water Current: Xenia require at least moderate water flow. They are one of the few corals that seem content to be right against the strong output of a powerhead. In still waters the pumping usually diminishes and the coral goes into decline.
Temperature: Does well within a range of at least 75º to 83º F. Temperatures around 84º can sometimes appear to cause stress and Xenia appears to be more stable at lower temperatures of 76º - 78º.
Aggressiveness: Low. Xenia does not possess any apparent stinging capability and will not bother other corals, but can tend to grow over and shadow its neighbors. When happy, the coral can reproduce by division at an alarming rate and may require frequent pruning to keep it from crowding out other corals.
Feeding: Xenia is photosynthetic and does not accept any known foods. It is thought that they absorb some of their nutrients directly from the water. In fact, some hobbyist keep large colonies of Xenia as filter beds where the xenia is regularly pruned for nutrient export. It is unclear if this is very effective. Xenia may do better in tanks that are not heavily skimmed.
Supplements: The main supplement normally associated with successfully keeping Xenia is Iodine. Many authors state categorically that iodine supplements are critical to success and lack of iodine supplements will cause xenia to crash. I have keep Xenia with and without iodine supplementation and have observed no difference, so I am more skeptical of the iodine connection. Low Alkalinity levels can cause Xenia pulsing to decrease or cease altogether, so alkalinity levels should be monitored and kept above a minimum of 2.5meq/l.
Tank Positioning: Usually kept high up on the reef for strong water flow and highest possible lighting. Xenia will reproduce in the tank by attaching its stalk against adjacent surfaces it contacts and splitting into two colonies. In this way, Xenia colonies tend to 'walk' in the direction that water movement bends their stocks, so you may want to consider this in your placement. Xenia can usually be coaxed to grow up the back glass of the tank and forms a nice background display.
125

Sea Mats
Scientific Name: Palythoa sp. Classification: Soft Coral Common Names: Sea Mats
Description: Sea Mats are composed of small anemone looking polyps similar to button polyps. These polyps are connected at the base in a continuous mat unlike button polyps which is their main distinguishing feature. Sea Mats tend to have shorter tentacles and be a more colorful group of coral than button polyps.
At least some Palythoa are considered toxic. References normally cite that Palythoa toxica and Palythoa tuberculosa are the two most toxic species. I do not think that these two species are normally found in the hobby.
Natural Environment: ? This coral is normally collected in the wild, but it is easily propagated. Care: Hardiness: Sea Mats are very hardy. Lighting: Moderate to fairly intense lighting is required to maintain the colors of some of the brightly colored specimens. They do not seem to like extremely intense lighting and do not expand well under those conditions.
126
Water Current: Sea Mats prefer low to moderate water motion.
Temperature: Does well within a range of at least 76º to 84º F.
Aggressiveness: Very low. Encrusting growth pattern can lead to encroachment on its neighbors.
Feeding: Sea Mats are photosynthetic and survive with no feeding, but occasional feeding of small meaty foods like brine shrimp is beneficial and will result in faster growth.
Supplements: No special requirement are noted. Normal acceptable water parameters seem to suite it just fine.
Tank Positioning: No special requirements other than keeping them out of forceful water flow. These specimens are usually placed near the bottom of the tank.
Propagation:: Sea Mats are easily propagated by cutting through the fibrous material that connects the polyps. A group of several polyps can be separated this way. They can then be superglued or rubber banded to a suitable substrate such as a reef plug.
All Palythoa should be considered at least a little toxic if cutting them such as when propagating them, but generally this is not a major reason for concern. Washing hands after handling them is a good idea and major cutting of the coral should be done outside of the tank to prevent the potential for poisoning other tank inhabitants.
Link to article on Palythoa toxicity
127

Button Polyp Coral
Scientific Name: Zooanthus sp. Classification: Soft Coral Common Names: Sinularia, Green Finger Coral
Description: Button polyps are colonies of small anemone looking polyps similar to Sea Mats. Fine tentacles radiate out from the edge of the disc. These polyps may be connected at the base due to the way they spread by budding, but the polyps do not share a common base like Sea Mats do. Coloration is variable depending on type and are commonly shades of brown, green, yellow, pink or even red.
Natural Environment: ? This coral is normally collected in the wild, but it is easily propagated. Care: Hardiness: Button Polyps are extremely hardy and an excellent beginner coral. They will survive in almost any type of reef tank setup. Due to their ability to spread fairly rapidly, they can become a nuisance if they start to crowd out other corals. Lighting: Will tolerate very low light levels, especially if they are otherwise fed, but tend to develop brighter colors under higher intensity lighting.
128

Water Current: Button Polyps prefer low to moderate water motion.
Temperature: Does well within a range of at least 76º to 84º F.
Aggressiveness: Low. Encrusting growth pattern can lead to encroachment on its neighbors, but they have been in contact with SPS, Clams and other softies without any apparent affect.
Feeding: Button Polyps are photosynthetic and survive with no feeding, but occasional feeding of small meaty foods like brine shrimp is beneficial and will result in faster growth.
Supplements: No special requirement are noted. Normal acceptable water parameters seem to suite it just fine.
Tank Positioning: No special requirements other than keeping them out of forceful water flow. These specimens are usually placed near the bottom of the tank since they are not very light demanding. They are great filler corals to place between larger specimens.
Propagation:: Button Polyps are easily propagated by cutting individual polyps from the main colonies. These can be placed on a gravel bed with low water flow and will attach themselves to pieces of gravel. They can then be superglued to a suitable substrate such as a reef plug.
Further Reading:
Zoanthids by Eric Borneman
129

Ricordea
Scientific Name: Ricordea florida Classification: Soft Coral Common Names: Ricordea
Description: Ricordea is a type of mushroom coral of moderate size. It can be identified by the fact that it has contrasting raised dots across its surface. The colors can range from orange, blue, brown, green or purple and be quite vibrant.
Natural Environment: Come from Florida waters. Due to restrictions on shipping live rock from that area, individual polyps are now sometimes sold. There are also now being imported from outside Florida on live rock, but they are usually not as attractive. Care: Hardiness: Ricordea seem to be a little more delicate than the typical mushroom coral and success is not automatically guaranteed. Lighting: Requires at least moderate light levels. Very high intensity lighting may cause the colors to fade somewhat. The salmon colored specimen at the top is under 400W MH lighting and has faded somewhat from its original color.
130
Water Current: Prefers low water motion for best expansion.
Temperature: Does well within a range of at least 78º to 82º F.
Aggressiveness: Moderate. Growth pattern can lead to encroachment on its neighbors. Ricordea appears to be able to effectively kill other corals that it comes into contact with as can be seen in the picture above. Since they are slow growing corals, this does not generally create a large issue.
Feeding: Ricordea are photosynthetic and survive fine with no feeding. They will take small meaty foods like brine shrimp if offered. Photo above shows one eating a mysid shrimp
Supplements: No special requirements are noted. Normal acceptable water parameters seem to suite it just fine.
Tank Positioning: No special requirements other than keeping them in a fairly low water flow part of the tank and ensure that they get adequate lighting. This usually implies that they will be positioned need the bottom of the tank.
Propagation:: Picture above shows a specimen that dividing in two on its own. Ricordea can also be divided similar to most soft corals such as mushroom coral.
131
Introduction to LPS Coral
LPS (Large Polyp Stony) corals are generally larger calcareous corals with large fleshy polyps. Almost all LPS corals are wild caught as they are the most difficult corals to propagate in captivity. They range in ease of keep from being some of the easiest to some of the most difficult of corals to keep.
Many LPS corals have strong stinging capability similar to an anemone and care must be used in their placement so that they cannot reach their neighbors. To complicate matters a little more, some LPS corals also have long tentacles called sweeper tentacles which are longer than the normal tentacles and are used to 'clear' other corals away from their immediate vicinity.
Guidelines to buying LPS corals:
• Check where the polyp tissue meets the skeleton. The tissue should not show recession (pulling away) from the skeleton which typically shows up as a bright white area where the skeleton is newly exposed or a green algae covered area where the algae has taken advantage of the newly exposed real estate. A small amount of recession may not be cause to pass up the specimen if it looks healthy otherwise.
• Check the expansion of the polyps. LPS coral tend to fully extend their polyps when they are happy and healthy. If the polyps are withdrawn into the skeleton or abnormally flaccid, this may indicate a problem. Of course newly introduced specimens may take some time to expand, so if the specimen is very new to the LPS, it may not be expanded for that reason.
• Look for a jelly like substance on the coral. LPS are subject to an infection called 'brown jelly'. This is often a fatal condition and may spread to other corals. These corals should not be purchased, even to try to save it, as it may spread to other corals.
• Some LPS corals can grow fairly large and at a fairly quick rate. An example is the hammer coral.
See acclimation procedure for further information on introducing LPS corals to the tank.
132

Get Sheet Common Name(s) Scientific Name
Hammer Coral Euphyllia ancora
Bubble Coral Plerogyra sinuosa
Elegance Coral Catalaphyllia jardinei
Plate Coral Heliofungia actiniformis
Disk Coral Fungia sp.
Open Brain Coral Trachyphyllia geoffroyi
Moon Coral Flavites abdita
Blastomussa Blastomussa wellsi
133

Alveopora Coral Alveopora gigas
Flower Pot Coral Goniopora sp.
134
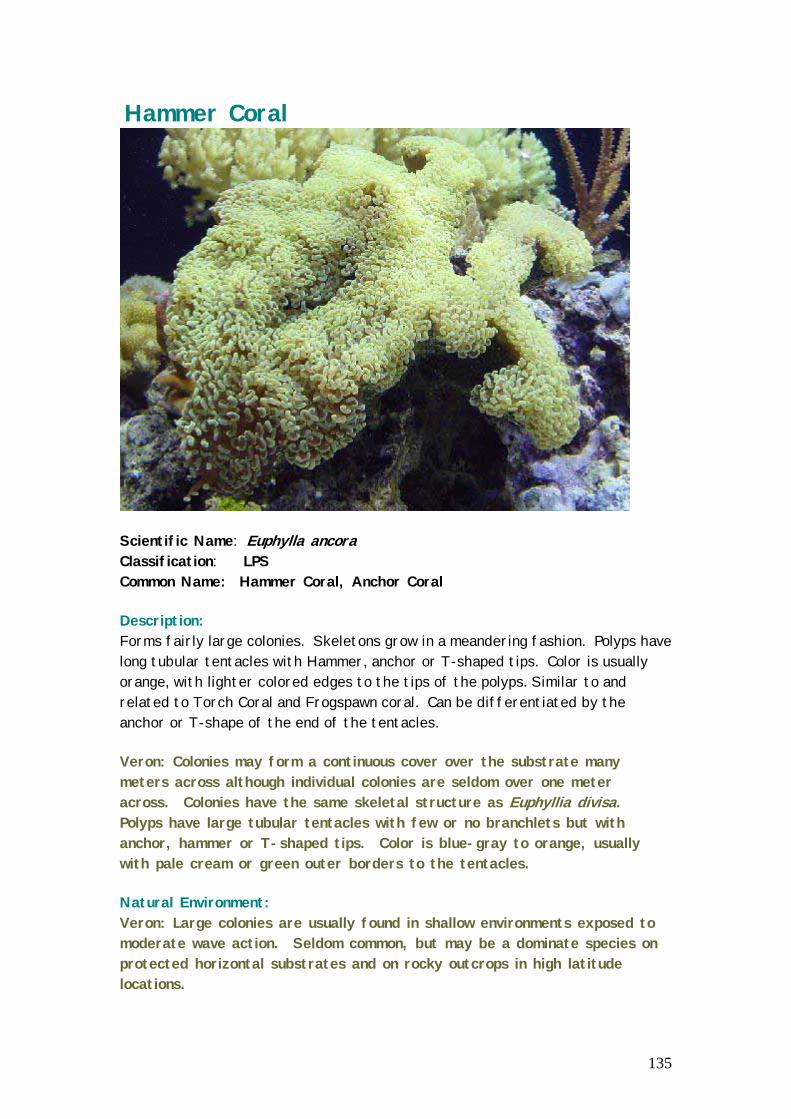
Hammer Coral
Scientific Name: Euphylla ancora Classification: LPS Common Name: Hammer Coral, Anchor Coral
Description: Forms fairly large colonies. Skeletons grow in a meandering fashion. Polyps have long tubular tentacles with Hammer, anchor or T-shaped tips. Color is usually orange, with lighter colored edges to the tips of the polyps. Similar to and related to Torch Coral and Frogspawn coral. Can be differentiated by the anchor or T-shape of the end of the tentacles.
Veron: Colonies may form a continuous cover over the substrate many meters across although individual colonies are seldom over one meter across. Colonies have the same skeletal structure as Euphyllia divisa. Polyps have large tubular tentacles with few or no branchlets but with anchor, hammer or T-shaped tips. Color is blue-gray to orange, usually with pale cream or green outer borders to the tentacles.
Natural Environment: Veron: Large colonies are usually found in shallow environments exposed to moderate wave action. Seldom common, but may be a dominate species on protected horizontal substrates and on rocky outcrops in high latitude locations.
135
Care: Hardiness: Hammer coral is fairly hardy once established in the aquarium Lighting: Requires moderate to strong lighting.
Water Current: Hammer corals prefer low to moderate water motion.
Temperature: Does well within a range of at least 75º to 84º F
Aggressiveness: High. Hammer coral can expand considerably from its skeleton and has sweeper tentacles that are up to 2" longer than normal tentacles that can sting neighbors. Hammer corals grow fairly quickly and to a large size, so they do best in larger reef tanks. They can be kept in contact with others in the same family such as frogspawn coral.
Feeding: Hammer coral is photosynthetic and does not need to be directly fed, but will take small meaty foods that are offered.
Supplements: Maintaining correct calcium levels is important for skeletal development
Tank Positioning: Best positioning is a low to moderate water flow area where it has room to expand and grow.
Further Reading:
Sweeping Beauty (Euphyllia sp) By Eric Borneman
Preserving What We Have: Euphyllia ancora By Terry Siegel
136

Bubble Coral
Scientific Name: Plerogyra sinuosa Classification: LPS Common Names: Bubble Coral
Description: Bubble corals are characterized by having large water filled bubbles (vesicles) covering large sharp sepia. The vesicles are expanded during the day and look like cream colored grapes. During the night the vesicles are deflated and tentacles become apparent.
Veron: Colonies are flabello-meandroid with valleys more or less connected by a light blistery coenosteum. Sometimes living parts of colonies are separated by dead basal parts. Vesicles are the size of grapes and usually have the shape of grapes but may be tubular, bifurcated or irregular, depending primarily on the state of inflation. Color is cream or bluish-gray.
Natural Environment: Veron: Protected reef environments, especially, but not necessarily, in turbid water. Care: Hardiness: Bubble corals are moderately hardy and sometimes take a while to adapt to the aquarium conditions and start to grow.
137

Lighting: Prefers moderate to strong lighting, but will tolerate fairly low light conditions.
Water Current: Bubble coral prefer low to moderate water currents and lack of bubble extension may be related to excessive water current.
Temperature: Does well within a range of at least 75º to 84º F.
Aggressiveness: Moderate. Bubble coral packs a fairly potent sting, but its sweeper tentacles are not much longer than the bubbles, so it can be positioned fairly close to its neighbors. The picture to the right shows typical sweeper tentacle size.
Feeding: Bubble coral is photosynthetic, but seem to benefit more than many LPS corals from occasional direct feeding of shrimp or other meaty food. Feeding up to once a week will result in faster growth.
Supplements: Maintaining correct calcium levels is important for skeletal development.
Tank Positioning: Best positioning is usually not critical as long as it is not in the path of a strong current flow.
138

Elegance Coral
Scientific Name: Catalaphyllia jardinei Classification: LPS Common Name: Elegance Coral
Description: To the uninitiated, the Elegance coral looks a lot like an anemone. It has a cone-shaped base from which the large fleshy polyps and tentacles are extended during the day. The color is usually green or light brown with green high-lights and pink, yellow or blue tentacle tips. Elegance corals can grow fairly large and become the dominate specimen in a smaller tank.
Veron: Colonies are flabello-meandroid with straight edged septa forming wide V-shaped valleys. Valleys are evenly spaced and have sharp edged walls. Septa are widely spaced. There are no columellae. Polyps have large tubular tentacles extending from large fleshy oral discs. Forms satellite colonies (like the poritid Goniopora stokesi) in aquaria. Color is distinctive green with pink tentacle tips and a striped oral disc.
Natural Environment: Veron: Occurs in protected, preferably turbid water.
139
Care: Hardiness: Elegance coral is usually considered to be very hardy. There have been reports over the last 2 years or so that success with this coral is becoming less common and the reason why is not yet understood. Elegance will occasionally withdraw their tentacles and inflate their bodies into a contorted shape. This may be in an effort to expel waste products and should not be a cause for concern. If they remain like this for more than a couple of days, it may be a sign that they are not happy for some reason and you should investigate water conditions and verify that nothing is attacking the coral. Lighting: Requires moderate to strong lighting.
Water Current: Elegance corals prefer low to moderate water flow. Optimum water flow is enough to lightly wave its tentacles. They will tolerate stronger water flows, but will expand less and the tentacles will become stubbier as shown in the picture to the right.
Temperature: Does well within a range of at least 75º to 84º F
Aggressiveness: High. The Elegance coral packs a fairly powerful sting and can expand greatly, so it is best to give it plenty of room to expand without coming into contact with other corals.
Feeding: Elegance coral is photosynthetic and requires no direct feeding, but an occasional feeding of shrimp or other meaty food up to once a week is appreciated.
Supplements: Maintaining correct calcium levels is important for skeletal development
Tank Positioning: Best positioning is normally in the bottom of the tank with the cone base embedded in the substrate as it is found in the wild. If tank lighting is low, it is acceptable to mount the coral up on the live rock closer to the lighting.
140

Plate Coral
Scientific Name: Heliofungia actiniformis Classification: LPS Common Names: Plate Coral
Description: To the uninitiated, the Plate coral can look like an anemone. It has a rounded flat skeletal disk with long tentacles extending from the top. These tentacles are frequently brown or green in color, sometimes with brightly colored tips. The coral can swell up its tissues with water and 'float' to a new location using water currents.
Veron: Polyps are solitary, free-living (except for juveniles) and flat with a central mouth. Septa have large lobed teeth. Polyps are among the largest of all corals. Tentacles are extended day and night and are long, similar to those of giant anemones. There is one mouth up to 30 millimeters wide. Color is pale or dark blue-green or gray tentacles with white or pink tips. The oral disc is striped.
Natural Environment: Veron: Usually found on flat soft or rubble substrates especially in reef lagoons or shallow turbid environments. Abundance: Common.
141
Care: Hardiness: Considered to be fairly delicate. Care has to be exercised when removing the coral from the water not to tear the tissues on the sharp sepia. It is best to get the coral to deflate before removing it. Lighting: Requires moderate to strong lighting.
Water Current Plate corals prefer low to moderate water flow. Optimum is enough to lightly wave its tentacles.
:
Temperature: Does well within a range of at least 75º to 84º F
Aggressiveness: High. The Plate coral packs a fairly powerful sting similar to an anemone and this is aggravated by the fact that it also has the habit of moving itself by inflating its tissues and floating around a little. It is usually best to pen the Plate coral in using small rocks to prevent its wandering.
Feeding: Plate coral is photosynthetic and requires no direct feeding, but an occasional feeding of shrimp or other meaty food once or twice a month is appreciated.
Supplements: Maintaining correct calcium levels is important for skeletal development
Tank Positioning: Should be placed on the bottom of the tank on the sandy substrate. As noted above, penning it in with small rocks is a good idea to prevent it from wandering.
142

Open Brain Coral
Scientific Name: Trachyphyllia geoffroyi Classification: LPS Common Name: Open Brain Coral
Description: The Open Brain coral has a heavy conical base skeleton that is usually in the form of a pinched oval when viewed from the top. There are usually 2 or 3 large polyps which are red or green in color. The red forms are usually from lower light environments than the green forms. Tentacles are extended around the mouth during evening and night time.
Veron: Colonies are flabello-meandroid and free-living. They are usually hourglass shaped, up to 80 millimeters in length with one to three separate mouths. Large, fully flabello-meandroid colonies are uncommon. Valleys have large regular septa and paliform lobes and a large columella of tangled spines. Polyps are fleshy. When tentacles are retracted during the day a large mantle extends well beyond the perimeter of the skeleton. This retracts if disturbed. At night tentacles in several rows are extended from the expanded oral disc inside the mantle. The mouth is approximately 10 millimeters across. Color: Polyps, especially the mantles, are often brightly colored, usually yellow, brown, blue or green.
143

Natural Environment: Veron: Inter-reef environments and on soft substrates around continental islands. Frequently found with other free-living corals: Heteropsammia (Dendropphylliidae), Heterocya hus (Caryophylliidae) and the fungiids, Cycloseris and Diaseris. Large colonies are found only in certain protected, shallow island embayments. Abundance: Rare on reefs, common around continental islands and some inter-reef areas. Care: Hardiness: Moderately hardy. Sometimes will be picked on by aggressive fish. A thumbnail above shows the skeleton showing through where a fish has picked at the coral. It is possible for the coral to recover if the offending fish and the coral are separated. Lighting: Requires moderate to strong lighting. As noted above, the red variants may require less light than the green variety.
t
Water Current:Open Brain corals prefer low to moderate water flow for optimum polyp extension..
Temperature: Does well within a range of at least 75º to 84º F
Aggressiveness: Low.
Feeding: Open Brain coral is photosynthetic and requires no direct feeding, but an occasional feeding of shrimp or other meaty food once or twice a month is appreciated.
Supplements: Maintaining correct calcium levels is important for skeletal development. There is some evidence that iodine may be important for this specimen.
Tank Positioning: Should be placed on the bottom of the tank on the sandy substrate in a low to moderate water flow area.
144

Moon Coral
Scientific Name: Flavites abdita (tentative) Classification: LPS Common Names: Moon Coral, Pineapple Coral
Description: Moon coral is a massive boulder shaped coral, brown or greenish brown in color. Tentacles up to about 2" long are extended in the evening and at night..
Veron: Colonies are massive, either rounded or hillocky and sometimes over one meter across. Corallites are rounded, with thick walls. Septa are straight with exsert teeth. Color is dark in turbid environments, otherwise pale brown with brown or green oral discs.
Natural Environment: Veron: Most reef environments Care: Hardiness: Moon coral is fairly hardy. Lighting: Seems to prefer moderate lighting. Is easily burned by high UV levels.
145
Water Current: Low to moderate water current levels seems to suit this coral just fine.
Temperature: Does well within a range of at least 75º to 84º F
Aggressiveness: Low. Moon coral seems to pack a weak stinging capability and seems to frequently come out on the losing end when doing battle with other corals.
Feeding: Moon coral is photosynthetic and requires no direct feeding, but will take small meaty foods if offered when tentacles are out in the evening or at night.
Supplements: Maintaining correct calcium levels is important for skeletal development
Tank Positioning: Best positioning is normally on or near the bottom of the tank if under high intensity lighting. Can be mounted higher up on the live rock under moderate lighting.
146

Blastomussa Coral
Scientific Name: Blastomussa wellsi Classification: LPS Common Name: Blastomussa Coral
Description: Relatively large fleshy polyps that cover the skeleton structure when expanded. Forms small to medium sized colonies when tend to look something like brain corals when fully expanded. Blastomussa is a fairly rare coral.
Veron: Colonies are phaceloid, rarely subplocoid. Corallites are 9-14 millimeters diameter. Septa are not arranged in cycles and are numerous. They have small blunt teeth. Mantles, but not tentacles, are extended during the day and may form a continuous surface obscuring the underlying growth-form. Color: Mantles are usually dark gray, but may be red or green. Oral discs are usually green but may be red or dark gray.
Natural Environment: Veron: Lower reef slopes protected from wave action, and turbid environments. Care: Hardiness: Blastomussa is fairly hardy when provided with the proper
147

conditions as outlined below. Lighting: Seems to prefer moderate lighting but will tolerate dim lighting fairly well. These corals should not be exposed to intense lighting. If lighting is too intense, they should be positioned with the polyps facing out rather than up or should be shaded by another coral or rock.
Water Current: Prefer low to moderate water motion.
Temperature: Does well within a range of at least 77º to 84º F
Aggressiveness: Appears to be low.
Feeding: Blastomussa is photosynthetic and does not take any known foods.
Supplements: Maintaining correct calcium and alkalinity levels is undoubtedly important for skeletal development
Tank Positioning: Best positioning is usually at the bottom of the tank, in low water flow and in a moderately lit area of the tank. They may be positioned higher up in the tank in a dimly lit tank or if provided with some shade from intense lighting.
Propagation:: Blastomussa may be propagated by division of the skeleton keeping one or more polyps on the severed piece. The specimens shown here are frags from a larger colony.
148
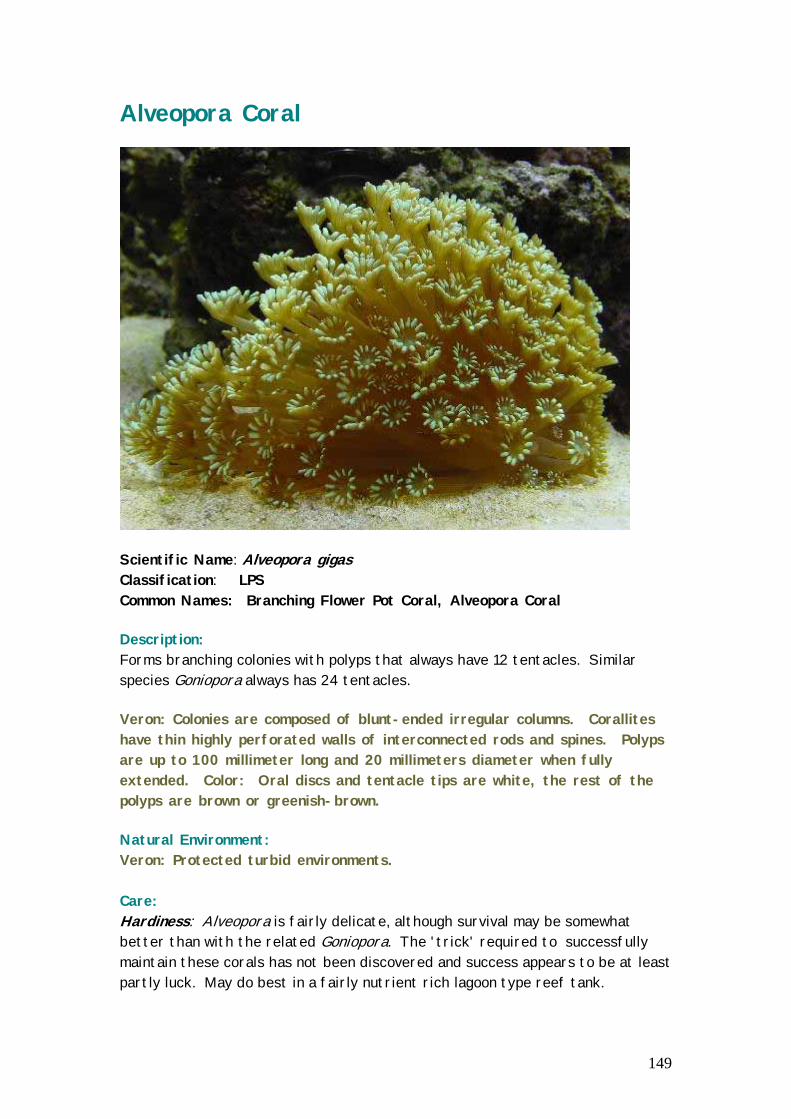
Alveopora Coral
Scientific Name: Alveopora gigas Classification: LPS Common Names: Branching Flower Pot Coral, Alveopora Coral
Description: Forms branching colonies with polyps that always have 12 tentacles. Similar species Goniopora always has 24 tentacles.
Veron: Colonies are composed of blunt-ended irregular columns. Corallites have thin highly perforated walls of interconnected rods and spines. Polyps are up to 100 millimeter long and 20 millimeters diameter when fully extended. Color: Oral discs and tentacle tips are white, the rest of the polyps are brown or greenish-brown.
Natural Environment: Veron: Protected turbid environments. Care: Hardiness: Alveopora is fairly delicate, although survival may be somewhat better than with the related Goniopora. The 'trick' required to successfully maintain these corals has not been discovered and success appears to be at least partly luck. May do best in a fairly nutrient rich lagoon type reef tank.
149

Lighting: Seems to like moderate, and not intense, lighting.
Water Current: Seem to prefer low to moderate water motion which is in keeping with their natural habitat conditions.
Temperature: Does well within a range of at least 78º to 82º F
Aggressiveness: Appears to be low.
Feeding: Alveopora is photosynthetic and it is not known if they will take any offered foods. It may benefit from nutrient rich water, based on its natural habitat which is counter to most reef tank conditions.
Supplements: Maintaining correct calcium and alkalinity levels is undoubtedly important for skeletal development
Tank Positioning: Best positioning seems to be in a low water flow, moderate light area of the tank. The specimen to the right was originally kept under 400W MH lights and wave maker water conditions and seem to decline and bleach over several months. It was moved to a low current moderate (175W 10K MH) lighting and has recovered significantly over in the last 8 months. Coloration has returned, although darker than originally and polyp extension is slowly improving.
150

Goniopora Coral
Scientific Name: Goniopora sp. Classification: LPS Common Names: Flower Pot Coral, Goniopora Coral
Description: Typically rounded or oblong colonies with polyps that have 24 tentacles. Similar species Alveopora, always has 12 tentacles. Color most often seen is green as seen in the baby above. Other more colorful variations exist including pink and purple as shown above.
Veron: Colonies are usually branching, columnar or massive but may be encrusting. Corallites have thick but porous walls and calices are filled with compacted septa and columellae. Polyps are long and fleshy and tentacles are normally extended day and night. Polyps have 24 tentacles. Different species have polyps of different shapes and colors.
Natural Environment: Veron: Low to moderate current areas such as lagoons and often associated with turbid water conditions. Care: Hardiness: Goniopora is delicate and long term survival (>12 months) is probably
151
less than 10%. Not recommended for the beginning hobbyist, although success is as much luck as skill at this point in our understanding of this coral. It does appear that the more colorful short tentacled specimens, like the pink and purple shown above are more hardy than the more common greenish brown versions with long tentacles. Lighting: Seems to like moderate lighting in general. Brightly colored specimens seem to like the highest intensity lighting. The specimens above are all kept 24" under 400W 10K MH lamps.
Water Current: Seem to prefer moderate water motion which keeps their polyps gently waving in the water current.
Temperature: Does well within a range of at least 77º to 84º F
Aggressiveness: Appears to be low.
Feeding: Goniopora is photosynthetic and does not take any known foods. The method of death when a specimen dies is usually a long period of decline that may be caused by nutritional deficiency. What is lacking is unfortunately so far unknown. Its natural habitat of turbid lagoons indicates that it may benefit from less than pristine water.
Supplements: Maintaining correct calcium and alkalinity levels is undoubtedly important for skeletal development
Tank Positioning: Best positioning is in moderate water flow, in a moderate to high light area of the tank.
Further Reading:
A death in the family? The mystery of Goniopora by Eric Borneman
Goniopora Revisited By Terry Siegel
152

Introduction to SPS Corals SPS (Small Polyp Stony) corals are the major reef builders in the wild. They form the prominent reef structures that most people associate with reefs. SPS coral polyps are relatively small and inconspicuous compared to the coral skeleton, unlike LPS corals whose polyps are the major identifying feature of those corals. SPS corals grow in many different forms and it is the skeletal growth pattern and shapes of the corallites (skeletal housing for individual polyps) that is primarily used to identify these corals. Even so, accurate identification of this group of corals is much more difficult than with the other tank inhabitants and many SPS coral ID's are tentative at best. This group also has very few common names in usage.
The principal family of SPS corals is called Acroporidae. This family includes the Acropora and Montipora genus which constitute the majority of SPS corals kept in the hobby.
The SPS growth patterns can be categorized into several basic forms.
Staghorn
Upwards branching, usually with large cylindrical branches that branch only infrequently. Shape resembles the horns of a deer, hence the name.
Corymbose
Forms flattened table type formations with short upwards pointing branches.
Table / Plate
Forms flat plates that may be positioned horizontally in tiers or upwards in a cup like arrangement called a whorl.
Bushy
Forms random looking heavily branched structures. The branches may interlock together.
153

Encrusting
The coral encrusts the substrate that it leaves on and does not have a typical growth pattern of its own.
Digitate
Forms short, non-dividing branches like the fingers on a hand.
Arborescent
Forms tree-like branches
As a group, SPS corals are the most difficult to keep in the home reef tank. Until relatively recently, they were impossible to keep. Now that their needs for high intensity lighting, vigorous water motion and high demands for calcium, magnesium and strontium are understood better, they are becoming easier to keep. Still they are the most demanding on the hobbyist and generally are the highest cost to maintain.
Most hobbyists do not start out with SPS corals and this is probably a good thing. Most hobbyist report difficulty in maintaining SPS corals until the tank has matured for a considerable period of time (6 months to a year), even though all measurable tank parameters are within requirements. Growth of coralline algae within the tank is a good sign that the tank conditions will support SPS corals. I have seen recommendations that SPS corals should not be added until the coralline algae spots on the tank walls grow to the size of a dime and that is probably a good rule of thumb to follow.
Guidelines to buying SPS corals:
• Avoid specimens that have obvious areas of tissue recession or die-off. Although it is tempting to try to save the coral, once SPS corals start into decline it is difficult to reverse the process. A last ditch effort to save a dieing colony is to fragment it into the remaining small healthy sections and mounting them onto coral rubble using superglue. More often than not, this plan fails to give the desired results, but is usually worth a try.
• Avoid specimens that are extremely pale or white looking. This may be a sign of bleaching which may lead to the corals death regardless of the
154

conditions you provide. Some SPS corals are naturally fairly white so this can be difficult to determine at times.
• Chose propagated frags over large wild colonies when possible. There are several good reasons for this. One is that it is more reef friendly since the specimen was not removed from the reef. Second, it has been acclimated to normal aquarium conditions and is more likely to adapt and grow within your own tank. Third is that it is cheaper, although you must be patient to allow it time and space to grow. Lastly, it is very satisfying to grow a complete coral head from a small fragment of coral.
See acclimation procedure for further information on introducing SPS corals to the tank.
155
Feeding
Feeding your reef tank is one of the rewards you get for all that effort you put into it. Feeding allows you to interact with your tank inhabitants and it is also a good time to look for any signs of problems. A loss of appetite is often a sign of an ailing specimen.
How much to feed is an important consideration. Feeding is the main way that nutrients enter the tank, so some people prefer to feed minimal amounts to keep the tank as nutrient poor as possible to reduce the chance of problems that excess nutrients can cause, such as increased nitrate levels, algae growth, etc. They might only feed the tank a couple of times a week. A well setup reef tank with adequate protein skimming, live rock and a 2" or deeper sand bed can handle a higher level of feeding without any problems. I prefer to feed once a day in an amount that can be consumed within a couple of minutes. Once a week or so, I will feed more to ensure that everyone in the tank gets an occasional bite to eat. I also feed some of my LPS corals once a week. When starting out, it is always better to under feed than to over feed. If you do increase your feeding, do it slowly so that the tank ecosystem can modify itself to handle the increased nutrient load. Also keep in mind that some fish, such as herbivorous tangs, will get a portion of their nutrition by grazing off the live rock. Keeping them slightly hungry helps to encourage them to keep problem type algae in check.
Types of food fall into the following basic categories:
Phytoplankton - Smallest available food which is comprised of microscopicalgae. A common example is DT's Marine Phytoplankton. Utilized by filterfeeding organisms. Zooplankton - Very small (but larger than phytoplankton) food which iscomposed primarily of juvenile forms of crustaceans. A common example isnewly hatched brine shrimp. Utilized by filter feeding organisms and smallpolyps such as might be found on SPS corals Meaty foods - include animal based foods large enough to be taken by fish orfed to larger invertebrates. Examples include adult brine shrimp or choppedup shrimp.. Vegetable foods - Include marine algae such as Nori and are used forfeeding herbivorous fish. Food additives - Are added to other foods to increase their food value. Acommon example is Selcon.
Fish
The best advice when feeding fish is to offer a varied diet. There is no such thing as a perfect food and by feeding a variety of foodstuffs, it helps to
156

ensure that all the nutritional requirements of all the fish in the tank are being met. It also provides the fish with some variety in their lives. Some fish are mainly herbivores and others are carnivores and the mix should address the nutritional requirements of both. Below are some of the most common foods.
Diced seafood (shrimp/clams/scallops/squid/etc.) can be served raw afterbeing cut into appropriate sized pieces Brine shrimp (live or frozen) are eagerly eaten by virtually all fish. Nutritional value is fairly low, so it should not be overfed. Bloodworms (frozen) are eagerly eaten by most fish and have a little morenutrition than brine shrimp Fish eggs (fresh/frozen) are a treat that many fish enjoy, but should not beoverfed due to the high fat content. You should not use eggs that have beenprocessed in any fashion such as fishing eggs or caviar. Silversides (frozen) are small thin fish that are good for feeding larger fishand invertebrates. Some frozen prepared foods, such as those from Ocean Nutrition, areexcellent. They provide mixtures of several different ingredients and havea number of versions. Formula One is the main course and I highlyrecommend it as a staple of your feeding program. Dry flake foods. A good brand such as O.S.I. Marine Flake food is a goodsupplemental food, but should not be overused because it is so easy to use. Vegetable foods for herbivores such as Nori seaweed. Some people feedromaine lettuce and similar foods, by I am doubtful of the nutritional valuefor the fish and do not recommend them.
Clams
Almost all clams kept in the reef tank are member of the Tridacna family. These are all photosynthetic and require no feeding. Flame scallops and oysters are also sometimes sold. These are not recommended in a reef tank due to their feeding habits, but if they are kept their requirements are the same as filter feeders below.
Filter Feeders
Filter feeders are composed of any animals that feed by filtering water through their body or appendages to obtain the microscopic particles that are suspended in the water. Common filter feeders include sponges, feather duster worms and flame scallops. Some can make a decent living by filtering the normal tank water and in fact will sprout up from the live rock with no encouragement. Others require, and all will do better, when additional microscopic food is provided such as phytoplankton. Phytoplankton are microscopic plants that live suspended in the water (green algae water). A common type used by hobbyists is called DT's Marine Phytoplankton and is available commercially. This is a live culture which
157
has the benefit that it does not pollute the water. Another additive popular with many hobbyists is Selcon. There are many filter feeder formulas sold in local LFS, but the hobbyist has to be wary as many are nutrient rich mixtures of dubious value that can easily over-tax the biological filtration of the tank. Generally it is best to steer clear of any filter feeding invertebrates that require specific feeding if you do not want to mess with providing phytoplankton.
Mobile Invertebrates
Shrimp, crabs, brittle stars and similar mobile invertebrates will take the same meaty foods that are offered to fish. It is good to try to target feed them at least once a week. This also helps to ensure that they don't get too aggressive with their tank mates.
LPS corals
LPS corals are photosynthetic and will survive and grow with no feeding, but many seem to do better with occasional feedings. Most LPS corals, such as a bubble corals, open brain corals, elegance corals, etc. will take small chunks of shrimp or other meaty foods that are feed to the fish such as Formula One. Feeding once a week seems to be about the optimum frequency. There are a few corals, such as the bright orange sun coral, that are non-photosynthetic and require targeted feeding to stay healthy.
SPS corals
SPS corals never require feeding. They are all photosynthetic and live off the light. In the wild, they partake of zooplankton and some hobbyists like to try to simulate this natural food, but it is unnecessary and the fine food particles can cause a high load on the system.
Soft Corals
Soft corals are mostly photosynthetic. Large polyp types, such as button polyps can be fed small items such as brine shrimp, but it is not necessary. Small polyp types, such as Sinularia, do not take any known foods, but may benefit from very small zooplankton type foods such as would benefit SPS corals. There are some soft corals, such as carnation corals that are non-photosynthetic and require targeted feeding of small food. These types of corals can be difficult to keep unless the hobbyist is willing to spend the time taking care of their nutritional needs.
Food additives
There are some nutritional supplements that can be added to foods to improve their food value. Probably the best known is Selcon by American Marine Inc.
158

This liquid product provides fatty acids and vitamins. Foods, such as brine shrimp can be soaked in it to increase its nutritional value before feeding to fish. The solution can also added to the water to benefit filter feeding invertebrates. Any filter feeding type supplement use should be monitored to ensure that its use does not increase algae growth. If so, the dosage should be reduced.
Below are some typical foods suitable for feeding the reef.
Ocean Nutrition Formula One
Good general purpose frozen food in handy cubes. Well balanced with meaty and vegetable components in a gel base. Good staple food for feeding regime
Ocean Nutrition Prime Reef
Primarily a meaty food that is not get based.
Ocean Nutrition Angle Formula
A formula targeted for Angle fish which includes some sea sponges which are part of an angle fishes food.
Ocean Nutrition Special Formula VHP
A high protein formula in Ocean Nutrition's lineup
Bloodworms
A freshwater larval form of a flying insect. Bright red in color. Eagerly taken by most fish.
Brine Shrimp
Brine shrimp are natural to very salty waters. Eagerly eaten by almost everything, but is not nutritionally complete and should not be over feed.
159

Fish Roe
Fish roe (eggs) are a nice treat to feed on occasion. Very high in fat and should not be overfed. Good food for very small mouthed fish and smaller polyps.
Raw Seafood
Shrimp, scallops, saltwater fish, squid, etc. are all good foods for feeding fish, crustaceans and target feeding LPS corals.
Silversides
These are small, long fish. They can be thawed and fed to larger fish and invertebrates, or chopped for smaller fish.
O.S.I Marine Flake Food
O.S.I. is a high quality flake food
Selcon
This is a popular food supplement. Food can be soaked in it to raise its food value. It also benefits filter feeders in the tank. I like to soak frozen brine shrimp in it for a half hour and then dump the mixture into the tank. The water will cloud for a period, feeding the filter feeders as well as fish.
Here is a suggestion that you might find useful. While looking for a way to make it easy for my tank sitter to feed my tank the variety of foods they are use too while making it easy on the sitter, I hit on the follow idea. It works so well that I use it myself to make my life a little easier and give my tank a better selection at the same time.
I utilize an empty Ocean Nutrition Formula carton to make my own mixtures in. I chop various Formula foods like Formula One, Formula two up and add them to the tray as can be seen here.
160

I continue to fill the trays with a mix of frozen foods. Shrimp, squid or any typical fresh or frozen food can be added. I top the cubes off with brineshrimp. This shows the carton pretty much filled up.
I then add a couple of drops of Selcon to each tray to raise the food value and to improve the taste of the food for the fish. I then add a little water to fill the voids in the cubes and place them in the freezer.
Now when I feed the fish, I just pop a cube or two and put them into the tank. I am feeding a number of different foods at once (usually 4 or 5) and the fish get a better variety and I have less work to do for each feeding.
Good Reading
Necessary Nutrition, Foods and Supplements, A Preliminary Investigation
by: Ronald L. Shimek
161

SPS Coloration
SPS corals frequently have brightly colored tips or whole branches in the wild. These colors tend to be shades of blue, purple or pink. It is common, unfortunately, that the hobbyist brings home a brightly colored SPS coral, places it into his tank only to have the color fade to a boring brown. This phenomenon is sometimes referred to as brown-out.
The reason why the coral has bright colors to begin with has been a hot topic of discussion. Most experts in the field chalk the colors up to an adaptation to protect themselves against the relatively high levels of UV radiation that the corals receive on the shallow reefs. Similar to how a persons skin suntans to protect itself against the sun. Optimum SPS coloration also appears to track with general coral health. Increased coloration is often associated with increased polyp extension and growth rates. The brightly colored areas are often sites of new growth. In the aquarium, there appears to be a number of other factors as well that can affect SPS coloration. These include:
Alkalinity level Lighting intensity Lighting color spectrum Calcium level Salinity level of the water Temperature
Alkalinity level appears to be a critical factor in SPS coloration. Normal seawater level of 2.5meq/l does not seem to provide for optimum coloration. Alkalinity should be maintained in the range of about 3.2 – 4.0 for best SPS coloration.
Lighting intensity also appears to be a factor. The general rule is that more intense lighting equals better coloration. This might possibly be due to the fact that more intense lighting also generally has a more intense UV component to the lighting. Although some people seem to be able to achieve good coloration with less bright VHO or PC lamps, most SPS hobbyists opt for metal halide lighting which provides for the most intense lighting possible. There has been a general trend to put more and more lighting over reef tanks in general over the last few years. Two 400W MH lights over a 70 –90 gallon tank is pretty standard for SPS. Four to six 400W lamps over a 200-300 gallon tank is also pretty common. Using the old watts/gallon rule, most SPS tanks have 8-12 watts/gallon.
Lighting color spectrum affects coloration in a couple of ways. The color of light directly affects how the color of the coral is perceived even though the color
162

remains unchanged. A coral with purple tips under 10K lighting may look blue under 5500K lighting for instance. The other aspect is that lighting color can apparently affect overall coloration of the SPS coral. Typically, the higher color temperature lamps seem to provide for better coloration. For that reason, most SPS keepers opt for 10K lamps or higher when using MH. VHO users typically supplement with actinic lamps to achieve a higher color temperature.
Calcium levels have, I believe, an indirect affect on coloration. Good calcium levels promote coral health and growth with tends to optimize coloration. Calcium levels in the range of 400-500 are generally considered acceptable.
Salinity level of the water may also be a factor. Although I have not come across this cause and effect in the literature, I have observed this in my own tank. My main tank underwent a period of neglect while on vacation and shortly thereafter. I began to notice that many of my SPS were starting to brown-out. The only water parameter I could find out of whack was that the salinity had crept up to about 1.027. I decreased this back down to 1.025 over a couple of days and within a week, with no other changes, the coral coloration returned to normal.
Temperature may also have an affect according to some peoples observations. If so, this might be related to the normal temperature range for the specimen in question.
Further Reading:
Coloration in Acropora nano By Dana Riddle and Andy Amussen Experiments with alkalinity and lighting and its effects on the coloration in Acropora nano
Pocillopora- The Cauliflower Coral and the beginnings of coloration pt. 1 by Eric Borneman
Bird's Nest Coral..Feathers Not Included ..and coloration, part 2 By Eric Borneman
163
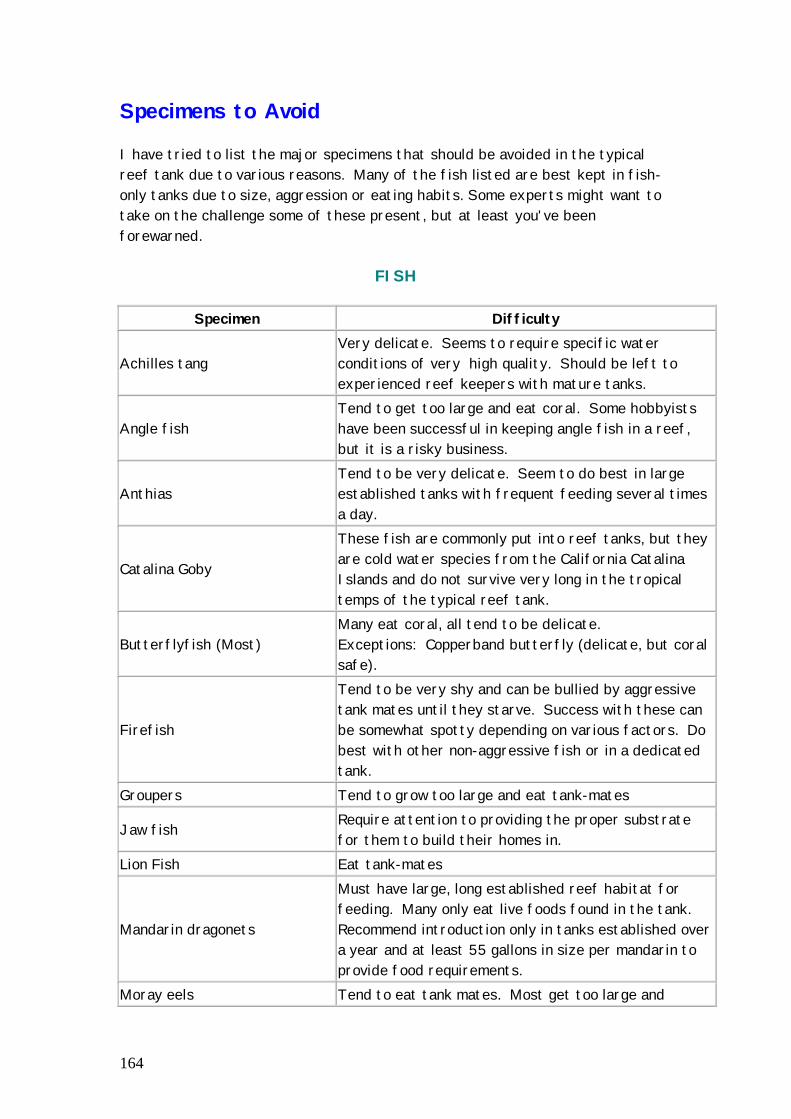
Specimens to Avoid
I have tried to list the major specimens that should be avoided in the typical reef tank due to various reasons. Many of the fish listed are best kept in fish-only tanks due to size, aggression or eating habits. Some experts might want to take on the challenge some of these present, but at least you've been forewarned.
FISH
Specimen Difficulty
Achilles tang Very delicate. Seems to require specific water conditions of very high quality. Should be left to experienced reef keepers with mature tanks.
Angle fish Tend to get too large and eat coral. Some hobbyists have been successful in keeping angle fish in a reef, but it is a risky business.
Anthias Tend to be very delicate. Seem to do best in large established tanks with frequent feeding several times a day.
Catalina Goby
These fish are commonly put into reef tanks, but they are cold water species from the California Catalina Islands and do not survive very long in the tropical temps of the typical reef tank.
Butterflyfish (Most) Many eat coral, all tend to be delicate. Exceptions: Copperband butterfly (delicate, but coral safe).
Firefish
Tend to be very shy and can be bullied by aggressive tank mates until they starve. Success with these can be somewhat spotty depending on various factors. Do best with other non-aggressive fish or in a dedicated tank.
Groupers Tend to grow too large and eat tank-mates
Jaw fish Require attention to providing the proper substrate for them to build their homes in.
Lion Fish Eat tank-mates
Mandarin dragonets
Must have large, long established reef habitat for feeding. Many only eat live foods found in the tank. Recommend introduction only in tanks established over a year and at least 55 gallons in size per mandarin to provide food requirements.
Moray eels Tend to eat tank mates. Most get too large and
164

become a nuisance in the reef tank. Moorish Idol Tend to be delicate, difficult to feed, may eat coral Parrot fish Notorious coral eaters
Pipe fish Have difficulty competing with other fish for food. Best kept in dedicated tank or with seahorses.
Porcupine fish Eats invertebrates and can be difficult to keep nutritional requirements met.
Sea horses
Not well suited to the typical reef tank due to need for low water currents, plus they have difficulty competing with faster fish for food. Best kept in a dedicated tank.
Sharks Most grow too large and tend to eat tank mates. Should be kept in fish-only tanks.
Sleeper Gobies (Valenciennea sp.)
Sometimes will not take food and cannot get enough by sifting sand and slowly waste away. Their aggressive sand sifting style can also pile sand on the coral and other places you don't want it.
Triggerfish Very aggressive and destructive. Should be kept in fish-only tanks.
Wrasses Larger wrasses can be destructive in the reef tank, most tend to be somewhat delicate. Best bet for a reef tank is probably the 6-line wrasse.
Invertebrates
Some of the specimens listed here are completely unsuitable for a reef tank while others require specialized care and only hobbyists that are willing or able to address those specialized care issues should attempt to keep these specimens.
Specimen Difficulty
Anemones (Carpet varieties)
Anemones, especially of the large carpet varieties tend to require the highest lighting possible and often wander around the tank stinging other corals while looking for the best spot to settle down. Best kept in dedicated tank under intense lighting.
Basket starfish Very difficult to care for due to filter feeding habits.
Brittle star (Long-spined) Brittle stars tend to be good reef tank specimens, but some of the long-spined varieties seem to be very difficult to acclimate and immediately fragment upon
165

introduction to the tank. Camel Shrimp Tend to eat tank mates including clams and polyps. Chambered nautilus Eats tank-mates. Requires dedicated tank. Chocolate chip starfish Eats tank-mates
Goniopora / Flowerpot coral
Majority do not survive past 6 months in reef tanks, but some do. Appears to require relatively 'dirty' water with heavy organics in order to survive. The candidates with the best chance of survival include the purple and pink varieties or the related Alveopora.
Flame Scallop Non-photosynthetic unlike Tridacna clams and therefore require supplemental feeding of phytoplankton or similar to survive.
Harlequin (Clown) shrimp Has specialty diet that is hard meet (small starfish)
Non-photosynthetic corals
These all require targeted supplemental feeding if you are going to keep them. Some of the most common include: Sun corals, carnation corals, non-photosynthetic type gorgonians.
Octopus Tend to eat tank mates and escape from the tank. Best in dedicated tank.
Sea Apple
These sea cucumbers are filter feeders and require that their feeding requirements are met. There are also reports that they can poison the tank if unhappy or they die.
Sea Slugs Most are not compatible with the reef tank due to eating habits, or the tendency to fit through the power heads.
The Elusive Blue Tipped Acropora By Eric Borneman
166

When Good Things Go Bad
This is what separates a seasoned hobbyist from the newbies. Over a period of time, the question is not whether a reef tank will experience some difficulty, it is only a question of when it will occur and what type of form it will take. Many people abandon the hobby due to the frustration that these obstacles can present, especially early in their hobby experience, so it is critical to identify and resolve these problems before they get to that point.
The most common thing to go wrong is to have the ecological balance of the system get out of balance resulting in rampant growth of obnoxious algae in the system. Besides being cosmetically unacceptable, this can choke out the desirable specimens in the tank.
The system can also go into a state of general decline and malaise where most or all the coral can decline in health or die off.
Fish can become infected with Ick or one of the other saltwater parasites or diseases.
Hair algae (Derbesia)
Description: Hair algae is composed of long dark green filamentous strands up to several inches long. Hair algae usually starts out in clumps, but can spread into large smothering sheets. The algae mass seems to be detrimental to corals. In some cases, it can smother the coral directly, in others, the algae presence seems to cause recession of the coral through chemical or other means. Once recession starts, the hair algae takes the opportunity to invade the newly exposed skeleton area of the coral.
Hair algae is probably the most common and toughest problem to overcome. It is definitely easiest to fight hair algae when it first starts before it gets a strong foot hold. The growth of hair algae is generally attributed to there being excessive amounts of nutrients in the water, usually in the form of nitrates or phosphates, although this does not always seem to be the case.
Cyanobacteria
Cyanobacteria looks like a smothering red algae, which coats gravel, rock and reef specimens.
Good water flow and low nutrients seems to help keep this pest in check. If not, there is a controversial measure that can be taken as shown below. I recommend using this method only if the situation is getting completely out of
167

control since it can possibly have an adverse affect on the tank bacterial population.
This treatment method includes using an antibacterial medicine such as Erythromycin. Tablets are readily available through your local pet store. I have successfully treated a 29 gallon reef by putting one 200mg. tablet into the sump (remove the carbon during treatment). This cured the problem within about 3 days. I have treated a 20 gallon tank using ½ tablet.
It is important to remove any carbon and stop skimming during the treatment period to prevent premature removal of the antibiotics from the system and to prevent the skimmer from overflowing.
As with antibiotics in general, they should be used only when really needed. Over use can suppress the normal bacterial processes within the tank, and possibly result in creating a strain of cyanobacteria that is resistant to the antibiotic. In both cases that I used this measure, I did not detect any negative affects on the tank.
Diatoms
Diatoms show up as brown or tan spots on the glass of the tank and on the rocks which are hard to remove. They also show up as a tan or pink ‘jelly’ looking coating on sand and rocks. Diatoms require silica in the water to proliferate.
Best cure for diatoms is prevention. Usage of replacement water that is silicate free will help to minimize diatom grow, but may not prevent it totally as silicates can enter the tank through foods, etc. In high silicate water areas, it is probably necessary to use a RO/DI unit to remove the silicates and not just an RO unit. Treatment includes removal of silicates in the water. The product Phosgard can remove silicates (as well as phosphates) from the tank water. I have successfully treated a 70 gallon reef by putting a cup of Phosgard into a filter bag in the sump and then replace it with a new cup of Phosgard in 3 days. Within about 5 days, the diatom problem was pretty much resolved. Phosgard will tend to pull out the phosphates first, so several applications over a couple of weeks may be needed to resolve the issue.
Green algae coating glass
It is normal to get a light dusting of algae on the glass. How quickly it builds up will depend upon several factors including lighting levels, number of herbivores, nutrient levels in the tank. Most tanks require a cleaning every couple of days to keep the glass completely clean. If you have to clean every day, that may be an
168

indication that the nutrient levels are too high. Again, Phosgard my help if phosphate is causing the excessive growth.
I have successfully reduced the problem from a fairly noticeable coating which needed to be cleaned every day to a light dusting requiring cleaning about twice a week. Used about a cup of Phosgard in a 70 gallon tank which was changed in about 3 days. Algae appeared to be pretty much under control within a week.
169